Embed Size (px)
Citation preview
3 0 3 N 1 7 T H A V E E , E LY, M N 5 5 7 3 1 | 8 0 0 - 5 4 1 - 1 4 5 8 | w w w . r a z o r e d g e s y s t e m s . c o m
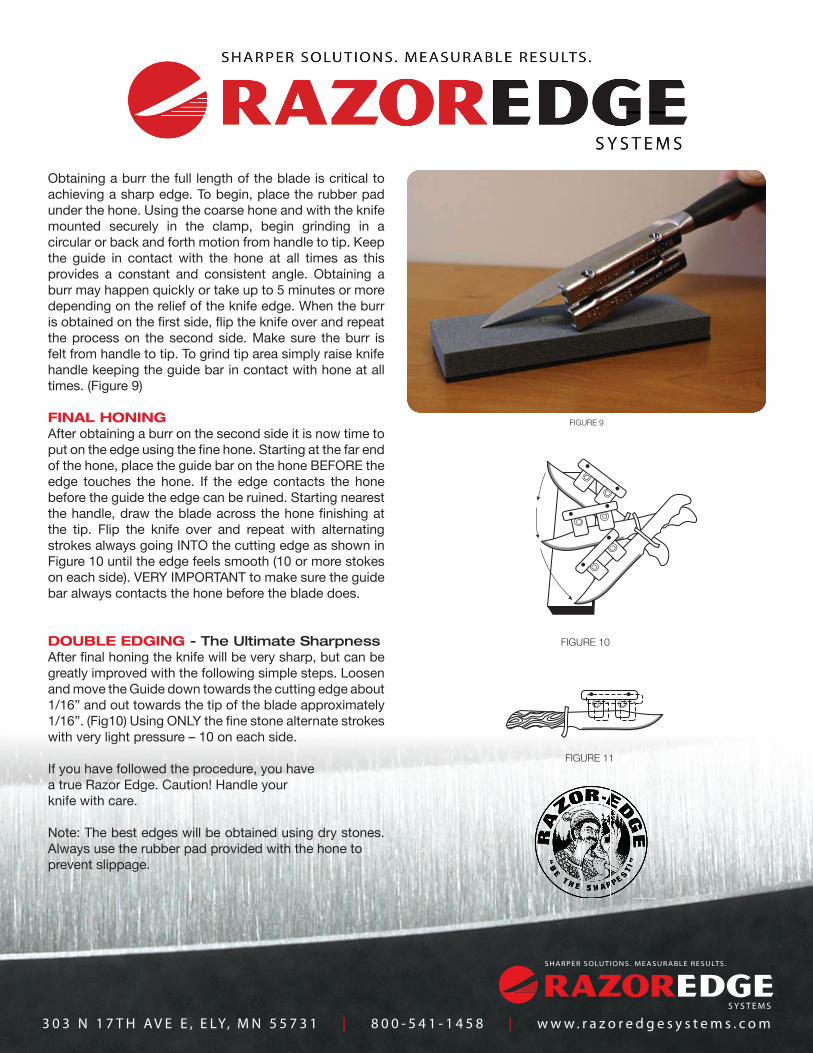
Obtaining a burr the full length of the blade is critical to achieving a sharp edge. To begin, place the rubber pad under the hone. Using the coarse hone and with the knifemounted securely in the clamp, begin grinding in a circular or back and forth motion from handle to tip. Keepthe guide in contact with the hone at all times as this provides a constant and consistent angle. Obtaining a burr may happen quickly or take up to 5 minutes or moredepending on the relief of the knife edge. When the burr is obtained on the fi rst side, fl ip the knife over and repeatthe process on the second side. Make sure the burr is felt from handle to tip. To grind tip area simply raise knifehandle keeping the guide bar in contact with hone at all times. (Figure 9)
FINAL HONINGAfter obtaining a burr on the second side it is now time toput on the edge using the fi ne hone. Starting at the far end of the hone, place the guide bar on the hone BEFORE the edge touches the hone. If the edge contacts the hone before the guide the edge can be ruined. Starting nearest the handle, draw the blade across the hone fi nishing at the tip. Flip the knife over and repeat with alternating strokes always going INTO the cutting edge as shown in Figure 10 until the edge feels smooth (10 or more stokes on each side). VERY IMPORTANT to make sure the guide bar always contacts the hone before the blade does.
DOUBLE EDGING - The Ultimate SharpnessAfter fi nal honing the knife will be very sharp, but can be greatly improved with the following simple steps. Loosen and move the Guide down towards the cutting edge about 1/16” and out towards the tip of the blade approximately 1/16”. (Fig10) Using ONLY the fi ne stone alternate strokes with very light pressure – 10 on each side.
If you have followed the procedure, you havea true Razor Edge. Caution! Handle yourknife with care.
Note: The best edges will be obtained using dry stones. Always use the rubber pad provided with the hone toprevent slippage.
Razor Edge Guide and Cub Guide Anatomy
COARSE HONE COARSE HONE SHADED AREA: EDGE FACE
FIGURE AFIGURE 5A
A CB
FIGURE 5
FIGURE 1TRUE HOLLOW GRIND
1/2”
WEDGE GRIND CHISEL GRIND BLUNT GRINDFIGURE 2 FIGURE 3 FIGURE 4
1/2” 1/2” 1/2”
FIGURE 6AFIGURE 6
FIGURE 11
FIGURE 7 FIGURE 8
FIGURE 6B
CLAMPFEET
CLAMPFEET
BLADETHICKNESSADJUSTMENT
CLAMPING SCREW
GUIDE BAR
CORRECT INCORRECT
KNIFE BLADE
BURR TURNEDUP BY HONE
HONE
FIGURE 10
FIGURE 9
NOTICE: It is important that these instructions are carefully studied and followed to achieve the best results.
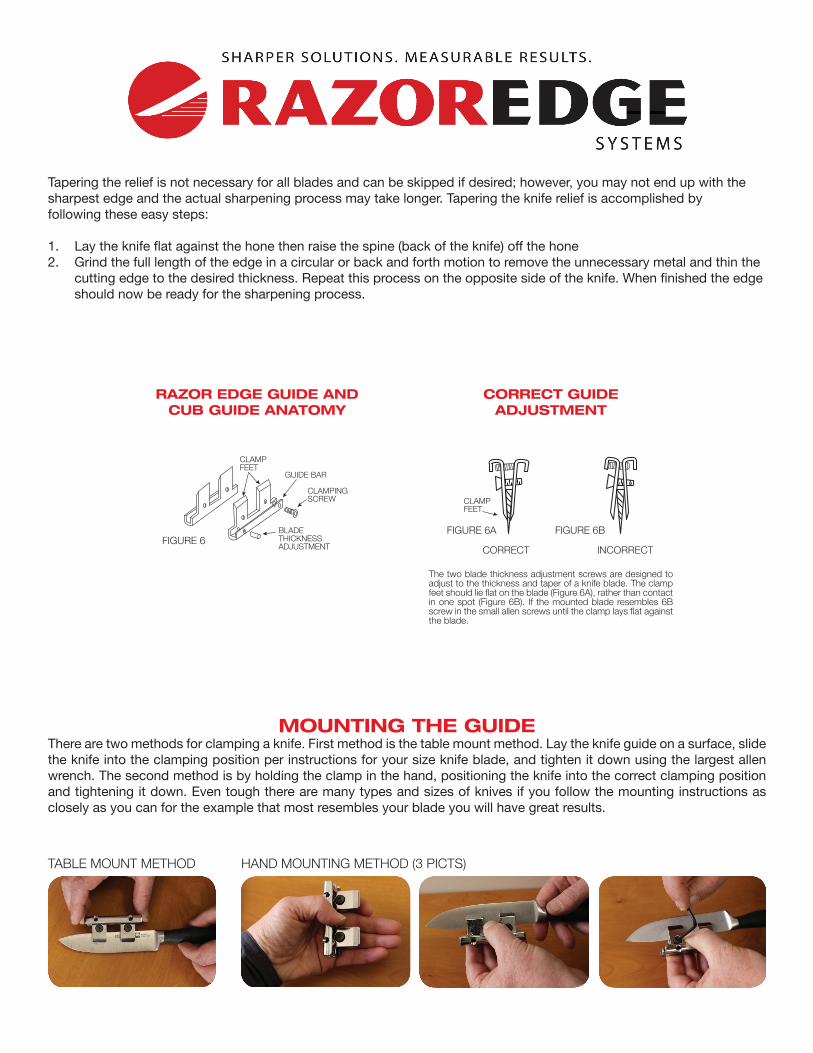
GENERAL INFORMATIONBefore going into the actual sharpening, it is most important to understand the edge, or relief of the knife we are going to sharpen. A good relief will sharpen very quickly and can achieve a very high-quality edge. A knife with a poor relief will be very diffi cult to sharpen and have a poor edge as in fi gure 4. Unfortunately, many quality knives are manufactured with poor relief. The edges on these knives can be tapered back easily to a wedge grind (Fig. 2) by using the coarse hone. Remember, your knife is only as good as its relief.
1. The true hollow grind will produce the ultimate in an edge. (Fig 1)2. The wedge grind will produce a very satisfactory edge. The thinner it is tapered back,
the more desirable the edge will be.(Fig 2)3. The chisel grind should be tapered back to a wedge grind, or hollow ground. (Fig.3)4. The blunt grind should also be tapered or hollow ground. (Fig. 4)
WHAT WE ARE TRYING TO DOBefore we go any further let’s understand what we are working toward accomplishing. The goal is to ultimately prepare the edge for the sharpening process for achieving a very sharp edge. It is important to understand fi gures1 – 5A are highly magnifi ed and exaggerated drawings of the cutting edge. A knife edge resembling the Blunt Grind, (Fig 4) must be thinned out to resemble the wedge grind (Fig 2) Note how this has been done in Fig. 5A. Lines AB and AC are the fl at sides we have ground down with the coarse hone to obtain a better relief. They are called “edge faces,” (Fig. A) and are easy to see under a good light. If during the sharpening process the edge face appears to be any wider than sewing thread you can improve your edge by removing the Razor Edge guide and tapering back the relief on your knife, as indicated by the dotted lines on Fig. 5A.
COARSE HONE COARSE HONE SHADED AREA: EDGE FACE
FIGURE AFIGURE 5AFIGURE 5A
A CB
FIGURE 5
Razor Edge Guide and Cub Guide Anatomy
COARSE HONE COARSE HONE SHADED AREA: EDGE FACE
FIGURE AFIGURE 5A
A CB
FIGURE 5
FIGURE 1TRUE HOLLOW GRIND
1/2”
WEDGE GRIND CHISEL GRIND BLUNT GRINDFIGURE 2 FIGURE 3 FIGURE 4
1/2” 1/2” 1/2”
FIGURE 6AFIGURE 6
FIGURE 11
FIGURE 7 FIGURE 8
FIGURE 6B
CLAMPFEET
CLAMPFEET
BLADETHICKNESSADJUSTMENT
CLAMPING SCREW
GUIDE BAR
CORRECT INCORRECT
KNIFE BLADE
BURR TURNEDUP BY HONE
HONE
FIGURE 10
SHARPENING INSTRUCTIONS
Mounting the Cub Guide will vary per knife due to varying blade sizes. What is most important is, 1) The clamp feet are parallel to the blade edge, 2) One inch or more of the blade tip protrudes beyond the guide bar and, 3) As much of the blade as possible is protruding from the clamp feet (up to approximately ¾”). Cub Guide is mounted with the long end of the guide bar toward the knife tip (Exam 1a), but can be mounted the opposite direction for very short blades so that the tip of the knife can still be sharpened. (Exam 1b)
Chef KnivesExtra-large blades, such as the chef knife, will not follow the typical sharpening pattern due to the blade depth. The 10” chef knife, as an example, is best sharpened in two sections but can be done without moving the guide if using 8” hones. The guide will need to be mounted approximately 2” from the tip and the guide feet approximately ¾” from the cutting edge.
Razor Edge Guide (Blades over 3 ½”)For sharpening long, thin blades such as fi let knives, 1) Mount the guide in approximately the center of the knife or approximately 2” from the tip with clamp feet parallel to the cutting edge, 2) Clamp enough of the blade to get a fi rm hold.(Example 3) Rule of thumb for most other blades over 3 ½” is 1) The guide should be mounted approximately 1 ½” from the tip with the guide feet parallel to the knife edge and 2) Approximately ½” - ¾” of the knife should be protruding from the clamp feet. This distance may be more depending on the depth of the blade.
OBTAINING THE BURRBurr defi nition: A protruding, ragged edge created by the coarse hone and rolled upward and away from the side of the knife edge that is in contact with the hone (fi g_7). The burr is created with the coarse hone and may be too small to see but can be felt using your fi nger nail or fi nger (fi g 8).
Razor Edge Guide and Cub Guide Anatomy
COARSE HONE COARSE HONE SHADED AREA: EDGE FACE
FIGURE AFIGURE 5A
A CB
FIGURE 5
FIGURE 1TRUE HOLLOW GRIND
1/2”
WEDGE GRIND CHISEL GRIND BLUNT GRINDFIGURE 2 FIGURE 3 FIGURE 4
1/2” 1/2” 1/2”
FIGURE 6AFIGURE 6
FIGURE 11
FIGURE 7 FIGURE 8
FIGURE 6B
CLAMPFEET
CLAMPFEET
BLADETHICKNESSADJUSTMENT
CLAMPING SCREW
GUIDE BAR
CORRECT INCORRECT
KNIFE BLADE
BURR TURNEDUP BY HONE
HONE
FIGURE 10
EXAMPLE 6
EXAMPLE 5
EXAMPLE 2
EXAMPLE 4
EXAMPLE 1b
EXAMPLE 3
EXAMPLE 1a
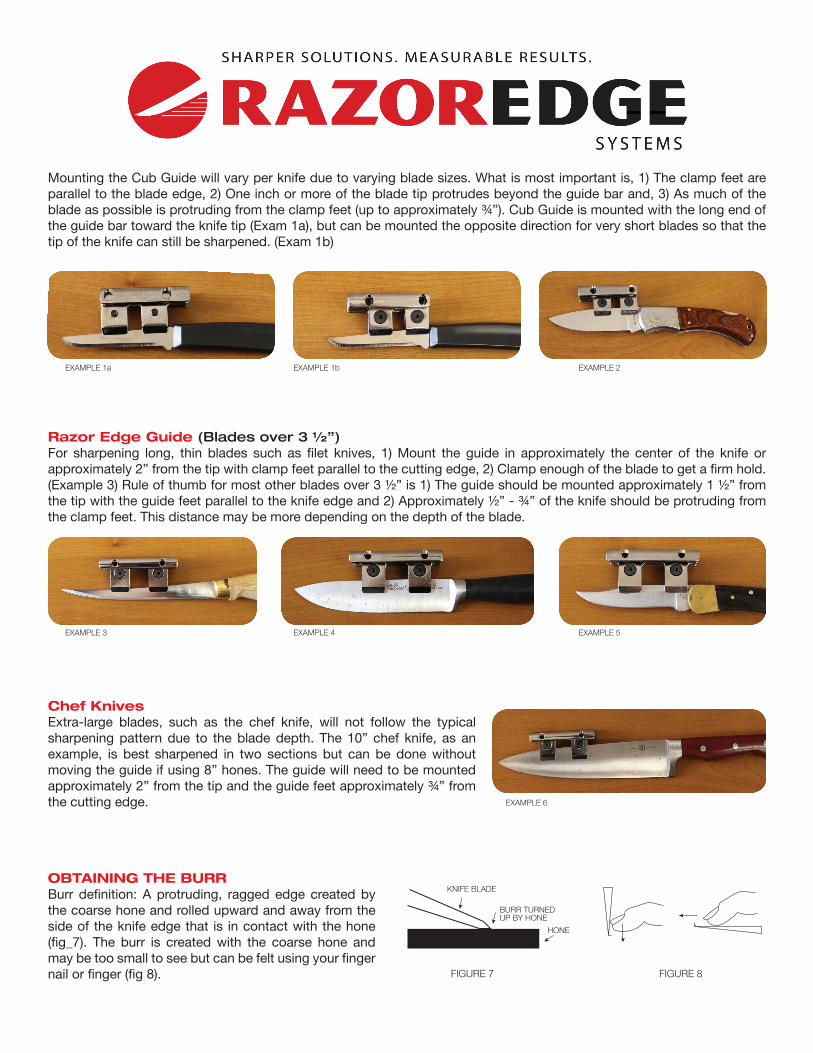
Tapering the relief is not necessary for all blades and can be skipped if desired; however, you may not end up with thesharpest edge and the actual sharpening process may take longer. Tapering the knife relief is accomplished byfollowing these easy steps:
1. Lay the knife fl at against the hone then raise the spine (back of the knife) off the hone2. Grind the full length of the edge in a circular or back and forth motion to remove the unnecessary metal and thin the
cutting edge to the desired thickness. Repeat this process on the opposite side of the knife. When fi nished the edge should now be ready for the sharpening process.
The two blade thickness adjustment screws are designed to adjust to the thickness and taper of a knife blade. The clamp feet should lie fl at on the blade (Figure 6A), rather than contact in one spot (Figure 6B). If the mounted blade resembles 6B screw in the small allen screws until the clamp lays fl at against the blade.
MOUNTING THE GUIDEThere are two methods for clamping a knife. First method is the table mount method. Lay the knife guide on a surface, slide the knife into the clamping position per instructions for your size knife blade, and tighten it down using the largest allen wrench. The second method is by holding the clamp in the hand, positioning the knife into the correct clamping position and tightening it down. Even tough there are many types and sizes of knives if you follow the mounting instructions as closely as you can for the example that most resembles your blade you will have great results.
Razor Edge Guide and Cub Guide Anatomy
COARSE HONE COARSE HONE SHADED AREA: EDGE FACE
FIGURE AFIGURE 5A
A CB
FIGURE 5
FIGURE 1TRUE HOLLOW GRIND
1/2”
WEDGE GRIND CHISEL GRIND BLUNT GRINDFIGURE 2 FIGURE 3 FIGURE 4
1/2” 1/2” 1/2”
FIGURE 6AFIGURE 6
FIGURE 11
FIGURE 7 FIGURE 8
FIGURE 6B
CLAMPFEET
CLAMPFEET
BLADETHICKNESSADJUSTMENT
CLAMPING SCREW
GUIDE BAR
CORRECT INCORRECT
KNIFE BLADE
BURR TURNEDUP BY HONE
HONE
FIGURE 10
CORRECT GUIDE ADJUSTMENT
RAZOR EDGE GUIDE AND CUB GUIDE ANATOMY
TABLE MOUNT METHOD HAND MOUNTING METHOD (3 PICTS)
Mounting the Cub Guide will vary per knife due to varying blade sizes. What is most important is, 1) The clamp feet are parallel to the blade edge, 2) One inch or more of the blade tip protrudes beyond the guide bar and, 3) As much of the blade as possible is protruding from the clamp feet (up to approximately ¾”). Cub Guide is mounted with the long end of the guide bar toward the knife tip (Exam 1a), but can be mounted the opposite direction for very short blades so that the tip of the knife can still be sharpened. (Exam 1b)
Chef KnivesExtra-large blades, such as the chef knife, will not follow the typical sharpening pattern due to the blade depth. The 10” chef knife, as an example, is best sharpened in two sections but can be done without moving the guide if using 8” hones. The guide will need to be mounted approximately 2” from the tip and the guide feet approximately ¾” from the cutting edge.
Razor Edge Guide (Blades over 3 ½”)For sharpening long, thin blades such as fi let knives, 1) Mount the guide in approximately the center of the knife or approximately 2” from the tip with clamp feet parallel to the cutting edge, 2) Clamp enough of the blade to get a fi rm hold.(Example 3) Rule of thumb for most other blades over 3 ½” is 1) The guide should be mounted approximately 1 ½” from the tip with the guide feet parallel to the knife edge and 2) Approximately ½” - ¾” of the knife should be protruding from the clamp feet. This distance may be more depending on the depth of the blade.
OBTAINING THE BURRBurr defi nition: A protruding, ragged edge created by the coarse hone and rolled upward and away from the side of the knife edge that is in contact with the hone (fi g_7). The burr is created with the coarse hone and may be too small to see but can be felt using your fi nger nail or fi nger (fi g 8).
Razor Edge Guide and Cub Guide Anatomy
COARSE HONE COARSE HONE SHADED AREA: EDGE FACE
FIGURE AFIGURE 5A
A CB
FIGURE 5
FIGURE 1TRUE HOLLOW GRIND
1/2”
WEDGE GRIND CHISEL GRIND BLUNT GRINDFIGURE 2 FIGURE 3 FIGURE 4
1/2” 1/2” 1/2”
FIGURE 6AFIGURE 6
FIGURE 11
FIGURE 7 FIGURE 8
FIGURE 6B
CLAMPFEET
CLAMPFEET
BLADETHICKNESSADJUSTMENT
CLAMPING SCREW
GUIDE BAR
CORRECT INCORRECT
KNIFE BLADE
BURR TURNEDUP BY HONE
HONE
FIGURE 10
Razor Edge Guide and Cub Guide Anatomy
COARSE HONE COARSE HONE SHADED AREA: EDGE FACE
FIGURE AFIGURE 5A
A CB
FIGURE 5
FIGURE 1TRUE HOLLOW GRIND
1/2”
WEDGE GRIND CHISEL GRIND BLUNT GRINDFIGURE 2 FIGURE 3 FIGURE 4
1/2” 1/2” 1/2”
FIGURE 6AFIGURE 6
FIGURE 11
FIGURE 7 FIGURE 8
FIGURE 6B
CLAMPFEET
CLAMPFEET
BLADETHICKNESSADJUSTMENT
CLAMPING SCREW
GUIDE BAR
CORRECT INCORRECT
KNIFE BLADE
BURR TURNEDUP BY HONE
HONE
FIGURE 10
EXAMPLE 6
EXAMPLE 5
EXAMPLE 2
EXAMPLE 4
EXAMPLE 1b
EXAMPLE 3
EXAMPLE 1a
Tapering the relief is not necessary for all blades and can be skipped if desired; however, you may not end up with thesharpest edge and the actual sharpening process may take longer. Tapering the knife relief is accomplished byfollowing these easy steps:
1. Lay the knife fl at against the hone then raise the spine (back of the knife) off the hone2. Grind the full length of the edge in a circular or back and forth motion to remove the unnecessary metal and thin the
cutting edge to the desired thickness. Repeat this process on the opposite side of the knife. When fi nished the edge should now be ready for the sharpening process.
The two blade thickness adjustment screws are designed to adjust to the thickness and taper of a knife blade. The clamp feet should lie fl at on the blade (Figure 6A), rather than contact in one spot (Figure 6B). If the mounted blade resembles 6B screw in the small allen screws until the clamp lays fl at against the blade.
MOUNTING THE GUIDEThere are two methods for clamping a knife. First method is the table mount method. Lay the knife guide on a surface, slide the knife into the clamping position per instructions for your size knife blade, and tighten it down using the largest allen wrench. The second method is by holding the clamp in the hand, positioning the knife into the correct clamping position and tightening it down. Even tough there are many types and sizes of knives if you follow the mounting instructions as closely as you can for the example that most resembles your blade you will have great results.
Razor Edge Guide and Cub Guide Anatomy
COARSE HONE COARSE HONE SHADED AREA: EDGE FACE
FIGURE AFIGURE 5A
A CB
FIGURE 5
FIGURE 1TRUE HOLLOW GRIND
1/2”
WEDGE GRIND CHISEL GRIND BLUNT GRINDFIGURE 2 FIGURE 3 FIGURE 4
1/2” 1/2” 1/2”
FIGURE 6AFIGURE 6
FIGURE 11
FIGURE 7 FIGURE 8
FIGURE 6B
CLAMPFEET
CLAMPFEET
BLADETHICKNESSADJUSTMENT
CLAMPING SCREW
GUIDE BAR
CORRECT INCORRECT
KNIFE BLADE
BURR TURNEDUP BY HONE
HONE
FIGURE 10
Razor Edge Guide and Cub Guide Anatomy
COARSE HONE COARSE HONE SHADED AREA: EDGE FACE
FIGURE AFIGURE 5A
A CB
FIGURE 5
FIGURE 1TRUE HOLLOW GRIND
1/2”
WEDGE GRIND CHISEL GRIND BLUNT GRINDFIGURE 2 FIGURE 3 FIGURE 4
1/2” 1/2” 1/2”
FIGURE 6AFIGURE 6
FIGURE 11
FIGURE 7 FIGURE 8
FIGURE 6B
CLAMPFEET
CLAMPFEET
BLADETHICKNESSADJUSTMENT
CLAMPING SCREW
GUIDE BAR
CORRECT INCORRECT
KNIFE BLADE
BURR TURNEDUP BY HONE
HONE
FIGURE 10
CORRECT GUIDE ADJUSTMENT
RAZOR EDGE GUIDE AND CUB GUIDE ANATOMY
TABLE MOUNT METHOD HAND MOUNTING METHOD (3 PICTS)
3 0 3 N 1 7 T H A V E E , E LY, M N 5 5 7 3 1 | 8 0 0 - 5 4 1 - 1 4 5 8 | w w w . r a z o r e d g e s y s t e m s . c o m
Obtaining a burr the full length of the blade is critical to achieving a sharp edge. To begin, place the rubber pad under the hone. Using the coarse hone and with the knifemounted securely in the clamp, begin grinding in a circular or back and forth motion from handle to tip. Keepthe guide in contact with the hone at all times as this provides a constant and consistent angle. Obtaining a burr may happen quickly or take up to 5 minutes or moredepending on the relief of the knife edge. When the burr is obtained on the fi rst side, fl ip the knife over and repeatthe process on the second side. Make sure the burr is felt from handle to tip. To grind tip area simply raise knifehandle keeping the guide bar in contact with hone at all times. (Figure 9)
FINAL HONINGAfter obtaining a burr on the second side it is now time toput on the edge using the fi ne hone. Starting at the far end of the hone, place the guide bar on the hone BEFORE the edge touches the hone. If the edge contacts the hone before the guide the edge can be ruined. Starting nearest the handle, draw the blade across the hone fi nishing at the tip. Flip the knife over and repeat with alternating strokes always going INTO the cutting edge as shown in Figure 10 until the edge feels smooth (10 or more stokes on each side). VERY IMPORTANT to make sure the guide bar always contacts the hone before the blade does.
DOUBLE EDGING - The Ultimate SharpnessAfter fi nal honing the knife will be very sharp, but can be greatly improved with the following simple steps. Loosen and move the Guide down towards the cutting edge about 1/16” and out towards the tip of the blade approximately 1/16”. (Fig10) Using ONLY the fi ne stone alternate strokes with very light pressure – 10 on each side.
If you have followed the procedure, you havea true Razor Edge. Caution! Handle yourknife with care.
Note: The best edges will be obtained using dry stones. Always use the rubber pad provided with the hone toprevent slippage.
Razor Edge Guide and Cub Guide Anatomy
COARSE HONE COARSE HONE SHADED AREA: EDGE FACE
FIGURE AFIGURE 5A
A CB
FIGURE 5
FIGURE 1TRUE HOLLOW GRIND
1/2”
WEDGE GRIND CHISEL GRIND BLUNT GRINDFIGURE 2 FIGURE 3 FIGURE 4
1/2” 1/2” 1/2”
FIGURE 6AFIGURE 6
FIGURE 11
FIGURE 7 FIGURE 8
FIGURE 6B
CLAMPFEET
CLAMPFEET
BLADETHICKNESSADJUSTMENT
CLAMPING SCREW
GUIDE BAR
CORRECT INCORRECT
KNIFE BLADE
BURR TURNEDUP BY HONE
HONE
FIGURE 10
Razor Edge Guide and Cub Guide Anatomy
COARSE HONE COARSE HONE SHADED AREA: EDGE FACE
FIGURE AFIGURE 5A
A CB
FIGURE 5
FIGURE 1TRUE HOLLOW GRIND
1/2”
WEDGE GRIND CHISEL GRIND BLUNT GRINDFIGURE 2 FIGURE 3 FIGURE 4
1/2” 1/2” 1/2”
FIGURE 6AFIGURE 6
FIGURE 11
FIGURE 7 FIGURE 8
FIGURE 6B
CLAMPFEET
CLAMPFEET
BLADETHICKNESSADJUSTMENT
CLAMPING SCREW
GUIDE BAR
CORRECT INCORRECT
KNIFE BLADE
BURR TURNEDUP BY HONE
HONE
FIGURE 10
FIGURE 9
NOTICE: It is important that these instructions are carefully studied and followed to achieve the best results.
GENERAL INFORMATIONBefore going into the actual sharpening, it is most important to understand the edge, or relief of the knife we are going to sharpen. A good relief will sharpen very quickly and can achieve a very high-quality edge. A knife with a poor relief will be very diffi cult to sharpen and have a poor edge as in fi gure 4. Unfortunately, many quality knives are manufactured with poor relief. The edges on these knives can be tapered back easily to a wedge grind (Fig. 2) by using the coarse hone. Remember, your knife is only as good as its relief.
1. The true hollow grind will produce the ultimate in an edge. (Fig 1)2. The wedge grind will produce a very satisfactory edge. The thinner it is tapered back,
the more desirable the edge will be.(Fig 2)3. The chisel grind should be tapered back to a wedge grind, or hollow ground. (Fig.3)4. The blunt grind should also be tapered or hollow ground. (Fig. 4)
WHAT WE ARE TRYING TO DOBefore we go any further let’s understand what we are working toward accomplishing. The goal is to ultimately prepare the edge for the sharpening process for achieving a very sharp edge. It is important to understand fi gures1 – 5A are highly magnifi ed and exaggerated drawings of the cutting edge. A knife edge resembling the Blunt Grind, (Fig 4) must be thinned out to resemble the wedge grind (Fig 2) Note how this has been done in Fig. 5A. Lines AB and AC are the fl at sides we have ground down with the coarse hone to obtain a better relief. They are called “edge faces,” (Fig. A) and are easy to see under a good light. If during the sharpening process the edge face appears to be any wider than sewing thread you can improve your edge by removing the Razor Edge guide and tapering back the relief on your knife, as indicated by the dotted lines on Fig. 5A.
COARSE HONE COARSE HONE SHADED AREA: EDGE FACE
FIGURE AFIGURE 5AFIGURE 5A
A CB
FIGURE 5
Razor Edge Guide and Cub Guide Anatomy
COARSE HONE COARSE HONE SHADED AREA: EDGE FACE
FIGURE AFIGURE 5A
A CB
FIGURE 5
FIGURE 1TRUE HOLLOW GRIND
1/2”
WEDGE GRIND CHISEL GRIND BLUNT GRINDFIGURE 2 FIGURE 3 FIGURE 4
1/2” 1/2” 1/2”
FIGURE 6AFIGURE 6
FIGURE 11
FIGURE 7 FIGURE 8
FIGURE 6B
CLAMPFEET
CLAMPFEET
BLADETHICKNESSADJUSTMENT
CLAMPING SCREW
GUIDE BAR
CORRECT INCORRECT
KNIFE BLADE
BURR TURNEDUP BY HONE
HONE
FIGURE 10
SHARPENING INSTRUCTIONS


![The Edge - 2016 Energy Market Review - The Edge - 2016 Energy... · Figure 1 –LNG Facility Daily Gas Consumption (TJ/d) [GMAT Permalink: LNG Timeline] Oil Price Review Figure 2](https://img.pdfslide.us/doc/110x75/5b60972e7f8b9a45488b6c00/the-edge-2016-energy-market-review-the-edge-2016-energy-figure-1-lng.jpg)