Embed Size (px)
Citation preview

Rational Business Developer
Access a database with EGL Rich UIVersion 8 Release 5
���


Rational Business Developer
Access a database with EGL Rich UIVersion 8 Release 5
���

NoteBefore using this information and the product it supports, read the information in “Notices,” on page 87.
This edition applies to version 8.5 of Rational Business Developer and to all subsequent releases and modificationsuntil otherwise indicated in new editions.
© Copyright IBM Corporation 2009, 2012.US Government Users Restricted Rights – Use, duplication or disclosure restricted by GSA ADP Schedule Contractwith IBM Corp.

Contents
Access a database with EGL Rich UI . . 1Introduction . . . . . . . . . . . . . . 1Lesson 1: Plan the application . . . . . . . . 3
Sketch the interface . . . . . . . . . . . 3Consider the application flow. . . . . . . . 3Identify the application structure . . . . . . 4Lesson checkpoint . . . . . . . . . . . 5
Lesson 2: Connect to a new Derby database . . . . 5Create an SQL database connection . . . . . . 5Switch to the Data perspective . . . . . . . 7Create a table . . . . . . . . . . . . . 8Lesson checkpoint . . . . . . . . . . . 9
Lesson 3: Set up the projects and use the EGL SQLretrieve feature . . . . . . . . . . . . . 9
Create the PaymentService project . . . . . . 10Create the PaymentClient project . . . . . . 12Edit the build descriptor for the PaymentServiceproject . . . . . . . . . . . . . . . 14Use the EGL SQL retrieve feature to create aRecord part . . . . . . . . . . . . . 15Lesson checkpoint . . . . . . . . . . . 17
Lesson 4: Create the Rich UI handler . . . . . . 17Create the initial layout . . . . . . . . . 17Create a data grid to hold the content of a set ofdatabase rows . . . . . . . . . . . . 19Add the first set of buttons . . . . . . . . 24Add a variable and layout to handle a single row 26Add the second set of buttons . . . . . . . 31Lesson checkpoint . . . . . . . . . . . 33
Lesson 5: Create the service . . . . . . . . . 33Create a Service part . . . . . . . . . . 34Lesson checkpoint . . . . . . . . . . . 35
Lesson 6: Add code for the service functions . . . 36Add a payment record . . . . . . . . . 36Read all database records. . . . . . . . . 38Replace a record . . . . . . . . . . . . 39Delete a record . . . . . . . . . . . . 39Create test data . . . . . . . . . . . . 40Lesson checkpoint . . . . . . . . . . . 41
Lesson 7: Create a library of reusable functions . . 41Create a Library part . . . . . . . . . . 41Create the categories array . . . . . . . . 42Create the get functions for categories . . . . 42Lesson checkpoint . . . . . . . . . . . 43
Lesson 8: Add variables and functions to the RichUI handler. . . . . . . . . . . . . . . 43
Add code to support the data grid . . . . . 43Code the function that responds when the userclicks the data grid . . . . . . . . . . . 44Format column values in the grid . . . . . . 45Test the formatting of the data grid and thetransfer of data to the single-record layout . . . 45Comment the prototype data . . . . . . . 46Declare a service-access variable . . . . . . 47Create functions that use the service-accessvariable to invoke the service . . . . . . . 47Update the start function to initialize the datagrid with database rows . . . . . . . . . 49Complete the callback functions . . . . . . 49Test the interface . . . . . . . . . . . 50Lesson checkpoint . . . . . . . . . . . 52
Lesson 9: Complete the code that supports the userinterface . . . . . . . . . . . . . . . 52
Complete the layout that displays a single row 53Test the new code . . . . . . . . . . . 53Complete the code for the second set of buttons 54Test the new code . . . . . . . . . . . 55Lesson checkpoint . . . . . . . . . . . 58
Lesson 10: Install Apache Tomcat . . . . . . . 58Download and access the server . . . . . . 58Lesson checkpoint . . . . . . . . . . . 59
Lesson 11: Deploy and test the payment application 60Edit the deployment descriptor . . . . . . . 60Set the data source for the new project . . . . 62Deploy the Rich UI application . . . . . . . 63Run the generated code . . . . . . . . . 64Lesson checkpoint . . . . . . . . . . . 67
Summary . . . . . . . . . . . . . . . 67Resources . . . . . . . . . . . . . . . 67
Code for PaymentFileMaintenance.egl afterlesson 4. . . . . . . . . . . . . . . 68Finished code for SQLService.egl after lesson 6 73Finished code for PaymentLib.egl after lesson 7 74Code for PaymentFileMaintenance.egl afterlesson 8. . . . . . . . . . . . . . . 74Finished code for PaymentFileMaintenance.egl . 80
Appendix. Notices . . . . . . . . . . 87Trademarks . . . . . . . . . . . . . . 89
© Copyright IBM Corp. 2009, 2012 iii

iv Rational Business Developer: Access a database with EGL Rich UI

Access a database with EGL Rich UI
In this tutorial, you create a Rich UI application so that the user can access rows inan SQL database.
Learning objectives
In this tutorial, you will complete these tasks:v Plan the application and design the interface.v Create a Derby database.v Write a data-access service that interacts with the database tables.v Create a web application that accesses the service, displays the retrieved data,
and processes the user's updates.v Install and configure the Apache Tomcat web server.v Deploy the web application and service.
Time required
About 3 hoursThe tutorial in HTML format:
“Access a database with EGL Rich UI” at http://wilson.boulder.ibm.com/infocenter/rbdhelp/v8r0m0
Introduction
The following image shows the main page of the application that you will create:
© Copyright IBM Corp. 2009, 2012 1

The web page displays all rows in a database table and lets the user update eachone. In addition, the user can add and delete rows.
The technology for developing the web page with EGL Rich UI involves severalsteps:1. You write the code.2. You generate the code and deploy it to another project in the workbench. At
that point, the code that is destined for a browser is an HTML and JavaScriptformat; but other code is in Java format, as described later.
3. You deploy all the code to a server such as Apache Tomcat.4. The server transmits the HTML and JavaScript code to the user's browser.5. The application both presents data to the user and accesses services that run
remotely on a server.
A main benefit of EGL Rich UI is that users can interact with a responsive,local-running web application even as services do background work such asaccessing a database.
In this tutorial, the Rich UI application accesses a service that you write anddeploy along with the Rich UI application. This kind of service is called an EGLdedicated service. In general, you can use a dedicated service to do tasks that otherEGL-generated Java services can do, such as accessing a database or file system.However, the dedicated service is not available to other code unless you redeployit as an EGL-generated web service.
The benefit of a dedicated service results from its shared deployment with the RichUI application. If a Rich UI application accesses a web service, your deployment ofthe application typically requires that you specify the service location. However, ifa Rich UI application accesses a dedicated service, your deployment of theapplication does not require the location detail. Instead, the service will beavailable wherever you deploy the Rich UI application.
Note: Invocation of a dedicated service is slow in the Rich UI editor, but access ismuch faster when the application and services are deployed to a server.
Learning objectives
The learning objectives are described in “Access a database with EGL Rich UI,” onpage 1.
Time required
This tutorial takes about 3 hours to finish. If you explore other concepts related tothis tutorial, it might take longer to complete.
You can create the EGL files you need for this application in one of the followingways:v Line by line (most helpful): Complete the individual lessons to explore the code
in small, manageable chunks, learning important keywords and concepts. Thismethod also requires the greatest time commitment.
v Finished code files: At the end of each lesson in which you develop logic, youcan link to the completed code, which you can copy into the Rich UI editor.
2 Rational Business Developer: Access a database with EGL Rich UI
Skill level
Introductory
Audience
This tutorial is designed for people who know the basic concepts of programmingand want experience with EGL Rich UI.
System requirements
To complete this tutorial, you must have the following tools and componentsinstalled on your computer:v Rational® Business Developer Version 8.0.1.2 or higher.v A working Internet connection.
Prerequisites
You do not need any experience with EGL to complete this tutorial.
Expected results
You will create a working Rich UI application and database-access service.
Lesson 1: Plan the applicationDesign your application on paper before you begin coding.
When you plan an application, do as follows:v List your objectives, as this tutorial did earlier.v Sketch the interface.v Consider the flow of events.v Identify the application structure.
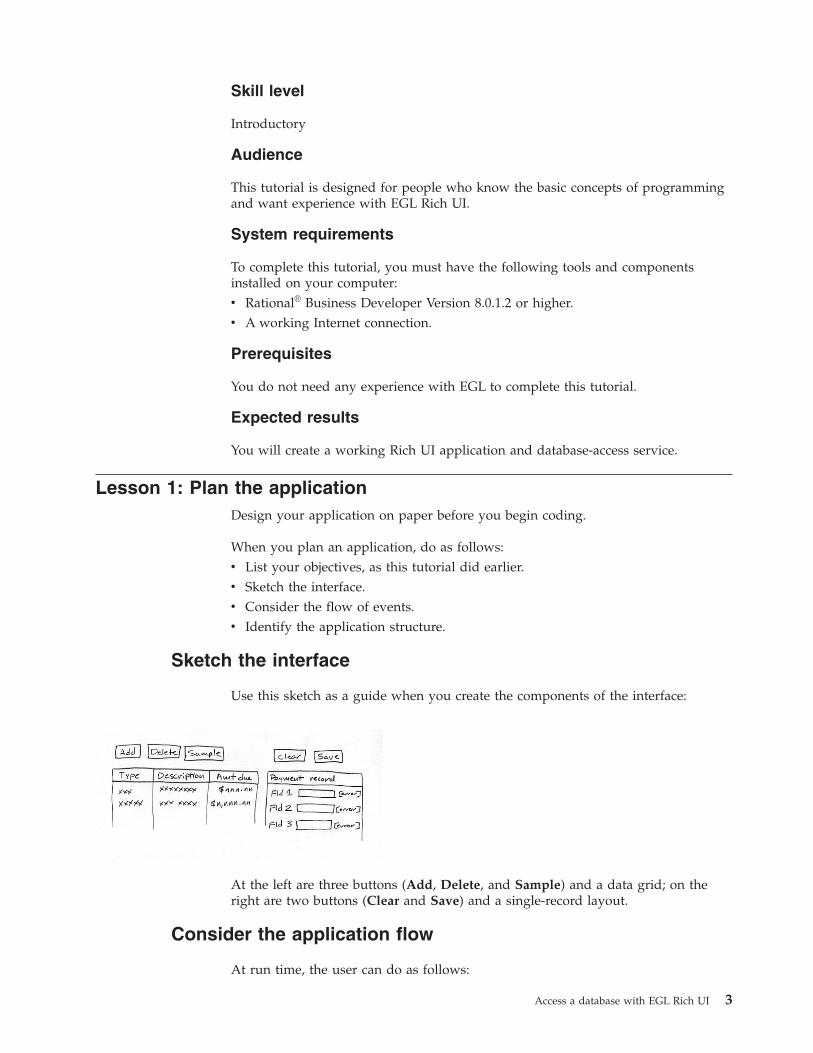
Sketch the interface
Use this sketch as a guide when you create the components of the interface:
At the left are three buttons (Add, Delete, and Sample) and a data grid; on theright are two buttons (Clear and Save) and a single-record layout.
Consider the application flow
At run time, the user can do as follows:
Access a database with EGL Rich UI 3

v Click the Sample button to delete all rows from the database table, to addsample rows, and to display the sample rows in the data grid.
v Click the Add button to add an almost empty row to the database and todisplay that data.
v Click the Delete button to delete, from the database, the data that was displayedin the currently selected row of the data grid.
v Click the Clear button to remove content from the single-record layout.v Click a row of the data grid to copy the details of that row to the single-record
layout.v Change the details in the single-record layout and click the Save button to
update the related database row.
The reader might disagree with this flow of events. For example, why not have theuser clear the single-record layout, type data into the layout, and click the Addbutton to create a database row that has useful data from the start? That change isone of many options, and a good learning strategy is to follow the steps of thistutorial and to use the lessons learned for a production-level application.
Identify the application structure
When you write a complex Rich UI application, you write code in several Rich UIhandlers, each of which corresponds to a web page or to a section of a web page.However, in this tutorial you develop only one handler. As noted earlier, a handlercan access services, some of which you might develop by using an EGL Servicepart.
Whenever possible, use preexisting resources. Your Rich UI application will use thefollowing EGL projects that are provided with the product:
com.ibm.egl.rui.dojo.widgetsProvides the following widget types for this tutorial:v DojoButtonv DojoCheckboxv DojoComboBoxv DojoCurrencyTextBoxv DojoDateTextBoxv DojoTitlePane
All those widget types are based on Dojo, as are many other widgets thatare available to you. For background details on that technology, see Dojotoolkit (http://dojotoolkit.org).
com.ibm.egl.ruiProvides the following widget types for this tutorial:v DataGridv GridLayoutv TextFieldv TextLabel
You will develop the following logic:
SQLServiceA dedicated service that interacts with a database table.
4 Rational Business Developer: Access a database with EGL Rich UI
PaymentLibA library that can provide code to several handlers
PaymentFileMaintenanceHandlerThe handler that defines the web application.
Lesson checkpoint
In this lesson, you completed the following tasks:v Sketched the application interfacev Considered the runtime flow of events.v Identified the application structure
In the next lesson, you create a Derby database and a table.
Lesson 2: Connect to a new Derby databaseUse the Derby open source database manager to handle the data store for theapplication.
This tutorial uses the open source Derby database. In this chapter, you connect to aDerby database and create the table to be accessed. Alternatively, you can connectto a database of one of the following kinds: Cloudscape, DB2® UDB, Informix®,Oracle, or SQL Server. If you prefer to use one of those databases, review thefollowing help topic: “Creating an SQL database connection” athttp://publib.boulder.ibm.com/infocenter/rbdhelp/v8r0m0. In any case, create thetable described in this lesson.
Follow these steps to set up the Derby database:1. Create an SQL database connection through the EGL Preferences.2. Use the Data perspective to create and connect to the database.3. Write an SQL script to create a table within the database.4. Disconnect from the database, as is necessary because Derby allows only one
connection, which you will need during code development.
Create an SQL database connection1. In the top menu of the EGL workbench, click Window and then click
Preferences > EGL > SQL Database Connections.2. Next to the list of connection details, click New.3. In the Connection Profile window, complete these steps:
a. Under Connection Profile Types, click Derby.b. In the Name field, type the following string:
Derby Database Connection
c. Click Next.4. In the Specify a Driver and Connection Details window, specify the following
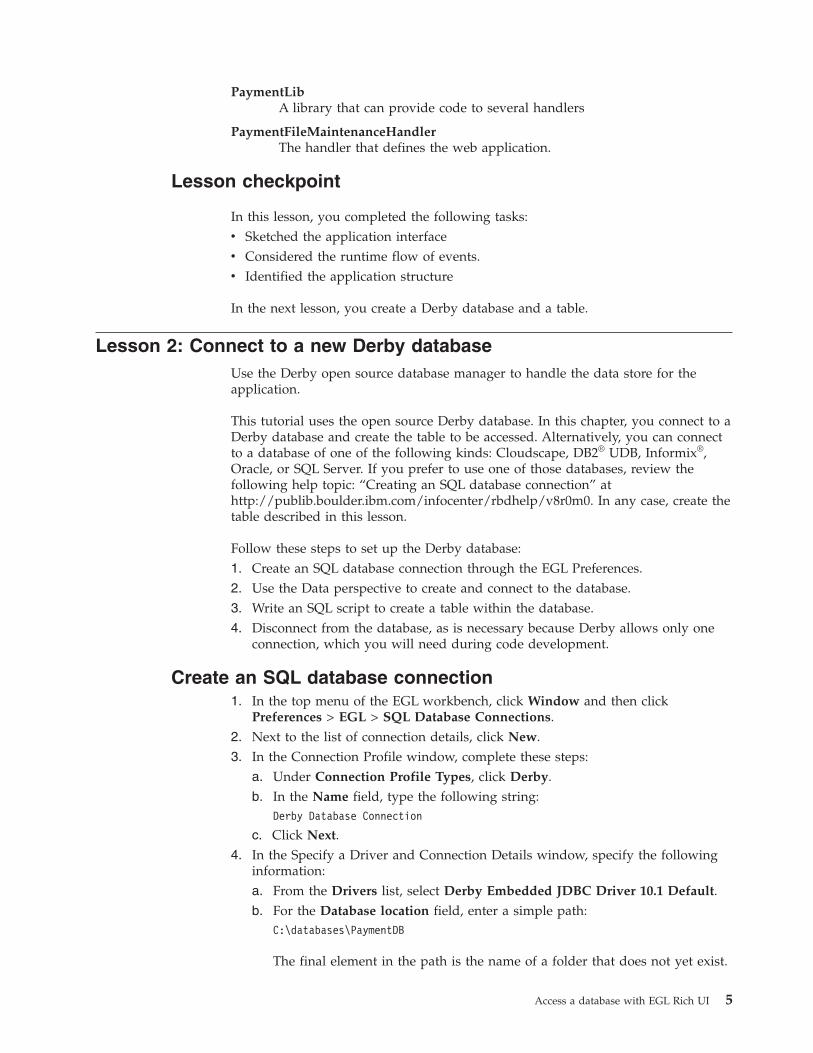
information:a. From the Drivers list, select Derby Embedded JDBC Driver 10.1 Default.b. For the Database location field, enter a simple path:
C:\databases\PaymentDB
The final element in the path is the name of a folder that does not yet exist.
Access a database with EGL Rich UI 5

c. Specify generic login information:v In the User name field, enter admin
v In the Password field, also enter admin
d. Select the Create database (if required) check box.e. Select the Save password check box. When you work with live data, you
might prefer not to select this option, but it simplifies the tutorial.f. Make sure that Connect when the wizard completes is selected and that
Connect every time the workbench is started is cleared.
g. Click Test Connection. You should see a message that says “Pingsucceeded!” Click OK to close the message window. If the test failed, getmore information by clicking Details on the failure message.
h. Click Finish.
6 Rational Business Developer: Access a database with EGL Rich UI

5. In the Preferences window, make sure that Derby Database Connection ishighlighted, then click OK.
Switch to the Data perspective
To set up the Derby database for your application, use the Data perspective, whichis a workbench perspective and different from the EGL Data view.
To connect to the database:1. Change to the Data perspective as follows:
a. Click the Open Perspective button, which is located by default in the rightside of the navigation bar.
b. If the Data perspective is not shown on the menu, click Other.c. If you still do not see the Data perspective, select Show All at the bottom of
the wizard. Click Data and then click OK.
2. Locate the Data Source Explorer view, by default in the lower left corner of theworkbench; and under Database Connections, right-click Derby DatabaseConnection. Click the Connect option. The option was enabled because you set
Access a database with EGL Rich UI 7

the following check boxes when you created the connection: Create database (ifrequired) and Connect when the wizard completes.
Create a table
While in the Data perspective, you can write an SQL script to create a table in thedatabase.1. In the Data Source Explorer view, expand Derby Database Connection.
Right-click the PaymentDB database name and click New SQL Script.A new script file opens in the editor.
2. Copy the following SQL code into the script file:CREATE TABLE PAYMENT(
PAYMENT_ID INT PRIMARY KEY NOT NULLGENERATED ALWAYS AS IDENTITY(START WITH 1, INCREMENT BY 1),
CATEGORY INT,DESCRIPTION CHAR(30),AMOUNT DECIMAL(10,2),FIXED_PAYMENT SMALLINT,DUE_DATE DATE,PAYEE_NAME CHAR(30),PAYEE_ADDRESS1 CHAR(30),PAYEE_ADDRESS2 CHAR(30));
In the next step, you run this code to create a table named PAYMENT.
Note:
a. The PAYMENT_ID column is an identity column, which means thatDerby will place a unique value into that column whenever the usercreates a record. Each value is one more than the last.
b. The names of Derby tables and columns are always in uppercaseregardless of the case of names that are in the CREATE TABLEstatement.
8 Rational Business Developer: Access a database with EGL Rich UI

3. Right-click anywhere in the background of the editor pane, and then click RunSQL. The SQL Results view, which is by default at the bottom center of theworkbench, should show the “create table” operation and a status of“Succeeded”. You can now expand the PaymentDB entry in the Data SourceExplorer and see the columns for the new table:
4. Close the script file. You do not need to save the file, as you will not need itagain.
5. You cannot access the database from EGL source code while the Data view isusing the connection. Right-click Derby database connection and clickDisconnect.
Lesson checkpoint
In this lesson, you completed the following tasks:v Created an EGL database connectionv Created a database named PaymentDB
v Created a database table named PAYMENT
In the next lesson, you start writing application code.
Lesson 3: Set up the projects and use the EGL SQL retrieve featureBefore you write your logic, create two EGL projects, as well as a Record part thatis based on the database table.
An EGL application is organized in one or more projects, each of which is aphysical folder in the workspace. A project contains an EGL source folder that isprovided for you, and that folder contains one or more packages, which in turncontain EGL source files. This hierarchy is basic to your work in EGL: a project,then an EGL source folder, then a package with EGL source files.
Access a database with EGL Rich UI 9
The EGL source files include EGL parts, which are type definitions that you create.For example, a Service part contains logic, and a Record part can be the basis of avariable that you declare in your Service part.
Packages are important because they separate parts into different contexts, ornamespaces:v A part name might be duplicated in two different packages, and any EGL source
code can reference each part precisely. The main benefit of namespaces is thatdifferent teams can develop different EGL parts without causing name collisions.
v Each part name in a given package is unique within that package:– A part in one package can easily reference another part in the same package
by specifying the part name. For example, here is a declaration of a recordthat is based on the Record part MyRecordPart:myRecord MyRecordPart{};
– A part in one package can also reference a part in a second package by givingthe package name and part name, or by a shortcut that involves importingthe part.
One project can reference the parts in a second project, but only if the EGL buildpath of the referencing project identifies the referenced project. Again, this tutorialgives examples. However, in all cases, avoid using the same package name indifferent projects, as that usage can cause problems in name resolution.
Your next task in this tutorial is to create the following projects:
PaymentServiceHolds an EGL Service part and related definitions
PaymentClientHolds the Rich UI handlers and related definitions
You can include all your code in a single project, but the separation shown herelets you easily deploy the two kinds of code in different ways.
Parts in one project can use parts in a different project. EGL uses a build path tosearch for unresolved references. Later in this lesson, you will add thePaymentService project to the build path for the PaymentClient project.
Create the PaymentService project
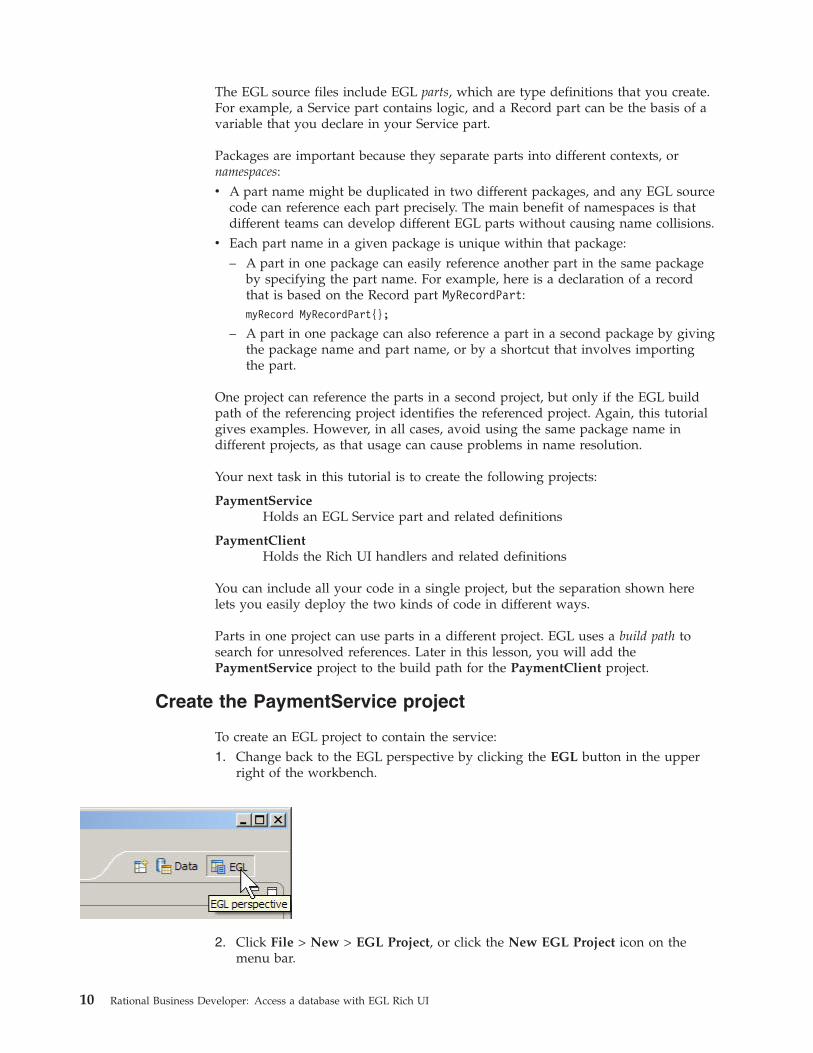
To create an EGL project to contain the service:1. Change back to the EGL perspective by clicking the EGL button in the upper
right of the workbench.
2. Click File > New > EGL Project, or click the New EGL Project icon on themenu bar.
10 Rational Business Developer: Access a database with EGL Rich UI

3. In the New EGL Project window, enter the following information:a. In the Project name field, type the following name:
PaymentService
b. In the EGL project types section, click General Project.
c. Click Next.4. In the second EGL Project window, the defaults that EGL provides should be
correct. Verify the following information:a. The Target runtime platform is Java. This setting indicates that EGL
generates Java source code from your EGL Service part.b. Under Build descriptor options, the Create a build descriptor radio button
is selected. Build descriptors control the generation process. Because you arecreating a separate project for your service, you can use the default builddescriptor that EGL creates for you.
5. Click Finish.
Access a database with EGL Rich UI 11
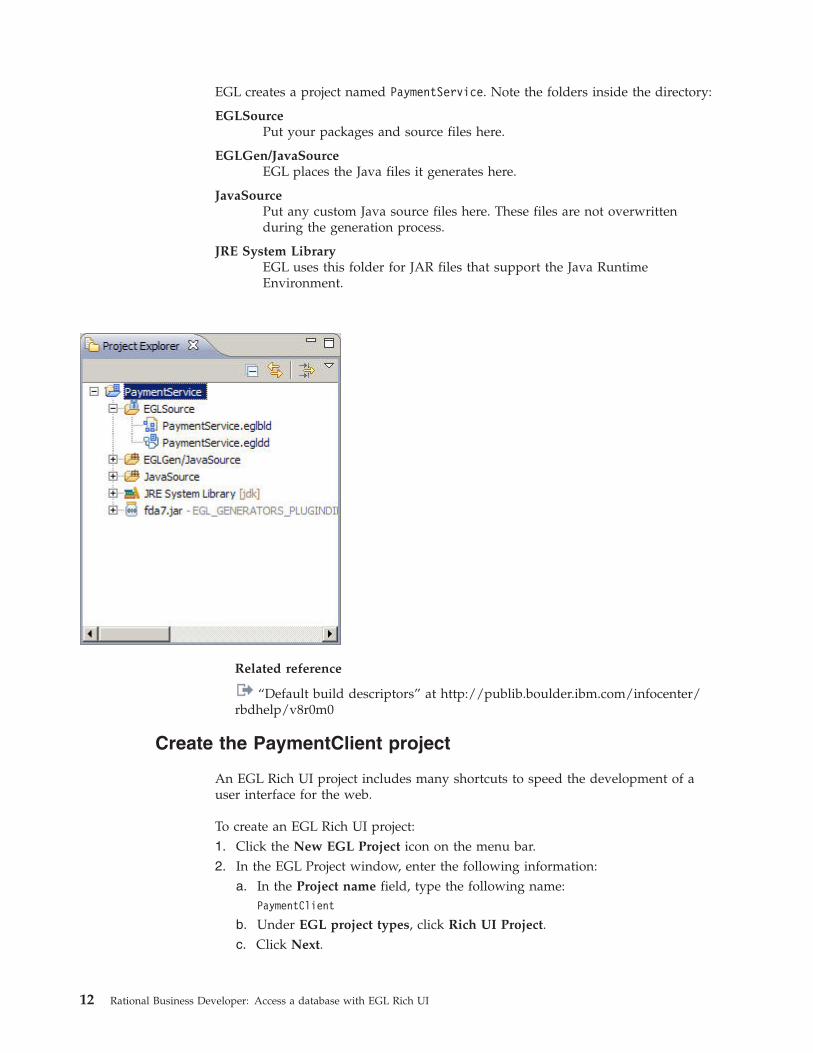
EGL creates a project named PaymentService. Note the folders inside the directory:
EGLSourcePut your packages and source files here.
EGLGen/JavaSourceEGL places the Java files it generates here.
JavaSourcePut any custom Java source files here. These files are not overwrittenduring the generation process.
JRE System LibraryEGL uses this folder for JAR files that support the Java RuntimeEnvironment.
Related reference
“Default build descriptors” at http://publib.boulder.ibm.com/infocenter/rbdhelp/v8r0m0
Create the PaymentClient project
An EGL Rich UI project includes many shortcuts to speed the development of auser interface for the web.
To create an EGL Rich UI project:1. Click the New EGL Project icon on the menu bar.2. In the EGL Project window, enter the following information:
a. In the Project name field, type the following name:PaymentClient
b. Under EGL project types, click Rich UI Project.c. Click Next.
12 Rational Business Developer: Access a database with EGL Rich UI

3. In the second EGL Project window, the defaults that EGL provides should becorrect. Verify the following information:a. Use the default location for the project is selected.b. The Widget libraries list contains the following projects:
v EGL Rich UI widgetsv EGL Dojo widgets
c. In the EGL project features group, Create an EGL deployment descriptor isselected.
4. Click Next.5. On the build settings page, select PaymentService.
The PaymentService project is added to the build path for the project beingcreated so that the Rich UI handler can use parts that are defined inPaymentService.
6. Click Finish.
EGL creates a project named PaymentClient and adds support projects to theworkspace for Rich UI, Dojo Widgets, and the Dojo runtime library. In addition tothe directories that EGL created for the General project, a Rich UI project includesthe following directory:
WebContentContains support files, such as cascading style sheets (CSS) and images.
Access a database with EGL Rich UI 13

When you first add a Rich UI project to your workspace, three other projects areadded automatically:v com.ibm.egl.ruiv com.ibm.egl.rui.dojo.runtime.localv com.ibm.egl.rui.dojo.widgets
These three projects contain widgets and other support files that you use increating a Rich UI application.
Edit the build descriptor for the PaymentService project
The EGL build file has the extension .eglbld and contains build parts, which areXML definitions that are inputs for the EGL generator.
A build file typically includes multiple build descriptors so that you can generateEGL code in multiple ways. For example, EGL created the following builddescriptors in the PaymentService.eglbld file:v PaymentServiceJavaBuildOptionsv PaymentServiceDebugBuildOptions
You must change the build descriptors for the project so that the logic you writethere can access a database.
To edit the build descriptor:1. In the PaymentService project, expand the EGLSource folder. Double-click the
PaymentService.eglbld file. The Build Parts editor opens.2. In the Load DB options using Connection field, click the down arrow and
select the Derby Database Connection.3. Find the Outline view, located by default in the lower left corner of the
workbench. The PaymentServiceJavaBuildOptions build descriptor shouldcurrently be highlighted. Double-click PaymentServiceDebugBuildOptions and
14 Rational Business Developer: Access a database with EGL Rich UI

repeat step 2 for the other build descriptor, which is used by the EGL debugger.
4. Save and close the build descriptor file.
Use the EGL SQL retrieve feature to create a Record partYou can automatically retrieve the fields for a Record part that corresponds to thePAYMENT table in the PaymentDB database. The column names are the basis of thefield names in the Record part.1. Change preferences for the SQL retrieve feature:
a. From the top menu in the workbench, click Window > Preferences > EGL> SQL.
b. In the third group of options, Case control rules for naming structureitems, select Change to lower case and capitalize first letter afterunderscore. Field names will be in mixed case.
c. In the fourth group of options, Underscore control rules for namingstructure items, select Remove underscores. Field names will not includethe underscores in column names.
d. In the last group of options, make sure that Retrieve primary keyinformation from the system catalog is selected. One or more fields in theRecord part will correspond to key fields in the SQL table, as is useful whenyou rely on default EGL SQL processing.
e. Clear Prompt for SQL user ID and password when needed. You prevent adialog window from opening each time you access the database.
f. Click OK.2. In the Project Explorer view, right-click PaymentService and then click New >
Record
3. In the New EGL Source Record window, enter the following information:a. In the EGL source file name field, enter the following name:
ServiceRecords
EGL adds the .egl file extension automatically.b. In the Package field, enter the following name:
records
c. Click Finish.
EGL creates the records directory and the ServiceRecords.egl file and thenopens the file in the EGL editor.
4. Replace the contents of the file by copying and pasting the following code:
Access a database with EGL Rich UI 15

package records;
record paymentRec type SQLRecord {tableNames = [["PAYMENT"]]}
end
Note:
a. Your use of a Record part that is labeled with SQLRecord meansthat, in the following case, the EGL generator will create code that isappropriate for SQL I/O:v You code an I/O statement such as add, as in this example:
add mySQLRecord;
v The record on which the I/O statement operates (in the example,mySQLRecord) is an SQL record; that is, the record is based on aRecord part that is labeled with SQLRecord.
b. The SQL Record part uses several properties such as tableNames, inmost cases to change the output of the EGL generator and in thisway to change runtime behavior.
c. Table names are specified as two-dimensional arrays because youmight have reason to specify a table label (an SQL alias), which isuseful when you write custom SQL statements. Here is a tableNamesproperty setting that includes a table label:tableNames=[["PAYMENT", "A"]]
d. You can avoid setting the tableNames property if you are creating aRecord part that corresponds to a single database table and if thatRecord part has the same name as the database table. In this tutorial,the Record part has a different name, and the tableNames property isrequired.
5. Right-click anywhere in the Record statement and click SQL record > RetrieveSQL. EGL automatically creates fields for the Record part in accordance withinformation that is provided by the database management system. Youspecified little more than the table name, and here is the result:
6. Change the type for amount from decimal(10,2) to money. The change providesadditional options when you drag-and-drop the Record part from the EGL dataview to the Rich UI Design surface, as shown later.
7. Change the type for fixedPayment to boolean. Again, the change is usefulduring a later drag-and-drop operation.
16 Rational Business Developer: Access a database with EGL Rich UI

8. Save (Ctrl-S) and close the ServiceRecords.egl file.
Lesson checkpoint
In this lesson, you completed the following tasks:v Created an EGL project for developing a data-access service.v Created an EGL project for developing a Rich UI application.v Modified the build descriptors in a build file; specifically, by adding database
information from a connection definition in the workbench.v Set preferences for the EGL SQL retrieve feature.v Created a Record part, retrieving most information from a database.
In the next lesson, you develop some of the Rich UI application and view yourprototype code in action.
Lesson 4: Create the Rich UI handlerStart to build the handler by using EGL wizards and then the Rich UI editor.
You can add widgets to a web page by dragging content to the Design surface ofthe Rich UI editor. The drag-and-drop and subsequent interaction with the editorupdates the source code for the Rich UI handler that you are developing.
Two sources of drag-and-drop content are available:v A palette of widget typesv The EGL Data view, which provides data-type definitions such as EGL Record
parts. You first drag content from this view and then choose from among thewidget types that can display the type of data you selected.
By default, the widget palette is at the right of the editor, and the Data view is atthe lower left of the workbench.
In this lesson, you create a Rich UI Handler and add a data grid to display allrows in the database. Later, you will add a grid layout to display the fields in aselected record.
Create the initial layout
To create the handler:1. In the PaymentClient project, select the EGLSource folder and click New >
Rich UI Handler.
2. In the New Rich UI Handler part window, enter the following information:
Access a database with EGL Rich UI 17
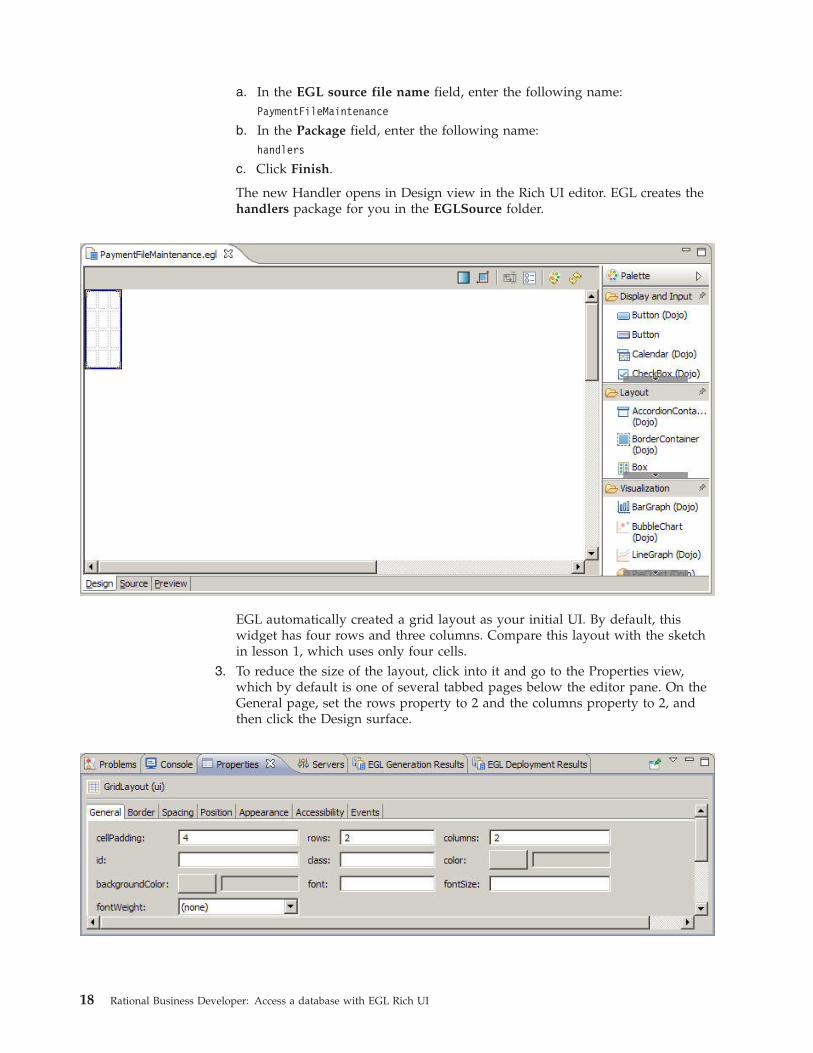
a. In the EGL source file name field, enter the following name:PaymentFileMaintenance
b. In the Package field, enter the following name:handlers
c. Click Finish.
The new Handler opens in Design view in the Rich UI editor. EGL creates thehandlers package for you in the EGLSource folder.
EGL automatically created a grid layout as your initial UI. By default, thiswidget has four rows and three columns. Compare this layout with the sketchin lesson 1, which uses only four cells.
3. To reduce the size of the layout, click into it and go to the Properties view,which by default is one of several tabbed pages below the editor pane. On theGeneral page, set the rows property to 2 and the columns property to 2, andthen click the Design surface.
18 Rational Business Developer: Access a database with EGL Rich UI

A later step demonstrates a different way to change the number of rows andcolumns in a grid layout. The main layout of this Rich UI handler now has afirst row, where the handler will display two sets of buttons, and a second row,where the handler will display the following content: on the left, a list ofrecords, and on the right, a layout for displaying the details of one record.
Create a data grid to hold the content of a set of databaserows
Create a data grid by dragging a record array variable onto the Rich UI editor.
To create the data grid:1. Create a record array variable.
a. The EGL Data view, which is located by default in the lower left corner ofthe workbench, lists all of the primitive and record variables for the handlerthat is currently open in the editor. Right-click the empty space below theentry for the PaymentFileMaintenance file. Click New > EGL Variable.
b. In the New EGL Rich UI Data Fields wizard, request a new record variablebased on the paymentRec record:v Make sure Type Selection is set to Record.v Select the paymentRec record. This record should be the only one in the
list.v In the Array Properties section, select the Array check box. Leave the
Size field blank.v For Enter the name of the field, enter the following name:
allPayments
v Click Finish.
Access a database with EGL Rich UI 19

This process creates the following record declaration in the source code for thehandler:allPayments paymentRec[0];
In the EGL Data view is now a record variable that you can drag the variableonto the editor.
2. Drag the allPayments record variable from the EGL Data view to the lower leftcell of the layout.
20 Rational Business Developer: Access a database with EGL Rich UI

EGL displays the Configure data widgets page of the Insert Data wizard. Usethis page to configure the widgets that EGL creates. The widget types dependon the type of fields in the record array that you dragged onto the Designsurface.
3. Make the following changes in the Insert Data wizard:a. Under Create Widgets for, leave the default value of Read-only data.b. The check boxes under the allPayments variable indicate the fields that are
to be used as columns in the display. Clear all the fields by clicking None.c. Check the following fields:
v categoryv descriptionv amount
d. Change the labels for those fields:v Change category to Type.v Change description to Description.v Change amount to Amount due.
The wizard uses these labels as column headers for the grid.e. Clear Add support for formatting and validation. Here are the completed
settings:
Access a database with EGL Rich UI 21

f. Click Finish. The empty grid is displayed:
4. Click into the Properties view:v Ensure that the following title is displayed: DataGrid (allPayments_ui). If
not, click into the data grid, ensure that the title is displayed, and click backto the Properties view.
v On the General page, change the selectionMode property to SINGLE. Thisproperty indicates that the user can select only one row of the grid at a time.
v On the Layout page, change the verticalAlignment property to TOP.
22 Rational Business Developer: Access a database with EGL Rich UI

This property ensures that the allPayments_ui data grid will line up with thedetail grid you will add later.
5. Click the Source tab at the bottom of the editor to see the code that youalready created. Take this opportunity to reduce the width of two columns inthe data grid. Specifically, consider the DataGridColumn declarations for thecategory and amount columns and change the width property from the default120 pixels to 90 pixels. Here is the data grid declaration after your change:allPayments_ui DataGrid {
layoutData = new GridLayoutData{row = 2, column = 1verticalAlignment = GridLayoutLib.VALIGN_TOP},
columns =[new DataGridColumn{name = "category",
displayName = "Type",width = 90},
new DataGridColumn{name = "description",displayName = "Description",width = 120},
new DataGridColumn{name = "amount",displayName = "Amount due",width = 90}
],data = allPayments as any[],selectionMode = DataGridLib.SINGLE_SELECTION};
6. Add prototype data in the start function, which is referenced in theonConstructionFunction property of the handler and which runs before theuser first accesses the web page. Specifically, assign an array of records to thedata property of the data grid:function start()
allPayments_ui.data =[
new paymentRec{category = 1, description = "test01", amount = 100.00},new paymentRec{category = 2, description = "test02", amount = 200.00},new paymentRec{category = 3, description = "test03", amount = 300.00}
]; end
7. To format the file, click Ctrl-Shift-F.8. Click the Preview tab.
Access a database with EGL Rich UI 23

9. Save the file.
Add the first set of buttons
To create the Add, Delete, and Sample buttons on the Design surface:1. Click the Design tab.2. In the Palette view, go to the Layout drawer and find the GridLayout widget
type. Drag a new grid layout to the upper left corner of the main layout.Assign the following name to the new widget:buttonLayout
3. Click into the new layout, right click a cell, and notice that you can insert ordelete content by using the menu.
4. Click Delete > Row.5. Click again into the new layout, right click a cell, and click Delete > Row. A
single row remains, with three columns.6. Create the Add button:
a. In the Palette view, go to the Display and Input drawer and then toButton (Dojo). Drag a Dojo Button widget to the leftmost cell ofbuttonLayout.
24 Rational Business Developer: Access a database with EGL Rich UI

b. Assign the following name to the button:addButton
c. Go to the Properties view:v On the General page, change the text property to Add.v On the Events page, select the row for the onClick event. A plus sign
(+) is displayed at the far right of the line. Click the plus sign andspecify the following name for a function that will be invoked when theuser clicks the Add button:addRow
The Source view opens to display the addRow function. Rather than completethe function now, finish laying out this section of the web page. Click theDesign tab to return to the Design surface.
7. Create the Delete button:a. In the Palette view, go to the Display and Input drawer and then to
Button (Dojo). Drag a Dojo Button widget to the middle cell ofbuttonLayout.
b. Assign the following name to the button:deleteButton
c. Go the Properties view for the button:v On the General page, change the text property to Delete.v On the Events page, assign the following function name to the onClick
event:deleteRow
d. When the deleteRow function is displayed, click the Design tab.8. Using the same process as in previous steps, create a Dojo button in the
rightmost cell of buttonLayout. Name the button sampleButton, change thetext property to Sample, and use the following name for the onClick function:sampleData. The sampleData function is displayed.
9. Inspect the source code, noting the code that was provided for each of thebuttons.
10. Click the Preview tab.
Access a database with EGL Rich UI 25

11. Save the file.
Add a variable and layout to handle a single row
You previously created an array to hold the database rows. You now declare avariable for a single row and then drag that variable onto the Design surface tocreate a layout for displaying the row.
To create the variable:1. Click the Design tab to display the Design surface.2. Right-click the background of the EGL Data view, which is likely to be at the
bottom left of the workbench. Click New > Variable.3. In the Create a new EGL Data Variable wizard, request a new record variable
based on the paymentRec record:a. Make sure that Type Selection is set to Record.b. Select the paymentRec record.c. In the Array Properties section, make sure that the Array check box is
cleared.d. For Enter the name of the field, enter the following name:
selectedPayment
26 Rational Business Developer: Access a database with EGL Rich UI

e. Click Finish.
As noted in the Preview section of the page shown, the following recorddeclaration is created in the source code for the handler:selectedPayment paymentRec;
To create the grid layout:4. In the Palette view, go to the Layout drawer and find the TitlePane (Dojo)
widget type. Drag a new title pane to the lower right cell of the main gridlayout, next to the cell that holds the allPayments_ui grid.
Access a database with EGL Rich UI 27

5. Assign the following name to the title pane:editPane
Click OK.6. Make the following changes to the properties for the editPane widget:
v On the General page, change the title property to Payment record
v On the Position page, change the width property to 350. This value leavesroom for error messages.
v On the Layout page, change the verticalAlignment property to TOP.
The web page should now look like the following image:
7. Save the file.8. From the EGL Data view, drag the selectedPayment variable to the bracketed
area inside the payment record pane.
28 Rational Business Developer: Access a database with EGL Rich UI
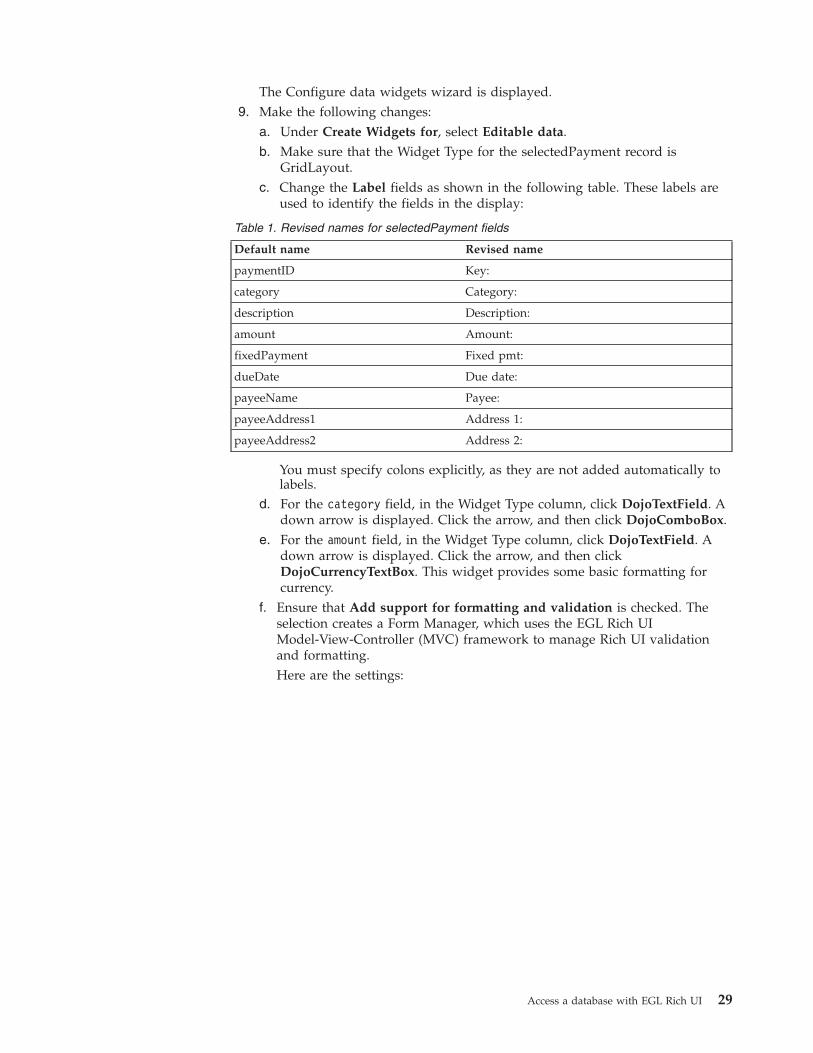
The Configure data widgets wizard is displayed.9. Make the following changes:
a. Under Create Widgets for, select Editable data.b. Make sure that the Widget Type for the selectedPayment record is
GridLayout.c. Change the Label fields as shown in the following table. These labels are
used to identify the fields in the display:
Table 1. Revised names for selectedPayment fields
Default name Revised name
paymentID Key:
category Category:
description Description:
amount Amount:
fixedPayment Fixed pmt:
dueDate Due date:
payeeName Payee:
payeeAddress1 Address 1:
payeeAddress2 Address 2:
You must specify colons explicitly, as they are not added automatically tolabels.
d. For the category field, in the Widget Type column, click DojoTextField. Adown arrow is displayed. Click the arrow, and then click DojoComboBox.
e. For the amount field, in the Widget Type column, click DojoTextField. Adown arrow is displayed. Click the arrow, and then clickDojoCurrencyTextBox. This widget provides some basic formatting forcurrency.
f. Ensure that Add support for formatting and validation is checked. Theselection creates a Form Manager, which uses the EGL Rich UIModel-View-Controller (MVC) framework to manage Rich UI validationand formatting.Here are the settings:
Access a database with EGL Rich UI 29

g. Click Finish.
The new grid layout contains a form.
30 Rational Business Developer: Access a database with EGL Rich UI

Note: You might need to click the Refresh button in the upper right corner ofthe Rich UI editor to see this change:
10. Make the Key field read-only:a. Repeatedly click the Dojo text field next to the Key label until only that
field is surrounded by a dotted line.
b. In the Properties view, General page, select the readOnly check box.
11. For a more uniform appearance, do as follows:a. Click the DojoCurrencyTextBox widget for Amount until only that widget
is surrounded by a dotted line.b. On the Position page of the Properties view, set the width property to 166.
Add the second set of buttons
To add the Clear and Save buttons:
Access a database with EGL Rich UI 31
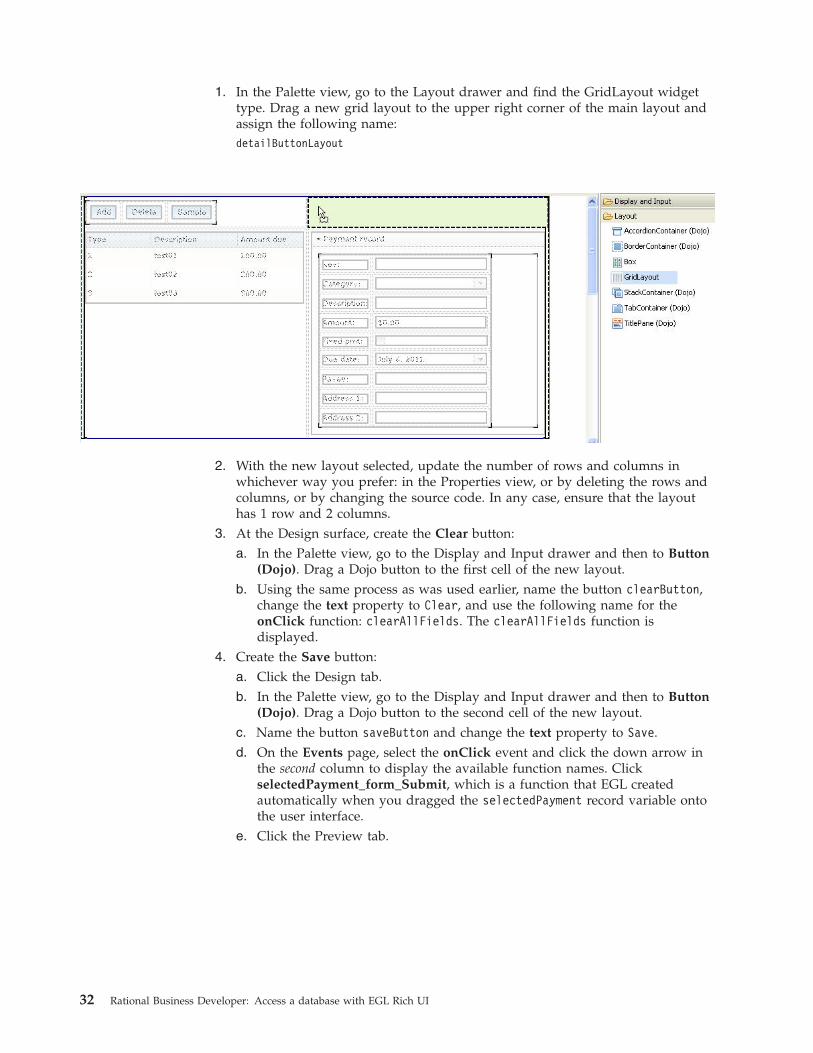
1. In the Palette view, go to the Layout drawer and find the GridLayout widgettype. Drag a new grid layout to the upper right corner of the main layout andassign the following name:detailButtonLayout
2. With the new layout selected, update the number of rows and columns inwhichever way you prefer: in the Properties view, or by deleting the rows andcolumns, or by changing the source code. In any case, ensure that the layouthas 1 row and 2 columns.
3. At the Design surface, create the Clear button:a. In the Palette view, go to the Display and Input drawer and then to Button
(Dojo). Drag a Dojo button to the first cell of the new layout.b. Using the same process as was used earlier, name the button clearButton,
change the text property to Clear, and use the following name for theonClick function: clearAllFields. The clearAllFields function isdisplayed.
4. Create the Save button:a. Click the Design tab.b. In the Palette view, go to the Display and Input drawer and then to Button
(Dojo). Drag a Dojo button to the second cell of the new layout.c. Name the button saveButton and change the text property to Save.d. On the Events page, select the onClick event and click the down arrow in
the second column to display the available function names. ClickselectedPayment_form_Submit, which is a function that EGL createdautomatically when you dragged the selectedPayment record variable ontothe user interface.
e. Click the Preview tab.
32 Rational Business Developer: Access a database with EGL Rich UI

f. Save the file, which should match the finished code in “Code forPaymentFileMaintenance.egl after lesson 4” on page 68.
Related reference
“Rich UI overview” at http://publib.boulder.ibm.com/infocenter/rbdhelp/v8r0m0
“Rich UI DataGrid and DataGridTooltip” at http://publib.boulder.ibm.com/infocenter/rbdhelp/v8r0m0
“Rich UI GridLayout” at http://publib.boulder.ibm.com/infocenter/rbdhelp/v8r0m0
“Rich UI validation and formatting” at http://publib.boulder.ibm.com/infocenter/rbdhelp/v8r0m0
“Form processing with Rich UI” at http://publib.boulder.ibm.com/infocenter/rbdhelp/v8r0m0
Lesson checkpoint
In this lesson, you completed the following tasks:v Created a Rich UI handler.v Created variables in the EGL Data view.v Created a data grid by dragging a record array variable onto the editor.v Adjusted widgets in the Properties view and by using a menu.v Worked in all three tabs of the Rich UI editor, updating the source and
previewing the web page.
In the next lesson, you create the service that will access the database.
Lesson 5: Create the serviceCreate a dedicated service to access the database.
Access a database with EGL Rich UI 33

In this lesson, you create an EGL Service part, which is a generatable part. Youmust place each generatable part in a separate source file, and the name of the partmust be the same as the name of the file.
Create a Service part
To create a Service part:1. In the Project Explorer window, right-click PaymentService, and then click
New > Service.2. In the New EGL Service Part window, enter the following information:
a. In the EGL source file name field, enter the following name:SQLService
EGL adds the .egl file extension automatically.b. In the Package field, enter the following name:
services
c. Verify that Create as web (SOAP) service and Create as web (REST)service are cleared, and leave the Implements Interfaces field empty.
34 Rational Business Developer: Access a database with EGL Rich UI
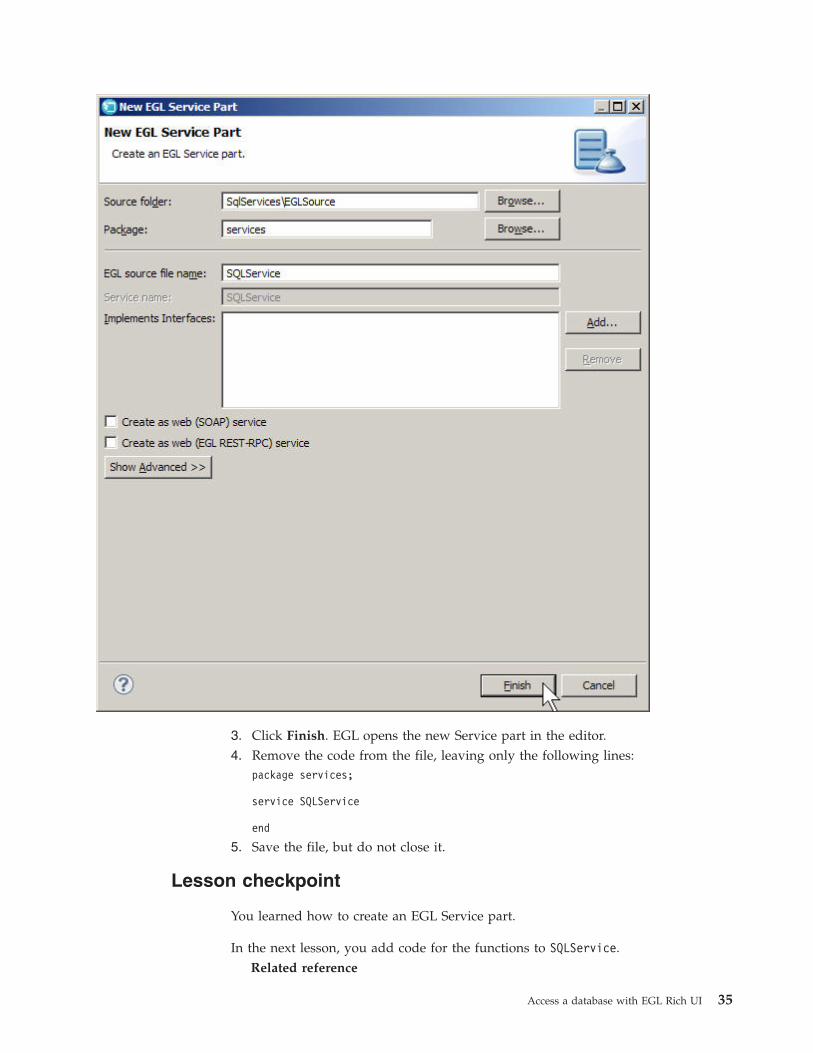
3. Click Finish. EGL opens the new Service part in the editor.4. Remove the code from the file, leaving only the following lines:
package services;
service SQLService
end
5. Save the file, but do not close it.
Lesson checkpoint
You learned how to create an EGL Service part.
In the next lesson, you add code for the functions to SQLService.Related reference
Access a database with EGL Rich UI 35

“Services: a top-level overview” at http://publib.boulder.ibm.com/infocenter/rbdhelp/v8r0m0
Lesson 6: Add code for the service functionsIn EGL, I/O statements such as add and get access data that resides in differentkinds of persistent data storage, from file systems to queues to databases. Thecoding is similar for the different cases.
In this lesson, you add functions that access rows in a relational database. Add thefunctions in order, before the final end statement in SQLService.egl.
Add a payment record
The addPayment() function adds a new row to the database.
To code the function:1. In the EGL editor, copy and paste the following lines into SQLService.egl
before the end statement:function addPayment(newPayment paymentRec inOut)add newPayment;end
2. Before you continue, you must resolve the reference to the paymentRec Recordpart. You can automatically create import statements by using the OrganizeImports feature. Right-click any blank area in the editor and click OrganizeImports.EGL adds the following statement to the beginning of the file:
import records.paymentRec;
36 Rational Business Developer: Access a database with EGL Rich UI

The reference is now resolved. You will use this feature often, whether byselecting the menu item or by pressing Ctrl-Shift-O.
3. Save the file (Ctrl-S), and then place your cursor anywhere in the addstatement. Right-click and select SQL Statement > Add.This feature changes the implicit SQL that underlies the EGL add statement
into embedded code that you can modify.
4. Because the paymentID field is auto-generated, you must not overwrite it:a. Delete PAYMENT_ID and subsequent comma from the INSERT list.
Access a database with EGL Rich UI 37

b. Delete :newPayment.paymentId and subsequent comma from the VALUESlist.
Note: In keeping with SQL terminology, each variable that is referenced inan SQL statement is called a host variable. The word host refers to thelanguage that embeds the SQL statement; in this case, EGL. Forexample, the initial colon in :newPayment.paymentId indicates a hostvariable.
The revised add statement looks like the following image:
5. Save the file.Related reference
“add considerations for SQL” at http://publib.boulder.ibm.com/infocenter/rbdhelp/v8r0m0
“Functions” at http://publib.boulder.ibm.com/infocenter/rbdhelp/v8r0m0
“import” at http://publib.boulder.ibm.com/infocenter/rbdhelp/v8r0m0
“SQL data access” at http://publib.boulder.ibm.com/infocenter/rbdhelp/v8r0m0
Read all database records
The getAllPayments function reads all of the records from the table and storesthem in an array.
To code the function:1. In the EGL editor, copy and paste the following lines into SQLService.egl
before the end statement:function getAllPayments() returns (paymentRec[])
paymentArray paymentRec[];get paymentArray;return (paymentArray);
end
38 Rational Business Developer: Access a database with EGL Rich UI

The EGL get statement generates an SQL SELECT statement to retrieve a resultset. When the target of the get statement is a dynamic array of records, EGLretrieves all matching rows from the result set and inserts each successive rowinto the next array element.
2. Save the file.Related reference
“get considerations for SQL” at http://publib.boulder.ibm.com/infocenter/rbdhelp/v8r0m0
Replace a record
The editPayment function replaces an existing row in the database with an editedversion. The function assumes that the user previously read the row from thedatabase.
To code the function:1. In the EGL editor, copy and paste the following lines into SQLService.egl
before the end statement:function editPayment(chgPayment paymentRec inOut)
replace chgPayment nocursor;end
The EGL replace statement generates an SQL UPDATE statement.2. Save the file.
Related reference
“replace considerations for SQL” at http://publib.boulder.ibm.com/infocenter/rbdhelp/v8r0m0
Delete a record
The deletePayment function deletes the specified record from the table.
To code the function:1. In the EGL editor, copy and paste the following lines into SQLService.egl
before the end statement:function deletePayment(delPayment paymentRec inOut)
trydelete delPayment nocursor;
onException(exception SQLException)if(SQLLib.sqlData.sqlState != "02000") // sqlState is of type CHAR(5)
throw exception;end
endend
The EGL delete statement generates an SQL DELETE statement. If no rows arepresent, the Derby database returns an SQLState value of "02000", and the EGLruntime code throws an exception that the function catches: that is, processes insome onException logic.When a function catches but ignores an exception, processing continues withoutinterruption. That rule applies to the preceding logic, when the value ofSQLState is "02000". When a function uses the throw statement to throw an
Access a database with EGL Rich UI 39

exception, the exception stays active. That rule also applies to the precedinglogic, when the value of SQLState is other than "02000".At run time, if a service does not handle an exception, the service requesterreceives an exception of type ServiceInvocationException. Incidentally, if theservice cannot be accessed, the requester receives an exception of typeServiceInvocationException or ServiceBindingException, depending on thedetails of the error.
2. Save the file.Related reference
“delete considerations for SQL” at http://publib.boulder.ibm.com/infocenter/rbdhelp/v8r0m0
“Exception handling” at http://publib.boulder.ibm.com/infocenter/rbdhelp/v8r0m0
Create test data
The createDefaultTable function creates a set of data for testing your completedapplication.
To code the function:1. In the EGL editor, copy and paste the following lines into SQLService.egl
before the end statement:function createDefaultTable() returns (paymentRec[])
tryexecute #sql{
delete from PAYMENT};
onException(exception SQLException)
if (SQLLib.sqlData.sqlState != "02000") // sqlState is of type CHAR(5)throw exception;
endend;
ispDate DATE = dateTimeLib.dateValueFromGregorian(20110405);addPayment(new paymentRec{category = 1, description = "Apartment",
amount = 880, fixedPayment = YES});addPayment(new paymentRec{category = 2, description = "Groceries",
amount = 450, fixedPayment = NO});addPayment(new paymentRec{category = 5, description = "ISP",
amount = 19.99, fixedPayment = YES, dueDate = ispDate });return (getAllPayments());
end
The code acts as follows:v The EGL execute statement runs a literal SQL statement that deletes all rows
from the PAYMENT table.v The ispDate variable receives a date value from the
dateTimeLib.dateValueFromGregorian() system function. The content of thevariable is then in a format that is appropriate for insertion into the dueDatefield in the database.
v The addPayment function is repeatedly invoked to add new rows to thePAYMENT table.
v The call to the getAllPayments function returns an array of rows that wereretrieved from the table.
40 Rational Business Developer: Access a database with EGL Rich UI

2. Press Ctrl-Shift-F to format the code. If you see any red Xs, compare your codewith the finished code in “Finished code for SQLService.egl after lesson 6” onpage 73
3. Save and close the file.Related reference
“execute considerations for SQL” at http://publib.boulder.ibm.com/infocenter/rbdhelp/v8r0m0
“dateValueFromGregorian” at http://publib.boulder.ibm.com/infocenter/rbdhelp/v8r0m0
Lesson checkpoint
You learned how to complete the following tasks:v Add embedded SQL code to a program and modify that codev Automatically create and organize import statements
In the next lesson, you will create a widget to hold the table of expense data.
Lesson 7: Create a library of reusable functionsCreate a library to format money values and to associate category numbers withdescriptions.
Libraries contain functions, constants, and variables that you can use in multiplelocations.
When you reference a declaration in the library from other logic such as a serviceor handler, you can include the library name as a prefix. For example,MyLibrary.myLibraryVariable is appropriate if the library name is MyLibrary andthe library includes the myLibraryVariable variable. Alternatively, you can includethe library name in a use statement in the other logic and avoid the need toqualify every reference. In that case, myLibraryVariable is sufficient to referencethat variable.
Create a Library part
To create a Library part:1. Right-click the PaymentClient folder, then click New > Library.2. In the New EGL Library window, enter the following information:
v In the EGL source file name field, enter the following name:PaymentLib
v In the Package field, enter the following name:libraries
v Under EGL Library Type, leave the default value of Basic selected.
The new Library part opens in the EGL editor.3. Replace the boilerplate code in the Library part with the following lines:
package libraries;
library PaymentLib type BasicLibrary {}
end
Access a database with EGL Rich UI 41

4. Save the file.
Create the categories array
Add the following code before the final end statement:categories STRING[] = [
"Rent", // 1"Food", // 2"Entertainment", // 3"Automotive", // 4"Utilities", // 5"Clothes", // 6"Other" // 7
];
The value is an array, and as is true of all arrays in EGL, the index of the firstelement is 1, not 0.
The array is used in logic that acts as follows:v Places an expense category into the database in integer form, to save space.v Places the expense category onto the web page in string form, for clarity.
Create the get functions for categories
The next functions convert between the following two formats for expensecategories: integer and string.1. Add the following code before the final end statement:
function getCategoryDesc(cat INT in) returns(STRING)if(cat) // the integer is not 0
return(categories[cat]);else
return("");end
end
The function receives the integer format of an expense category and returns therelated array element. If the input value is 0, the function returns an emptystring.
2. Add the following code before the final end statement:function getCategoryNum(desc STRING in) returns(INT)
for(i INT from 1 to categories.getSize())if(categories[i] == desc)
return(i);end
endreturn(0); // no match
end
This function receives the string format of an expense category and returns theinteger format, if possible. If no match is found for the received string, thefunction returns 0.
3. Format the file.4. Save and close the PaymentLib Library. If you see errors in your source file,
compare your code to the file contents in “Finished code for PaymentLib.eglafter lesson 7” on page 74.Related reference
“Arrays” at http://publib.boulder.ibm.com/infocenter/rbdhelp/v8r0m0
42 Rational Business Developer: Access a database with EGL Rich UI
Lesson checkpoint
You learned how to complete the following tasks:v Create a Library part.v Add functions and a variable to a library.
Lesson 8: Add variables and functions to the Rich UI handlerAdd source code that supports the user interface.
In lessons 8 and 9, you update the EGL source code directly and review changes inthe Preview tab.
Add code to support the data grid
Change the declaration of the data grid for two purposes: to cause the web pageto react when the user selects a cell and to ensure that the grid output is formattedcorrectly.1. In Project Explorer, open PaymentClient > EGLSource > handlers and
double-click PaymentFileMaintenance.egl.2. Click on the Source tab.Make the following changes, ignoring the error marks:3. In the allPayments_ui DataGrid declaration, add the following code
immediately before the columns property:selectionListeners ::= cellClicked,
The selectionListeners property specifies one or more functions that are calledwhenever the user selects a cell in the grid. In this case, you are appending afunction name to a pre-existing array. You will write the cellClicked functionlater in this lesson.
4. Formatters are functions that change the appearance of the values in DataGridcolumns. To demonstrate the feature, find the DataGridColumn declaration forcategory. To ensure that the user sees a category description rather than aninteger, add this code after width=90:, formatters = [ formatCategory ]
5. When you display dollar amounts in a column, you typically right-align thevalues. You do not need to code a function to cause right-alignment. Instead,add this code after the width entry for amount:, alignment = DataGridLib.ALIGN_RIGHT
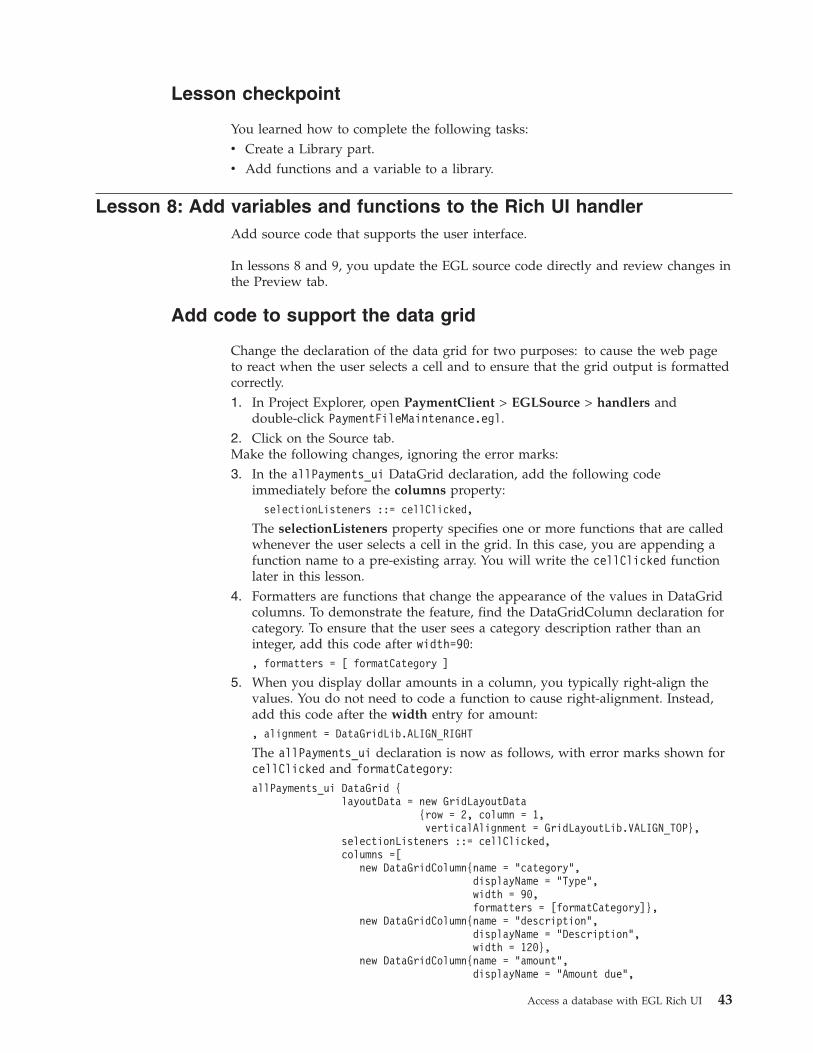
The allPayments_ui declaration is now as follows, with error marks shown forcellClicked and formatCategory:allPayments_ui DataGrid {
layoutData = new GridLayoutData{row = 2, column = 1,verticalAlignment = GridLayoutLib.VALIGN_TOP},
selectionListeners ::= cellClicked,columns =[
new DataGridColumn{name = "category",displayName = "Type",width = 90,formatters = [formatCategory]},
new DataGridColumn{name = "description",displayName = "Description",width = 120},
new DataGridColumn{name = "amount",displayName = "Amount due",
Access a database with EGL Rich UI 43

width = 90,alignment = DataGridLib.ALIGN_RIGHT}
],data = allPayments as any[],selectionMode = DataGridLib.SINGLE_SELECTION};
6. Save the file.
Code the function that responds when the user clicks the datagrid
The cellClicked function is invoked when the user clicks a cell in the data grid.
Immediately below the start function, add the following lines:function cellClicked(myGrid DataGrid in)
selectedPayment = allPayments_ui.getSelection()[1] as paymentRec;selectedPayment_form.publish();
end
First, the cellClicked function updates the selectedPayment record with data froma single data-grid row. That row can include more fields than are displayed to theuser. In this application, the single row in the data grid will have come from asingle row in the database.
Second, the publish function causes the transfer of data from the selectedPaymentrecord to the selectedPayment_ui layout. That transfer is made possible by codethat was provided for you when you created the selectedPayment_ui layout, whichis the single-record layout at the right of your web page. If you review the code,you can trace the relationships:v A Form Manager declaration includes form fields.v Each form field references a controller declaration.v The controller declaration relates a model to a view; in this case, a field of the
selectedPayment record to a child of the selectedPayment_ui layout.
The Form Manager provides various benefits but is essentially a collection ofcontrollers.
Here is an explanation of two other issues—the use of the bracketed array index([1]), and the use of the as operator:v The getSelection function always returns a subset of the rows in the data array
of the data grid. However, when you declared the data grid, you specified thefollowing setting to indicate that the user can select only one row at a time:selectionMode = DataGridLib.SINGLE_SELECTION. When the user can select onlyone row, only one element is available.
v Every element in the array returned by a getSelection function is of type ANY.You typically use the same Record part to process input to the grid and toprocess output from the grid, and in this tutorial, the Record part is paymentRec.The Record part has the following uses:– To be the basis of the array elements that you assign to the data property of
the data grid, as shown in the following setting:data = allPayments as any[]
– To cast the array element that is returned by the getSelection function of thedata grid, as shown here:allPayments_ui.getSelection()[1] as paymentRec
In each case, the as clause provides the necessary cast.
44 Rational Business Developer: Access a database with EGL Rich UI

Format column values in the grid
To add the formatter function:1. Add the following code before the final end statement in the file:
function formatCategory(class string, value string, rowData any in)value = PaymentLib.getCategoryDesc(value as INT);
end
Formatters have the parameters shown. In this case, the formatter wraps alibrary function you created earlier.
2. Press Ctrl-Shift-O to organize the required import statements and save the file.All the error marks disappear.
Test the formatting of the data grid and the transfer of data tothe single-record layout
You can test your recent changes even before you gain access to the database.1. Click the Preview tab and note that the categories are now descriptions (for
example, “Rent” rather than “1”).
2. Click one or another row in the data grid and note that the single-row layout isupdated appropriately. However, the formatter affected only the data grid, andthe description field in the single-row layout contains a numeric. The tutorialwill address that issue later.
3. Click the Source tab and change the start function so that the first record inthe prototype data includes a value for payeeName, which is a paymentRec recordfield that is not displayed by the data grid:function start()
allPayments_ui.data =[new paymentRec{
category = 1, description = "test01", amount = 100.00, payeeName = "Someone"},
new paymentRec{category = 2, description = "test02", amount = 200.00},new paymentRec{category = 3, description = "test03", amount = 300.00}];
end
4. Click the Preview tab and click the first row in the data grid.
Access a database with EGL Rich UI 45

As shown, you can switch quickly from one tab in the Rich UI editor to another, totest even a small change.
Comment the prototype data
You can comment or uncomment code quickly, as shown in this step.1. Click the Source tab.2. In the start function, select the complete assignment statement, right-click the
area selected, and click Comment.
3. Comment marks (//) are now at the start of each line. You could remove thecomments by repeating the task and clicking Uncomment instead of Comment.However, leave the comments in place. EGL also supports the use of slashasterisk (/*) and asterisk slash (*/) delimiters, as shown here:
46 Rational Business Developer: Access a database with EGL Rich UI

/*
You can add comments in either of two ways.
*/
Declare a service-access variable
You now declare a service-access variable, which will let you communicate withthe service that you defined earlier.
To create the variable:1. Near the top of the EGL source code, find the handler declaration for
PaymentFileMaintenance. Add a blank line, and immediately before the uiGridLayout declaration, add the following statement:dbService SQLService{@dedicatedService};
The @dedicatedService property indicates that the service being referenced is adedicated service, which will be deployed with the Rich UI handler.In the following display, the red X in the margin indicates a problem in thecode:
To see the error message, move the cursor over the X.2. Fix the “unresolved type” error by pressing Ctrl+Shift+O. The new import
statement provides access to the services package, SQLService part, which is inthe PaymentService project. The reference to SQLService is resolved becausethat project is on the EGL build path of the PaymentClient project.
3. Save the file.
Create functions that use the service-access variable toinvoke the service
You now create several functions to invoke different functions in the dedicatedservice. Once you understand how to set up one invocation, the others arestraightforward.
Begin by creating the function that reads all data.1. Leave a blank line after the cellClicked function and add the following code:
function readFromTable()call dbService.getAllPayments() returning to updateAll
onException serviceLib.serviceExceptionHandler;end
Note:
a. The call statement in Rich UI is a variation used only to accessservices. The runtime communication in this case is asynchronous,which means that the user can continue to interact with the handlerwhile the service is responding.
Access a database with EGL Rich UI 47

b. The asynchronous call statement includes two function names:v updateAll
v serviceLib.serviceExceptionHandler
The two are callback functions, which are invoked by the EGLruntime code after the service responds or fails. If the servicereturns a value successfully, the updateAll function is invoked. Ifthe call fails, the EGL runtime code invokes a function that isassociated with the name serviceLib.serviceExceptionHandler.By default, an error results in the display of error information in theConsole view (at development time) or at the bottom of the webpage (at run time). However, you can specify an error handler ofyour own, typically by assigning a function name in place ofserviceLib.serviceExceptionHandler.
2. Click anywhere in the call statement, right-click, and click Create CallbackFunctions. Alternatively, you could clicked anywhere in the statement, helddown the Ctrl key, and pressed 1.EGL creates an empty updateAll function. An error handler would have been
created as well if you had specified a function name for onException, otherthan serviceLib.serviceExceptionHandler.The parameter list in the created updateAll function is equivalent to the typeof return value that is expected from the service. Here are the relationshipsthat explain the behavior of the Rich UI editor:v The parameter list in the callback function is correct because the
getAllPayments function in the Service part is available to the editor.v The function is available because you resolved the reference to the
SQLService part in a previous step.
Next, create the function that adds sample data.3. Click Ctrl-F to gain access to the Find/Replace dialog, type SampleData, and
click Find.4. Update the sampleData function so that the code is as follows:
function sampleData(event Event in)call dbService.createDefaultTable() returning to updateAll
onException serviceLib.serviceExceptionHandler;end
You do not use the Create Callback Functions feature because the callbackfunctions exist.
Next, create the function that adds data.5. Update the addRow function so that the code is as follows:
function addRow(event Event in)call dbService.addPayment(new paymentRec) returning to recordAdded
onException serviceLib.serviceExceptionHandler;end
48 Rational Business Developer: Access a database with EGL Rich UI

6. Click anywhere in the call statement, right-click, and click Create CallbackFunctions. EGL adds the recordAdded function.
Create the function that deletes data.7. Update the deleteRow function so that the code is as follows:
function deleteRow(event Event in)
for(i INT from 1 to allPayments.getSize())if(allPayments[i].paymentID == selectedPayment.paymentID)
allPayments.removeElement(i);exit for;
endend
call dbService.deletePayment(selectedPayment) returning to recordRevisedonException serviceLib.serviceExceptionHandler;
end
The function acts as follows:v Deletes the selected row from the local array of recordsv Calls the database service to delete the row from the database itself
8. Click anywhere in the call statement, right-click, and click Create CallbackFunctions. EGL adds the recordRevised function.
9. Press Ctrl-Shift-F to format the code.10. Save the file.Related information:
“Invoking a service asynchronously from a Rich UI application” athttp://publib.boulder.ibm.com/infocenter/rbdhelp/v8r0m0
Update the start function to initialize the data grid withdatabase rows
To initialize the data grid, add the following code before the end statement of thestart function:readFromTable();
Although you could have assigned the readFromTable function directly to theonConstructionFunction property, you are advised to retain the start function asa separate unit of logic in case you later decide to add other code that runs beforethe web page is rendered.
Retain the commented code in the start function in case you need to test the webpage without accessing the database. You can use the comment and uncommentcapability of the Rich UI editor to quickly switch from the function call to theprototype data and back again.
Complete the callback functions
You now complete the callback functions that were created automatically:v updateAll
v recordAdded
v recordRevised
The updateAll function receives an array of paymentRec records from the dedicatedservice. The function is called in the following ways:
Access a database with EGL Rich UI 49
v As a callback function at startup, after the readFromTable function calls theservice.
v As a callback function whenever the user clicks the Sample button to invoke thesampleData function.
1. Update the updateAll function so that the code is as follows:function updateAll(retResult paymentRec[] in)
allPayments = retResult;allPayments_ui.data = allPayments as any[];
end
The function updates the global array of payment records with the datareceived from the service and then refreshes the data grid.
The recordAdded function receives the record that was sent to and returned by theservice function addPayment.2. Update the recordAdded function so that the code is as follows:
function recordAdded(newPayment paymentRec in)readFromTable();
end
The function readFromTable reads all the rows from the database. The datastored by the grid can then contain the new row, including the paymentID valuethat was automatically generated by the database and that is otherwiseunavailable to the grid.
The recordRevised function receives the record that was sent to and returned bythe service function addPayment.3. Update the recordRevised function so that the code is as follows:
function recordRevised(delPayment paymentRec in)allPayments_ui.data = allPayments as any[];
end
The function refreshes the data grid.4. Press Ctrl-Shift-F to format the code. If you see errors in your source file,
compare your code to the file contents in “Code forPaymentFileMaintenance.egl after lesson 8” on page 74.
5. Save the file.
Test the interface
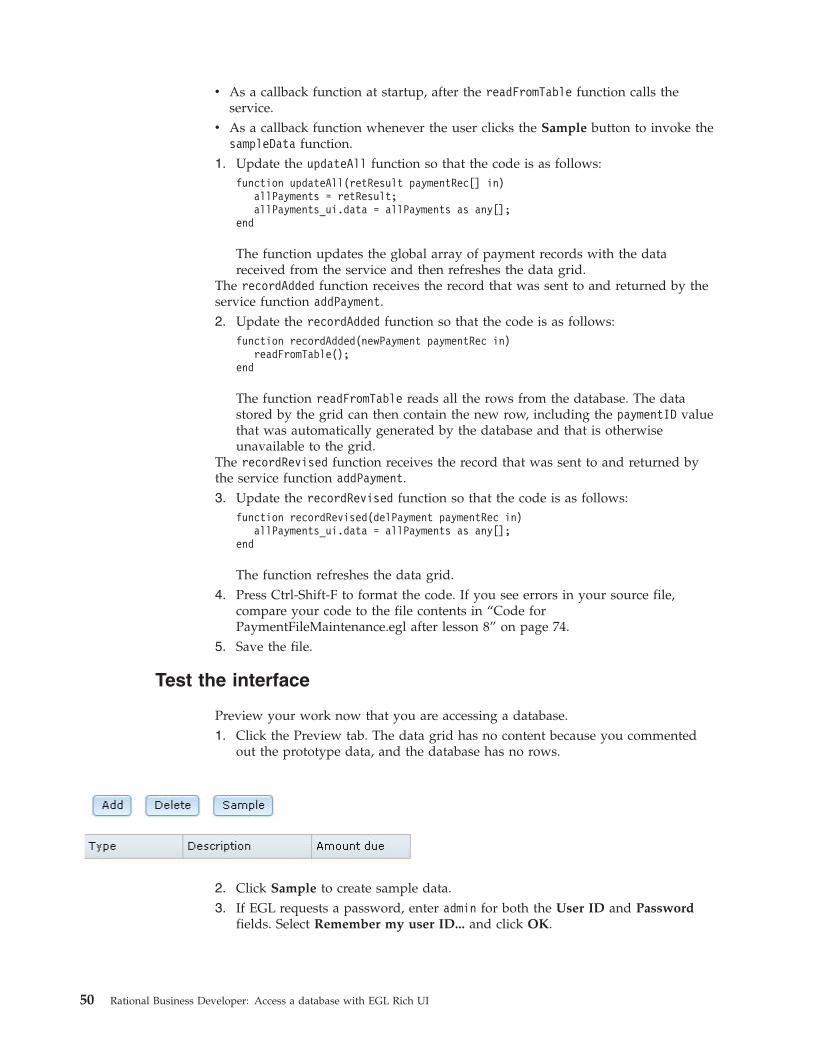
Preview your work now that you are accessing a database.1. Click the Preview tab. The data grid has no content because you commented
out the prototype data, and the database has no rows.
2. Click Sample to create sample data.3. If EGL requests a password, enter admin for both the User ID and Password
fields. Select Remember my user ID... and click OK.
50 Rational Business Developer: Access a database with EGL Rich UI

If you exit and restart the workbench before you complete this tutorial, thiswindow might be re-displayed the next time you attempt to access thedatabase. Eventually the grid is re-displayed with rows of sample data.
4. Click the Add button. A new row with a single default value is displayed atthe bottom of the grid.
5. Select the Apartment row and click Delete. The row is deleted from both thedisplay and the database.
Access a database with EGL Rich UI 51

6. Click the first row of the data grid.Data from the database was transferred from the data grid to the single-record
layout. Note that the value of the Key field reflects how many rows wereadded to the database and will probably not match the value on your webpage.
Lesson checkpoint
You learned how to complete the following tasks:v To create formatters.v To respond to the user's selection in a data grid.v To transfer data from the data grid to a grid layout.v To comment and uncomment code.v To access services from a Rich UI application.
In the next lesson, you will complete the code for the Rich UI handler.
Lesson 9: Complete the code that supports the user interfaceNext, you will complete the single-row layout, as well as the code that supportsthe Clear and Save buttons.
52 Rational Business Developer: Access a database with EGL Rich UI

Complete the layout that displays a single row
To complete the single-row layout:1. Click the Source tab, if necessary.2. Locate the selectedPayment_category_comboBox declaration. In the set-values
block, in place of the brackets for the values property, specify thePaymentLib.categories array. The list of values in the combo box will now bethe values in the categories array that you created in the PaymentLib library.Here is the changed declaration:selectedPayment_category_comboBox DojoComboBox{ values = PaymentLib.categories,
layoutData = new GridLayoutData{row = 2, column = 2}};
3. To set the value of that combo box to a category description rather than aninteger, update the cellClicked function to access a library function that youcoded earlier:function cellClicked(myGrid DataGrid in)
selectedPayment = allPayments_ui.getSelection()[1] as paymentRec;selectedPayment_form.publish();selectedPayment_category_comboBox.value =
PaymentLib.getCategoryDesc(selectedPayment.category);end
4. Save the file, but do not close it.
Test the new code
Review the effect of your last change.1. Click the Preview tab.2. Click the first line of sample data. The single-record layout now displays the
category name rather than an integer.
Access a database with EGL Rich UI 53
Complete the code for the second set of buttons
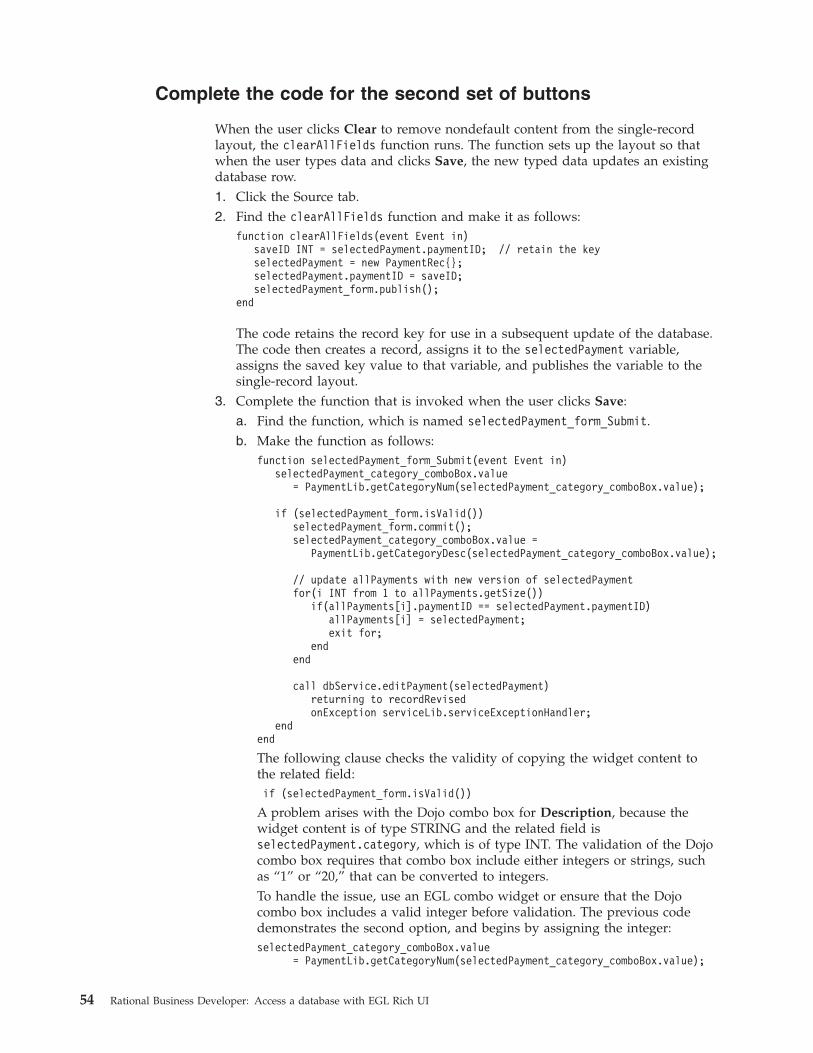
When the user clicks Clear to remove nondefault content from the single-recordlayout, the clearAllFields function runs. The function sets up the layout so thatwhen the user types data and clicks Save, the new typed data updates an existingdatabase row.1. Click the Source tab.2. Find the clearAllFields function and make it as follows:
function clearAllFields(event Event in)saveID INT = selectedPayment.paymentID; // retain the keyselectedPayment = new PaymentRec{};selectedPayment.paymentID = saveID;selectedPayment_form.publish();
end
The code retains the record key for use in a subsequent update of the database.The code then creates a record, assigns it to the selectedPayment variable,assigns the saved key value to that variable, and publishes the variable to thesingle-record layout.
3. Complete the function that is invoked when the user clicks Save:a. Find the function, which is named selectedPayment_form_Submit.b. Make the function as follows:
function selectedPayment_form_Submit(event Event in)selectedPayment_category_comboBox.value
= PaymentLib.getCategoryNum(selectedPayment_category_comboBox.value);
if (selectedPayment_form.isValid())selectedPayment_form.commit();selectedPayment_category_comboBox.value =
PaymentLib.getCategoryDesc(selectedPayment_category_comboBox.value);
// update allPayments with new version of selectedPaymentfor(i INT from 1 to allPayments.getSize())
if(allPayments[i].paymentID == selectedPayment.paymentID)allPayments[i] = selectedPayment;exit for;
endend
call dbService.editPayment(selectedPayment)returning to recordRevisedonException serviceLib.serviceExceptionHandler;
endend
The following clause checks the validity of copying the widget content tothe related field:if (selectedPayment_form.isValid())
A problem arises with the Dojo combo box for Description, because thewidget content is of type STRING and the related field isselectedPayment.category, which is of type INT. The validation of the Dojocombo box requires that combo box include either integers or strings, suchas “1” or “20,” that can be converted to integers.To handle the issue, use an EGL combo widget or ensure that the Dojocombo box includes a valid integer before validation. The previous codedemonstrates the second option, and begins by assigning the integer:selectedPayment_category_comboBox.value
= PaymentLib.getCategoryNum(selectedPayment_category_comboBox.value);
54 Rational Business Developer: Access a database with EGL Rich UI

The function thereafter checks the validity of the data in the single-recordlayout and, if the data is valid, does as follows:1) Commits the validated data to the selectedPayment record. This
“commit” is part of MVC processing and has nothing to do with adatabase commit.
2) Updates the Dojo combo box in the single-record layout so that thevalue of that field is again a string.
3) Revises the allPayments array element that contains the saved keyvalue. At that point, the array element includes a copy of the data thatthe user wants in the database.
4) Calls the service to update a single row in the database. The relatedcallback function assigns the allPayments array to the data array of thedata grid, and that assignment re-renders the grid with the updateddata. The grid will be re-rendered with data assigned in theselectedPayment_form_Submit function, not with data retrieved from thedatabase.
4. Save the file, but do not close it. If you see errors in your source file, compareyour code to the file contents in “Finished code forPaymentFileMaintenance.egl” on page 80.
Test the new code
You can now test the completed application.1. Click the Preview tab. The sample data that you entered earlier is displayed.2. Select the blank record at the bottom of the sample data. You created this
record in a previous lesson. The Payment record grid shows blank fields, withthe following exceptions:v A key number is displayed.v The Amount field shows a zero value.v The current date is used as a default because the value of the DATE variable
is null.
Access a database with EGL Rich UI 55

3. Complete the record with data such as the following:v For Category, enter Automotive.v For Description, enter Gas.v For Amount, enter $80.00.v Leave the Fixed pmt check box clear.v Click the current date in the Due Date field and select a date from the
displayed calendar.
56 Rational Business Developer: Access a database with EGL Rich UI
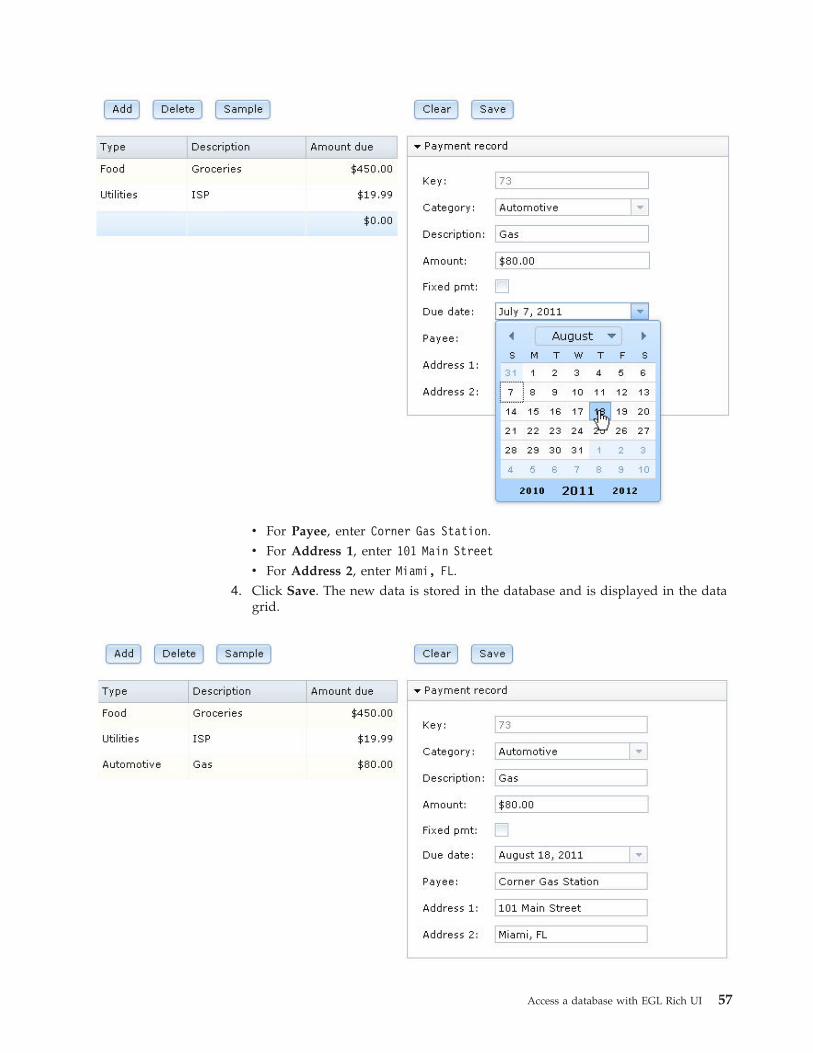
v For Payee, enter Corner Gas Station.v For Address 1, enter 101 Main Street
v For Address 2, enter Miami, FL.4. Click Save. The new data is stored in the database and is displayed in the data
grid.
Access a database with EGL Rich UI 57

5.
6. Click Clear. The single-record layout is reset to initial values.
Lesson checkpoint
You learned how to complete the following tasks:v Assign a preset string array as the set of values that are provided by a Dojo
combo box.v Use conversion functions if you need to relate a field of type INT to a Dojo
combo box that contains strings.v Use the Form Manager isValid and commit functions.
In the next lesson, you install Apache Tomcat on your system so that you can runyour application on a web server.
Lesson 10: Install Apache TomcatYou can use Apache Tomcat to display the web page and to run the EGL-generatedservice.
Download and access the server
If you have IBM® WebSphere® Application Server installed, you can skip to thenext lesson. In any case, you can download Apache Tomcat, if necessary, and makeit available in the workbench.
To gain access to server:1. Locate the Servers view, which is by default at the lower right of the
workbench. EGL created an AJAX Test Server by default. Right-click the emptyspace and click New > Server.
2. In the Define a New Server window, expand Apache and click Tomcat v6.0Server with EGL debugging support. Accept the default values for the otherfields. Click Next.
3. In the Tomcat Server window, access the open-source software either by usingthe Browse to find an existing installation directory (for example,apache-tomcat-6.0.26) on your machine; or click Download and Install. If you
58 Rational Business Developer: Access a database with EGL Rich UI

found an existing installation directory, click Finish and continue the lesson atstep 5.Accept the terms of the license agreement. Browse to a directory for the
application files, such as C:\Program Files\Apache. While the workbenchcompletes the installation, the Define a New Server window is displayed withthe installation directory specified. Progress is shown at the lower right of theworkbench.
4. When the installation is completed, click Finish.5. Start the server by highlighting the server name and clicking the green Start
icon at the top of the Server view.
Lesson checkpoint
In this lesson, you completed the following tasks:v Downloaded Apache Tomcat, if necessary
Access a database with EGL Rich UI 59

v Started the server.
In the next lesson, you deploy the application to a server and run it there.
Lesson 11: Deploy and test the payment applicationDuring the deployment process, EGL creates HTML files and server-specific codeto match your target environment.
Deployment is a two stage process:1. Internal deployment, when you deploy your handlers to a web project.2. External deployment, when you deploy the web project to an application
server.
After you deploy the tutorial application internally, you can run it on anapplication server in the workbench.
Edit the deployment descriptor
The EGL deployment descriptor manages the internal deployment and is createdautomatically in each EGLSource folder. The main handler is in theMortgageUIProject, and you use the EGL deployment descriptor in thePaymentClient/EGLSource folder.
To edit the EGL deployment descriptor:1. In the EGLSource folder, double-click the PaymentClient.egldd file. The EGL
deployment descriptor opens in the Deployment Descriptor editor. EGLautomatically added the embedded handlers to the list of Rich UI handlers todeploy.
2. Because you are using a dedicated service, you do not need to add informationto the Service Bindings Configuration section. The list is empty.
3. Under Deployment Target, next to the Target project field, click New.
60 Rational Business Developer: Access a database with EGL Rich UI

The Dynamic Web Project wizard opens.4. In the Project Name field, enter the following name:
PaymentWeb
Any web project is acceptable. You are creating a simple one for the purposesof the tutorial.
5. For Target runtime, select one of the following options from the list:v Apache Tomcat v6.0
v WebSphere Application Server vn.n
The value of the Configuration field changes automatically to match the newruntime environment.
6. If you are deploying to a WebSphere Application Server runtime, select Addproject to an EAR, which is underneath EAR membership. If you add theproject to an EAR, accept the default name that the wizard displays. ForApache Tomcat, ensure that the Add project to an EAR check box is clear.
Access a database with EGL Rich UI 61

7. Click Finish. EGL creates the web project and re-displays the deploymentdescriptor.
8. Save and close the deployment descriptor.
Set the data source for the new project
Before you can access the database from the new project, you must connect theproject to the database.1. In the Project Explorer view, right-click the PaymentWeb project and click
Properties > EGL Runtime Data Source.2. Click Load values from a data tools connection.3. Click the down arrow next to the Connection field and select Derby Database
Connection, which is the connection profile that you created in Lesson 2.
62 Rational Business Developer: Access a database with EGL Rich UI

4. Click OK.
Deploy the Rich UI application
You can now launch the deployment process:1. In the EGLSource folder, right-click the PaymentClient.egldd file.2. Click Deploy EGL Descriptor.
The deployment process requires no further action on your part. The process
copies many files and might take several minutes.3. If the Tomcat server shows a status of “Restart”, consider that statement a
directive: restart the server by clicking the green Start icon in the upper right of
the Servers view . Alternatively, you can right-click the server name andclick Restart. When the server has restarted, the status is "Started,Synchronized".
Access a database with EGL Rich UI 63

Run the generated code1. To run the internally deployed code, focus your attention on the target project,
PaymentWeb. In the PaymentWeb/WebContent folder, findPaymentFileMaintenance-en_US.html.
2. Right-click the file name and click Run As > Run on Server
The Run On Server window opens.3. In the Run On Server window, select the appropriate server and click Always
use this server when running this project. Click Finish.
64 Rational Business Developer: Access a database with EGL Rich UI

Access a database with EGL Rich UI 65

4. If you are using Tomcat and see a page not found error (404), check whetherthe server is showing a Restart status. If so, restart the server and refresh thepage.The page opens.
5. Test the application by adding, deleting, and modifying payment records.
66 Rational Business Developer: Access a database with EGL Rich UI

Related concepts
“Introduction to EGL generation and deployment” at http://publib.boulder.ibm.com/infocenter/rbdhelp/v8r0m0
Lesson checkpoint
You learned how to complete the following tasks:v Edit a deployment descriptor to deploy a Rich UI handler.v Run the application on an application server.
SummaryYou completed the Access a database with EGL Rich UI tutorial.
You practiced the following skills:v Creating and accessing a relational database.v Creating a library of reusable functions.v Designing and deploying a Rich UI application and a dedicated service.
ResourcesA variety of resources are available.v Completed tutorial code is here:
– “Code for PaymentFileMaintenance.egl after lesson 4” on page 68– “Finished code for SQLService.egl after lesson 6” on page 73– “Finished code for PaymentLib.egl after lesson 7” on page 74– “Code for PaymentFileMaintenance.egl after lesson 8” on page 74– “Finished code for PaymentFileMaintenance.egl” on page 80
v A complementary example of database processing is here:– “End-to-end processing with a UI program and a data grid” at
http://publib.boulder.ibm.com/infocenter/rbdhelp/v8r0m0v The following help topics are of particular interest, and each has additional
links:– “Overview of EGL Rich UI” at http://publib.boulder.ibm.com/infocenter/
rbdhelp/v8r0m0– “Services: a top-level overview” at http://publib.boulder.ibm.com/
infocenter/rbdhelp/v8r0m0– “SQL data” at http://publib.boulder.ibm.com/infocenter/rbdhelp/v8r0m0– “Introduction to EGL generation and deployment” at http://
publib.boulder.ibm.com/infocenter/rbdhelp/v8r0m0– “Rich UI validation and formatting” at http://publib.boulder.ibm.com/
infocenter/rbdhelp/v8r0m0– “Form processing with Rich UI” at http://publib.boulder.ibm.com/
infocenter/rbdhelp/v8r0m0– “Rich UI DataGrid and DataGridTooltip” at http://publib.boulder.ibm.com/
infocenter/rbdhelp/v8r0m0– “Rich UI GridLayout” at http://publib.boulder.ibm.com/infocenter/rbdhelp/
v8r0m0
Access a database with EGL Rich UI 67

EGL Rich UI follows the Visual Formatting Model of the World Wide WebConsortium (W3C). For details, go to the W3C web site (http://www.w3.org) andsearch for “Visual formatting model.”
Code for PaymentFileMaintenance.egl after lesson 4The following code is the text of the PaymentFileMaintenance.egl file at the end oflesson 4.package handlers;
import com.ibm.egl.rui.mvc.Controller;import com.ibm.egl.rui.mvc.FormField;import com.ibm.egl.rui.mvc.FormManager;import com.ibm.egl.rui.mvc.MVC;import com.ibm.egl.rui.widgets.DataGrid;import com.ibm.egl.rui.widgets.DataGridColumn;import com.ibm.egl.rui.widgets.DataGridLib;import com.ibm.egl.rui.widgets.Div;import com.ibm.egl.rui.widgets.GridLayout;import com.ibm.egl.rui.widgets.GridLayoutData;import com.ibm.egl.rui.widgets.GridLayoutLib;import com.ibm.egl.rui.widgets.TextLabel;import egl.io.sql.column;import egl.ui.rui.Event;import egl.ui.rui.Widget;import dojo.widgets.DojoButton;import dojo.widgets.DojoCheckBox;import dojo.widgets.DojoComboBox;import dojo.widgets.DojoCurrencyTextBox;import dojo.widgets.DojoDateTextBox;import dojo.widgets.DojoLib;import dojo.widgets.DojoTextField;import dojo.widgets.DojoTitlePane;import records.paymentRec;
handler PaymentFileMaintenance type RUIhandler{initialUI =[ui], onConstructionFunction = start,cssFile = "css/PaymentClient.css", title = "PaymentFileMaintenance"}
ui GridLayout{columns = 2, rows = 2, cellPadding = 4,children =
[detailButtonLayout, editPane, buttonLayout, allPayments_ui ]};
allPayments paymentRec[0];
allPayments_ui DataGrid{layoutData = new GridLayoutData{
row = 2, column = 1,verticalAlignment = GridLayoutLib.VALIGN_TOP},
columns =[new DataGridColumn{name = "category", displayName = "Type", width = 90},new DataGridColumn{name = "description", displayName = "Description",
width = 120},new DataGridColumn{name = "amount", displayName = "Amount due", width = 90}
],data = allPayments as any[],selectionMode = DataGridLib.SINGLE_SELECTION};
buttonLayout GridLayout{layoutData = new GridLayoutData{ row = 1, column = 1 },cellPadding = 4, rows = 1, columns = 3,children = [ sampleButton, deleteButton, addButton ] };
addButton DojoButton{layoutData = new GridLayoutData{ row = 1, column = 1 },
68 Rational Business Developer: Access a database with EGL Rich UI

text = "Add", onClick ::= addRow };
deleteButton DojoButton{layoutData = new GridLayoutData{ row = 1, column = 2 },text = "Delete", onClick ::= deleteRow };
sampleButton DojoButton{layoutData = new GridLayoutData{ row = 1, column = 3 },text = "Sample", onClick ::= sampleData };
selectedPayment paymentRec;
editPane DojoTitlePane{layoutData = new GridLayoutData{ row = 2, column = 2,
verticalAlignment = GridLayoutLib.VALIGN_TOP },title = "Payment record",isOpen=true, duration=1000, width = "350",children =
[ new Div {children = [ selectedPayment_ui ]}]};
selectedPayment_ui GridLayout {rows = 9, columns = 2, cellPadding = 4,children = [ selectedPayment_paymentId_nameLabel,
selectedPayment_paymentId_field,selectedPayment_category_nameLabel,selectedPayment_category_comboBox,selectedPayment_description_nameLabel,selectedPayment_description_field,selectedPayment_amount_nameLabel,selectedPayment_amount_textBox,selectedPayment_fixedPayment_nameLabel,selectedPayment_fixedPayment_checkBox,selectedPayment_dueDate_nameLabel,selectedPayment_dueDate_textBox,selectedPayment_payeeName_nameLabel,selectedPayment_payeeName_field,selectedPayment_payeeAddress1_nameLabel,selectedPayment_payeeAddress1_field,selectedPayment_payeeAddress2_nameLabel,selectedPayment_payeeAddress2_field ] };
selectedPayment_paymentId_nameLabel TextLabel {text="Key:" ,layoutData = new GridLayoutData { row = 1, column = 1} };
selectedPayment_paymentId_field DojoTextField {layoutData = new GridLayoutData { row = 1, column = 2},readOnly = true };
selectedPayment_paymentId_controller Controller {@MVC {model = selectedPayment.paymentId,
view = selectedPayment_paymentId_field as Widget},validStateSetter = handleValidStateChange_selectedPayment};
selectedPayment_paymentId_formField FormField {controller = selectedPayment_paymentId_controller,nameLabel = selectedPayment_paymentId_nameLabel};
selectedPayment_category_nameLabel TextLabel {text="Category:",layoutData = new GridLayoutData { row = 2, column = 1} };
selectedPayment_category_comboBox DojoComboBox {values = [],layoutData = new GridLayoutData { row = 2, column = 2} };
Access a database with EGL Rich UI 69
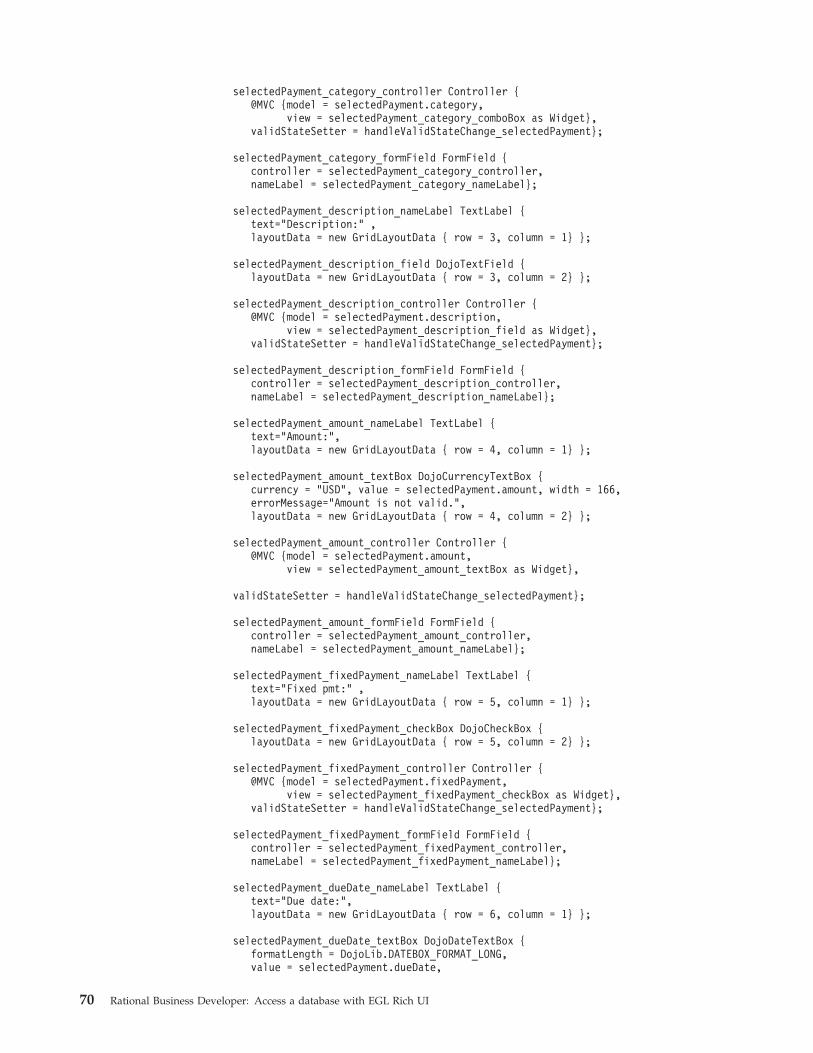
selectedPayment_category_controller Controller {@MVC {model = selectedPayment.category,
view = selectedPayment_category_comboBox as Widget},validStateSetter = handleValidStateChange_selectedPayment};
selectedPayment_category_formField FormField {controller = selectedPayment_category_controller,nameLabel = selectedPayment_category_nameLabel};
selectedPayment_description_nameLabel TextLabel {text="Description:" ,layoutData = new GridLayoutData { row = 3, column = 1} };
selectedPayment_description_field DojoTextField {layoutData = new GridLayoutData { row = 3, column = 2} };
selectedPayment_description_controller Controller {@MVC {model = selectedPayment.description,
view = selectedPayment_description_field as Widget},validStateSetter = handleValidStateChange_selectedPayment};
selectedPayment_description_formField FormField {controller = selectedPayment_description_controller,nameLabel = selectedPayment_description_nameLabel};
selectedPayment_amount_nameLabel TextLabel {text="Amount:",layoutData = new GridLayoutData { row = 4, column = 1} };
selectedPayment_amount_textBox DojoCurrencyTextBox {currency = "USD", value = selectedPayment.amount, width = 166,errorMessage="Amount is not valid.",layoutData = new GridLayoutData { row = 4, column = 2} };
selectedPayment_amount_controller Controller {@MVC {model = selectedPayment.amount,
view = selectedPayment_amount_textBox as Widget},
validStateSetter = handleValidStateChange_selectedPayment};
selectedPayment_amount_formField FormField {controller = selectedPayment_amount_controller,nameLabel = selectedPayment_amount_nameLabel};
selectedPayment_fixedPayment_nameLabel TextLabel {text="Fixed pmt:" ,layoutData = new GridLayoutData { row = 5, column = 1} };
selectedPayment_fixedPayment_checkBox DojoCheckBox {layoutData = new GridLayoutData { row = 5, column = 2} };
selectedPayment_fixedPayment_controller Controller {@MVC {model = selectedPayment.fixedPayment,
view = selectedPayment_fixedPayment_checkBox as Widget},validStateSetter = handleValidStateChange_selectedPayment};
selectedPayment_fixedPayment_formField FormField {controller = selectedPayment_fixedPayment_controller,nameLabel = selectedPayment_fixedPayment_nameLabel};
selectedPayment_dueDate_nameLabel TextLabel {text="Due date:",layoutData = new GridLayoutData { row = 6, column = 1} };
selectedPayment_dueDate_textBox DojoDateTextBox {formatLength = DojoLib.DATEBOX_FORMAT_LONG,value = selectedPayment.dueDate,
70 Rational Business Developer: Access a database with EGL Rich UI
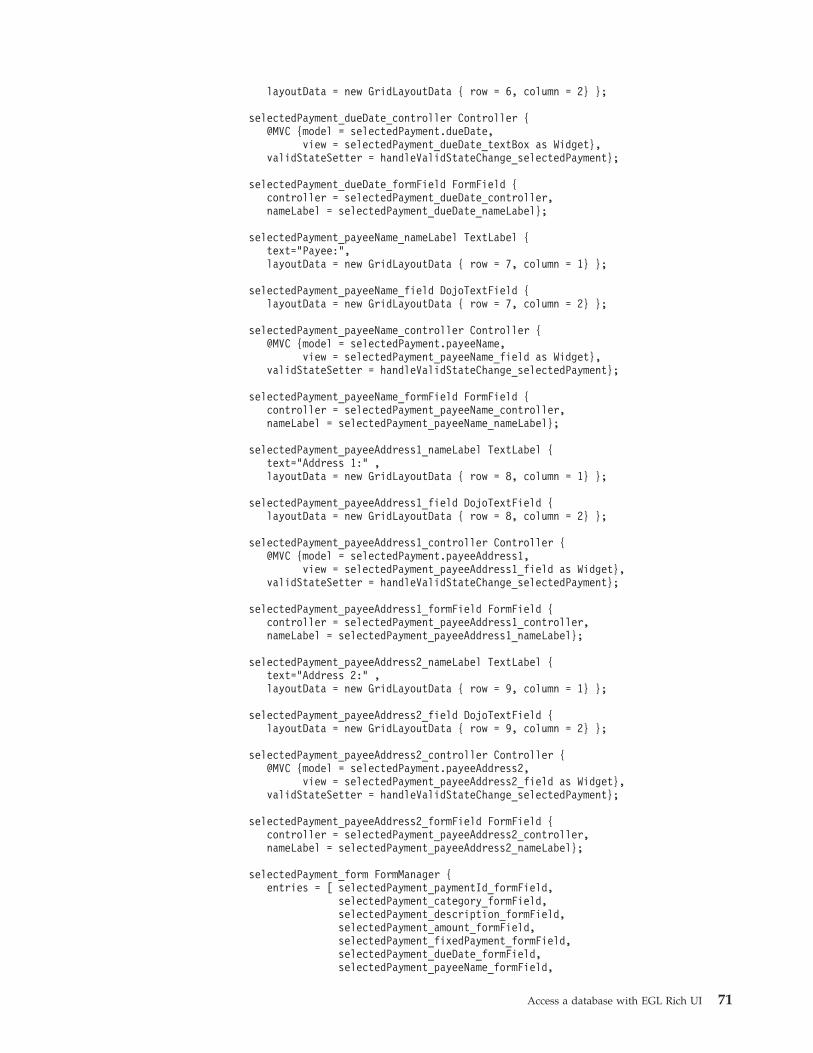
layoutData = new GridLayoutData { row = 6, column = 2} };
selectedPayment_dueDate_controller Controller {@MVC {model = selectedPayment.dueDate,
view = selectedPayment_dueDate_textBox as Widget},validStateSetter = handleValidStateChange_selectedPayment};
selectedPayment_dueDate_formField FormField {controller = selectedPayment_dueDate_controller,nameLabel = selectedPayment_dueDate_nameLabel};
selectedPayment_payeeName_nameLabel TextLabel {text="Payee:",layoutData = new GridLayoutData { row = 7, column = 1} };
selectedPayment_payeeName_field DojoTextField {layoutData = new GridLayoutData { row = 7, column = 2} };
selectedPayment_payeeName_controller Controller {@MVC {model = selectedPayment.payeeName,
view = selectedPayment_payeeName_field as Widget},validStateSetter = handleValidStateChange_selectedPayment};
selectedPayment_payeeName_formField FormField {controller = selectedPayment_payeeName_controller,nameLabel = selectedPayment_payeeName_nameLabel};
selectedPayment_payeeAddress1_nameLabel TextLabel {text="Address 1:" ,layoutData = new GridLayoutData { row = 8, column = 1} };
selectedPayment_payeeAddress1_field DojoTextField {layoutData = new GridLayoutData { row = 8, column = 2} };
selectedPayment_payeeAddress1_controller Controller {@MVC {model = selectedPayment.payeeAddress1,
view = selectedPayment_payeeAddress1_field as Widget},validStateSetter = handleValidStateChange_selectedPayment};
selectedPayment_payeeAddress1_formField FormField {controller = selectedPayment_payeeAddress1_controller,nameLabel = selectedPayment_payeeAddress1_nameLabel};
selectedPayment_payeeAddress2_nameLabel TextLabel {text="Address 2:" ,layoutData = new GridLayoutData { row = 9, column = 1} };
selectedPayment_payeeAddress2_field DojoTextField {layoutData = new GridLayoutData { row = 9, column = 2} };
selectedPayment_payeeAddress2_controller Controller {@MVC {model = selectedPayment.payeeAddress2,
view = selectedPayment_payeeAddress2_field as Widget},validStateSetter = handleValidStateChange_selectedPayment};
selectedPayment_payeeAddress2_formField FormField {controller = selectedPayment_payeeAddress2_controller,nameLabel = selectedPayment_payeeAddress2_nameLabel};
selectedPayment_form FormManager {entries = [ selectedPayment_paymentId_formField,
selectedPayment_category_formField,selectedPayment_description_formField,selectedPayment_amount_formField,selectedPayment_fixedPayment_formField,selectedPayment_dueDate_formField,selectedPayment_payeeName_formField,
Access a database with EGL Rich UI 71

selectedPayment_payeeAddress1_formField,selectedPayment_payeeAddress2_formField ] };
detailButtonLayout GridLayout{layoutData = new GridLayoutData{ row = 1, column = 2 },cellPadding = 4, rows = 1, columns = 2,children = [ saveButton, clearButton ] };
clearButton DojoButton{layoutData = new GridLayoutData{ row = 1, column = 1 },text = "Clear", onClick ::= clearAllFields };
saveButton DojoButton{layoutData = new GridLayoutData{ row = 1, column = 2 },text = "Save", onClick ::= selectedPayment_form_Submit };
function start()allPayments_ui.data =[
new paymentRec{category = 1, description = "test01", amount = 100.00},new paymentRec{category = 2, description = "test02", amount = 200.00},new paymentRec{category = 3, description = "test03", amount = 300.00}];
end
function addRow(event Event in)end
function deleteRow(event Event in)end
function sampleData(event Event in)end
function selectedPayment_form_Submit(event Event in)
if(selectedPayment_form.isValid())selectedPayment_form.commit();
endend
function selectedPayment_form_Publish(event Event in)selectedPayment_form.publish();selectedPayment_form_Validate();
end
function selectedPayment_form_Validate()selectedPayment_form.isValid();
end
function handleValidStateChange_selectedPayment(view Widget in, valid boolean in)
for (n int from selectedPayment_form.entries.getSize() to 1 decrement by 1)entry FormField = selectedPayment_form.entries[n];
if(entry.controller.view == view)
if(valid)// TODO: handle valid value
elsemsg String? = entry.controller.getErrorMessage();// TODO: handle invalid value
endend
endend
72 Rational Business Developer: Access a database with EGL Rich UI

function clearAllFields(event Event in)end
end
Related tasks
“Lesson 4: Create the Rich UI handler” on page 17Start to build the handler by using EGL wizards and then the Rich UI editor.
Finished code for SQLService.egl after lesson 6The following code is the text of the SQLService.egl file after Lesson 6.package services;
import records.paymentRec;
service SQLServicefunction addPayment(newPayment paymentRec inOut)
add newPayment with #sql{insert into PAYMENT
(CATEGORY, DESCRIPTION, AMOUNT, FIXED_PAYMENT,DUE_DATE, PAYEE_NAME, PAYEE_ADDRESS1, PAYEE_ADDRESS2)
values(:newPayment.category, :newPayment.description, :newPayment.amount,:newPayment.fixedPayment, :newPayment.dueDate, :newPayment.payeeName,:newPayment.payeeAddress1, :newPayment.payeeAddress2)
};end
function getAllPayments() returns(paymentRec[])paymentArray paymentRec[];get paymentArray;return(paymentArray);
end
function editPayment(chgPayment paymentRec inOut)replace chgPayment nocursor;
end
function deletePayment(delPayment paymentRec inOut)
trydelete delPayment nocursor;
onException(exception SQLException)if(SQLLib.sqlData.sqlState != "02000") // sqlState is of type CHAR(5)
throw exception;end
endend
function createDefaultTable() returns(paymentRec[])
tryexecute #sql{
delete from PAYMENT};
onException(exception SQLException)if (SQLLib.sqlData.sqlState != "02000") // sqlState is of type CHAR(5)
throw exception;end
end;
ispDate date = dateTimeLib.dateValueFromGregorian(20110405);addPayment(new paymentRec
Access a database with EGL Rich UI 73

{category = 1, description = "Apartment", amount = 880, fixedPayment = yes});addPayment (new paymentRec
{category = 2, description = "Groceries", amount = 450, fixedPayment = no});addPayment(new paymentRec
{category = 5, description = "ISP", amount = 19.99,fixedPayment = yes, dueDate = ispDate});
return(getAllPayments());end
end
Related tasks
“Lesson 6: Add code for the service functions” on page 36In EGL, I/O statements such as add and get access data that resides in differentkinds of persistent data storage, from file systems to queues to databases. Thecoding is similar for the different cases.
Finished code for PaymentLib.egl after lesson 7The following code is the text of the PaymentLib.egl file after lesson 7.package libraries;
library PaymentLib type BasicLibrary{}
categories string[] =[
"Rent", // 1"Food", // 2"Entertainment", // 3"Automotive", // 4"Utilities", // 5"Clothes", // 6"Other" // 7
];function getCategoryDesc(cat int in) returns(string)if(cat) // the integer is not 0
return(categories[cat]);else
return("");end
end
function getCategoryNum(desc string in) returns(int)for(i int from 1 to categories.getSize())
if(categories[i] == desc)return(i);
endend
return(0); // no matchend
end
Related tasks
“Lesson 7: Create a library of reusable functions” on page 41Create a library to format money values and to associate category numberswith descriptions.
Code for PaymentFileMaintenance.egl after lesson 8The following code is the text of the PaymentFileMaintenance.egl file at the end oflesson 8.package handlers;
import com.ibm.egl.rui.mvc.Controller;import com.ibm.egl.rui.mvc.FormField;import com.ibm.egl.rui.mvc.FormManager;
74 Rational Business Developer: Access a database with EGL Rich UI

import com.ibm.egl.rui.mvc.MVC;import com.ibm.egl.rui.widgets.DataGrid;import com.ibm.egl.rui.widgets.DataGridColumn;import com.ibm.egl.rui.widgets.DataGridLib;import com.ibm.egl.rui.widgets.Div;import com.ibm.egl.rui.widgets.GridLayout;import com.ibm.egl.rui.widgets.GridLayoutData;import com.ibm.egl.rui.widgets.GridLayoutLib;import com.ibm.egl.rui.widgets.TextLabel;import egl.ui.rui.Event;import egl.ui.rui.Widget;import dojo.widgets.DojoButton;import dojo.widgets.DojoCheckBox;import dojo.widgets.DojoComboBox;import dojo.widgets.DojoCurrencyTextBox;import dojo.widgets.DojoDateTextBox;import dojo.widgets.DojoLib;import dojo.widgets.DojoTextField;import dojo.widgets.DojoTitlePane;import libraries.PaymentLib;import records.paymentRec;import services.SQLService;
handler PaymentFileMaintenance type RUIhandler{initialUI =[ui], onConstructionFunction = start,cssFile = "css/PaymentClient.css", title = "PaymentFileMaintenance"}
dbService SQLService{@dedicatedService};
ui GridLayout{columns = 2, rows = 2, cellPadding = 4,children =
[detailButtonLayout, editPane, buttonLayout, allPayments_ui ]};
allPayments paymentRec[0];
allPayments_ui DataGrid{layoutData = new GridLayoutData{
row = 2, column = 1,verticalAlignment = GridLayoutLib.VALIGN_TOP},
selectionListeners ::= cellClicked,columns =[
new DataGridColumn{name = "category", displayName = "Type",width = 90, formatters = [ formatCategory ]},
new DataGridColumn{name = "description", displayName = "Description",width = 120},
new DataGridColumn{name = "amount", displayName = "Amount due",width = 90, alignment = DataGridLib.ALIGN_RIGHT}
],data = allPayments as any[],selectionMode = DataGridLib.SINGLE_SELECTION};
buttonLayout GridLayout{layoutData = new GridLayoutData{ row = 1, column = 1 },cellPadding = 4, rows = 1, columns = 3,children = [ sampleButton, deleteButton, addButton ] };
addButton DojoButton{layoutData = new GridLayoutData{ row = 1, column = 1 },text = "Add", onClick ::= addRow };
deleteButton DojoButton{layoutData = new GridLayoutData{ row = 1, column = 2 },text = "Delete", onClick ::= deleteRow };
sampleButton DojoButton{layoutData = new GridLayoutData{ row = 1, column = 3 },
Access a database with EGL Rich UI 75

text = "Sample", onClick ::= sampleData };
selectedPayment paymentRec;
editPane DojoTitlePane{layoutData = new GridLayoutData{ row = 2, column = 2,
verticalAlignment = GridLayoutLib.VALIGN_TOP },title = "Payment record",isOpen=true, duration=1000, width = "350",children =
[ new Div {children = [ selectedPayment_ui ]}]};
selectedPayment_ui GridLayout {rows = 9, columns = 2, cellPadding = 4,children = [ selectedPayment_paymentId_nameLabel,
selectedPayment_paymentId_field,selectedPayment_category_nameLabel,selectedPayment_category_comboBox,selectedPayment_description_nameLabel,selectedPayment_description_field,selectedPayment_amount_nameLabel,selectedPayment_amount_textBox,selectedPayment_fixedPayment_nameLabel,selectedPayment_fixedPayment_checkBox,selectedPayment_dueDate_nameLabel,selectedPayment_dueDate_textBox,selectedPayment_payeeName_nameLabel,selectedPayment_payeeName_field,selectedPayment_payeeAddress1_nameLabel,selectedPayment_payeeAddress1_field,selectedPayment_payeeAddress2_nameLabel,selectedPayment_payeeAddress2_field ] };
selectedPayment_paymentId_nameLabel TextLabel {text="Key:" ,layoutData = new GridLayoutData { row = 1, column = 1} };
selectedPayment_paymentId_field DojoTextField {layoutData = new GridLayoutData { row = 1, column = 2},readOnly = true };
selectedPayment_paymentId_controller Controller {@MVC {model = selectedPayment.paymentId,
view = selectedPayment_paymentId_field as Widget},validStateSetter = handleValidStateChange_selectedPayment};
selectedPayment_paymentId_formField FormField {controller = selectedPayment_paymentId_controller,nameLabel = selectedPayment_paymentId_nameLabel};
selectedPayment_category_nameLabel TextLabel {text="Category:",layoutData = new GridLayoutData { row = 2, column = 1} };
selectedPayment_category_comboBox DojoComboBox {values = [],layoutData = new GridLayoutData { row = 2, column = 2} };
selectedPayment_category_controller Controller {@MVC {model = selectedPayment.category,
view = selectedPayment_category_comboBox as Widget},validStateSetter = handleValidStateChange_selectedPayment};
selectedPayment_category_formField FormField {controller = selectedPayment_category_controller,nameLabel = selectedPayment_category_nameLabel};
76 Rational Business Developer: Access a database with EGL Rich UI
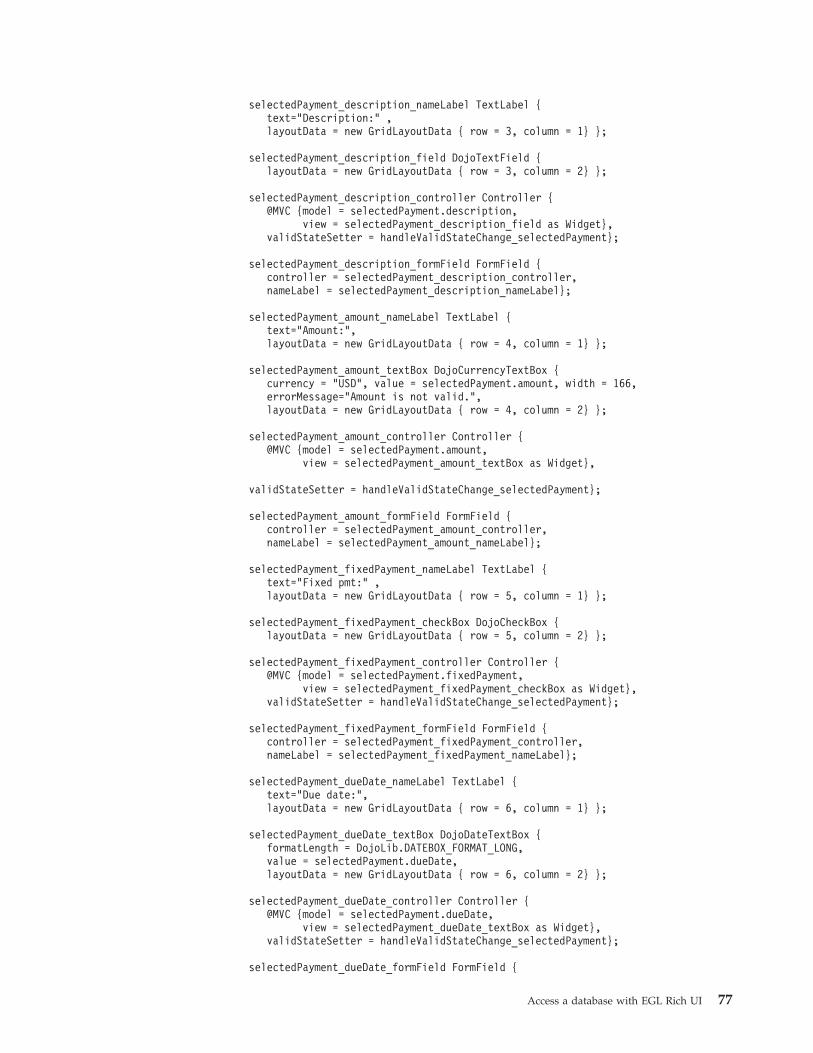
selectedPayment_description_nameLabel TextLabel {text="Description:" ,layoutData = new GridLayoutData { row = 3, column = 1} };
selectedPayment_description_field DojoTextField {layoutData = new GridLayoutData { row = 3, column = 2} };
selectedPayment_description_controller Controller {@MVC {model = selectedPayment.description,
view = selectedPayment_description_field as Widget},validStateSetter = handleValidStateChange_selectedPayment};
selectedPayment_description_formField FormField {controller = selectedPayment_description_controller,nameLabel = selectedPayment_description_nameLabel};
selectedPayment_amount_nameLabel TextLabel {text="Amount:",layoutData = new GridLayoutData { row = 4, column = 1} };
selectedPayment_amount_textBox DojoCurrencyTextBox {currency = "USD", value = selectedPayment.amount, width = 166,errorMessage="Amount is not valid.",layoutData = new GridLayoutData { row = 4, column = 2} };
selectedPayment_amount_controller Controller {@MVC {model = selectedPayment.amount,
view = selectedPayment_amount_textBox as Widget},
validStateSetter = handleValidStateChange_selectedPayment};
selectedPayment_amount_formField FormField {controller = selectedPayment_amount_controller,nameLabel = selectedPayment_amount_nameLabel};
selectedPayment_fixedPayment_nameLabel TextLabel {text="Fixed pmt:" ,layoutData = new GridLayoutData { row = 5, column = 1} };
selectedPayment_fixedPayment_checkBox DojoCheckBox {layoutData = new GridLayoutData { row = 5, column = 2} };
selectedPayment_fixedPayment_controller Controller {@MVC {model = selectedPayment.fixedPayment,
view = selectedPayment_fixedPayment_checkBox as Widget},validStateSetter = handleValidStateChange_selectedPayment};
selectedPayment_fixedPayment_formField FormField {controller = selectedPayment_fixedPayment_controller,nameLabel = selectedPayment_fixedPayment_nameLabel};
selectedPayment_dueDate_nameLabel TextLabel {text="Due date:",layoutData = new GridLayoutData { row = 6, column = 1} };
selectedPayment_dueDate_textBox DojoDateTextBox {formatLength = DojoLib.DATEBOX_FORMAT_LONG,value = selectedPayment.dueDate,layoutData = new GridLayoutData { row = 6, column = 2} };
selectedPayment_dueDate_controller Controller {@MVC {model = selectedPayment.dueDate,
view = selectedPayment_dueDate_textBox as Widget},validStateSetter = handleValidStateChange_selectedPayment};
selectedPayment_dueDate_formField FormField {
Access a database with EGL Rich UI 77

controller = selectedPayment_dueDate_controller,nameLabel = selectedPayment_dueDate_nameLabel};
selectedPayment_payeeName_nameLabel TextLabel {text="Payee:",layoutData = new GridLayoutData { row = 7, column = 1} };
selectedPayment_payeeName_field DojoTextField {layoutData = new GridLayoutData { row = 7, column = 2} };
selectedPayment_payeeName_controller Controller {@MVC {model = selectedPayment.payeeName,
view = selectedPayment_payeeName_field as Widget},validStateSetter = handleValidStateChange_selectedPayment};
selectedPayment_payeeName_formField FormField {controller = selectedPayment_payeeName_controller,nameLabel = selectedPayment_payeeName_nameLabel};
selectedPayment_payeeAddress1_nameLabel TextLabel {text="Address 1:" ,layoutData = new GridLayoutData { row = 8, column = 1} };
selectedPayment_payeeAddress1_field DojoTextField {layoutData = new GridLayoutData { row = 8, column = 2} };
selectedPayment_payeeAddress1_controller Controller {@MVC {model = selectedPayment.payeeAddress1,
view = selectedPayment_payeeAddress1_field as Widget},validStateSetter = handleValidStateChange_selectedPayment};
selectedPayment_payeeAddress1_formField FormField {controller = selectedPayment_payeeAddress1_controller,nameLabel = selectedPayment_payeeAddress1_nameLabel};
selectedPayment_payeeAddress2_nameLabel TextLabel {text="Address 2:" ,layoutData = new GridLayoutData { row = 9, column = 1} };
selectedPayment_payeeAddress2_field DojoTextField {layoutData = new GridLayoutData { row = 9, column = 2} };
selectedPayment_payeeAddress2_controller Controller {@MVC {model = selectedPayment.payeeAddress2,
view = selectedPayment_payeeAddress2_field as Widget},validStateSetter = handleValidStateChange_selectedPayment};
selectedPayment_payeeAddress2_formField FormField {controller = selectedPayment_payeeAddress2_controller,nameLabel = selectedPayment_payeeAddress2_nameLabel};
selectedPayment_form FormManager {entries = [ selectedPayment_paymentId_formField,
selectedPayment_category_formField,selectedPayment_description_formField,selectedPayment_amount_formField,selectedPayment_fixedPayment_formField,selectedPayment_dueDate_formField,selectedPayment_payeeName_formField,selectedPayment_payeeAddress1_formField,selectedPayment_payeeAddress2_formField ] };
detailButtonLayout GridLayout{layoutData = new GridLayoutData{ row = 1, column = 2 },cellPadding = 4, rows = 1, columns = 2,children = [ saveButton, clearButton ] };
78 Rational Business Developer: Access a database with EGL Rich UI

clearButton DojoButton{layoutData = new GridLayoutData{ row = 1, column = 1 },text = "Clear", onClick ::= clearAllFields };
saveButton DojoButton{layoutData = new GridLayoutData{ row = 1, column = 2 },text = "Save", onClick ::= selectedPayment_form_Submit };
function start()// allPayments_ui.data =[// new paymentRec{category = 1, description = "test01",// amount = 100.00, payeeName = "Someone"},// new paymentRec{category = 2, description = "test02", amount = 200.00},// new paymentRec{category = 3, description = "test03", amount = 300.00}];readFromTable();
end
function cellClicked(myGrid DataGrid in)selectedPayment = allPayments_ui.getSelection()[1] as paymentRec;selectedPayment_form.publish();
end
function readFromTable()call dbService.getAllPayments() returning to updateAll
onException serviceLib.serviceExceptionHandler;end
function updateAll(retResult paymentRec[] in)allPayments = retResult;allPayments_ui.data = allPayments as any[];
end
function addRow(event Event in)call dbService.addPayment(new paymentRec) returning to recordAdded
onException serviceLib.serviceExceptionHandler;end
function recordAdded(newPayment paymentRec in)readFromTable();
end
function deleteRow(event Event in)
for(i INT from 1 to allPayments.getSize())if(allPayments[i].paymentID == selectedPayment.paymentID)
allPayments.removeElement(i);exit for;
endend
call dbService.deletePayment(selectedPayment) returning to recordRevisedonException serviceLib.serviceExceptionHandler;
end
function recordRevised(delPayment paymentRec in)allPayments_ui.data = allPayments as any[];
end
function sampleData(event Event in)call dbService.createDefaultTable() returning to updateAll
onException serviceLib.serviceExceptionHandler;end
function selectedPayment_form_Submit(event Event in)
if(selectedPayment_form.isValid())selectedPayment_form.commit();
Access a database with EGL Rich UI 79

endend
function selectedPayment_form_Publish(event Event in)selectedPayment_form.publish();selectedPayment_form_Validate();
end
function selectedPayment_form_Validate()selectedPayment_form.isValid();
end
function handleValidStateChange_selectedPayment(view Widget in, valid boolean in)
for (n int from selectedPayment_form.entries.getSize() to 1 decrement by 1)entry FormField = selectedPayment_form.entries[n];
if(entry.controller.view == view)
if(valid)// TODO: handle valid value
elsemsg String? = entry.controller.getErrorMessage();// TODO: handle invalid value
endend
endend
function clearAllFields(event Event in)end
function formatCategory(class string, value string, rowData any in)value = PaymentLib.getCategoryDesc(value as INT);
endend
Related tasks
“Lesson 8: Add variables and functions to the Rich UI handler” on page 43Add source code that supports the user interface.
Finished code for PaymentFileMaintenance.eglThe following code is the text of the PaymentFileMaintenance.egl file at the end oflesson 9.package handlers;
import com.ibm.egl.rui.mvc.Controller;import com.ibm.egl.rui.mvc.FormField;import com.ibm.egl.rui.mvc.FormManager;import com.ibm.egl.rui.mvc.MVC;import com.ibm.egl.rui.widgets.DataGrid;import com.ibm.egl.rui.widgets.DataGridColumn;import com.ibm.egl.rui.widgets.DataGridLib;import com.ibm.egl.rui.widgets.Div;import com.ibm.egl.rui.widgets.GridLayout;import com.ibm.egl.rui.widgets.GridLayoutData;import com.ibm.egl.rui.widgets.GridLayoutLib;import com.ibm.egl.rui.widgets.TextLabel;import egl.ui.rui.Event;import egl.ui.rui.Widget;import dojo.widgets.DojoButton;import dojo.widgets.DojoCheckBox;import dojo.widgets.DojoComboBox;import dojo.widgets.DojoCurrencyTextBox;import dojo.widgets.DojoDateTextBox;
80 Rational Business Developer: Access a database with EGL Rich UI

import dojo.widgets.DojoLib;import dojo.widgets.DojoTextField;import dojo.widgets.DojoTitlePane;import libraries.PaymentLib;import records.paymentRec;import services.SQLService;
handler PaymentFileMaintenance type RUIhandler{initialUI =[ui], onConstructionFunction = start,cssFile = "css/PaymentClient.css", title = "PaymentFileMaintenance"}
dbService SQLService{@dedicatedService};
ui GridLayout{columns = 2, rows = 2, cellPadding = 4,children =
[detailButtonLayout, editPane, buttonLayout, allPayments_ui ]};
allPayments paymentRec[0];
allPayments_ui DataGrid{layoutData = new GridLayoutData{
row = 2, column = 1,verticalAlignment = GridLayoutLib.VALIGN_TOP},
selectionListeners ::= cellClicked,columns =[
new DataGridColumn{name = "category", displayName = "Type",width = 90, formatters = [ formatCategory ]},
new DataGridColumn{name = "description", displayName = "Description",width = 120},
new DataGridColumn{name = "amount", displayName = "Amount due",width = 90, alignment = DataGridLib.ALIGN_RIGHT}
],data = allPayments as any[],selectionMode = DataGridLib.SINGLE_SELECTION};
buttonLayout GridLayout{layoutData = new GridLayoutData{ row = 1, column = 1 },cellPadding = 4, rows = 1, columns = 3,children = [ sampleButton, deleteButton, addButton ] };
addButton DojoButton{layoutData = new GridLayoutData{ row = 1, column = 1 },text = "Add", onClick ::= addRow };
deleteButton DojoButton{layoutData = new GridLayoutData{ row = 1, column = 2 },text = "Delete", onClick ::= deleteRow };
sampleButton DojoButton{layoutData = new GridLayoutData{ row = 1, column = 3 },text = "Sample", onClick ::= sampleData };
selectedPayment paymentRec;
editPane DojoTitlePane{layoutData = new GridLayoutData{ row = 2, column = 2,
verticalAlignment = GridLayoutLib.VALIGN_TOP },title = "Payment record",isOpen=true, duration=1000, width = "350",children =
[ new Div {children = [ selectedPayment_ui ]}]};
selectedPayment_ui GridLayout {rows = 9, columns = 2, cellPadding = 4,children = [ selectedPayment_paymentId_nameLabel,
Access a database with EGL Rich UI 81
selectedPayment_paymentId_field,selectedPayment_category_nameLabel,selectedPayment_category_comboBox,selectedPayment_description_nameLabel,selectedPayment_description_field,selectedPayment_amount_nameLabel,selectedPayment_amount_textBox,selectedPayment_fixedPayment_nameLabel,selectedPayment_fixedPayment_checkBox,selectedPayment_dueDate_nameLabel,selectedPayment_dueDate_textBox,selectedPayment_payeeName_nameLabel,selectedPayment_payeeName_field,selectedPayment_payeeAddress1_nameLabel,selectedPayment_payeeAddress1_field,selectedPayment_payeeAddress2_nameLabel,selectedPayment_payeeAddress2_field ] };
selectedPayment_paymentId_nameLabel TextLabel {text="Key:" ,layoutData = new GridLayoutData { row = 1, column = 1} };
selectedPayment_paymentId_field DojoTextField {layoutData = new GridLayoutData { row = 1, column = 2},readOnly = true };
selectedPayment_paymentId_controller Controller {@MVC {model = selectedPayment.paymentId,
view = selectedPayment_paymentId_field as Widget},validStateSetter = handleValidStateChange_selectedPayment};
selectedPayment_paymentId_formField FormField {controller = selectedPayment_paymentId_controller,nameLabel = selectedPayment_paymentId_nameLabel};
selectedPayment_category_nameLabel TextLabel {text="Category:",layoutData = new GridLayoutData { row = 2, column = 1} };
selectedPayment_category_comboBox DojoComboBox {values = PaymentLib.categories,layoutData = new GridLayoutData { row = 2, column = 2} };
selectedPayment_category_controller Controller {@MVC {model = selectedPayment.category,
view = selectedPayment_category_comboBox as Widget},validStateSetter = handleValidStateChange_selectedPayment};
selectedPayment_category_formField FormField {controller = selectedPayment_category_controller,nameLabel = selectedPayment_category_nameLabel};
selectedPayment_description_nameLabel TextLabel {text="Description:" ,layoutData = new GridLayoutData { row = 3, column = 1} };
selectedPayment_description_field DojoTextField {layoutData = new GridLayoutData { row = 3, column = 2} };
selectedPayment_description_controller Controller {@MVC {model = selectedPayment.description,
view = selectedPayment_description_field as Widget},validStateSetter = handleValidStateChange_selectedPayment};
selectedPayment_description_formField FormField {controller = selectedPayment_description_controller,nameLabel = selectedPayment_description_nameLabel};
82 Rational Business Developer: Access a database with EGL Rich UI
selectedPayment_amount_nameLabel TextLabel {text="Amount:",layoutData = new GridLayoutData { row = 4, column = 1} };
selectedPayment_amount_textBox DojoCurrencyTextBox {currency = "USD", value = selectedPayment.amount, width = 166,errorMessage="Amount is not valid.",layoutData = new GridLayoutData { row = 4, column = 2} };
selectedPayment_amount_controller Controller {@MVC {model = selectedPayment.amount,
view = selectedPayment_amount_textBox as Widget},
validStateSetter = handleValidStateChange_selectedPayment};
selectedPayment_amount_formField FormField {controller = selectedPayment_amount_controller,nameLabel = selectedPayment_amount_nameLabel};
selectedPayment_fixedPayment_nameLabel TextLabel {text="Fixed pmt:" ,layoutData = new GridLayoutData { row = 5, column = 1} };
selectedPayment_fixedPayment_checkBox DojoCheckBox {layoutData = new GridLayoutData { row = 5, column = 2} };
selectedPayment_fixedPayment_controller Controller {@MVC {model = selectedPayment.fixedPayment,
view = selectedPayment_fixedPayment_checkBox as Widget},validStateSetter = handleValidStateChange_selectedPayment};
selectedPayment_fixedPayment_formField FormField {controller = selectedPayment_fixedPayment_controller,nameLabel = selectedPayment_fixedPayment_nameLabel};
selectedPayment_dueDate_nameLabel TextLabel {text="Due date:",layoutData = new GridLayoutData { row = 6, column = 1} };
selectedPayment_dueDate_textBox DojoDateTextBox {formatLength = DojoLib.DATEBOX_FORMAT_LONG,value = selectedPayment.dueDate,layoutData = new GridLayoutData { row = 6, column = 2} };
selectedPayment_dueDate_controller Controller {@MVC {model = selectedPayment.dueDate,
view = selectedPayment_dueDate_textBox as Widget},validStateSetter = handleValidStateChange_selectedPayment};
selectedPayment_dueDate_formField FormField {controller = selectedPayment_dueDate_controller,nameLabel = selectedPayment_dueDate_nameLabel};
selectedPayment_payeeName_nameLabel TextLabel {text="Payee:",layoutData = new GridLayoutData { row = 7, column = 1} };
selectedPayment_payeeName_field DojoTextField {layoutData = new GridLayoutData { row = 7, column = 2} };
selectedPayment_payeeName_controller Controller {@MVC {model = selectedPayment.payeeName,
view = selectedPayment_payeeName_field as Widget},validStateSetter = handleValidStateChange_selectedPayment};
selectedPayment_payeeName_formField FormField {
Access a database with EGL Rich UI 83

controller = selectedPayment_payeeName_controller,nameLabel = selectedPayment_payeeName_nameLabel};
selectedPayment_payeeAddress1_nameLabel TextLabel {text="Address 1:" ,layoutData = new GridLayoutData { row = 8, column = 1} };
selectedPayment_payeeAddress1_field DojoTextField {layoutData = new GridLayoutData { row = 8, column = 2} };
selectedPayment_payeeAddress1_controller Controller {@MVC {model = selectedPayment.payeeAddress1,
view = selectedPayment_payeeAddress1_field as Widget},validStateSetter = handleValidStateChange_selectedPayment};
selectedPayment_payeeAddress1_formField FormField {controller = selectedPayment_payeeAddress1_controller,nameLabel = selectedPayment_payeeAddress1_nameLabel};
selectedPayment_payeeAddress2_nameLabel TextLabel {text="Address 2:" ,layoutData = new GridLayoutData { row = 9, column = 1} };
selectedPayment_payeeAddress2_field DojoTextField {layoutData = new GridLayoutData { row = 9, column = 2} };
selectedPayment_payeeAddress2_controller Controller {@MVC {model = selectedPayment.payeeAddress2,
view = selectedPayment_payeeAddress2_field as Widget},validStateSetter = handleValidStateChange_selectedPayment};
selectedPayment_payeeAddress2_formField FormField {controller = selectedPayment_payeeAddress2_controller,nameLabel = selectedPayment_payeeAddress2_nameLabel};
selectedPayment_form FormManager {entries = [ selectedPayment_paymentId_formField,
selectedPayment_category_formField,selectedPayment_description_formField,selectedPayment_amount_formField,selectedPayment_fixedPayment_formField,selectedPayment_dueDate_formField,selectedPayment_payeeName_formField,selectedPayment_payeeAddress1_formField,selectedPayment_payeeAddress2_formField ] };
detailButtonLayout GridLayout{layoutData = new GridLayoutData{ row = 1, column = 2 },cellPadding = 4, rows = 1, columns = 2,children = [ saveButton, clearButton ] };
clearButton DojoButton{layoutData = new GridLayoutData{ row = 1, column = 1 },text = "Clear", onClick ::= clearAllFields };
saveButton DojoButton{layoutData = new GridLayoutData{ row = 1, column = 2 },text = "Save", onClick ::= selectedPayment_form_Submit };
function start()// allPayments_ui.data =[// new paymentRec{category = 1, description = "test01",// amount = 100.00, payeeName = "Someone"},// new paymentRec{category = 2, description = "test02", amount = 200.00},// new paymentRec{category = 3, description = "test03", amount = 300.00}];readFromTable();
end
84 Rational Business Developer: Access a database with EGL Rich UI

function cellClicked(myGrid DataGrid in)selectedPayment = allPayments_ui.getSelection()[1] as paymentRec;selectedPayment_form.publish();selectedPayment_category_comboBox.value =
PaymentLib.getCategoryDesc(selectedPayment.category);end
function readFromTable()call dbService.getAllPayments() returning to updateAll
onException serviceLib.serviceExceptionHandler;end
function updateAll(retResult paymentRec[] in)allPayments = retResult;allPayments_ui.data = allPayments as any[];
end
function addRow(event Event in)call dbService.addPayment(new paymentRec) returning to recordAdded
onException serviceLib.serviceExceptionHandler;end
function recordAdded(newPayment paymentRec in)readFromTable();
end
function deleteRow(event Event in)
for(i INT from 1 to allPayments.getSize())if(allPayments[i].paymentID == selectedPayment.paymentID)
allPayments.removeElement(i);exit for;
endend
call dbService.deletePayment(selectedPayment) returning to recordRevisedonException serviceLib.serviceExceptionHandler;
end
function recordRevised(delPayment paymentRec in)allPayments_ui.data = allPayments as any[];
end
function sampleData(event Event in)call dbService.createDefaultTable() returning to updateAll
onException serviceLib.serviceExceptionHandler;end
function selectedPayment_form_Submit(event Event in)selectedPayment_category_comboBox.value =
PaymentLib.getCategoryNum(selectedPayment_category_comboBox.value);
if (selectedPayment_form.isValid())selectedPayment_form.commit();selectedPayment_category_comboBox.value =
PaymentLib.getCategoryDesc(selectedPayment_category_comboBox.value);
// update allPayments with new version of selectedPaymentfor(i INT from 1 to allPayments.getSize())
if(allPayments[i].paymentID == selectedPayment.paymentID)allPayments[i] = selectedPayment;exit for;
endend
Access a database with EGL Rich UI 85
call dbService.editPayment(selectedPayment)returning to recordRevisedonException serviceLib.serviceExceptionHandler;
endend
function selectedPayment_form_Publish(event Event in)selectedPayment_form.publish();selectedPayment_form_Validate();
end
function selectedPayment_form_Validate()selectedPayment_form.isValid();
end
function handleValidStateChange_selectedPayment(view Widget in, valid boolean in)
for (n int from selectedPayment_form.entries.getSize() to 1 decrement by 1)entry FormField = selectedPayment_form.entries[n];
if(entry.controller.view == view)
if(valid)// TODO: handle valid value
elsemsg String? = entry.controller.getErrorMessage();// TODO: handle invalid value
endend
endend
function clearAllFields(event Event in)saveID INT = selectedPayment.paymentID; // retain the keyselectedPayment = new PaymentRec{};selectedPayment.paymentID = saveID;selectedPayment_form.publish();
end
function formatCategory(class string, value string, rowData any in)value = PaymentLib.getCategoryDesc(value as INT);
endend
Related tasks
“Lesson 9: Complete the code that supports the user interface” on page 52Next, you will complete the single-row layout, as well as the code that supportsthe Clear and Save buttons.
86 Rational Business Developer: Access a database with EGL Rich UI

Appendix. Notices
This information was developed for products and services offered in the U.S.A.IBM may not offer the products, services, or features discussed in this document inother countries. Consult your local IBM representative for information on theproducts and services currently available in your area. Any reference to an IBMproduct, program, or service is not intended to state or imply that only that IBMproduct, program, or service may be used. Any functionally equivalent product,program, or service that does not infringe any IBM intellectual property right maybe used instead. However, it is the user's responsibility to evaluate and verify theoperation of any non-IBM product, program, or service.
IBM may have patents or pending patent applications covering subject matterdescribed in this document. The furnishing of this document does not grant youany license to these patents. You can send license inquiries, in writing, to:
IBM Director of LicensingIBM CorporationNorth Castle DriveArmonk, NY 10504-1785U.S.A.
For license inquiries regarding double-byte (DBCS) information, contact the IBMIntellectual Property Department in your country or send inquiries, in writing, to:
Intellectual Property LicensingLegal and Intellectual Property LawIBM Japan, Ltd.1623-14, Shimotsuruma, Yamato-shiKanagawa 242-8502 Japan
The following paragraph does not apply to the United Kingdom or any othercountry where such provisions are inconsistent with local law:INTERNATIONALBUSINESS MACHINES CORPORATION PROVIDES THIS PUBLICATION "AS IS"WITHOUT WARRANTY OF ANY KIND, EITHER EXPRESS OR IMPLIED,INCLUDING, BUT NOT LIMITED TO, THE IMPLIED WARRANTIES OFNON-INFRINGEMENT, MERCHANTABILITY OR FITNESS FOR A PARTICULARPURPOSE. Some states do not allow disclaimer of express or implied warranties incertain transactions, therefore, this statement may not apply to you.
This information could include technical inaccuracies or typographical errors.Changes are periodically made to the information herein; these changes will beincorporated in new editions of the publication. IBM may make improvementsand/or changes in the product(s) and/or the program(s) described in thispublication at any time without notice.
Any references in this information to non-IBM Web sites are provided forconvenience only and do not in any manner serve as an endorsement of those Websites. The materials at those Web sites are not part of the materials for this IBMproduct and use of those Web sites is at your own risk.
Licensees of this program who wish to have information about it for the purposeof enabling: (i) the exchange of information between independently created
© Copyright IBM Corp. 2009, 2012 87

programs and other programs (including this one) and (ii) the mutual use of theinformation which has been exchanged, should contact:
Intellectual Property Dept. for Rational SoftwareIBM Corporation5 Technology Park DriveWestford, MA 01886U.S.A.
Such information may be available, subject to appropriate terms and conditions,including in some cases, payment of a fee.
The licensed program described in this document and all licensed materialavailable for it are provided by IBM under terms of the IBM Customer Agreement,IBM International Program License Agreement or any equivalent agreementbetween us.
Any performance data contained herein was determined in a controlledenvironment. Therefore, the results obtained in other operating environments mayvary significantly. Some measurements may have been made on development-levelsystems and there is no guarantee that these measurements will be the same ongenerally available systems. Furthermore, some measurements may have beenestimated through extrapolation. Actual results may vary. Users of this documentshould verify the applicable data for their specific environment.
Information concerning non-IBM products was obtained from the suppliers ofthose products, their published announcements or other publicly available sources.IBM has not tested those products and cannot confirm the accuracy ofperformance, compatibility or any other claims related to non-IBM products.Questions on the capabilities of non-IBM products should be addressed to thesuppliers of those products.
All statements regarding IBM's future direction or intent are subject to change orwithdrawal without notice, and represent goals and objectives only.
This information is for planning purposes only. The information herein is subject tochange before the products described become available.
This information contains examples of data and reports used in daily businessoperations. To illustrate them as completely as possible, the examples include thenames of individuals, companies, brands, and products. All of these names arefictitious and any similarity to the names and addresses used by an actual businessenterprise is entirely coincidental.
COPYRIGHT LICENSE:
This information contains sample application programs in source language, whichillustrate programming techniques on various operating platforms. You may copy,modify, and distribute these sample programs in any form without payment toIBM, for the purposes of developing, using, marketing or distributing applicationprograms conforming to the application programming interface for the operatingplatform for which the sample programs are written. These examples have notbeen thoroughly tested under all conditions. IBM, therefore, cannot guarantee orimply reliability, serviceability, or function of these programs. The sampleprograms are provided "AS IS", without warranty of any kind. IBM shall not beliable for any damages arising out of your use of the sample programs.
88 Rational Business Developer: Access a database with EGL Rich UI

Each copy or any portion of these sample programs or any derivative work, mustinclude a copyright notice as follows:
© (your company name) (year). Portions of this code are derived from IBM Corp.Sample Programs. © Copyright IBM Corp. enter the year or year, year.
If you are viewing this information softcopy, the photographs and colorillustrations may not appear.
TrademarksIBM, the IBM logo, and ibm.com are trademarks or registered trademarks ofInternational Business Machines Corp., registered in many jurisdictions worldwide.Other product and service names might be trademarks of IBM or other companies.A current list of IBM trademarks is available on the Web at http://www.ibm.com/legal/copytrade.html.
Adobe, the Adobe logo, PostScript, and the PostScript logo are either registeredtrademarks or trademarks of Adobe Systems Incorporated in the United States,and/or other countries.
Cell Broadband Engine is a trademark of Sony Computer Entertainment, Inc. in theUnited States, other countries, or both and is used under license therefrom.
IT Infrastructure Library is a registered trademark of the Central Computer andTelecommunications Agency which is now part of the Office of GovernmentCommerce.
Intel, Intel logo, Intel Inside, Intel Inside logo, Intel Centrino, Intel Centrino logo,Celeron, Intel Xeon, Intel SpeedStep, Itanium, and Pentium are trademarks orregistered trademarks of Intel Corporation or its subsidiaries in the United Statesand other countries.
Linear Tape-Open, LTO, the LTO Logo, Ultrium, and the Ultrium logo aretrademarks of HP, IBM Corp. and Quantum in the U.S. and other countries.
Microsoft, Windows, Windows NT, and the Windows logo are trademarks ofMicrosoft Corporation in the United States, other countries, or both.
Java and all Java-based trademarks and logos are trademarks or registeredtrademarks of Oracle and/or its affiliates.
Linux is a registered trademark of Linus Torvalds in the United States, othercountries, or both.
UNIX is a registered trademark of The Open Group in the United States and othercountries.
Other company, product, or service names may be trademarks or service marks ofothers.
Appendix. Notices 89

90 Rational Business Developer: Access a database with EGL Rich UI


����
Printed in USA