Embed Size (px)
Citation preview
The Native Plant Society of New Jersey
Office of Continuing Professional Education Cook College 102 Ryders Lane New Brunswick, NJ 08901-8519
www.npsnj.org
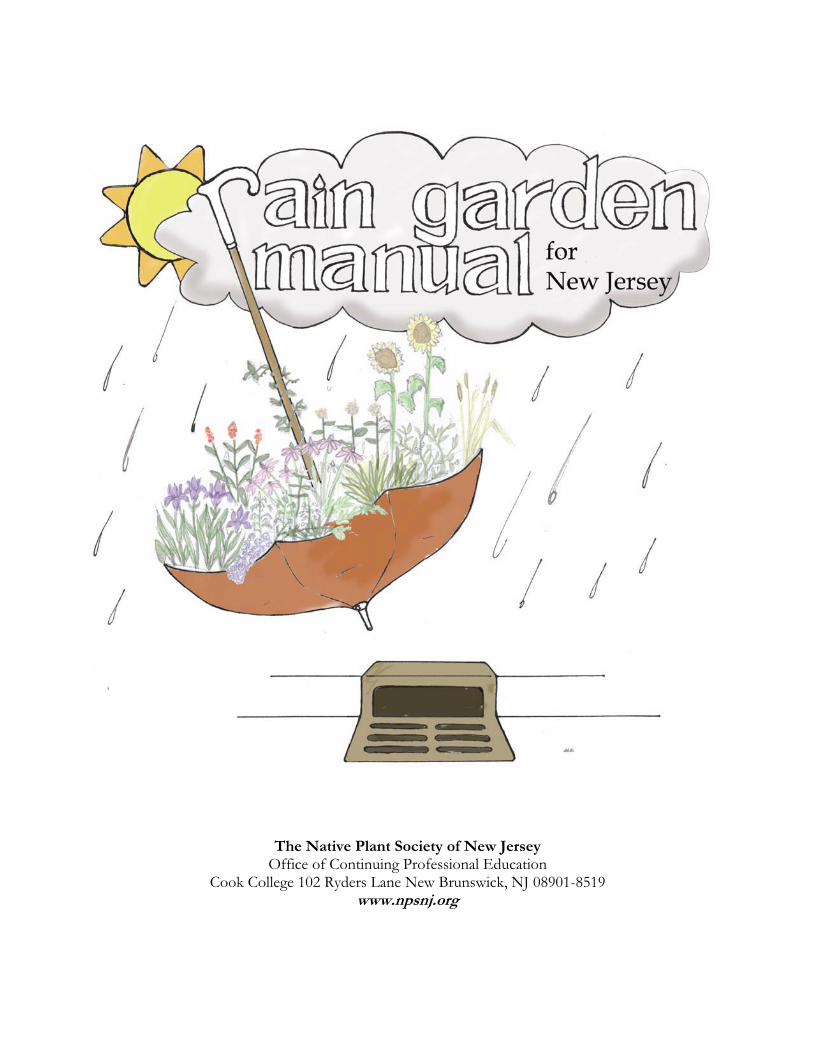
Native Plants of New Jersey
Amsonia tabernaemontana
Blue Star
Anemone canadensis
Canadian Anemone
Arisaema triphyllum Jack-in-the-pulpit
Asclepias incarnata
Swamp Milkweed
Asclepias syriaca
Common Milkweed
Aster (Eurybia) divaricatus
White Wood Aster
Aster (Symphyotrichum) novae-angliae
New England Aster
Chelone glabra
White Turtlehead
Eupatorium perfoliatum
Boneset
Eupatorium sp. Joe-pye-weed
Geranium maculatum Wild Geranium
Lilium superbum
Turk's Cap Lily
Lobelia cardinalis
Cardinal Flower
Lobelia siphilitica
Great Blue Lobelia
Mertensia viriginica
Virginia Bluebells
2

The Native Plant Society of New Jersey
Officers
PresidentAntonio F. Federici
Vice PresidentRobert L. Swain
Newsletter EditorBill Young
Treasurer, MembershipPeggie Leifeste
HorticulturistHubert Ling, Ph.D.
Secretary/Calendar of EventsBunny Jaskot
Recording SecretaryPat Eisemann
Contributing Members
Rusty Bell, Daniel DiLollo, Kevin Smarz, Millie Ling,Catherine Ambos, Elizabeth Jackson, Donald Knezick, Richard Pillar,
Tara McQuade and Isaac Martin
April 2005
4
TABLE OF CONTENTS
Foreward 5 Preface 6 FAQs: 7
STEP ONE: The Planning 8
Goals and Strategies
Budget Preliminary Steps: Call Before You Dig, Check Your Soil
STEP TWO: The Design 11
Determining the Location
Determining the Depth and Level Determining Surface Area: Soil, Draining, Size Factors Selecting Plants
STEP THREE: Build Your Rain Garden 18
Preliminary Plans for Construction Day Construction- Day 1 & Day 2
STEP FOUR: Maintenance 19 STEP FIVE: Enjoy! 20
Key Information 21 Web Sites for Rain Gardens 22 Sample Rain Garden Plans 23
List of Nurseries Providing Native Plants 27 List of Native Plants for New Jersey 30 Assistance and Funding for Teachers 34 Lesson Plans 37

5
FOREWARD
Congratulations! You are about to embark on a journey that can improve the future of your state! The Native Plant Society of New Jersey is proud to present this manual on rain gardens. Although we did not invent rain gardens, we have surely adopted them as a perfect way to protect and restore our natural resources. The rain garden has become the NPS’s “poster child”, in that, while promoting native plants, rain gardens intercept runoff and infiltrate storm water to recharge our depleted aquifer. Every drop of water kept out of our storm drains reduces flooding, purifies water, and improves base flow of streams and rivers. The NPS staff has worked on this important project for over one year. The NPS has adopted rain garden publications from other states, finally adapting it for New Jersey. In a rain garden is hope for much of what plagues New Jersey-sprawl, excessive flooding, depletion of groundwater, and loss of habitat. And it is educational and fun to build. Kids love them. If I can impart one message with you, the user of this Manual, it is that rain gardens are easy. It is a project where perfection is not required. Like NIKE says: “Just do it”. If you only have enough space to collect twenty percent of the runoff, it is still well worth it—don’t pass on this wonderful opportunity to teach, learn, and grow together. This manual is intended to walk you through any fears or reservations you might have, give you encouragement, tools, and all the answers you need to make and sustain a rain garden-one of the best and easiest things you can do to protect and conserve NJ natural resources. So, grab a shovel, get some plants and get out there and do it. And, most of all, have fun. Yours in native plants, William E. Young Native Plant Society of New Jersey

6
PREFACE
The Native Plant Society of New Jersey (NPSNJ) is proud to share The Rain Garden Manual (the Manual) with you. Though much of the Manual is designed to help homeowners build their own rain garden, its impetus comes from the growing demand of educators throughout New Jersey for help in creating rain gardens on their campuses with and for their students. It is with these students and teachers in mind that we have developed the Rain Garden Manual you now hold in your hands. Although the Manual can be adapted for use at homes and schools in most of the United States, it has been written specifically for application in New Jersey with the state’s unique and varied native plants, soils and climate in mind. Whether you are a private homeowner, a park naturalist or a school teacher, it is our hope that you will use the instructions in the Rain Garden Manual to create a rain garden of your own. Even a small rain garden can look good while doing good work!
Armed with the information in this Manual, you can enhance the natural functions of your home or
school. With a little planning, your rain garden can become a native plant oasis that provides habitat for birds, butterflies and other wildlife. While having fun and beautifying the landscape, you will also be benefiting water quality by filtering stormwater runoff and facilitating groundwater recharge. Plus, a rain garden serves as an outdoor classroom offering new, engaging and multi-disciplinary teaching opportunities that contribute to healthier watersheds. In fact, building a rain garden with your students is perhaps the single best thing you can do to improve the environment in New Jersey!
The goal of the Manual is to outline a step-by-step guide to build a rain garden both easily and
economically. However, it is important to realize that this is merely a guide; your own creativity will allow you to tailor the process to your own needs and will make for a more enjoyable experience. We hope that this Manual will be your first step in the designing and building your own rain garden.
NPSNJ would like to thank The Watershed Institute, a program of the Stony Brook Millstone
Watershed Association, for a generous grant which provided for the development and distribution of this manual. Visit their website at:
http://www.thewatershedinstitute.org
We would also like to cite two primary sources, used with permission, which were invaluable in the creation of a New Jersey-focused manual: “Rain Gardens, A how-to manual for homeowners” Developed by Roger Bannerman, Wisconsin Department of Natural Resources and Ellen Considine, U.S. Geological Survey. Special thanks to John Gishnock, Applied Ecological Services, Inc., Jennifer Baker, Prairie Nursery Inc. and Joyce Powers, CRM Ecosystems Inc. http://clean-water.uwex.edu/pubs/raingarden
LID Sustainable School Projects Website
Low Impact Development Center 5010 Sunnyside Avenue, Suite 200 Beltsville, Maryland 20705 Their work was developed through a Cooperative Assistance Agreement under the US EPA Office of Water 104b(3) Program in order to provide guidance to administrators, teachers, students, and parents for developing, administering, and incorporating Low Impact Development (LID) into their school community. http://www.lowimpactdevelopment.org/school
7
FAQs
Q: Why are rain gardens important?
A: Two of the most important environmental issues are water quality and stormwater control. Rain Gardens
enhance local water quality by allowing water to be naturally filtered by soil instead of being piped, untreated into large bodies of water. A simple, yet effective method to enhance water quality and control stormwater is through the use of rain gardens.
Beyond its environmental use, rain gardens provide attractive landscaping and a natural habitat for
birds and butterflies, while encouraging environmental stewardship and community pride. In addition, using native plant species in your rain garden will be an excellent way to increase native populations in a developed area.
Q: How is a “rain garden” different from any other garden?
A: To a certain extent, a regular flower garden, or even a vegetable garden, functions like a rain garden.
But, for a garden to be a rain garden – i.e. to capture and infiltrate precipitation into the groundwater – it must be dug down or planted slightly below-grade to catch the runoff in a shallow basin. Ideally, a rain garden is also planted with a variety of native grasses, forbs and other herbaceous or woody plants that are adapted to the soil, precipitation, climate and other site conditions. These native plants have deeper root systems that facilitate the efficient recharge of our aquifers and also sustain the plants through the draughts that sometimes occur in our NJ summers.
Q: How do you build a rain garden?
A: The design of a rain garden involves, among other things, the hydrologic cycle, non-point pollutant
treatment, resource conservation, habitat creation, nutrient cycles, soil chemistry, horticulture, landscape architecture, and ecology. Sound complicated? Don’t worry, it isn’t! In this manual we will provide you with simple step-by-step instructions that will allow you to enjoy helping the environment and enhancing your landscape.

8
1
STEP ONE: The Planning
Goals & Strategies It is good to set goals and objectives to help guide you through the process. Goals are useful to let
you know if you succeeded. “Capturing 50% of site runoff in my rain garden” is an excellent goal one might choose. An objective could be: “using only native plants in the rain garden”, “reducing watering in my garden”, “capturing water in rain barrels from my gutters”. The obvious goal of your project is to design and build a rain garden. However, this experience can be much more rewarding both personally and environmentally if you include other individuals and groups in your project. Not only will you forge and strengthen bonds with those in your community, you will provide the knowledge and experience necessary to create a rain garden of their own and further strengthen the local natural community.
Budget
Residential rain gardens average about $3 to $4 per square foot, depending on soil conditions and the desired species, size and density of plants used. Commercial, industrial and institutional site costs can range between $10 and $40 per square foot if there is a need for other control structures including: curbing, storm drains and under-drains. Generally, the cost of the plants will be the majority of the total cost of the project. A list of plants and concept sketches are provided in the back of this manual. Call your local nursery to determine costs of plants.
Preliminary Steps Here are some preliminary steps to complete before designing:
Research site specific information such as the location of utilities, wetlands, fire lanes, future building plans, etc.
Be sure you have proper approval from school administration and maintenance staff
Survey the grounds to identify possible rain gardens sites including areas with downspouts, gutters, soil erosion or locations where water ponds and puddles form during/after storms

9
Do you need a permit? Not typically, but if you are in doubt, it is best to ask your county and township offices.
Pay attention to drainage problem areas; it may help to take pictures.
Conduct an informal survey of your community (including students, staff, parents, and maintenance staff) to determine their satisfaction with the current state of the local environment
Create an informal contract with the students and staff. Designate responsibility to upkeep the
garden from year to year. Perhaps use an honor system or honor contract.
Call Before You Dig
Common utilities will include: water, sewer, electricity, natural gas, telephone, cable, and possibly a separate storm sewer (some older areas have combined sewers, where the stormwater drains directly into the sanitary sewer system). It is often difficult and time consuming to find out exactly where all of the utilities are buried on your site, so start early. Write letters to each of the utility companies, requesting plans showing the locations of underground utilities on your property. Try to avoid using areas where the utilities enter the building. Before construction, you can call NJ One Call at 1-800-272-1000*. A representative will come to your site and mark the locations of utilities with spray paint, so you can be certain of avoiding them. Stay at least five feet horizontally and one foot vertically from any utilities. * The State of New Jersey requires that the location of underground installations (e.g., sewer, telephone, electrical, fuel, natural gas, water and other lines, and underground tanks) must be identified and marked out prior to work that involved any digging operation. Activities covered by this requirement include, but are not limited to, excavations or trenching, blasting, installation of tents, sign posts, or fence posts, removing or planting of trees, or the planting of a new garden. New Jersey One-Call must be contacted at 1-800-272-1000 at least three (3) full working days, but not more than ten (10) days, prior to the planned start date of the digging operations. In the event of an emergency (e.g., broken water line, etc.) that will require an excavation, the One-Call system operator must still be contacted. The One-Call system operator has an emergency response procedure that includes the immediate dispatch of mark-out technicians.
Check Your Soil
This is an excellent time to call your local Rutgers Cooperative Extension** (see next page) to have them test the soil. They will do this for a small fee (around $10). Since a lot of earth was moved during the school’s construction it is likely that your soils will be highly compacted and will not drain well. In order to compensate for this, you may need to use a special soil mix within the rain garden. A good soil mix for a rain garden is 50% sand, 20% topsoil, and 30% compost. If the soil onsite contains less than 10% clay, then it can be used in place of imported topsoil in the mix. You may be able to use the existing soil, but if it is not in good condition, you may have to spend some money on new soil and/or amendments such as lime, gypsum and specific nutrients.
Locate Your Utility Lines
Call BEFORE
You Build!
NJ One Call 1-800-272-1000*

10
Consider This
Before building the rain garden, think about how it will catch water. Runoff will flow out of a downspout and should spread evenly across the entire length of the rain garden. The rain garden must be as level as possible so water doesn’t pool at one end and spill over before it has a chance to infiltrate.
Also consider what will happen to any rain garden runoff during very large storms. The rain garden is designed for small storms. When there is a great deal of rain, the rain garden will fill and eventually overflow. Where will the water go when it overflows the rain garden? Minimize the impact that this overflow will have by directing it toward grassy areas, wooded areas or existing storm drains.
** Contact information for your local Rutgers Cooperative Extension by county can be found at the following website: http:// www.rce.rutgers.edu/county
Rutgers Cooperative Extension
Cook College Rutgers, The State University of New Jersey 88 Lipman Dr. New Brunswick, NJ 08901-8525 Phone: 732-932-9306
TIP Avoid putting a
rain garden next to trees. Soils
near trees tend to have the best drainage, and should not be
disturbed.
TIP:
Avoid putting a rain garden near heavy foot traffic
areas.
Heavy foot traffic will pack down
the soil in the rain garden, which will degrade its ability to infiltrate runoff.
11
2
STEP TWO: The Design
There are two primary factors to consider when designing a rain garden: The location of your rain garden and the surface area of your rain garden
HOW TO: Find an appropriate location for a Rain Garden Walk around the area during the next rain, noting where puddles form, where areas are not draining well and where runoff is flowing. The rain garden should be located in a place where it will receive runoff. You want to make sure runoff flows toward your rain garden site, or could flow with minor modifications. Do not plan a rain garden too close to the foundation. A good location is at least 30 feet or more from your building foundation if you have a basement. If you do not have a basement the garden can be as close as 10 feet from your building.
HOW TO: Determine the Surface Area of a Rain Garden
The surface area of the rain garden can be almost any size and shape, but time and cost will always be important considerations in making your decisions. Although any size rain garden will provide some stormwater runoff control, a typical residential rain garden ranges from 100 to 300 square feet. Rain gardens can be smaller than 100 square feet, but very small gardens have little plant variety. If a rain garden is larger than 300 square feet it takes a lot more time to dig, it is more difficult to make level, and could be hard on your budget.
12
The Surface Area of your Rain Garden will depend on: • The DEPTH of the rain garden • What TYPE OF SOILS are used in the rain garden • How much will DRAINAGE will go to the garden This information, along with the sizing factor from the tables on page 16, will determine the surface area of the rain garden. First, we will figure out how the depth of your rain garden.
HOW TO: Determine the Depth of a Rain Garden
The depth is how far you need to dig to make the base of your rain garden level. A typical rain garden is between four and eight inches deep. A rain garden more than eight inches deep might pond water too long. It may also look like a hole in the ground and present a tripping hazard for somebody. A rain garden much less than four inches deep will need an excessive amount of surface area to provide enough water storage to infiltrate the larger storms. The slope of the lawn should determine the depth of the rain garden.
A good rule of thumb:
The rain garden should be about
twice as long (perpendicular to the slope) as it
is wide.

13
HOW TO: Find the slope of your lawn
1. Pound one stake in the ground at the uphill end of your rain garden site and pound another stake in the ground at the downhill end (figure 3). The stakes should be about 15 feet apart. 2. Tie a string to the bottom of the uphill stake and run the string to the downhill stake. 3. Using a string level or the carpenter’s level, make the string level and tie to downhill stake. 4. Measure the width (in inches) between the two stakes. 5. Now measure the height (in inches) on the downhill stake between the ground and string. 6. Divide the height by the width and multiply the result by 100 to find the lawn’s percent slope. If the
slope is more than 12%, it’s best to find another site or talk to a professional landscaper. Using the slope of the lawn, select the depth of the rain garden from the following options:
• If the slope is less than 4%, it is easiest to build a 3 to 5-in. deep rain garden. • If the slope is between 5 and 7%, it is easiest to build a 6 to 7 in. deep rain garden. • If the slope is between 8 and 12%, it is easiest to build an 8 in. deep rain garden.
EXAMPLE: Todd measures the length of the string between the stakes; it is 180 inches long. The height is 9 inches. He divides the height by the width to find his lawn’s percent slope.
Height x 100 = % Slope 9 inches x 100 = 5 % Slope Width 180 inches With a 5% slope, Todd should build a 6-inch deep Rain Garden.
HOW TO: Keep Your Rain Garden Level. No matter what the depth of the rain garden, the goal is to keep the garden level. Digging a very shallow rain garden on a steep lawn will require bringing in extra topsoil in order to bring the down-slope part of the garden up to the same height as the up-slope part of the garden. As the slope gets steeper, it is easier to dig the rain garden a little deeper to make it level.
Figure 4. Plants at base of a 6-inch deep Rain Garden

14

15
Now that you know how deep your rain garden should be, you need to determine the rain garden’s surface area. This requires investigation in your type of soil and how big the area draining to the rain garden is.
HOW TO: Determine What Types of Soils Are on the Rain Garden Site? After you choose the rain garden depth, you need to identify the lawn’s soil type as sandy, silty, or clayey. Sandy soils have the fastest infiltration; clayey soils have the slowest. Since clayey soils take longer to absorb water, rain gardens in clayey soil must be bigger than rain gardens in sandy or silty soil. If the soil feels very gritty and coarse, you probably have sandy soil. If your soil is smooth but not sticky, you have silty soil. If it is very sticky and clumpy, you probably have clayey soil. If you bring in your soil for the county extension agent to analyze, ask them the soil type. (See page 10 for contact info.)
HOW TO: Measure the Area Draining to the Rain Garden? The next step in choosing your rain garden surface area is to find the area that will drain to the rain garden. As the size of the drainage area increases so should the surface area of the rain garden. There is some guesswork in determining the size of a drainage area, especially if a large part of the lawn is up-slope from the proposed garden site. Use the suggestions below to estimate the drainage area without spending a lot of time.
If your rain garden is LESS than 30 feet from the downspout
In this case, where the rain garden is close to the school or house, almost all water will come from the roof downspout. Walk around the building and estimate what percent of the roof feeds to that downspout. Many houses have four downspouts, each taking about 25% of the roof’s runoff. Next find your building’s footprint, the area of the first floor. If you don’t already know it, use a tape measure to find its length and width. Multiply the two together to find the approximate area of your roof.
Finally, multiply the roof area by the percent of the roof that feeds to the rain garden downspout. This is the roof drainage area. If your rain garden will be draining the large, flat roof of a school or if the downspouts are buried and run to the street or parking lot, you may want to get input from a professional landscaper.
If your rain garden is MORE than 30 feet from the downspout
If there is a significant area of lawn uphill that will also drain to the rain garden, add this lawn area to the roof drainage area. First find the roof drainage area using the steps (above) for a Rain Garden less than 30’ from the downspout.
Next find the area of the lawn that will drain to the rain garden. Stand where your rain garden will be and look up toward the house. Identify the part of the lawn sloping into the rain garden.
Measure the length and width of the uphill lawn, and multiply them to find the lawn area.
Add the lawn area to the roof drainage area to find the total drainage area. EXAMPLE:
Todd’s house is 60 feet by 40 feet, so the roof area is 2400 square feet. He estimates that the downspout collects water from 25% of the roof, so he multiplies 2400 by 0.25 to get a downspout drainage area of 600 square feet. Roof Area: 60 ft by 40 ft = 2400 square ft. Drainage Area: 2400 square ft. x 0.25 = 600 square ft.
16
HOW TO: Use the Rain Garden Sizing Factors Having estimated the drainage area, soil type, and depth for your rain garden, use Table 1 or Table 2 to determine the rain garden’s surface area. Use Table 1 if the rain garden is less than 30 feet from the downspout, and use Table 2 if it is more than 30 feet from the downspout. TABLE 1: If Your Rain Garden is LESS than 30ft from downspout TYPE OF SOIL 3-5in. DEEP 6-7in. DEEP 8in. DEEP Sandy Soil 0.19 0.15 0.08 Silty Soil 0.34 0.25 0.16 Clayey Soil 0.43 0.32 0.20
TABLE 2: If Your Rain Garden is MORE than 30ft from downspout TYPE OF SOIL Size Factor for ALL Depths Sandy Soil 0.03 Silty Soil 0.06 Clayey Soil 0.10
1. Find the size factor on Table 1 or 2 for your soil type and rain garden depth. 2. Multiply the size factor by the drainage area. This number is the recommended rain garden surface area. 3. If the recommended rain garden surface area is much more than 300 square feet, you can divide it into smaller rain gardens for easier management. EXAMPLE: Todd’s rain garden is less than 30 feet from the downspout, and his lawn has a 5% slope, so he will have a 6-inch deep rain garden. His lawn is silty, so Table 1 recommends a size factor of 0.25. He multiplies the downspout drainage area, 600 square feet, by 0.25 to find the recommended rain garden area, 150 square feet. 600 square ft. by 0.25 = 150 square ft.
HOW TO: Select Plants for Your Rain Garden The success of your rain garden depends on selecting the right types of plants. Observe your rain garden site and record pertinent information such as hours of sun, reflections off adjacent buildings and excessive wind. These conditions may contribute to unusual ‘microclimates’ due to increased heat or exposure and it is necessary to choose plants accordingly. Plant your rain garden with plants that will thrive in that environment. Whether in the sun or shade, rain gardens can be planted with shrubs and flowers that are beautiful and low maintenance – as long as you select the plants that love those conditions. Native plants – or plants that are indigenous to this climate or region -- can thrive without a lot of care, extra water, or extra fertilizer.
TIP: Remember that
many plants provide berries
for birds or have interesting
architecture especially when accentuated by snow and ice.

17
There is a wide variety of plants available for each condition such as: full sun (6 or more hours), part sun (4-6 hours) or shade (less than 4 hours), or that can withstand ‘wet feet’ or are drought tolerant. For esthetic purposes select plants that have various heights, leaf color and shape, and that bloom in a wide array of colors throughout the seasons.
Consider these factors when selecting your plants:
Native plants provide better habitat and require less watering Non-native invasive plants overtake gardens and may escape into surrounding areas Some toxic/poisonous plants cause harm to pets and children
18
3
STEP THREE: Build Your Rain Garden!
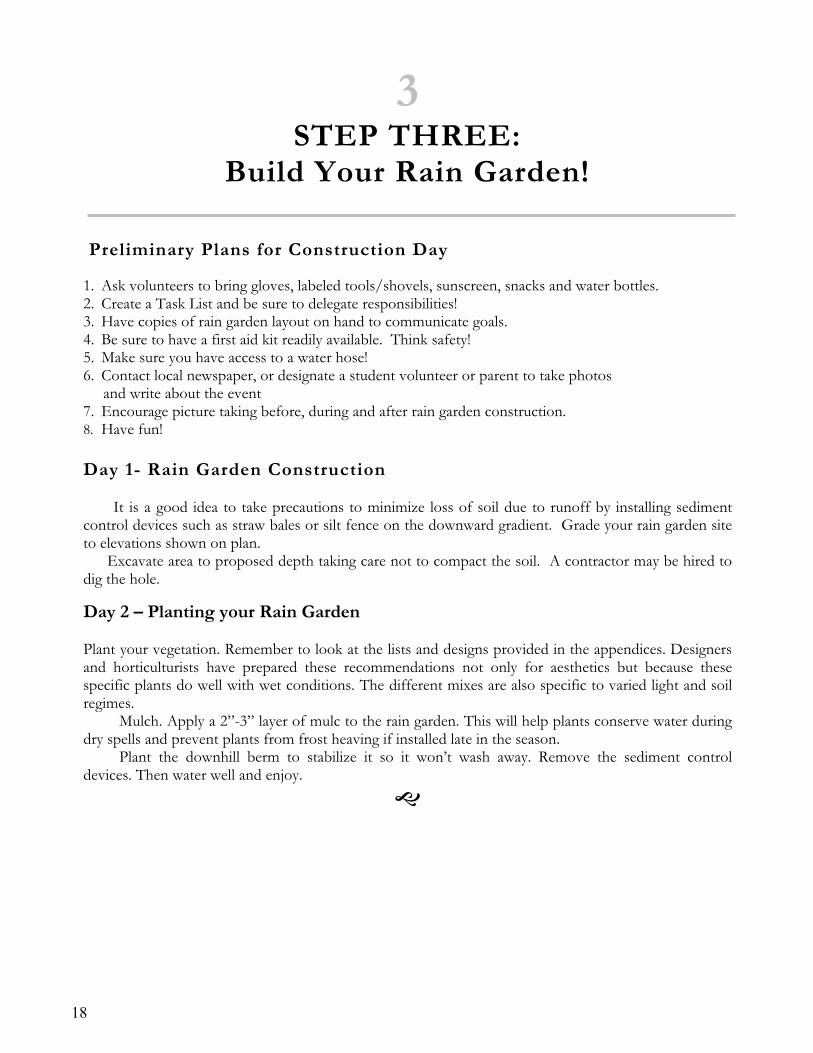
Preliminary Plans for Construction Day 1. Ask volunteers to bring gloves, labeled tools/shovels, sunscreen, snacks and water bottles. 2. Create a Task List and be sure to delegate responsibilities! 3. Have copies of rain garden layout on hand to communicate goals. 4. Be sure to have a first aid kit readily available. Think safety! 5. Make sure you have access to a water hose! 6. Contact local newspaper, or designate a student volunteer or parent to take photos and write about the event 7. Encourage picture taking before, during and after rain garden construction. 8. Have fun!
Day 1- Rain Garden Construction
It is a good idea to take precautions to minimize loss of soil due to runoff by installing sediment
control devices such as straw bales or silt fence on the downward gradient. Grade your rain garden site to elevations shown on plan.
Excavate area to proposed depth taking care not to compact the soil. A contractor may be hired to dig the hole.
Day 2 – Planting your Rain Garden Plant your vegetation. Remember to look at the lists and designs provided in the appendices. Designers and horticulturists have prepared these recommendations not only for aesthetics but because these specific plants do well with wet conditions. The different mixes are also specific to varied light and soil regimes. Mulch. Apply a 2”-3” layer of mulc to the rain garden. This will help plants conserve water during dry spells and prevent plants from frost heaving if installed late in the season.
Plant the downhill berm to stabilize it so it won’t wash away. Remove the sediment control devices. Then water well and enjoy.
19
4
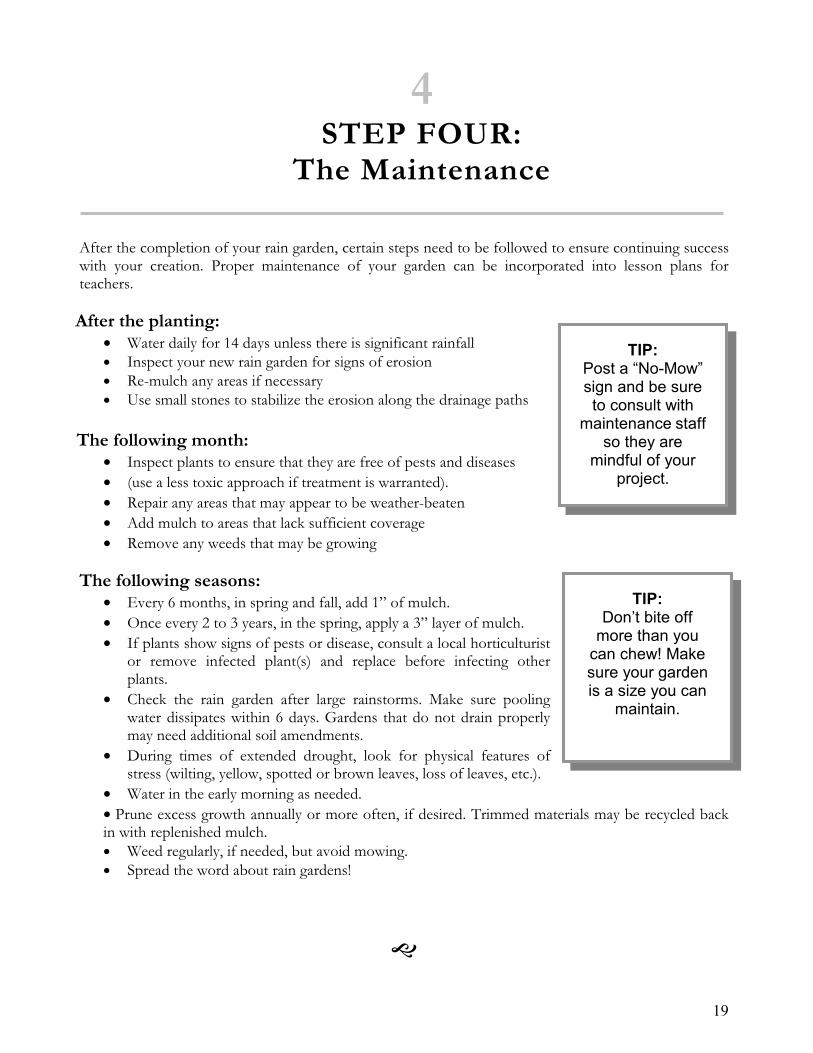
STEP FOUR: The Maintenance
After the completion of your rain garden, certain steps need to be followed to ensure continuing success with your creation. Proper maintenance of your garden can be incorporated into lesson plans for teachers.
After the planting:
• Water daily for 14 days unless there is significant rainfall • Inspect your new rain garden for signs of erosion
• Re-mulch any areas if necessary
• Use small stones to stabilize the erosion along the drainage paths
The following month:
• Inspect plants to ensure that they are free of pests and diseases
• (use a less toxic approach if treatment is warranted).
• Repair any areas that may appear to be weather-beaten
• Add mulch to areas that lack sufficient coverage
• Remove any weeds that may be growing
The following seasons:
• Every 6 months, in spring and fall, add 1” of mulch.
• Once every 2 to 3 years, in the spring, apply a 3” layer of mulch.
• If plants show signs of pests or disease, consult a local horticulturist or remove infected plant(s) and replace before infecting other plants.
• Check the rain garden after large rainstorms. Make sure pooling water dissipates within 6 days. Gardens that do not drain properly may need additional soil amendments.
• During times of extended drought, look for physical features of stress (wilting, yellow, spotted or brown leaves, loss of leaves, etc.).
• Water in the early morning as needed.
• Prune excess growth annually or more often, if desired. Trimmed materials may be recycled back in with replenished mulch. • Weed regularly, if needed, but avoid mowing. • Spread the word about rain gardens!
TIP: Post a “No-Mow” sign and be sure to consult with
maintenance staffso they are
mindful of your project.
TIP: Don’t bite off
more than you can chew! Make sure your garden is a size you can
maintain.

20
5
STEP FIVE: Enjoy Your Rain Garden!
The beauty and endless opportunities to learn from a maturing rain garden are now yours to discover. Watch, learn and feel good about your contribution to a healthier environment. There are many ways to enjoy your new rain garden. You can:
• Take pictures throughout the seasons to document changes/growth.
• Examine the ecology of the bugs and other animals.
• Collect and press flowers for art projects.
• Provide tours to friends, family and administrators.
• Add interpretative signs for passerbys
• Have a contest to name your rain garden
• Label the different plant species with common and latin names so that others may appreciate the garden.
• Call the local newspaper or TV to show off your hard work – perhaps a public unveiling!
• Decorate your garden with art (sculpture students, etc.)

21
Key Information
What is Non-point Source Pollution? Related to water resources, non-point source pollution is the introduction of impurities into a surface-water body or an aquifer, usually through a non-direct route and from sources that are "diffuse" in nature. Discharges from non-point sources are usually intermittent, associated with a rainfall or snowmelt event, and occur less frequently and for shorter periods of time than do point source discharges. Non-point sources of pollution are often difficult to identify, isolate and control. "Non-point Source" is commonly abbreviated as "NPS." Examples of NPS pollution include: automobile emissions, road salt, dirt and grit, and runoff from parking lots; runoff and leachate from agricultural fields, barnyards, feedlots, lawns, home gardens and failing on-site wastewater treatment systems. Most NPS pollutants fall into six major categories: sediment, nutrients, acid and salts, heavy metals, toxic chemicals and pathogens, according to the U.S. Department of Agriculture (USDA), and other state and federal agencies.
What is NPS vs. Point Source Pollution? Pollutants affecting water quality may come from point or non-point sources, or a combination of both. Like NPS pollution, point source pollution is the introduction of an impurity into a surface-water body or aquifer. However, the difference is that the point source impurity enters the water resource at an easily identifiable, distinct location though a direct route. Discharges from point sources of pollution often are continuous, and easier to identify and measure compared to NPS discharges. Because of these properties, point sources are somewhat easier to control, although control measures are usually more expensive compared to NPS controls. Examples of point sources include: construction, agriculture, mining, home & garden, logging, industrial plants, commercial businesses and wastewater treatment plants. Point source pollutants are usually municipal or industrial wastes, but are not limited to these.
What is Best Management Practices or BMPs? A major activity of many water quality projects is the implementation of Best Management Practices, usually called BMPs. As related to water resources, BMPs are implemented to improve or protect the quality and/or quantity of the resource. In terms of NPS pollution, a BMP is a cultural or engineering technique, or a management strategy that has been evaluated and accepted to be an effective and practical means of preventing or reducing non-point source pollution in a local area. The evaluation and implementation of a BMP, or combination of BMPs, should focus on the management of inputs, and try to provide a balance between economic and environmental considerations. rain gardens in schoolyard habitats are effective BMPs for managing and retaining building runoff, irrigating a garden site and preventing soil erosion.

22
Rain Garden Web Sites
University of Wisconsin-Extension, Rain Garden Publications http://clean-water.uwex.edu/pubs/raingarden
Rain Gardens A how-to manual for homeowners
http://clean-water.uwex.edu/pubs/raingarden/rgmanual.pdf Rain Gardens A household way to improve water quality in your community
http://clean-water.uwex.edu/pubs/raingarden/gardens.pdf Rain Gardens of West Michigan-Home
http://www.raingardens.org/index.php Montgomery County Maryland, Rainscapes resource page
http://www.montgomerycountymd.gov/mc/services/dep/rainscapes/garden.htm
Southeastern Oakland County Resource Recovery Authority Healthy Lawns and Gardens
Program http://www.socwa.org/lawn_and_garden.htm
Maplewood Minnesota Rainwater Gardens Site (search site for “rain water garden”)
http://www.ci.maplewood.mn.us
Wisconsin Natural Resources Magazine http://www.wnrmag.com/supps/2003/feb03/run.htm
Montgomery County Government Services in Maryland
http://www.montgomerycountymd.gov/mc/services/dep/rainscapes/home.html
Low Impact & Conservation Web Sites
Impact Development Center’s sizing tool explained:
http://www.lid-stormwater.net/bioretention/bio_sizing.htm Low Impact Development Center, Sustainable School Projects Website
http://www.lowimpactdevelopment.org/school/index.html Prince George’s County Maryland (Search for Bioretention)
http://www.goprincegeorgescounty.com Rutgers Cooperative Extension: Restoring NJ Riparian Forest Buffers
http://www.rce.rutgers.edu/njriparianforestbuffers/index.htm
Rain Bird Games, Trivia and Water Conservation Activities (Teaching Tool with Answers) http://www.rainbird.com/iuow/community/crossword.htm

10 feet wide;full to partial sunwith silt andsandy soils
Total Area:70 sq. ft.
Symbol Scientific Name Common Name Numberof plants
Cl Carex lurida Shallow sedge 3Cg Chelone glabra White turtlehead 4Em Eupatorium maculatum Spotted joepyeweed 3Ha Helenium autumnale Common sneezeweed 6Iv Iris versicolor Blue flag 4Je Juncus effusus Soft rush 5Lc Lobelia cardinalis Cardinal flower 4Ls Lobelia siphilitica Great blue lobelia 6Pav Panicum virgatum Switchgrass 5Pv Pycnanthemum virginianum Mountain mint 7Rh Rudbeckia hirta Blackeyed Susan 5Sg Solidago graminifolia Flat-top goldenrod 3Sna Symphyotrichum novae-angliae New England Aster 6Za Zizia aurea Golden Alexander 11
Total Plants Needed: 72
20 feet wide;full to partial sunwith silt andsandy soils
Symbol Scientific Name Common Name Number of plantsCl Carex lurida Shallow sedge 9Cg Chelone glabra White turtlehead 13Ep Eupatorium perfoliatum Common boneset 12Em Eupatorium maculatum Spotted joepyeweed 3Ha Helenium autumnale Common sneezeweed 5Iv Iris versicolor Blue flag 9Je Juncus effusus Soft rush 10Lc Lobelia cardinalis Cardinal flower 7Ls Lobelia siphilitica Great blue lobelia 9Mf Monarda fistulosa Wild bergmont 5Pav Panicum virgatum Switchgrass 6Pv Pycnanthemum virginianum Mountain mint 4Rh Rudbeckia hirta Blackeyed Susan 10Sg Solidago graminifolia Flat-top goldenrod 17Sna Symphyotrichum novae-angliae New England Aster 9Za Zizia aurea Golden Alexander 16
Total Plants Needed: 14423
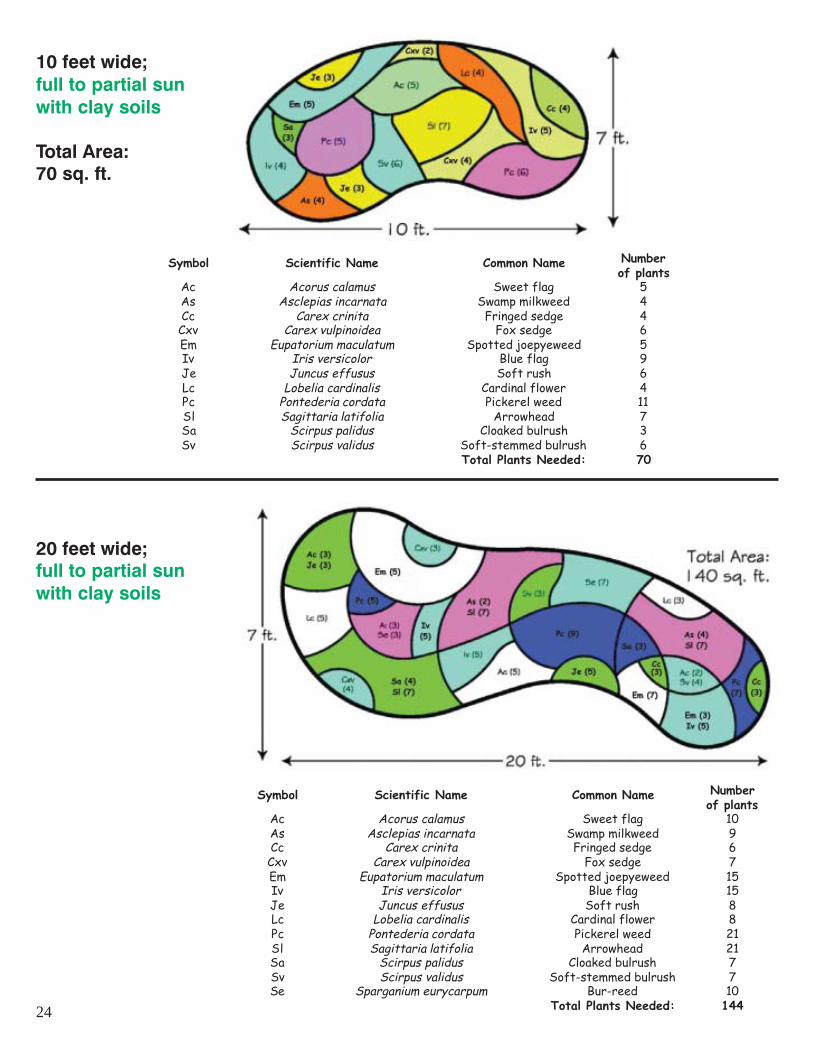
10 feet wide;full to partial sunwith clay soils
Total Area:70 sq. ft.
Symbol Scientific Name Common Name Numberof plants
Ac Acorus calamus Sweet flag 5As Asclepias incarnata Swamp milkweed 4Cc Carex crinita Fringed sedge 4Cxv Carex vulpinoidea Fox sedge 6Em Eupatorium maculatum Spotted joepyeweed 5Iv Iris versicolor Blue flag 9Je Juncus effusus Soft rush 6Lc Lobelia cardinalis Cardinal flower 4Pc Pontederia cordata Pickerel weed 11Sl Sagittaria latifolia Arrowhead 7Sa Scirpus palidus Cloaked bulrush 3Sv Scirpus validus Soft-stemmed bulrush 6
Total Plants Needed: 70
20 feet wide;full to partial sunwith clay soils
Symbol Scientific Name Common Name Numberof plants
Ac Acorus calamus Sweet flag 10As Asclepias incarnata Swamp milkweed 9Cc Carex crinita Fringed sedge 6Cxv Carex vulpinoidea Fox sedge 7Em Eupatorium maculatum Spotted joepyeweed 15Iv Iris versicolor Blue flag 15Je Juncus effusus Soft rush 8Lc Lobelia cardinalis Cardinal flower 8Pc Pontederia cordata Pickerel weed 21Sl Sagittaria latifolia Arrowhead 21Sa Scirpus palidus Cloaked bulrush 7Sv Scirpus validus Soft-stemmed bulrush 7Se Sparganium eurycarpum Bur-reed 10
Total Plants Needed: 14424
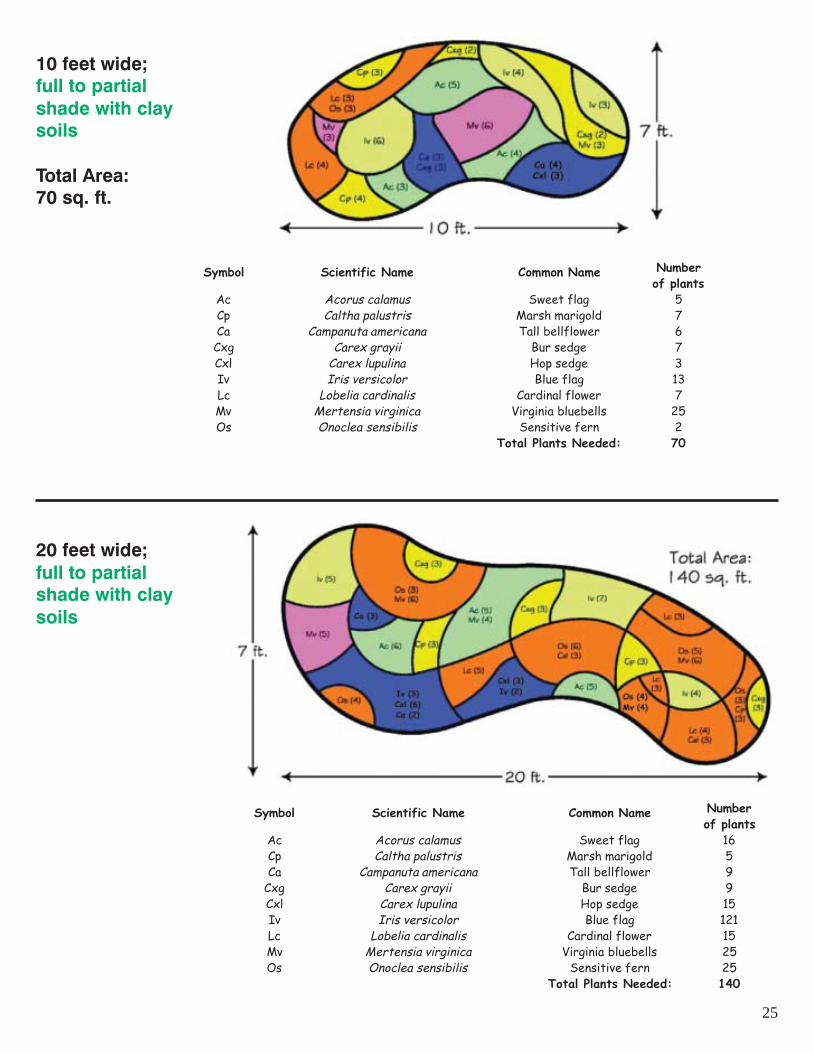
10 feet wide;full to partialshade with claysoils
Total Area:70 sq. ft.
Symbol Scientific Name Common Name Numberof plants
Ac Acorus calamus Sweet flag 5Cp Caltha palustris Marsh marigold 7Ca Campanuta americana Tall bellflower 6Cxg Carex grayii Bur sedge 7Cxl Carex lupulina Hop sedge 3Iv Iris versicolor Blue flag 13Lc Lobelia cardinalis Cardinal flower 7Mv Mertensia virginica Virginia bluebells 25Os Onoclea sensibilis Sensitive fern 2
Total Plants Needed: 70
20 feet wide;full to partialshade with claysoils
Symbol Scientific Name Common Name Numberof plants
Ac Acorus calamus Sweet flag 16Cp Caltha palustris Marsh marigold 5Ca Campanuta americana Tall bellflower 9
Cxg Carex grayii Bur sedge 9Cxl Carex lupulina Hop sedge 15Iv Iris versicolor Blue flag 121Lc Lobelia cardinalis Cardinal flower 15Mv Mertensia virginica Virginia bluebells 25Os Onoclea sensibilis Sensitive fern 25
Total Plants Needed: 140
25
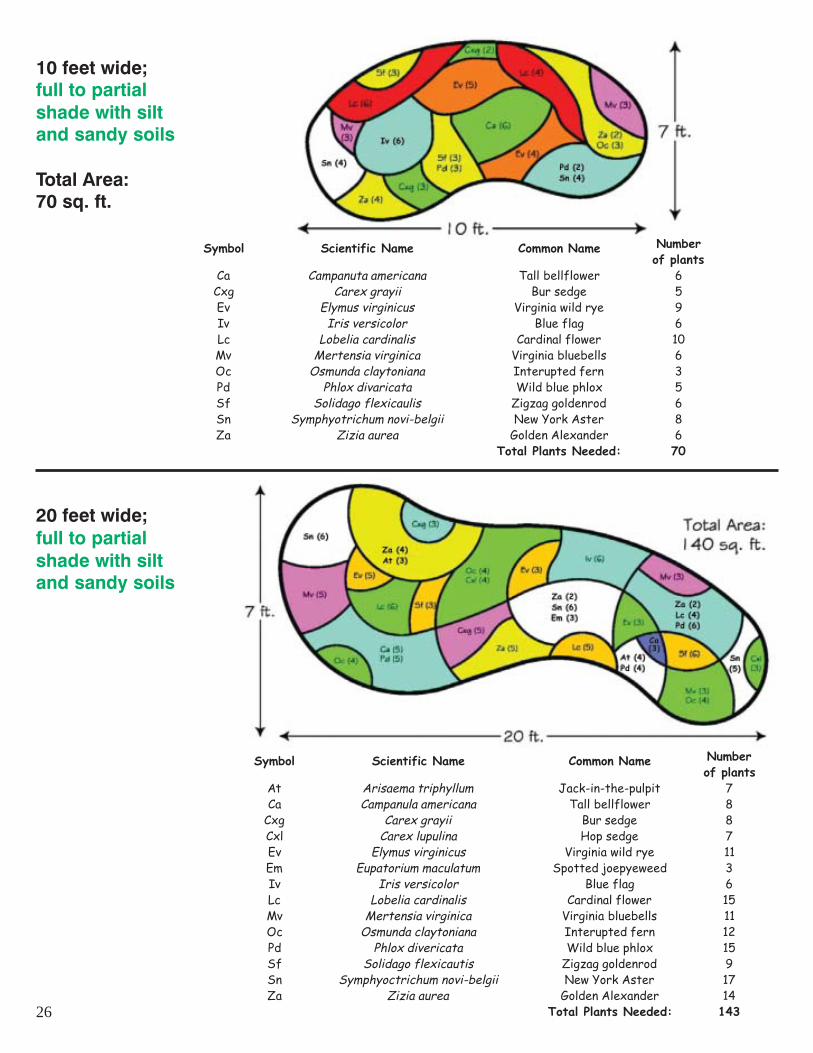
10 feet wide;full to partialshade with siltand sandy soils
Total Area:70 sq. ft.
Symbol Scientific Name Common Name Numberof plants
Ca Campanuta americana Tall bellflower 6Cxg Carex grayii Bur sedge 5Ev Elymus virginicus Virginia wild rye 9Iv Iris versicolor Blue flag 6Lc Lobelia cardinalis Cardinal flower 10Mv Mertensia virginica Virginia bluebells 6Oc Osmunda claytoniana Interupted fern 3Pd Phlox divaricata Wild blue phlox 5Sf Solidago flexicaulis Zigzag goldenrod 6Sn Symphyotrichum novi-belgii New York Aster 8Za Zizia aurea Golden Alexander 6
Total Plants Needed: 70
20 feet wide;full to partialshade with siltand sandy soils
Symbol Scientific Name Common Name Numberof plants
At Arisaema triphyllum Jack-in-the-pulpit 7Ca Campanula americana Tall bellflower 8
Cxg Carex grayii Bur sedge 8Cxl Carex lupulina Hop sedge 7Ev Elymus virginicus Virginia wild rye 11Em Eupatorium maculatum Spotted joepyeweed 3Iv Iris versicolor Blue flag 6Lc Lobelia cardinalis Cardinal flower 15Mv Mertensia virginica Virginia bluebells 11Oc Osmunda claytoniana Interupted fern 12Pd Phlox divericata Wild blue phlox 15Sf Solidago flexicautis Zigzag goldenrod 9Sn Symphyoctrichum novi-belgii New York Aster 17Za Zizia aurea Golden Alexander 14
Total Plants Needed: 14326
27
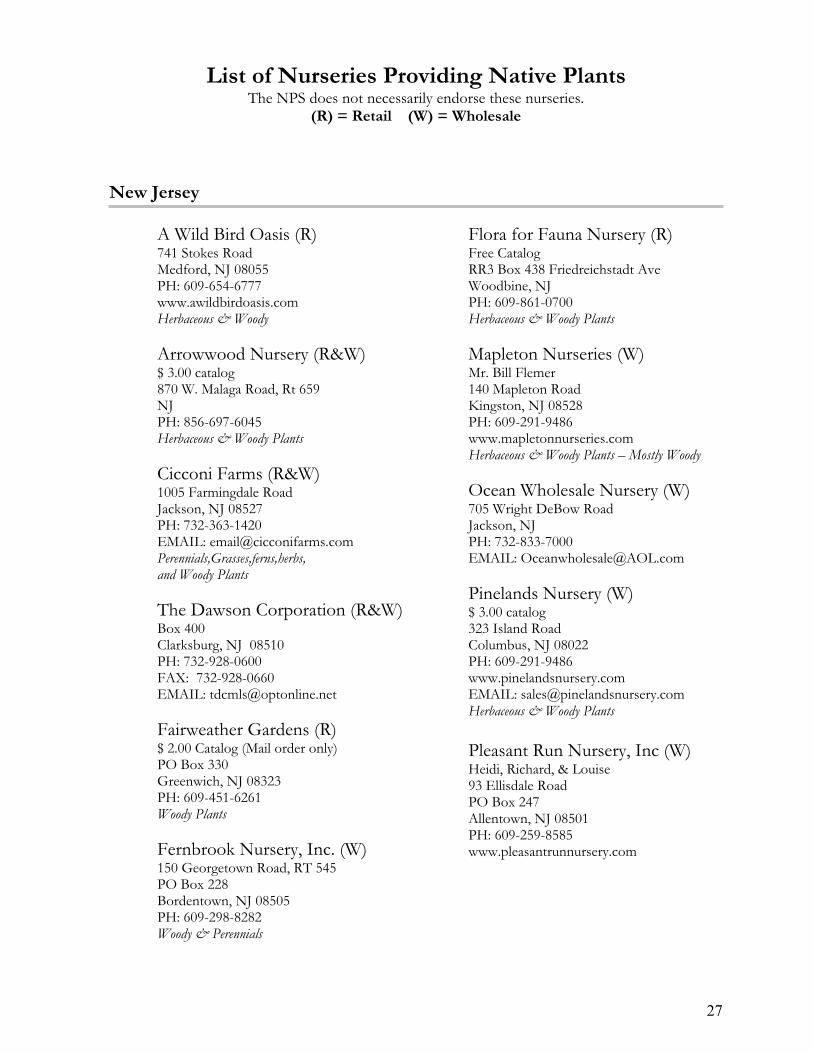
List of Nurseries Providing Native Plants The NPS does not necessarily endorse these nurseries.
(R) = Retail (W) = Wholesale
New Jersey
A Wild Bird Oasis (R) 741 Stokes Road Medford, NJ 08055 PH: 609-654-6777 www.awildbirdoasis.com Herbaceous & Woody
Arrowwood Nursery (R&W) $ 3.00 catalog 870 W. Malaga Road, Rt 659 NJ PH: 856-697-6045 Herbaceous & Woody Plants
Cicconi Farms (R&W) 1005 Farmingdale Road Jackson, NJ 08527 PH: 732-363-1420 EMAIL: [email protected] Perennials,Grasses,ferns,herbs, and Woody Plants
The Dawson Corporation (R&W) Box 400 Clarksburg, NJ 08510 PH: 732-928-0600 FAX: 732-928-0660 EMAIL: [email protected]
Fairweather Gardens (R) $ 2.00 Catalog (Mail order only) PO Box 330 Greenwich, NJ 08323 PH: 609-451-6261 Woody Plants
Fernbrook Nursery, Inc. (W) 150 Georgetown Road, RT 545 PO Box 228 Bordentown, NJ 08505 PH: 609-298-8282 Woody & Perennials
Flora for Fauna Nursery (R) Free Catalog RR3 Box 438 Friedreichstadt Ave Woodbine, NJ PH: 609-861-0700 Herbaceous & Woody Plants
Mapleton Nurseries (W) Mr. Bill Flemer 140 Mapleton Road Kingston, NJ 08528 PH: 609-291-9486 www.mapletonnurseries.com Herbaceous & Woody Plants – Mostly Woody
Ocean Wholesale Nursery (W) 705 Wright DeBow Road Jackson, NJ PH: 732-833-7000 EMAIL: [email protected]
Pinelands Nursery (W) $ 3.00 catalog 323 Island Road Columbus, NJ 08022 PH: 609-291-9486 www.pinelandsnursery.com EMAIL: [email protected] Herbaceous & Woody Plants
Pleasant Run Nursery, Inc (W) Heidi, Richard, & Louise 93 Ellisdale Road PO Box 247 Allentown, NJ 08501 PH: 609-259-8585 www.pleasantrunnursery.com

28
Princeton Nurseries (W) PO Box 185 Ellisdale Road Allentown, NJ 08501 PH: 609-259-0492 TOLL FREE 1-800-916-1776 EMAIL: [email protected]
Rare Find Nursery, Inc (R&W) 957 Patterson Road Jackson, NJ 08527 PH: 732-833-0613 EMAIL: [email protected]
Toadshade Wildflower Farm (R) Free catalog 53 Everittstown Road Frenchtown, NJ 08825 PH: 908-996-7500 www.toadshade.com EMAIL: [email protected] Herbaceous Plants
Tuckahoe Nurseries, Inc. (W) PO Box 576 Tuckahoe, NJ 08250 PH: 609-861-0533 EMAIL: [email protected]
Pennsylvania
Aquascapes Unlimited (W) PO Box 364 Pipersville, PA 18947 PH: 215-766-8151 Native Herbaceous Wetland Plants
Bowmans Hill Wildflower Preserve (R) No mail orders PO Box 685 New Hope, PA 18938 PH: 215-862-2924 www.bhwp.org EMAIL: [email protected] Herbaceous & Woody Plants Note: Has lecture/seminars every Sunday
Ernst Conservation Seeds (W) 9006 Mercer Pike Meadville, PA 16335 TOLL FREE 1-800-873-3321 www.ernstseed.com
Octoraro Native Plant (W) 6126 Street Road Kirkwood, PA 17536-9647 PH: 717-529-3160 www.Octoraro.com EMAIL: [email protected]
New Moon Nursery (W) 1492 Kirkwood Pike Kirkwood, PA 17536 PH: 717-529-3870 www.NewMoonNursery.com EMAIL: [email protected]
Redbud Native Plant Nursery (R&W) 1214 N. Middletown Road Glen Mills, PA 19342 PH: 610 358-4300 FAX: 610 358-3330
New York
Greenbelt Native Plant (W) 3808 Victory Blvd. Staten Island, NY 10314 PH: 718-370-0932 Aquatic Plants, Ferns, Grasses, Salt Marsh Grasses, Herbaceous & Woody Plants
Wetland Plant Catalog (W) 2701 – A Route 305 PO Box 30 West Clarksville, NY 14786 PH: 716- 968-3120 www.southerntierconsulting.com EMAIL: [email protected]

29
Talmage Farm (W) 2975 Sound Avenue Riverhead, NY 11901-1114 PH: 631-727-0124 www.talmagefarm.com EMAIL: [email protected]
Maryland Virginia
The Perennial Farm 12017 Glen Arm Road Glen Arm, Maryland 21057 PH: 410-592-6106 www.pernnialfarm.com www.growingforyou.com www.perennialavailability.com
EMAIL: [email protected]
Bobtown Nursery (W) 16212 Country Club Road Melfa, VA 23410 PH: 757-787-8484 Natives, Ornamentals, & Wetland
Wisconsin Georgia
Prairie Nursey (W) PO Box 306 Westfield ,WI 53964 TOLL FREE 1-800-476-9453 www.prairienursery.com EMAIL: [email protected]
Prairies, Woodlands, & Wetlands
Classic Groundcovers, Inc. (W) 405 Belmont Road Athens, Georgia 30605-4905 TOLL FREE 1-800-248-8424 www.classic-groundcovers.com

Na
tiv
e P
lan
t L
ist
for
New
Jer
sey
: A
han
dfu
l of
spec
ies
is a
deq
uat
e fo
r a
rain
gar
den
--th
is l
ist
is i
nte
nded
to g
ive
you
flex
ibil
ity i
n y
ou
r p
lan
t se
lect
ion
. G
enu
s sp
ecie
s C
om
mo
n N
am
e T
yp
e F
low
er c
olo
r S
un
/Sh
ad
e W
et F
eet
OK
?
Wet
lan
d I
nd
ica
tor
Aco
rus
amer
ican
us
Sw
eetf
lag
her
b
yel
low
su
n
yes
O
BL
An
dro
po
go
n
vir
gin
icu
s
Bu
shy b
roo
mse
dge
gra
ss
no
ne
FA
CW
+
var
. ab
bre
via
tus
(A
. glo
mer
atu
s)
Aro
nia
p
run
ifo
lia
Pu
rple
ch
okeb
erry
sh
rub
w
hit
e su
n/s
had
e n
o
FA
CW
Asc
lep
ias
inca
rnat
a S
wam
p m
ilkw
eed
h
erb
ro
se-p
urp
le
sun
n
o
OB
L
Ast
er
no
vae
-an
gli
ae
New
En
gla
nd
Ast
er
her
b
blu
e su
n/s
had
e
FA
CW
-
Ast
er
no
vi-
bel
gii
N
ew Y
ork
ast
er
her
b
vio
let-
blu
e su
n
F
AC
W+
Cal
amag
rost
is c
anad
ensi
s B
luej
oin
t gra
ss
gra
ss
no
ne
yes
F
AC
W+
Cal
tha
pal
ust
ris
Mar
sh m
arig
old
h
erb
yel
low
yes
O
BL
Car
ex
crin
ita
Fri
nged
sed
ge
her
b
sh
ade
yes
O
BL
Car
ex
luri
da
Sh
allo
w s
edge
her
b
yes
O
BL
Cep
hal
anth
us
occ
iden
tali
s B
utt
on
bu
sh
shru
b
wh
ite
sun
yes
O
BL
Ch
elo
ne
gla
bra
T
urt
leh
ead
h
erb
w
hit
e su
n
O
BL
Cle
thra
al
nif
oli
a S
wee
t p
epp
erb
ush
sh
rub
w
hit
e sh
ade
no
F
AC
+
Co
rnu
s
amo
mu
m
Sil
ky d
ogw
oo
d
shru
b
wh
ite
sun
n
o
FA
CW
Ely
mu
s
vir
gin
icu
s V
irgin
ia W
ild
Rye
gra
ss
no
ne
FA
CW
-
Eu
pat
ori
um
m
acu
latu
m
Sp
ott
ed J
oe-
pye
Wee
d
her
b
pin
k
sun
n
o
FA
CW
Eu
pat
ori
um
p
erfo
liat
um
B
on
eset
h
erb
w
hit
e su
n
no
F
AC
W+
Gen
tian
a cl
ausa
B
ott
le g
enti
an
her
b
blu
e-p
urp
le
sun
FA
CW
Ger
ard
ia
pu
rpu
rea
Pu
rple
ger
ard
ia
her
b
pu
rple
su
n
Gly
ceri
a
can
aden
sis
Rat
tles
nak
e gra
ss
gra
ss
no
ne
yes
O
BL
Hel
ian
thu
s gig
ante
us
Sw
amp
su
nfl
ow
er
her
b
yel
low
F
AC
W
Hel
iniu
m
autu
mn
ale
Sn
eeze
wee
d
her
b
yel
low
su
n
F
AC
W+
Hib
iscu
s m
osc
heu
tos
Sw
amp
ro
se-m
allo
w
her
b
pin
k,
wh
ite
sun
, sh
ade
yes
O
BL
Ilex
ver
tici
llat
a W
inte
rber
ry
shru
b
whit
e su
n-s
had
e yes
F
AC
W+
Imp
atie
ns
bif
lora
Je
wel
wee
d
her
b
ora
nge
sun
Iris
ver
sico
lor
Blu
efla
g i
ris
her
b
pu
rple
su
n,
shad
e yes
O
BL
Itea
vir
gin
ica
Vir
gin
ia s
wee
tsp
ire
shru
b
whit
e
O
BL
Jun
cus
effu
sus
So
ft r
ush
h
erb
yes
F
AC
W+
Lee
rsia
o
ryzo
ides
R
ice
cutg
rass
gra
ss
no
ne
sun
yes
O
BL
Lo
bel
ia
card
inal
is
Car
din
al f
low
er
her
b
red
su
n
F
AC
W+
Lo
bel
ia
sip
hil
itic
a B
lue
lob
elia
h
erb
b
lue
sun
n
o
FA
CW
30

+
Gen
us
sp
ecie
s C
om
mo
n N
am
e T
yp
e F
low
er c
olo
r S
un
/Sh
ad
e W
et F
eet
OK
?
Wet
lan
d I
nd
ica
tor
Lysi
mac
hia
ci
liat
a F
rin
ged
lo
ose
stri
fe
her
b
yel
low
su
n
Mat
teu
ccia
st
ruth
iop
teri
s O
stri
ch f
ern
fe
rn
sh
ade
F
AC
W
Mer
ten
sia
vir
gin
ica
Vir
gin
ia b
lueb
ells
h
erb
shad
e
Mim
ulu
s ri
ngen
s M
on
key
flo
wer
h
erb
b
lue
sun
O
BL
Mo
nar
da
did
ym
a B
ee b
alm
h
erb
re
d
sun
On
ocl
ea
sen
sib
ilis
S
ensi
tive
fern
fe
rn
sh
ade
F
AC
W
Osm
un
da
regal
is
Ro
yal
fer
n
fern
OB
L
Pan
icu
m
vir
gat
um
S
wit
chgra
ss
gra
ss
su
n
F
AC
Ph
lox
p
ilo
sa
Pra
irie
ph
lox
h
erb
Pycn
anth
enu
m
vir
gin
ian
a M
ou
nta
in m
int
her
b
su
n
Rh
exia
vir
gin
ica
Mea
do
w b
eau
ty
her
b
pin
k
sun
OB
L
Ro
sa
pal
ust
ris
Sw
amp
ro
se
shru
b
pin
k
sun
yes
O
BL
Sag
itta
ria
lati
foli
a D
uck
po
tato
h
erb
w
hit
e su
n
O
BL
Sau
ruru
s ce
rnu
us
Liz
ard
tai
l h
erb
w
hit
e
O
BL
Sci
rpu
s cy
per
inu
s W
oo
lgra
ss
sed
ge
yes
F
AC
W+
Sci
rpu
s p
un
gen
s C
om
mo
n t
hre
esq
uar
e se
dge
yes
F
AC
W+
Sci
rpu
s ta
ber
nae
mo
nta
nii
S
oft
stem
bu
lru
sh
sed
ge
yes
O
BL
Sen
ecio
au
reu
s G
old
en r
agw
ort
h
erb
yel
low
su
n
F
AC
W
Sp
argan
ium
am
eric
anu
m
Les
ser
bu
r-re
ed
her
b
su
n
yes
O
BL
Sp
irea
to
men
tosa
S
teep
leb
ush
, H
ard
hac
k
shru
b
pin
k
sun
FA
CW
Sp
irea
al
ba
var
. la
tifo
lia
Mea
do
wsw
eet
shru
b
whit
e
F
AC
+
Thal
ictr
um
d
asyca
rpu
m
Tal
l m
ead
ow
ru
e h
erb
w
hit
e su
n
F
AC
W+
Th
elyp
teri
s p
alu
stri
s M
arsh
fer
n
fern
sun
-sh
ade
F
AC
W+
Vac
cin
ium
co
rym
bo
sum
H
igh
bu
sh b
lueb
erry
sh
rub
w
hit
e su
n-s
had
e
FA
CW
-
Ver
no
nia
n
oveb
ora
cen
sis
NY
Iro
nw
eed
h
erb
m
agen
ta
sun
FA
CW
+
Ver
ben
a h
asta
ta
Blu
e ver
vai
n
her
b
blu
e su
n
no
F
AC
W+
Vib
urn
um
d
enta
tum
N
ort
her
n a
rro
ww
oo
d
shru
b
wh
ite
sun
-sh
ade
no
F
AC
Vib
urn
um
tr
ilo
bu
m
Am
eric
an c
ran
ber
ryb
ush
sh
rub
w
hit
e su
n-s
had
e
FA
CW
Vio
la
con
sper
sa
Am
eric
an d
og v
iole
t h
erb
b
lue
sun
, p
art
shad
e n
o
FA
CW
Z
izia
au
rea
Go
lden
ale
xan
der
h
erb
yel
low
su
n
31

Assistance and Funding Available for Teachers
In 2004 NPSNJ began working together with representatives from Project WILD (Sponsored by New Jersey Department of Environmental Protection, Division of Fish and Wildlife). Natural Resources Conservation Service (NRCS) and the NJ DEP Division of Fish and Wildlife have teamed up to bring wildlife habitat to students in New Jersey by using the Wildlife Habitat Incentives Program (WHIP) and WILD School Sites.
WHIP, an NRCS program, provides technical and financial assistance to create, enhance, or maintain habitat to be used as outdoor classrooms on school grounds and at environmental education centers. Funds can be used to plant native trees, shrubs, and grasses, and also to establish wetlands and native meadows. WHIP can provide up to 75% cost sharing to implement projects. On most WILD School sites WHIP provides about $2000-$3000, and the school and other partners provide the remaining 25% of the project cost.
As a condition of participation in WHIP, at least one teacher from each school or education center must complete NJ DEP Division of Fish and Wildlife's WILD School Site training. At the workshop, teachers learn about wildlife needs, which plants provide the best wildlife habitat, how to inventory a potential WILD School site, how to prepare wildlife habitat development plans, and how to involve students in the development and implementation of the plan. The workshops equip teachers with all of the resources they need to design an outdoor classroom and to incorporate it into lesson plans. Participating teachers receive 5 to 6 Professional Development Credits.
For more information go to the following websites:
http://www.nj.gov/dep/seeds/bo/bofall03.htm#wild
"Captain Planet Foundation"
http://www.captainplanetfdn.org/aboutUs.html#policies_grant_guidelines
32

33
LESSON 1: Mini Brilliant Ideas (MBI)
These ideas are short and quick. Teachers can use these as introductory activities, closure activities, or fillers. They must be educational and connected to the big picture, and are fun. This is also known as Learning on the Run. MBI # 1 Odes An ode is a poem about something that you like. Your ode is a mini advertisement that illustrates the virtues of the object under study. Try an Ode to Rain Gardens, Ode to Native Plants, or an ode to any part of a rain garden. Students can choose to rhyme in any pattern they wish, or have no rhyme at all. Sharing odes is fun. Some unedited first draft student odes are included as samples. MBI # 2 How can you figure out how many plants you need for a given area (a plant layout)? Example: If you have 86 square feet and plan to plant seedlings at 1.5 foot on center, how many do you need? The formula for figuring this out is to divide the area by the spacing squared. In this example, it is 86 divided by 2.25 (1.5 squared) = 38.2 plants MBI # 3 How can you measure the infiltration rate of your potential rain garden? Take a large juice or coffee can that has had both the top and bottom taken off. Wedge it an inch or two into the soil of your potential rain garden to prevent water from leaking out. Pour a gallon of water into the can. (If it doesn’t all fit, pour the rest in as the drains into the soil. Measure the time it takes for that water to disappear. That is your infiltration rate. If the soil is clay, it may take hours. You want the soil to drain well.
34
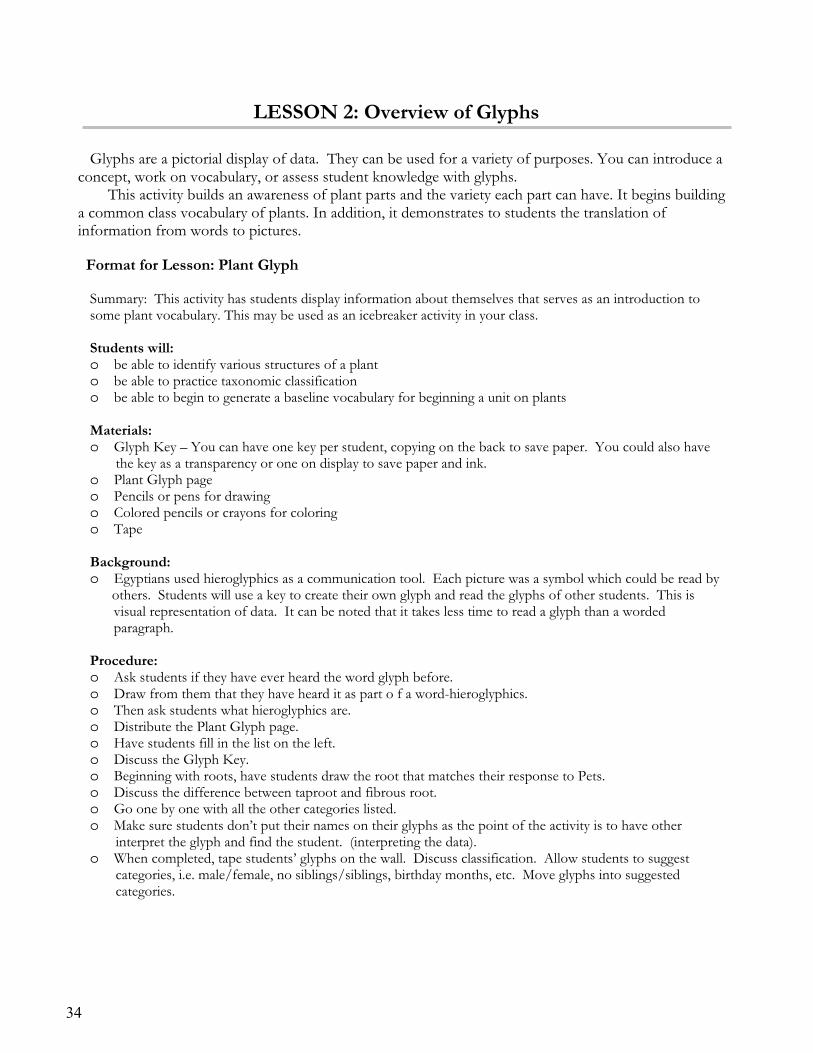
LESSON 2: Overview of Glyphs
Glyphs are a pictorial display of data. They can be used for a variety of purposes. You can introduce a concept, work on vocabulary, or assess student knowledge with glyphs.
This activity builds an awareness of plant parts and the variety each part can have. It begins building a common class vocabulary of plants. In addition, it demonstrates to students the translation of information from words to pictures.
Format for Lesson: Plant Glyph
Summary: This activity has students display information about themselves that serves as an introduction to some plant vocabulary. This may be used as an icebreaker activity in your class.
Students will: o be able to identify various structures of a plant o be able to practice taxonomic classification o be able to begin to generate a baseline vocabulary for beginning a unit on plants
Materials: o Glyph Key – You can have one key per student, copying on the back to save paper. You could also have the key as a transparency or one on display to save paper and ink. o Plant Glyph page o Pencils or pens for drawing o Colored pencils or crayons for coloring o Tape
Background: o Egyptians used hieroglyphics as a communication tool. Each picture was a symbol which could be read by others. Students will use a key to create their own glyph and read the glyphs of other students. This is
visual representation of data. It can be noted that it takes less time to read a glyph than a worded paragraph.
Procedure: o Ask students if they have ever heard the word glyph before. o Draw from them that they have heard it as part o f a word-hieroglyphics. o Then ask students what hieroglyphics are. o Distribute the Plant Glyph page. o Have students fill in the list on the left. o Discuss the Glyph Key. o Beginning with roots, have students draw the root that matches their response to Pets. o Discuss the difference between taproot and fibrous root. o Go one by one with all the other categories listed. o Make sure students don’t put their names on their glyphs as the point of the activity is to have other interpret the glyph and find the student. (interpreting the data). o When completed, tape students’ glyphs on the wall. Discuss classification. Allow students to suggest categories, i.e. male/female, no siblings/siblings, birthday months, etc. Move glyphs into suggested categories.

35
Assessment o Observe students as they interact and check for their understanding
Extension o This activity can begin an exploration of categories of leaf shape, margin, vein patterns, roots, etc. o Have students create another glyph using the characteristics of flowers, buds, monocots vs dicots, indigenous vs non indigenous plants, etc. o Make an Excel Graph using the data from just the glyphs. o Before hanging glyphs, have the students cut off the left half so that no words are hung. o Glyphs are a great Back-to-School night activity. Students can create a glyph which is put on their desk. When parents enter the room, they must find their child’s desk using the glyph key.
Glyphs: Standards
Standard 4.4 (Data Analysis, Probability, and Discrete Mathematics) All students will develop an understanding of the concepts and techniques of data analysis, probability, and discrete mathematics, and will use them to model situations, solve problems, and analyze and draw appropriate inferences from data. A. Data Analysis Standard 5.5 Characteristics of Life
B. Diversity and Biological Evolution
36
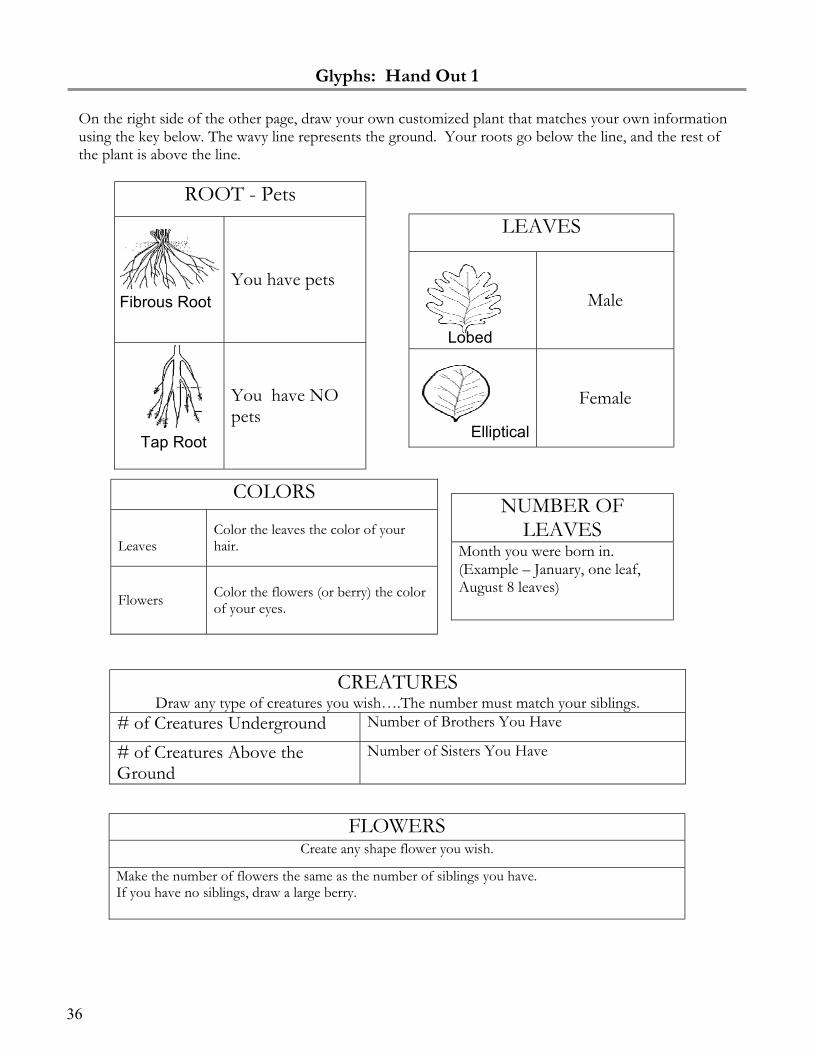
Glyphs: Hand Out 1
On the right side of the other page, draw your own customized plant that matches your own information using the key below. The wavy line represents the ground. Your roots go below the line, and the rest of the plant is above the line.
ROOT - Pets
You have pets
You have NO pets
LEAVES
Male
Female
COLORS
Leaves
Color the leaves the color of your hair.
Flowers Color the flowers (or berry) the color of your eyes.
NUMBER OF LEAVES
Month you were born in. (Example – January, one leaf, August 8 leaves)
CREATURES Draw any type of creatures you wish….The number must match your siblings.
# of Creatures Underground Number of Brothers You Have
# of Creatures Above the Ground
Number of Sisters You Have
FLOWERS Create any shape flower you wish.
Make the number of flowers the same as the number of siblings you have. If you have no siblings, draw a large berry.
Fibrous Root
Elliptical
Lobed
Tap Root

37
Glyphs: Handout 2
Data Collection
Circle one answer for each question below.
Do you have any pets? Yes No Do you have siblings? Yes No What is your gender? Male Female
Answer these questions.
What color is your hair? _____ What color are your eyes? _____ How many brothers do you have? _____ How many sisters do you have? _____ What is the number of the month you were born in? _____
38
LESSON 3: Conflict Resolution Problems For Rain Gardens
Coloring is a challenging and enjoyable part of discrete math. There are two introductory lessons in coloring and three conflict resolution coloring problems. The NJ Counties Map introduces the process of vertex coloring, and the Lake Topanemus problem gives the students practice in coloring an actual vertex problem. The other two problems use this knowledge of vertex problems to explore soil additives and plants for your rain garden.
Coloring Introduction
Two worksheets are provided as introduction, reprinted with permission from the Rutgers Leadership Program in Discrete Mathematics.
• You can choose to do both coloring exercises, one, or none.
• NJ Counties Map –The rule is that no two areas which share a border can be the same color.
• Graph Coloring – Introduces graphs (created using vertices - singular is vertex - and connecting edges) The rule is that no two vertices can be the same color as others it is connected to with an edge.
• Rules for BOTH Map and Vertex coloring – Use as few colors as possible… Less is Best!
Conflict Resolution Problems
1. Summary: Students will use conflict resolution activities as a vehicle for learning more about requirements for their rain garden.
2. Students will:
• Be able to improve their visualization of patterns when planning map coloring
• be able to translate conflict situations into a vertex coloring problem
• be able to practice open-ended problems with several solutions and explain and defend their answer
• 3. Materials
• NJ Counties Map handout, if desired
• One or more of the conflict resolution worksheets – New Jersey Native Plant Plot Decisions, Barkalow School Service Learning Garden Experiments, and Lake Topanemus Biological Monitoring Problem
• Colored pencils or crayons
4. Background You can choose to use this activity to springboard research about your area’s native plants, and
water monitoring with your class. Begin research on native plants using the ones listed on these activies, then challenge students to find which native plants are available in and appropriate to your particular region, sun, soil, and water condition. This activity can spark a great environmental discussion among students.

39
• The idea of map coloring is that no two sections which touch can be the same color. This practice makes sure that neighboring areas don’t appear combined.
• The challenge is to use the fewest colors possible. This practice saves money when printed with a charge per color, and hones higher-level thinking skills.
5. Procedure
• Discuss the big idea about which one(s) you will be using in class – Native plants, stream macroinvertebrate environments, and/or experiment design for service learning garden.
• Distribute the worksheets and read the problem aloud. Tell students that they are being asked to find a solution for this problem.
• Ask students to take some colored pencils/crayons to find a solution.
• OPTIONAL - While students are engaged in thinking, and have not yet begun to color, suggest they use manipulatives (aka M&Ms or Skittles) to perform trial and error with coloring. When they have decided on a solution they like, they should color the verticies.
• When all students have reached a solution, have them compare their choices, and stand in groups with others who have chosen to plant the same plants in the same plots. Discuss choices with the class. This is always a dynamic cooperative activity as students compare the size of each group, and listen to each others’ reasoning for their choices.
6. Assessment
• Watch students as they interact and check for their understanding
7. Extension
• Students can make graphs using vertices and edges for others to solve. Students can create conflict resolution situations into a problem to solve
Barkalow Garden Problem: Standards Standard 4.4 (Data Analysis, Probability, and Discrete Mathematics) All students will develop an understanding of the concepts and techniques of data analysis, probability, and discrete mathematics, and will use them to model situations, solve problems, and analyze and draw appropriate inferences from data. Discrete Mathematics-Vertex-Edge Graphs and Algorithms. Vertex-edge graphs, consisting of dots (vertices) and lines joining them (edges), can be used to represent and solve problems based on real-world situations. Students should learn to follow and devise lists of instructions, called "algorithms," and use algorithmic thinking to find the best solution to problems like those involving vertex-edge graphs, but also to solve other problems. STANDARD 5.1 (SCIENTIFIC PROCESSES)
Habits of Mind
A. Inquiry and Problem Solving B. Safety
Standard 5.3 (Mathematical Applications) All students will integrate mathematics as a tool for problem-solving in science, and as a means of expressing and/or modeling scientific theories.

40
Standard 5.5 Characteristics of Life
B. Diversity and Biological Evolution Reproduction and Heredity
Standard 5.10 Environmental Studies
A. Natural Systems and Interactions B. Human Interactions and Impact
Standard 9.1 - Career and Technical Education A. Career Awareness and Planning
7. Plan and conduct a cooperative project that addresses one of the problems faced by the school and/or community.
B. Employability 1. Describe and demonstrate the importance of personal and interpersonal skills. 2. Identify positive work habits and attitudes necessary for home, community, and school. 3. Identify reasons for working as part of a team.
Lake Topanemus Problem Standards
If the students use the problem as an activity in discrete mathematics, these standards apply: Standard 4.4 (Data Analysis, Probability, and Discrete Mathematics) All students will develop an understanding of the concepts and techniques of data analysis, probability, and discrete mathematics, and will use them to model situations, solve problems, and analyze and draw appropriate inferences from data. Discrete Mathematics-Vertex-Edge Graphs and Algorithms. Vertex-edge graphs, consisting of dots (vertices) and lines joining them (edges), can be used to represent and solve problems based on real-world situations. Students should learn to follow and devise lists of instructions, called "algorithms," and use algorithmic thinking to find the best solution to problems like those involving vertex-edge graphs, but also to solve other problems. Standard 5.3 (Mathematical Applications) All students will integrate mathematics as a tool for problem-solving in science, and as a means of expressing and/or modeling scientific theories.
Standard 5.5 Characteristics of Life C. Diversity and Biological Evolution Reproduction and Heredity
If your class uses the extra credit extension and investigates “macroinvertebrates,” the following science standards also apply:
Standard 5.10 Environmental Studies C. Natural Systems and Interactions D. Human Interactions and Impact
41
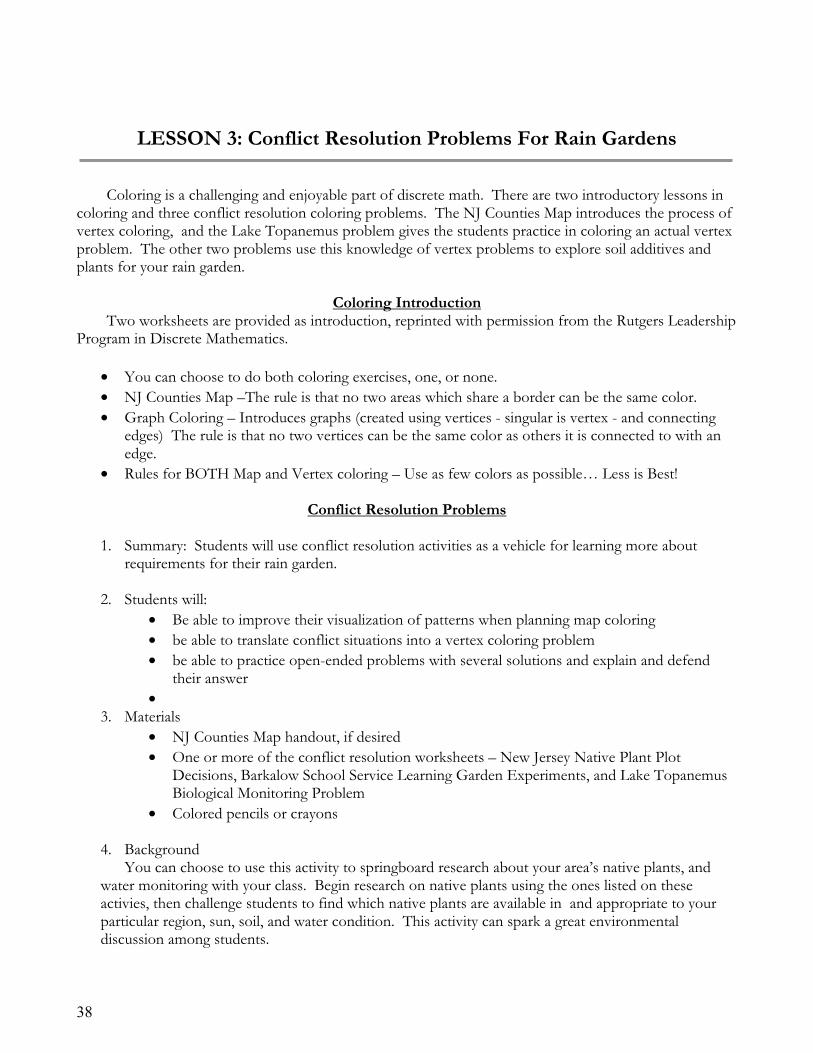
Barkalow Garden Problem: Hand Out
BARKALOW SCHOOL
SERVICE LEARNING GARDEN EXPERIMENTS
er
Worm Compost
Lunchroom Compost
Horse Manure
Rye - Winter Cover Crop
Powdered Sea Kelp
Shredded Paper
Worm Compost - - X - X -
Lunchroom Compost
- - - X - X
Horse Manure
X - - X X X
Rye - Winter Cover Crop - X X - X X
Powdered Sea Kelp
X - X X - X
Shredded Paper
- X X X X -
A service-learning project is part of the curriculum in Ms Eisemann’s class. Students design and carry out vegetable experiments with watershed-friendly soil additives as alternatives to chemical fertilizers. The vegetables that result from these experiments are delivered weekly in the summer to local food pantries. Each vertex represents an additive using its first initial. The combinations of additives overlap between experiments. Connect each vertex below to all in the table that have a conflict (shown as an X) with a pencil or pen. Worm Compost has been connected and checked off for you as an example. Then color the vertices so that no two vertices have the same color when shared by an edge (line). How many different plots will the class have to divide the garden into so that all students’ experiment designs will work? EXTRA CREDIT – 1. How many different solutions can you find?
2. Choose one additive from the table, and research it on a search engine. Write your findings on the back of this paper.
Keep in mind that you are connecting conflicts in this graph.
Therefore you need to color (solve) so that no two vertices are
the same color that are connected by a line (edge).
R
L
P
W
H
S
NOTE: Check with the newspapers you are using to be sure the ink
they use is soy-based. Shredded newspaper may be ontaminated
withcadmium and other chemicals if any colored sections are used. Use with caution.

Lake Topanemus: Hand Out
Stonefly Nymphs
Dragonfly
Nymphs
Water Penny Larvae
Caddisfly Larvae Riffle Beetle Larvae
Aquatic Worms
Stonefly Nymphs
- X X X - -
Dragonfly Nymphs
X - X - X X
Water Penny Larvae
X X - - X X
Caddisfly Larvae X - - - X -
Riffle Beetle Larvae
- X X X - X
Aquatic Worms
- X X - X -
LAKE TOPANEMUS BIOLOGICAL MONITORING PROBLEM Ms Eisemann’s class is monitoring the health of the water at Lake Topanemus with biological monitoring using macroinvertebrates. Students have been researching the habitats of several species. From their research, they have created the above table showing which species may be found in similar habitats. They look forward to further research and discovery from their explorations. This table will evolve from their findings as time goes on. Each vertex below represents a macroinvertebrate using its first initial. Connect each vertex below to all in the table that have a conflict (shown as an X) with a pencil or pen. Stoneflies has been connected and checked off for you as an example. Then color the vertices so that no two vertices have the same color when shared by an edge (line). There are four general areas that stream samples can be taken from. From your graph solution, do you think that the Watershed Ambassadors sampled all four areas of the stream off of the lake? (In other words, are four colors the fewest amount of colors you can use?) Be ready to defend your answer. EXTRA CREDIT –
1. How many different solutions can you find? 1. Go to a search engine and type in “benthic macroinvertebrates.” Research each creature and
see what makes it compatible or incompatible with another. What environment might each creature need? Can any be in more than one environment? Write your findings on the back of this paper.
42
Keep in mind that you are connecting conflicts in this graph.
Therefore you need to color (solve) so that no two vertices are
the same color that are connected by a line (edge).
S
R
W
A
D
C

LESSON 4: ID Wheel
This plant ID Wheel serves several purposes. The blank wheels can be customized to your garden. When students enter plant information by hand, it is more memorable to them. If they research information, this gives them more choices. After information is filled in, students can practice matching all characteristics of plants and see that there are several choices for each category. This drives home that planning a garden is open-ended; there is no one correct answer. In addition, a student-designed wheel will hold far more credence with other students than a pre-conceived wheel that one has to memorize.
Format for Lesson ID Wheel
Summary: This activity leads students to compare and contrast plants in several categories for the purpose of designing a garden.
Students will:
be able to identify several native plants that would be successful in a rain garden be able to practice classification be able to begin to generate a baseline knowledge of plants which may be included your rain garden to create the best design
Materials
Paper for copying circles – cardstock or tag board are more durable than copy paper Scissors Pencils, pens, thin markers for writing Brass fastener for holding it all together Push pin or other implement for making center holes to assemble.
Background
This activity familiarizes students and you with the characteristics of the plants you are considering for your rain garden. It categorizes plant information into light requirements, flower color, blooming time, height, wildlife role (food, shelter), etc. This can be done at a variety of places in your project. Before beginning, you may wish to have students research plants native to your area that would be successful in a rain garden. They can choose which to include on the ID Wheel. Or they can use the chart provided to put information in the wheels. You could use this as a starting point to gather information that will help you make plant choices. The activity promotes knowledge of plants and comparison of characteristics to help you make the best-informed decision for optimum rain garden design for your purposes.
Procedure
Distribute ID Wheels to students. You may wish to have one set per student, one per pair, or one per group. Discuss categories of individual plants: Plant botanical and common name, light requirement, height, flower color, blooming season, wildlife role (food, shelter), etc. Students can use plants from the included table or research their own, according to your assignment. There is room for 8 plants. These blank wheels allow for customization and different ways of seeing things.
Direct students to cut out the three wheels and make a hole at the center of the three circles with a push pin or similar object and assemble wheels with the smallest one on top. Keeping in mind that the 3 wheels are available for three combined characteristics of plants, students can fill them in. Their writing can be in any direction. It would be helpful if students complete a table for their chosen plants in the categories. This can serve as the answer key for their wheel.
43

There are three wheels. The chart shows the information paired below. Students can add other categories and combine them in different ways.
Botanical and common name of plant - A sketch of the plant and/or flower would be helpful. Light requirement and height Flower color and blooming season
Allowing students to choose which wheel should include which categories allows creativity and individual choice. It puts ownership on student creators. Students can choose to keep all wheels in the same order, so when one plant is lined up all plants are correctly lined up. Or they may choose to scramble the order in each wheel so answers don’t necessarily match.
Assessment
Observe students as they create their table, including research if applicable. Notice the creative approach taken by individual students as they plan their wheel. Have students exchange wheels and try out others. An answer key, in the form of a table or otherwise, is important.
Extension Students can create multiple wheels for more garden choices. They could make one for low-growing plants, one for medium-growing plants, and one for higher plants, or one for shade, one for sun, and one for partial sun. This would demonstrate a variety of choices for your individual situation. From the information the wheels give, students can design a designated-size garden according to the information given. This is a good opportunity for them to see that the garden blueprint is open-ended, and many designs can be achieved using height, color, etc. Students can create other gardens – wetlands, vegetable, etc. – filling in these ID Wheels.
Plant ID Wheel: Standards
Standard 4.3 (Patterns and Algebra)
All students will represent and analyze relationships among variable quantities and solve problems involving patterns, functions, and algebraic concepts and processes.
Standard 5.3 (Mathematical Applications) All students will integrate mathematics as a tool for problem-solving in science, and as a means of expressing and/or modeling scientific theories.
Standard 5.5 Characteristics of Life Diversity and Biological Evolution
Reproduction and Heredity
Standard 5.10 Environmental Studies
Natural Systems and Interactions
44

ID Wheel: Handout
45
Rain Garden Plants ID Wheel
Do Not Write Here – This area
will be covered by next wheel.

ID Wheel: Hand Out
46
Other categories can be added such as
drawing of flower, wildlife it attracts,
etc. Be creative.
You can show flower color with
a scribble of color pencil or
crayon, or write the word.
No Writing Here – Will be
covered by next wheel.

ID Wheel: Hand Out
Sample Plant ID Wheel Table for Rain Garden Plants
Botanical and Common Plant Name
Light Requirement
And Height
Flower Color and Blooming Season
Lobelia cardinalis Red Cardinal Flower
Full Sun 2-3 feet
Red July-September
Acorus Species Sweet Flag
Full Sun 3-6 feet
Yellow July-August
Asclepias incarnate Swamp Milkweed
Full Sun 3-4 feet
Rose-purple August
Epatorium purpureum Green-stemmed Joe-pye Weed
Sun/Part Shade 4-6 feet
Rosy-purple August-September
Iris versicolor Blue Flag Iris
Full Sun 2-3 feet
Purple June-July
Ligularia species Goden Ray
Part Shade 1 foot
Golden Yellow July-September
Viola cucullata Blue Marsh Flower
Sun/Part Shade 6 – 10 inches
Purple, White May
* Lysimachia ciliate Fringed Loostrife
Full Sun 2-4 feet
Yellow May
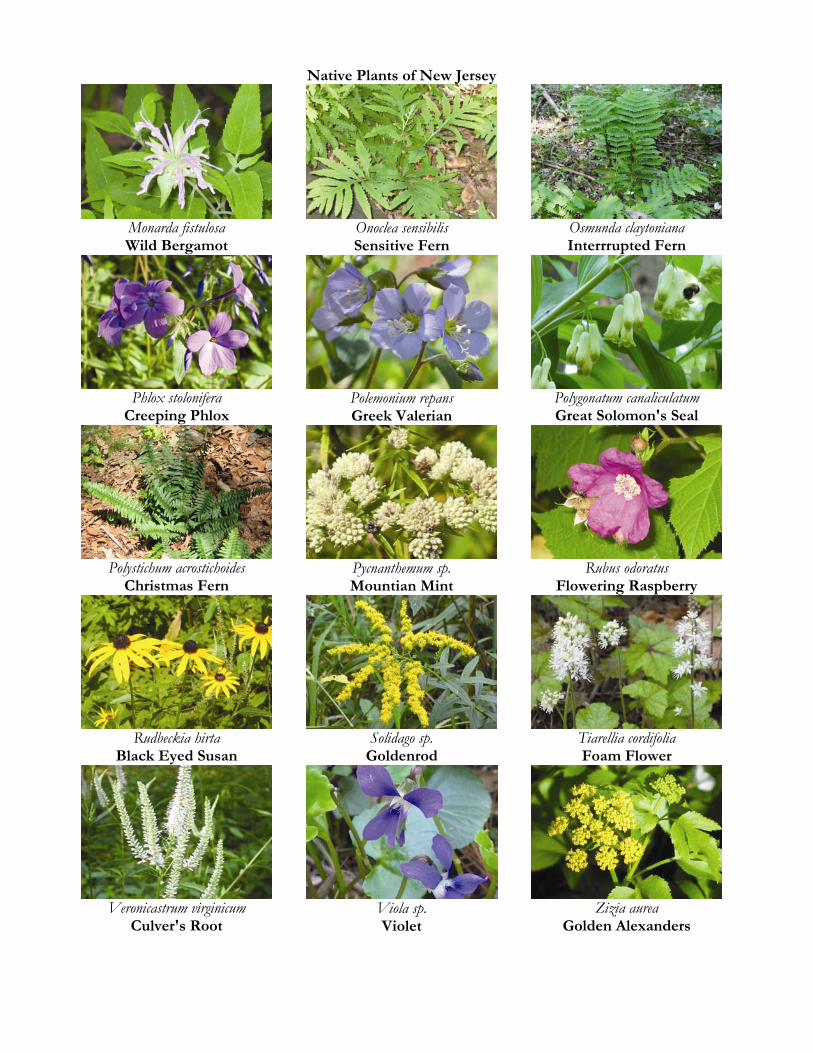
Native Plants of New Jersey
Monarda fistulosa Wild Bergamot
Onoclea sensibilis Sensitive Fern
Osmunda claytoniana Interrrupted Fern
Phlox stolonifera
Creeping Phlox
Polemonium repans Greek Valerian
Polygonatum canaliculatum Great Solomon's Seal
Polystichum acrostichoides
Christmas Fern
Pycnanthemum sp. Mountian Mint
Rubus odoratus
Flowering Raspberry
Rudbeckia hirta
Black Eyed Susan
Solidago sp.
Goldenrod
Tiarellia cordifolia Foam Flower
Veronicastrum virginicum
Culver's Root
Viola sp. Violet
Zizia aurea
Golden Alexanders