Embed Size (px)
Citation preview
Rails 4 Quickly
Bala Paranj
1
www.rubyplus.com
About the Author
Bala Paranj has a Master’s degree in Electrical Engineering from The WichitaState University. He has over 15 years of experience in the software industry.He was a Java developer before he found Ruby in May 2006. He has alsodeveloped iPhone and iPad apps.His academic background includes mathematics and electronics. Some ofhis clients include telecommunication, banks, financial and electronic designautomation companies. He consults through his company Zepho, Inc. forclients within USA. He loves to learn and teach technical topics. He hasspoken at Silicon Valley Ruby Meetup, San Francisco Ruby Meetup andSilicon Valley Code Camp. You can reach him at [email protected] any feedback.
2
www.rubyplus.com
About Reader
This book assumes that you have already installed Ruby 2.0, Rails 4 andyour favorite IDE. The reader must already have a basic understanding ofRuby language. This is a short book. The objective is to bring you up tospeed in Rails 4 quickly. Hence the title Rails 4 Quickly. This book is writtenfor beginners who want to learn the fundamentals. It will give you a solidfoundation for you to build upon.The book’s main focus is on Rails. You will not find any discussion ofCucumber, Git, Heroku, RSpec, FactoryGirl or any other irrelevant topics. Itprovides a practical and hands-on approach to learning Rails. You learn bydoing so you will benefit the most by following the instructions as you readeach chapter.
3
www.rubyplus.com
How to Read this Book
This step-by-step tutorial was written as a hands-on guide to Rails. You mustread and follow the instructions to work through the application we will bedeveloping. It is written to be read sequentially. Learning by doing is the bestway to understand something new. So, make an attempt to do the exercises.This will make your brain more receptive to absorbing the concepts.
Software Versions Used
Ruby Gems : 2.1.5 Ruby : 2.0 Rails : 4.0
Source Code
Source code is available from bitbucket Git repo : https://bitbucket.org/bparanj/rails-4-blog
4
www.rubyplus.com
Acknowlegments
This book is the result of teaching Rails tutorials at the Silicon Valley Rubymeetup. The members of Silicon Valley Ruby meetup provided me earlyfeedback on every chapter. This book is also an experiment in applying ‘LeanStartup’ principles to self publishing. The advice that was very powerful tome was ‘Do not develop a product in a vacuum.’I owe debts to the creator of Ruby, Matz for creating such a beautiful language;as well as the Ruby community for creating useful frameworks and gems tomake a developer’s life easy. I hope this book makes your learning process alittle easier.
5
www.rubyplus.com

Table of Contents
1. Running the Server
2. Hello Rails
3. Model
4. Model View Controller
5. View to Model
6. Update Article
7. Show Article
8. Delete Article
9. View Duplication
10. Relationships
11. Delete Comment
12. Restricting Operations
Appendix
A. Self Learning
6
www.rubyplus.com

CHAPTER 1
Running the Server
Objective
• To run your rails application on your machine.
Steps
Step 1
Check the versions of installed ruby, rails and ruby gems by running thefollowing commands in the terminal:
$ ruby -vruby 2.0.0p247 (2013-06-27 revision 41674) [x86_64-darwin12.5.0]
$ rails -vRails 4.0.0
$ gem envRUBYGEMS VERSION: 2.1.5
Step 2
Change directory to where you want to work on new projects.
$ cd projects
Step 3
Create a new Rails project called blog by running the following command.
$ rails new blog
7
www.rubyplus.com
Step 4
Open a terminal and change directory to the blog project.
$ cd blog
Step 5
Open the blog project in your favorite IDE. For textmate :
$ mate .
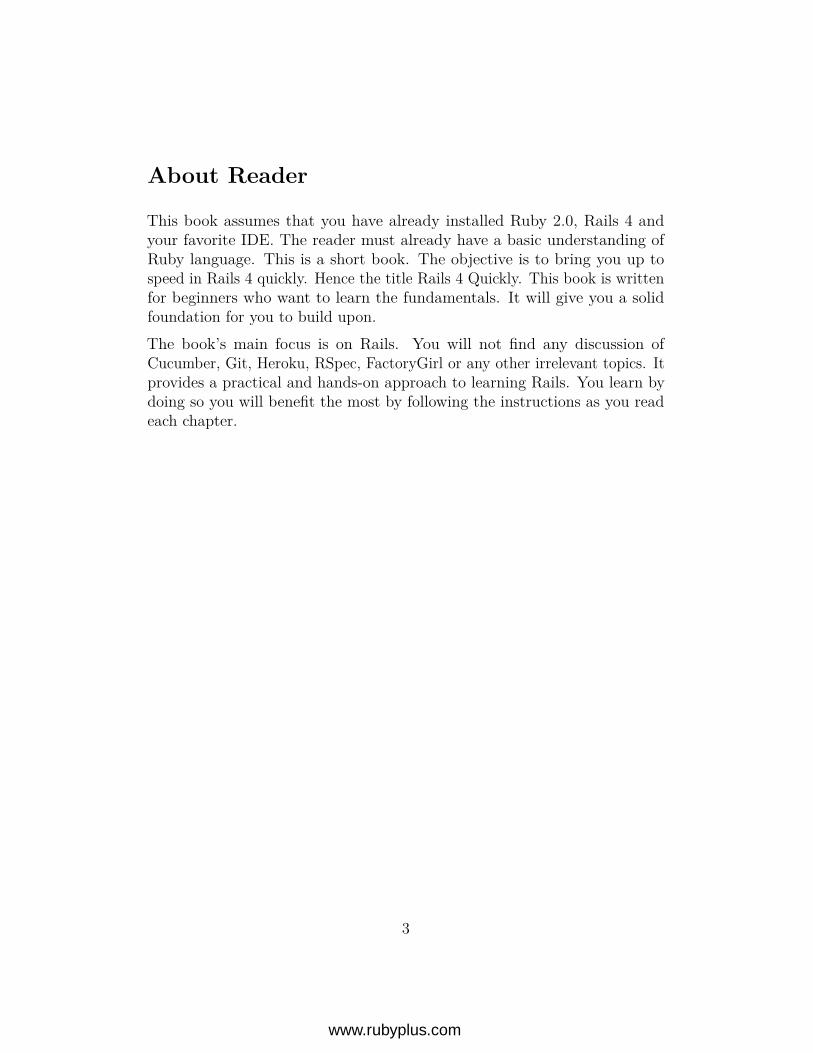
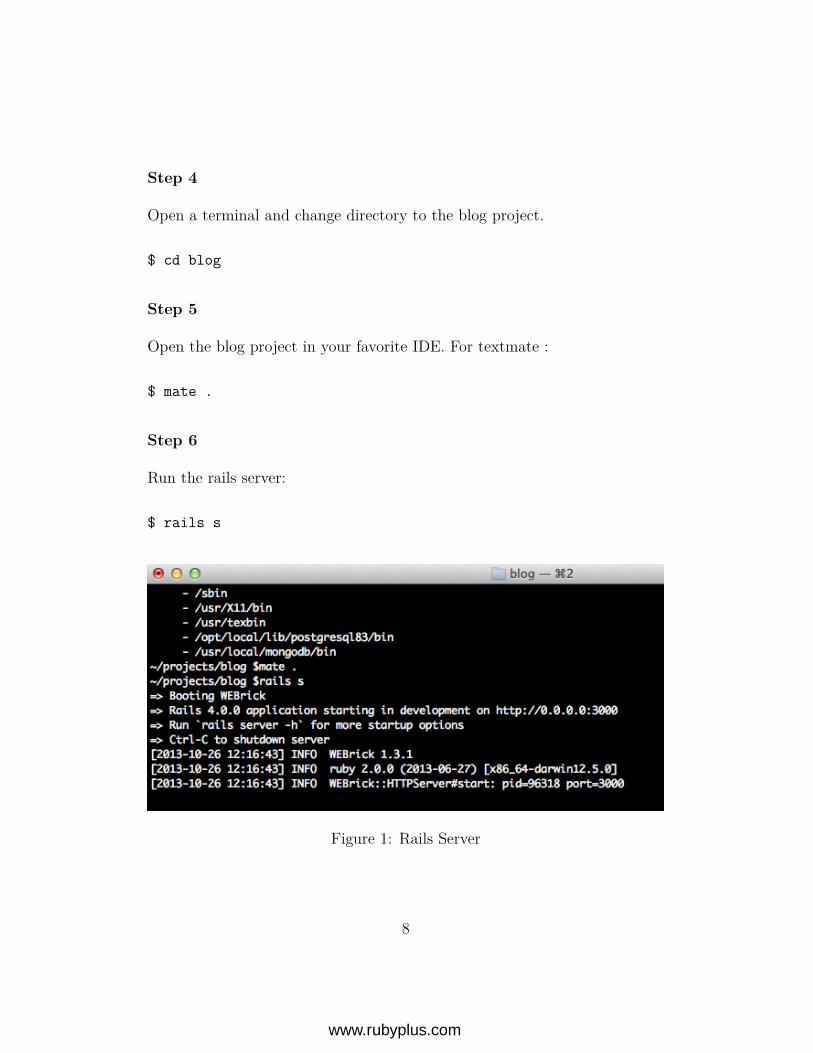
Step 6
Run the rails server:
$ rails s
Figure 1: Rails Server
8
www.rubyplus.com
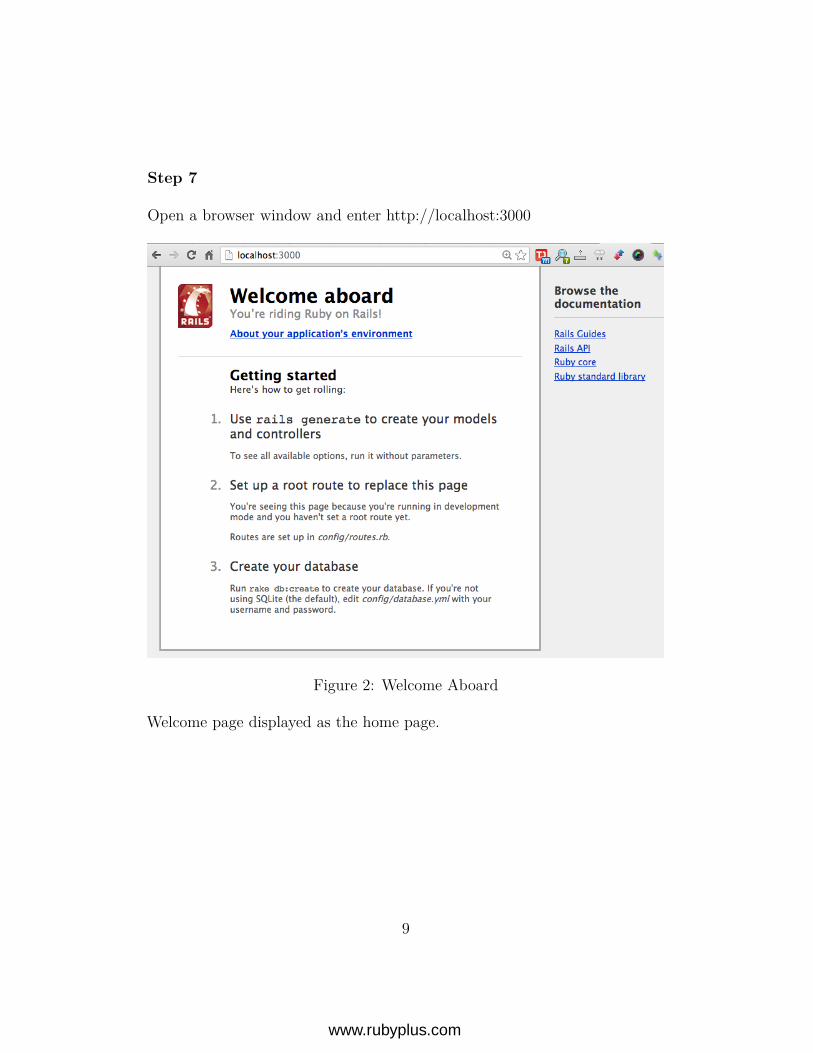
Step 7
Open a browser window and enter http://localhost:3000
Figure 2: Welcome Aboard
Welcome page displayed as the home page.
9
www.rubyplus.com
Step 8
You can shutdown your server by pressing Control+C. If you use Control+Z,you will send the process to the background which means it will still berunning but the terminal will be available for you to enter other commands.If you want to see the server running to see the log messages you can do :
$ fg
which will bring the background process to the foreground.
10
www.rubyplus.com
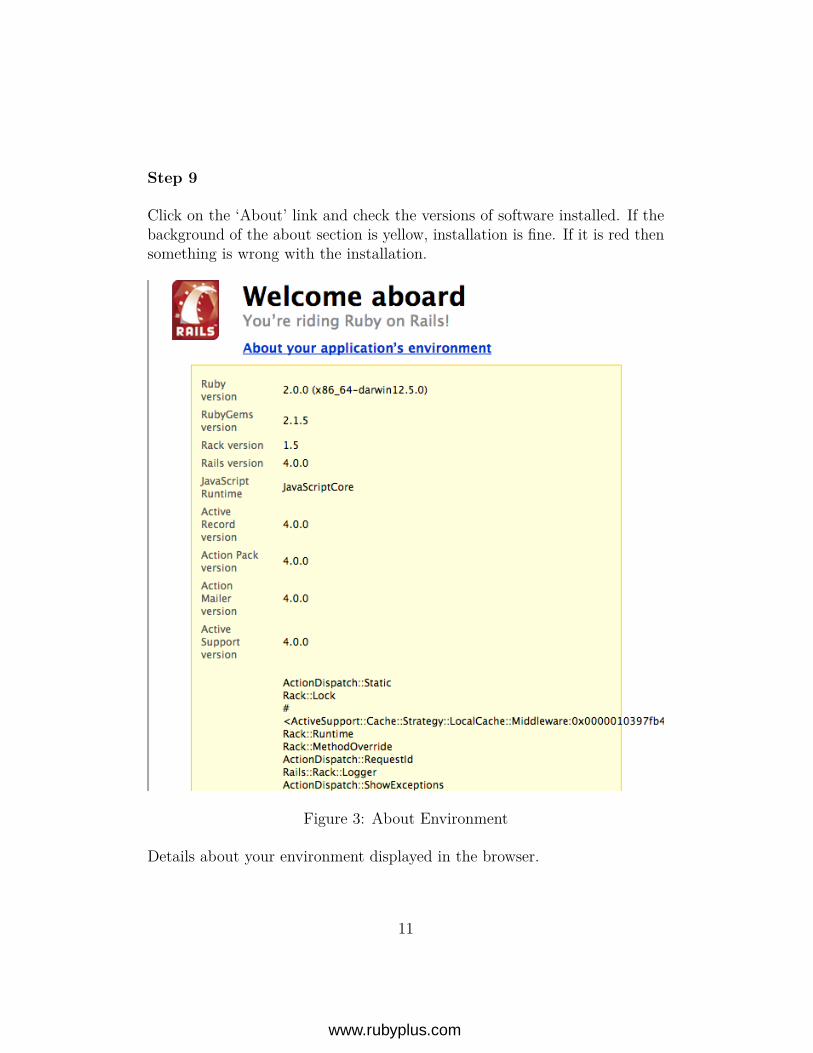
Step 9
Click on the ‘About’ link and check the versions of software installed. If thebackground of the about section is yellow, installation is fine. If it is red thensomething is wrong with the installation.
Figure 3: About Environment
Details about your environment displayed in the browser.
11
www.rubyplus.com
Explanation
The rails generator automatically runs the Bundler command bundle to installyour application dependencies by reading the Gemfile. The Gemfile containsall the gems that your application needs. rails s (s is a short-cut for server)runs your server on your machine on port 3000.
Summary
In this lesson you learned how to run the server locally. We also saw how tocheck if everything is installed properly on our machine. In the next lessonyou will learn how to create a home page for your web appliction.
12
www.rubyplus.com
CHAPTER 2
Hello Rails
Objective
• To create a home page for your web application.
Steps
Step 1
Open the config/routes.rb file in your IDE, routes.rb defines the routes thatis installed on your web application. Rails will recognize the routes you definein this configuration file.
Step 2
Look for the line :
# root ’welcome#index’
Step 3
Uncomment that line by removing #.
root ’welcome#index’
The method root() takes a string parameter. In this case it maps the homepage of your site to welcome controller (class), index action (method).
13
www.rubyplus.com
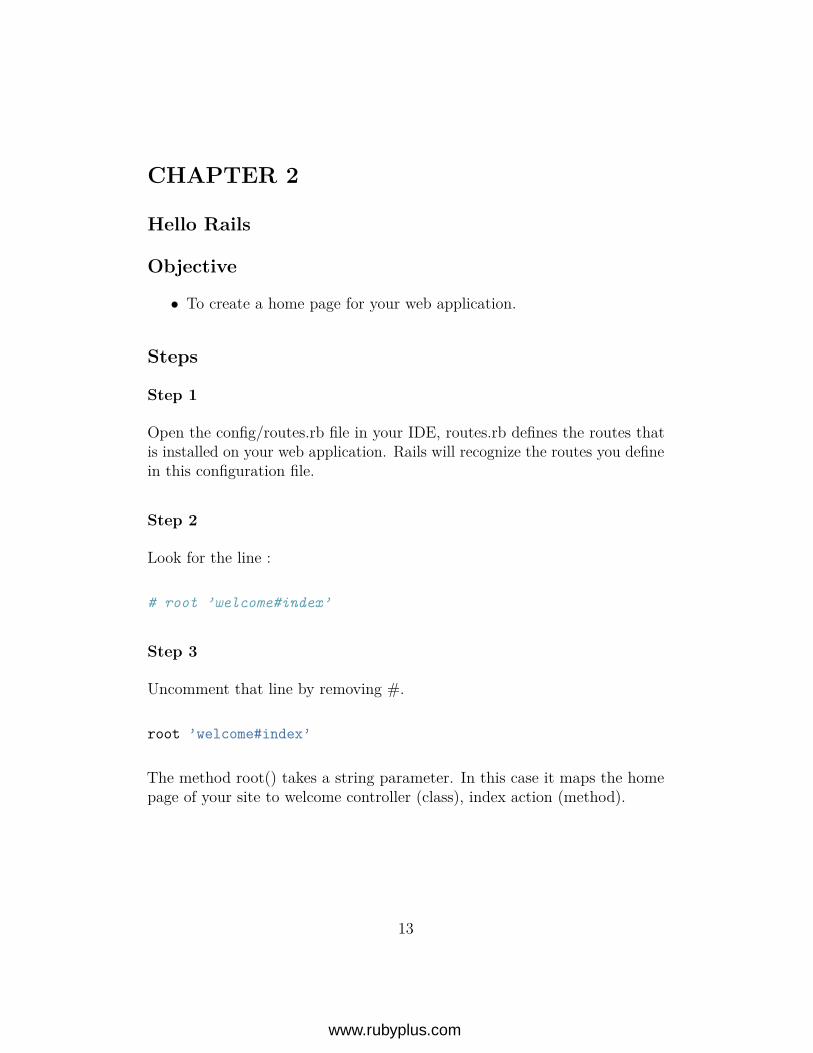
Step 4
Go to the terminal and change directory to the blog project and run:
rake routes
Figure 4: Rake Output
The output of this command shows you the installed routes. Rails will beable to recognize the GET request for welcome page.The output has four columns, namely Prefix, Verb, URI Pattern and Con-troller#Action.Prefix is the name of the helper that you can use in your view and controllerto take the user to a given view or controller. In this case it is root_path orroot_url that is mapped to your home page.Verb is the Http Verb such as GET, POST, PUT, DELETE etc.URI Pattern is what you see in the browser URL. In this case, it iswww.example.com
14
www.rubyplus.com
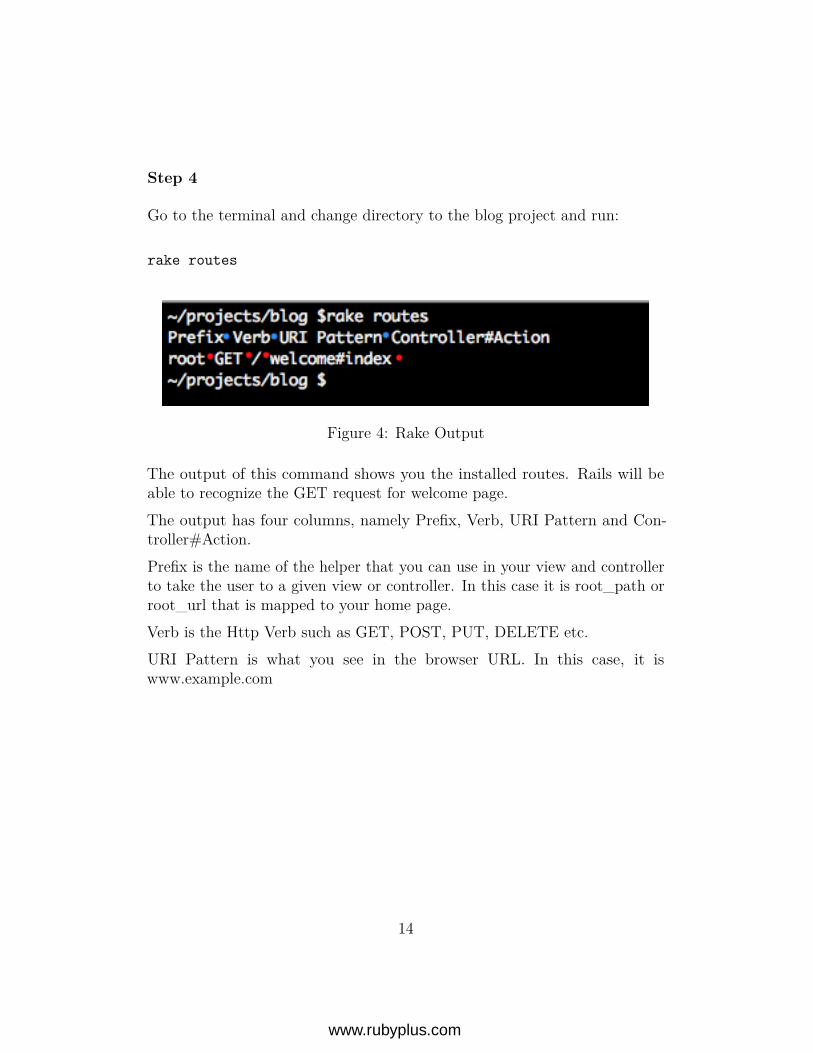
Step 5
Go to the browser and reload the page : http://localhost:3000
Figure 5: Create Controller
We see the uninitialized constant WelcomeController error. This happensbecause we don’t have a welcome controller.
15
www.rubyplus.com
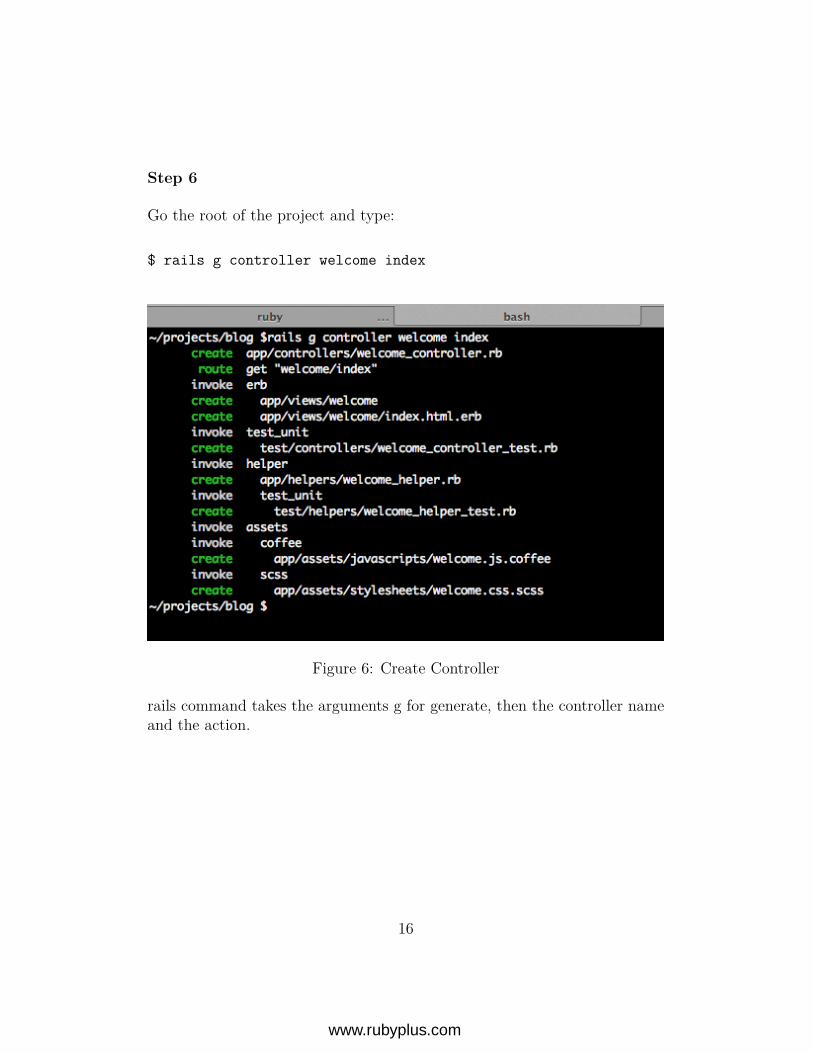
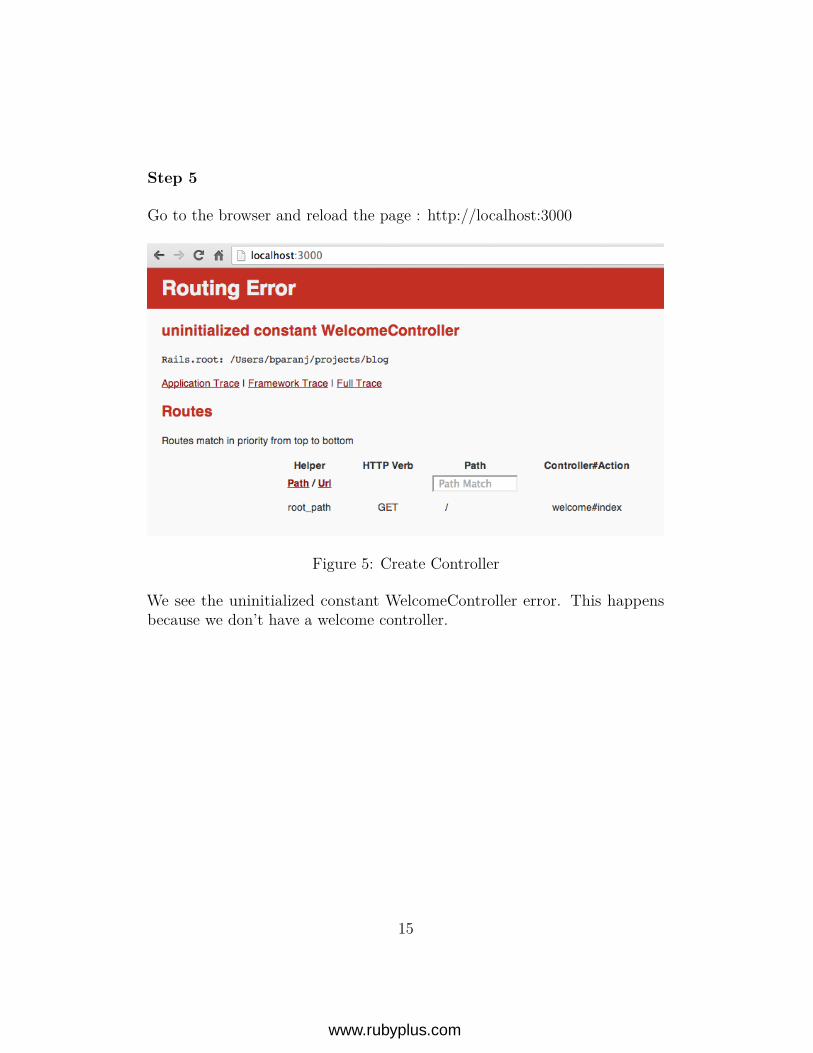
Step 6
Go the root of the project and type:
$ rails g controller welcome index
Figure 6: Create Controller
rails command takes the arguments g for generate, then the controller nameand the action.
16
www.rubyplus.com
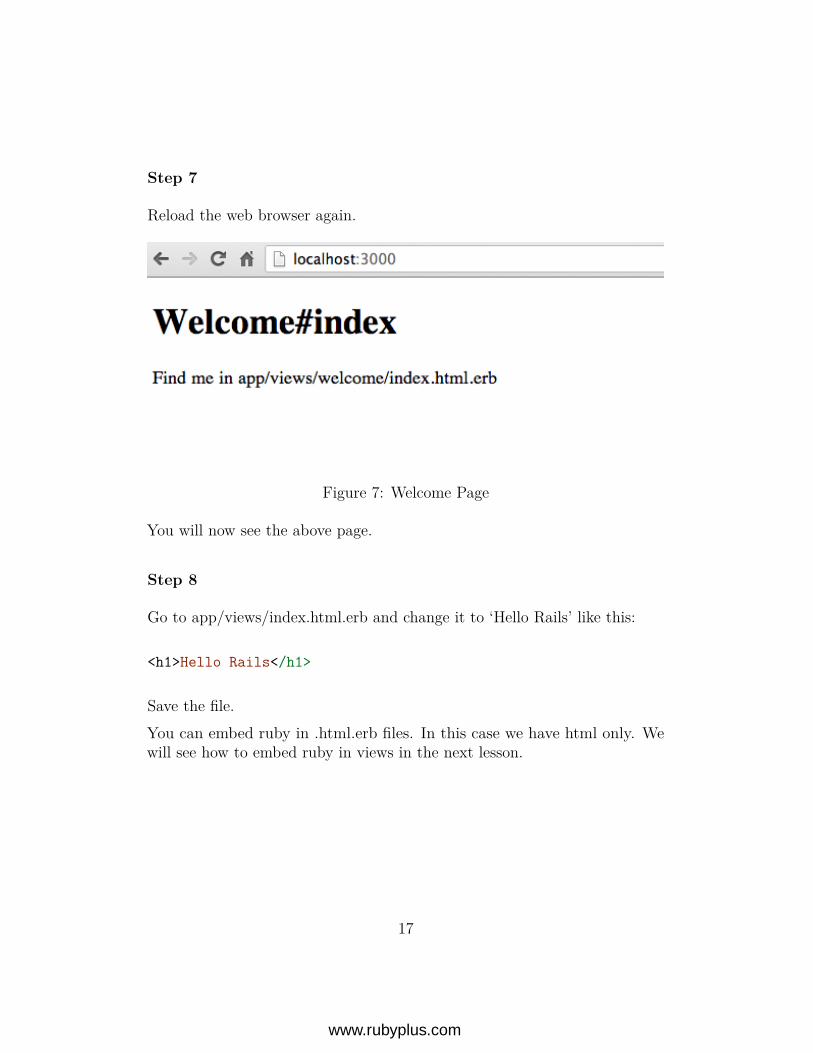
Step 7
Reload the web browser again.
Figure 7: Welcome Page
You will now see the above page.
Step 8
Go to app/views/index.html.erb and change it to ‘Hello Rails’ like this:
<h1>Hello Rails</h1>
Save the file.You can embed ruby in .html.erb files. In this case we have html only. Wewill see how to embed ruby in views in the next lesson.
17
www.rubyplus.com
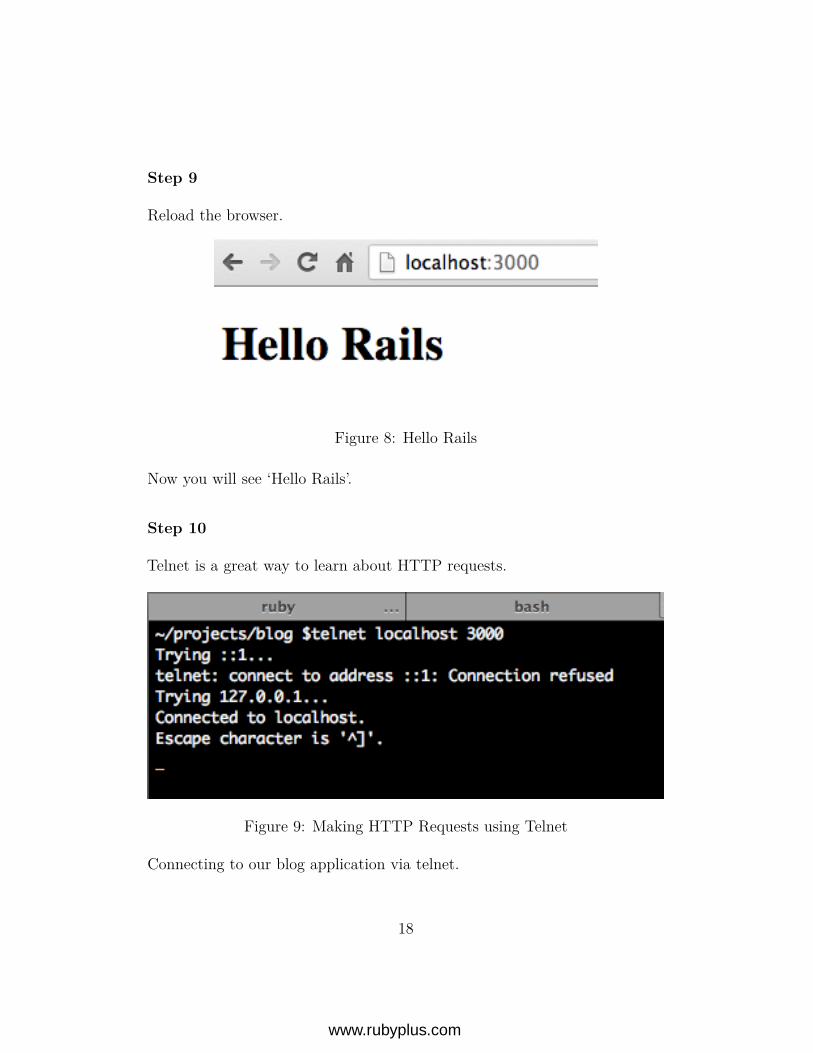
Step 9
Reload the browser.
Figure 8: Hello Rails
Now you will see ‘Hello Rails’.
Step 10
Telnet is a great way to learn about HTTP requests.
Figure 9: Making HTTP Requests using Telnet
Connecting to our blog application via telnet.
18
www.rubyplus.com
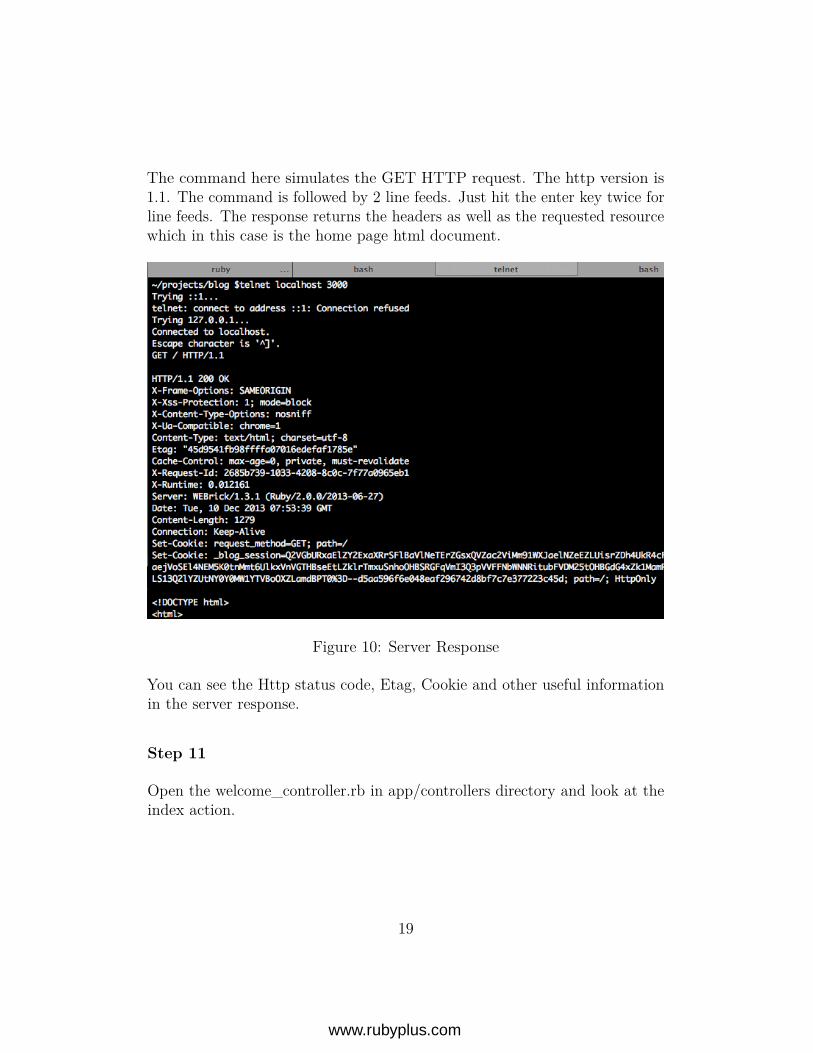
The command here simulates the GET HTTP request. The http version is1.1. The command is followed by 2 line feeds. Just hit the enter key twice forline feeds. The response returns the headers as well as the requested resourcewhich in this case is the home page html document.
Figure 10: Server Response
You can see the Http status code, Etag, Cookie and other useful informationin the server response.
Step 11
Open the welcome_controller.rb in app/controllers directory and look at theindex action.
19
www.rubyplus.com
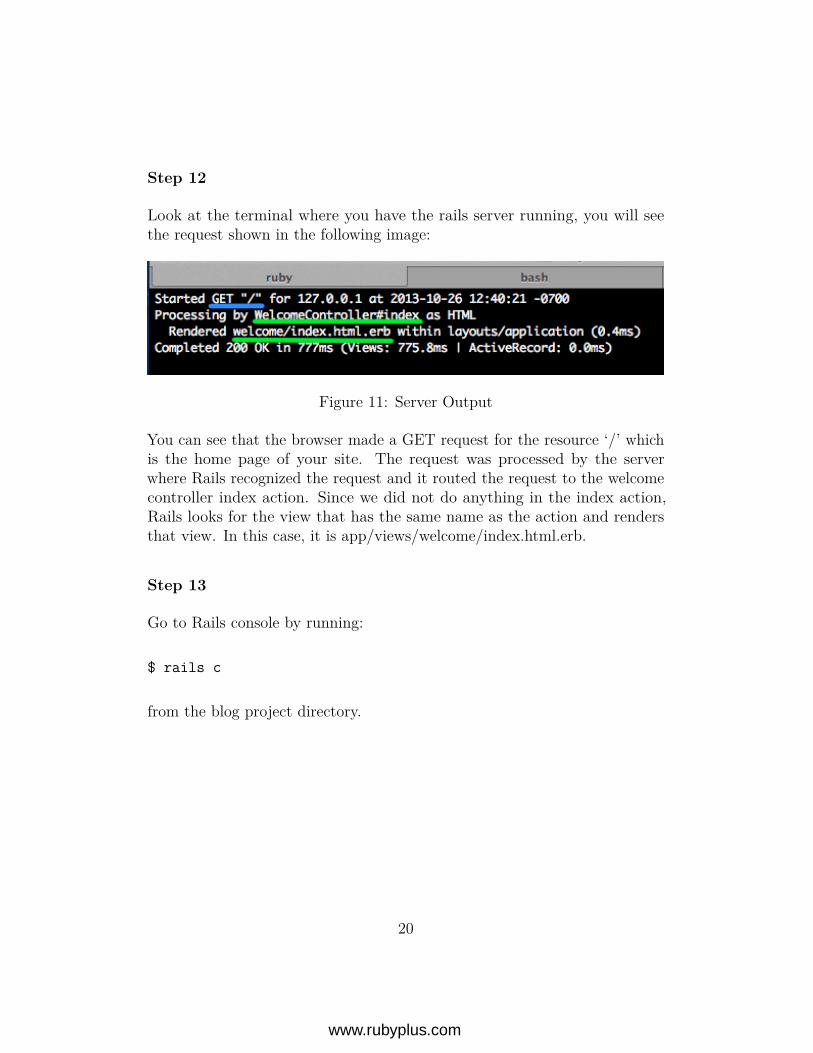
Step 12
Look at the terminal where you have the rails server running, you will seethe request shown in the following image:
Figure 11: Server Output
You can see that the browser made a GET request for the resource ‘/’ whichis the home page of your site. The request was processed by the serverwhere Rails recognized the request and it routed the request to the welcomecontroller index action. Since we did not do anything in the index action,Rails looks for the view that has the same name as the action and rendersthat view. In this case, it is app/views/welcome/index.html.erb.
Step 13
Go to Rails console by running:
$ rails c
from the blog project directory.
20
www.rubyplus.com
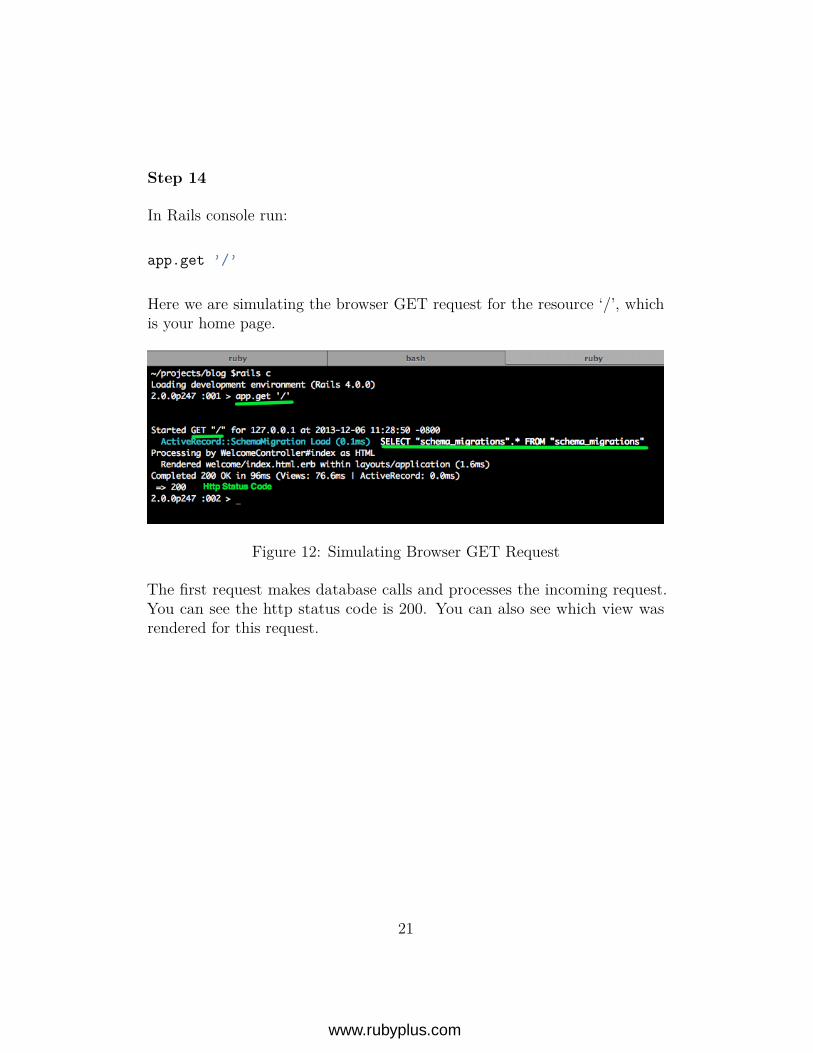
Step 14
In Rails console run:
app.get ’/’
Here we are simulating the browser GET request for the resource ‘/’, whichis your home page.
Figure 12: Simulating Browser GET Request
The first request makes database calls and processes the incoming request.You can see the http status code is 200. You can also see which view wasrendered for this request.
21
www.rubyplus.com
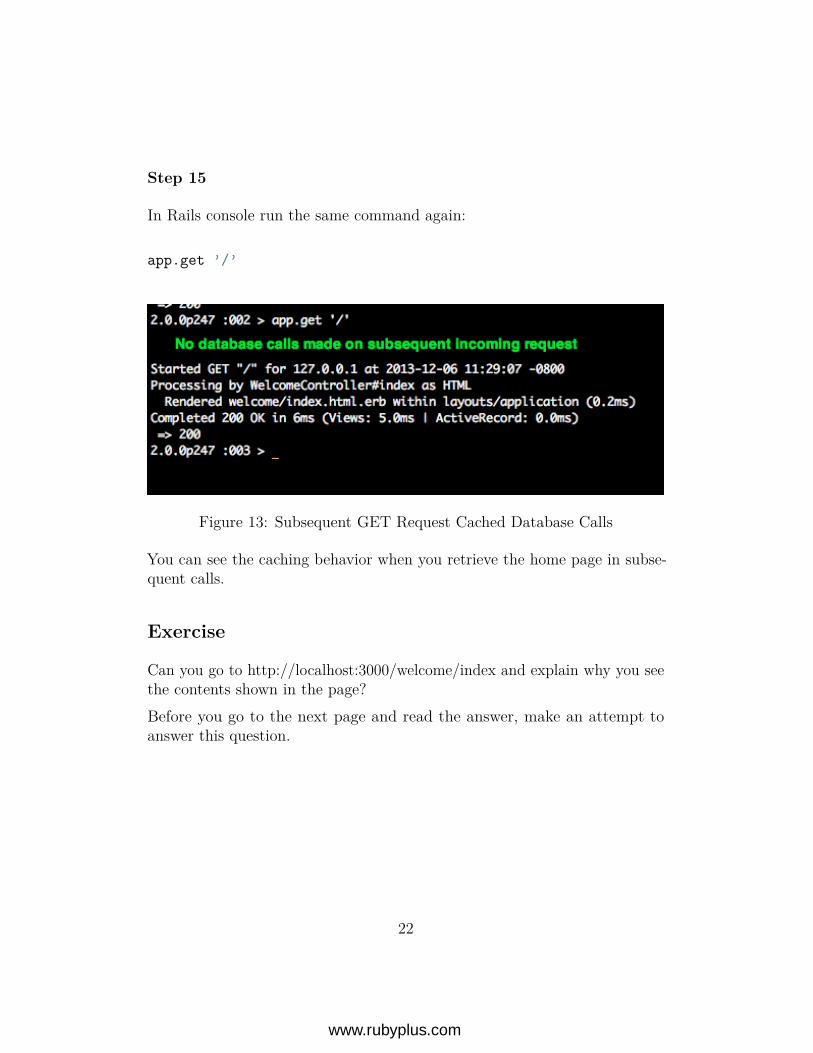
Step 15
In Rails console run the same command again:
app.get ’/’
Figure 13: Subsequent GET Request Cached Database Calls
You can see the caching behavior when you retrieve the home page in subse-quent calls.
Exercise
Can you go to http://localhost:3000/welcome/index and explain why you seethe contents shown in the page?Before you go to the next page and read the answer, make an attempt toanswer this question.
22
www.rubyplus.com
Answer
You will see the same ‘Hello Rails’ page. Because if you check the rails serverlog you can see it made a request : GET ‘/welcome/index’ and if you look atthe routes.rb file, you see :
get "welcome/index"
This definition is used by the Rails router to handle this request. It knowsthe URI pattern of the format ‘welcome/index’ with http verb GET must behandled by the welcome controller index action.
23
www.rubyplus.com

Step 16
Delete the get “welcome/index” line in the routes.rb file. Reload the page :http://localhost:3000/welcome/index.
Figure 14: Welcome Index
You will now see the error page.
24
www.rubyplus.com
Summary
In this lesson we wrote a simple Hello Rails program. We saw how the viewand controller work in Rails to handle browser requests. We have seen justthe VC part of MVC framework. We will see how the model fits in the MVCframework in the next lesson.
25
www.rubyplus.com
CHAPTER 3
Model
Objective
• To learn the model part M of the MVC framework
Steps
Step 1
In Rails, model is a persistent object that can also contain business logic.Model is the Object Relational Mapping (ORM) layer that uses ActiveRecorddesign pattern. Open config/routes.rb file and add :
resources :articles
Save the file. Your file should like this :
Blog::Application.routes.draw doroot ’welcome#index’
resources :articlesend
What is a resource? Resource can represent any concept. For instance ifyou read the documenation for Twitter API, you will see that Timeline is aresource. It is defined in the documenation as collections of Tweets, orderedwith the most recent first.There may not be a one-to-one correspondence between a resource anddatabase table. In our case we have one-to-one correspondence between thedatabase table articles and the article resource.We have a plural resource so we will have index page that displays a list of allthe articles in our case. Singular resource can be used when you don’t need
26
www.rubyplus.com
index action, for instance if a customer has a billing profile then from theperspective of a customer you can use a singular resource for billing_profile.From an admin perspective you could have a plural resource to manage billingprofiles of customers (most likely using admin namespace in the routes).
Step 2
Go to the blog directory in the terminal and run:
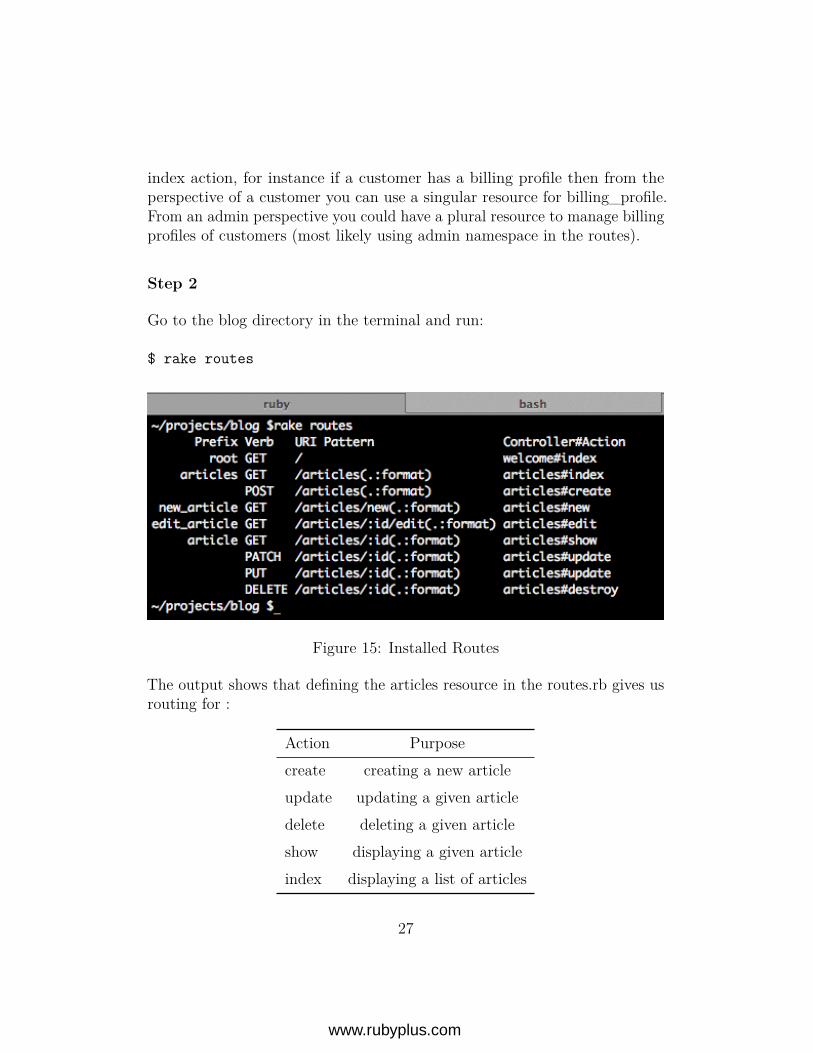
$ rake routes
Figure 15: Installed Routes
The output shows that defining the articles resource in the routes.rb gives usrouting for :
Action Purposecreate creating a new articleupdate updating a given articledelete deleting a given articleshow displaying a given articleindex displaying a list of articles
27
www.rubyplus.com
Since we have plural resources in the routes.rb, we get the index action. Ifyou had used a singular resource :
resource :article
then you will not have a routing for index action. Based on the requirementsyou will choose a singular or plural resources for your application.
Step 3
In the previous lesson we saw how the controller and view work together.Now let’s look at the model. Create an active_record object by running thefollowing command:
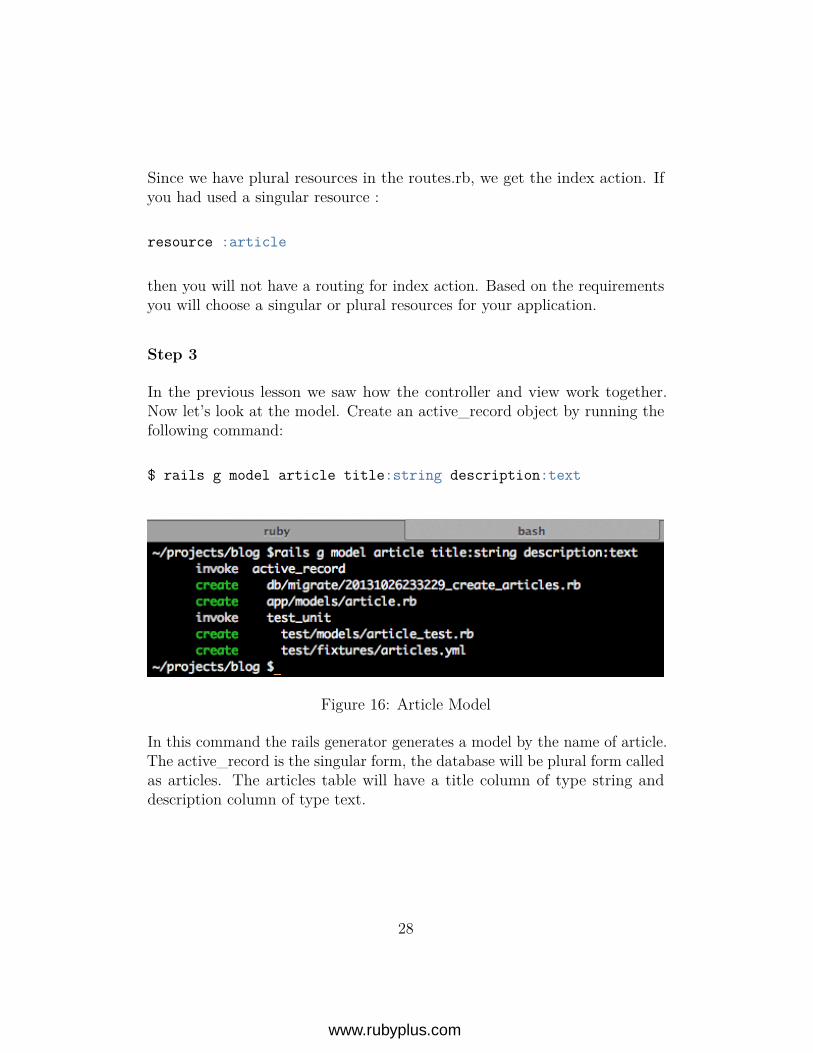
$ rails g model article title:string description:text
Figure 16: Article Model
In this command the rails generator generates a model by the name of article.The active_record is the singular form, the database will be plural form calledas articles. The articles table will have a title column of type string anddescription column of type text.
28
www.rubyplus.com
Step 4
Open the file db/migrate/xyz_create_articles.rb file. The xyz will be atimestamp and it will differ based on when you ran the command.There is a change() method in the migration file. Inside the change() methodthere is create_table() method that takes the name of the table to create andalso the columns and it’s data type.In our case we are creating the articles table. Timestamps gives created_atand updated_at timestamps that tracks when a given record was created andupdated respectively. By convention the primary key of the table is id. Soyou don’t see it explictly in the migration file.
Step 5
Go to the blog directory in the terminal and run :
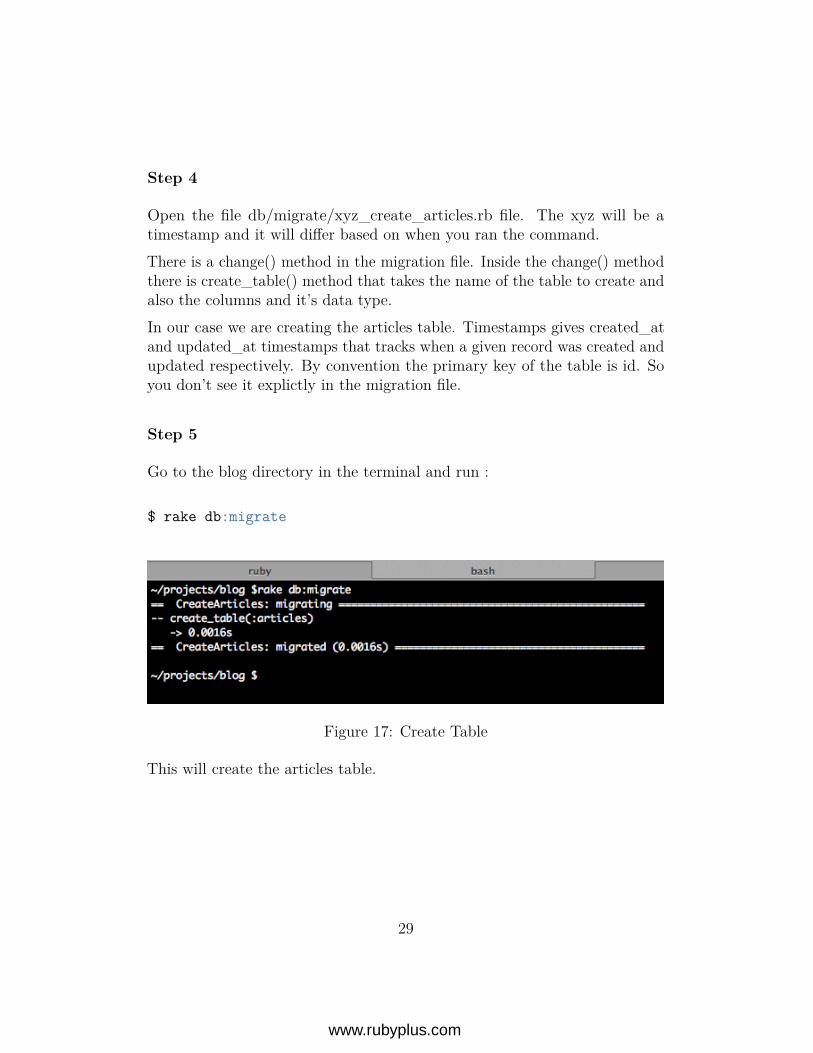
$ rake db:migrate
Figure 17: Create Table
This will create the articles table.
29
www.rubyplus.com
Step 6
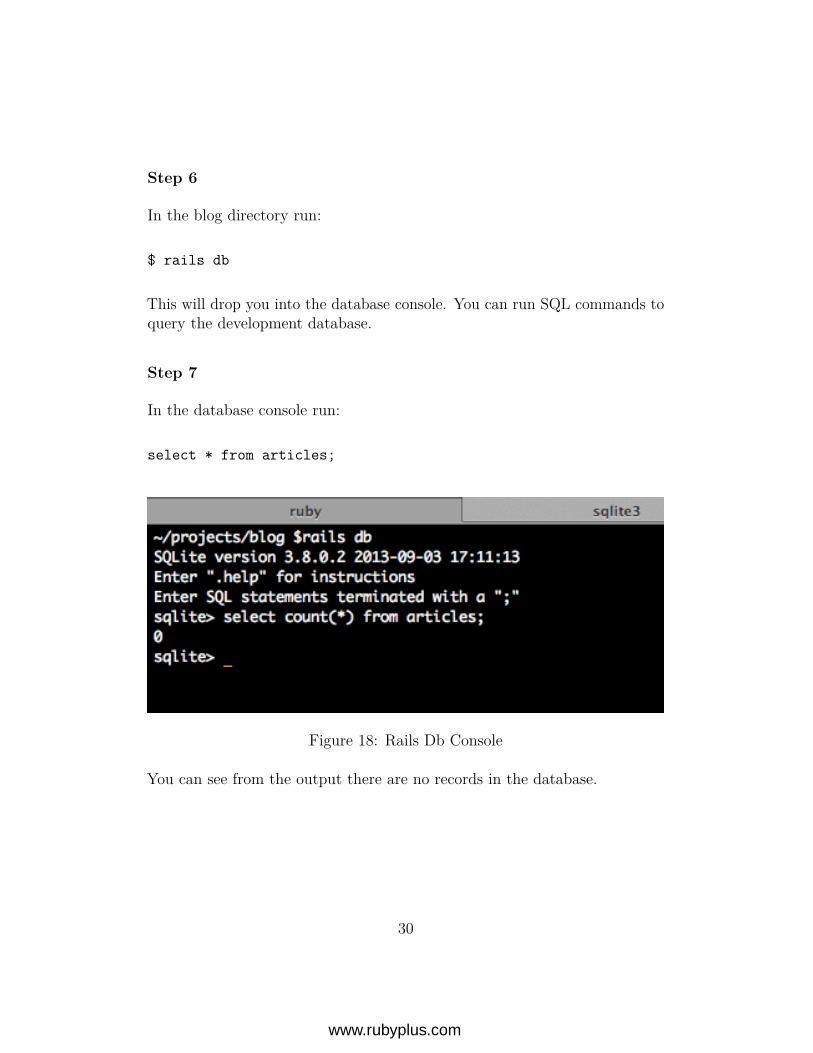
In the blog directory run:
$ rails db
This will drop you into the database console. You can run SQL commands toquery the development database.
Step 7
In the database console run:
select * from articles;
Figure 18: Rails Db Console
You can see from the output there are no records in the database.
30
www.rubyplus.com
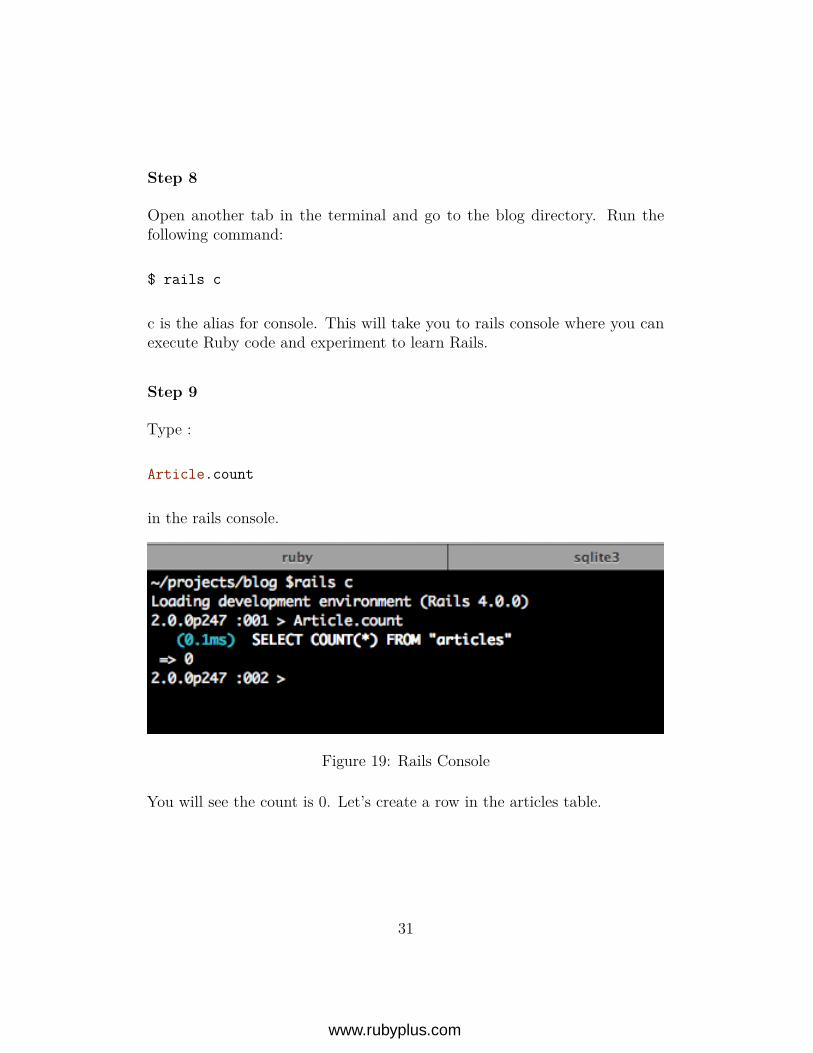
Step 8
Open another tab in the terminal and go to the blog directory. Run thefollowing command:
$ rails c
c is the alias for console. This will take you to rails console where you canexecute Ruby code and experiment to learn Rails.
Step 9
Type :
Article.count
in the rails console.
Figure 19: Rails Console
You will see the count is 0. Let’s create a row in the articles table.
31
www.rubyplus.com
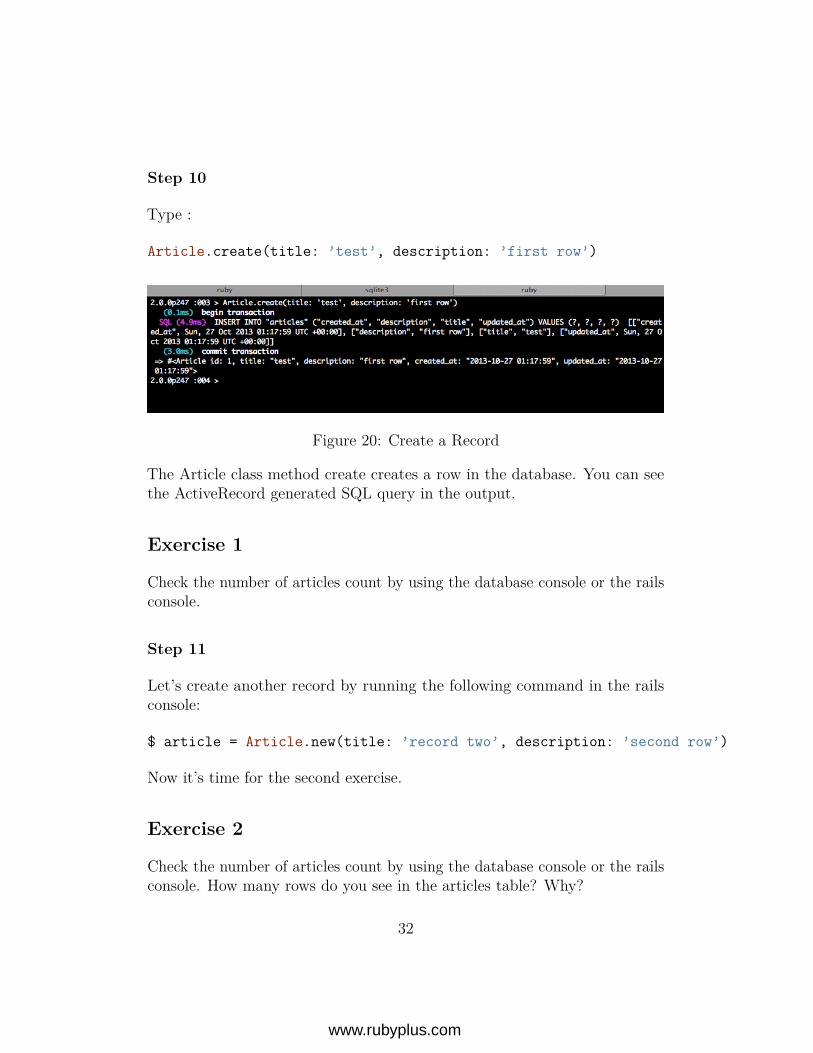
Step 10
Type :
Article.create(title: ’test’, description: ’first row’)
Figure 20: Create a Record
The Article class method create creates a row in the database. You can seethe ActiveRecord generated SQL query in the output.
Exercise 1
Check the number of articles count by using the database console or the railsconsole.
Step 11
Let’s create another record by running the following command in the railsconsole:
$ article = Article.new(title: ’record two’, description: ’second row’)
Now it’s time for the second exercise.
Exercise 2
Check the number of articles count by using the database console or the railsconsole. How many rows do you see in the articles table? Why?
32
www.rubyplus.com
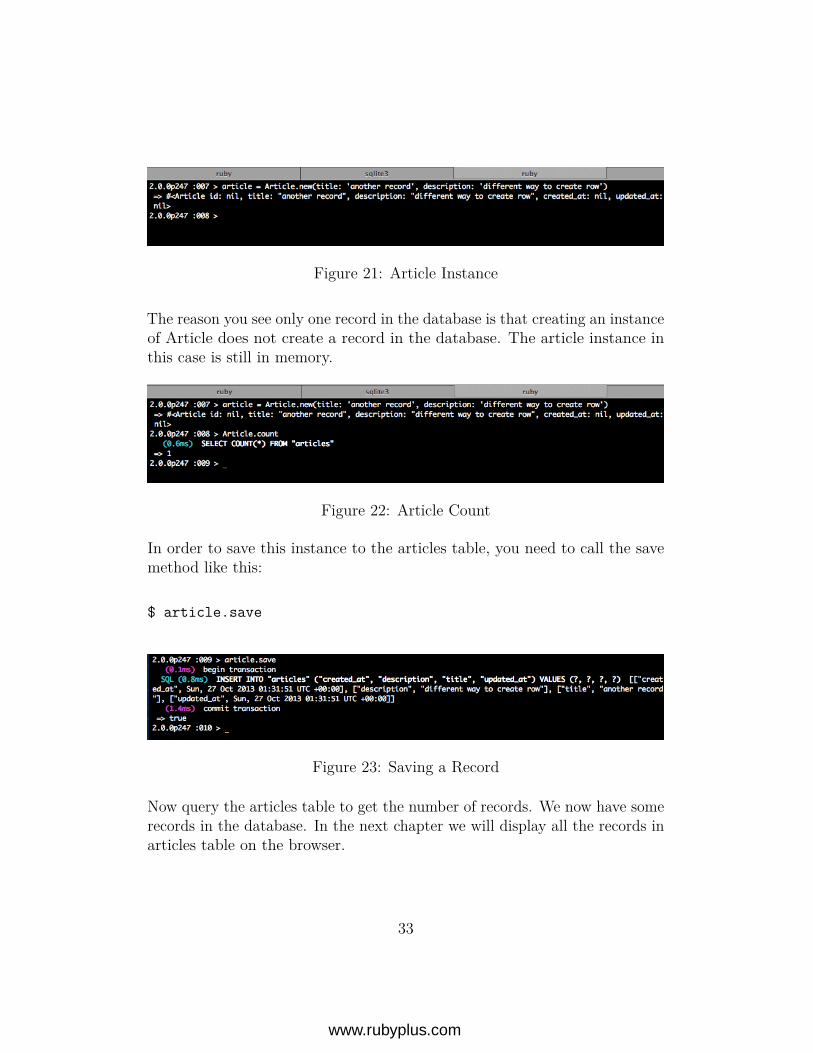
Figure 21: Article Instance
The reason you see only one record in the database is that creating an instanceof Article does not create a record in the database. The article instance inthis case is still in memory.
Figure 22: Article Count
In order to save this instance to the articles table, you need to call the savemethod like this:
$ article.save
Figure 23: Saving a Record
Now query the articles table to get the number of records. We now have somerecords in the database. In the next chapter we will display all the records inarticles table on the browser.
33
www.rubyplus.com
Summary
In this chapter we focused on learning the model part M of the MVC frame-work. We experimented in the rails console and database console to createrecords in the database. In the next lesson we will see how the different partsof the MVC interact to create database driven dynamic web application.
34
www.rubyplus.com
CHAPTER 4
Model View Controller
Objectives
• Learn how the View communicates with Controller
• Learn how Controller interacts with the Model and how Controller picksthe next View to show to the user.
Context
Router knows which controller can handle the incoming request. Controlleris like a traffic cop who controls the flow of traffic on busy streets. Controllerhas the knowledge of which model can get the job done, so it delegates thework to the appropriate model object. Controller also knows which view todisplay to the user after the incoming request has been processed.Views can be in any format such as XML, CSV, Html, JSON etc. Html isdisplayed on the browser, JSON and other formats can be consumed by anyclient such as mobile devices, WebService client etc.Why MVC architecture? The advantage of MVC is the clean separation ofView from the Model and Controller. It allows you to allocate work to teamsaccording to their strengths. The View layer can be developed in parallel bythe front-end developers without waiting for the Model and Controller partsto be completed by the back-end developers.If we agree on the contract between the front-end and back-end by definingthe data representation exchanged between the client and server then we candevelop in parallel.
Steps
Step 1
Let’s modify the existing static page in welcome/index.html.erb to use a viewhelper for hyperlink:
35
www.rubyplus.com
<%= link_to ’My Blog’, ? %>
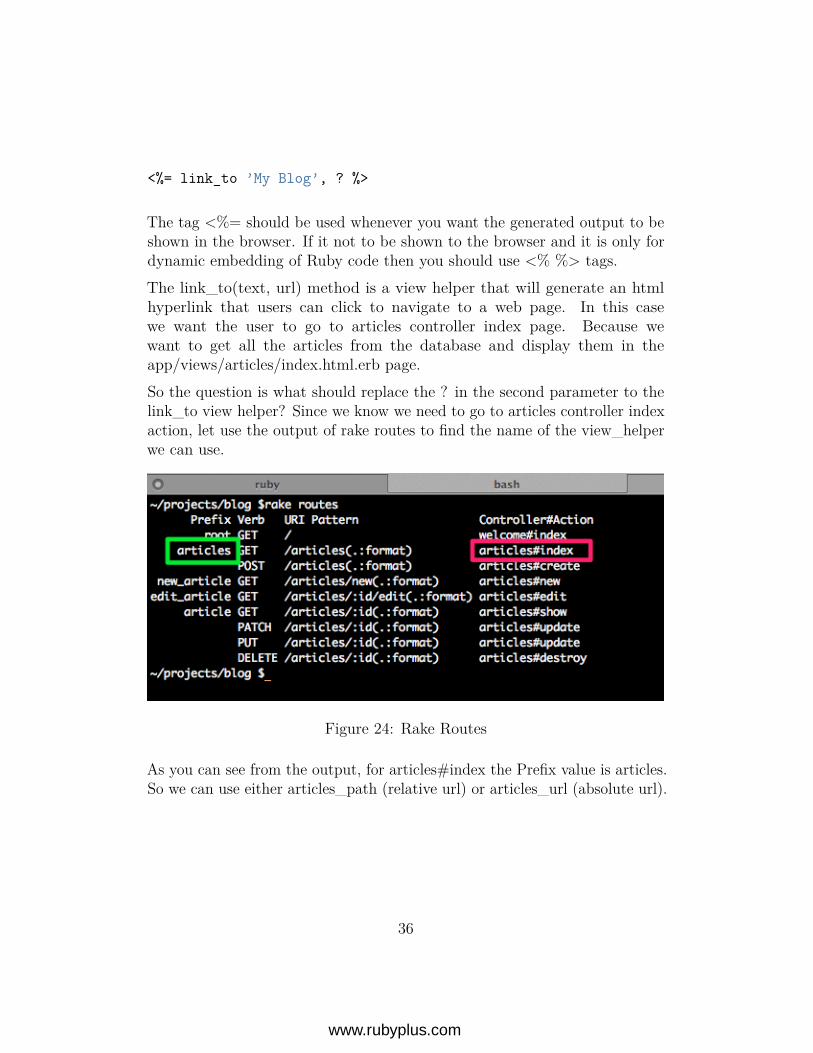
The tag <%= should be used whenever you want the generated output to beshown in the browser. If it not to be shown to the browser and it is only fordynamic embedding of Ruby code then you should use <% %> tags.The link_to(text, url) method is a view helper that will generate an htmlhyperlink that users can click to navigate to a web page. In this casewe want the user to go to articles controller index page. Because wewant to get all the articles from the database and display them in theapp/views/articles/index.html.erb page.So the question is what should replace the ? in the second parameter to thelink_to view helper? Since we know we need to go to articles controller indexaction, let use the output of rake routes to find the name of the view_helperwe can use.
Figure 24: Rake Routes
As you can see from the output, for articles#index the Prefix value is articles.So we can use either articles_path (relative url) or articles_url (absolute url).
36
www.rubyplus.com
Step 2
Change the link as follows :
<%= link_to ’My Blog’, articles_path %>
Step 3
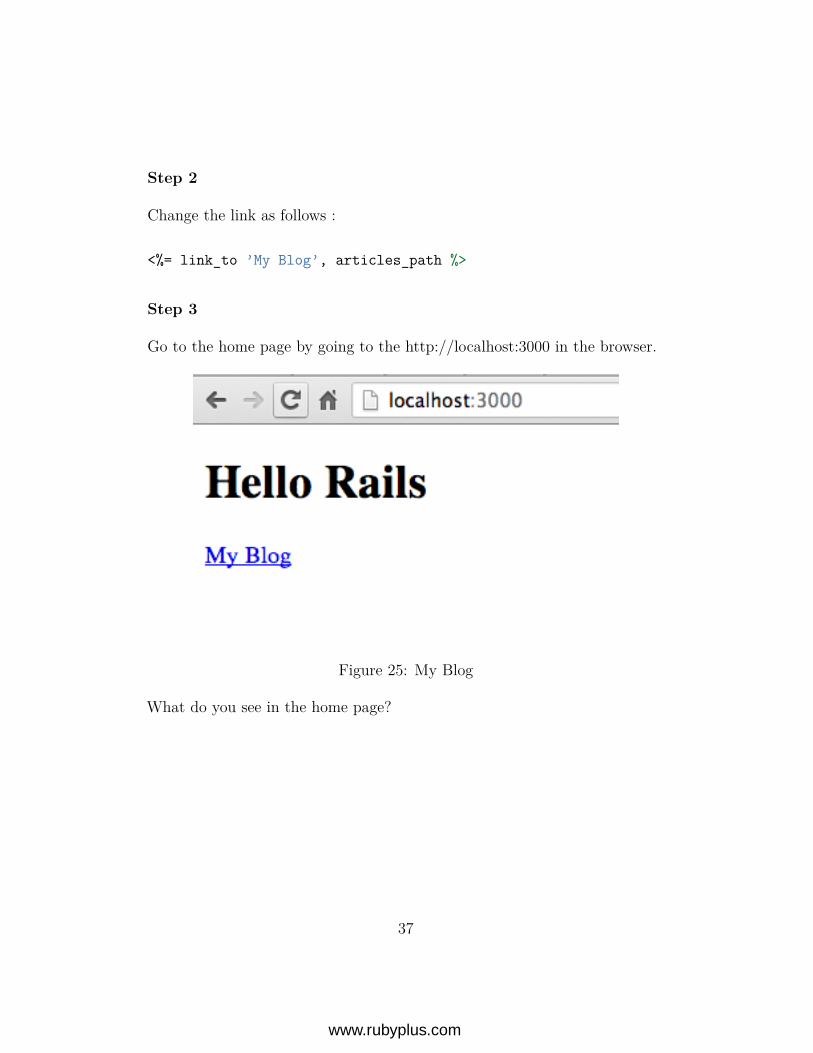
Go to the home page by going to the http://localhost:3000 in the browser.
Figure 25: My Blog
What do you see in the home page?
37
www.rubyplus.com
You will see the hyper link in the home page.
Step 4
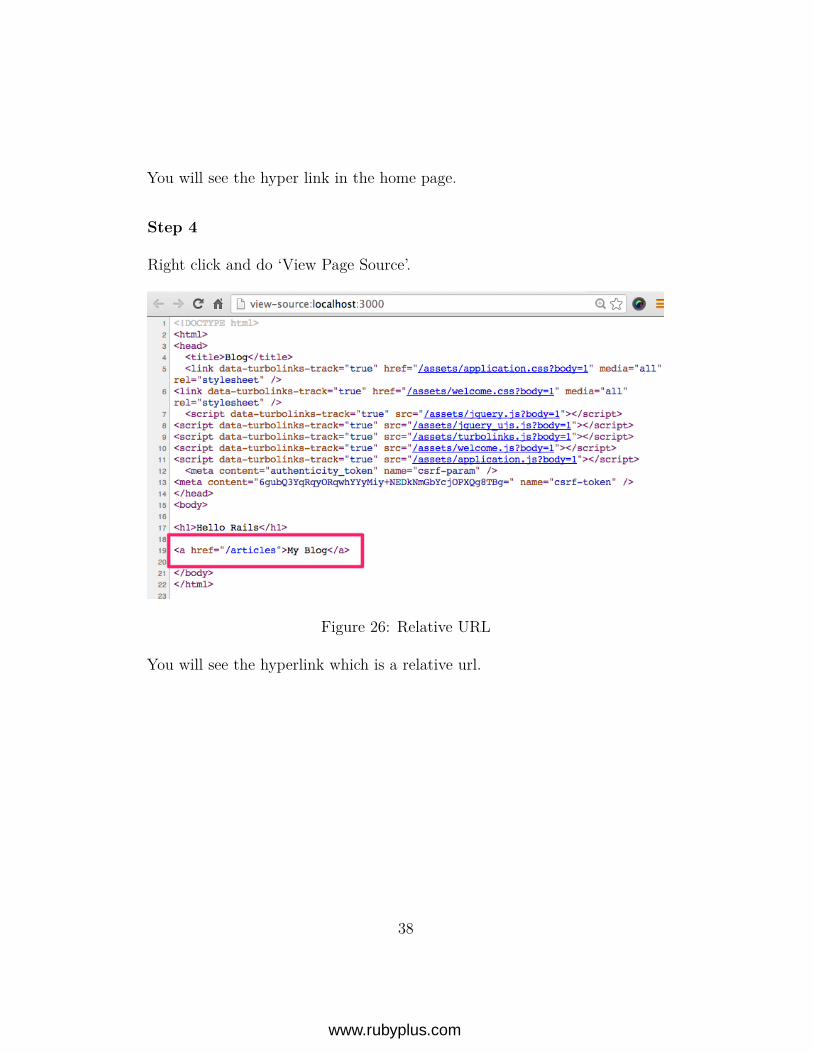
Right click and do ‘View Page Source’.
Figure 26: Relative URL
You will see the hyperlink which is a relative url.
38
www.rubyplus.com
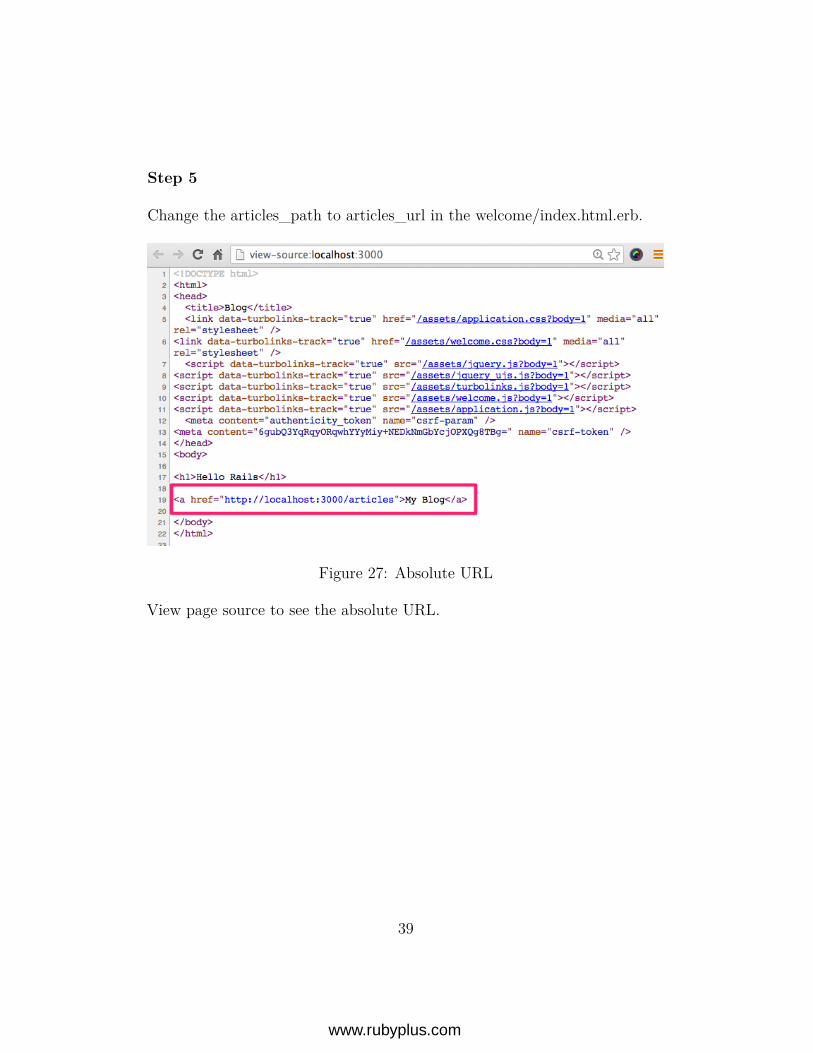
Step 5
Change the articles_path to articles_url in the welcome/index.html.erb.
Figure 27: Absolute URL
View page source to see the absolute URL.
39
www.rubyplus.com
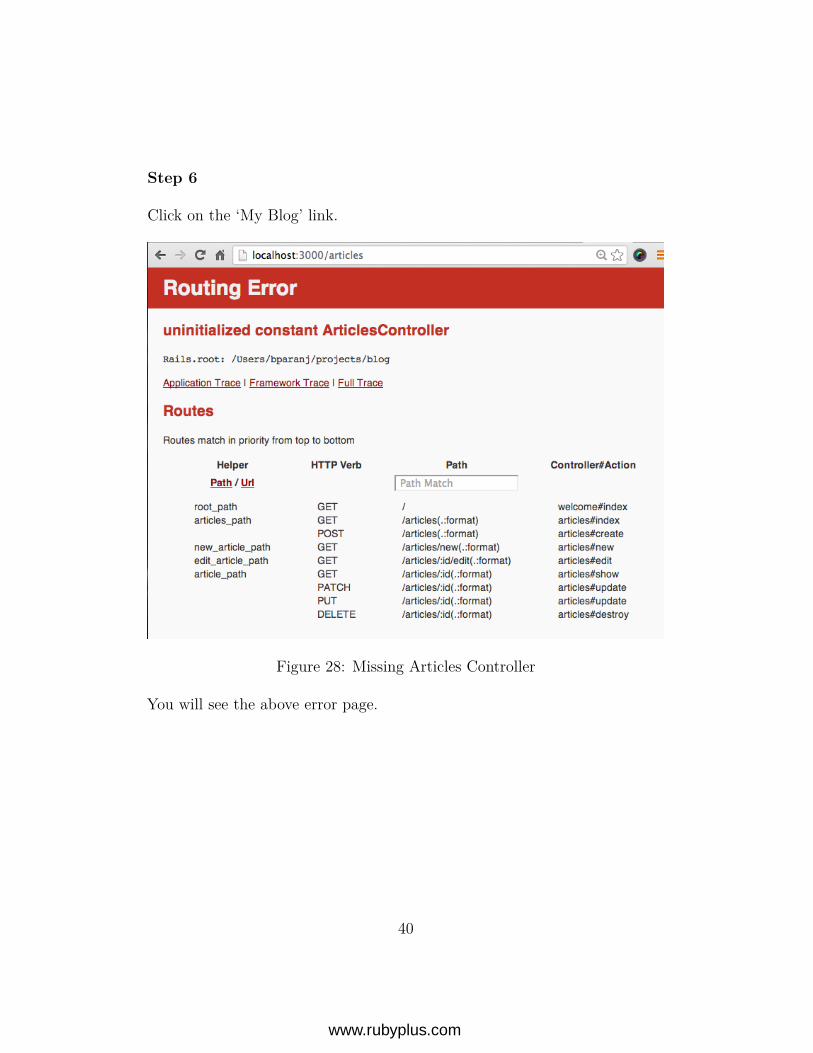
Step 6
Click on the ‘My Blog’ link.
Figure 28: Missing Articles Controller
You will see the above error page.
40
www.rubyplus.com
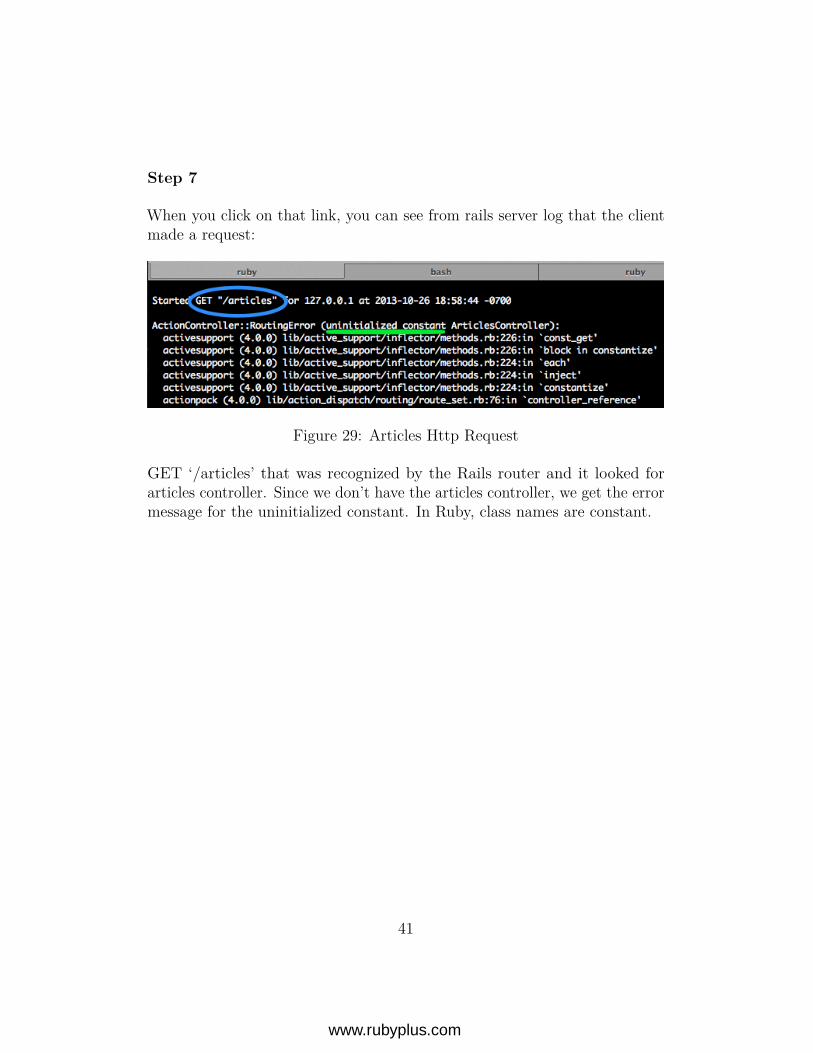
Step 7
When you click on that link, you can see from rails server log that the clientmade a request:
Figure 29: Articles Http Request
GET ‘/articles’ that was recognized by the Rails router and it looked forarticles controller. Since we don’t have the articles controller, we get the errormessage for the uninitialized constant. In Ruby, class names are constant.
41
www.rubyplus.com
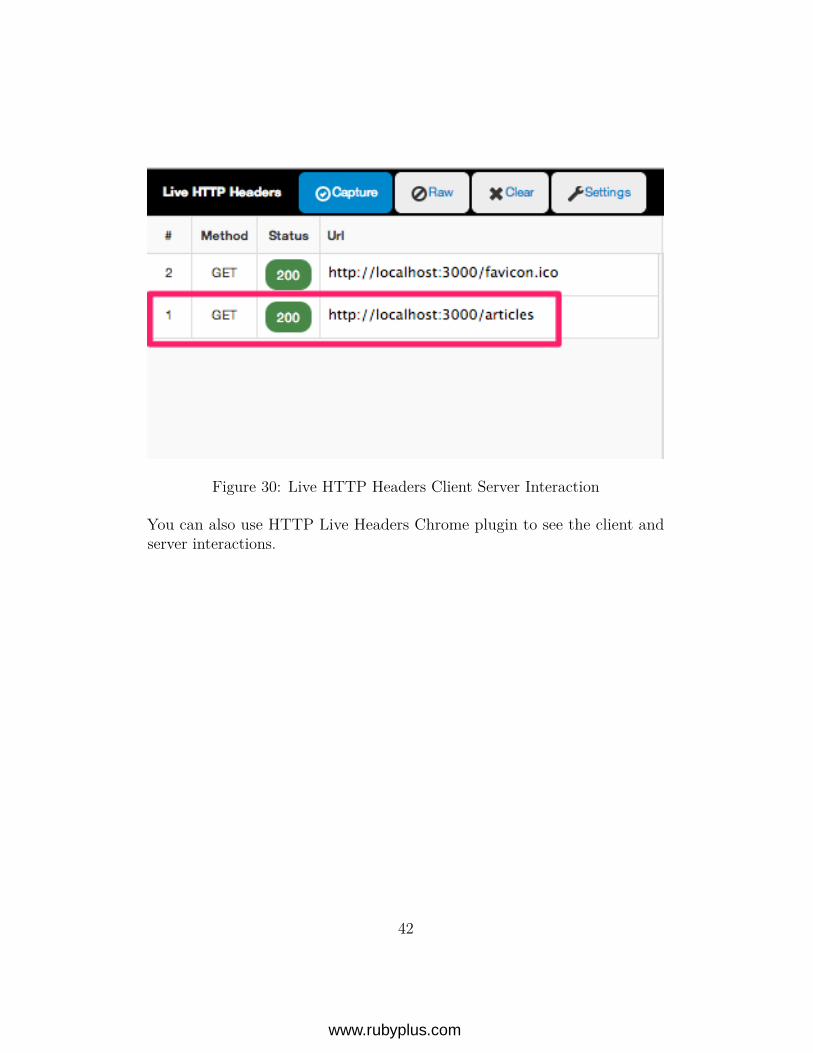
Figure 30: Live HTTP Headers Client Server Interaction
You can also use HTTP Live Headers Chrome plugin to see the client andserver interactions.
42
www.rubyplus.com
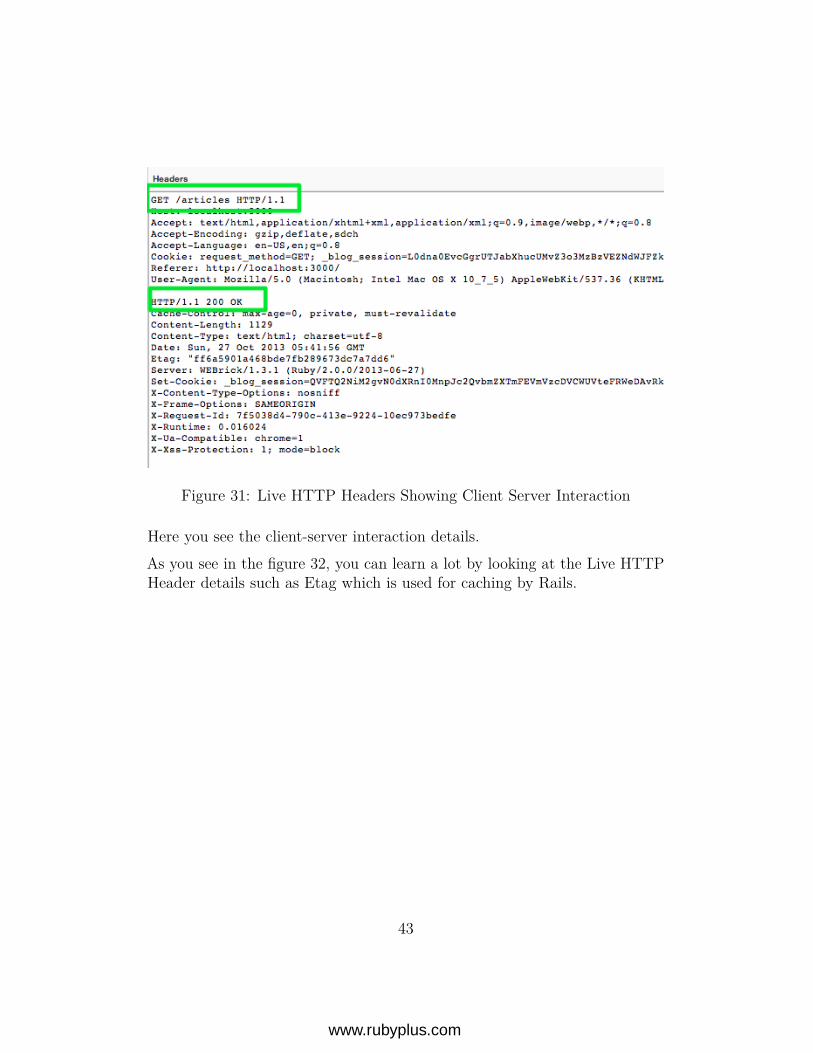
Figure 31: Live HTTP Headers Showing Client Server Interaction
Here you see the client-server interaction details.As you see in the figure 32, you can learn a lot by looking at the Live HTTPHeader details such as Etag which is used for caching by Rails.
43
www.rubyplus.com

Figure 32: Live HTTP Headers Gives Ton of Information
44
www.rubyplus.com
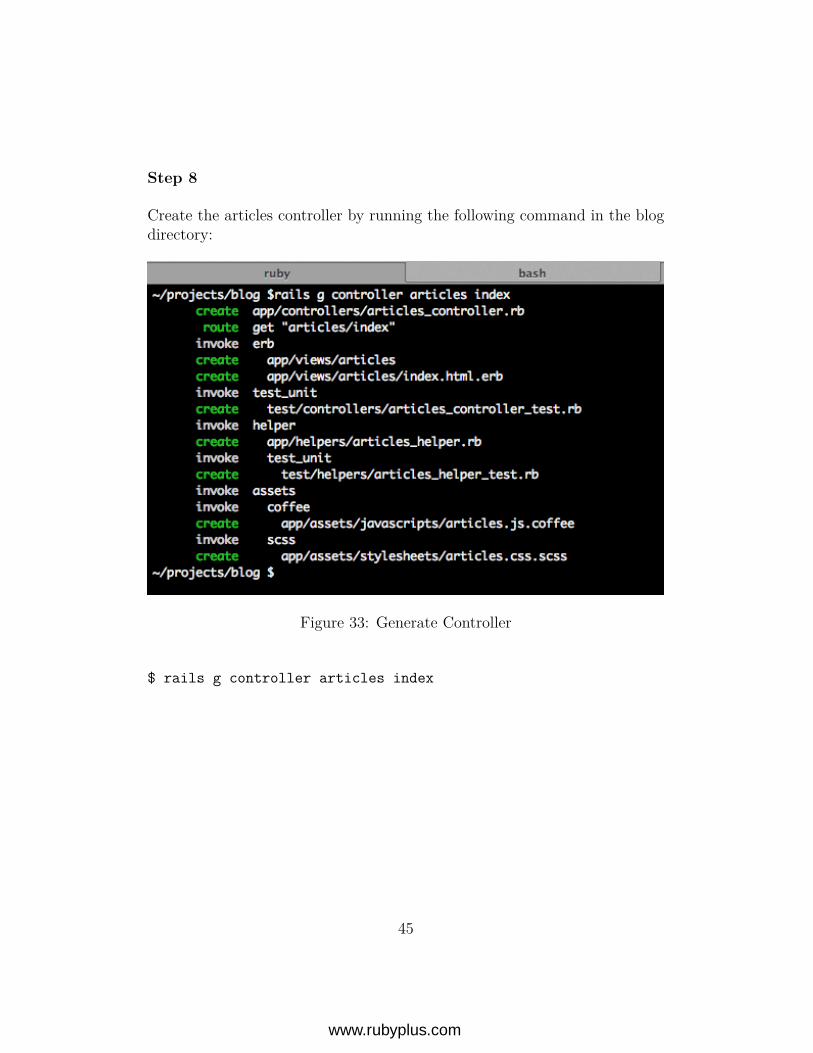
Step 8
Create the articles controller by running the following command in the blogdirectory:
Figure 33: Generate Controller
$ rails g controller articles index
45
www.rubyplus.com
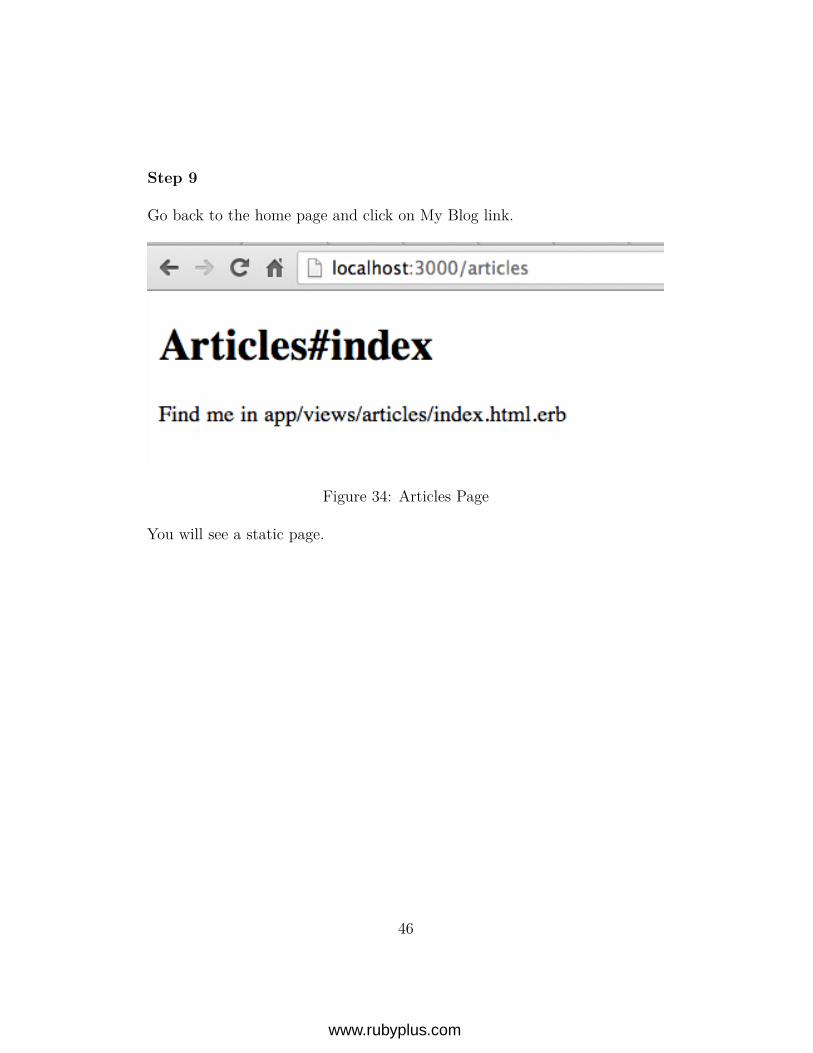
Step 9
Go back to the home page and click on My Blog link.
Figure 34: Articles Page
You will see a static page.
46
www.rubyplus.com
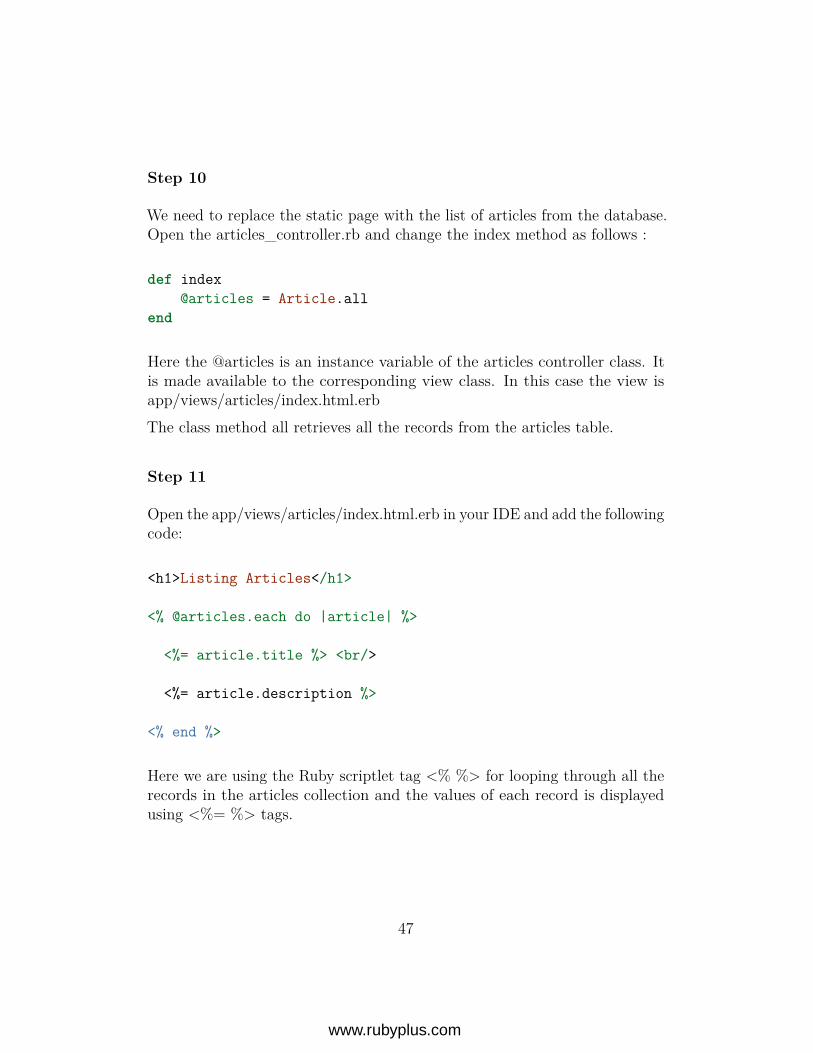
Step 10
We need to replace the static page with the list of articles from the database.Open the articles_controller.rb and change the index method as follows :
def index@articles = Article.all
end
Here the @articles is an instance variable of the articles controller class. Itis made available to the corresponding view class. In this case the view isapp/views/articles/index.html.erbThe class method all retrieves all the records from the articles table.
Step 11
Open the app/views/articles/index.html.erb in your IDE and add the followingcode:
<h1>Listing Articles</h1>
<% @articles.each do |article| %>
<%= article.title %> <br/>
<%= article.description %>
<% end %>
Here we are using the Ruby scriptlet tag <% %> for looping through all therecords in the articles collection and the values of each record is displayedusing <%= %> tags.
47
www.rubyplus.com
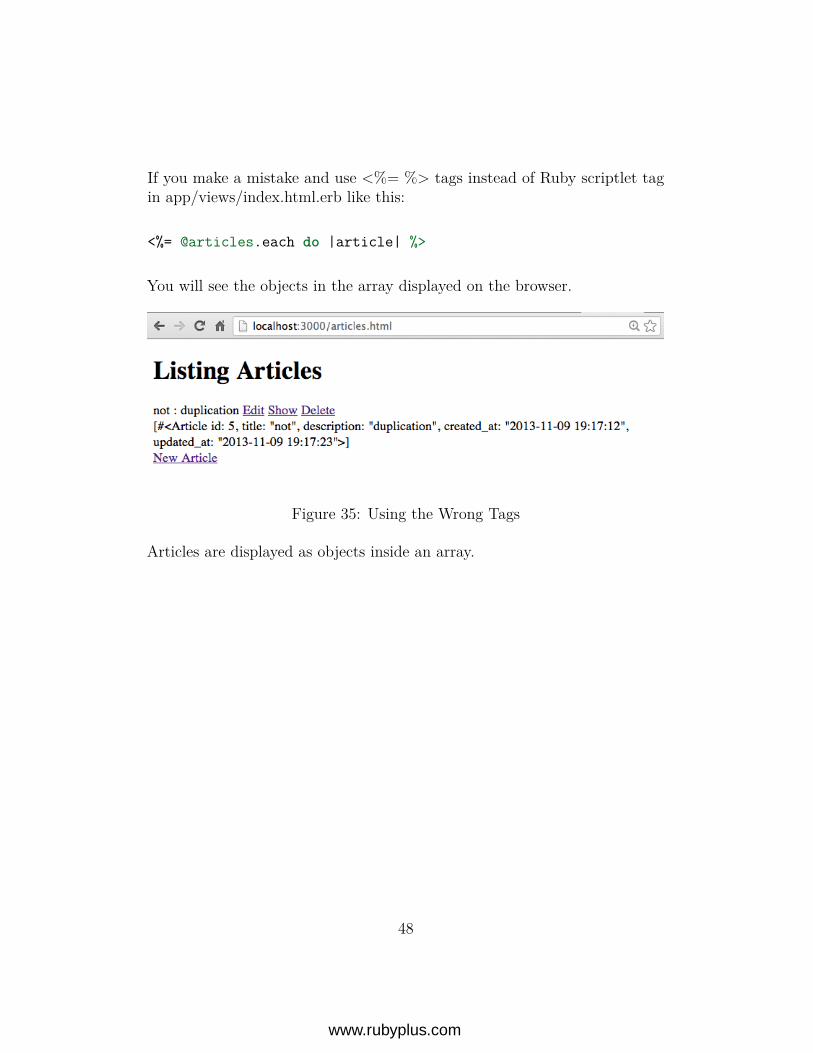
If you make a mistake and use <%= %> tags instead of Ruby scriptlet tagin app/views/index.html.erb like this:
<%= @articles.each do |article| %>
You will see the objects in the array displayed on the browser.
Figure 35: Using the Wrong Tags
Articles are displayed as objects inside an array.
48
www.rubyplus.com

If you use the Ruby scriptlet tag :
Title : <% article.title %>
instead of the tags used to evaluate expressions and display to the browserthen you will not see it in the browser.
Figure 36: No Title Value in Browser
49
www.rubyplus.com
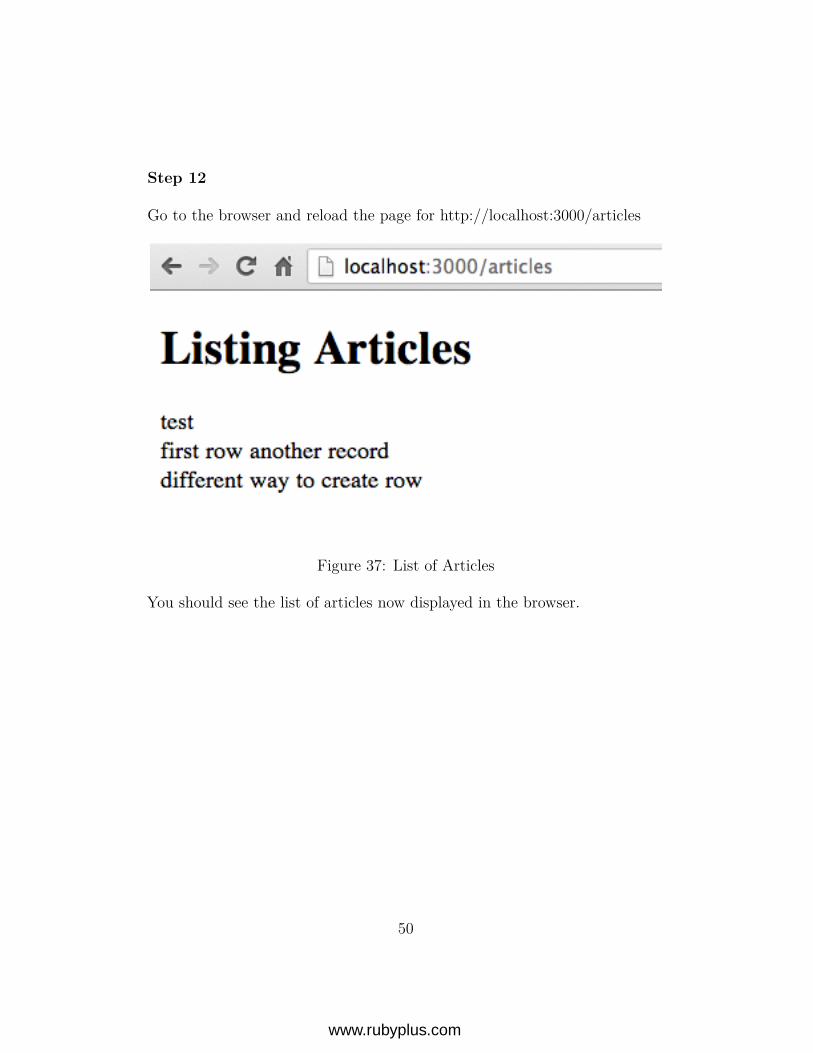
Step 12
Go to the browser and reload the page for http://localhost:3000/articles
Figure 37: List of Articles
You should see the list of articles now displayed in the browser.
50
www.rubyplus.com
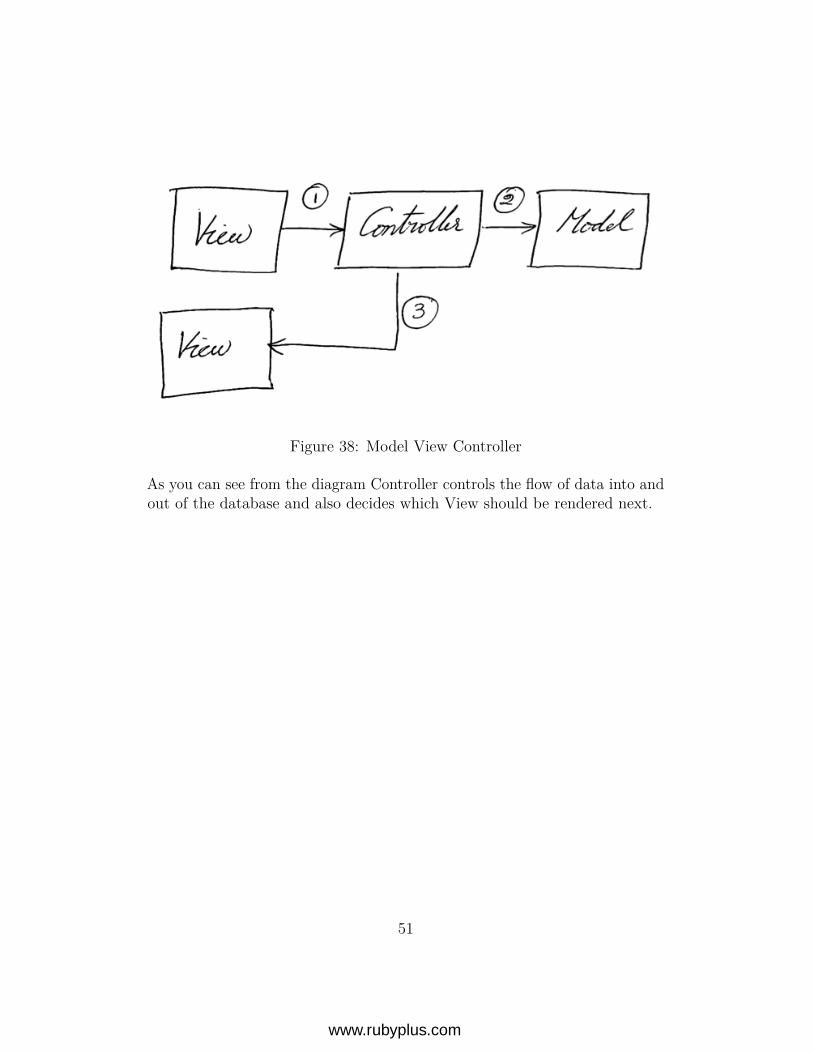
Figure 38: Model View Controller
As you can see from the diagram Controller controls the flow of data into andout of the database and also decides which View should be rendered next.
51
www.rubyplus.com
Exercise
Go to the rails server log terminal, what is the http verb used to makethe request for displaying all the articles? What is the resource that wasrequested?
Summary
In this lesson we went from the view (home page) to the controller for articlesand to the article model and back to the view (index page for articles). Sothe MVC components interaction as shown in the diagram:
1. View to Controller
2. Controller to Model
3. Controller to View.
The data flow was from the database to the user.In real world the user data comes from the user so we cannot create them inthe rails console or in the database directly. In the next lesson we will seehow we can capture data from the view provided by the user and save it inthe database.
52
www.rubyplus.com
CHAPTER 5
View to Model
Objective
• Learn how to get data from the user and save it in the database
Steps
Step 1
We need to display a form for the user to fill out the text field for the articletitle and text area for the description. In order for the user to go to this form,let’s create a ‘New Article’ link to load an empty form in the articles indexpage.Add the following code to the bottom of the app/views/articles/index.htmlfile:
<%= link_to ’New Article’, ? %>
53
www.rubyplus.com
Step 2
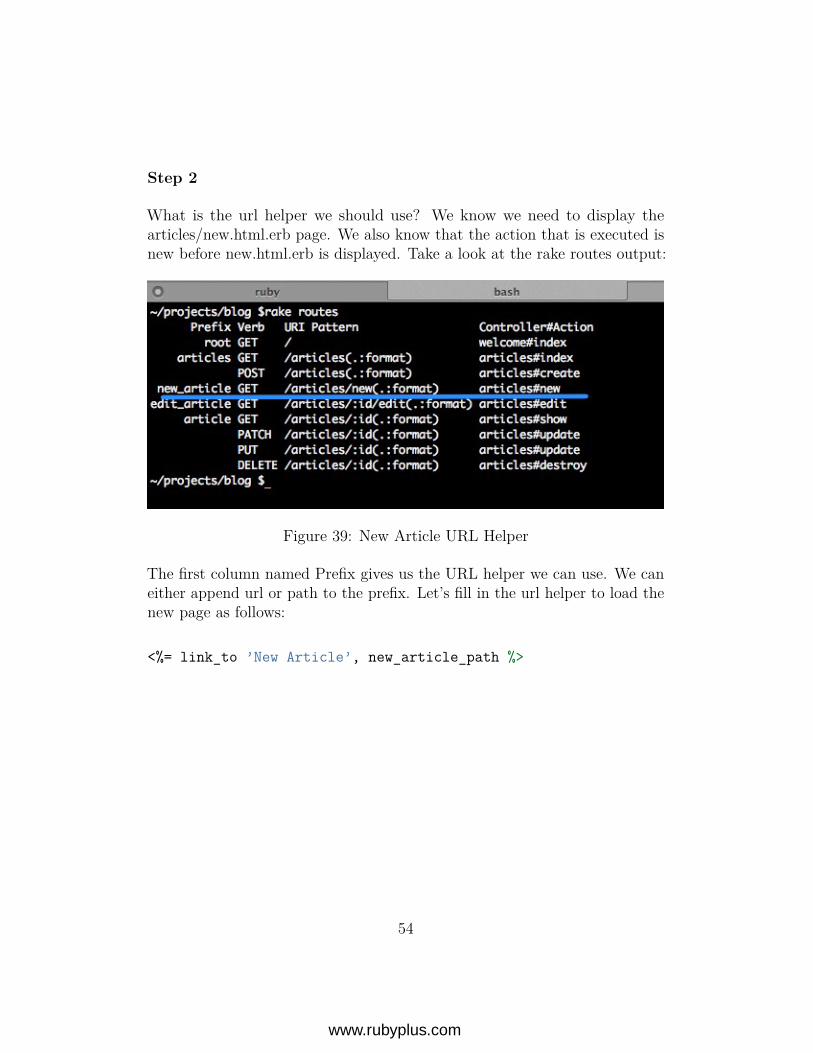
What is the url helper we should use? We know we need to display thearticles/new.html.erb page. We also know that the action that is executed isnew before new.html.erb is displayed. Take a look at the rake routes output:
Figure 39: New Article URL Helper
The first column named Prefix gives us the URL helper we can use. We caneither append url or path to the prefix. Let’s fill in the url helper to load thenew page as follows:
<%= link_to ’New Article’, new_article_path %>
54
www.rubyplus.com
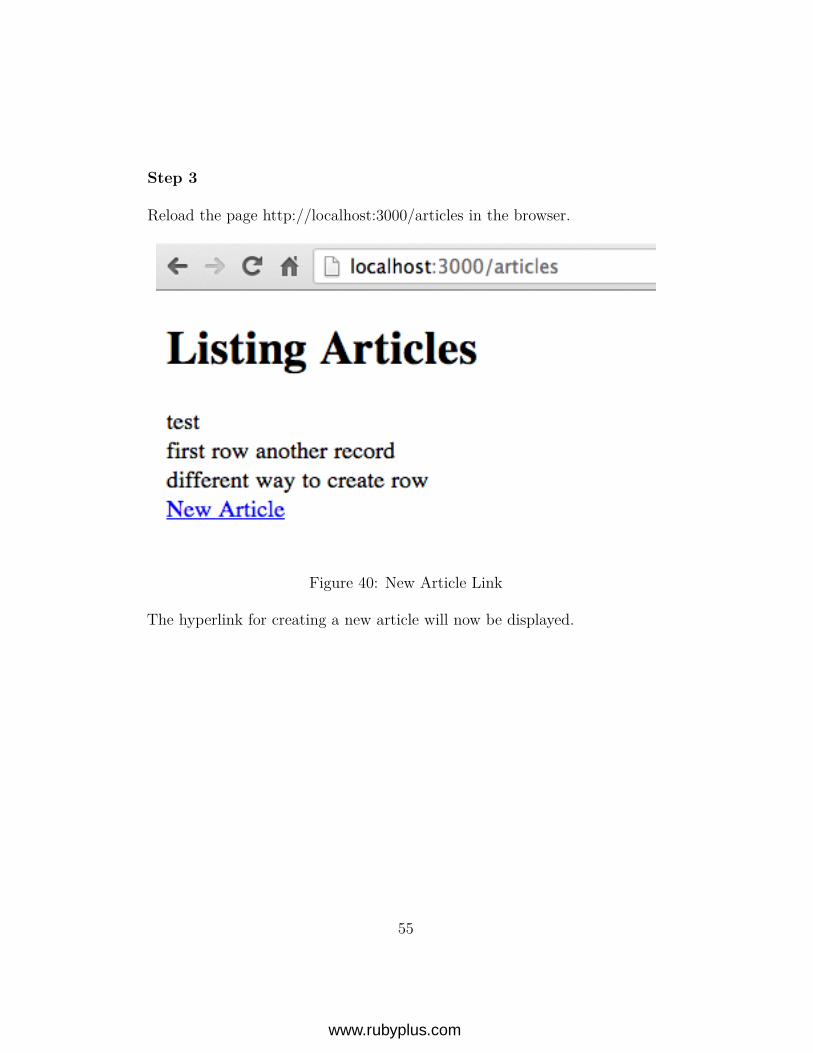
Step 3
Reload the page http://localhost:3000/articles in the browser.
Figure 40: New Article Link
The hyperlink for creating a new article will now be displayed.
55
www.rubyplus.com
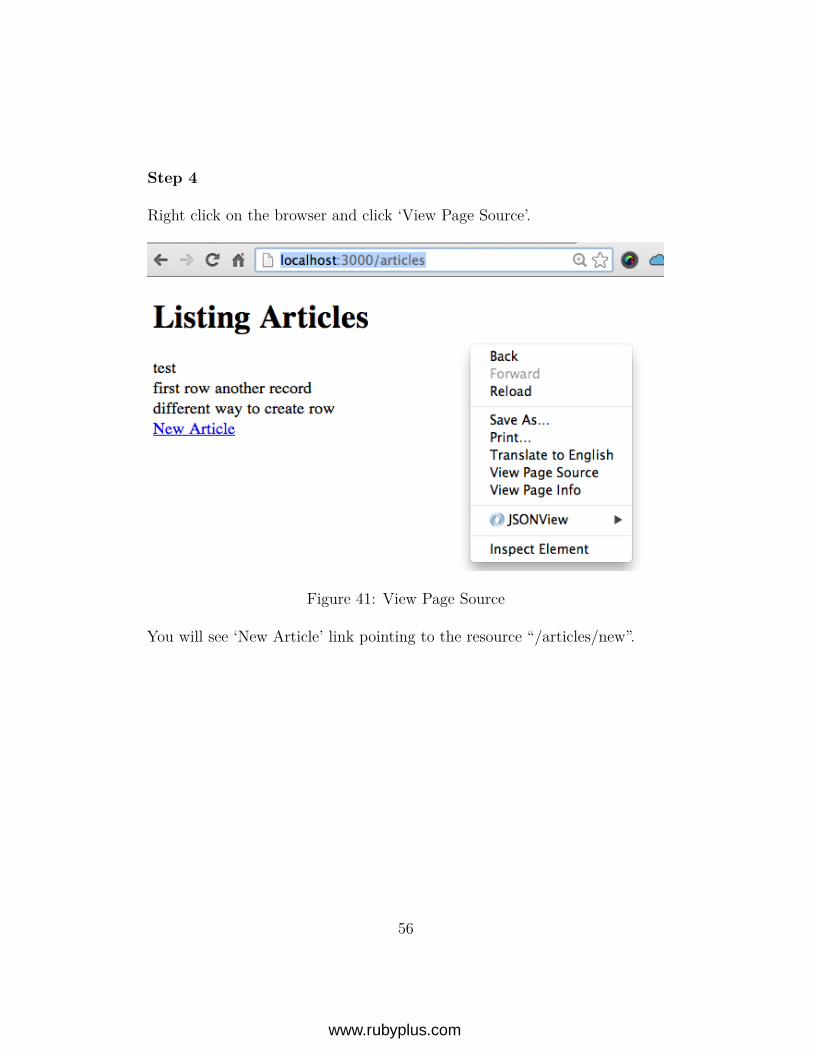
Step 4
Right click on the browser and click ‘View Page Source’.
Figure 41: View Page Source
You will see ‘New Article’ link pointing to the resource “/articles/new”.
56
www.rubyplus.com
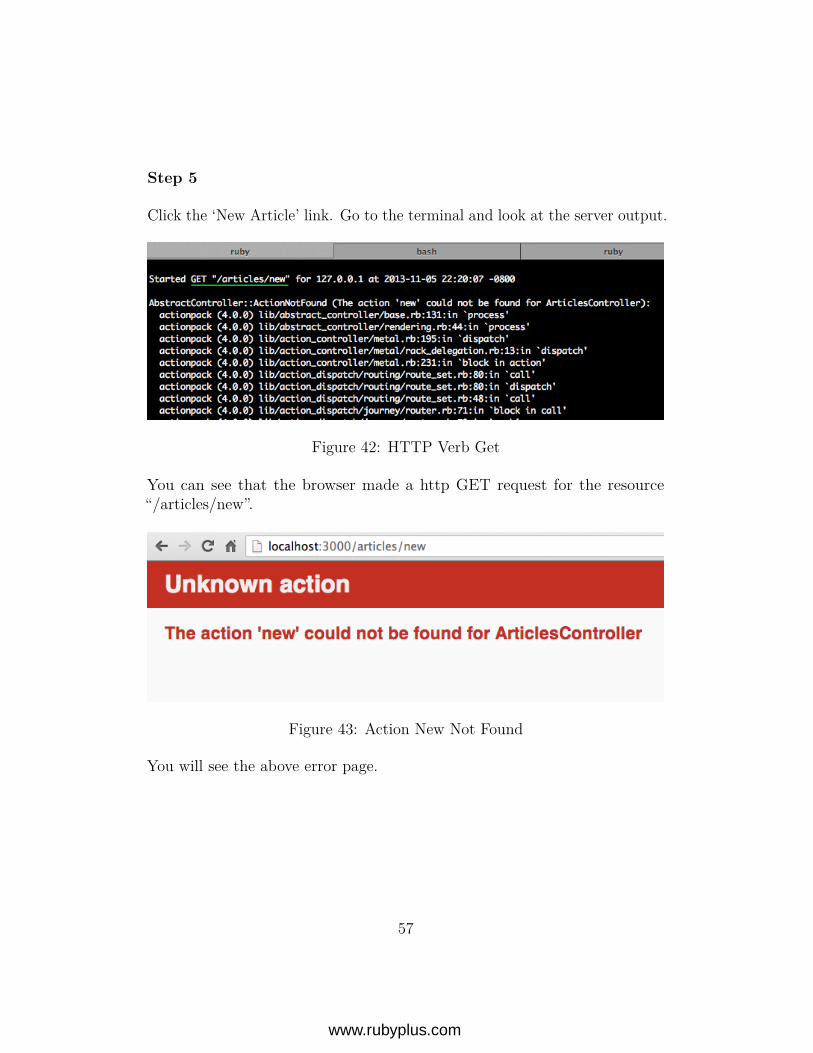
Step 5
Click the ‘New Article’ link. Go to the terminal and look at the server output.
Figure 42: HTTP Verb Get
You can see that the browser made a http GET request for the resource“/articles/new”.
Figure 43: Action New Not Found
You will see the above error page.
57
www.rubyplus.com
Step 6
Let’s create the new action in articles controller. Add the following code toarticles controller:
def new
end
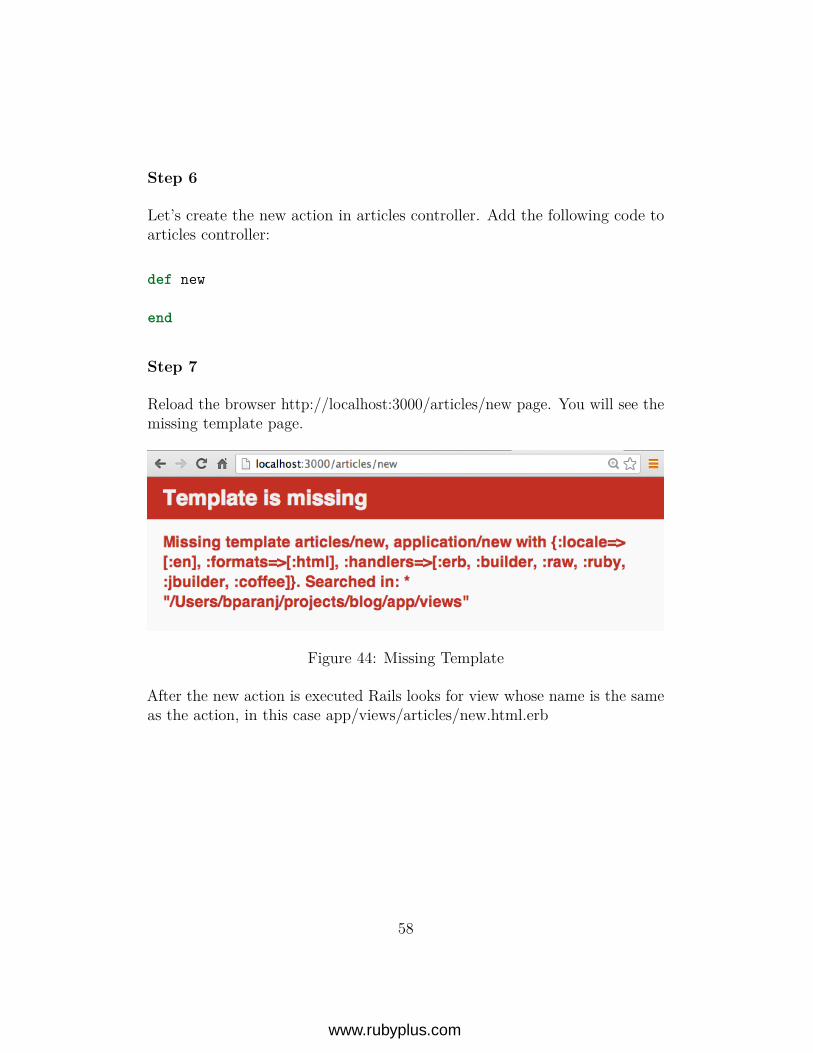
Step 7
Reload the browser http://localhost:3000/articles/new page. You will see themissing template page.
Figure 44: Missing Template
After the new action is executed Rails looks for view whose name is the sameas the action, in this case app/views/articles/new.html.erb
58
www.rubyplus.com
Step 8
So lets create new.html.erb under app/views/articles directory with thefollowing content:
<%= form_for @article do |f| %><p>
<%= f.label :title %><br><%= f.text_field :title %>
</p>
<p><%= f.label :description %><br><%= f.text_area :description %>
</p>
<p><%= f.submit %>
</p><% end %>
59
www.rubyplus.com
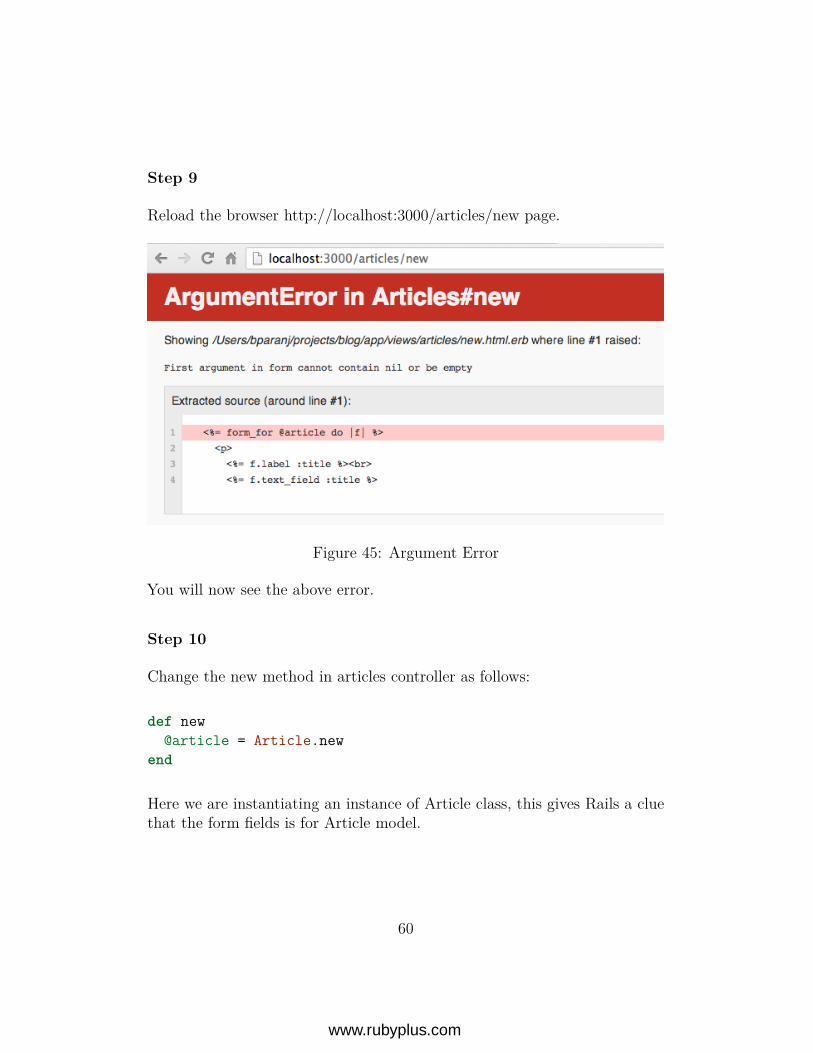
Step 9
Reload the browser http://localhost:3000/articles/new page.
Figure 45: Argument Error
You will now see the above error.
Step 10
Change the new method in articles controller as follows:
def new@article = Article.new
end
Here we are instantiating an instance of Article class, this gives Rails a cluethat the form fields is for Article model.
60
www.rubyplus.com
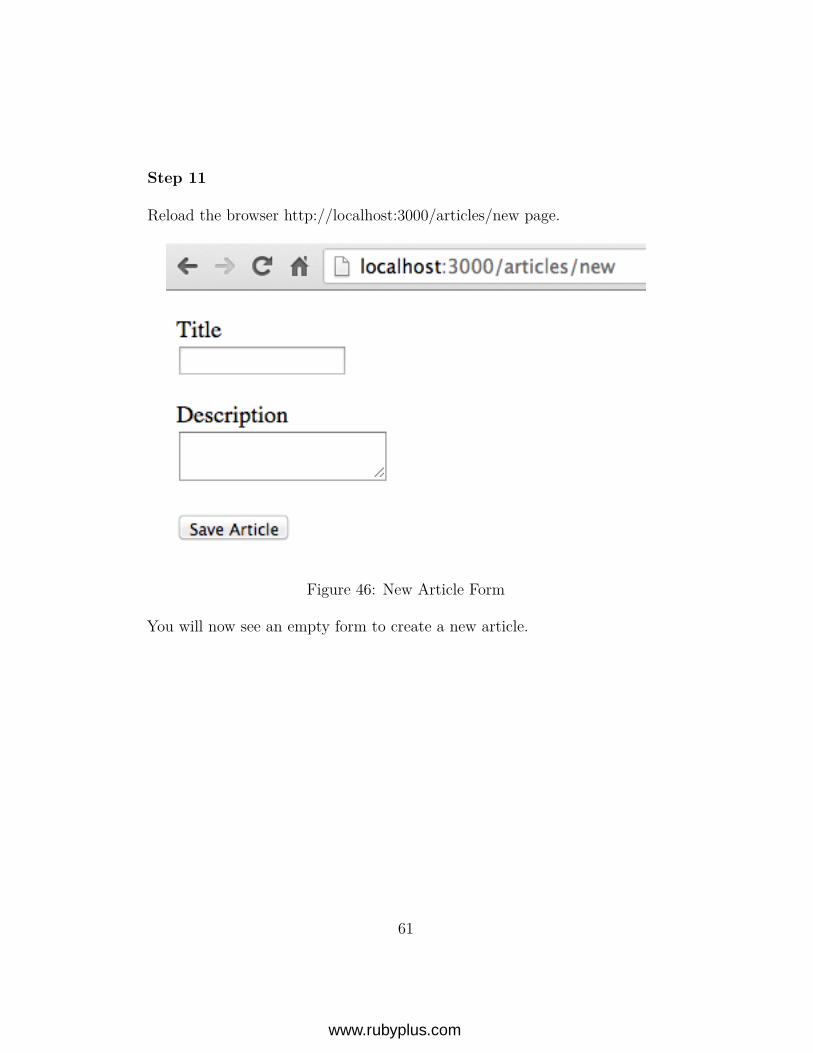
Step 11
Reload the browser http://localhost:3000/articles/new page.
Figure 46: New Article Form
You will now see an empty form to create a new article.
61
www.rubyplus.com
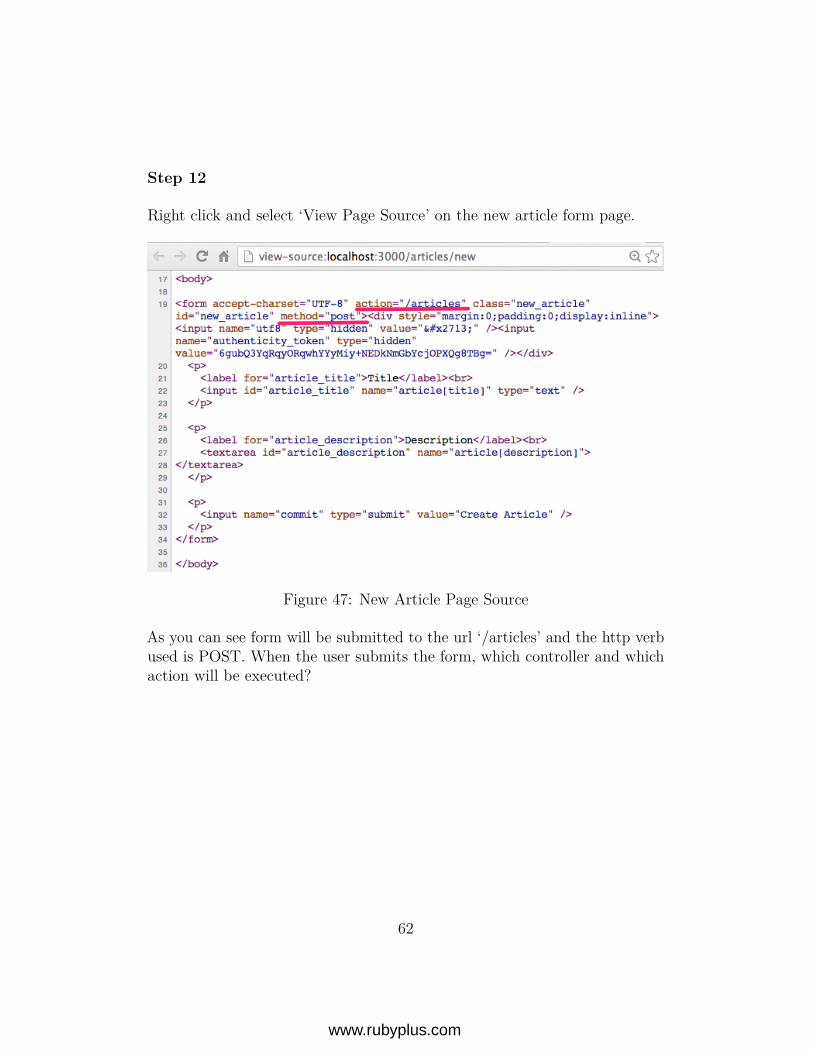
Step 12
Right click and select ‘View Page Source’ on the new article form page.
Figure 47: New Article Page Source
As you can see form will be submitted to the url ‘/articles’ and the http verbused is POST. When the user submits the form, which controller and whichaction will be executed?
62
www.rubyplus.com
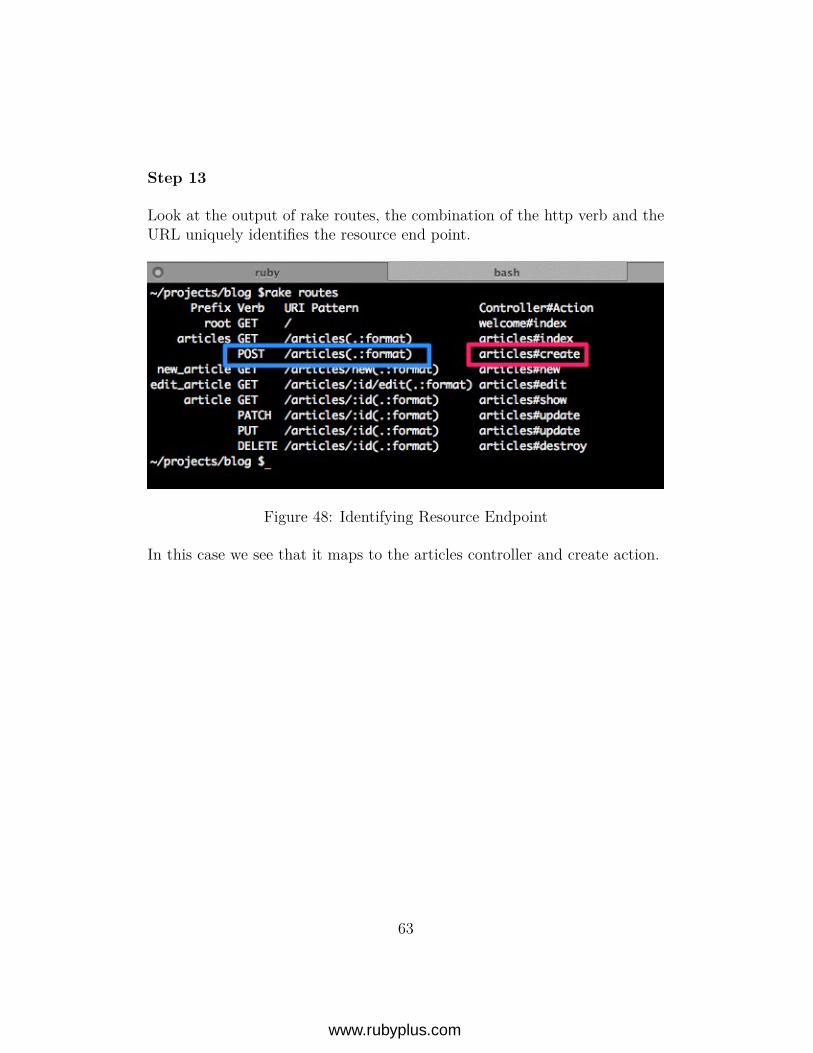
Step 13
Look at the output of rake routes, the combination of the http verb and theURL uniquely identifies the resource end point.
Figure 48: Identifying Resource Endpoint
In this case we see that it maps to the articles controller and create action.
63
www.rubyplus.com
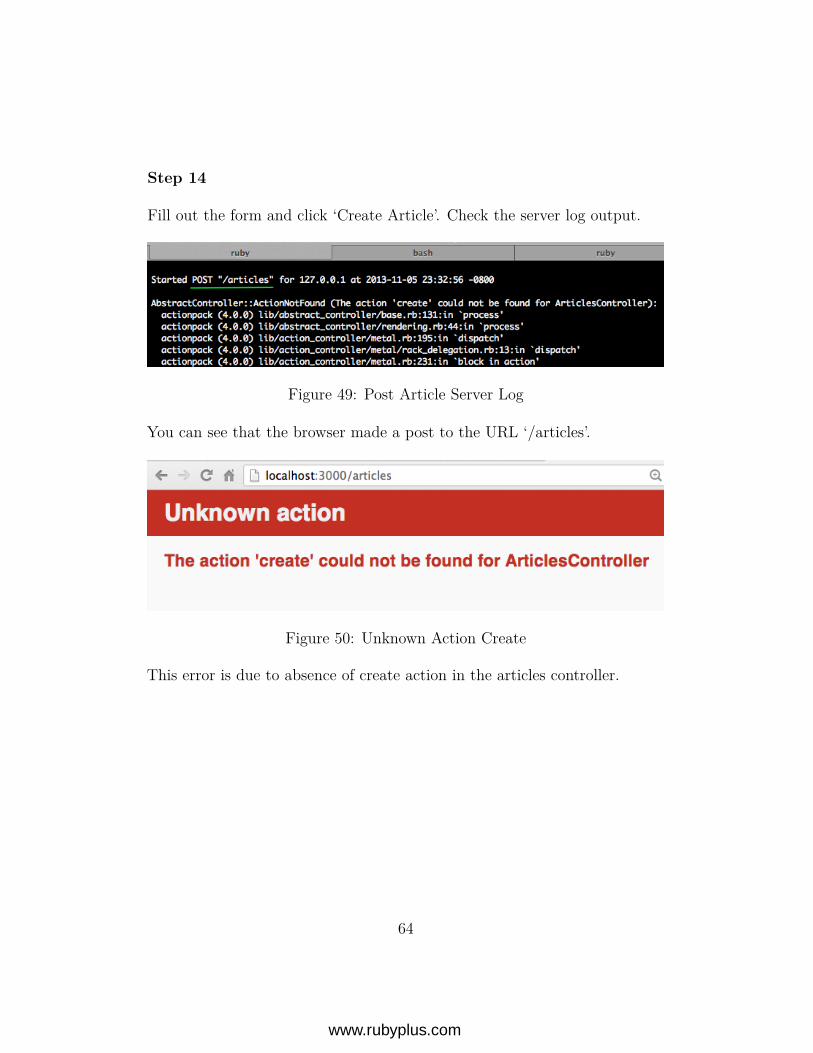
Step 14
Fill out the form and click ‘Create Article’. Check the server log output.
Figure 49: Post Article Server Log
You can see that the browser made a post to the URL ‘/articles’.
Figure 50: Unknown Action Create
This error is due to absence of create action in the articles controller.
64
www.rubyplus.com
Step 15
Define the create method in the articles controller as follows:
def create
end
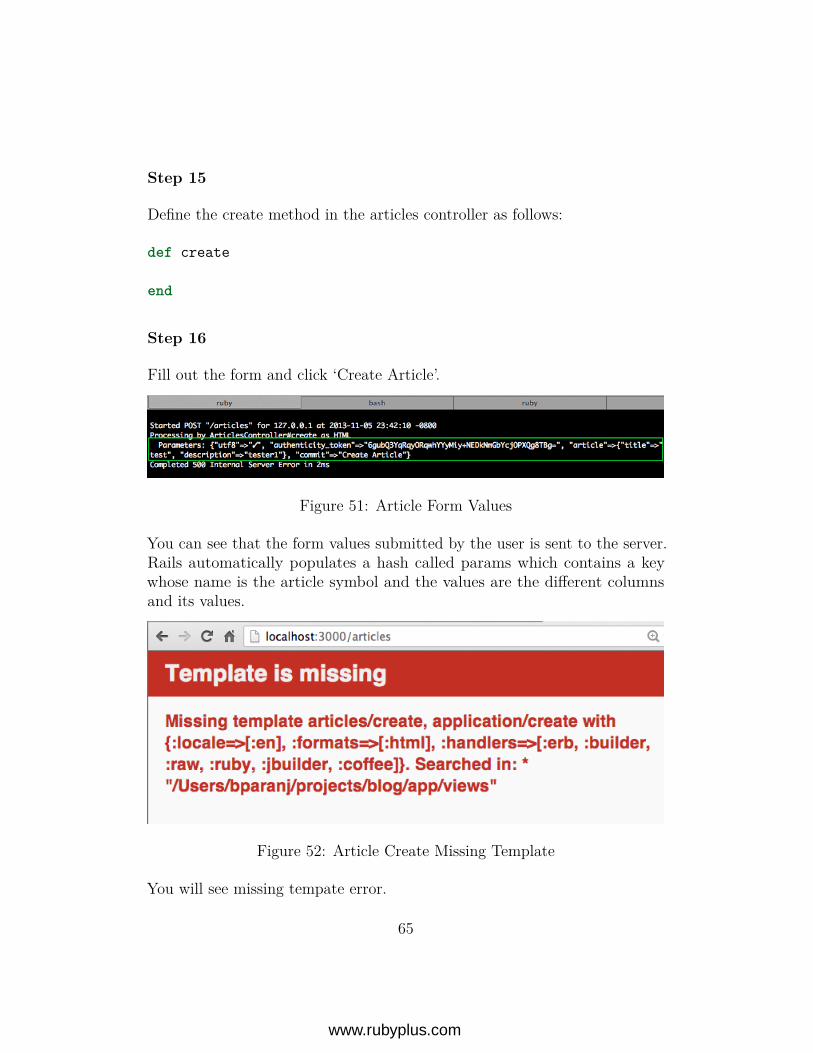
Step 16
Fill out the form and click ‘Create Article’.
Figure 51: Article Form Values
You can see that the form values submitted by the user is sent to the server.Rails automatically populates a hash called params which contains a keywhose name is the article symbol and the values are the different columnsand its values.
Figure 52: Article Create Missing Template
You will see missing tempate error.
65
www.rubyplus.com
Step 17
Before we fix the missing template issue, we need to save the data submittedby the user in the database. You already know how to use the ActiveRecordclass method create to save a record. You also know how Rails populates theparams hash, this hash is made available to you in the controller. So we canaccess it like this :
def createArticle.create(params[:article])
end
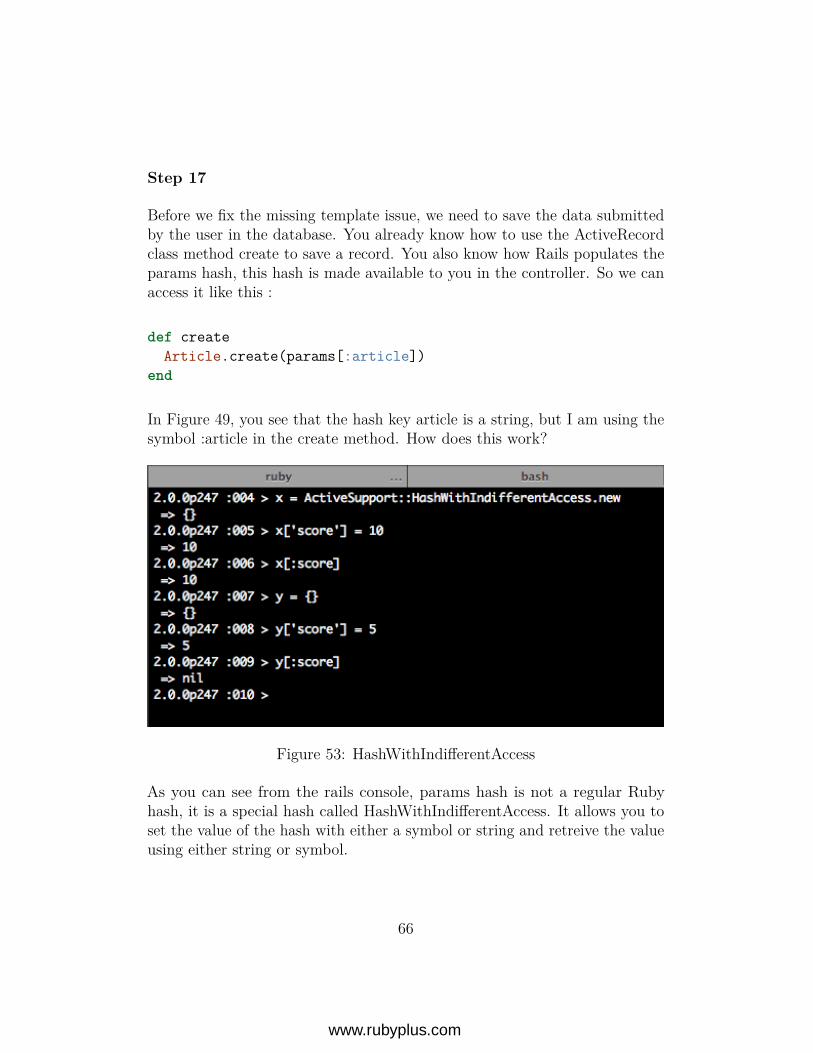
In Figure 49, you see that the hash key article is a string, but I am using thesymbol :article in the create method. How does this work?
Figure 53: HashWithIndifferentAccess
As you can see from the rails console, params hash is not a regular Rubyhash, it is a special hash called HashWithIndifferentAccess. It allows you toset the value of the hash with either a symbol or string and retreive the valueusing either string or symbol.
66
www.rubyplus.com
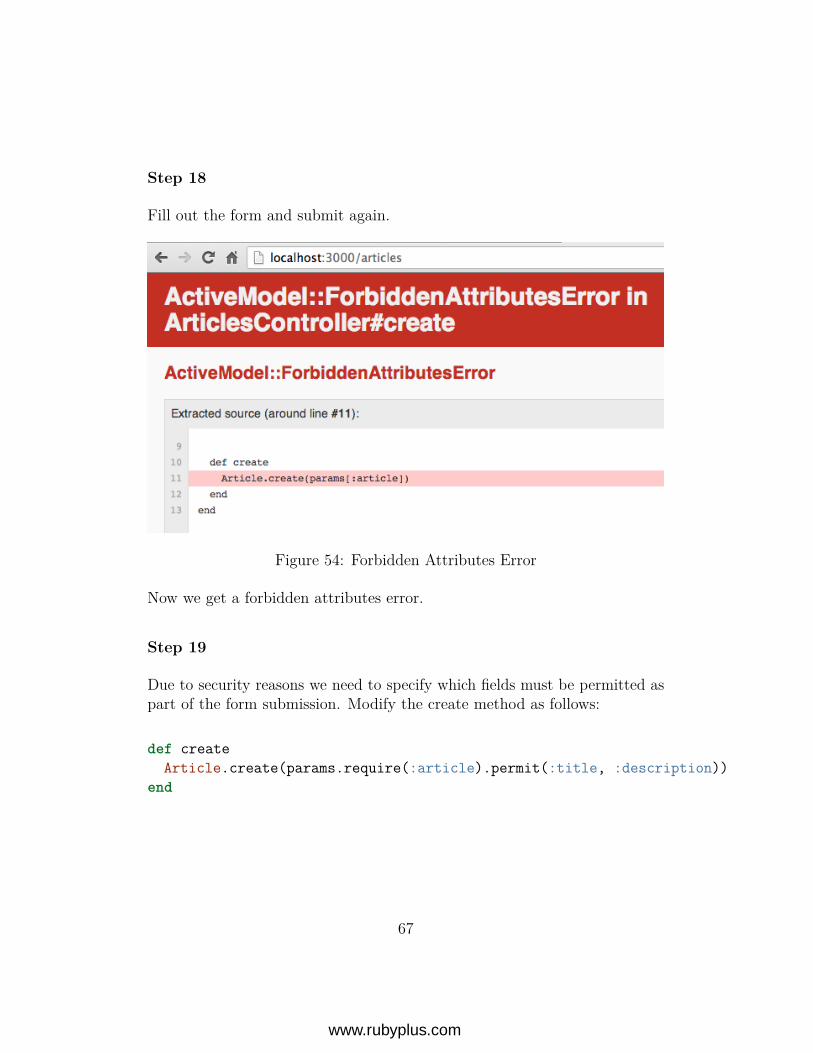
Step 18
Fill out the form and submit again.
Figure 54: Forbidden Attributes Error
Now we get a forbidden attributes error.
Step 19
Due to security reasons we need to specify which fields must be permitted aspart of the form submission. Modify the create method as follows:
def createArticle.create(params.require(:article).permit(:title, :description))
end
67
www.rubyplus.com
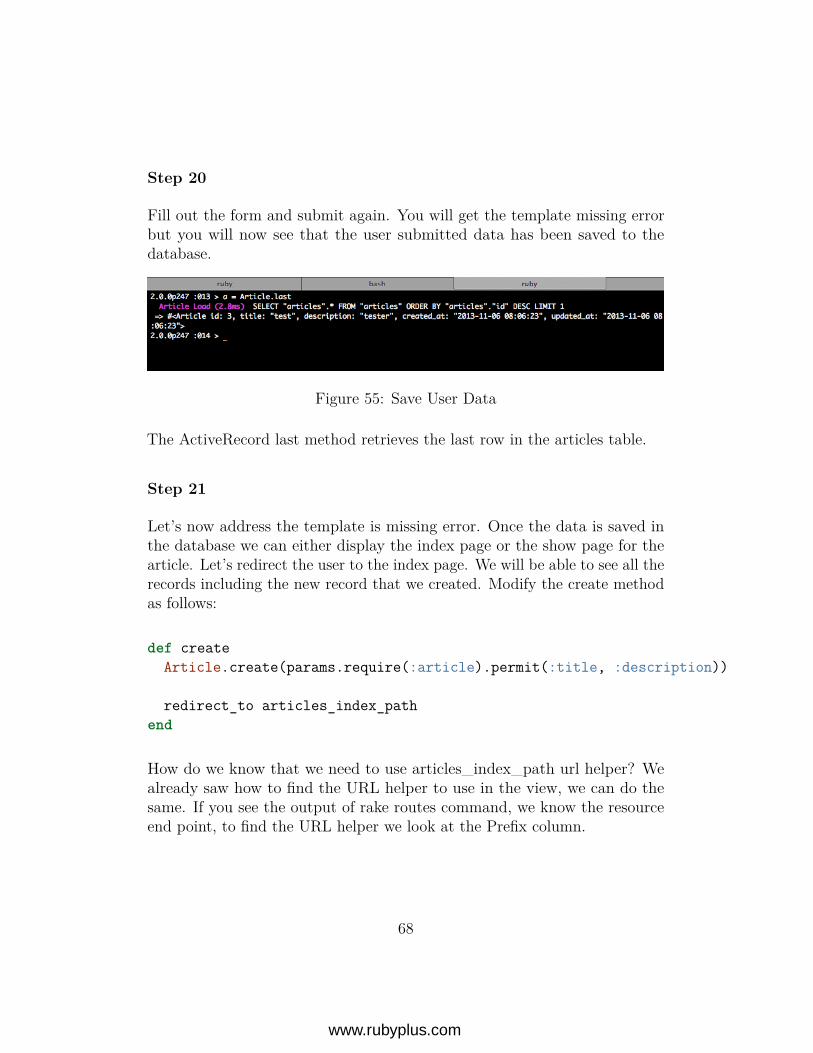
Step 20
Fill out the form and submit again. You will get the template missing errorbut you will now see that the user submitted data has been saved to thedatabase.
Figure 55: Save User Data
The ActiveRecord last method retrieves the last row in the articles table.
Step 21
Let’s now address the template is missing error. Once the data is saved inthe database we can either display the index page or the show page for thearticle. Let’s redirect the user to the index page. We will be able to see all therecords including the new record that we created. Modify the create methodas follows:
def createArticle.create(params.require(:article).permit(:title, :description))
redirect_to articles_index_pathend
How do we know that we need to use articles_index_path url helper? Wealready saw how to find the URL helper to use in the view, we can do thesame. If you see the output of rake routes command, we know the resourceend point, to find the URL helper we look at the Prefix column.
68
www.rubyplus.com
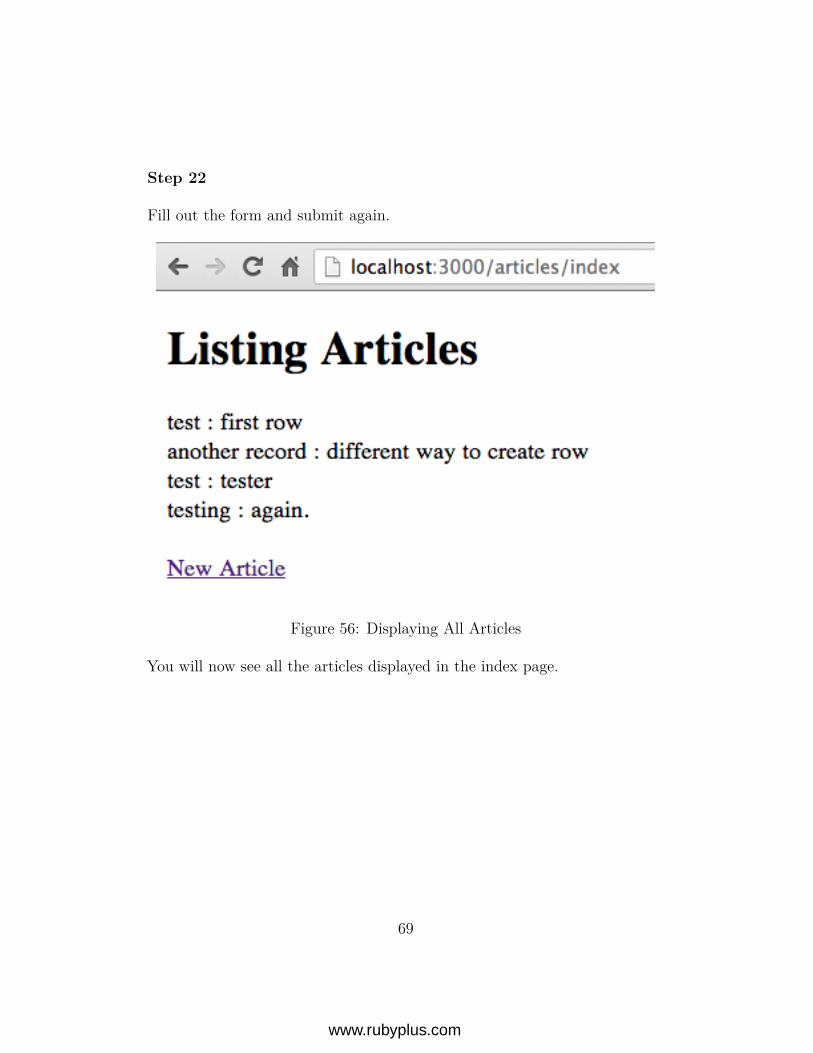
Step 22
Fill out the form and submit again.
Figure 56: Displaying All Articles
You will now see all the articles displayed in the index page.
69
www.rubyplus.com
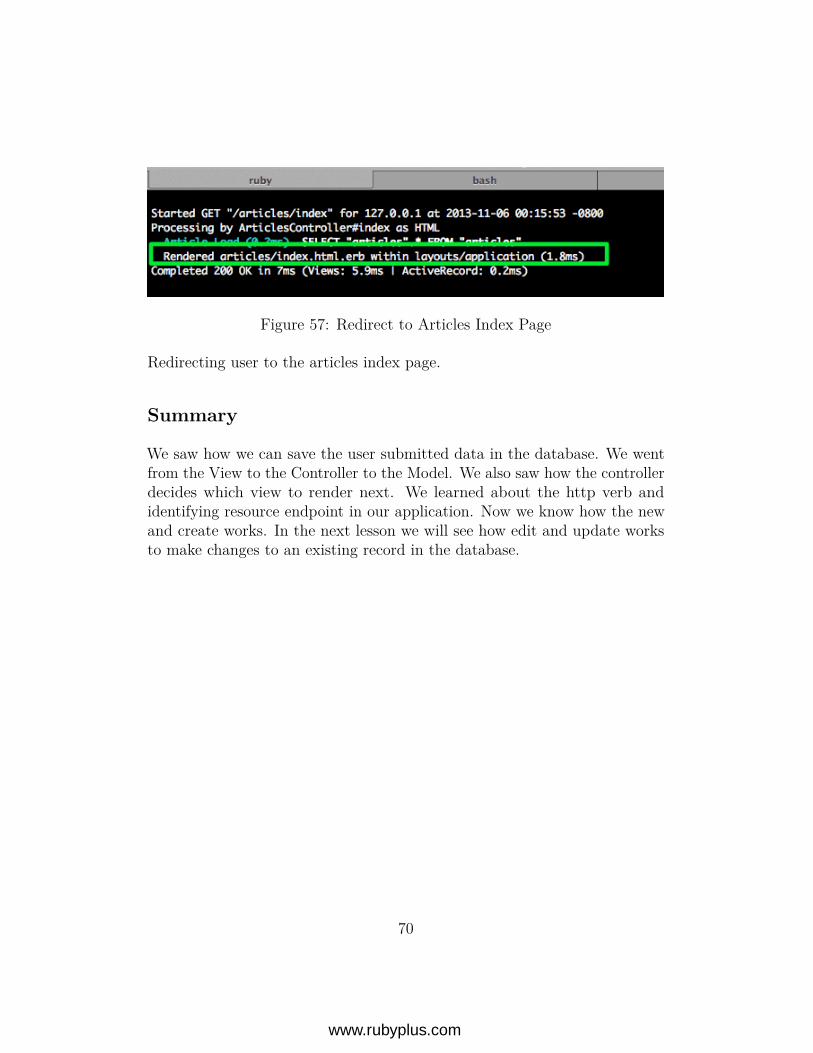
Figure 57: Redirect to Articles Index Page
Redirecting user to the articles index page.
Summary
We saw how we can save the user submitted data in the database. We wentfrom the View to the Controller to the Model. We also saw how the controllerdecides which view to render next. We learned about the http verb andidentifying resource endpoint in our application. Now we know how the newand create works. In the next lesson we will see how edit and update worksto make changes to an existing record in the database.
70
www.rubyplus.com
CHAPTER 6
Update Article
Objective
• Learn how to update an existing record in the database
Steps
Step 1
Let’s add ‘Edit’ link to each record that is displayed in the index page. Openthe app/views/index.html.erb and add the edit link:
<%= link_to ’Edit’, ? %>
What should be the url helper to use in the second parameter to the link_tomethod?
71
www.rubyplus.com

Step 2
We know that when someone clicks the ‘Edit’ link we need to load a form forthat particular row with the existing values for that record. So we know theresource endpoint is articles#edit, if you look at the rake routes output, thePrefix column gives us the url helper to use.
Figure 58: Edit Article URL Helper
So we now have:
<%= link_to ’Edit’, edit_article_path() %>
72
www.rubyplus.com
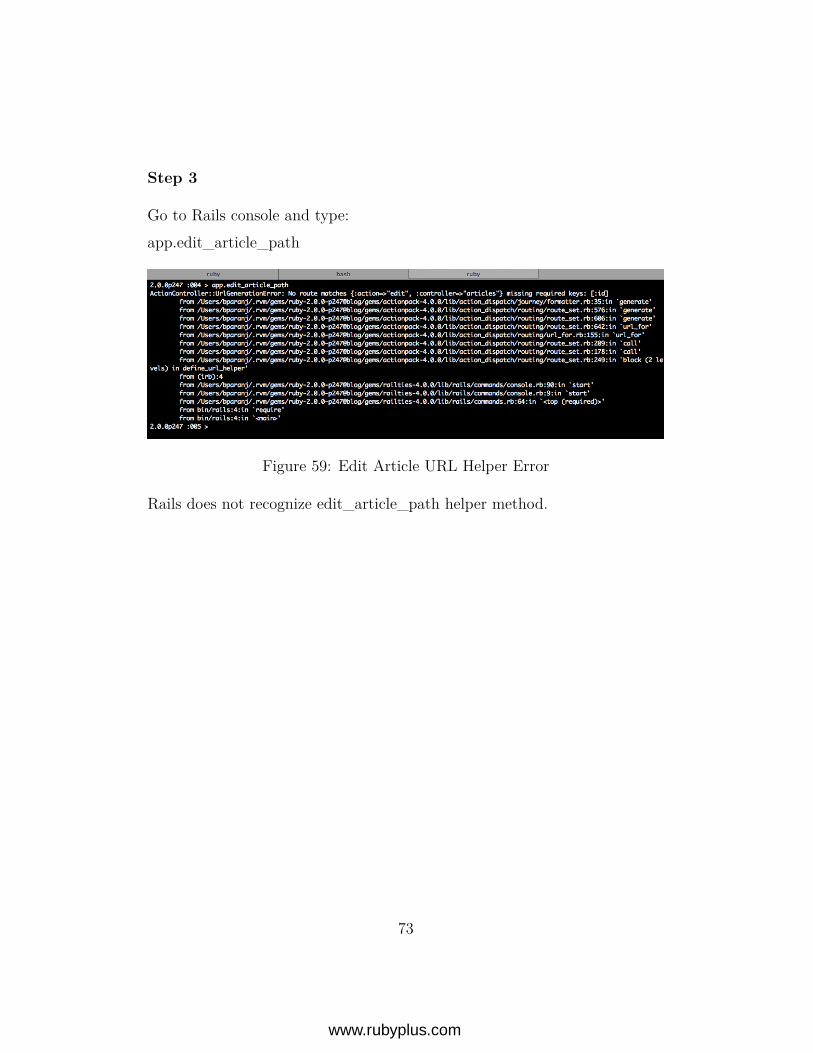
Step 3
Go to Rails console and type:app.edit_article_path
Figure 59: Edit Article URL Helper Error
Rails does not recognize edit_article_path helper method.
73
www.rubyplus.com
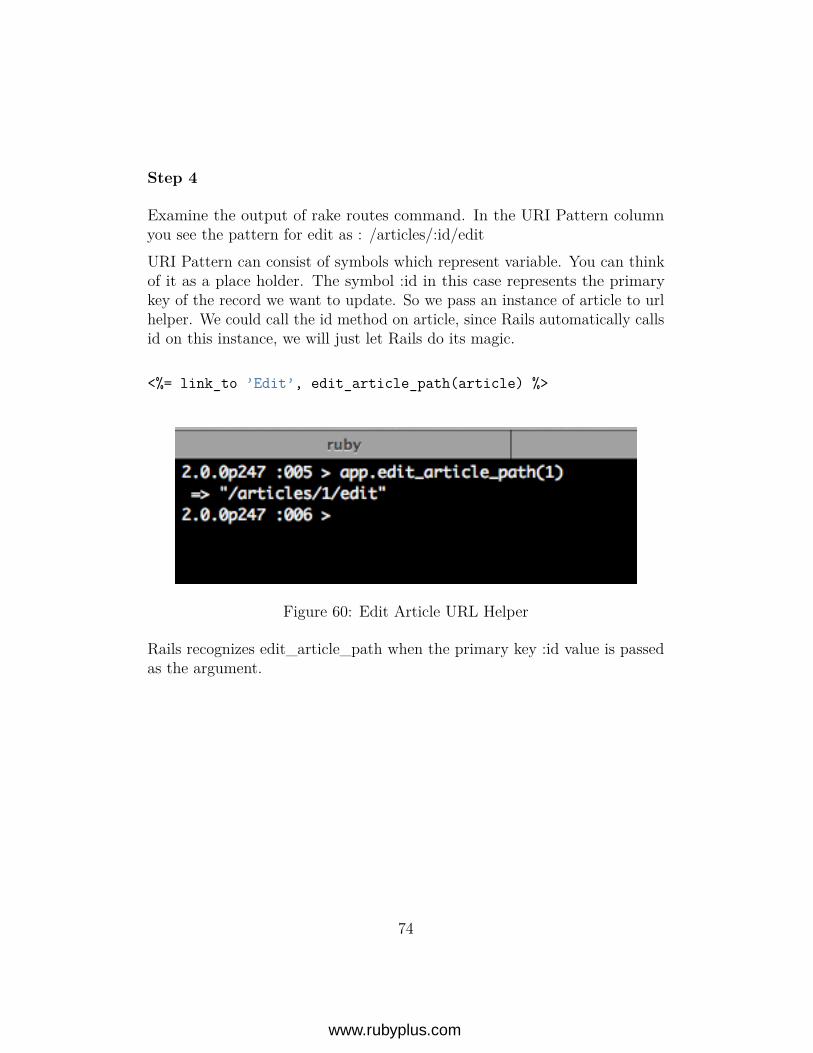
Step 4
Examine the output of rake routes command. In the URI Pattern columnyou see the pattern for edit as : /articles/:id/editURI Pattern can consist of symbols which represent variable. You can thinkof it as a place holder. The symbol :id in this case represents the primarykey of the record we want to update. So we pass an instance of article to urlhelper. We could call the id method on article, since Rails automatically callsid on this instance, we will just let Rails do its magic.
<%= link_to ’Edit’, edit_article_path(article) %>
Figure 60: Edit Article URL Helper
Rails recognizes edit_article_path when the primary key :id value is passedas the argument.
74
www.rubyplus.com
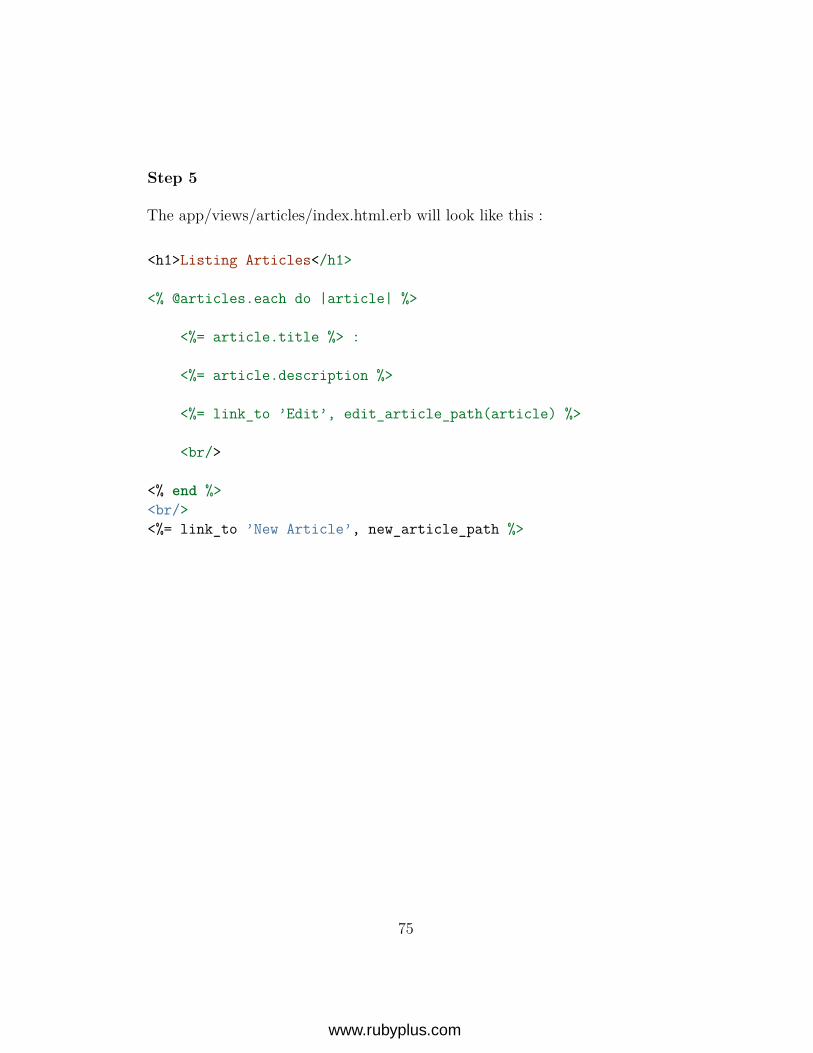
Step 5
The app/views/articles/index.html.erb will look like this :
<h1>Listing Articles</h1>
<% @articles.each do |article| %>
<%= article.title %> :
<%= article.description %>
<%= link_to ’Edit’, edit_article_path(article) %>
<br/>
<% end %><br/><%= link_to ’New Article’, new_article_path %>
75
www.rubyplus.com
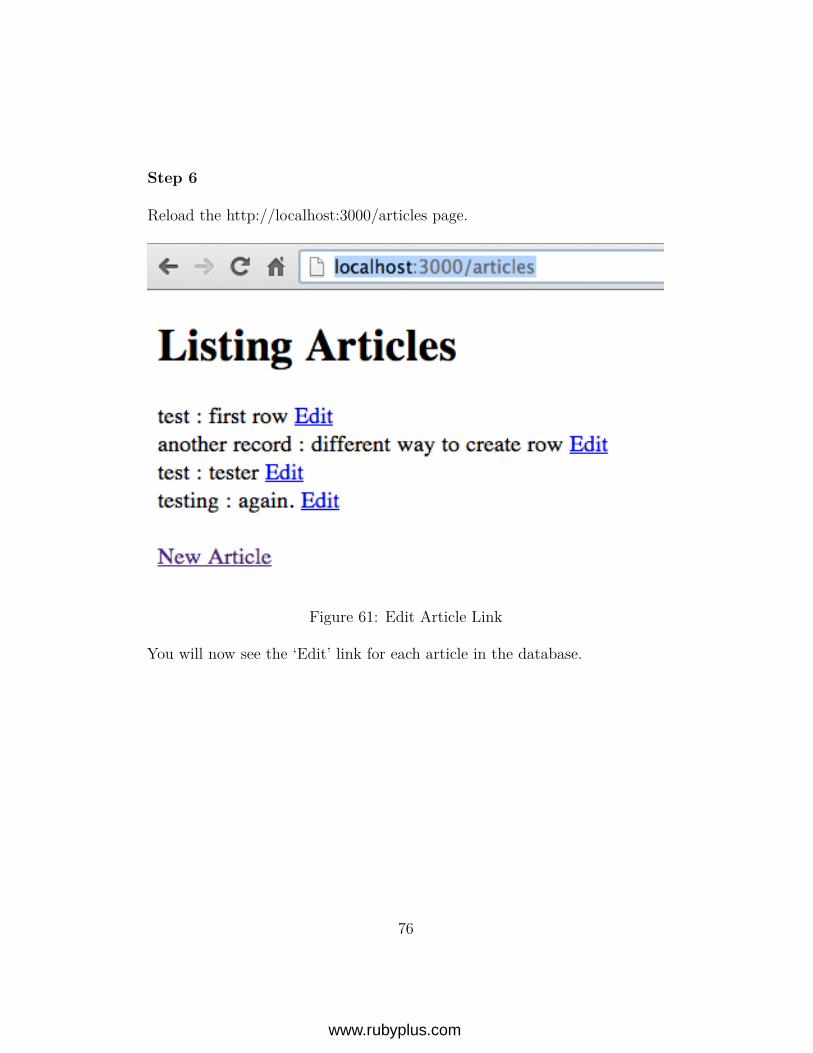
Step 6
Reload the http://localhost:3000/articles page.
Figure 61: Edit Article Link
You will now see the ‘Edit’ link for each article in the database.
76
www.rubyplus.com
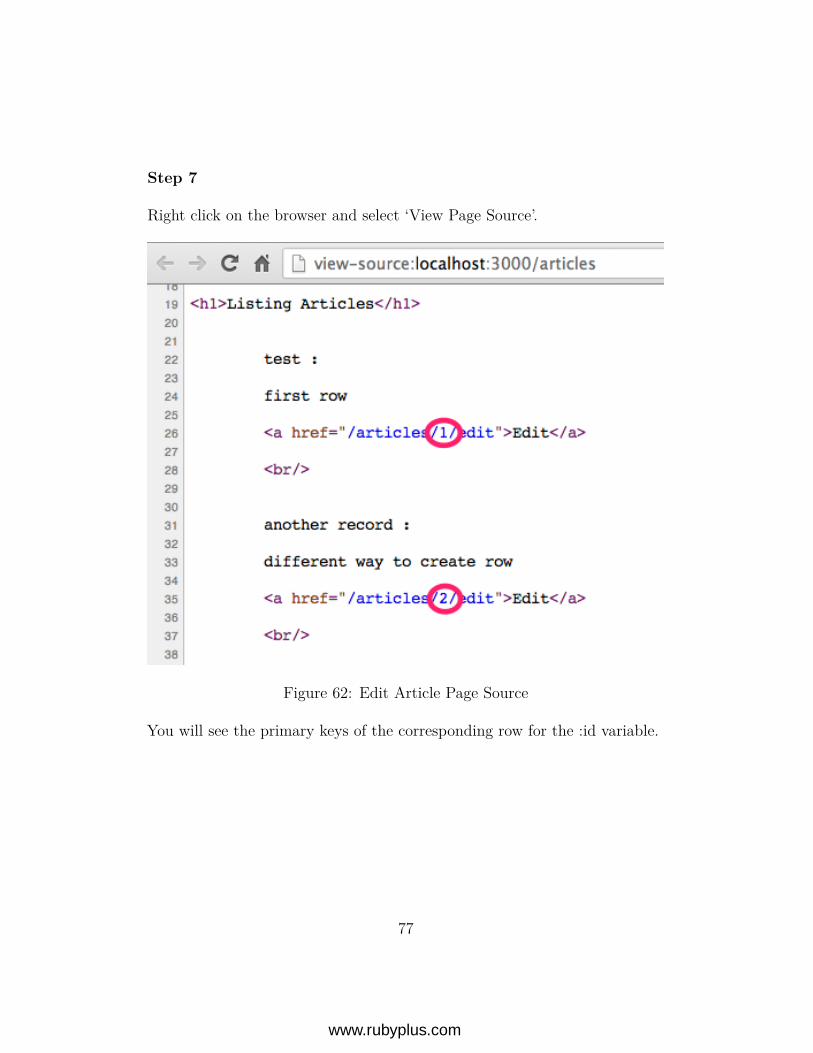
Step 7
Right click on the browser and select ‘View Page Source’.
Figure 62: Edit Article Page Source
You will see the primary keys of the corresponding row for the :id variable.
77
www.rubyplus.com
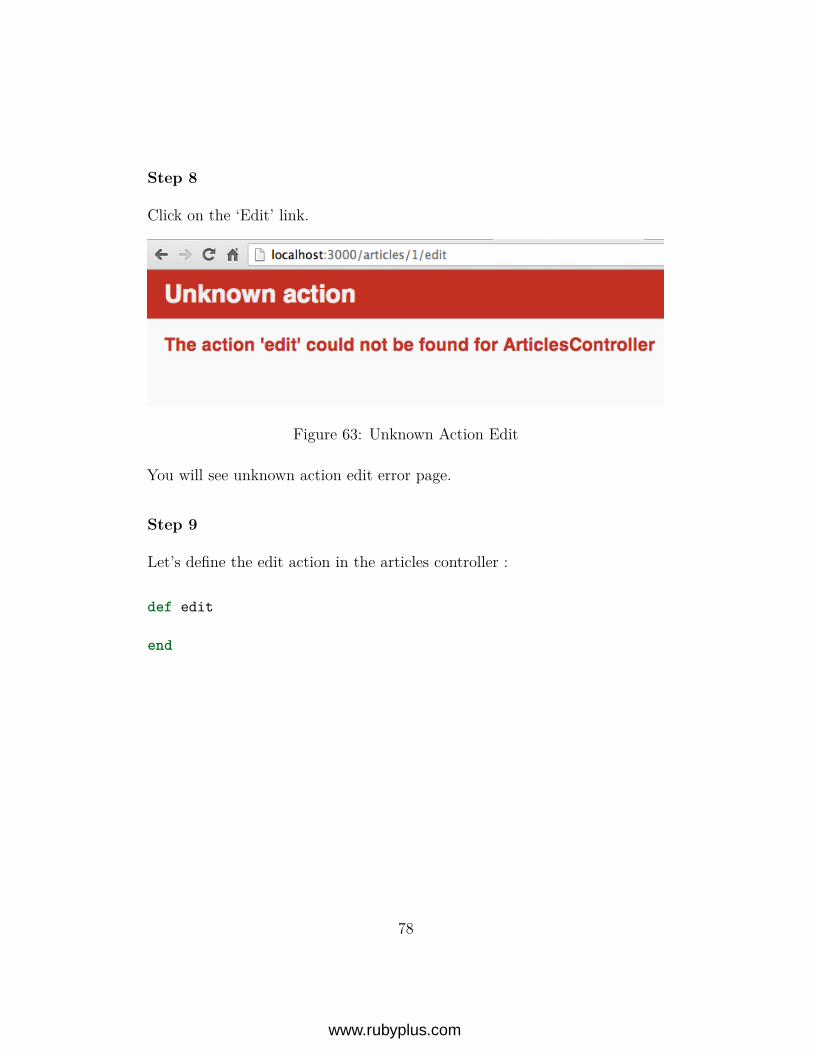
Step 8
Click on the ‘Edit’ link.
Figure 63: Unknown Action Edit
You will see unknown action edit error page.
Step 9
Let’s define the edit action in the articles controller :
def edit
end
78
www.rubyplus.com

Step 10
Click on the ‘Edit’ link. You now get template is missing error. Let’s createapp/views/articles/edit.html.erb with the following contents:
<%= form_for @article do |f| %><p>
<%= f.label :title %><br><%= f.text_field :title %>
</p>
<p><%= f.label :description %><br><%= f.text_area :description %>
</p>
<p><%= f.submit %>
</p><% end %>
79
www.rubyplus.com
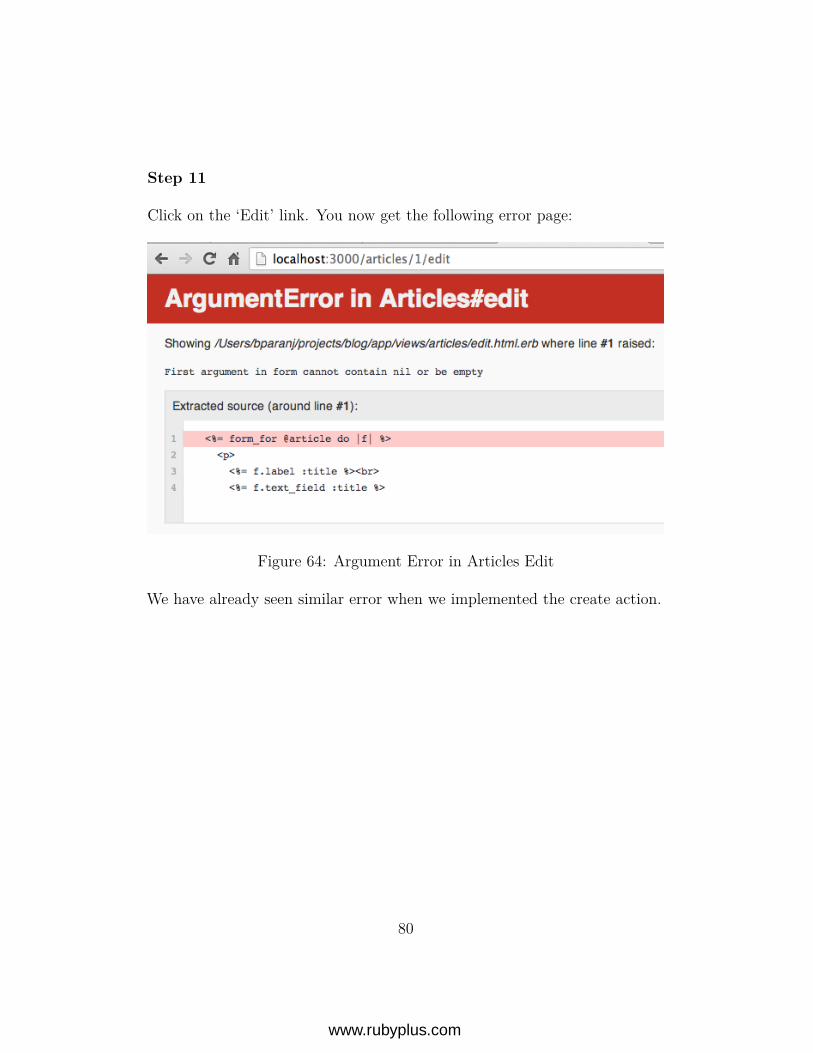
Step 11
Click on the ‘Edit’ link. You now get the following error page:
Figure 64: Argument Error in Articles Edit
We have already seen similar error when we implemented the create action.
80
www.rubyplus.com
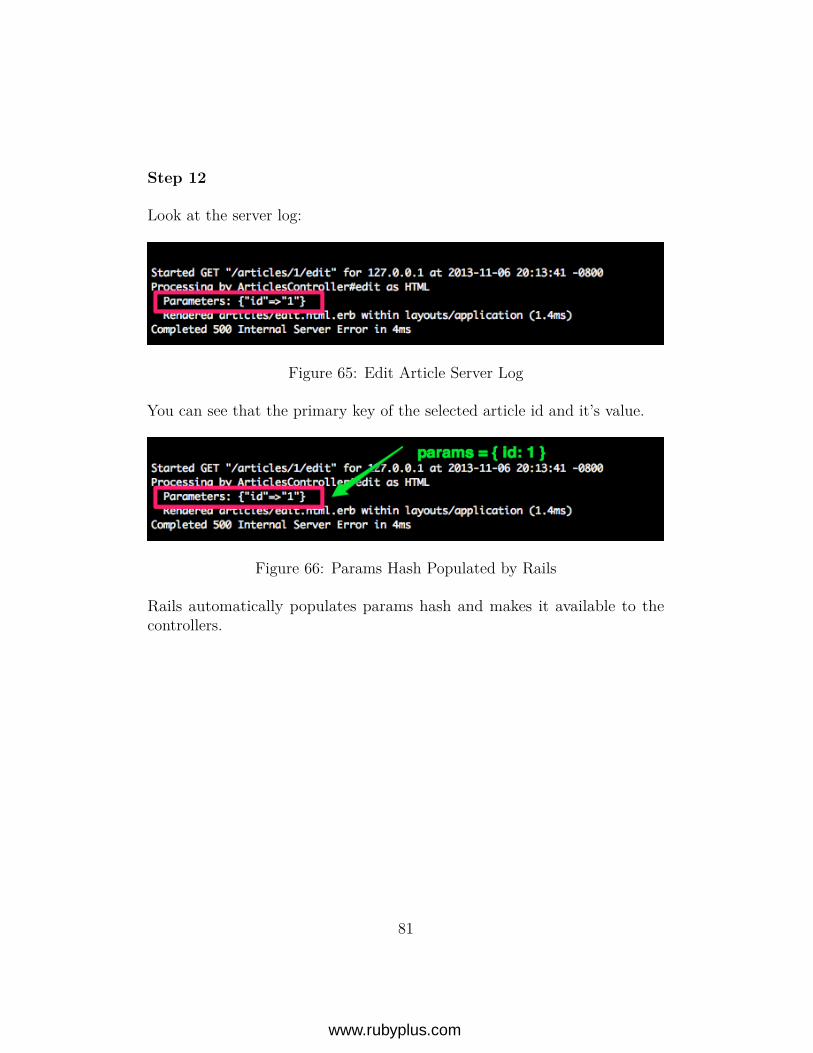
Step 12
Look at the server log:
Figure 65: Edit Article Server Log
You can see that the primary key of the selected article id and it’s value.
Figure 66: Params Hash Populated by Rails
Rails automatically populates params hash and makes it available to thecontrollers.
81
www.rubyplus.com
Step 13
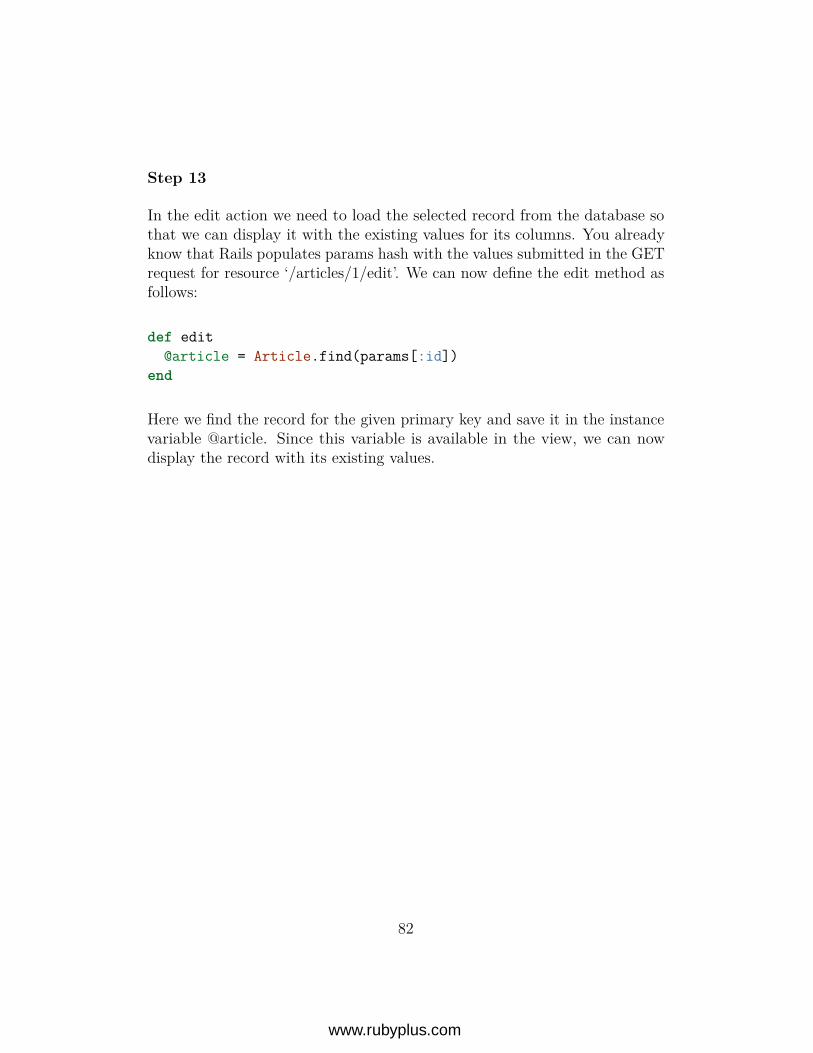
In the edit action we need to load the selected record from the database sothat we can display it with the existing values for its columns. You alreadyknow that Rails populates params hash with the values submitted in the GETrequest for resource ‘/articles/1/edit’. We can now define the edit method asfollows:
def edit@article = Article.find(params[:id])
end
Here we find the record for the given primary key and save it in the instancevariable @article. Since this variable is available in the view, we can nowdisplay the record with its existing values.
82
www.rubyplus.com
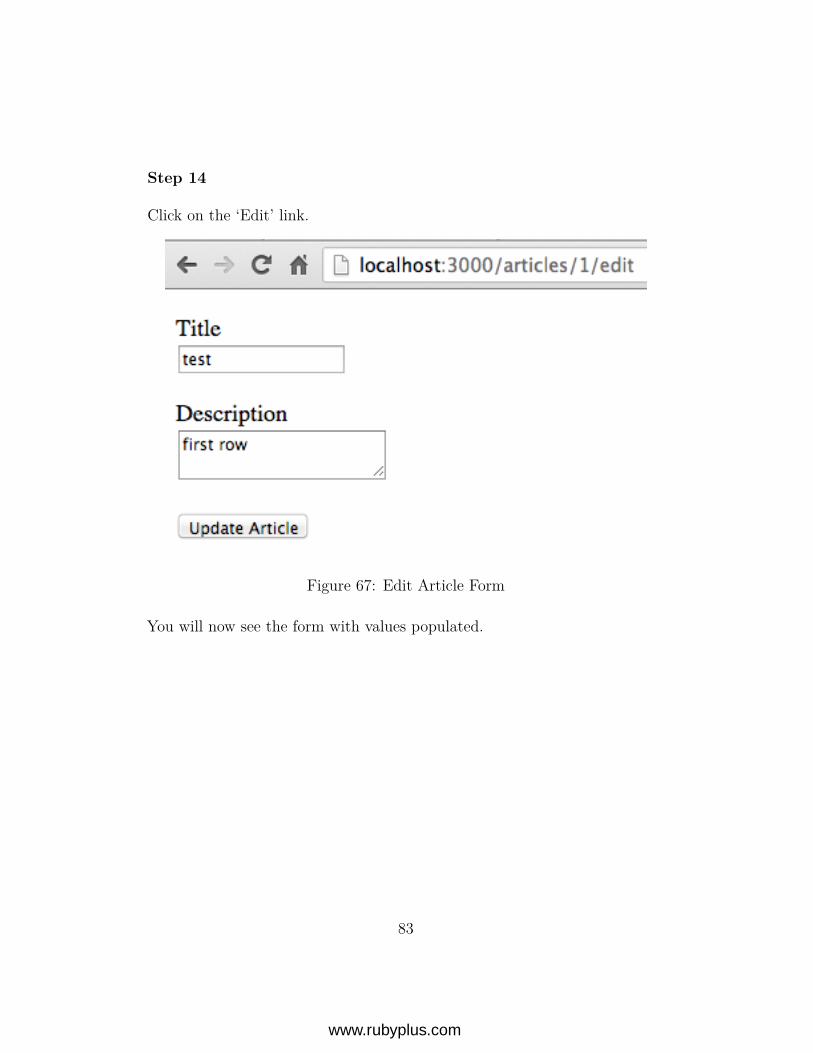
Step 14
Click on the ‘Edit’ link.
Figure 67: Edit Article Form
You will now see the form with values populated.
83
www.rubyplus.com
Step 15
Right click on the browser and click ‘View Page Source’.
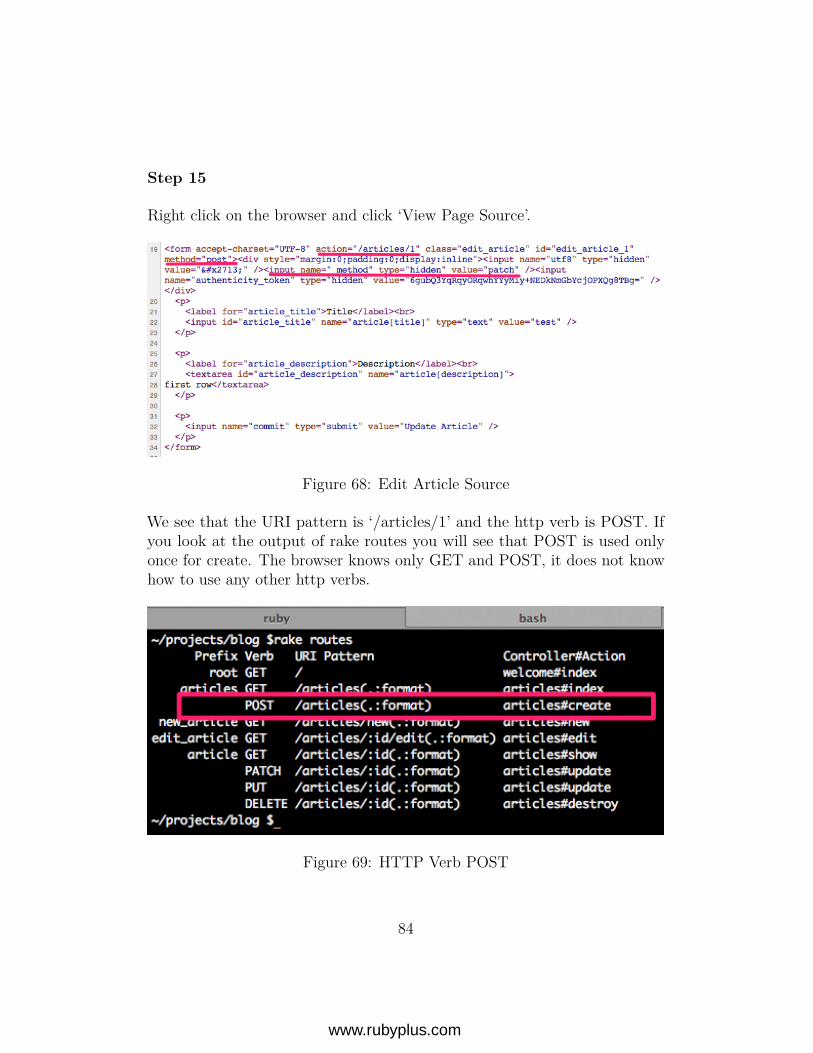
Figure 68: Edit Article Source
We see that the URI pattern is ‘/articles/1’ and the http verb is POST. Ifyou look at the output of rake routes you will see that POST is used onlyonce for create. The browser knows only GET and POST, it does not knowhow to use any other http verbs.
Figure 69: HTTP Verb POST
84
www.rubyplus.com
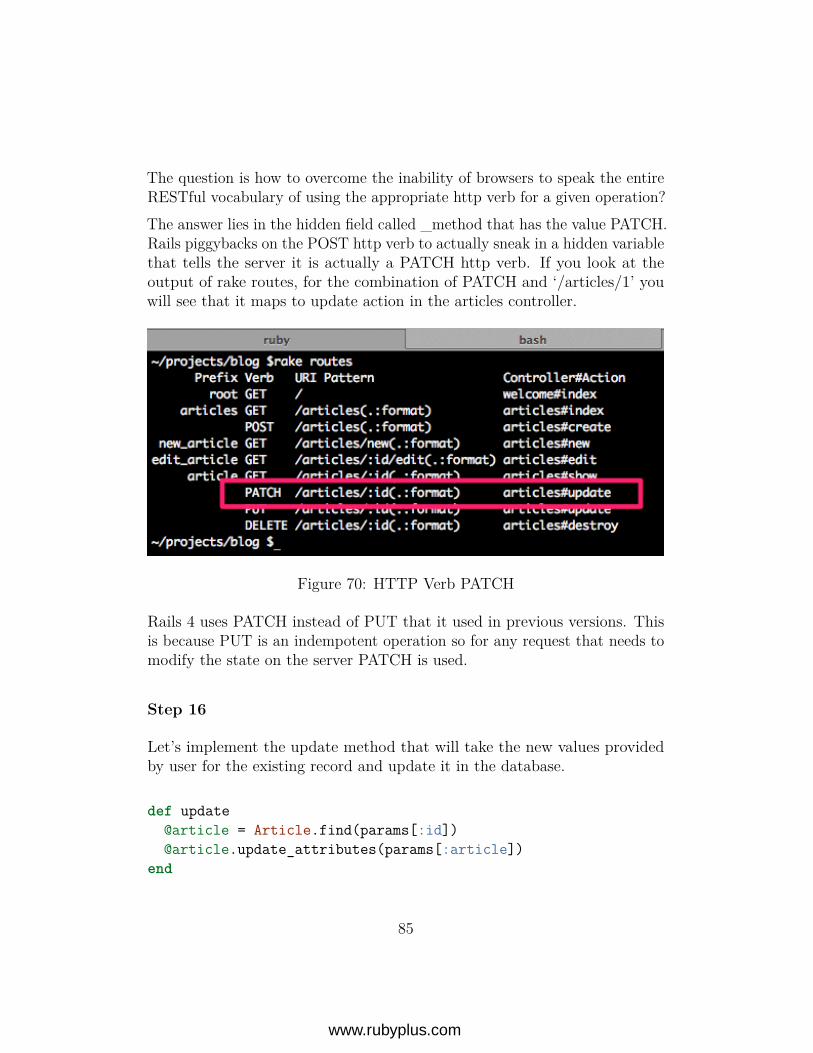
The question is how to overcome the inability of browsers to speak the entireRESTful vocabulary of using the appropriate http verb for a given operation?The answer lies in the hidden field called _method that has the value PATCH.Rails piggybacks on the POST http verb to actually sneak in a hidden variablethat tells the server it is actually a PATCH http verb. If you look at theoutput of rake routes, for the combination of PATCH and ‘/articles/1’ youwill see that it maps to update action in the articles controller.
Figure 70: HTTP Verb PATCH
Rails 4 uses PATCH instead of PUT that it used in previous versions. Thisis because PUT is an indempotent operation so for any request that needs tomodify the state on the server PATCH is used.
Step 16
Let’s implement the update method that will take the new values providedby user for the existing record and update it in the database.
def update@article = Article.find(params[:id])@article.update_attributes(params[:article])
end
85
www.rubyplus.com
Before we update the record we need to load the existing record from thedatabase. Why? Because the instance variable in the controller will only existfor one request-response cycle. Since http is stateless we need to retrieve itagain before we can update it.
Step 17
Go to articles index page. Click on the ‘Edit’ link. In the edit form, you canchange the value of either the title or description and click ‘Update Article’.
Step 18
To fix the forbidden attributes error, we can do the same thing we did forcreate action. Change the update method as follows:
def update@article = Article.find(params[:id])permitted_columns = params.require(:article).permit(:title, :description)@article.update_attributes(permitted_columns)
end
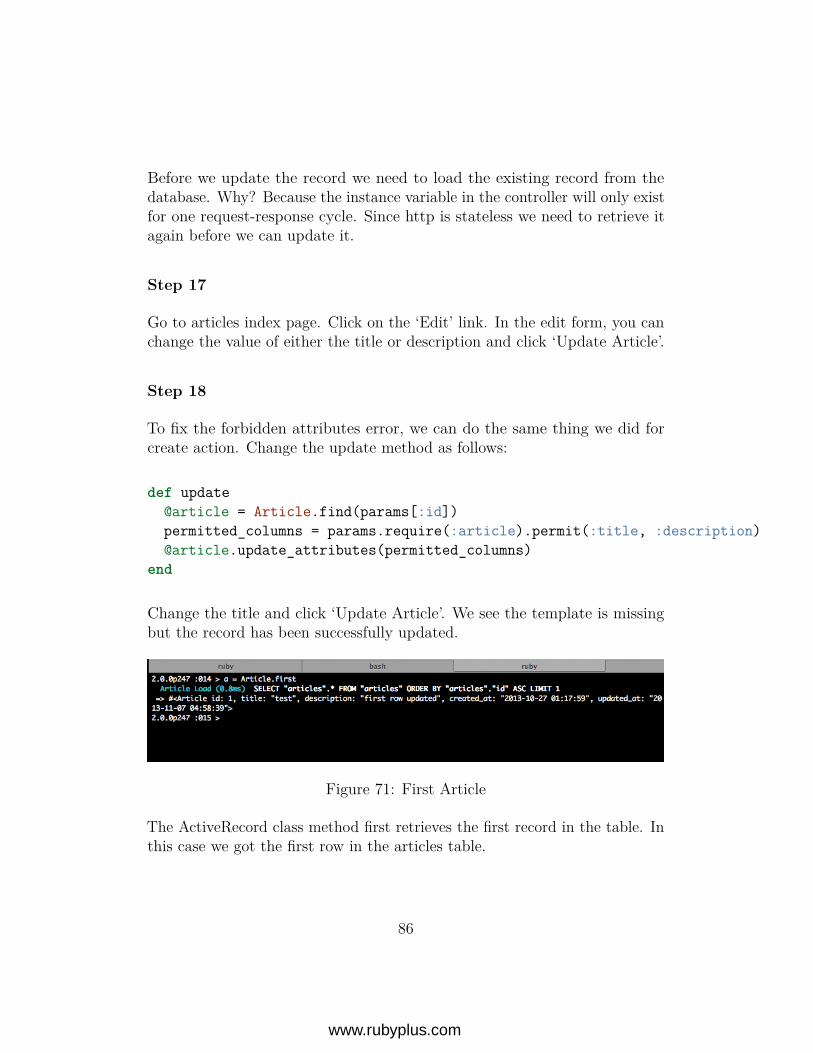
Change the title and click ‘Update Article’. We see the template is missingbut the record has been successfully updated.
Figure 71: First Article
The ActiveRecord class method first retrieves the first record in the table. Inthis case we got the first row in the articles table.
86
www.rubyplus.com
Step 19
Let’s address the template is missing error. We don’t need update.html.erb,we can redirect the user to the index page where all the records are displayed.Change the update method as follows:
def update@article = Article.find(params[:id])permitted_columns = params.require(:article).permit(:title, :description)@article.update_attributes(permitted_columns)
redirect_to articles_pathend
Step 20
Edit the article and click ‘Update Article’. You should see that it now updatesthe article.
Step 21
An annoying thing about Rails 4 is that when you run the rails generator tocreate a controller with a given action it also creates an entry in the routes.rbwhich is not required for a RESTful route. Let’s delete the following line:
get "articles/index"
in the config/routes.rb file. Update the create method to use the articles_pathas follows:
def createArticle.create(params.require(:article).permit(:title, :description))
redirect_to articles_pathend
87
www.rubyplus.com
Summary
In this lesson you learned how to update an existing record. In the nextlesson we will see how to display a given article.
88
www.rubyplus.com
CHAPTER 7
Show Article
Objective
• Learn how to display a selected article in the article show page.
Steps
Step 1
Add the ‘Show’ link to each article in the index page. The hyperlink text willbe ‘Show’.
<%= link_to ’Show’, ? %>
When the user clicks the ‘Show’ link we need to go the articles controllershow action. We will retrieve the record from the database and display it inthe view.What should be the url helper?
89
www.rubyplus.com
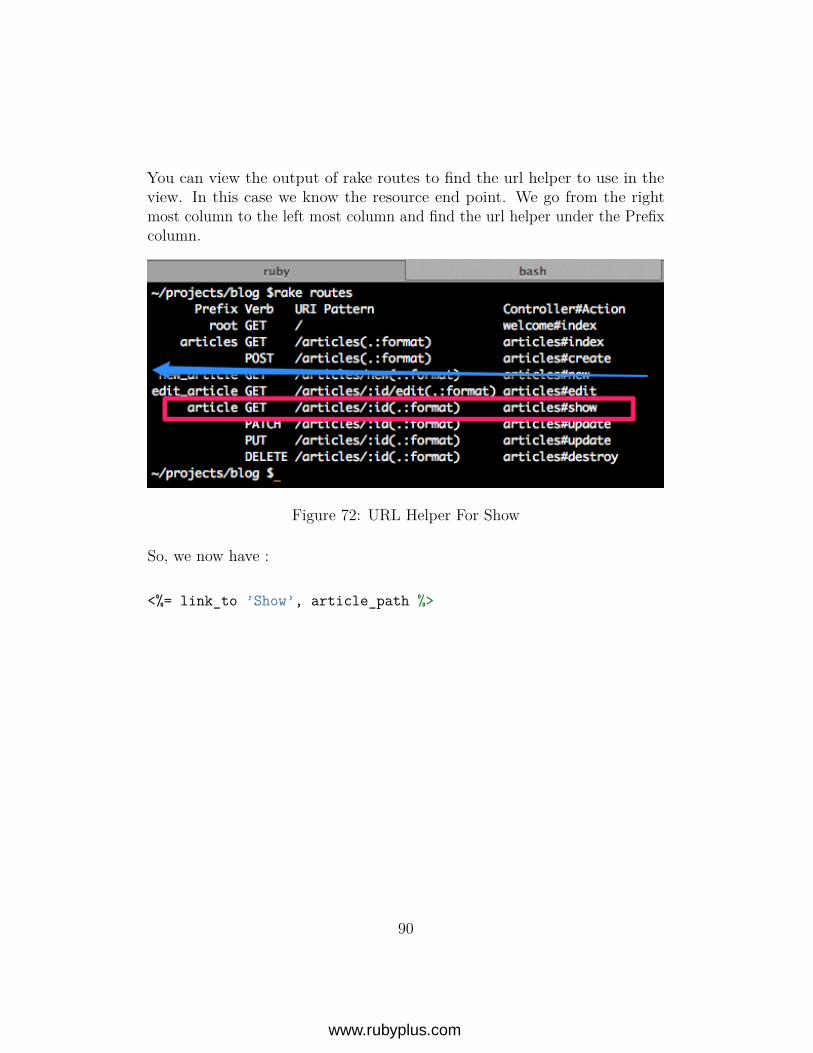
You can view the output of rake routes to find the url helper to use in theview. In this case we know the resource end point. We go from the rightmost column to the left most column and find the url helper under the Prefixcolumn.
Figure 72: URL Helper For Show
So, we now have :
<%= link_to ’Show’, article_path %>
90
www.rubyplus.com
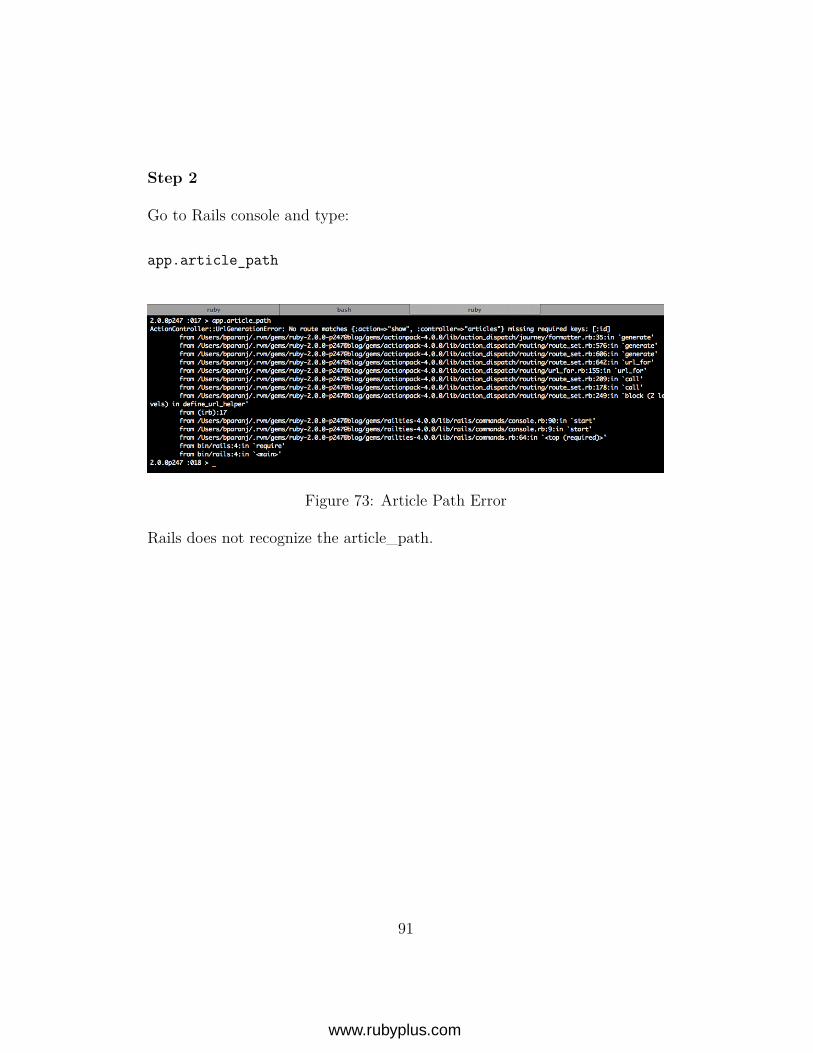
Step 2
Go to Rails console and type:
app.article_path
Figure 73: Article Path Error
Rails does not recognize the article_path.
91
www.rubyplus.com

Step 3
Look at the output of rake routes command. You can see in the URI patterncolumn the :id variable for primary key.
Figure 74: Show Article Path Primary Key
So we need to pass the id as the parameter as shown below:
<%= link_to ’Show’, article_path(article.id) %>
Figure 75: Show Article Path
Rails recognizes article path when an id is passed in as the parameter to theurl helper method.You can see the generated string is the same as the URI pattern in the outputof the rake routes command.We can simplify it even further by letting Rails call the id method for us byjust passing the article object.
92
www.rubyplus.com
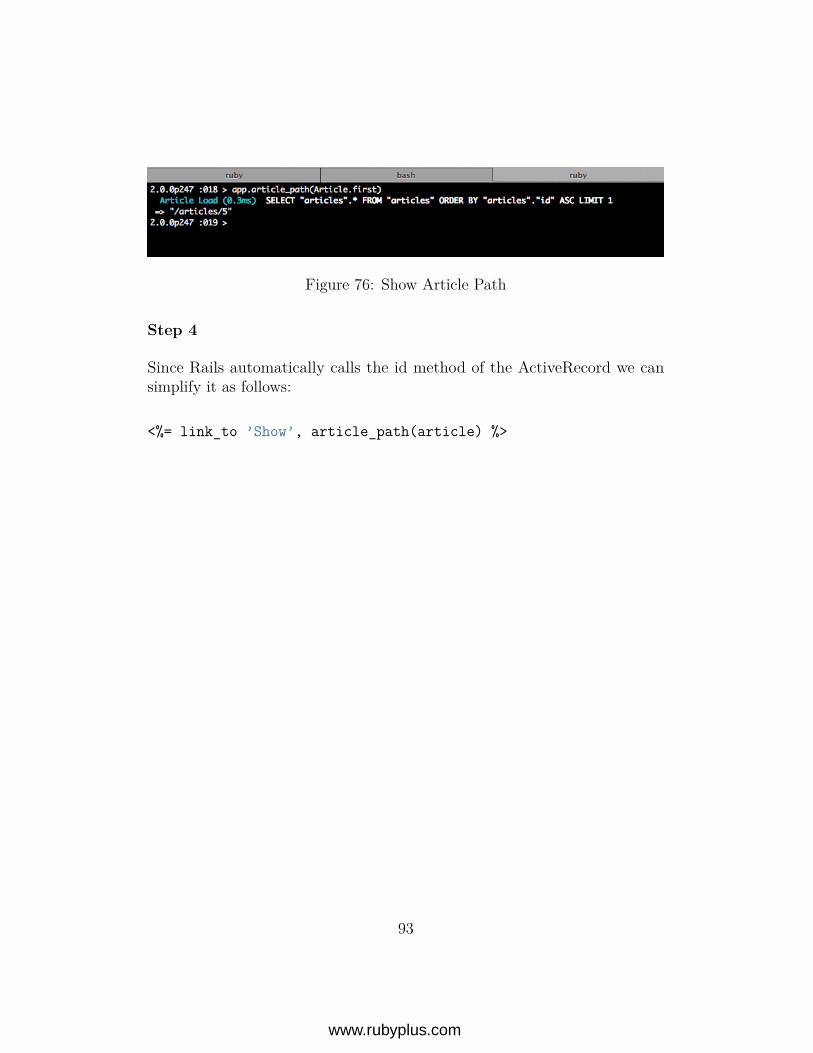
Figure 76: Show Article Path
Step 4
Since Rails automatically calls the id method of the ActiveRecord we cansimplify it as follows:
<%= link_to ’Show’, article_path(article) %>
93
www.rubyplus.com
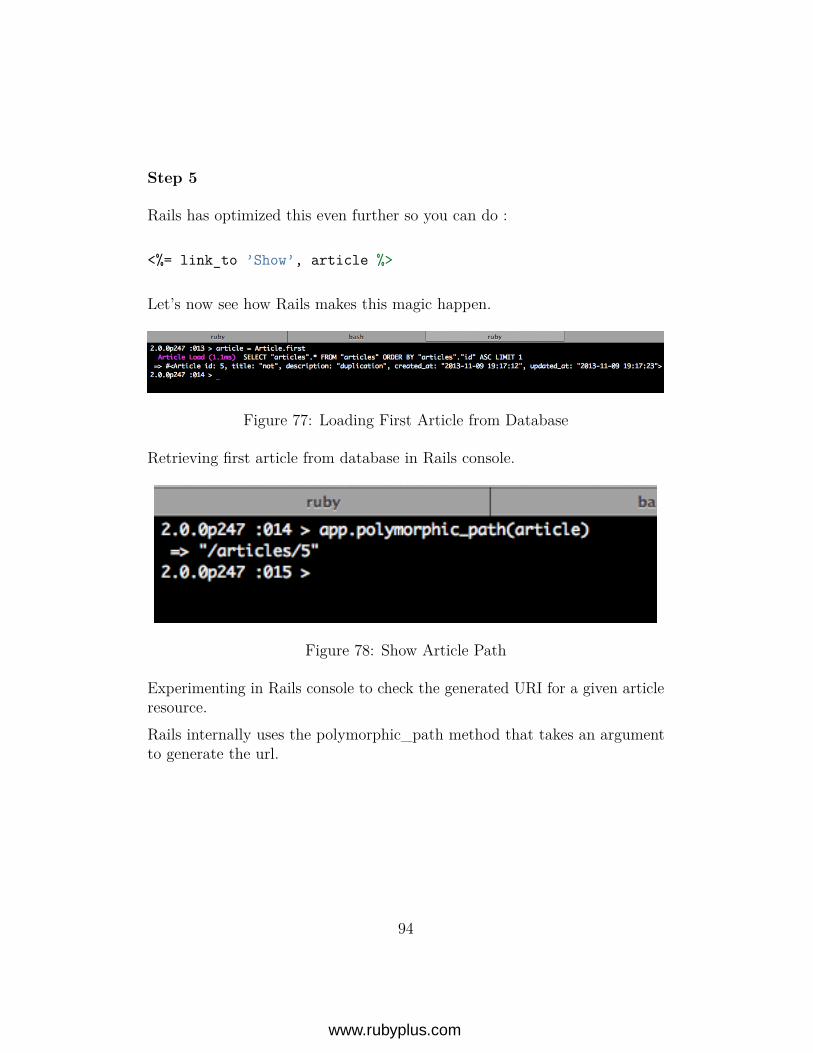
Step 5
Rails has optimized this even further so you can do :
<%= link_to ’Show’, article %>
Let’s now see how Rails makes this magic happen.
Figure 77: Loading First Article from Database
Retrieving first article from database in Rails console.
Figure 78: Show Article Path
Experimenting in Rails console to check the generated URI for a given articleresource.Rails internally uses the polymorphic_path method that takes an argumentto generate the url.
94
www.rubyplus.com

Step 6
The app/views/articles/index.html.erb looks as shown below:
<h1>Listing Articles</h1>
<% @articles.each do |article| %>
<%= article.title %> :
<%= article.description %>
<%= link_to ’Edit’, edit_article_path(article) %><%= link_to ’Show’, article_path(article) %>
<br/>
<% end %><br/><%= link_to ’New Article’, new_article_path %>
95
www.rubyplus.com
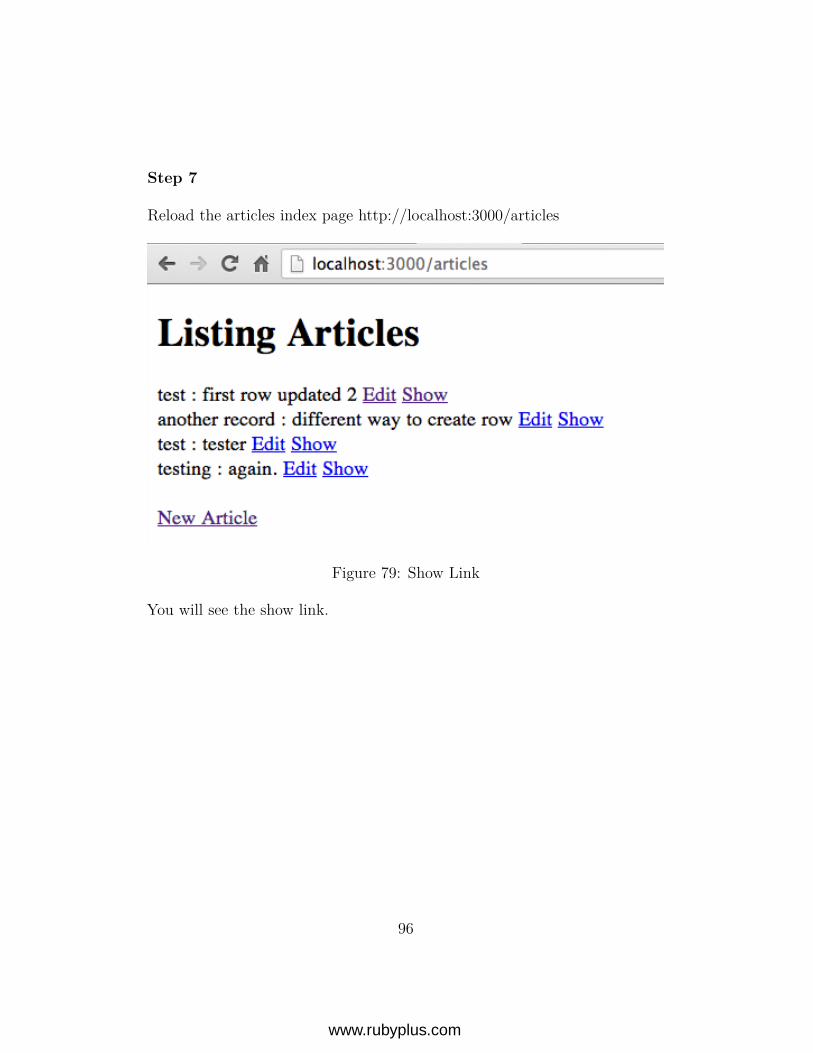
Step 7
Reload the articles index page http://localhost:3000/articles
Figure 79: Show Link
You will see the show link.
96
www.rubyplus.com
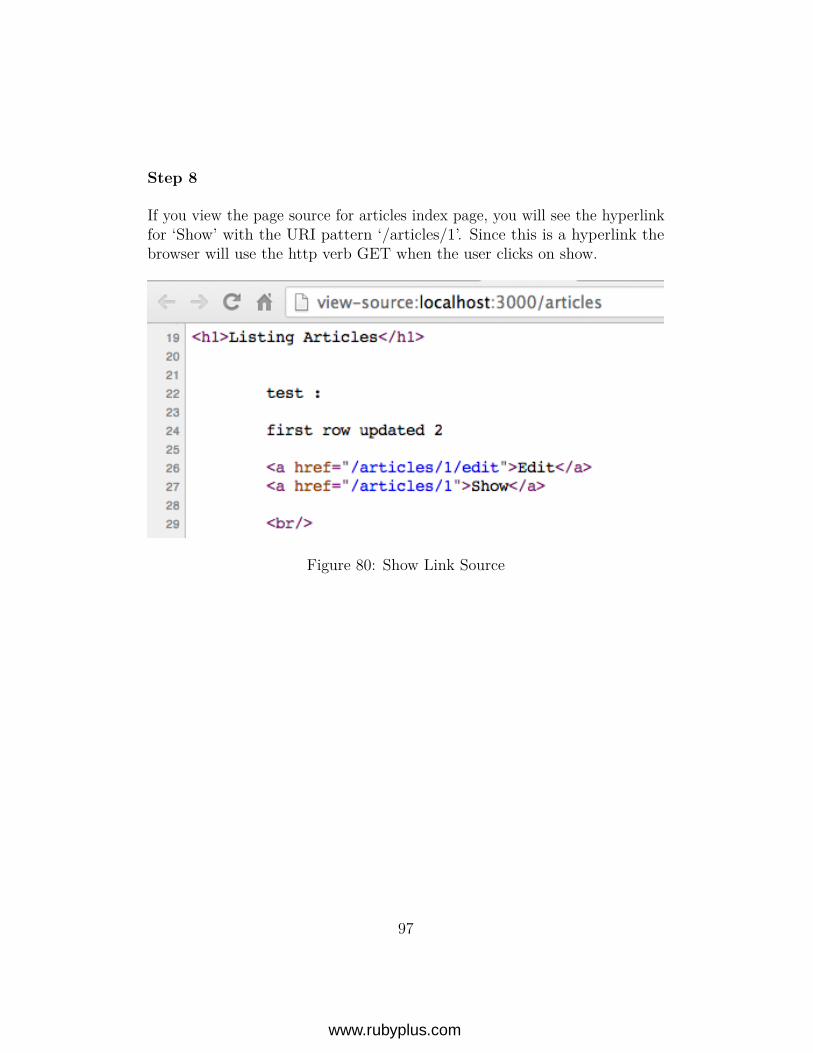
Step 8
If you view the page source for articles index page, you will see the hyperlinkfor ‘Show’ with the URI pattern ‘/articles/1’. Since this is a hyperlink thebrowser will use the http verb GET when the user clicks on show.
Figure 80: Show Link Source
97
www.rubyplus.com
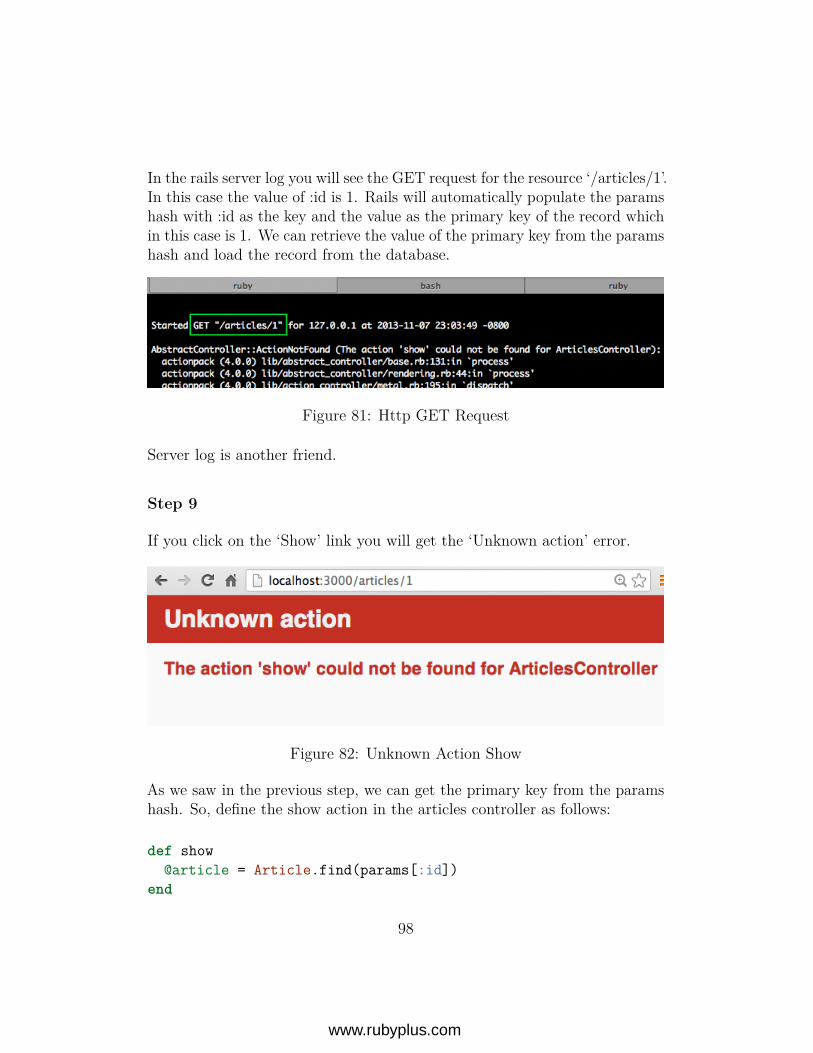
In the rails server log you will see the GET request for the resource ‘/articles/1’.In this case the value of :id is 1. Rails will automatically populate the paramshash with :id as the key and the value as the primary key of the record whichin this case is 1. We can retrieve the value of the primary key from the paramshash and load the record from the database.
Figure 81: Http GET Request
Server log is another friend.
Step 9
If you click on the ‘Show’ link you will get the ‘Unknown action’ error.
Figure 82: Unknown Action Show
As we saw in the previous step, we can get the primary key from the paramshash. So, define the show action in the articles controller as follows:
def show@article = Article.find(params[:id])
end
98
www.rubyplus.com
We already know the instance variable @article will be made available in theview.
Step 10
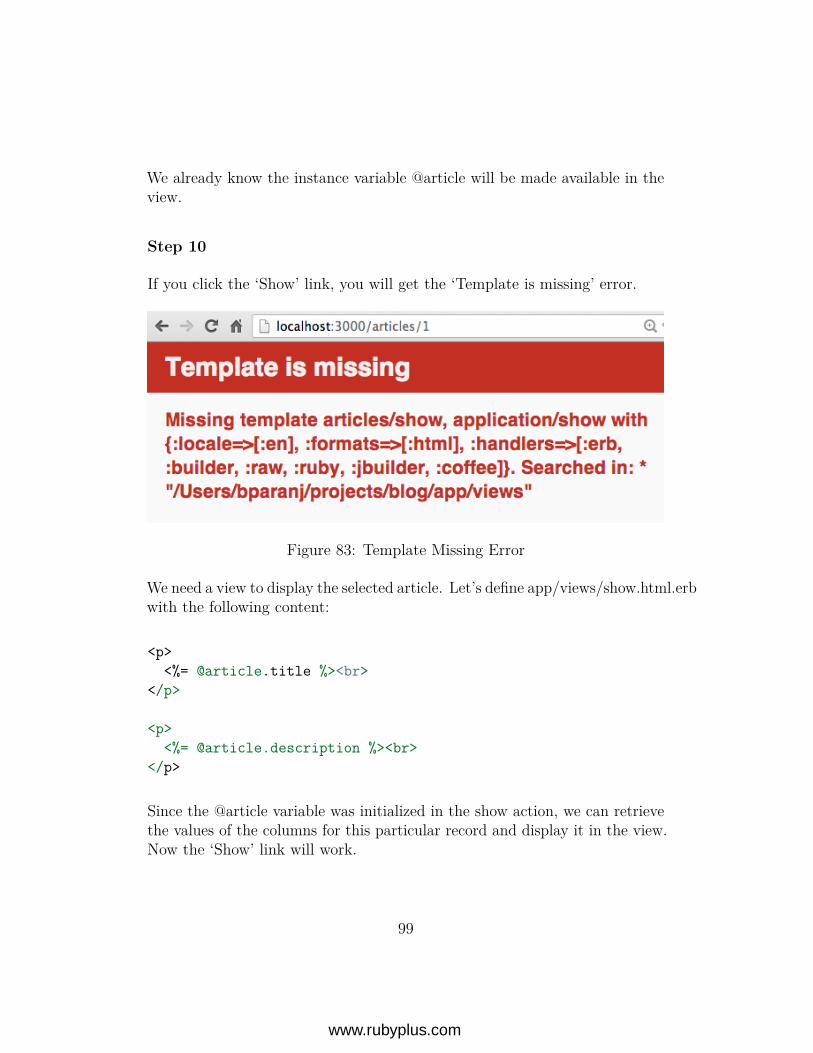
If you click the ‘Show’ link, you will get the ‘Template is missing’ error.
Figure 83: Template Missing Error
We need a view to display the selected article. Let’s define app/views/show.html.erbwith the following content:
<p><%= @article.title %><br>
</p>
<p><%= @article.description %><br>
</p>
Since the @article variable was initialized in the show action, we can retrievethe values of the columns for this particular record and display it in the view.Now the ‘Show’ link will work.
99
www.rubyplus.com
Summary
In this lesson we saw how to display a selected article in the show page. Inthe next lesson we will see how to delete a given record from the database.
100
www.rubyplus.com
CHAPTER 8
Delete Article
Objectives
• Learn how to delete a given article.
• Learn how to use flash messages.
Steps
Step 1
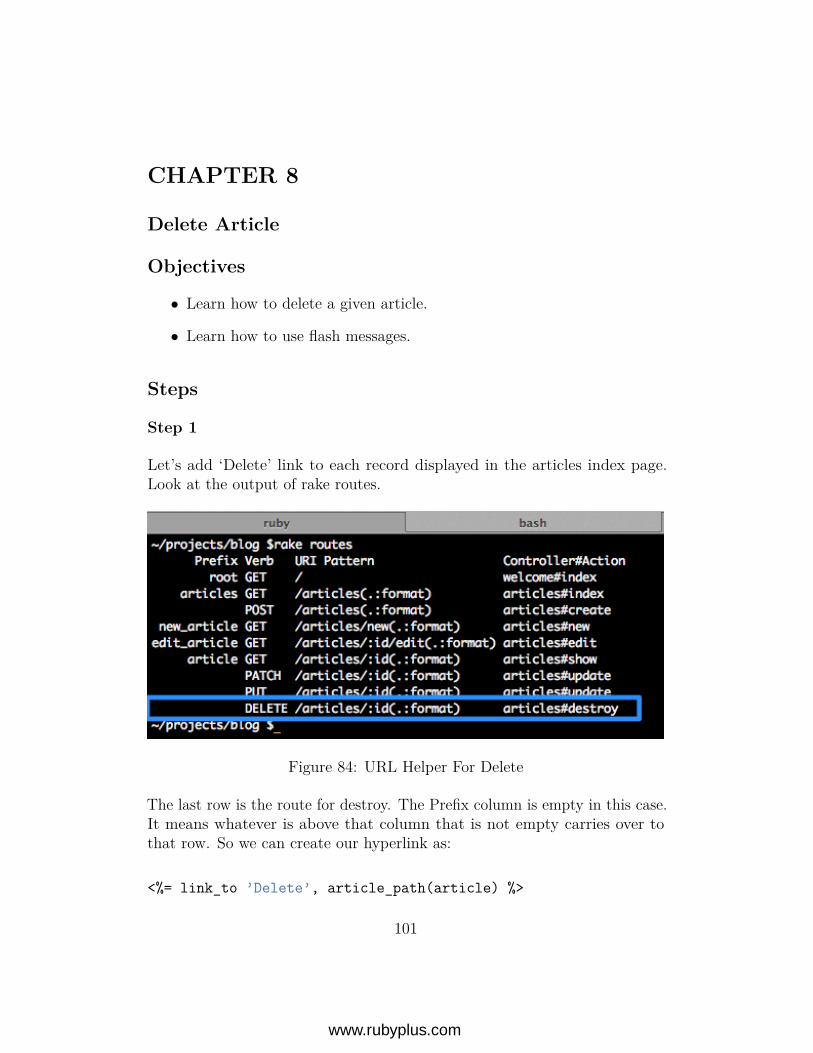
Let’s add ‘Delete’ link to each record displayed in the articles index page.Look at the output of rake routes.
Figure 84: URL Helper For Delete
The last row is the route for destroy. The Prefix column is empty in this case.It means whatever is above that column that is not empty carries over tothat row. So we can create our hyperlink as:
<%= link_to ’Delete’, article_path(article) %>
101
www.rubyplus.com
This will create an hyperlink, when a user clicks on the link the browser willmake a http GET request, which means it will end up in show action insteadof destroy. Look the Verb column, you see we need to use DELETE http verbto hit the destroy action in the articles controller. So now we have:
<%= link_to ’Delete’, article_path(article), method: :delete %>
The third parameter specifies that the http verb to be used is DELETE. Sincethis is an destructive action we want to avoid accidental deletion of records,so let’s popup a javascript confirmation for delete like this:
<%= link_to ’Delete’,article_path(article),
method: :delete,data: { confirm: ’Are you sure?’ } %>
The fourth parameter will popup a window that confirms the delete action.The app/views/articles/index.html.erb now looks like this:
<h1>Listing Articles</h1>
<% @articles.each do |article| %>
<%= article.title %> :
<%= article.description %>
<%= link_to ’Edit’, edit_article_path(article) %><%= link_to ’Show’, article %><%= link_to ’Delete’,
article_path(article),method: :delete,data: { confirm: ’Are you sure?’ } %>
<br/>
<% end %><br/><%= link_to ’New Article’, new_article_path %>
102
www.rubyplus.com
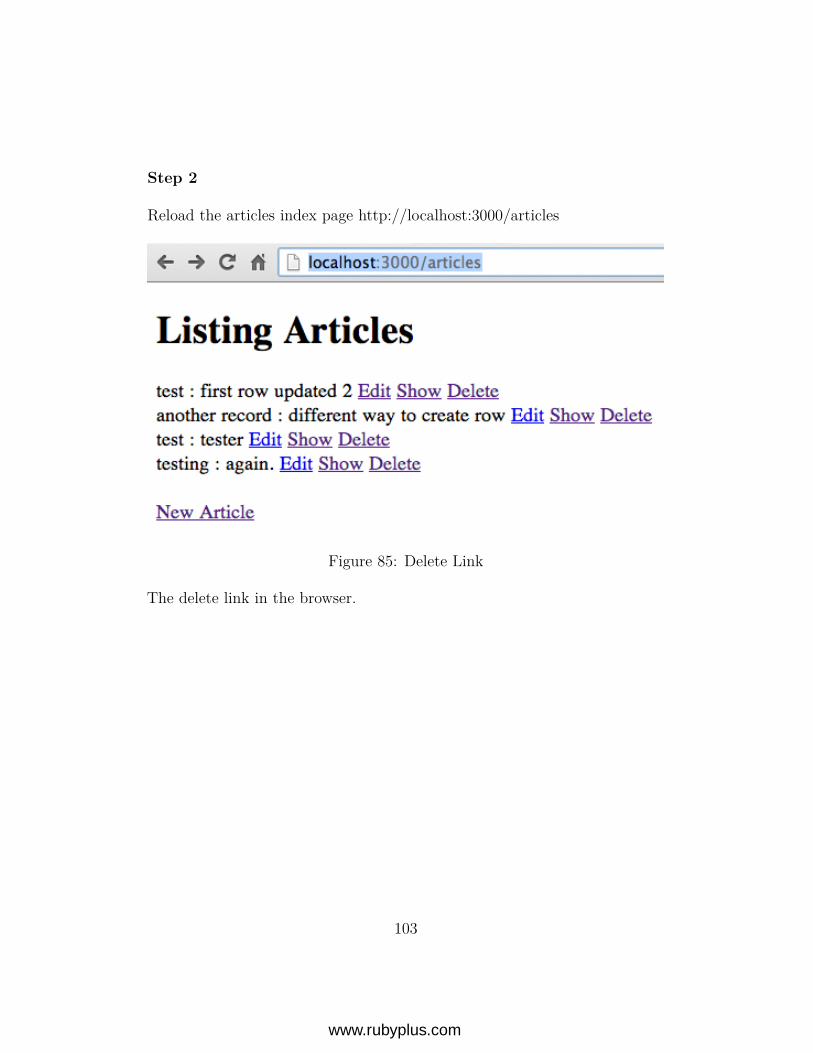
Step 2
Reload the articles index page http://localhost:3000/articles
Figure 85: Delete Link
The delete link in the browser.
103
www.rubyplus.com
Step 3
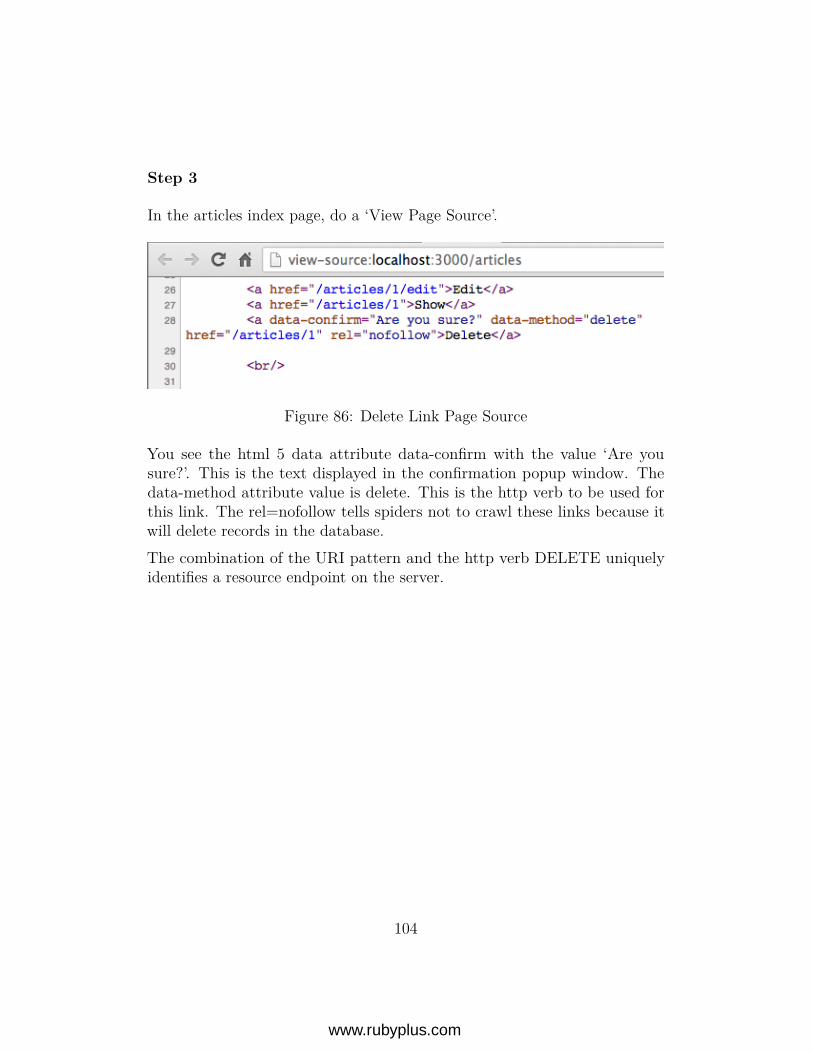
In the articles index page, do a ‘View Page Source’.
Figure 86: Delete Link Page Source
You see the html 5 data attribute data-confirm with the value ‘Are yousure?’. This is the text displayed in the confirmation popup window. Thedata-method attribute value is delete. This is the http verb to be used forthis link. The rel=nofollow tells spiders not to crawl these links because itwill delete records in the database.The combination of the URI pattern and the http verb DELETE uniquelyidentifies a resource endpoint on the server.
104
www.rubyplus.com
Step 4
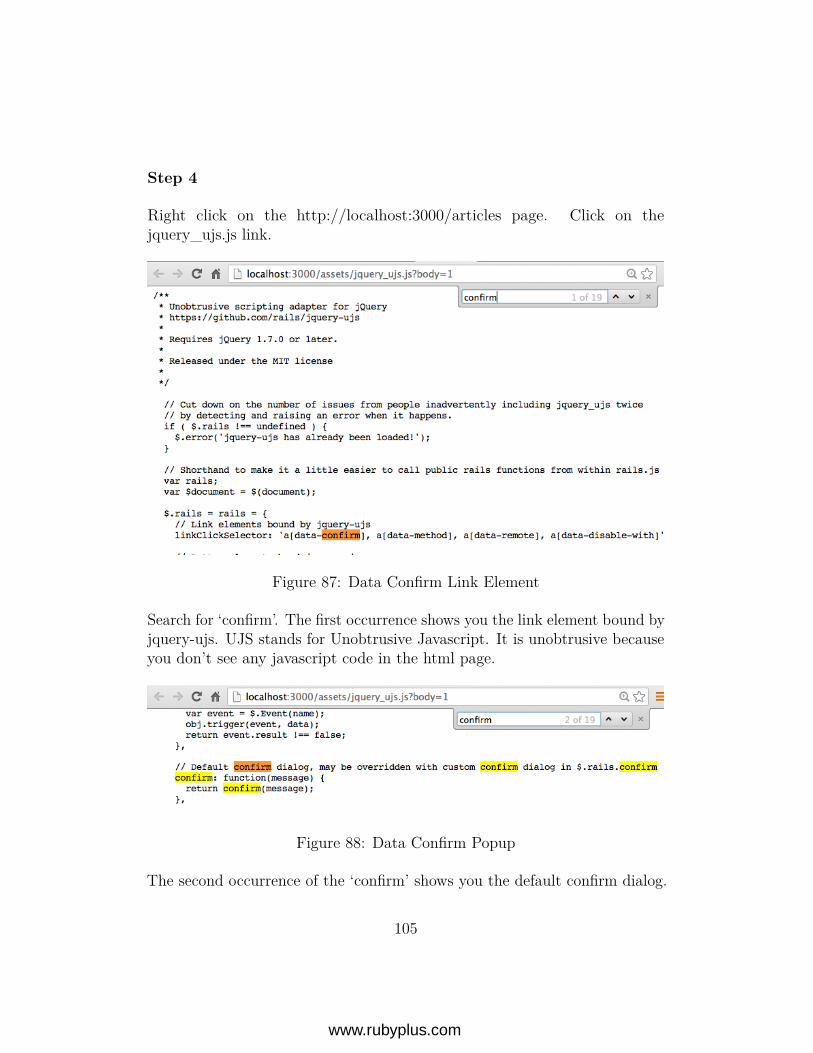
Right click on the http://localhost:3000/articles page. Click on thejquery_ujs.js link.
Figure 87: Data Confirm Link Element
Search for ‘confirm’. The first occurrence shows you the link element bound byjquery-ujs. UJS stands for Unobtrusive Javascript. It is unobtrusive becauseyou don’t see any javascript code in the html page.
Figure 88: Data Confirm Popup
The second occurrence of the ‘confirm’ shows you the default confirm dialog.
105
www.rubyplus.com
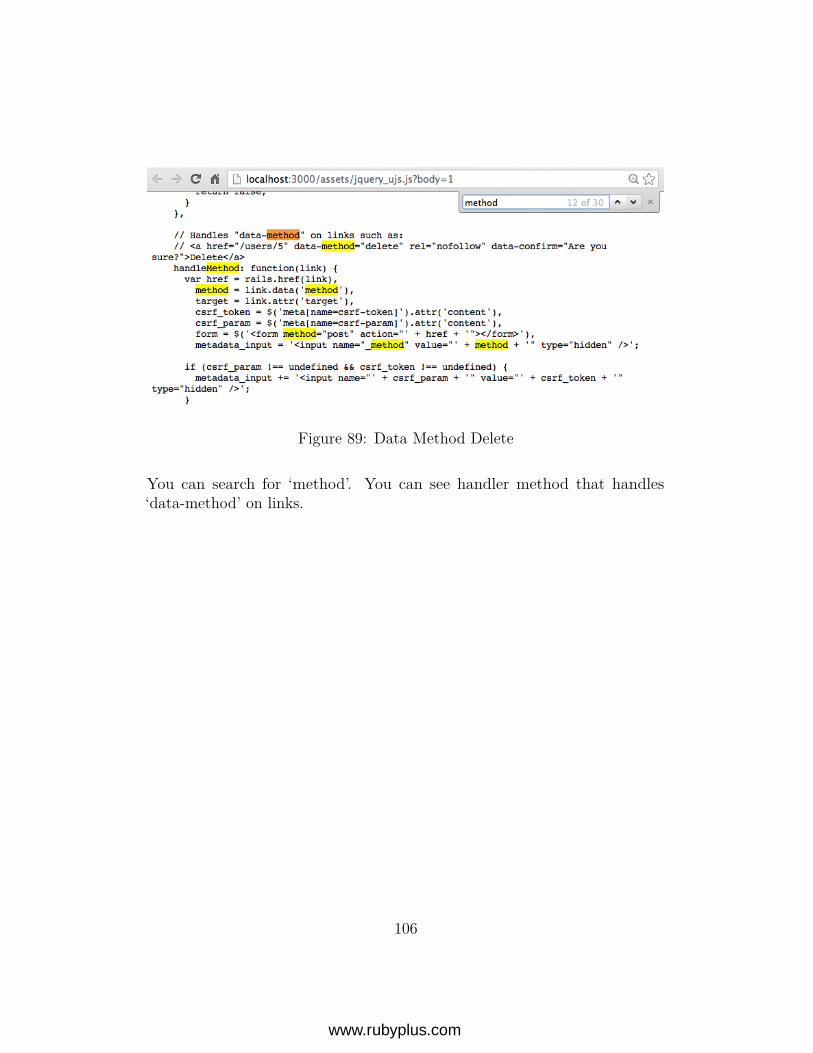
Figure 89: Data Method Delete
You can search for ‘method’. You can see handler method that handles‘data-method’ on links.
106
www.rubyplus.com
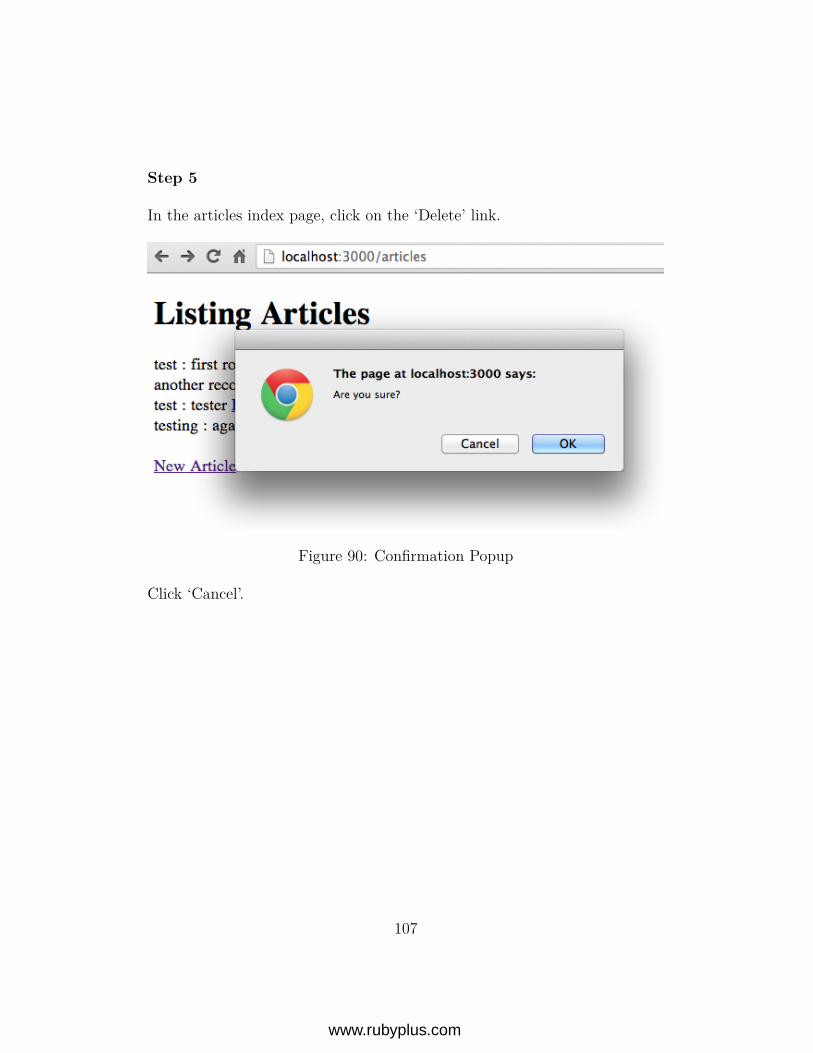
Step 5
In the articles index page, click on the ‘Delete’ link.
Figure 90: Confirmation Popup
Click ‘Cancel’.
107
www.rubyplus.com
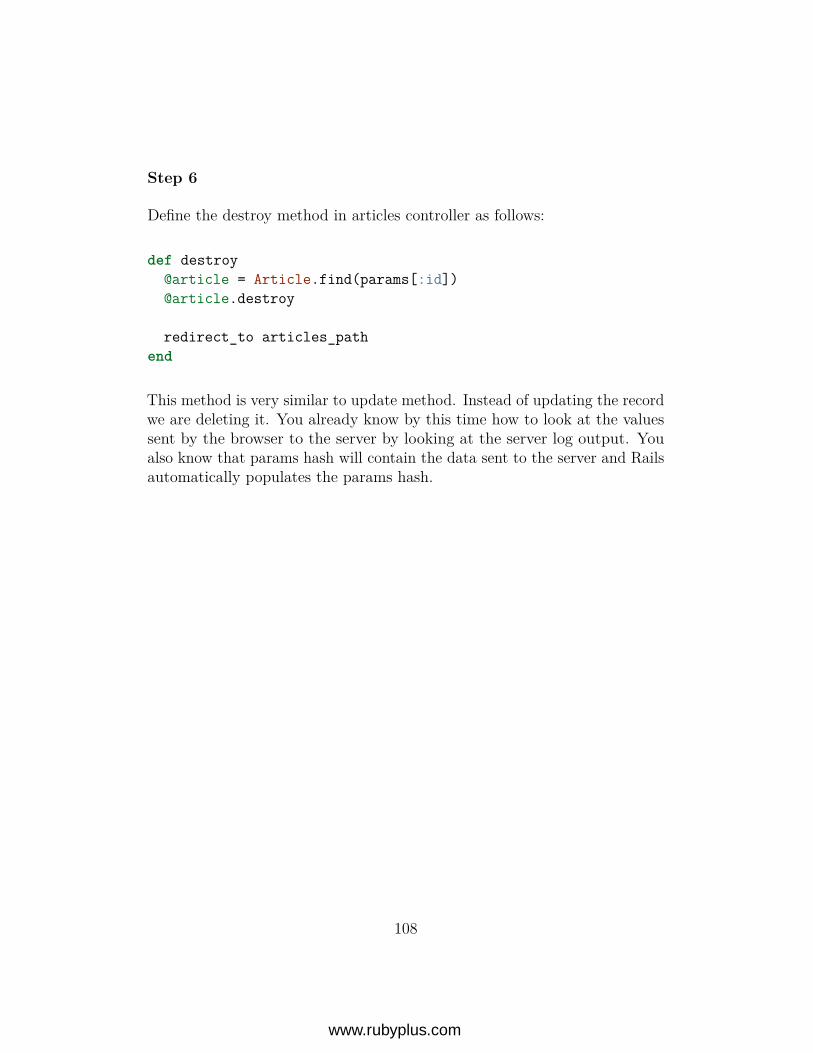
Step 6
Define the destroy method in articles controller as follows:
def destroy@article = Article.find(params[:id])@article.destroy
redirect_to articles_pathend
This method is very similar to update method. Instead of updating the recordwe are deleting it. You already know by this time how to look at the valuessent by the browser to the server by looking at the server log output. Youalso know that params hash will contain the data sent to the server and Railsautomatically populates the params hash.
108
www.rubyplus.com
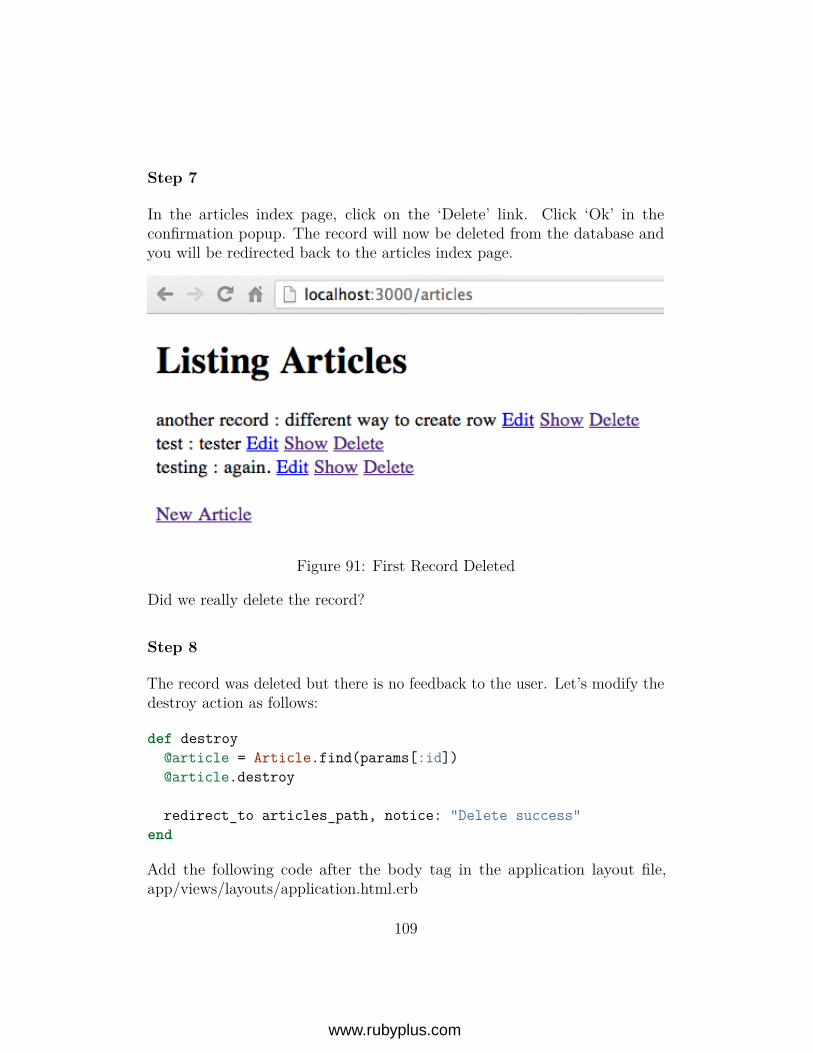
Step 7
In the articles index page, click on the ‘Delete’ link. Click ‘Ok’ in theconfirmation popup. The record will now be deleted from the database andyou will be redirected back to the articles index page.
Figure 91: First Record Deleted
Did we really delete the record?
Step 8
The record was deleted but there is no feedback to the user. Let’s modify thedestroy action as follows:
def destroy@article = Article.find(params[:id])@article.destroy
redirect_to articles_path, notice: "Delete success"end
Add the following code after the body tag in the application layout file,app/views/layouts/application.html.erb
109
www.rubyplus.com
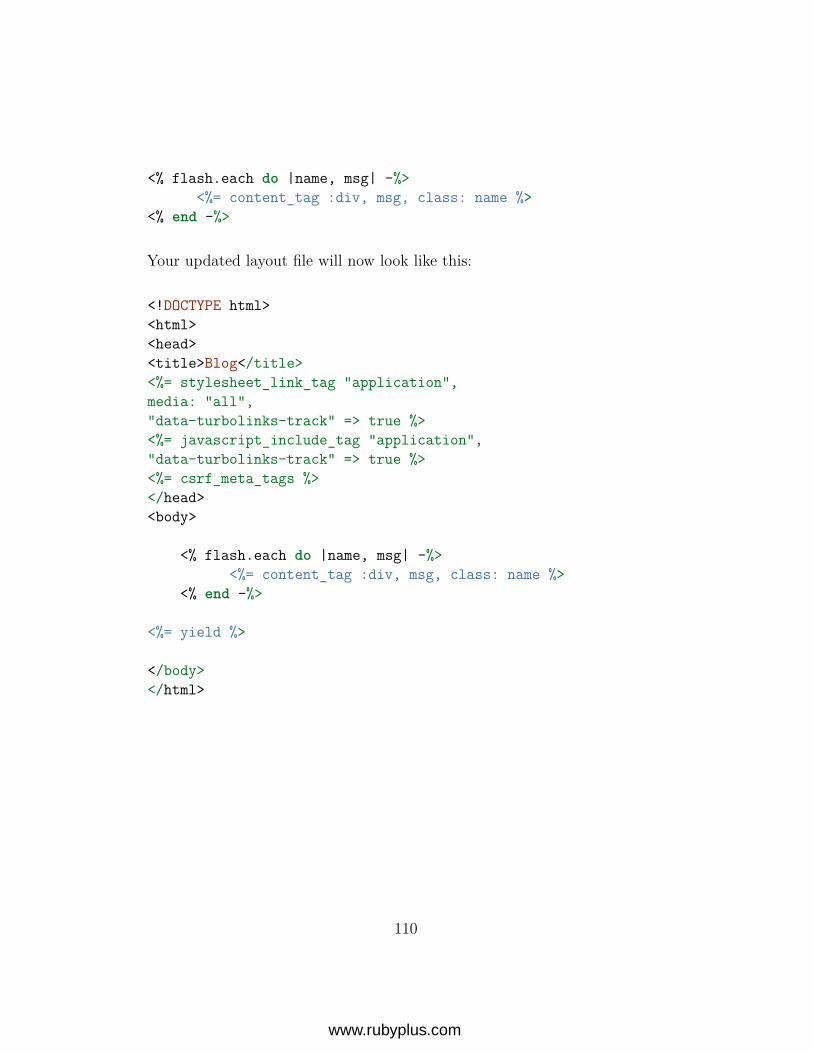
<% flash.each do |name, msg| -%><%= content_tag :div, msg, class: name %>
<% end -%>
Your updated layout file will now look like this:
<!DOCTYPE html><html><head><title>Blog</title><%= stylesheet_link_tag "application",media: "all","data-turbolinks-track" => true %><%= javascript_include_tag "application","data-turbolinks-track" => true %><%= csrf_meta_tags %></head><body>
<% flash.each do |name, msg| -%><%= content_tag :div, msg, class: name %>
<% end -%>
<%= yield %>
</body></html>
110
www.rubyplus.com
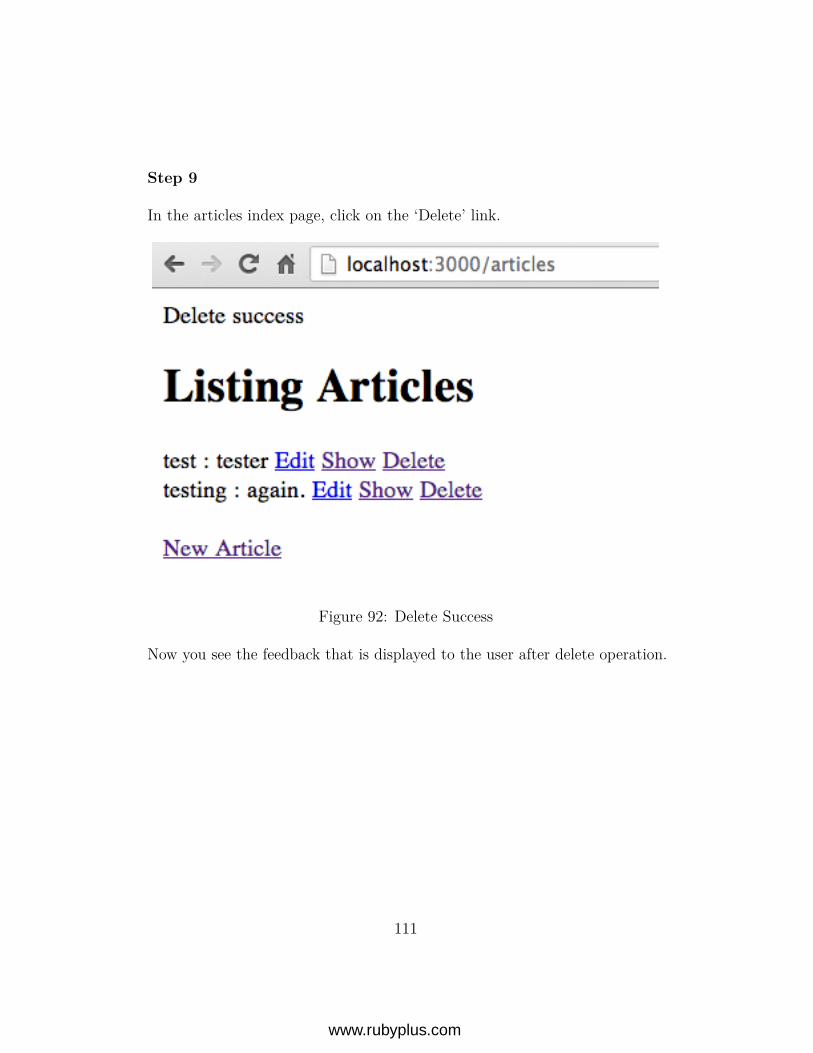
Step 9
In the articles index page, click on the ‘Delete’ link.
Figure 92: Delete Success
Now you see the feedback that is displayed to the user after delete operation.
111
www.rubyplus.com
Step 10
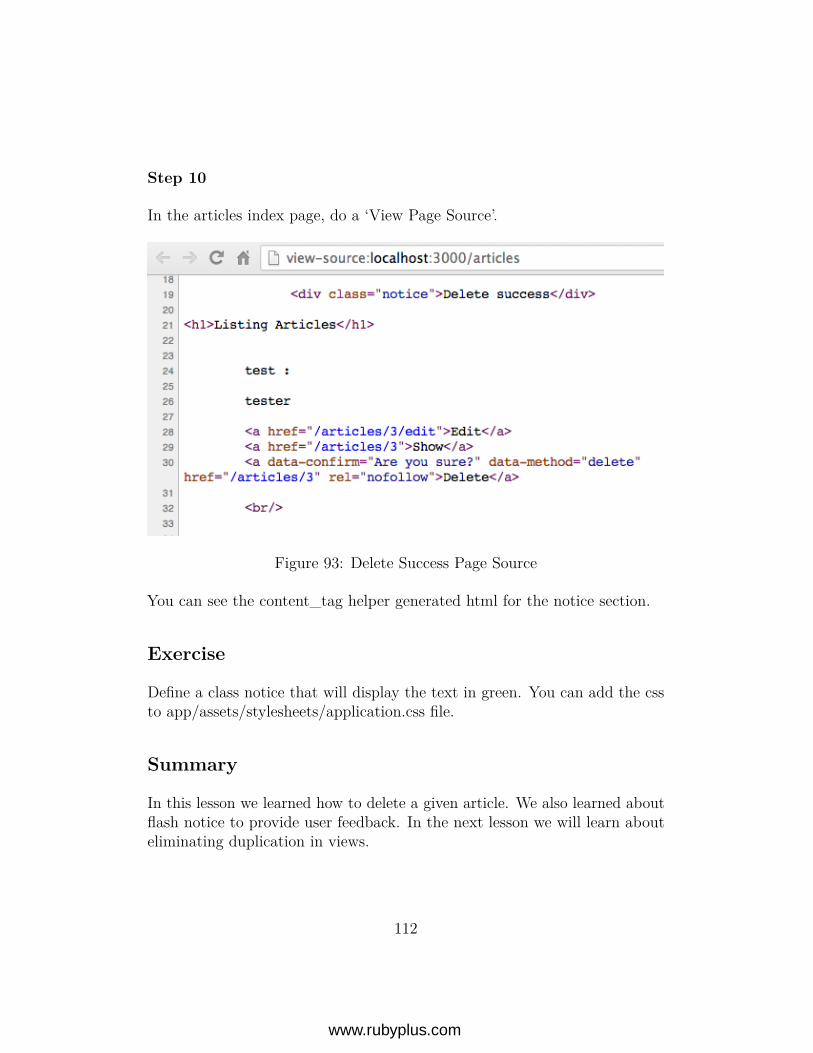
In the articles index page, do a ‘View Page Source’.
Figure 93: Delete Success Page Source
You can see the content_tag helper generated html for the notice section.
Exercise
Define a class notice that will display the text in green. You can add the cssto app/assets/stylesheets/application.css file.
Summary
In this lesson we learned how to delete a given article. We also learned aboutflash notice to provide user feedback. In the next lesson we will learn abouteliminating duplication in views.
112
www.rubyplus.com
CHAPTER 9
View Duplication
Objective
• Learn how to eliminate duplication in views by using partials
Steps
Step 1
Look at the app/views/new.html.erb and app/views/edit.html.erb. There isduplication.
Step 2
Create a file called _form.html.erb under app/views/articles directory withthe following contents:
<%= form_for @article do |f| %><p>
<%= f.label :title %><br><%= f.text_field :title %>
</p>
<p><%= f.label :description %><br><%= f.text_area :description %>
</p>
<p><%= f.submit %>
</p><% end %>
113
www.rubyplus.com
Step 3
Edit the app/views/articles/new.html.erb and change the content as follows:
<h1>New Article</h1>
<%= render ’form’ %>
Step 4
Edit the app/views/articles/edit.html.erb and change the content as follows:
<h1>Edit Article</h1>
<%= render ’form’ %>
114
www.rubyplus.com
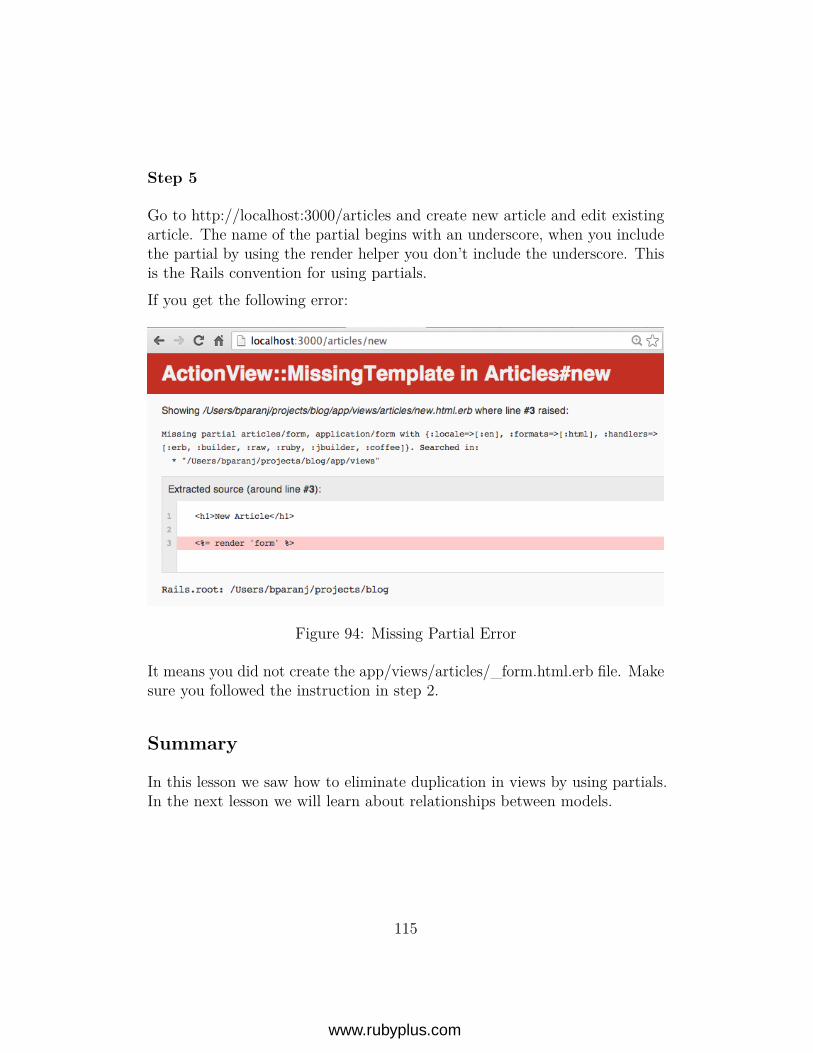
Step 5
Go to http://localhost:3000/articles and create new article and edit existingarticle. The name of the partial begins with an underscore, when you includethe partial by using the render helper you don’t include the underscore. Thisis the Rails convention for using partials.If you get the following error:
Figure 94: Missing Partial Error
It means you did not create the app/views/articles/_form.html.erb file. Makesure you followed the instruction in step 2.
Summary
In this lesson we saw how to eliminate duplication in views by using partials.In the next lesson we will learn about relationships between models.
115
www.rubyplus.com
CHAPTER 10
Relationships
Objective
• To learn relationships between models.
Steps
Step 1
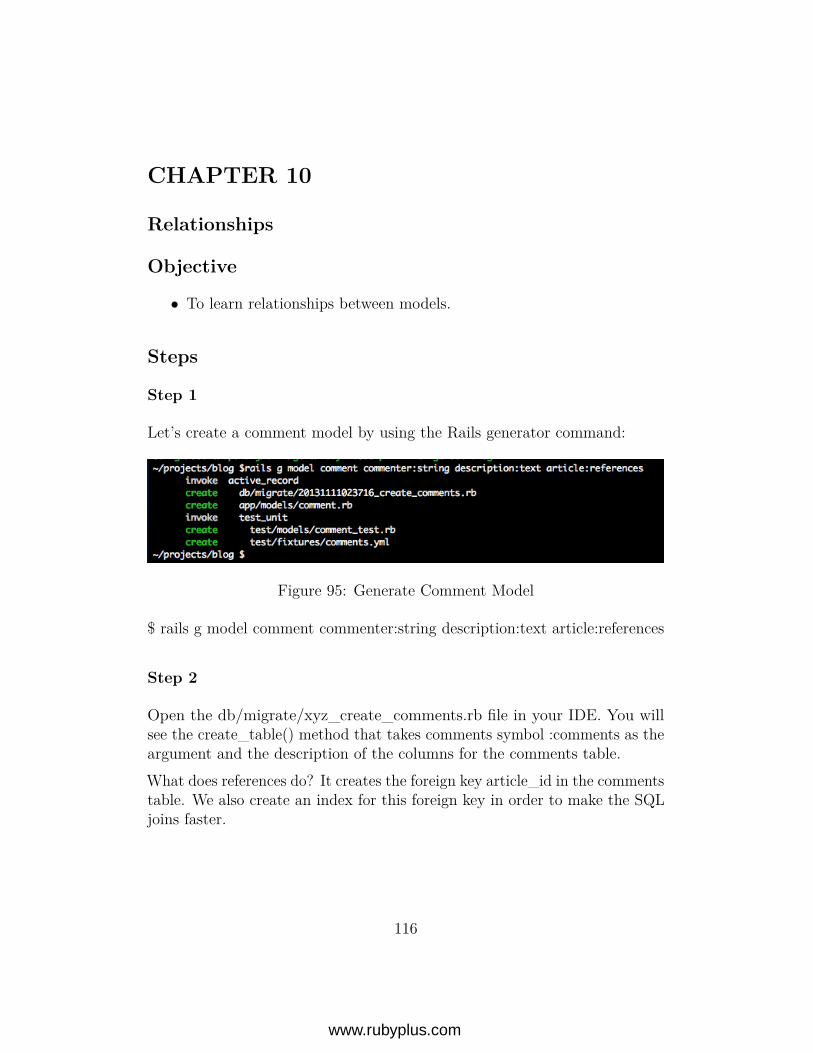
Let’s create a comment model by using the Rails generator command:
Figure 95: Generate Comment Model
$ rails g model comment commenter:string description:text article:references
Step 2
Open the db/migrate/xyz_create_comments.rb file in your IDE. You willsee the create_table() method that takes comments symbol :comments as theargument and the description of the columns for the comments table.What does references do? It creates the foreign key article_id in the commentstable. We also create an index for this foreign key in order to make the SQLjoins faster.
116
www.rubyplus.com
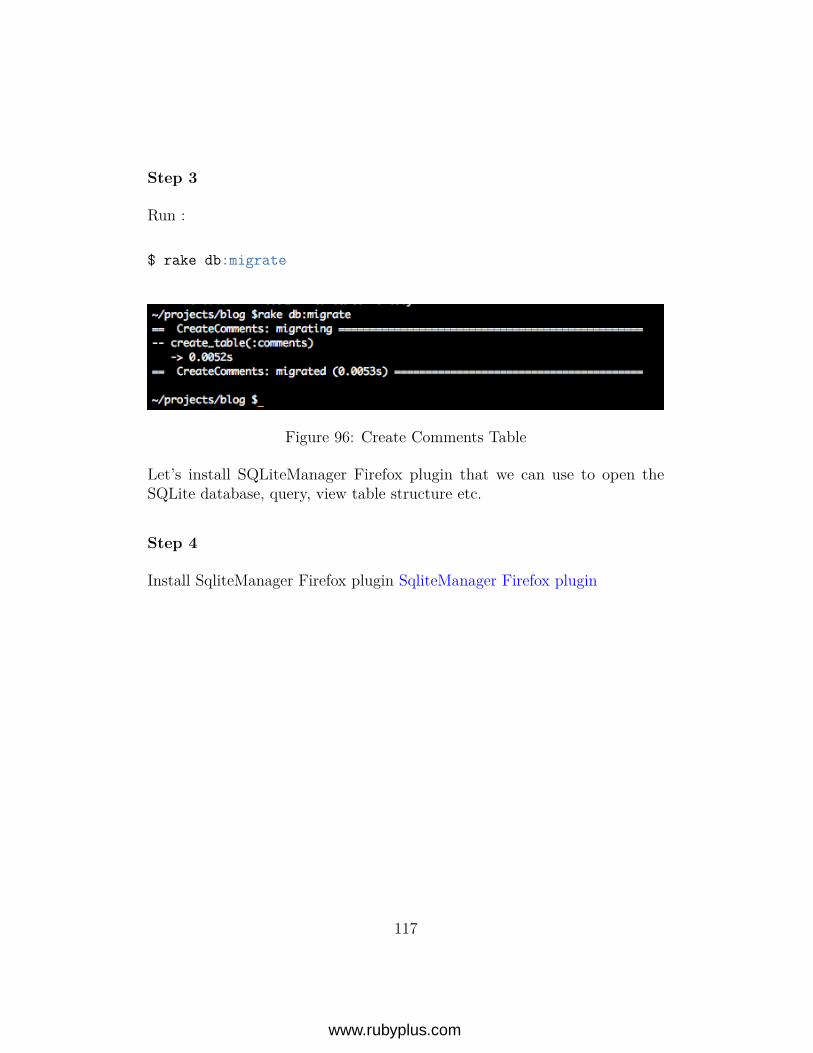
Step 3
Run :
$ rake db:migrate
Figure 96: Create Comments Table
Let’s install SQLiteManager Firefox plugin that we can use to open theSQLite database, query, view table structure etc.
Step 4
Install SqliteManager Firefox plugin SqliteManager Firefox plugin
117
www.rubyplus.com
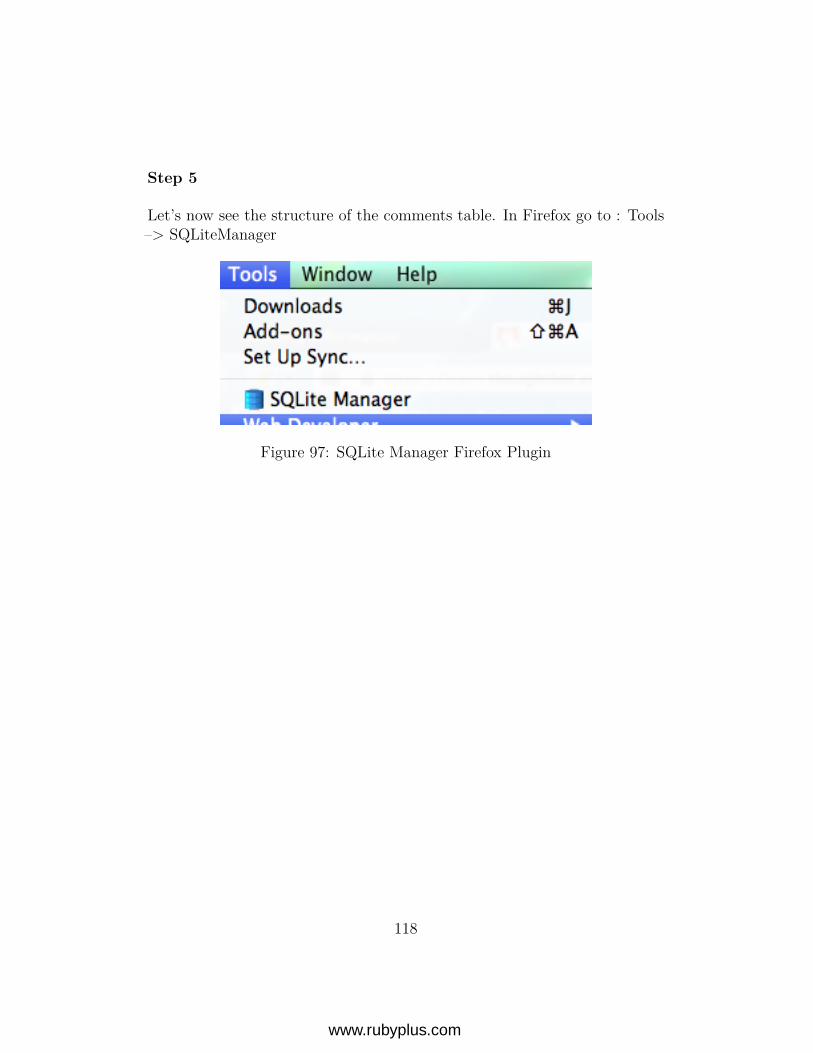
Step 5
Let’s now see the structure of the comments table. In Firefox go to : Tools–> SQLiteManager
Figure 97: SQLite Manager Firefox Plugin
118
www.rubyplus.com
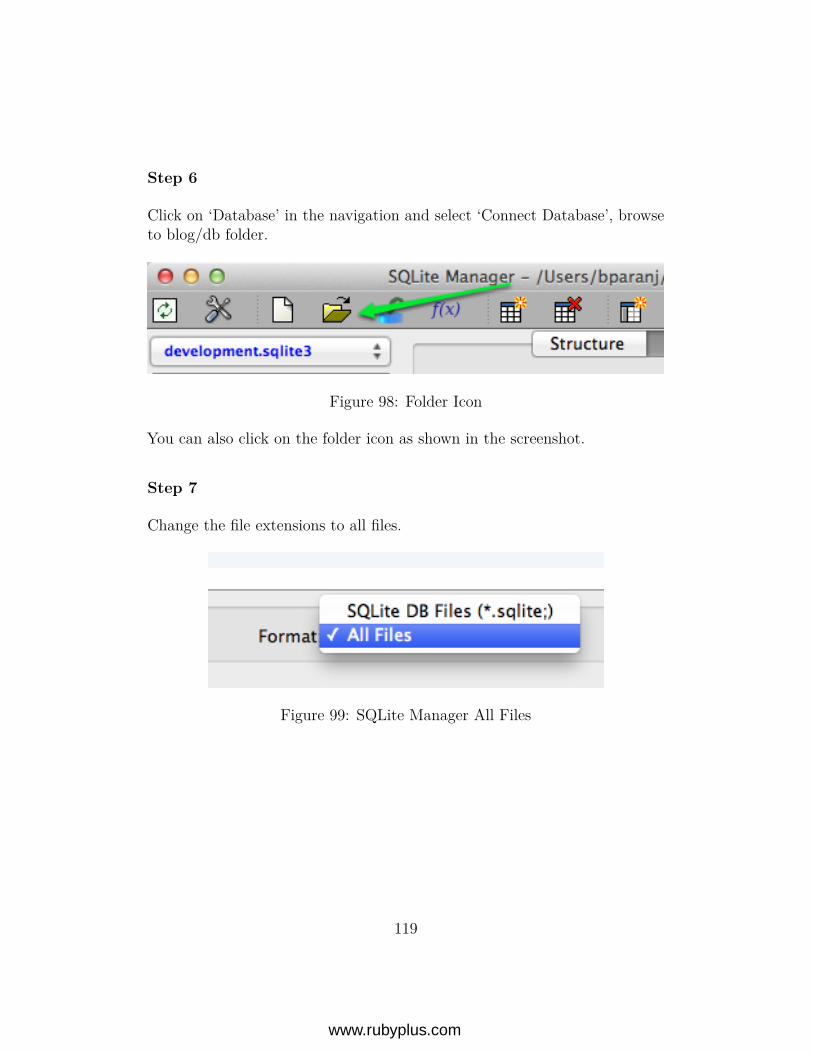
Step 6
Click on ‘Database’ in the navigation and select ‘Connect Database’, browseto blog/db folder.
Figure 98: Folder Icon
You can also click on the folder icon as shown in the screenshot.
Step 7
Change the file extensions to all files.
Figure 99: SQLite Manager All Files
119
www.rubyplus.com
Step 8
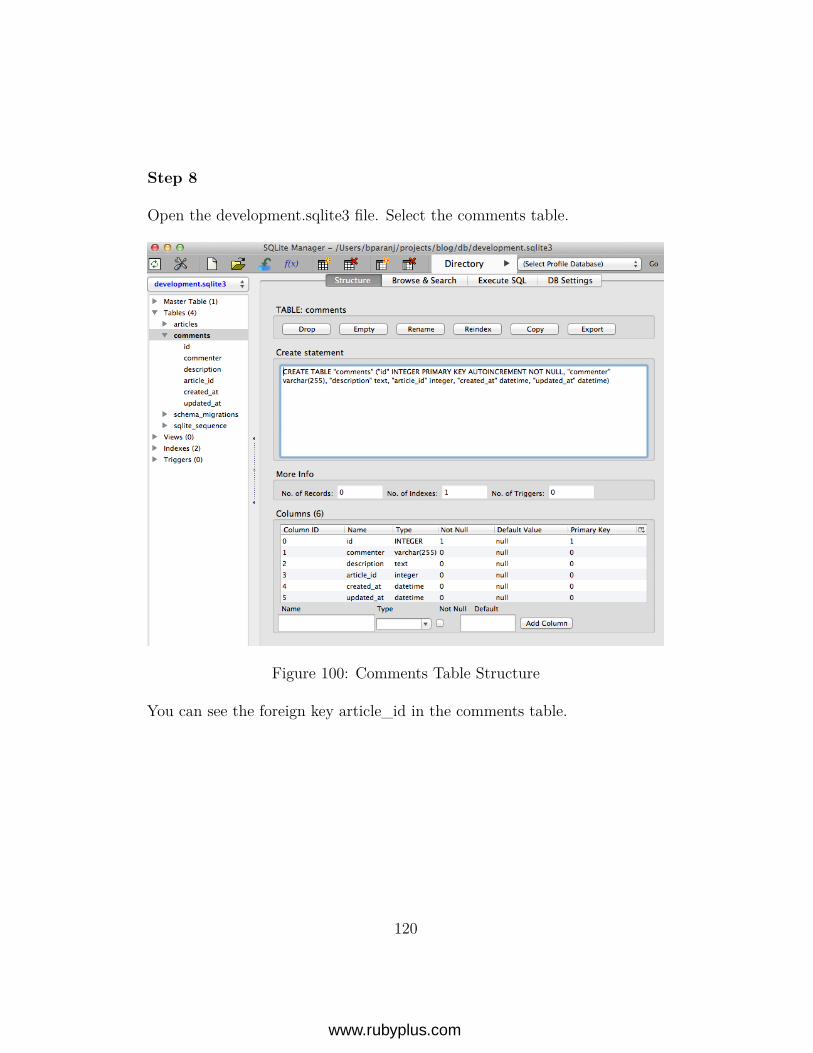
Open the development.sqlite3 file. Select the comments table.
Figure 100: Comments Table Structure
You can see the foreign key article_id in the comments table.
120
www.rubyplus.com
Step 9
Open the app/models/comment.rb file. You will see the
belongs_to :article
declaration. This means you have a foreign key article_id in the commentstable.The belongs_to declaration in the model will not create or manipulatedatabase tables. The belongs_to or references in the migration will manipu-late the database tables. Since your models are not aware of the databaserelationships, you need to declare them.
Step 10
Open the app/models/article.rb file. Add the following declaration:
has_many :comments
This means each article can have many comments. Each comment points toit’s corresponding article.
Step 11
Open the config/routes.rb and define the route for comments:
resources :articles doresources :comments
end
Since we have parent-children relationship between articles and comments wehave nested routes for comments.
121
www.rubyplus.com
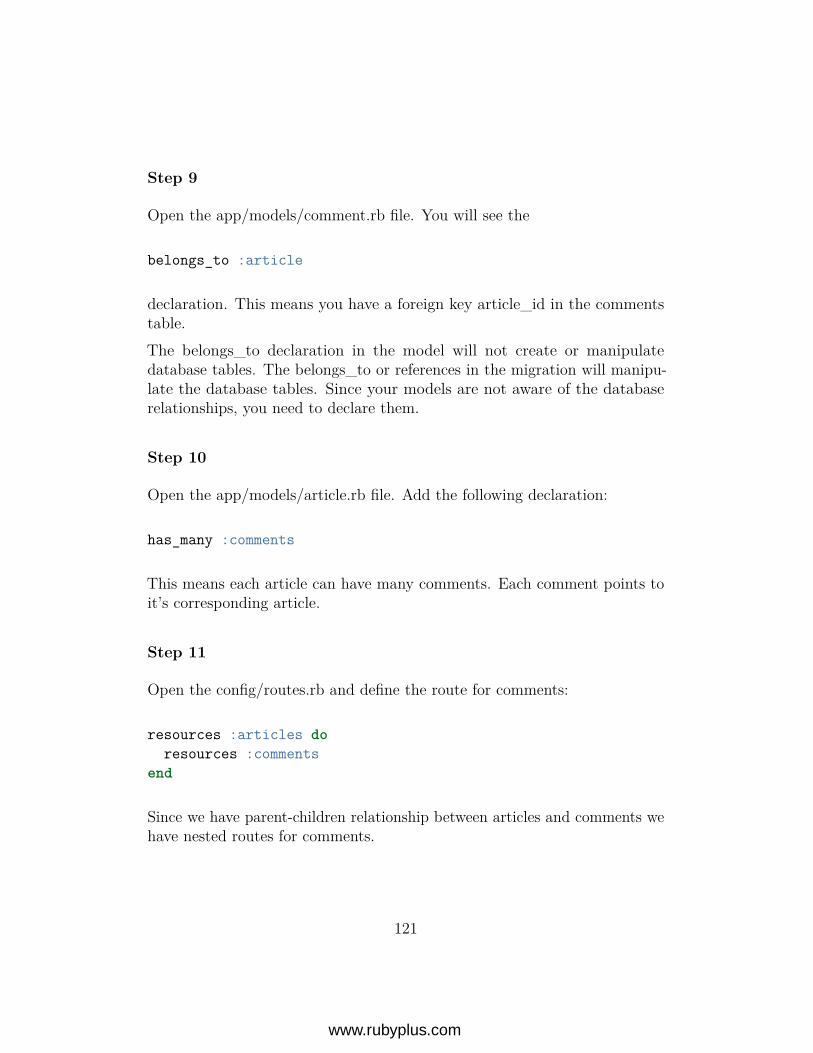
Step 12
Let’s create the controller for comments.
$ rails g controller comments
Figure 101: Generate Comments Controller
Readers can comment on any article. When someone comments we willdisplay the comments for that article on the article’s show page.
122
www.rubyplus.com
Step 13
Let’s modify the app/views/articles/show.html.erb to let us make a newcomment:
<h2>Add a comment:</h2><%= form_for([@article, @article.comments.build]) do |f| %>
<p><%= f.label :commenter %><br /><%= f.text_field :commenter %>
</p><p>
<%= f.label :description %><br /><%= f.text_area :description %>
</p><p>
<%= f.submit %></p>
<% end %>
123
www.rubyplus.com
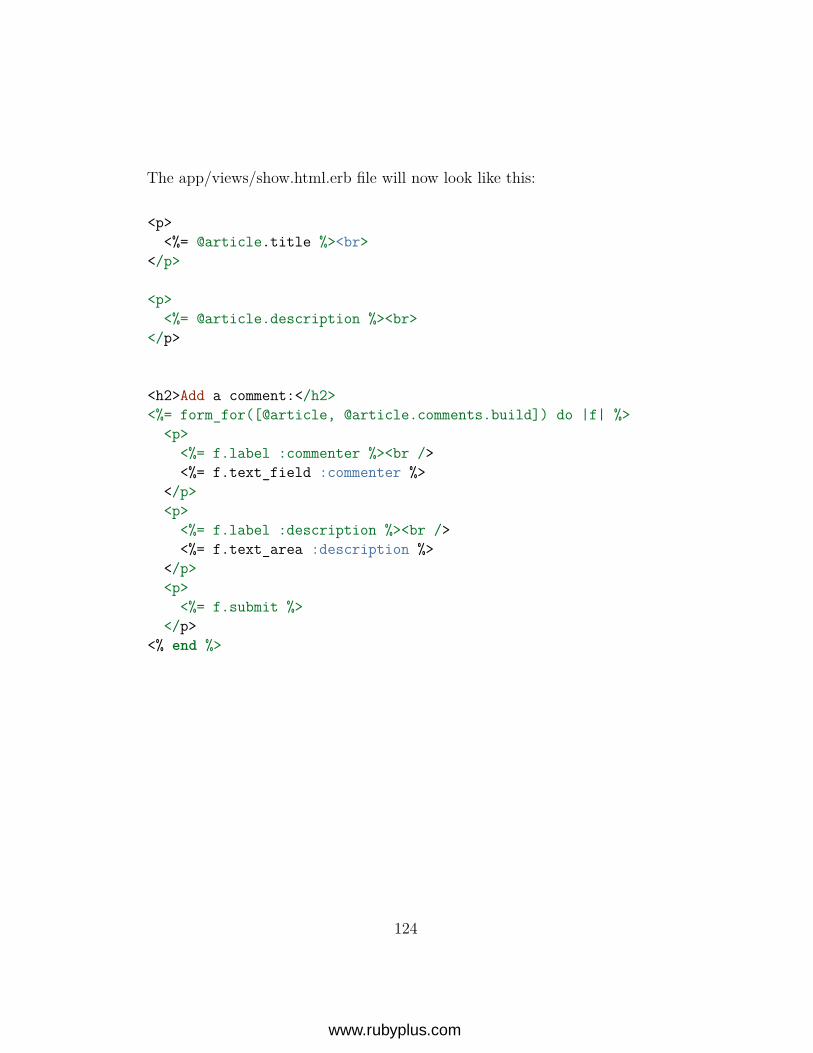
The app/views/show.html.erb file will now look like this:
<p><%= @article.title %><br>
</p>
<p><%= @article.description %><br>
</p>
<h2>Add a comment:</h2><%= form_for([@article, @article.comments.build]) do |f| %>
<p><%= f.label :commenter %><br /><%= f.text_field :commenter %>
</p><p>
<%= f.label :description %><br /><%= f.text_area :description %>
</p><p>
<%= f.submit %></p>
<% end %>
124
www.rubyplus.com
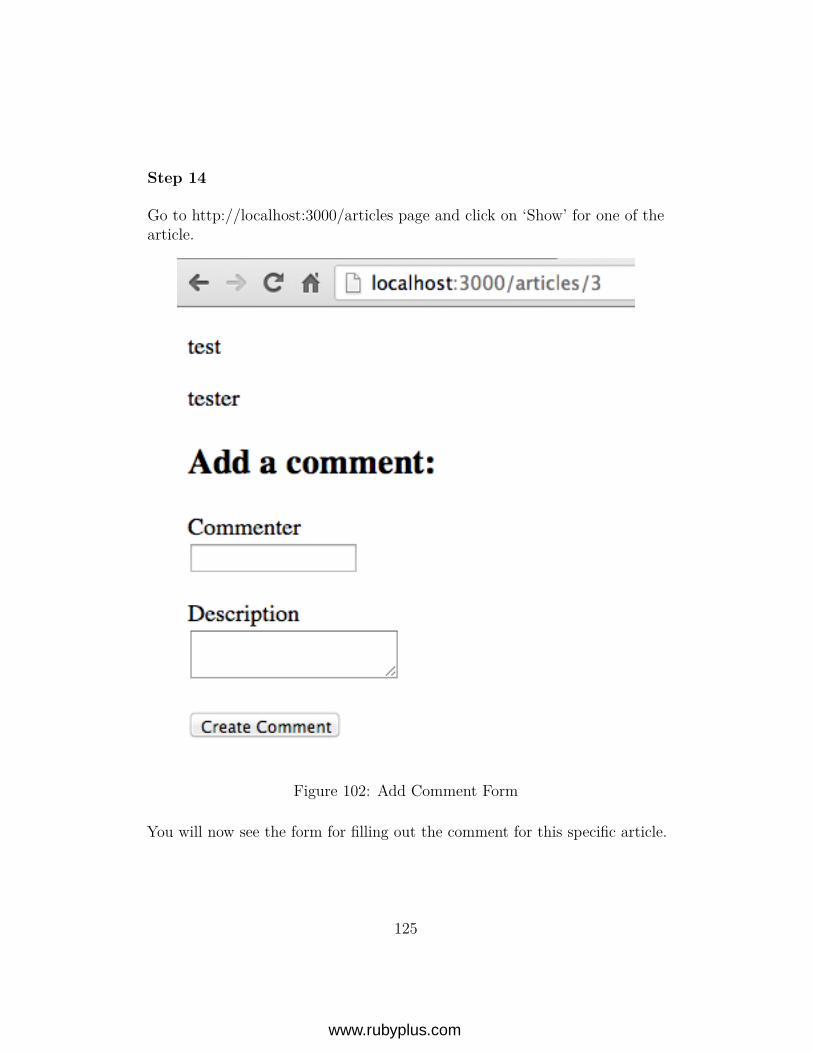
Step 14
Go to http://localhost:3000/articles page and click on ‘Show’ for one of thearticle.
Figure 102: Add Comment Form
You will now see the form for filling out the comment for this specific article.
125
www.rubyplus.com
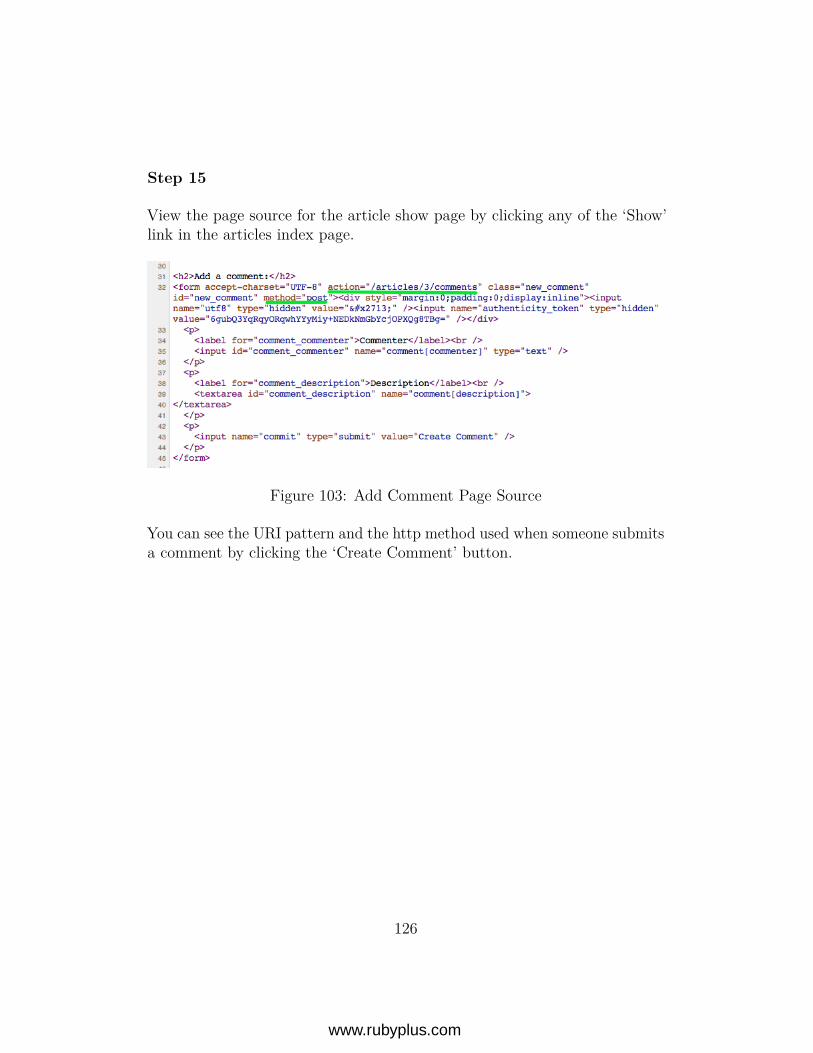
Step 15
View the page source for the article show page by clicking any of the ‘Show’link in the articles index page.
Figure 103: Add Comment Page Source
You can see the URI pattern and the http method used when someone submitsa comment by clicking the ‘Create Comment’ button.
126
www.rubyplus.com
Exercise 1
Take a look at the output of rake routes and find out the resource endpointfor the URI pattern and http method combination found in step 12.
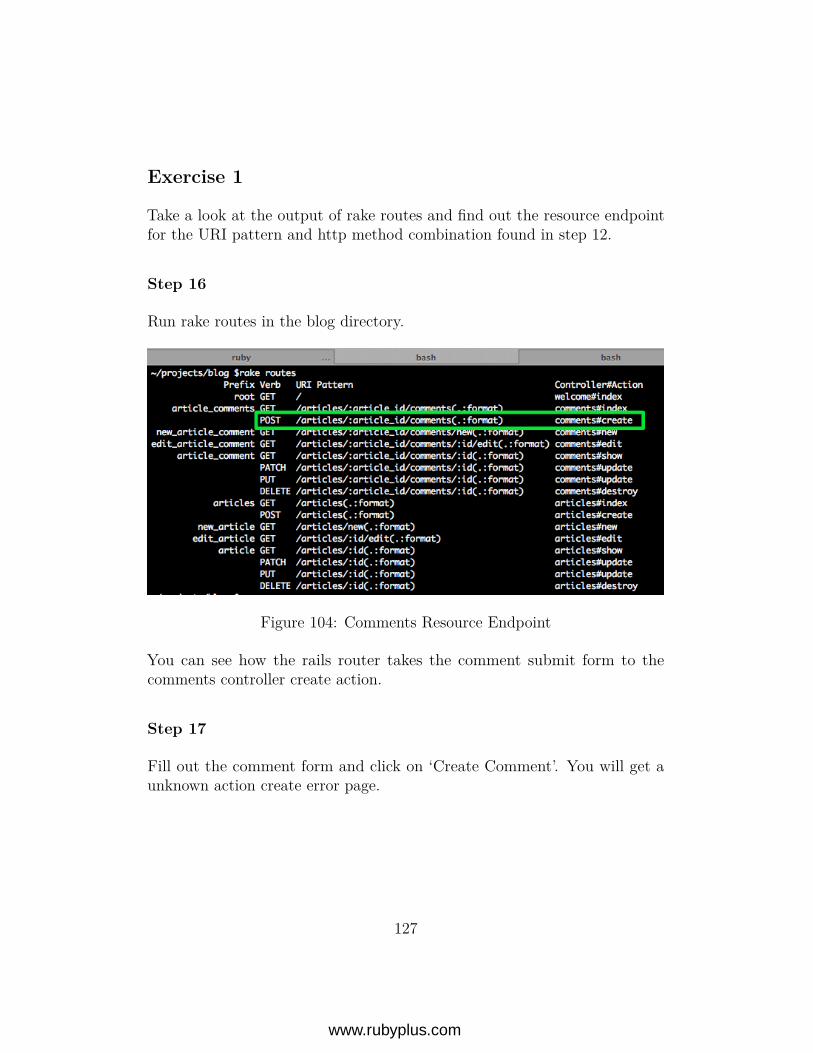
Step 16
Run rake routes in the blog directory.
Figure 104: Comments Resource Endpoint
You can see how the rails router takes the comment submit form to thecomments controller create action.
Step 17
Fill out the comment form and click on ‘Create Comment’. You will get aunknown action create error page.
127
www.rubyplus.com
Step 18
Define the create method in comments controller as follows:
def create
end
Step 19
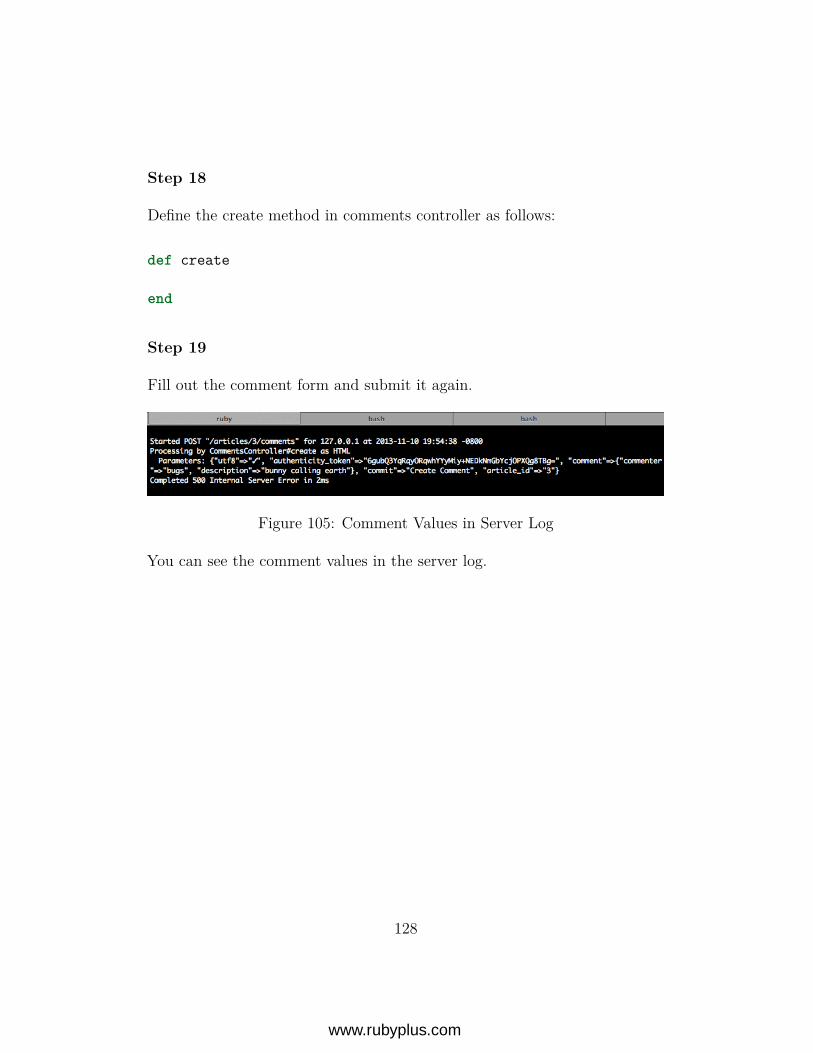
Fill out the comment form and submit it again.
Figure 105: Comment Values in Server Log
You can see the comment values in the server log.
128
www.rubyplus.com
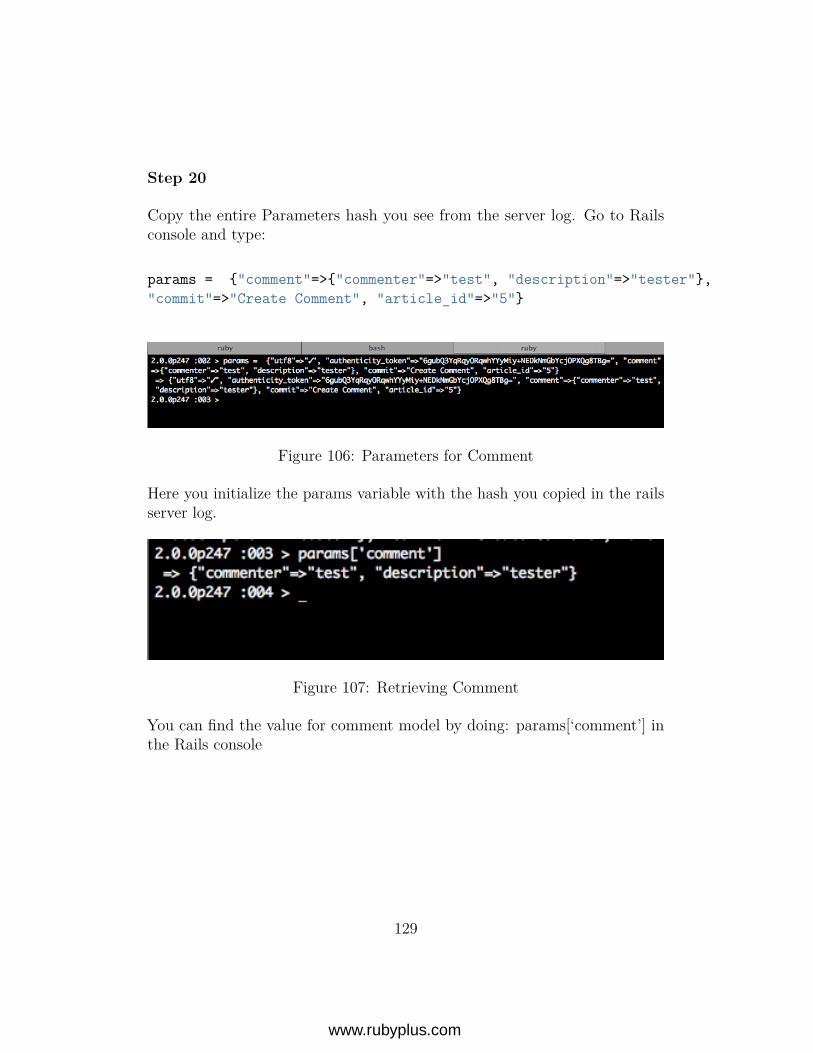
Step 20
Copy the entire Parameters hash you see from the server log. Go to Railsconsole and type:
params = {"comment"=>{"commenter"=>"test", "description"=>"tester"},"commit"=>"Create Comment", "article_id"=>"5"}
Figure 106: Parameters for Comment
Here you initialize the params variable with the hash you copied in the railsserver log.
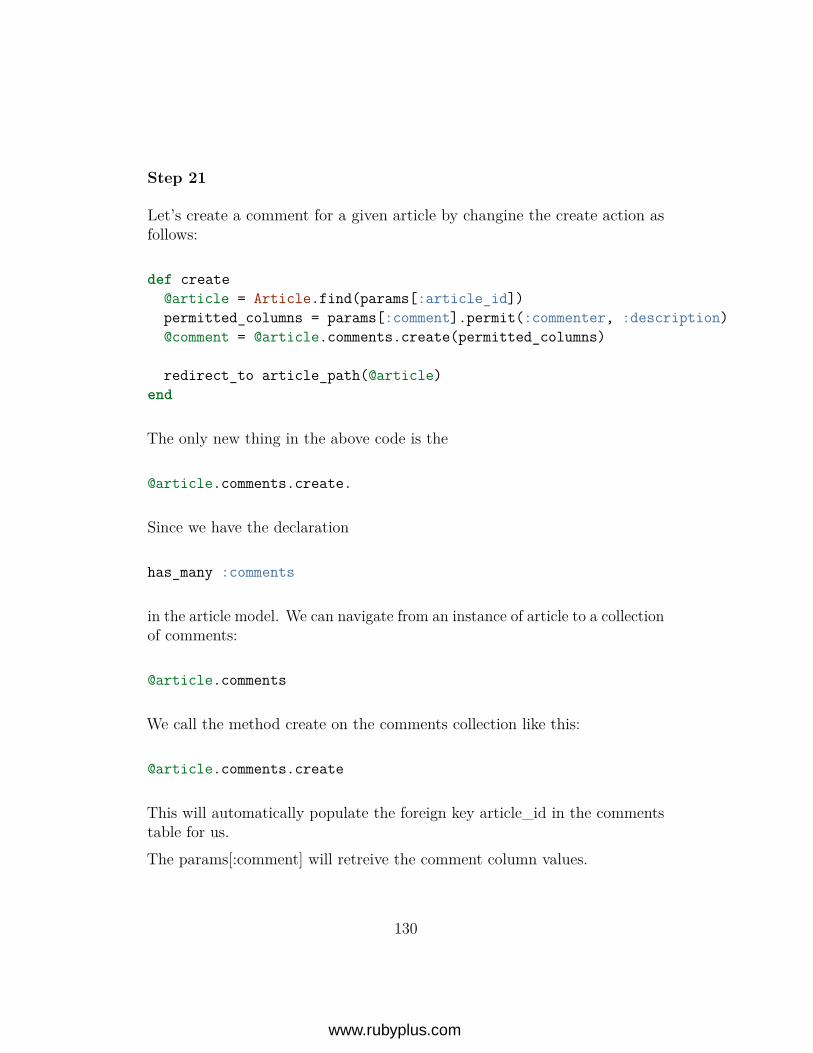
Figure 107: Retrieving Comment
You can find the value for comment model by doing: params[‘comment’] inthe Rails console
129
www.rubyplus.com
Step 21
Let’s create a comment for a given article by changine the create action asfollows:
def create@article = Article.find(params[:article_id])permitted_columns = params[:comment].permit(:commenter, :description)@comment = @article.comments.create(permitted_columns)
redirect_to article_path(@article)end
The only new thing in the above code is the
@article.comments.create.
Since we have the declaration
has_many :comments
in the article model. We can navigate from an instance of article to a collectionof comments:
@article.comments
We call the method create on the comments collection like this:
@article.comments.create
This will automatically populate the foreign key article_id in the commentstable for us.The params[:comment] will retreive the comment column values.
130
www.rubyplus.com
Step 22
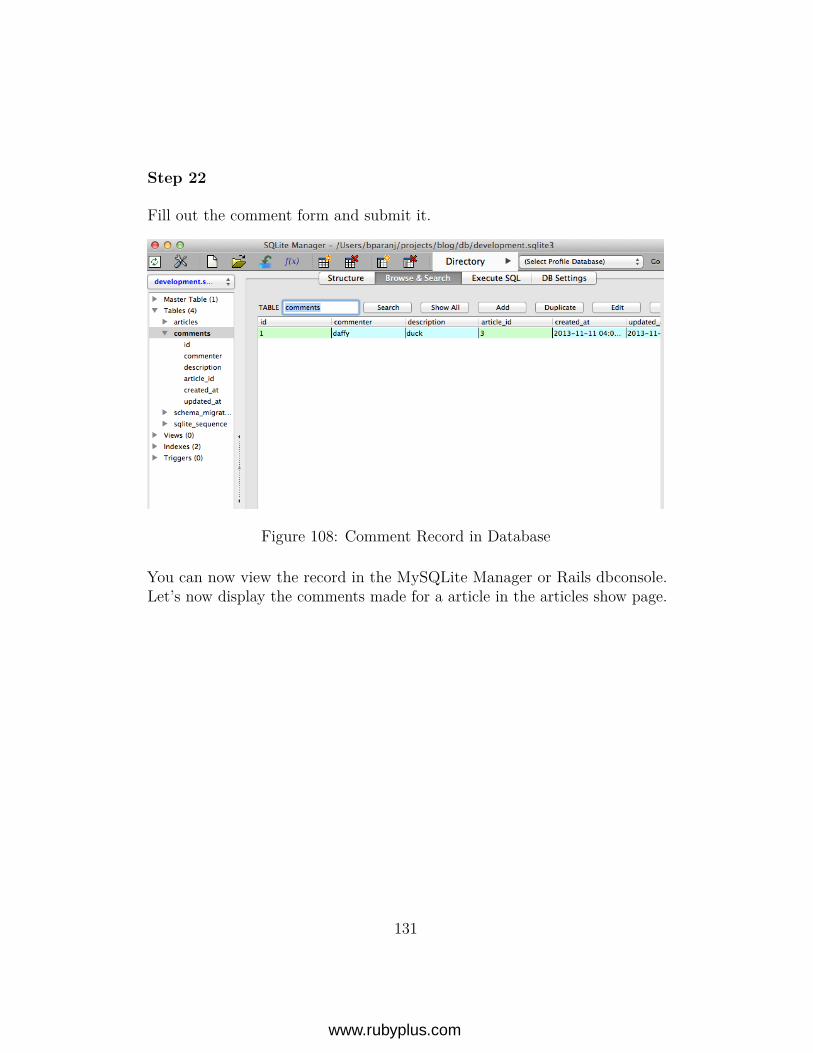
Fill out the comment form and submit it.
Figure 108: Comment Record in Database
You can now view the record in the MySQLite Manager or Rails dbconsole.Let’s now display the comments made for a article in the articles show page.
131
www.rubyplus.com
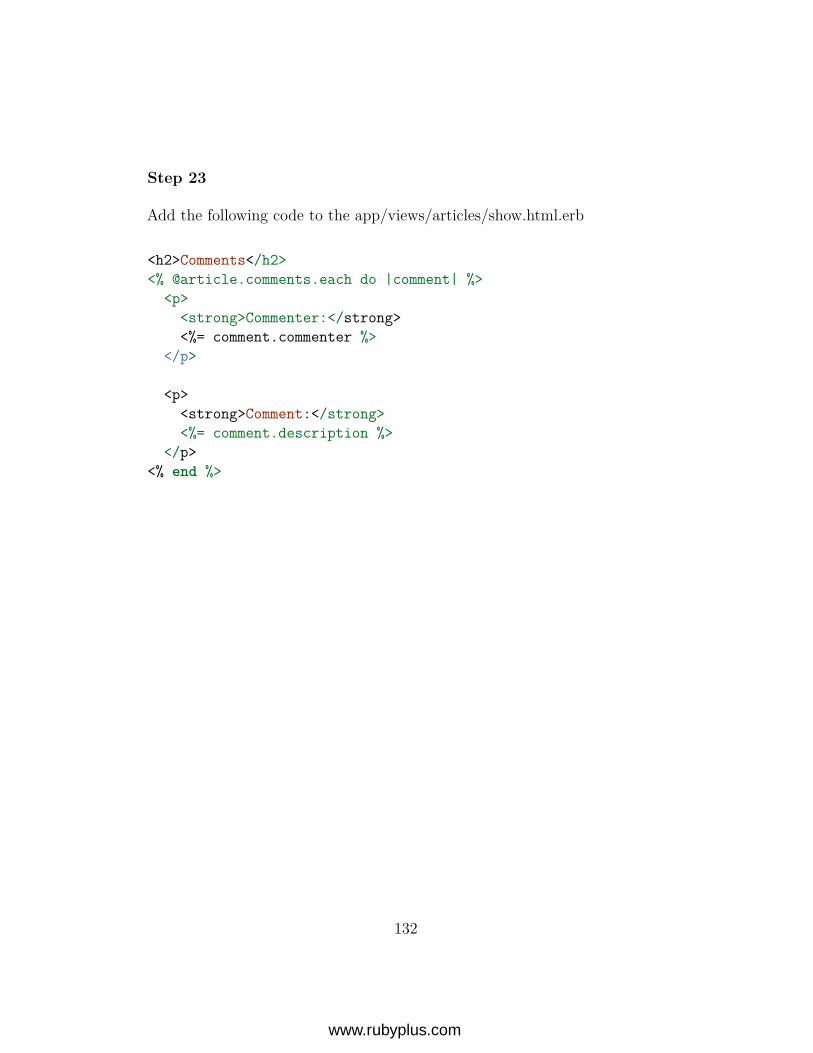
Step 23
Add the following code to the app/views/articles/show.html.erb
<h2>Comments</h2><% @article.comments.each do |comment| %>
<p><strong>Commenter:</strong><%= comment.commenter %>
</p>
<p><strong>Comment:</strong><%= comment.description %>
</p><% end %>
132
www.rubyplus.com
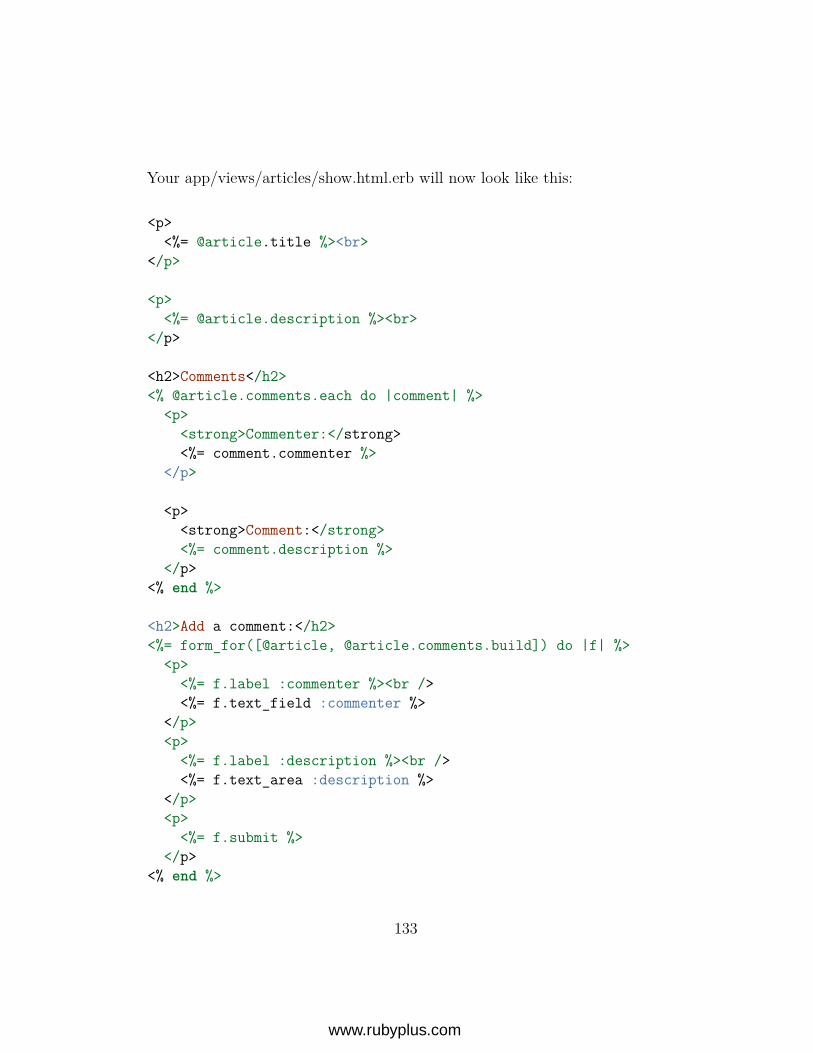
Your app/views/articles/show.html.erb will now look like this:
<p><%= @article.title %><br>
</p>
<p><%= @article.description %><br>
</p>
<h2>Comments</h2><% @article.comments.each do |comment| %>
<p><strong>Commenter:</strong><%= comment.commenter %>
</p>
<p><strong>Comment:</strong><%= comment.description %>
</p><% end %>
<h2>Add a comment:</h2><%= form_for([@article, @article.comments.build]) do |f| %>
<p><%= f.label :commenter %><br /><%= f.text_field :commenter %>
</p><p>
<%= f.label :description %><br /><%= f.text_area :description %>
</p><p>
<%= f.submit %></p>
<% end %>
133
www.rubyplus.com
Step 24
Reload the article show page or click on the ‘Show’ link for the article withcomments by going to the articles index page.You will now see the existing comments for an article.
134
www.rubyplus.com

Figure 109: Comments For an Article
135
www.rubyplus.com
Summary
We saw how to create parent-child relationship in the database and how to useActiveRecord declarations in models to handle 1 to many relationship. Welearned about nested routes and how to make forms work in the parent-childrelationship. In the next lesson we will implement the feature to deletecomments to keep our blog clean from spam.
136
www.rubyplus.com
CHAPTER 11
Delete Comment
Objective
• Learn how to work with nested resources
Steps
Step 1
Let’s add ‘Delete’ link for the comment in app/views/articles/show.html.erb.We know the hyperlink text will be ‘Delete Comment’, so:
<%= link_to ’Delete Comment’, ? %>
What should be URL helper to use in the second parameter?
137
www.rubyplus.com
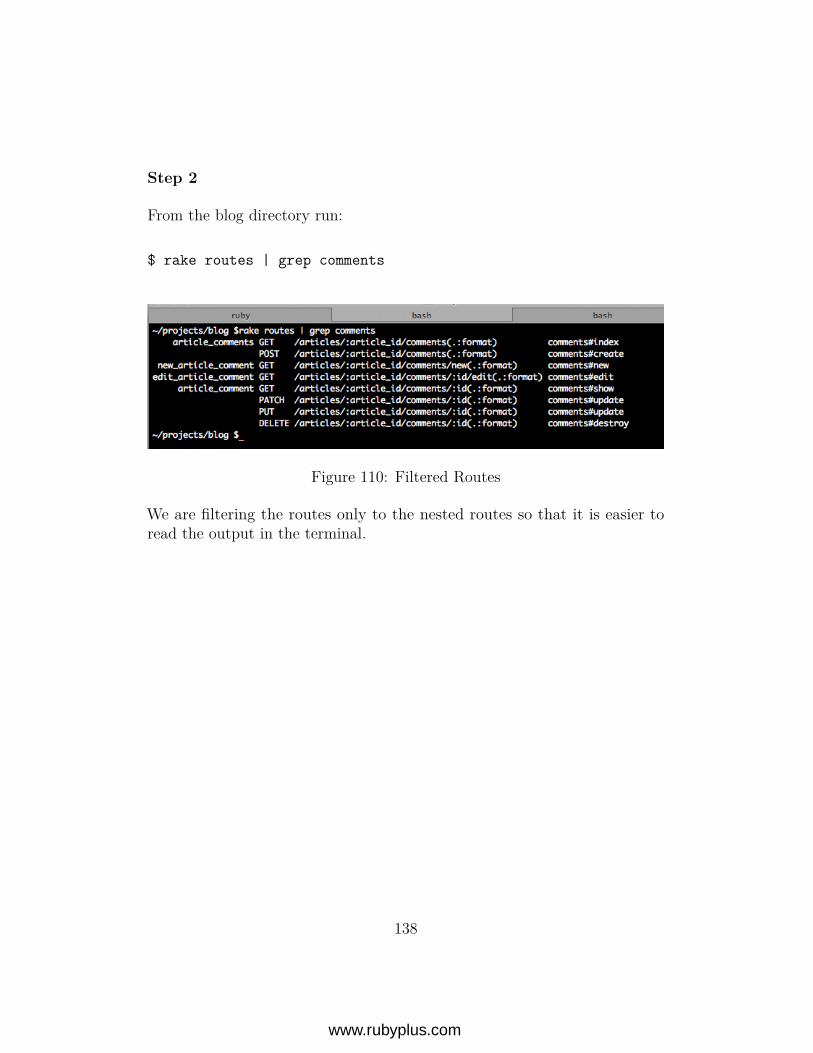
Step 2
From the blog directory run:
$ rake routes | grep comments
Figure 110: Filtered Routes
We are filtering the routes only to the nested routes so that it is easier toread the output in the terminal.
138
www.rubyplus.com
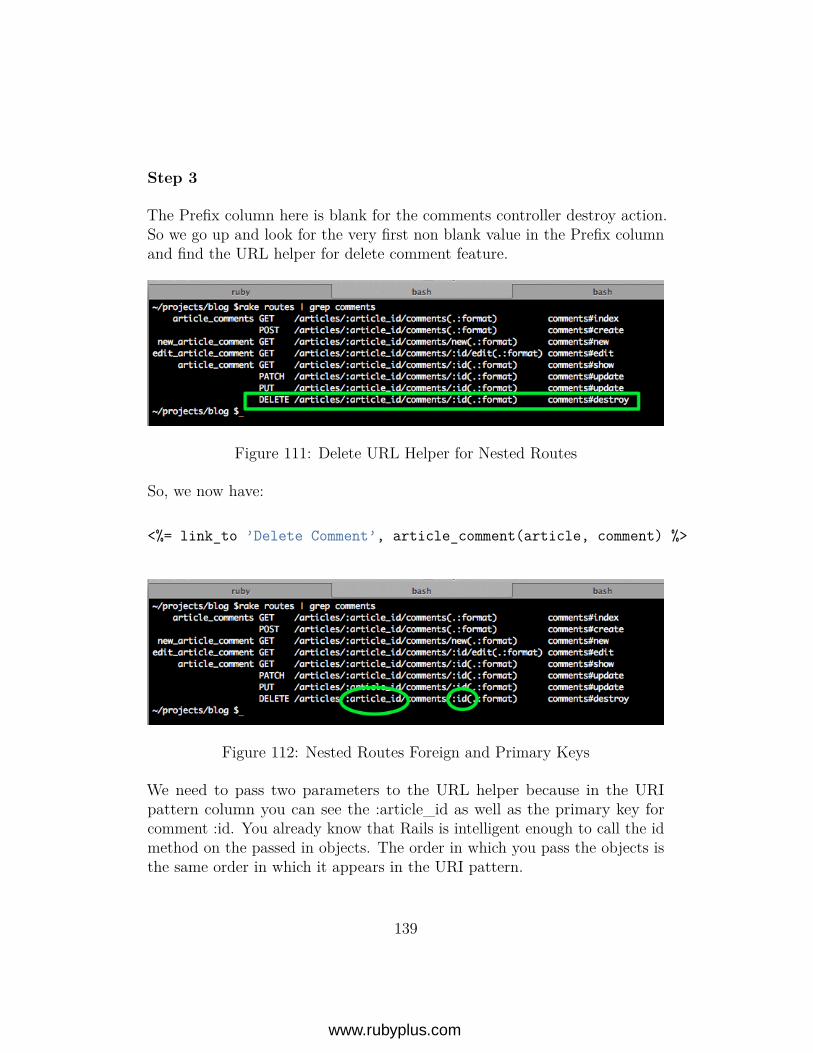
Step 3
The Prefix column here is blank for the comments controller destroy action.So we go up and look for the very first non blank value in the Prefix columnand find the URL helper for delete comment feature.
Figure 111: Delete URL Helper for Nested Routes
So, we now have:
<%= link_to ’Delete Comment’, article_comment(article, comment) %>
Figure 112: Nested Routes Foreign and Primary Keys
We need to pass two parameters to the URL helper because in the URIpattern column you can see the :article_id as well as the primary key forcomment :id. You already know that Rails is intelligent enough to call the idmethod on the passed in objects. The order in which you pass the objects isthe same order in which it appears in the URI pattern.
139
www.rubyplus.com
Step 4
There are other URI patterns which are similar to the comments controllerdestroy action. So we need to do the same thing we did for articles resource.So the link_to now becomes:
<%= link_to ’Delete Comment’,article_comment(article, comment),method: :delete %>
Step 5
The ‘Delete Comment’ is a destructive operation so let’s add the confirmationpopup to the link_to helper.
<%= link_to ’Delete Comment’,article_comment(article, comment),method: :delete,data: { confirm: ’Are you sure?’ } %>
The app/views/articles/show.html.erb now looks as follows:
<p><%= @article.title %><br>
</p>
<p><%= @article.description %><br>
</p>
<h2>Comments</h2><% @article.comments.each do |comment| %>
<p><strong>Commenter:</strong><%= comment.commenter %>
</p>
140
www.rubyplus.com
<p><strong>Comment:</strong><%= comment.description %>
</p>
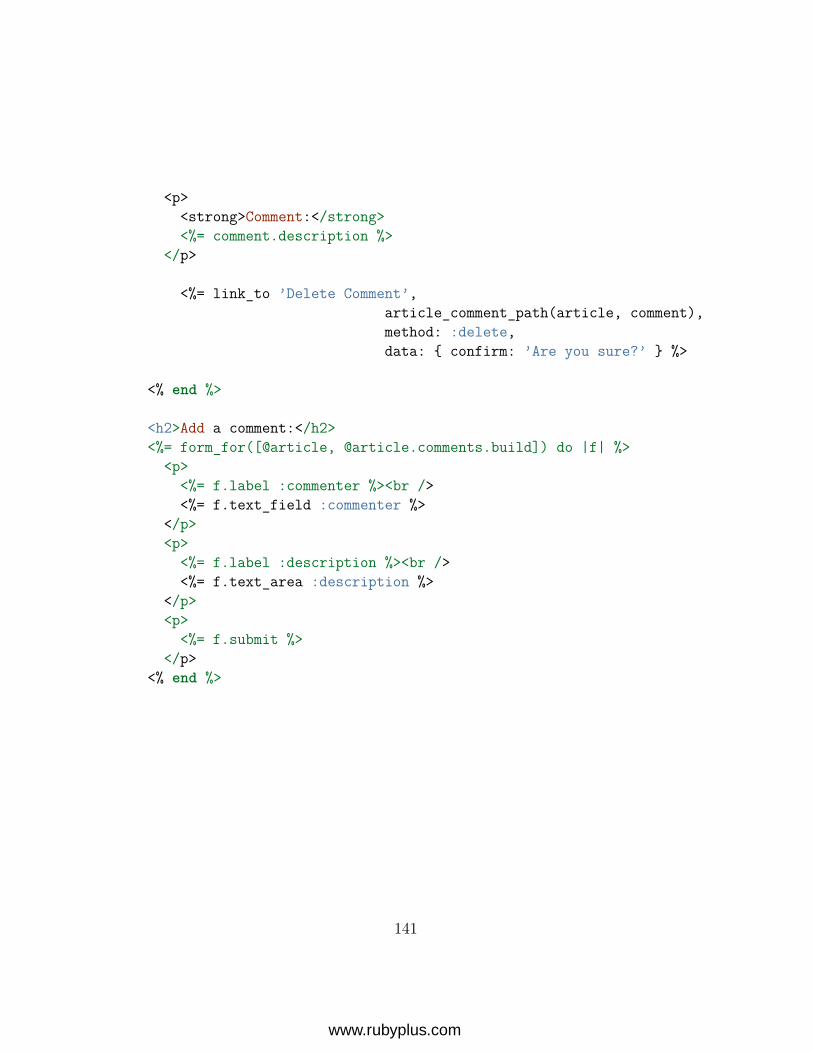
<%= link_to ’Delete Comment’,article_comment_path(article, comment),method: :delete,data: { confirm: ’Are you sure?’ } %>
<% end %>
<h2>Add a comment:</h2><%= form_for([@article, @article.comments.build]) do |f| %>
<p><%= f.label :commenter %><br /><%= f.text_field :commenter %>
</p><p>
<%= f.label :description %><br /><%= f.text_area :description %>
</p><p>
<%= f.submit %></p>
<% end %>
141
www.rubyplus.com
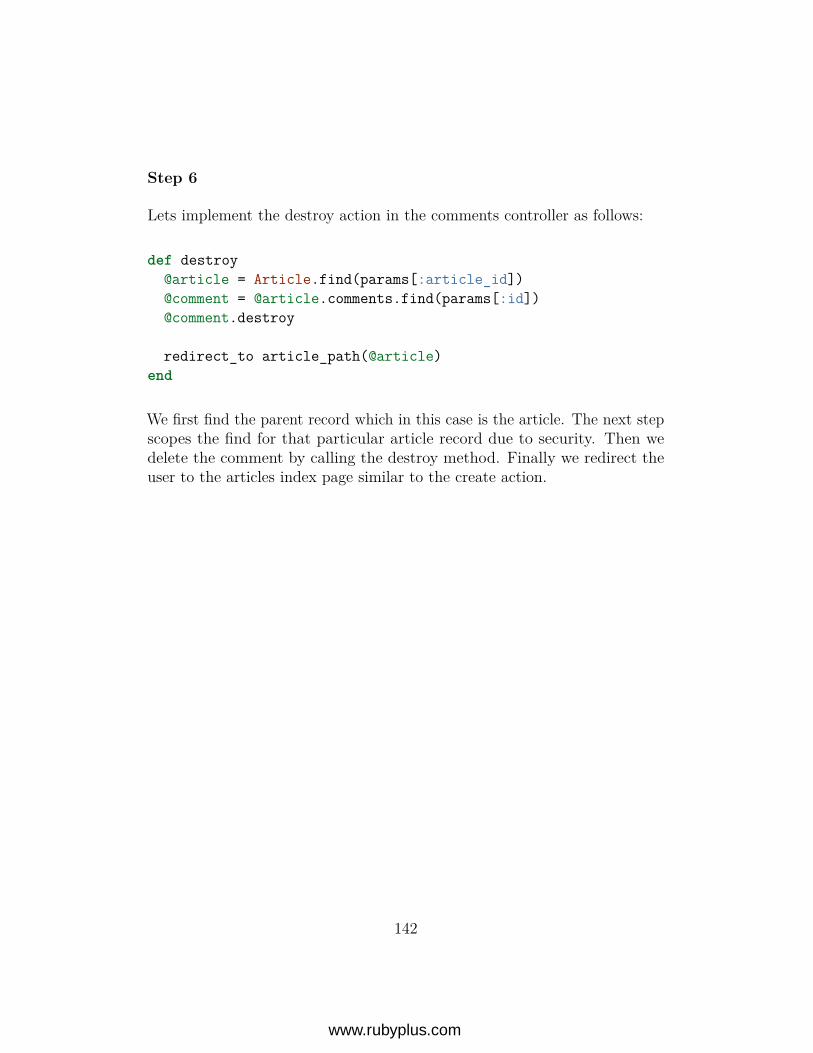
Step 6
Lets implement the destroy action in the comments controller as follows:
def destroy@article = Article.find(params[:article_id])@comment = @article.comments.find(params[:id])@comment.destroy
redirect_to article_path(@article)end
We first find the parent record which in this case is the article. The next stepscopes the find for that particular article record due to security. Then wedelete the comment by calling the destroy method. Finally we redirect theuser to the articles index page similar to the create action.
142
www.rubyplus.com
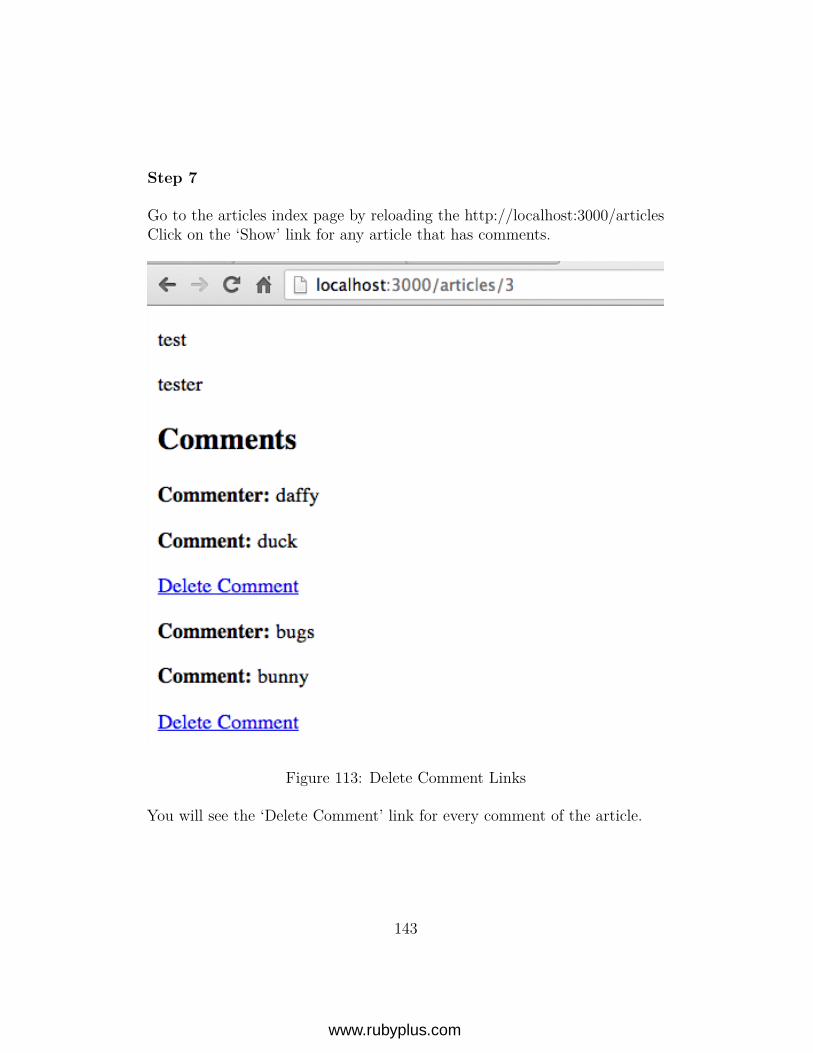
Step 7
Go to the articles index page by reloading the http://localhost:3000/articlesClick on the ‘Show’ link for any article that has comments.
Figure 113: Delete Comment Links
You will see the ‘Delete Comment’ link for every comment of the article.
143
www.rubyplus.com
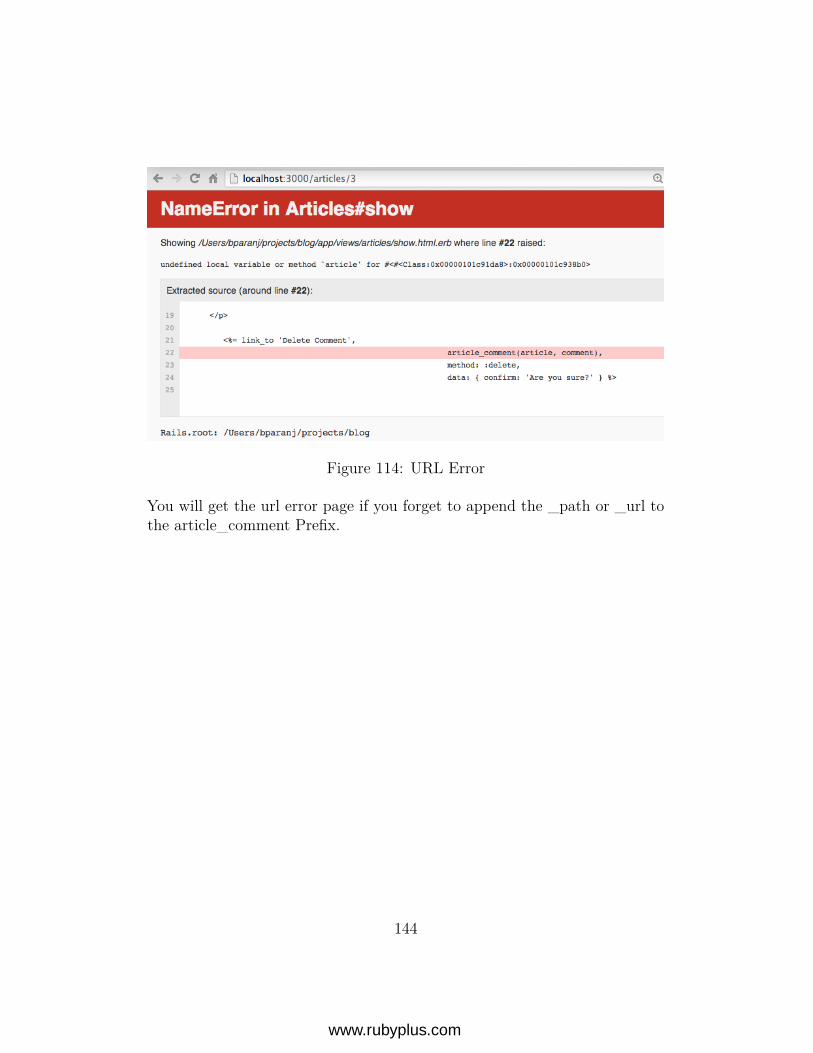
Figure 114: URL Error
You will get the url error page if you forget to append the _path or _url tothe article_comment Prefix.
144
www.rubyplus.com
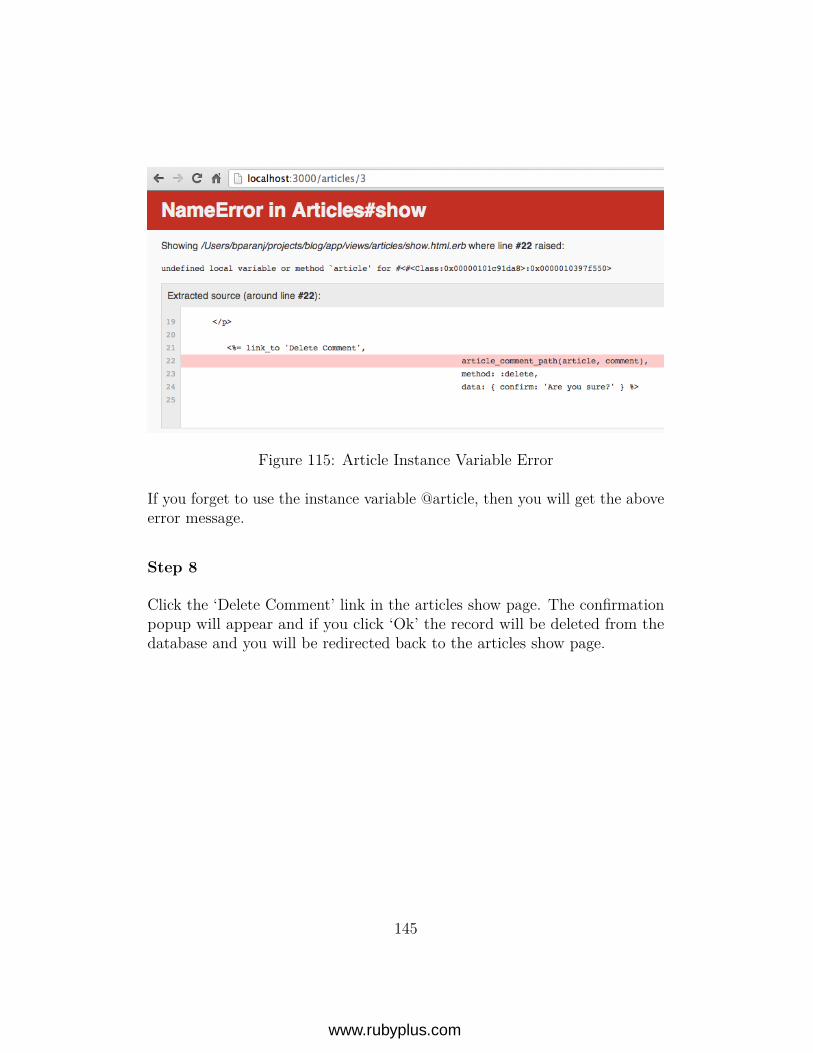
Figure 115: Article Instance Variable Error
If you forget to use the instance variable @article, then you will get the aboveerror message.
Step 8
Click the ‘Delete Comment’ link in the articles show page. The confirmationpopup will appear and if you click ‘Ok’ the record will be deleted from thedatabase and you will be redirected back to the articles show page.
145
www.rubyplus.com
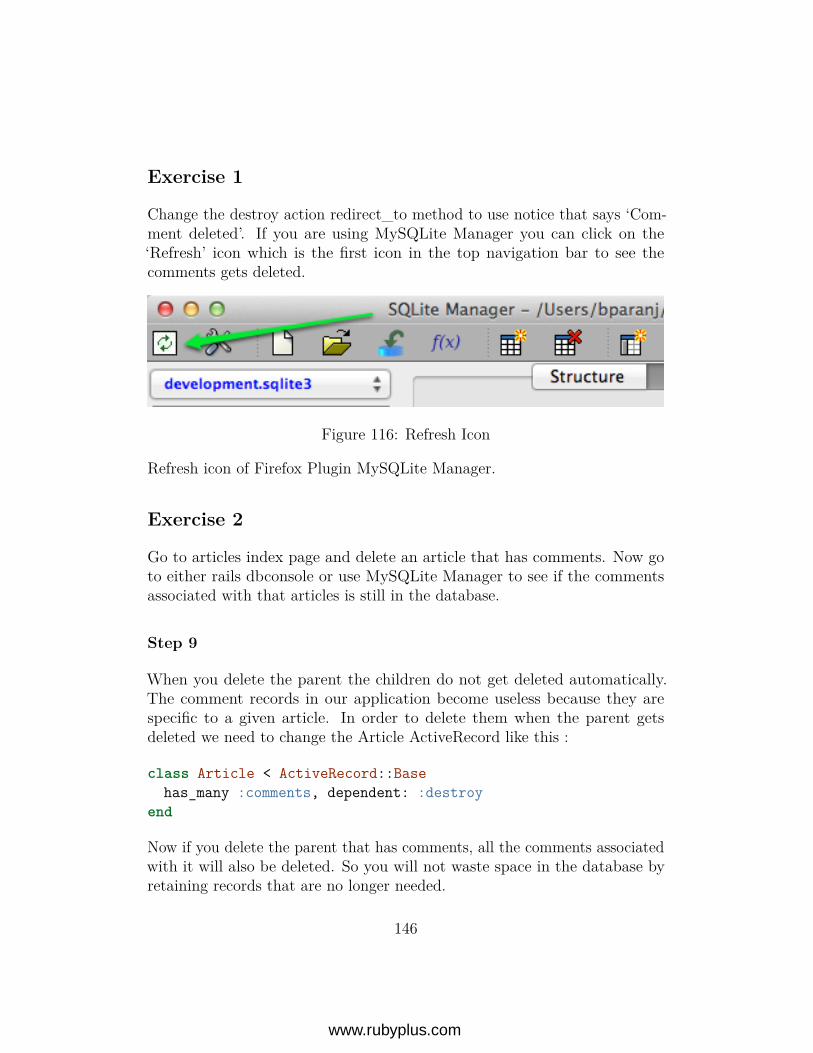
Exercise 1
Change the destroy action redirect_to method to use notice that says ‘Com-ment deleted’. If you are using MySQLite Manager you can click on the‘Refresh’ icon which is the first icon in the top navigation bar to see thecomments gets deleted.
Figure 116: Refresh Icon
Refresh icon of Firefox Plugin MySQLite Manager.
Exercise 2
Go to articles index page and delete an article that has comments. Now goto either rails dbconsole or use MySQLite Manager to see if the commentsassociated with that articles is still in the database.
Step 9
When you delete the parent the children do not get deleted automatically.The comment records in our application become useless because they arespecific to a given article. In order to delete them when the parent getsdeleted we need to change the Article ActiveRecord like this :
class Article < ActiveRecord::Basehas_many :comments, dependent: :destroy
end
Now if you delete the parent that has comments, all the comments associatedwith it will also be deleted. So you will not waste space in the database byretaining records that are no longer needed.
146
www.rubyplus.com
Step 10
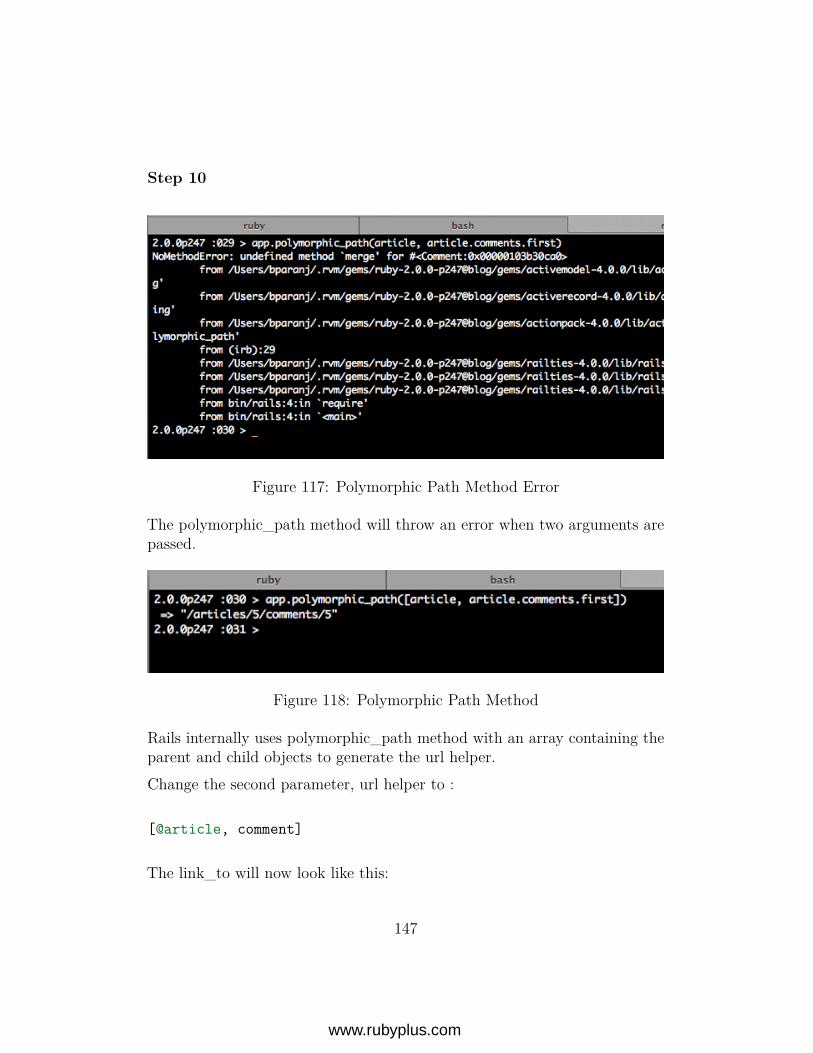
Figure 117: Polymorphic Path Method Error
The polymorphic_path method will throw an error when two arguments arepassed.
Figure 118: Polymorphic Path Method
Rails internally uses polymorphic_path method with an array containing theparent and child objects to generate the url helper.Change the second parameter, url helper to :
[@article, comment]
The link_to will now look like this:
147
www.rubyplus.com
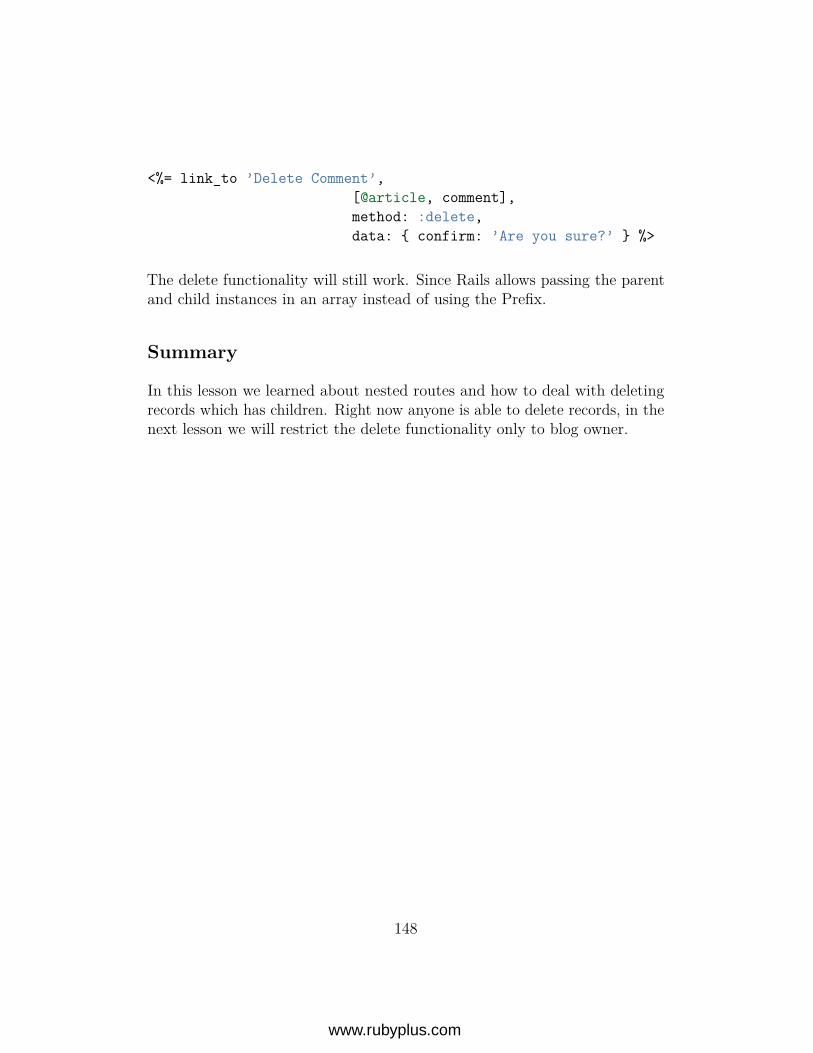
<%= link_to ’Delete Comment’,[@article, comment],method: :delete,data: { confirm: ’Are you sure?’ } %>
The delete functionality will still work. Since Rails allows passing the parentand child instances in an array instead of using the Prefix.
Summary
In this lesson we learned about nested routes and how to deal with deletingrecords which has children. Right now anyone is able to delete records, in thenext lesson we will restrict the delete functionality only to blog owner.
148
www.rubyplus.com
CHAPTER 12
Restricting Operations
Objective
• To learn how to use simple HTTP authentication to restrict access toactions
Steps
Step 1
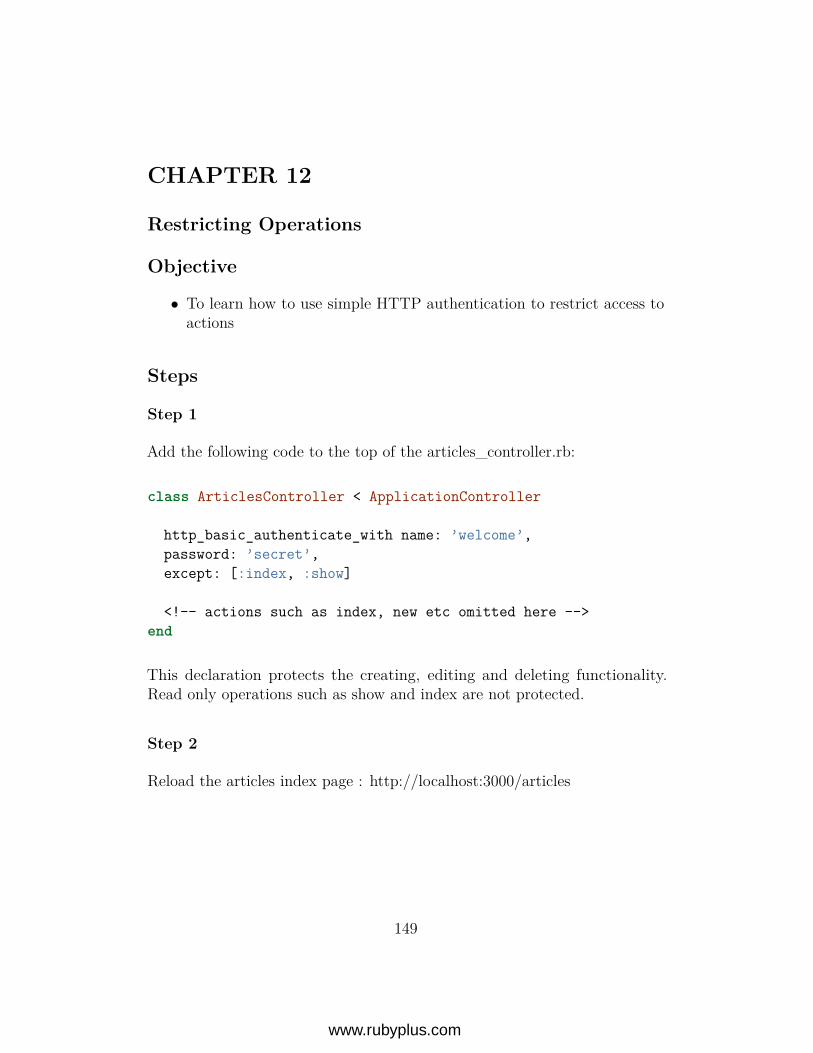
Add the following code to the top of the articles_controller.rb:
class ArticlesController < ApplicationController
http_basic_authenticate_with name: ’welcome’,password: ’secret’,except: [:index, :show]
<!-- actions such as index, new etc omitted here -->end
This declaration protects the creating, editing and deleting functionality.Read only operations such as show and index are not protected.
Step 2
Reload the articles index page : http://localhost:3000/articles
149
www.rubyplus.com
Step 3
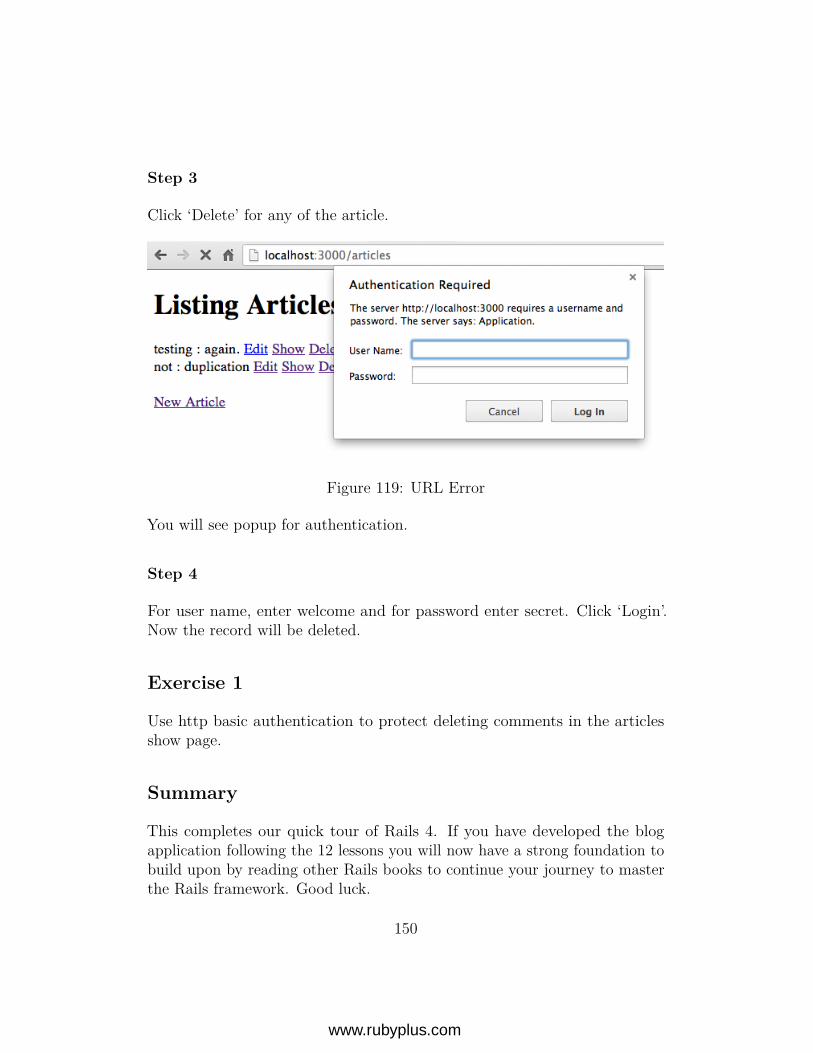
Click ‘Delete’ for any of the article.
Figure 119: URL Error
You will see popup for authentication.
Step 4
For user name, enter welcome and for password enter secret. Click ‘Login’.Now the record will be deleted.
Exercise 1
Use http basic authentication to protect deleting comments in the articlesshow page.
Summary
This completes our quick tour of Rails 4. If you have developed the blogapplication following the 12 lessons you will now have a strong foundation tobuild upon by reading other Rails books to continue your journey to masterthe Rails framework. Good luck.
150
www.rubyplus.com
Bonus Chapters
1. Multiple Representations of a Resource
Objective
• To learn how to represent a resource in different formats such as XMLand JSON.
Steps
Step 1
Add the line:
respond_to :xml
to articles_controller.rb file like this:
class ArticlesController < ApplicationControllerrespond_to :xml
# Rest of the code remains the same as beforeend
Step 2
Add the line:
respond_with(@articles)
to index action in the articles_controller like this:
151
www.rubyplus.com
def index@articles = Article.all
respond_with(@articles)end
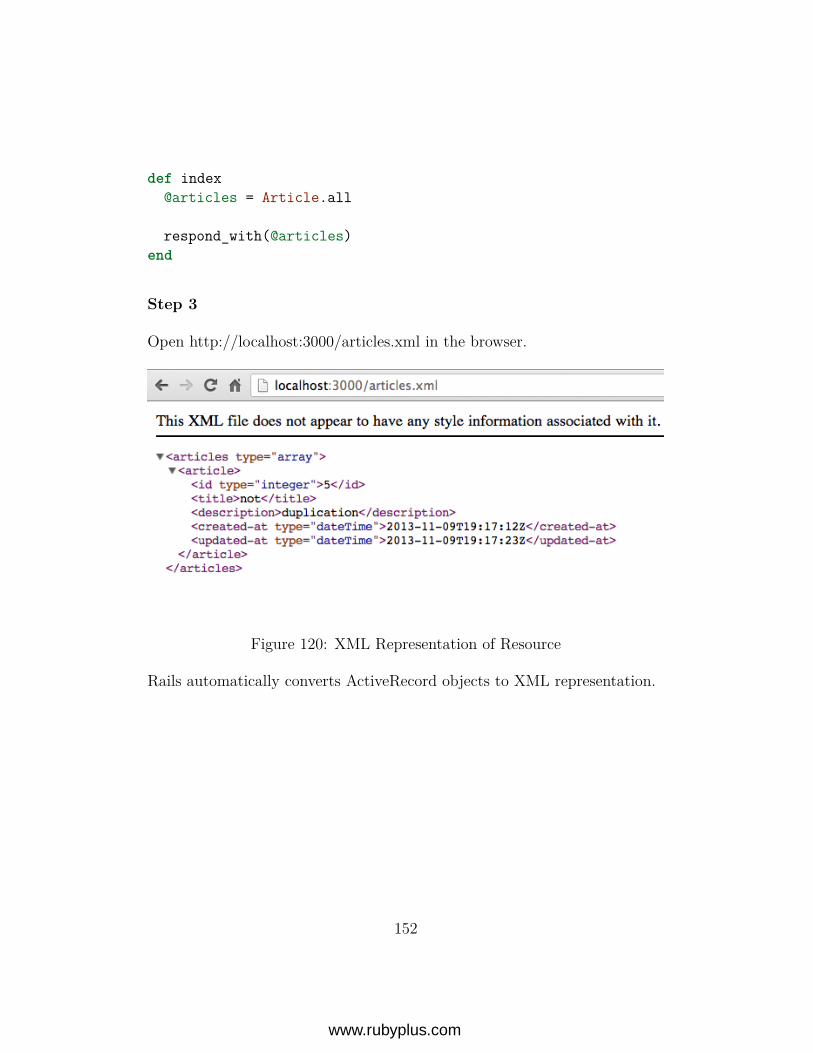
Step 3
Open http://localhost:3000/articles.xml in the browser.
Figure 120: XML Representation of Resource
Rails automatically converts ActiveRecord objects to XML representation.
152
www.rubyplus.com
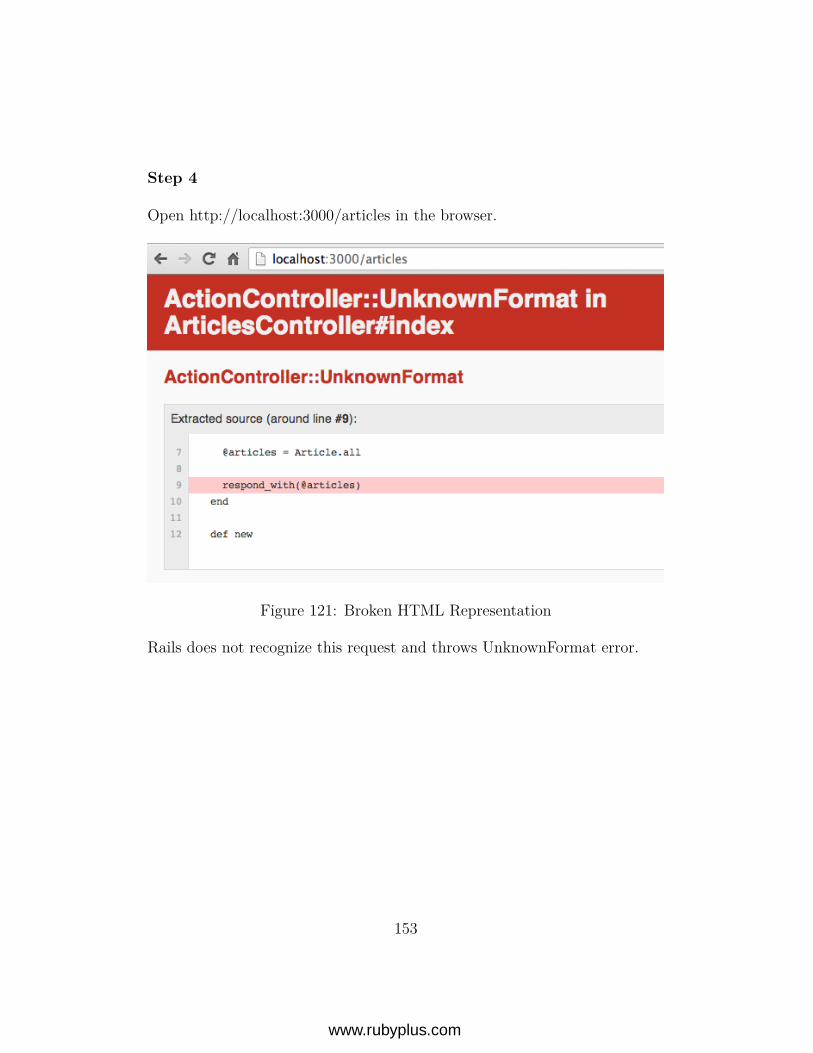
Step 4
Open http://localhost:3000/articles in the browser.
Figure 121: Broken HTML Representation
Rails does not recognize this request and throws UnknownFormat error.
153
www.rubyplus.com
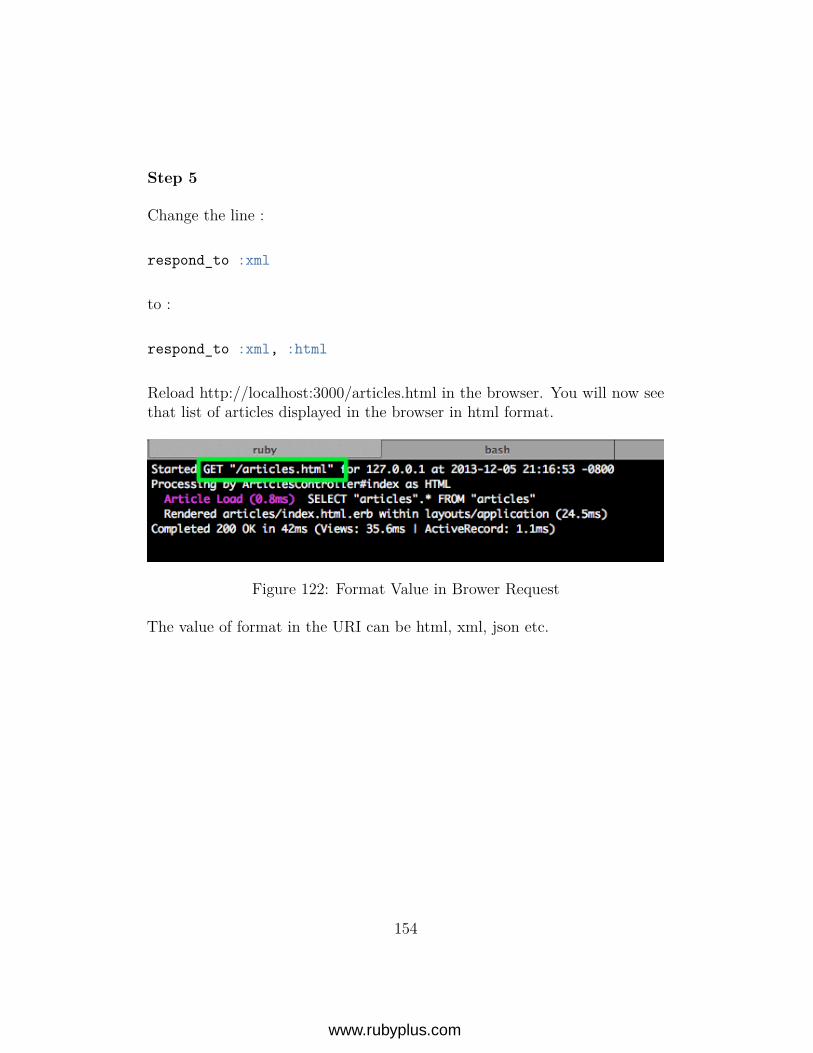
Step 5
Change the line :
respond_to :xml
to :
respond_to :xml, :html
Reload http://localhost:3000/articles.html in the browser. You will now seethat list of articles displayed in the browser in html format.
Figure 122: Format Value in Brower Request
The value of format in the URI can be html, xml, json etc.
154
www.rubyplus.com
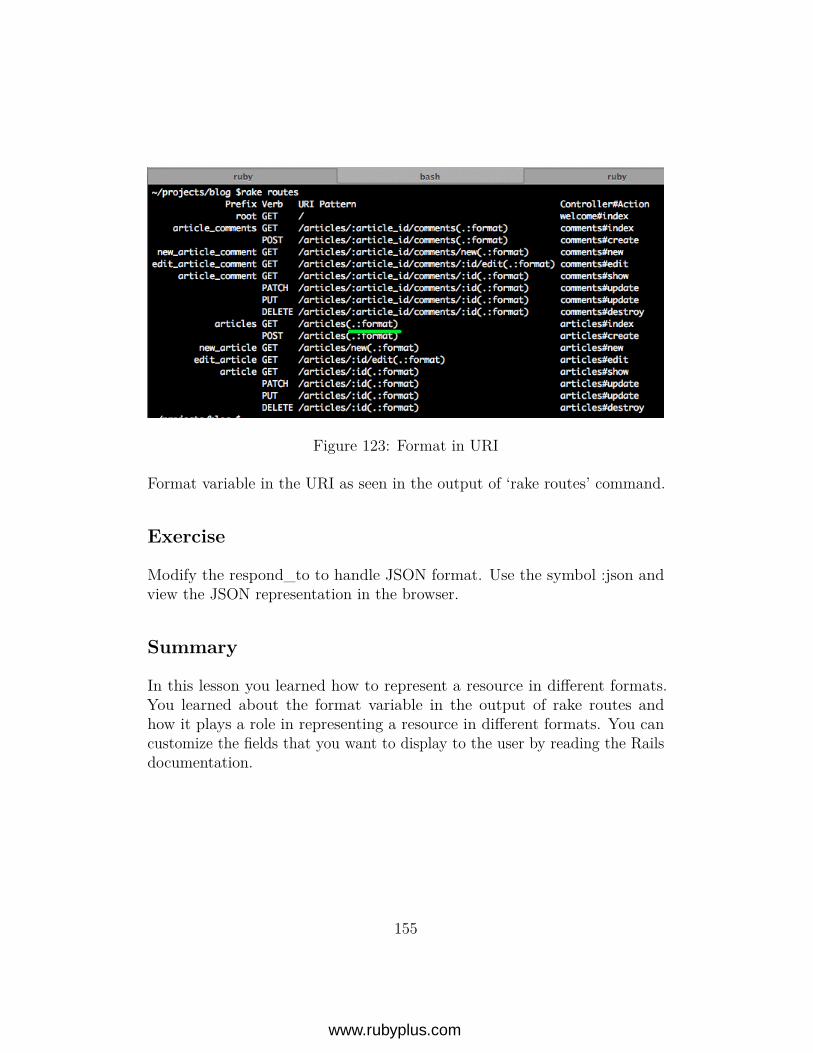
Figure 123: Format in URI
Format variable in the URI as seen in the output of ‘rake routes’ command.
Exercise
Modify the respond_to to handle JSON format. Use the symbol :json andview the JSON representation in the browser.
Summary
In this lesson you learned how to represent a resource in different formats.You learned about the format variable in the output of rake routes andhow it plays a role in representing a resource in different formats. You cancustomize the fields that you want to display to the user by reading the Railsdocumentation.
155
www.rubyplus.com
2. Filters
Objective
• To learn how to use before_action filter
Steps
Step 1
Add find_article method to articles_controller.rb:
def find_articleArticle.find(params[:id])
end
Step 2
Add the before_action filter to articles_controller.rb:
before_action :find_article, except: [:new, :create, :index]
We are excluding the new, create and index actions because we don’t need tofind an article for a given id for those methods.
Step 3
Remove the duplication in edit, updated, show and destroy by using thefind_article method. The articles_controller.rb now looks like this:
class ArticlesController < ApplicationControllerbefore_action :find_article, except: [:new, :create, :index]
respond_to :xml, :html
156
www.rubyplus.com
http_basic_authenticate_with name: ’welcome’,password: ’secret’,except: [:index, :show]
def index@articles = Article.all
respond_with(@articles)end
def new@article = Article.new
end
def createArticle.create(params.require(:article).permit(:title, :description))
redirect_to articles_pathend
def edit@article = find_article
end
def update@article = find_articleallowed_params = params.require(:article).permit(:title, :description)@article.update_attributes(allowed_params)
redirect_to articles_pathend
def show@article = find_article
end
def destroy@article = find_article
157
www.rubyplus.com
@article.destroy
redirect_to articles_path, notice: "Delete success"end
def find_articleArticle.find(params[:id])
endend
Step 4
We don’t want the find_article method to be exposed as an action that canbe called. So let’s make it private like this:
private
def find_articleArticle.find(params[:id])
end
Now this method can only be used within the articles controller class. Edit,delete and show features will work.
Summary
In this lesson we learned how to use before_action filter. It takes the name ofthe method as a symbol and calls that method before an action is executed.We customized the filter by excluding some of the actions that does notrequire loading the article from the database. To learn more about filterscheck out the http://guides.rubyonrails.org/ site.
158
www.rubyplus.com
3. Validations
Objectives
• To learn about validating user input
• To learn about render and redirect
Steps
Step 1
Go to http://localhost:3000/articles page in the browser. Click on ‘NewArticle’ link and click submit without filling out the form. You will see thatthe title and description of the article is blank in the database. Let’s fix thisproblem.
Step 2
Add the validation declarations to article.rb as follows:
validates :title, presence: truevalidates :description, presence: true
The article.rb file now looks like this:
class Article < ActiveRecord::Basehas_many :comments, dependent: :destroy
validates :title, presence: truevalidates :description, presence: true
end
159
www.rubyplus.com
Step 3
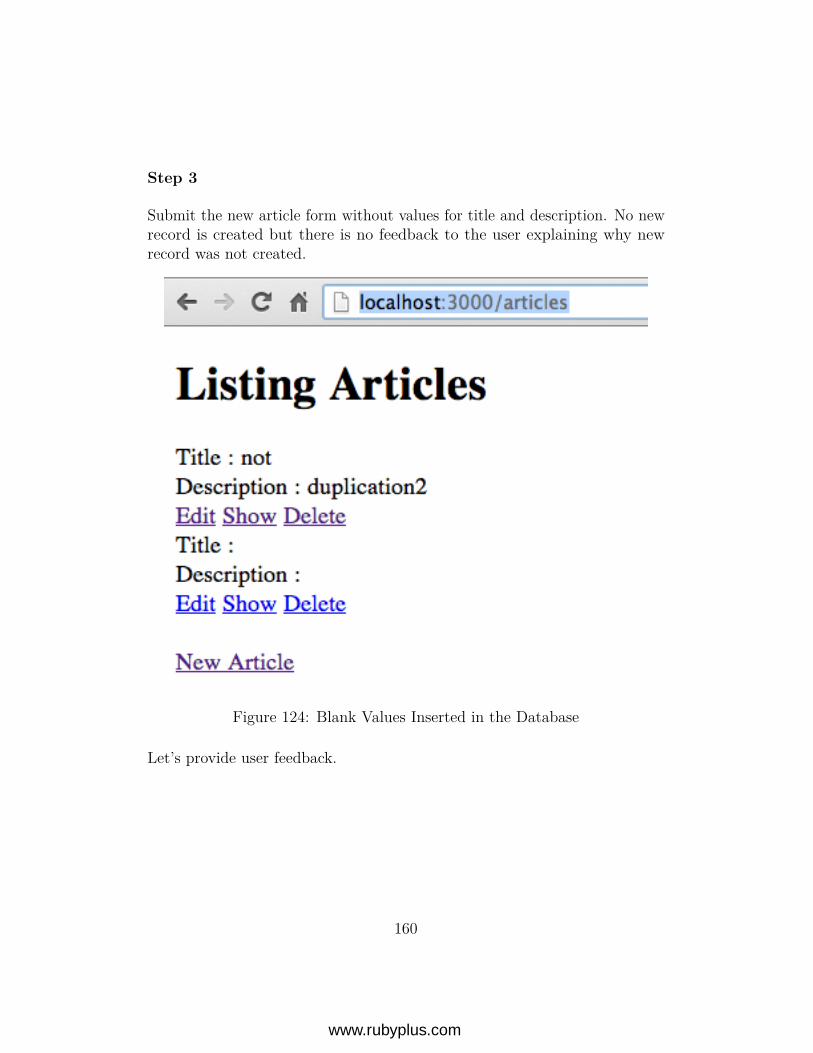
Submit the new article form without values for title and description. No newrecord is created but there is no feedback to the user explaining why newrecord was not created.
Figure 124: Blank Values Inserted in the Database
Let’s provide user feedback.
160
www.rubyplus.com
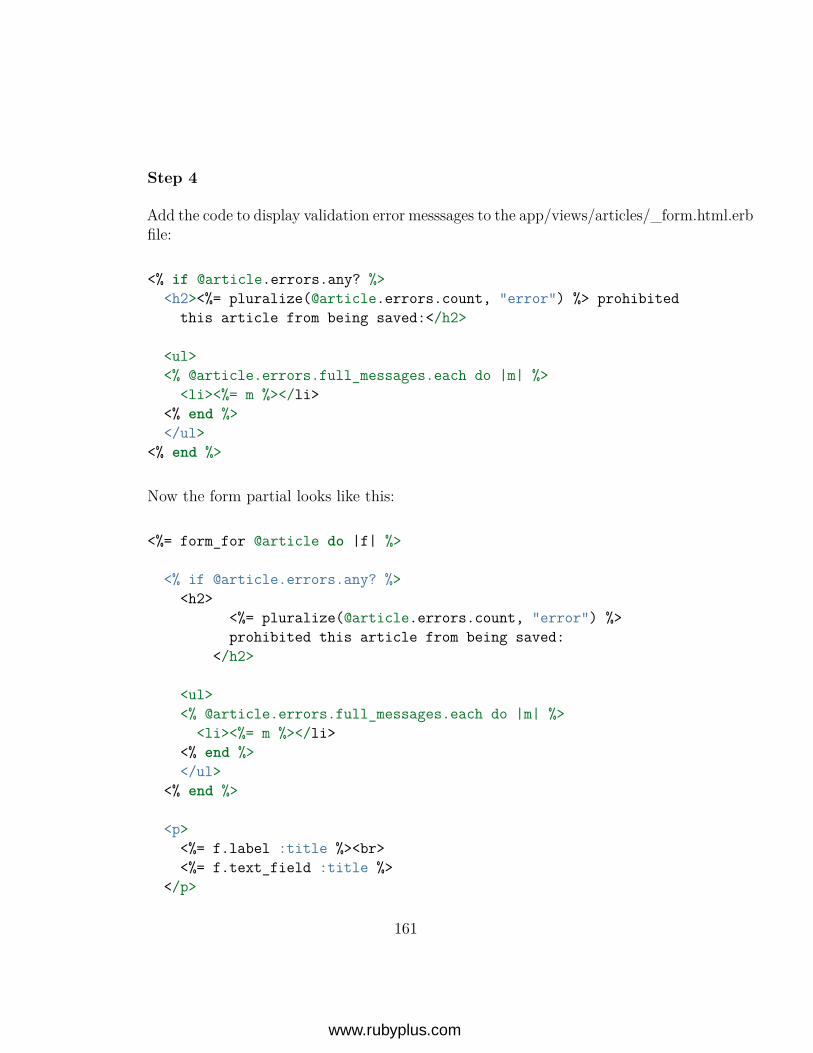
Step 4
Add the code to display validation error messsages to the app/views/articles/_form.html.erbfile:
<% if @article.errors.any? %><h2><%= pluralize(@article.errors.count, "error") %> prohibitedthis article from being saved:</h2>
<ul><% @article.errors.full_messages.each do |m| %>
<li><%= m %></li><% end %></ul>
<% end %>
Now the form partial looks like this:
<%= form_for @article do |f| %>
<% if @article.errors.any? %><h2>
<%= pluralize(@article.errors.count, "error") %>prohibited this article from being saved:
</h2>
<ul><% @article.errors.full_messages.each do |m| %>
<li><%= m %></li><% end %></ul>
<% end %>
<p><%= f.label :title %><br><%= f.text_field :title %>
</p>
161
www.rubyplus.com
<p><%= f.label :description %><br><%= f.text_area :description %>
</p>
<p><%= f.submit %>
</p><% end %>
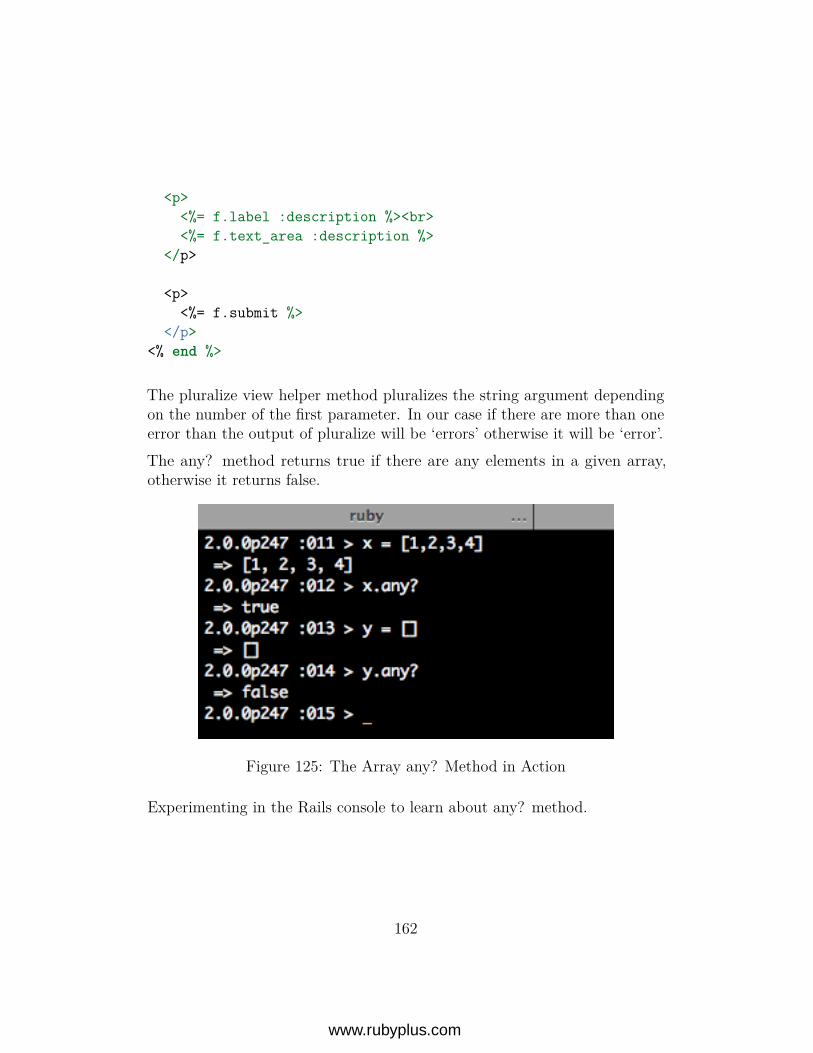
The pluralize view helper method pluralizes the string argument dependingon the number of the first parameter. In our case if there are more than oneerror than the output of pluralize will be ‘errors’ otherwise it will be ‘error’.The any? method returns true if there are any elements in a given array,otherwise it returns false.
Figure 125: The Array any? Method in Action
Experimenting in the Rails console to learn about any? method.
162
www.rubyplus.com
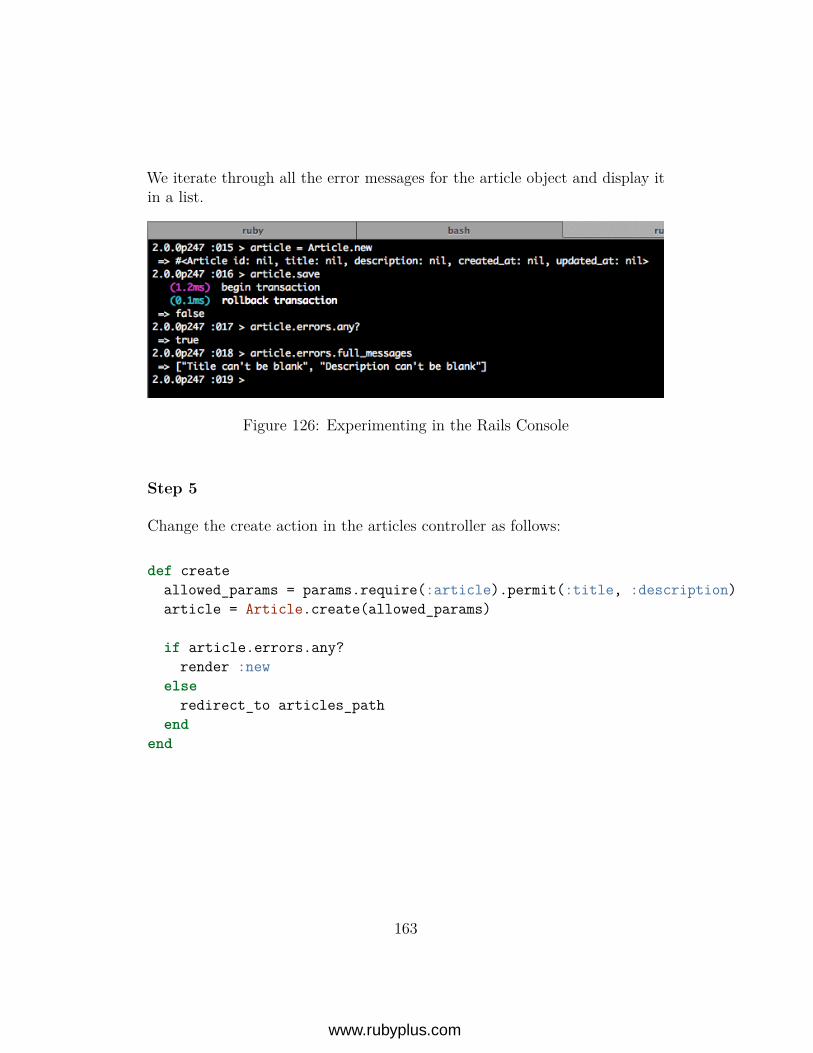
We iterate through all the error messages for the article object and display itin a list.
Figure 126: Experimenting in the Rails Console
Step 5
Change the create action in the articles controller as follows:
def createallowed_params = params.require(:article).permit(:title, :description)article = Article.create(allowed_params)
if article.errors.any?render :new
elseredirect_to articles_path
endend
163
www.rubyplus.com
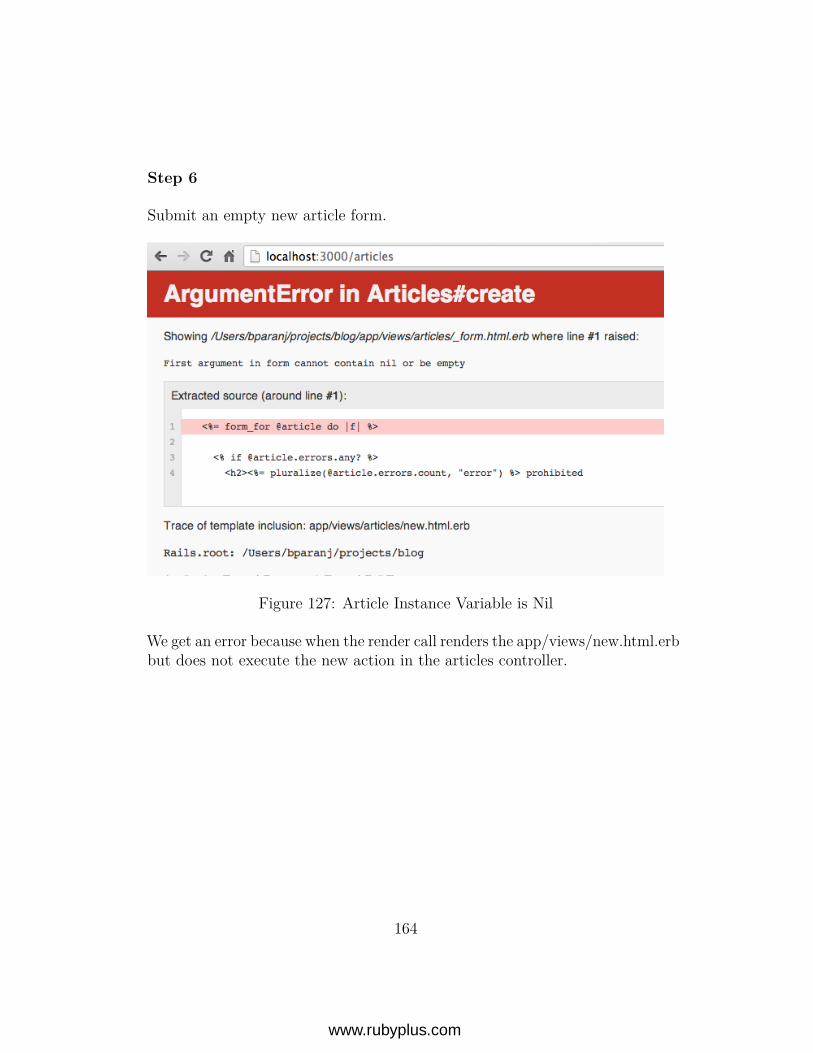
Step 6
Submit an empty new article form.
Figure 127: Article Instance Variable is Nil
We get an error because when the render call renders the app/views/new.html.erbbut does not execute the new action in the articles controller.
164
www.rubyplus.com
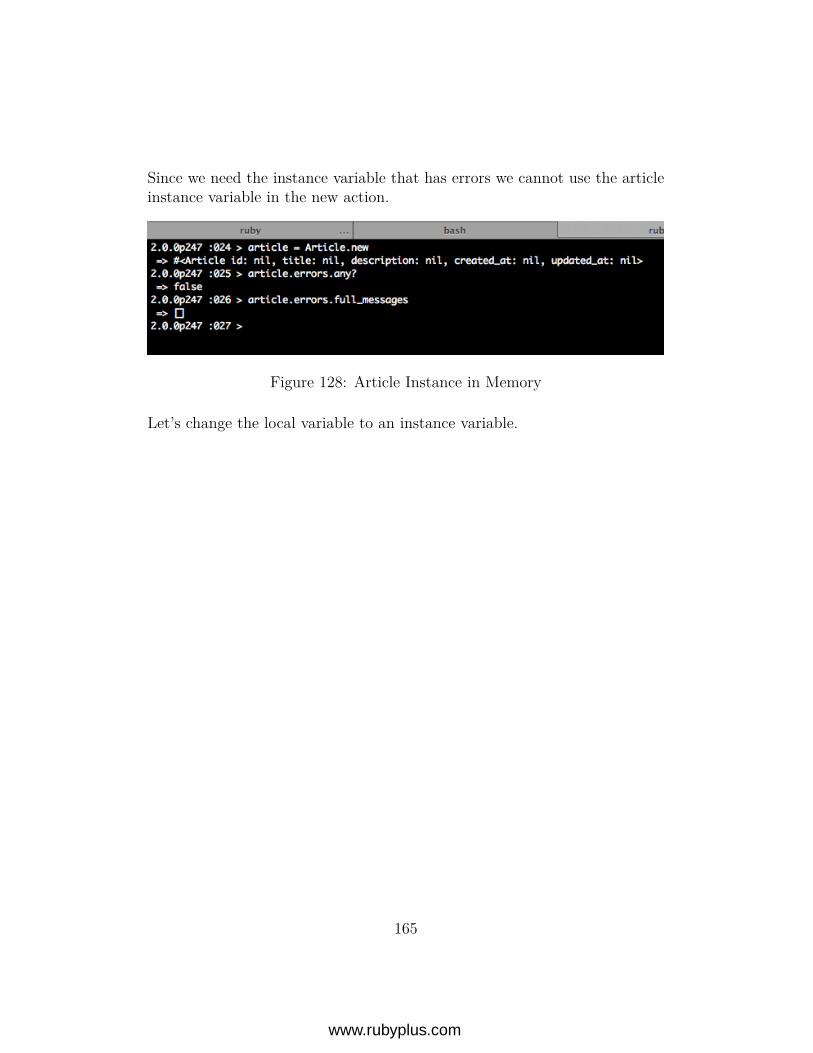
Since we need the instance variable that has errors we cannot use the articleinstance variable in the new action.
Figure 128: Article Instance in Memory
Let’s change the local variable to an instance variable.
165
www.rubyplus.com
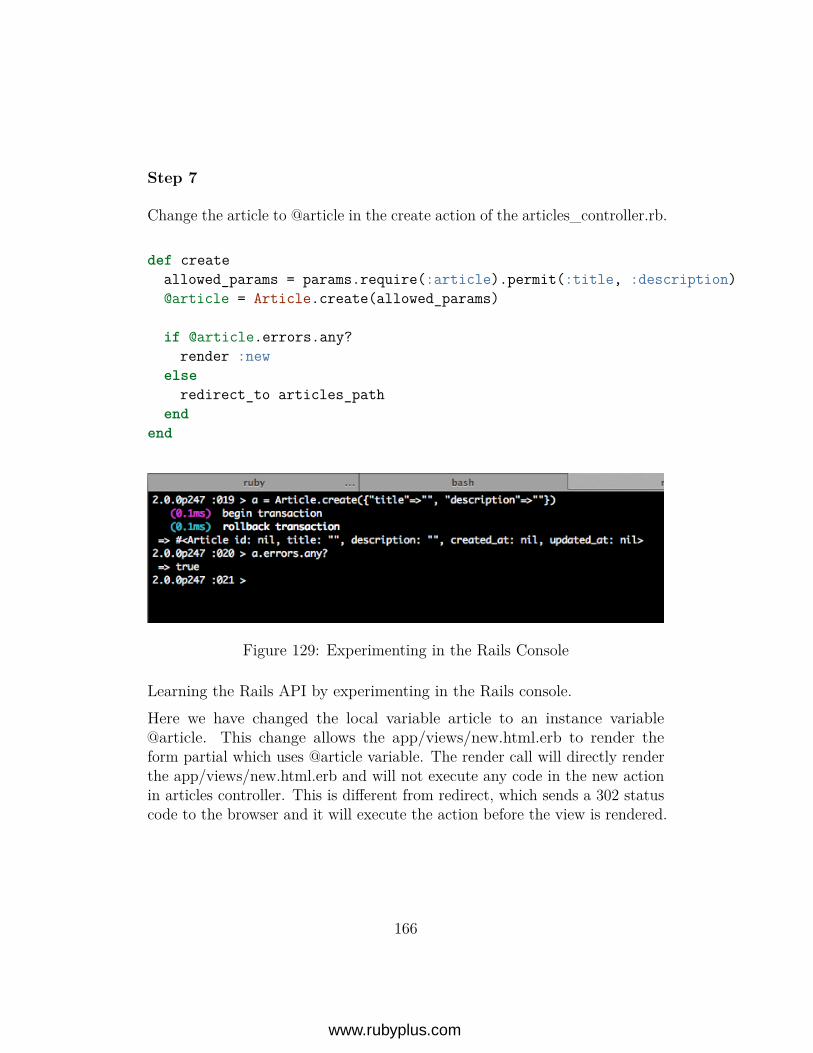
Step 7
Change the article to @article in the create action of the articles_controller.rb.
def createallowed_params = params.require(:article).permit(:title, :description)@article = Article.create(allowed_params)
if @article.errors.any?render :new
elseredirect_to articles_path
endend
Figure 129: Experimenting in the Rails Console
Learning the Rails API by experimenting in the Rails console.Here we have changed the local variable article to an instance variable@article. This change allows the app/views/new.html.erb to render theform partial which uses @article variable. The render call will directly renderthe app/views/new.html.erb and will not execute any code in the new actionin articles controller. This is different from redirect, which sends a 302 statuscode to the browser and it will execute the action before the view is rendered.
166
www.rubyplus.com
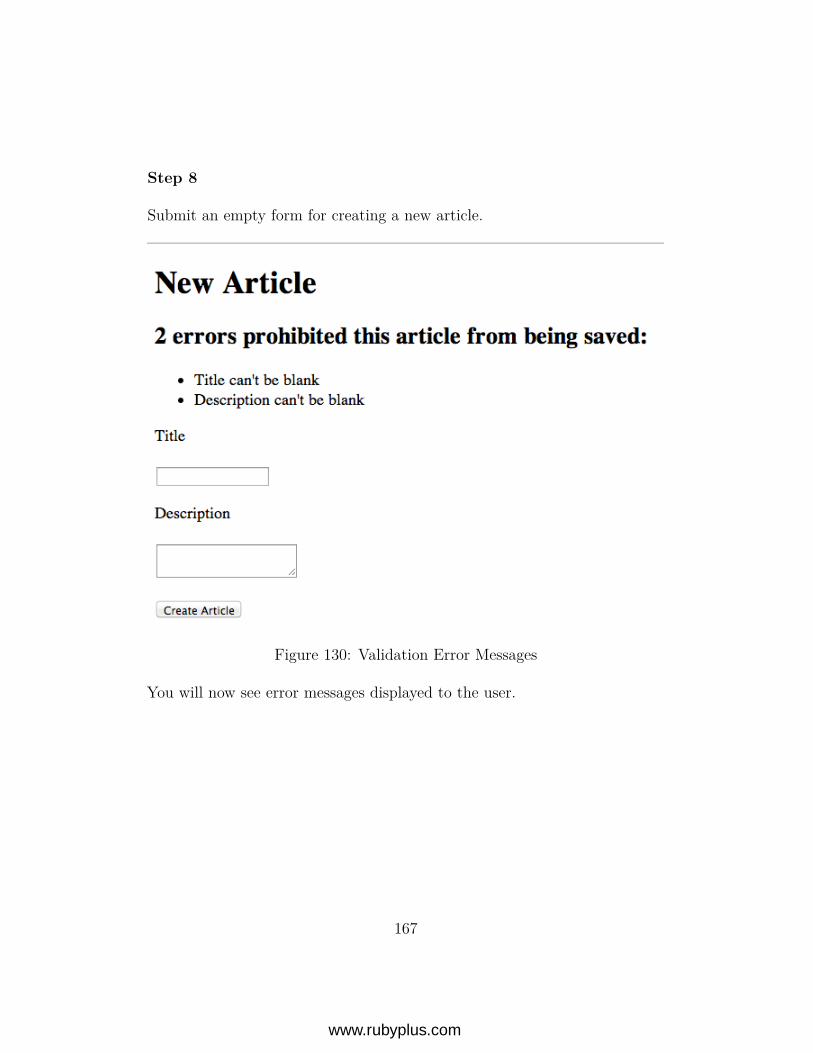
Step 8
Submit an empty form for creating a new article.
Figure 130: Validation Error Messages
You will now see error messages displayed to the user.
167
www.rubyplus.com
Exercises
1. Read the Rails documentation and add the validation check for the titleso that the minimum length of title is 2.
2. Why does Article.new with no values for title and description have noerrors whereas Article.create with no values for title and descriptionhave errors?
Summary
In this lesson we learned how to display validation error messages to the userwhen the user does not provide required fields. We also learned the differencebetween the render and redirect calls.
168
www.rubyplus.com
4. Using Twitter Bootstrap 3
Objective
• Learn how to integrate Twitter Bootstrap 3 with Rails 4 and style yourweb application.
Steps
Step 1
Add the following line to Gemfile:
gem ’bootstrap-sass’, github: ’thomas-mcdonald/bootstrap-sass’
Step 2
Run :
bundle install
from the blog directory.
Step 3
Add the following line in your app/assets/javascripts/application.js file:
//= require bootstrap
Step 4
Make a file in app/assets/stylesheets called load_bootstrap.css.scss and inthat file put:
@import "bootstrap";
169
www.rubyplus.com

Step 5
The app/assets/stylesheets/application.css should look something like this:
*= require_self*= require load_bootstrap*= require_tree .*/
This loads the load_bootstrap file into the asset pipeline.
Step 6
In app/views/layouts/application.html.erb, inside the body tag change thehtml to the code shown below:
<nav class="navbar navbar-default" role="navigation"><!-- Brand and toggle get grouped for better mobile display --><div class="navbar-header">
<button type="button" class="navbar-toggle" data-toggle="collapse" data-target="#bs-example-navbar-collapse-1"><span class="sr-only">Toggle navigation</span><span class="icon-bar"></span><span class="icon-bar"></span><span class="icon-bar"></span>
</button><a class="navbar-brand" href="#">My Blog</a>
</div>
<!-- Collect the nav links, forms, and other content for toggling --><div class="collapse navbar-collapse" id="bs-example-navbar-collapse-1">
<ul class="nav navbar-nav"><li class="active"><a href="#">About</a></li><li><a href="#">Contact</a></li>
</ul>
</div><!-- /.navbar-collapse -->
170
www.rubyplus.com
</nav>
<% flash.each do |name, msg| -%><%= content_tag :div, msg, class: name %>
<% end -%>
<%= yield %>
The layout file application.html.erb is responsible for application wide layout.The yield is a place holder and its contents can change for different views.The header, footer and navigation defined in the layout will remain the sameacross different views.
Step 7
Wrap a :
<div class="container">
around the yield in app/views/layouts/application.html.erb. So your yieldcall in layout file app/views/layouts/application.html.erb will look like this:
<div class=’container’><%= yield %></div>
171
www.rubyplus.com
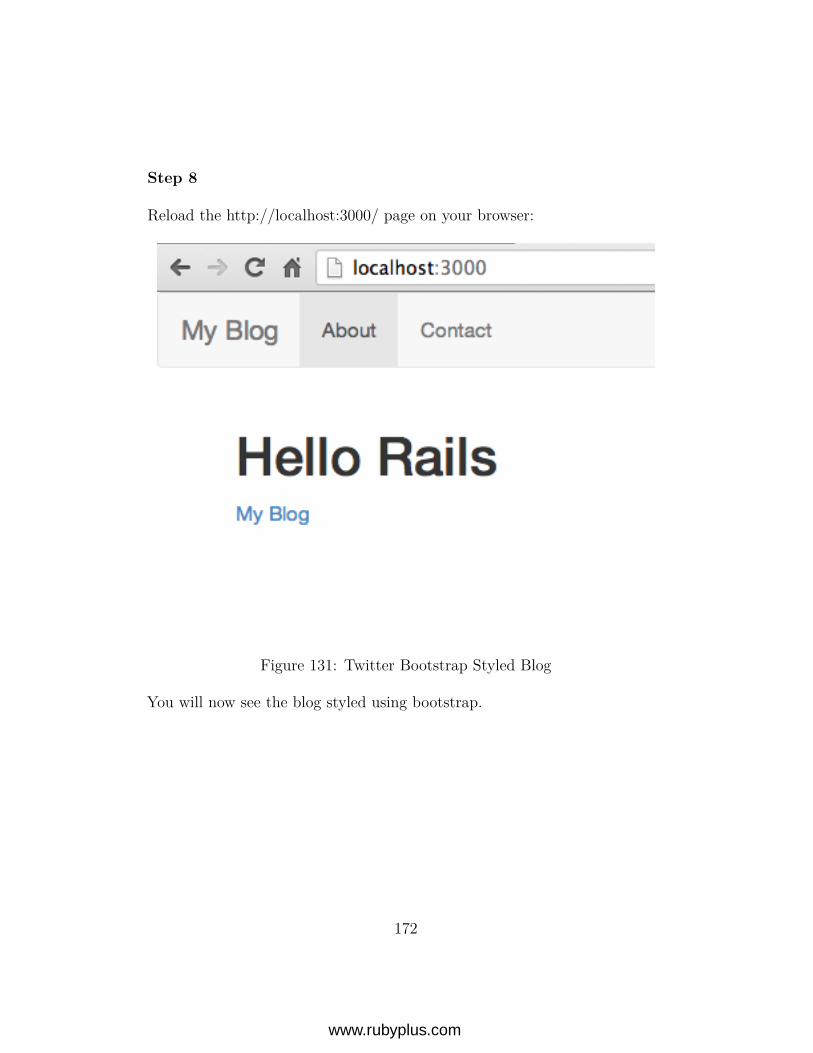
Step 8
Reload the http://localhost:3000/ page on your browser:
Figure 131: Twitter Bootstrap Styled Blog
You will now see the blog styled using bootstrap.
172
www.rubyplus.com
Step 9
Click on ‘My Blog’ link, the list of blog posts is not styled. Let’s make themlook nice now. Replace the contents of app/views/index.html.erb with thefollowing code:
<h1>Articles</h1><table class="table table-striped">
<thead><tr>
<th>ID</th><th>Title</th><th>Description</th><th>Actions</th>
</tr></thead><tbody>
<% @articles.each do |article| %><tr>
<td><%= article.id %></td><td><%= link_to article.title, article %></td><td><%= article.description %></td><td>
<%= link_to ’Edit’,edit_article_path(article),:class => ’btn btn-mini’ %>
<%= link_to ’Delete’,article_path(article),:method => :delete,:confirm => ’Are you sure?’,:class => ’btn btn-mini btn-danger’ %>
</td></tr>
<% end %></tbody>
</table>
<%= link_to ’New Article’, new_article_path, :class => ’btn btn-primary’ %>
173
www.rubyplus.com
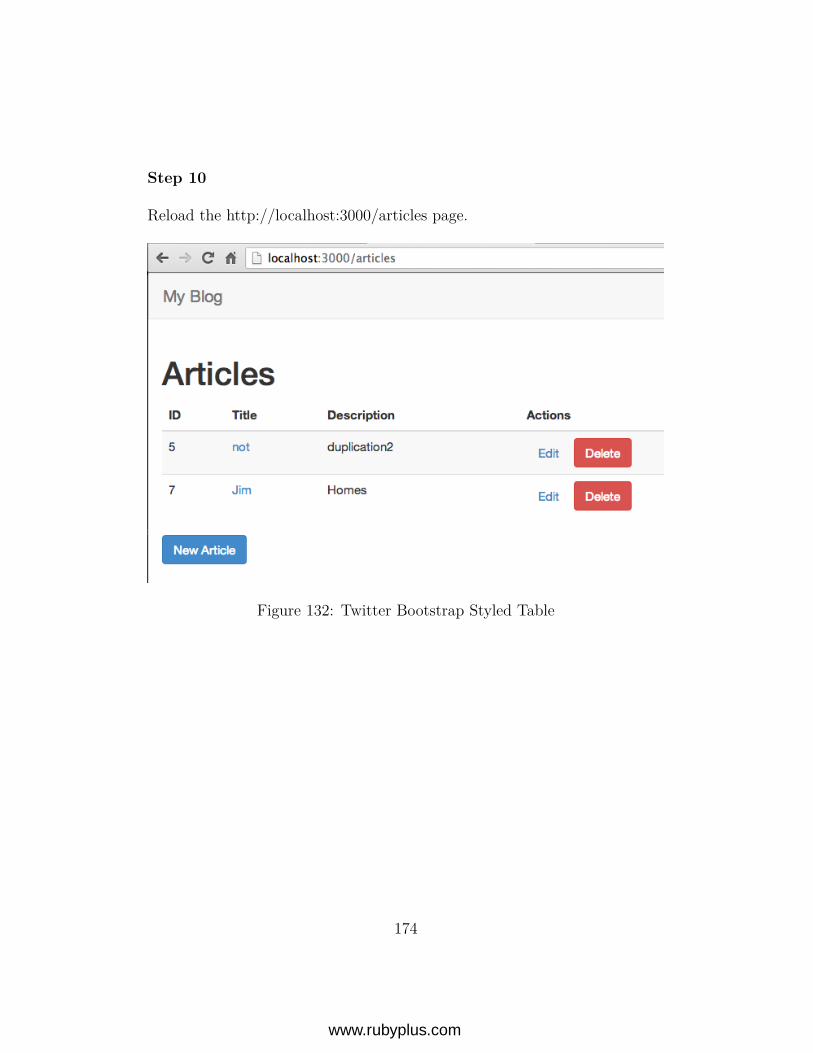
Step 10
Reload the http://localhost:3000/articles page.
Figure 132: Twitter Bootstrap Styled Table
174
www.rubyplus.com
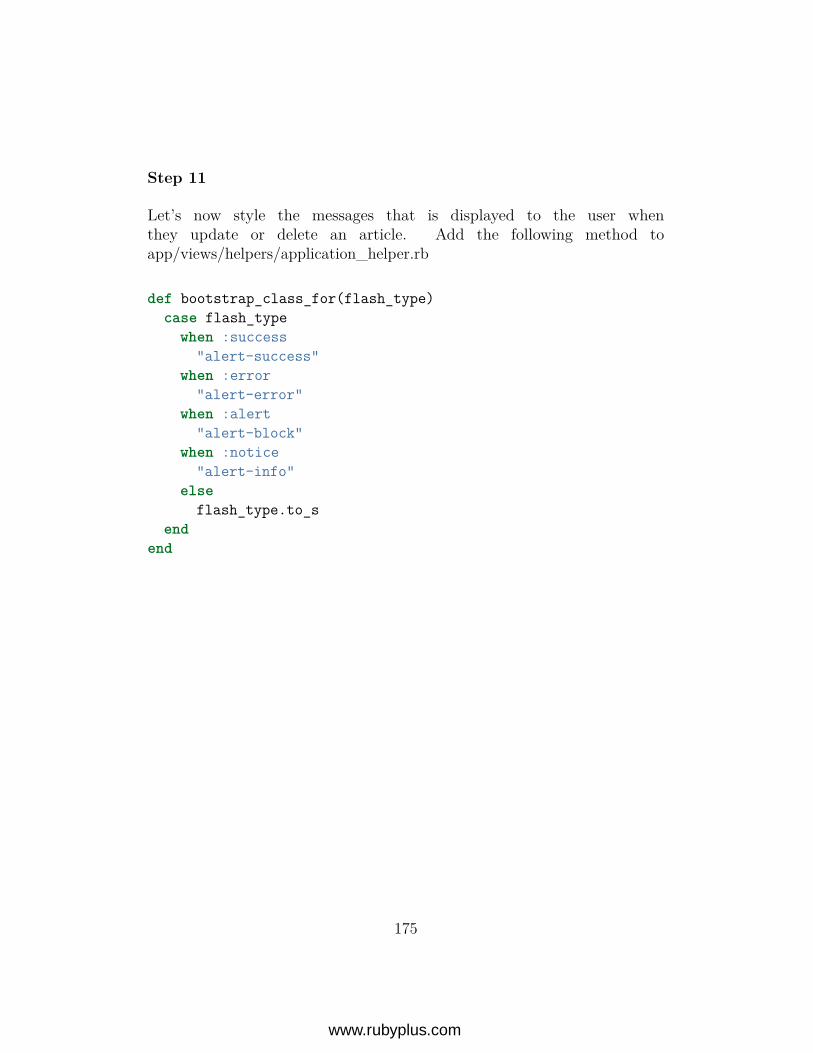
Step 11
Let’s now style the messages that is displayed to the user whenthey update or delete an article. Add the following method toapp/views/helpers/application_helper.rb
def bootstrap_class_for(flash_type)case flash_type
when :success"alert-success"
when :error"alert-error"
when :alert"alert-block"
when :notice"alert-info"
elseflash_type.to_s
endend
175
www.rubyplus.com
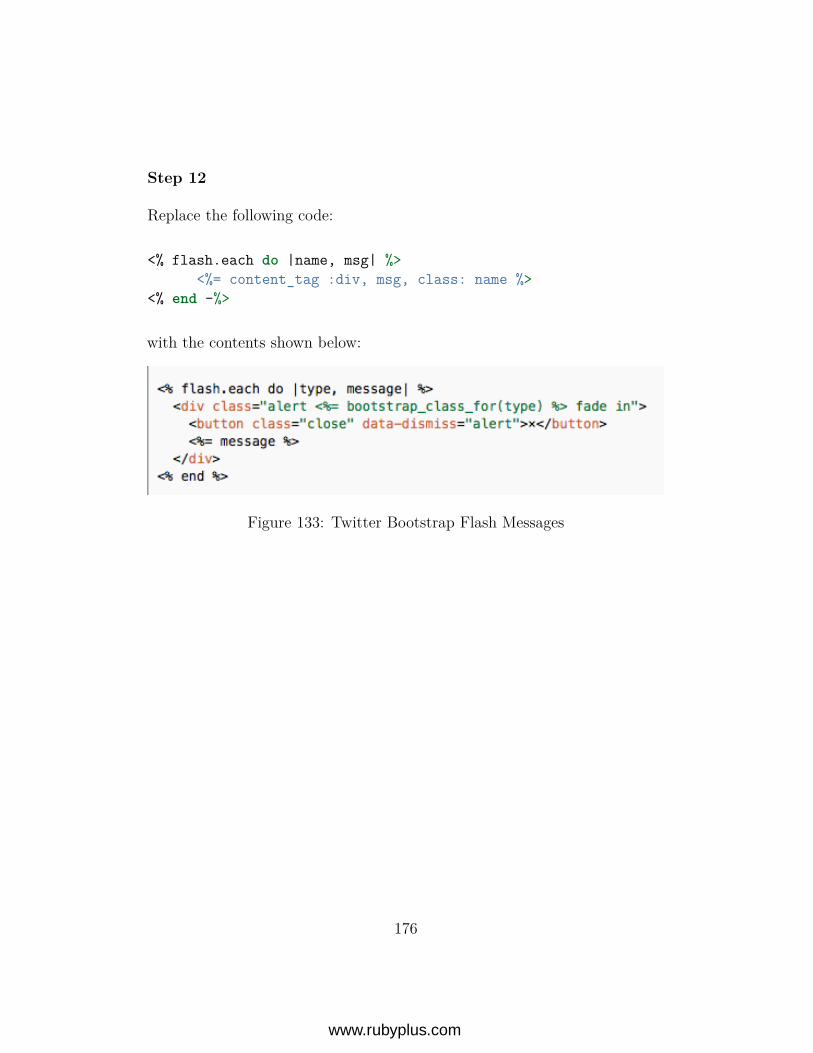
Step 12
Replace the following code:
<% flash.each do |name, msg| %><%= content_tag :div, msg, class: name %>
<% end -%>
with the contents shown below:
Figure 133: Twitter Bootstrap Flash Messages
176
www.rubyplus.com

Step 13
Go to articles index page and delete any one of the articles.
Figure 134: Twitter Bootstrap Styled Flash Messages
The flash messages will now be styled using Twitter Bootstrap alerts.
177
www.rubyplus.com
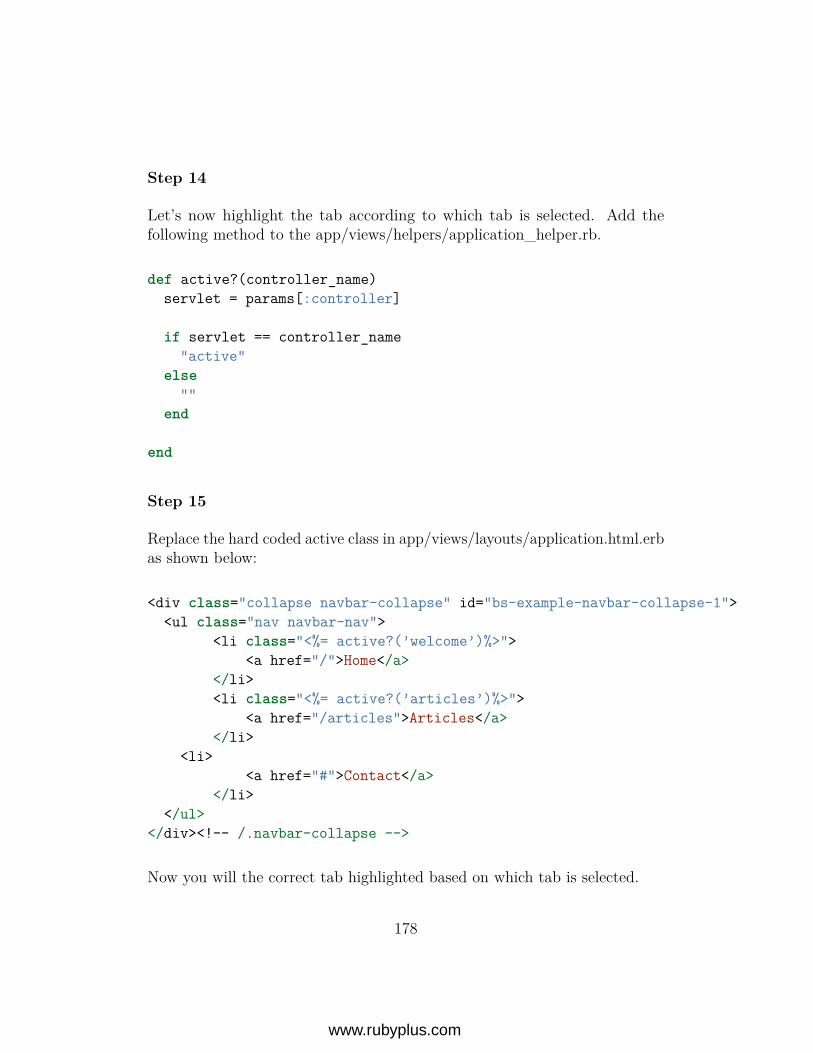
Step 14
Let’s now highlight the tab according to which tab is selected. Add thefollowing method to the app/views/helpers/application_helper.rb.
def active?(controller_name)servlet = params[:controller]
if servlet == controller_name"active"
else""
end
end
Step 15
Replace the hard coded active class in app/views/layouts/application.html.erbas shown below:
<div class="collapse navbar-collapse" id="bs-example-navbar-collapse-1"><ul class="nav navbar-nav">
<li class="<%= active?(’welcome’)%>"><a href="/">Home</a>
</li><li class="<%= active?(’articles’)%>">
<a href="/articles">Articles</a></li>
<li><a href="#">Contact</a>
</li></ul>
</div><!-- /.navbar-collapse -->
Now you will the correct tab highlighted based on which tab is selected.
178
www.rubyplus.com
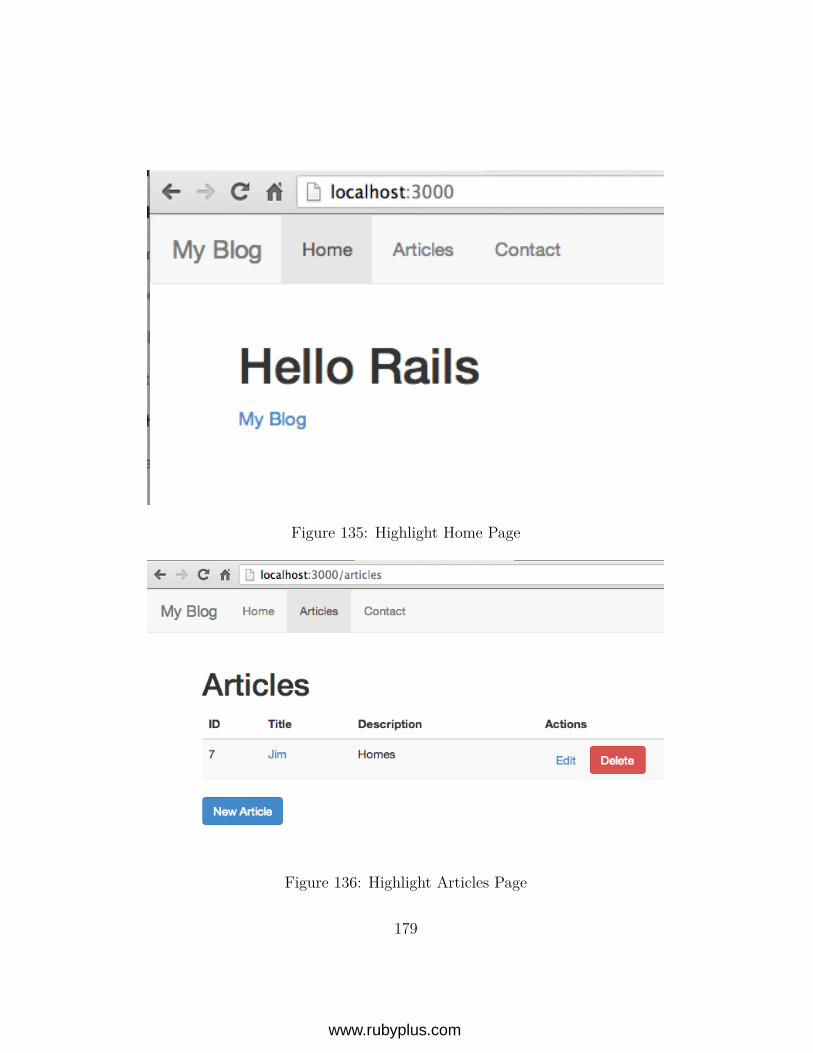
Figure 135: Highlight Home Page
Figure 136: Highlight Articles Page
179
www.rubyplus.com
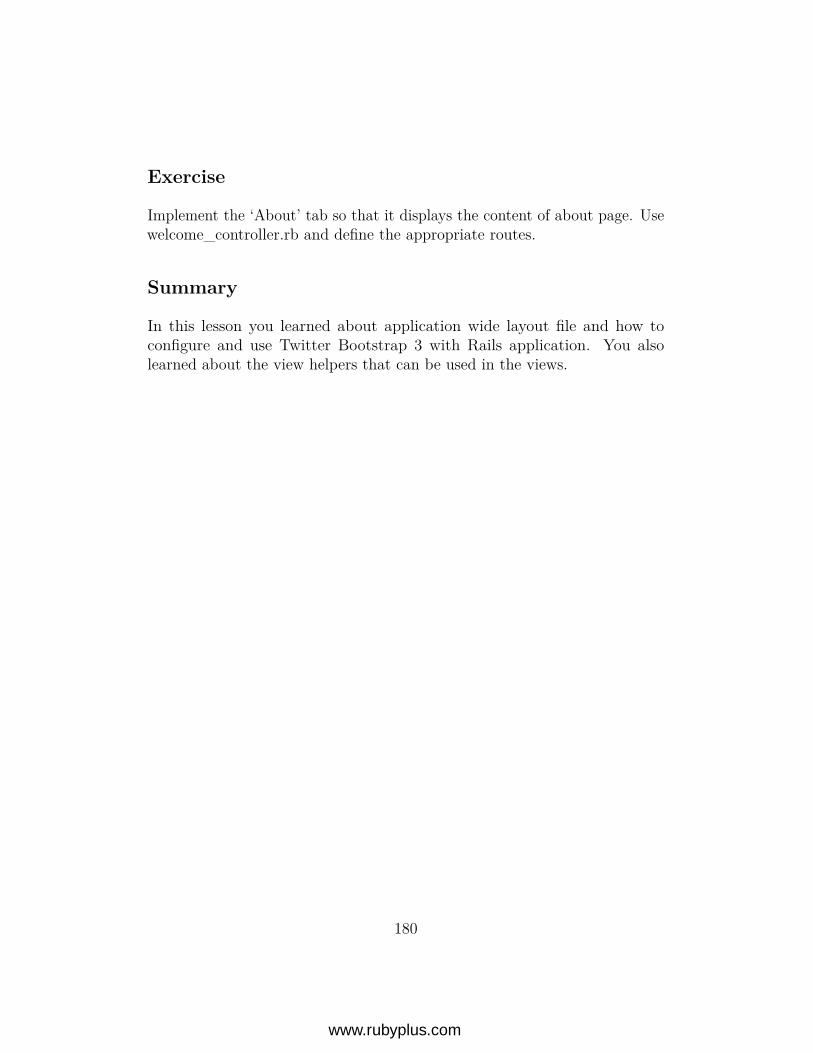
Exercise
Implement the ‘About’ tab so that it displays the content of about page. Usewelcome_controller.rb and define the appropriate routes.
Summary
In this lesson you learned about application wide layout file and how toconfigure and use Twitter Bootstrap 3 with Rails application. You alsolearned about the view helpers that can be used in the views.
180
www.rubyplus.com
A. Self Learning
Solving Programming Problems
1. Write down your question. This makes you think and clarify yourthoughts.
2. Design an experiment to answer that question. Keep the variables to aminimum so that you can solve the problem easily.
3. Run the experiment to learn.
Use the IRB and Rails console to run your experiments.
Learning from Rails Documentation
1. Go to http://apidock.com/rails
2. Type the method on the search box at the top.
3. Select the matching result
4. View the documentation, look for an example similar to what you wantto accomplish
5. Experiment in the Rails console to learn how it works.
6. Copy it to your project and customize it for your project
Getting Help from Forums
If you have followed the above two suggestions and you still have difficulties,post to forums that clearly explains the problem and what you have done tosolve the problem on your own. During this process sometimes you will solveyour own problem since explaining the problem to someone will clarify yourthinking.
181
www.rubyplus.com
Form Study Group
You can accelerate your learning by forming a study group that meets regularly.If you teach one concept that takes 10 minutes then having a group of 6people, you can easily cover 6 concepts in one hour.
Practice Makes Perfect
When learning anything new, you will make mistakes. You will go very slow.As you practice you will learn from your mistakes. Learning is a process.Setup 30 mins to an hour everyday for learning. You will get better and fasterover time. Repetition is key to gaining development speed.
182
www.rubyplus.com
B. Troubleshooting
1. Use rails console to experiment.
2. To inspect a variables in views you can use debug, to_yaml and inspect.
<%= debug(@article) %>
will display the @article object in YAML format.The to_yaml can be used anywhere (not just views). You can do a query inRails console and call to_yaml on an article object.
article = Article.firstarticle.to_yaml
The inspect method is handy to display values in arrays and hashes.
a = [1,2,3,4]
p a.inspect
If you customize the to_s method in your classes then the inspect methodwill use your to_s method to create a human friendly representation of theobject.
class Car
def to_s"I am a car"
endend
c = Car.new
print c
183
www.rubyplus.com
3. You can use logger.info in the controller to log messages to the log file.In development log messages will go to development.log in log directory.
logger.info "You can log anything here #{@article.inspect}"
To use the logger in model, you have to do the following:
Rails.logger.info "My logging goes here"
4. Using tail to view development log file.
Open a new tab in the terminal (On Mac Command+T opens a new tab onan existing open terminal), go the rails project blog directory and type thefollowing command:
$ tail -f log/development.log
5. View source in the browser. For example: Checking if path to imagesare correct.
6. Use rails dbconsole
7. Firebug Firefox plugin, Chrome Dev Tools or something equivalent
8. Debugger in Rubymine is simply the best debugger. JetBrains updatesfixes any issues with Ruby debugging gems and provides a well integratedIDE for serious development.
9. Useful plugins:
• Rails Footnotes
• Rails Panel
184
www.rubyplus.com
C. FAQ
1. Adding a new source to gem.
$ gem sources -a http://gems.github.com
2. Suppress installing rdoc for gems. For example to install passenger gemwithout any rdoc or ri type:
$ gem install passenger -d --no-rdoc --no-ri
3. How to upgrade gems on my system?
$ gem update —system
185
www.rubyplus.com
Resources
1. Rails Installer for Windows and Mac OS
2. Sublime Text 2 IDE
3. RubyMine IDE 30-day free trial.
4. Learning Git
5. Install SQLite3 Manager Firefox Addon or Standalone tool for Mac
6. Visual representation of relationships in ActiveRecord
7. Live HTTP Headers Chrome Plugin
References
https://github.com/ivanoats/store-rails4-boot3-sass
186
www.rubyplus.com
Survey
Please take the time to answer the three questions below and email them [email protected] . I will review your suggestions and make changes asnecessary. Thank you for taking the time to contribute improvements.
1. What did you like about this book?
2. What would you like to see added?
3. What changes should be made and why?
187
www.rubyplus.com


![Ruby On Rails Introduction [Εισαγωγή στο Rails]](https://img.pdfslide.us/doc/110x75/55830112d8b42a50628b45bb/ruby-on-rails-introduction-rails.jpg)