Embed Size (px)
Citation preview
1
MECHATRON-KART
Eulerweg 11, 64291 DARMSTADT, Germany
Tel : +49 6151 2733667 | Fax: +49 6151 9579652
Mail: [email protected]
Web: www.mechatron-kart.com
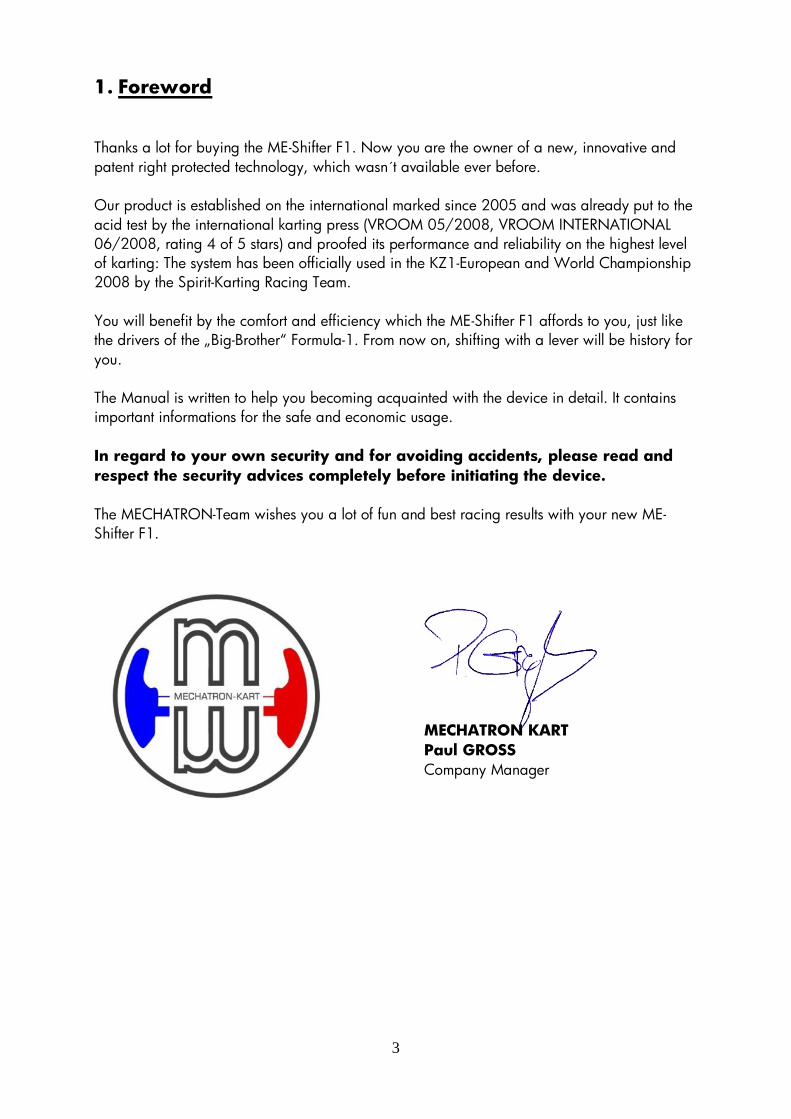
Racing Evo
Patent Pending No. 20 2006 003 853.1
The manual contains important information about the use of the product. Therefore
you should keep it at a safe place as long as you are the owner of the device.
Electronic Shifting System

2
Index
1. Foreword .......................................................................................... 3
2. Security advices.................................................................................. 4
3. Assembling and usage of the System .................................................... 6
3.1. Application of the MECHATRON ME-SHIFTER F1 ....................... 6
3.2. Assembly of the MECHATRON ME-SHIFTER F1 .......................... 6
3.3. Assembly of the shifting paddle ............................................. 12
3.4. Assembly of the battery holder .............................................. 13
3.5. Assembly of the ECU (Electronic Control Unit) ................................ 14
3.6. Installing the cables of the ME-SHIFTER F1 ............................... 14
3.7. Initiation ............................................................................. 16
3.8. Neutral Finder .................................................................... 17
3.9. Double Downshift function ..................................................... 17
3.10. ECU Programming Mode ..................................................... 18
4. FAQ – frequently asked questions ...................................................... 23
5. Attachment ..................................................................................... 25
6. Declaration of conformity ................................................................... 26
3
1. Foreword
Thanks a lot for buying the ME-Shifter F1. Now you are the owner of a new, innovative and
patent right protected technology, which wasn´t available ever before.
Our product is established on the international marked since 2005 and was already put to the
acid test by the international karting press (VROOM 05/2008, VROOM INTERNATIONAL
06/2008, rating 4 of 5 stars) and proofed its performance and reliability on the highest level
of karting: The system has been officially used in the KZ1-European and World Championship
2008 by the Spirit-Karting Racing Team.
You will benefit by the comfort and efficiency which the ME-Shifter F1 affords to you, just like
the drivers of the „Big-Brother“ Formula-1. From now on, shifting with a lever will be history for
you.
The Manual is written to help you becoming acquainted with the device in detail. It contains
important informations for the safe and economic usage.
In regard to your own security and for avoiding accidents, please read and
respect the security advices completely before initiating the device.
The MECHATRON-Team wishes you a lot of fun and best racing results with your new ME-
Shifter F1.
MECHATRON KART
Paul GROSS
Company Manager
4
2. Security advices
At processing and production process of the ME-Shifter F1, many
acknowledged rules of technics and directives were applied.
The construction of the device minimizes the risk of accidents during
intended usage.
Please respect the following security advices to avoid remaining
dangers.
Pull the plug!
Pull the plug of the device whenever you don´t use it. Pull the plug directly at the battery
contacts. Particularly if you are doing maintenance work at your kart, you have to disconnect
the device of the power supply. In case of an unintentional actuation of the device there is a
high risk of injury.
Pay attention on correct voltage Supply!
Only use closed (maintenance-free) and vibration-proofed batteries with a nominal voltage of
12V. Leaking battery acid causes the risk of chemical burn!
Always make sure that the red connector is connected to the positive pole and the black one to
the negative pole of the battery.
Never short-circuit the battery poles!
Especially during maintenance: Always pay attention that no tools are put on the battery-poles
accidentally.
Only use the device with fully charged battery. If the battery is discharged it may be possible
that gears won´t be shifted safely. In this case you have to charge the battery immediately.
Always use an extra battery for the ME-Shifter. If you use a common battery for ME-Shifter and
other electrical devices, it might be possible that the devices bug or even damage each other.
Protection against overload!
Only Shift up and down during driving! Never change some gears fast when
the engine is not running!
Please check the temperature of device and battery after every turn (ca. 30min.). If device or
battery will exceed a temperature of 60°C (140°F) you must take a rest of one hour.
5
Protection against fire and explosion!
Inside the device may be generated sparks. Don´t let the device get in contact with
inflammable liquids or gases. Otherwise there is an explosion hazard. Don´t pass fuel lines
near the device.
If the device gets contact with inflammable liquids or gases, wait until the substances
volatilized completely.
Check device for damages, ensure that plugs are connected
correctly!
Check the device and plug connections before you go on the track. If device, plugs or cables
are damaged, you mustn´t use the device until a reparation is done by a professional. In this
case please refer to your karting-dealer.
Avoid handling-mistakes!
If a handling-mistake happened, especially pushing the button „gear down“ accidentally,
could this cause dangerous situations. The reaction of the vehicle could differ from the usual
case and possibly you will need some seconds to get back control of the vehicle.
In addition to this, the engine will rev up which could cause damage or destruction of the
engine. To minimize these risks shift up early and don´t drive your vehicle with high engine
speed. Please make yourself familiar with the function of the pushbuttons. Always drive
forward-looking and limit your speed to be able to react safely in case of a handling-mistake.
Further important security advices:
Don´t use the device if you are distracted. Don´t use it if you are alcoholised or drugged.
The device may only be used by adults. Protect the device against usage of children or
unauthorized persons in regard to their own safety. If you can´t watch the device, take away
the battery for example.
Reparations must only be done by a professional. Therefore refer to your karting-dealer.
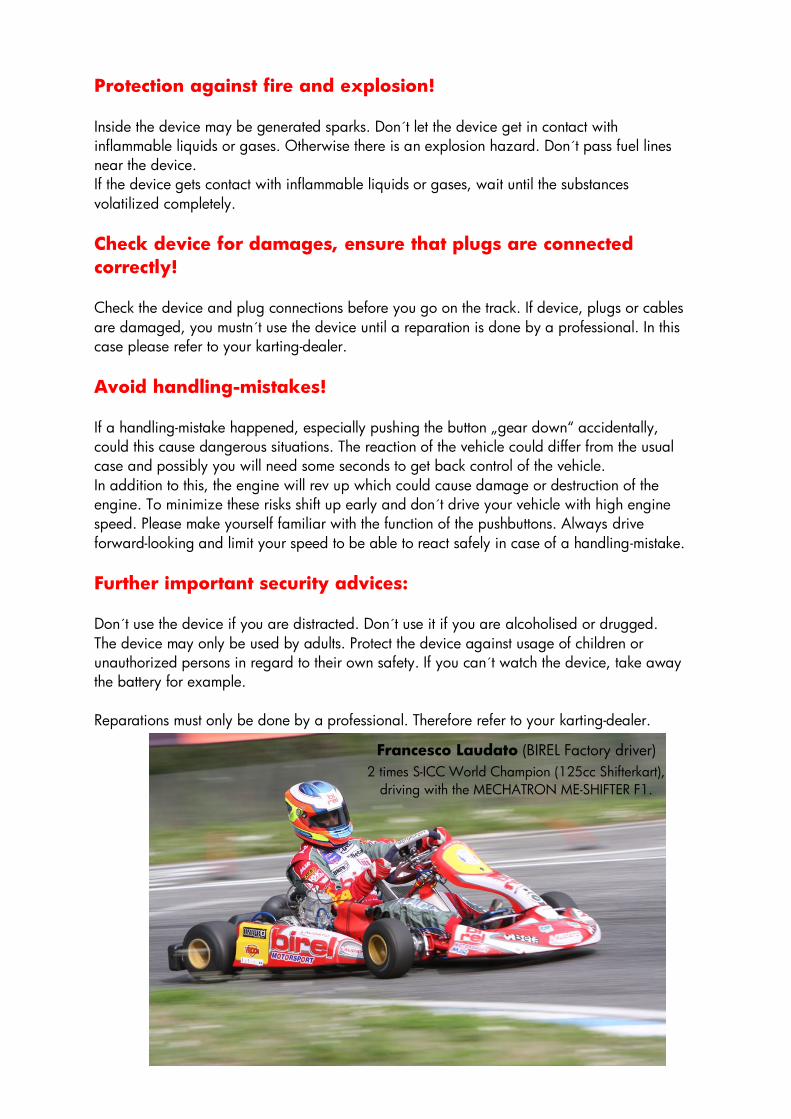
Francesco Laudato (BIREL Factory driver)
2 times S-ICC World Champion (125cc Shifterkart),
driving with the MECHATRON ME-SHIFTER F1.
6
You drive. It Shifts. Together you win.
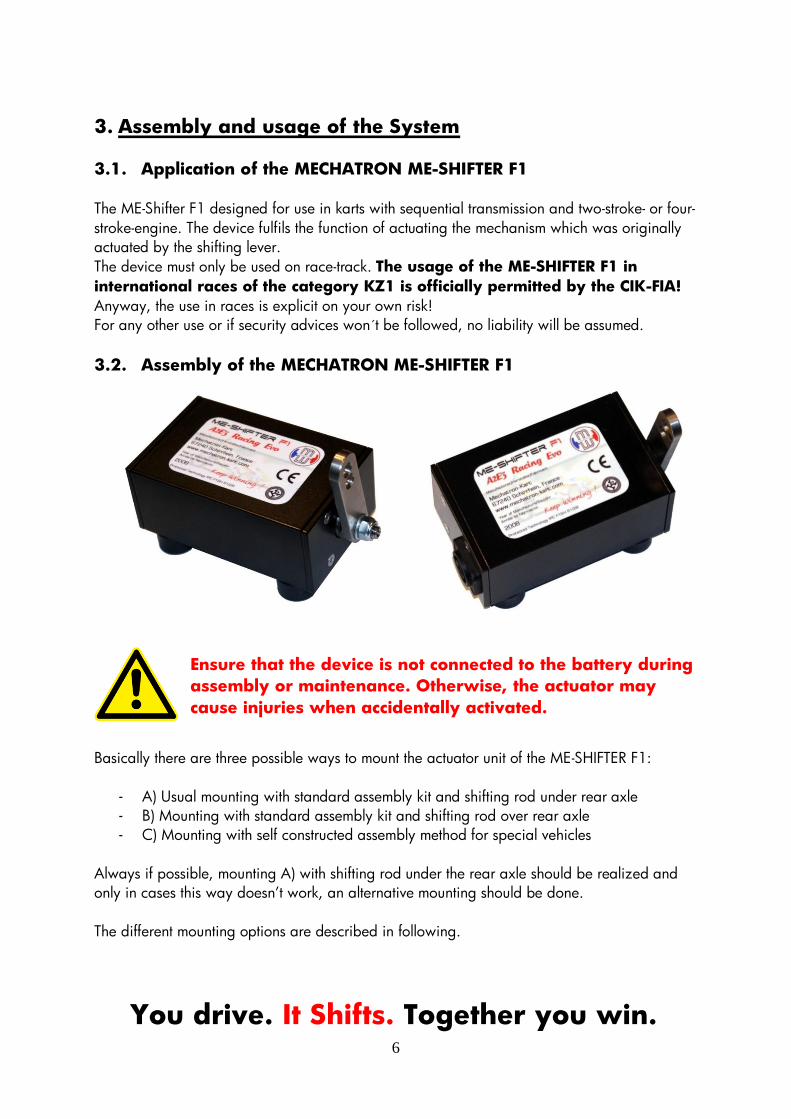
3. Assembly and usage of the System
3.1. Application of the MECHATRON ME-SHIFTER F1
The ME-Shifter F1 designed for use in karts with sequential transmission and two-stroke- or four-
stroke-engine. The device fulfils the function of actuating the mechanism which was originally
actuated by the shifting lever.
The device must only be used on race-track. The usage of the ME-SHIFTER F1 in
international races of the category KZ1 is officially permitted by the CIK-FIA!
Anyway, the use in races is explicit on your own risk!
For any other use or if security advices won´t be followed, no liability will be assumed.
3.2. Assembly of the MECHATRON ME-SHIFTER F1
Ensure that the device is not connected to the battery during
assembly or maintenance. Otherwise, the actuator may
cause injuries when accidentally activated.
Basically there are three possible ways to mount the actuator unit of the ME-SHIFTER F1:
- A) Usual mounting with standard assembly kit and shifting rod under rear axle
- B) Mounting with standard assembly kit and shifting rod over rear axle
- C) Mounting with self constructed assembly method for special vehicles
Always if possible, mounting A) with shifting rod under the rear axle should be realized and
only in cases this way doesn’t work, an alternative mounting should be done.
The different mounting options are described in following.
7
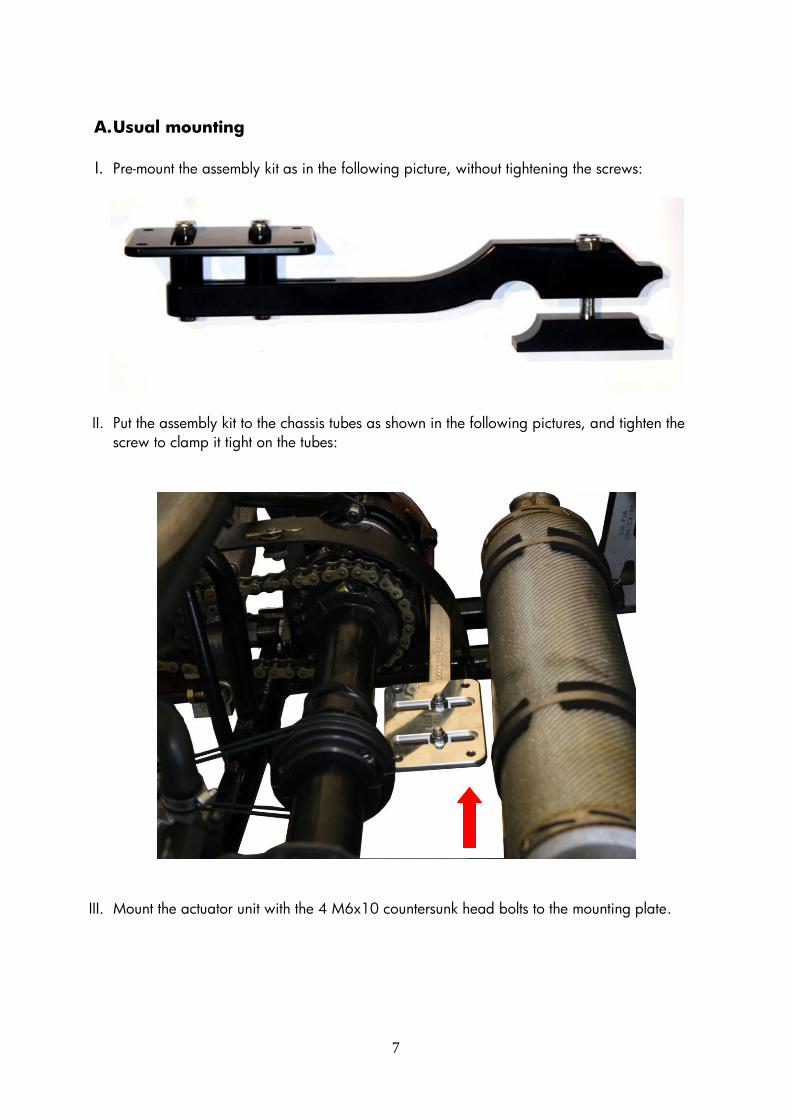
A. Usual mounting
I. Pre-mount the assembly kit as in the following picture, without tightening the screws:
II. Put the assembly kit to the chassis tubes as shown in the following pictures, and tighten the
screw to clamp it tight on the tubes:
III. Mount the actuator unit with the 4 M6x10 countersunk head bolts to the mounting plate.
8
IV. Now connect the shifting lever of the actuator unit with the shifting lever of your karting
engine by mounting the shifting rod (1).
Some chassis have a seat bar which handicaps a straight shifting rod mounting (2). For this
case, use the delivered distance-nut M8 to get the shifting rod more to the left side.
Please make sure to mount the Uniball at the frontside of the lever (A). Never mount as shown
in (B). This might cause damages tot he Servomotor.
Position (C) shows the Uniball mounted at the upper hole. This position provides more force
than position (A). We recommend to use this setup
Please also make sure, that the shifting rod has enough distance to the rear axle and cannot hit
it when shifting!
A B C

9
V. Now adjust the actuator unit like shown in the following picture, and ensure that:
- The minimum distance between actuating unit to rear axle and muffler is at least 2cm
- The actuating unit is fixed parallel to the rear axle
- The shifting rod is aligned in a right angle to the rear axle
After good adjustment, please tighten the M8 bolts of the mounting plate to fix the unit.
Note: If the minimum distance cannot be realized because of your chassis, you can try to get
the distance by mounting the muffler higher.
10
VI. Now adjust the length of the shifting rod. The length must be adjusted in a way that it is in a
right angle to both levers of your karting engine and the actuator unit (1). You can adjust
the length by screwing in or out one of the uniballs.
VII. Finishing the mounting, checklist:
The correct assembly of the system is extremely important for a correct and reliable function
of the Shifting System. Please check the following points before you go ahead with the
installation:
- Is the assembly kit fixed tightly to the chassis tubes and cannot move?
- Is the actuator unit fixed tightly to the mounting plate, and are the screws safe for getting
loose by vibrations?
- Is there a distance of at least 2cm between actuator unit and muffler / rear axle?
- Is the actuator unit aligned parallel to the rear axle and in a right angle to the shifting
rod?
- Can the shifting lever of the gearbox move free and is not blocked by anything?
- Are shifting lever of gearbox und actuator unit parallel to each other and in a right angle
to the shifting rod?
- Has the shifting rod enough distance to the rear axle and cannot hit it when shifting?
- Are the shifting levers aligned with each other, so the shifting rod is straight?
- Are the mounting bolts of the shifting rod fixed well and cannot get loose?
Jonathan Thonon (CRG Factory driver)
KZ1 European and World Champion driving
with the MECHATRON ME-SHIFTER F1.
11
B. Mounting with 180° rotated shifting levers
Note: Mounting with 180° rotated shifting levers should only be an alternative if mounting
variant A. is not possible because of constructive reasons.
I. Follow the instructions I. to III. of mounting variant A.
II. Now dismount the shifting lever of your karting engine and re-mount it 180° rotated, so that
the shifting rod can be assembled over the rear axle. To fix the shifting lever in this position,
it can be necessary to use a M5 bolt with M5 nut because you cannot reach anymore the
M6 bolt head with the tool.
Note: Ensure that the shifting lever can move without hitting obstacles (gearbox housing for
example). Please check if all gears can be shifted manually (by moving the lever by hand)
III. Now please turn the lever of the actuator unit parallel to the shifting lever of the gearbox
and in a way that it is adjusted in a 90° angle with the shifting rod (2.). Do not adjust the
lever as shown in (3.)!
At some engine models (VORTEX for example) it can be possible that the levers are not at
the same height. For this case, adjust the levers as shown in (4.) parallel to each other and
in a right angle to the shifting rod.
IV. Now please follow instructions V) to VII) of mounting variant A.

12
C. Mounting with self constructed mounting kit for special vehicles
In some cases it can be possible that the standard mounting kit does not fit to your
application (use in Crosskarts, Motorcycle Kartings or touring cars for example).
Please note that the use of the ME-SHIFTER F1 is only intended in
combination with the standard mounting kit. For using the ME-SHIFTER
F1 with another mounting kit we exclude the liability for all eventual
damages at the vehicle and/or the device!
A correct mounting is also decisive for a perfect function of the device!
Anyhow if you are going to use the ME-SHIFTER F1 at a self constructed mounting kit,
please attend to the following informations:
The mounting platform must be stable enough to take all forces! The shifting process
provides forces up to 450 N (ca. 45kgs / 99lbs) which must be taken without
deformation of the support. Further, the mounting kit must withstand the forces which
can apply during driving over bumps or at a crash.
When assembling the system, you have to apply all information given in mounting
variant A. Please regard to all shown pictures for a professional assembly
3.3. Assembly of the shifting paddle
To assemble the shifting paddle, we recommend the use of the standard-cockpit MW TIP (on
request) or the Tip Racing Pro Paddle Cockpit (provided), like shown in the pictures below. To
mount the cockpits, please dismount your steering wheel by loosen the three M6 screws.
Set the cockpit between steering wheel and hub and re-mount it with three
screws which are 5mm longer than the old ones, to ensure that the lock-nuts
work correctly.
Ensure that the lock-nut of all three screws is tightened safe!
When you do not respect this point overcarefully, it can lead to
lose the steering wheel, which can cause dangerous accidents!
MK-F1 Shifting paddle on steering wheel
13
3.4. Assembly of the battery holder
If you use a lead acid battery, it must be installed left next to the seat. Therefore please clamp
the provided battery holder on the recommended place on your chassis. The battery should be
installed as horizontal as possible. Please avoid incline angles over 30°; otherwise the battery
may be damaged.
Always ensure a minimum space of 10mm between seat and battery.
Otherwise the battery can be damaged by touching the seat.
If you use the Racing-Powerpack, please mount the delivered battery holder at the backside of
the seat.
Attention: Mount the battery holder exactly as shown in the picture
perpendicular showing down, and not horizontally, because the Power Pack
gets here higher force peaks and may be damaged!
Don't connect the battery before you are requested for it in this
manual. Also in later usage, only connect the battery shortly before
going on track and disconnect one pole (black or red) immediately
after the end of your turn.
Lead acid battery, mounted on Chassis
Racing Powerpack mounted at Seat
Electronic Shifting System ME-SHIFTER F1
Developed by
14
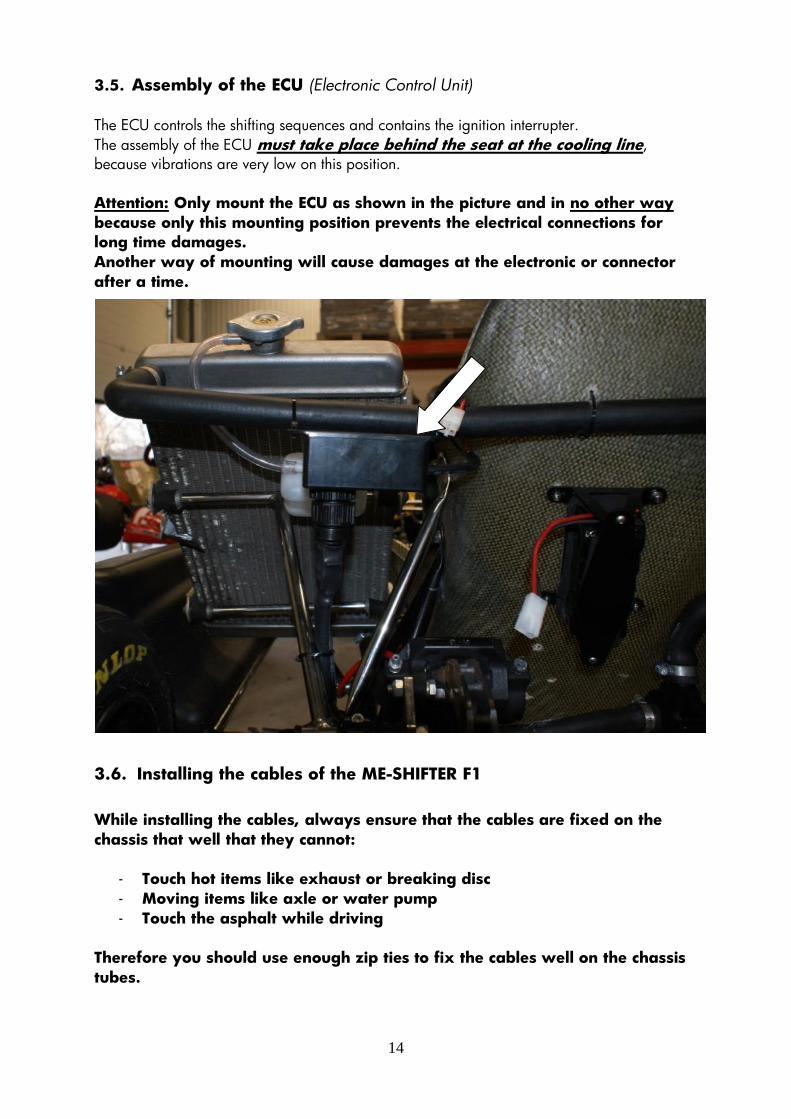
3.5. Assembly of the ECU (Electronic Control Unit)
The ECU controls the shifting sequences and contains the ignition interrupter.
The assembly of the ECU must take place behind the seat at the cooling line,
because vibrations are very low on this position.
Attention: Only mount the ECU as shown in the picture and in no other way
because only this mounting position prevents the electrical connections for
long time damages.
Another way of mounting will cause damages at the electronic or connector
after a time.
3.6. Installing the cables of the ME-SHIFTER F1
While installing the cables, always ensure that the cables are fixed on the
chassis that well that they cannot:
- Touch hot items like exhaust or breaking disc
- Moving items like axle or water pump
- Touch the asphalt while driving
Therefore you should use enough zip ties to fix the cables well on the chassis
tubes.

15
Now install the cables on your chassis as shown in the following picture: The green line
shows the cable for the ignition interrupt, the yellow line shows the cable to the cockpit, the
red line shows the battery cable and the blue line shows the energy cable to the ME-SHIFTER
F1. The ECU is shown in black.
The ignition interrupt is connected by connecting the round plug with the free plug on the
ignition coil and the eye plug must be screwed onto the mounting plate of the ignition coil
(vehicle ground potential).
Now connect the end of the cables with the corresponding plugs, but not the Battery
cable!
Note: Engines with digital ignition (engines with electrical starter for example) may not always
provide a kill-connector. In some cases the ignition interrupt may not work! For this case please
contact the technical direction at [email protected]
Free plug for connecting ignition
interrupt cable of the ME-SHIFTER F1
16
3.7. Initiation
Ensure that all assembly-advices have been executed correctly and conscientiously. Check all
screw connections for adequate retention against vibrations. Ensure that the used Battery is
charged completely.
Now connect the system to the battery. If you use a lead acid battery, always
pay attention to the correct connection (red = +, black = -).
A wrong connection causes the destruction of the Electronic Control Unit, we
will give no warranty in this case.
Information about Racing Powerpack Batteries (12V-3900 or 6000mAh /
lightweight battery):
The Racing Powerpacks are charged at time of delivery, but we recommend recharging the
battery again before first use to ensure that it is fully charged when driving.
When charging the battery, always follow the instructions of the manual of the Battery-charger
manufacturer. Always take care of the safety instructions! When charging, always use the
temperature-sensor for charging supervision.
The Racing Powepack loses about 1% of charge every day. Therefore we recommend
recharging your Power Pack one time per month when not using it to refresh the cells.
The Powerpack gets its full power and capacity after 3 charging cycles. Therefore it is possible
that the battery has not yet its full power when using it the first times.
At cold temperatures (<10°C) we recommend to warm up your Power Pack in a warm room to
about 20°C before using it. The best performance will be provided between 20°C and 30°C.
Actuator movements may cause injuries. Take care that no body
parts are in the mechanical danger area!
Never get into the Kart while engine is running! If you push a
pushbutton accidentally, you could lose control of the Kart!
The standard shifting direction is: Right paddle for shifting up, left paddle for shifting down.
When using not the standard mounting variant, it may be inverted.
A later change of the direction is only possible at request.
Please drive carefully until you are familiar with the system. Keep the paddle assignment very
good in mind to avoid accidentally shifting down instead of shifting up. If necessary, please
mark the paddles clearly!
If a gear isn´t changed correctly or even unlocks after a few seconds (engine will rev up or last
gear will be locked again) is this a sign for an empty battery. In this case please avoid further
shifting sequences and take a pit stop to recharge or change your battery.
17
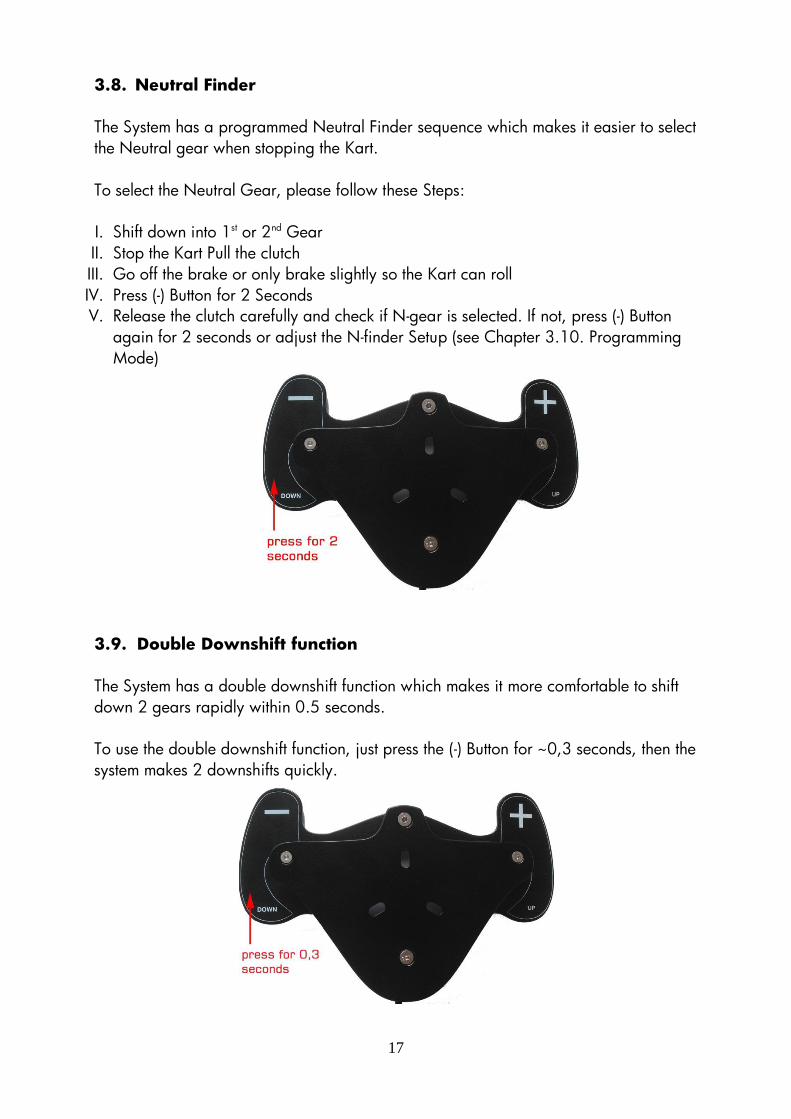
3.8. Neutral Finder
The System has a programmed Neutral Finder sequence which makes it easier to select
the Neutral gear when stopping the Kart.
To select the Neutral Gear, please follow these Steps:
I. Shift down into 1st or 2nd Gear
II. Stop the Kart Pull the clutch
III. Go off the brake or only brake slightly so the Kart can roll
IV. Press (-) Button for 2 Seconds
V. Release the clutch carefully and check if N-gear is selected. If not, press (-) Button
again for 2 seconds or adjust the N-finder Setup (see Chapter 3.10. Programming
Mode)
3.9. Double Downshift function
The System has a double downshift function which makes it more comfortable to shift
down 2 gears rapidly within 0.5 seconds.
To use the double downshift function, just press the (-) Button for ~0,3 seconds, then the
system makes 2 downshifts quickly.
18
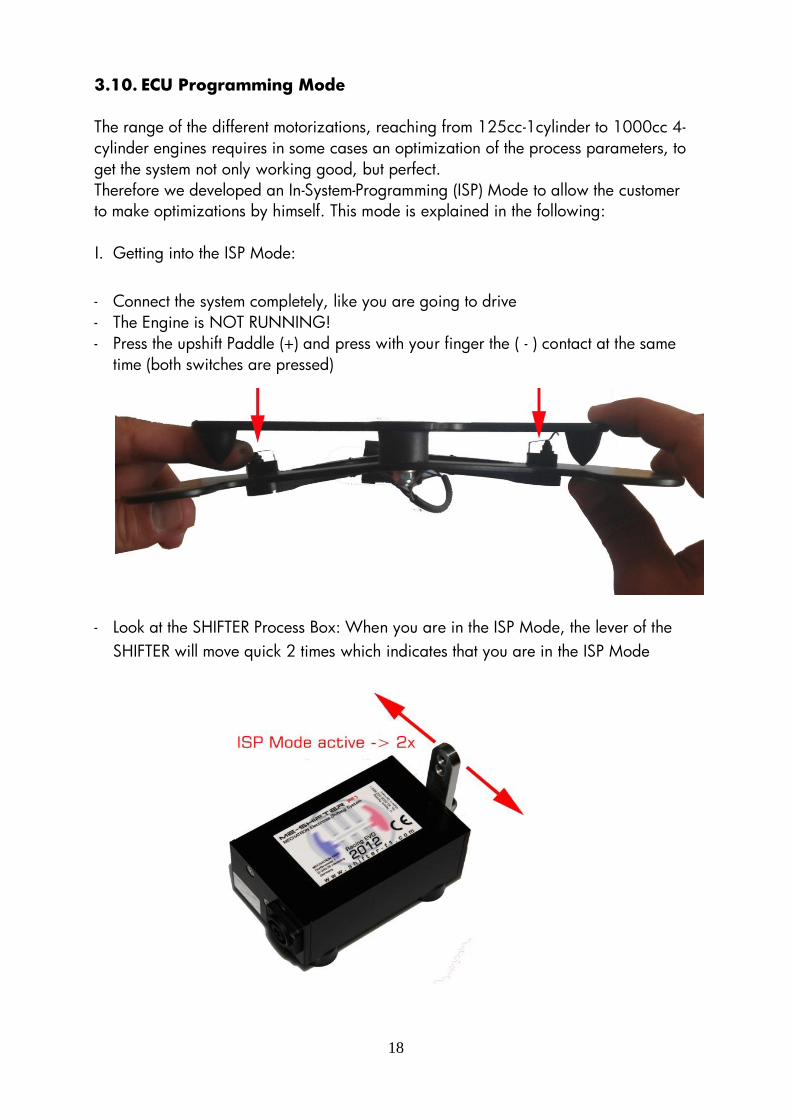
3.10. ECU Programming Mode
The range of the different motorizations, reaching from 125cc-1cylinder to 1000cc 4-
cylinder engines requires in some cases an optimization of the process parameters, to
get the system not only working good, but perfect.
Therefore we developed an In-System-Programming (ISP) Mode to allow the customer
to make optimizations by himself. This mode is explained in the following:
I. Getting into the ISP Mode:
- Connect the system completely, like you are going to drive
- The Engine is NOT RUNNING!
- Press the upshift Paddle (+) and press with your finger the ( - ) contact at the same
time (both switches are pressed)
- Look at the SHIFTER Process Box: When you are in the ISP Mode, the lever of the
SHIFTER will move quick 2 times which indicates that you are in the ISP Mode
19
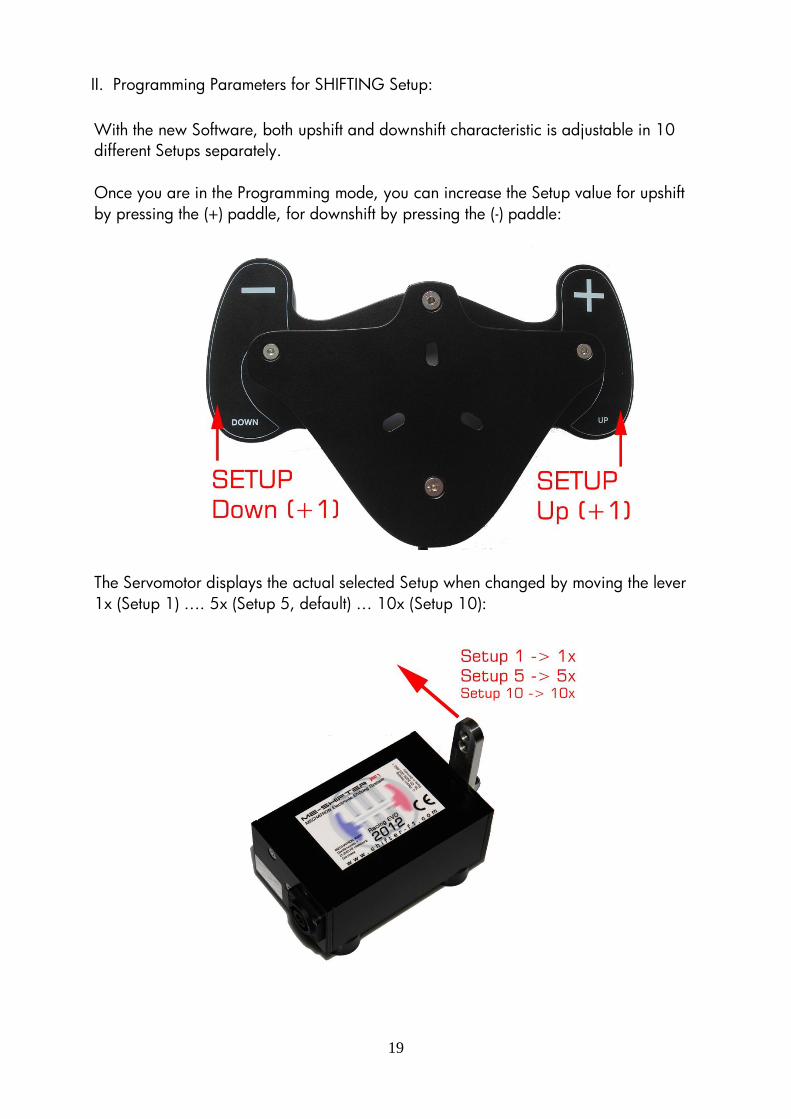
II. Programming Parameters for SHIFTING Setup:
With the new Software, both upshift and downshift characteristic is adjustable in 10
different Setups separately.
Once you are in the Programming mode, you can increase the Setup value for upshift
by pressing the (+) paddle, for downshift by pressing the (-) paddle:
The Servomotor displays the actual selected Setup when changed by moving the lever
1x (Setup 1) …. 5x (Setup 5, default) … 10x (Setup 10):

20
To decrease the setup, for example from Setup 5 to Setup 1, you must increase the
Setup until the Setup changes from 10 to 1 again. The Setup menu diagram is shown
below (same for upshift and downshift):
We recommend, as a strategy for optimizing the Setup of the system, to start at Setup
1 and increase until you found the perfect working Setup for your installation.
Note: Setup 5 (default) is the Setup which leads to a good result at the most standard
installations. If the system works always perfect from your feeling (no gear misses and
fast shifting) we recommend leaving the system as it is to avoid malfunction by wrong
setup.
The following diagram shows the effects of the different Setups:
Setup 5 (default)
Setup 6
Setup 7
Setup 8
Setup 9
Setup 10
Setup 1
Setup 2
Setup 3
Setup 4
0%
50%
100%
150%
Setup 1
Setup 2
Setup 3
Setup 4
Setup 5
Setup 6
Setup 7
Setup 8
Setup 9
Setup 10
Setup Differences
Battery Endurance Shifting Force Shifting Time
21
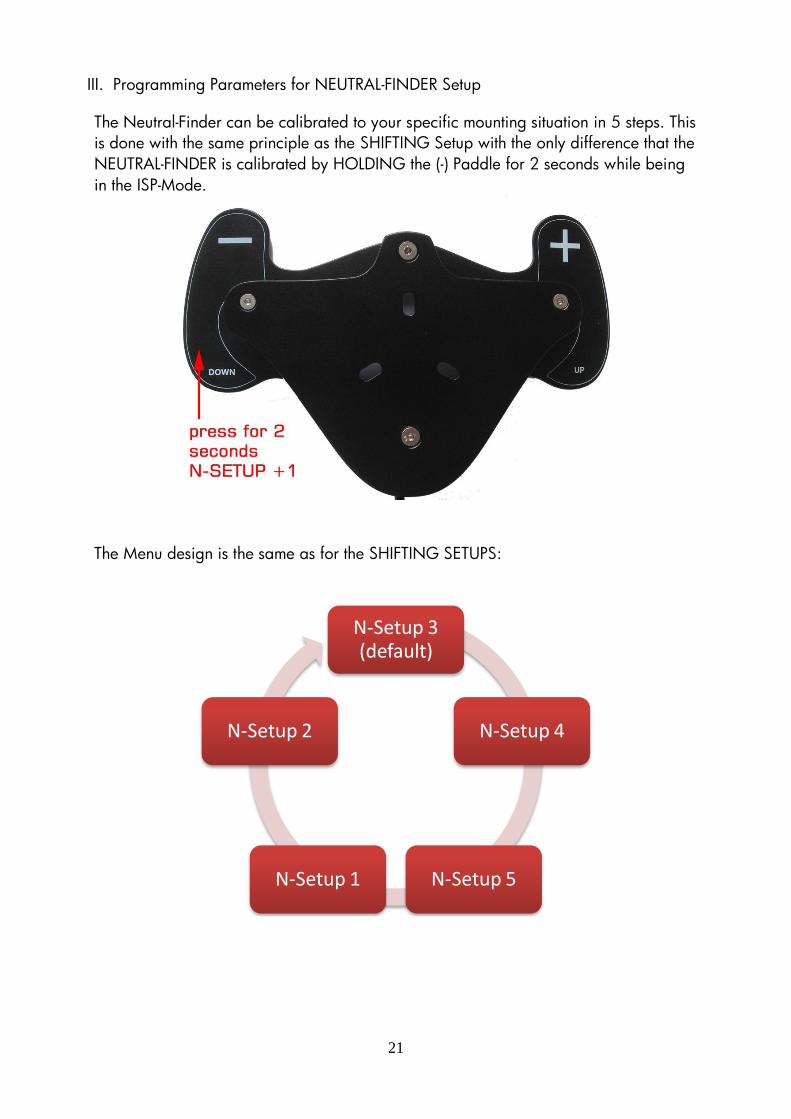
III. Programming Parameters for NEUTRAL-FINDER Setup
The Neutral-Finder can be calibrated to your specific mounting situation in 5 steps. This
is done with the same principle as the SHIFTING Setup with the only difference that the
NEUTRAL-FINDER is calibrated by HOLDING the (-) Paddle for 2 seconds while being
in the ISP-Mode.
The Menu design is the same as for the SHIFTING SETUPS:
N-Setup 3 (default)
N-Setup 4
N-Setup 5N-Setup 1
N-Setup 2
22
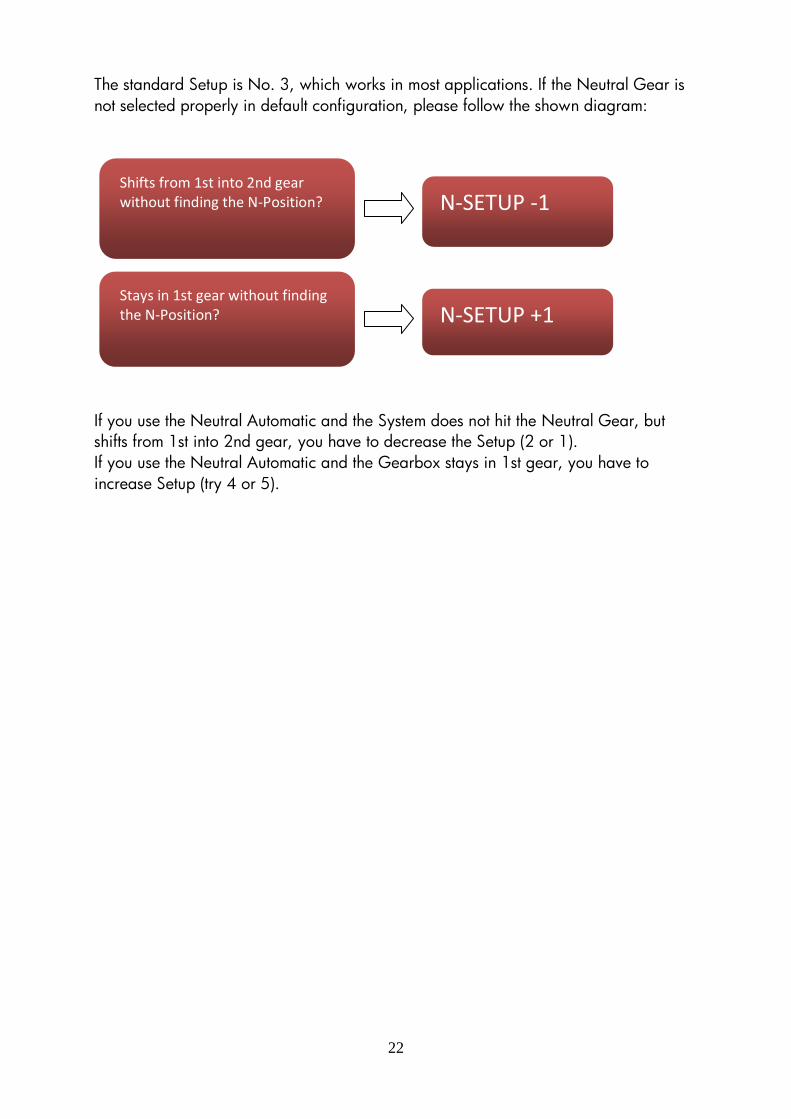
N-SETUP -1 Shifts from 1st into 2nd gear without finding the N-Position?
N-SETUP +1 Stays in 1st gear without finding the N-Position?
The standard Setup is No. 3, which works in most applications. If the Neutral Gear is
not selected properly in default configuration, please follow the shown diagram:
If you use the Neutral Automatic and the System does not hit the Neutral Gear, but
shifts from 1st into 2nd gear, you have to decrease the Setup (2 or 1).
If you use the Neutral Automatic and the Gearbox stays in 1st gear, you have to
increase Setup (try 4 or 5).
23
4. FAQ – frequently asked questions
“The lever at the SHIFTER F1 actuator unit has 2 drills. At which do I mount the
Uniball of the shifting rod?”
Answer: Usually you mount the Uniball at the upper position 1 (longer lever). After a
customization with the system of at least 1 hour you can also try pos. 2 to see if you feel a
difference.
Due to a long range of different chassis and engine type, this possibility provides the option to
perfectly adapt the system to your kart.
“How long does my Racing-Powerpack work until it needs to be recharged?”
Answer: A perfect function of the system is ensured for up to 1500 shifting sequences without
recharging in between. We recommend connecting the battery to the loader in every driving
break to extend the driving time.
„I push the shifting paddle, but the shifter does not move or moves very
weak. All cables and the battery are checked and connected correctly“
Solution, step 1: Check the fuse, which is mounted at the battery connecting cable. If the
fuse is defect, change it with a new one (30A) and try it again. Also check the screw-
connection of the fuse holder, and tighten it if it is loose.
Solution, step 2: If the fuse is ok, change the used battery with a new one (completely
charged) and check the function of the system again. If the system now works well again, your
old battery is discharged or defect.
Note: The correct mounting of the battery is essentially for its life expectancy. If the battery
gets continuous hard vibrations, it can be destroyed within 20 minutes or less. A defect
appears directly, so the battery gets useless from one second to the other.
„The system changes the gears perfectly, but sometimes I cannot shift up at
full throttle“
Solution: In first, second and maybe third gear, do not full throttle but take your foot slightly
from the accelerator when shifting up. Therefore, the gearbox gets discharged, the kart reacts
much smoother and the gears will change easily.
„I also cannot shift up at full throttle in the higher gears“
Solution: Check the connection of the ignition interrupt, in particular the connectors at the
ignition coil, as well as the cable to the ECU for defects like ragged connectors, cable abrased
by grinding on the track etc.
24
„The system often shifts perfectly, but sometimes not“
Solution, step 1: Check the position of the shifting rod at the lever of the shifter. If it is
mounted at the upper hole, mount it at the lower hole and try it again.
Solution, step 2: To change the 5th gear to the 6th, the system needs more energy. If this is
your main problem, it indicates a discharged or defect battery. Change your battery with a
new, charged battery. If the problem appears again after charging the old battery, the battery
is defect.
Solution, step 3: If the change of the battery makes no difference, check the connector of
the ECU. If the cable gets bended often, this can cause defective contacts. To solve this
problem, you should fix the cable in a way that it cannot bend in the area of the ECU
connector.
„There are often explosions in the exhaust when shifting up“
Solution: Check the spark plug of your engine for correct carburation and eventually change
the carburator setting. Pay attention because a too meagerly setting can cause damages on
your engine.
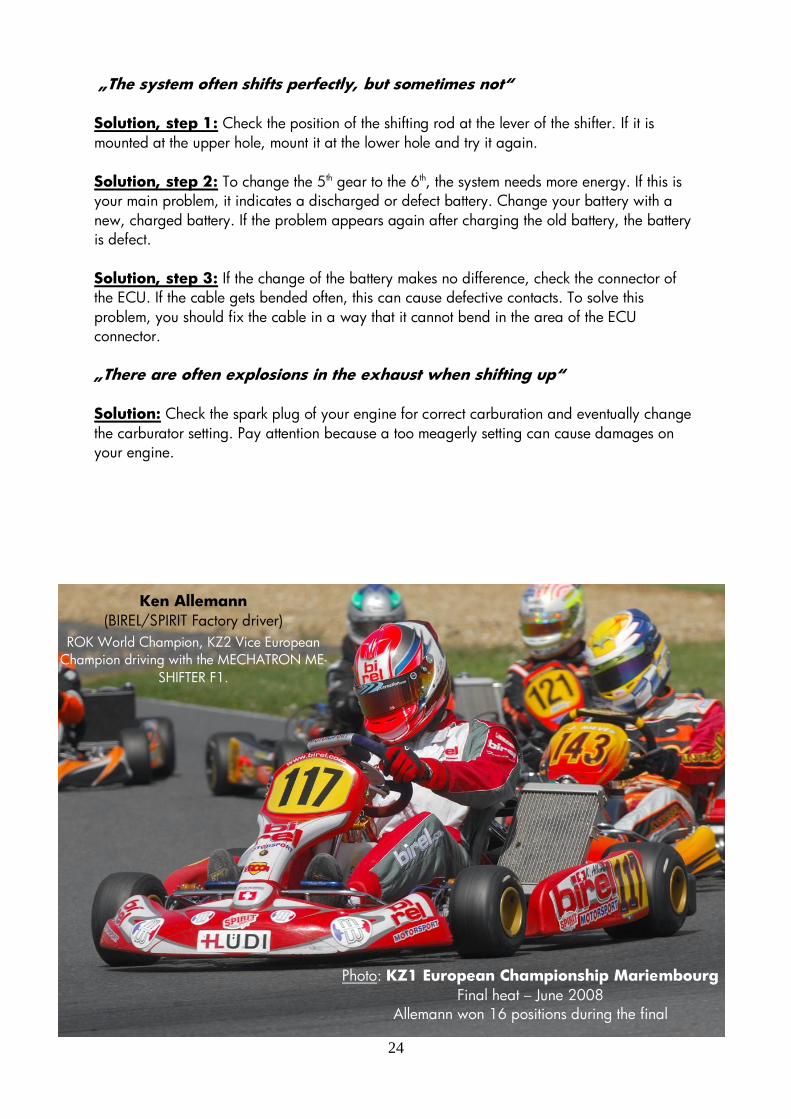
Ken Allemann
(BIREL/SPIRIT Factory driver)
ROK World Champion, KZ2 Vice European
Champion driving with the MECHATRON ME-
SHIFTER F1.
Photo: KZ1 European Championship Mariembourg
Final heat – June 2008
Allemann won 16 positions during the final
25
5. Attachment
1. Maintenance
The device is maintenance-free. Please keep it always dry and clean. Ensure that the battery is
charged completely before you go for a racing weekend and disconnect the Battery if you
don´t want to use it for a longer time.
2. Disposal
If you don´t need your ME-Shifter anymore or if you use it that much, that you have to replace
the device one day, please dispose it environmentally, don´t put it into the domestic waste.
You can rely on your karting dealer or send it to the manufacturer directly. The disposal will be
free.
3. Service
Although the device is designated for racing usage, which always is combined with high
material-stress, we issue a product warranty of 6 months for our products.
During this time you have a right for free reparation of the device. In this case please deliver
the device to your local karting dealer or send it directly to the manufacturer. Please don´t
forget to add a copy of your invoice.
MECHATRON KART – Warranty
Eulerweg 11, 64291 DARMSTADT, Germany
If defects appear after the time of warranty, we will make an effort to repair your device fast
and economic.
4. Technical specifications
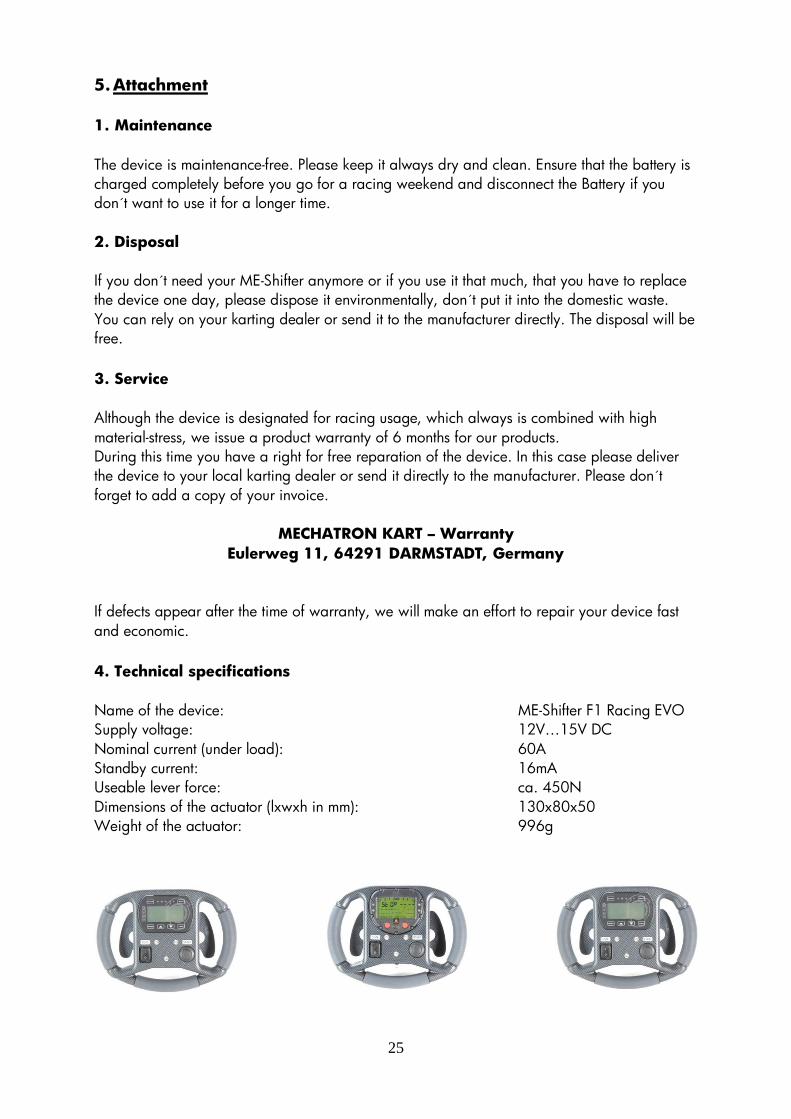
Name of the device: ME-Shifter F1 Racing EVO
Supply voltage: 12V…15V DC
Nominal current (under load): 60A
Standby current: 16mA
Useable lever force: ca. 450N
Dimensions of the actuator (lxwxh in mm): 130x80x50
Weight of the actuator: 996g
26
6. Declaration of conformity
We confirm that the construction of the device
ME-Shifter F1, Typ A2E3 Racing EVO
Since 11/2006 meets following EU-directives:
2006/42/EG (EU-machines directive)
2004/108/EC/EMC (EU-EMV- Directive)
CE marking 2006
MECHATRON KART
Eulerweg 11
D-64291 DARMSTADT Paul Groß
Germany CEO