Embed Size (px)
Citation preview
11 36 090 Removing and installing/replacing toothed
shafts of VANOS gear on left and right (S62)
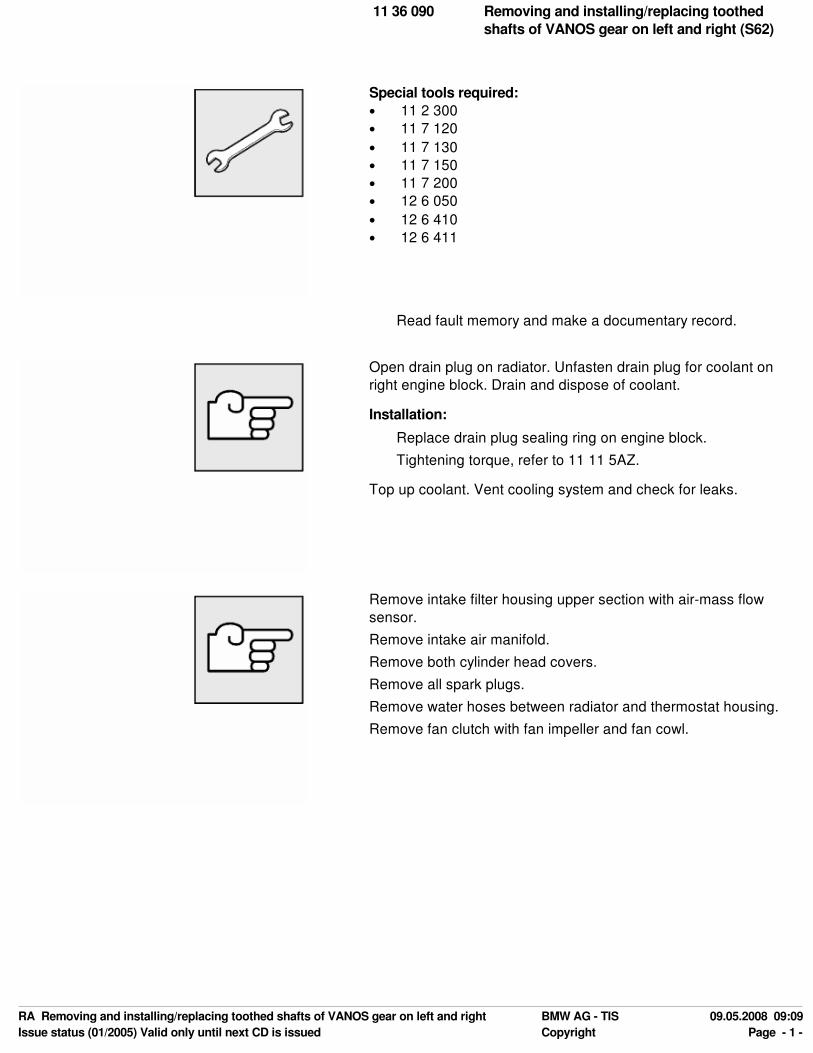
Special tools required:
• 11 2 300
• 11 7 120
• 11 7 130
• 11 7 150
• 11 7 200
• 12 6 050
• 12 6 410
• 12 6 411
Read fault memory and make a documentary record.
Open drain plug on radiator. Unfasten drain plug for coolant on
right engine block. Drain and dispose of coolant.
Installation:
Replace drain plug sealing ring on engine block.
Tightening torque, refer to 11 11 5AZ.
Top up coolant. Vent cooling system and check for leaks.
Remove intake filter housing upper section with air-mass flow
sensor.
Remove intake air manifold.
Remove both cylinder head covers.
Remove all spark plugs.
Remove water hoses between radiator and thermostat housing.
Remove fan clutch with fan impeller and fan cowl.
RA Removing and installing/replacing toothed shafts of VANOS gear on left and right BMW AG - TIS 09.05.2008 09:09
Issue status (01/2005) Valid only until next CD is issued Copyright Page - 1 -

Remove oil lines (1) from cylinder head on cylinder
banks 1 to 4 and 5 to 8.
Note:
The oil lines (1) of cylinder banks 1 to 4 and 5 to 8 are
different.
Note:
Joint removal and installation of the VANOS adjustment unit
on cylinder banks 1 to 4 and 5 to 8 requires a step-by-
step procedure.
The work steps alternate between cylinder banks 1 to 4
and 5 to 8.
Removal:
Removal of the VANOS adjustment unit and the toothed shafts is
described separately from installation. The assembly sequence for
removal and installation is different.
When the engine is switched off, VANOS moves the camshafts to
a position which is advantageous to engine starting.
Caution!
Before the VANOS adjustment unit is removed, the camshafts
on both cylinder banks must be rotated back to their initial
position.
Rotate crankshaft in direction of rotation as far as ignition TDC
position of cylinder 1. Secure vibration damper in position with
special tool 11 2 300 .
RA Removing and installing/replacing toothed shafts of VANOS gear on left and right BMW AG - TIS 09.05.2008 09:09
Issue status (01/2005) Valid only until next CD is issued Copyright Page - 2 -
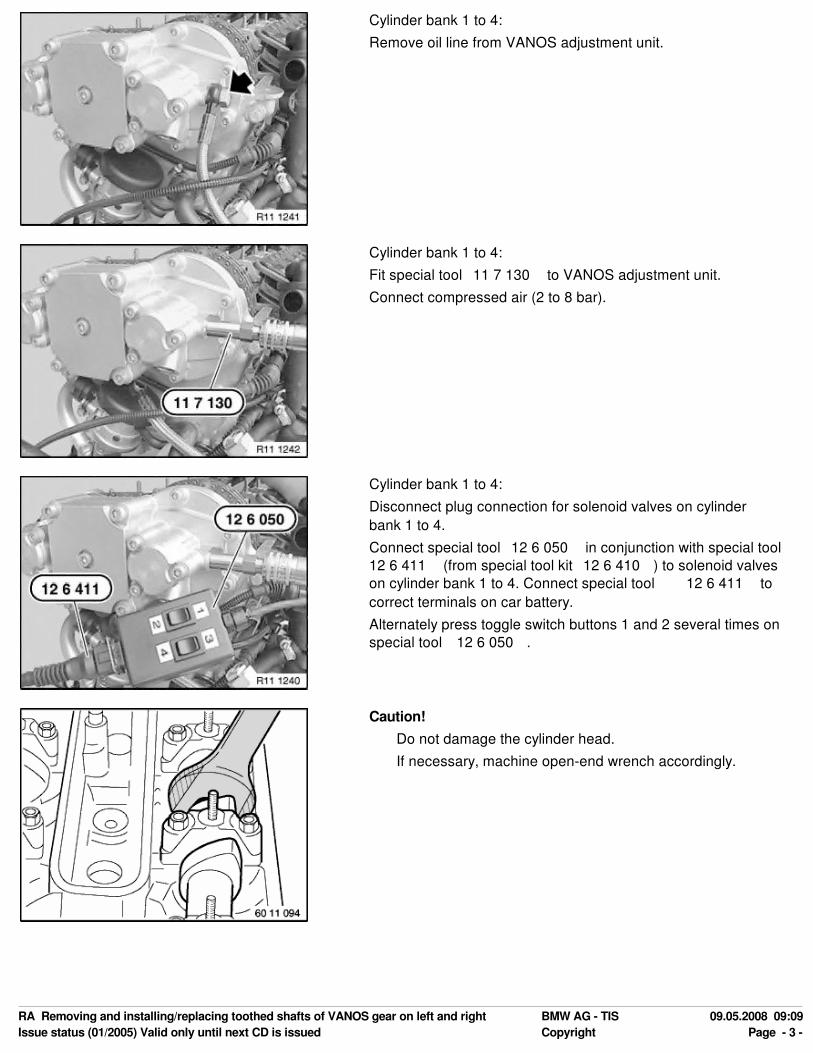
Cylinder bank 1 to 4:
Remove oil line from VANOS adjustment unit.
Cylinder bank 1 to 4:
Fit special tool 11 7 130 to VANOS adjustment unit.
Connect compressed air (2 to 8 bar).
Cylinder bank 1 to 4:
Disconnect plug connection for solenoid valves on cylinder
bank 1 to 4.
Connect special tool 12 6 050 in conjunction with special tool
12 6 411 (from special tool kit 12 6 410 ) to solenoid valves
on cylinder bank 1 to 4. Connect special tool 12 6 411 to
correct terminals on car battery.
Alternately press toggle switch buttons 1 and 2 several times on
special tool 12 6 050 .
Caution!
Do not damage the cylinder head.
If necessary, machine open-end wrench accordingly.
RA Removing and installing/replacing toothed shafts of VANOS gear on left and right BMW AG - TIS 09.05.2008 09:09
Issue status (01/2005) Valid only until next CD is issued Copyright Page - 3 -
Cylinder bank 1 to 4:
Press and hold down toggle switch button 1 on special tool
12 6 050 .
Simultaneously rotate inlet camshaft at hexagon against direction
of rotation up to stop.
Note:
The splines in the VANOS gear are now in contact; the inlet
camshaft cannot be rotated further.
Cylinder bank 1 to 4:
Alternately press toggle switch buttons 3 and 4 several times on
special tool 12 6 050 .
Cylinder bank 1 to 4:
Press and hold down toggle switch button 3 on special tool
12 6 050 .
Simultaneously rotate exhaust camshaft at hexagon against
direction of rotation up to stop.
Note:
The splines in the VANOS gear are now in contact; the
exhaust camshaft cannot be rotated further.
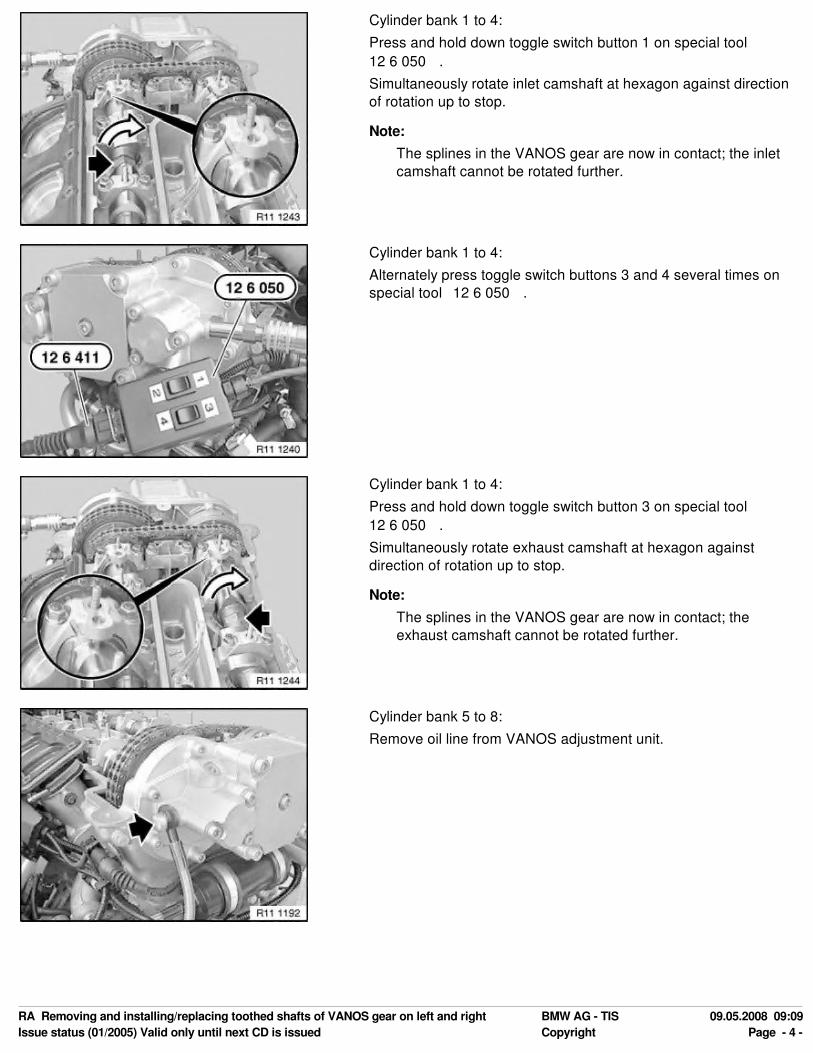
Cylinder bank 5 to 8:
Remove oil line from VANOS adjustment unit.
RA Removing and installing/replacing toothed shafts of VANOS gear on left and right BMW AG - TIS 09.05.2008 09:09
Issue status (01/2005) Valid only until next CD is issued Copyright Page - 4 -
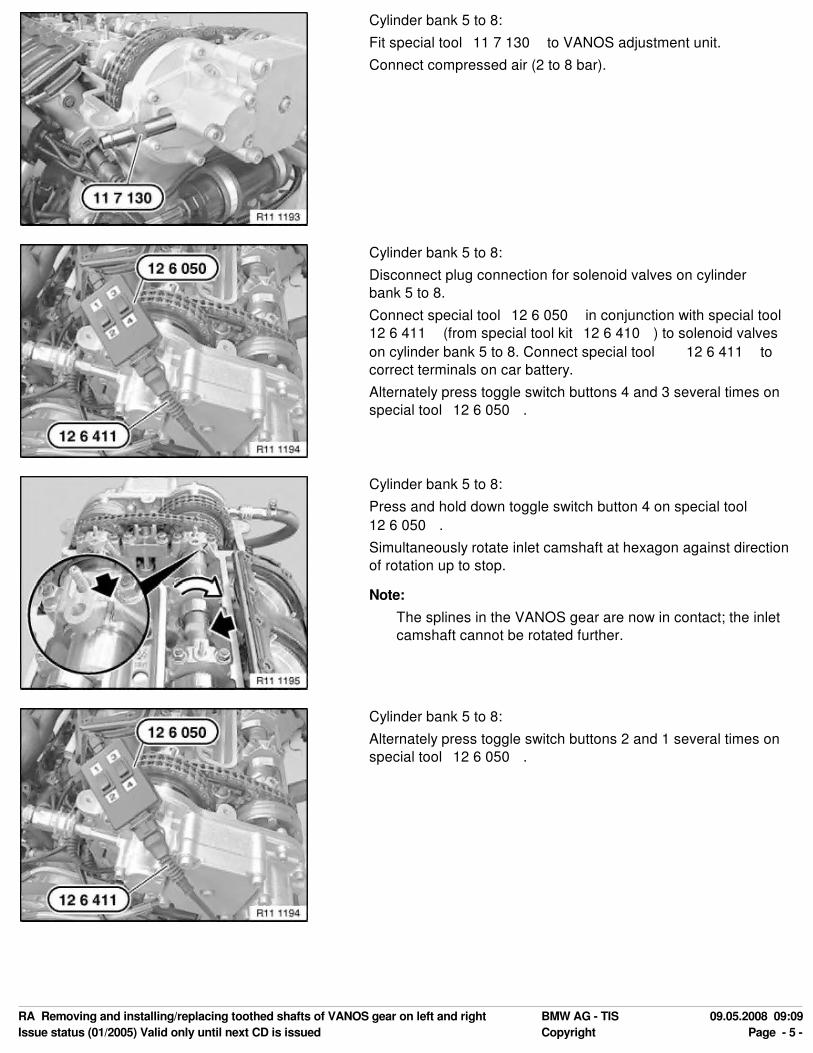
Cylinder bank 5 to 8:
Fit special tool 11 7 130 to VANOS adjustment unit.
Connect compressed air (2 to 8 bar).
Cylinder bank 5 to 8:
Disconnect plug connection for solenoid valves on cylinder
bank 5 to 8.
Connect special tool 12 6 050 in conjunction with special tool
12 6 411 (from special tool kit 12 6 410 ) to solenoid valves
on cylinder bank 5 to 8. Connect special tool 12 6 411 to
correct terminals on car battery.
Alternately press toggle switch buttons 4 and 3 several times on
special tool 12 6 050 .
Cylinder bank 5 to 8:
Press and hold down toggle switch button 4 on special tool
12 6 050 .
Simultaneously rotate inlet camshaft at hexagon against direction
of rotation up to stop.
Note:
The splines in the VANOS gear are now in contact; the inlet
camshaft cannot be rotated further.
Cylinder bank 5 to 8:
Alternately press toggle switch buttons 2 and 1 several times on
special tool 12 6 050 .
RA Removing and installing/replacing toothed shafts of VANOS gear on left and right BMW AG - TIS 09.05.2008 09:09
Issue status (01/2005) Valid only until next CD is issued Copyright Page - 5 -
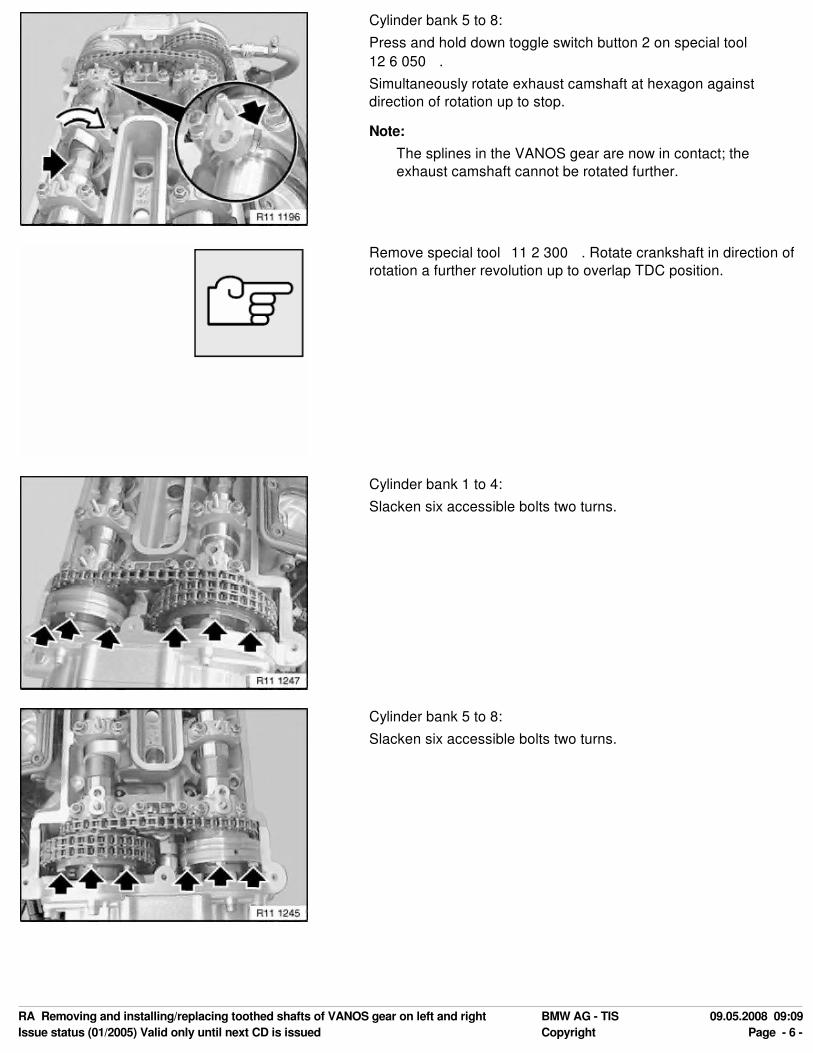
Cylinder bank 5 to 8:
Press and hold down toggle switch button 2 on special tool
12 6 050 .
Simultaneously rotate exhaust camshaft at hexagon against
direction of rotation up to stop.
Note:
The splines in the VANOS gear are now in contact; the
exhaust camshaft cannot be rotated further.
Remove special tool 11 2 300 . Rotate crankshaft in direction of
rotation a further revolution up to overlap TDC position.
Cylinder bank 1 to 4:
Slacken six accessible bolts two turns.
Cylinder bank 5 to 8:
Slacken six accessible bolts two turns.
RA Removing and installing/replacing toothed shafts of VANOS gear on left and right BMW AG - TIS 09.05.2008 09:09
Issue status (01/2005) Valid only until next CD is issued Copyright Page - 6 -
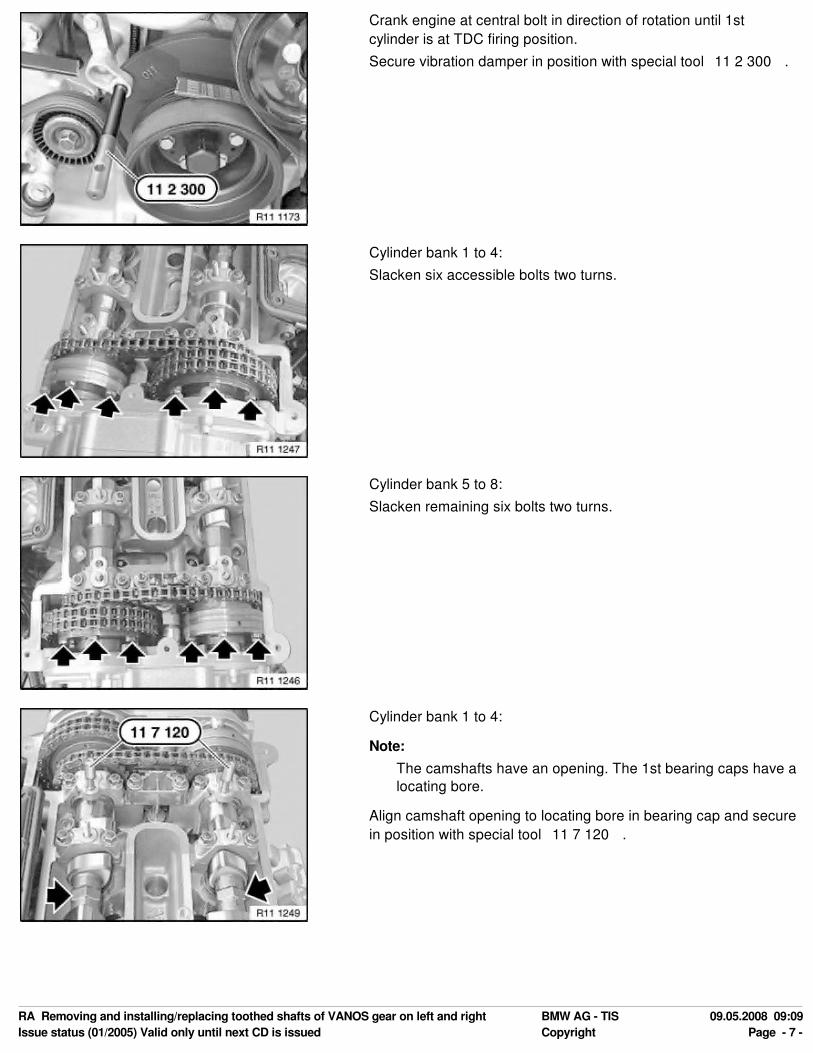
Crank engine at central bolt in direction of rotation until 1st
cylinder is at TDC firing position.
Secure vibration damper in position with special tool 11 2 300 .
Cylinder bank 1 to 4:
Slacken six accessible bolts two turns.
Cylinder bank 5 to 8:
Slacken remaining six bolts two turns.
Cylinder bank 1 to 4:
Note:
The camshafts have an opening. The 1st bearing caps have a
locating bore.
Align camshaft opening to locating bore in bearing cap and secure
in position with special tool 11 7 120 .
RA Removing and installing/replacing toothed shafts of VANOS gear on left and right BMW AG - TIS 09.05.2008 09:09
Issue status (01/2005) Valid only until next CD is issued Copyright Page - 7 -
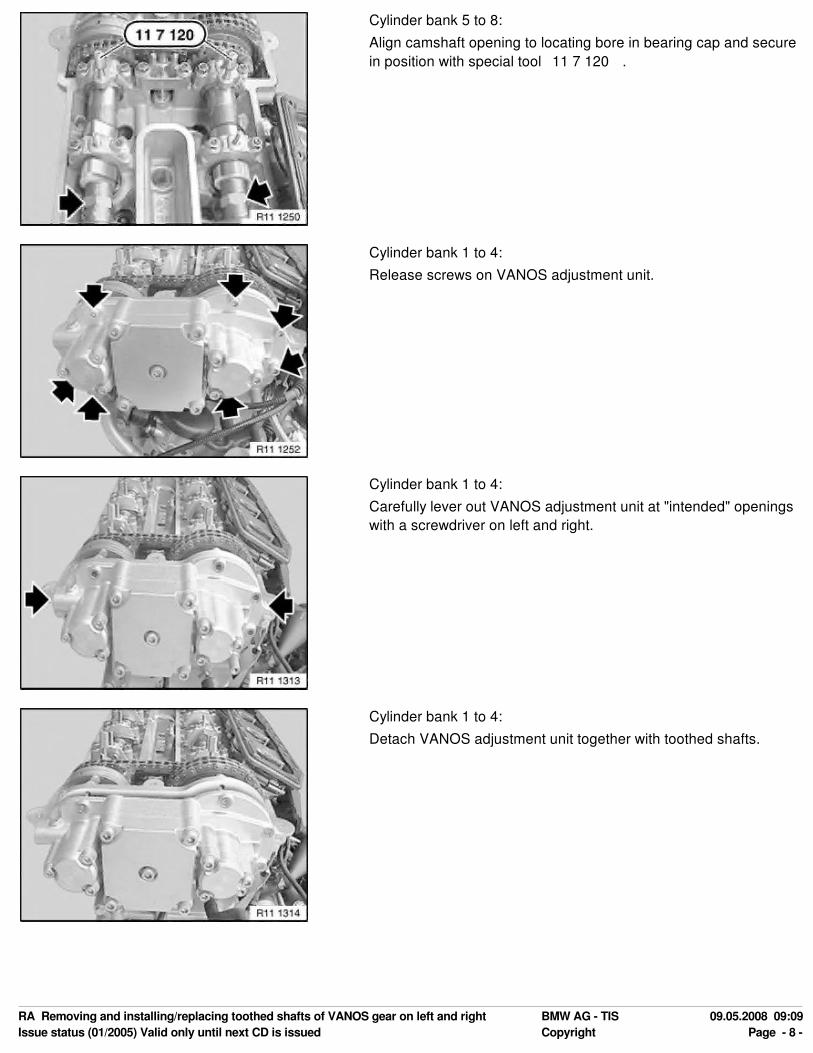
Cylinder bank 5 to 8:
Align camshaft opening to locating bore in bearing cap and secure
in position with special tool 11 7 120 .
Cylinder bank 1 to 4:
Release screws on VANOS adjustment unit.
Cylinder bank 1 to 4:
Carefully lever out VANOS adjustment unit at "intended" openings
with a screwdriver on left and right.
Cylinder bank 1 to 4:
Detach VANOS adjustment unit together with toothed shafts.
RA Removing and installing/replacing toothed shafts of VANOS gear on left and right BMW AG - TIS 09.05.2008 09:09
Issue status (01/2005) Valid only until next CD is issued Copyright Page - 8 -
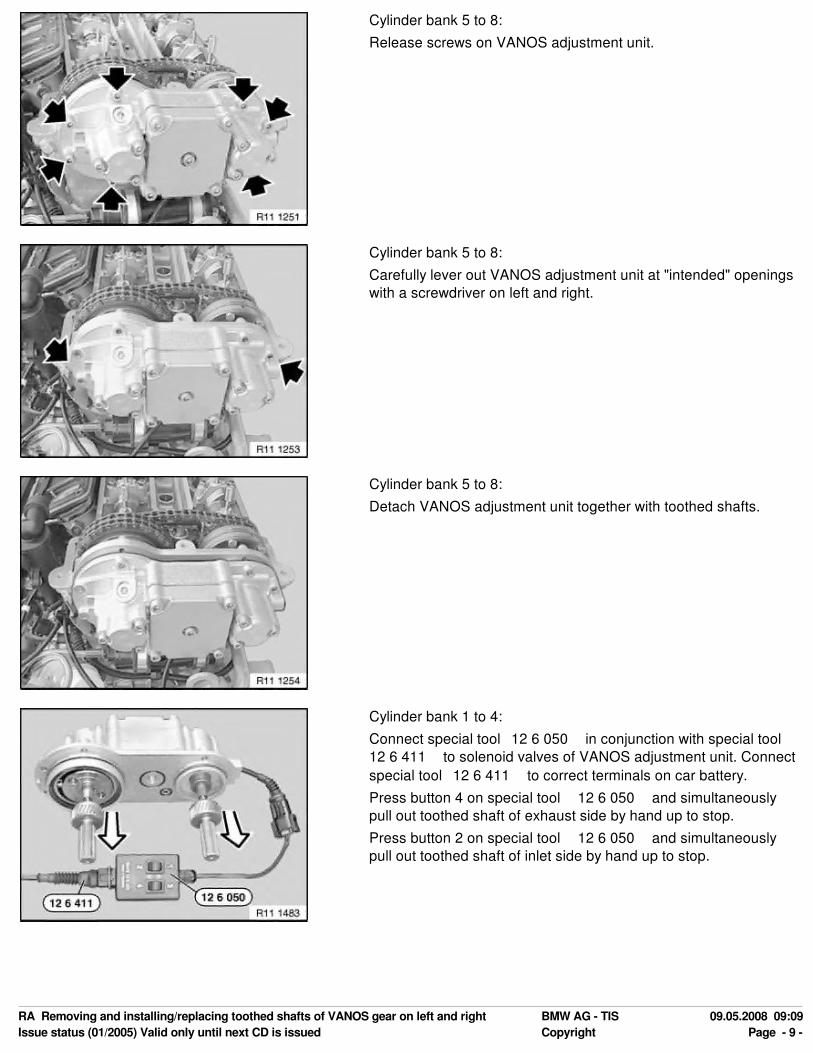
Cylinder bank 5 to 8:
Release screws on VANOS adjustment unit.
Cylinder bank 5 to 8:
Carefully lever out VANOS adjustment unit at "intended" openings
with a screwdriver on left and right.
Cylinder bank 5 to 8:
Detach VANOS adjustment unit together with toothed shafts.
Cylinder bank 1 to 4:
Connect special tool 12 6 050 in conjunction with special tool
12 6 411 to solenoid valves of VANOS adjustment unit. Connect
special tool 12 6 411 to correct terminals on car battery.
Press button 4 on special tool 12 6 050 and simultaneously
pull out toothed shaft of exhaust side by hand up to stop.
Press button 2 on special tool 12 6 050 and simultaneously
pull out toothed shaft of inlet side by hand up to stop.
RA Removing and installing/replacing toothed shafts of VANOS gear on left and right BMW AG - TIS 09.05.2008 09:09
Issue status (01/2005) Valid only until next CD is issued Copyright Page - 9 -

Cylinder bank 1 to 4:
Caution!
CCW thread!
Brace against twin surface (1) and release hex head (2).
Release toothed shaft screw connection on inlet and exhaust
sides.
Cylinder bank 5 to 8:
Connect special tool 12 6 050 in conjunction with special tool
12 6 411 to solenoid valves of VANOS adjustment unit. Connect
special tool 12 6 411 to correct terminals on car battery.
Press button 1 on special tool 12 6 050 and simultaneously
pull out toothed shaft of exhaust side by hand up to stop.
Press button 3 on special tool 12 6 050 and simultaneously
pull out toothed shaft of inlet side by hand up to stop.
Cylinder bank 5 to 8:
Caution!
CCW thread!
Brace against twin surface (1) and release hex head (2).
Release toothed shaft screw connection on inlet and exhaust
sides.
Installation:
Installation of the toothed shafts and the VANOS adjustment unit
is described separately from removal. The assembly sequence for
installation and removal is different.
RA Removing and installing/replacing toothed shafts of VANOS gear on left and right BMW AG - TIS 09.05.2008 09:09
Issue status (01/2005) Valid only until next CD is issued Copyright Page - 10 -
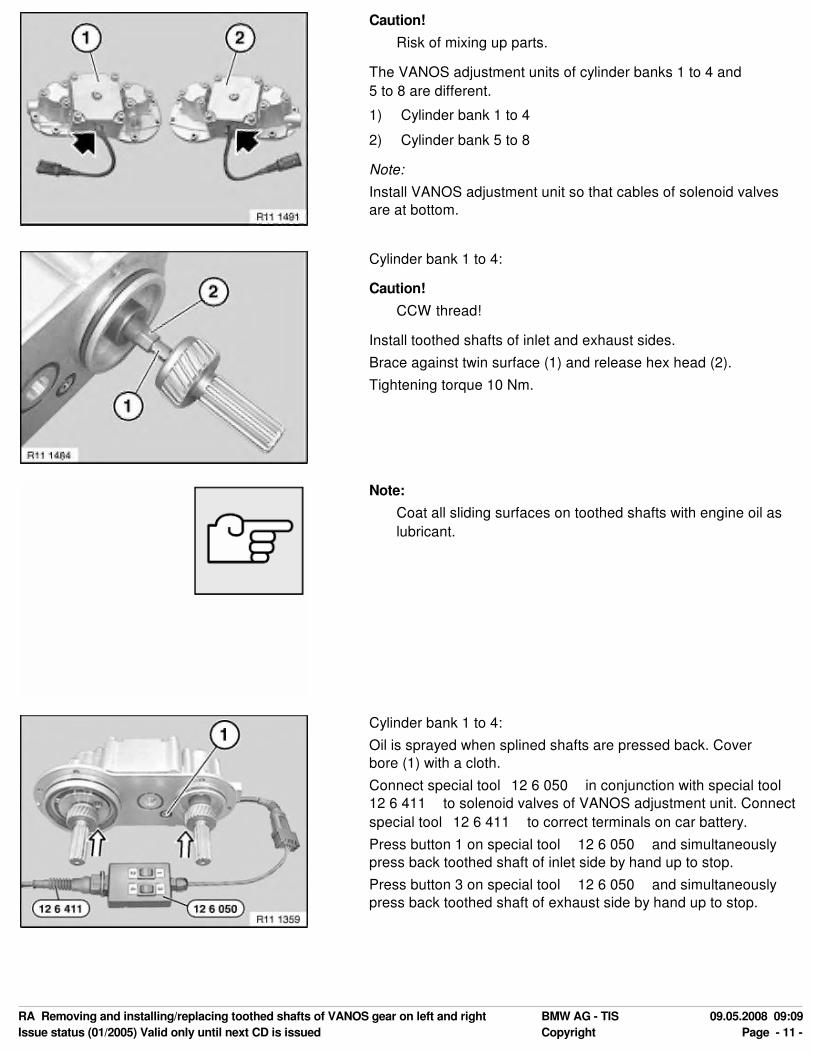
Caution!
Risk of mixing up parts.
The VANOS adjustment units of cylinder banks 1 to 4 and
5 to 8 are different.
1) Cylinder bank 1 to 4
2) Cylinder bank 5 to 8
Note:
Install VANOS adjustment unit so that cables of solenoid valves
are at bottom.
Cylinder bank 1 to 4:
Caution!
CCW thread!
Install toothed shafts of inlet and exhaust sides.
Brace against twin surface (1) and release hex head (2).
Tightening torque 10 Nm.
Note:
Coat all sliding surfaces on toothed shafts with engine oil as
lubricant.
Cylinder bank 1 to 4:
Oil is sprayed when splined shafts are pressed back. Cover
bore (1) with a cloth.
Connect special tool 12 6 050 in conjunction with special tool
12 6 411 to solenoid valves of VANOS adjustment unit. Connect
special tool 12 6 411 to correct terminals on car battery.
Press button 1 on special tool 12 6 050 and simultaneously
press back toothed shaft of inlet side by hand up to stop.
Press button 3 on special tool 12 6 050 and simultaneously
press back toothed shaft of exhaust side by hand up to stop.
RA Removing and installing/replacing toothed shafts of VANOS gear on left and right BMW AG - TIS 09.05.2008 09:09
Issue status (01/2005) Valid only until next CD is issued Copyright Page - 11 -
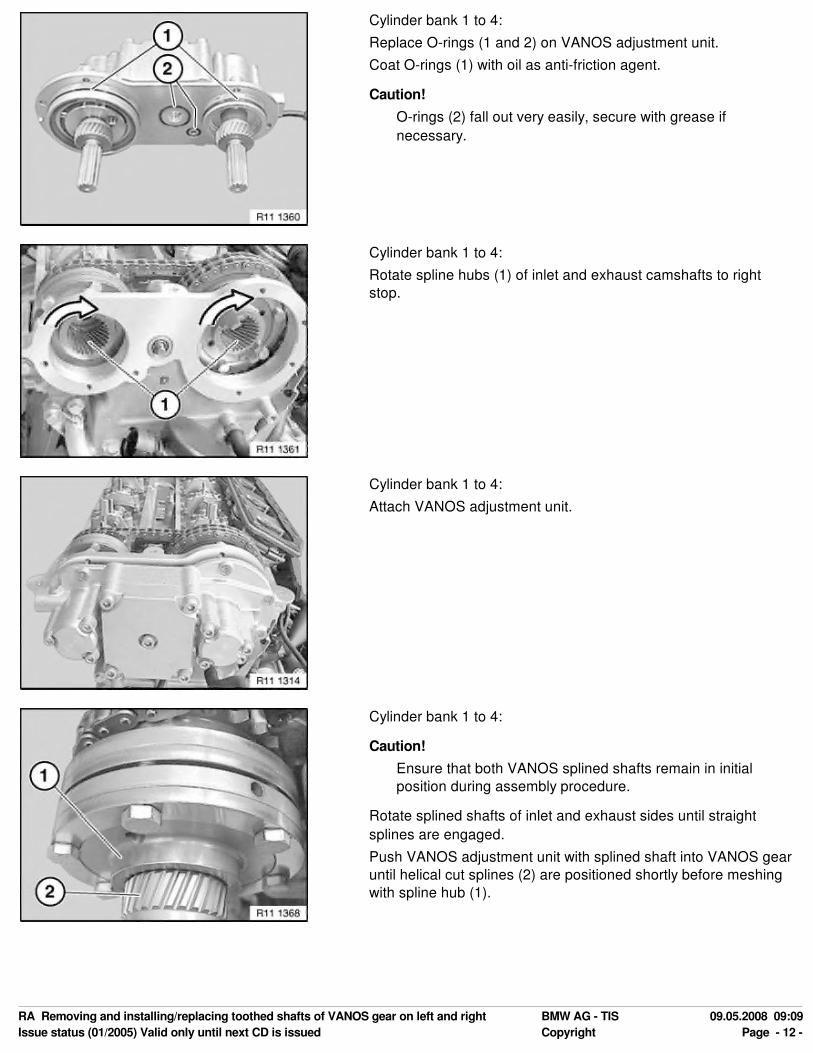
Cylinder bank 1 to 4:
Replace O-rings (1 and 2) on VANOS adjustment unit.
Coat O-rings (1) with oil as anti-friction agent.
Caution!
O-rings (2) fall out very easily, secure with grease if
necessary.
Cylinder bank 1 to 4:
Rotate spline hubs (1) of inlet and exhaust camshafts to right
stop.
Cylinder bank 1 to 4:
Attach VANOS adjustment unit.
Cylinder bank 1 to 4:
Caution!
Ensure that both VANOS splined shafts remain in initial
position during assembly procedure.
Rotate splined shafts of inlet and exhaust sides until straight
splines are engaged.
Push VANOS adjustment unit with splined shaft into VANOS gear
until helical cut splines (2) are positioned shortly before meshing
with spline hub (1).
RA Removing and installing/replacing toothed shafts of VANOS gear on left and right BMW AG - TIS 09.05.2008 09:09
Issue status (01/2005) Valid only until next CD is issued Copyright Page - 12 -

Cylinder bank 1 to 4 (exhaust side):
If the helical cut splines cannot be pushed into the spline hub (1):
Place special tool 11 7 150 on bore in spline hub (1). Rotate
spline hub (1) against direction of rotation until splined shaft (2)
is positioned with spline hub (1) exactly "tooth-to-tooth gap".
Caution!
The "first" fitting tooth must snap into place.
Cylinder bank 1 to 4 (inlet side):
Place special tool 11 7 150 on bore in spline hub (1). Rotate
spline hub (1) against direction of rotation until splined shaft (2)
is positioned with spline hub (1) exactly "tooth-to-tooth gap".
Caution!
The "first" fitting tooth must snap into place.
Cylinder bank 1 to 4 (inlet side):
Align radial piston pump to driver on spline hub.
Note:
Picture shows a schematic representation.
Cylinder bank 1 to 4:
Push on VANOS adjustment unit only until O-rings of VANOS
adjustment unit rest against timing case cover.
Caution!
If this position is not reached, realign position of radial piston
pump to driver.
Insert one bolt each on left and right and initially tighten without
play. The bolts serve to locate the VANOS adjustment unit in
position. Do "not" tighten down bolts yet. VANOS adjustment unit
must "not" rest against timing case cover.
RA Removing and installing/replacing toothed shafts of VANOS gear on left and right BMW AG - TIS 09.05.2008 09:09
Issue status (01/2005) Valid only until next CD is issued Copyright Page - 13 -
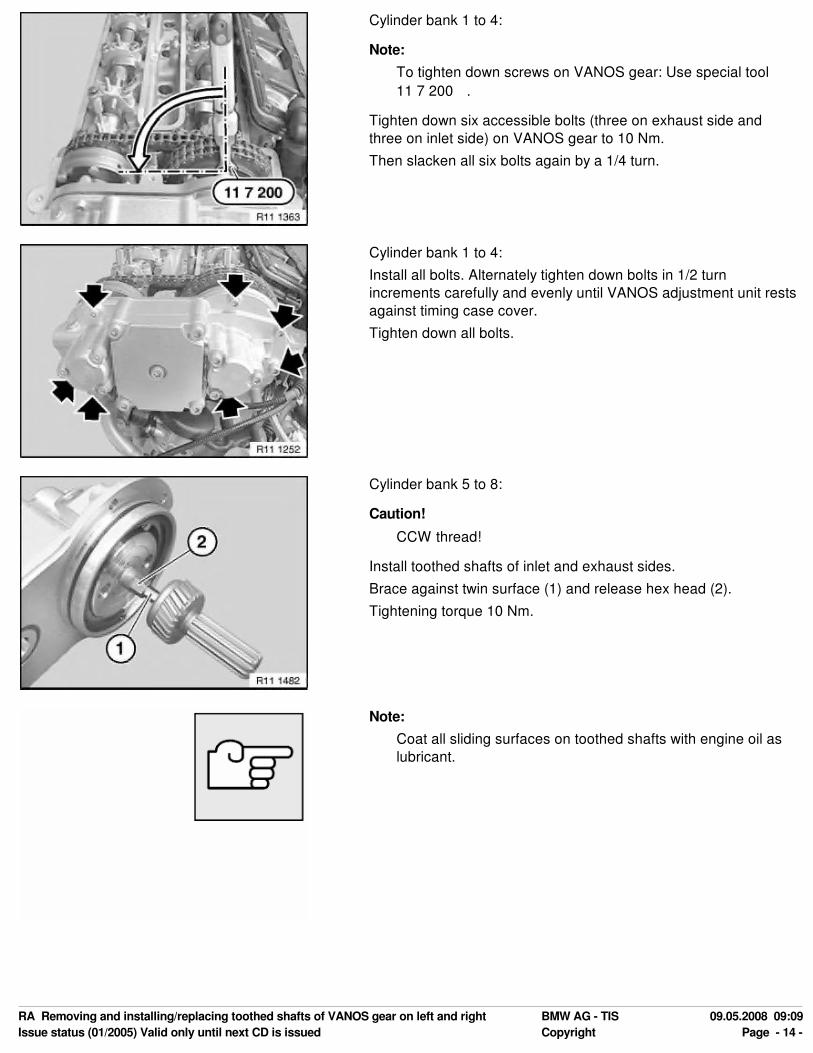
Cylinder bank 1 to 4:
Note:
To tighten down screws on VANOS gear: Use special tool
11 7 200 .
Tighten down six accessible bolts (three on exhaust side and
three on inlet side) on VANOS gear to 10 Nm.
Then slacken all six bolts again by a 1/4 turn.
Cylinder bank 1 to 4:
Install all bolts. Alternately tighten down bolts in 1/2 turn
increments carefully and evenly until VANOS adjustment unit rests
against timing case cover.
Tighten down all bolts.
Cylinder bank 5 to 8:
Caution!
CCW thread!
Install toothed shafts of inlet and exhaust sides.
Brace against twin surface (1) and release hex head (2).
Tightening torque 10 Nm.
Note:
Coat all sliding surfaces on toothed shafts with engine oil as
lubricant.
RA Removing and installing/replacing toothed shafts of VANOS gear on left and right BMW AG - TIS 09.05.2008 09:09
Issue status (01/2005) Valid only until next CD is issued Copyright Page - 14 -
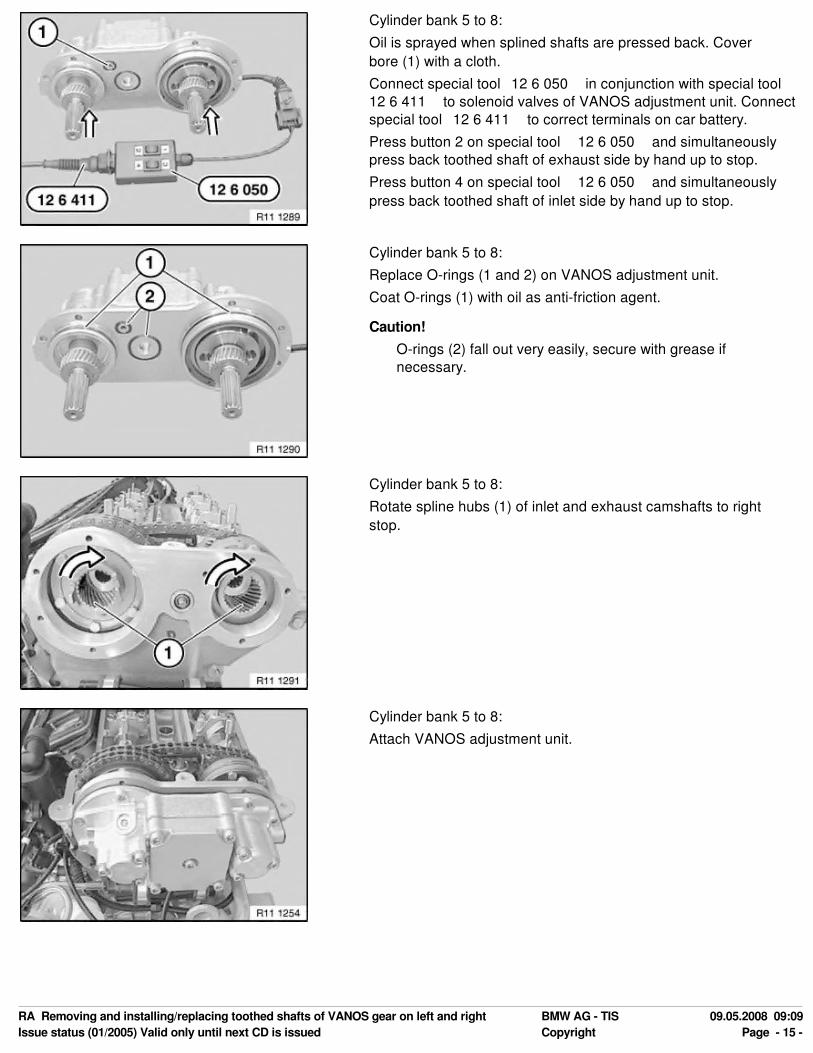
Cylinder bank 5 to 8:
Oil is sprayed when splined shafts are pressed back. Cover
bore (1) with a cloth.
Connect special tool 12 6 050 in conjunction with special tool
12 6 411 to solenoid valves of VANOS adjustment unit. Connect
special tool 12 6 411 to correct terminals on car battery.
Press button 2 on special tool 12 6 050 and simultaneously
press back toothed shaft of exhaust side by hand up to stop.
Press button 4 on special tool 12 6 050 and simultaneously
press back toothed shaft of inlet side by hand up to stop.
Cylinder bank 5 to 8:
Replace O-rings (1 and 2) on VANOS adjustment unit.
Coat O-rings (1) with oil as anti-friction agent.
Caution!
O-rings (2) fall out very easily, secure with grease if
necessary.
Cylinder bank 5 to 8:
Rotate spline hubs (1) of inlet and exhaust camshafts to right
stop.
Cylinder bank 5 to 8:
Attach VANOS adjustment unit.
RA Removing and installing/replacing toothed shafts of VANOS gear on left and right BMW AG - TIS 09.05.2008 09:09
Issue status (01/2005) Valid only until next CD is issued Copyright Page - 15 -

Cylinder bank 5 to 8:
Caution!
Ensure that both VANOS splined shafts remain in initial
position during assembly procedure.
Rotate splined shafts of inlet and exhaust sides until straight
splines are engaged.
Push VANOS adjustment unit with splined shaft into VANOS gear
until helical cut splines (2) are positioned shortly before meshing
with spline hub (1).
Cylinder bank 5 to 8 (exhaust side):
If the helical cut splines cannot be pushed into the spline hub (1):
Place special tool 11 7 150 on bore in spline hub (1). Rotate
spline hub (1) against direction of rotation until splined shaft (2)
is positioned with spline hub (1) exactly "tooth-to-tooth gap".
Caution!
The "first" fitting tooth must snap into place.
Cylinder bank 5 to 8 (inlet side):
Place special tool 11 7 150 on bore in spline hub (1). Rotate
spline hub (1) against direction of rotation until splined shaft (2)
is positioned with spline hub (1) exactly "tooth-to-tooth gap".
Caution!
The "first" fitting tooth must snap into place.
Cylinder bank 5 to 8 (inlet side):
Align radial piston pump to driver on spline hub.
Note:
Picture shows a schematic representation.
RA Removing and installing/replacing toothed shafts of VANOS gear on left and right BMW AG - TIS 09.05.2008 09:09
Issue status (01/2005) Valid only until next CD is issued Copyright Page - 16 -
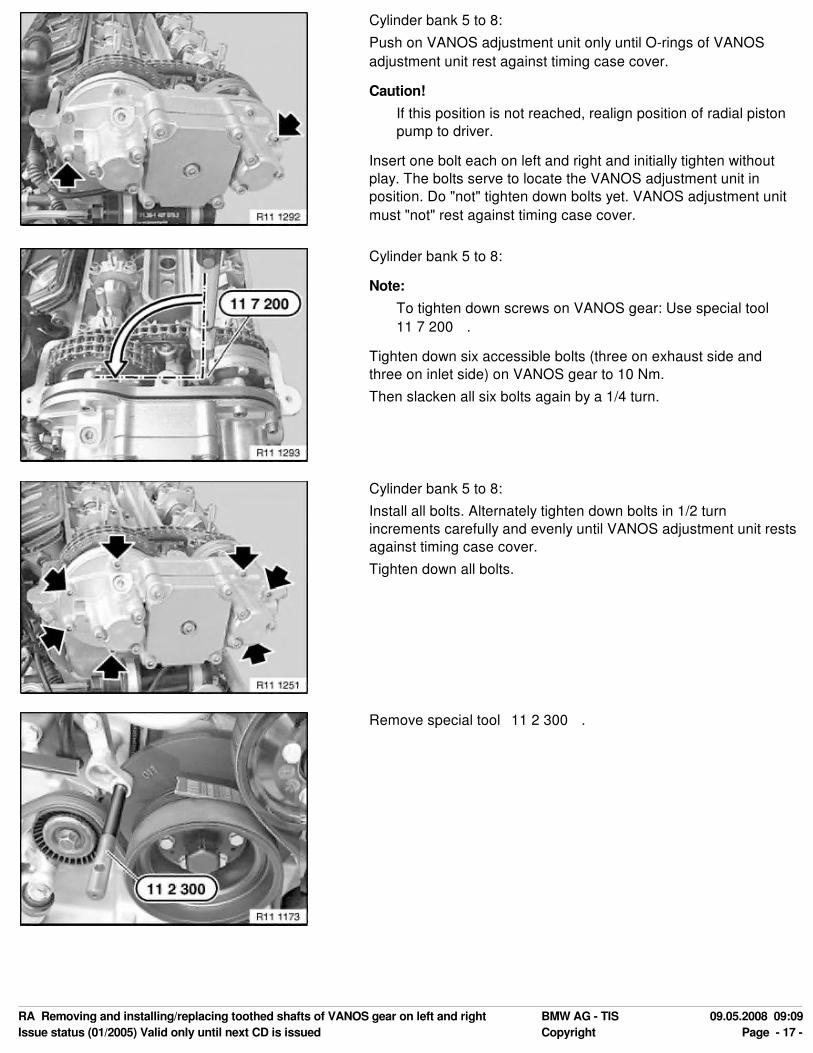
Cylinder bank 5 to 8:
Push on VANOS adjustment unit only until O-rings of VANOS
adjustment unit rest against timing case cover.
Caution!
If this position is not reached, realign position of radial piston
pump to driver.
Insert one bolt each on left and right and initially tighten without
play. The bolts serve to locate the VANOS adjustment unit in
position. Do "not" tighten down bolts yet. VANOS adjustment unit
must "not" rest against timing case cover.
Cylinder bank 5 to 8:
Note:
To tighten down screws on VANOS gear: Use special tool
11 7 200 .
Tighten down six accessible bolts (three on exhaust side and
three on inlet side) on VANOS gear to 10 Nm.
Then slacken all six bolts again by a 1/4 turn.
Cylinder bank 5 to 8:
Install all bolts. Alternately tighten down bolts in 1/2 turn
increments carefully and evenly until VANOS adjustment unit rests
against timing case cover.
Tighten down all bolts.
Remove special tool 11 2 300 .
RA Removing and installing/replacing toothed shafts of VANOS gear on left and right BMW AG - TIS 09.05.2008 09:09
Issue status (01/2005) Valid only until next CD is issued Copyright Page - 17 -
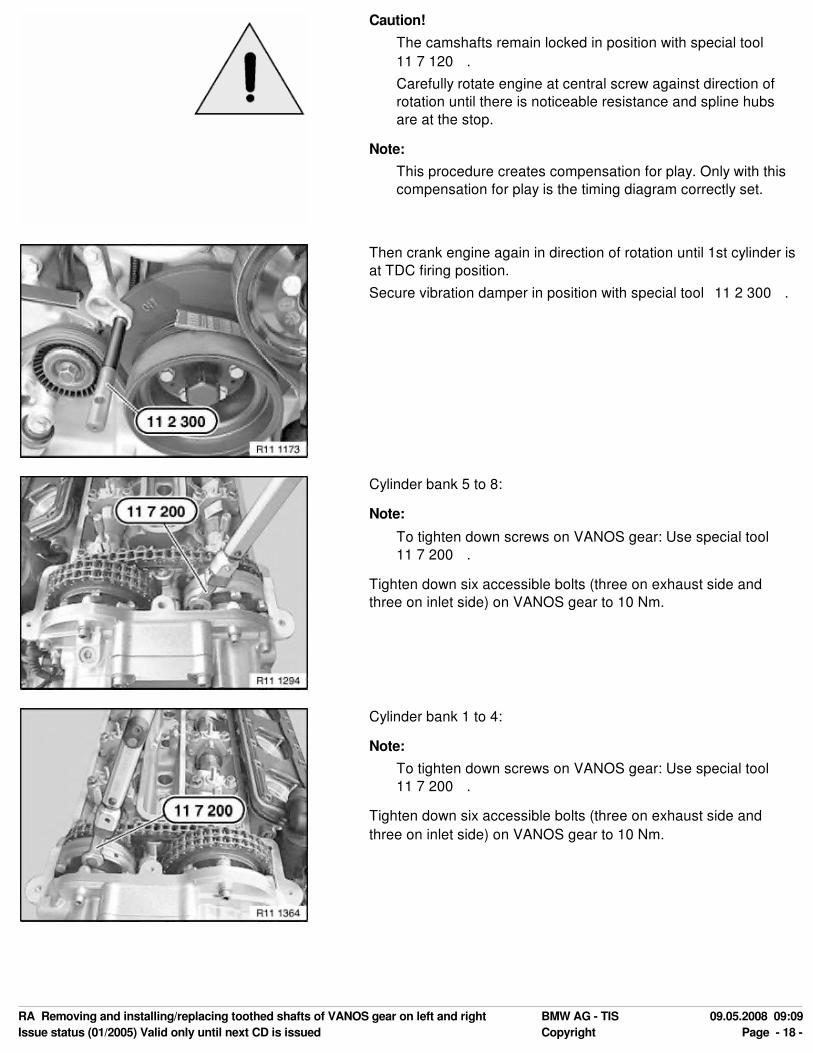
Caution!
The camshafts remain locked in position with special tool
11 7 120 .
Carefully rotate engine at central screw against direction of
rotation until there is noticeable resistance and spline hubs
are at the stop.
Note:
This procedure creates compensation for play. Only with this
compensation for play is the timing diagram correctly set.
Then crank engine again in direction of rotation until 1st cylinder is
at TDC firing position.
Secure vibration damper in position with special tool 11 2 300 .
Cylinder bank 5 to 8:
Note:
To tighten down screws on VANOS gear: Use special tool
11 7 200 .
Tighten down six accessible bolts (three on exhaust side and
three on inlet side) on VANOS gear to 10 Nm.
Cylinder bank 1 to 4:
Note:
To tighten down screws on VANOS gear: Use special tool
11 7 200 .
Tighten down six accessible bolts (three on exhaust side and
three on inlet side) on VANOS gear to 10 Nm.
RA Removing and installing/replacing toothed shafts of VANOS gear on left and right BMW AG - TIS 09.05.2008 09:09
Issue status (01/2005) Valid only until next CD is issued Copyright Page - 18 -
Cylinder bank 1 to 4:
Remove special tool 11 7 120 .
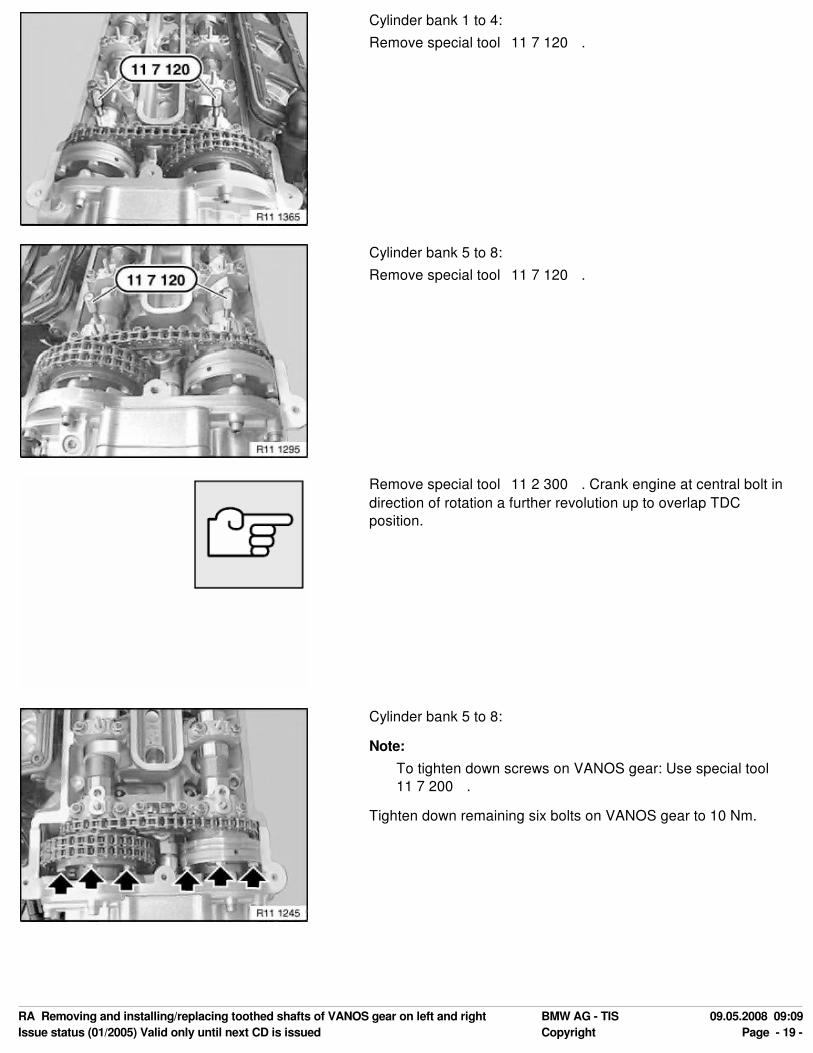
Cylinder bank 5 to 8:
Remove special tool 11 7 120 .
Remove special tool 11 2 300 . Crank engine at central bolt in
direction of rotation a further revolution up to overlap TDC
position.
Cylinder bank 5 to 8:
Note:
To tighten down screws on VANOS gear: Use special tool
11 7 200 .
Tighten down remaining six bolts on VANOS gear to 10 Nm.
RA Removing and installing/replacing toothed shafts of VANOS gear on left and right BMW AG - TIS 09.05.2008 09:09
Issue status (01/2005) Valid only until next CD is issued Copyright Page - 19 -
Cylinder bank 1 to 4:
Note:
To tighten down screws on VANOS gear: Use special tool
11 7 200 .
Tighten down remaining six bolts on VANOS gear to 10 Nm.
Rotate crankshaft in direction of rotation as far as ignition TDC
position of cylinder 1. Secure vibration damper in position with
special tool 11 2 300 .
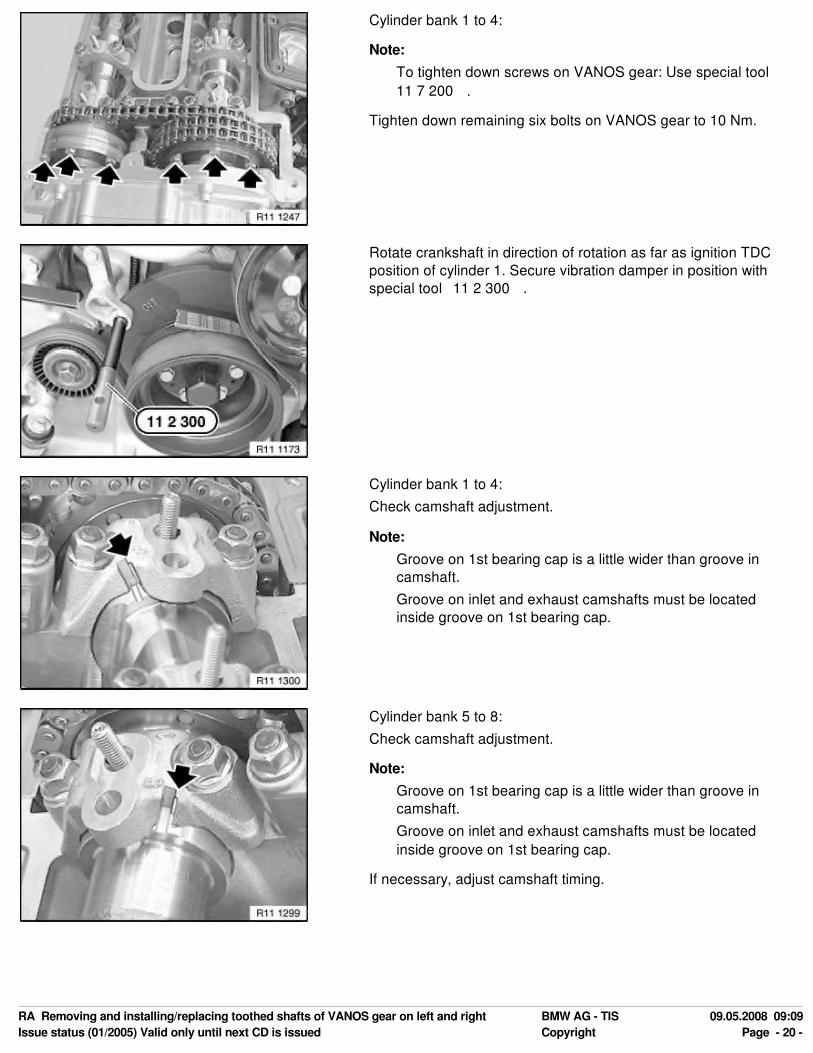
Cylinder bank 1 to 4:
Check camshaft adjustment.
Note:
Groove on 1st bearing cap is a little wider than groove in
camshaft.
Groove on inlet and exhaust camshafts must be located
inside groove on 1st bearing cap.
Cylinder bank 5 to 8:
Check camshaft adjustment.
Note:
Groove on 1st bearing cap is a little wider than groove in
camshaft.
Groove on inlet and exhaust camshafts must be located
inside groove on 1st bearing cap.
If necessary, adjust camshaft timing.
RA Removing and installing/replacing toothed shafts of VANOS gear on left and right BMW AG - TIS 09.05.2008 09:09
Issue status (01/2005) Valid only until next CD is issued Copyright Page - 20 -
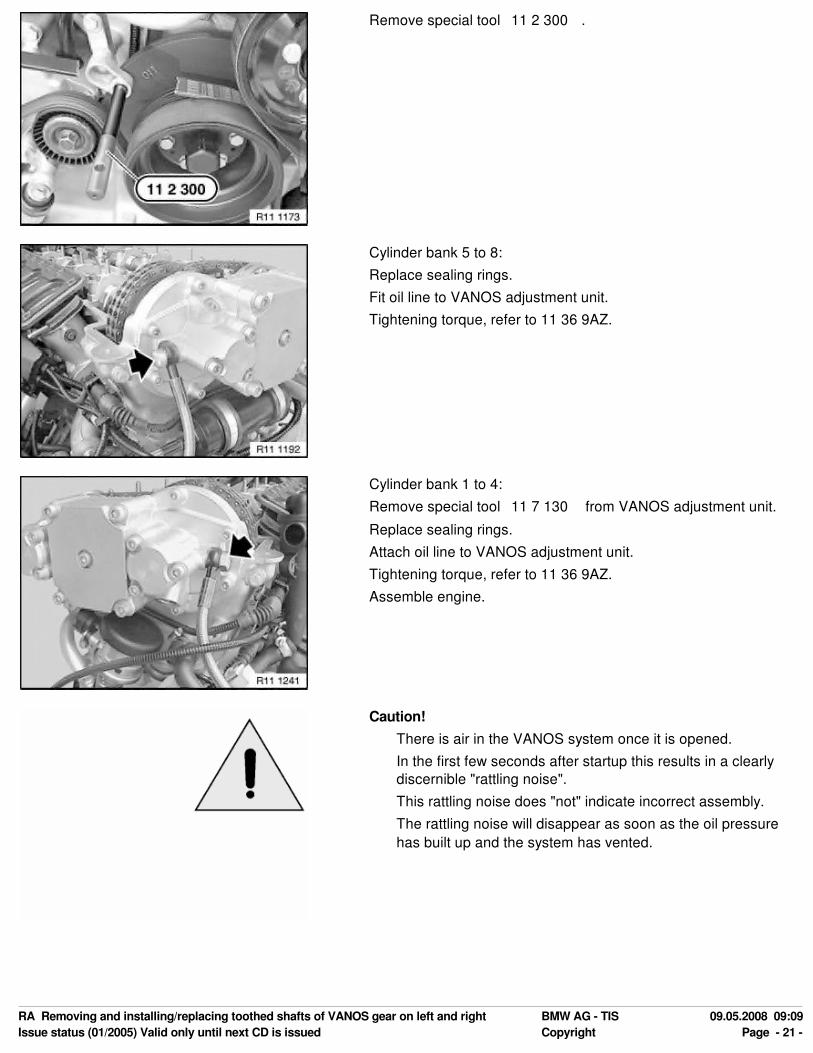
Remove special tool 11 2 300 .
Cylinder bank 5 to 8:
Replace sealing rings.
Fit oil line to VANOS adjustment unit.
Tightening torque, refer to 11 36 9AZ.
Cylinder bank 1 to 4:
Remove special tool 11 7 130 from VANOS adjustment unit.
Replace sealing rings.
Attach oil line to VANOS adjustment unit.
Tightening torque, refer to 11 36 9AZ.
Assemble engine.
Caution!
There is air in the VANOS system once it is opened.
In the first few seconds after startup this results in a clearly
discernible "rattling noise".
This rattling noise does "not" indicate incorrect assembly.
The rattling noise will disappear as soon as the oil pressure
has built up and the system has vented.
RA Removing and installing/replacing toothed shafts of VANOS gear on left and right BMW AG - TIS 09.05.2008 09:09
Issue status (01/2005) Valid only until next CD is issued Copyright Page - 21 -