Embed Size (px)
Citation preview
R540 Series
User Manual V1.1
Enhanced Small Animal
Anesthesia Machine
© 2016 Shenzhen RWD Life Science Co., Ltd, All rights reserved.
Intellectual Property Right
The intellectual property rights of this product and its instruction manual belong to RWD Life
Science Co., Ltd (hereinafter referred to as the RWD), including but not limited to patent,
trademark, copyright etc..
RWD reserves final interpretation right of this instruction manual.
RWD have the right to use the instruction as confidential information. Any individual and
organization shall not disclose the instruction of all or parts of the information by any means
without RWD’s written permission. Nor shall any other person or organization be allowed to
obtain all or part of the information of this instruction manual by any means.
No individual and organization shall but not limited to publish, modify, reproduce, issue, rental,
adapted, and translated into other languages with RWD’s writen permission.
is RWD’s registered trademark or mark, these trademarks and the related security
mark belong to RWD’s intangible property. The use of non RWD’s trademark or mark in this
instruction manual are only for editing purposes, without other purposes, the rights belong to their
respective rights owners.
Statement
RWD reserves the right to modify the content of this manual without prior notice.
RWD reserves the right to change the technology without prior notice.
RWD reserves the right to modify the product specifications without prior notice.
RWD is not to guarantee the information in any forms, including (but not limited to) the guarantee
responsibility of proposing the implied merchantability and suitability for a specific purpose.
RWD only in the following conditions is considered to be responsible for the safety, reliability
and performance of the instruments, i.e.:
Assembly operation, expansion, adjustment, improvements and repairs were carried out by RWD
authorized personnel;
Relevant electrical equipments in line with national standards;
The instrument is operated according to the instruction manual.
RWD is not responsible for the products’ safety, reliability and operation status in the following
conditions:
Components are disassembled, stretched and debugged;
Non RWD authorized personnel repairs or alterations to the instruments;
Product using not in accordance with the manual.

CONTENTS 1、INTRODUCTION ................................................................................................. 1
1.1 Overview ................................................................................................................................. 1
1.2 Safety ...................................................................................................................................... 1
1.3 General description ................................................................................................................. 1
1.4 Equipment environment requirements .................................................................................. 2
1.5 Features of main components of equipment ......................................................................... 3
2、Safety ....................................................................................................................... 5
2.1 Overview ............................................................................................................................... 5
2.2 Usage restriction ..................................................................................................................... 5
2.3 Description of safety symbols ................................................................................................. 5
2.4 Basic safety precautions and practices .................................................................................... 6
2.5 System malfunction ................................................................................................................ 7
2.6 Emergency shutdown .............................................................................................................. 7
3、Unpacking and Assembly ...................................................................................... 7
3.1 Overview ............................................................................................................................... 7
3.2 Unpacking ............................................................................................................................. 7
3.3 System assembling ................................................................................................................ 8
4、System Preparation ................................................................................................ 9
4.1 Overview ............................................................................................................................... 9
4.2 Materials and Goods ............................................................................................................... 9
4.3 Initial system preparation ...................................................................................................... 10
5、Operation Guide .................................................................................................. 14
5.1 Overview ............................................................................................................................... 14
5.2 Pre-use checkout ................................................................................................................... 14
5.3 Animal anesthesia procedures ............................................................................................... 14
5.4 Post-anesthesia procedures ................................................................................................. 16
6、Trouble Shooting .................................................................................................. 17
6.1 Overview ............................................................................................................................... 17
6.2 Safety .................................................................................................................................... 17
6.3 Equipment Status .................................................................................................................. 17
6.4 Record keeping ..................................................................................................................... 17
6.5 Problem (fault) - solution summary .................................................................................... 17
7、Maintenance ......................................................................................................... 20
7.1 Overview ............................................................................................................................. 20
7.2 Safety .................................................................................................................................. 20
7.3 Annual inspection ............................................................................................................... 20
7.4 Equipment status ................................................................................................................. 20
7.5 Record keeping ................................................................................................................... 20
7.6 Parts and materials ................................................................................................................ 20
7.7 Equipment Cleaning ............................................................................................................ 21
8、Product Information ............................................................................................ 23
8.1 Overview ............................................................................................................................... 23
8.2 Product warranty ................................................................................................................... 23
8.3 Product features .................................................................................................................... 23
8.4 Product technology specifications ........................................................................................ 24
9、Other Reference Information ............................................................................. 25
9.1 Overview ............................................................................................................................... 25
9.2 Pressure measurement ........................................................................................................... 25
9.3 Pressure unit conversion ..................................................................................................... 25
9.4 Maintain anesthesia concentration reference ...................................................................... 25
- 1 -
1-CONTENTS
1.1 Overview
First of all, sincerely thanks for selecting the R500 series Small Animal Anesthesia
Machine made by RWD Company.
Please read this instruction manual and all other auxiliary materials carefully before
installing and using the product, which will be helpful to work with it better.
RWD has been always dedicated to improving the product function and the service
quality, and will reserve the rights to revise the product itself and contents described
in the instruction manual at any time without notice in advance.
If you find the practical situations about the supplied goods do not agree with the
contents described in the manual, or have any questions or ideas about our products
and service, welcome to contact us. For latest information, please visit our web site
(www.rwdstco.com) or contact us immediately.
This manual is applicable to:
R540IP Enhanced Small Animal Anesthesia Machine - Isoflurane,Pour Fil
R540IE Enhanced Small Animal Anesthesia Machine - Isoflurane,Easy Fil
R540SP Enhanced Small Animal Anesthesia Machine - Sevoflurane,Pour Fil
R540SE Enhanced Small Animal Anesthesia Machine - Sevoflurane,Easy Fil
1.2 Safety
Operation of Anesthesia System involves oxygen gas with high pressure and the use
of potentially hazardous materials. In order to prevent injury to animals and/or
operators and damage to the anesthesia system, please read carefully Section 2 -
System security before performing any of the procedures contained in this manual.
If you have any safety questions or advises, please contact us for support.
1.3 General description
R540 enhanced anesthesia machines are compact and stable equipments newly
designed by RWD Life Science Co., Ltd. It can withstand daily rigorous test use,
and ensure trouble-free operation for a long time.
The principle is that the anesthetic agent transforms from liquid to gas and mixes
with oxygen according to a certain proportion for inspiration of animals in order to
make them anesthetized.
Note: Because of the different type of RWD produced small animal anesthesia
This small animal anesthesia system should only be operated
and administered by professional personnel.
- 2 -
machine, its internal structure may also be different, the following principle
description and principle charts just for reference, please carefully read the
content of the instructions for specific parts name and detailed operation.
Figure 1-1 shows a basic working principle diagram of the system. The operator
regulates the valve of the oxygen supply to set the desired flow rate according to the
indication of oxygen meter float. The operator toggles gas switch or the three-way
valve and makes sure one outlet of valve is accessed to the anesthesia induction box,
and sets the concentration of the anesthetic gas (vol%) by turning the knob on the
vaporizer to the desired setting, then puts small animal into the induction box to
start induction anesthesia. After the animal is fully anesthetized, the operator
regulates the concentration of anesthetic gas to maintaining concentration, takes out
the small animal to the end of anesthesia mask, make it to continue inhaling
anesthetic gas, and the exhaled waste gas can be recycled by an optional recovery
unit.
Figure 1-1 Basic working principle diagram of the system
No. Description No. Description
○1 Anesthetic vaporizer ○5 Gas switch
○2 O2 flowmeter ○6 Anesthesia induction box
○3 O2 flowmeter control valve
○7 Anesthesia mask
○4 O2 flush button ○8 Small animal
1.4 Equipment Environment Requirements
Please prepare equipment operation status as Table 1-1 to ensure reliable operation
and safety.
- 3 -
Table 1-1 Equipment Environment Requirements
1.5 Features of main components of equipment
Figure 1-2 Equipment main body
No. Description No. Description
○1 Handle ○6 Anesthesia induction chamber interface
○2 O2 flowmeter ○7 Gas switch
○3 Anesthetic vaporizer ○8 Anesthesia mask interface
○4 O2 Flow control valve ○9 O2 flush button
○5 Main Suport ○10 Air connecion
Detail Description
Gas Supply Medical oxygen or air pump
Pressure: below 0.4MPa
Working
Environment
Storage temperature:-40 - 55℃
Operating temperature:10-35℃
Relative Humidity:5-90%
- 4 -
○1 Handle
Provides hand-hold for steadying the anesthesia system while it is being moved.
○2 ○4 O2 flowmeter assembly
Used to control the oxygen or air flow that goes into the anesthesia system. Turn the
O2flowmeter control valve to regulate the oxygen flow between 0.1~4L/min.
○3 Anesthetic vaporizer
The vaporizer is the most core part of the whole anesthesia system. More attention
should be paid to its maintenance and operation.
The vaporizer converts liquid anesthetic into a gaseous state, and add into oxygen in
volume percentage (vol.%). The volume percentage is adjusted by the digital dial
on the upper part of the vaporizer, and the gas out of the outlet is the set
concentration mixed gas
RWD produce and design vaporizer can ensure stable anesthesia gas concentration
output, without influencing by external environment (pressure, temperature,
humidity etc.).
The inner design of the vaporizer is different according to the anesthetic agent.
Please use the correct anesthetic agent following the tag on the vaporizer. The
misuse may cause the damage to the equipment and animal.
○5 Main support
Solid metal support for mounting and supporting all of the above components。
○6 Anesthesia induction chamber interface
Used for connecting animal anesthesia induction chamber.
○7 Gas switch
Pull the gas switch to the direction of the "Chamber", the anesthetic gas flows to the
anesthesia induction chamber. Pull to the direction of the "Mask", the anesthetic gas to
flow to the anesthesia mask.
○8 Anesthesia mask interface
Used for connecting the anesthesia mask.

- 5 -
○9 Quick flush button.
Press to deliver the oxygen or air directly to induction box. It is generally used
while emergency or excluding residual anesthetic gas in the induction box.
○10 Air connection
Used for connecting oxygen or air pumps.
2- Safety
2.1 Overview
This section provides basic safety information necessary for operating our R540
enhanced small animal anesthesia machine. If you have any questions or advise,
please contact us for more support.
2.2 Usage restriction
RWD R540 enhanced anesthesia machine is only for laboratory or veterinary use. All
the operation and maintenance should follow the instructions of this manual. Misuse
of your system may result in injury to animals and operators and/or damage to
property. Misuse includes:
Using inappropriate gases and anesthetic agents
Making unauthorized modifications to the equipment
Operating the system using gas pressure exceeding maximum ratings
2.3 Description of safety symbols
The following types of symbols are included in this manual with notes that alert the
reader to potential hazards.
Property Damage Caution.This symbol appears in a shaded text block to
warn that your actions could cause damage to the system or the facility.
Personal and Animal Safety Warning. This symbol appears in a shaded text
block to warn that your actions could cause personal injury or death.
This small animal anesthesia system should only be operated
and administered by professional personnel.
- 6 -
2.4 Basic safety precautions and practices
This section provides requirements necessary to ensure safe and reliable operation of
your R540 enhanced anesthesia machine.
2.4.1 Animal and operator safety
If possible. please prepare a backup set anesthesia machine in case an emergency occur;
Any person responsible for the installation or operation of the system shall carefully
read and familiar with the instruction manual.
To ensure proper function of your system, perform a pre-use checkout procedure in
accordance with Section 5 - Operation.
The system must always be attended by a veterinarian or trained anesthesia technician.
After guarantee period, annual service inspections to ensure proper operation is
recommended. Only RWD-certified technicians should be permitted to service the system
or replace internal parts.
Keep open flames and combustibles (e.g., ether and acetone) away from the anesthesia
system.
Do not place any heavy things on the anesthesia system.
Make sure that the oxygen hose is unobstructed to avoid blockage.
Wearing personal protective equipments is suggested.
Make sure the oxygen hose is securely connected to the system before starting a procedure.
Make sure that any exhaled gas containing anesthetic is vented outside of the operating
room or recycled by other proper equipment.
RWD recommends the use of an electrocardiograph, and equipment capable of monitoring
the animal’s pulse, oxygen (O2) saturation, carbon dioxide (CO2) level, and anesthetic
agent level at all times when operating the system.
Remove the system from service if any indications of improper function exist, and contact
RWD.
Never pour water or any other fluids into the anesthetic vaporizer. Fill vaporizer only with
the anesthetic agent for which it is designed, note the identification outside the vaporizer
before use.
Avoid use of oil or grease on any anesthesia or respiratory equipment where oxygen is
used. An explosion may occur.
Make sure the pressure of the oxygen is below 400kPa。
2.4.2 Preventing system and facility damage
Immediately collect and clean up spilled anesthetic.
Isoflurane is very caustic, avoid it contact with mask and other components if spillage
occurs. If spillage should occur, allow it to evaporate. Do not attempt to wipe it with a
cloth.
Do not place anything on top of the anesthesia equipment.
- 7 -
Follow all recommended system maintenance procedures specified in Section 7 -
Maintenance.
Keep appropriate distance from the wall to ensure a stable gas supply.
Ensure the stability of gas supply.
2.4.3 Environmental health
Immediately collect and clean up any spilled anesthetic agent.
If the system is used in a confined space, ensure that there is adequate ventilation.
Dispose of any hazardous materials and items contaminated with hazardous materials
should be in accordance with local regulations.
2.5 System malfunction
If your system does not operate properly, refer to Section 6 - Trouble shooting which
includes descriptions, possible causes, and suggested solutions.
2.6 Emergency shutdown
In the event of a major malfunction, please proceed as follow procedures:
1) Turn off the oxygen supply and the vaporizer;
2) Disconnect the line between the equipment and the air source;
3) Switch the animal to a backup anesthesia delivery system and continue the
experiment.;
4) Contact RWD for after-sale service.
3- Unpacking and assembling
3.1 Overview
This section introduces the unpacking and assembly procedures for your R540
anesthesia machine.
3.2 Unpacking
Your RWD R540 enhanced anesthesia machine has been carefully packed in our
factory for safe delivery to you. When you have received your product, please do the
as follow:
Check the shipping documents to ensure that all boxes have been received.
Examine the shipping boxes for damage. Immediately make a damage claim to
the carrier if there is serious damage and contact RWD. Taking photos is
suggested for keeping the evidence.
- 8 -
Carefully open each box and remove each individual component. Save all boxes
and packing materials for future shipments.
Check the packing list or invoice to ensure all components ordered are included.
In case there is any doubt or need any help, contact RWD or local dealer
immediately.
3.3 Assembling the system
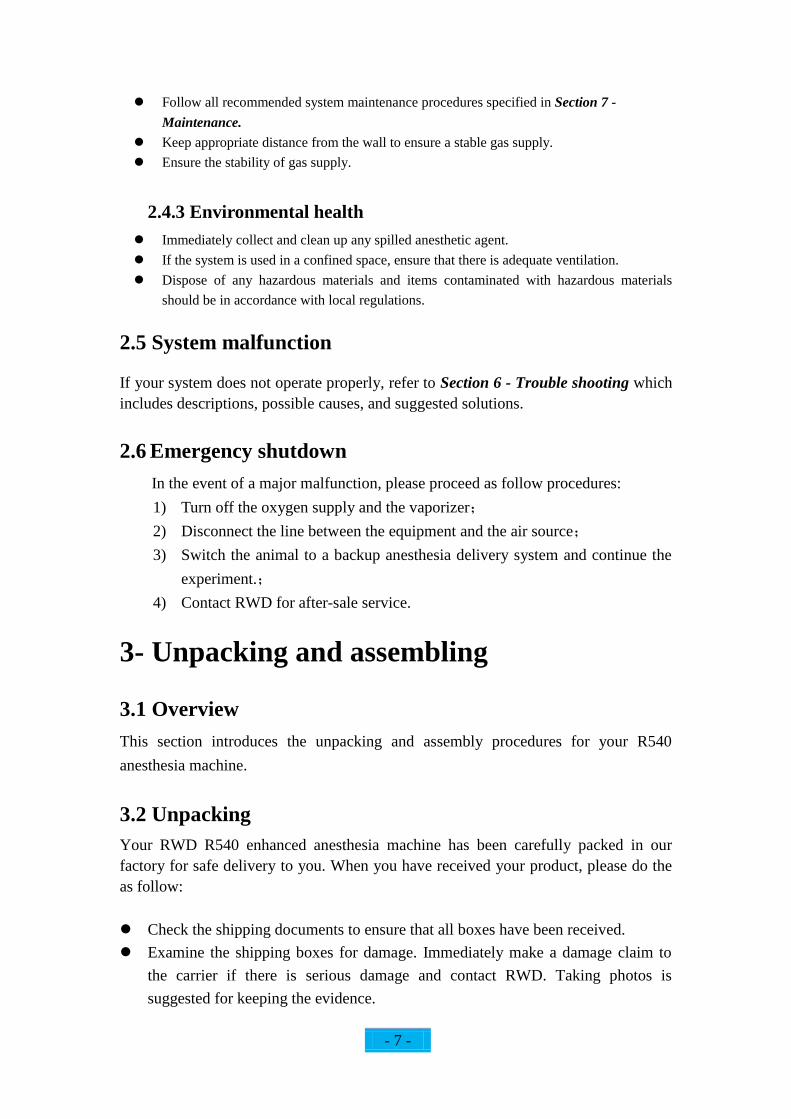
3.3.1 Install Vaporizer
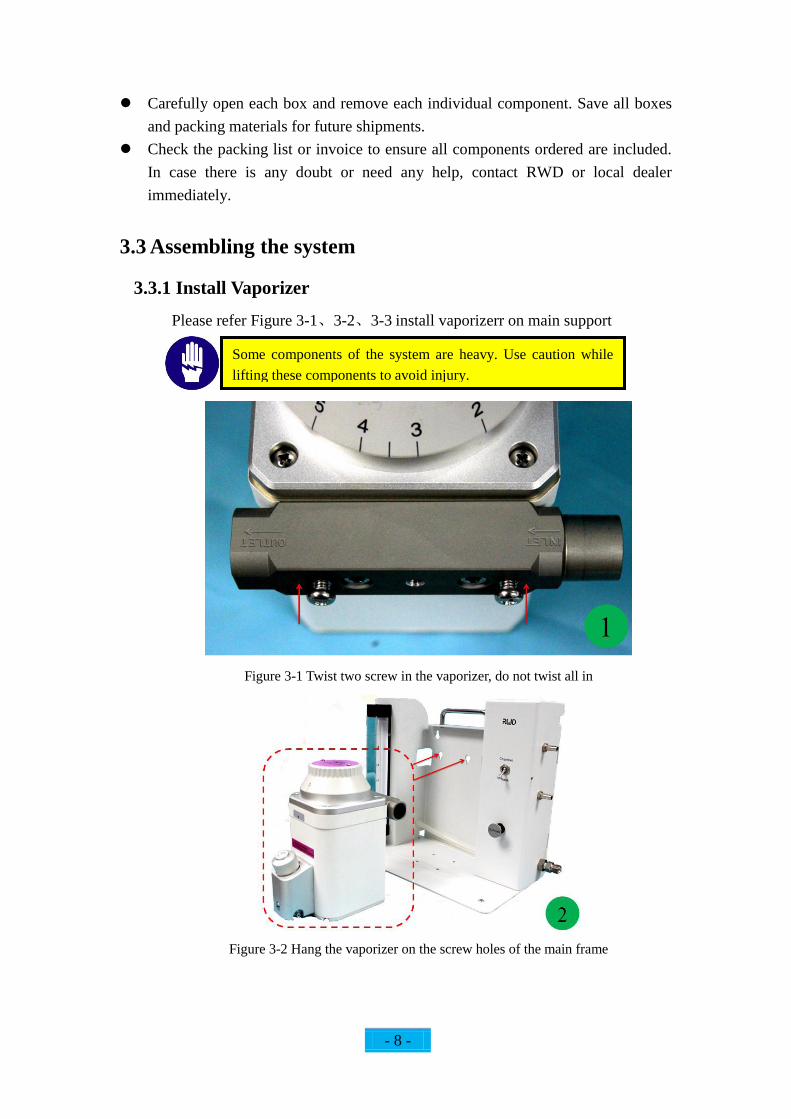
Please refer Figure 3-1、3-2、3-3 install vaporizerr on main support
Figure 3-1 Twist two screw in the vaporizer, do not twist all in
Figure 3-2 Hang the vaporizer on the screw holes of the main frame
Some components of the system are heavy. Use caution while
lifting these components to avoid injury.
- 9 -
Figure 3-3 Use screwdriver to tighten the screw
3.3.2 Vaporizer line connection
Please refer to Figure 3-4 Connect the tube of the anesthesia machine to the gas
INLET and OUTLET of the vaporizer.
Figure3-4 Vaporizer tube connection
4-System setup
4.1 Overview
This section provides the setup procedures required to prepare your R540 enhanced
animal anesthesia machine.
4.2 Materials and goods
- 10 -
Oxygen or air source(below 400kPa)
Anesthetics (optional, according to the type of vaporizer)
Anesthesia induction chamber(optional)
Anesthesia mask (optional)
The anesthetic gas recovery system (optional)
4.3 Initial system preparation
4.3.1 Setting up the system
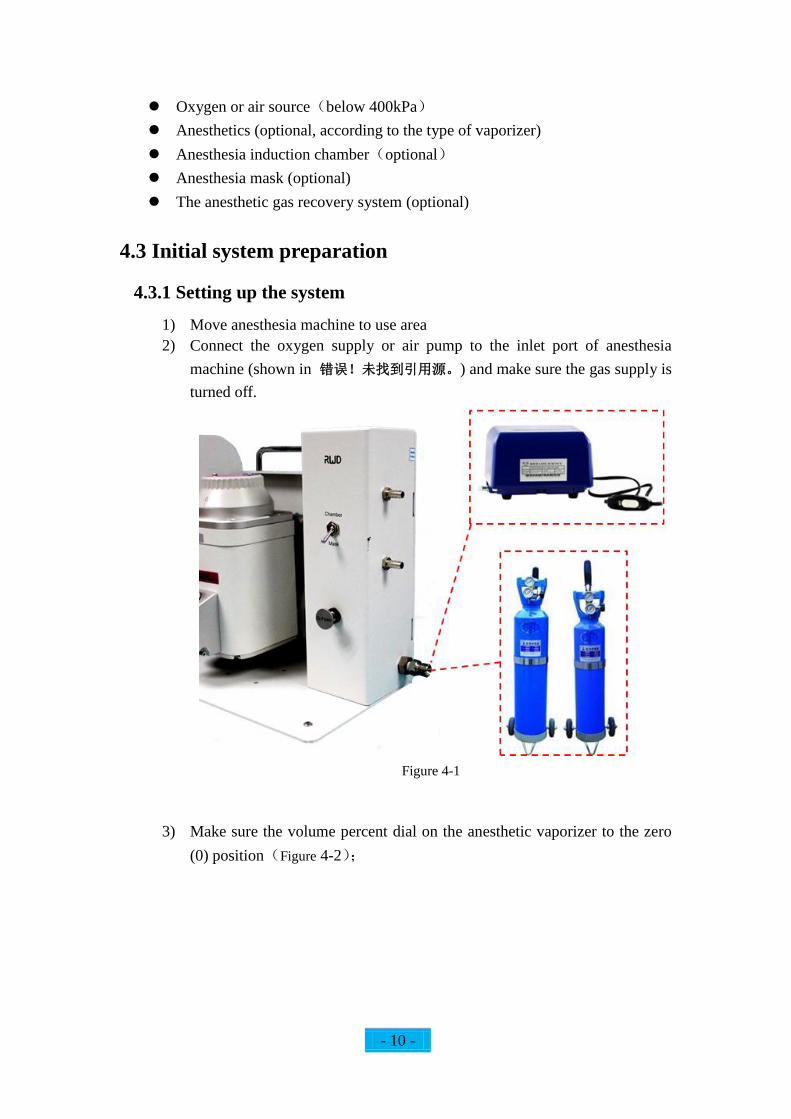
1) Move anesthesia machine to use area
2) Connect the oxygen supply or air pump to the inlet port of anesthesia
machine (shown in 错误!未找到引用源。) and make sure the gas supply is
turned off.
Figure 4-1
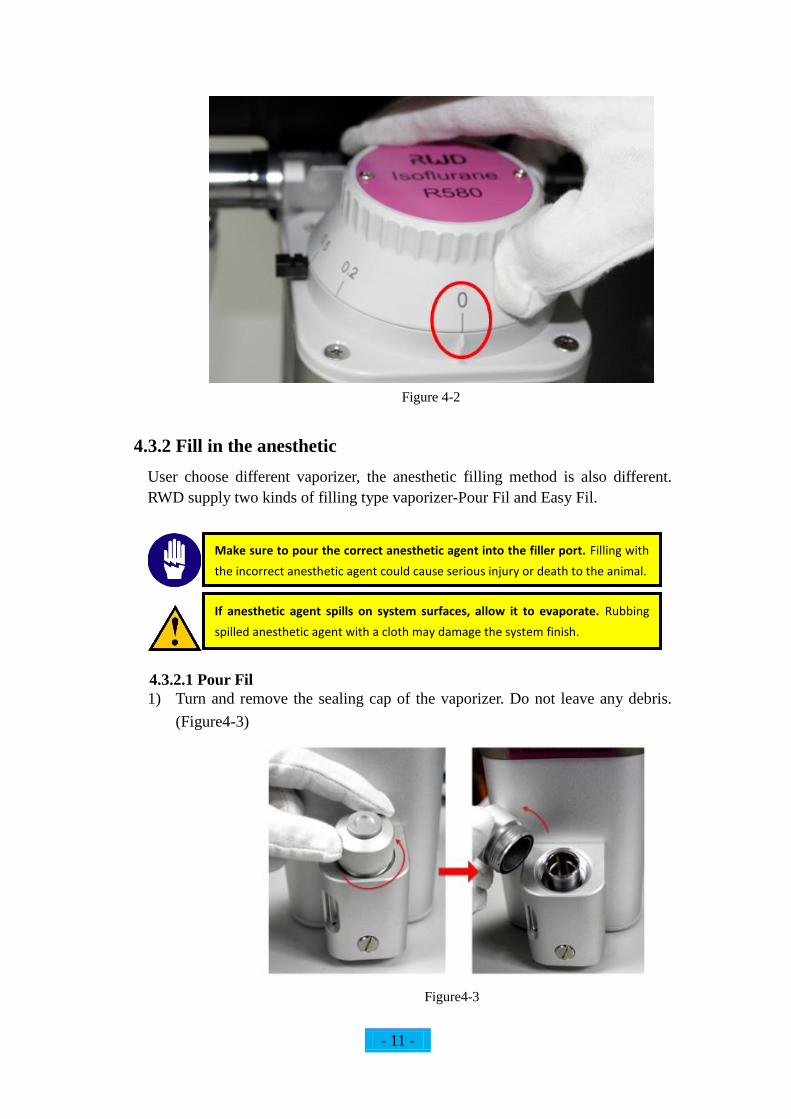
3) Make sure the volume percent dial on the anesthetic vaporizer to the zero
(0) position(Figure 4-2);
- 11 -
Figure 4-2
4.3.2 Fill in the anesthetic
User choose different vaporizer, the anesthetic filling method is also different.
RWD supply two kinds of filling type vaporizer-Pour Fil and Easy Fil.
4.3.2.1 Pour Fil
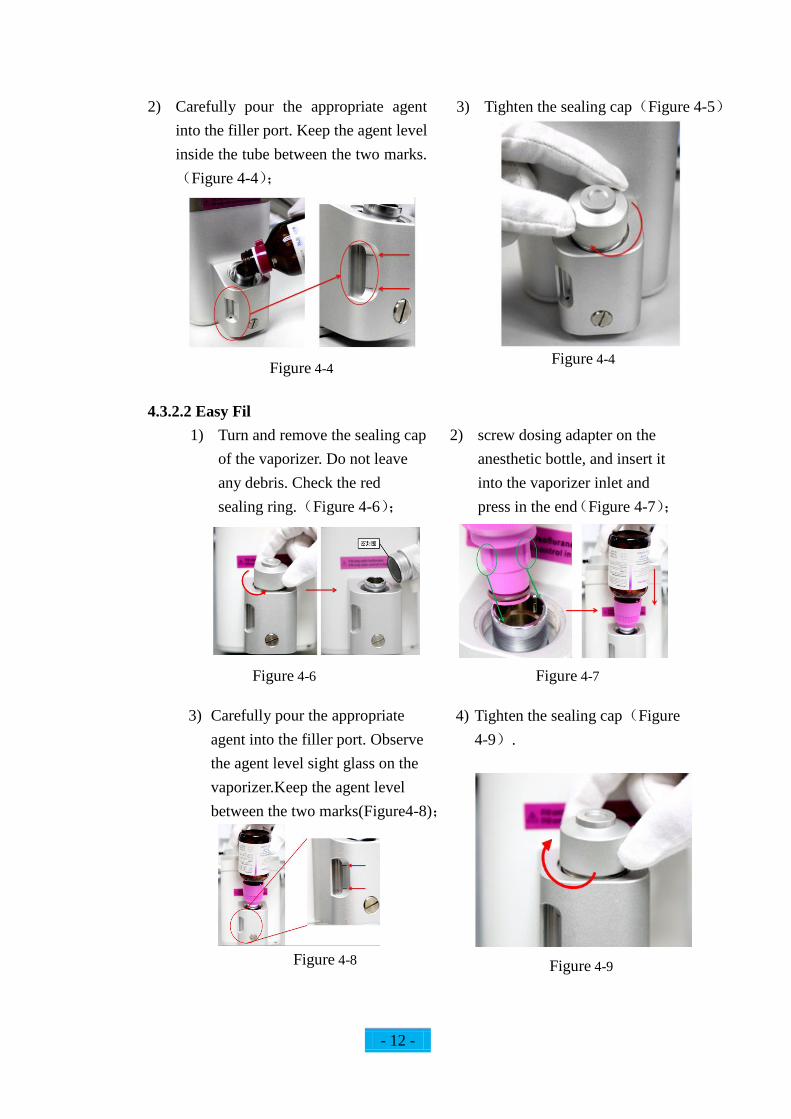
1) Turn and remove the sealing cap of the vaporizer. Do not leave any debris.
(Figure4-3)
Figure4-3
If anesthetic agent spills on system surfaces, allow it to evaporate. Rubbing
spilled anesthetic agent with a cloth may damage the system finish.
Make sure to pour the correct anesthetic agent into the filler port. Filling with
the incorrect anesthetic agent could cause serious injury or death to the animal.
- 12 -
2) Carefully pour the appropriate agent
into the filler port. Keep the agent level
inside the tube between the two marks.
(Figure 4-4);
Figure 4-4
3) Tighten the sealing cap(Figure 4-5)
Figure 4-4
4.3.2.2 Easy Fil
1) Turn and remove the sealing cap
of the vaporizer. Do not leave
any debris. Check the red
sealing ring.(Figure 4-6);
Figure 4-6
2) screw dosing adapter on the
anesthetic bottle, and insert it
into the vaporizer inlet and
press in the end(Figure 4-7);
Figure 4-7
3) Carefully pour the appropriate
agent into the filler port. Observe
the agent level sight glass on the
vaporizer.Keep the agent level
between the two marks(Figure4-8);
Figure 4-8
4) Tighten the sealing cap(Figure
4-9).
Figure 4-9
- 13 -
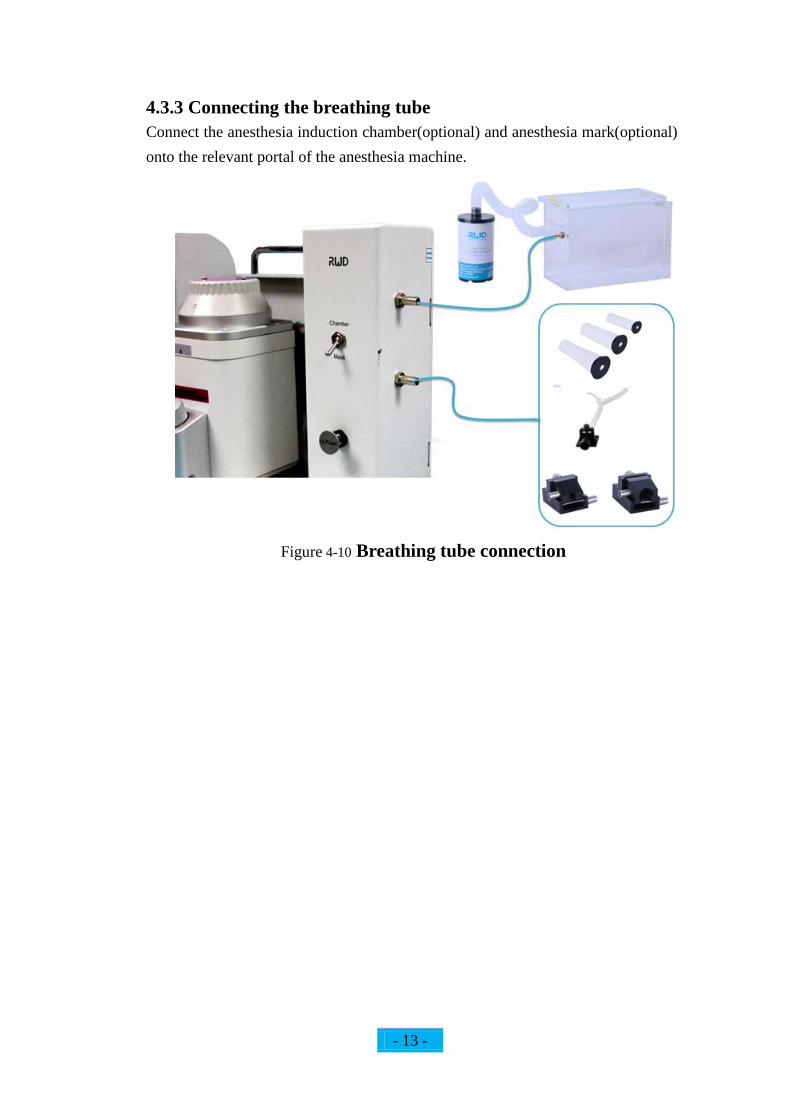
4.3.3 Connecting the breathing tube
Connect the anesthesia induction chamber(optional) and anesthesia mark(optional)
onto the relevant portal of the anesthesia machine.
Figure 4-10 Breathing tube connection
- 14 -
5- Operation
5.1 Overview
This section introduces how to use the R540 enhanced animal anesthesia machine
to handle animal anesthesia experiments after the preparation works.
5.2 Pre-use checkout
RWD recommend you to check below items before using R540 enhanced animal
anesthesia machine to ensure the stability of the equipment.
Ensure anesthetic agent is filled into the vaporizer.
Make sure the vaporizer volume-percent dial is set to zero (0).
Ensure the oxygen source or air pump is connected with anesthesia system
closely.
Ensure the pressure of air supply is below 400 kPa and it is enough during the
complete experiment.
Make sure the O2 control valve functions normally.
Confirm that the breathing circuit is clear and clean and check the ventilation
and cleanliness of the experimental environment.
5.3 Anesthesia procedures
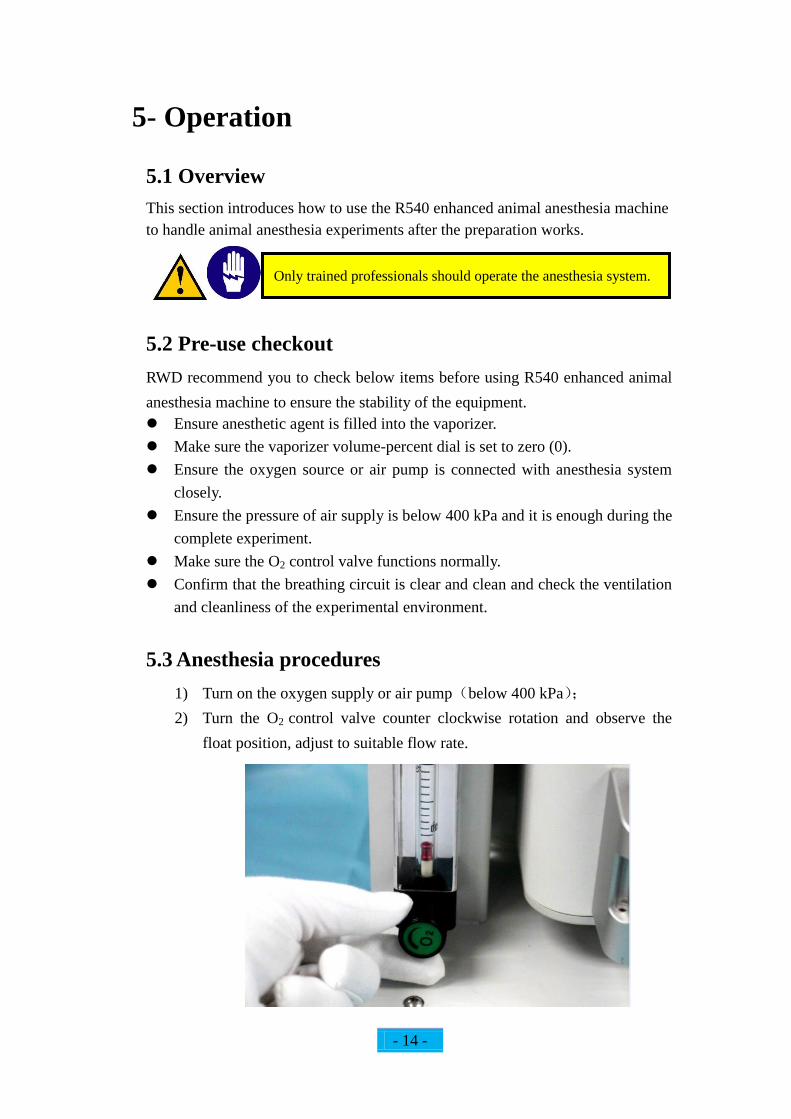
1) Turn on the oxygen supply or air pump(below 400 kPa);
2) Turn the O2 control valve counter clockwise rotation and observe the
float position, adjust to suitable flow rate.
Only trained professionals should operate the anesthesia system.
- 15 -
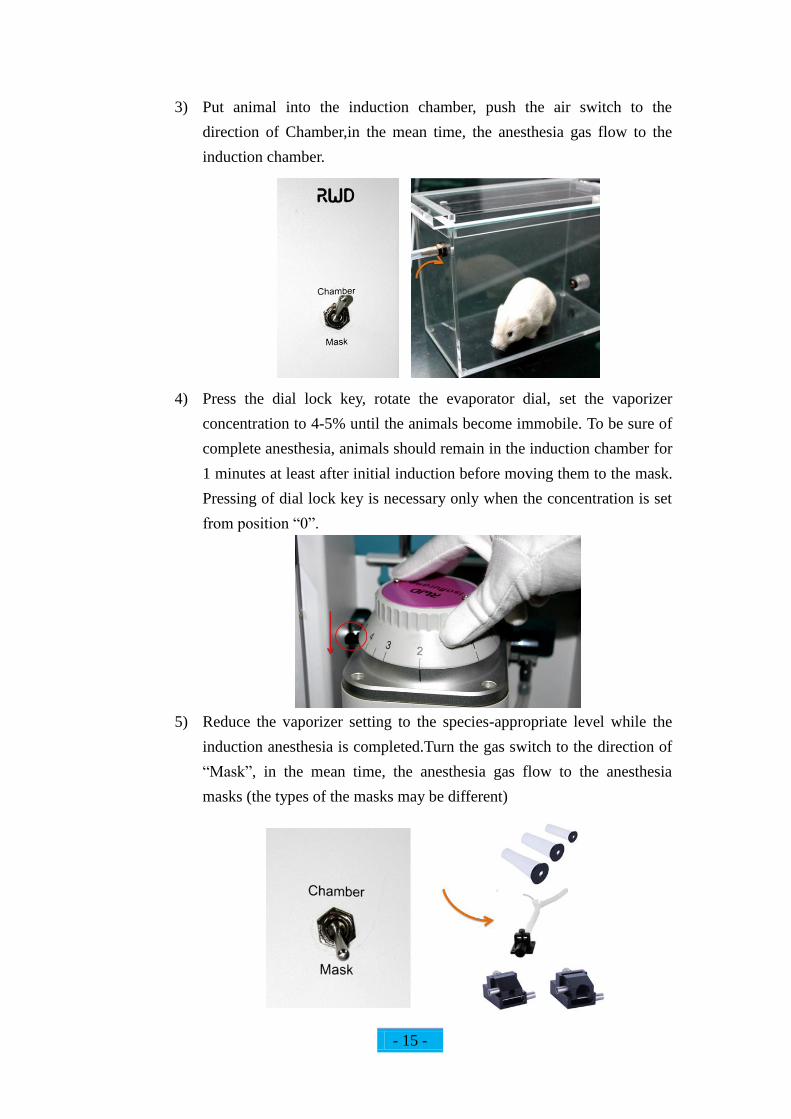
3) Put animal into the induction chamber, push the air switch to the
direction of Chamber,in the mean time, the anesthesia gas flow to the
induction chamber.
4) Press the dial lock key, rotate the evaporator dial, set the vaporizer
concentration to 4-5% until the animals become immobile. To be sure of
complete anesthesia, animals should remain in the induction chamber for
1 minutes at least after initial induction before moving them to the mask.
Pressing of dial lock key is necessary only when the concentration is set
from position “0”.
5) Reduce the vaporizer setting to the species-appropriate level while the
induction anesthesia is completed.Turn the gas switch to the direction of
“Mask”, in the mean time, the anesthesia gas flow to the anesthesia
masks (the types of the masks may be different)
- 16 -
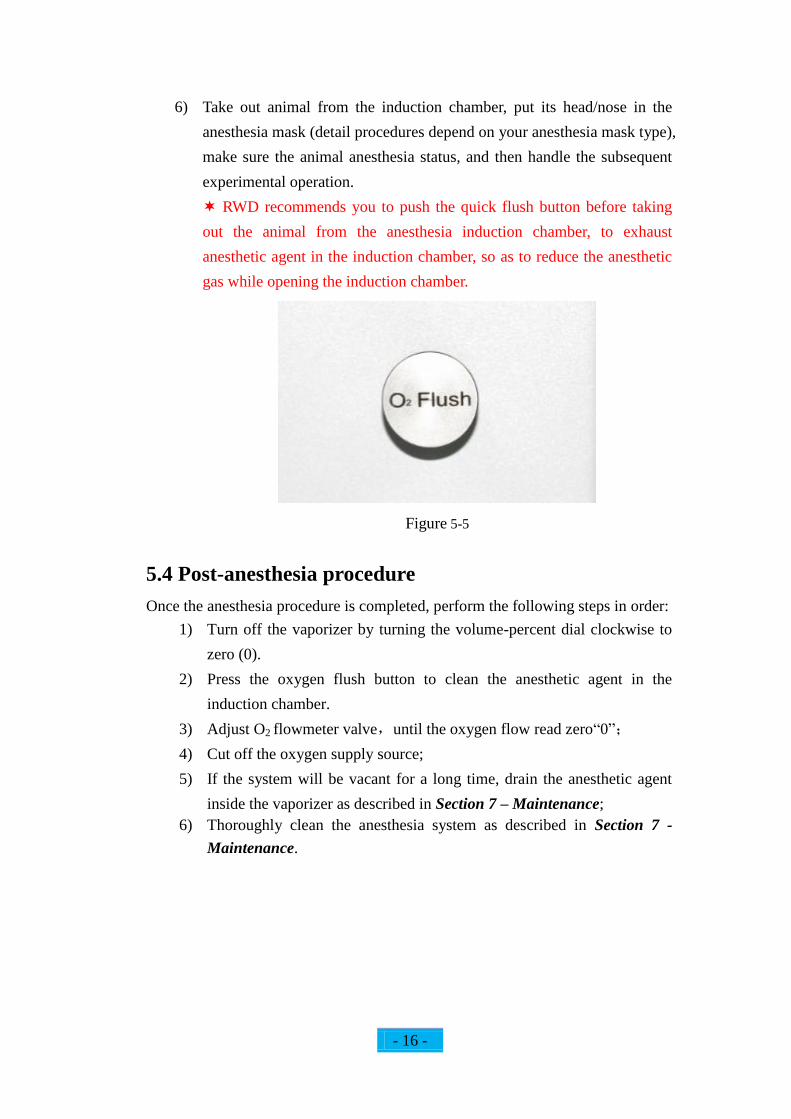
6) Take out animal from the induction chamber, put its head/nose in the
anesthesia mask (detail procedures depend on your anesthesia mask type),
make sure the animal anesthesia status, and then handle the subsequent
experimental operation.
RWD recommends you to push the quick flush button before taking
out the animal from the anesthesia induction chamber, to exhaust
anesthetic agent in the induction chamber, so as to reduce the anesthetic
gas while opening the induction chamber.
Figure 5-5
5.4 Post-anesthesia procedure
Once the anesthesia procedure is completed, perform the following steps in order:
1) Turn off the vaporizer by turning the volume-percent dial clockwise to
zero (0).
2) Press the oxygen flush button to clean the anesthetic agent in the
induction chamber.
3) Adjust O2 flowmeter valve,until the oxygen flow read zero“0”;
4) Cut off the oxygen supply source;
5) If the system will be vacant for a long time, drain the anesthetic agent
inside the vaporizer as described in Section 7 – Maintenance;
6) Thoroughly clean the anesthesia system as described in Section 7 -
Maintenance.
- 17 -
6 Troubleshooting
6.1 Overview
This section will help you determine the origin of common problems/alarms you
may experience with your R500 series Anesthesia System and recommended
corrective actions. If you experience problems not listed in this section, or
continue experiencing the problem after trying the suggested corrective actions,
please contact RWD or your local dealer for support.
6.2 Safety
Some troubleshooting procedures may involve the use of hazardous materials and
contact with biological hazards. Always follow all applicable local regulations
and the material manufacturer’s Material Safety Data Sheet (MSDS)
recommendations. During the procedure, basic personal protective is necessary,
such as wearing gloves, mask and eye protection.
6.3 Machine status
Unless otherwise specified, the anesthesia system may be connected to gas
supplies during the performance of the troubleshooting procedures described in
this manual. Make sure the gas supplies and vaporizer are turned off before the
procedure.
6.4 Record keeping
A record of problems and their resolution should be kept. Such records should
include the date, the nature of the problem encountered, and the actions that
resolved the problem.
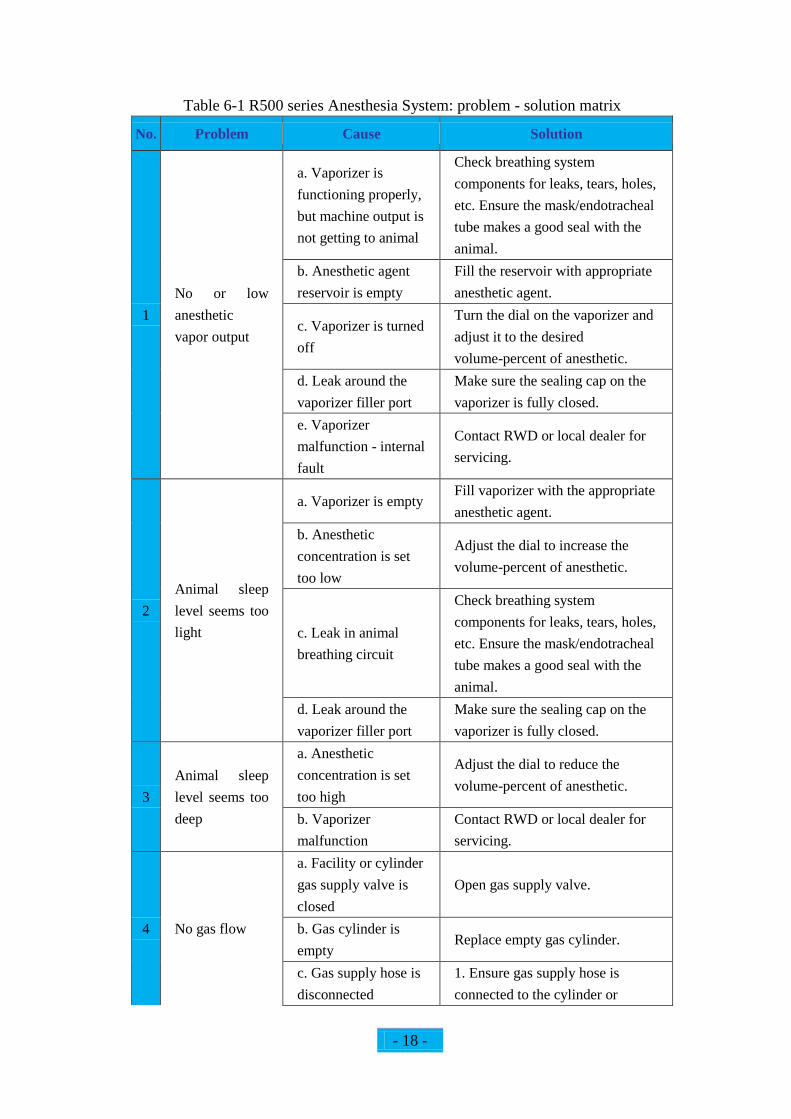
6.5 Problem – Solution matrix
Table 6-1 contains problems that may occur during operation of your R500 series
Anesthesia System and their corrective actions. If you continue experiencing a
problem after trying the suggested corrective actions, please contact RWD or
local dealer for support.
- 18 -
Table 6-1 R500 series Anesthesia System: problem - solution matrix
No. Problem Cause Solution
1
No or low
anesthetic
vapor output
a. Vaporizer is
functioning properly,
but machine output is
not getting to animal
Check breathing system
components for leaks, tears, holes,
etc. Ensure the mask/endotracheal
tube makes a good seal with the
animal.
b. Anesthetic agent
reservoir is empty
Fill the reservoir with appropriate
anesthetic agent.
c. Vaporizer is turned
off
Turn the dial on the vaporizer and
adjust it to the desired
volume-percent of anesthetic.
d. Leak around the
vaporizer filler port
Make sure the sealing cap on the
vaporizer is fully closed.
e. Vaporizer
malfunction - internal
fault
Contact RWD or local dealer for
servicing.
2
Animal sleep
level seems too
light
a. Vaporizer is empty Fill vaporizer with the appropriate
anesthetic agent.
b. Anesthetic
concentration is set
too low
Adjust the dial to increase the
volume-percent of anesthetic.
c. Leak in animal
breathing circuit
Check breathing system
components for leaks, tears, holes,
etc. Ensure the mask/endotracheal
tube makes a good seal with the
animal.
d. Leak around the
vaporizer filler port
Make sure the sealing cap on the
vaporizer is fully closed.
3
Animal sleep
level seems too
deep
a. Anesthetic
concentration is set
too high
Adjust the dial to reduce the
volume-percent of anesthetic.
b. Vaporizer
malfunction
Contact RWD or local dealer for
servicing.
4 No gas flow
a. Facility or cylinder
gas supply valve is
closed
Open gas supply valve.
b. Gas cylinder is
empty Replace empty gas cylinder.
c. Gas supply hose is
disconnected
1. Ensure gas supply hose is
connected to the cylinder or
- 19 -
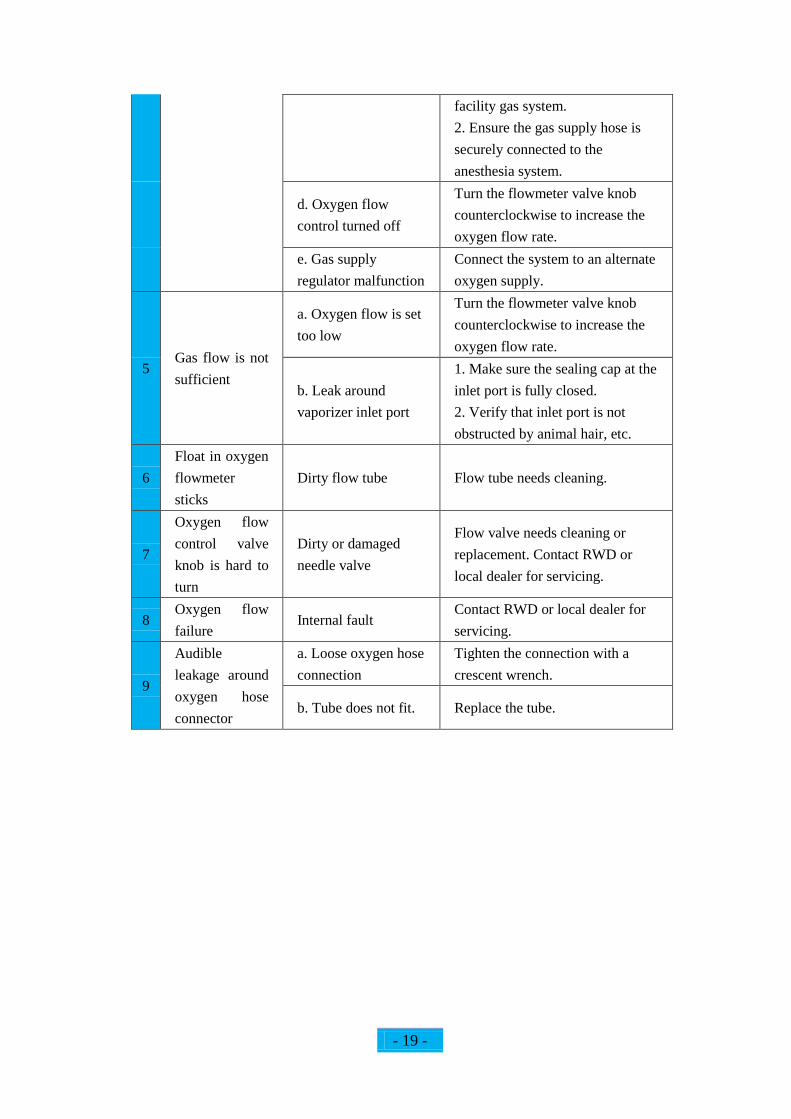
facility gas system.
2. Ensure the gas supply hose is
securely connected to the
anesthesia system.
d. Oxygen flow
control turned off
Turn the flowmeter valve knob
counterclockwise to increase the
oxygen flow rate.
e. Gas supply
regulator malfunction
Connect the system to an alternate
oxygen supply.
5 Gas flow is not
sufficient
a. Oxygen flow is set
too low
Turn the flowmeter valve knob
counterclockwise to increase the
oxygen flow rate.
b. Leak around
vaporizer inlet port
1. Make sure the sealing cap at the
inlet port is fully closed.
2. Verify that inlet port is not
obstructed by animal hair, etc.
6
Float in oxygen
flowmeter
sticks
Dirty flow tube Flow tube needs cleaning.
7
Oxygen flow
control valve
knob is hard to
turn
Dirty or damaged
needle valve
Flow valve needs cleaning or
replacement. Contact RWD or
local dealer for servicing.
8 Oxygen flow
failure Internal fault
Contact RWD or local dealer for
servicing.
9
Audible
leakage around
oxygen hose
connector
a. Loose oxygen hose
connection
Tighten the connection with a
crescent wrench.
b. Tube does not fit. Replace the tube.
- 20 -
7 Maintenance
7.1 Overview
This section provides the maintenance procedures to keep your R500 series
Anesthesia System in good operating condition.
7.2 Safety
Some maintenance procedures may involve the use of hazardous materials and
contact with biological hazards. Always follow all applicable local regulations and
the material manufacturer’s Material Safety Data Sheet (MSDS) recommendations.
During the procedure, basic personal protective is necessary, such as wearing
gloves, mask and eye protection.
7.3 Annual inspection
RWD recommends that your R500 series Anesthesia System be inspected annually
for proper function. Contact RWD or your local dealer for service.
7.4 Machine status
Unless otherwise specified, the anesthesia system may be connected to gas supplies
during the performance of the maintenance procedures described in this manual.
However, make sure the oxygen supply is OFF and the vaporizer is set to zero
volume-percent.
7.5 Record keeping
A record of system service and maintenance should be kept. Such records should
include service and maintenance dates, part numbers of any replaced parts, dates
when consumables are replenished, and other pertinent data.
7.6 Parts and materials
Contact RWD or your local dealer if parts or materials are needed during the
maintenance.
- 21 -
7.7 Cleaning the equipment
7.7.1 Required materials and supplies
Germicidal cleaner
Water and clean cloth
Personal Protective Equipment (masks, eye protection, gloves, etc.)
7.7.2 Weekly maintenance
Wipe all surfaces of the system with a cloth dampened with germicidal
cleaning solution.
Remove hair, dust, and debris from all vaporizer surfaces; especially around
the volume-percent dial and the anesthetic fill port.
Check the weight of gas filter canister, replace it if more than 1000 g.
Perform a pre-use checkout as specified in Section 5 - Operation.
Check the cleanliness of the oxygen supply.
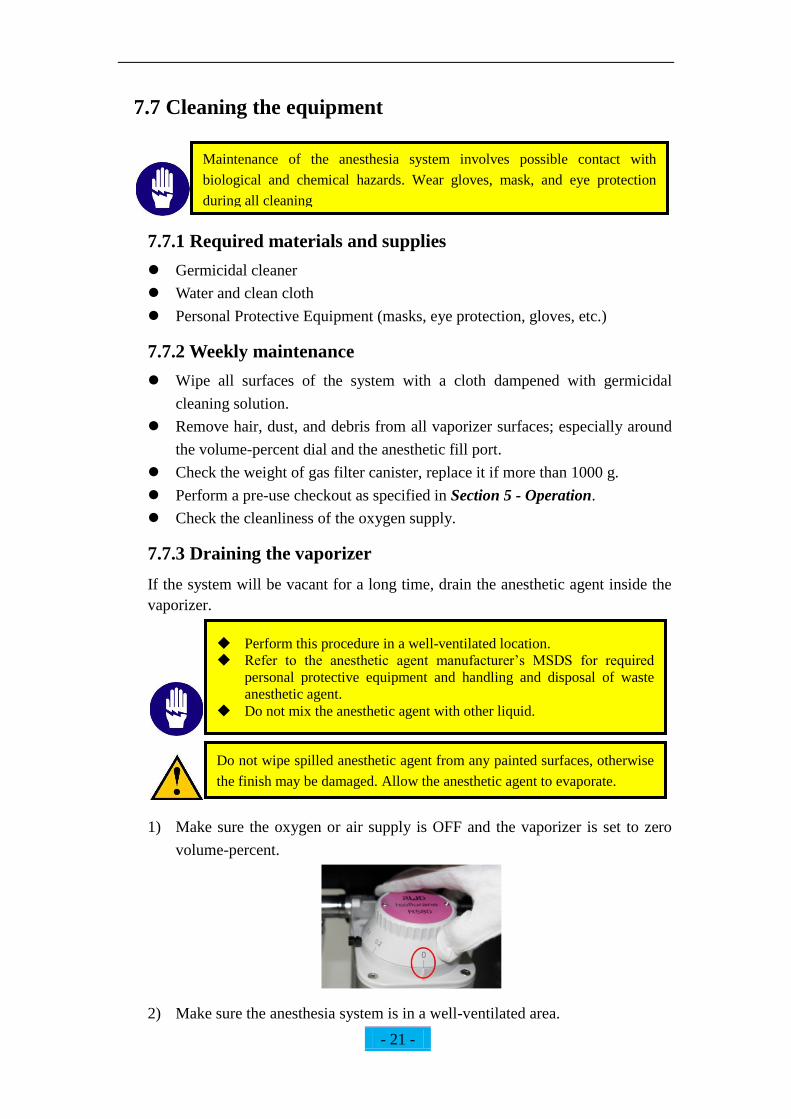
7.7.3 Draining the vaporizer
If the system will be vacant for a long time, drain the anesthetic agent inside the
vaporizer.
1) Make sure the oxygen or air supply is OFF and the vaporizer is set to zero
volume-percent.
2) Make sure the anesthesia system is in a well-ventilated area.
Do not wipe spilled anesthetic agent from any painted surfaces, otherwise
the finish may be damaged. Allow the anesthetic agent to evaporate.
Perform this procedure in a well-ventilated location.
Refer to the anesthetic agent manufacturer’s MSDS for required
personal protective equipment and handling and disposal of waste
anesthetic agent.
Do not mix the anesthetic agent with other liquid.
Maintenance of the anesthesia system involves possible contact with
biological and chemical hazards. Wear gloves, mask, and eye protection
during all cleaning
procedures.
- 22 -
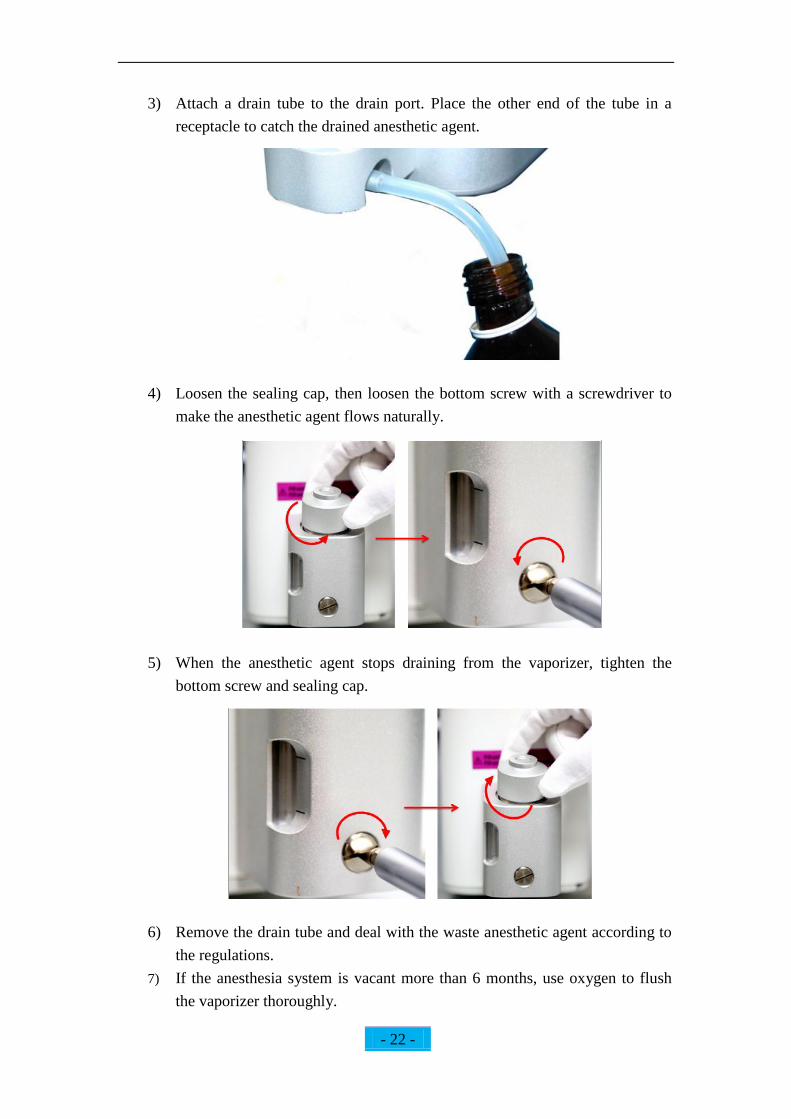
3) Attach a drain tube to the drain port. Place the other end of the tube in a
receptacle to catch the drained anesthetic agent.
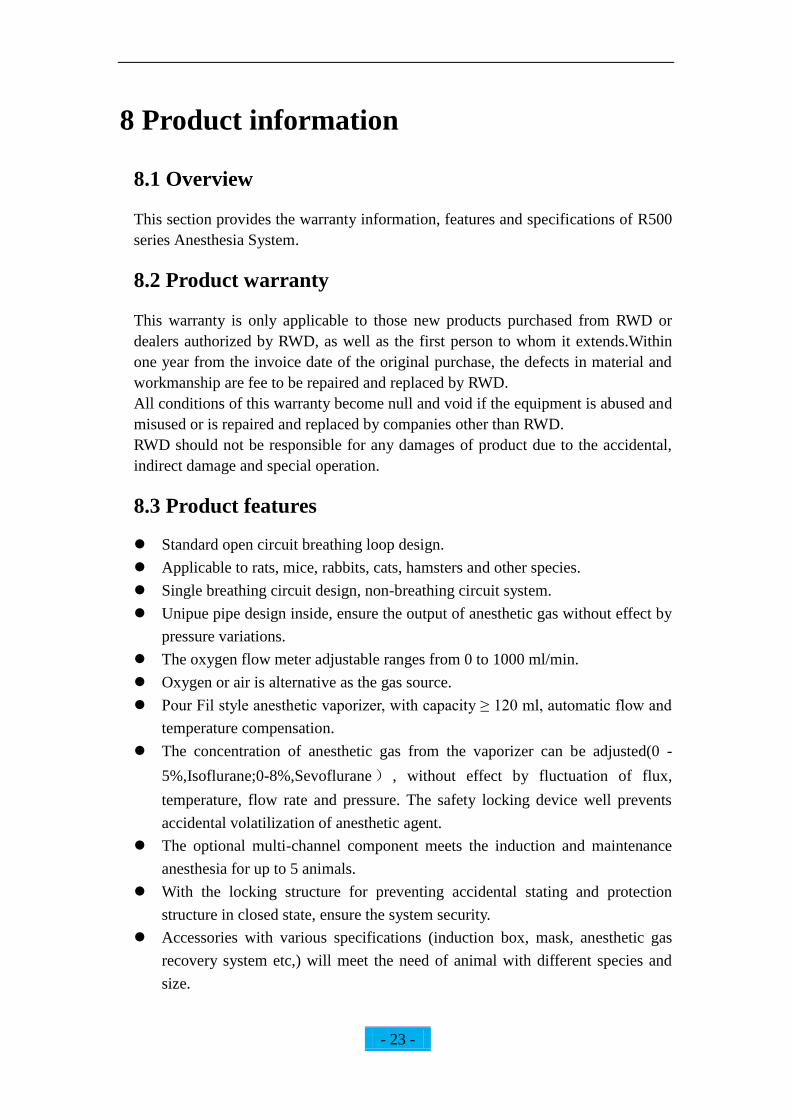
4) Loosen the sealing cap, then loosen the bottom screw with a screwdriver to
make the anesthetic agent flows naturally.
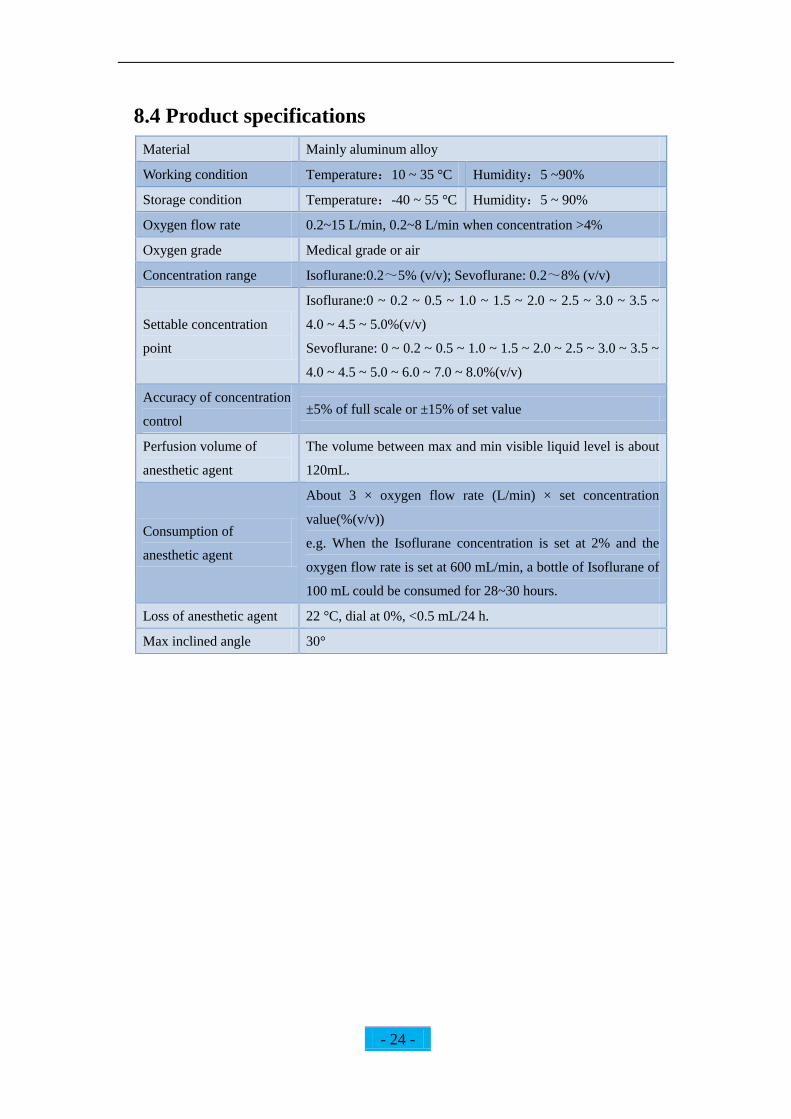
5) When the anesthetic agent stops draining from the vaporizer, tighten the
bottom screw and sealing cap.
6) Remove the drain tube and deal with the waste anesthetic agent according to
the regulations.
7) If the anesthesia system is vacant more than 6 months, use oxygen to flush
the vaporizer thoroughly.
- 23 -
8 Product information
8.1 Overview
This section provides the warranty information, features and specifications of R500
series Anesthesia System.
8.2 Product warranty
This warranty is only applicable to those new products purchased from RWD or
dealers authorized by RWD, as well as the first person to whom it extends.Within
one year from the invoice date of the original purchase, the defects in material and
workmanship are fee to be repaired and replaced by RWD.
All conditions of this warranty become null and void if the equipment is abused and
misused or is repaired and replaced by companies other than RWD.
RWD should not be responsible for any damages of product due to the accidental,
indirect damage and special operation.
8.3 Product features
Standard open circuit breathing loop design.
Applicable to rats, mice, rabbits, cats, hamsters and other species.
Single breathing circuit design, non-breathing circuit system.
Unipue pipe design inside, ensure the output of anesthetic gas without effect by
pressure variations.
The oxygen flow meter adjustable ranges from 0 to 1000 ml/min.
Oxygen or air is alternative as the gas source.
Pour Fil style anesthetic vaporizer, with capacity ≥ 120 ml, automatic flow and
temperature compensation.
The concentration of anesthetic gas from the vaporizer can be adjusted(0 -
5%,Isoflurane;0-8%,Sevoflurane) , without effect by fluctuation of flux,
temperature, flow rate and pressure. The safety locking device well prevents
accidental volatilization of anesthetic agent.
The optional multi-channel component meets the induction and maintenance
anesthesia for up to 5 animals.
With the locking structure for preventing accidental stating and protection
structure in closed state, ensure the system security.
Accessories with various specifications (induction box, mask, anesthetic gas
recovery system etc,) will meet the need of animal with different species and
size.
- 24 -
8.4 Product specifications
Material Mainly aluminum alloy
Working condition Temperature:10 ~ 35 °C Humidity:5 ~90%
Storage condition Temperature:-40 ~ 55 °C Humidity:5 ~ 90%
Oxygen flow rate 0.2~15 L/min, 0.2~8 L/min when concentration >4%
Oxygen grade Medical grade or air
Concentration range Isoflurane:0.2~5% (v/v); Sevoflurane: 0.2~8% (v/v)
Settable concentration
point
Isoflurane:0 ~ 0.2 ~ 0.5 ~ 1.0 ~ 1.5 ~ 2.0 ~ 2.5 ~ 3.0 ~ 3.5 ~
4.0 ~ 4.5 ~ 5.0%(v/v)
Sevoflurane: 0 ~ 0.2 ~ 0.5 ~ 1.0 ~ 1.5 ~ 2.0 ~ 2.5 ~ 3.0 ~ 3.5 ~
4.0 ~ 4.5 ~ 5.0 ~ 6.0 ~ 7.0 ~ 8.0%(v/v)
Accuracy of concentration
control ±5% of full scale or ±15% of set value
Perfusion volume of
anesthetic agent
The volume between max and min visible liquid level is about
120mL.
Consumption of
anesthetic agent
About 3 × oxygen flow rate (L/min) × set concentration
value(%(v/v))
e.g. When the Isoflurane concentration is set at 2% and the
oxygen flow rate is set at 600 mL/min, a bottle of Isoflurane of
100 mL could be consumed for 28~30 hours.
Loss of anesthetic agent 22 °C, dial at 0%, <0.5 mL/24 h.
Max inclined angle 30°
- 25 -
9 Useful information
9.1 Overview
This section provides information that may be helpful to the users of R500 series
Anesthesia Systems.
9.2 Pressure equivalents
1 atm = 1033 cmH2O = 760 mmHg = 760 Torr = 1013 mb = 14.7 psi
1 psi = 70.3 cmH2O = 51.7 mmHg = 68.9 mb = 6.9 kPa
1 mmHg = 1.36 cmH2O = 1.33 mb
1 cmH2O = 0.736 mmHg = 0.981 mb
9.3 Pressure unit conversions
Table 9-1 Pressure unit conversions
Unit psi inchH2O kPa millibar cmH2O mmHg
psi 27.680 6.8947 68.947 70.308 51.715
inch H2O 3.6127x10⁻²
0.2491 2.491 2.5400 1.8683
kPa 0.14504 4.0147 10.000 10.1973 7.5006
millibar 0.01450 0.40147 0.100 1.01973 0.75006
cmH2O 1.4223x10⁻²
0.3937 0.09806 0.9806 0.7355
mmHg 1.9337x10⁻²
0.53525 0.13332 1.3332 1.3595


RWD Life Science
Add: 6540 Lusk Blvd, San Diego,CA 92121,USA
Add: No.11 Hi Tech North Rd, Nan Shan Dist., Shenzhen, P.R.China
Tel: 001-858-900-6602 86-755-86111286
Email: [email protected]
Website: www.rwdstco.com


![KD-A645 / KD-R640 / KD-R540 / KD-R440 - Car Audio ...santafeautosound.com/uploads/product-manuals/JVC KD-R540.pdfKD-A645 / KD-R640 / KD-R540 / KD-R440 GET0829-001A [J/JW] ENGLISH ESPAÑOL](https://img.pdfslide.us/doc/110x75/5aaf5da87f8b9a25088d67c4/kd-a645-kd-r640-kd-r540-kd-r440-car-audio-kd-r540pdfkd-a645-kd-r640.jpg)