Embed Size (px)
Citation preview

Kreg Jig ®
www.kregtool.com
Educational Content Online This logo notes further educational videos online at www.kregtool.com to help you with that particular joint or technique.
BookcaseProject Plan
R
You can visit us online for additional resources such as accessories, project plans, product manuals, and more tips and techniques for getting the most out of your Kreg Products.
1/25/83/47/8
11-1/81-1/41-3/81-1/2
KREG JIG® SETTING
In this project all Pocket-Holes will be drilled using the 3/4" settings and 11⁄4"-long Coarse Thread Pocket-Hole Screws will be used.

Materials
Cutting Diagram
SHOPPING LISTQuantity Description2 sheets 4' x 8' - 3⁄4" Hardwood Plywood3 each 1 x 2 - 6'-long Pine2 each 1 x 2 - 4'-long Pine1 each 1 x 4 - 4'-long Pine1 each 1 x 8 - 4'-long Pine1 each 5 1/4" - 6' tall Base Molding*1 each 6' Bed Molding*
PARTS TO CUTPart Qty. Description Length Width Thickness
A 2 Sides 60" 11 1⁄4" 3⁄4"B 4 Shelves 349⁄16"* 101⁄2" 3⁄4"C 2 Face Frame Stiles 60" 11⁄2" 3⁄4"D 2 Shelf Edgebanding 33" 11⁄2" 3⁄4"E 1 Top Rail 331⁄8" 23⁄4" 3⁄4"F 1 Bottom Rail 331⁄8" 71⁄4" 3⁄4"G 1 Top 36" 12" 3⁄4"H 1 Back Panel 60" 349⁄16" 3⁄4"I 2 Edgeband (Top Sides) 131⁄2" 11⁄2" 3⁄4"J 1 Edgeband (Top Front) 39" 11⁄2" 3⁄4"
SHOPPING LISTQuantity Description
100 SML-C125 11⁄4", #7 Coarse, Pocket-Hole Screws1 Bottle of Wood Glue2 Sheets 120-Grit Sandpaper
Paint or Stain of preference
D
BB B
G G G
D
A A
EF F
CC
*Note: We recommend cutting 2 shelves 1/16" shorter for a looser fit on the adjustable shelves
*Note: Optional Pieces. Cut to Dimensions of your choice
B B
B
B
A
A
C D
E F
G
H
IJ
Online: www.kregtool.com | Phone: 800.447.8638 R
You can visit us online for additional resources such as accessories, project plans, product manuals, and more tips and techniques for getting the most out of your Kreg Products.

BUILDING THE BOX5. You’ll start by drilling Pocket-Holes in the top and bottom shelves (Parts ‘B’) and Sides (Parts 'A') using the Kreg Jig settings as shown above. Place 3 Pocket-Holes on the ends and 5 along the side of the shelves and place two at the top and bottom of each Side piece.Finally, drill a couple of holes in the center approximately where the shelves will be. These holes will be used to attach the Shelves to the Sides and the Face-Frame assembly.
6. Assemble the top and bottom shelves to the sides (Parts 'A') as shown at your desired positions. The Kreg Right Angle Clamp is very helpful in this appication.
Use 11⁄4"-long Pocket-Hole Screws with Coarse Threads
To get some help making face frames, view the SkillBuilder™ section of our media center on "Kreg Joinery™ for 90 Degree Panel Joints"
How to Build it!STEP-BY-STEP
GETTING STARTED1. The first thing to do is cut the pieces for the bookshelf as shown in the Cutting Diagram. Take extra care to ensure that you are cutting to the accurate lengths and making square cuts.
LAYOUT THE FACE-FRAME2. Start by making your Face-Frame, mark your layout for the face-frame (Parts C,E,F) .
3. Once you have your face-frame assembly marked, you can drill Pocket-Holes in your Rails, including the Top and Bottom Rails (Parts 'E,F')
4. With the Pocket-Holes in the 3/4" setting drilled you can assemble your face-frame as shown to the right. Clamping your pieces ensures best success for flush joints.
To get some help making face frames, view the SkillBuilder™ section of our media center on "Kreg Joinery™ for Frames, Facings or Panels"
Use 11⁄4"-long Pocket-Hole Screws with Coarse Threads
CC
F
E
View from back side
A
B
B
A
Pocket-Holes on the top and bottom of the Sides to attach the Face-FrameNote: Keep the holes below the bottom shelf so they will be hidden once assembled
Pocket-Holes on the top, bottom and middle of the Sides to attach the Face-FrameNote: Keep the holes at least 2 1/2" from the top. The Top Rail will hide them when assembled
Attach Shelves flush with front of the Side
Adjustable Shelf Pin HolesAdd prior to step 3 or after.
3/4" spacing allows for the back
Adjustable Shelf Holes:If you know where you want your adjustable shelves, you can drill the holes prior to attaching your top and bottom shelves or after. If you choose to do it before just remember, there needs to be a left and right side so drill accordingly.
Also, the design of the Kreg Shelf Pin Jig allows you to drill your holes last if you prefer.
Tip: When drilling Shelf Pin holes, slow drill strokes make for much cleaner holes and can eliminate the need for sanding.
Refer to the Shelf Pin Jig Instructions for best practices.

B
D
BookshelfProject Plan
MAKING THE TOP13. Drill your Pocket-Holes in the Top (Part 'G') as shown to the right.Spacing is not critical.
14. Now, you can join the edgebanding for the top (Parts 'I', 'J')
15. Next, attach the top to the bookcase assembly with a nail gun or Kreg Screws.
To get some help making face frames, view the SkillBuilder™ section of our media center on "Kreg Joinery™ for Edgejoining"
FINISHING UP16. With the assembly finished you can add the bed molding and the base molding to your bookcase.
17. Finally, you can stain or paint your bookcase as you desire.
Use 11⁄4"-long Pocket-Hole Screws with Coarse Threads
To get some help making face frames, view the SkillBuilder™ section of our media center on "Crown Molding Installation"
G
J
I
I
ADJUSTABLE SHELVES
10. Now, it's time to edgeband the remaining two shelves. Start by drilling Pocket-Holes along the edge of the shelves (Parts 'B') Spacing is not critical but you'll want to stay in at least an inch from each edge.
11. Next, secure the Shelf Edgebanding (Parts 'D') to edge of the shelf.
12. Place your shelf pins and dry fit your shelves.
Visit us online at www.kregtool.com for more plans, tips, and tricks.
To get some help Edgebanding, view the SkillBuilder™ section of our media center on "Kreg Joinery™ for Edgebanding"
ADDING THE FACE-FRAME7. Now, with the top and bottom shelvess joined to the sides you can join the face-frame to the box assembly using the Pocket-Holes you drilled into the front of the shelves. Use 11⁄4"-long Pocket-Hole
Screws with Coarse Threads
B
D
View from bottom
BUILDING THE BOX8. With the face-frame assembled to the sides, you can now drill all of the Pocket-Holes into the back (Part 'H') as shown to the right. Spacing isn't critical.
9. With that done, you now join the back into the shelving and sides assembly. With the bookcase laying face down, place the back into the assembly and drive screws. Use 11⁄4"-long Pocket-Hole Screws with Coarse Threads
H
Note: If you want to flush trim your face frame you can do it now
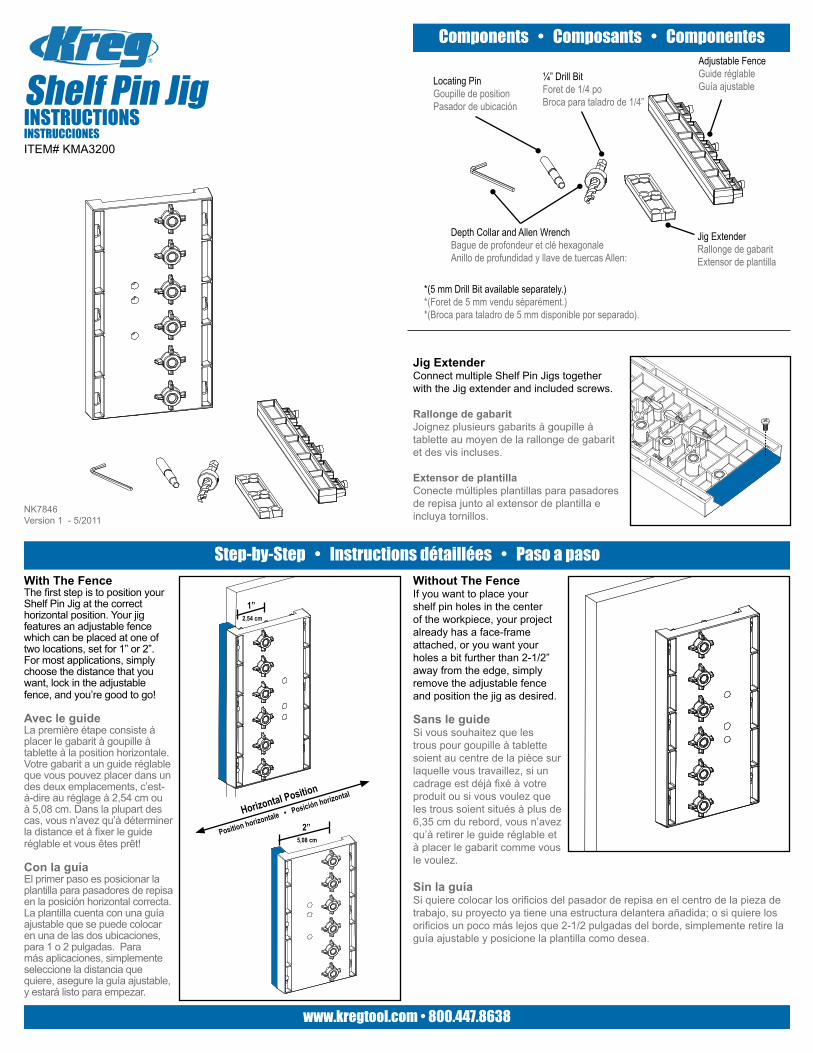
Depth Collar and Allen WrenchBague de profondeur et clé hexagonaleAnillo de profundidad y llave de tuercas Allen:
www.kregtool.com • 800.447.8638
NK7846Version 1 - 5/2011
Shelf Pin JigINSTRUCTIONSITEM# KMA3200
Step-by-Step • Instructions détaillées • Paso a paso
Components • Composants • Componentes
Sans le guideSi vous souhaitez que les trous pour goupille à tablette soient au centre de la pièce sur laquelle vous travaillez, si un cadrage est déjà fixé à votre produit ou si vous voulez que les trous soient situés à plus de 6,35 cm du rebord, vous n’avez qu’à retirer le guide réglable et à placer le gabarit comme vous le voulez.
Sin la guíaSi quiere colocar los orificios del pasador de repisa en el centro de la pieza de trabajo, su proyecto ya tiene una estructura delantera añadida; o si quiere los orificios un poco más lejos que 2-1/2 pulgadas del borde, simplemente retire la guía ajustable y posicione la plantilla como desea.
Jig ExtenderConnect multiple Shelf Pin Jigs together with the Jig extender and included screws.
Rallonge de gabaritJoignez plusieurs gabarits à goupille à tablette au moyen de la rallonge de gabarit et des vis incluses.
Extensor de plantillaConecte múltiples plantillas para pasadores de repisa junto al extensor de plantilla e incluya tornillos.
¼” Drill BitForet de 1/4 poBroca para taladro de 1/4”
Locating PinGoupille de positionPasador de ubicación
With The FenceThe first step is to position your Shelf Pin Jig at the correct horizontal position. Your jig features an adjustable fence which can be placed at one of two locations, set for 1” or 2”. For most applications, simply choose the distance that you want, lock in the adjustable fence, and you’re good to go!
Avec le guideLa première étape consiste à placer le gabarit à goupille à tablette à la position horizontale. Votre gabarit a un guide réglable que vous pouvez placer dans un des deux emplacements, c’est-à-dire au réglage à 2,54 cm ou à 5,08 cm. Dans la plupart des cas, vous n’avez qu’à déterminer la distance et à fixer le guide réglable et vous êtes prêt!
Con la guíaEl primer paso es posicionar la plantilla para pasadores de repisa en la posición horizontal correcta. La plantilla cuenta con una guía ajustable que se puede colocar en una de las dos ubicaciones, para 1 o 2 pulgadas. Para más aplicaciones, simplemente seleccione la distancia que quiere, asegure la guía ajustable, y estará listo para empezar.
Without The FenceIf you want to place your shelf pin holes in the center of the workpiece, your project already has a face-frame attached, or you want your holes a bit further than 2-1/2” away from the edge, simply remove the adjustable fence and position the jig as desired.
Jig ExtenderRallonge de gabaritExtensor de plantilla
Adjustable FenceGuide réglableGuía ajustable
Horizontal Position
*(5 mm Drill Bit available separately.)*(Foret de 5 mm vendu séparément.)*(Broca para taladro de 5 mm disponible por separado).
1”
2”
INSTRUCCIONES
Position horizontale • Posición horizontal
2,54 cm
5,08 cm

Step-by-Step • Instructions détaillées • Paso a paso
Goupille de positionLa bague de profondeur et le gabarit fixés en place, percez la première série de trous. Ensuite, retirez le gabarit et placez la goupille de position dans le trou le plus proche de la prochaine série que vous allez percer. La goupille de position en place, insérez le gabarit à goupille à tablette sur la goupille afin de vous assurer que la prochaine série de trous sera parfaitement alignée avec la première. Fixez de nouveau le gabarit en place et percez la prochaine série de trous.
Pasador de ubicaciónCon el anillo de profundidad asegurado y la plantilla posicionada y asegurada en el lugar, taladre el primer conjunto de orificios. Luego, retire la plantilla y coloque el pasador de ubicación en el orificio más cercano al siguiente conjunto que taladrará. Con el pasador de ubicación en el lugar, deslice la plantilla para pasador de repisa por sobre la plantilla para asegurarse de que el siguiente conjunto de orificios se alineará perfectamente con el primero. Asegure nuevamente la plantilla, y taladre el siguiente conjunto.
Locating PinWith the depth collar locked down and your jig positioned and secured in place, drill your first set of holes. Then, remove the jig, and place the Locating Pin in the hole closest to the next set you’ll be drilling. With the Locating Pin in place, slide the Shelf Pin Jig over the Pin to ensure that your next set of holes will be perfectly aligned with the first. Re-secure the jig, and drill your next set.
Set the DepthIn order to ensure that your holes are drilled proper depth, you must first set the depth collar on the bit. Place the drill bit with the depth collar into its storage slot on the back of the Shelf Pin Jig as shown. Slide the bit until the shoulder of the brad point bit impacts the jig. Then, secure the depth collar in place with the included allen wrench.
Déterminez la profondeurAfin de vous assurer que les trous sont percés à la profondeur appropriée, vous devez d’abord régler la bague de profondeur sur le foret. Placez le foret et la bague de profondeur dans la fente de rangement à l’arrière du gabarit à goupille à tablette comme illustré. Faites glisser le foret jusqu’à ce que l’épaulement de la pointe s’appuie sur le gabarit. Ensuite, fixez la bague de profondeur en place à l’aide de la clé hexagonale incluse.
Ajuste la profundidadPara asegurarse de que los orificios se taladren a la profundidad correcta, primero debe ajustar el anillo de profundidad en la broca. Coloque la broca para taladro con el anillo de profundidad en la ranura de almacenamiento en la parte posterior de la plantilla para pasadores de repisa como se muestra. Deslice la broca hasta que el reborde de la broca de tres puntas impacte con la plantilla. Luego, asegure el anillo de profundidad en el lugar con la llave de tuercas Allen que viene incluida.
Story SticksTo maintain consistent spacing off the bottom of the workpiece, consider using a homemade story stick to rest the jig on while you drill your first set of holes. By resting it on the story stick when starting each set of holes, you’ll ensure consistent vertical spacing on all four corners of each shelf.
Baguette pour reporter les mesuresPour assurer un espacement égal depuis la base de la pièce sur laquelle vous travaillez, vous pouvez utiliser une planche de référence faite maison pour y reporter les mesures et y placer le gabarit lorsque vous percez les premiers trous. En plaçant le gabarit sur la planche chaque fois que vous percez une série de trous, vous assurez un espacement vertical constant aux quatre coins de l’étagère.
GuíasPara mantener un espacio consistente de la parte inferior de la pieza de trabajo, considere utilizar una guía casera para posar la plantilla mientras taladra el primer conjunto de orificios. Al posarla en la guía cuando comienza cada conjunto de orificios, asegurará un espacio vertical consistente en las cuatro esquinas de cada estante.
www.kregtool.com • 800.447.8638
ClampingWith your jig positioned correctly, secure it in place by clamping the jig to your workpiece. If you’re placing holes in the center of the workpiece where your clamp can’t reach, carefully hold it in place with your hand while you drill (next step). With the first hole drilled, use the locating pin to limit the jig’s movement while you drill the next 5 holes.
SerrageEn veillant à placer le gabarit correctement, fixez-le en place en le serrant sur la pièce sur laquelle vous travaillez. Si vous percez des trous au centre de la pièce, au-delà de la portée du serre-joints, tenez le gabarit soigneusement en place avec votre main pendant que vous percez un trou (prochaine étape). Après avoir percé le premier trou, utilisez la goupille de position pour limiter le mouvement du gabarit lorsque vous percerez les cinq trous suivants.
SujeciónCon la plantilla posicionada correctamente, asegurarlo en el lugar sujetando la plantilla a la pieza de trabajo. Si usted coloca orificios en el centro de la pieza de trabajo donde la abrazadera no llega, sostenga cuidadosamente en el lugar con la mano mientras taladra (siguiente paso). Con el primer orificio taladrado, utilice el pasador de ubicación para limitar el movimiento de la plantilla mientras taladra los siguientes 5 orificios.
Vertical Position
Position verticale
Posición vertical