Embed Size (px)
DESCRIPTION
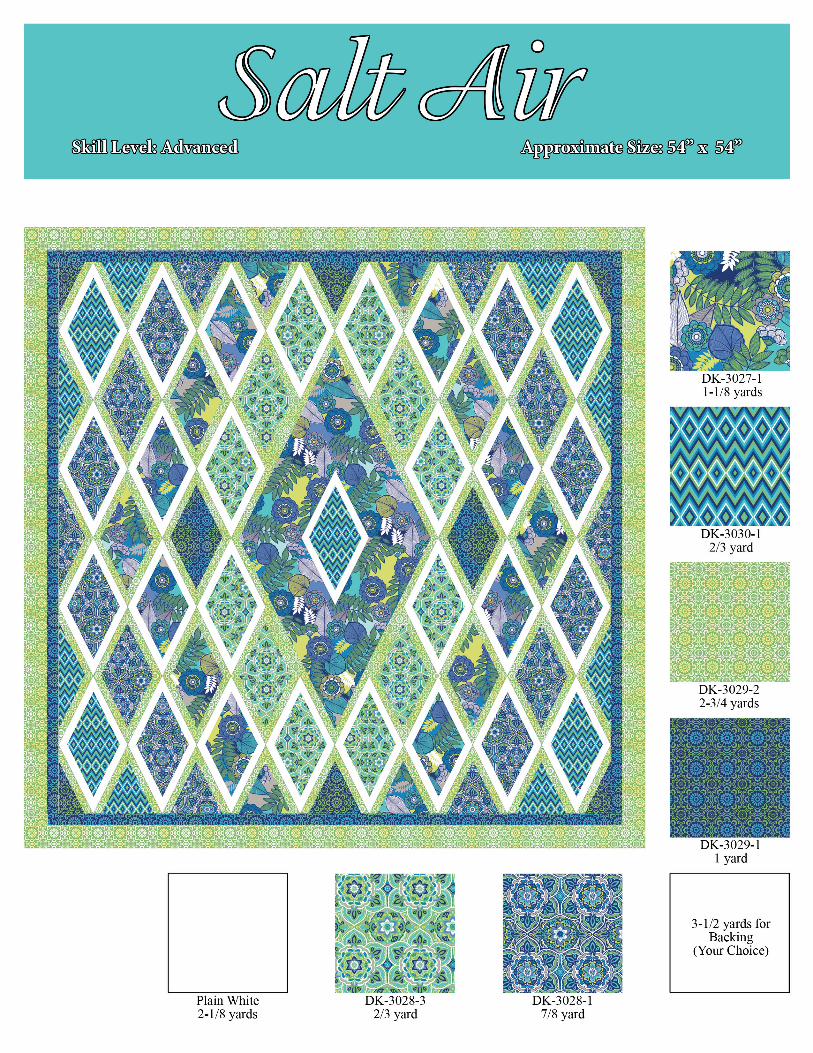
Quilt Pattern: "Salt Air" by David Textiles For advanced quilters.
Citation preview

1 2 3
Border strip length measurements are approximate. Please measure your quilt top before cutting the borders. Use 1/4” seam allowance.
Salt AirQuilt approximate size 54” x 54”
FIG. 2FIG. 1 FIG. 3
FIG. 4 FIG. 5 QUILT LAYOUT
Width/Length of Fabric- WOF/LOF
You will also need:• Fusible Web • Tri Rec Ruler Set (optional)
7) Repeat Step 6 with the 18” x 35 Fabric A rectangle, trim the rectangle to 16 ½” x 33” before drawing and cutting the diamond 8) Repeat Step 6 with the 7” x 12 ½” Fabric G rectangle, trim the rectangle to 6” x 11 ½” before drawing and cutting the diamond.9) Refer to the quilt photo for fabric placement to press the assorted diamonds in the center of each white diamond block. TIP: Fold and press the diamond block in half each way to mark the center lines to use as a guide to position the fusible diamond in place.10) Finish the raw edges of each shape with a decorative stitch such as a buttonhole or satin stitch.11) Refer to the quilt layout to sew four diamond blocks into one column. Repeat to make the 2nd, 3rd, 5th, 6th and 7th columns Sew together four Diamond Blocks and one 12 ½” x 24 ½” Fabric C rectangle to make the 4th column. Sew the columns together to make the quilt top.12) Refer to the quilt photo for fabric placement to press the remaining small diamonds and large diamond in place. Trim outer diamonds even with quilt top edge. Finish the edges of each diamond with a decorative stitch.13) Sew one 1 ½” x 48 ½” Fabric D strip to each side of the quilt top. Sew one 1 ½” x 50 ½” Fabric D strip to the top and bottom of the quilt top.14) Sew one 2 ½” x 50 ½” Fabric C strip to each side of the quilt top. Sew one 2 ½” x 54 ½” Fabric C strip to the top and bottom of the quilt top.15) Layer, quilt and bind as desired.
Fabric A-Salt Air-Blue 1 1/8 yards of DK-3027-4C-1 • Cut one 18” x 35” rectangle• Cut eighteen 5” x 10” rectangles
Fabric B-High Tide-Blue/Green 2/3 yard of DK-3030-4C-1• Cut thirteen 5” x 10” rectangles
Fabric C-Salt Medallion- Green 2 3/4 yards of DK-3029-3C-2• Cut one 12 ½” x 24 ½” strip• Cut six 2 ½” x WOF strips. Sew the strips together and cut two 2 ½” x 54 ½” strips and two 2 ½”x 50 ½” strips• Cut fifty-six Template Ones and fifty-six Template Threes
Fabric D-Salt Medallion-Blue 1 1/8 yard of DK-3029-3C-1• Cut eight 5” x 10” rectangles• Cut six 1 ½” x WOF strips. Sew the strips together and cut two 1 ½” x 48 ½” strips and two 1 ½” x 50 ½” strips• Cut six 2 ½” x WOF strips for the binding
Fabric E-Medallion-Blue 7/8 yard of DK-3028-4C-1• Cut eighteen 5” x 10” rectangles
Fabric F- Medallion-Green 2/3 yard of DK-3028-4C-3• Cut twelve 5” x 10” rectangles
Fabric G-Plain White 2 1/8 yards• Cut one 7” x 12 ½” rectangle• Cut fifty-six Template Twos
Backing – Your Choice 3 ½ yards• Cut two 62” x WOF strips. Sew the pieces together and trim to make the 62” x 62” back.
Block Assembly Instructions1) Place one Fabric C- Template One triangle on top of one Fabric G-Template Two triangle, right sides together, aligning the left sides (Fig. 1). Sew the two triangles together along the left side. Press the smaller triangle open.2) Place one Fabric C- Template Three triangle on top of the Fabric G-Template Two triangle, right sides together, aligning the right sides (Fig. 2). Sew the two triangles together along the right side. Press the smaller triangle open to make one CG Unit (Fig. 3). Trim to measure 6 ½” square.
3) Repeat Steps 1 and 2 to make fifty-six CG units total.4) Sew two CG units together to make one diamond block (Fig. 4). Repeat to make twenty-eight diamond blocks total.5) Following the manufacturer’s instructions and press fusible web to the wrong side of each 5” x 10” rectangle. Trim the rectangles to measure 4 ½” x 9” rectangles. 6) Mark the center point on the width and the length of the rectangle on the fusible side. Draw line from the top center point to each side center point and from the bottom center point to each side center to make a diamond (Fig. 5). Cut on the drawn lines to make one diamond. Repeat with the remaining 4 ½” x 9” fusible web backed rectangles.
Quilt Layout without Appliquéd Diamonds