Embed Size (px)
Citation preview
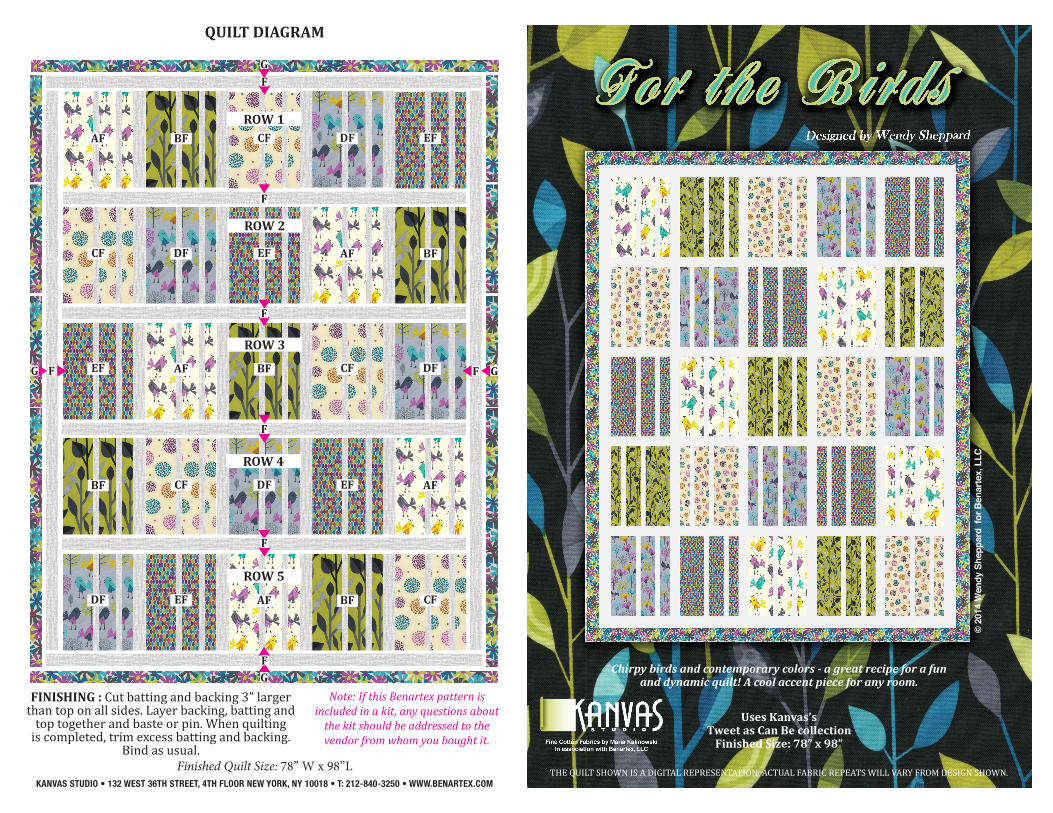
FINISHING : Cut batting and backing 3” larger than top on all sides. Layer backing, batting and
top together and baste or pin. When quilting is completed, trim excess batting and backing.
Bind as usual.Finished Quilt Size: 78” W x 98”L
Note: If this Benartex pattern is included in a kit, any questions about
the kit should be addressed to the vendor from whom you bought it.
KANVAS STUDIO • 132 WEST 36TH STREET, 4TH FLOOR NEW YORK, NY 10018 • T: 212-840-3250 • WWW.BENARTEX.COM
Chirpy birds and contemporary colors - a great recipe for a fun and dynamic quilt! A cool accent piece for any room.
Uses Kanvas’s Tweet as Can Be collection
Finished Size: 78” x 98”
THE QUILT SHOWN IS A DIGITAL REPRESENTATION. ACTUAL FABRIC REPEATS WILL VARY FROM DESIGN SHOWN.
© 20
14 W
endy
She
ppar
d fo
r Ben
arte
x, L
LC
AF BF CF DF EF
CF DF EF AF BF
EF AF BF CF DF
BF CF DF EF AF
DF EF AF BF CF
FG F G
F
G
FG
F
F
F
F
QUILT DIAGRAM
ROW 1
ROW 2
ROW 3
ROW 4
ROW 5

BLOCK ASSEMBLY
1. Arrange and sew the rectangles in the following order from left to right to complete 1 block. Square to 12 ½” x 16 ½”. Make 5 AF Blocks.
1 A (5 1/2” x 16 1/2”) strip.1 F (1 1/2” x 16 1/2”) strip.1 A (3 1/2” x 16 1/2”) strip.1 F (1 1/2” x 16 1/2”) strip.1 A (2 1/2” x 16 1/2”) strip.
A
C
DTweety Pie8047-11Silver
Birdie8045-07Cream
Leaf Circles8044-07Cream
SAMPLE KEY/SKU QTY CUT
B
Linear Leaves8048-44Chartreuse
1 1/8 YDS
1 1/8 YDS
1 1/8 YDS
1 1/8 YDS
(2) 16 ½” x wof strips, subcut (5) 5 ½” x 16 ½” strips (5) 3 ½” x 16 ½” strips (5) 2 ½” x 16 ½” strips
(2) 16 ½” x wof strips, subcut (5) 5 ½” x 16 ½” strips (5) 3 ½” x 16 ½” strips (5) 2 ½” x 16 ½” strips
(2) 16 ½” x wof strips, subcut (5) 5 ½” x 16 ½” strips (5) 3 ½” x 16 ½” strips (5) 2 ½” x 16 ½” strips
(2) 16 ½” x wof strips, subcut (5) 5 ½” x 16 ½” strips (5) 3 ½” x 16 ½” strips (5) 2 ½” x 16 ½” strips
EGeo Leaf8049-07Cream/Multi
1 1/8 YDS
(2) 16 ½” x wof strips, subcut (5) 5 ½” x 16 ½” strips (5) 3 ½” x 16 ½” strips (5) 2 ½” x 16 ½” strips
FBurlap Solid757-01Pewter
3 1/4 YDS
(2) 16 ½” x wof strips, subcut (50) 1 ½” x 16 ½” strips(2) 16 ½” x wof strips, subcut (20) 2 ½” x 16 ½” strips(7) 2 ½” x wof strips*; sashing strips(9) 3” x wof strips*; inner border
GFlower Field8046-07Cream
1 1/2 YDS(9) 3” x wof strips*; outer border(10) 2 ¼” x wof strips*; binding
2. Repeat to make a total of 5 blocks for each colorway:
3. Arrange and sew blocks and (4) F 2 1/2” x 16 1/2” strips in rows as shown in Quilt Diagram.
4. Sew rows and (4) F 2 1/2” x 68 1/2” sashing strips together to complete quilt center.
Border Assembly: MEASURE WIDTH AND LENGTH OF THE QUILT TOP TO ENSURE BORDER SIZES, BELOW ARE OUR CUTTING SIZES.
5. Inner border: Sew (1) F 3” x (88 1/2”) border strip to each side of quilt center. Sew (1) F 3” x (73 1/2”) border strip to the top and bottom of quilt center.
6. Outer border: Sew (1) G 3” x (93 1/2”) border strip to each side of quilt center. Sew (1) G 3” x (78 1/2”) border strip to the top and bottom of quilt center.
A A AF F
AF BF CF DF EF
AF BF CF DF EF
(MAKE 5 EACH)


![[ 15 ] • 877-807-5291 · • Ultra durable batting glove for the elite slowpitch player. • Full Lycra backing to ensure comfortable fit for any sized hand. • Full reinforced](https://img.pdfslide.us/doc/110x75/5fb6ac00ed7f443d3c4b4b84/-15-a-877-807-5291-a-ultra-durable-batting-glove-for-the-elite-slowpitch.jpg)