Embed Size (px)
Citation preview
1
qu
icksta
rt g
uid
e
www.crestron.com 888.273.7876 201.767.3400Specifications subject to change without notice.
Cre
stro
n M
ob
ile a
nd
Cre
stro
n M
ob
ile P
ro
QUICKSTART DOC. 6766C (2023854, Sheet 1 of 2) 02.12
Control Apps for Apple® iPhone® and iPod® touchCrestron Mobile® and Crestron Mobile Pro®
1 Introduction 3 Upload the SIMPL Windows ProgramThe Crestron Mobile® and Crestron Mobile Pro® apps provide a Crestron® touch screen user interface on Apple® iPhone® and iPod® touch devices. Fully integrated with Crestron programming software including SystemBuilder™, VT Pro-e®, and SIMPL Windows software, the Crestron apps are available for download from the iTunes® App StoreSM.
NOTE: It is recommended that an authorized Crestron installer download the Crestron app and configure the iPhone/iPod touch for the customer according to the instructions in this guide. If, however, it is not practical that the download and configuration be performed for the customer, the installer should complete the form at www.crestron.com/crestronmobilesetup. The instructions in this guide will then be e-mailed to the customer to provide assistance with the installation and startup of the Crestron app from the iPhone/iPod touch.
2 Download the Crestron App
Prerequisites:
● Cellular data network (iPhone devices only) or Wi-Fi network that is connected to the Internet. (Refer to http://support.apple.com/kb/HT2031 for Wi-Fi
network information.)
● iTunes Store account. (Refer to http://support.apple.com/kb/HT2731 for information about setting up an account.)
Download the Crestron App from the App Store on the iPhone/iPod touch:
1. On the home screen, tap the App Store icon ( ). The App Store opens.
2. Search for the desired Crestron app (Crestron Mobile or Crestron Mobile Pro):
a. Tap Search.
b. Tap the search field.
c. Enter the following: crestron mobile
d. Tap Search. The Crestron app is listed.
3. Tap the Crestron app, and then follow the prompts to download it.
The Crestron app downloads to the iPhone/iPod touch. The Crestron app icon ( for Crestron Mobile or for Crestron Mobile Pro) appears on the home screen and shows the status of the download and installation.
NOTE: This section provides instructions to download the Crestron app from the App Store that is available on the iPhone/iPod touch. The application is downloaded directly to the device. Alternatively, the application can be downloaded from the App Store using iTunes on a computer. The application is downloaded to the Applications section of the iTunes library and must then be synced to the iPhone/iPod touch. For detailed information, refer to www.apple.com/support/itunes/store/apps.
Upload the SIMPL Windows program to the control system(s):
1. Based on the firmware version of the control system, locate the appropriate sample SIMPL Windows program for the iPhone/iPod touch at www.crestron.com/exampleprograms, and then download the
program to your computer.
2. Modify the program as required (refer to the SIMPL Windows online help for information).
3. Using Crestron Toolbox™, do the following:
a. From the Tools menu, select System Info.
b. In the Address Book drop-down list, select the control system to which you want to connect.
c. Click the Quick function access button ( ), and then select SIMPL Program.
d. Browse for the program, select the program, and then click Open.
e. Click Send.
The “Confirmation” window opens, asking you if you want to overwrite the default IP table of the control system with the default
IP table of the SIMPL Windows program.
f. Click Yes.
g. In the “SIMPL Program” window, click Close.
NOTE: Do not close Crestron Toolbox. You must use Crestron Toolbox in section . 4
4 Upload the VT Pro-e ProjectUpload the VT Pro-e project to the control system(s):
1. Locate the sample VT Pro-e project for the iPhone/iPod touch at www.crestron.com/exampleprograms, and then download it to
your computer.
2. If desired, modify the project or create a new project, and then compile the project.
3. Using Crestron Toolbox, do the following:
a. From the Functions menu of the System Info tool, select Web Pages and Mobility Projects. The “Web Pages and Mobility Projects”
window opens.
b. Verify that Enable Web Server and VT-Pro XPanel Web or Mobility Project are selected.
c. Browse for the project folder, select the folder, and then click OK.
d. In the “Web Pages and Mobility Projects” window, click Send and then click OK.
NOTE: In VT Pro-e, names of the panel types are Crestron Mobile and Crestron Mobile Pro.
NOTE: When used with the free Crestron Mobile app, the VT Pro-e project is limited to about 10 pages; however, the limitation also depends on the complexity of the project (for example, number of buttons, graphics, and so on). If the project is too large, VT Pro-e displays an error message at compile time.
“Web Pages and Mobility Projects” Window
NOTE: Do not close Crestron Toolbox. You must use Crestron Toolbox in section . 5
2
qu
icksta
rt g
uid
e
www.crestron.com 888.273.7876 201.767.3400Specifications subject to change without notice.QUICKSTART DOC. 6766C (2023854, Sheet 1 of 2) 02.12
Control Apps for Apple® iPhone® and iPod® touchCrestron Mobile® and Crestron Mobile Pro®
Cre
stro
n M
ob
ile a
nd
Cre
stro
n M
ob
ile P
ro
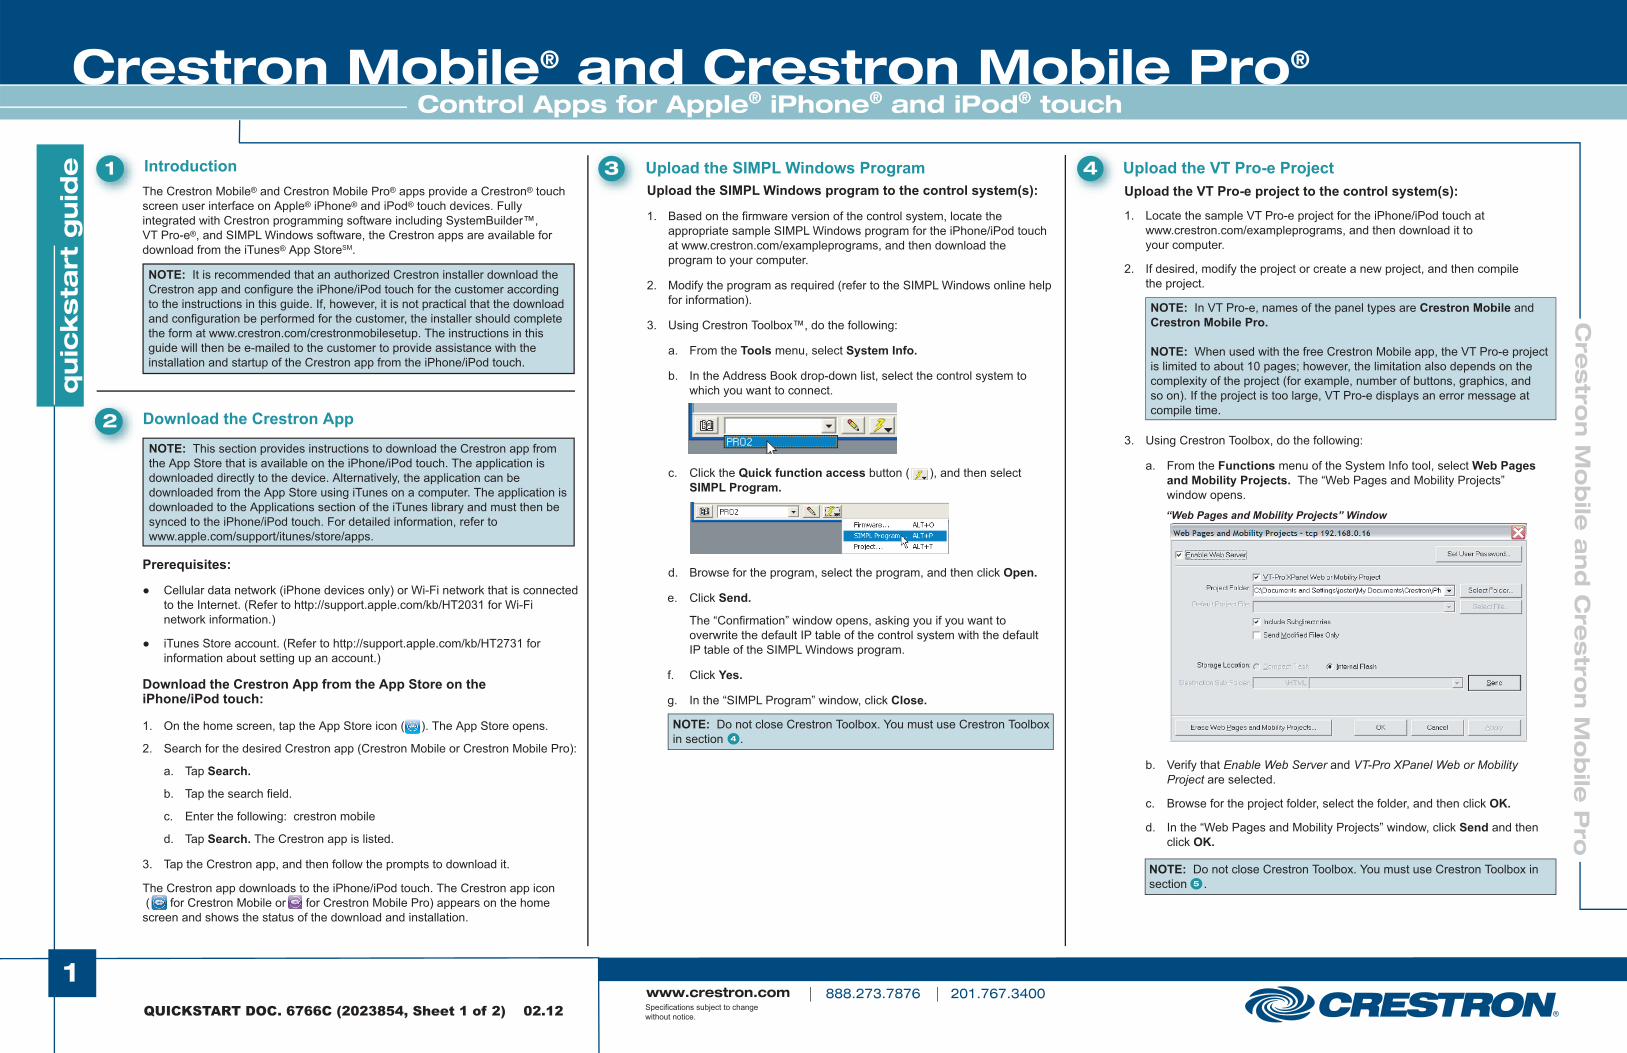
5 Connect the iPhone/iPod touch to the Control System(s) Sample Router Configuration Screen
“Ethernet Addressing” Window
To connect the iPhone/iPod touch to the Crestron control system(s), perform the steps in section or :
● Section : Mobile Solution. Use this solution if the customer requires iPhone/iPod touch access within and also outside of the home network.
● Section : Local Solution. Use this solution if the customer requires iPhone/iPod touch access within the home network only (refer to page 3).
5A 5B
5A
5B
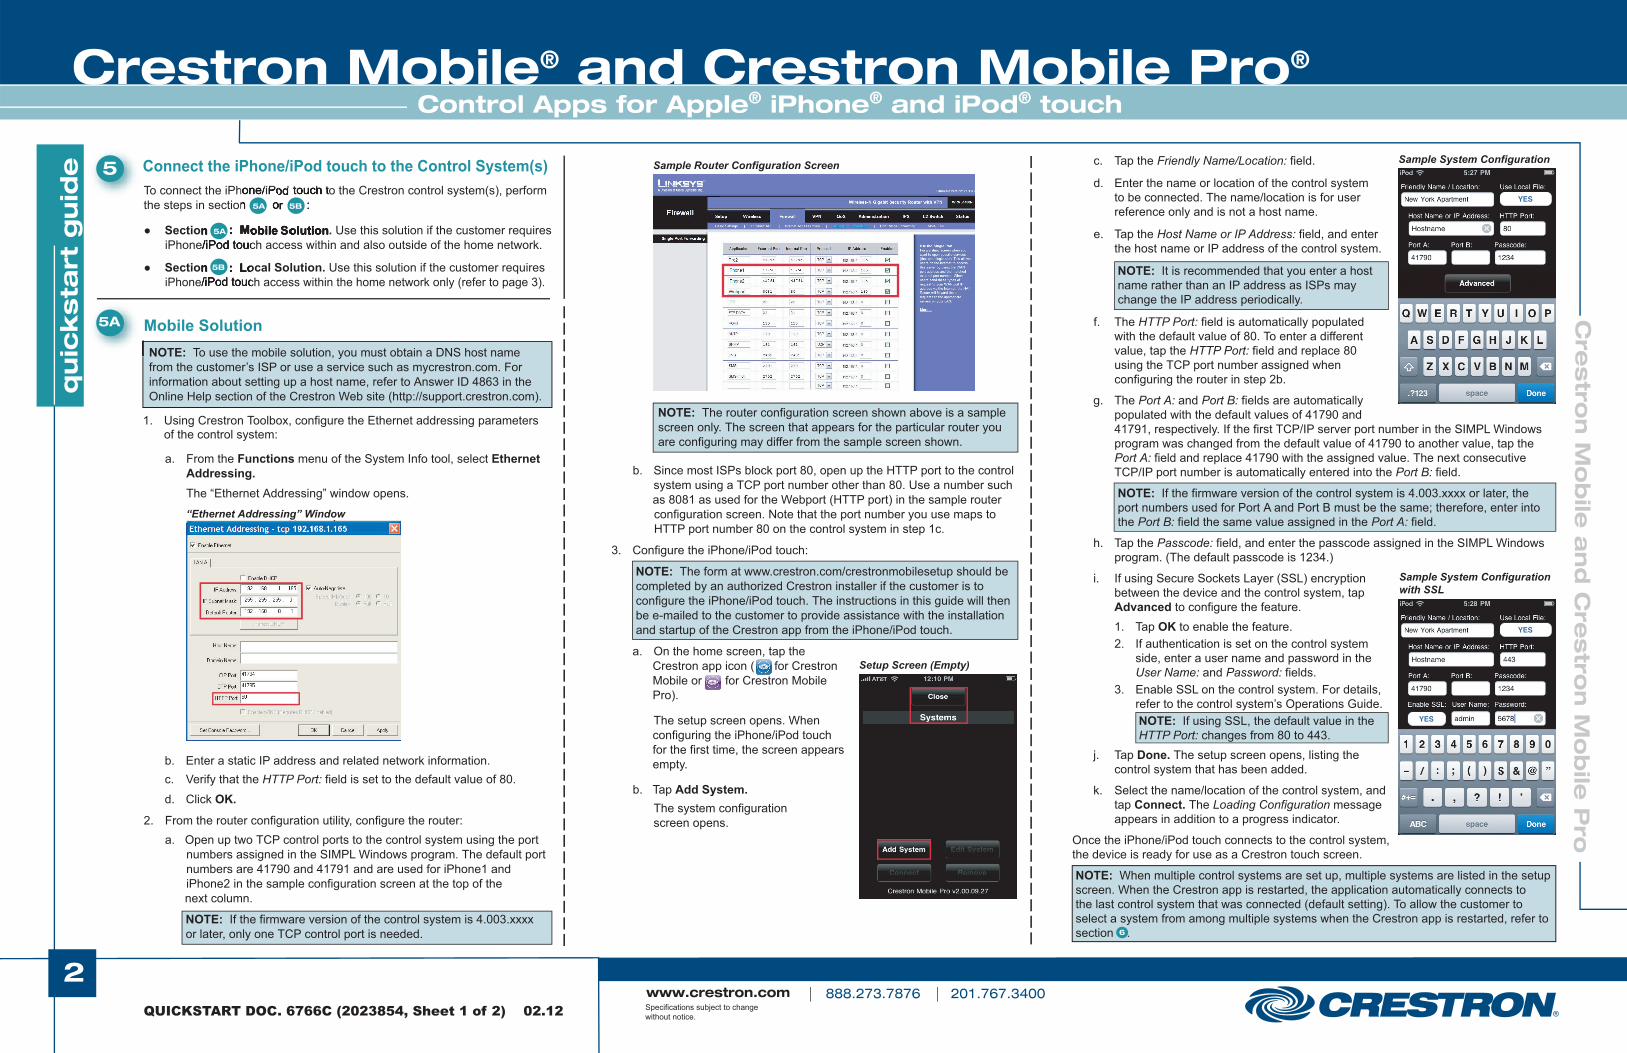
c. Tap the Friendly Name/Location: field.
d. Enter the name or location of the control system to be connected. The name/location is for user reference only and is not a host name.
e. Tap the Host Name or IP Address: field, and enter the host name or IP address of the control system.
NOTE: It is recommended that you enter a host name rather than an IP address as ISPs may change the IP address periodically.
f. The HTTP Port: field is automatically populated with the default value of 80. To enter a different value, tap the HTTP Port: field and replace 80 using the TCP port number assigned when configuring the router in step 2b.
g. The Port A: and Port B: fields are automatically populated with the default values of 41790 and 41791, respectively. If the first TCP/IP server port number in the SIMPL Windows program was changed from the default value of 41790 to another value, tap the Port A: field and replace 41790 with the assigned value. The next consecutive TCP/IP port number is automatically entered into the Port B: field.
NOTE: If the firmware version of the control system is 4.003.xxxx or later, the port numbers used for Port A and Port B must be the same; therefore, enter into the Port B: field the same value assigned in the Port A: field.
h. Tap the Passcode: field, and enter the passcode assigned in the SIMPL Windows program. (The default passcode is 1234.)
i. If using Secure Sockets Layer (SSL) encryption between the device and the control system, tap Advanced to configure the feature. 1. Tap OK to enable the feature. 2. If authentication is set on the control system side, enter a user name and password in the User Name: and Password: fields. 3. Enable SSL on the control system. For details, refer to the control system’s Operations Guide. NOTE: If using SSL, the default value in the HTTP Port: changes from 80 to 443. j. Tap Done. The setup screen opens, listing the control system that has been added.
k. Select the name/location of the control system, and tap Connect. The Loading Configuration message appears in addition to a progress indicator.
Once the iPhone/iPod touch connects to the control system, the device is ready for use as a Crestron touch screen.
NOTE: When multiple control systems are set up, multiple systems are listed in the setup screen. When the Crestron app is restarted, the application automatically connects to the last control system that was connected (default setting). To allow the customer to select a system from among multiple systems when the Crestron app is restarted, refer to section .
b. Since most ISPs block port 80, open up the HTTP port to the control system using a TCP port number other than 80. Use a number such as 8081 as used for the Webport (HTTP port) in the sample router
configuration screen. Note that the port number you use maps to HTTP port number 80 on the control system in step 1c.
3. Configure the iPhone/iPod touch:
NOTE: The form at www.crestron.com/crestronmobilesetup should be completed by an authorized Crestron installer if the customer is to configure the iPhone/iPod touch. The instructions in this guide will then be e-mailed to the customer to provide assistance with the installation and startup of the Crestron app from the iPhone/iPod touch.
a. On the home screen, tap the Crestron app icon ( for Crestron Mobile or for Crestron Mobile Pro).
The setup screen opens. When configuring the iPhone/iPod touch for the first time, the screen appears empty.
b. Tap Add System. The system configuration screen opens.
6
Setup Screen (Empty)
NOTE: To use the mobile solution, you must obtain a DNS host name from the customer’s ISP or use a service such as mycrestron.com. For information about setting up a host name, refer to Answer ID 4863 in the Online Help section of the Crestron Web site (http://support.crestron.com).
Mobile Solution5A
a. From the Functions menu of the System Info tool, select Ethernet Addressing.
The “Ethernet Addressing” window opens.
b. Enter a static IP address and related network information. c. Verify that the HTTP Port: field is set to the default value of 80.
d. Click OK.
2. From the router configuration utility, configure the router: a. Open up two TCP control ports to the control system using the port
numbers assigned in the SIMPL Windows program. The default port numbers are 41790 and 41791 and are used for iPhone1 and iPhone2 in the sample configuration screen at the top of the
next column.
1. Using Crestron Toolbox, configure the Ethernet addressing parameters of the control system:
NOTE: The router configuration screen shown above is a sample screen only. The screen that appears for the particular router you are configuring may differ from the sample screen shown.
NOTE: If the firmware version of the control system is 4.003.xxxx or later, only one TCP control port is needed.
Sample System Configuration
Sample System Configuration with SSL
3
qu
icksta
rt g
uid
e
www.crestron.com 888.273.7876 201.767.3400Specifications subject to change without notice.QUICKSTART DOC. 6766C (2023854, Sheet 2 of 2) 02.12
Control Apps for Apple® iPhone® and iPod® touchCrestron Mobile® and Crestron Mobile Pro®
Cre
stro
n M
ob
ile a
nd
Cre
stro
n M
ob
ile P
ro
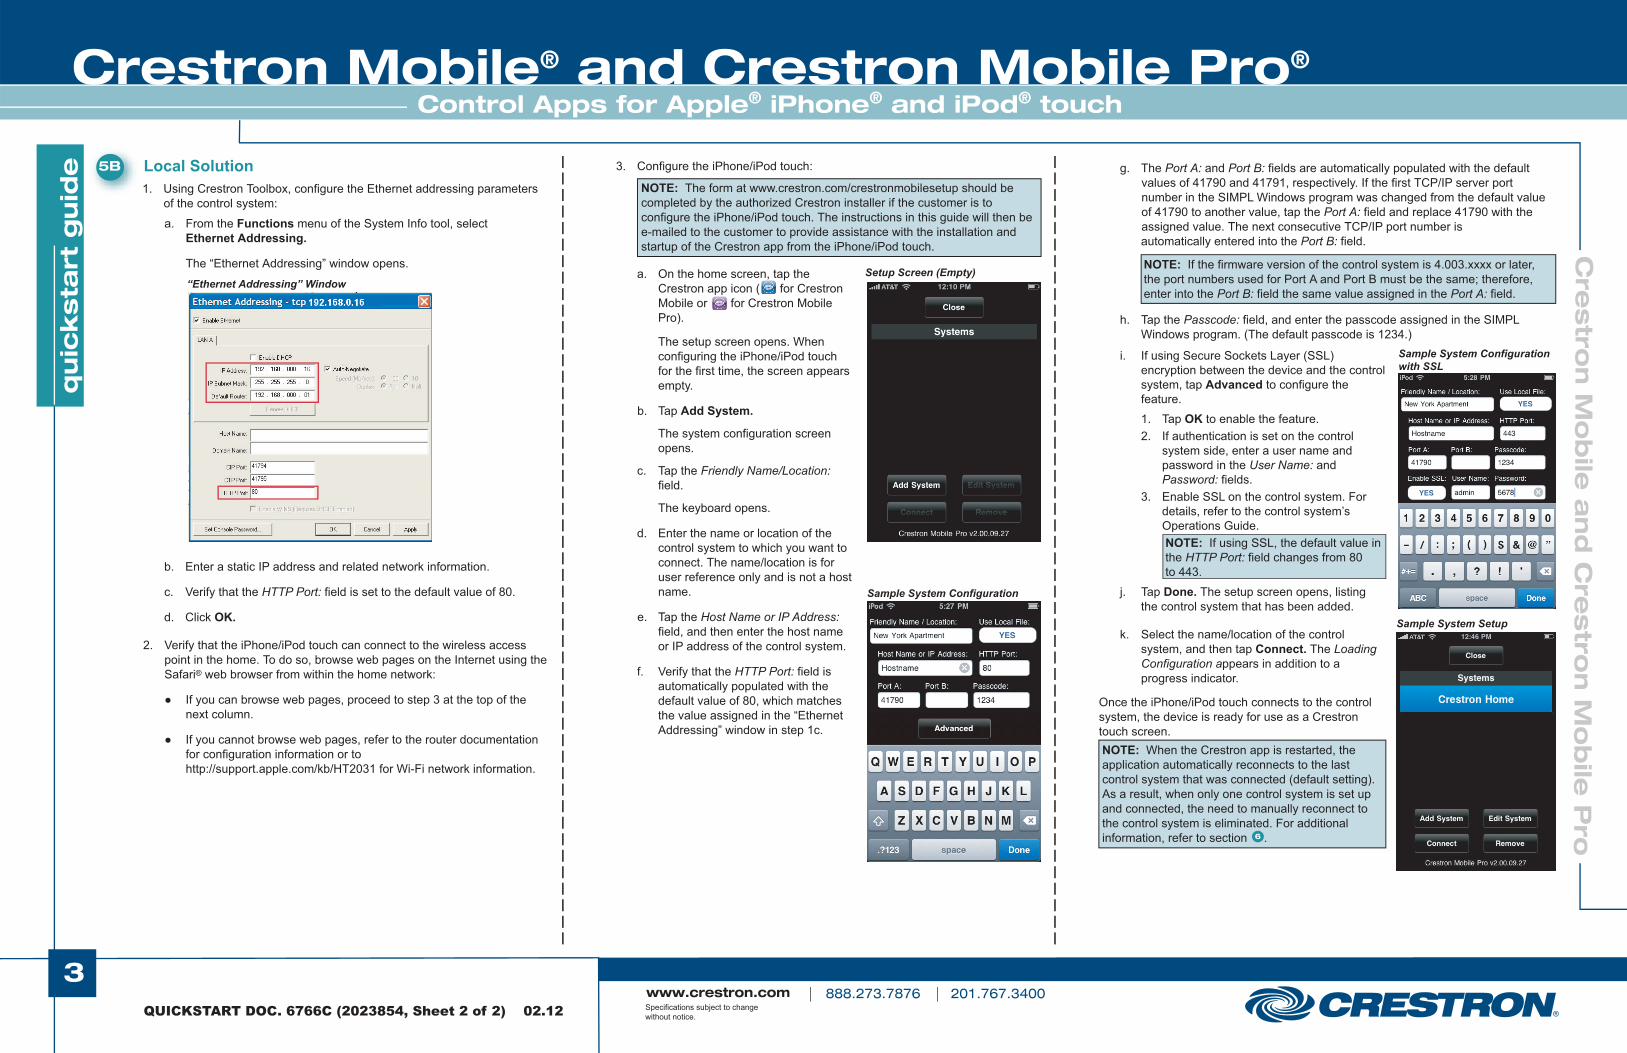
Local Solution5B
a. From the Functions menu of the System Info tool, select Ethernet Addressing.
The “Ethernet Addressing” window opens.
b. Enter a static IP address and related network information.
c. Verify that the HTTP Port: field is set to the default value of 80.
d. Click OK.
2. Verify that the iPhone/iPod touch can connect to the wireless access point in the home. To do so, browse web pages on the Internet using the Safari® web browser from within the home network:
● If you can browse web pages, proceed to step 3 at the top of the next column.
● If you cannot browse web pages, refer to the router documentation for configuration information or to http://support.apple.com/kb/HT2031 for Wi-Fi network information.
Setup Screen (Empty)
1. Using Crestron Toolbox, configure the Ethernet addressing parameters of the control system:
3. Configure the iPhone/iPod touch:
a. On the home screen, tap the Crestron app icon ( for Crestron Mobile or for Crestron Mobile Pro). The setup screen opens. When configuring the iPhone/iPod touch for the first time, the screen appears empty.
b. Tap Add System.
The system configuration screen opens.
c. Tap the Friendly Name/Location: field.
The keyboard opens.
d. Enter the name or location of the control system to which you want to connect. The name/location is for user reference only and is not a host name.
e. Tap the Host Name or IP Address: field, and then enter the host name or IP address of the control system.
f. Verify that the HTTP Port: field is automatically populated with the default value of 80, which matches the value assigned in the “Ethernet Addressing” window in step 1c.
NOTE: The form at www.crestron.com/crestronmobilesetup should be completed by the authorized Crestron installer if the customer is to configure the iPhone/iPod touch. The instructions in this guide will then be e-mailed to the customer to provide assistance with the installation and startup of the Crestron app from the iPhone/iPod touch.
5B
“Ethernet Addressing” Window
g. The Port A: and Port B: fields are automatically populated with the default values of 41790 and 41791, respectively. If the first TCP/IP server port number in the SIMPL Windows program was changed from the default value of 41790 to another value, tap the Port A: field and replace 41790 with the assigned value. The next consecutive TCP/IP port number is
automatically entered into the Port B: field.
h. Tap the Passcode: field, and enter the passcode assigned in the SIMPL Windows program. (The default passcode is 1234.)
i. If using Secure Sockets Layer (SSL) encryption between the device and the control system, tap Advanced to configure the feature. 1. Tap OK to enable the feature. 2. If authentication is set on the control system side, enter a user name and password in the User Name: and Password: fields. 3. Enable SSL on the control system. For details, refer to the control system’s Operations Guide. NOTE: If using SSL, the default value in the HTTP Port: field changes from 80 to 443.
j. Tap Done. The setup screen opens, listing the control system that has been added.
k. Select the name/location of the control system, and then tap Connect. The Loading Configuration appears in addition to a progress indicator.
Once the iPhone/iPod touch connects to the control system, the device is ready for use as a Crestron touch screen. NOTE: When the Crestron app is restarted, the application automatically reconnects to the last control system that was connected (default setting). As a result, when only one control system is set up and connected, the need to manually reconnect to the control system is eliminated. For additional information, refer to section .6
NOTE: If the firmware version of the control system is 4.003.xxxx or later, the port numbers used for Port A and Port B must be the same; therefore, enter into the Port B: field the same value assigned in the Port A: field.
Sample System Configuration
Sample System Setup
Sample System Configuration with SSL
4
qu
icksta
rt g
uid
e
www.crestron.com 888.273.7876 201.767.3400Specifications subject to change without notice.QUICKSTART DOC. 6766C (2023854, Sheet 2 of 2) 02.12
Control Apps for Apple® iPhone® and iPod® touch
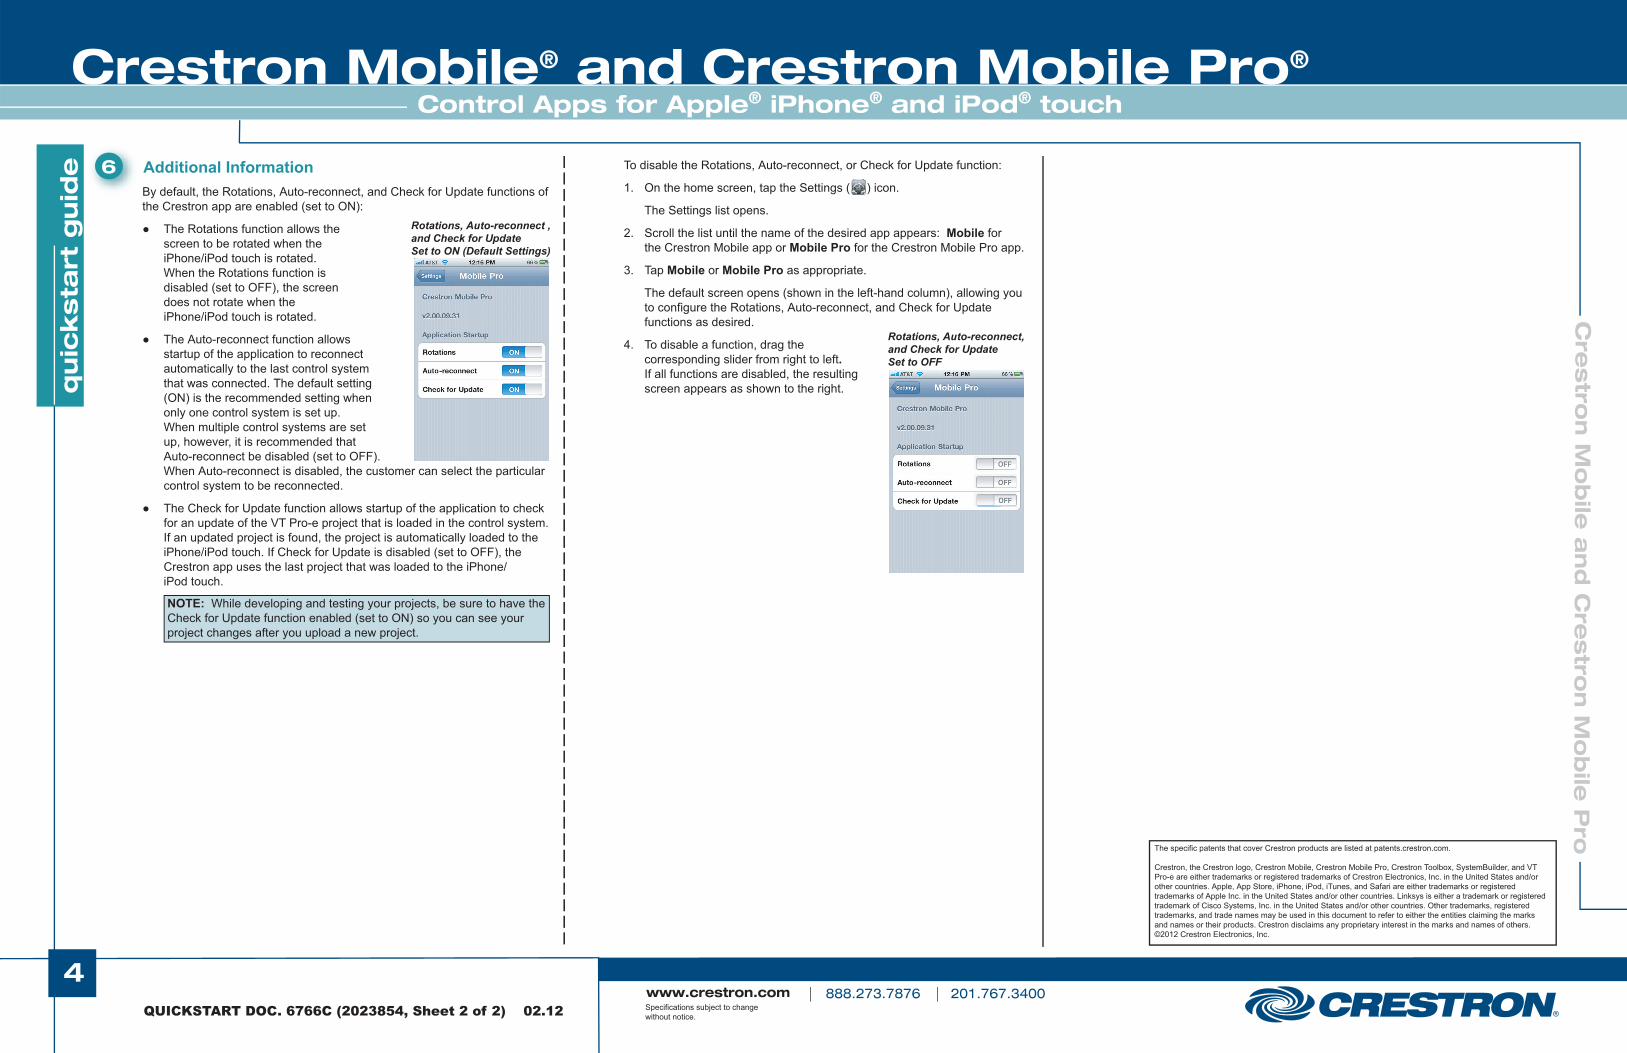
6 Additional InformationBy default, the Rotations, Auto-reconnect, and Check for Update functions of the Crestron app are enabled (set to ON):
● The Rotations function allows the screen to be rotated when the iPhone/iPod touch is rotated. When the Rotations function is disabled (set to OFF), the screen does not rotate when the iPhone/iPod touch is rotated.
● The Auto-reconnect function allows startup of the application to reconnect automatically to the last control system that was connected. The default setting (ON) is the recommended setting when only one control system is set up. When multiple control systems are set up, however, it is recommended that Auto-reconnect be disabled (set to OFF). When Auto-reconnect is disabled, the customer can select the particular control system to be reconnected.
● The Check for Update function allows startup of the application to check for an update of the VT Pro-e project that is loaded in the control system. If an updated project is found, the project is automatically loaded to the iPhone/iPod touch. If Check for Update is disabled (set to OFF), the Crestron app uses the last project that was loaded to the iPhone/
iPod touch.
Rotations, Auto-reconnect,and Check for UpdateSet to OFF
Crestron Mobile® and Crestron Mobile Pro® C
restro
n M
ob
ile a
nd
Cre
stro
n M
ob
ile P
ro
Rotations, Auto-reconnect ,and Check for Update Set to ON (Default Settings)
NOTE: While developing and testing your projects, be sure to have the Check for Update function enabled (set to ON) so you can see your project changes after you upload a new project.
To disable the Rotations, Auto-reconnect, or Check for Update function:
1. On the home screen, tap the Settings ( ) icon.
The Settings list opens.
2. Scroll the list until the name of the desired app appears: Mobile for the Crestron Mobile app or Mobile Pro for the Crestron Mobile Pro app.
3. Tap Mobile or Mobile Pro as appropriate.
The default screen opens (shown in the left-hand column), allowing you to configure the Rotations, Auto-reconnect, and Check for Update functions as desired.
4. To disable a function, drag the corresponding slider from right to left. If all functions are disabled, the resulting screen appears as shown to the right.
The specific patents that cover Crestron products are listed at patents.crestron.com.
Crestron, the Crestron logo, Crestron Mobile, Crestron Mobile Pro, Crestron Toolbox, SystemBuilder, and VT Pro-e are either trademarks or registered trademarks of Crestron Electronics, Inc. in the United States and/or other countries. Apple, App Store, iPhone, iPod, iTunes, and Safari are either trademarks or registered trademarks of Apple Inc. in the United States and/or other countries. Linksys is either a trademark or registered trademark of Cisco Systems, Inc. in the United States and/or other countries. Other trademarks, registered trademarks, and trade names may be used in this document to refer to either the entities claiming the marks and names or their products. Crestron disclaims any proprietary interest in the marks and names of others.©2012 Crestron Electronics, Inc.