Embed Size (px)
Citation preview

Quickbooks 2008-09
Introduction
Trademarks and Acknowledgments Quickbooks is a registered trademark of Quicken. Microsoft, Windows, Microsoft Excel, Microsoft Word for Windows are registered trademarks of the Microsoft Corporation.
Disclaimer Every effort has been made to provide accurate and complete information. However, GMO Consulting Services Pty Ltd assumes no responsibility for any direct, indirect, incidental or consequential damages arising from the use of information in this document. Data and case study examples are intended to be fictional. Any resemblance to real persons or companies is coincidental.
Copyright Notice No part of this publication may be reproduced in any form, or stored in a database or retrieval system, or transmitted or distributed in any form by any means, electronic, mechanical photocopying, recording, or otherwise without written permission from GMO Consulting Services Pty Ltd.
GMO Consulting Services Pty Ltd
P O Box 509 Mount Eliza
Victoria 3930.

Page 2
© GMO Consulting Services Pty Ltd
Jan 2009
2009Qbks08-09 Lv1-Ed1.docx
Quickbooks Level 1
Page 3
© GMO Consulting Services Pty Ltd
Jan 2009
2009Qbks08-09 Lv1-Ed1.docx
Quickbooks Level 1
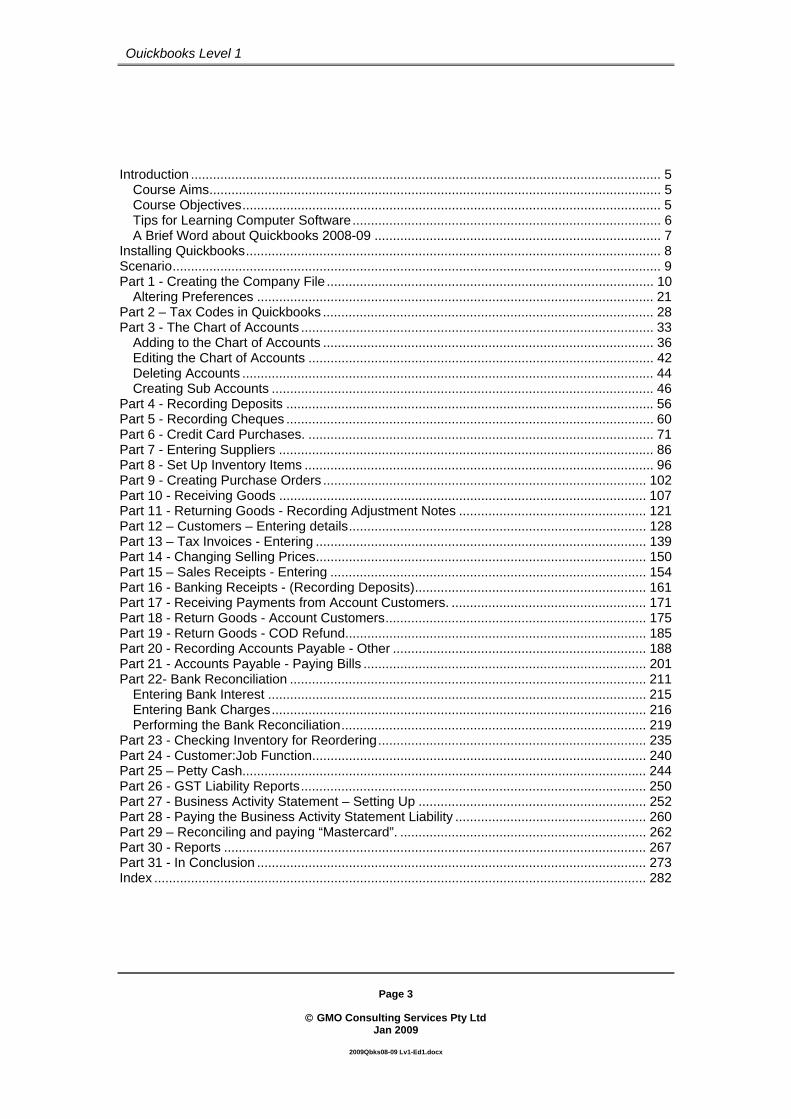
Introduction ................................................................................................................................ 5 Course Aims ........................................................................................................................... 5 Course Objectives .................................................................................................................. 5 Tips for Learning Computer Software .................................................................................... 6 A Brief Word about Quickbooks 2008-09 .............................................................................. 7
Installing Quickbooks ................................................................................................................. 8 Scenario ..................................................................................................................................... 9 Part 1 - Creating the Company File ......................................................................................... 10
Altering Preferences ............................................................................................................ 21 Part 2 – Tax Codes in Quickbooks .......................................................................................... 28 Part 3 - The Chart of Accounts ................................................................................................ 33
Adding to the Chart of Accounts .......................................................................................... 36 Editing the Chart of Accounts .............................................................................................. 42 Deleting Accounts ................................................................................................................ 44 Creating Sub Accounts ........................................................................................................ 46
Part 4 - Recording Deposits .................................................................................................... 56 Part 5 - Recording Cheques .................................................................................................... 60 Part 6 - Credit Card Purchases. .............................................................................................. 71 Part 7 - Entering Suppliers ...................................................................................................... 86 Part 8 - Set Up Inventory Items ............................................................................................... 96 Part 9 - Creating Purchase Orders ........................................................................................ 102 Part 10 - Receiving Goods .................................................................................................... 107 Part 11 - Returning Goods - Recording Adjustment Notes ................................................... 121 Part 12 – Customers – Entering details ................................................................................. 128 Part 13 – Tax Invoices - Entering .......................................................................................... 139 Part 14 - Changing Selling Prices .......................................................................................... 150 Part 15 – Sales Receipts - Entering ...................................................................................... 154 Part 16 - Banking Receipts - (Recording Deposits) ............................................................... 161 Part 17 - Receiving Payments from Account Customers. ..................................................... 171 Part 18 - Return Goods - Account Customers ....................................................................... 175 Part 19 - Return Goods - COD Refund .................................................................................. 185 Part 20 - Recording Accounts Payable - Other ..................................................................... 188 Part 21 - Accounts Payable - Paying Bills ............................................................................. 201 Part 22- Bank Reconciliation ................................................................................................. 211
Entering Bank Interest ....................................................................................................... 215 Entering Bank Charges ...................................................................................................... 216 Performing the Bank Reconciliation ................................................................................... 219
Part 23 - Checking Inventory for Reordering ......................................................................... 235 Part 24 - Customer:Job Function ........................................................................................... 240 Part 25 – Petty Cash.............................................................................................................. 244 Part 26 - GST Liability Reports .............................................................................................. 250 Part 27 - Business Activity Statement – Setting Up .............................................................. 252 Part 28 - Paying the Business Activity Statement Liability .................................................... 260 Part 29 – Reconciling and paying “Mastercard”. ................................................................... 262 Part 30 - Reports ................................................................................................................... 267 Part 31 - In Conclusion .......................................................................................................... 273 Index ...................................................................................................................................... 282

Page 4
© GMO Consulting Services Pty Ltd
Jan 2009
2009Qbks08-09 Lv1-Ed1.docx
Quickbooks Level 1
Page 5
© GMO Consulting Services Pty Ltd
Jan 2009
2009Qbks08-09 Lv1-Ed1.docx
Quickbooks Level 1
Introduction
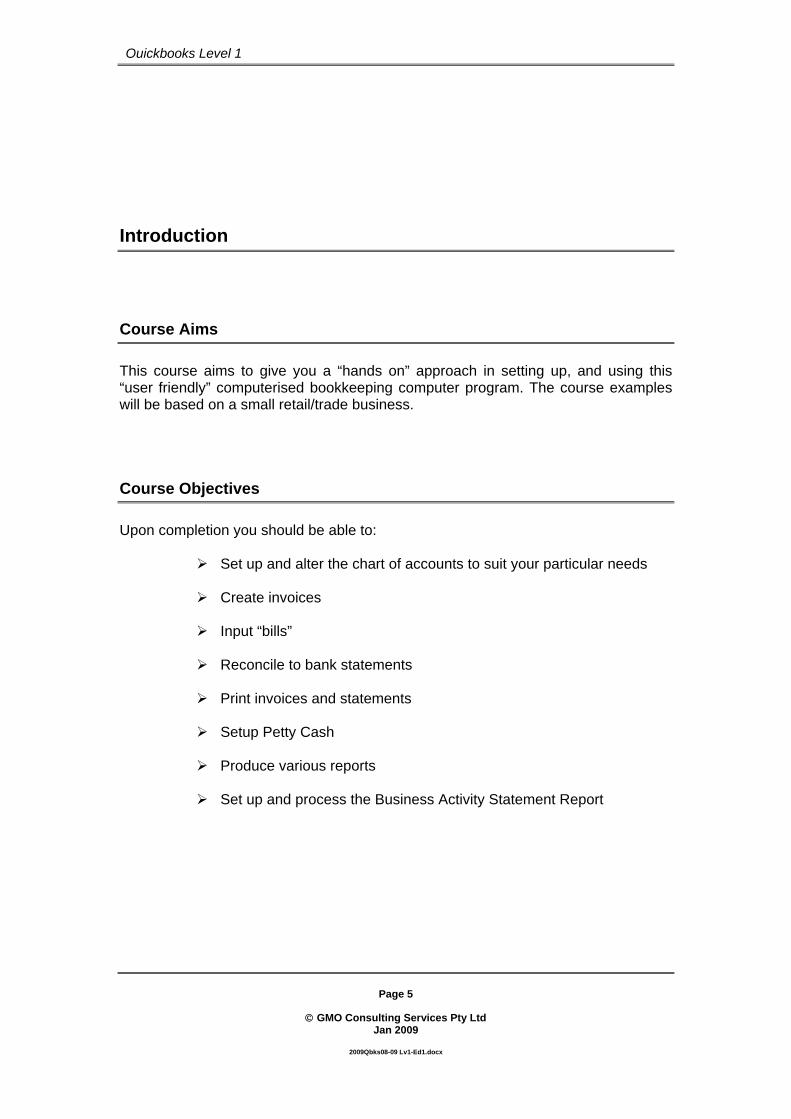
Course Aims This course aims to give you a “hands on” approach in setting up, and using this “user friendly” computerised bookkeeping computer program. The course examples will be based on a small retail/trade business.
Course Objectives Upon completion you should be able to:
Set up and alter the chart of accounts to suit your particular needs
Create invoices
Input “bills”
Reconcile to bank statements
Print invoices and statements
Setup Petty Cash
Produce various reports
Set up and process the Business Activity Statement Report
Page 6
© GMO Consulting Services Pty Ltd
Jan 2009
2009Qbks08-09 Lv1-Ed1.docx
Quickbooks Level 1
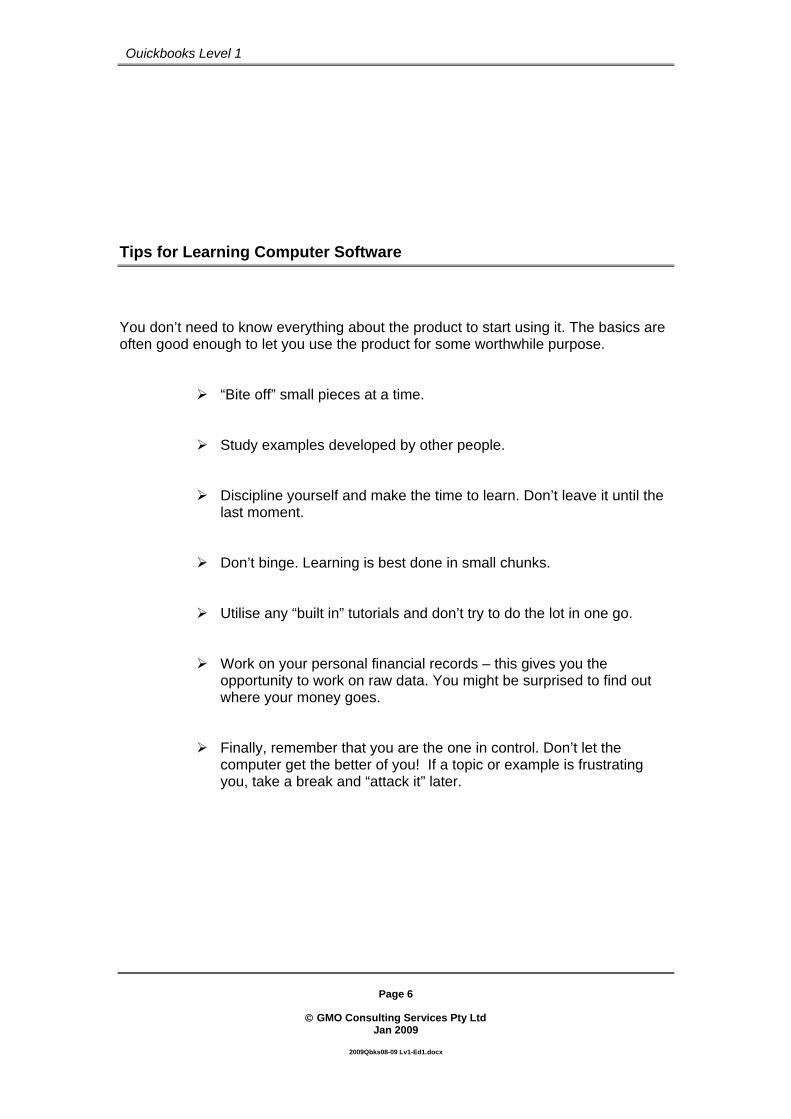
Tips for Learning Computer Software You don’t need to know everything about the product to start using it. The basics are often good enough to let you use the product for some worthwhile purpose.
“Bite off” small pieces at a time.
Study examples developed by other people.
Discipline yourself and make the time to learn. Don’t leave it until the last moment.
Don’t binge. Learning is best done in small chunks.
Utilise any “built in” tutorials and don’t try to do the lot in one go.
Work on your personal financial records – this gives you the opportunity to work on raw data. You might be surprised to find out where your money goes.
Finally, remember that you are the one in control. Don’t let the computer get the better of you! If a topic or example is frustrating you, take a break and “attack it” later.

Page 7
© GMO Consulting Services Pty Ltd
Jan 2009
2009Qbks08-09 Lv1-Ed1.docx
Quickbooks Level 1
A Brief Word about Quickbooks 2008-09 Quickbooks is a very useful program for people in small business who do not wish to know all about accounting terms and practices. A fundamental understanding on how businesses operate is a decided advantage when working with this (or any) accounting software. Quickbooks should be used in conjunction with advice from your accountant. It is a very good program for producing various reports that your accountant needs at the end of the financial year to do your company financial statements and tax returns. The various Tax reports will enable you to easily fill out the quarterly (or monthly) Business Activity Statements, which has been required from July 1, 2000. This courseware is designed to introduce you to the basic use of the program - we want you to be productive as quickly as possible. In addition, since MS Windows environment can be customised to suit your particular requirements, you may find that your screen at times appears a little different from the screen shots in these notes. This is particularly so in Quickbooks as it may have different settings with regard to the use of the Enter key and where the cursor is positioned at the beginning of new cheques. If someone has been using Quickbooks before you there is a good chance that some of the preferences have been altered. Don’t be alarmed by this. The preferences can be changed quite readily and we will cover this topic in the course.

Page 8
© GMO Consulting Services Pty Ltd
Jan 2009
2009Qbks08-09 Lv1-Ed1.docx
Quickbooks Level 1
Installing Quickbooks Quickbooks is usually installed from the installation CD in the normal manner for MS Windows. Following the procedure in the “Getting Started” manual that comes with the package explains this. For this exercise it is already installed. Quickbooks is accessed by double-clicking the Quickbooks icon on the desktop (or from the Programs option in the Start Menu.)

Page 9
© GMO Consulting Services Pty Ltd
Jan 2009
2009Qbks08-09 Lv1-Ed1.docx
Quickbooks Level 1
Scenario We will start a new business and will use Quickbooks to record all the financial events that occur. The business is a photographic equipment business that sells cameras and accessories to retailers and to certain trade customers. GST will be applicable on all stock purchases and all sales. The name of the company in this manual will be shown as {Your Name} Camera Store. It is suggested that the student use their first name when they create their company. This will avoid confusion when reports etc. are printed. The business will commence on the 1/1/2009 when the owner deposits his initial outlay of $50,000.00 into the cheque account. It will open the doors and commence trading on the 12/1/2009. GST Disclaimer - All transactions regarding "inputs & outputs" should be treated as exercises only. They should not be treated as fact and relied on in any way. Any GST issues should be referred to your Accountant for final determination.

Page 10
© GMO Consulting Services Pty Ltd
Jan 2009
2009Qbks08-09 Lv1-Ed1.docx
Quickbooks Level 1
Part 1 - Creating the Company File Please note that this manual has been produced using the “Premier” version of Quickbooks 08-09. Your version may not have all the features of “Premier”
Double click on the desktop (or click Start, Programs and click Quickbooks in the appropriate menu.)
After a few moments you will be presented with the Quickbooks Window:
Please note that if another person has used Quickbooks before you then Quickbooks will open the last company that was used.
Click If another company is open when Quickbooks is started, then click File on the Menu Bar and click New Company…
Page 11
© GMO Consulting Services Pty Ltd
Jan 2009
2009Qbks08-09 Lv1-Ed1.docx
Quickbooks Level 1
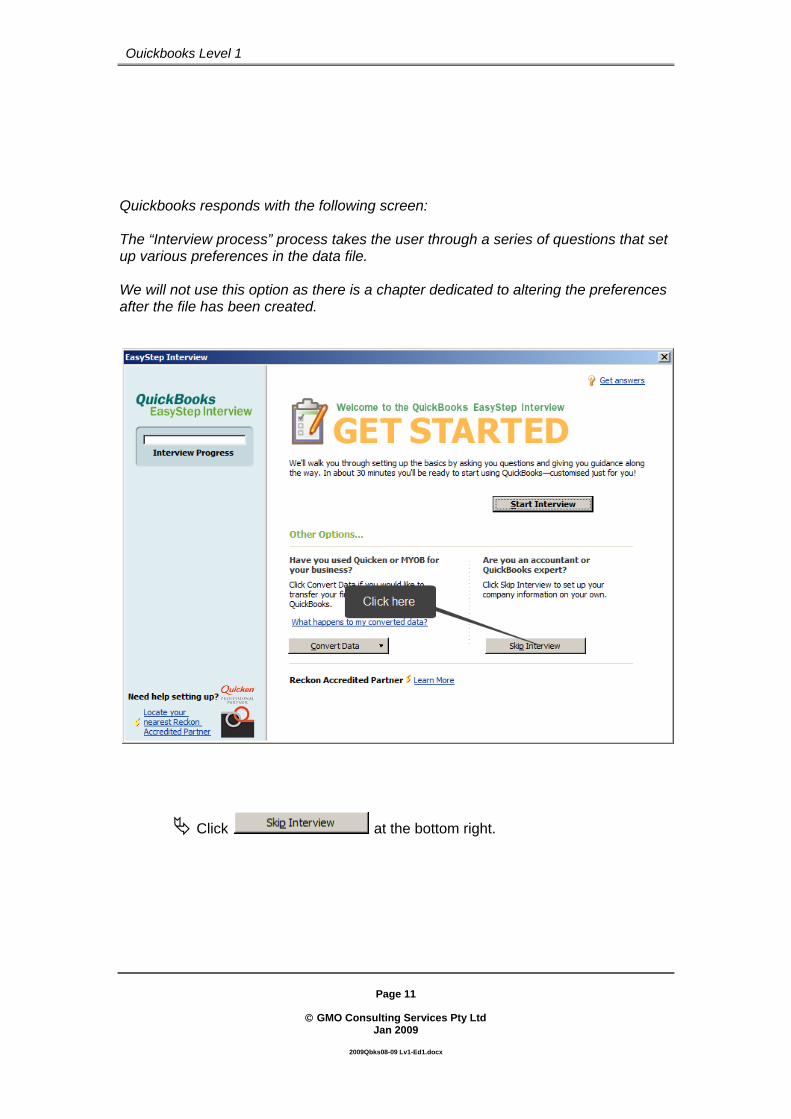
Quickbooks responds with the following screen: The “Interview process” process takes the user through a series of questions that set up various preferences in the data file. We will not use this option as there is a chapter dedicated to altering the preferences after the file has been created.
Click at the bottom right.

Page 12
© GMO Consulting Services Pty Ltd
Jan 2009
2009Qbks08-09 Lv1-Ed1.docx
Quickbooks Level 1
The following screen will now be displayed:
Go the following page and follow the instructions.
Page 13
© GMO Consulting Services Pty Ltd
Jan 2009
2009Qbks08-09 Lv1-Ed1.docx
Quickbooks Level 1
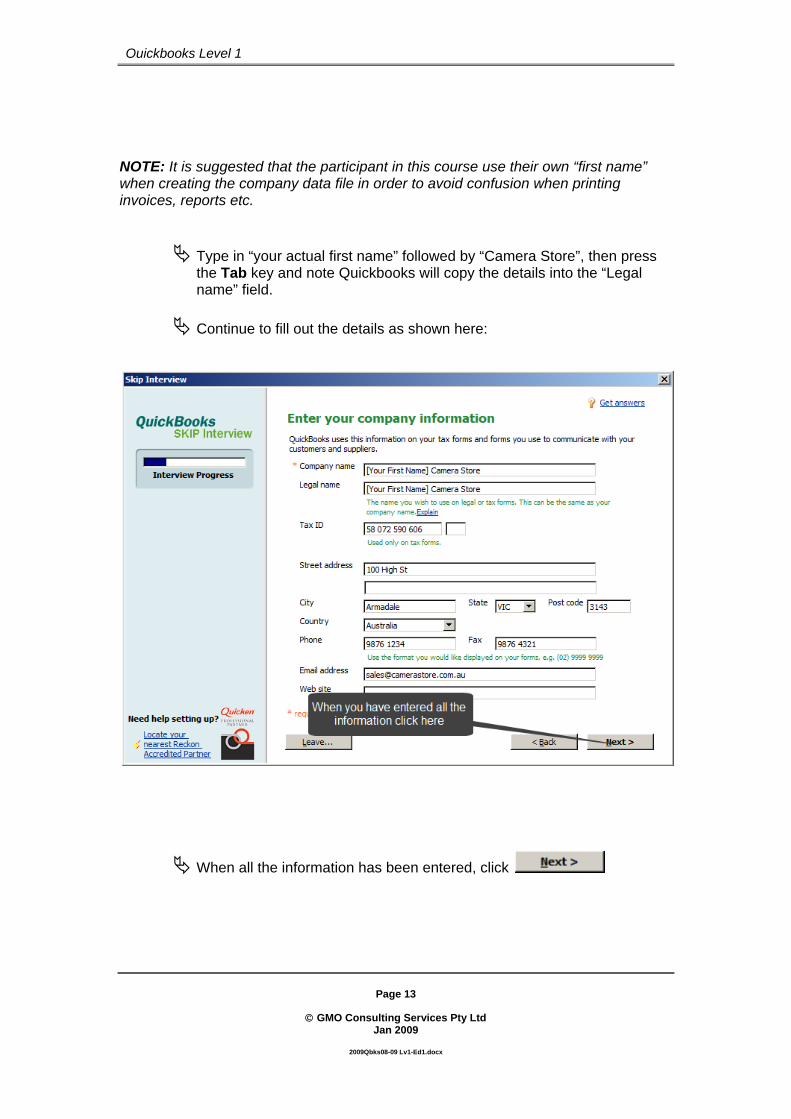
NOTE: It is suggested that the participant in this course use their own “first name” when creating the company data file in order to avoid confusion when printing invoices, reports etc.
Type in “your actual first name” followed by “Camera Store”, then press the Tab key and note Quickbooks will copy the details into the “Legal name” field.
Continue to fill out the details as shown here:
When all the information has been entered, click
Page 14
© GMO Consulting Services Pty Ltd
Jan 2009
2009Qbks08-09 Lv1-Ed1.docx
Quickbooks Level 1
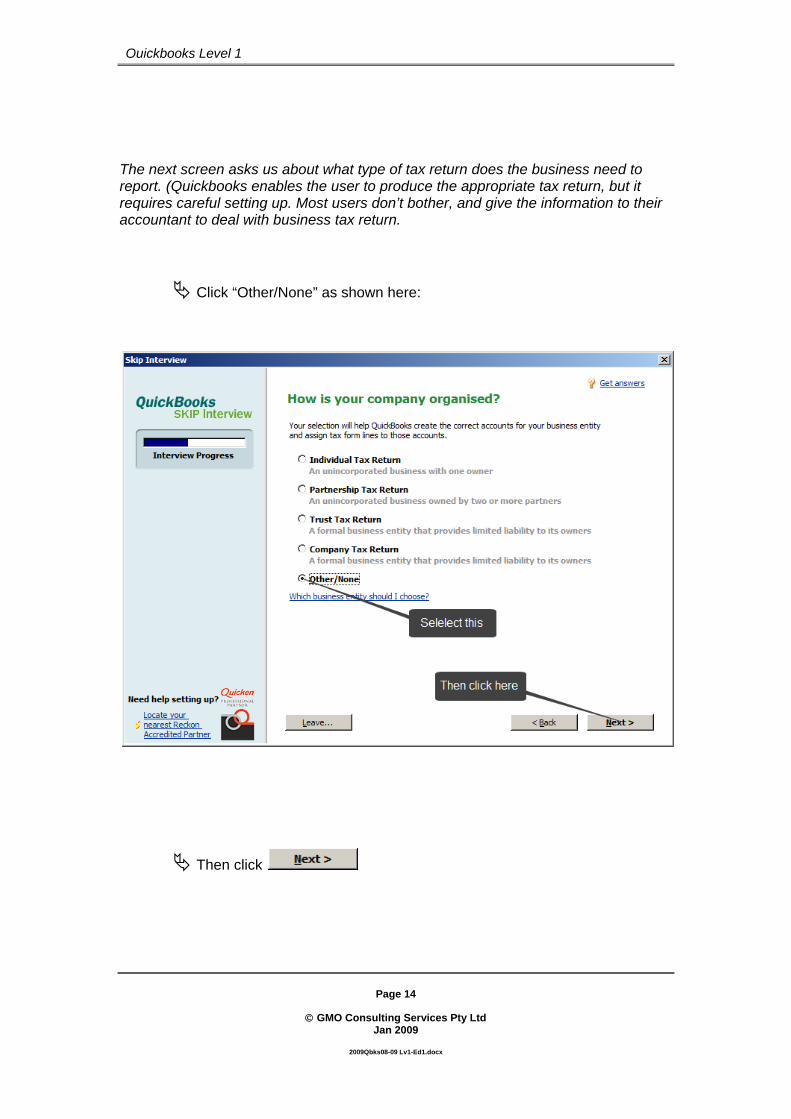
The next screen asks us about what type of tax return does the business need to report. (Quickbooks enables the user to produce the appropriate tax return, but it requires careful setting up. Most users don’t bother, and give the information to their accountant to deal with business tax return.
Click “Other/None” as shown here:
Then click

Page 15
© GMO Consulting Services Pty Ltd
Jan 2009
2009Qbks08-09 Lv1-Ed1.docx
Quickbooks Level 1
This screen asks the starting month of the business’s financial year. This will impact on how Quickbooks processes reports. Most businesses in Australia run their financial year from July to June. But many “Not for Profit” entities run their books on a “calendar year”. Our Camera Business will run report on a standard financial year so no change is required on this screen.
Click

Page 16
© GMO Consulting Services Pty Ltd
Jan 2009
2009Qbks08-09 Lv1-Ed1.docx
Quickbooks Level 1
This screen asks the user to select a set of accounts for the business.
Click to scroll to the bottom of the list and go to the next page.
Page 17
© GMO Consulting Services Pty Ltd
Jan 2009
2009Qbks08-09 Lv1-Ed1.docx
Quickbooks Level 1
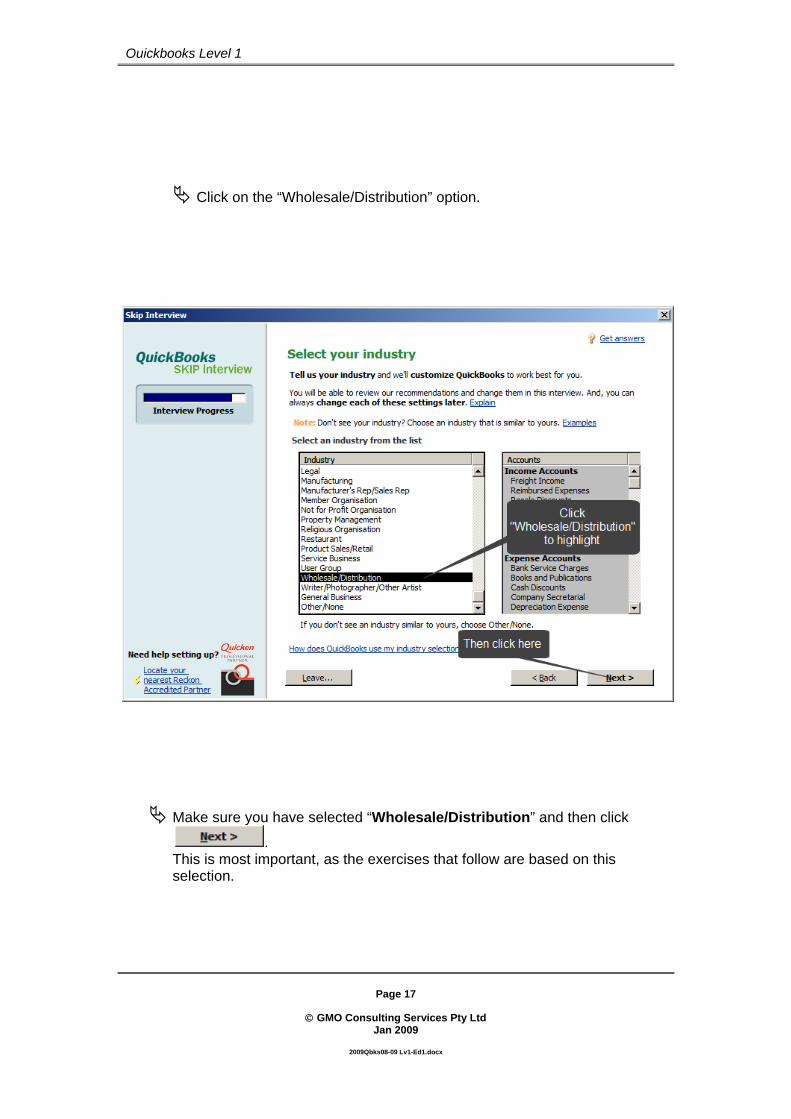
Click on the “Wholesale/Distribution” option.
Make sure you have selected “Wholesale/Distribution” and then click
. This is most important, as the exercises that follow are based on this selection.

Page 18
© GMO Consulting Services Pty Ltd
Jan 2009
2009Qbks08-09 Lv1-Ed1.docx
Quickbooks Level 1
Quickbooks is telling us that the data file will now be created.
Click and go to the next page.
Page 19
© GMO Consulting Services Pty Ltd
Jan 2009
2009Qbks08-09 Lv1-Ed1.docx
Quickbooks Level 1
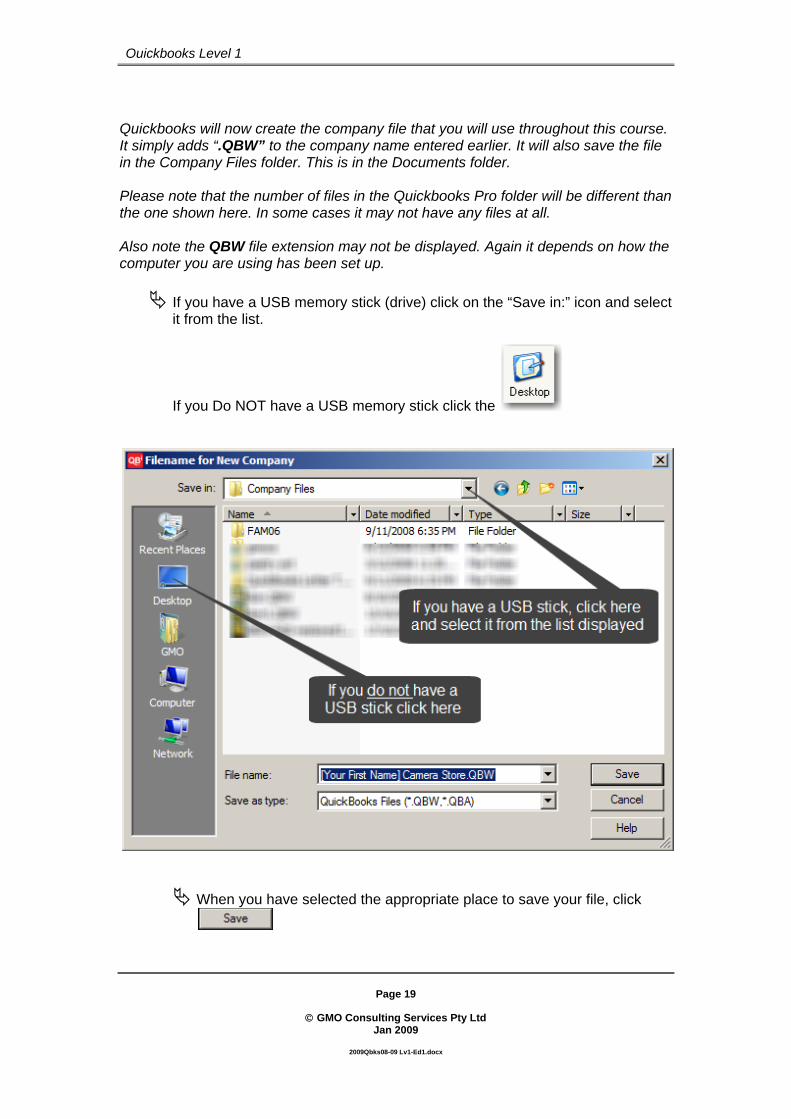
Quickbooks will now create the company file that you will use throughout this course. It simply adds “.QBW” to the company name entered earlier. It will also save the file in the Company Files folder. This is in the Documents folder. Please note that the number of files in the Quickbooks Pro folder will be different than the one shown here. In some cases it may not have any files at all. Also note the QBW file extension may not be displayed. Again it depends on how the computer you are using has been set up.
If you have a USB memory stick (drive) click on the “Save in:” icon and select it from the list.
If you Do NOT have a USB memory stick click the
When you have selected the appropriate place to save your file, click

Page 20
© GMO Consulting Services Pty Ltd
Jan 2009
2009Qbks08-09 Lv1-Ed1.docx
Quickbooks Level 1
The following screen should be displayed.
Note the “Home” window. This is the “new look” of Quickbooks. It displays most of the functions available in a “flow chart” sequence, The Flow Chart emulates the order that these transactions would occur in “real life”.

Page 21
© GMO Consulting Services Pty Ltd
Jan 2009
2009Qbks08-09 Lv1-Ed1.docx
Quickbooks Level 1
Altering Preferences When we created our company file we “skipped the interview” process. (refer to page 11) The interview process simply allows the user set up the preferences in Quickbooks that will suit the business. The producer of this courseware has decided to dedicate a chapter to altering preferences after the file has been created. This will show the user where these preferences can be altered, and also that preferences can be changed if the business alters and needs to use additional features available in the software.
Click Edit on the Menu Bar, (top left corner of the screen) and select Preferences from the menu.
Here is a picture of the Edit menu:

Page 22
© GMO Consulting Services Pty Ltd
Jan 2009
2009Qbks08-09 Lv1-Ed1.docx
Quickbooks Level 1
The “Preferences” window with the “General Preferences: My Preferences” screen displayed. Note the different Preference sections are displayed on the left. And on the right the options are available on two screens “My Preferences” and “Company Preferences”
Click and alter the preference as shown on the next page.
Page 23
© GMO Consulting Services Pty Ltd
Jan 2009
2009Qbks08-09 Lv1-Ed1.docx
Quickbooks Level 1
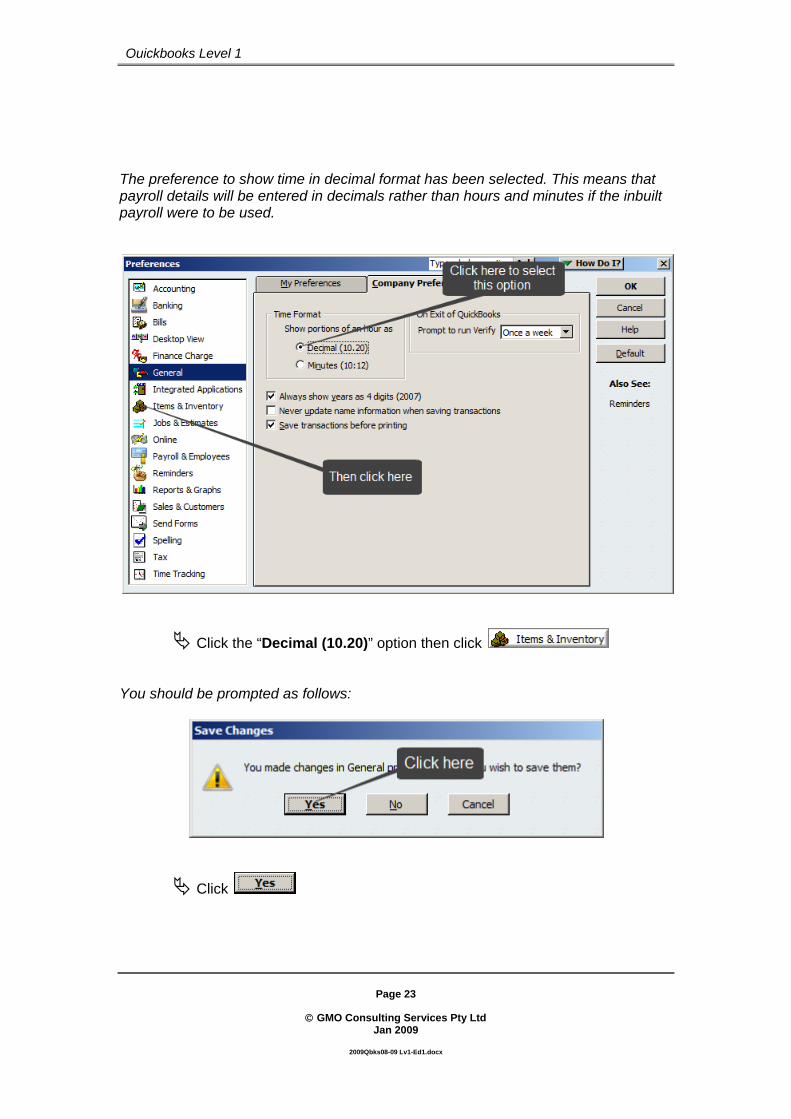
The preference to show time in decimal format has been selected. This means that payroll details will be entered in decimals rather than hours and minutes if the inbuilt payroll were to be used.
Click the “Decimal (10.20)” option then click You should be prompted as follows:
Click

Page 24
© GMO Consulting Services Pty Ltd
Jan 2009
2009Qbks08-09 Lv1-Ed1.docx
Quickbooks Level 1
The “Items & Inventory” screen displaying “Company Preferences”.
When you have clicked the “Inventory and purchase orders are active” option, click
The following prompt should be displayed:
Click

Page 25
© GMO Consulting Services Pty Ltd
Jan 2009
2009Qbks08-09 Lv1-Ed1.docx
Quickbooks Level 1
The next prompt is:
Click The Company Preferences screen for Jobs & Estimates.
When you have clicked the “No” button for the “Do You Create Estimates?” option click

Page 26
© GMO Consulting Services Pty Ltd
Jan 2009
2009Qbks08-09 Lv1-Ed1.docx
Quickbooks Level 1
This prompt will be displayed:
Click The “Sales& Customers” Company Preferences screen is displayed:
The “Company Preferences” screen for Tax.
Click the box to “un-tick” the “Enable Sales Orders” option.
Then click

Page 27
© GMO Consulting Services Pty Ltd
Jan 2009
2009Qbks08-09 Lv1-Ed1.docx
Quickbooks Level 1
The following prompt is displayed:
Click
Click No to “switch off” this preference.
Then click as we have finished with the preferences for now.
.

Page 28
© GMO Consulting Services Pty Ltd
Jan 2009
2009Qbks08-09 Lv1-Ed1.docx
Quickbooks Level 1
Part 2 – Tax Codes in Quickbooks Quickbooks has automatically created a list of Tax Codes that are likely to be used in transactions. Some of the Tax Codes are only relevant to specific industries such as the Wine industry.
Here are two tables of Tax Codes with an explanation of how they should be used:
Note: The codes with a light grey shading are common codes that all businesses would use.
TAX CODES FOR PURCHASES
CODE DESCRIPTION TYPE USED FOR EXAMPLES
CAF Capital Acquisition No GST in the price
GST – Free
ASSET PURCHASES
Fixed Asset purchase over $300.00 with no GST in the price
CAG Capital Acquisition Including GST GST ASSET
PURCHASESFixed Asset purchases over $300.00 including GST
CAI Capital Acquisition for making input tax supplies
Input Taxed
ASSET PURCHASES
Fixed Asset purchases over $300.00 for making input tax supplies.
NCF Non Capital Acquisitions No GST in the price
GST – Free
PURCHASESEXPENSES
GST free expenses that should be included on the BAS
NCG Non Capital Acquisitions Including GST
GST PURCHASESEXPENSES
Expenses with GST included in the price.
NCI Non Capital Acquisition for making input taxed supplies
Input Taxed
PURCHASESEXPENSES
Expenses for making input taxed supplies
TAX CODES FOR SALES
CODE DESCRIPTION TYPE USED FOR EXAMPLES
CDC Combined Cellar Door Combined SALES Wine sales at Cellar Door
CDG Cellar door GST GST SALES GST on Cellar Door Sales CDS Cellar Door WET Sales Tax SALES WET on Cellar Door Sales
EXP GST Free Exports GST – Free SALES Sales for export that do not
include GST in the price
FRE GST Free Supplies GST – Free SALES Sales that do not include GST
(excluding exports).
GST 10% GST GST SALES Goods & Services subject to 10% Tax
INP Input Taxed Sales GST Free SALES Sales that are input taxed.
WC Combined WET & WGST Combined SALES Code used to track both GST
and WET
WET Wine Equalisation Tax Sales Tax SALES Special Wine Tax levied at 29%
WGST GST on WET GST SALES WET sales subject to GST
Please note that for a more detailed explanation of “Tax Codes” and their use, you should consult with your accountant.

Page 29
© GMO Consulting Services Pty Ltd
Jan 2009
2009Qbks08-09 Lv1-Ed1.docx
Quickbooks Level 1
These tax codes can easily be deleted if not needed. We can also create additional codes if required. We will now have a look at the Tax Code list and make some changes.
Click List on the Menu Bar and click on Tax Codes.
The following list will be displayed:
Single click on the WC Tax Code to highlight it
Page 30
© GMO Consulting Services Pty Ltd
Jan 2009
2009Qbks08-09 Lv1-Ed1.docx
Quickbooks Level 1
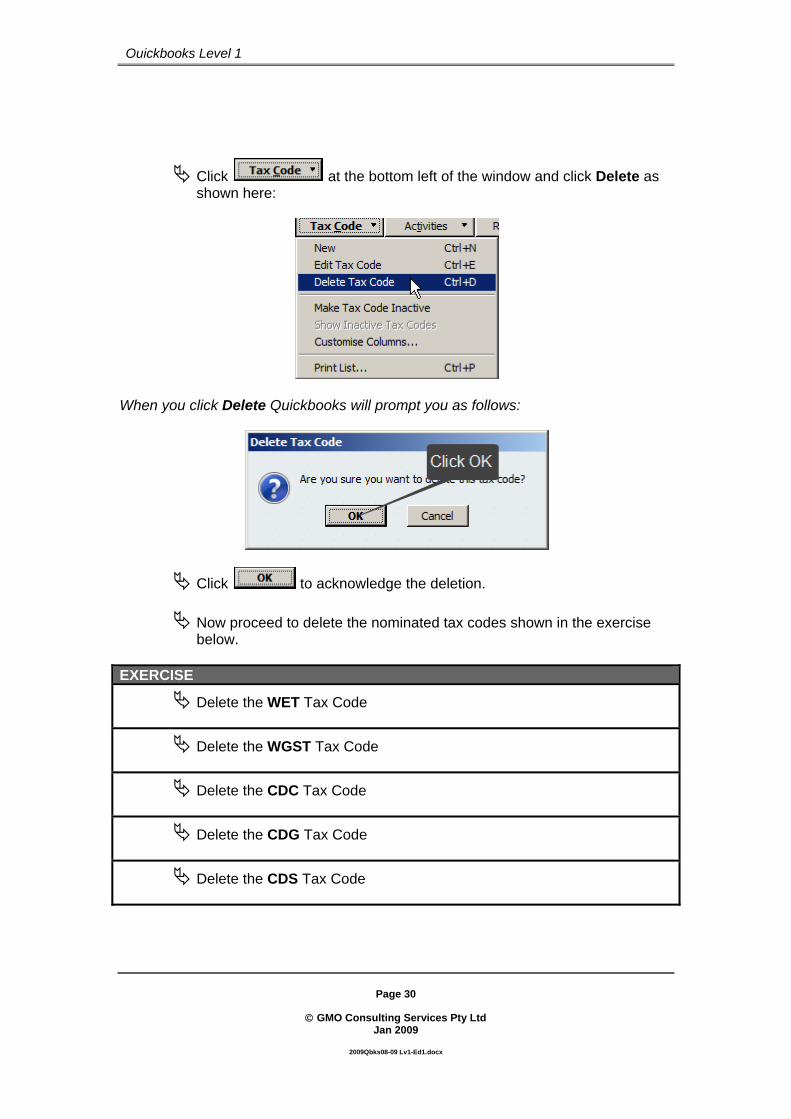
Click at the bottom left of the window and click Delete as shown here:
When you click Delete Quickbooks will prompt you as follows:
Click to acknowledge the deletion.
Now proceed to delete the nominated tax codes shown in the exercise below.
EXERCISE
Delete the WET Tax Code
Delete the WGST Tax Code
Delete the CDC Tax Code
Delete the CDG Tax Code
Delete the CDS Tax Code

Page 31
© GMO Consulting Services Pty Ltd
Jan 2009
2009Qbks08-09 Lv1-Ed1.docx
Quickbooks Level 1
Here is pictures of the “Tax Code List” after all the deletions have been done:
NOTE: For further information about the Tax Codes and their meanings you should consult with your Accountant.
Page 32
© GMO Consulting Services Pty Ltd
Jan 2009
2009Qbks08-09 Lv1-Ed1.docx
Quickbooks Level 1
PART 1 & 2 – SUMMARY We set up the data file that we’ll be working with. We entered the name and address of the business and chose “Wholesale/distribution” as the chart of accounts. This will simplify the process of modifying the chart of accounts later on. Quickbooks created the data file for us and gave it the same name as the name that we entered earlier. The file was saved in the “Quickbooks” folder. You can have many different “data files” in Quickbooks – it is always a good idea to have a data file which you can “experiment with” before entering transactions in the “real file”. We then proceeded to alter some preferences – you may have noted that these preference changes resulted in some icons appearing and disappearing from the Quickbooks “Home Page”. Finally we worked with the “Tax Code List” and modified it by deleting various tax codes related to the Wine industry. Although not necessary it showed the flexibility of the program and the ease with which we can modify various aspects of the data file.
Page 33
© GMO Consulting Services Pty Ltd
Jan 2009
2009Qbks08-09 Lv1-Ed1.docx
Quickbooks Level 1
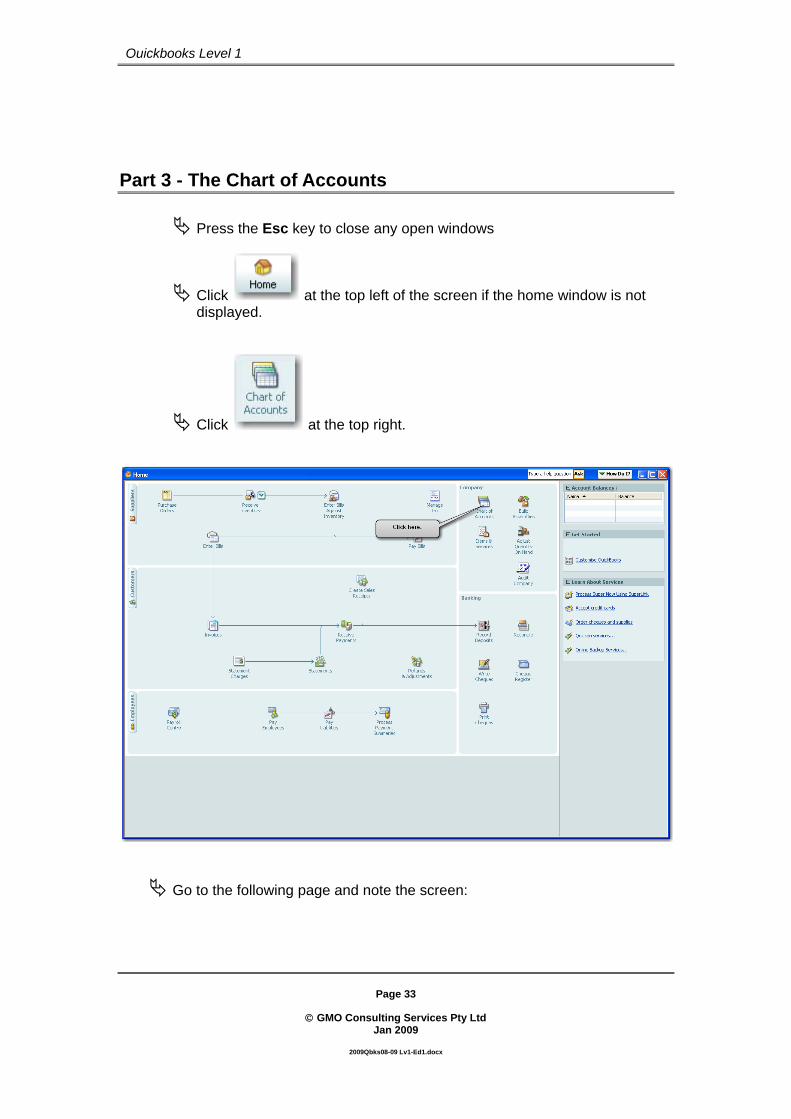
Part 3 - The Chart of Accounts
Press the Esc key to close any open windows
Click at the top left of the screen if the home window is not displayed.
Click at the top right.
Go to the following page and note the screen:

Page 34
© GMO Consulting Services Pty Ltd
Jan 2009
2009Qbks08-09 Lv1-Ed1.docx
Quickbooks Level 1
The following window is displayed. This is the Chart of Accounts before we modify it.

Page 35
© GMO Consulting Services Pty Ltd
Jan 2009
2009Qbks08-09 Lv1-Ed1.docx
Quickbooks Level 1
Quickbooks has created some liability accounts for tracking GST & Payroll Liabilities, as well as a set of income and expense accounts. This is a result of the preferences that were chosen during the set up procedure. When the Chart of Accounts is selected invariably there will be accounts that we need to add alter or delete as required. The next section will show you how to alter the accounts list.
Spend a few minutes scrolling through the list to see what has been set up.
Note: If your Chart of accounts is substantially different, then it may be easier to start again rather than try to alter the one you have created. Go back to page 10 and follow each step exactly, paying particular attention to the selection of the Type of Business shown on page 15.

Page 36
© GMO Consulting Services Pty Ltd
Jan 2009
2009Qbks08-09 Lv1-Ed1.docx
Quickbooks Level 1
Adding to the Chart of Accounts We will create a new Account called Issued Capital.
Make sure that the Chart of Accounts Window is open.
Click at the bottom left corner of the window and the following menu will be displayed:
Click New at the top of the menu and the following screen will be displayed:

Page 37
© GMO Consulting Services Pty Ltd
Jan 2009
2009Qbks08-09 Lv1-Ed1.docx
Quickbooks Level 1
The “Add New Account: Choose Account Type” Window:
When we create a new account in Quickbooks we must choose what type of account we are going to set up.
Click the “Equity” option as shown in the picture, then click

Page 38
© GMO Consulting Services Pty Ltd
Jan 2009
2009Qbks08-09 Lv1-Ed1.docx
Quickbooks Level 1
The “Add New Account” screen:
Enter “Issued Capital” in the Account Name field then click

Page 39
© GMO Consulting Services Pty Ltd
Jan 2009
2009Qbks08-09 Lv1-Ed1.docx
Quickbooks Level 1
Part of the Chart of Accounts List showing the newly created Equity account Issued Capital.
Page 40
© GMO Consulting Services Pty Ltd
Jan 2009
2009Qbks08-09 Lv1-Ed1.docx
Quickbooks Level 1
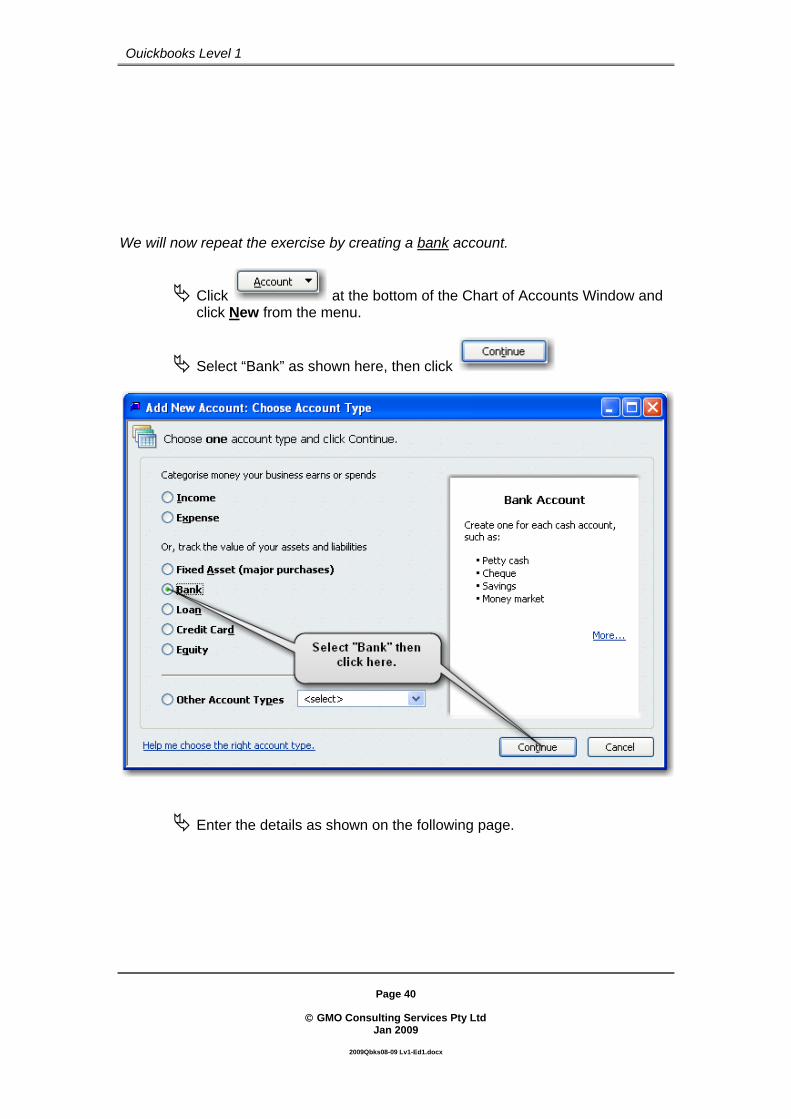
We will now repeat the exercise by creating a bank account.
Click at the bottom of the Chart of Accounts Window and click New from the menu.
Select “Bank” as shown here, then click
Enter the details as shown on the following page.

Page 41
© GMO Consulting Services Pty Ltd
Jan 2009
2009Qbks08-09 Lv1-Ed1.docx
Quickbooks Level 1
Enter the name then click
A portion of the Chart of Accounts that shows the “Cheque Account” that was created.

Page 42
© GMO Consulting Services Pty Ltd
Jan 2009
2009Qbks08-09 Lv1-Ed1.docx
Quickbooks Level 1
Editing the Chart of Accounts In this section we alter names of certain accounts. You may wish to alter names of certain accounts to match a list that has been supplied by your accountant.
Scroll down the list of accounts and single click the Miscellaneous Expense Account to highlight it.
Click at the bottom and this time choose Edit from the menu.

Page 43
© GMO Consulting Services Pty Ltd
Jan 2009
2009Qbks08-09 Lv1-Ed1.docx
Quickbooks Level 1
Press the Tab key to move to the Account Name field and enter Sundry Expenses.
Tab to the Tax Code field and enter NCG.
The relevant parts of the “Edit Account” window should look like this:
Click when it does.

Page 44
© GMO Consulting Services Pty Ltd
Jan 2009
2009Qbks08-09 Lv1-Ed1.docx
Quickbooks Level 1
Deleting Accounts When you first set up Quickbooks you selected a set of accounts. (It was the “Wholesale/Distribution” Chart of Accounts). Some of these accounts will not be required so they can be deleted.
Scroll UP through the Chart of Accounts and highlight the Income account called “Reimbursed Expenses”.
Click at the bottom left corner of the Chart of Accounts and click “Delete” from the menu.
Page 45
© GMO Consulting Services Pty Ltd
Jan 2009
2009Qbks08-09 Lv1-Ed1.docx
Quickbooks Level 1
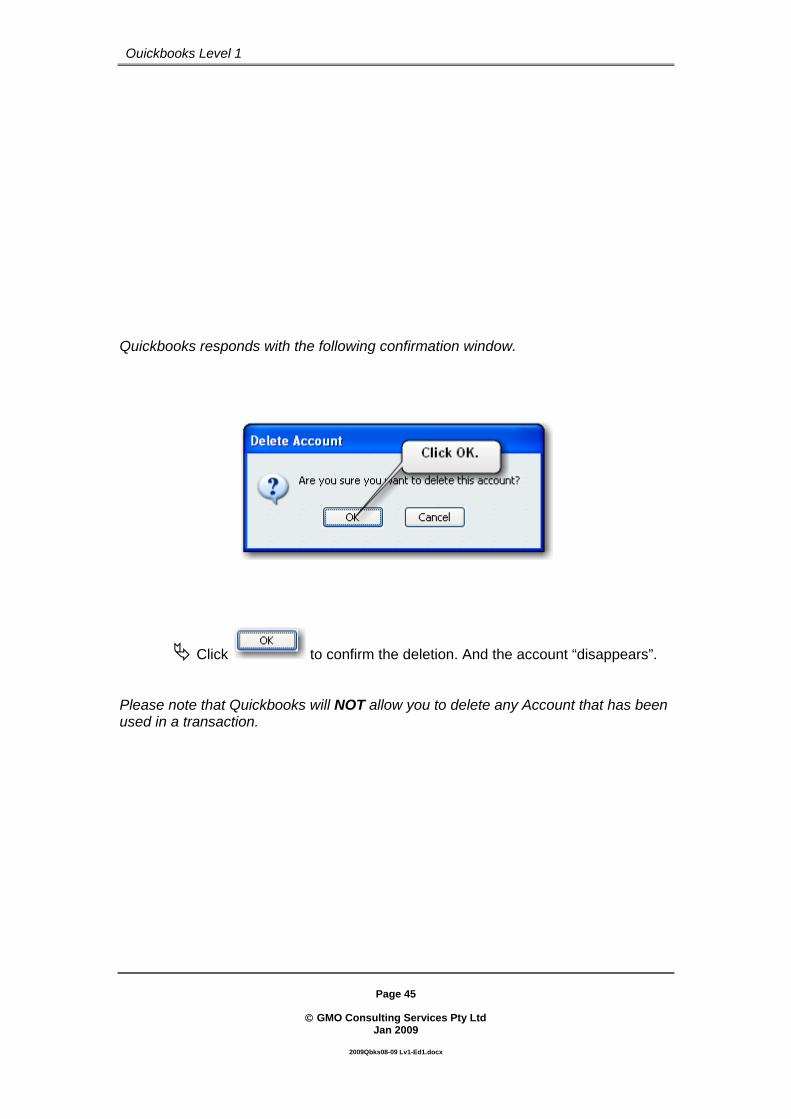
Quickbooks responds with the following confirmation window.
Click to confirm the deletion. And the account “disappears”. Please note that Quickbooks will NOT allow you to delete any Account that has been used in a transaction.

Page 46
© GMO Consulting Services Pty Ltd
Jan 2009
2009Qbks08-09 Lv1-Ed1.docx
Quickbooks Level 1
Creating Sub Accounts You may have noticed as you have been scrolling through the Chart of Accounts that some of the Items are indented. (ie: "Accounting" and "Legal Fees" are indented below Professional Fees.) These types of accounts are sub accounts of the Expense Account: Professional Fees. This enables us to group together “like” accounts. Sub Accounts are most useful to organise financial information in a more meaningful way.
Note: Whenever sub-accounts exist you should not use the main account for allocation. The main account automatically sums the amounts allocated to all its sub-accounts.
Click at the bottom and click New.
Select “Expense” and click
Proceed to the next page and enter the details as shown.
Page 47
© GMO Consulting Services Pty Ltd
Jan 2009
2009Qbks08-09 Lv1-Ed1.docx
Quickbooks Level 1
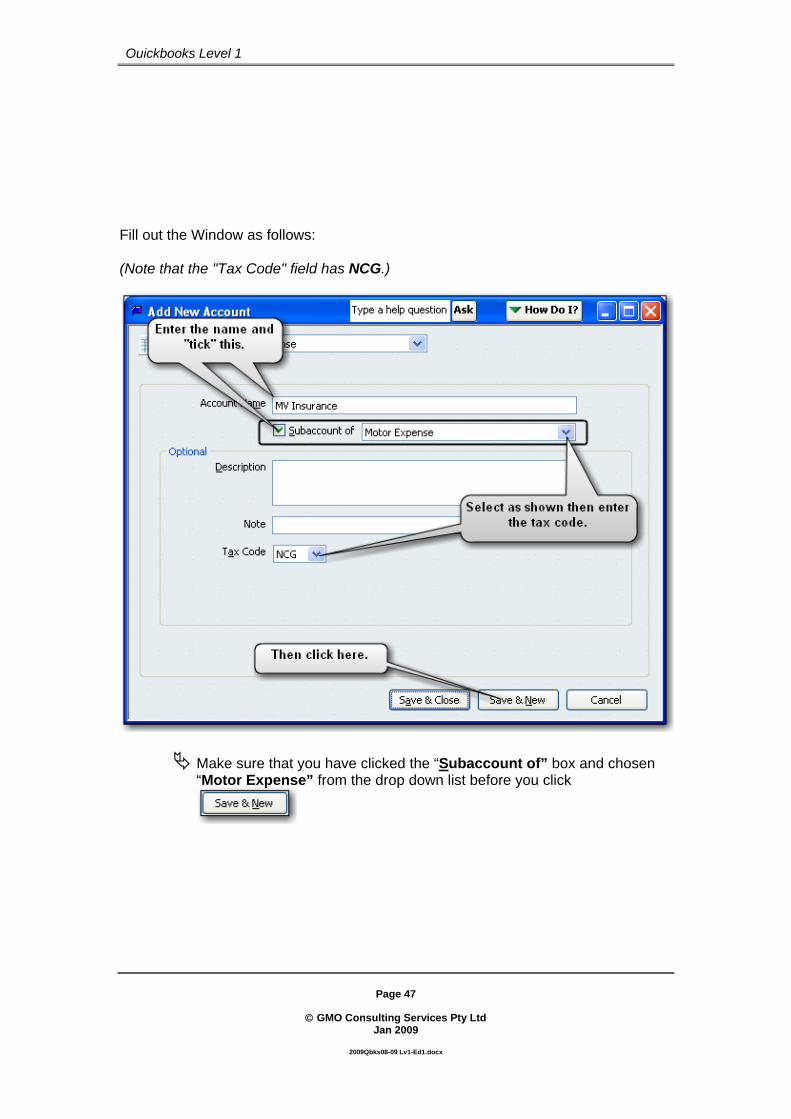
Fill out the Window as follows: (Note that the "Tax Code" field has NCG.)
Make sure that you have clicked the “Subaccount of” box and chosen “Motor Expense” from the drop down list before you click

Page 48
© GMO Consulting Services Pty Ltd
Jan 2009
2009Qbks08-09 Lv1-Ed1.docx
Quickbooks Level 1
EXERCISE
Create an Expense sub-account called MV Registration under Motor Expense in exactly the same way as described on the previous page. Enter NCF in the Tax Code field. Only part of the Motor Registration Fee includes GST. Later you will see how we deal with this by splitting the transaction.
The Chart of Accounts list showing MV Insurance and MV Registration as sub-accounts of Motor Expense:

Page 49
© GMO Consulting Services Pty Ltd
Jan 2009
2009Qbks08-09 Lv1-Ed1.docx
Quickbooks Level 1
REVISION EXERCISE
Create a new Equity Account called Drawings.
Alter (Edit) the name of the Expense Account Motor Expenses to Motor Vehicle Expenses.
Create a new Expense account called Rates and enter NCF in the Tax Code field.
Change (Edit) the Expense account Printing and Reproduction to read Printing and Stationery. Enter NCG in the Tax Code field.
Edit the Expense account Postage & Delivery by adding NCG in the “Tax Code” field.
Edit the Expense account Rent by adding NCG in the “Tax Code” field.
Delete the Expense account called Equipment Rental.
(HINT: A quick way to delete accounts is to press the Ctrl key down and press the letter D)
Delete the Expense account Cash Discounts.
Delete all the Income Accounts except for Sales.

Page 50
© GMO Consulting Services Pty Ltd
Jan 2009
2009Qbks08-09 Lv1-Ed1.docx
Quickbooks Level 1
REVISION EXERCISE
Edit the Expense account Legal Fees (under Professional Fees) by adding NCG in the “Tax Code” field.
Edit the Expense account Accounting (under “Professional Fees”) by adding NCG in the “Tax Code” field.
Alter the name of the Expense Account Depreciation Expense to simply Depreciation. Do not enter any tax code.
Delete both Expense sub-accounts Marketing and Office under Supplies, then delete the main account Supplies.
Alter (Edit) the Expense sub-account Fax under Telephone to Office Phone & FAX and enter NCG in the “Tax Code” field.
Delete the Expense account Company Secretarial.
Create two Expense sub accounts under Motor Vehicle Expenses and enter the appropriate tax code as shown here:
Petrol & LPG NCG Service & Repairs NCG
Create an Other Asset Account called Bonds Paid. HINT
Delete the Expense account Storage.

Page 51
© GMO Consulting Services Pty Ltd
Jan 2009
2009Qbks08-09 Lv1-Ed1.docx
Quickbooks Level 1
REVISION EXERCISE
Delete the Expense sub-accounts Gas & Electricity and Water under Utilities.
Change (Edit) the name of the Expense account Utilities to Electricity and enter NCG in the “Tax Code” field.
Delete the Expense sub-accounts Finance Charge, Loan Interest, and Mortgage. These are under Interest Expense.
Delete the Expense account Interest Expense.
Edit the Expense account Subscriptions by adding NCG in the “Tax Code” field.
Create a Fixed Asset Account called Plant & Equipment.
Create two “Fixed Asset” sub-accounts under Plant & Equipment called: At Cost and Less Accumulated Depreciation.
Edit the Other Current Liability account Tax Payable by changing the name to GST Payable.
Edit the Expense account Software Expense by adding NCG in the “Tax Code” field.
Edit the Expense sub-account Sickness and Accident Insurance (under Insurance) by re-naming it to Building Insurance and adding NCG in the “Tax Code” field.

Page 52
© GMO Consulting Services Pty Ltd
Jan 2009
2009Qbks08-09 Lv1-Ed1.docx
Quickbooks Level 1
REVISION EXERCISE
Alter (Edit) the Expense account Bank Service Charges to Bank Charges and adding “NCF” in the tax code field.
Edit the Expense account Mobile (under Telephone) by adding NCG in the “Tax Code” field.
Delete the Expense accounts Dues & Subscriptions, Expensed Equipment and Licenses and Permits.
Delete the “Other Income” accounts, Interest Income and Other Income.
Delete the “Other Expense” account called Other Expenses.
Delete the Expense sub accounts Building Repairs, Computer Repairs, & Equipment Repairs. These accounts are “under Repairs”.
Rename (Edit) the Expense account Repairs to Repairs & Maintenance and enter NCG in the “Tax Code” field.
Create a new Expense sub account under Insurance called Liability Insurance. Enter NCG in the “Tax Code” field.
Edit the Expense account Gifts & Donations by adding NCF in the “Tax Code” field.
Edit the Expense account Books and Publications by adding NCG in the “Tax Code” field.
Check the Chart of Accounts List shown on the next page. Make any alterations as required before you continue.
Page 53
© GMO Consulting Services Pty Ltd
Jan 2009
2009Qbks08-09 Lv1-Ed1.docx
Quickbooks Level 1
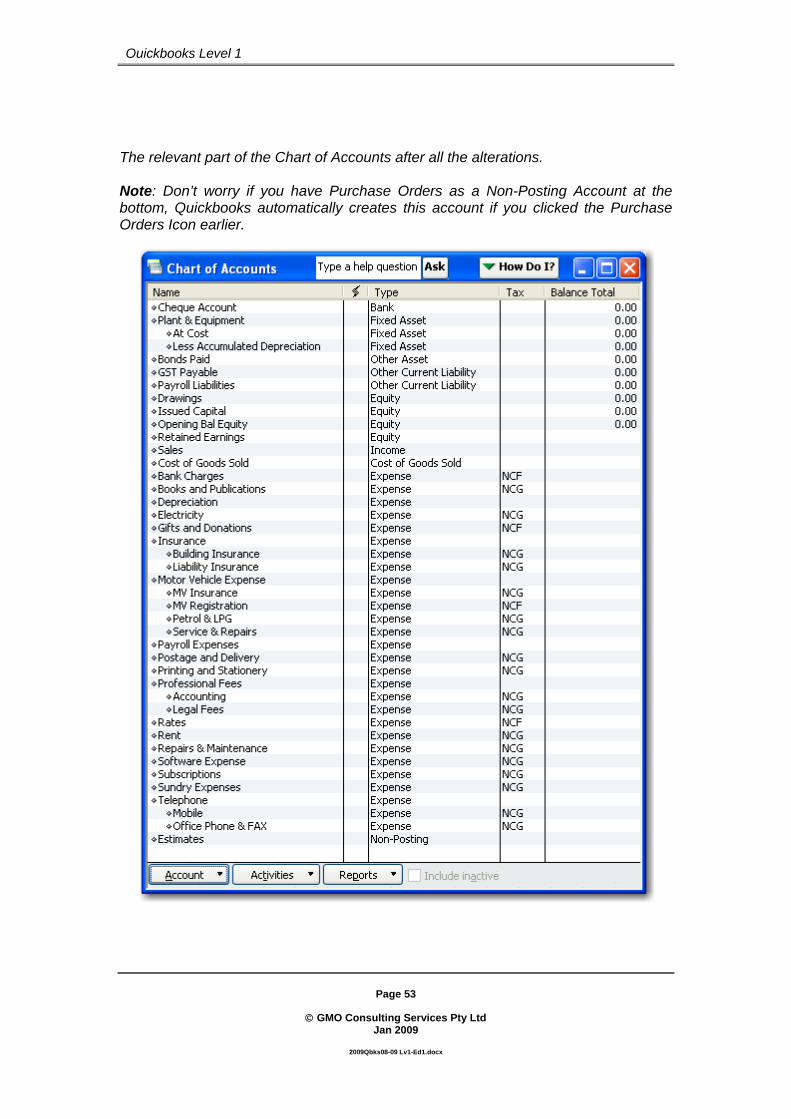
The relevant part of the Chart of Accounts after all the alterations. Note: Don’t worry if you have Purchase Orders as a Non-Posting Account at the bottom, Quickbooks automatically creates this account if you clicked the Purchase Orders Icon earlier.
Page 54
© GMO Consulting Services Pty Ltd
Jan 2009
2009Qbks08-09 Lv1-Ed1.docx
Quickbooks Level 1
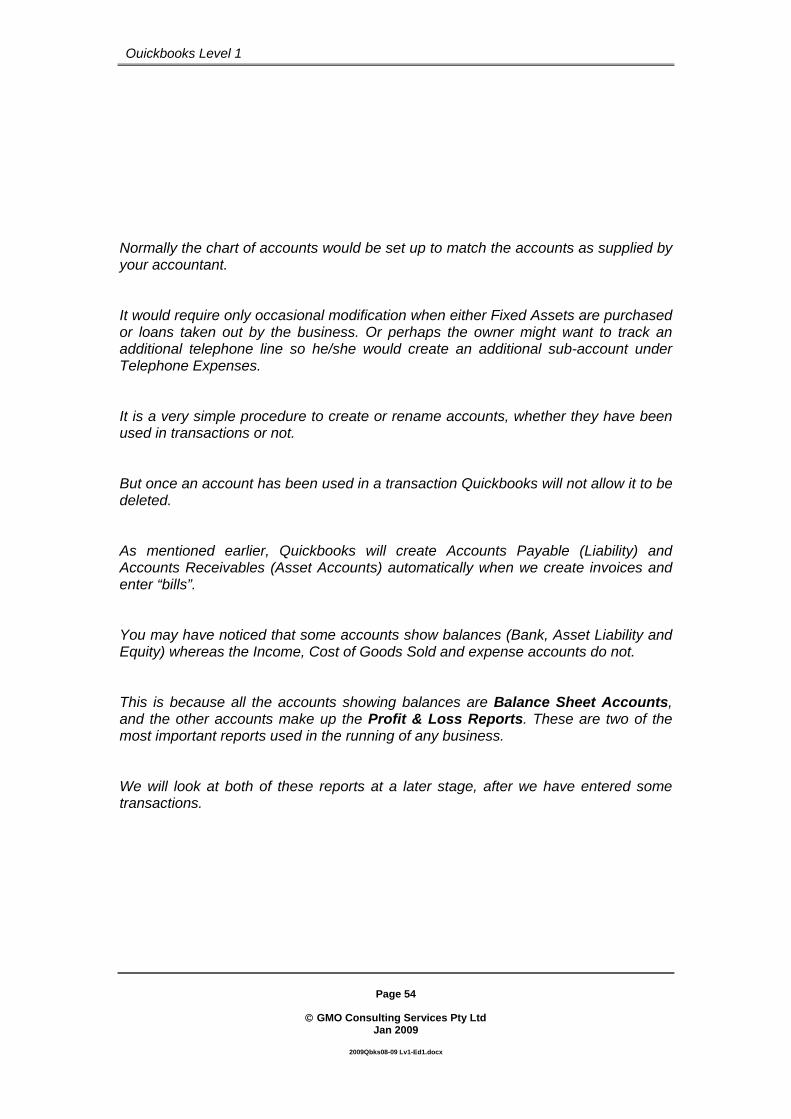
Normally the chart of accounts would be set up to match the accounts as supplied by your accountant. It would require only occasional modification when either Fixed Assets are purchased or loans taken out by the business. Or perhaps the owner might want to track an additional telephone line so he/she would create an additional sub-account under Telephone Expenses. It is a very simple procedure to create or rename accounts, whether they have been used in transactions or not. But once an account has been used in a transaction Quickbooks will not allow it to be deleted. As mentioned earlier, Quickbooks will create Accounts Payable (Liability) and Accounts Receivables (Asset Accounts) automatically when we create invoices and enter “bills”. You may have noticed that some accounts show balances (Bank, Asset Liability and Equity) whereas the Income, Cost of Goods Sold and expense accounts do not. This is because all the accounts showing balances are Balance Sheet Accounts, and the other accounts make up the Profit & Loss Reports. These are two of the most important reports used in the running of any business. We will look at both of these reports at a later stage, after we have entered some transactions.

Page 55
© GMO Consulting Services Pty Ltd
Jan 2009
2009Qbks08-09 Lv1-Ed1.docx
Quickbooks Level 1
PART 3 – SUMMARY We modified the Chart of Accounts quite extensively. We deleted unwanted accounts and created new accounts. In the case of the “expense accounts” we entered tax codes. These tax codes will automatically be entered when the accounts are used in a transaction. We also set up “sub-accounts” – which allow us to “group” together related accounts, such as Motor Vehicle expenses etc. As stated earlier, this part of setting up the data file should be done in conjunction with your accountant, particularly if you aren’t sure about which accounts might be required for your data file.

Page 56
© GMO Consulting Services Pty Ltd
Jan 2009
2009Qbks08-09 Lv1-Ed1.docx
Quickbooks Level 1
Part 4 - Recording Deposits We will now enter the initial funding that the owner is investing in the business.
Close any open windows by pressing the Esc key at the top left of the keyboard and make sure the “Home Page” is displayed.
Click in the Banking flow chart of the Home Page and press Tab to move to the date field,
Alter the date to 2/1/09 and press Tab three times. The cursor should be in the “From Account” column.
Type the letters “is”. Quickbooks matches to the account Issued Capital (which should have been created earlier). Press tab once to move to the memo field and type in “Initial Funding for the business”. Press tab three more times to move to the “Amount” column. Enter 50000. (You do not need to enter any commas or decimal points. Quickbooks will enter these for you.)
Then press Tab once; the cursor will move to the second line.
Please note, that we would only ever enter non BAS related transactions in this way – any BAS related transactions should be entered using Invoices, Sales Receipts, “Bills”, Cheques or Credit card transactions.
Page 57
© GMO Consulting Services Pty Ltd
Jan 2009
2009Qbks08-09 Lv1-Ed1.docx
Quickbooks Level 1
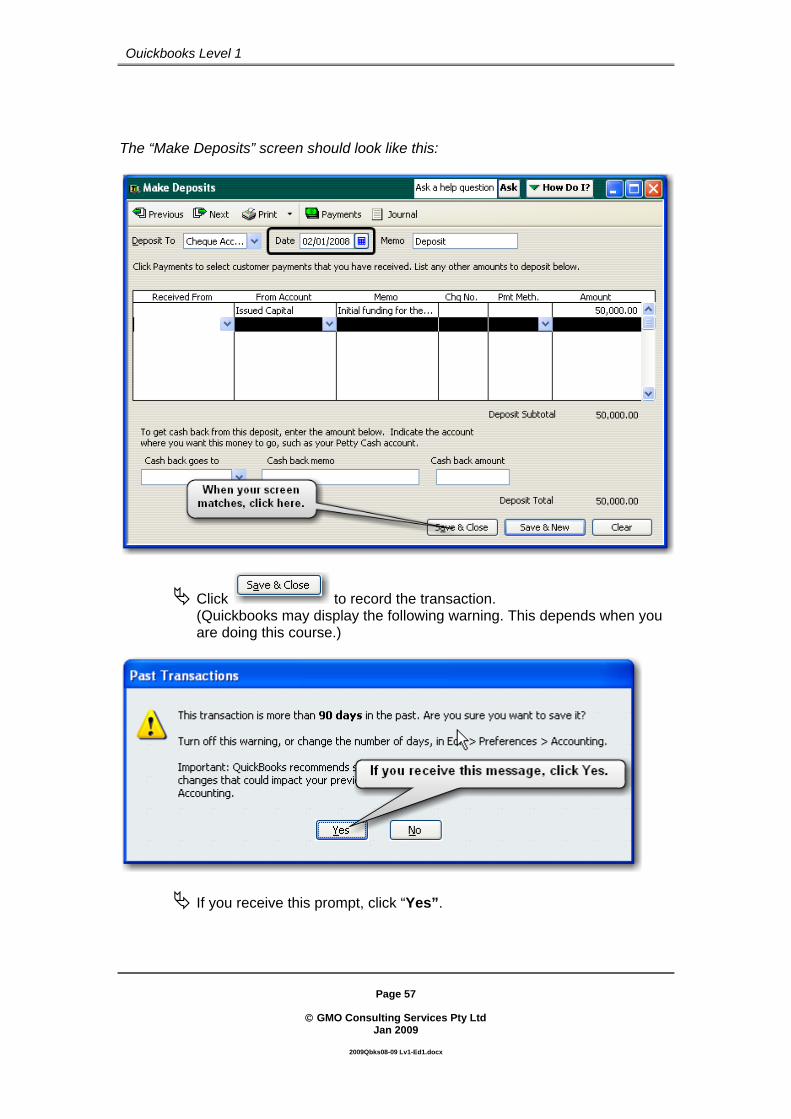
The “Make Deposits” screen should look like this:
Click to record the transaction. (Quickbooks may display the following warning. This depends when you are doing this course.)
If you receive this prompt, click “Yes”.

Page 58
© GMO Consulting Services Pty Ltd
Jan 2009
2009Qbks08-09 Lv1-Ed1.docx
Quickbooks Level 1
To see where this transaction has been “stored”, click on the Home Page.
The “Cheque Account Register” showing the deposit that has been entered.

Page 59
© GMO Consulting Services Pty Ltd
Jan 2009
2009Qbks08-09 Lv1-Ed1.docx
Quickbooks Level 1
To recap: We have entered a deposit transaction of $50,000.00 into the Cheque Account. This is the money that the owner of the business has “invested” to start the business. The owner of the business has leased a warehouse from which to conduct the business. He/she has paid a month’s rent in advance as well as a month’s rent as security (a bond). We will now enter a cheque into Quickbooks to record the rent and bond that has been paid. We will be splitting the initial transaction between the Bonds Paid Asset account, the Rent Expense account and the GST will automatically be entered into the Other Current Liability Account GST Paid. We will also be entering the details of the Real Estate Agent to whom the cheque was paid. Note: Splitting a transaction is when you wish to allocate a transaction to more than one account. PART 4 – SUMMARY In this section we entered a simple transaction using the “Make a Deposit” function. Normally, if there are GST implications we would NOT enter a transaction in this way, as there is no way of tracking any GST collected. Perhaps in future versions of Quickbooks we will be able to assign a tax code to a simple deposit. We were able to record the deposit in this way because it was a financial transaction and there was no GST implication. It was simply recording the fact that the owners’ funds were “given” to the business.
Page 60
© GMO Consulting Services Pty Ltd
Jan 2009
2009Qbks08-09 Lv1-Ed1.docx
Quickbooks Level 1
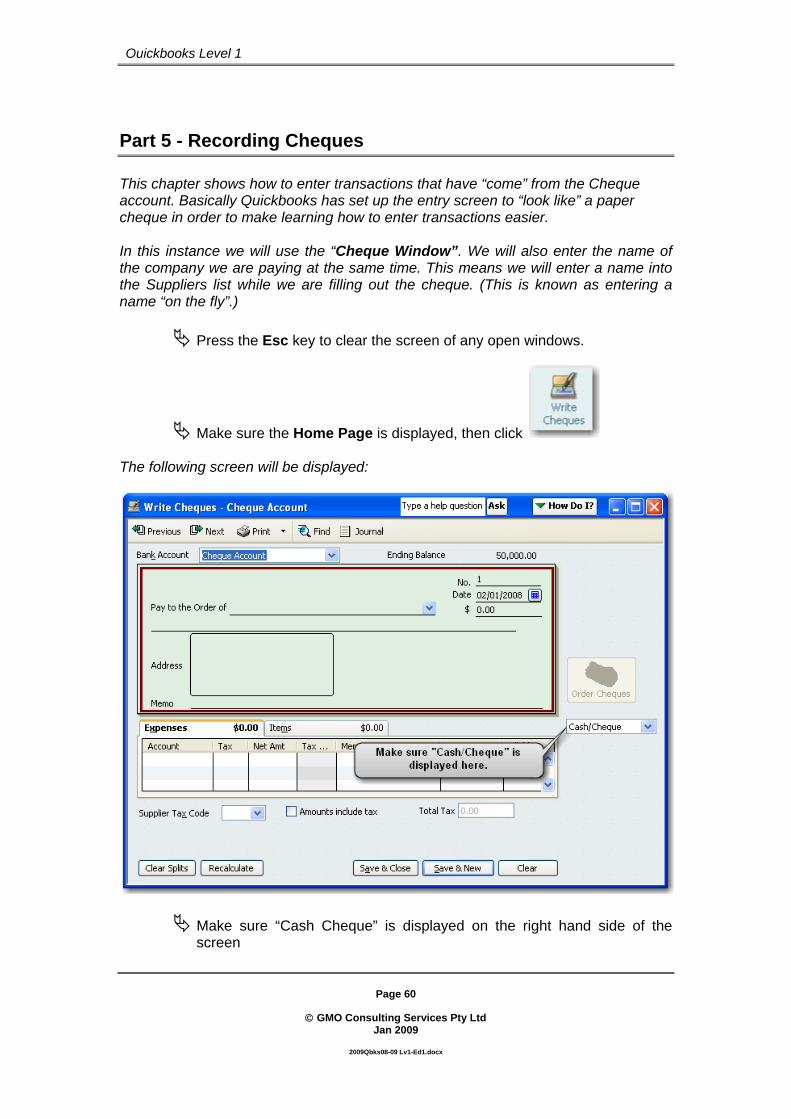
Part 5 - Recording Cheques This chapter shows how to enter transactions that have “come” from the Cheque account. Basically Quickbooks has set up the entry screen to “look like” a paper cheque in order to make learning how to enter transactions easier. In this instance we will use the “Cheque Window”. We will also enter the name of the company we are paying at the same time. This means we will enter a name into the Suppliers list while we are filling out the cheque. (This is known as entering a name “on the fly”.)
Press the Esc key to clear the screen of any open windows.
Make sure the Home Page is displayed, then click The following screen will be displayed:
Make sure “Cash Cheque” is displayed on the right hand side of the screen

Page 61
© GMO Consulting Services Pty Ltd
Jan 2009
2009Qbks08-09 Lv1-Ed1.docx
Quickbooks Level 1
Click to the right of the “No.” field. (This is located at the top right of the window.) And enter 1001.
Then alter the date to 2/1/2009 and press Tab.
The cursor should be in the “Pay to the Order of” field. Type “Shark Real Estate and press the Tab key.
Note the response Quickbooks will display on the next page.

Page 62
© GMO Consulting Services Pty Ltd
Jan 2009
2009Qbks08-09 Lv1-Ed1.docx
Quickbooks Level 1
Click Quickbooks asks what type of name you wish to set up
Click as we will treat Shark Real Estate as a “Supplier”.

Page 63
© GMO Consulting Services Pty Ltd
Jan 2009
2009Qbks08-09 Lv1-Ed1.docx
Quickbooks Level 1
Enter the details as shown here:
Click the at the top of the window, when you have entered the address and other details, and enter the ABN as shown on the following page:

Page 64
© GMO Consulting Services Pty Ltd
Jan 2009
2009Qbks08-09 Lv1-Ed1.docx
Quickbooks Level 1
Be sure to enter the ABN accurately as Quickbooks verifies the number and will not accept a “made up” one. Don’t alter the “as of” date as it is irrelevant in this exercise because we are not entering any opening balances.
Click to continue. Quickbooks takes you back to the “Write Cheque” window to continue recording the cheque transaction.

Page 65
© GMO Consulting Services Pty Ltd
Jan 2009
2009Qbks08-09 Lv1-Ed1.docx
Quickbooks Level 1
At this point the “Write Cheques” screen should look like this:
Enter 3570 in the “$” field and press Tab twice to move to the Memo field.
Type in Rent for January & Bond and press the Tab key to move to the Account field.
Go to the next page to see how the “Write Cheques” screen should look.

Page 66
© GMO Consulting Services Pty Ltd
Jan 2009
2009Qbks08-09 Lv1-Ed1.docx
Quickbooks Level 1
At this point the “Write Cheques” screen should look like this:
Click on the drop down arrow that is displayed in the Account column. Quickbooks displays the list of expense accounts
Scroll down and click on Rent.
Press the Tab key to move to the “Net Amount” column and enter 1700 by typing over the 3,245.45 that is displayed.
Press the Tab key to move to the Account column on the second line. (Note how Quickbooks automatically shows the balance on the second line – this will only occur if you use the tab key).
Type the letters bo and Quickbooks selects the Asset account Bonds Paid.
Your screen should look like the one shown on the next page.
Page 67
© GMO Consulting Services Pty Ltd
Jan 2009
2009Qbks08-09 Lv1-Ed1.docx
Quickbooks Level 1
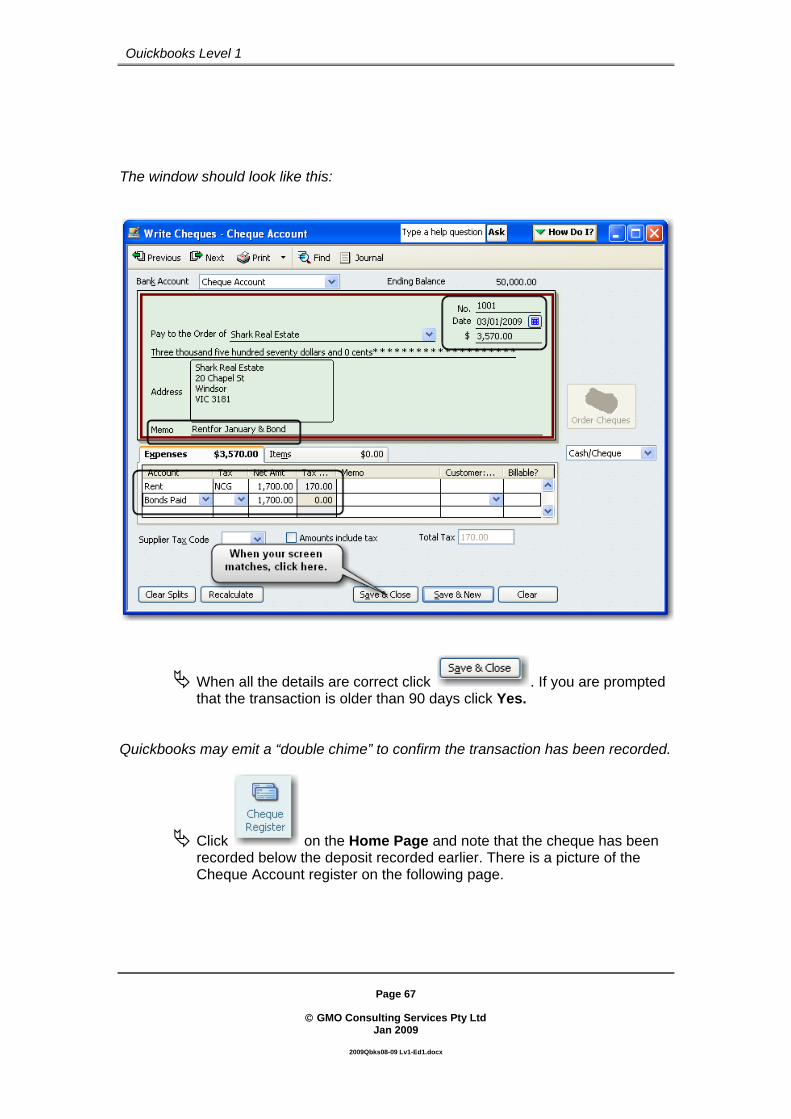
The window should look like this:
When all the details are correct click . If you are prompted that the transaction is older than 90 days click Yes.
Quickbooks may emit a “double chime” to confirm the transaction has been recorded.
Click on the Home Page and note that the cheque has been recorded below the deposit recorded earlier. There is a picture of the Cheque Account register on the following page.

Page 68
© GMO Consulting Services Pty Ltd
Jan 2009
2009Qbks08-09 Lv1-Ed1.docx
Quickbooks Level 1
The Cheque Account Register showing the transactions entered so far.
Press the Esc key to close the register.
Page 69
© GMO Consulting Services Pty Ltd
Jan 2009
2009Qbks08-09 Lv1-Ed1.docx
Quickbooks Level 1
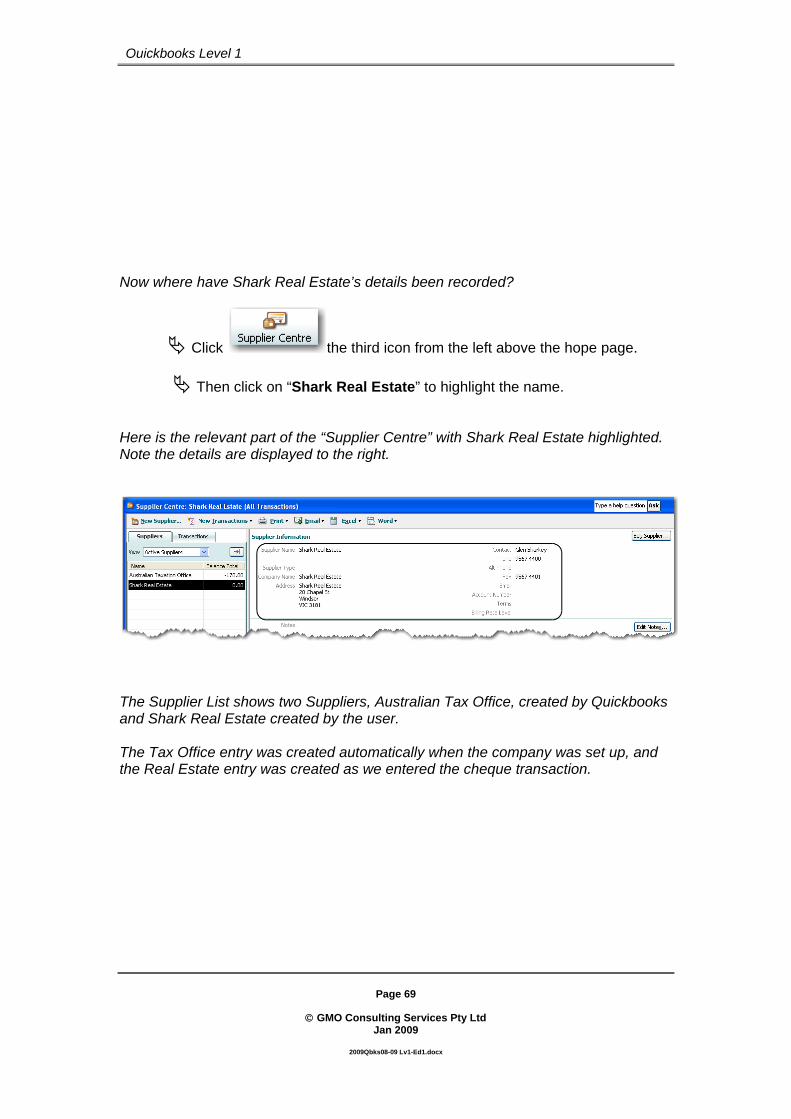
Now where have Shark Real Estate’s details been recorded?
Click the third icon from the left above the hope page.
Then click on “Shark Real Estate” to highlight the name. Here is the relevant part of the “Supplier Centre” with Shark Real Estate highlighted. Note the details are displayed to the right.
The Supplier List shows two Suppliers, Australian Tax Office, created by Quickbooks and Shark Real Estate created by the user. The Tax Office entry was created automatically when the company was set up, and the Real Estate entry was created as we entered the cheque transaction.

Page 70
© GMO Consulting Services Pty Ltd
Jan 2009
2009Qbks08-09 Lv1-Ed1.docx
Quickbooks Level 1
PART 5 – SUMMARY In this section we entered a simple cheque transaction showing that we had paid the Real Estate Agent an amount for the rent as well as the bond. Quickbooks automatically deducted 1/11th of the rent and placed the amount into the “Tax Amt” column. This was because we had entered a “default” tax code against the rent expense account earlier. (The bond, being a financial transaction did not include any GST). Whilst we entered the cheque transaction, we also entered the details of the real estate agency into the “Suppliers Centre”.
Page 71
© GMO Consulting Services Pty Ltd
Jan 2009
2009Qbks08-09 Lv1-Ed1.docx
Quickbooks Level 1
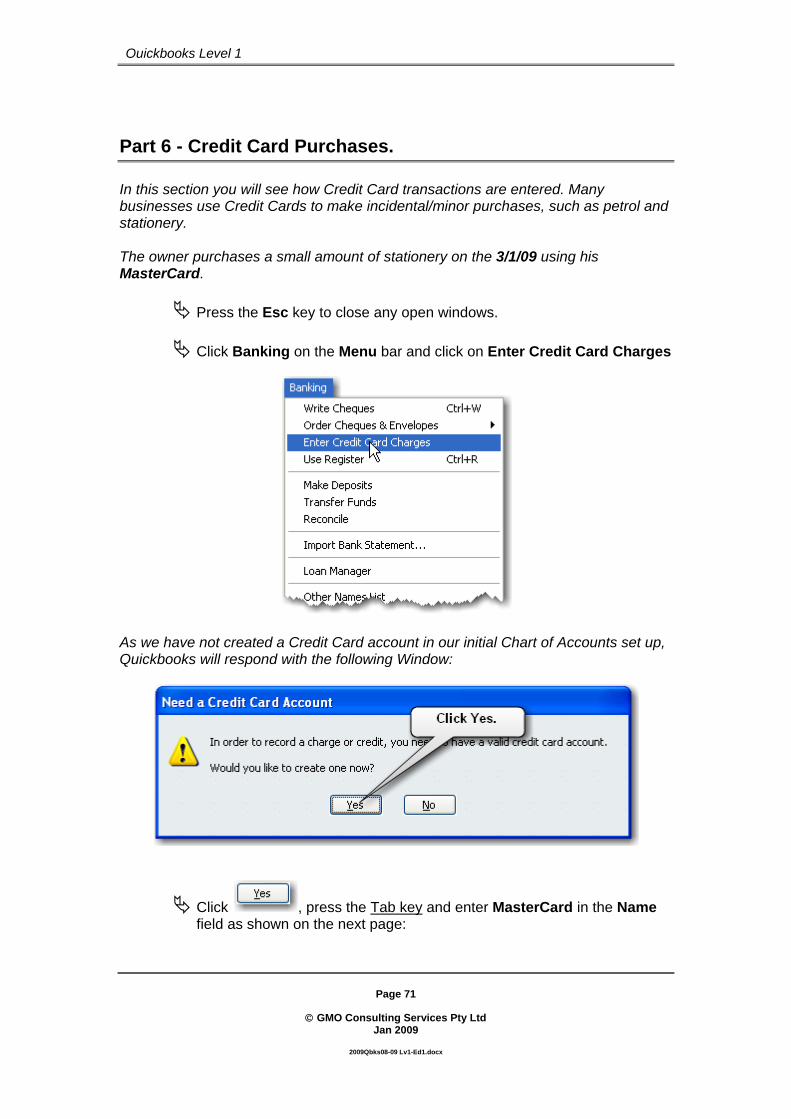
Part 6 - Credit Card Purchases. In this section you will see how Credit Card transactions are entered. Many businesses use Credit Cards to make incidental/minor purchases, such as petrol and stationery. The owner purchases a small amount of stationery on the 3/1/09 using his MasterCard.
Press the Esc key to close any open windows.
Click Banking on the Menu bar and click on Enter Credit Card Charges
As we have not created a Credit Card account in our initial Chart of Accounts set up, Quickbooks will respond with the following Window:
Click , press the Tab key and enter MasterCard in the Name field as shown on the next page:

Page 72
© GMO Consulting Services Pty Ltd
Jan 2009
2009Qbks08-09 Lv1-Ed1.docx
Quickbooks Level 1
Enter “Mastercard” in the Name field as shown here:
Click

Page 73
© GMO Consulting Services Pty Ltd
Jan 2009
2009Qbks08-09 Lv1-Ed1.docx
Quickbooks Level 1
Fill out as shown in the picture below: HINT: When you enter the name “Officeworld” in the “Purchased From” field (and
press the Tab key), click to enter the name into the Supplier List. This saves time when you don't want to enter any Supplier details. The address etc. can always be entered at a later stage.
Note: The Reference number would be the number on the copy of the credit card docket. Or you could enter the Tax Invoice number if you preferred.
When you have entered all the details, click and click “Yes” if you are prompted that the transaction is older than 90 days.
Now proceed with the exercises on the next few pages. These are based on the “Write Cheques” and the “Credit Card” examples, you have just entered. Be sure to read all the details in each “box” before you enter the transaction. This will help you “get a clearer picture” of the scenario.
Page 74
© GMO Consulting Services Pty Ltd
Jan 2009
2009Qbks08-09 Lv1-Ed1.docx
Quickbooks Level 1
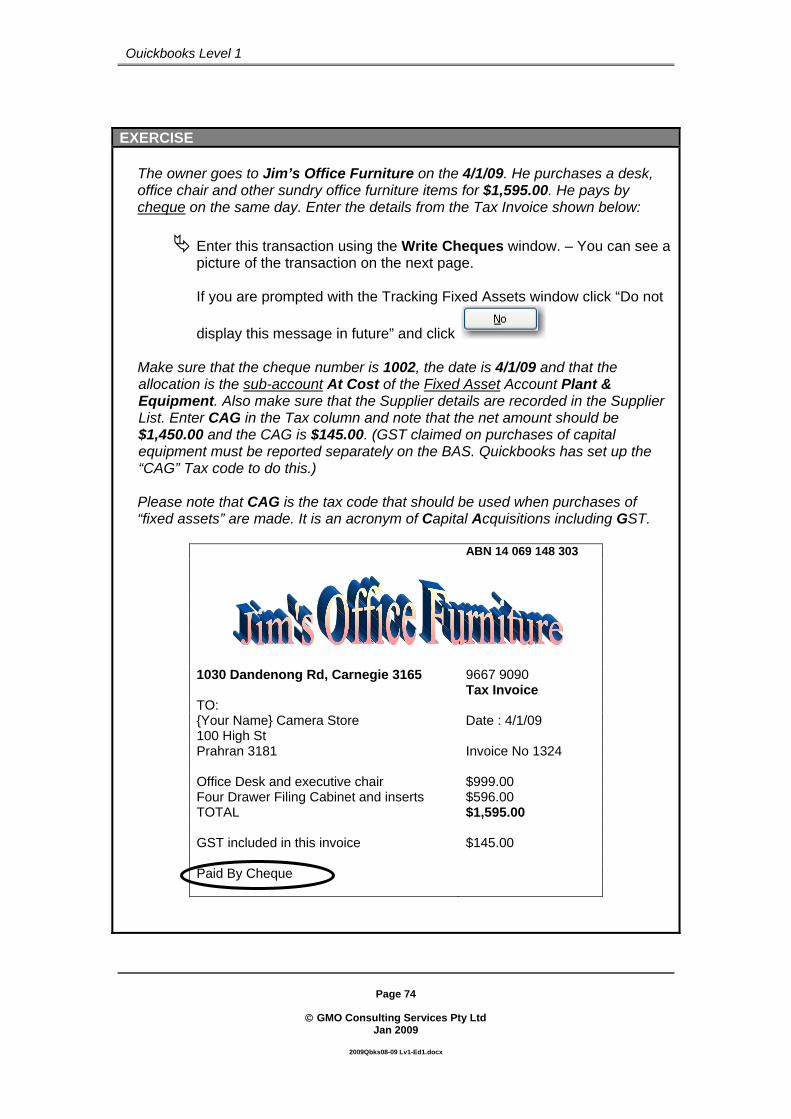
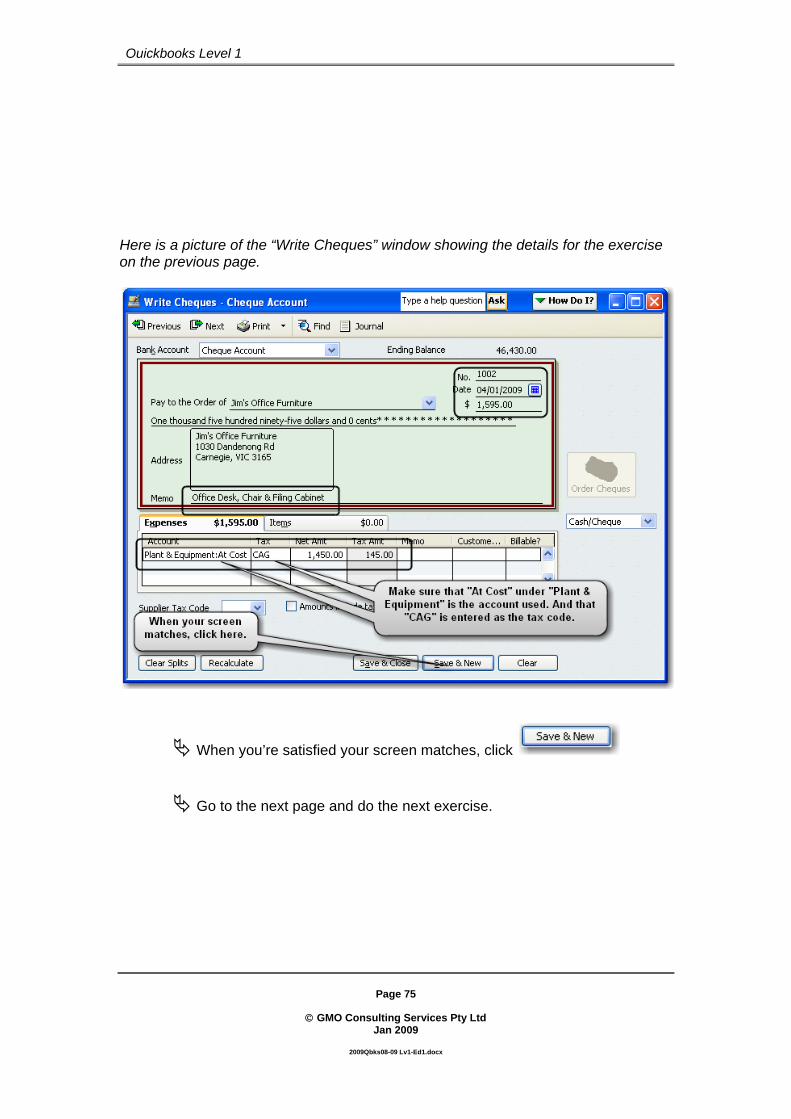
EXERCISE
The owner goes to Jim’s Office Furniture on the 4/1/09. He purchases a desk, office chair and other sundry office furniture items for $1,595.00. He pays by cheque on the same day. Enter the details from the Tax Invoice shown below:
Enter this transaction using the Write Cheques window. – You can see a picture of the transaction on the next page. If you are prompted with the Tracking Fixed Assets window click “Do not
display this message in future” and click
Make sure that the cheque number is 1002, the date is 4/1/09 and that the allocation is the sub-account At Cost of the Fixed Asset Account Plant & Equipment. Also make sure that the Supplier details are recorded in the Supplier List. Enter CAG in the Tax column and note that the net amount should be $1,450.00 and the CAG is $145.00. (GST claimed on purchases of capital equipment must be reported separately on the BAS. Quickbooks has set up the “CAG” Tax code to do this.)
Please note that CAG is the tax code that should be used when purchases of “fixed assets” are made. It is an acronym of Capital Acquisitions including GST.
ABN 14 069 148 303
1030 Dandenong Rd, Carnegie 3165 9667 9090 Tax Invoice TO: {Your Name} Camera Store Date : 4/1/09 100 High St Prahran 3181 Invoice No 1324 Office Desk and executive chair $999.00 Four Drawer Filing Cabinet and inserts $596.00 TOTAL $1,595.00 GST included in this invoice $145.00 Paid By Cheque
Page 75
© GMO Consulting Services Pty Ltd
Jan 2009
2009Qbks08-09 Lv1-Ed1.docx
Quickbooks Level 1
Here is a picture of the “Write Cheques” window showing the details for the exercise on the previous page.
When you’re satisfied your screen matches, click
Go to the next page and do the next exercise.

Page 76
© GMO Consulting Services Pty Ltd
Jan 2009
2009Qbks08-09 Lv1-Ed1.docx
Quickbooks Level 1
EXERCISE CONTINUED
The owner goes to Computer Heaven, and purchases a computer, and printer. He again pays by cheque (1003).
Enter the computer cost on the first line and the printer cost on the second line. Allocate each line to the Fixed Asset sub-account At Cost under Plant & Equipment. Again, enter CAG in the Tax Column on each line. Enter the details of each line in the memo field. Make sure that you enter the date shown on the Tax Invoice. – Note that there is a picture of the transaction on the following page.
Here is the Tax Invoice:
Tax Invoice ABN: 84 434 201 642
ABN 84 434 201 642 Computer Heaven 45 Commercial Rd Prahran 3181 TO: {Your Name} Camera Store Date : 5 January 2009 100 High St Armadale 3143 Invoice Number 1324 P4 Computer $3,000.00 HP Laser Printer $450.00
SUB TOTAL $3,450.00 GST $345.00
TOTAL $3,795.00
Paid By Cheque with thanks

Page 77
© GMO Consulting Services Pty Ltd
Jan 2009
2009Qbks08-09 Lv1-Ed1.docx
Quickbooks Level 1
Here is a picture of “Write Cheques” showing the details for the exercise on the previous page.
When your screen matches, click

Page 78
© GMO Consulting Services Pty Ltd
Jan 2009
2009Qbks08-09 Lv1-Ed1.docx
Quickbooks Level 1
EXERCISE CONTINUED
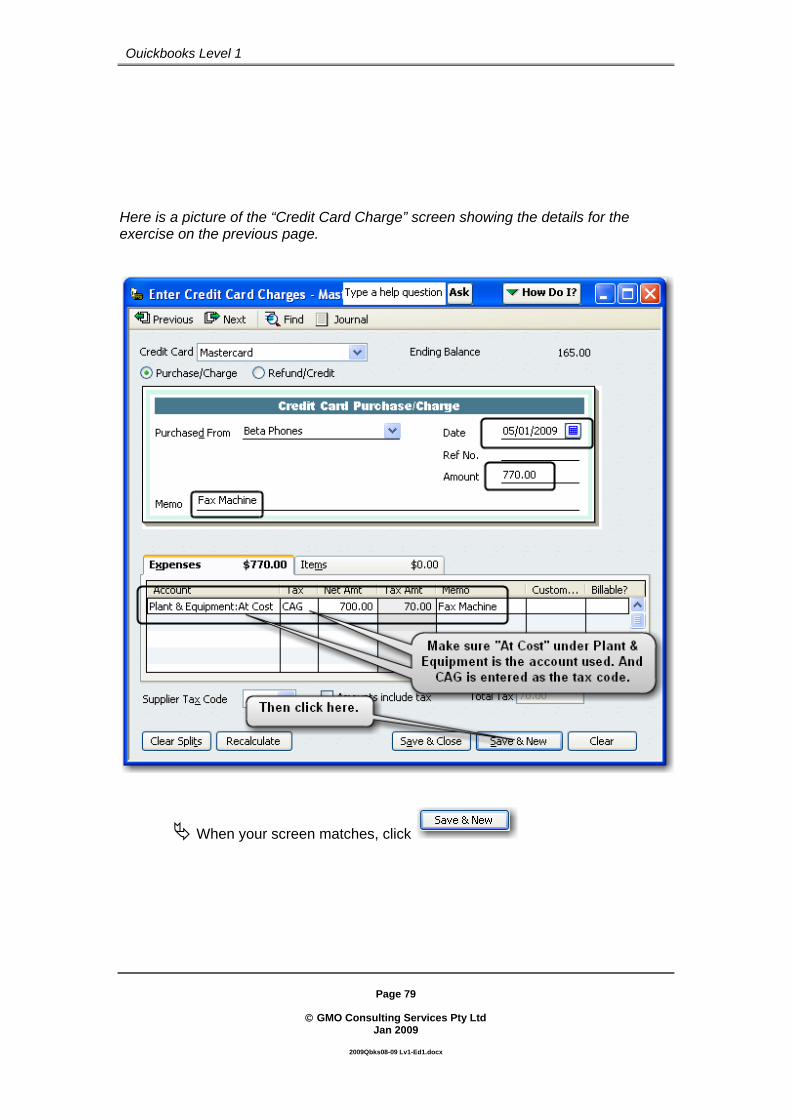
Later in the day (5/1/09) he goes to Beta Phones and purchases a Fax machine. He pays for it with his MasterCard. Use Quick Add to enter the name only for Beta Phones.
Record this transaction and, again, allocate it to the sub-account At Cost under Plant & Equipment. Don't forget to enter CAG in the Tax column, (Note that the net amount is 700.00 and that the Tax amount is 70.00.)There is a picture of the transaction on the following page.
The Tax Invoice is shown here:
Tax Invoice ABN 14 069 148 303
160 Chapel St Prahran 3181 Date : 05/01/09 TO: {Your Name} Camera Store 100 High St Prahran 3181 Invoice No 1324 Panasonic Fax model PN1047 770.00
TOTAL 770.00
GST included in this invoice $70.00
Paid By Mastercard
Page 79
© GMO Consulting Services Pty Ltd
Jan 2009
2009Qbks08-09 Lv1-Ed1.docx
Quickbooks Level 1
Here is a picture of the “Credit Card Charge” screen showing the details for the exercise on the previous page.
When your screen matches, click

Page 80
© GMO Consulting Services Pty Ltd
Jan 2009
2009Qbks08-09 Lv1-Ed1.docx
Quickbooks Level 1
EXERCISE CONTINUED
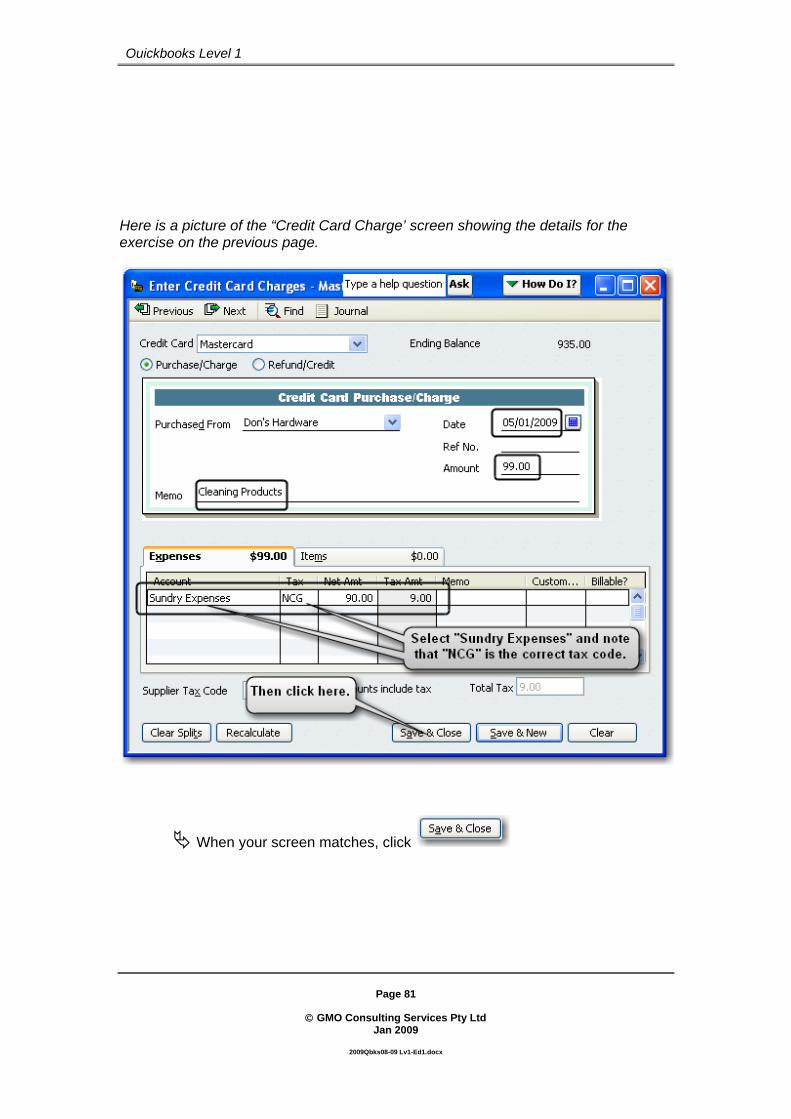
On the way back to the warehouse the owner stops at the local hardware store and purchases $99.00 worth of cleaning products. The MasterCard is used to pay for these goods. You can use “Quick Add” again to enter the Supplier name only.
Record this transaction and allocate it to Sundry Expenses. The date is 5/1/09. The net amount of the purchase is 90.00 and the Tax amount is 9.00. (When you allocate to Sundry Expenses the default tax code NCG should automatically be entered if all the alterations to the Chart of Accounts were done correctly). Note the picture on the next page.
Here is the Tax Invoice:
Don’s Hardware ABN 77 427 890 132 Tax Invoice Drano $ 13.00 Windex Forte $ 6.00 Sugar Soap $ 15.50 Scrub Brush $ 16.00 Scraper $ 17.50 Disinfectant $ 14.50 Polish Cloth $ 16.50 TOTAL $ 99.00 Paid by Mastercard GST included $ 9.00 Thank you for shopping at Don’s Hardware Date 5/1/09
Page 81
© GMO Consulting Services Pty Ltd
Jan 2009
2009Qbks08-09 Lv1-Ed1.docx
Quickbooks Level 1
Here is a picture of the “Credit Card Charge’ screen showing the details for the exercise on the previous page.
When your screen matches, click
Page 82
© GMO Consulting Services Pty Ltd
Jan 2009
2009Qbks08-09 Lv1-Ed1.docx
Quickbooks Level 1
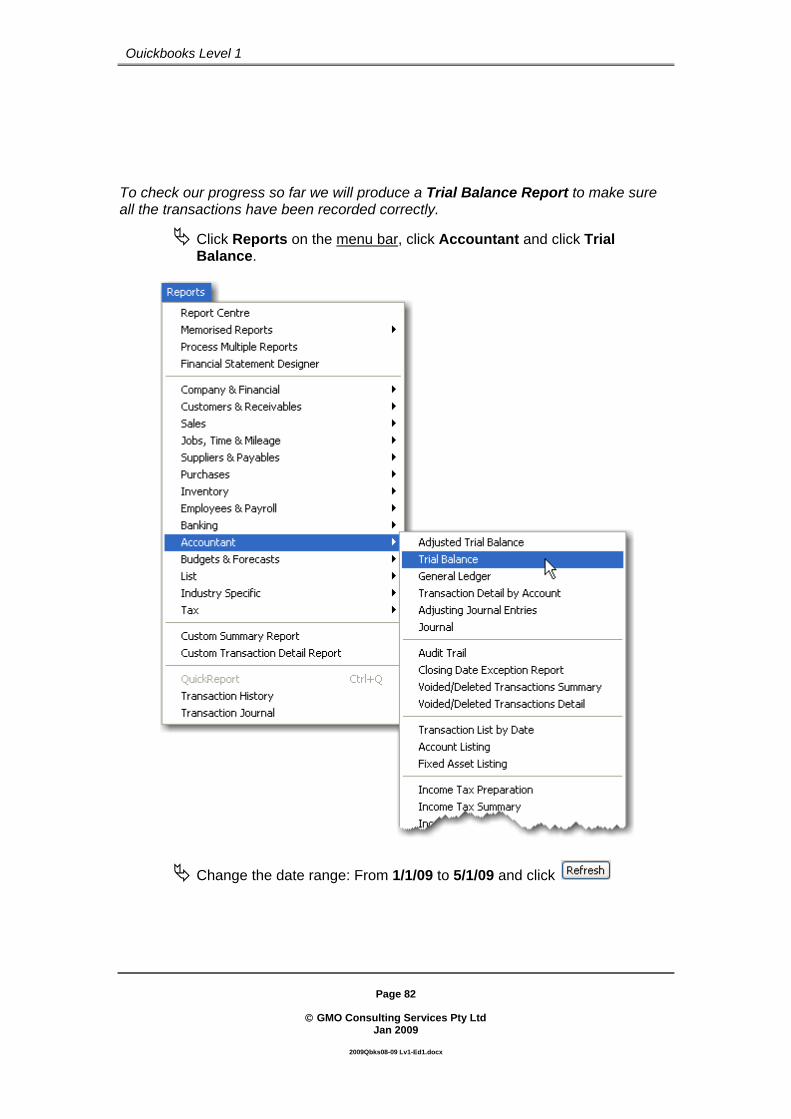
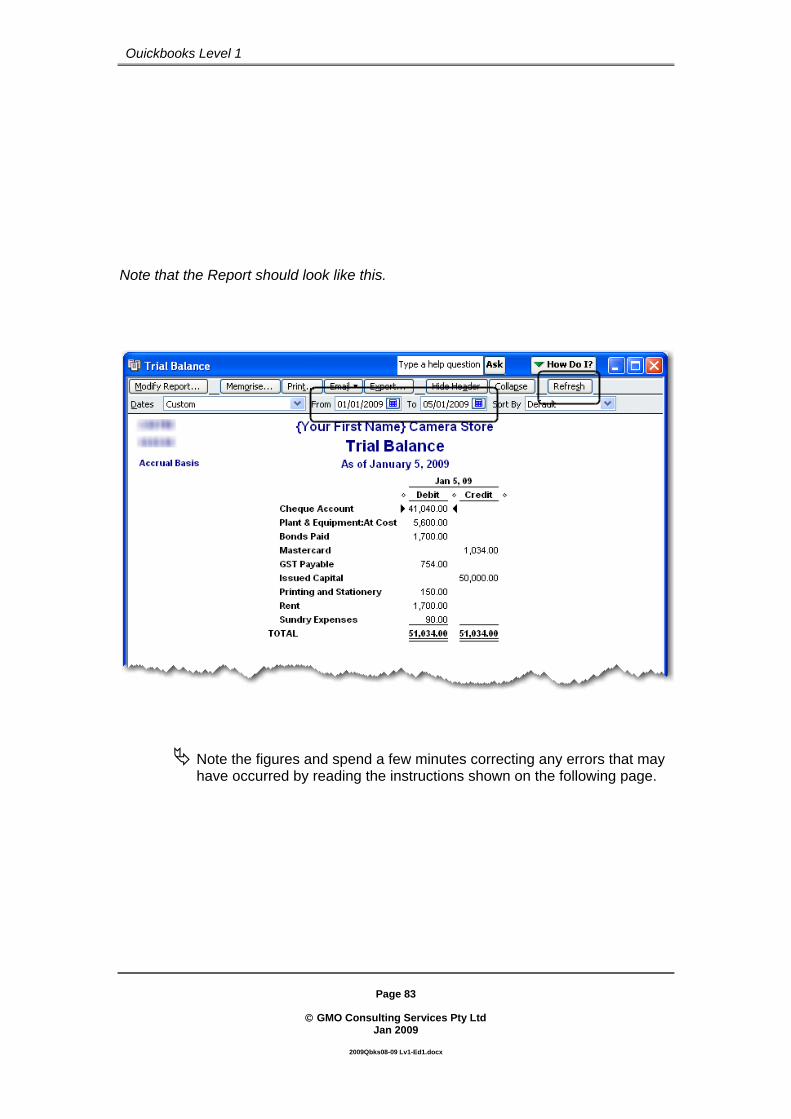
To check our progress so far we will produce a Trial Balance Report to make sure all the transactions have been recorded correctly.
Click Reports on the menu bar, click Accountant and click Trial Balance.
Change the date range: From 1/1/09 to 5/1/09 and click
Page 83
© GMO Consulting Services Pty Ltd
Jan 2009
2009Qbks08-09 Lv1-Ed1.docx
Quickbooks Level 1
Note that the Report should look like this.
Note the figures and spend a few minutes correcting any errors that may have occurred by reading the instructions shown on the following page.

Page 84
© GMO Consulting Services Pty Ltd
Jan 2009
2009Qbks08-09 Lv1-Ed1.docx
Quickbooks Level 1
HINT: If you do not have some of the transactions recorded it may be that you have recorded wrong dates. As Quickbooks is entirely date driven, any transactions that do not fall within the date range 1/1/09 to 5/1/09 will be ignored. Increase the date range and see if all the transactions appear. If you have wrong figures, simply place the cursor over the wrong figure and when it
turns to a “magnifying glass” with a Z inside
, double click the mouse and Quickbooks will take you to a detailed report. Again, place the cursor over the figure you wish to change and double click. Quickbooks will then take you back to the original transaction where you can make any necessary alterations. Even if your report is correct, spend a few minutes “zooming back” to the original transaction. The “Quickzoom” feature in Quickbooks is a very powerful tool that enables you to get return to the original transaction from virtually any report.
Press the Esc key to close the report when it matches the previous page.
If you are prompted with the following message click as shown in the messages on the screen.
Click the “Do not display this message in the future” checkbox and then click

Page 85
© GMO Consulting Services Pty Ltd
Jan 2009
2009Qbks08-09 Lv1-Ed1.docx
Quickbooks Level 1
PART 6 – SUMMARY In part 6 we created a “credit card” account and entered a transaction. The method of entering Credit Card transactions is virtually the same as entering cheques, except the screen looks different. The different screen layouts help avoid confusion. Many small businesses now use credit cards for small purchases, as there is a reduction in “bank charge” – as long as the credit card is paid out in full at the appropriate time. Otherwise credit cards can be become “very expensive” overdrafts. Now that we have to account for all GST credits, the credit card is a very good way of organising all those small expenditures, as they are all displayed on the statement. We also did some exercises that covered both recording “Cheque” as well as “Credit Card” transactions. Finally we looked at a “Trial Balance” report. This report adds up the transactions in all the accounts used so far. This report was produced for the date range from 1/1/09 to 5/1/09. This made sure that all transactions were entered with appropriate dates.
Page 86
© GMO Consulting Services Pty Ltd
Jan 2009
2009Qbks08-09 Lv1-Ed1.docx
Quickbooks Level 1
Part 7 - Entering Suppliers This chapter deals with entering details of the suppliers that you will be dealing with. The advantage of this is that you have all the details in the database, so it’s relatively easy to contact them by simply looking up the details in Quickbooks. Earlier we added Shark Real Estate “on the fly” whilst we were recording our first transaction. (We paid the rent and the bond). We will now open the Supplier Centre and add all the relevant details of the suppliers we will be dealing with.
Press the Esc key to close any open windows. Make sure the Home Page is displayed.
Click at the top left corner of the Home Page.
Page 87
© GMO Consulting Services Pty Ltd
Jan 2009
2009Qbks08-09 Lv1-Ed1.docx
Quickbooks Level 1
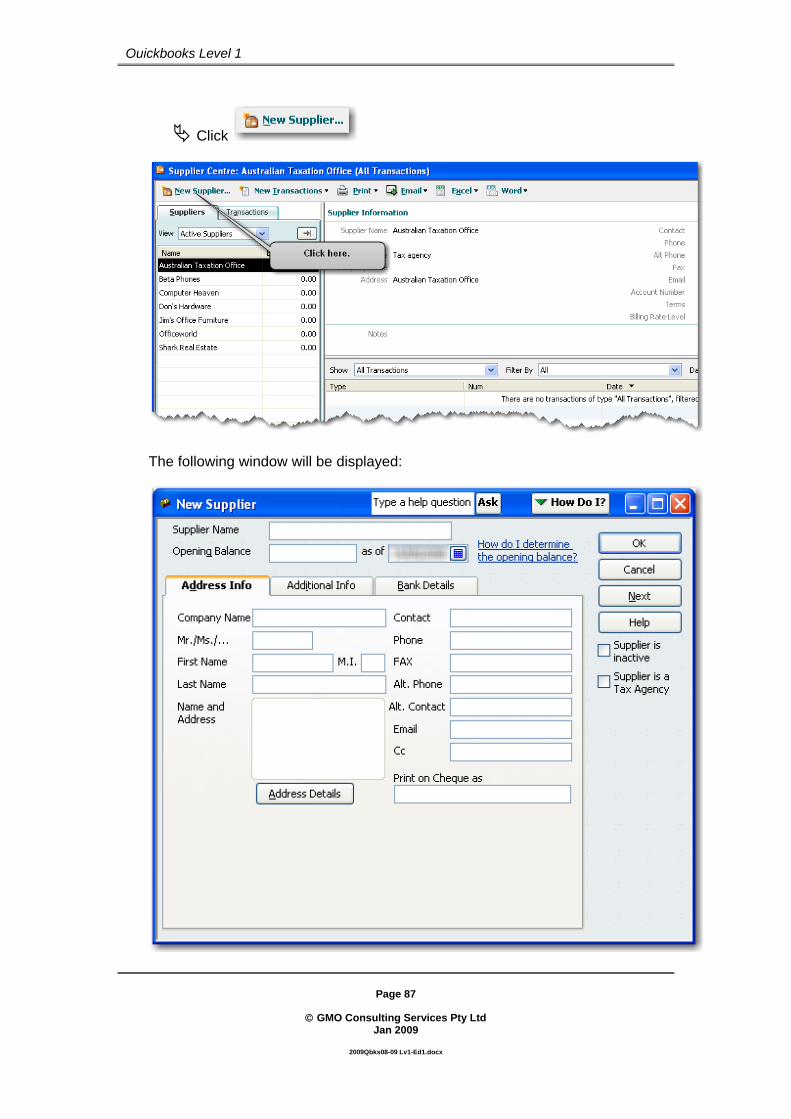
Click
The following window will be displayed:

Page 88
© GMO Consulting Services Pty Ltd
Jan 2009
2009Qbks08-09 Lv1-Ed1.docx
Quickbooks Level 1
Fill out the details as shown here:
When you are done with this screen, click and fill out the details as shown on the next page:

Page 89
© GMO Consulting Services Pty Ltd
Jan 2009
2009Qbks08-09 Lv1-Ed1.docx
Quickbooks Level 1
Note: Do not enter any details in the Opening Balance fields or concern yourself about the date shown in the “as of” field. This would be used if we were entering information for an existing business.
When you have entered the details as shown click
Page 90
© GMO Consulting Services Pty Ltd
Jan 2009
2009Qbks08-09 Lv1-Ed1.docx
Quickbooks Level 1
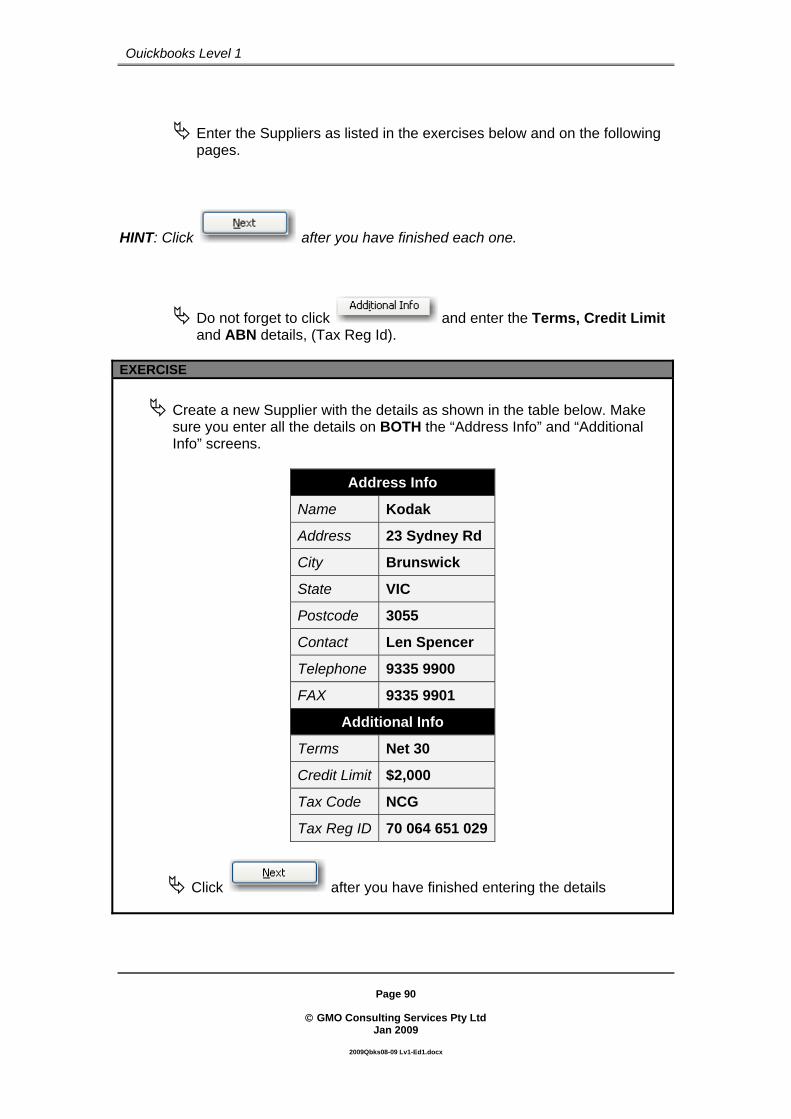
Enter the Suppliers as listed in the exercises below and on the following pages.
HINT: Click after you have finished each one.
Do not forget to click and enter the Terms, Credit Limit and ABN details, (Tax Reg Id).
EXERCISE
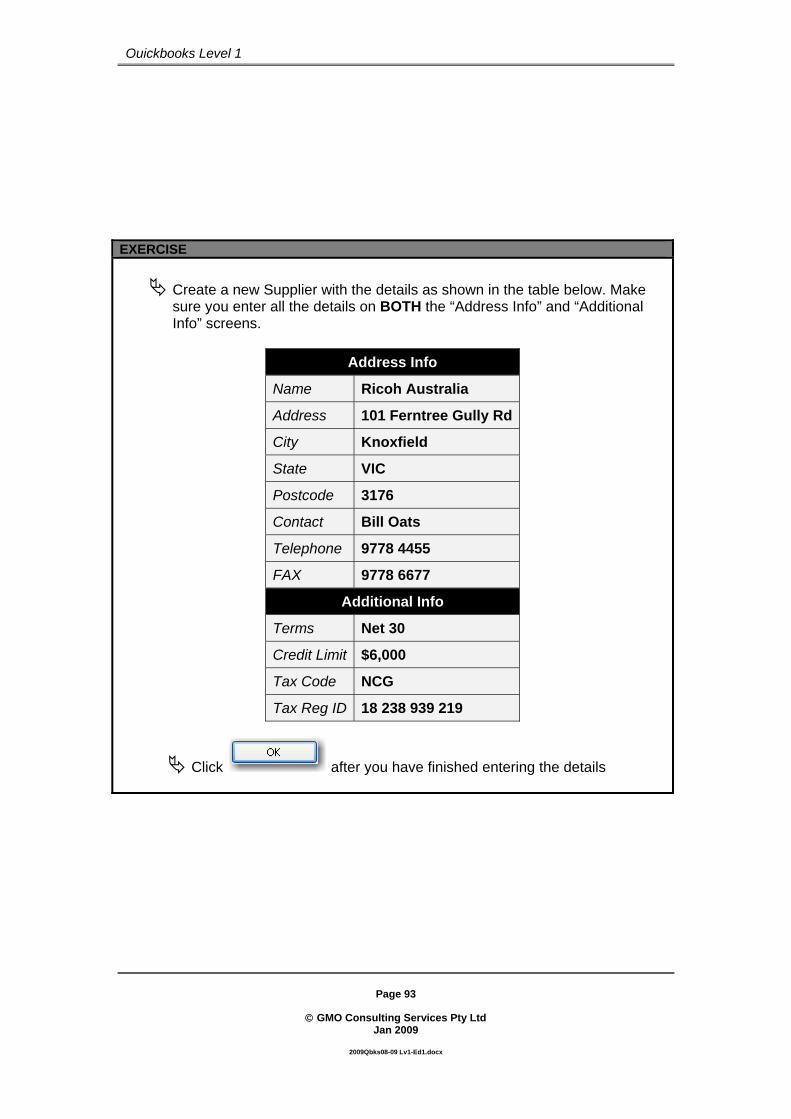
Create a new Supplier with the details as shown in the table below. Make sure you enter all the details on BOTH the “Address Info” and “Additional Info” screens.
Address Info
Name Kodak
Address 23 Sydney Rd
City Brunswick
State VIC
Postcode 3055
Contact Len Spencer
Telephone 9335 9900
FAX 9335 9901
Additional Info
Terms Net 30
Credit Limit $2,000
Tax Code NCG
Tax Reg ID 70 064 651 029
Click after you have finished entering the details

Page 91
© GMO Consulting Services Pty Ltd
Jan 2009
2009Qbks08-09 Lv1-Ed1.docx
Quickbooks Level 1
EXERCISE
Create a new Supplier with the details as shown in the table below. Make sure you enter all the details on BOTH the “Address Info” and “Additional Info” screens.
Address Info
Name Nikon Australia
Address 45 Atherton Rd
City Oakleigh
State VIC
Postcode 3166
Contact Jill Bruce
Telephone 9552 6301
FAX 9552 1045
Additional Info
Terms Net 30
Credit Limit $10,000
Tax Code NCG
Tax Reg ID 12 072 214 932
Click after you have finished entering the details

Page 92
© GMO Consulting Services Pty Ltd
Jan 2009
2009Qbks08-09 Lv1-Ed1.docx
Quickbooks Level 1
EXERCISE
Create a new Supplier with the details as shown in the table below. Make sure you enter all the details on BOTH the “Address Info” and “Additional Info” screens.
Address Info
Name Pentax Cameras
Address 66 Wickham Rd
City Moorabbin
State VIC
Postcode 3189
Contact Harry Short
Telephone 9532 0011
FAX 9532 0012
Additional Info
Terms Net 30
Credit Limit $10,000
Tax Code NCG
Tax Reg ID 82 081 834 871
Click after you have finished entering the details
Page 93
© GMO Consulting Services Pty Ltd
Jan 2009
2009Qbks08-09 Lv1-Ed1.docx
Quickbooks Level 1
EXERCISE
Create a new Supplier with the details as shown in the table below. Make sure you enter all the details on BOTH the “Address Info” and “Additional Info” screens.
Address Info
Name Ricoh Australia
Address 101 Ferntree Gully Rd
City Knoxfield
State VIC
Postcode 3176
Contact Bill Oats
Telephone 9778 4455
FAX 9778 6677
Additional Info
Terms Net 30
Credit Limit $6,000
Tax Code NCG
Tax Reg ID 18 238 939 219
Click after you have finished entering the details

Page 94
© GMO Consulting Services Pty Ltd
Jan 2009
2009Qbks08-09 Lv1-Ed1.docx
Quickbooks Level 1
Here is the “List” portion of the Supplier Centre displaying all Suppliers entered so far.
Note – If your screen differs slightly it means you may have entered a “once only” Supplier and it wasn’t when this manual was produced. Make sure that all the names in this chapter have been entered.
Press the Esc key to close the Window.
Page 95
© GMO Consulting Services Pty Ltd
Jan 2009
2009Qbks08-09 Lv1-Ed1.docx
Quickbooks Level 1
PART 7 – SUMMARY In this section we saw how we can easily enter all the details of the Suppliers that we would regularly use in our business. This can be very useful if you need to contact them for any reason – the telephone and other details are simply a “mouse click away”. The details included such things as address, telephone and Fax numbers as well as Terms and credit limits.
Page 96
© GMO Consulting Services Pty Ltd
Jan 2009
2009Qbks08-09 Lv1-Ed1.docx
Quickbooks Level 1
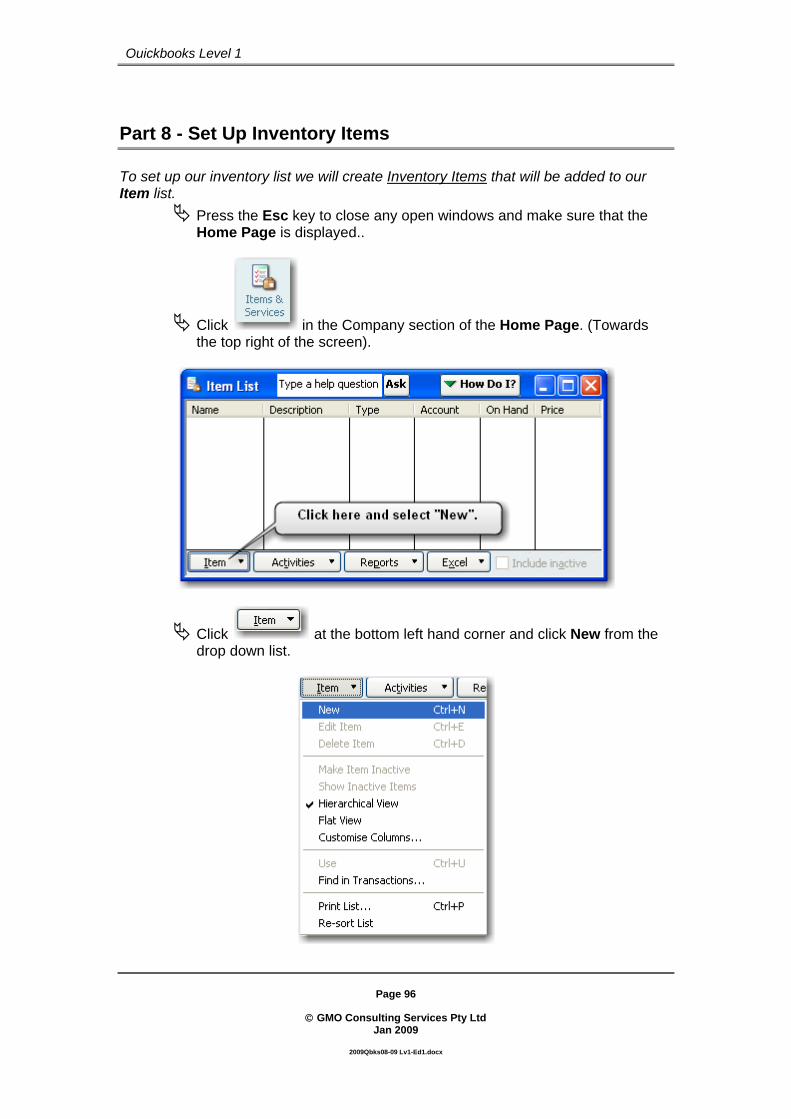
Part 8 - Set Up Inventory Items To set up our inventory list we will create Inventory Items that will be added to our Item list.
Press the Esc key to close any open windows and make sure that the Home Page is displayed..
Click in the Company section of the Home Page. (Towards the top right of the screen).
Click at the bottom left hand corner and click New from the drop down list.

Page 97
© GMO Consulting Services Pty Ltd
Jan 2009
2009Qbks08-09 Lv1-Ed1.docx
Quickbooks Level 1
Select Inventory Part from the Type drop down list and fill out the window as shown:
Use the Tab key to move to each field and make sure all fields are accurately filled in.
(Don’t worry about the “As of” date, as it is only used if you enter opening balances.)
Click when you are satisfied you have filled all the fields in correctly.

Page 98
© GMO Consulting Services Pty Ltd
Jan 2009
2009Qbks08-09 Lv1-Ed1.docx
Quickbooks Level 1
Create the rest of the items as shown in each table shown below. Make sure that you enter “NCG” for the purchase tax code and “GST” for the sales tax code in all cases. Also pay careful attention to the Cost and Sale Price.
Inventory Item Details
Item Name/Number K1 Description on Purchase Transaction
Kodak Disposable Camera
Cost 10.00 Purch Tax Code NCG COGS Account Cost of Goods Sold Preferred Supplier Kodak Description on Sales Transaction Kodak Disposable
Camera Sales Price 20.00 Tax Code GST Income Account Sales Asset Account Inventory Asset Reorder Point 5
Inventory Item Details
Item Name/Number N1 Description on Purchase Transaction Nikon EM1 Digital Camera Cost 300.00 Purch Tax Code NCG COGS Account Cost of Goods Sold Preferred Supplier Nikon Australia Description on Sales Transaction Nikon EM1 Digital Camera Sales Price 550.00 Tax Code GST Income Account Sales Asset Account Inventory Asset Reorder Point 4

Page 99
© GMO Consulting Services Pty Ltd
Jan 2009
2009Qbks08-09 Lv1-Ed1.docx
Quickbooks Level 1
Inventory Item Details Item Name/Number N2 Description on Purchase Transaction Nikon EM2 Digital Camera Cost 360.00 Purch Tax Code NCG COGS Account Cost of Goods Sold Preferred Supplier Nikon Australia Description on Sales Transaction Nikon EM2 Digital Camera Sales Price 630.00 Tax Code GST Income Account Sales Asset Account Inventory Asset Reorder Point 2
Inventory Item Details
Item Name/Number P1 Description on Purchase Transaction Pentax AP1 Digital Camera Cost 280.00 Purch Tax Code NCG COGS Account Cost of Goods Sold Preferred Supplier Pentax Cameras Description on Sales Transaction Pentax AP1 Digital Camera Sales Price 530.00 Tax Code GST Income Account Sales Asset Account Inventory Asset Reorder Point 4
Inventory Item Details
Item Name/Number P2 Description on Purchase Transaction Pentax AP2 Digital Camera Cost 340.00 Purch Tax Code NCG COGS Account Cost of Goods Sold Preferred Supplier Pentax Cameras Description on Sales Transaction Pentax AP2 Digital Camera Sales Price 610.00 Tax Code GST Income Account Sales Asset Account Inventory Asset Reorder Point 2

Page 100
© GMO Consulting Services Pty Ltd
Jan 2009
2009Qbks08-09 Lv1-Ed1.docx
Quickbooks Level 1
Inventory Item Details Item Name/Number R1 Description on Purchase Transaction Ricoh Digital Camera Cost 270.00 Purch Tax Code NCG COGS Account Cost of Goods Sold Preferred Supplier Ricoh Australia Description on Sales Transaction Ricoh Digital Camera Sales Price 540.00 Tax Code GST Income Account Sales Asset Account Inventory Asset Reorder Point 2
Inventory Item Details
Item Name/Number R2 Description on Purchase Transaction Ricoh Tripod Cost 40.00 Purch Tax Code NCG COGS Account Cost of Goods Sold Preferred Supplier Ricoh Australia Description on Sales Transaction Ricoh Tripod Sales Price 70.00 Tax Code GST Income Account Sales Asset Account Inventory Asset Reorder Point 5
Note the item list on the following page.

Page 101
© GMO Consulting Services Pty Ltd
Jan 2009
2009Qbks08-09 Lv1-Ed1.docx
Quickbooks Level 1
Your Item List should look like the picture shown here when you are done:
If your list does not have all the items shown above, spend a few minutes
adding the missing items or do any corrections. Click and click Edit from the drop down menu. (Or you can simply double click the item to “open it”).
PART 8 – SUMMARY In this section, we set up all the “items” that will be “bought and sold”. They were “Inventory items”, as we want Quickbooks to keep track of how many of each item we have in stock – this means that we will have very accurate “books”. Later on you will see that we will set up some other items, including a “Service item”. Quickbooks requires us to set up items as these are to be used in invoices. This means that there will be “less margin for error” when creating invoices - as long as the items are set up correctly and “linked” to the correct accounts in the “Chart of Accounts”.
Page 102
© GMO Consulting Services Pty Ltd
Jan 2009
2009Qbks08-09 Lv1-Ed1.docx
Quickbooks Level 1
Part 9 - Creating Purchase Orders Quickbooks has a Purchase Order “tracking” system that does not have any impact on the financial transactions of our company. (This system would replace any manual Order Book or system that may have been used.) You could print these orders and fax or mail them to your supplier. (Or if a modem is installed on your computer you could print the order directly to your supplier’s fax. You can also email the purchase orders with this version of Quickbooks.) When the goods are received and you wish to record the purchase invoice, Quickbooks allows you to copy the information recorded on the Purchase Order into a “bill” in the system, thereby saving extra recording. This also allows you to compare information on the Purchase invoice (“bill”) to what was ordered.
Page 103
© GMO Consulting Services Pty Ltd
Jan 2009
2009Qbks08-09 Lv1-Ed1.docx
Quickbooks Level 1
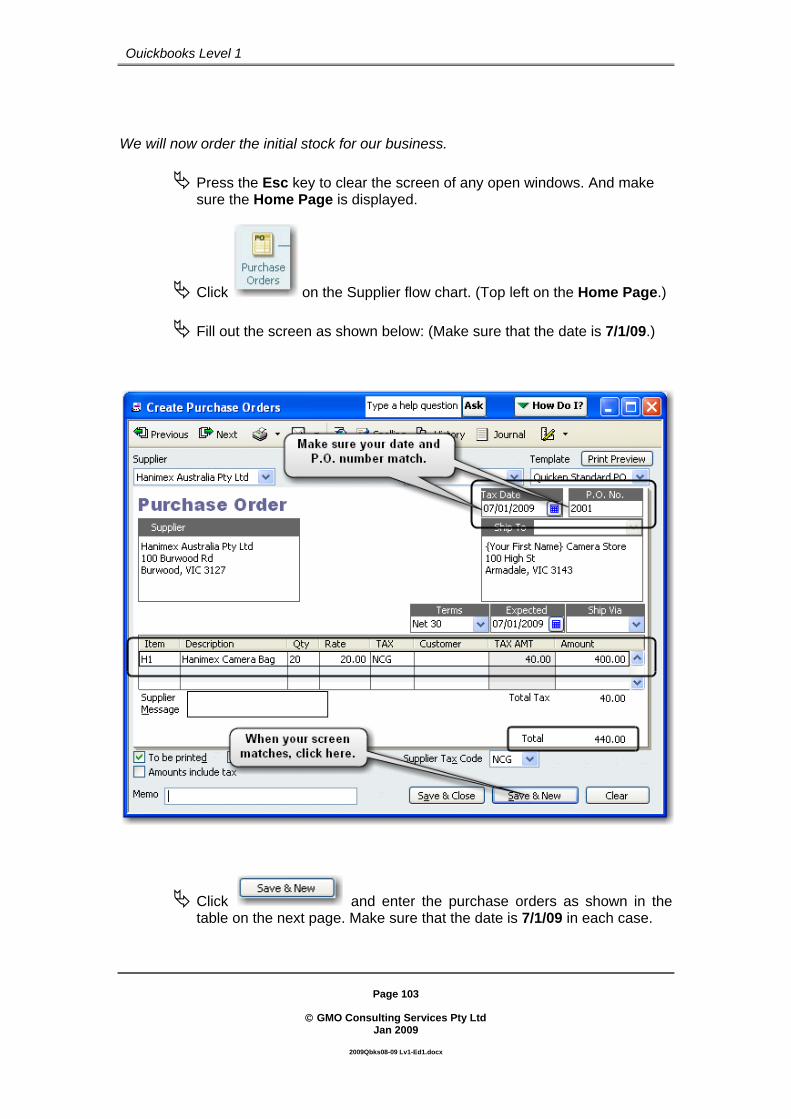
We will now order the initial stock for our business.
Press the Esc key to clear the screen of any open windows. And make sure the Home Page is displayed.
Click on the Supplier flow chart. (Top left on the Home Page.)
Fill out the screen as shown below: (Make sure that the date is 7/1/09.)
Click and enter the purchase orders as shown in the table on the next page. Make sure that the date is 7/1/09 in each case.
Page 104
© GMO Consulting Services Pty Ltd
Jan 2009
2009Qbks08-09 Lv1-Ed1.docx
Quickbooks Level 1
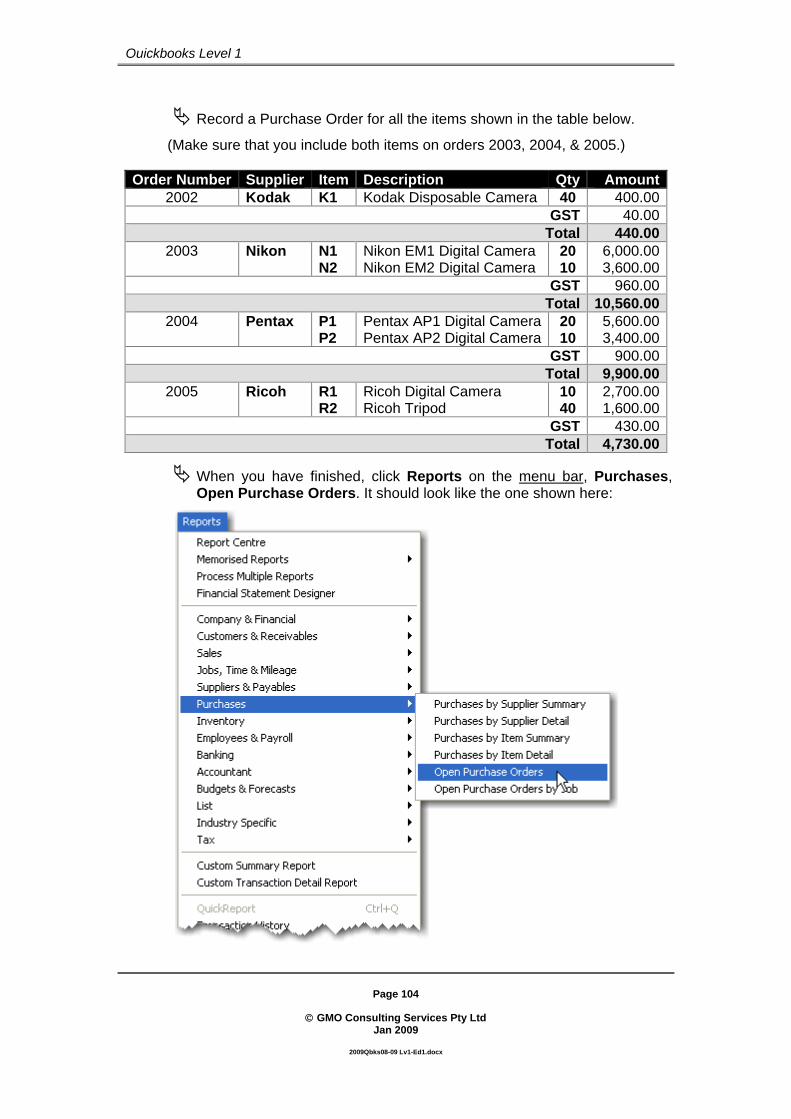
Record a Purchase Order for all the items shown in the table below.
(Make sure that you include both items on orders 2003, 2004, & 2005.)
Order Number Supplier Item Description Qty Amount2002 Kodak K1 Kodak Disposable Camera 40 400.00
GST 40.00Total 440.00
2003 Nikon N1 N2
Nikon EM1 Digital Camera Nikon EM2 Digital Camera
20 10
6,000.003,600.00
GST 960.00Total 10,560.00
2004 Pentax P1 P2
Pentax AP1 Digital CameraPentax AP2 Digital Camera
20 10
5,600.003,400.00
GST 900.00Total 9,900.00
2005 Ricoh R1 R2
Ricoh Digital Camera Ricoh Tripod
10 40
2,700.001,600.00
GST 430.00Total 4,730.00
When you have finished, click Reports on the menu bar, Purchases, Open Purchase Orders. It should look like the one shown here:

Page 105
© GMO Consulting Services Pty Ltd
Jan 2009
2009Qbks08-09 Lv1-Ed1.docx
Quickbooks Level 1
It should look like this:

Page 106
© GMO Consulting Services Pty Ltd
Jan 2009
2009Qbks08-09 Lv1-Ed1.docx
Quickbooks Level 1
PART 9 – SUMMARY In this section we entered all the goods that we wish to purchase from our Suppliers as purchase orders. In the “real world” we would then print and fax (or email) these orders to the various Suppliers. Some (generally larger) businesses require that orders be placed via a “written order” – they will not accept a verbal order. Clearly, purchase orders can help us become more organised because, as we all know, what we order and what we actually receive may not be the same thing.
Page 107
© GMO Consulting Services Pty Ltd
Jan 2009
2009Qbks08-09 Lv1-Ed1.docx
Quickbooks Level 1
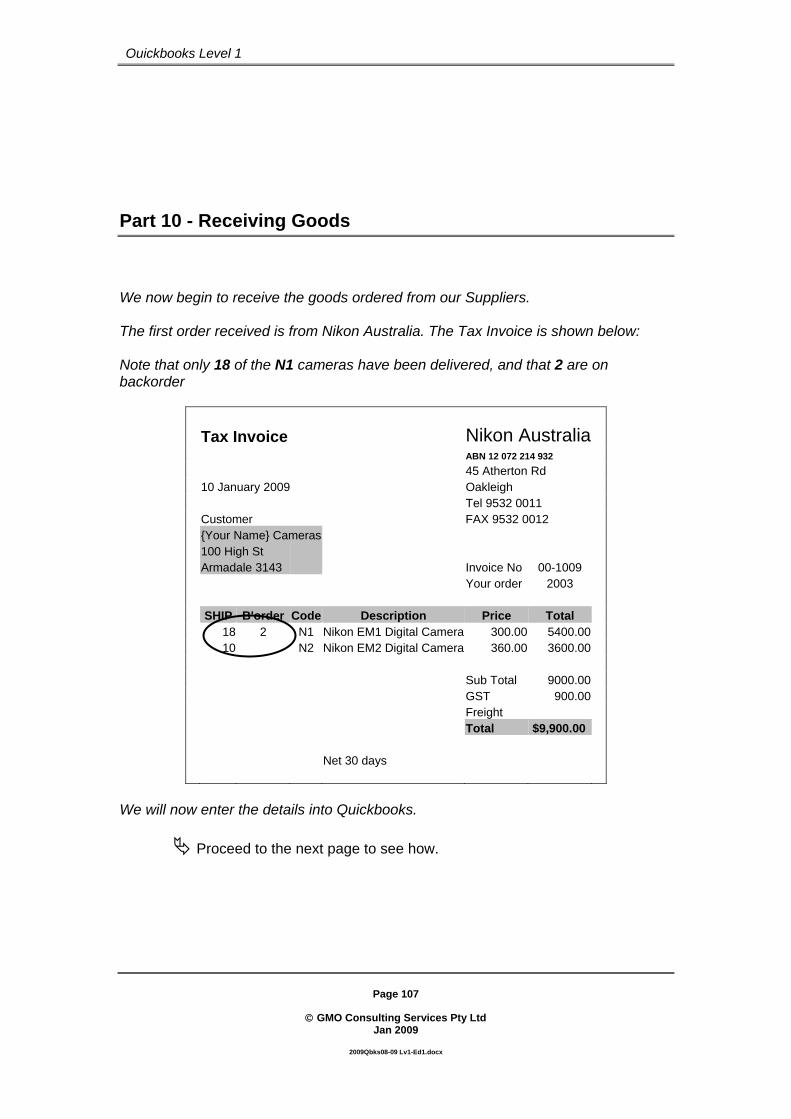
Part 10 - Receiving Goods We now begin to receive the goods ordered from our Suppliers. The first order received is from Nikon Australia. The Tax Invoice is shown below: Note that only 18 of the N1 cameras have been delivered, and that 2 are on backorder
Tax Invoice Nikon Australia ABN 12 072 214 932 45 Atherton Rd 10 January 2009 Oakleigh Tel 9532 0011 Customer FAX 9532 0012 {Your Name} Cameras 100 High St Armadale 3143 Invoice No 00-1009 Your order 2003 SHIP B'order Code Description Price Total 18 2 N1 Nikon EM1 Digital Camera 300.00 5400.00 10 N2 Nikon EM2 Digital Camera 360.00 3600.00 Sub Total 9000.00 GST 900.00 Freight Total $9,900.00 Net 30 days
We will now enter the details into Quickbooks.
Proceed to the next page to see how.

Page 108
© GMO Consulting Services Pty Ltd
Jan 2009
2009Qbks08-09 Lv1-Ed1.docx
Quickbooks Level 1
Press the Esc key to close any open windows. Make sure the Home Page is displayed.
Click on the drop arrow next to the icon as shown below. Select “Receive Inventory with Bill”

Page 109
© GMO Consulting Services Pty Ltd
Jan 2009
2009Qbks08-09 Lv1-Ed1.docx
Quickbooks Level 1
The following screen will be displayed:
Type N. (Quickbooks will fill in the name “Nikon Australia” for you as it should be the only name in the Supplier List beginning with “N”.)

Page 110
© GMO Consulting Services Pty Ltd
Jan 2009
2009Qbks08-09 Lv1-Ed1.docx
Quickbooks Level 1
Press the Tab key and Quickbooks responds with the following message:
Click Quickbooks displays a list of all outstanding purchase orders for Nikon. We only have one listed.
Click the column to the left of the date column to enter a 4
If your screen looks like the one above, click
Page 111
© GMO Consulting Services Pty Ltd
Jan 2009
2009Qbks08-09 Lv1-Ed1.docx
Quickbooks Level 1
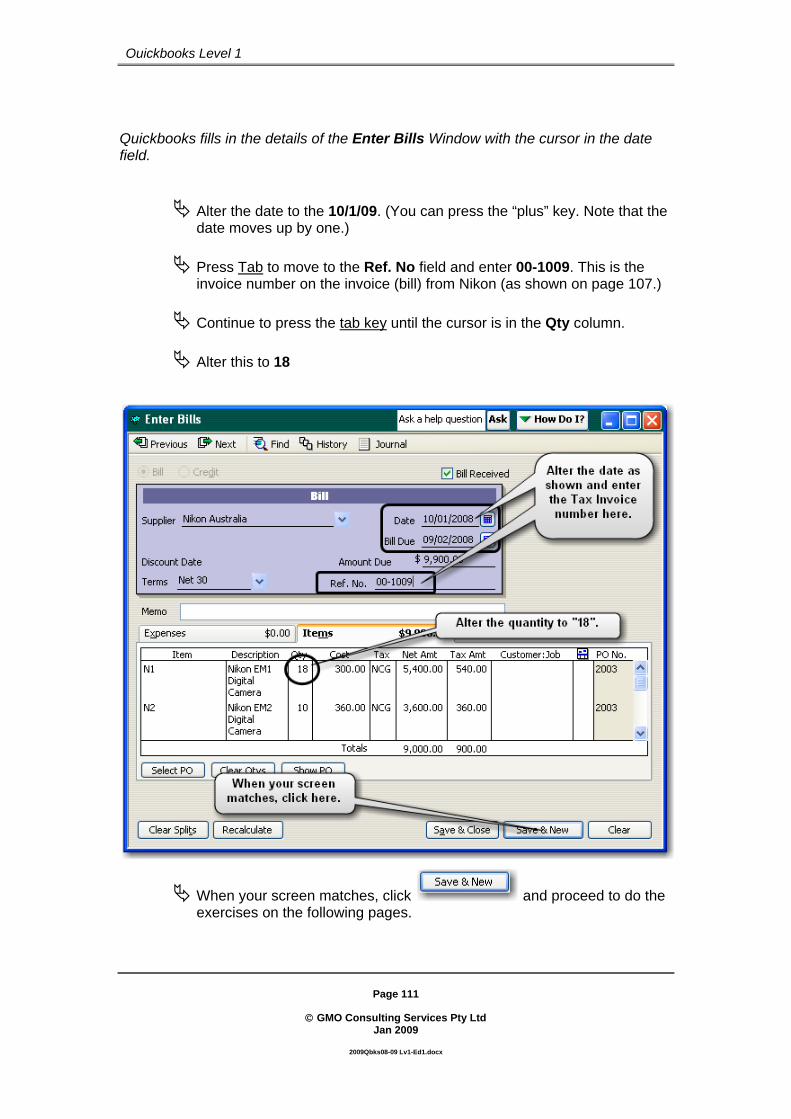
Quickbooks fills in the details of the Enter Bills Window with the cursor in the date field.
Alter the date to the 10/1/09. (You can press the “plus” key. Note that the date moves up by one.)
Press Tab to move to the Ref. No field and enter 00-1009. This is the invoice number on the invoice (bill) from Nikon (as shown on page 107.)
Continue to press the tab key until the cursor is in the Qty column.
Alter this to 18
When your screen matches, click and proceed to do the exercises on the following pages.

Page 112
© GMO Consulting Services Pty Ltd
Jan 2009
2009Qbks08-09 Lv1-Ed1.docx
Quickbooks Level 1
EXERCISE You receive 20 “Hanimex Camera Bags” on the 10/1/09. The invoice is shown below:
Record this transaction. (Be sure to alter the bill date to 10/1/09 and enter the invoice number in the “Ref. No.” field.
(Don’t forget to click Yes to the “Open Purchase Orders Exist” prompt, then place a tick in the box to select the Purchase Order)
Tax Invoice 100 Highbury Rd, Burwood 3127 ABN: 93 001 476 758 T 9667 1204 F 9667 1235 10 January 2009 {Your Name} Cameras 100 High St Armadale 3143 Invoice 12004 Order 2001 QTY PART DESCRIPTION PRICE TOTAL 20 H1 CAMERA BAGS 20.00 400.00 SUB TOTAL 400.00 TAX 40.00 TOTAL $440.00 TERMS: NET 30
Page 113
© GMO Consulting Services Pty Ltd
Jan 2009
2009Qbks08-09 Lv1-Ed1.docx
Quickbooks Level 1
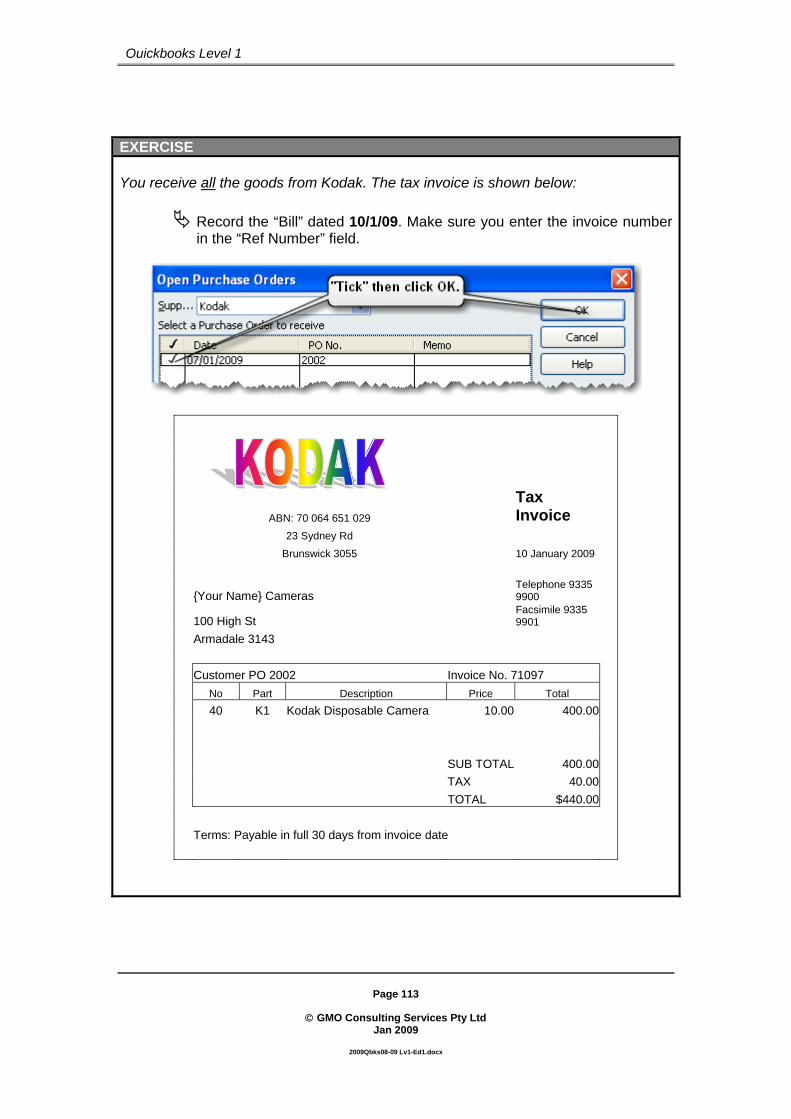
EXERCISE You receive all the goods from Kodak. The tax invoice is shown below:
Record the “Bill” dated 10/1/09. Make sure you enter the invoice number in the “Ref Number” field.
ABN: 70 064 651 029 Tax Invoice
23 Sydney Rd Brunswick 3055 10 January 2009
{Your Name} Cameras Telephone 9335 9900
100 High St Facsimile 9335 9901
Armadale 3143 Customer PO 2002 Invoice No. 71097 No Part Description Price Total 40 K1 Kodak Disposable Camera 10.00 400.00 SUB TOTAL 400.00 TAX 40.00 TOTAL $440.00 Terms: Payable in full 30 days from invoice date

Page 114
© GMO Consulting Services Pty Ltd
Jan 2009
2009Qbks08-09 Lv1-Ed1.docx
Quickbooks Level 1
EXERCISE All the goods are received from Ricoh Australia. Note the Tax Invoice as shown below:
Record this Bill. Make sure that you click “Yes” for the “Purchase Orders Exist” prompt.
Tax Invoice ABN 18 238 939 219 10 January 2009 101 Ferntree Gully Rd Knoxfield 3176 Tel 9778 4455 {Your Name} Cameras FAX 9778 6677 100 High St Armadale 3143 Invoice No 6879 Your order 2005 Qty Code Description Price Total 10 R1 Standard Digital Camera 270.00 2700.00 40 R2 Tripod 40.00 1600.00 Sub Total 4300.00 GST 430.00 Freight Total $4,730.00 Net 30 days

Page 115
© GMO Consulting Services Pty Ltd
Jan 2009
2009Qbks08-09 Lv1-Ed1.docx
Quickbooks Level 1
EXERCISE All the goods were received from Pentax on the 10/1/09. Here is the Tax Invoice
Record this “bill” after you have selected the Purchase Order.
Tax Invoice ABN 82 081 834 871 66 Wickham Rd 10 January 2009 Moorabbin 3189 Tel 9532 0011 FAX 9532 0012 {Your Name} Cameras 100 High St Armadale 3143 Invoice No 45046 Your order 2004 Qty Code Description Price Total 20 P1 AP1 Digital Camera $280.00 $5,600.00 10 P2 AP2 Digital Camera $340.00 $3,400.00 Sub Total $9,000.00 GST $900.00 Freight Net 30 days Total $9,900.00

Page 116
© GMO Consulting Services Pty Ltd
Jan 2009
2009Qbks08-09 Lv1-Ed1.docx
Quickbooks Level 1
We will now check our progress by producing some reports.
Press the Esc key to clear any windows that may be open.
Click Reports on the menu bar, Inventory, Inventory Status by Item.
Alter the date range from 1/1/09 to 10/1/09 and note that your report should look like the one shown on the following page. Note that the report has been “cut down” to show the relevant part.

Page 117
© GMO Consulting Services Pty Ltd
Jan 2009
2009Qbks08-09 Lv1-Ed1.docx
Quickbooks Level 1

Page 118
© GMO Consulting Services Pty Ltd
Jan 2009
2009Qbks08-09 Lv1-Ed1.docx
Quickbooks Level 1
Now we will produce a Balance Sheet as at 10/1/09
Click Reports on the menu bar then Company & Financial, Balance Sheet.
Alter the date to 10/1/09 and compare the report to the one on the following page.
Feel free to print this report and compare it with the report in the manual.
Note that the GST Payable is a negative figure. Can you guess why? At this point in time we have only paid for goods and services and recorded the GST - (inputs).
If your figures don’t match those of the Balance Sheet Report in the manual, please spend time to make the necessary corrections.
HINT: The most likely error is where a wrong date has been entered and it does not fall within the date range of the report. To fix the problem, go to the Chart of Accounts (Lists; Chart of Accounts on the menu bar) and look in each register that shows a balance. Make sure that the dates of all transactions fall between 1/1/09 and 10/1/09. Alter any wrong dates and produce the Balance Sheet Report again. Another reason that your report may be incorrect is that you may have missed recording some of the transactions. Check back through the manual so far and make sure all transactions have been entered. Finally, you may have simply transcribed a figure wrongly when doing one of the exercises. You can use the Quickzoom function to get back to any transactions that have wrong figures. (Place the cursor on the figure and double click.)

Page 119
© GMO Consulting Services Pty Ltd
Jan 2009
2009Qbks08-09 Lv1-Ed1.docx
Quickbooks Level 1
Page 120
© GMO Consulting Services Pty Ltd
Jan 2009
2009Qbks08-09 Lv1-Ed1.docx
Quickbooks Level 1
PART 10 – SUMMARY In this section we recorded the goods that were received from the Purchase Orders – we saw how Quickbooks “cross references” the purchase order to the “bill”. We also looked at a report showing the “Inventory levels” after entering all the bills. And we looked at another very important report called the Balance Sheet. This report shows the balances of various accounts at a “point in time” – how much money was in the bank, how much stock we are holding, the balance of our fixed assets purchased in the earlier exercises. The Balance Sheet also showed how much we owe our suppliers for the Inventory purchases, as well as how much GST has been “paid”. The “point in time” was 10/1/09.
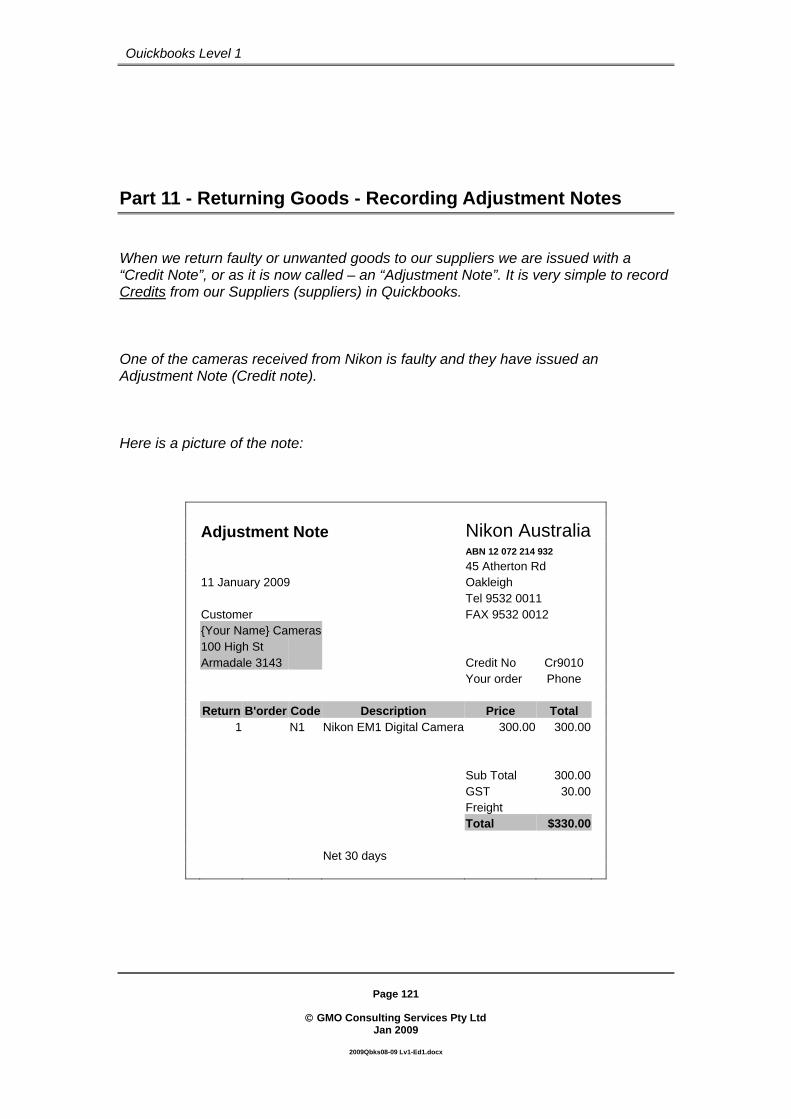
Page 121
© GMO Consulting Services Pty Ltd
Jan 2009
2009Qbks08-09 Lv1-Ed1.docx
Quickbooks Level 1
Part 11 - Returning Goods - Recording Adjustment Notes When we return faulty or unwanted goods to our suppliers we are issued with a “Credit Note”, or as it is now called – an “Adjustment Note”. It is very simple to record Credits from our Suppliers (suppliers) in Quickbooks. One of the cameras received from Nikon is faulty and they have issued an Adjustment Note (Credit note). Here is a picture of the note:
Adjustment Note Nikon Australia ABN 12 072 214 932 45 Atherton Rd 11 January 2009 Oakleigh Tel 9532 0011 Customer FAX 9532 0012 {Your Name} Cameras 100 High St Armadale 3143 Credit No Cr9010 Your order Phone Return B'order Code Description Price Total 1 N1 Nikon EM1 Digital Camera 300.00 300.00 Sub Total 300.00 GST 30.00 Freight Total $330.00 Net 30 days

Page 122
© GMO Consulting Services Pty Ltd
Jan 2009
2009Qbks08-09 Lv1-Ed1.docx
Quickbooks Level 1
Make sure the “Home Page” is displayed on your screen.
Click and click Credit to change the “Enter Bills” window to a Credit note.
Click on the Supplier Field and press the letter n. Quickbooks will enter Nikon Australia.
Press the Tab key and alter the date to 11/1/09. (You can also just type in 11/1 and press the Tab key. Quickbooks will enter the current year as a default).
Enter Cr9010 in the Ref No field. (This is the reference number of the credit note from the supplier.)
Click on the Items Tab and enter N1 in the Item column.
Press the Tab key and enter 1 in the Quantity field.

Page 123
© GMO Consulting Services Pty Ltd
Jan 2009
2009Qbks08-09 Lv1-Ed1.docx
Quickbooks Level 1
The window should look like this when you are done.
Click when all the information is correct.
Quickbooks will display a new Credit window waiting to be “filled in”. Proceed to the next page and enter the details for the adjustment notes in the exercises.
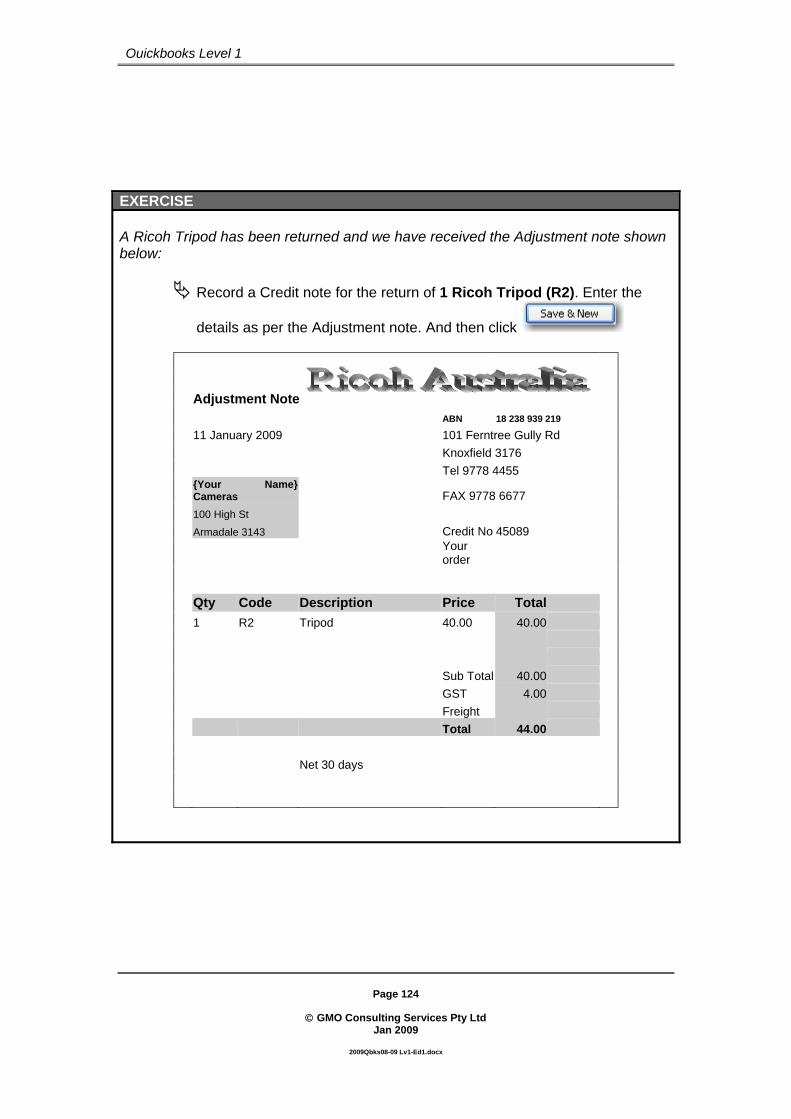
Page 124
© GMO Consulting Services Pty Ltd
Jan 2009
2009Qbks08-09 Lv1-Ed1.docx
Quickbooks Level 1
EXERCISE A Ricoh Tripod has been returned and we have received the Adjustment note shown below:
Record a Credit note for the return of 1 Ricoh Tripod (R2). Enter the
details as per the Adjustment note. And then click
Adjustment Note ABN 18 238 939 219 11 January 2009 101 Ferntree Gully Rd Knoxfield 3176 Tel 9778 4455
{Your Name} Cameras FAX 9778 6677
100 High St Armadale 3143 Credit No 45089
Your order
Qty Code Description Price Total 1 R2 Tripod 40.00 40.00 Sub Total 40.00 GST 4.00 Freight Total 44.00 Net 30 days

Page 125
© GMO Consulting Services Pty Ltd
Jan 2009
2009Qbks08-09 Lv1-Ed1.docx
Quickbooks Level 1
EXERCISE We have discovered that a Pentax AP1 camera is damaged and have returned it to the supplier who, in turn have issued us with the appropriate Adjustment Note as shown below:
Record the credit note for the return of 1 Pentax AP1 (P1) camera on the
11/1/09. And then click
Adjustment Note ABN 82 081 834 871 66 Wickham Rd 11 January 2009 Moorabbin 3189 Tel 9532 0011 FAX 9532 0012 {Your Name} Cameras 100 High St Armadale 3143 Credit No: Cr1266 Your order: oral Qty Code Description Price Total 1 P1 AP1 Digital Camera $280.00 $280.00 Sub Total $280.00 GST $28.00 Freight Net 30 days Total $308.00

Page 126
© GMO Consulting Services Pty Ltd
Jan 2009
2009Qbks08-09 Lv1-Ed1.docx
Quickbooks Level 1
Click
Alter the date range from 1/1/09 to 11/1/09. Part of the Inventory is displayed here. Your “On Hand” figures should match if the previous exercises have been completed correctly:
Part of the “Inventory Status by Item” report showing the current Inventory position after the adjustment notes have been processed.

Page 127
© GMO Consulting Services Pty Ltd
Jan 2009
2009Qbks08-09 Lv1-Ed1.docx
Quickbooks Level 1
PART 11 – SUMMARY In this section we saw how we enter “adjustment notes” into Quickbooks when faulty goods have been returned to our suppliers. We saw the impact on our Inventory levels when the credits had been processed. Inventory levels had reduced accordingly. Compare the inventory figures on pages 116 and 126.

Page 128
© GMO Consulting Services Pty Ltd
Jan 2009
2009Qbks08-09 Lv1-Ed1.docx
Quickbooks Level 1
Part 12 – Customers – Entering details We will now enter some invoices for our “account” customers. (These are customers that have opened “an account” with us and will pay for goods purchased at a later time.)
Press Esc to close and open windows. Make sure the Home Page is displayed.
Click at the top left of the screen.. The following list will be displayed:
Click and click New Customer on the menu displayed.

Page 129
© GMO Consulting Services Pty Ltd
Jan 2009
2009Qbks08-09 Lv1-Ed1.docx
Quickbooks Level 1
Quickbooks responds with the following screen:
Don’t bother with the date shown as it irrelevant in this exercise. Tab to the “Company Name”, type South Yarra Photographic Studio and press the tab. Quickbooks will automatically fill in the name into the “Customer field”.
Note the screen will now look like the one shown on the following page.
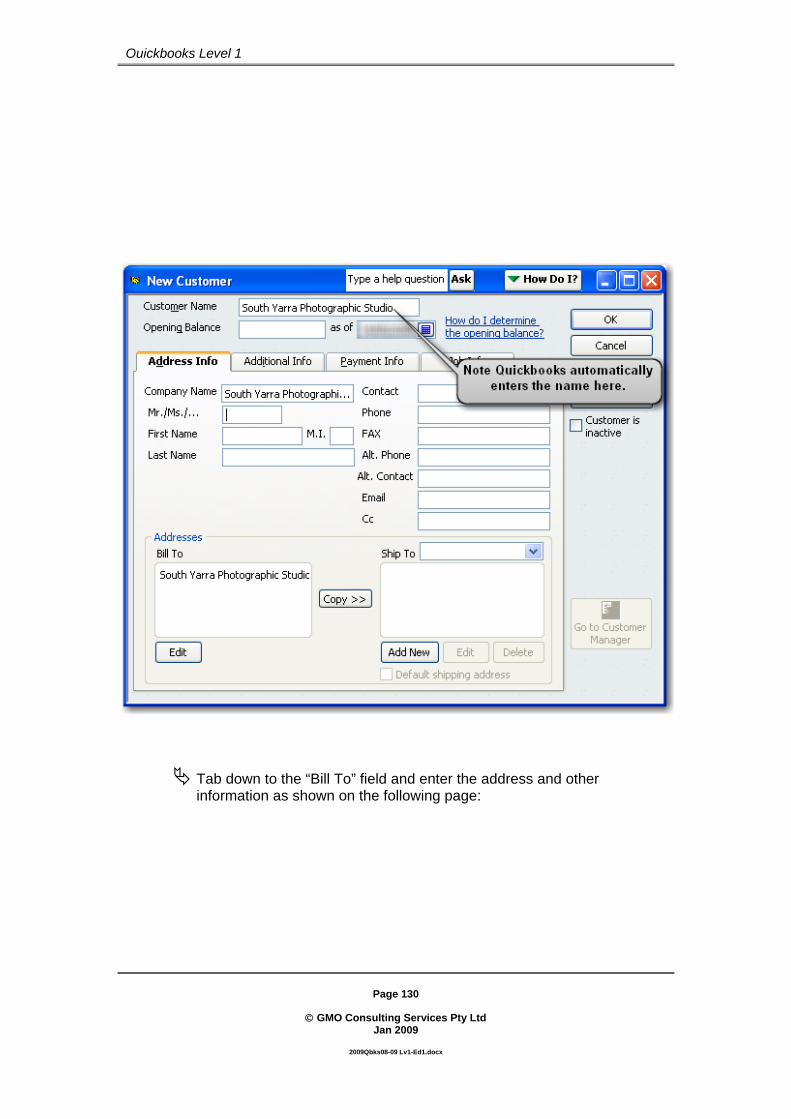
Page 130
© GMO Consulting Services Pty Ltd
Jan 2009
2009Qbks08-09 Lv1-Ed1.docx
Quickbooks Level 1
Tab down to the “Bill To” field and enter the address and other information as shown on the following page:

Page 131
© GMO Consulting Services Pty Ltd
Jan 2009
2009Qbks08-09 Lv1-Ed1.docx
Quickbooks Level 1
The “Address Info” screen:
When all the information has been entered click and enter the details as shown on the following page.

Page 132
© GMO Consulting Services Pty Ltd
Jan 2009
2009Qbks08-09 Lv1-Ed1.docx
Quickbooks Level 1
The “Additional Info” screen:
Click and enter the details as shown on the next page:
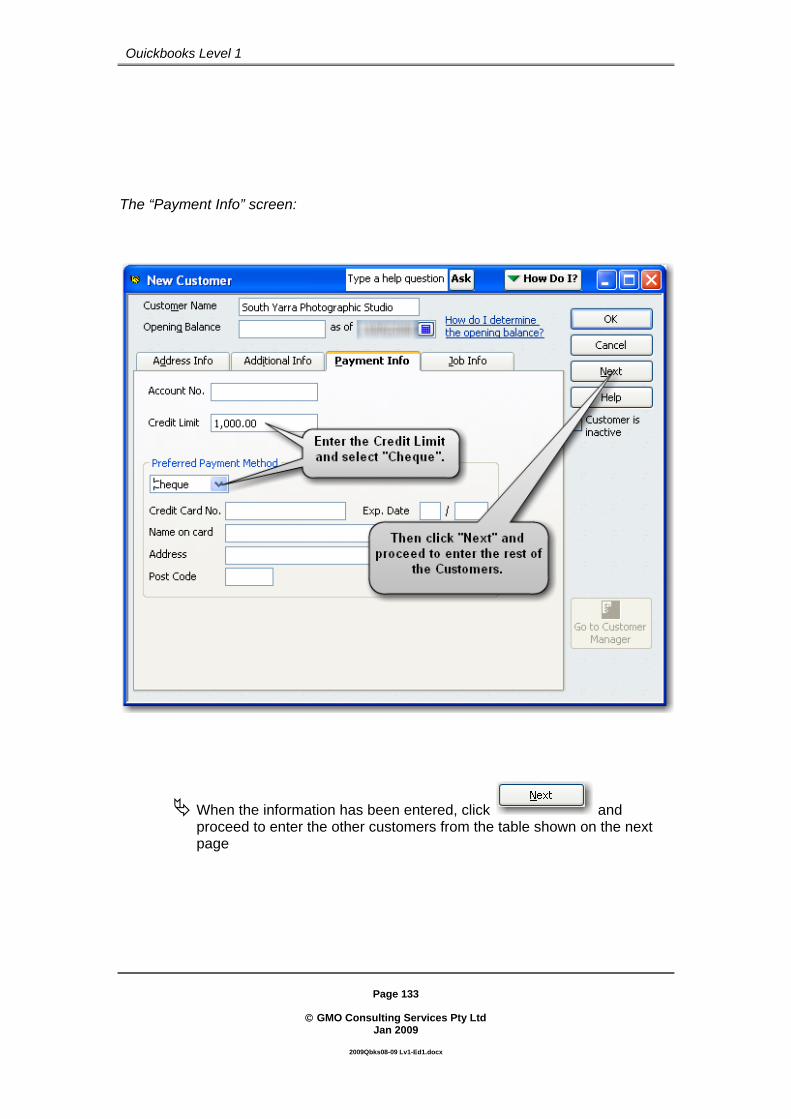
Page 133
© GMO Consulting Services Pty Ltd
Jan 2009
2009Qbks08-09 Lv1-Ed1.docx
Quickbooks Level 1
The “Payment Info” screen:
When the information has been entered, click and proceed to enter the other customers from the table shown on the next page

Page 134
© GMO Consulting Services Pty Ltd
Jan 2009
2009Qbks08-09 Lv1-Ed1.docx
Quickbooks Level 1
Proceed to enter the names and details of the customers listed in the following exercises. Don’t forget to enter the “Terms”, “Credit Limit” and “Preferred Payment Method” details in the Additional Info and Payment Info screens.
Click to get a “fresh screen” until you finish the “Last
One” then click
EXERCISE
Create a new Customer with the details as shown in the table below. Make sure you enter all the details on the THREE screens. (Profile, Selling & Payment)
Address Info
Name Melbourne Photo Rentals
Address 30 Collins St
City Melbourne
State VIC
Postcode 3000
Contact Rick Melbourne
Telephone 9667 4500
FAX 9667 4505
Additional Info
Terms Net 30
Tax Code GST
Payment Info
Credit Limit 4,000
Preferred Payment Method Cheque
Click and proceed to the next exercise.

Page 135
© GMO Consulting Services Pty Ltd
Jan 2009
2009Qbks08-09 Lv1-Ed1.docx
Quickbooks Level 1
EXERCISE
Create a new Customer with the details as shown in the table below. Make sure you enter all the details on the THREE screens. (Profile, Selling & Payment)
Address Info
Name Peter H's Photographic Services
Address 120 Toorak Rd
City South Yarra
State VIC
Postcode 3141
Contact Peter Hardy
Telephone 9877 1404
FAX 9877 1623
Additional Info
Terms Net 30
Tax Code GST
Payment Info
Credit Limit 3,000
Preferred Payment Method Cheque
Click and proceed to the next exercise.
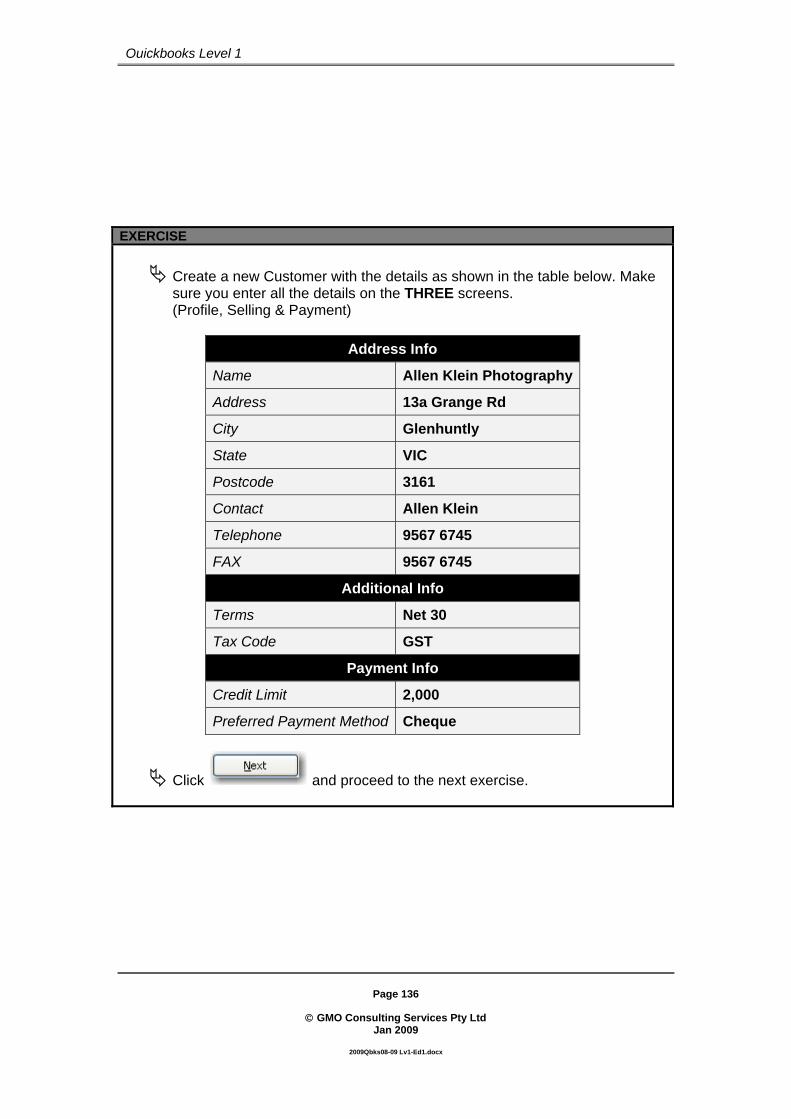
Page 136
© GMO Consulting Services Pty Ltd
Jan 2009
2009Qbks08-09 Lv1-Ed1.docx
Quickbooks Level 1
EXERCISE
Create a new Customer with the details as shown in the table below. Make sure you enter all the details on the THREE screens. (Profile, Selling & Payment)
Address Info
Name Allen Klein Photography
Address 13a Grange Rd
City Glenhuntly
State VIC
Postcode 3161
Contact Allen Klein
Telephone 9567 6745
FAX 9567 6745
Additional Info
Terms Net 30
Tax Code GST
Payment Info
Credit Limit 2,000
Preferred Payment Method Cheque
Click and proceed to the next exercise.

Page 137
© GMO Consulting Services Pty Ltd
Jan 2009
2009Qbks08-09 Lv1-Ed1.docx
Quickbooks Level 1
EXERCISE
Create a new Customer with the details as shown in the table below. Make sure you enter all the details on the THREE screens. (Profile, Selling & Payment)
Address Info
Name Oakleigh Camera Rentals
Address 12 Warrigal Rd
City Oakleigh
State VIC
Postcode 3166
Contact Harry Jones
Telephone 9577 2378
FAX 9577 4512
Additional Info
Terms Net 30
Tax Code GST
Payment Info
Credit Limit 5,000
Preferred Payment Method Cheque
Click

Page 138
© GMO Consulting Services Pty Ltd
Jan 2009
2009Qbks08-09 Lv1-Ed1.docx
Quickbooks Level 1
Part of “Customer Centre” showing the list of Customer.
PART 11 –SUMMARY In this section we entered customer details including telephone numbers, terms and credit limits.

Page 139
© GMO Consulting Services Pty Ltd
Jan 2009
2009Qbks08-09 Lv1-Ed1.docx
Quickbooks Level 1
Part 13 – Tax Invoices - Entering
Press Esc to close any open windows. Make sure that Home Page is displayed.
Now click on the Home Page. The following prompt may be displayed:
Click “Do not display this message in future” and click
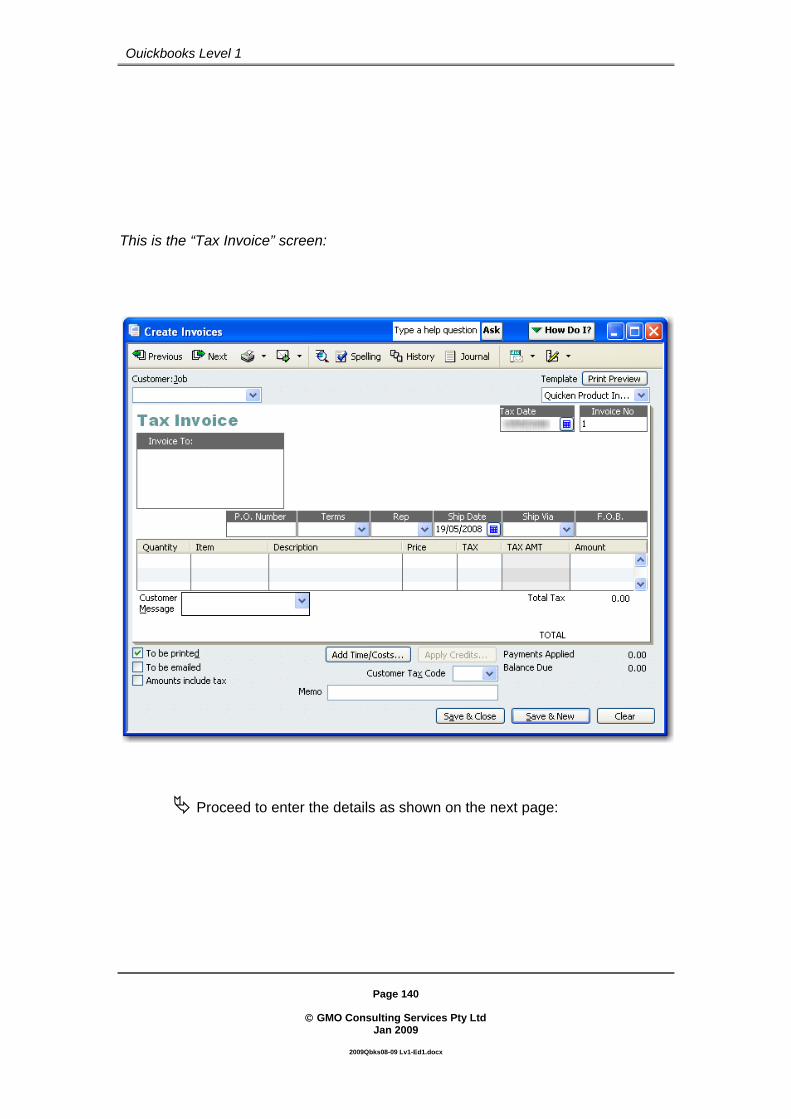
Page 140
© GMO Consulting Services Pty Ltd
Jan 2009
2009Qbks08-09 Lv1-Ed1.docx
Quickbooks Level 1
This is the “Tax Invoice” screen:
Proceed to enter the details as shown on the next page:

Page 141
© GMO Consulting Services Pty Ltd
Jan 2009
2009Qbks08-09 Lv1-Ed1.docx
Quickbooks Level 1
Tab through the various fields to enter all the details
Click and
The following prompt should be displayed if you entered the “Terms” for “South Yarra Photographic Studio” correctly
At this point in time the business owner/manager would need to make a decision about allowing this sale to proceed. We will allow the sale to proceed.
Click to allow the sale to proceed.
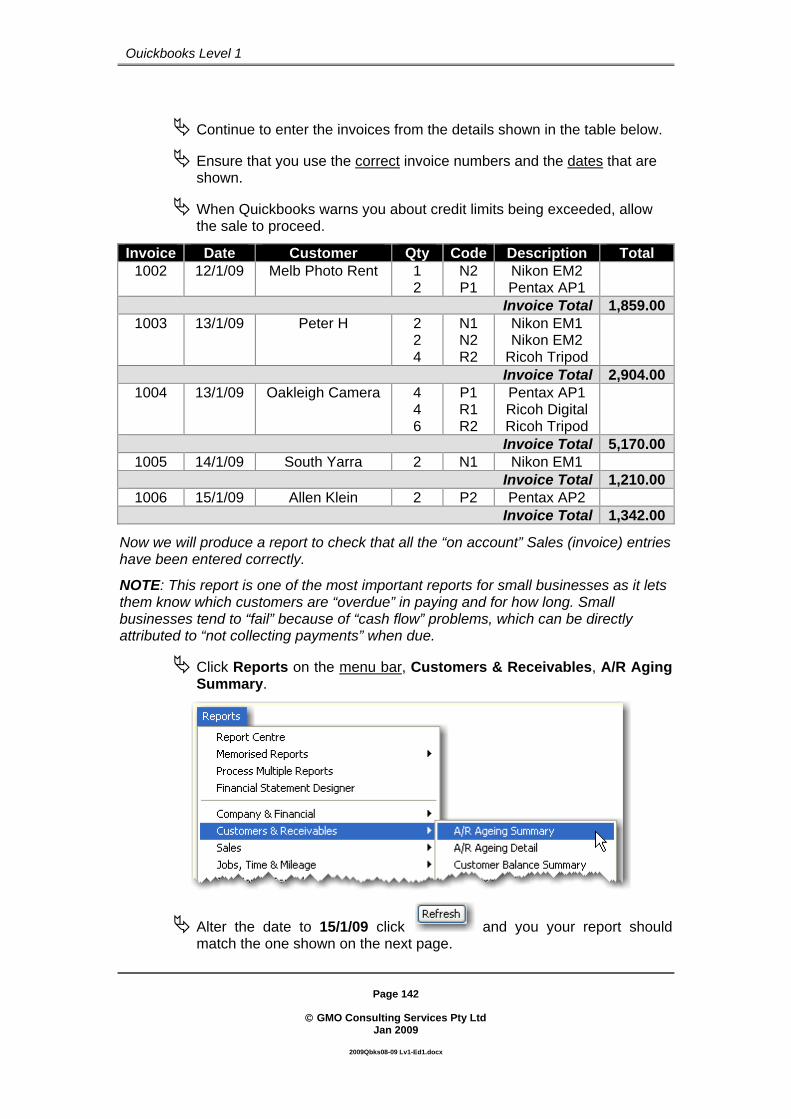
Page 142
© GMO Consulting Services Pty Ltd
Jan 2009
2009Qbks08-09 Lv1-Ed1.docx
Quickbooks Level 1
Continue to enter the invoices from the details shown in the table below.
Ensure that you use the correct invoice numbers and the dates that are shown.
When Quickbooks warns you about credit limits being exceeded, allow the sale to proceed.
Invoice Date Customer Qty Code Description Total 1002 12/1/09 Melb Photo Rent 1
2 N2 P1
Nikon EM2 Pentax AP1
Invoice Total 1,859.00 1003 13/1/09 Peter H 2
2 4
N1 N2 R2
Nikon EM1 Nikon EM2
Ricoh Tripod Invoice Total 2,904.00
1004 13/1/09 Oakleigh Camera 4 4 6
P1 R1 R2
Pentax AP1 Ricoh Digital Ricoh Tripod Invoice Total 5,170.00
1005 14/1/09 South Yarra 2 N1 Nikon EM1 Invoice Total 1,210.00
1006 15/1/09 Allen Klein 2 P2 Pentax AP2 Invoice Total 1,342.00
Now we will produce a report to check that all the “on account” Sales (invoice) entries have been entered correctly.
NOTE: This report is one of the most important reports for small businesses as it lets them know which customers are “overdue” in paying and for how long. Small businesses tend to “fail” because of “cash flow” problems, which can be directly attributed to “not collecting payments” when due.
Click Reports on the menu bar, Customers & Receivables, A/R Aging Summary.
Alter the date to 15/1/09 click and you your report should match the one shown on the next page.
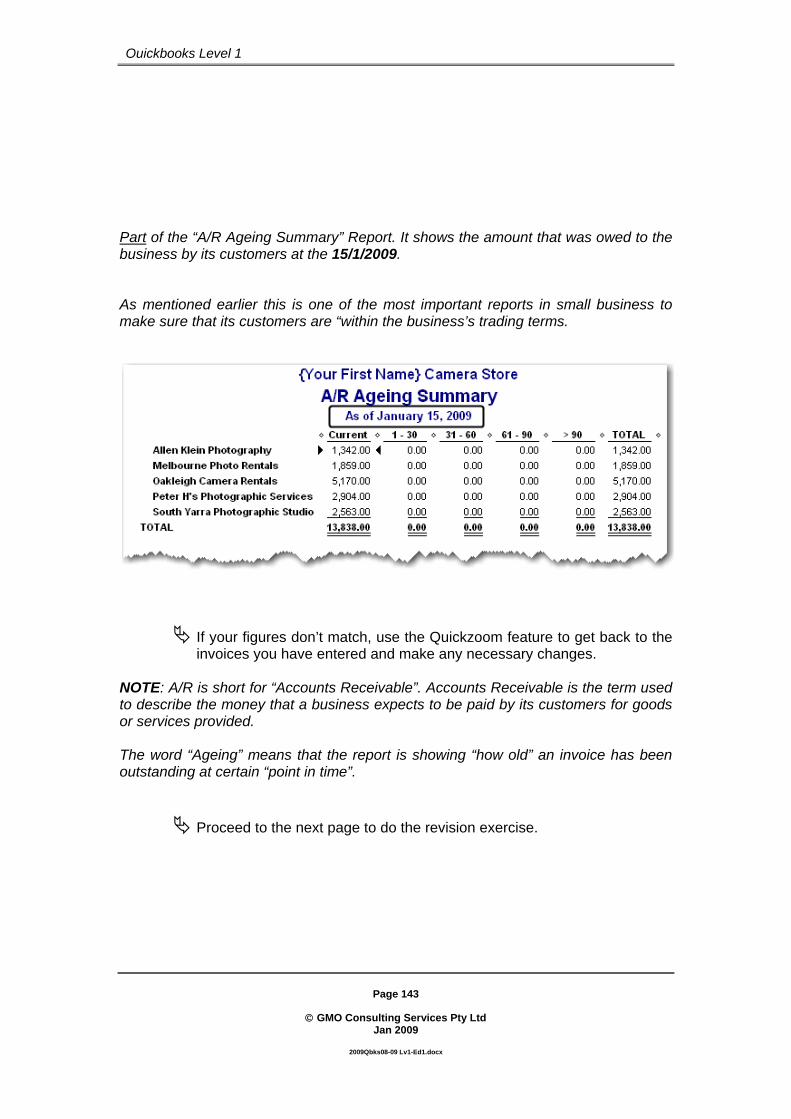
Page 143
© GMO Consulting Services Pty Ltd
Jan 2009
2009Qbks08-09 Lv1-Ed1.docx
Quickbooks Level 1
Part of the “A/R Ageing Summary” Report. It shows the amount that was owed to the business by its customers at the 15/1/2009. As mentioned earlier this is one of the most important reports in small business to make sure that its customers are “within the business’s trading terms.
If your figures don’t match, use the Quickzoom feature to get back to the invoices you have entered and make any necessary changes.
NOTE: A/R is short for “Accounts Receivable”. Accounts Receivable is the term used to describe the money that a business expects to be paid by its customers for goods or services provided. The word “Ageing” means that the report is showing “how old” an invoice has been outstanding at certain “point in time”.
Proceed to the next page to do the revision exercise.

Page 144
© GMO Consulting Services Pty Ltd
Jan 2009
2009Qbks08-09 Lv1-Ed1.docx
Quickbooks Level 1
REVISION EXERCISE
You notice that two more Tripods (R2’s) are damaged. You return them to Ricoh and receive an Adjustment Note.
Record the credit note from Ricoh dated the 15/1/09 – the total of the Credit is $88.00
(HINT Click , alter the Bill to a Credit and enter the Supplier’s name.)
Adjustment Note ABN 18 238 939 219 15 January 2009 101 Ferntree Gully Rd Knoxfield 3176 Tel 9778 4455
{Your Name} Cameras FAX 9778 6677
100 High St Armadale 3143 Credit No 45099
Your order
Qty Code Description Price Total 2 R2 Tripod 40.00 80.00 Sub Total 80.00 GST 8.00 Freight Total $88.00 Net 30 days
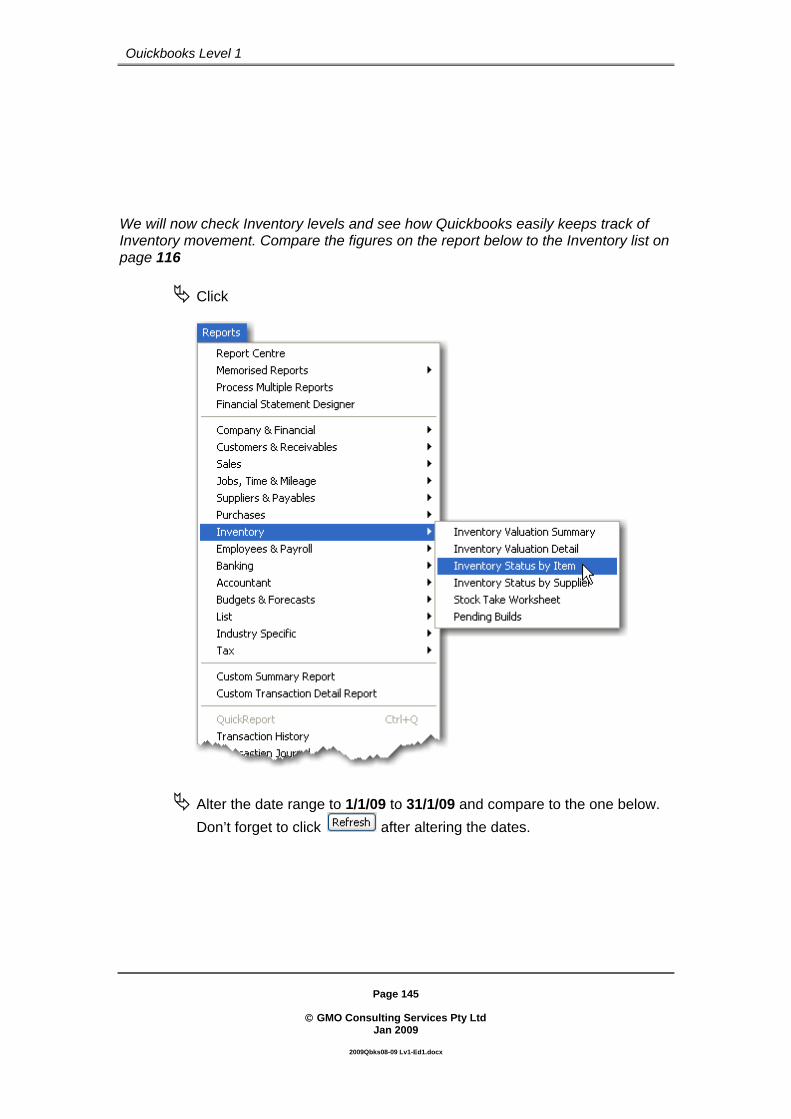
Page 145
© GMO Consulting Services Pty Ltd
Jan 2009
2009Qbks08-09 Lv1-Ed1.docx
Quickbooks Level 1
We will now check Inventory levels and see how Quickbooks easily keeps track of Inventory movement. Compare the figures on the report below to the Inventory list on page 116
Click
Alter the date range to 1/1/09 to 31/1/09 and compare to the one below. Don’t forget to click after altering the dates.

Page 146
© GMO Consulting Services Pty Ltd
Jan 2009
2009Qbks08-09 Lv1-Ed1.docx
Quickbooks Level 1

Page 147
© GMO Consulting Services Pty Ltd
Jan 2009
2009Qbks08-09 Lv1-Ed1.docx
Quickbooks Level 1
We will now produce a report to see how the Payables have been recorded.
Click Reports on the menu bar, Suppliers & Payables, A/P Ageing Summary
Alter the date to 31/1/09 and click .
Ensure that the right hand TOTAL column matches the above picture.
If you wish print this report. Note the Credits that have been recorded in the “1-30 column” and that all the purchases have been recorded in the Current column. This is because the terms we set up with our suppliers are Net 30 and therefore all these payables have a “due date” in February. Our report is dated 31/1/09 so Quickbooks lists all the bills in the current column. The credit notes, on the other hand, do not have due dates. Quickbooks uses the issue date of the credit note. As the credits are dated 12th to 15th January then Quickbooks lists these in the “1-30 column”.

Page 148
© GMO Consulting Services Pty Ltd
Jan 2009
2009Qbks08-09 Lv1-Ed1.docx
Quickbooks Level 1
If your report totals do not agree with the figures in the picture of the report on page 147 use the Quickzoom function to get to the original transactions and correct any errors.
Again, you may have entered wrong dates for either your invoices or bills. You can go into the Accounts Payable and Accounts Receivables, registers and check all your dates. (Open the Chart of Accounts, and double click on the appropriate register.) The single biggest problem that new users of Quickbooks face is incorrect dates entered. Quickbooks is “date driven” and incorrect dates result in incorrect reporting. It is imperative to make sure all dates are entered accurately if the program is to be used to produce figures for the Business Activity Statement.

Page 149
© GMO Consulting Services Pty Ltd
Jan 2009
2009Qbks08-09 Lv1-Ed1.docx
Quickbooks Level 1
PART 13 –SUMMARY We entered a series of invoices and we looked at another very important report; the Accounts Receivable Aging Summary. This report gives us a summary of all the outstanding amounts owed to the business, and, more importantly, for how long. Many businesses have failed because they have not “kept on top” of their “debtors” – the cash flow has suffered and they were unable to pay their suppliers (creditors). Contacting customers who are in default of their terms and asking for payment is a necessary but thankless task. We also had another look at the inventory reports and noted that the Inventory levels had changed because of the sales that were recorded. Quickbooks also displayed some statistical information relating to the number of items “sold per week”. The last report we produced was another fairly important report – the Accounts Payable Aging Summary. This report shows how much money the business owes suppliers, and for how long the account has been outstanding.

Page 150
© GMO Consulting Services Pty Ltd
Jan 2009
2009Qbks08-09 Lv1-Ed1.docx
Quickbooks Level 1
Part 14 - Changing Selling Prices Quickbooks allows the user to change the sales price of items without the need to go into each item and alter the price. We will alter the selling price of all our “Inventory products”.
Click Lists on the Menu Bar then Item List
Click at the bottom of the list and select Change Item Prices.

Page 151
© GMO Consulting Services Pty Ltd
Jan 2009
2009Qbks08-09 Lv1-Ed1.docx
Quickbooks Level 1
The following screen will be displayed:
Click on the drop arrow at the top left and select “Inventory Part”. Note the screen on the following page.

Page 152
© GMO Consulting Services Pty Ltd
Jan 2009
2009Qbks08-09 Lv1-Ed1.docx
Quickbooks Level 1
The “Change Item Prices” screen showing all the “Inventory parts.
Proceed to the following page and carefully enter the prices as shown in the “New Price” column.

Page 153
© GMO Consulting Services Pty Ltd
Jan 2009
2009Qbks08-09 Lv1-Ed1.docx
Quickbooks Level 1
Enter the prices as shown here. (Note that the K1 price remains unchanged.)
After entering the new prices, click The “Item List” showing the new prices is displayed here.

Page 154
© GMO Consulting Services Pty Ltd
Jan 2009
2009Qbks08-09 Lv1-Ed1.docx
Quickbooks Level 1
Part 15 – Sales Receipts - Entering Fundamentally a Sales Receipt and a Tax Invoice are recorded in virtually the same way. However, when Sales Receipts are recorded, Quickbooks automatically assumes receipt of the payment. The user chooses to either have payments automatically entered into the bank, or a special account called Undeposited Funds. Another important difference between a Sales Receipt and an Invoice is that you don’t have to record the name of the Customer. The assumption is that you would not want to clutter up your Customer List with “once only” Customers. (Note: Some small businesses would try to record all customers to establish a “mailing list” for future use.) We will now proceed to record a Sales Receipt however, the customer has asked for a discount as he is paying in cash. So we will create a “Special Item” that will calculate the percentage discount automatically.
Make sure the Item list is still displayed on your screen.
Click and click New. Fill out the window as shown on the following page:
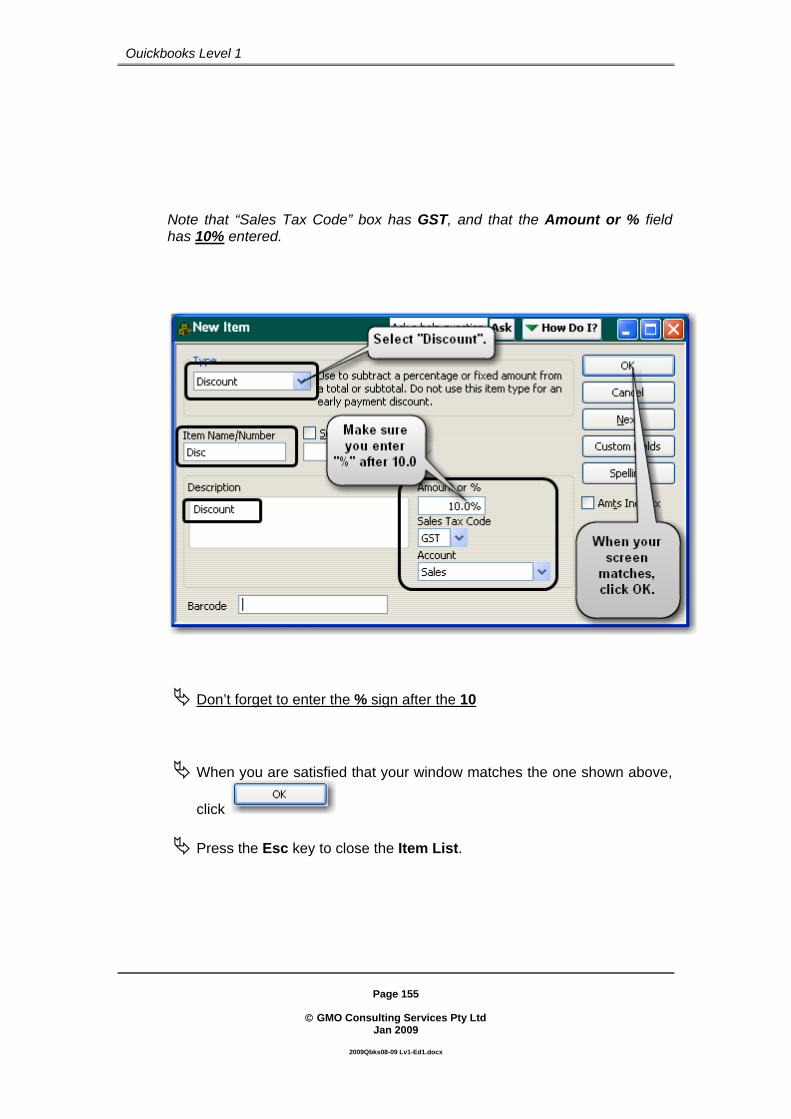
Page 155
© GMO Consulting Services Pty Ltd
Jan 2009
2009Qbks08-09 Lv1-Ed1.docx
Quickbooks Level 1
Note that “Sales Tax Code” box has GST, and that the Amount or % field has 10% entered.
Don’t forget to enter the % sign after the 10
When you are satisfied that your window matches the one shown above,
click
Press the Esc key to close the Item List.

Page 156
© GMO Consulting Services Pty Ltd
Jan 2009
2009Qbks08-09 Lv1-Ed1.docx
Quickbooks Level 1
Click in the Customer area of the Home Page.
Leave the Customer:Job field blank and press Tab to move to the date field.
Alter the date to 15/1/09 and press Tab to move to the Pay Method field and type in C. Quickbooks will fill in the word “Cash” for you.
Press Tab to move to the Item column and enter R1, Tab to the Quantity field and enter 1.
Continue to press the Tab key to move to the second line and enter the letter d in the Item column.
Quickbooks automatically discounts the item above by 10%
Turn to the next page and compare your screen to the picture.

Page 157
© GMO Consulting Services Pty Ltd
Jan 2009
2009Qbks08-09 Lv1-Ed1.docx
Quickbooks Level 1
The window should look like the one shown here:
When your Sales Receipt\Tax Invoice is the same as the one above
click
Now click Lists on the menu bar and click Chart of Accounts. Open the Undeposited Funds Register by highlighting “Undeposited Funds”,
clicking and clicking “Use Register”. (Or, alternately, just double click on Undeposited Funds.)

Page 158
© GMO Consulting Services Pty Ltd
Jan 2009
2009Qbks08-09 Lv1-Ed1.docx
Quickbooks Level 1
The Sales Receipt you have just recorded is recorded automatically in the “Undeposited Funds” account as shown here:
Click and note that the Sales Receipt you just recorded will be “opened up”.
Use the Esc key to close all screens when you are done and proceed to the exercises on the next page.
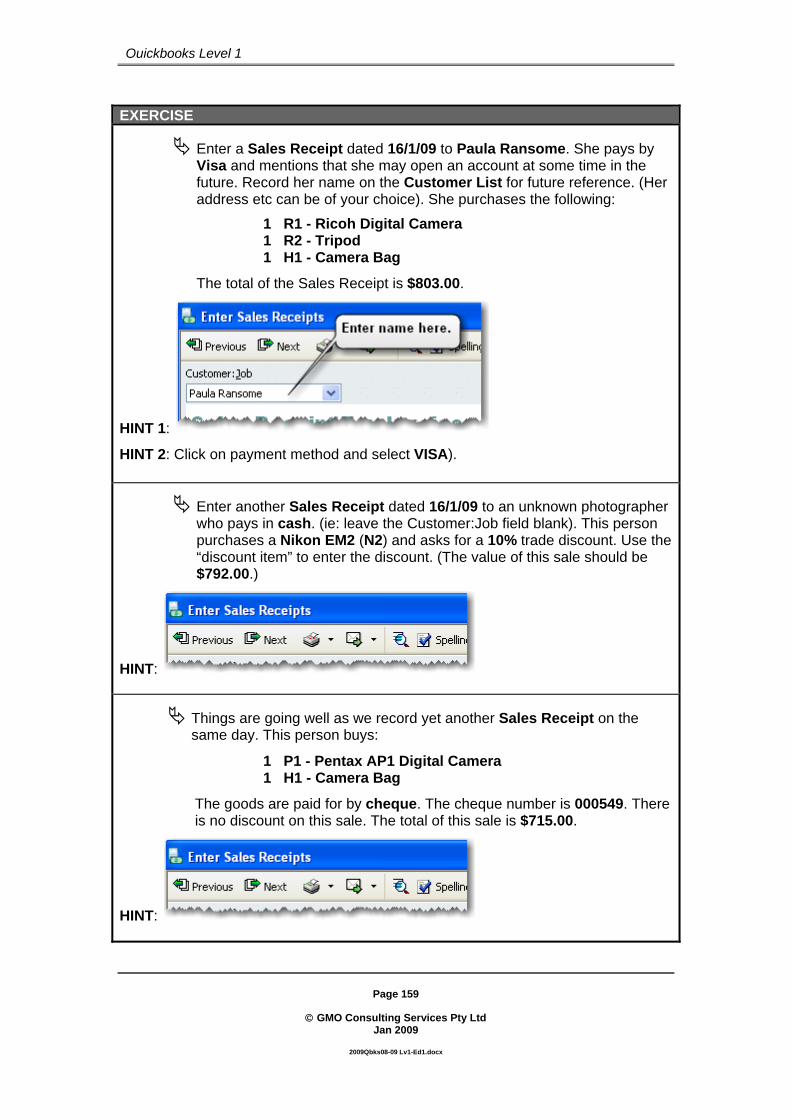
Page 159
© GMO Consulting Services Pty Ltd
Jan 2009
2009Qbks08-09 Lv1-Ed1.docx
Quickbooks Level 1
EXERCISE
Enter a Sales Receipt dated 16/1/09 to Paula Ransome. She pays by Visa and mentions that she may open an account at some time in the future. Record her name on the Customer List for future reference. (Her address etc can be of your choice). She purchases the following:
1 R1 - Ricoh Digital Camera 1 R2 - Tripod 1 H1 - Camera Bag
The total of the Sales Receipt is $803.00.
HINT 1:
HINT 2: Click on payment method and select VISA).
Enter another Sales Receipt dated 16/1/09 to an unknown photographer who pays in cash. (ie: leave the Customer:Job field blank). This person purchases a Nikon EM2 (N2) and asks for a 10% trade discount. Use the “discount item” to enter the discount. (The value of this sale should be $792.00.)
HINT:
Things are going well as we record yet another Sales Receipt on the same day. This person buys:
1 P1 - Pentax AP1 Digital Camera 1 H1 - Camera Bag
The goods are paid for by cheque. The cheque number is 000549. There is no discount on this sale. The total of this sale is $715.00.
HINT:

Page 160
© GMO Consulting Services Pty Ltd
Jan 2009
2009Qbks08-09 Lv1-Ed1.docx
Quickbooks Level 1
PART 15 - SUMMARY In this section we saw how to enter sales that “are paid on the spot”. Sales Receipts are entered in exactly the same way as invoices. There are two important differences between a Sales Receipts and an invoice. Firstly, the system assumes we have received payment as soon as the transaction is recorded and secondly, there is no need to enter a “customer name”. As you will see later, “Sales Receipts” transaction will also be used to enter other types of transactions so that they are correctly reported on the BAS. We will use the “Sales Receipts” to enter bank interest earned.

Page 161
© GMO Consulting Services Pty Ltd
Jan 2009
2009Qbks08-09 Lv1-Ed1.docx
Quickbooks Level 1
Part 16 - Banking Receipts - (Recording Deposits) On the 17/1/09 all the payments received from the “Sales Receipts” were deposited into the cheque account. We will also record this into Quickbooks. This is a simple task to do, but first we will have another look at where all the monies receipted have been recorded in Quickbooks.
Press the Esc key to clear the screen of any open windows.
Click List on the menu bar and click Chart of Accounts.
Highlight Undeposited Funds and press the Ctrl and R keys to open the register.
The following window should be displayed:
The “Undeposited funds Register shows all the Sales Receipts entered so far.

Page 162
© GMO Consulting Services Pty Ltd
Jan 2009
2009Qbks08-09 Lv1-Ed1.docx
Quickbooks Level 1
Undeposited Funds - What does it mean? Undeposited Funds is an asset account that Quickbooks uses to record all monies received that have not yet been banked. You could think of it as a “cash register”. Many businesses do not bank each payment when it is received. In our instance we would have several transactions in a day (or week) and then would bank all monies at hand in one deposit. This function allows the user to “group together” a number of payments to “emulate” what is done “in real life”. As we will see later, this makes the process of bank reconciliation very easy, as the deposit transactions in Quickbooks will match the bank statement. Another reason why the Undeposited Funds account is useful, is that the user can choose what funds will be deposited into which bank account (if more than one bank account is used.) Quickbooks has the ability to print out a “deposit slip” that can be used at the bank, thus saving the user time. Note: In some businesses where payments are infrequent it may be more relevant to switch the default to “Deposit directly to a bank account”. In this manual we will always use Undeposited Funds to record payments received, prior to recording deposits.

Page 163
© GMO Consulting Services Pty Ltd
Jan 2009
2009Qbks08-09 Lv1-Ed1.docx
Quickbooks Level 1
Press the Esc key until all windows are closed. Make sure that the Home Page is displayed.
Click on the Banking section of the Home Page. The following Window is displayed:
This Window summarises the "undeposited funds" that are available for banking. This is where you choose which items are going to be banked. As the Mastercard transaction has been processed through the electronic terminal it will be deposited separately to other types of payments. It will be separately listed on the bank statement.
Click the drop arrow at the top and select Mastercard and VISA
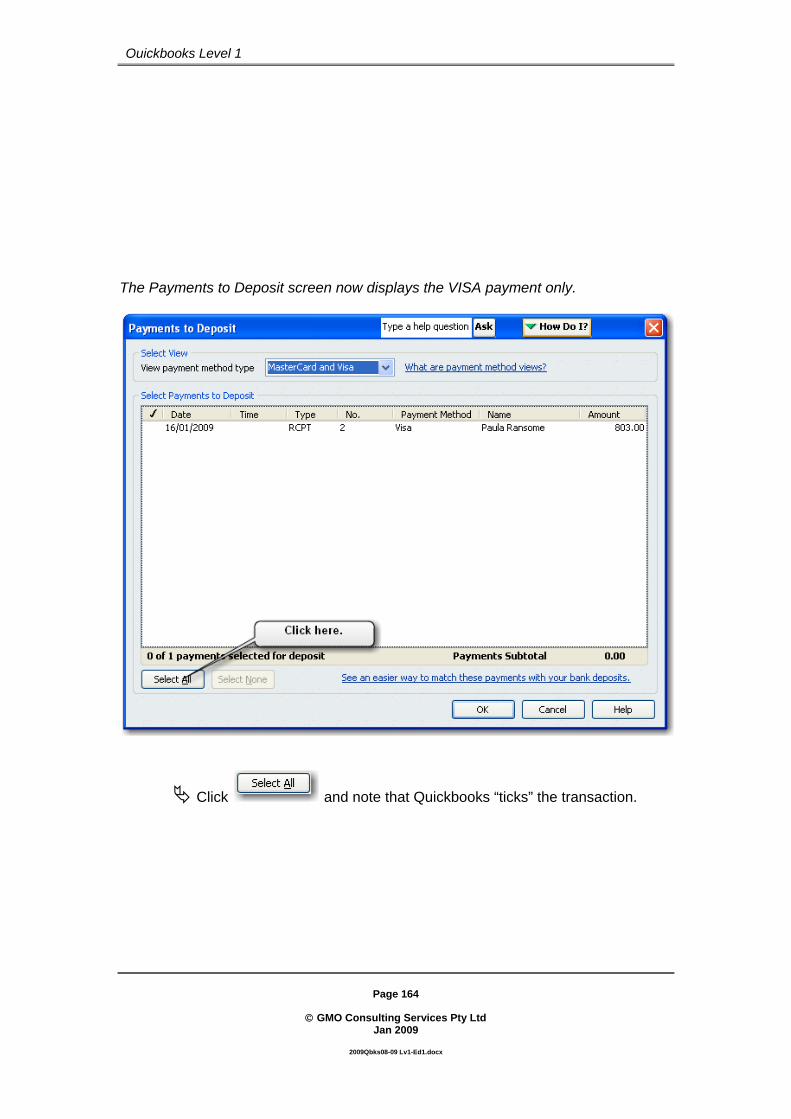
Page 164
© GMO Consulting Services Pty Ltd
Jan 2009
2009Qbks08-09 Lv1-Ed1.docx
Quickbooks Level 1
The Payments to Deposit screen now displays the VISA payment only.
Click and note that Quickbooks “ticks” the transaction.
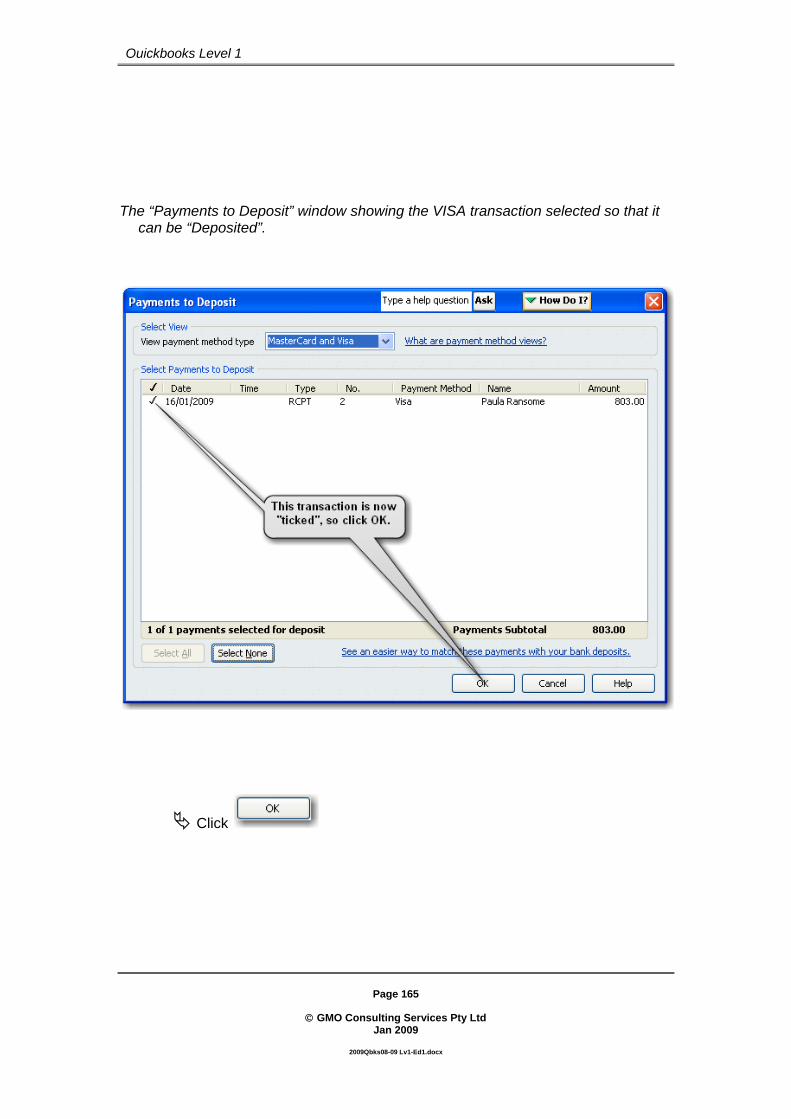
Page 165
© GMO Consulting Services Pty Ltd
Jan 2009
2009Qbks08-09 Lv1-Ed1.docx
Quickbooks Level 1
The “Payments to Deposit” window showing the VISA transaction selected so that it can be “Deposited”.
Click
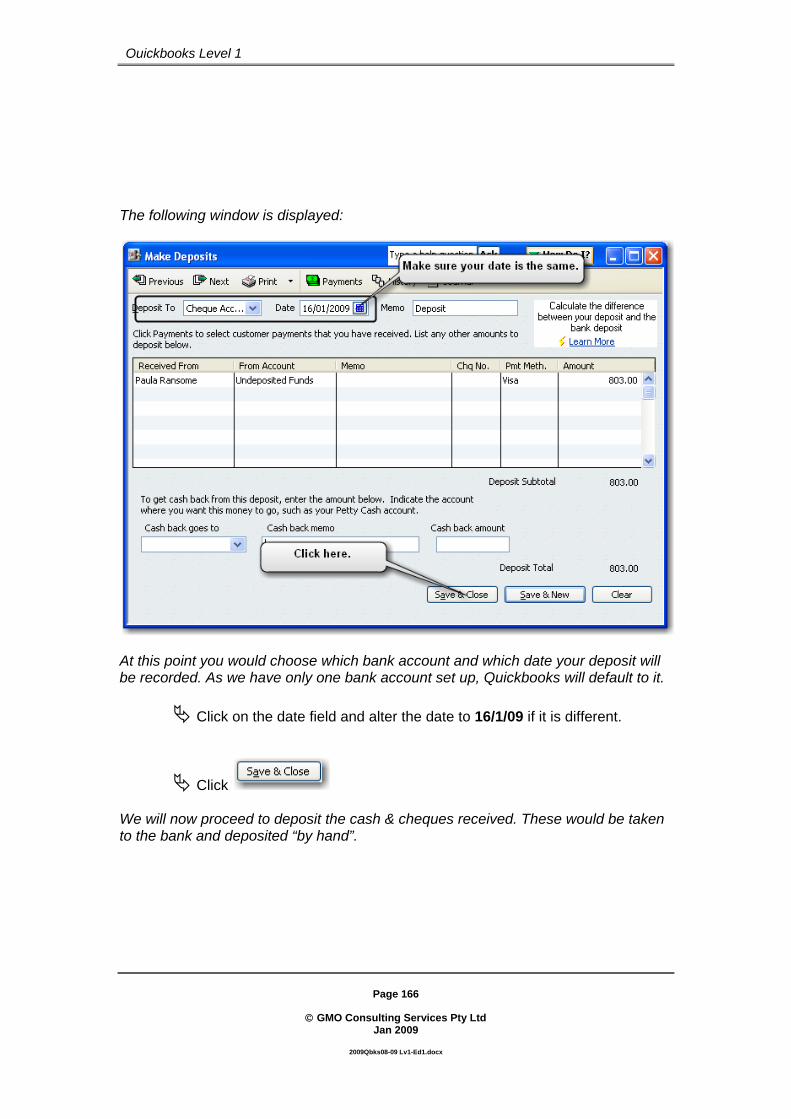
Page 166
© GMO Consulting Services Pty Ltd
Jan 2009
2009Qbks08-09 Lv1-Ed1.docx
Quickbooks Level 1
The following window is displayed:
At this point you would choose which bank account and which date your deposit will be recorded. As we have only one bank account set up, Quickbooks will default to it.
Click on the date field and alter the date to 16/1/09 if it is different.
Click We will now proceed to deposit the cash & cheques received. These would be taken to the bank and deposited “by hand”.

Page 167
© GMO Consulting Services Pty Ltd
Jan 2009
2009Qbks08-09 Lv1-Ed1.docx
Quickbooks Level 1
Click and note the screen below:
Click the then click Note the screen on the following page.

Page 168
© GMO Consulting Services Pty Ltd
Jan 2009
2009Qbks08-09 Lv1-Ed1.docx
Quickbooks Level 1
Alter the date to the 17/1/09
When your screen matches click
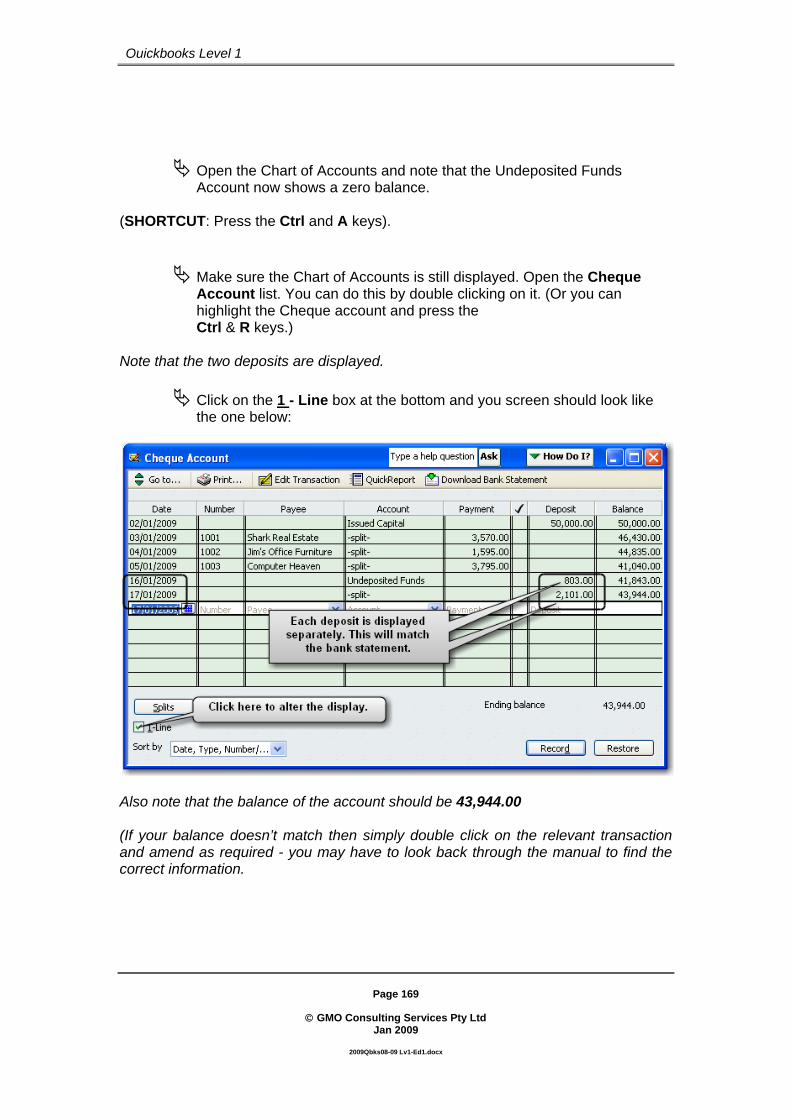
Page 169
© GMO Consulting Services Pty Ltd
Jan 2009
2009Qbks08-09 Lv1-Ed1.docx
Quickbooks Level 1
Open the Chart of Accounts and note that the Undeposited Funds Account now shows a zero balance.
(SHORTCUT: Press the Ctrl and A keys).
Make sure the Chart of Accounts is still displayed. Open the Cheque Account list. You can do this by double clicking on it. (Or you can highlight the Cheque account and press the Ctrl & R keys.)
Note that the two deposits are displayed.
Click on the 1 - Line box at the bottom and you screen should look like the one below:
Also note that the balance of the account should be 43,944.00 (If your balance doesn’t match then simply double click on the relevant transaction and amend as required - you may have to look back through the manual to find the correct information.

Page 170
© GMO Consulting Services Pty Ltd
Jan 2009
2009Qbks08-09 Lv1-Ed1.docx
Quickbooks Level 1
PART 16 - SUMMARY In this section we saw how Quickbooks enables the user to “group together” payments that will be banked at the one time. The implication of this is that when we do the bank reconciliation the total amount deposited will be displayed in exactly the same way as is displayed on the bank statement. This makes the reconciliation process very easy indeed. As mentioned earlier, in some instances businesses have several bank accounts. The system then allows the user to choose “which payments” get banked into “which account”. Electronic payments can also be entered separately. We also are able to print a deposit slip from Quickbooks which is perfectly acceptable to most banking institutions.
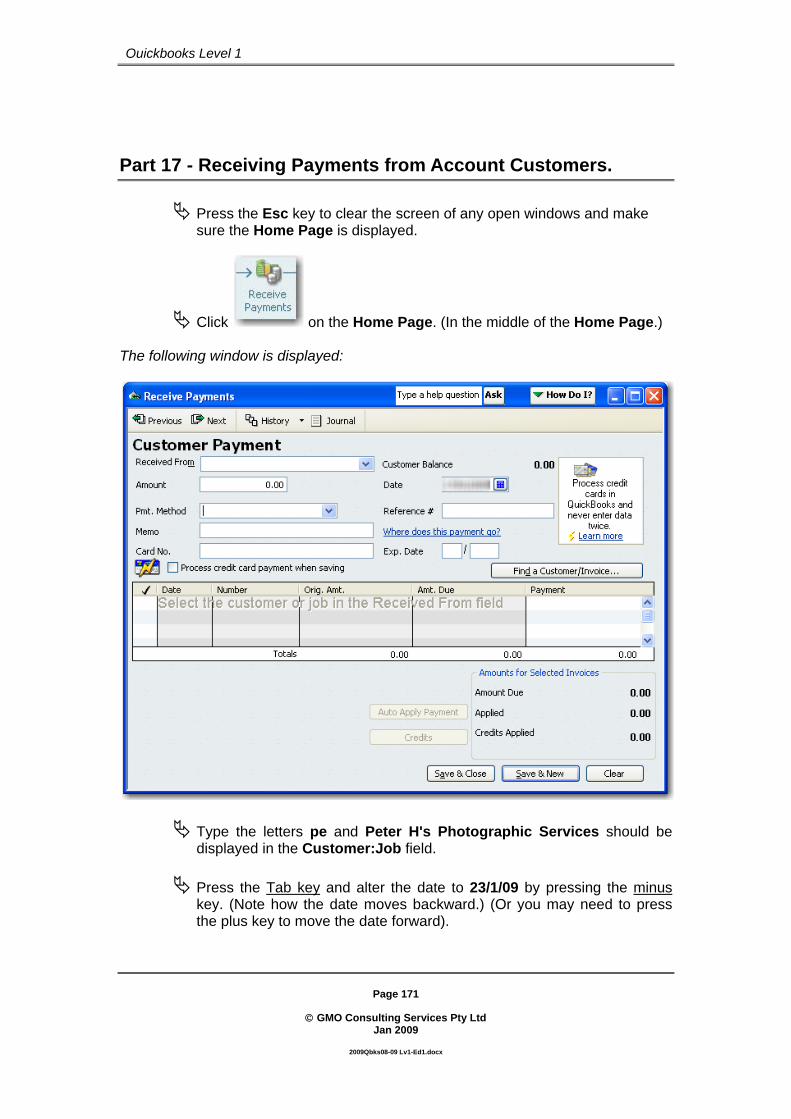
Page 171
© GMO Consulting Services Pty Ltd
Jan 2009
2009Qbks08-09 Lv1-Ed1.docx
Quickbooks Level 1
Part 17 - Receiving Payments from Account Customers.
Press the Esc key to clear the screen of any open windows and make sure the Home Page is displayed.
Click on the Home Page. (In the middle of the Home Page.) The following window is displayed:
Type the letters pe and Peter H's Photographic Services should be displayed in the Customer:Job field.
Press the Tab key and alter the date to 23/1/09 by pressing the minus key. (Note how the date moves backward.) (Or you may need to press the plus key to move the date forward).
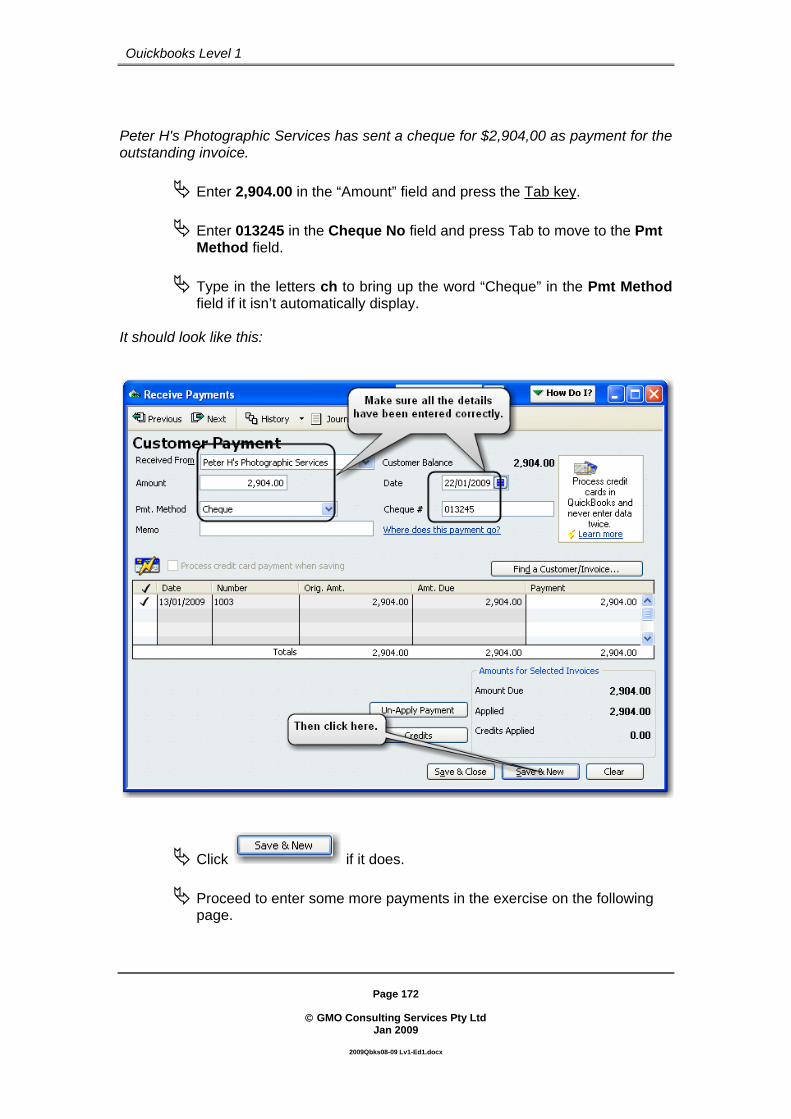
Page 172
© GMO Consulting Services Pty Ltd
Jan 2009
2009Qbks08-09 Lv1-Ed1.docx
Quickbooks Level 1
Peter H's Photographic Services has sent a cheque for $2,904,00 as payment for the outstanding invoice.
Enter 2,904.00 in the “Amount” field and press the Tab key. Enter 013245 in the Cheque No field and press Tab to move to the Pmt Method field.
Type in the letters ch to bring up the word “Cheque” in the Pmt Method field if it isn’t automatically display.
It should look like this:
Click if it does.
Proceed to enter some more payments in the exercise on the following page.

Page 173
© GMO Consulting Services Pty Ltd
Jan 2009
2009Qbks08-09 Lv1-Ed1.docx
Quickbooks Level 1
EXERCISE We receive a cheque payment from Allen Klein Photography on the 23/1/09. He pays us $1,342.00. The cheque number is 14235.
Click to record this transaction
HINT: Melbourne Photo Rentals, pays us $1,859.00 on the 23/1/09 with cheque number 43005
Click to record this transaction.
HINT:
Bank the cheque payments that you have received since the last time you banked. The amount should be $6,105.00 and the date is 24/1/09.
HINT: click on the Home Page. Don’t forget to click
Use the Chart of Accounts to check the balance of the Cheque Account (HINT: Press the Ctrl and A keys to quickly open the Chart of Accounts).
The balance should be:

Page 174
© GMO Consulting Services Pty Ltd
Jan 2009
2009Qbks08-09 Lv1-Ed1.docx
Quickbooks Level 1
PART 17 - SUMMARY In this section we saw how we entered payments received from customers. Quickbooks automatically applied the payment to the invoice. All payments were “grouped together” so that we were able to enter one deposit for the period.
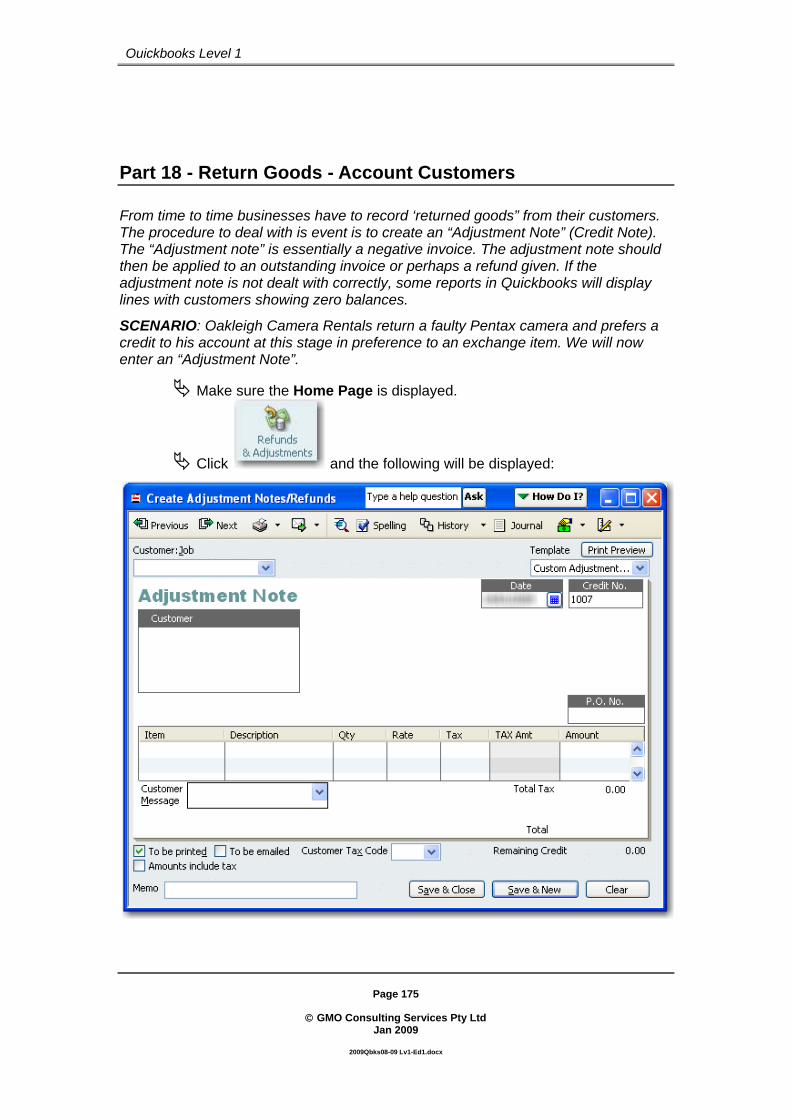
Page 175
© GMO Consulting Services Pty Ltd
Jan 2009
2009Qbks08-09 Lv1-Ed1.docx
Quickbooks Level 1
Part 18 - Return Goods - Account Customers From time to time businesses have to record ‘returned goods” from their customers. The procedure to deal with is event is to create an “Adjustment Note” (Credit Note). The “Adjustment note” is essentially a negative invoice. The adjustment note should then be applied to an outstanding invoice or perhaps a refund given. If the adjustment note is not dealt with correctly, some reports in Quickbooks will display lines with customers showing zero balances.
SCENARIO: Oakleigh Camera Rentals return a faulty Pentax camera and prefers a credit to his account at this stage in preference to an exchange item. We will now enter an “Adjustment Note”.
Make sure the Home Page is displayed.
Click and the following will be displayed:

Page 176
© GMO Consulting Services Pty Ltd
Jan 2009
2009Qbks08-09 Lv1-Ed1.docx
Quickbooks Level 1
Press the letter O to enter Oakleigh Camera Rentals in the Customer:Job field.
Press the Tab key and alter the date to 27/1/09
Continue to press the Tab key to move the cursor to the Item column and enter P1. Continue with the Tab key and enter 1 in the Qty field. Alter the price to 530.00 – this is the original price paid for this product. It would be foolhardy to offer a credit more than the original price paid. Click on the memo field at the bottom and enter the memo as shown on the next page.
The “Adjustment Note” screen:
When your screen matches the picture click

Page 177
© GMO Consulting Services Pty Ltd
Jan 2009
2009Qbks08-09 Lv1-Ed1.docx
Quickbooks Level 1
Quickbooks will respond with the following prompt:
Click on “Apply to tax invoice”. Then click Quickbooks will now display the “Apply Credit to Invoices” screen:
Click

Page 178
© GMO Consulting Services Pty Ltd
Jan 2009
2009Qbks08-09 Lv1-Ed1.docx
Quickbooks Level 1
We will now have a look at how the “Adjustment Note” has been applied to the Invoice.
Now click at the top left of the screen and click on Oakleigh Camera Rentals to highlight them in the Customer: Job list on the left of the screen.
Make sure you select “All” in the date field to display all transactions.
Then “double click” on the Tax invoice line to see how the Credit is applied. (This will open the invoice.)
You should now have the invoice displayed on your screen. Note the picture on the next page.

Page 179
© GMO Consulting Services Pty Ltd
Jan 2009
2009Qbks08-09 Lv1-Ed1.docx
Quickbooks Level 1
Note the “Balance” displayed at the bottom right of the invoice is now LESS than the Total of the Invoice.
Click at the top of the invoice and note the picture on the next page.
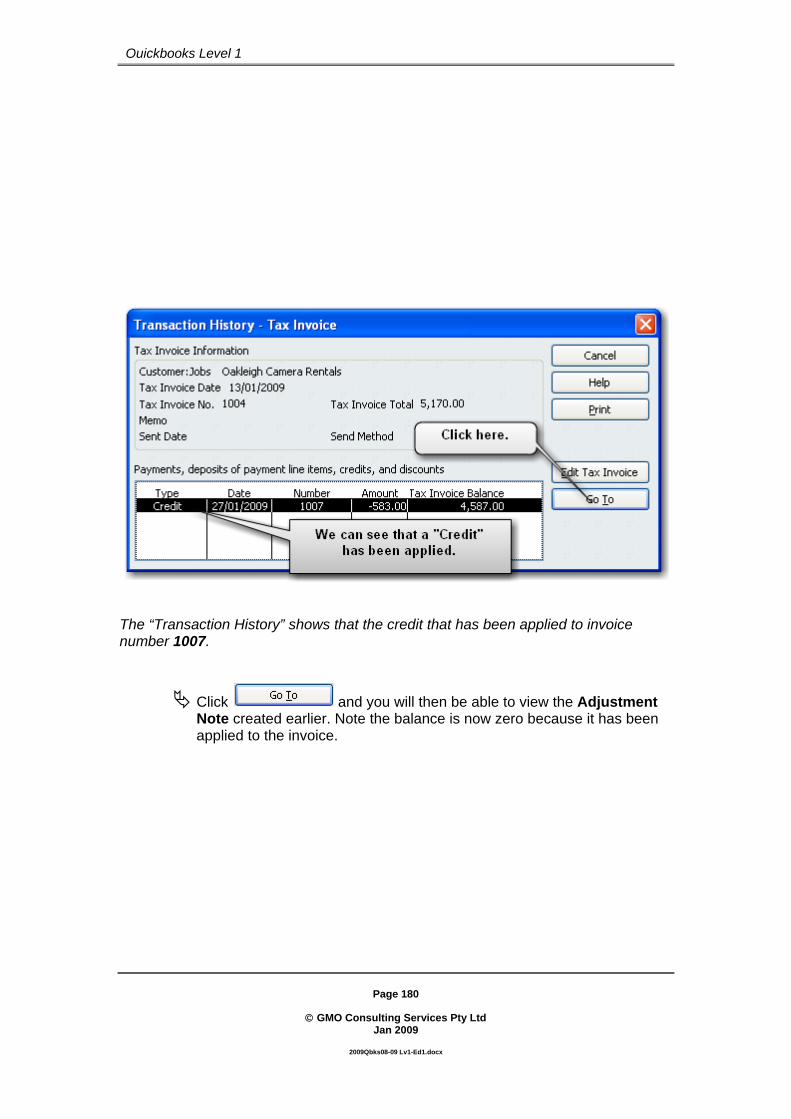
Page 180
© GMO Consulting Services Pty Ltd
Jan 2009
2009Qbks08-09 Lv1-Ed1.docx
Quickbooks Level 1
The “Transaction History” shows that the credit that has been applied to invoice number 1007.
Click and you will then be able to view the Adjustment Note created earlier. Note the balance is now zero because it has been applied to the invoice.

Page 181
© GMO Consulting Services Pty Ltd
Jan 2009
2009Qbks08-09 Lv1-Ed1.docx
Quickbooks Level 1
Press the Esc key until to return to the Home Page, and complete the following exercises.
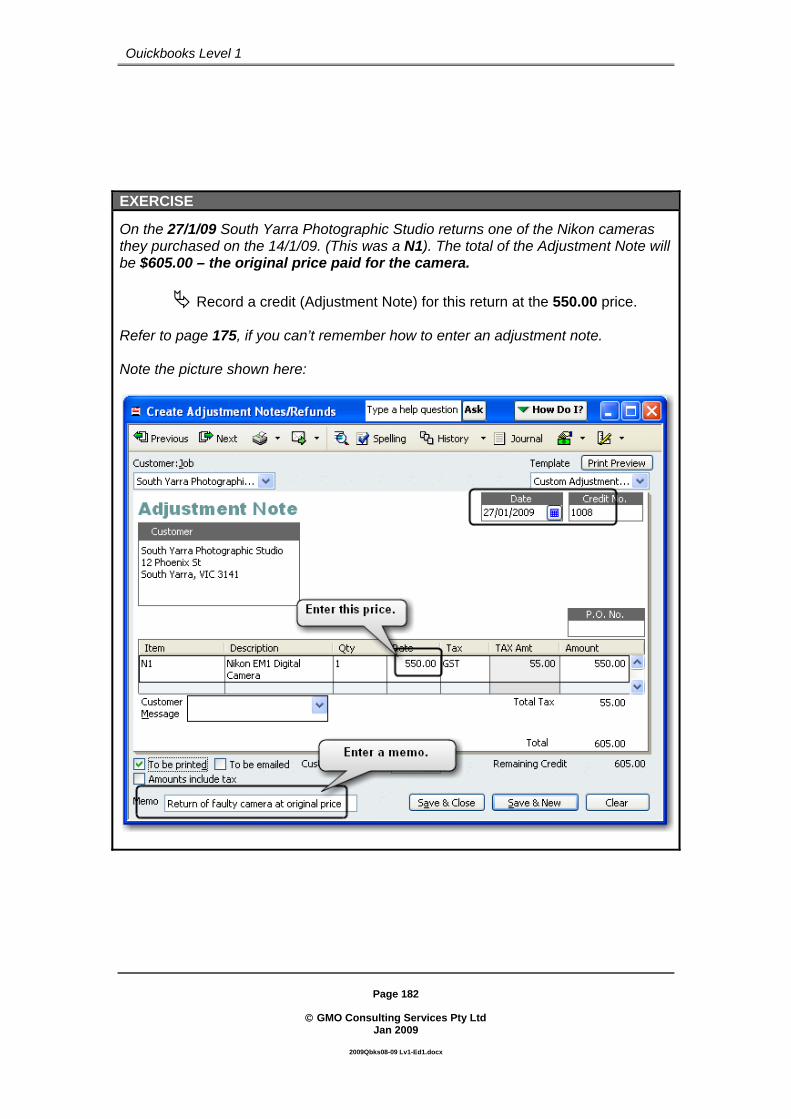
Page 182
© GMO Consulting Services Pty Ltd
Jan 2009
2009Qbks08-09 Lv1-Ed1.docx
Quickbooks Level 1
EXERCISE
On the 27/1/09 South Yarra Photographic Studio returns one of the Nikon cameras they purchased on the 14/1/09. (This was a N1). The total of the Adjustment Note will be $605.00 – the original price paid for the camera.
Record a credit (Adjustment Note) for this return at the 550.00 price.
Refer to page 175, if you can’t remember how to enter an adjustment note. Note the picture shown here:

Page 183
© GMO Consulting Services Pty Ltd
Jan 2009
2009Qbks08-09 Lv1-Ed1.docx
Quickbooks Level 1
EXERCISE
Apply the credit to invoice 1001. Note the “Available Credits” screen:
Now note that the credit is being applied to invoice 1001.

Page 184
© GMO Consulting Services Pty Ltd
Jan 2009
2009Qbks08-09 Lv1-Ed1.docx
Quickbooks Level 1
EXERCISE
Go to the Customer Centre, highlight “South Yarra Photographic Studio” and check that the closing balance is $1,958.00
PART 18 - SUMMARY In this section we entered an “Adjustment Note” and saw that is virtually the same as entering an invoice. We also saw how to apply the credit to an invoice. Unfortunately, this important step is often overlooked by new Quickbooks users, causing the Accounts Receivable reports to be incorrect. We also saw how to use the cross referencing functions in Quickbooks to see that the credit was applied to the invoice.

Page 185
© GMO Consulting Services Pty Ltd
Jan 2009
2009Qbks08-09 Lv1-Ed1.docx
Quickbooks Level 1
Part 19 - Return Goods - COD Refund On the 28/1/09 Paula Ransome returns the tripod that she purchased (on sales receipt no 2) You issue a refund cheque.
Click on the Home Page.
Enter Paula Ransome in the “Customer: Job” field
Fill out the Adjustment Note as follows:
Don’t forget to change the date to 28/1/09
Click at the top right.

Page 186
© GMO Consulting Services Pty Ltd
Jan 2009
2009Qbks08-09 Lv1-Ed1.docx
Quickbooks Level 1
Quickbooks fills out the “Issue a Refund” screen for you.
Enter the memo as shown, “un-tick” the “To be printed” box. Make sure
you have the same cheque number, then click Quickbooks now takes you back to the “Adjustment Note” window.
Note the picture on the following page.

Page 187
© GMO Consulting Services Pty Ltd
Jan 2009
2009Qbks08-09 Lv1-Ed1.docx
Quickbooks Level 1
Quickbooks now displays the “Adjustment Note” with the word “Refunded” ‘stamped” on it.
Click PART 19 - SUMMARY In this section we saw how we enter a refund transaction from entering an adjustment note. The process was the same as entering a normal adjustment note, but by clicking “Refund” on the adjustment note window, Quickbooks generated a “cheque” which was allocated to the customer, and recorded in “Accounts Receivable”.

Qu
Pa We to ebus HerQui(Pleacc
uickbooks Le
art 20 - R
will record expenses otsiness such
re is the releckbooks – p
ease refer toounting).
Telstr Telstra C
ABN 33 Account 331
Opening $0.00
{Your NaCameras
100 High Armadal
Item Account 194 Usage c195 Service
vel 1
Recording
some “billsther than iteas for telep
evant part oparticularly o your acco
ra Bill Corporation Li
051 775 556
number 0149 100
g Balance
ame} s h St le 3143
Summary
charges & equipment
© GMO Co
200
g Accou
” that we haems we sell.phone and e
of a “bill” fromif the busin
ountant if yo
mited
TaxInv
Bill T57
We received $0.00 $0.
YouRef
to 2
10
GSbill
Totbill GS
Page 188
onsulting Servi
Jan 2009
09Qbks08-09 Lv1-Ed1.d
nts Paya
ave receive. They are eelectricity.
m Telstra thess is repo
ou are uncle
x voice
number Date
70259385 28 J
Balance Tota00 209
ur ference
28 Jan 28 Apr
ST in this
tal of this (inc
ST)
ces Pty Ltd
docx
able - Oth
d in the maexpenses in
hat needs torting GST o
ear about ca
e of Issue Jan 09
al of this bill 9.00
Paymen
E
her
il. These bilncurred in ru
o be recordon an “accruash and acc
Bill e 13 2
20
nt to be made
Exc GST
130.00 60.00
190.00
19.00
209.00
ills are relatunning the
ded into ual basis”. crual
enquiries 2220
Total amounpayabl
9.00
by 19 Feb 09
Inc GST
143.066.00
209.00
ted
nt e
T 0 0
0

Page 189
© GMO Consulting Services Pty Ltd
Jan 2009
2009Qbks08-09 Lv1-Ed1.docx
Quickbooks Level 1
Press Esc to close any open windows. And make sure that the Home Page is displayed.
Click on the Home Page, Type in Telstra and press the Tab key.
Quickbooks responds with the following Window
We will now add the name Telstra without any address and any other details by
clicking . This allows us to continue entering the information as shown on the “Telstra bill”. We could, at a later time, fill out the rest of the Telstra details.
Click

Page 190
© GMO Consulting Services Pty Ltd
Jan 2009
2009Qbks08-09 Lv1-Ed1.docx
Quickbooks Level 1
Continue to fill out the window as follows: The allocation account is “Office Phone & Fax” under Telephone.
When all the details have been entered click . (Make sure that the due date has been filled in correctly.) Proceed to the exercise on the next page and enter the “bills” as shown.
HINT: Read all the information for each exercise BEFORE entering any details. Try to get all information from the Tax Invoice shown. Remember that in the “real world” information is entered into Quickbooks directly from the “Tax Invoices”.

Page 191
© GMO Consulting Services Pty Ltd
Jan 2009
2009Qbks08-09 Lv1-Ed1.docx
Quickbooks Level 1
EXERCISE United Energy has sent us an "electricity bill” for $165.00 dated the 28/1/09. It is due for payment on the 16/2/09. (The net Amount is 150.00 and the GST is 15.00).
Record this “bill” and allocate it to the Expense account Electricity. (The NCG tax code should automatically come up in the Tax column when you select Electricity from the account list.)
Note the picture on the following page.
United Energy ABN 064 651 029 P O Box 1234 Melbourne 3000 Issue Date {Your Name} Cameras 28Jan 09 100 High Street Armadale 3143 Invoice No 120567 Electricity usage 2 Jan to 25 Jan 165.00 Total GST included 15.00 Usage Jan Total due 165.00 Please pay by 16 Feb 09

Page 192
© GMO Consulting Services Pty Ltd
Jan 2009
2009Qbks08-09 Lv1-Ed1.docx
Quickbooks Level 1
The United Energy bill:
Click

Page 193
© GMO Consulting Services Pty Ltd
Jan 2009
2009Qbks08-09 Lv1-Ed1.docx
Quickbooks Level 1
EXERCISE David Syme & Co has sent us a tax invoice for advertising in the Green Guide. Here is a copy of the invoice:
Record this “bill” and make sure that the allocation is to “Advertising”. You will have to create a new expense account called Advertising. Make sure that you enter NCG in the "Tax Code" field. Note the picture on the next page. HINT: Just type in the word “Advertising” in the Account field and Quickbooks will prompt you to set it up.
Tax Invoice David Syme & Co ABN 28 078 679 722 P O Box 33 Tel 9532 0011 28 January 2009 Melbourne 8000 FAX 9532 0012 {Your Name} Cameras 100 High St Armadale 3143 Invoice No TT-1009 Qty Code Description Price Total 4CL12 Ads in January - The Age Green Guide 140.25 561.00 Sub Total 561.00 GST included in this invoice 51.00 Due by 7 Feb 2009 Total $561.00

Page 194
© GMO Consulting Services Pty Ltd
Jan 2009
2009Qbks08-09 Lv1-Ed1.docx
Quickbooks Level 1
The “David Syme” Bill
Click
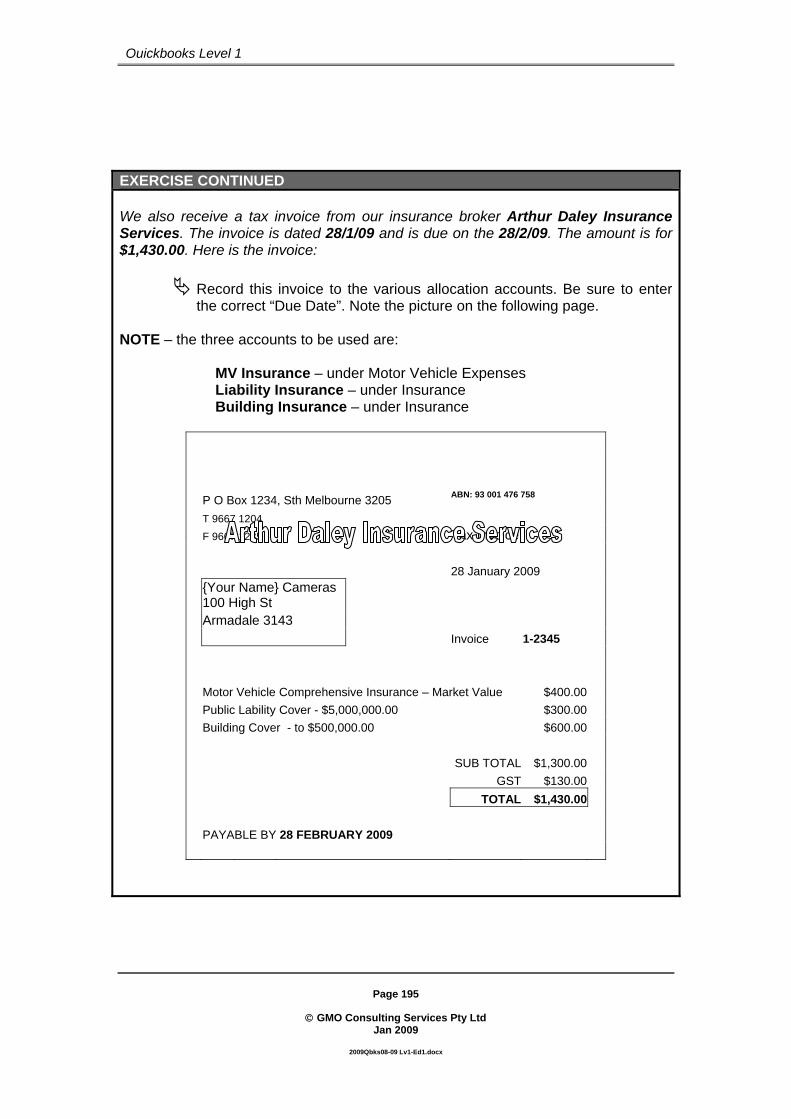
Page 195
© GMO Consulting Services Pty Ltd
Jan 2009
2009Qbks08-09 Lv1-Ed1.docx
Quickbooks Level 1
EXERCISE CONTINUED We also receive a tax invoice from our insurance broker Arthur Daley Insurance Services. The invoice is dated 28/1/09 and is due on the 28/2/09. The amount is for $1,430.00. Here is the invoice:
Record this invoice to the various allocation accounts. Be sure to enter the correct “Due Date”. Note the picture on the following page.
NOTE – the three accounts to be used are:
MV Insurance – under Motor Vehicle Expenses Liability Insurance – under Insurance Building Insurance – under Insurance
P O Box 1234, Sth Melbourne 3205 ABN: 93 001 476 758 T 9667 1204 F 9667 1235 Tax Invoice 28 January 2009
{Your Name} Cameras 100 High St
Armadale 3143 Invoice 1-2345 Motor Vehicle Comprehensive Insurance – Market Value $400.00 Public Lability Cover - $5,000,000.00 $300.00 Building Cover - to $500,000.00 $600.00 SUB TOTAL $1,300.00 GST $130.00 TOTAL $1,430.00 PAYABLE BY 28 FEBRUARY 2009
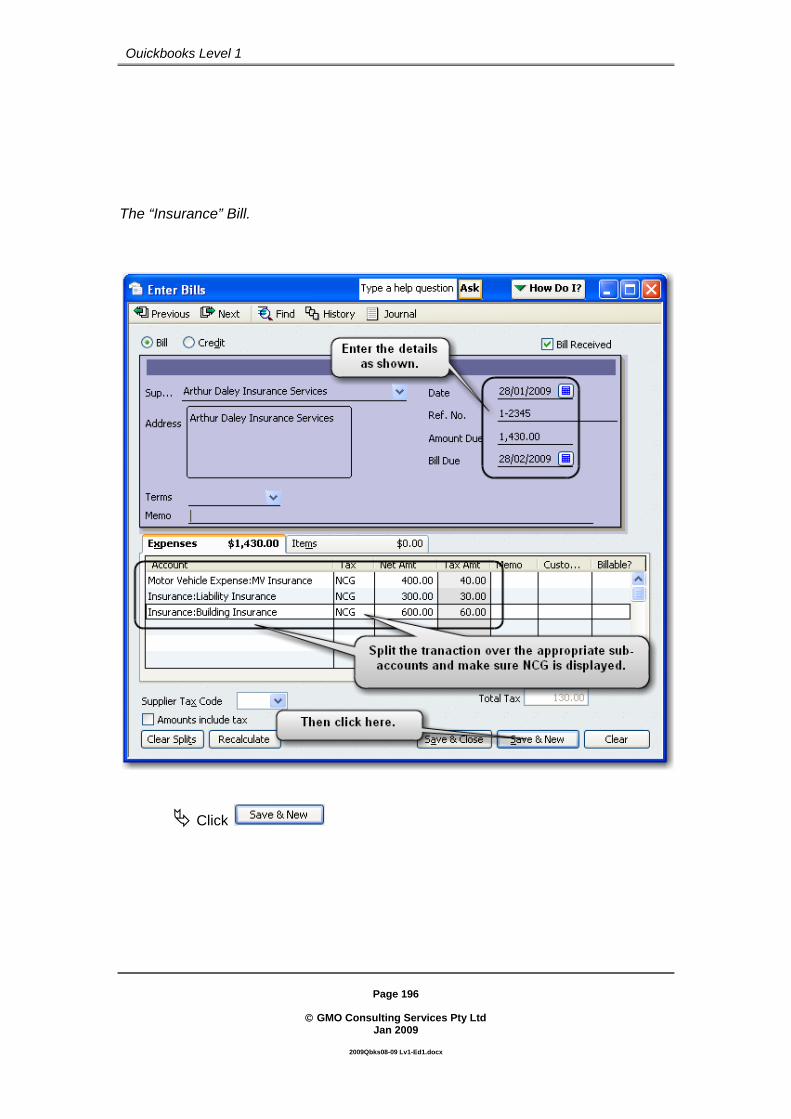
Page 196
© GMO Consulting Services Pty Ltd
Jan 2009
2009Qbks08-09 Lv1-Ed1.docx
Quickbooks Level 1
The “Insurance” Bill.
Click
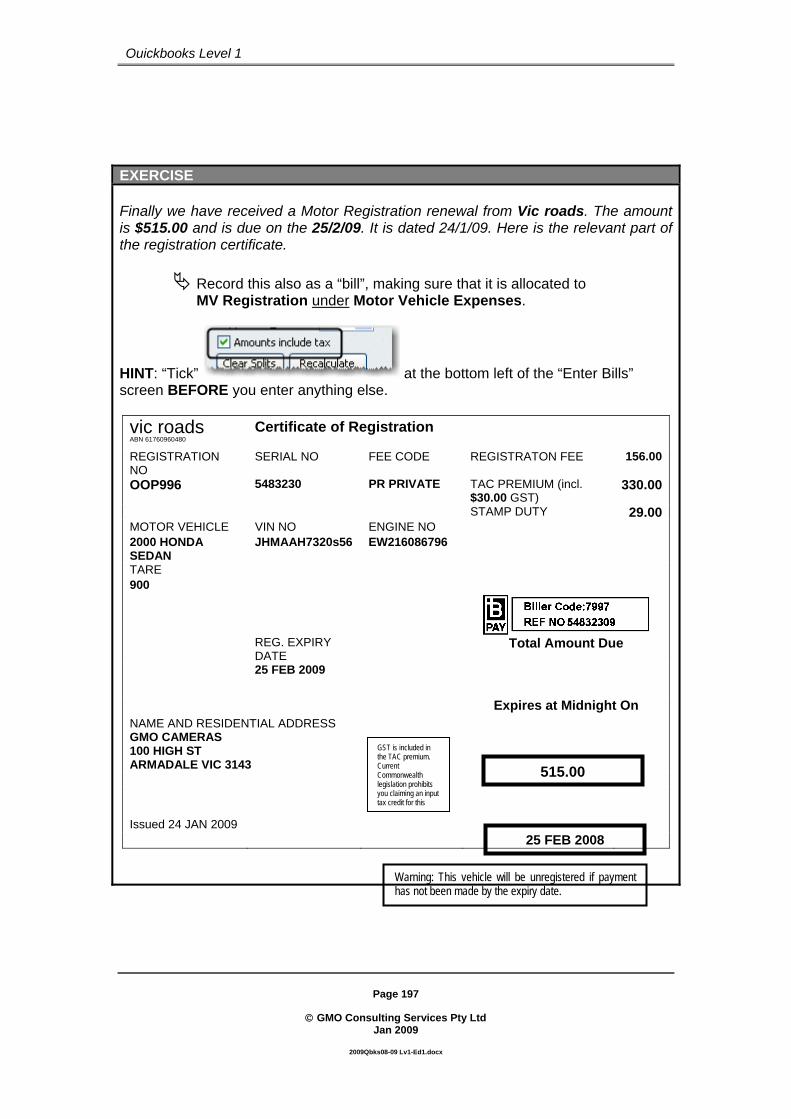
Page 197
© GMO Consulting Services Pty Ltd
Jan 2009
2009Qbks08-09 Lv1-Ed1.docx
Quickbooks Level 1
EXERCISE Finally we have received a Motor Registration renewal from Vic roads. The amount is $515.00 and is due on the 25/2/09. It is dated 24/1/09. Here is the relevant part of the registration certificate.
Record this also as a “bill”, making sure that it is allocated to MV Registration under Motor Vehicle Expenses.
HINT: “Tick” at the bottom left of the “Enter Bills” screen BEFORE you enter anything else. vic roads Certificate of Registration ABN 61760960480 REGISTRATION NO
SERIAL NO FEE CODE REGISTRATON FEE 156.00
OOP996 5483230 PR PRIVATE TAC PREMIUM (incl. $30.00 GST)
330.00
STAMP DUTY 29.00MOTOR VEHICLE VIN NO ENGINE NO 2000 HONDA SEDAN
JHMAAH7320s56 EW216086796
TARE 900
REG. EXPIRY
DATE Total Amount Due
25 FEB 2009
Expires at Midnight On NAME AND RESIDENTIAL ADDRESS GMO CAMERAS 100 HIGH ST ARMADALE VIC 3143
Issued 24 JAN 2009
515.00
GST is included in the TAC premium. Current Commonwealth legislation prohibits you claiming an input tax credit for this
25 FEB 2008
Warning: This vehicle will be unregistered if payment has not been made by the expiry date.

Page 198
© GMO Consulting Services Pty Ltd
Jan 2009
2009Qbks08-09 Lv1-Ed1.docx
Quickbooks Level 1
Here is a picture of the “Vic Roads” registration bill
Click
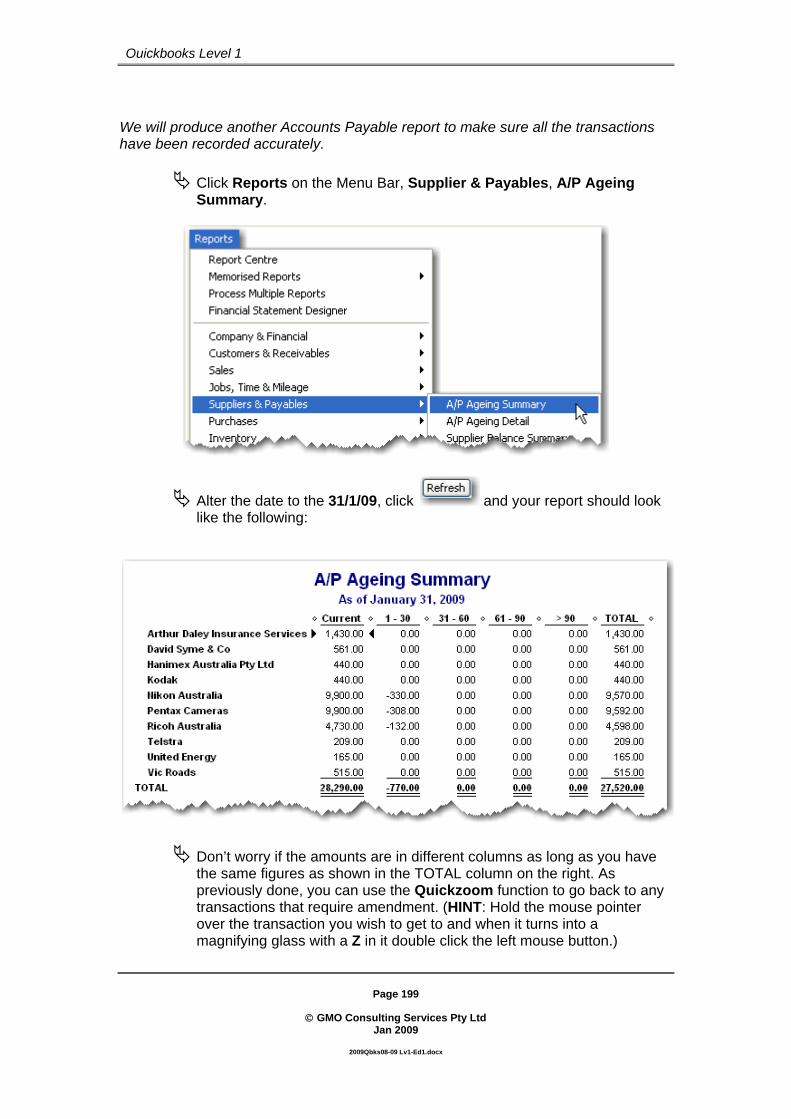
Page 199
© GMO Consulting Services Pty Ltd
Jan 2009
2009Qbks08-09 Lv1-Ed1.docx
Quickbooks Level 1
We will produce another Accounts Payable report to make sure all the transactions have been recorded accurately.
Click Reports on the Menu Bar, Supplier & Payables, A/P Ageing Summary.
Alter the date to the 31/1/09, click and your report should look like the following:
Don’t worry if the amounts are in different columns as long as you have the same figures as shown in the TOTAL column on the right. As previously done, you can use the Quickzoom function to go back to any transactions that require amendment. (HINT: Hold the mouse pointer over the transaction you wish to get to and when it turns into a magnifying glass with a Z in it double click the left mouse button.)
Page 200
© GMO Consulting Services Pty Ltd
Jan 2009
2009Qbks08-09 Lv1-Ed1.docx
Quickbooks Level 1
PART 20 - SUMMARY In this section we saw how to enter the “miscellaneous bills” that most businesses get. They are entered in much the same way as entering cheques, but they are “linked” to the Accounts Payable account and tell the user how much is owed to the suppliers (Suppliers). (People working in the field of accounting, refer to “Suppliers” as “Creditors”.) We also looked at the Accounts Payable report that showed all the funds owed by the business to the suppliers. Please note, if the business is accounting on an “accrual basis” for GST then, the user should enter all bills, in order to take advantage of this accounting method. If the business is on a “cash basis”, then it is not strictly necessary to enter the bills in as they are received. However, if the user wants to keep track of the amounts owed to the suppliers in an “organised way” then, it is a good idea to follow the procedure outlined in this section.

Page 201
© GMO Consulting Services Pty Ltd
Jan 2009
2009Qbks08-09 Lv1-Ed1.docx
Quickbooks Level 1
Part 21 - Accounts Payable - Paying Bills We will now use the “Pay Bills” function to pay any outstanding bills of the 9/2/09.
Make sure the Home Page is displayed then click in the Supplier section. Alter the “Due on or before” date to 9/2/09 and the “Payment Date” to 9/2/09
Click the Sort Bills By field and select Supplier.
You should have the following window displayed:
HINT: If you want to see all the transactions, you may need to maximise the window (if it’s not already maximised.)
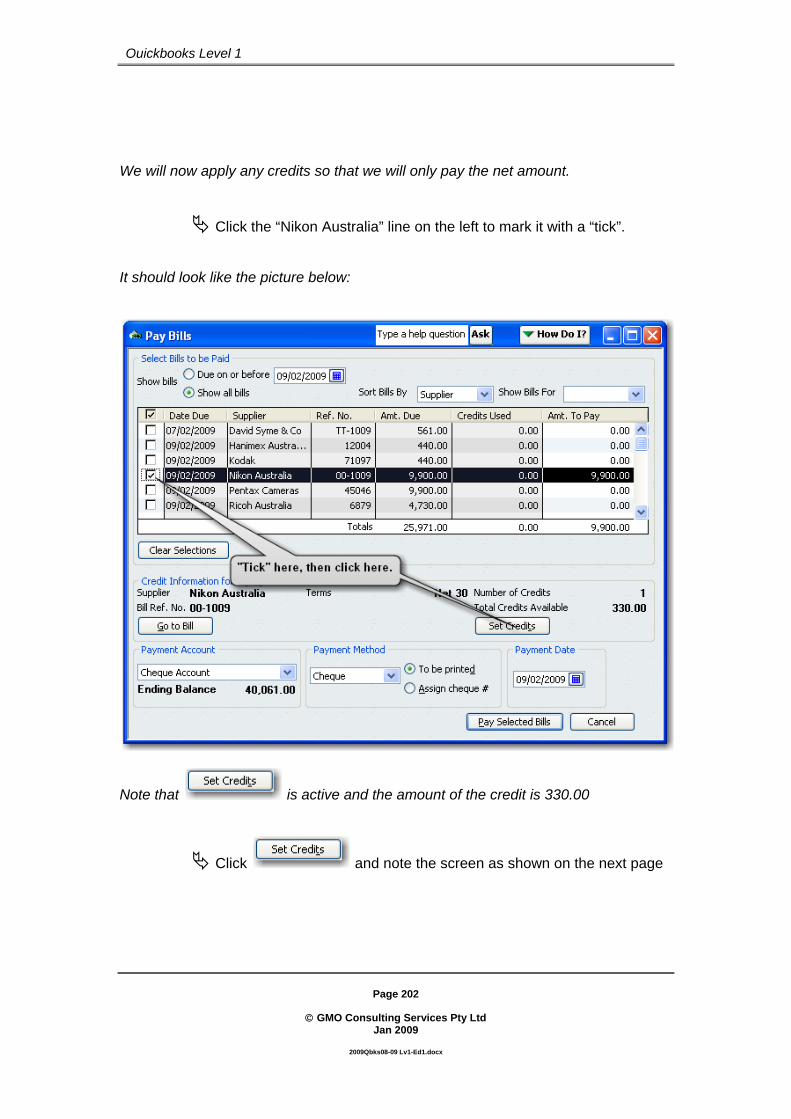
Page 202
© GMO Consulting Services Pty Ltd
Jan 2009
2009Qbks08-09 Lv1-Ed1.docx
Quickbooks Level 1
We will now apply any credits so that we will only pay the net amount.
Click the “Nikon Australia” line on the left to mark it with a “tick”. It should look like the picture below:
Note that is active and the amount of the credit is 330.00
Click and note the screen as shown on the next page

Page 203
© GMO Consulting Services Pty Ltd
Jan 2009
2009Qbks08-09 Lv1-Ed1.docx
Quickbooks Level 1
Click
Now click on the “Pentax Cameras” line to mark it with a “tick”.
Click to set the credit as previously done. Don’t forget
to click on the “Credits” window.
Now click on the Ricoh line to mark it with a “tick” and set the two credits.
It should look like the picture on the next page. Note that each line has been “ticked”.

Page 204
© GMO Consulting Services Pty Ltd
Jan 2009
2009Qbks08-09 Lv1-Ed1.docx
Quickbooks Level 1
Note that each credit has been “ticked”
Click
Now click on the Hanimex line and the Kodak line to mark each of them with a “tick”.
Click “Assign cheque no.” to select it. It should look like the following picture: Note that the total amount being paid is $24,640.00

Page 205
© GMO Consulting Services Pty Ltd
Jan 2009
2009Qbks08-09 Lv1-Ed1.docx
Quickbooks Level 1
When your screen matches the picture above, click Quickbooks will now display the “Assign Cheque Numbers screen as shown on the next page:
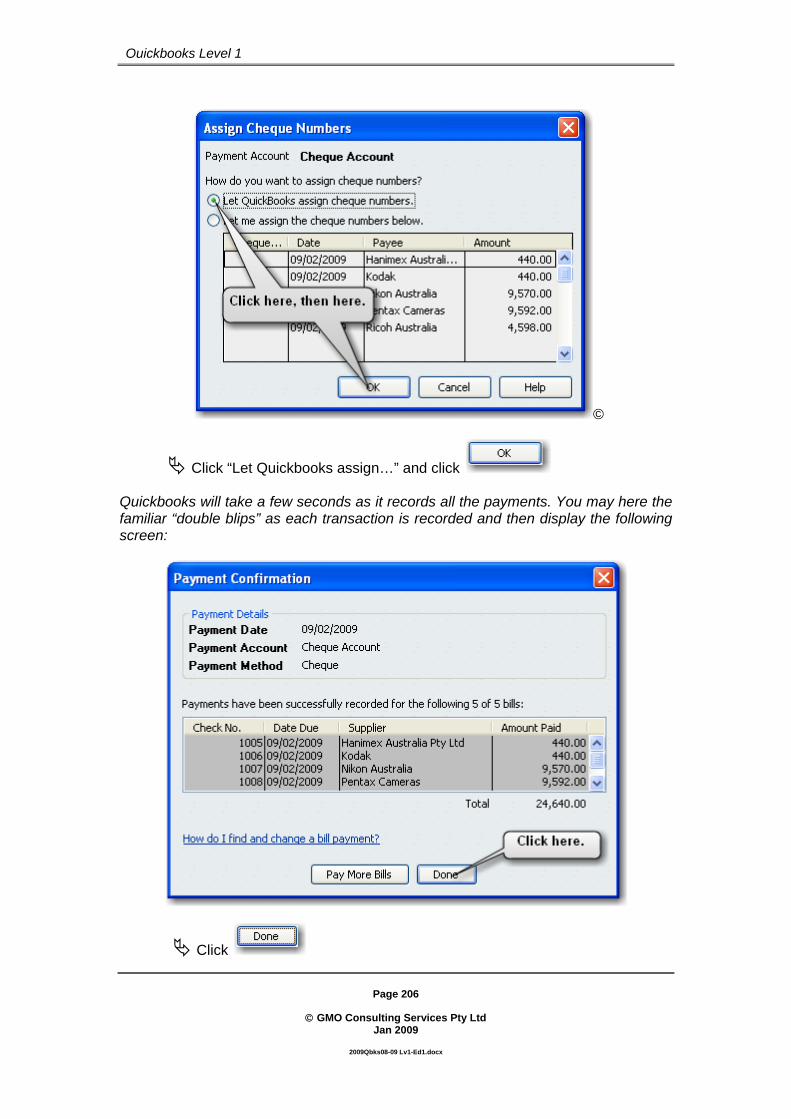
Page 206
© GMO Consulting Services Pty Ltd
Jan 2009
2009Qbks08-09 Lv1-Ed1.docx
Quickbooks Level 1
©
Click “Let Quickbooks assign…” and click Quickbooks will take a few seconds as it records all the payments. You may here the familiar “double blips” as each transaction is recorded and then display the following screen:
Click

Page 207
© GMO Consulting Services Pty Ltd
Jan 2009
2009Qbks08-09 Lv1-Ed1.docx
Quickbooks Level 1
Click Lists on the menu bar, click Chart of Accounts and open the Cheque Account register (by double clicking on it).
Click the Maximise button at the top right corner to see all the transactions so far recorded.
You will note that the most recent transactions are posted with sequential cheque numbers, all dated 9/2/09. If your cheque numbers differ, you can change them by
clicking on the number, altering it and then clicking at the bottom of the screen.
Procedurally you would then write the cheques manually, copying all relevant details from the register. This would ensure that the cheques you remit are for the correct amount (taking up any credits) as well as being paid on time (not early). Note: If the cheque number field shows To Print then, you did not click “Assign Cheque No” in the pay bills window. (Refer to the “circled” part at the bottom of the picture on page 205).

Page 208
© GMO Consulting Services Pty Ltd
Jan 2009
2009Qbks08-09 Lv1-Ed1.docx
Quickbooks Level 1
EXERCISE
Pay the United Energy and David Syme Bills by Mastercard on the 12/02/09.
Shown below is the relevant part of the “Pay Bills” screen.
Click to the payment confirmation.
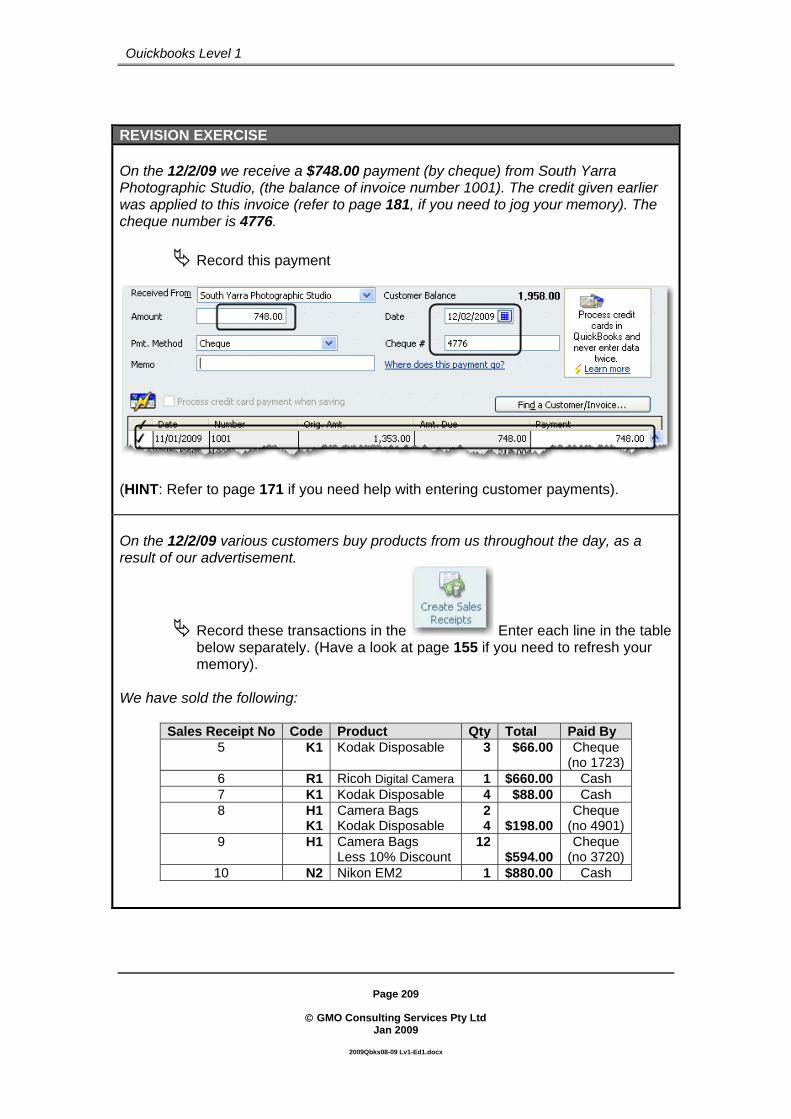
Page 209
© GMO Consulting Services Pty Ltd
Jan 2009
2009Qbks08-09 Lv1-Ed1.docx
Quickbooks Level 1
REVISION EXERCISE On the 12/2/09 we receive a $748.00 payment (by cheque) from South Yarra Photographic Studio, (the balance of invoice number 1001). The credit given earlier was applied to this invoice (refer to page 181, if you need to jog your memory). The cheque number is 4776.
Record this payment
(HINT: Refer to page 171 if you need help with entering customer payments). On the 12/2/09 various customers buy products from us throughout the day, as a result of our advertisement.
Record these transactions in the Enter each line in the table below separately. (Have a look at page 155 if you need to refresh your memory).
We have sold the following:
Sales Receipt No Code Product Qty Total Paid By 5 K1 Kodak Disposable 3 $66.00 Cheque
(no 1723) 6 R1 Ricoh Digital Camera 1 $660.00 Cash 7 K1 Kodak Disposable 4 $88.00 Cash 8 H1
K1 Camera Bags Kodak Disposable
24 $198.00
Cheque (no 4901)
9 H1 Camera Bags Less 10% Discount
12$594.00
Cheque (no 3720)
10 N2 Nikon EM2 1 $880.00 Cash

Page 210
© GMO Consulting Services Pty Ltd
Jan 2009
2009Qbks08-09 Lv1-Ed1.docx
Quickbooks Level 1
REVISION EXERCISE
Deposit all the takings on 13/2/09, referring to page 163 if need be. The deposit should total $3,234.00
The “secondary” deposit window:
PART 20 – SUMMARY In this section we saw how to “pay bills” within Quickbooks. We saw how Quickbooks generates “cheques” as payments to suppliers. We also saw that we also need to mark the credits so that Quickbooks “nets” the amount paid to the Supplier.

Page 211
© GMO Consulting Services Pty Ltd
Jan 2009
2009Qbks08-09 Lv1-Ed1.docx
Quickbooks Level 1
Part 22- Bank Reconciliation This chapter deals with how the Bank Reconciliation is processed in Quickbooks. The Bank Reconciliation process is probably the most important part of bookkeeping whether done manually or done in a computerised system. SCENARIO: We receive a bank statement at the start of February showing all the transactions that have been cleared by the bank as at the end of January. (Refer to page 222) Before we do the reconciliation we must enter all the transactions that the bank has “debited and credited” to our account. You will note that there is “Interest” received as well as “Account Keeping Fees” and “Merchant Fees” deducted. We will use the “Sales Receipt” & “Write Cheques” to enter these transactions. We need to use this procedure to accurately record these transactions on the Business Activity Statement (BAS). But before we do this we need to create a new “Income” account.
Click Lists on the menu bar, click Chart of Accounts. (Or you can press the Ctrl & A keys).
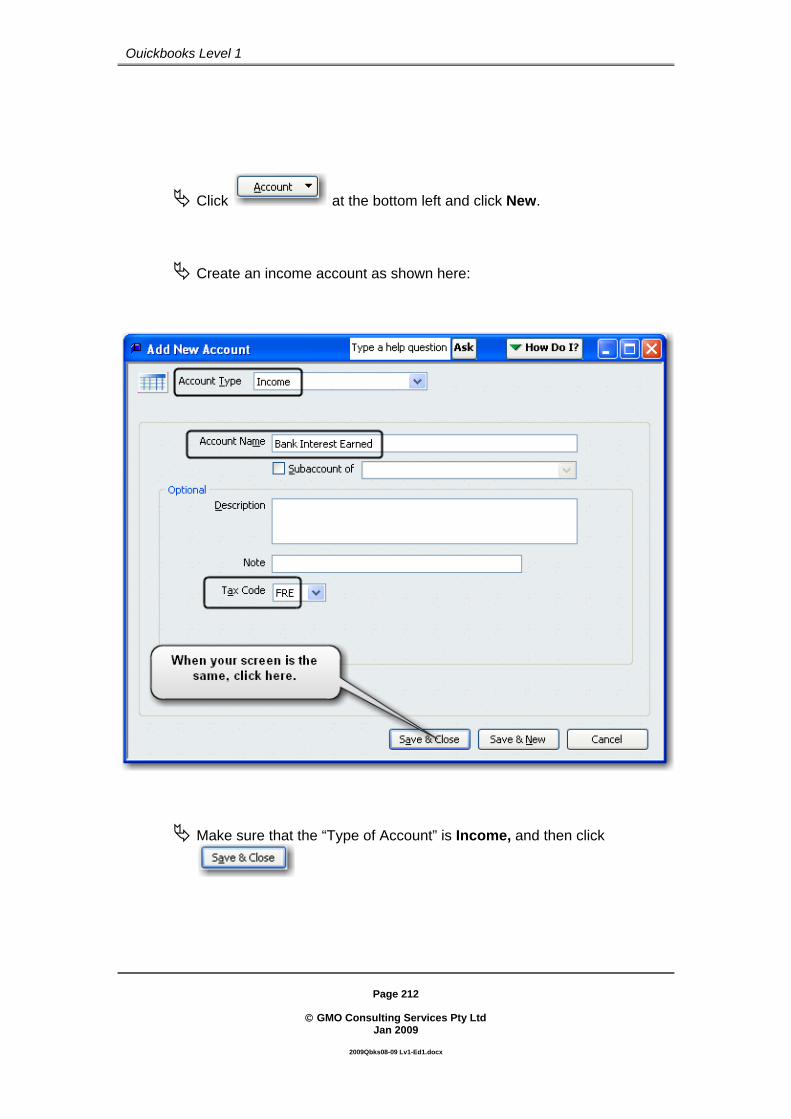
Page 212
© GMO Consulting Services Pty Ltd
Jan 2009
2009Qbks08-09 Lv1-Ed1.docx
Quickbooks Level 1
Click at the bottom left and click New.
Create an income account as shown here:
Make sure that the “Type of Account” is Income, and then click

Page 213
© GMO Consulting Services Pty Ltd
Jan 2009
2009Qbks08-09 Lv1-Ed1.docx
Quickbooks Level 1
We need to create an item in the “Items & Services List” to enter the bank interest earned.
Press the Esc key to close the Chart of Accounts.
Make sure the Home Page is displayed then click
Click and click New.
Fill out the screen as shown here:
Click when your screen matches the picture above.

Page 214
© GMO Consulting Services Pty Ltd
Jan 2009
2009Qbks08-09 Lv1-Ed1.docx
Quickbooks Level 1
We will now alter a preference that will allow us to select how the funds will be banked.
Click Edit on the Menu Bar, and then select Preferences.
Alter as shown here.
When “Use Undeposited Funds….” has been “un-ticked” click

Page 215
© GMO Consulting Services Pty Ltd
Jan 2009
2009Qbks08-09 Lv1-Ed1.docx
Quickbooks Level 1
Entering Bank Interest
Make sure the Home Page is displayed, and then click
Fill out the screen as shown here, ensuring that you click “Deposit To”. Make sure you enter 31/1/09 in the date field – this is the date of the transaction shown on the bank statement.
When you have accurately entered all details click Please note that, in order to report bank interest correctly on the BAS in Quickbooks, the above method should be used.
Page 216
© GMO Consulting Services Pty Ltd
Jan 2009
2009Qbks08-09 Lv1-Ed1.docx
Quickbooks Level 1
Entering Bank Charges We will now enter the bank charges using “Write Cheques”. Tip: Bank Charges should be entered in exactly the same way as shown on the bank statement. They should NOT be added together and entered as one entry. This enables the reconciliation process to be completed consistently easier. It also enables anyone looking at the “books” to clearly see that things have been entered correctly.
Press the Esc key to close any windows. Make sure that the Home Page is active.
Click and enter the details as shown on the next page:
Note, you will have to create a Supplier called NAB and a new expense account called Merchant Fees Also note that the entry does not have a cheque number and has the letters “BS” to indicate that it is an entry derived from the Bank Statement. The transaction has been allocated to the account “Merchant Fees”.

Page 217
© GMO Consulting Services Pty Ltd
Jan 2009
2009Qbks08-09 Lv1-Ed1.docx
Quickbooks Level 1
Note the picture below and enter as shown you will need to create an expense account called “Merchant Fees” – the tax code should be NCG.
When your screen matches the above click
EXERCISE
Using the same procedure, record another “cheque” for the “Account Keeping Fee” (as shown on the statement on page 222). The “allocation account” is Bank Charges. The date, of course is 31/1/09. Make sure you enter “BS” in the cheque number field.
Shown here is a portion of the transaction

Page 218
© GMO Consulting Services Pty Ltd
Jan 2009
2009Qbks08-09 Lv1-Ed1.docx
Quickbooks Level 1
Press the Esc key and click After completing the previous exercises, the Cheque register should look like the one below. The Bank Register in “1 Line” view, showing the bank interest and bank charges entered on the 31/1/2009.
Make sure you have the Bank Statement entries on your screen.

Page 219
© GMO Consulting Services Pty Ltd
Jan 2009
2009Qbks08-09 Lv1-Ed1.docx
Quickbooks Level 1
Performing the Bank Reconciliation We can now proceed with the Bank reconciliation.
Press Esc to clear the screen of any open windows. Make sure the Home Page is displayed.
Click
The following screen will be displayed:
Select Cheque Account from the Account to Reconcile field if it is not already displayed, and press Tab o move to the “Statement Date” field.
Enter 31/1/2009 in the “Statement Date” field, which is the closing date of the Bank Statement shown on page 222.
Press Tab to move to the “Ending Balance” field.
Enter 49956 in this field. This is the closing balance from the Bank Statement shown on page 222.

Page 220
© GMO Consulting Services Pty Ltd
Jan 2009
2009Qbks08-09 Lv1-Ed1.docx
Quickbooks Level 1
Your screen should now look like the one shown here:
Click
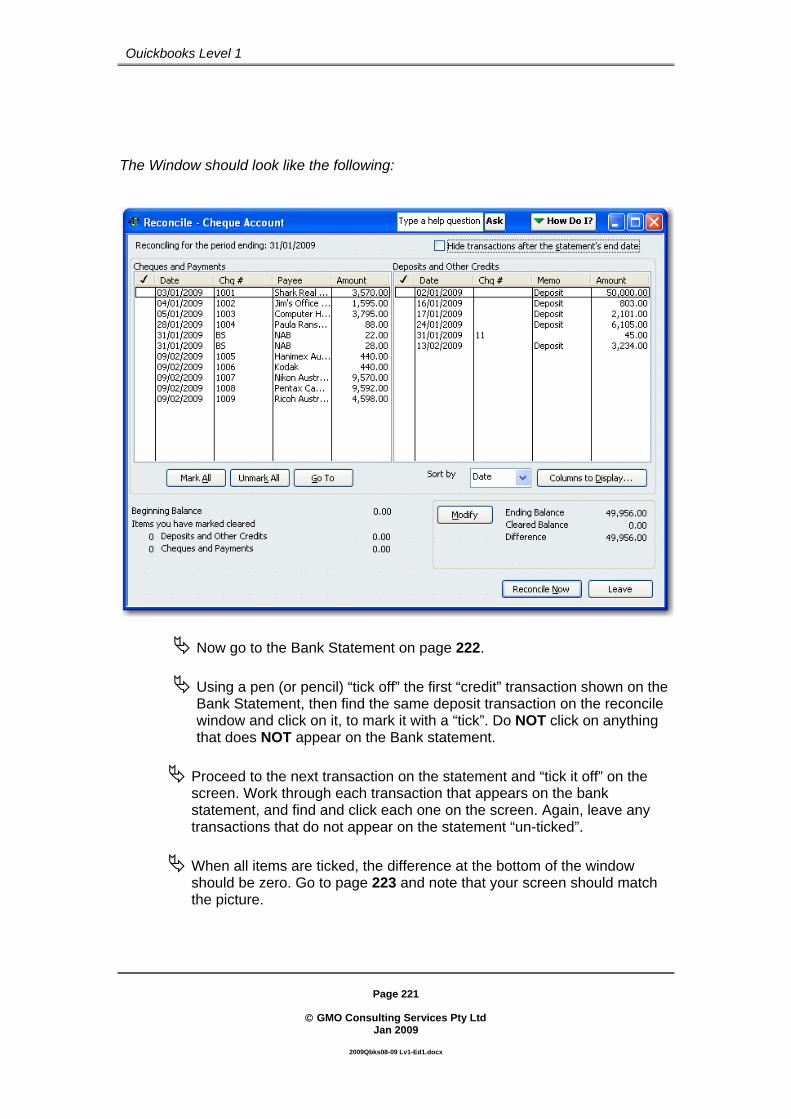
Page 221
© GMO Consulting Services Pty Ltd
Jan 2009
2009Qbks08-09 Lv1-Ed1.docx
Quickbooks Level 1
The Window should look like the following:
Now go to the Bank Statement on page 222.
Using a pen (or pencil) “tick off” the first “credit” transaction shown on the Bank Statement, then find the same deposit transaction on the reconcile window and click on it, to mark it with a “tick”. Do NOT click on anything that does NOT appear on the Bank statement.
Proceed to the next transaction on the statement and “tick it off” on the screen. Work through each transaction that appears on the bank statement, and find and click each one on the screen. Again, leave any transactions that do not appear on the statement “un-ticked”. When all items are ticked, the difference at the bottom of the window should be zero. Go to page 223 and note that your screen should match the picture.
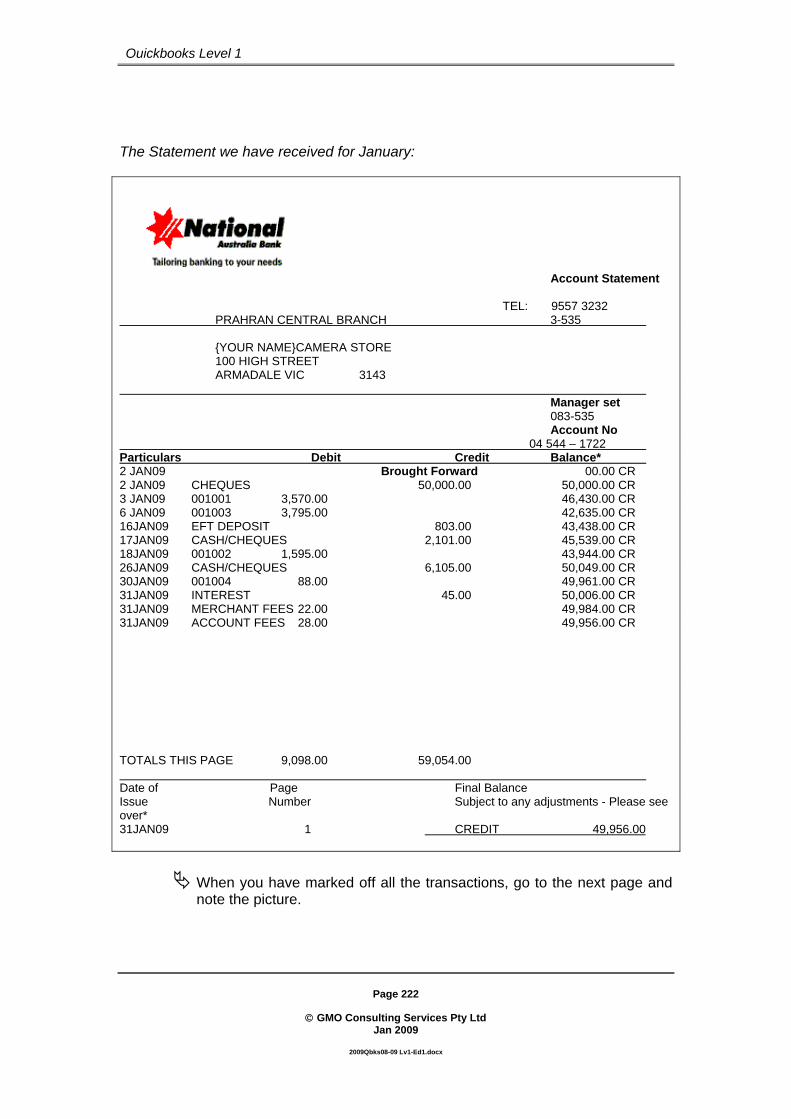
Page 222
© GMO Consulting Services Pty Ltd
Jan 2009
2009Qbks08-09 Lv1-Ed1.docx
Quickbooks Level 1
The Statement we have received for January:
Account Statement TEL: 9557 3232 PRAHRAN CENTRAL BRANCH 3-535 {YOUR NAME}CAMERA STORE 100 HIGH STREET ARMADALE VIC 3143 Manager set 083-535 Account No 04 544 – 1722 Particulars Debit Credit Balance* 2 JAN09 Brought Forward 00.00 CR 2 JAN09 CHEQUES 50,000.00 50,000.00 CR 3 JAN09 001001 3,570.00 46,430.00 CR 6 JAN09 001003 3,795.00 42,635.00 CR 16JAN09 EFT DEPOSIT 803.00 43,438.00 CR 17JAN09 CASH/CHEQUES 2,101.00 45,539.00 CR 18JAN09 001002 1,595.00 43,944.00 CR 26JAN09 CASH/CHEQUES 6,105.00 50,049.00 CR 30JAN09 001004 88.00 49,961.00 CR 31JAN09 INTEREST 45.00 50,006.00 CR 31JAN09 MERCHANT FEES 22.00 49,984.00 CR 31JAN09 ACCOUNT FEES 28.00 49,956.00 CR TOTALS THIS PAGE 9,098.00 59,054.00 Date of Page Final Balance Issue Number Subject to any adjustments - Please see over* 31JAN09 1 CREDIT 49,956.00
When you have marked off all the transactions, go to the next page and note the picture.

Page 223
© GMO Consulting Services Pty Ltd
Jan 2009
2009Qbks08-09 Lv1-Ed1.docx
Quickbooks Level 1
The window should look like this when you have marked all the items:
If you have keyed in wrong amounts, simply click on the entry to highlight
it, and click Quickbooks takes you back to the original transaction where you are then able to correct it.
When your reconciliation window shows a difference of zero, click
at the bottom.
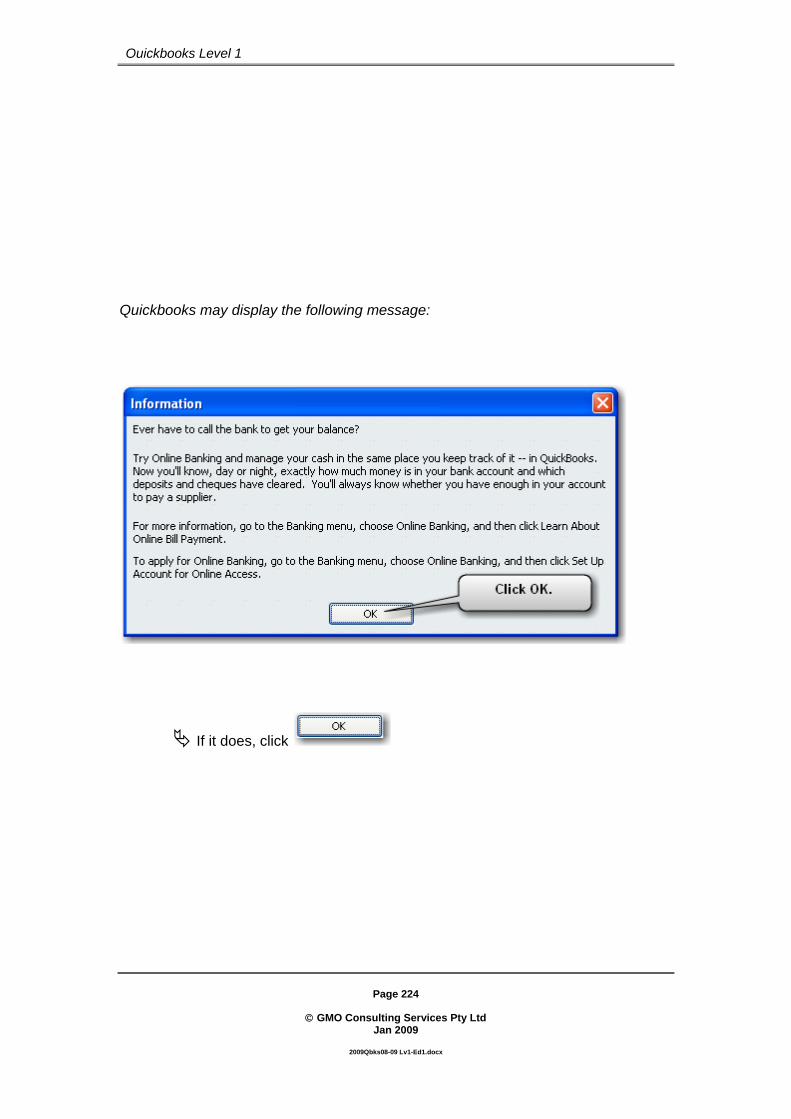
Page 224
© GMO Consulting Services Pty Ltd
Jan 2009
2009Qbks08-09 Lv1-Ed1.docx
Quickbooks Level 1
Quickbooks may display the following message:
If it does, click

Page 225
© GMO Consulting Services Pty Ltd
Jan 2009
2009Qbks08-09 Lv1-Ed1.docx
Quickbooks Level 1
Quickbooks responds with the following window.
Click
If you are prompted by the following screen:
Tick “Do not Display….” Then click .
After you have looked at the screen reports press Esc.

Page 226
© GMO Consulting Services Pty Ltd
Jan 2009
2009Qbks08-09 Lv1-Ed1.docx
Quickbooks Level 1
When Quickbooks completes the reconciliation it adds a “tick” to all the reconciled transactions and they will no longer appear in the reconciliation window. The ending balance of this reconciliation becomes the opening balance of the next reconciliation.
Click on the Home Page to open the register and note the “ticks”.
Note: By definition, all transactions that are not marked with a “tick” are un-presented i.e. they are yet to be reconciled.

Page 227
© GMO Consulting Services Pty Ltd
Jan 2009
2009Qbks08-09 Lv1-Ed1.docx
Quickbooks Level 1
REVISION EXERCISES
Invoice Melbourne Photo Rentals on 12/2/09) for the following.
4 N1 - Nikon EM1 8 R2 - Ricoh Tripods
(The total should be $3,784.00 and the invoice number should be 1010)
HINT: Click on the Home Page.
Invoice (number 1011) Peter H's Photographic Services (on the 13/2/09) for the following (Quickbooks should warn you that this customer is exceeding his credit limit – allow the sale to proceed).
4 N1 - Nikon EM1 1 N2 - Nikon EM2
(The total should be $3,960.00).
HINT: Click on the Home Page.
Invoice (number 1012) Allen Klein Photography (on the 14/2/09) for the following (This total should be $4,620.00). Again, allow the sale to proceed if Quickbooks warns you that the credit limit has been exceeded.
5 R2 - Tripods 2 P2 - Pentax AP2 4 P1 - Pentax AP1
HINT: Click on the Home Page.

Page 228
© GMO Consulting Services Pty Ltd
Jan 2009
2009Qbks08-09 Lv1-Ed1.docx
Quickbooks Level 1
REVISION EXERCISES
On the 13/2/09 Melbourne Photo Rentals pays us $3,784.00 by cheque (no 1890)
Record this “Customer payment”. Make sure that the account Undeposited Funds is selected.
HINT 1: Click on the Home Page.
HINT 2:
Go to the Item & Services list and create a “Service Item” called Service. Leave the description blank but enter $80.00 in the Rate field, Sales in the Account field and GST in the Sales Tax Code field. Refer to page 96 if you need to refresh your memory about creating items.
Note the picture of the item shown below:
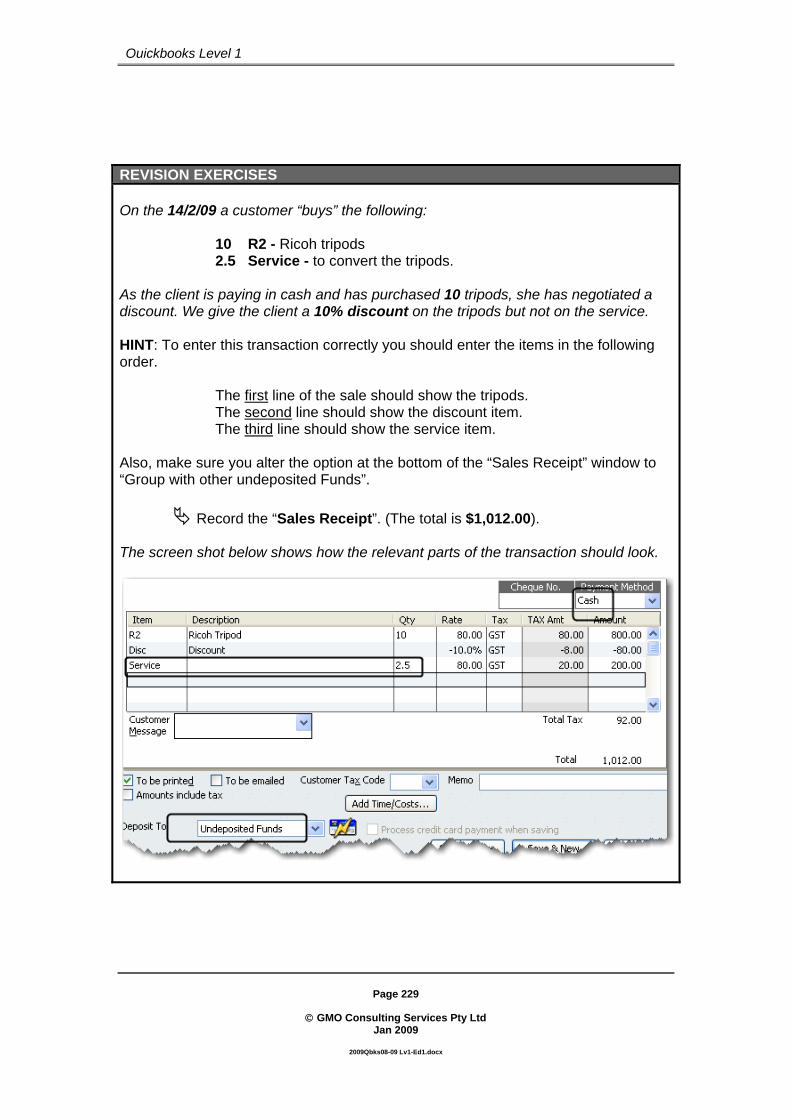
Page 229
© GMO Consulting Services Pty Ltd
Jan 2009
2009Qbks08-09 Lv1-Ed1.docx
Quickbooks Level 1
REVISION EXERCISES On the 14/2/09 a customer “buys” the following:
10 R2 - Ricoh tripods 2.5 Service - to convert the tripods.
As the client is paying in cash and has purchased 10 tripods, she has negotiated a discount. We give the client a 10% discount on the tripods but not on the service. HINT: To enter this transaction correctly you should enter the items in the following order.
The first line of the sale should show the tripods. The second line should show the discount item. The third line should show the service item.
Also, make sure you alter the option at the bottom of the “Sales Receipt” window to “Group with other undeposited Funds”.
Record the “Sales Receipt”. (The total is $1,012.00). The screen shot below shows how the relevant parts of the transaction should look.

Page 230
© GMO Consulting Services Pty Ltd
Jan 2009
2009Qbks08-09 Lv1-Ed1.docx
Quickbooks Level 1
REVISION EXERCISES
Paula Ransome makes a request to open an account with us and we accept.
Go to the “Customers Centre” and “edit” her details by altering her terms to Net 30. Alter the credit limit to $2,000.00.
HINT: Click to enter the credit limit.
Paula purchases the following:
10 K1 - Kodak Disposable Cameras. 2 P1 - Pentax AP1 Digital Cameras.
Record this invoice (number 1013) dated 15/2/09. (The total is 1,540.00).
HINT: Click on the Home Page.
On the 15/2/09 we receive a cheque (No. 000477) from South Yarra Photographic Studio for $1210.00
Record this payment on the 15/2/09 and make sure that the amount is allocated to invoice 1005. Also make sure that “Group with other undeposited funds” is selected
at the bottom left of the window.
Deposit all funds in hand on the 16/2/09. The total of the deposit should be $6,006.00 (Displayed here is part of the SECOND screen summarising the deposit).

Page 231
© GMO Consulting Services Pty Ltd
Jan 2009
2009Qbks08-09 Lv1-Ed1.docx
Quickbooks Level 1
REVISION EXERCISES
Here is a tax invoice from Officeworld for stationery.
Officeworld ABN 77 427 890 132 Tax Invoice
Reflex Paper $ 35.00 “D” Folder $ 25.00 Suspension Files $ 40.00 Highlighters Yellow $ 15.50 Pens $ 16.50 TOTAL $ 132.00 Paid by Mastercard
GST included $ 12.00
Thank you for shopping at Officeworld Date 16/2/09
Enter this transaction (using Mastercard) and allocate it to the Printing & Stationery expense account.
HINT – Click on the Home Page.
Here is a Tax Invoice for Petrol
Caltex Australia Ltd Caltex - North Caulfield
* Indicates GST inclusive item(s) ABN 48 947 493 680
Tax Invoice * 07 Ultimate 42.39 L 1,189 $/L $55.00
Mastercard $55.00 GST Amount $5.00
QUEST EFT Sale Advice = Approved Quest Seq Num = 5006
16 FEB 2009 08:58 am 9791/01 33 The Total Price includes GST
For this supply THANK YOU - PLEASE CALL AGAIN SOON
Enter this transaction (using Mastercard as on the previous exercise) and allocate it to the Petrol & LPG expense sub-account under Motor Vehicle Expenses.

Page 232
© GMO Consulting Services Pty Ltd
Jan 2009
2009Qbks08-09 Lv1-Ed1.docx
Quickbooks Level 1
REVISION EXERCISES
Here is a Tax Invoice for subscription to “Camera Monthly” a trade magazine.
Camera Monthly Tax Invoice
ABN 14 069 148 303
P O Box 123 Sydney NSW 2000 Date : 12/02/09
TO: {Your Name} Camera Store 100 High St Prahran 3181 Invoice No 00669 Subscription for two years $ 77.00
TOTAL $ 77.00
GST included in this invoice $ 7.00
Enter this transaction (using Write Cheques) and allocate it to the Subscriptions expense account. Replace the “Cheque number with the word BPay to indicate that this has been paid from the cheque account by “Bpay”. The date of the transaction is 17/2/09.
Here is a picture of the relevant part of the window.
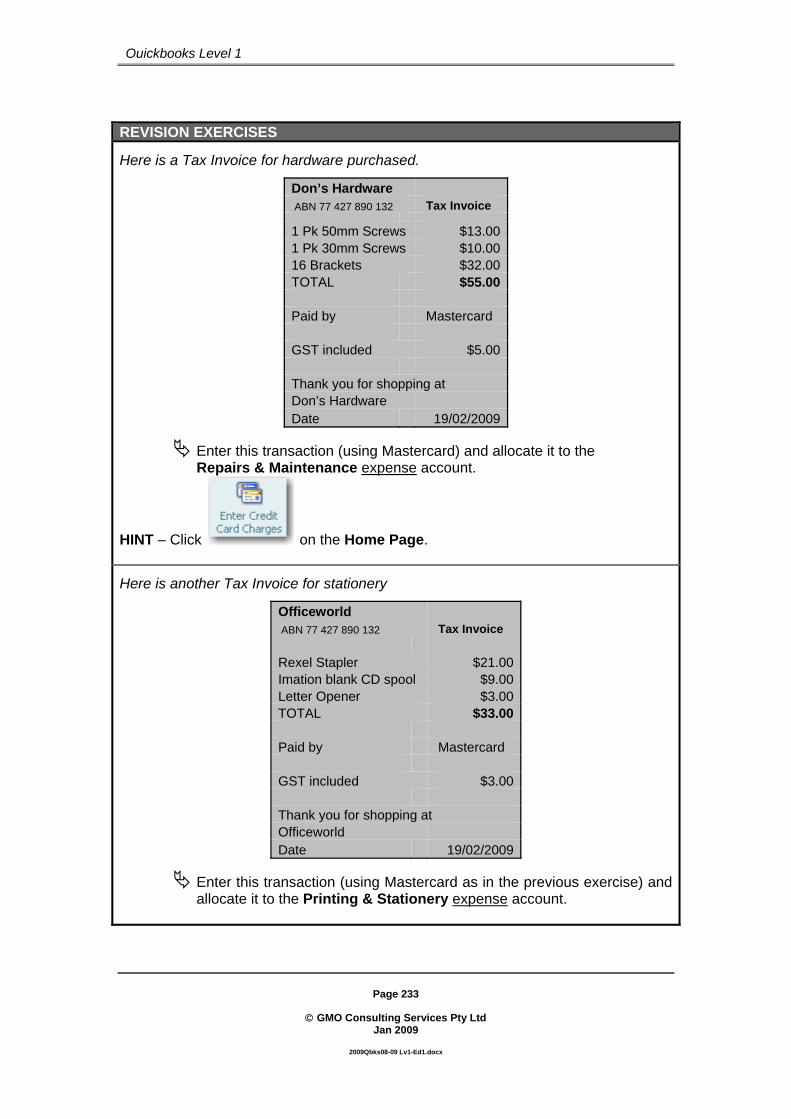
Page 233
© GMO Consulting Services Pty Ltd
Jan 2009
2009Qbks08-09 Lv1-Ed1.docx
Quickbooks Level 1
REVISION EXERCISES
Here is a Tax Invoice for hardware purchased.
Don’s Hardware ABN 77 427 890 132 Tax Invoice
1 Pk 50mm Screws $13.00 1 Pk 30mm Screws $10.00 16 Brackets $32.00 TOTAL $55.00 Paid by Mastercard GST included $5.00 Thank you for shopping at Don’s Hardware Date 19/02/2009
Enter this transaction (using Mastercard) and allocate it to the Repairs & Maintenance expense account.
HINT – Click on the Home Page.
Here is another Tax Invoice for stationery
Officeworld ABN 77 427 890 132 Tax Invoice Rexel Stapler $21.00 Imation blank CD spool $9.00 Letter Opener $3.00 TOTAL $33.00 Paid by Mastercard GST included $3.00 Thank you for shopping at Officeworld Date 19/02/2009
Enter this transaction (using Mastercard as in the previous exercise) and allocate it to the Printing & Stationery expense account.

Page 234
© GMO Consulting Services Pty Ltd
Jan 2009
2009Qbks08-09 Lv1-Ed1.docx
Quickbooks Level 1
PART 22 – SUMMARY In this section we entered bank interest and bank charges prior to actually doing the bank reconciliation. Bank interest was entered using the “cash sale” window. This means that the BAS will be able to correctly report the amount. Bank charges were entered using the “cheque” window and allocated to the appropriate expense accounts. Please note that all bank charges should be entered “as they appear on the bank statement”. The user should not “add up” the charges and enter them as a single transaction as this would make it difficult for other users of the file to identify the charges correctly and easily. Finally, we did the bank reconciliation by “marking off” the transactions on the screen against those shown on the bank statement. It is a good idea to work strictly from the bank statement when doing bank reconciliations. Reconciliations can (and should) be done for all accounts where the user receives statements, including credit cards, loans etc. We also revised some of the transactions covered earlier.

Page 235
© GMO Consulting Services Pty Ltd
Jan 2009
2009Qbks08-09 Lv1-Ed1.docx
Quickbooks Level 1
Part 23 - Checking Inventory for Reordering We will now have another look at the report that will give us some information about Inventory levels and what we should order.
Click Reports on the menu bar and click Inventory, Inventory Status by Item.
Alter the date range to display items in Inventory from 1/1/09 to 28/2/09
as shown below. Don’t forget to click Below is the relevant part of the report displayed.
The Inventory Status Report with next to items, which are at, or below the reorder points set up earlier.

Page 236
© GMO Consulting Services Pty Ltd
Jan 2009
2009Qbks08-09 Lv1-Ed1.docx
Quickbooks Level 1
REVISION EXERCISES
We will order products including those that have reached their re-order point. Make sure the Home Page is displayed. (Please note all prices displayed here include
GST – the is ticked
Enter a Purchase Order (dated 19/2/09) to Nikon Australia for the following:
Enter a Purchase Order (dated 19/2/09) to Ricoh Australia for the following:
Enter a Purchase Order (dated 19/2/09) to Hanimex Australia Pty Ltd for the following:
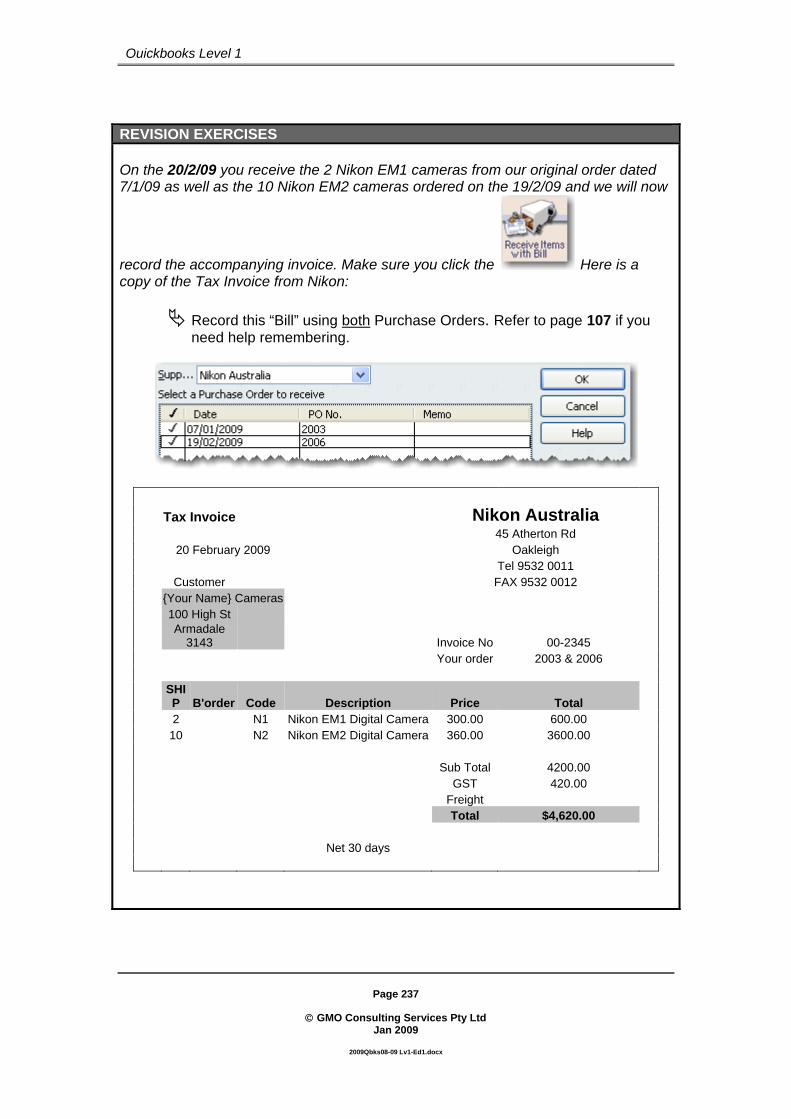
Page 237
© GMO Consulting Services Pty Ltd
Jan 2009
2009Qbks08-09 Lv1-Ed1.docx
Quickbooks Level 1
REVISION EXERCISES On the 20/2/09 you receive the 2 Nikon EM1 cameras from our original order dated 7/1/09 as well as the 10 Nikon EM2 cameras ordered on the 19/2/09 and we will now
record the accompanying invoice. Make sure you click the Here is a copy of the Tax Invoice from Nikon:
Record this “Bill” using both Purchase Orders. Refer to page 107 if you need help remembering.
Tax Invoice Nikon Australia 45 Atherton Rd 20 February 2009 Oakleigh Tel 9532 0011 Customer FAX 9532 0012 {Your Name} Cameras 100 High St
Armadale
3143 Invoice No 00-2345 Your order 2003 & 2006
SHIP B'order Code Description Price Total
2 N1 Nikon EM1 Digital Camera 300.00 600.00 10 N2 Nikon EM2 Digital Camera 360.00 3600.00 Sub Total 4200.00 GST 420.00 Freight Total $4,620.00 Net 30 days
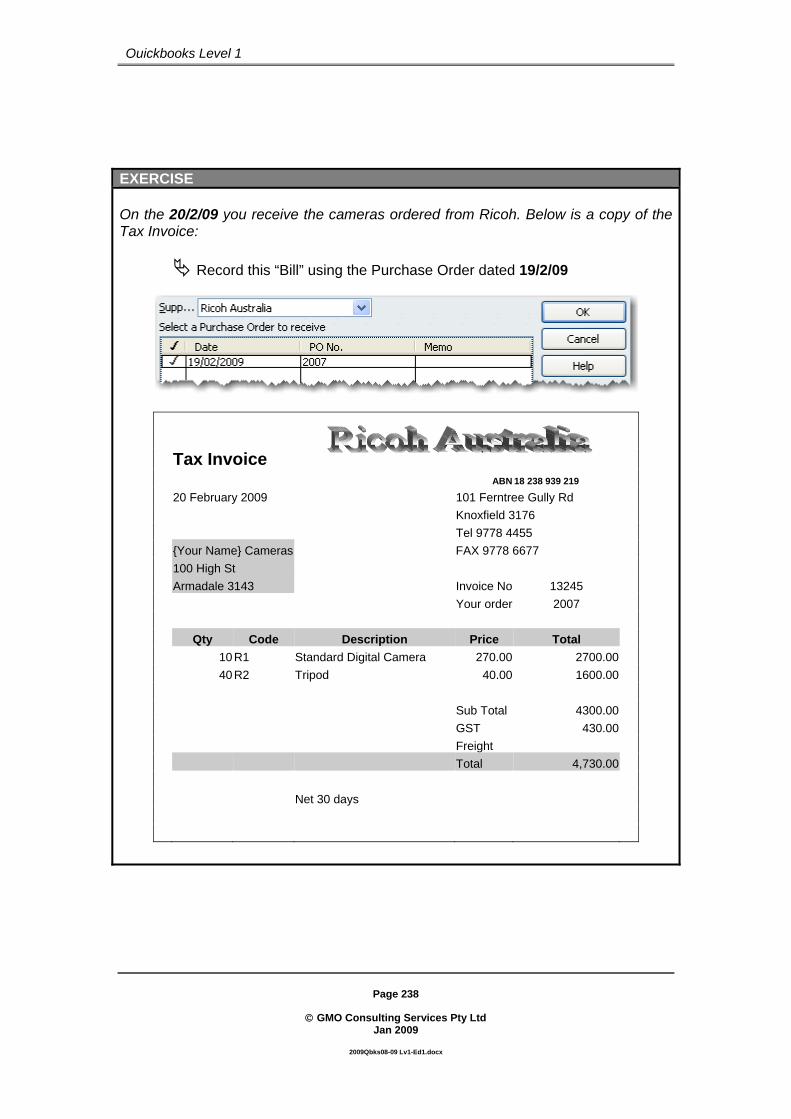
Page 238
© GMO Consulting Services Pty Ltd
Jan 2009
2009Qbks08-09 Lv1-Ed1.docx
Quickbooks Level 1
EXERCISE On the 20/2/09 you receive the cameras ordered from Ricoh. Below is a copy of the Tax Invoice:
Record this “Bill” using the Purchase Order dated 19/2/09
Tax Invoice ABN 18 238 939 219 20 February 2009 101 Ferntree Gully Rd Knoxfield 3176 Tel 9778 4455 {Your Name} Cameras FAX 9778 6677 100 High St Armadale 3143 Invoice No 13245 Your order 2007 Qty Code Description Price Total 10 R1 Standard Digital Camera 270.00 2700.00 40 R2 Tripod 40.00 1600.00 Sub Total 4300.00 GST 430.00 Freight Total 4,730.00 Net 30 days

Page 239
© GMO Consulting Services Pty Ltd
Jan 2009
2009Qbks08-09 Lv1-Ed1.docx
Quickbooks Level 1
EXERCISE Shark Real Estate rings to remind you that the rent for February has not been paid.
Record a Cheque paid to Shark Real Estate dated 20/2/09 for $1870.00 – (1,700.00 for rent and 170.00 GST).
HINT: Click
PART 23 – SUMMARY In this section we produced a “Inventory Status” report and re-ordered Inventory from our suppliers. The report showed additional statistical information such as “items sold per week”.

Page 240
© GMO Consulting Services Pty Ltd
Jan 2009
2009Qbks08-09 Lv1-Ed1.docx
Quickbooks Level 1
Part 24 - Customer:Job Function The Customer: Job function to useful in many situations. Quickbooks allows the user to “group” together various “jobs” by customer. We have gained a new customer who has three shops. He would like us to “break up” the orders he makes for each store even though we will be sending invoices and statements to his main address at 111 Nepean Hwy. We will use the Customer:Job function to do this.
Clear the screen of any open windows by using the Esc key.
Click (on the icon bar below the menu bar), and create a new customer called Ed's Cameras. The address is 111 Nepean Hwy Brighton, 3186 and the terms are Net 30. Make sure you click
when you’re done. Make sure “Ed’s Cameras” is highlighted, now click
“Add Job”
Type in 111 Nepean Hwy in the Job Field and click
Enter 12 Puckle Street in the Job field and click
Enter 100 Burke Rd as the last “Job” then click

Page 241
© GMO Consulting Services Pty Ltd
Jan 2009
2009Qbks08-09 Lv1-Ed1.docx
Quickbooks Level 1
The customer list should look like this:
Now that we have set up the “Jobs” for Ed's Cameras, we will supply him with the items he has ordered. Below is a table of the invoices that need to be recorded. Make sure that in each case you use the Name and Job. The date of each invoice is 21/2/09.
Invoice No Site Product Code Qty Total 1014 100 Burke Rd Nikon EM1
Nikon EM2 Pentax AP1 Pentax AP2 Ricoh Cameras
N1 N2 P1 P2 R1
4 6 3 2 4
Invoice Total $14,520.00 1015 111 Nepean Hwy Pentax AP1
Pentax AP2 Ricoh Digital Ricoh Tripods
P1 P2 R1 R2
4 3 6 4
Invoice Total $9,262.00 1016 12 Puckle St Nikon EM1
Nikon EM2 Ricoh Tripod
N1 N2 R2
2 2 2
Invoice Total $3,476.00

Page 242
© GMO Consulting Services Pty Ltd
Jan 2009
2009Qbks08-09 Lv1-Ed1.docx
Quickbooks Level 1
We will now produce a statement for Ed's Cameras.
Click on the icon bar (below the menu bar), and highlight “Ed's Cameras”.
Click and click Create Statements.
Alter the date Range from 1/1/09 to 21/2/09. Make sure that the Statement date is 21/2/09.
Click
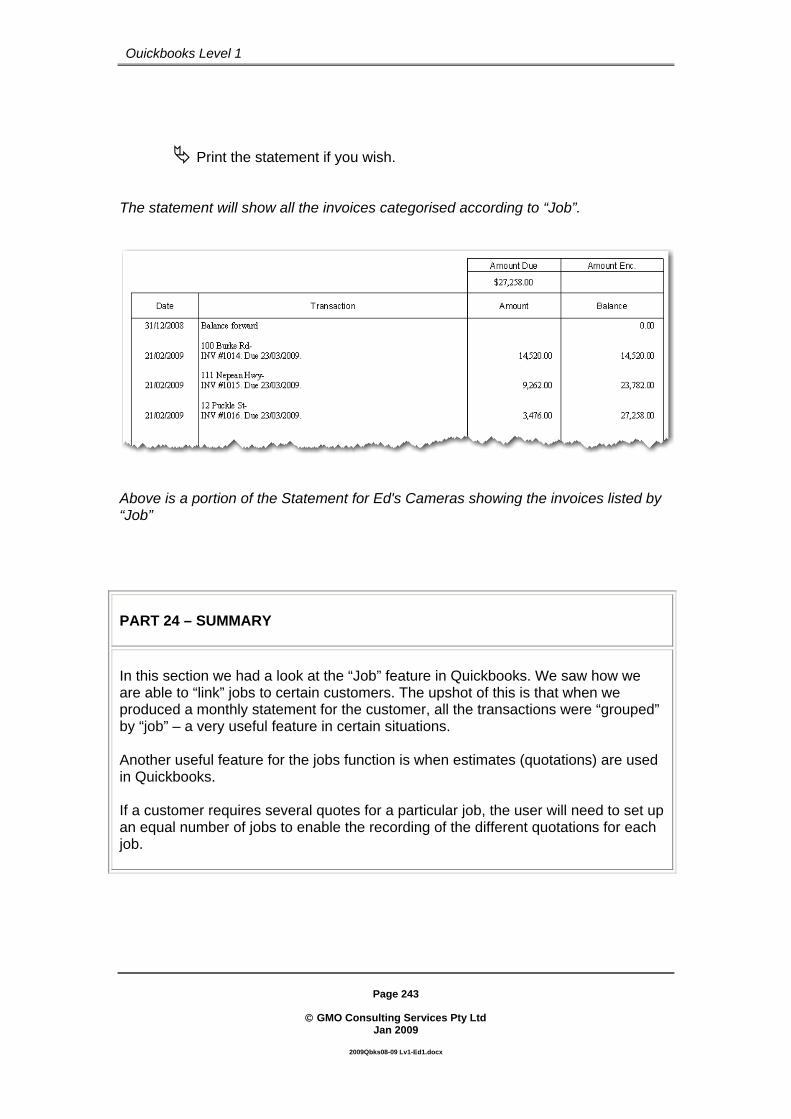
Page 243
© GMO Consulting Services Pty Ltd
Jan 2009
2009Qbks08-09 Lv1-Ed1.docx
Quickbooks Level 1
Print the statement if you wish. The statement will show all the invoices categorised according to “Job”.
Above is a portion of the Statement for Ed's Cameras showing the invoices listed by “Job” PART 24 – SUMMARY In this section we had a look at the “Job” feature in Quickbooks. We saw how we are able to “link” jobs to certain customers. The upshot of this is that when we produced a monthly statement for the customer, all the transactions were “grouped” by “job” – a very useful feature in certain situations. Another useful feature for the jobs function is when estimates (quotations) are used in Quickbooks. If a customer requires several quotes for a particular job, the user will need to set up an equal number of jobs to enable the recording of the different quotations for each job.

Page 244
© GMO Consulting Services Pty Ltd
Jan 2009
2009Qbks08-09 Lv1-Ed1.docx
Quickbooks Level 1
Part 25 – Petty Cash SCENARIO: A lot of businesses use a petty cash system for small cash purchases. This generally consists of cash that is kept in a cash tin. The cash has been withdrawn from the cheque account. Periodically the cash tin is “topped up” by cashing additional cheques at the bank. Purchases made from petty cash are generally recorded in an exercise book. We will set up a Petty Cash system in Quickbooks thus eliminating the need for the petty cash book. The added bonus is that Quickbooks will “pick up” the GST paid that will be claimed in the BAS later on. It also means that the financial reports will be more accurate. The first step is to create a Petty Cash account. The “type” of account will be Bank.
Press Esc to close any open windows and click on the Home Page.
Click and click New. Enter the following details:
Part of the “New Account” screen
Click

Page 245
© GMO Consulting Services Pty Ltd
Jan 2009
2009Qbks08-09 Lv1-Ed1.docx
Quickbooks Level 1
Press the Esc key to close any open windows and click on the Home Page.
Enter the following details:(You’ll need to create a “Supplier” called Petty Cash.
Click This transaction represents the cheque that has been cashed at the bank. The $200.00 will be placed in the Petty Cash tin.

Page 246
© GMO Consulting Services Pty Ltd
Jan 2009
2009Qbks08-09 Lv1-Ed1.docx
Quickbooks Level 1
We will now enter expenditure from the Petty Cash account.
Select Petty Cash from the “Bank Account” field. Here is the relevant part of the screen:
Note: When you change the account, Quickbooks may prompt you as follows:
If you are prompted click

Page 247
© GMO Consulting Services Pty Ltd
Jan 2009
2009Qbks08-09 Lv1-Ed1.docx
Quickbooks Level 1
Now fill out “Write Cheques” as shown here: You will need to create a new expense account called “Staff Amenities” and a new supplier called Safeway.
This transaction is recording purchases made from Safeway, the transaction has been split to reflect the “GST” and “GST Free” parts of the transaction. The information would be taken from the Safeway Tax invoice. Note the Tax Codes used are “NCG & NCF”.
Click

Page 248
© GMO Consulting Services Pty Ltd
Jan 2009
2009Qbks08-09 Lv1-Ed1.docx
Quickbooks Level 1
REVISION EXERCISES
We have purchased various stamps for $66.00 from Australia Post on the 26/2/09.
Enter a “Write Cheques” transaction (on the 26/2/09) from Petty Cash. Allocate this transaction to Postage and Delivery.
On the same day we have some keys cut from Don’s Hardware for $11.00 The purchase is made using Petty Cash
Enter this transaction in “Write Cheques” from the Petty Cash account.Allocate the transaction to Repairs & Maintenance.

Page 249
© GMO Consulting Services Pty Ltd
Jan 2009
2009Qbks08-09 Lv1-Ed1.docx
Quickbooks Level 1
Open the “Petty Cash” register and note the transactions. HINT: open the Chart of Accounts and “double click” Petty Cash”.
The “Petty Cash” register. This effectively replaces the “Exercise Book” many small businesses use to keep track of Petty Cash. Note: The balance shown in the Petty Cash account should be the “actual cash” left in the Cash Tin. PART 25 – SUMMARY We set up a Petty Cash system by creating a “bank” type account. We entered a cheque allocated to “Petty Cash”. This cheque was the one cashed at the bank. The cash was then placed in the Petty Cash Tin. We then entered some “Write Cheques” transactions spent from “Petty Cash”. We then looked at the Petty Cash register and noted the transactions listed.
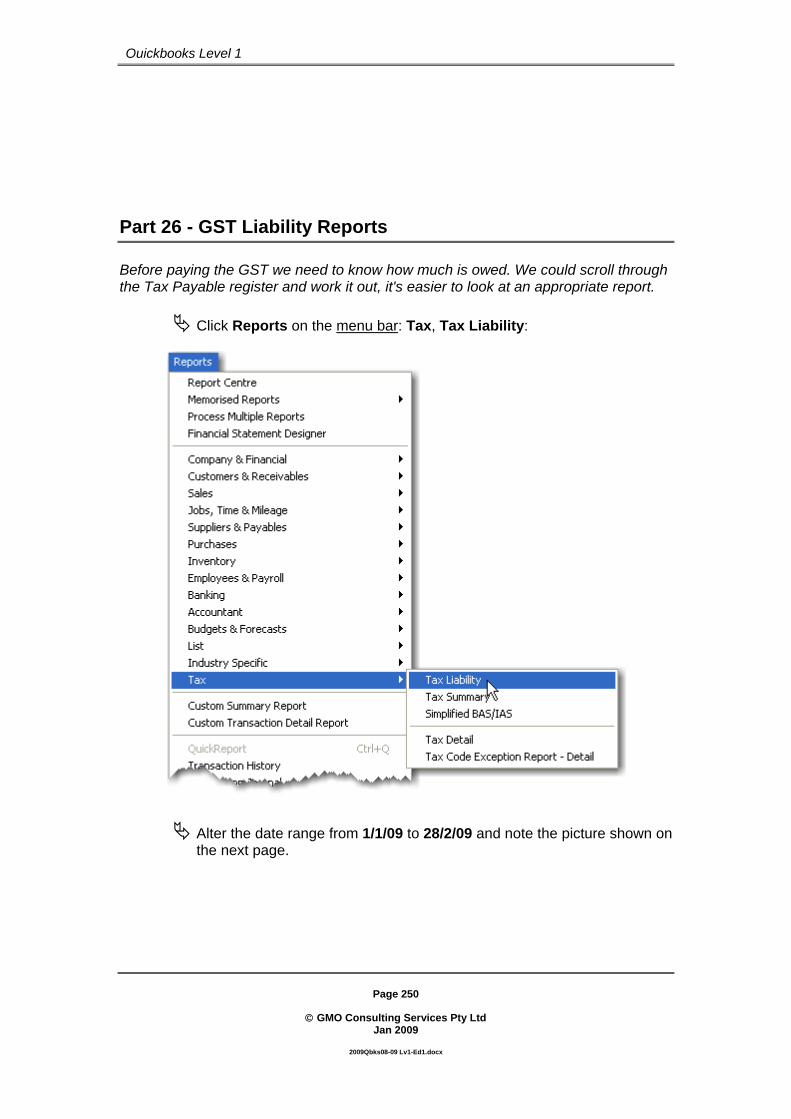
Page 250
© GMO Consulting Services Pty Ltd
Jan 2009
2009Qbks08-09 Lv1-Ed1.docx
Quickbooks Level 1
Part 26 - GST Liability Reports Before paying the GST we need to know how much is owed. We could scroll through the Tax Payable register and work it out, it's easier to look at an appropriate report.
Click Reports on the menu bar: Tax, Tax Liability:
Alter the date range from 1/1/09 to 28/2/09 and note the picture shown on the next page.

Page 251
© GMO Consulting Services Pty Ltd
Jan 2009
2009Qbks08-09 Lv1-Ed1.docx
Quickbooks Level 1
Below is the relevant portion of the Tax Liability Report:
Click Lists, then Chart of Accounts and note that the balance of GST Payable is 1165.00 - under normal circumstances this balance would be different as in most cases, small businesses will be paying GST quarterly on the 21st of the following month. Therefore, the GST register would also display any GST paid/collected up to the current day. (We wouldn't want to pay the GST early).
PART 26 – SUMMARY Here we had a look at one of the GST reports that summarises the GST paid and collected for a certain period. This report should be compared to the BAS report that will be produced in the next section. If there are any discrepancies then, the user has “a problem” – which usually is due to incorrect usage of tax codes in the transactions.
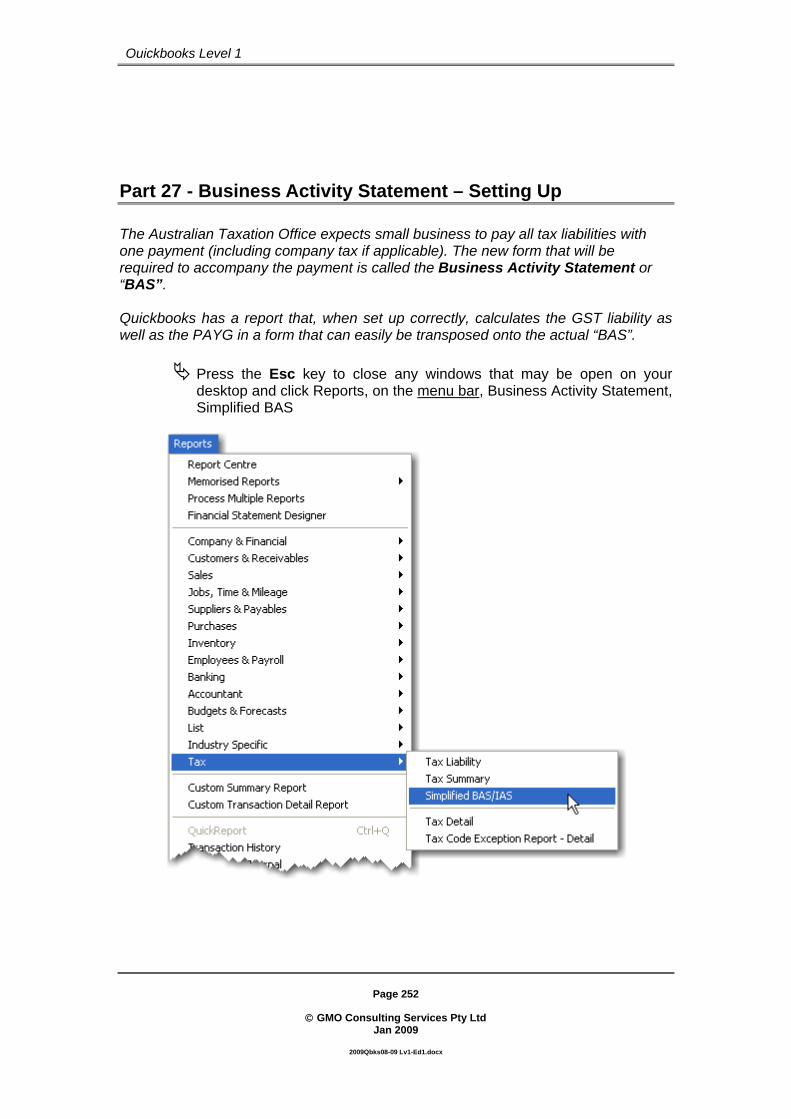
Page 252
© GMO Consulting Services Pty Ltd
Jan 2009
2009Qbks08-09 Lv1-Ed1.docx
Quickbooks Level 1
Part 27 - Business Activity Statement – Setting Up The Australian Taxation Office expects small business to pay all tax liabilities with one payment (including company tax if applicable). The new form that will be required to accompany the payment is called the Business Activity Statement or “BAS”. Quickbooks has a report that, when set up correctly, calculates the GST liability as well as the PAYG in a form that can easily be transposed onto the actual “BAS”.
Press the Esc key to close any windows that may be open on your desktop and click Reports, on the menu bar, Business Activity Statement, Simplified BAS

Page 253
© GMO Consulting Services Pty Ltd
Jan 2009
2009Qbks08-09 Lv1-Ed1.docx
Quickbooks Level 1
Quickbooks may prompt you with the following:
If it does click
The following will now be displayed:
Click at the bottom left hand corner. (You may need to scroll down the screen.

Page 254
© GMO Consulting Services Pty Ltd
Jan 2009
2009Qbks08-09 Lv1-Ed1.docx
Quickbooks Level 1
Alter to match as shown below:
When you have altered the details screen as shown above, click
then alter as shown:

Page 255
© GMO Consulting Services Pty Ltd
Jan 2009
2009Qbks08-09 Lv1-Ed1.docx
Quickbooks Level 1
Click and alter as shown below:
Then click
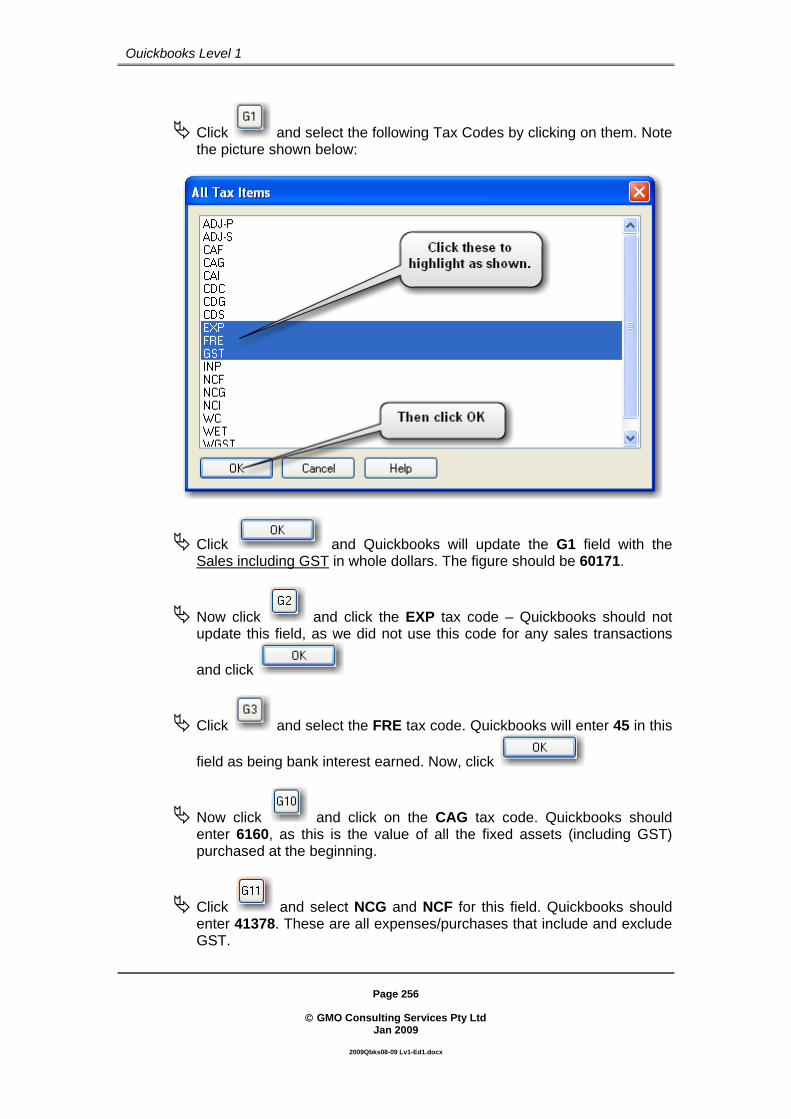
Page 256
© GMO Consulting Services Pty Ltd
Jan 2009
2009Qbks08-09 Lv1-Ed1.docx
Quickbooks Level 1
Click and select the following Tax Codes by clicking on them. Note the picture shown below:
Click and Quickbooks will update the G1 field with the Sales including GST in whole dollars. The figure should be 60171.
Now click and click the EXP tax code – Quickbooks should not update this field, as we did not use this code for any sales transactions
and click
Click and select the FRE tax code. Quickbooks will enter 45 in this
field as being bank interest earned. Now, click
Now click and click on the CAG tax code. Quickbooks should enter 6160, as this is the value of all the fixed assets (including GST) purchased at the beginning.
Click and select NCG and NCF for this field. Quickbooks should enter 41378. These are all expenses/purchases that include and exclude GST.
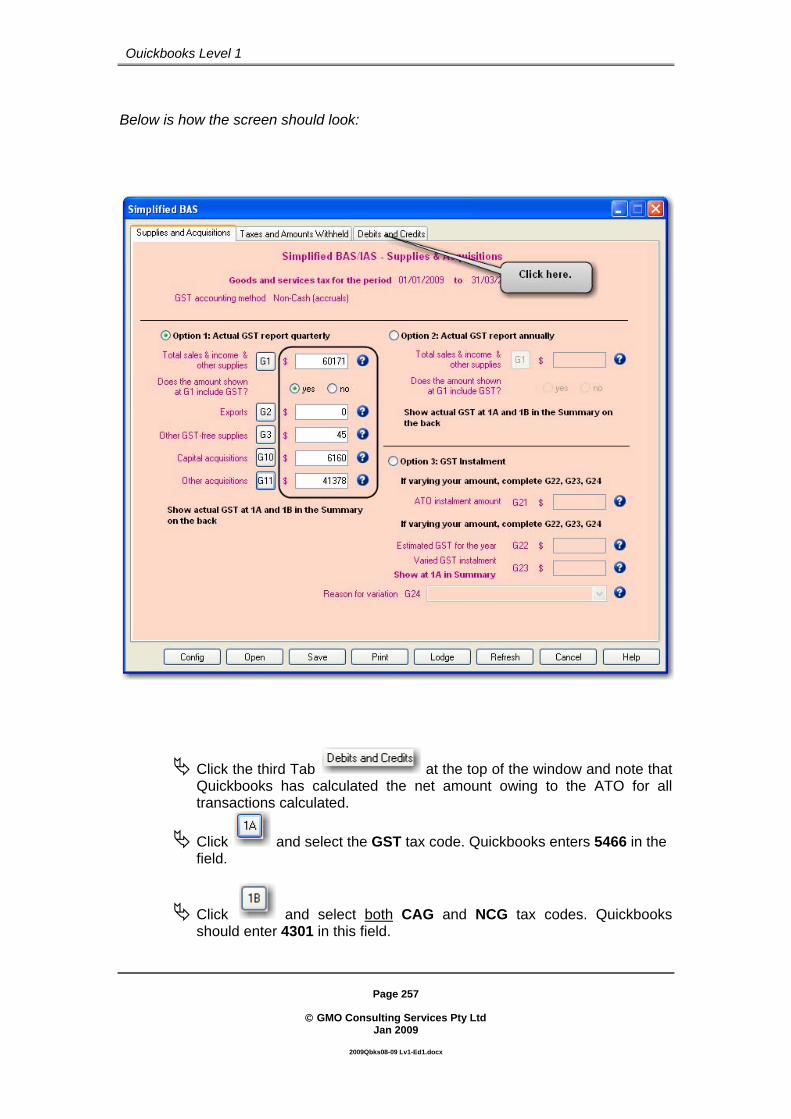
Page 257
© GMO Consulting Services Pty Ltd
Jan 2009
2009Qbks08-09 Lv1-Ed1.docx
Quickbooks Level 1
Below is how the screen should look:
Click the third Tab at the top of the window and note that Quickbooks has calculated the net amount owing to the ATO for all transactions calculated.
Click and select the GST tax code. Quickbooks enters 5466 in the field.
Click and select both CAG and NCG tax codes. Quickbooks should enter 4301 in this field.

Page 258
© GMO Consulting Services Pty Ltd
Jan 2009
2009Qbks08-09 Lv1-Ed1.docx
Quickbooks Level 1
Below is a picture of how the screen should look:
This report would then be printed out and the figures would be transcribed on to the BAS sent by the Australian Tax Office. (Please not you should NOT send this form – the ATO want their “bar-coded” for back.) Also note the “Lodge” button. This enables the BAS to be lodged over the internet through the ATO “Portal” if it has been set up.
Print this report out if you wish then click

Page 259
© GMO Consulting Services Pty Ltd
Jan 2009
2009Qbks08-09 Lv1-Ed1.docx
Quickbooks Level 1
PART 26 – SUMMARY In this section we set up the tax codes that were relevant for each part of the “G” section of the BAS. It should now be quite clear to the user the importance of using the correct tax codes and should now be obvious of the impact on the BAS. Obviously, any incorrect tax codes used will be reflected within the BAS. When the BAS is set up in this way, Quickbooks will “remember” these settings and each time a BAS is due, all the user needs to do is choose the appropriate period in the “Configure” section and the BAS is done! The “G” part of this report should be compared to the report produced in previous section. Note that the figures are the same.
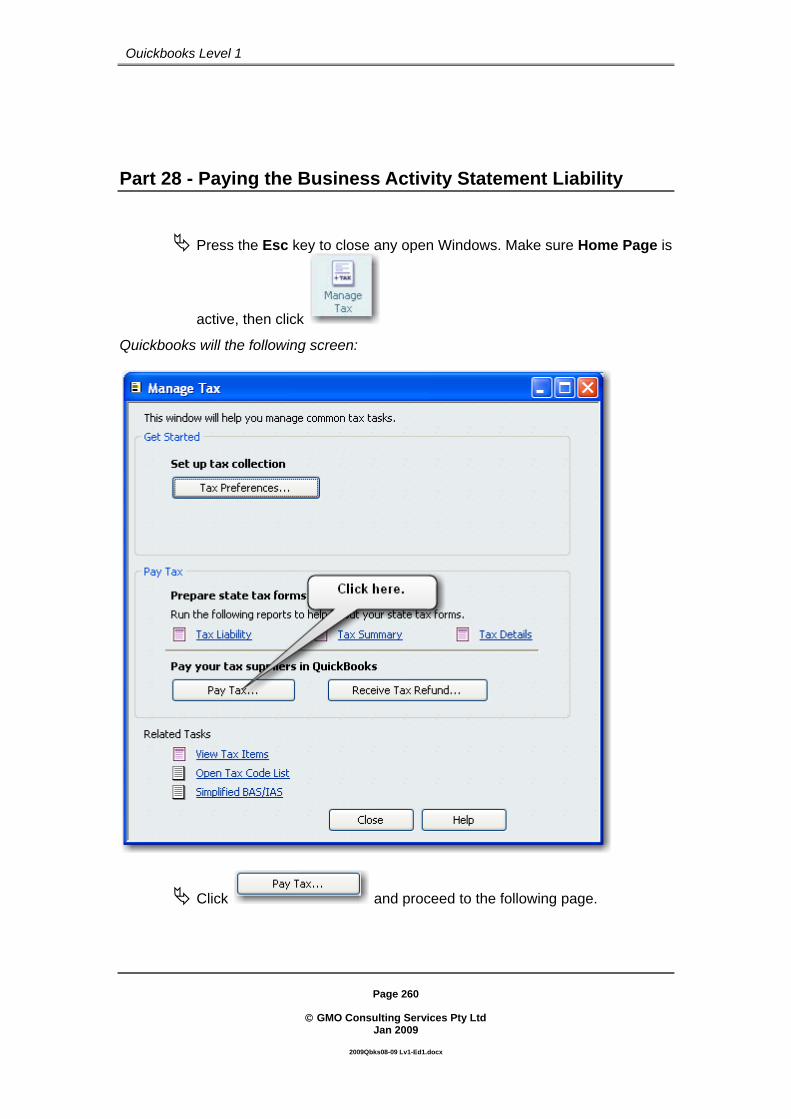
Page 260
© GMO Consulting Services Pty Ltd
Jan 2009
2009Qbks08-09 Lv1-Ed1.docx
Quickbooks Level 1
Part 28 - Paying the Business Activity Statement Liability
Press the Esc key to close any open Windows. Make sure Home Page is
active, then click
Quickbooks will the following screen:
Click and proceed to the following page.
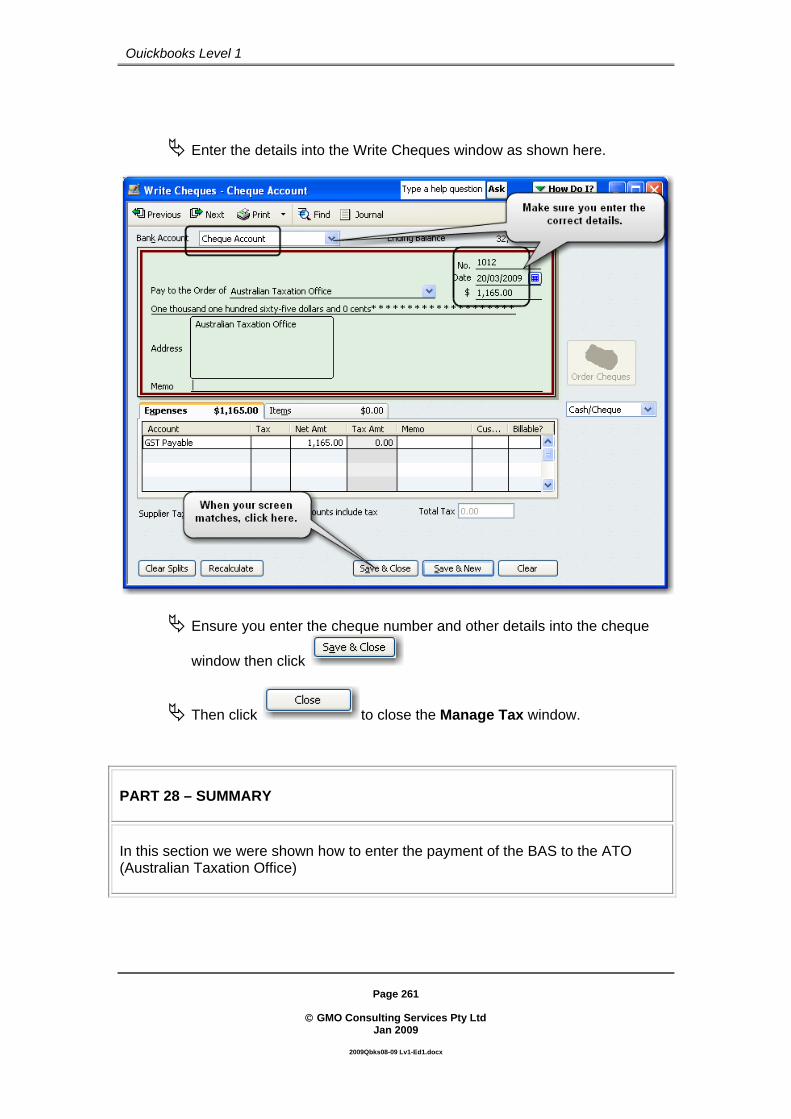
Page 261
© GMO Consulting Services Pty Ltd
Jan 2009
2009Qbks08-09 Lv1-Ed1.docx
Quickbooks Level 1
Enter the details into the Write Cheques window as shown here.
Ensure you enter the cheque number and other details into the cheque
window then click
Then click to close the Manage Tax window.
PART 28 – SUMMARY In this section we were shown how to enter the payment of the BAS to the ATO (Australian Taxation Office)

Page 262
© GMO Consulting Services Pty Ltd
Jan 2009
2009Qbks08-09 Lv1-Ed1.docx
Quickbooks Level 1
Part 29 – Reconciling and paying “Mastercard”. In this section we will pay the Mastercard after reconciling to the statement.
Proceed to do the following exercises. EXERCISE We have received the statement from Mastercard There is a picture of the statement on page 265. Note there has been an additional Bank Charge of $1.00.
Click on the Home Page and enter a transaction for 1.00 dated 1/2/09. Allocate this to Bank Charges.

Page 263
© GMO Consulting Services Pty Ltd
Jan 2009
2009Qbks08-09 Lv1-Ed1.docx
Quickbooks Level 1
EXERCISE
Reconcile the Credit Card.
HINT: Click Banking on the menu bar and click Reconcile and choose Mastercard from the “Account to Reconcile” field.
Enter the closing date and balance from the statement shown on page 265
Mark off all the transactions that appear on the Statement. The Difference at the bottom should show zero.
Click and Quickbooks responds with the following:
Click and click to the report prompt.
Quickbooks fills out a cheque for you allocated to Mastercard.
Alter the cheque date to 3/3/09, enter Mastercard in the “Pay to the
Order Of” field and click to record the cheque. Make sure you are paying this from the “Cheque Account”. Have a look at a picture of the cheque on the following page.

Page 264
© GMO Consulting Services Pty Ltd
Jan 2009
2009Qbks08-09 Lv1-Ed1.docx
Quickbooks Level 1
Here is a picture of part of the reconciliation screen:
The Cheque that Quickbooks has partially filled out to pay the Mastercard:
When your screen matches, click

Page 265
© GMO Consulting Services Pty Ltd
Jan 2009
2009Qbks08-09 Lv1-Ed1.docx
Quickbooks Level 1
Statement for MASTERCARD TEL: 9557 3232 {YOUR NAME}CAMERA STORE 100 HIGH STREET ARMADALE VIC 3143 Statement Period 2 Jan to 1 Feb Account No 5331 3530 0044 2321 Your Transaction Record Amount Balance* 2 JAN09 Brought Forward 00.00 DR 4 JAN09 Officeworld 165.00 165.00 DR 6 JAN09 Beta Phones 770.00 935.00 DR 6 JAN09 Don’s Hardware 99.00 1,034.00 DR 1 FEB09 Account Fee 1.00 1,035.00 DR TOTALS THIS PAGE 1,035.00 Date of Page Final Balance Issue Number Subject to any adjustments - Please see over* 3 FEB09 1 CREDIT 1,035.00 DR

Page 266
© GMO Consulting Services Pty Ltd
Jan 2009
2009Qbks08-09 Lv1-Ed1.docx
Quickbooks Level 1
PART 29 – SUMMARY In this section we reconciled the Mastercard and entered the payment. If we did not wish to pay the Mastercard off at the time of the reconciliation we could have clicked the “Cancel” button. We then could then enter the payment at a later date.

Page 267
© GMO Consulting Services Pty Ltd
Jan 2009
2009Qbks08-09 Lv1-Ed1.docx
Quickbooks Level 1
Part 30 - Reports We will now produce two fundamental reports to tell us how the business is going. These are the Profit & Loss report and the Balance Sheet. The profit & loss report shows an “accumulation” of the income and expenses for a selected period. The balance sheet shows a summary of the “balances” of asset and liability and equity accounts at a selected “point in time”. For more detailed information regarding these reports you should read literature about accounting principals and practice or ask your accountant.
Click Reports on the menu bar and click Company & Financials, Profit & Loss Standard.
Alter the date range from 1/1/09 to 28/2/09.
Print the Report if you wish. This report should show identical figures to the report on page 267.
Now produce a Balance Sheet report. The date will be 28/2/09. A copy of the report is on page 269. If the figures in your reports are not the same as those displayed on pages 267 and 269. Please spend a few minutes making the necessary corrections. The most common errors, as mentioned before, are incorrect dates. The other possibilities are either incorrect transcription of figures or transactions that were not recorded.

Page 268
© GMO Consulting Services Pty Ltd
Jan 2009
2009Qbks08-09 Lv1-Ed1.docx
Quickbooks Level 1
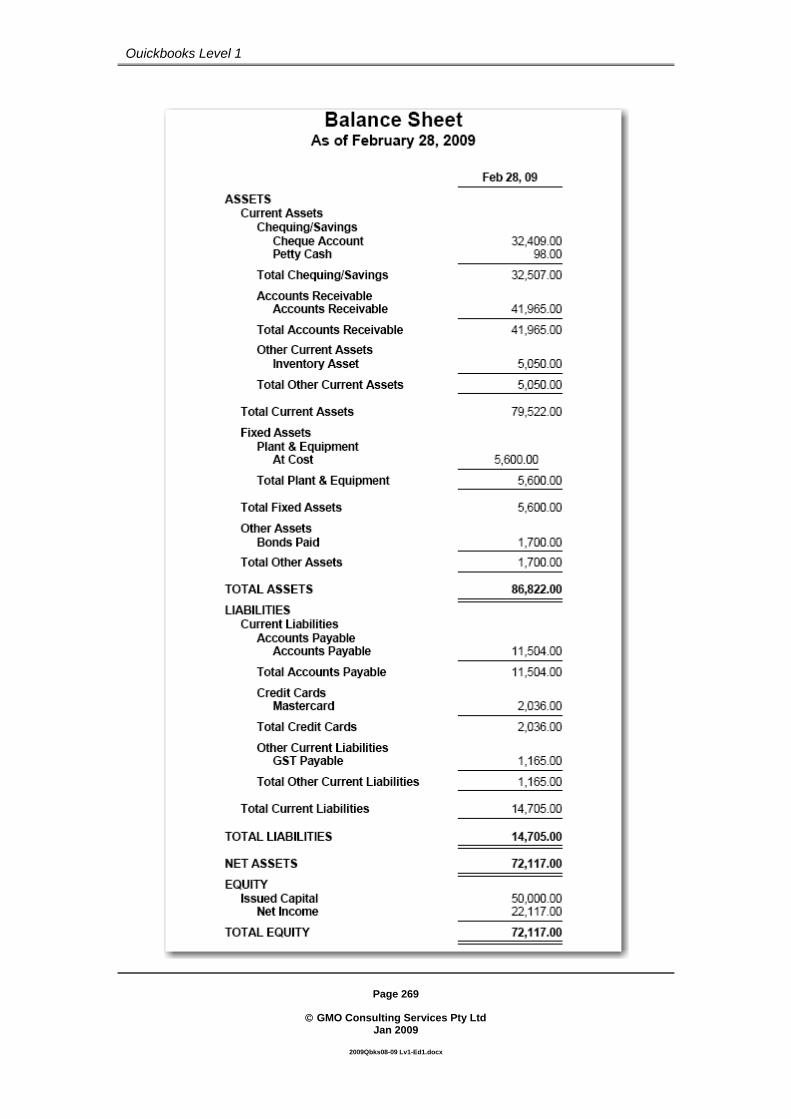
Page 269
© GMO Consulting Services Pty Ltd
Jan 2009
2009Qbks08-09 Lv1-Ed1.docx
Quickbooks Level 1
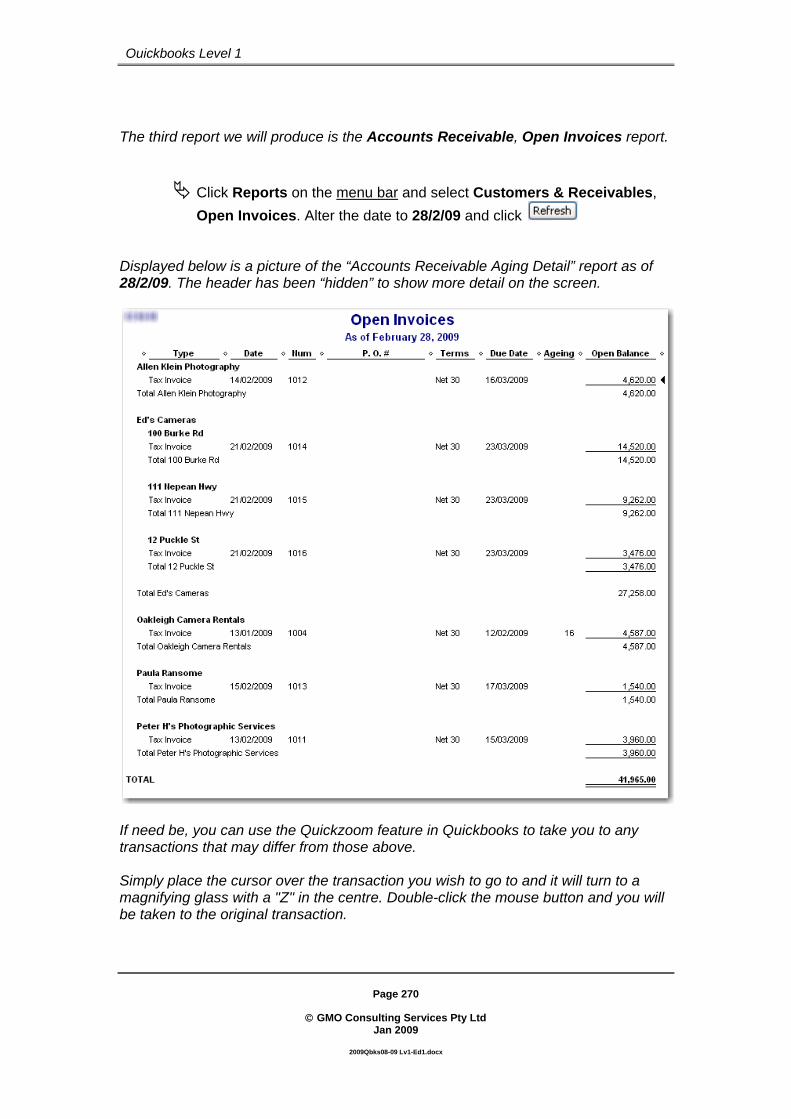
Page 270
© GMO Consulting Services Pty Ltd
Jan 2009
2009Qbks08-09 Lv1-Ed1.docx
Quickbooks Level 1
The third report we will produce is the Accounts Receivable, Open Invoices report.
Click Reports on the menu bar and select Customers & Receivables, Open Invoices. Alter the date to 28/2/09 and click
Displayed below is a picture of the “Accounts Receivable Aging Detail” report as of 28/2/09. The header has been “hidden” to show more detail on the screen.
If need be, you can use the Quickzoom feature in Quickbooks to take you to any transactions that may differ from those above. Simply place the cursor over the transaction you wish to go to and it will turn to a magnifying glass with a "Z" in the centre. Double-click the mouse button and you will be taken to the original transaction.

Page 271
© GMO Consulting Services Pty Ltd
Jan 2009
2009Qbks08-09 Lv1-Ed1.docx
Quickbooks Level 1
The last report we will look at is the Accounts Payable Detail report as of 28/2/09
Click Reports on the menu bar and select Suppliers & Payables, Unpaid Bills Detail. Alter the date to 28/2/09, click and compare to the report shown below.
If required, use the Quickzoom feature to go to any of the transactions.
Page 272
© GMO Consulting Services Pty Ltd
Jan 2009
2009Qbks08-09 Lv1-Ed1.docx
Quickbooks Level 1
PART 30 – SUMMARY In this final section we looked at some of the most important reports in any business. The astute businessperson will regularly look at these sorts of reports to try to gain an insight into the “health” of the business. At the end of the day these reports should aid the user in analysing the business and help in making sounder financial decisions. Quickbooks offers a wide range of reports that should be explored by the user. The “zoom in” feature is a wonderful feature that is not available in other more expensive accounting packages.

Page 273
© GMO Consulting Services Pty Ltd
Jan 2009
2009Qbks08-09 Lv1-Ed1.docx
Quickbooks Level 1
Part 31 - In Conclusion Remember, when you set up your own businesses in Quickbooks, any information regarding expense accounts, Cost of goods Sold, Asset and Liability Accounts should be verified with your Accountant. Quickbooks is set up to work as things occur in “real life”. That is: A product/service is sold to a customer - an invoice is recorded. You are paid for the product/service - record the payment against the customer's invoice. You then bank the money received into your bank account - record the deposit. Reconciling the bank register details with bank the statement, becomes easier when done regularly. It’s much easier! If your business has a lot of activity in the bank account, ask your bank to send statements more frequently. A lot of businesses get bank statements on a weekly basis. Most banks (to date) don’t charge for more frequently produced statements. You receive invoices (“Bills”) for goods/services purchased on credit. Record the details using the Enter Bills feature. Quickbooks will remind you when they are due to be paid. If you have any regular deductions coming out of your bank account such as loan repayments Quickbooks can automatically record these for you when they fall due. Any purchases made and paid for immediately should be recorded using the Write Cheques Window. If you need to control Inventory, Quickbooks offers a powerful and simple method to track and reorder Inventory. Re-allocating accounts on transactions already recorded is a relatively simple matter within Quickbooks. However, a word of warning; altering amounts after the item has been reconciled can be done, but it alters the reconciliation total and can lead to confusion and problems.

Page 274
© GMO Consulting Services Pty Ltd
Jan 2009
2009Qbks08-09 Lv1-Ed1.docx
Quickbooks Level 1
The following reports are lists of transactions that have been created in this manual. They have been listed as an aid to finding errors. You do not have to produce these reports.
They have been produced by doing a “Quick Report” on each relevant account.
The following are all Profit & Loss transactions.

Page 275
© GMO Consulting Services Pty Ltd
Jan 2009
2009Qbks08-09 Lv1-Ed1.docx
Quickbooks Level 1
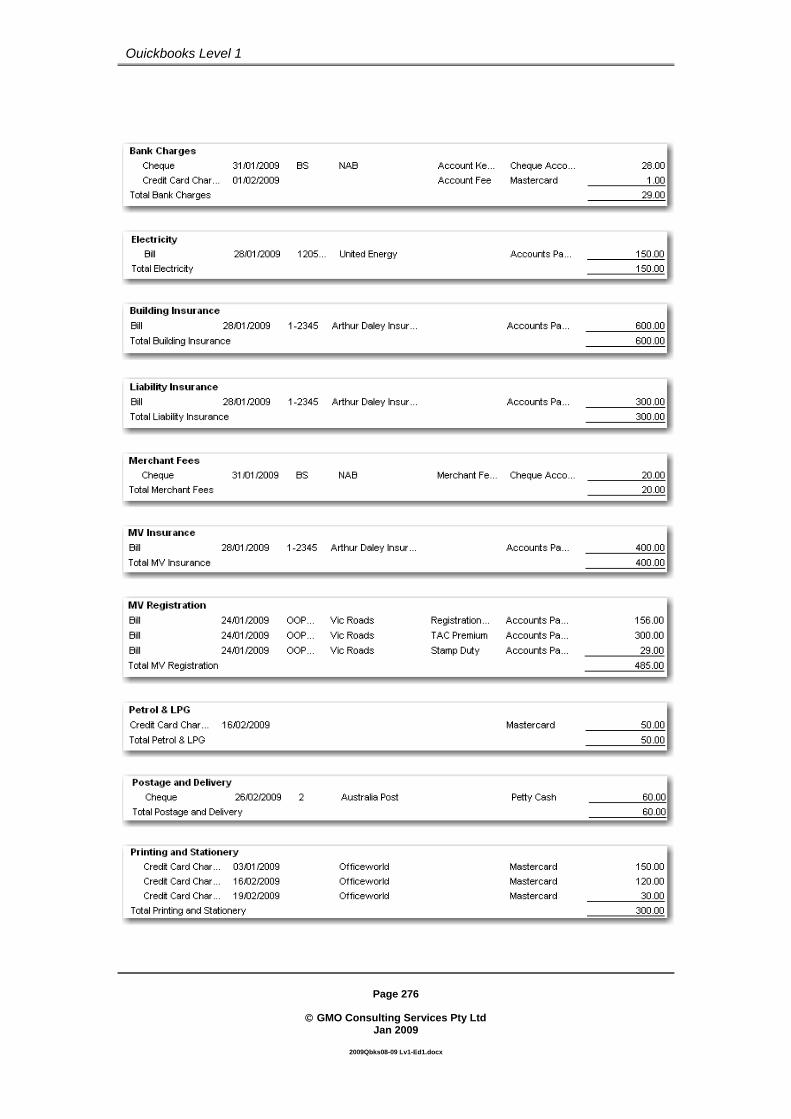
Page 276
© GMO Consulting Services Pty Ltd
Jan 2009
2009Qbks08-09 Lv1-Ed1.docx
Quickbooks Level 1

Page 277
© GMO Consulting Services Pty Ltd
Jan 2009
2009Qbks08-09 Lv1-Ed1.docx
Quickbooks Level 1
The following are for the Balance Sheet.

Page 278
© GMO Consulting Services Pty Ltd
Jan 2009
2009Qbks08-09 Lv1-Ed1.docx
Quickbooks Level 1

Page 279
© GMO Consulting Services Pty Ltd
Jan 2009
2009Qbks08-09 Lv1-Ed1.docx
Quickbooks Level 1

Page 280
© GMO Consulting Services Pty Ltd
Jan 2009
2009Qbks08-09 Lv1-Ed1.docx
Quickbooks Level 1

Page 281
© GMO Consulting Services Pty Ltd
Jan 2009
2009Qbks08-09 Lv1-Ed1.docx
Quickbooks Level 1

Page 282
© GMO Consulting Services Pty Ltd
Jan 2009
2009Qbks08-09 Lv1-Ed1.docx
Quickbooks Level 1
Index Accounts Payable
Applying Adjustment Notes/Credits, 202 Other Bills, 188 Paying Bills, 201 Paying Bills using Credit Card, 208
Accounts Receivable Entering Tax Invoices, 139 Reports. See Reports
Adjustment Notes Account Customers, 175 Applying to Sales Invoices, 177 Purchases, 121 Refunds, 185
Asset Purchases - Entering, 75, 77, 79 Balance Sheet. See Reports Bank Deposits. See Deposits Bank Reconciliation, 211
Doing the Reconciliation, 219 Entering Bank Charges, 216 Entering Interest Earned, 215 Reconciling the Credit Card, 263
Business Activity Statement. See Reports - BAS
Chart of Accounts, 33 Adding Accounts, 36 Deleting Accounts, 44 Editing Accounts, 42 Sub Acounts - Adding, 46
Cheques Entering transactions, 60
Credit Cards Creating, 71 Entering Transactions, 73 Reconciling, 263
Credit Notes. See Adjustment Notes Customers
Customer Payments, 171 Entering details, 128 Job Function, 241
Deposits Banking Sales Receipts, 161 Issued Capital, 56
File - Creating A New Company file, 10
GST Reports. See Reports Inventory
Re-Ordering, 236 Items
Entering Inventory Items, 96 Entering Service Items, 228 Receiving Inventory items, 107
Paying GST. See Cheques Petty Cash
Entering petty cash float, 246 Entering transactions, 247 Setting up, 245
Preferences - Altering, 21 Prices - Changing. See Selling Prices -
Changing Profit & Loss. See Reports Purchase Orders - entering, 102 Reconciliation. See Bank Reconciliation Reports
Accounts Payable - Ageing Summary, 147, 199
Accounts Payable – Unpaid Bills Detail, 272
Accounts Receivable – Open Invoices, 271
Accounts Receivable Ageing Summary, 143
Balance Sheet, 118, 268 GST Reports, 251 Inventory Status, 125, 146, 236 Profit & Loss, 268 Setting up BAS, 253 Trial Balance, 83
Sales Receipts - entering, 154 Selling Prices - Changing, 150 Suppliers - Entering, 86 Tax Codes
Deleting Codes, 30 Tax Code List, 28
Tax Invoices - entering, 139 Undeposited Funds. See
Deposits:Banking Sales Receipts