Embed Size (px)
Citation preview

Quick Start Manual
First steps in building game audio with
© CRI Middleware, Inc. 2014

2
Contents
Introduction
About this manual……………………………………………………………………………………………………………………………………..
About ADX2……………………………………………………………………………………………………………………………………………….
About CRI Middleware……………………………………………………………………………………………………………………………….
What are game audio middleware?
Starting a new project
Creating the project……………………………………………………………………………………………………………………………………
Work Units…………………………………………………………………………………………………………………………………………………
Main Window…………………………………………………………………………………………………………………………………………….
Adding sound files……………………………………………………………………………………………………………………………..………
Creating sound cues
Cue sheets, cues and tracks……………………………………………………………………………………………………………………….
Randomizing parameters…………………………………………………………………………………………………………………………… Different types of cues……………………………………………………………………………………………………………………………….
Nesting cues and complex behaviors………………………………………………………………………………………………………….
Adding automation……………………………………………………………………………………………………………………………………
Building a sound scene
What’s in a sound scene…………………………………………………………………………………………………………………………….
Looping waveforms……………………………………………………………………………………………………………………………………
AISAC control……………………………………………………………………………………………………………………………………………..
Sound emitters…………………………………………………………………………………………………………………………………………..
Implementing interactive music
Introduction………………………………………………………………………………………………………………………………………………
Using AISAC……………………………………………………………………………………………………………………………………………….
Using blocks……………………………………………………………………………………………………………………………………………….
Adding dialog
Using cues………………………………………………………………………………………………………………………………………………….
Localization………………………………………………………………………………………………………………………………………….…….
Playing everything together
Voice limiting and grouping……………………………………………………………………………………………………………………….
REACT………………………………………………………………………………………………………………………………………………..………
Mixing and effects………………………………………………………………………………………………………..……………………………
MIDI control…………………………………………………………………………………………………………………….………………………..
Exporting
Target configuration…………………………………………………………………………………….………………………………………….…
Codecs…………………………………………………………………………………………………………………………………………………….…
Files exported…………………………………………………………………………………………………………………………………………….
Where to go from here?
3
3
3
3
4
5
5
5
6
7
8
8
10
10
12
14
17
17
17
19
22
23
23
23
24
28
28
28
30
30
32
33
34
35
35
35
36
38

3
Introduction
About this manual
This manual will guide you through the first steps of creating a game audio project with ADX2 from
CRI Middleware. It will give you a quick tour of the possibilities of AtomCraft, the authoring tool of
ADX2.
Through this Quick Start manual the following pictograms will be used to indicate sections of
interest:
A “key term” section will describe an important word from the ADX2 terminology.
A “note” section will add some extra information about an ADX2 feature.
A “Tip” section will give an idea about how to use an ADX2 feature.
About ADX2
ADX2 is the leading game audio middleware in Japan, used in as many as 2600 games in all genres
and on all platforms.
ADX2 offers a user-friendly, DAW-like, authoring tool and a full-featured audio engine including a
high-performance proprietary codec.
ADX2 is available for PlayStation®4 , Xbox One®, Wii, Wii UTM ,PSP, PlayStation® Vita, Nintendo
3DS™ , PlayStation®3 , Xbox 360®, Windows®, iOS and Android.
About CRI
CRI Middleware is a Japanese company headquartered in Tokyo, with offices in San Francisco.
Founded in 1983, it specializes in audio and video software solutions for the digital entertainment
industry.
Popular products include CRI Movie, a high-quality, multi-platform, movie playback system and CRI
ADX2, an all-in-one audio solution.

4
What are game audio middleware?
Game audio middleware are composed of an authoring tool and a run-time component (game audio
engine), in this case AtomCraft and the ADX2 API.
The authoring tool allows the sound designer to import audio assets (wave files), transform them
into dynamic events that can be triggered and controlled, organize them into sound banks and
export them to the game.
Game audio middleware provide specific features for sound effects (e.g. randomization and 3D
positioning), interactive music (e.g. beat synchronization) and dialog (e.g. support for multiple
languages).
Game audio middleware also offer mechanisms for the game and the audio engine to communicate
(e.g. through game audio variables), so that the audio can truly be dynamic and react to what is
happening in the game.
Last but not least, game audio middleware usually provide game audio previewing from within the
authoring tool, lowering the time required to debug and iterate on the sound design.
As we will see, all this - and much more – can be done with AtomCraft and the ADX2 API, in a very
easy and intuitive way. ADX2 truly empowers sound designers while offering rock-solid run-time
performance.

5
Starting a new project
Creating the project
Creating a new AtomCraft project is as easy as specifying the name of the project and its location on
your hard drive.
From that information, AtomCraft will derive the project file path as well as the material root path.
Materials are audio assets - i.e. sound files - that your project will use. The Material Root Path is the
parent folder in which all of these audio assets will be contained.
Work Units
At this point AtomCraft will create the first Work Unit for you, and will ask if you want the
management of its materials to depend on the work unit itself or on the global material folder.
Work Units are components of your project that can be checked out / checked-in independently.
This is a very convenient system that allows several sound designers to work on the same project
simultaneously. For example a sound designer could be in charge of the weapon sound effects,
another one of the dialogue etc…

6
To check out a work unit, a sound designer simply uses the context menu and selects Include work
unit in the edit. Once he is done, he can check the work unit back in by selecting Exclude work unit
from editing.
Main window
The main window opens! On the left side, the project tree displays the different objects in the
project. Many types of audio objects can be found here: we will discover more of them later in this
manual.
Just under the project tree is the Materials folder. The materials folder contains the sample data
(waveforms) that are referenced by the objects in the project.
As you can see, all the objects that can be saved have a small disk icon on their right. By checking the
state of these icons it is possible to see in one glance what objects have been modified and need to
be saved or checked in, which is very convenient.
The main part of the window is dedicated to the display and editing of the audio objects. This area
often looks like a typical DAW interface and in turn will display multiple audio tracks, a mixer, effects
parameters etc… Several panes can be visible at the same time, including one with all the properties
of the object currently edited, usually located on the right side.

7
Adding sound files
The materials folder will contain the audio data referenced by your project. To add a sound file to
the materials folder, you can use the context menu but also drag and drop sound files directly from
Windows Explorer.
Please note that it is possible and recommended to create subfolders in the root material folder to
organize the sample data per level, per type etc…
Let’s add our first sound file!
As you can see, we just added a footstep sound. Some basic information about the file is available and it is possible to listen to it. When you click on the file name, the central pane of the window will display a lot more information, including its waveform, as well as looping and encoding options.
In addition to Wave files, you can also add AIFF files to the material folders.
Files can be synchronized and material information files (i.e. list of files) can be imported and
exported, speeding up the process in some cases.

8
Creating sound cues
Cue sheets, cues and tracks
Now that we have added a waveform, how can we turn it into a sound effect that a game can play?
Looking back at the project tree, we can see that at the same time it created a work unit, AtomCraft
also generated a cue sheet folder and a cue sheet.
The only thing left for us to do is to add a cue.
A Cue is a sound object that the game can trigger. A set of cues is called a Cue Sheet. It is possible to
organize cues and cue sheets even more with folders.
Let’s drag our footstep waveform from the material folder and drop it on the cue sheet. A cue with
the same name is created and a track is automatically added to it, which references our footstep
waveform.
There is an even faster way to create a cue: by dragging wave files directly from Windows Explorer
and dropping them on a cue sheet. AtomCraft will add the audio files to the material folder, then
create a cue and reference the samples!

9
A Track in AtomCraft is similar to a track in your DAW. It is a timeline on which you can place one or
more waveforms.
The picture above shows the newly created cue (at the top, in orange) and its child track, which
includes the waveform.
The cue editor in AtomCraft resembles very much to a DAW. You can see the timeline at the top, and
there can be many tracks. Each of the tracks can have several waveforms, and it is easy to move
them along the timeline just by drag and drop.
Let’s press on the play button at the top of the window (or press “space” on your keyboard) to listen
to the result. When we do that, AtomCraft runs the Atom Previewer application which simulates the
way it would sound in a game. It’s a success, our first cue is playing!

10
Randomizing parameters
Now that the cue is playing, it is possible to adjust its parameters in the tabs located at the bottom
of the track view. Pitch, volume, pan, filter and more can be modified there.
To make a sound effect seem less repetitive in a game, it is sometimes a good idea to add a random
variation to some of its parameters. This is done very easily in AtomCraft: just as you are setting a
parameter value by moving a slider horizontally, you can set a random range around this value by
moving the mouse vertically. At the bottom of the previous picture, you can see some of the track’s
parameters. A zone around the volume and pitch slider values has been highlighted: this is their
random range.
If we play the footstep cue again, now it will sound slightly different each time, because its volume
and its pitch will be different, while still staying in the range we set.
Different types of cues
Although it is possible to get a slightly different sound effect each time a cue is triggered by
randomizing some of its parameters, there are some cases where what is really needed is a different
waveform. That is especially true for footsteps!
Fortunately, there are many more things you can do with a cue, and complex behaviors can be
defined in very simple ways in AtomCraft. For example, in order to get more realistic footsteps, let’s
just introduce new waveforms! Instead of always playing the same sound effect over and over again,
we would like to play a sound selected randomly among five. First, let’s add the four new footsteps
waveforms to the materials folder. Then, we can drag them on the cue sheet.
Four new cues have been created. However we want the new variations to be part of the same
sound effect, i.e. the same cue. We can use the context menu and merge the cues as depicted below.

11
Alternatively it is also possible to drop wave files directly on the timeline of the cue editor: they will
automatically be added as materials and new tracks will be created for each of them.
As depicted above, we now have our five tracks with five different waveforms in one cue. Let’s play
this. All the footsteps are playing simultaneously!
This is because cues can be of various types: polyphonic, sequential, shuffle, random, random no
repeat, switch and combo sequential. The default type is polyphonic, which is why all the tracks are
played at the same time.

12
The most appropriate type for us in this case is “Random with no repeat”. This means that the tracks
will be randomly selected, while making sure that the same track is never played twice in a row,
which would break the realism.
Let’s try this again: this time, every time we trigger the cue, a different waveform is played, and it
has a slightly different volume and pitch. It is now much more realistic!
The various AtomCraft’s cue types are very useful. They allow for specific behaviors when the cue is
triggered. For example, choosing the sequential cue type would have played a different waveform
each time, but always in the same order, while the shuffle type would have played them in random
order, but making sure that all waveforms were played once before playing a waveform again. The
switch type allows ADX2 to select the track to be played based on a game variable, and finally the
combo sequential type adds options to the sequential type, such as a return to the first track after a
given time.
Nesting cues and complex behaviors
It is possible for cues to reference other cues instead of tracks. This opens the door to many complex
behaviors.
Actually, to add even more variations to game footsteps, sound designers often divide them into two
parts: toe and heel, using a different set of waveforms for each of them. Dividing our 5 footsteps
waveforms gives us 10 samples, for a total of 25 possible combinations!
To achieve this, we simply create two footstep cues, one for the toe and on for the heel. Each of
them is similar to the cue (of random type) we built previously. The toe cue randomly plays one of
the 5 toe waveforms, and the heel cue randomly plays on of the 5 heel waveforms. Then we create

13
a parent cue and we simply drop both cues on a track next to each other so that they will be played
sequentially but that their content will be chosen randomly.
Press play and listen to even more realistic footsteps!
Dividing samples in shorter waveforms and recombining them in different ways not only allows us to
create more variations but also saves memory and storage space!
Another way to create complex behaviors is to use Actions. Actions can be added to a cue by
creating a special Action Track.

14
By putting actions on the timeline of that special track we are actually performing some basic
scripting as shown on the picture below. Actions include Start / Stop / Mute / Set Parameter and Set
a Selector (project-wide switch).
Adding automation
Another way to create variations without using more memory is to use automation curves. These are
multi-segments envelopes that can affect the value of many parameters of the cue over time.
This time, let’s try with a wind sample. Drop an appropriate sample file in the material folder and
create a cue. Click on the cue to show the newly created track and then click on the combo box
displaying No Automation.
One can add automation to a large number of parameters, such as volume, pitch but also filter
cutoff frequency and resonance, panning etc…
We will be adding a volume automation curve. A colored line appears. Simply click on it to add points and drag them to shape the curve as you want.

15
We could add many automation curves (one per parameter) on the same track.
Let’s listen to it! Indeed, the volume of our wind sample now changes over time. We could drag the
same wind waveform to create another cue, and add different automation curves. Because we
would only be changing the automation curves and not the waveform itself, we could have several
versions of the wind, all sounding slightly different, without needing any more memory to store
additional waveforms.
We have a last thing to do. Because it is a wind sound effect, we want it to loop. However, the
automation curve should also loop with the waveform, so the looping has to be done at the cue level.
To do that, let’s bring the context menu of the cue, select New Object and then Add Marker.
This will open the window below. It is possible to specify different markers and loop settings such as
the range of the loop and how many times it should repeat itself. Let’s choose a marker of type Loop
and make sure it is looping indefinitely.
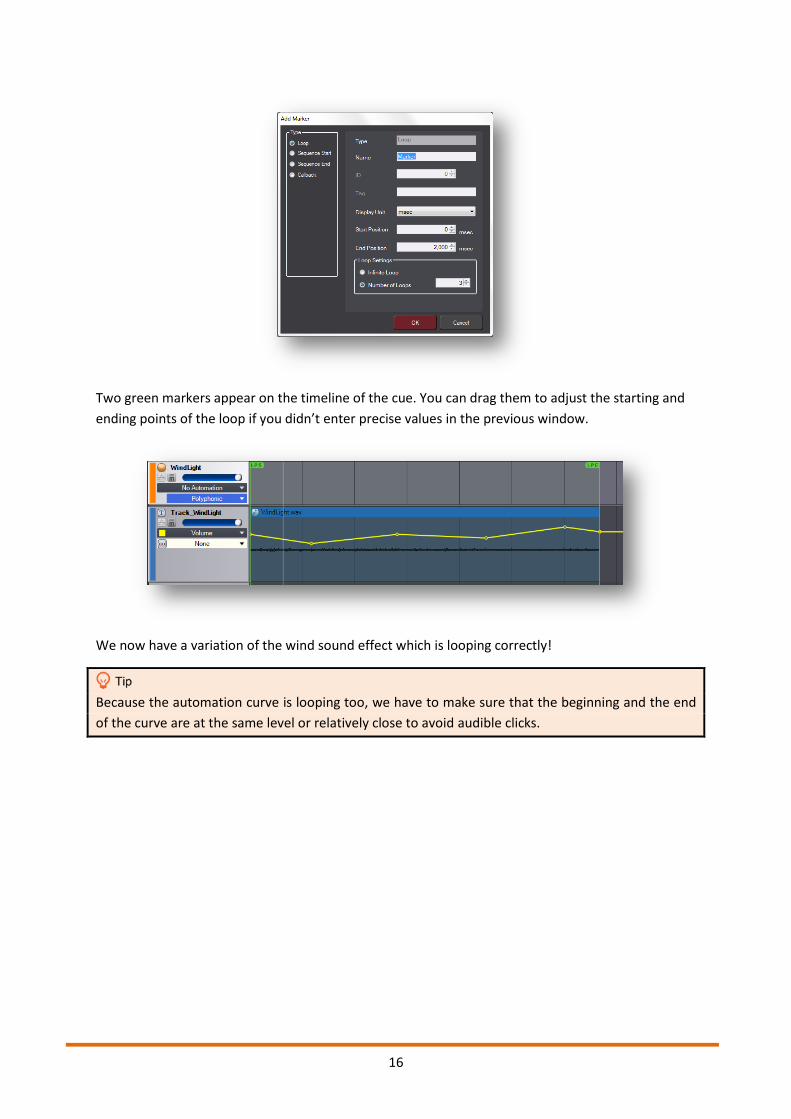
16
Two green markers appear on the timeline of the cue. You can drag them to adjust the starting and
ending points of the loop if you didn’t enter precise values in the previous window.
We now have a variation of the wind sound effect which is looping correctly!
Because the automation curve is looping too, we have to make sure that the beginning and the end
of the curve are at the same level or relatively close to avoid audible clicks.

17
Building a sound scene
What’s in a sound scene?
ADX2 and its authoring tool AtomCraft have everything needed to create immersive sound worlds.
Now that we have seen the basics of cue creation, let’s get a bit more ambitious and check what
would be involved in implementing the sound design of a whole game scene.
On the sound design side - we will talk about music and dialog a bit later - a sound scene will usually
consist of one or more ambience layers, as well as several fixed or moving 3D sound emitters (for
example for enemies, the player and other scene objects). [There may also be some 2D interface
sounds as well (and of course if the game is totally in 2D then most sounds will be too)].
Let’s try to recreate the following sound scene:
We will have 5 layers of ambiances: a generic jungle ambience, exotic birds in the distance, some kind of sporadic monkey sounds in the back too, the constant gurgling of the river in the front, and a weather layer (the sound of a light breeze and the rustling of the leaves). In addition we will add a couple of 3D sound emitters for animals in the front. Finally, a spaceship will sometimes quickly fly over the planet.
Looping waveforms
Let’s start by adding our five ambiance samples to the materials folder. An ambiance is a sound that
plays constantly in the background. In AtomCraft, there are several ways to make a sample loop. We
saw one with the cue markers in the previous section. This time we will simply do it at the
waveforms level. It is possible to use the loop points set in the original sample file or to override
these points in the tool. Click on a waveform from the material folder and edit it:

18
The Loop parameters are the ones coming directly from the wave file. The Re-Loop parameters are
used to override them.
Once a track is using a looping waveform, it will look like depicted below (notice the ghosted
repetitions after the initial waveform to indicate that it is looping):
Once the five waveforms have been set up to loop, we create a cue containing five tracks, each one
with a looping sound. We will keep the type of the cue as polyphonic, so that our five tracks will play
simultaneously.
Adding layers with samples of different durations automatically creates evolving ambiences, as the
loops don’t repeat themselves at the same frequency. If we wanted that amount of variation from
one single sample, we would need a much longer one, which would be costly in memory or disk
space.
We should now have something like this:

19
When working with many cues and tracks, it is easy to get overwhelmed. AtomCraft offers the
possibility to color the various audio objects, which is very convenient and efficient to organize your
work. Use the Color Settings command from the context menu when available.
AISAC control
We now have an evolving ambience built from five looping sounds of different durations. The next
step is to make this ambience dynamic, i.e. responsive to the events in the game. For example, the
sound of the jungle will normally be different depending on the time of the day. It would be great if
there was a way to notify the cue to change its parameters if it’s day-time or night-time. Luckily for
us, that’s what AISAC is all about.
AISAC is a system allowing the control of audio parameters by values coming from the game.
Right click on the track corresponding to the ambient birds. In the context menu, select New Object
and then Add AISAC.
The following window appears, allowing you to associate a parameter with the new AISAC control.
Like with automation curves, many parameters can be controlled by AISAC, such as volume, pitch,
pan, filter and so on. The idea is to make the birds quiet at night, so let’s choose the volume
parameter.

20
Once the window closed, the AISAC tab is selected in the FX / AISAC panel at the bottom of the main
window and a default line is drawn. Similarly to the automation curves, simply click on the line to
add points and drag them to shape the curve as you wish (you can also type in the values directly in
a pane on the right).
AISAC maps input values coming from the game (in the range from 0 to 1) to the values in the range
of the parameter we have chosen. The curve we draw is therefore a mapping curve. When we move
the points on the curve, AtomCraft displays the equivalent values in the parameter’s units.

21
Because we want to simulate the day / night cycle, we first draw a volume fade-in for the morning,
then a stable part at full volume for the day, a fade out part for the evening, and finally a silent part
for the night. The ambient jungle birds will chirp during the day but not at night.
Let’s try it! But first, to hear exactly what is happening, let’s mute the other tracks. This can be easily
done by pressing on the small M-shaped buttons on all tracks except for the jungle birds’ ambience.
The muted tracks will appear in gray. Press the preview button. While the sound is looping drag the
AISAC cursor to change the time of the day: the birds are now waking up, chirping during the day,
stopping progressively and sleeping at night!
We now do the same for the ambient layer with the monkey screams. Select the right track and add
another AISAC control for the volume. We draw a slightly different curve this time to take into
account their different lifestyle and we even add a midday nap during which they will be quieter!
Finally, we can unmute all the tracks and listen to the result of our 5-layer evolving ambience with
day / night control from the game. It was really easy!
The AISAC mapping curve can also have a random range and be retriggered periodically, which
opens the door to a lot of other possibilities!

22
Sound Emitters
Until now all the cues from our sound scenes were background ambiences but some objects or
characters (moving or immobile) can make sounds too. These sound sources are more local and
directional. This is for example the case of the bird and the reptile in the front of the scene as well as
the spaceship which flies by from time to time.
The 3D positioning tab from the Cue parameters lets you set the actual directionality of the sound
emitter by specifying the inner and outer angles of its emission cone, as well as its distance
attenuation by providing minimum and maximum values.
You will notice that there is no choice of attenuation curve, but because the distance can be
controlled by AISAC, it is possible to map the parameter to any curve we design. Actually, even the
angle can be controlled by AISAC.
Do not confuse Pan 3D which describes the location of the sound relatively to the speakers and 3D
positioning, which indicates how a sound should be emitted in a 3D world (distance attenuation,
directionality etc…).
For the creatures in the front of our sound scene, we can select a rather narrow emission cone and
fast attenuation curve, as you can’t hear a bird very fast away. The case of the spaceship is a bit
different: because we can hear it at a distance and because it will fly by at a high speed, which makes
it a perfect candidate for a Doppler effect.
As you can see in the window above, there is a Doppler Factor parameter. Because if we applied the
real Doppler formula, the resulting effect would be too subtle and not similar to what we have come
to expect from movies and video games, many games use a Doppler effect which is many times
bigger than normal. It is totally unrealistic but much more convincing and dramatic in the context of
a video game!

23
Implementing interactive music
Introduction
Interactive music in a video game can be implemented in different ways, from simple crossfades
between musical stems to very complex reactive systems. ADX2 can do it all and we will see below
two ways to implement interactive music in AtomCraft.
To be reactive, the music must know what is happening in the game. Usually, a variable will be
defined and its value (level or a state) will be sent by the game to the audio engine. For example, the
game could define an “activity” variable based on how active the player’s character is and send its
value to the game audio engine. The audio engine would then interpret this value and play the
appropriate music.
The following picture describes a game scenario where the player would be walking in an open
world, and in that case, the level of activity is normal. But he soon sees enemies approaching and
the activity level is increasing. They reach him and attack him! At this point the level of activity is
maximal as they are fighting. Finally, the player is victorious. He picks up the loot the enemies left
behind and rests. The activity level reaches its lowest point. Instead of passing the activity level as a
value, the game could also communicate a state: walking, encounter, battle or rest.
Using AISAC
Modifying sounds based on a curve (like the activity curve described above) seems the prefect job
for AISAC. Indeed, we could use the same technique than for our jungle ambience, and make musical
tracks appear and disappear depending on the game context.
In this simple example, we will use four tracks for the various states of the game:
Walking Encounter Battle Rest
Synth Synth Synth Synth
Bass Bass Bass
Drums Drums
Electric Guitar

24
The higher the level of activity will be, the more tracks we will play. We will keep it very soft for the
resting and walking states, but we will progressively add drums for the encounter to build up
excitement and then an electric guitar for the fight.
Let’s add the four waveforms to the materials folder and make sure they are all flagged as loops.
Then, we create a cue with a track for each waveform. For each track, we add AISAC control over the
volume parameter. It is more convenient to reorder the states from the quietest to the more active:
rest, walking, encounter and fight. Finally, we edit the volume curves as below to make each track
progressively appear as the activity level increases.
While previewing, moving the AISAC cursor from left to right will indeed increase the activity level
and make the music become more and more dynamic.
Using blocks
Another way to implement interactive music in AtomCraft is to use the blocks in the cues. To do that,
create a new cue and change the display units for the timeline to bars / beat. You can do this in the
first tab of the FX / AISAC panel. Next to it, you can also set the tempo (the default is 120 BPM).

25
From the cue context menu, we will now create several blocks (New Object -> Create Block) to
organize our composition.
This is a good time to use the color options of AtomCraft!
A Block is a vertical structure which groups all the waveforms that are playing in a specific time slice.
By opposition, a track is a horizontal structure defining what will be played over time.
Now simply add your loops and riffs in the material folders, and create a track per instrument. Drop
the loops in the appropriate blocks and on the right tracks. Here is an example:
26
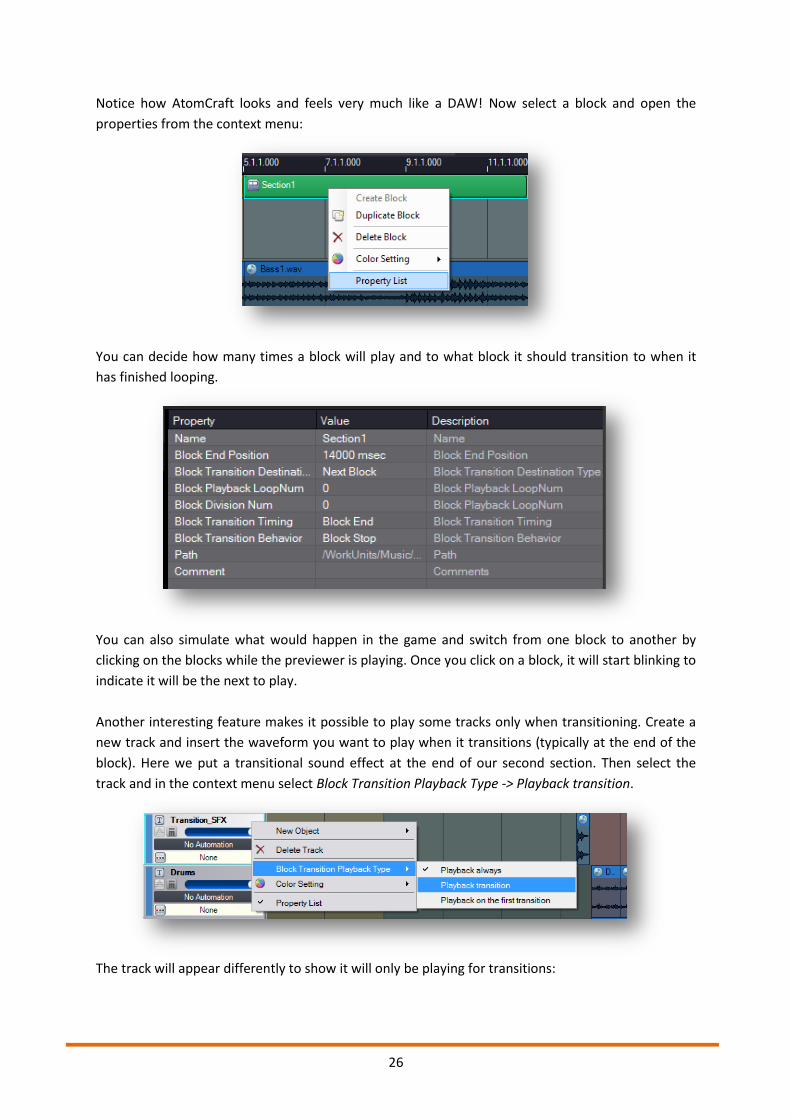
Notice how AtomCraft looks and feels very much like a DAW! Now select a block and open the
properties from the context menu:
You can decide how many times a block will play and to what block it should transition to when it
has finished looping.
You can also simulate what would happen in the game and switch from one block to another by
clicking on the blocks while the previewer is playing. Once you click on a block, it will start blinking to
indicate it will be the next to play.
Another interesting feature makes it possible to play some tracks only when transitioning. Create a
new track and insert the waveform you want to play when it transitions (typically at the end of the
block). Here we put a transitional sound effect at the end of our second section. Then select the
track and in the context menu select Block Transition Playback Type -> Playback transition.
The track will appear differently to show it will only be playing for transitions:

27
This is a nice trick that works especially well with a small drum pattern, a reversed piano note etc…
Coming back to our initial example for interactive music, it is easy to see how each block could
actually correspond to a state of the game (walking, encounter, battle and relax).
Because of their advanced sequencing capabilities, blocks can also be very useful when creating
sound effects!

28
Adding dialog
Using cues
Dialog lines can be defined as any other cues in AtomCraft, which means they will automatically
benefit from 3D positioning, DSP effects and so on... For example, you can use the DSP effects to
create radio-transmissions or robotic voices in real-time. You can also use the cue’s filter to make
the voice appear behind a wall or far away.
Thanks to all the potential combinations of the different types of cues, it is possible to build complex
sentences at run-time, based on what is happening in the game. You can for example have a track
referencing different cues, one for each part of a sentence.
Let’s imagine a soccer game. When the player scores a goal, you may want to have a few variations
of the announcer message to avoid repetitiveness. Therefore the first cue could be of Shuffle type to
announce the goal (e.g. “What a wonderful goal for”, “This is a fantastic goal for”, “And it goes into
the net for”, “That’s one more for” etc…) Then you could have a second cue of Switch type, which
would allow ADX2 to play the name of the team (e.g. “England”, “Brazil”) who scored, based on a
game variable.
Localization
Dialog usually needs to be translated in various languages. AtomCraft offers the possibility to define
alternative paths for the sample materials for each language.

29
Click on the LanguageSettings folder in the project tree. Here you can add and remove languages
and specify a subfolder name for them.
For example, the default subfolder name for French is “fr”. Later, when you will be adding dialog
files (.wav) to a material folder, you can create a subfolder called “fr” at the same level than the
wave files you want to localize. Then, you can put your French dialog files in that subfolder. The
translated samples must have the same name than the original ones.
The pictures above show the dialog line Welcome to ADX2.wav in the Materials folder and in
Windows Explorer. Another Welcome to ADX2.wav file must be in the ”fr” subfolder. It will contain
the line in French. If no file is present, then the default one will be used.
You need to create a subfolder in Windows Explorer. This is different from creating a regular
material subfolder in the tool, and it will not appear in AtomCraft.
For testing purposes, you can select the language used by the AtomCraft previewer in the top-right
corner of the main window. All the cues will be played using the material files corresponding to the
specified language.

30
Playing everything together
Voice limiting and grouping
With so many things simultaneously happening in games, they usually trigger a large number of
requests to play cues, be it sound effects, dialog or music. However, smartphones, handhelds, and
even consoles have hardware or software limitations that prevent them to play too many sounds at
the same time (and it would be too noisy too!).
To avoid some sounds being cut off brutally or not even getting started at all in such cases, cues have
both priorities (to know which ones are important and should be played) and instances limiting (to
know the maximum number of similar sounds that can be played simultaneously). Also depicted
below, voice behavior can be used to determine what happens when a voice becomes inaudible (in
order to save resources). It could simply be stopped, or maintained in a virtual mode with or without
update of its parameters in case it becomes audible again.
Because it would be cumbersome to set the behavior of all voices manually and because a lot of
them are used in the same context (character Foley sounds, weapon’s projectiles, impacts etc…),
AtomCraft offers the possibility to group them into categories.
A Category is a group of volume and playback rules that applies to a set of cues.
Category groups and categories can be created by selecting the Categories folder in the project tree
and using the context menu commands.

31
To assign a category to a cue, you can drag the cue from its cue sheet (in the project tree) to the
Categories folder.
As shown above, categories offer a parent volume for all of their cues as well as a limit to the
number of cues from this category that can be played simultaneously. It is also possible to define a
common ASIAC control for the category. Although it makes more sense for the volume, AISAC curves
can be created for other parameters too.
In a similar way, a VoiceLimitGroup allows instances limiting at the waveform level.
A VoiceLimitGroup is a set of waveforms for which the total number of instances playing can be
limited.
A VoiceLimitGroup can be created in the project tree under the VoiceLimitGroups folder. To add
waveforms to it, you can drop either tracks or cues onto it (all their waveforms will be included).

32
REACT
In the previous section we have seen how we can limit the number of waveforms or cues playing and
group them into sets which are more convenient to control. But even with a limited number of
voices playing it, it can sometimes be difficult to single one of them. Making sure a cue is heard is
the job of REACT.
REACT is an automatic ducking system for cues.
To ensure the player will not miss an important sound, the REACT system can perform ducking
automatically. Creating and setting up a REACT object is very easy. Select the REACT folder in the
project tree and in the context menu chose Create REACT. Once you click on the new REACT object
you will be presented with the following window:
You can select a category for the sound that should trigger the ducking and a category for the
sounds that should duck. For example here we specified that the level music should duck if a stinger
is played on top of it.
You can of course set the fade-out and fade-in durations for the ducking as well as the level to which
the playing sound should duck. A graphical representation helps making all these values very clear.

33
Mixing and effects
Mixing is also an important part of how so many sounds can coexist together. ADX2 offers seven
busses to which the cues can be sent. The send levels are set in the FX1 tab of the FX / AISAC pane
for the cue.
A DSP Bus Setting is a snapshot of a mixer, including volume and send levels, effect chains and their
parameters.
It is possible to create several DSP bus configurations which will be available in the DspBusSettings
folder in the project tree. The effects available to insert on a bus depend on the target platform. For
example, here are the effects available for PC / PS4 / PS3 / Xbox360 and WiiU:
The DSP Bus Settings editor looks like a typical mixer, with faders and send buttons (the send can be
pre-volume, post-volume or post-pan) as well as real-time display of levels while previewing.

34
Clicking on an effect will bring up its parameters in the property grid on the right. Effects can also be
bypassed.
MIDI control
Like in any DAW, you can also use a MIDI control surface (or any other MIDI controller) to drive
AtomCraft! It is especially convenient to quickly adjust parameters and debug while the previewer is
playing. Once you have selected your MIDI input device in the Tools->Properties menu, you can use
the MIDI Controller Assign window (also in the Tools menu) to assign MIDI CC’s to bus levels, track
volumes and even AISAC parameters!

35
Exporting
Target configuration
Once you have prepared your cues for sound effects, music and dialog, it is time to export the cue
sheets towards the game. First, make sure that the target platforms and target languages are
correctly configured. We have already seen in the dialog section that you can setup the languages by
clicking on the LanguageSettings folder in the project tree. Similarly, you can configure the target
platforms by clicking on the TargetConfigs folder. In particular, you will be able to select the
encoding for each platform:
Codecs
In addition to the regular offer from the console manufacturers, CRI Middleware has developed two
proprietary codecs for sample data.
ADX is a high-fidelity, high compression, low CPU-load codec running on all game platforms, mobile
devices, and embedded systems. With ADX, 48kHz stereo sounds can be compressed up to 1/16.
The HCA codec (for High Compression Audio) offers a compression ratio from 1/6 to 1/12. This codec
has been tuned for games, the CPU load is very low (compared to MP3 and AAC) and stable during
decoding. HCA also supports seeking. The HCA-MX codec is a variation of the HCA which reduces the
CPU load when playing back a large number of sounds simultaneously. Thanks to this, the engine can
play hundreds of sounds on consoles, and tens of sounds on mobile platforms.

36
Files exported
The export itself consists in generating a binary representation of the cue sheets (you can think of
them as the equivalent of the binary sound banks in other systems). To trigger the export, call the
Build Atom CueSheet Binary command from the Build menu or from the toolbar:
You will be able to select the target platforms, the target languages, and of course what cue sheets
you want to export.
When AtomCraft exports a project, several files are generated: one ACF file for the whole project,
and one ACB and one AWB file per cue sheet exported.

37
The ACF file (for Atom Configuration File) contains the general information about the project and
what cue sheets are parts of it. There is only one ACF file outputted per project.
The ACB files (for Atom Cue sheet Binary) contain all the parameters of a given cue sheet as well as
any sample data destined to be played in memory by that cue sheet. If the audio data is expected to
be streamed, it is stored in the corresponding AWB file.
The AWB files (for Atom Wave Bank) contain the encoded data for the streams referenced by the
cue sheet (the parameters for the stream playback are in the ACB file).

38
Where to go from here?
Congratulations! You know how to create a new project in AtomCraft, build cues for sound effects,
dialogue and music, organize them and mix them, and export them to the game.
This Quick Start manual is only the beginning. Very complex things can be simulated with AtomCraft
by combining AISAC, all the different cue types, blocks, automation etc... Whatever your project you
will find creative ways to implement it within AtomCraft.
AtomCraft and ADX2 in general have been developed over many years and have been used in a
multitude of games: you will find a lot of other useful features in the tool to create engaging
interactive audio content. Sky is the limit!


