Embed Size (px)
Citation preview
Quick start guideto
CuteDCP for Premiere Prov1.5.0
http://www.fandev.com
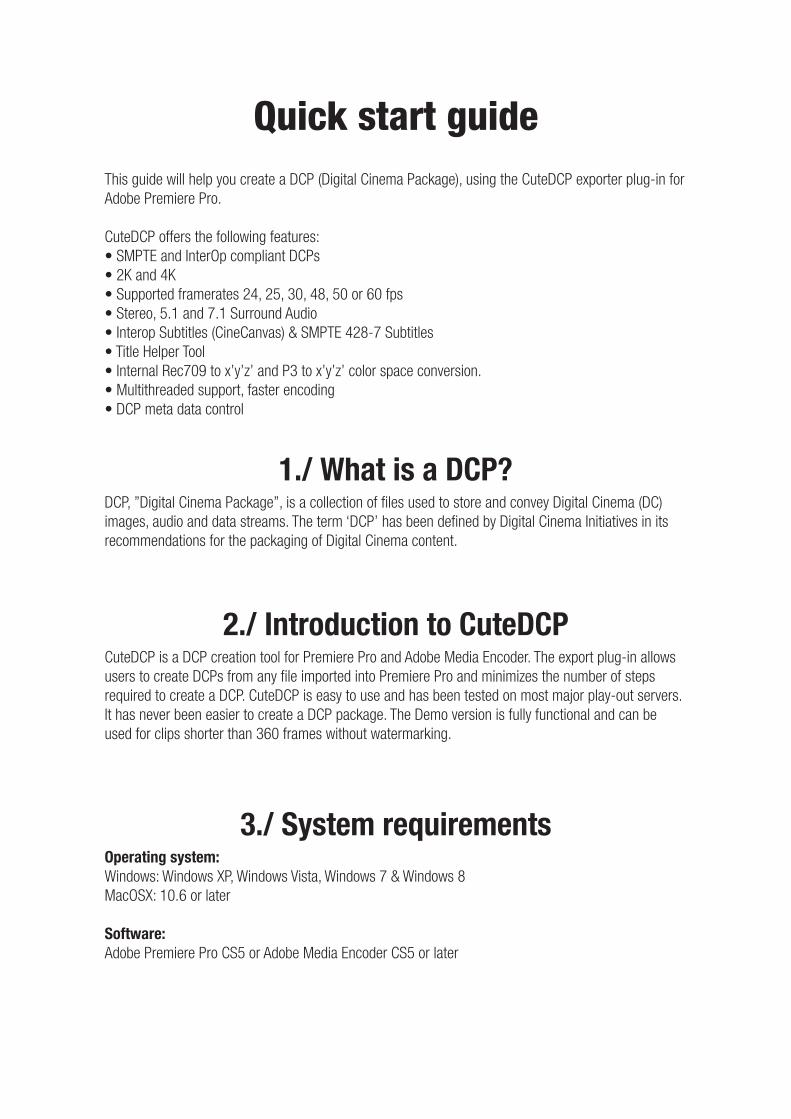
Quick start guide
1./ What is a DCP?
3./ System requirements
2./ Introduction to CuteDCP
This guide will help you create a DCP (Digital Cinema Package), using the CuteDCP exporter plug-in for Adobe Premiere Pro.
CuteDCP offers the following features:• SMPTE and InterOp compliant DCPs• 2K and 4K• Supported framerates 24, 25, 30, 48, 50 or 60 fps• Stereo, 5.1 and 7.1 Surround Audio• Interop Subtitles (CineCanvas) & SMPTE 428-7 Subtitles• Title Helper Tool• Internal Rec709 to x’y’z’ and P3 to x’y’z’ color space conversion.• Multithreaded support, faster encoding• DCP meta data control
DCP, ”Digital Cinema Package”, is a collection of files used to store and convey Digital Cinema (DC) images, audio and data streams. The term ‘DCP’ has been defined by Digital Cinema Initiatives in its recommendations for the packaging of Digital Cinema content.
Operating system:Windows: Windows XP, Windows Vista, Windows 7 & Windows 8MacOSX: 10.6 or later
Software:Adobe Premiere Pro CS5 or Adobe Media Encoder CS5 or later
CuteDCP is a DCP creation tool for Premiere Pro and Adobe Media Encoder. The export plug-in allows users to create DCPs from any file imported into Premiere Pro and minimizes the number of steps required to create a DCP. CuteDCP is easy to use and has been tested on most major play-out servers. It has never been easier to create a DCP package. The Demo version is fully functional and can be used for clips shorter than 360 frames without watermarking.
4./ Installation of CuteDCP
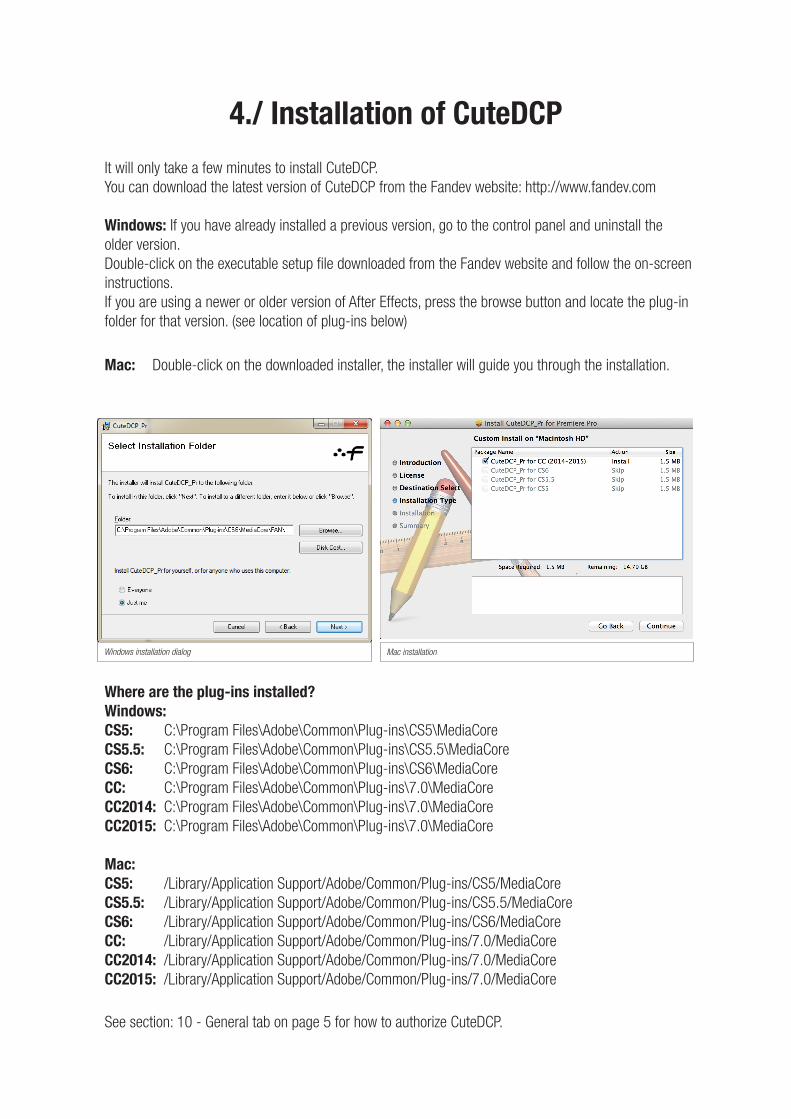
It will only take a few minutes to install CuteDCP. You can download the latest version of CuteDCP from the Fandev website: http://www.fandev.com
Windows: If you have already installed a previous version, go to the control panel and uninstall the older version. Double-click on the executable setup file downloaded from the Fandev website and follow the on-screen instructions.If you are using a newer or older version of After Effects, press the browse button and locate the plug-in folder for that version. (see location of plug-ins below)
See section: 10 - General tab on page 5 for how to authorize CuteDCP.
Mac: Double-click on the downloaded installer, the installer will guide you through the installation.
Where are the plug-ins installed?Windows:CS5: C:\Program Files\Adobe\Common\Plug-ins\CS5\MediaCoreCS5.5: C:\Program Files\Adobe\Common\Plug-ins\CS5.5\MediaCoreCS6: C:\Program Files\Adobe\Common\Plug-ins\CS6\MediaCoreCC: C:\Program Files\Adobe\Common\Plug-ins\7.0\MediaCoreCC2014: C:\Program Files\Adobe\Common\Plug-ins\7.0\MediaCoreCC2015: C:\Program Files\Adobe\Common\Plug-ins\7.0\MediaCore
Mac:CS5: /Library/Application Support/Adobe/Common/Plug-ins/CS5/MediaCoreCS5.5: /Library/Application Support/Adobe/Common/Plug-ins/CS5.5/MediaCoreCS6: /Library/Application Support/Adobe/Common/Plug-ins/CS6/MediaCoreCC: /Library/Application Support/Adobe/Common/Plug-ins/7.0/MediaCoreCC2014: /Library/Application Support/Adobe/Common/Plug-ins/7.0/MediaCoreCC2015: /Library/Application Support/Adobe/Common/Plug-ins/7.0/MediaCore
Mac installationWindows installation dialog
5./ Creating the DCP- Setting up a project -
-Exporting your sequence
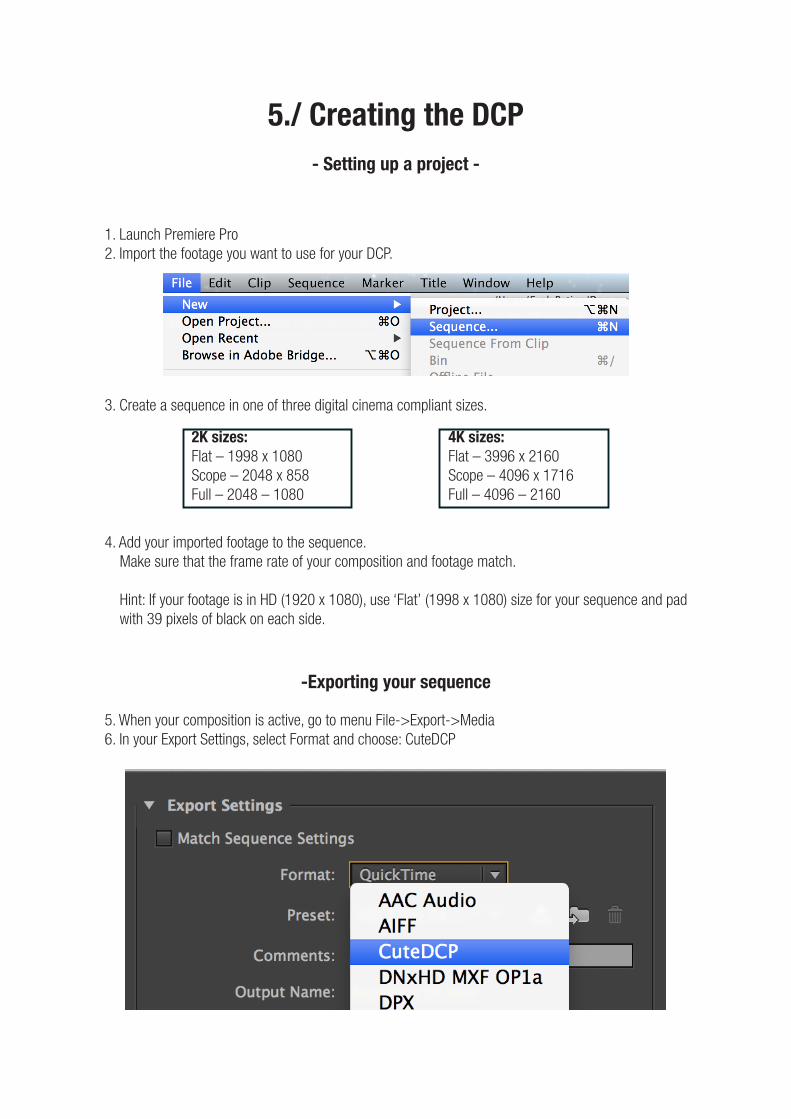
5. When your composition is active, go to menu File->Export->Media6. In your Export Settings, select Format and choose: CuteDCP
1. Launch Premiere Pro2. Import the footage you want to use for your DCP.
3. Create a sequence in one of three digital cinema compliant sizes.
2K sizes:Flat – 1998 x 1080Scope – 2048 x 858Full – 2048 – 1080
4K sizes:Flat – 3996 x 2160Scope – 4096 x 1716Full – 4096 – 2160
4. Add your imported footage to the sequence. Make sure that the frame rate of your composition and footage match.
Hint: If your footage is in HD (1920 x 1080), use ‘Flat’ (1998 x 1080) size for your sequence and padwith 39 pixels of black on each side.
-Format Options-
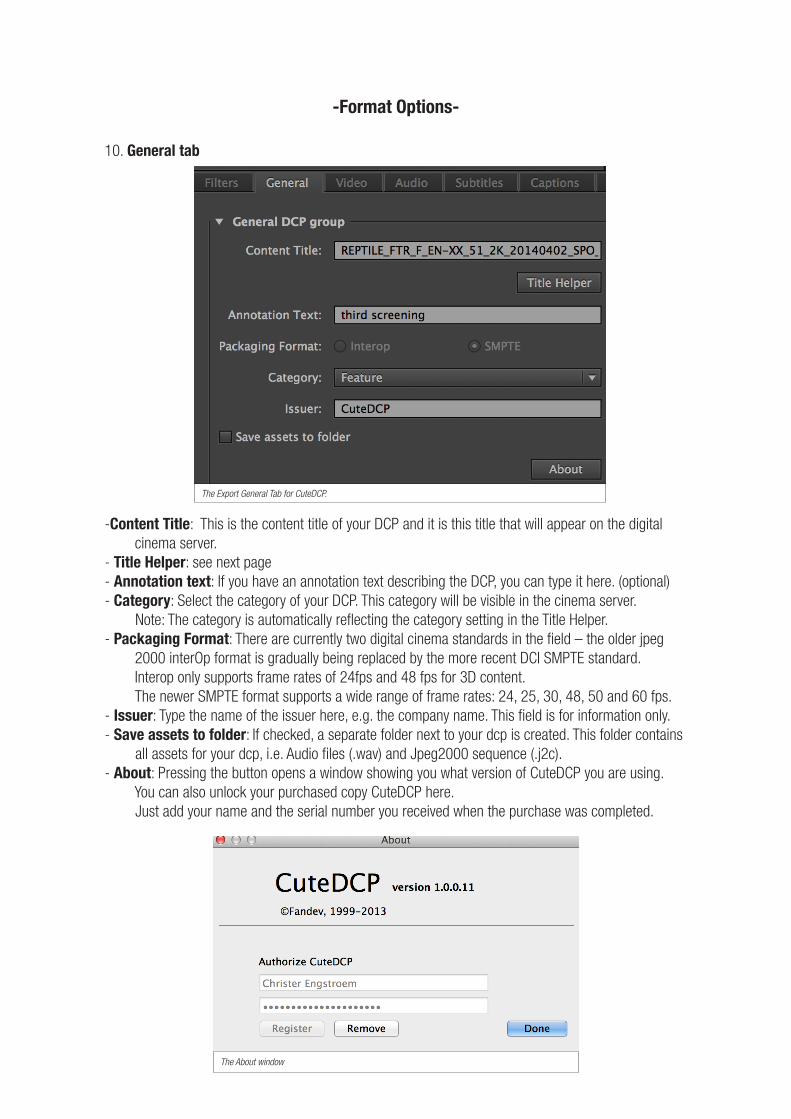
-Content Title: This is the content title of your DCP and it is this title that will appear on the digital cinema server.
- Title Helper: see next page- Annotation text: If you have an annotation text describing the DCP, you can type it here. (optional)- Category: Select the category of your DCP. This category will be visible in the cinema server. Note: The category is automatically reflecting the category setting in the Title Helper.- Packaging Format: There are currently two digital cinema standards in the field – the older jpeg
2000 interOp format is gradually being replaced by the more recent DCI SMPTE standard.Interop only supports frame rates of 24fps and 48 fps for 3D content. The newer SMPTE format supports a wide range of frame rates: 24, 25, 30, 48, 50 and 60 fps.
- Issuer: Type the name of the issuer here, e.g. the company name. This field is for information only.- Save assets to folder: If checked, a separate folder next to your dcp is created. This folder contains all assets for your dcp, i.e. Audio files (.wav) and Jpeg2000 sequence (.j2c).- About: Pressing the button opens a window showing you what version of CuteDCP you are using. You can also unlock your purchased copy CuteDCP here. Just add your name and the serial number you received when the purchase was completed.
10. General tab
The Export General Tab for CuteDCP.
The About window
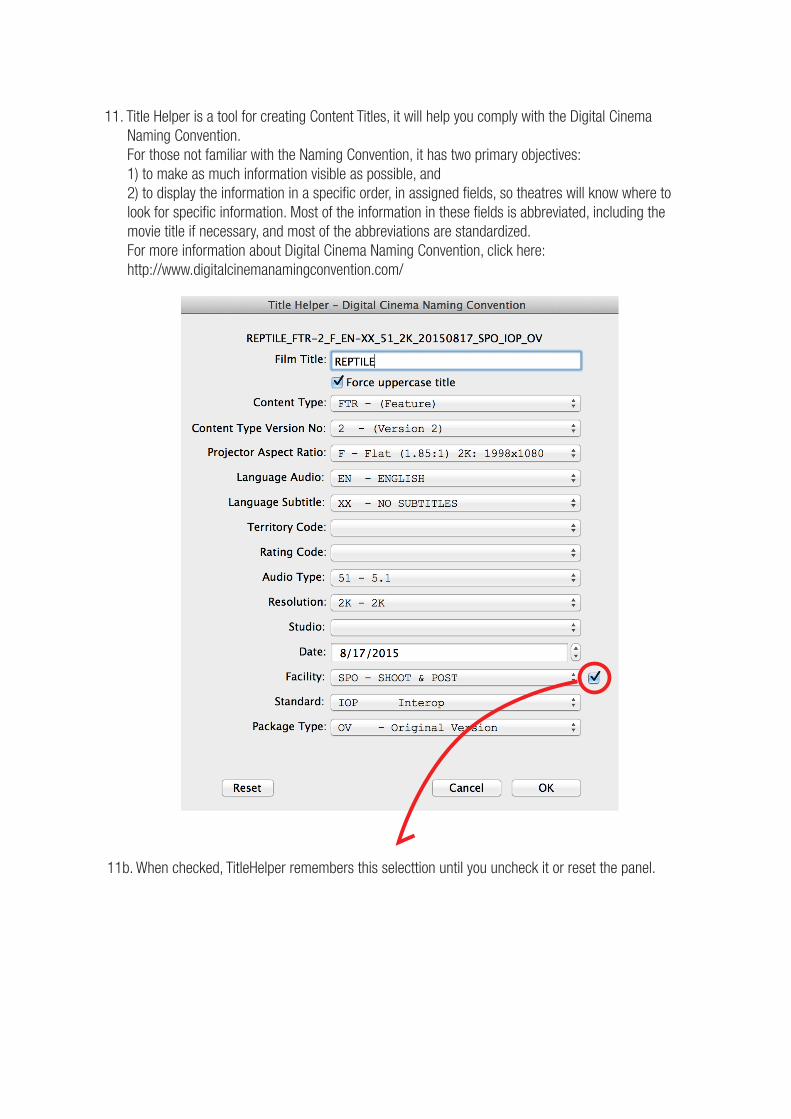
11. Title Helper is a tool for creating Content Titles, it will help you comply with the Digital Cinema Naming Convention.For those not familiar with the Naming Convention, it has two primary objectives: 1) to make as much information visible as possible, and 2) to display the information in a specific order, in assigned fields, so theatres will know where to look for specific information. Most of the information in these fields is abbreviated, including the movie title if necessary, and most of the abbreviations are standardized. For more information about Digital Cinema Naming Convention, click here:http://www.digitalcinemanamingconvention.com/
11b. When checked, TitleHelper remembers this selecttion until you uncheck it or reset the panel.
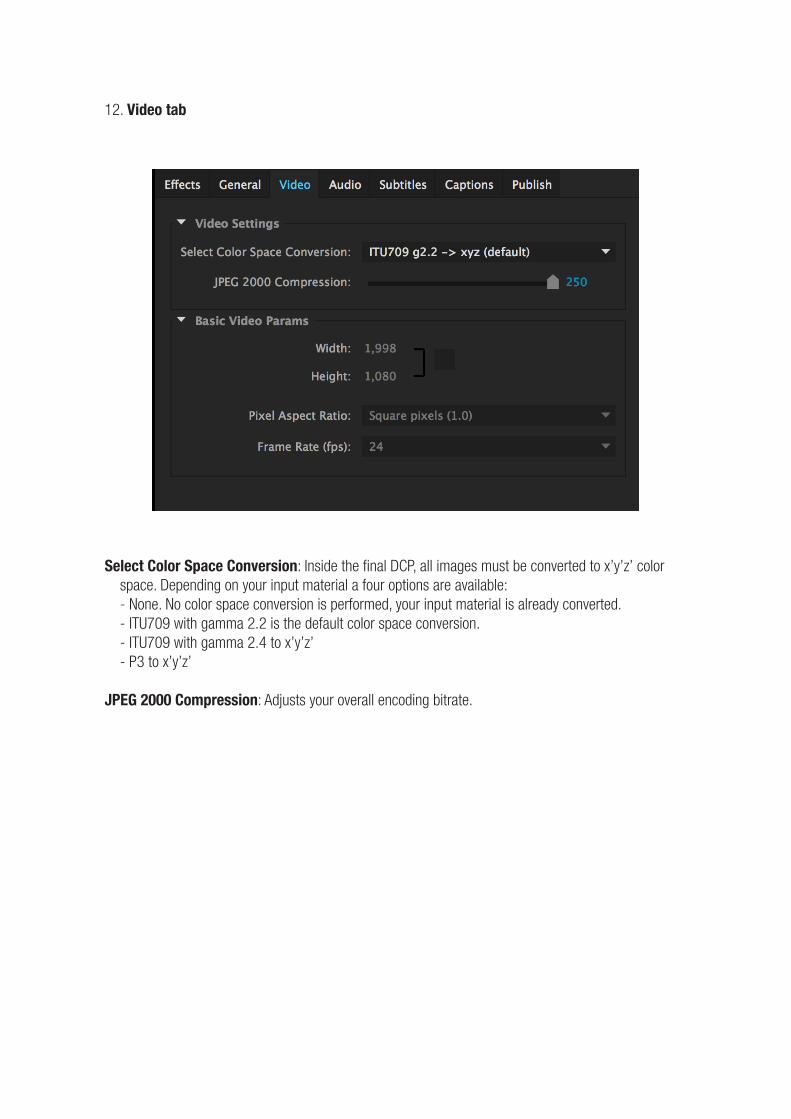
12. Video tab
Select Color Space Conversion: Inside the final DCP, all images must be converted to x’y’z’ color space. Depending on your input material a four options are available: - None. No color space conversion is performed, your input material is already converted. - ITU709 with gamma 2.2 is the default color space conversion. - ITU709 with gamma 2.4 to x’y’z’ - P3 to x’y’z’
JPEG 2000 Compression: Adjusts your overall encoding bitrate.
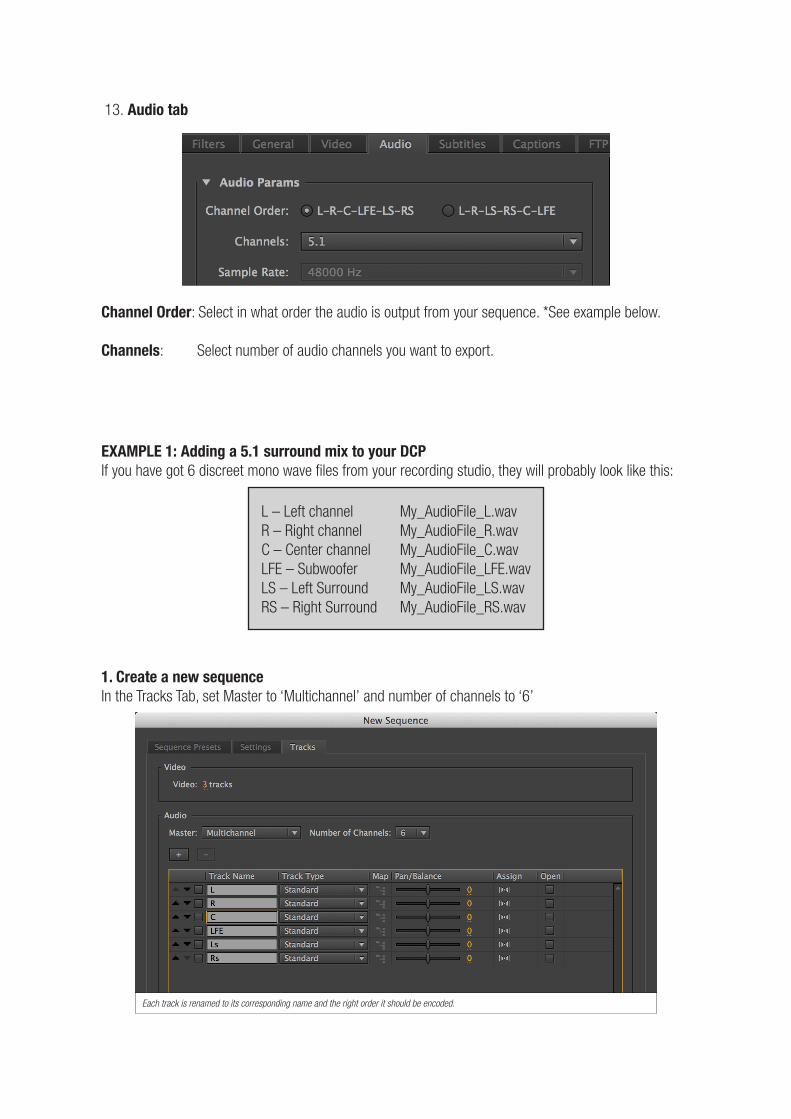
Channel Order: Select in what order the audio is output from your sequence. *See example below.
Channels: Select number of audio channels you want to export.
EXAMPLE 1: Adding a 5.1 surround mix to your DCP If you have got 6 discreet mono wave files from your recording studio, they will probably look like this:
1. Create a new sequence In the Tracks Tab, set Master to ‘Multichannel’ and number of channels to ‘6’
13. Audio tab
L – Left channelR – Right channelC – Center channelLFE – SubwooferLS – Left SurroundRS – Right Surround
My_AudioFile_L.wavMy_AudioFile_R.wavMy_AudioFile_C.wavMy_AudioFile_LFE.wavMy_AudioFile_LS.wavMy_AudioFile_RS.wav
Each track is renamed to its corresponding name and the right order it should be encoded.
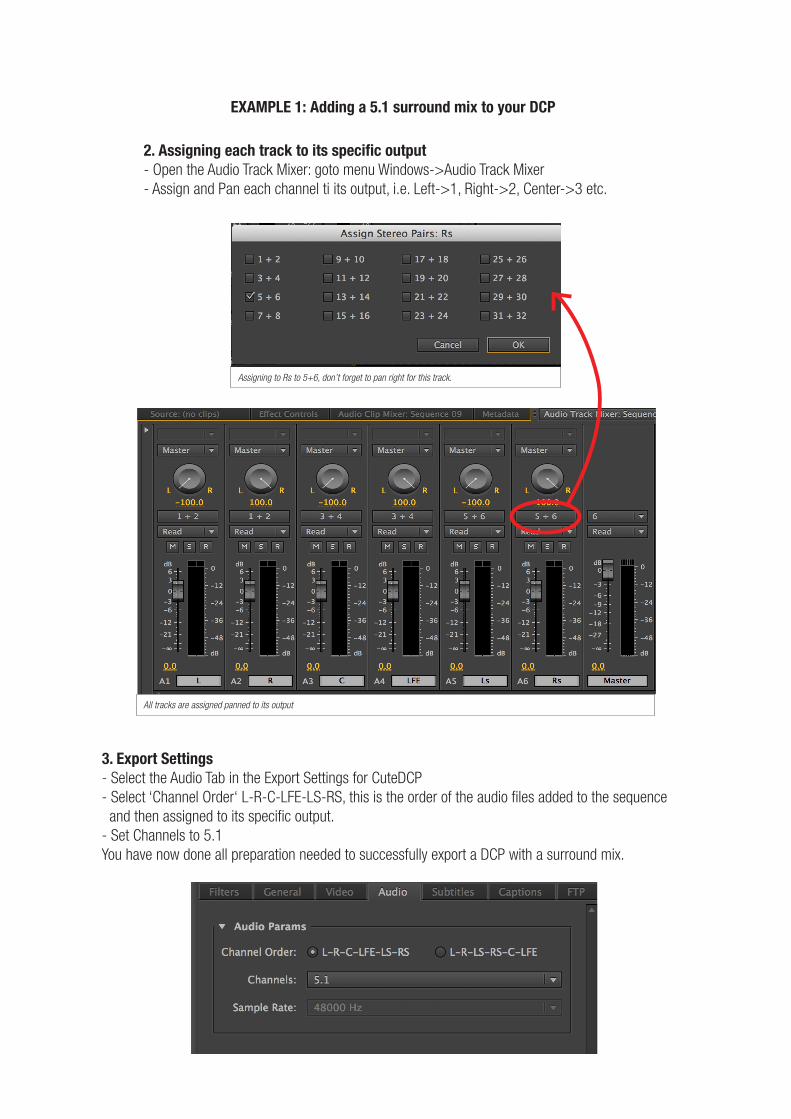
2. Assigning each track to its specific output- Open the Audio Track Mixer: goto menu Windows->Audio Track Mixer- Assign and Pan each channel ti its output, i.e. Left->1, Right->2, Center->3 etc.
3. Export Settings- Select the Audio Tab in the Export Settings for CuteDCP- Select ‘Channel Order‘ L-R-C-LFE-LS-RS, this is the order of the audio files added to the sequence and then assigned to its specific output.- Set Channels to 5.1You have now done all preparation needed to successfully export a DCP with a surround mix.
All tracks are assigned panned to its output
Assigning to Rs to 5+6, don’t forget to pan right for this track.
EXAMPLE 1: Adding a 5.1 surround mix to your DCP
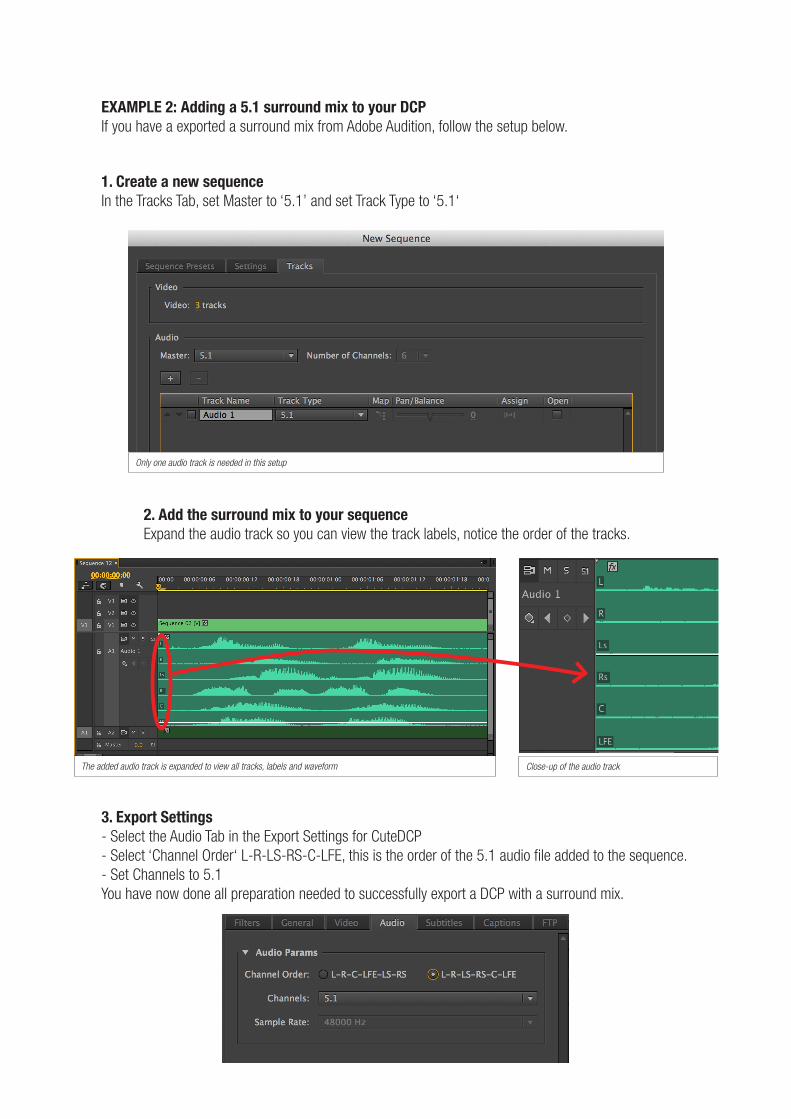
EXAMPLE 2: Adding a 5.1 surround mix to your DCP If you have a exported a surround mix from Adobe Audition, follow the setup below.
1. Create a new sequence In the Tracks Tab, set Master to ‘5.1’ and set Track Type to ‘5.1‘
Only one audio track is needed in this setup
2. Add the surround mix to your sequenceExpand the audio track so you can view the track labels, notice the order of the tracks.
The added audio track is expanded to view all tracks, labels and waveform Close-up of the audio track
3. Export Settings- Select the Audio Tab in the Export Settings for CuteDCP- Select ‘Channel Order‘ L-R-LS-RS-C-LFE, this is the order of the 5.1 audio file added to the sequence.- Set Channels to 5.1You have now done all preparation needed to successfully export a DCP with a surround mix.
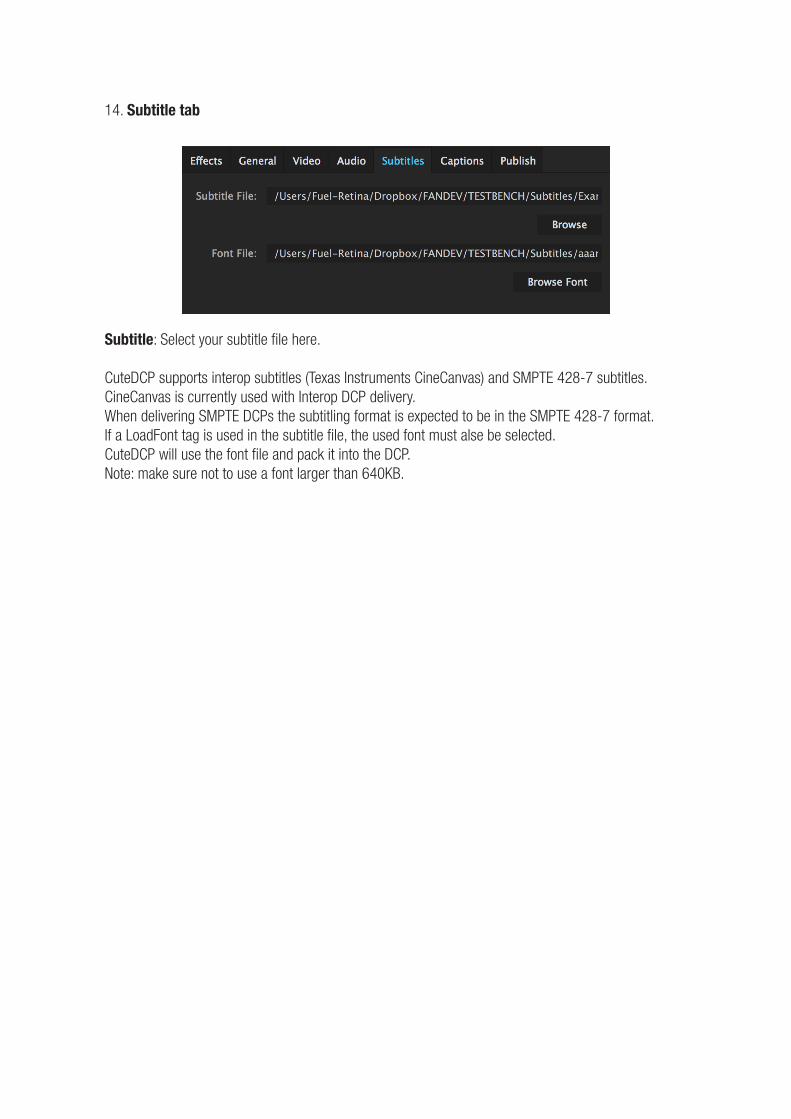
14. Subtitle tab
Subtitle: Select your subtitle file here.
CuteDCP supports interop subtitles (Texas Instruments CineCanvas) and SMPTE 428-7 subtitles. CineCanvas is currently used with Interop DCP delivery. When delivering SMPTE DCPs the subtitling format is expected to be in the SMPTE 428-7 format.If a LoadFont tag is used in the subtitle file, the used font must alse be selected. CuteDCP will use the font file and pack it into the DCP.Note: make sure not to use a font larger than 640KB.
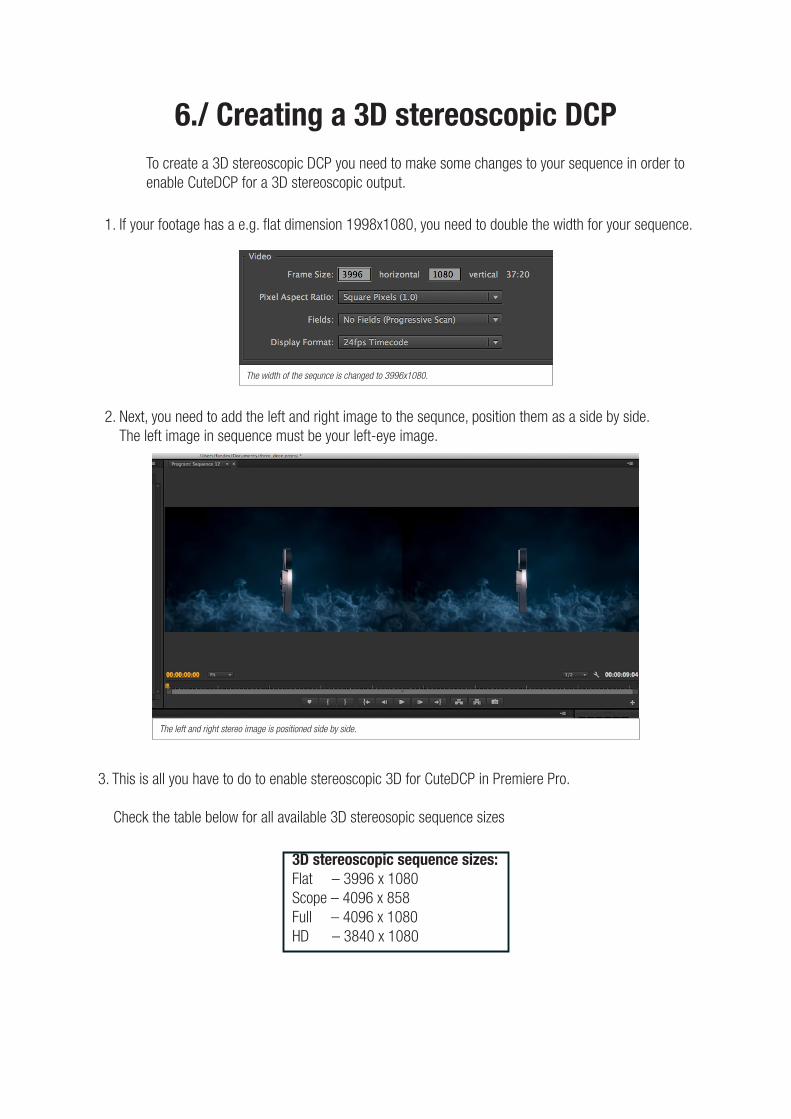
6./ Creating a 3D stereoscopic DCPTo create a 3D stereoscopic DCP you need to make some changes to your sequence in order to enable CuteDCP for a 3D stereoscopic output.
3. This is all you have to do to enable stereoscopic 3D for CuteDCP in Premiere Pro. Check the table below for all available 3D stereosopic sequence sizes
2. Next, you need to add the left and right image to the sequnce, position them as a side by side. The left image in sequence must be your left-eye image.
1. If your footage has a e.g. flat dimension 1998x1080, you need to double the width for your sequence.
3D stereoscopic sequence sizes:Flat – 3996 x 1080Scope – 4096 x 858Full – 4096 x 1080HD – 3840 x 1080
The width of the sequnce is changed to 3996x1080.
The left and right stereo image is positioned side by side.

7./ Rendering the DCP
When export is is complete, the result will be a folder containing various files. This is the DCP.
Note:If you have selected “Save assets to folder“ in the general tab. A folder next to your DCP is created, this special folder almost has the same name as your DCP except for a trailing ASSETS in the filename. Make sure you are not using this special folder as your DCP.
When everything has been set up, just press Export to generate your DCP.You also have the option to queue your export to Adobe Media Encode by pressing Queue.
The final DCP looks like this.
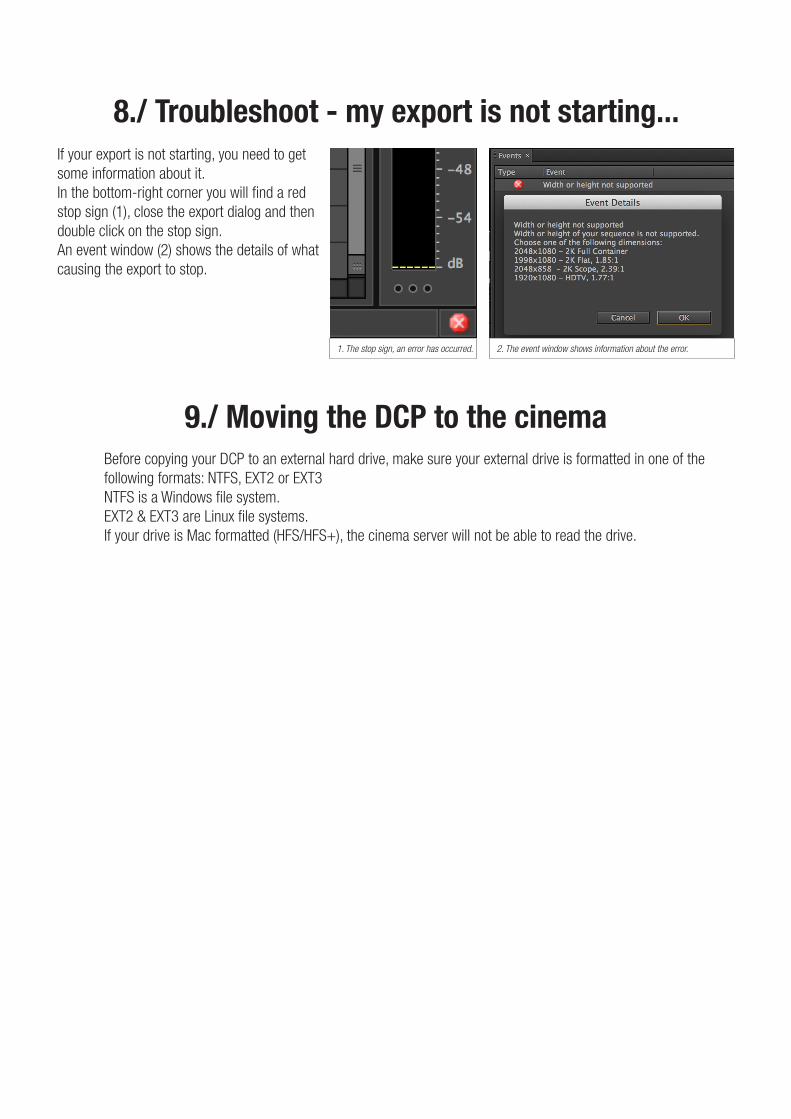
8./ Troubleshoot - my export is not starting...
9./ Moving the DCP to the cinema
If your export is not starting, you need to get some information about it.In the bottom-right corner you will find a red stop sign (1), close the export dialog and then double click on the stop sign. An event window (2) shows the details of what causing the export to stop.
Before copying your DCP to an external hard drive, make sure your external drive is formatted in one of the following formats: NTFS, EXT2 or EXT3NTFS is a Windows file system.EXT2 & EXT3 are Linux file systems.If your drive is Mac formatted (HFS/HFS+), the cinema server will not be able to read the drive.
1. The stop sign, an error has occurred. 2. The event window shows information about the error.
We welcome your feedback on CuteDCP.
If you have any suggestions, problems or questions, please contact us at:e-mail: [email protected]
http://www.fandev.com