Embed Size (px)
Citation preview
Quick Start GuideAquaLab Pre Water Activity Meter
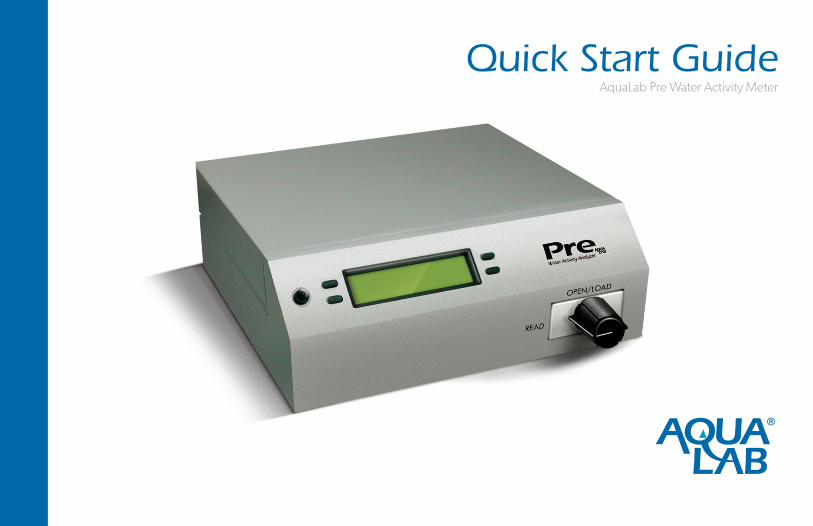
Congratulations on your new PRE Water Activity Meter.This guide will help you begin gathering data in just afew short steps.
The Setup
1 Customer support: [email protected] / 509-332-5601 8 a.m. to 5 p.m. (Pacific)
Let instrument warm up for15 minutes.
3
Wash hands and continuereading this guide duringinstrument warm up.
4
Plug in instrument with black power cord. Turn on by flipping the rocker switch on the back of the instrument.
2
Place on level surface,in a stable environment*
*Optimal Temperature 25˚C
1
15 MIN
2
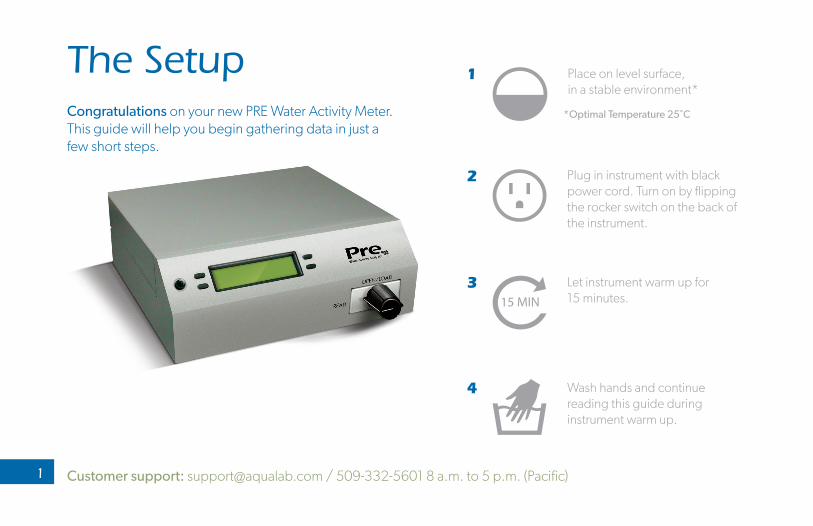
What’s Included?
Operator’sManualInstrument instructionsand care.
AquaLink 4Software to save, export, and graphyour data. Registration key inside coverif purchased with the instrument.
Serial CableConnect your PRE directly to your computer.
Power Cord
StandardsTrial Package
LidsTrial Package
CupsTrial Package
VerificationStandards*If you don’t have two boxes go to store.aqualab.com to purchase.
Periodically purchase athttps://store.aqualab.com
*
Sample Cups500 per case.
*
(optional)(optional)
Cleaning Kit1 year supply
*
3 Important!
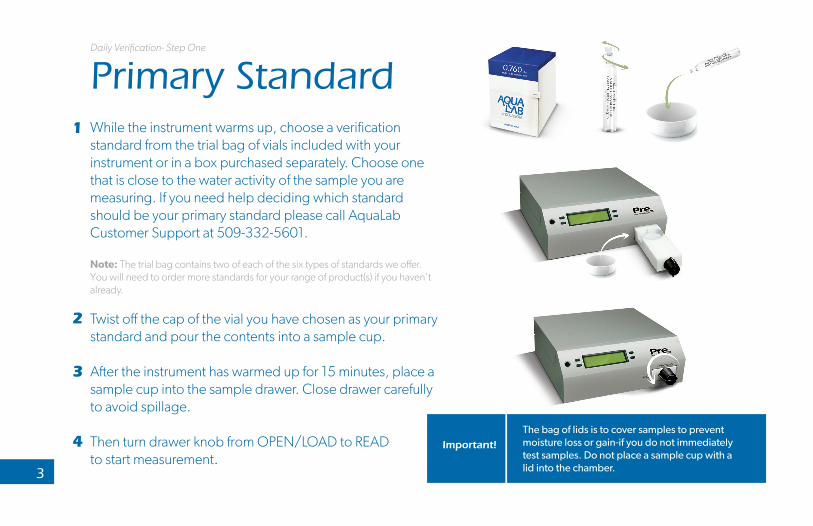
Primary StandardWhile the instrument warms up, choose a verification standard from the trial bag of vials included with your instrument or in a box purchased separately. Choose one that is close to the water activity of the sample you are measuring. If you need help deciding which standard should be your primary standard please call AquaLab Customer Support at 509-332-5601.
Note: The trial bag contains two of each of the six types of standards we offer. You will need to order more standards for your range of product(s) if you haven’t already.
Twist off the cap of the vial you have chosen as your primary standard and pour the contents into a sample cup.
After the instrument has warmed up for 15 minutes, place a sample cup into the sample drawer. Close drawer carefully to avoid spillage.
Then turn drawer knob from OPEN/LOAD to READto start measurement.
1
2
3
4The bag of lids is to cover samples to preventmoisture loss or gain-if you do not immediately test samples. Do not place a sample cup with alid into the chamber.
Important!
Daily Verification- Step One
4
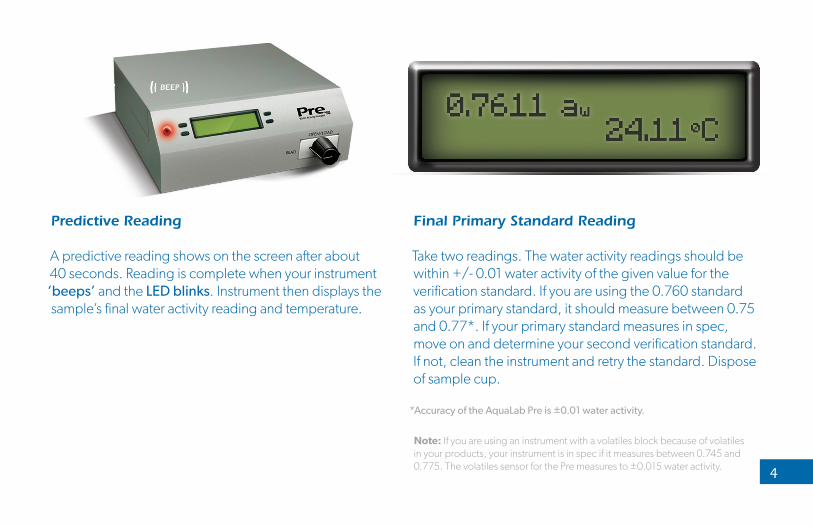
Predictive Reading
A predictive reading shows on the screen after about 40 seconds. Reading is complete when your instrument ‘beeps’ and the LED blinks. Instrument then displays the sample’s final water activity reading and temperature.
Final Primary Standard Reading
Take two readings. The water activity readings should be within +/- 0.01 water activity of the given value for the verification standard. If you are using the 0.760 standard as your primary standard, it should measure between 0.75 and 0.77*. If your primary standard measures in spec, move on and determine your second verification standard. If not, clean the instrument and retry the standard. Dispose of sample cup.
*Accuracy of the AquaLab Pre is ±0.01 water activity.
Note: If you are using an instrument with a volatiles block because of volatiles in your products, your instrument is in spec if it measures between 0.745 and 0.775. The volatiles sensor for the Pre measures to ±0.015 water activity.
5
Determine Second StandardDaily Verification- Step Two
Need Vials? Go to https://store.aqualab.com
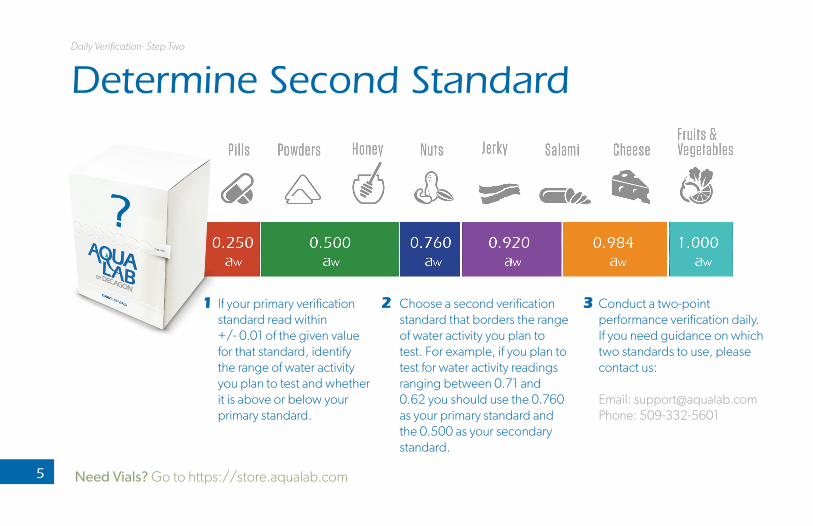
If your primary verification standard read within +/- 0.01 of the given value for that standard, identify the range of water activity you plan to test and whether it is above or below your primary standard.
Choose a second verification standard that borders the range of water activity you plan to test. For example, if you plan to test for water activity readings ranging between 0.71 and 0.62 you should use the 0.760 as your primary standard and the 0.500 as your secondary standard.
Conduct a two-point performance verification daily. If you need guidance on which two standards to use, please contact us:
Email: [email protected]: 509-332-5601
1 2 3
6
4
5
6
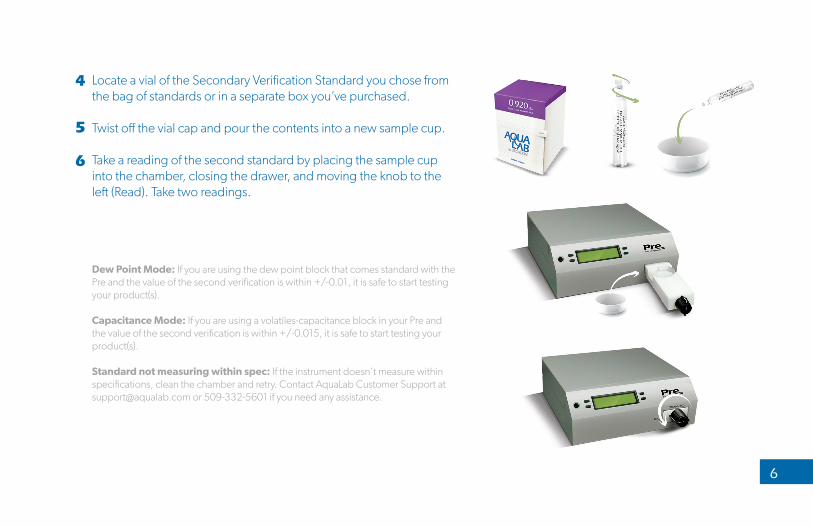
Locate a vial of the Secondary Verification Standard you chose from the bag of standards or in a separate box you’ve purchased.
Twist off the vial cap and pour the contents into a new sample cup.
Take a reading of the second standard by placing the sample cup into the chamber, closing the drawer, and moving the knob to the left (Read). Take two readings.
Dew Point Mode: If you are using the dew point block that comes standard with the Pre and the value of the second verification is within +/-0.01, it is safe to start testing your product(s).
Capacitance Mode: If you are using a volatiles-capacitance block in your Pre and the value of the second verification is within +/-0.015, it is safe to start testing your product(s).
Standard not measuring within spec: If the instrument doesn’t measure within specifications, clean the chamber and retry. Contact AquaLab Customer Support at [email protected] or 509-332-5601 if you need any assistance.
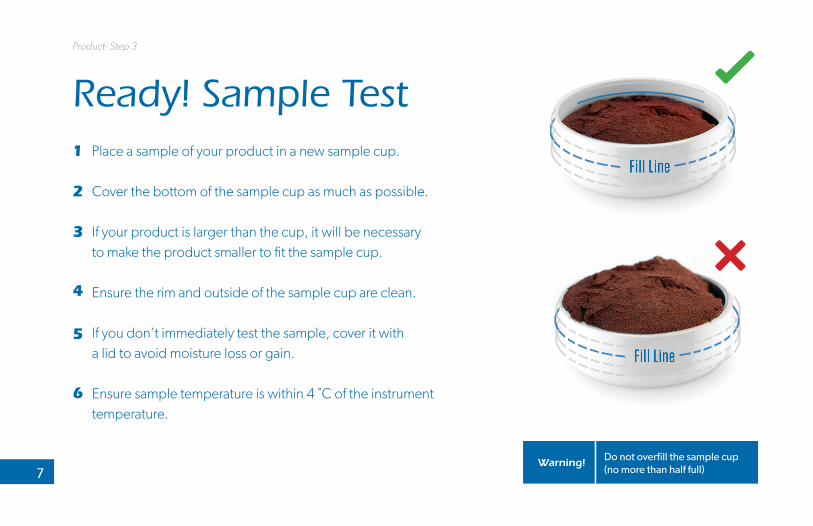
Ready! Sample TestProduct- Step 3
7
Place a sample of your product in a new sample cup.
Cover the bottom of the sample cup as much as possible.
If your product is larger than the cup, it will be necessaryto make the product smaller to fit the sample cup. Ensure the rim and outside of the sample cup are clean.
If you don’t immediately test the sample, cover it witha lid to avoid moisture loss or gain.
Ensure sample temperature is within 4 ˚C of the instrument temperature.
1
2
3
4
5
6
Do not overfill the sample cup(no more than half full)
Warning!
8
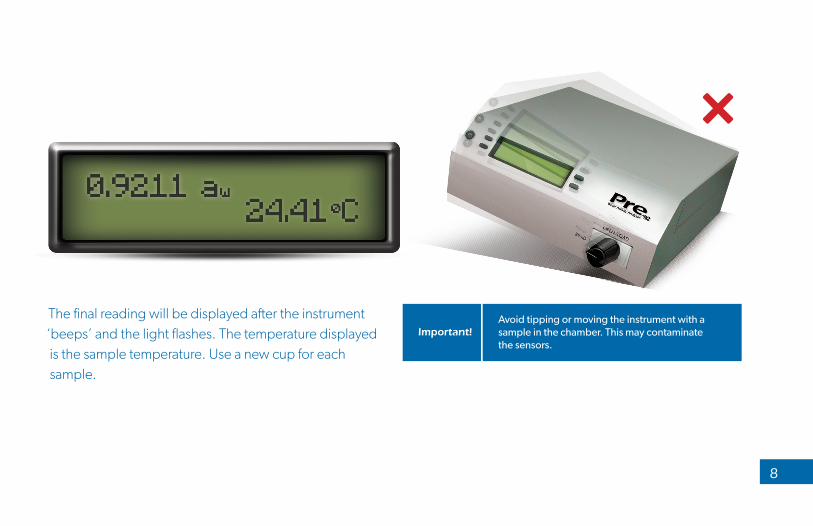
The final reading will be displayed after the instrument ‘beeps’ and the light flashes. The temperature displayed is the sample temperature. Use a new cup for each sample.
Avoid tipping or moving the instrument with a sample in the chamber. This may contaminatethe sensors.
Important!
9
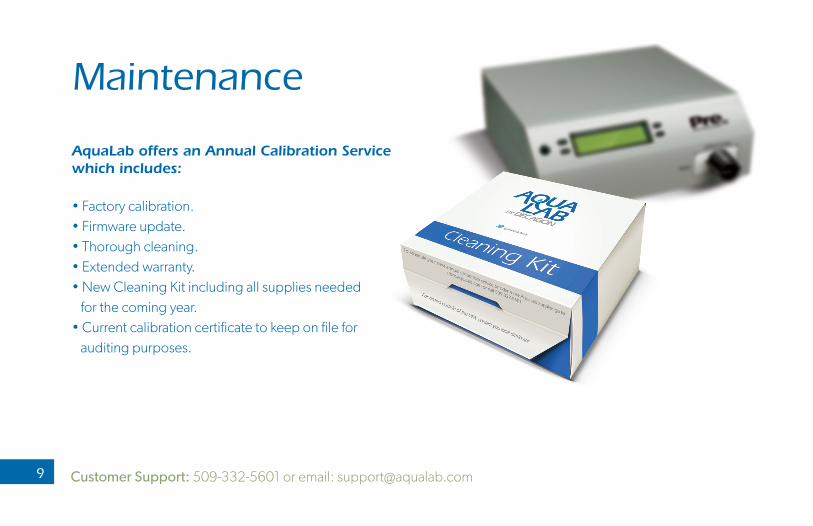
AquaLab offers an Annual Calibration Servicewhich includes:
• Factory calibration.• Firmware update.• Thorough cleaning.• Extended warranty.• New Cleaning Kit including all supplies needed for the coming year.• Current calibration certificate to keep on file for auditing purposes.
Maintenance
Customer Support: 509-332-5601 or email: [email protected]
10
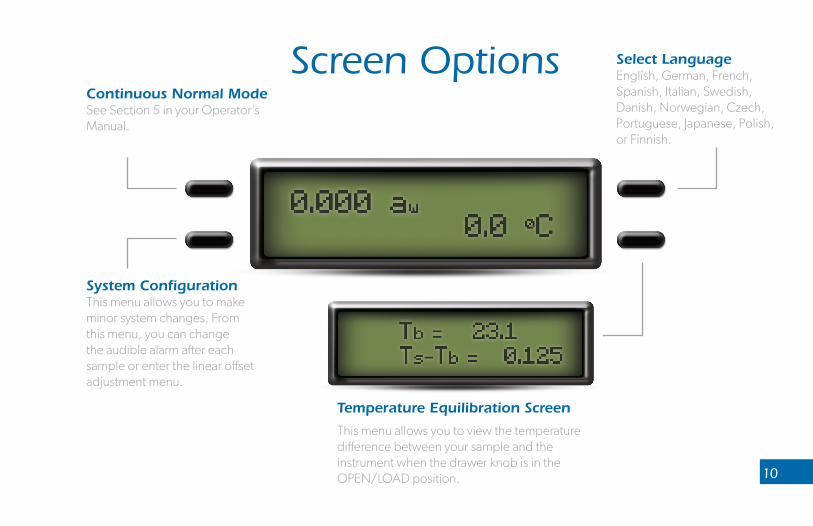
Screen Options
This menu allows you to view the temperature difference between your sample and the instrument when the drawer knob is in the OPEN/LOAD position.
Temperature Equilibration Screen
System ConfigurationThis menu allows you to make minor system changes. From this menu, you can change the audible alarm after each sample or enter the linear offset adjustment menu.
Continuous Normal ModeSee Section 5 in your Operator’s Manual.
Select LanguageEnglish, German, French, Spanish, Italian, Swedish, Danish, Norwegian, Czech, Portuguese, Japanese, Polish, or Finnish.
11
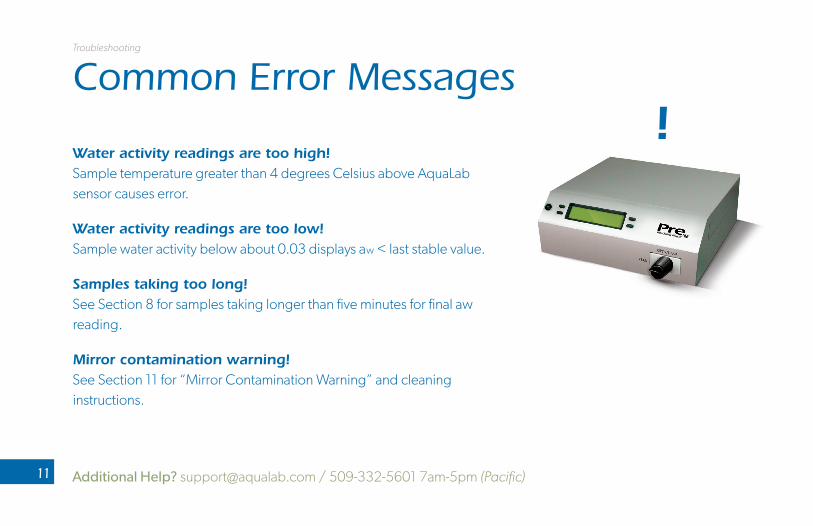
Water activity readings are too high!Sample temperature greater than 4 degrees Celsius above AquaLab sensor causes error.
Water activity readings are too low!Sample water activity below about 0.03 displays aw < last stable value.
Samples taking too long!See Section 8 for samples taking longer than five minutes for final aw reading.
Mirror contamination warning!See Section 11 for “Mirror Contamination Warning” and cleaning instructions.
Additional Help? [email protected] / 509-332-5601 7am-5pm (Pacific)
Common Error MessagesTroubleshooting
!

12
AquaLink 4
Make Your Data Meaningful
With AquaLink you can:• Graph your data to analyze and investigate trends.• Export it to Excel and other programs.• Back up your data to a safe location.
Some additional benefits are:
• No need to write your readings down and struggle with transcription errors.
• Complete details of each reading are saved including temperature, date, time, and user.
• Easily share your data and make more informed decisions quickly.
Data Management Software
Free 30 Day Trial of AquaLink software included with your AquaLab instrument. Includes Serial Cable to connect yourinstrument to your computer.

Learn more about using water activity for your specific application.
Get everyone on your team certified for this instrument.
Explore several free courses from Microbial Growth to Moisture Sorption Isotherms.
www.aqualab.com/university
Water Activity Education
13
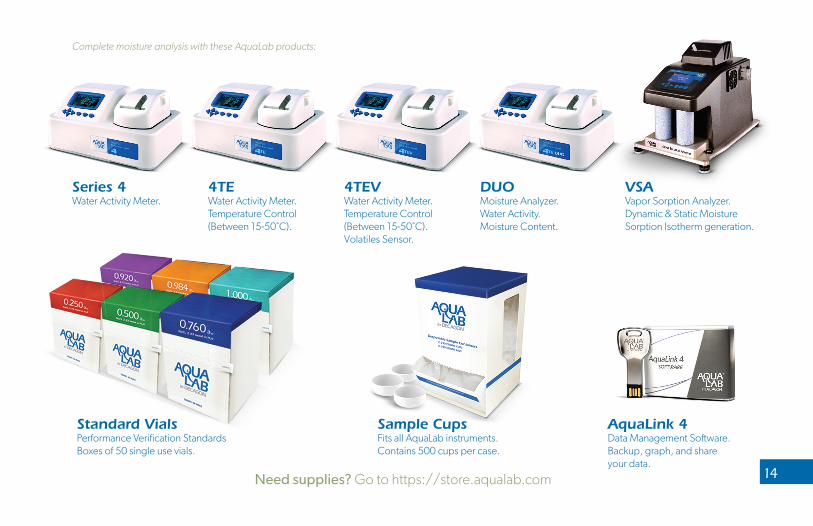
Series 4Water Activity Meter.
4TEWater Activity Meter.Temperature Control(Between 15-50˚C).
Standard VialsPerformance Verification StandardsBoxes of 50 single use vials.
Sample CupsFits all AquaLab instruments.Contains 500 cups per case.
AquaLink 4Data Management Software.Backup, graph, and shareyour data.
4TEVWater Activity Meter.Temperature Control(Between 15-50˚C).Volatiles Sensor.
DUOMoisture Analyzer.Water Activity.Moisture Content.
VSAVapor Sorption Analyzer.Dynamic & Static MoistureSorption Isotherm generation.
Complete moisture analysis with these AquaLab products:
14Need supplies? Go to https://store.aqualab.com
Water Activity Analysis
USA AquaLab Sales 509-332-2756USA AquaLab Customer Support 509-332-5601Service outside USA, contact your local distributor
Copyright ©2017 METER Group2365 NE Hopkins Court, Pullman, WA 9916314539
PRINTED IN USA
1.19.2017