Embed Size (px)
Citation preview

Magnavox MDR161V DVD/VCR Dubbing Unit
Quick Start Guide

ATTENTION!
You must purchase DVD-R
or DVD-RW discs to use
with this unit.
DVD+R and DVD+RW discs
are NOT SUPPORTED.

Magnavox MDR161V DVD Recorder/VCR with Line-In Recording
The Magnavox MDR161V allows you to record:
-from VHS to DVD-R/DVD-RW
-from DVD-R/DVD-RW to VHS
NOTE: DVD+R/DVD+RW discs are NOT SUPPORTED by this player.
1. Plugging in the Recorder to your TV
To begin, locate your TV’s “Line In” jack. First you need to determine what kind of connection
your TV has. The MDR161V has both HDMI and composite connections.
Now, connect the cable to your ‘Composite In’ or ‘HDMI In’ jack on your TV, then connect to
either the HDMI Out (labeled below left) or the Composite Out (labeled below right) on the
recorder. Also, plug in the recorder’s power plug to a grounded wall socket.
Once these steps are complete, turn to the next page to begin the process.
HDMI cable and port Composite cables and ports
HDMI Port
Component/Composite Ports

Magnavox MDR161V DVD Recorder/VCR with Line-In Recording
Now you must first find the correct input of your TV/receiver.
If you have an HDMI cable connected from the unit to your TV, the [INPUT] or [SOURCE]
button will allow you to select the HDMI input that you need.
NOTE: This most likely will be [HDMI 1] or [HDMI 2].
The chart shown below (also included in the User’s Manual) outlines the most likely buttons
your TV or remote might have to switch the input/source.
If you are having trouble finding how
to change your TV’s source input,
find your TV’s brand in the list to the
right and try looking for that button
on your TV (or on your TV’s remote).
Magnavox MDR161V DVD Recorder/VCR with Line-In Recording
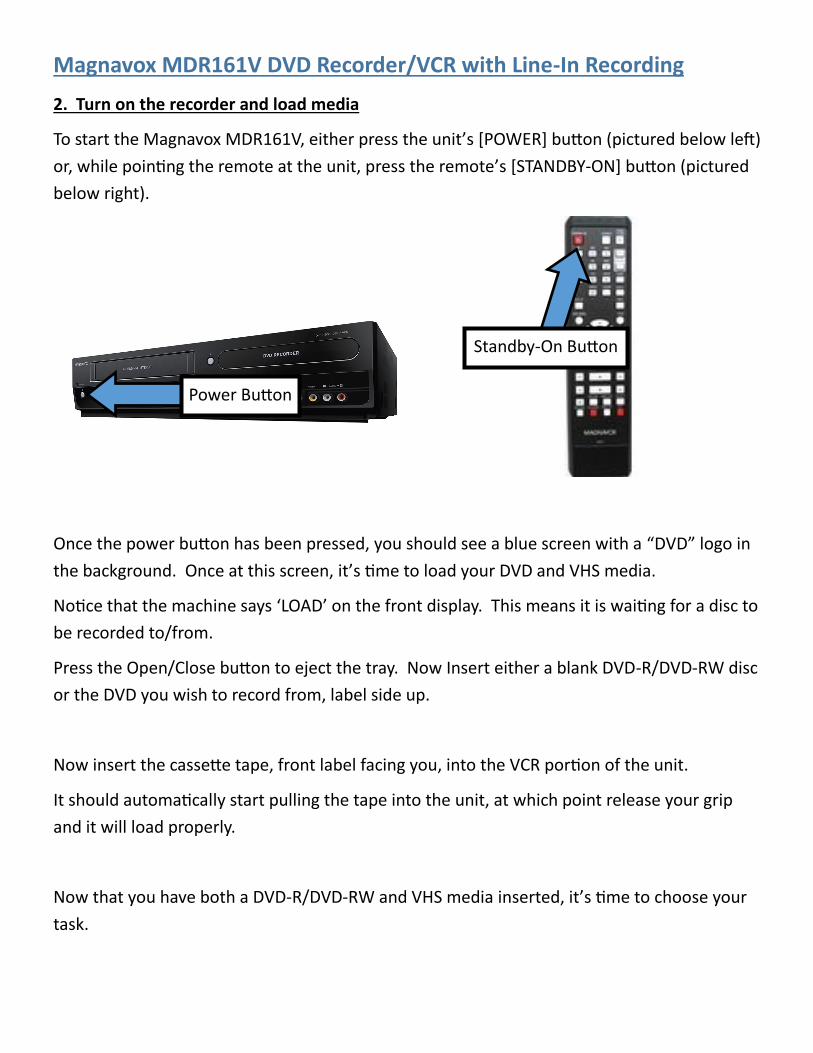
2. Turn on the recorder and load media
To start the Magnavox MDR161V, either press the unit’s [POWER] button (pictured below left)
or, while pointing the remote at the unit, press the remote’s [STANDBY-ON] button (pictured
below right).
Once the power button has been pressed, you should see a blue screen with a “DVD” logo in
the background. Once at this screen, it’s time to load your DVD and VHS media.
Notice that the machine says ‘LOAD’ on the front display. This means it is waiting for a disc to
be recorded to/from.
Press the Open/Close button to eject the tray. Now Insert either a blank DVD-R/DVD-RW disc
or the DVD you wish to record from, label side up.
Now insert the cassette tape, front label facing you, into the VCR portion of the unit.
It should automatically start pulling the tape into the unit, at which point release your grip
and it will load properly.
Now that you have both a DVD-R/DVD-RW and VHS media inserted, it’s time to choose your
task.
Power Button
Standby-On Button

Magnavox MDR161V DVD Recorder/VCR with Line-In Recording
3. Choose your recording mode and begin
Once you have both the DVD and VHS media inserted, pick up the unit’s remote control and
press [SETUP].
In the setup menu, you’ll see four options. Select
[General Setting].
In the [General Setting] menu, select [Recording].
In the [Recording] menu, select the bottom
listing: [Dubbing Mode].
NOTE:
To record from VHS to DVD, follow steps marked (A).
To record from DVD to VHS, follow steps marked (B).

Magnavox MDR161V DVD Recorder/VCR with Line-In Recording
4(A): Recording from VHS to DVD
To begin copying your VHS tape to DVD, first you
must select the correct dubbing mode from the
list. Select [VCR -> DVD].
Then press [SETUP] to exit.
Now press [DVD] on the remote. At this point,
you should see the indicator light on the front of the Magnavox Unit switch from VCR mode to
DVD mode, shown below.
NOTE: If you don’t see the video mode switch to DVD (above), press [DVD] until you do.
NOTE: The screen will remain blank after pressing [DVD]. This is normal.
Now, press [REC MODE] repeatedly until
the desired recording mode is set.
A chart explaining the specifics of the re-
cording modes is at the right. If you are
unsure which recording mode to use,
press [REC MODE] until [SP] is selected.

Magnavox MDR161V DVD Recorder/VCR with Line-In Recording
5(A): Recording from VHS to DVD
Press [VCR], then press PLAY [ ] to find the point where
you want to begin recording.
Press PAUSE [ ] when you come to a good starting point
for recording.
Finally, press [D. DUBBING].
You should now see the video start playing…
which means you have successfully started recording!
When you reach the point on the VHS at which you want
to stop recording, press the STOP button [ ].
NOTE: The disc MUST BE FINALIZED in order to be playable. To do this, turn to page 6(A) now.
PLAY Button PAUSE Button
D. DUBBING Button
STOP Button

Magnavox MDR161V DVD Recorder/VCR with Line-In Recording
6(A): Finalizing Your Recorded Disc
To begin finalizing your disc, press [SETUP], then
navigate down to the [DVD MENU] listing and se-
lect it.
Use the arrows to select [Finalize] then press
[OK].
Use the arrows to select [Yes], then press [OK].
At this point it will begin finalizing your disc. Finalizing your disc may take several minutes or
up to an hour, depending how much content and in which mode you have recorded.
Once the finalization process is complete, your disc is ready to eject and play in other DVD-
compatible players!
Simply press the [Open/Close] Button to eject the DVD, and the [STOP/EJECT] button to eject
your cassette tape. Thanks for being a Northbrook patron, and we hope you’ve enjoyed mak-
ing use of our DVD VHS Recorder Units!

Magnavox MDR161V DVD Recorder/VCR with Line-In Recording
4(B): Recording from DVD to VHS
To begin the process of copying your DVD to a
VHS tape, first you must select the correct dub-
bing mode from the list. Select [DVD -> VCR].
Then press [SETUP] to exit.
Now press [VCR] on the remote, then press [REC MODE] repeatedly until the desired record-
ing mode is set.
NOTE: At this point, rewind or fast-forward the tape to the point which you want to start re-
cording at. Pre-existing media on the VHS will be overwritten from this point.
Press [DVD], then press PLAY [ ] to find the point where you want to begin recording.
Press PAUSE [ ] when you come to a good starting point for recording.
Finally, press [D. DUBBING], and DVD to VHS duplication will begin.
When you reach the point on the DVD at which you want to stop recording, press the [STOP]
button [ ].
Once you have pressed STOP, your recorded VHS tape is ready to be ejected!