Embed Size (px)
Citation preview
Quick Start Guide 2014-15
Get up and running with TaxCycle and DoxCycle
TaxCycle

1PAGE
QUICK START GUIDE
www.taxcycle.com
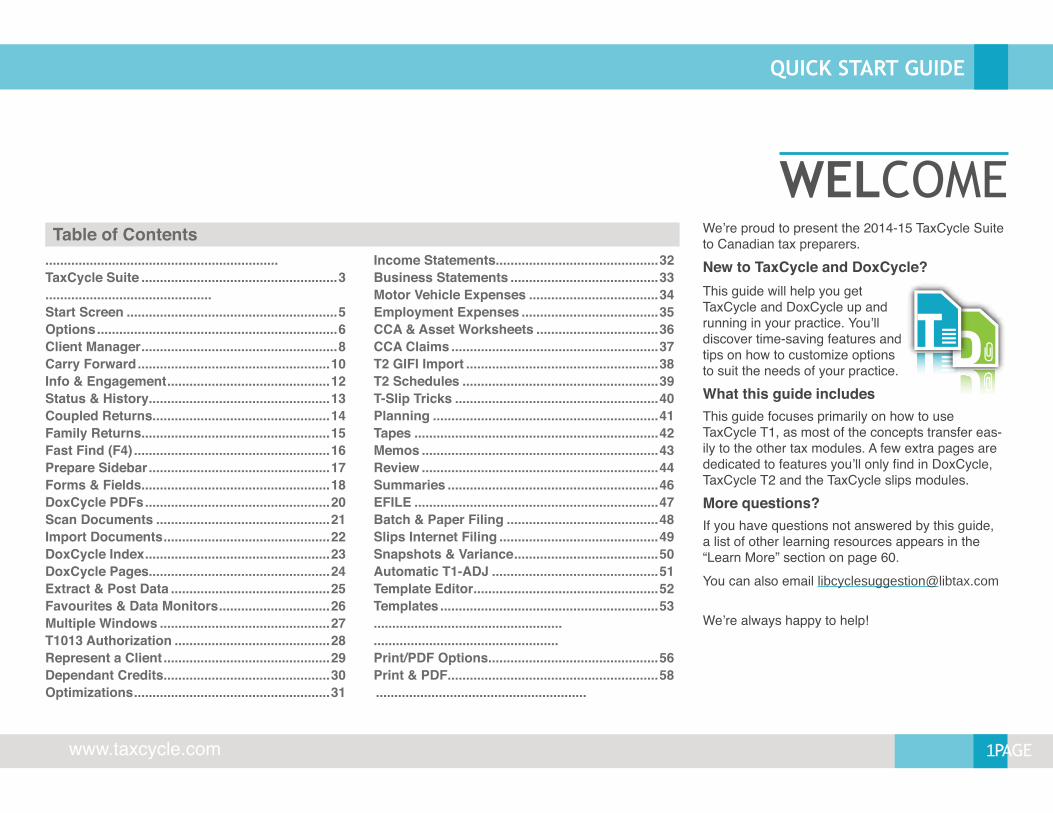
WELCOMEWe’re proud to present the 2014-15 TaxCycle Suite to Canadian tax preparers. New to TaxCycle and DoxCycle?This guide will help you get TaxCycle and DoxCycle up and running in your practice. You’ll discover time-saving features and tips on how to customize options to suit the needs of your practice.What this guide includesThis guide focuses primarily on how to use TaxCycle T1, as most of the concepts transfer eas-ily to the other tax modules. A few extra pages are dedicated to features you’ll only find in DoxCycle, TaxCycle T2 and the TaxCycle slips modules.More questions?If you have questions not answered by this guide, a list of other learning resources appears in the “Learn More” section on page 60.You can also email [email protected] We’re always happy to help!
...............................................................TaxCycle Suite .....................................................3.............................................Start Screen .........................................................5Options .................................................................6Client Manager .....................................................8Carry Forward ....................................................10Info & Engagement ............................................12Status & History.................................................13Coupled Returns ................................................14Family Returns...................................................15Fast Find (F4) .....................................................16Prepare Sidebar .................................................17Forms & Fields...................................................18DoxCycle PDFs ..................................................20Scan Documents ...............................................21Import Documents .............................................22DoxCycle Index ..................................................23DoxCycle Pages.................................................24Extract & Post Data ...........................................25Favourites & Data Monitors ..............................26Multiple Windows ..............................................27T1013 Authorization ..........................................28Represent a Client .............................................29Dependant Credits .............................................30Optimizations .....................................................31
Table of ContentsIncome Statements............................................32Business Statements ........................................33Motor Vehicle Expenses ...................................34Employment Expenses .....................................35CCA & Asset Worksheets .................................36CCA Claims ........................................................37T2 GIFI Import ....................................................38T2 Schedules .....................................................39T-Slip Tricks .......................................................40Planning .............................................................41Tapes ..................................................................42Memos ................................................................43Review ................................................................44Summaries .........................................................46EFILE ..................................................................47Batch & Paper Filing .........................................48Slips Internet Filing ...........................................49Snapshots & Variance .......................................50Automatic T1-ADJ .............................................51Template Editor ..................................................52Templates ...........................................................53.....................................................................................................Print/PDF Options ..............................................56Print & PDF .........................................................58 .........................................................
3PAGE
QUICK START GUIDE
www.taxcycle.com
TAXCYCLE SUITE
5013
3010
3 3010
50133
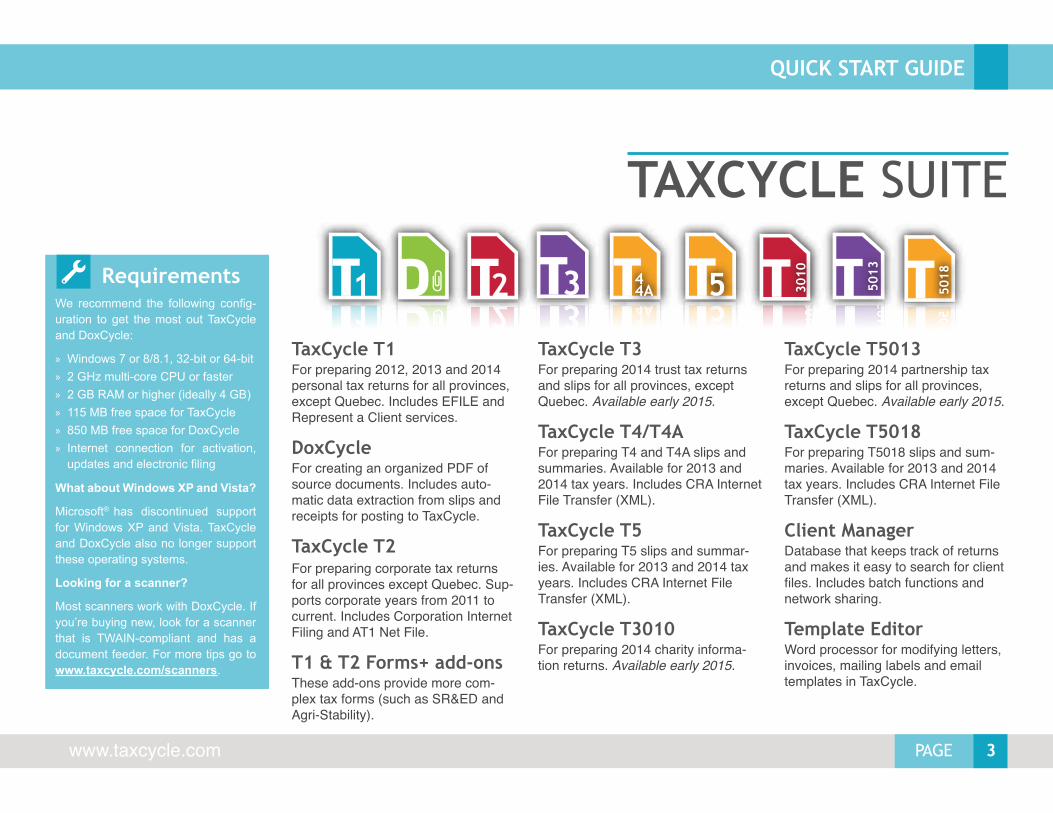
TaxCycle T1For preparing 2012, 2013 and 2014 personal tax returns for all provinces, except Quebec. Includes EFILE and Represent a Client services.
DoxCycleFor creating an organized PDF of source documents. Includes auto-matic data extraction from slips and receipts for posting to TaxCycle.
TaxCycle T2For preparing corporate tax returns for all provinces except Quebec. Sup-ports corporate years from 2011 to current. Includes Corporation Internet Filing and AT1 Net File.
T1 & T2 Forms+ add-onsThese add-ons provide more com-plex tax forms (such as SR&ED and Agri-Stability).
TaxCycle T3For preparing 2014 trust tax returns and slips for all provinces, except Quebec. Available early 2015.
TaxCycle T4/T4AFor preparing T4 and T4A slips and summaries. Available for 2013 and 2014 tax years. Includes CRA Internet File Transfer (XML).
TaxCycle T5For preparing T5 slips and summar-ies. Available for 2013 and 2014 tax years. Includes CRA Internet File Transfer (XML).
TaxCycle T3010For preparing 2014 charity informa-tion returns. Available early 2015.
TaxCycle T5013 For preparing 2014 partnership tax returns and slips for all provinces, except Quebec. Available early 2015.
TaxCycle T5018For preparing T5018 slips and sum-maries. Available for 2013 and 2014 tax years. Includes CRA Internet File Transfer (XML).
Client ManagerDatabase that keeps track of returns and makes it easy to search for client files. Includes batch functions and network sharing.
Template EditorWord processor for modifying letters, invoices, mailing labels and email templates in TaxCycle.
RequirementsWe recommend the following config-uration to get the most out TaxCycle and DoxCycle:
» Windows 7 or 8/8.1, 32-bit or 64-bit » 2 GHz multi-core CPU or faster » 2 GB RAM or higher (ideally 4 GB) » 115 MB free space for TaxCycle » 850 MB free space for DoxCycle » Internet connection for activation,
updates and electronic filing
What about Windows XP and Vista?
Microsoft® has discontinued support for Windows XP and Vista. TaxCycle and DoxCycle also no longer support these operating systems.
Looking for a scanner?
Most scanners work with DoxCycle. If you’re buying new, look for a scanner that is TWAIN-compliant and has a document feeder. For more tips go to www.taxcycle.com/scanners.
5PAGE
QUICK START GUIDE
www.taxcycle.com
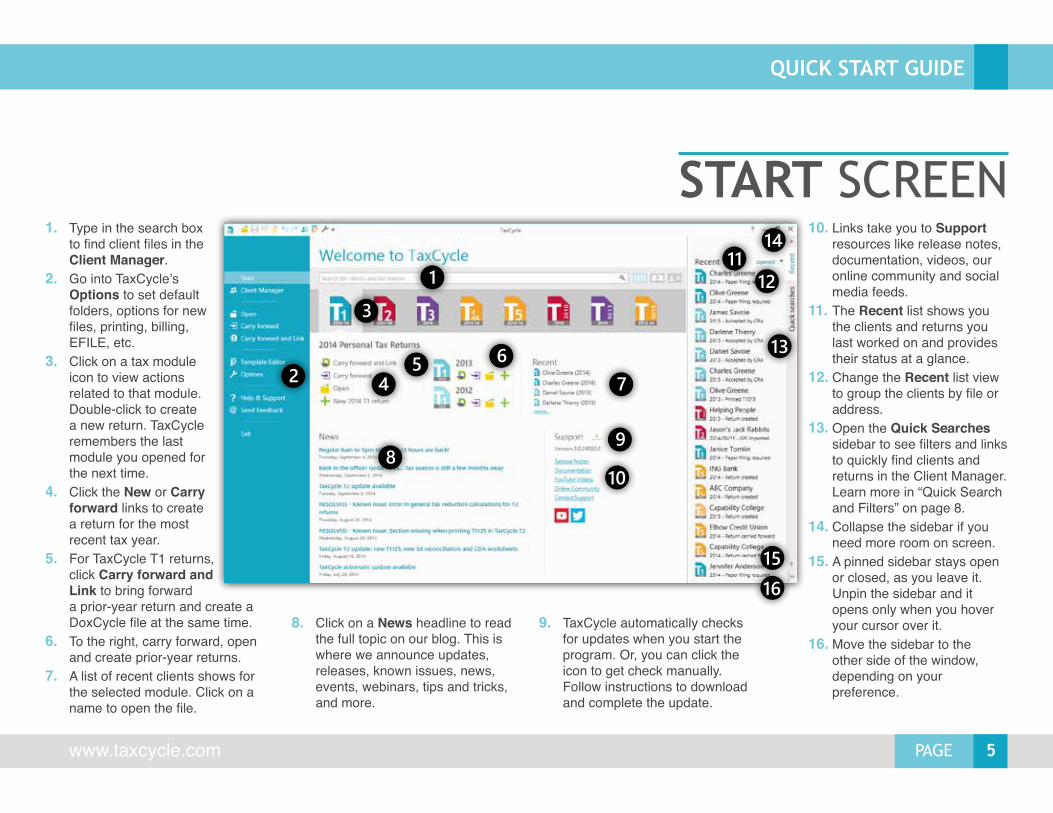
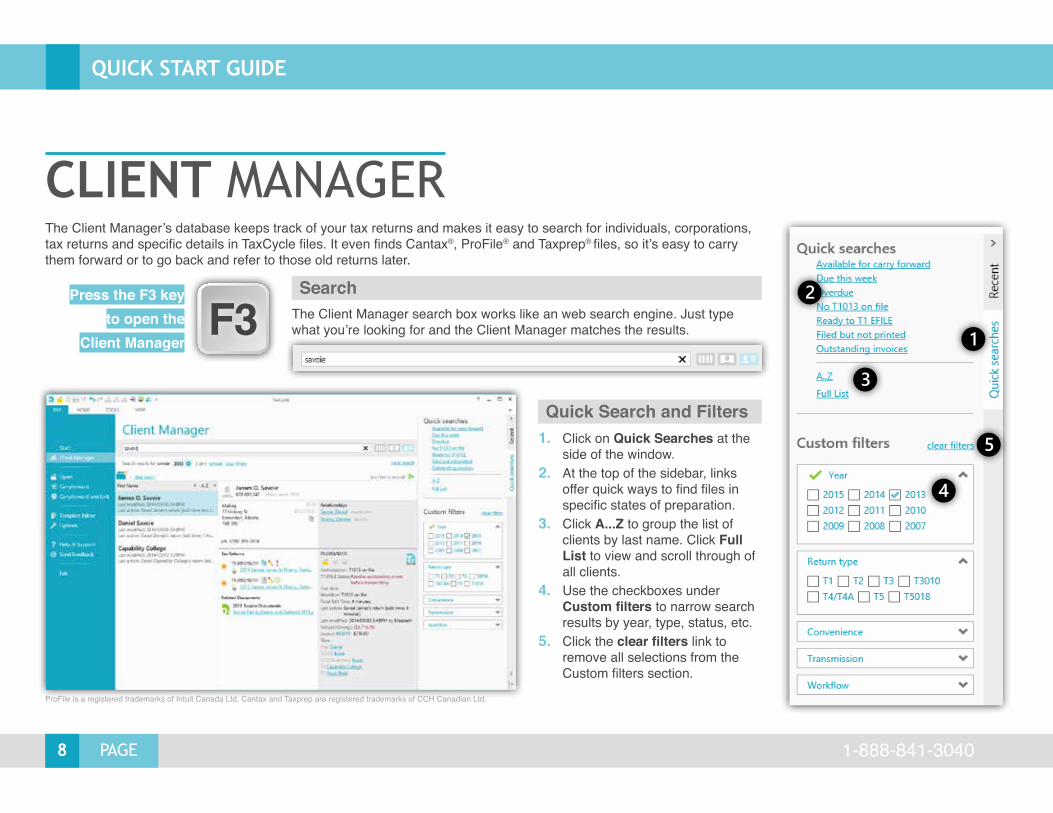
START SCREEN1. Type in the search box
to find client files in the Client Manager.
2. Go into TaxCycle’s Options to set default folders, options for new files, printing, billing, EFILE, etc.
3. Click on a tax module icon to view actions related to that module. Double-click to create a new return. TaxCycle remembers the last module you opened for the next time.
4. Click the New or Carry forward links to create a return for the most recent tax year.
5. For TaxCycle T1 returns, click Carry forward and Link to bring forward a prior-year return and create a DoxCycle file at the same time.
6. To the right, carry forward, open and create prior-year returns.
7. A list of recent clients shows for the selected module. Click on a name to open the file.
8. Click on a News headline to read the full topic on our blog. This is where we announce updates, releases, known issues, news, events, webinars, tips and tricks, and more.
9. TaxCycle automatically checks for updates when you start the program. Or, you can click the icon to get check manually. Follow instructions to download and complete the update.
10. Links take you to Support resources like release notes, documentation, videos, our online community and social media feeds.
11. The Recent list shows you the clients and returns you last worked on and provides their status at a glance.
12. Change the Recent list view to group the clients by file or address.
13. Open the Quick Searches sidebar to see filters and links to quickly find clients and returns in the Client Manager. Learn more in “Quick Search and Filters” on page 8.
14. Collapse the sidebar if you need more room on screen.
15. A pinned sidebar stays open or closed, as you leave it. Unpin the sidebar and it opens only when you hover your cursor over it.
16. Move the sidebar to the other side of the window, depending on your preference.
16
6 PAGE
QUICK START GUIDE
1-888-841-3040
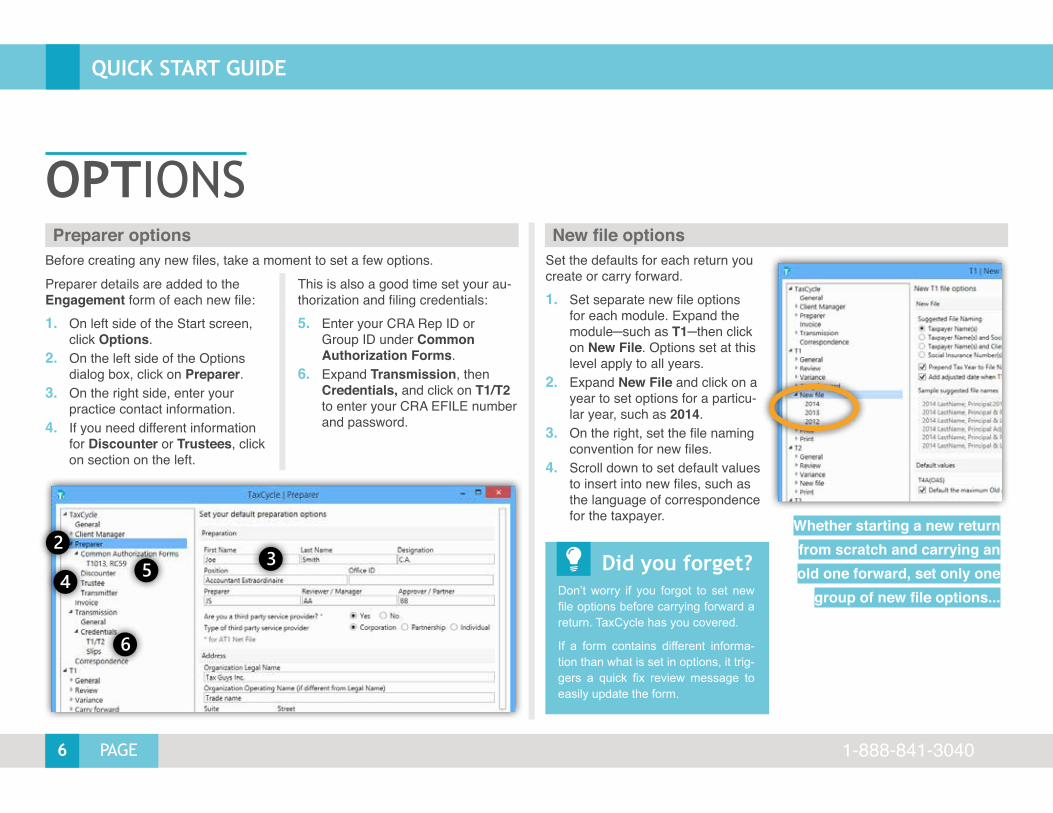
OPTIONSPreparer options
Before creating any new files, take a moment to set a few options. Preparer details are added to the Engagement form of each new file:1. On left side of the Start screen,
click Options.2. On the left side of the Options
dialog box, click on Preparer.3. On the right side, enter your
practice contact information.4. If you need different information
for Discounter or Trustees, click on section on the left.
This is also a good time set your au-thorization and filing credentials:5. Enter your CRA Rep ID or
Group ID under Common Authorization Forms.
6. Expand Transmission, then Credentials, and click on T1/T2 to enter your CRA EFILE number and password.
New file options
Did you forget?Don’t worry if you forgot to set new file options before carrying forward a return. TaxCycle has you covered.
If a form contains different informa-tion than what is set in options, it trig-gers a quick fix review message to easily update the form.
Set the defaults for each return you create or carry forward. 1. Set separate new file options
for each module. Expand the module─such as T1─then click on New File. Options set at this level apply to all years.
2. Expand New File and click on a year to set options for a particu-lar year, such as 2014.
3. On the right, set the file naming convention for new files.
4. Scroll down to set default values to insert into new files, such as the language of correspondence for the taxpayer. Whether starting a new return
from scratch and carrying an old one forward, set only one
group of new file options...
7PAGE
QUICK START GUIDE
www.taxcycle.com
OPTIONS
Server configurationTo share the Client Manager data-base with others in your office, choose Set up a server. For this config-uration, choose a computer that is fast (good processor) and has lots of RAM memory.To make the setup simple, this should also be the same machine where all users store their TaxCycle files.Connecting to a serverIf there is already a server set up on your office network, join in other com-puters by clicking on Connect to an existing server on each machine
If your license includes the Client Manager, a setup wizard appears the first time you run TaxCycle. Choose the option that best suits the needs of your office, then follow the on-screen instructions.
Can’t find it?Did you close the wizard and now can’t find it again? Go to the File menu, then click on Options. Select the Client Manager in the left-hand pane, and then click on the Setup Wizard link on the right.
Client Manager setup
Standalone setupSolo preparers who use TaxCycle on only one computer, or those who don’t want to share the Client Man-ager database with others in the
office, choose Set up a server. From here, you can also cre-ate a private server that no one else on the network can access.
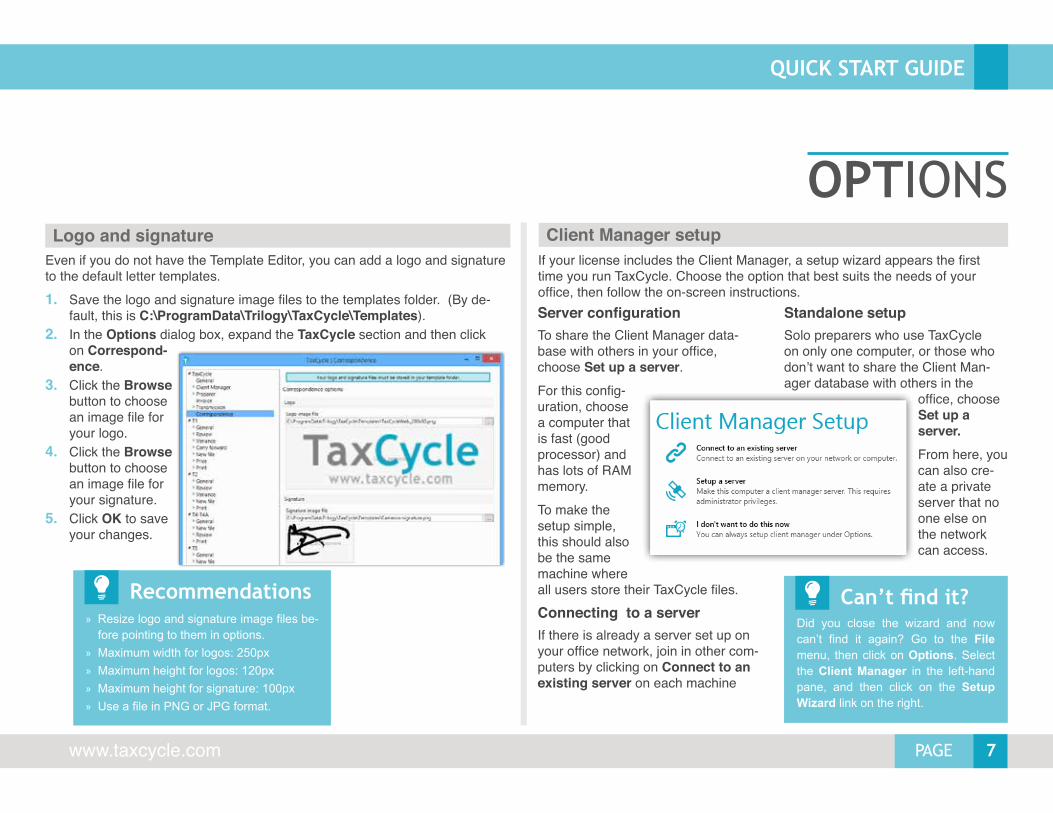
Logo and signatureEven if you do not have the Template Editor, you can add a logo and signature to the default letter templates. 1. Save the logo and signature image files to the templates folder. (By de-
fault, this is C:\ProgramData\Trilogy\TaxCycle\Templates).2. In the Options dialog box, expand the TaxCycle section and then click
on Correspond-ence.
3. Click the Browse button to choose an image file for your logo.
4. Click the Browse button to choose an image file for your signature.
5. Click OK to save your changes.
Recommendations » Resize logo and signature image files be-
fore pointing to them in options. » Maximum width for logos: 250px » Maximum height for logos: 120px » Maximum height for signature: 100px » Use a file in PNG or JPG format.
8 PAGE
QUICK START GUIDE
1-888-841-3040
CLIENT MANAGER
The Client Manager search box works like an web search engine. Just type what you’re looking for and the Client Manager matches the results.
Search
Quick Search and Filters
F3Press the F3 key
to open the Client Manager
1. Click on Quick Searches at the side of the window.
2. At the top of the sidebar, links offer quick ways to find files in specific states of preparation.
3. Click A...Z to group the list of clients by last name. Click Full List to view and scroll through of all clients.
4. Use the checkboxes under Custom filters to narrow search results by year, type, status, etc.
5. Click the clear filters link to remove all selections from the Custom filters section.
The Client Manager’s database keeps track of your tax returns and makes it easy to search for individuals, corporations, tax returns and specific details in TaxCycle files. It even finds Cantax®, ProFile® and Taxprep® files, so it’s easy to carry them forward or to go back and refer to those old returns later.
ProFile is a registered trademarks of Intuit Canada Ltd. Cantax and Taxprep are registered trademarks of CCH Canadian Ltd.
9PAGE
QUICK START GUIDE
www.taxcycle.com
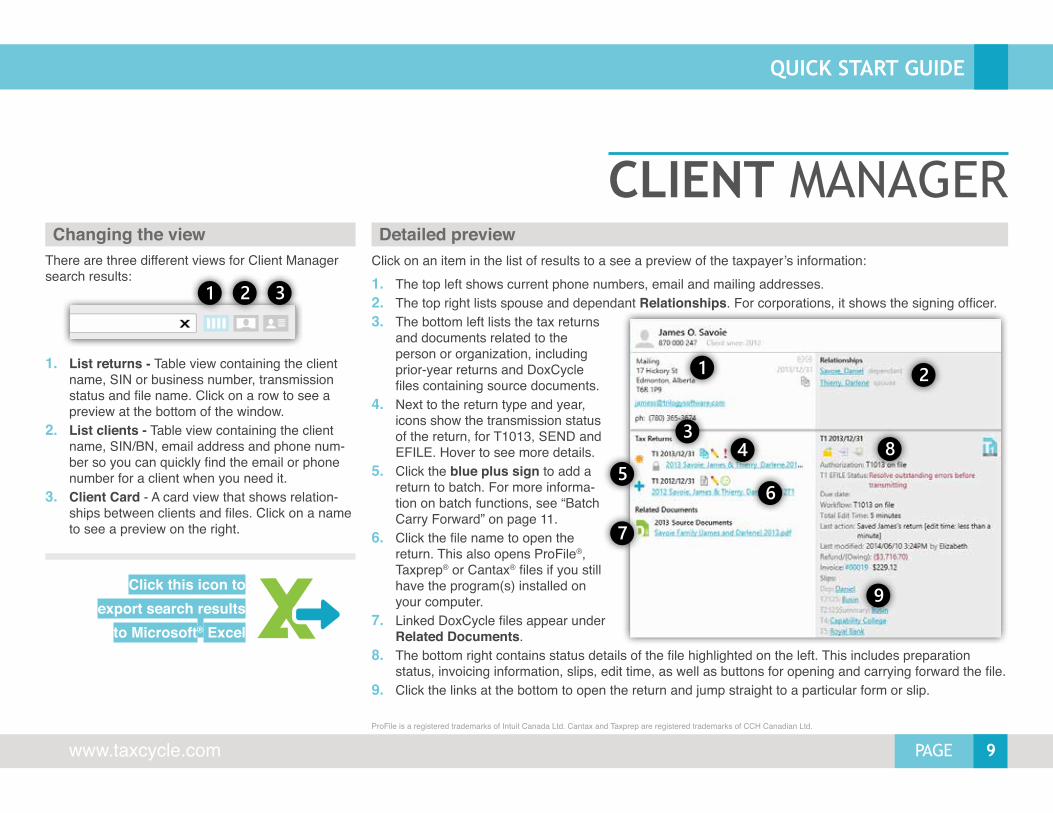
Click on an item in the list of results to a see a preview of the taxpayer’s information: 1. The top left shows current phone numbers, email and mailing addresses. 2. The top right lists spouse and dependant Relationships. For corporations, it shows the signing officer.3. The bottom left lists the tax returns
and documents related to the person or organization, including prior-year returns and DoxCycle files containing source documents.
4. Next to the return type and year, icons show the transmission status of the return, for T1013, SEND and EFILE. Hover to see more details.
5. Click the blue plus sign to add a return to batch. For more informa-tion on batch functions, see “Batch Carry Forward” on page 11.
6. Click the file name to open the return. This also opens ProFile®, Taxprep® or Cantax® files if you still have the program(s) installed on your computer.
7. Linked DoxCycle files appear under Related Documents.
8. The bottom right contains status details of the file highlighted on the left. This includes preparation status, invoicing information, slips, edit time, as well as buttons for opening and carrying forward the file.
9. Click the links at the bottom to open the return and jump straight to a particular form or slip.
CLIENT MANAGERThere are three different views for Client Manager search results:
1. List returns - Table view containing the client name, SIN or business number, transmission status and file name. Click on a row to see a preview at the bottom of the window.
2. List clients - Table view containing the client name, SIN/BN, email address and phone num-ber so you can quickly find the email or phone number for a client when you need it.
3. Client Card - A card view that shows relation-ships between clients and files. Click on a name to see a preview on the right.
Detailed previewChanging the view
Click this icon to export search results
to Microsoft® Excel
ProFile is a registered trademarks of Intuit Canada Ltd. Cantax and Taxprep are registered trademarks of CCH Canadian Ltd.
10 PAGE
QUICK START GUIDE
1-888-841-3040
CARRY FORWARDProFile®
T1 returns from 2011 onward T2 returns from 2010 onward T4, T4A, T5, T5018 from 2012 T3, T3010, T5013 from 2013
Cantax®
T1 returns from 2011 onward T2 returns from 2010 onward
Taxprep®
T1 returns from 2013 onward T2 returns from 2013 onward
VisualTax®
Import taxpayer contact infor-mation from VisualTax® DBF (database) files to create stub T1 and T2 returns. Requires the Power edition of VisualTax®.
P
C
T
VProFile is a registered trademark of Intuit Canada Ltd. Cantax and Taxprep are registered trademarks of CCH Canadian Ltd. VisualTax is a registered trademark of Microsophic Inc.
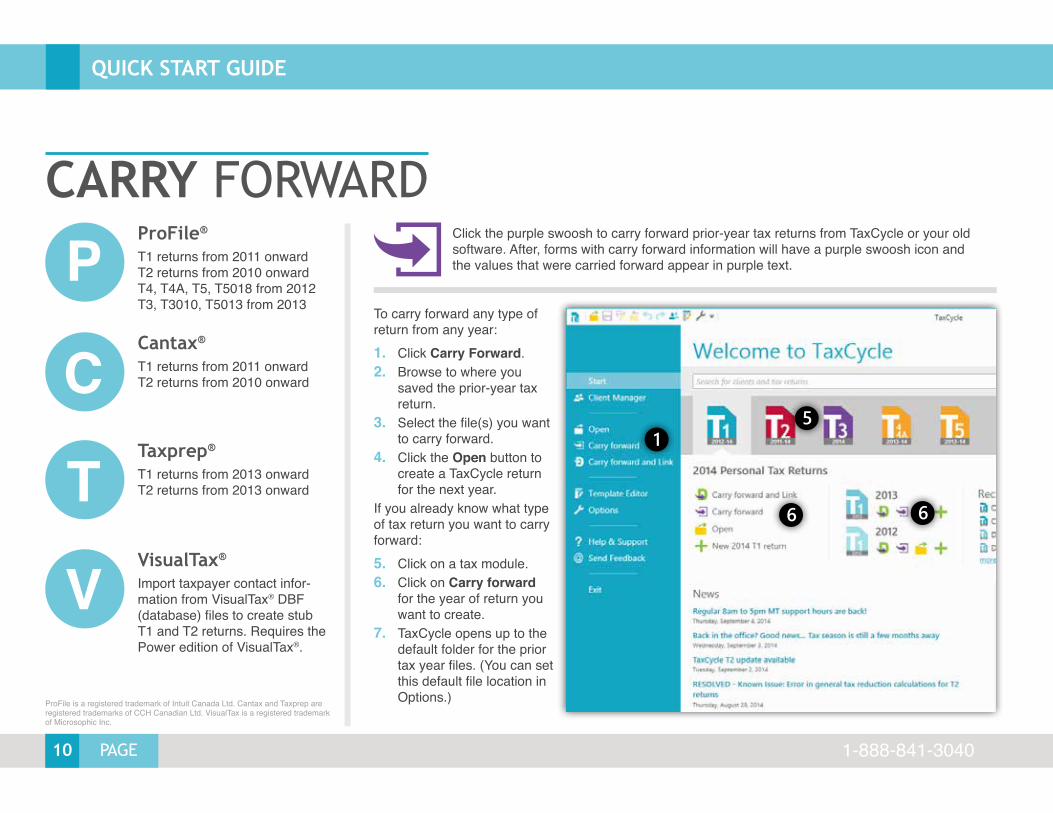
Click the purple swoosh to carry forward prior-year tax returns from TaxCycle or your old software. After, forms with carry forward information will have a purple swoosh icon and the values that were carried forward appear in purple text.
To carry forward any type of return from any year:1. Click Carry Forward.2. Browse to where you
saved the prior-year tax return.
3. Select the file(s) you want to carry forward.
4. Click the Open button to create a TaxCycle return for the next year.
If you already know what type of tax return you want to carry forward:5. Click on a tax module.6. Click on Carry forward
for the year of return you want to create.
7. TaxCycle opens up to the default folder for the prior tax year files. (You can set this default file location in Options.)

11PAGE
QUICK START GUIDE
www.taxcycle.com
CARRY FORWARD
Carry Forward and Link
Batch Carry Forward Refresh a Carry ForwardFamily ReturnsIn TaxCycle, linked tax returns for all family members are stored in the same file. So, if you’re carrying forward linked taxpayer, spouse and dependant re-turns from ProFile®, you’ll end up with only one file for the whole family.
If you already carried forward from a TaxCycle file, and then made chan-ges in the earlier tax return, you can “refresh” the carry forward.
1. Save any changes in the prior-year return.
2. Open the current-year return.3. Right-click on a form and select
Refresh carry forward.
If you usually also create a DoxCycle file for each of your clients, save time with Carry Forward and Link. 1. Click the green D with the purple
swoosh when you carry forward.2. Browse for a prior-year T1 return
and click Open.3. TaxCycle creates a new T1 file.4. At the same time, DoxCycle opens
and creates a new PDF with the taxpayer name(s), ready for you to add source documents.
5. Save both files to create a link be-tween them so you can later post data from scanned slips straight into TaxCycle. See “Linking with TaxCycle” on page 20.
1. Click the Available for carry forward link in the Quick Searches sidebar.
2. Narrow the results by checking Return type and Year filters.
3. To add all files to the batch, click the plus sign in the heading of the first column. This locks each file so it cannot be edited.
4. To add a single file, click the blue plus sign next to the row.
5. Files already in the batch have a yellow star.6. To remove a file from the batch, hover over
an item and click on the red minus sign.7. When you’re ready to process the files in
the batch, click on the blue box to go to the batch operations screen.
8. Select Carry forward from the drop-down. 9. Select options for the batch carry for-
ward, such as: exporting results to Excel, clearing the batch on completion, carrying forward files to a separate folder, or over-writing existing files, etc.
10. Click the Start button to begin processing. The time it takes to carry forward all the files depends on how many files are in the batch and how fast your computer is.
12 PAGE
QUICK START GUIDE
1-888-841-3040
INFO & ENGAGEMENTThe heart of taxpayer information for any return is the Info worksheet. 1. This is where you record contact
information for the taxpayer and preferences for filing and tax credits.
2. TaxCycle completes some of these fields when you carry forward a return. Other fields are populated based on defaults set for new files. See “New file options” on page 6.
3. A review message appears when details on the Info worksheet do not match defaults set in options.
4. Close unneeded sections by clicking on the heading. Click again to reopen.
Info worksheetThe Engagement worksheet is the source of information about your rela-tionship with the client.5. When the file is created—either
by carry forward or as a new file— TaxCycle inserts the prepar-er information, disclaimers and other settings from defaults set in options. See “Preparer options” on page 6.
6. You can edit these details so they apply only to that individual client.
7. The worksheet also shows a history of T1013 and RC59 consent and authorization requests.
8. When preparer details on the Engagement worksheet do not match the defaults set in options, a review message appears.
9. Click the link at the top of the worksheet to restore the defaults from preparer options.
10. The bottom of the worksheet summarizes billing and invoice details. See more in “Billing work-sheet” on page 55.
Engagement worksheet
ELetterCheck out the Engagement (ELetter) and Pre-season (PreSeason) letter templates to help set client expectations and collect information for the tax season.
13PAGE
QUICK START GUIDE
www.taxcycle.com
STATUS & HISTORY1. Click the File menu, then
Info.2. Click on History to see the
complete history for the file.3. The History list shows an
audit trail of actions for all taxpayers in the file, includ-ing the spouse and any dependants.
4. A history entry is recorded for each transmission at-tempt, for example EFILE or T1013 transmissions.
5. Click the save icons to save a copy of the XML transmit-ted or response received.
6. Click on a taxpayer’s name to see the Workflow Sum-mary.
7. Set a due date for the return by clicking on the calendar icon and choosing a date.
8. Click the comment link to add a comment to any status item. Click remove to delete an existing comment.
9. For some status items, you must check the box to indi-cate they are complete.
10. Other items are auto-matically checked. For example, when you carry forward or EFILE a return.
11. Click the override link to change automatic items.
12. Completed items show the name of the person who completed it and the comple-tion date.
History and workflow items
Linked files
Show on saveOn the File Information screen, check Show Workflow before save to see the status and history every time you save a file. You can also change this later on the Save As dialog box.
Click Linked Files to view a list of any other files associated with the TaxCycle file.The list includes DoxCycle files and files related through carry forward. From here, you can open the file or sever the link between files.
14 PAGE
QUICK START GUIDE
1-888-841-3040
Coupling returns1. Start a new return or carry forward a return for the
principal taxpayer.2. In the principal taxpayer’s return, set the marital
status to Married or Common-Law. 3. Press F5 or click on the taxpayer
drop-down and select Add Spouse/Partner.
4. If you haven’t yet started the spouse’s return, click Create a new return for spouse.
5. If you have a return started for the spouse, click the button to Open an existing return for spouse, and then browse for the file to add the return.
F5Press the F5 key
to switch between coupled taxpayers
COUPLED RETURNSCoupling tax returns allows TaxCycle to automatically optimize credit calculations between the principal tax-payer and the spouse or partner. When you couple tax returns, both returns are saved in the same file.
Working with coupled returns99Data flows between the Spouse section on the principal taxpayer’s Info worksheet and the spouse’s Info worksheet.
99Slips and income statements with a percentage shared between the taxpayer and spouse show up in the forms list for both returns.
99Dependant-related worksheets appear in both taxpayers’ returns.
99Motor vehicle worksheets always show up in both returns, allowing you to quickly allocate expenses from same vehicle to either spouse.
Before saving...Before saving the newly-coupled file, make sure to enter the spouse’s name and any other information included in your default file name options so TaxCycle can create file name with your preferred naming convention.
Detaching returns6. Click on the taxpayer drop-down or Switch Tax-
payer button in the Home menu.7. Click the detach icon next to the taxpayer whose
return you want to detach.8. Save (Ctrl+S) the new file and Save As
(Ctrl+Shift+S) the old file to give it a new name.
15PAGE
QUICK START GUIDE
www.taxcycle.com
FAMILY RETURNSIf you are also preparing a dependant’s tax return, it is worthwhile to create a family return to easily share tax credits between family members. Family returns allow you to prepare full tax returns for the taxpayer, spouse/partner and any number dependants, all in a single TaxCycle T1 file.
99 In Cantax® T1, all family mem-bers are stored in a single file and carry forward into a single TaxCycle file.
99ProFile® T1 family linking has a single file for the taxpayer/spouse and separate files for each dependant. Carry forward each file and then add it to the family return.
99TaxCycle automatically carries forward all family members to the following year TaxCycle return.
Carrying forward families
Press Ctrl and F5 at the same time to toggle between
dependant returns
Single parentsAdding a spouse or partner is option-al. If a taxpayer is single, separated, widowed or divorced, you can still add dependants returns without having a spouse/partner return in the file.
1. Click on the list of taxpayers, or click on the Switch taxpayers button on the Home menu.
2. If the return already contains a Dep worksheet, the dependant’s name appears in the list. Click the name to create a full return from details on the Dep worksheet.
3. Click Add dependant if the name is not in the list, then either open the dependant’s existing file or create a new return for the de-pendant.
Adding dependant returns
99The Dep worksheet is a cross between the Info form and a slip.
99Fill out one Dep worksheet for each dependant.
99Dep worksheets are shared be-tween spouses and appear in the forms list for both spouses.
99Complete the Dep worksheet in the principal taxpayer’s return to claim tax credits without preparing a full tax return for the dependant. (Learn more about claiming “De-pendant Credits” on page 30.)
99When you add a full dependant return, the Dep worksheet shows in the both the principal taxpayer and spouse returns.
99 Information entered on the Dep worksheet in the principal taxpay-er’s return flows to the depend-ant’s Info worksheet and other forms (and vice versa).
The Dep worksheet
ProFile is a registered trademark of Intuit Canada Ltd. Cantax and Taxprep are registered trademarks of CCH Canadian Ltd. VisualTax is a registered trademark of Microsophic Inc.

16 PAGE
QUICK START GUIDE
1-888-841-3040
FAST FIND (F4)
F4Press the F4 key to open the Fast Find
search boxThe quickest way to find and open forms is to use the Fast Find search box:1. Press the F4 key (or click the Fast Find button
on the menu) to open the Fast Find box.
2. Type a word, such as a form name, slip de-scription, keyword, box or line number. Search results appear instantly, narrowing the list with each keystroke.
3. Press the Up and Down arrows on your key-board to move through the list.
4. Press Enter to open the selected slip or form. Or, click with your mouse.
Fast Find search box What can F4 find? » Forms, slips, statements and summaries » Slip issuers or descriptions, even if the word is not at
the beginning of the name » Line or box numbers on slips and schedules » Forms related to a keyword » Account numbers, if you use the slip description field
to store the account number » GIFI codes, so you can preview the information or
jump straight to the line entry
Press Ctrl+Enter to create a new slip or form instead of going to the first matched slip in the list.Press Shift+Enter to open the form side-by-side in a new window on a wide-screen monitor, or on the other monitor in a multi-monitor setup.Preview
Fast Switch is a quick way to jump between forms:1. Press and hold Ctrl+Tab to open the Fast
Switch window. This selects the last form you were on. Let go of the keys to go to that form.
2. Keep holding the Ctrl key and press Tab again to move through the list of active forms.
3. Hold down the Shift key at the same time as Ctrl+Tab to move backwards through the list.
4. In family returns, forms for the principal taxpay-er, spouse and dependants all appear in the Fast Switch list.
Fast Switch (Ctrl+Tab)For line numbers, box numbers and GIFI codes, the Fast Find box also works as a preview of the amounts in the fields.
“Live” form icons (see “Form icons” on page 18) appear in the search results, so you know whether a form or slip is empty, has carry-forward data or data posted from DoxCycle.
Keyboard shortcuts
17PAGE
QUICK START GUIDE
www.taxcycle.com
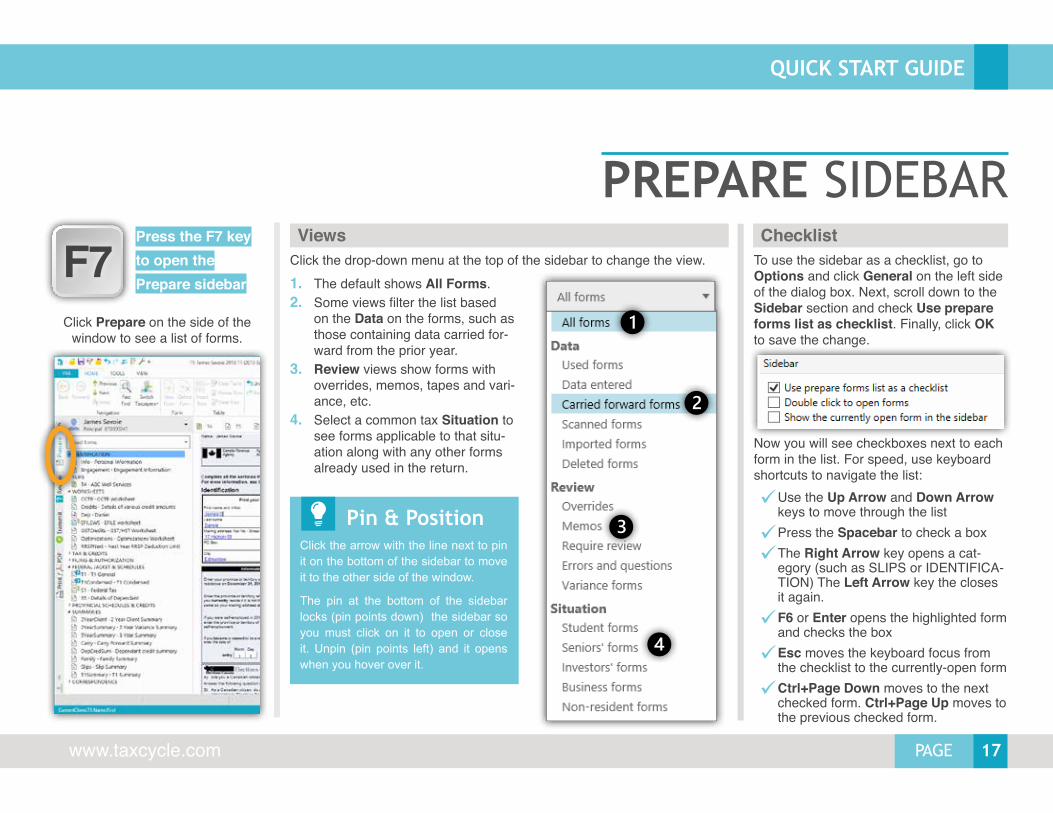
PREPARE SIDEBARChecklist
To use the sidebar as a checklist, go to Options and click General on the left side of the dialog box. Next, scroll down to the Sidebar section and check Use prepare forms list as checklist. Finally, click OK to save the change.
Now you will see checkboxes next to each form in the list. For speed, use keyboard shortcuts to navigate the list:
99Use the Up Arrow and Down Arrow keys to move through the list
99Press the Spacebar to check a box
99The Right Arrow key opens a cat-egory (such as SLIPS or IDENTIFICA-TION) The Left Arrow key the closes it again.
99F6 or Enter opens the highlighted form and checks the box
99Esc moves the keyboard focus from the checklist to the currently-open form
99Ctrl+Page Down moves to the next checked form. Ctrl+Page Up moves to the previous checked form.
Click the drop-down menu at the top of the sidebar to change the view. 1. The default shows All Forms.2. Some views filter the list based
on the Data on the forms, such as those containing data carried for-ward from the prior year.
3. Review views show forms with overrides, memos, tapes and vari-ance, etc.
4. Select a common tax Situation to see forms applicable to that situ-ation along with any other forms already used in the return.
F7Press the F7 key to open the Prepare sidebar
Views
Pin & PositionClick the arrow with the line next to pin it on the bottom of the sidebar to move it to the other side of the window.
The pin at the bottom of the sidebar locks (pin points down) the sidebar so you must click on it to open or close it. Unpin (pin points left) and it opens when you hover over it.
Click Prepare on the side of the window to see a list of forms.
18 PAGE
QUICK START GUIDE
1-888-841-3040
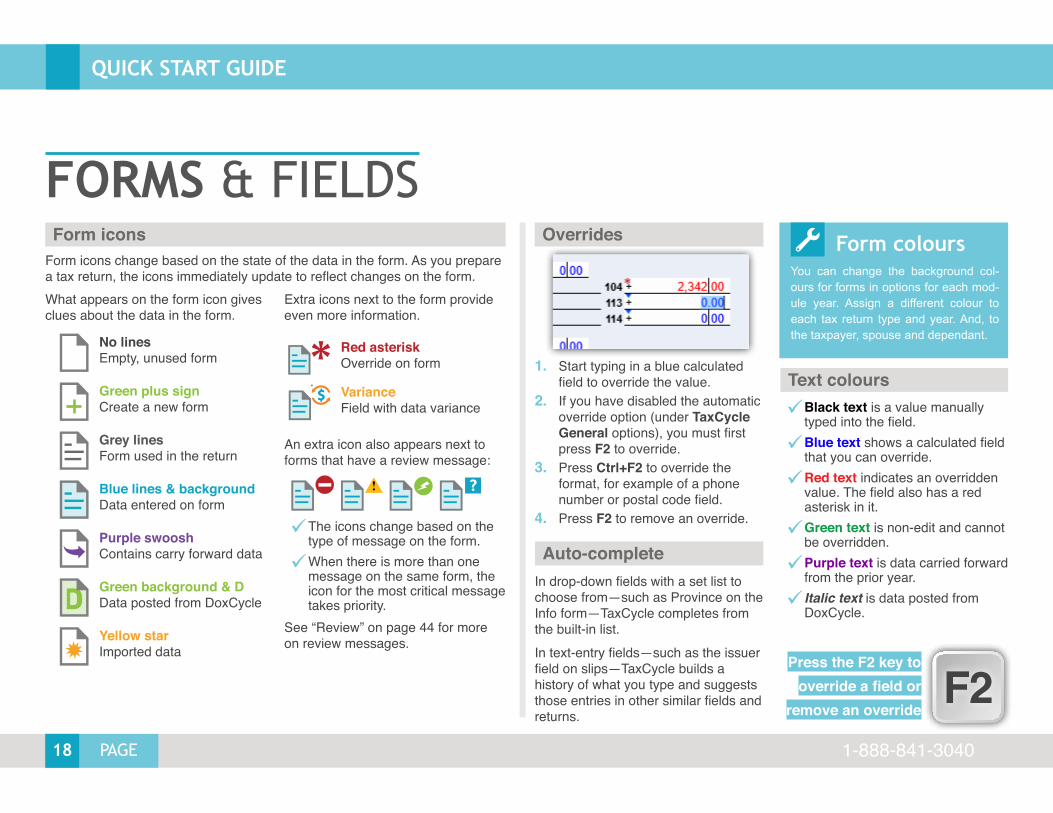
Extra icons next to the form provide even more information.
Red asterisk Override on form
Variance Field with data variance
An extra icon also appears next to forms that have a review message:
99The icons change based on the type of message on the form.
99When there is more than one message on the same form, the icon for the most critical message takes priority.
See “Review” on page 44 for more on review messages.
FORMS & FIELDSForm icons change based on the state of the data in the form. As you prepare a tax return, the icons immediately update to reflect changes on the form.
Form icons
Text colours
What appears on the form icon gives clues about the data in the form.
No lines Empty, unused form
Green plus sign Create a new form
Grey lines Form used in the return
Blue lines & background Data entered on form
Purple swoosh Contains carry forward data
Green background & D Data posted from DoxCycle
Yellow star Imported data
!
Form coloursYou can change the background col-ours for forms in options for each mod-ule year. Assign a different colour to each tax return type and year. And, to the taxpayer, spouse and dependant.
99Black text is a value manually typed into the field.
99Blue text shows a calculated field that you can override.
99Red text indicates an overridden value. The field also has a red asterisk in it.
99Green text is non-edit and cannot be overridden.
99Purple text is data carried forward from the prior year.
99 Italic text is data posted from DoxCycle.
1. Start typing in a blue calculated field to override the value.
2. If you have disabled the automatic override option (under TaxCycle General options), you must first press F2 to override.
3. Press Ctrl+F2 to override the format, for example of a phone number or postal code field.
4. Press F2 to remove an override.
Overrides
F2Press the F2 key to
override a field or remove an override
Auto-completeIn drop-down fields with a set list to choose from—such as Province on the Info form—TaxCycle completes from the built-in list. In text-entry fields—such as the issuer field on slips—TaxCycle builds a history of what you type and suggests those entries in other similar fields and returns.
19PAGE
QUICK START GUIDE
www.taxcycle.com
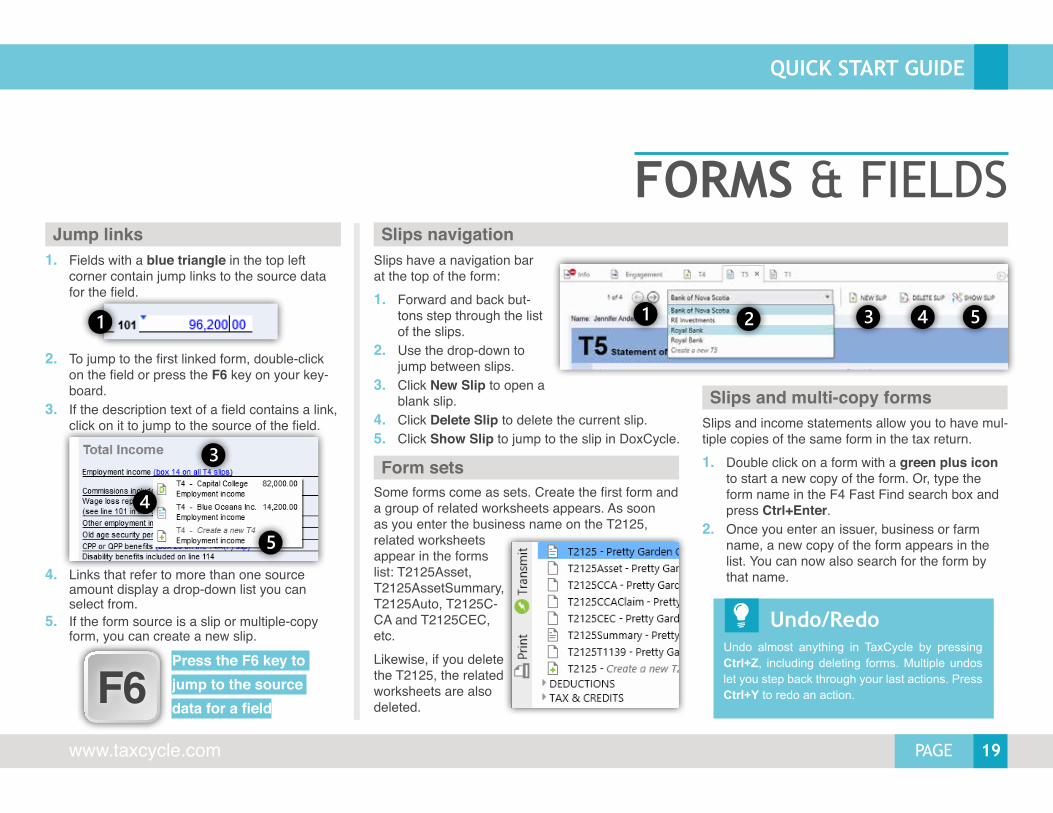
1. Fields with a blue triangle in the top left corner contain jump links to the source data for the field.
2. To jump to the first linked form, double-click on the field or press the F6 key on your key-board.
3. If the description text of a field contains a link, click on it to jump to the source of the field.
4. Links that refer to more than one source amount display a drop-down list you can select from.
5. If the form source is a slip or multiple-copy form, you can create a new slip.
FORMS & FIELDSSlips navigation
Slips and multi-copy forms
Jump links
F6Press the F6 key to jump to the source data for a field
Slips and income statements allow you to have mul-tiple copies of the same form in the tax return.1. Double click on a form with a green plus icon
to start a new copy of the form. Or, type the form name in the F4 Fast Find search box and press Ctrl+Enter.
2. Once you enter an issuer, business or farm name, a new copy of the form appears in the list. You can now also search for the form by that name.
Form setsSome forms come as sets. Create the first form and a group of related worksheets appears. As soon as you enter the business name on the T2125, related worksheets appear in the forms list: T2125Asset, T2125AssetSummary, T2125Auto, T2125C-CA and T2125CEC, etc.Likewise, if you delete the T2125, the related worksheets are also deleted.
Undo/RedoUndo almost anything in TaxCycle by pressing Ctrl+Z, including deleting forms. Multiple undos let you step back through your last actions. Press Ctrl+Y to redo an action.
Slips have a navigation bar at the top of the form:1. Forward and back but-
tons step through the list of the slips.
2. Use the drop-down to jump between slips.
3. Click New Slip to open a blank slip.
4. Click Delete Slip to delete the current slip.5. Click Show Slip to jump to the slip in DoxCycle.

20 PAGE
QUICK START GUIDE
1-888-841-3040
1. Open the tax return in TaxCycle as well as the DoxCycle PDF.
2. Click the TaxLink button in either program and choose to link it to the open file in the other program.
3. For families, you can keep all the family member’s source documents in a single DoxCycle PDF, or you can have separate PDF files for each person.
4. Once files are linked and saved, click the link button to open the related form or document in the other program. Or, press F11.
DOXCYCLE PDFSUse DoxCycle to store supporting documents your clients provide for preparing their tax returns. At the end of the season, you’ll have an organized, paperless archive of the tax return and related documents for each taxpayer and family.
Linking with TaxCycle
Create a DoxCycle PDF
DoxCycle is a separate program. Look for this icon.
1. If you have a prior-year TaxCycle return, use Carry forward and link in TaxCycle. See “Carry For-ward and Link” on page 11.
2. If you have the current-year TaxCycle file, open it, then click the TaxLink button and select Create (or Create a family file).
3. With the TaxCycle file open, you can also go to DoxCycle and click From a TaxCycle T1 return.
4. To create an blank file, go to DoxCycle and click Create a new file. You must then link it to TaxCycle later. (See “Linking with TaxCycle” on right.)
Managing taxpayersA DoxCycle file must contain at least one taxpayer. To add or remove taxpayers from the file:5. Click the Edit taxpayers button. 6. Type the name to add a spouse or more
dependants. 7. To remove a taxpayer, click the delete
button next to the taxpayer’s name.
21PAGE
QUICK START GUIDE
www.taxcycle.com
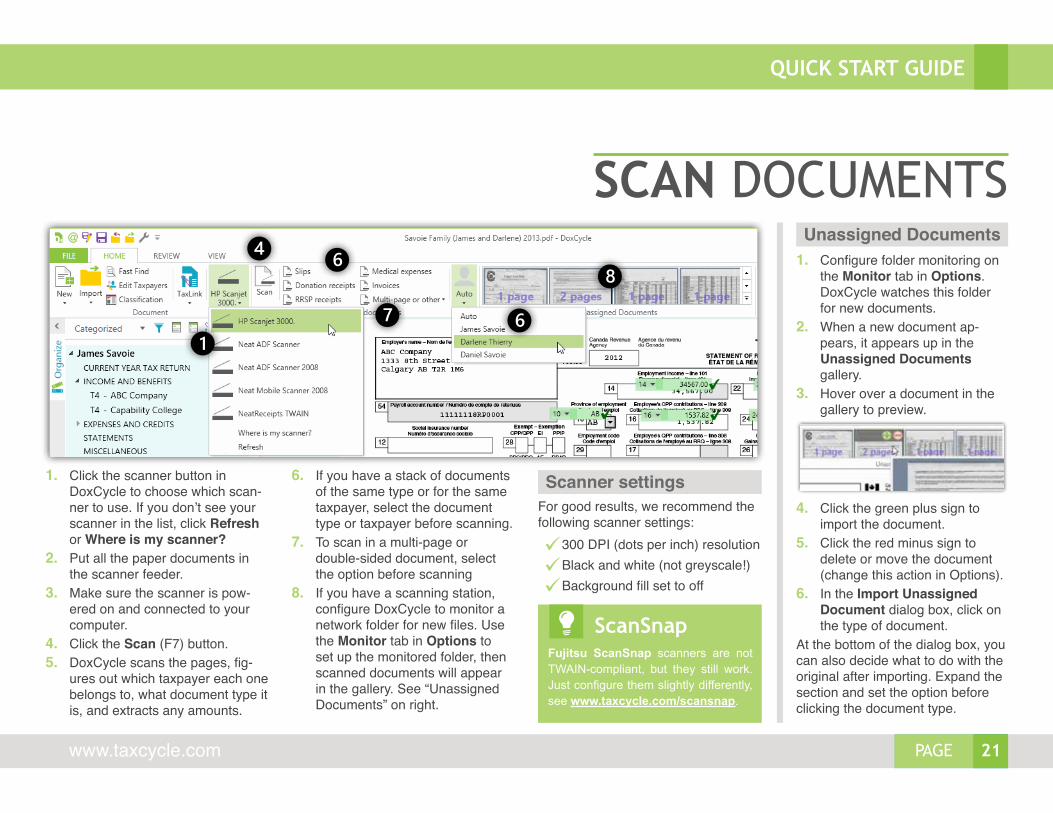
SCAN DOCUMENTS
1. Click the scanner button in DoxCycle to choose which scan-ner to use. If you don’t see your scanner in the list, click Refresh or Where is my scanner?
2. Put all the paper documents in the scanner feeder.
3. Make sure the scanner is pow-ered on and connected to your computer.
4. Click the Scan (F7) button.5. DoxCycle scans the pages, fig-
ures out which taxpayer each one belongs to, what document type it is, and extracts any amounts.
ScanSnapFujitsu ScanSnap scanners are not TWAIN-compliant, but they still work. Just configure them slightly differently, see www.taxcycle.com/scansnap.
For good results, we recommend the following scanner settings:
99300 DPI (dots per inch) resolution
99Black and white (not greyscale!)
99Background fill set to off
Scanner settings6. If you have a stack of documents of the same type or for the same taxpayer, select the document type or taxpayer before scanning.
7. To scan in a multi-page or double-sided document, select the option before scanning
8. If you have a scanning station, configure DoxCycle to monitor a network folder for new files. Use the Monitor tab in Options to set up the monitored folder, then scanned documents will appear in the gallery. See “Unassigned Documents” on right.
Unassigned Documents1. Configure folder monitoring on
the Monitor tab in Options. DoxCycle watches this folder for new documents.
2. When a new document ap-pears, it appears up in the Unassigned Documents gallery.
3. Hover over a document in the gallery to preview.
4. Click the green plus sign to import the document.
5. Click the red minus sign to delete or move the document (change this action in Options).
6. In the Import Unassigned Document dialog box, click on the type of document.
At the bottom of the dialog box, you can also decide what to do with the original after importing. Expand the section and set the option before clicking the document type.
22 PAGE
QUICK START GUIDE
1-888-841-3040
The easiest way to import documents is to drag and drop them onto an open DoxCycle window:1. Open a Windows® folder
on your screen and place it side-by-side with DoxCycle. Then, drag the files onto the DoxCycle window.
2. If your clients send you slips and other supporting documents as email attach-ments, drag and drop the email message, including attachments, onto the DoxCycle window.
3. DoxCycle strips the attach-ments to imports them as separate documents.
IMPORT DOCUMENTSImport button Drag and drop files and email messages with attachments
1. Click the import button and browse to a loca-tion to import the documents from.
2. If you have a stack of documents of the same type, choose the type from the import button:
3. If you know the documents are all from the same taxpayer, select the taxpayer before im-porting (using the same button as you do when scanning). This is useful for documents that do not include the taxpayer’s name.
File typesImport documents from electronic files that clients give you. These can be in PDF, BMP, PNG, JPG format, photos taken from smart-phones, or files clients scanned themselves.
23PAGE
QUICK START GUIDE
www.taxcycle.com
DOXCYCLE INDEXClassification Assistant1. The Acquired view lists the
documents in the order they were imported or scanned in.
2. The Categorized view shows all the documents, grouped by tax-payer and document type.
3. Documents you just scanned or imported have a New label.
4. Double-click on the document to edit the name or issuer.
5. Right-click on a document to switch taxpayer, rename, delete, print and email.
6. To group pages into a document, hold down the Ctrl key and click on each page. Right-click and select Group pages together.
7. Drag pages within a multi-page document to change their order.
8. Hover over a name and click the grey checkmark once to indicate a first review (blue checkmark), click again for a second review (green checkmark). Click a third time to remove all checkmarks.
9. Click the blue or green icons at the top of the index to show only checked or double-checked items.
10. Click the Link icon to show the equivalent form, slip or worksheet in TaxCycle. Toggle the link button at the top of the index to open each matching form in TaxCycle.
11. If DoxCycle could not recognize the scanned or imported docu-ments, they appear as Unclassi-fied. To assign a category, right-click and select Classification Assistant.
12. If an orange bar appears after scanning or importing, click Fix Now to enter the Classification Assistant.
13. In the Classification Assistant, you can quickly group pages, and assign names and taxpayers to multiple pages at once.
24 PAGE
QUICK START GUIDE
1-888-841-3040
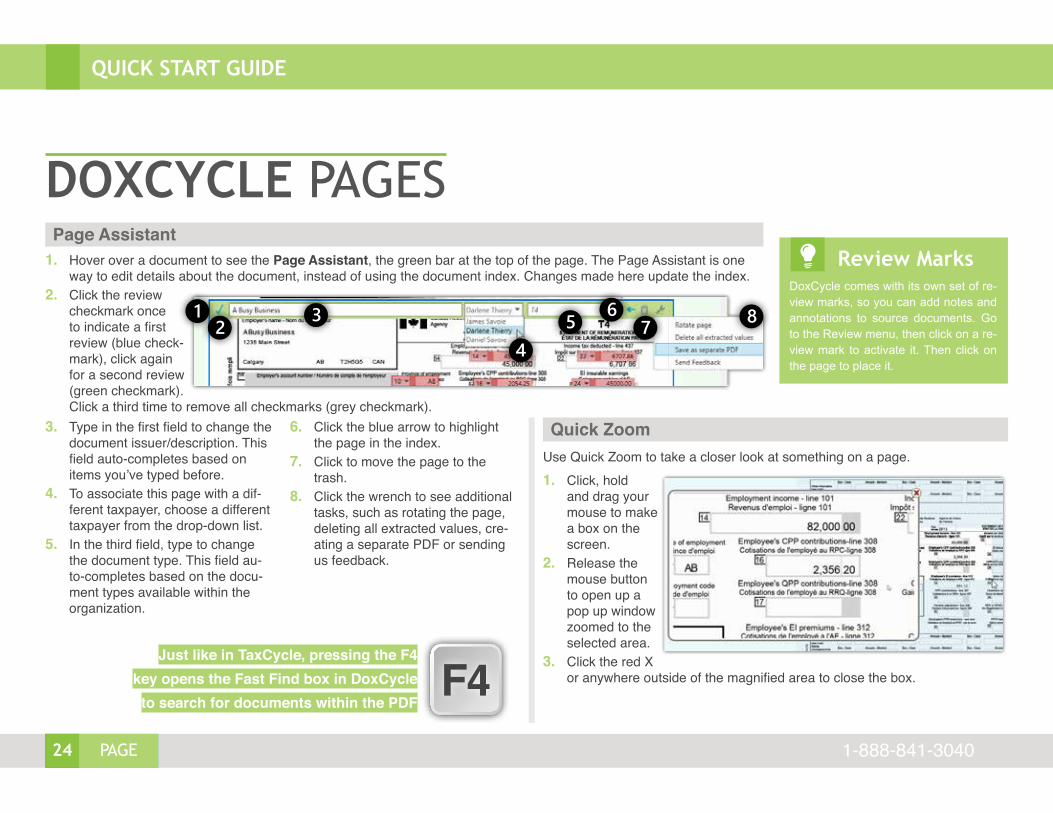
1. Hover over a document to see the Page Assistant, the green bar at the top of the page. The Page Assistant is one way to edit details about the document, instead of using the document index. Changes made here update the index.
2. Click the review checkmark once to indicate a first review (blue check-mark), click again for a second review (green checkmark). Click a third time to remove all checkmarks (grey checkmark).
DOXCYCLE PAGESPage Assistant
Quick ZoomUse Quick Zoom to take a closer look at something on a page.1. Click, hold
and drag your mouse to make a box on the screen.
2. Release the mouse button to open up a pop up window zoomed to the selected area.
3. Click the red X or anywhere outside of the magnified area to close the box.
Review MarksDoxCycle comes with its own set of re-view marks, so you can add notes and annotations to source documents. Go to the Review menu, then click on a re-view mark to activate it. Then click on the page to place it.
3. Type in the first field to change the document issuer/description. This field auto-completes based on items you’ve typed before.
4. To associate this page with a dif-ferent taxpayer, choose a different taxpayer from the drop-down list.
5. In the third field, type to change the document type. This field au-to-completes based on the docu-ment types available within the organization.
6. Click the blue arrow to highlight the page in the index.
7. Click to move the page to the trash.
8. Click the wrench to see additional tasks, such as rotating the page, deleting all extracted values, cre-ating a separate PDF or sending us feedback.
F4Just like in TaxCycle, pressing the F4
key opens the Fast Find box in DoxCycle to search for documents within the PDF
25PAGE
QUICK START GUIDE
www.taxcycle.com
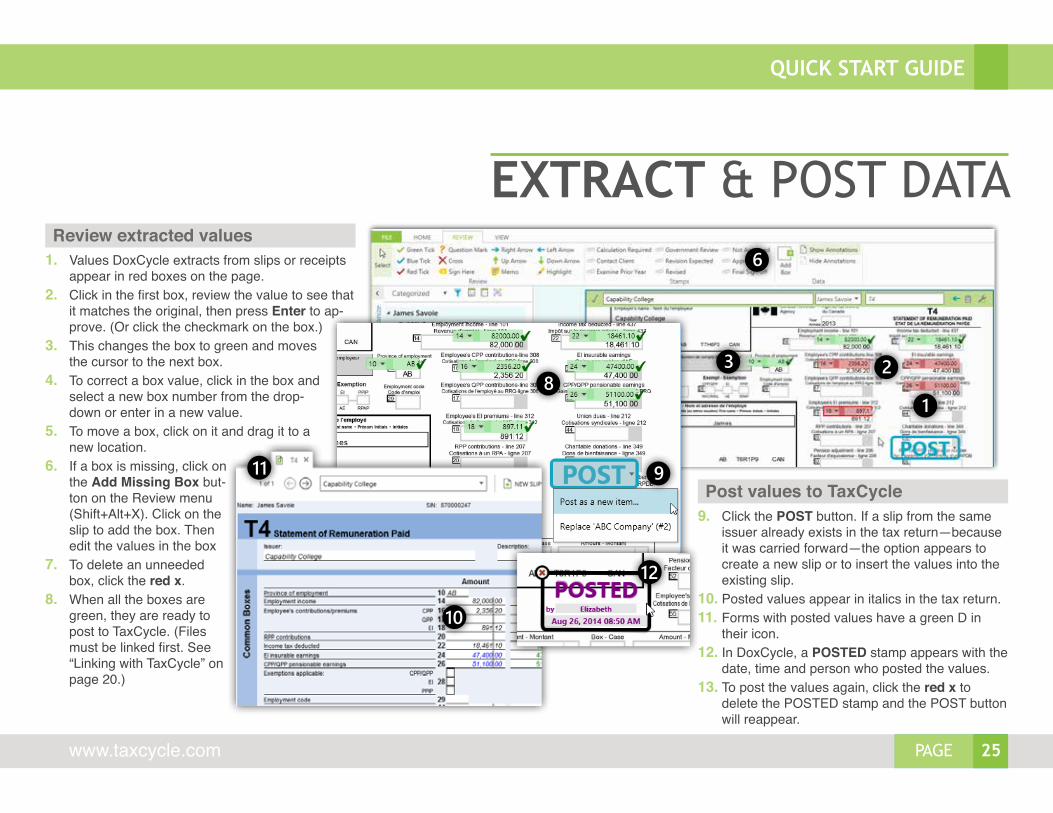
EXTRACT & POST DATA1. Values DoxCycle extracts from slips or receipts
appear in red boxes on the page.2. Click in the first box, review the value to see that
it matches the original, then press Enter to ap-prove. (Or click the checkmark on the box.)
3. This changes the box to green and moves the cursor to the next box.
4. To correct a box value, click in the box and select a new box number from the drop-down or enter in a new value.
5. To move a box, click on it and drag it to a new location.
6. If a box is missing, click on the Add Missing Box but-ton on the Review menu (Shift+Alt+X). Click on the slip to add the box. Then edit the values in the box
7. To delete an unneeded box, click the red x.
8. When all the boxes are green, they are ready to post to TaxCycle. (Files must be linked first. See “Linking with TaxCycle” on page 20.)
Review extracted values
Post values to TaxCycle9. Click the POST button. If a slip from the same
issuer already exists in the tax return—because it was carried forward—the option appears to create a new slip or to insert the values into the existing slip.
10. Posted values appear in italics in the tax return.11. Forms with posted values have a green D in
their icon.12. In DoxCycle, a POSTED stamp appears with the
date, time and person who posted the values.13. To post the values again, click the red x to
delete the POSTED stamp and the POST button will reappear.
26 PAGE
QUICK START GUIDE
1-888-841-3040
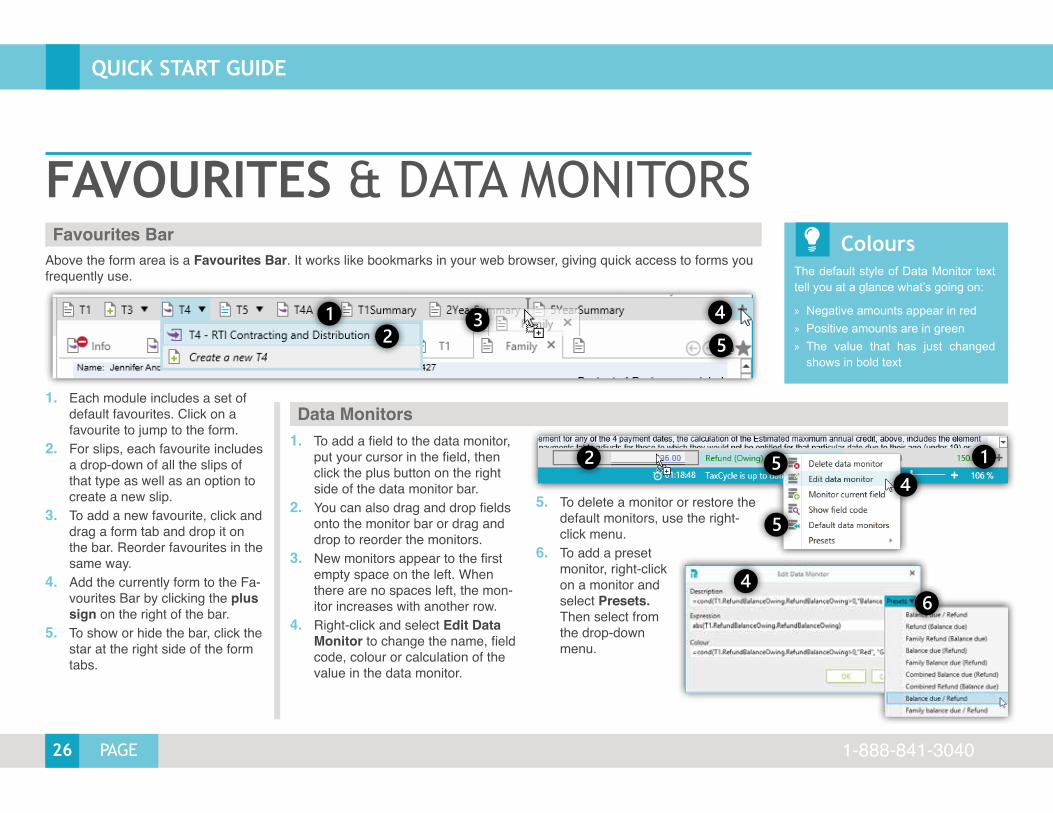
FAVOURITES & DATA MONITORS
Data Monitors1. Each module includes a set of
default favourites. Click on a favourite to jump to the form.
2. For slips, each favourite includes a drop-down of all the slips of that type as well as an option to create a new slip.
3. To add a new favourite, click and drag a form tab and drop it on the bar. Reorder favourites in the same way.
4. Add the currently form to the Fa-vourites Bar by clicking the plus sign on the right of the bar.
5. To show or hide the bar, click the star at the right side of the form tabs.
Above the form area is a Favourites Bar. It works like bookmarks in your web browser, giving quick access to forms you frequently use.
1. To add a field to the data monitor, put your cursor in the field, then click the plus button on the right side of the data monitor bar.
2. You can also drag and drop fields onto the monitor bar or drag and drop to reorder the monitors.
3. New monitors appear to the first empty space on the left. When there are no spaces left, the mon-itor increases with another row.
4. Right-click and select Edit Data Monitor to change the name, field code, colour or calculation of the value in the data monitor.
5. To delete a monitor or restore the default monitors, use the right-click menu.
6. To add a preset monitor, right-click on a monitor and select Presets. Then select from the drop-down menu.
Favourites Bar ColoursThe default style of Data Monitor text tell you at a glance what’s going on:
» Negative amounts appear in red » Positive amounts are in green » The value that has just changed
shows in bold text
27PAGE
QUICK START GUIDE
www.taxcycle.com
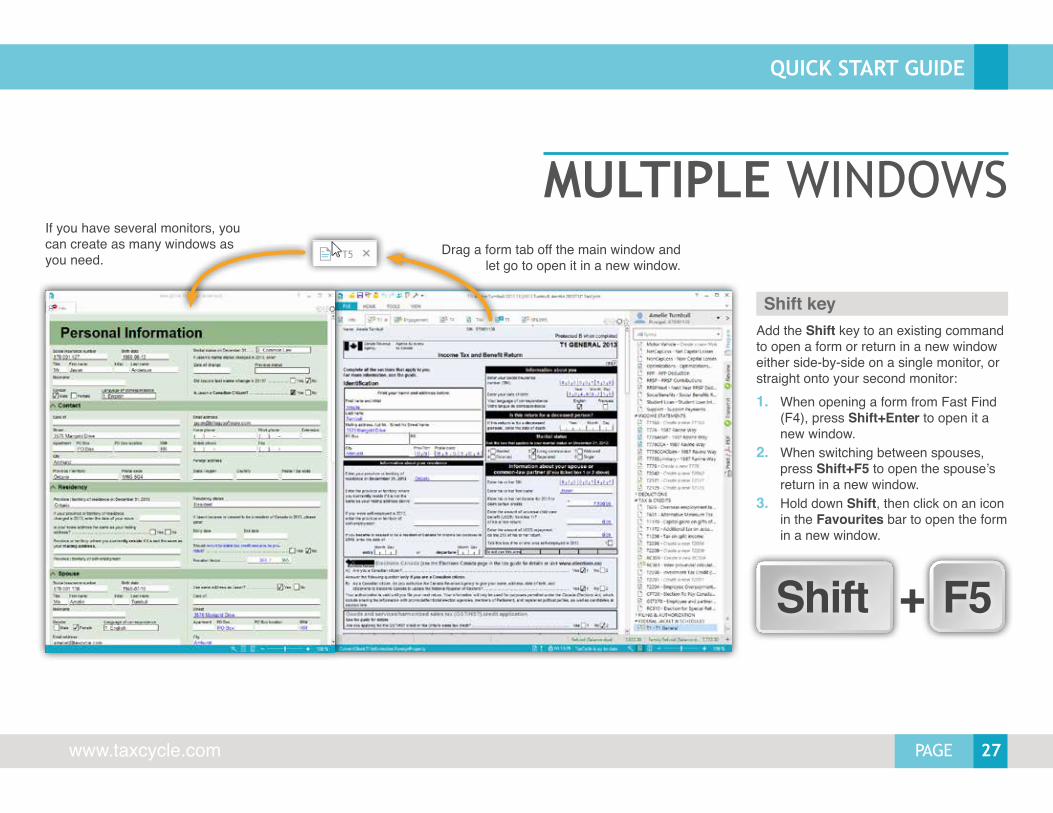
Add the Shift key to an existing command to open a form or return in a new window either side-by-side on a single monitor, or straight onto your second monitor:1. When opening a form from Fast Find
(F4), press Shift+Enter to open it a new window.
2. When switching between spouses, press Shift+F5 to open the spouse’s return in a new window.
3. Hold down Shift, then click on an icon in the Favourites bar to open the form in a new window.
Shift key
MULTIPLE WINDOWSDrag a form tab off the main window and
let go to open it in a new window.
If you have several monitors, you can create as many windows as you need.
Shift F5+
28 PAGE
QUICK START GUIDE
1-888-841-3040
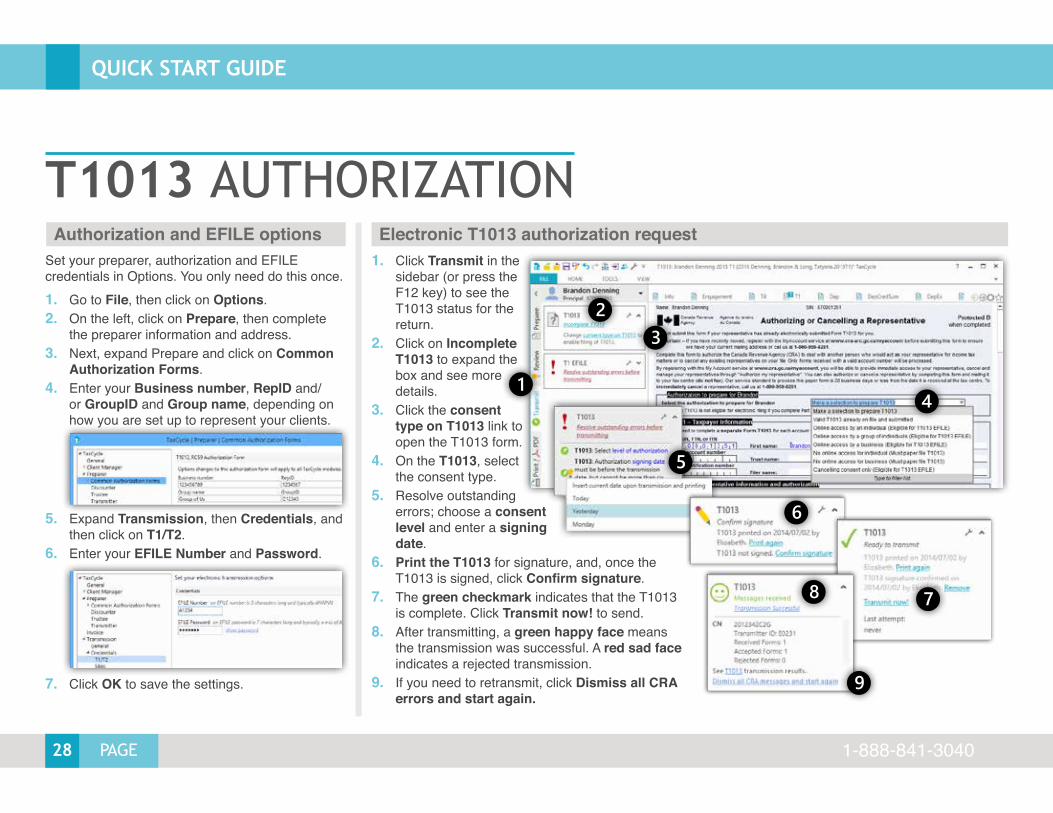
T1013 AUTHORIZATIONSet your preparer, authorization and EFILE credentials in Options. You only need do this once.1. Go to File, then click on Options.2. On the left, click on Prepare, then complete
the preparer information and address.3. Next, expand Prepare and click on Common
Authorization Forms.4. Enter your Business number, RepID and/
or GroupID and Group name, depending on how you are set up to represent your clients.
5. Expand Transmission, then Credentials, and then click on T1/T2.
6. Enter your EFILE Number and Password.
7. Click OK to save the settings.
Authorization and EFILE options1. Click Transmit in the
sidebar (or press the F12 key) to see the T1013 status for the return.
2. Click on Incomplete T1013 to expand the box and see more details.
3. Click the consent type on T1013 link to open the T1013 form.
4. On the T1013, select the consent type.
5. Resolve outstanding errors; choose a consent level and enter a signing date.
6. Print the T1013 for signature, and, once the T1013 is signed, click Confirm signature.
7. The green checkmark indicates that the T1013 is complete. Click Transmit now! to send.
8. After transmitting, a green happy face means the transmission was successful. A red sad face indicates a rejected transmission.
9. If you need to retransmit, click Dismiss all CRA errors and start again.
Electronic T1013 authorization request
29PAGE
QUICK START GUIDE
www.taxcycle.com
REPRESENT A CLIENT
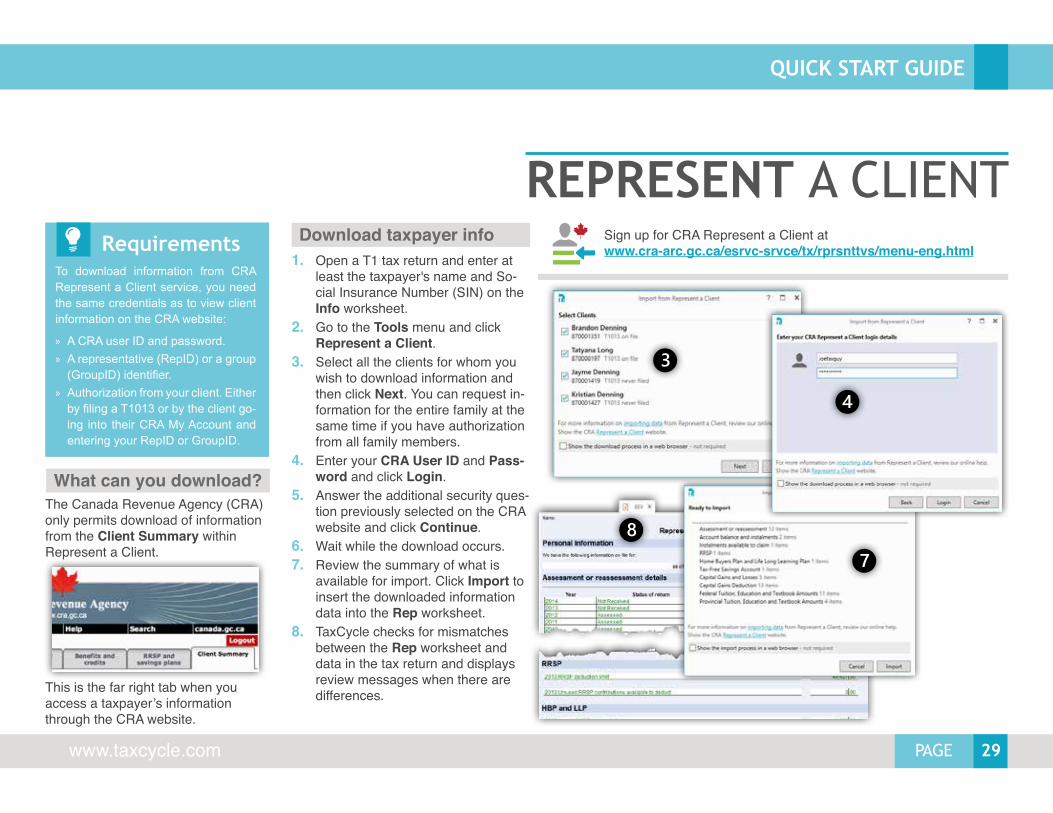
The Canada Revenue Agency (CRA) only permits download of information from the Client Summary within Represent a Client.
This is the far right tab when you access a taxpayer’s information through the CRA website.
1. Open a T1 tax return and enter at least the taxpayer's name and So-cial Insurance Number (SIN) on the Info worksheet.
2. Go to the Tools menu and click Represent a Client.
3. Select all the clients for whom you wish to download information and then click Next. You can request in-formation for the entire family at the same time if you have authorization from all family members.
4. Enter your CRA User ID and Pass-word and click Login.
5. Answer the additional security ques-tion previously selected on the CRA website and click Continue.
6. Wait while the download occurs. 7. Review the summary of what is
available for import. Click Import to insert the downloaded information data into the Rep worksheet.
8. TaxCycle checks for mismatches between the Rep worksheet and data in the tax return and displays review messages when there are differences.
What can you download?
Download taxpayer infoRequirementsTo download information from CRA Represent a Client service, you need the same credentials as to view client information on the CRA website:
» A CRA user ID and password. » A representative (RepID) or a group
(GroupID) identifier. » Authorization from your client. Either
by filing a T1013 or by the client go-ing into their CRA My Account and entering your RepID or GroupID.
Sign up for CRA Represent a Client at www.cra-arc.gc.ca/esrvc-srvce/tx/rprsnttvs/menu-eng.html
30 PAGE
QUICK START GUIDE
1-888-841-3040
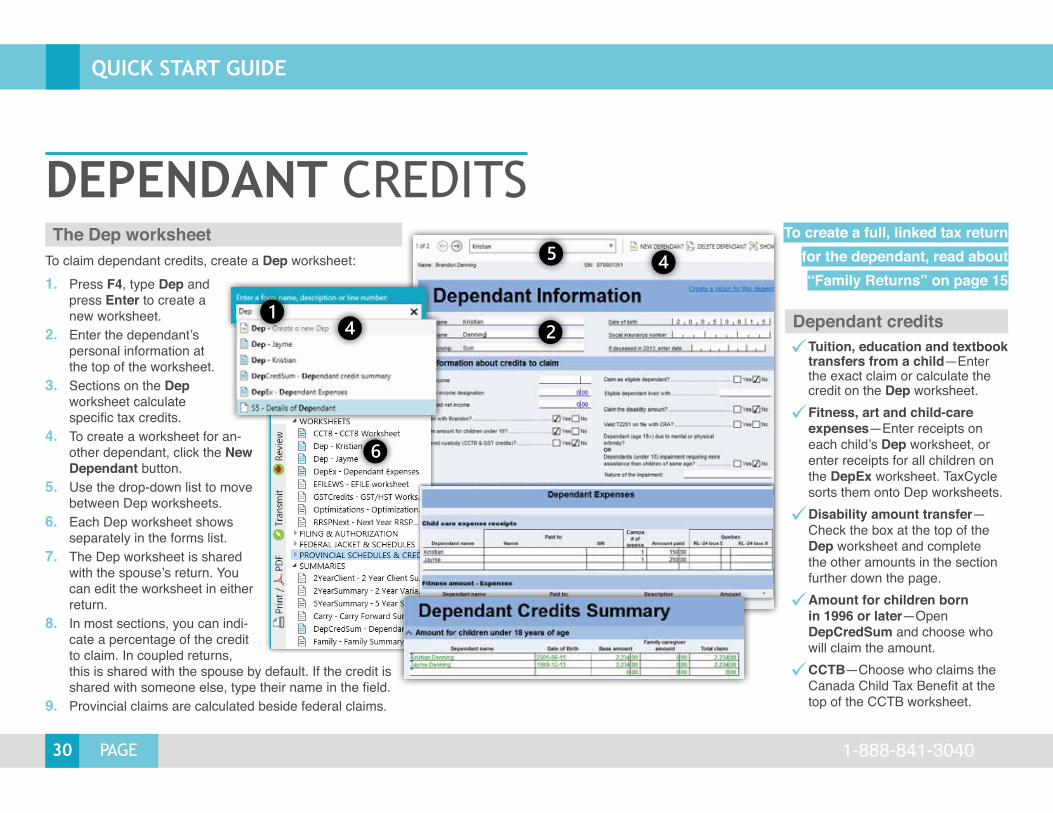
DEPENDANT CREDITSTo claim dependant credits, create a Dep worksheet:1. Press F4, type Dep and
press Enter to create a new worksheet.
2. Enter the dependant’s personal information at the top of the worksheet.
3. Sections on the Dep worksheet calculate specific tax credits.
4. To create a worksheet for an-other dependant, click the New Dependant button.
5. Use the drop-down list to move between Dep worksheets.
6. Each Dep worksheet shows separately in the forms list.
7. The Dep worksheet is shared with the spouse’s return. You can edit the worksheet in either return.
8. In most sections, you can indi-cate a percentage of the credit to claim. In coupled returns, this is shared with the spouse by default. If the credit is shared with someone else, type their name in the field.
9. Provincial claims are calculated beside federal claims.
99Tuition, education and textbook transfers from a child—Enter the exact claim or calculate the credit on the Dep worksheet.
99Fitness, art and child-care expenses—Enter receipts on each child’s Dep worksheet, or enter receipts for all children on the DepEx worksheet. TaxCycle sorts them onto Dep worksheets.
99Disability amount transfer—Check the box at the top of the Dep worksheet and complete the other amounts in the section further down the page.
99Amount for children born in 1996 or later—Open DepCredSum and choose who will claim the amount.
99CCTB—Choose who claims the Canada Child Tax Benefit at the top of the CCTB worksheet.
The Dep worksheet
Dependant credits
To create a full, linked tax return for the dependant, read about “Family Returns” on page 15
31PAGE
QUICK START GUIDE
www.taxcycle.com
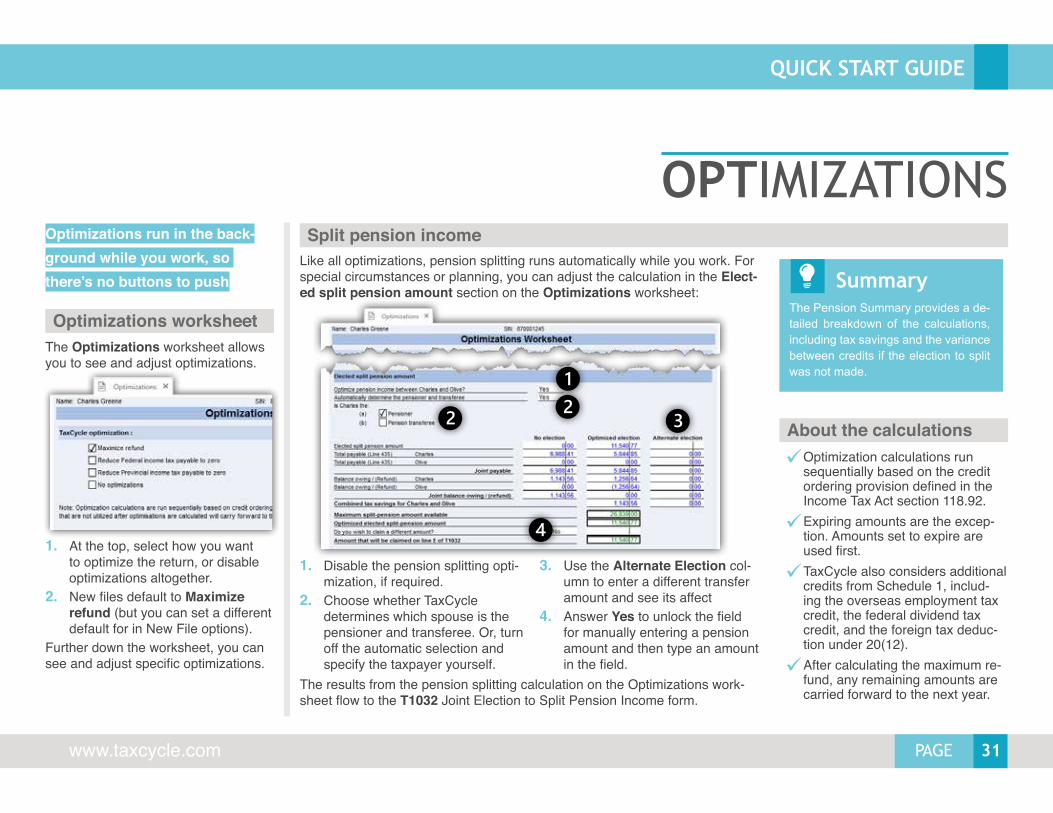
Like all optimizations, pension splitting runs automatically while you work. For special circumstances or planning, you can adjust the calculation in the Elect-ed split pension amount section on the Optimizations worksheet:
OPTIMIZATIONS
99Optimization calculations run sequentially based on the credit ordering provision defined in the Income Tax Act section 118.92.
99Expiring amounts are the excep-tion. Amounts set to expire are used first.
99TaxCycle also considers additional credits from Schedule 1, includ-ing the overseas employment tax credit, the federal dividend tax credit, and the foreign tax deduc-tion under 20(12).
99After calculating the maximum re-fund, any remaining amounts are carried forward to the next year.
The Optimizations worksheet allows you to see and adjust optimizations.
1. At the top, select how you want to optimize the return, or disable optimizations altogether.
2. New files default to Maximize refund (but you can set a different default for in New File options).
Further down the worksheet, you can see and adjust specific optimizations.
Optimizations worksheet
About the calculations
Optimizations run in the back-ground while you work, so there’s no buttons to push
Split pension income
1. Disable the pension splitting opti-mization, if required.
2. Choose whether TaxCycle determines which spouse is the pensioner and transferee. Or, turn off the automatic selection and specify the taxpayer yourself.
3. Use the Alternate Election col-umn to enter a different transfer amount and see its affect
4. Answer Yes to unlock the field for manually entering a pension amount and then type an amount in the field.
The results from the pension splitting calculation on the Optimizations work-sheet flow to the T1032 Joint Election to Split Pension Income form.
SummaryThe Pension Summary provides a de-tailed breakdown of the calculations, including tax savings and the variance between credits if the election to split was not made.
32 PAGE
QUICK START GUIDE
1-888-841-3040
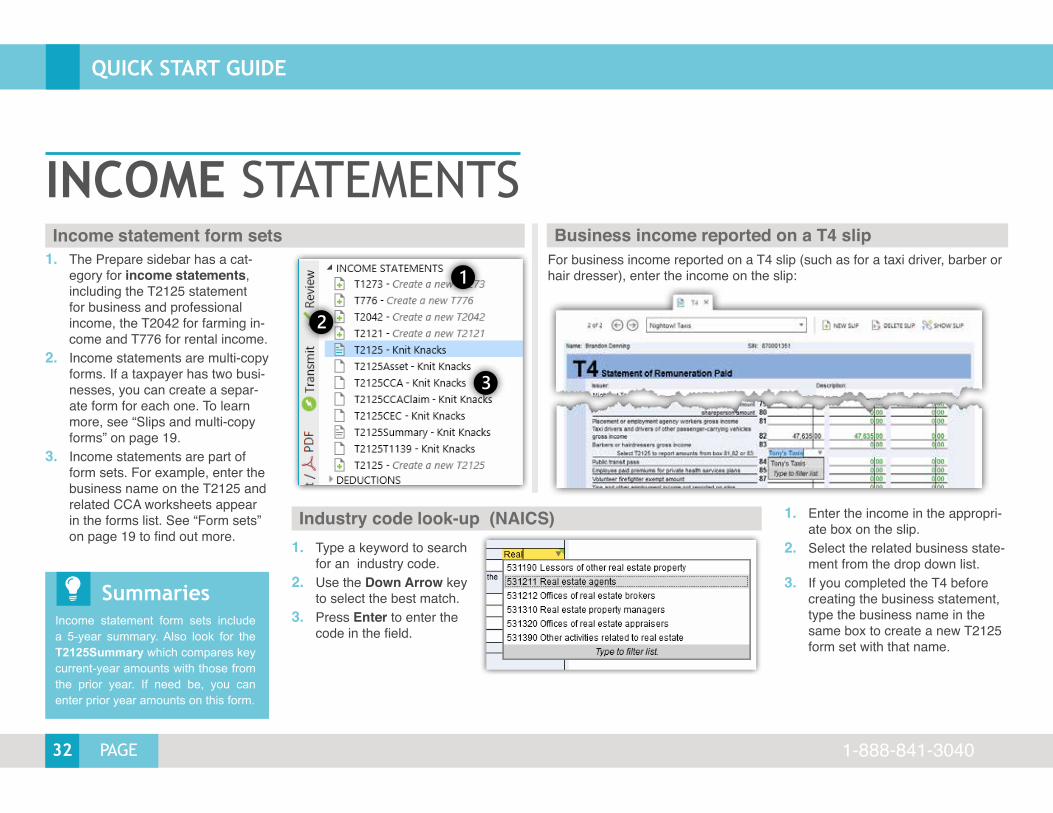
INCOME STATEMENTS1. The Prepare sidebar has a cat-
egory for income statements, including the T2125 statement for business and professional income, the T2042 for farming in-come and T776 for rental income.
2. Income statements are multi-copy forms. If a taxpayer has two busi-nesses, you can create a separ-ate form for each one. To learn more, see “Slips and multi-copy forms” on page 19.
3. Income statements are part of form sets. For example, enter the business name on the T2125 and related CCA worksheets appear in the forms list. See “Form sets” on page 19 to find out more.
Income statement form sets
Industry code look-up (NAICS)
Business income reported on a T4 slip
1. Type a keyword to search for an industry code.
2. Use the Down Arrow key to select the best match.
3. Press Enter to enter the code in the field.
SummariesIncome statement form sets include a 5-year summary. Also look for the T2125Summary which compares key current-year amounts with those from the prior year. If need be, you can enter prior year amounts on this form.
For business income reported on a T4 slip (such as for a taxi driver, barber or hair dresser), enter the income on the slip:
1. Enter the income in the appropri-ate box on the slip.
2. Select the related business state-ment from the drop down list.
3. If you completed the T4 before creating the business statement, type the business name in the same box to create a new T2125 form set with that name.
33PAGE
QUICK START GUIDE
www.taxcycle.com
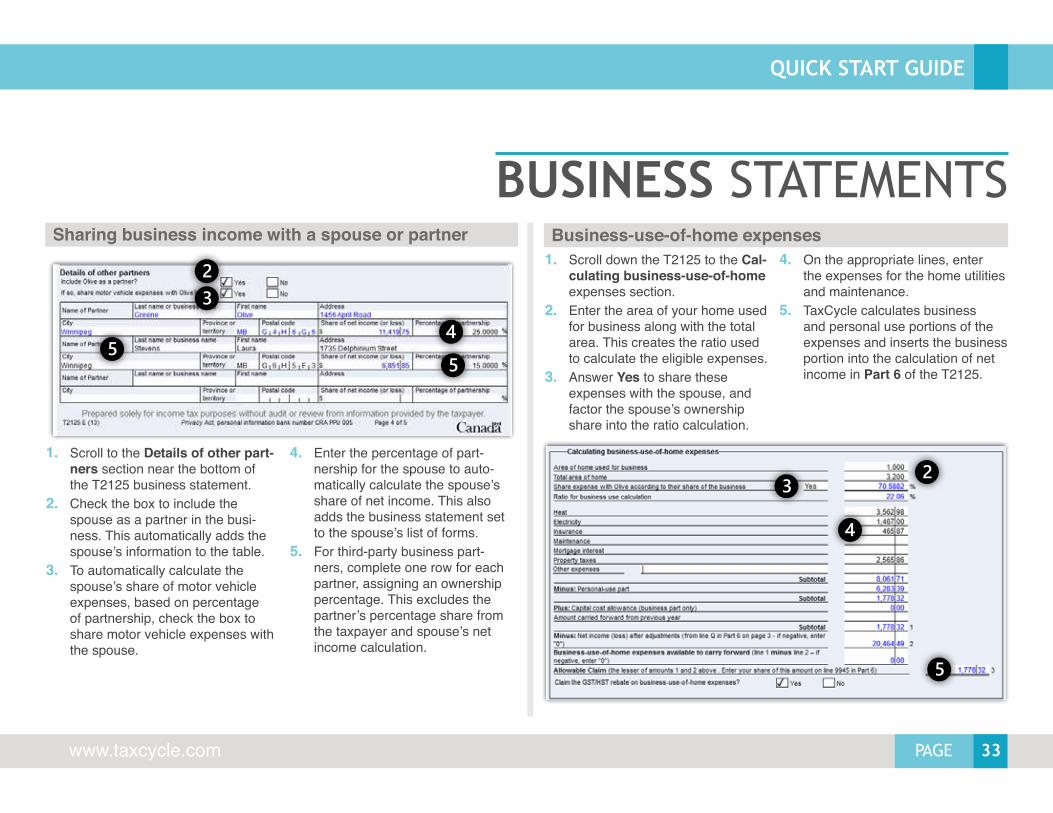
BUSINESS STATEMENTSBusiness-use-of-home expensesSharing business income with a spouse or partner
1. Scroll to the Details of other part-ners section near the bottom of the T2125 business statement.
2. Check the box to include the spouse as a partner in the busi-ness. This automatically adds the spouse’s information to the table.
3. To automatically calculate the spouse’s share of motor vehicle expenses, based on percentage of partnership, check the box to share motor vehicle expenses with the spouse.
1. Scroll down the T2125 to the Cal-culating business-use-of-home expenses section.
2. Enter the area of your home used for business along with the total area. This creates the ratio used to calculate the eligible expenses.
3. Answer Yes to share these expenses with the spouse, and factor the spouse’s ownership share into the ratio calculation.
4. Enter the percentage of part-nership for the spouse to auto-matically calculate the spouse’s share of net income. This also adds the business statement set to the spouse’s list of forms.
5. For third-party business part-ners, complete one row for each partner, assigning an ownership percentage. This excludes the partner’s percentage share from the taxpayer and spouse’s net income calculation.
4. On the appropriate lines, enter the expenses for the home utilities and maintenance.
5. TaxCycle calculates business and personal use portions of the expenses and inserts the business portion into the calculation of net income in Part 6 of the T2125.
34 PAGE
QUICK START GUIDE
1-888-841-3040
MOTOR VEHICLE EXPENSESUse the Motor Vehicle worksheet to enter details of vehicle expenses and associate them with an income statement (T776, T2125, T2121, T2042, T1163) or employment expenses claim (T777).1. Before creating a worksheet, create
the statement with which you want to associate the expenses.
2. Create a separate Motor Vehicle worksheet for each expense claim, entering the make, model and year of the vehicle at the top of the work-sheet.
3. Enter the total kilometers driven during the year.
4. Allocate a portion of the kilometres driven to a statement. When there is more than one income statement or employment expense claim in the return, all appear on the worksheet, making it possible to share expenses from one vehicle to between them.Just make sure the total allocated kilometers does not exceed the total kilometers driven in the year.
5. Motor vehicle worksheet is shared in coupled returns. Create a worksheet for one taxpayer, and it appears in the forms list for the other’s return. If a couple shares a vehicle, this allows you to allocate kilometers/expense to their income statements.
6. Enter fuel, maintenance, etc. expenses in the Details of mo-tor vehicle expenses table. If eligible, split out expenses that qualify for the GST/HST rebate into separate columns.
7. Scroll down to Charts 1, 2 and 3 to calculate loan interest, leasing costs and CCA for the vehicle. Calculated amounts flow back up to the related lines in the expens-es table.
35PAGE
QUICK START GUIDE
www.taxcycle.com
1. Since each T777WS is associated with a T4 slip, create the slip first, making sure to enter any commissioned income in box 42.
2. Select the T4 slip from the top of the T777WS.3. Indicate whether the employee is eligible for GST/HST
rebate. If yes, enter the Employer GST/HST number.4. Enter expenses. If the employee is
claiming the GST/HST rebate, enter the amounts, including tax, in the appropriate column. If they are not claiming the rebate, use the Not eligible column.
5. If the expenses were incurred in more than one province (or there was a tax rate change) split the ex-penses out into separate columns.
6. For entertainment, food and bever-age, enter the full amount. TaxCycle automatically calculates the 50% non-deductible portion.
7. Some expenses are only eligible for commission employees. If the taxpayer did not earn commission, you can ignore these rows.
EMPLOYMENT EXPENSESEnter the details of employment expenses on the T777WS. The amounts from this worksheet flow into the T777 form and into the GST370, if the taxpayer is claiming the GST/HST rebate on the expenses.
99The allowable credits for salaried and commissioned employees are based on the information en-tered in the expenses table and on the T4 slip.
99You can choose what type of claim to make: as salaried em-ployee (default) or as commis-sion-paid employee.
99 If no commission appears in box 42 of the T4 slip, the commis-sion-paid expense claim is not calculated.
99 If the employee has both salary and commission income, you can check the box to claim the higher of the two amounts.
T2200 formThe employer must complete the T2200 to allow the employee to de-duct employment expenses. You can complete this form in TaxCycle, but the amounts are not used in calculat-ing the tax return. Keep the employ-ee’s original in case the CRA needs it.
T777WS Employment expenses worksheet
Claim calculation
36 PAGE
QUICK START GUIDE
1-888-841-3040
CCA worksheets—such as T2125C-CA—are similar to the CCA claim tables on government forms. 1. Amounts entered on the CCA
worksheet flow to the Asset Man-ager (T2125Asset).
2. Each row on the CCA worksheet also has an equivalent page in the Asset Manager.
3. Click the blue links at the top of the columns to jump to a particular Asset Manager page.
4. TaxCycle calculates CCA on a pooling of costs basis for all the assets under the same CCA class and lists the items together on the CCA worksheet. You can tell it is a pooled entry because the text is green and not editable.
Asset Managers—like T2125Asset—allow detailed tracking of assets and CCA details: 5. Create and navigate Asset Managers like slips.6. To select a class, type the class number or
description in the field, When you find the right class press Enter.
CCA & ASSET WORKSHEETS
Vehicle CCAIf you calculate motor vehicle CCA in Chart 3 on the Motor Vehicle worksheet, the result flows back to the first table on the CCA worksheet but does not appear as a page in the Asset Manager.
CCA worksheet
Capital Cost Allowance (CCA) and asset worksheets are part of income statement form sets. Once you create an income statement—such as the T2125—TaxCycle adds the related T2125CCA, T2125Asset and T2125C-CAClaim worksheets to the set.
Asset Manager
7. Each class number has a letter on the end to help in pooling and separating assets of the same class.
8. In the top section, enter UCC and other CCA details.
9. At the bottom, enter current year additions and dispos-itions. Each time you add an item, a blank space appears for a new one.
37PAGE
QUICK START GUIDE
To trigger a terminal loss for all assets under the same class, make a single terminal loss entry on one of the Asset Manager pages for the asset class:1. Enter the total cost and total
proceeds of the disposition for all assets in that class/pool.
2. Answer Yes to the Create termin-al loss?
3. On the CCA worksheet and Asset Managers, that class/pool will show as zero.
www.taxcycle.com
Use the CCAClaim worksheet—such as T2125CCAClaim—to set the order in which CCA is claimed. For example, when claiming only part of the avail-able CCA:1. On the CCA work-
sheet, choose Yes to claim a different CCA amount.
2. Enter a CCA claim amount that is less that the maximum available claim.
3. Go to the CCAClaim worksheet and switch the claim order. (You can also do this from the drop-down on the CCA worksheet.)
4. In the table at the bottom of the worksheet, the Actual CCA Claim for each class changes as you change the claim order while the Total CCA Claim stays constant.
CCA CLAIMSTaxCycle automatically adds a letter to the end of each CCA class. For example, 1-a or 1-b. This allows you to create separate CCA classes for capital assets that you are not permitted to calculate by pooling the cost basis. For example, class 1 rental properties costing $50,000 or more cannot be in the same class:1. Create a class 1-a entry in
T776CCA or T776Asset.2. Create a class 1-b entry in
T776CCA or T776Asset.3. Class 1-a and 1-b They appear
separately T776CCA worksheet.
CCAClaim worksheetSeparate asset pools Terminal losses
38 PAGE
QUICK START GUIDE
1-888-841-3040
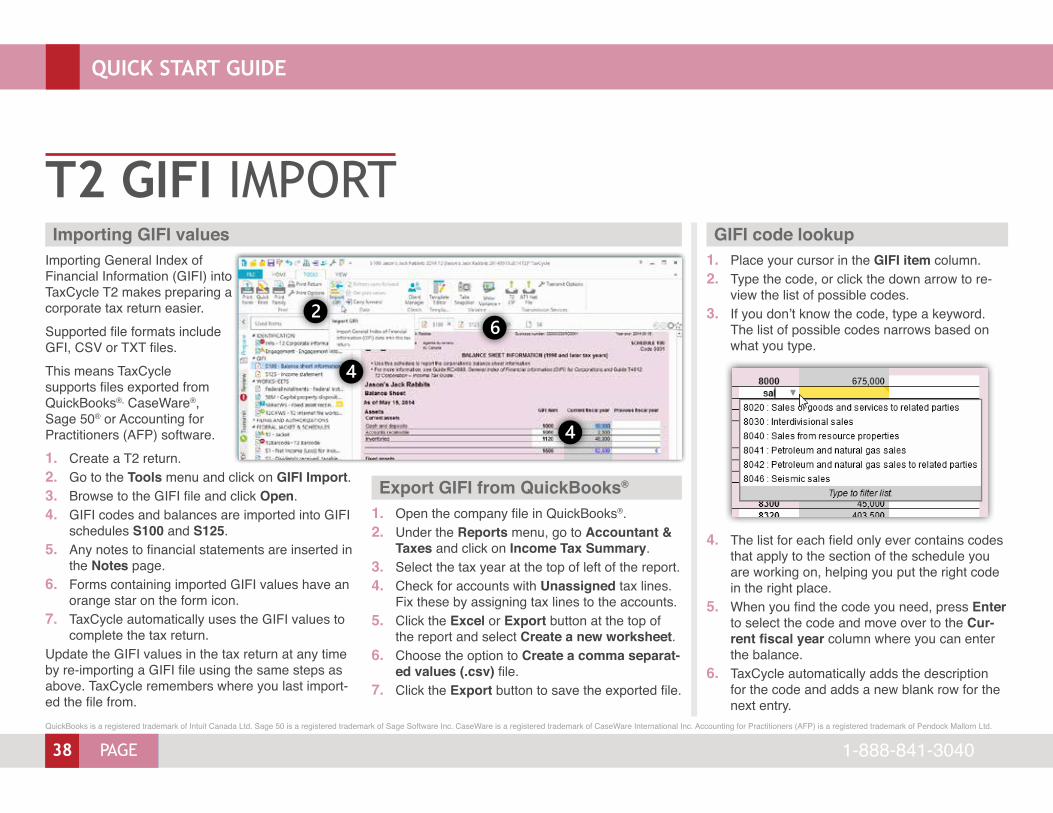
T2 GIFI IMPORTImporting GIFI values
Importing General Index of Financial Information (GIFI) into TaxCycle T2 makes preparing a corporate tax return easier. Supported file formats include GFI, CSV or TXT files. This means TaxCycle supports files exported from QuickBooks®, CaseWare®, Sage 50® or Accounting for Practitioners (AFP) software.1. Create a T2 return. 2. Go to the Tools menu and click on GIFI Import. 3. Browse to the GIFI file and click Open.4. GIFI codes and balances are imported into GIFI
schedules S100 and S125. 5. Any notes to financial statements are inserted in
the Notes page.6. Forms containing imported GIFI values have an
orange star on the form icon.7. TaxCycle automatically uses the GIFI values to
complete the tax return.Update the GIFI values in the tax return at any time by re-importing a GIFI file using the same steps as above. TaxCycle remembers where you last import-ed the file from.
Export GIFI from QuickBooks®
QuickBooks is a registered trademark of Intuit Canada Ltd. Sage 50 is a registered trademark of Sage Software Inc. CaseWare is a registered trademark of CaseWare International Inc. Accounting for Practitioners (AFP) is a registered trademark of Pendock Mallorn Ltd.
1. Open the company file in QuickBooks®.2. Under the Reports menu, go to Accountant &
Taxes and click on Income Tax Summary.3. Select the tax year at the top of left of the report.4. Check for accounts with Unassigned tax lines.
Fix these by assigning tax lines to the accounts.5. Click the Excel or Export button at the top of
the report and select Create a new worksheet. 6. Choose the option to Create a comma separat-
ed values (.csv) file.7. Click the Export button to save the exported file.
GIFI code lookup1. Place your cursor in the GIFI item column.2. Type the code, or click the down arrow to re-
view the list of possible codes.3. If you don’t know the code, type a keyword.
The list of possible codes narrows based on what you type.
4. The list for each field only ever contains codes that apply to the section of the schedule you are working on, helping you put the right code in the right place.
5. When you find the code you need, press Enter to select the code and move over to the Cur-rent fiscal year column where you can enter the balance.
6. TaxCycle automatically adds the description for the code and adds a new blank row for the next entry.
39PAGE
QUICK START GUIDE
www.taxcycle.com
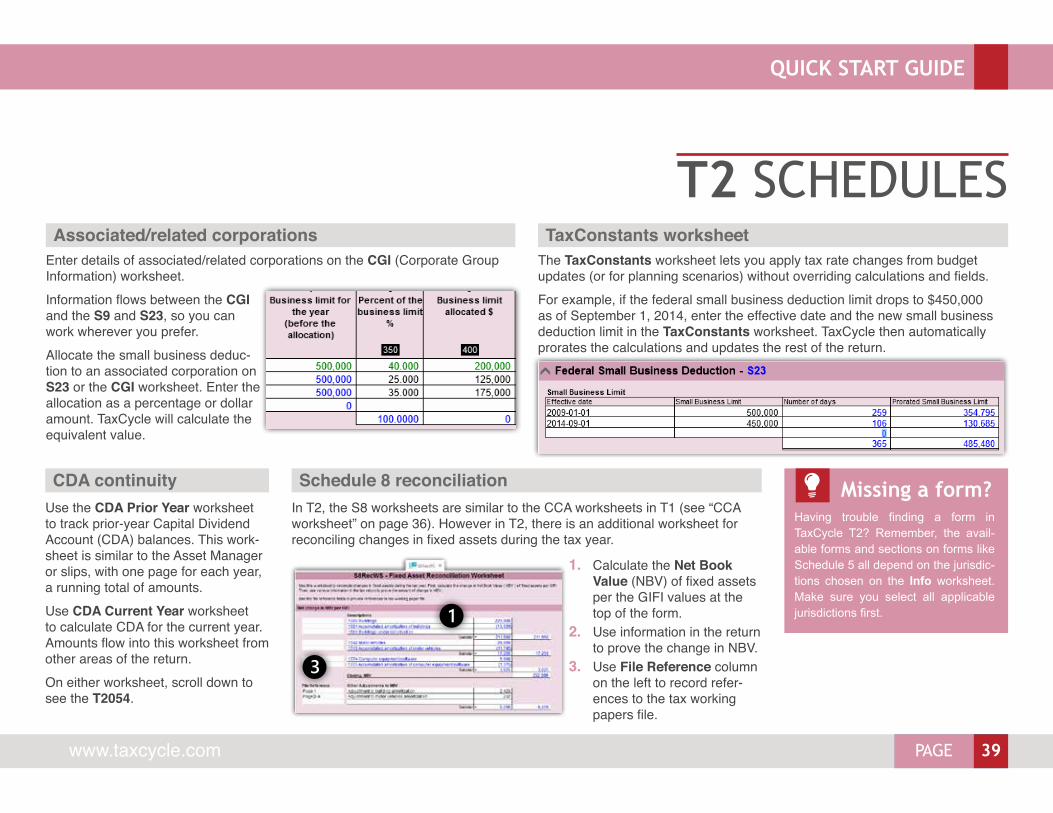
CDA continuity
Associated/related corporations
Use the CDA Prior Year worksheet to track prior-year Capital Dividend Account (CDA) balances. This work-sheet is similar to the Asset Manager or slips, with one page for each year, a running total of amounts.Use CDA Current Year worksheet to calculate CDA for the current year. Amounts flow into this worksheet from other areas of the return.On either worksheet, scroll down to see the T2054.
Enter details of associated/related corporations on the CGI (Corporate Group Information) worksheet. Information flows between the CGI and the S9 and S23, so you can work wherever you prefer.Allocate the small business deduc-tion to an associated corporation on S23 or the CGI worksheet. Enter the allocation as a percentage or dollar amount. TaxCycle will calculate the equivalent value.
Schedule 8 reconciliationIn T2, the S8 worksheets are similar to the CCA worksheets in T1 (see “CCA worksheet” on page 36). However in T2, there is an additional worksheet for reconciling changes in fixed assets during the tax year.
T2 SCHEDULESTaxConstants worksheet
Missing a form?Having trouble finding a form in TaxCycle T2? Remember, the avail-able forms and sections on forms like Schedule 5 all depend on the jurisdic-tions chosen on the Info worksheet. Make sure you select all applicable jurisdictions first.
1. Calculate the Net Book Value (NBV) of fixed assets per the GIFI values at the top of the form.
2. Use information in the return to prove the change in NBV.
3. Use File Reference column on the left to record refer-ences to the tax working papers file.
The TaxConstants worksheet lets you apply tax rate changes from budget updates (or for planning scenarios) without overriding calculations and fields. For example, if the federal small business deduction limit drops to $450,000 as of September 1, 2014, enter the effective date and the new small business deduction limit in the TaxConstants worksheet. TaxCycle then automatically prorates the calculations and updates the rest of the return.
40 PAGE
QUICK START GUIDE
1-888-841-3040
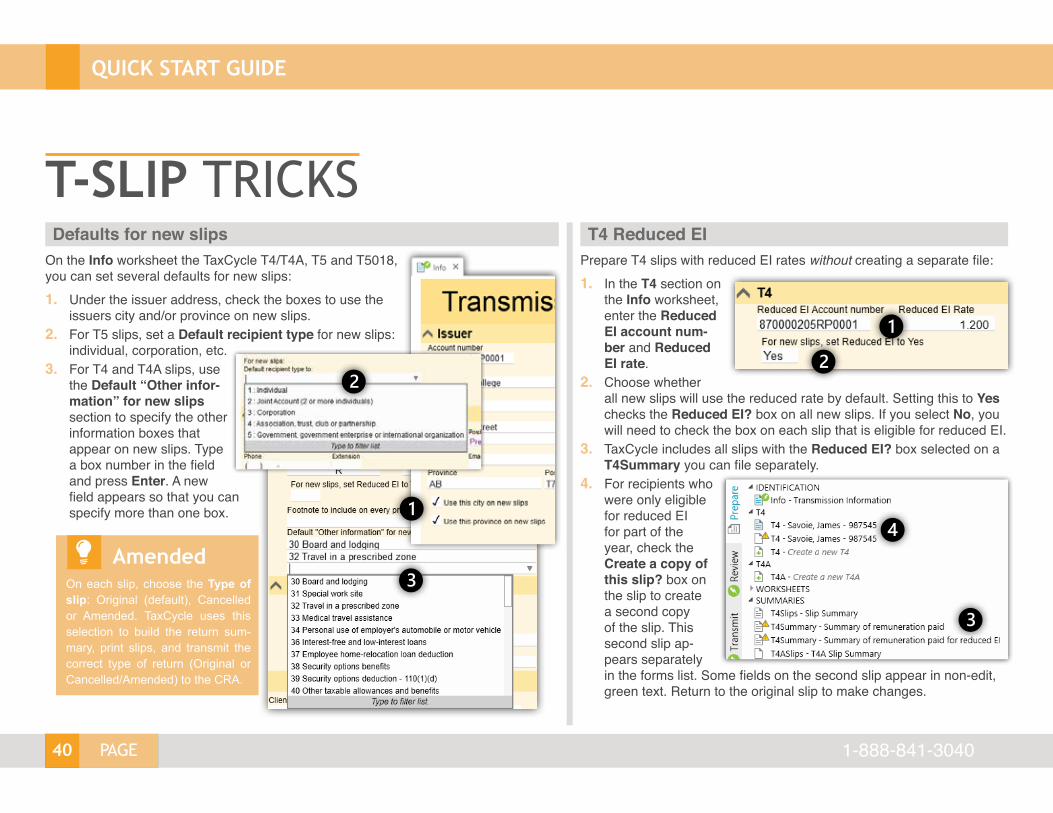
T-SLIP TRICKST4 Reduced EIDefaults for new slips
On the Info worksheet the TaxCycle T4/T4A, T5 and T5018, you can set several defaults for new slips:1. Under the issuer address, check the boxes to use the
issuers city and/or province on new slips.2. For T5 slips, set a Default recipient type for new slips:
individual, corporation, etc.3. For T4 and T4A slips, use
the Default “Other infor-mation” for new slips section to specify the other information boxes that appear on new slips. Type a box number in the field and press Enter. A new field appears so that you can specify more than one box.
Prepare T4 slips with reduced EI rates without creating a separate file: 1. In the T4 section on
the Info worksheet, enter the Reduced EI account num-ber and Reduced EI rate.
2. Choose whether all new slips will use the reduced rate by default. Setting this to Yes checks the Reduced EI? box on all new slips. If you select No, you will need to check the box on each slip that is eligible for reduced EI.
3. TaxCycle includes all slips with the Reduced EI? box selected on a T4Summary you can file separately.
4. For recipients who were only eligible for reduced EI for part of the year, check the Create a copy of this slip? box on the slip to create a second copy of the slip. This second slip ap-pears separately in the forms list. Some fields on the second slip appear in non-edit, green text. Return to the original slip to make changes.
AmendedOn each slip, choose the Type of slip: Original (default), Cancelled or Amended. TaxCycle uses this selection to build the return sum-mary, print slips, and transmit the correct type of return (Original or Cancelled/Amended) to the CRA.
41PAGE
QUICK START GUIDE
www.taxcycle.com
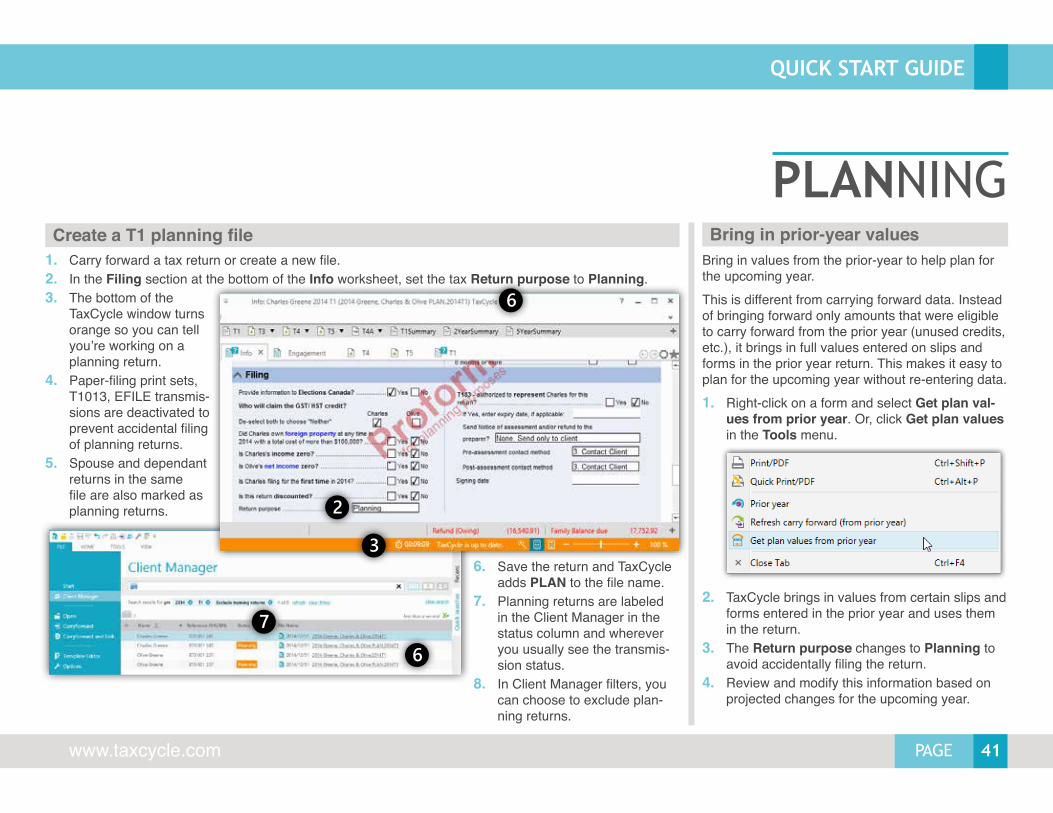
PLANNING1. Carry forward a tax return or create a new file.2. In the Filing section at the bottom of the Info worksheet, set the tax Return purpose to Planning.3. The bottom of the
TaxCycle window turns orange so you can tell you’re working on a planning return.
4. Paper-filing print sets, T1013, EFILE transmis-sions are deactivated to prevent accidental filing of planning returns.
5. Spouse and dependant returns in the same file are also marked as planning returns.
Create a T1 planning fileBring in values from the prior-year to help plan for the upcoming year. This is different from carrying forward data. Instead of bringing forward only amounts that were eligible to carry forward from the prior year (unused credits, etc.), it brings in full values entered on slips and forms in the prior year return. This makes it easy to plan for the upcoming year without re-entering data.1. Right-click on a form and select Get plan val-
ues from prior year. Or, click Get plan values in the Tools menu.
2. TaxCycle brings in values from certain slips and forms entered in the prior year and uses them in the return.
3. The Return purpose changes to Planning to avoid accidentally filing the return.
4. Review and modify this information based on projected changes for the upcoming year.
Bring in prior-year values
6. Save the return and TaxCycle adds PLAN to the file name.
7. Planning returns are labeled in the Client Manager in the status column and wherever you usually see the transmis-sion status.
8. In Client Manager filters, you can choose to exclude plan-ning returns.
42 PAGE
QUICK START GUIDE
1-888-841-3040
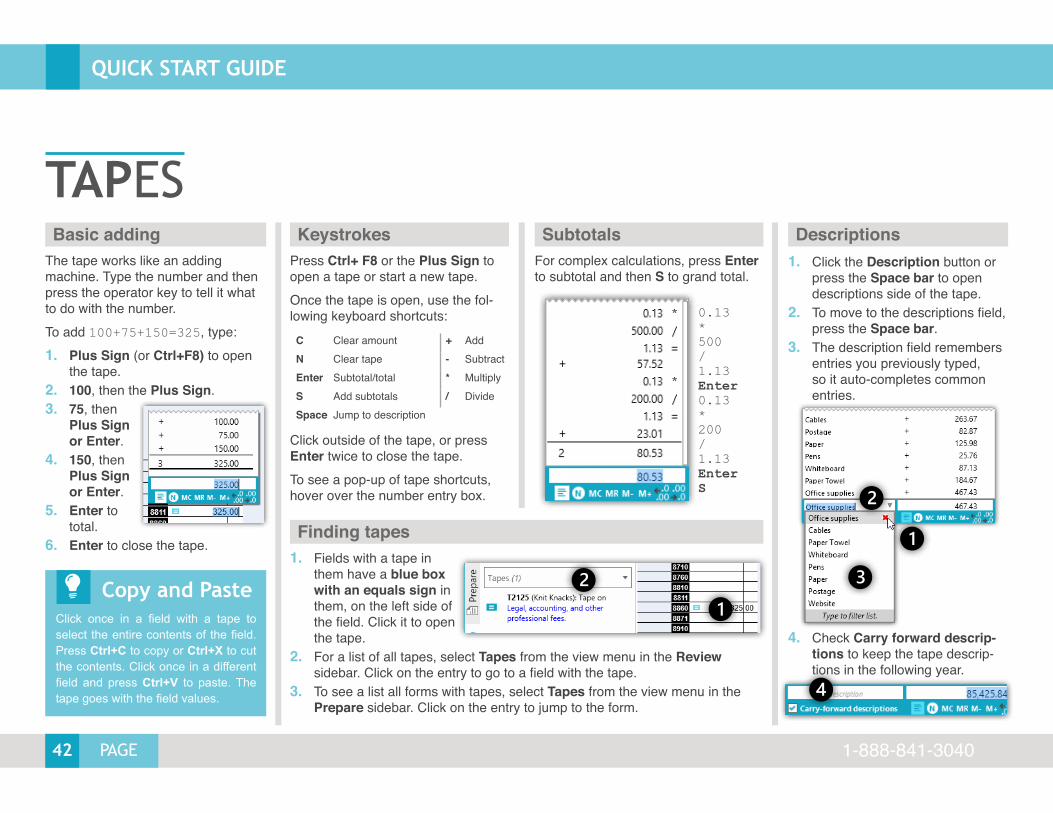
TAPESThe tape works like an adding machine. Type the number and then press the operator key to tell it what to do with the number.To add 100+75+150=325, type:1. Plus Sign (or Ctrl+F8) to open
the tape.2. 100, then the Plus Sign.3. 75, then
Plus Sign or Enter.
4. 150, then Plus Sign or Enter.
5. Enter to total.
6. Enter to close the tape.
Press Ctrl+ F8 or the Plus Sign to open a tape or start a new tape.Once the tape is open, use the fol-lowing keyboard shortcuts:
C Clear amount + AddN Clear tape - SubtractEnter Subtotal/total * MultiplyS Add subtotals / DivideSpace Jump to description
Click outside of the tape, or press Enter twice to close the tape.To see a pop-up of tape shortcuts, hover over the number entry box.
For complex calculations, press Enter to subtotal and then S to grand total.
1. Click the Description button or press the Space bar to open descriptions side of the tape.
2. To move to the descriptions field, press the Space bar.
3. The description field remembers entries you previously typed, so it auto-completes common entries.
Basic adding Subtotals Descriptions
1. Fields with a tape in them have a blue box with an equals sign in them, on the left side of the field. Click it to open the tape.
2. For a list of all tapes, select Tapes from the view menu in the Review sidebar. Click on the entry to go to a field with the tape.
3. To see a list all forms with tapes, select Tapes from the view menu in the Prepare sidebar. Click on the entry to jump to the form.
Copy and PasteClick once in a field with a tape to select the entire contents of the field. Press Ctrl+C to copy or Ctrl+X to cut the contents. Click once in a different field and press Ctrl+V to paste. The tape goes with the field values.
Finding tapes
4. Check Carry forward descrip-tions to keep the tape descrip-tions in the following year.
0.13*500/1.13Enter0.13*200/1.13EnterS
Keystrokes
43PAGE
QUICK START GUIDE
www.taxcycle.com
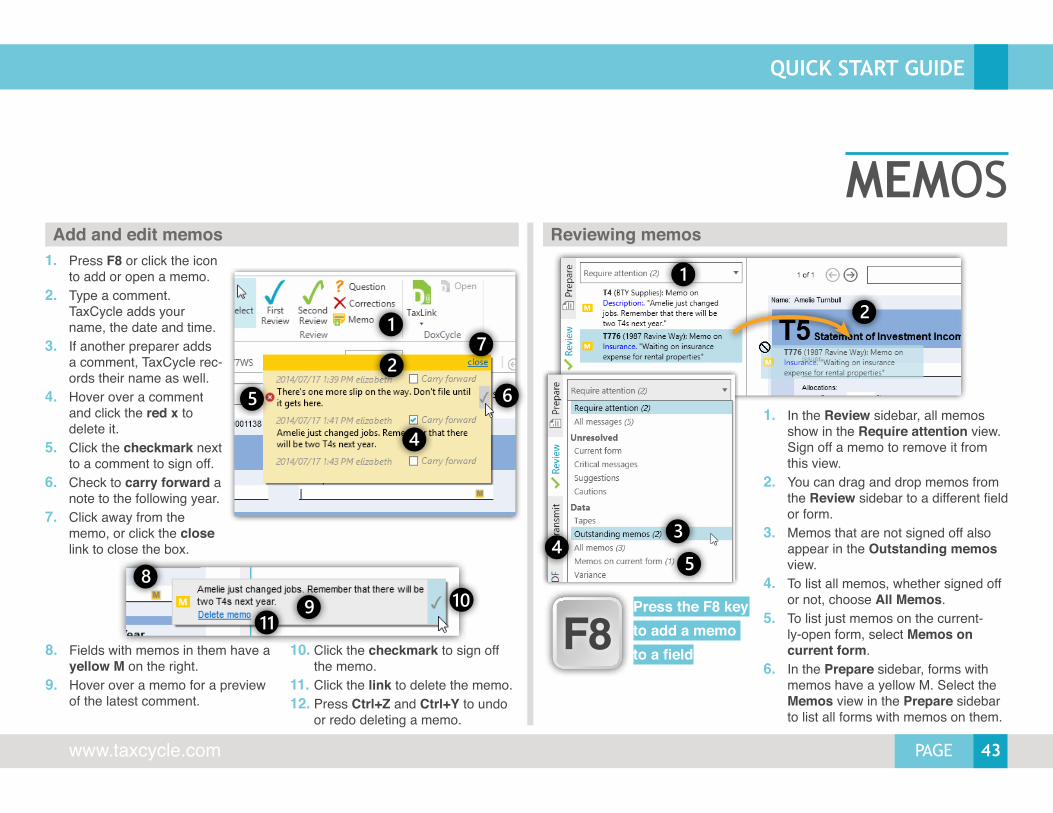
MEMOS
1. In the Review sidebar, all memos show in the Require attention view. Sign off a memo to remove it from this view.
2. You can drag and drop memos from the Review sidebar to a different field or form.
3. Memos that are not signed off also appear in the Outstanding memos view.
4. To list all memos, whether signed off or not, choose All Memos.
5. To list just memos on the current-ly-open form, select Memos on current form.
6. In the Prepare sidebar, forms with memos have a yellow M. Select the Memos view in the Prepare sidebar to list all forms with memos on them.
F8Press the F8 key to add a memo to a field
1. Press F8 or click the icon to add or open a memo.
2. Type a comment. TaxCycle adds your name, the date and time.
3. If another preparer adds a comment, TaxCycle rec-ords their name as well.
4. Hover over a comment and click the red x to delete it.
5. Click the checkmark next to a comment to sign off.
6. Check to carry forward a note to the following year.
7. Click away from the memo, or click the close link to close the box.
Add and edit memos Reviewing memos
8. Fields with memos in them have a yellow M on the right.
9. Hover over a memo for a preview of the latest comment.
10. Click the checkmark to sign off the memo.
11. Click the link to delete the memo. 12. Press Ctrl+Z and Ctrl+Y to undo
or redo deleting a memo.

44 PAGE
QUICK START GUIDE
1-888-841-3040
REVIEWQuick Fix messages
Review sidebar
F9Press the F9 key to open the Review sidebar
1. Forms with a review message have an extra icon over the form icon, making them easy to spot. See also “Form icons” on page 18.
2. Fields with review messages have a corner colour similar to the severity of the review message. For ex-ample, red for critical messages.
3. If you check the option to Show a coloured background on fields with review messages, the field will also have a yellow background. (See the Review section in TaxCycle General options.)
4. Hover over the field to see a pop-up of the review message.
5. If there is more than one review message in the field, all messages appear in the pop-up.
6. If you choose not to deal with a message, click the checkmark to sign it off and hide the message from view. Not all messages can be signed off.
7. Click Review at the side of the window or press F9 to open the review sidebar.
If you hover over a review message in the sidebar and a light bulb appears, the message has a Quick Fix.
1. Click on the light bulb to see the possible solutions.
2. Click a solution to update the field and resolve the error in one step.
3. Quick Fix messages also work when you hover over a field. Click a link to choose a solution.
8. The Require attention view lists messages you must resolve before completing the return.
9. Choose a different view to see all messages, or just certain types of messages, such as those re-quired for EFILE.
10. Double-click on the message to jump directly to the form and field with the issue.
11. Click the blue link in the mes-sage to jump straight to the field.
Review messages
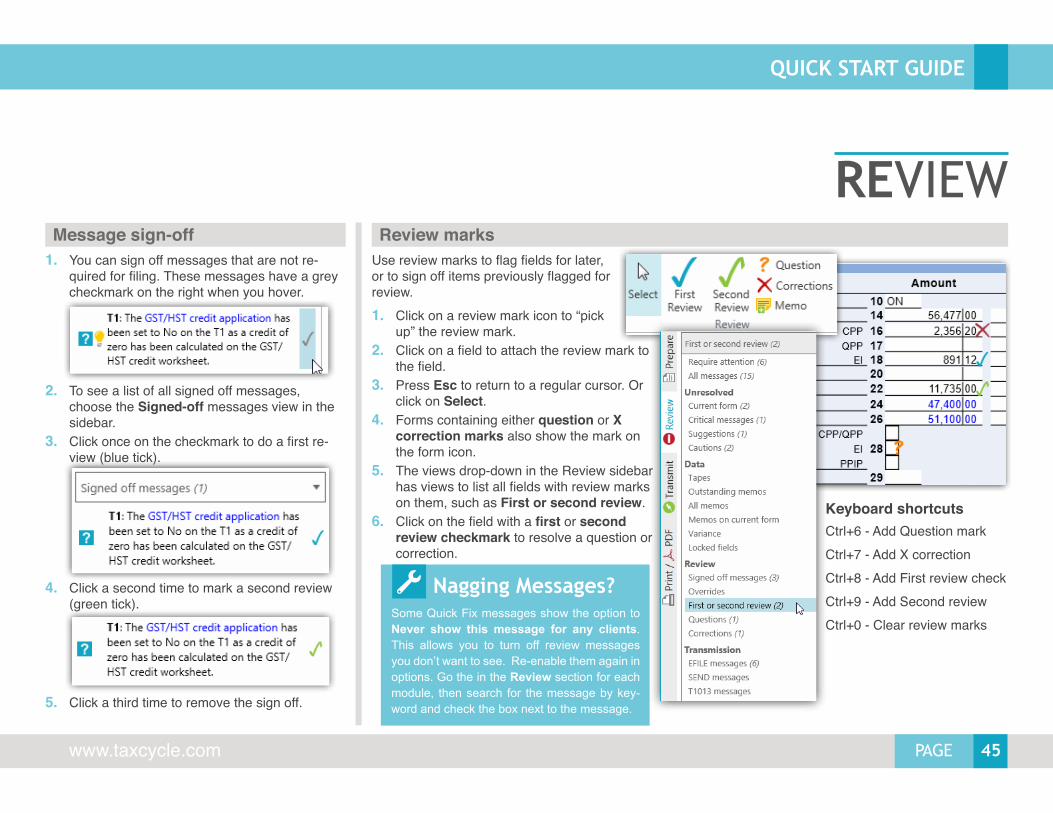
45PAGE
QUICK START GUIDE
www.taxcycle.com
REVIEWMessage sign-off
1. You can sign off messages that are not re-quired for filing. These messages have a grey checkmark on the right when you hover.
2. To see a list of all signed off messages, choose the Signed-off messages view in the sidebar.
3. Click once on the checkmark to do a first re-view (blue tick).
4. Click a second time to mark a second review (green tick).
5. Click a third time to remove the sign off.
Nagging Messages?Some Quick Fix messages show the option to Never show this message for any clients. This allows you to turn off review messages you don’t want to see. Re-enable them again in options. Go the in the Review section for each module, then search for the message by key-word and check the box next to the message.
Review marksUse review marks to flag fields for later, or to sign off items previously flagged for review.1. Click on a review mark icon to “pick
up” the review mark.2. Click on a field to attach the review mark to
the field.3. Press Esc to return to a regular cursor. Or
click on Select.4. Forms containing either question or X
correction marks also show the mark on the form icon.
5. The views drop-down in the Review sidebar has views to list all fields with review marks on them, such as First or second review.
6. Click on the field with a first or second review checkmark to resolve a question or correction.
Keyboard shortcutsCtrl+6 - Add Question markCtrl+7 - Add X correctionCtrl+8 - Add First review checkCtrl+9 - Add Second reviewCtrl+0 - Clear review marks
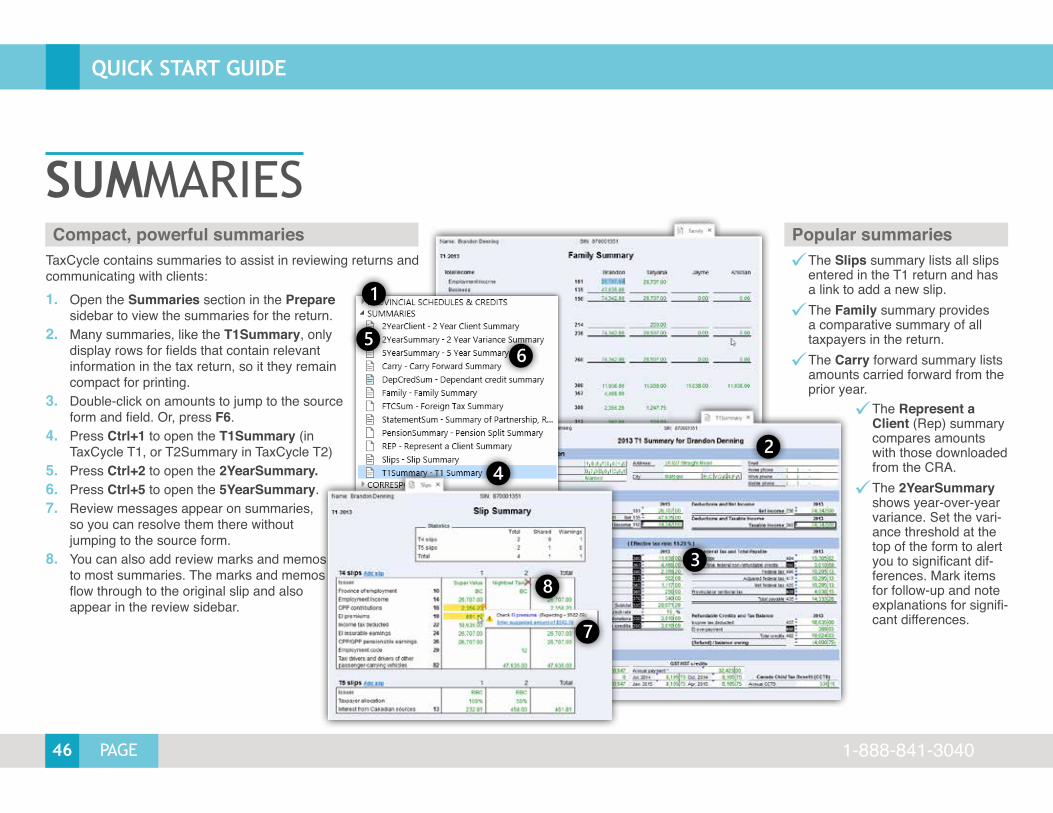
46 PAGE
QUICK START GUIDE
1-888-841-3040
SUMMARIESCompact, powerful summaries Popular summaries
TaxCycle contains summaries to assist in reviewing returns and communicating with clients:1. Open the Summaries section in the Prepare
sidebar to view the summaries for the return.2. Many summaries, like the T1Summary, only
display rows for fields that contain relevant information in the tax return, so it they remain compact for printing.
3. Double-click on amounts to jump to the source form and field. Or, press F6.
4. Press Ctrl+1 to open the T1Summary (in TaxCycle T1, or T2Summary in TaxCycle T2)
5. Press Ctrl+2 to open the 2YearSummary.6. Press Ctrl+5 to open the 5YearSummary.7. Review messages appear on summaries,
so you can resolve them there without jumping to the source form.
8. You can also add review marks and memos to most summaries. The marks and memos flow through to the original slip and also appear in the review sidebar.
99The Slips summary lists all slips entered in the T1 return and has a link to add a new slip.
99The Family summary provides a comparative summary of all taxpayers in the return.
99The Carry forward summary lists amounts carried forward from the prior year.
99The Represent a Client (Rep) summary compares amounts with those downloaded from the CRA.
99The 2YearSummary shows year-over-year variance. Set the vari-ance threshold at the top of the form to alert you to significant dif-ferences. Mark items for follow-up and note explanations for signifi-cant differences.
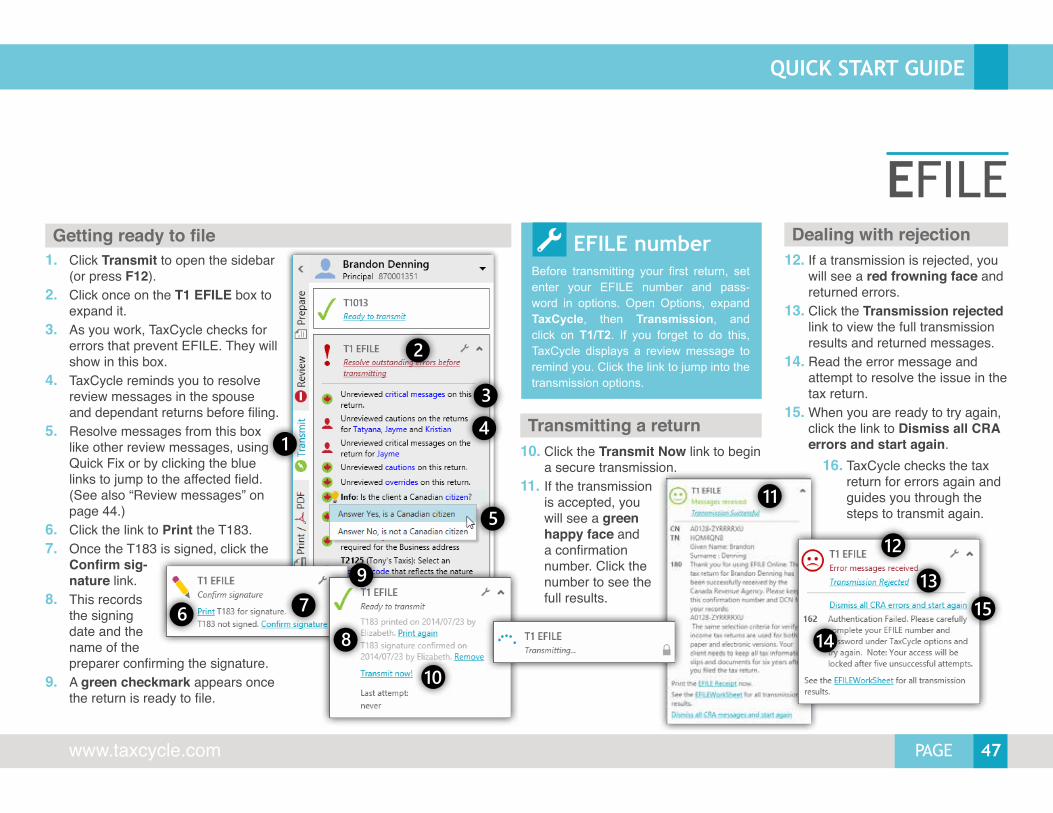
47PAGE
QUICK START GUIDE
www.taxcycle.com
12. If a transmission is rejected, you will see a red frowning face and returned errors.
13. Click the Transmission rejected link to view the full transmission results and returned messages.
14. Read the error message and attempt to resolve the issue in the tax return.
15. When you are ready to try again, click the link to Dismiss all CRA errors and start again.
EFILEEFILE number
Before transmitting your first return, set enter your EFILE number and pass-word in options. Open Options, expand TaxCycle, then Transmission, and click on T1/T2. If you forget to do this, TaxCycle displays a review message to remind you. Click the link to jump into the transmission options.
1. Click Transmit to open the sidebar (or press F12).
2. Click once on the T1 EFILE box to expand it.
3. As you work, TaxCycle checks for errors that prevent EFILE. They will show in this box.
4. TaxCycle reminds you to resolve review messages in the spouse and dependant returns before filing.
5. Resolve messages from this box like other review messages, using Quick Fix or by clicking the blue links to jump to the affected field. (See also “Review messages” on page 44.)
6. Click the link to Print the T183.7. Once the T183 is signed, click the
Confirm sig-nature link.
8. This records the signing date and the name of the preparer confirming the signature.
9. A green checkmark appears once the return is ready to file.
Getting ready to file
Transmitting a return
Dealing with rejection
10. Click the Transmit Now link to begin a secure transmission.
11. If the transmission is accepted, you will see a green happy face and a confirmation number. Click the number to see the full results.
16. TaxCycle checks the tax return for errors again and guides you through the steps to transmit again.
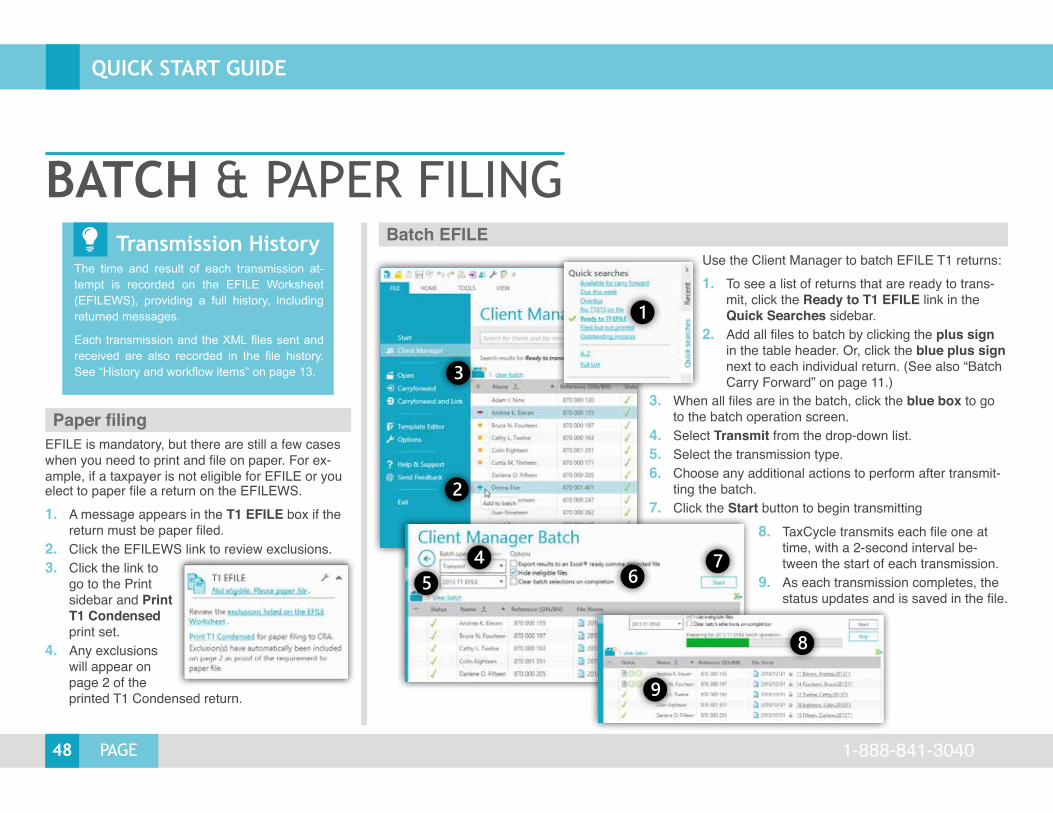
48 PAGE
QUICK START GUIDE
1-888-841-3040
BATCH & PAPER FILING
Paper filing
Batch EFILEUse the Client Manager to batch EFILE T1 returns:1. To see a list of returns that are ready to trans-
mit, click the Ready to T1 EFILE link in the Quick Searches sidebar.
2. Add all files to batch by clicking the plus sign in the table header. Or, click the blue plus sign next to each individual return. (See also “Batch Carry Forward” on page 11.)
Transmission HistoryThe time and result of each transmission at-tempt is recorded on the EFILE Worksheet (EFILEWS), providing a full history, including returned messages.
Each transmission and the XML files sent and received are also recorded in the file history. See “History and workflow items” on page 13.
EFILE is mandatory, but there are still a few cases when you need to print and file on paper. For ex-ample, if a taxpayer is not eligible for EFILE or you elect to paper file a return on the EFILEWS.1. A message appears in the T1 EFILE box if the
return must be paper filed.2. Click the EFILEWS link to review exclusions.3. Click the link to
go to the Print sidebar and Print T1 Condensed print set.
4. Any exclusions will appear on page 2 of the printed T1 Condensed return.
3. When all files are in the batch, click the blue box to go to the batch operation screen.
4. Select Transmit from the drop-down list.5. Select the transmission type.6. Choose any additional actions to perform after transmit-
ting the batch. 7. Click the Start button to begin transmitting
8. TaxCycle transmits each file one at time, with a 2-second interval be-tween the start of each transmission.
9. As each transmission completes, the status updates and is saved in the file.
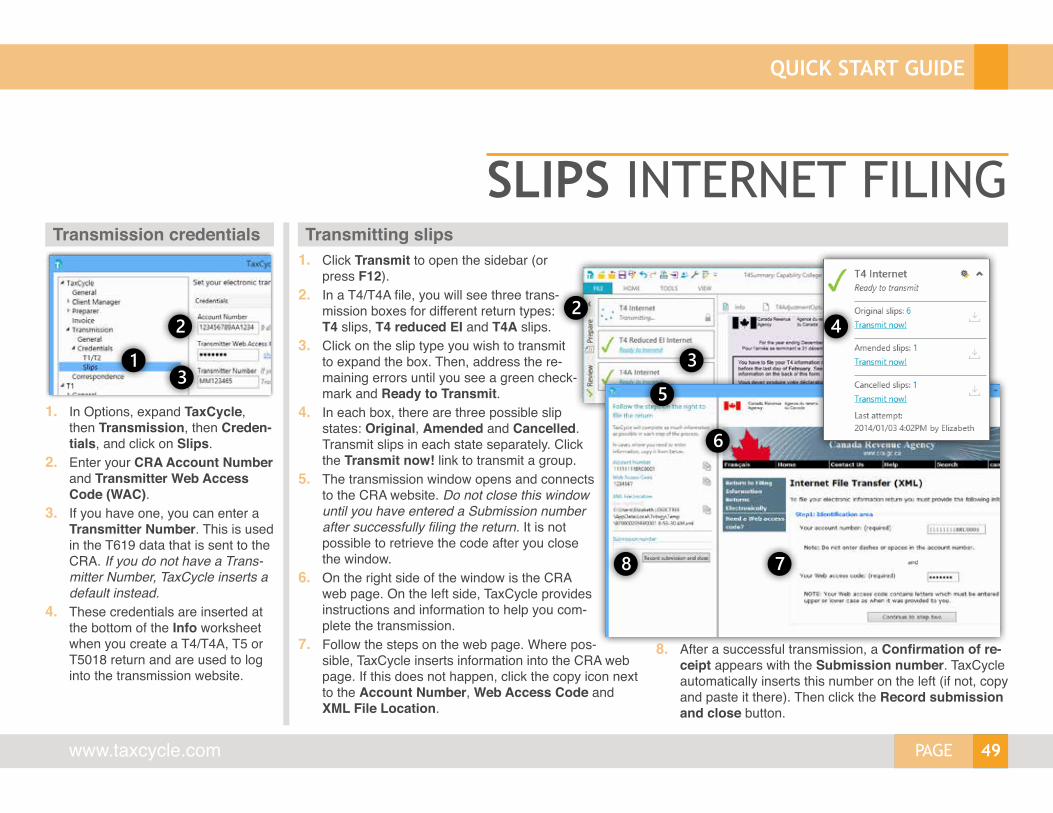
49PAGE
QUICK START GUIDE
www.taxcycle.com
1. Click Transmit to open the sidebar (or press F12).
2. In a T4/T4A file, you will see three trans-mission boxes for different return types: T4 slips, T4 reduced EI and T4A slips.
3. Click on the slip type you wish to transmit to expand the box. Then, address the re-maining errors until you see a green check-mark and Ready to Transmit.
4. In each box, there are three possible slip states: Original, Amended and Cancelled. Transmit slips in each state separately. Click the Transmit now! link to transmit a group.
5. The transmission window opens and connects to the CRA website. Do not close this window until you have entered a Submission number after successfully filing the return. It is not possible to retrieve the code after you close the window.
6. On the right side of the window is the CRA web page. On the left side, TaxCycle provides instructions and information to help you com-plete the transmission.
7. Follow the steps on the web page. Where pos-sible, TaxCycle inserts information into the CRA web page. If this does not happen, click the copy icon next to the Account Number, Web Access Code and XML File Location.
SLIPS INTERNET FILINGTransmission credentials
1. In Options, expand TaxCycle, then Transmission, then Creden-tials, and click on Slips.
2. Enter your CRA Account Number and Transmitter Web Access Code (WAC).
3. If you have one, you can enter a Transmitter Number. This is used in the T619 data that is sent to the CRA. If you do not have a Trans-mitter Number, TaxCycle inserts a default instead.
4. These credentials are inserted at the bottom of the Info worksheet when you create a T4/T4A, T5 or T5018 return and are used to log into the transmission website.
Transmitting slips
8. After a successful transmission, a Confirmation of re-ceipt appears with the Submission number. TaxCycle automatically inserts this number on the left (if not, copy and paste it there). Then click the Record submission and close button.
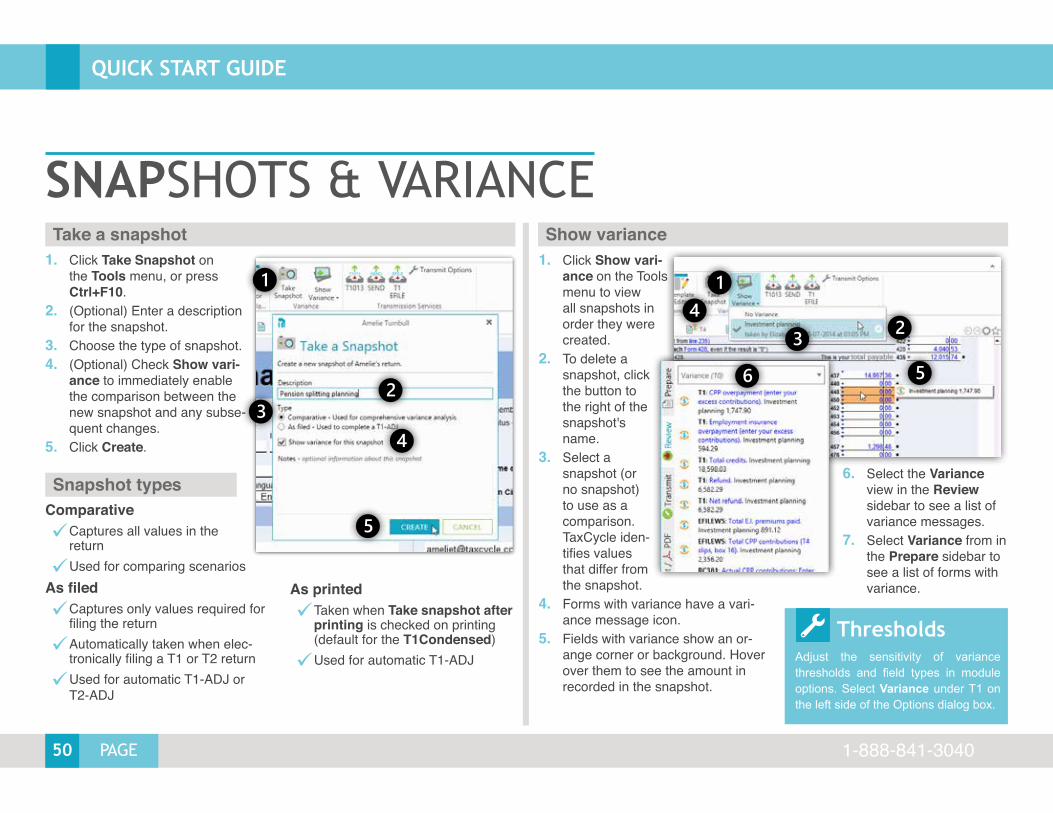
50 PAGE
QUICK START GUIDE
1-888-841-3040
SNAPSHOTS & VARIANCETake a snapshot
1. Click Take Snapshot on the Tools menu, or press Ctrl+F10.
2. (Optional) Enter a description for the snapshot.
3. Choose the type of snapshot.4. (Optional) Check Show vari-
ance to immediately enable the comparison between the new snapshot and any subse-quent changes.
5. Click Create.
1. Click Show vari-ance on the Tools menu to view all snapshots in order they were created.
2. To delete a snapshot, click the button to the right of the snapshot's name.
3. Select a snapshot (or no snapshot) to use as a comparison. TaxCycle iden-tifies values that differ from the snapshot.
4. Forms with variance have a vari-ance message icon.
5. Fields with variance show an or-ange corner or background. Hover over them to see the amount in recorded in the snapshot.
Show variance
ThresholdsAdjust the sensitivity of variance thresholds and field types in module options. Select Variance under T1 on the left side of the Options dialog box.
Comparative99Captures all values in the return
99Used for comparing scenariosAs filed99Captures only values required for filing the return
99Automatically taken when elec-tronically filing a T1 or T2 return
99Used for automatic T1-ADJ or T2-ADJ
As printed99Taken when Take snapshot after printing is checked on printing (default for the T1Condensed)
99Used for automatic T1-ADJ
Snapshot types 6. Select the Variance view in the Review sidebar to see a list of variance messages.
7. Select Variance from in the Prepare sidebar to see a list of forms with variance.
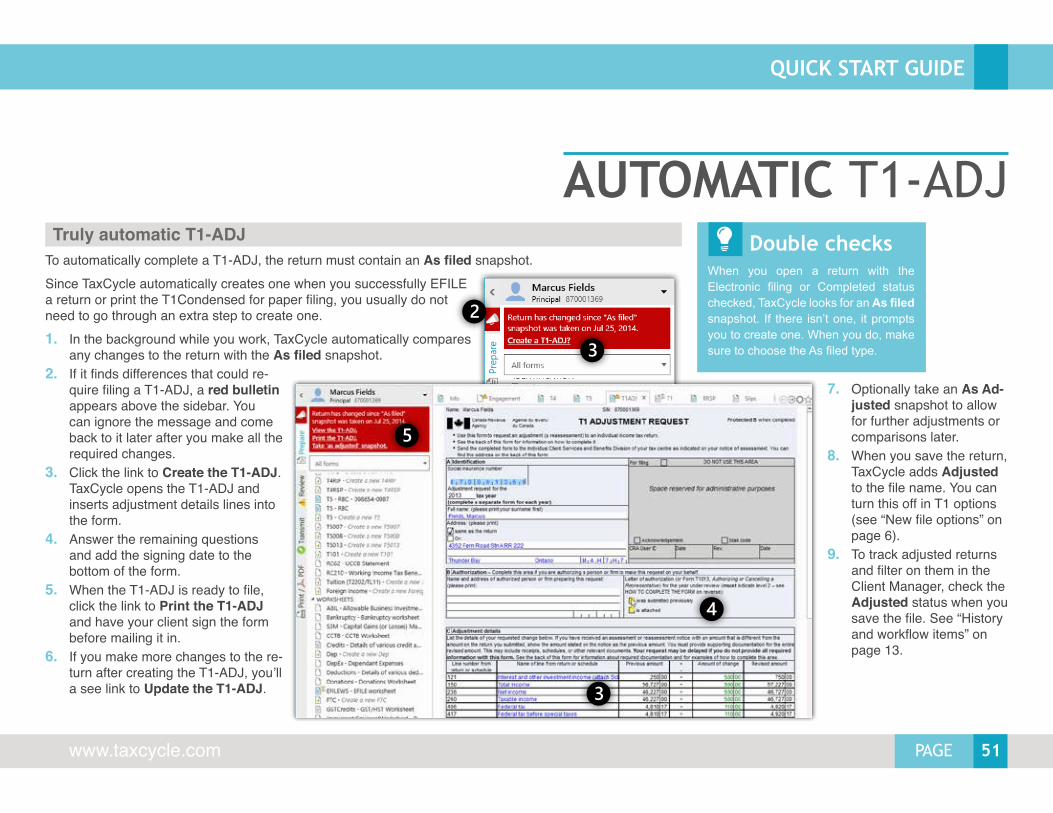
51PAGE
QUICK START GUIDE
www.taxcycle.com
AUTOMATIC T1-ADJTo automatically complete a T1-ADJ, the return must contain an As filed snapshot. Since TaxCycle automatically creates one when you successfully EFILE a return or print the T1Condensed for paper filing, you usually do not need to go through an extra step to create one.1. In the background while you work, TaxCycle automatically compares
any changes to the return with the As filed snapshot.2. If it finds differences that could re-
quire filing a T1-ADJ, a red bulletin appears above the sidebar. You can ignore the message and come back to it later after you make all the required changes.
3. Click the link to Create the T1-ADJ. TaxCycle opens the T1-ADJ and inserts adjustment details lines into the form.
4. Answer the remaining questions and add the signing date to the bottom of the form.
5. When the T1-ADJ is ready to file, click the link to Print the T1-ADJ and have your client sign the form before mailing it in.
6. If you make more changes to the re-turn after creating the T1-ADJ, you’ll a see link to Update the T1-ADJ.
Double checksWhen you open a return with the Electronic filing or Completed status checked, TaxCycle looks for an As filed snapshot. If there isn’t one, it prompts you to create one. When you do, make sure to choose the As filed type.
Truly automatic T1-ADJ
7. Optionally take an As Ad-justed snapshot to allow for further adjustments or comparisons later.
8. When you save the return, TaxCycle adds Adjusted to the file name. You can turn this off in T1 options (see “New file options” on page 6).
9. To track adjusted returns and filter on them in the Client Manager, check the Adjusted status when you save the file. See “History and workflow items” on page 13.
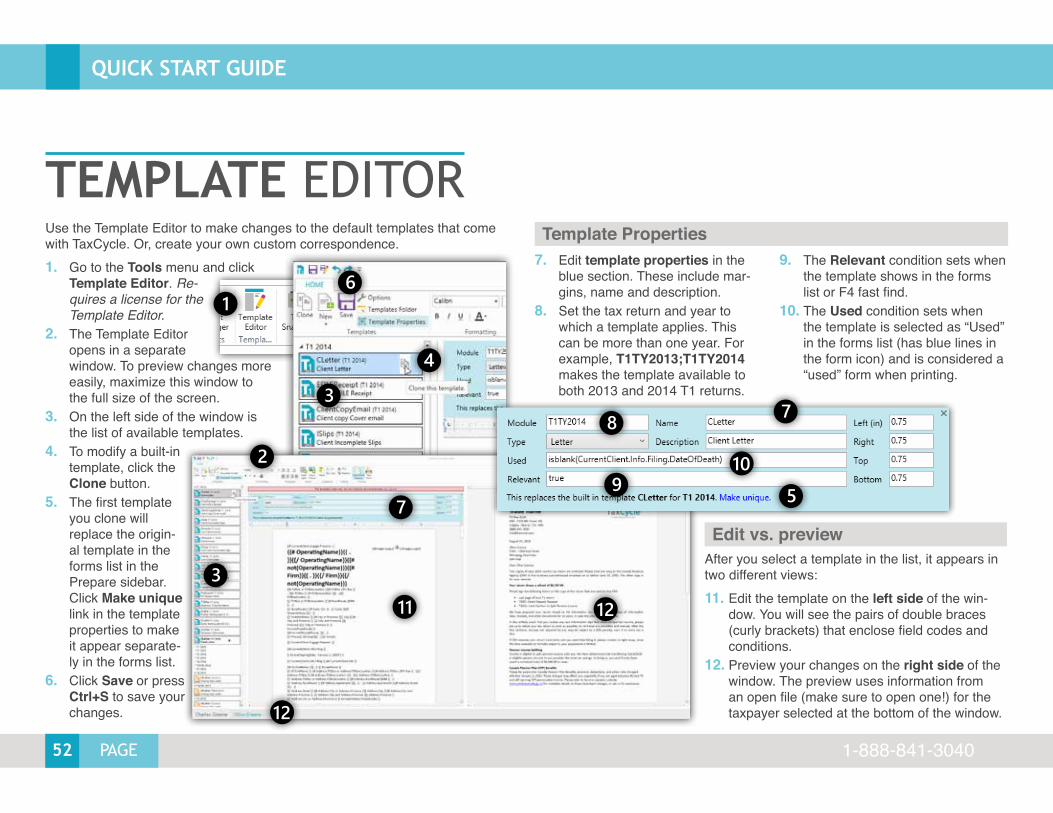
52 PAGE
QUICK START GUIDE
1-888-841-3040
TEMPLATE EDITORTemplate PropertiesUse the Template Editor to make changes to the default templates that come
with TaxCycle. Or, create your own custom correspondence.1. Go to the Tools menu and click
Template Editor. Re-quires a license for the Template Editor.
2. The Template Editor opens in a separate window. To preview changes more easily, maximize this window to the full size of the screen.
3. On the left side of the window is the list of available templates.
4. To modify a built-in template, click the Clone button.
5. The first template you clone will replace the origin-al template in the forms list in the Prepare sidebar. Click Make unique link in the template properties to make it appear separate-ly in the forms list.
6. Click Save or press Ctrl+S to save your changes.
Edit vs. preview
7. Edit template properties in the blue section. These include mar-gins, name and description.
8. Set the tax return and year to which a template applies. This can be more than one year. For example, T1TY2013;T1TY2014 makes the template available to both 2013 and 2014 T1 returns.
9. The Relevant condition sets when the template shows in the forms list or F4 fast find.
10. The Used condition sets when the template is selected as “Used” in the forms list (has blue lines in the form icon) and is considered a “used” form when printing.
After you select a template in the list, it appears in two different views: 11. Edit the template on the left side of the win-
dow. You will see the pairs of double braces (curly brackets) that enclose field codes and conditions.
12. Preview your changes on the right side of the window. The preview uses information from an open file (make sure to open one!) for the taxpayer selected at the bottom of the window.

53PAGE
QUICK START GUIDE
www.taxcycle.com
Field codes
TEMPLATES
Labels
Email templatesField codes allow you to add pull information from tax return data. For example, {{CurrentClient.Info.ID.FirstName}} inserts the first name of the client as it appears on the Info worksheet. To add a field code to a letter:1. Put your cursor in a field you want to add to the template.2. Click the link in the blue
bar at the bottom of the window to put the field code onto your clip-board.
3. Paste the code into the template.
Conditional statements allow you to in-clude or exclude sections of a template based on whether the condition is met.1. A condition opens with a field code
prefixed with a # (hash): {{#CurrentClient.Info.ID.Title}}
2. Close a condition with {{/end}} (or the same the exact same tag as the opening with a backslash instead of a hash.
Conditional statements Calculations and logic1. Add the values of two field
codes by placing a + (plus sign) between the codes.
2. Two field codes separated by and or or will require both or either statements to be matched.
3. Operators like > (greater than), < (less than), = (equal to) and != (not equal) also work within these statements.
To create an email tem-plate, select Email as the Type in the Template Properties box.The email template becomes available in the Destination drop-down when printing to Adobe PDF and XPS formats. It does not ap-pear in the forms list or F4 Fast Find. TaxCycle supports desktop label
printers, such as the Brother QL-570 and the Dymo Turbo 450. TaxCycle comes with two sample label tem-plates for these printers, DLabel and BLabel. After you clone one of these tem-plates, customize the margins and orientation and print a test label.
Template filesAny templates you create or modify are saved to the templates folder on your computer, making it easy to copy and share them with others.
To open your templates folder, click Templates Folder in the menu.
If you save templates elsewhere, they will not show in TaxCycle, unless you also change the location in Options.
Set the location to save your templates in the Common folders section in General options.
PersonalizationAdd one-off personalizations to a letter in the client file, rather than the Template Editor. Click on letter and then type.A message appears at the top of the letter to remind you it contains customizations.
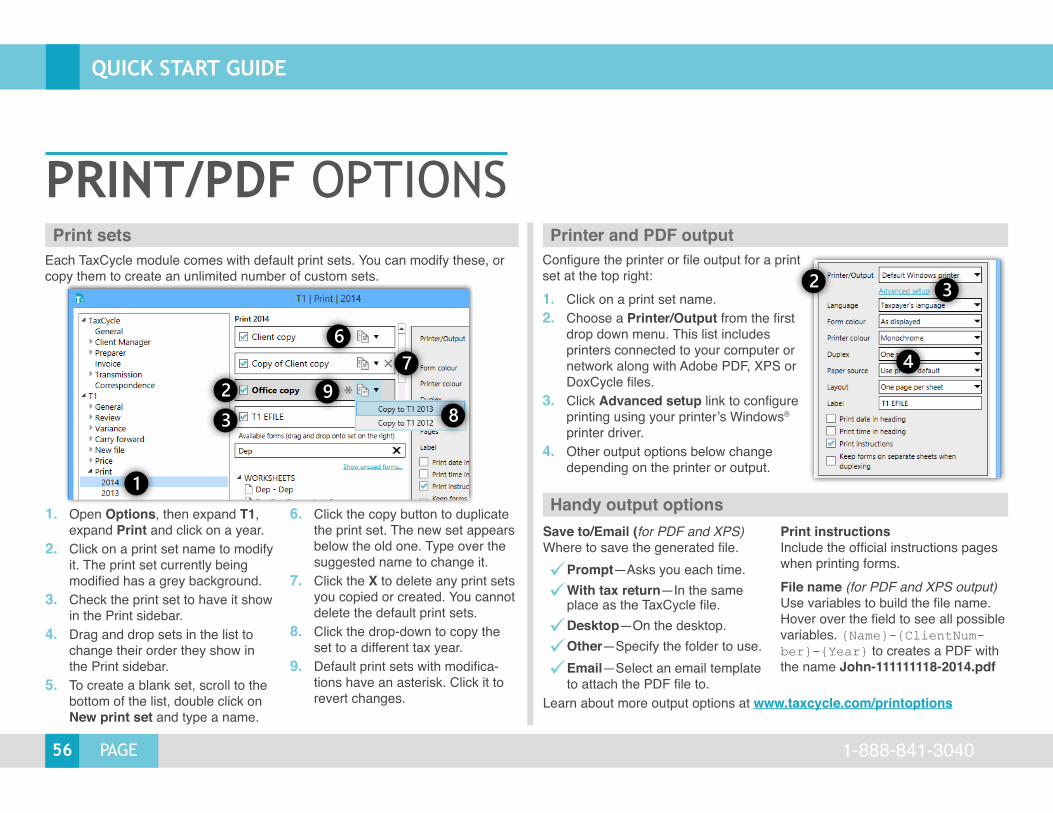
56 PAGE
QUICK START GUIDE
1-888-841-3040
PRINT/PDF OPTIONSPrint sets
Print instructions Include the official instructions pages when printing forms.File name (for PDF and XPS output) Use variables to build the file name. Hover over the field to see all possible variables. {Name}-{ClientNum-ber}-{Year} to creates a PDF with the name John-111111118-2014.pdf
Each TaxCycle module comes with default print sets. You can modify these, or copy them to create an unlimited number of custom sets.
1. Open Options, then expand T1, expand Print and click on a year.
2. Click on a print set name to modify it. The print set currently being modified has a grey background.
3. Check the print set to have it show in the Print sidebar.
4. Drag and drop sets in the list to change their order they show in the Print sidebar.
5. To create a blank set, scroll to the bottom of the list, double click on New print set and type a name.
6. Click the copy button to duplicate the print set. The new set appears below the old one. Type over the suggested name to change it.
7. Click the X to delete any print sets you copied or created. You cannot delete the default print sets.
8. Click the drop-down to copy the set to a different tax year.
9. Default print sets with modifica-tions have an asterisk. Click it to revert changes.
Printer and PDF outputConfigure the printer or file output for a print set at the top right:1. Click on a print set name.2. Choose a Printer/Output from the first
drop down menu. This list includes printers connected to your computer or network along with Adobe PDF, XPS or DoxCycle files.
3. Click Advanced setup link to configure printing using your printer’s Windows® printer driver.
4. Other output options below change depending on the printer or output.
Handy output optionsSave to/Email (for PDF and XPS) Where to save the generated file.
99Prompt—Asks you each time.
99With tax return—In the same place as the TaxCycle file.
99Desktop—On the desktop.
99Other—Specify the folder to use.
99Email—Select an email template to attach the PDF file to.
Learn about more output options at www.taxcycle.com/printoptions
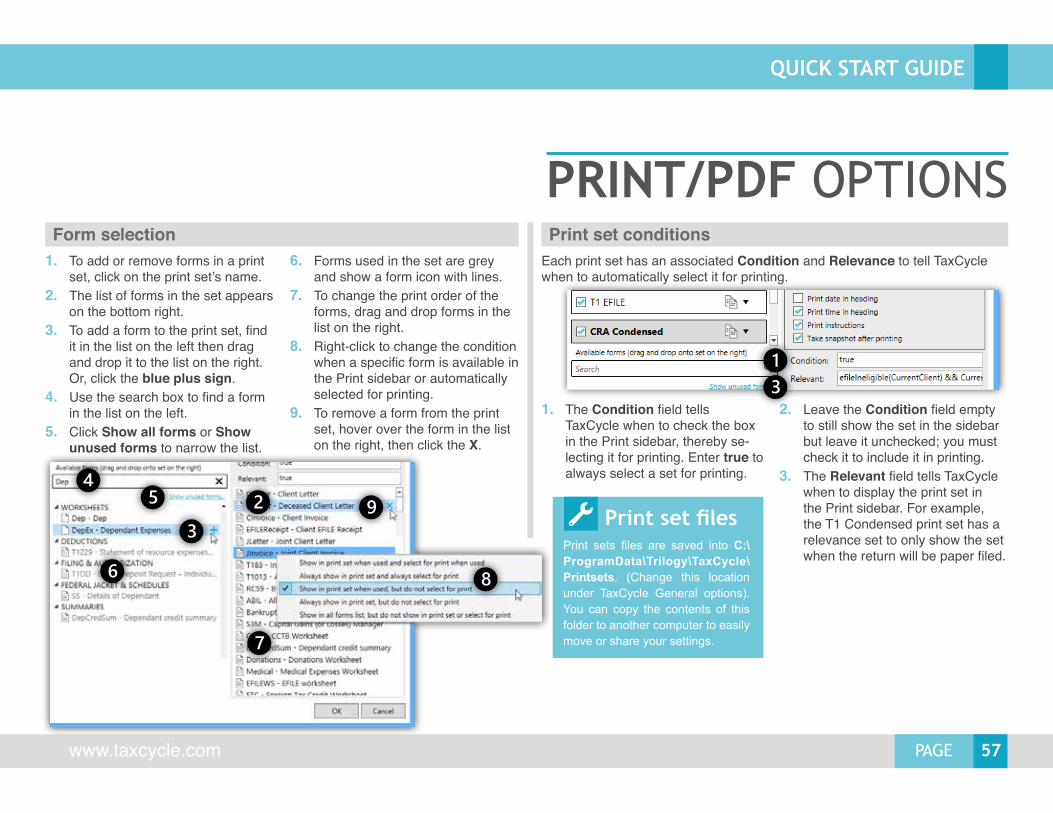
57PAGE
QUICK START GUIDE
www.taxcycle.com
PRINT/PDF OPTIONSForm selection
1. To add or remove forms in a print set, click on the print set’s name.
2. The list of forms in the set appears on the bottom right.
3. To add a form to the print set, find it in the list on the left then drag and drop it to the list on the right. Or, click the blue plus sign.
4. Use the search box to find a form in the list on the left.
5. Click Show all forms or Show unused forms to narrow the list.
6. Forms used in the set are grey and show a form icon with lines.
7. To change the print order of the forms, drag and drop forms in the list on the right.
8. Right-click to change the condition when a specific form is available in the Print sidebar or automatically selected for printing.
9. To remove a form from the print set, hover over the form in the list on the right, then click the X.
Print set conditionsEach print set has an associated Condition and Relevance to tell TaxCycle when to automatically select it for printing.
Print set filesPrint sets files are saved into C:\ProgramData\Trilogy\TaxCycle\Printsets. (Change this location under TaxCycle General options). You can copy the contents of this folder to another computer to easily move or share your settings.
1. The Condition field tells TaxCycle when to check the box in the Print sidebar, thereby se-lecting it for printing. Enter true to always select a set for printing.
2. Leave the Condition field empty to still show the set in the sidebar but leave it unchecked; you must check it to include it in printing.
3. The Relevant field tells TaxCycle when to display the print set in the Print sidebar. For example, the T1 Condensed print set has a relevance set to only show the set when the return will be paper filed.
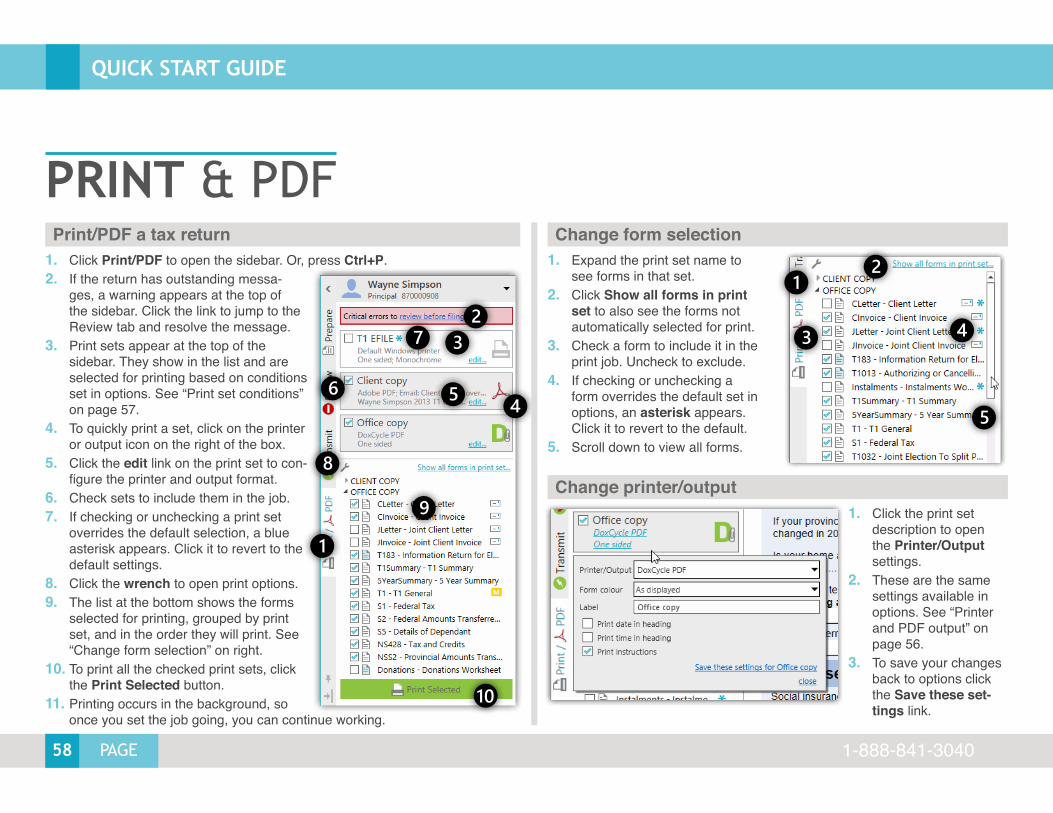
58 PAGE
QUICK START GUIDE
1-888-841-3040
PRINT & PDFPrint/PDF a tax return
1. Click Print/PDF to open the sidebar. Or, press Ctrl+P. 2. If the return has outstanding messa-
ges, a warning appears at the top of the sidebar. Click the link to jump to the Review tab and resolve the message.
3. Print sets appear at the top of the sidebar. They show in the list and are selected for printing based on conditions set in options. See “Print set conditions” on page 57.
4. To quickly print a set, click on the printer or output icon on the right of the box.
5. Click the edit link on the print set to con-figure the printer and output format.
6. Check sets to include them in the job.7. If checking or unchecking a print set
overrides the default selection, a blue asterisk appears. Click it to revert to the default settings.
8. Click the wrench to open print options.9. The list at the bottom shows the forms
selected for printing, grouped by print set, and in the order they will print. See “Change form selection” on right.
10. To print all the checked print sets, click the Print Selected button.
11. Printing occurs in the background, so once you set the job going, you can continue working.
Change form selection
Change printer/output
1. Expand the print set name to see forms in that set.
2. Click Show all forms in print set to also see the forms not automatically selected for print.
3. Check a form to include it in the print job. Uncheck to exclude.
4. If checking or unchecking a form overrides the default set in options, an asterisk appears. Click it to revert to the default.
5. Scroll down to view all forms.
1. Click the print set description to open the Printer/Output settings.
2. These are the same settings available in options. See “Printer and PDF output” on page 56.
3. To save your changes back to options click the Save these set-tings link.
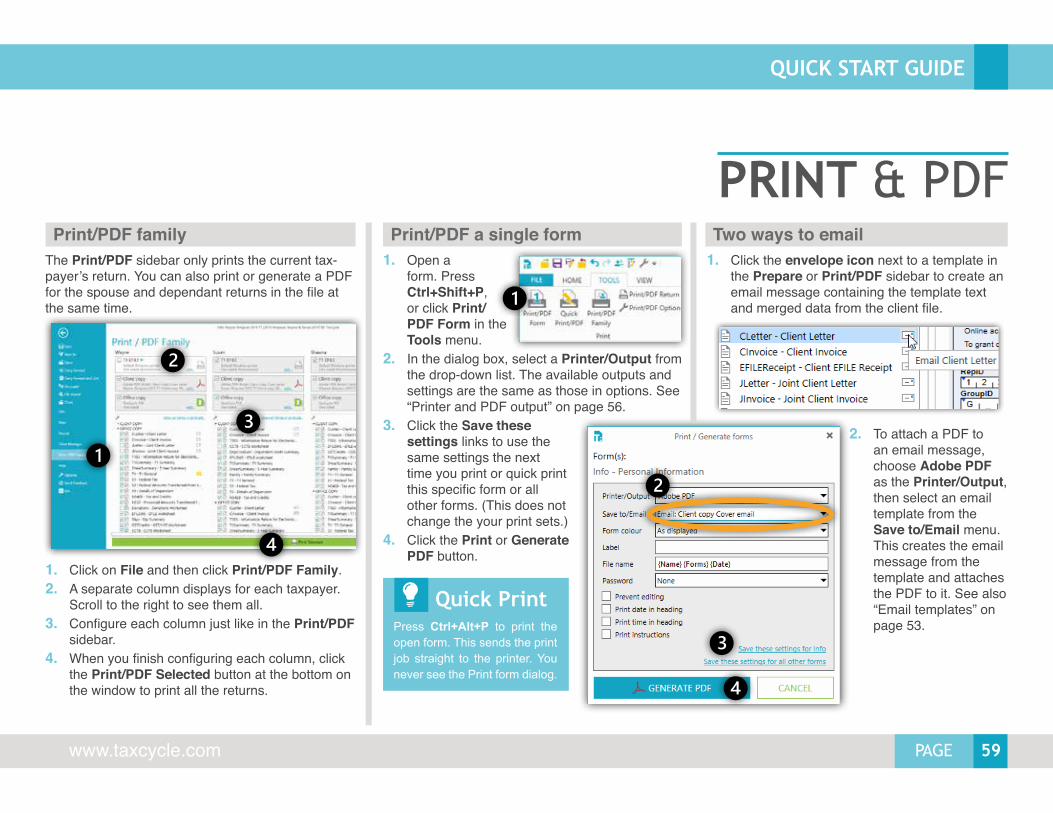
59PAGE
QUICK START GUIDE
www.taxcycle.com
PRINT & PDFPrint/PDF a single formPrint/PDF family Two ways to email
The Print/PDF sidebar only prints the current tax-payer’s return. You can also print or generate a PDF for the spouse and dependant returns in the file at the same time.
1. Click on File and then click Print/PDF Family. 2. A separate column displays for each taxpayer.
Scroll to the right to see them all.3. Configure each column just like in the Print/PDF
sidebar.4. When you finish configuring each column, click
the Print/PDF Selected button at the bottom on the window to print all the returns.
1. Open a form. Press Ctrl+Shift+P, or click Print/PDF Form in the Tools menu.
2. In the dialog box, select a Printer/Output from the drop-down list. The available outputs and settings are the same as those in options. See “Printer and PDF output” on page 56.
3. Click the Save these settings links to use the same settings the next time you print or quick print this specific form or all other forms. (This does not change the your print sets.)
4. Click the Print or Generate PDF button.
Quick PrintPress Ctrl+Alt+P to print the open form. This sends the print job straight to the printer. You never see the Print form dialog.
1. Click the envelope icon next to a template in the Prepare or Print/PDF sidebar to create an email message containing the template text and merged data from the client file.
2. To attach a PDF to an email message, choose Adobe PDF as the Printer/Output, then select an email template from the Save to/Email menu. This creates the email message from the template and attaches the PDF to it. See also “Email templates” on page 53.