Embed Size (px)
Citation preview
Quick Start Guide
How to register as a new user of Connect and link your user profile to a single customer account, or multiple customer accounts, in Connect
This quick start guide is comprised of three parts:
See Part 1 to register as a Connect user for the first time.
See Part 2 to link your newly-created user profile to a customer account in Connect in order to view records associated with the customer account, and perform actions on behalf of the customer account.
See Part 3 to link your user profile to multiple customer accounts in Connect in order to view records associated with those customer accounts, and perform actions on behalf of those customer accounts.
Part 1: User registration
Use this quick start guide to register as a new user in Connect.
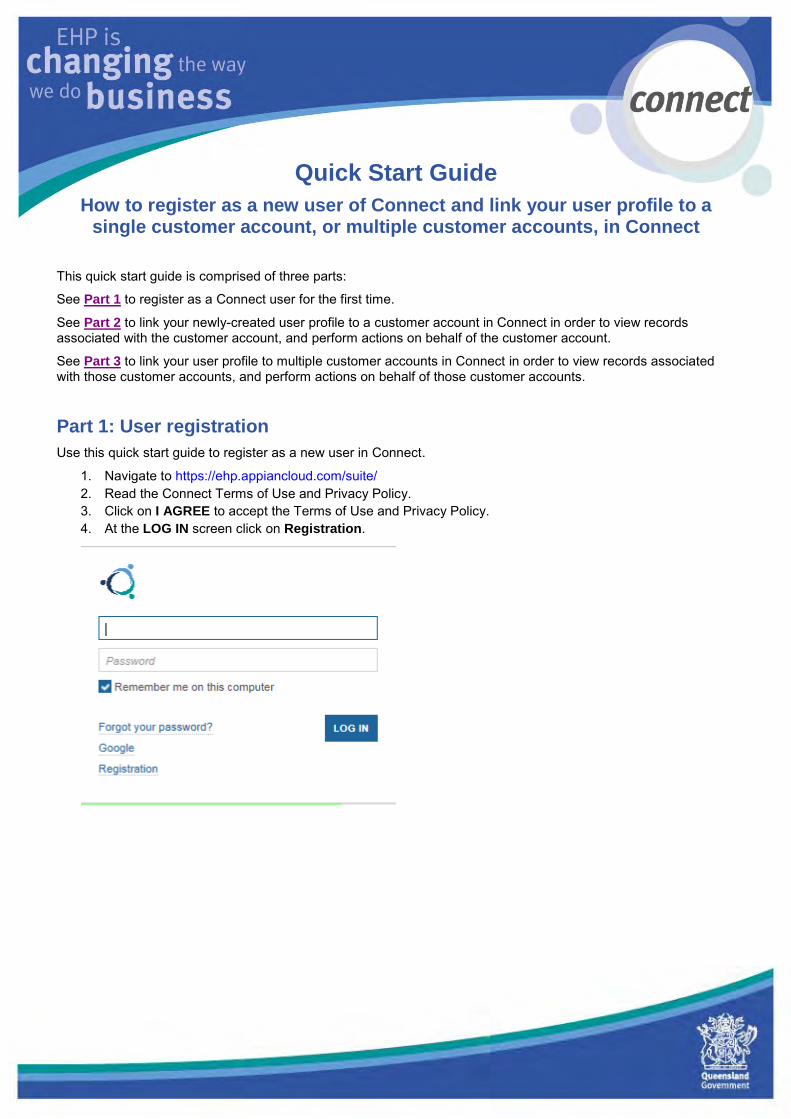
1. Navigate to https://ehp.appiancloud.com/suite/ 2. Read the Connect Terms of Use and Privacy Policy. 3. Click on I AGREE to accept the Terms of Use and Privacy Policy. 4. At the LOG IN screen click on Registration.
Register as a new user of Connect and link to a single customer account, or multiple customer accounts
2
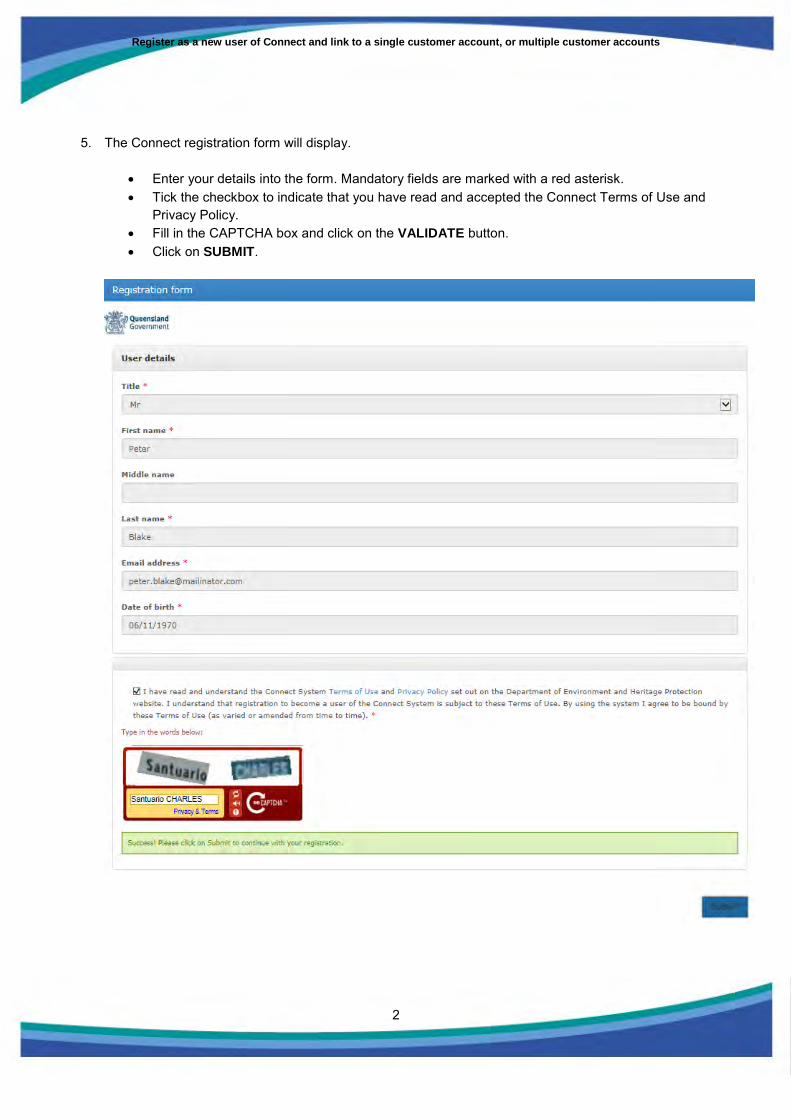
5. The Connect registration form will display.
Enter your details into the form. Mandatory fields are marked with a red asterisk. Tick the checkbox to indicate that you have read and accepted the Connect Terms of Use and
Privacy Policy. Fill in the CAPTCHA box and click on the VALIDATE button. Click on SUBMIT.
Register as a new user of Connect and link to a single customer account, or multiple customer accounts
3
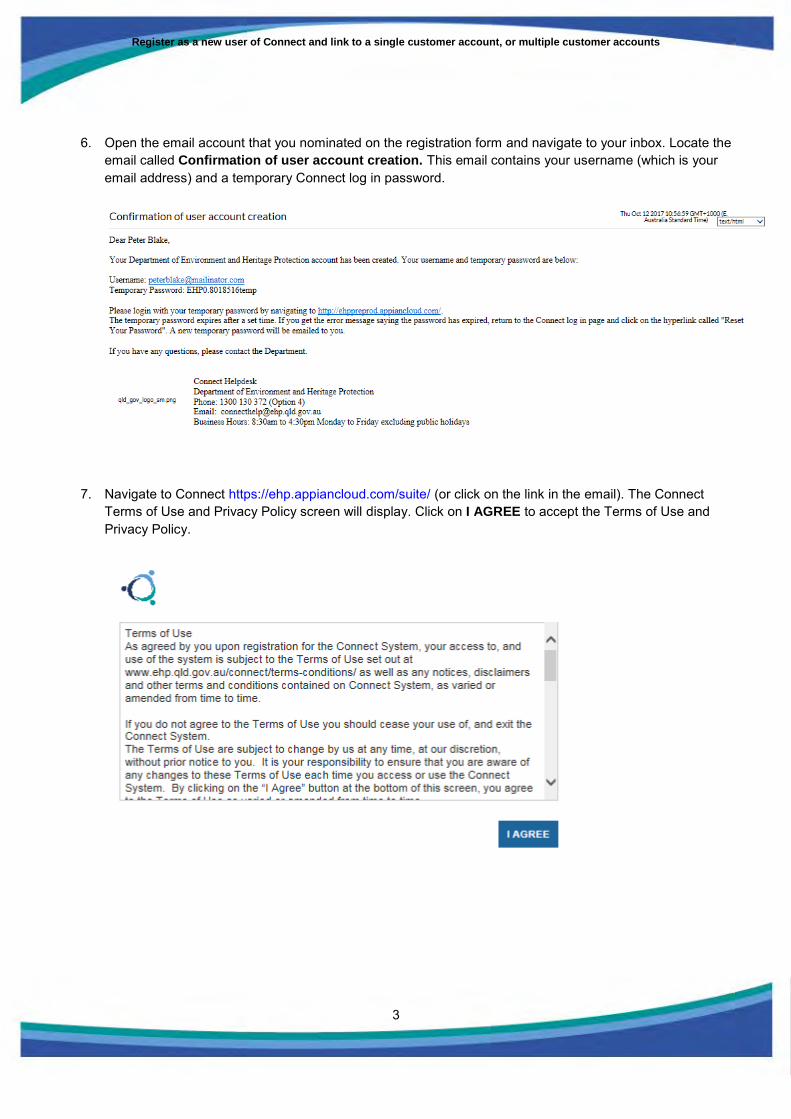
6. Open the email account that you nominated on the registration form and navigate to your inbox. Locate the email called Confirmation of user account creation. This email contains your username (which is your email address) and a temporary Connect log in password.
7. Navigate to Connect https://ehp.appiancloud.com/suite/ (or click on the link in the email). The Connect Terms of Use and Privacy Policy screen will display. Click on I AGREE to accept the Terms of Use and Privacy Policy.
Register as a new user of Connect and link to a single customer account, or multiple customer accounts
4
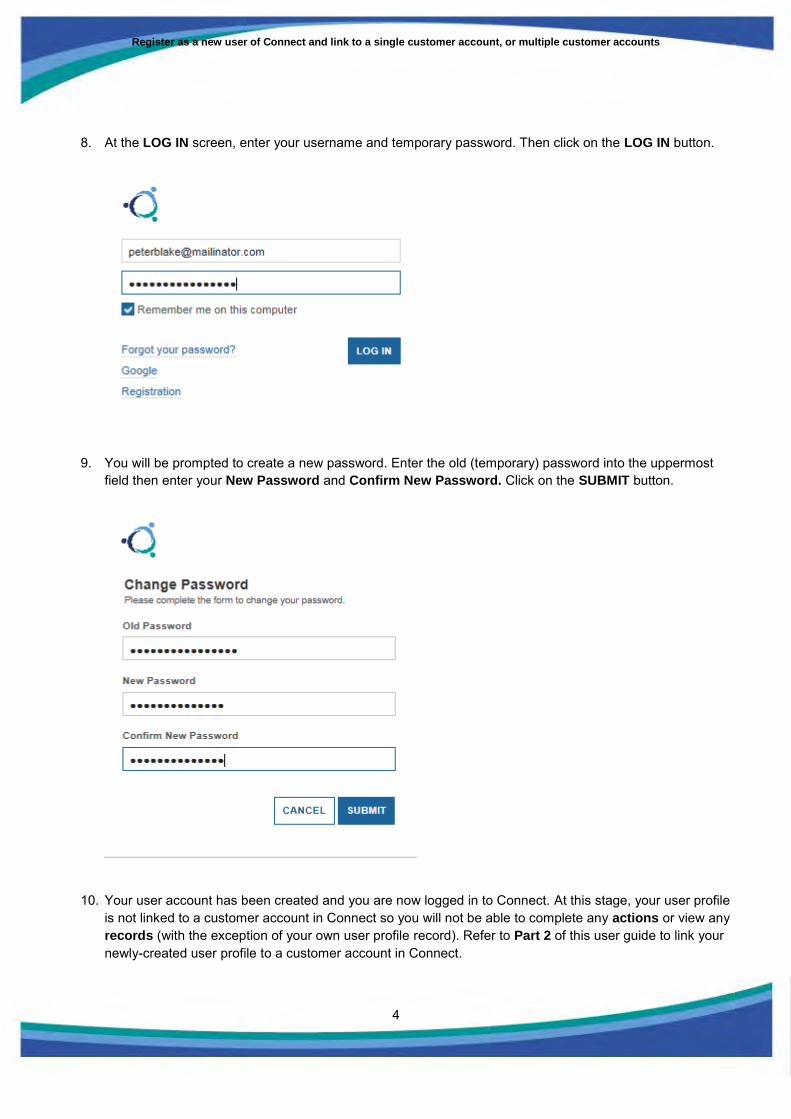
8. At the LOG IN screen, enter your username and temporary password. Then click on the LOG IN button.
9. You will be prompted to create a new password. Enter the old (temporary) password into the uppermost field then enter your New Password and Confirm New Password. Click on the SUBMIT button.
10. Your user account has been created and you are now logged in to Connect. At this stage, your user profile is not linked to a customer account in Connect so you will not be able to complete any actions or view any records (with the exception of your own user profile record). Refer to Part 2 of this user guide to link your newly-created user profile to a customer account in Connect.
Register as a new user of Connect and link to a single customer account, or multiple customer accounts
5
Part 2: Link your newly-created user profile to a customer account in Connect
Part 2 of this quick reference guide outlines 5 scenarios. Please refer to the section of the user guide that is relevant to what you wish to do.
Scenario 1
Refer to page 7 if the customer account that you wish to link your user profile to is: - An existing customer account in Connect and; - An organisation customer type and; - There are no user profiles linked to the organisation customer account in Connect.
Prior to commencing this process, you will need the Connect customer account reference number for the organisation customer account that you wish to link to. If you do not have the Connect customer account reference number, contact Connect Support on 1300 130 372 (Option 6). Connect Support can also advise whether the organisation customer account exists in Connect, and whether there are any user profiles already linked to the organisation customer account.
Before commencing this process you will need to have completed the Letter of Authorisation which can be obtained here: http://www.ehp.qld.gov.au/connect/documents/authority-letter.pdf . You will be prompted to upload the completed and signed Letter of Authorisation as part of this process.
Scenario 2
Refer to page 9 if the customer account that you wish to link your user profile to is: - An existing customer account in Connect and; - An organisation customer type and; - There are one or more existing user profiles already linked to the organisation customer account in
Connect. Prior to commencing this process, you will need the Connect customer account reference number for the organisation customer account that you wish to link to. If you do not have the Connect customer account reference number, contact Connect Support on 1300 130 372 (Option 6). Connect Support can also advise whether the organisation customer account exists in Connect, and whether there are any users already linked to the organisation customer account.
Scenario 3
Refer to page 11 if the customer account that you wish to link to your user profile to is; - An organisation customer type, and; - The organisation customer account does not yet exist in Connect.
If you are not sure whether your organisation customer account exists in Connect, contact Connect Support on 1300 130 372 (Option 6).
In this scenario, you will need the following prior to commencing the process:
- A completed and signed Letter of Authorisation which can be found here:
http://www.ehp.qld.gov.au/connect/documents/authority-letter.pdf . You will be required to upload the Letter of Authorisation as part of this process.
- The business number for the organisation. Depending on the type of organisation, this could be an ACN number for a company or government body, an ARBN for an Australian Registered (Foreign)
Register as a new user of Connect and link to a single customer account, or multiple customer accounts
6
Body, an IA number for a not for profit organisation or an incorporated association, or an AN number for a co-operative.
- The registered address of the organisation.
Scenario 4
Refer to page 16 if the customer account that you wish to link your user profile to is: - ‘Yourself’ as an individual customer type (i.e. your user profile and customer account will be your own
name), and; - The individual customer account (i.e. ‘yourself’) does not yet exist in Connect.
If you are not sure whether your own individual customer account exists in Connect, contact Connect Support on 1300 130 372 (Option 6).
Scenario 5
Refer to page 19 if the customer account that you wish to link your user profile to is: - ‘Yourself’ as an individual customer type (i.e. your user profile and customer account will be your own
name), and; - The individual customer account (i.e. ‘yourself’) already exists in Connect
If you are not sure whether your own individual customer account exists in Connect, contact Connect Support on 1300 130 372 (Option 6).
Register as a new user of Connect and link to a single customer account, or multiple customer accounts
7
Scenario 1
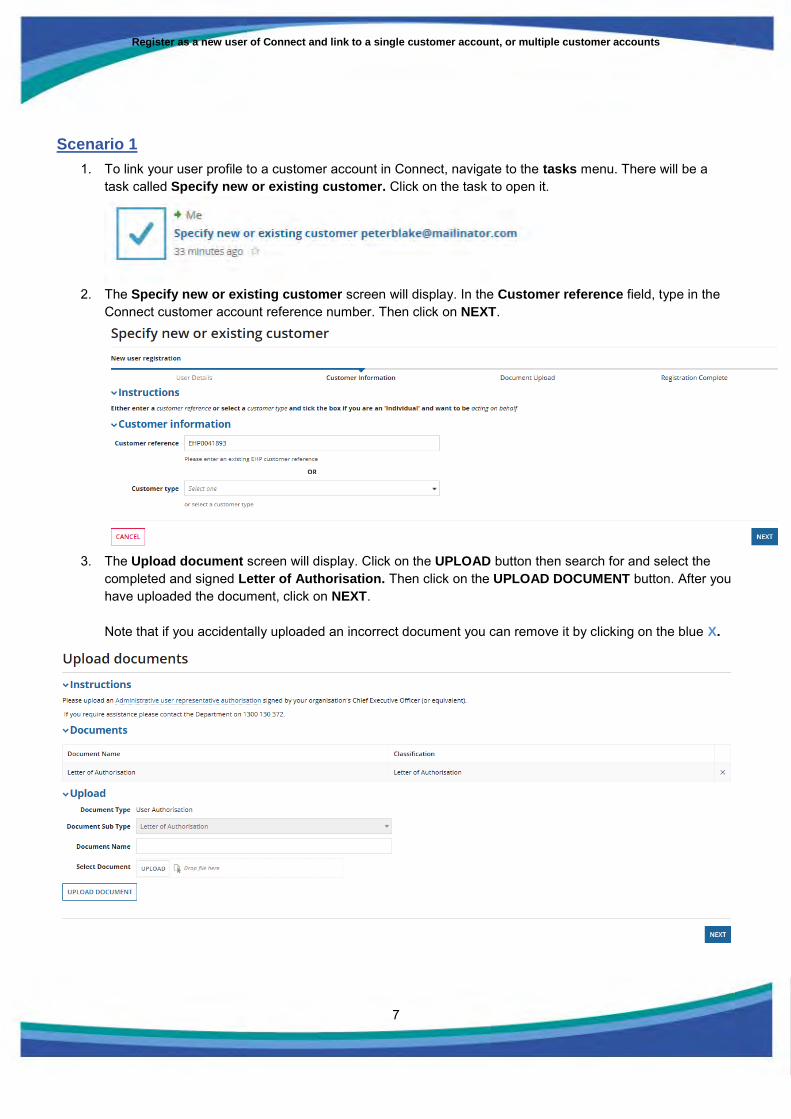
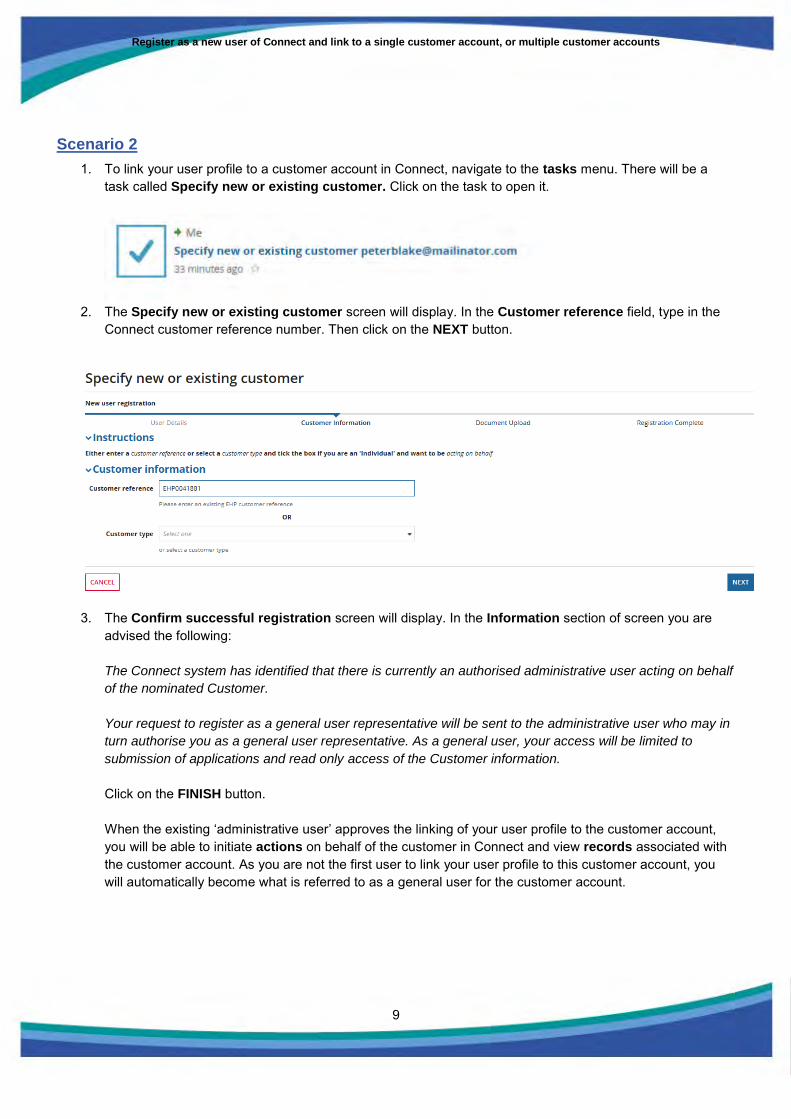
1. To link your user profile to a customer account in Connect, navigate to the tasks menu. There will be a task called Specify new or existing customer. Click on the task to open it.
2. The Specify new or existing customer screen will display. In the Customer reference field, type in the
Connect customer account reference number. Then click on NEXT.
3. The Upload document screen will display. Click on the UPLOAD button then search for and select the
completed and signed Letter of Authorisation. Then click on the UPLOAD DOCUMENT button. After you have uploaded the document, click on NEXT. Note that if you accidentally uploaded an incorrect document you can remove it by clicking on the blue X.
Register as a new user of Connect and link to a single customer account, or multiple customer accounts
8
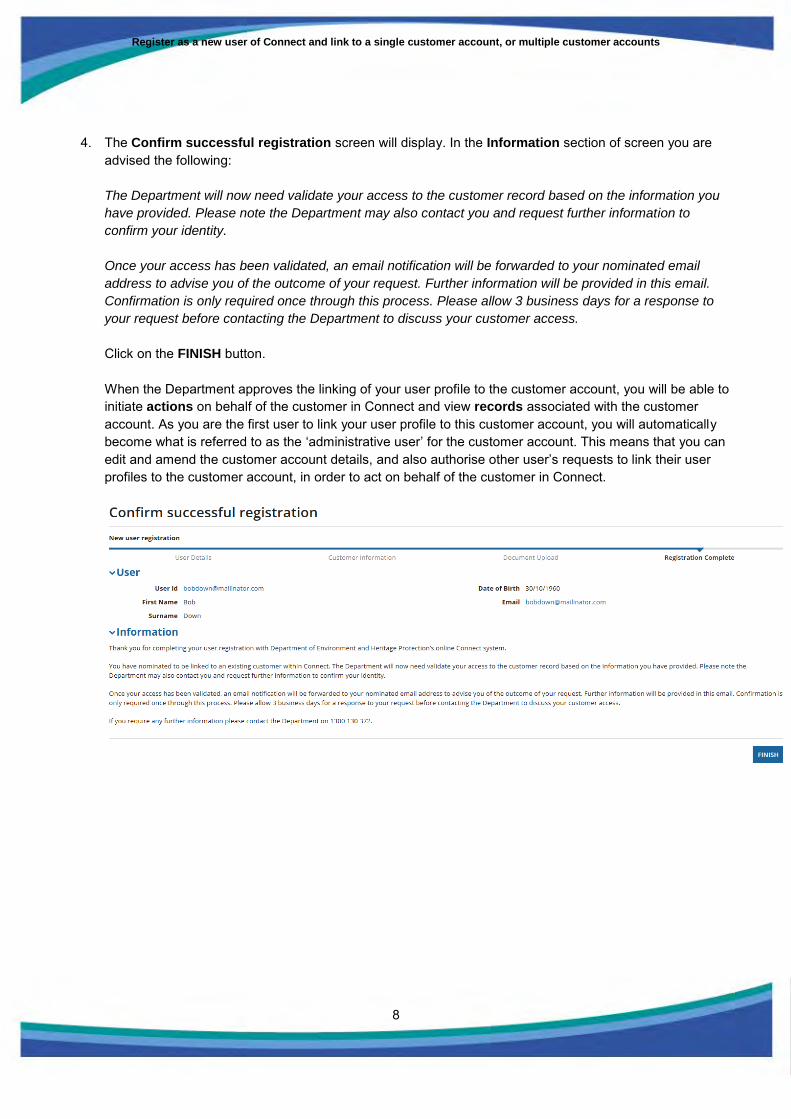
4. The Confirm successful registration screen will display. In the Information section of screen you are advised the following:
The Department will now need validate your access to the customer record based on the information you
have provided. Please note the Department may also contact you and request further information to
confirm your identity.
Once your access has been validated, an email notification will be forwarded to your nominated email
address to advise you of the outcome of your request. Further information will be provided in this email.
Confirmation is only required once through this process. Please allow 3 business days for a response to
your request before contacting the Department to discuss your customer access.
Click on the FINISH button.
When the Department approves the linking of your user profile to the customer account, you will be able to initiate actions on behalf of the customer in Connect and view records associated with the customer account. As you are the first user to link your user profile to this customer account, you will automatically become what is referred to as the ‘administrative user’ for the customer account. This means that you can edit and amend the customer account details, and also authorise other user’s requests to link their user profiles to the customer account, in order to act on behalf of the customer in Connect.
Register as a new user of Connect and link to a single customer account, or multiple customer accounts
9
Scenario 2
1. To link your user profile to a customer account in Connect, navigate to the tasks menu. There will be a task called Specify new or existing customer. Click on the task to open it.
2. The Specify new or existing customer screen will display. In the Customer reference field, type in the
Connect customer reference number. Then click on the NEXT button.
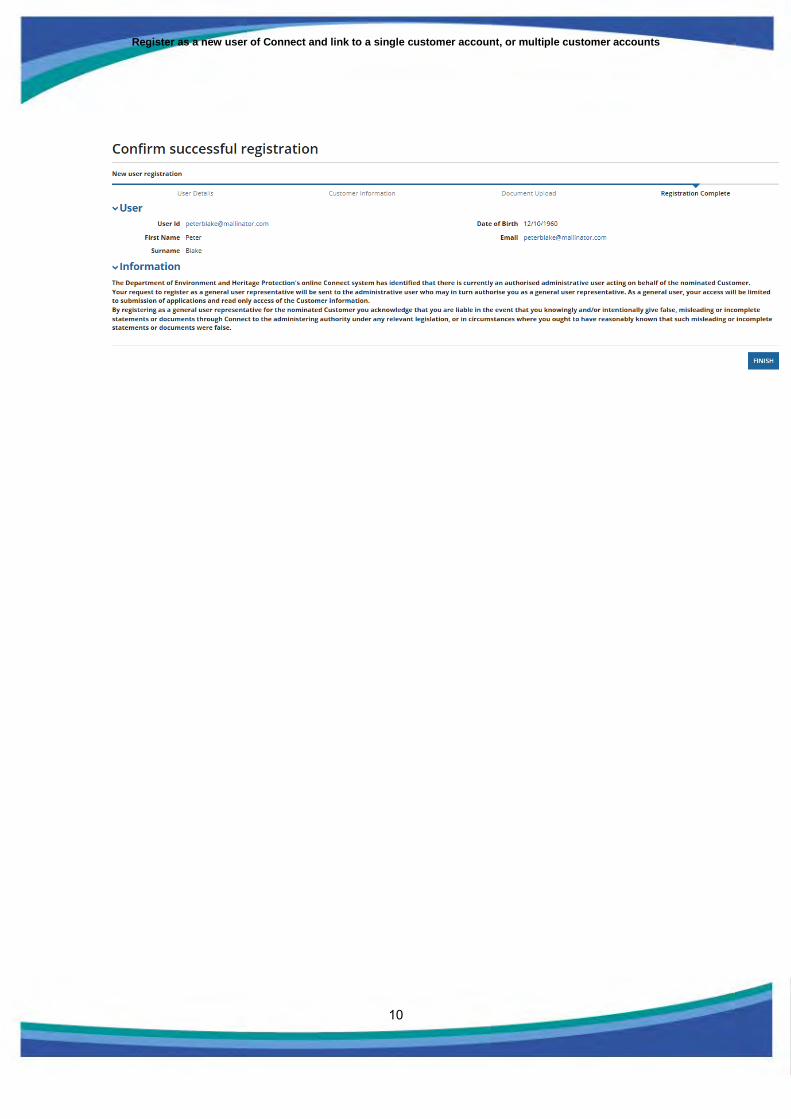
3. The Confirm successful registration screen will display. In the Information section of screen you are
advised the following: The Connect system has identified that there is currently an authorised administrative user acting on behalf
of the nominated Customer.
Your request to register as a general user representative will be sent to the administrative user who may in
turn authorise you as a general user representative. As a general user, your access will be limited to
submission of applications and read only access of the Customer information.
Click on the FINISH button. When the existing ‘administrative user’ approves the linking of your user profile to the customer account, you will be able to initiate actions on behalf of the customer in Connect and view records associated with the customer account. As you are not the first user to link your user profile to this customer account, you will automatically become what is referred to as a general user for the customer account.
Register as a new user of Connect and link to a single customer account, or multiple customer accounts
10
Register as a new user of Connect and link to a single customer account, or multiple customer accounts
11
Scenario 3
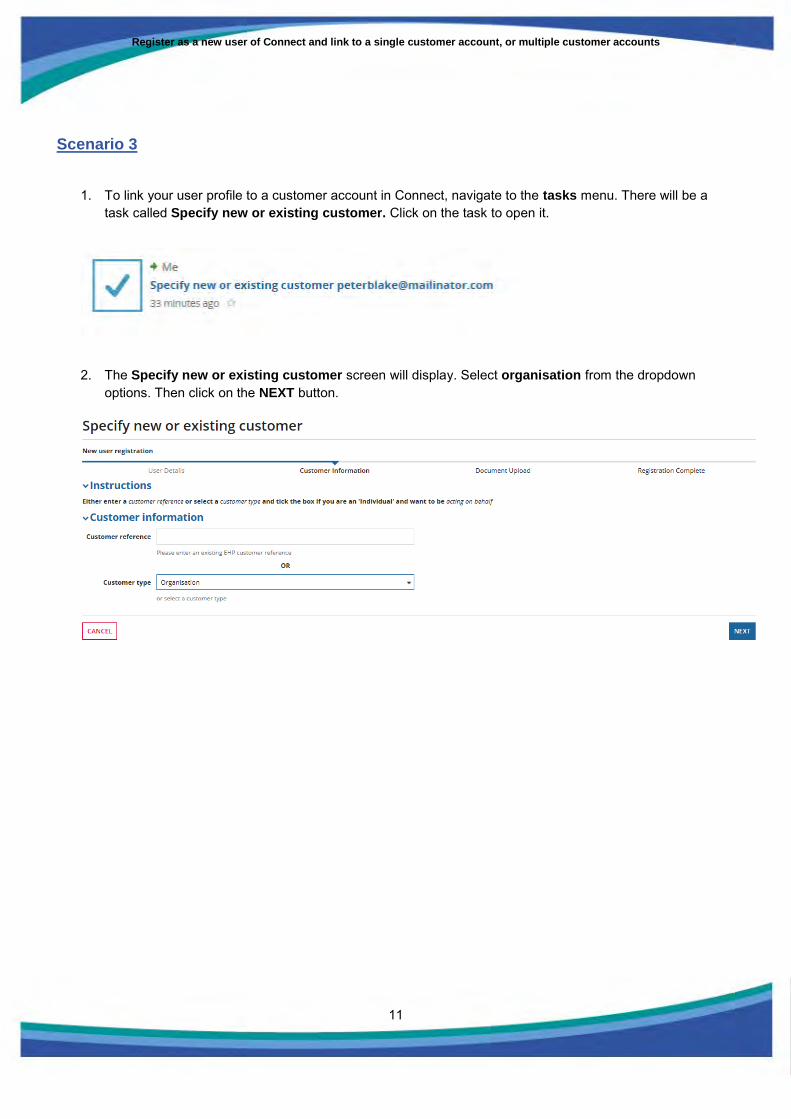
1. To link your user profile to a customer account in Connect, navigate to the tasks menu. There will be a task called Specify new or existing customer. Click on the task to open it.
2. The Specify new or existing customer screen will display. Select organisation from the dropdown options. Then click on the NEXT button.
Register as a new user of Connect and link to a single customer account, or multiple customer accounts
12
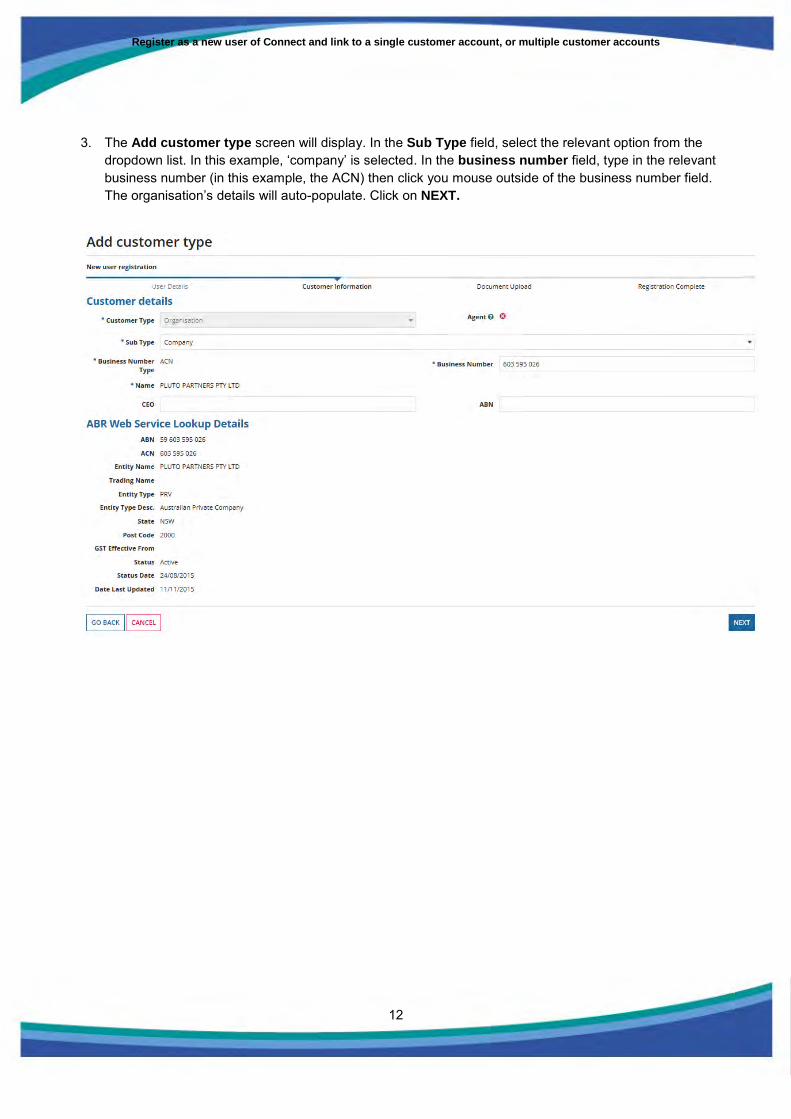
3. The Add customer type screen will display. In the Sub Type field, select the relevant option from the dropdown list. In this example, ‘company’ is selected. In the business number field, type in the relevant business number (in this example, the ACN) then click you mouse outside of the business number field. The organisation’s details will auto-populate. Click on NEXT.
Register as a new user of Connect and link to a single customer account, or multiple customer accounts
13
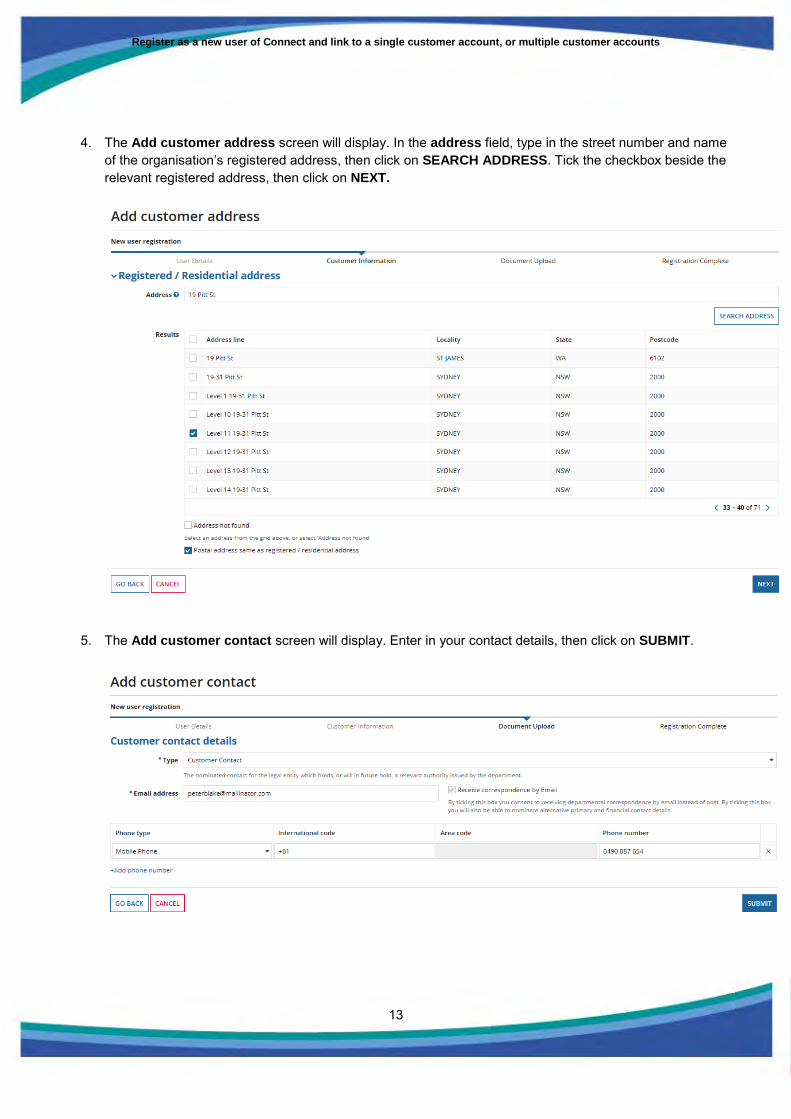
4. The Add customer address screen will display. In the address field, type in the street number and name of the organisation’s registered address, then click on SEARCH ADDRESS. Tick the checkbox beside the relevant registered address, then click on NEXT.
5. The Add customer contact screen will display. Enter in your contact details, then click on SUBMIT.

Register as a new user of Connect and link to a single customer account, or multiple customer accounts
14
6. The Upload documents screen will display. Click on the UPLOAD button then search for and select the completed and signed Letter of Authorisation. Then click on the UPLOAD DOCUMENT button. After you have uploaded the document, click on NEXT. Note that if you accidentally uploaded an incorrect document you can remove it by clicking on the blue X.
Register as a new user of Connect and link to a single customer account, or multiple customer accounts
15
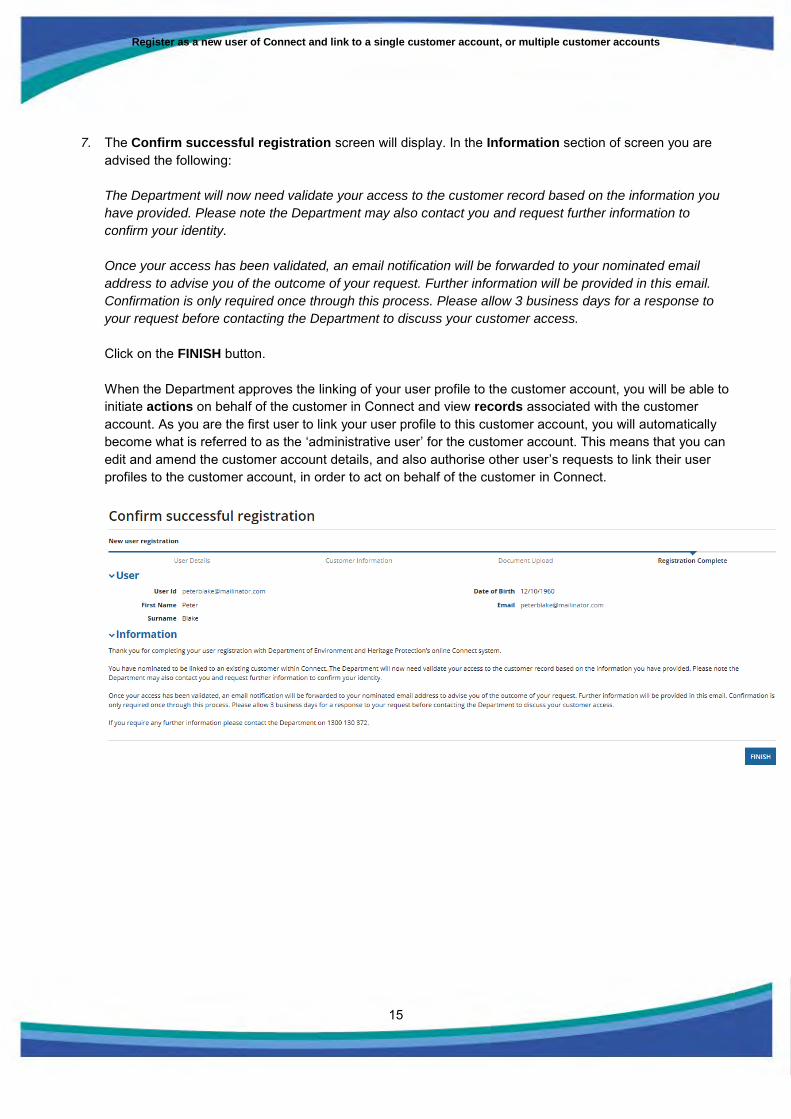
7. The Confirm successful registration screen will display. In the Information section of screen you are advised the following:
The Department will now need validate your access to the customer record based on the information you
have provided. Please note the Department may also contact you and request further information to
confirm your identity.
Once your access has been validated, an email notification will be forwarded to your nominated email
address to advise you of the outcome of your request. Further information will be provided in this email.
Confirmation is only required once through this process. Please allow 3 business days for a response to
your request before contacting the Department to discuss your customer access.
Click on the FINISH button.
When the Department approves the linking of your user profile to the customer account, you will be able to initiate actions on behalf of the customer in Connect and view records associated with the customer account. As you are the first user to link your user profile to this customer account, you will automatically become what is referred to as the ‘administrative user’ for the customer account. This means that you can edit and amend the customer account details, and also authorise other user’s requests to link their user profiles to the customer account, in order to act on behalf of the customer in Connect.
Register as a new user of Connect and link to a single customer account, or multiple customer accounts
16
Scenario 4
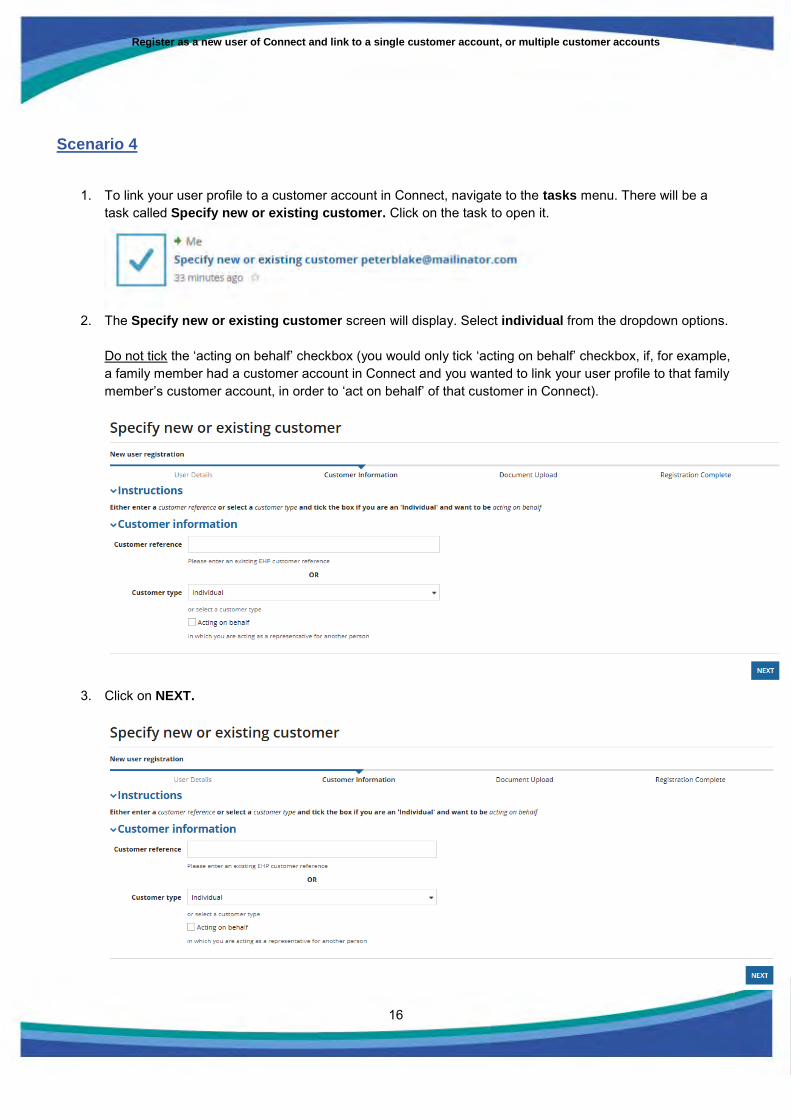
1. To link your user profile to a customer account in Connect, navigate to the tasks menu. There will be a task called Specify new or existing customer. Click on the task to open it.
2. The Specify new or existing customer screen will display. Select individual from the dropdown options.
Do not tick the ‘acting on behalf’ checkbox (you would only tick ‘acting on behalf’ checkbox, if, for example, a family member had a customer account in Connect and you wanted to link your user profile to that family member’s customer account, in order to ‘act on behalf’ of that customer in Connect).
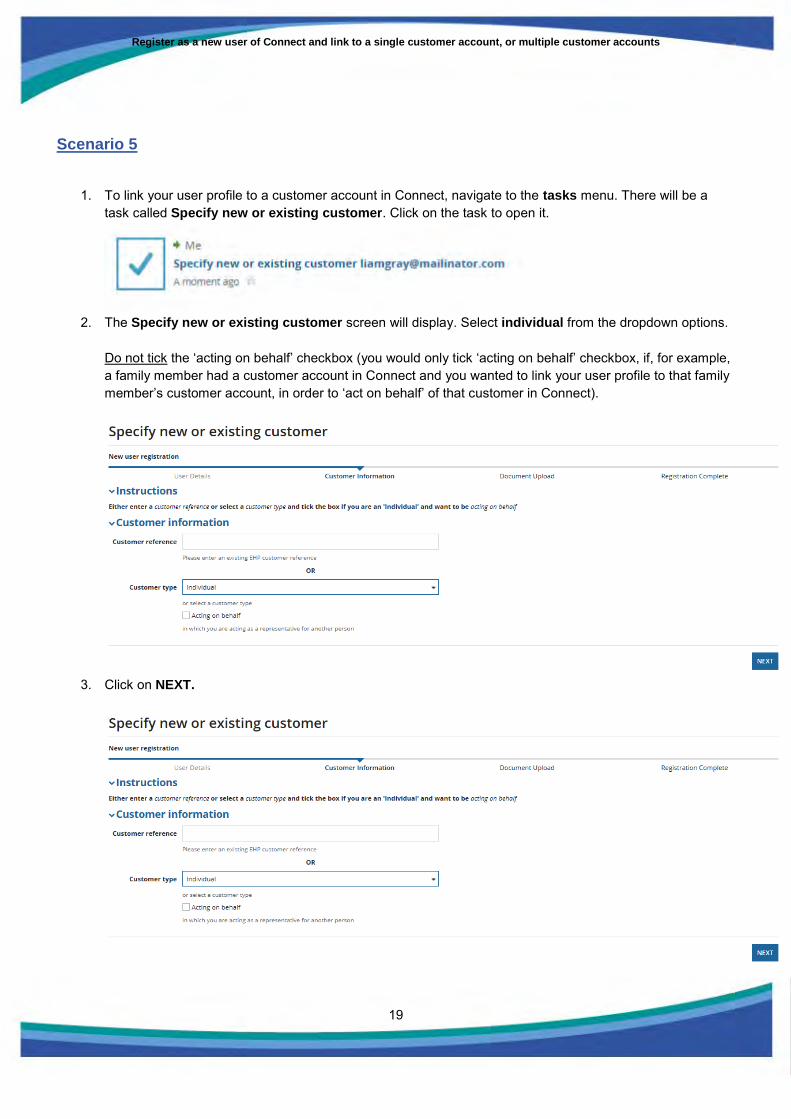
3. Click on NEXT.
Register as a new user of Connect and link to a single customer account, or multiple customer accounts
17
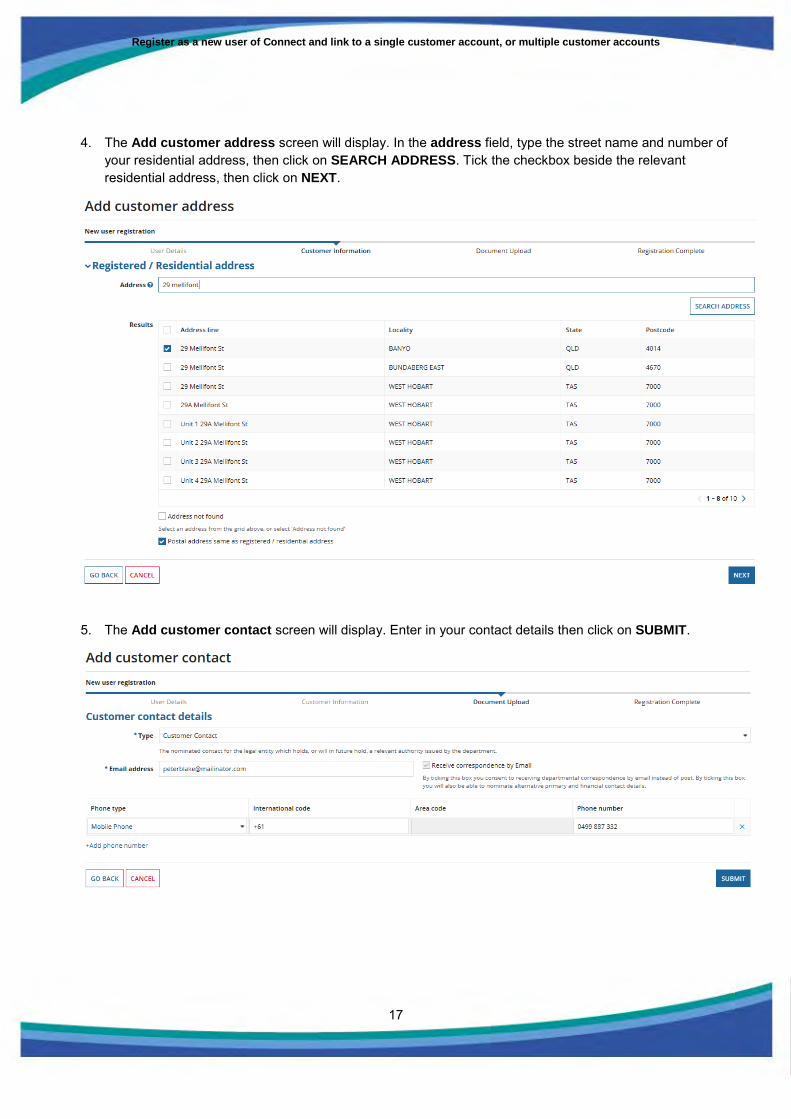
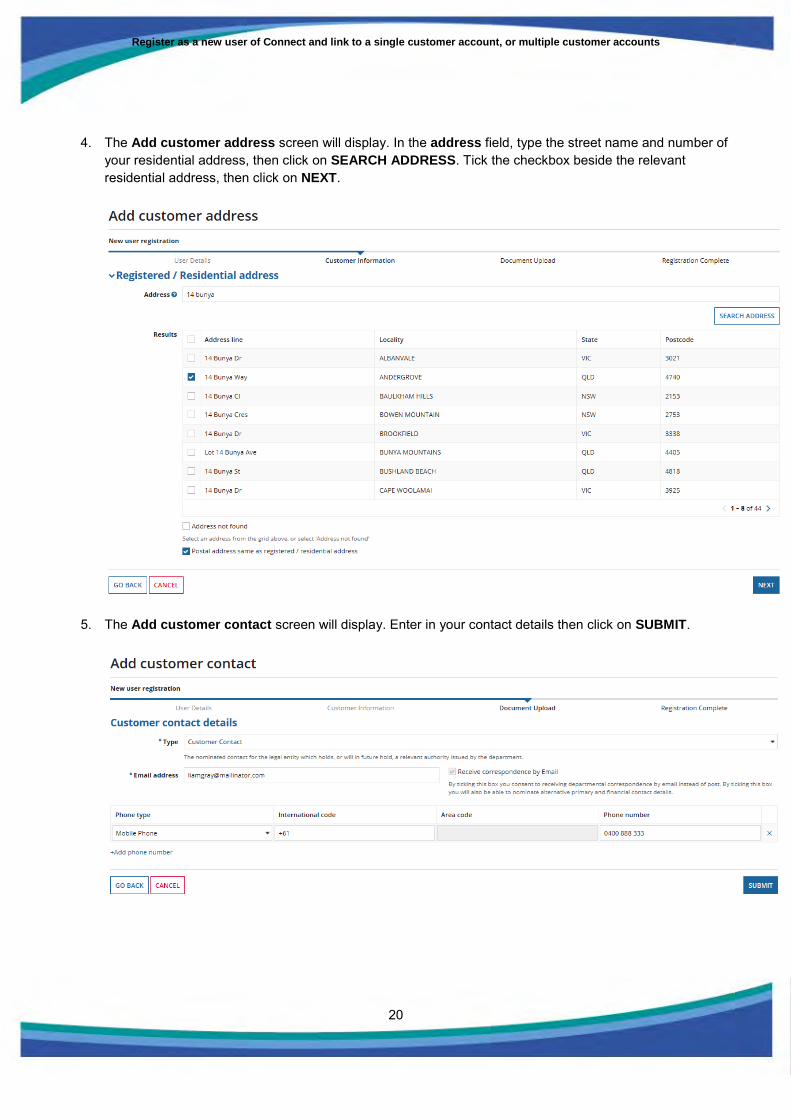
4. The Add customer address screen will display. In the address field, type the street name and number of your residential address, then click on SEARCH ADDRESS. Tick the checkbox beside the relevant residential address, then click on NEXT.
5. The Add customer contact screen will display. Enter in your contact details then click on SUBMIT.
Register as a new user of Connect and link to a single customer account, or multiple customer accounts
18
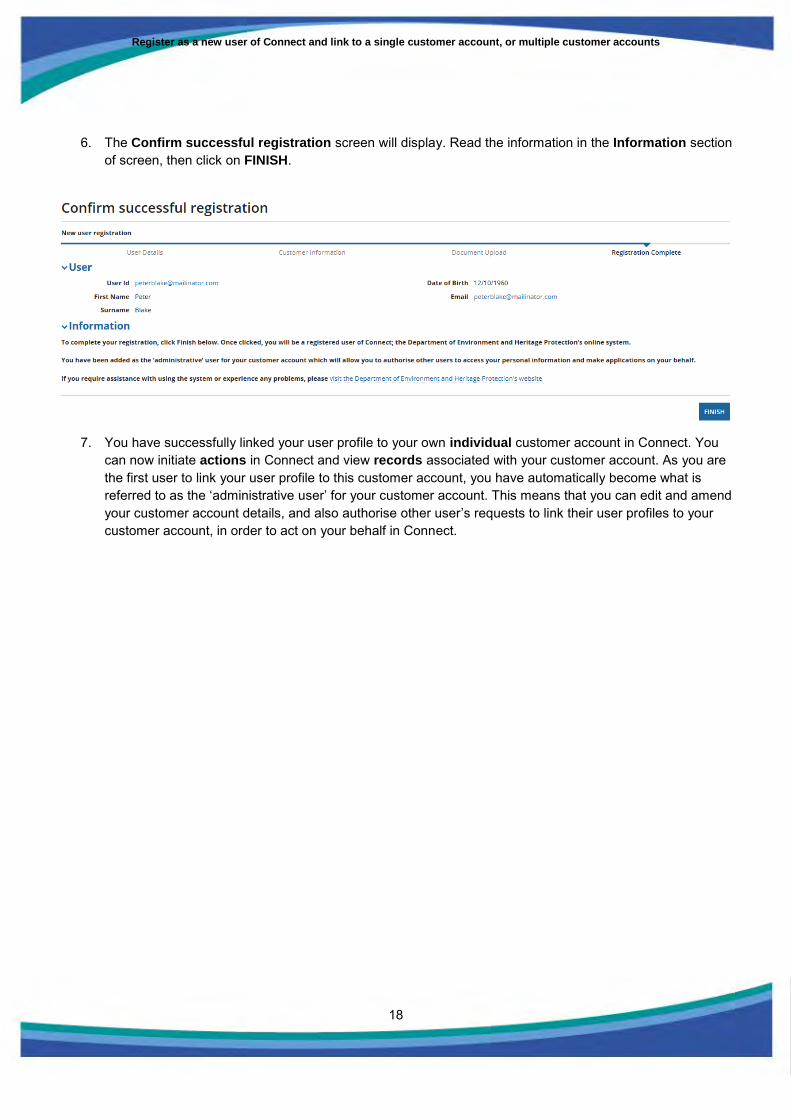
6. The Confirm successful registration screen will display. Read the information in the Information section of screen, then click on FINISH.
7. You have successfully linked your user profile to your own individual customer account in Connect. You
can now initiate actions in Connect and view records associated with your customer account. As you are the first user to link your user profile to this customer account, you have automatically become what is referred to as the ‘administrative user’ for your customer account. This means that you can edit and amend your customer account details, and also authorise other user’s requests to link their user profiles to your customer account, in order to act on your behalf in Connect.
Register as a new user of Connect and link to a single customer account, or multiple customer accounts
19
Scenario 5
1. To link your user profile to a customer account in Connect, navigate to the tasks menu. There will be a task called Specify new or existing customer. Click on the task to open it.
2. The Specify new or existing customer screen will display. Select individual from the dropdown options.
Do not tick the ‘acting on behalf’ checkbox (you would only tick ‘acting on behalf’ checkbox, if, for example, a family member had a customer account in Connect and you wanted to link your user profile to that family member’s customer account, in order to ‘act on behalf’ of that customer in Connect).
3. Click on NEXT.
Register as a new user of Connect and link to a single customer account, or multiple customer accounts
20
4. The Add customer address screen will display. In the address field, type the street name and number of your residential address, then click on SEARCH ADDRESS. Tick the checkbox beside the relevant residential address, then click on NEXT.
5. The Add customer contact screen will display. Enter in your contact details then click on SUBMIT.

Register as a new user of Connect and link to a single customer account, or multiple customer accounts
21
6. The Confirm successful registration screen will display. In the Information section of screen you are advised the following:
The Department will now need validate your access to the customer record based on the information you
have provided. Please note the Department may also contact you and request further information to
confirm your identity.
Once your access has been validated, an email notification will be forwarded to your nominated email
address to advise you of the outcome of your request. Further information will be provided in this email.
Confirmation is only required once through this process. Please allow 3 business days for a response to
your request before contacting the Department to discuss your customer access.
Click on the FINISH button.
When the Department approves the linking of your user profile to the customer account, you will be able to initiate actions on behalf of the customer in Connect and view records associated with the customer account. As you are the first user to link your user profile to this customer account, you will automatically become what is referred to as the ‘administrative user’ for the customer account. This means that you can edit and amend the customer account details, and also authorise other user’s requests to link their user profiles to the customer account, in order to act on behalf of the customer in Connect.

Register as a new user of Connect and link to a single customer account, or multiple customer accounts
22
Part 3: Link your user profile to multiple customer accounts in Connect
Registered users of Connect who are already linked to one customer account in Connect have the option to link to any number of additional customer accounts, and act on behalf of any of those customer accounts in Connect.
It is important to note that the first user to link to a customer account will automatically become the ‘administrative user’ for that customer account. The administrative user, once in place, is responsible for approving any additional users, known as ‘general users’. If an existing administrative user needs to elect a different administrative user, they can do this by changing one of the general user profiles to be the administrative user, at which point the original administrative user will revert to being a general user. It is at the discretion of each customer who they wish to elect as the administrative user for their customer account. It could be yourself as an individual customer, a staff member within your organisation, or another entity such as a consultant or an agent.
Once linked, an administrative or general user can undertake numerous actions on behalf of a customer, including accessing records associated with the customer account, applying for suitable operator registration, applying for an environmental authority or wildlife authority, authorising the customer’s inclusion as a joint applicant of a permit application, completing annual returns and paying annual fees. If relevant to the customer account, linked users can also undertake various waste tracking and wildlife actions in Connect. However, the functionality to update or amend the customer record, and to approve general users wishing to link to the customer account, is only available to the administrative user for the customer account.
While linking a user account to multiple customer accounts in Connect is quite simple, there are a handful of minor variations to the process. Please refer to the section of the user guide that is relevant to what you wish to do.
Scenario 1
Refer to page 24 if the customer account that you wish to link your user profile to is: - An existing customer account in Connect and; - An organisation customer type and; - There are no user profiles linked to the organisation customer account in Connect.
Prior to commencing this process, you will need the Connect customer account reference number for the organisation customer account that you wish to link to. If you do not have the Connect customer account reference number, contact Connect Support on 1300 130 372 (Option 6). Connect Support can also advise whether the organisation customer account exists in Connect, and whether there are any user profiles already linked to the organisation customer account.
Before commencing this process you will need to have completed the Letter of Authorisation which can be obtained here: http://www.ehp.qld.gov.au/connect/documents/authority-letter.pdf . You will be prompted to upload the completed and signed Letter of Authorisation as part of this process.
Scenario 2
Refer to page 27 if the customer account that you wish to link your user profile to is: - An existing customer account in Connect and; - An organisation customer type and; - There are one or more existing user profiles already linked to the organisation customer account in
Connect. Prior to commencing this process, you will need the Connect customer account reference number for the organisation customer account that you wish to link to. If you do not have the Connect customer account reference number, contact Connect Support on 1300 130 372 (Option 6). Connect Support can also advise whether the organisation customer account exists in Connect, and whether there are any users already linked to the organisation customer account.
Register as a new user of Connect and link to a single customer account, or multiple customer accounts
23
Scenario 3
Refer to page 29 if the customer account that you wish to link to your user profile to is; - An organisation customer type, and; - The organisation customer account does not yet exist in Connect.
If you are not sure whether your organisation customer account exists in Connect, contact Connect Support on 1300 130 372 (Option 6).
In this scenario, you will need the following prior to commencing the process:
- A completed and signed Letter of Authorisation which can be found here:
http://www.ehp.qld.gov.au/connect/documents/authority-letter.pdf. You will be required to upload the Letter of Authorisation as part of this process.
- The business number for the organisation. Depending on the type of organisation this could be an ACN number for a company or government body, an ARBN for an Australian Registered (Foreign) Body, an IA number for a not for profit organisation or an incorporated association or an AN number for a co-operative.
- The registered address of the organisation.
Scenario 4
Refer to page 34 if the customer account that you wish to link your user profile to is: - An individual customer type which is not your own ‘individual’ customer account (e.g. a family member
may have an existing ‘individual’ customer account in Connect and you may wish to link to that customer account in order to act on their behalf)
- The individual customer account (i.e. not ‘yourself’) already exists in Connect
If you are not sure whether the individual customer account exists in Connect, contact Connect Support on 1300 130 372 (Option 6).
Register as a new user of Connect and link to a single customer account, or multiple customer accounts
24
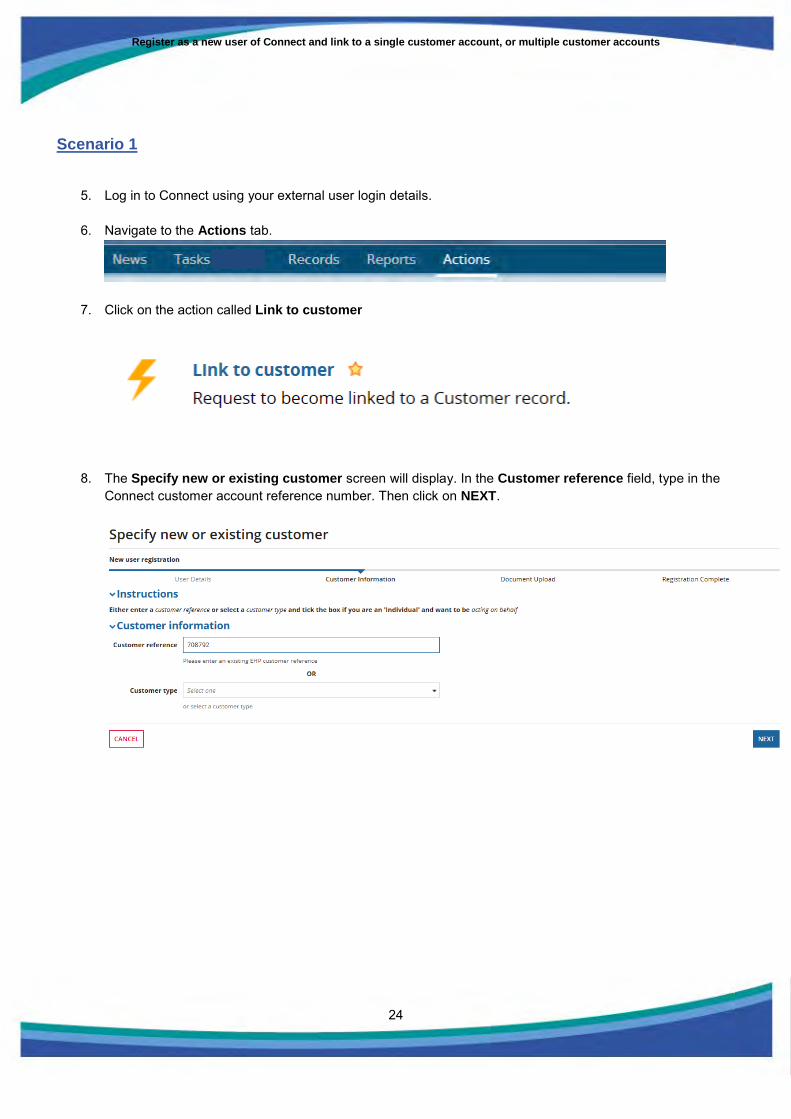
Scenario 1
5. Log in to Connect using your external user login details.
6. Navigate to the Actions tab.
7. Click on the action called Link to customer
8. The Specify new or existing customer screen will display. In the Customer reference field, type in the Connect customer account reference number. Then click on NEXT.

Register as a new user of Connect and link to a single customer account, or multiple customer accounts
25
9. The Upload document screen will display. Click on the UPLOAD button then search for and select the completed and signed Letter of Authorisation. Then click on the UPLOAD DOCUMENT button. After you have uploaded the document, click on NEXT. Note that if you accidentally uploaded an incorrect document you can remove it by clicking on the blue X.

Register as a new user of Connect and link to a single customer account, or multiple customer accounts
26
10. The Confirm successful registration screen will display. In the Information section of screen you are advised the following:
The Department will now need validate your access to the customer record based on the information you
have provided. Please note the Department may also contact you and request further information to
confirm your identity.
Once your access has been validated, an email notification will be forwarded to your nominated email
address to advise you of the outcome of your request. Further information will be provided in this email.
Confirmation is only required once through this process. Please allow 3 business days for a response to
your request before contacting the Department to discuss your customer access.
Click on the FINISH button.
When the Department approves the linking of your user profile to the customer account, you will be able to initiate actions on behalf of the customer in Connect and view records associated with the customer account. As you are the first user to link your user profile to this customer account, you will automatically become what is referred to as the ‘administrative user’ for the customer account. This means that you can edit and amend the customer account details, and also authorise other user’s requests to link their user profiles to the customer account, in order to act on behalf of the customer in Connect.
Register as a new user of Connect and link to a single customer account, or multiple customer accounts
27
Scenario 2
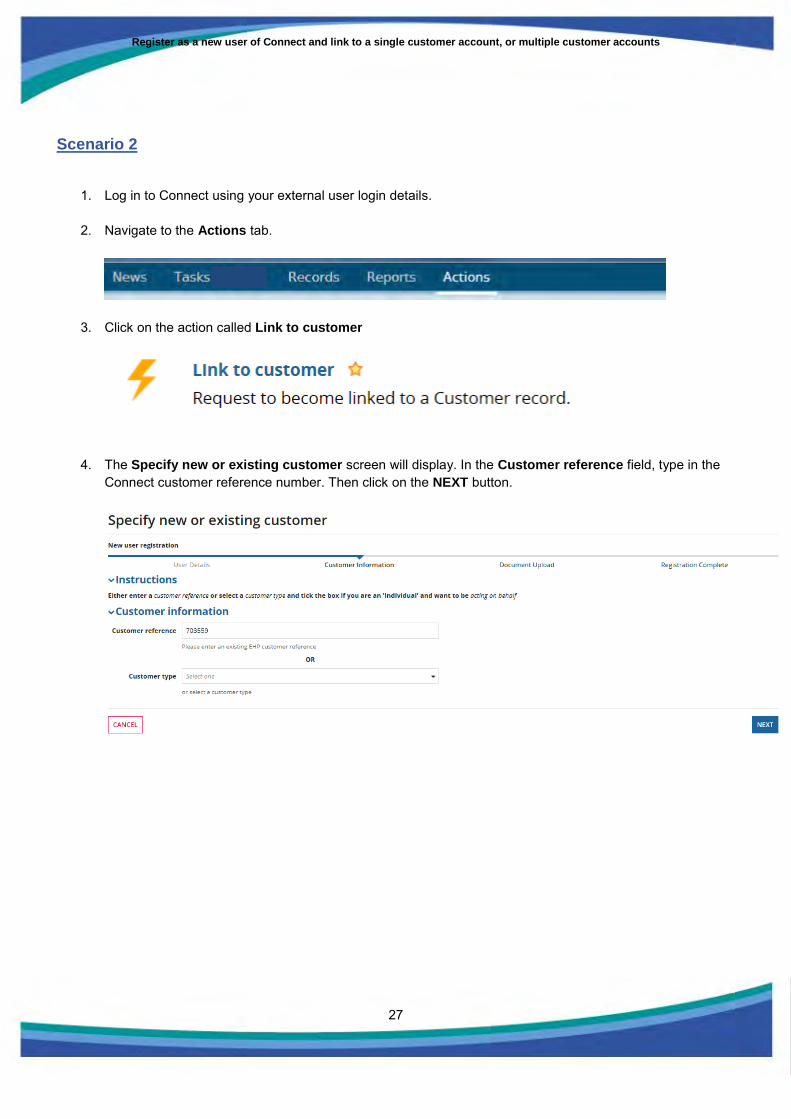
1. Log in to Connect using your external user login details.
2. Navigate to the Actions tab.
3. Click on the action called Link to customer
4. The Specify new or existing customer screen will display. In the Customer reference field, type in the Connect customer reference number. Then click on the NEXT button.
Register as a new user of Connect and link to a single customer account, or multiple customer accounts
28
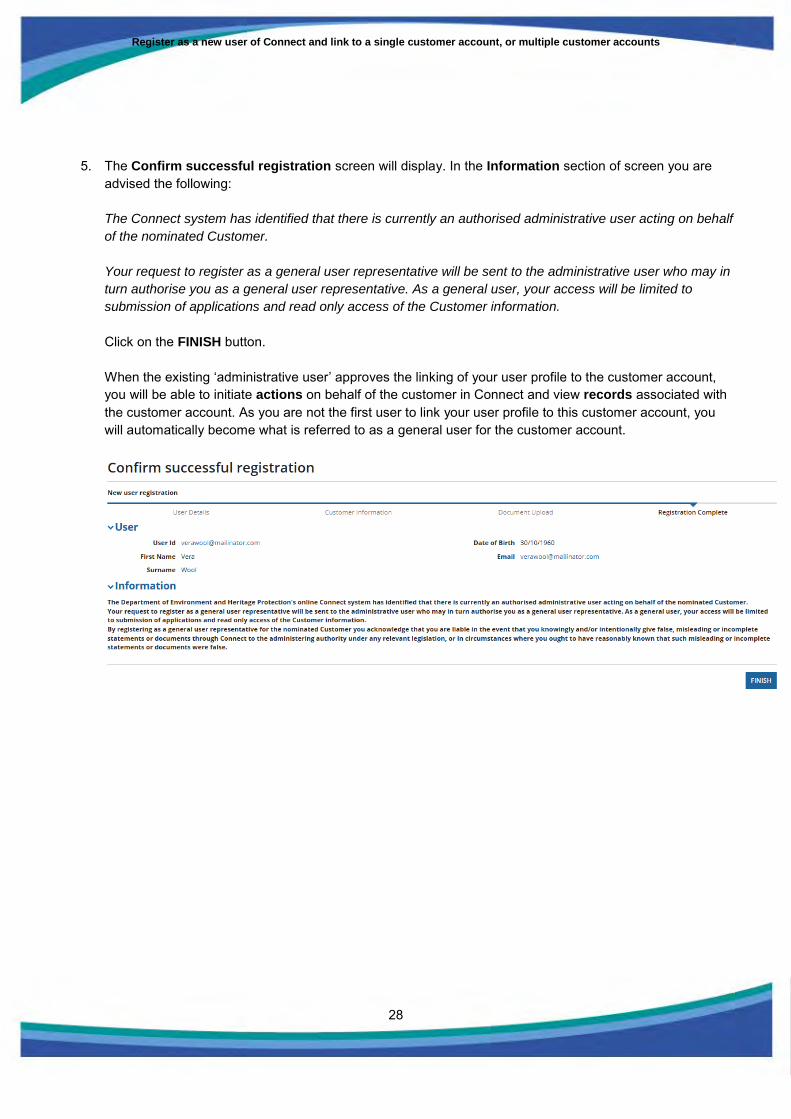
5. The Confirm successful registration screen will display. In the Information section of screen you are advised the following: The Connect system has identified that there is currently an authorised administrative user acting on behalf
of the nominated Customer.
Your request to register as a general user representative will be sent to the administrative user who may in
turn authorise you as a general user representative. As a general user, your access will be limited to
submission of applications and read only access of the Customer information.
Click on the FINISH button. When the existing ‘administrative user’ approves the linking of your user profile to the customer account, you will be able to initiate actions on behalf of the customer in Connect and view records associated with the customer account. As you are not the first user to link your user profile to this customer account, you will automatically become what is referred to as a general user for the customer account.
Register as a new user of Connect and link to a single customer account, or multiple customer accounts
29
Scenario 3
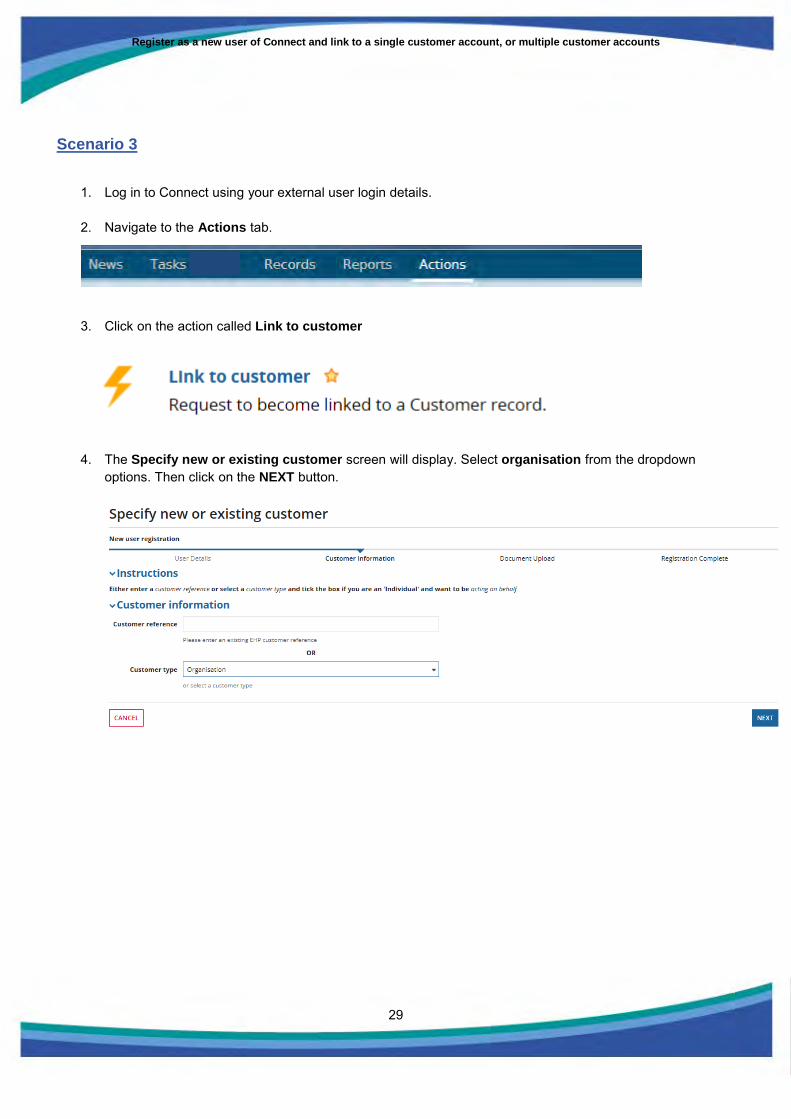
1. Log in to Connect using your external user login details.
2. Navigate to the Actions tab.
3. Click on the action called Link to customer
4. The Specify new or existing customer screen will display. Select organisation from the dropdown
options. Then click on the NEXT button.
Register as a new user of Connect and link to a single customer account, or multiple customer accounts
30
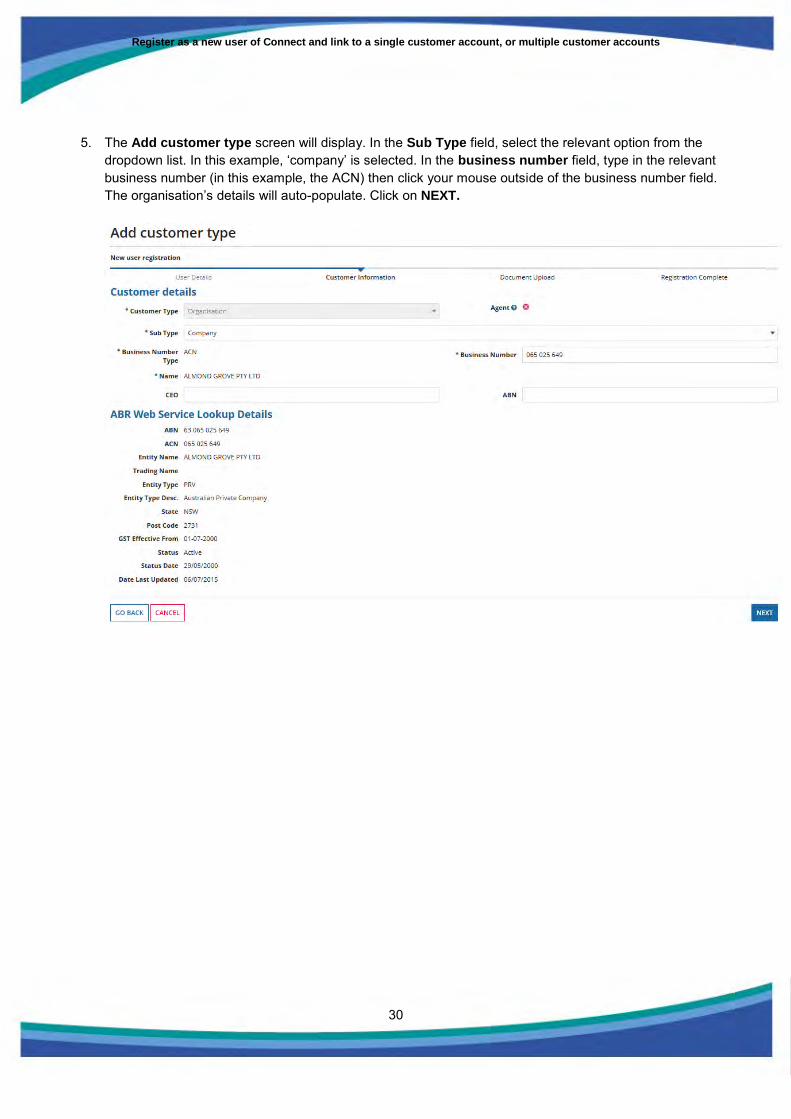
5. The Add customer type screen will display. In the Sub Type field, select the relevant option from the dropdown list. In this example, ‘company’ is selected. In the business number field, type in the relevant business number (in this example, the ACN) then click your mouse outside of the business number field. The organisation’s details will auto-populate. Click on NEXT.
Register as a new user of Connect and link to a single customer account, or multiple customer accounts
31
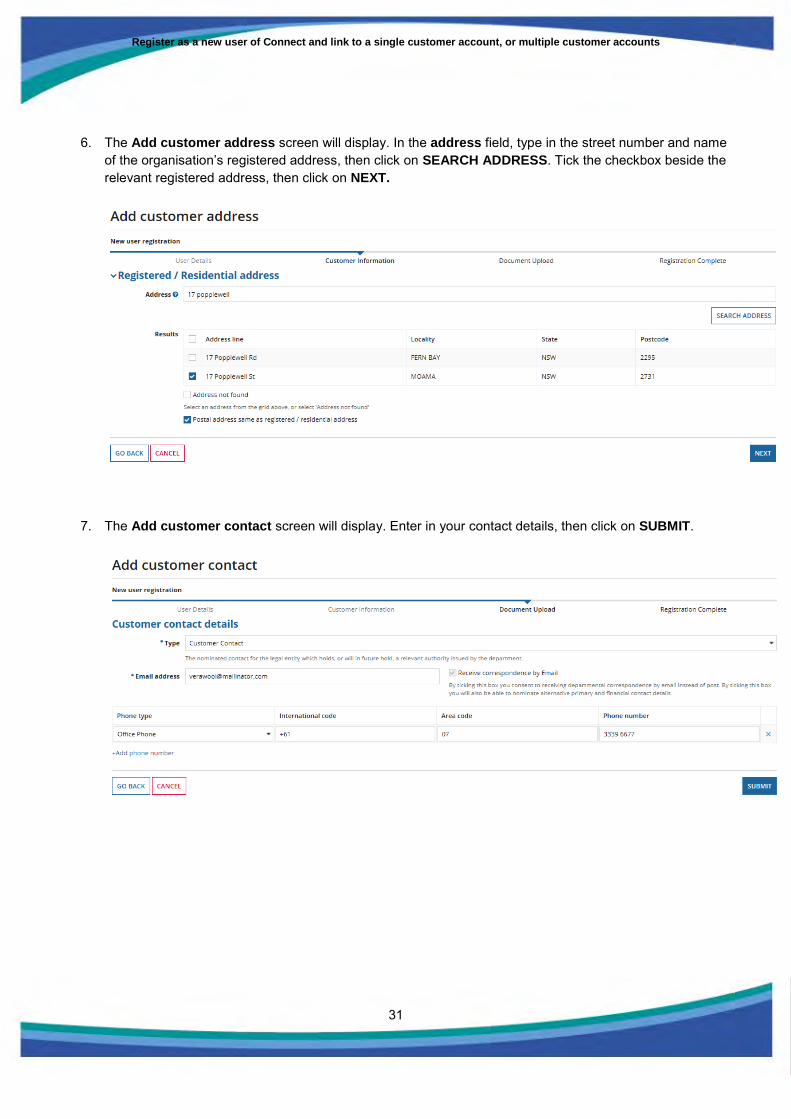
6. The Add customer address screen will display. In the address field, type in the street number and name of the organisation’s registered address, then click on SEARCH ADDRESS. Tick the checkbox beside the relevant registered address, then click on NEXT.
7. The Add customer contact screen will display. Enter in your contact details, then click on SUBMIT.
Register as a new user of Connect and link to a single customer account, or multiple customer accounts
32
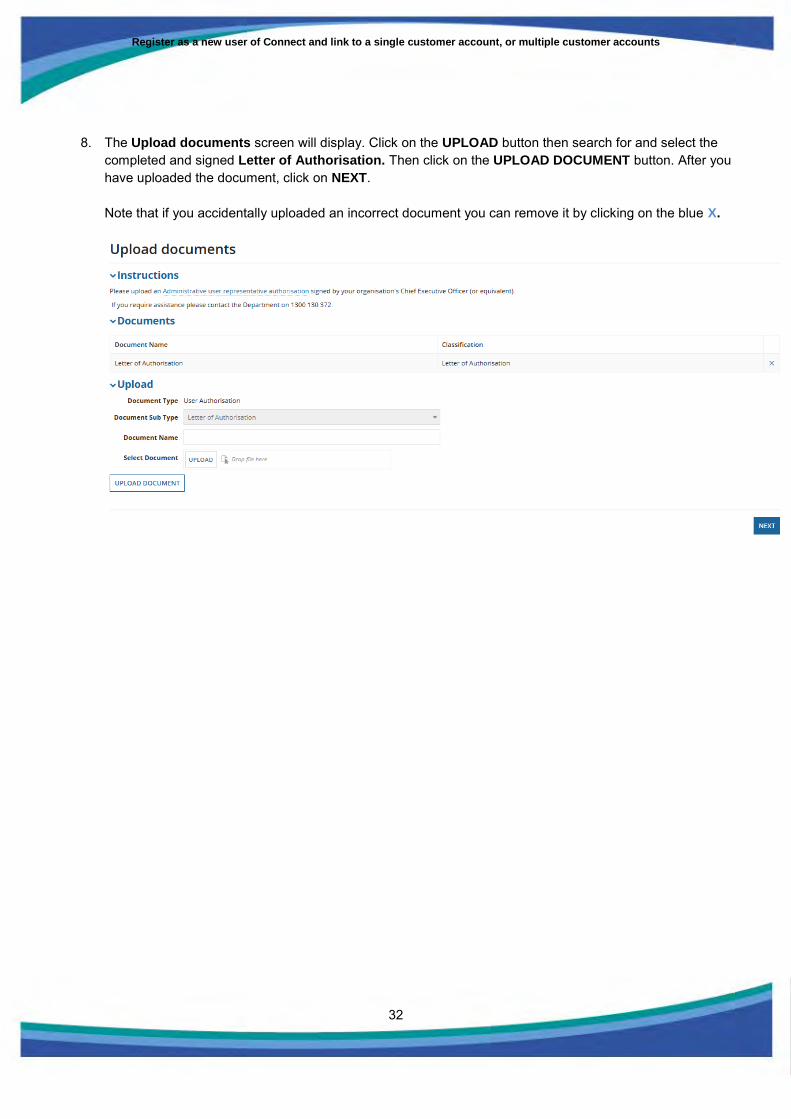
8. The Upload documents screen will display. Click on the UPLOAD button then search for and select the completed and signed Letter of Authorisation. Then click on the UPLOAD DOCUMENT button. After you have uploaded the document, click on NEXT. Note that if you accidentally uploaded an incorrect document you can remove it by clicking on the blue X.
Register as a new user of Connect and link to a single customer account, or multiple customer accounts
33
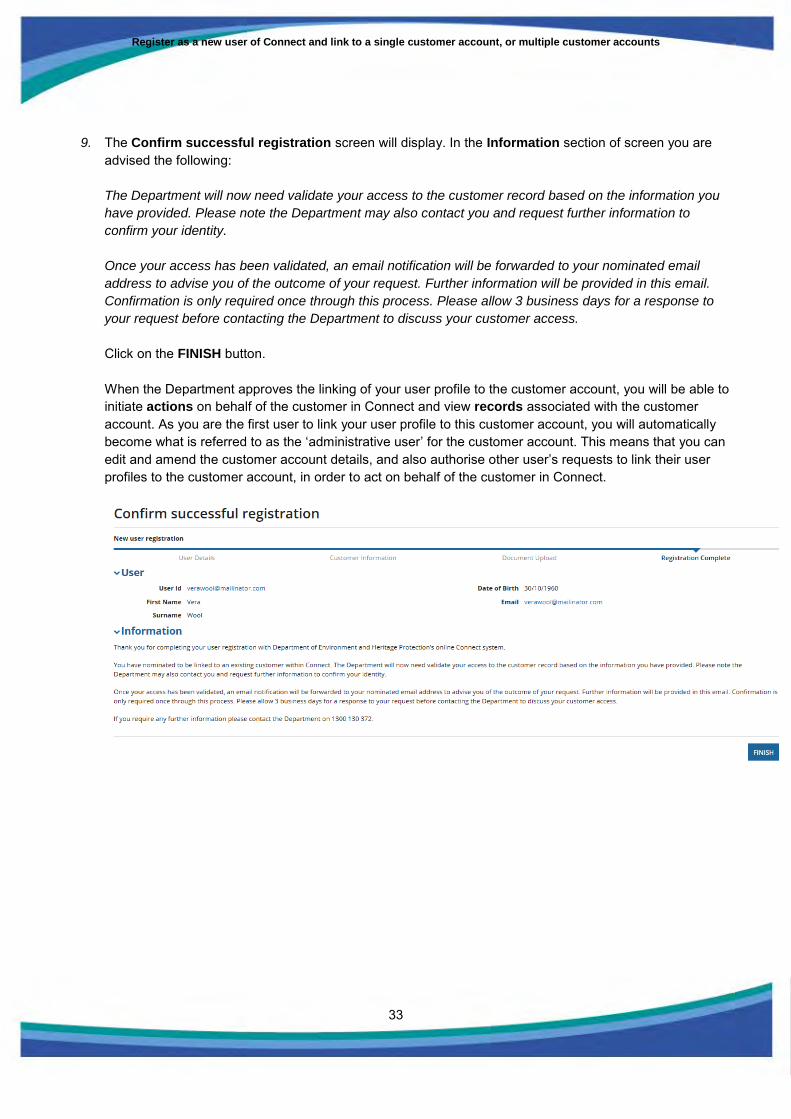
9. The Confirm successful registration screen will display. In the Information section of screen you are advised the following:
The Department will now need validate your access to the customer record based on the information you
have provided. Please note the Department may also contact you and request further information to
confirm your identity.
Once your access has been validated, an email notification will be forwarded to your nominated email
address to advise you of the outcome of your request. Further information will be provided in this email.
Confirmation is only required once through this process. Please allow 3 business days for a response to
your request before contacting the Department to discuss your customer access.
Click on the FINISH button.
When the Department approves the linking of your user profile to the customer account, you will be able to initiate actions on behalf of the customer in Connect and view records associated with the customer account. As you are the first user to link your user profile to this customer account, you will automatically become what is referred to as the ‘administrative user’ for the customer account. This means that you can edit and amend the customer account details, and also authorise other user’s requests to link their user profiles to the customer account, in order to act on behalf of the customer in Connect.

Register as a new user of Connect and link to a single customer account, or multiple customer accounts
34
Scenario 4
1. Log in to Connect using your external user login details.
2. Navigate to the Actions tab.
3. Click on the action called Link to customer
4. The Specify new or existing customer screen will display. Select individual from the dropdown options
and tick the Acting on behalf checkbox. Then click on the NEXT button.
Register as a new user of Connect and link to a single customer account, or multiple customer accounts
35
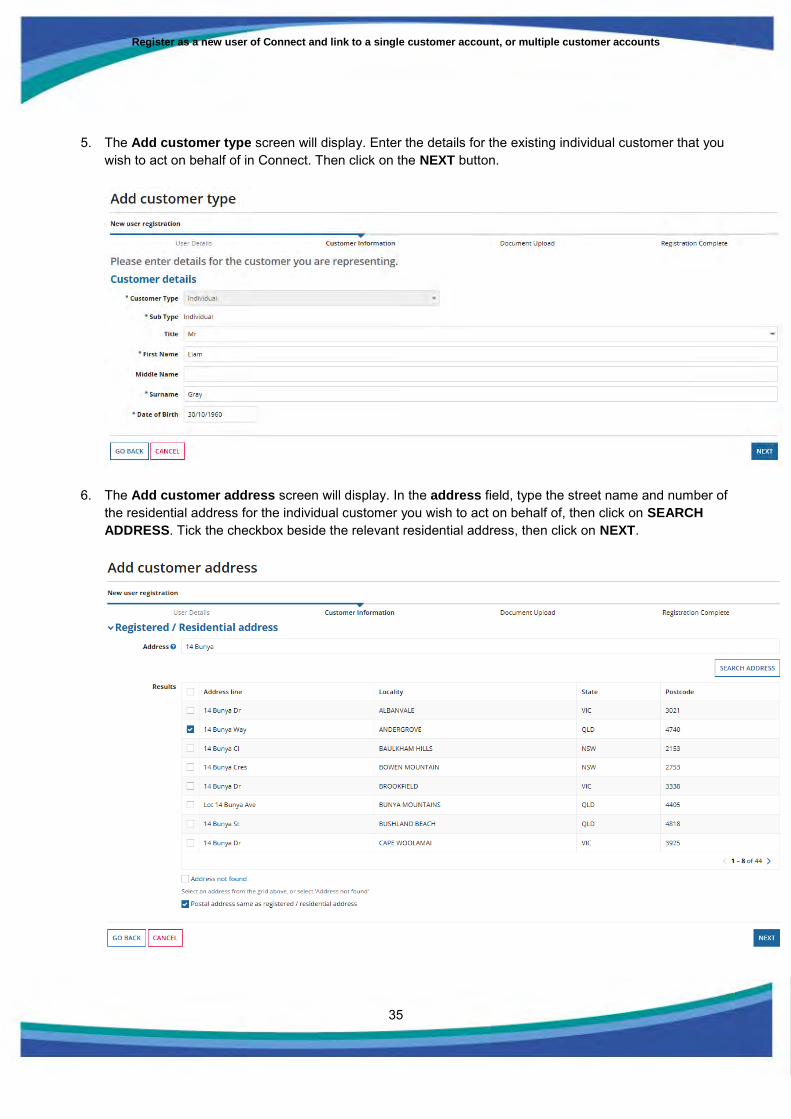
5. The Add customer type screen will display. Enter the details for the existing individual customer that you wish to act on behalf of in Connect. Then click on the NEXT button.
6. The Add customer address screen will display. In the address field, type the street name and number of the residential address for the individual customer you wish to act on behalf of, then click on SEARCH
ADDRESS. Tick the checkbox beside the relevant residential address, then click on NEXT.
Register as a new user of Connect and link to a single customer account, or multiple customer accounts
36
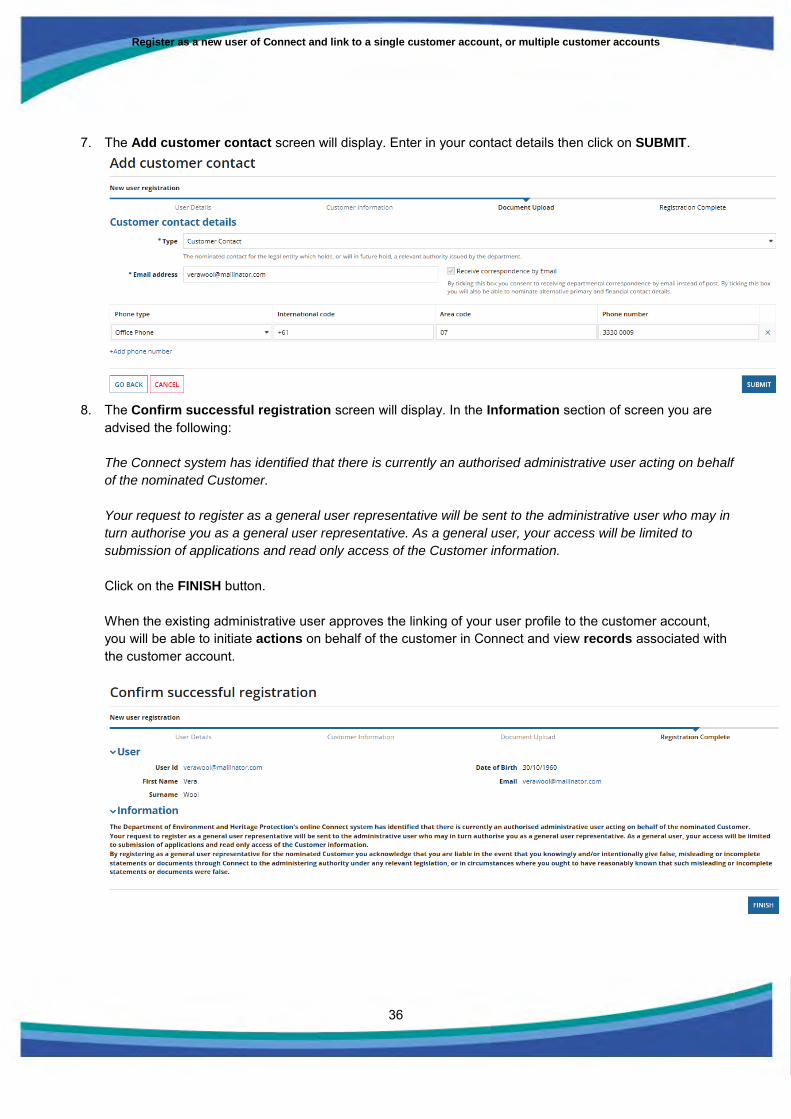
7. The Add customer contact screen will display. Enter in your contact details then click on SUBMIT.
8. The Confirm successful registration screen will display. In the Information section of screen you are
advised the following:
The Connect system has identified that there is currently an authorised administrative user acting on behalf
of the nominated Customer.
Your request to register as a general user representative will be sent to the administrative user who may in
turn authorise you as a general user representative. As a general user, your access will be limited to
submission of applications and read only access of the Customer information.
Click on the FINISH button.
When the existing administrative user approves the linking of your user profile to the customer account, you will be able to initiate actions on behalf of the customer in Connect and view records associated with the customer account.