Embed Size (px)
Citation preview
Quick Start GuideGuide de Démarrage rapide
Guía Rápida de Inicio
i1037
Questions?Need Some Help?This manual should help you understand your new product.
or visit www.polaroid.com/support.
If you still have questions, call our help line found on the
insert with this icon:
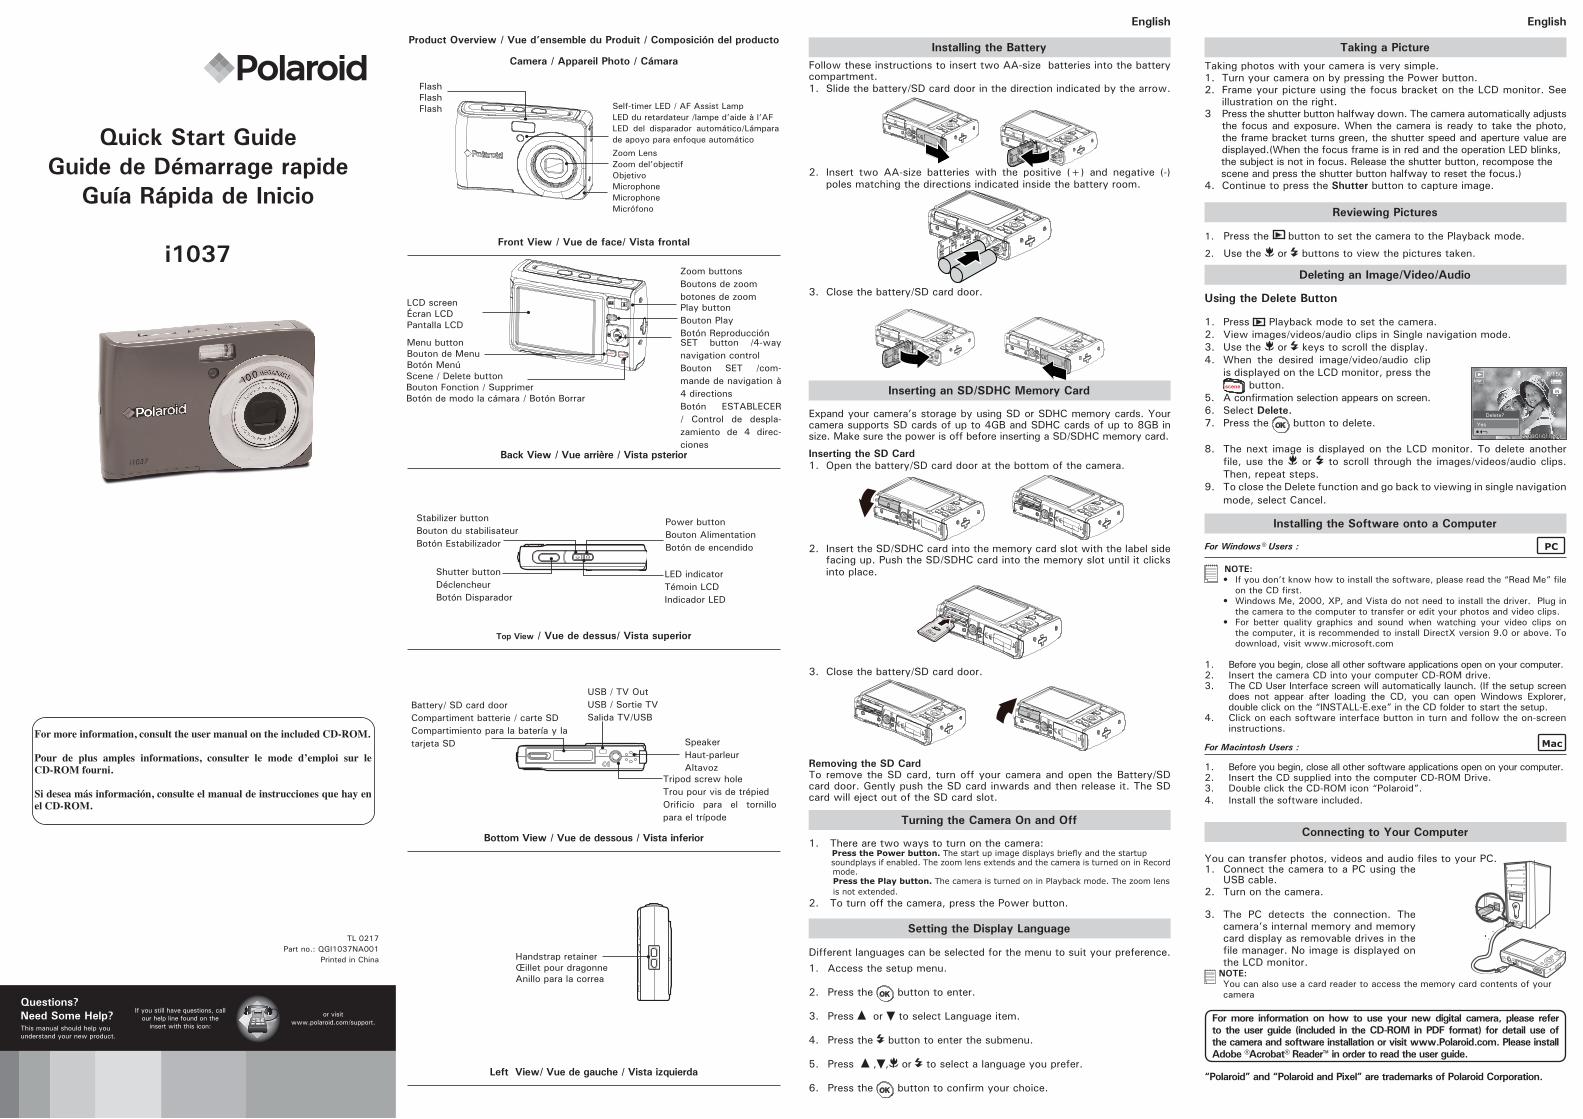
Product Overview / Vue d’ensemble du Produit / Composición del producto
Camera / Appareil Photo / Cámara
Self-timer LED / AF Assist LampLED du retardateur /lampe d’aide à l’AFLED del disparador automático/Lámpara de apoyo para enfoque automáticoZoom LensZoom del’objectifObjetivoMicrophoneMicrophoneMicrófono
FlashFlashFlash
Front View / Vue de face/ Vista frontal
Zoom buttonsBoutons de zoombotones de zoomPlay buttonBouton PlayBotón ReproducciónSET button /4-way navigation controlBouton SET /com-mande de navigation à 4 directionsBotón ESTABLECER / Control de despla-zamiento de 4 direc-ciones
LCD screenÉcran LCDPantalla LCD
Menu buttonBouton de MenuBotón MenúScene / Delete buttonBouton Fonction / SupprimerBotón de modo la cámara / Botón Borrar
scenemenu
Back View / Vue arrière / Vista psterior
Stabilizer buttonBouton du stabilisateurBotón Estabilizador
Power buttonBouton AlimentationBotón de encendido
Shutter buttonDéclencheurBotón Disparador
LED indicatorTémoin LCDIndicador LED
Top View / Vue de dessus/ Vista superior
USB / TV OutUSB / Sortie TVSalida TV/USB
Battery/ SD card doorCompartiment batterie / carte SDCompartimiento para la batería y la tarjeta SD
Tripod screw holeTrou pour vis de trépiedOrificio para el tornillo para el trípode
SpeakerHaut-parleurAltavoz
Bottom View / Vue de dessous / Vista inferior
Handstrap retainerŒillet pour dragonneAnillo para la correa
Left View/ Vue de gauche / Vista izquierda
English
Installing the BatteryFollow these instructions to insert two AA-size batteries into the battery compartment.1. Slide the battery/SD card door in the direction indicated by the arrow.
2. Insert two AA-size batteries with the positive (+) and negative (-) poles matching the directions indicated inside the battery room.
3. Close the battery/SD card door.
Inserting an SD/SDHC Memory Card
Expand your camera’s storage by using SD or SDHC memory cards. Your camera supports SD cards of up to 4GB and SDHC cards of up to 8GB in size. Make sure the power is off before inserting a SD/SDHC memory card.
Inserting the SD Card1. Open the battery/SD card door at the bottom of the camera.
2. Insert the SD/SDHC card into the memory card slot with the label side facing up. Push the SD/SDHC card into the memory slot until it clicks into place.
M B
3. Close the battery/SD card door.
Removing the SD CardTo remove the SD card, turn off your camera and open the Battery/SD card door. Gently push the SD card inwards and then release it. The SD card will eject out of the SD card slot.
Turning the Camera On and Off
1. There are two ways to turn on the camera: Press the Power button. The start up image displays briefl y and the startup soundplays if enabled. The zoom lens extends and the camera is turned on in Record
mode. Press the Play button. The camera is turned on in Playback mode. The zoom lens is not extended.
2. To turn off the camera, press the Power button.
Setting the Display Language
Different languages can be selected for the menu to suit your preference.1. Access the setup menu.
2. Press the button to enter.
3. Press or to select Language item.
4. Press the button to enter the submenu.
5. Press , , or to select a language you prefer.
6. Press the button to confirm your choice.
English
Taking a PictureTaking photos with your camera is very simple.1. Turn your camera on by pressing the Power button.2. Frame your picture using the focus bracket on the LCD monitor. See
illustration on the right.3 Press the shutter button halfway down. The camera automatically adjusts
the focus and exposure. When the camera is ready to take the photo, the frame bracket turns green, the shutter speed and aperture value are displayed.(When the focus frame is in red and the operation LED blinks,
the subject is not in focus. Release the shutter button, recompose the scene and press the shutter button halfway to reset the focus.)4. Continue to press the Shutter button to capture image.
Reviewing Pictures
1. Press the button to set the camera to the Playback mode.
2. Use the or buttons to view the pictures taken.
Deleting an Image/Video/Audio
Using the Delete Button
1. Press Playback mode to set the camera.2. View images/videos/audio clips in Single navigation mode.3. Use the or keys to scroll the display.4. When the desired image/video/audio clip
is displayed on the LCD monitor, press the scene button.
5. A confirmation selection appears on screen.6. Select Delete.7. Press the button to delete.
5/150
IN
2008/01/0118:59
10M
Delete?
Yes
8. The next image is displayed on the LCD monitor. To delete another file, use the or to scroll through the images/videos/audio clips. Then, repeat steps.
9. To close the Delete function and go back to viewing in single navigation mode, select Cancel.
Installing the Software onto a Computer
For Windows® Users : PC
NOTE:• If you don’t know how to install the software, please read the “Read Me” fi le
on the CD fi rst. • Windows Me, 2000, XP, and Vista do not need to install the driver. Plug in
the camera to the computer to transfer or edit your photos and video clips.• For better quality graphics and sound when watching your video clips on
the computer, it is recommended to install DirectX version 9.0 or above. To download, visit www.microsoft.com
1. Before you begin, close all other software applications open on your computer.2. Insert the camera CD into your computer CD-ROM drive.3. The CD User Interface screen will automatically launch. (If the setup screen
does not appear after loading the CD, you can open Windows Explorer, double click on the “INSTALL-E.exe” in the CD folder to start the setup.
4. Click on each software interface button in turn and follow the on-screen instructions.
For Macintosh Users : Mac
1. Before you begin, close all other software applications open on your computer.2. Insert the CD supplied into the computer CD-ROM Drive.3. Double click the CD-ROM icon “Polaroid”.4. Install the software included.
Connecting to Your Computer
You can transfer photos, videos and audio files to your PC.1. Connect the camera to a PC using the
USB cable.2. Turn on the camera.
3. The PC detects the connection. The camera’s internal memory and memory card display as removable drives in the file manager. No image is displayed on the LCD monitor.
NOTE: You can also use a card reader to access the memory card contents of your camera
For more information on how to use your new digital camera, please refer to the user guide (included in the CD-ROM in PDF format) for detail use of the camera and software installation or visit www.Polaroid.com. Please install Adobe ®Acrobat® Reader™ in order to read the user guide.
“Polaroid” and “Polaroid and Pixel” are trademarks of Polaroid Corporation.
For more information, consult the user manual on the included CD-ROM.
Pour de plus amples informations, consulter le mode d’emploi sur le CD-ROM fourni.
Si desea más información, consulte el manual de instrucciones que hay en el CD-ROM.
TL 0217Part no.: QGI1037NA001
Printed in China

Français
Prendre une photoPrendre une photo avec votre appareil photo est une opération très simple.1. Allumez l’appareil photo en appuyant sur le bouton d’alimentation. 2. Cadrez l’image à l’aide de crochets de mise au point sur l’écran LCD.
Voyez l’illustration sur la droite.3 Appuyez à mi-course sur le Déclencheur. L’appareil photo ajuste
automatiquement la mise au point et l’exposition. Lorsque l’appareil photo est prêt à prendre la photo, les crochets de mise au point deviennent vers, et les valeurs de vitesse d’obturation et d’ouverture s’affichent.
4. Appuyez à fond sur le déclencheur pour prendre l’image.
Suppression des prises de vue et des clips vidéo
1. Appuyez sur le bouton pour régler l’appareil photo sur le Mode .2. Appuyez sur le bouton ou pour visualiser les photos prises.
Supprimer une image/une vidéo/de l’audio
Utiliser le bouton Supprimer1. Appuyez sur le bouton pour régler l’appareil photo sur le Mode .2. Visualisez les images/vidéos/séquences audio en mode de navigation
unique.3. Utilisez les touches or pour faire défiler l’écran.4. Lorsque l’image/la vidéo/la séquence
audio souhaitée s’affiche sur l’écran LCD, appuyez sur le bouton Supprimer.
5. Un choix de confirmation apparaît à l’écran.6. Sélectionnez Supprimer.7. Appuyez sur le bouton pour
supprimer.
5/150
IN
2008/01/0118:59
10M
Delete?
Yes
8. Aucune image ne s’affiche sur l’écran LCD. Pour supprimer un autre fichier, utilisez l et pour défiler parmi les images/vidéos/séquences audio. Puis répétez les étapes 4 à 7.
9. Pour fermer la fonction de suppression et revenir à la visualisation en mode de navigation unique, sélectionnez Annuler.
Installation du logiciel sur l’ordinateur
Pour les utilisateurs de Windows® : PC
REMARQUE: • Si vous ne savez pas comment installer le logiciel, lisez d’abord le fichier “Read Me” sur
le CD. • Windows 98SE impose une installation du pilote de votre appareil photo numérique pour
la fonction de stockage de masse. Après l’installation, redémarrez l’ordinateur avant de brancher votre appareil photo à l’ordinateur.
• Windows Me, 2000, XP, et Vista ne nécessitent pas d’installation du pilote. Branchez l’appareil photo sur l’ordinateur pour transférer ou éditer vos photos et clips vidéo.
• hhzzzzPour obtenir une meilleure qualité graphique et sonore d’affichage de vos clips vidéo sur l’ordinateur, il est recommandé d’installer DirectX version 9,0 ou supérieure. Pour le télécharger, visitez le site www.microsoft.com.
1. Avant de commencer, fermez toutes les applications ouvertes sur votre ordinateur.
2. Insérez le disque d’installation dans le lecteur de CD-ROM.3. L’écran d’interface utilisateur du CD démarre automatiquement. (Si l’écran
d’installation n’apparait pas après chargement du CD, vous pouvez ouvrir l’explorateur Windows, faire un double-clic sur “INSTALL-E.exe” dans le dossier du CD pour démarrer l’installation.
4. Cliquez tour à tour sur chaque bouton d’interface de logiciel et suivez les instructions à l’écran.
Pour les utilisateurs d’un Macintosh : Mac
1. Avant de commencer, fermez toutes les applications ouvertes sur votre ordinateur.
2. Insérez le disque d’installation dans le lecteur de CD-ROM.3. Dans le répertoire du CD-ROM, double-cliquez sur l’icône
« Polaroid ».4. Installer le logiciel fourni.
Brancher l’appareil photo sur un PCVous pouvez transférer vos photos, vidéos et fichiers audio vers votre PC.1. Branchez l’appareil photo sur un PC à l’aide du câble
USB.2. Allumez l’appareil photo.
3. Le PC détecte le branchement. La mémoire interne et la carte mémoire de l’appareil photo apparaissent en tant que lecteurs amovibles dans le gestionnaire de fichiers. Aucun image ne s’affiche sur l’écran LCD.
NOTA: Vous pouvez également utiliser le lecteur de cartes pour accéder au contenu de la carte mémoire de votre appareil photo.
Reportez-vous au guide de l’utilisateur (inclus dans le CD-Rom en fichier pdf) pour une description détaillée de l’utilisation de l’appareil photo, de l’installation et de l’utilisation du logiciel. Veuillez installer Adobe® Acrobat® Reader™ pour pouvoir lire le guide de l’utilisateur en fichier pdf.
“Polaroid” et “Polaroid et Pixel” sont des marques de Polaroid Corporation.
Français
Insertion de la pileSuivez ces instructions pour insérer la AA batterie dans le compartiment de la batterie.1. Glissez le couvercle des piles dans le sens indiqué par la flèche.
2. Insérer deux piles alcalines de type AA avec les pôles positifs (+) et négatifs (-) correspondants aux instructions à l’intérieur du compartiment des piles.
3. Faire glisser le couvercle des piles pour fermer.
Insertion d’une carte mémoire SD/SDHC
Étendez le stockage de votre appareil en utilisant des cartes mémoires SD ou SDHC. Votre appareil photo prend en charge les cartes SD jusqu’à 4GB et les cartes SDHC jusqu’à 8GB en taille.
Insertion de la carte SD1. Ouvrez le compartiment de la batterie à la base de l’appareil photo.
2. Insérez la carte SD/SDHC dans la fente pour carte mémoire, la partie métallique étant dirigée vers l’avant de l’appareil photo. Enfoncez la carte SD/SDHC dans la fente pour mémoire, jusqu’à ce qu’elle s’encliquète en place.
M B
3. Fermez le couvercle du compartiment à piles.
Retrait de la carte SDPour retirer la carte SD, éteignez l’appareil, ouvrez le couvercle du logement de la carte SD, poussez délicatement la carte vers le haut puis relâchez pour que la carte SD se glisse hors du logement comme dans l’illustration.
Mise en marche et arrêt de l’appareil
1. Il y a deux façons d’allumer l’appareil photo :• Appuyez sur le bouton Alimentation. L’image de démarrage s’affiche
brièvement et le son de démarrage, s’il est activé, retentit. Le zoom de l’objectif se déploie et l’appareil photo passe en mode Enregis-trement.
• Appuyez sur le bouton Play (Lecture). L’appareil photo s’allume en mode lecture. Le zoom de l’objectif ne se déploie pas.
2. Pour éteindre l’appareil photo, appuyez sur le bouton Alimentation.
Réglage de la langue d’affichageDans le menu, vous pouvez sélectionner la langue parmi un large choix.1. Ouvrez le menu reglages.2. Appuyez sur le bouton .3. Appuyez sur le bouton et pour sélectionner “Langue”.4. Appuyez sur le bouton pour accéder au sous-menu5. Appuyez sur les boutons , , et pour sélectionner des options.6. Appuyez sur le bouton pour confirmer une sélection.
Capturar fotografías
Capturar fotografías con la cámara es muy sencillo.1. Encienda la cámara presionando el botón de encendido. 2. Encuadre el disparo utilizando el cuadro de enfoque del monitor LCD.
Consulte la ilustración de la derecha.3 Presione el botón Disparador hasta la mitad de su recorrido La cámara
ajustará el enfoque y la exposición automáticamente. Cuando la cámara esté lista para capturar la fotografía, el color de las barras del cuadro de enfoque pasarán a ser verdes y se mostrarán los valores de la velocidad del obturador y de la apertura.
4. Presione totalmente el botón Disparador para capturar la imagen.
Revisión de fotografías en la pantalla LCD
1. Presione el botón para dejar la cámara en el modo Modo Playback.
2. Pulse el botón y para ver las fotografías realizadas.
Eliminar una imagen, un vídeo o un clip de audio
Utilizar el botón Eliminar1. Establezca la cámara en el modo Reproducción.2. Vea las imágenes, los vídeos o los clips de audio en el modo de
desplazamiento individual.3. Utilice los botones y para desplazarse
por la pantalla.4. Cuando la imagen, vídeo o clip de audio que
desee se muestre en el monitor LCD, presione el botón Eliminar.
5. Aparecerán dos opciones en la pantalla para que confirme su selección.
6. Seleccione Borrar.7. Presione el botón ESTABLECER para eliminar
el contenido.
5/150
IN
2008/01/0118:59
10M
Delete?
Yes
8. La imagen siguiente se mostrará en el monitor LCD. Para eliminar otro archivo, utilice y tpara desplazarse por las imágenes, los vídeos o los clips de audio. A continuación, repita los pasos.
9. Para cerrar la función Eliminar y regresar a la visualización en el modo de desplazamiento individual, seleccione Cancelar.
Instalación del software en el ordenador
Para usuarios de Windows® : PC
NOTA: • Si no sabe cómo instalar el software, lea antes el archivo “Read Me” (Léame) incluido en el
CD. • Windows 98SE necesita que se instale el controlador de la cámara digital para la función
de almacenamiento masivo. Después de la instalación, antes de conectar la cámara al ordenador, reinícielo.
• Para Windows Me, 2000, XP y Vista no es necesario instalar el controlador. Conecte la cámara al ordenador para transferir o editar las fotos y los vídeos.
• Para obtener una mayor calidad en los gráficos y los sonidos mientras ve los vídeos en el ordenador, se recomienda instalar DirectX Versión 9.0 o superior. Para descargarlo, visite www.microsoft.com.
1. Antes de comenzar, cierre el resto de las aplicaciones abiertas en su ordenador.
2. Inserte el CD suministrado en la unidad de CD-ROM.3. Se iniciará automáticamente la pantalla CD User Interface (Interfaz de
usuario del CD). Si la pantalla de instalación no aparece al cargar el CD, puede abrir el Explorador de Windows y hacer doble clic en “INSTALL-E.exe” en la carpeta del CD para iniciar la instalación.
4. Haga clic en cada uno de los botones de la interfaz de software y siga las instrucciones que aparecen en pantalla.
Para usuarios de Macintosh : Mac
1. Antes de comenzar, cierre el resto de las aplicaciones abiertas en su ordenador.
2. Inserte el CD suministrado en la unidad de CD-Rom.3. Haga doble clic en el icono de CD-ROM “Polaroid“.4. Instale el programa que aparece incluido.
Conectar la cámara a su PC
Puede transferir fotografías y archivos de vídeo y audio a su PC1. Conecte la cámara a su PC mediante el cable USB.2. Encienda la cámara.
3. Su PC detectará la conexión. La memoria interna y la tarjeta de memoria de la cámara aparecerán como unidades extraíbles en el administrador de archivos. Ninguna imagen se mostrará en la pantalla LCD.
NOTA: También puede usar un lector de tarjetas para obtener acceso al contenido de la tarjeta de memoria de la cámara.
Consulte el manual del usuario (incluido en el CD-Rom como archivo pdf) acerca del uso detallado de la cámara e instalación del software. Para poder leer la guía del usuario, instale Adobe® Acrobat® Reader™.
“Polaroid” y “Polaroid and Pixel” son marcas registradas de Polaroid Corporation.
Español
Instalación de la bateríaSiga estas instrucciones para insertar la batería de ion-litio en su compartimento.1. Desplace la tapa de las pilas en la dirección que indica la flecha.
2. Inserte dos baterías alcalinas tipo AA de forma que los polos positivo (+) y negativo (-) coincidan con las direcciones que se indican en el interior del compartimento de las baterías.
3. Cierre la tapa de las baterías.
Insertar una tarjeta de memoria SD/SDHC
Expanda el almacenamiento de la cámara usando tarjetas de memoria SD o SDHC. La cámara admite tarjetas SD de hasta 4 GB y tarjetas SDHC de hasta 8 GB.Siga estas instrucciones para insertar la tarjeta SD/SDHC.
Inserción de la tarjeta SD1. Abra el compartimento de la batería situado en la parte inferior de la
cámara.
2. Inserta la tarjeta SD/SDHC en la ranura para tarjetas de memoria con la parte metálica orientada hacia el lado frontal de la cámara. Empuje la tarjeta SD/SDHC hacia el interior de la ranura de memoria hasta que quede encajada en su lugar.
M B
3. Cierre el compartimento de la batería.
Extracción de la tarjeta SDPara extraer la tarjeta SD, apague la cámara, abra la cubierta de la ranura, empuje suavemente la tarjeta hacia dentro y, a continuación, suéltela para permitir que salga expulsada de la ranura como se muestra en el dibujo.
Encendido y apagado de la cámara
1. Hay dos formas de encender la cámara:• Pulse y mantenga presionado el botón de encendido. La imagen de
inicio aparecerá brevemente y el sonido de inicio se reproducirá en caso de estar habilitado. El objetivo se extenderá y la cámara se encenderá en el modo Grabación.
• Pulse y mantenga presionado el botón Reproducir. La cámara se encenderá en el modo Reproducción. El objetivo no se enciende.
2. Para apagar la cámara, presione el botón de encendido.
Selección del idioma de la pantalla
Puede seleccionar diferentes idiomas para el menú.
1. Acceda al menú de configuración. 2. Presione el botón para acceder.3. Presione el botón o para selecciona “Idioma”.4. Presione el botón para acceder.5. Presione el botón , , o para seleccionar el ajuste deseado.6. Presione el botón para confirmar la selección.
Español