Embed Size (px)
Citation preview

Quick Start Guide for Columbus
Prepare for Collection
There are two methods of navigation that can be used with Columbus.
GPS Navigation: This mode does not require any special setup and allows the user to walk or drive an
area collecting data with GPS coordinates being saved with each measurement point.
Indoor Navigation: This mode allows the user to collect data and assign coordinates when GPS is
unavailable. This mode requires that a geocoded image (floorplan or map) be first loaded into
Columbus. The users will then periodically place waypoints on the image defining their locations as they
walk through the test route. Columbus will automatically interpolate the data between the waypoints.
Note. This Quick Start Guide describes Columbus when being used with indoor navigation.
Setting up a Project If using the Indoor Navigation method you will need to setup a project in Columbus.

Click on the “New Project” Button on the bar just below the menu option line.
This brings up the window below; type in a name for your project and click the “Create” Button. This
will bring up the selection box shown below.
Navigate to the location of the Geocoded Image (.TAB file) representing a map or floorplan you would
like to use as the basis for the navigation.

You can add a name to the floorplan by clicking on the “Rename Floor” icon on the top edge of the map
window.
Creating Routes

You can create a proposed route as a guide for your test by clicking on the mode setting dropdown and
selecting “Routes”.
Once in the Route mode a mouse click in the main map window will place a point on the floorplan with a
line segment attaching it to the previous point creating a route that can act as a walking guide when the
subsequent test is performed.
When the route path is finished a right-mouse button click on the map window will bring up the context
menu above. Select the “Final Route Point” option and that route is finished.
To create a new route right mouse button click anywhere in the map window screen and select the
“Create New Route” option. Each subsequent left mouse button click will lay down another point and
line segment of a new route.

Editing Routes
You can edit routes by left-clicking and holding on a Route point, dragging, and then releasing it on a
new position.
You can also right mouse button click on a line segment and select “Add Route Point” to add a point to
the route. The same context menu allows the ability to copy, delete or hide (not delete - just not display
them on the screen) a route.

Right mouse button clicking on a route point allows you to delete the point by selecting the “Delete
Route Point” option in the resulting context menu.
Configuring the Scanner Now that you have setup your project - loaded in floorplans and defined routes – you need to choose
the frequencies and technologies that you wish to scan. The left side of the screen in Columbus is
dedicated to the receiver functionality.
The scanner is able to tune to the following frequency ranges:
In these frequency ranges it can decode the following technologies:
GSM
UMTS
LTE
DASPoint Red Eye Transmitter System

Setting DAS Frequencies
Right mouse button click in the top frequency box for “DAS test” and select the “Add Frequency” option
in the context menu.
This will bring up a small window where you will type in the center frequencies in MHz that the RedEye
transmitters have been set to. Once you have typed in your frequency click the “Add” button. You can
repeat this process to add as many frequencies as your RedEye transmitters are operating on.
Note. The RedEye transmitters broadcast 4 Mhz signals and the entire bandwidth must be in the
operational range of the scanner or you will get an error.

Setting GSM Frequencies
A Right mouse button click in the GSM frequency area offers two ways of selecting GSM channels to
measure. The first option in the context menu is “Add Frequency from Channel”.
You can type in any GSM channel number into the box, Columbus will automatically convert it into a
frequency.
The second option is “Add Frequency Range”. From here you can type in any frequency range (in MHz),
within the operational range of the scanner and it will measure any GSM channels it finds within that
range.
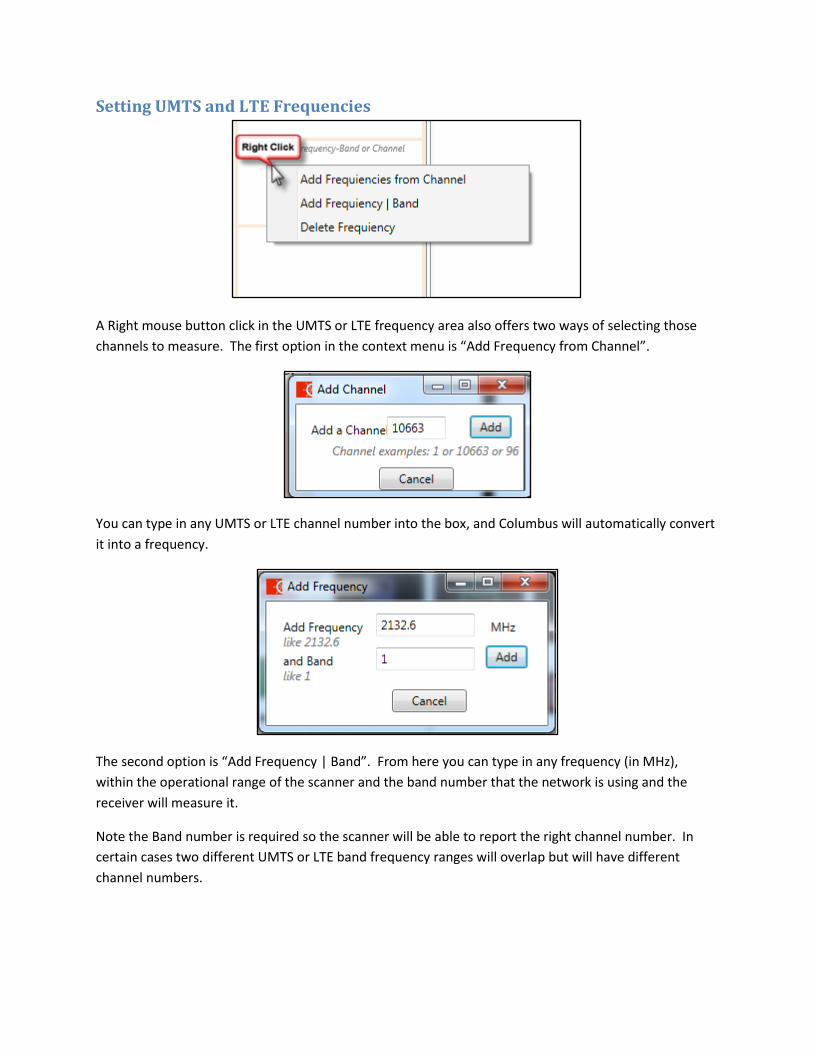
Setting UMTS and LTE Frequencies
A Right mouse button click in the UMTS or LTE frequency area also offers two ways of selecting those
channels to measure. The first option in the context menu is “Add Frequency from Channel”.
You can type in any UMTS or LTE channel number into the box, and Columbus will automatically convert
it into a frequency.
The second option is “Add Frequency | Band”. From here you can type in any frequency (in MHz),
within the operational range of the scanner and the band number that the network is using and the
receiver will measure it.
Note the Band number is required so the scanner will be able to report the right channel number. In
certain cases two different UMTS or LTE band frequency ranges will overlap but will have different
channel numbers.

Data Collection
Now that the project is setup you need to begin collecting data. Make sure that your WIND3G scanner
is turned on and connect it to the tablet running Columbus with the USB cable.
Starting Data Collection
When the scanner is ready to begin collecting data you should see the ID of the scanner below the Start
Collection button. Below that it should say “Calibrated” in green. Once these two conditions are met
you can begin data collection.

Press the Button that says “Start Collection”. Once you do a file save window opens with a unique file
name which is created from the following bits of information:
Project Name
Floor Name
Floor Height
Date
Time
You can change the name of the file before saving but the standard naming convention has been
designed to ensure clarity and uniqueness so it is best just to hit the “Save” Button.

Once the save button has been clicked then the Columbus software will be collecting measurement data
from the WIND3G hardware.
Creating Waypoints
If you are using the indoor navigation system then you need to select “Scanner” from the Mode Setting
dropdown. When you are in this mode a left mouse button click on the floorplan will drop a waypoint.
Waypoints denote the current position of the operator.

As the user moves through the floorplan collecting data he should periodically mark his position with a
waypoint. It is absolutely necessary to create a waypoint when the user changes his direction.
Note. Columbus will spread the collected data between each waypoint. Because of this interpolation it is
good practice to walk at an even pace between your waypoints. If you need to stop for a while at a
single location you should drop a waypoint when you first stop and then a second one when you are
ready to proceed again.
Ending Collection
When you have come to the end of your collection test and have dropped your last waypoint, simply
press the “Stop Collection” button and all of your data will be saved and Columbus will stop collecting
measurements from the WIND3G receiver.
Note. Columbus will only save data that is collected between waypoints. So any data collected before
you dropped the first waypoint or after you dropped your last waypoint will be thrown out.
Map Control Bar
The map control bar consists of buttons that allow the user to control what is displayed in the map
window and how it will function. The first four set of buttons control the display. Whatever button is in
currently operative will be highlighted with a red border.
You can use the + magnifying glass to make a left mouse button click in the map window to zoom in.
You can also click and drag to define a box that you would like to zoom to.
You can use the – magnifying glass to make a left mouse button click in the map window to zoom out.
The Palm button allows you to use the cursor to pan around in the map window.

The Flag button allows you to create new route points, transmitter locations or data collection
waypoints depending on the mode that you are in.
The tab button allows you to edit name of the floorplan that is being displayed.
The zoom to fit button when clicked on will scale the map window so that it is filled by the floorplan.
The snap to route toggle button will try to assign snap a waypoint to the nearest route point if it is
within 10 pixels of it.
The Show All button when pressed will either show all the routes on a floorplan or show all of the
waypoints files. This is used in cases where you have chosen to hide some or all of the individual route
or waypoint files in either route or scanner mode.
The