Embed Size (px)
Citation preview

Exsys Corvid Quick-Start Guide - Fundamentals & Tutorials 1
Quick-Start Guide Building Knowledge Automation Systems with Exsys Corvid
Exsys Corvid Fundamentals Quick-Start Tutorial – Using Logic Blocks Quick-Start Tutorial – Using Action Blocks

Exsys Corvid Quick-Start Guide - Fundamentals & Tutorials 2
Exsys Corvid is a very powerful environment for developing knowledge automation systems.
It allows the logical rules and procedural steps used by experts or business operations to be efficiently emulated in a system that is easy to read, understand and maintain. In an interactive session delivered online, the underlying Inference Engine processes the problem-solving logic to interact with the end user as if they were talking to the expert, producing situation-specific recommendations and advice on a wide range of subjects. Decision-making knowledge is delivered to prospects, customers and employees when they need it, efficiently providing needed answers - not just data - to precisely solve their specific problem at hand. Corvid systems can provide advice, access and analyze external data, automate reports, monitor for developing problems, perform diagnostics, optimize operations, troubleshoot, alert operators to unusual situations and perform many other decision support tasks. Systems can be fielded on the Web, run stand-alone or may front-end to existing process control systems. Proven across the enterprise and throughout organizations from broad application decision support to smarter business rules, and “best practices” implementation to knowledge asset management. Businesses using this technology are increasing productivity, cutting costs and improving customer relations - while creating new profit centers and achieving demonstrable return on investment. This Quick-Start document is designed to get you started using Exsys Corvid, and give you some ideas of how you can use it. Corvid has a very wide range of features and capabilities for handling different types of problems, special deployment environments and the unique requirements of some types of systems. However, very few developers use all the features. This document includes a “Quick Start” manual designed to explain Corvid in a way that will allow you to learn about core parts of Corvid needed for most systems, without having to learn everything about Corvid.
The 1st section is on Fundamentals. This covers the concepts that you will need to know to build almost any Corvid system. Several features are explained.
The 2nd section explores the key way to build rules in Exsys Corvid using Logic Blocks. It will step you through a basic tutorial – “The Light Bulb Problem”.
The 3rd section looks at using Action Blocks and a tutorial – “Financial Smart Questionnaire”.)
An additional tutorial is available that goes a little more in depth on more Corvid features and techniques - “The Best Way to Drive to Work Advisor”.
It is highly recommended that you follow along with the tutorials and actually build the systems. This will give you a good background to start your own systems. In addition to this document there is the full Corvid manual. It provides much more detail on the functions and capabilities of Corvid. The Exsys web site also includes a “How To” section that provides detailed instructions on specific commonly needed tasks, such as interfacing to databases, building dynamic web sites, saving state, running validations, etc. If your applications require these functions or you have questions about them go to: www.exsys.com/support/howto on the Exsys web site.
Expertise at Your Fingertips™

Exsys Corvid Quick-Start Guide - Fundamentals & Tutorials 3
Exsys Corvid Knowledge Automation Systems Exsys Corvid Knowledge Automation tools enable development of systems that provide expert problem-solving advice. They are based on decision-makinglogic to provide answers tailored to individual users, using expert knowledge and analysis that has beenincorporated into the system. The system’s interaction with an end user emulates the interaction that a person would have with a human expert to obtain advice or a recommendation.
The systems ask questions in a logical way, skippingirrelevant questions, but asking for more details where needed. When all of the needed informationhas been provided, the system will produce preciseadvice tailored to the individual user and situation. Systems can be delivered via web browsers, run standalone or embedded with other programs. Expert knowledge of how to solve a problem is often scarce and valuable - it can be a company's greatest asset and key competitive differentiator. Knowledge Automation systems capture this knowledge and allow its dissemination to others.
Systems can be built for a wide range of decision-making tasks where the decision or advice is based on “rules” and a process that can be precisely described. Most decision-making processes can be broken down into many small parts. A human expert often makes decisions almost automatically and does not consciously think about each small step to solve a problem or reach conclusions. However, the logic and basis for the decision becomes apparent when the reason for a decision is explained to someone else, or the decision process is taught to others. This same logic and process is the basis for building a Knowledge Automation system.
How an Expert Explains a Solution to Other People When experts explain how they make a decision to other people they typically explain it with the “rules of thumb” they have learned lead to a correct conclusion. For example, if a decision is being made about investing, a top-level rule might be, “If the customer has a high risk tolerance, and requires rapid growth to reach their objectives, Mutual Fund X would be a good choice.” This could be a valid rule, but unless you know if “the customer has a high risk tolerance”, you can’t make use of it. If you wanted to learn how to make the best decision, you would ask the expert, “How do you know if the customer has a high risk tolerance?" This would lead to other rules, “If the customer has a risk tolerance ranking of greater than 15,
Diagnostics Best Practices Regulatory Compliance Engineering Assistance Predictive Maintenance Troubleshooting Help Desk Customer / Sales Support Product Selection Monitoring Scheduling Smart Questionnaires Risk Identification Complex Document Generation Automated Visitor-Specific Web Sites
SOME PROVEN AREAS FOR KNOWLEDGE AUTOMATION SYSTEMS

Exsys Corvid Quick-Start Guide - Fundamentals & Tutorials 4
then they have a high risk tolerance" and “If the customer's portfolio… then they have a high risk tolerance”. These new rules of thumb allow you to determine if the “high risk tolerance” part of the first rule is valid. If a person spends enough time with the expert, and remembers everything they say, they will eventually learn all of the knowledge they need to make the decisions themselves. However, that can be a long and often difficult process. Building a Knowledge Automation system for a decision-making task is an effective way to get the expert to systematically detail and explain all of the relevant logic, and do it in a way that allows it to be automated and implemented to deliver “best practice” advice How a Knowledge Automation System Delivers Expert Advice When developing a system, the decision-making knowledge and procedures of a human expert are converted to “rules”, a form of logical representation that the computer can process. The rules are analyzed by the expert system Inference Engine, which determines how to use them to perform a desired action or reach a specific goal. The system asks the user questions, and uses their input to determine which rules are true and can be used to provide advice. Individual rules in the system can describe small parts of the overall decision-making task. The Inference Engine provides the “brains” that will determine what rules to use, and how to use them. Since all decisions are based on a logical and consistent use of precise rules, the system can logically explain the basis for its conclusions, and provide consistent advice. Most other approaches to knowledge distribution just provide people with information, and rely on them to read, understand, and convert it to usable knowledge on their own - in effect, self-teaching themselves to be an expert. The problem is that realistically, most people do not remember everything that they are shown. It is difficult to teach people how to solve problems of even average complexity. And, most importantly in today’s rapidly changing world and information overload, people don’t have time to learn all of the problem-solving skills they need. Knowledge Automation systems are different in that they directly deliver knowledge to people - "know-how", advice, and recommendations - rather than just information. This enables people to solve complex decision-making problems without training or having to learn the underlying logic. As an example, think of going to the doctor - the doctor asks a few questions, does a few tests to get data, and prescribes a medicine or therapy. The patient does not need to understand anatomy or the details of how the diagnosis was done - they have their answer. This is the power that Knowledge Automation systems provide - direct delivery of knowledge to the people that need it, when they need it. Ideally, people would have immediate contact with human experts in every area of specialty that they might need, 24 hours a day. But this can’t happen. Experts are scarce, busy and often difficult to reach, and many decisions can’t wait for access to an expert. Knowledge Automation systems provide a very effective and efficient way to provide prospects, customers, employees and even advisors themselves with a way to have access to top-level expert decision-making knowledge and advice for specific problems. This expert knowledge can be delivered via the Web and made constantly and consistently available worldwide.
What is Exsys Corvid? Exsys Corvid, is a powerful, easy-to-learn, general-purpose development environment suitable for any type of knowledge automation system project – anywhere expert advice and answers need to be distributed or accessed. Used for any task that is based on a logical decision-making process, it provides all the power and flexibility needed to handle problem-solving situations whether basic or complicated. Corvid provides an intuitive development environment allowing domain experts to easily “describe” their decision-making steps in a logical manner, much as they would to another person. There is no complex syntax to learn. The rules are described simply in English and algebra, and are easy to read, understand,

Exsys Corvid Quick-Start Guide - Fundamentals & Tutorials 5
edit and maintain. Tree-structured logic diagrams are used to describe individual sections of the process. Corvid supports both data-driven forward chaining and goal-driven backward chaining, allowing the problem to be broken into small discrete parts for faster structured development.
Corvid provides two views of the logic – in tree diagrams that allow users to see the overall system structure, and in the full text of the individual rules. The benefit is that, instead of seeing lines of code, users can see the logic side-by-side in an easily understood way that also enables developers to quickly edit the rules. The Corvid Inference Engine combines and analyzes the rules to determine what pieces are needed and which rules can be used to reach the desired conclusions.
An open architecture and a wide range of features allow Corvid systems to integrate with corporate databases, external programs, CRM tools, process monitoring systems, Web sites and other IT infrastructures. Templates and screen commands can be utilized to design the system user interface, or HTML editors can be used to match the look and feel of existing sites. Corvid systems can be delivered on the Web or intranets via portable Exsys Java Runtime programs, or be distributed as standalone applications. Systems can be developed and fielded in multiple languages, be incorporated into emails, and run on many PDAs. The end-user interface for fielded systems is designed with Exsys screen commands orHTML, depending on the Exsys Runtime program used.
Who Benefits from Corvid Knowledge Automation Systems? Both large corporations and smaller companies use Corvid across industries, military and government agencies, researchers and universities. The most common types of systems built with Corvid are diagnostics, maintenance (predictive or troubleshooting), regulatory compliance, product recommendation, customer support, smart questionnaires and data analysis.
Corvid systems are most beneficial for distributing
the decision-making knowledge of commonly occurring problems that are well documented and understood by domain experts. Deploying systems to handle these types of problems guarantees a rapid ROI by reducing the workload and cost of interruption caused by frequently having to solving them. Also, commonly occurring problems are ones that the experts understand fully, know all the exceptions and can describe the logic of the problem-solving process.
Information Technology Sales and Marketing Contact and Customer Support Centers Policy and Compliance Human Resources Plant Operations and Process Control Financial Services Quality Assurance Legal Training Research & Development
DEPARTMENTS TYPICALLY USING CORVID

Exsys Corvid Quick-Start Guide - Fundamentals & Tutorials 6
How Easy Is It to Use Corvid?
Exsys Corvid is based on over 25 years of working with customers to provide a development environment that is easy to use, yet able to handle complex problems. Exsys’ philosophy has always been that it is far easier to teach the expert to use the development tool than to teach someone to become a subject matter expert. The tutorials that are included with Corvid help developers building their first systems in a few hours. A three-day, hands-on training class is available, which covers everything needed for even very complex projects. In most cases, the person building an expert system with Corvid should be the expert or someone that already has a good knowledge of the domain. For those with limited time, Exsys Inc. offers consulting in many areas including system approaches, knowledge engineering, data integration, interface design and how to handle more complex systems. Exsys’s goal is to provide the toolset and support to enable each company’s domain experts to build and maintain their own systems in the most cost and time-effective manner possible.

Exsys Corvid Quick-Start Guide - Fundamentals & Tutorials 7
Building a System - Overview This section covers the basic concepts and operations that are used to build almost all Corvid systems. It is important to fully understand the concepts explained here before proceeding to the full Exsys Corvid manual. This document also provides an overview of the main windows in Corvid and how they work. The tutorials will take you through actually building some systems.
Developing a knowledge automation system with Exsys Corvid typically has a series of basic steps:
1. Determine the specific problem the system will solve A precise description of what your system is intended to do can go a long way in preventing confusion and misunderstandings later. Systems should be aimed at solving a particular problem or providing advice in a particular area. The more focused the task, the easier it will be to build the system. For example, a system to diagnose problems with the Model X printer would be a good focused problem. Diagnosing problems with all models of ink jet printers in general would be a more complex system, but still a reasonable thing to do since they are based on similar technology. Diagnosing all problems with all printers would be overly broad since it would require combining many different technologies, and would be better handled by a set of morefocused systems. There are no exact limits as to when a problem becomes “too broad”, but when first starting with Corvid, it is best to select well-defined, precise problems.
In all cases, the solution to the selected problem should be based on logical reasoning and precise steps. Problems that require intuition, emotional decisions, random factors or other steps that cannot be described precisely are not a good choice for knowledge automation systems. A good test is:
Can the expert explain to another person how to solve the problem?
If the answer is “no”, it is not likely to be a good problem for Corvid. (Remember that some problems can be explained conceptually, but are too computationally demanding for a person to do – often these are especially good problems for a Corvid solution.)
2. Gather the documentation of the logic to go into the system The human expert on the problem or decision-making task is called the “Subject Matter Expert” or SME. (“Domain Expert” is another term frequently used.)
Ideally the Corvid system developer is also the SME, though that is not required. Experienced Corvid developers, who are also the SME, can often use Corvid itself to document the logic far more quickly than could be done in other ways, while producing the Corvid system at the same time. In most cases, the decision-making logic and steps that are to be included in the systems are documented in some way. This can be anything from simple diagrams to formal documents. In many cases, there is already documentation on how to solve the problem in instructional materials, user manuals, diagnostic tree diagrams, tutorials or other explanations.
The more precisely the steps in the solution are documented, the easier it will be to build the system. If all the logic is documented, building the system is a matter of converting the logic into the syntactical form used
Exsys Corvid Quick-Start Guide - Fundamentals & Tutorials 8
in Corvid. When the logic is poorly documented, there will likely be “gaps” found in the process of building the system. These gaps will have to be filled, typically by asking the SME for more details. The process of refining and extracting more detailed knowledge from the SME while building the rules makes a better system, and documents knowledge that might otherwise be lost. Ideally the documentation will be complete and organized in a structured and logical way that can be directly converted into a Corvid system.
3. Determine an Architecture for the System There are many ways to build systems in Corvid, and often many different but equally valid ways to solve the same problem. Even very simple systems can be built in different ways that are all “correct”. It requires an approach to the problem and an architecture that:
Will produce correct results Makes sense to the developer Will be easy for others to understand and maintain
The architecture requires selecting between technical issues such as backward and forward chaining, determining where and how to handle procedural operations, segmenting the logic into maintainable and reusable blocks, and other factors.
4. Use Corvid to Describe the System Logic Once the problem-solving logic is documented, it must be converted into the rule form used in Corvid. As you will see, the Corvid development environment is designed to make it easy to describe many types of logic.
5. Design the End User Interface When building a system, many developers prefer to get it fully working with a simple end user interface, and then modify the interface to match a site or other desired look-and-feel. However, in practice, it is often better to establish a good, polished user interface early on in the development process. System demos are often shown early in the development process and many people are (unfortunately) more impressed by a “pretty” system that actually does less than a very capable system that looks plain. In the end, your system should both produce good advice and have a polished user interface. However, designing a polished user interface early will often help to build management support needed to get a project finished – and the user interface will be tested extensively during the building and testing of the system logic. The optional Exsys Corvid Servlet Runtime License enables the use of extensive system user interface and design capabilities.
6. Test the System A Corvid system should be treated like any other software development project, thoroughly beta tested and validated by the expert to make sure it provides the correct results. The system rules should be printed out and reviewed by the expert(s) to make sure they are individually correct, and many sample sessions should be run to make sure they collectively are complete and give the correct results. A system can be tested either by running many sessions by hand (which also tests the user interface), or by using the Corvid Validation function which can test very large numbers of cases in a short time and report any logical errors. The developer is responsible for testing a system thoroughly before it is fielded. The amount of effort required to test a system increases with system complexity. In many cases, segmenting a problem into sections can simplify the testing process.
Exsys Corvid Quick-Start Guide - Fundamentals & Tutorials 9
7. Field the System Once a system is validated, it can be moved to the server and made available to end users. Corvid automatically builds all the files needed to field a system, so this step is normally just a matter of moving the appropriate files to a server.
Rules Building a system with Corvid is largely based on creating “Rules” that describe the logic of a decision-making process. The Corvid development environment simplifies the process by helping to organize related rules in logical tree structures, but the underlying form of representation is the rule – trees are only an aid in structuring the logic so that it can be seen more easily, understood and maintained. The rules are processed by the Corvid Inference Engine, which combines and uses them to drive the users sessions and produce results. In rule-based representations of knowledge, each of the expert's “rules of thumb” is called a “heuristic”. That is a specific small fact that tells how to make a part of the decision. The combination of all the heuristics allows the overall decision-making problem to be solved. In our brain, we combine these individual heuristics intuitively and systematically. We don’t have to stop and say, “now I need to know this, to help make this decision…”, our brain just does it. A large part of building a Corvid system is identifying the individual decision steps and converting them into a form that a computer can use. There are many ways of describing the heuristics for a decision-making process, but the one that has proven the most effective and efficient is the IF/THEN rule. This is a rule where there is an IF part that can be tested to be true or false based on the data for a specific case or situation. This is how a basic rule is written.
IF It is raining THEN You should wear a raincoat
When the IF part is true, the statements in the THEN part are also considered true, and are added to the information in the system that can be used by other rules or presented as results.
Note: When the IF part is false, that does NOT mean the THEN part is false. Rules that have the IF part false do not add any information to a system. If having the IF part false means something logically, there should be a rule to implement that. In this case, it would be something like “IF it is NOT raining THEN ….”. Here the IF part will be true when it is not raining.
Rules can have multiple IF and THEN conditions. When there are more then one IF conditions, they are ANDed together. This means that all of the IF conditions must be true for the rule to be considered true. If any are false, the rule will be false. When there are multiple THEN conditions, if the rule is true, all of the THEN statements, assignment and consequence are added to the data in the system. In Exsys Corvid, rules are very similar to the form that you would use to explain to another person how decisions are made. The rules are written using English and algebra. For example, the expert might explain: “If the investment customer has a high risk tolerance and requires rapid growth to reach their objectives, Mutual Fund X would be a good choice.”

Exsys Corvid Quick-Start Guide - Fundamentals & Tutorials 10
In a Corvid rule this would become: IF The customer has high-risk tolerance AND Meeting objectives requires rapid growth THEN Mutual Fund X is a good choice
This rule shows a small amount of syntax, but it is still very easy to read and understand what it means. Building a system with Corvid is fundamentally a matter of building rules for each of the heuristics in the decision-making process.
Inference Engine Our brain processes and combines decision-making heuristics intuitively. Unfortunately, a computer is nowhere near as effective as our brain. In Exsys Corvid a special program called an “Inference Engine” is used to analyze and combine individual rules to solve a larger problem. The Inference Engine determines:
What possible answers there are to the problem What data is needed to determine if a particular answer is appropriate If there is a way to derive or calculate the needed data from other rules When enough data is available to eliminate a possible answer, and stop asking unnecessary
questions related to it How to differentiate between remaining answers Which answer(s) is most likely based on the rules
It is the Inference Engine that makes IF/THEN rules in a Corvid system very different from IF/THEN commands in computer languages such as Visual Basic or C++. Rules are not equivalent to lines of code; they are facts that are automatically combined in various ways by the Inference Engine. This makes a Corvid system approach far more powerful, effective and maintainable for knowledge delivery than traditional programming techniques. This ability for the Inference Engine to find and use rules as they are needed and relevant to the problem allows a much more “unstructured” approach to the heuristics. In most Corvid systems, it does not matter what order the rules are entered or how they are arranged. The Inference Engine will find the ones it needs, when it needs them, wherever they are. In some systems rule order can be important, but in general, rules can be entered in any order and segmented into Blocks in whatever way the developer wants. This is quite different from standard procedural programming. In addition, the Corvid Inference Engine controls the question formatting and presentation to the system user, the display of results and conclusions of the session. The Corvid Inference Engine processes both procedural commands (usually in Command Blocks) along with the logical rules in Logic Blocks and Action Blocks. The rules can be run using either Backward or Forward Chaining. When a system is run, Corvid builds a file of the rules and commands in the system and passes that to the Corvid Runtime program, which contains the Corvid Inference Engine. There are 2 runtime programs: the Corvid Applet Runtime (which runs in a browser window on the client machine) and the optional Corvid Servlet Runtime (which runs on a server and sends HTML forms to the web browser). The Corvid Applet Runtime can also be run as a standalone program using Java. Either Runtime program can be used to run a system; it is just a matter of the desired complexity and look-and-feel of the system user interface. During development of the logic, the Applet Runtime is normally used.
Exsys Corvid Quick-Start Guide - Fundamentals & Tutorials 11
Backward Chaining / Forward Chaining There are 2 primary ways for the Inference Engine (Corvid Runtime) to test and use rules – backward chaining and forward chaining. These are often referred to as “Data Driven” (forward chaining) or “Goal Driven” (backward chainging), but these terms are often confuse new users. It may be easier to think of them as using the rules:
“in order” Forward Chaining
“when needed” Backward Chaining
A system will have numerous rules ranging from a few dozen in a small system to thousands in a large system. Typically the rules are divided into multiple sections, which provide an order to the rules. Logic Blocks use tree diagrams to structure the rules. The top branch in the tree is the first rule, the second branch the second rule and so on.
Forward Chaining When rules are run in Forward Chaining, they are run in order. The first rule is tested first. If the system does not have enough data to determine whether the IF conditions are true or false, it will ask the end user questions to get the specific data it needs to test those conditions. If the IF conditions are determined to be true, the statements in the THEN part will be considered true and added to what the system “knows”. It will then move on to the second rule, repeat the process, move on to the third, repeat the process, … until it reaches the end of the rules. Forward Chaining is often called “data driven” because the rules can simply be run with a set of input data to see what the results are.
For example, if you had the rules:
IF It is raining THEN Wear a raincoat IF There are puddles THEN Wear boots IF It is cold outside THEN Wear a hat
In forward chaining, the system would first test the first rules and ask the end user “Is it raining”. If they answered “yes”, it would add “Wear a raincoat” to what it knows. It would then test the second rule, asking: “Are there puddles”, and the answer would determine that “Wear boots” was added to what it knows. It would then move to the third rule. This is a very controlled and procedural way to use the rules, and it is easy to see how the rules will be tested. However, if the values set in the THEN part of one rule are used in the IF part of another rule, the rule using the data MUST be later in the rule list or that data will not be available.
If you have the rules: IF It is raining THEN It is wet out
Exsys Corvid Quick-Start Guide - Fundamentals & Tutorials 12
IF It is wet out THEN Wear a raincoat
In forward chaining, the first rule will cause the system to ask the end user “Is it raining”. If they answer “Yes”, the system will know “It is wet out”. That will be enough to know the second rule is true without asking any additional questions, and it will know to “Wear a raincoat”. If the user answers “No” to the “Is it raining?” question, the first rule will not be used, and it will NOT know if it is wet out. (Remember, rules only are used if they are TRUE. A false rule, does not add any information to what is known.) In that case, the second rule will lead to the system asking “Is it wet out?” with the answer determining if the “Wear a raincoat” condition is true or not. Here the first rule can set a value that is used in the second rule. If the order of the rules was reversed, this would not work.
IF It is wet out THEN Wear a raincoat IF It is raining THEN It is wet out
With this order and Forward Chaining, the system would first ask “Is it wet out?”, use the answer and then ask “Is it raining?” – even though the answer would not add to what it knows. In this case the performance of the system is dependent on rule order. In Forward Chaining, the Inference Engine uses the rules in order - with no consideration of the usefulness of the values that might be set by the THEN conditions.
Backward Chaining The other way that the Inference Engine can use the rules is called backward chaining, where rules are not used in order, but rather based on the need to achieve a particular goal. “Goals” are specific items of data that the system needs. A Goal for backward chaining can be created in 2 main ways:
1. Corvid commands which tell the Inference Engine to determine the value of something. These become the top-level goals.
2. When testing the IF conditions in a rule – if an item of data is not know, it will become the new
goal, temporarily replacing the current goal. For example if a Corvid command created the goal to “determine if a raincoat should be worn”, and there was a rule somewhere in the system:
IF It is raining THEN Wear a raincoat

Exsys Corvid Quick-Start Guide - Fundamentals & Tutorials 13
In Backward Chaining, the inference engine would look through the rules to find one that was relevant to the goal. In this case “relevant” means that the needed data appears in the THEN part of the rule. The rule can occur anywhere in the system – all that matters is that it has the potential to provide information needed at the moment. The rule would be tested, and determined to be true or false based on user input. If there was another rule that had “Wear a raincoat” in the THEN part, it would be tested next – but if this was the only relevant rule, it is the only one that would be tested. Backward chaining only uses the rules that are relevant to the specific goal. The advantage that makes Backward Chainging really powerful is that it is recursive – the goal that it is trying to achieve changes based on what it needs at the moment. If you had the rules:
IF It is wet out THEN Wear a raincoat IF It is raining THEN It is wet out
If the goal was to determine if we should wear a raincoat, it would find the first rule, determine it was relevant to the goal and test the rule. This would require that it determine if it is “wet out”. In a Forward Chaining system this would just be asked of the end user, but in a Backward Chaining system, the determination of if it is “wet out” becomes the new goal, temporarily superseding the original goal. The “wear a raincoat” goal is not forgotten, and the system will return to it once the new goal is achieved. However, first the system will find rules relevant to the “it is wet out” goal. It will find the rule with “It is wet out” in the THEN part and test the IF conditions in that rule. This leads to needing to know if it is raining, so that becomes the new goal, temporarily superseding the “is it wet out” goal. If there were other rules that would allow this goal to be derived they would be used, until there were no rules relevant to the immediate goal. As goals are resolved, data is added to the system and the goal that they superseded again becomes the active goal. This ability to work backward through the logic from high level rules to lower level ones is what gives Backward Chaining its name – and is a very powerful technique in building “smart logic” into Corvid systems. Backward Chaining allows rules to be anywhere in a system. A group of rules may define a decision-making process in high level terms, with other rules used to derive the details. In general, these can be ordered in any way by the developer. This allows a much more “free form” approach to system design and allows a truly heuristic approach to the problem. The ability to rely on the inference engine to find and use whatever rules are relevant makes it much easier to build and maintain systems. If there are several ways to derive a value, there can be several rules to cover it. If a new way needs to be added, just add another rule and it will be used by the system if and when it is needed. If you have the rules:
IF It is wet out THEN Wear a raincoat

Exsys Corvid Quick-Start Guide - Fundamentals & Tutorials 14
IF It is raining THEN It is wet out IF It is snowing THEN It is wet out
In a Backward Chaining system to determine if one should wear a raincoat, it would test the first rule, determine it needed additional information and set the new goal to “It is wet out”. This would lead to the “IF It is raining” rule. If that rule was false, it would move on to the next rule relevant to the “Is it wet out” rule, and test the “IF It is snowing” rule. If there were other rules relevant to the immediate goal, those would be used when appropriate. These rules can be in any order and can have many rules in between these relevant ones. The ability to write rules that cover many aspects of a decision-making task also allows a Corvid system to be used in multiple ways depending on the goal it is asked to achieve. The system can contain a variety of heuristic knowledge, and different Corvid commands may apply that knowledge to different decision-making tasks. Backward Chaining can be a little confusing at first compared to more procedural approaches like forward chaining, but it is the key to most powerful Corvid systems. It allows a system to have an interaction with the end user that emulates a conversation with a human expert because questions are only asked when they are relevant to the decision-making task. If an answer leads to other data becoming relevant, those will become goals and the associated questions will be asked. Backward chaining automatically drives interactive sessions that ask questions in a “smart” way. The way that Backward or Forward Chaining is called in a system is determined by the command used to run the rules. Forward Chaining is used when a specific named set of rules is run as a Logic Block or Action Block. Backward Chaining is used when the command tells the system to derive the value for a specific goal. In general, Forward Chaining will be used for Action Blocks and Backward Chaining for Logic Blocks, but there are exceptions and some systems mix the two modes.
Building a System – The Main Windows Building a Corvid system requires describing the system logic either in Logic Blocks or Action Blocks. There are special windows for building each of these. In either case, the system logic will be described using Variables. The overall procedural control of the system will come from a Command Block, which is often just a few commands, but can be more complex when needed. The system is run using the Corvid Runtime program. The main windows for each of these functions can be accessed from the buttons on the Corvid Command bar.

Exsys Corvid Quick-Start Guide - Fundamentals & Tutorials 15
Corvid Variables – The Key Elements Variables in Corvid are very much like variables in other computer languages. They are named items that have an associated value. The value can be asked of the end user, tested in rules, assigned by rues, and used in many ways in a Corvid system. Variables are the key elements that are used to describe a decision-making process. For instance, if a system uses temperature to help make the decision, there is be a Variable named TEMPERATURE, which is used in the rules.
Variable Types Corvid supports 7 types of variables. All of the types of variables share some characteristics and functions, but each type has special functionality and capability. Understanding and using variables correctly is key to successfully building Corvid systems.
Static List This is a variable that has a specific list of possible values. These are typical multiple choice lists. There can be any number of values in the list. For example: Day of the week, Yes/No, High/Medium/Low. The possible values always remain the same for each user of the system. Static List variables should be used whenever there is a fixed list of possible values that the variable could have. When asked of the user, they generate multiple-choice questions that are easy to answer, and they automatically divide up the logic into the possible values for consideration. They are one of the most commonly used types of variables in Corvid systems.
Dynamic List
Dynamic Lists are a type variable with a specific list of possible values, but unlike Static List variables, the value list is set dynamically at runtime – allowing the list of value options to be selected based on previous user input. The value list may come from external sources such as a database or be set by the logic of the system. Dynamic Lists are not often used, but can be useful for selection of options that change frequently or are not known at the time of system development. This can be very powerful for some situations, since it can limit which values that a system user can select from to those that are reasonable in the context of earlier answers. For example, if a user answers they want to vacation in a warm climate, the system will not included “skiing” among the activity options in subsequent questions.
Numeric This is a variable that is assigned a numeric value. The value may be asked of the end user, calculated from other rules, obtained from a external source, etc. Examples: temperature, pressure, stock price, interest rate. When used in the IF conditions of rules, the value is used in test expressions that will evaluate to True or False (e.g. [Temperature] > 100).
String This is a variable that will be assigned a value that is a text string. Examples: name, address, phone number. The value of a String variable can be parsed and tested in various ways to build test conditions, but generally they are used as identifiers for external data sources or text to use in reports.
Date This is a variable that assigns a value that is a date. The date can be a calendar date, or include a time accurate to a millisecond. A date value can be used in comparison (future/past, etc.) tests, or calculated from various Corvid functions. Examples: birth date, option maturity date. Date variables should be used when the logic of a system has a time dependency.

Exsys Corvid Quick-Start Guide - Fundamentals & Tutorials 16
Collection / Report Collection variables are a very useful type of variable. The value is a list (collection) of text strings. Unlike the previous variable types, which are fairly intuitive, collections can be confusing at first. One way to visualize them is to think of them as a grocery list. Items can be added to the list for various reasons and at different times. Items can also be removed from the list as they are “purchased”. There is no fixed limit to the list, and the contents can be any text. The end user is never asked to directly provide the value for a collection variable (though information provided by the user for other variable types could be added to a collection). Instead collections are used to build up the overall content, with multiple rules providing individual items of text. One of the most common uses of collection variables is to build reports. These may be a simple list of recommendations or a complex report in RTF, PDF or HTML format. The ability to add any amount of text to the collection, and to have many different rules adding content separately makes collection variables very flexible. Various Corvid functions allow you to add, remove, sort, and test items in the list. Any string or variable value can be added to the collection. Examples: "best" products, configuration, overall comments, selections from a database.
Confidence This is a variable that will be assigned a value that reflects a degree of certainty in a specific result or recommendation. Like a numeric variable, the value is a number, but in this case it is a measure of how likely it is that the variable applies to a particular situation. For example, a confidence variable might be a diagnosis (e.g. “patient has the flu”). The value would be set by end user input causing various rules to fire that would increase or decrease the probability that this is a correct diagnosis for the particular end user. A single confidence variable can be assigned values by various rules in a system, and Corvid will automatically combine the values to arrive at single overall confidence value. Various formulas in Corvid can be selected to combine the assigned values in various ways. Confidence variables are never directly asked of the end user, but are always set by the rules in a system. Confidence variables are used most effectively in systems where there are multiple possible recommendations based on how likely they are. Each recommendation is a separate Confidence variable, and each is given a confidence value by the rules in the system. The one(s) with the highest confidence value are the ones that will be displayed in the system run results. However, there are many other ways to use Confidence variables in systems that do not use uncertain reasoning or “fuzzy logic”.
Most Corvid systems are built with Static List and Numeric variables to build IF conditions, and either Collection or Confidence variables for the recommendations.
Variable Name and Prompt All variables in Corvid have a Name and a Prompt. The name is used to refer to the variable and to find it in lists. The name for each variable in a system must be unique. Names can be any length, but should be kept fairly short to make the system more readable. They should be clear and make it easy to identify the meaning of the variable. Each variable also has a Prompt. This is used primarily when asking the user for a value for the variable. Prompts to ask for data are typically phrased as questions. For example, a variable named COLOR might have a prompt “What is the color of the light?” Prompt text can be as long as needed. Corvid also supports multiple prompts for the same variable, which is used in systems that will run in multiple languages.
Exsys Corvid Quick-Start Guide - Fundamentals & Tutorials 17
For variables that are not asked of the user, the Prompt is used to indicate the meaning of the value in results and reports. These may be values that are calculated by the system, and the prompt will be a statement that will be followed by the calculated value. For example, if a system that calculates the amount of water to add to a mixture, there might be a numeric variable AMOUNT_OF_WATER with a Prompt “The amount of water to add is”. For Confidence variables, the Prompt is the full description of the item or action that the system is evaluating based on various factors. For example, a diagnostic system might determine that Part XYZ failed. This could have a confidence variable PART_XYZ_FAILURE with a Prompt “The part XYZ failed and needs to be replaced”. For Collection variables, the Prompt is used to identify the meaning of the variable’s content. In addition to the required Name and Prompt, each variable has many other options that can be set and which vary with each type of variable.
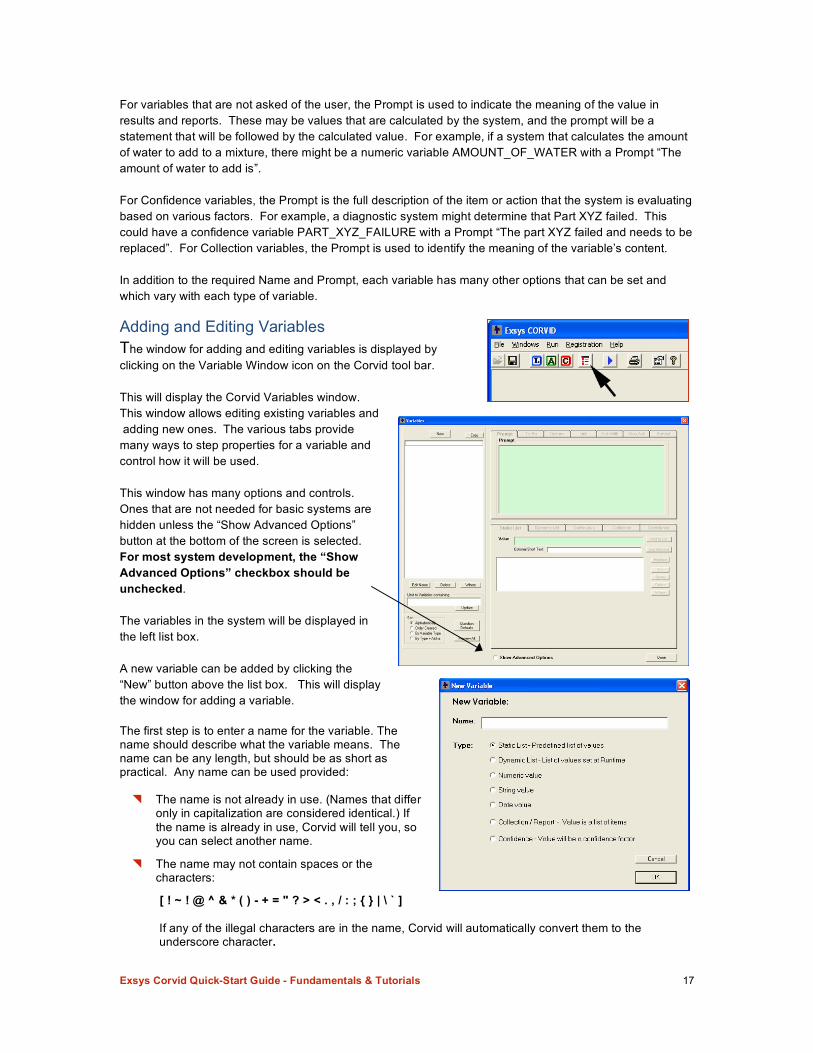
Adding and Editing Variables The window for adding and editing variables is displayed by clicking on the Variable Window icon on the Corvid tool bar. This will display the Corvid Variables window. This window allows editing existing variables and adding new ones. The various tabs provide many ways to step properties for a variable and control how it will be used. This window has many options and controls. Ones that are not needed for basic systems are hidden unless the “Show Advanced Options” button at the bottom of the screen is selected. For most system development, the “Show Advanced Options” checkbox should be unchecked. The variables in the system will be displayed in the left list box. A new variable can be added by clicking the “New” button above the list box. This will display the window for adding a variable. The first step is to enter a name for the variable. The name should describe what the variable means. The name can be any length, but should be as short as practical. Any name can be used provided:
The name is not already in use. (Names that differ only in capitalization are considered identical.) If the name is already in use, Corvid will tell you, so you can select another name.
The name may not contain spaces or the characters:
[ ! ~ ! @ ^ & * ( ) - + = " ? > < . , / : ; { } | \ ` ] If any of the illegal characters are in the name, Corvid will automatically convert them to the underscore character.
Exsys Corvid Quick-Start Guide - Fundamentals & Tutorials 18
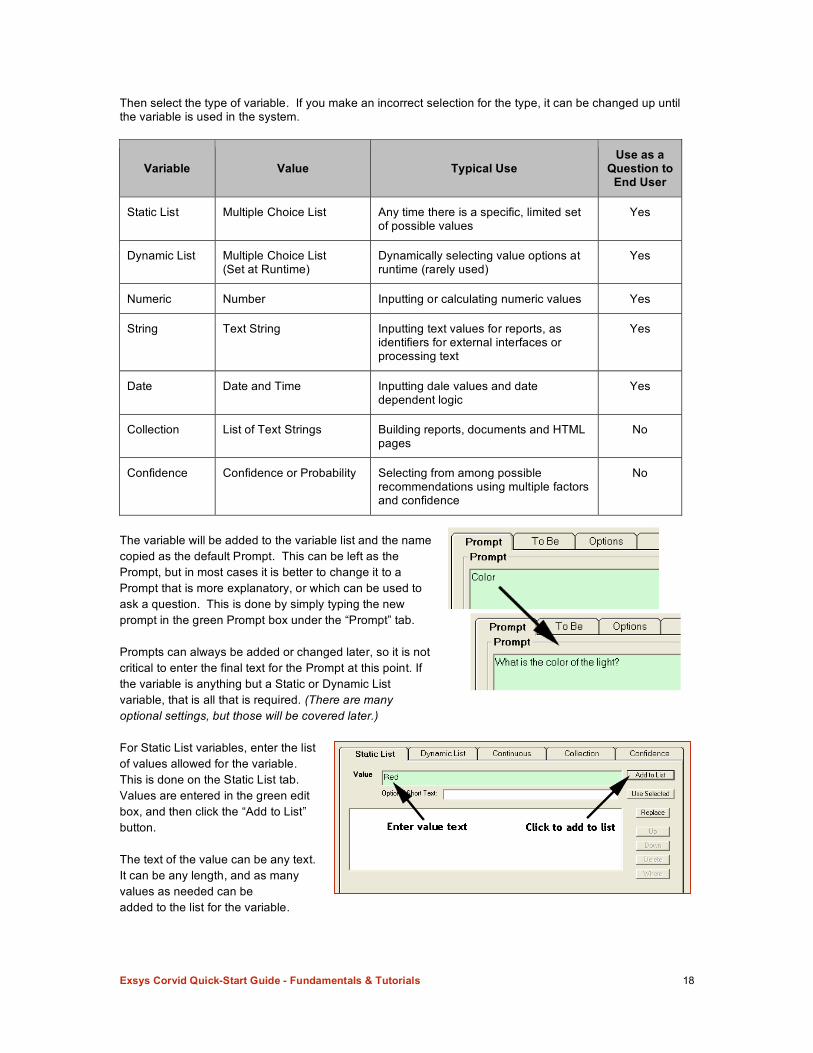
Then select the type of variable. If you make an incorrect selection for the type, it can be changed up until the variable is used in the system.
Variable Value Typical Use Use as a
Question to End User
Static List Multiple Choice List Any time there is a specific, limited set of possible values
Yes
Dynamic List Multiple Choice List (Set at Runtime)
Dynamically selecting value options at runtime (rarely used)
Yes
Numeric Number Inputting or calculating numeric values Yes
String Text String Inputting text values for reports, as identifiers for external interfaces or processing text
Yes
Date Date and Time Inputting dale values and date dependent logic
Yes
Collection List of Text Strings Building reports, documents and HTML pages
No
Confidence Confidence or Probability Selecting from among possible recommendations using multiple factors and confidence
No
The variable will be added to the variable list and the name copied as the default Prompt. This can be left as the Prompt, but in most cases it is better to change it to a Prompt that is more explanatory, or which can be used to ask a question. This is done by simply typing the new prompt in the green Prompt box under the “Prompt” tab. Prompts can always be added or changed later, so it is not critical to enter the final text for the Prompt at this point. If the variable is anything but a Static or Dynamic List variable, that is all that is required. (There are many optional settings, but those will be covered later.) For Static List variables, enter the list of values allowed for the variable. This is done on the Static List tab. Values are entered in the green edit box, and then click the “Add to List” button. The text of the value can be any text. It can be any length, and as many values as needed can be added to the list for the variable.
Exsys Corvid Quick-Start Guide - Fundamentals & Tutorials 19
If the value text is very long, it is a good idea to also enter an “Optional Short Text” for the value. This will make it easier to refer to the value in the rules. If there is no Optional Short Text entered, it is automatically given the text of the value, with the illegal characters converted to the underscore character. The illegal characters are the same as for variable names: [ ! ~ ! @ ^ & * ( ) - + = " ? > < . , / : ; { } | \ ` ] The optional short text can be directly entered in the edit box. Another way to enter the short text is to highlight a section of the full value with the cursor, and then click the “Use Selected” button. This will put that text in as the short text, with illegal characters converted to underscores. The list of values can be reordered by selecting a value and clicking the “Up” and “Down” keys. The text of a value can be replaced by selecting it, entering the new text and clicking the “Replace” button. If needed, additional values can be entered later. There are many options for setting how variables are used, asked and displayed, but to get started all that is needed is the Name, Type, Prompt and for Static Lists, the values.
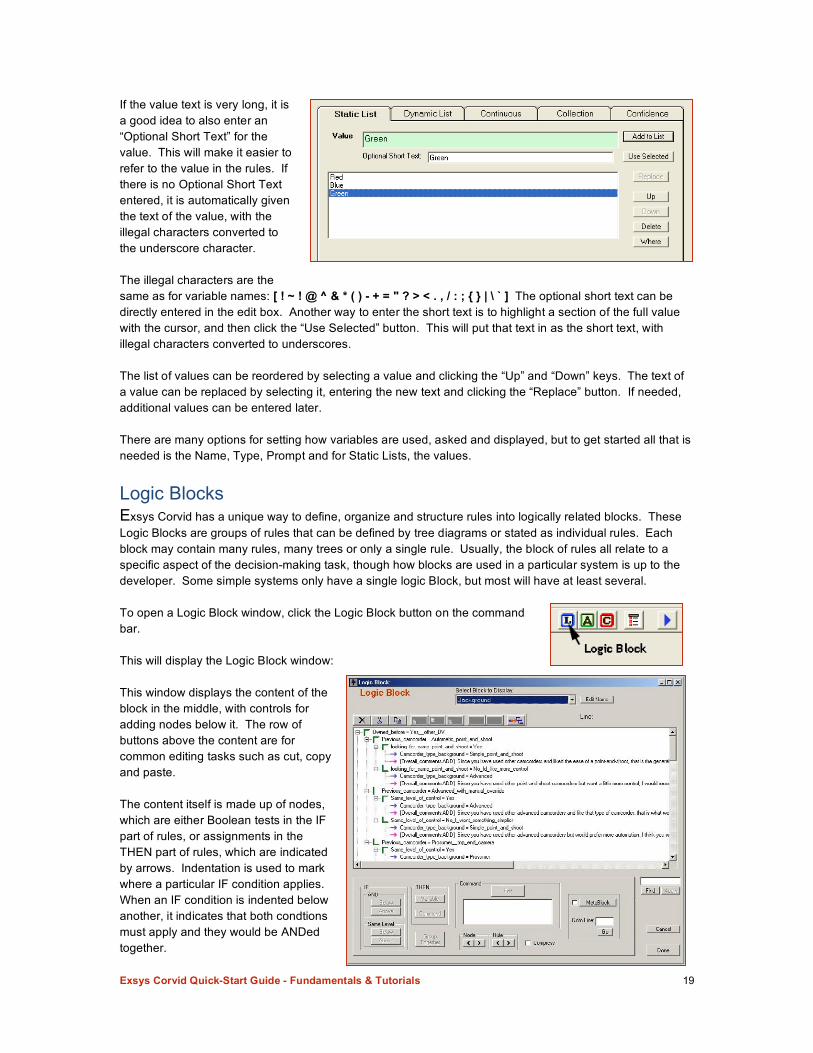
Logic Blocks Exsys Corvid has a unique way to define, organize and structure rules into logically related blocks. These Logic Blocks are groups of rules that can be defined by tree diagrams or stated as individual rules. Each block may contain many rules, many trees or only a single rule. Usually, the block of rules all relate to a specific aspect of the decision-making task, though how blocks are used in a particular system is up to the developer. Some simple systems only have a single logic Block, but most will have at least several. To open a Logic Block window, click the Logic Block button on the command bar. This will display the Logic Block window: This window displays the content of the block in the middle, with controls for adding nodes below it. The row of buttons above the content are for common editing tasks such as cut, copy and paste. The content itself is made up of nodes, which are either Boolean tests in the IF part of rules, or assignments in the THEN part of rules, which are indicated by arrows. Indentation is used to mark where a particular IF condition applies. When an IF condition is indented below another, it indicates that both condtions must apply and they would be ANDed together.
Exsys Corvid Quick-Start Guide - Fundamentals & Tutorials 20
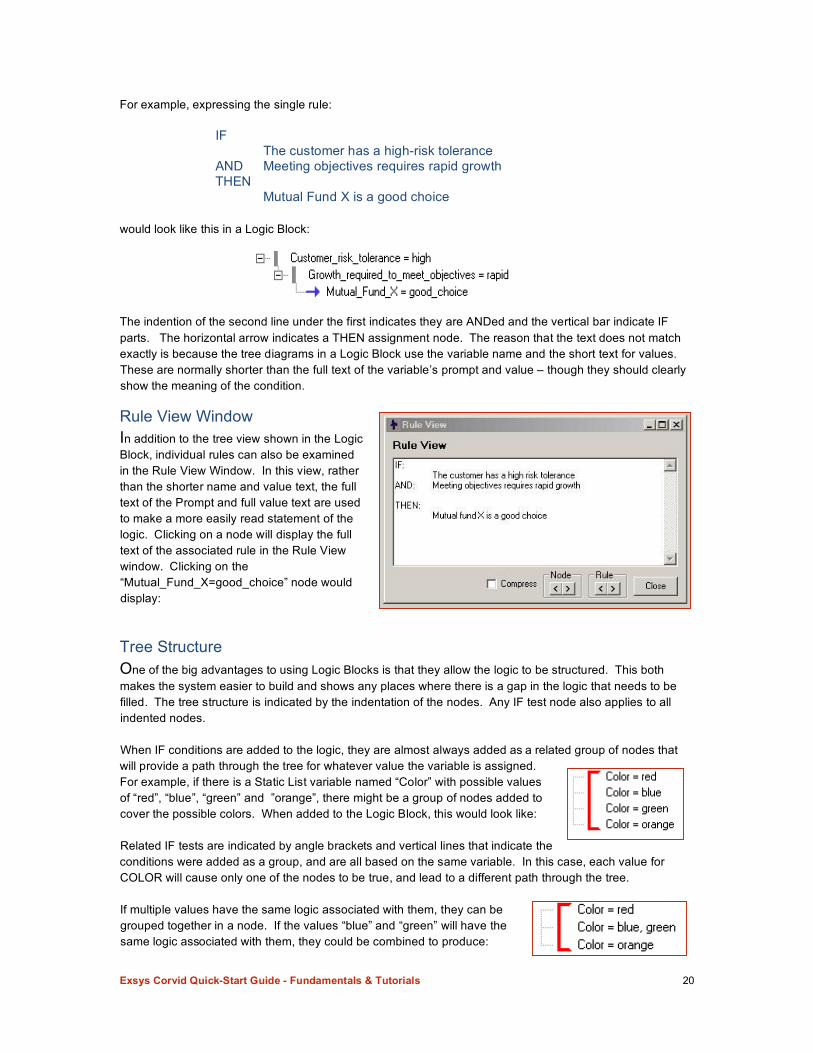
For example, expressing the single rule:
IF The customer has a high-risk tolerance
AND Meeting objectives requires rapid growth THEN
Mutual Fund X is a good choice
would look like this in a Logic Block:
The indention of the second line under the first indicates they are ANDed and the vertical bar indicate IF parts. The horizontal arrow indicates a THEN assignment node. The reason that the text does not match exactly is because the tree diagrams in a Logic Block use the variable name and the short text for values. These are normally shorter than the full text of the variable’s prompt and value – though they should clearly show the meaning of the condition.
Rule View Window In addition to the tree view shown in the Logic Block, individual rules can also be examined in the Rule View Window. In this view, ratherthan the shorter name and value text, the full text of the Prompt and full value text are used to make a more easily read statement of the logic. Clicking on a node will display the full text of the associated rule in the Rule View window. Clicking on the “Mutual_Fund_X=good_choice” node would display:
Tree Structure One of the big advantages to using Logic Blocks is that they allow the logic to be structured. This both makes the system easier to build and shows any places where there is a gap in the logic that needs to be filled. The tree structure is indicated by the indentation of the nodes. Any IF test node also applies to all indented nodes.
When IF conditions are added to the logic, they are almost always added as a related group of nodes that will provide a path through the tree for whatever value the variable is assigned. For example, if there is a Static List variable named “Color” with possible values of “red”, “blue”, “green” and ”orange”, there might be a group of nodes added to cover the possible colors. When added to the Logic Block, this would look like:
Related IF tests are indicated by angle brackets and vertical lines that indicate the conditions were added as a group, and are all based on the same variable. In this case, each value for COLOR will cause only one of the nodes to be true, and lead to a different path through the tree.
If multiple values have the same logic associated with them, they can be grouped together in a node. If the values “blue” and “green” will have the same logic associated with them, they could be combined to produce:
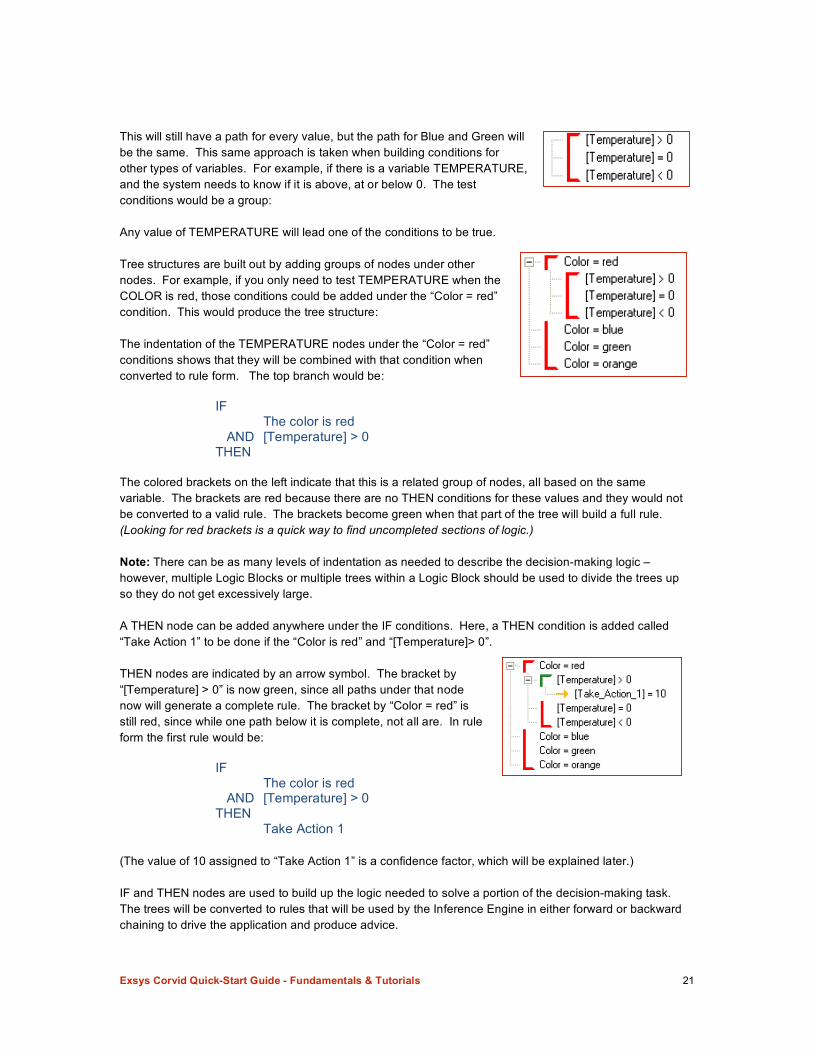
Exsys Corvid Quick-Start Guide - Fundamentals & Tutorials 21
This will still have a path for every value, but the path for Blue and Green will be the same. This same approach is taken when building conditions for other types of variables. For example, if there is a variable TEMPERATURE, and the system needs to know if it is above, at or below 0. The test conditions would be a group: Any value of TEMPERATURE will lead one of the conditions to be true. Tree structures are built out by adding groups of nodes under other nodes. For example, if you only need to test TEMPERATURE when the COLOR is red, those conditions could be added under the “Color = red” condition. This would produce the tree structure: The indentation of the TEMPERATURE nodes under the “Color = red” conditions shows that they will be combined with that condition when converted to rule form. The top branch would be:
IF The color is red AND [Temperature] > 0 THEN
The colored brackets on the left indicate that this is a related group of nodes, all based on the same variable. The brackets are red because there are no THEN conditions for these values and they would not be converted to a valid rule. The brackets become green when that part of the tree will build a full rule. (Looking for red brackets is a quick way to find uncompleted sections of logic.) Note: There can be as many levels of indentation as needed to describe the decision-making logic – however, multiple Logic Blocks or multiple trees within a Logic Block should be used to divide the trees up so they do not get excessively large. A THEN node can be added anywhere under the IF conditions. Here, a THEN condition is added called “Take Action 1” to be done if the “Color is red” and “[Temperature]> 0”. THEN nodes are indicated by an arrow symbol. The bracket by “[Temperature] > 0” is now green, since all paths under that node now will generate a complete rule. The bracket by “Color = red” is still red, since while one path below it is complete, not all are. In rule form the first rule would be:
IF The color is red AND [Temperature] > 0 THEN Take Action 1
(The value of 10 assigned to “Take Action 1” is a confidence factor, which will be explained later.) IF and THEN nodes are used to build up the logic needed to solve a portion of the decision-making task. The trees will be converted to rules that will be used by the Inference Engine in either forward or backward chaining to drive the application and produce advice.
Exsys Corvid Quick-Start Guide - Fundamentals & Tutorials 22
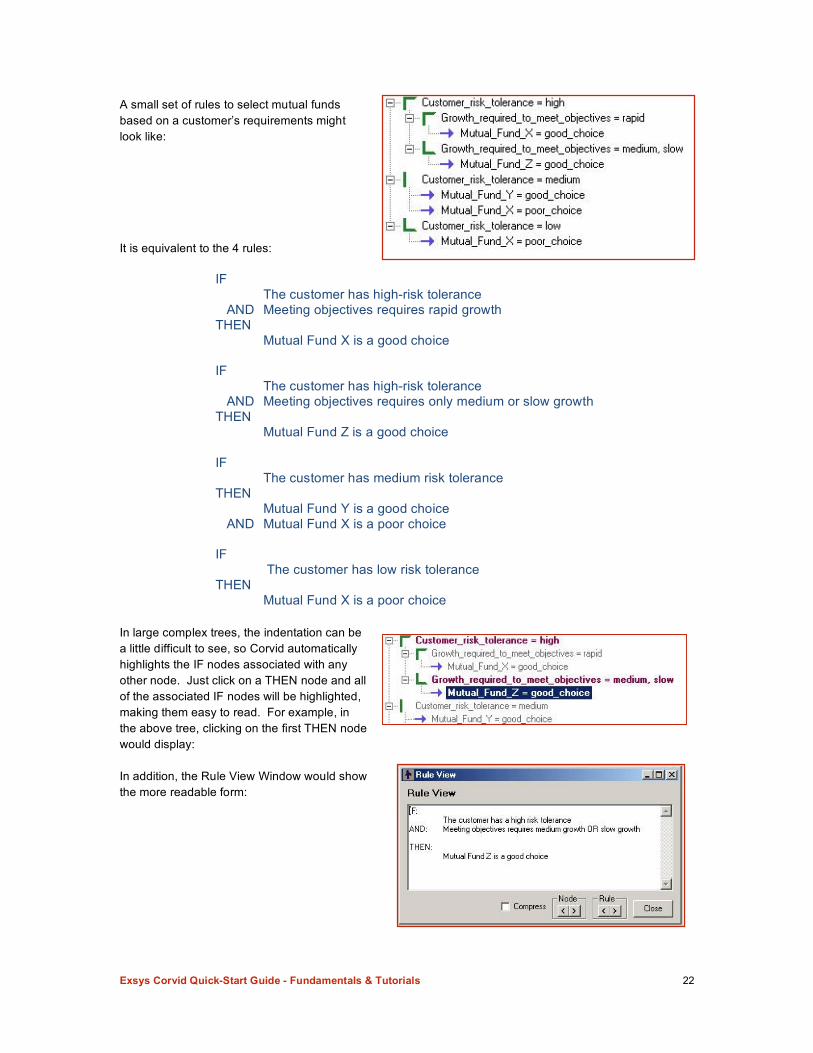
A small set of rules to select mutual funds based on a customer’s requirements might look like: It is equivalent to the 4 rules:
IF The customer has high-risk tolerance AND Meeting objectives requires rapid growth THEN Mutual Fund X is a good choice IF The customer has high-risk tolerance AND Meeting objectives requires only medium or slow growth THEN Mutual Fund Z is a good choice IF The customer has medium risk tolerance THEN Mutual Fund Y is a good choice AND Mutual Fund X is a poor choice IF The customer has low risk tolerance THEN Mutual Fund X is a poor choice
In large complex trees, the indentation can be a little difficult to see, so Corvid automatically highlights the IF nodes associated with any other node. Just click on a THEN node and all of the associated IF nodes will be highlighted, making them easy to read. For example, in the above tree, clicking on the first THEN node would display: In addition, the Rule View Window would show the more readable form:
Exsys Corvid Quick-Start Guide - Fundamentals & Tutorials 23
Compressing and Expanding Trees Each node that has other nodes indented under it has a + or – sign next to it in a small square. Clicking the + or – will expand or compress that section of the tree. The – sign indicates that all the branches are expaned. For example, this tree is fully expanded: Clicking the – sign next to “Color = red” will produce: The + next to “Color = red” indicates that there are compressed nodes under this node. A compressed node can be expanded by either clicking on the + or just clicking on the node itself. Any node that is selected will be expanded. The Expand All button on the button control bar can be used to expand all the nodes in a tree. Clicking this will expand all compressed nodes. Clicking it again will compress all nodes except the currently selected node. In large tree, this is a convenient way to quickly compress the sections of the tree that are not being edited at the moment.
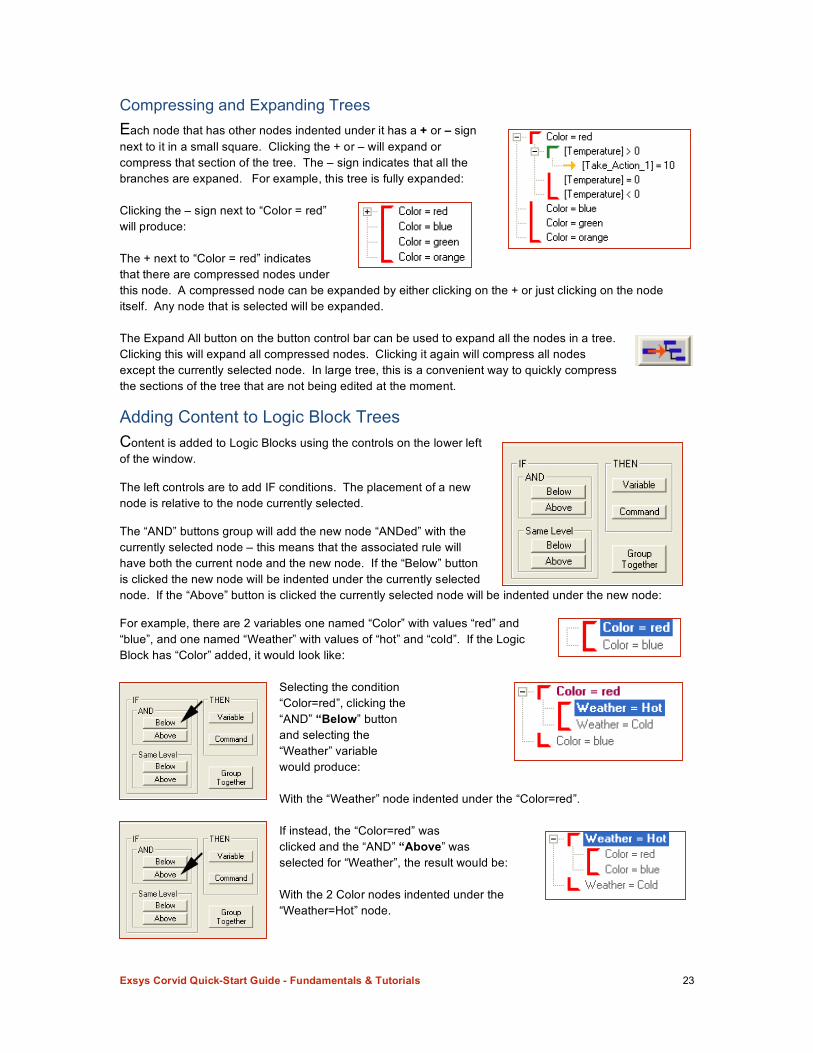
Adding Content to Logic Block Trees Content is added to Logic Blocks using the controls on the lower left of the window. The left controls are to add IF conditions. The placement of a new node is relative to the node currently selected. The “AND” buttons group will add the new node “ANDed” with the currently selected node – this means that the associated rule will have both the current node and the new node. If the “Below” button is clicked the new node will be indented under the currently selected node. If the “Above” button is clicked the currently selected node will be indented under the new node: For example, there are 2 variables one named “Color” with values “red” and “blue”, and one named “Weather” with values of “hot” and “cold”. If the Logic Block has “Color” added, it would look like:
Selecting the condition “Color=red”, clicking the “AND” “Below” button and selecting the “Weather” variable would produce: With the “Weather” node indented under the “Color=red”. If instead, the “Color=red” was clicked and the “AND” “Above” was selected for “Weather”, the result would be: With the 2 Color nodes indented under the “Weather=Hot” node.
Exsys Corvid Quick-Start Guide - Fundamentals & Tutorials 24
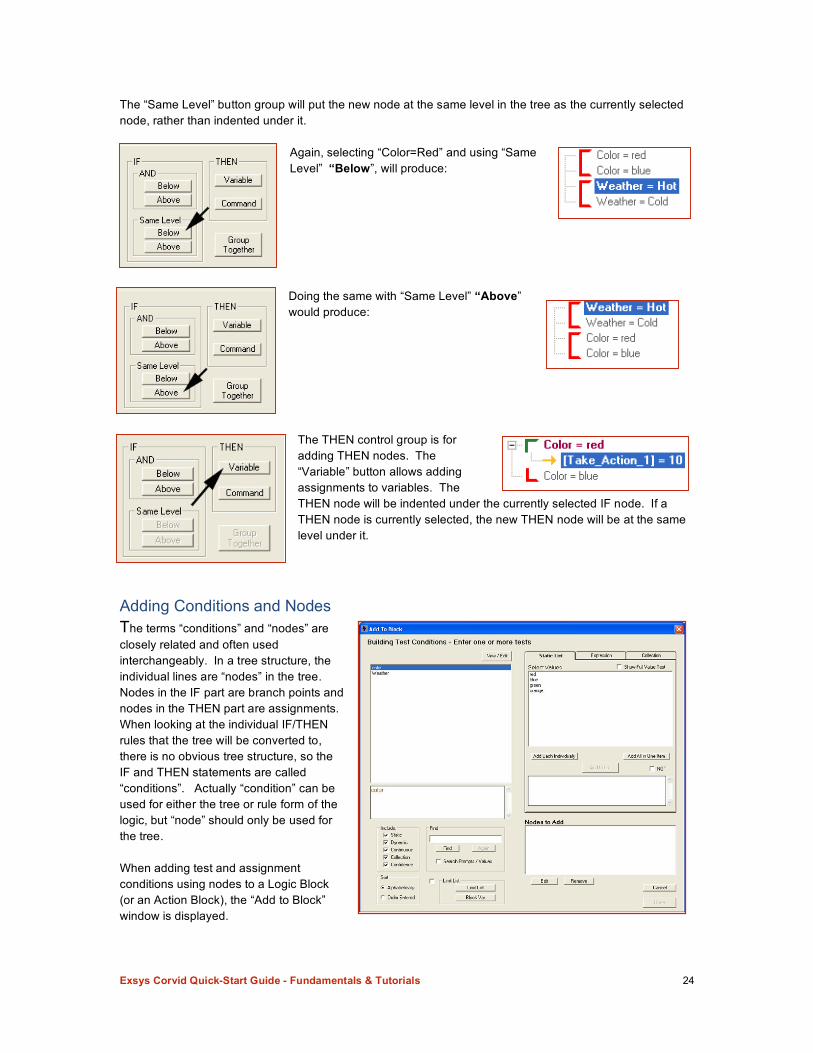
The “Same Level” button group will put the new node at the same level in the tree as the currently selected node, rather than indented under it.
Again, selecting “Color=Red” and using “Same Level” “Below”, will produce: Doing the same with “Same Level” “Above” would produce:
The THEN control group is for adding THEN nodes. The “Variable” button allows adding assignments to variables. The THEN node will be indented under the currently selected IF node. If a THEN node is currently selected, the new THEN node will be at the same level under it.
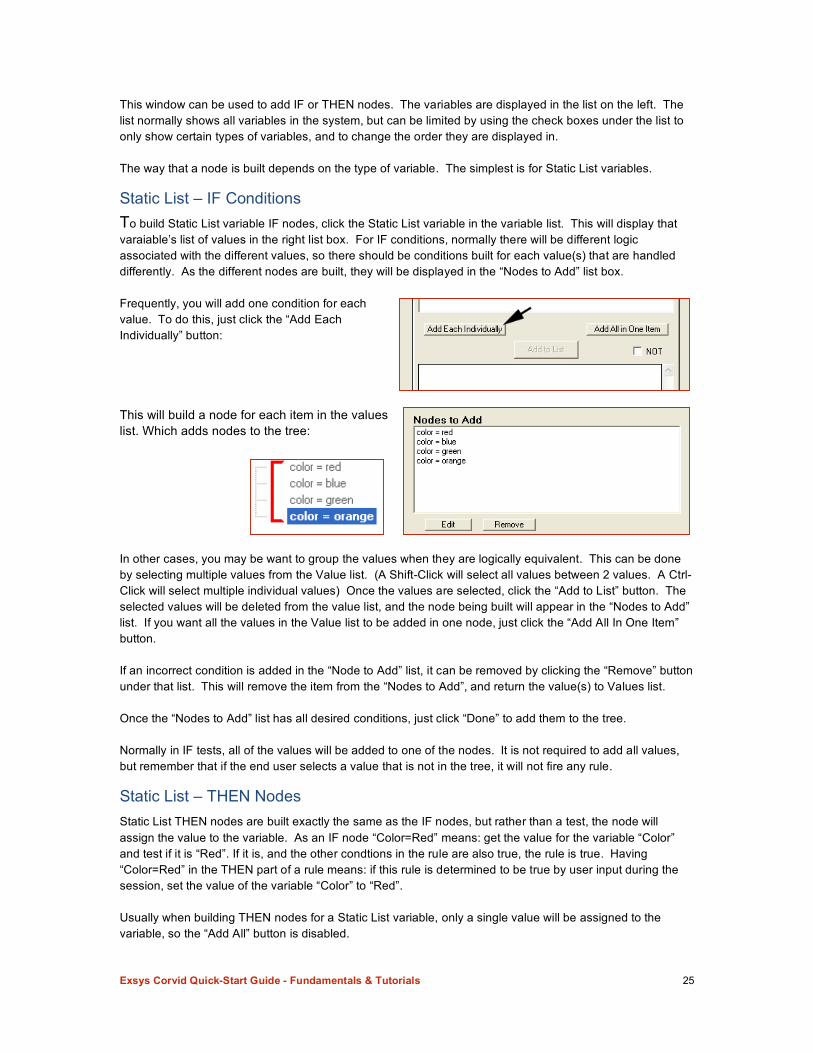
Adding Conditions and Nodes The terms “conditions” and “nodes” are closely related and often used interchangeably. In a tree structure, the individual lines are “nodes” in the tree. Nodes in the IF part are branch points and nodes in the THEN part are assignments. When looking at the individual IF/THEN rules that the tree will be converted to, there is no obvious tree structure, so the IF and THEN statements are called “conditions”. Actually “condition” can be used for either the tree or rule form of the logic, but “node” should only be used for the tree. When adding test and assignment conditions using nodes to a Logic Block (or an Action Block), the “Add to Block” window is displayed.
Exsys Corvid Quick-Start Guide - Fundamentals & Tutorials 25
This window can be used to add IF or THEN nodes. The variables are displayed in the list on the left. The list normally shows all variables in the system, but can be limited by using the check boxes under the list to only show certain types of variables, and to change the order they are displayed in. The way that a node is built depends on the type of variable. The simplest is for Static List variables.
Static List – IF Conditions To build Static List variable IF nodes, click the Static List variable in the variable list. This will display that varaiable’s list of values in the right list box. For IF conditions, normally there will be different logic associated with the different values, so there should be conditions built for each value(s) that are handled differently. As the different nodes are built, they will be displayed in the “Nodes to Add” list box. Frequently, you will add one condition for each value. To do this, just click the “Add Each Individually” button: This will build a node for each item in the values list. Which adds nodes to the tree: In other cases, you may be want to group the values when they are logically equivalent. This can be done by selecting multiple values from the Value list. (A Shift-Click will select all values between 2 values. A Ctrl-Click will select multiple individual values) Once the values are selected, click the “Add to List” button. The selected values will be deleted from the value list, and the node being built will appear in the “Nodes to Add” list. If you want all the values in the Value list to be added in one node, just click the “Add All In One Item” button. If an incorrect condition is added in the “Node to Add” list, it can be removed by clicking the “Remove” button under that list. This will remove the item from the “Nodes to Add”, and return the value(s) to Values list. Once the “Nodes to Add” list has all desired conditions, just click “Done” to add them to the tree. Normally in IF tests, all of the values will be added to one of the nodes. It is not required to add all values, but remember that if the end user selects a value that is not in the tree, it will not fire any rule.
Static List – THEN Nodes Static List THEN nodes are built exactly the same as the IF nodes, but rather than a test, the node will assign the value to the variable. As an IF node “Color=Red” means: get the value for the variable “Color” and test if it is “Red”. If it is, and the other condtions in the rule are also true, the rule is true. Having “Color=Red” in the THEN part of a rule means: if this rule is determined to be true by user input during the session, set the value of the variable “Color” to “Red”. Usually when building THEN nodes for a Static List variable, only a single value will be assigned to the variable, so the “Add All” button is disabled.
Exsys Corvid Quick-Start Guide - Fundamentals & Tutorials 26
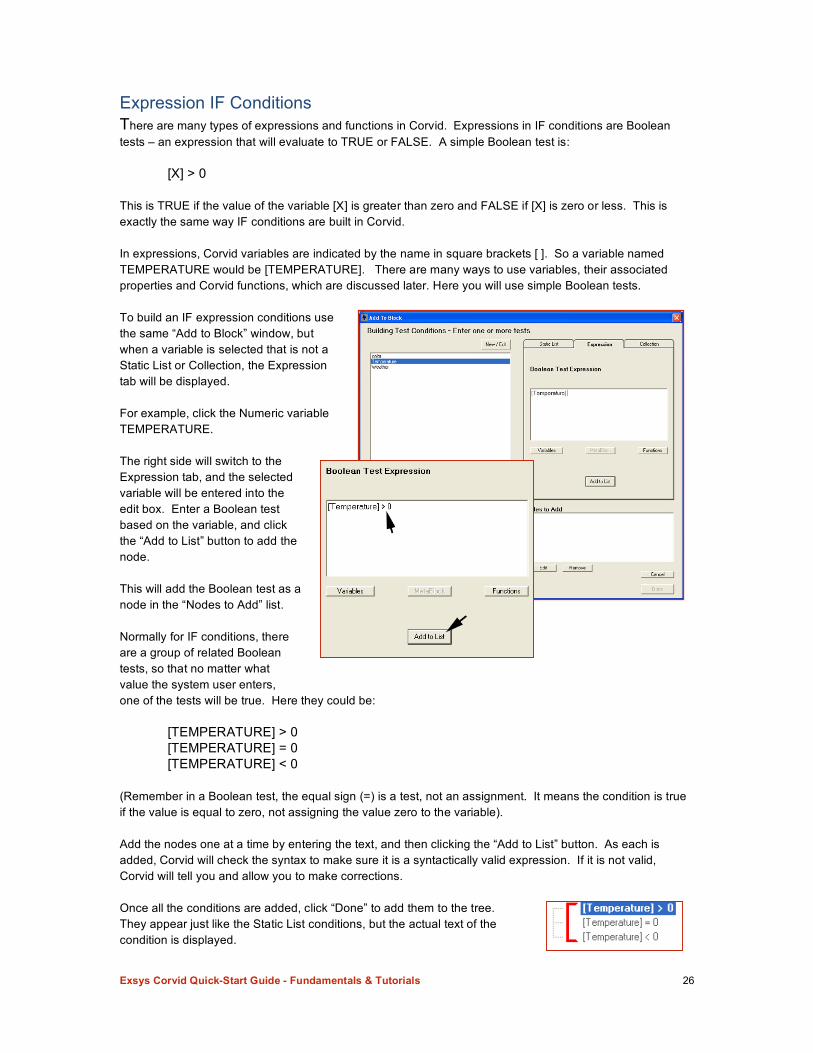
Expression IF Conditions There are many types of expressions and functions in Corvid. Expressions in IF conditions are Boolean tests – an expression that will evaluate to TRUE or FALSE. A simple Boolean test is: [X] > 0 This is TRUE if the value of the variable [X] is greater than zero and FALSE if [X] is zero or less. This is exactly the same way IF conditions are built in Corvid. In expressions, Corvid variables are indicated by the name in square brackets [ ]. So a variable named TEMPERATURE would be [TEMPERATURE]. There are many ways to use variables, their associated properties and Corvid functions, which are discussed later. Here you will use simple Boolean tests. To build an IF expression conditions use the same “Add to Block” window, but when a variable is selected that is not a Static List or Collection, the Expression tab will be displayed. For example, click the Numeric variable TEMPERATURE. The right side will switch to the Expression tab, and the selected variable will be entered into the edit box. Enter a Boolean test based on the variable, and click the “Add to List” button to add the node. This will add the Boolean test as a node in the “Nodes to Add” list. Normally for IF conditions, there are a group of related Boolean tests, so that no matter what value the system user enters, one of the tests will be true. Here they could be:
[TEMPERATURE] > 0 [TEMPERATURE] = 0 [TEMPERATURE] < 0
(Remember in a Boolean test, the equal sign (=) is a test, not an assignment. It means the condition is true if the value is equal to zero, not assigning the value zero to the variable). Add the nodes one at a time by entering the text, and then clicking the “Add to List” button. As each is added, Corvid will check the syntax to make sure it is a syntactically valid expression. If it is not valid, Corvid will tell you and allow you to make corrections. Once all the conditions are added, click “Done” to add them to the tree. They appear just like the Static List conditions, but the actual text of the condition is displayed.
Exsys Corvid Quick-Start Guide - Fundamentals & Tutorials 27
Expression THEN Nodes Building THEN node expression assignments is very similar to building IF condition expressions and uses the same window. In the THEN part, the expression is an assignment of value to a variable. When a variable that is not a Static List or Collection is selected for a THEN node, the expression text will have the variable name in [ ] followed by an =. Assignments must always be in the form: [name] = expression
where “expression” is the correct type for the variable. – The variable is numeric, the expression must produce a numeric value. If the variable is a String variable, the expression must produce a text string. Corvid will automatically check the assignment to make sure that the correct types are being used. A group of THEN nodes can assign values to multiple variables, but usually will only assign one value to an individual variable. Confidence variables are assigned numeric values in the THEN nodes. Likewise, data can be added to Collections variables in THEN conditions. These will be covered later.
Confidence Variables Confidence variables are a special type of Corvid variable that has a value which, indicates how likely it is that the variable applies in a particular situation. A Confidence variable can be assigned multiple values during a session, and Corvid will automatically combine the various values into a single overall confidence value. Corvid provides various ways to mathematically combine the values, ranging from simple to complex. The overall value of the variable can be used in sorting (displaying the ones with the highest confidence) or used in any mathematical expressions allowing the confidence of one part to propagate through to other parts of the system. Useful in many systems, one of the simplest ways to combine confidence values is to add the values together. For example, a confidence variable WEAR_A_HAT that will be used to recommend wearing a hat when going outside. The system would have rules:
IF [Temperature] < 32 THEN [Wear_a_hat] = 10 IF It is snowing THEN [Wear_a_hat] = 20 IF It is raining THEN [Wear_a_hat] = 5
Since each of these rules is independent, any combination could fire during a session, resulting in different confidence values for the WEAR_A_HAT variable. If the temperature is less than 32 and it is snowing, the overall confidence would be 10 + 20 = 30. If it were less than 32 but raining, the confidence would be 10 + 5 = 15. If it were less than 32, but sunny, the confidence would be 10.
Exsys Corvid Quick-Start Guide - Fundamentals & Tutorials 28
Corvid also provides many other ways to combine confidence values including combining them using mathematical formulas for independent or dependent probability, min, max, or other mathematical methods. Each approach can be customized, and individual variables can use different methods. This provides many ways to handle and propagate confidence values in a system. Confidence variables are often used to select the most likely diagnosis or action to take. Various rules will increase or decrease the overall confidence value of the Confidence variables. At the end of a session, the ones with the highest confidence value will be presented to the system user.
Collection Variables Collection variables are a special type of variable whose value is a list of text strings. These are most often used to build reports where various rules in the system add pieces to the overall report. The overall list can be used many ways in Corvid, ranging from simple recommendations, to building a complex report. The actual text added to the collection can even be sections of HTML and used to dynamically build a Web page. When using Corvid, these are often called: WINK (What I Need to Know)® systems. As new values are assigned to the collection, they are added to the list. There are various ways to add them, but one of the easiest (and most common) is to simply add them to the end of the list. In Action Blocks, the Add to Collection action always adds text to the end of the report. In Logic Blocks, this can also be done, but there are also other ways to add items to the collection. Items are added to a collection by using “methods”. These are commands added to the variable name. For example to add an item to the collection variable MYLIST, the syntax is: [mylist.ADD] item
The .ADD following the collection variable name, all in square brackets [ ] means “add whatever follows the closing ] to the contents of the list”. There are several methods for collection variables that allow adding items to the list in various ways (e.g. add to the top of the list, add sorted, add only if not already in the list, etc.). The Collection variable methods are covered in the Reference part of the Corvid manual. A simple way to think of Collections is as a grocery list. It can have any number of items, which can be added for various reasons. There could be rules:
IF Planning to make a cake AND [Number_of_eggs_available] = 0 THEN [ShoppingList.ADD] Eggs IF Planning to make a cake THEN [ShoppingList.ADD] Sugar IF Planning to make a salad THEN [ShoppingList.ADD] Lettuce
Exsys Corvid Quick-Start Guide - Fundamentals & Tutorials 29
If when the system is run, the user says they want to make a cake, but have eggs, the list will be just “Sugar”. If they want to make a cake, don’t have eggs and also want to make a salad, the list will be “ Eggs, Sugar, Lettuce”. Most Corvid system results will either rank Confidence variables to find the most likely, or generate a report using a Collection variable.
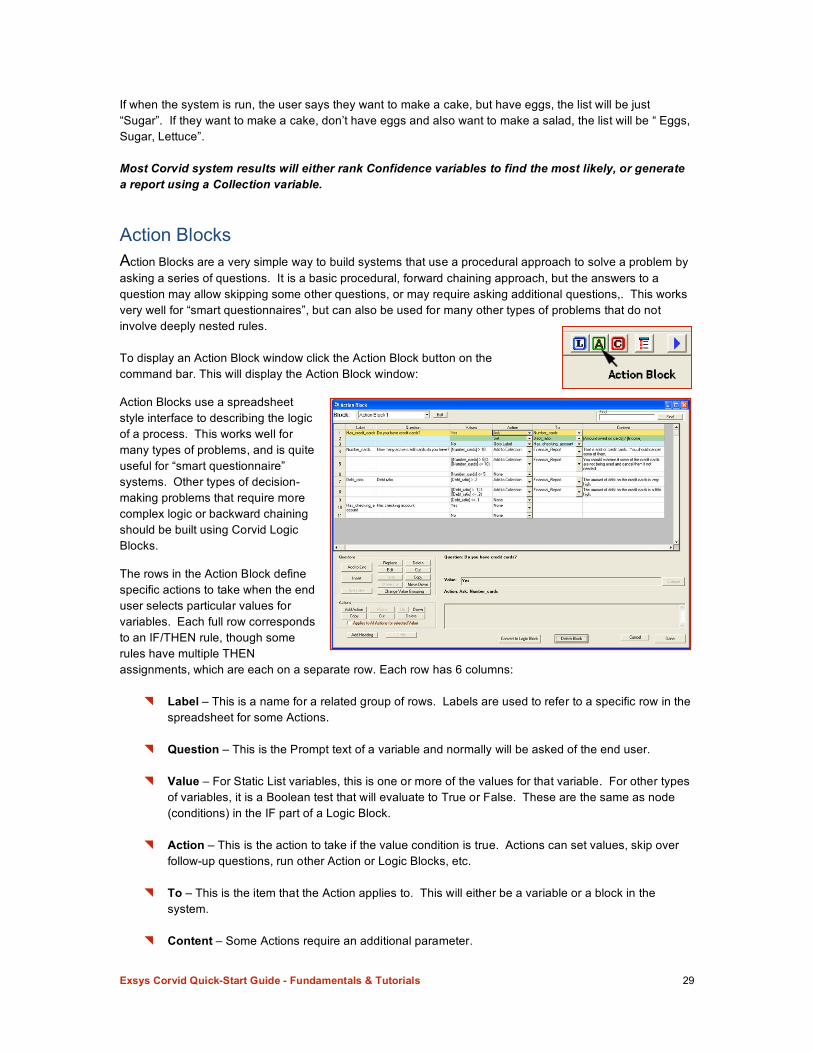
Action Blocks Action Blocks are a very simple way to build systems that use a procedural approach to solve a problem by asking a series of questions. It is a basic procedural, forward chaining approach, but the answers to a question may allow skipping some other questions, or may require asking additional questions,. This works very well for “smart questionnaires”, but can also be used for many other types of problems that do not involve deeply nested rules. To display an Action Block window click the Action Block button on the command bar. This will display the Action Block window: Action Blocks use a spreadsheet style interface to describing the logic of a process. This works well for many types of problems, and is quite useful for “smart questionnaire” systems. Other types of decision-making problems that require more complex logic or backward chaining should be built using Corvid Logic Blocks. The rows in the Action Block define specific actions to take when the end user selects particular values for variables. Each full row corresponds to an IF/THEN rule, though some rules have multiple THEN assignments, which are each on a separate row. Each row has 6 columns:
Label – This is a name for a related group of rows. Labels are used to refer to a specific row in the spreadsheet for some Actions.
Question – This is the Prompt text of a variable and normally will be asked of the end user.
Value – For Static List variables, this is one or more of the values for that variable. For other types
of variables, it is a Boolean test that will evaluate to True or False. These are the same as node (conditions) in the IF part of a Logic Block.
Action – This is the action to take if the value condition is true. Actions can set values, skip over
follow-up questions, run other Action or Logic Blocks, etc.
To – This is the item that the Action applies to. This will either be a variable or a block in the system.
Content – Some Actions require an additional parameter.

Exsys Corvid Quick-Start Guide - Fundamentals & Tutorials 30
Answers and Actions The fundamental way that Action Blocks work is quite simple.
1. Specify a Corvid variable that will be asked of the end user. (The input for the variable can also come from other sources, but the typical approach is to ask the user.)
2. For each possible value of a Static List variable the user can select, or for various Boolean tests on
the value of other types of variables; associate one or more actions that can set values, skip over questions, run other blocks, etc.
The block is made up of a series of these question/action groups. Running the block in Forward Chaining will ask the questions in order and perform the actions associated with the input that the system user provides. For example, an insurance questionnaire might have a question “Does your house have smoke detectors?” If you answer “yes”, it would give a 2% discount. If you answer “no”, it would add installing smoke detectors to a “Recommendations” list. In an Action Block, this would look like:
The Label is “Smoke_Detectors”. The Question is “Does your house have Smoke Detectors”, with 2 possible values. The “Yes” value leads to setting the variable “Discount” to .02. The “No” value adds “Smoke detectors should be installed” to the “Recommendations”. For Static List variables, the values are the possible items for the variable, but for other types of variables Boolean tests are used, where the input from the system user will make one (or more) of the tests true. For example: The age of the house input by the system user will fall into one of the age ranges in the “Values” column. This will lead to the actions on that row.
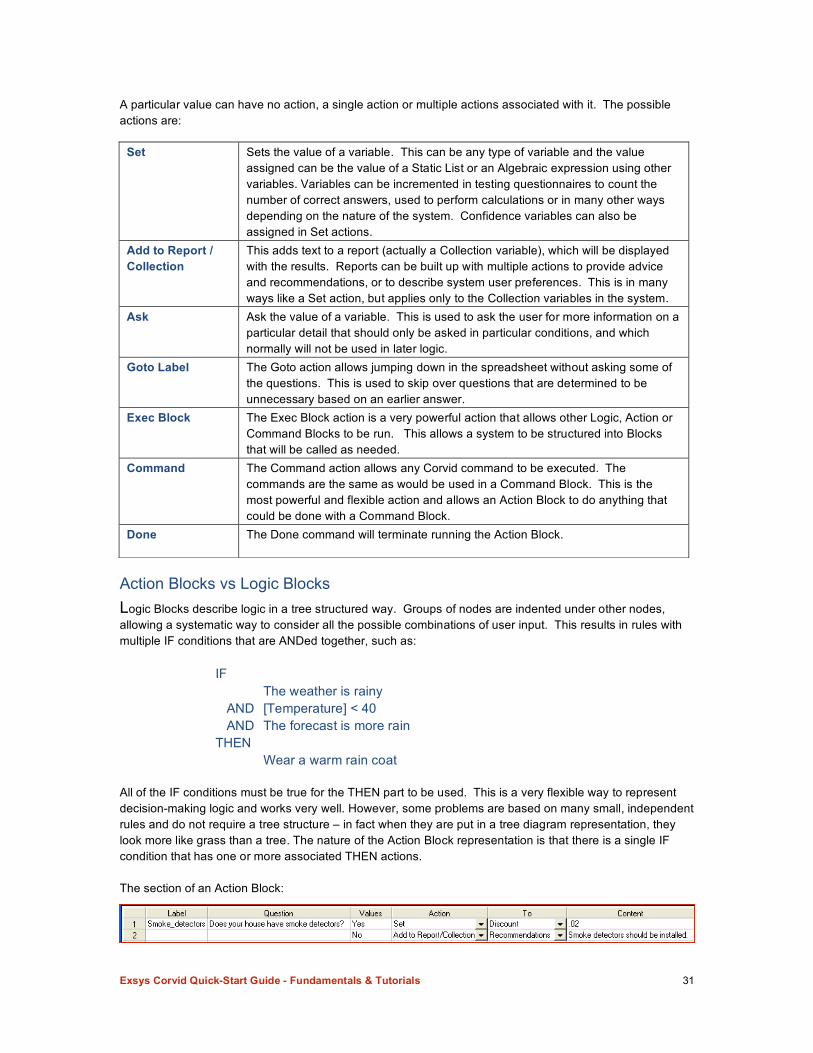
Exsys Corvid Quick-Start Guide - Fundamentals & Tutorials 31
A particular value can have no action, a single action or multiple actions associated with it. The possible actions are:
Action Blocks vs Logic Blocks Logic Blocks describe logic in a tree structured way. Groups of nodes are indented under other nodes, allowing a systematic way to consider all the possible combinations of user input. This results in rules with multiple IF conditions that are ANDed together, such as:
IF The weather is rainy AND [Temperature] < 40 AND The forecast is more rain THEN Wear a warm rain coat
All of the IF conditions must be true for the THEN part to be used. This is a very flexible way to represent decision-making logic and works very well. However, some problems are based on many small, independent rules and do not require a tree structure – in fact when they are put in a tree diagram representation, they look more like grass than a tree. The nature of the Action Block representation is that there is a single IF condition that has one or more associated THEN actions. The section of an Action Block:
Set Sets the value of a variable. This can be any type of variable and the value assigned can be the value of a Static List or an Algebraic expression using other variables. Variables can be incremented in testing questionnaires to count the number of correct answers, used to perform calculations or in many other ways depending on the nature of the system. Confidence variables can also be assigned in Set actions.
Add to Report / Collection
This adds text to a report (actually a Collection variable), which will be displayed with the results. Reports can be built up with multiple actions to provide advice and recommendations, or to describe system user preferences. This is in many ways like a Set action, but applies only to the Collection variables in the system.
Ask Ask the value of a variable. This is used to ask the user for more information on a particular detail that should only be asked in particular conditions, and which normally will not be used in later logic.
Goto Label
The Goto action allows jumping down in the spreadsheet without asking some of the questions. This is used to skip over questions that are determined to be unnecessary based on an earlier answer.
Exec Block
The Exec Block action is a very powerful action that allows other Logic, Action or Command Blocks to be run. This allows a system to be structured into Blocks that will be called as needed.
Command
The Command action allows any Corvid command to be executed. The commands are the same as would be used in a Command Block. This is the most powerful and flexible action and allows an Action Block to do anything that could be done with a Command Block.
Done
The Done command will terminate running the Action Block.
Exsys Corvid Quick-Start Guide - Fundamentals & Tutorials 32
corresponds to the rules:
IF The house has smoke detectors THEN Discount = .02 IF The house does not have smoke detectors THEN Add “Smoke detectors should be installed” to the recommendations
While this type of logic is less complex, it is quite often all that is needed for many types of problems. While Action Blocks do not directly have the multiple IF conditions of a Logic Block, they do provide a way to create a comparable structure by using the “Goto Label” and “Exec Block” actions. The “Goto Label” action makes it easy to skip across questions based on some answers, or allow the questions when other input in provided. Since the question(s) are only used in particular cases, they effectively are ANDed with those questions. For example, if an earlier question asked if the user owned a house or rented, and answering “rented” caused a Goto Label action that slipped over the house smoke detector questions, the equivalent rules would be:
IF The user has a house AND The house has smoke detectors THEN Discount = .02 IF The user has a house AND The house does not have smoke detectors THEN Add “Smoke detectors should be installed” to the recommendations
However in the Action Block, each individual rule would only have a single IF condition. The “Goto Label” action can effectively create multiple ANDed conditions. The “Exec Block” action allows this to be done to an even greater degree since it allows running another entire Action or Logic block. Since this block can have additional Goto Label and Exec Block commands, the structure can effectively be deeply nested. While deeply nested logic can be represented in Action Blocks, if more than a few levels are needed, Logic Blocks will make the organization easier. Action Blocks are intended for the situations where the logic has many independent factors that can be represented by rules that have one, or only a few, IF conditions. Another difference between Logic and Action Blocks is that Logic Blocks are run with either backward or forward chaining, but Action Blocks are generally run only with forward chaining. This causes the questions in the Action Block to be tested in order, except when a Goto Label action causes some to be skipped. However, some systems combine backward and forward chaining with individual conditions in an Action Block using the values of variables that are derived from other parts of the system using backward chaining.
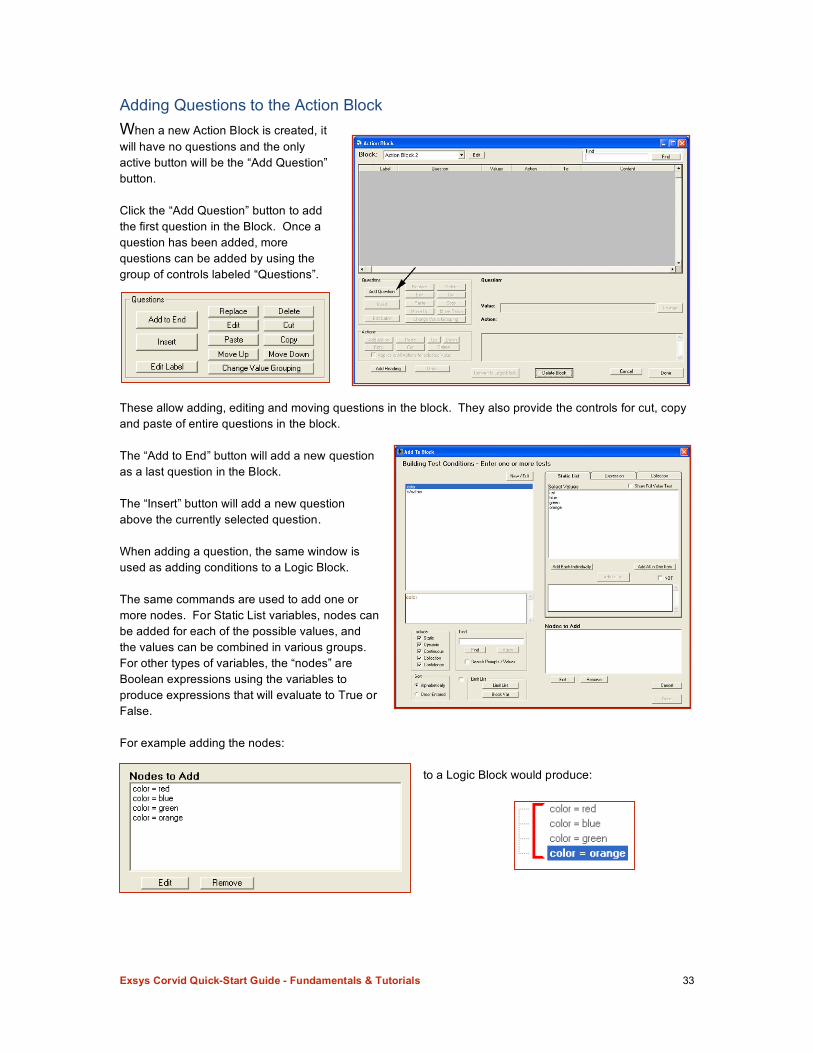
Exsys Corvid Quick-Start Guide - Fundamentals & Tutorials 33
Adding Questions to the Action Block When a new Action Block is created, it will have no questions and the only active button will be the “Add Question” button. Click the “Add Question” button to add the first question in the Block. Once a question has been added, more questions can be added by using the group of controls labeled “Questions”.
These allow adding, editing and moving questions in the block. They also provide the controls for cut, copy and paste of entire questions in the block. The “Add to End” button will add a new question as a last question in the Block. The “Insert” button will add a new question above the currently selected question. When adding a question, the same window is used as adding conditions to a Logic Block. The same commands are used to add one or more nodes. For Static List variables, nodes can be added for each of the possible values, and the values can be combined in various groups. For other types of variables, the “nodes” are Boolean expressions using the variables to produce expressions that will evaluate to True or False. For example adding the nodes:
to a Logic Block would produce:

Exsys Corvid Quick-Start Guide - Fundamentals & Tutorials 34
Adding the same nodes to an Action Block would produce:
The Label column is automatically generated and is the name of the variable. The Question column is the prompt for the variable, and one row has been added for each value. To add an Action for a row, click on the dropdown list and select the desired action: Depending on the action selected, the “To” and “Content” columns may need to be filled in. For example, if the “Set” action is selected, the variable to assign a value to must be selected in the “To” column, and the value (expression) to assign must be put in the “Content” column. Corvid highlights the cells that need input in red. When the “Set” action is selected, the “To” column will be highlighted in red, and converted to a dropdown list of the variables in the system.
Once a variable is selected from the dropdown, the “Content” cell will be highlighted in red until the value (expression) to assign is entered.
The Content value can be directly typed into the cell (double click on the cell to select it and display the typing cursor) or it can be input in the edit box in the lower part of the window. Clicking on a row in the spreadsheet will select and highlight the row, and display the question, value, action and content in the lower part of the window. The edit box for the Content can be edited and the changes will appear in the spreadsheet. The highlighting in the spreadsheet shows the full question, with all values in light blue and the currently selected row highlighted in yellow, along with the question associated with the value. If there are multiple actions associated with a value, they will be highlighted in green.
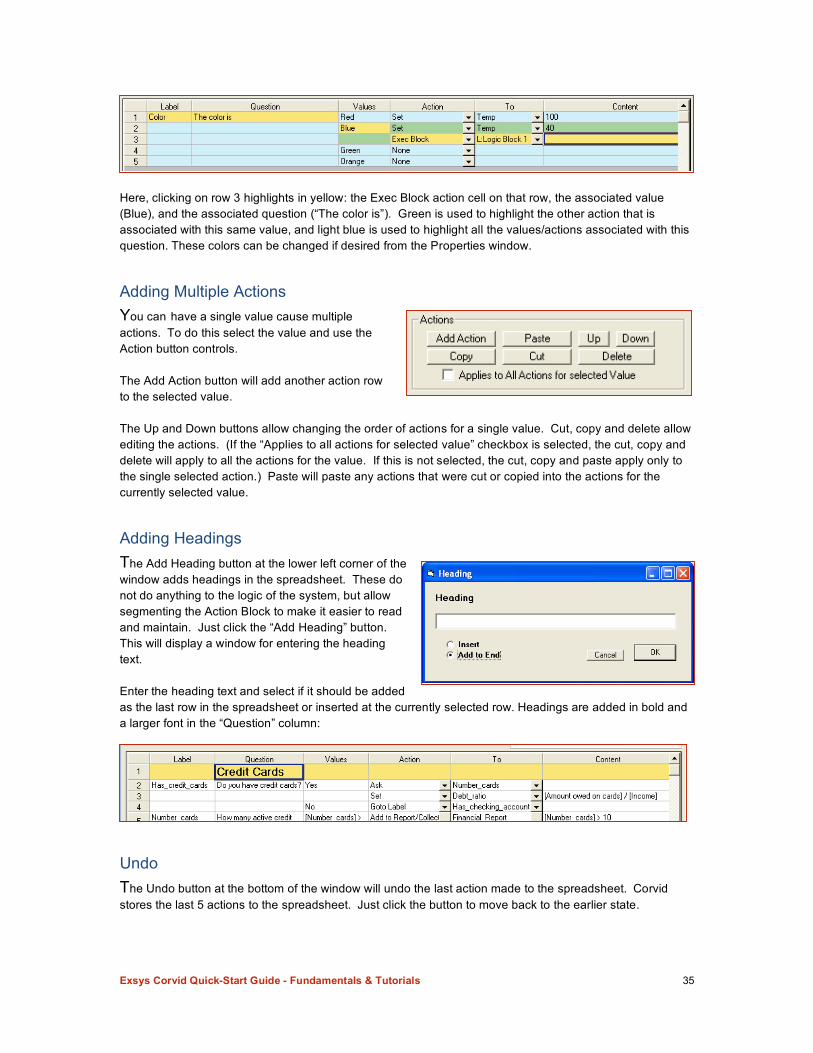
Exsys Corvid Quick-Start Guide - Fundamentals & Tutorials 35
Here, clicking on row 3 highlights in yellow: the Exec Block action cell on that row, the associated value (Blue), and the associated question (“The color is”). Green is used to highlight the other action that is associated with this same value, and light blue is used to highlight all the values/actions associated with this question. These colors can be changed if desired from the Properties window.
Adding Multiple Actions You can have a single value cause multiple actions. To do this select the value and use the Action button controls. The Add Action button will add another action row to the selected value. The Up and Down buttons allow changing the order of actions for a single value. Cut, copy and delete allow editing the actions. (If the “Applies to all actions for selected value” checkbox is selected, the cut, copy and delete will apply to all the actions for the value. If this is not selected, the cut, copy and paste apply only to the single selected action.) Paste will paste any actions that were cut or copied into the actions for the currently selected value.
Adding Headings The Add Heading button at the lower left corner of the window adds headings in the spreadsheet. These do not do anything to the logic of the system, but allow segmenting the Action Block to make it easier to read and maintain. Just click the “Add Heading” button. This will display a window for entering the heading text. Enter the heading text and select if it should be added as the last row in the spreadsheet or inserted at the currently selected row. Headings are added in bold and a larger font in the “Question” column:
Undo The Undo button at the bottom of the window will undo the last action made to the spreadsheet. Corvid stores the last 5 actions to the spreadsheet. Just click the button to move back to the earlier state.
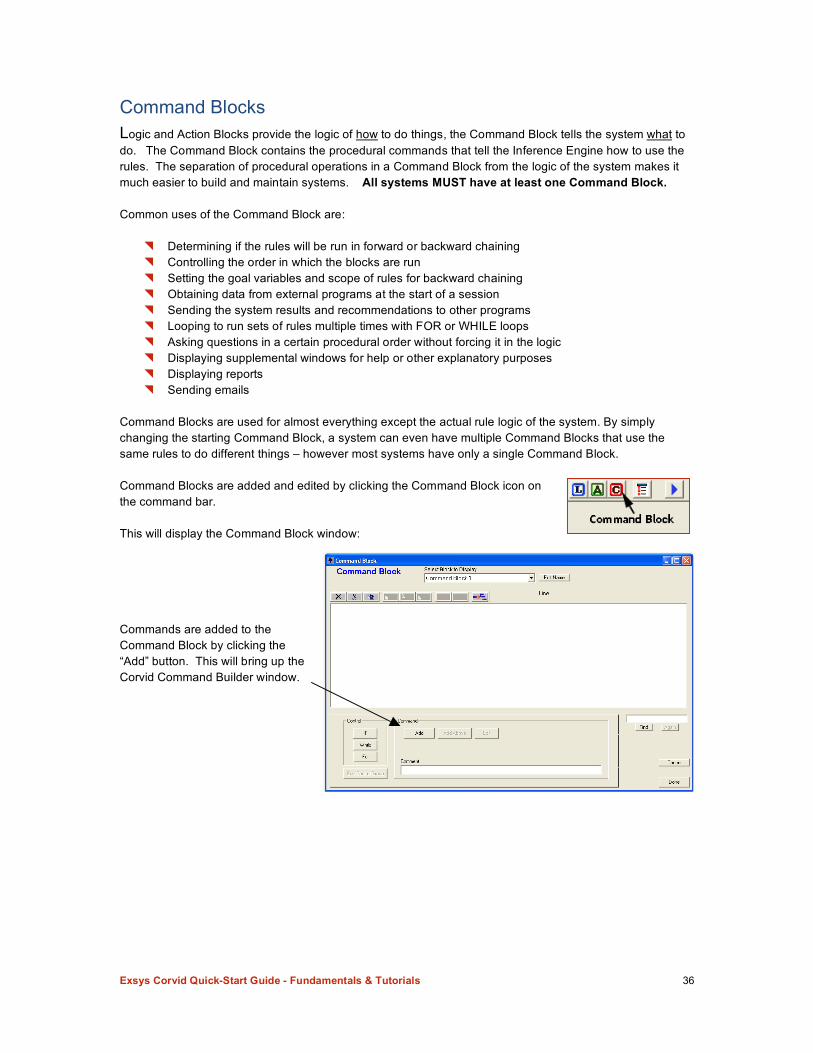
Exsys Corvid Quick-Start Guide - Fundamentals & Tutorials 36
Command Blocks Logic and Action Blocks provide the logic of how to do things, the Command Block tells the system what to do. The Command Block contains the procedural commands that tell the Inference Engine how to use the rules. The separation of procedural operations in a Command Block from the logic of the system makes it much easier to build and maintain systems. All systems MUST have at least one Command Block. Common uses of the Command Block are:
Determining if the rules will be run in forward or backward chaining Controlling the order in which the blocks are run Setting the goal variables and scope of rules for backward chaining Obtaining data from external programs at the start of a session Sending the system results and recommendations to other programs Looping to run sets of rules multiple times with FOR or WHILE loops Asking questions in a certain procedural order without forcing it in the logic Displaying supplemental windows for help or other explanatory purposes Displaying reports Sending emails
Command Blocks are used for almost everything except the actual rule logic of the system. By simply changing the starting Command Block, a system can even have multiple Command Blocks that use the same rules to do different things – however most systems have only a single Command Block. Command Blocks are added and edited by clicking the Command Block icon on the command bar. This will display the Command Block window: Commands are added to the Command Block by clicking the “Add” button. This will bring up the Corvid Command Builder window.
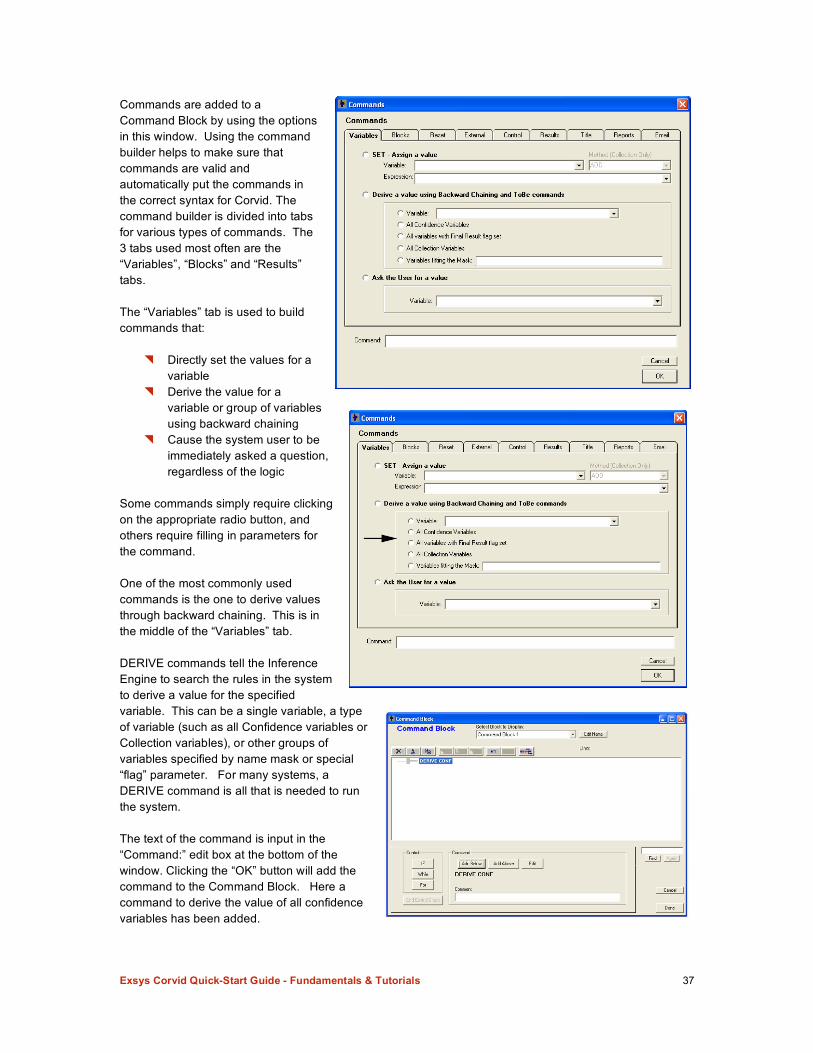
Exsys Corvid Quick-Start Guide - Fundamentals & Tutorials 37
Commands are added to a Command Block by using the options in this window. Using the command builder helps to make sure that commands are valid and automatically put the commands in the correct syntax for Corvid. The command builder is divided into tabs for various types of commands. The 3 tabs used most often are the “Variables”, “Blocks” and “Results” tabs. The “Variables” tab is used to build commands that:
Directly set the values for a variable
Derive the value for a variable or group of variables using backward chaining
Cause the system user to be immediately asked a question, regardless of the logic
Some commands simply require clicking on the appropriate radio button, and others require filling in parameters for the command. One of the most commonly used commands is the one to derive values through backward chaining. This is in the middle of the “Variables” tab. DERIVE commands tell the Inference Engine to search the rules in the system to derive a value for the specified variable. This can be a single variable, a type of variable (such as all Confidence variables or Collection variables), or other groups of variables specified by name mask or special “flag” parameter. For many systems, a DERIVE command is all that is needed to run the system. The text of the command is input in the “Command:” edit box at the bottom of the window. Clicking the “OK” button will add the command to the Command Block. Here a command to derive the value of all confidence variables has been added.

Exsys Corvid Quick-Start Guide - Fundamentals & Tutorials 38
The “Blocks” tab provides the commands to run systems that use forward chaining to run the blocks. This includes many systems built with Logic Blocks and almost all systems that are built using Action Blocks. A system can run all the Logic and Action Blocks in the order they were entered, or specify specific blocks to run. If several blocks should be run in a particular sequence, just add one command for each. The command to display a Results screen at the end of a session is built from the “Results” tab. For most systems, just click the “Display Default Results Screen” radio button and add the command as the last one in the Command Block. If the box below the radio button is empty, the command will display all variables set during the session. These will be displayed as simple text with no formatting. The Results screen can be customized to display only certain variables, images and text with formatting for color, font and size by clicking the “Edit” button under the “Display Default Results Screen” group. Many Corvid systems have very simple Command Blocks with only a few commands. This Command Block will derive the values for all Confidence variables and display the results. Systems that have complex integration with other programs, requirements for specific procedural operations or use looping will call for more complex Command Blocks.
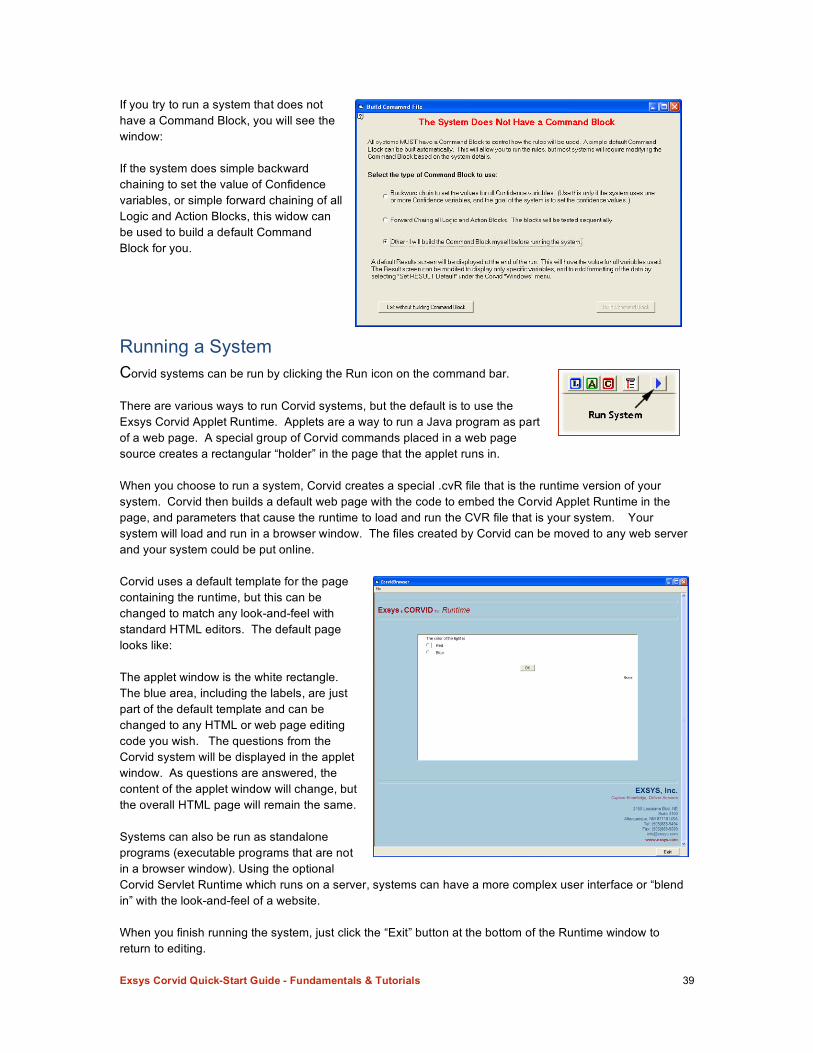
Exsys Corvid Quick-Start Guide - Fundamentals & Tutorials 39
If you try to run a system that does not have a Command Block, you will see the window: If the system does simple backward chaining to set the value of Confidence variables, or simple forward chaining of all Logic and Action Blocks, this widow can be used to build a default Command Block for you.
Running a System Corvid systems can be run by clicking the Run icon on the command bar. There are various ways to run Corvid systems, but the default is to use the Exsys Corvid Applet Runtime. Applets are a way to run a Java program as part of a web page. A special group of Corvid commands placed in a web page source creates a rectangular “holder” in the page that the applet runs in. When you choose to run a system, Corvid creates a special .cvR file that is the runtime version of your system. Corvid then builds a default web page with the code to embed the Corvid Applet Runtime in the page, and parameters that cause the runtime to load and run the CVR file that is your system. Your system will load and run in a browser window. The files created by Corvid can be moved to any web server and your system could be put online. Corvid uses a default template for the page containing the runtime, but this can be changed to match any look-and-feel with standard HTML editors. The default page looks like: The applet window is the white rectangle. The blue area, including the labels, are just part of the default template and can be changed to any HTML or web page editing code you wish. The questions from the Corvid system will be displayed in the applet window. As questions are answered, the content of the applet window will change, but the overall HTML page will remain the same. Systems can also be run as standalone programs (executable programs that are not in a browser window). Using the optional Corvid Servlet Runtime which runs on a server, systems can have a more complex user interface or “blend in” with the look-and-feel of a website. When you finish running the system, just click the “Exit” button at the bottom of the Runtime window to return to editing.
Exsys Corvid Quick-Start Guide - Fundamentals & Tutorials 40
Action Blocks are a very quick and easy way to build many types of systems like smart questionnaires, but they are not suitable for problems that call for more tree structured logic. For those, Logic Blocks are a better alternative. Logic Blocks are suitable for more problems, and any system that can be built in Action Blocks can also be built in Logic Blocks. (In fact, Action Blocks can be converted to the equivalent Logic Block by clicking the button at the bottom of the Action Block window.) This tutorial will introduce Logic Blocks and show how to use them to build logic to solve a simple problem. It also shows how as a problem becomes more complex; a Logic Block can be expanded to cover it. Exsys Corvid uses IF/THEN rules to describe the decision-making steps and logic to solve a problem. In Action Blocks, each question value was equivalent to a simple rule, where the IF condition was the value and the THEN conditions were the associated actions.
IF Question = Value 1
THEN Action 1 Action 2
This works for many types of problems, but often you need to have multiple IF conditions to describe the rule, and specify when the rule applies:
IF Question1 = Value x
AND Quesiton2 = Value y AND Quesiton3 = Value z THEN Action 1 Action 2
Building a more complex rule such as this requires using Logic Blocks.
The Light Bulb Problem For this tutorial, you will build a system to advise someone on the very simple issue of what to do when a light bulb goes out. In the simplest form, this is 2 rules:
IF The light bulb suddenly goes out THEN Replace the bulb
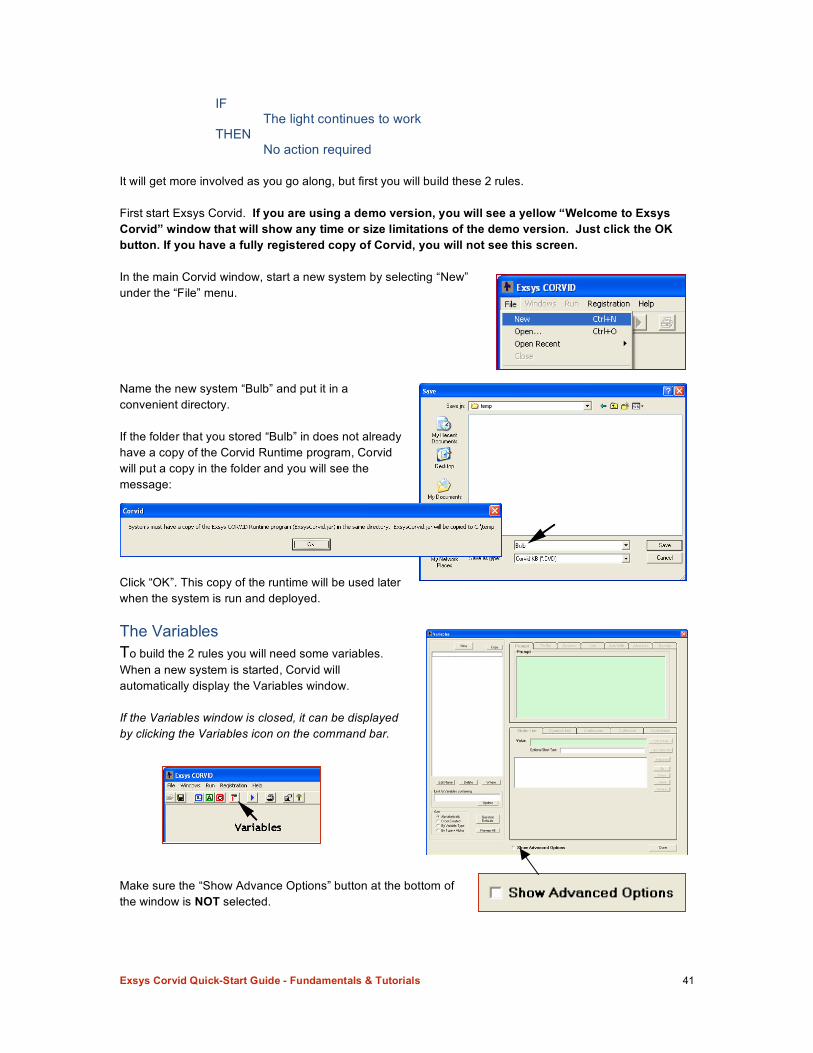
Exsys Corvid Quick-Start Guide - Fundamentals & Tutorials 41
IF The light continues to work THEN No action required
It will get more involved as you go along, but first you will build these 2 rules. First start Exsys Corvid. If you are using a demo version, you will see a yellow “Welcome to Exsys Corvid” window that will show any time or size limitations of the demo version. Just click the OK button. If you have a fully registered copy of Corvid, you will not see this screen. In the main Corvid window, start a new system by selecting “New” under the “File” menu. Name the new system “Bulb” and put it in a convenient directory. If the folder that you stored “Bulb” in does not already have a copy of the Corvid Runtime program, Corvid will put a copy in the folder and you will see the message:
Click “OK”. This copy of the runtime will be used later when the system is run and deployed. The Variables To build the 2 rules you will need some variables. When a new system is started, Corvid will automatically display the Variables window. If the Variables window is closed, it can be displayed by clicking the Variables icon on the command bar.
Make sure the “Show Advance Options” button at the bottom of the window is NOT selected.

Exsys Corvid Quick-Start Guide - Fundamentals & Tutorials 42
The first variable needed is one to describe the state of the light bulb. This is a variable with 2 possible values, so it should be a Static List variable. The prompt will be “The light bulb” and the possible values that complete the sentence are “suddenly goes out” and “continues working” To add this variable, click the “New” button on the Variables window. In the New Variable window, name the variable “Bulb” and select that it is a Static List variable. Then click the OK button to add it to the variable list. Now to add the values to the Static List variable. There are various ways to phrase the values associated with a question. Some prefer the prompt to be a full statement or question, and the values the answers. Here you will use an approach where the Prompt plus a value will make a sentence. However, other approaches that convey the same information could be used. The actual wording (and even language) used to build the rules does not matter to the system. Corvid is only concerned that a particular value for a particular variable is selected – not the wording associated with the prompt or the value. Corvid automatically makes the Prompt the same as the variable name. Here you want to change “Bulb” to “The light bulb”. Just click in the Prompt edit box and make the change. Now to add the values. The first value is “suddenly goes out”. Click in the Value edit box and enter the text. Then click the “Add to List” button. Now enter the second value, “continues to work” in the Value edit box and click the “Add to List” button again. The list should now have the 2 values. One last step for this variable is to make sure only a single value is ever set, since only one value can be true at a time. This will become important later in the system when you start to add backward chaining.
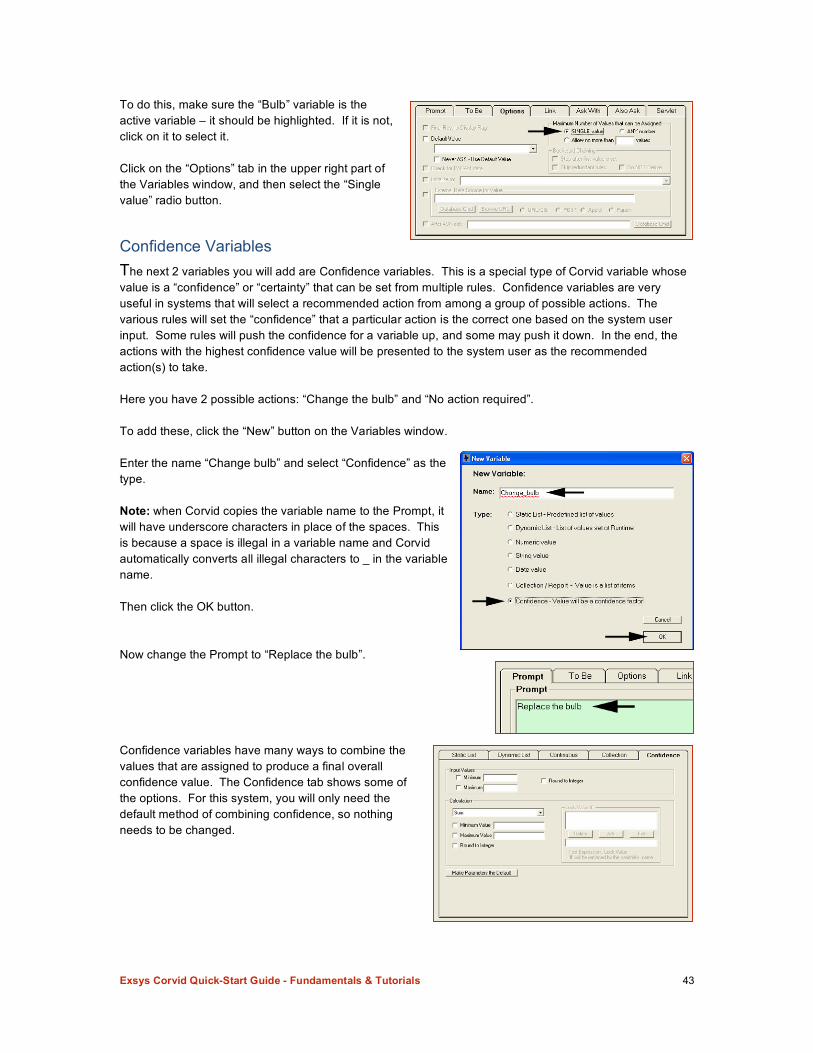
Exsys Corvid Quick-Start Guide - Fundamentals & Tutorials 43
To do this, make sure the “Bulb” variable is the active variable – it should be highlighted. If it is not, click on it to select it. Click on the “Options” tab in the upper right part of the Variables window, and then select the “Single value” radio button.
Confidence Variables The next 2 variables you will add are Confidence variables. This is a special type of Corvid variable whose value is a “confidence” or “certainty” that can be set from multiple rules. Confidence variables are very useful in systems that will select a recommended action from among a group of possible actions. The various rules will set the “confidence” that a particular action is the correct one based on the system user input. Some rules will push the confidence for a variable up, and some may push it down. In the end, the actions with the highest confidence value will be presented to the system user as the recommended action(s) to take. Here you have 2 possible actions: “Change the bulb” and “No action required”. To add these, click the “New” button on the Variables window. Enter the name “Change bulb” and select “Confidence” as the type. Note: when Corvid copies the variable name to the Prompt, it will have underscore characters in place of the spaces. This is because a space is illegal in a variable name and Corvid automatically converts all illegal characters to _ in the variable name. Then click the OK button. Now change the Prompt to “Replace the bulb”. Confidence variables have many ways to combine the values that are assigned to produce a final overall confidence value. The Confidence tab shows some of the options. For this system, you will only need the default method of combining confidence, so nothing needs to be changed.
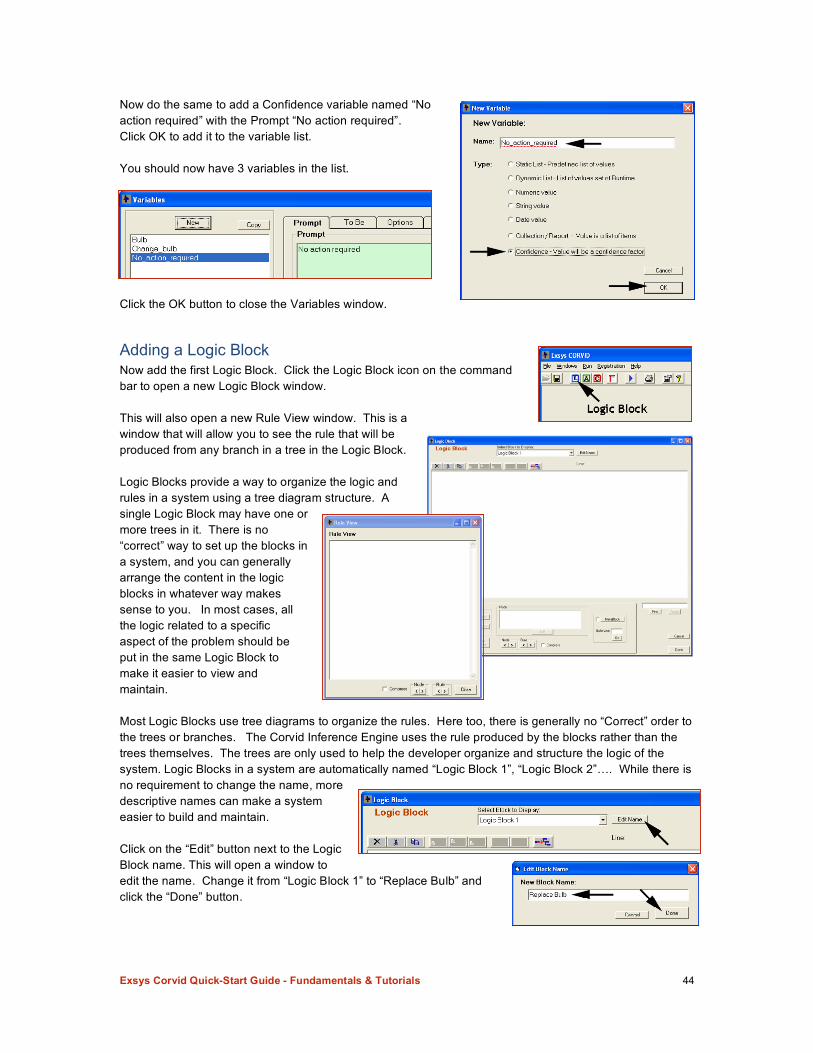
Exsys Corvid Quick-Start Guide - Fundamentals & Tutorials 44
Now do the same to add a Confidence variable named “No action required” with the Prompt “No action required”. Click OK to add it to the variable list. You should now have 3 variables in the list.
Click the OK button to close the Variables window.
Adding a Logic Block Now add the first Logic Block. Click the Logic Block icon on the command bar to open a new Logic Block window. This will also open a new Rule View window. This is a window that will allow you to see the rule that will be produced from any branch in a tree in the Logic Block. Logic Blocks provide a way to organize the logic and rules in a system using a tree diagram structure. A single Logic Block may have one or more trees in it. There is no “correct” way to set up the blocks in a system, and you can generally arrange the content in the logic blocks in whatever way makes sense to you. In most cases, all the logic related to a specific aspect of the problem should be put in the same Logic Block to make it easier to view and maintain. Most Logic Blocks use tree diagrams to organize the rules. Here too, there is generally no “Correct” order to the trees or branches. The Corvid Inference Engine uses the rule produced by the blocks rather than the trees themselves. The trees are only used to help the developer organize and structure the logic of the system. Logic Blocks in a system are automatically named “Logic Block 1”, “Logic Block 2”…. While there is no requirement to change the name, more descriptive names can make a system easier to build and maintain. Click on the “Edit” button next to the Logic Block name. This will open a window to edit the name. Change it from “Logic Block 1” to “Replace Bulb” and click the “Done” button.
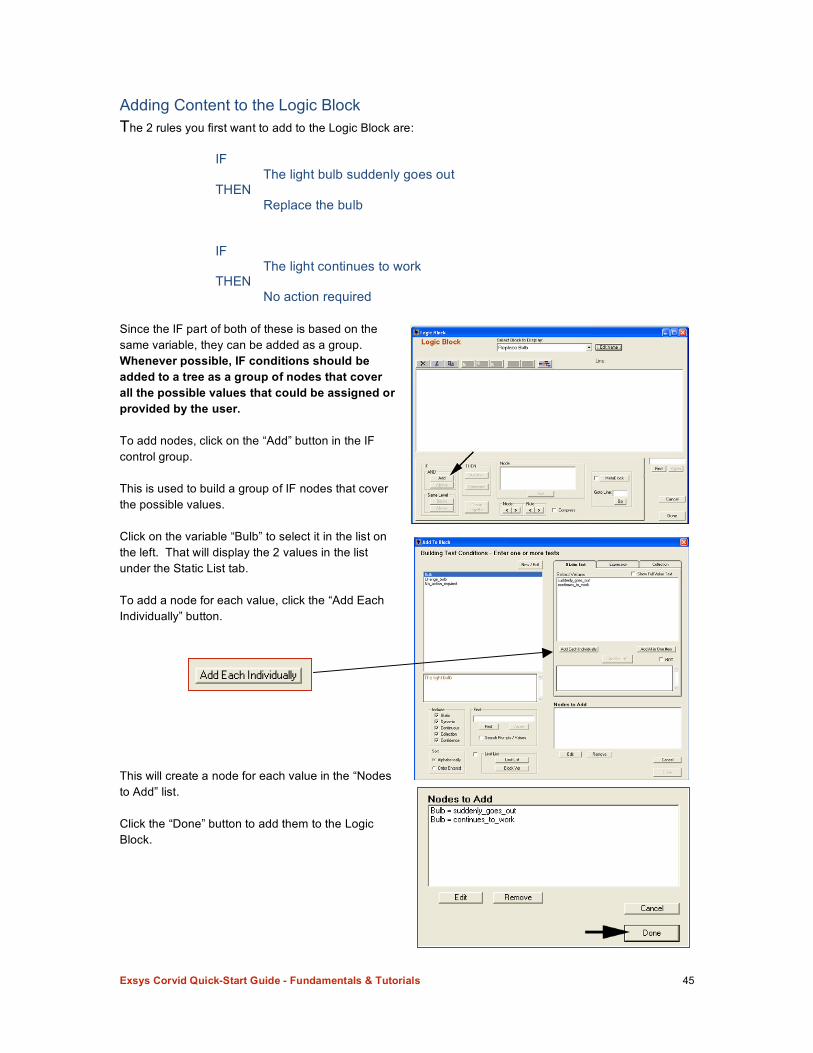
Exsys Corvid Quick-Start Guide - Fundamentals & Tutorials 45
Adding Content to the Logic Block The 2 rules you first want to add to the Logic Block are:
IF The light bulb suddenly goes out THEN Replace the bulb IF The light continues to work THEN No action required
Since the IF part of both of these is based on the same variable, they can be added as a group. Whenever possible, IF conditions should be added to a tree as a group of nodes that cover all the possible values that could be assigned or provided by the user. To add nodes, click on the “Add” button in the IF control group. This is used to build a group of IF nodes that cover the possible values. Click on the variable “Bulb” to select it in the list on the left. That will display the 2 values in the list under the Static List tab. To add a node for each value, click the “Add Each Individually” button. This will create a node for each value in the “Nodes to Add” list. Click the “Done” button to add them to the Logic Block.
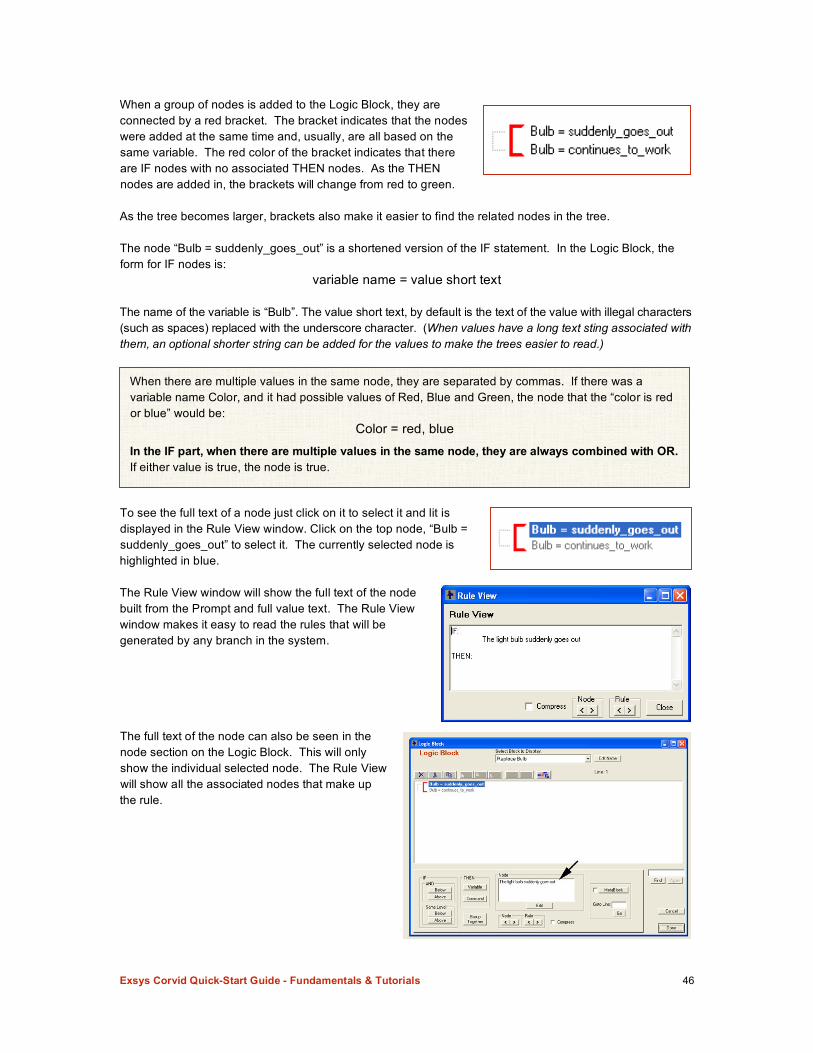
Exsys Corvid Quick-Start Guide - Fundamentals & Tutorials 46
When a group of nodes is added to the Logic Block, they are connected by a red bracket. The bracket indicates that the nodes were added at the same time and, usually, are all based on the same variable. The red color of the bracket indicates that thereare IF nodes with no associated THEN nodes. As the THEN nodes are added in, the brackets will change from red to green.
As the tree becomes larger, brackets also make it easier to find the related nodes in the tree.
The node “Bulb = suddenly_goes_out” is a shortened version of the IF statement. In the Logic Block, the form for IF nodes is:
variable name = value short text
The name of the variable is “Bulb”. The value short text, by default is the text of the value with illegal characters (such as spaces) replaced with the underscore character. (When values have a long text sting associated with them, an optional shorter string can be added for the values to make the trees easier to read.)
To see the full text of a node just click on it to select it and lit is displayed in the Rule View window. Click on the top node, “Bulb = suddenly_goes_out” to select it. The currently selected node is highlighted in blue.
The Rule View window will show the full text of the node built from the Prompt and full value text. The Rule Viewwindow makes it easy to read the rules that will be generated by any branch in the system.
The full text of the node can also be seen in the node section on the Logic Block. This will only show the individual selected node. The Rule View will show all the associated nodes that make up the rule.
When there are multiple values in the same node, they are separated by commas. If there was a variable name Color, and it had possible values of Red, Blue and Green, the node that the “color is red or blue” would be:
Color = red, blue
In the IF part, when there are multiple values in the same node, they are always combined with OR. If either value is true, the node is true.
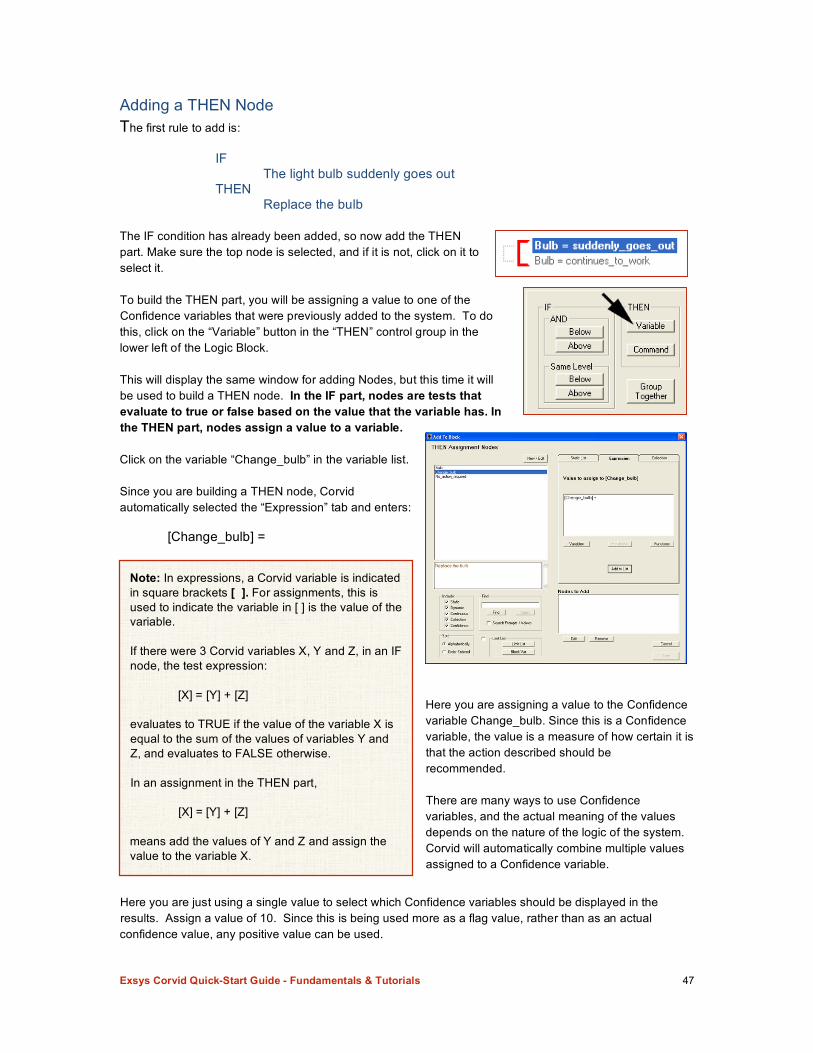
Exsys Corvid Quick-Start Guide - Fundamentals & Tutorials 47
Adding a THEN Node The first rule to add is:
IF The light bulb suddenly goes out
THEN Replace the bulb
The IF condition has already been added, so now add the THEN part. Make sure the top node is selected, and if it is not, click on it toselect it.
To build the THEN part, you will be assigning a value to one of the Confidence variables that were previously added to the system. To do this, click on the “Variable” button in the “THEN” control group in thelower left of the Logic Block.
This will display the same window for adding Nodes, but this time it will be used to build a THEN node. In the IF part, nodes are tests that evaluate to true or false based on the value that the variable has. In the THEN part, nodes assign a value to a variable.
Click on the variable “Change_bulb” in the variable list.
Since you are building a THEN node, Corvid automatically selected the “Expression” tab and enters:
[Change_bulb] =
Here you are assigning a value to the Confidence variable Change_bulb. Since this is a Confidencevariable, the value is a measure of how certain it is that the action described should be recommended. There are many ways to use Confidence variables, and the actual meaning of the values depends on the nature of the logic of the system. Corvid will automatically combine multiple values assigned to a Confidence variable.
Here you are just using a single value to select which Confidence variables should be displayed in the results. Assign a value of 10. Since this is being used more as a flag value, rather than as an actual confidence value, any positive value can be used.
Note: In expressions, a Corvid variable is indicated in square brackets [ ]. For assignments, this is used to indicate the variable in [ ] is the value of the variable. If there were 3 Corvid variables X, Y and Z, in an IF node, the test expression: [X] = [Y] + [Z] evaluates to TRUE if the value of the variable X is equal to the sum of the values of variables Y and Z, and evaluates to FALSE otherwise. In an assignment in the THEN part, [X] = [Y] + [Z] means add the values of Y and Z and assign the value to the variable X.
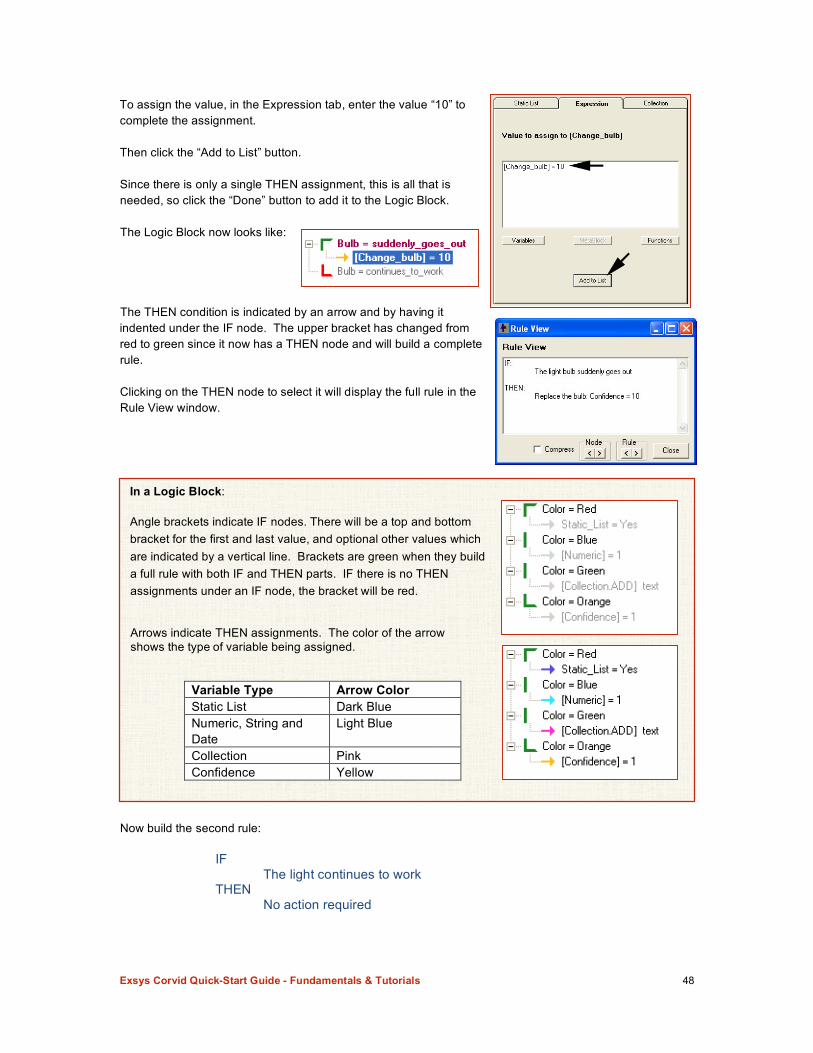
Exsys Corvid Quick-Start Guide - Fundamentals & Tutorials 48
To assign the value, in the Expression tab, enter the value “10” to complete the assignment.
Then click the “Add to List” button.
Since there is only a single THEN assignment, this is all that is needed, so click the “Done” button to add it to the Logic Block.
The Logic Block now looks like:
The THEN condition is indicated by an arrow and by having it indented under the IF node. The upper bracket has changed from red to green since it now has a THEN node and will build a complete rule.
Clicking on the THEN node to select it will display the full rule in the Rule View window.
Now build the second rule:
IF The light continues to work
THEN No action required
In a Logic Block: Angle brackets indicate IF nodes. There will be a top and bottom bracket for the first and last value, and optional other values which are indicated by a vertical line. Brackets are green when they build a full rule with both IF and THEN parts. IF there is no THEN assignments under an IF node, the bracket will be red. Arrows indicate THEN assignments. The color of the arrow shows the type of variable being assigned.
Variable Type Arrow Color Static List Dark Blue Numeric, String and Date
Light Blue
Collection Pink Confidence Yellow

Exsys Corvid Quick-Start Guide - Fundamentals & Tutorials 49
In the Logic Block:
Click the “Bulb=continues_to_work” node to select it.
Click the “Variables” button under the THEN
control group. In the window for adding nodes:
Click the “No_action_required” variable to select it
Enter “10” to build the expression
[No_action_required]=10
Click the “Add to List” button
Click the “Done” button to add the node to the Logic Block
The Logic Block should now look like:
You now have a Logic Block that contains the 2 rules needed. Adding a Command Block All Corvid systems must have a Command Block to provide the procedural commands to run the system. This can be as simple as a few commands or quite extensive when many procedural operations are needed. Here you will build a Command Block using the Command Builder. Click the Command Block icon on the command bar. This will display the Command Block window. The commands in the Command Block are built with the Command Builder window. This lets you build complex commands without having to memorize the command syntax of Corvid. To add a command, click the “Add” button.
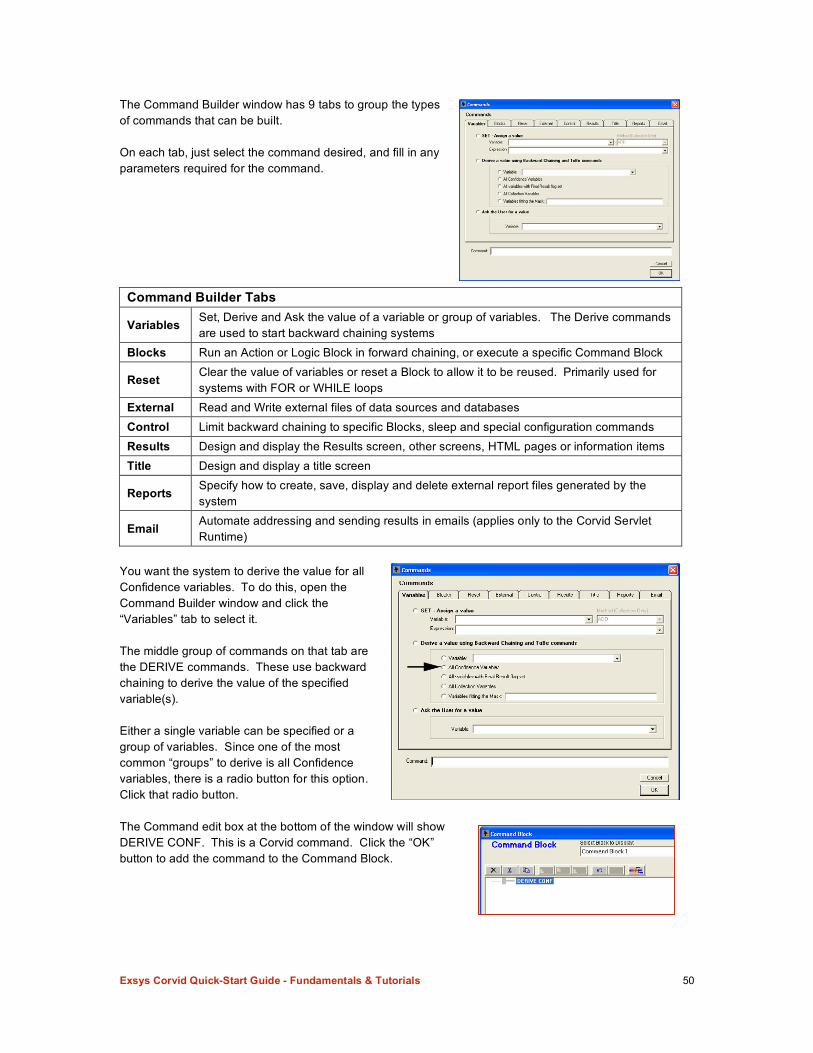
Exsys Corvid Quick-Start Guide - Fundamentals & Tutorials 50
The Command Builder window has 9 tabs to group the types of commands that can be built. On each tab, just select the command desired, and fill in any parameters required for the command.
Command Builder Tabs
Variables Set, Derive and Ask the value of a variable or group of variables. The Derive commands are used to start backward chaining systems
Blocks Run an Action or Logic Block in forward chaining, or execute a specific Command Block
Reset Clear the value of variables or reset a Block to allow it to be reused. Primarily used for systems with FOR or WHILE loops
External Read and Write external files of data sources and databases Control Limit backward chaining to specific Blocks, sleep and special configuration commands Results Design and display the Results screen, other screens, HTML pages or information items Title Design and display a title screen
Reports Specify how to create, save, display and delete external report files generated by the system
Email Automate addressing and sending results in emails (applies only to the Corvid Servlet Runtime)
You want the system to derive the value for all Confidence variables. To do this, open the Command Builder window and click the “Variables” tab to select it. The middle group of commands on that tab are the DERIVE commands. These use backward chaining to derive the value of the specified variable(s). Either a single variable can be specified or a group of variables. Since one of the most common “groups” to derive is all Confidence variables, there is a radio button for this option. Click that radio button. The Command edit box at the bottom of the window will show DERIVE CONF. This is a Corvid command. Click the “OK” button to add the command to the Command Block.
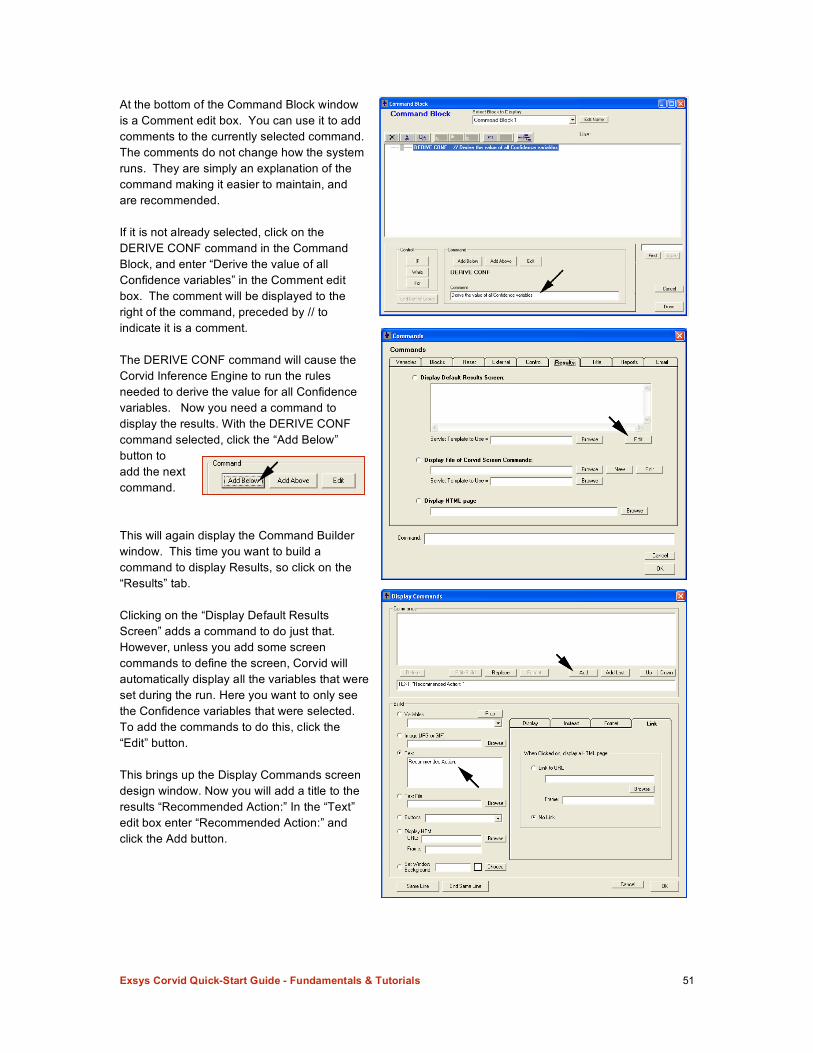
Exsys Corvid Quick-Start Guide - Fundamentals & Tutorials 51
At the bottom of the Command Block window is a Comment edit box. You can use it to add comments to the currently selected command. The comments do not change how the system runs. They are simply an explanation of the command making it easier to maintain, and are recommended. If it is not already selected, click on the DERIVE CONF command in the Command Block, and enter “Derive the value of all Confidence variables” in the Comment edit box. The comment will be displayed to the right of the command, preceded by // to indicate it is a comment. The DERIVE CONF command will cause the Corvid Inference Engine to run the rules needed to derive the value for all Confidence variables. Now you need a command to display the results. With the DERIVE CONF command selected, click the “Add Below” button to add the next command. This will again display the Command Builder window. This time you want to build a command to display Results, so click on the “Results” tab. Clicking on the “Display Default Results Screen” adds a command to do just that. However, unless you add some screen commands to define the screen, Corvid will automatically display all the variables that were set during the run. Here you want to only see the Confidence variables that were selected. To add the commands to do this, click the “Edit” button. This brings up the Display Commands screen design window. Now you will add a title to the results “Recommended Action:” In the “Text” edit box enter “Recommended Action:” and click the Add button.
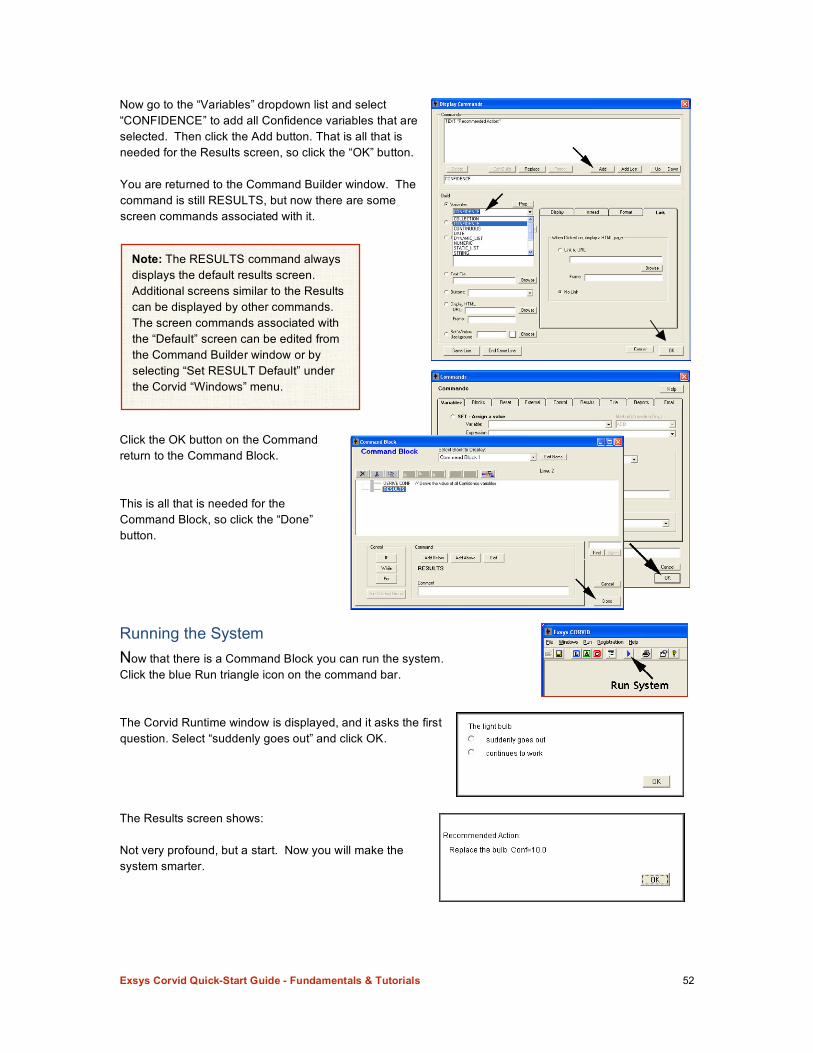
Exsys Corvid Quick-Start Guide - Fundamentals & Tutorials 52
Now go to the “Variables” dropdown list and select “CONFIDENCE” to add all Confidence variables that are selected. Then click the Add button. That is all that is needed for the Results screen, so click the “OK” button.
You are returned to the Command Builder window. The command is still RESULTS, but now there are some screen commands associated with it.
Click the OK button on the Command Builder to return to the Command Block.
This is all that is needed for the Command Block, so click the “Done” button.
Running the System Now that there is a Command Block you can run the system. Click the blue Run triangle icon on the command bar.
The Corvid Runtime window is displayed, and it asks the first question. Select “suddenly goes out” and click OK.
The Results screen shows:
Not very profound, but a start. Now you will make the system smarter.
Note: The RESULTS command always displays the default results screen. Additional screens similar to the Results can be displayed by other commands. The screen commands associated with the “Default” screen can be edited from the Command Builder window or by selecting “Set RESULT Default” under the Corvid “Windows” menu.

Exsys Corvid Quick-Start Guide - Fundamentals & Tutorials 53
Enhancing the Logic One of the problems with this small system is that it does not consider why the light went out. It assumes that the only possible cause is the bulb burned out, which is overly simplistic. If the circuit breaker for a room went out, the system would have you changing all the light bulbs in the room, and if there was a power failure, you would be changing all the bulbs in the house. These problems can be avoided by making the system more capable. You need some additional variables to tell us if the other lights in the room went out at the same time, and if all the lights in the house went out. To do this, open the Variables window by clicking on the Variables icon on the command bar. Click “New” to add a new variable. Name it “Other lights in the room” and make it a Static List variable. Then click OK. Back in the Variables window, change the Prompt to “The other lights in the room.” Add a value “stayed on” and click the “Add to List” button. Also enter a value “also went out” and click the “Add to List” button. That is all that is needed for that variable.
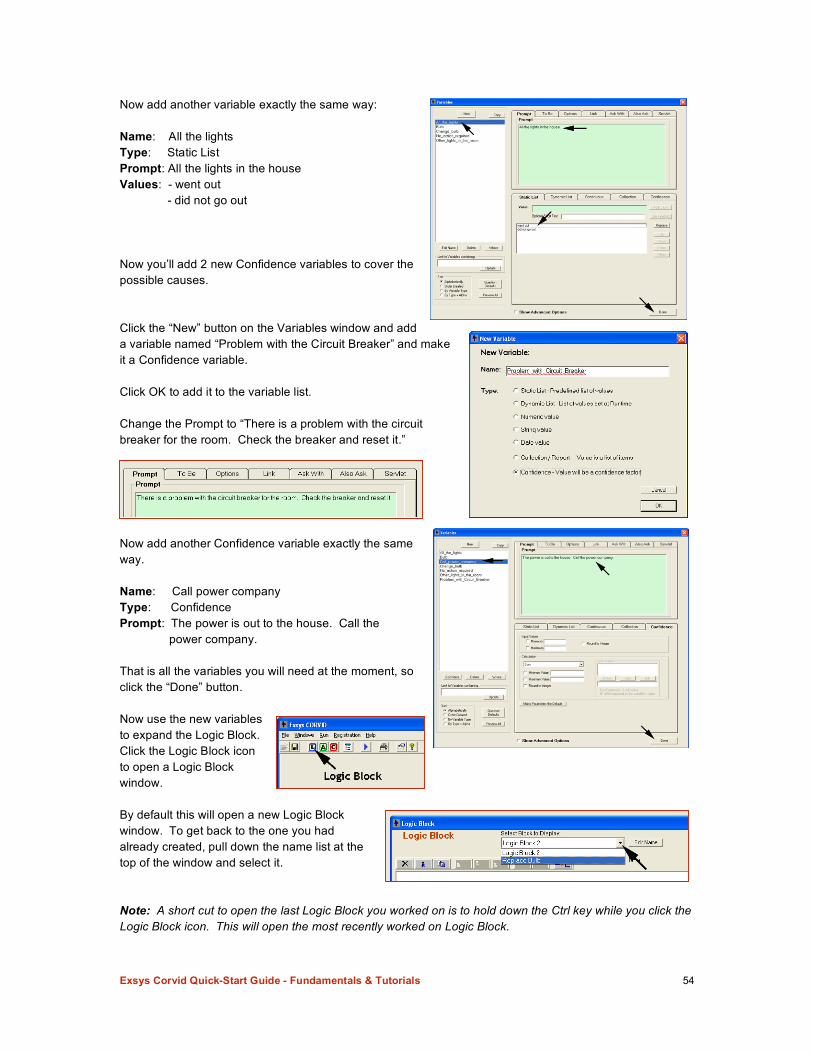
Exsys Corvid Quick-Start Guide - Fundamentals & Tutorials 54
Now add another variable exactly the same way: Name: All the lights Type: Static List Prompt: All the lights in the house Values: - went out - did not go out Now you’ll add 2 new Confidence variables to cover the possible causes. Click the “New” button on the Variables window and add a variable named “Problem with the Circuit Breaker” and make it a Confidence variable. Click OK to add it to the variable list. Change the Prompt to “There is a problem with the circuit breaker for the room. Check the breaker and reset it.”
Now add another Confidence variable exactly the same way. Name: Call power company Type: Confidence Prompt: The power is out to the house. Call the power company. That is all the variables you will need at the moment, so click the “Done” button. Now use the new variables to expand the Logic Block. Click the Logic Block icon to open a Logic Block window. By default this will open a new Logic Block window. To get back to the one you had already created, pull down the name list at the top of the window and select it. Note: A short cut to open the last Logic Block you worked on is to hold down the Ctrl key while you click the Logic Block icon. This will open the most recently worked on Logic Block.
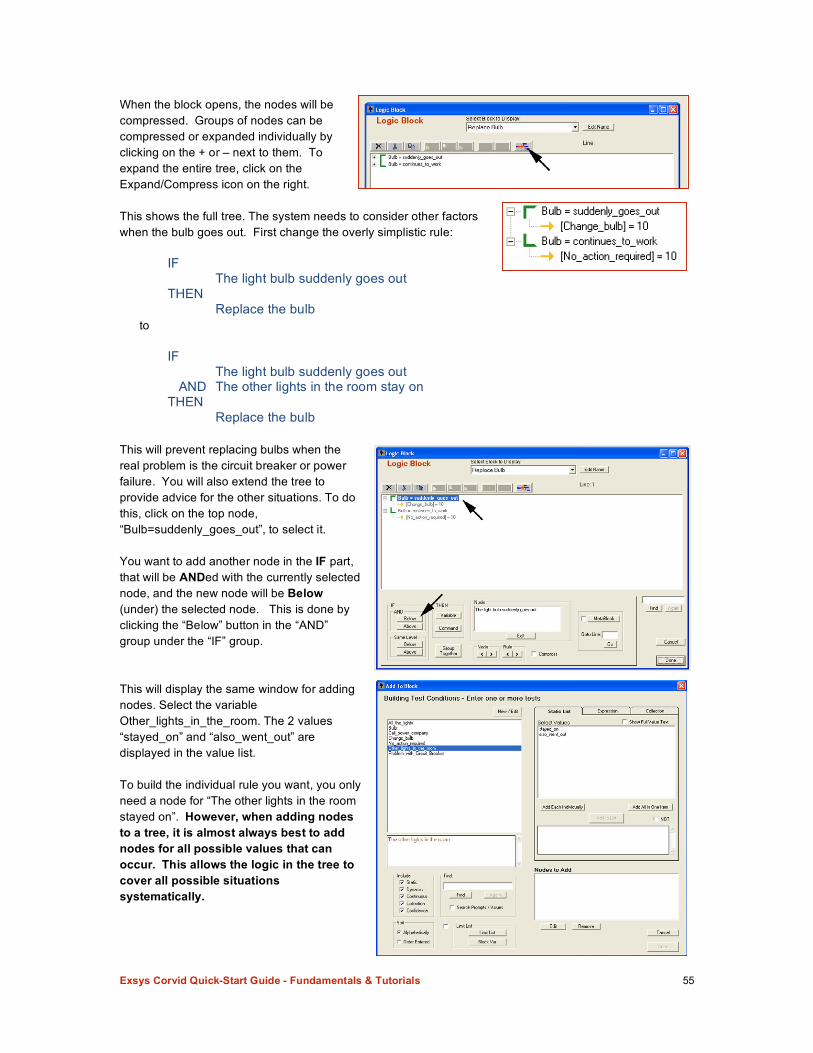
Exsys Corvid Quick-Start Guide - Fundamentals & Tutorials 55
When the block opens, the nodes will be compressed. Groups of nodes can be compressed or expanded individually by clicking on the + or – next to them. To expand the entire tree, click on the Expand/Compress icon on the right. This shows the full tree. The system needs to consider other factors when the bulb goes out. First change the overly simplistic rule:
IF The light bulb suddenly goes out THEN Replace the bulb
to IF The light bulb suddenly goes out AND The other lights in the room stay on THEN Replace the bulb
This will prevent replacing bulbs when the real problem is the circuit breaker or power failure. You will also extend the tree to provide advice for the other situations. To do this, click on the top node, “Bulb=suddenly_goes_out”, to select it. You want to add another node in the IF part, that will be ANDed with the currently selected node, and the new node will be Below (under) the selected node. This is done by clicking the “Below” button in the “AND” group under the “IF” group. This will display the same window for adding nodes. Select the variable Other_lights_in_the_room. The 2 values “stayed_on” and “also_went_out” are displayed in the value list. To build the individual rule you want, you only need a node for “The other lights in the room stayed on”. However, when adding nodes to a tree, it is almost always best to add nodes for all possible values that can occur. This allows the logic in the tree to cover all possible situations systematically.
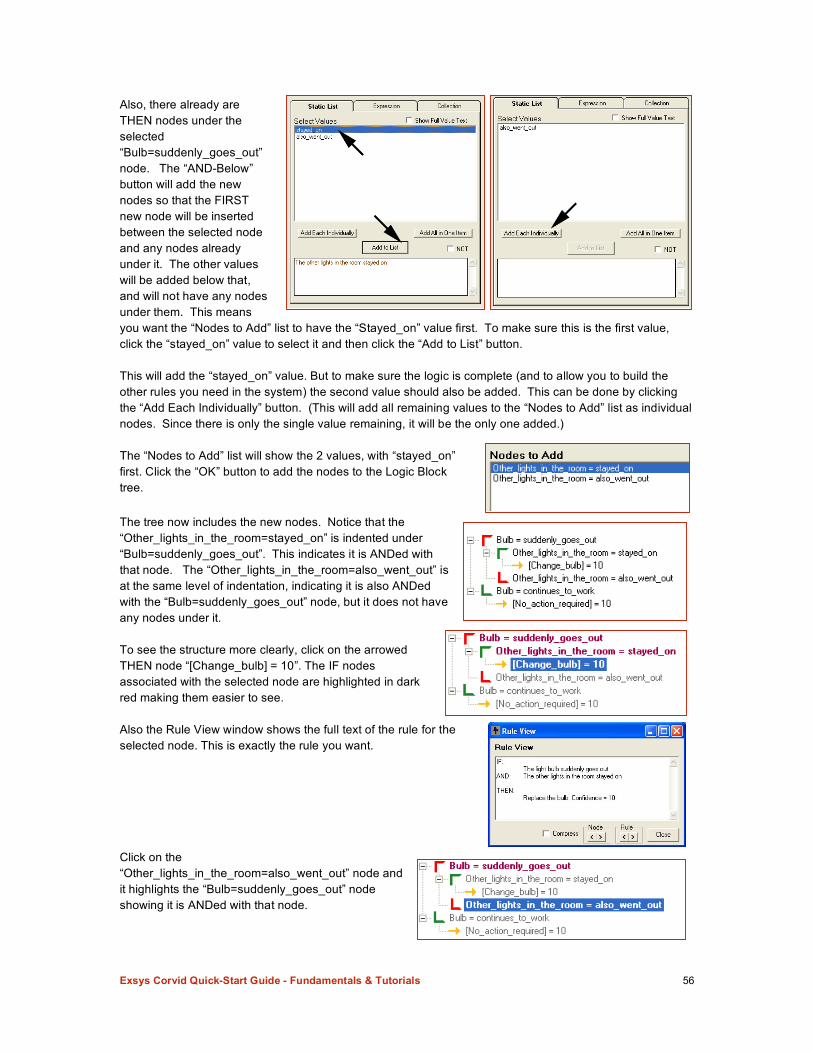
Exsys Corvid Quick-Start Guide - Fundamentals & Tutorials 56
Also, there already are THEN nodes under the selected “Bulb=suddenly_goes_out” node. The “AND-Below” button will add the new nodes so that the FIRST new node will be inserted between the selected node and any nodes already under it. The other values will be added below that, and will not have any nodes under them. This means you want the “Nodes to Add” list to have the “Stayed_on” value first. To make sure this is the first value, click the “stayed_on” value to select it and then click the “Add to List” button. This will add the “stayed_on” value. But to make sure the logic is complete (and to allow you to build the other rules you need in the system) the second value should also be added. This can be done by clicking the “Add Each Individually” button. (This will add all remaining values to the “Nodes to Add” list as individual nodes. Since there is only the single value remaining, it will be the only one added.) The “Nodes to Add” list will show the 2 values, with “stayed_on” first. Click the “OK” button to add the nodes to the Logic Block tree. The tree now includes the new nodes. Notice that the “Other_lights_in_the_room=stayed_on” is indented under “Bulb=suddenly_goes_out”. This indicates it is ANDed with that node. The “Other_lights_in_the_room=also_went_out” is at the same level of indentation, indicating it is also ANDed with the “Bulb=suddenly_goes_out” node, but it does not have any nodes under it. To see the structure more clearly, click on the arrowed THEN node “[Change_bulb] = 10”. The IF nodes associated with the selected node are highlighted in dark red making them easier to see. Also the Rule View window shows the full text of the rule for the selected node. This is exactly the rule you want. Click on the “Other_lights_in_the_room=also_went_out” node and it highlights the “Bulb=suddenly_goes_out” node showing it is ANDed with that node.
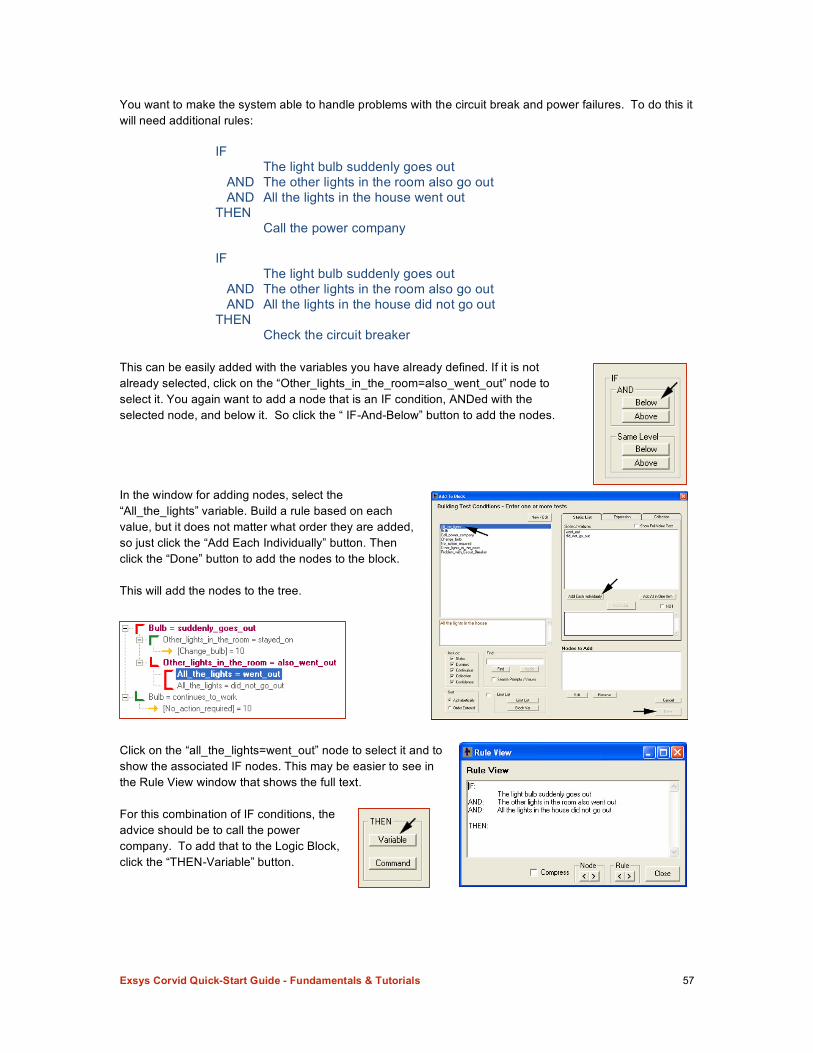
Exsys Corvid Quick-Start Guide - Fundamentals & Tutorials 57
You want to make the system able to handle problems with the circuit break and power failures. To do this it will need additional rules:
IF The light bulb suddenly goes out AND The other lights in the room also go out AND All the lights in the house went out THEN Call the power company IF The light bulb suddenly goes out AND The other lights in the room also go out AND All the lights in the house did not go out THEN Check the circuit breaker
This can be easily added with the variables you have already defined. If it is not already selected, click on the “Other_lights_in_the_room=also_went_out” node to select it. You again want to add a node that is an IF condition, ANDed with the selected node, and below it. So click the “ IF-And-Below” button to add the nodes. In the window for adding nodes, select the “All_the_lights” variable. Build a rule based on each value, but it does not matter what order they are added, so just click the “Add Each Individually” button. Then click the “Done” button to add the nodes to the block. This will add the nodes to the tree.
Click on the “all_the_lights=went_out” node to select it and to show the associated IF nodes. This may be easier to see in the Rule View window that shows the full text. For this combination of IF conditions, the advice should be to call the power company. To add that to the Logic Block, click the “THEN-Variable” button.
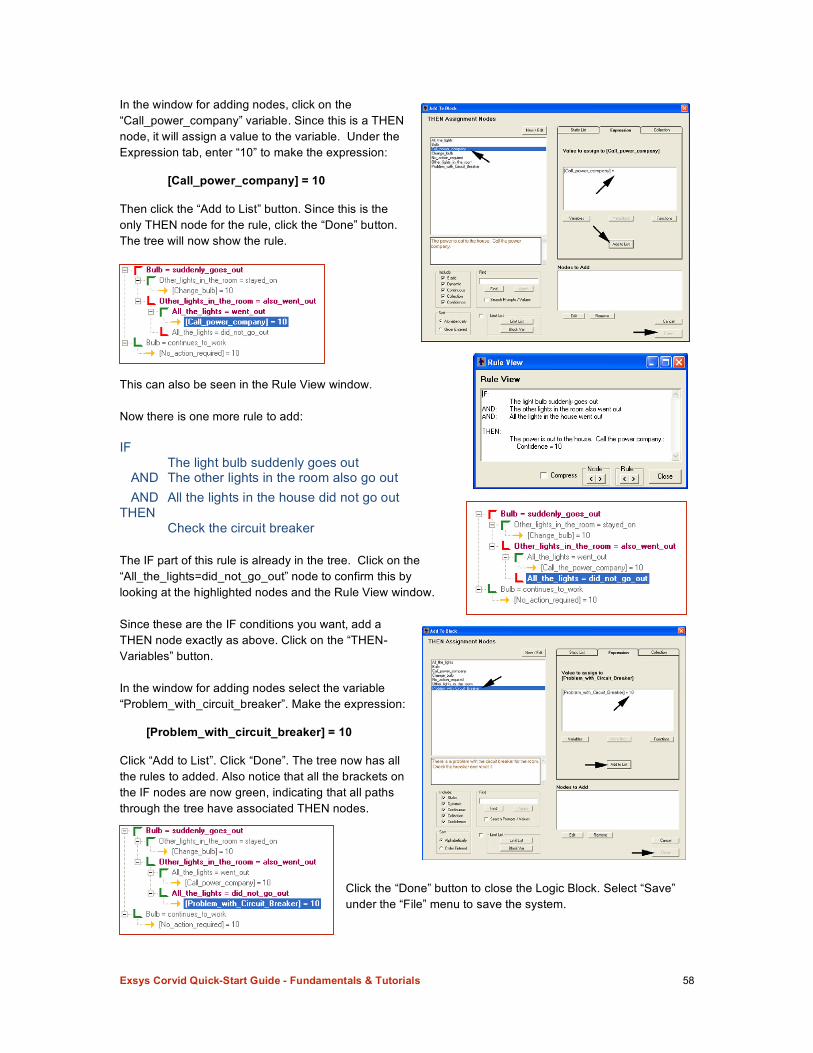
Exsys Corvid Quick-Start Guide - Fundamentals & Tutorials 58
In the window for adding nodes, click on the “Call_power_company” variable. Since this is a THEN node, it will assign a value to the variable. Under the Expression tab, enter “10” to make the expression:
[Call_power_company] = 10 Then click the “Add to List” button. Since this is the only THEN node for the rule, click the “Done” button. The tree will now show the rule.
This can also be seen in the Rule View window. Now there is one more rule to add: IF The light bulb suddenly goes out AND The other lights in the room also go out AND All the lights in the house did not go out THEN Check the circuit breaker The IF part of this rule is already in the tree. Click on the “All_the_lights=did_not_go_out” node to confirm this by looking at the highlighted nodes and the Rule View window. Since these are the IF conditions you want, add a THEN node exactly as above. Click on the “THEN-Variables” button. In the window for adding nodes select the variable “Problem_with_circuit_breaker”. Make the expression: [Problem_with_circuit_breaker] = 10 Click “Add to List”. Click “Done”. The tree now has all the rules to added. Also notice that all the brackets on the IF nodes are now green, indicating that all paths through the tree have associated THEN nodes.
Click the “Done” button to close the Logic Block. Select “Save” under the “File” menu to save the system.

Exsys Corvid Quick-Start Guide - Fundamentals & Tutorials 59
Now run the system by clicking on the blue Run icon on the command bar. Input various combinations of symptoms and the system will give advice consistent with that input.
Backward Chaining You will now use the system to explore Backward Chaining and how it can make systems easier to build and maintain. Backward chaining is a “Goal Driven” way to use the rules. In Corvid, a “Goal” is defined as a variable that the system is trying to set the value for. The Corvid Inference Engine looks through the rules to see if there are any that could provide an answer for the Goal variable – the Goal variable is assigned a value in the THEN part of the rule. If such a rule is found, the IF conditions are checked. If the system has enough information to be able to determine that the IF conditions are TRUE, the rule is used and the THEN part adds some information about the Goal variable. The Inference Engine then continues on, looking for other rules that would add additional information on the Goal variable. What makes Backward Chaining so powerful is that if while trying to set the value for the Goal variable, there is another variable whose value is needed, that variable temporarily becomes the “Goal”, superseding the original Goal. The process then starts over to set the value for the new Goal. Once the value of that variable is set, it stops being the active Goal and the original Goal again becomes active. However, while trying to set the new Goal, another variable may be needed and temporarily becomes the active Goal. While running in Backward Chaining, the active Goal can change many times. One of the major benefits of Backward Chaining is that since the system will go and find rules that tell it “what it needs, when it needs it”, the order of the rules is generally not important. Also, unlike traditional programming, rules are not explicitly linked to each other – instead the linkages are dynamic and based on what the system needs to know. This makes it practical to build small groups of rules that set the values of variables that may be used in many places in the system. Breaking the system up this way makes it easier to build and maintain. Actually, the system is already being run in Backward Chaining. The Command Block command used to start the system was DERIVE CONF. All of the DERIVE commands set the top level Goal for backward chaining and then tests the rules to see how the value for the Goal variable can be set. The DERIVE CONF command sequentially makes each of the Confidence variables in the system the top level Goal. Once the value is set for the first Confidence variable, the next one is made the top level goal, etc. To illustrate how Backward Chaining can be used to derive a value that is needed, you will add a rule to derive the value for a variable that will be the temporary Goal. Run the system and answer the questions.
The light bulb suddenly goes out The other lights in the room also went out
The next question that the system asks is if all the lights in the house went out. You will give the system a way to derive the value for this variable from another rule. Assume that you normally have a radio in another room, and can hear it. If the power goes out in that room, the radio will stop. Add a rule that says: IF
The radio can still be heard THEN
All the lights in the house did not go out
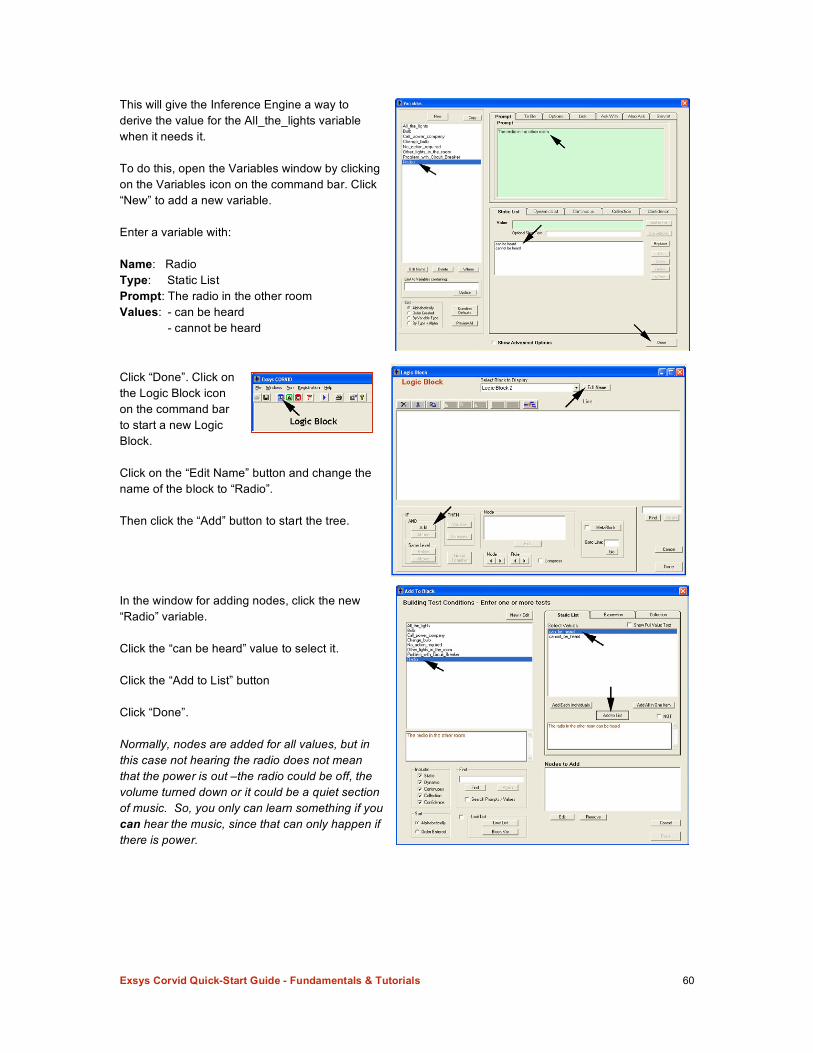
Exsys Corvid Quick-Start Guide - Fundamentals & Tutorials 60
This will give the Inference Engine a way to derive the value for the All_the_lights variable when it needs it. To do this, open the Variables window by clicking on the Variables icon on the command bar. Click “New” to add a new variable. Enter a variable with: Name: Radio Type: Static List Prompt: The radio in the other room Values: - can be heard - cannot be heard Click “Done”. Click on the Logic Block icon on the command bar to start a new Logic Block. Click on the “Edit Name” button and change the name of the block to “Radio”. Then click the “Add” button to start the tree. In the window for adding nodes, click the new “Radio” variable. Click the “can be heard” value to select it. Click the “Add to List” button Click “Done”. Normally, nodes are added for all values, but in this case not hearing the radio does not mean that the power is out –the radio could be off, the volume turned down or it could be a quiet section of music. So, you only can learn something if you can hear the music, since that can only happen if there is power.
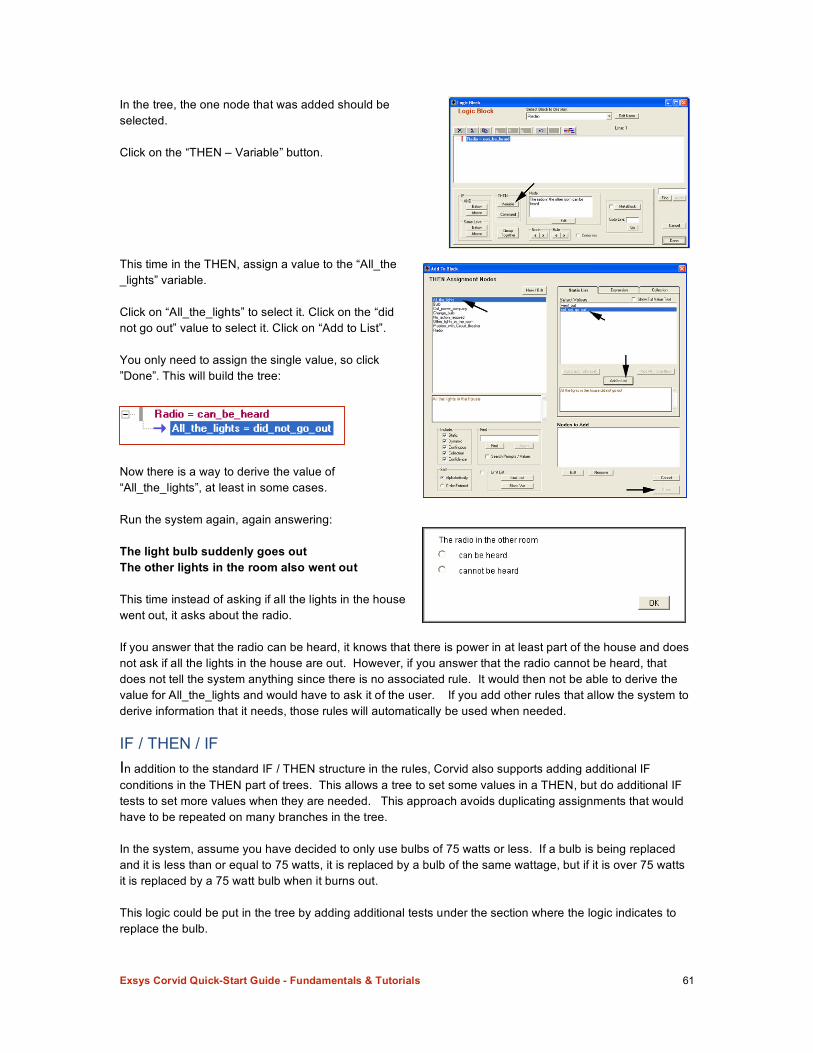
Exsys Corvid Quick-Start Guide - Fundamentals & Tutorials 61
In the tree, the one node that was added should be selected. Click on the “THEN – Variable” button. This time in the THEN, assign a value to the “All_the _lights” variable. Click on “All_the_lights” to select it. Click on the “did not go out” value to select it. Click on “Add to List”. You only need to assign the single value, so click ”Done”. This will build the tree:
Now there is a way to derive the value of “All_the_lights”, at least in some cases. Run the system again, again answering: The light bulb suddenly goes out The other lights in the room also went out This time instead of asking if all the lights in the house went out, it asks about the radio. If you answer that the radio can be heard, it knows that there is power in at least part of the house and does not ask if all the lights in the house are out. However, if you answer that the radio cannot be heard, that does not tell the system anything since there is no associated rule. It would then not be able to derive the value for All_the_lights and would have to ask it of the user. If you add other rules that allow the system to derive information that it needs, those rules will automatically be used when needed.
IF / THEN / IF In addition to the standard IF / THEN structure in the rules, Corvid also supports adding additional IF conditions in the THEN part of trees. This allows a tree to set some values in a THEN, but do additional IF tests to set more values when they are needed. This approach avoids duplicating assignments that would have to be repeated on many branches in the tree. In the system, assume you have decided to only use bulbs of 75 watts or less. If a bulb is being replaced and it is less than or equal to 75 watts, it is replaced by a bulb of the same wattage, but if it is over 75 watts it is replaced by a 75 watt bulb when it burns out. This logic could be put in the tree by adding additional tests under the section where the logic indicates to replace the bulb.
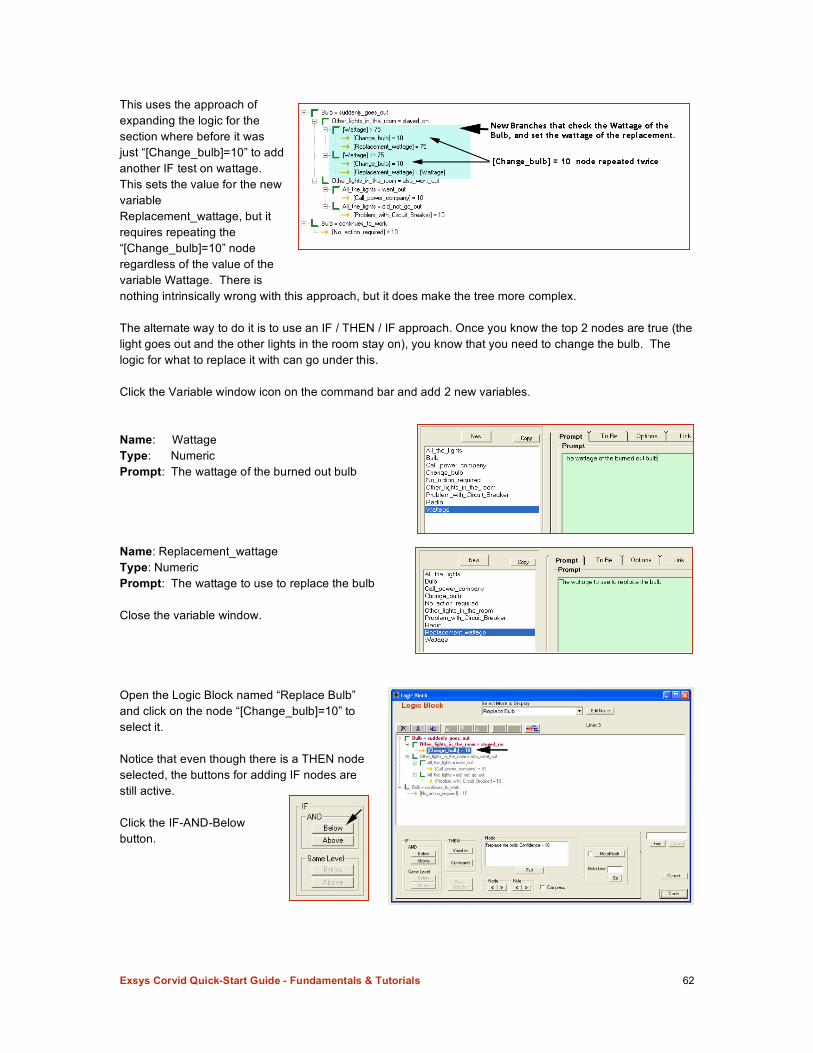
Exsys Corvid Quick-Start Guide - Fundamentals & Tutorials 62
This uses the approach of expanding the logic for the section where before it was just “[Change_bulb]=10” to add another IF test on wattage. This sets the value for the new variable Replacement_wattage, but it requires repeating the “[Change_bulb]=10” node regardless of the value of the variable Wattage. There is nothing intrinsically wrong with this approach, but it does make the tree more complex. The alternate way to do it is to use an IF / THEN / IF approach. Once you know the top 2 nodes are true (the light goes out and the other lights in the room stay on), you know that you need to change the bulb. The logic for what to replace it with can go under this. Click the Variable window icon on the command bar and add 2 new variables. Name: Wattage Type: Numeric Prompt: The wattage of the burned out bulb Name: Replacement_wattage Type: Numeric Prompt: The wattage to use to replace the bulb Close the variable window. Open the Logic Block named “Replace Bulb” and click on the node “[Change_bulb]=10” to select it. Notice that even though there is a THEN node selected, the buttons for adding IF nodes are still active. Click the IF-AND-Below button.
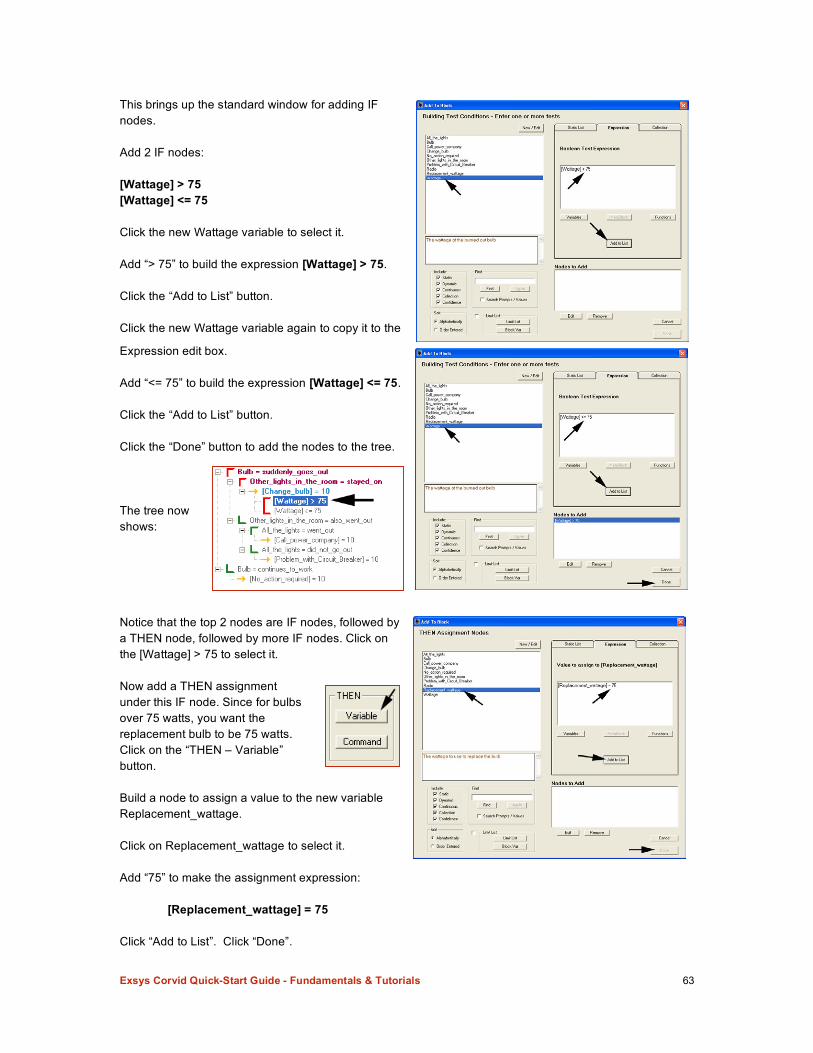
Exsys Corvid Quick-Start Guide - Fundamentals & Tutorials 63
This brings up the standard window for adding IF nodes. Add 2 IF nodes: [Wattage] > 75 [Wattage] <= 75
Click the new Wattage variable to select it. Add “> 75” to build the expression [Wattage] > 75. Click the “Add to List” button. Click the new Wattage variable again to copy it to the
Expression edit box. Add “<= 75” to build the expression [Wattage] <= 75. Click the “Add to List” button. Click the “Done” button to add the nodes to the tree. The tree now shows: Notice that the top 2 nodes are IF nodes, followed by a THEN node, followed by more IF nodes. Click on the [Wattage] > 75 to select it. Now add a THEN assignment under this IF node. Since for bulbs over 75 watts, you want the replacement bulb to be 75 watts. Click on the “THEN – Variable” button. Build a node to assign a value to the new variable Replacement_wattage. Click on Replacement_wattage to select it. Add “75” to make the assignment expression:
[Replacement_wattage] = 75 Click “Add to List”. Click “Done”.
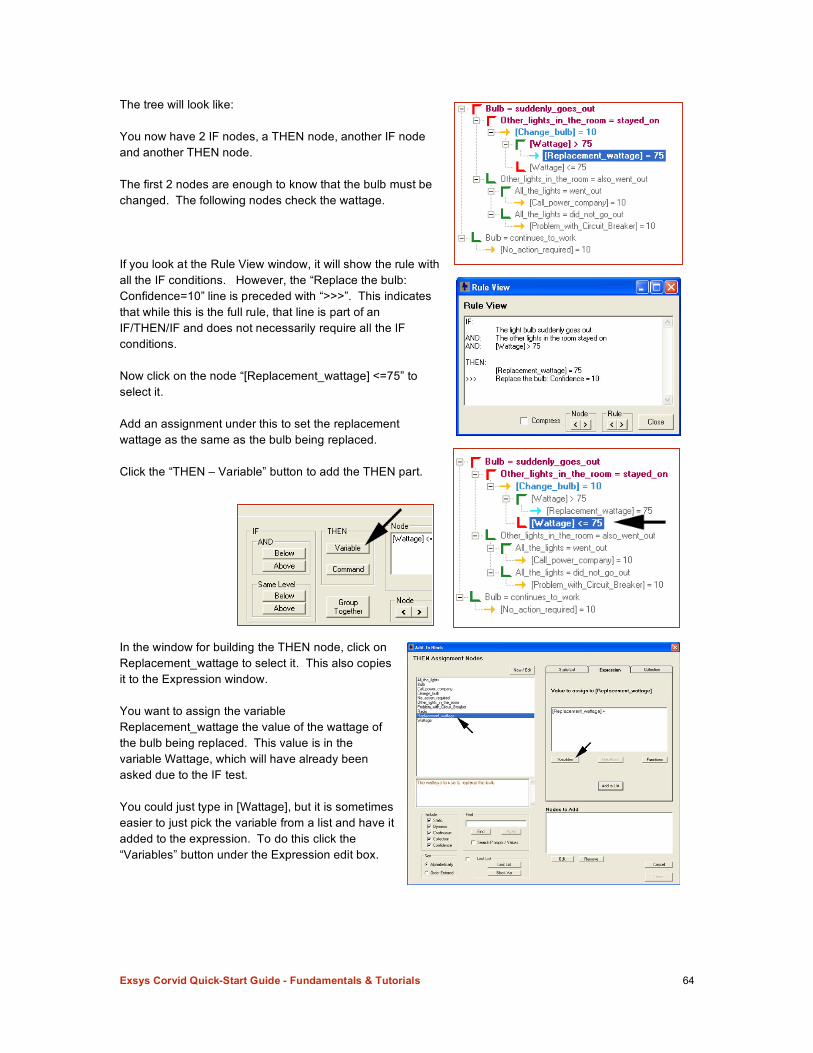
Exsys Corvid Quick-Start Guide - Fundamentals & Tutorials 64
The tree will look like: You now have 2 IF nodes, a THEN node, another IF node and another THEN node. The first 2 nodes are enough to know that the bulb must be changed. The following nodes check the wattage. If you look at the Rule View window, it will show the rule with all the IF conditions. However, the “Replace the bulb: Confidence=10” line is preceded with “>>>”. This indicates that while this is the full rule, that line is part of an IF/THEN/IF and does not necessarily require all the IF conditions. Now click on the node “[Replacement_wattage] <=75” to select it. Add an assignment under this to set the replacement wattage as the same as the bulb being replaced. Click the “THEN – Variable” button to add the THEN part. In the window for building the THEN node, click on Replacement_wattage to select it. This also copies it to the Expression window. You want to assign the variable Replacement_wattage the value of the wattage of the bulb being replaced. This value is in the variable Wattage, which will have already been asked due to the IF test. You could just type in [Wattage], but it is sometimes easier to just pick the variable from a list and have it added to the expression. To do this click the “Variables” button under the Expression edit box.
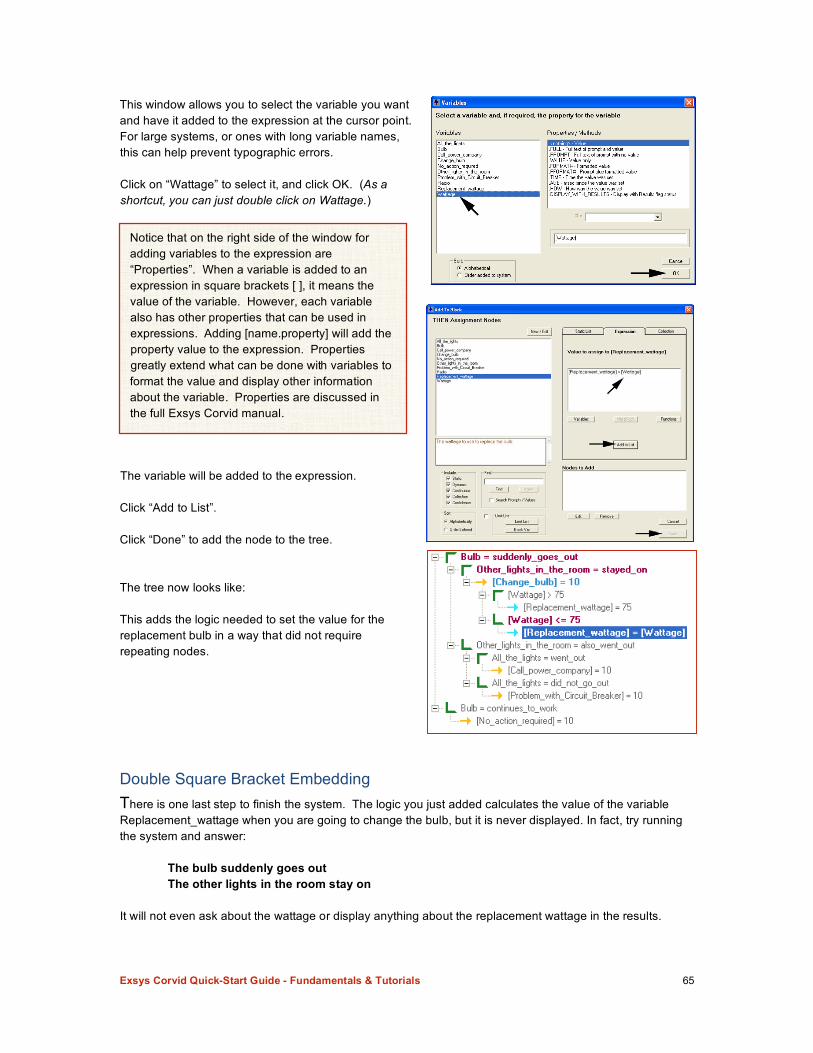
Exsys Corvid Quick-Start Guide - Fundamentals & Tutorials 65
This window allows you to select the variable you want and have it added to the expression at the cursor point. For large systems, or ones with long variable names, this can help prevent typographic errors.
Click on “Wattage” to select it, and click OK. (As a shortcut, you can just double click on Wattage.)
The variable will be added to the expression.
Click “Add to List”.
Click “Done” to add the node to the tree.
The tree now looks like:
This adds the logic needed to set the value for the replacement bulb in a way that did not require repeating nodes.
Double Square Bracket Embedding There is one last step to finish the system. The logic you just added calculates the value of the variable Replacement_wattage when you are going to change the bulb, but it is never displayed. In fact, try running the system and answer:
The bulb suddenly goes out The other lights in the room stay on
It will not even ask about the wattage or display anything about the replacement wattage in the results.
Notice that on the right side of the window for adding variables to the expression are “Properties”. When a variable is added to anexpression in square brackets [ ], it means the value of the variable. However, each variable also has other properties that can be used in expressions. Adding [name.property] will add the property value to the expression. Properties greatly extend what can be done with variables to format the value and display other information about the variable. Properties are discussed in the full Exsys Corvid manual.
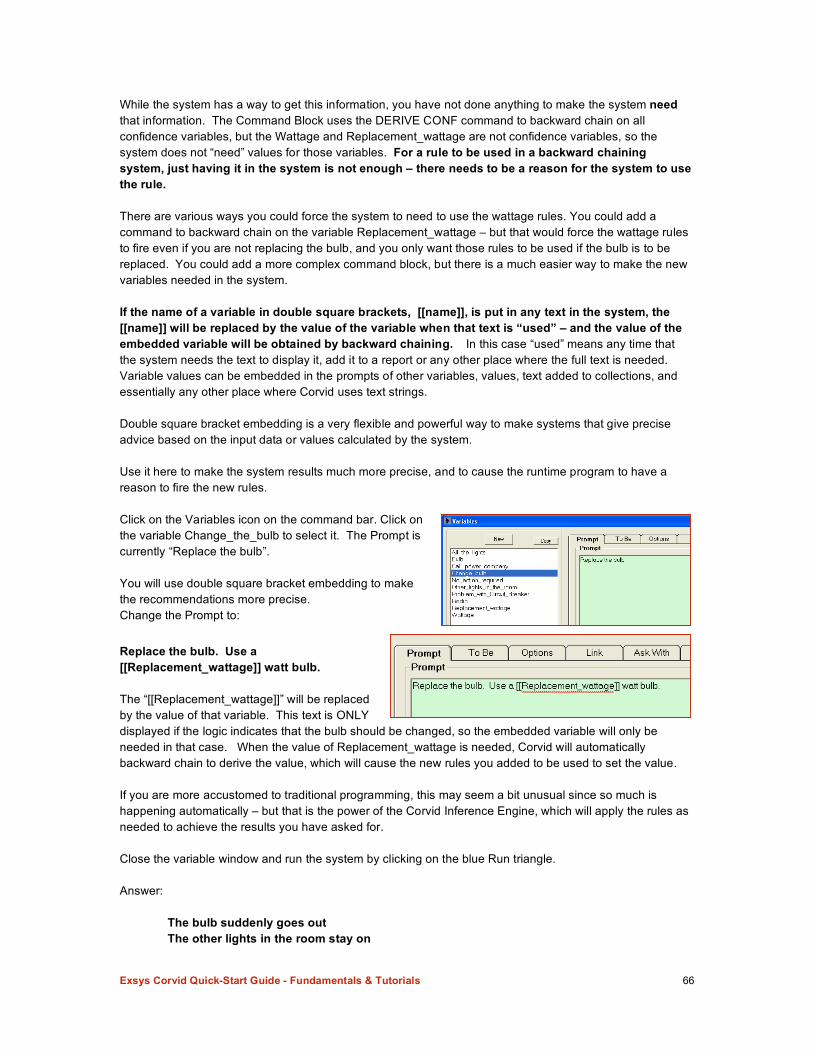
Exsys Corvid Quick-Start Guide - Fundamentals & Tutorials 66
While the system has a way to get this information, you have not done anything to make the system need that information. The Command Block uses the DERIVE CONF command to backward chain on all confidence variables, but the Wattage and Replacement_wattage are not confidence variables, so the system does not “need” values for those variables. For a rule to be used in a backward chaining system, just having it in the system is not enough – there needs to be a reason for the system to use the rule. There are various ways you could force the system to need to use the wattage rules. You could add a command to backward chain on the variable Replacement_wattage – but that would force the wattage rules to fire even if you are not replacing the bulb, and you only want those rules to be used if the bulb is to be replaced. You could add a more complex command block, but there is a much easier way to make the new variables needed in the system. If the name of a variable in double square brackets, [[name]], is put in any text in the system, the [[name]] will be replaced by the value of the variable when that text is “used” – and the value of the embedded variable will be obtained by backward chaining. In this case “used” means any time that the system needs the text to display it, add it to a report or any other place where the full text is needed. Variable values can be embedded in the prompts of other variables, values, text added to collections, and essentially any other place where Corvid uses text strings. Double square bracket embedding is a very flexible and powerful way to make systems that give precise advice based on the input data or values calculated by the system. Use it here to make the system results much more precise, and to cause the runtime program to have a reason to fire the new rules. Click on the Variables icon on the command bar. Click on the variable Change_the_bulb to select it. The Prompt is currently “Replace the bulb”. You will use double square bracket embedding to make the recommendations more precise. Change the Prompt to:
Replace the bulb. Use a [[Replacement_wattage]] watt bulb. The “[[Replacement_wattage]]” will be replaced by the value of that variable. This text is ONLY displayed if the logic indicates that the bulb should be changed, so the embedded variable will only be needed in that case. When the value of Replacement_wattage is needed, Corvid will automatically backward chain to derive the value, which will cause the new rules you added to be used to set the value. If you are more accustomed to traditional programming, this may seem a bit unusual since so much is happening automatically – but that is the power of the Corvid Inference Engine, which will apply the rules as needed to achieve the results you have asked for. Close the variable window and run the system by clicking on the blue Run triangle. Answer:
The bulb suddenly goes out The other lights in the room stay on

Exsys Corvid Quick-Start Guide - Fundamentals & Tutorials 67
Now you will be asked about the wattage of the bulb being replaced. Enter a value of 60. The results will be displayed: Notice that the value you input for Wattage was assigned to the variable Replacement_wattage by the rules, and that value was embedded into the recommendations. The only problems are:
The value for Replacement_wattage is shown as “60.0”, which is unnecessarily precise for light bulbs. It would be better to have it be an integer value, such as “60”.
The “Conf=10” might be confusing to system users since it was only used as a flag to select
variables, and has no actual meaning. Both of these issues can be easily fixed. You can format the embedded value by using a property of the variable. Instead of embedding the value with the default format using [[name]], you can use [[name.property]] to format the value or provide other information about the variable. Open the variable window and click Change_bulb to select it. In the Prompt text change: [[Replacement_wattage]]
to [[Replacement_wattage.Format #]] (Be sure to put only a period between “Replacement_wattage” and “Format”, and a space between “Format” and the “#”.) The Format property provides a way to format the value in various ways, including controlling the number of characters right of the decimal point. The “#” means just show the integer value. (For details on all of the options for the Format and other properties, see the full Corvid manual.) Now run the system again with the same input as above. This time the results look like:
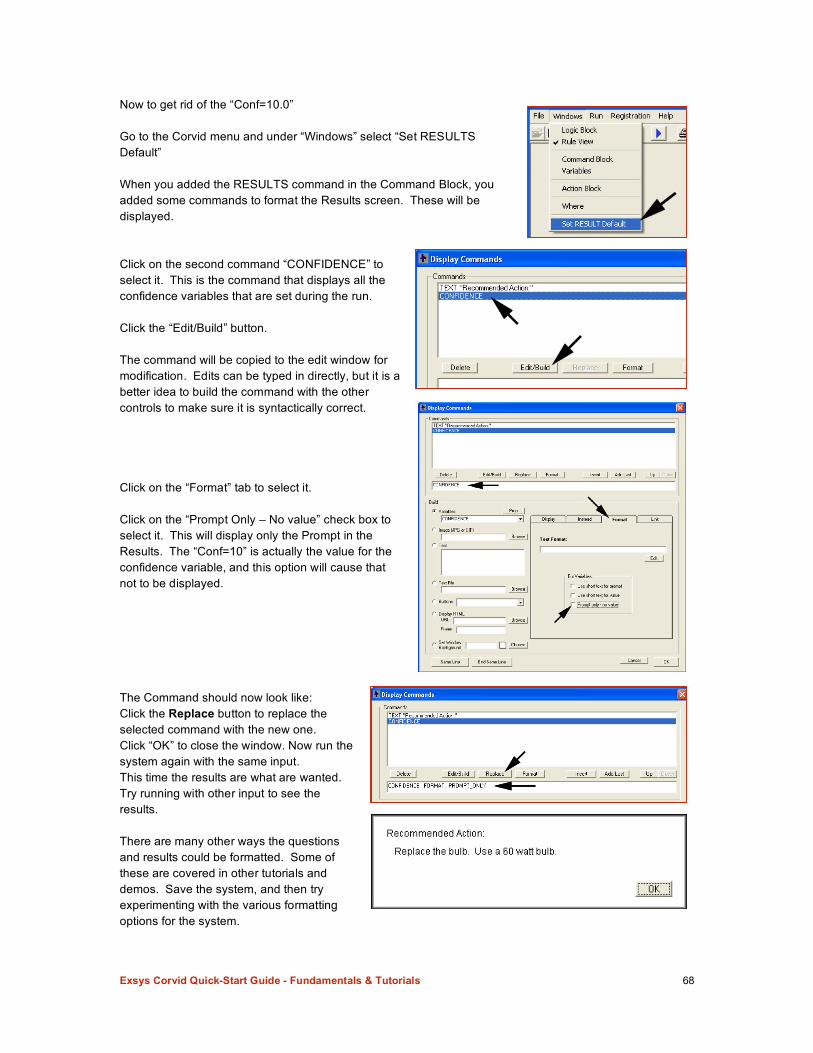
Exsys Corvid Quick-Start Guide - Fundamentals & Tutorials 68
Now to get rid of the “Conf=10.0” Go to the Corvid menu and under “Windows” select “Set RESULTS Default” When you added the RESULTS command in the Command Block, you added some commands to format the Results screen. These will be displayed. Click on the second command “CONFIDENCE” to select it. This is the command that displays all the confidence variables that are set during the run. Click the “Edit/Build” button. The command will be copied to the edit window for modification. Edits can be typed in directly, but it is a better idea to build the command with the other controls to make sure it is syntactically correct. Click on the “Format” tab to select it. Click on the “Prompt Only – No value” check box to select it. This will display only the Prompt in the Results. The “Conf=10” is actually the value for the confidence variable, and this option will cause that not to be displayed. The Command should now look like: Click the Replace button to replace the selected command with the new one. Click “OK” to close the window. Now run the system again with the same input. This time the results are what are wanted. Try running with other input to see the results. There are many other ways the questions and results could be formatted. Some of these are covered in other tutorials and demos. Save the system, and then try experimenting with the various formatting options for the system.
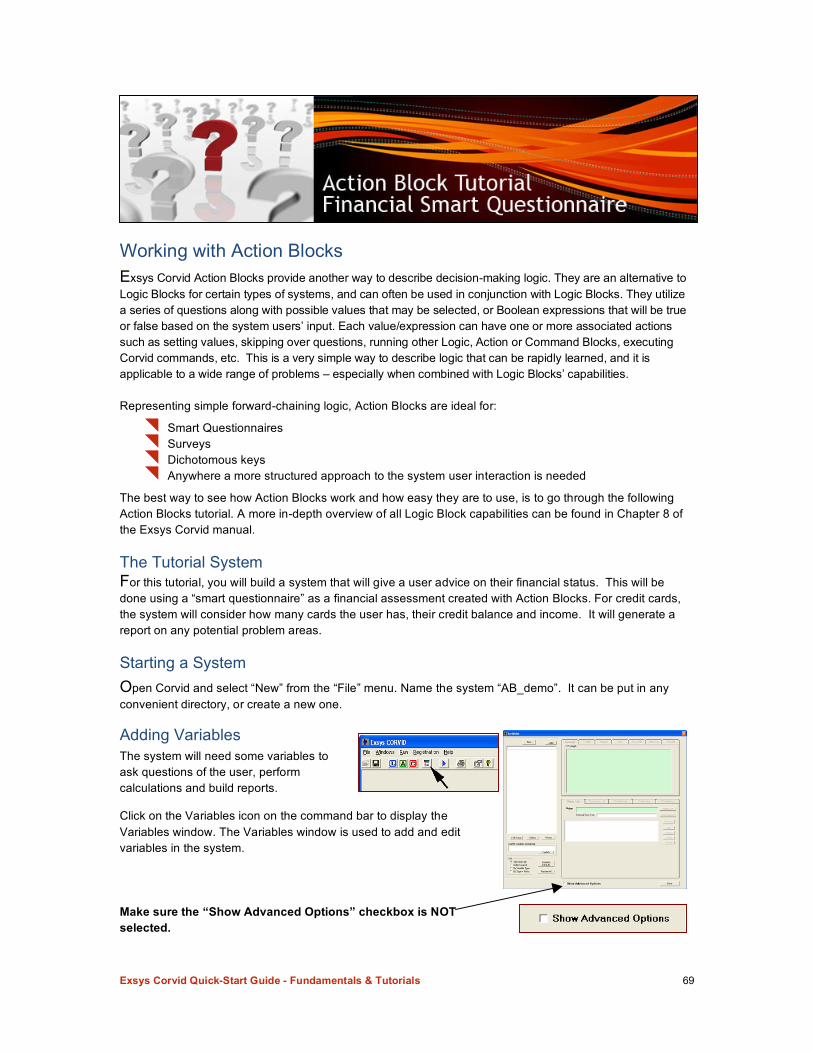
Exsys Corvid Quick-Start Guide - Fundamentals & Tutorials 69
Working with Action Blocks Exsys Corvid Action Blocks provide another way to describe decision-making logic. They are an alternative to Logic Blocks for certain types of systems, and can often be used in conjunction with Logic Blocks. They utilize a series of questions along with possible values that may be selected, or Boolean expressions that will be true or false based on the system users’ input. Each value/expression can have one or more associated actions such as setting values, skipping over questions, running other Logic, Action or Command Blocks, executing Corvid commands, etc. This is a very simple way to describe logic that can be rapidly learned, and it is applicable to a wide range of problems – especially when combined with Logic Blocks’ capabilities. Representing simple forward-chaining logic, Action Blocks are ideal for:
Smart Questionnaires Surveys Dichotomous keys Anywhere a more structured approach to the system user interaction is needed
The best way to see how Action Blocks work and how easy they are to use, is to go through the following Action Blocks tutorial. A more in-depth overview of all Logic Block capabilities can be found in Chapter 8 of the Exsys Corvid manual.
The Tutorial System For this tutorial, you will build a system that will give a user advice on their financial status. This will be done using a “smart questionnaire” as a financial assessment created with Action Blocks. For credit cards, the system will consider how many cards the user has, their credit balance and income. It will generate a report on any potential problem areas. Starting a System Open Corvid and select “New” from the “File” menu. Name the system “AB_demo”. It can be put in any convenient directory, or create a new one.
Adding Variables The system will need some variables to ask questions of the user, perform calculations and build reports.
Click on the Variables icon on the command bar to display the Variables window. The Variables window is used to add and edit variables in the system. Make sure the “Show Advanced Options” checkbox is NOT selected.
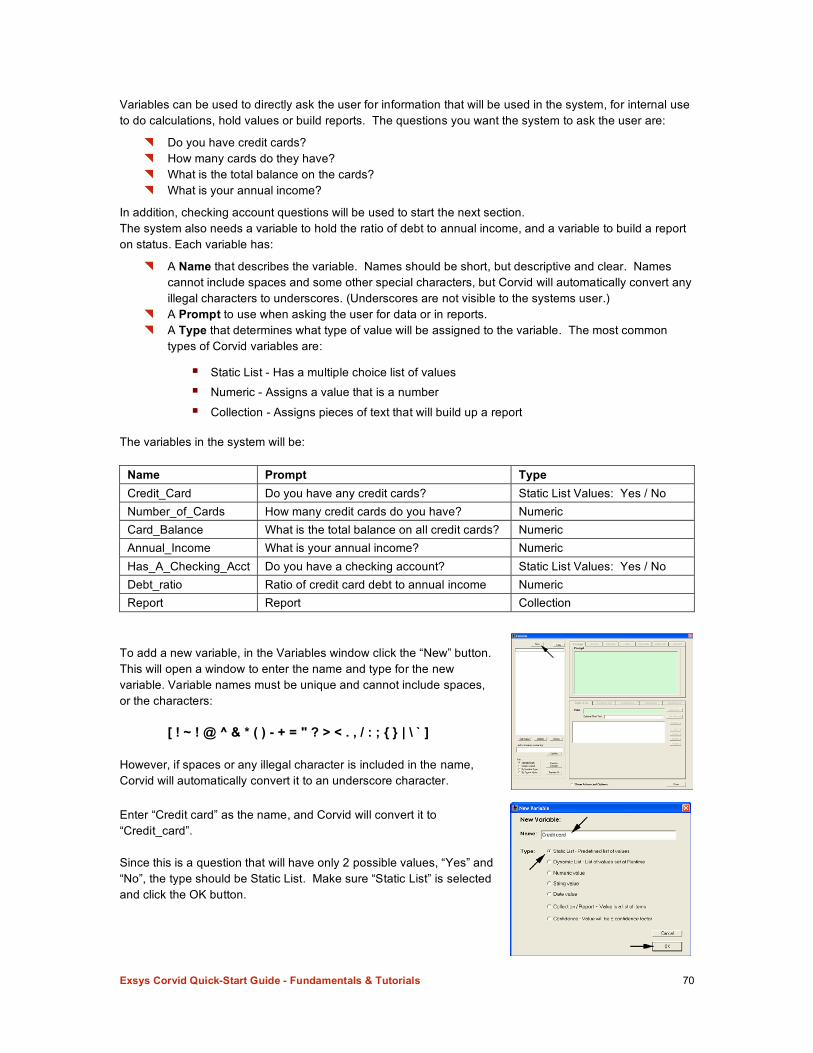
Exsys Corvid Quick-Start Guide - Fundamentals & Tutorials 70
Variables can be used to directly ask the user for information that will be used in the system, for internal use to do calculations, hold values or build reports. The questions you want the system to ask the user are:
Do you have credit cards? How many cards do they have? What is the total balance on the cards? What is your annual income?
In addition, checking account questions will be used to start the next section. The system also needs a variable to hold the ratio of debt to annual income, and a variable to build a report on status. Each variable has:
A Name that describes the variable. Names should be short, but descriptive and clear. Names cannot include spaces and some other special characters, but Corvid will automatically convert any illegal characters to underscores. (Underscores are not visible to the systems user.)
A Prompt to use when asking the user for data or in reports. A Type that determines what type of value will be assigned to the variable. The most common
types of Corvid variables are:
Static List - Has a multiple choice list of values
Numeric - Assigns a value that is a number
Collection - Assigns pieces of text that will build up a report The variables in the system will be:
Name Prompt Type Credit_Card Do you have any credit cards? Static List Values: Yes / No Number_of_Cards How many credit cards do you have? Numeric Card_Balance What is the total balance on all credit cards? Numeric Annual_Income What is your annual income? Numeric Has_A_Checking_Acct Do you have a checking account? Static List Values: Yes / No Debt_ratio Ratio of credit card debt to annual income Numeric Report Report Collection
To add a new variable, in the Variables window click the “New” button. This will open a window to enter the name and type for the new variable. Variable names must be unique and cannot include spaces, or the characters: [ ! ~ ! @ ^ & * ( ) - + = " ? > < . , / : ; { } | \ ` ] However, if spaces or any illegal character is included in the name, Corvid will automatically convert it to an underscore character. Enter “Credit card” as the name, and Corvid will convert it to “Credit_card”. Since this is a question that will have only 2 possible values, “Yes” and “No”, the type should be Static List. Make sure “Static List” is selected and click the OK button.
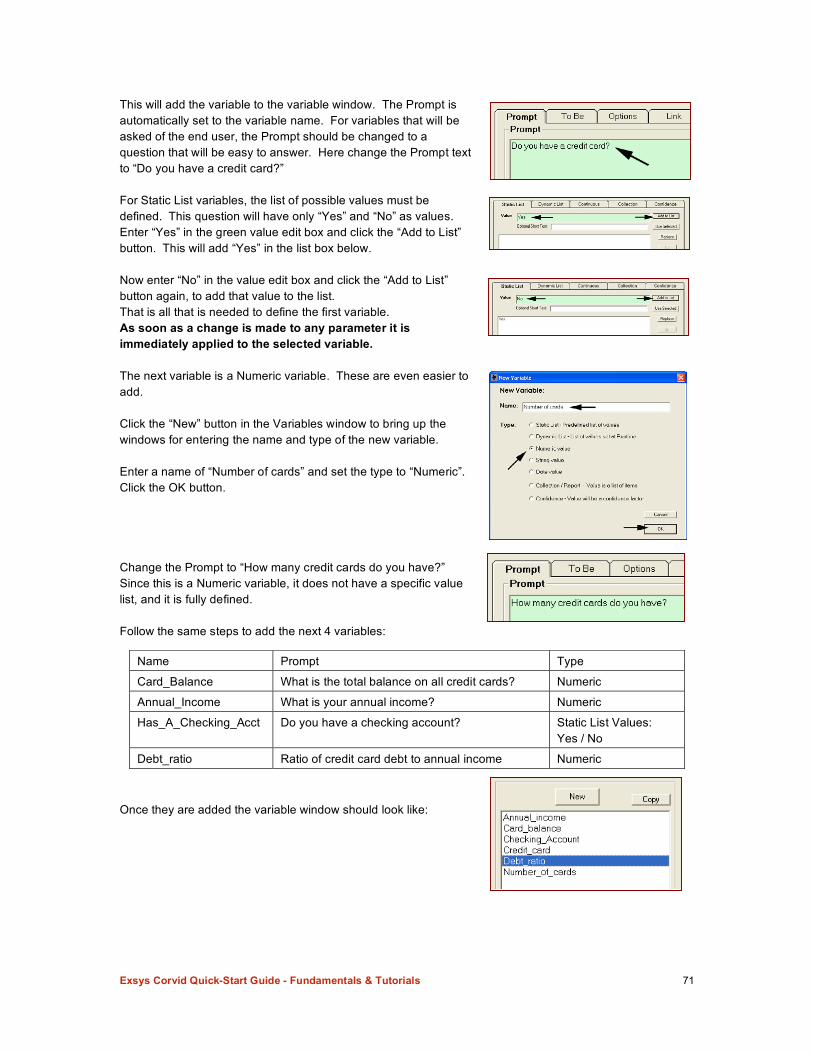
Exsys Corvid Quick-Start Guide - Fundamentals & Tutorials 71
This will add the variable to the variable window. The Prompt is automatically set to the variable name. For variables that will be asked of the end user, the Prompt should be changed to a question that will be easy to answer. Here change the Prompt text to “Do you have a credit card?”
For Static List variables, the list of possible values must be defined. This question will have only “Yes” and “No” as values. Enter “Yes” in the green value edit box and click the “Add to List” button. This will add “Yes” in the list box below. Now enter “No” in the value edit box and click the “Add to List” button again, to add that value to the list. That is all that is needed to define the first variable. As soon as a change is made to any parameter it is immediately applied to the selected variable. The next variable is a Numeric variable. These are even easier to add. Click the “New” button in the Variables window to bring up the windows for entering the name and type of the new variable. Enter a name of “Number of cards” and set the type to “Numeric”. Click the OK button. Change the Prompt to “How many credit cards do you have?” Since this is a Numeric variable, it does not have a specific value list, and it is fully defined. Follow the same steps to add the next 4 variables:
Once they are added the variable window should look like:
Name Prompt Type
Card_Balance What is the total balance on all credit cards? Numeric
Annual_Income What is your annual income? Numeric
Has_A_Checking_Acct Do you have a checking account? Static List Values: Yes / No
Debt_ratio Ratio of credit card debt to annual income Numeric
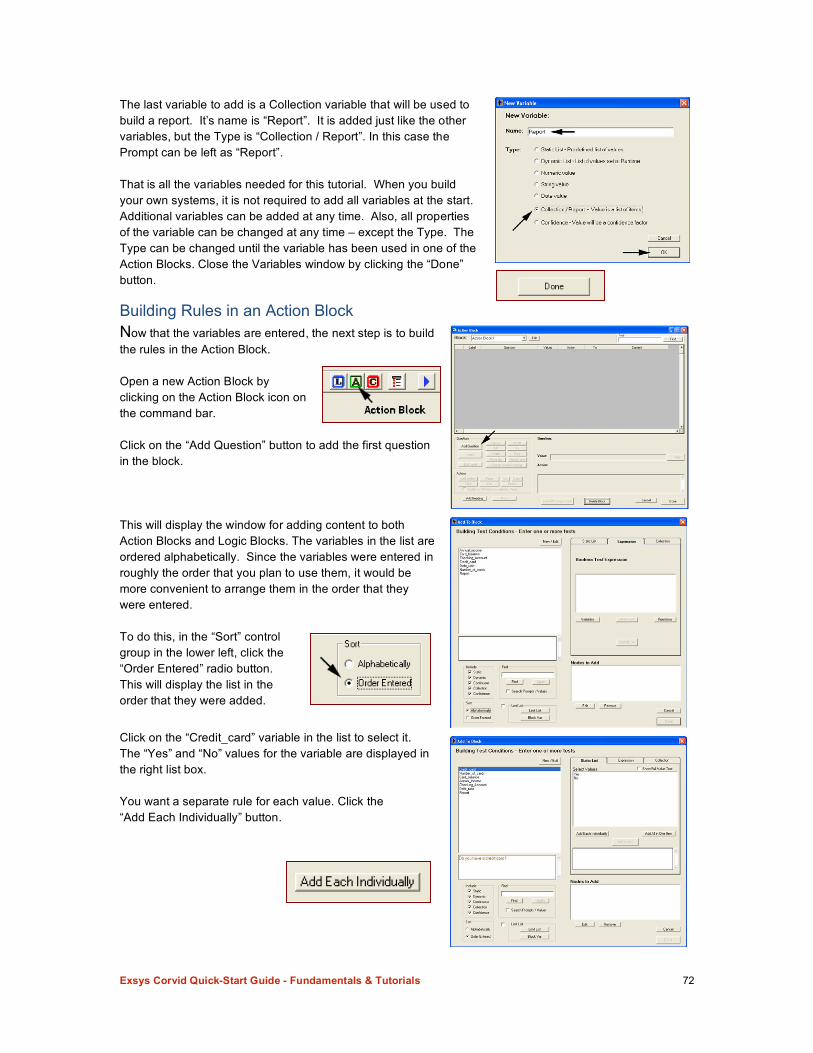
Exsys Corvid Quick-Start Guide - Fundamentals & Tutorials 72
The last variable to add is a Collection variable that will be used to build a report. It’s name is “Report”. It is added just like the other variables, but the Type is “Collection / Report”. In this case the Prompt can be left as “Report”. That is all the variables needed for this tutorial. When you build your own systems, it is not required to add all variables at the start. Additional variables can be added at any time. Also, all properties of the variable can be changed at any time – except the Type. The Type can be changed until the variable has been used in one of the Action Blocks. Close the Variables window by clicking the “Done” button. Building Rules in an Action Block Now that the variables are entered, the next step is to build the rules in the Action Block. Open a new Action Block by clicking on the Action Block icon on the command bar. Click on the “Add Question” button to add the first question in the block. This will display the window for adding content to both Action Blocks and Logic Blocks. The variables in the list are ordered alphabetically. Since the variables were entered in roughly the order that you plan to use them, it would be more convenient to arrange them in the order that they were entered. To do this, in the “Sort” control group in the lower left, click the “Order Entered” radio button. This will display the list in the order that they were added.
Click on the “Credit_card” variable in the list to select it. The “Yes” and “No” values for the variable are displayed in the right list box. You want a separate rule for each value. Click the “Add Each Individually” button.
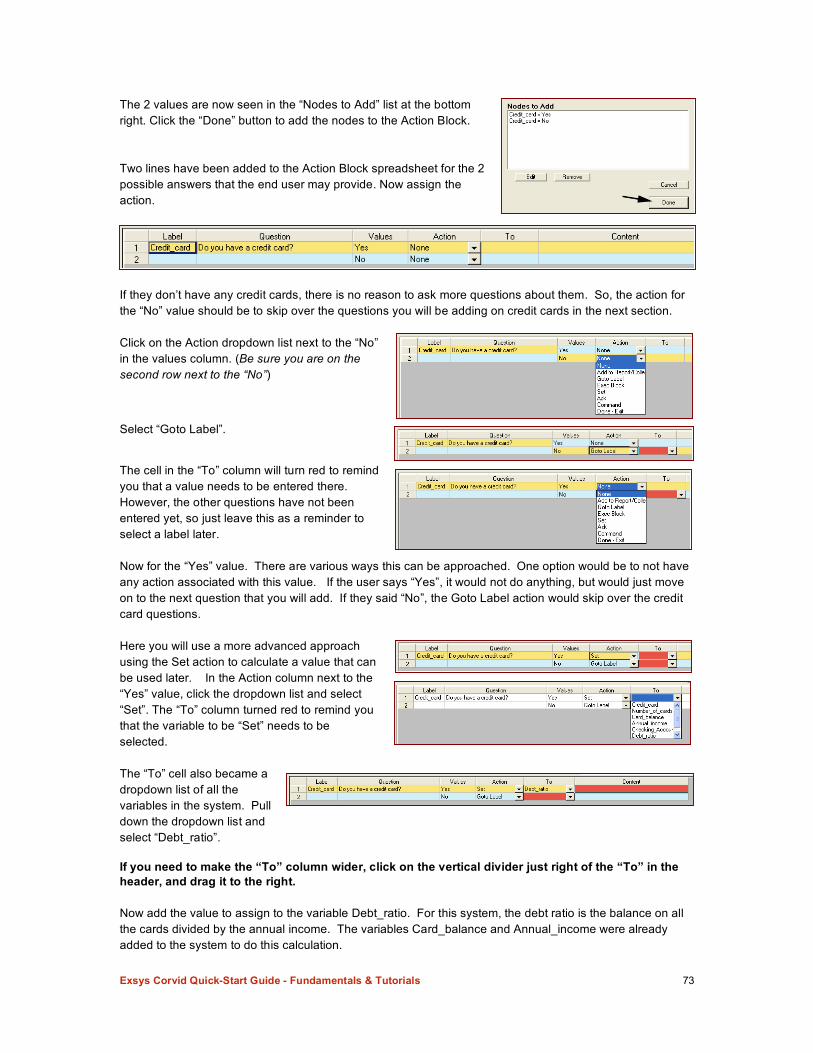
Exsys Corvid Quick-Start Guide - Fundamentals & Tutorials 73
The 2 values are now seen in the “Nodes to Add” list at the bottom right. Click the “Done” button to add the nodes to the Action Block. Two lines have been added to the Action Block spreadsheet for the 2 possible answers that the end user may provide. Now assign the action.
If they don’t have any credit cards, there is no reason to ask more questions about them. So, the action for the “No” value should be to skip over the questions you will be adding on credit cards in the next section. Click on the Action dropdown list next to the “No” in the values column. (Be sure you are on the second row next to the “No”)
Select “Goto Label”.
The cell in the “To” column will turn red to remind you that a value needs to be entered there. However, the other questions have not been entered yet, so just leave this as a reminder to select a label later. Now for the “Yes” value. There are various ways this can be approached. One option would be to not have any action associated with this value. If the user says “Yes”, it would not do anything, but would just move on to the next question that you will add. If they said “No”, the Goto Label action would skip over the credit card questions. Here you will use a more advanced approach using the Set action to calculate a value that can be used later. In the Action column next to the “Yes” value, click the dropdown list and select “Set”. The “To” column turned red to remind you that the variable to be “Set” needs to be selected. The “To” cell also became a dropdown list of all the variables in the system. Pull down the dropdown list and select “Debt_ratio”.
If you need to make the “To” column wider, click on the vertical divider just right of the “To” in the header, and drag it to the right. Now add the value to assign to the variable Debt_ratio. For this system, the debt ratio is the balance on all the cards divided by the annual income. The variables Card_balance and Annual_income were already added to the system to do this calculation.
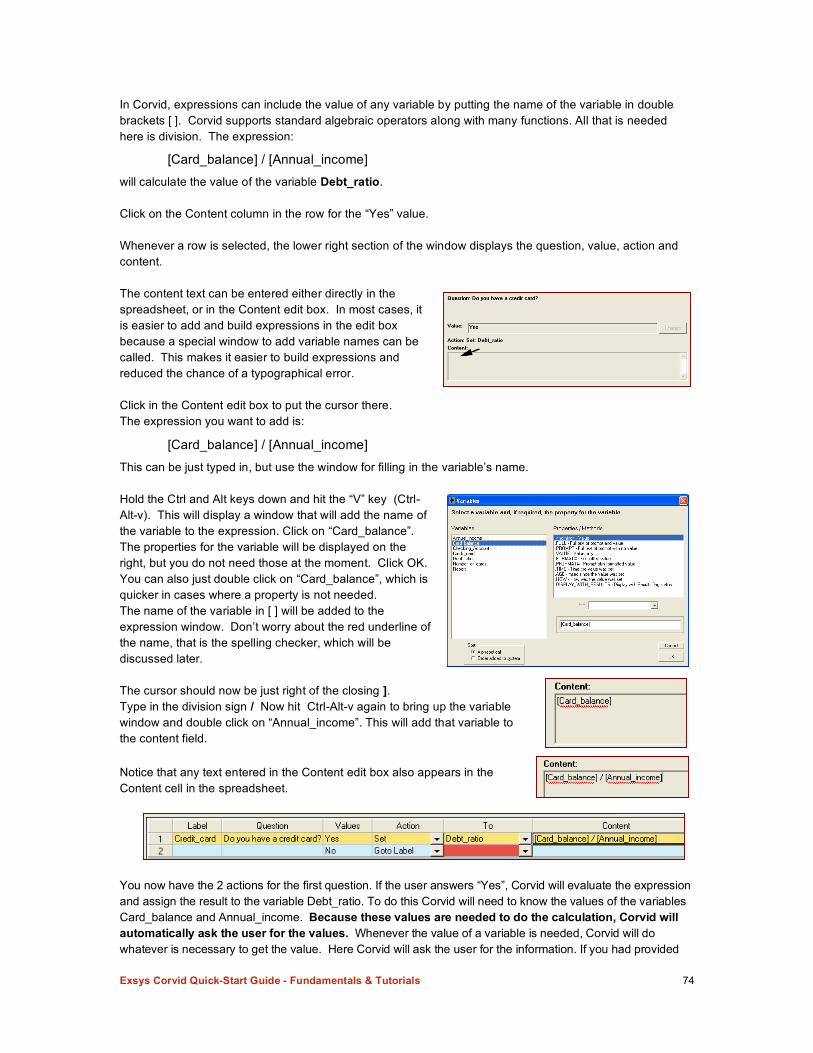
Exsys Corvid Quick-Start Guide - Fundamentals & Tutorials 74
In Corvid, expressions can include the value of any variable by putting the name of the variable in double brackets [ ]. Corvid supports standard algebraic operators along with many functions. All that is needed here is division. The expression:
[Card_balance] / [Annual_income]
will calculate the value of the variable Debt_ratio. Click on the Content column in the row for the “Yes” value. Whenever a row is selected, the lower right section of the window displays the question, value, action and content. The content text can be entered either directly in the spreadsheet, or in the Content edit box. In most cases, it is easier to add and build expressions in the edit box because a special window to add variable names can be called. This makes it easier to build expressions and reduced the chance of a typographical error. Click in the Content edit box to put the cursor there. The expression you want to add is:
[Card_balance] / [Annual_income]
This can be just typed in, but use the window for filling in the variable’s name. Hold the Ctrl and Alt keys down and hit the “V” key (Ctrl-Alt-v). This will display a window that will add the name of the variable to the expression. Click on “Card_balance”. The properties for the variable will be displayed on the right, but you do not need those at the moment. Click OK. You can also just double click on “Card_balance”, which is quicker in cases where a property is not needed. The name of the variable in [ ] will be added to the expression window. Don’t worry about the red underline of the name, that is the spelling checker, which will be discussed later. The cursor should now be just right of the closing ]. Type in the division sign / Now hit Ctrl-Alt-v again to bring up the variable window and double click on “Annual_income”. This will add that variable to the content field. Notice that any text entered in the Content edit box also appears in the Content cell in the spreadsheet.
You now have the 2 actions for the first question. If the user answers “Yes”, Corvid will evaluate the expression and assign the result to the variable Debt_ratio. To do this Corvid will need to know the values of the variables Card_balance and Annual_income. Because these values are needed to do the calculation, Corvid will automatically ask the user for the values. Whenever the value of a variable is needed, Corvid will do whatever is necessary to get the value. Here Corvid will ask the user for the information. If you had provided
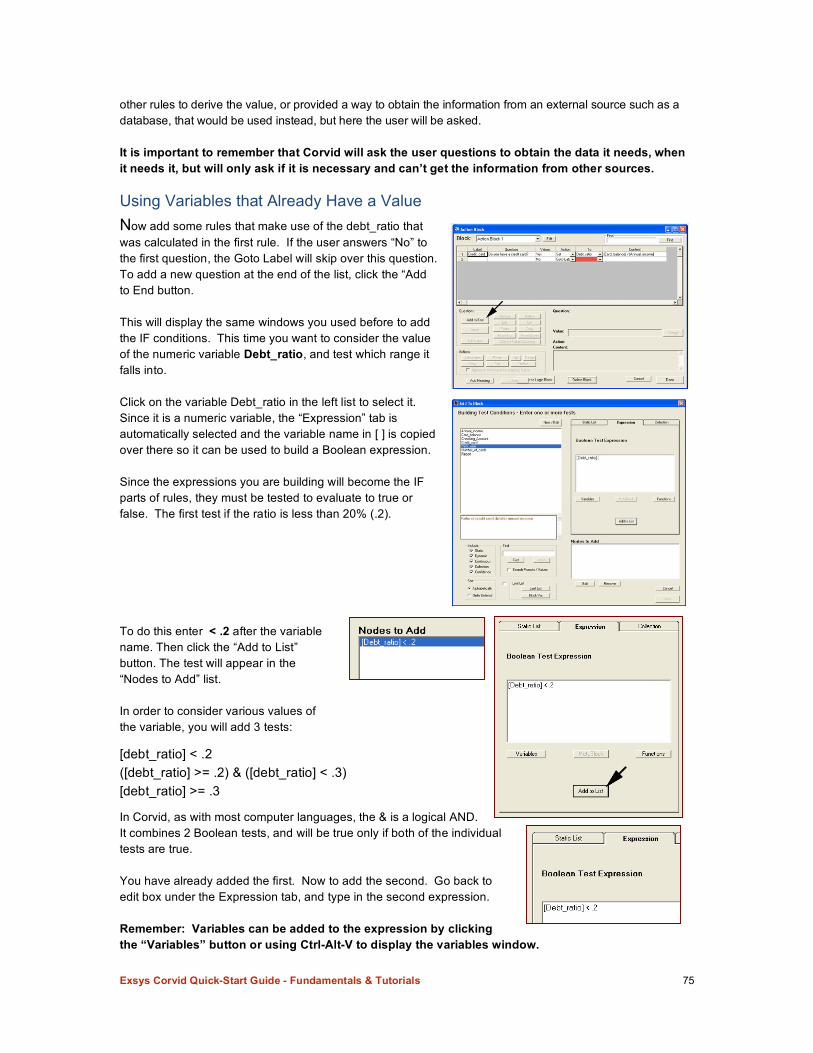
Exsys Corvid Quick-Start Guide - Fundamentals & Tutorials 75
other rules to derive the value, or provided a way to obtain the information from an external source such as a database, that would be used instead, but here the user will be asked. It is important to remember that Corvid will ask the user questions to obtain the data it needs, when it needs it, but will only ask if it is necessary and can’t get the information from other sources.
Using Variables that Already Have a Value Now add some rules that make use of the debt_ratio that was calculated in the first rule. If the user answers “No” to the first question, the Goto Label will skip over this question. To add a new question at the end of the list, click the “Add to End button. This will display the same windows you used before to add the IF conditions. This time you want to consider the value of the numeric variable Debt_ratio, and test which range it falls into. Click on the variable Debt_ratio in the left list to select it. Since it is a numeric variable, the “Expression” tab is automatically selected and the variable name in [ ] is copied over there so it can be used to build a Boolean expression. Since the expressions you are building will become the IF parts of rules, they must be tested to evaluate to true or false. The first test if the ratio is less than 20% (.2).
To do this enter < .2 after the variable name. Then click the “Add to List” button. The test will appear in the “Nodes to Add” list. In order to consider various values of the variable, you will add 3 tests:
[debt_ratio] < .2 ([debt_ratio] >= .2) & ([debt_ratio] < .3) [debt_ratio] >= .3
In Corvid, as with most computer languages, the & is a logical AND. It combines 2 Boolean tests, and will be true only if both of the individual tests are true. You have already added the first. Now to add the second. Go back to edit box under the Expression tab, and type in the second expression. Remember: Variables can be added to the expression by clicking the “Variables” button or using Ctrl-Alt-V to display the variables window.

Exsys Corvid Quick-Start Guide - Fundamentals & Tutorials 76
Once ([debt_ratio] >= .2) & ([debt_ratio] < .3) is entered, click the “Add to List” button. Whenever an expression is entered, Corvid checks the syntax to make sure it is correct. If there are no errors, it will be added. If any errors are found, Corvid will display a window indicating the error so you can make corrections. If the expression was correct, you should not see this window. If it is displayed, correct the text and click the “Recheck”. (In this sample one of the parenthesis was left off.) Now add the third expression, [debt_ratio] >= .3 and click the “Add to List” button. The list of added nodes should look like: Click the “Done” button to add the tests to the Action Block. Now you will start building up a report based on the information the user tells you. To do this click on the Action column in line 3 next to [debt_ratio] < .2 and select the Action “Add to Report/Collection”. The “Add to Report/Collection” action requires that the “To” column be a “Collection variable”. Since there is only one Collection variable defined, it is automatically selected. The Content column is the text that will be added to the report. It is automatically set to the value that was used. In this case, what you want to add to the report is the note: “The amount on the credit cards is reasonable considering the income.” To do this, click the Content cell for the row. This will display the information for this row. Change the text in the Content edit box to: The amount on the credit cards is reasonable considering the income. Note: This text could also be directly entered in the spreadsheet cell, but it is better to use the edit box for text since it provides spell checking. The changes made in the edit box will also appear in the spreadsheet.
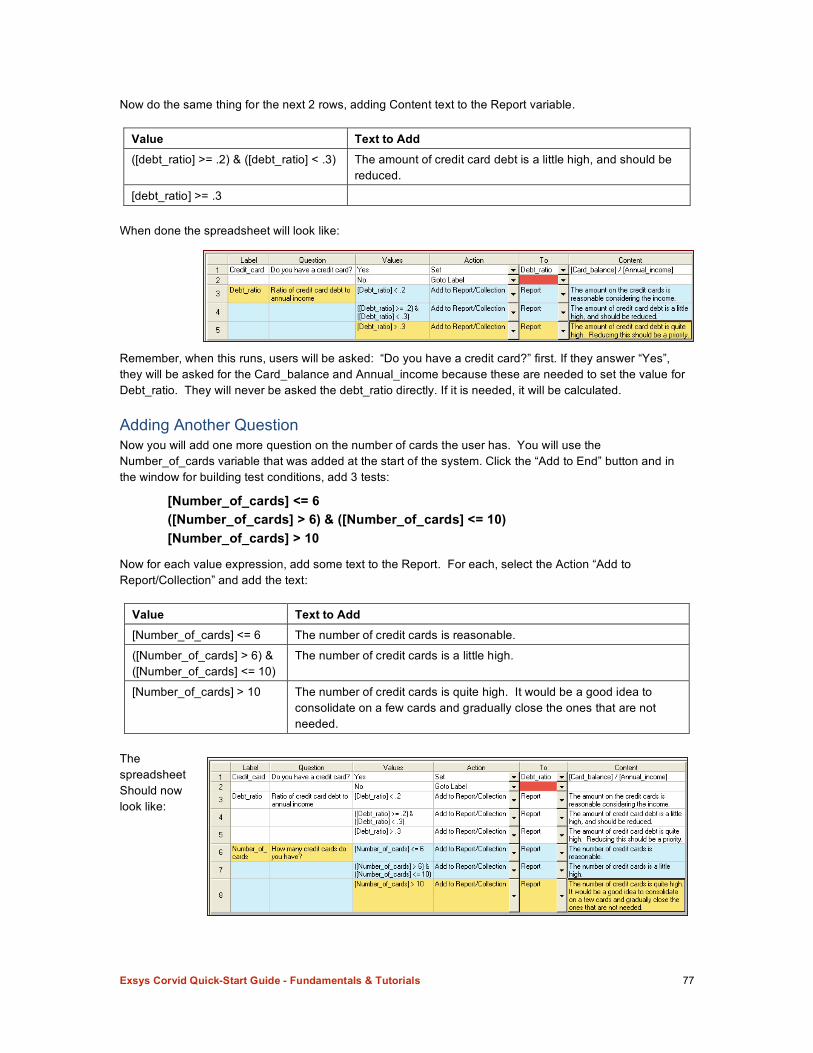
Exsys Corvid Quick-Start Guide - Fundamentals & Tutorials 77
Now do the same thing for the next 2 rows, adding Content text to the Report variable.
Value Text to Add ([debt_ratio] >= .2) & ([debt_ratio] < .3) The amount of credit card debt is a little high, and should be
reduced.
[debt_ratio] >= .3
When done the spreadsheet will look like: Remember, when this runs, users will be asked: “Do you have a credit card?” first. If they answer “Yes”, they will be asked for the Card_balance and Annual_income because these are needed to set the value for Debt_ratio. They will never be asked the debt_ratio directly. If it is needed, it will be calculated. Adding Another Question Now you will add one more question on the number of cards the user has. You will use the Number_of_cards variable that was added at the start of the system. Click the “Add to End” button and in the window for building test conditions, add 3 tests:
[Number_of_cards] <= 6 ([Number_of_cards] > 6) & ([Number_of_cards] <= 10) [Number_of_cards] > 10
Now for each value expression, add some text to the Report. For each, select the Action “Add to Report/Collection” and add the text:
Value Text to Add [Number_of_cards] <= 6 The number of credit cards is reasonable.
([Number_of_cards] > 6) & ([Number_of_cards] <= 10)
The number of credit cards is a little high.
[Number_of_cards] > 10 The number of credit cards is quite high. It would be a good idea to consolidate on a few cards and gradually close the ones that are not needed.
The spreadsheet Should now look like:
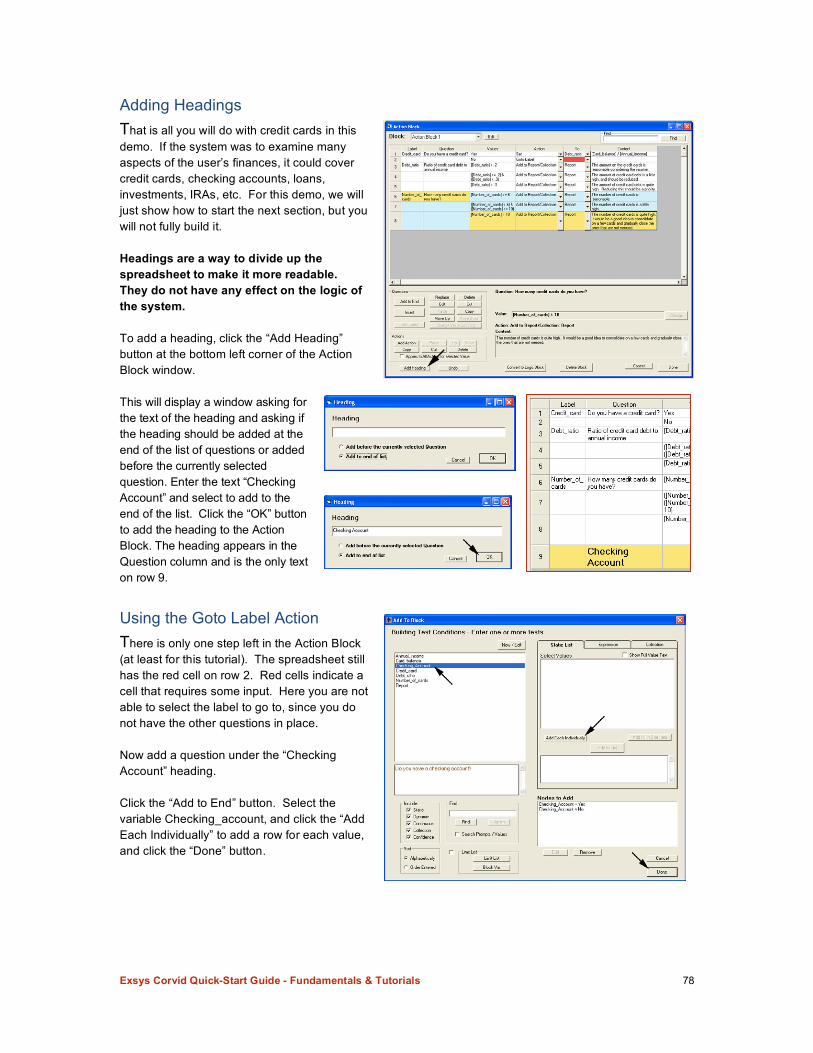
Exsys Corvid Quick-Start Guide - Fundamentals & Tutorials 78
Adding Headings That is all you will do with credit cards in this demo. If the system was to examine many aspects of the user’s finances, it could cover credit cards, checking accounts, loans, investments, IRAs, etc. For this demo, we will just show how to start the next section, but you will not fully build it. Headings are a way to divide up the spreadsheet to make it more readable. They do not have any effect on the logic of the system. To add a heading, click the “Add Heading” button at the bottom left corner of the Action Block window. This will display a window asking for the text of the heading and asking if the heading should be added at the end of the list of questions or added before the currently selected question. Enter the text “Checking Account” and select to add to the end of the list. Click the “OK” button to add the heading to the Action Block. The heading appears in the Question column and is the only text on row 9.
Using the Goto Label Action There is only one step left in the Action Block (at least for this tutorial). The spreadsheet still has the red cell on row 2. Red cells indicate a cell that requires some input. Here you are not able to select the label to go to, since you do not have the other questions in place. Now add a question under the “Checking Account” heading. Click the “Add to End” button. Select the variable Checking_account, and click the “Add Each Individually” to add a row for each value, and click the “Done” button.
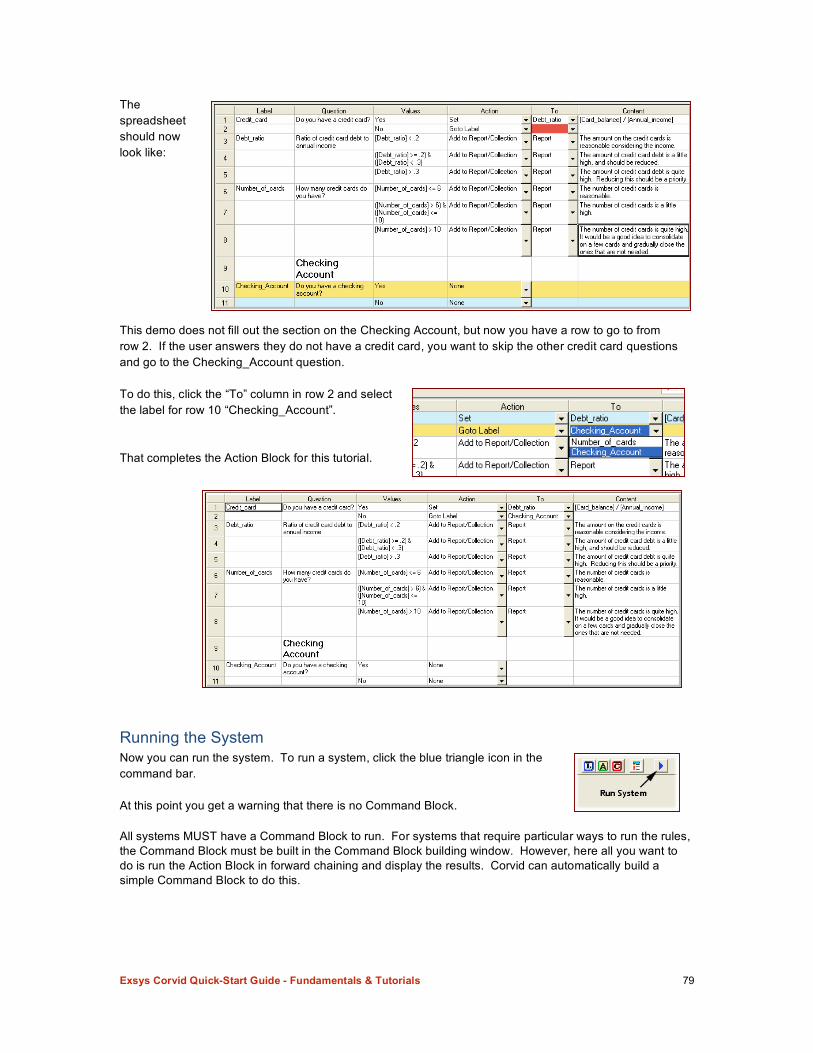
Exsys Corvid Quick-Start Guide - Fundamentals & Tutorials 79
The spreadsheet should now look like: This demo does not fill out the section on the Checking Account, but now you have a row to go to from row 2. If the user answers they do not have a credit card, you want to skip the other credit card questions and go to the Checking_Account question. To do this, click the “To” column in row 2 and select the label for row 10 “Checking_Account”. That completes the Action Block for this tutorial.
Running the System Now you can run the system. To run a system, click the blue triangle icon in the command bar. At this point you get a warning that there is no Command Block.
All systems MUST have a Command Block to run. For systems that require particular ways to run the rules, the Command Block must be built in the Command Block building window. However, here all you want to do is run the Action Block in forward chaining and display the results. Corvid can automatically build a simple Command Block to do this.
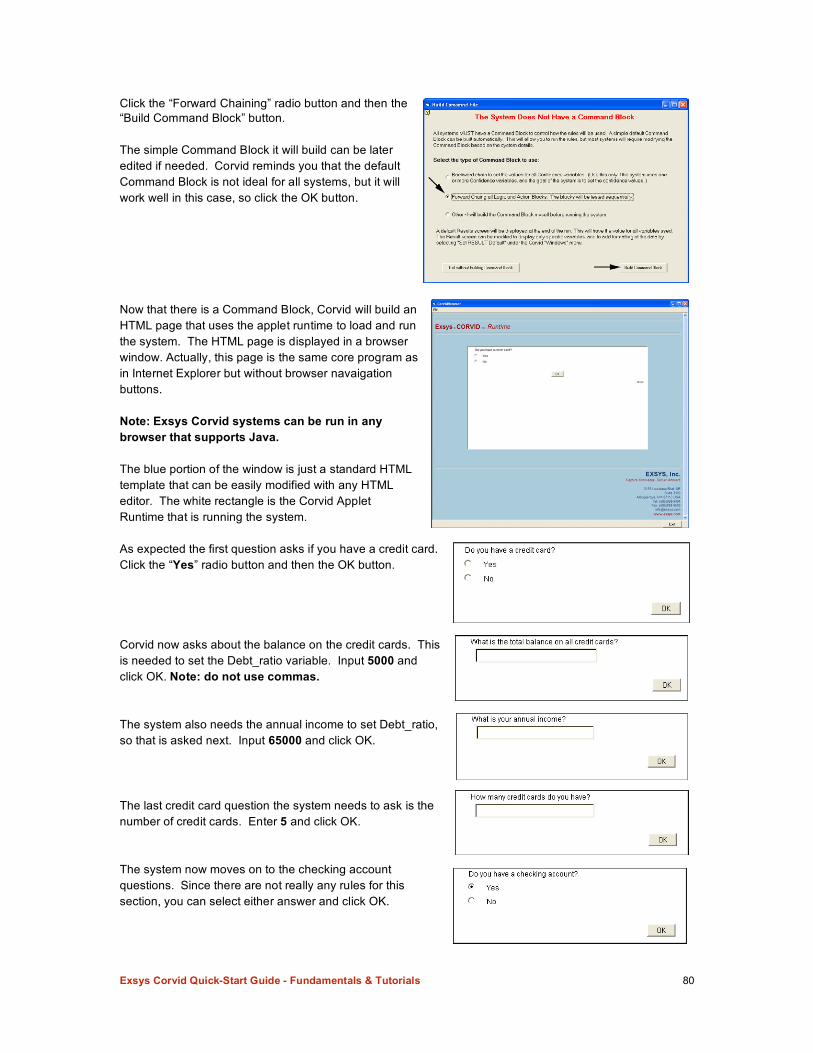
Exsys Corvid Quick-Start Guide - Fundamentals & Tutorials 80
Click the “Forward Chaining” radio button and then the “Build Command Block” button. The simple Command Block it will build can be later edited if needed. Corvid reminds you that the default Command Block is not ideal for all systems, but it will work well in this case, so click the OK button. Now that there is a Command Block, Corvid will build an HTML page that uses the applet runtime to load and run the system. The HTML page is displayed in a browser window. Actually, this page is the same core program as in Internet Explorer but without browser navaigation buttons. Note: Exsys Corvid systems can be run in any browser that supports Java. The blue portion of the window is just a standard HTML template that can be easily modified with any HTML editor. The white rectangle is the Corvid Applet Runtime that is running the system. As expected the first question asks if you have a credit card. Click the “Yes” radio button and then the OK button. Corvid now asks about the balance on the credit cards. This is needed to set the Debt_ratio variable. Input 5000 and click OK. Note: do not use commas. The system also needs the annual income to set Debt_ratio, so that is asked next. Input 65000 and click OK. The last credit card question the system needs to ask is the number of credit cards. Enter 5 and click OK.
The system now moves on to the checking account questions. Since there are not really any rules for this section, you can select either answer and click OK.
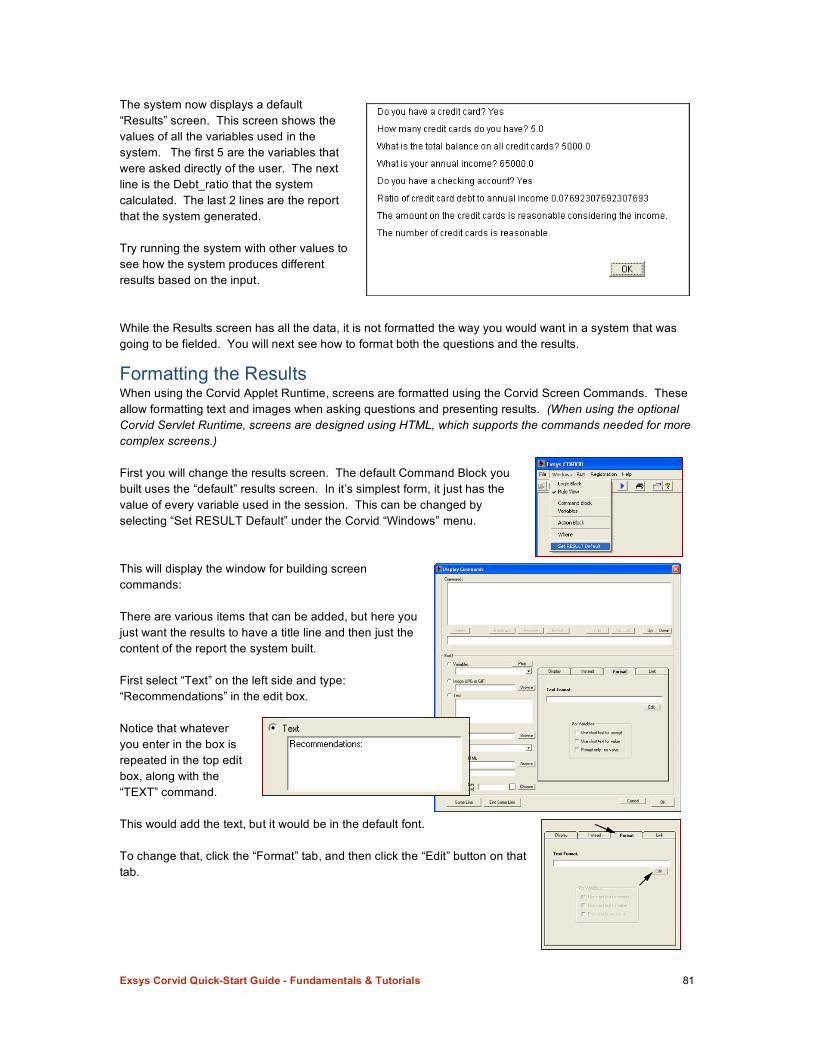
Exsys Corvid Quick-Start Guide - Fundamentals & Tutorials 81
The system now displays a default “Results” screen. This screen shows the values of all the variables used in the system. The first 5 are the variables that were asked directly of the user. The next line is the Debt_ratio that the system calculated. The last 2 lines are the report that the system generated. Try running the system with other values to see how the system produces different results based on the input. While the Results screen has all the data, it is not formatted the way you would want in a system that was going to be fielded. You will next see how to format both the questions and the results. Formatting the Results When using the Corvid Applet Runtime, screens are formatted using the Corvid Screen Commands. These allow formatting text and images when asking questions and presenting results. (When using the optional Corvid Servlet Runtime, screens are designed using HTML, which supports the commands needed for more complex screens.) First you will change the results screen. The default Command Block you built uses the “default” results screen. In it’s simplest form, it just has the value of every variable used in the session. This can be changed by selecting “Set RESULT Default” under the Corvid “Windows” menu. This will display the window for building screen commands: There are various items that can be added, but here you just want the results to have a title line and then just the content of the report the system built. First select “Text” on the left side and type: “Recommendations” in the edit box. Notice that whatever you enter in the box is repeated in the top edit box, along with the “TEXT” command. This would add the text, but it would be in the default font. To change that, click the “Format” tab, and then click the “Edit” button on that tab.
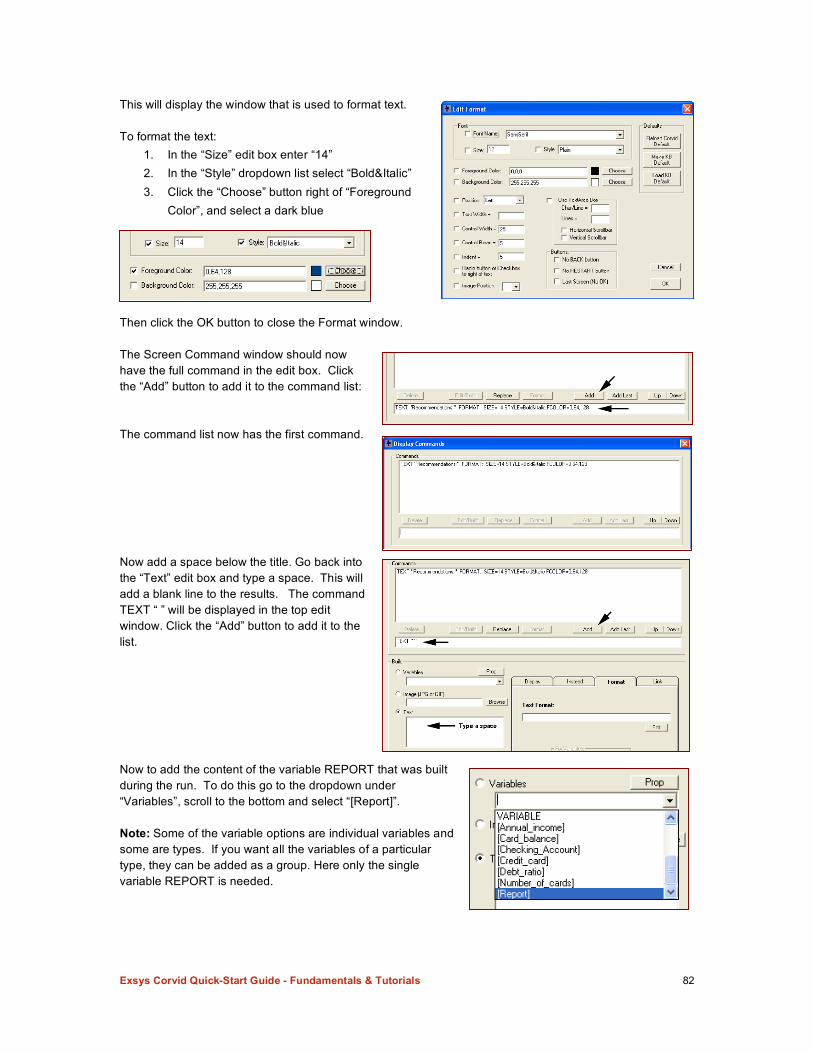
Exsys Corvid Quick-Start Guide - Fundamentals & Tutorials 82
This will display the window that is used to format text. To format the text:
1. In the “Size” edit box enter “14” 2. In the “Style” dropdown list select “Bold&Italic” 3. Click the “Choose” button right of “Foreground
Color”, and select a dark blue
Then click the OK button to close the Format window. The Screen Command window should now have the full command in the edit box. Click the “Add” button to add it to the command list: The command list now has the first command. Now add a space below the title. Go back into the “Text” edit box and type a space. This will add a blank line to the results. The command TEXT “ ” will be displayed in the top edit window. Click the “Add” button to add it to the list. Now to add the content of the variable REPORT that was built during the run. To do this go to the dropdown under “Variables”, scroll to the bottom and select “[Report]”. Note: Some of the variable options are individual variables and some are types. If you want all the variables of a particular type, they can be added as a group. Here only the single variable REPORT is needed.
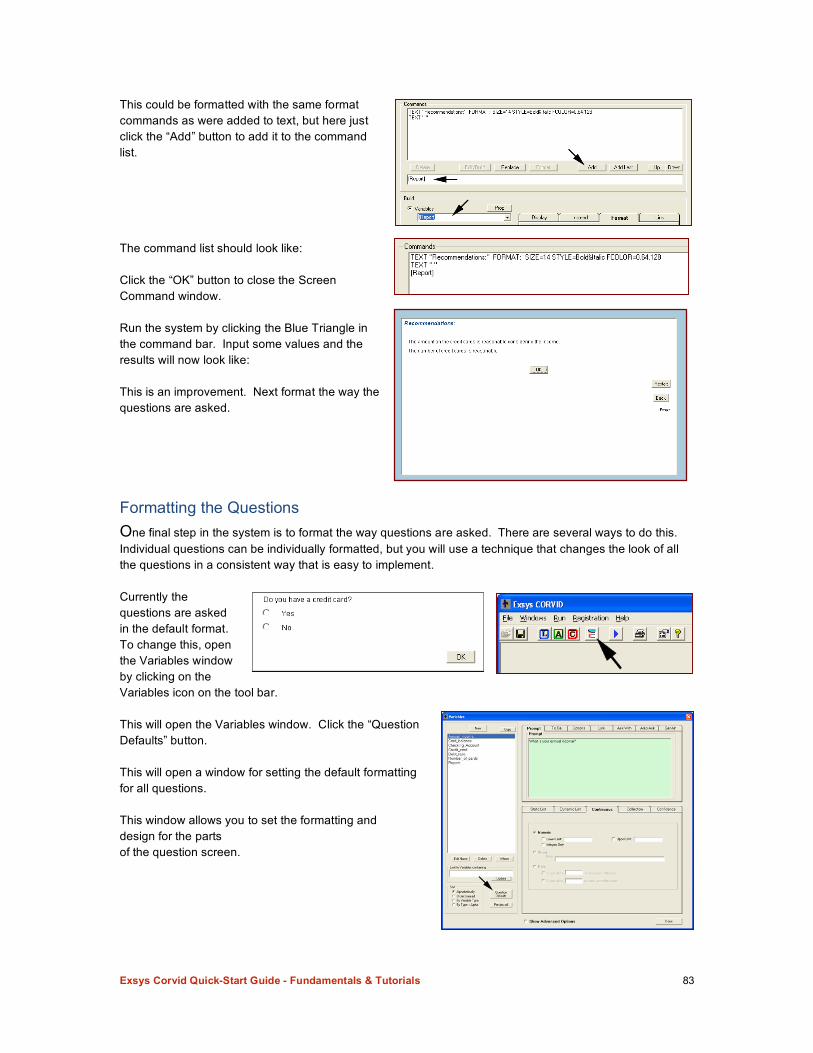
Exsys Corvid Quick-Start Guide - Fundamentals & Tutorials 83
This could be formatted with the same format commands as were added to text, but here just click the “Add” button to add it to the command list. The command list should look like: Click the “OK” button to close the Screen Command window. Run the system by clicking the Blue Triangle in the command bar. Input some values and the results will now look like: This is an improvement. Next format the way the questions are asked.
Formatting the Questions One final step in the system is to format the way questions are asked. There are several ways to do this. Individual questions can be individually formatted, but you will use a technique that changes the look of all the questions in a consistent way that is easy to implement. Currently the questions are asked in the default format. To change this, open the Variables window by clicking on the Variables icon on the tool bar. This will open the Variables window. Click the “Question Defaults” button. This will open a window for setting the default formatting for all questions. This window allows you to set the formatting and design for the parts of the question screen.
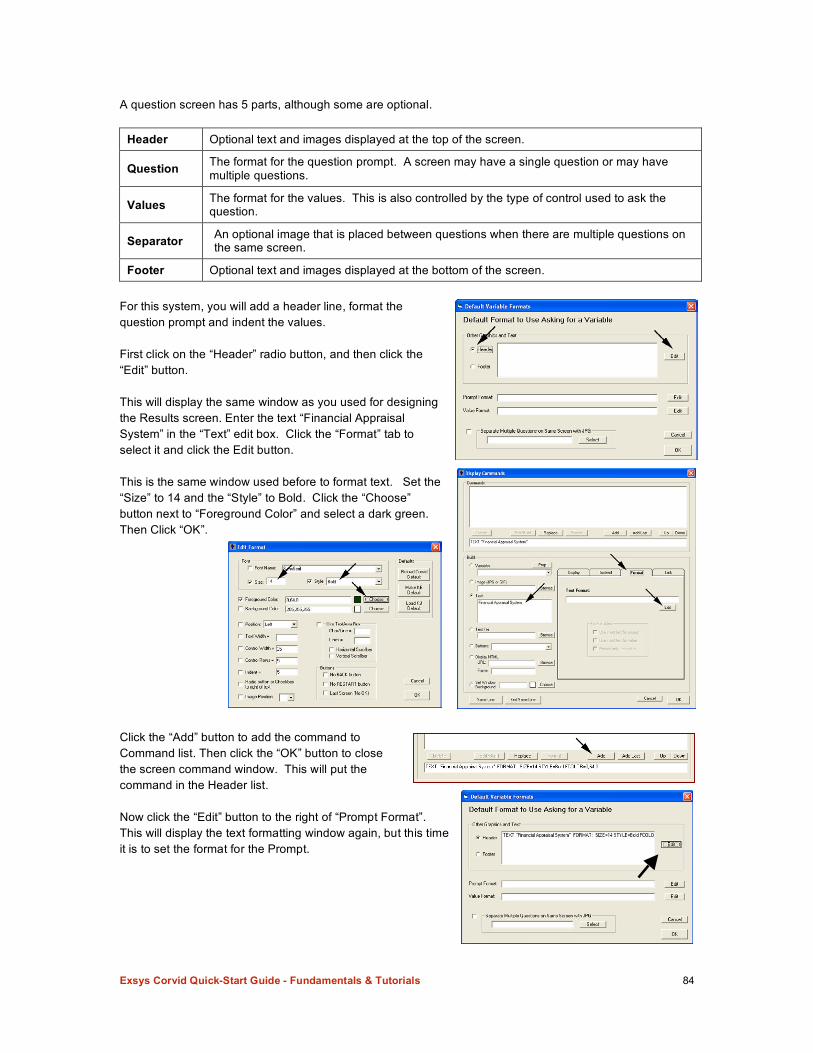
Exsys Corvid Quick-Start Guide - Fundamentals & Tutorials 84
A question screen has 5 parts, although some are optional.
Header Optional text and images displayed at the top of the screen.
Question The format for the question prompt. A screen may have a single question or may have multiple questions.
Values The format for the values. This is also controlled by the type of control used to ask the question.
Separator An optional image that is placed between questions when there are multiple questions on the same screen.
Footer Optional text and images displayed at the bottom of the screen. For this system, you will add a header line, format the question prompt and indent the values. First click on the “Header” radio button, and then click the “Edit” button. This will display the same window as you used for designing the Results screen. Enter the text “Financial Appraisal System” in the “Text” edit box. Click the “Format” tab to select it and click the Edit button. This is the same window used before to format text. Set the “Size” to 14 and the “Style” to Bold. Click the “Choose” button next to “Foreground Color” and select a dark green. Then Click “OK”.
Click the “Add” button to add the command to Command list. Then click the “OK” button to close the screen command window. This will put the command in the Header list. Now click the “Edit” button to the right of “Prompt Format”. This will display the text formatting window again, but this time it is to set the format for the Prompt.
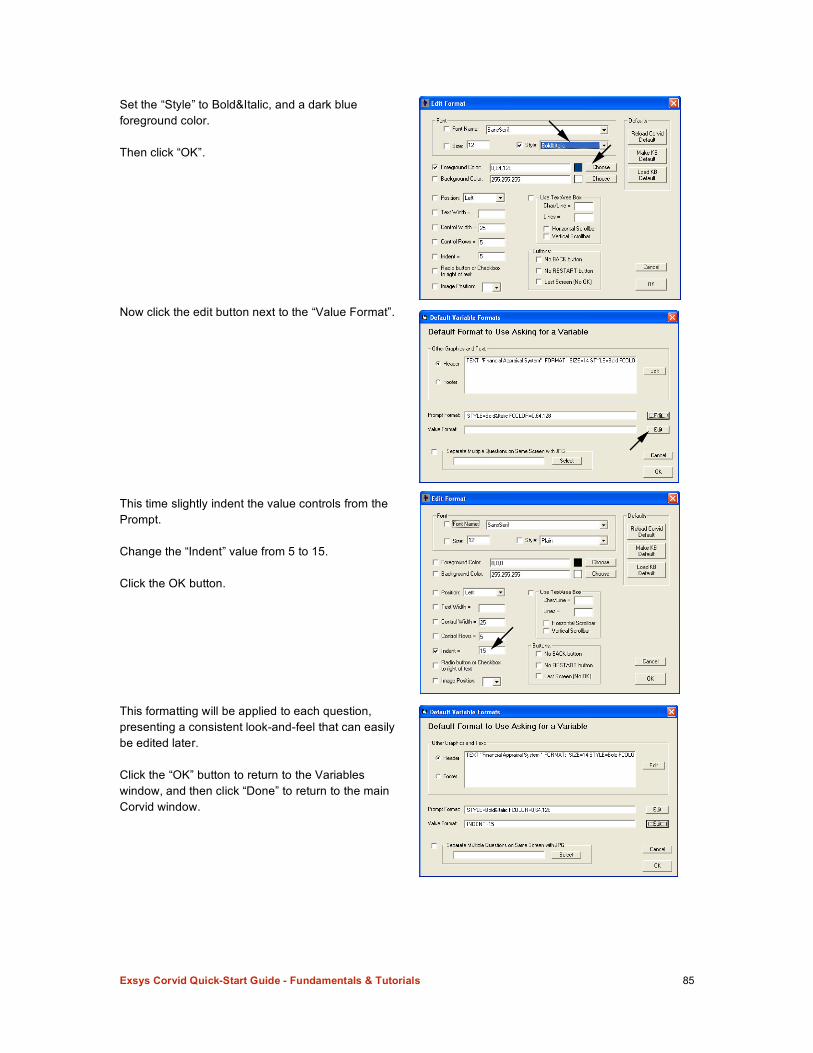
Exsys Corvid Quick-Start Guide - Fundamentals & Tutorials 85
Set the “Style” to Bold&Italic, and a dark blue foreground color. Then click “OK”. Now click the edit button next to the “Value Format”. This time slightly indent the value controls from the Prompt. Change the “Indent” value from 5 to 15. Click the OK button. This formatting will be applied to each question, presenting a consistent look-and-feel that can easily be edited later. Click the “OK” button to return to the Variables window, and then click “Done” to return to the main Corvid window.
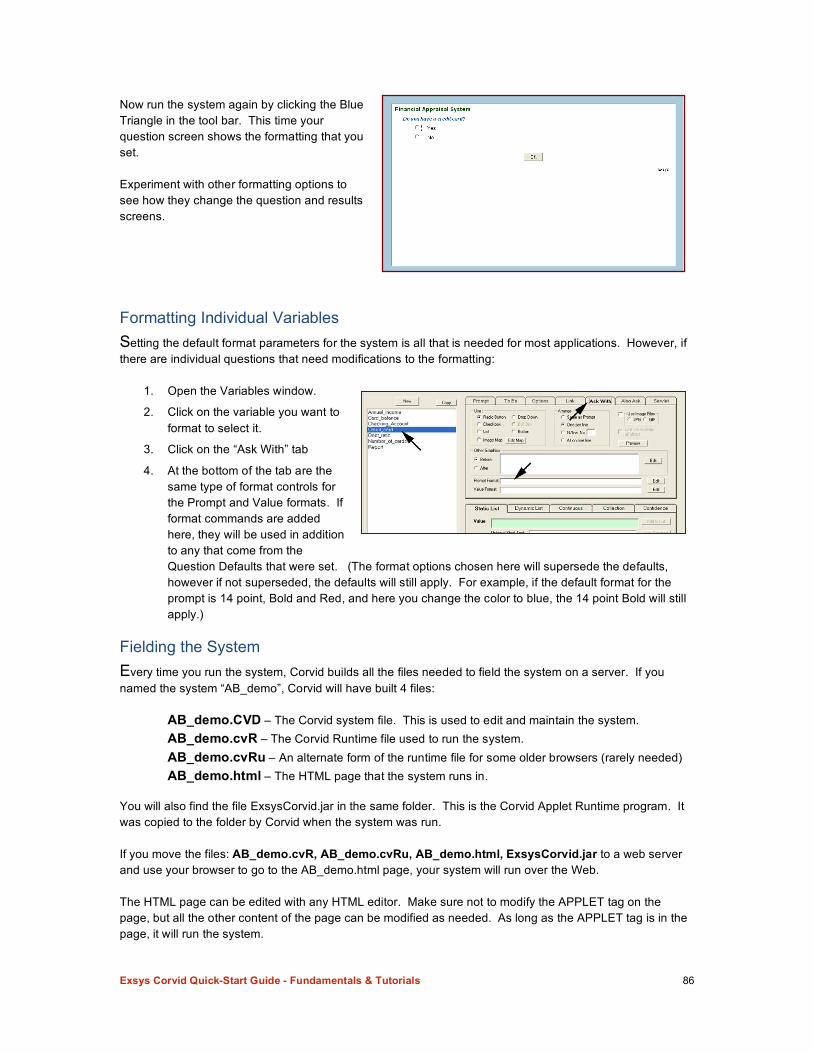
Exsys Corvid Quick-Start Guide - Fundamentals & Tutorials 86
Now run the system again by clicking the Blue Triangle in the tool bar. This time your question screen shows the formatting that you set. Experiment with other formatting options to see how they change the question and results screens.
Formatting Individual Variables Setting the default format parameters for the system is all that is needed for most applications. However, if there are individual questions that need modifications to the formatting:
1. Open the Variables window.
2. Click on the variable you want to format to select it.
3. Click on the “Ask With” tab
4. At the bottom of the tab are the same type of format controls for the Prompt and Value formats. If format commands are added here, they will be used in addition to any that come from the Question Defaults that were set. (The format options chosen here will supersede the defaults, however if not superseded, the defaults will still apply. For example, if the default format for the prompt is 14 point, Bold and Red, and here you change the color to blue, the 14 point Bold will still apply.)
Fielding the System Every time you run the system, Corvid builds all the files needed to field the system on a server. If you named the system “AB_demo”, Corvid will have built 4 files: AB_demo.CVD – The Corvid system file. This is used to edit and maintain the system. AB_demo.cvR – The Corvid Runtime file used to run the system. AB_demo.cvRu – An alternate form of the runtime file for some older browsers (rarely needed) AB_demo.html – The HTML page that the system runs in. You will also find the file ExsysCorvid.jar in the same folder. This is the Corvid Applet Runtime program. It was copied to the folder by Corvid when the system was run. If you move the files: AB_demo.cvR, AB_demo.cvRu, AB_demo.html, ExsysCorvid.jar to a web server and use your browser to go to the AB_demo.html page, your system will run over the Web. The HTML page can be edited with any HTML editor. Make sure not to modify the APPLET tag on the page, but all the other content of the page can be modified as needed. As long as the APPLET tag is in the page, it will run the system.

Exsys Corvid Quick-Start Guide - Fundamentals & Tutorials 87
Building Knowledge Automation Systems with Exsys® Corvid® This fundamentals and tutorial document describes Exsys Corvid software which is furnished under license and may be used or copied only in accordance with the terms of such license. This content is furnished for informational use only, is subject to change without notice, and should not be construed as a commitment by Exsys Inc. Exsys Inc assumes no responsibility of or liability for any errors or inaccuracies that may appear in this documentation. Any references to company names in samples or exercises are for demonstration purposes only and are not intended to refer to any actual organization. Exsys, the Exsys logo, Corvid, the Corvid logo, Exsys RuleBook, the Exsys RuleBook logos and WINK (What I Need to Know) are either registered trademarks or trademarks of Exsys Inc. in the United States and /or other countries. Notice to U.S. government end users. The software and documentation are “commercial items,” as that term is defined at 48 C.F.R. §2.101, consisting of “commercial computer software” and “commercial computer software documentation,” as such terms are used in 48 C.F.R. §12.212 or 48 C.F.R. §227.7202, as applicable. Consistent with 48 C.F.R. §12.212 or 48 C.F.R. §§227.7202-1 through 227.7202-4, as applicable, the commercial computer software and commercial computer software documentation are being licensed to U.S. government end users (A) only as commercial items and (B) with only those rights as are granted to all other end users pursuant to the terms and conditions set forth in the EXSYS standard licensing agreement for this software. Unpublished rights reserved under the copyright laws of the United States. Exsys Inc. Albuquerque, NM U.S.A. Tel: +1 (505) 888-9494 www.exsys.com © 2007 Exsys Inc.