Embed Size (px)
Citation preview
QUICK PLAY FLASH
QUICKSTART GUIDE ENGLISH ( 2 – 4 )
GUÍA DE INICIO RÁPIDO
ESPAÑOL ( 5 – 7 )
GUIDE D'UTILISATION RAPIDE FRANÇAIS ( 8 – 10 )
GUIDA RAPIDA ITALIANO ( 11 – 13 )
KURZANLEITUNG
DEUTSCH ( 14 – 16 )
SNELSTARTGIDS NEDERLANDS ( 17 – 19 )
2
2
7
55
4
73
1
QUICKSTART GUIDE
BOX CONTENTS o Make sure that the items listed below are included in the box:
• QUICK PLAY FLASH
• Slipmat
• Power adapter
• USB Flash Drive
• Software CD
• USB Cable
• Quickstart Guide
• Safety Instructions & Warranty Information
o READ SAFETY INSTRUCTION BOOKLET BEFORE USING THE PRODUCT
INTRODUCTION You should install EZ Vinyl/Tape Converter to take advantage of computer recording. EZ Vinyl/Tape Converter is the quickest and easiest way to turn your recordings into digital media. EZ Vinyl/Tape Converter conveniently saves your recordings in your iTunes* library. We have included a handy software Quickstart Guide with step-by-step instructions on software installation and operation. To install the software: simply insert the included CD into your computer and follow the on-screen instructions. After you finish converting your vinyl, you can then burn to CD or load onto portable media devices. Visit www.ionaudio.com/computer-optimization for more information on optimizing your computer for audio.
* iTunes is a trademark of Apple, Inc., registered in the U.S.A. and other countries.
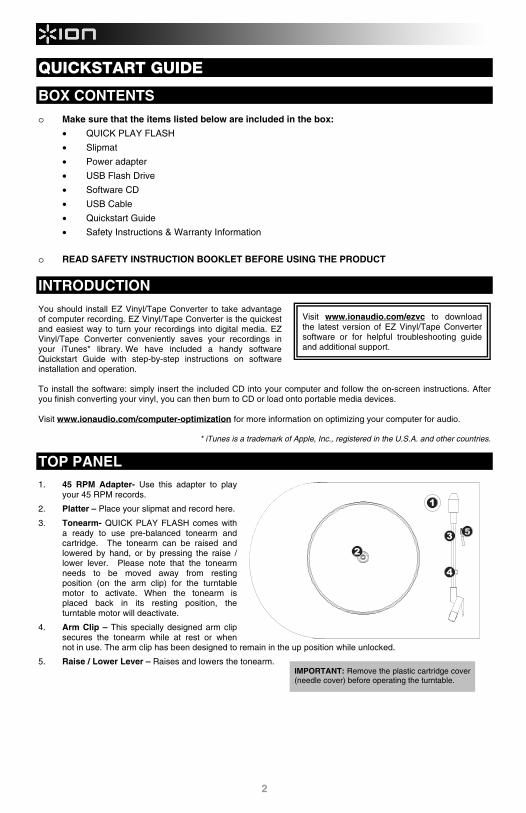
TOP PANEL 1. 45 RPM Adapter- Use this adapter to play
your 45 RPM records.
2. Platter – Place your slipmat and record here.
3. Tonearm- QUICK PLAY FLASH comes with a ready to use pre-balanced tonearm and cartridge. The tonearm can be raised and lowered by hand, or by pressing the raise / lower lever. Please note that the tonearm needs to be moved away from resting position (on the arm clip) for the turntable motor to activate. When the tonearm is placed back in its resting position, the turntable motor will deactivate.
4. Arm Clip – This specially designed arm clip secures the tonearm while at rest or when not in use. The arm clip has been designed to remain in the up position while unlocked.
5. Raise / Lower Lever – Raises and lowers the tonearm.
IMPORTANT: Remove the plastic cartridge cover (needle cover) before operating the turntable.
Visit www.ionaudio.com/ezvc to download the latest version of EZ Vinyl/Tape Converter software or for helpful troubleshooting guide and additional support.
3
* If needed, you may adjust the speed of the turntable platter by tightening/loosening the appropriate screw (there are separate screws for 33/45/78 RPM operation on the underside of QUICK PLAY FLASH) with a standard Phillips-head screwdriver.
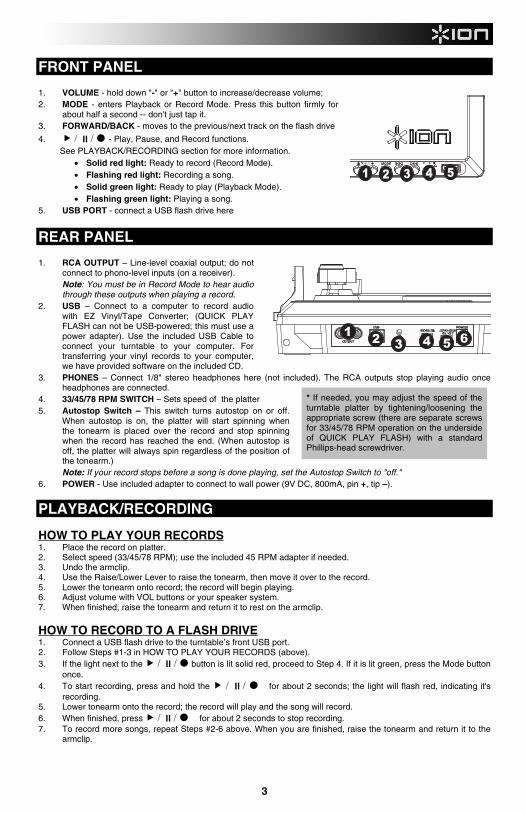
FRONT PANEL 1. VOLUME - hold down "-" or "+" button to increase/decrease volume; 2. MODE - enters Playback or Record Mode. Press this button firmly for
about half a second -- don't just tap it. 3. FORWARD/BACK - moves to the previous/next track on the flash drive
4. / / - Play, Pause, and Record functions. See PLAYBACK/RECORDING section for more information.
• Solid red light: Ready to record (Record Mode). • Flashing red light: Recording a song. • Solid green light: Ready to play (Playback Mode). • Flashing green light: Playing a song.
5. USB PORT - connect a USB flash drive here
REAR PANEL 1. RCA OUTPUT – Line-level coaxial output; do not
connect to phono-level inputs (on a receiver). Note: You must be in Record Mode to hear audio through these outputs when playing a record.
2. USB – Connect to a computer to record audio with EZ Vinyl/Tape Converter; (QUICK PLAY FLASH can not be USB-powered; this must use a power adapter). Use the included USB Cable to connect your turntable to your computer. For transferring your vinyl records to your computer, we have provided software on the included CD.
3. PHONES – Connect 1/8" stereo headphones here (not included). The RCA outputs stop playing audio once headphones are connected.
4. 33/45/78 RPM SWITCH – Sets speed of the platter 5. Autostop Switch – This switch turns autostop on or off.
When autostop is on, the platter will start spinning when the tonearm is placed over the record and stop spinning when the record has reached the end. (When autostop is off, the platter will always spin regardless of the position of the tonearm.) Note: If your record stops before a song is done playing, set the Autostop Switch to "off."
6. POWER - Use included adapter to connect to wall power (9V DC, 800mA, pin +, tip –).
PLAYBACK/RECORDING
HOW TO PLAY YOUR RECORDS 1. Place the record on platter. 2. Select speed (33/45/78 RPM); use the included 45 RPM adapter if needed. 3. Undo the armclip. 4. Use the Raise/Lower Lever to raise the tonearm, then move it over to the record. 5. Lower the tonearm onto record; the record will begin playing. 6. Adjust volume with VOL buttons or your speaker system. 7. When finished, raise the tonearm and return it to rest on the armclip.
HOW TO RECORD TO A FLASH DRIVE 1. Connect a USB flash drive to the turntable’s front USB port. 2. Follow Steps #1-3 in HOW TO PLAY YOUR RECORDS (above). 3. If the light next to the / / button is lit solid red, proceed to Step 4. If it is lit green, press the Mode button
once. 4. To start recording, press and hold the / / for about 2 seconds; the light will flash red, indicating it's
recording. 5. Lower tonearm onto the record; the record will play and the song will record. 6. When finished, press / / for about 2 seconds to stop recording. 7. To record more songs, repeat Steps #2-6 above. When you are finished, raise the tonearm and return it to the
armclip.
1 2 3 4 5 6
MODE
1 2 3 4 5 / /
4
HOW TO PLAYBACK FROM A FLASH DRIVE 1. Connect a USB flash drive with MP3 to the turntable’s front USB port. 2. If the light next to the / / button is lit solid green, proceed to Step 3. If it is lit red, press the Mode button
once. 3. Press / / ; the first song will play.
Note: Songs will play in alphabetical order by file name within each folder on the drive. QUICK PLAY FLASH will scan through the drive’s folders/subfolders for playable music files in the following order: (1) songs recorded by the turntable that are located in the MUSIC _ION folder. (2) songs in the root directory (3) songs in other folders/subfolders (including any hidden or .Trash folders)
4. Press |<< or >>| to skip to the previous/next song.
HOW TO ACCESS FLASH DRIVE RECORDED MUSIC ON YOUR COMPUTER 1. Connect the USB flash drive to a free USB port on your computer (preferably one on the rear panel of your
computer). 2. On a PC, your flash drive can be accessed by opening the My Computer icon on your desktop (this is called
‘Computer’ in Windows Vista and Windows 7). On a Mac, the USB flash drive icon will appear on your desktop. 3. Select your USB flash drive from the list of drives in My Computer (PC) or on your desktop (Mac) and double
click to open the drive. 4. The files that you recorded using the QUICK PLAY FLASH can be found in the MUSIC _ION folder and will
be titled "Rec001.MP3”, "Rec002.MP3, etc. You can then select your songs and drag them to a folder on your computer. Then use your favorite MP3 music player software to play back the songs.
5. After you have transferred your songs, to safely remove the USB drive, right-click on the drive icon in the System Tray and select the option to “safely remove” the drive (PC), or right-click (Ctrl+click) on the drive icon on the desktop and select ‘Eject’ (Mac). Once the drive has been ejected, you can remove the USB flash drive from the computer’s USB port.
TROUBLESHOOTING
PROBLEM CAUSE SOLUTION I am not hearing any audio when I am recording.
Needle is not on the record. Place the needle on the record.
Cartridge connection is not secure.
Cartridge must be securely connected to the tonearm whenever you are using the turntable. I am experiencing poor
sound quality. Vinyl record is dirty or scratched.
Try dusting off and gently wiping the surface of the record before playing it.
When recording into my computer on Windows Vista, my recordings are mono instead of stereo.
Recording input properties in Vista not set to “stereo”.
In Vista, you may need to manually specify “stereo” for the recording input. Go to Start Control Panel Sound (in Classic View). Then, click on the Recording tab and highlight the Microphone input (USB Audio Codec). Click on Properties to bring up the input settings. Next, click on the Advanced tab and select “2 channel, 16 bit, 44100 Hz (CD quality)” in the Default Format pull-down menu. Lastly, click Apply to accept the settings.
My music is playing at a strange pitch.
Incorrect speed selected on the turntable.
Make sure that you are playing your records at the speed they were intended to be played. Select between the different speeds (33, 45, or 78 RPM).
When recording into my computer on Windows 7, my recordings are distorted.
The Windows 7 Sound Panel> Levels setting is turned up too high
Go to Start Control Panel Sound (in Classic View). Then click on the Recording tab and highlight the Microphone input (USB Audio Codec). Click on Properties to bring up the input settings. Next, click on the Advanced tab and select “2 channel, 16 bit, 44100 Hz (CD quality)” Uncheck the two boxes in Exclusive Mode and click Apply. Select the Levels tab and set the level slider to ‘4’. Then click Apply and Ok.
My record stopped playing before the end of the song.
If you are playing a 45RPM record, the Autostop feature may have detected that the tonearm is close enough to the center to stop the record.
Set the Autostop Switch to "off."
5
2
7
55
4
73
1
GUÍA DE INICIO RÁPIDO
CONTENIDO DE LA CAJA Asegúrese de que todos los elementos abajo indicados estén incluidos en la caja.
• QUICK PLAY FLASH
• Afombrilla antideslizante
• Adaptador de alimentación
• Unidad flash USB
• CD de software
• Cable USB
• Guía de inicio rápido
• Instrucciones de seguridad e información sobre la garantía
LEA EL FOLLETO DE INSTRUCCIONES DE SEGURIDAD ANTES DE UTILIZAR EL PRODUCTO.
INTRODUCCIÓN Debe instalar EZ Vinyl/Tape Converter para aprovechar la función de grabación de su computadora. EZ Vinyl/Tape Converter es la forma más rápida y fácil de convertir las grabaciones en medios digitales. Este software guarda convenientemente sus grabaciones en la biblioteca de iTunes. Incluimos una práctica guía de inicio rápido con instrucciones paso a paso sobre la instalación y la operación del software. Para instalar el software: inserte simplemente el CD incluido en la computadora y siga las instrucciones de la pantalla. Después de terminar de convertir su vinilo, puede quemarlo en CD o cargarlo en dispositivos de medios portátiles. Visite www.ionaudio.com/computer-optimization para más información sobre la optimización de su computadora para audio.
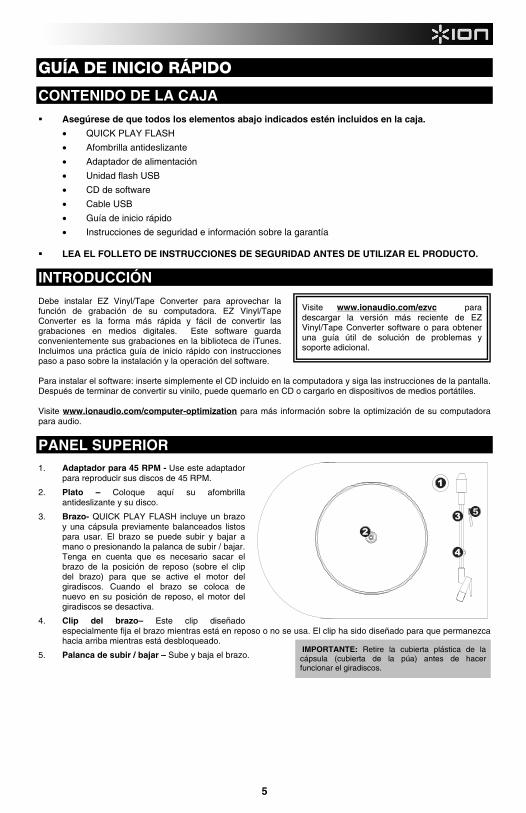
PANEL SUPERIOR 1. Adaptador para 45 RPM - Use este adaptador
para reproducir sus discos de 45 RPM.
2. Plato – Coloque aquí su afombrilla antideslizante y su disco.
3. Brazo- QUICK PLAY FLASH incluye un brazo y una cápsula previamente balanceados listos para usar. El brazo se puede subir y bajar a mano o presionando la palanca de subir / bajar. Tenga en cuenta que es necesario sacar el brazo de la posición de reposo (sobre el clip del brazo) para que se active el motor del giradiscos. Cuando el brazo se coloca de nuevo en su posición de reposo, el motor del giradiscos se desactiva.
4. Clip del brazo– Este clip diseñado especialmente fija el brazo mientras está en reposo o no se usa. El clip ha sido diseñado para que permanezca hacia arriba mientras está desbloqueado.
5. Palanca de subir / bajar – Sube y baja el brazo.
IMPORTANTE: Retire la cubierta plástica de la cápsula (cubierta de la púa) antes de hacer funcionar el giradiscos.
Visite www.ionaudio.com/ezvc para descargar la versión más reciente de EZ Vinyl/Tape Converter software o para obtener una guía útil de solución de problemas y soporte adicional.
6
* Si es necesario, es posible ajustar la velocidad del plato dl giradiscos apretando o aflojando el tornillo apropiado (hay tres tornillos por separado para funcionamiento a 33, 45 ó 78 RPM en la parte inferior del QUICK PLAY FLASH) con un destornillador Phillips estándar.
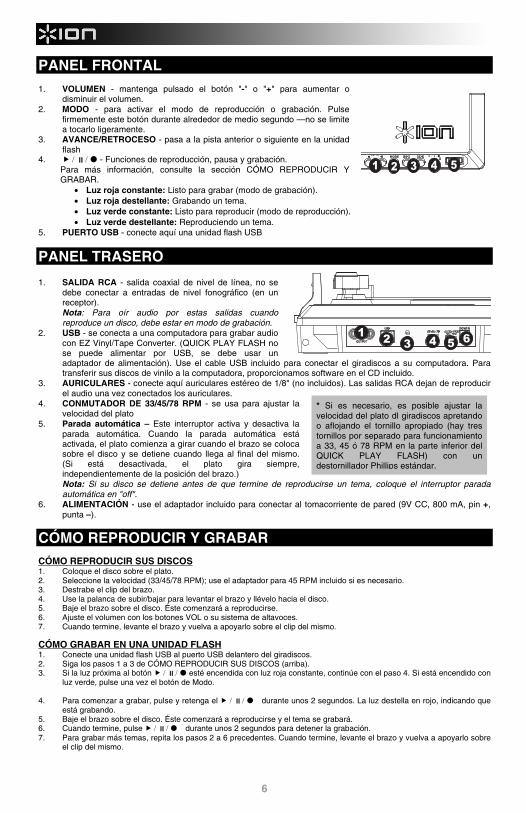
PANEL FRONTAL 1. VOLUMEN - mantenga pulsado el botón "-" o "+" para aumentar o
disminuir el volumen. 2. MODO - para activar el modo de reproducción o grabación. Pulse
firmemente este botón durante alrededor de medio segundo —no se limite a tocarlo ligeramente.
3. AVANCE/RETROCESO - pasa a la pista anterior o siguiente en la unidad flash
4. / / - Funciones de reproducción, pausa y grabación. Para más información, consulte la sección CÓMO REPRODUCIR Y
GRABAR. • Luz roja constante: Listo para grabar (modo de grabación). • Luz roja destellante: Grabando un tema. • Luz verde constante: Listo para reproducir (modo de reproducción). • Luz verde destellante: Reproduciendo un tema.
5. PUERTO USB - conecte aquí una unidad flash USB
PANEL TRASERO 1. SALIDA RCA - salida coaxial de nivel de línea, no se
debe conectar a entradas de nivel fonográfico (en un receptor).
Nota: Para oír audio por estas salidas cuando reproduce un disco, debe estar en modo de grabación.
2. USB - se conecta a una computadora para grabar audio con EZ Vinyl/Tape Converter. (QUICK PLAY FLASH no se puede alimentar por USB, se debe usar un adaptador de alimentación). Use el cable USB incluido para conectar el giradiscos a su computadora. Para transferir sus discos de vinilo a la computadora, proporcionamos software en el CD incluido.
3. AURICULARES - conecte aquí auriculares estéreo de 1/8" (no incluidos). Las salidas RCA dejan de reproducir el audio una vez conectados los auriculares.
4. CONMUTADOR DE 33/45/78 RPM - se usa para ajustar la velocidad del plato
5. Parada automática – Este interruptor activa y desactiva la parada automática. Cuando la parada automática está activada, el plato comienza a girar cuando el brazo se coloca sobre el disco y se detiene cuando llega al final del mismo. (Si está desactivada, el plato gira siempre, independientemente de la posición del brazo.) Nota: Si su disco se detiene antes de que termine de reproducirse un tema, coloque el interruptor parada automática en "off".
6. ALIMENTACIÓN - use el adaptador incluido para conectar al tomacorriente de pared (9V CC, 800 mA, pin +, punta –).
CÓMO REPRODUCIR Y GRABAR CÓMO REPRODUCIR SUS DISCOS 1. Coloque el disco sobre el plato. 2. Seleccione la velocidad (33/45/78 RPM); use el adaptador para 45 RPM incluido si es necesario. 3. Destrabe el clip del brazo. 4. Use la palanca de subir/bajar para levantar el brazo y llévelo hacia el disco. 5. Baje el brazo sobre el disco. Éste comenzará a reproducirse. 6. Ajuste el volumen con los botones VOL o su sistema de altavoces. 7. Cuando termine, levante el brazo y vuelva a apoyarlo sobre el clip del mismo.
CÓMO GRABAR EN UNA UNIDAD FLASH 1. Conecte una unidad flash USB al puerto USB delantero del giradiscos. 2. Siga los pasos 1 a 3 de CÓMO REPRODUCIR SUS DISCOS (arriba). 3. Si la luz próxima al botón / / esté encendida con luz roja constante, continúe con el paso 4. Si está encendido con
luz verde, pulse una vez el botón de Modo. 4. Para comenzar a grabar, pulse y retenga el / / durante unos 2 segundos. La luz destella en rojo, indicando que
está grabando. 5. Baje el brazo sobre el disco. Éste comenzará a reproducirse y el tema se grabará. 6. Cuando termine, pulse / / durante unos 2 segundos para detener la grabación. 7. Para grabar más temas, repita los pasos 2 a 6 precedentes. Cuando termine, levante el brazo y vuelva a apoyarlo sobre
el clip del mismo.
1 2 3 4 5 6
MODE
1 2 3 4 5 / /
7
CÓMO REPRODUCIR DESDE UNA UNIDAD FLASH 1. Conecte una unidad flash USB con MP3 al puerto USB delantero del giradiscos. 2. Si la luz próxima al botón / / esté encendida con luz verde constante, continúe con el paso 3. Si está encendido
con luz roja, pulse una vez el botón de Modo. 3. Pulse / / . Se reproducirá el primer tema. Nota: Los temas se reproducen en orden alfabético por nombre dentro de cada carpeta de la unidad. QUICK PLAY
FLASH explora las carpetas y subcarpetas de la unidad para detectar los archivos de música reproducibles en el siguiente orden: (1) temas grabados por el giradiscos que se encuentran en la carpeta MUSIC _ION. (2) temas del directorio raíz (3) temas de las otras carpetas y subcarpetas (incluidas las carpetas ocultas o .Trash)
4. Pulse |<< o >>| para saltar al tema anterior o siguiente. CÓMO ACCEDER A LA MÚSICA GRABADA EN LA UNIDAD FLASH EN SU COMPUTADORA 1. Conecte la unidad flash USB a un puerto USB libre de su computadora (preferiblemente uno del panel trasero de la
misma). 2. En una PC, es posible acceder a su unidad flash abriendo el icono My Computer (Mi PC) del escritorio (se denomina
‘Computer en Windows Vista y Windows 7). En una Mac, aparece en el escritorio el icono de la unidad flash USB. 3. Seleccione su unidad flash USB en la lista de unidades de My Computer (Mi PC) o en su escritorio (Mac) y haga doble
clic para abrirla. 4. Los archivos que grabó usando QUICK PLAY FLASH se pueden encontrar en la carpeta MUSIC _ION y se
denominan "Rec001.MP3”, "Rec002.MP3, etc. Puede seleccionar entonces sus temas y arrastrarlos a una carpeta de la computadora. Use ahora su software reproductor de música MP3 para reproducir los temas.
5. Después de transferir sus temas, para retirar la unidad USB con seguridad, haga clic derecho en el icono de la unidad de la bandeja del sistema y seleccione la opción “retirar con seguridad” la unidad (PC) o haga clic derecho (Ctrl+clic) en el icono del escritorio y seleccione ‘Eject (Expulsar) (Mac). Una vez expulsada la unidad, puede retirar la unidad flash USB del puerto USB de la computadora.
SOLUCIÓN DE PROBLEMAS
PROBLEMA CAUSA SOLUCIÓN
No oigo ningún audio mientras grabo.
La púa no está sobre el disco.
Coloque la púa sobre el disco.
La conexión de la cápsula no es firme.
La cápsula debe estar conectada firmemente al brazo toda vez que use el giradiscos. Experimento un sonido de
baja calidad. El disco de vinilo está sucio o rayado.
Pruebe desempolvando y limpiando suavemente la superficie del disco antes de reproducirlo.
Cuando grabo en la computadora bajo Windows Vista, mis grabaciones son mono en lugar de estéreo.
Propiedades de entrada de grabación en Vista no configuradas a “stereo” (estéreo).
En Vista, es posible que sea necesario especificar manualmente “stereo” para la entrada de grabación. Vaya a Start Control Panel Sound (Inicio > Panel de control > Sonido (en la vista clásica). Luego, haga clic en la pestaña Recording (Grabación) y resalte la entrada Microphone (Micrófono) (USB Audio Codec). Haga clic en Properties (Propiedades) para activar la configuración de la entrada. Luego, haga clic en la pestaña Advanced (Avanzadas) y seleccione “2 channel, 16 bit, 44100 Hz (CD quality)” (2 canales, 16 bits, 44100 Hz (calidad de CD)) en el menú desplegable Default Format (Formato por defecto). Finalmente, haga clic en Apply (Aplicar) para aceptar los valores de configuración.
La música se reproduce con un pitch extraño.
Velocidad incorrecta seleccionada en el giradiscos.
Asegúrese de que esté reproduciendo sus discos a la velocidad a la que están previstos. Seleccione entre las diferentes velocidades (33, 45 ó 78 RPM).
Cuando grabo en mi computadora con Windows 7, las grabaciones se distorsionan.
El ajuste Sound Panel> Levels (Panel de sonido > Niveles) de Windows 7 está en un valor demasiado alto.
Vaya a Start Control Panel Sound (Inicio > Panel de control > Sonido (en la vista clásica). Luego, haga clic en la pestaña Recording (Grabación) y resalte la entrada Microphone (Micrófono) (USB Audio Codec). Haga clic en Properties (Propiedades) para activar la configuración de la entrada. Luego, haga clic en la pestaña Advanced (Avanzadas) y seleccione “2 channel, 16 bit, 44100 Hz (CD quality)” (2 canales, 16 bits, 44100 Hz (calidad de CD)). Deseleccione las dos casillas de Exclusive Mode (Modo exclusivo) y haga clic en Apply (Aplicar). Seleccione la pestaña Levels (Niveles) y ajuste el cursor de nivel a 4’. Luego haga clic en Apply y Ok (Aceptar).
Mi disco dejó de reproducirse antes del final del tema.
Si está reproduciendo un disco de 45 RPM, la característica Autostop (Parada automática) puede haber detectado que el brazo está suficientemente cerca del centro como para detener el disco.
Coloque el interruptor Autostop en "off".
8
2
7
55
4
73
1
GUIDE D’UTILISATION SIMPLIFIÉ
CONTENU DE LA BOÎTE Assurez-vous que tous les articles énumérés dans le contenu de la boîte de ce guide sont inclus dans
la boîte: • QUICK PLAY FLASH • Tapis • Bloc d’alimentation • Clé USB • CD logiciel • Câble USB • Guide d’utilisation simplifié • Consignes de sécurité et information concernant la garantie
VEUILLEZ LIRE LE LIVRET DES CONSIGNES DE SÉCURITÉ AVANT D'UTILISER LE PRODUIT.
INTRODUCTION Vous devez installer EZ Vinyl/Tape Converter afin d’enregistrer sur ordinateur. EZ Vinyl/Tape Converter est la façon la plus rapide et la plus simple de convertir vos enregistrements au média numérique. EZ Vinyl/Tape Converter permet de sauvegarder vos enregistrements dans votre bibliothèque iTunes. Nous avons inclus un guide d'utilisation simplifié avec des instructions détaillées sur l'installation et le fonctionnement du logiciel. Installation du logiciel : Insérez simplement le CD dans le lecteur de votre ordinateur et suivez les instructions à l'écran. Lorsque vous avez terminé la conversion du vinyle, vous le pouvez graver sur un CD ou le télécharger sur des lecteurs multimédia portables. Visitez le site www.ionaudio.com/computer-optimization afin d’obtenir plus d’information concernant l’optimisation de votre ordinateur pour une meilleure qualité audio.
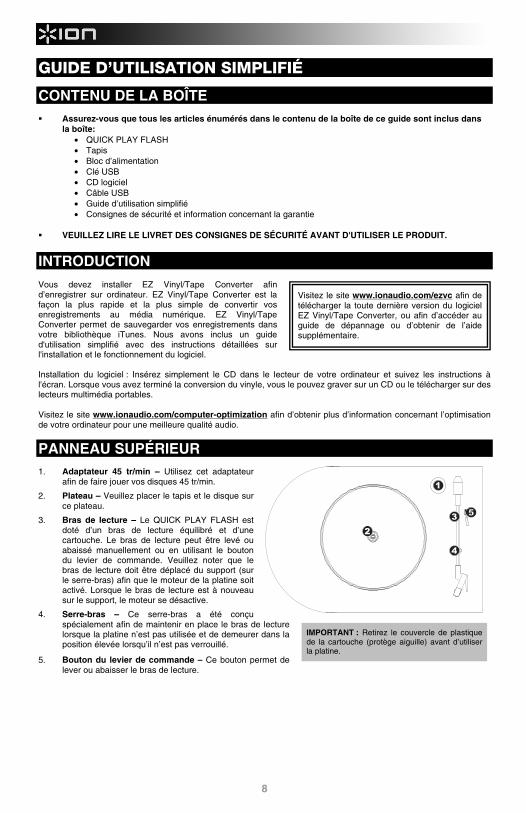
PANNEAU SUPÉRIEUR 1. Adaptateur 45 tr/min – Utilisez cet adaptateur
afin de faire jouer vos disques 45 tr/min.
2. Plateau – Veuillez placer le tapis et le disque sur ce plateau.
3. Bras de lecture – Le QUICK PLAY FLASH est doté d’un bras de lecture équilibré et d’une cartouche. Le bras de lecture peut être levé ou abaissé manuellement ou en utilisant le bouton du levier de commande. Veuillez noter que le bras de lecture doit être déplacé du support (sur le serre-bras) afin que le moteur de la platine soit activé. Lorsque le bras de lecture est à nouveau sur le support, le moteur se désactive.
4. Serre-bras – Ce serre-bras a été conçu spécialement afin de maintenir en place le bras de lecture lorsque la platine n’est pas utilisée et de demeurer dans la position élevée lorsqu’il n’est pas verrouillé.
5. Bouton du levier de commande – Ce bouton permet de lever ou abaisser le bras de lecture.
IMPORTANT : Retirez le couvercle de plastique de la cartouche (protège aiguille) avant d’utiliser la platine.
Visitez le site www.ionaudio.com/ezvc afin de télécharger la toute dernière version du logiciel EZ Vinyl/Tape Converter, ou afin d’accéder au guide de dépannage ou d’obtenir de l’aide supplémentaire.
9
* Vous pouvez ajuster la vitesse du plateau de la platine en serrant ou en desserrant la vis correspondante (sous le QUICK PLAY FLASH, il y a une vis pour chaque vitesse 33/45/78 tr/min) à l’aide d’un tournevis à pointe cruciforme standard.
PANNEAU AVANT
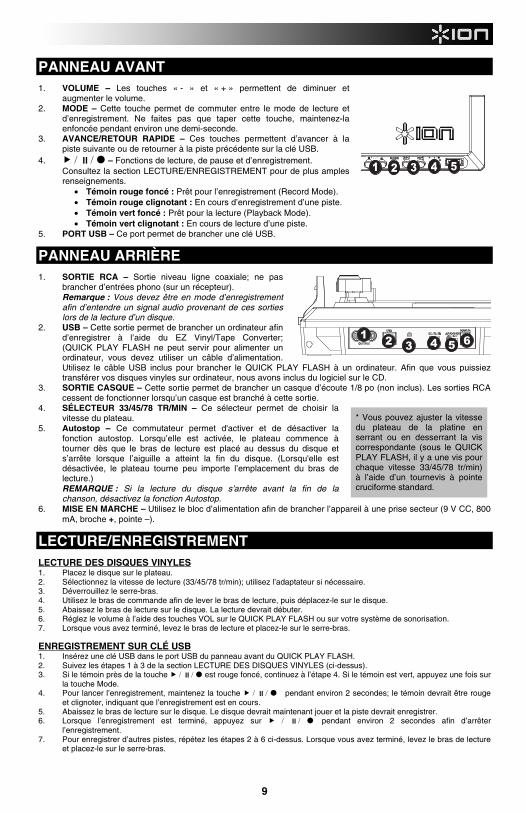
1. VOLUME – Les touches « - » et « + » permettent de diminuer et augmenter le volume.
2. MODE – Cette touche permet de commuter entre le mode de lecture et d’enregistrement. Ne faites pas que taper cette touche, maintenez-la enfoncée pendant environ une demi-seconde.
3. AVANCE/RETOUR RAPIDE – Ces touches permettent d’avancer à la piste suivante ou de retourner à la piste précédente sur la clé USB.
4. / / – Fonctions de lecture, de pause et d’enregistrement. Consultez la section LECTURE/ENREGISTREMENT pour de plus amples
renseignements. • Témoin rouge foncé : Prêt pour l’enregistrement (Record Mode). • Témoin rouge clignotant : En cours d’enregistrement d’une piste. • Témoin vert foncé : Prêt pour la lecture (Playback Mode). • Témoin vert clignotant : En cours de lecture d’une piste.
5. PORT USB – Ce port permet de brancher une clé USB.
PANNEAU ARRIÈRE
1. SORTIE RCA – Sortie niveau ligne coaxiale; ne pas brancher d’entrées phono (sur un récepteur).
Remarque : Vous devez être en mode d’enregistrement afin d’entendre un signal audio provenant de ces sorties lors de la lecture d’un disque.
2. USB – Cette sortie permet de brancher un ordinateur afin d’enregistrer à l’aide du EZ Vinyl/Tape Converter; (QUICK PLAY FLASH ne peut servir pour alimenter un ordinateur, vous devez utiliser un câble d’alimentation. Utilisez le câble USB inclus pour brancher le QUICK PLAY FLASH à un ordinateur. Afin que vous puissiez transférer vos disques vinyles sur ordinateur, nous avons inclus du logiciel sur le CD.
3. SORTIE CASQUE – Cette sortie permet de brancher un casque d’écoute 1/8 po (non inclus). Les sorties RCA cessent de fonctionner lorsqu’un casque est branché à cette sortie.
4. SÉLECTEUR 33/45/78 TR/MIN – Ce sélecteur permet de choisir la vitesse du plateau.
5. Autostop – Ce commutateur permet d'activer et de désactiver la fonction autostop. Lorsqu’elle est activée, le plateau commence à tourner dès que le bras de lecture est placé au dessus du disque et s’arrête lorsque l’aiguille a atteint la fin du disque. (Lorsqu'elle est désactivée, le plateau tourne peu importe l’emplacement du bras de lecture.) REMARQUE : Si la lecture du disque s'arrête avant la fin de la chanson, désactivez la fonction Autostop.
6. MISE EN MARCHE – Utilisez le bloc d’alimentation afin de brancher l’appareil à une prise secteur (9 V CC, 800 mA, broche +, pointe –).
LECTURE/ENREGISTREMENT
LECTURE DES DISQUES VINYLES 1. Placez le disque sur le plateau. 2. Sélectionnez la vitesse de lecture (33/45/78 tr/min); utilisez l’adaptateur si nécessaire. 3. Déverrouillez le serre-bras. 4. Utilisez le bras de commande afin de lever le bras de lecture, puis déplacez-le sur le disque. 5. Abaissez le bras de lecture sur le disque. La lecture devrait débuter. 6. Réglez le volume à l’aide des touches VOL sur le QUICK PLAY FLASH ou sur votre système de sonorisation. 7. Lorsque vous avez terminé, levez le bras de lecture et placez-le sur le serre-bras.
ENREGISTREMENT SUR CLÉ USB 1. Insérez une clé USB dans le port USB du panneau avant du QUICK PLAY FLASH. 2. Suivez les étapes 1 à 3 de la section LECTURE DES DISQUES VINYLES (ci-dessus). 3. Si le témoin près de la touche / / est rouge foncé, continuez à l’étape 4. Si le témoin est vert, appuyez une fois sur
la touche Mode. 4. Pour lancer l’enregistrement, maintenez la touche / / pendant environ 2 secondes; le témoin devrait être rouge
et clignoter, indiquant que l’enregistrement est en cours. 5. Abaissez le bras de lecture sur le disque. Le disque devrait maintenant jouer et la piste devrait enregistrer. 6. Lorsque l’enregistrement est terminé, appuyez sur / / pendant environ 2 secondes afin d’arrêter
l’enregistrement. 7. Pour enregistrer d’autres pistes, répétez les étapes 2 à 6 ci-dessus. Lorsque vous avez terminé, levez le bras de lecture
et placez-le sur le serre-bras.
1 2 3 4 5 6
MODE
1 2 3 4 5 / /
10
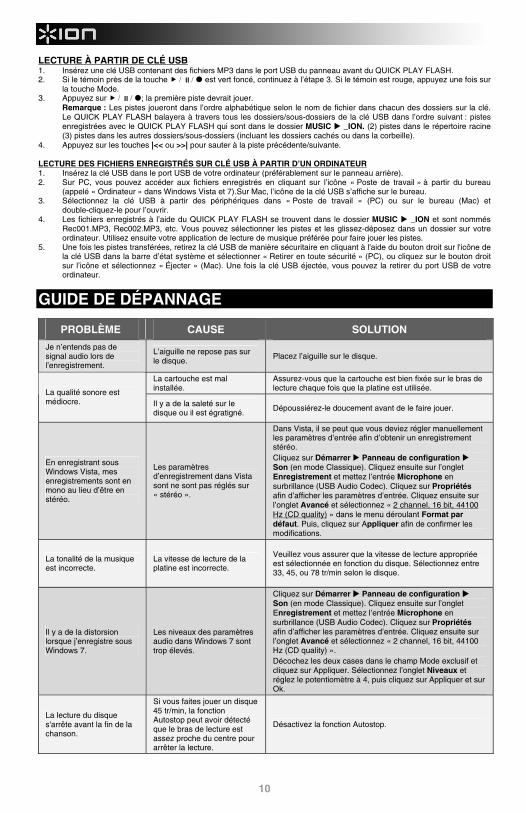
LECTURE À PARTIR DE CLÉ USB 1. Insérez une clé USB contenant des fichiers MP3 dans le port USB du panneau avant du QUICK PLAY FLASH. 2. Si le témoin près de la touche / / est vert foncé, continuez à l’étape 3. Si le témoin est rouge, appuyez une fois sur
la touche Mode. 3. Appuyez sur / / ; la première piste devrait jouer. Remarque : Les pistes joueront dans l’ordre alphabétique selon le nom de fichier dans chacun des dossiers sur la clé.
Le QUICK PLAY FLASH balayera à travers tous les dossiers/sous-dossiers de la clé USB dans l’ordre suivant : pistes enregistrées avec le QUICK PLAY FLASH qui sont dans le dossier MUSIC _ION. (2) pistes dans le répertoire racine (3) pistes dans les autres dossiers/sous-dossiers (incluant les dossiers cachés ou dans la corbeille).
4. Appuyez sur les touches |<< ou >>| pour sauter à la piste précédente/suivante. LECTURE DES FICHIERS ENREGISTRÉS SUR CLÉ USB À PARTIR D’UN ORDINATEUR 1. Insérez la clé USB dans le port USB de votre ordinateur (préférablement sur le panneau arrière). 2. Sur PC, vous pouvez accéder aux fichiers enregistrés en cliquant sur l’icône « Poste de travail » à partir du bureau
(appelé « Ordinateur » dans Windows Vista et 7).Sur Mac, l’icône de la clé USB s’affiche sur le bureau. 3. Sélectionnez la clé USB à partir des périphériques dans « Poste de travail » (PC) ou sur le bureau (Mac) et
double-cliquez-le pour l’ouvrir. 4. Les fichiers enregistrés à l’aide du QUICK PLAY FLASH se trouvent dans le dossier MUSIC _ION et sont nommés
Rec001.MP3, Rec002.MP3, etc. Vous pouvez sélectionner les pistes et les glissez-déposez dans un dossier sur votre ordinateur. Utilisez ensuite votre application de lecture de musique préférée pour faire jouer les pistes.
5. Une fois les pistes transférées, retirez la clé USB de manière sécuritaire en cliquant à l'aide du bouton droit sur l'icône de la clé USB dans la barre d’état système et sélectionner « Retirer en toute sécurité » (PC), ou cliquez sur le bouton droit sur l’icône et sélectionnez « Éjecter » (Mac). Une fois la clé USB éjectée, vous pouvez la retirer du port USB de votre ordinateur.
GUIDE DE DÉPANNAGE
PROBLÈME CAUSE SOLUTION
Je n’entends pas de signal audio lors de l’enregistrement.
L’aiguille ne repose pas sur le disque.
Placez l’aiguille sur le disque.
La cartouche est mal installée.
Assurez-vous que la cartouche est bien fixée sur le bras de lecture chaque fois que la platine est utilisée. La qualité sonore est
médiocre. Il y a de la saleté sur le disque ou il est égratigné.
Dépoussiérez-le doucement avant de le faire jouer.
En enregistrant sous Windows Vista, mes enregistrements sont en mono au lieu d’être en stéréo.
Les paramètres d’enregistrement dans Vista sont ne sont pas réglés sur « stéréo ».
Dans Vista, il se peut que vous deviez régler manuellement les paramètres d’entrée afin d’obtenir un enregistrement stéréo. Cliquez sur Démarrer Panneau de configuration Son (en mode Classique). Cliquez ensuite sur l’onglet Enregistrement et mettez l’entrée Microphone en surbrillance (USB Audio Codec). Cliquez sur Propriétés afin d’afficher les paramètres d’entrée. Cliquez ensuite sur l’onglet Avancé et sélectionnez « 2 channel, 16 bit, 44100 Hz (CD quality) » dans le menu déroulant Format par défaut. Puis, cliquez sur Appliquer afin de confirmer les modifications.
La tonalité de la musique est incorrecte.
La vitesse de lecture de la platine est incorrecte.
Veuillez vous assurer que la vitesse de lecture appropriée est sélectionnée en fonction du disque. Sélectionnez entre 33, 45, ou 78 tr/min selon le disque.
Il y a de la distorsion lorsque j’enregistre sous Windows 7.
Les niveaux des paramètres audio dans Windows 7 sont trop élevés.
Cliquez sur Démarrer Panneau de configuration Son (en mode Classique). Cliquez ensuite sur l’onglet Enregistrement et mettez l’entrée Microphone en surbrillance (USB Audio Codec). Cliquez sur Propriétés afin d’afficher les paramètres d’entrée. Cliquez ensuite sur l’onglet Avancé et sélectionnez « 2 channel, 16 bit, 44100 Hz (CD quality) ». Décochez les deux cases dans le champ Mode exclusif et cliquez sur Appliquer. Sélectionnez l’onglet Niveaux et réglez le potentiomètre à 4, puis cliquez sur Appliquer et sur Ok.
La lecture du disque s'arrête avant la fin de la chanson.
Si vous faites jouer un disque 45 tr/min, la fonction Autostop peut avoir détecté que le bras de lecture est assez proche du centre pour arrêter la lecture.
Désactivez la fonction Autostop.
11
2
7
55
4
73
1
GUIDA RAPIDA
CONTENUTI DELLA CONFEZIONE Assicurarsi che gli elementi elencati di seguito siano contenuti nella confezione:
• QUICK PLAY FLASH
• Tappentino
• Adattatore di alimentazione
• Flash Drive USB
• CD recante il software
• Cavo USB
• Guida rapida
• Istruzioni di sicurezza e garanzia LEGGERE ATTENTAMENTE IL LIBRETTO DI ISTRUZIONI PRIMA DI UTILIZZARE IL PRODOTTO
INTRODUZIONE Sarà necessario installare EZ Vinyl/Tape Converter per sfruttare la registrazione su computer. EZ Vinyl/Tape Converter è il modo più facile e veloce di trasformare le vostre registrazioni in media digitali. EZ Vinyl/Tape Converter salva comodamente le vostre registrazioni nella libreria iTunes. Abbiamo allegato una comoda Guida Rapida con istruzioni passo passo circa l’installazione e l’uso del software. Per installare il software: inserire il CD in dotazione nel computer e seguire le istruzioni da schermo. Una volta terminato di convertire il vinile, lo si può masterizzare su un CD o caricare su dispositivi media portatili. Recarsi alla pagina www.ionaudio.com/computer-optimization per maggiori informazioni su come ottimizzare il computer per l’audio.
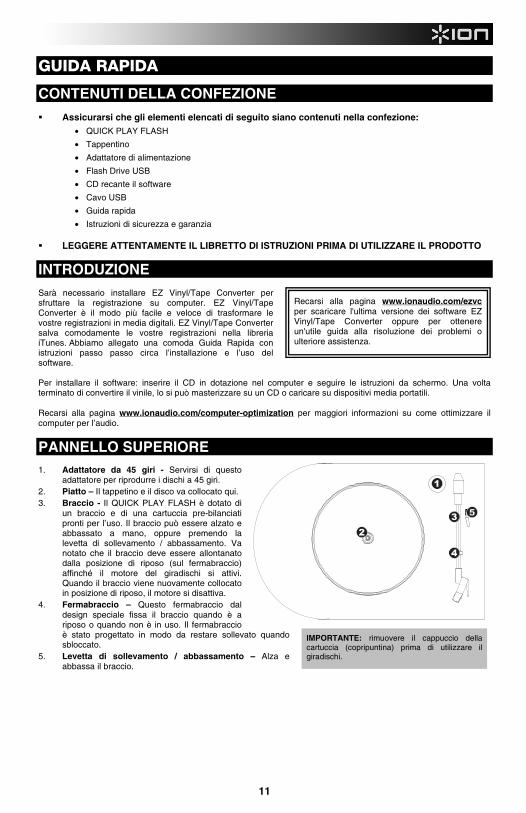
PANNELLO SUPERIORE 1. Adattatore da 45 giri - Servirsi di questo
adattatore per riprodurre i dischi a 45 giri. 2. Piatto – Il tappetino e il disco va collocato qui. 3. Braccio - Il QUICK PLAY FLASH è dotato di
un braccio e di una cartuccia pre-bilanciati pronti per l’uso. Il braccio può essere alzato e abbassato a mano, oppure premendo la levetta di sollevamento / abbassamento. Va notato che il braccio deve essere allontanato dalla posizione di riposo (sul fermabraccio) affinché il motore del giradischi si attivi. Quando il braccio viene nuovamente collocato in posizione di riposo, il motore si disattiva.
4. Fermabraccio – Questo fermabraccio dal design speciale fissa il braccio quando è a riposo o quando non è in uso. Il fermabraccio è stato progettato in modo da restare sollevato quando sbloccato.
5. Levetta di sollevamento / abbassamento – Alza e abbassa il braccio.
IMPORTANTE: rimuovere il cappuccio della cartuccia (copripuntina) prima di utilizzare il giradischi.
Recarsi alla pagina www.ionaudio.com/ezvc per scaricare l'ultima versione dei software EZ Vinyl/Tape Converter oppure per ottenere un'utile guida alla risoluzione dei problemi o ulteriore assistenza.
12
* Se necessario, è possibile regolare la velocità del piatto del giradischi stringendo / allentando la vite adeguata (vi sono viti distinte per l'uso a 33/45/78 giri sul lato inferiore del QUICK PLAY FLASH) servendosi di un cacciavite standard a croce.
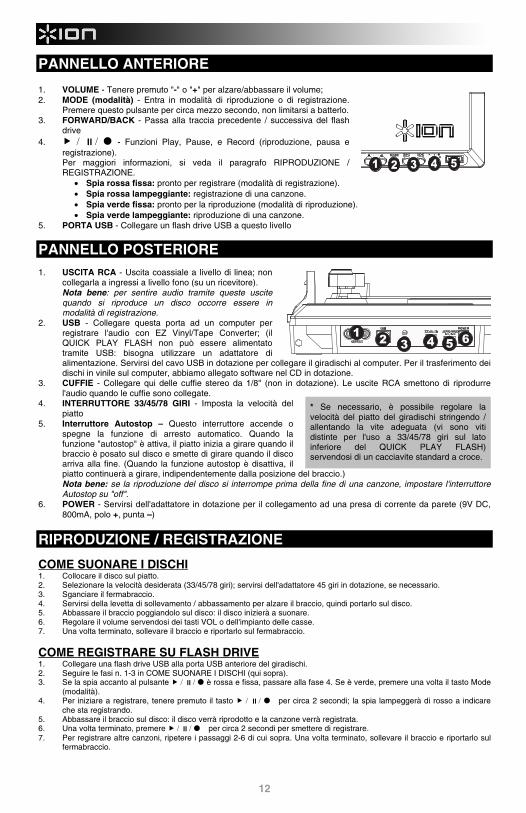
PANNELLO ANTERIORE 1. VOLUME - Tenere premuto "-" o "+" per alzare/abbassare il volume; 2. MODE (modalità) - Entra in modalità di riproduzione o di registrazione.
Premere questo pulsante per circa mezzo secondo, non limitarsi a batterlo. 3. FORWARD/BACK - Passa alla traccia precedente / successiva del flash
drive 4. / / - Funzioni Play, Pause, e Record (riproduzione, pausa e
registrazione). Per maggiori informazioni, si veda il paragrafo RIPRODUZIONE / REGISTRAZIONE.
• Spia rossa fissa: pronto per registrare (modalità di registrazione). • Spia rossa lampeggiante: registrazione di una canzone. • Spia verde fissa: pronto per la riproduzione (modalità di riproduzione). • Spia verde lampeggiante: riproduzione di una canzone.
5. PORTA USB - Collegare un flash drive USB a questo livello
PANNELLO POSTERIORE 1. USCITA RCA - Uscita coassiale a livello di linea; non
collegarla a ingressi a livello fono (su un ricevitore). Nota bene: per sentire audio tramite queste uscite
quando si riproduce un disco occorre essere in modalità di registrazione.
2. USB - Collegare questa porta ad un computer per registrare l'audio con EZ Vinyl/Tape Converter; (il QUICK PLAY FLASH non può essere alimentato tramite USB: bisogna utilizzare un adattatore di alimentazione. Servirsi del cavo USB in dotazione per collegare il giradischi al computer. Per il trasferimento dei dischi in vinile sul computer, abbiamo allegato software nel CD in dotazione.
3. CUFFIE - Collegare qui delle cuffie stereo da 1/8" (non in dotazione). Le uscite RCA smettono di riprodurre l'audio quando le cuffie sono collegate.
4. INTERRUTTORE 33/45/78 GIRI - Imposta la velocità del piatto
5. Interruttore Autostop – Questo interruttore accende o spegne la funzione di arresto automatico. Quando la funzione "autostop" è attiva, il piatto inizia a girare quando il braccio è posato sul disco e smette di girare quando il disco arriva alla fine. (Quando la funzione autostop è disattiva, il piatto continuerà a girare, indipendentemente dalla posizione del braccio.) Nota bene: se la riproduzione del disco si interrompe prima della fine di una canzone, impostare l'interruttore Autostop su "off".
6. POWER - Servirsi dell'adattatore in dotazione per il collegamento ad una presa di corrente da parete (9V DC, 800mA, polo +, punta –)
RIPRODUZIONE / REGISTRAZIONE
COME SUONARE I DISCHI 1. Collocare il disco sul piatto. 2. Selezionare la velocità desiderata (33/45/78 giri); servirsi dell'adattatore 45 giri in dotazione, se necessario. 3. Sganciare il fermabraccio. 4. Servirsi della levetta di sollevamento / abbassamento per alzare il braccio, quindi portarlo sul disco. 5. Abbassare il braccio poggiandolo sul disco: il disco inizierà a suonare. 6. Regolare il volume servendosi dei tasti VOL o dell'impianto delle casse. 7. Una volta terminato, sollevare il braccio e riportarlo sul fermabraccio.
COME REGISTRARE SU FLASH DRIVE 1. Collegare una flash drive USB alla porta USB anteriore del giradischi. 2. Seguire le fasi n. 1-3 in COME SUONARE I DISCHI (qui sopra). 3. Se la spia accanto al pulsante / / è rossa e fissa, passare alla fase 4. Se è verde, premere una volta il tasto Mode
(modalità). 4. Per iniziare a registrare, tenere premuto il tasto / / per circa 2 secondi; la spia lampeggerà di rosso a indicare
che sta registrando. 5. Abbassare il braccio sul disco: il disco verrà riprodotto e la canzone verrà registrata. 6. Una volta terminato, premere / / per circa 2 secondi per smettere di registrare. 7. Per registrare altre canzoni, ripetere i passaggi 2-6 di cui sopra. Una volta terminato, sollevare il braccio e riportarlo sul
fermabraccio.
1 2 3 4 5 6
MODE
1 2 3 4 5 / /
13
COME RIPRODURRE MUSICA DA UN FLASH DRIVE 1. Collegare un drive flash USB recante MP3 alla porta USB anteriore del giradischi. 2. Se la spia accanto al pulsante / / è verde e fissa, passare alla fase 3. Se è rossa, premere una volta il tasto Mode
(modalità). 3. Premere / / : la prima canzone inizierà a suonare. Nota bene: le canzoni verranno riprodotte in ordine alfabetico in base al nome del file contenuto in ciascuna cartella del
drive. Il QUICK PLAY FLASH effettuerà una scansione delle cartelle / sottocartelle del drive alla ricerca di file musicali riproducibili nel seguente ordine: (1) canzoni registrate dal giradischi contenute nella cartella MUSIC _ION (2) canzoni contenute nella cartella principale (3) canzoni contenute in altre cartelle / sottocartelle (incluse cartelle nascoste o la cartella cestino)
4. Premere |<< or >>| per passare alla canzone precedente / successiva.
COME ACCEDERE A MUSICA REGISTRATA SU FLASH DRIVE PRESENTE SUL COMPUTER 1. Collegare il drive flash USB ad una porta USB libera del computer (preferibilmente una del pannello posteriore del
computer). 2. Su PC, è possibile accedere al drive flash aprendo l'icona Il mio Computer sul desktop (denominata ‘Computer’ in
Windows Vista e Windows 7). Su Mac, l'icona del drive flash USB apparirà sul desktop. 3. Selezionare il drive flash USB dall'elenco di drive in Computer (PC) o sul desktop (Mac) e fare doppio clic per aprire il
drive. 4. I file rgistrati servendosi di QUICK PLAY FLASH si trovano nella cartella MUSIC _ION e saranno intitolati
"Rec001.MP3”, "Rec002.MP3, ecc. Si possono quindi selezionare e trascinare le canzoni desiderate in una cartella presente sul computer. Servirsi quindi del proprio lettore MP3 preferito per riprodurre le canzoni.
5. Dopo aver trasferito le canzoni, per rimuovere il drive USB in maniera sicura, fare clic col pulsante destro del mouse sull'icona del drive nella barra di sistema e selezionare l'opzione di “rimozione sicura” del drive (PC), oppure fare clic col pulsante destro del mouse (Ctrl+click) sull'icona del drive sul desktop e selezionare ‘Espelli’ (Mac). Una volta espulso il drive, si può rimuovere il drive flash USB dalla porta USB del computer.
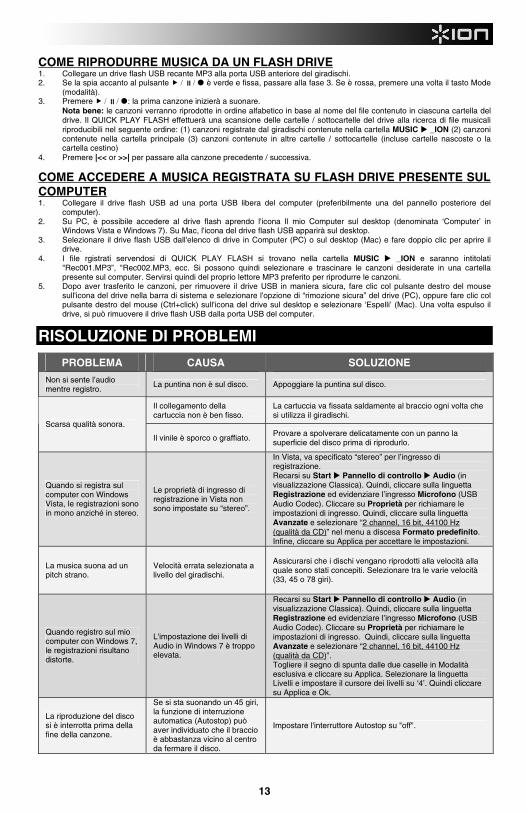
RISOLUZIONE DI PROBLEMI
PROBLEMA CAUSA SOLUZIONE
Non si sente l’audio mentre registro.
La puntina non è sul disco. Appoggiare la puntina sul disco.
Il collegamento della cartuccia non è ben fisso.
La cartuccia va fissata saldamente al braccio ogni volta che si utilizza il giradischi.
Scarsa qualità sonora.
Il vinile è sporco o graffiato. Provare a spolverare delicatamente con un panno la superficie del disco prima di riprodurlo.
Quando si registra sul computer con Windows Vista, le registrazioni sono in mono anziché in stereo.
Le proprietà di ingresso di registrazione in Vista non sono impostate su “stereo”.
In Vista, va specificato “stereo” per l’ingresso di registrazione. Recarsi su Start Pannello di controllo Audio (in visualizzazione Classica). Quindi, cliccare sulla linguetta Registrazione ed evidenziare l’ingresso Microfono (USB Audio Codec). Cliccare su Proprietà per richiamare le impostazioni di ingresso. Quindi, cliccare sulla linguetta Avanzate e selezionare “2 channel, 16 bit, 44100 Hz (qualità da CD)” nel menu a discesa Formato predefinito. Infine, cliccare su Applica per accettare le impostazioni.
La musica suona ad un pitch strano.
Velocità errata selezionata a livello del giradischi.
Assicurarsi che i dischi vengano riprodotti alla velocità alla quale sono stati concepiti. Selezionare tra le varie velocità (33, 45 o 78 giri).
Quando registro sul mio computer con Windows 7, le registrazioni risultano distorte.
L'impostazione dei livelli di Audio in Windows 7 è troppo elevata.
Recarsi su Start Pannello di controllo Audio (in visualizzazione Classica). Quindi, cliccare sulla linguetta Registrazione ed evidenziare l’ingresso Microfono (USB Audio Codec). Cliccare su Proprietà per richiamare le impostazioni di ingresso. Quindi, cliccare sulla linguetta Avanzate e selezionare “2 channel, 16 bit, 44100 Hz (qualità da CD)”. Togliere il segno di spunta dalle due caselle in Modalità esclusiva e cliccare su Applica. Selezionare la linguetta Livelli e impostare il cursore dei livelli su ‘4’. Quindi cliccare su Applica e Ok.
La riproduzione del disco si è interrotta prima della fine della canzone.
Se si sta suonando un 45 giri, la funzione di interruzione automatica (Autostop) può aver individuato che il braccio è abbastanza vicino al centro da fermare il disco.
Impostare l'interruttore Autostop su "off".
14
2
7
55
4
73
1
SCHNELLSTART-ANLEITUNG
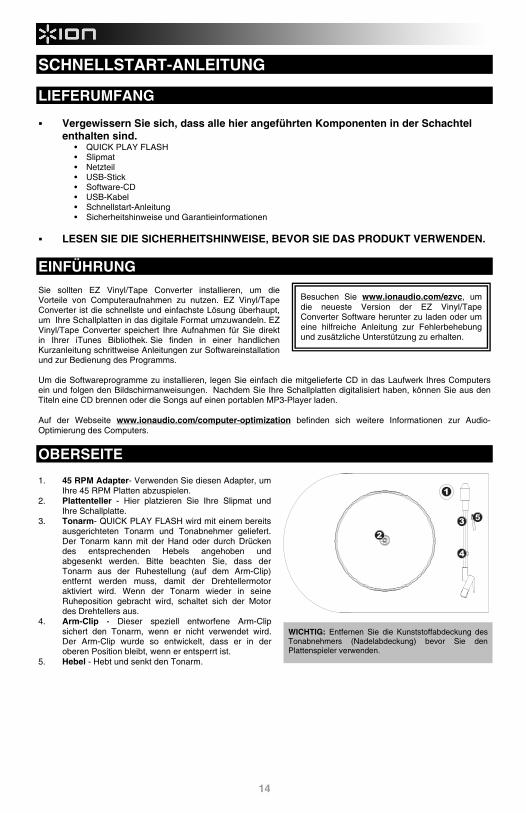
LIEFERUMFANG Vergewissern Sie sich, dass alle hier angeführten Komponenten in der Schachtel
enthalten sind. • QUICK PLAY FLASH • Slipmat • Netzteil • USB-Stick • Software-CD • USB-Kabel • Schnellstart-Anleitung • Sicherheitshinweise und Garantieinformationen
LESEN SIE DIE SICHERHEITSHINWEISE, BEVOR SIE DAS PRODUKT VERWENDEN.
EINFÜHRUNG Sie sollten EZ Vinyl/Tape Converter installieren, um die Vorteile von Computeraufnahmen zu nutzen. EZ Vinyl/Tape Converter ist die schnellste und einfachste Lösung überhaupt, um Ihre Schallplatten in das digitale Format umzuwandeln. EZ Vinyl/Tape Converter speichert Ihre Aufnahmen für Sie direkt in Ihrer iTunes Bibliothek. Sie finden in einer handlichen Kurzanleitung schrittweise Anleitungen zur Softwareinstallation und zur Bedienung des Programms. Um die Softwareprogramme zu installieren, legen Sie einfach die mitgelieferte CD in das Laufwerk Ihres Computers ein und folgen den Bildschirmanweisungen. Nachdem Sie Ihre Schallplatten digitalisiert haben, können Sie aus den Titeln eine CD brennen oder die Songs auf einen portablen MP3-Player laden. Auf der Webseite www.ionaudio.com/computer-optimization befinden sich weitere Informationen zur Audio-Optimierung des Computers.
OBERSEITE 1. 45 RPM Adapter- Verwenden Sie diesen Adapter, um
Ihre 45 RPM Platten abzuspielen. 2. Plattenteller - Hier platzieren Sie Ihre Slipmat und
Ihre Schallplatte. 3. Tonarm- QUICK PLAY FLASH wird mit einem bereits
ausgerichteten Tonarm und Tonabnehmer geliefert. Der Tonarm kann mit der Hand oder durch Drücken des entsprechenden Hebels angehoben und abgesenkt werden. Bitte beachten Sie, dass der Tonarm aus der Ruhestellung (auf dem Arm-Clip) entfernt werden muss, damit der Drehtellermotor aktiviert wird. Wenn der Tonarm wieder in seine Ruheposition gebracht wird, schaltet sich der Motor des Drehtellers aus.
4. Arm-Clip - Dieser speziell entworfene Arm-Clip sichert den Tonarm, wenn er nicht verwendet wird. Der Arm-Clip wurde so entwickelt, dass er in der oberen Position bleibt, wenn er entsperrt ist.
5. Hebel - Hebt und senkt den Tonarm.
WICHTIG: Entfernen Sie die Kunststoffabdeckung des Tonabnehmers (Nadelabdeckung) bevor Sie den Plattenspieler verwenden.
Besuchen Sie www.ionaudio.com/ezvc, um die neueste Version der EZ Vinyl/Tape Converter Software herunter zu laden oder um eine hilfreiche Anleitung zur Fehlerbehebung und zusätzliche Unterstützung zu erhalten.

15
VORDERSEITE 1. VOLUME - halten Sie die "-" oder "+"-Taste gedrückt, um die Lautstärke zu
erhöhen/verringern; 2. MODUS - Um in den Wiedergabe- oder Aufnahme-Modus zu gelangen.
Drücken Sie diese Taste fest für etwa eine halbe Sekunde - tippen Sie nicht nur drauf.
3. VOR/ZURÜCK - Springt zum vorherigen/nächsten Titel am USB-Stick 4. / / - Wiedergabe-, Pause- und Aufnahme-Funktionen.
Siehe WIEDERGABE/AUFNAHME für weitere Informationen. • Stetes rotes Licht: Bereit zur Aufnahme (Aufnahmemodus). • Blinkendes rotes Licht: Aufnahme eines Songs. • Stetes grünes Licht: Bereit für die Wiedergabe (Wiedergabe-Modus). • Blinkendes grünes Licht: Wiedergabe eines Songs.
5. USB BUCHSE - verbinden Sie hier den USB-Stick
RÜCKSEITE 1. RCA- AUSGANG - Line-Level Koaxial-Ausgang;
Verbinden Sie diesen Ausgang nicht mit Phono-Eingängen (auf einem Empfänger). Hinweis: Sie müssen im Aufnahme-Modus sein, um einen Ton über diese Ausgänge beim Abspielen einer Platte zu hören.
2. USB - Verbindung zu einem Computer, um Audio mit EZ Vinyl/Tape Converter aufzunehmen; (QUICK PLAY FLASH kann nicht über USB mit Strom versorgt werden, dies muss mit einem Netzteil geschehen). Schließen Sie Ihren Plattenspieler mit dem mitgelieferten USB-Kabel an Ihren Computer an. Für das Übertragen von Ihren Schallplatten auf Ihren Computer haben wir Software auf der beiliegenden CD für Sie vorbereitet.
3. KOPFHÖRER - Verbinden Sie hier 1/8"-Stereo-Kopfhörer (nicht enthalten). Die RCA-Ausgänge stellen die Audiowiedergabe ein, sobald Kopfhörer angeschlossen sind.
4. 33/45/78 RPM-SCHALTER - Regelt die Geschwindigkeit des Plattentellers.
5. Autostop-Schalter - Dieser Schalter schaltet Autostop an oder aus. Wenn Autostop eingeschaltet ist, wird der Plattenteller zu rotieren beginnen, sobald der Tonarm über die Schallplatte gelegt wird und stoppen, wenn die Platte das Ende erreicht hat. (Wenn Autostop ausgeschaltet ist, wird sich der Plattenteller immer und unabhängig von der Position des Tonarms drehen.) Hinweis: Wenn Ihre Platte stoppt, bevor das Lied fertig abgespielt wurde, stellen Sie den Autostop-Schalter auf "Aus"
6. POWER - Verwenden Sie den mitgelieferten Adapter, um ihn mit einer Steckdose zu verbinden (9V DC, 800mA, Pin +, Spitze -)
WIEDERGABE/AUFNAHME
SO SPIELEN SIE IHRE SCHALLPLATTEN AB 1. Legen Sie die Schallplatte auf den Teller. 2. Wählen Sie die Geschwindigkeit (33/45/78 RPM); Verwenden Sie den beiliegenden 45 RPM Adapter, wenn nötig. 3. Lösen Sie den Arm-Clip. 4. Verwenden Sie den Hebel, um den Tonarm anzuheben. Platzieren Sie ihn dann oberhalb der Schallplatte. 5. Senken Sie den Tonarm auf die Platte; Die Platte wird nun abgespielt. 6. Stellen Sie die Lautstärke mit den VOL-Tasten oder Ihrem Lautsprechersystem ein. 7. Wenn Sie fertig sind, heben Sie den Tonarm und bringen ihn wieder in die Ruheposition im Arm-Clip.
SO NEHMEN SIE AUF EINEN USB-STICK AUF 1. Schließen Sie einen USB-Stick an den vorderen USB-Port des Plattenspielers an. 2. Befolgen Sie die Schritte #1-3 im Abschnitt SO SPIELEN SIE IHRE SCHALLPLATTEN AB (siehe oben). 3. Wenn das Licht neben der / / Taste stetig rot leuchtet, fahren Sie mit Schritt 4 fort. Wenn es grün leuchtet,
drücken Sie einmal die Modus-Taste. 4. Um die Aufnahme zu starten, halten Sie die / / •ca. 2 Sekunden lang gedrückt; Das Licht wird rot blinken, um
anzuzeigen, dass aufgenommen wird. 5. Senken Sie den Tonarm auf die Schallplatte ab; Die Platte wird abgespielt und der Song wird aufgezeichnet. 6. Wenn Sie fertig sind, drücken Sie ca. 2 Sekunden lang / / , um die Aufnahme zu stoppen. 7. Um weitere Songs aufzunehmen, wiederholen Sie die oben angegebenen Schritte #2-6. Wenn Sie fertig sind, heben Sie
den Tonarm und bringen ihn wieder in die Ruheposition im Arm-Clip.
MODE
1 2 3 4 5 / /
1 2 3 4 5 6
* Bei Bedarf können Sie die Geschwindigkeit des Plattentellers durch Anziehen/Lockern der entsprechenden Schraube (an der Unterseite der QUICK PLAY FLASH) mithilfe eines herkömmlichen Kreuzschlitzschraubendrehers anpassen.

16
SO SPIELEN SIE SONGS VOM USB-STICK AB 1. Schließen Sie einen USB-Stick mit MP3 an den vorderen USB-Port des Plattenspielers an. 2. Wenn das Licht neben der / / Taste konstant grün leuchtet, fahren Sie mit Schritt 3 fort. Wenn es rot leuchtet,
drücken Sie einmal die Modus-Taste. 3. Drücken Sie / / ; Der erste Song wird abgespielt.
Hinweis: Songs werden in jedem Laufwerksordner nach alphabetischer Reihenfolge der Dateinamen abgespielt. QUICK PLAY FLASH durchsucht die Ordner/Unterordner des Laufwerks nach abspielbaren Musik-Dateien in der folgenden Reihenfolge: (1) Songs, die vom Plattenspieler aufgenommen wurden und sich im Order MUSIC _ION befinden. (2) Songs im Root-Verzeichnis (3) Songs in anderen Ordnern/Unterordnern (einschließlich aller versteckter Ordner und des Papierkorbs)
4. Drücken Sie| << oder >>||, um zum vorherigen/nächsten Titel zu springen.
SO GREIFEN SIE VON IHREM COMPUTER AUF MUSIK ZU, DIE MIT EINEM USB-GERÄT AUFGENOMMEN WURDE 1. Verbinden Sie den USB-Stick mit einem freien USB-Port Ihres Computers (vorzugsweise auf der Rückseite des
Computers). 2. Auf einem PC können Sie auf Ihren USB-Stick zugreifen, indem Sie das Arbeitsplatz-Symbol auf Ihrem Desktop öffnen
(in Windows Vista und Windows 7 heisst es "Computer"). Auf einem Mac wird das USB-Stick-Symbol am Desktop erscheinen.
3. Wählen Sie Ihren USB-Stick aus der Liste der Laufwerke am Arbeitsplatz (PC) oder auf dem Desktop (Mac) aus. Mit einem Doppelklick öffnen Sie das Laufwerk.
4. Die Dateien, die Sie mit dem QUICK PLAY FLASH aufgenommen haben, finden Sie im Ordner MUSIC _ION. Sie werden mit "Rec001.MP3”, "Rec002.MP3 etc. benannt sein. Sie können dann Ihre Songs wählen und diese in einen Ordner auf Ihrem Computer ziehen. Anschließend verwenden Sie Ihre Lieblings-MP3-Software zum Abspielen der Songs.
5. Nachdem Sie Ihre Songs übertragen haben, entfernen Sie den USB-Stick sicher, indem Sie mit der rechten Maustaste auf das Laufwerk-Symbol in der Taskleiste klicken und die Option Laufwerk (PC) "sicher entfernen" wählen oder mit der rechten Maustaste (Ctrl + Mausklick) auf das Laufwerk-Symbol am Desktop klicken und "Auswerfen" (Mac) wählen. Sobald das Laufwerk entfernt wurde, können Sie den USB-Stick vom USB-Port entfernen.
FEHLERBEHEBUNG
PROBLEM URSACHE LÖSUNG
Ich höre bei der Aufnahme keinen Ton.
Die Nadel liegt nicht auf der Platte auf.
Setzen Sie die Nadel auf die Schallplatte auf.
Die Tonabnehmerverbindung ist instabil.
Der Tonabnehmer muss fest am Tonarm sitzen, wenn Sie den Plattenspieler verwenden. Die Klangqualität ist
schlecht. Die Schallplatte ist schmutzig oder zerkratzt.
Versuchen Sie vor dem Abspielen die Oberfläche der Platte mit einem antistatischen Tuch vorsichtig abzuwischen.
Bei der Aufnahme mit meinem Computer unter Windows Vista sind meine Aufnahmen in Mono statt in Stereo.
Die Aufnahmeeinstellungen in Vista sind nicht auf "Stereo" eingestellt.
In Vista müssen Sie die Option "Stereo" beim Aufnahme-Eingang möglicherweise manuell festlegen. Wählen Sie Start Systemsteuerung Sound (in der klassischen Ansicht). Klicken Sie dann auf die Registerkarte Aufnahme und markieren Sie den Mikrofon-Eingang (USB Audio Codec). Klicken Sie auf Eigenschaften, um die Eingangs-Einstellungen aufzurufen. Klicken Sie anschließend auf die Registerkarte Erweitert und wählen Sie "2-Kanal, 16 Bit, 44100 Hz (CD Qualität)" im Pulldown-Menü Standardformat. Schließlich klicken Sie auf Anwenden, um die Einstellungen anzuwenden.
Meine Musik wird in einer ungewöhnlichen Tonhöhe abgespielt.
Die am Plattenspieler gewählte Geschwindigkeit ist falsch eingestellt.
Stellen Sie sicher, dass Sie Ihre Platten mit der vorgesehenen Geschwindigkeit abspielen. Wählen Sie zwischen verschiedenen Geschwindigkeiten (33, 45 oder 78 RPM).
Bei der Aufnahme mit meinem Computer unter Windows 7 klingen meine Aufnahmen verzerrt.
Die Lautstärke der Windows 7 Audioeinstellungen ist zu hoch eingestellt
Wählen Sie Start Systemsteuerung Sound (in der klassischen Ansicht). Klicken Sie dann auf die Registerkarte Aufnahme und markieren Sie den Mikrofon-Eingang (USB Audio Codec). Klicken Sie auf Eigenschaften, um die Eingangs-Einstellungen aufzurufen. Klicken Sie anschließend auf die Registerkarte Erweitert und wählen Sie "2-Kanal, 16 Bit, 44100 Hz (CD Qualität)" Deaktivieren Sie die beiden Kästchen in Exklusiv-Modus und klicken Sie auf Anwenden. Wählen Sie die Registerkarte Pegel und stellen Sie den Schieberegler auf '4'. Klicken Sie dann auf Übernehmen und OK.
Meine Platte stoppte bevor sie das Ende des Liedes erreicht hat.
Wenn Sie eine 45RPM-Platte spielen, kann es sein, dass die Autostop-Funktion die Nähe des Tonarms zum Mittelpunkt erkannt hat und so die Platte gestoppt hat.
Stellen Sie den Autostop-Schalter auf "Aus".
17
2
7
55
4
73
1
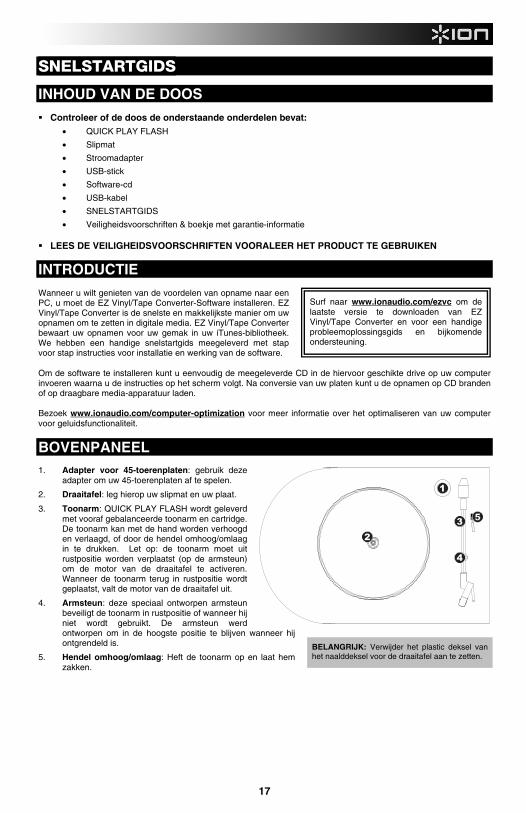
SNELSTARTGIDS
INHOUD VAN DE DOOS Controleer of de doos de onderstaande onderdelen bevat:
• QUICK PLAY FLASH
• Slipmat
• Stroomadapter
• USB-stick
• Software-cd
• USB-kabel
• SNELSTARTGIDS
• Veiligheidsvoorschriften & boekje met garantie-informatie
LEES DE VEILIGHEIDSVOORSCHRIFTEN VOORALEER HET PRODUCT TE GEBRUIKEN
INTRODUCTIE Wanneer u wilt genieten van de voordelen van opname naar een PC, u moet de EZ Vinyl/Tape Converter-Software installeren. EZ Vinyl/Tape Converter is de snelste en makkelijkste manier om uw opnamen om te zetten in digitale media. EZ Vinyl/Tape Converter bewaart uw opnamen voor uw gemak in uw iTunes-bibliotheek. We hebben een handige snelstartgids meegeleverd met stap voor stap instructies voor installatie en werking van de software. Om de software te installeren kunt u eenvoudig de meegeleverde CD in de hiervoor geschikte drive op uw computer invoeren waarna u de instructies op het scherm volgt. Na conversie van uw platen kunt u de opnamen op CD branden of op draagbare media-apparatuur laden. Bezoek www.ionaudio.com/computer-optimization voor meer informatie over het optimaliseren van uw computer voor geluidsfunctionaliteit.
BOVENPANEEL 1. Adapter voor 45-toerenplaten: gebruik deze
adapter om uw 45-toerenplaten af te spelen.
2. Draaitafel: leg hierop uw slipmat en uw plaat.
3. Toonarm: QUICK PLAY FLASH wordt geleverd met vooraf gebalanceerde toonarm en cartridge. De toonarm kan met de hand worden verhoogd en verlaagd, of door de hendel omhoog/omlaag in te drukken. Let op: de toonarm moet uit rustpositie worden verplaatst (op de armsteun) om de motor van de draaitafel te activeren. Wanneer de toonarm terug in rustpositie wordt geplaatst, valt de motor van de draaitafel uit.
4. Armsteun: deze speciaal ontworpen armsteun beveiligt de toonarm in rustpositie of wanneer hij niet wordt gebruikt. De armsteun werd ontworpen om in de hoogste positie te blijven wanneer hij ontgrendeld is.
5. Hendel omhoog/omlaag: Heft de toonarm op en laat hem zakken.
BELANGRIJK: Verwijder het plastic deksel van het naalddeksel voor de draaitafel aan te zetten.
Surf naar www.ionaudio.com/ezvc om de laatste versie te downloaden van EZ Vinyl/Tape Converter en voor een handige probleemoplossingsgids en bijkomende ondersteuning.
18
* U kunt indien nodig de snelheid van de draaitafel aanpassen door de gepaste schroef vaster/losser te draaien (onderaan de QUICK PLAY FLASH zijn er aparte schroeven voor 33/45/78 toeren per minuut) met een standaard kruiskopschroevendraaier.
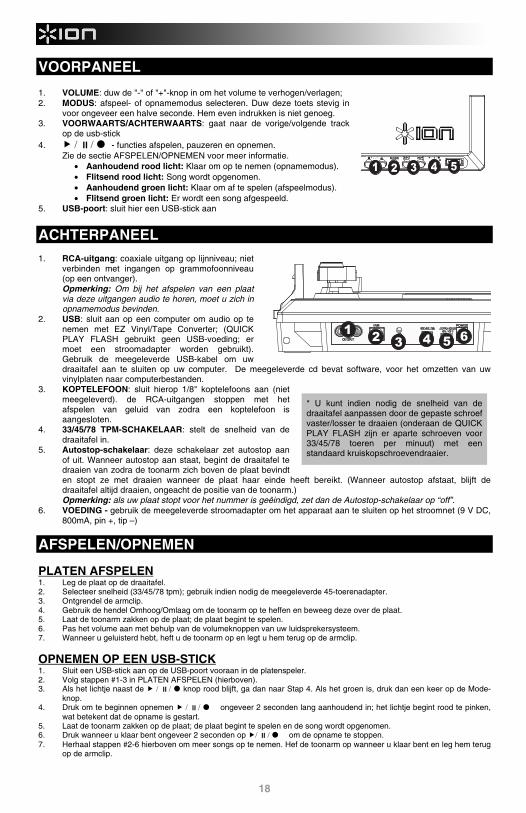
VOORPANEEL 1. VOLUME: duw de "-" of "+"-knop in om het volume te verhogen/verlagen; 2. MODUS: afspeel- of opnamemodus selecteren. Duw deze toets stevig in
voor ongeveer een halve seconde. Hem even indrukken is niet genoeg. 3. VOORWAARTS/ACHTERWAARTS: gaat naar de vorige/volgende track
op de usb-stick 4. / / - functies afspelen, pauzeren en opnemen.
Zie de sectie AFSPELEN/OPNEMEN voor meer informatie. • Aanhoudend rood licht: Klaar om op te nemen (opnamemodus). • Flitsend rood licht: Song wordt opgenomen. • Aanhoudend groen licht: Klaar om af te spelen (afspeelmodus). • Flitsend groen licht: Er wordt een song afgespeeld.
5. USB-poort: sluit hier een USB-stick aan
ACHTERPANEEL 1. RCA-uitgang: coaxiale uitgang op lijnniveau; niet
verbinden met ingangen op grammofoonniveau (op een ontvanger). Opmerking: Om bij het afspelen van een plaat via deze uitgangen audio te horen, moet u zich in opnamemodus bevinden.
2. USB: sluit aan op een computer om audio op te nemen met EZ Vinyl/Tape Converter; (QUICK PLAY FLASH gebruikt geen USB-voeding; er moet een stroomadapter worden gebruikt). Gebruik de meegeleverde USB-kabel om uw draaitafel aan te sluiten op uw computer. De meegeleverde cd bevat software, voor het omzetten van uw vinylplaten naar computerbestanden.
3. KOPTELEFOON: sluit hierop 1/8" koptelefoons aan (niet meegeleverd). de RCA-uitgangen stoppen met het afspelen van geluid van zodra een koptelefoon is aangesloten.
4. 33/45/78 TPM-SCHAKELAAR: stelt de snelheid van de draaitafel in.
5. Autostop-schakelaar: deze schakelaar zet autostop aan of uit. Wanneer autostop aan staat, begint de draaitafel te draaien van zodra de toonarm zich boven de plaat bevindt en stopt ze met draaien wanneer de plaat haar einde heeft bereikt. (Wanneer autostop afstaat, blijft de draaitafel altijd draaien, ongeacht de positie van de toonarm.) Opmerking: als uw plaat stopt voor het nummer is geëindigd, zet dan de Autostop-schakelaar op “off”.
6. VOEDING - gebruik de meegeleverde stroomadapter om het apparaat aan te sluiten op het stroomnet (9 V DC, 800mA, pin +, tip –)
AFSPELEN/OPNEMEN
PLATEN AFSPELEN 1. Leg de plaat op de draaitafel. 2. Selecteer snelheid (33/45/78 tpm); gebruik indien nodig de meegeleverde 45-toerenadapter. 3. Ontgrendel de armclip. 4. Gebruik de hendel Omhoog/Omlaag om de toonarm op te heffen en beweeg deze over de plaat. 5. Laat de toonarm zakken op de plaat; de plaat begint te spelen. 6. Pas het volume aan met behulp van de volumeknoppen van uw luidsprekersysteem. 7. Wanneer u geluisterd hebt, heft u de toonarm op en legt u hem terug op de armclip.
OPNEMEN OP EEN USB-STICK 1. Sluit een USB-stick aan op de USB-poort vooraan in de platenspeler. 2. Volg stappen #1-3 in PLATEN AFSPELEN (hierboven). 3. Als het lichtje naast de / / knop rood blijft, ga dan naar Stap 4. Als het groen is, druk dan een keer op de Mode-
knop. 4. Druk om te beginnen opnemen / / ongeveer 2 seconden lang aanhoudend in; het lichtje begint rood te pinken,
wat betekent dat de opname is gestart. 5. Laat de toonarm zakken op de plaat; de plaat begint te spelen en de song wordt opgenomen. 6. Druk wanneer u klaar bent ongeveer 2 seconden op / / om de opname te stoppen. 7. Herhaal stappen #2-6 hierboven om meer songs op te nemen. Hef de toonarm op wanneer u klaar bent en leg hem terug
op de armclip.
1 2 3 4 5 6
MODE
1 2 3 4 5 / /
19
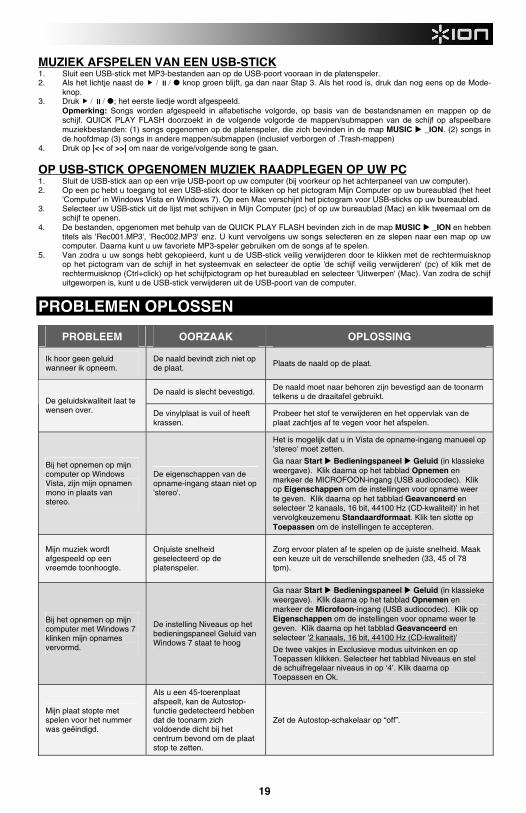
MUZIEK AFSPELEN VAN EEN USB-STICK 1. Sluit een USB-stick met MP3-bestanden aan op de USB-poort vooraan in de platenspeler. 2. Als het lichtje naast de / / knop groen blijft, ga dan naar Stap 3. Als het rood is, druk dan nog eens op de Mode-
knop. 3. Druk / / ; het eerste liedje wordt afgespeeld.
Opmerking: Songs worden afgespeeld in alfabetische volgorde, op basis van de bestandsnamen en mappen op de schijf. QUICK PLAY FLASH doorzoekt in de volgende volgorde de mappen/submappen van de schijf op afspeelbare muziekbestanden: (1) songs opgenomen op de platenspeler, die zich bevinden in de map MUSIC _ION. (2) songs in de hoofdmap (3) songs in andere mappen/submappen (inclusief verborgen of .Trash-mappen)
4. Druk op |<< of >>| om naar de vorige/volgende song te gaan.
OP USB-STICK OPGENOMEN MUZIEK RAADPLEGEN OP UW PC 1. Sluit de USB-stick aan op een vrije USB-poort op uw computer (bij voorkeur op het achterpaneel van uw computer). 2. Op een pc hebt u toegang tot een USB-stick door te klikken op het pictogram Mijn Computer op uw bureaublad (het heet
'Computer' in Windows Vista en Windows 7). Op een Mac verschijnt het pictogram voor USB-sticks op uw bureaublad. 3. Selecteer uw USB-stick uit de lijst met schijven in Mijn Computer (pc) of op uw bureaublad (Mac) en klik tweemaal om de
schijf te openen. 4. De bestanden, opgenomen met behulp van de QUICK PLAY FLASH bevinden zich in de map MUSIC _ION en hebben
titels als 'Rec001.MP3', 'Rec002.MP3' enz. U kunt vervolgens uw songs selecteren en ze slepen naar een map op uw computer. Daarna kunt u uw favoriete MP3-speler gebruiken om de songs af te spelen.
5. Van zodra u uw songs hebt gekopieerd, kunt u de USB-stick veilig verwijderen door te klikken met de rechtermuisknop op het pictogram van de schijf in het systeemvak en selecteer de optie 'de schijf veilig verwijderen' (pc) of klik met de rechtermuisknop (Ctrl+click) op het schijfpictogram op het bureaublad en selecteer 'Uitwerpen' (Mac). Van zodra de schijf uitgeworpen is, kunt u de USB-stick verwijderen uit de USB-poort van de computer.
PROBLEMEN OPLOSSEN
PROBLEEM OORZAAK OPLOSSING
Ik hoor geen geluid wanneer ik opneem.
De naald bevindt zich niet op de plaat. Plaats de naald op de plaat.
De naald is slecht bevestigd. De naald moet naar behoren zijn bevestigd aan de toonarm telkens u de draaitafel gebruikt. De geluidskwaliteit laat te
wensen over. De vinylplaat is vuil of heeft krassen.
Probeer het stof te verwijderen en het oppervlak van de plaat zachtjes af te vegen voor het afspelen.
Bij het opnemen op mijn computer op Windows Vista, zijn mijn opnamen mono in plaats van stereo.
De eigenschappen van de opname-ingang staan niet op 'stereo'.
Het is mogelijk dat u in Vista de opname-ingang manueel op 'stereo' moet zetten.
Ga naar Start Bedieningspaneel Geluid (in klassieke weergave). Klik daarna op het tabblad Opnemen en markeer de MICROFOON-ingang (USB audiocodec). Klik op Eigenschappen om de instellingen voor opname weer te geven. Klik daarna op het tabblad Geavanceerd en selecteer '2 kanaals, 16 bit, 44100 Hz (CD-kwaliteit)' in het vervolgkeuzemenu Standaardformaat. Klik ten slotte op Toepassen om de instellingen te accepteren.
Mijn muziek wordt afgespeeld op een vreemde toonhoogte.
Onjuiste snelheid geselecteerd op de platenspeler.
Zorg ervoor platen af te spelen op de juiste snelheid. Maak een keuze uit de verschillende snelheden (33, 45 of 78 tpm).
Bij het opnemen op mijn computer met Windows 7 klinken mijn opnames vervormd.
De instelling Niveaus op het bedieningspaneel Geluid van Windows 7 staat te hoog
Ga naar Start Bedieningspaneel Geluid (in klassieke weergave). Klik daarna op het tabblad Opnemen en markeer de Microfoon-ingang (USB audiocodec). Klik op Eigenschappen om de instellingen voor opname weer te geven. Klik daarna op het tabblad Geavanceerd en selecteer '2 kanaals, 16 bit, 44100 Hz (CD-kwaliteit)'
De twee vakjes in Exclusieve modus uitvinken en op Toepassen klikken. Selecteer het tabblad Niveaus en stel de schuifregelaar niveaus in op ‘4’. Klik daarna op Toepassen en Ok.
Mijn plaat stopte met spelen voor het nummer was geëindigd.
Als u een 45-toerenplaat afspeelt, kan de Autostop-functie gedetecteerd hebben dat de toonarm zich voldoende dicht bij het centrum bevond om de plaat stop te zetten.
Zet de Autostop-schakelaar op “off”.
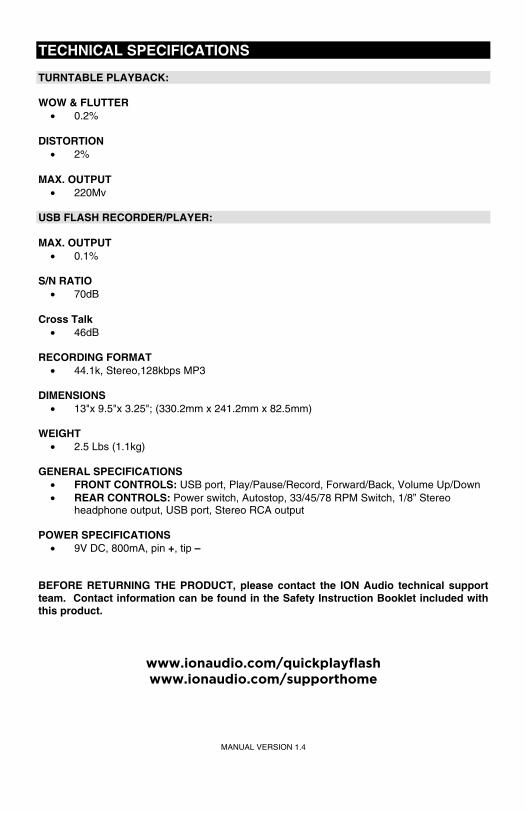
TECHNICAL SPECIFICATIONS TURNTABLE PLAYBACK: WOW & FLUTTER
• 0.2% DISTORTION
• 2% MAX. OUTPUT
• 220Mv USB FLASH RECORDER/PLAYER: MAX. OUTPUT
• 0.1% S/N RATIO
• 70dB Cross Talk
• 46dB RECORDING FORMAT
• 44.1k, Stereo,128kbps MP3 DIMENSIONS
• 13"x 9.5"x 3.25"; (330.2mm x 241.2mm x 82.5mm) WEIGHT
• 2.5 Lbs (1.1kg) GENERAL SPECIFICATIONS
• FRONT CONTROLS: USB port, Play/Pause/Record, Forward/Back, Volume Up/Down • REAR CONTROLS: Power switch, Autostop, 33/45/78 RPM Switch, 1/8” Stereo
headphone output, USB port, Stereo RCA output
POWER SPECIFICATIONS • 9V DC, 800mA, pin +, tip –
BEFORE RETURNING THE PRODUCT, please contact the ION Audio technical support team. Contact information can be found in the Safety Instruction Booklet included with this product.
www.ionaudio.com/quickplayflash www.ionaudio.com/supporthome
MANUAL VERSION 1.4