Embed Size (px)
Citation preview

Quick Overview
R
Quick OverviewTHE REMOTE HANDSET
1. Key release button. Press to release the folded key.
2. Lock button. Superlocks all doors and activates perimetric alarm. If interior space protection and tilt sensor options are fitted, they can be over-ridden by pressing the button twice within 3 seconds. See Superlocking, 30, Perimetric alarm, 31, Interior space protection*, 31, and Tilt Sensor*, 31.
Note: When the doors have been superlocked, they cannot be opened from inside the vehicle.
3. Unlock button. Press once to disarm all alarm features and unlock driver’s door only. Press twice to open all doors.
4. Land Rover button. The handset can be programmed to initiate one of 5 features; Panic alarm, Headlamp courtesy delay Tailgate release, Tailglass release or Air suspension control. For a full description of how to programme this button see ‘LAND ROVER’ BUTTON, 26.
Partial armingIf the driver’s door is not fully closed when the handset lock button is pressed the vehicle horn will activate. Until the door is fully closed the vehicle will remain unlocked and unprotected by the alarm system.
EMERGENCY UNLOCKING
If the handset should fail there is an emergency access feature on the left-hand front door lock. With the key inserted into the slot beneath the handle cap, the cap can be pulled outwards slightly and then moved backwards to unhook it. The key can now be used to unlock the vehicle. For a full description of this feature see Emergency locking/unlocking, 35.
H5910G
2
3
1
4
H5946G
7

Quick Overview
L
FACIA CONTROLS
1. Headlamps and direction indicator controls
2. Wiper and washer control
3. Audio/display controls
4. Hazard warning light switch
5. Heater/air conditioning controls
6. Display screen*7. Electric parkbrake switch
8. Starter switch
9. Cruise Control switches*10. Lamps master switch
Note: The precise specification and location of the controls may vary according to territorial requirements and from vehicle to vehicle.
For a full description of facia controls and their functions, see FACIA CONTROLS, 77.
1 2 3
4 5 6
7 8 9
ABC DEF
JKL MNOGHI
TUV WXYZPQRS
0
6CD-465
CD 3 14 : 54
1 2 3 4 5 6
2Tr 1 5 : 43
AUTO
H5911L
1 2
7
9 8
43 5
10
6
8

Quick Overview
R
WARNING LIGHTS
1. Dynamic Response (RED).
2. Battery charging (RED).
3. Low oil pressure (RED).
4. Safety belts (RED).
5. Airbag SRS (RED).
6. Brakes (RED).
7. Parkbrake (RED).
If one of these red warning lights illuminates, a serious fault is indicated. Stop the vehicle and refer to the main section of this handbook.
For a full description of warning lights and their functions, see WARNING INDICATORS, 97
SERVICE INTERVAL INDICATOR
To view the next service date, turn the starter key to position 1 and then, within 5 seconds, press the System Check control button (arrowed). The next service date is displayed (dd.mm.yy) for 5 seconds.
For a full description of this feature, see SERVICE INTERVAL INDICATOR, 95.
2 3 4 5
H5931L
6 71
H5949G
9
Quick Overview
L
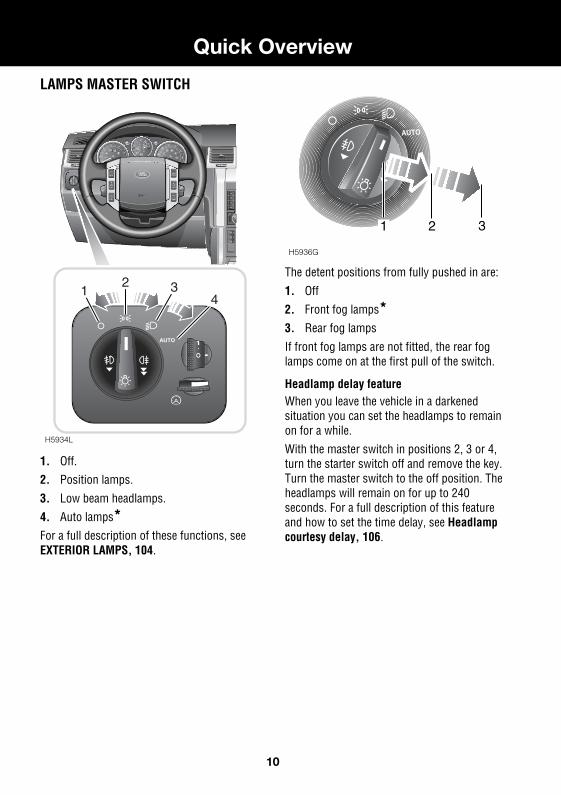
LAMPS MASTER SWITCH
1. Off.
2. Position lamps.
3. Low beam headlamps.
4. Auto lamps*For a full description of these functions, see EXTERIOR LAMPS, 104.
The detent positions from fully pushed in are:
1. Off
2. Front fog lamps*3. Rear fog lamps
If front fog lamps are not fitted, the rear fog lamps come on at the first pull of the switch.
Headlamp delay featureWhen you leave the vehicle in a darkened situation you can set the headlamps to remain on for a while.
With the master switch in positions 2, 3 or 4, turn the starter switch off and remove the key. Turn the master switch to the off position. The headlamps will remain on for up to 240 seconds. For a full description of this feature and how to set the time delay, see Headlamp courtesy delay, 106.
AUTO
AUTO
H5934L
21 3
4
AUTO
H5936G
1 2 3
10

Quick Overview
R
Headlamp beam adjustmentPosition of the lever will vary depending on type of headlamps and side of vehicle.
When this is moved it enables the vehicle to be driven in opposite-hand-drive markets without having to stick blanking decals onto the headlamp lens.
Follow the process shown in HEADLAMP UNIT, 296 to gain access to the inside of the headlamp unit. Move the lever to adjust the beam.
Lever default position
WIPERS & WASHERS
1. Intermittent wipe
2. Normal speed wipe.
3. Fast speed wipe.
For a single wipe, pull the lever down and release immediately.
Intermittent variable delay
With the lever in position 1, rotate the switch to vary the delay between wipes.
Halogen Bi-XenonRight hand side lamp
Down Up
Left hand side lamp
Up Up
H6339G
1
2
3
H5937G
H5938G
11

Quick Overview
L
Windscreen washer control
Rear window wash/wipe
For more detailed information on the wash/wipe system, see WINDSCREEN WIPERS, 109
H5939G
H5940G
12

Quick Overview
R
CONFIGURABLE FEATURES
Settings options (trip computer)A number of features can be configured via the settings menu that can be displayed on the main message centre. See SELECTING SETTINGS OPTION, 81.
Remote handset
• Single point entry, allowing only the drivers door to be opened remotely. See, Single-point entry, 32.
• Panic alarm, for personal protection. See, ‘LAND ROVER’ BUTTON, 26.
• Headlamp courtesy delay, providing lighting for personal safety. See,‘LAND ROVER’ BUTTON, 26.
• Tailgate release function, releases the tailgate as a whole. See,‘LAND ROVER’ BUTTON, 26.
• Tailglass release function, releases only the tailglass. See,‘LAND ROVER’ BUTTON, 26.
• Air suspension control, allows remote operation of the air suspension. See,‘LAND ROVER’ BUTTON, 26.
Starter key reminderProvides an audible warning indicating that the key is in the starter switch when the drivers door is open. See, Starter key reminder, 102.
Passenger airbag disablingThe safest place for a child seat is fitted to the rear seating. However, if it is necessary to fit a child seat to the front passenger seat the front passenger airbag must be disabled. See, PASSENGER AIRBAG DISABLING SWITCH, 66.
Daytime running lampsUnless prevented by legislation, it is possible to automatically switch on the exterior lamps whenever the engine is running. See, Daytime running lamps*, 107.
SETTINGS CHOICETRIP DISTANCE UNITS (odometer) MILES/KMFUEL USAGE UNITS MPG
l/100kmKm/l
EXTERNAL TEMPERATURE oC or oFOVERSPEED WARNING Off
20 - 250 km/h or 15 to 140 mph in 5-unit steps(Units set as trip distance)
HEADLAMP OFF DELAY 30/60/120/240 secondsAUTO DOOR LOCK (speed related locking) ON/OFFREVERSE MIRROR DIP ON/OFFLAZY ENTRY ON/OFFRESTORE DEFAULT SETTINGS YES/NO
13

Quick Overview
L
Speed dependant wiper modeThe wiper speed in all modes can be automatically varied according to vehicle speed. See, Speed-dependant mode*, 110.
AUTOMATIC TRANSMISSION INTERLOCKSVehicles can only be started when the gear selector lever is in the ‘P’(Park) or ‘N’(Neutral) position.
To move the lever from ‘P’ to ‘R’, ‘R’ to ‘P’ or ‘N’ to ‘R’, the selector release button (see inset) must be pressed.
To move from ‘P’ or ‘N’ into a drive gear position, the foot brake must be applied.
For more detailed information on the automatic gearbox, see AUTOMATIC TRANSMISSION USE, 164.
PARKBRAKEThe parkbrake is electrically operated.
To apply the parkbrake, lift the lever and release it. A RED indicator light in the instrument pack will illuminate continuously.
To release the parkbrake the starter key must be switched on and pressure must be applied to the foot brake.
The parkbrake will release automatically if the accelerator pedal is pressed. To delay this release, hold the parkbrake lever in the raised position until you are ready to move, then release it.
For more detailed information on the parkbrake, see PARKBRAKE, 184.
1 2 3
4 5 6
7 8 9
ABC DEF
JKL MNOGHI
TUV WXYZPQRS
0
CD 3
1 2 3 4 5 6
2Tr 1 5 : 43
AUTO
H6171L
H5951L
14

Quick Overview
R
TEMPERATURE CONTROLS
1. Auto mode:
Press for fully automatic operation.
2. Blower control
3. Temperature controls:
Rotate anticlockwise for maximum cooling.
4. Air distribution controls
5. Air recirculation control - manual
6. Air recirculation control - auto*7. Off
8. Economy mode
9. Heated rear screen
10. Heated front screen.*11. Defrost mode
Press to defrost or demist the windscreen.
12. Front seat heaters*For more detailed information on the climate control system, see TEMPERATURE CONTROLS, 119.
3 2 3
11
109
4
12 1 12
H6099G
5 6 7 8
5
15

Quick Overview
L
AUTOMATIC MIRROR DIPPINGIf your vehicle is fitted with the driver’s seat memory option, the door mirrors may dip when reverse gear is selected. This gives the driver a view of the kerbside to aid vehicle positioning when reversing.
The feature is optional and can be adjusted by the user.
For more detailed information on automatic mirror dipping, see Automatic mirror dipping*, 76.
RESONANCE WITH LOWERED WINDOWSIf a resonance/booming sound occurs with only the rear windows open, lowering a front window about 25 mm (1 inch) will eliminate the condition. This will change the frequency of the air volume moving in/out of the vehicle and thus lessen or remove the booming sound.
AIRBAG DISABLINGThe airbag directly ahead of the front passenger seat can be disabled. Although the recommended and safest position for a child seat is in the rear seats, the front passenger seat is an optional position.
From the passenger side of the car, open the front door and insert the starter key into the airbag disabling switch. Turn to the ‘OFF’ position.
For more detailed information on airbag disabling, see PASSENGER AIRBAG DISABLING SWITCH, 66.
H6033L
16

Quick Overview
R
VOICE RECOGNITION*Voice control provides a safe and convenient way of operating the audio system without the need to operate the controls manually. This enables you to concentrate fully on driving the vehicle, and removes the need to divert your attention from the road ahead in order to change settings, or receive feedback from the system.
A number of voice commands are available, and with a little experience you will find them easy and convenient to use. Whenever you issue one of the defined commands with the system active, the voice control system converts your command into a control signal for the audio system. Your inputs take the form of dialogues or commands. You are guided through these dialogues by announcements or questions.
Activating the system
To activate voice control:
• Briefly pull the control paddle (your Audio will mute at this point). A brief acoustic signal will be heard, and ‘LISTENING’ will be displayed on the main message centre to indicate that the system is now waiting for a voice command.
Note: It is only necessary to use the steering wheel voice control paddle at the beginning of each voice session.
Defined voice commandsThe voice control system understands predefined commands which need to be quoted word for word.
An audio feedback of voice commands is available. To activate the feedback, pull the voice control paddle briefly and give one of the following commands:
General commands
• Voice help: To list all commands.
• Notepad Help: To list Notepad commands.
Audio commands
• Radio help: To list Radio commands.
• CD help: To list CD commands.
Please refer to the Audio System Handbook for full operating instructions.
Navigation & Telephone commands
• Phone help: To list telephone commands.
• Navigation help: To list Navigation commands.
Please refer to the Navigation, TV & Telephone Handbook for full operating instructions.
For further information see VOICE RECOGNITION*, 148.
AUTO
H6159L
17

Filling Station Information
L
Filling Station InformationFUEL FILLERThe fuel filler is located in the rear right-hand wing. Ensuring that the vehicle is not superlocked, press the fuel filler flap to open.
The fuel filler flap springs out, revealing the filler cap.
Unscrew the filler cap and place it on the projection on top of the hinge of the fuel filler flap.
Insert the pump nozzle into the filler neck, pushing aside the spring-loaded cover.
When delivery is complete, withdraw the nozzle and replace the cap. Tighten the cap clockwise until you hear it click three times. Return the fuel filler flap to its closed position.
Note: For more detailed information, see LUBRICANTS AND FLUIDS, 307.
OPENING THE BONNET 1. Inside bonnet release
2. Bonnet safety catch
Note: For more detailed information, see LUBRICANTS AND FLUIDS, 307
H5944G
Fuel typePetrol vehicles Premium unleaded 95 RONDiesel vehicles To EN590 specification. NOT compatible with Bio-diesel fuels.
H5945G
1
2
Engine oil top-upV8 petrol vehicles Use a 5W/30 oil to specification ACEA:A1or A3 (with API SJ or SL)Engine oil top-upDiesel vehicles Use a 5W/30 oil to specification ACEA: B1/B3Cooling system top-upAll vehicles to -36°C (-33°F) 50% mix of water and an approved antifreeze
18

Filling Station Information
R
TYRE PRESSURESAir pressure naturally increases in warm tyres (after the vehicle has been driven for a while). If you have to check warm tyres, you should expect the pressures to have increased by between 30 and 40 kPa (0.3 to 0.4 bar) (4 to 6 lbf/in2). In this circumstance, NEVER let air out of the tyres in order to match the recommended pressures.
Loading condition kPa bar lbf/in2
Normal operating conditions Front 230 2.3 34
Rear 250 2.5 36
Vehicle loaded to maximum gross vehicle weight Front 260 2.6 38
Rear 290 2.9 42
Temporary spare wheel (All operating conditions) 420 4.2 60
19

L
20