Embed Size (px)
Citation preview

Release the Shipping Lock2
Check the scanner and accessories1Confirm that all of the following items are included.
ScannerAC cable
fi-4010CU Quick Installation Guide
USB interface cable
AC adapter
Pad ASY
ADF paper chute A
ADF paper chute B
Document stopper
Slide the Shipping Lock to "Release" position.
ADF paper chute B
ADF paper chute A
Document stopperFlip out part
Lock
Release
Shipping Lock
Continued on next page
Carefully read the "fi-4010CU Image Scanner Operator's Guide" before using this product. Particularly read and understand the "Safety Precautions" before using this product.
Quick Installation Guide
Attach the ADF paper chute and Document stopper3
1. Attach the ADF paper chute A to the ADF unit so that the side guide of the ADF paper chute faces up.
2. Attach the ADF paper chute B to the ADF paper chute A so that the flip out of part of the ADF paper chute B faces up.
3. Insert the clows of the document stopper into the slots of the scanner. Slide the document stopper in the direction of the arrow marked on it to fix the stopper.
4
1. Connect the PC end of the USB interface cable to the PC.
2. Connect the scanner end of the USB interface cable to the scanner.
3. Connect the ADF cable to the ADF cable connector of the scanner, and fix the thumb screws of the ADF cable connector.
4. Connect the AC adapter with the AC Cable, and then connect it to the DC inlet on the Scanner.
5. Insert the AC cable into the power outlet. Next, install the FUJITSU TWAIN32 Scanner driver.
Caution
P3PC-E117-02EN
Install FUJITSU TWAIN32 Scanner driver 5Windows® 98, Windows® Me, Windows® 2000, Windows® XP
Install the mini-driver first, and then the TWAIN data source. If the old version of FUJITSU TWAIN32 Scanner driver has been installed on your personal computer, refer to the "Scanner Utility for Microsoft® Windows® User's Guide" on the Scanner driver (CD-ROM), and update the mini-driver.
Caution
The Windows® XP screen samples are shown below. The screen and operations will differ slightly depending on the OS that is being used.
Preparation
Confirm that the Scanner is connected to your personal computer with the USB interface cable.
Installing the mini-driver
1. Turn on the power by pushing the power switch in the back of the scanner. The power lamp lights.
2. Turn on your personal computer and log on to Windows®.When using Windows® 2000 or Windows® XP log on as an administrator . The "Found New Hardware Wizard" dialog box is displayed.
3. Check "Install from a list or specific location (Advanced)", then click [Next].
For Windows® Me check "Specify the location of the driver (Advanced)", then click [Next]. For Windows® 2000 and Windows® 98, clicking on [Next] the select search method screen is displayed. • For Windows® 98 select "Search for the best driver for your devise (Recommended)" then click [Next].
• For Windows® 2000 select "Search for a suitable driver for my device (Recommended)" then click [Next].
4. Insert the Scanner driver (CD-ROM).
5. Select "Search for the best driver in these locations." Check "Include this location in the search:" then specify D:\Driver2 (When your CD-ROM is the D drive). After that click [Next].
For Windows® 98, just check "Specify a location:" then specify D:\Driver2 (When your CD-ROM is the D drive). After that click [Next].For Windows® Me, select "Find the most suitable driver for the device being used" then click [Next]. Check "Specify search location" then specify D:\Driver2 (When your CD-ROM is the D drive). After that click [Next]. For Windows® 2000, just check "Specify a location" and then in the next screen specify "Copy manufacturer's files from:" then specify D:\Driver2 (When your CD-ROM is the D drive), then click [OK].
Refer to the "fi-4010CU Image Scanner Operator's Guide" when you would like to know more about the scanner. Refer to the "Scanner Utility for Microsoft® Windows® User's Guide" on the Scanner driver (CD-ROM) when you would like to know more detailed information about the FUJITSU TWAIN32 Scanner driver installation.
fi-4010CU Image ScannerOperator's Guide
fi-XXXX XXXXXXXXX
Scanner driver (CD-ROM)
User Manual (CD-ROM) Adobe ® Acrobat ® 5.0
(CD-ROM)
ADF cable connectorUSB interface connector
Connect to your PC. Connect to the power outlet.
ADF cable
DC inlet
AC cableUSB interface cable
Caution
When automatic start has been set, the "SETUP DISK START UP SCREEN" is displayed. To close this screen, click the [Exit] button on this screen.
Make sure to slide the shipping lock in place (located on the bottom of the scanner) to secure the internal carrier unit during transportation.After transporting and placing the scanner, tilt the scanner (approx. 30 degrees) and release the shipping lock.
Confirm that the power of PC and the image scanner device is turned off.
Connect the USB interface cable, ADF cable, and the AC cable
ABBYY FineReader 6.0(CD-ROM)
(for EU)
7
Caution
Scanning documents
6
When using Windows® 2000 or Windows® XP, log on as an administrator .
1. Insert the Scanner driver (CD-ROM), then use explorer to double click on ScandAll 21.exe in the ScandAll folder in the CD-ROM drive.
2. Select the language you use during installation in [Choose Setup Language] then click [OK].This screen might not be displayed.
3. Click [Next] in the welcome screen.
4. Carefully read the License Agreement then click [Yes], if you agree.
5. Confirm the name of the destination folder then click [Next].
6. Click [Finish].
The screen images may be changed due to improvements without notice.If the displayed screen images are different from the screen images in "Quick Installation Guide" follow the actual screen display for installation. Please also refer to the software operation manual and do the installation according to the actual screens.
Hint
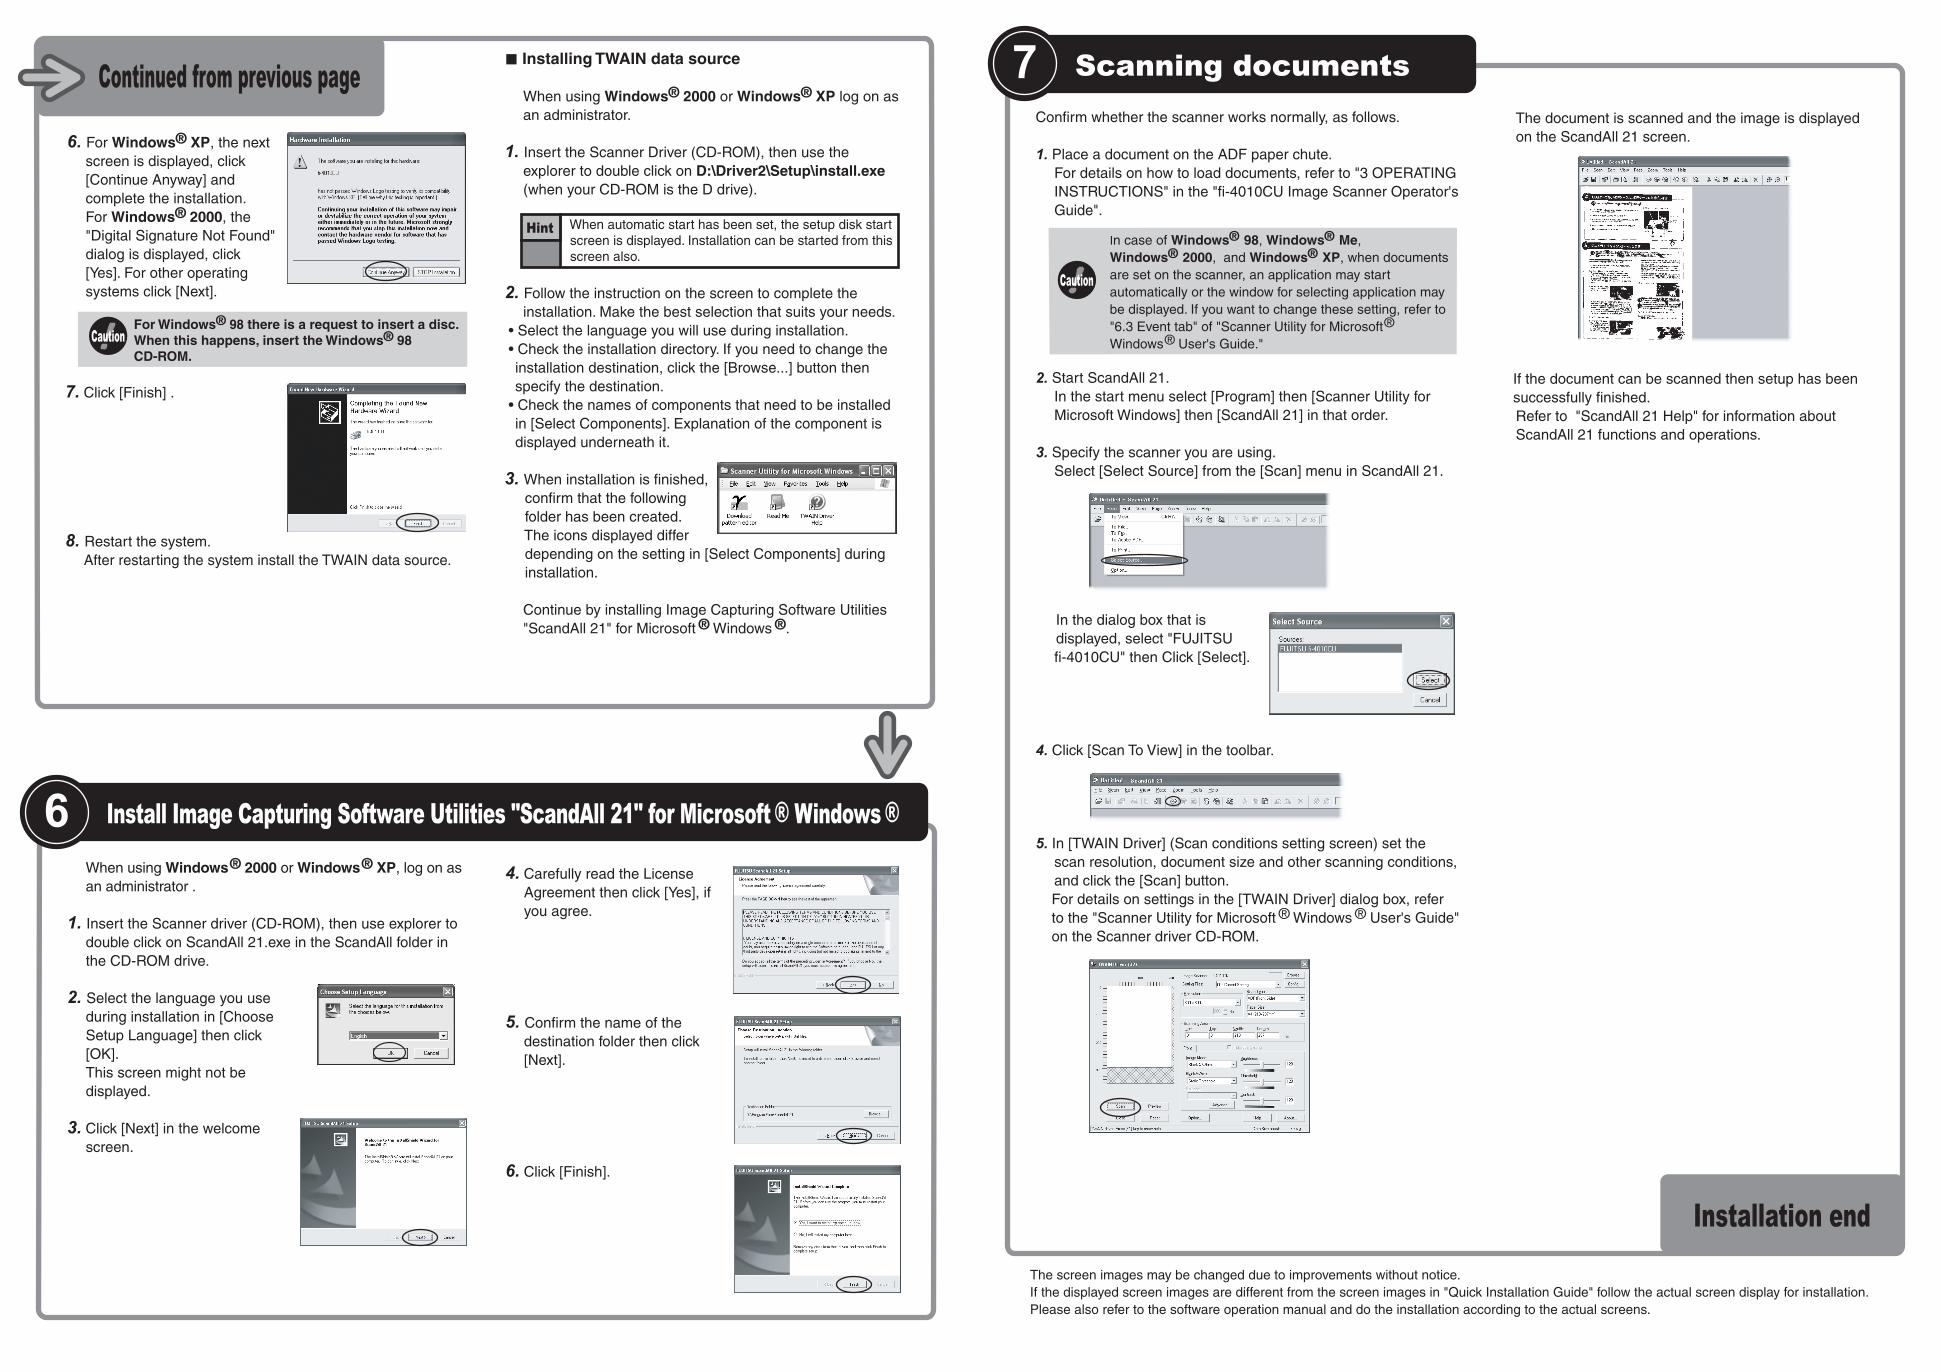
Continued from previous page
6. For Windows® XP, the next screen is displayed, click [Continue Anyway] and complete the installation.For Windows® 2000, the "Digital Signature Not Found" dialog is displayed, click [Yes]. For other operating systems click [Next].
For Windows® 98 there is a request to insert a disc. When this happens, insert the Windows® 98 CD-ROM.
7. Click [Finish] .
8. Restart the system.After restarting the system install the TWAIN data source.
Installing TWAIN data source
When using Windows® 2000 or Windows® XP log on as an administrator.
1. Insert the Scanner Driver (CD-ROM), then use the explorer to double click on D:\Driver2\Setup\install.exe (when your CD-ROM is the D drive).
When automatic start has been set, the setup disk start screen is displayed. Installation can be started from this screen also.
2. Follow the instruction on the screen to complete the installation. Make the best selection that suits your needs.
• Select the language you will use during installation.• Check the installation directory. If you need to change the installation destination, click the [Browse...] button then specify the destination.
• Check the names of components that need to be installed in [Select Components]. Explanation of the component is displayed underneath it.
3. When installation is finished, confirm that the following folder has been created. The icons displayed differ depending on the setting in [Select Components] during installation.
Continue by installing Image Capturing Software Utilities "ScandAll 21" for Microsoft ® Windows ®.
Install Image Capturing Software Utilities "ScandAll 21" for Microsoft ® Windows ®
Confirm whether the scanner works normally, as follows.
1. Place a document on the ADF paper chute.For details on how to load documents, refer to "3 OPERATING INSTRUCTIONS" in the "fi-4010CU Image Scanner Operator's Guide".
2. Start ScandAll 21. In the start menu select [Program] then [Scanner Utility for Microsoft Windows] then [ScandAll 21] in that order.
3. Specify the scanner you are using.Select [Select Source] from the [Scan] menu in ScandAll 21.
In the dialog box that is displayed, select "FUJITSU
fi-4010CU" then Click [Select].
4. Click [Scan To View] in the toolbar.
5. In [TWAIN Driver] (Scan conditions setting screen) set the scan resolution, document size and other scanning conditions, and click the [Scan] button.For details on settings in the [TWAIN Driver] dialog box, refer to the "Scanner Utility for Microsoft ® Windows ® User's Guide" on the Scanner driver CD-ROM.
Installation end
Caution
In case of Windows® 98, Windows® Me, Windows® 2000, and Windows® XP, when documents are set on the scanner, an application may start automatically or the window for selecting application may be displayed. If you want to change these setting, refer to "6.3 Event tab" of "Scanner Utility for Microsoft® Windows® User's Guide."
The document is scanned and the image is displayed on the ScandAll 21 screen.
If the document can be scanned then setup has been successfully finished. Refer to "ScandAll 21 Help" for information about ScandAll 21 functions and operations.