Embed Size (px)
Citation preview

Celuplast Ltd / Guardian Products UK Ltd52 Baldoyle ind Est, Baldoyle, Dublin 13 Tel: 01-8326210 Fax: 01-8326277
www.guardianroof.co.uk Quick and easy luxury vinyl flooring
MO130506 Celuplast Flooring Brochure.indd 1-2 23/05/2013 14:42
Thickness: 4.5mm Wearlayer: PU 0.30mm
Thickness: 4.5mm Wearlayer: PU 0.55mm
Pacific Wood 24880 191 x 1316mm
Oriental Beech 28280 191 x 1316mm
Easton Stone 46110 324 x 655mm
Ocean Slate 36970L 324 x 655mm
Olympian 36223L 324 x 655mm
Flint Stone 40870L 324 x 655mm
Dorato Stone 40879 324 x 655mm
Pacific Wood 24880
Dorato Stone 40879
Olympian 36223L
Ocean Slate 36970L
Oriental Beech 28280
Quick and easy luxury vinyl flooring
MO130506 Celuplast Flooring Brochure.indd 3-4 23/05/2013 14:42
Recommended tools• Broom and/or vacuum cleaner • Tape measure • Pencil • Set square and ruler • Utility knife • Rubber mallet • Tapping block
General conditionsThe installation of Clever Click is straight forward and follows the same guidelines that apply to all quality resilient tile floors. Good preparation is essential for a trouble-free installation. Clever Click can be laid on concrete, timber, stone and many other subfloors, which have been suitably prepared. Site conditions must comply with the relevant national regulations. Clever Click is not suitable for external installation or unheated locations but it can be used with under-floor heating providing it is switched off for 24 hours before and after laying (the maximum permitted surface temperature is 28C/81°F). Tiles and sub-floor must be allowed to stabilise to a consistent temperature between 18C and 27°C (64°F and 81°F) for a period of 24 hours before and after installation. Tiles must be stored flat. Following installation, Clever Click should be protected from heavy traffic for 24 hours and must not be washed for 24 hours. Always follow other manufacturers’ recommendations when using their proprietary materials for sub-floor preparation.
Preparation1) The floor should be fitted at a room temperature
of minimum 18°C/62°F and maximum 27°C/80°F.
2) Before installation, check all panels in daylight for possible defects or discrepancies in colour or shine.
3) Check that the tongue and groove of the click profile is free from dirt and undamaged.
4) For best results mix at least two packs when fitting to avoid repetitions in the pattern. It is also preferable only to use material from the same batch in a single room.
5) The surface beneath the floor must be sufficiently prepared in advance to guarantee successful fitting of the floor covering. In particular, it must be clean, dry, smooth, firm, level, free from defects and not contaminated with grease, oil or chemicals.
Step-by-step fitting instructionsClever Click is a “floating” floor. Never glue or fix the panels to the surface below. The flooring can be installed wall-to-wall, however in large areas (greater than 50m²) or where the floor may be exposed to unusually wide temperature ranges (such as where under floor heating is used, in a conservatory or areas adjacent to a south facing window), then it is advisable to use a 5mm space around the edge, as appropriate. For surfaces larger than 50m², we advise that an expansion joint of 5mm is created around the perimeter of the room. In addition, should a single wall or run be longer than 10 linear metres, then a 5mm expansion joint should be allowed around the perimeter. If you are uncertain of the requirements, please contact your retailer who can confirm the exact requirements. The Clever Click system panels can be joined in two different ways; either tongue-in-groove or groove-in-tongue. The simplest procedure, however, is groove-in-tongue. The advantage of the Clever Click system is that
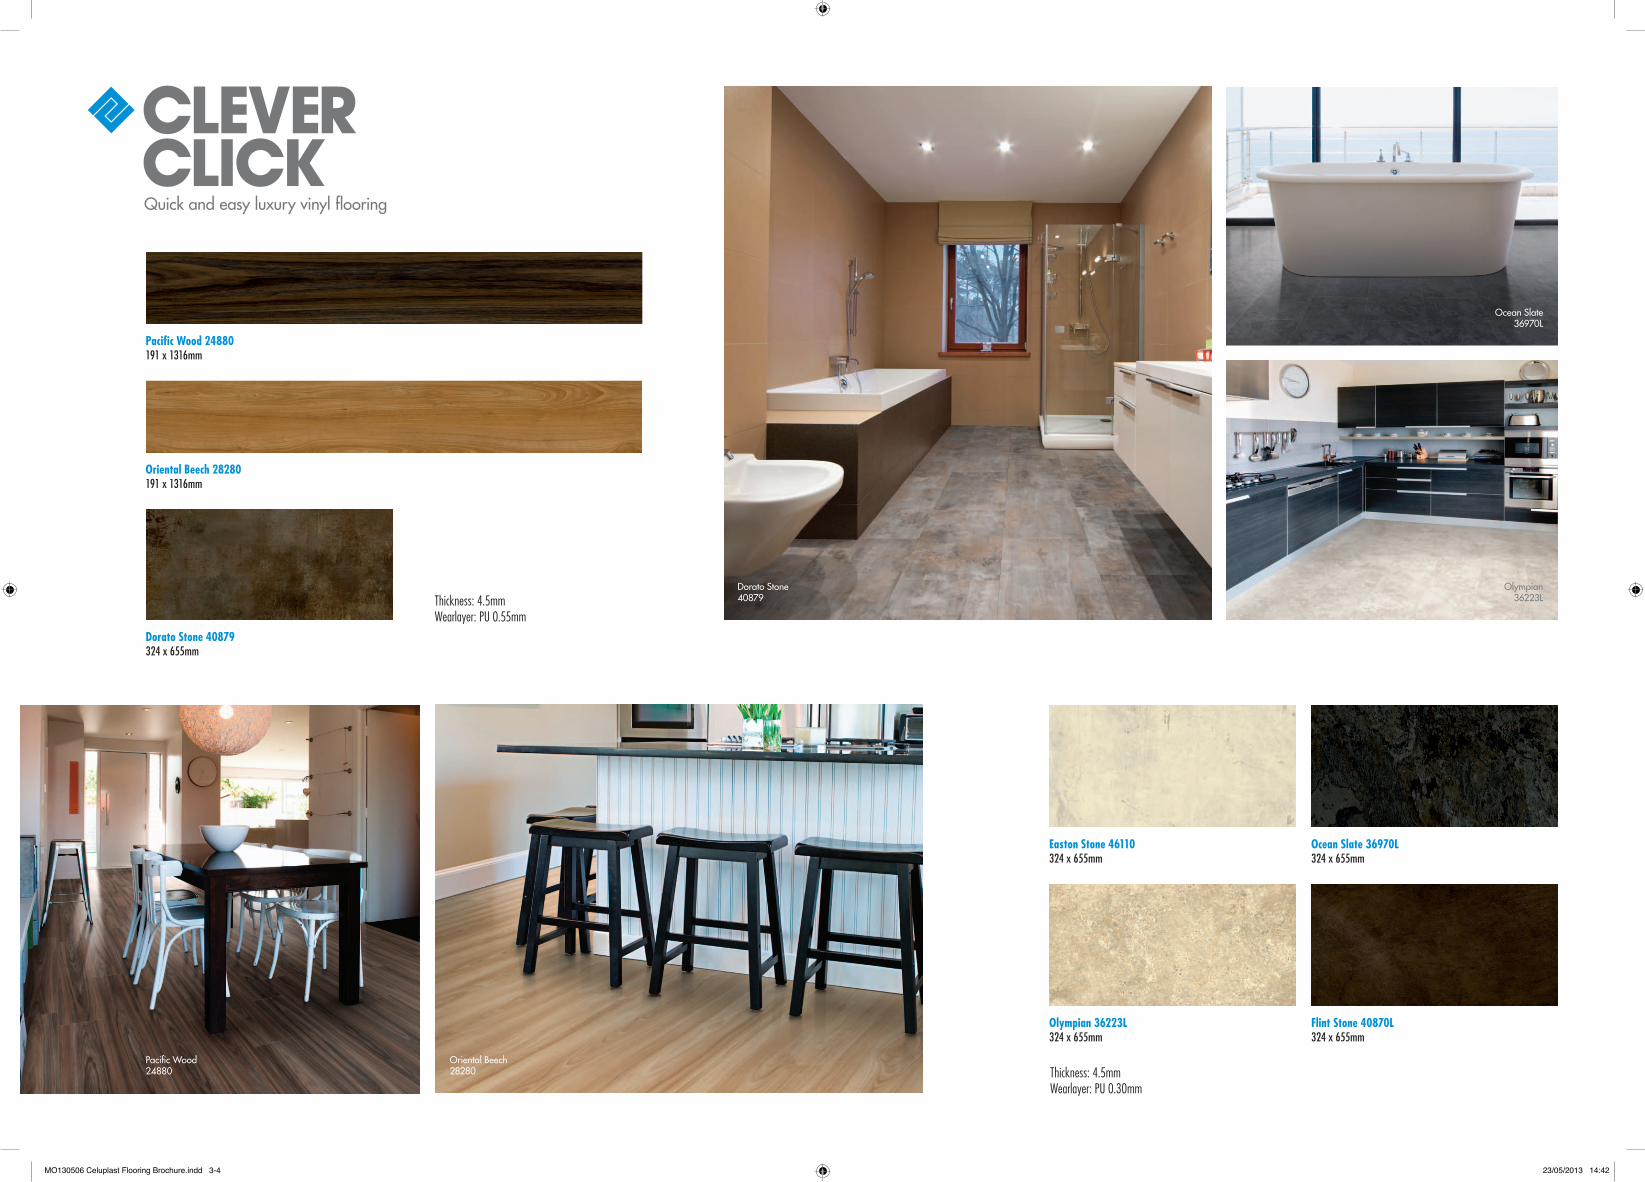
WallTile orientation
spacer
Figure 1 Figure 4Figure 2 Figure 5Figure 3 Figure 6
Clever Click installation instructions
it allows you to choose your own starting position. Moreover, you may work either from left to right or from right to left, whichever is best for you. Depending on the direction in which you work, you are advised to begin from either a corner or a door. It is advisable to begin with the groove side of the plank towards the wall and work from left to right.
1) Measure the room carefully to determine the central axis, from which the first row to be laid is outlined.
2) Check whether the first row of panels needs to be narrowed. If not, the lower groove lip of the first row of panels need to be removed. Use a utility knife to neatly cut off the lower groove lip.
3) Begin by laying the first row in the corner of the room on your left hand side as you are looking at the wall. Always work from left to right and with the tongue towards yourself. (Figure 1)
4) Lay the first row in a straight line and click the head ends together. Put the short side of the profile into head end of the previous panel and press the panel downwards. It is recommended to use a rubber mallet for connecting the head ends so that the joint fits securely. Continue laying the first row in the same way until you get to the last piece. (Figure 2)
5) For the last piece, measure the last plank to ensure a tight fit to the wall. Then cut away the marked piece and fit the end panel in the same way as the previous panels. When cutting the panel with a utility knife, make sure that you cut through the wear layer before breaking the panel. (Figure 3)
6) For an attractive and natural appearance, we advise you to use the piece left over from row 1 as the first piece in the next row, as long as the remaining piece is at least 1/3 of the total plank length. Do this for all subsequent rows.
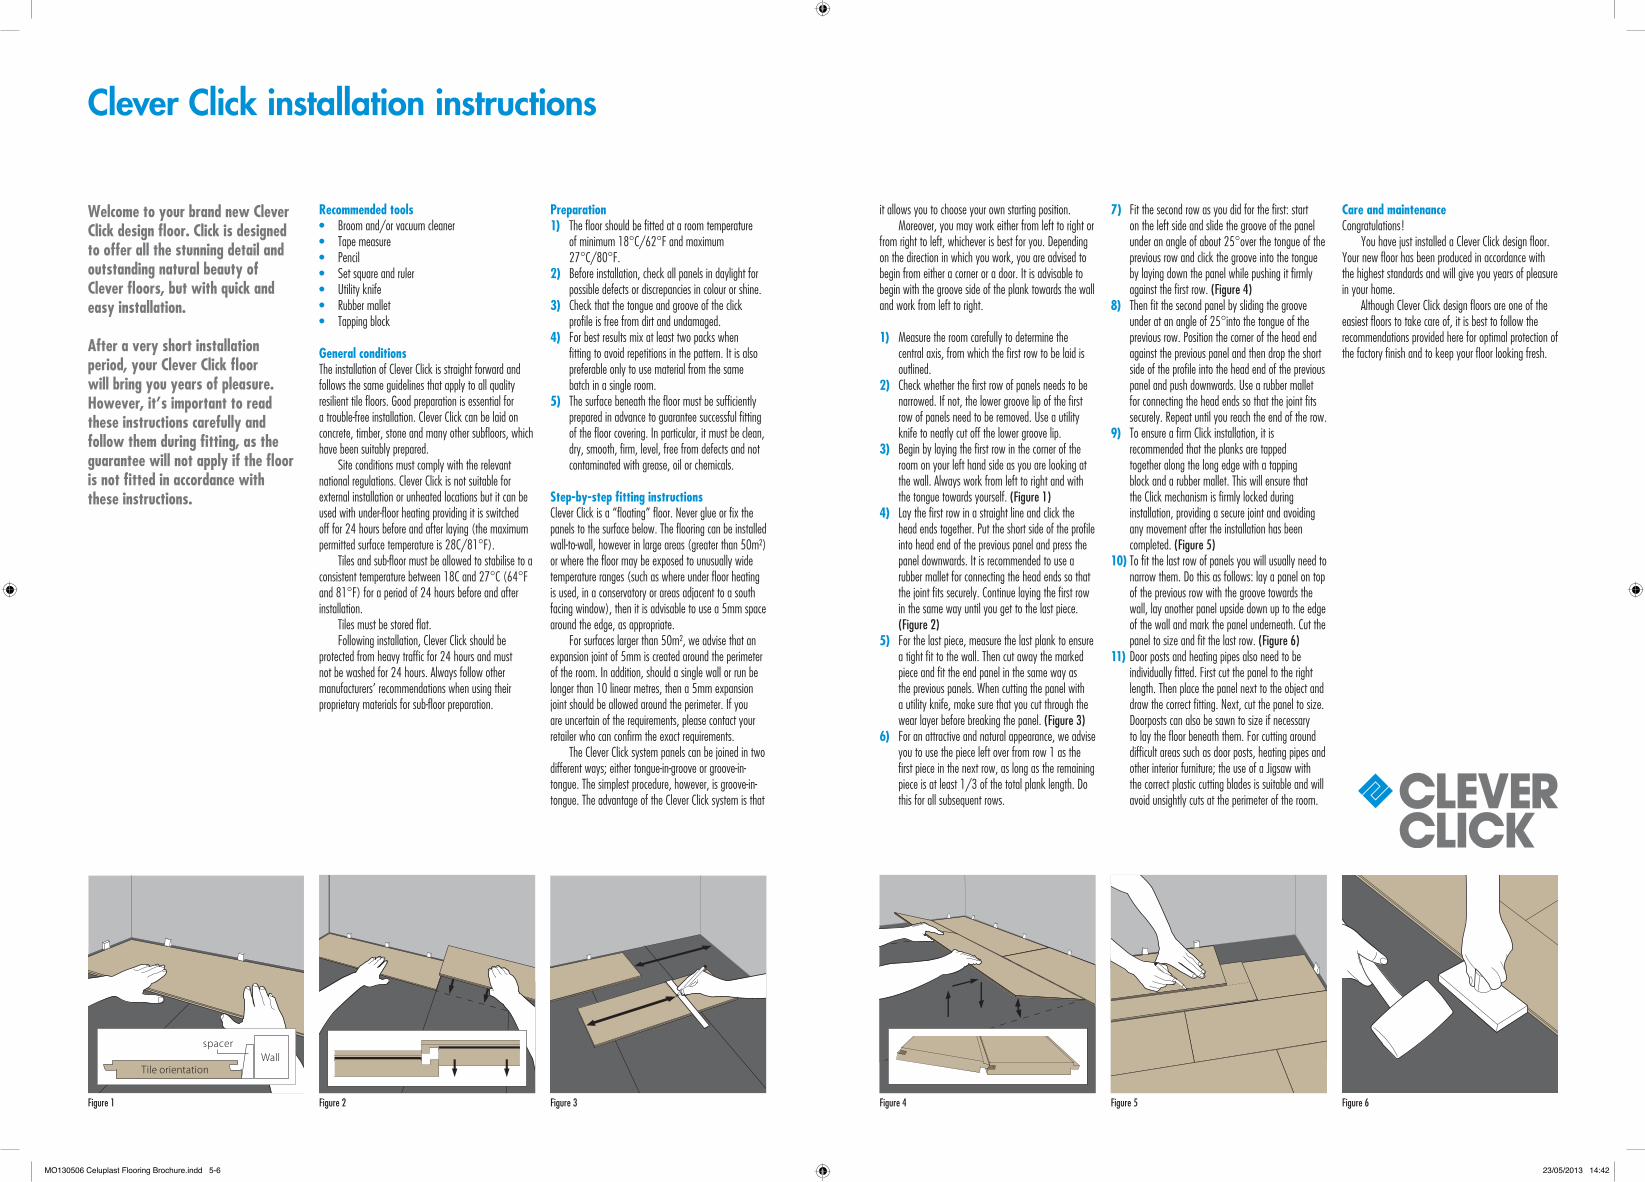
7) Fit the second row as you did for the first: start on the left side and slide the groove of the panel under an angle of about 25°over the tongue of the previous row and click the groove into the tongue by laying down the panel while pushing it firmly against the first row. (Figure 4)
8) Then fit the second panel by sliding the groove under at an angle of 25°into the tongue of the previous row. Position the corner of the head end against the previous panel and then drop the short side of the profile into the head end of the previous panel and push downwards. Use a rubber mallet for connecting the head ends so that the joint fits securely. Repeat until you reach the end of the row.
9) To ensure a firm Click installation, it is recommended that the planks are tapped together along the long edge with a tapping block and a rubber mallet. This will ensure that the Click mechanism is firmly locked during installation, providing a secure joint and avoiding any movement after the installation has been completed. (Figure 5)
10) To fit the last row of panels you will usually need to narrow them. Do this as follows: lay a panel on top of the previous row with the groove towards the wall, lay another panel upside down up to the edge of the wall and mark the panel underneath. Cut the panel to size and fit the last row. (Figure 6)
11) Door posts and heating pipes also need to be individually fitted. First cut the panel to the right length. Then place the panel next to the object and draw the correct fitting. Next, cut the panel to size. Doorposts can also be sawn to size if necessary to lay the floor beneath them. For cutting around difficult areas such as door posts, heating pipes and other interior furniture; the use of a Jigsaw with the correct plastic cutting blades is suitable and will avoid unsightly cuts at the perimeter of the room.
Care and maintenanceCongratulations! You have just installed a Clever Click design floor. Your new floor has been produced in accordance with the highest standards and will give you years of pleasure in your home. Although Clever Click design floors are one of the easiest floors to take care of, it is best to follow the recommendations provided here for optimal protection of the factory finish and to keep your floor looking fresh.
Welcome to your brand new Clever Click design floor. Click is designed to offer all the stunning detail and outstanding natural beauty of Clever floors, but with quick and easy installation.
After a very short installation period, your Clever Click floor will bring you years of pleasure. However, it’s important to read these instructions carefully and follow them during fitting, as the guarantee will not apply if the floor is not fitted in accordance with these instructions.
MO130506 Celuplast Flooring Brochure.indd 5-6 23/05/2013 14:42
Product InformationLevel of use EN 685 23 - 33 - 42 23 - 33 - 42
Total thickness EN 428 ca. 4.50mm ca. 4.50mm
Wear layer EN 429 ca. 0.30mm / 0.55mm ca. 0.30mm / 0.55mm
Wear layer PUR treatment Superguard® Superguard®
Total weight g/m2 EN 430 ca. 7.680 ca. 7.680
Size and PackagingPlanks A EN 427 191mm x 1316mm 324mm x 655mm
Box planks A 7 pcs / box 1.76m2 / box 1.49m2 / box
Test ResultsInflammability EN 13501 Bfl-S1 Bfl-S1
Scratch resistance EN 660-2 Class T Class T
Squareness & straightness EN 427 ≤ 0.35mm (Planks A) ≤ 0.35mm (Tiles)
Slip resistance EN 13893 DS DS
Slip restraint DIN 51130 R9 / R10 R9 / R10
Residual indentation EN 433 ≤ 0.10 mm ≤ 0.10 mm
Furniture leg resistance EN 424 No cracks, no damage No cracks, no damage
Curling EN 434 ≤ 2mm ≤ 2mm
Electrical resistance EN 1081 ≤ 109hm ≤ 109hm
Dimensional stability EN 434 Norm: ≤ 0.25%, average result measured: ≤ 0.05%
Norm: ≤ 0.25%, average result measured: ≤ 0.05%
Heat insulation EN 12524 0.25w/(m.K) 0.25w/(m.K)
Thermal resistance R ISO 8302 0.0159m2.K/W 0.0159m2.K/W
Electrostatic performance EN 1815 < 2kV < 2kV
Fomaldehyde group EN 717-1 E1 E1
Acoustic insulation ISO 717-1 4dB 4dB
Castor chair resistance EN 425 No damage to wearlayer, no delamination
No damage to wearlayer, no delamination
Stain resistance EN 423 Very good Very good
Light fastness ISO 105 B02 ≥ 6 ≥ 6
Underfloor heating EN 12524 Suitable, max 27OC Suitable, max 27OC
Resistance to chemicals EN 423 Very good Very good
Warranty (year) 15 / 20 Residential 15 / 20 Residential
XtrafloorComposition Permanent resilient underlayment
including mineral fillers and Polyurethane binder.
Thickness Approx. 1.5 mm (+/- 0.1 mm)
Roll format Approx. 10 m x 1 m (10m2 per roll)
Weight per sqm 1.5 kg/m2
Weight per roll 15 kg/roll
Fire behaviour Bfl - S1 as per EN 13501-1
Footfall sound absorption
Approx. 11db/EN 140-5
The warranty covers manufacturing defects and premature wear in the event of normal use.
Wood Stone
Technical information
Scuff and Stain Resistant
Residential Guarantee
Commercial Guarantee
Eco Friendly Product
Water Resistant Natural Look and Feel
Quick and easy click installation
Easy to clean and maintain
Warm and quiet under foot
Superguard
Patented technology
Suitable for all rooms, including
bathrooms
No glue marksMade in the EU
EUNo Delamination
No underlay or glue required
General floor maintenance
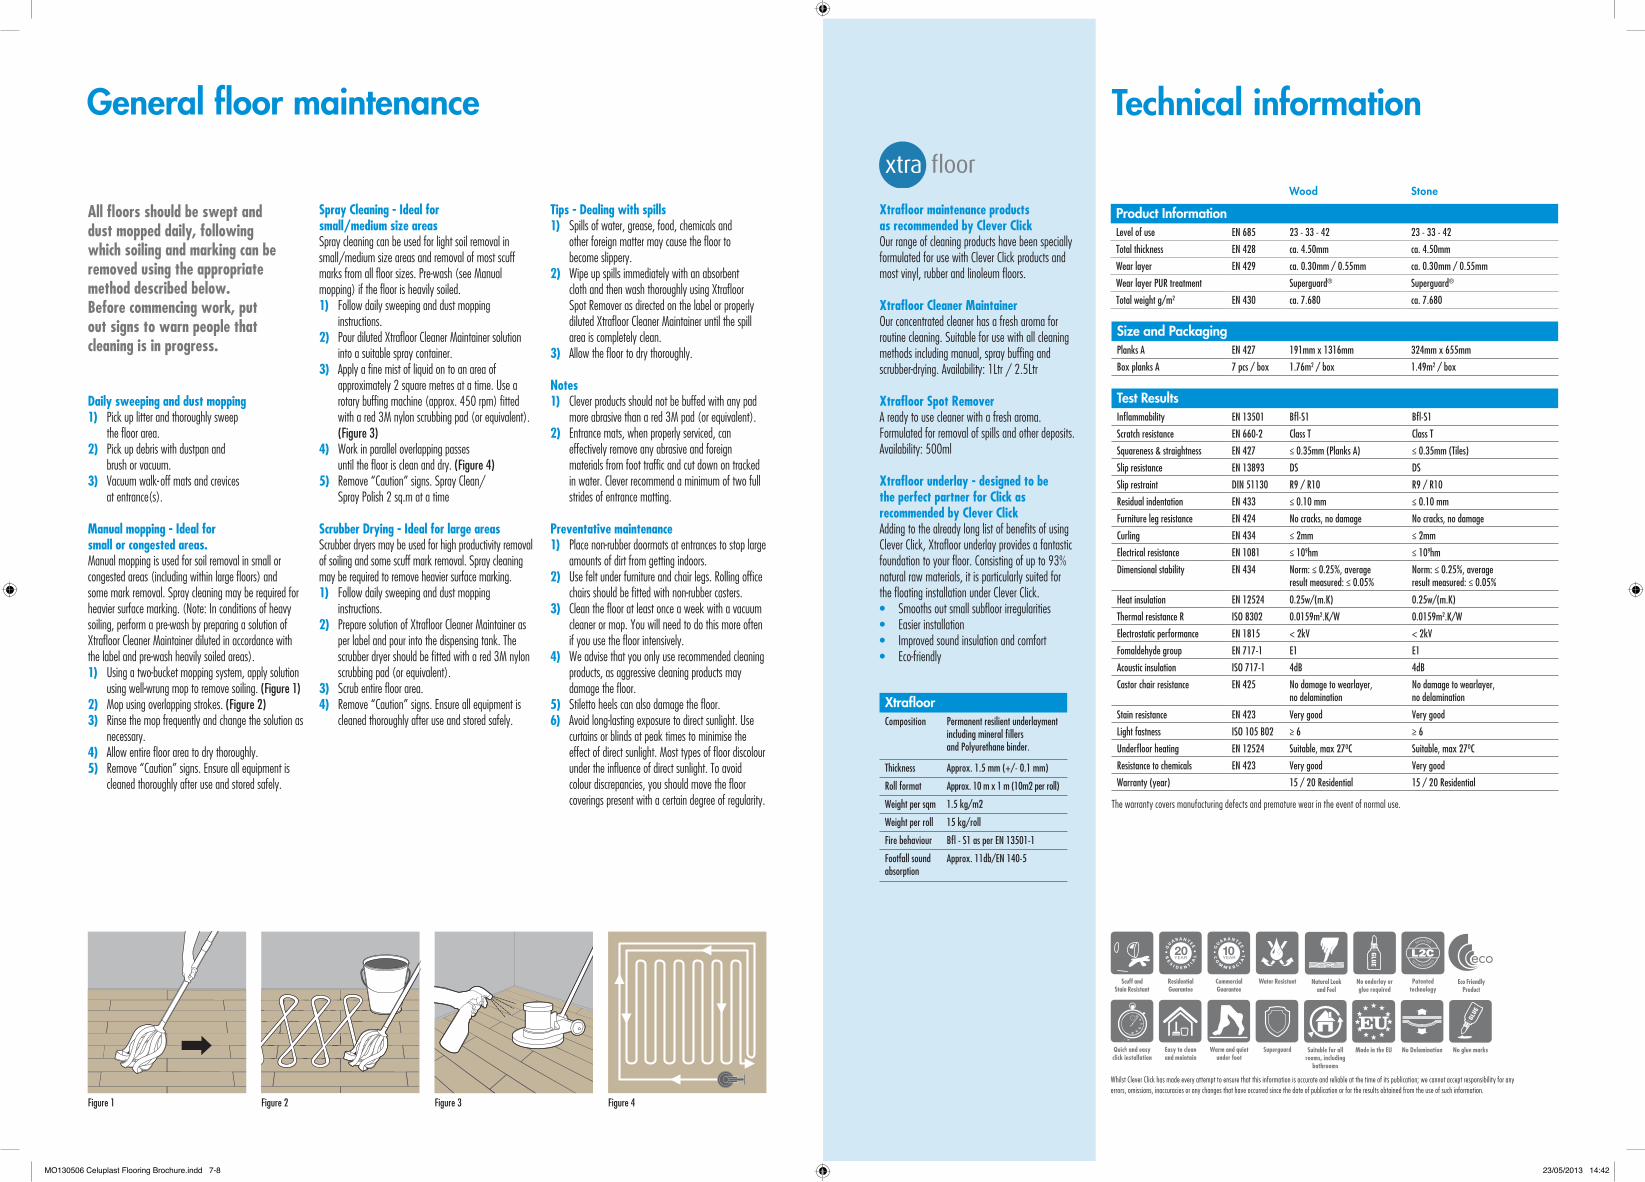
Daily sweeping and dust mopping1) Pick up litter and thoroughly sweep the floor area.2) Pick up debris with dustpan and brush or vacuum.3) Vacuum walk- off mats and crevices at entrance(s).
Manual mopping - Ideal for small or congested areas. Manual mopping is used for soil removal in small or congested areas (including within large floors) and some mark removal. Spray cleaning may be required for heavier surface marking. (Note: In conditions of heavy soiling, perform a pre-wash by preparing a solution of Xtrafloor Cleaner Maintainer diluted in accordance with the label and pre-wash heavily soiled areas). 1) Using a two-bucket mopping system, apply solution
using well-wrung mop to remove soiling. (Figure 1)2) Mop using overlapping strokes. (Figure 2)3) Rinse the mop frequently and change the solution as
necessary.4) Allow entire floor area to dry thoroughly.5) Remove “Caution” signs. Ensure all equipment is
cleaned thoroughly after use and stored safely.
Spray Cleaning - Ideal for small/medium size areasSpray cleaning can be used for light soil removal in small/medium size areas and removal of most scuff marks from all floor sizes. Pre-wash (see Manual mopping) if the floor is heavily soiled.1) Follow daily sweeping and dust mopping
instructions.2) Pour diluted Xtrafloor Cleaner Maintainer solution
into a suitable spray container.3) Apply a fine mist of liquid on to an area of
approximately 2 square metres at a time. Use a rotary buffing machine (approx. 450 rpm) fitted with a red 3M nylon scrubbing pad (or equivalent). (Figure 3)
4) Work in parallel overlapping passes until the floor is clean and dry. (Figure 4)
5) Remove “Caution” signs. Spray Clean/ Spray Polish 2 sq.m at a time
Scrubber Drying - Ideal for large areasScrubber dryers may be used for high productivity removal of soiling and some scuff mark removal. Spray cleaning may be required to remove heavier surface marking.1) Follow daily sweeping and dust mopping
instructions.2) Prepare solution of Xtrafloor Cleaner Maintainer as
per label and pour into the dispensing tank. The scrubber dryer should be fitted with a red 3M nylon scrubbing pad (or equivalent).
3) Scrub entire floor area.4) Remove “Caution” signs. Ensure all equipment is
cleaned thoroughly after use and stored safely.
Tips - Dealing with spills1) Spills of water, grease, food, chemicals and
other foreign matter may cause the floor to become slippery.
2) Wipe up spills immediately with an absorbent cloth and then wash thoroughly using Xtrafloor Spot Remover as directed on the label or properly diluted Xtrafloor Cleaner Maintainer until the spill area is completely clean.
3) Allow the floor to dry thoroughly.
Notes1) Clever products should not be buffed with any pad
more abrasive than a red 3M pad (or equivalent).2) Entrance mats, when properly serviced, can
effectively remove any abrasive and foreign materials from foot traffic and cut down on tracked in water. Clever recommend a minimum of two full strides of entrance matting.
Preventative maintenance1) Place non-rubber doormats at entrances to stop large
amounts of dirt from getting indoors.2) Use felt under furniture and chair legs. Rolling office
chairs should be fitted with non-rubber casters.3) Clean the floor at least once a week with a vacuum
cleaner or mop. You will need to do this more often if you use the floor intensively.
4) We advise that you only use recommended cleaning products, as aggressive cleaning products may damage the floor.
5) Stiletto heels can also damage the floor.6) Avoid long-lasting exposure to direct sunlight. Use
curtains or blinds at peak times to minimise the effect of direct sunlight. Most types of floor discolour under the influence of direct sunlight. To avoid colour discrepancies, you should move the floor coverings present with a certain degree of regularity.
Xtrafloor maintenance products as recommended by Clever ClickOur range of cleaning products have been specially formulated for use with Clever Click products and most vinyl, rubber and linoleum floors.
Xtrafloor Cleaner MaintainerOur concentrated cleaner has a fresh aroma for routine cleaning. Suitable for use with all cleaning methods including manual, spray buffing and scrubber-drying. Availability: 1Ltr / 2.5Ltr
Xtrafloor Spot RemoverA ready to use cleaner with a fresh aroma. Formulated for removal of spills and other deposits. Availability: 500ml
Xtrafloor underlay - designed to be the perfect partner for Click as recommended by Clever Click Adding to the already long list of benefits of using Clever Click, Xtrafloor underlay provides a fantastic foundation to your floor. Consisting of up to 93% natural raw materials, it is particularly suited for the floating installation under Clever Click. • Smooths out small subfloor irregularities• Easier installation• Improved sound insulation and comfort• Eco-friendly
Whilst Clever Click has made every attempt to ensure that this information is accurate and reliable at the time of its publication; we cannot accept responsibility for any errors, omissions, inaccuracies or any changes that have occurred since the date of publication or for the results obtained from the use of such information.
All floors should be swept and dust mopped daily, following which soiling and marking can be removed using the appropriate method described below. Before commencing work, put out signs to warn people that cleaning is in progress.
Figure 1 Figure 2 Figure 3 Figure 4
MO130506 Celuplast Flooring Brochure.indd 7-8 23/05/2013 14:42