Embed Size (px)
Citation preview
1
Questions?/ Des questions?/ ¿Preguntas? 1-800-334-6871 [email protected]
Instruction Manual / Manuel d’instructions/ Instrucciones
guarantee that interference will not occur in a particular installation. If this equipment does cause harmful interference to radio or television reception, which can be determined by turning the equipment off and on, the user is encouraged to try to correct the interference by one or more of the following measures:
- Reorient or relocate the receiving antenna. - Increase the separation between the equipment and receiver. - Connect the equipment into an outlet on a circuit different from that to which the receiver is connected. - Consult the dealer or an experienced radio/TV technician for help. WARNING: FCC Regulations state that any unauthorized changes or modifications to this equipment not expressly approved by the manufacturer could void the user’s authorization to operate this equipment.
SAVE THESE INSTRUCTIONS AND WARNINGS.
ASSEMBLING YOUR FIXTURE WARNING: Deviation from the assembly
instructions may result in a risk of fire or electric shock.
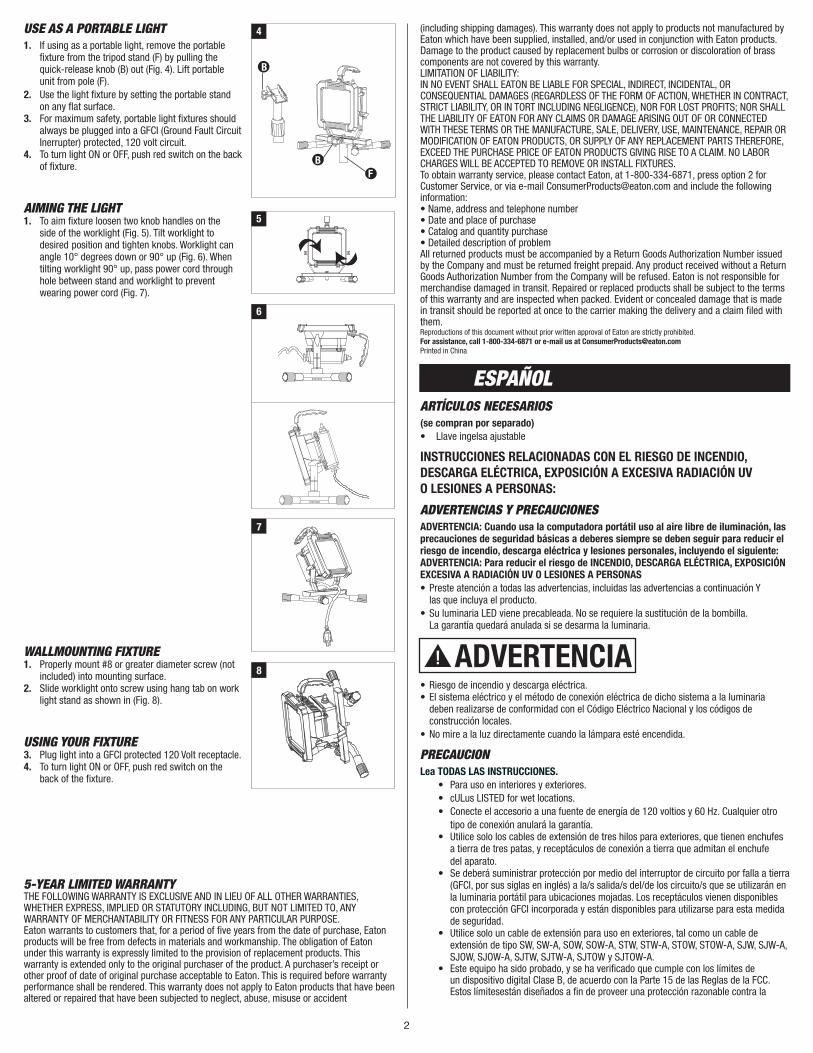
1. Using adjustable wrench (not included) attach worklight (A) with bracket to worklight stand (C) using QTY 1 M6 Hex nut (H) and QTY 1 M6 lock washers (G) as in (Fig. 1).
USE AS A STAND LIGHT1. Unlock tripod stand (F) legs first by pulling each
leg out approximately 1 inch, then loosen the knob at the top of the leg assembly and pull legs out, extending to full open position so that the top black bracket slides down until crossbars are hori-zontal with ground (Fig. 2). Retighten knob.
2. Attach portable fixture to the tripod stand (F) by pulling out the quick-release knob (B), lining up the pin with the slot, and seating portable light fixture on tripod (F) (Fig. 3).
3. Plug light into a 120 volt receptacle.4. To turn light ON or OFF, push red switch on the back of the fixture (A).5. Adjust the tripod stand (F) to the desired height by loosening and tightening the locking collars on the pole.Note: Legs must be secured with sand bags or other suitable weight: • when used on uneven or rocky surfaces • when used in windy areas • anytime extra stability is required
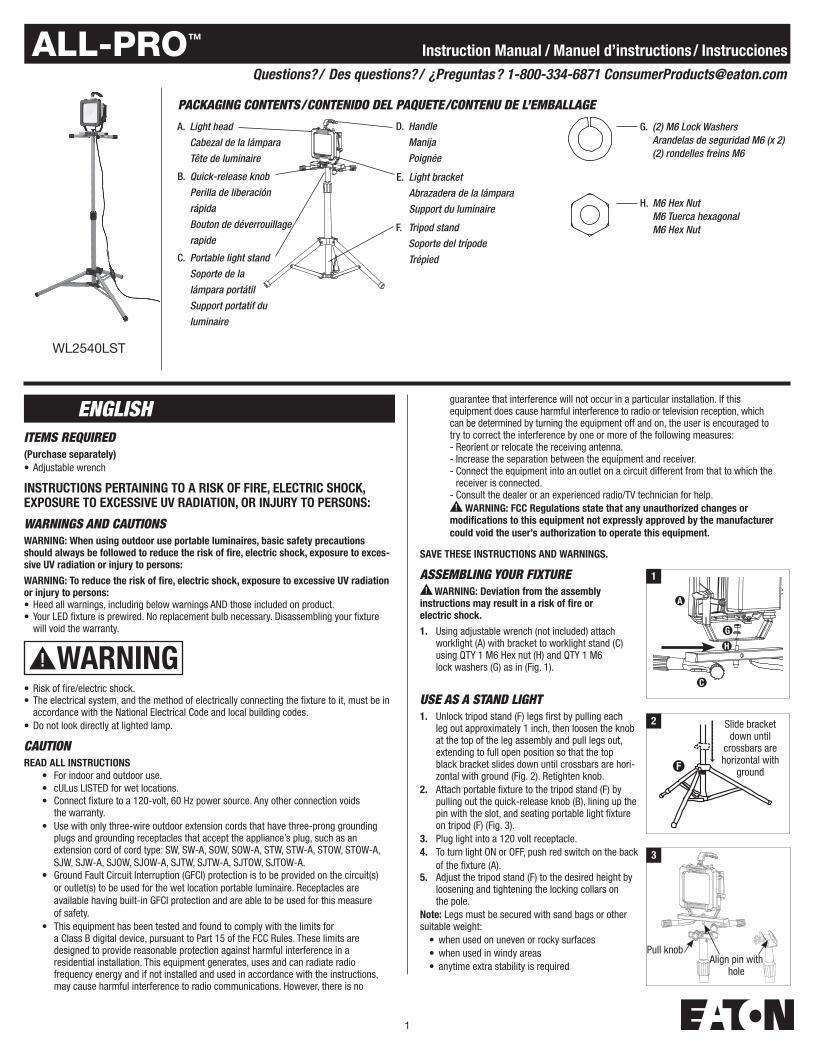
PACKAGING CONTENTS/CONTENIDO DEL PAQUETE/CONTENU DE L’EMBALLAGE
WL2540LST
ENGLISH
A. Light head Cabezal de la lámpara Tête de luminaire
C. Portable light stand Soporte de la lámpara portátil Support portatif du luminaire
B. Quick-release knob Perilla de liberación rápida Bouton de déverrouillage rapide
F. Tripod stand Soporte del trípode Trépied
D. Handle Manija Poignée
E. Light bracket Abrazadera de la lámpara Support du luminaire
G. (2) M6 Lock Washers Arandelas de seguridad M6 (x 2) (2) rondelles freins M6
ITEMS REQUIRED
(Purchase separately)• Adjustable wrench
INSTRUCTIONS PERTAINING TO A RISK OF FIRE, ELECTRIC SHOCK, EXPOSURE TO EXCESSIVE UV RADIATION, OR INJURY TO PERSONS:
WARNINGS AND CAUTIONSWARNING: When using outdoor use portable luminaires, basic safety precautions should always be followed to reduce the risk of fire, electric shock, exposure to exces-sive UV radiation or injury to persons:
WARNING: To reduce the risk of fire, electric shock, exposure to excessive UV radiation or injury to persons:• Heed all warnings, including below warnings AND those included on product.• Your LED fixture is prewired. No replacement bulb necessary. Disassembling your fixture will void the warranty.
WARNING• Risk of fire/electric shock.• The electrical system, and the method of electrically connecting the fixture to it, must be in accordance with the National Electrical Code and local building codes.• Do not look directly at lighted lamp.
CAUTIONREAD ALL INSTRUCTIONS
• For indoor and outdoor use. • cULus LISTED for wet locations.• Connect fixture to a 120-volt, 60 Hz power source. Any other connection voids
the warranty.• Use with only three-wire outdoor extension cords that have three-prong grounding
plugs and grounding receptacles that accept the appliance’s plug, such as an extension cord of cord type: SW, SW-A, SOW, SOW-A, STW, STW-A, STOW, STOW-A, SJW, SJW-A, SJOW, SJOW-A, SJTW, SJTW-A, SJTOW, SJTOW-A.
• Ground Fault Circuit Interruption (GFCI) protection is to be provided on the circuit(s) or outlet(s) to be used for the wet location portable luminaire. Receptacles are available having built-in GFCI protection and are able to be used for this measure of safety.• This equipment has been tested and found to comply with the limits for
a Class B digital device, pursuant to Part 15 of the FCC Rules. These limits are designed to provide reasonable protection against harmful interference in a residential installation. This equipment generates, uses and can radiate radio frequency energy and if not installed and used in accordance with the instructions, may cause harmful interference to radio communications. However, there is no
H. M6 Hex Nut M6 Tuerca hexagonal M6 Hex Nut
3
Slide bracket down until
crossbars are horizontal with
groundF
2
1
G
H
A
C
Pull knobAlign pin with
hole
2
(including shipping damages). This warranty does not apply to products not manufactured by Eaton which have been supplied, installed, and/or used in conjunction with Eaton products. Damage to the product caused by replacement bulbs or corrosion or discoloration of brass components are not covered by this warranty.LIMITATION OF LIABILITY:IN NO EVENT SHALL EATON BE LIABLE FOR SPECIAL, INDIRECT, INCIDENTAL, OR CONSEQUENTIAL DAMAGES (REGARDLESS OF THE FORM OF ACTION, WHETHER IN CONTRACT, STRICT LIABILITY, OR IN TORT INCLUDING NEGLIGENCE), NOR FOR LOST PROFITS; NOR SHALL THE LIABILITY OF EATON FOR ANY CLAIMS OR DAMAGE ARISING OUT OF OR CONNECTED WITH THESE TERMS OR THE MANUFACTURE, SALE, DELIVERY, USE, MAINTENANCE, REPAIR OR MODIFICATION OF EATON PRODUCTS, OR SUPPLY OF ANY REPLACEMENT PARTS THEREFORE, EXCEED THE PURCHASE PRICE OF EATON PRODUCTS GIVING RISE TO A CLAIM. NO LABOR CHARGES WILL BE ACCEPTED TO REMOVE OR INSTALL FIXTURES. To obtain warranty service, please contact Eaton, at 1-800-334-6871, press option 2 for Customer Service, or via e-mail [email protected] and include the following information:• Name, address and telephone number• Date and place of purchase• Catalog and quantity purchase• Detailed description of problemAll returned products must be accompanied by a Return Goods Authorization Number issued by the Company and must be returned freight prepaid. Any product received without a Return Goods Authorization Number from the Company will be refused. Eaton is not responsible for merchandise damaged in transit. Repaired or replaced products shall be subject to the terms of this warranty and are inspected when packed. Evident or concealed damage that is made in transit should be reported at once to the carrier making the delivery and a claim filed with them. Reproductions of this document without prior written approval of Eaton are strictly prohibited. For assistance, call 1-800-334-6871 or e-mail us at [email protected] in China
ARTÍCULOS NECESARIOS
(se compran por separado)• Llave ingelsa ajustable
INSTRUCCIONES RELACIONADAS CON EL RIESGO DE INCENDIO, DESCARGA ELÉCTRICA, EXPOSICIÓN A EXCESIVA RADIACIÓN UV O LESIONES A PERSONAS:
ADVERTENCIAS Y PRECAUCIONESADVERTENCIA: Cuando usa la computadora portátil uso al aire libre de iluminación, las precauciones de seguridad básicas a deberes siempre se deben seguir para reducir el riesgo de incendio, descarga eléctrica y lesiones personales, incluyendo el siguiente:ADVERTENCIA: Para reducir el riesgo de INCENDIO, DESCARGA ELÉCTRICA, EXPOSICIÓN EXCESIVA A RADIACIÓN UV O LESIONES A PERSONAS• Preste atención a todas las advertencias, incluidas las advertencias a continuación Y las que incluya el producto.• Su luminaria LED viene precableada. No se requiere la sustitución de la bombilla. La garantía quedará anulada si se desarma la luminaria.
• Riesgo de incendio y descarga eléctrica.• El sistema eléctrico y el método de conexión eléctrica de dicho sistema a la luminaria deben realizarse de conformidad con el Código Eléctrico Nacional y los códigos de construcción locales.• No mire a la luz directamente cuando la lámpara esté encendida.
PRECAUCIONLea TODAS LAS INSTRUCCIONES.
• Para uso en interiores y exteriores.• cULus LISTED for wet locations.• Conecte el accesorio a una fuente de energía de 120 voltios y 60 Hz. Cualquier otro tipo de conexión anulará la garantía.• Utilice solo los cables de extensión de tres hilos para exteriores, que tienen enchufes a tierra de tres patas, y receptáculos de conexión a tierra que admitan el enchufe del aparato.• Se deberá suministrar protección por medio del interruptor de circuito por falla a tierra (GFCI, por sus siglas en inglés) a la/s salida/s del/de los circuito/s que se utilizarán en la luminaria portátil para ubicaciones mojadas. Los receptáculos vienen disponibles con protección GFCI incorporada y están disponibles para utilizarse para esta medida de seguridad.• Utilice solo un cable de extensión para uso en exteriores, tal como un cable de extensión de tipo SW, SW-A, SOW, SOW-A, STW, STW-A, STOW, STOW-A, SJW, SJW-A, SJOW, SJOW-A, SJTW, SJTW-A, SJTOW y SJTOW-A.• Este equipo ha sido probado, y se ha verificado que cumple con los límites de
un dispositivo digital Clase B, de acuerdo con la Parte 15 de las Reglas de la FCC. Estos límitesestán diseñados a fin de proveer una protección razonable contra la
ESPAÑOL
ADVERTENCIA
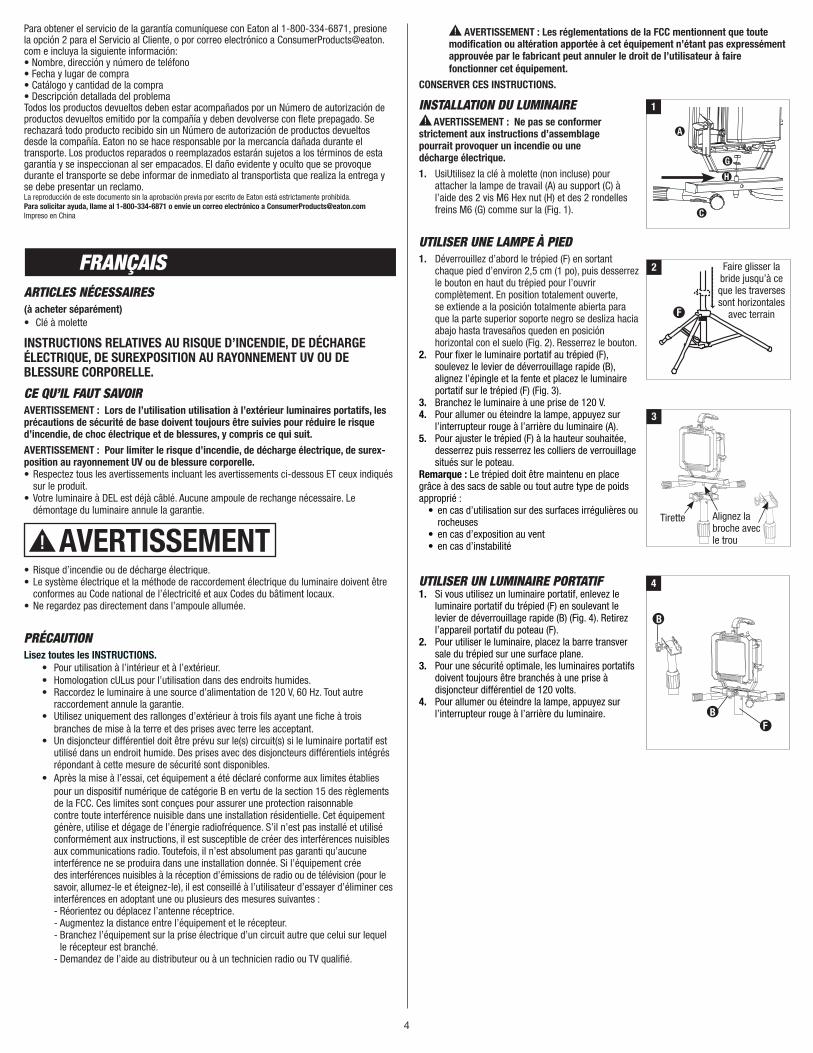
USE AS A PORTABLE LIGHT1. If using as a portable light, remove the portable
fixture from the tripod stand (F) by pulling the quick-release knob (B) out (Fig. 4). Lift portable unit from pole (F).
2. Use the light fixture by setting the portable stand on any flat surface.
3. For maximum safety, portable light fixtures should always be plugged into a GFCI (Ground Fault Circuit Inerrupter) protected, 120 volt circuit.4. To turn light ON or OFF, push red switch on the back of fixture.
AIMING THE LIGHT1. To aim fixture loosen two knob handles on the side of the worklight (Fig. 5). Tilt worklight to desired position and tighten knobs. Worklight can angle 10° degrees down or 90° up (Fig. 6). When tilting worklight 90° up, pass power cord through hole between stand and worklight to prevent wearing power cord (Fig. 7).
WALLMOUNTING FIXTURE1. Properly mount #8 or greater diameter screw (not included) into mounting surface.2. Slide worklight onto screw using hang tab on work light stand as shown in (Fig. 8).
USING YOUR FIXTURE3. Plug light into a GFCI protected 120 Volt receptacle.4. To turn light ON or OFF, push red switch on the back of the fixture.
5-YEAR LIMITED WARRANTYTHE FOLLOWING WARRANTY IS EXCLUSIVE AND IN LIEU OF ALL OTHER WARRANTIES, WHETHER EXPRESS, IMPLIED OR STATUTORY INCLUDING, BUT NOT LIMITED TO, ANY WARRANTY OF MERCHANTABILITY OR FITNESS FOR ANY PARTICULAR PURPOSE.Eaton warrants to customers that, for a period of five years from the date of purchase, Eaton products will be free from defects in materials and workmanship. The obligation of Eaton under this warranty is expressly limited to the provision of replacement products. This warranty is extended only to the original purchaser of the product. A purchaser’s receipt or other proof of date of original purchase acceptable to Eaton. This is required before warranty performance shall be rendered. This warranty does not apply to Eaton products that have been altered or repaired that have been subjected to neglect, abuse, misuse or accident
4
5
6
7
8
F
B
B

3
interferencia dañina en una instalación residencial. Este equipo genera, usa y puede irradiar energía de radio frecuencia, y si no se instala y utiliza de acuerdo con las instrucciones, puede causar interferencia dañina en las comunicaciones de radio. Sin embargo, no se garantiza que no vaya a producirse interferencia en una instalación en particular. Si este equipo efectivamente causa una interferencia dañina en la recepción de radio o televisión, lo que puede determinarse apagándolo y encendiéndolo, se recomienda al usuario que trate de corregir la interferencia por medio de una o más de las siguientes medidas:- Reoriente o cambie de lugar la antena receptora.- Aumente la separación entre el equipo y el receptor.- Conecte el equipo en un tomacorriente que esté en un circuito difer ente de aquél al que se conecta el receptor.- Consulte a su proveedor, o a un técnico de radio/TV experimenta do, para que le ayuden. ADVERTENCIA: Las Reglamentaciones de la FCC establecen que todo
cambio o modificación no autorizados en este equipo, que no estén aprobados expresamente por el fabricante, podrían anular la autorización del usuario para operar el equipo.
GUARDE ESTAS INSTRUCCIONES Y ADVERTENCIAS.
INSTALACIÓN DE SU LUMINARIA ADVERTENCIA: Si no se atiene a las instrucciones
de ensamblaje, se pueden generar riesgos de incendio o descarga eléctrica.
1. Por medio de una llave inglesa (no incluida), sujete la luminaria para sitios de trabajo (A) con soporte, al pie de base de la luminaria (C) con los dos tornillos QTY 1 M6 Tuerca hexagonal (H) y las dos arandelas de seguridad QTY 1 M6 (G) como se muestra en la (Fig. 1).
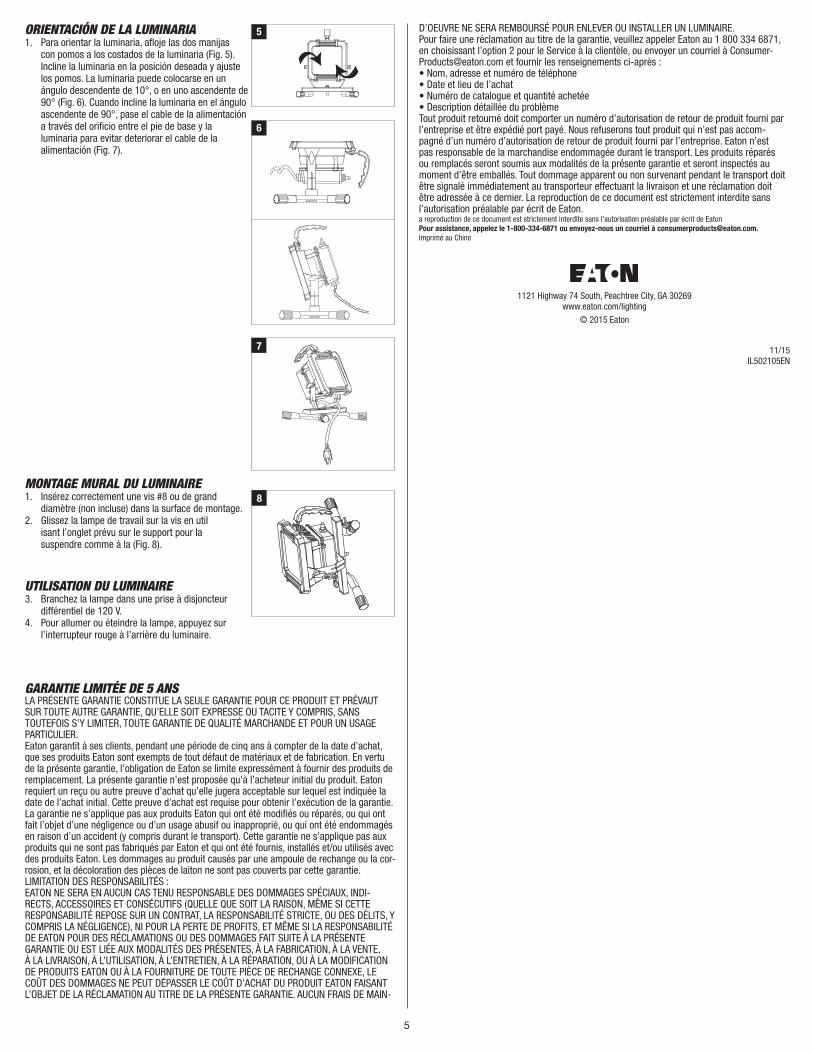
USO COMO LÁMPARA VERTICAL1. Desbloquee las patas del soporte del trípode (F) primero jalando cada pata hacia afuera aproximadamente 2,54 cm, luego afloje la perilla en la parte superior del ensamble de patas y tire de las patas hacia fuera, se extiende a la posición totalmente abierta para que la parte superior soporte negro se desliza hacia abajo hasta travesaños queden en posición horizontal con el suelo (Fig. 2). Vuelva a apretar la perilla.2. Fije la lámpara portátil al soporte del trípode (F) jalando la perilla de liberación rápida (B), alineando el pasador con la ranura y colocando la lámpara portátil en el trípode (F) (Fig. 3).3. Enchufe la luminaria en un receptáculo de 120 voltios.4. Para ENCENDER o APAGAR la luminaria, empuje el interruptor rojo en la parte posterior de la luminaria. (A)5. Ajuste el soporte del trípode (F) a la altura deseada aflojando y apretando los anillos de sujeción en el poste.
NOTA: Las patas deben estar fijas con sacos de arena uotro peso apropiado:• Cuando se usa en superficies irregulares o pedregosas.• Cuando se usa en áreas de mucho viento.• En cualquier momento que se necesite estabilidad adicional.
UTILIZACIÓN COMO LUMINARIA PORTÁTIL1. Si la va a utilizar como luminaria portátil, extráigala del soporte trípode portátil (F) tirando hacia afuera la perilla de liberación rápida (B) (Fig. 4). Levante la unidad portátil del poste (F).2. Utilice la luminaria acomodando el estante portátil sobre cualquier superficie plana.3. Para mayor seguridad, las luminarias portátiles siempre deben conectarse a un circuito de 120 voltios protegido por un interruptor de circuito de fallos de conexión a tierra (GFCI, por sus siglas en inglés Inerrupter).4. Para ENCENDER o APAGAR la luminaria, empuje el interruptor rojo en la parte posterior de la luminaria.
ORIENTACIÓN DE LA LUMINARIA1. Para orientar la luminaria, afloje las dos manijas con pomos a los costados de la luminaria (Fig. 5). Incline la luminaria en la posición deseada y ajuste los pomos. La luminaria puede colocarse en un ángulo descendente de 10°, o en uno ascendente de 90° (Fig. 6). Cuando incline la luminaria en el ángulo ascendente de 90°, pase el cable de la alimentación a través del orificio entre el pie de base y la luminaria para evitar deteriorar el cable de la alimentación (Fig. 7).
MONTAJE EN PARED DE LA LUMINARIA1. Coloque correctamente un tornillo N.º 8 o de mayor diá metro (no incluido) en la superficie de montaje.2. Deslice la luminaria sobre el tornillo, utilizando la lengüeta de suspensión en el pie de base de la luminaria, como se muestra en la (Fig. 8).
UTILIZACIÓN DE SU LUMINARIA 3. Enchufe la luminaria en un receptáculo de 120 voltios con protección GFCI.4. Para ENCENDER o APAGAR la luminaria, empuje el interruptor rojo en la parte posterior de la luminaria.
GARANTIA LIMITADA DE 5 AÑOSLA SIGUIENTE GARANTÍA ES EXCLUSIVA Y REEMPLAZA A TODAS LAS DEMÁS GARANTÍAS, YA SEAN IMPLÍCITAS, EXPLÍCITAS O ESTATUTARIAS, INCLUIDAS ENTRE OTRAS, LAS GARANTÍAS DE COMERCIABILIDAD E IDONEIDAD PARA UN FIN PARTICULAR.Eaton garantiza a sus clientes que los productos de Eaton no presentarán defectos en los materiales y en la fabricación durante un período de cinco años desde la fecha de compra. La obligación de Eaton según esta garantía se limita expresamente al suministro de los productos de reemplazo. Esta garantía se extiende sólo para el comprador original del producto. Un recibo del comprador u otra prueba de la fecha de compra original aceptable para Eaton. Esto es necesario para la ejecución de la garantía. Esta garantía no se aplica a los productos de Eaton que hayan sido alterados o reparadoso que estuvieron sujetos a negligencia, abuso, mal uso o accidente (incluso los daños durante el envío). Esta garantía no se aplica a los productos Eaton no fabricados por Eaton que hayan sido suministrados, instalados o utilizados junto con los productos Eaton. Los daños del producto causados por bombillas de reemplazo, corrosión o decoloración de los componentes de latón no están cubiertos por esta garantía. LIMITACIÓN DE RESPONSABILIDAD:EATON NO SERÁ RESPONSABLE LEGAL EN NINGÚN CASO DE DAÑOS INDIRECTOS, ACCIDENTALES O RESULTANTES.(SIN IMPORTAR LA ACCIÓN LEGAL, YA SEA POR CONTRATO, RESPONSABILDIAD ESTRICTA O DE FORMA EXTRACONTRACTUAL INCLUYENDO LANEGLIGENCIA) TAMPOCO DE LA PÉRDIDA DE GANANCIAS, EATON TAMPOCO SERÁ RESPONSABLE DES O DAÑOS QUE SURJAN O ESTÉN CONECTADOS CON ESTOS TÉRMINOS O CON LA FABRICACIÓN, VENTA , ENTREGA , USO, MANTENIMIENTOM, REPARACIÓN O MODIFICACIÓN DE LOS PRODUCTOS DE EATON O DEL SUMINISTRO DE CUALQUIER PIEZA DE REPUESTO QUE EXCEDA EL PRECIO DE COMPRA DE LOS PRODUCTOS DE EATON ORIGINANDO UN RECLAMO. NO SE ACEPTARÁN CARGOS POR MANO DE OBRA PARA QUITAR O INSTALAR LOS ACCESORIOS.
Slide bracket down to line Deslice
el soporte hacia abajo hasta travesañosF
2
5
6
7
8
queden en posición horizontal con el suelo
1
G
H
A
C
perilla Tire
3
Alinee la pata
con el agujero
4
F
B
B
4
Para obtener el servicio de la garantía comuníquese con Eaton al 1-800-334-6871, presione la opción 2 para el Servicio al Cliente, o por correo electrónico a [email protected] e incluya la siguiente información:• Nombre, dirección y número de teléfono• Fecha y lugar de compra• Catálogo y cantidad de la compra• Descripción detallada del problemaTodos los productos devueltos deben estar acompañados por un Número de autorización de productos devueltos emitido por la compañía y deben devolverse con flete prepagado. Se rechazará todo producto recibido sin un Número de autorización de productos devueltos desde la compañía. Eaton no se hace responsable por la mercancía dañada durante el transporte. Los productos reparados o reemplazados estarán sujetos a los términos de esta garantía y se inspeccionan al ser empacados. El daño evidente y oculto que se provoque durante el transporte se debe informar de inmediato al transportista que realiza la entrega y se debe presentar un reclamo.La reproducción de este documento sin la aprobación previa por escrito de Eaton está estrictamente prohibida.Para solicitar ayuda, llame al 1-800-334-6871 o envíe un correo electrónico a [email protected] en China
ARTICLES NÉCESSAIRES(à acheter séparément)• Clé à molette
INSTRUCTIONS RELATIVES AU RISQUE D’INCENDIE, DE DÉCHARGE ÉLECTRIQUE, DE SUREXPOSITION AU RAYONNEMENT UV OU DE BLESSURE CORPORELLE.
CE QU’IL FAUT SAVOIRAVERTISSEMENT : Lors de I’utilisation utilisation à l’extérieur luminaires portatifs, les précautions de sécurité de base doivent toujours être suivies pour réduire le risque d’incendie, de choc électrique et de blessures, y compris ce qui suit.
AVERTISSEMENT : Pour limiter le risque d’incendie, de décharge électrique, de surex-position au rayonnement UV ou de blessure corporelle.• Respectez tous les avertissements incluant les avertissements ci-dessous ET ceux indiqués sur le produit.• Votre luminaire à DEL est déjà câblé. Aucune ampoule de rechange nécessaire. Le démontage du luminaire annule la garantie.
• Risque d’incendie ou de décharge électrique.• Le système électrique et la méthode de raccordement électrique du luminaire doivent être conformes au Code national de l’électricité et aux Codes du bâtiment locaux.• Ne regardez pas directement dans l’ampoule allumée.
PRÉCAUTIONLisez toutes les INSTRUCTIONS.
• Pour utilisation à l’intérieur et à l’extérieur. • Homologation cULus pour l’utilisation dans des endroits humides.• Raccordez le luminaire à une source d’alimentation de 120 V, 60 Hz. Tout autre raccordement annule la garantie.• Utilisez uniquement des rallonges d’extérieur à trois fils ayant une fiche à trois branches de mise à la terre et des prises avec terre les acceptant.• Un disjoncteur différentiel doit être prévu sur le(s) circuit(s) si le luminaire portatif est utilisé dans un endroit humide. Des prises avec des disjoncteurs différentiels intégrés répondant à cette mesure de sécurité sont disponibles.• Après la mise à l’essai, cet équipement a été déclaré conforme aux limites établies pour un dispositif numérique de catégorie B en vertu de la section 15 des règlements de la FCC. Ces limites sont conçues pour assurer une protection raisonnable contre toute interférence nuisible dans une installation résidentielle. Cet équipement génère, utilise et dégage de l’énergie radiofréquence. S’il n’est pas installé et utilisé conformément aux instructions, il est susceptible de créer des interférences nuisibles aux communications radio. Toutefois, il n’est absolument pas garanti qu’aucune interférence ne se produira dans une installation donnée. Si l’équipement crée des interférences nuisibles à la réception d’émissions de radio ou de télévision (pour le savoir, allumez-le et éteignez-le), il est conseillé à l’utilisateur d’essayer d’éliminer ces interférences en adoptant une ou plusieurs des mesures suivantes :
- Réorientez ou déplacez l’antenne réceptrice. - Augmentez la distance entre l’équipement et le récepteur. - Branchez l’équipement sur la prise électrique d’un circuit autre que celui sur lequel le récepteur est branché. - Demandez de l’aide au distributeur ou à un technicien radio ou TV qualifié.
AVERTISSEMENT : Les réglementations de la FCC mentionnent que toute modification ou altération apportée à cet équipement n’étant pas expressément approuvée par le fabricant peut annuler le droit de l’utilisateur à faire fonctionner cet équipement.
CONSERVER CES INSTRUCTIONS.
INSTALLATION DU LUMINAIRE AVERTISSEMENT : Ne pas se conformer
strictement aux instructions d’assemblage pourrait provoquer un incendie ou une décharge électrique.
1. UsiUtilisez la clé à molette (non incluse) pour attacher la lampe de travail (A) au support (C) à l’aide des 2 vis M6 Hex nut (H) et des 2 rondelles freins M6 (G) comme sur la (Fig. 1).
UTILISER UNE LAMPE À PIED1. Déverrouillez d’abord le trépied (F) en sortant chaque pied d’environ 2,5 cm (1 po), puis desserrez le bouton en haut du trépied pour l’ouvrir complètement. En position totalement ouverte, se extiende a la posición totalmente abierta para que la parte superior soporte negro se desliza hacia abajo hasta travesaños queden en posición horizontal con el suelo (Fig. 2). Resserrez le bouton.2. Pour fixer le luminaire portatif au trépied (F), soulevez le levier de déverrouillage rapide (B), alignez l’épingle et la fente et placez le luminaire portatif sur le trépied (F) (Fig. 3).3. Branchez le luminaire à une prise de 120 V.4. Pour allumer ou éteindre la lampe, appuyez sur l’interrupteur rouge à l’arrière du luminaire (A).5. Pour ajuster le trépied (F) à la hauteur souhaitée, desserrez puis resserrez les colliers de verrouillage situés sur le poteau.Remarque : Le trépied doit être maintenu en place grâce à des sacs de sable ou tout autre type de poids approprié : • en cas d’utilisation sur des surfaces irrégulières ou rocheuses • en cas d’exposition au vent • en cas d’instabilité
UTILISER UN LUMINAIRE PORTATIF1. Si vous utilisez un luminaire portatif, enlevez le luminaire portatif du trépied (F) en soulevant le levier de déverrouillage rapide (B) (Fig. 4). Retirez l’appareil portatif du poteau (F).2. Pour utiliser le luminaire, placez la barre transver sale du trépied sur une surface plane.3. Pour une sécurité optimale, les luminaires portatifs doivent toujours être branchés à une prise à disjoncteur différentiel de 120 volts.4. Pour allumer ou éteindre la lampe, appuyez sur l’interrupteur rouge à l’arrière du luminaire.
Faire glisser la bride jusqu’à ce que les traverses sont horizontales
avec terrainF
2 FRANÇAIS
AVERTISSEMENT
1
G
H
A
C
4
F
B
B
Tirette
3
Alignez la broche avec le trou
5
D’OEUVRE NE SERA REMBOURSÉ POUR ENLEVER OU INSTALLER UN LUMINAIRE.Pour faire une réclamation au titre de la garantie, veuillez appeler Eaton au 1 800 334 6871, en choisissant l’option 2 pour le Service à la clientèle, ou envoyer un courriel à [email protected] et fournir les renseignements ci-après :• Nom, adresse et numéro de téléphone• Date et lieu de l’achat• Numéro de catalogue et quantité achetée• Description détaillée du problèmeTout produit retourné doit comporter un numéro d’autorisation de retour de produit fourni parl’entreprise et être expédié port payé. Nous refuserons tout produit qui n’est pas accom-pagné d’un numéro d’autorisation de retour de produit fourni par l’entreprise. Eaton n’est pas responsable de la marchandise endommagée durant le transport. Les produits réparés ou remplacés seront soumis aux modalités de la présente garantie et seront inspectés au moment d’être emballés. Tout dommage apparent ou non survenant pendant le transport doit être signalé immédiatement au transporteur effectuant la livraison et une réclamation doit être adressée à ce dernier. La reproduction de ce document est strictement interdite sans l’autorisation préalable par écrit de Eaton.a reproduction de ce document est strictement interdite sans l’autorisation préalable par écrit de EatonPour assistance, appelez le 1-800-334-6871 ou envoyez-nous un courriel à [email protected]é au Chine
1121 Highway 74 South, Peachtree City, GA 30269www.eaton.com/lighting
© 2015 Eaton
11/15IL502105EN
ORIENTACIÓN DE LA LUMINARIA1. Para orientar la luminaria, afloje las dos manijas con pomos a los costados de la luminaria (Fig. 5). Incline la luminaria en la posición deseada y ajuste los pomos. La luminaria puede colocarse en un ángulo descendente de 10°, o en uno ascendente de 90° (Fig. 6). Cuando incline la luminaria en el ángulo ascendente de 90°, pase el cable de la alimentación a través del orificio entre el pie de base y la luminaria para evitar deteriorar el cable de la alimentación (Fig. 7).
MONTAGE MURAL DU LUMINAIRE1. Insérez correctement une vis #8 ou de grand diamètre (non incluse) dans la surface de montage.2. Glissez la lampe de travail sur la vis en util isant l’onglet prévu sur le support pour la suspendre comme à la (Fig. 8).
UTILISATION DU LUMINAIRE3. Branchez la lampe dans une prise à disjoncteur différentiel de 120 V.4. Pour allumer ou éteindre la lampe, appuyez sur l’interrupteur rouge à l’arrière du luminaire.
GARANTIE LIMITÉE DE 5 ANSLA PRÉSENTE GARANTIE CONSTITUE LA SEULE GARANTIE POUR CE PRODUIT ET PRÉVAUTSUR TOUTE AUTRE GARANTIE, QU’ELLE SOIT EXPRESSE OU TACITE Y COMPRIS, SANSTOUTEFOIS S’Y LIMITER, TOUTE GARANTIE DE QUALITÉ MARCHANDE ET POUR UN USAGE PARTICULIER.Eaton garantit à ses clients, pendant une période de cinq ans à compter de la date d’achat, que ses produits Eaton sont exempts de tout défaut de matériaux et de fabrication. En vertu de la présente garantie, l’obligation de Eaton se limite expressément à fournir des produits de remplacement. La présente garantie n’est proposée qu’à l’acheteur initial du produit. Eaton requiert un reçu ou autre preuve d’achat qu’elle jugera acceptable sur lequel est indiquée la date de l’achat initial. Cette preuve d’achat est requise pour obtenir l’exécution de la garantie.La garantie ne s’applique pas aux produits Eaton qui ont été modifiés ou réparés, ou qui ont fait l’objet d’une négligence ou d’un usage abusif ou inapproprié, ou qui ont été endommagés en raison d’un accident (y compris durant le transport). Cette garantie ne s’applique pas aux produits qui ne sont pas fabriqués par Eaton et qui ont été fournis, installés et/ou utilisés avec des produits Eaton. Les dommages au produit causés par une ampoule de rechange ou la cor-rosion, et la décoloration des pièces de laiton ne sont pas couverts par cette garantie.LIMITATION DES RESPONSABILITÉS :EATON NE SERA EN AUCUN CAS TENU RESPONSABLE DES DOMMAGES SPÉCIAUX, INDI-RECTS, ACCESSOIRES ET CONSÉCUTIFS (QUELLE QUE SOIT LA RAISON, MÊME SI CETTE RESPONSABILITÉ REPOSE SUR UN CONTRAT, LA RESPONSABILITÉ STRICTE, OU DES DÉLITS, Y COMPRIS LA NÉGLIGENCE), NI POUR LA PERTE DE PROFITS, ET MÊME SI LA RESPONSABILITÉ DE EATON POUR DES RÉCLAMATIONS OU DES DOMMAGES FAIT SUITE À LA PRÉSENTE GARANTIE OU EST LIÉE AUX MODALITÉS DES PRÉSENTES, À LA FABRICATION, À LA VENTE, À LA LIVRAISON, À L’UTILISATION, À L’ENTRETIEN, À LA RÉPARATION, OU À LA MODIFICATION DE PRODUITS EATON OU À LA FOURNITURE DE TOUTE PIÈCE DE RECHANGE CONNEXE, LE COÛT DES DOMMAGES NE PEUT DÉPASSER LE COÛT D’ACHAT DU PRODUIT EATON FAISANT L’OBJET DE LA RÉCLAMATION AU TITRE DE LA PRÉSENTE GARANTIE. AUCUN FRAIS DE MAIN-
5
6
7
8