Embed Size (px)
Citation preview

Quest – Student Information System USER‟S MANUAL
SE 463 – Assignment 4 Michael Aasen
Muhammad Kassamali Sean Oczkowski
Sina Eizadshenass

Preface
User Interface The entire User Interface (UI) has been changed for almost every section. One of the major changes is a
persistent navigation bar on the left side of the screen. This will mean you always have a sense of where
you are in the application. The UI has also simplified to include only relevant options. For example if you
are not in a distance education course for the current term, distance education information is not
viewable in the academics section.
Calendar The calendar is now a major idea that is persistent throughout Quest. Whenever something can be
scheduled during a particular time it will show up on the calendar. For example all classes will appear on
the calendar or your enrolment appointment will appear.
The calendar is embedded on many different pages to supplement information. While enrolling it will
appear and show the times available for classes as well as your current schedule. When exam dates and
times are released they will be added to your calendar.
Short List This is a logical section of Quest. It will contain a list of classes that you are thinking about taking. It
shows up in many different areas with context specific information. For example while enrolling the
short list will show all courses you are interested in taking and that are offered in the semester you are
currently enrolling in.
Notifications This is a section that is viewable in all areas of Quest. It is a section on the right side of the screen that
will display notifications to you. For example when your enrolment appointment has been decided a
notification will appear. This notification will contain a description of the notification and if it is
schedulable it will contain a link to the even on the calendar.
Planning The planning section is a major new area of Quest. It allows you to view all terms that you currently
have remaining. You can then move courses from your short list to the term you intend on taking them
in. This allows you to view in a logical manner the courses you wish to take and make sure that you have
taken all required prerequisites. This will also allow you to verify you are on the right track to complete
your degree.

iv
Table of Contents
Preface ......................................................................................................................................................... iii
User Interface ........................................................................................................................................... iii
Calendar ................................................................................................................................................... iii
Short List .................................................................................................................................................. iii
Notifications ............................................................................................................................................. iii
Planning ................................................................................................................................................... iii
1 Introduction ........................................................................................................................................... 1
1.1 Product Overview ......................................................................................................................... 1
1.2 Navigation ..................................................................................................................................... 1
2 Graphical Components .......................................................................................................................... 4
2.1 Short List ....................................................................................................................................... 4
2.2 Notifications Box .......................................................................................................................... 4
2.3 Course Object ................................................................................................................................ 5
2.4 Calendar ........................................................................................................................................ 5
3 Getting Started ...................................................................................................................................... 6
3.1 Logging In ..................................................................................................................................... 6
3.1.1 Incorrect Username or Password .......................................................................................... 6
3.1.2 Forgotten Login Information ................................................................................................ 6
3.1.3 Obtaining a Username and Password .................................................................................... 6
3.2 Logging Out .................................................................................................................................. 7
4 Use Cases .............................................................................................................................................. 8
4.1 Personal Portfolio .......................................................................................................................... 8
4.1.1 View Personal Portfolio ........................................................................................................ 8
4.1.2 Update Personal Portfolio ..................................................................................................... 8
v
4.1.3 View Holds ........................................................................................................................... 8
4.2 Finance .......................................................................................................................................... 9
4.2.1 View Financial Overview ..................................................................................................... 9
4.2.2 View Detailed Account Summary ........................................................................................ 9
4.2.3 View Financial Aid Summary ............................................................................................. 10
4.2.4 View Payment Dates ........................................................................................................... 10
4.2.5 How to Pay .......................................................................................................................... 11
4.3 Academics ................................................................................................................................... 12
4.3.1 View Grades ........................................................................................................................ 12
4.3.2 View Unofficial Transcript ................................................................................................. 12
4.3.3 View Course Catalogue ...................................................................................................... 12
4.3.4 Add to Short List ................................................................................................................. 14
4.3.5 View Schedule of Classes ................................................................................................... 14
4.3.6 View Pre-Enrollment/Enrollment Appointments ................................................................ 15
4.3.7 Enroll in a Class .................................................................................................................. 15
4.3.8 Drop a Course ..................................................................................................................... 17
4.3.9 Swap Classes ....................................................................................................................... 18
4.3.10 View Exam Schedule .......................................................................................................... 19
4.3.11 Change Distance Education Exam Location ....................................................................... 19
4.3.12 Pre-enroll in a Course ......................................................................................................... 20
4.3.13 Plan for Future Terms ......................................................................................................... 20
4.3.14 Check Degree Requirements ............................................................................................... 22
4.3.15 Request an Override for a Course ....................................................................................... 22
5 Help ..................................................................................................................................................... 24
6 Acknowledgements ............................................................................................................................. 25

vi
Table of Figures
Figure 1.1 - Navigation ................................................................................................................................. 1
Figure 1.2 - Personal Portfolio ...................................................................................................................... 2
Figure 1.3 - Finance ...................................................................................................................................... 2
Figure 1.4 - Academics ................................................................................................................................. 3
Figure 2.1 - Short List ................................................................................................................................... 4
Figure 2.2 - Notification Box ........................................................................................................................ 5
Figure 2.3 - Course Object ............................................................................................................................ 5
Figure 2.4 - Calendar .................................................................................................................................... 6
Figure 4.1 - Financial Overview ................................................................................................................... 9
Figure 4.2 - Detailed Account Summary .................................................................................................... 10
Figure 4.3 - Course Catalog ........................................................................................................................ 13
Figure 4.4 - Add to Short List ..................................................................................................................... 14
Figure 4.5 - Schedule of Classes ................................................................................................................. 15
Figure 4.6 - Enroll In a Course ................................................................................................................... 16
Figure 4.7 - Drop a Course ......................................................................................................................... 18
Figure 4.8 - Plan for a Future Term ............................................................................................................ 21
Figure 4.9 - Request Override ..................................................................................................................... 23

1
1 Introduction
1.1 Product Overview Quest is Student Administration web-based software that caters to the needs of students at the
University of Waterloo. Through Quest, students have the ability to view and edit their contact
and financial information, course schedules, grades and various other self-service options.
Quest is available 23 hours a day, 7 days a week, due to daily maintenance occurring from
midnight until 1:00 am. Quest is accessed by going to http://quest.uwaterloo.ca. The following
browsers are supported: Internet Explorer 6 and later, Firefox 2.0 and later, and Safari 3.0 and
later.
1.2 Navigation
In all pages of Quest, a navigational bar exists on the left side of the screen [ Figure 1.1 #1].
This allows students to enter any of the four primary sections of Quest: Personal Portfolio,
Finance, Academics, or Calendar.
Figure 1.1 - Navigation
Personal Portfolio [Figure 1.2 #1] is the section in which students can view and edit their
Personal Portfolios [Figure 1.2 #2] as well as any holds on their accounts.

2
Figure 1.2 - Personal Portfolio
Finance [Figure 1.3 #1] is the section in which students can view their financial status including
any fees they owe to the University [Figure 1.3 # 2] and financial aid packages they have
received.
Figure 1.3 - Finance
The Academics [Figure 1.4 #1] section is the heart of Quest. Among other things, this section
allows the student to enroll and pre-enroll, drop and swap courses, view the university course
catalogue, and view course schedules and grades.

3
Figure 1.4 - Academics
The Calendar [Figure 1.1 #1] is a feature that shows all Quest-related events relevant to
students. This includes items such as course schedules, payment due dates, and enrollment
appointments.

4
2 Graphical Components The following graphical components appear on many of the pages in Quest. These components are referenced throughout the user‟s manual.
2.1 Short List
A short list [Figure 2.1 #1] is a list of course objects that you are interested in taking during future terms. This list is used with other sections of Quest, allowing you to view only relevant courses when enrolling or planning your degree.
The short list is merely for your own convenience; adding a course to the list does not enroll you.
Figure 2.1 - Short List
2.2 Notifications Box
The Notifications Box [Figure 2.2 #1] is an area on the right side of all Quest pages that displays important notifications. Individual notifications can be cleared and the entire box may be collapsed. Notifications of scheduled events will link to the Calendar.

5
Figure 2.2 - Notification Box
2.3 Course Object
The Course Object [Figure 2.3 #1] is a representation of a course that contains all pertinent information such as the course name, code, description, and requirements. When available, term-specific information will also be displayed. This includes the various sections and their respective timings and instructors.
Based upon the context in which the course object is being viewed, context-specific information and action buttons will also be displayed. For example, a button to add the course to your short list will appear when viewing course objects in the course catalog.
Figure 2.3 - Course Object
2.4 Calendar
The Calendar is a component that displays all schedulable information. This includes specific courses, examinations, enrollment appointments, and deadlines for fee payment. You can filter the calendar using any of this information. There are various views for the calendar, such as monthly, weekly, and daily views, as well as a list view.

6
The Calendar [Figure 2.4] may be opened by directly clicking a link from the navigation menu of any Quest page. It also exists within the enroll pages, allowing you to view potential enrollment schedules before officially enrolling.
Figure 2.4 - Calendar
3 Getting Started
3.1 Logging In
In order to use Quest, you must identify yourself to the system by providing your username and password.
To log in:
1. Go to http://quest.uwaterloo.ca in your browser.
2. Enter your username and password.
3. Click „Log In‟.
Once logged in, the calendar is displayed.
3.1.1 Incorrect Username or Password
If the username and password provided are not correct, Quest will prevent you from entering the site and prompt you to enter the correct username and password. For security reasons, after three tries Quest will prevent you from trying a new username and password for 5 minutes. After 5 minutes you will be able to try again.
3.1.2 Forgotten Login Information
If you have forgotten your username or password, you should contact the Registrar‟s Office to receive new login information.
3.1.3 Obtaining a Username and Password
To obtain a username and password you should contact the Registrar‟s Office.

7
3.2 Logging Out
To logout of Quest:
1. Click „Logout‟ on the top right corner of the screen.

8
4 Use Cases
The fundamental use cases of Quest may be classified into the following sections: Personal Portfolio, Finance, and Academics. Each use case is described below, and specific steps to carry out the use case are also provided.
4.1 Personal Portfolio
4.1.1 View Personal Portfolio
Quest stores your personal information, for University use. This consists of your name, address, phone number, email, emergency contacts as well as demographic information.
In order to view the Personal Portfolio section, starting from the Personal Portfolio page:
1. Click on the specific information item that you wish to view.
4.1.2 Update Personal Portfolio
If you wish to edit any of the personal information, starting from the Personal Portfolio page:
1. Click on the specific information item that you wish to view.
2. Edit the information.
3. Click „Save‟.
4.1.3 View Holds
The University may place a hold on your account for various academic or financial reasons. The effects and restrictions entailed by this hold will vary based on the type of hold. For example, a financial hold as a result of unpaid fees may result in the inability for you to enroll in classes.
To view the Holds section, starting from the Personal Portfolio page:
1. Click on the „View Holds‟ link.

9
4.2 Finance
4.2.1 View Financial Overview
The Financial Overview [Figure 4.1] provides a summary of all financial information related to your account per term. Each term is listed as a box containing four lines of text. Each line will correspond to one of the following: total fees, financial aid received, amount paid and outstanding balance.
To view the Financial Overview section, starting from the Finance page:
1. Click on the link „Financial Overview‟.
Once on the Financial Overview page, clicking on each term will take you to the detailed view of the specified term.
Figure 4.1 - Financial Overview
4.2.2 View Detailed Account Summary
Quest provides detailed financial information for each term [Figure 4.2]. This includes fees, financial aid, amount paid and your outstanding balance for the term.
To view the Detailed Account Summary section, starting from the Finance page:
1. Click on „Financial Overview‟ link.
2. Once on the „Financial Overview‟ page, click on the term you are interested in to view the term‟s detailed account summary.

10
Figure 4.2 - Detailed Account Summary
4.2.3 View Financial Aid Summary
This section allows you to view all the financial aid that you have received on a per term basis. If there are multiple bursaries or scholarship for a particular term, they will all be listed along with the date each will be available to you.
To view the Financial Aid Summary section, starting from the Finance page:
1. Click on „View Financial Aid‟.
4.2.4 View Payment Dates
Payment dates are the due dates for each fee that you are subject to. These dates are specific to you, depending on the program you are enrolled in. These payment dates also include late fees when applicable.
The payment dates will also appear in your notifications box and your calendar.
To view the Payment Dates section, starting from the Finance page:
1. Click on the „Payment Dates‟ link to go to that page
Note: The Payment Dates page only reflects information for payments regarding the current term.

11
4.2.5 How to Pay
The How to Pay section includes details on how to pay using different methods of payment and different banks.
To view the How to Pay section, starting from the Finance page:
1. „Click on the „How to Pay‟ link.

12
4.3 Academics
4.3.1 View Grades
The final grade achieved in each enrolled course may be viewed by term. When the grades for the current term have been released, a message will appear on the notifications box indicating that you may view these grades.
To view the Grades section, starting from the Academics page:
1. Click on „View My Grades‟.
2. Click on the appropriate term.
4.3.2 View Unofficial Transcript
While official transcripts must be printed at the Registrar‟s Office, the Quest system provides an unofficial transcript. This displays your academic record for all terms that you have been enrolled in.
To view the Unofficial Transcript section, starting from the Academics page:
1. Click on „View My Unofficial Transcript‟.
2. Select the academic institution and report type that you wish to view.
3. Select the format type you wish to view.
4. Click „View‟.
4.3.3 View Course Catalogue
Viewing the course catalogue [Figure 4.3] allows you to look at the courses offered by the University and their descriptions. This will provide a list of course objects [Figure 4.3 #3] that can be added to your short list.

13
Figure 4.3 - Course Catalog
To view the Course Catalogue section, starting from the Academics page:
1. Click on the „View Course Catalogue‟ link.
By default no courses are show in the list.
2. To start, enter a search for a particular subject or course [Figure 4.3 #1], for example “CS” or “AMATH 245”. The course code may be omitted in order to return all courses of the entered subject.
3. Press „Search‟.
Once a search is entered, all matching courses will be displayed. To further narrow down the search, a filter can be selected. The filter restricts what results are displayed. Results can be filtered by term, such as “Spring 2009”, as well as more generally by what season they are offered.
4. To select a filter, choose the drop down menu [Figure 4.3 #2] from under the search box, and select the filter you would like to apply.
4.3.3.1 Advanced Searches
There are two types of advanced searches:
Multiple Queries
Along with searching for a particular subject or course, multiple courses can be searched by using the “|” in the search box. For example entering “CS 134 | CS 136” will return results for both courses.
Wild Card Character
The character “?” can be used as a wild card character when searching for courses, to return all results with similar course numbers. For example “CS 3??” will return all

14
the 300 level courses in the CS faculty.
4.3.4 Add to Short List
The simplest way to add a course to the short list is from the course catalogue. To add a course to your short list:
1. First, open the Course Catalogue from the Academics page.
2. Search for the course you want to add to the short list.
3. Find the course object of the course you want to add.
4. Click the „Add to Short List‟ [Figure 4.4 #1] button on the course object.
If the add to short list button is disabled or grayed out, and then the course is already on your short list.
Note: Adding the course to the short list does not automatically enroll you in the course.
Figure 4.4 - Add to Short List
4.3.5 View Schedule of Classes
To view your schedule of classes [Figure 4.5] for a particular term, starting from the Academics page:
1. Click the link labeled „View Schedule of Classes‟.
This will display a calendar showing when your individual classes are scheduled. By default, this will show the days and times for the current term.
2. Select the term you want to see from the drop down menu at the top of the calendar and the calendar will reload.

15
Figure 4.5 - Schedule of Classes
4.3.6 View Pre-Enrollment/Enrollment Appointments
The undergraduate pre-enrollment appointment is the time period when you are able to pre-enroll in courses for two terms ahead, while the enrollment appointment is when you are able to enroll in courses for your next term.
As your pre-enrollment/enrollment appointment approaches, there will be three messages in your notification box indicating when your appointment is. The first will be sent when your enrollment appointment has been scheduled, a second will be sent one week prior to your appointment start, and finally a third notification will appear when your enrollment appointment starts. All of these messages will include your individual appointment start and end dates for the next term.
To check when your pre-enrollment/enrollment appointment is, from the Academics page:
1. Click „View pre-enrollment/enrollment appointment‟.
This will only take you to the calendar displaying the appointments.
Note: In general you will only be able to see the enrollment appointment up to one term in advance.
4.3.7 Enroll in a Class
Enrolling in a course will officially add you to the course. You can only enroll in a course for the term that you have an open enrollment appointment for. To be able to enroll in a course, that course must already be in your short list and available for the current term.
From the Academics page:
1. Click on „Enroll in a Course‟.

16
You will automatically be taken to the term that you can currently enroll in; the term will be displayed at the top. You can toggle the term with the tab at the top of the screen. In the middle of the screen the calendar with your current schedule of classes will appear. On the left side of the screen a list of currently available courses will be displayed from your short list
This list of courses is arranged as follows:
i. The first set of courses will show mandatory core courses if they exist for the
current term, as well as other courses you are currently enrolled in.
ii. The second set shows courses available this term where you meet the pre-
requirements.
iii. The third set will show all other courses in your short list being offered this term.
By clicking on the requirements section at the bottom of the course object, a list
of required courses will appear. This list will inform you of which courses you are
missing.
iv. If the course you wish to register in is not yet in your short list click the „Add
Course to List‟ button at the top of the list view. This will temporarily take you to
the course catalogue and allow you to add courses to your short list.
Figure 4.6 - Enroll In a Course
2. For courses you wish to enroll in, select the „Select‟ checkbox in the course object.
The „Enroll‟ button will remain disabled until all necessary information is filled out. After you select it, another area in the course object will appear. This area will include the various sections offered with the course. These sections will display the date, time and professor associated with them.
3. Select which section you wish to enroll in.

17
When you select a section, it will automatically fill in the time slot on your schedule. If there is a time conflict, it will appear in a different color and a warning message will be displayed and a link to generate an override request form will be provided. If there are mandatory tutorials or labs associated with this course, they will appear automatically in the same area.
4. Select the tutorial and lab section you wish to enroll in if applicable.
The „Enroll‟ button will now be enabled.
5. Click on the „Enroll‟ [Figure 4.6 #2] button to enroll in the course.
This will officially enroll you in a course. The course object will automatically be moved to the top section of the list on the left.
4.3.8 Drop a Course
When you drop a class for the current term, you will no longer be registered for it. This will allow you to add other courses to your schedule.
Note: If the course is full, your spot in the dropped course will be given away to the next person on the waiting list.
Note: If you wish to drop the course and add another one, you are advised to use the „Swap Courses‟ feature.
From the Academics page:
1. Click on „Drop a course‟.
The calendar with your current schedule of classes will appear. On the left side of the screen a list of currently available courses will be displayed from your short list.
This list of courses is arranged as follows:
i. The first set of courses will show mandatory core courses if they exist for the
current term, as well as other courses you are currently enrolled in.
ii. The second set will show courses available this term where you meet the pre-
requirements.
iii. The third set will show all other courses in your short list being offered this term.
By clicking on the requirements section at the bottom of the course object a list
of required courses will appear. This list will inform you of which courses you
are missing.
2. In the top section of the list, find the course you wish to drop. Click the „Drop Course‟
button in the course object.
A confirmation message will appear.
3. Select „Confirm‟ to drop the course, or select „Cancel‟ if you wish to remain enrolled.
18
All associated labs and tutorials that are tied to the course will be automatically dropped.
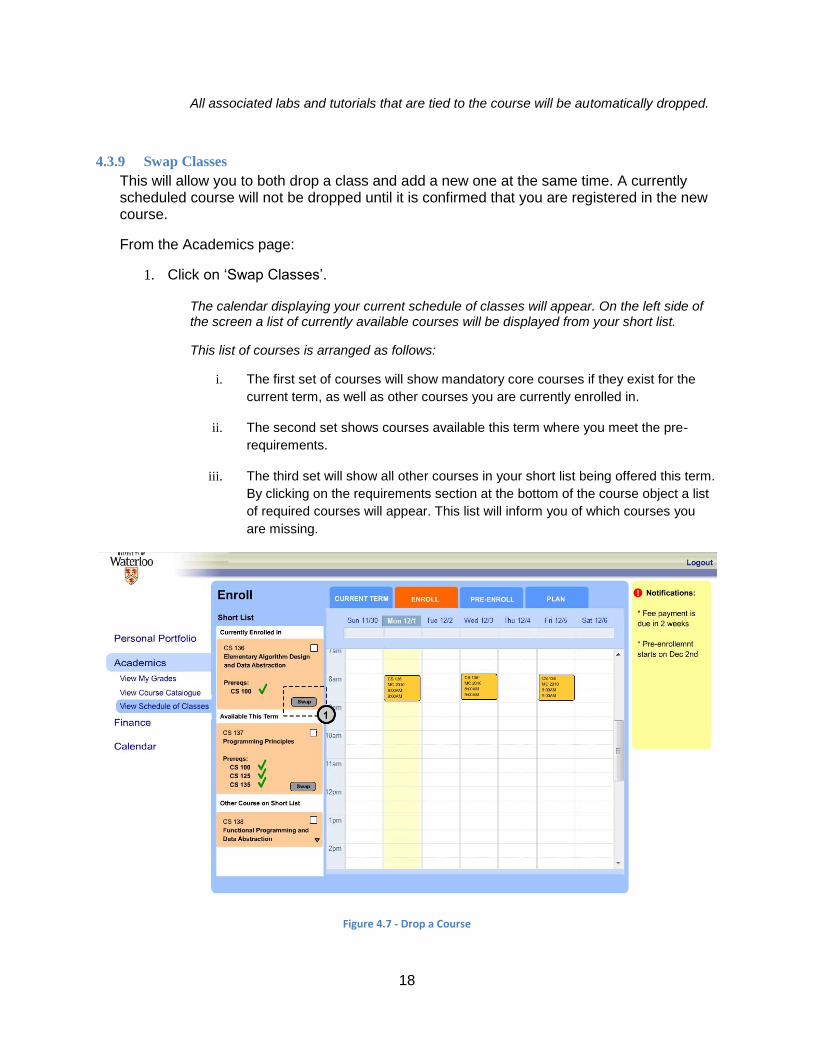
4.3.9 Swap Classes
This will allow you to both drop a class and add a new one at the same time. A currently scheduled course will not be dropped until it is confirmed that you are registered in the new course.
From the Academics page:
1. Click on „Swap Classes‟.
The calendar displaying your current schedule of classes will appear. On the left side of the screen a list of currently available courses will be displayed from your short list.
This list of courses is arranged as follows:
i. The first set of courses will show mandatory core courses if they exist for the
current term, as well as other courses you are currently enrolled in.
ii. The second set shows courses available this term where you meet the pre-
requirements.
iii. The third set will show all other courses in your short list being offered this term.
By clicking on the requirements section at the bottom of the course object a list
of required courses will appear. This list will inform you of which courses you
are missing.
Figure 4.7 - Drop a Course

19
2. At the top of the list view click the „Swap‟ [Figure 4.7 #1] button.
3. Select the course you wish to drop by clicking the „Swap Out‟ button in the course
object.
The course object will be highlighted in a different color to confirm that you have selected it.
4. Select the course you wish to add.
5. Fill in the information in the same way you would in the „Enroll in a Course‟ section.
When the information has been filled out completely, the „Enroll‟ button will be enabled. If you are successfully registered in the course, it will appear at the top of the list with the other course dropped. If you are unsuccessful in getting into the course, your schedule
will remain unchanged and a dialogue will appear stating the problem.
4.3.10 View Exam Schedule
You are able to view a schedule of your course examinations for the current term. When the Registrar releases the exam schedule there will be a message on you notification box saying the exam schedule has been released. The message contains a link to your exam schedule.
To view your exam schedule for a particular term, from the Academics page:
1. Click „View Exam Schedule‟.
This will bring up a list of all your exams and their times for the selected term. By default the current term is selected. To view the exam schedule from a previous term:
2. Select the term you want to see from the „Select Term‟ drop down menu.
Note: The exam schedules are generally released for the current term about halfway through. This schedule is subject to change.
4.3.11 Change Distance Education Exam Location
When registered for a Distant Education (DE) course, you are able to select which city is convenient to write your final exam in. When you are enrolled in a DE course, a message is sent to your notification box reminding you to select a city for writing your exam. This message also has a link to the Exam Schedule page where you can change the city.
To select the location for your exam from the Academics page:
1. Go to „View Exam Schedule‟.
2. Go to the current term if you are not already there.
Under the list of exams if you are in a DE course there will be a message stating which city you are currently scheduled to take your exam in, along with a link labeled „Change City‟.

20
3. Click the „Change City‟ link and choose which city you would like to write the final exam in. By default the city is Waterloo.
4.3.12 Pre-enroll in a Course
Pre-enrollment allows you to try to reserve a spot in a future term. Pre-enrolling for a course will not guarantee you a spot in the course; however, it will help you get one. This feature is only available during your pre-enrollment appointment.
To pre-enroll in a course, from the Academics page:
1. Click on the „Pre-enroll in a Class‟ link.
You will be taken to a screen that shows the term you are able to pre-enroll for. The list shows all of the courses available for the pre-enroll term that are contained in your short list.
This list of courses is arranged as follows:
i. The first set of courses will show mandatory core courses if they exist for the
pre-enroll term, as well as other courses you are currently pre-enrolled in.
ii. The second set shows courses available this term where you meet the pre-
requirements.
iii. The third set will show all other courses in your short list being offered this term.
By clicking on the requirements section at the bottom of the course object, a list
of required courses will appear. This list will inform you of which courses you
are missing.
2. Choose a course from the list view that you wish to pre-enroll in.
3. Select a priority for this course.
When you pre-enroll in multiple courses, preference for enrollment will be given to the course with the highest priority.
4. Click the „Pre-enroll‟ button
A confirmation message will appear. The course object will automatically appear in the „Currently Pre-enrolled‟ section of the list.
4.3.13 Plan for Future Terms
Planning for future terms allows you to look ahead at future terms and organize your short list. This ensures that you will have the prerequisites to take all the courses you are interested in, as well as to graduate in your program.
To plan for a future term, starting from the Academics page:
1. Click „Plan for Future Terms‟.

21
In this view you will have your short list on the left and a series of columns on the right side of the page labeled with the current term, as well as all future terms, until your registered graduation date. These columns represent the classes you will be taking in future terms. Initially these columns will be filled out with required courses that have been scheduled for you, as well as any co-op terms, if applicable.
i. If you wish to add additional terms after your registered graduation date, click
the „Add Term‟ [Figure 4.8 #2] button at the top right of the screen.
2. Drag the course object from your short list on the left into the column representing the term you wish to take it in.
Once a course is added, it will be in one of three states: Unmet Requirements, Pending and OK. Each state will be coloured red, yellow or green, while required courses will be in orange.
Figure 4.8 - Plan for a Future Term
If a course is in red, it means you will not have met all the requirements to be in the course at the time you wish to take it. To look at which requirements you will have not met:
3. Expand the Requirements section of the course object.
All the prerequisites you do not have scheduled will show up in red at the top of the prerequisite list. From here you will have an option to add the unmet prerequisites to your short list. Once you have also placed the prerequisites into the planning columns the course will move into the pending state. If the reason you have not met the requirements for the course is not because of missing prerequisites, you will need to request special authorization to enroll in the course, which will need to be done during the selected terms‟ enrollment period.
If a course is yellow, it is in the pending state. A yellow course means that you plan to take all the required prerequisites, but you have not completed them and your entrance to the course will be dependent on your passing them. To view which prerequisites are still pending:
4. Open the “Requirements” section of the course object*.

22
All pending requirements will be displayed in yellow.
If a course is in the OK state, it will be displayed in green in the term column. This means that there should be no reason you cannot take that course in that term.
Note: Adding a course in your planning view will NOT enroll you in the course, and all courses are subject to change and availability.
4.3.14 Check Degree Requirements
Checking degree requirements will tell you if your plan in the planning view will allow you to graduate with your selected degree.
NOTE: This is UNOFFICIAL INFORMATION and you will still need to have your plan approved by an academic advisor.
To check if you are meeting degree requirements, go to the planning view. From the Academics page:
1. Click on „Plan for Future Terms‟.
2. Click „Validate Degree Requirements‟ from the top right.
This will check the classes from your planning view and classes you have taken, and return whether you have met the requirements for your selected degree. If you have not met the requirements, it will show a list of requirements that you are missing.
To check programs other than your registered program:
3. From the page showing your results from your selected degree, click „Check Against a Different Degree‟.
4. Fill in the degree you want to check against.
This will bring up a screen telling you what courses you need to add to meet degree requirements for the selected degree.
4.3.15 Request an Override for a Course
Getting an override for a course will allow you to seek instructor or faculty permission to enroll in a course even though you are not currently eligible. The method of requesting an override for a course will vary based on the reason the override is needed. The three main reasons for an override are the following: there is a time conflict with another course you are enrolled in, the course requires a prerequisite you do not have, or a class is full.
To request an override for any of these reason, from the Academics page:
1. Click on „Enroll in a class‟.
2. From the left side choose the course and section you are interested in.
3. Click „Enroll‟ [Figure 4.9 #1].

23
If there is an issue, a message will be displayed saying you cannot enroll in the course because there is a time conflict, you do not have a prerequisite, or the class is full, and asking if you would like to request an override.
4. Click „Yes‟ [Figure 4.9 #2].
This will add the class to your schedule in a tentative form. You will not be enrolled in the class and the entry on the calendar will say “waiting for approval”. After you click yes, a PDF will open in a new window with an override request form mostly filled in. You must print out the file and then fill in the remaining fields. Next you must get the required instructor to sign the request for override form and submit it to the required office.
Figure 4.9 - Request Override

24
5 Help
If at any point you run into difficulties while using Quest, click the „Help‟ button on the page you are currently in and help information regarding that page will be displayed. For more information please fax all queries to the 24-hour support desk, Fax No: 1-519-GO-QUEST.

25
6 Acknowledgements
We would like to acknowledge Nancy Oczkowski for her help in reviewing and editing the text to this user‟s manual.
We would also like to note that the concept calendar was taken from Google Calendar.