Embed Size (px)
Citation preview

Queen’s Thesis Templates MS-WORD2007/2010
A Student Guide
prepared by
Sam Kalb Scholarly Communication Services Coordinator
Rev. December 2012
Queen’s MS-WORD(2007/2010) Thesis Templates - Guide
i
Introduction ................................................................................................................................................................................... 1 Step 1: Decide which Template you need ............................................................................................................................. 1 Main ....................................................................................................................................................................................................................... 1 Chapter ................................................................................................................................................................................................................. 1 Thesis chapters prepared without the thesis templates ................................................................................................................. 1
Step 2: Downloading the templates ....................................................................................................................................... 2 Chapter Template ............................................................................................................................................................................................ 2 Why Use the Chapter Template? .......................................................................................................................................................... 2 Install ................................................................................................................................................................................................................ 2 Use the Chapter Template ....................................................................................................................................................................... 2
Step 3: Read the Guidelines ....................................................................................................................................................... 3 Step 4a: Styles & Macros ............................................................................................................................................................ 4 What is a style? .................................................................................................................................................................................................. 4 Styles will keep your formatting consistent .................................................................................................................................... 4 Styles will help generate a table of contents (with page numbers) automatically ........................................................ 5 Styles will help you navigate your large document. .................................................................................................................... 5
What is a Macro? .............................................................................................................................................................................................. 5 List of Template Macros ........................................................................................................................................................................... 5
Step 4b: Missing or Disappearing Macros – Working Without Macros ..................................................................... 6 Step 5: What about saving my files? ...................................................................................................................................... 9 Use QShare .......................................................................................................................................................................................................... 9 Backup Copies, Backup Copies, Backup Copies ................................................................................................................................... 9
Step 6: OK, I'm ready to write! .............................................................................................................................................. 10 To add a new chapter in the same file ................................................................................................................................................. 10 Creating numbered or un-‐numbered chapter sections and subsections .............................................................................. 10 To create a section heading ................................................................................................................................................................. 10 Top create a subsection heading ....................................................................................................................................................... 10
Styles ................................................................................................................................................................................................................... 10 To Apply a style ......................................................................................................................................................................................... 11
Changing the Base Text Font ................................................................................................................................................................... 11 Pagination ........................................................................................................................................................................................................ 11 Spacing .............................................................................................................................................................................................................. 12

Queen’s MS-WORD(2007/2010) Thesis Templates - Guide
ii
Table, Figure and Plate Headings .......................................................................................................................................................... 12 To Generate or Change a Caption ..................................................................................................................................................... 12 To create a new caption ................................................................................................................................................................... 12 To change a caption ........................................................................................................................................................................... 12
Footnotes & References .............................................................................................................................................................................. 13 Creating Footnotes .................................................................................................................................................................................. 13 Creating References or Endnotes ...................................................................................................................................................... 13 Restarting Footnote/Endnote Numbering for Each Chapter ............................................................................................... 14 Editing Footnotes and Endnotes ....................................................................................................................................................... 14 Deleting Footnotes and Endnotes ..................................................................................................................................................... 14 RefWork: Collecting references and compiling your bibliography .................................................................................... 15
Figures ............................................................................................................................................................................................................... 15 List of Figures & Illustrations, List of Tables, List of Plates ................................................................................................... 15 Charts from Excel ..................................................................................................................................................................................... 15 Can I refer to figure captions in my text, so if my figure numbers change I don't have to change the text? ... 16 To insert a cross-‐reference: ................................................................................................................................................................. 16
Step 7: Setting up the Front Matter ..................................................................................................................................... 16 Install the Main Template ......................................................................................................................................................................... 16 Use the Main Template ............................................................................................................................................................................... 17 To Delete an Unneeded Section .......................................................................................................................................................... 17 To insert chapter text ............................................................................................................................................................................. 17
Step 8: Assembling Chapters with the Front Matter ..................................................................................................... 18 To assemble your chapters & front matter ........................................................................................................................................ 18 With Text from Outside the Thesis Templates ............................................................................................................................. 18 If Bibliography at the end of the thesis ........................................................................................................................................... 18 If List of References at the end of the thesis .................................................................................................................................. 18
Insert Appendices .......................................................................................................................................................................................... 19 Bibliography (or References) ................................................................................................................................................................... 19
Start Bibliography .............................................................................................................................................................................. 19 Sort a reference list ............................................................................................................................................................................ 19
Step 9: Creating Landscape Pages ....................................................................................................................................... 20 To Insert a Landscape Page ...................................................................................................................................................................... 20 To Switch back to Portrait Paging ........................................................................................................................................................ 20
Step 10: Update the Table of Contents, List of Figures & Illustrations, and List of Plates ................................ 20

Queen’s MS-WORD(2007/2010) Thesis Templates - Guide
iii
Appendix 1. Editing, Navigation, Formatting and Selecting Shortcuts ................................................................. 21 Style Tips ........................................................................................................................................................................................................... 21 Create your own “quick” style ............................................................................................................................................................. 21 Update a style ............................................................................................................................................................................................ 21
Inserting Diacritics or Accents to Letters ........................................................................................................................................... 21 Keyboard Shortcuts ...................................................................................................................................................................................... 22 Editing Shortcuts ...................................................................................................................................................................................... 22 Navigation Shortcuts .............................................................................................................................................................................. 23 Formatting Shortcuts ............................................................................................................................................................................. 23 Selecting Shortcuts .................................................................................................................................................................................. 23
Typing Shortcuts & Tips ............................................................................................................................................................................. 24 Right click Spell-‐check ................................................................................................................................................................................ 24 Right click Thesaurus .................................................................................................................................................................................. 24 Add commonly misspelled words to AutoCorrect ........................................................................................................................... 24 Superscript & Subscript characters ...................................................................................................................................................... 25 Apply superscript or subscript ............................................................................................................................................................ 25
Deleting Section Breaks .............................................................................................................................................................................. 25 Inserting Section Breaks ............................................................................................................................................................................ 25 Dealing with Page Numbers ..................................................................................................................................................................... 25 Formatting Page Numbers .................................................................................................................................................................. 25 Creating Roman Numeral Page Numbers ..................................................................................................................................... 27
Set up a Hanging Indent for a Reference ............................................................................................................................................ 27

Queen’s MS-WORD(2007/2010) Thesis Templates - Guide
1
Introduction
IT has developed templates for use when writing your thesis The point of these templates is to try to let you forget about the formatting of your thesis, and focus on the writing. But in order to do that, you must first understand what formatting is expected, and what the easiest way to achieve that formatting is. This web site is structured as a tutorial to guide you through the process of creating your thesis in Microsoft Word. Some time spent up front to learn the skills to create such a structured document will save you hours and hours of mindless re-‐formatting your document before it is time to hand it in. Using these templates from the first paragraph that you write, and understanding the use of styles, will help in you in achieving a consistently formatted document, and will allow you to generate a table of contents and list of figures with page numbers automatically. Formatting inconsistency and mis-‐numbered table of contents are two of the most common errors -‐ so understanding the templates before you start writing will save you effort in the long run!!
Step 1: Decide which Template you need
Know which Template you want? Go to HUStep 2: Downloading the TemplatesU
Main
All Word users will need the main template: Uqueen's_thesis_word.docmUH. It contains all the required thesis sections, formatted according to Queen’s Thesis formatting specifications HUGeneral Forms of ThesesUH, including the "Front Matter" (Title page, table of contents, List of figures, approval pages, etc). It contains preformatted settings for numbered chapters and sections, switching between portrait and landscape page format, fonts, etc. The correct margins and line spacing are set up for you, as well as page numbering. NOTE: If you have already written your thesis without using the templates, you load your thesis into this template to ensure the correct formatting.
Chapter
If you are planning to prepare your chapters as separate files, the recommended approach (see Step 2), you will need this template. HUThesis-‐chapter.docmUH. It contains preformatted settings for numbered chapters and sections, switching between portrait and landscape page format, fonts, etc. The correct margins and line spacing are set up for you, as well as page numbering.
Thesis chapters prepared without the thesis templates
If you have already written your thesis without using the templates:
• Install the Chapter Template (HUStep 2UH below).

Queen’s MS-WORD(2007/2010) Thesis Templates - Guide
2
• Paste the text from each chapter into the template until all the chapters have been entered, following the instructions in Step 8: With Text from Outside the Thesis Templates.
• Save the file. • Install the Main Template and follow the steps in HUStep 7UH to complete the rest of the thesis.
Step 2: Downloading the templates
Got the Template Downloaded? Go to HUStep 3: GuidelinesU
There is a main template for your front matter (Approval page, table of contents, etc.), and a template for your chapters. You can simply ignore the front matter template until you need it (HUsee step 7UH), but use the chapter template to compose each of your chapters. If you have already composed your thesis without the templates, go directly to HUstep 7UH.
Chapter Template
Why Use the Chapter Template?
Writing and editing one or more chapters in a separate document is much simpler and less unwieldy that trying to work on your whole thesis in one document, before it is complete. Reordering chapters before they have been compiled into a complete thesis is infinitely easier. The longer your thesis becomes, the more potentially complex it may become to edit and the long it may take to make changes. Finally, mislaying a single chapter is probably much less traumatic than losing a copy of the whole thesis.
Install
• Go to the E-‐thesis Web site: http://www.queensu.ca/etheses/H. • To Download the Chapter Template click HUChapter TemplateUH à choose “Open” • Save the file to the Desktop, onto a USB key, into My Documents, or wherever you can locate the
file again.
Use the Chapter Template
• Locate the file saved in the installation through My Computer or Windows Explorer. Double-‐click on it (or Right Click and choose New). NOTE: Some people may have to open Word first and select the template file, if the double-‐clicked file does not display the Thesis Tools menu tab.
• Word should open with a new document based on the template.

Queen’s MS-WORD(2007/2010) Thesis Templates - Guide
3
• If you see the following message under the menu bar, Security warning Macros have been disabled, click on the Options… box.
• In the new window, select Enable this content and click on OK.
• Click on the F12 key to open the Save As window or press the Office Button à Save As. Give the file a unique name, e.g. Chapter1.docm (for Word 2007) or Chapter1.docm (for Word 2010).
• Start typing!
Step 3: Read the Guidelines
Read the Guidelines? Then go to HUStep 4: Why Style MattersU
The School of Graduate Studies and Research (Grad Studies) has specific guidelines for the formatting and layout of your thesis. It's worth the time to read & print these guidelines. They are available on the Grad Studies web site in a document entitle: HUGeneral Forms of ThesesU

Queen’s MS-WORD(2007/2010) Thesis Templates - Guide
4
Step 4a: Styles & Macros
Understand the value and importance of styles and macros? If so, skip step 4 and go on to HUStep 5: Where should I save my files?U
Many of the automated features in Word require that you use styles. For example, the Table of Contents or the List of Figures can only be generated automatically if you use styles consistently. The styles and functions required to perform certain basic thesis activities, such as generating numbered chapters or changing paging formats, have been automated for you in macros.
What is a style?
A style is a set of formatting characteristics stored together that can be applied to text. A style can apply several formats in one quick step. For example, without styles to format a heading, you would select the text and then change the font size to 14 pt, turn on bold, turn on italics, and then adding spacing above and below it. With styles, you would select the text and then choose the Heading 1 style from the style drop down box -‐ all of the formatting would be applied together in one step. All the styles you'll need for your thesis are part of the template, and you can modify them to suit your preferences. The Graduate Studies guidelines do not layout specific formatting for your fonts and headings. So you can override any of these styles in the template with your own formatting. A guide to modifying and using styles is available in HUStep 6 -‐ WritingUH.
Styles will keep your formatting consistent
The Grad Studies Guidelines specify that: “The type of font, font size, footnote/reference method, pagination, margins, and any other aspects of production are to be consistent throughout the thesis”. Using styles will help ensure that consistency throughout your document. With styles, your formatting is laid out before you start typing. All you need to think about is where the text belongs in the overall structure of the document -‐ not how to apply a particular formatting attribute. Have you ever been working on a document, and you're about to start a new section. Then you try to remember what the previous section heading looks like. Was it Times New Roman font? Or Arial? Was is 12 pt and bold? Or was it 14 pt and italics? Instead of guessing what the previous section heading looks like, or having to scroll through the document to look at it, you can use styles. It's a section heading? Then apply the Heading 2 style. It's a chapter heading? Then apply the Heading 1 style. Then all of the headings will look consistent.
Queen’s MS-WORD(2007/2010) Thesis Templates - Guide
5
Styles will help generate a table of contents (with page numbers) automatically
If you use template styles, the Table of Contents on the Main template will automatically pick up the text with the Chapter title, Appendix, Section heading and other heading styles, and show the page number that it falls on.
Styles will help you navigate your large document.
If you use styles, the Document Map feature will help you navigate your document. To try this feature: • From the menu, choose View -‐-‐> Document Map • The panel on the left hand side should show all of the headings (all text formatted with a heading
style). • Click on a heading to navigate to that point in the document. • Click on View -‐-‐> Document Map to turn it off.
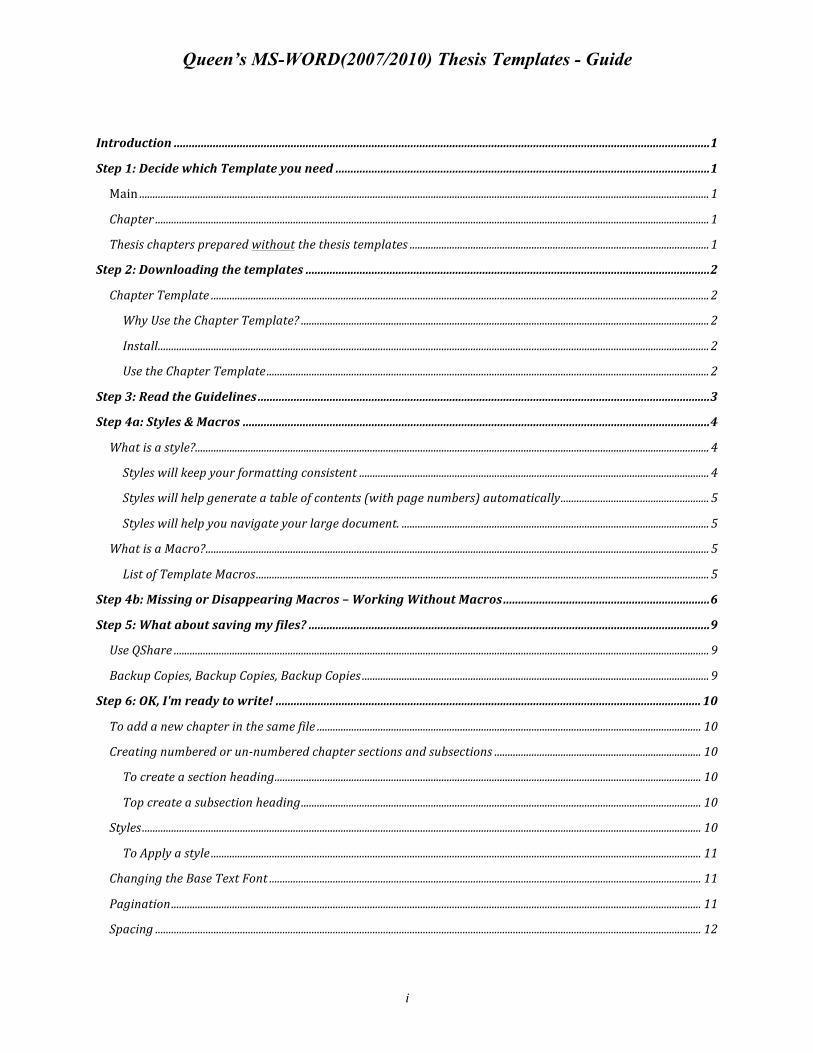
What is a Macro?
A macro is a mini-‐program script that instructs Word to carry out a number of activities and apply specific styles with just the click of a key. FOR EXAMPLE: The “New Chapter” macro generates a new page with a numbered chapter heading in the appropriate style, and then switches the text style for the body of the thesis to double-‐spaced, Times Roman (default), 11 pt text. Ready for you to begin typing. The macros in this template are activated by selecting the relevant “Thesis Tools” menu item in HUStep 6 -‐ WritingUH.
List of Template Macros
New Chapter Starts new chapter with next chapter number, e.g. Chapter 2, and sample chapter title, and position the cursor to begin entering double-‐spaced text.
New Appendix Starts new appendix with next appendix letter, e.g. Appendix B, and sample appendix title, and position the cursor to begin entering double-‐spaced text.
Start Bibliography Starts Bibliography page with heading “Bibliography (or References)” and position the cursor to begin entering double-‐spaced text.
Restart Page Numbering Starts new document section with new paging starting from 1 onward Landscape Page Starts new document section and switches from portrait to landscape
paging; continues same paging. Useful for adding long charts.
Queen’s MS-WORD(2007/2010) Thesis Templates - Guide
6
Portrait Page Starts new document section and switches from landscape to portrait format; continues same paging. Useful to switch back to standard paging after inserting a chart in landscape format.
Block Quote Switch font to block quote style. Useful to highlight text. Start New Numbered Section
Start new section within a chapter, e.g. In chapter 3, starts new paragraph with heading “3.1. Section Title.” Useful for adding numbered sections to a chapter. The section heading will appear in the Table of Contents.
Start New Numbered Subsection
Start new subsection within a chapter section, e.g. In chapter 3, section 3.1, starts new paragraph with heading “3.1. 1. Subsection Title.” Useful for adding a level of sections under a chapter section. The subsection headings will appear in the Table of Contents.
Start New Un-‐numbered APA Level 1 Heading
Start new un-‐numbered section within a chapter (APA style). Heading is centered. The section heading will appear in the Table of Contents.
Start New Un-‐numbered APA Level 2 Heading
Start new un-‐numbered subsection within a chapter (APA style). Heading is aligned with left margin. The section heading will appear in the Table of Contents.
Start New Un-‐numbered APA Level 3 Heading
Start new un-‐numbered subsection within a chapter (APA style). Heading is aligned with left margin. The section heading will appear in the Table of Contents.
Start New Un-‐numbered APA Level 4 Heading
Start new un-‐numbered subsection within a chapter (APA style). Heading is indented from left margin. The section heading will appear in the Table of Contents.
Step 4b: Missing or Disappearing Macros – Working Without Macros
If the macros are missing from your template and you have tried unsuccessfully to reload the template with the macros, you can perform the activities successfully by following the steps below.
New Chapter The Chapter Template will automatically provide the appropriate chapter heading and numbering. If you save each chapter as a separate file and load them into the Main Template, you will not need this action. If you wish to add another chapter to At the end of the current chapter: 1. Generate Page Break: Ctrl+Return 2. From Home menu tab, click on the down arrow beside the Styles
Menu 3. Select Chapter heading 1 and press Enter/Return key 4. If you need to title your chapter, return to the Styles Menu 5. Select Chapter title and press Enter/Return key Starts new chapter with next chapter number, e.g. Chapter 2, adds chapter title, and positions the cursor to begin entering double-‐spaced text.
New Appendix 1. Generate Page Break, press Ctrl+ Enter/Return keys 2. From Home menu tab, click on the down arrow beside the Styles
Queen’s MS-WORD(2007/2010) Thesis Templates - Guide
7
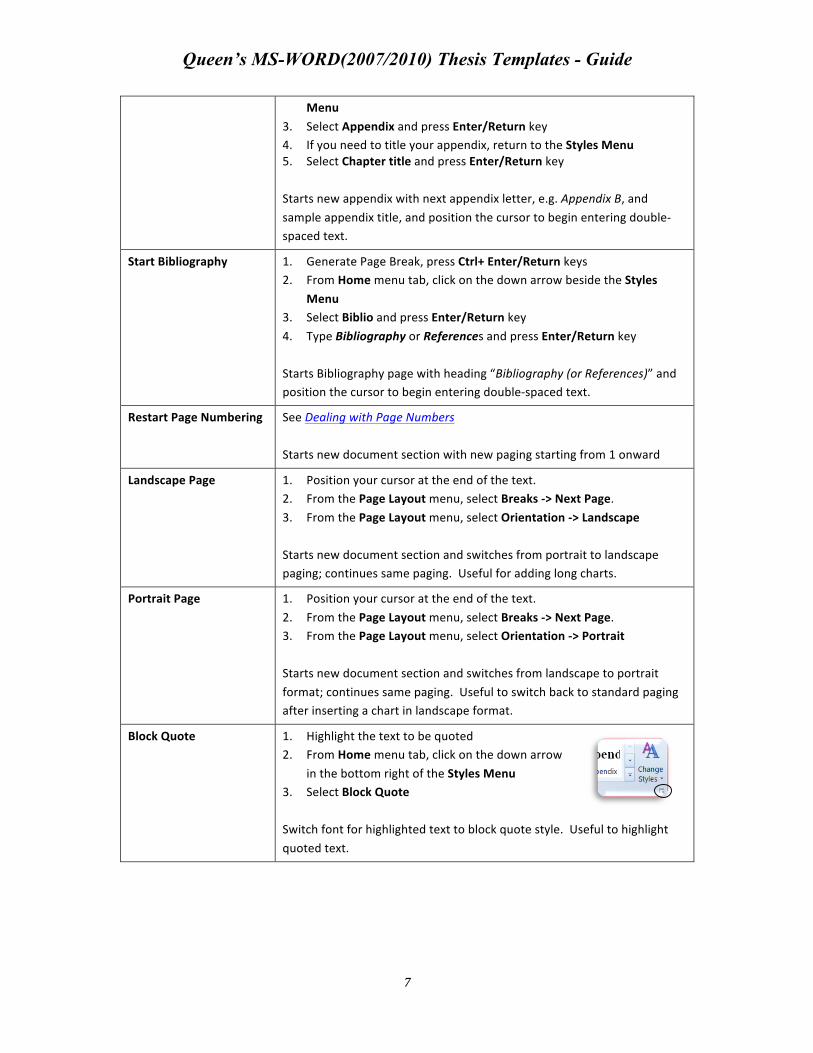
Menu 3. Select Appendix and press Enter/Return key 4. If you need to title your appendix, return to the Styles Menu 5. Select Chapter title and press Enter/Return key
Starts new appendix with next appendix letter, e.g. Appendix B, and sample appendix title, and position the cursor to begin entering double-‐spaced text.
Start Bibliography 1. Generate Page Break, press Ctrl+ Enter/Return keys 2. From Home menu tab, click on the down arrow beside the Styles
Menu 3. Select Biblio and press Enter/Return key 4. Type Bibliography or References and press Enter/Return key Starts Bibliography page with heading “Bibliography (or References)” and position the cursor to begin entering double-‐spaced text.
Restart Page Numbering See Dealing with Page Numbers Starts new document section with new paging starting from 1 onward
Landscape Page 1. Position your cursor at the end of the text. 2. From the Page Layout menu, select Breaks -‐> Next Page. 3. From the Page Layout menu, select Orientation -‐> Landscape Starts new document section and switches from portrait to landscape paging; continues same paging. Useful for adding long charts.
Portrait Page 1. Position your cursor at the end of the text. 2. From the Page Layout menu, select Breaks -‐> Next Page. 3. From the Page Layout menu, select Orientation -‐> Portrait Starts new document section and switches from landscape to portrait format; continues same paging. Useful to switch back to standard paging after inserting a chart in landscape format.
Block Quote 1. Highlight the text to be quoted 2. From Home menu tab, click on the down arrow
in the bottom right of the Styles Menu 3. Select Block Quote Switch font for highlighted text to block quote style. Useful to highlight quoted text.

Queen’s MS-WORD(2007/2010) Thesis Templates - Guide
8
Start New Numbered Section
1. Position the cursor on the line where the heading will be located 2. From the Styles menu, select Heading 2 3. Key in the title of the heading and press Enter/Return key. Start new section within a chapter, e.g. In chapter 3, starts new paragraph with heading “3.1. Section Title.” Useful for adding numbered sections to a chapter. The section heading will appear in the Table of Contents.
Start New Numbered Subsection
1. Position the cursor on the line where the heading will be located 2. From the Styles menu, select Heading 3 3. Key in the title of the heading and press Enter/Return key. Start new subsection within a chapter section, e.g. In chapter 3, section 3.1, starts new paragraph with heading “3.1. 1. Subsection Title.” Useful for adding a level of sections under a chapter section. The subsection headings will appear in the Table of Contents.
Start New Un-‐numbered APA Level 1 Heading
1. Position the cursor on the line where the heading will be located 2. From the Styles menu, select APA Level 1 3. Key in the title of the heading and press Enter/Return key. Start new un-‐numbered section within a chapter (APA style). Heading is centered. The section heading will appear in the Table of Contents.
Start New Un-‐numbered APA Level 2 Heading
1. Position the cursor on the line where the heading will be located 2. From the Styles menu, select APA Level 2 3. Key in the title of the heading and press Enter/Return key. Start new un-‐numbered subsection within a chapter (APA style). Heading is aligned with left margin. The section heading will appear in the Table of Contents.
Start New Un-‐numbered APA Level 3 Heading
1. Position the cursor on the line where the heading will be located 2. From the Styles menu, select APA Level 3 3. Key in the title of the heading and press Enter/Return key. Start new un-‐numbered subsection within a chapter (APA style). Heading is aligned with left margin. The section heading will appear in the Table of Contents.
Start New Un-‐numbered APA Level 4 Heading
1. Position the cursor on the line where the heading will be located 2. From the Styles menu, select APA Level 4 3. Key in the title of the heading and press Enter/Return key. Start new un-‐numbered subsection within a chapter (APA style). Heading is indented from left margin. The section heading will appear in the Table of Contents.

Queen’s MS-WORD(2007/2010) Thesis Templates - Guide
9
Step 5: What about saving my files?
As you work on your thesis, it is preferable to save each chapter as a separate file, e.g. Chapter1.docm, Chapter2.docm, etc. Once you've finished each chapter, you can insert each of the files into the Main template. It may be preferable to also save each of your figures as separate files as well. Use the chapter template to start each new figure file (so the formatting will stay consistent between files). When it comes time to assemble your thesis, you'll have a much better idea for the placement of the figures. Until then, if they are in your chapter file they will just get in the way and make the file size larger. Save the placement of the figures until the end.
Use QShare
is an on-‐line file storage, distribution and sharing solution for the Queen’s community. It provides a secure, web-‐based file space where your thesis can be securely stored and, if desired, shared with your thesis advisor and others -‐
anywhere, anytime. QShare Personal accounts are available free of charge to all graduate students of Queen's University: Uhttps://qshare.queensu.ca/xythoswfs/webuiUH. Log in with your Queen’s netid and password. With your thesis files stored in QShare, you can work on them anywhere that you can access the internet. You do not need to carry the files with you and risk losing or damaging them.
Backup Copies, Backup Copies, Backup Copies
Let's face it -‐ you can't have too many back-‐up copies of your thesis. Working on your thesis in QShare is probably your surest way to keep your files from getting lost. Save backups on memory keys or burn them to CD. Write the date on the disk. Keep older backups of your thesis. If the newer backups are corrupted or damaged, you at least have an older version to go back to. Keep the backups in a safe place (i.e.: Not at the bottom of your backpack) A good old fashioned print out is a good idea too!
Other Saving Tips • Turn Word's AutoSave feature on, so it will do background saves for you as you work. Click the
Office Button , then Word Options, and select the Save tab. If it is not already set, set the Save Autorecover Info every ___ minutes to any value between 1 and 120 minutes. A good time interval is 10 minutes.
• Save often. Nothing can be worse than completing four hours of work and losing it all to a
random power fluctuation or program crash.

Queen’s MS-WORD(2007/2010) Thesis Templates - Guide
10
Now, you're ready to write! Take a look at HUStep 6: OK, I'm ready to write!U
Step 6: OK, I'm ready to write!
Using the Chapter Template, click on [Insert text here.] and begin typing. Delete the help text on the page.
The ‘Thesis Tools’ macros are there to help you easily format elements of your thesis, by applying the appropriate styles and actions by simply clicking of a menu item (see the HUList of Template MacrosUH).
You can use Word’s styles to help you with many other formatting activities, not included among the macros, as you write you text.
To add a new chapter in the same file
If you wish to prepare more than one chapter in a single file:
• Place the cursor at the end of the chapter • Click on the Thesis ToolsàNew Chapter menu item to generate each new chapter heading.
Creating numbered or un-‐numbered chapter sections and subsections
You may wish to subdivide your content into sections and subsection within a chapter. You may choose from numbered sections or un-‐numbered sections (APA style). The section and subsection headings will display in the Table of Contents under the chapter.
To create a section heading
• Position your cursor at the point in the chapter where you wish to start a new section • For numbered section heading, click on Thesis Toolsà Start New Section. • For un-‐numbered section heading, click on Thesis Toolsà Start New Level 1 Heading.
Top create a subsection heading
• Position your cursor at the point within a section where you wish to start a new subsection • For numbered subheading, click on Thesis Toolsà Start New Subsection. • For un-‐numbered subheading, click on Thesis Toolsà Start New Level 3 Heading. • For another level of headings, under the un-‐numbered subheading, click on Thesis Toolsà Start
New Level 4 Heading.
Styles

Queen’s MS-WORD(2007/2010) Thesis Templates - Guide
11
To Apply a style
The Style Task Pane, which can be used to apply and modify styles, is visible when you click on the Home Tab in the menu. The styles appearing in the Style pane show a preview of the formatting that will be applied to the selected text. • Highlight the text. Be sure to select the whole line of text, including the paragraph marker ¶ at the
end of the line. Click the ¶ button on the toolbar again to hide the paragraph markers.
• If the style you want is not visible, click on the More down arrow or click on the Styles arrow to see all the available style.
• You can preview the styles by moving your cursor across the styles. Your text will change temporarily until you move your cursor to the next style.
• Click the style name you want to apply in the task pane, and it will be applied to the text you have selected.
• Some styles automatically turn off, reverting to the normal style, when you press Enter to start a new line. If you want to continue typing in that style, select the style again.
Changing the Base Text Font
The Normal style sets the base font for your text. The default is Times Roman, 11 pt. The Grad Studies thesis specifications, HUGeneral Forms of ThesesUH, do not specify which font, only that it be used consistently throughout the document. So, you can change the default font by changing the Normal style. However, ornate type styles are not acceptable. Italics may be used only for emphasis, or where appropriate (e.g. scientific names). To Change the base font:
• In the Styles menu, scroll down to Normal and right-‐click on the selection • Right-‐click on the selected style • Select the Modify item from the menu • Select the desired font from the font box • Select a new size if required • Click on OK.
Pagination
While the template contains a macro to change page numbering, the HUGeneral Forms of ThesesUH, specifies that the “main body of the thesis, including the text, bibliography and appendices, must be numbered continuously by Arabic numerals.” So, do not change the pagination of the Chapter Template.

Queen’s MS-WORD(2007/2010) Thesis Templates - Guide
12
When you come to combine the chapter files, the default style will automatically repaginate each chapter sequentially.
Spacing
The thesis text must be double-‐spaced except for footnotes, figure captions and quotations of five lines or more that should be single-‐spaced. To change a quote from the default double-‐spacing to single-‐space: • Highlight the entire quote. • In the HomeàParagraph menu, click on the Line Spacing icon • Change spacing to 1.0.
Table, Figure and Plate Headings
As with the Table of Contents page, the automated List of Figures and List of Tables features will only work if you generate figure and table headings using Word’s Caption function. The caption headings are bold 11 point Times New Roman font, but can be modified (HUsee belowUH). When you use this feature, Word will automatically number your figures and tables for you.
To Generate or Change a Caption
This feature is used when you insert a caption on a figure, table, picture, or other object.
To create a new caption
• Select the Reference-‐>Captions menu, select Insert Caption or right-‐click on the figure to open the
Caption window. • Label drop-‐down menu, select Table or Figure to ensure
that the figure, etc. will be automatically included in the List of Tables or List of Figures.
• Position drop-‐down menu, select to place the caption above or below the figure
• Numbering: you can let Word number the items automatically; or you can select a different numbering style by clicking on the Numbering button.
To change a caption
• Highlight the whole caption & right-‐click to change the font, numbering style, etc.
Queen’s MS-WORD(2007/2010) Thesis Templates - Guide
13
Footnotes & References
The style of footnotes and/or references must be consistent throughout the thesis. Footnotes may also be collected separately at the end of each chapter of the thesis or immediately following the text, where they should be divided and numbered by chapter.
Creating Footnotes
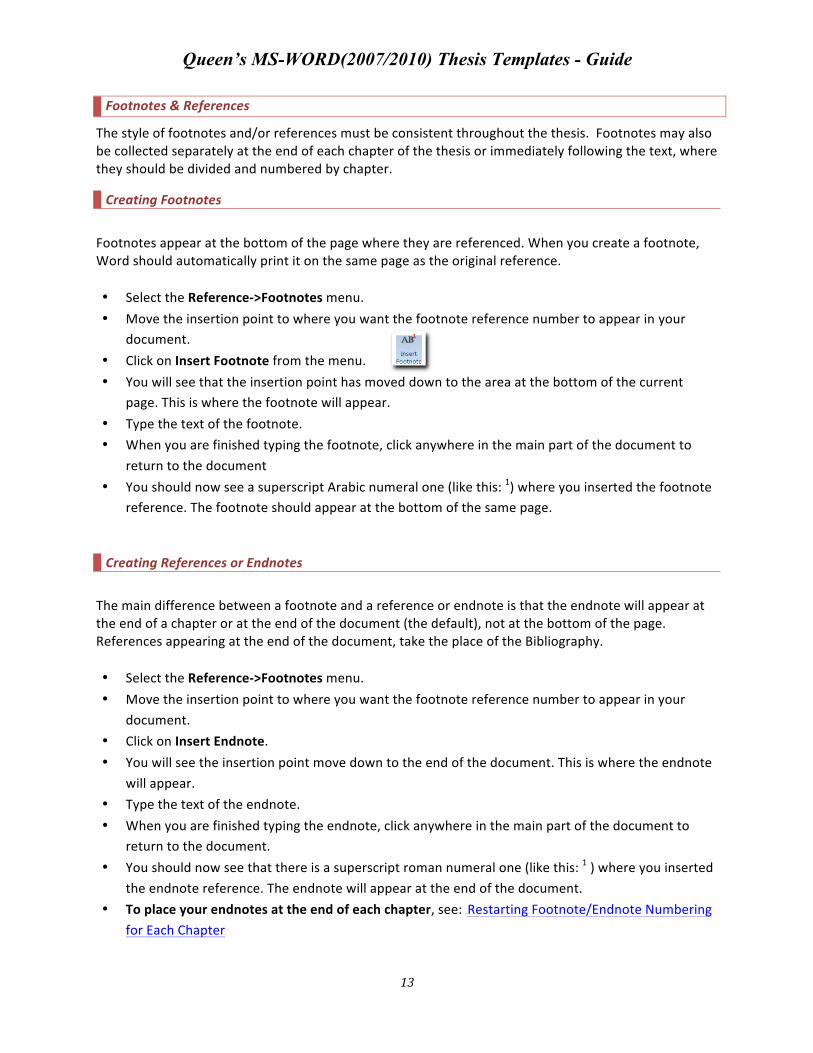
Footnotes appear at the bottom of the page where they are referenced. When you create a footnote, Word should automatically print it on the same page as the original reference. • Select the Reference-‐>Footnotes menu. • Move the insertion point to where you want the footnote reference number to appear in your
document. • Click on Insert Footnote from the menu. • You will see that the insertion point has moved down to the area at the bottom of the current
page. This is where the footnote will appear. • Type the text of the footnote. • When you are finished typing the footnote, click anywhere in the main part of the document to
return to the document • You should now see a superscript Arabic numeral one (like this: 1) where you inserted the footnote
reference. The footnote should appear at the bottom of the same page.
Creating References or Endnotes
The main difference between a footnote and a reference or endnote is that the endnote will appear at the end of a chapter or at the end of the document (the default), not at the bottom of the page. References appearing at the end of the document, take the place of the Bibliography. • Select the Reference-‐>Footnotes menu. • Move the insertion point to where you want the footnote reference number to appear in your
document. • Click on Insert Endnote. • You will see the insertion point move down to the end of the document. This is where the endnote
will appear. • Type the text of the endnote. • When you are finished typing the endnote, click anywhere in the main part of the document to
return to the document. • You should now see that there is a superscript roman numeral one (like this: 1 ) where you inserted
the endnote reference. The endnote will appear at the end of the document. • To place your endnotes at the end of each chapter, see: HURestarting Footnote/Endnote Numbering
for Each ChapterU

Queen’s MS-WORD(2007/2010) Thesis Templates - Guide
14
• To place your endnotes at the end of the thesis, see: Assembling your chapters with the List of References at the end of the thesis
Restarting Footnote/Endnote Numbering for Each Chapter
• In order to restart numbering of footnotes/endnotes between
chapters, you will need to include a Section Break each time you want the numbering to restart.
• Position your cursor at the end of a chapter. • From the Page Layout menu, choose BreaksàSection
Breaks. • Choose Next Page. • Select the Reference-‐>Footnotes menu.
• Click on the icon in the bottom right of this pane to open the Footnote & Endnote window.
• Under Location, select Footnotes or Endnotes • , select End of
section. • Change the Numbering option to Restart Each Section, and
the Apply changes to option to Whole Document. Click Apply.
• Check that the numbering has changed.
Editing Footnotes and Endnotes
• Scroll through your document to find the right note: the bottom of the page for a footnote, or the
end of the document for an endnote. • Click on the text of the note. You can cut, copy, paste, insert, delete, and format the text as you
would any other text in your document. • When you are finished editing the note, click on your document to move the insertion point.
Deleting Footnotes and Endnotes
To delete a footnote or endnote, you must delete the reference to it in the body of your document: • Move the insertion point to the right of the reference number in the text that you want to delete. • Press the Backspace key on your keyboard until the number is gone. • When you delete a reference number.
Tip Whenever you create or delete a note, Word automatically updates the numbering of the other notes in the document for you.

Queen’s MS-WORD(2007/2010) Thesis Templates - Guide
15
RefWork: Collecting references and compiling your bibliography
is a web-‐based bibliographic management tool (often called a "citation manager"). It will help you save references from database and library catalogue
searches, produce bibliographies, and create personal (or group) databases of citations: http://library.queensu.ca/help/refworks. The Library offers periodic training sessions and students may also approach the Learning Common Information Desk for help with RefWorks.
Figures
Keep your figures in separate files until you are ready to compile your complete thesis. BUT, if you are going to create figures in Word, create them in a file based on the Chapter Template. This way, when you go to insert the figures into your full thesis document, the formatting will look the same. Figures must be included with the page where they are mentioned. Unfortunately, there is no way to tell Word "put the figure on the page after it is first mentioned". When you go to insert your figures, you will likely need to put in manual page breaks that fall mid-‐paragraph in order to get the figures positioned on their own page properly. You'll want to do this near the end of your editing, because any additions/deletions of text in pages before the figures may change where the manual page breaks need to be.
List of Figures & Illustrations, List of Tables, List of Plates
If you have added captions to each figure, using the Word HUCreate caption featureUH, the figures will be picked up in the appropriate lists in the Main template.
Charts from Excel
Charts may be copy and pasted from Excel. When you paste into Word, depending on the version of MS Office that you are using, the chart may be pasted as an "Excel Object" or it may be pasted as a picture. If it is an "Excel Object" then you may continue to edit the chart, whereas the picture cannot be edited. "Excel Objects" will increase your file size, as it copies the complete Excel workbook into the Word file, the picture is much smaller. An "Excel Object" is also much more difficult to manipulate and place than the chart as a picture. • Open the chart in Excel • Select the Chart Area • From the menu choose Edit-‐-‐>Copy • Open your file in Word • From the menu choose HomeàPaste Special (down arrow under Paste) • Choose either Picture (Windows Metafile) or Microsoft Excel SpreadsheetObject

Queen’s MS-WORD(2007/2010) Thesis Templates - Guide
16
Can I refer to figure captions in my text, so if my figure numbers change I don't have to change the text?
Yes. If you've included a figure, and used a caption to label it, you can use a "Cross Reference" to refer to the caption in your body text. Example: Your caption: Figure 1.1 Column Chart Your text: In Figure 1.1, note the fourth quarter is the highest number of sales. "Figure 1.1" is a cross reference, and if the caption changes, Figure 1.1 will update to the new number.
To insert a cross-‐reference:
• From the menu choose InsertàCross-‐
reference • Under Reference Type, choose Figure. Under
Insert reference to:, choose Only label and number.
• Choose the Figure from the list, and click Insert.
After lots and lots of work, you'll be ready for HUStep 7: Front matter SetupU
Step 7: Setting up the Front Matter
The front matter of your thesis must conform to the Queen’s Thesis formatting specifications HUGeneral Forms of ThesesUH. The Main Template, HUqueen's_thesis_word.docmUH, contains all the necessary elements. These include the following pages: a title page, abstract, co-‐authorship, acknowledgements, statement of originality, table of contents, lists of tables, figures and illustrations, introduction, literature review. You may not need all of these sections. Follow the instructions here to delete any section that you do not need. Until you assemble your thesis, you will not be able to generate your table of contents or lists of tables, figures, and plates. HUStep 8UH will show you how to generate these tables. This step deals with the remaining front matter.
Install the Main Template
• Go to the E-‐thesis Web site: HUhttp://www.queensu.ca/etheses/U

Queen’s MS-WORD(2007/2010) Thesis Templates - Guide
17
• To Download the Main Template click HUMain TemplateUH à choose “Open” • Click on “Enable Content” • Save the file to the Desktop, onto a USB key, into My Documents, or wherever you can locate the
file again.
Use the Main Template
• Locate the saved queens_thesis_word.docm file through My Computer or Windows Explorer
(ODON'T OPEN MS WORDO). Double-‐click on it (or Right Click and choose New). • Word should open, and a new document has been started based on the template.
• Click on the F12 key to open the Save As window or press the Office Button àSave As. Give the file a unique name, e.g. MyThesis.docm or MyThesis.doc.
• Click the text in square brackets [] on each preliminary page and replace the text with your own information
• Delete any unneeded sections.
To Delete an Unneeded Section
To delete an unneeded section, follow the instructions below. • Turn on the hidden characters by clicking the Show/Hide button on the
HomeàParagraph menu bar. • Scroll to the section you want to delete. • Select the section, including the extra paragraph marks ¶ and the section break
• Press the Delete or Backspace key on your keyboard to delete the section.
To insert chapter text
Next Step -‐ HUStep 8 -‐ Assembling the Chapters with the Front MatterU

Queen’s MS-WORD(2007/2010) Thesis Templates - Guide
18
Step 8: Assembling Chapters with the Front Matter
To assemble your chapters & front matter
With Text from Outside the Thesis Templates
• Open your Main file created in HUStep 7UH. • Open your file containing the text to be copied. • Highlight and copy the text. • In the Template (Main file), position your cursor where you wish to insert the text. • Paste the text into the Template. • At the end of the inserted text, you will see a clipboard icon. • Put your cursor over the icon and click on the down arrow. • Select Match Destination Formatting.
If Bibliography at the end of the thesis
• Open your Main file created in HUStep 7UH. • Position your cursor on Chapter 3. • Delete all the text on this page.
• Position your cursor at the top of the now blank page. • From the menu, choose InsertàObjectàText from file… • Locate your Chapter 1 file. Select it, and click Insert. • Press Ctrl+Enter (or from the menu, choose InsertàPage Break). • Repeat the previous three steps as needed, for all of you chapters.
If List of References at the end of the thesis
• Open your Main file created in HUStep 7UH. • Position your cursor on Chapter 3. • Delete all the text on this page.
• Position your cursor at the top of the now blank page. • From the menu, choose InsertàObjectàText from file… • Locate your Chapter 1 file. Select it, and click Insert. • Position your cursor at the end of the chapter’s text, before the references or endnotes. • Press Ctrl+Enter (or from the menu, choose InsertàPage Break). • Locate the next chapter file. Select it and click Insert. You will notice that Word has
appended the references from the 2nd chapter to the references from Chapter 1, renumbered correctly.
• Repeat the previous three steps as needed, for all of you chapters.
Next Step -‐ HUInsert AppendicesUH

Queen’s MS-WORD(2007/2010) Thesis Templates - Guide
19
Insert Appendices
• Position your cursor at the bottom of the last chapter. • From the menu, choose Thesis Tools à New Appendix. • Enter or insert the Appendix content. • If you have more than one appendix, repeat steps two and three above until all appendices have
been entered.
HUNext Step –Bibliography (or References)U
Bibliography (or References)
Most Bibliographies use a Hanging Indent, where the second line of a reference is indented about half an inch. Word has a hanging indent feature, which will work much better than your space bar! If you set up your formatting properly at the start of your Bibliography/References, Word can handle alphabetizing them for you as well. Be careful to use the hanging indent style to configure the spacing between the references rather than pressing "Enter" two times between them. Then, the sort will work properly -‐ otherwise it will sort all of the blank lines to the top of the list.
Start Bibliography
• Position your cursor at the bottom of the last appendix. • From the menu, choose Thesis Tools à Start Bibliography. • To select the Hanging Indent style, click the down arrow at the right side of the Styles menu.
• Select the Bibliography Indent style. • Start to enter or the bibliography or insert your bibliography from other file. • If you have inserted your bibliography from other file and the newly inserted citations lack the
hanging indent, highlight all of the inserted citations, then repeat steps 3 and 4. All of your citations will be reformatted to a hanging indent in a single step.
Sort a reference list
• Select the whole list of references
• From the Home menu choose Sort • Select sorting method • Click OK

Queen’s MS-WORD(2007/2010) Thesis Templates - Guide
20
• If the spacing was set up as shown above, the list should be sorted as well as have the appropriate spacing between each reference.
Step 9: Creating Landscape Pages
Some of the objects you insert into your thesis might be too wide to fit on a standard portrait page. They may, however, fit if you change them to a landscape orientation. This basically means that the bottom of the object will line up with the long side of the page.
To Insert a Landscape Page
• Position your cursor at the end of the text on the page. • From the menu, choose Thesis Tools à Landscape Page.
To Switch back to Portrait Paging
After you have finished entering or inserting your tables, etc. requiring the wide page format, you can switch back to the standard portrait format by:
• Position your cursor at the end of the text on the page. • From the menu, choose Thesis Tools à Portrait Page.
Step 10: Update the Table of Contents, List of Figures & Illustrations, and List of Plates
• Open the assembled document file. • Click View, make sure the screen is set to Print Layout
view. • Move the cursor to the Table of Contents page. • Right-‐click anywhere on the table of contents. • Select Update Field from the menu. • Select Update entire table.
TIP To view paragraph and formatting characteristics that have been applied to text within a document, press the Shift+F1 keys. Click on any text whose paragraph and formatting attributes you wish to view. Press Shift+F1 keys again or click on the “x” in the top right of the window to get out of this screen.

Queen’s MS-WORD(2007/2010) Thesis Templates - Guide
21
• Click OK. • Follow the same steps to display the updated List of Figures and List of Tables.
Appendix 1. Editing, Navigation, Formatting and Selecting Shortcuts
Style Tips
Create your own “quick” style
• Select the text you wish to format • From the menu, choose HomeàStyles and click on the More down arrow
• Choose Save Selection as New Quick Style… • In the Create New Style from Formatting
window, type a name for the style in the Name box and make whatever changes you wish.
• If you want to further modify the style, click the Modify button.
• Click OK. Update a style
By updating the formatting of a style, all occurrences of text with the style applied will pick up the new formatting. • From the menu, choose HomeàStyles and click on the More down arrow • In the Styles window, right-‐click style name you want to update. • Choose Modify. • Make the required formatting changes.
Inserting Diacritics or Accents to Letters
There are two main methods for inserting diacritic characters. 1. Keyboard Shortcuts. Common accents have shortcuts in Office generally (Word and Outlook which
uses Word as its email editor). Command Diacritic Examples
Ctrl + single quote and the letter Acute é = Ctrl + ’ and e
Ctrl + comma and the letter Cedilla ç = Ctrl + , and c Ctrl + Shift + colon and the letter Umlaut ü = Ctrl + Shift + : and u
Ctrl + Shift + caret (above the number “6”) and the letter Circumflex ô = Ctrl + Shift + ^ and o Ctrl + Shift + tilde (to the left of the number “1”) and the letter Tilde ã = Ctrl + Shift + ~ and a
Ctrl + grave (below the tilde) and the letter Grave è = Ctrl + ` and e

Queen’s MS-WORD(2007/2010) Thesis Templates - Guide
22
2. Insert Symbol. Another option for inserting accents or other characters is via the menu selection Insert Symbol. Choose More Symbols then scroll down to find the character you want.
If there is a shortcut for the symbol it will be displayed and even a full name.
Keyboard Shortcuts
For a complete list of MS-‐Word keyboard shortcuts, go to: HUhttp://www.queensu.ca/etheses/wp-‐content/uploads/Word-‐Keyboard-‐Shortcuts.pdfU
Editing Shortcuts
Command Function
Home Takes cursor to the beginning of the line End Takes cursor to the end of the line
CTRL + Arrows Moves cursor either a word at a time (left & right arrows) or a paragraph at a

Queen’s MS-WORD(2007/2010) Thesis Templates - Guide
23
Command Function
time (up and down arrows) CTRL + Backspace Backspaces over whole word to the left of the cursor
CTRL + Delete Delete whole word to the right of the cursor Double click a word Selects the word. Type while it is selected to replace it.
Right Click a misspelled word Shows a list of suggested spellings
CTRL + C Copy selected text CTRL + V Paste
CTRL + X Cut selected text CTRL + Z Undo
CTRL + ENTER Insert a Page Break
SHIFT + F5 Moves cursor to the last revision (use when opening a document) SHIFT + UP or DOWN ARROW Move a row in a table or an item in a list, up or down
Navigation Shortcuts
Command Function
CTRL + Home Takes cursor to top of document
CTRL + End Takes cursor to end of document CTRL + G Go To a specific page number
View-‐-‐>Document Map Click on text in the pane to go to that point in the document
Formatting Shortcuts
Command Function CTRL+1 Single spacing
CTRL+2 Double spacing
CTRL+5 1.5 spacing ALT+CTRL+1 Applies Heading 1
ALT+CTRL+2 Applies Heading 2 ALT+CTRL+3 Applies Heading 3
CTRL+SHIFT+N Applies Normal style
CTRL + U Underline CTRL + B Bold
CTRL + I Italics
Selecting Shortcuts
Command Selects a...
Double click word Word

Queen’s MS-WORD(2007/2010) Thesis Templates - Guide
24
CTRL + Click a word Whole sentence
Triple click word in paragraph Whole paragraph Single click margin beside a paragraph Whole Line
Double click margin beside a paragraph Whole paragraph Triple click margin beside a paragraph Whole document
SHIFT + Arrow keys Extends selection from cursor location
CTRL + A Whole Document
Typing Shortcuts & Tips
To stop Word from automatically formatting numbered lists, bullets, turning webpage addresses into links, applying styles and other annoying things!!
• Click the Office Button àWord OptionsàProofingàAutoformat Corrections. • Click on the Autoformat As You Type tab • Uncheck boxes! • Click OK
Right click Spell-‐check
• Type a misspelled word. For example: Clagary • Press Enter/space so you see the red line under it • Right-‐click on the word. • Choose the correct spelling from the list.
Right click Thesaurus
• Right click on a word • Choose Synonyms • View the list of synonyms, or choose Thesaurus to search further
Add commonly misspelled words to AutoCorrect
• Type a misspelled word. For example: Clagary • Press Enter/space so you see the red line under it • Right click on the word. • Under AutoCorrect, choose the proper spelling of the word • The next time you misspell the word, it will be automatically corrected for you.

Queen’s MS-WORD(2007/2010) Thesis Templates - Guide
25
Superscript & Subscript characters
There are times that you will need superscript & subscript characters in your text. For example: H20 r2
Apply superscript or subscript
• Type the text. For example, H20. • Select only the characters that you want to be super/sub script.
• From the HomeàFont menu pane, click on the Subscript or Superscript icon, or • Right-‐click the mouse and select FontàSuperscript or FontàSubscript. Click OK.
Deleting Section Breaks
• Section breaks are easiest to see in Draft View. Choose View from the menu line, and then Draft. • Look for any page breaks between the last part of your front matter, and the first line of your first
chapter. If there are any, position your cursor on them, and press the Delete key.
Inserting Section Breaks
• Position your cursor at the end of the text. • From the Page Layout menu, choose BreaksàNext Page. • You have now inserted a Section break, and are ready to set up the page numbering...
Dealing with Page Numbers
To start a new set of page numbers, you must start a HUNew SectionUH.
Formatting Page Numbers
• The front matter template should have the correct page numbering (roman numerals) until the first
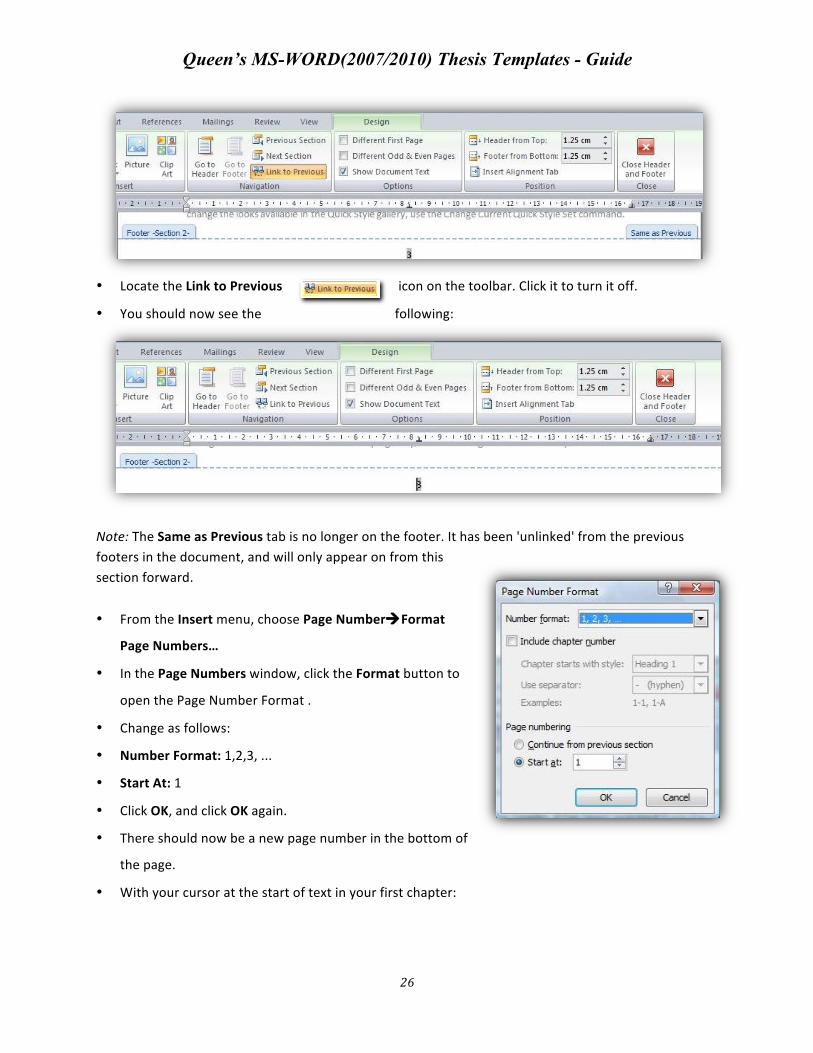
chapter. If not, see HUCreating Roman Numeral Page NumbersUH below. • Double-‐click in the footer of your first chapter. • You should see the following Design menu pane (the section number may be different):
Queen’s MS-WORD(2007/2010) Thesis Templates - Guide
26
• Locate the Link to Previous icon on the toolbar. Click it to turn it off.
• You should now see the following:
Note: The Same as Previous tab is no longer on the footer. It has been 'unlinked' from the previous footers in the document, and will only appear on from this section forward.
• From the Insert menu, choose Page NumberàFormat
Page Numbers…
• In the Page Numbers window, click the Format button to
open the Page Number Format .
• Change as follows:
• Number Format: 1,2,3, ...
• Start At: 1
• Click OK, and click OK again.
• There should now be a new page number in the bottom of
the page.
• With your cursor at the start of text in your first chapter:

Queen’s MS-WORD(2007/2010) Thesis Templates - Guide
27
Creating Roman Numeral Page Numbers
• Position your cursor in the correct section (in the front matter). • Double-‐click the page number to position your cursor in the footer. • Locate the Link to Previous icon on the toolbar. Click it to turn it off if the footer
should not be applied to previous sections.
• Choose InsertàPage NumberàFormat Page Numbers… • Choose Number Format: i, ii, iii • Choose Start at: i to start the numbering from i at the beginning of the section. • Click OK.
Set up a Hanging Indent for a Reference
• Key in the reference. Don't press enter at the end of the line.
For example: Haddad, A. Teach Yourself: Microsoft PowerPoint 2000 in 24 Hours. Indianapolis, IN. Sam's Publishing, (2000).
• Highlight the whole reference. • Right-‐click and select Paragraph, or • Select Page LayoutàParagraph menu.
• Click on the icon in the bottom right of this pane to open the Paragraph window.
• In the Indentation section, under Special choose Hanging , and under By select 0.5". This will wrap the second line indented by half an inch.
• Click OK. Your results should look as follows: Haddad, A. Teach Yourself: Microsoft PowerPoint 2000 in 24 Hours. Indianapolis, IN. Sam's
Publishing, (2000).