Embed Size (px)
Citation preview

Qualys API(VM, SCA, PC)User GuideVersion 8.15
September 18, 2018

Copyright 2018 by Qualys, Inc. All Rights Reserved.
Qualys and the Qualys logo are registered trademarks of Qualys, Inc. All other trademarks are the property of their respective owners.
Qualys, Inc. 919 E Hillsdale Blvd 4th Floor Foster City, CA 94404 1 (650) 801 6100
Table of Contents
Preface................................................................................................................ 7
Chapter 1 - Welcome....................................................................................... 8API Conventions ...................................................................................................................... 8
Qualys User Account ........................................................................................................ 8URL to Qualys API Server ................................................................................................. 8
Making API requests................................................................................................................ 9API Limits ............................................................................................................................... 11Tracking API usage by user .................................................................................................. 12HTTP Response Headers ....................................................................................................... 12Activity Log............................................................................................................................. 14
Chapter 2 - Authentication to your account ........................................... 16What do I need to know?...................................................................................................... 16Using Basic HTTP Authentication ....................................................................................... 16Using Session Based Authentication ................................................................................... 17Session Login.......................................................................................................................... 20Session Logout ....................................................................................................................... 22
Chapter 3 - Scans.......................................................................................... 24VM Scans ................................................................................................................................ 25
VM Scan List .................................................................................................................... 25Launch VM Scan ............................................................................................................. 28Launch VM Scan on EC2 assets ..................................................................................... 30Manage VM Scans ........................................................................................................... 32
Compliance Scans ................................................................................................................. 34Compliance Scan List ..................................................................................................... 35SCAP Scan List................................................................................................................. 36Launch Compliance Scan............................................................................................... 38Launch Compliance Scan on EC2 assets ...................................................................... 39Manage Compliance Scans ............................................................................................ 41
Scan Schedules ...................................................................................................................... 44Scan List Parameters............................................................................................................. 52Scan Parameters .................................................................................................................... 54Scan Schedule Parameters ................................................................................................... 59VM Scan Statistics ................................................................................................................. 63VM Scan Summary................................................................................................................ 66Share PCI Scan ....................................................................................................................... 69Discovery Scans (maps) ........................................................................................................ 73
3

Chapter 4 - Scan Configuration ................................................................. 82Scanner Appliance List ......................................................................................................... 83Manage Virtual Scanner Appliances ................................................................................... 88Update Physical Scanner Appliance.................................................................................... 93Replace Scanner Appliance .................................................................................................. 96Scanner Appliance VLANs and Static Routes..................................................................... 98Option Profile Export........................................................................................................... 103Option Profile Import .......................................................................................................... 112Option Profiles for VM......................................................................................................... 118Option Profiles for PCI......................................................................................................... 133Option Profiles for Compliance.......................................................................................... 141KnowledgeBase .................................................................................................................... 155Editing Vulnerabilities......................................................................................................... 159Static Search Lists ............................................................................................................... 162Dynamic Search Lists.......................................................................................................... 167Vendor IDs and References ................................................................................................ 178
Chapter 5 - Scan Authentication............................................................... 181User Permissions Summary ............................................................................................... 182List Authentication Records ............................................................................................... 183List Authentication Records by Type ................................................................................ 185Application Server Records ................................................................................................ 188Docker Record...................................................................................................................... 192HTTP Record ........................................................................................................................ 195IBM DB2 Record ................................................................................................................... 198JBoss Server record .............................................................................................................. 202MariaDB Record ................................................................................................................... 206MongoDB Record ................................................................................................................. 210MS SQL Record..................................................................................................................... 216MySQL Record ...................................................................................................................... 224Oracle Record....................................................................................................................... 231Oracle Listener Record........................................................................................................ 236Oracle WebLogic Server Record ......................................................................................... 238Palo Alto Firewall Record.................................................................................................... 241PostgreSQL Record............................................................................................................... 245SNMP Record........................................................................................................................ 251Sybase Record ...................................................................................................................... 256Unix Record.......................................................................................................................... 261VMware Record.................................................................................................................... 268Windows Record.................................................................................................................. 271
Chapter 6 - Vault Support ........................................................................ 277Vault Support matrix .......................................................................................................... 277Vault Definition ................................................................................................................... 280List Vaults............................................................................................................................. 285Manage Vaults ..................................................................................................................... 288
4
Chapter 7 - Assets ...................................................................................... 296IP List..................................................................................................................................... 297Add IPs .................................................................................................................................. 299Update IPs............................................................................................................................. 301Host List................................................................................................................................ 305Host List Detection .............................................................................................................. 313Host List Detection - Normalized Data ............................................................................. 329Host List Detection - Use Cases ......................................................................................... 330Host List Detection - Best Practices ................................................................................... 331Excluded Host List ............................................................................................................... 332Excluded Hosts Change History......................................................................................... 335Manage Excluded Hosts...................................................................................................... 338Virtual Host List................................................................................................................... 342Manage Virtual Hosts.......................................................................................................... 343Restricted IPs List ................................................................................................................ 345Manage Restricted IPs ......................................................................................................... 346Asset Group List................................................................................................................... 350Manage Asset Groups.......................................................................................................... 353Purge Hosts........................................................................................................................... 358
Chapter 8 - IPv6 Assets............................................................................. 363API Support for IPv6 Asset Management and Scanning.................................................. 363IPv6 Mapping Record List.................................................................................................... 371Add IPv6 Mapping Records ................................................................................................. 372Remove IPv6 Mapping Records .......................................................................................... 373
Chapter 9 - Networks................................................................................. 375Network List ......................................................................................................................... 375Create Network.................................................................................................................... 376Update Network................................................................................................................... 378Assign Scanner Appliance to Network.............................................................................. 379
Chapter 10 - Reports ................................................................................... 381Report List ............................................................................................................................ 382Launch Report...................................................................................................................... 385Using Asset Tags.................................................................................................................. 391Report Template List........................................................................................................... 392Launch Scorecard................................................................................................................ 394Cancel Running Report ....................................................................................................... 401Download Saved Report...................................................................................................... 402Delete Saved Report ............................................................................................................ 405Scheduled Reports List........................................................................................................ 406Launch Scheduled Report................................................................................................... 407Asset Search Report ............................................................................................................ 407
Chapter 11 - VM Report Templates .......................................................... 416API Support for Report Templates..................................................................................... 416Scan Template ..................................................................................................................... 417
5

PCI Scan Template .............................................................................................................. 429Patch Template.................................................................................................................... 431Map Template...................................................................................................................... 435
Chapter 12 - VM Remediation Tickets.................................................... 450Remediation Tickets overview ........................................................................................... 450Ticket Parameters................................................................................................................ 451View Ticket List.................................................................................................................... 453Edit Tickets........................................................................................................................... 455Delete Tickets ...................................................................................................................... 457View Deleted Ticket List ..................................................................................................... 458Get Ticket Information ....................................................................................................... 460
Chapter 13 - Compliance........................................................................... 462Compliance Control List ..................................................................................................... 463Compliance Policy List ........................................................................................................ 468Compliance Policy - Export ................................................................................................ 472Compliance Policy - Import................................................................................................ 477Compliance Policy - Merge ................................................................................................. 479Compliance Policy - Manage Asset Groups ...................................................................... 485Compliance Posture Information ...................................................................................... 488Control Criticality ................................................................................................................ 494Exceptions ............................................................................................................................ 495SCAP Cyberscope Report..................................................................................................... 504SCAP ARF Report ................................................................................................................. 508SCAP Policy List.................................................................................................................... 509
Chapter 14 - Users and Activity Log ....................................................... 513User List................................................................................................................................ 513Add/Edit User ....................................................................................................................... 515User Registration Process ................................................................................................... 524Accept Qualys EULA............................................................................................................ 525Activate/Deactivate Users .................................................................................................. 526User Password Change........................................................................................................ 527Export User Activity Log ..................................................................................................... 529
Appendix A - API Documentation .......................................................... 532
Appendix B - Ports used for scanning................................................... 533
Appendix C - Error codes / descriptions .............................................. 535
Index .............................................................................................................. 537
6

Preface
7
PrefaceUsing the Qualys API, third parties can integrate their own applications with Qualys cloud security and compliance solutions using an extensible XML interface. The APIs described in this guide are available to customers using Qualys Cloud Platform (VM, SCA, PC).
About QualysQualys, Inc. (NASDAQ: QLYS) is a pioneer and leading provider of cloud-based security and compliance solutions. The Qualys Cloud Platform and its integrated apps help businesses simplify security operations and lower the cost of compliance by delivering critical security intelligence on demand and automating the full spectrum of auditing, compliance and protection for IT systems and web applications.
Founded in 1999, Qualys has established strategic partnerships with leading managed service providers and consulting organizations including Accenture, BT, Cognizant Technology Solutions, Deutsche Telekom, Fujitsu, HCL, HP Enterprise, IBM, Infosys, NTT, Optiv, SecureWorks, Tata Communications, Verizon and Wipro. The company is also a founding member of the Cloud Security Alliance (CSA). For more information, please visit www.qualys.com.
Contact Qualys SupportQualys is committed to providing you with the most thorough support. Through online documentation, telephone help, and direct email support, Qualys ensures that your questions will be answered in the fastest time possible. We support you 7 days a week, 24 hours a day. Access support information at www.qualys.com/support/.

Chapter 1 - WelcomeAPI Conventions
Chapter 1 - WelcomeThe Qualys API allows third parties to integrate their own applications with Qualys cloud security and compliance solutions using an extensible XML interface. APIs in this user guide are supported using Qualys Cloud Platform (VM, SCA, PC).
We recommend you join our Community and subscribe to our API Notifications RSS Feeds for announcements and discussions.
API Conventions
Qualys User AccountAuthentication with valid Qualys user account credentials is required for making Qualys API requests to the Qualys API servers. These servers are hosted at the Qualys platform, also referred to as the Security Operations Center (SOC), where your account is located. If you need assistance with obtaining a Qualys account, please contact your Qualys account representative.
Users with a Qualys user account may access the API functions. When a subscription has multiple users, all users with any user role (except Contact) can use the Qualys API. Each user’s permissions correspond to their assigned user role.
Qualys user accounts that have been enabled with VIP two-factor authentication can be used with the Qualys API, however two-factor authentication will not be used when making API requests. Two-factor authentication is only supported when logging into the Qualys GUI.
URL to Qualys API ServerQualys maintains multiple Qualys platforms. The Qualys API server URL that you should use for API requests depends on the platform where your account is located.
Account Location API Server URL
Qualys US Platform 1 https://qualysapi.qualys.com
Qualys US Platform 2 https://qualysapi.qg2.apps.qualys.com
Qualys US Platform 3 https://qualysapi.qg3.apps.qualys.com
Qualys EU Platform 1 https://qualysapi.qualys.eu
Qualys EU Platform 2 https://qualysapi.qg2.apps.qualys.eu
Get API Notifications
Join our Community
API Notifications RSS Feeds
8

Chapter 1 - WelcomeMaking API requests
The Qualys API documentation and sample code use the API server URL for the Qualys US Platform 1. If your account is located on another platform, please replace this URL with the appropriate server URL for your account.
Still have questions? You can easily find the API server URL for your account.
Just log in to your Qualys account and go to Help > About. You’ll see this information under Security Operations Center (SOC).
Making API requestsCurl samples in our API docs
We use curl in our API documentation to show an example how to form REST API calls, and it is not meant to be an actual production example of implementation.
GET and POST Methods
Qualys API functions allow API users to submit parameters (name=value pairs) using the GET and/or POST method. There are known limits for the amount of data that can be sent using the GET method, and these limits are dependent on the toolkit used. Please refer to the individual descriptions of the API function calls to learn about the supported methods for each function.
Qualys India Platform 1 https://qualysapi.qg1.apps.qualys.in
Qualys Private Cloud Platform https://qualysapi.<customer_base_url>
Account Location API Server URL
9

Chapter 1 - WelcomeMaking API requests
Parameters in URLs
API parameters, as documented in this user guide, should be specified one time for each URL. In the case where the same parameter is specified multiple times in a single URL, the last parameter takes effect and the previous instances are silently ignored.
Date Format in API Results
The Qualys API has adopted a date/time format to provide consistency and interoperability of the Qualys API with third-party applications. The date format follows standards published in RFC 3339 and ISO 8601, and applies throughout the Qualys API.
The date format is:
yyyy-mm-ddThh-mm-ssZ
This represents a UTC value (GMT time zone).
URL Encoding in API Code
You must URL encode variables when using the Qualys API. This is standard practice for HTTP communications. If your application passes special characters, like the single quote (‘), parentheses, and symbols, they must be URL encoded.
For example, the pound (#) character cannot be used as an input parameter in URLs. If “#” is specified, the Qualys API returns an error. To specify the “#” character in a URL you must enter the encoded value “%23”. The “#” character is considered by browsers and other Internet tools as a separator between the URL and the results page, so whatever follows an un-encoded “#” character is not passed to the Qualys API server and returns an error.
UTF-8 Encoding
The Qualys API uses UTF-8 encoding. The encoding is specified in the XML output header as shown below.
<?xml version="1.0" encoding="UTF-8" ?>
URL Elements are Case Sensitive
URL elements are case sensitive. The sample URL below will retrieve a previously saved scan report that has the reference code “scan/987659876.19876”. The parameter name “ref” is defined in lower-case characters. This URL will return the specified scan report:
https://qualysapi.qualys.com/msp/scan_report.php?ref=scan/987659876.19876
The sample URL below is incorrect and will not return the specified scan report because the parameter name “Ref” appears in mixed-case characters:
https://qualysapi.qualys.com/msp/scan_report.php?Ref=scan/987659876.19876
10

Chapter 1 - WelcomeAPI Limits
Decoding XML Reports
There are a number of ways to parse an XML file. Select the method which is most appropriate for your application and its users. Qualys publishes DTDs for each report on its Web site. For example, the scan list output DTD is found at the URL shown:
https://qualysapi.qualys.com/api/2.0/fo/scan/scan_list_output.dtdThe URLs to current report DTDs are included with the function descriptions in this document.
Occasionally Qualys updates the report DTDs. It is recommended that you request the most recent DTDs from the Qualys platform to decode your reports. The URLs to the report DTDs are included in this user guide.
Detailed information about each XML report is provided in the document Qualys API for VM and Compliance XML/DTD Reference
Some parts of the XML report may contain HTML tags or other special characters (such as accented letters). Therefore, many elements contain CDATA sections, which allow HTML tags to be included in the report. “High” ASCII and other non-printable characters are escaped using question marks.
API LimitsQualys Cloud Platform enforces limits on the API calls subscription users can make. The limits apply to the use of all APIs, except “session” API (session login/logout).
API controls are applied per subscription based on your subscription’s service level. Default settings are provided and these may be customized per subscription by Qualys Support.
There’s 2 controls defined per subscription:
- Concurrency Limit per Subscription (per API). The maximum number of API calls allowed within the subscription during the configured rate limit period (as per service level).
- Rate Limit per Subscription (per API). The period of time that defines a window when API calls are counted within the subscription for each API. The window starts from the moment each API call is received by the service and extends backwards 1 hour or 1 day. Individual rate and count settings are applied (as per service level).
Click here to learn more about the controls and settings per service level.
How it works - Qualys checks the concurrency limit and rate limit each time an API request is received. In a case where an API call is received and our service determines a limit has been exceeded, the API call is blocked and an error is returned (the concurrency limit error takes precedence).
11
Chapter 1 - WelcomeTracking API usage by user
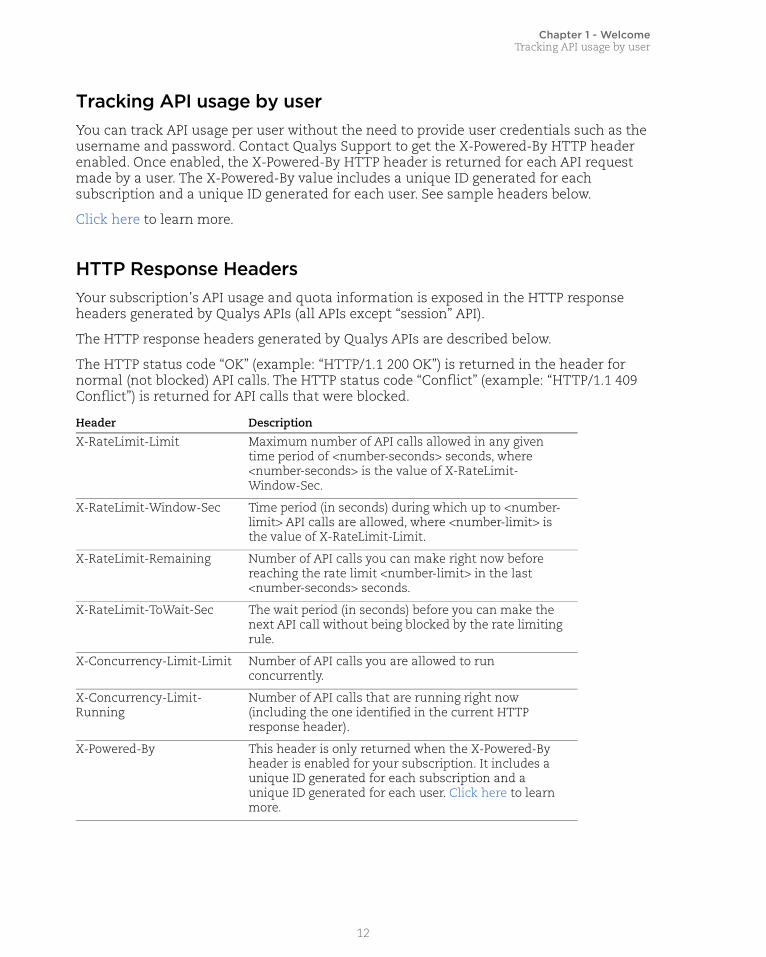
Tracking API usage by userYou can track API usage per user without the need to provide user credentials such as the username and password. Contact Qualys Support to get the X-Powered-By HTTP header enabled. Once enabled, the X-Powered-By HTTP header is returned for each API request made by a user. The X-Powered-By value includes a unique ID generated for each subscription and a unique ID generated for each user. See sample headers below.
Click here to learn more.
HTTP Response HeadersYour subscription’s API usage and quota information is exposed in the HTTP response headers generated by Qualys APIs (all APIs except “session” API).
The HTTP response headers generated by Qualys APIs are described below.
The HTTP status code “OK” (example: “HTTP/1.1 200 OK”) is returned in the header for normal (not blocked) API calls. The HTTP status code “Conflict” (example: “HTTP/1.1 409 Conflict”) is returned for API calls that were blocked.
Header Description
X-RateLimit-Limit Maximum number of API calls allowed in any given time period of <number-seconds> seconds, where <number-seconds> is the value of X-RateLimit-Window-Sec.
X-RateLimit-Window-Sec Time period (in seconds) during which up to <number-limit> API calls are allowed, where <number-limit> is the value of X-RateLimit-Limit.
X-RateLimit-Remaining Number of API calls you can make right now before reaching the rate limit <number-limit> in the last <number-seconds> seconds.
X-RateLimit-ToWait-Sec The wait period (in seconds) before you can make the next API call without being blocked by the rate limiting rule.
X-Concurrency-Limit-Limit Number of API calls you are allowed to run concurrently.
X-Concurrency-Limit-Running
Number of API calls that are running right now (including the one identified in the current HTTP response header).
X-Powered-By This header is only returned when the X-Powered-By header is enabled for your subscription. It includes a unique ID generated for each subscription and a unique ID generated for each user. Click here to learn more.
12

Chapter 1 - WelcomeHTTP Response Headers
Sample HTTP Response Headers
Sample 1: Normal API call (API call not blocked)
Returned from API call using HTTP authentication.
HTTP/1.1 200 OKDate: Fri, 22 Apr 2018 00:13:18 GMTServer: qwebX-RateLimit-Limit: 15X-RateLimit-Window-Sec: 360X-Concurrency-Limit-Limit: 3X-Concurrency-Limit-Running: 1X-RateLimit-ToWait-Sec: 0X-RateLimit-Remaining: 4Transfer-Encoding: chunkedContent-Type: application/xml
Sample 2: API Call Blocked (Rate Limit exceeded)
Returned from API call using HTTP authentication.
HTTP/1.1 409 ConflictDate: Fri, 22 Apr 2018 00:13:18 GMTServer: qwebX-RateLimit-Limit: 15X-RateLimit-Window-Sec: 360X-Concurrency-Limit-Limit: 3X-Concurrency-Limit-Running: 1X-RateLimit-ToWait-Sec: 181X-RateLimit-Remaining: 0Transfer-Encoding: chunkedContent-Type: application/xml
Sample 3: API Call Blocked (Concurrency Limit exceeded)
Returned from API call using API session authentication.
HTTP/1.1 409 ConflictDate: Fri, 22 Apr 2018 00:13:18 GMTServer: qwebExpires: Mon, 24 Oct 1970 07:30:00 GMTCache-Control: post-check=0,pre-check=0Pragma: no-cacheX-RateLimit-Limit: 15X-RateLimit-Window-Sec: 360X-Concurrency-Limit-Limit: 3X-Concurrency-Limit-Running: 3
13

Chapter 1 - WelcomeActivity Log
Transfer-Encoding: chunkedContent-Type: application/xml
In case where the concurrency limit has been reached, no information about rate limits will appear in the HTTP headers.
Sample 4: Tracking API usage through the X-Powered-By HTTP headerHTTP/1.1 200 OKDate: Fri, 22 Apr 2018 00:13:18 GMTServer: qweb X-Powered-By: Qualys:USPOD1:d9a7e94c-0a9d-c745-82e9-980877cc5043:f178af1e-4049-7fce-81ca-75584feb8e93X-RateLimit-Limit: 15X-RateLimit-Window-Sec: 360X-Concurrency-Limit-Limit: 3X-Concurrency-Limit-Running: 1X-RateLimit-ToWait-Sec: 0X-RateLimit-Remaining: 4Transfer-Encoding: chunked Content-Type: application/xml
Once X-Powered-By HTTP header is enabled, information is returned in the following format:
X-Powered-By Qualys:<POD_ID>:<SUB_UUID>:<USER_UUID>
Where,
POD_ID is the shared POD or a PCP. Shared POD is USPOD1, USPOD2, etc.
SUB_UUID is the unique ID generated for the subscription
USER_UUID is the unique ID generated for the user
For example,
X-Powered-By: Qualys:USPOD1:d9a7e94c-0a9d-c745-82e9-980877cc5043:f178af1e-4049-7fce-81ca-75584feb8e93
You can use the USER_UUID to track API usage per user.
Activity LogYou can view the Activity Log using the Qualys user interface and the Activity Log API (/api/2.0/fo/activity_log). The Activity Log shows details about user actions taken.
To view the Activity Log, log into your Qualys account. Go to Users and click the Activity Log tab. Select Filters > Recent API Calls. You’ll see the API Processes list showing the API calls subject to the API limits (all APIs except “session” API) made by subscription users and/or updated by the service in the past week.
14

Chapter 1 - WelcomeActivity Log
Tip - You can search the processes list to find API processes. You can search by process state (Queued, Running, Expired, Finished and/or Blocked), by submitted date and by last updated date. You can search for API processes that were blocked due to exceeding the API rate limit and/or the API concurrency limit.
15

Chapter 2 - Authentication to your accountWhat do I need to know?
Chapter 2 - Authentication to your accountAuthentication with valid Qualys account credentials is required for making Qualys API requests to the Qualys API servers. When calling the V2 APIs (i.e. APIs with /2.0/ as URL element), users have the option to choose between session based authentication (using login and logout operations) and basic HTTP authentication (method supported for V1 APIs (i.e. APIs with /msp/ as URL element).
What do I need to know?
Using the API Session Resource
Session Login
Session Logout
What do I need to know?Here’s some things to know about making authenticated API requests to Qualys API servers.
Required Header ParameterThe following header parameter must be included in all API calls using basic HTTP authentication and session based authentication:
"X-Requested-With: <user description, like a user agent>"
Specifying the required “X-Requested-With” parameter helps to protect Qualys API users from cross-site request forgery (CSRF) attacks.
Using Basic HTTP AuthenticationUsing this method, Qualys account credentials are transmitted using the “Basic Authentication Scheme” over HTTPS for each API call. For information, see the “Basic Authentication Scheme” section of RFC #2617:
http://www.faqs.org/rfcs/rfc2617.html
The exact method of implementing authentication will vary according to which programming language is used.
A sample asset/host API request (Curl) using basic HTTP authentication:
curl -H "X-Requested-With: Curl Sample" -u "acme_ab12:passwd" "https://qualysapi.qualys.com/api/2.0/fo/asset/host/?action=list"
16

Chapter 2 - Authentication to your accountUsing Session Based Authentication
Using Session Based AuthenticationUsing this method, the user makes a sequence of API requests as follows (supported for V2 API calls):
Step 1: Make session login request
Use the Qualys API session resource to make a login request. Upon success, the request returns a session ID in the Set-Cookie HTTP header:
curl -H "X-Requested-With: Curl Sample" -D headers-d "action=login&username=acme_ab12&password=passwd""https://qualysapi.qualys.com/api/2.0/fo/session/"
Step 2: Make resource requests
Use the API resources to make API requests, as described in this user guide, and include the session ID in the cookie header for each request.
You’ll notice the session cookie (QualysSession) was extracted from the “headers” file contents returned from the session login API call (Step 1 above):
curl -H "X-Requested-With: Curl Sample" -b "QualysSession=71e6cda2a35d2cd404cddaf305ea0208; path=/api; secure" -d "action=list" "https://qualysapi.qualys.com/api/2.0/fo/report/"
Step 3: Make session logout request
Once logged in to Qualys you can make multiple API requests. Use the Qualys API session resource to logout of the current session. Logging out of the session closes the open session and ensures secure, ongoing access to your account. Access may be denied if a user makes too many session login requests without closing sessions properly:
curl -H "X-Requested-With: Curl Sample" -b "QualysSession=10b8eb6d4553b4d1ecb860c2b3c247d4; path=/api; secure" -d "action=logout" "https://qualysapi.qualys.com/api/2.0/fo/session/"
Using the API Session Resource
Sessions created using the Qualys API via the session resource are equivalent in every way to sessions created by users logging into the Qualys user interface. Too many open sessions, whether created via the API and/or via user interface login, will lock out new session login attempts from both interfaces (user and API).
17

Chapter 2 - Authentication to your accountUsing Session Based Authentication
The request URL has several elements. The following elements appear in every request URL based on the API V2 architecture.
Session Login RequestThe session login request includes the Qualys user login credentials, the request URL, and the location where the HTTP response headers will be saved.
The sample API call below saves the HTTP headers in a local file named “headers”:
curl -H "X-Requested-With: Curl Sample" -D headers-d "action=login&username=acme_ab12&password=passwd""https://qualysapi.qualys.com/api/2.0/fo/session/"
If you do not wish to store this information in the “headers” file, you can save the HTTP header in a cookie as shown below:
curl -H "X-Requested-With: Curl Sample" -c cookie.txt-d "action=login&username=acme_ab12&password=passwd""https://qualysapi.qualys.com/api/2.0/fo/session/"
Upon success, the sample Qualys API call returns an XML response with the message “Logged in” and the Qualys API session ID in the Set-Cookie HTTP header. See “HTTP Response Headers” for further information.
Resource RequestsWhen session based authentication is used, the session cookie returned in the XML response from the session login request must be included in the cookie header of subsequent API requests. Multiple API requests can be made using the same session cookie (this is supported using V2 API requests).
The resource request includes the Qualys user login credentials, the Qualys API session ID, the request URL, and the location where the HTTP response headers are saved.
The sample API request below is used to request a list of reports in the user’s Report Share storage space. You’ll notice the session cookie (QualysSession) was extracted from the “headers” file contents returned from the session login API call.
URL element Description
qualysapi.qualys.com:443 FQDN of the Qualys API server and option port (443 if specified).
api Qualys Application component name.
2.0 Qualys API version number.
fo Qualys interface component name.
session|scan|report or other component name
Qualys API resource name, i.e. session or some other component like scan or report etc.
action={value} Qualys API resource-specific action. In the sample session login URL above, the action is “login”.
18

Chapter 2 - Authentication to your accountUsing Session Based Authentication
curl -H "X-Requested-With: Curl Sample"-d "action=list"-b "QualysSession=71e6cda2a35d2cd404cddaf305ea0208; path=/api; secure" "https://qualysapi.qualys.com/api/2.0/fo/report/"
If you saved the HTTP response headers (from the session login request) in a cookie file, make an API request to obtain the cookie from the cookie file as shown below:
curl -H "X-Requested-With: Curl Sample"-d "action=list"-b "cookie.txt" "https://qualysapi.qualys.com/api/2.0/fo/report/"
Upon success, the sample report list API call returns an XML response listing the reports in the user’s Report Share. In progress and completed reports are included.
HTTP Response HeadersThese API requests return HTTP response headers: session login requests, session logout requests, and fetch (download) report requests. These requests provide information to the third party application about the XML output.
Sample XML output showing HTML response headers returned from a session logout request:
HTTP/1.1 200 OKDate: Wed, 20 Jun 2007 16:21:03 GMTServer: qweb/3.3hSet-Cookie: QualysSession=71e6cda2a35d2cd404cddaf305ea0208; path=/api; secureExpires: Mon, 24 Oct 1970 07:30:00 GMTCache-Control: post-check=0,pre-check=0Pragma: no-cacheConnection: closeTransfer-Encoding: chunkedContent-Type: text/xml
Sample XML output showing HTML response headers returned from a fetch (download) report request, where the report format is HTML:
HTTP/1.1 200 OKDate: Wed, 20 Jun 2007 16:36:42 GMTServer: qweb/3.3hExpires: Mon, 24 Oct 1970 07:30:00 GMTCache-Control: post-check=0,pre-check=0Pragma: no-cacheContent-Disposition: attachment; filename=scan_report__1182357402.zipContent-length: 98280Connection: close
19

Chapter 2 - Authentication to your accountSession Login
Content-Type: application/zip
Expires HTTP Header - For the Expires header, Qualys complies with RFC #2109 and sets the Expires date to an old date (a date long in the past). Currently Qualys sets the Expires date to “Mon, 24 Oct 1970 07:30:00 GMT”. Note that Qualys cookie expiration is managed on the server side, and Qualys does not rely on clients to drop their expired cookies.
Session Logout Request
A sample session logout request (POST method) is shown below. Upon success, the sample Qualys API call returns an XML response with the message “Logged out”.
curl -H "X-Requested-With: Curl Sample"-d "action=logout" -b "QualysSession=71e6cda2a35d2cd404cddaf305ea0208; path=/api; secure" "https://qualysapi.qualys.com/api/2.0/fo/session/"
See “Session Logout” below for further information.
Session TimeoutEvery Qualys user account has a session timeout setting. This setting is configurable at the subscription level by Manager users in the Qualys user interface (go to Users > Setup > Security). For a new subscription, this is set to 60 minutes.
The session timeout applies to sessions started using the user interface and sessions started using the Qualys APIs, including APIs based on the new API architecture.
When you launch a scan or report (using Report Share), the task is launched in the background, and processing does not timeout until the task has completed.
Session Login/api/2.0/fo/session/?action=login
[POST]
Make a request to Qualys API server for session login.
A session login request is used to authenticate to the Qualys API and receive a Qualys API session ID, which must be included in the cookie header of subsequent API resource requests.
Input Parameters
Parameter Description
action=login (Required) A flag used to make a session login request.
username (Required) The user name (login) of a Qualys user account.
20

Chapter 2 - Authentication to your accountSession Login
A sample session login request (POST method) is shown below. Upon success, the sample Qualys API call returns an XML response with the message “Logged in” and the Qualys API session ID as shown.
curl -H "X-Requested-With: Curl Sample" -D headers.4 -d "action=login&username=acme_ab12&password=passwd""https://qualysapi.qualys.com/api/2.0/fo/session/"
<?xml version="1.0" encoding="UTF-8" ?><!DOCTYPE GENERIC SYSTEM "https://qualysapi.qualys.com/api/2.0/simple_return.dtd">
<SIMPLE_RETURN> <RESPONSE> <DATETIME>2007-06-20T16:21:04Z</DATETIME> <TEXT>Logged in</TEXT> </RESPONSE></SIMPLE_RETURN>
cat headers.4
HTTP/1.1 200 OKDate: Wed, 20 Jun 2007 16:21:03 GMTServer: qweb/3.3hSet-Cookie: QualysSession=71e6cda2a35d2cd404cddaf305ea0208; path=/api; secureExpires: Mon, 24 Oct 1970 07:30:00 GMTCache-Control: post-check=0,pre-check=0Pragma: no-cacheConnection: closeTransfer-Encoding: chunkedContent-Type: text/xml
password (Required) The password of a Qualys user account.
echo_request={0|1} (Optional) Specifies whether to echo the request’s input parameters (names and values) in the XML output. When not specified, parameters are not included in the XML output. Specify 1 to view parameters in the XML output.
Parameter Description
21

Chapter 2 - Authentication to your accountSession Logout
Session Logout/api/2.0/fo/session/?action=logout
[POST]
Make a request to Qualys API server for session logout.
When you’re done making V2 API resource requests, the third party application must make a session logout request. This results in closing the session ID for the user’s account, preventing future API requests from running.
Input Parameters
A sample session logout request (POST method) is shown below. Upon success, the sample Qualys API call returns an XML response with the message “Logged out” as shown.
curl -H "X-Requested-With: Curl Sample"-d "action=logout" -b "QualysSession=71e6cda2a35d2cd404cddaf305ea0208; path=/api; secure" "https://qualysapi.qualys.com/api/2.0/fo/session/"
<?xml version="1.0" encoding="UTF-8" ?><!DOCTYPE GENERIC SYSTEM "https://qualysapi.qualys.com/api/2.0/simple_return.dtd"><SIMPLE_RETURN> <RESPONSE> <DATETIME>2007-06-20T21:50:37Z</DATETIME> <TEXT>Logged out</TEXT> </RESPONSE></SIMPLE_RETURN>
cat headers.18
HTTP/1.1 200 OKDate: Wed, 20 Jun 2007 21:50:36 GMTServer: qweb/3.3hExpires: Mon, 24 Oct 1970 07:30:00 GMTCache-Control: post-check=0,pre-check=0Pragma: no-cache
Parameter Description
action=logout (Required) A flag used to make a session logout request.
echo_request={0|1} (Optional) Specifies whether to echo the request’s input parameters (names and values) in the XML output. When not specified, parameters are not included in the XML output. Specify 1 to view parameters in the XML output.
22

Chapter 2 - Authentication to your accountSession Logout
Set-Cookie: QualysSession=71e6cda2a35d2cd404cddaf305ea0208; expires=Wed, 13-Jun-2007 21:50:37 GMT; path=/foConnection: closeTransfer-Encoding: chunkedContent-Type: text/xml
23

Chapter 3 - Scans
Chapter 3 - ScansLaunch and manage vulnerability scans, compliance scans, discovery scans (maps).
VM Scans | Compliance Scans
Scan Schedules
Scan List Parameters | Scan Parameters | Scan Schedule Parameters
VM Scan Statistics
VM Scan Summary
Share PCI Scan
Discovery Scans (maps) | Domain List | Add/Edit Domain
24

Chapter 3 - ScansVM Scans
VM ScansThe VM Scan API (/api/2.0/fo/scan/) is used to obtain a list of vulnerability scans in your account and to take actions on them like cancel, pause, resume, and fetch (download) finished results.
Express Lite: This API is available to Express Lite users.
Permissions
VM Scan List/api/2.0/fo/scan/?action=list
[GET] [POST]
List vulnerability scans in the user’s account. By default the XML output lists scans launched in the past 30 days.
Input Parameters
The input parameters for requesting a VM scan list are shown below. See Scan List Parameters for complete details.
User Role Permissions
Manager Manage scans on all IPs in the subscription.
Unit Manager Launch, list and fetch scans on IPs in the user’s business unit. And take actions on scans launched by users in the same business unit (cancel, pause, resume and delete).
Scanner Launch, list and fetch scans on IPs in the user’s account. And take actions on scans that the user owns (cancel, pause, resume and delete).
Reader View scans with targets containing IPs in the user’s account. Download scan results when the target includes at least one IP in the user’s account.
Auditor No permissions.
Type Parameter List
Request action=list (required), echo_request
Scan List Filters scan_ref, state, processed, type, target, user_login, launched_after_datetime, launched_before_datetime, scan_type=certview, client_id and client_name (only for Consultant type subscriptions)
Show/Hide Information show_ags, show_op, show_status, show_last, ignore_target
25

Chapter 3 - ScansVM Scans
Samples
List all scans in the user account.
curl -H "X-Requested-With: Curl Sample"-b "QualysSession=71e6cda2a35d2cd404cddaf305ea0208; path=/api; secure" "https://qualysapi.qualys.com/api/2.0/fo/scan/?action=list&echo_request=1&show_ags=1&show_op=1"
<?xml version="1.0" encoding="UTF-8" ?><!DOCTYPE SCAN_LIST_OUTPUT SYSTEM "https://qualysapi.qualys.com/api/2.0/fo/scan/scan_list_output.dtd"><SCAN_LIST_OUTPUT> <REQUEST> <DATETIME>2018-05-25T12:28:29Z</DATETIME> <USER_LOGIN>acme_ab</USER_LOGIN> <RESOURCE>https://qualysapi.qualys.com/api/2.0/fo/scan/ </RESOURCE> <PARAM_LIST> <PARAM> <KEY>action</KEY> <VALUE>list</VALUE> </PARAM> <PARAM> <KEY>echo_request</KEY> <VALUE>1</VALUE> </PARAM> <PARAM> <KEY>show_ags</KEY> <VALUE>1</VALUE> </PARAM> <PARAM> <KEY>show_op</KEY> <VALUE>1</VALUE> </PARAM> </PARAM_LIST> </REQUEST> <RESPONSE> <DATETIME>2018-05-25T12:28:29Z</DATETIME> <SCAN_LIST> <SCAN> <REF>scan/1187117392.587</REF> <TYPE>On-Demand</TYPE> <TITLE><![CDATA[Web Servers 09/25]]></TITLE> <USER_LOGIN>acme_ab</USER_LOGIN> <LAUNCH_DATETIME>2018-05-25-25T08:10:43Z</LAUNCH_DATETIME>
26

Chapter 3 - ScansVM Scans
<DURATION>00:05:16</DURATION> <PROCESSED>1</PROCESSED> <STATUS> <STATE>Finished</STATE> </STATUS> <TARGET><![CDATA[10.10.10.10-10.10.10.113]]></TARGET> <OPTION_PROFILE> <TITLE><![CDATA[Initial Options]]></TITLE> <DEFAULT_FLAG>1</DEFAULT_FLAG> </OPTION_PROFILE> </SCAN> <SCAN> <REF>scan/1169604974.6553</REF> <TYPE>Scheduled</TYPE> <TITLE><![CDATA[Web Servers]]></TITLE> <USER_LOGIN>acme_sb3</USER_LOGIN> <LAUNCH_DATETIME>2018-05-24T15:40:02Z</LAUNCH_DATETIME> <DURATION>00:05:16</DURATION> <PROCESSED>0</PROCESSED> <STATUS> <STATE>Finished</STATE> </STATUS> <TARGET><![CDATA[10.10.10.10-10.10.10.113]]></TARGET> <OPTION_PROFILE> <TITLE><![CDATA[Initial Options]]></TITLE> <DEFAULT_FLAG>1</DEFAULT_FLAG> </OPTION_PROFILE> </SCAN> </SCAN_LIST> </RESPONSE></SCAN_LIST_OUTPUT>...
List all running scans that were launched by the user with the login ID “acme_ab”:
curl -H "X-Requested-With: Curl Sample"-b "QualysSession=71e6cda2a35d2cd404cddaf305ea0208; path=/api; secure" "https://qualysapi.qualys.com/api/2.0/fo/scan/?action=list&state=Running&user_login=acme_ab"
List all scheduled scans that were launched after June 5, 2018.
curl -H "X-Requested-With: Curl Sample"-b "QualysSession=71e6cda2a35d2cd404cddaf305ea0208; path=/api; secure" "https://qualysapi.qualys.com/api/2.0/fo/scan/?action=list&type=Scheduled&launched_after_datetime=2018-06-05"
27

Chapter 3 - ScansVM Scans
List all scans for AFCO Company client (only for Consultant type subscriptions).
curl -u "USERNAME:PASSWORD" -H "content-type: text/xml""https://qualysapi.qualys.com/api/2.0/fo/scan/?action=list&client_name=AFCO Company"
DTD
<platform API server>/api/2.0/fo/scan/scan_list_output.dtd
Launch VM Scan/api/2.0/fo/scan/?action=launch
[POST]
Launch vulnerability scan in the user’s account.
The Launch Scan API is asynchronous. When you make a request to launch a scan using this API, the service will return a scan reference ID right away and the call will quit without waiting for the complete scan results.
Using networks? Choose the Global Default Network to scan IPs on your network perimeter.
Input ParametersThe input parameters for launching a VM scan are shown below. See Scan Parameters for complete details.
Type Parameter List
Request action=launch (required), echo_request, runtime_http_header
Scan Title scan_title
Option Profile option_id or option_title
Scanner Appliance iscanner_id or iscanner_name, ec2_instance_ids
Processing Priority priority
Asset IPs/Groups ip, asset_group_ids, asset_groups, exclude_ip_per_scan, default_scanner, scanners_in_ag
Asset Tags target_from=tags, use_ip_nt_range_tags, tag_include_selector, tag_exclude_selector, tag_set_by, tag_set_exclude, tag_set_include
Network ip_network_id (when the Network Support feature is enabled)
Client client_id and client_name (only for Consultant type subscriptions)
28

Chapter 3 - ScansVM Scans
Sample - Launch scan on IP address
API request:
curl -H "X-Requested-With: Curl" -u "USERNAME:PASSWORD" -X "POST" -d "action=launch&scan_title=My+Vulnerability+Scan&ip=10.10.10.10&option_id=43165&iscanner_name=scanner1" "https://qualysapi.qualys.com/api/2.0/fo/scan/" > outputfile.txt
XML output:
<?xml version="1.0" encoding="UTF-8" ?><!DOCTYPE SIMPLE_RETURN SYSTEM "https://qualysapi.qualys.com/api/2.0/simple_return.dtd"><SIMPLE_RETURN> <RESPONSE> <DATETIME>2013-01-15T21:32:40Z</DATETIME> <TEXT>New vm scan launched</TEXT> <ITEM_LIST> <ITEM> <KEY>ID</KEY> <VALUE>136992</VALUE> </ITEM> <ITEM> <KEY>REFERENCE</KEY> <VALUE>scan/1358285558.36992</VALUE> </ITEM> </ITEM_LIST> </RESPONSE></SIMPLE_RETURN>
Sample - Launch scan using asset tags
API request:
curl -H "X-Requested-With: Curl" -u "USERNAME:PASSWD" -X "POST" -d "action=launch&scan_title=My+Vulnerability+Scan&target_from=tags&tag_set_by=name&tag_set_include=Windows&option_id=43165&iscanner_name=scanner1" "https://qualysapi.qualys.com/api/2.0/fo/scan/" > file.txt
Sample - Launch scan using All Scanners in Network
API request:
curl -u "username:password" -H "X-Requested-With:curl demo" -d "action=launch&scan_title=scan3&option_title=Initial+Options&ip_network_id=12807913&scanners_in_network=1&asset_groups=AG1-GDN" "https://qualysapi.qualys.com/api/2.0/fo/scan/"
29

Chapter 3 - ScansVM Scans
Launch VM Scan on EC2 assets/api/2.0/fo/scan/?action=launch
[POST]
Launch vulnerability scan on your Amazon EC2 hosts (in your Amazon Web Services account).
A few things to consider...
- EC2 Scanning must be enabled for your Qualys account.
- Only a Manager user can launch EC2 scans.
- Before scanning you’ll need to complete some set up steps. See Securing Amazon Web Services with Qualys
Input Parameters
The input parameters for launching an EC2 scan are shown below. See Scan Parameters for complete details.
Sample - Launch EC2 Vulnerability scanLaunch an EC2 vulnerability scan using the connector “EC2_Connector” on assets that match tags with IDs 1558997 and 1559222.
Type Parameter List
Request action=launch (required), echo_request
Scan Title scan_title
EC2 environment connector_name (required), ec2_endpoint (required)
Option Profile option_id or option_title
Scanner Appliance iscanner_id or iscanner_name
Processing Priority priority
Target Hosts
Note: You can use either ec2_instance_ids or tags parameter or both
target_from=tags Use tags to select the EC2 hosts you want to scan.
use_ip_nt_range_tags=0The default setting is “0”. Important - This cannot be set to “1” for EC2 scanning.
These tag parameters are used to select tags:tag_set_include={tag1,tag2,...} (required)tag_set_exclude={tag1,tag2,...} (optional)tag_include_selector={any|all} (default in bold)tag_exclude_selector={any|all} (default in bold)tag_set_by={id|name} (default in bold)
ec2_instance_ids={value}The ID of the target EC2 instance to launch the VM or compliance scan. Multiple ec2 instance ids are comma separated. You can add up to maximum 10 instance Ids.
30

Chapter 3 - ScansVM Scans
API request:
curl -H "X-Requested-With: Curl" -u "USERNAME:PASSWD" -X "POST" -d "action=launch&scan_title=My+EC2+Scan&connector_name=EC2_Connector&ec2_endpoint=us-east-1&target_from=tags&use_ip_nt_range_tags=0 &tag_include_selector=any&tag_set_by=id&tag_set_include=1558997,1559222&option_id=43165&iscanner_name=EC2-1" "https://qualysapi.qualys.com/api/2.0/fo/scan/" > outputfile.txt
XML output:
<?xml version="1.0" encoding="UTF-8" ?><!DOCTYPE SIMPLE_RETURN SYSTEM "https://qualysapi.qualys.com/api/2.0/simple_return.dtd"><SIMPLE_RETURN> <RESPONSE> <DATETIME>2018-02-25T21:32:40Z</DATETIME> <TEXT>New vm scan launched</TEXT> <ITEM_LIST> <ITEM> <KEY>ID</KEY> <VALUE>136992</VALUE> </ITEM> <ITEM> <KEY>REFERENCE</KEY> <VALUE>scan/1358285558.36992</VALUE> </ITEM> </ITEM_LIST> </RESPONSE></SIMPLE_RETURN>
Sample - Launch EC2 Vulnerability scan for EC2 instance
Launch a VM scan on EC2 instances using the parameter ec2_instance_ids.
API request:
curl -u "USERNAME:PASSWORD" -H "content-type: text/xml""action=launch&scan_title=Ec2InstanceScanScan_TAGS_1525653991&&option_title=Initial+Options&iscanner_id=212711&connector_name=arn&ec2_endpoint=useast-1&ec2_instance_ids=i-0c9768f97a2816ad6, i-0211dfd18a6dff979""https://qualysapi.qualys.com/api/2.0/fo/scan/"
31

Chapter 3 - ScansVM Scans
Manage VM Scans/api/2.0/fo/scan/?action={action}
Take actions on vulnerability scans in their account, like cancel, pause, resume, delete and fetch completed scan results.
Input Parameters
Parameter Description
action={action} (Required) One action required for the request:cancel - Stop a scan in progress (POST method) pause - Stop a scan in progress and change status to “Paused” (POST method) resume - Restart a scan that has been paused (POST method)delete - Delete a scan in your account (POST method)fetch - Download scan results for a scan with status of “Finished”, “Canceled”, “Paused” or “Error” (GET or POST method)
echo_request={0|1} (Optional) Specify 1 to echo the input parameters in the XML output. When unspecified, parameters are not listed in the XML output.
scan_ref={value} (Required) The scan reference for a vulnerability scan. This will have the format: scan/nnnnnnnnnn.nnnnn
Parameter Description
action={action} (Required) An action for the request:cancel - stop a scan in progress, “Running” or “Paused”pause - stop a scan in progress and change status to “Paused”resume - restart a scan that has been pausedfetch - download scan results for a scan with the status “Finished”, “Canceled”, “Paused” or “Error”.
echo_request={0|1} (Optional) Specifies whether to echo the request’s input parameters (names and values) in the XML output. When not specified, parameters are not included in the XML output. Specify 1 to view parameters in the XML output.
scan_ref={value} (Required) Specifies a scan reference. A scan reference has the format “scan/987659876.19876”.
ips={value} (Optional for a fetch request) Show only certain IP addresses/ranges in the scan results. One or more IPs/ranges may be specified. A range entry is specified using a hyphen (for example, 10.10.10.1-10.10.10.20). Multiple entries are comma separated.
32

Chapter 3 - ScansVM Scans
Samples - Take actions on scansCancel a scan (POST method) is shown below.
curl -H "X-Requested-With: Curl Sample"-d "action=cancel&scan_ref=234234234.12345"-b "QualysSession=71e6cda2a35d2cd404cddaf305ea0208; path=/api; secure" "https://qualysapi.qualys.com/api/2.0/fo/scan/"
Pause a scan (POST method) is shown below.
curl -H "X-Requested-With: Curl Sample"-d "action=pause&scan_ref=234234234.12345"-b "QualysSession=71e6cda2a35d2cd404cddaf305ea0208; path=/api; secure" "https://qualysapi.qualys.com/api/2.0/fo/scan/"
Resume a scan (POST method) is shown below.
curl -H "X-Requested-With: Curl Sample"-d "action=resume&scan_ref=234234234.12345"-b "QualysSession=71e6cda2a35d2cd404cddaf305ea0208; path=/api; secure" "https://qualysapi.qualys.com/api/2.0/fo/scan/"
DTD
<platform API server>/api/2.0/simple_return.dtd
mode={brief|extended} (Optional for fetch request) The verbosity of the scan results details: brief (the default) or extended. The brief output includes this information: IP address, DNS hostname, NetBIOS hostname, QID and scan test results if applicable. The extended output includes the brief output plus this extended information: protocol, port, an SSL flag (“yes” is returned when SSL was used for the detection, “no” is returned when SSL was not used), and FQDN if applicable.
output_format={csv|json| csv_extended|json_extended}
(Optional for fetch request) The output format of the vulnerability scan results. A valid value is: csv (the default), json (for JavaScript Object Notation(), csv_extended, json_extended.
client_id={value} (Optional for fetch request) Id assigned to the client (Consultant type subscription only). Parameter client_id or client_name may be specified for the same request.
client_name={value} (Optional for fetch request) Name of the client (Consultant type subscription only). Parameter client_id or client_name may be specified for the same request.
Parameter Description
33

Chapter 3 - ScansCompliance Scans
Compliance ScansThe Compliance Scan API (/api/2.0/fo/scan/compliance/) is used to launch compliance scans, get a list of compliance scans in your account and manage them. The SCAP Scan API (/api/2.0/fo/scan/scap/) is used to get a list of SCAP scans in your account.
Permissions
To use this API, these options must be enabled in the user’s subscription: Policy Compliance (PC) module and New Scanner Services. Role-based user permissions are described below.
User Role Permissions
Manager Manage compliance scans on all compliance IPs in the subscription.
Unit Manager When the "Manage compliance" permission is enabled in the user’s account settings: 1) ability to launch, list and fetch compliance scans on IPs in the user’s business unit, 2) ability to take actions on scans launched by users in the same business unit (cancel, pause, resume and delete).
Scanner When the "Manage compliance" permission is enabled in the user’s account settings: 1) ability to launch, list and fetch compliance scans on IPs in the user’s account, 2) ability to take actions on scans that the user owns (cancel, pause, resume and delete).
Reader No permissions to manage compliance scans.
Auditor No permissions to manage compliance scans.
34

Chapter 3 - ScansCompliance Scans
Compliance Scan List/api/2.0/fo/scan/compliance/ with action=list
[GET] [POST]
List of compliance scans in your account. By default the XML output lists scans launched in the past 30 days.
The input parameters for requesting a PC scan list are below. See Scan List Parameters for complete details.
API Request:
curl -u "USERNAME:PASSWORD" -H "X-Requested-With: Curl" -X "POST" -d "action=list&state=Finished&scan_ref=compliance/1344842952.1340" "https://qualysapi.qualys.com/api/2.0/fo/scan/compliance/"
XML output:
<?xml version="1.0" encoding="UTF-8" ?><!DOCTYPE SCAN_LIST_OUTPUT SYSTEM "https://qualysapi.qualys.com/api/2.0/fo/scan/scan_list_output.dtd"><SCAN_LIST_OUTPUT> <RESPONSE> <DATETIME>2018-06-12T07:28:46Z</DATETIME> <SCAN_LIST> <SCAN> <ID>3332486</ID> <REF>compliance/1344842952.1340</REF> <TYPE>Scheduled</TYPE> <TITLE><![CDATA[MY PC Scan]]></TITLE> <USER_LOGIN>USERNAME</USER_LOGIN> <LAUNCH_DATETIME>2018-05-13T07:30:09Z</LAUNCH_DATETIME> <DURATION>00:06:29</DURATION> <PROCESSED>1</PROCESSED> <STATUS> <STATE>Finished</STATE> </STATUS>
Type Parameter List
Request action=list (required), echo_request
Scan List Filters scan_id (compliance scan ID), scan_ref, state, processed, type, target, user_login, launched_after_datetime, launched_before_datetime, client_id and client_name (only for Consultant type subscriptions)
Show Information show_ags, show_op, show_status, show_last
35

Chapter 3 - ScansCompliance Scans
<TARGET><![CDATA[10.10.25.50]]></TARGET> </SCAN> </SCAN_LIST> </RESPONSE></SCAN_LIST_OUTPUT>
DTD:
<platform API server>/api/2.0/fo/scan/scan_list_output.dtd
SCAP Scan List/api/2.0/fo/scan/scap/ with action=list
[GET] [POST]
List SCAP scans in your account. By default the XML output lists scans launched in the past 30 days.
The input parameters for requesting a SCAP scan list are below. See Scan List Parameters for complete details.
API request 1: all SCAP scans
curl -u "USERNAME:PASSWORD" -H "X-Requested-With: Curl" -d "action=list" "https://qualysapi.qualys.com/api/2.0/fo/scan/scap/"
API request 2: SCAP scan by reference number
curl -u "USERNAME:PASSWORD" -H "X-Requested-With: Curl" -d "action=list&scan_ref=qscap/1402642816.80342" "https://qualysapi.qualys.com/api/2.0/fo/scan/scap/"
API request 3: On Demand SCAP scans only
curl -u "USERNAME:PASSWORD" -H "X-Requested-With: Curl" -d "action=list&type=On-Demand" "https://qualysapi.qualys.com/api/2.0/fo/scan/scap/"
XML output:
<?xml version="1.0" encoding="UTF-8" ?><!DOCTYPE SCAN_LIST_OUTPUT SYSTEM "https://qualysapi.qualys.com/api/2.0/fo/scan/scap/qscap_scan_list
Type Parameter List
Request action=list (required), echo_request
Scan List Filters scan_id (compliance scan ID), scan_ref, state, type, target, user_login, launched_after_datetime, launched_before_datetime
Show Information show_ags, show_op, show_status, show_last
36

Chapter 3 - ScansCompliance Scans
_output.dtd"><SCAN_LIST_OUTPUT> <RESPONSE> <DATETIME>2018-06-13T22:56:19Z</DATETIME> <SCAN_LIST> <SCAN> <ID>6980366</ID> <REF>qscap/1402694682.80366</REF> <TYPE>On-Demand</TYPE> <TITLE><![CDATA[<IMG SRC="http://www.google.com/images/logos/ps_logo2.png">]]></TITLE> <POLICY> <ID>39298</ID> <TITLE><![CDATA[Policy A]]></TITLE> </POLICY> <USER_LOGIN>acme_ab</USER_LOGIN> <LAUNCH_DATETIME>2018-06-13T21:24:42Z</LAUNCH_DATETIME> <STATUS> <STATE>Finished</STATE> </STATUS> <TARGET><![CDATA[10.10.30.244, 10.10.34.222]]></TARGET>... </SCAN_LIST> </RESPONSE></SCAN_LIST_OUTPUT>
DTD:
<platform API server>/api/2.0/fo/scan/qscap_scan_list_output.dtd
37

Chapter 3 - ScansCompliance Scans
Launch Compliance Scan/api/2.0/fo/scan/compliance/?action=launch
[POST]
Launch compliance scan in the user’s account.
Using networks? Choose the Global Default Network to scan IPs on your network perimeter.
Input Parameters
The input parameters for launching a compliance scan are shown below. See Securing Amazon Web Services with Qualys
Sample - Launch a Compliance Scan
API request:
curl -u "USERNAME:PASSWORD" -H "X-Requested-With: Curl" -X "POST" -d "action=launch&ip=10.10.25.52&iscanner_name=iscan_er5&option_title=Initial+PC+Options&echo_request=1" "https://qualysapi.qualys.com/api/2.0/fo/scan/compliance/" > apiOutputScan.txt
Sample - Launch a compliance scan using all scanners in network
API request:
curl -u "USERNAME:PASSWORD" -H "X-Requested-With:curl demo 2" -d "action=launch&scan_title=pc+scan+API&option_id=3262&ip_network_id
Type Parameter List
Request action=launch (required), echo_request, runtime_http_header
Scan Title scan_title
Option Profile option_id or option_title
Scanner Appliance iscanner_id or iscanner_name
Asset IPs/Groups ip, asset_group_ids, asset_groups, exclude_ip_per_scan, default_scanner, scanners_in_ag
Asset Tags target_from=tags, use_ip_nt_range_tags, tag_include_selector, tag_exclude_selector, tag_set_by, tag_set_exclude, tag_set_include
Network ip_network_id (when the Network Support feature is enabled)
Client client_id and client_name (only for Consultant type subscriptions)
38

Chapter 3 - ScansCompliance Scans
=12807913&scanners_in_network=1&ip=10.10.10.10,10.10.10.11" "https://qualysapi.qualys.com/api/2.0/fo/scan/compliance/"
XML output:
<?xml version="1.0" encoding="UTF-8" ?><!DOCTYPE SIMPLE_RETURN SYSTEM "https://qualysapi.qualys.com/api/2.0/simple_return.dtd"><SIMPLE_RETURN> <RESPONSE> <DATETIME>2018-06-15T21:55:36Z</DATETIME> <TEXT>New compliance scan launched</TEXT> <ITEM_LIST> <ITEM> <KEY>ID</KEY> <VALUE>18198</VALUE> </ITEM> <ITEM> <KEY>REFERENCE</KEY> <VALUE>compliance/1473976536.18198</VALUE> </ITEM> </ITEM_LIST> </RESPONSE></SIMPLE_RETURN>
Launch Compliance Scan on EC2 assets/api/2.0/fo/scan/compliance/?action=launch
[POST]
Launch a compliance scan on your Amazon EC2 hosts (in your Amazon Web Services account).
A few things to consider...
- EC2 Scanning must be enabled for your Qualys account.
- Only a Manager user can launch EC2 scans.
- Before scanning you’ll need to complete some set up steps. See Securing Amazon Web Services with Qualys
39

Chapter 3 - ScansCompliance Scans
Input Parameters
The input parameters for launching an EC2 scan are shown below. Please see Scan Parameters for complete details.
Sample - Launch EC2 compliance scan
API request:
curl -u "USERNAME:PASSWORD" -H "X-Requested-With: Curl" -X "POST" -d "action=launch&scan_title=My+EC2+Scan+via+API&connector_name=EC2-Connector-Lab&ec2_endpoint=us-east-1&target_from=tags&tag_include_selector=any&tag_set_by=id&tag_set_include=270325&option_id=61769&iscanner_name=my-ec2-scanner" "https://qualysapi.qualys.com/api/2.0/fo/scan/compliance/"
XML output:
<?xml version="1.0" encoding="UTF-8" ?><!DOCTYPE SIMPLE_RETURN SYSTEM "https://qualysapi.qualys.com/api/2.0/simple_return.dtd"><SIMPLE_RETURN> <REQUEST> <DATETIME>2018-06-24T10:10:51Z</DATETIME> <USER_LOGIN>USERNAME</USER_LOGIN><RESOURCE>https://qualysapi.qualys.com/api/2.0/fo/scan/compliance/</RESOURCE> </REQUEST> <RESPONSE>
Type Parameter List
Request action=launch (required), echo_request
Scan Title scan_title
EC2 environment connector_name (required), ec2_endpoint (required)
Option Profile option_id or option_title
Scanner Appliance iscanner_id or iscanner_name
Target Hosts target_from=tags (required)Use tags to select the EC2 hosts you want to scan.
use_ip_nt_range_tags=0The default setting is “0”. Important - This cannot be set to “1” for EC2 scanning.
These tag parameters are used to select tags:tag_set_include={tag1,tag2,...} (required)tag_set_exclude={tag1,tag2,...} (optional)tag_include_selector={any|all} (default in bold)tag_exclude_selector={any|all} (default in bold)tag_set_by={id|name} (default in bold)
40

Chapter 3 - ScansCompliance Scans
<DATETIME>2018-06-24T10:10:57Z</DATETIME> <TEXT>New compliance scan launched</TEXT> <ITEM_LIST> <ITEM> <KEY>ID</KEY> <VALUE>2222345</VALUE> </ITEM> <ITEM> <KEY>REFERENCE</KEY> <VALUE>compliance/1347771234.36444</VALUE> </ITEM> </ITEM_LIST> </RESPONSE></SIMPLE_RETURN>
Manage Compliance Scans/api/2.0/fo/scan/compliance/?action={action}
Take actions on compliance scans in their account, like cancel, pause, resume, delete and fetch completed scan results.
Sample - Fetch PC Scan ResultsAPI request:
curl -u USERNAME:PASSWORD -H "X-Requested-With: Curl" "https://qualysapi.qualys.com/api/2.0/fo/scan/compliance/?action=fetch&scan_ref=compliance/1347709693.37303" > apiOutputScanFetch.txt
Parameter Description
action={action} (Required) One action required for the request:cancel - Stop a scan in progress (POST method)pause - Stop a scan in progress and change status to “Paused” (POST method)resume - Restart a scan that has been paused (POST method)delete - Delete a scan in your account (POST method)fetch - Download scan results for a scan with status of “Finished”, “Canceled”, “Paused” or “Error” (GET or POST method)
echo_request={0|1} (Optional) Specify 1 to echo the input parameters in the XML output. When unspecified, parameters are not listed in the XML output.
scan_ref={value} (Required) The scan reference for a compliance scan. This will have the format: compliance/nnnnnnnnnn.nnnnn
41

Chapter 3 - ScansCompliance Scans
XML output:
<?xml version="1.0" encoding="UTF-8" ?><!DOCTYPE COMPLIANCE_SCAN_RESULT_OUTPUT SYSTEM
"https://qualysapi.qualys.com/api/2.0/fo/scan/compliance/compliance_scan_result_output.dtd"><COMPLIANCE_SCAN_RESULT_OUTPUT> <RESPONSE> <DATETIME>2018-06-17T10:23:53Z</DATETIME> <COMPLIANCE_SCAN> <HEADER> <NAME><![CDATA[Compliance Scan Results]]></NAME> <GENERATION_DATETIME>2012-09-17T10:23:53Z</GENERATION_DATETIME> <COMPANY_INFO> <NAME><![CDATA[Qualys]]></NAME> <ADDRESS><![CDATA[1600 Bridge Parkway]]></ADDRESS> <CITY><![CDATA[Redwood Shores]]></CITY> <STATE><![CDATA[California]]></STATE> <COUNTRY><![CDATA[United States]]></COUNTRY> <ZIP_CODE><![CDATA[94065]]></ZIP_CODE> </COMPANY_INFO> <USER_INFO> <NAME><![CDATA[NAME]]></NAME> <USERNAME>USERNAME</USERNAME> <ROLE>Manager</ROLE> </USER_INFO> <KEY value="USERNAME">USERNAME</KEY> <KEY value="COMPANY"><![CDATA[Qualys]]></KEY> <KEY value="DATE">2018-06-15T11:49:08Z</KEY> <KEY value="TITLE"><![CDATA[My PC Scan]]></KEY> <KEY value="TARGET">10.10.10.29</KEY> <KEY value="EXCLUDED_TARGET"><![CDATA[N/A]]></KEY> <KEY value="DURATION">00:01:00</KEY> <KEY value="SCAN_HOST">10.10.21.122 (Scanner 6.6.28-1, Vulnerability Signatures 2.2.215-2)</KEY> <KEY value="NBHOST_ALIVE">1</KEY> <KEY value="NBHOST_TOTAL">1</KEY> <KEY value="REPORT_TYPE">Scheduled</KEY> <KEY value="OPTIONS">File Integrity Monitoring: Enabled, Scanned Ports: Standard Scan, Hosts to Scan in Parallel - External Scanners: 15, Hosts to Scan in Parallel - Scanner Appliances: 30, Total Processes to Run in Parallel: 10, HTTP Processes to Run in Parallel: 10,
Packet (Burst) Delay: Medium, Intensity: Normal, Overall
42

Chapter 3 - ScansCompliance Scans
Performance: Normal, ICMP Host Discovery, Ignore RST packets: Off, Ignore firewall-generated SYN-ACK packets: Off, Do not send ACK or SYN-ACK packets during host discovery: Off</KEY> <KEY value="STATUS">FINISHED</KEY> <OPTION_PROFILE> <OPTION_PROFILE_TITLE option_profile_default="0"><![CDATA[11412]]></OPTION_PROFILE_TITLE> </OPTION_PROFILE> </HEADER> <APPENDIX> <TARGET_HOSTS> <HOSTS_SCANNED>10.10.10.29</HOSTS_SCANNED> </TARGET_HOSTS> <TARGET_DISTRIBUTION> <SCANNER> <NAME><![CDATA[iscan_sx]]></NAME> <HOSTS>10.10.10.29</HOSTS> </SCANNER> </TARGET_DISTRIBUTION> <AUTHENTICATION> <AUTH> <TYPE>Windows</TYPE> <SUCCESS> <IP>10.10.10.29</IP> </SUCCESS> </AUTH> </AUTHENTICATION> </APPENDIX> </COMPLIANCE_SCAN> </RESPONSE></COMPLIANCE_SCAN_RESULT_OUTPUT>
43
Chapter 3 - ScansScan Schedules
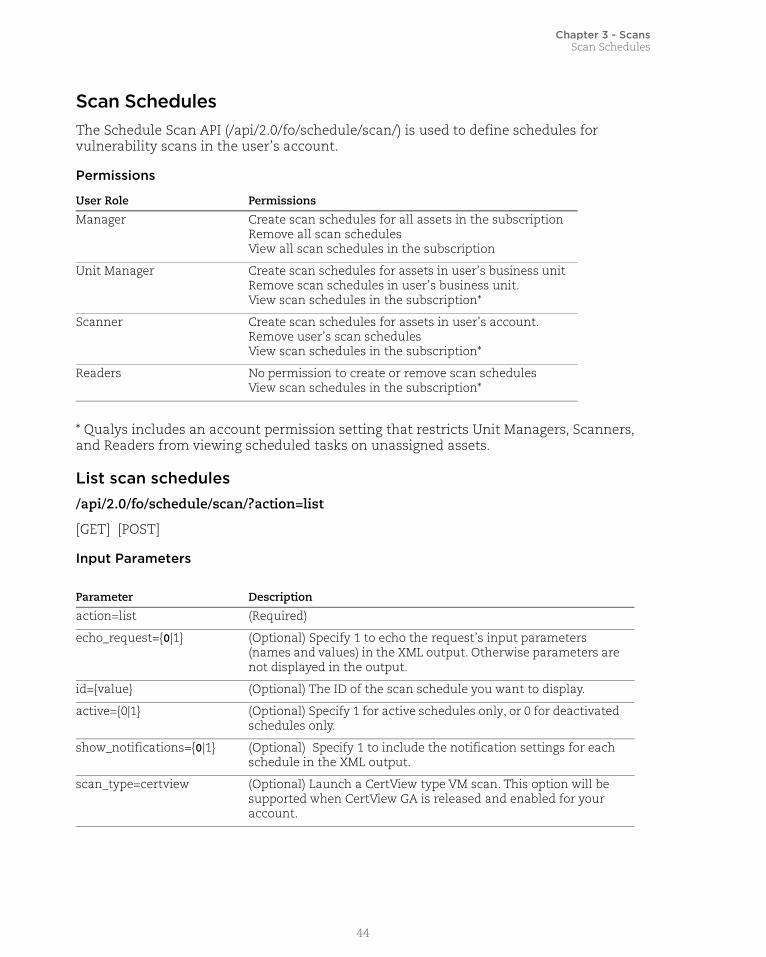
Scan SchedulesThe Schedule Scan API (/api/2.0/fo/schedule/scan/) is used to define schedules for vulnerability scans in the user’s account.
Permissions
* Qualys includes an account permission setting that restricts Unit Managers, Scanners, and Readers from viewing scheduled tasks on unassigned assets.
List scan schedules/api/2.0/fo/schedule/scan/?action=list
[GET] [POST]
Input Parameters
User Role Permissions
Manager Create scan schedules for all assets in the subscriptionRemove all scan schedulesView all scan schedules in the subscription
Unit Manager Create scan schedules for assets in user’s business unitRemove scan schedules in user’s business unit.View scan schedules in the subscription*
Scanner Create scan schedules for assets in user’s account.Remove user’s scan schedulesView scan schedules in the subscription*
Readers No permission to create or remove scan schedulesView scan schedules in the subscription*
Parameter Description
action=list (Required)
echo_request={0|1} (Optional) Specify 1 to echo the request’s input parameters (names and values) in the XML output. Otherwise parameters are not displayed in the output.
id={value} (Optional) The ID of the scan schedule you want to display.
active={0|1} (Optional) Specify 1 for active schedules only, or 0 for deactivated schedules only.
show_notifications={0|1} (Optional) Specify 1 to include the notification settings for each schedule in the XML output.
scan_type=certview (Optional) Launch a CertView type VM scan. This option will be supported when CertView GA is released and enabled for your account.
44
Chapter 3 - ScansScan Schedules
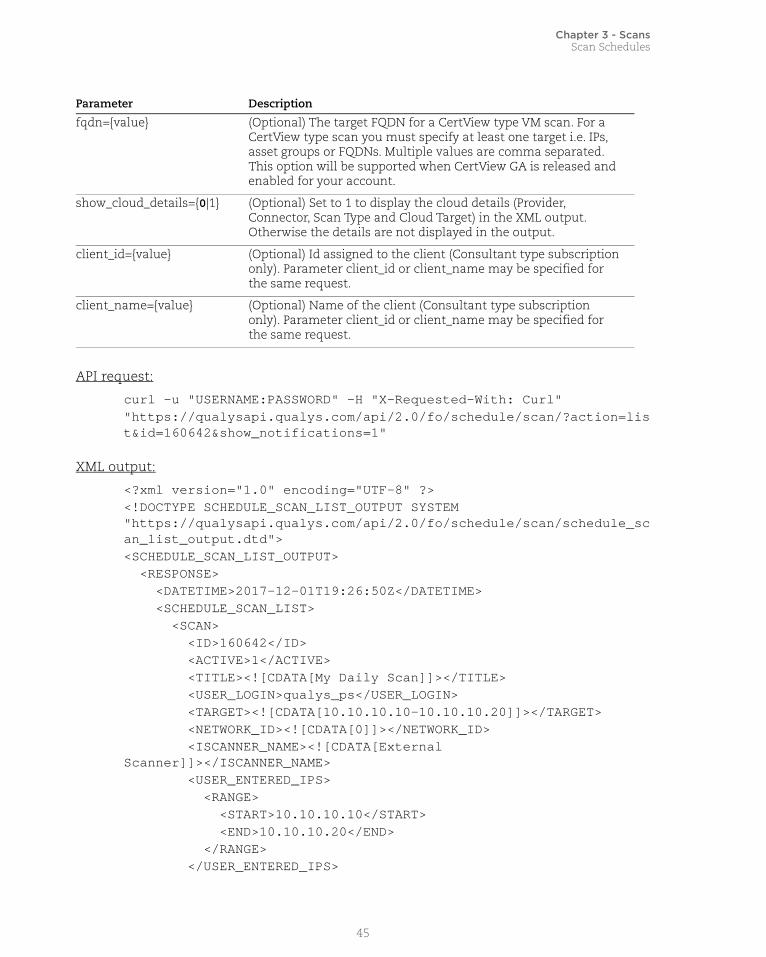
API request:
curl -u "USERNAME:PASSWORD" -H "X-Requested-With: Curl""https://qualysapi.qualys.com/api/2.0/fo/schedule/scan/?action=list&id=160642&show_notifications=1"
XML output:
<?xml version="1.0" encoding="UTF-8" ?><!DOCTYPE SCHEDULE_SCAN_LIST_OUTPUT SYSTEM "https://qualysapi.qualys.com/api/2.0/fo/schedule/scan/schedule_scan_list_output.dtd"><SCHEDULE_SCAN_LIST_OUTPUT> <RESPONSE> <DATETIME>2017-12-01T19:26:50Z</DATETIME> <SCHEDULE_SCAN_LIST> <SCAN> <ID>160642</ID> <ACTIVE>1</ACTIVE> <TITLE><![CDATA[My Daily Scan]]></TITLE> <USER_LOGIN>qualys_ps</USER_LOGIN> <TARGET><![CDATA[10.10.10.10-10.10.10.20]]></TARGET> <NETWORK_ID><![CDATA[0]]></NETWORK_ID> <ISCANNER_NAME><![CDATA[External Scanner]]></ISCANNER_NAME> <USER_ENTERED_IPS> <RANGE> <START>10.10.10.10</START> <END>10.10.10.20</END> </RANGE> </USER_ENTERED_IPS>
fqdn={value} (Optional) The target FQDN for a CertView type VM scan. For a CertView type scan you must specify at least one target i.e. IPs, asset groups or FQDNs. Multiple values are comma separated. This option will be supported when CertView GA is released and enabled for your account.
show_cloud_details={0|1} (Optional) Set to 1 to display the cloud details (Provider, Connector, Scan Type and Cloud Target) in the XML output. Otherwise the details are not displayed in the output.
client_id={value} (Optional) Id assigned to the client (Consultant type subscription only). Parameter client_id or client_name may be specified for the same request.
client_name={value} (Optional) Name of the client (Consultant type subscription only). Parameter client_id or client_name may be specified for the same request.
Parameter Description
45

Chapter 3 - ScansScan Schedules
<OPTION_PROFILE> <TITLE><![CDATA[Initial Options]]></TITLE> <DEFAULT_FLAG>1</DEFAULT_FLAG> </OPTION_PROFILE> <PROCESSING_PRIORITY>0 - No Priority</PROCESSING_PRIORITY> <SCHEDULE> <DAILY frequency_days="1" /> <START_DATE_UTC>2017-11-30T00:30:00Z</START_DATE_UTC> <START_HOUR>16</START_HOUR> <START_MINUTE>30</START_MINUTE> <NEXTLAUNCH_UTC>2017-12-02T00:30:00</NEXTLAUNCH_UTC> <TIME_ZONE> <TIME_ZONE_CODE>US-CA</TIME_ZONE_CODE> <TIME_ZONE_DETAILS>(GMT-0800) United States: America/Los_Angeles</TIME_ZONE_DETAILS> </TIME_ZONE> <DST_SELECTED>1</DST_SELECTED> </SCHEDULE> <NOTIFICATIONS> <BEFORE_LAUNCH> <TIME>30</TIME> <UNIT><![CDATA[minutes]]></UNIT> <MESSAGE><![CDATA[This is my custom before scan email message.]]></MESSAGE> </BEFORE_LAUNCH> <AFTER_COMPLETE> <MESSAGE><![CDATA[This is my custom after scan email message.]]></MESSAGE> </AFTER_COMPLETE> </NOTIFICATIONS> </SCAN> </SCHEDULE_SCAN_LIST> </RESPONSE></SCHEDULE_SCAN_LIST_OUTPUT>
DTD:
<platform API server>/api/2.0/fo/schedule/scan/schedule_scan_list_output.dtd
46

Chapter 3 - ScansScan Schedules
Create scan schedule/api/2.0/fo/schedule/scan/?action=create
[POST]
Create a scan schedule in the user’s account.
Input Parameters
The input parameters for creating a scan schedule are below. For complete details see Scan Parameters and Scan Schedule Parameters.
Type Parameter List
Request action=create (required), echo_request
Scan scan_title (required), active=0|1 (required)
Option Profile option_id or option_profile (one is required)
Scanner Appliance iscanner_id or iscanner_name
Processing Priority priority
Asset IPs/Groups ip, asset_group_ids, asset_groups, exclude_ip_per_scan,default_scanner, scanners_in_ag
Asset Tags target_from=tags, tag_include_selector,tag_exclude_selector, tag_set_by, tag_set_exclude,tag_set_include, use_ip_nt_range_tags
Network ip_network_id to filter IPs/ranges in “ip” parameter (valid when the networks feature is enabled)
EC2 Hosts target_from=tags (required)use_ip_nt_range_tags=0 (optional)tag_set_include (required)More Asset Tags parameters (optional)
EC2 Environment connector_name or connector_uuid (one is required)ec2_endpoint (required)
Scheduling start_date (current date by default)start_hour, start_minute, time_zone_code, occurrence (required)observe_dst, recurrence, end_after, pause_after_hours, resume_in_days
Daily Scan occurrence=daily, frequency_days (required)
Weekly Scan occurrence=weekly, frequency_weeks, weeks (required)
Monthly Scan occurrence=monthly, frequency_months (required)Nth day of month: day_of_month (required)Day in Nth week: day_of_week, week_of_month (required)
Notifications before_notify, before_notify_unit, before_notify_time, before_notify_message, after_notify, after_notify_message, recipient_group_ids
47
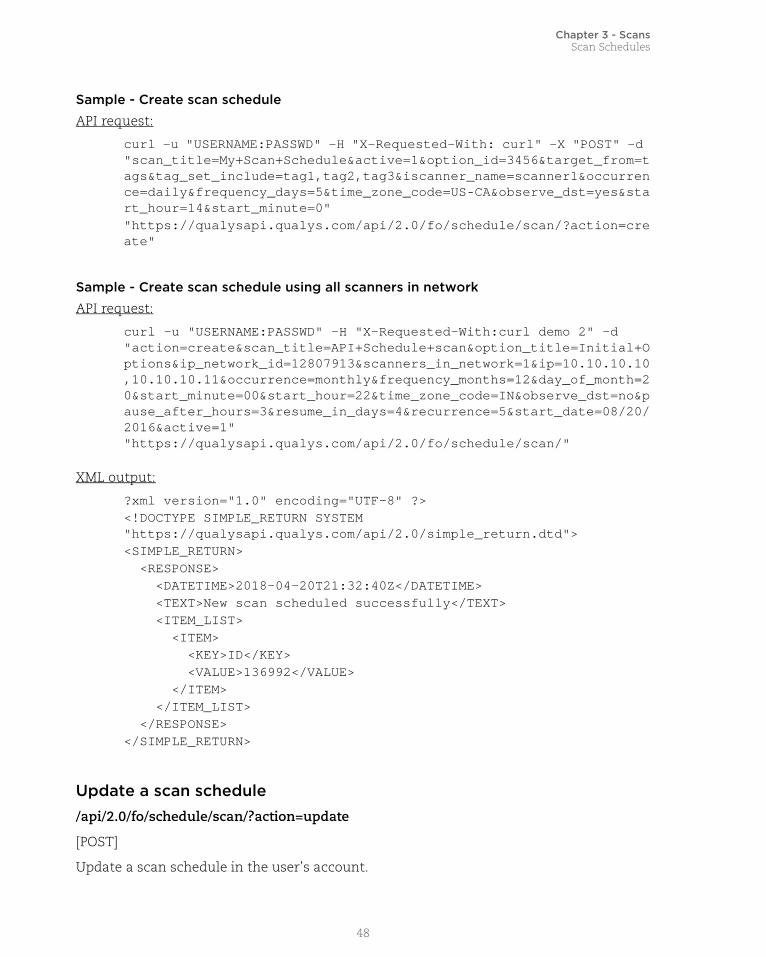
Chapter 3 - ScansScan Schedules
Sample - Create scan schedule
API request:
curl -u "USERNAME:PASSWD" -H "X-Requested-With: curl" -X "POST" -d "scan_title=My+Scan+Schedule&active=1&option_id=3456&target_from=tags&tag_set_include=tag1,tag2,tag3&iscanner_name=scanner1&occurrence=daily&frequency_days=5&time_zone_code=US-CA&observe_dst=yes&start_hour=14&start_minute=0" "https://qualysapi.qualys.com/api/2.0/fo/schedule/scan/?action=create"
Sample - Create scan schedule using all scanners in network
API request:
curl -u "USERNAME:PASSWD" -H "X-Requested-With:curl demo 2" -d "action=create&scan_title=API+Schedule+scan&option_title=Initial+Options&ip_network_id=12807913&scanners_in_network=1&ip=10.10.10.10,10.10.10.11&occurrence=monthly&frequency_months=12&day_of_month=20&start_minute=00&start_hour=22&time_zone_code=IN&observe_dst=no&pause_after_hours=3&resume_in_days=4&recurrence=5&start_date=08/20/2016&active=1" "https://qualysapi.qualys.com/api/2.0/fo/schedule/scan/"
XML output:
?xml version="1.0" encoding="UTF-8" ?><!DOCTYPE SIMPLE_RETURN SYSTEM "https://qualysapi.qualys.com/api/2.0/simple_return.dtd"><SIMPLE_RETURN> <RESPONSE> <DATETIME>2018-04-20T21:32:40Z</DATETIME> <TEXT>New scan scheduled successfully</TEXT> <ITEM_LIST> <ITEM> <KEY>ID</KEY> <VALUE>136992</VALUE> </ITEM> </ITEM_LIST> </RESPONSE></SIMPLE_RETURN>
Update a scan schedule/api/2.0/fo/schedule/scan/?action=update
[POST]
Update a scan schedule in the user’s account.
48

Chapter 3 - ScansScan Schedules
Input Parameters
The input parameters for updating a scan schedule are below. For complete details see Scan Parameters and Scan Schedule Parameters.
Type Parameter List
Request action=update (required), id (required), echo_request
Scan Title scan_title
Status active=0|1
Option Profile option_id or option_title
Scanner Appliance iscanner_id, iscanner_name, default_scanner, scanners_in_ag, scanners_in_network, scanners_in_tagset
Processing Priority priority
Asset IPs/Groups ip, asset_group_ids or asset_groups, exclude_ip_per_scan
Asset Tags target_from=tags, use_ip_nt_range_tags, tag_include_selector, tag_exclude_selector, tag_set_by, tag_set_exclude, tag_set_include
EC2 Environment connector_name or connector_uuid, ec2_endpoint, ec2_only_classic
Network ip_network_id (when the Network Support feature is enabled)
Start Time Must be specified together: set_start_time=1, start_date, start_hour, start_minute, time_zone_code, observe_dst
Recurrence recurrence
Daily Scan Must be specified together: occurrence=daily, frequency_days
Weekly Scan Must be specified together: occurrence=weekly, frequency_weeks, weekdays
Monthly Scan Must be specified together: occurrence=monthly, frequency_months, Nth day of month: day_of_month, Day in Nth week: day_of_week, week_of_month
End end_after, end_after_mins
Pause and Resume pause_after_hours, pause_after_mins, resume_in_days, resume_in_hours
Notifications before_notify, before_notify_unit, before_notify_time, before_notify_message, after_notify, after_notify_message, recipient_group_ids
49

Chapter 3 - ScansScan Schedules
Sample - Update scan schedule
API request:
curl -u "USERNAME:PASSWORD" -H "X-Requested-With: Curl" -X "POST" -d "action=update&id=146754&pause_after_hours=5&pause_after_mins=5&resume_in_days=5&resume_in_hours=5" "https://qualysapi.qualys.com/api/2.0/fo/schedule/scan/"
XML output:
<?xml version="1.0" encoding="UTF-8" ?><!DOCTYPE SIMPLE_RETURN SYSTEM "https://qualysapi.qualys.com/api/2.0/simple_return.dtd"><SIMPLE_RETURN> <RESPONSE> <DATETIME>2018-05-14T11:57:42Z</DATETIME> <TEXT>Edit scheduled Scan Completed successfully</TEXT> <ITEM_LIST> <ITEM> <KEY>ID</KEY> <VALUE>146754</VALUE> </ITEM> </ITEM_LIST> </RESPONSE></SIMPLE_RETURN>
Delete scan schedule/api/2.0/fo/schedule/scan/?action=update
[POST]
Delete a scan schedule in the user’s account.
Input Parameters
Parameter Description
action=delete (Required)
echo_request={0|1} (Optional) Specify 1 to echo the request’s input parameters (names and values) in the XML output. Otherwise parameters are not displayed in the output.
id={value} (Optional) The ID of the scan schedule you want to delete.
50

Chapter 3 - ScansScan Schedules
Sample - Delete scan schedule
API request:
curl -u "USERNAME:PASSWD" -H "X-Requested-With: curl" -X "POST" -d "id=123456" "https://qualysapi.qualys.com/api/2.0/fo/schedule/scan/?action=delete"
XML output:
<?xml version="1.0" encoding="UTF-8" ?><!DOCTYPE SIMPLE_RETURN SYSTEM "https://qualysapi.qualys.com/api/2.0/simple_return.dtd"><SIMPLE_RETURN> <RESPONSE> <DATETIME>2018-05-30T21:32:40Z</DATETIME> <TEXT>Schedule scan deleted successfully</TEXT> <ITEM_LIST> <ITEM> <KEY>ID</KEY> <VALUE>123456</VALUE> </ITEM> </ITEM_LIST> </RESPONSE></SIMPLE_RETURN>
51
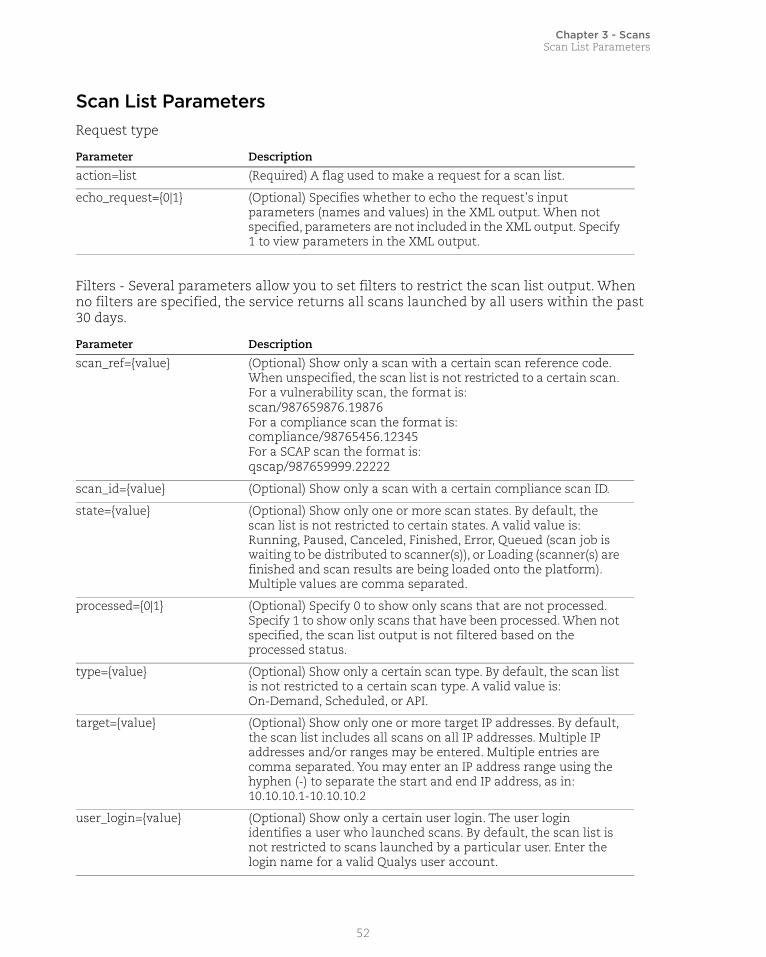
Chapter 3 - ScansScan List Parameters
Scan List ParametersRequest type
Filters - Several parameters allow you to set filters to restrict the scan list output. When no filters are specified, the service returns all scans launched by all users within the past 30 days.
Parameter Description
action=list (Required) A flag used to make a request for a scan list.
echo_request={0|1} (Optional) Specifies whether to echo the request’s input parameters (names and values) in the XML output. When not specified, parameters are not included in the XML output. Specify 1 to view parameters in the XML output.
Parameter Description
scan_ref={value} (Optional) Show only a scan with a certain scan reference code. When unspecified, the scan list is not restricted to a certain scan. For a vulnerability scan, the format is:scan/987659876.19876For a compliance scan the format is: compliance/98765456.12345For a SCAP scan the format is:qscap/987659999.22222
scan_id={value} (Optional) Show only a scan with a certain compliance scan ID.
state={value} (Optional) Show only one or more scan states. By default, the scan list is not restricted to certain states. A valid value is: Running, Paused, Canceled, Finished, Error, Queued (scan job is waiting to be distributed to scanner(s)), or Loading (scanner(s) are finished and scan results are being loaded onto the platform). Multiple values are comma separated.
processed={0|1} (Optional) Specify 0 to show only scans that are not processed. Specify 1 to show only scans that have been processed. When not specified, the scan list output is not filtered based on the processed status.
type={value} (Optional) Show only a certain scan type. By default, the scan list is not restricted to a certain scan type. A valid value is: On-Demand, Scheduled, or API.
target={value} (Optional) Show only one or more target IP addresses. By default, the scan list includes all scans on all IP addresses. Multiple IP addresses and/or ranges may be entered. Multiple entries are comma separated. You may enter an IP address range using the hyphen (-) to separate the start and end IP address, as in: 10.10.10.1-10.10.10.2
user_login={value} (Optional) Show only a certain user login. The user login identifies a user who launched scans. By default, the scan list is not restricted to scans launched by a particular user. Enter the login name for a valid Qualys user account.
52

Chapter 3 - ScansScan List Parameters
Show/Hide - These parameters specify whether certain information will be shown in the XML output.
launched_after_datetime={date}
(Optional) Show only scans launched after a certain date and time (optional). The date/time is specified in YYYY-MM-DD[THH:MM:SSZ] format (UTC/GMT), like “2007-07-01” or “2007-01-25T23:12:00Z”.
When launched_after_datetime and launched_before_datetime are unspecified, the service selects scans launched within the past 30 days.
A date/time in the future returns an empty scans list.
launched_before_datetime={date}
(Optional) Show only scans launched before a certain date and time (optional). The date/time is specified in YYYY-MM-DD[THH:MM:SSZ] format (UTC/GMT), like “2007-07-01” or “2007-01-25T23:12:00Z”.
When launched_after_datetime and launched_before_datetime are unspecified, the service selects scans launched within the past 30 days.
A date/time in the future returns a list of all scans (not limited to scans launched within the past 30 days).
scan_type=certview (Optional) List CertView VM scans only. This option will be supported when CertView GA is released and enabled for your account.
client_id={value} (Optional) Id assigned to the client (Consultant type subscriptions).
client_name={value} (Optional) Name of the client (Consultant type subscriptions).
Note: The client_id and client_name parameters are mutually exclusive and cannot be specified together in the same request.
Parameter Description
show_ags={0|1} (Optional) Specify 1 to show asset group information for each scan in the XML output. By default, asset group information is not shown.
show_op={0|1} (Optional) Specify 1 to show option profile information for each scan in the XML output. By default, option profile information is not shown.
show_status={0|1} (Optional) Specify 0 to not show scan status for each scan in the XML output. By default, scan status is shown.
show_last={0|1} (Optional) Specify 1 to show only the most recent scan (which meets all other search filters in the request) in the XML output. By default, all scans are shown in the XML output.
Parameter Description
53

Chapter 3 - ScansScan Parameters
Scan ParametersInput parameters used to launch a VM or PC scan are below.
pci_only={0|1} (Optional) Specify 1 to show only external PCI scans in the XML output. External PCI scans are vulnerability scans run with the option profile “Payment Card Industry (PCI) Options”. When pci_only=1 is specified, the XML output will not include other types of scans run with other option profiles.
ignore_target={0|1} (Optional) Specify 1 to hide target information from the scan list. Specify 0 to display the target information.
Parameter Description
action={launch} (Required) Specify “launch” to launch a new scan.
echo_request={0|1} (Optional) Specify 1 to list the input parameters in the XML output. When unspecified, parameters are not listed in the XML output.
scan_title={value} (Optional) The scan title. This can be a maximum of 2000 characters (ascii).
target_from={assets|tags} (Optional) Specify “assets” (the default) when your scan target will include IP addresses/ranges and/or asset groups. Specify “tags” when your scan target will include asset tags.
ip={value} (Optional) The IP addresses to be scanned. You may enter individual IP addresses and/or ranges. Multiple entries are comma separated. One of these parameters is required: ip, asset_groups or asset_group_ids.
ip is valid only when target_from=assets is specified.
asset_groups={value} (Optional) The titles of asset groups containing the hosts to be scanned. Multiple titles are comma separated. One of these parameters is required: ip, asset_groups or asset_group_ids.
asset_groups is valid only when target_from=assets is specified.
These parameters are mutually exclusive and cannot be specified in the same request: asset_groups and asset_group_ids.
asset_group_ids={value} (Optional) The IDs of asset groups containing the hosts to be scanned. Multiple IDs are comma separated. One of these parameters is required: ip, asset_groups or asset_group_ids.
asset_group_ids is valid only when target_from=assets is specified.
These parameters are mutually exclusive and cannot be specified in the same request: asset_groups and asset_group_ids.
Parameter Description
54

Chapter 3 - ScansScan Parameters
exclude_ip_per_scan={value}
(Optional) The IP addresses to be excluded from the scan when the scan target is specified as IP addresses (not asset tags). You may enter individual IP addresses and/or ranges. Multiple entries are comma separated.
exclude_ip_per_scan is valid only when target_from=assets is specified.
tag_include_selector={all|any}
(Optional) Select “any” (the default) to include hosts that match at least one of the selected tags. Select “all” to include hosts that match all of the selected tags.
tag_include_selector is valid only when target_from=tags is specified.
tag_exclude_selector={all|any}
(Optional) Select “any” (the default) to exclude hosts that match at least one of the selected tags. Select “all” to exclude hosts that match all of the selected tags.
tag_exclude_selector is valid only when target_from=tags is specified.
tag_set_by={id|name} (Optional) Specify “id” (the default) to select a tag set by providing tag IDs. Specify “name” to select a tag set by providing tag names.
tag_set_by is valid only when target_from=tags is specified.
tag_set_include={value} (Optional) Specify a tag set to include. Hosts that match these tags will be included. You identify the tag set by providing tag name or IDs. Multiple entries are comma separated.
tag_set_include is valid only when target_from=tags is specified.
tag_set_exclude={value} (Optional) Specify a tag set to exclude. Hosts that match these tags will be excluded. You identify the tag set by providing tag name or IDs. Multiple entries are comma separated.
tag_set_exclude is valid only when target_from=tags is specified.
use_ip_nt_range_tags={0|1} (Optional) Specify “0” (the default) to select from all tags (tags with any tag rule). Specify “1” to scan all IP addresses defined in tags. When this is specified, only tags with the dynamic IP address rule called “IP address in Network Range(s)” can be selected.
use_ip_nt_range_tags is valid only when target_from=tags is specified.
Parameter Description
55

Chapter 3 - ScansScan Parameters
iscanner_id={value} (Optional) The IDs of the scanner appliances to be used. Multiple entries are comma separated. For an Express Lite user, Internal Scanning must be enabled in the user’s account.
One of these parameters must be specified in a request: iscanner_name, iscanner_id, default_scanner, scanners_in_ag, scanners_in_tagset. When none of these are specified, External scanners are used.
These parameters are mutually exclusive and cannot be specified in the same request: iscanner_id and iscanner_name.
iscanner_name={value} (Optional) The friendly names of the scanner appliances to be used or “External” for external scanners. Multiple entries are comma separated. For an Express Lite user, Internal Scanning must be enabled in the user’s account.
One of these parameters must be specified in a request for an internal scan: iscanner_name, iscanner_id, default_scanner, scanners_in_ag, scanners_in_tagset. When none of these are specified, External scanners are used.
These parameters are mutually exclusive and cannot be specified in the same request: iscanner_id and iscanner_name.
default_scanner={0|1} (Optional) Specify 1 to use the default scanner in each target asset group. For an Express Lite user, Internal Scanning must be enabled in the user’s account.
One of these parameters must be specified in a request for an internal scan: iscanner_name, iscanner_id, default_scanner, scanners_in_ag, scanners_in_tagset. When none of these are specified, External scanners are used.
default_scanner is valid when the scan target is specified using one of these parameters: asset_groups, asset_group_ids.
scanners_in_ag={0|1} (Optional) Specify 1 to distribute the scan to the target asset groups’ scanner appliances. Appliances in each asset group are tasked with scanning the IPs in the group. By default up to 5 appliances per group will be used and this can be configured for your account (please contact your Account Manager or Support). For an Express Lite user, Internal Scanning must be enabled in the user’s account.
One of these parameters must be specified in a request for an internal scan: iscanner_name, iscanner_id, default_scanner, scanners_in_ag, scanners_in_tagset. When none of these are specified, External scanners are used.
scanners_in_ag is valid when the scan target is specified using one of these parameters: asset_groups, asset_group_ids.
Parameter Description
56

Chapter 3 - ScansScan Parameters
scanners_in_tagset={0|1} (Optional) Specify 1 to distribute the scan to scanner appliances that match the asset tags specified for the scan target.
One of these parameters must be specified in a request for an internal scan: iscanner_name, iscanner_id, default_scanner, scanners_in_ag, scanners_in_tagset. When none of these are specified, External scanners are used.
scanners_in_tagset is valid when the target_from=tags is specified.
scanners_in_network={value}
(Optional) Specify 1 to distribute the scan to all scanner appliances in the network.
option_title={value} (Optional) The title of the option profile to be used.
One of these parameters must be specified in a request: option_title or option_id. These are mutually exclusive and cannot be specified in the same request.
option_id={value} (Optional) The ID of the option profile to be used.
One of these parameters must be specified in a request: option_title or option_id. These are mutually exclusive and cannot be specified in the same request.
priority={value} (Optional for VM scans only) Specify a value of 0 - 9 to set a processing priority level for the scan. When not specified, a value of 0 (no priority) is used. Valid values are:0 = No Priority (the default)1 = Emergency2 = Ultimate3 = Critical4 = Major5 = High6 = Standard7 = Medium8 = Minor9 = Low
connector_name={value} (Required for an EC2 scan) The name of the EC2 connector for the AWS integration you want to run the scan on.
ec2_endpoint={value} (Required for an EC2 scan) The EC2 region code or the ID of the Virtual Private Cloud (VPC) zone. Need help finding the region code? See the following: http://docs.aws.amazon.com/AWSEC2/latest/UserGuide/using-regions-availability-zones.html#concepts-regions-availability-zones
ec2_instance_ids={value} (Optional) The ID of the EC2 instance on which you want to launch the VM or compliance scan. Multiple ec2 instance ids are comma separated. You can add up to maximum 10 instance Ids.
Parameter Description
57

Chapter 3 - ScansScan Parameters
ip_network_id={value} (Optional, and valid only when the Network Support feature is enabled for the user’s account) The ID of a network used to filter the IPs/ranges specified in the“ip” parameter. Set to a custom network ID (note this does not filter IPs/ranges specified in “asset_groups” or “asset_group_ids”). Or set to “0” (the default) for the Global Default Network - this is used to scan hosts outside of your custom networks.
runtime_http_header={value}
(Optional) Set a custom value in order to drop defenses (such as logging, IPs, etc) when an authorized scan is being run. The value you enter will be used in the “Qualys-Scan:” header that will be set for many CGI and web application fingerprinting checks. Some discovery and web server fingerprinting checks will not use this header.
scan_type=certview
(Optional) Launch a CertView type scan. This option will be supported when CertView GA is released and enabled for your account.
fqdn={value} (Optional) The target FQDN for a CertView type VM scan. For a this scan you must specify at least one target i.e. IPs, asset groups or FQDNs. Multiple values are comma separated. This option will be supported when CertView GA is released and enabled for your account.
client_id={value} (Optional) Id assigned to the client (Consultant type subscriptions).
client_name={value} (Optional) Name of the client (Consultant type subscriptions).
Note: The client_id and client_name parameters are mutually exclusive and cannot be specified together in the same request.
include_agent_targets={0|1} (Optional) Specify 1 when your scan target includes agent hosts. This lets you scan private IPs where agents are installed when these IPs are not in your VM/PC license.
Supported capabilities- This parameter is supported for internal scans using scanner appliance(s). This option is not supported for scans using External scanners.- This parameter is supported when launching on demand scans only. It is not supported for scheduled scans.
Parameter iscanner_id or iscanner_name must be specified in the same request.
Parameter Description
58

Chapter 3 - ScansScan Schedule Parameters
Scan Schedule ParametersScan Schedule - Occurrence
Scan Schedule - Start Time
Parameter Description
occurrence=daily Required for a daily scan.
frequency_days={value} Required for a daily scan. The scan will run every N number of days. Value is an integer from 1 to 365.
occurrence=weekly Required for a weekly scan.
frequency_weeks={value} Required for a weekly scan. The scan will run every N number of weeks. Value is an integer from 1 to 52.
weekdays={value} Required for a weekly scan. The scan will run on the one or more weekdays. Value is one or more days: sunday, monday, tuesday, wednesday, thursday, friday, saturday. Multiple days are comma separated.
occurrence=monthly Required for a monthly scan.
frequency_months={value} Required for a monthly scan. The scan will run every N number of months. Value is an integer from 1 to 12.
day_of_month={value} Required for monthly scan - Nth day of the month. The scan will run on the Nth day of the month. Value is an integer from 1 to 31.
day_of_week={value} Required for monthly scan - day in Nth week. The scan will run on this day of the week. Value is and integer from 0 to 6, where 0 is Sunday and 2 is Tuesday.
week_of_month={value} Required for monthly scan - day in Nth week. The scan will run on this week of the month. Value is one of: first, second, third, fourth, last.
Parameter Description
start_date={mm/dd/yyyy} (Optional) By default the start date is the date when the schedule is created. You can define another start date in mm/dd/yyyy format.
start_hour={hour} (Required) The hour when a scan will start. The hour is an integer from 0 to 23, where 0 represents 12 AM, 7 represents 7 AM, and 22 represents 10 PM.
start_minute={minute} (Required) The minute when a scan will start. A valid value is an integer from 0 to 59.
time_zone_code={value} (Required) The time zone code for starting a scan, in upper case. For example, the time zone code for US California is US-CA. Valid codes are returned by the Time Zone Code API (/msp/time_zone_code_list.php).
observe_dst={yes|no} (Optional) Specify yes to observe Daylight Saving Time (DST). This parameter is valid when the time zone code specified in time_zone_code supports DST.
59
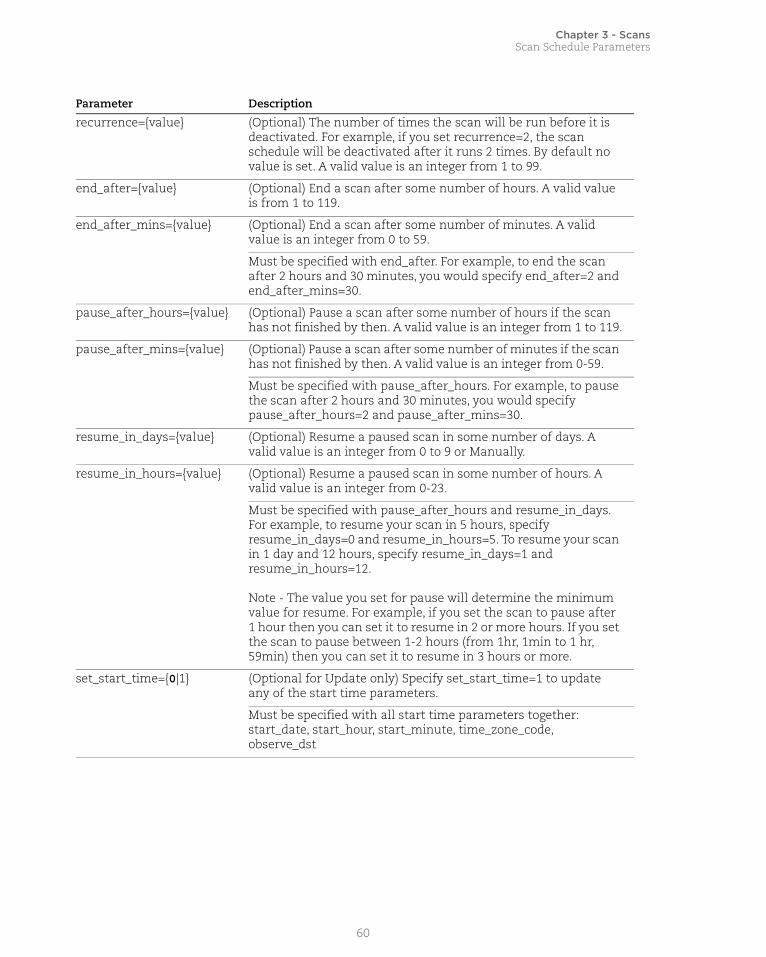
Chapter 3 - ScansScan Schedule Parameters
recurrence={value} (Optional) The number of times the scan will be run before it is deactivated. For example, if you set recurrence=2, the scan schedule will be deactivated after it runs 2 times. By default no value is set. A valid value is an integer from 1 to 99.
end_after={value} (Optional) End a scan after some number of hours. A valid value is from 1 to 119.
end_after_mins={value} (Optional) End a scan after some number of minutes. A valid value is an integer from 0 to 59.
Must be specified with end_after. For example, to end the scan after 2 hours and 30 minutes, you would specify end_after=2 and end_after_mins=30.
pause_after_hours={value} (Optional) Pause a scan after some number of hours if the scan has not finished by then. A valid value is an integer from 1 to 119.
pause_after_mins={value} (Optional) Pause a scan after some number of minutes if the scan has not finished by then. A valid value is an integer from 0-59.
Must be specified with pause_after_hours. For example, to pause the scan after 2 hours and 30 minutes, you would specify pause_after_hours=2 and pause_after_mins=30.
resume_in_days={value} (Optional) Resume a paused scan in some number of days. A valid value is an integer from 0 to 9 or Manually.
resume_in_hours={value} (Optional) Resume a paused scan in some number of hours. A valid value is an integer from 0-23.
Must be specified with pause_after_hours and resume_in_days. For example, to resume your scan in 5 hours, specify resume_in_days=0 and resume_in_hours=5. To resume your scan in 1 day and 12 hours, specify resume_in_days=1 and resume_in_hours=12.
Note - The value you set for pause will determine the minimum value for resume. For example, if you set the scan to pause after 1 hour then you can set it to resume in 2 or more hours. If you set the scan to pause between 1-2 hours (from 1hr, 1min to 1 hr, 59min) then you can set it to resume in 3 hours or more.
set_start_time={0|1} (Optional for Update only) Specify set_start_time=1 to update any of the start time parameters.
Must be specified with all start time parameters together: start_date, start_hour, start_minute, time_zone_code, observe_dst
Parameter Description
60

Chapter 3 - ScansScan Schedule Parameters
Scan Schedule - Notifications
Parameter Description
before_notify={0|1} (Optional) Specify before_notify=1 to send a notification before the scan starts. When not specified during a create request no notification is sent. When not specified during an update request we keep the previous setting.
before_notify_unit={value} (Optional) Specify the time unit for when to send the before scan notification. Possible values are: days, hours, minutes.
This parameter is required when before_notify=1. Not valid when before_notify=0.
before_notify_time={value} (Optional) Indicates the number of days, hours or minutes before the scan starts the notification will be sent. For days, enter a value of 1-31. For hours, enter a value of 1-24. For minutes, enter a value of 5-120.
This parameter is required when before_notify=1. Not valid when before_notify=0.
before_notify_message= {value}
(Optional) Specify a custom message to add to the before scan notification. The notification will always include certain details like the scan title, owner, option profile and start time. Include up to 4000 characters, no HTML tags. For update requests:- When not specified we keep the previous setting. - Specify an empty string to delete the last saved message.
This parameter is only valid when before_notify=1.
after_notify={0|1} (Optional) Specify after_notify=1 to send a notification after the scan is finished. When not specified during a create request no notification is sent. When not specified during an update request we keep the previous setting.
after_notify_message={value}
(Optional) Specify a custom message to add to the after scan notification. When not specified during a create request, no notification message is saved. Include up to 4000 characters, no HTML tags. For update requests:- When not specified we keep the previous setting. - Specify an empty string to delete the last saved message.- If both notifications are disabled (before_notify=0 and after_notify=0) we will delete the after notify message.
This parameter is only valid when after_notify=1.
61
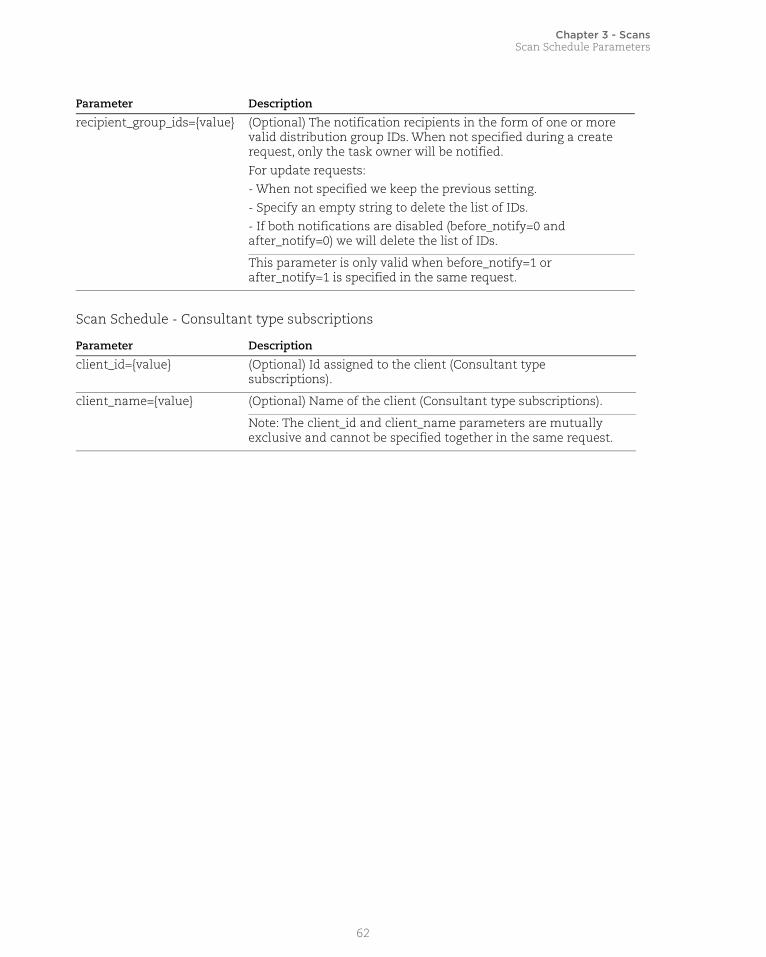
Chapter 3 - ScansScan Schedule Parameters
Scan Schedule - Consultant type subscriptions
recipient_group_ids={value} (Optional) The notification recipients in the form of one or more valid distribution group IDs. When not specified during a create request, only the task owner will be notified. For update requests:- When not specified we keep the previous setting. - Specify an empty string to delete the list of IDs.- If both notifications are disabled (before_notify=0 and after_notify=0) we will delete the list of IDs.
This parameter is only valid when before_notify=1 or after_notify=1 is specified in the same request.
Parameter Description
client_id={value} (Optional) Id assigned to the client (Consultant type subscriptions).
client_name={value} (Optional) Name of the client (Consultant type subscriptions).
Note: The client_id and client_name parameters are mutually exclusive and cannot be specified together in the same request.
Parameter Description
62

Chapter 3 - ScansVM Scan Statistics
VM Scan Statistics/api/2.0/fo/scan/stats/?action=list
[GET] [POST]
List details about vulnerability scans and assets that are waiting to be processed.
Permissions - Manager role is required.
You’ll see these sections in the XML output:
UNPROCESSED SCANS - The total number of scans that are not processed, including scans that are queued, running, loading, finished, etc.
VM RECRYPT BACKLOG - The total number of assets across your finished scans that are waiting to be processed.
VM RECRYPT BACKLOG BY SCAN - Scan details for vulnerability scans that are waiting to be processed. For each scan, you’ll see the scan ID, scan title, scan status, processing priority and number of hosts that the scan finished but not processed.
VM RECRYPT BACKLOG BY TASK - Processing task details for vulnerability scans that are waiting to be processed. For each task, you’ll see the same scan details as VM RECRYPT BACKLOG BY SCAN plus additional information like the total hosts alive for the scan, the number of hosts from the scan that have been processed, the number of hosts waiting to be processed, the scan start date, the task type and task status.
Sample - List VM statistics
API request:
curl -u "USERNAME:PASSWORD" -H "X-Requested-With:curl" "https://qualysapi.qualys.com/api/2.0/fo/scan/stats/?action=list"
XML output:
<?xml version="1.0" encoding="UTF-8" ?><!DOCTYPE TASK_PROCESSING SYSTEM "https://qualysapi.qualys.com/api/2.0/fo/scan/stats/vm_recrypt_results.dtd"> <TASK_PROCESSING> <UNPROCESSED_SCANS><![CDATA[366]]></UNPROCESSED_SCANS> <VM_RECRYPT_BACKLOG><![CDATA[116]]></VM_RECRYPT_BACKLOG> <VM_RECRYPT_BACKLOG_BY_SCAN> <SCAN> <ID><![CDATA[189275]]></ID> <TITLE><![CDATA[API_V2_IP_Scan_1511513769]]></TITLE> <STATUS><![CDATA[Loading]]></STATUS> <PROCESSING_PRIORITY><![CDATA[None]]></PROCESSING_PRIORITY> <COUNT><![CDATA[2]]></COUNT>
63

Chapter 3 - ScansVM Scan Statistics
</SCAN> <SCAN> <ID><![CDATA[189281]]></ID> <TITLE><![CDATA[API_V2_AG_Scan_1511513846]]></TITLE> <STATUS><![CDATA[Loading]]></STATUS> <PROCESSING_PRIORITY><![CDATA[None]]></PROCESSING_PRIORITY> <COUNT><![CDATA[2]]></COUNT> </SCAN> <SCAN> <ID><![CDATA[190773]]></ID> <TITLE><![CDATA[API_V2_IP_Scan_]]></TITLE> <STATUS><![CDATA[Finished]]></STATUS> <PROCESSING_PRIORITY><![CDATA[None]]></PROCESSING_PRIORITY> <COUNT><![CDATA[2]]></COUNT> </SCAN> <SCAN> <ID><![CDATA[190775]]></ID> <TITLE><![CDATA[API_V2_IP_Scan_]]></TITLE> <STATUS><![CDATA[Finished]]></STATUS> <PROCESSING_PRIORITY><![CDATA[None]]></PROCESSING_PRIORITY> <COUNT><![CDATA[2]]></COUNT> </SCAN> ... </VM_RECRYPT_BACKLOG_BY_SCAN> <VM_RECRYPT_BACKLOG_BY_TASK> <SCAN> <ID><![CDATA[210337]]></ID> <TITLE><![CDATA[API_V2_AG_Scan_1515055579]]></TITLE> <STATUS><![CDATA[Loading]]></STATUS> <PROCESSING_PRIORITY><![CDATA[None]]></PROCESSING_PRIORITY> <NBHOST><![CDATA[]]></NBHOST> <TO_PROCESS><![CDATA[3]]></TO_PROCESS> <PROCESSED><![CDATA[0]]></PROCESSED> <SCAN_DATE><![CDATA[2018-01-04T08:46:13Z]]></SCAN_DATE> <SCAN_UPDATED_DATE><![CDATA[2018-01-04T08:58:05Z]]></SCAN_UPDATED_DATE> <TASK_TYPE><![CDATA[VM Scan Processing]]></TASK_TYPE> <TASK_STATUS><![CDATA[Queued]]></TASK_STATUS> <TASK_UPDATED_DATE><![CDATA[2018-01-12T08:17:09Z]]></TASK_UPDATED_DATE> </SCAN> <SCAN>
64

Chapter 3 - ScansVM Scan Statistics
<ID><![CDATA[215356]]></ID> <TITLE><![CDATA[API_V2_AG_Scan_1515742250]]></TITLE> <STATUS><![CDATA[Running]]></STATUS> <PROCESSING_PRIORITY><![CDATA[None]]></PROCESSING_PRIORITY> <NBHOST><![CDATA[]]></NBHOST> <TO_PROCESS><![CDATA[0]]></TO_PROCESS> <PROCESSED><![CDATA[0]]></PROCESSED> <SCAN_DATE><![CDATA[2018-01-12T07:30:42Z]]></SCAN_DATE> <SCAN_UPDATED_DATE><![CDATA[2018-01-12T08:01:10Z]]></SCAN_UPDATED_DATE> <TASK_TYPE><![CDATA[VM Scan Processing]]></TASK_TYPE> <TASK_STATUS><![CDATA[Queued]]></TASK_STATUS> <TASK_UPDATED_DATE><![CDATA[2018-01-12T08:17:11Z]]></TASK_UPDATED_DATE> </SCAN> <SCAN> <ID><![CDATA[215357]]></ID> <TITLE><![CDATA[API_V2_AG_Scan_1515742265]]></TITLE> <STATUS><![CDATA[Loading]]></STATUS> <PROCESSING_PRIORITY><![CDATA[None]]></PROCESSING_PRIORITY> <NBHOST><![CDATA[]]></NBHOST> <TO_PROCESS><![CDATA[0]]></TO_PROCESS> <PROCESSED><![CDATA[0]]></PROCESSED> <SCAN_DATE><![CDATA[2018-01-12T07:30:58Z]]></SCAN_DATE> <SCAN_UPDATED_DATE><![CDATA[2018-01-12T08:14:45Z]]></SCAN_UPDATED_DATE> <TASK_TYPE><![CDATA[VM Scan Processing]]></TASK_TYPE> <TASK_STATUS><![CDATA[Queued]]></TASK_STATUS> <TASK_UPDATED_DATE><![CDATA[2018-01-12T08:17:11Z]]></TASK_UPDATED_DATE> </SCAN> ... </VM_RECRYPT_BACKLOG_BY_TASK> </TASK_PROCESSING>
DTD
<platform API server>/api/2.0/fo/scan/stats/vm_recrypt_results.dtd
65

Chapter 3 - ScansVM Scan Summary
VM Scan Summary/api/2.0/fo/scan/summary/
[GET] [POST]
Identify hosts that were not scanned and why.
Permissions - Manager role is required.
How it works - First we’ll find all the scans launched since the date (or within the date range) that you specify. Then we’ll identify hosts that were included in the scan target but not scanned for some reason. For each host you’ll see the category/reason it was not scanned and the host’s tracking method.
Categories for hosts not scanned:
Excluded - The hosts were excluded. Hosts may be excluded on a per scan basis (by the user launching or scheduling the scan) or globally for all scans. Managers and Unit Managers have privileges to edit the global excluded hosts list for the subscription.
Cancelled - Hosts were not scanned because the scan was cancelled. Scans may be cancelled by a user, by an administrator or automatically by the service as specified in scheduled scan settings.
Dead - The hosts were not “alive” at the time of the scan, meaning that they did not respond to probes sent by the scanning engine, and the option to Scan Dead Hosts was not enabled.
Unresolved - Hosts were scanned but they could not be reported because the NetBIOS or DNS hostname, whichever tracking method is specified for each host, could not be resolved.
Duplicate - The hosts were duplicated within a single segment/slice of the scan job. For example, two different hostnames resolving to the same IP with tracking by IP.
Not Vulnerable - Hosts were found to be not vulnerable during host discovery without having to run a full scan. This could happen for example if the list of QIDs to be scanned are limited to certain ports and those ports are found to be closed.
Aborted - The scan was abruptly discontinued. This is a rare occurrence that may be caused for various reasons. Contact Support for assistance.
Blocked - Hosts were blocked from scanning for some reason.
Input Parameters
Parameter Description
action=list (Required)
scan_date_since={value} (Required) Include scans started since a certain date. Specify the date in YYYY-MM-DD format. The date must be less than or equal to today’s date.
66

Chapter 3 - ScansVM Scan Summary
Sample - VM scan summary
API request:
curl -u "USERNAME:PASSWORD" -H "X-Requested-With: Curl" "https://qualysapi.qualys.com/api/2.0/fo/scan/summary/?action=list &scan_date_since=2018-04-27&include_excluded=1&include_unresolved=1 &include_cancelled=1&include_notvuln=1&include_duplicate=1"
XML output:
<?xml version="1.0" encoding="UTF-8" ?><!DOCTYPE SCAN_SUMMARY_OUTPUT SYSTEM "https://qualysapi.qualys.com/api/2.0/fo/scan/summary/scan_summary_output.dtd"><SCAN_SUMMARY_OUTPUT> <RESPONSE> <DATETIME>2018-05-02T10:45:40Z</DATETIME> <SCAN_SUMMARY_LIST> <SCAN_SUMMARY>
scan_date_to={value} (Optional) Include scans started up to a certain date. Specify the date in YYYY-MM-DD format. The date must be more than or equal to scan_date_since, and less than or equal to today’s date.
output_format={value} (Optional) The output format: XML (the default), CSV or JSON.
tracking_method={value} (Optional) By default hosts with any tracking method will be returned in the output. Use this option to only include hosts with a certain tracking method. Valid values are: IP, DNS, NETBIOS.
include_dead={0|1} (Optional) Set to 0 if you do not want to include dead hosts in the output. Dead hosts are included by default.
include_excluded={0|1} (Optional) Set to 1 to include hosts that were excluded from a scan in the output. Excluded hosts are not included by default.
include_unresolved={0|1} (Optional) Set to 1 to include unresolved hosts in the output. Unresolved hosts are not included by default.
include_cancelled={0|1} (Optional) Set to 1 to include cancelled hosts in the output. Cancelled hosts are not included by default.
include_notvuln={0|1} (Optional) Set to 1 to include hosts that are not vulnerable in the output. Not vulnerable hosts are not included by default.
include_blocked={0|1} (Optional) Set to 1 to include blocked hosts in the output. Blocked hosts are not included by default.
include_duplicate={0|1} (Optional) Set to 1 to include duplicate hosts in the output. Duplicate hosts are not included by default.
include_aborted={0|1} (Optional) Set to 1 to include aborted hosts in the output. Aborted hosts are not included by default.
Parameter Description
67

Chapter 3 - ScansVM Scan Summary
<SCAN_REF>scan/1525251885.92469</SCAN_REF> <SCAN_DATE>2018-05-02T09:04:34Z</SCAN_DATE> <HOST_SUMMARY category="notvuln" tracking="IP">10.10.10.10-10.10.10.15,10.10.10.17</HOST_SUMMARY> <HOST_SUMMARY category="notvuln" tracking="DNS">gfi-31-1.caac125.qualys.com,gfi-31-2.caac125.qualys.com</HOST_SUMMARY> <HOST_SUMMARY category="notvuln" tracking="NETBIOS">gfi-31-3,gfi-31-4</HOST_SUMMARY> <HOST_SUMMARY category="cancelled" tracking="IP">10.10.10.20,10.10.10.22</HOST_SUMMARY> <HOST_SUMMARY category="cancelled" tracking="DNS">gfi-31-5.caac125.qualys.com,gfi-31-6.caac125.qualys.com</HOST_SUMMARY> <HOST_SUMMARY category="dead" tracking="IP">10.10.10.25</HOST_SUMMARY> <HOST_SUMMARY category="dead" tracking="NETBIOS">gfi-31-10,gfi-31-11</HOST_SUMMARY> <HOST_SUMMARY category="excluded" tracking="IP">10.10.10.26</HOST_SUMMARY> <HOST_SUMMARY category="unresolved" tracking="NETBIOS">gfi-31-13</HOST_SUMMARY> <HOST_SUMMARY category="duplicate" tracking="IP">10.10.10.27</HOST_SUMMARY> <HOST_SUMMARY category="duplicate" tracking="DNS">gfi-31-14.caac125.qualys.com</HOST_SUMMARY> </SCAN_SUMMARY> </SCAN_SUMMARY_LIST> </RESPONSE></SCAN_SUMMARY_OUTPUT>
DTD
<platform API server>/api/2.0/fo/scan/summary/scan_summary_output.dtd
68

Chapter 3 - ScansShare PCI Scan
Share PCI ScanThe Share PCI Scan API (/api/2.0/fo/scan/pci/) povides an automated way to share (export) finished PCI scans to PCI Merchant accounts and check the export status. A PCI scan is a vulnerability scan that was run with the option profile “Payment Card Industry (PCI) Options”.
Express Lite: This API is available to Express Lite users.
In advance of sharing a PCI scan using the share PCI scan API, the target PCI Merchant account must be already defined as a PCI account link within the API user’s Qualys account. Account links can be defined using the Qualys user interface only.
Permissions - Any user with scan permissions (Manager, Unit Manager or Scanner) can share a PCI scan with one of their own PCI Merchant accounts and obtain share status. The user’s Qualys account must allow access to the PCI scan and must have a link to the target PCI Merchant account.
Share Restriction - The following share restriction applies to all users. One PCI scan can be shared (exported) to one PCI Merchant subscription one time only, assuming the share request is successful. (Note: If a particular scan has been exported to any PCI account in the same PCI Merchant subscription as your PCI account, the scan can’t be exported.) If a share request fails for some reason, it's possible to submit another share request for the same PCI scan and PCI Merchant account.
Share a PCI Scan/api/2.0/fo/scan/pci/ with action=share
[POST]
Export a finished PCI scan to a selected PCI Merchant account. It’s possible to export a PCI scan one time per PCI Merchant account, and the same PCI scan can be exported to multiple PCI Merchant accounts.
Input Parameters
Parameter Description
action=share (Required) Specify “share” to share a PCI scan.
echo_request={0|1} (Optional) Specify 1 to view parameters in the XML output. When unspecified, parameters are not included in the XML output.
scan_ref={value} (Required) The scan reference of a finished PCI scan. The scan status of this scan must be “Finished”.
merchant_username={value}
(Required) The user name of the PCI Merchant account that the PCI scan will be exported to. The API user’s Qualys account must have a PCI account link already defined for this target PCI Merchant account.
69

Chapter 3 - ScansShare PCI Scan
Sample - Share PCI scan
API request:
curl -s -H "X-Requested-With: curl demo 2" -D headers.15 -b "QualysSession=38255848108d68a2feaf9ee664ca78a7; path=/api; secure" -d "action=share&merchant_username=manager1@qualys&scan_ref=scan/1281646610.5720""https://qualysapi.qualys.com/api/2.0/fo/scan/pci/"
XML output Successful Share:
The XML output uses the simple return DTD and the message is “Requested share of scan to PCI”.
<?xml version="1.0" encoding="UTF-8" ?><!DOCTYPE SIMPLE_RETURN SYSTEM "https://qualysapi.qualys.com/api/2.0/simple_return.dtd"><SIMPLE_RETURN> <RESPONSE> <DATETIME>2018-01-17T00:50:39Z</DATETIME> <TEXT>Requested share of scan to PCI</TEXT> <ITEM_LIST> <ITEM> <KEY>scan_ref</KEY> <VALUE>scan/1281646610.5720</VALUE> </ITEM> <ITEM> <KEY>merchant_username</KEY> <VALUE>manager1@qualys</VALUE> </ITEM> </ITEM_LIST> </RESPONSE></SIMPLE_RETURN>
XML output Share Already in Progress or Completed:When the request to share a PCI scan fails, the XML output uses the simple return DTD with the error. If the failure is because sharing is in progress for the PCI Merchant account or the scan has already been shared to the PCI account, the output includes the message “This scan has already been shared with the Merchant account”.
<?xml version="1.0" encoding="UTF-8" ?><!DOCTYPE SIMPLE_RETURN SYSTEM "https://qualysapi.qualys.com/api/2.0/simple_return.dtd"><SIMPLE_RETURN> <RESPONSE> <DATETIME>2018-01-04T14:54:01Z</DATETIME> <CODE>999</CODE>
70

Chapter 3 - ScansShare PCI Scan
<TEXT>This scan has already been shared with the Merchant account.</TEXT> </RESPONSE></SIMPLE_RETURN>
Get PCI Share Status/api/2.0/fo/scan/pci/ with action=status
[GET] [POST]
Get the share status of a PCI scan that has already been shared with a PCI merchant account.
Input Parameters
Sample - PCI Share status
API request:
curl -s -H "X-Requested-With: curl demo 2" -u "USERNAME:PASSWD" -d "action=status&scan_ref=scan/1531755831.21639&merchant_username=asmith@hq" "https://qualysapi.qualys.com/api/2.0/fo/scan/pci/"
XML output:
The XML response for a status requests identifies the share status: Queued (request was received and not started yet), In Progress, Finished (scan was exported to PCI account successfully), or Error.
<?xml version="1.0" encoding="UTF-8" ?> <!DOCTYPE PCI_SCAN_SHARE_STATUS SYSTEM "https://qualysapi.qualys.com/api/2.0/fo/scan/pci/pci_scan_share_status.dtd"> <PCI_SCAN_SHARE_STATUS> <RESPONSE> <SCAN> <MERCHANT_USERNAME>asmith@hq</MERCHANT_USERNAME> <SCAN_REF>scan/1531755831.21639</SCAN_REF>
Parameter Description
action=status (Required)
echo_request={0|1} (Optional) Specify 1 to view parameters in the XML output. When unspecified, parameters are not included in the XML output.
scan_ref={value} (Required) The scan reference of the shared scan that you want to check the export status for.
merchant_username={value}
(Required) The username of the PCI account which the scan was shared with.
71

Chapter 3 - ScansShare PCI Scan
<STATUS>In Progress</STATUS> <LAST_SHARED>2018-07-19T05:05:58Z</LAST_SHARED> </SCAN> </RESPONSE></PCI_SCAN_SHARE_STATUS>
DTD
<platform API server>/api/2.0/fo/scan/pci/pci_scan_share_status.dtd
72

Chapter 3 - ScansDiscovery Scans (maps)
Discovery Scans (maps)Launch discovery scans, also called maps, to launch network discovery of your domains and/or IP addresses in asset groups. This returns an inventory of your network devices.
Launch Map | Launch Map | Cancel Running Map | Download Saved Map Report | Delete Saved Map Report | Domain List | Add/Edit Domain
Launch Map/msp/map-2.php
[GET] [POST]
Launch a Qualys network map for one or more domains, initiating network discovery. The map target may include asset groups and the default scanner option may be enabled for distributed mapping across multiple scanner appliances.
Basic HTTP authentication is required. Session based authentication is not supported using this API.
A map request for multiple domains issued using the map-2.php API, runs one map at a time, one domain at a time. If you cancel a running map for a domain using the scan_cancel.php function and there are multiple domains in the map target, the service cancels the maps for any remaining, undiscovered domains in the same map target.
For a map request with multiple domains, the XML map report returned by the map-2.php function includes all domains that were successfully discovered. When you view the map results for this request using the map_report.php function or the Qualys user interface, each map report includes map results for one domain. Also, if the map summary notification is enabled in your account, there is a separate notification for each target domain.
Permissions - Managers can map all domains in the subscription. Unit Managers can map domains in the user’s same business unit. Scanners can map domains in their own account.
73

Chapter 3 - ScansDiscovery Scans (maps)
Input Parameters
Parameter Description
map_title={title} (Optional) Specifies a title for the map. The map title can have a maximum of 2,000 characters. When specified, the map title appears in the header section of the map results. When unspecified, the API returns a standard, descriptive title in the header section.
domain={target} (Optional) Specifies one or more domain names for the map target. Multiple entries are comma separated. (Target may include domain names and/or asset groups)
For each domain, include the domain name only; do not enter “www.” at the start of the domain name. Netblocks may be specified with each domain name to extend the scope of the map. Multiple domains must be comma separated.
This parameter and/or asset_groups must be specified.
asset_groups={title1,title2...} (Optional) Specifies the titles of asset groups for the map target. Multiple asset groups must be comma separated. (Target may include domain names and/or asset groups)
This parameter and/or the domain parameter must be specified.
iscanner_name={name} (Optional) Specifies the name of the Scanner Appliance for the map, when the map target has private use internal IPs. Using Express Lite, Internal Scanning must be enabled in your account.
One of these parameters may be specified in the map request: iscanner_name or default scanner.
default_scanner=1 (Optional) Enables the default scanner feature, which is only valid when the map target consists of asset groups. A valid value is 1 to enable the default scanner, or 0 (the default) to disable it. Using Express Lite, Internal Scanning must be enabled in your account.
One of these parameters may be specified in the same map request: iscanner_name or default scanner.
74

Chapter 3 - ScansDiscovery Scans (maps)
Samples - Launch map
Request a map of the domain “www.mycompany.com” using the external scanners and to receive a map report:
https://qualysapi.qualys.com/msp/map-2.php?domain=mycompany.com
Request a map of the domain “www.mycompany.com” using the external scanners, save map report on the Qualys platform:
https://qualysapi.qualys.com/msp/map-2.php?domain=mycompany.com &save_report=yes
Request a map for the following domain/netblock pair using the scanner appliance “Hong Kong” and custom domain mycompany:
https://qualysapi.qualys.com/msp/map-2.php?domain=mycompany.com:192.168.0.1-192.168.0.254&iscanner_name=Hong+Kong
Request a map for this domain/netblock pair using the scanner appliance “San Francisco” and none domain:
https://qualysapi.qualys.com/msp/map-2.php?domain=none:192.168.0.1-192.168.0.254&iscanner_name=San+Franscisco
DTD
<platform API server>/map-2.dtd
option={title} (Optional) Specifies the title of an option profile to be applied to the map. The profile title must be defined in the user account, and it can have a maximum of 64 characters. If unspecified, the default option profile in the user account is applied.
save_report=yes (Optional) Saves a map report for each target domain on the Qualys server for later use. A valid value is “yes” to save a map report for each target domain, or “no” (the default) to not save the report.
If set to “yes”, you can close the HTTP connection when the map is in progress, without cancelling the map. When the map completes the resulting map report is saved on the Qualys platform, and a map summary email notification is sent (if this option is enabled in your user account).
Saved map reports can be retrieved using map_report_list.php and map_report.php.
Parameter Description
75

Chapter 3 - ScansDiscovery Scans (maps)
Map Report List/msp/map_report_list.php
[GET] [POST]
List saved map reports in the user’s account. Each entry in the map report list identifies a saved map report for a specific domain. There is a separate saved map report for each domain in the map target.
Basic HTTP authentication is required. Session based authentication is not supported using this API.
Permissions - Managers can view all saved map reports in the subscription. Unit Managers can view saved map reports for domains in user’s business unit. Scanners and Readers can view saved map reports for domains in user’s account.
Input Parameters
SampleReceive information about the last saved map for the domain “www.companyabc.com”:
https://qualysapi.qualys.com/msp/map_report_list.php? domain=www.companyabc.com&last=yes
DTD
<platform API server>/map_report_list.dtd
Parameter Description
last=yes (Optional) Used to retrieve information only about the last saved map report. A valid value is “yes” to retrieve the last saved map report, or “no” (the default) to retrieve all map reports.
domain={target} (Optional) Used to receive a list of all saved map reports for the specified target domain. If both parameters domain={target} and last=yes are specified, you will receive information about the last saved map for the target domain.
76

Chapter 3 - ScansDiscovery Scans (maps)
Running Map Report List/msp/scan_running_list.php
[GET] [POST]
List maps and scans that are currently running in the user's account. If you're interested in listing scans only (not maps), we recommend using VM Scan List (/api/2.0/fo/scan/) instead.
Basic HTTP authentication is required. Session based authentication is not supported using this API.
Permissions - Managers can view all running maps/scans in the subscription. Unit Managers can view running maps/scans on assets in the user’s business unit. Scanners and Readers can view running maps/scans on assets their account.
Sample - Running map/scan list
https://qualysapi.qualys.com/msp/scan_running_list.php?
DTD
<platform API server>/scan_running_list.dtd
Cancel Running Map/msp/scan_cancel.php
[GET] [POST]
Cancel a map in progress. It’s not possible to cancel a map when it has the scan status “Loading”.
Basic HTTP authentication is required. Session based authentication is not supported using this API.
Permissions - Managers can cancel all running maps in the subscription. Unit Managers can cancel running maps launched by users in their same business unit. Scanners can cancel running maps they have launched.
Input Parameter
Parameter Description
ref={value} (Required) Specifies the map reference for the map to be cancelled (or a scan reference for the scan to be cancelled). A map reference starts with “map/”.
77

Chapter 3 - ScansDiscovery Scans (maps)
Sample - Cancel a map in progress
https://qualysapi.qualys.com/msp/scan_cancel.php?ref=map/987659876.19876
DTD
<platform API server>/generic_return.dtd
Download Saved Map Report/msp/map_report.php
[GET] [POST]
Download a saved map in the user’s account, when the map has the scan status “Finished”. Each saved map report identifies map results for a specific domain. If you issue a map request for multiple domains using the map-2.php API, there is a separate saved map report for each domain in the map target.
Basic HTTP authentication is required. Session based authentication is not supported using this API.
Permissions - Managers can download all saved map reports in subscription. Unit Managers can download saved map report for domain in user’s business unit. Scanners and Readers can download saved map report for domain in user’s account.
Input Parameter
Sample - Download saved map report
https://qualysapi.qualys.com/msp/map_report.php? ref=map/987659876.19876
DTD
<platform API server>/map.dtd
Parameter Description
ref={value} (Required) Specifies the map reference for the scan you want to download. A map reference starts with “map/”.
78

Chapter 3 - ScansDiscovery Scans (maps)
Delete Saved Map Report/msp/scan_report_delete.php
[GET] [POST]
Delete a previously saved network map or scan report, when the scan status is “Finished”.
Basic HTTP authentication is required. Session based authentication is not supported using this API.
Permissions - Managers can delete saved map reports in the subscription. Unit Managers can delete saved map reports for domains in the user’s business unit, including the user’s own maps and maps run by other users in the same business unit. Scanners can delete saved map reports in user’s account.
Input Parameter
Sample - Delete saved map report
https://qualysapi.qualys.com/msp/scan_report_delete.php? ref=map/999666888.12345
DTD
<platform API server>/generic_return.dtd
Parameter Description
ref={value} (Required) Specifies the map reference for the map to be deleted. A map reference starts with “map/”.
79

Chapter 3 - ScansDiscovery Scans (maps)
Domain List/msp/asset_domain_list.php
[GET] [POST]
List asset domains in the user account.
Basic HTTP authentication is required. Session based authentication is not supporte using this API.
Permissions - Managers can view all domains in subscription. Unit Managers can view domains in user's business unit. Scanners, Readers can view domains in their own account.
Input Parameters
Sample - List all domains in accounthttps://qualysapi.qualys.com/msp/asset_domain_list.php
DTD
<platform API server>/domain_list.dtd
Add/Edit Domain/msp/asset_domain.php
[GET] [POST]
Add and edit domains and related netblocks in the subscription. The domains defined may be used as targets for network scans (maps).
Basic HTTP authentication is required. Session based authentication is not supported using this API.
Permissions - Manager user role is required.
Parameter Description
last={no|yes} (Optional) Used to retrieve information only about the last saved map report. A valid value is “yes” to retrieve the last saved map report, or “no” (the default) to retrieve all map reports.
domain={domain} (Optional) Used to receive a list of all saved map reports for the specified target domain. If both parameters domain={target} and last=yes are specified, you will receive information about the last saved map for the target domain.
80

Chapter 3 - ScansDiscovery Scans (maps)
Input Parameter
Sample - Add domain
https://qualysapi.qualys.com/msp/asset_domain.php?action=add&domain=mydomain.com
Sample - Edit domain
https://qualysapi.qualys.com/msp/asset_domain.php?action=edit&domain=acme.com&netblock=10.10.10.0/24,10.1.1.0-10.1.1.100
DTD
<platform API server>/generic_return.dtd
Parameter Description
action={add | edit} (Required)
domain={domain} (Required) Specifies the domain name to add or edit. Include the domain name only; do not enter “www.” at the start of the domain name.
netblock={ranges} (Optional for add request, and Required for an edit request)
Specifies the netblock(s) associated with the domain name. Multiple netblocks are comma separated. Looking for more help? Search for “none domain” or “netblock” in online help (log in to your account and go to Help > Online Help).
For an edit request, it’s not possible to add or remove netblocks for a domain. To clear associated netblocks for an existing domain, specify netblock=
81

Chapter 4 - Scan Configuration
Chapter 4 - Scan ConfigurationManage scan configurations in your account - scanner appliances, KnowledgeBase, search lists and option profiles.
Scanner Appliance List
Manage Virtual Scanner Appliances
Update Physical Scanner Appliance
Replace Scanner Appliance
Scanner Appliance VLANs and Static Routes
Option Profile Export | Option Profile Import
Option Profiles for VM | PCI | PC
KnowledgeBase | Editing Vulnerabilities
Static Search Lists
Dynamic Search Lists | Vendor IDs and References
82

Chapter 4 - Scan ConfigurationScanner Appliance List
Scanner Appliance List/api/2.0/fo/appliance/?action=list
[GET] [POST]
List scanner appliances in your account with their configurations. The list output is shown in “brief” mode by default. Specify output_mode=full to include full output (the same information available within the Qualys user interface).
Permissions - Managers can view all scanner appliances in the subscription. Unit Managers can view appliances in the user’s own business unit. Scanners and Readers can view appliances in their own account.
Express Lite - This API is available to Express Lite users when Internal Scanning is enabled in the user’s account.
Input Parameters
Parameter Description
action=list (Required) A flag used to make a request for a list of scanner appliances. The GET or POST method may be used for a list request.
echo_request={0|1} (Optional) Specifies whether to echo the request’s input parameters (names and values) in the XML output. When not specified, parameters are not included in the XML output. Specify 1 to view parameters in the XML output.
output_mode={brief|full} (Optional) The amount of detail provided for each scanner appliance in the output: brief (default) or full.
The “brief” output includes this information for each appliance: appliance ID, friendly name, software version, the number of running scans, and heartbeat check status (online or offline).
The “full” output includes the full appliance information, including the same details available in the Qualys user interface.
scan_detail={0|1} (Optional) Set to 1 to include scan details for scans currently running on the scanner appliance. Set to 0 (default) to not include scan details. Scan detail includes scan ID, title, scan reference, scan type and scan date.
show_tags={0|1} (Optional. When specified, output_mode=full is required.)Set to 1 (default) to include asset tag information for each scanner appliance in the output. Set to 0 to not include asset tag information in the output.
include_cloud_info={0|1} (Optional. When specified, output_mode=full is required.)Set to 1 to include cloud information in the output for virtual scanner appliances deployed on cloud platforms e.g. Amazon EC2, Microsoft Azure Cloud Platform and Google Cloud Platform. Set to 0 (default) to not include cloud info.
83

Chapter 4 - Scan ConfigurationScanner Appliance List
API request:
curl -u "USERNAME:PASSWORD" -H "X-Requested-With: Curl" -d "action=list&echo_request=1&ids=777,1127,1131&include_license_info=1" "https://qualysapi.qualys.com/api/2.0/fo/appliance/"
busy={0|1} (Optional) By default all scanner appliances in the user account are shown. Set to 0 to show only appliances which are not currently running scans. Set to 1 (default) to show only appliances which are currently running scans.
scan_ref={value} (Optional) Specify a scan reference code to show only the scanner appliances running a particular scan.You may enter a valid scan reference code for a currently running scan.
The scan reference code starts with a string that identifies the scan type: “scan/” for a vulnerability scan, “compliance/” for a compliance scan, “was/” for a web application scan, “qscap/” for an FDCC scan, or “map/” for a network map.
name={string} (Optional) List only scanner appliances (physical and virtual) that have names matching the string provided. Tip - Substring match is supported. For example, if you have 2 appliances named “myscanner” and “anotherscanner” and you supply the string “name=scan” both appliance both appliances will be returned in the XML output.
ids={id1,id2,..} (Optional) List only scanner appliances (physical and virtual) that have certain IDs. Multiple IDs are comma separated.
include_license_info={0|1} (Optional) Set to 1 to return virtual scanner license information in the XML output. This tells you the number of licenses you have and the number used. This information is not returned by default. When specified the XML output will include the LICENSE_INFO element.
type={physical | virtual | offline}
(Optional) Type of scanner appliances: physical, virtual, offline. Appears when output_mode=full is specified in API request.
Parameter Description
84

Chapter 4 - Scan ConfigurationScanner Appliance List
XML output:
<?xml version="1.0" encoding="UTF-8" ?><!DOCTYPE APPLIANCE_LIST_OUTPUT SYSTEM "https://qualysapi.qualys.com/api/2.0/fo/appliance/appliance_list_output.dtd"><APPLIANCE_LIST_OUTPUT> <RESPONSE> <DATETIME>2014-01-02T09:26:01Z</DATETIME> <APPLIANCE_LIST> <APPLIANCE> <ID>777</ID> <NAME>scanner1</NAME> <SOFTWARE_VERSION>2.6</SOFTWARE_VERSION> <RUNNING_SCAN_COUNT>0</RUNNING_SCAN_COUNT> <STATUS>Online</STATUS> </APPLIANCE> <APPLIANCE> <ID>1127</ID> <NAME>scanner2</NAME> <SOFTWARE_VERSION>2.6</SOFTWARE_VERSION> <RUNNING_SCAN_COUNT>0</RUNNING_SCAN_COUNT> <STATUS>Online</STATUS> </APPLIANCE> <APPLIANCE> <ID>1131</ID> <NAME>scanner3</NAME> <SOFTWARE_VERSION>2.6</SOFTWARE_VERSION> <RUNNING_SCAN_COUNT>0</RUNNING_SCAN_COUNT> <STATUS>Offline</STATUS> </APPLIANCE> </APPLIANCE_LIST> <LICENSE_INFO> <QVSA_LICENSES_COUNT>10</QVSA_LICENSES_COUNT> <QVSA_LICENSES_USED>3</QVSA_LICENSES_USED> </LICENSE_INFO> </RESPONSE></APPLIANCE_LIST_OUTPUT>
85
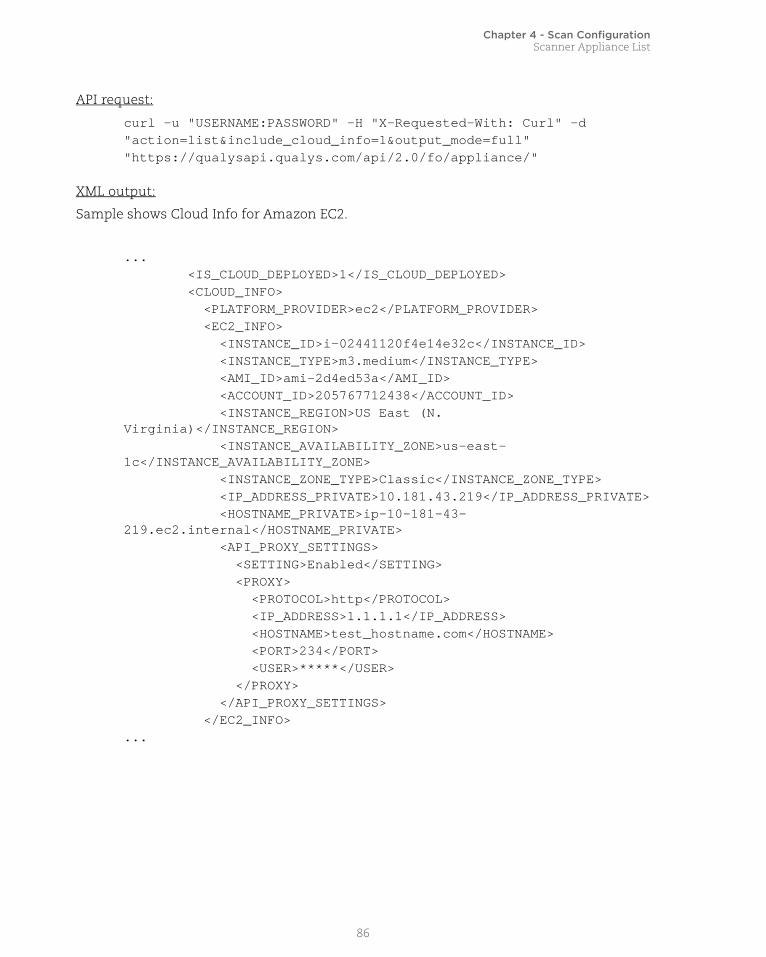
Chapter 4 - Scan ConfigurationScanner Appliance List
API request:
curl -u "USERNAME:PASSWORD" -H "X-Requested-With: Curl" -d"action=list&include_cloud_info=1&output_mode=full""https://qualysapi.qualys.com/api/2.0/fo/appliance/"
XML output:
Sample shows Cloud Info for Amazon EC2.
... <IS_CLOUD_DEPLOYED>1</IS_CLOUD_DEPLOYED> <CLOUD_INFO> <PLATFORM_PROVIDER>ec2</PLATFORM_PROVIDER> <EC2_INFO> <INSTANCE_ID>i-02441120f4e14e32c</INSTANCE_ID> <INSTANCE_TYPE>m3.medium</INSTANCE_TYPE> <AMI_ID>ami-2d4ed53a</AMI_ID> <ACCOUNT_ID>205767712438</ACCOUNT_ID> <INSTANCE_REGION>US East (N. Virginia)</INSTANCE_REGION> <INSTANCE_AVAILABILITY_ZONE>us-east-1c</INSTANCE_AVAILABILITY_ZONE> <INSTANCE_ZONE_TYPE>Classic</INSTANCE_ZONE_TYPE> <IP_ADDRESS_PRIVATE>10.181.43.219</IP_ADDRESS_PRIVATE> <HOSTNAME_PRIVATE>ip-10-181-43-219.ec2.internal</HOSTNAME_PRIVATE> <API_PROXY_SETTINGS> <SETTING>Enabled</SETTING> <PROXY> <PROTOCOL>http</PROTOCOL> <IP_ADDRESS>1.1.1.1</IP_ADDRESS> <HOSTNAME>test_hostname.com</HOSTNAME> <PORT>234</PORT> <USER>*****</USER> </PROXY> </API_PROXY_SETTINGS> </EC2_INFO>...
86

Chapter 4 - Scan ConfigurationScanner Appliance List
API request:
curl -u "USERNAME:PASSWORD" -H "X-Requested-With: Curl" -d"action=list&output_mode=full""https://qualysapi.qualys.com/api/2.0/fo/appliance/"
XML output:
Sample shows type of scanner appliance.
<?xml version="1.0" encoding="UTF-8" ?><!DOCTYPE APPLIANCE_LIST_OUTPUT SYSTEM "https://qualysapi.p04.eng.qualys.com/api/2.0/fo/appliance/appliance_list_output.dtd"><APPLIANCE_LIST_OUTPUT> <RESPONSE> <DATETIME>2017-08-31T09:14:49Z</DATETIME> <APPLIANCE_LIST> <APPLIANCE> <ID>132455</ID> <UUID>6ae4efce-0c5e-e227-82e0-1b7f55f1b98b</UUID> <NAME>VS_ND_1</NAME> <SOFTWARE_VERSION>2.6</SOFTWARE_VERSION> <RUNNING_SLICES_COUNT>0</RUNNING_SLICES_COUNT> <RUNNING_SCAN_COUNT>0</RUNNING_SCAN_COUNT> <STATUS>Offline</STATUS> <MODEL_NUMBER>cvscanner</MODEL_NUMBER> <TYPE>Virtual</TYPE> <SERIAL_NUMBER>0</SERIAL_NUMBER> <ACTIVATION_CODE>15440265032293</ACTIVATION_CODE> <INTERFACE_SETTINGS> <INTERFACE>lan</INTERFACE> <IP_ADDRESS>1.1.1.1</IP_ADDRESS> <NETMASK>128.0.0.0</NETMASK> <GATEWAY>128.0.0.0</GATEWAY> <LEASE>Static</LEASE> <IPV6_ADDRESS></IPV6_ADDRESS> <SPEED></SPEED> <DUPLEX>Unknown</DUPLEX> <DNS> <DOMAIN></DOMAIN> <PRIMARY>128.0.0.0</PRIMARY> <SECONDARY>128.0.0.0</SECONDARY> </DNS> </INTERFACE_SETTINGS>
DTD:
<platform API server>/api/2.0/fo/appliance/appliance_list_output.dtd
87

Chapter 4 - Scan ConfigurationManage Virtual Scanner Appliances
Manage Virtual Scanner AppliancesUse the Scanner Appliance API (/api/2.0/fo/appliance/ ) to create, update and delete virtual scanner appliances.
Tell me about permissions. Managers can perform all actions (create, update, delete). Unit Managers and Scanners must have the “Manage virtual scanner appliances” permission to create, update and delete virtual scanners. This permission is only available to Scanner users when your subscription is configured to allow it.
Add New Virtual Scanner Appliance/api/2.0/fo/appliance/ with action=create
[POST]
Create a new virtual scanner appliance in your account.
Permissions - Managers can create new virtual scanner appliance. Unit Managers and Scanners must have the “Manage virtual scanner appliances” permission. This permission is only available to Scanner users when your subscription is configured to allow it.
Input Parameters
API request:
curl -u "USERNAME:PASSWORD" -H "X-Requested-With: Curl" -X "POST" -d "action=create&echo_request=1&name=scanner1""https://qualysapi.qualys.com/api/2.0/fo/appliance/"
Parameter Description
action=create (Required)
name={string} (Required) The friendly name. This name can’t already be assigned to an appliance in your account. It can be a maximum of 15 characters, spaces are not allowed.
polling_interval={value} (Optional) The polling interval, in seconds. A valid value is 60 to 3600 (we recommend 180 which is the default). This is the frequency that the virtual scanner will attempt to connect to our Cloud Security Platform. The appliance calls home to provide health updates/heartbeats to the platform, to get software updates from the platform, to learn if new scan jobs have been requested by users, and to upload scan results data to the platform, if applicable.
asset_group_id={value} (Required for Unit Managers and Scanners for Create request) The ID of an asset group the virtual scanner will be assigned to.
88

Chapter 4 - Scan ConfigurationManage Virtual Scanner Appliances
XML output:
<?xml version="1.0" encoding="UTF-8" ?><!DOCTYPE APPLIANCE_LIST_OUTPUT SYSTEM "https://qualysapi.qualys.com/api/2.0/fo/appliance/appliance_create_output.dtd"><APPLIANCE_CREATE_OUTPUT> <RESPONSE> <DATETIME>2014-01-02T09:26:01Z</DATETIME> <ID>777</ID> <NAME>scanner1</NAME> <ACTIVATION CODE>ACTIVATION-CODE</ACTIVATION CODE> <REMAINING_QVSA_LICENSES>4</REMAINING_QVSA_LICENSES> </RESPONSE></APPLIANCE_CREATE_OUTPUT>
DTD:
<platform API server>/api/2.0/fo/appliance/appliance_create_output.dtd
Update Virtual Scanner Appliance/api/2.0/fo/appliance/ with action=update
[POST]
Update a virtual scanner appliance in your account. You can add tags, remove and reset tags for your scanner appliances.
Permissions - Managers can update a virtual scanner appliance. Unit Managers and Scanners must have the “Manage virtual scanner appliances” permission. This permission is only available to Scanner users when your subscription is configured to allow it.
Input Parameters
Parameter Description
action=update (Required)
id={id} (Required) A valid ID of a virtual scanner.
name={string} (Optional) The friendly name. This name can’t already be assigned to an appliance in your account. It can be a maximum of 15 characters, spaces are not allowed.
89

Chapter 4 - Scan ConfigurationManage Virtual Scanner Appliances
Sample - Update virtual scanner appliance name
API request:
curl -u "USERNAME:PASSWORD" -H "X-Requested-With: Curl" -X "POST" -d "action=update&echo_request=1&id=12345&name=scanner15""https://qualysapi.qualys.com/api/2.0/fo/appliance/"
XML output:
<?xml version="1.0" encoding="UTF-8" ?><!DOCTYPE SIMPLE_RETURN SYSTEM "https://qualysapi.qualys.com/api/2.0/simple_return.dtd"><SIMPLE_RETURN> <RESPONSE> <DATETIME>2014-04-03T12:12:45Z</DATETIME> <TEXT>Virtual scanner updated successfully</TEXT> <ITEM_LIST> <ITEM>
polling_interval={value} (Optional) The polling interval, in seconds. A valid value is 60 to 3600 (we recommend 180 which is the default). This is the frequency that the virtual scanner will attempt to connect to our Cloud Security Platform. The appliance calls home to provide health updates/heartbeats to the platform, to get software updates from the platform, to learn if new scan jobs have been requested by users, and to upload scan results data to the platform, if applicable.
comment={value} (Optional) User-defined comments.
set_tags={value} (Optional) Specify tag to be assigned to the scanner appliance. Both virtual and physical scanners can be tagged.
These parameters are mutually exclusive and cannot be specified in the same request: set_tags and add_tags, remove_tags.
add_tags={value} (Optional) Specify tag to be added to the existing list of tags assigned to the scanner. Multiple entries are comma separated.
These parameters are mutually exclusive and cannot be specified in the same request: set_tags and add_tags, remove_tags.
remove_tags={value} (Optional) Specify tag to be removed from the existing list of tags assigned to scanner. Multiple tags are comma separated.
These parameters are mutually exclusive and cannot be specified in the same request: set_tags and add_tags, remove_tags.
tag_set_by={id|name} (Optional) Specify “id” (the default) to select a tag set by providing tag IDs. Specify “name” to select a tag set by providing tag names.
Parameter Description
90
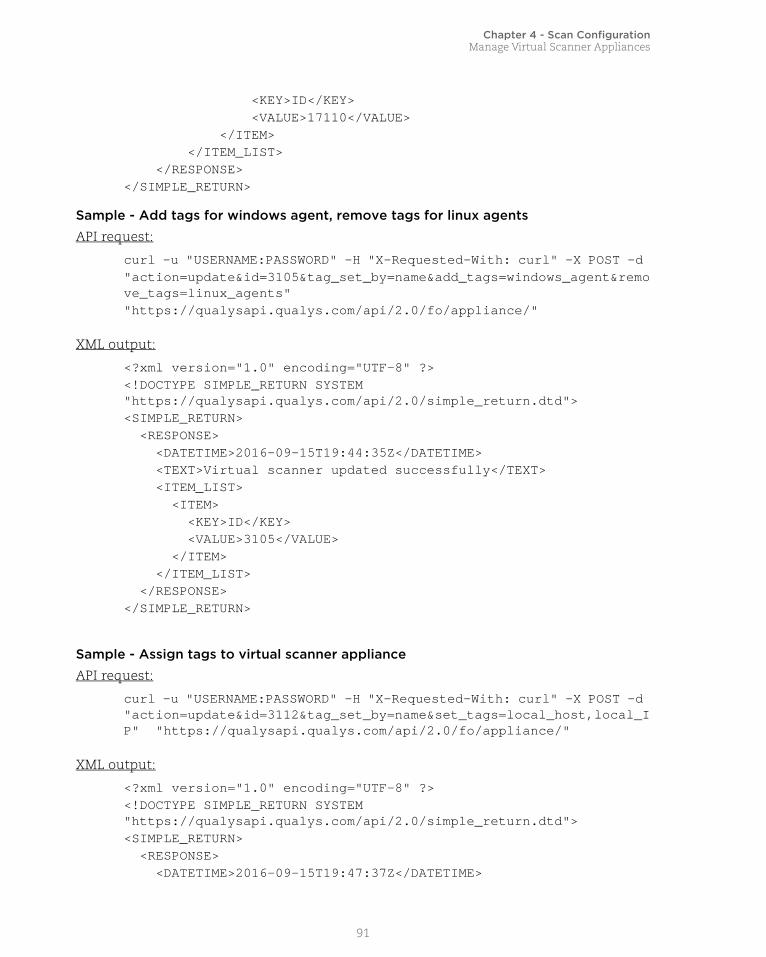
Chapter 4 - Scan ConfigurationManage Virtual Scanner Appliances
<KEY>ID</KEY> <VALUE>17110</VALUE> </ITEM> </ITEM_LIST> </RESPONSE></SIMPLE_RETURN>
Sample - Add tags for windows agent, remove tags for linux agents
API request:
curl -u "USERNAME:PASSWORD" -H "X-Requested-With: curl" -X POST -d "action=update&id=3105&tag_set_by=name&add_tags=windows_agent&remove_tags=linux_agents""https://qualysapi.qualys.com/api/2.0/fo/appliance/"
XML output:
<?xml version="1.0" encoding="UTF-8" ?><!DOCTYPE SIMPLE_RETURN SYSTEM "https://qualysapi.qualys.com/api/2.0/simple_return.dtd"><SIMPLE_RETURN> <RESPONSE> <DATETIME>2016-09-15T19:44:35Z</DATETIME> <TEXT>Virtual scanner updated successfully</TEXT> <ITEM_LIST> <ITEM> <KEY>ID</KEY> <VALUE>3105</VALUE> </ITEM> </ITEM_LIST> </RESPONSE></SIMPLE_RETURN>
Sample - Assign tags to virtual scanner appliance
API request:
curl -u "USERNAME:PASSWORD" -H "X-Requested-With: curl" -X POST -d "action=update&id=3112&tag_set_by=name&set_tags=local_host,local_IP" "https://qualysapi.qualys.com/api/2.0/fo/appliance/"
XML output:
<?xml version="1.0" encoding="UTF-8" ?><!DOCTYPE SIMPLE_RETURN SYSTEM "https://qualysapi.qualys.com/api/2.0/simple_return.dtd"><SIMPLE_RETURN> <RESPONSE> <DATETIME>2016-09-15T19:47:37Z</DATETIME>
91

Chapter 4 - Scan ConfigurationManage Virtual Scanner Appliances
<TEXT>Virtual scanner updated successfully</TEXT> <ITEM_LIST> <ITEM> <KEY>ID</KEY> <VALUE>3112</VALUE> </ITEM> </ITEM_LIST> </RESPONSE>
Delete Virtual Scanner Appliance/api/2.0/fo/appliance/ with action=delete
[POST]
Delete a virtual scanner appliance in your account.
Permissions - Managers can delete new virtual scanner appliance. Unit Managers and Scanners must have the “Manage virtual scanner appliances” permission. This permission is only available to Scanner users when your subscription is configured to allow it.
Deleting a virtual scanner results in these actions: 1) The scanner will be removed from associated Asset Groups, and 2) Scheduled Scans using this scanner will be deactivated.
Is your virtual scanner running scans? If yes it’s not possible to delete it. We recommend you check to be sure the virtual scanner you want to delete is not running scans.
Input Parameters
API request:
curl -u "USERNAME:PASSWORD" -H "X-Requested-With: Curl" -X "POST" -d "action=delete&echo_request=1&id=12345""https://qualysapi.qualys.com/api/2.0/fo/appliance/"
XML output:
The XML output uses the simple return (/api/2.0/simple_return.dtd).
<?xml version="1.0" encoding="UTF-8" ?><!DOCTYPE APPLIANCE_LIST_OUTPUT SYSTEM "https://qualysapi.qualys.com/api/2.0/fo/simple_return.dtd"><SIMPLE_RETURN> <RESPONSE>
Parameter Description
action=delete (Required)
id={id} (Required) A valid ID of a virtual scanner.
92

Chapter 4 - Scan ConfigurationUpdate Physical Scanner Appliance
<DATETIME>2014-01-02T09:26:01Z</DATETIME> <TEXT>Virtual scanner deleted successfully</ID> <ITEM_LIST> <ITEM> <KEY>ID<KEY> <VALUE>115<VALUE> </ITEM> <ITEM> <KEY>DEACTIVATED_SCHEDULED_SCANS<KEY> <VALUE>None<VALUE> </ITEM> <ITEM> <KEY>AFFECTED_ASSET_GROUPS<KEY> <VALUE>None<VALUE> </ITEM> <ITEM_LIST> </RESPONSE></SIMPLE_RETURN>
Update Physical Scanner Appliance/api/2.0/fo/appliance/physical/ with action=update
[POST]
Using the Physical Scanner Appliance API (/api/2.0/fo/appliance/physical/), Managers and Unit Managers can update physical scanner appliances.
Input Parameters
Parameter Description
action=update (Required)
id={id} (Required) A valid ID of a physical scanner.
name={string} (Optional) The friendly name. This name can’t already be assigned to an appliance in your account. It can be a maximum of 15 characters, spaces are not allowed.
polling_interval={value} (Optional) The polling interval, in seconds. A valid value is 60 to 3600 (we recommend 180 which is the default). This is the frequency that the physical scanner will attempt to connect to our Cloud Security Platform. The appliance calls home to provide health updates/heartbeats to the platform, to get software updates from the platform, to learn if new scan jobs have been requested by users, and to upload scan results data to the platform, if applicable.
93

Chapter 4 - Scan ConfigurationUpdate Physical Scanner Appliance
Sample 1
API Request:
curl -u "USERNAME:PASSWORD" -H "X-Requested-With: Curl" -X "POST" -d "action=update&id=5115&comment=Hello""https://qualysapi.qualys.com/api/2.0/fo/appliance/physical/"
Sample 2Add VLAN and routes with Name, Polling interval and comments to Physical scanner:
API Request:
curl -u "USERNAME:PASSWORD" -H "X-Requested-With: Curl" -X POST -d "action=update&id=5115&name=physcanner&polling_interval=360&set_routes=10.10.10.10|255.255.255.0|10.10.10.10|routes1&set_vlans=1|10.2.0.2|255.255.255.0|Testvlan1&comment=Update_scanner" "https://qualysapi.qualys.com/api/2.0/fo/appliance/physical/"
set_vlans={value} Use this parameter to specify one or more VLANs for scanner. See Manage Virtual Scanner Appliances.
set_tags= {value} (Optional) Specify tag to be assigned to the scanner appliance. Both virtual and physical scanners can be tagged.
These parameters are mutually exclusive and cannot be specified in the same request: set_tags and add_tags, remove_tags.
add_tags= {value} (Optional) Specify tag to be added to the existing list of tags assigned to the scanner. Multiple entries are commaseparated.
These parameters are mutually exclusive and cannot be specified in the same request: set_tags and add_tags, remove_tags.
remove_tags= {value} (Optional) Specify tag to be removed from the existing list of tags assigned to scanner. Multiple entries are commaseparated.
These parameters are mutually exclusive and cannot be specified in the same request: set_tags and add_tags, remove_tags.
tag_set_by= {id|name} (Optional) Specify “id” (the default) to select a tag set by providing tag IDs. Specify “name” to select a tag set by providing tag names.
set_routes={value} Use this parameter to specify one or more routes for scanner. See Manage Virtual Scanner Appliances
comment={value} (Optional) User-defined comments.
Parameter Description
94

Chapter 4 - Scan ConfigurationUpdate Physical Scanner Appliance
Sample 3
Update physical scanner using tag_set_by and add_tags parameters:
API Request:
curl -u "USERNAME:PASSWORD" -H "X-Requested-With: Curl" -X "POST" -d "action=update&id=5115&tag_set_by=id&add_tags=7691422" "https://qualysapi.qualys.com/api/2.0/fo/appliance/physical/"
Sample 4
Update physical scanner using tag_set_by and set_tags parameters:
API Request:
curl -u "USERNAME:PASSWORD" -H "X-Requested-With: Curl" -X "POST" -d "action=update&id=5115&tag_set_by=id&set_tags=7691422" "https://qualysapi.qualys.com/api/2.0/fo/appliance/physical/"
Sample 5Update physical scanner using tag_set_by and remove_tags parameters:
API Request:
curl -u "USERNAME:PASSWORD" -H "X-Requested-With: Curl" -X "POST" -d "action=update&id=5115&tag_set_by=id&remove_tags=7691422" "https://qualysapi.qualys.com/api/2.0/fo/appliance/physical/"
XML output:
<?xml version="1.0" encoding="UTF-8" ?><!DOCTYPE SIMPLE_RETURN SYSTEM "https://qualysapi.qualys.com/api/2.0/simple_return.dtd"><SIMPLE_RETURN> <RESPONSE> <DATETIME>2017-10-01T00:12:29Z</DATETIME> <TEXT>Physical scanner updated successfully</TEXT> <ITEM_LIST> <ITEM> <KEY>ID</KEY> <VALUE>5115</VALUE> </ITEM> </ITEM_LIST> </RESPONSE></SIMPLE_RETURN>
95

Chapter 4 - Scan ConfigurationReplace Scanner Appliance
Replace Scanner ApplianceUsing the Replace Scanner Appliance API (/api/2.0/fo/appliance/replace_iscanner), Managers and Unit Managers can replace a scanner appliance with a new one. Tell us the name of the appliance you want to replace and the one you want to use.
Good to Know - You can replace one scanner appliance at a time. - Do not replace a scanner appliance while scans (using the appliance) are in progress. - The old scanner and the new scanner must be in the same network, if applicable. - You can only replace an EC2 scanner with another EC2 scanner.
Input Parameters
Sample - Replace scanner with new oneReplace “scanner1” with “scanner2” and copy scanner appliance settings but do not remove the new scanner from business objects.
API request:
curl -u "USERNAME:PASSWORD" -H "X-Requested-With: Curl""https://qualysapi.qualys.com/api/2.0/fo/appliance/replace_iscanner/?action=replace&echo_request=1&old_scanner_name=scanner1&new_scanner_name=scanner2&do_not_copy_settings=0&do_not_remove_new_scanner_from_objects=1"
Parameter Description
action=replace (Required)
echo_request={0|1} (Optional) Specifies whether to echo the request’s input parameters (names and values) in the XML output. When not specified, parameters are not included in the XML output. Specify 1 to view parameters in the XML output.
old_scanner_name={value} (Required) The name of the scanner you want to replace.
new_scanner_name={value} (Required) The name of the scanner you want to use.
do_not_copy_settings={0|1} (Optional) When not specified, we will transfer settings from the old scanner to the new scanner for you. Specify 1 if you do not want us to transfer appliance settings. Settings include the polling interval, heartbeat checks, scanning options, VLANs and static routes, associated asset groups, schedules and network, if applicable.
do_not_remove_new_scanner_from_objects={0|1}
(Optional) When not specified, we will remove the new appliance from business objects (asset groups and schedules) that it’s already associated with. Specify 1 if you do not want us to remove the new appliance from business objects.
This parameter cannot be set for EC2 scanners.
96

Chapter 4 - Scan ConfigurationReplace Scanner Appliance
XML output:
<?xml version="1.0" encoding="UTF-8" ?><!DOCTYPE SCANNER_REPLACE_OUTPUT SYSTEM "https://qualysapi.qualys.com/api/2.0/fo/appliance/replace_iscanner/replace_iscanner_output.dtd"><SCANNER_REPLACE_OUTPUT> <REQUEST> <DATETIME>2018-01-16T06:52:53Z</DATETIME> <USER_LOGIN>abcd</USER_LOGIN> <RESOURCE>https://qualysapi.qualys.com/api/2.0/fo/appliance/replace_iscanner/</RESOURCE> <PARAM_LIST> <PARAM> <KEY>echo_request</KEY> <VALUE>1</VALUE> </PARAM> <PARAM> <KEY>old_scanner_name</KEY> <VALUE>scanner1</VALUE> </PARAM> <PARAM> <KEY>new_scanner_name</KEY> <VALUE>scanner2</VALUE> </PARAM> <PARAM> <KEY>do_not_copy_settings</KEY> <VALUE>0</VALUE> </PARAM> <PARAM> <KEY>do_not_remove_new_scanner_from_objects</KEY> <VALUE>1</VALUE> </PARAM> <PARAM> <KEY>action</KEY> <VALUE>replace</VALUE> </PARAM> </PARAM_LIST> </REQUEST> <RESPONSE> <DATETIME>2018-01-16T06:52:53Z</DATETIME> <NEW_SETTINGS>POLLING_INTERVAL: 180, HEARTBEAT: 1</NEW_SETTINGS> <SCHEDULED_SCANS>Scheduled-Scan1, Scheduled-Scan2</SCHEDULED_SCANS> <ASSET_GROUPS>AG123, AG456</ASSET_GROUPS>
97

Chapter 4 - Scan ConfigurationScanner Appliance VLANs and Static Routes
<SUCCESS>Scanner Appliance replaced successfully.</SUCCESS> </RESPONSE></SCANNER_REPLACE_OUTPUT>
DTDA replace scanner appliance API request uses this DTD:
<platform API server>/api/2.0/fo/appliance/replace_iscanner/ replace_iscanner_output.dtd
Scanner Appliance VLANs and Static Routes/api/2.0/fo/appliance/?action=update (virtual appliance)
/api/2.0/fo/appliance/physical/?action=update (physical appliance)
Manage your VLANs and static routes for virtual and physical scanner appliances using the Virtual Scanner Appliance API () or Physical Scanner Appliance API (/api/2.0/fo/appliance/physical/?action=update). Use the parameters “set_vlans” and “set_routes” to add, update and remove these settings.
What do I need? Your Qualys account must have the VLANs and Static Routes feature enabled. Please contact our Support Team or your Qualys TAM if you would like us to enable this feature for you.
Permissions - Managers can add/remove VLANs and static routes for all scanner appliances in the subscription. Unit Managers can add/remove VLANs and static routes in the user’s same business unit.
Set VLANs on Scanner Appliance
Use the “set_vlans” parameter to specify one or more VLANs.
The format for a single VLAN is ID|IPv4_ADDRESS|NETMASK|NAME|ipv6_static or ipv6_auto|IPv6_ADDRESS, with pipe (|) used as a delimiter. All attributes are required. Multiple VLANs can be assigned using a comma separated list.
Good to know - An API call with the parameter “set_vlans” set to ” (empty string) will replace (i.e. remove) *all* of the VLANs that are assigned to the scanner appliance.
Attribute Description
ID Customer-defined ID (not assigned by Qualys). Must be in the range 0 to 4096, inclusive.
IPv4_ADDRESS A valid IPv4 IP address (dotted quad), such as 10.10.10.1. Leave empty when specifying an IPv6 address.
NETMASK A valid network mask (dotted quad), such as 255.255.255.0. Leave empty when specifying an IPv6 address.
98
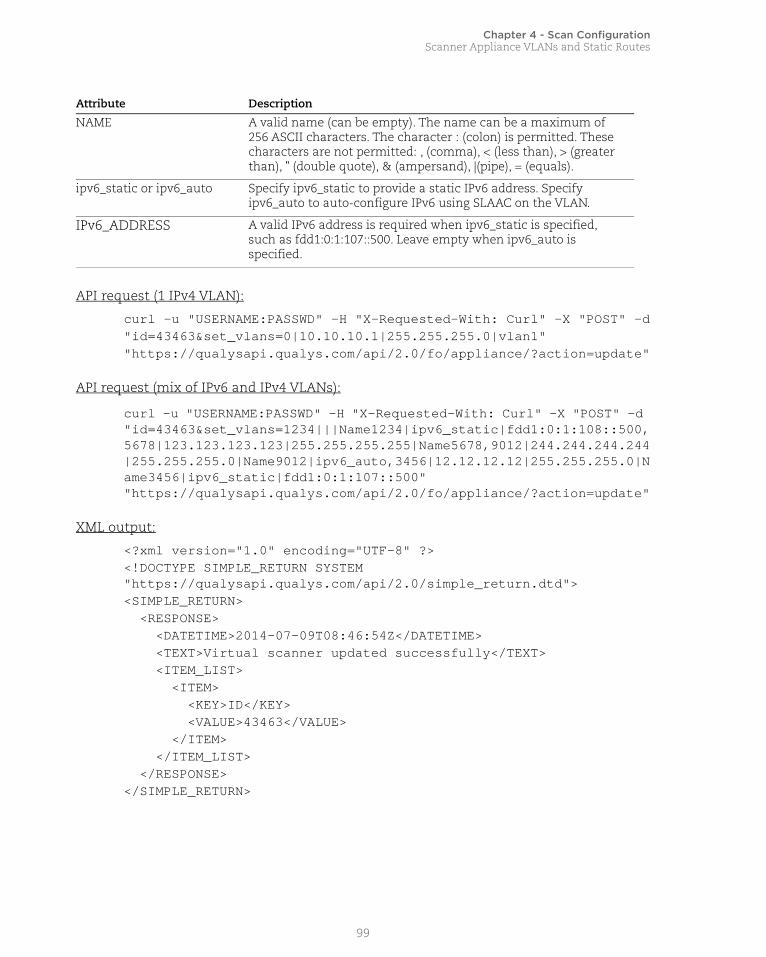
Chapter 4 - Scan ConfigurationScanner Appliance VLANs and Static Routes
API request (1 IPv4 VLAN):
curl -u "USERNAME:PASSWD" -H "X-Requested-With: Curl" -X "POST" -d"id=43463&set_vlans=0|10.10.10.1|255.255.255.0|vlan1" "https://qualysapi.qualys.com/api/2.0/fo/appliance/?action=update"
API request (mix of IPv6 and IPv4 VLANs):
curl -u "USERNAME:PASSWD" -H "X-Requested-With: Curl" -X "POST" -d "id=43463&set_vlans=1234|||Name1234|ipv6_static|fdd1:0:1:108::500,5678|123.123.123.123|255.255.255.255|Name5678,9012|244.244.244.244|255.255.255.0|Name9012|ipv6_auto,3456|12.12.12.12|255.255.255.0|Name3456|ipv6_static|fdd1:0:1:107::500" "https://qualysapi.qualys.com/api/2.0/fo/appliance/?action=update"
XML output:
<?xml version="1.0" encoding="UTF-8" ?><!DOCTYPE SIMPLE_RETURN SYSTEM "https://qualysapi.qualys.com/api/2.0/simple_return.dtd"><SIMPLE_RETURN> <RESPONSE> <DATETIME>2014-07-09T08:46:54Z</DATETIME> <TEXT>Virtual scanner updated successfully</TEXT> <ITEM_LIST> <ITEM> <KEY>ID</KEY> <VALUE>43463</VALUE> </ITEM> </ITEM_LIST> </RESPONSE></SIMPLE_RETURN>
NAME A valid name (can be empty). The name can be a maximum of 256 ASCII characters. The character : (colon) is permitted. These characters are not permitted: , (comma), < (less than), > (greater than), " (double quote), & (ampersand), |(pipe), = (equals).
ipv6_static or ipv6_auto Specify ipv6_static to provide a static IPv6 address. Specify ipv6_auto to auto-configure IPv6 using SLAAC on the VLAN.
IPv6_ADDRESS A valid IPv6 address is required when ipv6_static is specified, such as fdd1:0:1:107::500. Leave empty when ipv6_auto is specified.
Attribute Description
99
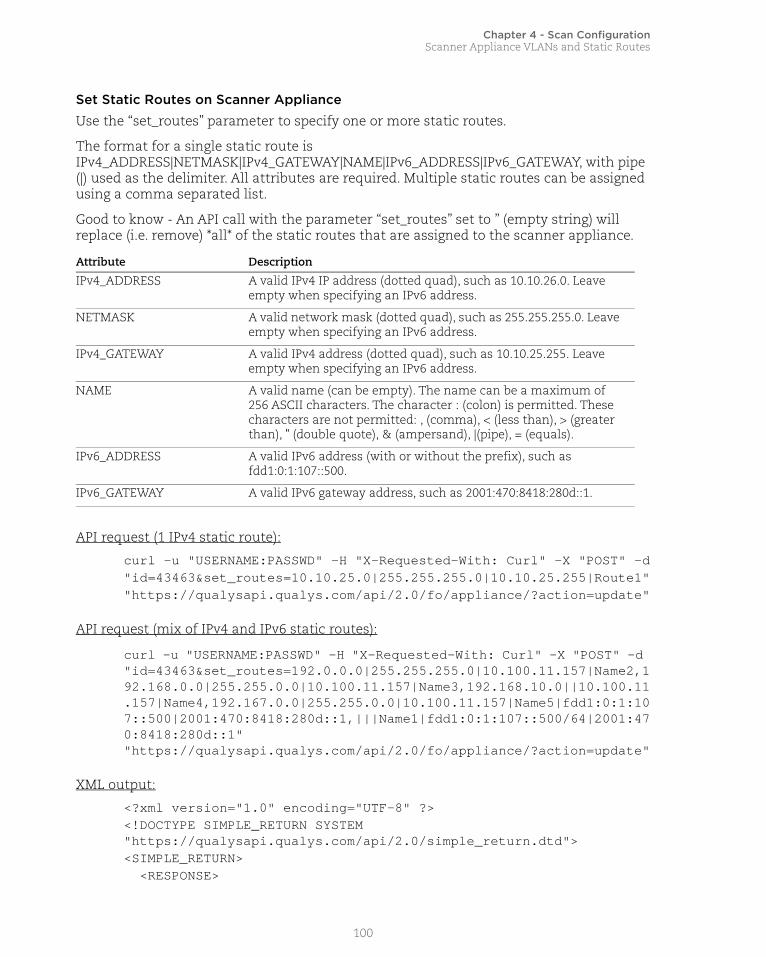
Chapter 4 - Scan ConfigurationScanner Appliance VLANs and Static Routes
Set Static Routes on Scanner Appliance
Use the “set_routes” parameter to specify one or more static routes.
The format for a single static route is IPv4_ADDRESS|NETMASK|IPv4_GATEWAY|NAME|IPv6_ADDRESS|IPv6_GATEWAY, with pipe (|) used as the delimiter. All attributes are required. Multiple static routes can be assigned using a comma separated list.
Good to know - An API call with the parameter “set_routes” set to ” (empty string) will replace (i.e. remove) *all* of the static routes that are assigned to the scanner appliance.
API request (1 IPv4 static route):
curl -u "USERNAME:PASSWD" -H "X-Requested-With: Curl" -X "POST" -d"id=43463&set_routes=10.10.25.0|255.255.255.0|10.10.25.255|Route1" "https://qualysapi.qualys.com/api/2.0/fo/appliance/?action=update"
API request (mix of IPv4 and IPv6 static routes):
curl -u "USERNAME:PASSWD" -H "X-Requested-With: Curl" -X "POST" -d "id=43463&set_routes=192.0.0.0|255.255.255.0|10.100.11.157|Name2,192.168.0.0|255.255.0.0|10.100.11.157|Name3,192.168.10.0||10.100.11.157|Name4,192.167.0.0|255.255.0.0|10.100.11.157|Name5|fdd1:0:1:107::500|2001:470:8418:280d::1,|||Name1|fdd1:0:1:107::500/64|2001:470:8418:280d::1" "https://qualysapi.qualys.com/api/2.0/fo/appliance/?action=update"
XML output:
<?xml version="1.0" encoding="UTF-8" ?><!DOCTYPE SIMPLE_RETURN SYSTEM "https://qualysapi.qualys.com/api/2.0/simple_return.dtd"><SIMPLE_RETURN> <RESPONSE>
Attribute Description
IPv4_ADDRESS A valid IPv4 IP address (dotted quad), such as 10.10.26.0. Leave empty when specifying an IPv6 address.
NETMASK A valid network mask (dotted quad), such as 255.255.255.0. Leave empty when specifying an IPv6 address.
IPv4_GATEWAY A valid IPv4 address (dotted quad), such as 10.10.25.255. Leave empty when specifying an IPv6 address.
NAME A valid name (can be empty). The name can be a maximum of 256 ASCII characters. The character : (colon) is permitted. These characters are not permitted: , (comma), < (less than), > (greater than), " (double quote), & (ampersand), |(pipe), = (equals).
IPv6_ADDRESS A valid IPv6 address (with or without the prefix), such as fdd1:0:1:107::500.
IPv6_GATEWAY A valid IPv6 gateway address, such as 2001:470:8418:280d::1.
100

Chapter 4 - Scan ConfigurationScanner Appliance VLANs and Static Routes
<DATETIME>2014-07-09T08:49:18Z</DATETIME> <TEXT>Virtual scanner updated successfully</TEXT> <ITEM_LIST> <ITEM> <KEY>ID</KEY> <VALUE>43463</VALUE> </ITEM> </ITEM_LIST> </RESPONSE></SIMPLE_RETURN>
View Scanner Appliances with VLANs, Static Routes
Use the parameters “action=list” and “output_mode=full”.
API request:
curl -u "USERNAME:PASSWD" -H "X-Requested-With: "https://qualysapi.qualys.com/api/2.0/fo/appliance/?action=list&ids=43463&output_mode=full"
XML output:
... <VLANS> <SETTING>Enabled</SETTING> <VLAN> <ID>0</ID> <NAME>vlan1</NAME> <IP_ADDRESS>10.10.10.1</IP_ADDRESS> <NETMASK>255.255.255.0</NETMASK> </VLAN> </VLANS> <STATIC_ROUTES> <ROUTE> <NAME>Route1</NAME> <IP_ADDRESS>10.10.25.0</IP_ADDRESS> <NETMASK>255.255.255.0</NETMASK> <GATEWAY>10.10.25.255</GATEWAY> </ROUTE> <ROUTE> <NAME>Route2</NAME> <IP_ADDRESS>10.10.26.0</IP_ADDRESS> <NETMASK>255.255.255.0</NETMASK> <GATEWAY>10.10.26.255</GATEWAY> </ROUTE> </STATIC_ROUTES>...
101

Chapter 4 - Scan ConfigurationScanner Appliance VLANs and Static Routes
Delete All VLAN Records
Use the “set_vlans” parameters and set it to “ (empty string).
API request (deletes all VLAN records):
curl -u "USERNAME:PASSWD" -H "X-Requested-With: -d "id=43463&set_vlans=""https://qualysapi.qualys.com/api/2.0/fo/appliance/?action=update"
XML output:
<?xml version="1.0" encoding="UTF-8" ?><!DOCTYPE SIMPLE_RETURN SYSTEM "https://qualysapi.qualys.com/api/2.0/simple_return.dtd"><SIMPLE_RETURN> <RESPONSE> <DATETIME>2014-07-09T08:49:18Z</DATETIME> <TEXT>Virtual scanner updated successfully</TEXT>...
Delete All Static Route RecordsUse the “set_routes” parameters and set it to “ (empty string).
API request (deletes all static route records):
curl -u "USERNAME:PASSWD" -H "X-Requested-With: -d "id=43463&set_routes=" "https://qualysapi.qualys.com/api/2.0/fo/appliance/?action=update"
XML output:
<?xml version="1.0" encoding="UTF-8" ?><!DOCTYPE SIMPLE_RETURN SYSTEM "https://qualysapi.qualys.com/api/2.0/simple_return.dtd"><SIMPLE_RETURN> <RESPONSE> <DATETIME>2014-07-09T08:49:18Z</DATETIME> <TEXT>Virtual scanner updated successfully</TEXT>...
102
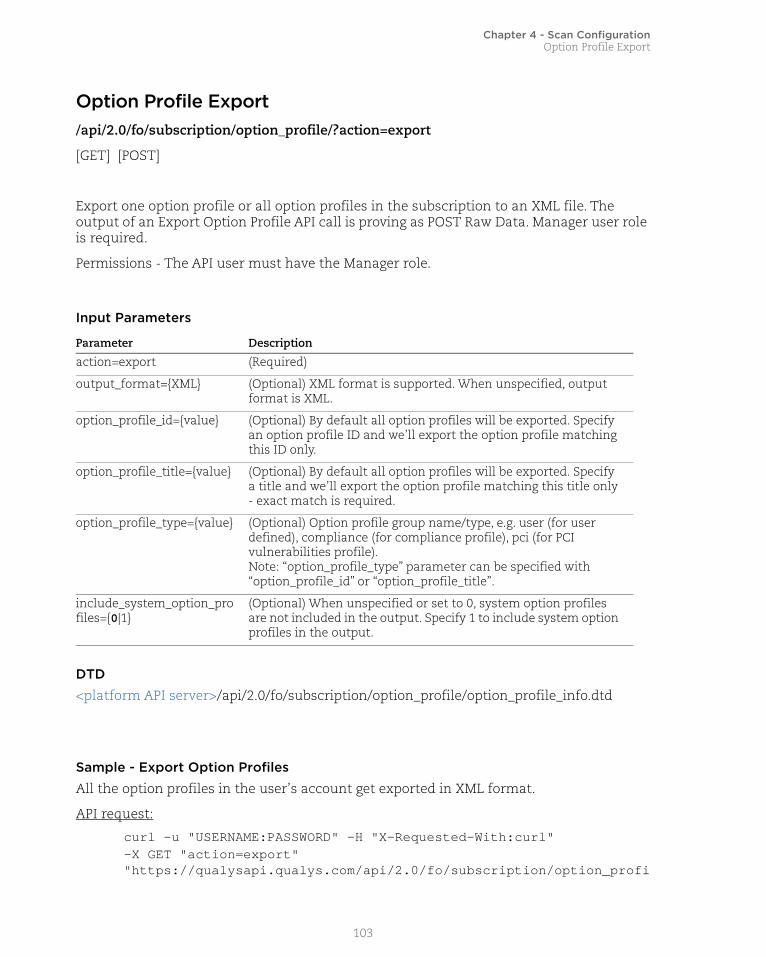
Chapter 4 - Scan ConfigurationOption Profile Export
Option Profile Export/api/2.0/fo/subscription/option_profile/?action=export
[GET] [POST]
Export one option profile or all option profiles in the subscription to an XML file. The output of an Export Option Profile API call is proving as POST Raw Data. Manager user role is required.
Permissions - The API user must have the Manager role.
Input Parameters
DTD
<platform API server>/api/2.0/fo/subscription/option_profile/option_profile_info.dtd
Sample - Export Option Profiles
All the option profiles in the user’s account get exported in XML format.
API request:
curl -u "USERNAME:PASSWORD" -H "X-Requested-With:curl" -X GET "action=export" "https://qualysapi.qualys.com/api/2.0/fo/subscription/option_profi
Parameter Description
action=export (Required)
output_format={XML} (Optional) XML format is supported. When unspecified, output format is XML.
option_profile_id={value} (Optional) By default all option profiles will be exported. Specify an option profile ID and we’ll export the option profile matching this ID only.
option_profile_title={value} (Optional) By default all option profiles will be exported. Specify a title and we’ll export the option profile matching this title only - exact match is required.
option_profile_type={value} (Optional) Option profile group name/type, e.g. user (for user defined), compliance (for compliance profile), pci (for PCI vulnerabilities profile). Note: “option_profile_type” parameter can be specified with “option_profile_id” or “option_profile_title”.
include_system_option_profiles={0|1}
(Optional) When unspecified or set to 0, system option profiles are not included in the output. Specify 1 to include system option profiles in the output.
103

Chapter 4 - Scan ConfigurationOption Profile Export
le/"
XML response:
<?xml version="1.0" encoding="UTF-8" ?><!DOCTYPE OPTION_PROFILES SYSTEM "https://qualysapi.qualys.com/api/2.0/fo/subscription/option_profile/option_profile_info.dtd"><OPTION_PROFILES> <OPTION_PROFILE> <BASIC_INFO> <ID>111186</ID> <GROUP_NAME><![CDATA[OP-SCAN]]></GROUP_NAME> <GROUP_TYPE>user</GROUP_TYPE> <USER_ID><![CDATA[John Doe(john_doe)]]></USER_ID> <UNIT_ID>0</UNIT_ID> <SUBSCRIPTION_ID>44</SUBSCRIPTION_ID> <IS_DEFAULT>0</IS_DEFAULT> <IS_GLOBAL>1</IS_GLOBAL> <IS_OFFLINE_SYNCABLE>0</IS_OFFLINE_SYNCABLE> <UPDATE_DATE>N/A</UPDATE_DATE> </BASIC_INFO> <SCAN> <PORTS> <TCP_PORTS> <TCP_PORTS_TYPE>full</TCP_PORTS_TYPE> <THREE_WAY_HANDSHAKE>1</THREE_WAY_HANDSHAKE> </TCP_PORTS> <UDP_PORTS> <UDP_PORTS_TYPE>none</UDP_PORTS_TYPE> <UDP_PORTS_ADDITIONAL> <HAS_ADDITIONAL>1</HAS_ADDITIONAL> <ADDITIONAL_PORTS>1-1024,8080,8181</ADDITIONAL_PORTS> </UDP_PORTS_ADDITIONAL> </UDP_PORTS> <AUTHORITATIVE_OPTION>1</AUTHORITATIVE_OPTION> </PORTS> <SCAN_DEAD_HOSTS>1</SCAN_DEAD_HOSTS> <CLOSE_VULNERABILITIES> <HAS_CLOSE_VULNERABILITIES>1</HAS_CLOSE_VULNERABILITIES> <HOST_NOT_FOUND_ALIVE>7</HOST_NOT_FOUND_ALIVE> </CLOSE_VULNERABILITIES> <PURGE_OLD_HOST_OS_CHANGED>1</PURGE_OLD_HOST_OS_CHANGED> <PERFORMANCE> <PARALLEL_SCALING>1</PARALLEL_SCALING> <OVERALL_PERFORMANCE>Custom</OVERALL_PERFORMANCE>
104
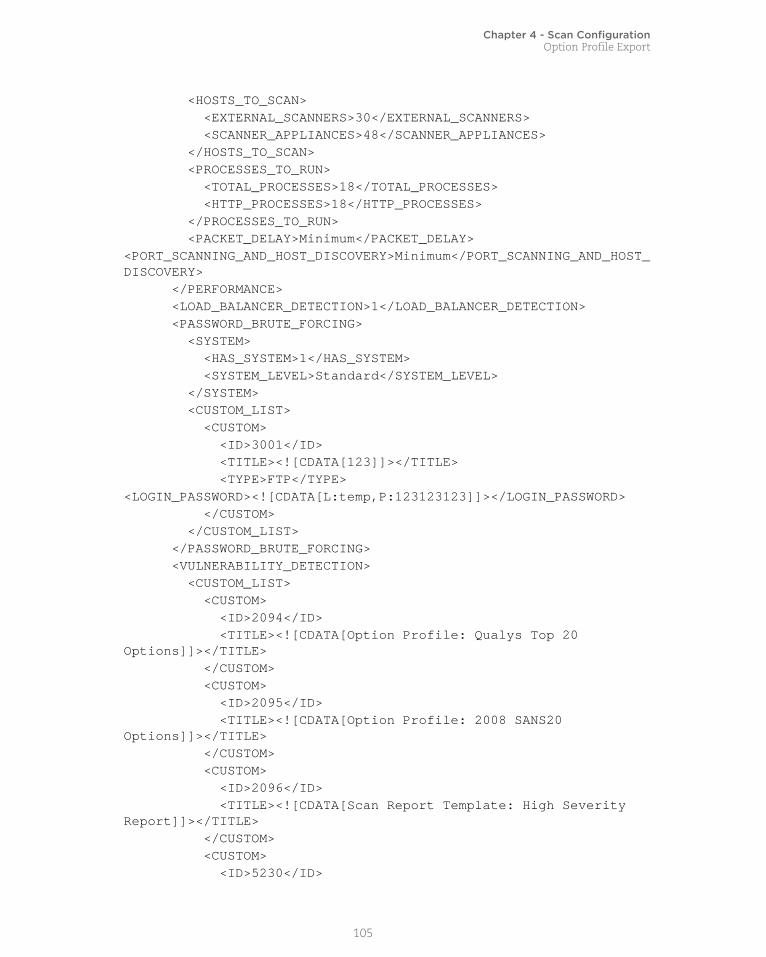
Chapter 4 - Scan ConfigurationOption Profile Export
<HOSTS_TO_SCAN> <EXTERNAL_SCANNERS>30</EXTERNAL_SCANNERS> <SCANNER_APPLIANCES>48</SCANNER_APPLIANCES> </HOSTS_TO_SCAN> <PROCESSES_TO_RUN> <TOTAL_PROCESSES>18</TOTAL_PROCESSES> <HTTP_PROCESSES>18</HTTP_PROCESSES> </PROCESSES_TO_RUN> <PACKET_DELAY>Minimum</PACKET_DELAY><PORT_SCANNING_AND_HOST_DISCOVERY>Minimum</PORT_SCANNING_AND_HOST_DISCOVERY> </PERFORMANCE> <LOAD_BALANCER_DETECTION>1</LOAD_BALANCER_DETECTION> <PASSWORD_BRUTE_FORCING> <SYSTEM> <HAS_SYSTEM>1</HAS_SYSTEM> <SYSTEM_LEVEL>Standard</SYSTEM_LEVEL> </SYSTEM> <CUSTOM_LIST> <CUSTOM> <ID>3001</ID> <TITLE><![CDATA[123]]></TITLE> <TYPE>FTP</TYPE><LOGIN_PASSWORD><![CDATA[L:temp,P:123123123]]></LOGIN_PASSWORD> </CUSTOM> </CUSTOM_LIST> </PASSWORD_BRUTE_FORCING> <VULNERABILITY_DETECTION> <CUSTOM_LIST> <CUSTOM> <ID>2094</ID> <TITLE><![CDATA[Option Profile: Qualys Top 20 Options]]></TITLE> </CUSTOM> <CUSTOM> <ID>2095</ID> <TITLE><![CDATA[Option Profile: 2008 SANS20 Options]]></TITLE> </CUSTOM> <CUSTOM> <ID>2096</ID> <TITLE><![CDATA[Scan Report Template: High Severity Report]]></TITLE> </CUSTOM> <CUSTOM> <ID>5230</ID>
105

Chapter 4 - Scan ConfigurationOption Profile Export
<TITLE><![CDATA[118960]]></TITLE> </CUSTOM> <CUSTOM> <ID>87936</ID> <TITLE><![CDATA[Bash Shellshock Detection]]></TITLE> </CUSTOM> <CUSTOM> <ID>87937</ID> <TITLE><![CDATA[Heartbleed Detection]]></TITLE> </CUSTOM> <CUSTOM> <ID>87938</ID> <TITLE><![CDATA[Windows Authentication Results v.1]]></TITLE> </CUSTOM> <CUSTOM> <ID>87939</ID> <TITLE><![CDATA[Unix Authentication Results v.1]]></TITLE> </CUSTOM> <CUSTOM> <ID>87940</ID> <TITLE><![CDATA[Inventory Results v.1]]></TITLE> </CUSTOM> <CUSTOM> <ID>87941</ID> <TITLE><![CDATA[SSL Certificates]]></TITLE> </CUSTOM> </CUSTOM_LIST> <DETECTION_INCLUDE> <BASIC_HOST_INFO_CHECKS>1</BASIC_HOST_INFO_CHECKS> <OVAL_CHECKS>1</OVAL_CHECKS> </DETECTION_INCLUDE> <DETECTION_EXCLUDE> <CUSTOM_LIST> <CUSTOM> <ID>2099</ID> <TITLE><![CDATA[DL]]></TITLE> </CUSTOM> </CUSTOM_LIST> </DETECTION_EXCLUDE> </VULNERABILITY_DETECTION> <AUTHENTICATION><![CDATA[Windows,Unix,Oracle,Oracle Listener,SNMP,VMware,DB2,HTTP,MySQL]]></AUTHENTICATION> <ADDL_CERT_DETECTION>1</ADDL_CERT_DETECTION> <DISSOLVABLE_AGENT>
106

Chapter 4 - Scan ConfigurationOption Profile Export
<DISSOLVABLE_AGENT_ENABLE>1</DISSOLVABLE_AGENT_ENABLE> <WINDOWS_SHARE_ENUMERATION_ENABLE>1</WINDOWS_SHARE_ENUMERATION_ENABLE> </DISSOLVABLE_AGENT> <LITE_OS_SCAN>1</LITE_OS_SCAN> <CUSTOM_HTTP_HEADER> <VALUE>AFCD</VALUE> </CUSTOM_HTTP_HEADER> <FILE_INTEGRITY_MONITORING> <AUTO_UPDATE_EXPECTED_VALUE>1</AUTO_UPDATE_EXPECTED_VALUE> </FILE_INTEGRITY_MONITORING> <DO_NOT_OVERWRITE_OS>1</DO_NOT_OVERWRITE_OS> </SCAN> <MAP> <BASIC_INFO_GATHERING_ON>netblockonly</BASIC_INFO_GATHERING_ON> <TCP_PORTS> <TCP_PORTS_STANDARD_SCAN>1</TCP_PORTS_STANDARD_SCAN> <TCP_PORTS_ADDITIONAL> <HAS_ADDITIONAL>1</HAS_ADDITIONAL> <ADDITIONAL_PORTS>1,2,3,80</ADDITIONAL_PORTS> </TCP_PORTS_ADDITIONAL> </TCP_PORTS> <UDP_PORTS> <UDP_PORTS_STANDARD_SCAN>1</UDP_PORTS_STANDARD_SCAN> <UDP_PORTS_ADDITIONAL> <HAS_ADDITIONAL>1</HAS_ADDITIONAL> <ADDITIONAL_PORTS>4,5,6,8181</ADDITIONAL_PORTS> </UDP_PORTS_ADDITIONAL> </UDP_PORTS> <MAP_OPTIONS> <PERFORM_LIVE_HOST_SWEEP>1</PERFORM_LIVE_HOST_SWEEP> <DISABLE_DNS_TRAFFIC>1</DISABLE_DNS_TRAFFIC> </MAP_OPTIONS> <MAP_PERFORMANCE> <OVERALL_PERFORMANCE>Custom</OVERALL_PERFORMANCE> <MAP_PARALLEL> <EXTERNAL_SCANNERS>16</EXTERNAL_SCANNERS> <SCANNER_APPLIANCES>14</SCANNER_APPLIANCES> <NETBLOCK_SIZE>64</NETBLOCK_SIZE> </MAP_PARALLEL> <PACKET_DELAY>Maximum</PACKET_DELAY> </MAP_PERFORMANCE> <MAP_AUTHENTICATION>VMware</MAP_AUTHENTICATION> </MAP>
107

Chapter 4 - Scan ConfigurationOption Profile Export
<ADDITIONAL> <HOST_DISCOVERY> <TCP_PORTS> <STANDARD_SCAN>1</STANDARD_SCAN> <TCP_ADDITIONAL> <HAS_ADDITIONAL>1</HAS_ADDITIONAL> <ADDITIONAL_PORTS>1-6,1024</ADDITIONAL_PORTS> </TCP_ADDITIONAL> </TCP_PORTS> <UDP_PORTS> <STANDARD_SCAN>1</STANDARD_SCAN> </UDP_PORTS> <ICMP>1</ICMP> </HOST_DISCOVERY> <BLOCK_RESOURCES><WATCHGUARD_DEFAULT_BLOCKED_PORTS>1</WATCHGUARD_DEFAULT_BLOCKED_PORTS> <ALL_REGISTERED_IPS>1</ALL_REGISTERED_IPS> </BLOCK_RESOURCES> <PACKET_OPTIONS><IGNORE_FIREWALL_GENERATED_TCP_RST>1</IGNORE_FIREWALL_GENERATED_TCP_RST> <IGNORE_ALL_TCP_RST>1</IGNORE_ALL_TCP_RST><IGNORE_FIREWALL_GENERATED_TCP_SYN_ACK>1</IGNORE_FIREWALL_GENERATED_TCP_SYN_ACK><NOT_SEND_TCP_ACK_OR_SYN_ACK_DURING_HOST_DISCOVERY>1</NOT_SEND_TCP_ACK_OR_SYN_ACK_DURING_HOST_DISCOVERY> </PACKET_OPTIONS> </ADDITIONAL> </OPTION_PROFILE></OPTION_PROFILES>
Sample - Export Option Profile with specific title and IDAPI request:
curl -u "USERNAME:PASSWORD" -H "X-Requested-With:curl" -X GET "action=export&option_profile_title=OP-COMP&option_profile_id=111235" "https://qualysapi.qualys.com/api/2.0/fo/subscription/option_profile/"
XML response:
<?xml version="1.0" encoding="UTF-8" ?><!DOCTYPE OPTION_PROFILES SYSTEM "https://qualysapi.qualys.com/api/2.0/fo/subscription/option_profi
108

Chapter 4 - Scan ConfigurationOption Profile Export
le/option_profile_info.dtd"><OPTION_PROFILES> <OPTION_PROFILE> <BASIC_INFO> <ID>111235</ID> <GROUP_NAME><![CDATA[OP-COMP]]></GROUP_NAME> <GROUP_TYPE>compliance</GROUP_TYPE> <USER_ID><![CDATA[John Doe (john_doe)]]></USER_ID> <UNIT_ID>0</UNIT_ID> <SUBSCRIPTION_ID>44</SUBSCRIPTION_ID> <IS_GLOBAL>0</IS_GLOBAL> <UPDATE_DATE>N/A</UPDATE_DATE> </BASIC_INFO> <SCAN> <PORTS> <TARGETED_SCAN>1</TARGETED_SCAN> </PORTS> <PERFORMANCE> <PARALLEL_SCALING>0</PARALLEL_SCALING> <OVERALL_PERFORMANCE>Normal</OVERALL_PERFORMANCE> <HOSTS_TO_SCAN> <EXTERNAL_SCANNERS>5</EXTERNAL_SCANNERS> <SCANNER_APPLIANCES>30</SCANNER_APPLIANCES> </HOSTS_TO_SCAN> <PROCESSES_TO_RUN> <TOTAL_PROCESSES>10</TOTAL_PROCESSES> <HTTP_PROCESSES>10</HTTP_PROCESSES> </PROCESSES_TO_RUN> <PACKET_DELAY>Short</PACKET_DELAY><PORT_SCANNING_AND_HOST_DISCOVERY>Minimum</PORT_SCANNING_AND_HOST_DISCOVERY> </PERFORMANCE> <DISSOLVABLE_AGENT> <DISSOLVABLE_AGENT_ENABLE>1</DISSOLVABLE_AGENT_ENABLE> <PASSWORD_AUDITING_ENABLE><HAS_PASSWORD_AUDITING_ENABLE>1</HAS_PASSWORD_AUDITING_ENABLE><CUSTOM_PASSWORD_DICTIONARY>asdf</CUSTOM_PASSWORD_DICTIONARY> </PASSWORD_AUDITING_ENABLE><WINDOWS_SHARE_ENUMERATION_ENABLE>1</WINDOWS_SHARE_ENUMERATION_ENABLE><WINDOWS_DIRECTORY_SEARCH_ENABLE>1</WINDOWS_DIRECTORY_SEARCH_ENABLE> </DISSOLVABLE_AGENT> <CONTROL_TYPES> <FIM_CONTROLS_ENABLED>1</FIM_CONTROLS_ENABLED> <CUSTOM_WMI_QUERY_CHECKS>1</CUSTOM_WMI_QUERY_CHECKS>
109

Chapter 4 - Scan ConfigurationOption Profile Export
</CONTROL_TYPES> <TEST_AUTHENTICATION>1</TEST_AUTHENTICATION> </SCAN> <ADDITIONAL> <HOST_DISCOVERY> <TCP_PORTS> <STANDARD_SCAN>1</STANDARD_SCAN> </TCP_PORTS> <UDP_PORTS> <STANDARD_SCAN>1</STANDARD_SCAN> </UDP_PORTS> <ICMP>1</ICMP> </HOST_DISCOVERY> <BLOCK_RESOURCES><WATCHGUARD_DEFAULT_BLOCKED_PORTS>1</WATCHGUARD_DEFAULT_BLOCKED_PORTS> <ALL_REGISTERED_IPS>1</ALL_REGISTERED_IPS> </BLOCK_RESOURCES> <PACKET_OPTIONS><IGNORE_FIREWALL_GENERATED_TCP_RST>1</IGNORE_FIREWALL_GENERATED_TCP_RST><IGNORE_FIREWALL_GENERATED_TCP_SYN_ACK>1</IGNORE_FIREWALL_GENERATED_TCP_SYN_ACK><NOT_SEND_TCP_ACK_OR_SYN_ACK_DURING_HOST_DISCOVERY>1</NOT_SEND_TCP_ACK_OR_SYN_ACK_DURING_HOST_DISCOVERY> </PACKET_OPTIONS> </ADDITIONAL> </OPTION_PROFILE></OPTION_PROFILES>
Sample - Export Option Profile of type PCIThe option profile with PCI type in the user’s account get exported in XML format.
API request:
curl -u "USERNAME:PASSWORD" -H "X-Requested-With:curl" -X GET "action=export&option_profile_type=pci" "https://qualysapi.qualys.com/api/2.0/fo/subscription/option_profile/"
XML response:
<?xml version="1.0" encoding="UTF-8" ?><!DOCTYPE OPTION_PROFILES SYSTEM "https://qualysapi.qualys.com/api/2.0/fo/subscription/option_profile/option_profile_info.dtd"><OPTION_PROFILES>
110

Chapter 4 - Scan ConfigurationOption Profile Export
<OPTION_PROFILE> <BASIC_INFO> <ID>111223</ID> <GROUP_NAME><![CDATA[PCI-Example]]></GROUP_NAME> <GROUP_TYPE>pci</GROUP_TYPE> <USER_ID><![CDATA[John Doe (john_doe)]]></USER_ID> <UNIT_ID>0</UNIT_ID> <SUBSCRIPTION_ID>44</SUBSCRIPTION_ID> <IS_GLOBAL>1</IS_GLOBAL> <IS_OFFLINE_SYNCABLE>0</IS_OFFLINE_SYNCABLE> <UPDATE_DATE>N/A</UPDATE_DATE> </BASIC_INFO> <SCAN> <SCAN_DEAD_HOSTS>1</SCAN_DEAD_HOSTS> <CLOSE_VULNERABILITIES> <HAS_CLOSE_VULNERABILITIES>1</HAS_CLOSE_VULNERABILITIES> <HOST_NOT_FOUND_ALIVE>4</HOST_NOT_FOUND_ALIVE> </CLOSE_VULNERABILITIES> <PURGE_OLD_HOST_OS_CHANGED>1</PURGE_OLD_HOST_OS_CHANGED> <PERFORMANCE> <PARALLEL_SCALING>1</PARALLEL_SCALING> <OVERALL_PERFORMANCE>Low</OVERALL_PERFORMANCE> <HOSTS_TO_SCAN> <EXTERNAL_SCANNERS>5</EXTERNAL_SCANNERS> <SCANNER_APPLIANCES>10</SCANNER_APPLIANCES> </HOSTS_TO_SCAN> <PROCESSES_TO_RUN> <TOTAL_PROCESSES>4</TOTAL_PROCESSES> <HTTP_PROCESSES>2</HTTP_PROCESSES> </PROCESSES_TO_RUN> <PACKET_DELAY>Long</PACKET_DELAY><PORT_SCANNING_AND_HOST_DISCOVERY>Minimum</PORT_SCANNING_AND_HOST_DISCOVERY> </PERFORMANCE> </SCAN> <ADDITIONAL> <HOST_DISCOVERY> <TCP_PORTS> <STANDARD_SCAN>1</STANDARD_SCAN> <TCP_ADDITIONAL> <HAS_ADDITIONAL>1</HAS_ADDITIONAL> <ADDITIONAL_PORTS>1-6,1024</ADDITIONAL_PORTS> </TCP_ADDITIONAL> </TCP_PORTS> </HOST_DISCOVERY> </ADDITIONAL>
111

Chapter 4 - Scan ConfigurationOption Profile Import
</OPTION_PROFILE></OPTION_PROFILES>
Option Profile Import /api/2.0/fo/subscription/option_profile/?action=import
[POST]
Import all option profiles defined in input XML file.
Permissions - The API user must have the Manager role.
When calling the Import Option Profile API the user needs to pass the proper XML with Content-Type XML. This will create option profiles in that user’s subscription. All validations are applied as in the Qualys portal UI while creating option profiles using the Import Option Profile API.
Validations and Constraints:
1) The Option Profile DTD file is used to validate a generated/exported Option Profile XML file.
2) An XSD file is used to validate a proper format and required elements of the option profile XML file when importing this file.
3) While importing, any Search Lists defined for Vulnerability Detection, Custom and/or Excluded Lists, must be created in the user’s subscription before making an Import Option Profile call. At import time we try to match the Search List “title” to a search list title in the user’s subscription. If a match is found the search list is used, otherwise “Complete” Vulnerability Detection is assigned.
4) Password Brute Force Lists are not imported and will always be empty assigned, regardless of Option Profile XML content.
5) Policies defined for the PC Scan Restriction feature are not imported and will be empty assigned, regardless of Option Profile XML content.
Input Parameter
Sample - Import option profiles in the input file into the user’s accountAPI request:
curl -u "USERNAME:PASSWORD" -H "content-type: text/xml"-X "POST"--data-binary @Export_OP.xml"https://qualysapi.qualys.com/api/2.0/fo/subscription/option_profile/?action=import"
Parameter Description
action=import (Required)
112

Chapter 4 - Scan ConfigurationOption Profile Import
Note: “Export_OP.xml” contains the request POST data.
Request POST data:
<?xml version="1.0" encoding="UTF-8"?><!DOCTYPE OPTION_PROFILES SYSTEM "https://qualysapi.qualys.com/api/2.0/fo/subscription/option_profile/option_profile_info.dtd"><OPTION_PROFILES> <OPTION_PROFILE> <BASIC_INFO> <ID>11123</ID> <GROUP_NAME><![CDATA[OP-SCAN]]></GROUP_NAME> <GROUP_TYPE>user</GROUP_TYPE> <USER_ID><![CDATA[John Doe (john_doe)]]></USER_ID> <UNIT_ID>0</UNIT_ID> <SUBSCRIPTION_ID>76084</SUBSCRIPTION_ID> <IS_DEFAULT>0</IS_DEFAULT> <IS_GLOBAL>1</IS_GLOBAL> <IS_OFFLINE_SYNCABLE>0</IS_OFFLINE_SYNCABLE> <UPDATE_DATE>N/A</UPDATE_DATE> </BASIC_INFO> <SCAN> <PORTS> <TCP_PORTS> <TCP_PORTS_TYPE>full</TCP_PORTS_TYPE> <THREE_WAY_HANDSHAKE>1</THREE_WAY_HANDSHAKE> </TCP_PORTS> <UDP_PORTS> <UDP_PORTS_TYPE>none</UDP_PORTS_TYPE> <UDP_PORTS_ADDITIONAL> <HAS_ADDITIONAL>1</HAS_ADDITIONAL> <ADDITIONAL_PORTS>1-1024,8080,8181</ADDITIONAL_PORTS> </UDP_PORTS_ADDITIONAL> </UDP_PORTS> <AUTHORITATIVE_OPTION>1</AUTHORITATIVE_OPTION> </PORTS> <SCAN_DEAD_HOSTS>1</SCAN_DEAD_HOSTS> <CLOSE_VULNERABILITIES> <HAS_CLOSE_VULNERABILITIES>1</HAS_CLOSE_VULNERABILITIES> <HOST_NOT_FOUND_ALIVE>7</HOST_NOT_FOUND_ALIVE> </CLOSE_VULNERABILITIES> <PURGE_OLD_HOST_OS_CHANGED>1</PURGE_OLD_HOST_OS_CHANGED> <PERFORMANCE> <PARALLEL_SCALING>1</PARALLEL_SCALING> <OVERALL_PERFORMANCE>Custom</OVERALL_PERFORMANCE>
113

Chapter 4 - Scan ConfigurationOption Profile Import
<HOSTS_TO_SCAN> <EXTERNAL_SCANNERS>30</EXTERNAL_SCANNERS> <SCANNER_APPLIANCES>48</SCANNER_APPLIANCES> </HOSTS_TO_SCAN> <PROCESSES_TO_RUN> <TOTAL_PROCESSES>18</TOTAL_PROCESSES> <HTTP_PROCESSES>18</HTTP_PROCESSES> </PROCESSES_TO_RUN> <PACKET_DELAY>Maximum</PACKET_DELAY><PORT_SCANNING_AND_HOST_DISCOVERY>Minimum</PORT_SCANNING_AND_HOST_DISCOVERY> </PERFORMANCE> <LOAD_BALANCER_DETECTION>1</LOAD_BALANCER_DETECTION> <PASSWORD_BRUTE_FORCING> <SYSTEM> <HAS_SYSTEM>1</HAS_SYSTEM> <SYSTEM_LEVEL>Standard</SYSTEM_LEVEL> </SYSTEM> <CUSTOM_LIST> <CUSTOM> <ID>3001</ID> <TITLE><![CDATA[123]]></TITLE> <TYPE>FTP</TYPE><LOGIN_PASSWORD><![CDATA[L:temp,P:123123123]]></LOGIN_PASSWORD> </CUSTOM> </CUSTOM_LIST> </PASSWORD_BRUTE_FORCING> <VULNERABILITY_DETECTION> <CUSTOM_LIST> <CUSTOM> <ID>2094</ID> <TITLE><![CDATA[Option Profile: Qualys Top 20 Options]]></TITLE> </CUSTOM> <CUSTOM> <ID>2095</ID> <TITLE><![CDATA[Option Profile: 2008 SANS20 Options]]></TITLE> </CUSTOM> <CUSTOM> <ID>2096</ID> <TITLE><![CDATA[Scan Report Template: High Severity Report]]></TITLE> </CUSTOM> <CUSTOM> <ID>5230</ID>
114

Chapter 4 - Scan ConfigurationOption Profile Import
<TITLE><![CDATA[118960]]></TITLE> </CUSTOM> <CUSTOM> <ID>87936</ID> <TITLE><![CDATA[Bash Shellshock Detection]]></TITLE> </CUSTOM> <CUSTOM> <ID>87937</ID> <TITLE><![CDATA[Heartbleed Detection]]></TITLE> </CUSTOM> <CUSTOM> <ID>87938</ID> <TITLE><![CDATA[Windows Authentication Results v.1]]></TITLE> </CUSTOM> <CUSTOM> <ID>87939</ID> <TITLE><![CDATA[Unix Authentication Results v.1]]></TITLE> </CUSTOM> <CUSTOM> <ID>87940</ID> <TITLE><![CDATA[Inventory Results v.1]]></TITLE> </CUSTOM> <CUSTOM> <ID>87941</ID> <TITLE><![CDATA[SSL Certificates]]></TITLE> </CUSTOM> </CUSTOM_LIST> <DETECTION_INCLUDE> <BASIC_HOST_INFO_CHECKS>1</BASIC_HOST_INFO_CHECKS> <OVAL_CHECKS>1</OVAL_CHECKS> </DETECTION_INCLUDE> <DETECTION_EXCLUDE> <CUSTOM_LIST> <CUSTOM> <ID>2099</ID> <TITLE><![CDATA[DL]]></TITLE> </CUSTOM> </CUSTOM_LIST> </DETECTION_EXCLUDE> </VULNERABILITY_DETECTION> <AUTHENTICATION><![CDATA[Windows,Unix,Oracle,Oracle Listener,SNMP,VMware,DB2,HTTP,MySQL]]></AUTHENTICATION> <ADDL_CERT_DETECTION>1</ADDL_CERT_DETECTION> <DISSOLVABLE_AGENT>
115
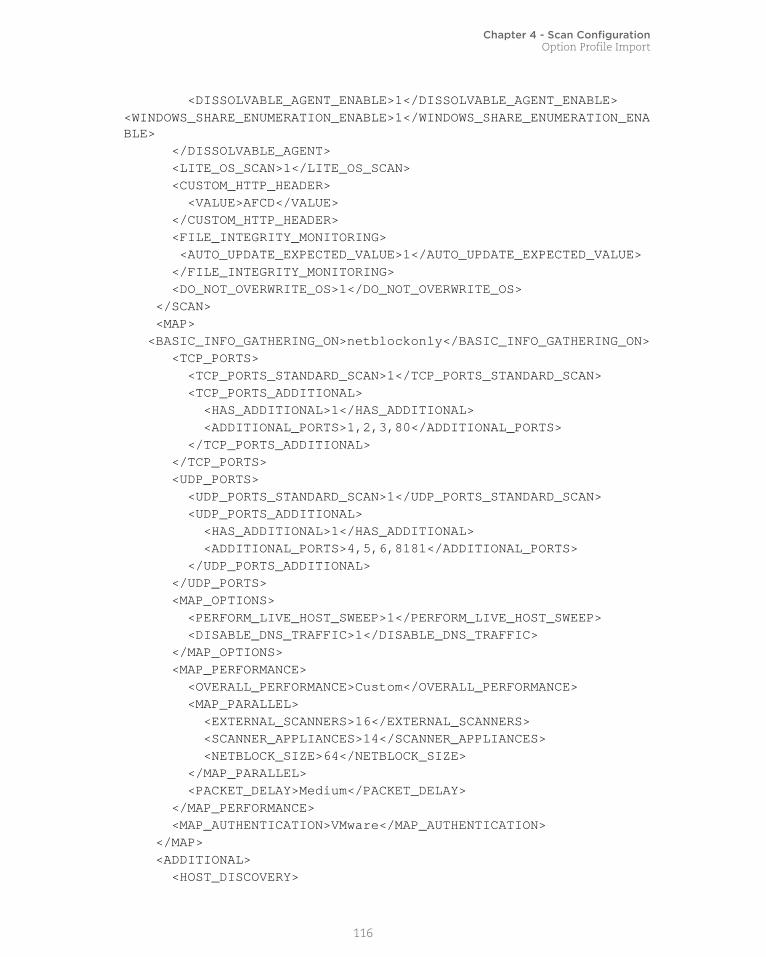
Chapter 4 - Scan ConfigurationOption Profile Import
<DISSOLVABLE_AGENT_ENABLE>1</DISSOLVABLE_AGENT_ENABLE><WINDOWS_SHARE_ENUMERATION_ENABLE>1</WINDOWS_SHARE_ENUMERATION_ENABLE> </DISSOLVABLE_AGENT> <LITE_OS_SCAN>1</LITE_OS_SCAN> <CUSTOM_HTTP_HEADER> <VALUE>AFCD</VALUE> </CUSTOM_HTTP_HEADER> <FILE_INTEGRITY_MONITORING> <AUTO_UPDATE_EXPECTED_VALUE>1</AUTO_UPDATE_EXPECTED_VALUE> </FILE_INTEGRITY_MONITORING> <DO_NOT_OVERWRITE_OS>1</DO_NOT_OVERWRITE_OS> </SCAN> <MAP> <BASIC_INFO_GATHERING_ON>netblockonly</BASIC_INFO_GATHERING_ON> <TCP_PORTS> <TCP_PORTS_STANDARD_SCAN>1</TCP_PORTS_STANDARD_SCAN> <TCP_PORTS_ADDITIONAL> <HAS_ADDITIONAL>1</HAS_ADDITIONAL> <ADDITIONAL_PORTS>1,2,3,80</ADDITIONAL_PORTS> </TCP_PORTS_ADDITIONAL> </TCP_PORTS> <UDP_PORTS> <UDP_PORTS_STANDARD_SCAN>1</UDP_PORTS_STANDARD_SCAN> <UDP_PORTS_ADDITIONAL> <HAS_ADDITIONAL>1</HAS_ADDITIONAL> <ADDITIONAL_PORTS>4,5,6,8181</ADDITIONAL_PORTS> </UDP_PORTS_ADDITIONAL> </UDP_PORTS> <MAP_OPTIONS> <PERFORM_LIVE_HOST_SWEEP>1</PERFORM_LIVE_HOST_SWEEP> <DISABLE_DNS_TRAFFIC>1</DISABLE_DNS_TRAFFIC> </MAP_OPTIONS> <MAP_PERFORMANCE> <OVERALL_PERFORMANCE>Custom</OVERALL_PERFORMANCE> <MAP_PARALLEL> <EXTERNAL_SCANNERS>16</EXTERNAL_SCANNERS> <SCANNER_APPLIANCES>14</SCANNER_APPLIANCES> <NETBLOCK_SIZE>64</NETBLOCK_SIZE> </MAP_PARALLEL> <PACKET_DELAY>Medium</PACKET_DELAY> </MAP_PERFORMANCE> <MAP_AUTHENTICATION>VMware</MAP_AUTHENTICATION> </MAP> <ADDITIONAL> <HOST_DISCOVERY>
116
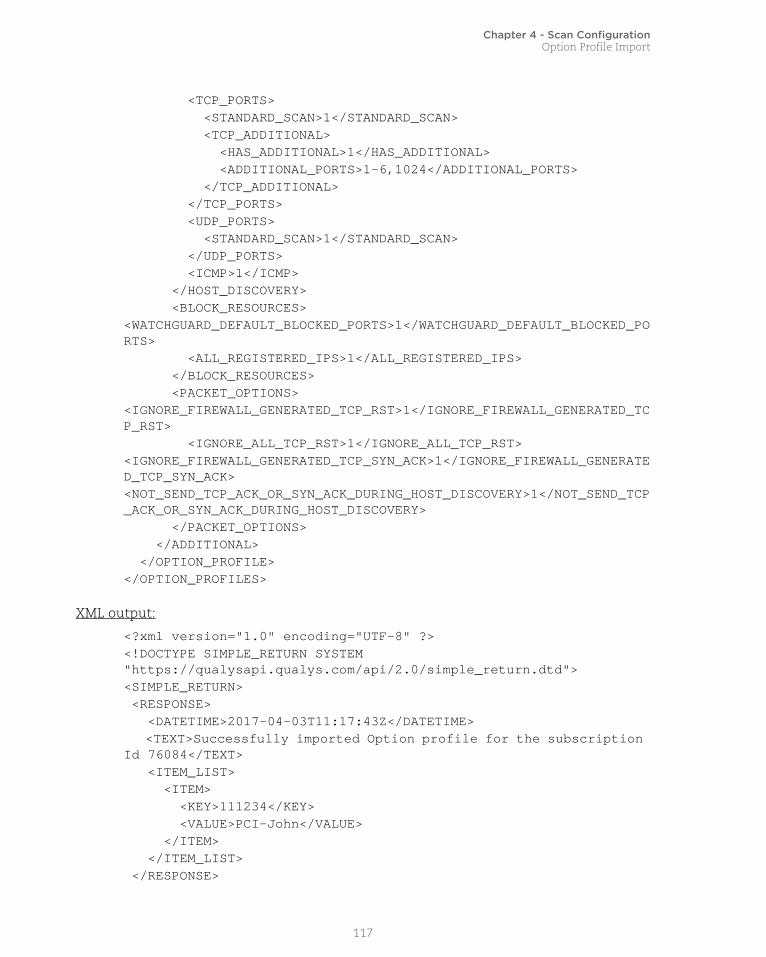
Chapter 4 - Scan ConfigurationOption Profile Import
<TCP_PORTS> <STANDARD_SCAN>1</STANDARD_SCAN> <TCP_ADDITIONAL> <HAS_ADDITIONAL>1</HAS_ADDITIONAL> <ADDITIONAL_PORTS>1-6,1024</ADDITIONAL_PORTS> </TCP_ADDITIONAL> </TCP_PORTS> <UDP_PORTS> <STANDARD_SCAN>1</STANDARD_SCAN> </UDP_PORTS> <ICMP>1</ICMP> </HOST_DISCOVERY> <BLOCK_RESOURCES><WATCHGUARD_DEFAULT_BLOCKED_PORTS>1</WATCHGUARD_DEFAULT_BLOCKED_PORTS> <ALL_REGISTERED_IPS>1</ALL_REGISTERED_IPS> </BLOCK_RESOURCES> <PACKET_OPTIONS><IGNORE_FIREWALL_GENERATED_TCP_RST>1</IGNORE_FIREWALL_GENERATED_TCP_RST> <IGNORE_ALL_TCP_RST>1</IGNORE_ALL_TCP_RST><IGNORE_FIREWALL_GENERATED_TCP_SYN_ACK>1</IGNORE_FIREWALL_GENERATED_TCP_SYN_ACK><NOT_SEND_TCP_ACK_OR_SYN_ACK_DURING_HOST_DISCOVERY>1</NOT_SEND_TCP_ACK_OR_SYN_ACK_DURING_HOST_DISCOVERY> </PACKET_OPTIONS> </ADDITIONAL> </OPTION_PROFILE></OPTION_PROFILES>
XML output:
<?xml version="1.0" encoding="UTF-8" ?> <!DOCTYPE SIMPLE_RETURN SYSTEM "https://qualysapi.qualys.com/api/2.0/simple_return.dtd"> <SIMPLE_RETURN> <RESPONSE> <DATETIME>2017-04-03T11:17:43Z</DATETIME> <TEXT>Successfully imported Option profile for the subscription Id 76084</TEXT> <ITEM_LIST> <ITEM> <KEY>111234</KEY> <VALUE>PCI-John</VALUE> </ITEM> </ITEM_LIST> </RESPONSE>
117

Chapter 4 - Scan ConfigurationOption Profiles for VM
</SIMPLE_RETURN>
Option Profiles for VM /api/2.0/fo/subscription/option_profile/vm/
Create, update, list and delete option profiles for VM scans.
Permissions - All users will be able to list option profiles. A Manager will be able to create, update, and delete option profiles in the subscription, and a Unit Manager will be able to create, update, and delete option profiles for users in their business unit.
Create VM Option Profile/api/2.0/fo/subscription/option_profile/vm/?action=create
[POST]
Input Parameters
Parameter Description
action=create (Required)
title={value} (Required) A title for easy identification.
owner={value} (Optional) The owner of the option profile(s), or the user who created the option profile.
default={0|1} (Optional) Make this profile the default for all scans and maps. Specify 1 to make default. There can only be one default profile for the subscription.
global={0|1} (Optional) Share this profile with other users by making it global.Are you a Manager? This profile will be available to all users.Are you a Unit Manager? This profile will be available to all users in your business unit.Specify 1 to make global.
offline_scanner={0|1} (Optional) Specify to 1 to download this profile to your offline scanners during the next sync.
scan_tcp_ports={none|full|standard|light}
(Required) We use ports to send packets to the host in order to determine whether the host is alive and also to do fingerprinting for the discovery of services. Specify “full” to scan all ports, “standard” to scan standard ports or “light” to scan fewer ports. See Appendix B - Ports used for scanning for a list of ports used for standard or light scan. We will scan the standard list of ports unless you choose a different option in the profile.
scan_tcp_ports_additional={port1,port2}
(Optional) Specify additional ports to scan (up to 12500 ports).
118

Chapter 4 - Scan ConfigurationOption Profiles for VM
3_way_handshake={0|1} (Optional) Specify 1 to let the scanning engine perform a 3-way handshake with target hosts. After a connection between the service and the target host is established, the connection will be closed. This option should be enabled only if you have a configuration that does not allow an SYN packet to be followed by an RST packet. Also, when this is enabled, TCP based OS detection is not performed on target hosts. Without TCP based OS detection, the service may not be able to identify the operating system installed on target hosts and perform OS-specific vulnerability checks
Scan
scan_udp_ports={none|full|standard|light}
(Required) Specify “full” to scan all ports, “standard” to scan standard ports or “light” to scan fewer ports. See Appendix B - Ports used for scanning for a list of UDP ports used for standard or light scan. We will scan the standard list of ports unless you choose a different option in the profile.
scan_udp_ports_additional={port1,port2}
(Optional) Specify additional ports to scan (up to 20500 ports).
authoritative_option={0|1} (Optional) Specify 1 to enable Authoritative Scan Option. By enabling the authoritative scan option your light scan will work like a full or standard scan. We will update the vulnerability status for all vulnerabilities found, regardless of which ports they were detected on.
scan_dead_hosts={0|1} (Optional) Specify 1 to enable scanning dead hosts. A dead host is a host that is unreachable - it didn't respond to any pings. Your scan may run longer if you choose to scan dead hosts.
close_vuln_on_dead_hosts={0|1}
(Optional) Specify 1 to quickly close vulnerabilities for hosts that are not found alive after a set number of scans. When enabled, we'll mark existing tickets associated with dead hosts as Closed/Fixed and update the vulnerability status to Fixed.
not_found_alive_times={value}
(Optional) Specify the number of times the host is not found alive after which the vulnerability should be closed. This setting is available only when close_vuln_on_dead_hosts=1.
purge_host_data={0|1} (Optional) Specify 1 to purge host data. This option is especially useful if you have systems that are regularly decommissioned or replaced. By specifying this option you’re telling us you want to purge the host if we detect a change in the host's Operating System (OS) vendor at scan time, for example the OS changed from Linux to Windows or Debian to Ubuntu. We will not purge the host for an OS version change like Linux 2.8.13 to Linux 2.9.4.
external_scanners_use={value}
(Optional) Specify the maximum number of external scanners to use for scanning perimeter assets. (This option is available when your subscription is configured with multiple external scanners).
Parameter Description
119

Chapter 4 - Scan ConfigurationOption Profiles for VM
scan_parallel_scaling={0|1} (Optional) Specify 1 to enable parallel scaling. This setting can be useful in subscriptions which have physical and virtual scanner appliances with different performance characteristics (e.g., CPU, RAM). Specify this option to dynamically scale up the number of hosts to scan in parallel (at scan time) to a calculated value which is based upon the computing resources available on each appliance. Note that the number of hosts to scan in parallel value determines how many hosts each appliance will target concurrently, not how many appliances will be used for the scan.
scan_overall_performance={high|normal|low|custom}
(Optional) The profile “normal” is recommended in most cases. The settings for scan_external_scanners, scan_scanner_appliances, scan_total_process, scan_http_process, scan_packet_delay, and scan_intensity change as per the specified profile.Normal - Well balanced between intensity and speed.High - Recommended only when scanning a single IP or a small number of IPs. Optimized for speed and shorter scan times.Low - Recommended if responsiveness for individual hosts and services is low. Optimized for low bandwidth network connections and highly utilized networks. May take longer to complete.
scan_external_scanners={value}
(Optional) Specify the number of external scanners to be used for associated scans. This setting is available only if you have multiple external scanners in your subscription. For example, if you have 10 external scanners in your subscription, you can configure this setting to any number between 1 to 10.
scan_scanner_appliances={value}
(Optional) Specify the number of scanner appliances to scan at the same time (per scan task). Launching several concurrent scans on the same scanner appliance has a multiplying effect on bandwidth usage and may exceed available scanner resources. Don't have scanner appliances? Disregard the Scanner Appliance setting.
scan_total_process={value} (Optional) Specify the maximum number of processes to run at the same time per host. Note that the total number of processes includes the HTTP processes.
scan_http_process={value} (Optional) Specify the maximum number of HTTP processes to run at the same time.
scan_packet_delay={minimum|short|medium|long|maximum}
(Optional) Specify the delay between groups of packets sent to each host during a scan. With a short delay, packets are sent more frequently. With a long delay, packets are sent less frequently.
Parameter Description
120

Chapter 4 - Scan ConfigurationOption Profiles for VM
scan_intensity={normal|medium|low|minimum}
(Optional) This setting determines the aggressiveness (parallelism) of port scanning and hostdiscovery at the port level. Lowering the intensity level has the effect of serializing port scanning and host discovery. This is useful for certain network conditions like cascading firewalls and lower scan prioritization on the network. Tip - If you are scanning through a firewall we recommended you reduce the intensity level. Unauthenticated scans see more of a performance difference using this option.
load_balancer={0|1} (Optional) Specify 1 to check each target host to determine if it's a load balancer.When a load balancer is detected, we determine the number of Web servers behind it and report QID 86189 "Presence of a Load-Balancing Device Detected" in your results.
password_brute_forcing_ system={minimal|limited|standard|exhaustive}
(Optional) How vulnerable are your hosts to password-cracking techniques? we'll attempt to guess the password for each detected login ID on each target host scanned. Specify the level of brute forcing you prefer ("minimal" to "exhaustive").
password_brute_forcing_ custom={value1,value2}
(Optional) Specify titles of the login/password pairs you create for password brute forcing on the Qualys Cloud Platform UI.
vulnerability_detection={complete|custom|runtime}
(Optional) With a "complete" scan we'll scan for all vulnerabilities (QIDs) in the KnowledgeBase applicable to each host being scanned. Specify "custom" to limit the scan to specified QIDs only. Then add the QIDs you want to scan. Specify “runtime” to scan QIDs at runtime.
custom_search_list_ids= {value1, value2}
(Optional) Specify ids of search lists you want to use in your scan.
custom_search_list_title= {value1, value2}
(Optional) Specify titles of search lists you want to use in your scan.
basic_host_information_ checks={0|1}
(Optional) Adds basic host information checks (hostname, OS, etc) to your Custom scans. These are already included in Complete scans. This setting is enabled by default.
oval_checks={0|1} (Optional) Specify 1 to add a search list with QID 105186 (a diagnostic check for OVAL).
all_qrdi_checks={0|1} (Optional) Specify 1 to scan target assets for all QRDI vulnerabilities in your subscription, i.e. all custom vulnerability checks defined with QRDI (Qualys Remote Detection Interface).
exclude_search_list_ids= {value1, value2}
(Optional) Specify ids of search lists you want to exclude from your scan.
Parameter Description
121

Chapter 4 - Scan ConfigurationOption Profiles for VM
authentication={value1,value2}
(Optional) Want to run authenticated scans? When you use authentication we'll perform a more in-depth assessment and get you the most accurate results with fewer false positives.Specify one or more technologies for the hosts you want to scan. Be sure you've configured authentication records (under Scans > Authentication) before running your scan.The following options are available:- Windows- Unix- Oracle- Oracle Listener- SNMP- VMware- DB2- HTTP- MySQL- MongoDB- Tomcat Server - Palo Alto Networks Firewall
enable_additional_certificate_detection={0|1}
(Optional) Want to detect additional certificates beyond ports? You need to enable authentication and then run new vulnerability scans. Specify 1 to enable this option before scanning and see additional certificate records (under Assets > Certificates).
enable_dissolvable_agent={0|1}
(Optional) Specify 1 to enable dissolvable agent. This is required for certain scan features like Windows Share Enumeration. How does it work? At scan time the Agent is installed on Windows devices to collect data, and once the scan is complete it removes itself completely from target systems.
enable_windows_share_ enumeration={0|1}
(Optional) Specify 1 to use Windows Share Enumeration to find and report details about Windows shares that are readable by everyone. This test is performed using QID 90635. Make sure 1) the Dissolvable Agent is enabled, 2) QID 90635 is included in the Vulnerability Detection section, and 3) a Windows authentication record is defined.
enable_lite_os_scan={0|1} (Optional) Only interested in OS detection? Specify 1 to include QID 45017 in the scan (under Vulnerability Detection).
custom_http_header={value}
(Optional) Specify a custom value in order to drop defenses (such as logging, IPs, etc) when authorized scans are being run.
custom_http_definition_key={value}
(Optional) Specify a custom HTTP header definition key
custom_http_definition_ header={value}
(Optional) Specify a value for the custom HTTP header definition key defined in custom_http_definition_key.
Parameter Description
122

Chapter 4 - Scan ConfigurationOption Profiles for VM
host_alive_testing={0|1} (Optional) Specify 1 to run a quick scan to determine which of your target hosts are alive without also performing other scan tests. The Appendix section of your Scan Results report will list the hosts that are alive and hosts that are not alive. You may see some Information Gathered QIDs in the results for hosts found alive.
not_overwrite_os={0|1} (Optional) Specify 1 if you're running a light or custom scan and you don't want to overwrite the OS detected by a previous scan.
test_authentication={0|1} (Optional) Specify 1 to test authentication to target hosts.
Map
basic_information_gathering=[all|register|netblockonly|none]
(Required) Perform basic information gathering on: All: All Hosts (hosts detected by the map), Register: Registered Hosts (hosts in your account),Netblockonly: Netblock Hosts (hosts added by a user to the netblock for the target domain) or None.
map_tcp_ports_standard_ scan={0|1}
(Optional) Specify 1 to enable standard scan of TCP ports. Standard Scan includes 13 ports: 21-23, 25, 53, 80, 88, 110-111, 135, 139, 443, 445.
map_tcp_ports_additional={value1,value2}
(Optional) Specify additional TCP ports to scan. You can specify up to 20 ports including the standard scan ports.
map_udp_ports_standard_ scan={0|1}
(Optional) Specify 1 to enable standard scan of UDP ports. Standard Scan includes 6 ports: 53, 111, 135, 137, 161, 500.
map_udp_ports_additional={value1,value2}
(Optional) Specify additional UDP ports to scan. You can specify up to 10 ports including the standard scan ports.
perform_live_host_sweep={0|1}
(Optional) Default setting is 1. Specify 0 to only discover devices using DNS discovery methods (DNS, Reverse DNS and DNS Zone Transfer.) Active probes will not be sent. As a result, we may not be able to detect all hosts in the netblock, and undetected hosts will not be analyzed.
disable_dns_traffic={0|1} (Optional) Specify 1 if you want to disable DNS traffic for maps. This is valid only when the target domain name includes one or more netblocks, e.g. none:[10.10.10.2-10.10.10.100].We'll perform network discovery only for the IP addresses in the netblocks. No forward or reverse DNS lookups, DNS zone transfers or DNS guessing/bruteforcing will be made, and DNS information will not be included in map results.
map_overall_performance={high|normal|low|custom}
(Optional) The profile “normal” is recommended in most cases. The settings for map_external_scanners, map_scanner_appliances, map_netblock_size, and map_packet_delay change as per the specified profile.Normal - Well balanced between intensity and speed.High - Optimized for speed. May be faster to complete but may overload firewalls and other networking devices.Low - Optimized for low bandwidth network connections. May take longer to complete.
Parameter Description
123

Chapter 4 - Scan ConfigurationOption Profiles for VM
map_external_scanners={value}
(Optional) Specify the number of external scanners for netblocks to map at the same time per scanner. This setting is available only if you have multiple external scanners in your subscription. For example, if you have 10 external scanners in your subscription, you can configure this setting to any number between 1 to 10.
map_scanner_appliances={value}
(Optional) Specify the number of scanner appliances for netblocks to map at the same time per scanner. Launching several concurrent scans on the same scanner appliance has a multiplying effect on bandwidth usage and may exceed available scanner resources. Don't have scanner appliances? Disregard the Scanner Appliance setting.
map_netblock_size={1024 IPs|4096 IPs|8192 IPs|16384 IPs|32768 IPs|65536 IPs}
(Optional) Specify the max number of IPs per netblock being mapped. The netblock specified for the domain is broken into smaller netblocks for processing. Each of these smaller netblocks equals a single map process. Use this setting to define how many IPs should be included in each process.
map_packet_delay={minimum|short|medium|long|maximum}
(Optional) This is the delay between groups of packets sent to the netblocks being mapped. With a short delay, packets are sent more frequently, resulting in more bandwidth utilization and a shorter mapping time. With a long delay, packets are sent less frequently, resulting in less bandwidth utilization and a longer mapping time.
map_authentication={VMware}
(Optional) Authentication enables the scanner to log into hosts at scan time to extend detection capabilities. See the online help to learn how to configure this option.
Additional
additional_tcp_ports={0|1} (Optional) Specify 1 to enable host discovery on additional TCP ports. Default setting is 1.
additional_tcp_ports_ standard_scan={0|1}
(Optional) Specify 1 to enable standard scan of additional TCP ports. Standard Scan includes 13 ports: 21-23, 25, 53, 80, 88, 110-111, 135, 139, 443, 445. Default setting is 1.
additional_tcp_ports_ additional={value1,value2}
(Optional) Specify additional TCP ports to scan. You can specify up to 20 ports including the standard scan ports.
additional_udp_ports={0|1} (Optional) Specify 1 to enable host discovery on additional UDP ports. Default setting is 1.
additional_udp_ports_type={standard|custom}
(Optional) Specify “standard” to enable standard scan of additional UDP ports. Standard Scan includes 6 ports: 53, 111, 135, 137, 161, 500. Default is “standard”. Specify “custom” to provide a custom list of ports using additional_udp_ports_custom.
additional_udp_ports_ custom={value1,value2}
(Optional) Specify additional UDP ports to scan. You can specify up to 10 ports including the standard scan ports.
icmp={0|1} (Optional) Specify 1 to only discover live hosts that respond to an ICMP ping. Default setting is 1.
Parameter Description
124

Chapter 4 - Scan ConfigurationOption Profiles for VM
API request:
curl -u "USERNAME:PASSWORD" -H "X-Requested-With:curl" -X POST "action=create&title=99&global=1&scan_tcp_ports=full&scan_udp_ports=standard&&scan_overall_performance=normal&vulnerability_detection=complete&basic_information_gathering=all" "http://qualysapi.qualys.com/api/2.0/fo/subscription/option_profile/vm/"
XML output:
<?xml version="1.0" encoding="UTF-8" ?><!DOCTYPE SIMPLE_RETURN SYSTEM "http://qualysapi.qualys.com/api/2.0/simple_return.dtd"><SIMPLE_RETURN> <RESPONSE> <DATETIME>2018-04-26T06:40:03Z</DATETIME> <TEXT>Option profile successfully added.</TEXT> <ITEM_LIST> <ITEM> <KEY>ID</KEY>
blocked_resources={0|1} (Optional) Specify 1 in order to add ports protected by your firewall/IDS to prevent them from being scanned.
protected_ports={default|custom}
(Optional) Ports protected by your firewall/IDS. Specify “default” to provide a list of default blocked ports: 0-1, 111, 513-514, 2049, 4100, 6000-6005, 7100, 8000. Default setting is “default”.Specify “custom” to provide a custom list of protected ports using protected_ports_custom.
protected_ports_custom= {value1,value2}
(Optional) Specify a custom list of protected ports.
protected_ips={all|custom} (Optional) IP addresses and ranges protected by your firewall/IDS. Default is “all”.
protected_ips_custom={value1,value2}
(Optional) Specify a custom list of IP addresses and ranges protected by your firewall/IDS.
ignore_firewall_generated_ tcp_rst_packets={0|1}
(Optional) Specify 1 to identify firewall-generated TCP RESET packets and ignore them.
ignore_all_tcp_rst_packets={0|1}
(Optional) Specify 1 to ignore all TCP RESET packets - firewall-generated and live-host-generated.
ignore_firewall_generated_ tcp_syn_ack_packets={0|1}
(Optional) Specify 1 to determine if TCP SYN-ACK packets are generated by a filtering device and ignore packets that appear to originate from such devices.
not_send_tcp_ack_or_syn_ ack_packets_during_host_ discovery={0|1}
(Optional) Specify 1 if you do not want to send TCP ACK or SYN-ACK packets. Out of state TCP packets are not SYN packets and do not belong to an existing TCP session.
Parameter Description
125

Chapter 4 - Scan ConfigurationOption Profiles for VM
<VALUE>32112</VALUE> </ITEM> </ITEM_LIST> </RESPONSE></SIMPLE_RETURN>
Update VM Option Profile/api/2.0/fo/subscription/option_profile/vm/?action=update
[POST]
Input Parameters
For a list of optional parameters, see Input Parameters for Create VM Option Profile.
API request:
curl -u "USERNAME:PASSWORD" -H "X-Requested-With:curl" -X POST "action=update&title=33jj&id=25121" "http://qualysapi.qualys.com/api/2.0/fo/subscription/option_profile/vm/"
XML output:
<?xml version="1.0" encoding="UTF-8" ?><!DOCTYPE SIMPLE_RETURN SYSTEM "http://qualysapi.qualys.com/api/2.0/simple_return.dtd"><SIMPLE_RETURN> <RESPONSE> <DATETIME>2018-04-26T09:51:15Z</DATETIME> <TEXT>Option profile successfully updated.</TEXT> <ITEM_LIST> <ITEM> <KEY>ID</KEY> <VALUE>25121</VALUE> </ITEM> </ITEM_LIST> </RESPONSE></SIMPLE_RETURN>
Parameter Description
action=update (Required)
id={value} (Required) The ID of the option profile.
126

Chapter 4 - Scan ConfigurationOption Profiles for VM
VM Option Profile List/api/2.0/fo/subscription/option_profile/vm/?action=list
[GET] [POST]
Input Parameters All option profiles are fetched if no parameters are given. To fetch a specific option profile, provide the “id” or “title” parameter with the option profile id or title of interest. Optionally, you can filter the results by using optional parameters listed under Input Parameters for Create VM Option Profile.
API request:
curl -u "USERNAME:PASSWORD" -H "X-Requested-With:curl" -X GET"action=list" "http://qualysapi.qualys.com/api/2.0/fo/subscription/option_profile/vm/"
XML output:
<?xml version="1.0" encoding="UTF-8" ?><!DOCTYPE OPTION_PROFILES SYSTEM "http://qualysapi.qualys.com/api/2.0/fo/subscription/option_profile/option_profile_info.dtd"><OPTION_PROFILES><OPTION_PROFILE> <BASIC_INFO> <ID>51451401</ID> <GROUP_NAME><![CDATA[user op - 1]]></GROUP_NAME> <GROUP_TYPE>user</GROUP_TYPE> <USER_ID><![CDATA[John smith (jsmith_ap)]]></USER_ID> <UNIT_ID>0</UNIT_ID> <SUBSCRIPTION_ID>10421401</SUBSCRIPTION_ID> <IS_DEFAULT>0</IS_DEFAULT> <IS_GLOBAL>1</IS_GLOBAL> <IS_OFFLINE_SYNCABLE>1</IS_OFFLINE_SYNCABLE> <UPDATE_DATE>2018-04-10T13:39:41Z</UPDATE_DATE> </BASIC_INFO> <SCAN> <PORTS> <TCP_PORTS> <TCP_PORTS_TYPE>standard</TCP_PORTS_TYPE> <TCP_PORTS_ADDITIONAL> <HAS_ADDITIONAL>1</HAS_ADDITIONAL> <ADDITIONAL_PORTS>1024</ADDITIONAL_PORTS> </TCP_PORTS_ADDITIONAL> <THREE_WAY_HANDSHAKE>1</THREE_WAY_HANDSHAKE> </TCP_PORTS>
127

Chapter 4 - Scan ConfigurationOption Profiles for VM
<UDP_PORTS> <UDP_PORTS_TYPE>light</UDP_PORTS_TYPE> <UDP_PORTS_ADDITIONAL> <HAS_ADDITIONAL>1</HAS_ADDITIONAL> <ADDITIONAL_PORTS>8080</ADDITIONAL_PORTS> </UDP_PORTS_ADDITIONAL> </UDP_PORTS> <AUTHORITATIVE_OPTION>1</AUTHORITATIVE_OPTION> </PORTS> <SCAN_DEAD_HOSTS>1</SCAN_DEAD_HOSTS> <CLOSE_VULNERABILITIES> <HAS_CLOSE_VULNERABILITIES>1</HAS_CLOSE_VULNERABILITIES> <HOST_NOT_FOUND_ALIVE>10</HOST_NOT_FOUND_ALIVE> </CLOSE_VULNERABILITIES> <PURGE_OLD_HOST_OS_CHANGED>1</PURGE_OLD_HOST_OS_CHANGED> <PERFORMANCE> <PARALLEL_SCALING>1</PARALLEL_SCALING> <OVERALL_PERFORMANCE>Normal</OVERALL_PERFORMANCE> <HOSTS_TO_SCAN> <EXTERNAL_SCANNERS>10</EXTERNAL_SCANNERS> <SCANNER_APPLIANCES>30</SCANNER_APPLIANCES> </HOSTS_TO_SCAN> <PROCESSES_TO_RUN> <TOTAL_PROCESSES>10</TOTAL_PROCESSES> <HTTP_PROCESSES>10</HTTP_PROCESSES> </PROCESSES_TO_RUN> <PACKET_DELAY>Medium</PACKET_DELAY> <PORT_SCANNING_AND_HOST_DISCOVERY>Normal</PORT_SCANNING_AND_HOST_DISCOVERY> </PERFORMANCE> <LOAD_BALANCER_DETECTION>1</LOAD_BALANCER_DETECTION> <PASSWORD_BRUTE_FORCING> <SYSTEM> <HAS_SYSTEM>1</HAS_SYSTEM> <SYSTEM_LEVEL>Standard</SYSTEM_LEVEL> </SYSTEM> <CUSTOM_LIST> <CUSTOM> <ID>1001</ID> <TITLE><![CDATA[ftp - 1]]></TITLE> <TYPE>FTP</TYPE> <LOGIN_PASSWORD><![CDATA[L:Guest,P:temp]]></LOGIN_PASSWORD> </CUSTOM> <CUSTOM>
128

Chapter 4 - Scan ConfigurationOption Profiles for VM
<ID>1002</ID> <TITLE><![CDATA[ssh - 1]]></TITLE> <TYPE>SSH</TYPE> <LOGIN_PASSWORD><![CDATA[L:Guest,P:temp]]></LOGIN_PASSWORD> </CUSTOM> <CUSTOM> <ID>1003</ID> <TITLE><![CDATA[window - 1]]></TITLE> <TYPE>Windows</TYPE> <LOGIN_PASSWORD><![CDATA[L:Guest,P:temp]]></LOGIN_PASSWORD> </CUSTOM> </CUSTOM_LIST> </PASSWORD_BRUTE_FORCING> <VULNERABILITY_DETECTION> <COMPLETE><![CDATA[complete]]></COMPLETE> <DETECTION_INCLUDE> <BASIC_HOST_INFO_CHECKS>0</BASIC_HOST_INFO_CHECKS> <OVAL_CHECKS>1</OVAL_CHECKS> </DETECTION_INCLUDE> </VULNERABILITY_DETECTION> <AUTHENTICATION><![CDATA[Windows,Unix,Oracle,Oracle Listener,SNMP,VMware,DB2,HTTP,MySQL]]></AUTHENTICATION> <ADDL_CERT_DETECTION>1</ADDL_CERT_DETECTION> <DISSOLVABLE_AGENT> <DISSOLVABLE_AGENT_ENABLE>1</DISSOLVABLE_AGENT_ENABLE> <WINDOWS_SHARE_ENUMERATION_ENABLE>1</WINDOWS_SHARE_ENUMERATION_ENABLE> </DISSOLVABLE_AGENT> <LITE_OS_SCAN>1</LITE_OS_SCAN> <CUSTOM_HTTP_HEADER> <VALUE>sdfdsf</VALUE> <DEFINITION_KEY>abc</DEFINITION_KEY> <DEFINITION_VALUE>xyz</DEFINITION_VALUE> </CUSTOM_HTTP_HEADER> </SCAN> <MAP> <BASIC_INFO_GATHERING_ON>all</BASIC_INFO_GATHERING_ON> <TCP_PORTS> <TCP_PORTS_STANDARD_SCAN>1</TCP_PORTS_STANDARD_SCAN> <TCP_PORTS_ADDITIONAL> <HAS_ADDITIONAL>1</HAS_ADDITIONAL> <ADDITIONAL_PORTS>2</ADDITIONAL_PORTS> </TCP_PORTS_ADDITIONAL>
129

Chapter 4 - Scan ConfigurationOption Profiles for VM
</TCP_PORTS> <UDP_PORTS> <UDP_PORTS_STANDARD_SCAN>1</UDP_PORTS_STANDARD_SCAN> <UDP_PORTS_ADDITIONAL> <HAS_ADDITIONAL>1</HAS_ADDITIONAL> <ADDITIONAL_PORTS>9</ADDITIONAL_PORTS> </UDP_PORTS_ADDITIONAL> </UDP_PORTS> <MAP_OPTIONS> <PERFORM_LIVE_HOST_SWEEP>1</PERFORM_LIVE_HOST_SWEEP> <DISABLE_DNS_TRAFFIC>1</DISABLE_DNS_TRAFFIC> </MAP_OPTIONS> <MAP_PERFORMANCE> <OVERALL_PERFORMANCE>Custom</OVERALL_PERFORMANCE> <MAP_PARALLEL> <EXTERNAL_SCANNERS>10</EXTERNAL_SCANNERS> <SCANNER_APPLIANCES>12</SCANNER_APPLIANCES> <NETBLOCK_SIZE>8192 IPs</NETBLOCK_SIZE> </MAP_PARALLEL> <PACKET_DELAY>Medium</PACKET_DELAY> </MAP_PERFORMANCE> <MAP_AUTHENTICATION>VMware</MAP_AUTHENTICATION> </MAP> <ADDITIONAL> <HOST_DISCOVERY> <TCP_PORTS> <STANDARD_SCAN>1</STANDARD_SCAN> <TCP_ADDITIONAL> <HAS_ADDITIONAL>1</HAS_ADDITIONAL> <ADDITIONAL_PORTS>1024</ADDITIONAL_PORTS> </TCP_ADDITIONAL> </TCP_PORTS> <UDP_PORTS> <CUSTOM_PORT><![CDATA[69,111]]></CUSTOM_PORT> </UDP_PORTS> <ICMP>1</ICMP> </HOST_DISCOVERY> <BLOCK_RESOURCES> <WATCHGUARD_DEFAULT_BLOCKED_PORTS>1</WATCHGUARD_DEFAULT_BLOCKED_PORTS> <ALL_REGISTERED_IPS>1</ALL_REGISTERED_IPS> </BLOCK_RESOURCES> <PACKET_OPTIONS> <IGNORE_FIREWALL_GENERATED_TCP_RST>1</IGNORE_FIREWALL_GENERATED_TC
130

Chapter 4 - Scan ConfigurationOption Profiles for VM
P_RST> <IGNORE_ALL_TCP_RST>1</IGNORE_ALL_TCP_RST> <IGNORE_FIREWALL_GENERATED_TCP_SYN_ACK>1</IGNORE_FIREWALL_GENERATED_TCP_SYN_ACK> <NOT_SEND_TCP_ACK_OR_SYN_ACK_DURING_HOST_DISCOVERY>1</NOT_SEND_TCP_ACK_OR_SYN_ACK_DURING_HOST_DISCOVERY> </PACKET_OPTIONS> </ADDITIONAL> </OPTION_PROFILE></OPTION_PROFILES>
DTD
<platform API server>/api/2.0/fo/subscription/option_profile/ option_profile_info.dtd
Delete VM Option Profile/api/2.0/fo/subscription/option_profile/vm/?action=delete
[GET] [POST]
Input Parameters
API request:
curl -u "USERNAME:PASSWORD" -H "X-Requested-With:curl" -X POST"action=delete&id=25121" "http://qualysapi.qualys.com/api/2.0/fo/subscription/option_profile/vm/"
XML output:
<?xml version="1.0" encoding="UTF-8" ?><!DOCTYPE SIMPLE_RETURN SYSTEM "http://qualysapi.qualys.com/api/2.0/simple_return.dtd"><SIMPLE_RETURN> <RESPONSE> <DATETIME>2018-04-26T10:58:06Z</DATETIME> <TEXT>Option Profile Deleted Successfully</TEXT> <ITEM_LIST> <ITEM> <KEY>ID</KEY> <VALUE>25121</VALUE>
Parameter Description
action=delete (Required)
id={value} (Required) The ID of the option profile.
131

Chapter 4 - Scan ConfigurationOption Profiles for VM
</ITEM> </ITEM_LIST> </RESPONSE></SIMPLE_RETURN>
132

Chapter 4 - Scan ConfigurationOption Profiles for PCI
Option Profiles for PCI /api/2.0/fo/subscription/option_profile/pci/
Create, update, list and delete option profiles for PCI.
Permissions - All users will be able to list option profiles. A Manager will be able to create, update, and delete option profiles in the subscription, and a Unit Manager will be able to create, update, and delete option profiles for users in their business unit.
Create PCI Option Profile/api/2.0/fo/subscription/option_profile/pci/?action=create
[POST]
Input Parameters
Parameter Description
action=create (Required)
title={value} (Required) A title for easy identification.
owner={value} (Optional) The owner of the option profile(s), or the user who created the option profile.
global={0|1} (Optional) Share this profile with other users by making it global.Are you a Manager? This profile will be available to all users.Are you a Unit Manager? This profile will be available to all users in your business unit.Specify 1 to make global.
offline_scanner={0|1} (Optional) Specify to 1 to download this profile to your offline scanners during the next sync.
scan_parallel_scaling={0|1} (Optional) Specify 1 to enable parallel scaling. This setting can be useful in subscriptions which have physical and virtual scanner appliances with different performance characteristics (e.g., CPU, RAM). Specify this option to dynamically scale up the number of hosts to scan in parallel (at scan time) to a calculated value which is based upon the computing resources available on each appliance. Note that the number of hosts to scan in parallel value determines how many hosts each appliance will target concurrently, not how many appliances will be used for the scan.
133

Chapter 4 - Scan ConfigurationOption Profiles for PCI
Scan
scan_overall_performance={high|normal|low|custom}
(Optional) The profile “normal” is recommended in most cases. The settings for scan_external_scanners, scan_scanner_appliances, scan_total_process, scan_http_process, scan_packet_delay, and scan_intensity change as per the specified profile.Normal - Well balanced between intensity and speed.High - Recommended only when scanning a single IP or a small number of IPs. Optimized for speed and shorter scan times.Low - Recommended if responsiveness for individual hosts and services is low. Optimized for low bandwidth network connections and highly utilized networks. May take longer to complete.
scan_external_scanners={value}
(Optional) Specify the number of external scanners to be used for associated scans. This setting is available only if you have multiple external scanners in your subscription. For example, if you have 10 external scanners in your subscription, you can configure this setting to any number between 1 to 10.
scan_scanner_appliances={value}
(Optional) Specify the number of scanner appliances to scan at the same time (per scan task). Launching several concurrent scans on the same scanner appliance has a multiplying effect on bandwidth usage and may exceed available scanner resources. Don't have scanner appliances? Disregard the Scanner Appliance setting.
scan_total_process={value} (Optional) Specify the maximum number of processes to run at the same time per host. Note that the total number of processes includes the HTTP processes.
scan_http_process={value} (Optional) Specify the maximum number of HTTP processes to run at the same time.
scan_packet_delay={minimum|short|medium|long|maximum}
(Optional) Specify the delay between groups of packets sent to each host during a scan. With a short delay, packets are sent more frequently. With a long delay, packets are sent less frequently.
scan_intensity={normal|medium|low|minimum}
(Optional) This setting determines the aggressiveness (parallelism) of port scanning and host discovery at the port level. Lowering the intensity level has the effect of serializing port scanning and host discovery. This is useful for certain network conditions like cascading firewalls and lower scan prioritization on the network. Tip - If you are scanning through a firewall we recommended you reduce the intensity level. Unauthenticated scans see more of a performance difference using this option.
scan_dead_hosts={0|1} (Optional) Specify 1 to enable scanning dead hosts. A dead host is a host that is unreachable - it didn't respond to any pings. Your scan may run longer if you choose to scan dead hosts.
Parameter Description
134

Chapter 4 - Scan ConfigurationOption Profiles for PCI
API request:
curl -u "USERNAME:PASSWORD" -H "X-Requested-With:curl" -X POST "action=create&title=jp pci 333&global=1&offline_scanner=1&external_scanners_use=3&scan_parallel_scaling=1&scan_overall_performance=high&additional_tcp_ports_additional=80,35" "http://qualysapi.qualys.com/api/2.0/fo/subscription/option_profile/pci/"
XML output:
<?xml version="1.0" encoding="UTF-8" ?><!DOCTYPE SIMPLE_RETURN SYSTEM "http://qualysapi.qualys.com/api/2.0/simple_return.dtd"><SIMPLE_RETURN> <RESPONSE> <DATETIME>2018-04-26T13:04:21Z</DATETIME> <TEXT>Option profile successfully added.</TEXT> <ITEM_LIST> <ITEM> <KEY>ID</KEY> <VALUE>32113</VALUE> </ITEM> </ITEM_LIST> </RESPONSE></SIMPLE_RETURN>
close_vuln_on_dead_hosts={0|1}
(Optional) Specify 1 to quickly close vulnerabilities for hosts that are not found alive after a set number of scans. When enabled, we'll mark existing tickets associated with dead hosts as Closed/Fixed and update the vulnerability status to Fixed.
not_found_alive_times={value}
(Optional) Specify the number of times the host is not found alive after which the vulnerability should be closed. This setting is available only when close_vuln_on_dead_hosts=1.
purge_host_data={0|1} (Optional) Specify 1 to purge host data. This option is especially useful if you have systems that are regularly decommissioned or replaced. By specifying this option you’re telling us you want to purge the host if we detect a change in the host's Operating System (OS) vendor at scan time, for example the OS changed from Linux to Windows or Debian to Ubuntu. We will not purge the host for an OS version change like Linux 2.8.13 to Linux 2.9.4.
Additional
additional_tcp_ports_ additional={value1,value2}
(Optional) Specify additional TCP ports to scan. You can specify up to 7 additional ports apart from the 13 standard scan ports used by default: 21-23, 25, 53, 80, 88, 110-111, 135, 139, 443, 445.
Parameter Description
135

Chapter 4 - Scan ConfigurationOption Profiles for PCI
Update PCI Option Profile/api/2.0/fo/subscription/option_profile/pci/?action=update
[POST]
Input Parameters
For a list of optional parameters, see Input Parameters for Create PCI Option Profile.
API request:
curl -u "USERNAME:PASSWORD" -H "X-Requested-With:curl" -X POST "action=update&id=31102&title=jp pci2" "http://qualysapi.qualys.com/api/2.0/fo/subscription/option_profile/pci/"
XML output:
<?xml version="1.0" encoding="UTF-8" ?><!DOCTYPE SIMPLE_RETURN SYSTEM "http://qualysapi.qualys.com/api/2.0/simple_return.dtd"><SIMPLE_RETURN> <RESPONSE> <DATETIME>2018-04-10T10:32:50Z</DATETIME> <TEXT>Option profile successfully updated.</TEXT> <ITEM_LIST> <ITEM> <KEY>ID</KEY> <VALUE>31102</VALUE> </ITEM> </ITEM_LIST> </RESPONSE></SIMPLE_RETURN>
Parameter Description
action=update (Required)
id={value} (Required) The ID of the option profile.
136

Chapter 4 - Scan ConfigurationOption Profiles for PCI
PCI Option Profile List/api/2.0/fo/subscription/option_profile/pci/?action=list
[GET] [POST]
Input Parameters All option profiles are fetched if no parameters are given. To fetch a specific option profile, provide the “id” or “title” parameter with the option profile id or title of interest. Optionally, you can filter the results by using optional parameters listed under Input Parameters for Create PCI Option Profile.
API request:
curl -u "USERNAME:PASSWORD" -H "X-Requested-With:curl" -X GET"action=list" "http://qualysapi.qualys.com/api/2.0/fo/subscription/option_profile/pci/"
XML output:
<?xml version="1.0" encoding="UTF-8" ?><!DOCTYPE OPTION_PROFILES SYSTEM "http://qualysapi.qualys.com/api/2.0/fo/subscription/option_profile/option_profile_info.dtd"><OPTION_PROFILES> <OPTION_PROFILE> <BASIC_INFO> <ID>31102</ID> <GROUP_NAME><![CDATA[jp pci 11]]></GROUP_NAME> <GROUP_TYPE>pci</GROUP_TYPE> <USER_ID><![CDATA[John Smith (jsmith_ap)]]></USER_ID> <UNIT_ID>0</UNIT_ID> <SUBSCRIPTION_ID>10421401</SUBSCRIPTION_ID> <IS_GLOBAL>1</IS_GLOBAL> <IS_OFFLINE_SYNCABLE>0</IS_OFFLINE_SYNCABLE> <UPDATE_DATE>2018-04-10T10:32:50Z</UPDATE_DATE> </BASIC_INFO> <SCAN> <SCAN_DEAD_HOSTS>0</SCAN_DEAD_HOSTS> <PURGE_OLD_HOST_OS_CHANGED>0</PURGE_OLD_HOST_OS_CHANGED> <PERFORMANCE> <PARALLEL_SCALING>0</PARALLEL_SCALING> <OVERALL_PERFORMANCE>high</OVERALL_PERFORMANCE> <HOSTS_TO_SCAN> <EXTERNAL_SCANNERS>20</EXTERNAL_SCANNERS> <SCANNER_APPLIANCES>40</SCANNER_APPLIANCES> </HOSTS_TO_SCAN> <PROCESSES_TO_RUN>
137

Chapter 4 - Scan ConfigurationOption Profiles for PCI
<TOTAL_PROCESSES>15</TOTAL_PROCESSES> <HTTP_PROCESSES>15</HTTP_PROCESSES> </PROCESSES_TO_RUN> <PACKET_DELAY>Short</PACKET_DELAY> </PERFORMANCE> </SCAN> <ADDITIONAL> <HOST_DISCOVERY> <TCP_PORTS> <STANDARD_SCAN>1</STANDARD_SCAN> <TCP_ADDITIONAL> <HAS_ADDITIONAL>1</HAS_ADDITIONAL> <ADDITIONAL_PORTS>80,35</ADDITIONAL_PORTS> </TCP_ADDITIONAL> </TCP_PORTS> </HOST_DISCOVERY> </ADDITIONAL> </OPTION_PROFILE> <OPTION_PROFILE> <BASIC_INFO> <ID>32113</ID> <GROUP_NAME><![CDATA[jp pci 333]]></GROUP_NAME> <GROUP_TYPE>pci</GROUP_TYPE> <USER_ID><![CDATA[John Smith (jsmith_ap)]]></USER_ID> <UNIT_ID>0</UNIT_ID> <SUBSCRIPTION_ID>10421401</SUBSCRIPTION_ID> <IS_GLOBAL>1</IS_GLOBAL> <IS_OFFLINE_SYNCABLE>1</IS_OFFLINE_SYNCABLE> <UPDATE_DATE>2018-04-10T10:32:50Z</UPDATE_DATE> </BASIC_INFO> <SCAN> <SCAN_DEAD_HOSTS>0</SCAN_DEAD_HOSTS> <PURGE_OLD_HOST_OS_CHANGED>0</PURGE_OLD_HOST_OS_CHANGED> <PERFORMANCE> <PARALLEL_SCALING>1</PARALLEL_SCALING> <OVERALL_PERFORMANCE>High</OVERALL_PERFORMANCE> <HOSTS_TO_SCAN> <EXTERNAL_SCANNERS>20</EXTERNAL_SCANNERS> <SCANNER_APPLIANCES>40</SCANNER_APPLIANCES> </HOSTS_TO_SCAN> <PROCESSES_TO_RUN> <TOTAL_PROCESSES>15</TOTAL_PROCESSES> <HTTP_PROCESSES>15</HTTP_PROCESSES> </PROCESSES_TO_RUN> <PACKET_DELAY>Short</PACKET_DELAY>
138

Chapter 4 - Scan ConfigurationOption Profiles for PCI
</PERFORMANCE> </SCAN> <ADDITIONAL> <HOST_DISCOVERY> <TCP_PORTS> <STANDARD_SCAN>1</STANDARD_SCAN> <TCP_ADDITIONAL> <HAS_ADDITIONAL>1</HAS_ADDITIONAL> <ADDITIONAL_PORTS>80,35</ADDITIONAL_PORTS> </TCP_ADDITIONAL> </TCP_PORTS> </HOST_DISCOVERY> </ADDITIONAL> </OPTION_PROFILE> <OPTION_PROFILE> <BASIC_INFO> <ID>51471401</ID> <GROUP_NAME><![CDATA[pci op - 1]]></GROUP_NAME> <GROUP_TYPE>pci</GROUP_TYPE> <USER_ID><![CDATA[John Smith (jsmith_ap)]]></USER_ID> <UNIT_ID>0</UNIT_ID> <SUBSCRIPTION_ID>10421401</SUBSCRIPTION_ID> <IS_GLOBAL>0</IS_GLOBAL> <IS_OFFLINE_SYNCABLE>0</IS_OFFLINE_SYNCABLE> <UPDATE_DATE>2018-04-10T10:32:50Z</UPDATE_DATE> </BASIC_INFO> <SCAN> <SCAN_DEAD_HOSTS>1</SCAN_DEAD_HOSTS> <PURGE_OLD_HOST_OS_CHANGED>0</PURGE_OLD_HOST_OS_CHANGED> <PERFORMANCE> <PARALLEL_SCALING>1</PARALLEL_SCALING> <OVERALL_PERFORMANCE>High</OVERALL_PERFORMANCE> <HOSTS_TO_SCAN> <EXTERNAL_SCANNERS>20</EXTERNAL_SCANNERS> <SCANNER_APPLIANCES>40</SCANNER_APPLIANCES> </HOSTS_TO_SCAN> <PROCESSES_TO_RUN> <TOTAL_PROCESSES>15</TOTAL_PROCESSES> <HTTP_PROCESSES>15</HTTP_PROCESSES> </PROCESSES_TO_RUN> <PACKET_DELAY>Short</PACKET_DELAY> <PORT_SCANNING_AND_HOST_DISCOVERY>Normal</PORT_SCANNING_AND_HOST_DISCOVERY> </PERFORMANCE> </SCAN>
139

Chapter 4 - Scan ConfigurationOption Profiles for PCI
<ADDITIONAL> <HOST_DISCOVERY> <TCP_PORTS> <STANDARD_SCAN>1</STANDARD_SCAN> <TCP_ADDITIONAL> <HAS_ADDITIONAL>1</HAS_ADDITIONAL> <ADDITIONAL_PORTS>1024</ADDITIONAL_PORTS> </TCP_ADDITIONAL> </TCP_PORTS> </HOST_DISCOVERY> </ADDITIONAL> </OPTION_PROFILE></OPTION_PROFILES>
DTD
<platform API server>/api/2.0/fo/subscription/option_profile/ option_profile_info.dtd
Delete PCI Option Profile/api/2.0/fo/subscription/option_profile/pci/?action=delete
[GET] [POST]
Input Parameters
API request:
curl -u "USERNAME:PASSWORD" -H "X-Requested-With:curl" -X POST"action=delete&id=51471401" "http://qualysapi.qualys.com/api/2.0/fo/subscription/option_profile/pci/"
XML output:
<?xml version="1.0" encoding="UTF-8" ?><!DOCTYPE SIMPLE_RETURN SYSTEM "http://qualysapi.qualys.com/api/2.0/simple_return.dtd"><SIMPLE_RETURN> <RESPONSE> <DATETIME>2018-04-10T10:32:50Z</DATETIME> <TEXT>Option Profile Deleted Successfully</TEXT> <ITEM_LIST>
Parameter Description
action=delete (Required)
id={value} (Required) The ID of the option profile.
140

Chapter 4 - Scan ConfigurationOption Profiles for Compliance
<ITEM> <KEY>ID</KEY> <VALUE>51471401</VALUE> </ITEM> </ITEM_LIST> </RESPONSE></SIMPLE_RETURN>
Option Profiles for Compliance/api/2.0/fo/subscription/option_profile/pc/
Create, update, list and delete option profiles for compliance scans.
Permissions - All users will be able to list option profiles. A Manager will be able to create, update, and delete option profiles in the subscription, and a Unit Manager will be able to create, update, and delete option profiles for users in their business unit.
Create PC Option Profile/api/2.0/fo/subscription/option_profile/pc/?action=create
[POST]
Input Parameters
Parameter Description
action=create (Required)
title={value} (Required) The title for the option profile.
owner={value} (Optional) The owner of the option profile(s), or the user who created the option profile.
global={0|1} (Optional) Share this profile with other users by making it global.Are you a Manager? This profile will be available to all users.Are you a Unit Manager? This profile will be available to all users in your business unit.Specify 1 to make global.
scan_parallel_scaling={0|1} (Optional) Specify 1 to enable parallel scaling. This setting can be useful in subscriptions which have physical and virtual scanner appliances with different performance characteristics (e.g., CPU, RAM). Specify this option to dynamically scale up the number of hosts to scan in parallel (at scan time) to a calculated value which is based upon the computing resources available on each appliance. Note that the number of hosts to scan in parallel value determines how many hosts each appliance will target concurrently, not how many appliances will be used for the scan.
141

Chapter 4 - Scan ConfigurationOption Profiles for Compliance
Scan
scan_overall_performance={high|normal|low|custom}
(Required) The profile “normal” is recommended in most cases. The settings for scan_external_scanners, scan_scanner_appliances, scan_total_process, scan_http_process, scan_packet_delay, and scan_intensity change as per the specified profile.Normal - Well balanced between intensity and speed.High - Recommended only when scanning a single IP or a small number of IPs. Optimized for speed and shorter scan times.Low - Recommended if responsiveness for individual hosts and services is low. Optimized for low bandwidth network connections and highly utilized networks. May take longer to complete.
scan_external_scanners={value}
(Optional) Specify the number of external scanners to be used for associated scans. This setting is available only if you have multiple external scanners in your subscription. For example, if you have 10 external scanners in your subscription, you can configure this setting to any number between 1 to 10.
scan_scanner_appliances={value}
(Optional) Specify the number of scanner appliances to scan at the same time (per scan task). Launching several concurrent scans on the same scanner appliance has a multiplying effect on bandwidth usage and may exceed available scanner resources. Don't have scanner appliances? Disregard the Scanner Appliance setting.
scan_total_process={value} (Optional) Specify the maximum number of processes to run at the same time per host. Note that the total number of processes includes the HTTP processes.
scan_http_process={value} (Optional) Specify the maximum number of HTTP processes to run at the same time.
scan_packet_delay={minimum|short|medium|long|maximum}
(Optional) Specify the delay between groups of packets sent to each host during a scan. With a short delay, packets are sent more frequently. With a long delay, packets are sent less frequently.
scan_intensity={normal|medium|low|minimum}
(Optional) This setting determines the aggressiveness (parallelism) of port scanning and host discovery at the port level. Lowering the intensity level has the effect of serializing port scanning and host discovery. This is useful for certain network conditions like cascading firewalls and lower scan prioritization on the network. Tip - If you are scanning through a firewall we recommended you reduce the intensity level. Unauthenticated scans see more of a performance difference using this option.
Parameter Description
142
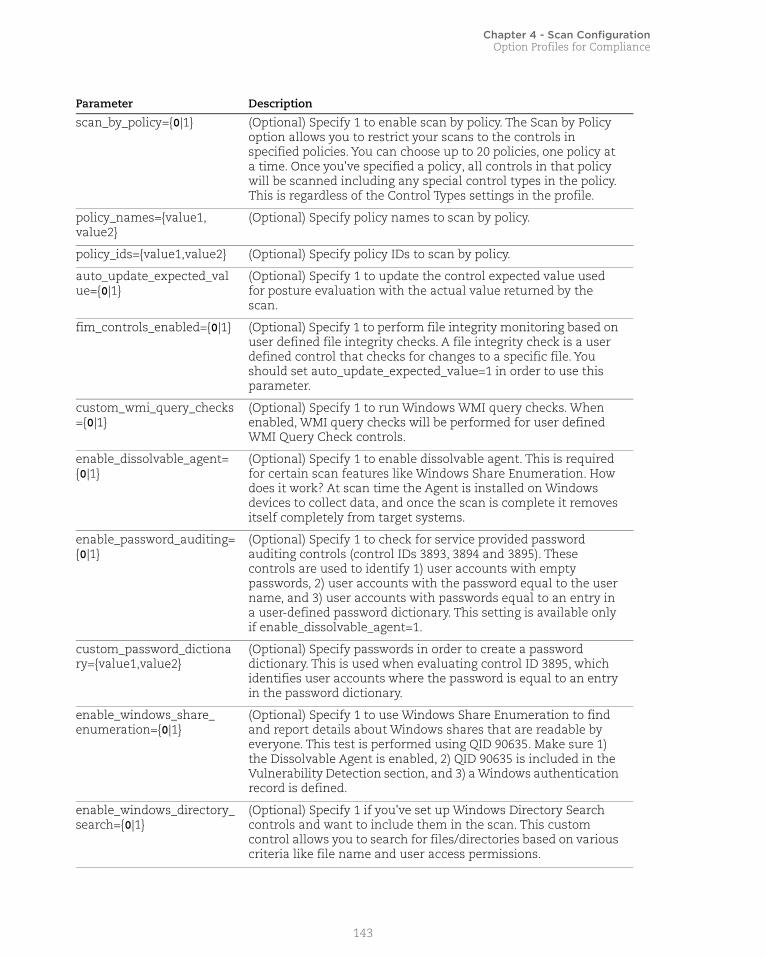
Chapter 4 - Scan ConfigurationOption Profiles for Compliance
scan_by_policy={0|1} (Optional) Specify 1 to enable scan by policy. The Scan by Policy option allows you to restrict your scans to the controls in specified policies. You can choose up to 20 policies, one policy at a time. Once you've specified a policy, all controls in that policy will be scanned including any special control types in the policy. This is regardless of the Control Types settings in the profile.
policy_names={value1,value2}
(Optional) Specify policy names to scan by policy.
policy_ids={value1,value2} (Optional) Specify policy IDs to scan by policy.
auto_update_expected_value={0|1}
(Optional) Specify 1 to update the control expected value used for posture evaluation with the actual value returned by the scan.
fim_controls_enabled={0|1} (Optional) Specify 1 to perform file integrity monitoring based on user defined file integrity checks. A file integrity check is a user defined control that checks for changes to a specific file. You should set auto_update_expected_value=1 in order to use this parameter.
custom_wmi_query_checks={0|1}
(Optional) Specify 1 to run Windows WMI query checks. When enabled, WMI query checks will be performed for user defined WMI Query Check controls.
enable_dissolvable_agent={0|1}
(Optional) Specify 1 to enable dissolvable agent. This is required for certain scan features like Windows Share Enumeration. How does it work? At scan time the Agent is installed on Windows devices to collect data, and once the scan is complete it removes itself completely from target systems.
enable_password_auditing={0|1}
(Optional) Specify 1 to check for service provided password auditing controls (control IDs 3893, 3894 and 3895). These controls are used to identify 1) user accounts with empty passwords, 2) user accounts with the password equal to the user name, and 3) user accounts with passwords equal to an entry in a user-defined password dictionary. This setting is available only if enable_dissolvable_agent=1.
custom_password_dictionary={value1,value2}
(Optional) Specify passwords in order to create a password dictionary. This is used when evaluating control ID 3895, which identifies user accounts where the password is equal to an entry in the password dictionary.
enable_windows_share_ enumeration={0|1}
(Optional) Specify 1 to use Windows Share Enumeration to find and report details about Windows shares that are readable by everyone. This test is performed using QID 90635. Make sure 1) the Dissolvable Agent is enabled, 2) QID 90635 is included in the Vulnerability Detection section, and 3) a Windows authentication record is defined.
enable_windows_directory_ search={0|1}
(Optional) Specify 1 if you've set up Windows Directory Search controls and want to include them in the scan. This custom control allows you to search for files/directories based on various criteria like file name and user access permissions.
Parameter Description
143

Chapter 4 - Scan ConfigurationOption Profiles for Compliance
scan_ports={standard|targeted}
(Required) Specify “standard” to enable standard scan of TCP ports. See Appendix B - Ports used for scanning for a list of ports used for standard scan. Specify “targeted” to perform a targeted scan. Which ports are included in a targeted scan? For Unix hosts, these well known ports are scanned: 22 (SSH), 23 (telnet) and 513 (rlogin). Any one of these services is sufficient for authentication. If services (SSH, telnet, rlogin) are not running on these well known ports for the hosts you will be scanning, specify this option and define a custom ports list in the Unix authentication record. Note: The actual ports scanned also depends on the Ports setting in the Unix authentication record.For Windows hosts, the service scans a fixed set of required Windows ports (a service defined, internal list).
Additional
additional_tcp_ports={0|1} (Optional) Specify 1 to enable host discovery on additional TCP ports. Default setting is 1.
additional_tcp_ports_ standard_scan={0|1}
(Optional) Specify 1 to enable standard scan of additional TCP ports. Standard Scan includes 13 ports: 21-23, 25, 53, 80, 88, 110-111, 135, 139, 443, 445. Default setting is 1.
additional_tcp_ports_ additional={value1,value2}
(Optional) Specify additional TCP ports to scan. You can specify up to 20 ports including the standard scan ports.
additional_udp_ports={0|1} (Optional) Specify 1 to enable host discovery on additional UDP ports. Default setting is 1.
additional_udp_ports_type={standard|custom}
(Optional) Specify “standard” to enable standard scan of additional UDP ports. Standard Scan includes 6 ports: 53, 111, 135, 137, 161, 500. Default is “standard”. Specify “custom” to provide a custom list of ports using additional_udp_ports_custom.
additional_udp_ports_ custom={value1,value2}
(Optional) Specify additional UDP ports to scan. You can specify up to 10 ports including the standard scan ports.
icmp={0|1} (Optional) Specify 1 to only discover live hosts that respond to an ICMP ping. Default setting is 1.
blocked_resources={0|1} (Optional) Specify 1 in order to add ports protected by your firewall/IDS to prevent them from being scanned.
protected_ports={default| custom}
(Optional) Ports protected by your firewall/IDS. Specify “default” to provide a list of default blocked ports: 0-1, 111, 513-514, 2049, 4100, 6000-6005, 7100, 8000. Default setting is “default”.Specify custom to provide a custom list of protected ports using protected_ports_custom.
protected_ports_custom={value1,value2}
(Optional) Specify a custom list of protected ports.
protected_ips={all|custom} (Optional) IP addresses and ranges protected by your firewall/IDS. Default is “all”.
Parameter Description
144

Chapter 4 - Scan ConfigurationOption Profiles for Compliance
API request:
curl -u "USERNAME:PASSWORD" -H "X-Requested-With:curl" -X POST "action=create&title=pcjp&global=1&scan_parallel_scaling=1&scan_overall_performance=high&scan_by_policy=1&policy_names=jp2&auto_update_expected_value=1&scan_ports=standard&additional_tcp_ports=1¬_send_ack_or_syn_ack_packets_during_host_discovery=1" "http://qualysapi.qualys.com/api/2.0/fo/subscription/option_profile/pc/"
XML output:
<?xml version="1.0" encoding="UTF-8" ?><!DOCTYPE SIMPLE_RETURN SYSTEM "http://qualysapi.qualys.com/api/2.0/simple_return.dtd"><SIMPLE_RETURN> <RESPONSE> <DATETIME>2018-04-10T11:10:36Z</DATETIME> <TEXT>Compliance Option profile successfully added.</TEXT> <ITEM_LIST> <ITEM> <KEY>ID</KEY> <VALUE>39044</VALUE> </ITEM> </ITEM_LIST> </RESPONSE></SIMPLE_RETURN>
protected_ips_custom={value1,value2}
(Optional) Specify a custom list of IP addresses and ranges protected by your firewall/IDS.
ignore_rst_packets={0|1} (Optional) Specify 1 to ignore all TCP RESET packets - firewall-generated and live-host-generated.
ignore_firewall_generated_ syn_ack_packets={0|1}
(Optional) Specify 1 to determine if TCP SYN-ACK packets are generated by a filtering device and ignore packets that appear to originate from such devices.
not_send_ack_or_syn_ack_ packets_during_host_ discovery={0|1}
(Optional) Specify 1 if you do not want to send TCP ACK or SYN-ACK packets. Out of state TCP packets are not SYN packets and do not belong to an existing TCP session.
Parameter Description
145

Chapter 4 - Scan ConfigurationOption Profiles for Compliance
Update Compliance Option Profile/api/2.0/fo/subscription/option_profile/pc/?action=update
[POST]
Input Parameters
For a list of optional parameters, see Input Parameters for Create PC Option Profile.
API request:
curl -u "USERNAME:PASSWORD" -H "X-Requested-With:curl" -X POST "action=update&title=pc-jp&id=51491401" "http://qualysapi.qualys.com/api/2.0/fo/subscription/option_profile/pc/"
XML output:
<?xml version="1.0" encoding="UTF-8" ?><!DOCTYPE SIMPLE_RETURN SYSTEM "http://qualysapi.qualys.com/api/2.0/simple_return.dtd"><SIMPLE_RETURN> <RESPONSE> <DATETIME>2018-04-10T11:10:36Z</DATETIME> <TEXT>Compliance Option profile successfully updated.</TEXT> <ITEM_LIST> <ITEM> <KEY>ID</KEY> <VALUE>51491401</VALUE> </ITEM> </ITEM_LIST> </RESPONSE></SIMPLE_RETURN>
Parameter Description
action=update (Required)
id={value} (Required) The ID of the option profile.
146

Chapter 4 - Scan ConfigurationOption Profiles for Compliance
Compliance Option Profile List/api/2.0/fo/subscription/option_profile/pc/?action=list
[GET] [POST]
Input Parameters All option profiles are fetched if no parameters are given. To fetch a specific option profile, provide the “id” or “title” parameter with the option profile id or title of interest. Optionally, you can filter the results by using optional parameters listed under Input Parameters for Create PC Option Profile.
API request:
curl -u "USERNAME:PASSWORD" -H "X-Requested-With:curl" -X GET"action=list" "http://qualysapi.qualys.com/api/2.0/fo/subscription/option_profile/pc/"
XML output:
<?xml version="1.0" encoding="UTF-8" ?><!DOCTYPE OPTION_PROFILES SYSTEM "http://qualysapi.qualys.com/api/2.0/fo/subscription/option_profile/option_profile_info.dtd"><OPTION_PROFILES> <OPTION_PROFILE> <BASIC_INFO> <ID>19026</ID> <GROUP_NAME><![CDATA[Initial PC Options 2]]></GROUP_NAME> <GROUP_TYPE>compliance</GROUP_TYPE> <USER_ID><![CDATA[John Smith (jsmith_ap)]]></USER_ID> <UNIT_ID>0</UNIT_ID> <SUBSCRIPTION_ID>10421401</SUBSCRIPTION_ID> <IS_GLOBAL>1</IS_GLOBAL> <UPDATE_DATE>2018-04-10T11:10:36Z</UPDATE_DATE> </BASIC_INFO> <SCAN> <PORTS> <TARGETED_SCAN>1</TARGETED_SCAN> </PORTS> <PERFORMANCE> <PARALLEL_SCALING>0</PARALLEL_SCALING> <OVERALL_PERFORMANCE>Normal</OVERALL_PERFORMANCE> <HOSTS_TO_SCAN> <EXTERNAL_SCANNERS>10</EXTERNAL_SCANNERS> <SCANNER_APPLIANCES>30</SCANNER_APPLIANCES> </HOSTS_TO_SCAN> <PROCESSES_TO_RUN>
147

Chapter 4 - Scan ConfigurationOption Profiles for Compliance
<TOTAL_PROCESSES>10</TOTAL_PROCESSES> <HTTP_PROCESSES>10</HTTP_PROCESSES> </PROCESSES_TO_RUN> <PACKET_DELAY>Medium</PACKET_DELAY> <PORT_SCANNING_AND_HOST_DISCOVERY>Normal</PORT_SCANNING_AND_HOST_DISCOVERY> </PERFORMANCE> <DISSOLVABLE_AGENT> <DISSOLVABLE_AGENT_ENABLE>0</DISSOLVABLE_AGENT_ENABLE> <PASSWORD_AUDITING_ENABLE> <HAS_PASSWORD_AUDITING_ENABLE>0</HAS_PASSWORD_AUDITING_ENABLE> </PASSWORD_AUDITING_ENABLE> <WINDOWS_SHARE_ENUMERATION_ENABLE>0</WINDOWS_SHARE_ENUMERATION_ENABLE> <WINDOWS_DIRECTORY_SEARCH_ENABLE>0</WINDOWS_DIRECTORY_SEARCH_ENABLE> </DISSOLVABLE_AGENT> <FILE_INTEGRITY_MONITORING> <AUTO_UPDATE_EXPECTED_VALUE>1</AUTO_UPDATE_EXPECTED_VALUE> </FILE_INTEGRITY_MONITORING> <CONTROL_TYPES> <FIM_CONTROLS_ENABLED>0</FIM_CONTROLS_ENABLED> <CUSTOM_WMI_QUERY_CHECKS>0</CUSTOM_WMI_QUERY_CHECKS> </CONTROL_TYPES> </SCAN> <ADDITIONAL> <HOST_DISCOVERY> <TCP_PORTS> <STANDARD_SCAN>1</STANDARD_SCAN> </TCP_PORTS> <UDP_PORTS> <STANDARD_SCAN>1</STANDARD_SCAN> </UDP_PORTS> <ICMP>1</ICMP> </HOST_DISCOVERY> <PACKET_OPTIONS> <IGNORE_FIREWALL_GENERATED_TCP_RST>0</IGNORE_FIREWALL_GENERATED_TCP_RST> <IGNORE_FIREWALL_GENERATED_TCP_SYN_ACK>0</IGNORE_FIREWALL_GENERATED_TCP_SYN_ACK>
148

Chapter 4 - Scan ConfigurationOption Profiles for Compliance
<NOT_SEND_TCP_ACK_OR_SYN_ACK_DURING_HOST_DISCOVERY>0</NOT_SEND_TCP_ACK_OR_SYN_ACK_DURING_HOST_DISCOVERY> </PACKET_OPTIONS> </ADDITIONAL> </OPTION_PROFILE> <OPTION_PROFILE> <BASIC_INFO> <ID>31118</ID> <GROUP_NAME><![CDATA[pc 55]]></GROUP_NAME> <GROUP_TYPE>compliance</GROUP_TYPE> <USER_ID><![CDATA[John Smith (jsmith_ap)]]></USER_ID> <UNIT_ID>0</UNIT_ID> <SUBSCRIPTION_ID>10421401</SUBSCRIPTION_ID> <IS_GLOBAL>0</IS_GLOBAL> <UPDATE_DATE>2018-04-10T11:10:36Z</UPDATE_DATE> </BASIC_INFO> <SCAN> <PORTS> <TARGETED_SCAN>1</TARGETED_SCAN> </PORTS> <PERFORMANCE> <PARALLEL_SCALING>0</PARALLEL_SCALING> <OVERALL_PERFORMANCE>High</OVERALL_PERFORMANCE> <HOSTS_TO_SCAN> <EXTERNAL_SCANNERS>20</EXTERNAL_SCANNERS> <SCANNER_APPLIANCES>40</SCANNER_APPLIANCES> </HOSTS_TO_SCAN> <PROCESSES_TO_RUN> <TOTAL_PROCESSES>15</TOTAL_PROCESSES> <HTTP_PROCESSES>15</HTTP_PROCESSES> </PROCESSES_TO_RUN> <PACKET_DELAY>Short</PACKET_DELAY> </PERFORMANCE> <SCAN_RESTRICTION> <SCAN_BY_POLICY> <POLICY> <ID>10472</ID> <TITLE><![CDATA[jp]]></TITLE> </POLICY> </SCAN_BY_POLICY> </SCAN_RESTRICTION> <FILE_INTEGRITY_MONITORING> <AUTO_UPDATE_EXPECTED_VALUE>1</AUTO_UPDATE_EXPECTED_VALUE> </FILE_INTEGRITY_MONITORING> </SCAN>
149

Chapter 4 - Scan ConfigurationOption Profiles for Compliance
<ADDITIONAL> <HOST_DISCOVERY> <TCP_PORTS> <STANDARD_SCAN>1</STANDARD_SCAN> <TCP_ADDITIONAL> <HAS_ADDITIONAL>1</HAS_ADDITIONAL> <ADDITIONAL_PORTS>80,35</ADDITIONAL_PORTS> </TCP_ADDITIONAL> </TCP_PORTS> <UDP_PORTS> <STANDARD_SCAN>1</STANDARD_SCAN> </UDP_PORTS> <ICMP>1</ICMP> </HOST_DISCOVERY> <BLOCK_RESOURCES> <WATCHGUARD_DEFAULT_BLOCKED_PORTS>1</WATCHGUARD_DEFAULT_BLOCKED_PORTS> <ALL_REGISTERED_IPS>1</ALL_REGISTERED_IPS> </BLOCK_RESOURCES> <PACKET_OPTIONS> <IGNORE_FIREWALL_GENERATED_TCP_RST>1</IGNORE_FIREWALL_GENERATED_TCP_RST> <IGNORE_FIREWALL_GENERATED_TCP_SYN_ACK>1</IGNORE_FIREWALL_GENERATED_TCP_SYN_ACK> <NOT_SEND_TCP_ACK_OR_SYN_ACK_DURING_HOST_DISCOVERY>1</NOT_SEND_TCP_ACK_OR_SYN_ACK_DURING_HOST_DISCOVERY> </PACKET_OPTIONS> </ADDITIONAL> </OPTION_PROFILE> <OPTION_PROFILE> <BASIC_INFO> <ID>51481401</ID> <GROUP_NAME><![CDATA[pc op - 1]]></GROUP_NAME> <GROUP_TYPE>compliance</GROUP_TYPE> <USER_ID><![CDATA[John Smith (jsmith_ap)]]></USER_ID> <UNIT_ID>0</UNIT_ID> <SUBSCRIPTION_ID>10421401</SUBSCRIPTION_ID> <IS_GLOBAL>0</IS_GLOBAL> <UPDATE_DATE>2018-04-10T11:10:36Z</UPDATE_DATE> </BASIC_INFO> <SCAN> <PORTS>
150

Chapter 4 - Scan ConfigurationOption Profiles for Compliance
<TARGETED_SCAN>1</TARGETED_SCAN> </PORTS> <PERFORMANCE> <PARALLEL_SCALING>1</PARALLEL_SCALING> <OVERALL_PERFORMANCE>High</OVERALL_PERFORMANCE> <HOSTS_TO_SCAN> <EXTERNAL_SCANNERS>20</EXTERNAL_SCANNERS> <SCANNER_APPLIANCES>40</SCANNER_APPLIANCES> </HOSTS_TO_SCAN> <PROCESSES_TO_RUN> <TOTAL_PROCESSES>15</TOTAL_PROCESSES> <HTTP_PROCESSES>15</HTTP_PROCESSES> </PROCESSES_TO_RUN> <PACKET_DELAY>Short</PACKET_DELAY> <PORT_SCANNING_AND_HOST_DISCOVERY>Normal</PORT_SCANNING_AND_HOST_DISCOVERY> </PERFORMANCE> <SCAN_RESTRICTION> <SCAN_BY_POLICY> <POLICY> <ID>14487</ID> <TITLE><![CDATA[jp2]]></TITLE> </POLICY> </SCAN_BY_POLICY> </SCAN_RESTRICTION> <FILE_INTEGRITY_MONITORING> <AUTO_UPDATE_EXPECTED_VALUE>0</AUTO_UPDATE_EXPECTED_VALUE> </FILE_INTEGRITY_MONITORING> </SCAN> <ADDITIONAL> <HOST_DISCOVERY> <TCP_PORTS> <STANDARD_SCAN>1</STANDARD_SCAN> <TCP_ADDITIONAL> <HAS_ADDITIONAL>1</HAS_ADDITIONAL> <ADDITIONAL_PORTS>1</ADDITIONAL_PORTS> </TCP_ADDITIONAL> </TCP_PORTS> <UDP_PORTS> <STANDARD_SCAN>1</STANDARD_SCAN> </UDP_PORTS> <ICMP>1</ICMP> </HOST_DISCOVERY> <BLOCK_RESOURCES>
151

Chapter 4 - Scan ConfigurationOption Profiles for Compliance
<WATCHGUARD_DEFAULT_BLOCKED_PORTS>1</WATCHGUARD_DEFAULT_BLOCKED_PORTS> <ALL_REGISTERED_IPS>1</ALL_REGISTERED_IPS> </BLOCK_RESOURCES> <PACKET_OPTIONS> <IGNORE_FIREWALL_GENERATED_TCP_RST>1</IGNORE_FIREWALL_GENERATED_TCP_RST> <IGNORE_FIREWALL_GENERATED_TCP_SYN_ACK>1</IGNORE_FIREWALL_GENERATED_TCP_SYN_ACK> <NOT_SEND_TCP_ACK_OR_SYN_ACK_DURING_HOST_DISCOVERY>1</NOT_SEND_TCP_ACK_OR_SYN_ACK_DURING_HOST_DISCOVERY> </PACKET_OPTIONS> </ADDITIONAL> </OPTION_PROFILE> <OPTION_PROFILE> <BASIC_INFO> <ID>51491401</ID> <GROUP_NAME><![CDATA[pc op - 2]]></GROUP_NAME> <GROUP_TYPE>compliance</GROUP_TYPE> <USER_ID><![CDATA[John Smith (jsmith_ap)]]></USER_ID> <UNIT_ID>0</UNIT_ID> <SUBSCRIPTION_ID>10421401</SUBSCRIPTION_ID> <IS_GLOBAL>0</IS_GLOBAL> <UPDATE_DATE>2018-04-10T11:10:36Z</UPDATE_DATE> </BASIC_INFO> <SCAN> <PORTS> <STANDARD_SCAN>1</STANDARD_SCAN> </PORTS> <PERFORMANCE> <PARALLEL_SCALING>0</PARALLEL_SCALING> <OVERALL_PERFORMANCE>Normal</OVERALL_PERFORMANCE> <HOSTS_TO_SCAN> <EXTERNAL_SCANNERS>10</EXTERNAL_SCANNERS> <SCANNER_APPLIANCES>30</SCANNER_APPLIANCES> </HOSTS_TO_SCAN> <PROCESSES_TO_RUN> <TOTAL_PROCESSES>10</TOTAL_PROCESSES> <HTTP_PROCESSES>10</HTTP_PROCESSES> </PROCESSES_TO_RUN> <PACKET_DELAY>Medium</PACKET_DELAY> <PORT_SCANNING_AND_HOST_DISCOVERY>Normal</PORT_SCANNING_AND_HOST_D
152
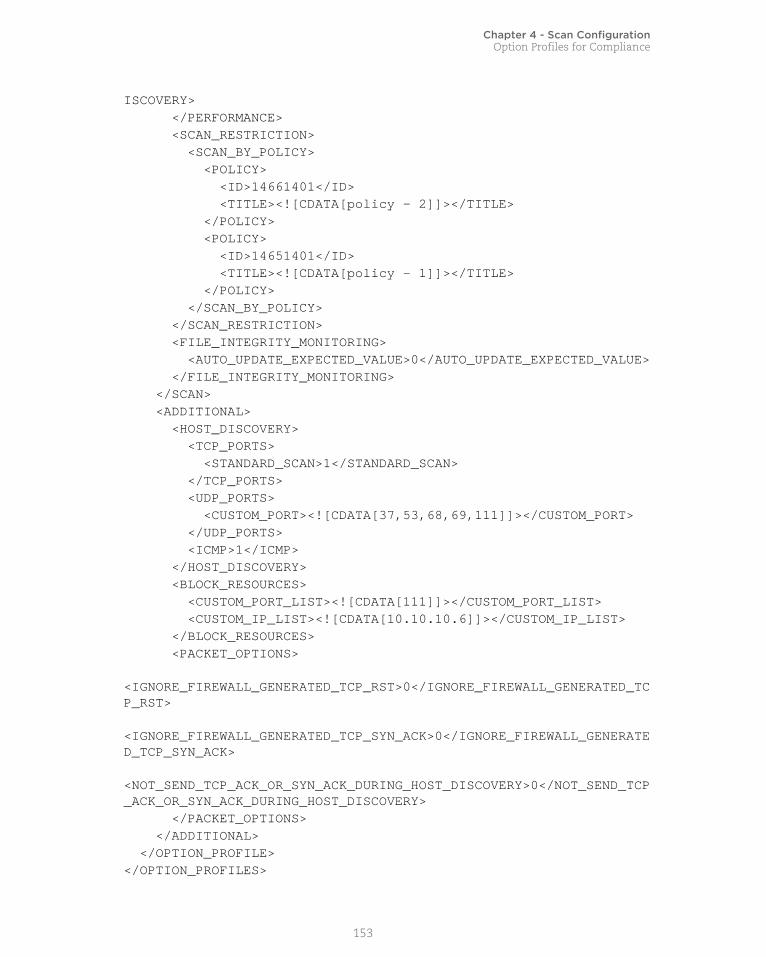
Chapter 4 - Scan ConfigurationOption Profiles for Compliance
ISCOVERY> </PERFORMANCE> <SCAN_RESTRICTION> <SCAN_BY_POLICY> <POLICY> <ID>14661401</ID> <TITLE><![CDATA[policy - 2]]></TITLE> </POLICY> <POLICY> <ID>14651401</ID> <TITLE><![CDATA[policy - 1]]></TITLE> </POLICY> </SCAN_BY_POLICY> </SCAN_RESTRICTION> <FILE_INTEGRITY_MONITORING> <AUTO_UPDATE_EXPECTED_VALUE>0</AUTO_UPDATE_EXPECTED_VALUE> </FILE_INTEGRITY_MONITORING> </SCAN> <ADDITIONAL> <HOST_DISCOVERY> <TCP_PORTS> <STANDARD_SCAN>1</STANDARD_SCAN> </TCP_PORTS> <UDP_PORTS> <CUSTOM_PORT><![CDATA[37,53,68,69,111]]></CUSTOM_PORT> </UDP_PORTS> <ICMP>1</ICMP> </HOST_DISCOVERY> <BLOCK_RESOURCES> <CUSTOM_PORT_LIST><![CDATA[111]]></CUSTOM_PORT_LIST> <CUSTOM_IP_LIST><![CDATA[10.10.10.6]]></CUSTOM_IP_LIST> </BLOCK_RESOURCES> <PACKET_OPTIONS> <IGNORE_FIREWALL_GENERATED_TCP_RST>0</IGNORE_FIREWALL_GENERATED_TCP_RST> <IGNORE_FIREWALL_GENERATED_TCP_SYN_ACK>0</IGNORE_FIREWALL_GENERATED_TCP_SYN_ACK> <NOT_SEND_TCP_ACK_OR_SYN_ACK_DURING_HOST_DISCOVERY>0</NOT_SEND_TCP_ACK_OR_SYN_ACK_DURING_HOST_DISCOVERY> </PACKET_OPTIONS> </ADDITIONAL> </OPTION_PROFILE></OPTION_PROFILES>
153

Chapter 4 - Scan ConfigurationOption Profiles for Compliance
DTD
<platform API server>/api/2.0/fo/subscription/option_profile/option_profile_info.dtd
Delete Compliance Option Profile/api/2.0/fo/subscription/option_profile/pc/?action=delete
[GET] [POST]
Input Parameters
API request:
curl -u "USERNAME:PASSWORD" -H "X-Requested-With:curl" -X POST"action=delete&id=51491401" "http://qualysapi.qualys.com/api/2.0/fo/subscription/option_profile/pc/"
XML output:
<?xml version="1.0" encoding="UTF-8" ?><!DOCTYPE SIMPLE_RETURN SYSTEM "http://qualysapi.qualys.com/api/2.0/simple_return.dtd"><SIMPLE_RETURN> <RESPONSE> <DATETIME>2018-04-10T11:10:36Z</DATETIME> <TEXT>Option Profile Deleted Successfully</TEXT> <ITEM_LIST> <ITEM> <KEY>ID</KEY> <VALUE>51491401</VALUE> </ITEM> </ITEM_LIST> </RESPONSE></SIMPLE_RETURN>
Parameter Description
action=delete (Required)
id={value} (Required) The ID of the option profile.
154

Chapter 4 - Scan ConfigurationKnowledgeBase
KnowledgeBase/api/2.0/fo/knowledge_base/vuln/?action=list
[GET] [POST]
Download a list of vulnerabilities from Qualys’ KnowledgeBase. Several input parameters grant users control over which vulnerabilities to download and the amount of detail to download, and the XML output provides a rich information source for each vulnerability.
Qualys’ Sofware-as-a-Service (SaaS) technology includes its KnowledgeBase, with the industry’s largest number of vulnerability signatures, that is continuously updated by Qualys’ Research and Development team. Qualys is fully dedicated to providing the most accurate security audits in the industry. Each day new and updated signatures are tested in Qualys’ own vulnerability labs and then published, making them available to Qualys customers.
Authorized Qualys users have the ability to download vulnerability data using the KnowledgeBase API. Please contact Qualys Support or your sales representative if you would like to obtain authorization for your subscription.
Permissions - Your subscription must be granted permission to run this API function. Please contact Qualys Support or your sales representative to receive this authorization.
Input Parameters
Several optional input parameters may be specified. When unspecified, the XML output includes all vulnerabilities in the KnowledgeBase, showing basic details for each vulnerability. Several optional parameters allow you specify filters. When filter parameters are specified, these parameters are ANDed by the service to filter the data from the output.
Role Permissions
Manager, Unit Manager, Scanner, Reader
Download vulnerability data from the KnowledgeBase.
Auditor No permission to download vulnerability data from the KnowledgeBase.
Parameter Description
action=list (Required)
echo_request={0|1} (Optional) Show (echo) the request’s input parameters (names and values) in the XML output. When unspecified, parameters are not included in the XML output. Specify 1 to view parameters in the XML output.
details={Basic|All|None} (Optional) Show the requested amount of information for each vulnerability in the XML output. A valid value is: Basic (default), All, or None. Basic includes basic elements plus CVSS Base and Temporal scores. All includes all vulnerability details, including the Basic details.
155
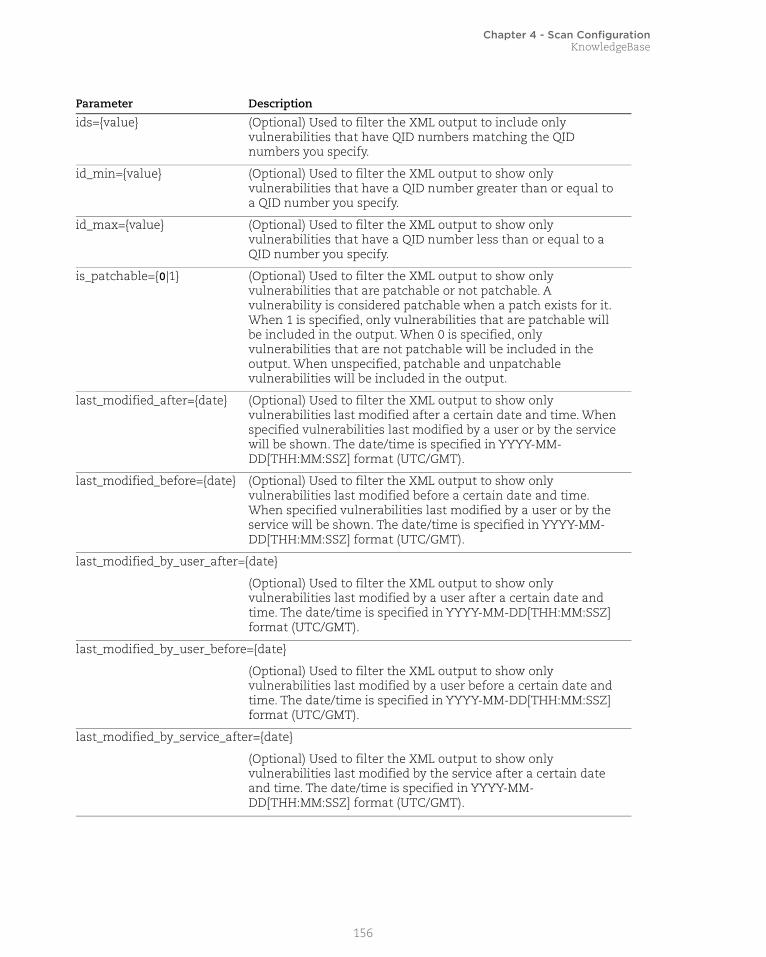
Chapter 4 - Scan ConfigurationKnowledgeBase
ids={value} (Optional) Used to filter the XML output to include only vulnerabilities that have QID numbers matching the QID numbers you specify.
id_min={value} (Optional) Used to filter the XML output to show only vulnerabilities that have a QID number greater than or equal to a QID number you specify.
id_max={value} (Optional) Used to filter the XML output to show only vulnerabilities that have a QID number less than or equal to a QID number you specify.
is_patchable={0|1} (Optional) Used to filter the XML output to show only vulnerabilities that are patchable or not patchable. A vulnerability is considered patchable when a patch exists for it. When 1 is specified, only vulnerabilities that are patchable will be included in the output. When 0 is specified, only vulnerabilities that are not patchable will be included in the output. When unspecified, patchable and unpatchable vulnerabilities will be included in the output.
last_modified_after={date} (Optional) Used to filter the XML output to show only vulnerabilities last modified after a certain date and time. When specified vulnerabilities last modified by a user or by the service will be shown. The date/time is specified in YYYY-MM-DD[THH:MM:SSZ] format (UTC/GMT).
last_modified_before={date} (Optional) Used to filter the XML output to show only vulnerabilities last modified before a certain date and time. When specified vulnerabilities last modified by a user or by the service will be shown. The date/time is specified in YYYY-MM-DD[THH:MM:SSZ] format (UTC/GMT).
last_modified_by_user_after={date}
(Optional) Used to filter the XML output to show only vulnerabilities last modified by a user after a certain date and time. The date/time is specified in YYYY-MM-DD[THH:MM:SSZ] format (UTC/GMT).
last_modified_by_user_before={date}
(Optional) Used to filter the XML output to show only vulnerabilities last modified by a user before a certain date and time. The date/time is specified in YYYY-MM-DD[THH:MM:SSZ] format (UTC/GMT).
last_modified_by_service_after={date}
(Optional) Used to filter the XML output to show only vulnerabilities last modified by the service after a certain date and time. The date/time is specified in YYYY-MM-DD[THH:MM:SSZ] format (UTC/GMT).
Parameter Description
156

Chapter 4 - Scan ConfigurationKnowledgeBase
last_modified_by_service_before={date}
(Optional) Used to filter the XML output to show only vulnerabilities last modified by the service before a certain date and time. The date/time is specified in YYYY-MM-DD[THH:MM:SSZ] format (UTC/GMT).
published_after={date} (Optional) Used to filter the XML output to show only vulnerabilities published after a certain date and time. The date/time is specified in YYYY-MM-DD[THH:MM:SSZ] format (UTC/GMT).
published_before={date} (Optional) Used to filter the XML output to show only vulnerabilities published before a certain date and time. The date/time is specified in YYYY-MM-DD[THH:MM:SSZ] format (UTC/GMT).
discovery_method={value} (Optional) Used to filter the XML output to show only vulnerabilities assigned a certain discovery method. A valid value is: Remote, Authenticated, RemoteOnly, AuthenticatedOnly, or RemoteAndAuthenticated.
When “Authenticated” is specified, the service shows vulnerabilities that have at least one associated authentication type. Vulnerabilities that have at least one authentication type can be detected in two ways: 1) remotely without using authentication, and 2) using authentication.
discovery_auth_types={value} (Optional) Used to filter the XML output to show only vulnerabilities having one or more authentication types. A valid value is: Windows, Oracle, Unix, SNMP, DB2, HTTP, MySQL, VMware. Multiple values should be comma-separated.
show_pci_reasons={0|1} (Optional) Used to filter the XML output to show reasons for passing or failing PCI compliance (when the CVSS Scoring feature is turned on in the user’s subscription). Specify 1 to view the reasons in the XML output. When unspecified, the reasons are not included in the XML output.
show_supported_modules_info={0|1}
(Optional) Used to filter the XML output to show Qualys modules that can be used to detect each vulnerability. Specify 1 to view supported modules in the XML output. When unspecified, supported modules are not included in the XML output.
show_disabled_flag={0|1} (Optional) Specify 1 to include the disabled flag for each vulnerability in the XML output.
show_qid_change_log={0|1} (Optional) Specify 1 to include QID changes for each vulnerability in the XML output.
Parameter Description
157

Chapter 4 - Scan ConfigurationKnowledgeBase
SamplesThese sample requests work on Qualys US Platform 1 where the FQDN in the API server URL is qualysapi.qualys.com. Please be sure to replace the FQDN with the proper API server URL for your platform. For a partner platform, use the URL for your @customer platform API server.
Sample 1 - Request all vulnerabilities in the KnowledgeBase showing basic details:
curl -u "user:password" -H "X-Requested-With: Curl" -X "POST"-d "action=list" "https://qualysapi.qualys.com/api/2.0/fo/knowledge_base/vuln/" > output.txt
Sample 2 - Request patchable vulnerabilities that have QIDs 1-200 showing all details:
curl -u "user:password" -H "X-Requested-With: Curl" -X "POST"-d "action=list&ids=1-200&is_patchable=1&details=All" "https://qualysapi.qualys.com/api/2.0/fo/knowledge_base/vuln/" > output.txt
Sample 3 - Request vulnerabilites that were last modified by the service after July 20, 2011 and that have the “remote and authenticated” discovery method:
curl -u "user:password" -H "X-Requested-With: Curl" -X "POST"-d "action=list&last_modified_by_service_after=2011-07-20&discovery_method=RemoteAndAuthenticated" "https://qualysapi.qualys.com/api/2.0/fo/knowledge_base/vuln/" > output.txt
DTD
<platform API server>/api/2.0/fo/knowledge_base/vuln/ knowledge_base_vuln_list_output.dtd
158

Chapter 4 - Scan ConfigurationEditing Vulnerabilities
Editing Vulnerabilities/api/2.0/fo/knowledge_base/vuln/
[POST]
Edit, reset and list the edited vulnerabilities in the Qualys Vulnerability KnowledgeBase.
Permissions - Managers have permissions to edit vulnerabilities and make API requests to edit a vulnerability, reset a vulnerability and list customized vulnerabilities.
Edit a vulnerabilityYou can change the severity level and/or add comments to Threat, Impact or Solution. Providing at least one optional parameter is mandatory.
Comments added for Threat, Impact, or Solution are appended to the service-provided descriptions in the vulnerability details.
API request:
curl -u "USERNAME:PASSWORD" -H "X-Requested-With:curl" -X POST "action=edit&impact_comment=testimpact&qid=27014" "https://qualysapi.qualys.com/api/2.0/fo/knowledge_base/vuln/"
XML output:
<?xml version="1.0" encoding="UTF-8" ?><!DOCTYPE SIMPLE_RETURN SYSTEM
Parameter Description
action=edit (Required) POST method is required
qid={value} (Required) QID of the vulnerability to be edited.
severity={value} (Optional) Severity level between 1 to 5.Changing the severity level of a vulnerability impacts how the vulnerability appears in reports and how it is eventually prioritized for remediation. For example, by changing a vulnerability from a severity 2 to a severity 5, remediation tickets for the vulnerability could have a higher priority and shorter deadline for resolution.
disable={0|1} (Optional) Specify 1 to disable the vulnerability. Default is 0.When you disable a vulnerability it is globally filtered out from all hosts in all scan reports. The vulnerability is also filtered from host information, asset search results and your dashboard. You may include disabled vulnerabilities in scan reports by changing report filter settings.
threat_comment (Optional) Threat comments in plain text.
impact_comment (Optional) Impact comments in plain text.
solution_comment (Optional) Solution comments in plain text.
159

Chapter 4 - Scan ConfigurationEditing Vulnerabilities
"https://qualysapi.qualys.com/api/2.0/simple_return.dtd"><SIMPLE_RETURN> <RESPONSE> <DATETIME>2017-03-02T08:51:59Z</DATETIME> <TEXT>Custom Vuln Data has been updated successfully</TEXT> <ITEM_LIST> <ITEM> <KEY>qid</KEY> <VALUE>27014</VALUE> </ITEM> </ITEM_LIST> </RESPONSE></SIMPLE_RETURN>
Reset a vulnerabilityYou can change the vulnerability settings back to original.
API request:
curl -u "USERNAME:PASSWORD" -H "X-Requested-With:curl" -X POST "action=reset&qid=27014" "https://qualysapi.qualys.com/api/2.0/fo/knowledge_base/vuln/"
XML output:
<?xml version="1.0" encoding="UTF-8" ?><!DOCTYPE SIMPLE_RETURN SYSTEM "https://qualysapi.qualys.com/api/2.0/simple_return.dtd"><SIMPLE_RETURN> <RESPONSE> <DATETIME>2017-03-02T08:55:11Z</DATETIME> <TEXT>Custom Vuln Data has been reset successfully</TEXT> </RESPONSE></SIMPLE_RETURN>
List customized vulnerabilitiesYou can list the vulnerabilities that are edited.
Parameter Description
action=reset (Required) POST method is required
qid={value} (Required) QID of the vulnerability to be reset.
Parameter Description
action=custom (Required) GET or POST method can be used.
160

Chapter 4 - Scan ConfigurationEditing Vulnerabilities
API request:
curl -u "USERNAME:PASSWORD" -H "X-Requested-With:curl" -X POST "action=custom" "https://qualysapi.qualys.com/api/2.0/fo/knowledge_base/vuln/"
XML output:
<?xml version="1.0" encoding="UTF-8" ?><!DOCTYPE KB_CUSTOM_VULN_LIST_OUTPUT SYSTEM "https://qualysapi.qualys.com/api/2.0/fo/knowledge_base/vuln/kb_custom_vuln_list_output.dtd"><KB_CUSTOM_VULN_LIST_OUTPUT> <RESPONSE> <DATETIME>2017-03-02T08:47:52Z</DATETIME> <CUSTOM_VULN_LIST> <CUSTOM_VULN_DATA> <QID> <![CDATA[27014]]> </QID> <SEVERITY_LEVEL>5</SEVERITY_LEVEL> <ORIGINAL_SEVERITY_LEVEL>5</ORIGINAL_SEVERITY_LEVEL> <IS_DISABLED>1</IS_DISABLED> <UPDATED_DATETIME> <![CDATA[2017-03-02T05:58:40Z]]> </UPDATED_DATETIME> <UPDATED_BY> <![CDATA[mr_md]]> </UPDATED_BY> <THREAT_COMMENT> <![CDATA[threat123]]> </THREAT_COMMENT> <IMPACT_COMMENT> <![CDATA[impact123]]> </IMPACT_COMMENT> <SOLUTION_COMMENT> <![CDATA[solution123]]> </SOLUTION_COMMENT> </CUSTOM_VULN_DATA> </CUSTOM_VULN_LIST> </RESPONSE></KB_CUSTOM_VULN_LIST_OUTPUT>
DTD
<platform API server>/api/2.0/fo/knowledge_base/vuln/kb_custom_vuln_list_output.dtd
161

Chapter 4 - Scan ConfigurationStatic Search Lists
Static Search Lists/api/2.0/fo/qid/search_list/static/
Create static search lists and get information about them.
Permissions - as below.
List static search lists
Input parameters
Sample - List static search list
API request:
curl -u "USERNAME:PASSWORD" -H "X-Requested-With: Curl""https://qualysapi.qualys.com/api/2.0/fo/qid/search_list/static/?action=list&ids=381"
XML response:
<?xml version="1.0" encoding="UTF-8" ?><!DOCTYPE STATIC_SEARCH_LIST_OUTPUT SYSTEM "https://qualysapi.qualys.com/api/2.0/fo/qid/search_list/static/static_list_output.dtd"><STATIC_SEARCH_LIST_OUTPUT> <RESPONSE> <DATETIME>2018-06-06T06:20:03Z</DATETIME> <STATIC_LISTS> <STATIC_LIST> <ID>381</ID> <TITLE><![CDATA[static search list]]></TITLE> <GLOBAL>Yes</GLOBAL> <OWNER>acme_tb</OWNER> <CREATED><![CDATA[06/01/2018 at 15:18:42 (GMT+0530)]]></CREATED>
User Role Permissions
Manager, Unit Manager, Scanner, Reader
Create, update, list and delete search lists.
Auditor No permission to create, update, list and delete search lists.
Parameter Description
action=list (Required)
echo_request={0|1} (Optional) Specify 1 to show input parameters in XML output.
ids={id1,id2...} (Optional) One or more search list IDs to display. Multiple IDs are comma separated.
162

Chapter 4 - Scan ConfigurationStatic Search Lists
<MODIFIED_BY>acme_tb</MODIFIED_BY> <MODIFIED><![CDATA[06/02/2018 at 15:18:42 (GMT+0530)]]></MODIFIED> <QIDS> <QID>1000<QID> <QID>1001<QID> </QIDS> <!-- This list is used in the following option profiles //--> <OPTION_PROFILES> <OPTION_PROFILE> <ID>135<ID> <TITLE><![CDATA[Initial Options]]></TITLE> <OPTION_PROFILE> </OPTION_PROFILES> <!-- This list is used in the following report templates //--> <REPORT_TEMPLATES> <REPORT_TEMPLATE> <ID>256<ID> <TITLE><![CDATA[Scan Report Template]]></TITLE> <REPORT_TEMPLATE> </REPORT_TEMPLATES> <!-- This list is used in the following remediation policies. //--> <REMEDIATION_POLICIES> <REMEDIATION_POLICY> <ID>655<ID> <TITLE><![CDATA[Remediation Policy 1]]></TITLE> <REMEDIATION_POLICY> </REMEDIATION_POLICIES> <!-- This search list is associated with following distribution groups. //--> <DISTRIBUTION_GROUPS> <DISTRIBUTION_GROUP> <NAME><![CDATA[All]]></NAME> <DISTRIBUTION_GROUP> </DISTRIBUTION_GROUPS> <COMMENTS><![CDATA[This is my first comment for this list]]></COMMENTS> </STATIC_LIST> </STATIC_LISTS> </RESPONSE></SEARCH_LIST_OUTPUT>
163

Chapter 4 - Scan ConfigurationStatic Search Lists
DTD
<platform API server>/api/2.0/fo/qid/search_list/static/static_list_output.dtd
Create static search lists
Input parameters
Sample - Create search list
API request:
curl -u "USERNAME:PASSWD" -H "X-Requested-With: Curl" -X "POST" -d"action=create&title=My+Static+Search+List&qids=68518-68522,48000""https://qualysapi.qualys.com/api/2.0/fo/qid/search_list/static/"
XML response:
<?xml version="1.0" encoding="UTF-8" ?><!DOCTYPE SIMPLE_RETURN SYSTEM "https://qualysapi.qualys.com/api/2.0/simple_return.dtd"><SIMPLE_RETURN> <RESPONSE> <DATETIME>2015-09-01T21:32:40Z</DATETIME> <TEXT>New search list created successfully</TEXT> <ITEM_LIST> <ITEM> <KEY>ID</KEY> <VALUE>136992</VALUE> </ITEM> </ITEM_LIST> </RESPONSE></SIMPLE_RETURN>
Parameter Description
action=create (Required)
echo_request={0|1} (Optional) Specify 1 to show input parameters in XML output.
title={value} (Required) A user defined search list title. Maximum is 256 characters (ascii).
qids=(num1, num2...} (Required) QIDs to include in the search list. Ranges are allowed.
global={0|1} (Optional) Specify 1 to make this a global search list, available to all subscription users.
comments={value} (Optional) User defined comments.
164

Chapter 4 - Scan ConfigurationStatic Search Lists
Update static search list
Input parameters
Sample - Update static search list
API request:
curl -u "USERNAME:PASSWD" -H "X-Requested-With: Curl" -X "POST" -d"action=update&id=136992&global=1&qids=68518-68522,48000-48004""https://qualysapi.qualys.com/api/2.0/fo/qid/search_list/static/"
XML response:
<?xml version="1.0" encoding="UTF-8" ?><!DOCTYPE SIMPLE_RETURN SYSTEM "https://qualysapi.qualys.com/api/2.0/simple_return.dtd"><SIMPLE_RETURN> <RESPONSE> <DATETIME>2015-09-01T21:32:40Z</DATETIME> <TEXT>Search list updated successfully</TEXT> <ITEM_LIST>
Parameter Description
action=update (Required)
echo_request={0|1} (Optional) Specify 1 to show input parameters in XML output.
id={id} (Required) The ID of the search list you want to update.
title={value} (Optional) The search list title. Maximum is 256 characters (ascii).
global={0|1} (Optional) Specify 1 to make this a global search list.
qids=(num1, num2...} (Optional) QIDs/ranges to include in the search list. Multiple entries are comma separated. ***QIDs specified will replace all existing ones defined for the search list, if any.
qids cannot be specified with add_qids or remove_qids in the same request.
add_qids=(num1, num2...} (Optional) QIDs/ranges you want to add to the existing ones defined for the search list. When the same QIDs are passed using add_qids and remove_qids in the same request, the QIDs are added to the list.
add_qids cannot be specified with qids in the same request.
remove_qids=(num1, num2...} (Optional) QIDs/ranges you want to remove the existing ones defined for the search list. When the same QIDs are passed using add_qids and remove_qids in the same request, the QIDs are added to the list.
remove_qids cannot be specified with qids in the same request.
comments={value} (Optional) User defined comments.
165

Chapter 4 - Scan ConfigurationStatic Search Lists
<ITEM> <KEY>ID</KEY> <VALUE>136992</VALUE> </ITEM> </ITEM_LIST> </RESPONSE></SIMPLE_RETURN>
Delete static search list
Input parameters
Sample - Delete static search list
API request:
curl -u "USERNAME:PASSWD" -H "X-Requested-With: Curl" -X "POST" -d"action=delete&id=136992""https://qualysapi.qualys.com/api/2.0/fo/qid/search_list/static/"
XML response:
<?xml version="1.0" encoding="UTF-8" ?><!DOCTYPE SIMPLE_RETURN SYSTEM "https://qualysapi.qualys.com/api/2.0/simple_return.dtd"><SIMPLE_RETURN> <RESPONSE> <DATETIME>2015-09-01T21:32:40Z</DATETIME> <TEXT>search list deleted successfully</TEXT> <ITEM_LIST> <ITEM> <KEY>ID</KEY> <VALUE>136992</VALUE> </ITEM> </ITEM_LIST> </RESPONSE></SIMPLE_RETURN>
Parameter Description
action=delete (Required)
echo_request={0|1} (Optional) Specify 1 to show input parameters in XML output.
id={id} (Required) The ID of the search list you want to delete.
166

Chapter 4 - Scan ConfigurationDynamic Search Lists
Dynamic Search Lists/api/2.0/fo/qid/search_list/dynamic/
Create dynamic search lists and get information about them.
Permissions - as described below
List dynamic search lists
Input parameters
Sample - List dynamic search list
API request:
curl -u "USERNAME:PASSWORD" -H "X-Requested-With: Curl""https://qualysapi.qualys.com/api/2.0/fo/qid/search_list/dynamic/?action=list&ids=381"
XML response:
<?xml version="1.0" encoding="UTF-8" ?><!DOCTYPE DYNAMIC_SEARCH_LIST_OUTPUT SYSTEM
User Role Permissions
Manager, Unit Manager, Scanner, Reader
Create, update, list and delete search lists.
Auditor No permission to create, update, list and delete search lists.
Parameter Description
action=list (Required)
echo_request={0|1} (Optional) Specify 1 to show input parameters in XML output.
ids={id1,id2...} (Optional) One or more search list IDs to display. Multiple IDs are comma separated.
show_qids={0|1}
(Optional) Set to 0 to hide QIDs defined for each search list in the XML output. By default these QIDs are shown.
show_option_profiles={0|1}
(Optional) Set to 0 to hide option profiles associated with each search list in the XML output. By default these option profiles are shown.
show_distribution_groups={0|1}
(Optional) Set to 0 to hide distribution groups associated with each search list in the XML output. By default these distribution groups are shown.
show_report_templates={0|1}
(Optional) Set to 0 to hide report templates associated with each search list in the XML output. By default these report templates will be shown.
show_remediation_policies={0|1}
(Optional) Set to 0 to hide remediation policies associated with each search list in the XML output. By default these remediation policies will be shown.
167

Chapter 4 - Scan ConfigurationDynamic Search Lists
"https://qualysapi.qualys.com/api/2.0/fo/qid/search_list/dynamic/dynamic_list_output.dtd"><SEARCH_LIST_OUTPUT> <RESPONSE> <DATETIME>2015-01-06T06:20:03Z</DATETIME> <DYNAMIC_LISTS> <DYNAMIC_LIST> <ID>381</ID> <TITLE><![CDATA[static search list]]></TITLE> <GLOBAL>Yes</GLOBAL> <OWNER>acme_tb</OWNER> <CREATED><![CDATA[07/27/2015 at 15:18:42 (GMT+0530)]]></CREATED> <MODIFIED_BY>acme_tb</MODIFIED_BY> <MODIFIED><![CDATA[07/27/2015 at 15:18:42 (GMT+0530)]]></MODIFIED> <QIDS> <QID>1000<QID> <QID>1001<QID> </QIDS> <CRITERIA> <VULNERABILITY_TITLE><![CDATA[NOT Title]]></VULNERABILITY_TITLE> <DISCOVERY_METHOD><![CDATA[Authenticated Only]]></DISCOVERY_METHOD> <AUTHENTICATION_TYPE><![CDATA[HTTP, Oracle, Unix]]></AUTHENTICATION_TYPE> <USER_CONFIGURATION><![CDATA[Disabled, Edited]]></USER_CONFIGURATION> <CATEGORY><![CDATA[NOT Backdoors and trojan horses, DNS and BIND]]> </CATEGORY> <CONFIRMED_SEVERITY><![CDATA[1, 2]]></CONFIRMED_SEVERITY> <POTENTIAL_SEVERITY><![CDATA[2, 3]]></POTENTIAL_SEVERITY> <INFORMATION_SEVERITY><![CDATA[4, 5]]></INFORMATION_SEVERITY> <VENDOR><![CDATA[NOT 2brightsparks,3com,4d]]></VENDOR> <PRODUCT><![CDATA[NOT .net_framework]]></PRODUCT> <CVSS_BASE_SCORE><![CDATA[2]]></CVSS_BASE_SCORE> <CVSS_TEMPORAL_SCORE><![CDATA[3]]></CVSS_TEMPORAL_SCORE> <CVSS_ACCESS_VECTOR><![CDATA[Adjacent Network]]></CVSS_ACCESS_VECTOR> <PATCH_AVAILABLE><![CDATA[Yes, No]]></PATCH_AVAILABLE><VIRTUAL_PATCH_AVAILABLE><![CDATA[Yes]]></VIRTUAL_PATCH_AVAILABLE>
168

Chapter 4 - Scan ConfigurationDynamic Search Lists
<CVE_ID><![CDATA[NOT CVE]]></CVE_ID> <EXPLOITABILITY><![CDATA[ExploitKits, Immunity - Dsquare]]> </EXPLOITABILITY> <ASSOCIATED_MALWARE><![CDATA[Trend Micro]]></ASSOCIATED_MALWARE> <VENDOR_REFERENCE><![CDATA[NOT Linux]]></VENDOR_REFERENCE> <BUGTRAQ_ID><![CDATA[NOT 15656]]></BUGTRAQ_ID> <VULNERABILITY_DETAILS><![CDATA[details]]></VULNERABILITY_DETAILS> <COMPLIANCE_DETAILS><![CDATA[details]]></COMPLIANCE_DETAILS> <COMPLIANCE_TYPE><![CDATA[PCI, CobIT, HIPAA, GLBA, SOX]]></COMPLIANCE_TYPE> <QUALYS_TOP_20><![CDATA[Top Internal 10, Top External 10]]></QUALYS_TOP_20> <OTHER><![CDATA[Not exploitable due to configuration, Non-running services, 2008 SANS 20]]></OTHER> <NETWORK_ACCESS><![CDATA[NAC / NAM]]></NETWORK_ACCESS> <USER_MODIFIED><![CDATA[NOT 07/27/2015-07/27/2015]]></USER_MODIFIED> <PUBLISHED><![CDATA[NOT 06/02/2015-07/20/2015]]></PUBLISHED> <SERVICE_MODIFIED><![CDATA[NOT Previous 1 week]]></SERVICE_MODIFIED> </CRITERIA> </CRITERIA> <!-- This list is used in the following option profiles //--> <OPTION_PROFILES> <OPTION_PROFILE> <ID>135<ID> <TITLE><![CDATA[Initial Options]]></TITLE> <OPTION_PROFILE> </OPTION_PROFILES> <!-- This list is used in the following report templates //--> <REPORT_TEMPLATES> <REPORT_TEMPLATE> <ID>256<ID> <TITLE><![CDATA[Scan Report Template]]></TITLE> <REPORT_TEMPLATE> </REPORT_TEMPLATES> <!-- This list is used in the following remediation policies. //--> <REMEDIATION_POLICIES> <REMEDIATION_POLICY> <ID>655<ID>
169

Chapter 4 - Scan ConfigurationDynamic Search Lists
<TITLE><![CDATA[Remediation Policy 1]]></TITLE> <REMEDIATION_POLICY> </REMEDIATION_POLICIES> <!-- This search list is associated with following distribution groups. //--> <DISTRIBUTION_GROUPS> <DISTRIBUTION_GROUP> <ID>226<ID> <TITLE><![CDATA[All]]></TITLE> <DISTRIBUTION_GROUP> </DISTRIBUTION_GROUPS> <COMMENTS><![CDATA[This is my first comment for this list]]></COMMENTS> </DYNAMIC_LIST> </DYNAMIC_LISTS> </RESPONSE></SEARCH_LIST_OUTPUT>
DTD<platform API server>/api/2.0/fo/qid/search_list/dynamic/dynamic_list_output.dtd
Create dynamic search list
Input parameters
Search criteria
Use these parameters to define search criteria for dynamic search lists, using create and update requests. All parameters act as vulnerability filters.
Parameter Description
action=create (Required)
echo_request={0|1} (Optional) Specify 1 to show input parameters in XML output.
title={value} (Required) A user defined search list title. Maximum is 256 characters (ascii).
global={0|1} (Optional) Specify 1 to make this a global search list, available to all subscription users.
comments={value} (Optional) User defined comments.
{criteria} (Required) User defined search criteria. See “Search criteria”
Parameter Value
vuln_title={value} Vulnerability title (string); to unset value use update request and set to empty value
not_vuln_title={0|1} Set to 1 for vulnerability title that does not match vuln_title parameter value
170

Chapter 4 - Scan ConfigurationDynamic Search Lists
discovery_methods={value} One or more discovery methods: Remote, Authenticated, Remote_Authenticated; by default all methods are included
auth_types={value} One or more of these authentication types: Windows, Unix, Oracle, SNMP, VMware, DB2, HTTP, MySQL; multiple values are comma separated; to unset value use update request and set to empty value
user_configuration={value} One or more of these user configuration values: disabled, custom; multiple values are comma separated; to unset value use update request and set to empty value
categories={value} One or more vulnerability category names (strings); to unset value use update request and set to empty value
not_categories={0|1} Set to 1 for categories that do not match categories parameter values
confirmed_severities={value} One or more confirmed vulnerability severities (1-5); multiple severities are comma separated; to unset value use update request and set to empty value
potential_severities={value} One or more potential vulnerability severities (1-5); multiple severities are comma separated; to unset value use update request and set to empty value
ig_severities={value} One or more information gathered severities (1-5); multiple severities are comma separated; to unset value use update request and set to empty value
vendor_ids={value} One or more vendor IDs; multiple IDs are comma separated; to unset value use update request and set to empty value
not_vendor_ids={0|1} Set to 1 for vendor IDs that do not match vendor_ids parameter values
products={value} Vendor product names; multiple names are comma separated; to unset value use update request and set to empty value
not_products={0|1} Set to 1 for product names that do not match products parameter values
patch_available={value} Vulnerabilities with patches: 0 (no), 1 (yes); by default all vulnerabilities with and without patches are included; multiple values are comma separated; to unset value use update request and set to empty value
Parameter Value
171
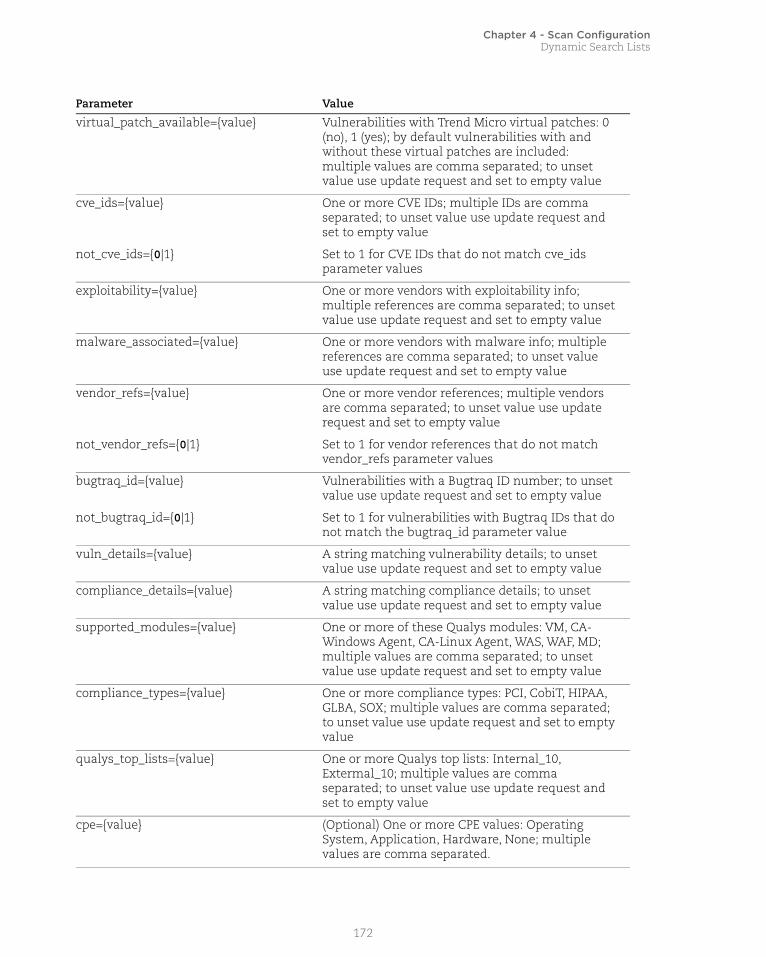
Chapter 4 - Scan ConfigurationDynamic Search Lists
virtual_patch_available={value} Vulnerabilities with Trend Micro virtual patches: 0 (no), 1 (yes); by default vulnerabilities with and without these virtual patches are included: multiple values are comma separated; to unset value use update request and set to empty value
cve_ids={value} One or more CVE IDs; multiple IDs are comma separated; to unset value use update request and set to empty value
not_cve_ids={0|1} Set to 1 for CVE IDs that do not match cve_ids parameter values
exploitability={value} One or more vendors with exploitability info; multiple references are comma separated; to unset value use update request and set to empty value
malware_associated={value} One or more vendors with malware info; multiple references are comma separated; to unset value use update request and set to empty value
vendor_refs={value} One or more vendor references; multiple vendors are comma separated; to unset value use update request and set to empty value
not_vendor_refs={0|1} Set to 1 for vendor references that do not match vendor_refs parameter values
bugtraq_id={value} Vulnerabilities with a Bugtraq ID number; to unset value use update request and set to empty value
not_bugtraq_id={0|1} Set to 1 for vulnerabilities with Bugtraq IDs that do not match the bugtraq_id parameter value
vuln_details={value} A string matching vulnerability details; to unset value use update request and set to empty value
compliance_details={value} A string matching compliance details; to unset value use update request and set to empty value
supported_modules={value} One or more of these Qualys modules: VM, CA-Windows Agent, CA-Linux Agent, WAS, WAF, MD; multiple values are comma separated; to unset value use update request and set to empty value
compliance_types={value} One or more compliance types: PCI, CobiT, HIPAA, GLBA, SOX; multiple values are comma separated; to unset value use update request and set to empty value
qualys_top_lists={value} One or more Qualys top lists: Internal_10, Extermal_10; multiple values are comma separated; to unset value use update request and set to empty value
cpe={value} (Optional) One or more CPE values: Operating System, Application, Hardware, None; multiple values are comma separated.
Parameter Value
172

Chapter 4 - Scan ConfigurationDynamic Search Lists
qids_not_exploitable={0|1} Set to 1 for vulnerabilities that are not exploitable due to configuration.
non_running_services={0|1} Set to 1 for vulnerabilities on non running services.
sans_20={0|1} Set to 1 for vulnerabilities in 2008 SANS 20 list
nac_nam={0|1} Set to 1 for NAC/NAM vulnerabilities
vuln_provider={value} Provider of the vulnerability if not Qualys; valid value is iDefense
cvss_base={value} CVSS base score value (matches greater than or equal to this value); to unset value use update request and set to empty value
cvss_temp={value} CVSS temporal score value (matches greater than or equal to this value); to unset value use update request and set to empty value
cvss_access_vector={value} CVSS access vector, one of: Undefined, Local, Adjacent_Network, Network; to unset value use update request and set to empty value
cvss_base_operand={value} Set the value to 1 to use the greater than equal to operand. Set the value to 2 to use the less than operand.You must always specify the "cvss_base" parameter along with the "cvss_base_operand" parameter in the API request.
cvss_temp_operand={value} Set the value to 1 to use the greater than equal to operand. Set the value to 2 to use the less than operand.You must always specify the "cvss_temp" parameter along with the "cvss_temp_operand" parameter in the API request.
cvss3_base={value} CVSS3 base score value assigned to the CVEs by NIST (matches greater than, less than, or equal to this value); to unset value use update request and set to empty value.
cvss3_temp={value} CVSS3 temporal score value assigned to the CVEs by NIST (matches greater than, less than, or equal to this value); to unset value use update request and set to empty value.
Parameter Value
173

Chapter 4 - Scan ConfigurationDynamic Search Lists
User modified filtersThe user_modified* parameters are mutually exclusive, only one of these can be passed per request.
Service modified filtersThese parameters are mutually exclusive, only one of these can be passed per request.
cvss3_base_operand={value} Set the value to 1 to use the greater than equal to operand. Set the value to 2 to use the less than operand.You must always specify the "cvss3_base" parameter along with the "cvss3_base_operand" parameter in the API request.
cvss3_temp_operand={value} Set the value to 1 to use the greater than equal to operand. Set the value to 2 to use the less than operand.You must always specify the "cvss3_temp" parameter along with the "cvss3_temp_operand" parameter in the API request.
Parameter Value
user_modified_date_between={value} date range in format (mm/dd/yyyy-mm/dd/yyyy)
user_modified_date_today={0|1} set to 1 for modified by user today; set to 0 for not modified by user today
user_modified_date_in previous={value} one of: Year, Month, Week, Quarter
user_modified_date_within_last_days={value}
number of days: 1-9999
not_user_modified={0|1} set to 1 to set the “not” flag for one of the user_modified* parameters
Parameter Value
service_modified_date_between={value} date range in format (mm/dd/yyyy-mm/dd/yyyy)
service_modified_date_today={0|1} set to 1 for modified by our service today; set to 0 for not modified by our service today
service_modified_date_in previous={value}
one of: Year, Month, Week, Quarter
service_modified_date_within_last_days={value}
number of days: 1-9999
not_service_modified={0|1} set to 1 to set the “not” flag for one of the service_modified* parameters
Parameter Value
174

Chapter 4 - Scan ConfigurationDynamic Search Lists
Published filters
These parameters are mutually exclusive, only one of these can be passed per request.
Sample - Create dynamic search listAPI request:
curl -u "USERNAME:PASSWD" -H "X-Requested-With: Curl" -X "POST" -d"action=create&title=My+Dynamic+Search+List&global=1&published_date_within_last_days=7&patch_available=1""https://qualysapi.qualys.com/api/2.0/fo/qid/search_list/dynamic/"
XML response:
<?xml version="1.0" encoding="UTF-8" ?><!DOCTYPE SIMPLE_RETURN SYSTEM "https://qualysapi.qualys.com/api/2.0/simple_return.dtd"><SIMPLE_RETURN> <RESPONSE> <DATETIME>2015-09-01T21:32:40Z</DATETIME> <TEXT>New search list created successfully</TEXT> <ITEM_LIST> <ITEM> <KEY>ID</KEY> <VALUE>136992</VALUE> </ITEM> </ITEM_LIST> </RESPONSE></SIMPLE_RETURN>
Sample - Create dynamic search list, CVSS scores
API request:
Request for CVSS2 base scores: greater than equal to 3, CVSS 2 temporal scores less than 2, CVSS3 base scores greater than or equal to 2, CVSS3 temporal scores less than 2.
curl -u "USERNAME:PASSWORD" -H "X-Requested-With:curl demo2" -d
Parameter Value
published_date_between={value} date range in format (mm/dd/yyyy-mm/dd/yyyy)
published_date_today={0|1} set to 1 for published today; set to 0 for not published today
published_date_in previous={value} one of: Year, Month, Week, Quarter
published_date_within_last_days={value}
number of days: 1-9999
not_published={0|1} set to 1 to set the “not” flag for one of the published* parameters
175
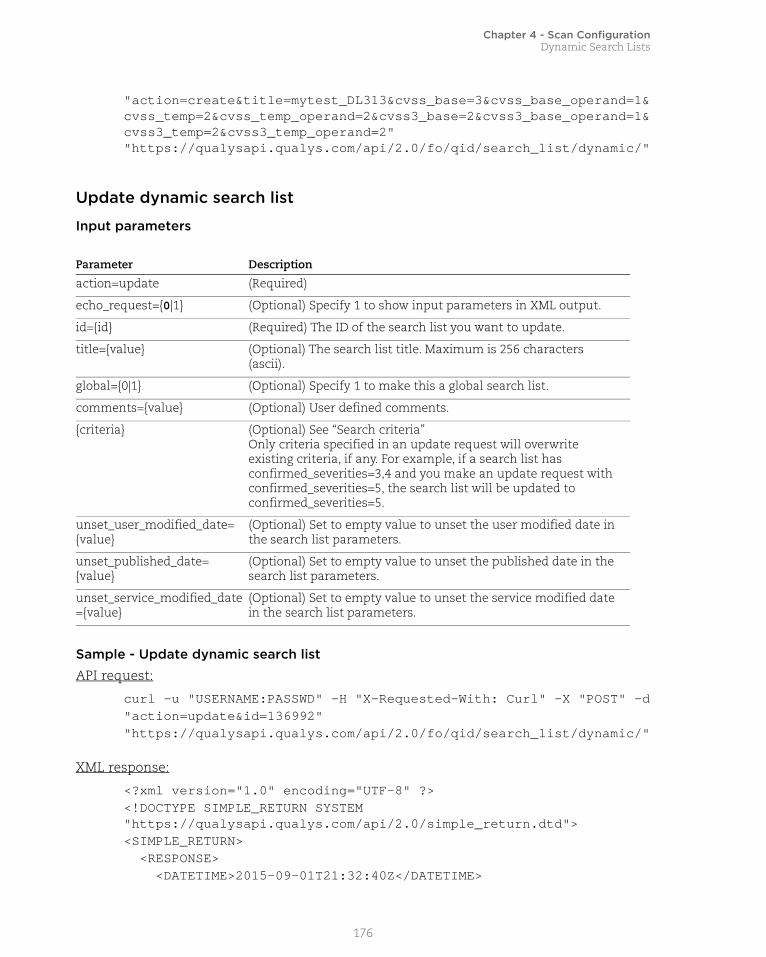
Chapter 4 - Scan ConfigurationDynamic Search Lists
"action=create&title=mytest_DL313&cvss_base=3&cvss_base_operand=1&cvss_temp=2&cvss_temp_operand=2&cvss3_base=2&cvss3_base_operand=1&cvss3_temp=2&cvss3_temp_operand=2" "https://qualysapi.qualys.com/api/2.0/fo/qid/search_list/dynamic/"
Update dynamic search list
Input parameters
Sample - Update dynamic search list
API request:
curl -u "USERNAME:PASSWD" -H "X-Requested-With: Curl" -X "POST" -d"action=update&id=136992""https://qualysapi.qualys.com/api/2.0/fo/qid/search_list/dynamic/"
XML response:
<?xml version="1.0" encoding="UTF-8" ?><!DOCTYPE SIMPLE_RETURN SYSTEM "https://qualysapi.qualys.com/api/2.0/simple_return.dtd"><SIMPLE_RETURN> <RESPONSE> <DATETIME>2015-09-01T21:32:40Z</DATETIME>
Parameter Description
action=update (Required)
echo_request={0|1} (Optional) Specify 1 to show input parameters in XML output.
id={id} (Required) The ID of the search list you want to update.
title={value} (Optional) The search list title. Maximum is 256 characters (ascii).
global={0|1} (Optional) Specify 1 to make this a global search list.
comments={value} (Optional) User defined comments.
{criteria} (Optional) See “Search criteria”Only criteria specified in an update request will overwrite existing criteria, if any. For example, if a search list has confirmed_severities=3,4 and you make an update request with confirmed_severities=5, the search list will be updated to confirmed_severities=5.
unset_user_modified_date={value}
(Optional) Set to empty value to unset the user modified date in the search list parameters.
unset_published_date={value}
(Optional) Set to empty value to unset the published date in the search list parameters.
unset_service_modified_date={value}
(Optional) Set to empty value to unset the service modified date in the search list parameters.
176
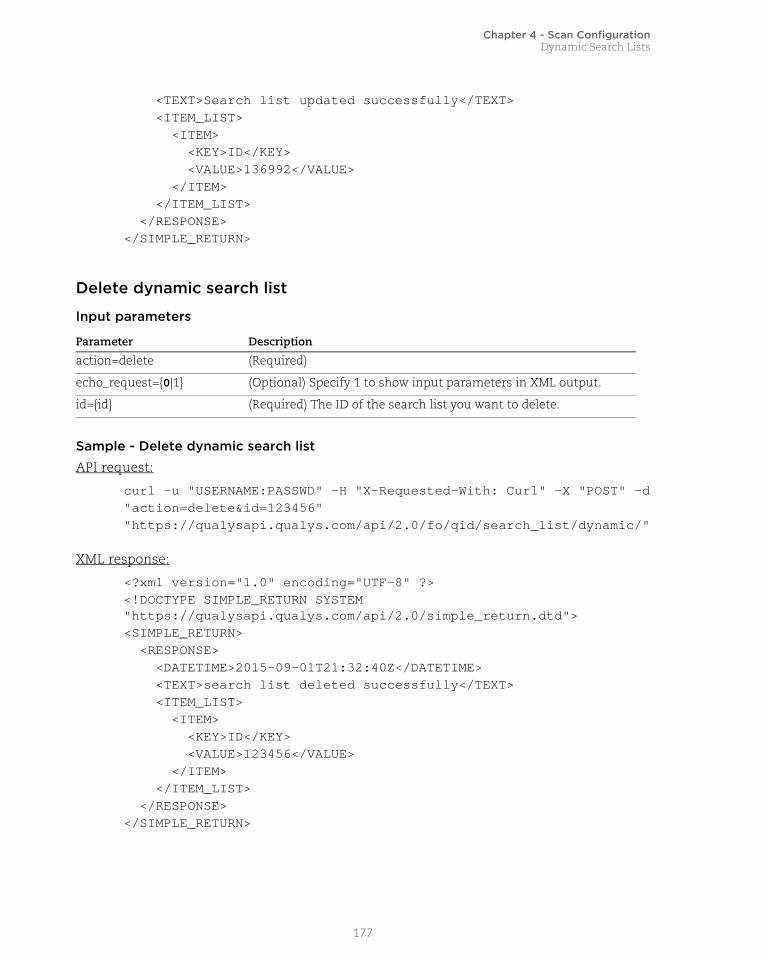
Chapter 4 - Scan ConfigurationDynamic Search Lists
<TEXT>Search list updated successfully</TEXT> <ITEM_LIST> <ITEM> <KEY>ID</KEY> <VALUE>136992</VALUE> </ITEM> </ITEM_LIST> </RESPONSE></SIMPLE_RETURN>
Delete dynamic search list
Input parameters
Sample - Delete dynamic search listAPI request:
curl -u "USERNAME:PASSWD" -H "X-Requested-With: Curl" -X "POST" -d"action=delete&id=123456""https://qualysapi.qualys.com/api/2.0/fo/qid/search_list/dynamic/"
XML response:
<?xml version="1.0" encoding="UTF-8" ?><!DOCTYPE SIMPLE_RETURN SYSTEM "https://qualysapi.qualys.com/api/2.0/simple_return.dtd"><SIMPLE_RETURN> <RESPONSE> <DATETIME>2015-09-01T21:32:40Z</DATETIME> <TEXT>search list deleted successfully</TEXT> <ITEM_LIST> <ITEM> <KEY>ID</KEY> <VALUE>123456</VALUE> </ITEM> </ITEM_LIST> </RESPONSE></SIMPLE_RETURN>
Parameter Description
action=delete (Required)
echo_request={0|1} (Optional) Specify 1 to show input parameters in XML output.
id={id} (Required) The ID of the search list you want to delete.
177
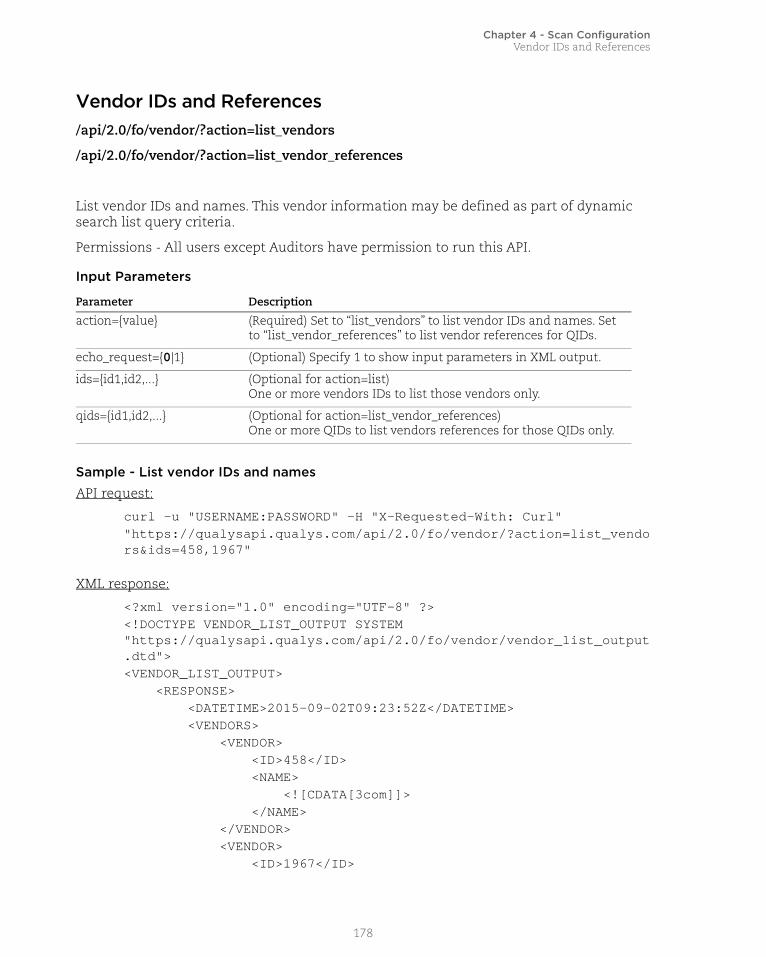
Chapter 4 - Scan ConfigurationVendor IDs and References
Vendor IDs and References/api/2.0/fo/vendor/?action=list_vendors
/api/2.0/fo/vendor/?action=list_vendor_references
List vendor IDs and names. This vendor information may be defined as part of dynamic search list query criteria.
Permissions - All users except Auditors have permission to run this API.
Input Parameters
Sample - List vendor IDs and namesAPI request:
curl -u "USERNAME:PASSWORD" -H "X-Requested-With: Curl""https://qualysapi.qualys.com/api/2.0/fo/vendor/?action=list_vendors&ids=458,1967"
XML response:
<?xml version="1.0" encoding="UTF-8" ?><!DOCTYPE VENDOR_LIST_OUTPUT SYSTEM "https://qualysapi.qualys.com/api/2.0/fo/vendor/vendor_list_output.dtd"><VENDOR_LIST_OUTPUT> <RESPONSE> <DATETIME>2015-09-02T09:23:52Z</DATETIME> <VENDORS> <VENDOR> <ID>458</ID> <NAME> <![CDATA[3com]]> </NAME> </VENDOR> <VENDOR> <ID>1967</ID>
Parameter Description
action={value} (Required) Set to “list_vendors” to list vendor IDs and names. Set to “list_vendor_references” to list vendor references for QIDs.
echo_request={0|1} (Optional) Specify 1 to show input parameters in XML output.
ids={id1,id2,...} (Optional for action=list) One or more vendors IDs to list those vendors only.
qids={id1,id2,...} (Optional for action=list_vendor_references) One or more QIDs to list vendors references for those QIDs only.
178

Chapter 4 - Scan ConfigurationVendor IDs and References
<NAME> <![CDATA[2glux]]> </NAME> </VENDOR> </VENDORS> </RESPONSE></VENDOR_LIST_OUTPUT>
DTD
<!-- QUALYS VENDOR_LIST_OUTPUT DTD --><!ELEMENT VENDOR_LIST_OUTPUT (REQUEST?,RESPONSE)><!ELEMENT REQUEST (DATETIME, USER_LOGIN, RESOURCE, PARAM_LIST?, POST_DATA?)><!ELEMENT DATETIME (#PCDATA)><!ELEMENT USER_LOGIN (#PCDATA)><!ELEMENT RESOURCE (#PCDATA)><!ELEMENT PARAM_LIST (PARAM+)><!ELEMENT PARAM (KEY, VALUE)><!ELEMENT KEY (#PCDATA)><!ELEMENT VALUE (#PCDATA)><!-- if returned, POST_DATA will be urlencoded --><!ELEMENT POST_DATA (#PCDATA)>
<!ELEMENT RESPONSE (DATETIME, VENDORS?)><!ELEMENT VENDORS (VENDOR+)><!ELEMENT VENDOR (ID, NAME)><!ELEMENT ID (#PCDATA)><!ELEMENT NAME (#PCDATA)>
<!-- EOF -->
Sample - List vendor references for qids
API request:
curl -u "USERNAME:PASSWORD" -H "X-Requested-With: Curl""https://qualysapi.qualys.com/api/2.0/fo/vendor/?action=list_vendor_references"
XML response:
<?xml version="1.0" encoding="UTF-8" ?><!DOCTYPE VENDOR_REFERENCE_LIST_OUTPUT SYSTEM "https://qualysapi.qualys.com/api/2.0/fo/vendor/vendor_reference_list_output.dtd"><VENDOR_REFERENCE_LIST_OUTPUT>
179

Chapter 4 - Scan ConfigurationVendor IDs and References
<RESPONSE> <DATETIME>2015-09-02T09:27:34Z</DATETIME> <VENDOR_REFERENCES> <VENDOR_REFERENCE> <QID>195464</QID> <REFERENCE_INFO> <REFERENCE> <![CDATA[USN-2186-1]]> </REFERENCE> <URL> <![CDATA[https://lists.ubuntu.com/archives/ubuntu-security-announce/2014-April/002483.html]]> </URL> </REFERENCE_INFO> </VENDOR_REFERENCE> <VENDOR_REFERENCE> <QID>115844</QID> <REFERENCE_INFO> <REFERENCE> <![CDATA[RHSA-2008-0508]]> </REFERENCE> <URL> <![CDATA[http://rhn.redhat.com/errata/RHSA-2008-0508.html]]> </URL> </REFERENCE_INFO> <REFERENCE_INFO> <REFERENCE> <![CDATA[RHSA-2008-0519]]> </REFERENCE> <URL> <![CDATA[http://rhn.redhat.com/errata/RHSA-2008-0519.html]]> </URL> </REFERENCE_INFO> </VENDOR_REFERENCE> </VENDOR_REFERENCES>... </RESPONSE></VENDOR_REFERENCE_LIST_OUTPUT>
DTD<platform API server>/api/2.0/fo/vendor/vendor_reference_list_output.dtd
180

Chapter 5 - Scan Authentication
Chapter 5 - Scan AuthenticationCreate, edit, list, delete authentication records for authenticated (trusted) scanning of various technologies (i.e. Windows, Unix, Docker, Oracle, etc).
Permissions
User Permissions Summary
List Auth Records
List Authentication Records
List Authentication Records by Type
Auth Record types
Application Server Records- Apache, MIIS, IBM Websphere, Tomcat
Palo Alto Firewall Record
Docker Record Oracle WebLogic Server Record
HTTP Record PostgreSQL Record
IBM DB2 Record SNMP Record
JBoss Server record Sybase Record
MariaDB Record Unix Record
MongoDB Record VMware Record
MS SQL Record Windows Record
MySQL Record
Oracle Record
Oracle Listener Record
181

Chapter 5 - Scan AuthenticationUser Permissions Summary
User Permissions SummaryA summary is provided below. For complete details, see “Managing Authentication Records” in Qualys online help.
Maximum Records per request
A maximum of 1,000 authentication records can be processed per request. If the requested list identifies more than 1,000 authentication records, then the XML output includes the <WARNING> element and instructions for making another request for the next batch of records.
View Record List
Create Record
Update/Delete Record
User Role Permissions
Manager View all authentication records in subscription.
Unit Manager View authentication records which contain hosts in the user’s business unit.
Scanner View authentication records which contain hosts in the user’s assigned asset groups.
Auditor, Reader No permissions.
User Role Permissions
Manager Create authentication records for hosts in the subscription.
Unit Manager Create authentication records for hosts in the user’s business unit. The permission “create/edit authentication records” must be granted in the user’s account.
Auditor, Scanner, Reader No permissions.
User Role Permissions
Manager Update and delete authentication records.
Unit Manager Update and delete authentication records. The permission “create/edit authentication records/vaults” must be granted in the user’s account. To edit a record, at least one host in the record must be in the user’s business unit. To delete a record, all hosts in the record must also be in the user’s business unit.
Auditor, Scanner, Reader No permissions.
182

Chapter 5 - Scan AuthenticationList Authentication Records
List Authentication Records/api/2.0/fo/auth/?action=list
{GET] [POST]
List all authentication records visible to the user for all technologies (i.e. Windows, Unix, Docker, etc).
A maximum of 1,000 authentication records can be processed per request. If the requested list identifies more than 1,000 authentication records, then the XML output includes the <WARNING> element and instructions for making another request for the next batch of records.
Input Parameters
DTD for list records<platform API server>/api/2.0/fo/auth/auth_records.dtd
Parameter Description
action=list (Required)
echo_request={0|1} (Optional) Show (echo) the request’s input parameters (names and values) in the XML output. When not specified, parameters are not included in the XML output. Specify 1 to view parameters in the XML output.
title={value} (Optional) Show only authentication records which have a certain string in the record title.
comments={value} (Optional) Show only authentication records which have a certain string in the record comments.
ids={value} (Optional) Show only authentication records with certain IDs and/or ID ranges. Multiple entries are comma separated. One or more IDs/ranges may be specified. An ID range entry is specified with a hyphen (for example, 3000-3250). Valid IDs are required.
id_min={value} (Optional) Show only authentication records which have a minimum ID value. A valid ID is required.
id_max={value} (Optional) Show only authentication records which have a maximum ID value. A valid ID is required.
183
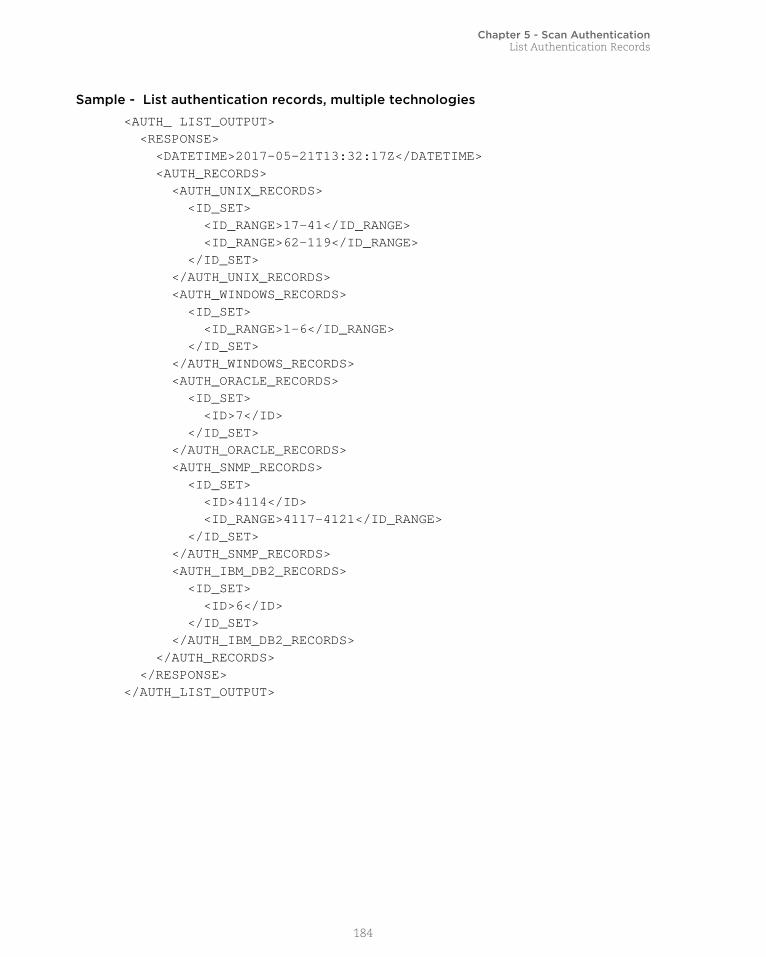
Chapter 5 - Scan AuthenticationList Authentication Records
Sample - List authentication records, multiple technologies
<AUTH_ LIST_OUTPUT> <RESPONSE> <DATETIME>2017-05-21T13:32:17Z</DATETIME> <AUTH_RECORDS> <AUTH_UNIX_RECORDS> <ID_SET> <ID_RANGE>17-41</ID_RANGE> <ID_RANGE>62-119</ID_RANGE> </ID_SET> </AUTH_UNIX_RECORDS> <AUTH_WINDOWS_RECORDS> <ID_SET> <ID_RANGE>1-6</ID_RANGE> </ID_SET> </AUTH_WINDOWS_RECORDS> <AUTH_ORACLE_RECORDS> <ID_SET> <ID>7</ID> </ID_SET> </AUTH_ORACLE_RECORDS> <AUTH_SNMP_RECORDS> <ID_SET> <ID>4114</ID> <ID_RANGE>4117-4121</ID_RANGE> </ID_SET> </AUTH_SNMP_RECORDS> <AUTH_IBM_DB2_RECORDS> <ID_SET> <ID>6</ID> </ID_SET> </AUTH_IBM_DB2_RECORDS> </AUTH_RECORDS> </RESPONSE></AUTH_LIST_OUTPUT>
184

Chapter 5 - Scan AuthenticationList Authentication Records by Type
List Authentication Records by Type/api/2.0/fo/auth/<type>
{GET] [POST}
List authentication records visible to the user for a specific technology (i.e. Unix, Windows, Docker, Sybase etc).
<type> will be a supported technology like: docker, http, ibm_db2, mongodb, ms_sql, mysql, oracle, oracle_listener, oracle_weblogic, palo_alto_firwall, postgresql, snmp, sybase, unix (for Unix, Cisco, Checkpoint Firewall), vmware, windows. For application servers: apache, ms_iis, ibm_websphere, tomcat.
A maximum of 1,000 authentication records can be processed per request. If the requested list identifies more than 1,000 authentication records, then the XML output includes the <WARNING> element and instructions for making another request for the next batch of records.
Input Parameters
Parameter Description
action=list (Required)
echo_request={0|1} (Optional) Show (echo) the request’s input parameters (names and values) in the XML output. When not specified, parameters are not included in the XML output. Specify 1 to view parameters in the XML output.
title={value} (Optional) how only authentication records which have a certain string in the record title.
comments={value} (Optional) Show only authentication records which have a certain string in the record comments.
details={Basic|All|None} (Optional) Show the requested amount of information for each authentication record. A valid value is:None - show record ID onlyBasic (default) - show record ID and all authentication record attributesAll - show record ID and all authentication record attributes and a glossary section with the user name and login for each record owner
ids={value} (Optional) Show only authentication records with certain IDs and/or ID ranges. Multiple entries are comma separated. One or more IDs/ranges may be specified. An ID range entry is specified with a hyphen (for example, 3000-3250). Valid IDs are required.
185
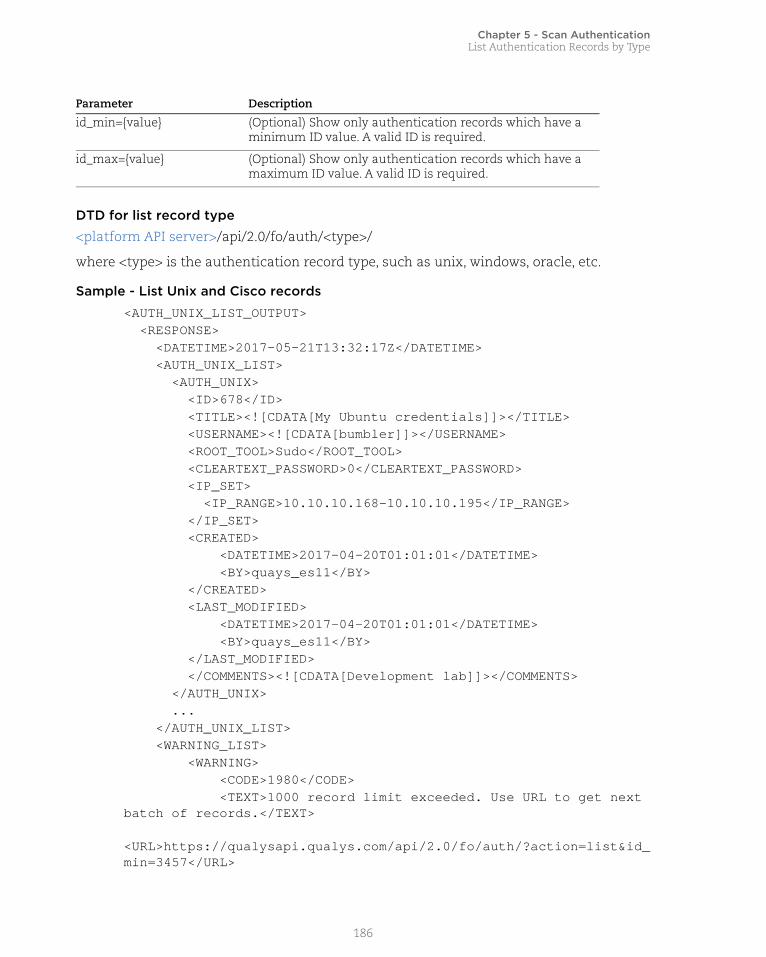
Chapter 5 - Scan AuthenticationList Authentication Records by Type
DTD for list record type
<platform API server>/api/2.0/fo/auth/<type>/
where <type> is the authentication record type, such as unix, windows, oracle, etc.
Sample - List Unix and Cisco records
<AUTH_UNIX_LIST_OUTPUT> <RESPONSE> <DATETIME>2017-05-21T13:32:17Z</DATETIME> <AUTH_UNIX_LIST> <AUTH_UNIX> <ID>678</ID> <TITLE><![CDATA[My Ubuntu credentials]]></TITLE> <USERNAME><![CDATA[bumbler]]></USERNAME> <ROOT_TOOL>Sudo</ROOT_TOOL> <CLEARTEXT_PASSWORD>0</CLEARTEXT_PASSWORD> <IP_SET> <IP_RANGE>10.10.10.168-10.10.10.195</IP_RANGE> </IP_SET> <CREATED> <DATETIME>2017-04-20T01:01:01</DATETIME> <BY>quays_es11</BY> </CREATED> <LAST_MODIFIED> <DATETIME>2017-04-20T01:01:01</DATETIME> <BY>quays_es11</BY> </LAST_MODIFIED> </COMMENTS><![CDATA[Development lab]]></COMMENTS> </AUTH_UNIX> ... </AUTH_UNIX_LIST> <WARNING_LIST> <WARNING> <CODE>1980</CODE> <TEXT>1000 record limit exceeded. Use URL to get next batch of records.</TEXT> <URL>https://qualysapi.qualys.com/api/2.0/fo/auth/?action=list&id_min=3457</URL>
id_min={value} (Optional) Show only authentication records which have a minimum ID value. A valid ID is required.
id_max={value} (Optional) Show only authentication records which have a maximum ID value. A valid ID is required.
Parameter Description
186

Chapter 5 - Scan AuthenticationList Authentication Records by Type
</WARNING> </WARNING_LIST> <GLOSSARY> <USER_LIST> <USER> <USER_LOGIN>quays_es11</USER_LOGIN> <FIRST_NAME>Ernie</FIRST_NAME> <LAST_NAME>Smith</LAST_NAME> </USER> </USER_LIST> </GLOSSARY> </RESPONSE></AUTH_UNIX_LIST_OUTPUT>
187

Chapter 5 - Scan AuthenticationApplication Server Records
Application Server Records/api/2.0/fo/auth/{web app server}/
where {application server} is one of apache, ms_iis, ibm_websphere, tomcat
[POST]
Create, update, list and delete application server records for authenticated scans of web application servers. Application Server records are used to authenticate to various web app servers.
Apache server authentication - We support multiple instances per host. Want to set it up? Just create multiple Apache server authentication records - 1 record for each host instance. In each record, a host instance is defined by a unique IP address and configuration file pair. You can create 2 records for the same IP address, but the config file can’t be the same in the 2 records.
Supported servers
Input Parameters
API URL (/api/2.0/fo...) Description
/auth/apache/ Apache 2.2- IBM HTTP Server 7.x (on Red Hat Linux 5/6)- VMware vFabric Web Server 5.2 (on Red Hat Linux 5/6) Compliance scans are supported (using PC, SCA)
/auth/apache/ms_iis Microsoft Internet Information Services (IIS) 6.0, 7.x Compliance scans are supported (using PC, SCA)
/auth/ibm_websphere/ IBM WebSphere Application Server 7.x, 8.xCompliance scans are supported (using PC, SCA)
/auth/tomcat Tomcat Server- Apache Tomcat 6.x and 7.x- VMware vFabric tc Server 2.9.x- Pivotal tc Server 3.xVulnerability Compliance scans are supported (using VM, PC, SCA)
Parameter Description
action={action} (Required) Specify create, update, delete (using POST) or list (using GET or POST).
echo_request={0|1} (Optional) Show (echo) the request’s input parameters (names and values) in the XML output. When unspecified, parameters are not included in the XML output.
188

Chapter 5 - Scan AuthenticationApplication Server Records
ids={value} (Required to update or delete record) Record IDs to update/delete. Specify record IDs and/or ID ranges (for example, 1359-1407). Multiple entries are comma separated.
title={value} (Required for create) The title of the Server record. The title must be unique and may include a maximum of 255 characters (ascii).
comments={value} (Optional) User defined notes about the Server record. The comments may include a maximum of 1999 characters (ascii); if comments have 2000 or more characters an error is returned and comments are not saved. Tags (such as <script>) cannot be included; if tags are included an error is returned and the request fails.
Application Server
unix_apache_config_file={value}
(Required to create an Apache Web Server record; valid only for this record). The path to the Apache configuration file.
unix_apache_control_command={value}
(Required to create an Apache Web Server record; valid only for this record) The path to the Apache control command. For IBM HTTP Server, enter the path to the IBM HTTP Server “bin” directory or the specific location of “apachectl”. For VMware vFabric Web Server, enter the path to the VMware vFabric global “bin” directory or the specific location of “httpdctl” for a web server instance.
unix_install_dir={value} (Required to create an IBM WebSphere App Server record; valid only for this record) The directory where the WebSphere application is installed.
installation_path={value} (Required to create Tomcat Server record; valid only for this record) The directory where the tomcat server is installed.
Examples:/opt/apache-tomcat-7.0.57 (e.g. $CATALINA_HOME)/opt/vmware/vfabric-tc-server-standard/opt/pivotal/pivotal-tc-server-standard
Parameter Description
189

Chapter 5 - Scan AuthenticationApplication Server Records
Sample - Create Apache recordcurl -u "USERNAME:PASSWORD" -H "X-Requested-With: Curl" -X "POST" -d "action=create&title=Apache+Record&unix_apache_config_file=/opt/IBM/HTTPServer/conf/httpd.conf1&unix_apache_control_command=/opt/IBM/HTTPServer/bin2&ips=10.10.25.25" "https://qualysapi.qualys.com/api/2.0/fo/auth/apache/"
instance_path={value} (Optional to create or update Tomcat Server record; valid only for this record) The directory where the tomcat server instance(s) are installed. You can specify a single tomcat instance (use with auto_discover_instances=0), or multiple instances (use with auto_discover_instances=1). Leave unspecified when the instance directory is the same as the installation directory or when your targets have different types of tomcat servers.
Examples:/opt/apache-tomcat-7.0.57 (e.g. $CATALINA_BASE)/opt/vmware/vfabric-tc-server-standard/tc1/opt/pivotal/pivotal-tc-server-standard/tc1
auto_discover_instances={0|1}
(Optional to create or update Tomcat Server record; valid only for this record) Specify auto_discover_instances=1 and we’ll find all tomcat server instances for you. Applies to VMware vFabric and Pivotal when you’ve specified a directory with multiple instances or you did not specify an instance.
When unspecified (auto_discover_instances=0), we will not auto discover instances. Applies to Apache Tomcat or when you’ve specified a single instance.
Target Hosts
ips={value} (Required to create record) Add IP addresses of the hosts you want to scan using this record.
add_ips={value} (Optional and valid only to update record) Add IP address(es) to the IP list for an existing record. You may enter a combination of IPs and IP ranges. Multiple entries are comma separated.
remove_ips={value} (Optional and valid only to update record) IPs to be removed from your record. You may enter a combination of IPs and ranges. Multiple entries are comma separated.
network_id={value} (Optional to create or update record, and valid when the networks feature is enabled) The network ID for the record.
Parameter Description
190

Chapter 5 - Scan AuthenticationApplication Server Records
Sample - Update Apache record
curl -u "USERNAME:PASSWORD" -H "X-Requested-With: Curl" -X "POST" -d "action=update&ids=1234&unix_apache_config_file=/opt/IBM/HTTPServer/conf/httpd.conf2" "https://qualysapi.qualys.com/api/2.0/fo/auth/apache/"
DTDs for server records
<platform API server>/api/2.0/batch_return.dtd
<platform API server>/api/2.0/fo/auth/apache/auth_apache_list_output.dtd
<platform API server>/api/2.0/fo/auth/ms_iis/auth_ms_iis_list_output.dtd
<platform API server>/api/2.0/fo/auth/ibm_websphere/ auth_ibm_websphere_list_output.dtd
<platform API server>/api/2.0/fo/auth/tomcat./auth_tomcat_list_output.dtd
191
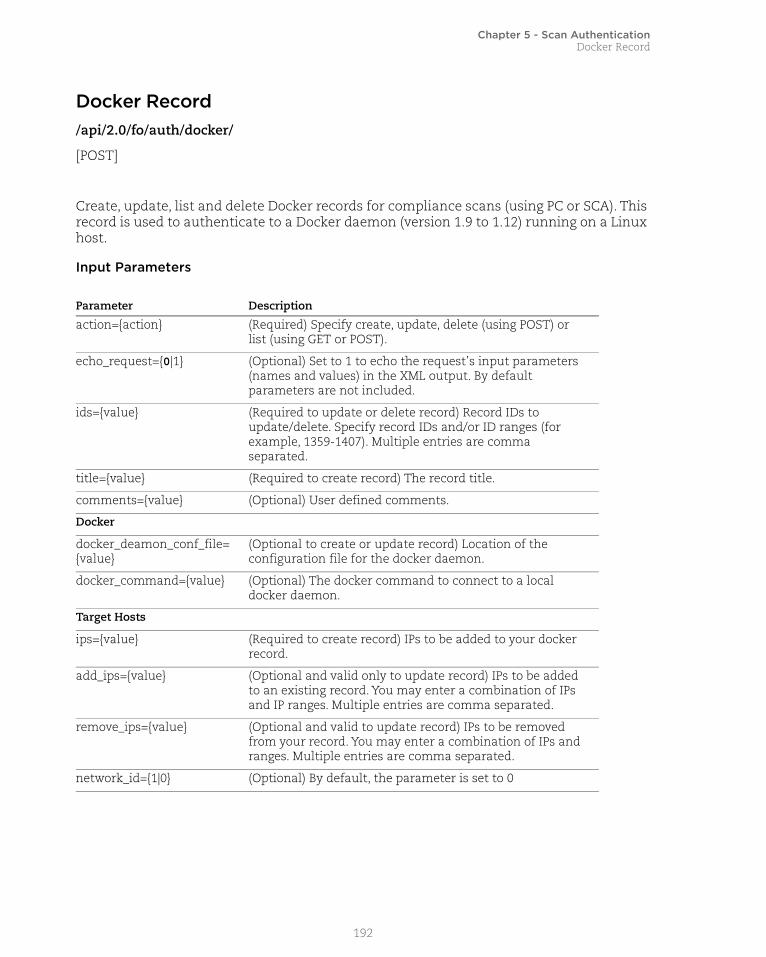
Chapter 5 - Scan AuthenticationDocker Record
Docker Record/api/2.0/fo/auth/docker/
[POST]
Create, update, list and delete Docker records for compliance scans (using PC or SCA). This record is used to authenticate to a Docker daemon (version 1.9 to 1.12) running on a Linux host.
Input Parameters
Parameter Description
action={action} (Required) Specify create, update, delete (using POST) or list (using GET or POST).
echo_request={0|1} (Optional) Set to 1 to echo the request’s input parameters (names and values) in the XML output. By default parameters are not included.
ids={value} (Required to update or delete record) Record IDs to update/delete. Specify record IDs and/or ID ranges (for example, 1359-1407). Multiple entries are comma separated.
title={value} (Required to create record) The record title.
comments={value} (Optional) User defined comments.
Docker
docker_deamon_conf_file= {value}
(Optional to create or update record) Location of the configuration file for the docker daemon.
docker_command={value} (Optional) The docker command to connect to a local docker daemon.
Target Hosts
ips={value} (Required to create record) IPs to be added to your docker record.
add_ips={value} (Optional and valid only to update record) IPs to be added to an existing record. You may enter a combination of IPs and IP ranges. Multiple entries are comma separated.
remove_ips={value} (Optional and valid to update record) IPs to be removed from your record. You may enter a combination of IPs and ranges. Multiple entries are comma separated.
network_id={1|0} (Optional) By default, the parameter is set to 0
192
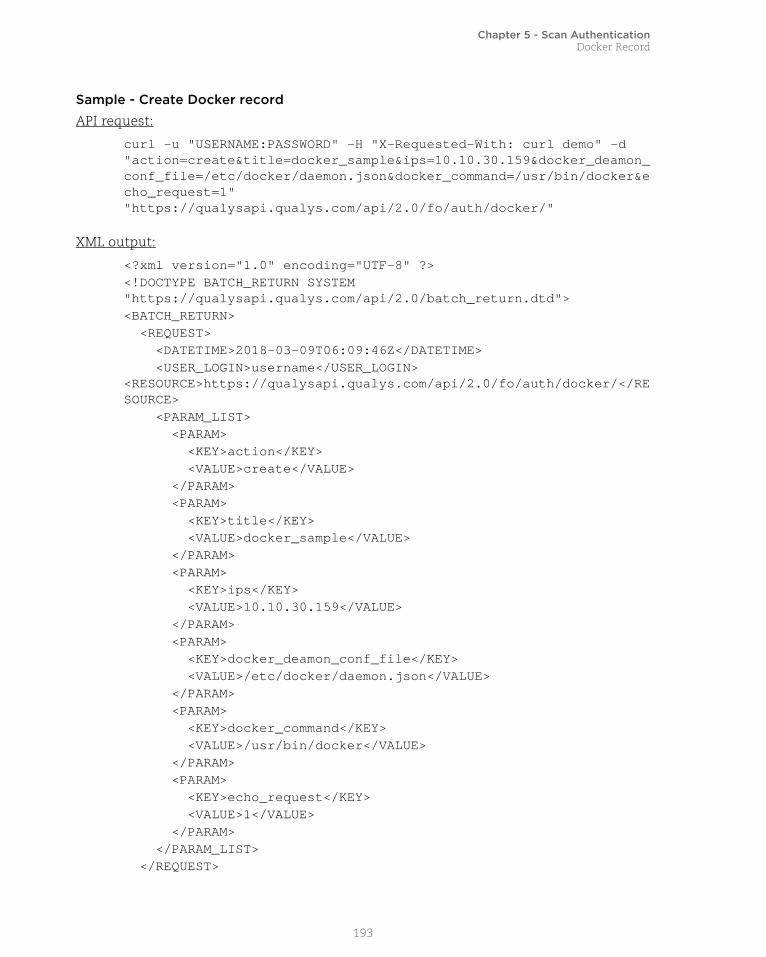
Chapter 5 - Scan AuthenticationDocker Record
Sample - Create Docker record
API request:
curl -u "USERNAME:PASSWORD" -H "X-Requested-With: curl demo" -d "action=create&title=docker_sample&ips=10.10.30.159&docker_deamon_conf_file=/etc/docker/daemon.json&docker_command=/usr/bin/docker&echo_request=1" "https://qualysapi.qualys.com/api/2.0/fo/auth/docker/"
XML output:
<?xml version="1.0" encoding="UTF-8" ?><!DOCTYPE BATCH_RETURN SYSTEM "https://qualysapi.qualys.com/api/2.0/batch_return.dtd"><BATCH_RETURN> <REQUEST> <DATETIME>2018-03-09T06:09:46Z</DATETIME> <USER_LOGIN>username</USER_LOGIN> <RESOURCE>https://qualysapi.qualys.com/api/2.0/fo/auth/docker/</RESOURCE> <PARAM_LIST> <PARAM> <KEY>action</KEY> <VALUE>create</VALUE> </PARAM> <PARAM> <KEY>title</KEY> <VALUE>docker_sample</VALUE> </PARAM> <PARAM> <KEY>ips</KEY> <VALUE>10.10.30.159</VALUE> </PARAM> <PARAM> <KEY>docker_deamon_conf_file</KEY> <VALUE>/etc/docker/daemon.json</VALUE> </PARAM> <PARAM> <KEY>docker_command</KEY> <VALUE>/usr/bin/docker</VALUE> </PARAM> <PARAM> <KEY>echo_request</KEY> <VALUE>1</VALUE> </PARAM> </PARAM_LIST> </REQUEST>
193

Chapter 5 - Scan AuthenticationDocker Record
<RESPONSE> <DATETIME>2018-03-09T06:09:46Z</DATETIME> <BATCH_LIST> <BATCH> <TEXT>Successfully Created</TEXT> <ID_SET> <ID>72685</ID> </ID_SET> </BATCH> </BATCH_LIST> </RESPONSE></BATCH_RETURN>
Sample - Update Docker RecordAPI request:
curl -u "USERNAME:PASSWORD" -H "X-Requested-With: curl demo" -d "action=update&ids=72685&add_ips=10.10.26.26" "https://qualysapi.qualys.com/api/2.0/fo/auth/docker/"
XML output:
<?xml version="1.0" encoding="UTF-8" ?><!DOCTYPE BATCH_RETURN SYSTEM "https://qualysapi.qualys.com/api/2.0/batch_return.dtd"><BATCH_RETURN> <RESPONSE> <DATETIME>2018-03-09T06:12:57Z</DATETIME> <BATCH_LIST> <BATCH> <TEXT>Successfully Updated</TEXT> <ID_SET> <ID>72685</ID> </ID_SET> </BATCH> </BATCH_LIST> </RESPONSE></BATCH_RETURN>
DTDs for auth type “docker”
<platform API server>/api/2.0/batch_return.dtd
<platform API server>/api/2.0/fo/auth/docker/auth_docker_list_output.dtd
194

Chapter 5 - Scan AuthenticationHTTP Record
HTTP Record/api/2.0/fo/auth/http/
[POST]
Create, update and delete HTTP records for authenticated scans of protected portions of web sites and devices, like printers and routers, that require HTTP protocol level authentication. Vulnerability scans are supported (using VM).
How it works - During a vulnerability scan, if we come across a web page that requires HTTP authentication then we’ll check to see if an HTTP record exists in your account with applicable credentials. If yes, we’ll use the credentials in the record to perform HTTP authentication. (Note this is not Form-based authentication.)
Input Parameters
Parameter Description
action={value} (Required) Specify create, update, delete (using POST) or list (using GET or POST).
echo_request={0|1} (Optional) Set to 1 to echo the request’s input parameters (names and values) in the XML output. By default parameters are not included.
comments={value} (Optional for create or update request) User-defined comments.
ids={value} (Required to update or delete record) One or more HTTP record IDs.
title={value} (Required for a create request; Optional for an update request; otherwise invalid) The HTTP record title.
username={value} (Required to create record, optional to update record) The user name to be used for authentication.
password={value} (Required to create record, optional to update record) The password to be used for authentication.
vhost={value} - or - realm={value}
(Required to create record; optional to update record) Specify the protected device or web page you want to authenticate against. You can specify a virtual host (an FQDN such as vhost=bank.qualys.com) or the name of a realm (realm=My+Homepage).
ssl={0|1} (Optional to create or update record) Specify 1 if you want to attempt authentication over SSL only. In this case authentication is attempted only when the form is submittedvia a link that uses https://...
195

Chapter 5 - Scan AuthenticationHTTP Record
Sample - Create HTTP record, realm
API request:
curl -u "USERNAME:PASSWORD" -H "X-Requested-With: curl" -d "action=create&username=jsmith&password=abc123&title=My+HTTP+Record+1&realm=My+Homepage" "https://qualysapi.qualys.com/api/2.0/fo/auth/http/"
XML output:
<?xml version="1.0" encoding="UTF-8" ?><!DOCTYPE BATCH_RETURN SYSTEM "https://qualysapi.qualys.com/api/2.0/batch_return.dtd"><BATCH_RETURN> <RESPONSE> <DATETIME>2018-01-03T07:51:48Z</DATETIME> <BATCH_LIST> <BATCH> <TEXT>Successfully Created</TEXT> <ID_SET> <ID>55111</ID> </ID_SET> </BATCH> </BATCH_LIST> </RESPONSE></BATCH_RETURN>
Create HTTP record, virtual host
API request:
curl -u "USERNAME:PASSWORD" -H "X-Requested-With: curl" -d "action=create&username=jsmith&password=abc123&title=My+HTTP+Record+2&vhost=bank.us.corp1.com" "https://qualysapi.qualys.com/api/2.0/fo/auth/http/"
XML output:
<?xml version="1.0" encoding="UTF-8" ?><!DOCTYPE BATCH_RETURN SYSTEM "https://qualysapi.qualys.com/api/2.0/batch_return.dtd"><BATCH_RETURN> <RESPONSE> <DATETIME>2018-01-03T08:02:44Z</DATETIME> <BATCH_LIST> <BATCH> <TEXT>Successfully Created</TEXT> <ID_SET> <ID>55112</ID>
196

Chapter 5 - Scan AuthenticationHTTP Record
</ID_SET> </BATCH> </BATCH_LIST> </RESPONSE></BATCH_RETURN
DTDs for auth type “http”
<platform API server>/api/2.0/batch_return.dtd
<platform API server>/api/2.0/fo/auth/http/auth_http_list_output.dtd
197

Chapter 5 - Scan AuthenticationIBM DB2 Record
IBM DB2 Record/api/2.0/fo/auth/ibm_db2/
[POST]
Create, update, list and delete IBM DB2 records for vulnerability and compliance scans (using VM, PC, SCA). This record is used for authenticated scanning of one or more DB2 instances on a single host. Want to scan multiple instances? See "Multiple DB2 Instances" in online help.
Requirement - You must set up target hosts per the Qualys User Guide.
Download Qualys User Guide - IBM DB2 Authentication (.zip)
Input Parameters
Parameter Description
action={action} (Required) Specify create, update, delete (using POST) or list (using GET or POST).
echo_request={0|1} (Optional) Show (echo) the request's input parameters (names and values) in the XML output. When unspecified, parameters are not included in the XML output.
ids={value} (Required to update or delete record) Record IDs to update/delete. Specify record IDs and/or ID ranges (for example, 1359-1407). Multiple entries are comma separated.
title={value} (Required to create record) The title for the record. The title must be unique and may include a maximum of 255 characters (ascii).
comments={value} (Optional) User defined notes about the record. Maximum of 1999 characters (ascii).
pc_only={0|1} (Optional) Specify pc_only=1 if the record will be used for compliance scans only. See “Multiple DB2 Instances.”
Login Credentials
username={value} (Required to create record, optional to update record)The user name for a DB2 database account. A maximum of 13 characters (ascii) may be specified.
password={value} (Required to create record, optional to update record)The password for a DB2 database account. A maximum of 13 characters (ascii) may be specified.
database={value} (Required to create record, optional to update record)The name of the DB2 database. A maximum of 8 characters (ascii) may be specified.
port={value} (Required to create record, optional to update record)The port the database instance is running on.
198
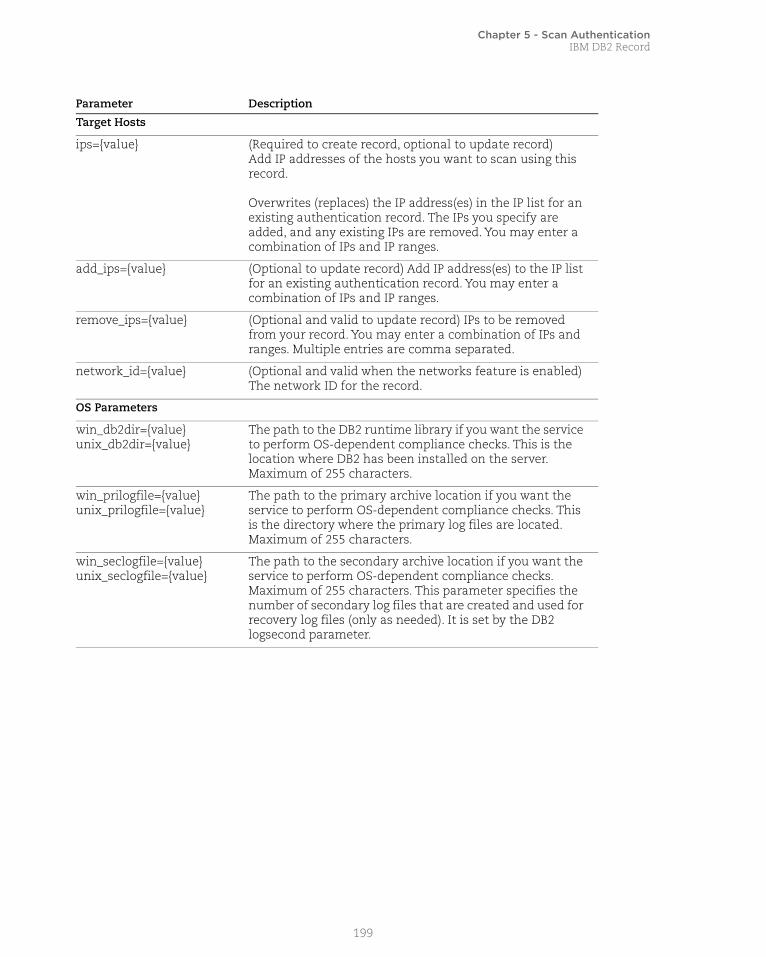
Chapter 5 - Scan AuthenticationIBM DB2 Record
Target Hosts
ips={value} (Required to create record, optional to update record) Add IP addresses of the hosts you want to scan using this record.
Overwrites (replaces) the IP address(es) in the IP list for an existing authentication record. The IPs you specify are added, and any existing IPs are removed. You may enter a combination of IPs and IP ranges.
add_ips={value} (Optional to update record) Add IP address(es) to the IP list for an existing authentication record. You may enter a combination of IPs and IP ranges.
remove_ips={value} (Optional and valid to update record) IPs to be removed from your record. You may enter a combination of IPs and ranges. Multiple entries are comma separated.
network_id={value} (Optional and valid when the networks feature is enabled)The network ID for the record.
OS Parameters
win_db2dir={value}unix_db2dir={value}
The path to the DB2 runtime library if you want the service to perform OS-dependent compliance checks. This is the location where DB2 has been installed on the server. Maximum of 255 characters.
win_prilogfile={value}unix_prilogfile={value}
The path to the primary archive location if you want the service to perform OS-dependent compliance checks. This is the directory where the primary log files are located. Maximum of 255 characters.
win_seclogfile={value}unix_seclogfile={value}
The path to the secondary archive location if you want the service to perform OS-dependent compliance checks. Maximum of 255 characters. This parameter specifies the number of secondary log files that are created and used for recovery log files (only as needed). It is set by the DB2 logsecond parameter.
Parameter Description
199

Chapter 5 - Scan AuthenticationIBM DB2 Record
Multiple DB2 Instances
The service has the ability to authenticate to multiple DB2 instances on a single host during scanning. For a vulnerability scan, an instance “uniqueness” is defined by an IP address and port. For a compliance scan, an instance “uniqueness” is defined by an IP address, port and database name. The setting for “pc_only” has an impact on how the services determines the uniqueness of a DB2 instance.
Let’s say you want to define these DB2 records in your account.
Record 1 and Record 2 will be used for vulnerability scans and compliance scans. You’ll notice Records 2 and 3 have the same IP address and port but different database names - this is allowed because Record 3 is used for compliance scans only.
win_terlogfile={value}unix_terlogfile={value}
The path to the tertiary archive location if you want the service to perform OS-dependent compliance checks. Maximum 255 characters.
This parameter specifies a path to which DB2 will try to archive log files if thelog files cannot be archived to either the primary or the secondary (if set) archivedestinations because of a media problem affecting those destinations. It is set by the DB2 failarchpath parameter.
win_mirlogfile={value}unix_mirlogfile={value}
The path to the mirror archive location if you want the service to perform OS-dependent compliance checks. Maximum 255 characters.
If mirrorlogpath is configured, DB2 will create active log files in both the log path and the mirror log path. All log data will be written to both paths. The mirror log path has a duplicate set of active log files. If the active log files are destroyed by a disk error or human error, the database can still function.
IP Address Port Database Name pc_only=0|1
Record 1 10.10.31.178 5000 SAMPLE pc_only=0
Record 2 10.10.30.159 5000 TOOLS pc_only=0
Record 3 10.10.30.159 5000 SAMPLE pc_only=1
Parameter Description
200

Chapter 5 - Scan AuthenticationIBM DB2 Record
DB2 Paths
When specifying the path to configuration files, these special characters are not allowed:
For Windows:
; & | # % ? ! * ` ( ) [ ] ” ’ > < = ^ /
For Unix:
; & | # % ? ! * ` ( ) [ ] ” ’ > < = ^ \
DTDs for auth type “ibm_db2”<platform API server>/api/2.0/batch_return.dtd
<platform API server>/api/2.0/fo/auth/ibm_db2/auth_ibm_db2_list_output.dtd
201

Chapter 5 - Scan AuthenticationJBoss Server record
JBoss Server record/api/2.0/fo/auth/jboss/
[POST]
Create, update, list and delete JBoss Server records for vulnerability and compliance scans (using VM, SCA, PC). Supports Windows and Unix platforms.
Supported technologies:
Windows - WildFly/JBoss EAP
Unix - WildFly/JBoss EAP
Input Parameters
Parameter Description
action={action} (Required) Specify create, update, delete (using POST) or list (using GET or POST).
echo_request={0|1} (Optional) Specify 1 to view (echo) input parameters in the XML output. By default these are not included.
ids={value} (Required) Specify a single or comma separated valid JBoss type auth record ID(s).
title={value} (Required to create record) A title for the record. The title must be unique.
comment={value} (Optional to create or update record) User defined comments.
Windows platform
windows_working_mode= {value}
(Optional) Input values should be standalone_mode or domain_controller_mode.
windows_home_path={value}
Required if windows working mode is selected.
windows_base_path= {value}
Required if windows working mode is selected.
windows_conf_dir_path= {value}
Required if windows working mode is selected.
windows_conf_file_path= {value}
Required if windows working mode is selected.
windows_conf_host_file_ path={value}
Required if selected Windows working mode is domain controller.
Unix platform
unix_working_mode= {value}
(Optional) Input values should be standalone_mode or domain_controller_mode.
unix_home_path={value} Required if Unix working mode is selected.
202

Chapter 5 - Scan AuthenticationJBoss Server record
Sample - Create JBoss Server record
API request:
curl -u "USERNAME:PASSWORD" -H "X-Requested-With:curl" -X POST "action=create&title=jbos_rec&windows_working_mode=standalone_mode&windows_base_path=c:\&windows_home_path=c:\&windows_conf_file_path=c:\&windows_conf_dir_path=c:\&comment=recordcreation&ips=10.10.10.224" "https://qualysapi.qualys.com/api/2.0/fo/auth/jboss/"
XML output:
<BATCH_RETURN> <RESPONSE> <DATETIME>2018-08-03T10:42:32Z</DATETIME> <BATCH_LIST> <BATCH> <TEXT>Successfully Created</TEXT> <ID_SET> <ID>296004</ID> </ID_SET> </BATCH> </BATCH_LIST> </RESPONSE>
unix_base_path={value} Required if Unix working mode is selected.
unix_conf_dir_path= {value} Required if Unix working mode is selected.
unix_conf_file_path= {value}
Required if Unix working mode is selected.
unix_conf_host_file_path= {value}
Required if selected Unix working mode is domain controller.
Target Hosts
ips={value} (Required to create record) The IP address(es) the server will log into using the record’s credentials. Multiple entries are comma separated.(Optional to update record) IPs specified will overwrite existing IPs in the record, and existing IPs will be removed.
add_ips={value} (Optional and valid only to update record) IPs to be added to an existing record. You may enter a combination of IPs and IP ranges. Multiple entries are comma separated.
remove_ips={value} (Optional and valid to update record) IPs to be removed from your record. You may enter a combination of IPs and ranges. Multiple entries are comma separated.
network_id={value} (Optional to create or update record, and valid when the networks feature is enabled) The network ID for the record.
Parameter Description
203
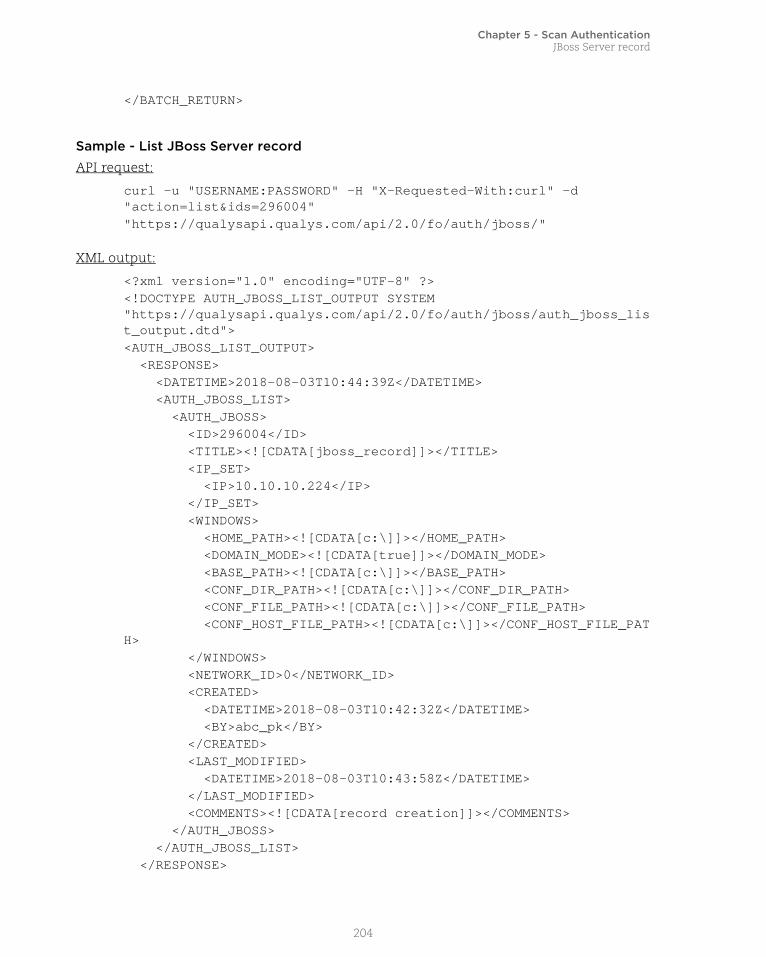
Chapter 5 - Scan AuthenticationJBoss Server record
</BATCH_RETURN>
Sample - List JBoss Server record
API request:
curl -u "USERNAME:PASSWORD" -H "X-Requested-With:curl" -d "action=list&ids=296004""https://qualysapi.qualys.com/api/2.0/fo/auth/jboss/"
XML output:
<?xml version="1.0" encoding="UTF-8" ?><!DOCTYPE AUTH_JBOSS_LIST_OUTPUT SYSTEM "https://qualysapi.qualys.com/api/2.0/fo/auth/jboss/auth_jboss_list_output.dtd"><AUTH_JBOSS_LIST_OUTPUT> <RESPONSE> <DATETIME>2018-08-03T10:44:39Z</DATETIME> <AUTH_JBOSS_LIST> <AUTH_JBOSS> <ID>296004</ID> <TITLE><![CDATA[jboss_record]]></TITLE> <IP_SET> <IP>10.10.10.224</IP> </IP_SET> <WINDOWS> <HOME_PATH><![CDATA[c:\]]></HOME_PATH> <DOMAIN_MODE><![CDATA[true]]></DOMAIN_MODE> <BASE_PATH><![CDATA[c:\]]></BASE_PATH> <CONF_DIR_PATH><![CDATA[c:\]]></CONF_DIR_PATH> <CONF_FILE_PATH><![CDATA[c:\]]></CONF_FILE_PATH> <CONF_HOST_FILE_PATH><![CDATA[c:\]]></CONF_HOST_FILE_PATH> </WINDOWS> <NETWORK_ID>0</NETWORK_ID> <CREATED> <DATETIME>2018-08-03T10:42:32Z</DATETIME> <BY>abc_pk</BY> </CREATED> <LAST_MODIFIED> <DATETIME>2018-08-03T10:43:58Z</DATETIME> </LAST_MODIFIED> <COMMENTS><![CDATA[record creation]]></COMMENTS> </AUTH_JBOSS> </AUTH_JBOSS_LIST> </RESPONSE>
204
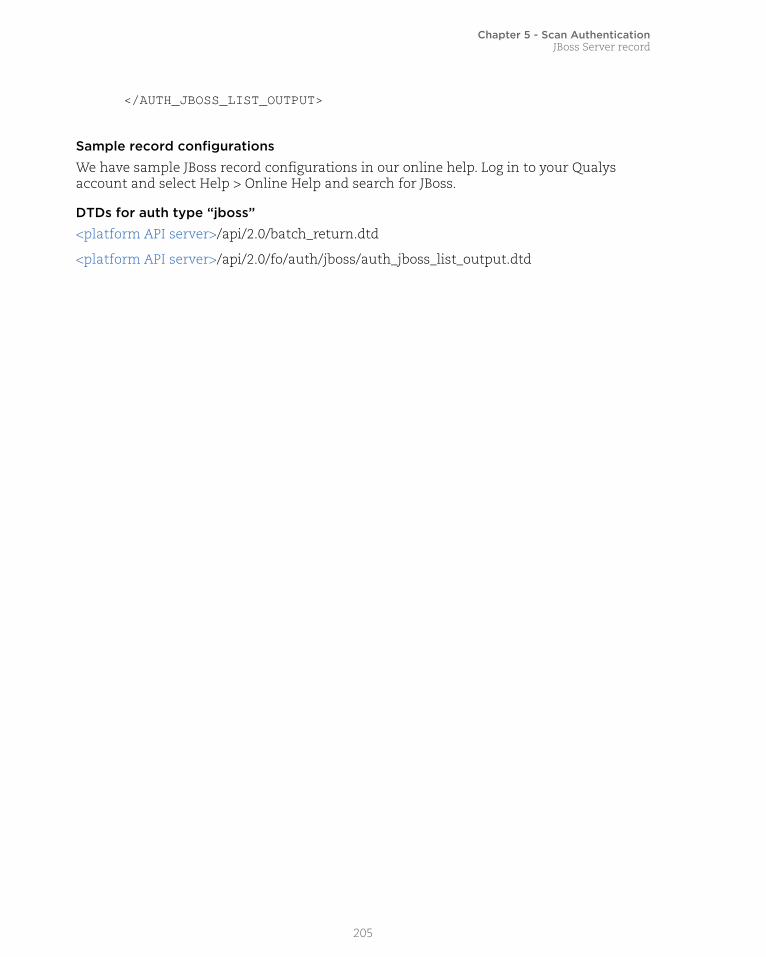
Chapter 5 - Scan AuthenticationJBoss Server record
</AUTH_JBOSS_LIST_OUTPUT>
Sample record configurations
We have sample JBoss record configurations in our online help. Log in to your Qualys account and select Help > Online Help and search for JBoss.
DTDs for auth type “jboss”<platform API server>/api/2.0/batch_return.dtd
<platform API server>/api/2.0/fo/auth/jboss/auth_jboss_list_output.dtd
205

Chapter 5 - Scan AuthenticationMariaDB Record
MariaDB Record/api/2.0/fo/auth/mariadb/
[POST]
Create, update, list and delete MariaDB authentication records. Compliance scans are supported (using PC or SCA).
Input Parameters
Parameter Description
action={action} (Required) Specify create, update, delete (using POST) or list (using GET or POST).
echo_request={0|1} (Optional) Specify 1 to view (echo) input parameters in the XML output. By default these are not included.
ids={value} (Required to update or delete record) Record IDs to update/delete. Specify record IDs and/or ID ranges (for example, 1359-1407). Multiple entries are comma separated.
title={value} (Required to create record) A title for the record. The title must be unique. Maximum 255 characters (ascii).
comments={value} (Optional to create or update record) User defined comments. Maximum of 1999 characters.
ssl_verify={0|1} (Optional to create or update record, and valid for server that supports SSL) Specify 1 for a complete SSL certificate validation.
- If unspecified (or ssl_verify=0), Qualys scanners authenticate with MySQL Servers that don’t use SSL or MariaDB servers that use SSL. However, in the SSL case, the server SSL certificate verification will be skipped.
- If ssl_verify=1, the Qualys scanners will only send a login request after verifying that a connection the MariaDB server uses SSL, the server SSL certificate is valid and matches the scanned host.
hosts={value} (Optional to create or update record) A list of FQDNs for the hosts that correspond to all host IP addresses on which a custom SSL certificate signed by a trusted root CA is installed. Multiple hosts are comma separated.
database={value} (Required to create record, optional to update record) The database name to authenticate to. Specify a valid MariaDB database name.
port={value} (Required to create record, optional to update record) The port the database name is running on. The default is 3306.
206

Chapter 5 - Scan AuthenticationMariaDB Record
windows_config_file={value}
(Optional to create or update record) The path to the Windows mariadb config file. Access to this config file is required to run certain checks on Windows hosts.
Note: You must include one or both of these parameters in a create request: windows_config_file and unix_config_file.
unix_config_file= {value}
(Optional to create or update record) The path to the Unix mariadb config file. Access to this config file is required to run certain checks on Unix hosts.
Note: You must include one or both of these parameters in a create request: windows_config_file and unix_config_file.
client_cert={value} (Optional to create or update record) PEM-encoded X.509 certificate. Specify if certificate authentication is required by your server to establish an SSL connection.
client_key={value} (Optional to create or update record) PEM-encoded RSA private key. Specify if certificate authentication is required by your server to establish an SSL connection.
Login credentials
login_type={basic|vault} (Optional) The login type is basic by default. You can choose vault (for vault based authentication).
username={value} (Required to create record, optional to update record) The username to be used for authentication to MariaDB server.
password={value} (Required to create record, optional to update record) The password to be used for authentication to MariaDB server.
Vault
vault_type={value} (Required to create record when login_type=vault)The vault type to be used for authentication.
vault_id={value} (Required to create record when login_type=vault and you want to retrieve private key from vault) The vault ID where you want to retrieve the private key from. Certain vaults support this capability.
{vault parameters} (Required to create record when login_type=vault)Vault specific parameters required depend on the vault type you’ve selected. See the API v2 User Guide for vault parameters.
Target Hosts
ips={value} (Required to create record) The IP address(es) the server will log into using the record’s credentials. Multiple entries are comma separated.
(Optional to update record) IPs specified will overwrite existing IPs in the record, and existing IPs will be removed.
add_ips={value} (Optional to update record) Add IPs to the IPs list for this record. Multiple IPs/ranges are comma separated.
Parameter Description
207

Chapter 5 - Scan AuthenticationMariaDB Record
Sample - Create MariaDB record (with basic login)
API request:
curl -u "USERNAME:PASSWORD" -H "X-Requested-With: curl sample" -d "action=create&title=MariaDB_Auth1&username=root&password=abc123&ips=10.10.31.86&echo_request=0&unix_config_file=/etc/my.cnf&port=22&database=mariadb" "https://qualysapi.qualys.com/api/2.0/fo/auth/mariadb/"
XML output:
<?xml version="1.0" encoding="UTF-8" ?><!DOCTYPE BATCH_RETURN SYSTEM "https://qualysapi.qualys.com/api/2.0/batch_return.dtd"><BATCH_RETURN> <RESPONSE> <DATETIME>2018-07-17T21:56:47Z</DATETIME> <BATCH_LIST> <BATCH> <TEXT>Successfully Created</TEXT> <ID_SET> <ID>284866</ID> </ID_SET> </BATCH> </BATCH_LIST> </RESPONSE></BATCH_RETURN>
Sample - List MariaDB recordsUse the new MariaDB Authentication Record List API (/api/2.0/fo/auth/mariadb/?action=list) to list MariaDB records.
API request:
curl -u "USERNAME:PASSWORD" -H "X-Requested-With: Curl" -d"action=list" "https://qualysapi.qualys.com/api/2.0/fo/auth/mariadb/"
remove_ips={value} (Optional to update record) IPs to be removed from your record. You may enter a combination of IPs and ranges. Multiple entries are comma separated.
This parameter and the ips parameter cannot be specified in the same request.
network_id={value} (Optional and valid when the networks feature is enabled) The network ID for the record.
Parameter Description
208

Chapter 5 - Scan AuthenticationMariaDB Record
XML output:
<?xml version="1.0" encoding="UTF-8" ?><!DOCTYPE AUTH_MARIADB_LIST_OUTPUT SYSTEM "https://qualysapi.qualys.com/api/2.0/fo/auth/mariadb/auth_mariadb_list_output.dtd"><AUTH_MARIADB_LIST_OUTPUT> <RESPONSE> <DATETIME>2018-07-17T21:57:32Z</DATETIME> <AUTH_MARIADB_LIST> <AUTH_MARIADB> <ID>284866</ID> <TITLE><![CDATA[MariaDB_Auth1]]></TITLE> <USERNAME><![CDATA[root]]></USERNAME> <DATABASE><![CDATA[mariadb]]></DATABASE> <PORT>22</PORT> <IP_SET> <IP>10.10.31.86</IP> </IP_SET> <LOGIN_TYPE><![CDATA[basic]]></LOGIN_TYPE> <SSL_VERIFY>false</SSL_VERIFY> <WINDOWS_CONF_FILE><![CDATA[]]></WINDOWS_CONF_FILE> <UNIX_CONF_FILE><![CDATA[/etc/my.cnf]]></UNIX_CONF_FILE> <NETWORK_ID>0</NETWORK_ID> <CREATED> <DATETIME>2018-07-17T21:56:47Z</DATETIME> <BY>seenu_yn</BY> </CREATED> <LAST_MODIFIED> <DATETIME>2018-07-17T21:56:47Z</DATETIME> </LAST_MODIFIED> </AUTH_MARIADB> </AUTH_MARIADB_LIST> </RESPONSE></AUTH_MARIADB_LIST_OUTPUT>
DTDs for auth type “mariadb”<platform API server>/api/2.0/batch_return.dtd
<platform API server>/api/2.0/fo/auth/mariadb/auth_mariadb_list_output.dtd
209

Chapter 5 - Scan AuthenticationMongoDB Record
MongoDB Record/api/2.0/fo/auth/mongodb/
[POST]
Create, update, list and delete MongoDB records for authenticated scans of MongoDB instances running on Unix. Vulnerability and compliance scans are supported (using VM, PC, SCA).
- Technologies supported: MongoDB 3.x
- Unix authentication is required for compliance scans using the PC app. Make sure the IP addresses you define in your MongoDB records are also defined in Unix records.
- We strongly recommend you create one or more dedicated user accounts to be used solely by the Qualys Cloud Platform to authenticate to MongoDB instances.
Requirement - You must configure authentication credentials on target hosts.
Download Qualys User Guide - MongoDB Authentication (.pdf)
Input Parameters
Parameter Description
action={action} (Required) Specify create, update, delete (using POST) or list (using GET or POST).
echo_request={0|1} (Optional) Show (echo) the request’s input parameters (names and values) in the XML output. When not specified, parameters are not included in the XML output. Specify 1 to view parameters in the XML output.
title={value} (Required to create record) A title for the record. The title must be unique. Maximum 255 characters (ascii).
comments={value} (Optional) User defined comments. Maximum of 1999 characters.
ids={id1,id2,...} (Required to update or delete record) Record IDs to update/delete. Specify record IDs and/or ID ranges (for example, 1359-1407). Multiple entries are comma separated.
Target Hosts
ips={value} (Required to create record, optional to update record)Add IP addresses of the hosts you want to scan using this record.
Overwrites (replaces) the IP address(es) in the IP list for an existing authentication record. The IPs you specify are added, and any existing IPs are removed. You may enter a combination of IPs and IP ranges.
210
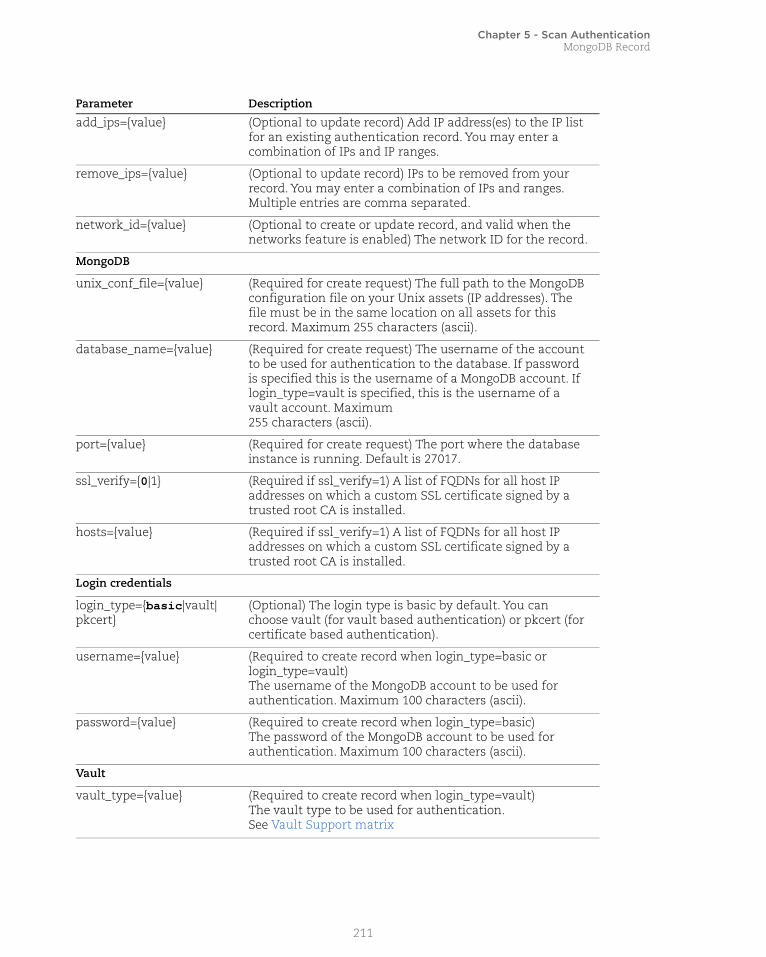
Chapter 5 - Scan AuthenticationMongoDB Record
add_ips={value} (Optional to update record) Add IP address(es) to the IP list for an existing authentication record. You may enter a combination of IPs and IP ranges.
remove_ips={value} (Optional to update record) IPs to be removed from your record. You may enter a combination of IPs and ranges. Multiple entries are comma separated.
network_id={value} (Optional to create or update record, and valid when the networks feature is enabled) The network ID for the record.
MongoDB
unix_conf_file={value} (Required for create request) The full path to the MongoDB configuration file on your Unix assets (IP addresses). The file must be in the same location on all assets for this record. Maximum 255 characters (ascii).
database_name={value} (Required for create request) The username of the account to be used for authentication to the database. If password is specified this is the username of a MongoDB account. If login_type=vault is specified, this is the username of a vault account. Maximum255 characters (ascii).
port={value} (Required for create request) The port where the database instance is running. Default is 27017.
ssl_verify={0|1} (Required if ssl_verify=1) A list of FQDNs for all host IP addresses on which a custom SSL certificate signed by a trusted root CA is installed.
hosts={value} (Required if ssl_verify=1) A list of FQDNs for all host IP addresses on which a custom SSL certificate signed by a trusted root CA is installed.
Login credentials
login_type={basic|vault|pkcert}
(Optional) The login type is basic by default. You can choose vault (for vault based authentication) or pkcert (for certificate based authentication).
username={value} (Required to create record when login_type=basic or login_type=vault)The username of the MongoDB account to be used for authentication. Maximum 100 characters (ascii).
password={value} (Required to create record when login_type=basic)The password of the MongoDB account to be used for authentication. Maximum 100 characters (ascii).
Vault
vault_type={value} (Required to create record when login_type=vault)The vault type to be used for authentication.See Vault Support matrix
Parameter Description
211

Chapter 5 - Scan AuthenticationMongoDB Record
Sample - Create MongoDB record - basic login
API request:
curl -u "USERNAME:PASSWORD" -H "X-Requested-With: curl sample" -d "action=create&title=API-mongodb-basic-login&username=mlqa&password=12345abc&ips=10.20.32.239&comments=mongo-basic-login&unix_conf_path=/etc/mongod3.conf&port=28020&ssl_verify=0&database_name=admin" "https://qualysapi.qualys.com/api/2.0/fo/auth/mongodb/" > file.xml
XML output:
<?xml version="1.0" encoding="UTF-8" ?><!DOCTYPE BATCH_RETURN SYSTEM "https://qualysapi.qualys.com/api/2.0/batch_return.dtd"><BATCH_RETURN> <RESPONSE> <DATETIME>2018-04-12T22:43:27Z</DATETIME> <BATCH_LIST> <BATCH> <TEXT>Successfully Created</TEXT>
vault_id={value} (Required to create record when login_type=vault and you want to retrieve private key from vault) The vault ID where you want to retrieve the private key from. Certain vaults support this capability.
{vault parameters} (Required to create record when login_type=vault)Vault specific parameters required depend on the vault type you’ve selected. See Vault Definition
private_key_vault_id={value}
(Required to create record when login_type=vault and you want to retrieve passphrase from vault) The vault ID where you want to retrieve the passphrase from. Certain vaults support this capability. See Vault Support matrix
passphrase_vault_id={value}
(For create request, required when login_type=vault and you want to retrieve passphrase from vault) The vault ID where you want to retrieve the passphrase from. Certain vaults support this capability. See Vault Support matrix
private_key={value} (For create request, required when login_type=pkcert) The private key to be used for authentication. Certain vaults support this capability. See Vault Support matrix
passphrase={value} (For create request, required when login_type=pkcert and passphrase_vault_id is not specified) The private key passphrase value of an encrypted private key. Maximum 255 characters (ascii). Certain vaults support this capability. See Vault Support matrix
certificate={value} (For create request, optional when login_type=pkcert ) The passphrase X.509 certificate content.
Parameter Description
212

Chapter 5 - Scan AuthenticationMongoDB Record
<ID_SET> <ID>125709</ID> </ID_SET> </BATCH> </BATCH_LIST> </RESPONSE></BATCH_RETURN>
Sample - Create MongoDB record, using SSL
API request:
curl -u "USERNAME:PASSWORD" -H "X-Requested-With: Curl Sample" -d "action=create&title=API-mongo-basic-login-with-ssl-verify1_hosts&username=mongo-admin&password=test123&ips=10.20.32.239&comments=mongo-basic-login-ssl_hosts&unix_conf_path=/opt/mongodb/&port=27018&ssl_verify=1&hosts=abc123.s2012r2.lab.acme.com],abc123.s2008r2.lab.acme.com" "https://qualysapi.qualys.com/api/2.0/fo/auth/mongodb/" > file.xml
XML output:
<?xml version="1.0" encoding="UTF-8" ?><!DOCTYPE BATCH_RETURN SYSTEM "https://qualysapi.qualys.com/api/2.0/batch_return.dtd"><BATCH_RETURN> <RESPONSE> <DATETIME>2018-03-12T22:45:06Z</DATETIME> <BATCH_LIST> <BATCH> <TEXT>Successfully Created</TEXT> <ID_SET> <ID>125710</ID> </ID_SET> </BATCH> </BATCH_LIST> </RESPONSE></BATCH_RETURN>
Sample - Create MongoDB record, using vault
API request:
curl -u "USERNAME:PASSWORD" -H "X-Requested-With: Curl Sample" -d "action=create&title=API-mongo-vault-CA_Access&ips=10.20.32.239&comments=mongo-CA-Access-vault_login&unix_conf_path=/opt/mongodb4.conf/&port=27010&login_type=vault&vault_type=CA Access Control&vault_id=166657&end_point_name=name&end_point_type=type&end_point_container=container&username=mlqa" "https://qualysapi.qualys.com/api/2.0/fo/auth/mongodb/" > file.xml
213

Chapter 5 - Scan AuthenticationMongoDB Record
XML output:
<?xml version="1.0" encoding="UTF-8" ?><!DOCTYPE BATCH_RETURN SYSTEM "https://qualysapi.qualys.com/api/2.0/batch_return.dtd"><BATCH_RETURN> <RESPONSE> <DATETIME>2018-03-12T22:46:47Z</DATETIME> <BATCH_LIST> <BATCH> <TEXT>Successfully Created</TEXT> <ID_SET> <ID>125711</ID> </ID_SET> </BATCH> </BATCH_LIST> </RESPONSE></BATCH_RETURN>
Sample - List MongoDB recordsAPI request:
curl -u "USERNAME:PASSWORD" -H "X-Requested-With: Curl Sample" -d "action=list&details=All" "https://qualysapi.qualys.com/api/2.0/fo/auth/mongodb/" > file.xml
XML output:
<?xml version="1.0" encoding="UTF-8" ?><!DOCTYPE AUTH_MONGODB_LIST_OUTPUT SYSTEM "https://qualysapi.qualys.com/api/2.0/fo/auth/mongodb/auth_mongodb_list_output.dtd"><AUTH_MONGODB_LIST_OUTPUT> <RESPONSE> <DATETIME>2017-09-12T22:42:45Z</DATETIME> <AUTH_MONGODB_LIST> <AUTH_MONGODB> <ID>125693</ID> <TITLE><![CDATA[API-mongo-basic-login]]></TITLE> <USERNAME><![CDATA[mongo-admin-name]]></USERNAME> <DATABASE><![CDATA[db-admin-name]]></DATABASE> <PORT>28020</PORT> <UNIX_CONFIGURATION_FILE><![CDATA[/opt/mongodb/updated]]></UNIX_CONFIGURATION_FILE> <IP_SET> <IP>10.20.32.239</IP>
214

Chapter 5 - Scan AuthenticationMongoDB Record
</IP_SET> <LOGIN_TYPE><![CDATA[basic]]></LOGIN_TYPE> <NETWORK_ID>0</NETWORK_ID> <CREATED> <DATETIME>2017-09-12T20:22:09Z</DATETIME>...
DTDs for auth type “mongodb”<platform API server>/api/2.0/batch_return.dtd
<platform API server>/api/2.0/fo/auth/mongodb/auth_mongodb_list_output.dtd
215

Chapter 5 - Scan AuthenticationMS SQL Record
MS SQL Record/api/2.0/fo/auth/ms_sql/
[POST]
Create, update, list and delete MS SQL Server authentication records. Compliance scans are supported (using PC or SCA).
Requirement - You must configure authentication credentials on target hosts.
Download Qualys User Guide - MS SQL Server 2000 Authentication (.pdf)
Download Qualys User Guide - MS SQL Server 2005-2017 Authentication (.pdf)
Input Parameters
Parameter Description
action={action} (Required) Specify create, update, delete (using POST) or list (using GET or POST).
echo_request={0|1} (Optional) Specify 1 to view (echo) input parameters in the XML output. By default these are not included.
ids={value} (Required to update or delete record) Record IDs to update/delete. Specify record IDs and/or ID ranges (for example, 1359-1407). Multiple entries are comma separated.
title={value} (Required to create record) A title for the record. The title must be unique. Maximum 255 characters (ascii).
comments={value} (Optional) User defined comments. Maximum 1999 characters.
Login credentials
username={value} (Required to create record, optional to update record) The user account to be used for authentication. May include 1-128 characters.
password={value} (Required to create record, optional to update record) The password corresponding to the user account defined in the record for authentication. May include 1-128 characters.
db_local={0|1} (Optional to create or update record) Set to 1 when login credentials are for a MS SQL Server database account. Set to 0 when login credentials are for a Microsoft Windows operating system account that is associated with a MS SQL Server database account. To create record if the db_local parameter is unspecified, the flag is set to 1.
216

Chapter 5 - Scan AuthenticationMS SQL Record
windows_domain={value} (Required when db_local=0, otherwise invalid)
The domain name where the login credentials are stored when the login credentials are for a Microsoft Windows operating system account that is associated with a MS SQL Server database account. The domain name may include 1-256 characters (ascii).
For an update request when the credentials for the record are for a Microsoft Windows account (db_local=0) and you want to change the record to use credentials for a MS SQL Server account (db_local=1) note the following. You must set windows_domain=’’ (the empty string) to clear the current parameter setting.
instance={value} (Optional to create or update record) The name of the database instance to be scanned. This is the instance name assigned to the TCP/IP port. Important: This is not the host name that is assigned to the MS SQL Server instance name (see “MS SQL Server Instance Name” in the Qualys online help for information). The instance name may include a maximum of 128 characters (ascii). For a create request if the instance parameter is unspecified, the instance name is set to “MSSQLSERVER”.
These parameters are mutually exclusive: instance and auto_discover_instances=1.
auto_discover_instances={0|1}
Set auto_discover_instances=1 and we’ll find all MS SQL Server instance names on each host. Note Windows authentication is required in order for us to auto discover instance names - be sure you set up Windows authentication records for your hostsrunning MS SQL Server.
These parameters are mutually exclusive: instance and auto_discover_instances=1.
database={value} (Optional to create or update record) The database name of the database to be scanned. The database name may contain a maximum of 128 characters. For a create request if the database name is unspecified, the database name is set to “master”.
auto_discover_databases={0|1}
Set auto_discover_databases=1 and we’ll find all MS SQL Server database names on each host.
These parameters are mutually exclusive: database and auto_discover_databases=1.
Parameter Description
217

Chapter 5 - Scan AuthenticationMS SQL Record
port={value} (Required to create record, optional to update record)
The port number assigned to the database instance to be scanned.
To create a record you must specify one of these parameters: port or auto_discover_ports=1. These parameters are mutually exclusive.
auto_discover_ports={0|1} Set auto_discover_ports=1 and for each host we’ll find all ports MS SQL Server is running on. Note Windows authentication is required for us to auto discover ports - be sure you set up Windows authentication records for your hosts running MS SQL Server.
To create a record you must specify one of these parameters: port or auto_discover_ports=1. These parameters are mutually exclusive.
Target Hosts
ips={value} You may enter a combination of IPs and IP ranges to identify compliance hosts. Multiple entries are comma separated.
(Optional to update record) Overwrites (replaces) the IP list for the authentication record. The IPs you specify are added and any existing IPs are removed.
For create request, it is required to specify either this parameter or member_domain parameter.
For update request, this parameter and the add_ips or remove_ips or member_domain parameter cannot be specified in the same request.
add_ips={value} (Optional to update record) You may enter a combination of IPs and IP ranges to identify compliance hosts. Multiple entries are comma separated.
This parameter is used to update an existing IP list in an existing authentication record. Specifies one or more IP addresses to add to the IP list for the authentication record.
This parameter and the ips or member_domain parameter cannot be specified in the same request.
remove_ips={value} (Optional for update request only) IPs to be removed from your record. You may enter a combination of IPs and ranges. Multiple entries are comma separated.
This parameter and the ips or member_domain parameter cannot be specified in the same request.
Parameter Description
218

Chapter 5 - Scan AuthenticationMS SQL Record
Sample - List record for Windows using member domain
API request:
curl -u "USERNAME:PASSWORD" -H "X-Requested-With: curl" -d"action=list&echo_request=1&ids=13907""https://qualysapi.qualys.com/api/2.0/fo/auth/ms_sql/"
XML output:
<?xml version="1.0" encoding="UTF-8" ?><!DOCTYPE AUTH_MS_SQL_LIST_OUTPUT SYSTEM"https://qualysapi.qualys.com/api/2.0/fo/auth/ms_sql/auth_ms_sql_list_output.dtd"><AUTH_MS_SQL_LIST_OUTPUT> <REQUEST> <DATETIME>2017-09-20T05:34:37Z</DATETIME> <USER_LOGIN>user_john</USER_LOGIN> <RESOURCE> https://qualysapi.qualys.com/api/2.0/fo/auth/ms_sql/ </RESOURCE> <PARAM_LIST> <PARAM>
network_id={value} (Optional and valid when the networks feature is enabled) The network ID for the record.
member_domain={value} Defines the domain of the MS SQL server for the authentication record.
For create request, it is required to specify either this parameter or ips or add_ips parameter.
For update request, this parameter and the ips or add_ips or remove_ips parameter cannot be specified in the same request.
Protocols
kerberos={0|1} (Optional to create or update record) When not specified, Kerberos is enabled allowing the scanning engine to try Kerberos when negotiating authentication to target hosts. Specify kerberos=0 if you do not want Kerberos attempted.
ntlmv2={0|1} (Optional to create or update record) When not specified, NTLMv2 is enabled allowing the scanning engine to try NTLMv2 when negotiating authentication to target hosts. Specify ntlmv2=0 if you do not want NTLMv2 attempted.
ntlmv1={0|1} (Optional to create or update record) When not specified, NTLMv1 will not be attempted. Specify ntlmv1=1 to try NTMLv1 when negotiating authentication to target hosts.
Parameter Description
219

Chapter 5 - Scan AuthenticationMS SQL Record
<KEY>action</KEY> <VALUE>list</VALUE> </PARAM> <PARAM> <KEY>echo_request</KEY> <VALUE>1</VALUE> </PARAM> <PARAM> <KEY>ids</KEY> <VALUE>13907</VALUE> </PARAM> </PARAM_LIST> </REQUEST> <RESPONSE> <DATETIME>2017-09-20T05:34:37Z</DATETIME> <AUTH_MS_SQL_LIST> <AUTH_MS_SQL> <ID>13907</ID> <TITLE><![CDATA[mssqlvt4]]></TITLE> <USERNAME><![CDATA[administrator]]></USERNAME> <NTLM_V2>1</NTLM_V2> <KERBEROS>1</KERBEROS> <INSTANCE><![CDATA[MSSQLSERVER]]></INSTANCE> <DATABASE><![CDATA[master]]></DATABASE> <PORT>8012</PORT> <DB_LOCAL>1</DB_LOCAL> <MEMBER_DOMAIN><![CDATA[sitedomain.com]]></MEMBER_DOMAIN> <NETWORK_ID>0</NETWORK_ID> <CREATED> <DATETIME>2017-09-20T05:26:31Z</DATETIME> <BY>user_john</BY> </CREATED> <LAST_MODIFIED> <DATETIME>2017-09-20T05:26:31Z</DATETIME> </LAST_MODIFIED> <COMMENTS><![CDATA[authcreated]]></COMMENTS> </AUTH_MS_SQL> </AUTH_MS_SQL_LIST> </RESPONSE></AUTH_MS_SQL_LIST_OUTPUT>
220

Chapter 5 - Scan AuthenticationMS SQL Record
Sample - Create record for Windows using member domain
API request:
curl -u "USERNAME:PASSWORD" -H "X-Requested-With: curl" -d"action=create&title=mssqlvt1&username=administrator&password=abc123&db_local=1&port=8012&member_domain=sitedomain.com&echo_request=1&comments=aut hcreated&instance=MSSQLSERVER&database=master" "https://qualysapi.qualys.com/api/2.0/fo/auth/ms_sql/"
XML output:
<?xml version="1.0" encoding="UTF-8" ?><!DOCTYPE BATCH_RETURN SYSTEM "https://qualysapi.qualys.com/api/2.0/batch_return.dtd"><BATCH_RETURN> <REQUEST> <DATETIME>2018-03-20T05:26:31Z</DATETIME> <USER_LOGIN>user_john</USER_LOGIN> <RESOURCE> https://qualysapi.qualys.com/api/2.0/fo/auth/ms_sql/</RESOURCE> <PARAM_LIST> <PARAM> <KEY>action</KEY> <VALUE>create</VALUE> </PARAM> <PARAM> <KEY>title</KEY> <VALUE>mssqlvt4</VALUE> </PARAM> <PARAM> <KEY>username</KEY> <VALUE>administrator</VALUE> </PARAM> <PARAM> <KEY>password</KEY> <VALUE>abc123</VALUE> </PARAM> <PARAM> <KEY>db_local</KEY> <VALUE>1</VALUE> </PARAM> <PARAM> <KEY>port</KEY> <VALUE>8012</VALUE> </PARAM> <PARAM>
221

Chapter 5 - Scan AuthenticationMS SQL Record
<KEY>member_domain</KEY> <VALUE>sitedomain.com</VALUE> </PARAM> <PARAM> <KEY>echo_request</KEY> <VALUE>1</VALUE> </PARAM> <PARAM> <KEY>comments</KEY> <VALUE>authcreated</VALUE> </PARAM> <PARAM> <KEY>instance</KEY> <VALUE>MSSQLSERVER</VALUE> </PARAM> <PARAM> <KEY>database</KEY> <VALUE>master</VALUE> </PARAM> </PARAM_LIST> </REQUEST> <RESPONSE> <DATETIME>2018-03-20T05:26:31Z</DATETIME> <BATCH_LIST> <BATCH> <TEXT>Successfully Created</TEXT> <ID_SET> <ID>13907</ID> </ID_SET> </BATCH> </BATCH_LIST> </RESPONSE></BATCH_RETURN>
Sample - Update record for Windows using member domain
API request:
curl -u "USERNAME:PASSWORD" -H "X-Requested-With: curl" -d"action=update&echo_request=1&ids=13907&member_domain=webdomain.com""https://qualysapi.qualys.com/api/2.0/fo/auth/ms_sql/"
XML output:
<?xml version="1.0" encoding="UTF-8" ?><!DOCTYPE BATCH_RETURN SYSTEM
222

Chapter 5 - Scan AuthenticationMS SQL Record
"https://qualysapi.qualys.com/api/2.0/batch_return.dtd"><BATCH_RETURN> <REQUEST> <DATETIME>2018-03-20T05:37:13Z</DATETIME> <USER_LOGIN>user_john</USER_LOGIN> <RESOURCE>https://qualysapi.qualys.com/api/2.0/fo/auth/ms_sql/ </RESOURCE> <PARAM_LIST> <PARAM> <KEY>action</KEY> <VALUE>update</VALUE> </PARAM> <PARAM> <KEY>echo_request</KEY> <VALUE>1</VALUE> </PARAM> <PARAM> <KEY>ids</KEY> <VALUE>13907</VALUE> </PARAM> <PARAM> <KEY>member_domain</KEY> <VALUE>webdomain.com</VALUE> </PARAM> </PARAM_LIST> </REQUEST> <RESPONSE> <DATETIME>2018-03-20T05:37:13Z</DATETIME> <BATCH_LIST> <BATCH> <TEXT>Successfully Updated</TEXT> <ID_SET><ID>13907</ID> </ID_SET> </BATCH> </BATCH_LIST> </RESPONSE></BATCH_RETURN>
DTDs for auth type “ms_sql”
<platform API server>/api/2.0/batch_return.dtd
<platform API server>/api/2.0/fo/auth/ms_sql/auth_ms_sql_list_output.dtd
223
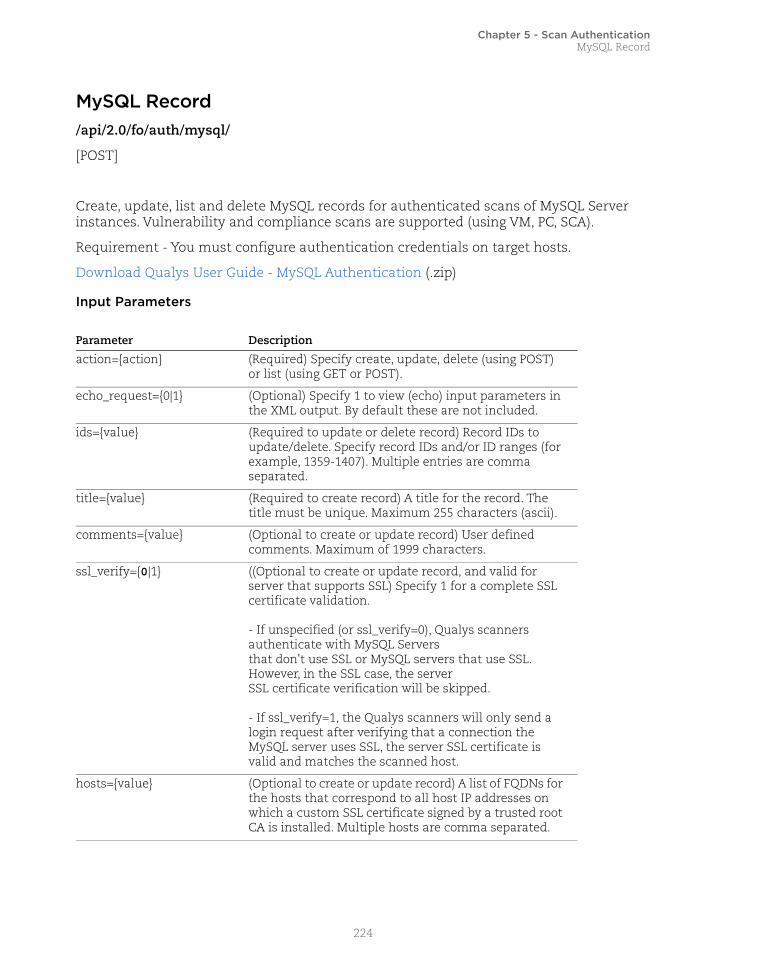
Chapter 5 - Scan AuthenticationMySQL Record
MySQL Record/api/2.0/fo/auth/mysql/
[POST]
Create, update, list and delete MySQL records for authenticated scans of MySQL Server instances. Vulnerability and compliance scans are supported (using VM, PC, SCA).
Requirement - You must configure authentication credentials on target hosts.
Download Qualys User Guide - MySQL Authentication (.zip)
Input Parameters
Parameter Description
action={action} (Required) Specify create, update, delete (using POST) or list (using GET or POST).
echo_request={0|1} (Optional) Specify 1 to view (echo) input parameters in the XML output. By default these are not included.
ids={value} (Required to update or delete record) Record IDs to update/delete. Specify record IDs and/or ID ranges (for example, 1359-1407). Multiple entries are comma separated.
title={value} (Required to create record) A title for the record. The title must be unique. Maximum 255 characters (ascii).
comments={value} (Optional to create or update record) User defined comments. Maximum of 1999 characters.
ssl_verify={0|1} ((Optional to create or update record, and valid for server that supports SSL) Specify 1 for a complete SSL certificate validation.
- If unspecified (or ssl_verify=0), Qualys scanners authenticate with MySQL Serversthat don't use SSL or MySQL servers that use SSL. However, in the SSL case, the serverSSL certificate verification will be skipped.
- If ssl_verify=1, the Qualys scanners will only send a login request after verifying that a connection the MySQL server uses SSL, the server SSL certificate is valid and matches the scanned host.
hosts={value} (Optional to create or update record) A list of FQDNs for the hosts that correspond to all host IP addresses on which a custom SSL certificate signed by a trusted root CA is installed. Multiple hosts are comma separated.
224

Chapter 5 - Scan AuthenticationMySQL Record
database={value} (Required to create, optional to update record) The database name to authenticate to. Specify a valid MySQL database name.
port={value} (Required to create, optional to update record) The port the database name is running on.
windows_config_file={value}
(Optional to create or update record) The path to the Windows MySQL config file. Access to this config file is required to run certain checks on Windows hosts.
Note: You must specify either windows_config_file or unix_config_file depending on the host OS.
unix_config_file={value} (Optional) Name of the client (Consultant type subscriptions).
Note: You must specify either windows_config_file or unix_config_file depending on the host OS.
client_cert={value} (Optional to create or update record) PEM-encoded X.509 certificate. Specify if certificate authentication is required by your server to establish an SSL connection.
client_key={value} (Optional to create or update record) PEM-encoded RSA private key. Specify if certificate authentication is required by your server to establish an SSL connection.
Login credentials
login_type={basic|vault} (Optional) The login type is basic by default. Specifylogin_type=vault to use an authentication vault.
username={value} (Required to create record, optional to update record) The IP address(es) the server will log into using the record’s credentials. Multiple entries are comma separated.
password={value} (Required to create record, optional to update record) The password to be used for authentication to MySQL server.
Vault
vault_type={value} (Required only when action=create and login_type= vault) The vault to be used for authentication. See Vault Support matrix.
vault_id={value} (Required only when action=create and login_type= vault) The ID of the vault you want to use.
{vault parameters} (Required only when action=create and login_type=vault) Vault specific parameters required depend on the vault type you've selected. See Vault Definition.
Target Hosts
Parameter Description
225

Chapter 5 - Scan AuthenticationMySQL Record
Sample - List MySQL recordYou'll see vault information in the XML output when you list MySQL authentication records with vaults.
API request:
curl -u "USERNAME:PASSWORD" -H "X-Requested-With: curl" -d"action=list&ids=284212""https://qualysapi.qualys.com/api/2.0/fo/auth/mysql/"
XML output:
<?xml version="1.0" encoding="UTF-8" ?><!DOCTYPE AUTH_MYSQL_LIST_OUTPUT SYSTEM "https://qualysapi.qualys.com/api/2.0/fo/auth/mysql/auth_mysql_list_output.dtd"><AUTH_MYSQL_LIST_OUTPUT> <RESPONSE> <DATETIME>2018-07-17T17:09:18Z</DATETIME> <AUTH_MYSQL_LIST> <AUTH_MYSQL> <ID>284212</ID> <TITLE><![CDATA[api-Thycotic Secret Server_tss]]></TITLE> <USERNAME><![CDATA[test_tss]]></USERNAME> <DATABASE><![CDATA[mysql]]></DATABASE> <PORT>22</PORT> <HOSTS> <HOST><![CDATA[www.test.com]]></HOST> </HOSTS>
ips={value} (Required to create record) The IP address(es) the server will log into using the record’s credentials. Multiple entries are comma separated.
(Optional to update record) IPs specified will overwrite existing IPs in the record, and existing IPs will be removed.
add_ips={value} (Optional to update record) Add IPs to the IPs list for this record. Multiple IPs/ranges are comma separated.
remove_ips={value} (Optional to update record) IPs to be removed from your record. You may enter a combination of IPs and ranges. Multiple entries are comma separated.
This parameter and the ips or member_domain parameter cannot be specified in the same request.
network_id={value} (Optional and valid when the networks feature is enabled) The network ID for the record.
Parameter Description
226

Chapter 5 - Scan AuthenticationMySQL Record
<IP_SET> <IP>10.10.10.181</IP> </IP_SET> <LOGIN_TYPE><![CDATA[vault]]></LOGIN_TYPE> <DIGITAL_VAULT> <DIGITAL_VAULT_ID><![CDATA[166638]]></DIGITAL_VAULT_ID> <DIGITAL_VAULT_TYPE><![CDATA[Thycotic Secret Server]]></DIGITAL_VAULT_TYPE> <DIGITAL_VAULT_TITLE><![CDATA[3_Secret Server]]></DIGITAL_VAULT_TITLE> <VAULT_SECRET_NAME><![CDATA[secret]]></VAULT_SECRET_NAME> </DIGITAL_VAULT> <SSL_VERIFY>true</SSL_VERIFY><WINDOWS_CONF_FILE><![CDATA[c:\mysql\myu.ini]]></WINDOWS_CONF_FILE> <UNIX_CONF_FILE><![CDATA[]]></UNIX_CONF_FILE> <NETWORK_ID>0</NETWORK_ID> <CREATED> <DATETIME>2018-07-16T21:53:55Z</DATETIME> <BY>seenu_yn</BY> </CREATED> <LAST_MODIFIED> <DATETIME>2018-07-16T21:55:05Z</DATETIME> </LAST_MODIFIED> <COMMENTS><![CDATA[test comments]]></COMMENTS> </AUTH_MYSQL> </AUTH_MYSQL_LIST> </RESPONSE></AUTH_MYSQL_LIST_OUTPUT>
Sample - Create new MySQL recordAPI request:
curl -u "USERNAME:PASSWORD" -H "X-Requested-With: Curl" -X "POST" -d "action=create&title=NewMySQLRecord&username=USERNAME&password=PASSWORD&ips=10.10.31.84&echo_request=1&windows_config_file=c:\mysql\my.ini&port=22&database=mysql" "https://qualysapi.qualys.com/api/2.0/fo/auth/mysql/"
XML output:
<?xml version="1.0" encoding="UTF-8" ?><!DOCTYPE BATCH_RETURN SYSTEM "https://qualysapi.qualys.com/api/2.0/batch_return.dtd"><BATCH_RETURN> <RESPONSE> <DATETIME>2018-07-27T17:02:23Z</DATETIME>
227

Chapter 5 - Scan AuthenticationMySQL Record
<BATCH_LIST> <BATCH> <TEXT>Successfully Created</TEXT> <ID_SET> <ID>291734</ID> </ID_SET> </BATCH> </BATCH_LIST> </RESPONSE></BATCH_RETURN>
Sample - Create MySQL record, using vaultAPI request:
curl -u "USERNAME:PASSWORD" -H "X-Requested-With: curl" -d "action=create&ips=10.10.10.189&username=USERNAME&title=api-Cyberark-vault_19&ssl_verify=1&login_type=vault&vault_type=CyberArk PIM Suite&vault_id=166655&folder=folder&file=file&hosts=www.test1.com&comments=test comments&port=8080&database=mysqldb&windows_config_file=c:\mysql\myu.ini&unix_config_file=/etc/updated/my.ucnf" "https://qualysapi.qualys.com/api/2.0/fo/auth/mysql/"
XML output:
<?xml version="1.0" encoding="UTF-8" ?><!DOCTYPE BATCH_RETURN SYSTEM "https://qualysapi.qualys.com/api/2.0/batch_return.dtd"><BATCH_RETURN> <RESPONSE> <DATETIME>2018-07-27T17:14:57Z</DATETIME> <BATCH_LIST> <BATCH> <TEXT>Successfully Created</TEXT> <ID_SET> <ID>291735</ID> </ID_SET> </BATCH> </BATCH_LIST> </RESPONSE></BATCH_RETURN>
228

Chapter 5 - Scan AuthenticationMySQL Record
Sample - Update MySQL record
API request:
curl -u "USERNAME:PASSWORD" -H "X-Requested-With: Curl" -X "POST" -d "action=update&ids=137296922&password=NEWPASSWORD" "https://qualysapi.qualys.com/api/2.0/fo/auth/mysql/"
XML output:
<BATCH_RETURN> <RESPONSE> <DATETIME>2018-01-23T17:14:28Z</DATETIME> <BATCH_LIST> <BATCH> <TEXT>Successfully Updated</TEXT> <ID_SET> <ID>137296922</ID> </ID_SET> </BATCH> </BATCH_LIST> </RESPONSE></BATCH_RETURN>
Sample - Update vault details in MySQL record
API request:
curl -u "USERNAME:PASSWORD" -H "X-Requested-With: curl" -d "action=update&ids=272380&ips=10.10.10.19&username=USERNAME&title=NewMySQLRecord&ssl_verify=0&login_type=vault&vault_type=CyberArk PIM Suite&vault_id=248308&folder=folder&file=file&hosts=www.qualys.com&comments=test comments updated" "https://qualysapi.qualys.com/api/2.0/fo/auth/mysql/"
XML output:
<?xml version="1.0" encoding="UTF-8" ?><!DOCTYPE BATCH_RETURN SYSTEM "qualysapi.qualys.com/api/2.0/batch_return.dtd"><BATCH_RETURN> <RESPONSE> <DATETIME>2018-07-27T21:53:55Z</DATETIME> <BATCH_LIST> <BATCH> <TEXT>Successfully Created</TEXT> <ID_SET> <ID>284212</ID> </ID_SET>
229

Chapter 5 - Scan AuthenticationMySQL Record
</BATCH> </BATCH_LIST> </RESPONSE></BATCH_RETURN>
DTDs for auth type “mysql”<platform API server>/api/2.0/batch_return.dtd
<platform API server>/api/2.0/fo/auth/mysql/auth_mysql_list_output.dtd
230

Chapter 5 - Scan AuthenticationOracle Record
Oracle Record/api/2.0/fo/auth/oracle/
[POST]
Create, update, list and delete Oracle records for authenticated scans of Oracle instances. Vulnerability and compliance scans are supported (using VM, PC, SCA).
How it works - During scanning we'll authenticate to one or more instances on a single host using all Oracle records in your account. For compliance scans, you can scan multiple Oracle instances on a single host and port combination. Looking for more help? Search for “Oracle Use Cases” in Qualys online help.
Requirement - You must configure login credentials on target hosts before scanning.
Download Qualys User Guide - Oracle Authentication for VM Scans (.zip)
Download Qualys User Guide - Oracle Authentication for Compliance Scans (.zip)
Input Parameters
Parameter Description
action={action} (Required) Specify create, update, delete (using POST) or list (using GET or POST).
echo_request={0|1} ((Optional) Specify 1 to view (echo) input parameters in the XML output. By default these are not included.
ids={value} (Required to update or delete record) Record IDs to update/delete. Specify record IDs and/or ID ranges (for example, 1359-1407). Multiple entries are comma separated.
title={value} (Required to create record, optional to update record) A title for the record. The title must be unique. Maximum 255 characters (ascii).
comments={value} (Optional to create or update record) User defined comments. Maximum of 1999 characters.
Login credentials
username={value} (Required to create record, optional to update record) The user account to be used for authentication to the Oracle database. The username may include 1-31 characters (ascii).
password={value} (Required to create record, optional to update record) The password corresponding to the user account defined in the record for authentication. The password may include 1-31 characters (ascii).
231

Chapter 5 - Scan AuthenticationOracle Record
sid={value} (Optional to create or update record) The Oracle System ID (SID) that identifies the database instance to be authenticated to. To create a record sid or servicename is required.
The parameters sid and servicename cannot be specified in the same request.
servicename={value} (Optional to create or update record) The Oracle service name that identifies the database instance to be authenticated to. A maximum of 30 characters may be specified.
The parameters sid and servicename cannot be specified in the same request.
port={value} (Optional to create record) The port number that the Oracle database instance is running on. When not specified, the “All Ports” option is used and the scanning engine will authenticate to the database instance on each port that the Oracle service is detected on. Ports used for Oracle authentication
These parameters are mutually exclusive: instance and auto_discover_instances=1.
pc_only={0|1) (Optional to create record, valid when the compliance module is enabled) Specify 1 to perform compliance scans on multiple instances running on host and port combinations in this record. This parameter must be specified if this Oracle record has some host and port combination, which is already defined in another record. Note, however, when pc_only=1 is specified, the record will be used for compliance scans only. When not specified, the record will be used for vulnerability scans and compliance scans.
Target Hosts
ips={value} (Required to create record) The IP address(es) the server will log into using the record’s credentials. Multiple entries are comma separated.
(Optional to update record) IPs specified will overwrite existing IPs in the record, and existing IPs will be removed.
This parameter and the add_ips parameter or the remove_ips parameter cannot be specified in the same request.
Parameter Description
232
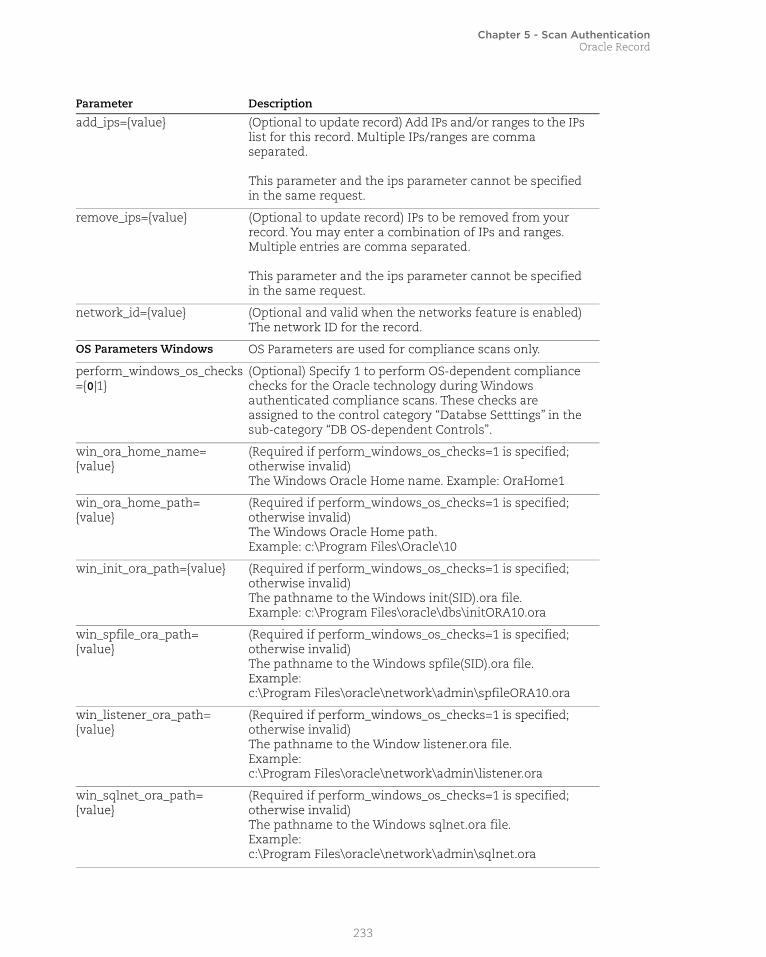
Chapter 5 - Scan AuthenticationOracle Record
add_ips={value} (Optional to update record) Add IPs and/or ranges to the IPs list for this record. Multiple IPs/ranges are comma separated.
This parameter and the ips parameter cannot be specified in the same request.
remove_ips={value} (Optional to update record) IPs to be removed from your record. You may enter a combination of IPs and ranges. Multiple entries are comma separated.
This parameter and the ips parameter cannot be specified in the same request.
network_id={value} (Optional and valid when the networks feature is enabled)The network ID for the record.
OS Parameters Windows OS Parameters are used for compliance scans only.
perform_windows_os_checks={0|1}
(Optional) Specify 1 to perform OS-dependent compliance checks for the Oracle technology during Windows authenticated compliance scans. These checks are assigned to the control category “Databse Setttings” in the sub-category “DB OS-dependent Controls”.
win_ora_home_name={value}
(Required if perform_windows_os_checks=1 is specified; otherwise invalid) The Windows Oracle Home name. Example: OraHome1
win_ora_home_path={value}
(Required if perform_windows_os_checks=1 is specified; otherwise invalid) The Windows Oracle Home path. Example: c:\Program Files\Oracle\10
win_init_ora_path={value} (Required if perform_windows_os_checks=1 is specified; otherwise invalid) The pathname to the Windows init(SID).ora file.Example: c:\Program Files\oracle\dbs\initORA10.ora
win_spfile_ora_path={value}
(Required if perform_windows_os_checks=1 is specified; otherwise invalid) The pathname to the Windows spfile(SID).ora file.Example:c:\Program Files\oracle\network\admin\spfileORA10.ora
win_listener_ora_path={value}
(Required if perform_windows_os_checks=1 is specified; otherwise invalid) The pathname to the Window listener.ora file.Example:c:\Program Files\oracle\network\admin\listener.ora
win_sqlnet_ora_path={value}
(Required if perform_windows_os_checks=1 is specified; otherwise invalid) The pathname to the Windows sqlnet.ora file.Example:c:\Program Files\oracle\network\admin\sqlnet.ora
Parameter Description
233

Chapter 5 - Scan AuthenticationOracle Record
win_tnsnames_ora_path={value}
(Required if perform_windows_os_checks=1 is specified; otherwise invalid) The pathname to the Windows tnsnames.ora file. Example: c:\ProgramFiles\oracle\network\admin\tnsnames.ora
OS Parameters Unix OS Parameters are used for compliance scans only.
perform_unix_os_checks={0|1}
(Optional) Specify 1 to perform OS-dependent compliance checks for the Oracle technology during Unix authenticated compliance scans. These checks are assigned to the control category “Databse Setttings” in the sub-category “DB OS-dependent Controls”.
perform_unix_opatch_checks={0|1}
(Optional) Specify 1 to perform OPatch checks using the OPatch binary to return a list of all installed patches for the Oracle instance.
In a case where perform_unix_os_checks=1 is specified and perform_unix_opatch_checks=0 is specified (or this parameter is not specified), the service checks for patch information from the Oracle database directly; information in the database may not be accurate so the list of installed patches returned by the service also may not be accurate.
unix_ora_home_path={value}
(Required if perform_unix_os_checks=1 and/or perform_unix_opatch_checks=1 is specified; otherwise invalid) The Unix Oracle Home path. Example: /usr/opt/oracle/10
unix_init_ora_path={value} (Required if perform_unix_os_checks=1 and/or perform_unix_opatch_checks=1 is specified; otherwise invalid) The pathname to the Unix init(SID).ora file. Example: /usr/opt/oracle/dbs/initORA10.ora
unix_spfile_ora_path={value}
(Required if perform_unix_os_checks=1 and/or perform_unix_opatch_checks=1 is specified; otherwise invalid) The pathname to the Unix spfile(SID).ora file.Example: /usr/opt/oracle/network/admin/spfileORA10.ora
unix_listener_ora_path={value}
(Required if perform_unix_os_checks=1 and/or perform_unix_opatch_checks=1 is specified; otherwise invalid) The pathname to the Unix listener.ora file.Example: /usr/opt/oracle/network/admin/listener.ora
unix_sqlnet_ora_path={value}
(Required if perform_unix_os_checks=1 and/or perform_unix_opatch_checks=1 is specified; otherwise invalid) The pathname to the Unix sqlnet.ora file.Example: /usr/opt/oracle/network/admin/sqlnet.ora
Parameter Description
234
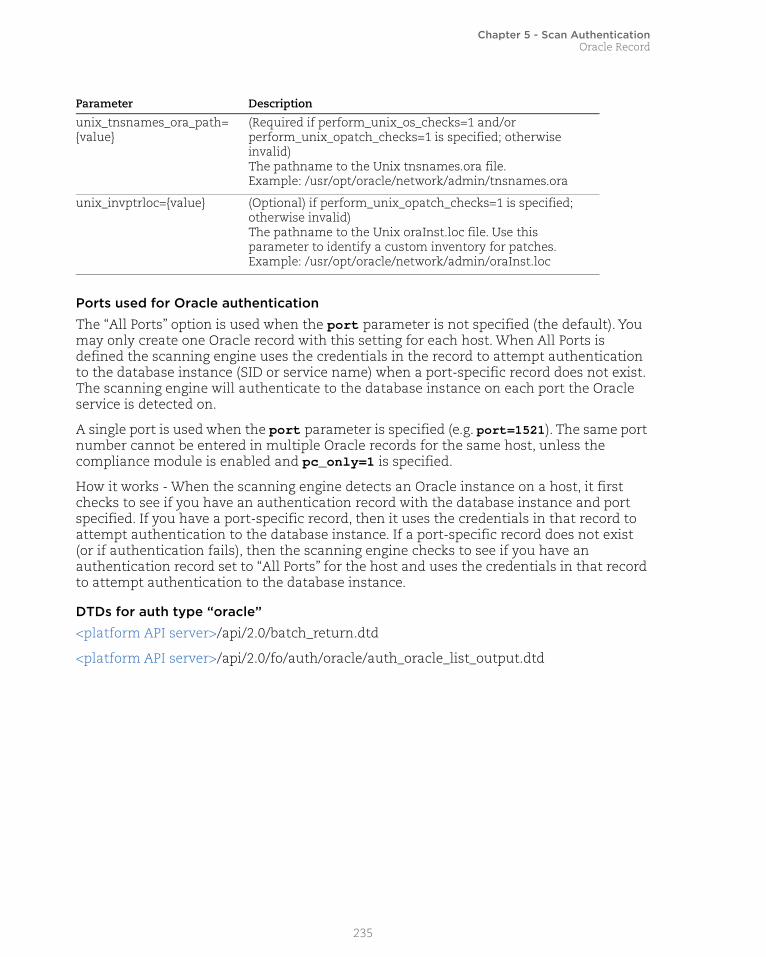
Chapter 5 - Scan AuthenticationOracle Record
Ports used for Oracle authentication
The “All Ports” option is used when the port parameter is not specified (the default). You may only create one Oracle record with this setting for each host. When All Ports is defined the scanning engine uses the credentials in the record to attempt authentication to the database instance (SID or service name) when a port-specific record does not exist. The scanning engine will authenticate to the database instance on each port the Oracle service is detected on.
A single port is used when the port parameter is specified (e.g. port=1521). The same port number cannot be entered in multiple Oracle records for the same host, unless the compliance module is enabled and pc_only=1 is specified.
How it works - When the scanning engine detects an Oracle instance on a host, it first checks to see if you have an authentication record with the database instance and port specified. If you have a port-specific record, then it uses the credentials in that record to attempt authentication to the database instance. If a port-specific record does not exist (or if authentication fails), then the scanning engine checks to see if you have an authentication record set to “All Ports” for the host and uses the credentials in that record to attempt authentication to the database instance.
DTDs for auth type “oracle”
<platform API server>/api/2.0/batch_return.dtd
<platform API server>/api/2.0/fo/auth/oracle/auth_oracle_list_output.dtd
unix_tnsnames_ora_path={value}
(Required if perform_unix_os_checks=1 and/or perform_unix_opatch_checks=1 is specified; otherwise invalid) The pathname to the Unix tnsnames.ora file.Example: /usr/opt/oracle/network/admin/tnsnames.ora
unix_invptrloc={value} (Optional) if perform_unix_opatch_checks=1 is specified; otherwise invalid) The pathname to the Unix oraInst.loc file. Use this parameter to identify a custom inventory for patches.Example: /usr/opt/oracle/network/admin/oraInst.loc
Parameter Description
235

Chapter 5 - Scan AuthenticationOracle Listener Record
Oracle Listener Record/api/2.0/fo/auth/oracle_listener/
[POST]
Create, update, list and delete Oracle Listener records for authenticated scans of Oracle Listener databases. Vulnerability scans are supported (using VM).
Oracle Listener records are used to connect to Oracle TNS Listeners in order to enumerate information about databases behind the Oracle Listeners. When authentication is successful and databases behind the Listener are discovered, the QID 19225 “Retrieved Oracle Database Name” is returned in the scan results. This is an information gathered check that lists the names of the databases discovered behind the Listener. This information is useful if you want to create Oracle authentication records on those databases and need the Oracle System IDs (SIDs).
Input Parameters
Parameter Description
action={action} (Required) Specify create, update, delete (using POST) or list (using GET or POST).
echo_request={0|1} (Optional) Specify 1 to view (echo) input parameters in the XML output. By default these are not included.
ids={value} (Required to update or delete record) Record IDs to update/delete. Specify record IDs and/or ID ranges (for example, 1359-1407). Multiple entries are comma separated.
title={value} (Required to create record, optional to update record) A title for the record. The title must be unique. Maximum 255 characters (ascii).
comments={value} (Optional to create or update record) User defined comments. Maximum of 1999 characters.
password={value} (Required to create record, optional to update record) Specifies a password for authentication to target hosts. If more than one Listener is detected on the same host, then the same password is attempted on each Listener. The password may include 1-31 characters (ascii).
236

Chapter 5 - Scan AuthenticationOracle Listener Record
DTDs for auth type “oracle_listener”
<platform API server>/api/2.0/batch_return.dtd
<platform API server>/api/2.0/fo/auth/oracle_listener/ auth_oracle_listener_list_output.dtd
Target Hosts
ips={value} (Required to create record) The IP address(es) the server will log into using the record’s credentials. Multiple entries are comma separated.
(Optional to update record) IPs specified will overwrite existing IPs in the record, and existing IPs will be removed.
This parameter and the add_ips parameter or the remove_ips parameter cannot be specifiedin the same request.
add_ips={value} (Optional to update record) Add IPs and/or ranges to the IPs list for this record. Multiple IPs/ranges are comma separated.
This parameter and the ips parameter cannot be specified in the same request.
remove_ips={value} ((Optional to update record) IPs to be removed from your record. You may enter a combination of IPs and ranges. Multiple entries are comma separated.
This parameter and the ips parameter cannot be specified in the same request.
network_id={value} (Optional to create or update record, and valid when the networks feature is enabled) The network ID for the record.
Parameter Description
237

Chapter 5 - Scan AuthenticationOracle WebLogic Server Record
Oracle WebLogic Server Record/api/2.0/fo/auth/oracle_weblogic/
[POST]
Create, update, list and delete Oracle WebLogic records for authenticated scans of Oracle WebLogic Server instances. Vulnerability and compliance scans are supported (using VM, PC, SCA).
What you'll need:
- We support these technologies: Oracle WebLogic Server 11g and Oracle WebLogic Server 12c
- Unix authentication is required so you’ll need a Unix record for each host running an Oracle WebLogic Server
Input Parameters
Parameter Description
action={action} (Required) Specify create, update, delete (using POST) or list (using GET or POST).
echo_request={0|1} (Optional) Specify 1 to view (echo) input parameters in the XML output. By default these are not included.
ids={value} (Required for update request; invalid for create request) The IDs of the Oracle WebLogic Server authentication records that you want to update. Multiple IDs are comma separated
title={value} (Required to create record) A title for the record. The title must be unique. Maximum 255 characters (ascii).
comments={value} (Optional to create or update record) User defined comments. Maximum of 1999 characters.
installation_path={value} (Required to create record, optional to update record) The directory where the Oracle WebLogic Server is installed (i.e. Home directory).Example: /u01/app/oracle/middleware
auto_discover={0|1} (Optional) For a create request, we default to auto_discover=1, which means we will use auto discovery to find all domains for you. Specify auto_discover=0 and we will not auto discover domains. For an update request, we will keep the record’s settings as is unless you overwrite them.
auto_discover=0 must be specified with the domain parameter in the same request.
238

Chapter 5 - Scan AuthenticationOracle WebLogic Server Record
Sample - Create WebLogic record, no auto discoverAPI request:
curl -u "USERNAME:PASSWORD" -H "X-Requested-With: Curl" -X "POST" -d "action=create&installation_path=/u01/app/oracle&auto_discover=0&domain=www.qualys.com&ips=10.10.10.23&title=WEB_ORA_CREATE" "https://qualysapi.qualys.com/api/2.0/fo/auth/oracle_weblogic/"
XML output:
<!DOCTYPE BATCH_RETURN SYSTEM "https://qualysapi.qualys.com/api/2.0/batch_return.dtd"><BATCH_RETURN>
domain={value} (Optional) A single Oracle WebLogic Server domain name.Example: website
The domain parameter must be specified with auto_discover=0 in the same request.
Target Hosts
ips={value} (Required to create record) The IP address(es) the server will log into using the record’s credentials. Multiple entries are comma separated.
(Optional to update record) IPs specified will overwrite existing IPs in the record, and existing IPs will be removed.
This parameter and the add_ips parameter or the remove_ips parameter cannot be specified in the same request.
add_ips={value} (Optional to update record) Add IPs and/or ranges to the IPs list for this record. Multiple IPs/ranges are comma separated.
This parameter and the ips parameter cannot be specified in the same request.
remove_ips={value} (Optional to update record) IPs to be removed from your record. You may enter a combination of IPs and ranges. Multiple entries are comma separated.
This parameter and the ips parameter cannot be specified in the same request.
network_id={value} (Optional to create or update record, and valid when the networks feature is enabled) The network ID for the record.
Parameter Description
239

Chapter 5 - Scan AuthenticationOracle WebLogic Server Record
<RESPONSE> <DATETIME>2018-03-10T13:30:49Z</DATETIME> <BATCH_LIST> <BATCH> <TEXT>Successfully Created</TEXT> <ID_SET> <ID>2707632279</ID> </ID_SET> </BATCH> </BATCH_LIST> </RESPONSE></BATCH_RETURN>
Sample - Create WebLogic record, with auto discoverAPI request:
curl -u "USERNAME:PASSWORD" -H "X-Requested-With: Curl" -X "POST" -d "action=create&installation_path=/u01/app/oracle&auto_discover=1&ips=10.10.10.23&title=ABC_ORA" "https://qualysapi.qualys.com/api/2.0/fo/auth/oracle_weblogic/"
XML output:
<!DOCTYPE BATCH_RETURN SYSTEM "https://qualysapi.qualys.com/api/2.0/batch_return.dtd"><BATCH_RETURN> <RESPONSE> <DATETIME>2018-03-10T13:42:46Z</DATETIME> <BATCH_LIST> <BATCH> <TEXT>Successfully Created</TEXT> <ID_SET> <ID>2707642279</ID> </ID_SET> </BATCH> </BATCH_LIST> </RESPONSE></BATCH_RETURN>
DTDs for auth type “oracle_weblogic”
<platform API server>/api/2.0/batch_return.dtd
<platform API server>/api/2.0/fo/auth/oracle_weblogic/ auth_oracle_weblogic_list_output.dtd
240

Chapter 5 - Scan AuthenticationPalo Alto Firewall Record
Palo Alto Firewall Record/api/2.0/fo/auth/palo_alto_firewall/
[POST]
Create, update, list and delete Palo Alto Firewall records for authenticated scans of Palo Alto Firewall instances. Vulnerability and compliance scans are supported (using VM, PC, SCA).
Requirements:
- The user account you provide for authentication must either have the predefined role “Superuser (read-only)” or a custom role with these XML API privileges enabled: Configuration and Operational Requests.
- We use the PANOS XML API to retrieve system information from Palo Alto Firewall on port 443 so this port must be open.
Tip - We strongly recommend you create one or more dedicated user accounts to be used solely by the Qualys Cloud Platform to authenticate to Palo Alto Firewall instances.
Input Parameters
Parameter Description
action={action} (Required) Specify create, update, delete (using POST) or list (using GET or POST).
echo_request={0|1} (Optional) Specify 1 to view (echo) input parameters in the XML output. By default these are not included.
ids={value} (Required to update or delete record) Record IDs to update/delete. Specify record IDs and/or ID ranges (for example, 1359-1407). Multiple entries are comma separated.
title={value} (Required to create record) A title for the record. The title must be unique. Maximum 255 characters (ascii).
comments={value} (Optional to create or update record) User defined comments. Maximum of 1999 characters.
Login credentials
username={value} (Required to create record, optional to update record) The username of the account to be used for authentication. If password is specified this is the username of a Palo Alto Firewall account. If login_type=vault is specified, this is the username of a vault account. Maximum 255 characters (ascii).
password={value} (To create record password or login_type=vault is required) The password of the Palo Alto Firewall account to be used for authentication. Maximum 100 characters (ascii).
241

Chapter 5 - Scan AuthenticationPalo Alto Firewall Record
Sample - Create Palo Alto Firewall record
API request:
curl -u "USERNAME:PASSWORD" -H "X-Requested-With: Curl Sample" -d "action=create&title=palo-4&ips=10.10.10.10&login_type=basic&username=root&password=123123" "https://qualysapi.qualys.com/api/2.0/fo/auth/palo_alto_firewall/"
XML output:
<?xml version="1.0" encoding="UTF-8" ?><!DOCTYPE BATCH_RETURN SYSTEM "https://qualysapi.qualys.com/api/2.0/batch_return.dtd"><BATCH_RETURN> <RESPONSE> <DATETIME>2018-01-14T06:29:41Z</DATETIME> <BATCH_LIST> <BATCH> <TEXT>Successfully Created</TEXT> <ID_SET>
login_type=vault (To create record password or login_type=vault is required) Set to vault if a third party vault will be used to retrieve password. Vault parameters need to be provided in the record. See Chapter 9 - Networks
Target Hosts
ips={value} (Required to create record) The IP address(es) the server will log into using the record’s credentials. Multiple entries are comma separated.
(Optional to update record) IPs specified will overwrite existing IPs in the record, and existing IPs will be removed.
This parameter and the add_ips parameter or the remove_ips parameter cannot be specified in the same request.
add_ips={value} (Optional to update record) Add IPs and/or ranges to the IPs list for this record. Multiple IPs/ranges are comma separated.
This parameter and the ips parameter cannot be specified in the same request.
remove_ips={value} (Optional to update record) IPs to be removed from your record. You may enter a combination of IPs and ranges. Multiple entries are comma separated.
This parameter and the ips parameter cannot be specified in the same request.
Parameter Description
242

Chapter 5 - Scan AuthenticationPalo Alto Firewall Record
<ID>125727</ID> </ID_SET> </BATCH> </BATCH_LIST> </RESPONSE></BATCH_RETURN>
Sample - Create Palo Alto Firewall record, using vaultAPI request:
curl -u "USERNAME:PASSWORD" -H "X-Requested-With: Curl Sample" -d "action=create&title=palo-4&ips=10.10.10.11&login_type=vault&username=root&vault_type=CyberArk AIM&vault_id=16034&file=file&folder=folder" "https://qualysapi.qualys.com/api/2.0/fo/auth/palo_alto_firewall/"
XML output:
<?xml version="1.0" encoding="UTF-8" ?><!DOCTYPE BATCH_RETURN SYSTEM "https://qualysapi.qualys.com/api/2.0/batch_return.dtd"><BATCH_RETURN> <RESPONSE> <DATETIME>2018-01-16T06:22:01Z</DATETIME> <BATCH_LIST> <BATCH> <TEXT>Successfully Created</TEXT> <ID_SET> <ID>125726</ID> </ID_SET> </BATCH> </BATCH_LIST> </RESPONSE></BATCH_RETURN>
243
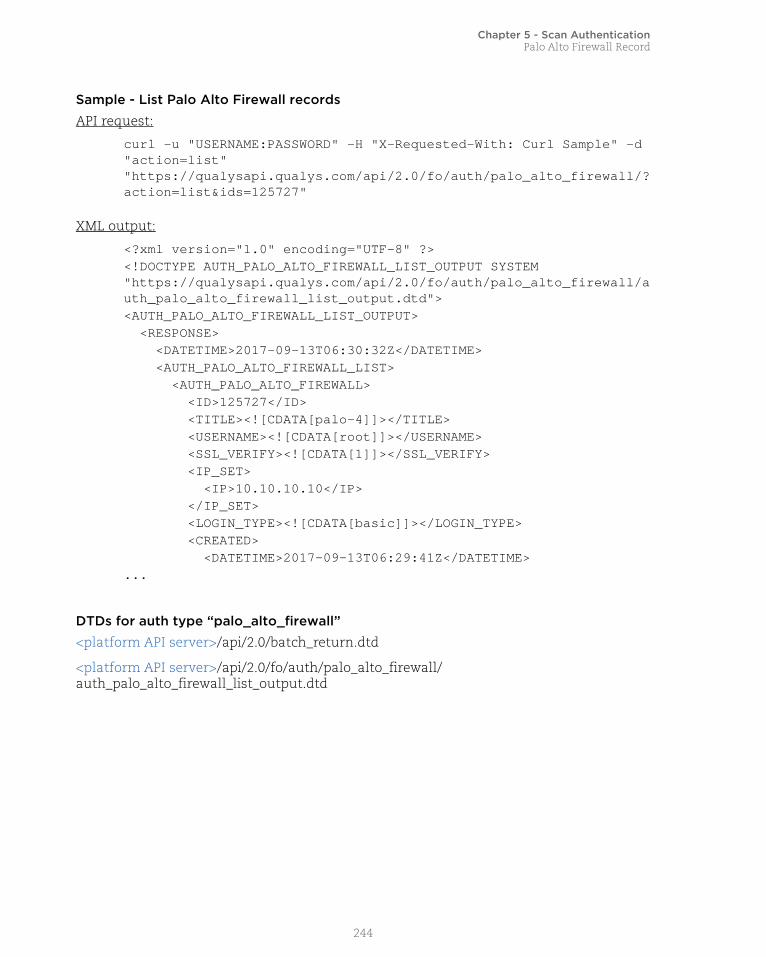
Chapter 5 - Scan AuthenticationPalo Alto Firewall Record
Sample - List Palo Alto Firewall records
API request:
curl -u "USERNAME:PASSWORD" -H "X-Requested-With: Curl Sample" -d "action=list" "https://qualysapi.qualys.com/api/2.0/fo/auth/palo_alto_firewall/?action=list&ids=125727"
XML output:
<?xml version="1.0" encoding="UTF-8" ?><!DOCTYPE AUTH_PALO_ALTO_FIREWALL_LIST_OUTPUT SYSTEM "https://qualysapi.qualys.com/api/2.0/fo/auth/palo_alto_firewall/auth_palo_alto_firewall_list_output.dtd"><AUTH_PALO_ALTO_FIREWALL_LIST_OUTPUT> <RESPONSE> <DATETIME>2017-09-13T06:30:32Z</DATETIME> <AUTH_PALO_ALTO_FIREWALL_LIST> <AUTH_PALO_ALTO_FIREWALL> <ID>125727</ID> <TITLE><![CDATA[palo-4]]></TITLE> <USERNAME><![CDATA[root]]></USERNAME> <SSL_VERIFY><![CDATA[1]]></SSL_VERIFY> <IP_SET> <IP>10.10.10.10</IP> </IP_SET> <LOGIN_TYPE><![CDATA[basic]]></LOGIN_TYPE> <CREATED> <DATETIME>2017-09-13T06:29:41Z</DATETIME>...
DTDs for auth type “palo_alto_firewall”<platform API server>/api/2.0/batch_return.dtd
<platform API server>/api/2.0/fo/auth/palo_alto_firewall/ auth_palo_alto_firewall_list_output.dtd
244

Chapter 5 - Scan AuthenticationPostgreSQL Record
PostgreSQL Record/api/2.0/fo/auth/postgresql/
[POST]
Create, update, list and delete PostgreSQL records for authenticated scans of PostgreSQL Version 9.0 instances running on Unix. Compliance scans are supported (using PC or SCA).
Requirement - You must configure login credentials on target hosts before scanning.
Qualys User Guide - PostreSQL Authentication (.zip)
Tip - We strongly recommend you create one or more dedicated user accounts to be used solely by the Qualys Cloud Platform to authenticate to PostgreSQL database instances.
Input Parameters
Parameter Description
action={action} (Required) Specify create, update, delete (using POST) or list (using GET or POST).
echo_request={0|1} (Optional) Specify 1 to view (echo) input parameters in the XML output. By default these are not included.
ids={value} (Required to update or delete record) Record IDs to update/delete. Specify record IDs and/or ID ranges (for example, 1359-1407). Multiple entries are comma separated.
title={value} (Required to create record) A title for the record. The title must be unique. Maximum 255 characters (ascii).
comments={value} (Optional to create or update record) User defined comments. Maximum of 1999 characters.
PostgreSQL
pgsql_unix_conf_file={value}
(Required for create request) The full path to the PostgreSQL configuration file on your Unix assets (IP addresses). The file must be in the same location on all assets for this record.
pgsql_db_name={value} (Required for create request) The database instance you want to authenticate to.
port={value} (Optional) The port where the database instance is running. Default is 5432.
hosts={value} (Required if ssl_verify=1) A list of FQDNs for all host IP addresses on which a custom SSL certificate signed by a trusted root CA is installed.
ssl_verify={0|1} (Optional) SSL verification is skipped by default. Set to 1 if you want to verify the server’s certificate is valid and trusted.
245
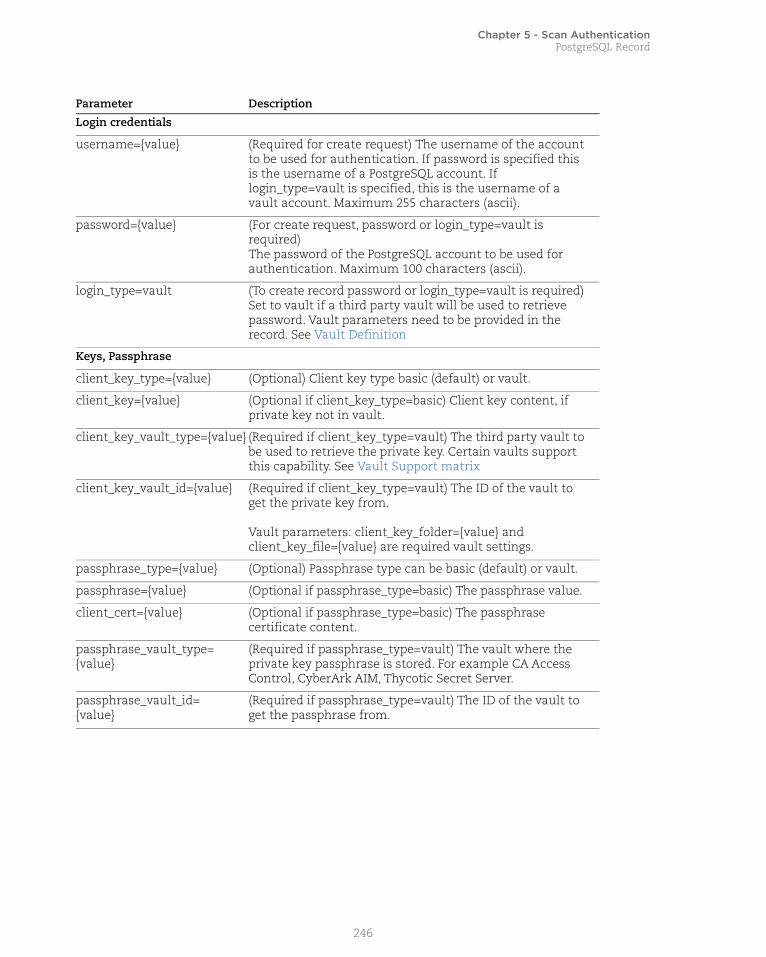
Chapter 5 - Scan AuthenticationPostgreSQL Record
Login credentials
username={value} (Required for create request) The username of the account to be used for authentication. If password is specified this is the username of a PostgreSQL account. If login_type=vault is specified, this is the username of a vault account. Maximum 255 characters (ascii).
password={value} (For create request, password or login_type=vault is required)The password of the PostgreSQL account to be used for authentication. Maximum 100 characters (ascii).
login_type=vault (To create record password or login_type=vault is required) Set to vault if a third party vault will be used to retrieve password. Vault parameters need to be provided in the record. See Vault Definition
Keys, Passphrase
client_key_type={value} (Optional) Client key type basic (default) or vault.
client_key={value} (Optional if client_key_type=basic) Client key content, if private key not in vault.
client_key_vault_type={value} (Required if client_key_type=vault) The third party vault to be used to retrieve the private key. Certain vaults support this capability. See Vault Support matrix
client_key_vault_id={value} (Required if client_key_type=vault) The ID of the vault to get the private key from.
Vault parameters: client_key_folder={value} and client_key_file={value} are required vault settings.
passphrase_type={value} (Optional) Passphrase type can be basic (default) or vault.
passphrase={value} (Optional if passphrase_type=basic) The passphrase value.
client_cert={value} (Optional if passphrase_type=basic) The passphrase certificate content.
passphrase_vault_type={value}
(Required if passphrase_type=vault) The vault where the private key passphrase is stored. For example CA Access Control, CyberArk AIM, Thycotic Secret Server.
passphrase_vault_id={value}
(Required if passphrase_type=vault) The ID of the vault to get the passphrase from.
Parameter Description
246

Chapter 5 - Scan AuthenticationPostgreSQL Record
Sample - Create PostgreSQL record
API request:
curl -u "USERNAME:PASSWORD" -H "X-Requested-With: curl sample" -d "action=create&title=API_POSTGRE_2&username=root&password=abc123&pgsql_db_name=presql&ips=10.10.10.35&pgsql_unix_conf_path=/etc&network_id=4002" "https://qualysapi.qualys.com/api/2.0/fo/auth/postgresql/" > file.xml
XML output:
<?xml version="1.0" encoding="UTF-8" ?><!DOCTYPE BATCH_RETURN SYSTEM "https://qualysapi.qualys.com/api/2.0/batch_return.dtd"><BATCH_RETURN> <RESPONSE> <DATETIME>2018-03-27T20:17:42Z</DATETIME> <BATCH_LIST> <BATCH> <TEXT>Successfully Created</TEXT>
Target Hosts
ips={value} (Required to create record) The IP address(es) the server will log into using the record’s credentials. Multiple entries are comma separated.
(Optional to update record) IPs specified will overwrite existing IPs in the record, and existing IPs will be removed.
This parameter and the add_ips parameter or the remove_ips parameter cannot be specified in the same request.
add_ips={value} (Optional to update record) Add IPs and/or ranges to the IPs list for this record. Multiple IPs/ranges are comma separated.
This parameter and the ips parameter cannot be specified in the same request.
remove_ips={value} (Optional to update record) IPs to be removed from your record. You may enter a combination of IPs and ranges. Multiple entries are comma separated.
This parameter and the ips parameter cannot be specified in the same request.
network_id={value} (Optional to create or update record, and valid when the networks feature is enabled) The network ID for the record.
Parameter Description
247

Chapter 5 - Scan AuthenticationPostgreSQL Record
<ID_SET> <ID>84307</ID> </ID_SET> </BATCH> </BATCH_LIST> </RESPONSE></BATCH_RETURN>
Sample - Update PostgreSQL record
API request:
curl -u "USERNAME:PASSWORD" -H "X-Requested-With: Curl Sample" -d "action=update&ids=84307&add_ips=10.10.10.40-10.10.10.42" "https://qualysapi.qualys.com/api/2.0/fo/auth/postgresql/" > file.xml
XML output:
<?xml version="1.0" encoding="UTF-8" ?><!DOCTYPE BATCH_RETURN SYSTEM "https://qualysapi.qualys.com/api/2.0/batch_return.dtd"><BATCH_RETURN> <RESPONSE> <DATETIME>2018-04-10T21:01:57Z</DATETIME> <BATCH_LIST> <BATCH> <TEXT>Successfully Updated</TEXT> <ID_SET> <ID>78782</ID> </ID_SET> </BATCH> </BATCH_LIST> </RESPONSE></BATCH_RETURN>
Sample - List PostgreSQL records
API request:
curl -u "USERNAME:PASSWORD" -H "X-Requested-With: Curl Sample" -d "action=list&details=All" "https://qualysapi.qualys.com/api/2.0/fo/auth/postgresql/" > file.xml
XML output:
<?xml version="1.0" encoding="UTF-8" ?><!DOCTYPE AUTH_POSTGRESQL_LIST_OUTPUT SYSTEM "https://qualysapi.qualys.com/api/2.0/fo/auth/postgresql/auth_post
248

Chapter 5 - Scan AuthenticationPostgreSQL Record
gresql_list_output.dtd"><AUTH_POSTGRESQL_LIST_OUTPUT> <RESPONSE> <DATETIME>2018-04-24T22:01:50Z</DATETIME> <AUTH_POSTGRESQL_LIST> <AUTH_POSTGRESQL> <ID>79518</ID> <TITLE><![CDATA[PostgesSQL1]]></TITLE> <USERNAME><![CDATA[acme_as1]]></USERNAME> <DATABASE><![CDATA[mydb1]]></DATABASE> <PORT>5432</PORT> <SSL_VERIFY><![CDATA[0]]></SSL_VERIFY> <IP_SET> <IP>10.10.10.45</IP> </IP_SET> <UNIX_CONF_FILE><![CDATA[/var/lib/pgsql/9.3/data/postgresql.conf]]></UNIX_CONF_FILE> <NETWORK_ID>0</NETWORK_ID> <CREATED> <DATETIME>2018-04-13T23:42:50Z</DATETIME> <BY>acme_as1</BY> </CREATED> <LAST_MODIFIED> <DATETIME>2018-04-20T23:35:42Z</DATETIME> </LAST_MODIFIED> <COMMENTS><![CDATA[my comments]]></COMMENTS> </AUTH_POSTGRESQL> <AUTH_POSTGRESQL> <ID>82110</ID> <TITLE><![CDATA[POstgreSQL2]]></TITLE> <USERNAME><![CDATA[acme_as1]]></USERNAME> <DATABASE><![CDATA[mydb2]]></DATABASE> <PORT>5432</PORT> <SSL_VERIFY><![CDATA[1]]></SSL_VERIFY> <HOSTS> <HOST><![CDATA[cent-31-107.ml2k8.vuln.qa.qualys.com]]></HOST> </HOSTS> <IP_SET> <IP>10.20.31.107</IP> </IP_SET> <UNIX_CONF_FILE><![CDATA[/var/lib/pgsql/9.3/data/postgresql.conf]]></UNIX_CONF_FILE> <NETWORK_ID>0</NETWORK_ID> <CREATED> <DATETIME>2018-04-20T20:12:48Z</DATETIME>
249

Chapter 5 - Scan AuthenticationPostgreSQL Record
<BY>acme_as1</BY> </CREATED> ... </AUTH_POSTGRESQL_LIST> </RESPONSE></AUTH_POSTGRESQL_LIST_OUTPUT>
DTDs for auth type “postgresql”<platform API server>/api/2.0/batch_return.dtd
<platform API server>/api/2.0/fo/auth/postgresql/auth_postgresql_list_output.dtd
250

Chapter 5 - Scan AuthenticationSNMP Record
SNMP Record/api/2.0/fo/auth/snmp/
[POST]
Create, update, list and delete SNMP records for authenticated scans of SNMP enabled devices. Supported are vulnerability and compliance scans (using VM, PC, SCA). Supported versions are SNMPv1, SNMPv2 and SNMPv3.
Input Parameters
Parameter Description
action={action} (Required) Specify create, update, delete (using POST) or list (using GET or POST).
echo_request={0|1} (Optional) Specify 1 to view (echo) input parameters in the XML output. By default these are not included.
ids={value} (Required to update or delete record) Record IDs to update/delete. Specify record IDs and/or ID ranges (for example, 1359-1407). Multiple entries are comma separated.
title={value} (Required to create record) A title for the record. The title must be unique. Maximum 255 characters (ascii).
comments={value} (Optional to create or update record) User defined comments. Maximum of 1999 characters.
version={v1|v2c|v3} (Optional to create or update record) Specifies the SNMP protocol version. For an update request, this parameter overwrites the existing SNMP version with a new version. A valid value is:v1 = SNMPv1 (the default)v2c = SNMPv2cv3 = SNMPv3
Login credentials
community_strings={value} (Optional and valid using SNMPv1 and SNMPv2c) The SNMP community strings to be used for authentication to target hosts. Multiple entries are comma separated. The service attempts authentication using several common default community strings. When community_strings is specified, the user-provided community strings are used for authentication before the default community strings.
251

Chapter 5 - Scan AuthenticationSNMP Record
username={value} (Optional and valid using SNMPv3) The user account for authentication to target hosts. A maximum of 128 characters may be specified.
These three parameters are used to specify authentication: username, password and auth_alg.
If creating a record and authentication will be used, it is required that all three parameters are specified together. If updating a record to change the username, the username specified will replace the existing username in the record. If updating a record to remove authentication, specify an empty value for all three parameters.
password={value} (Optional and valid using SNMPv3) The password for authentication to target hosts.Maximum of 128 characters..
These three parameters are used to specify authentication: username, password andauth_alg.
If creating a record and authentication will be used, it is required that all three parameters are specified together. If updating a record to change the password, the password specified will replace the existing password in the record. If updating a record to remove authentication, specify an empty value for all three parameters.
auth_alg={MD5|SHA1} (Optional and valid using SNMPv3) The algorithm for authentication: MD5 or SHA1. This algorithm is used to safely prove to the SNMP server knowledge of the password without sending the password.
These three parameters are used to specify authentication: username, password and auth_alg.
If creating a record and authentication will be used, it is required that all three parameters are specified together. If updating a record to change the authentication algorithm, the algorithm specified will replace the existing algorithm in the record. If updating a record to remove authentication, specify an empty value for all three parameters.
Parameter Description
252

Chapter 5 - Scan AuthenticationSNMP Record
encrypt_password={value} (Optional and valid using SNMPv3) The password if privacy (data encryption) is to be used for SNMP communication. Maximum of 128 characters.
These two parameters are used to specify privacy: encrypt_password and priv_alg.
If creating a record and privacy will be used, it is required that both parameters are specified together. If updating a record to change the password, the password specified will replace the existing password in the record. If updating a record to remove privacy, specify an empty value for both parameters.
priv_alg={DES|AES} (Optional and valid using SNMPv3) The algorithm to be used for privacy: DES or AES. This algorithm is used to encrypt and decrypt SNMP messages.
These two parameters are used to specify privacy: encrypt_password and priv_alg.
If creating a record and privacy will be used, it is required that both parameters are specified together. If updating a record to change the privacy algorithm, the algorithm specified will replace the existing algorithm in the record. If updating a record to remove privacy, specify an empty value for both parameters.
security_engine_id={value} (Optional and valid using SNMPv3) The security engine ID when a security engine is part of the target host configuration. A valid ID is required. A maximum of 128 characters may be specified.
If a security engine ID is part of the target host configuration, the parameter security_engine_id must be defined for the record in order for authentication to be successful.
If the security engine ID is not defined (and is required by the target host for all SNMP requests), then the SNMP service may not be detected on the target host and authentication will fail.
context_engine_id={value} (Optional and valid using SNMPv3) The context engine ID used in scoped PDUs when a context is part of the target host configuration. A valid ID is required. A maximum of 128 characters may be specified.
If an SNMP context is part of the target host configuration, the parameters context_engine_id and/or context must be defined for the record in order for the scanning engine to retrieve context-sensitive information from the target host.
Parameter Description
253

Chapter 5 - Scan AuthenticationSNMP Record
Sample - Create SNMP record, using SNMPv3
API request:
curl -H "X-Requested-With: Curl Sample" -d "action=create&title=My+Record&version=v3&username=user&password=password&auth_alg=MD5&encrypt_password=passwordabcde123456&priv_alg=DES&security_engine_id=0x80001F88805131F121BD9B194B&context_engine_id=0x80001F88805131F121BD9B194B&context=bridge1&ips=10.10.10.2-10.10.10.4"-b "QualysSession=a3863e31b486417f81eea7f8881f3142; path=/api; secure" "https://qualysapi.qualys.com/api/2.0/fo/auth/snmp/"
context={value} (Optional and valid using SNMPv3) The context name used in scoped PDUs when a context is part of the target host configuration. A maximum of 128 characters may be specified.
If an SNMP context is part of the target host configuration, the parameters context_engine_id and/or context must be defined for the record in order for the scanning engine to retrieve context-sensitive information from the target host.
Target Hosts
ips={value} (Required to create record) The IP address(es) the server will log into using the record’s credentials. Multiple entries are comma separated.
(Optional to update record) IPs specified will overwrite existing IPs in the record, and existing IPs will be removed.
This parameter and the add_ips parameter or the remove_ips parameter cannot be specified in the same request.
add_ips={value} (Optional to update record) Add IPs and/or ranges to the IPs list for this record. Multiple IPs/ranges are comma separated.
This parameter and the ips parameter cannot be specified in the same request.
remove_ips={value} (Optional to update record) IPs to be removed from your record. You may enter a combination of IPs and ranges. Multiple entries are comma separated.
This parameter and the ips parameter cannot be specified in the same request.
network_id={value} (Optional to create or update record, and valid when the networks feature is enabled) The network ID for the record.
Parameter Description
254

Chapter 5 - Scan AuthenticationSNMP Record
XML output:
<?xml version="1.0" encoding="UTF-8" ?><!DOCTYPE BATCH_RETURN SYSTEM "https://qualysapi.qualys.com/api/2.0/batch_return.dtd"><BATCH_RETURN> <RESPONSE> <DATETIME>2018-02-27T06:22:01Z</DATETIME> <BATCH_LIST> <BATCH> <TEXT>Successfully Created</TEXT> <ID_SET> <ID>125726</ID> </ID_SET> </BATCH> </BATCH_LIST> </RESPONSE></BATCH_RETURN>
Sample - Update an SNMP record
Change the user name and password for authentication and the target IPs.
curl -H "X-Requested-With: Curl Sample" -d "action=update&ids=65319&username=user2&password=password2&ips=10.10.10.5-10.10.10.6" -b "QualysSession=a3863e31b486417f81eea7f8881f3142; path=/api; secure" "https://qualysapi.qualys.com/api/2.0/fo/auth/snmp/"
DTDs for auth type “snmp”
<platform API server>/api/2.0/batch_return.dtd
<platform API server>/api/2.0/fo/auth/snmp/auth_snmp_list_output.dtd
255

Chapter 5 - Scan AuthenticationSybase Record
Sybase Record/api/2.0/fo/auth/sybase/
[POST]
Create, update, list and delete Sybase records for authenticating to Sybase Adaptive Server Enterprise (ASE) instances. Compliance scans are supported (using PC or SCA).
Requirement - You must configure login credentials on target hosts before scanning.
Download Qualys User Guide - Sybase Authentication (.zip)
Tip - We strongly recommend you create one or more dedicated user accounts to be used solely by the Qualys Cloud Platform to authenticate to Sybase database instances.
Input Parameters
Parameter Description
action={action} (Required) Specify create, update, delete (using POST) or list (using GET or POST).
echo_request={0|1} (Optional) Specify 1 to view (echo) input parameters in the XML output. By default these are not included.
ids={value} (Required to update or delete record) Record IDs to update/delete. Specify record IDs and/or ID ranges (for example, 1359-1407). Multiple entries are comma separated.
title={value} (Required to create record) A title for the record. The title must be unique. Maximum 255 characters (ascii).
comments={value} (Optional to create or update record) User defined comments. Maximum of 1999 characters.
Sybase
port={value} (Required to create record) The port the Sybase database is on.
database={value} (Required to create record) The name of the Sybase database you want to authenticate to.
install_dir={value} (Required for create request if this record will be used for scanning Unix hosts) The database installation directory for scanning Unix hosts.
Login credentials
username={value} (Required to create record, optional to update record) The username of the account to be used for authentication. If password is specified this is the username of a Sybase account. If login_type=vault is specified, this is the username of a vault account. Maximum 255 characters (ascii).
256

Chapter 5 - Scan AuthenticationSybase Record
Sample - Create Sybase Record
API request:
curl -u "USERNAME:PASSWORD" -H "X-Requested-With: Curl Sample" -d "action=create&title=sybase_record&network_id=19015&username=acme_ac12&password=password&port=444&database=sybaseDB1&ips=10.10.24.12,10.10.24.13,10.10.24.15&installation_dir=/dir123&comments=This%20Sybase%20comments" "https://qualysapi.qualys.com/api/2.0/fo/auth/sybase/" > file.xml
XML output:
<?xml version="1.0" encoding="UTF-8" ?><!DOCTYPE BATCH_RETURN SYSTEM "https://qualysapi.qualys.com/api/2.0/batch_return.dtd">
password={value} (To create record password or login_type=vault is required) The password of the Sybase account to be used for authentication. Maximum 100 characters (ascii).
login_type=vault (To create record password or login_type=vault is required) Set to vault if a third party vault will be used to retrieve password. Vault parameters need to be provided in the record. See Vault Definition
Target Hosts
ips={value} (Required to create record) The IP address(es) the server will log into using the record’s credentials. Multiple entries are comma separated.
(Optional to update record) IPs specified will overwrite existing IPs in the record, and existing IPs will be removed.
This parameter and the add_ips parameter or the remove_ips parameter cannot be specified in the same request.
add_ips={value} (Optional to update record) Add IPs and/or ranges to the IPs list for this record. Multiple IPs/ranges are comma separated.
This parameter and the ips parameter cannot be specified in the same request.
remove_ips={value} (Optional to update record) IPs to be removed from your record. You may enter a combination of IPs and ranges. Multiple entries are comma separated.
This parameter and the ips parameter cannot be specified in the same request.
network_id={value} (Optional to create or update record, and valid when the networks feature is enabled) The network ID for the record.
Parameter Description
257
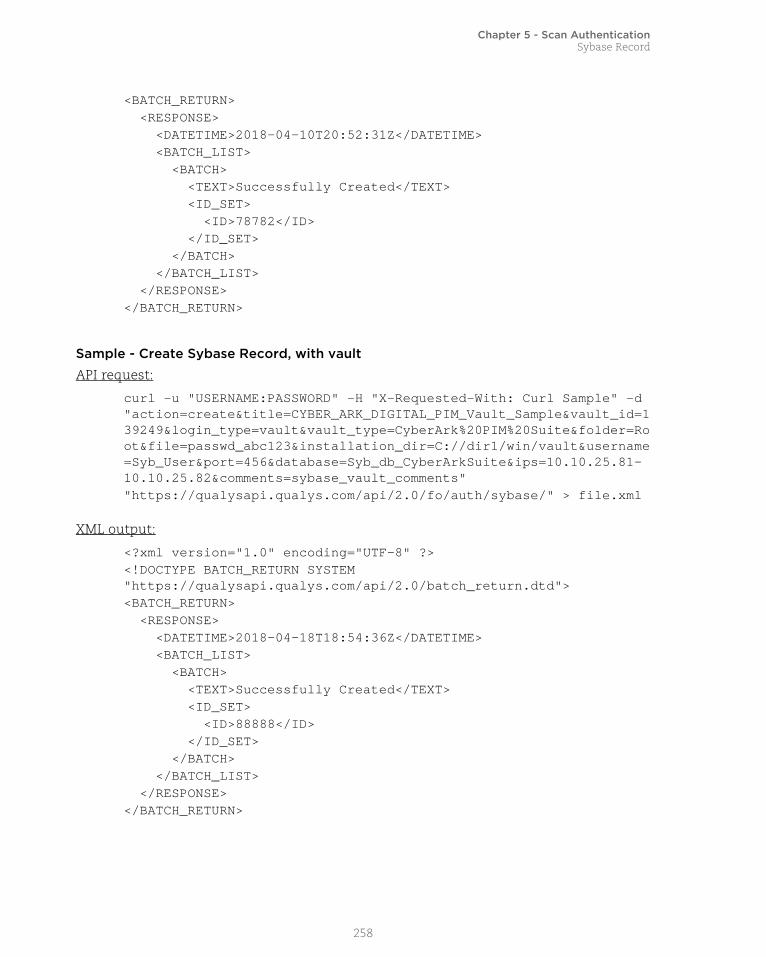
Chapter 5 - Scan AuthenticationSybase Record
<BATCH_RETURN> <RESPONSE> <DATETIME>2018-04-10T20:52:31Z</DATETIME> <BATCH_LIST> <BATCH> <TEXT>Successfully Created</TEXT> <ID_SET> <ID>78782</ID> </ID_SET> </BATCH> </BATCH_LIST> </RESPONSE></BATCH_RETURN>
Sample - Create Sybase Record, with vault
API request:
curl -u "USERNAME:PASSWORD" -H "X-Requested-With: Curl Sample" -d "action=create&title=CYBER_ARK_DIGITAL_PIM_Vault_Sample&vault_id=139249&login_type=vault&vault_type=CyberArk%20PIM%20Suite&folder=Root&file=passwd_abc123&installation_dir=C://dir1/win/vault&username=Syb_User&port=456&database=Syb_db_CyberArkSuite&ips=10.10.25.81-10.10.25.82&comments=sybase_vault_comments" "https://qualysapi.qualys.com/api/2.0/fo/auth/sybase/" > file.xml
XML output:
<?xml version="1.0" encoding="UTF-8" ?><!DOCTYPE BATCH_RETURN SYSTEM "https://qualysapi.qualys.com/api/2.0/batch_return.dtd"><BATCH_RETURN> <RESPONSE> <DATETIME>2018-04-18T18:54:36Z</DATETIME> <BATCH_LIST> <BATCH> <TEXT>Successfully Created</TEXT> <ID_SET> <ID>88888</ID> </ID_SET> </BATCH> </BATCH_LIST> </RESPONSE></BATCH_RETURN>
258
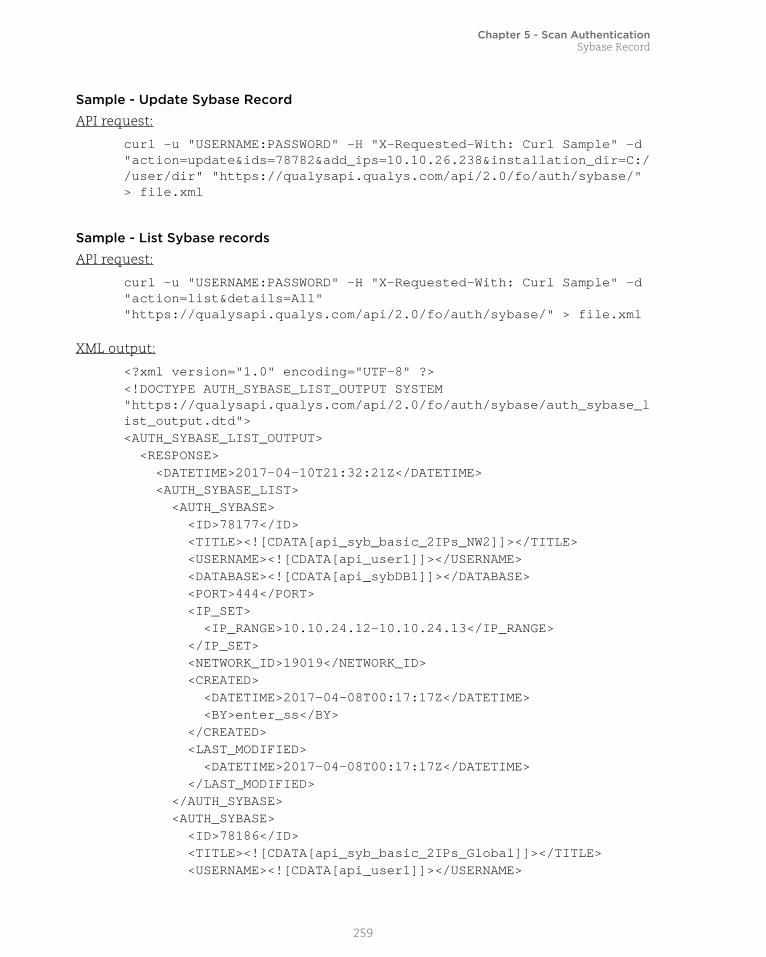
Chapter 5 - Scan AuthenticationSybase Record
Sample - Update Sybase Record
API request:
curl -u "USERNAME:PASSWORD" -H "X-Requested-With: Curl Sample" -d "action=update&ids=78782&add_ips=10.10.26.238&installation_dir=C://user/dir" "https://qualysapi.qualys.com/api/2.0/fo/auth/sybase/" > file.xml
Sample - List Sybase records
API request:
curl -u "USERNAME:PASSWORD" -H "X-Requested-With: Curl Sample" -d "action=list&details=All" "https://qualysapi.qualys.com/api/2.0/fo/auth/sybase/" > file.xml
XML output:
<?xml version="1.0" encoding="UTF-8" ?><!DOCTYPE AUTH_SYBASE_LIST_OUTPUT SYSTEM "https://qualysapi.qualys.com/api/2.0/fo/auth/sybase/auth_sybase_list_output.dtd"><AUTH_SYBASE_LIST_OUTPUT> <RESPONSE> <DATETIME>2017-04-10T21:32:21Z</DATETIME> <AUTH_SYBASE_LIST> <AUTH_SYBASE> <ID>78177</ID> <TITLE><![CDATA[api_syb_basic_2IPs_NW2]]></TITLE> <USERNAME><![CDATA[api_user1]]></USERNAME> <DATABASE><![CDATA[api_sybDB1]]></DATABASE> <PORT>444</PORT> <IP_SET> <IP_RANGE>10.10.24.12-10.10.24.13</IP_RANGE> </IP_SET> <NETWORK_ID>19019</NETWORK_ID> <CREATED> <DATETIME>2017-04-08T00:17:17Z</DATETIME> <BY>enter_ss</BY> </CREATED> <LAST_MODIFIED> <DATETIME>2017-04-08T00:17:17Z</DATETIME> </LAST_MODIFIED> </AUTH_SYBASE> <AUTH_SYBASE> <ID>78186</ID> <TITLE><![CDATA[api_syb_basic_2IPs_Global]]></TITLE> <USERNAME><![CDATA[api_user1]]></USERNAME>
259

Chapter 5 - Scan AuthenticationSybase Record
<DATABASE><![CDATA[api_sybDB1]]></DATABASE> <PORT>444</PORT> <IP_SET> <IP_RANGE>10.10.24.12-10.10.24.13</IP_RANGE> </IP_SET> <NETWORK_ID>0</NETWORK_ID> <CREATED> <DATETIME>2017-04-08T01:10:04Z</DATETIME> <BY>enter_ss</BY> </CREATED> <LAST_MODIFIED> <DATETIME>2017-04-08T01:10:04Z</DATETIME> </LAST_MODIFIED> </AUTH_SYBASE>...
DTDs for auth type “sybase”<platform API server>/api/2.0/batch_return.dtd
<platform API server>/api/2.0/fo/auth/sybase/auth_sybase_list_output.dtd
260

Chapter 5 - Scan AuthenticationUnix Record
Unix Record/api/2.0/fo/auth/unix/
[POST]
Create, update, list and delete Unix records for authenticated scans of hosts running on Unix, Cisco and Checkpoint Firewall. Vulnerability and compliance scans are supported on Unix and Cisco systems (using VM, PC, SCA). Compliance scans are supported on Checkpoint Firewall systems (using PC or SCA).
Download Qualys User Guide - Unix Authentication (pdf)
Input ParametersParameters: Request | Login credentials| Unix only | Target Hosts
Parameter Description
action={action} (Required) Specify create, update, delete (using POST) or list (using GET or POST).
sub_type={cisco|checkpoint_firewall}
(Required for hosts running on Cisco or Checkpoint Fiirewall) Choose cisco or checkpoint_firewall if you're scanning one of these system types.
echo_request={0|1} (Optional) Specify 1 to view (echo) input parameters in the XML output. By default these are not included.
ids={value} (Required to update or delete record) Record IDs to update/delete. Specify record IDs and/or ID ranges (for example, 1359-1407). Multiple entries are comma separated.
title={value} (Required to create record) A title for the record. The title must be unique. Maximum 255 characters (ascii).
comments={value} (Optional to create or update record) User defined comments. Maximum of 1999 characters.
port={value} (Optional and valid for compliance scans only) Custom ports to be used to perform authenticated compliance assessment (control testing). Ports Used For Unix Compliance Scans
Login credentials
username={value} (Required to create record, optional to update record) The username of the account to be used for authentication. If login_type=vault is specified, this is the username of a vault account. Maximum 255 characters (ascii).
password={value} (To create record password or login_type=vault is required) The password of the PostgreSQL account to be used for authentication when a vault will not be used. The password may include 1-31 characters (ascii).
261

Chapter 5 - Scan AuthenticationUnix Record
login_type={basic|vault} (To create record password or login_type=vault is required) Set to vault if a third party vault will be used to retrieve password. Vault parameters need to be provided in the record. See Vault Definition
cleartext_password={0|1} (Optional) When not specified, the scanning engine only uses strong password encryption for remote login. Specify 1 to allow your password to be transmitted in clear text when connecting to services which do not support strong password encryption. For more info, search for “Clear Text Password” in online help.
For a create request, if cleartext_password=1, the password parameter is required. For an update request, if cleartext_password=1, and the record does not have a password set, then cleartext_password=1 is *silently ignored*.
skip_password={0|1} (Optional and valid only for Unix record, i.e not supported for Cisco or Checkpoint Firewall sub-type) By default when only the required parameters are set (title, username, ips) the login account password is set to the empty password. You can set skip_password=1 if the login account does not have a password. When set it’s not possible to set the empty password, another password using the “password” parameter, or password in a vault.
enable_password={value} (Optional and valid only for Cisco sub-type) The password required for executing the “enable” command on the target hosts. The password may include 1-31 characters (ascii). Note: The pooled credentials feature is not supported if the “enable” command requires a password and it is specified using the enable_password parameter.
expert_password={value} (Optional and valid only for Checkpoint Firewall sub-type) The password required for executing the “expert” command on the target hosts. The password may include 1-31 characters (ascii).
Unix only
{XML File} (Optional and valid only for Unix record, i.e. not supported for Cisco or Checkpoint Firewall sub-type)
XML file where you define private-key certificates and root delegations. These are defined using this DTD: <platform API server>/api/2.0/fo/auth/unix/unix_auth_params.dtd
use_agentless_tracking=[0|1}
((Optional and valid for Unix record only, i.e. not supported for Cisco or Checkpoint Firewall sub-type)
Specify 1 to enable Agentless Tracking.
Parameter Description
262

Chapter 5 - Scan AuthenticationUnix Record
Ports Used For Unix Compliance Scans
The actual ports used for compliance scanning (Unix, Cisco, Checkpoint Firewall) depends on scan settings in 1) compliance option profile, and 2) Unix authentication record as indicated.
agentless_tracking_path={value}
(Required if use_agentless_tracking=1 for Unix record, i.e. not supported for Cisco or Checkpoint Firewall sub-type)
The pathname where you would like the service to store the host ID file on each host. This is required to enable Agentless Tracking for Unix.
Target Hosts
ips={value} (Required to create record) The IP address(es) the server will log into using the record’s credentials. Multiple entries are comma separated.
(Optional to update record) IPs specified will overwrite existing IPs in the record, and existing IPs will be removed.
This parameter and the add_ips parameter or the remove_ips parameter cannot be specified in the same request.
add_ips={value} (Optional to update record) Add IPs and/or ranges to the IPs list for this record. Multiple IPs/ranges are comma separated.
This parameter and the ips parameter cannot be specified in the same request.
remove_ips={value} (Optional to update record) IPs to be removed from your record. You may enter a combination of IPs and ranges. Multiple entries are comma separated.
This parameter and the ips parameter cannot be specified in the same request.
network_id={value} (Optional to create or update record, and valid when the networks feature is enabled) The network ID for the record.
Compliance Option Profile
Authentication Record Ports Scanned
Standard Scan UI; Well Known PortsAPI: no “port” parameter
~ 1900 Ports (includes Ports 22, 23, 513)
Standard Scan UI: Custom PortsAPI: “port” parameter
~ 1900 Ports + Custom Ports in record
Parameter Description
263

Chapter 5 - Scan AuthenticationUnix Record
Sample - Create Unix record, with password
Applies to record type Unix, Cisco and Checkpoint Firewall
API request:
curl -H "X-Requested-With: curl" -u "USERNAME:PASSWORD" "https://qualysapi.qualys.com/api/2.0/fo/auth/unix/?action=create&title=Unix&username=root&password=crazy8!&ips=10.10.36.63"
XML output:
<?xml version="1.0" encoding="UTF-8" ?><!DOCTYPE BATCH_RETURN SYSTEM "https://qualysapi.qualys.com/api/2.0/batch_return.dtd"><BATCH_RETURN> <RESPONSE> <DATETIME>2018-04-18T18:54:36Z</DATETIME> <BATCH_LIST> <BATCH> <TEXT>Successfully Created</TEXT> <ID_SET> <ID>12345</ID> </ID_SET> </BATCH> </BATCH_LIST> </RESPONSE></BATCH_RETURN>
Sample - Create Unix record, root delegation tools and vaultApplies to record type Unix only (not sub-types)
API request:
curl -H "X-Requested-With: curl" -H "Content-type:text/xml" -u "USERNAME:PASSWORD""https://qualysapi.qualys.com/api/2.0/fo/auth/unix/action=create&title=Unix&vault&username=Qualys&ips=10.113.195.152&port=5857&login_type=vault&vault_type=LiebermanERPM&vault_id=10873203&auto_discover_system_name=0&system_name_single_host=a&custom_system_type=custom&system_type=custom"
Targeted Scan UI: Well Known PortsAPI: no “port” parameter
Ports 22, 23 and 513 only
Targeted Scan UI: Custom PortsAPI: “port” parameter
Custom Ports in record
Compliance Option Profile
Authentication Record Ports Scanned
264

Chapter 5 - Scan AuthenticationUnix Record
--data-binary @add_params.xml
add_params.xml
<?xml version="1.0" encoding="UTF-8" ?><UNIX_AUTH_PARAMS> <ROOT_TOOLS> <ROOT_TOOL> <STANDARD_TYPE type="pimsu"/> <PASSWORD_INFO type="vault"> <DIGITAL_VAULT> <VAULT_USERNAME><![CDATA[root]]></VAULT_USERNAME> <VAULT_TYPE>Thycotic Secret Server</VAULT_TYPE> <VAULT_ID>25026922</VAULT_ID> <SECRET_NAME><![CDATA[super_secret_name]]></SECRET_NAME> </DIGITAL_VAULT> </PASSWORD_INFO> </ROOT_TOOL> <ROOT_TOOL> <CUSTOM_TYPE><![CDATA[test]]></CUSTOM_TYPE> <PASSWORD_INFO type="basic"> <PASSWORD><![CDATA[password]]></PASSWORD> </PASSWORD_INFO> </ROOT_TOOL> </ROOT_TOOLS> <PRIVATE_KEY_CERTIFICATES> <PRIVATE_KEY_CERTIFICATE> <PRIVATE_KEY_INFO type="vault"> <DIGITAL_VAULT> <VAULT_TYPE>CyberArk AIM</VAULT_TYPE> <VAULT_ID>25026922</VAULT_ID> <FOLDER><![CDATA[folder]]></FOLDER> <FILE><![CDATA[file]]></FILE> </DIGITAL_VAULT> </PRIVATE_KEY_INFO> <PASSPHRASE_INFO type="basic"> <PASSPHRASE><![CDATA[passphrase]]></PASSPHRASE> </PASSPHRASE_INFO> </PRIVATE_KEY_CERTIFICATE> <PRIVATE_KEY_CERTIFICATE> <PRIVATE_KEY_INFO type="basic"> <PRIVATE_KEY type="rsa"><
Chapter 5 - Scan AuthenticationUnix Record
FiLfGHOc0rREmC0cBPsiyqqaitPNYTGeqKRmSBwGNrAzNTAcsKslsoY/WkMDW6QDdLZNiGB0CFag94zyoMyCjyrdpayACAOWfH5w8VixxHF16Vxx5b6foLBE40FOYAIPsdm1HvCfSFaN2dPf1Unb0erwjigjJNwYIV78529elE+2+dZIemi90ibh0R35NB60TLeS3UUVezp/O9ZPLf0pqPPHnWgfW4GXp/SUpwojES9fCQE+BW4MMWHWu8XKtytt....-----END RSA PRIVATE KEY-----]]></PRIVATE_KEY> </PRIVATE_KEY_INFO> <PASSPHRASE_INFO type="vault"> <DIGITAL_VAULT> <VAULT_USERNAME><![CDATA[PASSPHRASE USERNAME]]></VAULT_USERNAME> <VAULT_TYPE>Quest Vault</VAULT_TYPE> <VAULT_ID>35046922</VAULT_ID> <SYSTEM_NAME><![CDATA[quest_system_name]]></SYSTEM_NAME> </DIGITAL_VAULT> </PASSPHRASE_INFO> <CERTIFICATE type="openssh"> <![CDATA[[email protected] AAAAHHNzaC1yc2EtY2VydC12MDFAb3BlbnNzaC5jb20AAAAgwR4bJSiBtJlOgCAQUF3yZ6Io2WYfnBiOEsQ45RKbqLgAAAADAQABAAABAQC5sVLb7emh8/v2uHp6x1pN5R+MHQwz3A5M3GRKtuuu1Njc/XYgqeWLMOJpbVtCVXwUcPgKt4Q0DmlGqc4uhZhzrdtpQGHrEivndNNLY9NQj7LozE7x/sGiWdtmlucUh1teXMaBpM4aER9Y6uW5wv6ZylY7CAV9bcVz/ljlSypmjzkPjJ39AJq+QxZkIv+H4uh/T05LwHdilFrjWWwEoI8DV/DRIw3h8o4jhnj1QxBxyjad3efmFaejgRnY6cBW821gm... </CERTIFICATE> </PRIVATE_KEY_CERTIFICATE> <PRIVATE_KEY_CERTIFICATE> <PRIVATE_KEY_INFO type="basic"> <PRIVATE_KEY type="rsa"><![CDATA[-----BEGIN OPENSSH PRIVATE KEY-----b3BlbnNzaC1rZXktdjEAAAAACmFlczI1Ni1jYmMAAAAGYmNyeXB0AAAAGAAAABCPiEUH5L3LZGInEw+h/m4+AAAAEAAAAAEAAAEXAAAAB3NzaC1yc2EAAAADAQABAAABAQCpuwFVTYVmske0bdFjSlYgsfvyCr7e5irIfoW7B8hNY0XJWyOEqZ5BzwPAEtzjua6m3vnqKPEQD1HyFdLse62JE7x0jDXLr9bZ64THFpogERC/gI2aorrLKLxdr0K7u5wQUTm1L0xO7Y0hE9Bbi8ok++xTW+Ymf7LbVRLWVdN6kUBunIGow3W+tHIohPoUlw82QayZRa4iXpqpWVbh/9OMnb1raC....-----END OPENSSH PRIVATE KEY-----]]></PRIVATE_KEY> </PRIVATE_KEY_INFO> </PRIVATE_KEY_CERTIFICATE> </PRIVATE_KEY_CERTIFICATES></UNIX_AUTH_PARAMS>
266

Chapter 5 - Scan AuthenticationUnix Record
XML output:
<?xml version="1.0" encoding="UTF-8" ?><!DOCTYPE BATCH_RETURN SYSTEM "https://qualysapi.qualys.com/api/2.0/batch_return.dtd"><BATCH_RETURN> <RESPONSE> <DATETIME>2018-04-18T18:54:36Z</DATETIME> <BATCH_LIST> <BATCH> <TEXT>Successfully Created</TEXT> <ID_SET> <ID>12333</ID> </ID_SET> </BATCH> </BATCH_LIST> </RESPONSE></BATCH_RETURN>
More Samples
Qualys API - Unix Authentication API samples (GitHub)
DTDs for auth type “unix”
<platform API server>/api/2.0/batch_return.dtd
<platform API server>/api/2.0/fo/auth/windows/auth_unix_list_output.dtd
For Unix type record type only, root delegation tools and private-key certificates are specified using the unix_auth_params.dtd here
<platform API server>/api/2.0/fo/auth/unix/unix_auth_params.dtd
267

Chapter 5 - Scan AuthenticationVMware Record
VMware Record/api/2.0/fo/auth/vmware/
[POST]
Create, update, list and delete VMware records for authenticating to vSphere components running vSphere v4.x and 5.x. Vulnerability and compliance scans are supported (using VM, PC, SCA).
How it works - The VMware record allows for connections to the vSphere API for vSphere 5.x and 4.x. The vSphere API is a SOAP API used by all vSphere components, including VMware ESXi, VMware ESX, VMware vCenter Server, and the VMware vCenter Server Appliance. By default, the API connection occurs over an encrypted SSL web services connection on port 443.
Input Parameters
Parameter Description
action={action} (Required) Specify create, update, delete (using POST) or list (using GET or POST).
echo_request={0|1} (Optional) Specify 1 to view (echo) input parameters in the XML output. By default these are not included.
ids={value} (Required to update or delete record) Record IDs to update/delete. Specify record IDs and/or ID ranges (for example, 1359-1407). Multiple entries are comma separated.
title={value} (Required to create record) A title for the record. The title must be unique. Maximum 255 characters (ascii).
comments={value} (Optional to create or update record) User defined comments. Maximum of 1999 characters.
Login credentials
username={value} (Required to create record, optional to update record) The user name for a VMware account. A maximum of 13 characters (ascii) may be specified.
password={value} (To create record password or login_type=vault is required) The password for a VMware account. Maximum 13 characters (ascii).
login_type={basic|vault} (To create record password or login_type=vault is required) Set to vault if a third party vault will be used to retrieve password. Vault parameters need to be provided in the record. See Vault Definition
port={value} (Optional) The service communicates with ESXi web services on port 443 and another port can be configured. When unspecified, port 443 is used.
268

Chapter 5 - Scan AuthenticationVMware Record
Sample - Create VMware record
API request:
curl -u "USERNAME:PASSWORD" -H "X-Requested-With: Curl" -X "POST" -d "action=create&title=NewVMwareRecordWithAPI&username=USERNAME&password=PASSWORD&ips=10.10.10.2-10.10.10.4" "https://qualysapi.qualys.com/api/2.0/fo/auth/vmware/" > apiOutputCreateVMwareRecord.txt
XML output:
<?xml version="1.0" encoding="UTF-8" ?><!DOCTYPE BATCH_RETURN SYSTEM
hosts={value} (Optional) A list of FQDNs for the hosts that correspond to all ESXi host IP addresses on which a custom SSL certificate signed by a trusted root CA is installed. Multiple hosts are comma separated.
ssl_verify={value} (Optional) Specify “all” for a complete SSL certificate validation. Specify “skip” if the host SSL certificate is self-signed or uses an SSL certificate signed by a custom root CA. Specify “none” for no SSL verification.
Target Hosts
ips={value} (Required to create record) The IP address(es) the server will log into using the record’s credentials. Multiple entries are comma separated.
(Optional to update record) IPs specified will overwrite existing IPs in the record, and existing IPs will be removed.
This parameter and the add_ips parameter or the remove_ips parameter cannot be specified in the same request.
add_ips={value} (Optional to update record) Add IPs and/or ranges to the IPs list for this record. Multiple IPs/ranges are comma separated.
This parameter and the ips parameter cannot be specified in the same request.
remove_ips={value} (Optional to update record) IPs to be removed from your record. You may enter a combination of IPs and ranges. Multiple entries are comma separated.
This parameter and the ips parameter cannot be specified in the same request.
network_id={value} (Optional to create or update record, and valid when the networks feature is enabled) The network ID for the record.
Parameter Description
269

Chapter 5 - Scan AuthenticationVMware Record
"https://qualysapi.qualys.com/api/2.0/batch_return.dtd"><BATCH_RETURN> <RESPONSE> <DATETIME>2018-02-13T21:16:41Z</DATETIME> <BATCH_LIST> <BATCH> <TEXT>Successfully Created</TEXT> <ID_SET> <ID>30486</ID> </ID_SET> </BATCH> </BATCH_LIST> </RESPONSE></BATCH_RETURN>
DTDs for auth type “vmware”
<platform API server>/api/2.0/batch_return.dtd
<platform API server>/api/2.0/fo/auth/vmware/auth_vmware_list_output.dtd
270
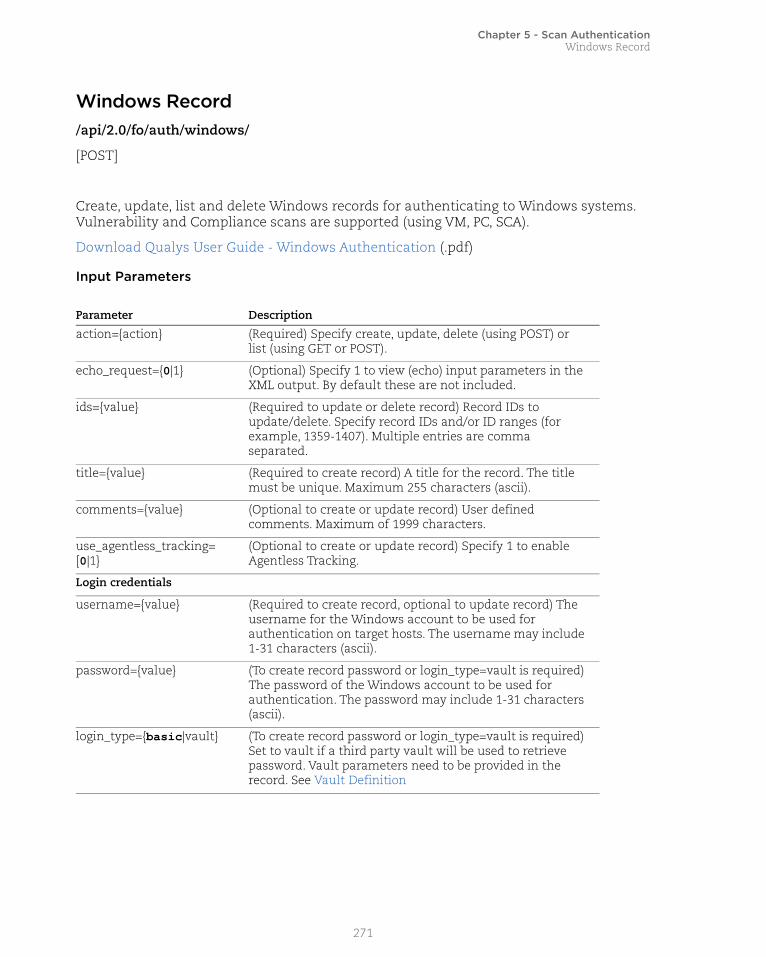
Chapter 5 - Scan AuthenticationWindows Record
Windows Record/api/2.0/fo/auth/windows/
[POST]
Create, update, list and delete Windows records for authenticating to Windows systems. Vulnerability and Compliance scans are supported (using VM, PC, SCA).
Download Qualys User Guide - Windows Authentication (.pdf)
Input Parameters
Parameter Description
action={action} (Required) Specify create, update, delete (using POST) or list (using GET or POST).
echo_request={0|1} (Optional) Specify 1 to view (echo) input parameters in the XML output. By default these are not included.
ids={value} (Required to update or delete record) Record IDs to update/delete. Specify record IDs and/or ID ranges (for example, 1359-1407). Multiple entries are comma separated.
title={value} (Required to create record) A title for the record. The title must be unique. Maximum 255 characters (ascii).
comments={value} (Optional to create or update record) User defined comments. Maximum of 1999 characters.
use_agentless_tracking=[0|1}
(Optional to create or update record) Specify 1 to enable Agentless Tracking.
Login credentials
username={value} (Required to create record, optional to update record) The username for the Windows account to be used for authentication on target hosts. The username may include 1-31 characters (ascii).
password={value} (To create record password or login_type=vault is required) The password of the Windows account to be used for authentication. The password may include 1-31 characters (ascii).
login_type={basic|vault} (To create record password or login_type=vault is required) Set to vault if a third party vault will be used to retrieve password. Vault parameters need to be provided in the record. See Vault Definition
271

Chapter 5 - Scan AuthenticationWindows Record
windows_ad_domain={value}
(Optional) The Windows Active Directory domain name for domain level authentication. When specified, we’ll use an Active Directory forest to authenticate to hosts in a certain domain within the framework. You’ll need to enter a Fully Qualified Domain Name (FQDN). See Windows Domains
This parameter and the windows_domain parameter cannot be specified in the same request.
This parameter and the ips parameter cannot be specified in the same request.
windows_domain={value} (Optional) The Windows NetBIOS domain name for domain level authentication. See Windows Domains
This parameter and the windows_ad_domain parameter cannot be specified in the same request.
When the ips parameter is also specified, the domain type is NetBIOS, User-Selected IPs. We’ll use NetBIOS to authenticate to the IPs in the domain configuration.
When the ips parameter is not specified, the domain type is NetBIOS, Service-Selected IPs. We’ll use NetBIOS to authenticate to hosts in the domain using credentials stored on the domain.
ntlm={0|1} (Optional) When not specified, NTLM authentication is enabled allowing the scanning engine to try the NTLM authentication protocol when negotiating authentication to target hosts. Specify ntlm=0 if you do not want the NTLM authentication protocol attempted for the hosts defined in the Windows record. This may be the case if the target hosts are running a version of Windows that supports a more secure authentication protocol like Kerberos. When NTLM authentication is disabled, it will not be attempted even if other methods like NTLMSSP and Kerberos fail.
Target Hosts
ips={value} (Required to create record) The IP address(es) the server will log into using the record’s credentials. Multiple entries are comma separated.
(Optional to update record) IPs specified will overwrite existing IPs in the record, and existing IPs will be removed.
This parameter and the add_ips parameter or the remove_ips parameter cannot be specified in the same request.
Parameter Description
272

Chapter 5 - Scan AuthenticationWindows Record
add_ips={value} (Optional to update record) Add IPs and/or ranges to the IPs list for this record. Multiple IPs/ranges are comma separated.
This parameter and the ips parameter cannot be specified in the same request.
remove_ips={value} (Optional to update record) IPs to be removed from your record. You may enter a combination of IPs and ranges. Multiple entries are comma separated.
This parameter and the ips parameter cannot be specified in the same request.
network_id={value} (Optional to create or update record, and valid when the networks feature is enabled) The network ID for the record.
Protocols
For Windows domain level authentication, all three authentication protocols are supported.Kerberos and NTLMv2 are enabled by default in new records. If NTLM was enabled ina record prior to this release, then NTLMv1 is enabled.
For Windows local host level authentication, NTLMv2 and NTLMv1 protocols are supported.NTLMv2 is enabled by default in new records. If NTLM was enabled in a record priorto this release, then NTLMv1 is enabled.
kerberos={0|1} (Optional) When not specified, Kerberos is enabled allowing the scanning engine to try Kerberos when negotiating authentication to target hosts. Specify kerberos=0 if you do not want Kerberos attempted.
Kerberos is supported for domain authentication only. When kerberos=1 you must define a domain name for Windows Active Directory (windows_ad_domain) or NetBIOS (windows_domain) for the record.
ntlmv2={0|1} (Optional) When not specified for a new record, NTLMv2 is enabled allowing the scanning engine to try NTLMv2 when negotiating authentication to target hosts. Specify ntlmv2=0 if you do not want NTLMv2 attempted.
ntlm={0|1} (Optional) When not specified, NTLMv1 will not be attempted. Specify ntlm=1 to allow the scanning engine to try NTMLv1 when negotiating authentication to target hosts.
SMB signing
SMB Signing option is disabled by default, meaning SMB signing is not required. Thisis the recommended setting. When disabled, we can authenticate to any Windows versionregardless of how SMB signing is configured on the target. You are not protected,however, against man-in-the-middle (MITM) attacks.
Parameter Description
273

Chapter 5 - Scan AuthenticationWindows Record
Windows Domains
- Supported doman types: Active Directory, NetBIOS User-Selected IPs, NetBIOS Service-Selected IPs.
- Authentication is performed at the local host level when a domain name is not defined for Active Directory (windows_ad_domain) or NetBIOS (windows_domain).
- Once a Windows record is saved, you cannot change the domain type from Active Directory to NetBIOS or from NetBIOS to Active Directory.
Sample - Create Windows recordAPI request:
curl -u "USERNAME:PASSWORD" -H "X-Requested-With:curl" -X POST "action=create&title=API_v2_utwrx_mp_Windows&username=User&password=Password&ips=10.10.10.200"
XML output:
<?xml version="1.0" encoding="UTF-8" ?><!DOCTYPE BATCH_RETURN SYSTEM "https://qualysapi.qualys.com/api/2.0/fo/auth/windows/batch_return.dtd"><BATCH_RETURN> <RESPONSE> <DATETIME>2018-04-13T21:16:41Z</DATETIME> <BATCH_LIST> <BATCH> <TEXT>Successfully Created</TEXT> <ID_SET> <ID>30486</ID> </ID_SET> </BATCH> </BATCH_LIST>
require_smb_signing={0|1} (Optional) Set to 0 (default) when SMB signing is not required.
Set value to 1 to require SMB signing. Should I require SMB signing? The answer is No in most cases. If you enable this option in your record, we will require each Windows target to support SMB signing. If SMB signing is disabled on a target host, authentication will fail and the host will not be scanned. This option protects against MITM attacks but we won't be able to authenticate to some hosts.
minimum_smb_version={value}
(Optional) The minimum SMB protocol version. Valid values are: 1, 2.0.2, 2.1, 3.0, 3.0.2, 3.1.1, and “” (empty string means no version set).
Parameter Description
274

Chapter 5 - Scan AuthenticationWindows Record
</RESPONSE></BATCH_RETURN>
Sample - List windows records
API request:
curl -u "USERNAME:PASSWORD" -H "X-Requested-With:curl" -X POST "action=list&ids=1310338&details=All" "https://qualysapi.qualys.com/api/2.0/fo/auth/windows/"
XML output:
<?xml version="1.0" encoding="UTF-8" ?><!DOCTYPE AUTH_WINDOWS_LIST_OUTPUT SYSTEM "https://qualysapi.qualys.com/api/2.0/fo/auth/windows/auth_windows_list_output.dtd"><AUTH_WINDOWS_LIST_OUTPUT> <RESPONSE> <DATETIME>2018-04-30T09:29:45Z</DATETIME> <AUTH_WINDOWS_LIST> <AUTH_WINDOWS> <ID>1310338</ID> <TITLE><![CDATA[Windows_Record_1]]></TITLE> <USERNAME><![CDATA[acme_jd]]></USERNAME> <IP_SET> <IP>10.10.10.202</IP> </IP_SET> <CREATED> <DATETIME>2018-04-30T09:28:00Z</DATETIME> <BY>acme_jd</BY> </CREATED> <LAST_MODIFIED> <DATETIME>2018-04-30T09:28:43Z</DATETIME> </LAST_MODIFIED> <COMMENTS><![CDATA[My comments on Windows Record 1]]></COMMENTS> </AUTH_WINDOWS> </AUTH_WINDOWS_LIST> <GLOSSARY> <USER_LIST> <USER> <USER_LOGIN>acme_jd</USER_LOGIN> <FIRST_NAME>John</FIRST_NAME> <LAST_NAME>Doe</LAST_NAME> </USER> </USER_LIST>
275

Chapter 5 - Scan AuthenticationWindows Record
</GLOSSARY> </RESPONSE></AUTH_WINDOWS_LIST_OUTPUT>
DTDs for auth type “windows”<platform API server>/api/2.0/batch_return.dtd
<platform API server>/api/2.0/fo/auth/windows/auth_windows_list_output.dtd
276

Chapter 6 - Vault SupportVault Support matrix
Chapter 6 - Vault SupportSet up and manage integration with third party password vaults, an option for authenticated scanning (e.g. trusted scanning).
Vault Support matrixSupported vaults by authentication type (OS/technology) and capability (password, private key, key passphrase, root delegation tool password). Use the vault name as shown when providing vault name using the Qualys API (i.e. vault_type=Quest Vault).
Vaults can be defined as part of authentication records using the Authentication API (/api/2.0/fo/auth/*) except as noted below. Some vaults can be defined using the Vault API (/api/2.0/fo/vault).
Vault summary
Vault Support matrix View supported vaults by OS and supported features (i.e. password, key passphrase, private key
Vault settings
Vault Definition Use Authentication API (/api/2.0/fo/auth/*) to add vault definition in authentication records
List Vaults Use Vault API (/api/2.0/fo/vault) to list vault records
Manage Vaults Use Vault API (/api/2.0/fo/vault) to create, edit, and delete vault records
password private key key passphrase root delegation passwd
Cisco
CyberArk AIMCyberArk PIM Suite
Checkpoint Firewall (compliance scans only)
CyberArk AIMCyberArk PIM Suite
277
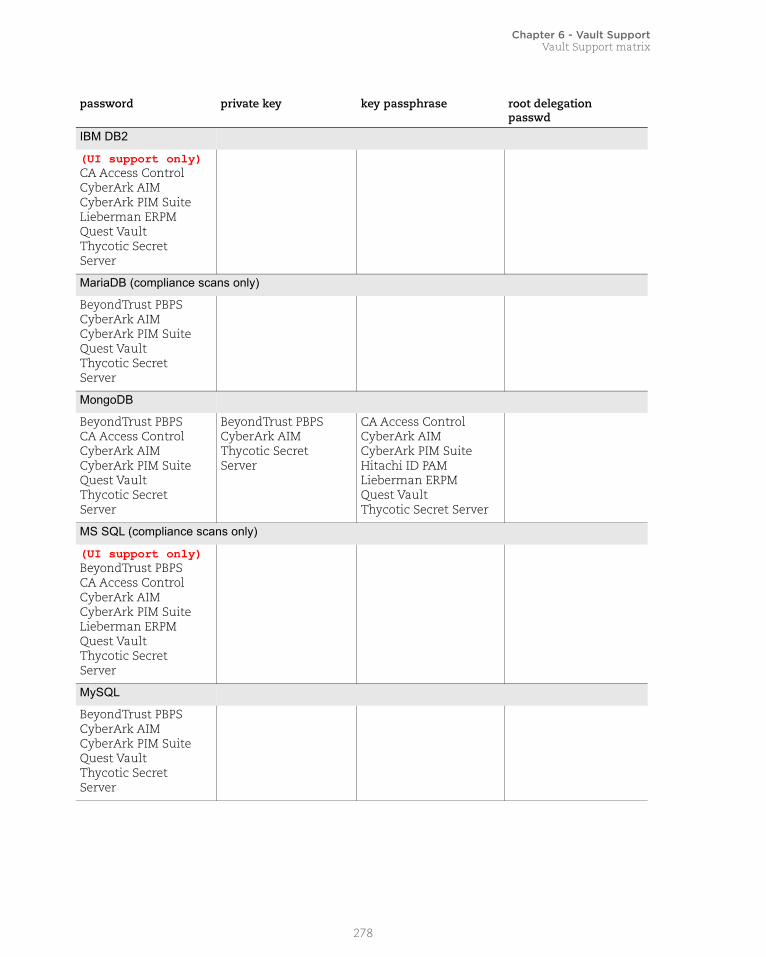
Chapter 6 - Vault SupportVault Support matrix
IBM DB2
(UI support only)CA Access ControlCyberArk AIMCyberArk PIM SuiteLieberman ERPMQuest VaultThycotic Secret Server
MariaDB (compliance scans only)
BeyondTrust PBPSCyberArk AIMCyberArk PIM SuiteQuest VaultThycotic Secret Server
MongoDB
BeyondTrust PBPSCA Access ControlCyberArk AIMCyberArk PIM SuiteQuest VaultThycotic Secret Server
BeyondTrust PBPSCyberArk AIMThycotic Secret Server
CA Access ControlCyberArk AIMCyberArk PIM SuiteHitachi ID PAMLieberman ERPMQuest VaultThycotic Secret Server
MS SQL (compliance scans only)
(UI support only)BeyondTrust PBPSCA Access ControlCyberArk AIMCyberArk PIM SuiteLieberman ERPMQuest VaultThycotic Secret Server
MySQL
BeyondTrust PBPSCyberArk AIMCyberArk PIM SuiteQuest VaultThycotic Secret Server
password private key key passphrase root delegation passwd
278

Chapter 6 - Vault SupportVault Support matrix
Oracle
(UI support only)BeyondTrust PBPSCA Access ControlCyberArk AIMCyberArk PIM SuiteHitachi ID PAMLieberman ERPMQuest VaultThycotic Secret Server
Oracle Listener
(UI support only)BeyondTrust PBPSCA Access ControlCyberArk AIM CyberArk PIM SuiteLieberman ERPMQuest VaultThycotic Secret Server
Palo Alto Firewall
BeyondTrust PBPSCyberArk AIMCyberArk PIM SuiteQuest VaultThycotic Secret Server
PostgreSQL (compliance scans only)
CA Access ControlCyberArk AIMCyberArk PIM SuiteHitatchi ID PAMQuest VaultThycotic Secret Server
CyberArk AIMThycotic Secret Server
CA Access ControlCyberArk AIMCyberArk PIM SuiteHitatchi ID PAMQuest VaultThycotic Secret Server
Sybase (compliance scans only)
CyberArk AIMCyberArk PIM SuiteLieberman ERPMQuest VaultThycotic Secret Server
password private key key passphrase root delegation passwd
279

Chapter 6 - Vault SupportVault Definition
Vault DefinitionVarious record types support adding vault definition as part of authentication record settings. When supported these parameters are used to provide the vault definition in record settings.
Unix
BeyondTrust PBPSCA Access ControlCyberArk AIMCyberArk PIM SuiteHitatchi ID PAMLieberman ERPMQuest VaultThycotic Secret ServerWallix AdminBastion
BeyondTrust PBPSCyberArk AIM Thycotic Secret ServerWallix AdminBastion
CA Access ControlCyberArk AIMCyberArk PIM SuiteHitatchi ID PAMLieberman ERPMQuest VaultThycotic Secret Server
BeyondTrust PBPSCA Access ControlCyberArk AIMCyberArk PIM SuiteHitatchi ID PAMLieberman ERPMQuest VaultThycotic Secret ServerWallix AdminBastion
VMware
BeyondTrust PBPSCA Access ControlCyberArk AIMCyberArk PIM SuiteLieberman ERPMQuest VaultThycotic Secret Server
Windows
BeyondTrust PBPSCA Access ControlCyberArk PIM SuiteCyberArk AIMHitatchi ID PAMLieberman ERPMQuest VaultThycotic Secret ServerWallix AdminBastion
Parameter Description
login_type={basic|vault} (Required only when you want to create or update vault information) Set login_type=vault, to add vault information. By default, the parameter is set to basic.
password private key key passphrase root delegation passwd
280

Chapter 6 - Vault SupportVault Definition
vault_id={value} (Required only when action=create and login_type=vault) A vault ID.
For Windows, vault_id and password parameters are mutually exclusive and cannot be specified in the same request.
For Unix, vault_id and password, cleartext_password parameters are mutually exclusive and cannot be specified in the same request.
vault_type={value} (Required only when action=create and login_type=vault) Want to know what vaults support what technologies and capabilities? See Vault Support matrixChoose one:BeyondTrust PBPSCA Access ControlCyberArk AIMCyberArk PIM SuiteHitachi ID PAM (no parameters specific to this vault type.)Lieberman ERPMQuest VaultThycotic Secret ServerWallix AdminBastion (WAB)
BeyondTrust PBPS
system_name={value} (Optional if vault type is BeyondTrust PBPS) The managed system name (also known as asset name). When not specified, we’ll attempt to auto-discover the system name at scan time.
account_name={value} (Optional if vault type is BeyondTrust PBPS) The account name. When not specified, we’ll try the username specified in the authentication record.
CA Access Control
end_point_name={value} (Required if vault type is CA Access Control) The End-Point name identifies a managed system, either a target for local accounts or a domain controller for domain accounts. An End-Point name is a user-defined value within your installation of CA Access Control Enterprise Management. The End-Point name entered in this record must match a pre-defined name exactly.
end_point_type={value} (Required if vault type is CA Access Control) The End-Point type represents the method of access to the End-Point system. CA Access Control Enterprise Management uses pre-defined values for various methods and the End-Point type value must match a pre-defined value exactly. Examples: "Windows Agentless" (for Windows accounts) and "SSH Device" (for Unix via SSH).
Parameter Description
281

Chapter 6 - Vault SupportVault Definition
end_point_container={value}
(Required if vault type is CA Access Control ) The End-Point container stores configuration values. CA Access Control Enterprise Management uses pre-defined values for various methods and the End-Point container value must match a pre-defined value exactly. Examples: "Accounts" (for Windows accounts) and "SSH Accounts" (for Unix via SSH).
CyberArk AIM
folder={value} (Required if vault type is CyberArk AIM) Specify the name of the folder in the secure digital safe where the password to be used for authentication should be stored.The folder name can contain a maximum of 169 characters. Entering a trailing /, as in folder/, is optional (when specified, the service removes the trailing / and does not save it in the folder name). The maximum length of a folder name with a file name is 170 characters (the leading and/or trailing space in the input value will be removed). These special characters cannot be included in a folder name: / : * ? " < > | <tab>
file={value} (Required if vault type is CyberArk AIM) Specify the name of the file in the secure digital safe where the password to be used for authentication should be stored.The file name can contain a maximum of 165 characters. The maximum length of a folder name plus a file name is 170 characters (the leading and/or trailing space in the input value will be removed). These special characters cannot be included in a file name: \ / : * ? " < > | <tab>
CyberArk PIM Suite
folder={value} (Required if vault type is CyberArk PIM Suite) Specify the name of the folder in the secure digital safe where the password to be used for authentication should be stored.The folder name can contain a maximum of 169 characters. Entering a trailing /, as in folder/, is optional (when specified, the service removes the trailing / and does not save it in the folder name). The maximum length of a folder name with a file name is 170 characters (the leading and/or trailing space in the input value will be removed). These special characters cannot be included in a folder name: / : * ? " < > | <tab>
file={value} (Required if vault type is CyberArk PIM Suite) Specify the name of the file in the secure digital safe where the password to be used for authentication should be stored.The file name can contain a maximum of 165 characters. The maximum length of a folder name plus a file name is 170 characters (the leading and/or trailing space in the input value will be removed). These special characters cannot be included in a file name: \ / : * ? " < > | <tab>
Parameter Description
282

Chapter 6 - Vault SupportVault Definition
Lieberman ERPM
auto_discover_system_name={0|1}
(Required if vault type is Lieberman ERPM) Specify 1 to enable auto discovery of the system name and 0 to disable auto discovery.Each system in your ERPM environment has a system name and this is needed in order to retrieve the password for authentication. Use auto discovery to allow the service to find the system name for you at scan time. The service uses information known about each host (like the IP address and FQDN) to query ERPM for the system name. Auto discovery is the only option available when your record includes multiple IPs.
system_name_single_host= {value}
(Required if vault type is Lieberman ERPM) Specify the system name that is needed to retrieve password for authentication.
To specify system_name_single_host, ensure that auto discovery of system name is disabled (auto_discover_system_name=0). If auto discovery of system name is enabled (auto_discover_system_name=1), specifying system_name_single_host is invalid.
system_type={value} (Required if vault type is Lieberman ERPM) A valid value is one of the following system type: auto, windows, unix, oracle, mssq, ldap, cisco, custom
custom_system_type={value}
(Required if vault type is Lieberman ERPM) Specify the custom system type name.
custom_system_type is valid only when system_type=custom.
Quest Vault
system_name={value} (Required if vault type is Quest Vault) Specify the system name. During a scan we'll perform a search for the system name and then retrieve the password. A single exact match of the system name must be found in order for authentication to be successful.
Thycotic Secret Server
secret_name={value} (Required if vault type is Thycotic Secret Server) Specify the secret name that contains the password to be used for authentication. The scanning engine will perform a search for the secret name and then get the password from the secret returned by the search. A single exact match of the secret name must be found in order for authentication to be successful. The secret name may contain a maximum of 256 characters, and must not contain multibyte characters.
Parameter Description
283
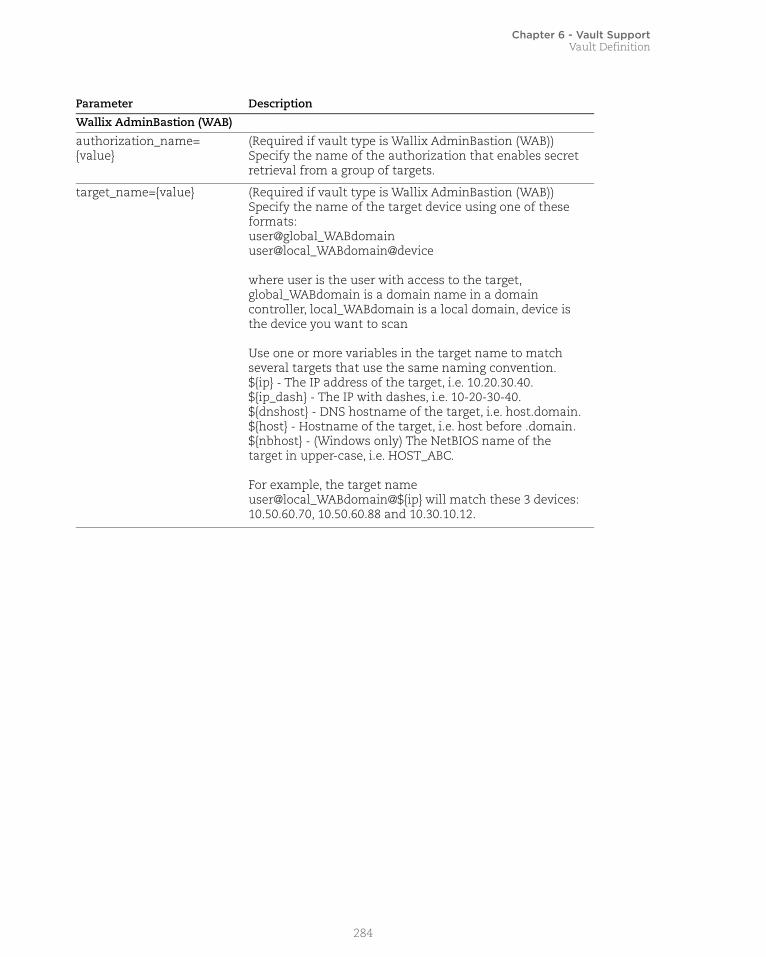
Chapter 6 - Vault SupportVault Definition
Wallix AdminBastion (WAB)
authorization_name={value}
(Required if vault type is Wallix AdminBastion (WAB)) Specify the name of the authorization that enables secret retrieval from a group of targets.
target_name={value} (Required if vault type is Wallix AdminBastion (WAB)) Specify the name of the target device using one of these formats:user@global_WABdomainuser@local_WABdomain@device
where user is the user with access to the target, global_WABdomain is a domain name in a domain controller, local_WABdomain is a local domain, device is the device you want to scan
Use one or more variables in the target name to match several targets that use the same naming convention.${ip} - The IP address of the target, i.e. 10.20.30.40.${ip_dash} - The IP with dashes, i.e. 10-20-30-40.${dnshost} - DNS hostname of the target, i.e. host.domain.${host} - Hostname of the target, i.e. host before .domain.${nbhost} - (Windows only) The NetBIOS name of the target in upper-case, i.e. HOST_ABC.
For example, the target name user@local_WABdomain@${ip} will match these 3 devices: 10.50.60.70, 10.50.60.88 and 10.30.10.12.
Parameter Description
284

Chapter 6 - Vault SupportList Vaults
List VaultsThe Authentication Vault API (resource /api/2.0/fo/vault/) allows you to list authentication vaults in your account. Use the parameter “action=list” to list the vaults
Permissions: Managers, Unit Managers and Scanners can view vaults and their settings.
API request:
curl -u "USERNAME:PASSWD" -H "X-Requested-With: curl" -d "action=list" "https://qualysapi.qualys.com/api/2.0/fo/vault/"
XML output:
<?xml version="1.0" encoding="UTF-8" ?><!DOCTYPE AUTH_VAULT_LIST_OUTPUT SYSTEM
"https://qualysapi.qualys.com/api/2.0/fo/vault/vault_output.dtd"><AUTH_VAULT_LIST_OUTPUT> <RESPONSE> <DATETIME>2014-09-12T13:55:57Z</DATETIME> <STATUS>Success</STATUS> <COUNT>13</COUNT> <AUTH_VAULTS> <AUTH_VAULT> <TITLE> <![CDATA[added failover ip]]> </TITLE> <VAULT_TYPE> <![CDATA[CyberArk PIM Suite]]> </VAULT_TYPE> <LAST_MODIFIED> <DATETIME>2014-02-13T12:05:21Z</DATETIME> <BY>quays_rn1</BY> </LAST_MODIFIED> <ID>1421</ID> </AUTH_VAULT> <AUTH_VAULT> <TITLE> <![CDATA[added failover ip1]]> </TITLE> <VAULT_TYPE> <![CDATA[CyberArk PIM Suite]]> </VAULT_TYPE> <LAST_MODIFIED> <DATETIME>2014-02-19T06:43:44Z</DATETIME> <BY>quays_rn1</BY> </LAST_MODIFIED>
285
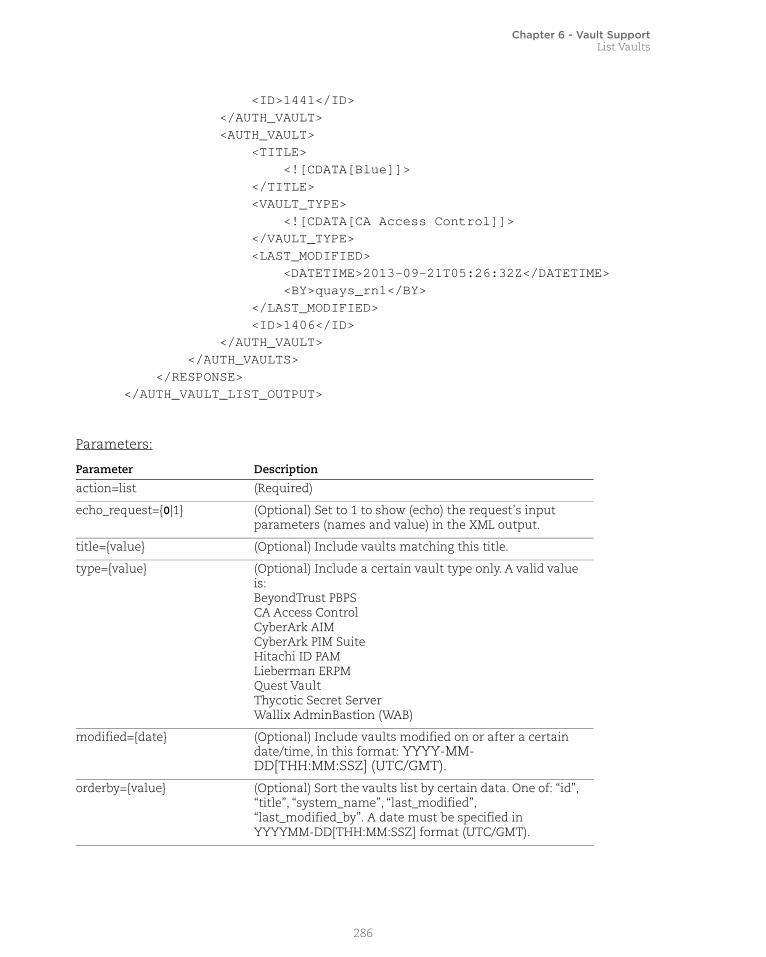
Chapter 6 - Vault SupportList Vaults
<ID>1441</ID> </AUTH_VAULT> <AUTH_VAULT> <TITLE> <![CDATA[Blue]]> </TITLE> <VAULT_TYPE> <![CDATA[CA Access Control]]> </VAULT_TYPE> <LAST_MODIFIED> <DATETIME>2013-09-21T05:26:32Z</DATETIME> <BY>quays_rn1</BY> </LAST_MODIFIED> <ID>1406</ID> </AUTH_VAULT> </AUTH_VAULTS> </RESPONSE></AUTH_VAULT_LIST_OUTPUT>
Parameters:
Parameter Description
action=list (Required)
echo_request={0|1} (Optional) Set to 1 to show (echo) the request’s input parameters (names and value) in the XML output.
title={value} (Optional) Include vaults matching this title.
type={value} (Optional) Include a certain vault type only. A valid value is:BeyondTrust PBPSCA Access ControlCyberArk AIMCyberArk PIM SuiteHitachi ID PAMLieberman ERPMQuest VaultThycotic Secret ServerWallix AdminBastion (WAB)
modified={date} (Optional) Include vaults modified on or after a certain date/time, in this format: YYYY-MM-DD[THH:MM:SSZ] (UTC/GMT).
orderby={value} (Optional) Sort the vaults list by certain data. One of: “id”, “title”, “system_name”, “last_modified”, “last_modified_by”. A date must be specified in YYYYMM-DD[THH:MM:SSZ] format (UTC/GMT).
286

Chapter 6 - Vault SupportList Vaults
More sample requests:
1) List all vaults, order vaults by system name
curl -H "X-Requested-With:API" -u "USERNAME:PASSWD" -d "action=list&orderby=system_name" "https://qualysapi.qualys.com/api/2.0/fo/vault/index.php/?"
2) List all vaults, order vaults by title in descending order
curl -H "X-Requested-With:API" -u "USERNAME:PASSWD" -d "action=list&sortorder=desc&title" "https://qualysapi.eng.qualys.com/api/2.0/fo/vault/index.php/?"
3) List only 9th and 10th vault records
curl -H "X-Requested-With:API" -u "USERNAME:PASSWD" -d "action=list&limit=2&offset=9" "https://qualysapi.qualys.com/api/2.0/fo/vault/index.php/?"
sortorder={asc|desc} (Optional) The sort order, used when the request includes the orderby parameter. One of: asc (for ascending order) or desc (for descending order).
limit={value} (Optional) The maximum number of vault records processed for the request, starting at the record number specified by the offset parameter. These parameters must be specified together: limit and offset.
When not specified, default limit is set to 1,000 vault records. You can specify a value less than or greater than the default.
It’s possible to specify “limit=0” for no limit. In this case the output is not paginated and all records are returned in a single output. Warning: This is not recommended since it may generate a very large output and processing large XML files can consume a lot of resources on the client side.
offset={value} (Optional) The starting vault record number, used only when the request includes the limit parameter.
Parameter Description
287
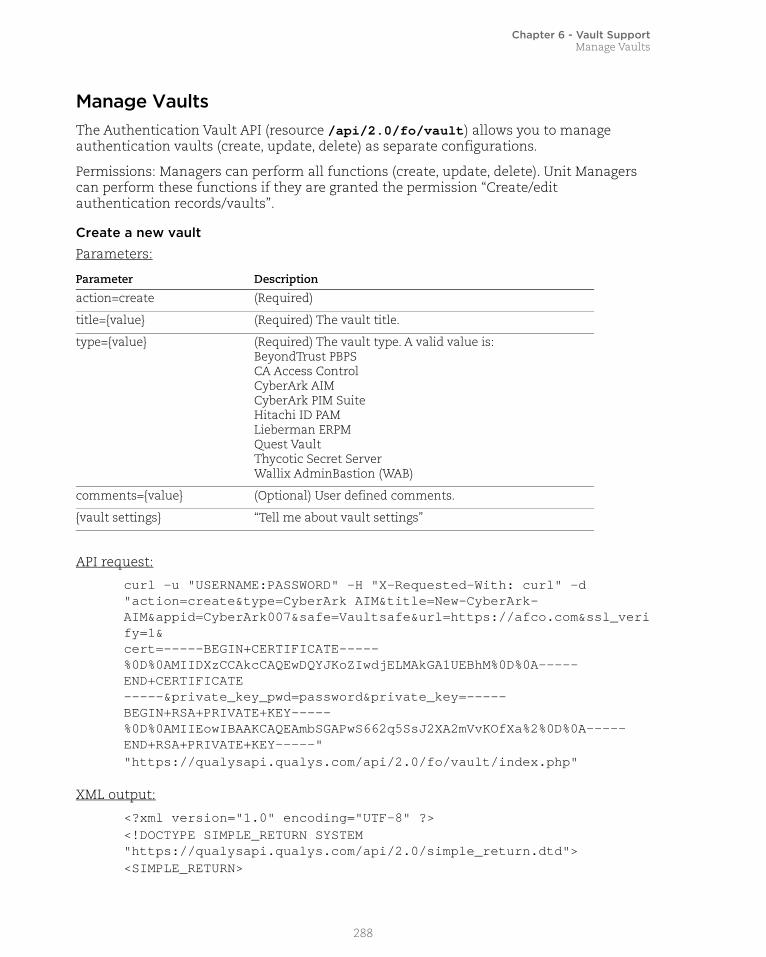
Chapter 6 - Vault SupportManage Vaults
Manage VaultsThe Authentication Vault API (resource /api/2.0/fo/vault) allows you to manage authentication vaults (create, update, delete) as separate configurations.
Permissions: Managers can perform all functions (create, update, delete). Unit Managers can perform these functions if they are granted the permission “Create/edit authentication records/vaults”.
Create a new vaultParameters:
API request:
curl -u "USERNAME:PASSWORD" -H "X-Requested-With: curl" -d "action=create&type=CyberArk AIM&title=New-CyberArk-AIM&appid=CyberArk007&safe=Vaultsafe&url=https://afco.com&ssl_verify=1& cert=-----BEGIN+CERTIFICATE-----%0D%0AMIIDXzCCAkcCAQEwDQYJKoZIwdjELMAkGA1UEBhM%0D%0A-----END+CERTIFICATE -----&private_key_pwd=password&private_key=-----BEGIN+RSA+PRIVATE+KEY-----%0D%0AMIIEowIBAAKCAQEAmbSGAPwS662q5SsJ2XA2mVvKOfXa%2%0D%0A-----END+RSA+PRIVATE+KEY-----" "https://qualysapi.qualys.com/api/2.0/fo/vault/index.php"
XML output:
<?xml version="1.0" encoding="UTF-8" ?><!DOCTYPE SIMPLE_RETURN SYSTEM "https://qualysapi.qualys.com/api/2.0/simple_return.dtd"><SIMPLE_RETURN>
Parameter Description
action=create (Required)
title={value} (Required) The vault title.
type={value} (Required) The vault type. A valid value is: BeyondTrust PBPSCA Access ControlCyberArk AIMCyberArk PIM SuiteHitachi ID PAMLieberman ERPMQuest VaultThycotic Secret ServerWallix AdminBastion (WAB)
comments={value} (Optional) User defined comments.
{vault settings} “Tell me about vault settings”
288

Chapter 6 - Vault SupportManage Vaults
<RESPONSE> <DATETIME>2016-09-02T06:10:02Z</DATETIME> <TEXT>Success</TEXT> <ITEM_LIST> <ITEM> <KEY>ID</KEY> <VALUE>7004</VALUE> </ITEM> </ITEM_LIST> </RESPONSE></SIMPLE_RETURN>
Update vault settings
Parameters:
API request:
curl -u "USERNAME:PASSWD" -H "X-Requested-With: curl" -X "POST" -d"id=14836922&server_address=10.10.10.10""https://qualysapi.qualys.com/api/2.0/fo/vault/?action=update"
XML output:
<?xml version="1.0" encoding="UTF-8" ?><!DOCTYPE SIMPLE_RETURN SYSTEM "https://qualysapi.qualys.com/api/2.0/simple_return.dtd"><SIMPLE_RETURN> <RESPONSE> <DATETIME>2014-09-12T14:13:28Z</DATETIME> <TEXT>Success</TEXT> <ITEM_LIST> <ITEM> <KEY>ID</KEY> <VALUE>14836922</VALUE> </ITEM> </ITEM_LIST> </RESPONSE></SIMPLE_RETURN>
Parameter Description
action=update (Required)
id={value} (Required) A vault ID.
title={value} (Optional) A new title to replace the existing title.
comments={value} (Optional) User defined comments.
{vault settings} “Tell me about vault settings”
289

Chapter 6 - Vault SupportManage Vaults
View vault settings
API request:
curl -u "USERNAME:PASSWORD" -H "X-Requested-With: curl" -d "action=view&id=7004""https://qualysapi.qualys.com/api/2.0/fo/vault/index.php"
XML output:
<?xml version="1.0" encoding="UTF-8" ?><!DOCTYPE VAULT_OUTPUT SYSTEM "https://qualysapi.qualys.com/api/2.0/fo/vault/vault_view.dtd"><VAULT_OUTPUT> <RESPONSE> <DATETIME>2016-09-08T06:38:28Z</DATETIME> <VAULT_QUEST> <TITLE><![CDATA[New CyberArk AIM Vault]]></TITLE> <COMMENTS><![CDATA[]]></COMMENTS> <VAULT_TYPE><![CDATA[CyberArk AIM]]></VAULT_TYPE> <CREATED_ON>2016-09-07T07:09:34Z</CREATED_ON> <OWNER>user_john</OWNER> <LAST_MODIFIED> <DATETIME>2016-09-08T06:37:49Z</DATETIME> <BY>user_john</BY> </LAST_MODIFIED> <APPID><![CDATA[735435]]></APPID> <URL><![CDATA[https://afco.com]]></URL> <SSL_VERIFY><![CDATA[1]]></SSL_VERIFY> <SAFE><![CDATA[56908456904]]></SAFE> <ID>7004</ID> </VAULT_QUEST> </RESPONSE></VAULT_OUTPUT>
Delete a vault
Parameter Description
action=view (Required)
id={value} (Required) A vault ID.
Parameter Description
action=view (Required)
id={value} (Required) A vault ID.
290

Chapter 6 - Vault SupportManage Vaults
API request:
curl -u "USERNAME:PASSWD" -H "X-Requested-With: curl" -d "id=43463""https://qualysapi.qualys.com/api/2.0/fo/vault/?action=delete"
XML output:
<?xml version="1.0" encoding="UTF-8" ?><!DOCTYPE SIMPLE_RETURN SYSTEM "https://qualysapi.qualys.com/api/2.0/simple_return.dtd"><SIMPLE_RETURN> <RESPONSE> <DATETIME>2014-09-12T14:13:28Z</DATETIME> <TEXT>Success</TEXT> <ITEM_LIST> <ITEM> <KEY>Status</KEY> <VALUE>Deleted</VALUE> </ITEM> </ITEM_LIST> </RESPONSE></SIMPLE_RETURN>
Tell me about vault settingsThe vault settings differ per vault type.
BeyondTrust PBPS
appkey={value} (Required for new vault) The application key (alpha-numeric string) for the BeyondTrust PBPS web services API. The maximum length is 128 bytes. A leading and/or trailing space or periods in the input value will be removed.
url={value} (Required for new vault) The HTTP or HTTPS URL to access the BeyondTrust PBPS web services API.
ssl_verify={1|0} (Optional) When set to 1, our service will verify the SSL certificate of the web server to make sure the certificate is valid and trusted. When set to 0, our service will not verify the certificate of the web server.
username={value} (Required for new vault) The user account that can call the BeyondTrust PBPS web services API. The maximum length is 64 characters. This special character cannot be included: @
password={value} (Optional) Specify a user password when required by the Application API Key configuration in BeyondTrust.
291

Chapter 6 - Vault SupportManage Vaults
cert={value} (Optional) Provide an X.509 client certificate with your private key when required by the Application API Key configuration in BeyondTrust. The certificate must be trusted by the PBPS web server.
Enter the certificate block after the key block and be sure to include the first and last line (-----BEGIN CERTIFICATE----- and -----END CERTIFICATE-----).
For a create/update request, if the cert parameter is specified, then the private_key parameter must also be specified.
private_key={value} (Optional) Specify the private key for authentication. Copy the contents of private key file (id_rsa) and be sure to include the first and last line (-----BEGIN PRIVATE KEY----- and -----END PRIVATE KEY-----).
For a create/update request, if the private_key parameter is specified, then the cert parameter must also be specified.
private_key_pwd={value} (Optional) Specify a password for your private key if it’s encrypted.
CA Access Control
ca_url={value} (Required for new vault) The HTTP or HTTPS URL of the CA Access Control web services, an API interface to your CA Access Control Enterprise Management installation. Note that the web services URL is different from the web management URL.
Sample web services URL: http://caac126u-32-235.caac125.domain.com:18080/iam/TEWS6/ac
Sample web management URL: http://caac126p-33-166.caac125.domain.com:18080/iam/ac/
ca_api_username={value} (Required for new vault) The name of a user that is granted GetAccountPassword API permissions.
ca_ssl_verify={1|0} (Required for new vault) When set to 1, our service will verify the SSL certificate of the web server to make sure the certificate is valid and trusted. When set to 0 our service will not verify the certificate of the web server.
ca_web_username={value} (Optional) The web user name used to access Basic Authentication of the CA Access Control web server.
ca_web_password={value} (Optional) The web password used to access Basic Authentication of the CA Access Control web server.
292

Chapter 6 - Vault SupportManage Vaults
CyberArk AIM
appid={value} (Required) Application ID string defined by the customer. The application ID acts as an authenticator for our scanner to call CCP web services API. The maximum length of an application ID name is 128 bytes and the first 28 characters must be unique (leading and/or trailing space or periods in the input value will be removed). These restricted words cannot be included in a application ID: Users, Addresses, Areas, XUserRules, unknown, Locations, Safes, Schedule, VaultCategories, Builtin. These special characters cannot be included in a application ID: \ / : * ? " < > | \t \r \n \x1F.
safe={value} (Required) The name of the digital password safe. The safe name can contain a maximum of 28 characters (leading and/or trailing space in the input value will be removed). These special characters cannot be included in a safe name: \ / : * ? " < > | \t \r \n \x1F
url={value} (Required) The HTTP or HTTPS URL over SSL protocols to access CyberArk's CCP web services.
ssl_verify={1|0} (Required) When set to 1, our service will verify the CCP SSL certificate of the web server to make sure the certificate is valid and trusted. When set to 0 our service will not verify the certificate of the web server.
cert={value} (Optional) You must include an X.509 certificate with your private key. Enter the certificate block after the key block and be sure to include the first and last line (-----BEGIN CERTIFICATE----- and -----END CERTIFICATE-----).
For a create/update request, if the certificate parameter is specified, then the private_key parameter must also be specified.
private_key={value} (Optional) Specify private key for authentication. Copy the contents of private key file (id_rsa) and be sure to include the first and last line (-----BEGIN PRIVATE KEY----- and -----END PRIVATE KEY-----).
For a create/update request, if the private_key parameter is specified, then the certificate parameter must also be specified.
private_key_pwd={value} (Optional) Specify a password for the encrypted private_key.
CyberArk PIM Suite
server_address={value} (Required for new vault) The IP address of the vault server that stores system login credentials to be used.
port={value} (Optional) The port the vault server is running on. The port must be in the range 1025 to 65535. For a new vault the port is set to 1858 by default, if the port parameter is not specified.
293

Chapter 6 - Vault SupportManage Vaults
safe={value} (Required for new vault) The name of the digital password safe. The safe name can contain a maximum of 28 characters (leading and/or trailing space in the input value will be removed). These special characters cannot be included in a safe name: \ / : * ? " < > . |
username={value} (Required for new vault) The username for an account with access to your CyberArk PIM Suite environment.
password={value} (Required for new vault) The password for an account with access to your CyberArk PIM Suite environment.
Hitachi ID PAM
url={value} (Required for new vault) The HTTP or HTTPS URL of the Hitachi ID PAM webservices.
username={value} (Required for new vault) The username (ID) for the Hitachi ID PAM user account. To allow Qualys scanners to connect using this account, this user must have the following settings under Administrator information in the Hitachi ID Management Suite: 1) the privilege “OTP IDAPI caller” and 2) the value entered in the “IP address with CIDR bitmask” field must include the Qualys scanner IP addresses.
password={value} (Required for new vault) The password for the Hitachi ID PAM user account.
ssl_verify={1|0} (Required for new vault) When set to 1, our service will verify the SSL certificate of the web server to make sure the certificate is valid and trusted. When set to 0 our service will not verify the certificate of the web server.
Lieberman ERPM
url={value} (Required for new vault) The HTTP or HTTPS URL of the Lieberman ERPM server.
domain={value} (Optional) A domain name if your Lieberman ERPM server is part of a domain.
username={value} (Required for new vault) The username for the Lieberman ERPM server account.
password={value} (Required) The password for the Lieberman ERPM server account.
ssl_verify={1|0} (Required for new vault) When set to 1, our service will verify the SSL certificate of the web server to make sure the certificate is valid and trusted. When set to 0 our service will not verify the certificate of the web server.
Quest Vault
server_address={value} (Required for new vault) The IP address of the vault server, Quest One Privileged Password Manager.
port={value} (Optional) The listing port of the vault server. For a new vault the port is set to 22 by default, if the port parameter is not specified.
294

Chapter 6 - Vault SupportManage Vaults
username={value} (Required for new vault) The username to be used for SSH authentication. We recommend you create a dedicated user account for Qualys scanning. Using Quest/Dell 2.4 or higher, enter the key for the API user account you've created for use with our service. We support both API and CLI keys but recommend use of an API key.
access_key={value} (Required for new vault) The DSA private key in PEM format for SSH authentication.
Thycotic Secret Server
url={value} (Required for new vault) The HTTP or HTTPS URL of the Secret Server webservices. The URL may contain a maximum of 256 characters, and must not contain multibyte characters.
username={value} (Required for new vault) The username for a Secret Server user. This user must have access to the secret names to be used for authentication.
password={value} (Required for new vault) The password for a Secret Server user.
domain={value} (Optional) Specify a fully qualified domain name if Secret Server is integrated with Active Directory. The domain may contain a maximum of 128 characters, and must not contain any multibyte characters.
Wallix AdminBastion (WAB)
url={value} (Required for new vault) The HTTP or HTTPS URL to access the WAB web services API.
ssl_verify={0|1} (Optional) When set to 1 (the default), our service will verify the SSL certificate of the web server to make sure the certificate is valid and trusted. When set to 0, our service will not verify the certificate of the web server.
username={value} (Required for new vault) The user account that can call the WAB web services API.
password={value} (Optional) The password for the user account that can call the WAB web services API. For a new vault, you must specify password or appkey. Both parameters cannot be specified in the same request.
appkey={value} (Optional) Your WAB REST API key (alpha-numeric value) for connecting to the WAB web services API. - Do not include leading or trailing periods or spaces. - These characters are not allowed: \\ / : * ? " < > |- UTF-8 multibyte characters are not allowed.
For a new vault, you must specify password or appkey. Both parameters cannot be specified in the same request.
295

Chapter 7 - Assets
Chapter 7 - AssetsManage the host assets you want to scan (internal and external facing) for vulnerabilities and compliance.
IP List | Add IPs | Update IPs
Host List
Host List Detection | Normalized Data | Best Practices | Use Cases
Excluded Host List | Excluded Hosts Change History | Manage Excluded Hosts
Virtual Host List | Manage Virtual Hosts
Restricted IPs List | Manage Restricted IPs
Asset Group List | Manage Asset Groups
Purge Hosts
296

Chapter 7 - AssetsIP List
IP List/api/2.0/fo/asset/ip/?action=list
[GET] [POST]
List IP addresses in the user account. By default, all hosts in the user account are included. Optional input parameters support filtering the list by IP addresses and host tracking method.
Permissions - Managers and Auditors view all assets in the subscription, Unit Managers view assets in their own business unit, Scanners and Readers view assets in their own account.
Express Lite - This API is available to Express Lite users.
Input Parameters
Parameter Description
action=list (Required) A flag used to make an IP list request.
echo_request={0|1} (Optional) Show (echo) the request’s input parameters (names and values) in the XML output. When unspecified, parameters are not included in the XML output. Specify 1 to view parameters in the XML output.
ips={value} (Optional) Show only certain IP addresses/ranges. One or more IPs/ranges may be specified. Multiple entries are comma separated. A host IP range is specified with a hyphen (for example, 10.10.10.44-10.10.10.90).
network_id={value} (Optional, and valid only when the Network Support feature is enabled for the user’s account) Restrict the request to a certain custom network ID.
tracking_method={value} (Optional) Show only IP addresses/ranges which have a certain tracking method. A valid value is: IP, DNS, or NETBIOS.
297

Chapter 7 - AssetsIP List
Filter the output by module
Only interested in seeing IP addresses for VM, PC or CertView? Your request must include the compliance_enabled and certview_enabled parameters as described below.
To return only VM IP addresses, specify compliance_enabled=0 and certview_enabled=0.
To return only PC IP addresses, specify compliance_enabled=1 and certview_enabled=0.
To return only CertView IP addresses, specify compliance_enabled=0 and certview_enabled=1.
To return both PC and CertView IP addresses, specify compliance_enabled=1 and certview_enabled=1.
compliance_enabled={0|1} (Optional) Specifying this parameter is valid only when the policy compliance module is enabled for the user account. This parameter is invalid for an Express Lite user.
Specify 1 to list IP addresses in the user’s account assigned to the Policy Compliance module. Specify 0 to list IPs which are not assigned to the Policy Compliance module.
An error is returned if a user specifies this parameter, and the user’s account does not have compliance management privileges to view the requested list. This may be due to the user’s role and/or account settings as indicated below.
For a Unit Manager, Scanner or Reader, the “Manage compliance” permission must be enabled in the user account. If the user does not have this permission and sets this parameter to 1, an error is returned.
An Auditor user cannot make a request to view vulnerability management IP addresses. If an Auditor sets this parameter to 0, an error is returned.
certview_enabled={0|1} (Optional) Set to 1 to list IP addresses in the user’s account assigned to the Certificate View module. Specify 0 to list IPs that are not assigned to the Certificate View module. Note - This option will be supported when Certificate View GA is released and is enabled for your account.
Parameter Description
298

Chapter 7 - AssetsAdd IPs
Sample - List Host IPs
API request:
curl -H "X-Requested-With: Curl Sample" -b "QualysSession=71e6cda2a35d2cd404cddaf305ea0208;path=/api; secure" "https://qualysapi.qualys.com/api/2.0/fo/asset/ip/?action=list"
XML output:
<!DOCTYPE IP_LIST_OUTPUT SYSTEM "https://qualysapi.qualys.com/api/2.0/fo/asset/ip/ip_list_output.dtd">
<IP_LIST_OUTPUT> <RESPONSE> <DATETIME>2018-05-21T13:32:17Z</DATETIME> <IP_SET> <IP>123.123.45.0</IP> <IP_RANGE>123.124.45.0-123.124.45.255</IP_RANGE> <IP_RANGE>123.124.46.0-123.124.46.255</IP_RANGE> <IP_RANGE>123.124.47.0-123.124.47.255</IP_RANGE> <IP_RANGE>123.124.48.0-123.124.48.255</IP_RANGE> </IP_SET> </RESPONSE></IP_LIST_OUTPUT>
DTD
<platform API server>/api/2.0/fo/asset/ip/ip_list_output.dtd
Add IPs/api/2.0/fo/asset/ip/?action=add
[POST]
Add IP addresses to the user's subscription. Once added they are available for scanning and reporting.
Permissions - A Manager has permissions to add IP addresses. A Unit Manager can add IP addresses when the “Add assets” permission is enabled in their account. Users with other roles (Scanner, Reader, Auditor) do not have permissions to add IP addresses.
299

Chapter 7 - AssetsAdd IPs
Input Parameters
Sample - Add IPs using POSTED data
API request:
curl -H "X-Requested-With: Curl" -H "Content-Type:text/csv" -u "USERNAME:PASSWORD" --data-binary @ips_list.csv"https://qualysapi.qualys.com/api/2.0/fo/asset/ip/?action=add&enable_vm=1&enable_pc=1&tracking_method=IP&owner=quays_es1"
Parameter Description
action=add (Required)
echo_request={0|1} (Optional) Specify 1 to view (echo) input parameters in the XML output. By default these are not included.
ips={value} -or- {POSTed CSV raw data}
(Required) The hosts you want to add to the subscription. IPs must be specified by using the “ips” parameter (using the POST method) or by uploading CSV raw data (using the POST method). To upload CSV raw data, specify --data-binary <data>.
How to specify IP addresses. One or more IPs/ranges may be specified. Multiple IPs/ranges are comma separated. An IP range is specified with a hyphen (for example, 10.10.30.1-10.10.30.50). CIDR notation is supported.
tracking_method={value} (Optional) The tracking method is set to IP for IP address by default. To use another tracking method specify DNS or NETBIOS.
enable_vm={0|1}enable_pc={0|1}
(Required) You must enable the hosts for the VM app (enable_vm=1) or the PC app (enable_pc=1) or both apps.
owner={value} (Optional) The owner of the host asset(s). The owner must be a Manager or a Unit Manager. A valid Unit Manager must have the “Add assets” permission and sufficient remaining IPs (maximum number of IPs that can be added to the Unit Manager’s business unit).
ud1={value}ud2={value}ud3={value}
(Optional) Values for user-defined fields 1, 2 and 3. You can specify a maximum of 128 characters (ascii) for each field value.
comment={value} (Optional) User-defined comments.
ag_title={value} (Required if the request is being made by a Unit Manager; otherwise invalid) The title of an asset group in the Unit Manager’s business unit that the host(s) will be added to.
enable_certview={0|1} (Optional) Set to 1 to add IPs to your CertView license. By default IPs are not added to your CertView license. This option will be supported when CertView GA is released and is enabled for your account.
300

Chapter 7 - AssetsUpdate IPs
XML output:
<?xml version="1.0" encoding="UTF-8" ?> <!DOCTYPE SIMPLE_RETURN SYSTEM "https://qualysapi.qualys.com/api/2.0/simple_return.dtd"> <SIMPLE_RETURN> <RESPONSE> <DATETIME>2018-08-07T01:21:03Z</DATETIME> <TEXT>IPs successfully added to Vulnerability Management/Compliance Management</TEXT> </RESPONSE></SIMPLE_RETURN>
Sample - Add IPs using “ips” parameter
API request:
curl -H "X-Requested-With: demo" -u "USERNAME:PASSWORD" -X "POST"-d "action=add&enable_vm=1&enable_pc=1&ips=10.10.10.1,10.10.10.10-10.10.10.20,10.10.10.200" "https://qualysapi.qualys.com/api/2.0/fo/asset/ip/"
DTD
<platform API server>/api/2.0/simple_return.dtd
Update IPs/api/2.0/fo/asset/ip/?action=update
[POST]
Update IP addresses in the user's subscription. Once added they are available for scanning and reporting.
Permissions - A Manager has permissions to update IP addresses. A Unit Manager can update IP addresses in asset groups assigned to the user’s business unit. Users with other roles (Scanner, Reader, Auditor) do not have permissions to update IP addresses.
Input Parameters
Parameter Description
action=update (Required)
echo_request={0|1} (Optional) Specify 1 to view (echo) input parameters in the XML output. By default these are not included.
301

Chapter 7 - AssetsUpdate IPs
Sample - Add IPs and assign tracking methodAPI request:
curl -H "X-Requested-With: demo" -u "USERNAME:PASSWORD" -X "POST"-d "action=update&ips=10.10.10.200,10.10.23.40&tracking_method=DNS" "https://qualysapi.qualys.com/api/2.0/fo/asset/ip/"
XML output:
<?xml version="1.0" encoding="UTF-8" ?><!DOCTYPE SIMPLE_RETURN SYSTEM "https://qualysapi.qualys.com/api/2.0/simple_return.dtd"><SIMPLE_RETURN> <RESPONSE> <DATETIME>2018-04-07T17:27:36Z</DATETIME> <TEXT>IPs successfully updated</TEXT> </RESPONSE></SIMPLE_RETURN>
ips={value} -or- {POSTed CSV raw data}
(Required) The hosts within the subscription you want to update. IPs must be specified by using the “ips” parameter (using the POST method) or by uploading CSV raw data (using the POST method). To upload CSV raw data, specify --data-binary <data>.
One or more IPs/ranges may be specified. Multiple entries are comma separated. An IP range is specified with a hyphen (for example, 10.10.30.1-10.10.30.50). CIDR notation is supported.
tracking_method={value} (Optional) To change to another tracking method specify IP for IP address, DNS or NETBIOS.
host_dns={value} (Optional) The DNS hostname for the IP you want to update. A single IP must be specified in the same request and the IP will only be updated if it matches the hostname specified.
host_netbios={value} (Optional) The NetBIOS hostname for the IP you want to update. A single IP must be specified in the same request and the IP will only be updated if it matches the hostname specified.
owner={value} (Optional) The owner of the host asset(s). The owner must be a Manager. Another user (Unit Manager, Scanner, Reader) can be the owner if the IP address is in the user’s account.
ud1={value}ud2={value}ud3={value}
(Optional) Values for user-defined fields 1, 2 and 3. You can specify a maximum of 128 characters (ascii) for each field value.
comment={value} (Optional) User-defined comments.
Parameter Description
302
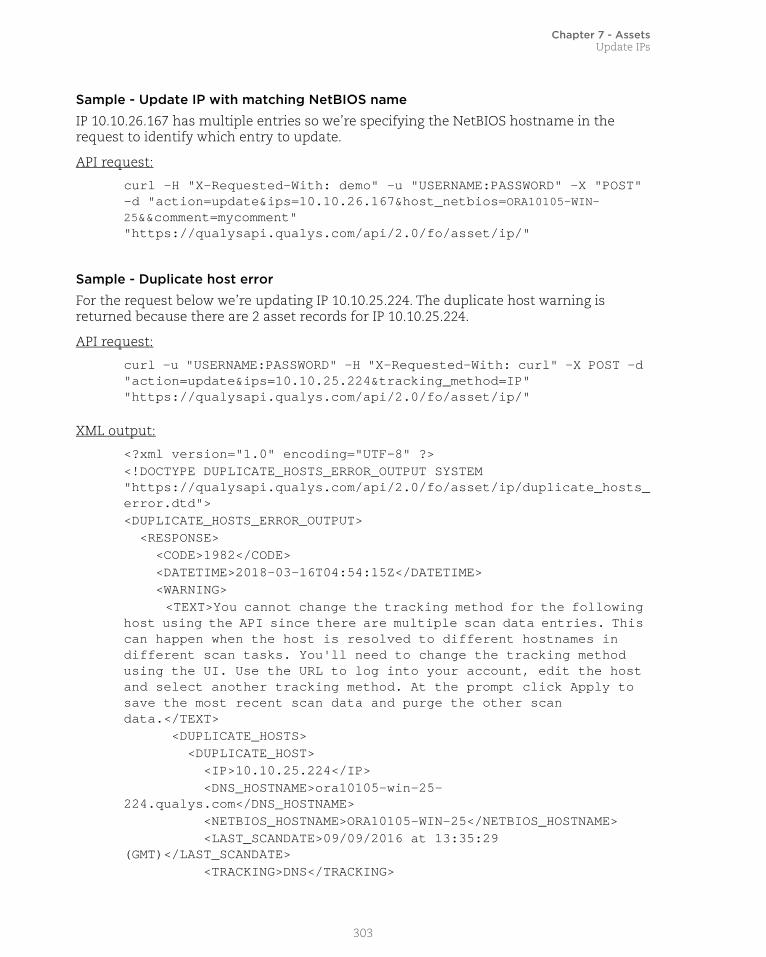
Chapter 7 - AssetsUpdate IPs
Sample - Update IP with matching NetBIOS name
IP 10.10.26.167 has multiple entries so we’re specifying the NetBIOS hostname in the request to identify which entry to update.
API request:
curl -H "X-Requested-With: demo" -u "USERNAME:PASSWORD" -X "POST" -d "action=update&ips=10.10.26.167&host_netbios=ORA10105-WIN-25&&comment=mycomment" "https://qualysapi.qualys.com/api/2.0/fo/asset/ip/"
Sample - Duplicate host error
For the request below we’re updating IP 10.10.25.224. The duplicate host warning is returned because there are 2 asset records for IP 10.10.25.224.
API request:
curl -u "USERNAME:PASSWORD" -H "X-Requested-With: curl" -X POST -d "action=update&ips=10.10.25.224&tracking_method=IP" "https://qualysapi.qualys.com/api/2.0/fo/asset/ip/"
XML output:
<?xml version="1.0" encoding="UTF-8" ?><!DOCTYPE DUPLICATE_HOSTS_ERROR_OUTPUT SYSTEM "https://qualysapi.qualys.com/api/2.0/fo/asset/ip/duplicate_hosts_error.dtd"><DUPLICATE_HOSTS_ERROR_OUTPUT> <RESPONSE> <CODE>1982</CODE> <DATETIME>2018-03-16T04:54:15Z</DATETIME> <WARNING> <TEXT>You cannot change the tracking method for the following host using the API since there are multiple scan data entries. This can happen when the host is resolved to different hostnames in different scan tasks. You'll need to change the tracking method using the UI. Use the URL to log into your account, edit the host and select another tracking method. At the prompt click Apply to save the most recent scan data and purge the other scan data.</TEXT> <DUPLICATE_HOSTS> <DUPLICATE_HOST> <IP>10.10.25.224</IP> <DNS_HOSTNAME>ora10105-win-25-224.qualys.com</DNS_HOSTNAME> <NETBIOS_HOSTNAME>ORA10105-WIN-25</NETBIOS_HOSTNAME> <LAST_SCANDATE>09/09/2016 at 13:35:29 (GMT)</LAST_SCANDATE> <TRACKING>DNS</TRACKING>
303

Chapter 7 - AssetsUpdate IPs
</DUPLICATE_HOST> </DUPLICATE_HOSTS> <URL><![CDATA[https://qualysguard.qualys.com/fo/tools/ip_assets.php]]></URL> </WARNING> </RESPONSE></DUPLICATE_HOSTS_ERROR_OUTPUT>
DTD for duplicate host error
<platform API server>/api/2.0/fo/asset/ip/duplicate_hosts_error.dtd"
304

Chapter 7 - AssetsHost List
Host List/api/2.0/fo/asset/host/?action=list
[GET] [POST]
Download a list of scanned hosts in the user’s account. By default, all scanned hosts in the user account are included and basic information about each host is provided. Hosts in the XML output are sorted by host ID in ascending order.
The output of the Host List API is paginated. By default, a maximum of 1,000 host records are returned per request. You can customize the page size (i.e. the number of host records) by using the parameter “truncation_limit=10000” for instance. In this case the results will be return with pages of 10,000 host records.
Permissions - Managers view all scanned hosts in subscription. Auditors view all scanned compliance hosts in subscription. Unit Managers view scanned hosts in user’s business unit. Scanners and Readers view scanned hosts in user’s account. For Unit Managers, Scanners, and Readers to view compliance hosts, the “Manage compliance” permission must be granted in the user’s account.
Express Lite - This API is available to Express Lite users.
Input Parameters
Parameter Description
action=list (Required) A flag used to make a host list request.
echo_request={0|1} (Optional) Specify 1 to view input parameters in the XML output. When unspecified, parameters are not included in the XML output.
305

Chapter 7 - AssetsHost List
details={Basic|Basic/AGs | All|All/AGs | None}
(Optional) Show the requested amount of host information for each host. A valid value is: Basic, Basic/AGs, All, All/AGs, or None.
Basic - (default) Show basic host information. Basic host information includes the host ID, IP address, tracking method, DNS and NetBIOS hostnames, and operating system.
Basic/AGs - Show basic host information plus asset group information. Asset group information includes the asset group ID and title.
All - Show all host information. All host information includes the basic host information plus the last vulnerability and compliance scan dates.
All/AGs - Show all host information plus asset group information. Asset group information includes the asset group ID and title.
None - Show only the host ID.
os_pattern={expression} (Optional) Show only hosts which have an operating system matching a certain regular expression. An empty value cannot be specified. Use “%5E%24” to match empty string.
Important: The regular expression string you enter must follow the PCRE standard and it must be URL encoded.
Sample regular expression strings for matching OS names:Qualys API - Host List Detection API samples (GitHub, see sample 17)
For information about the Perl Compatible Regular Expressions (PCRE) standard visit:http://php.net/manual/en/book.pcre.php
PCRE syntax:http://php.net/manual/en/reference.pcre.pattern.syntax.php
http://www.php.net/manual/en/reference.pcre.pattern.posix.php
Parameter Description
306

Chapter 7 - AssetsHost List
truncation_limit={value} (Optional) Specify the maximum number of host records processed per request. When not specified, the truncation limit is set to 1000 host records. You may specify a value less than the default (1-999) or greater than the default (1001-1000000).
If the requested list identifies more host records than the truncation limit, then the XML output includes the <WARNING> element and the URL for making another request for the next batch of host records.
See example:Qualys API - Host List API samples (GitHub, sample 3)
You can specify truncation_limit=0 for no truncation limit. This means that the output is not paginated and all the records are returned in a single output. WARNING: This can generate very large output and processing large XML files can consume a lot of resources on the client side. In this case it is recommended to use the pagination logic and parallel processing. The previous page can be processed while the next page is downloaded.
ips={value} (Optional) Show only certain IP addresses/ranges. One or more IPs/ranges may be specified. Multiple entries are comma separated. An IP range is specified with a hyphen (for example, 10.10.10.1-10.10.10.100).
ag_ids={value} (Optional) Show only hosts belonging to asset groups with certain IDs. One or more asset group IDs and/or ranges may be specified. Multiple entries are comma separated. A range is specified with a dash (for example, 386941-386945). Valid asset group IDs are required.
ag_titles={value} (Optional) Show only hosts belonging to asset groups with certain strings in the asset group title. One or more asset group titles may be specified. Multiple entries are comma separated (for example, My+First+Asset+Group,Another+Asset+Group).
ids={value} (Optional) Show only certain host IDs/ranges. One or more host IDs/ranges may be specified. Multiple entries are comma separated. A host ID range is specified with a hyphen (for example, 190-400).Valid host IDs are required.
id_min={value} (Optional) Show only hosts which have a minimum host ID value. A valid host ID is required.
id_max={value} (Optional) Show only hosts which have a maximum host ID value. A valid host ID is required.
network_ids={value} (Optional, and valid only when the Network Support feature is enabled for the user’s account) Restrict the request to certain custom network IDs. Multiple network IDs are comma separated.
Parameter Description
307
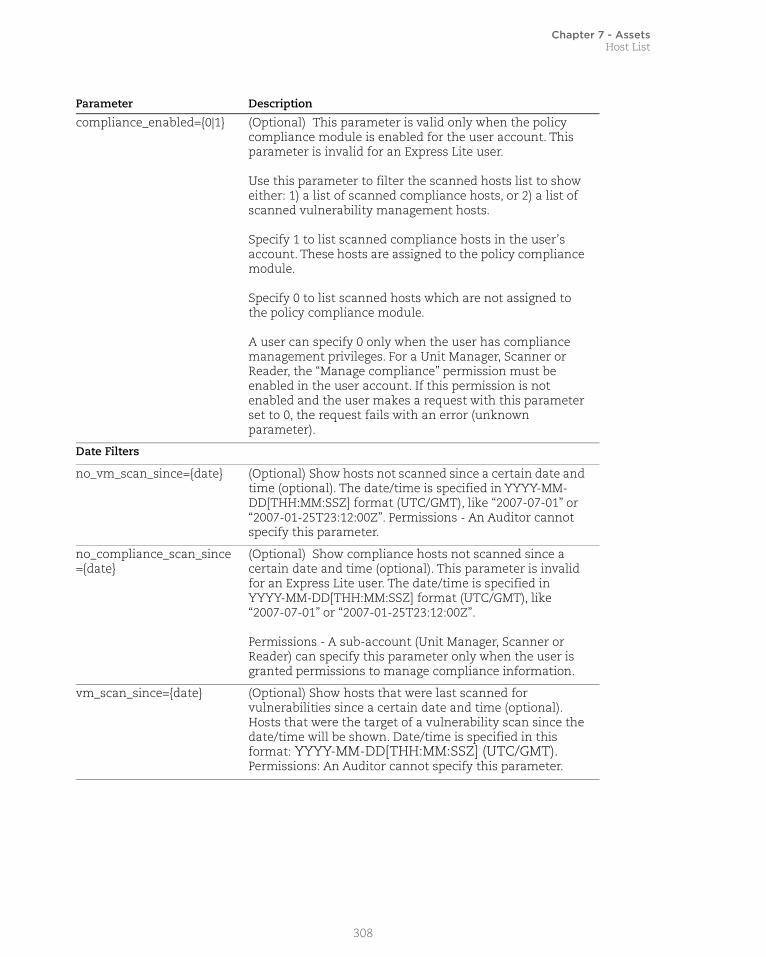
Chapter 7 - AssetsHost List
compliance_enabled={0|1} (Optional) This parameter is valid only when the policy compliance module is enabled for the user account. This parameter is invalid for an Express Lite user.
Use this parameter to filter the scanned hosts list to show either: 1) a list of scanned compliance hosts, or 2) a list of scanned vulnerability management hosts.
Specify 1 to list scanned compliance hosts in the user’s account. These hosts are assigned to the policy compliance module.
Specify 0 to list scanned hosts which are not assigned to the policy compliance module.
A user can specify 0 only when the user has compliance management privileges. For a Unit Manager, Scanner or Reader, the “Manage compliance” permission must be enabled in the user account. If this permission is not enabled and the user makes a request with this parameter set to 0, the request fails with an error (unknown parameter).
Date Filters
no_vm_scan_since={date} (Optional) Show hosts not scanned since a certain date and time (optional). The date/time is specified in YYYY-MM-DD[THH:MM:SSZ] format (UTC/GMT), like “2007-07-01” or “2007-01-25T23:12:00Z”. Permissions - An Auditor cannot specify this parameter.
no_compliance_scan_since={date}
(Optional) Show compliance hosts not scanned since a certain date and time (optional). This parameter is invalid for an Express Lite user. The date/time is specified in YYYY-MM-DD[THH:MM:SSZ] format (UTC/GMT), like “2007-07-01” or “2007-01-25T23:12:00Z”.
Permissions - A sub-account (Unit Manager, Scanner or Reader) can specify this parameter only when the user is granted permissions to manage compliance information.
vm_scan_since={date} (Optional) Show hosts that were last scanned for vulnerabilities since a certain date and time (optional). Hosts that were the target of a vulnerability scan since the date/time will be shown. Date/time is specified in this format: YYYY-MM-DD[THH:MM:SSZ] (UTC/GMT). Permissions: An Auditor cannot specify this parameter.
Parameter Description
308

Chapter 7 - AssetsHost List
compliance_scan_since={date}
(Optional) Show hosts that were last scanned for compliance since a certain date and time (optional). Hosts that were the target of a compliance scan since the date/time will be shown. This parameter is invalid for an Express Lite user. Date/time is specified in this format: YYYY-MM-DD[THH:MM:SSZ] (UTC/GMT).
Permissions: A sub-account (Unit Manager, Scanner or Reader) can specify this parameter only when the user is granted permissions to manage compliance information.
vm_processed_before={date}
(Optional) Show hosts with vulnerability scan results processed before a certain date and time. Specify the date in YYYY-MM-DD[THH:MM:SSZ] format (UTC/GMT), like “2016-09-12” or “2016-09-12T23:15:00Z”.
vm_processed_after={date} (Optional) Show hosts with vulnerability scan results processed after a certain date and time. Specify the date in YYYY-MM-DD[THH:MM:SSZ] format (UTC/GMT), like “2016-09-12” or “2016-09-12T23:15:00Z”.
vm_scan_date_before={date}
(Optional) Show hosts with a vulnerability scan end date before a certain date and time. Specify the date in YYYY-MM-DD[THH:MM:SSZ] format (UTC/GMT), like “2016-09-12” or “2016-09-12T23:15:00Z”.
vm_scan_date_after={date} (Optional) Show hosts with a vulnerability scan end date after a certain date and time. Specify the date in YYYY-MM-DD[THH:MM:SSZ] format (UTC/GMT), like “2016-09-12” or “2016-09-12T23:15:00Z”.
vm_auth_scan_date_before={date}
(Optional) Show hosts with a successful authenticated vulnerability scan end date before a certain date and time. Specify the date in YYYY-MM-DD[THH:MM:SSZ] format (UTC/GMT), like “2016-09-12” or “2016-09-12T23:15:00Z”.
vm_auth_scan_date_after={date}
(Optional) Show hosts with a successful authenticated vulnerability scan end date after a certain date and time. Specify the date in YYYY-MM-DD[THH:MM:SSZ] format (UTC/GMT), like “2016-09-12” or “2016-09-12T23:15:00Z”.
Asset Tags
use_tags={0|1} (Optional) Specify 0 (the default) if you want to select hosts based on IP addresses/ranges and/or asset groups. Specify 1 if you want to select hosts based on asset tags.
tag_set_by={id|name} (Optional when use_tags=1) Specify “id” (the default) to select a tag set by providing tag IDs. Specify “name” to select a tag set by providing tag names.
tag_include_selector={any|all}
(Optional when use_tags=1) Select “any” (the default) to include hosts that match at least one of the selected tags. Select “all” to include hosts that match all of the selected tags.
Parameter Description
309

Chapter 7 - AssetsHost List
Sample - List assets based on scan end date, scan processed dateAPI request:
curl -u "USERNAME:PASSWORD" -H "X-Requested-With: curl""https://qualysapi.p03.eng.sjc01.qualys.com/api/2.0/fo/asset/host/?action=list&truncation_limit=10&details=All/AGs&vm_scan_date_before=2017-09-14T06:32:15Z&vm_auth_scan_date_before=2017-09-14T06:32:15Z&vm_scan_date_after=2016-05-12T06:32:15Z&vm_auth_scan_date_after=2016-05-12T06:32:15Z&vm_processed_before=2017-09
XML output:
...<HOST_LIST_OUTPUT> <RESPONSE> <DATETIME>2018-04-26T11:22:56Z</DATETIME> <HOST_LIST> <HOST> <ID>2872568</ID> <IP>10.10.25.182</IP>
tag_exclude_selector={any|all}
(Optional when use_tags=1) Select “any” (the default) to exclude hosts that match at least one of the selected tags. Select “all” to exclude hosts that match all of the selected tags.
tag_set_include={value} (Optional when use_tags=1) Specify a tag set to include. Hosts that match these tags will be included. You identify the tag set by providing tag name or IDs. Multiple entries are comma separated.
tag_set_exclude={value} (Optional when use_tags=1) Specify a tag set to exclude. Hosts that match these tags will be excluded. You identify the tag set by providing tag name or IDs. Multiple entries are comma separated.
show_tags={0|1} (Optional) Specify 1 to display asset tags associated with each host in the XML output.
EC2 metadata
host_metadata={value} (Optional) Specify the name of the cloud provider to show the assets managed by that cloud provider, i.e. EC2.Note: Only supports fetching EC2 assets for now.
host_metadata_fields={value1,value2}
(Optional when host_metadata is specified) Specify the EC2 instance fields to fetch the data for.Data can be fetched for the following fields: accountId, region, availabilityZone, instanceId, instanceType, imageId, kernelId.
Parameter Description
310
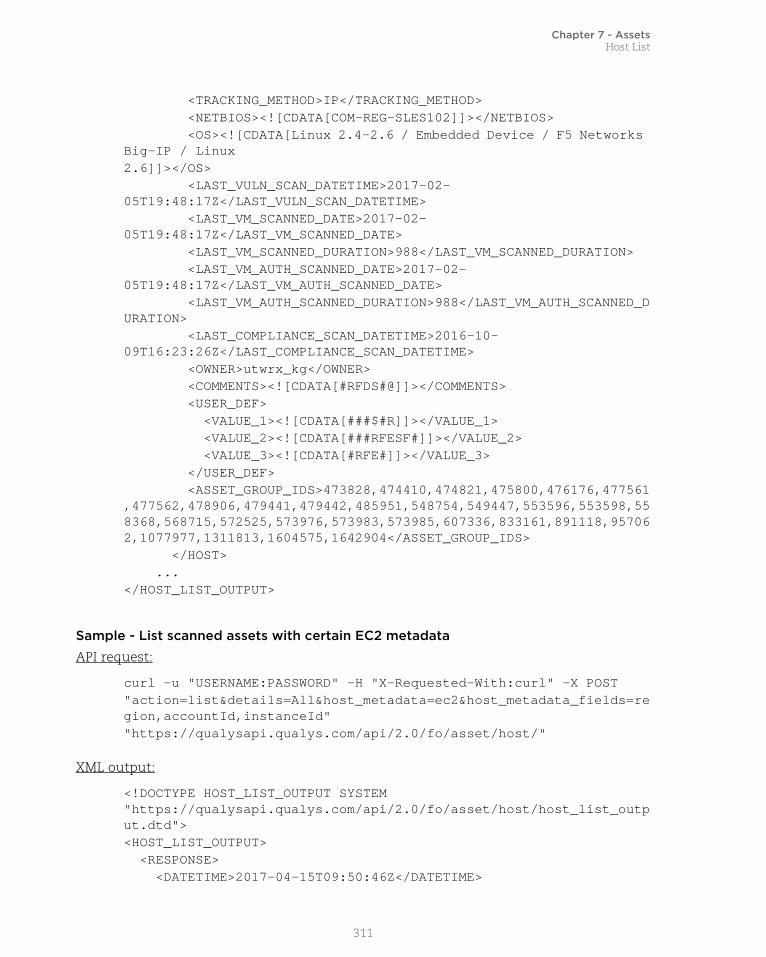
Chapter 7 - AssetsHost List
<TRACKING_METHOD>IP</TRACKING_METHOD> <NETBIOS><![CDATA[COM-REG-SLES102]]></NETBIOS> <OS><![CDATA[Linux 2.4-2.6 / Embedded Device / F5 Networks Big-IP / Linux2.6]]></OS> <LAST_VULN_SCAN_DATETIME>2017-02-05T19:48:17Z</LAST_VULN_SCAN_DATETIME> <LAST_VM_SCANNED_DATE>2017-02-05T19:48:17Z</LAST_VM_SCANNED_DATE> <LAST_VM_SCANNED_DURATION>988</LAST_VM_SCANNED_DURATION> <LAST_VM_AUTH_SCANNED_DATE>2017-02-05T19:48:17Z</LAST_VM_AUTH_SCANNED_DATE> <LAST_VM_AUTH_SCANNED_DURATION>988</LAST_VM_AUTH_SCANNED_DURATION> <LAST_COMPLIANCE_SCAN_DATETIME>2016-10-09T16:23:26Z</LAST_COMPLIANCE_SCAN_DATETIME> <OWNER>utwrx_kg</OWNER> <COMMENTS><![CDATA[#RFDS#@]]></COMMENTS> <USER_DEF> <VALUE_1><![CDATA[###$#R]]></VALUE_1> <VALUE_2><![CDATA[###RFESF#]]></VALUE_2> <VALUE_3><![CDATA[#RFE#]]></VALUE_3> </USER_DEF> <ASSET_GROUP_IDS>473828,474410,474821,475800,476176,477561,477562,478906,479441,479442,485951,548754,549447,553596,553598,558368,568715,572525,573976,573983,573985,607336,833161,891118,957062,1077977,1311813,1604575,1642904</ASSET_GROUP_IDS> </HOST> ...</HOST_LIST_OUTPUT>
Sample - List scanned assets with certain EC2 metadata
API request:
curl -u "USERNAME:PASSWORD" -H "X-Requested-With:curl" -X POST "action=list&details=All&host_metadata=ec2&host_metadata_fields=region,accountId,instanceId""https://qualysapi.qualys.com/api/2.0/fo/asset/host/"
XML output:
<!DOCTYPE HOST_LIST_OUTPUT SYSTEM "https://qualysapi.qualys.com/api/2.0/fo/asset/host/host_list_output.dtd"><HOST_LIST_OUTPUT> <RESPONSE> <DATETIME>2017-04-15T09:50:46Z</DATETIME>
311

Chapter 7 - AssetsHost List
<HOST_LIST> <HOST> <ID>135151</ID> <IP>10.97.5.247</IP> <TRACKING_METHOD>EC2</TRACKING_METHOD> <DNS><![CDATA[i-0bb87c3281243cdfd]]></DNS> <EC2_INSTANCE_ID><![CDATA[i-0bb87c3281243cdfd]]></EC2_INSTANCE_ID> <OS><![CDATA[Amazon Linux 2016.09]]></OS> <METADATA> <EC2> <ATTRIBUTE> <NAME><![CDATA[latest/dynamic/instance- identity/document/region]]></NAME> <LAST_STATUS>Success</LAST_STATUS> <VALUE><![CDATA[us-east-1]]></VALUE> <LAST_SUCCESS_DATE>2017-03-21T13:39:38Z</LAST_SUCCESS_DATE> <LAST_ERROR_DATE></LAST_ERROR_DATE> <LAST_ERROR><![CDATA[]]></LAST_ERROR> </ATTRIBUTE> <ATTRIBUTE> <NAME><![CDATA[latest/dynamic/instance- identity/document/instanceId]]></NAME> <LAST_STATUS>Success</LAST_STATUS> <VALUE><![CDATA[i-0bb87c3281243cdfd]]></VALUE> <LAST_SUCCESS_DATE>2017-03-21T13:39:38Z</LAST_SUCCESS_DATE> <LAST_ERROR_DATE></LAST_ERROR_DATE> <LAST_ERROR><![CDATA[]]></LAST_ERROR> </ATTRIBUTE> <ATTRIBUTE> <NAME><![CDATA[latest/dynamic/instance- identity/document/accountId]]></NAME> <LAST_STATUS>Success</LAST_STATUS> <VALUE><![CDATA[205767712438]]></VALUE> <LAST_SUCCESS_DATE>2017-03-21T13:39:38Z</LAST_SUCCESS_DATE> <LAST_ERROR_DATE></LAST_ERROR_DATE> <LAST_ERROR><![CDATA[]]></LAST_ERROR> </ATTRIBUTE> </EC2> </METADATA> <LAST_VULN_SCAN_DATETIME>2017-03- 21T13:39:38Z</LAST_VULN_SCAN_DATETIME> <LAST_VM_SCANNED_DATE>2017-03-
312

Chapter 7 - AssetsHost List Detection
21T13:39:38Z</LAST_VM_SCANNED_DATE> <LAST_VM_SCANNED_DURATION>229</LAST_VM_SCANNED_DURATION> <LAST_VM_AUTH_SCANNED_DATE>2017-03- 21T13:39:38Z</LAST_VM_AUTH_SCANNED_DATE> <LAST_VM_AUTH_SCANNED_DURATION>229</LAST_VM_AUTH_SCANNED_DURATION> <LAST_COMPLIANCE_SCAN_DATETIME>2017-03- 21T13:21:51Z</LAST_COMPLIANCE_SCAN_DATETIME> </HOST> </HOST_LIST> </RESPONSE></HOST_LIST_OUTPUT>
Sample - Record Limit Exceeded Warning
In this case 1,000 host records are included in the XML output and the Warning message (shown below) indicates the URL you need to use to request the next 1,000 host records.
<RESPONSE>... <WARNING> <CODE>1980</CODE> <TEXT>1000 record limit exceeded. Use URL to get next batch of results.</TEXT> <URL><![CDATA[https://qualysapi.qualys.com/api/2.0/fo/asset/host/?action=list&id_min=2400356]]></URL> </WARNING></RESPONSE>...
DTD
<platform API server>/api/2.0/fo/asset/host/host_list_output.dtd
Host List Detection /api/2.0/fo/asset/host/vm/detection/
[GET] [POST]
Download a list of hosts with the hosts latest vulnerability data, based on the host based scan data available in the user’s account. This data brings a lot of value to customers because they provide the latest complete vulnerability status for the hosts (NEW, ACTIVE, FIXED, REOPENED) and history information.
313

Chapter 7 - AssetsHost List Detection
Permissions - Managers view all VM scanned hosts in subscription. Auditors have no permission to view VM scanned hosts. Unit Managers view VM scanned hosts in user’s business unit. Scanners and Readers view VM scanned hosts in user’s account.
Express Lite - This API is available to Express Lite users.
Input Parameters
The input parameter action=list is required. All other input parameters are optional. Several filtering parameters are provided for filtering hosts and QIDs. When multiple filter parameters are specified, the service combines the effects of all the parameters in a way that corresponds to a logical “AND”. So if two filter parameters are specified in the request, the service returns hosts that match both filters.
Quick Links: Detection Filters | Host Filters | QID Filters | Asset tags | EC2 metadata | Detection Timestamp
API Request
Detection Filters
Parameter Description
action=list (Required)
echo_request={0|1} (Optional) Specify 1 to view input parameters in the XML output. When unspecified, parameters are not included in the XML output.
Parameter Description
action=list (Required)
echo_request={0|1} (Optional) Show (echo) the request’s input parameters (names and values) in the output. When unspecified, parameters are not included in the output. Specify 1 to view parameters in the output.
show_results={0|1} (Optional) When not specified, results are included in theoutput. Specify show_results=0 to exclude the results.If you exclude the results, CSV will have an empty Resultscolumn, and XML will not contain the Results tag.
show_reopened_info={0|1} (Optional) When not specified, reopened info for reopened vulnerabilities is not included in the output. Specify show_reopened_info=1 to include reopened info i.e. first/last reopened date, times reopened.
314
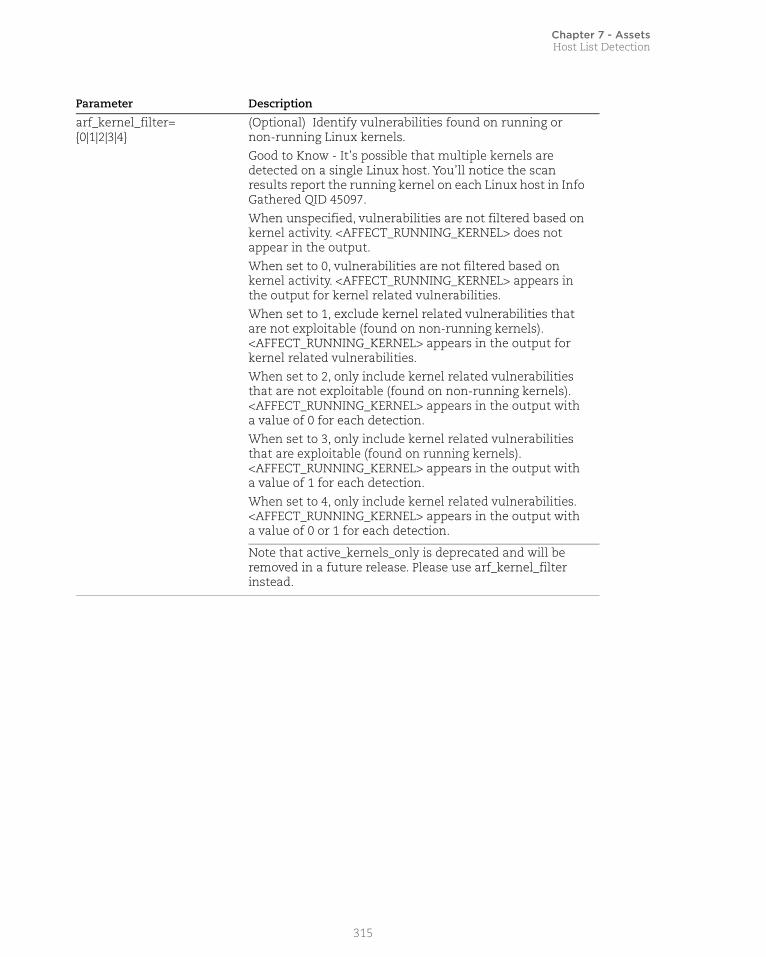
Chapter 7 - AssetsHost List Detection
arf_kernel_filter= {0|1|2|3|4}
(Optional) Identify vulnerabilities found on running or non-running Linux kernels.Good to Know - It’s possible that multiple kernels are detected on a single Linux host. You’ll notice the scan results report the running kernel on each Linux host in Info Gathered QID 45097.When unspecified, vulnerabilities are not filtered based on kernel activity. <AFFECT_RUNNING_KERNEL> does not appear in the output.When set to 0, vulnerabilities are not filtered based on kernel activity. <AFFECT_RUNNING_KERNEL> appears in the output for kernel related vulnerabilities. When set to 1, exclude kernel related vulnerabilities that are not exploitable (found on non-running kernels). <AFFECT_RUNNING_KERNEL> appears in the output for kernel related vulnerabilities. When set to 2, only include kernel related vulnerabilities that are not exploitable (found on non-running kernels). <AFFECT_RUNNING_KERNEL> appears in the output with a value of 0 for each detection. When set to 3, only include kernel related vulnerabilities that are exploitable (found on running kernels). <AFFECT_RUNNING_KERNEL> appears in the output with a value of 1 for each detection.When set to 4, only include kernel related vulnerabilities. <AFFECT_RUNNING_KERNEL> appears in the output with a value of 0 or 1 for each detection.
Note that active_kernels_only is deprecated and will be removed in a future release. Please use arf_kernel_filter instead.
Parameter Description
315

Chapter 7 - AssetsHost List Detection
arf_service_filter= {0|1|2|3|4}
(Optional) Identify vulnerabilities found on running or non-running ports/services.When unspecified, vulnerabilities are not filtered based on running ports/services. <AFFECT_RUNNING_SERVICE> does not appear in the output. When set to 0, vulnerabilities are not filtered based on running ports/services. <AFFECT_RUNNING_SERVICE> appears in the output for service related vulnerabilities. When set to 1, exclude service related vulnerabilities that are not exploitable (found on non-running ports/services). <AFFECT_RUNNING_SERVICE> appears in the output for service related vulnerabilities. When set to 2, only include service related vulnerabilities that are not exploitable (found on non-running ports/services). <AFFECT_RUNNING_SERVICE> appears in the output with a value of 0 for each detection. When set to 3, only include exploitable service related vulnerabilities (found on running ports/services). <AFFECT_RUNNING_SERVICE> appears in the output with a value of 1 for each detection.When set to 4, only include service related vulnerabilities. <AFFECT_RUNNING_SERVICE> appears in the output with a value of 0 or 1 for each detection.
arf_config_filter= {0|1|2|3|4}
(Optional) Identify vulnerabilities that may or may not be exploitable due to the current host configuration.When unspecified, vulnerabilities are not filtered based on host configuration. <AFFECT_EXPLOITABLE_CONFIG> does not appear in the output. When set to 0, vulnerabilities are not filtered based on host configuration. <AFFECT_EXPLOITABLE_CONFIG> appears in the output for config related vulnerabilities. When set to 1, exclude vulnerabilities not exploitable due to host configuration. <AFFECT_EXPLOITABLE_CONFIG> appears in the output for config related detections. When set to 2, only include config related vulnerabilities that are not exploitable. <AFFECT_EXPLOITABLE_CONFIG> appears in the output with a value of 0 for each detection. When set to 3, only include config related vulnerabilities that are exploitable. <AFFECT_EXPLOITABLE_CONFIG> appears in the output with a value of 1 for each detection.When set to 4, only include config related vulnerabilities. <AFFECT_EXPLOITABLE_CONFIG> appears in the output with a value of 0 or 1 for each detection.
Parameter Description
316
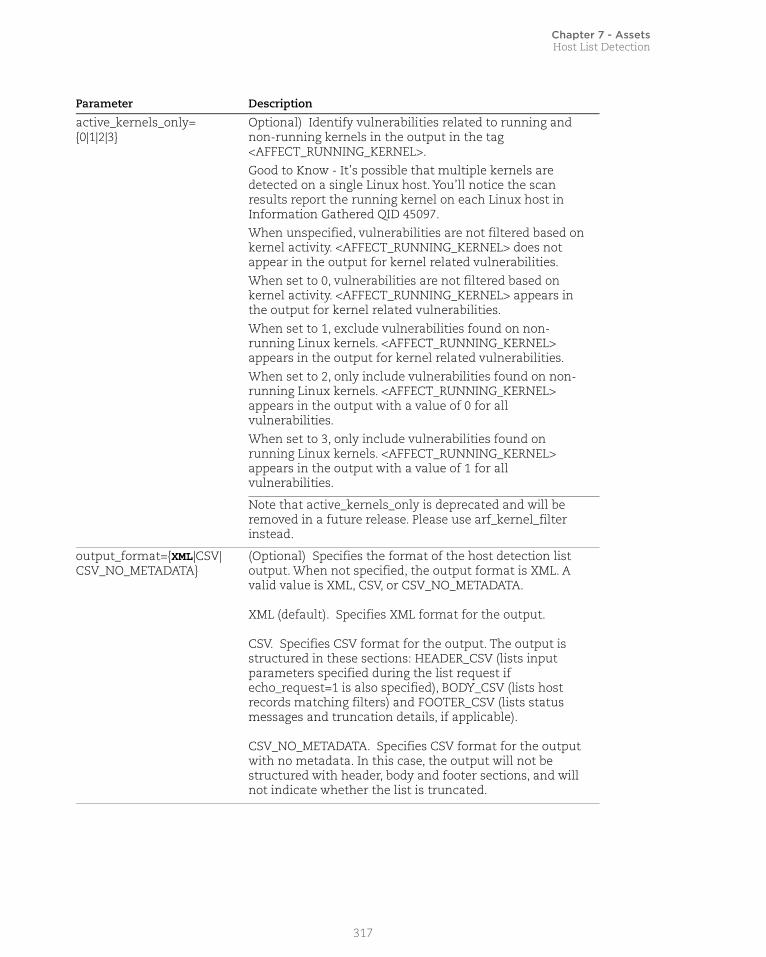
Chapter 7 - AssetsHost List Detection
active_kernels_only= {0|1|2|3}
Optional) Identify vulnerabilities related to running and non-running kernels in the output in the tag <AFFECT_RUNNING_KERNEL>.Good to Know - It’s possible that multiple kernels are detected on a single Linux host. You’ll notice the scan results report the running kernel on each Linux host in Information Gathered QID 45097. When unspecified, vulnerabilities are not filtered based on kernel activity. <AFFECT_RUNNING_KERNEL> does not appear in the output for kernel related vulnerabilities. When set to 0, vulnerabilities are not filtered based on kernel activity. <AFFECT_RUNNING_KERNEL> appears in the output for kernel related vulnerabilities. When set to 1, exclude vulnerabilities found on non-running Linux kernels. <AFFECT_RUNNING_KERNEL> appears in the output for kernel related vulnerabilities. When set to 2, only include vulnerabilities found on non-running Linux kernels. <AFFECT_RUNNING_KERNEL> appears in the output with a value of 0 for all vulnerabilities. When set to 3, only include vulnerabilities found on running Linux kernels. <AFFECT_RUNNING_KERNEL> appears in the output with a value of 1 for all vulnerabilities.
Note that active_kernels_only is deprecated and will be removed in a future release. Please use arf_kernel_filter instead.
output_format={XML|CSV| CSV_NO_METADATA}
(Optional) Specifies the format of the host detection list output. When not specified, the output format is XML. A valid value is XML, CSV, or CSV_NO_METADATA.
XML (default). Specifies XML format for the output.
CSV. Specifies CSV format for the output. The output is structured in these sections: HEADER_CSV (lists input parameters specified during the list request if echo_request=1 is also specified), BODY_CSV (lists host records matching filters) and FOOTER_CSV (lists status messages and truncation details, if applicable).
CSV_NO_METADATA. Specifies CSV format for the output with no metadata. In this case, the output will not be structured with header, body and footer sections, and will not indicate whether the list is truncated.
Parameter Description
317
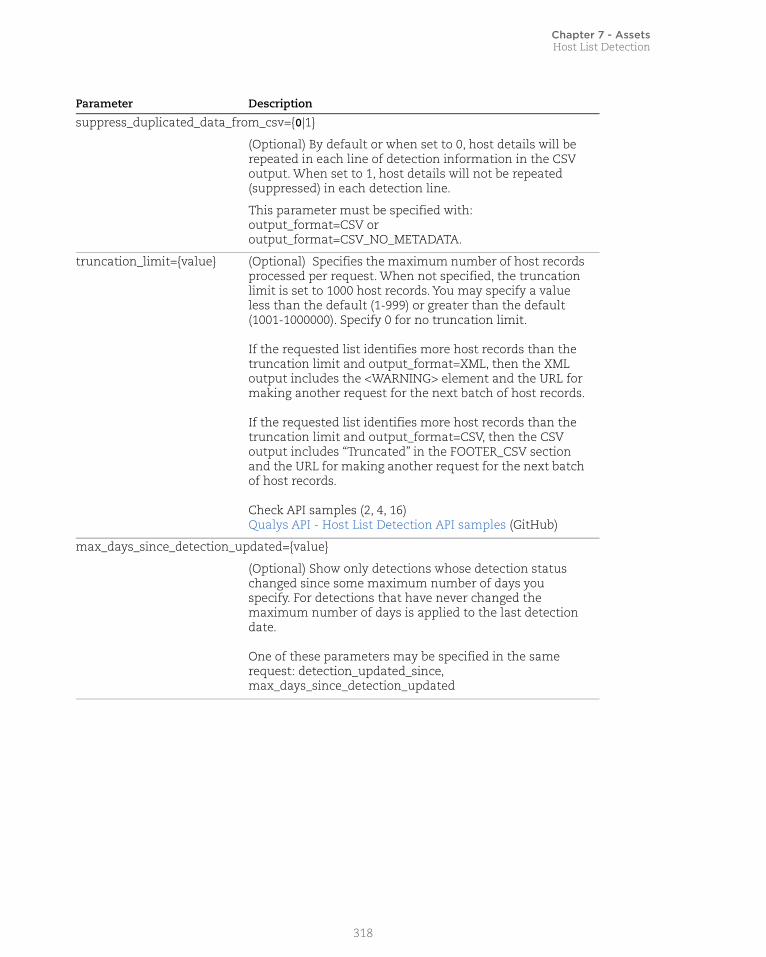
Chapter 7 - AssetsHost List Detection
suppress_duplicated_data_from_csv={0|1}
(Optional) By default or when set to 0, host details will be repeated in each line of detection information in the CSV output. When set to 1, host details will not be repeated (suppressed) in each detection line.
This parameter must be specified with: output_format=CSV or output_format=CSV_NO_METADATA.
truncation_limit={value} (Optional) Specifies the maximum number of host records processed per request. When not specified, the truncation limit is set to 1000 host records. You may specify a value less than the default (1-999) or greater than the default (1001-1000000). Specify 0 for no truncation limit.
If the requested list identifies more host records than the truncation limit and output_format=XML, then the XML output includes the <WARNING> element and the URL for making another request for the next batch of host records.
If the requested list identifies more host records than the truncation limit and output_format=CSV, then the CSV output includes “Truncated” in the FOOTER_CSV section and the URL for making another request for the next batch of host records.
Check API samples (2, 4, 16)Qualys API - Host List Detection API samples (GitHub)
max_days_since_detection_updated={value}
(Optional) Show only detections whose detection status changed since some maximum number of days you specify. For detections that have never changed the maximum number of days is applied to the last detection date.
One of these parameters may be specified in the same request: detection_updated_since, max_days_since_detection_updated
Parameter Description
318

Chapter 7 - AssetsHost List Detection
detection_updated_since={value}
(Optional) Show only detections whose detection status changed after a certain date and time. For detections that have never changed the date is applied to the last detection date. Valid date format is: YYYY-MMDD[THH:MM:SSZ] format (UTC/GMT), like “2017-02-15” or “2017-02-15T23:15:00Z”. Tip: You can use this parameter in conjunction with the detection_updated_before parameter to limit the detections shown to a specific date range.One of these parameters may be specified in the same request: detection_updated_since, max_days_since_detection_updated
detection_updated_before={value}
(Optional) Show only detections whose detection status changed before a certain date and time. Valid date format is: YYYY-MMDD[THH:MM:SSZ] format (UTC/GMT), like “2017-02-15” or “2017-02-15T23:15:00Z”.Tip: You can use this parameter in conjunction with the detection_updated_since parameter to limit the detections shown to a specific date range.One of these parameters may be specified in the same request: detection_updated_since, max_days_since_detection_updated
dectection_processed_before={date}
(Optional) Show detections with vulnerability scan resultsprocessed before a certain date and time. Specify the date inYYYY-MMDD[THH:MM:SSZ] format (UTC/GMT), like“2016-09-12” or “2016-09-12T23:15:00Z”.
dectection_processed_after={date}
(Optional) Show detections with vulnerability scan resultsprocessed after a certain date and time. Specify the date inYYYY-MMDD[ THH:MM:SSZ] format (UTC/GMT), like“2016-09-12” or “2016-09-12T23:15:00Z”.
Parameter Description
319

Chapter 7 - AssetsHost List Detection
Host Filters
Parameter Description
ids={value} (Optional) Show only certain host IDs/ranges. One or more host IDs/ranges may be specified. Multiple entries are comma separated. A host ID range is specified with a hyphen (for example: 190-400).Valid host IDs are required.
id_min={value} (Optional) Show only hosts which have a minimum host ID value.
id_max={value} (Optional) Show only hosts which have a maximum host ID value. A valid host ID is required.
ips={value} (Optional) Show only certain IP addresses/ranges. One or more IPs/ranges may be specified. Multiple entries are comma separated. An IP range is specified with a hyphen (for example: 10.10.10.1-10.10.10.100).
ag_ids={value} (Optional) Show only hosts belonging to asset groups with certain IDs. One or more asset group IDs and/or ranges may be specified. Multiple entries are comma separated. A range is specified with a dash (for example: 386941-386945). Valid asset group IDs are required.
The ag_ids and ag_titles parameters are mutually exclusive and cannot be specified together in the same request.
ag_titles={value} (Optional) Show only hosts belonging to asset groups with certain strings in the asset group title. One or more asset group titles may be specified. Multiple entries are comma separated (for example, My+First+Asset+Group,Another+Asset+Group).
The ag_ids and ag_titles parameters are mutually exclusive and cannot be specified together in the same request.
network_ids={value} (Optional, and valid only when the Network Support feature is enabled for the user’s account) Restrict the request to certain custom network IDs. Multiple network IDs are comma separated.
vm_scan_since={date} (Optional) Show hosts scanned and processed since a certain date and time (optional). The date/time is specified in YYYY-MM-DD[THH:MM:SSZ] format (UTC/GMT), like “2007-07-01” or “2007-01-25T23:12:00Z”.
This parameter cannot be specified with max_days_since_vm_scan in the same request.
no_vm_scan_since={date} (Optional) Show hosts not scanned and processed since a certain date and time (optional). The date/time is specified in YYYY-MM-DD[THH:MM:SSZ] format (UTC/GMT), like “2007-07-01” or “2007-01-25T23:12:00Z”.
This parameter cannot be specified with max_days_since_vm_scan in the same request.
320

Chapter 7 - AssetsHost List Detection
max_days_since_last_vm_scan={value}
(Optional) Show only hosts scanned and processed in the past number of days, where the value is a number of days.
This parameter cannot be specified with any of these parameters in the same request: vm_scan_since and no_vm_scan_since.
vm_processed_before={date}
(Optional) Show hosts with vulnerability scan results processed before a certain date and time. Specify the date in YYYY-MM-DD[THH:MM:SSZ] format (UTC/GMT), like “2016-09-12” or “2016-09-12T23:15:00Z”.
vm_processed_after={date} (Optional) Show hosts with vulnerability scan results processed after a certain date and time. Specify the date in YYYY-MM-DD[THH:MM:SSZ] format (UTC/GMT), like “2016-09-12” or “2016-09-12T23:15:00Z”.
vm_scan_date_before=date} (Optional) Show hosts with a vulnerability scan end date before a certain date and time. Specify the date in YYYY-MM-DD[THH:MM:SSZ] format (UTC/GMT), like “2016-09-12” or “2016-09-12T23:15:00Z”.
vm_scan_date_after={date} (Optional) Show hosts with a vulnerability scan end date after a certain date and time. Specify the date in YYYY-MM-DD[THH:MM:SSZ] format (UTC/GMT), like “2016-09-12” or “2016-09-12T23:15:00Z”.
vm_auth_scan_date_before={date}
(Optional) Show hosts with a successful authenticated vulnerability scan end date before a certain date and time. Specify the date in YYYY-MM-DD[THH:MM:SSZ] format (UTC/GMT), like “2016-09-12” or “2016-09-12T23:15:00Z”.
vm_auth_scan_date_after={date}
(Optional) Show hosts with a successful authenticated vulnerability scan end date after a certain date and time. Specify the date in YYYY-MM-DD[THH:MM:SSZ] format (UTC/GMT), like “2016-09-12” or “2016-09-12T23:15:00Z”.
status={value} (Optional) Show only hosts with one or more of these status values: New, Active, Re-Opened, Fixed. Multiple status values are entered as a comma-separated list.
If this parameter is not passed to the API, by default, the output contains detections with New, Active or Re-Opened <STATUS> only.
To get hosts with Fixed status, check this API sampleQualys API - Host List Detection API samples (GitHub, sample 11)
Parameter Description
321

Chapter 7 - AssetsHost List Detection
compliance_enabled={0|1} (Optional) This parameter is valid only when the policy compliance module is enabled for the user account. This parameter is invalid for an Express Lite user.Specify 1 to list compliance hosts in the user’s account that have been scanned and processed. These hosts are assigned to the policy compliance module. Specify 0 to list scanned hosts which are not assigned to the policy compliance module.
os_pattern={expression} (Optional) Show only hosts which have an operating system matching a certain regular expression. An empty value cannot be specified. Use “%5E%24” to match empty string.
Important: The regular expression string you enter must follow the PCRE standard and it must be URL encoded.
Sample regular expression strings for matching OS names:Qualys API - Host List Detection API samples (GitHub, see sample 17)
For information about the Perl Compatible Regular Expressions (PCRE) standard visit:http://php.net/manual/en/book.pcre.php
For the PCRE syntax, see:http://php.net/manual/en/reference.pcre.pattern.syntax.php
http://www.php.net/manual/en/reference.pcre.pattern.posix.php
Parameter Description
322

Chapter 7 - AssetsHost List Detection
QID Filters
Parameter Description
qids={value} (Optional) Show only detection records with certain QIDs. One or more QIDs may be specified. A range is specified with a dash (for example: 68518-68522). Multiple entries are comma separated. Valid QIDs are required.
severities={value} (Optional) Show only detection records which have certain severities. One or more levels may be specified. A range is specified with a dash (for example: 1-3). Multiple entries are comma separated.
show_igs={0|1} (Optional except as noted) Specify 1 to show detection records with information gathered along with confirmed vulnerabilities and potential vulnerabilities. Specify 0 (default) to hide information gathered.
The show_igs parameter is required in one use case. The parameter show_igs=1 must be specified if both these conditions are met: 1) search lists are included using the parameter include_search_list_titles or include_search_list_ids, and 2) if the included search lists contain only information gathered.
include_search_list_titles={value}
(Optional) Show detection records only when a record’s QID is INCLUDED IN in one or more of the specified search list titles. One or more titles may be specified. Multiple titles are comma separated.
This parameter cannot be specified with any of these parameters in the same request: qids, severities or include_search_list_ids.
exclude_search_list_titles={value}
(Optional) Show detection records only when a record’s QID is IS EXCLUDED from one or more of the specified search list titles. One or more titles may be specified. Multiple titles are comma separated.
This parameter cannot be specified with any of these parameters in the same request: qids, severities or exclude_search_list_ids.
include_search_list_ids={value,value...}
(Optional) Show detection records only when a record’s QID IS INCLUDED in one or more of the specified search list titles. One or more IDs may be specified. A range is specified with a dash (for example: 10-15). Multiple entries are comma separated.
This parameter cannot be specified with any of these parameters in the same request: qids, severities or include_search_list_titles.
323

Chapter 7 - AssetsHost List Detection
Asset tags
exclude_search_list_ids={value,value...}
(Optional) Show detection records only when a record’s QID IS EXCLUDED from one or more of the specified search list titles. One or more IDs may be specified. A range is specified with a dash (for example: 40-42). Multiple entries are comma separated.
This parameter cannot be specified with any of these parameters in the same request: qids, severities or exclude_search_list_titles.
Parameter Description
use_tags={0|1} (Optional) Specify 0 (the default) if you want to select hosts based on IP addresses/ranges and/or asset groups. Specify 1 if you want to select hosts based on asset tags.
tag_set_by={id|name} (Optional when use_tags=1) Specify “id” (the default) to select a tag set by providing tag IDs. Specify “name” to select a tag set by providing tag names.
tag_include_selector={any|all}
(Optional when use_tags=1) Select “any” (the default) to include hosts that match at least one of the selected tags. Select “all” to include hosts that match all of the selected tags.
tag_exclude_selector={any|all}
(Optional when use_tags=1) Select “any” (the default) to exclude hosts that match at least one of the selected tags. Select “all” to exclude hosts that match all of the selected tags.
tag_set_include={value} (Optional when use_tags=1) Specify a tag set to include. Hosts that match these tags will be included. You identify the tag set by providing tag name or IDs. Multiple entries are comma separated.
tag_set_exclude={value} (Optional when use_tags=1) Specify a tag set to exclude. Hosts that match these tags will be excluded. You identify the tag set by providing tag name or IDs. Multiple entries are comma separated.
show_tags={0|1} (Optional) Specify 1 to display asset tags associated with each host in the XML output.
Parameter Description
324

Chapter 7 - AssetsHost List Detection
EC2 metadata
Detection Timestamp
Use these parameters to view various timestamp values in the output.
Parameter Description
host_metadata={value} (Optional) Specify the name of the cloud provider to show the assets managed by that cloud provider, i.e. EC2.Note: Only supports fetching EC2 assets for now.
host_metadata_fields={value1,value2}
(Optional when host_metadata is specified) Specify the EC2 instance fields to fetch the data for.Data can be fetched for the following fields: accountId, region, availabilityZone, instanceId, instanceType, imageId, kernelId.
Parameter Description
LAST_SCAN_DATETIME= {date}
The date and time of the most recent vulnerability scan of the asset.
LAST_VM_SCANNED_DATE= {date}
The scan end date/time for the most recent unauthenticated vulnerability scan of the asset.
LAST_VM_SCANNED_DURATION={date}
The scan duration (in seconds) for the most recent unauthenticated vulnerability scan of the asset.
LAST_VM_AUTH_SCANNED_ DATE={date}
The scan end date/time for the last successful authenticated vulnerability scan of the asset.
LAST_VM_AUTH_SCANNED_ DURATION={date}
The scan duration (in seconds) for the last successful authenticated vulnerability scan of the asset.
LAST_PC_SCANNED_DATE= {date}
The scan end date/time for the most recent compliance scan on the asset.
FIRST_FOUND_DATETIME={date} The date/time when the vulnerability was first found.
LAST_FOUND_DATETIME={date} The most recent date/time when the vulnerability was found.
LAST_TEST_DATETIME={date} The most recent date/time when the vulnerability was tested.
LAST_UPDATE_DATETIME={date} The most recent date/time when the detection record was updated.
LAST_FIXED_DATETIME={date} The date/time when the vulnerability was verified fixed by a scan.
325

Chapter 7 - AssetsHost List Detection
Keep Alive Mechanism
The service uses a “keep alive” mechanism to maintain an open connection to the Qualys server for the duration of the host detection list API request. To keep the connection alive, the service sends some “dummy” data back to the client every 30 to 40 seconds if no “real” data has been sent already by the API during that time.
In XML output, this “dummy” data appears as a “<!-- keep-alive -->” line (since comments should be safely ignored by downstream XML parsers).
In CSV and CSV_NO_METADATA output, this “dummy” data appears as a <CR><LF> (carriage return, linefeed) pair (since empty lines clearly do not contain any CSV data).
Sample - List VM scanned hostsAPI request:
curl -u "username:password" -H "X-Requested-With: curl" "https://qualysapi.qualys.com/api/2.0/fo/asset/host/vm/detection/?action=list"
XML output:
<HOST_LIST_VM_DETECTION_OUTPUT> <RESPONSE> <DATETIME>2018-04-26T11:25:58Z</DATETIME> <HOST_LIST> <HOST> <ID>6506432</ID> <IP>10.10.10.11</IP> <TRACKING_METHOD>IP</TRACKING_METHOD> <OS><![CDATA[Windows 2008 R2 Enterprise Service Pack 1]]></OS> <DNS><![CDATA[2k8r2-u-10-11]]></DNS> <NETBIOS><![CDATA[2K8R2-U-10-11]]></NETBIOS> <LAST_SCAN_DATETIME>2018-04-13T03:49:05Z</LAST_SCAN_DATETIME> <LAST_VM_SCANNED_DATE>2018-04-13T03:48:50Z</LAST_VM_SCANNED_DATE> <LAST_VM_SCANNED_DURATION>352</LAST_VM_SCANNED_DURATION> <DETECTION_LIST> <DETECTION> <QID>38170</QID> <TYPE>Confirmed</TYPE> <SEVERITY>2</SEVERITY> <PORT>3389</PORT> <PROTOCOL>tcp</PROTOCOL> <SSL>1</SSL> <RESULTS><![CDATA[Certificate #0 CN=2k8r2-u-10-11 (2k8r2-u-10-11) doesn'tresolve]]></RESULTS>
326
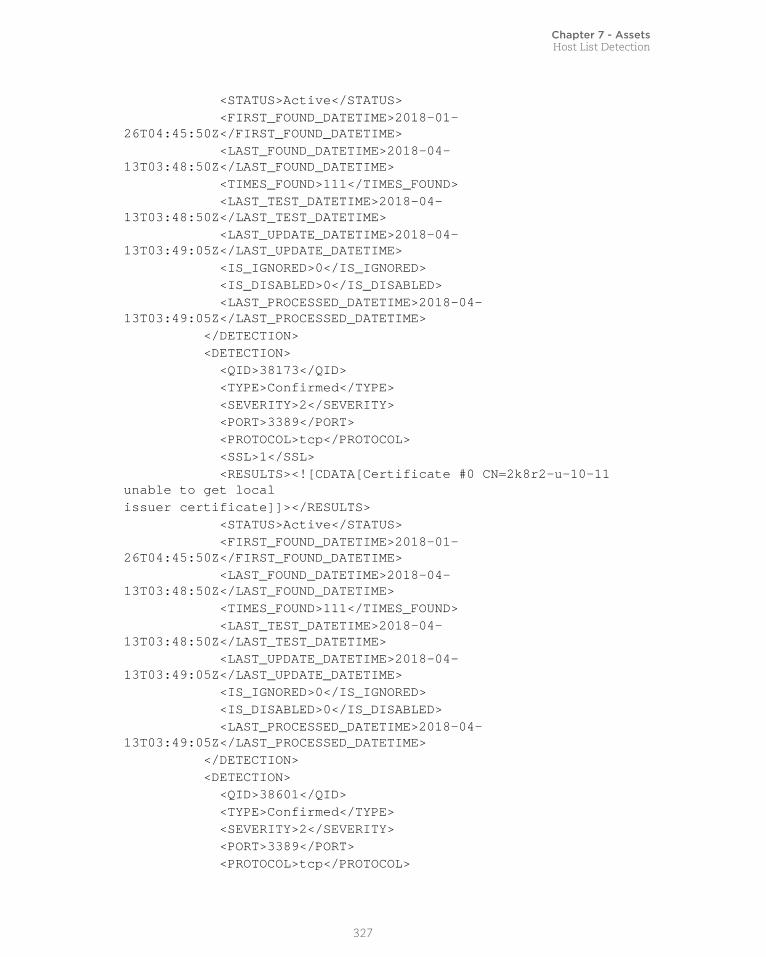
Chapter 7 - AssetsHost List Detection
<STATUS>Active</STATUS> <FIRST_FOUND_DATETIME>2018-01-26T04:45:50Z</FIRST_FOUND_DATETIME> <LAST_FOUND_DATETIME>2018-04-13T03:48:50Z</LAST_FOUND_DATETIME> <TIMES_FOUND>111</TIMES_FOUND> <LAST_TEST_DATETIME>2018-04-13T03:48:50Z</LAST_TEST_DATETIME> <LAST_UPDATE_DATETIME>2018-04-13T03:49:05Z</LAST_UPDATE_DATETIME> <IS_IGNORED>0</IS_IGNORED> <IS_DISABLED>0</IS_DISABLED> <LAST_PROCESSED_DATETIME>2018-04-13T03:49:05Z</LAST_PROCESSED_DATETIME> </DETECTION> <DETECTION> <QID>38173</QID> <TYPE>Confirmed</TYPE> <SEVERITY>2</SEVERITY> <PORT>3389</PORT> <PROTOCOL>tcp</PROTOCOL> <SSL>1</SSL> <RESULTS><![CDATA[Certificate #0 CN=2k8r2-u-10-11 unable to get localissuer certificate]]></RESULTS> <STATUS>Active</STATUS> <FIRST_FOUND_DATETIME>2018-01-26T04:45:50Z</FIRST_FOUND_DATETIME> <LAST_FOUND_DATETIME>2018-04-13T03:48:50Z</LAST_FOUND_DATETIME> <TIMES_FOUND>111</TIMES_FOUND> <LAST_TEST_DATETIME>2018-04-13T03:48:50Z</LAST_TEST_DATETIME> <LAST_UPDATE_DATETIME>2018-04-13T03:49:05Z</LAST_UPDATE_DATETIME> <IS_IGNORED>0</IS_IGNORED> <IS_DISABLED>0</IS_DISABLED> <LAST_PROCESSED_DATETIME>2018-04-13T03:49:05Z</LAST_PROCESSED_DATETIME> </DETECTION> <DETECTION> <QID>38601</QID> <TYPE>Confirmed</TYPE> <SEVERITY>2</SEVERITY> <PORT>3389</PORT> <PROTOCOL>tcp</PROTOCOL>
327
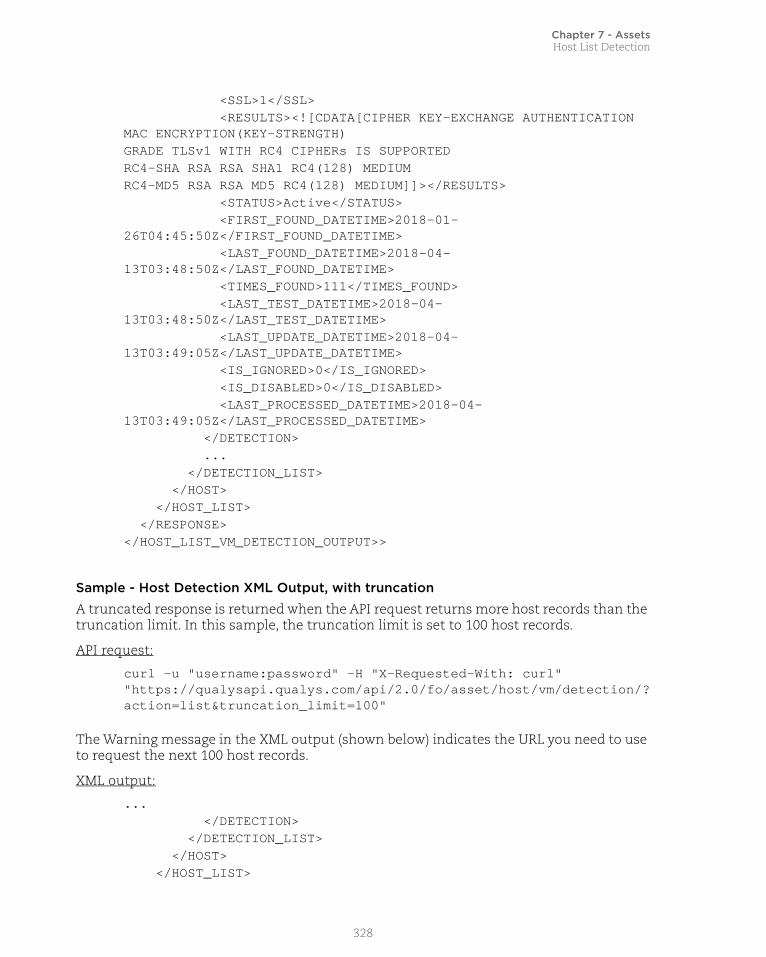
Chapter 7 - AssetsHost List Detection
<SSL>1</SSL> <RESULTS><![CDATA[CIPHER KEY-EXCHANGE AUTHENTICATION MAC ENCRYPTION(KEY-STRENGTH)GRADE TLSv1 WITH RC4 CIPHERs IS SUPPORTED RC4-SHA RSA RSA SHA1 RC4(128) MEDIUMRC4-MD5 RSA RSA MD5 RC4(128) MEDIUM]]></RESULTS> <STATUS>Active</STATUS> <FIRST_FOUND_DATETIME>2018-01-26T04:45:50Z</FIRST_FOUND_DATETIME> <LAST_FOUND_DATETIME>2018-04-13T03:48:50Z</LAST_FOUND_DATETIME> <TIMES_FOUND>111</TIMES_FOUND> <LAST_TEST_DATETIME>2018-04-13T03:48:50Z</LAST_TEST_DATETIME> <LAST_UPDATE_DATETIME>2018-04-13T03:49:05Z</LAST_UPDATE_DATETIME> <IS_IGNORED>0</IS_IGNORED> <IS_DISABLED>0</IS_DISABLED> <LAST_PROCESSED_DATETIME>2018-04-13T03:49:05Z</LAST_PROCESSED_DATETIME> </DETECTION> ... </DETECTION_LIST> </HOST> </HOST_LIST> </RESPONSE></HOST_LIST_VM_DETECTION_OUTPUT>>
Sample - Host Detection XML Output, with truncation
A truncated response is returned when the API request returns more host records than the truncation limit. In this sample, the truncation limit is set to 100 host records.
API request:
curl -u "username:password" -H "X-Requested-With: curl" "https://qualysapi.qualys.com/api/2.0/fo/asset/host/vm/detection/?action=list&truncation_limit=100"
The Warning message in the XML output (shown below) indicates the URL you need to use to request the next 100 host records.
XML output:
... </DETECTION> </DETECTION_LIST> </HOST> </HOST_LIST>
328

Chapter 7 - AssetsHost List Detection - Normalized Data
<WARNING> <CODE>1980</CODE> <TEXT>100 record limit exceeded. Use URL to get next batch of results.</TEXT> <URL><![CDATA[https://qualysapi.qualys.com/api/2.0/fo/asset/host/vm/detection/?action=list&truncation_limit=100&id_min=5641289]]></URL> </WARNING> </RESPONSE></HOST_LIST_VM_DETECTION_OUTPUT>
More Samples
Qualys API - Host List Detection API samples (GitHub)
DTD<platform API server>/api/2.0/fo/asset/host/vm/detection/ host_list_vm_detection_output.dtd
Host List Detection - Normalized DataQualys normalizes the vulnerability scan results into the database using a complex and sophisticated process. This mechanism generates what is called the vulnerability “host based”scan results. Normalized data brings a lot of value to customers because they provide the latest complete vulnerability status for the hosts (NEW, ACTIVE, FIXED, REOPENED) and history information. Normalized data is completely independent of scan results and option profiles, as shown in the diagram below.
The Qualys database stores automatic data for VM scanned hosts. For each of these hosts there can be multiple detection records.
329

Chapter 7 - AssetsHost List Detection - Use Cases
What is a VM Scanned Host? A VM scanned host is a host that has been successfully scanned by the Qualys VM service for vulnerabilities. Note that a host is considered successfully scanned when it was included as a scan target, the scan was launched and it completed successfully.
What is a Detection Record? A detection record is a unique instance of a discovered vulnerability for a given host. It identifies the host IP address, QID, port, service, FQDN and SSL flag (whether the vulnerability was detected over SSL).
Host List Detection - Use CasesThe host detection API is often used in conjunction with other information that can be downloaded using other Qualys APIs.
Create Custom Technical Reports with vulnerability detailsTechnical reports need additional information for each vulnerability such as the description, solution, threat or impact. The detection API provides the QID for each vulnerability found for an asset. The QID is a unique ID that references a vulnerability within the Qualys KnowledgeBase.
Use the following workflow to create custom technical reports:
Step 1 - Use the host list detection API to return “host based” vulnerability data for hosts in your account.
Step 2 - Use the KnowlegeBase API (/api/2.0/fo/knowledge_base/vuln/?action=list) to obtain vulnerability data, such as the vulnerability description, threat and impact. It’s possible to make a request for all vulnerabilities (QIDs) in the KnowledgeBase or just a specific vulnerability.
For example, to make a request for QID 90082 use the following URL:
https://qualysapi.qualys.com/api/2.0/fo/knowledge_base/vuln/?action=list&ids=90082
where “qualysapi.qualys.com” is the name of the API server where your account is located (in this case US Platform 1).
Step 3 - Correlate the vulnerability information in the third party application using the QID number provided in the <QID> XML output which is returned by the host detection API (Step 1) and the KnowledgeBase API (Step 2).
A typical integration would be to create tables in a database for the XML output from both Qualys API functions and use QID as a key for a join. This way it would be possible to create queries that will provide all the vulnerabilities for a given set of hosts (according to custom search criteria) and their descriptions.
330
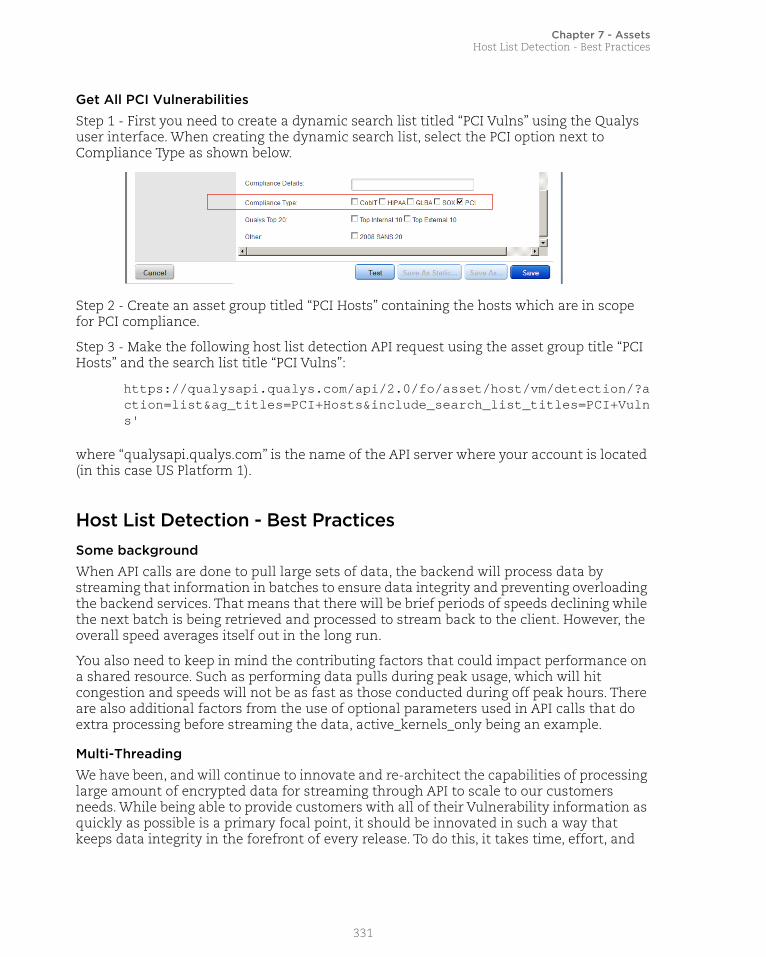
Chapter 7 - AssetsHost List Detection - Best Practices
Get All PCI Vulnerabilities
Step 1 - First you need to create a dynamic search list titled “PCI Vulns” using the Qualys user interface. When creating the dynamic search list, select the PCI option next to Compliance Type as shown below.
Step 2 - Create an asset group titled “PCI Hosts” containing the hosts which are in scope for PCI compliance.
Step 3 - Make the following host list detection API request using the asset group title “PCI Hosts” and the search list title “PCI Vulns”:
https://qualysapi.qualys.com/api/2.0/fo/asset/host/vm/detection/?action=list&ag_titles=PCI+Hosts&include_search_list_titles=PCI+Vulns'
where “qualysapi.qualys.com” is the name of the API server where your account is located (in this case US Platform 1).
Host List Detection - Best PracticesSome background
When API calls are done to pull large sets of data, the backend will process data by streaming that information in batches to ensure data integrity and preventing overloading the backend services. That means that there will be brief periods of speeds declining while the next batch is being retrieved and processed to stream back to the client. However, the overall speed averages itself out in the long run.
You also need to keep in mind the contributing factors that could impact performance on a shared resource. Such as performing data pulls during peak usage, which will hit congestion and speeds will not be as fast as those conducted during off peak hours. There are also additional factors from the use of optional parameters used in API calls that do extra processing before streaming the data, active_kernels_only being an example.
Multi-Threading
We have been, and will continue to innovate and re-architect the capabilities of processing large amount of encrypted data for streaming through API to scale to our customers needs. While being able to provide customers with all of their Vulnerability information as quickly as possible is a primary focal point, it should be innovated in such a way that keeps data integrity in the forefront of every release. To do this, it takes time, effort, and
331

Chapter 7 - AssetsExcluded Host List
dedicated resources to ensure full testing is done to account for all aspects. With that in mind, the use of automation, threading, and parallelism are techniques to that can assist with increasing performance with data pulls.
While fetching host information in an automated fashion, you can make use of multi-threading to collect data in batch sizes for optimum performance.
Maximum benefit has seen when the batch size is set evenly throughout the number of parallel threads used. For example, a host detection call resulting in a return of 100k assets, and using 10 threads in parallel, would benefit the most by using a batch size of (100,000 / 10) = 10,000. To reduce having one thread slow down the entire process by hitting a congested server, you can break this out further into batches of 5,000 hosts, resulting in 20 output files.
Looking for help? Check our examples here
Qualys API - Host List Detection API samples - Multithreading (GitHub)
Excluded Host List/api/2.0/fo/asset/excluded_ip/?action=list
[GET} [POST]
Show the excluded host list for the user's account. Hosts in your excluded host list will not be scanned.
Permissions - Managers, Auditors view all excluded hosts in subscription. Unit Managers view excluded hosts in their own business unit. Scanners, Readers view excluded hosts in their account.
Express Lite - This API is available to Express Lite users.
Input Parameters
Parameter Description
action=list (Required)
echo_request={0|1} (Optional) Specify 1 to view (echo) input parameters in the XML output. By default these are not included.
ips={value} (Optional) Show only certain excluded IP addresses/ranges. When unspecified, all excluded IPs/ranges in your account will be listed. One or more IPs/ranges may be specified. Multiple entries are comma separated. An IP range is specified with a hyphen (for example, 10.10.24.1-10.10.24.20).
332

Chapter 7 - AssetsExcluded Host List
network_id={value} (Optional and valid only when the Network Support feature is enabled for the user’s account) Restrict the request to a certain custom network ID. You might need to use this parameter to get the excluded host list you're interested in. See User Scenarios to know more about the behavior of this parameter.
Asset Groups
ag_ids={value} (Optional and valid only when the Network Support feature is enabled for the user’s account) Restrict the request to a certain custom network ID. You might need to use this parameter to get the excluded host list you're interested in.
ag_titles={value} (Optional) Show excluded hosts belonging to asset groups with certain strings in the asset group title. One or more asset group titles may be specified. Multiple entries are comma separated (for example, My+First+Asset+Group,Another+Asset+Group).
These parameters are mutually exclusive and cannot be specified together: ag_ids and ag_titles.
Asset Tags
use_tags={0|1} (Optional) Specify 0 (the default) if you want to select hosts based on IP addresses/ranges and/or asset groups. Specify 1 if you want to select hosts based on asset tags.
tag_include_selector= {any|all}
(Optional when use_tags=1) Specify "any" (the default) to include excluded hosts that match at least one of the selected tags. Specify "all" to include excluded hosts that match all of the selected tags.
tag_exclude_selector= {any|all}
(Optional when use_tags=1) Specify "any" (the default) to ignore excluded hosts that match at least one of the selected tags. Specify "all" to ignore excluded hosts that match all of the selected tags.
tag_set_by = {id|name} (Optional when use_tags=1) Specify “id” (the default) to select a tag set by providing tag IDs. Specify “name” to select a tag set by providing tag names.
tag_set_include={value} (Optional when use_tags=1) Specify a tag set to include. Excluded hosts that match these tags will be included. You identify the tag set by providing tag name or IDs. Multiple entries are comma separated.
tag_set_exclude={value} (Optional when use_tags=1) Specify a tag set to exclude. Excluded hosts that match these tags will be ignored. You identify the tag set by providing tag name or IDs. Multiple entries are comma separated.
Parameter Description
333

Chapter 7 - AssetsExcluded Host List
User Scenarios
Let us consider different user scenarios to know more about the behavior of network_id parameter:
Sample - List all excluded hosts
API request:
curl -u user:password -H "X-Requested-With: curl demo 2" -D headers.15 "https://qualysapi.qualys.com/api/2.0/fo/asset/excluded_ip/?action=list"
XML output
<?xml version="1.0" encoding="UTF-8" ?><!DOCTYPE IP_LIST_OUTPUT SYSTEM"https://qualysapi.qualys.com/api/2.0/fo/asset/excluded_ip/ip_list_output.dtd"><IP_LIST_OUTPUT> <RESPONSE> <DATETIME>2018-01-23T00:33:24Z</DATETIME> <IP_SET> <IP_RANGE network_id="0" expiration_date="2015-04-28T00:00:00Z">10.100.100.101-10.100.100.255</IP_RANGE> <IP network_id="14665885">10.10.10.1</IP> <IP network_id="0">10.100.100.100</IP> </IP_SET> </RESPONSE></IP_LIST_OUTPUT>
User Networks with access
network_id mandatory?
What does output include?
User 1 Global Default Network, Network 1, Network 2
No Excluded host list from all the networks the user has access to.
User 2 Global Default Network
No Excluded host list for global default network.
User 3 Network 1 Yes Excluded host list for Network 1.
User 4 Network 1, Network 2, Network 3
Yes Excluded host list for network that is listed in the request. Multiple entries are comma separated (for example, Network+1,Network+2,Network+3).
334

Chapter 7 - AssetsExcluded Hosts Change History
Sample - List all excluded hosts in IP range
API request:
curl -u user:password -H "X-Requested-With: curl demo 2" -D headers.16 "https://qualysapi.qualys.com/api/2.0/fo/asset/excluded_ip/?action=list&ips=10.10.24.1-10.10.24.255"
DTD
<platform API server>/api/2.0/fo/asset/excluded_ip/ip_list_output.dtd
Excluded Hosts Change History/api/2.0/fo/asset/excluded_ip/history/?action=list
[GET] {POST]
View change history for excluded hosts in the user’s subscription. History record IDs in the XML output are listed in decreasing order.
Permissions - Users with these roles have permission to view all excluded hosts in the subscription: Manager, Auditor, Unit Manager, Scanner and Reader.
Unlike other APIs, an excluded hosts change history request returns change history records for all relevant IP addresses in the subscription, regardless of whether the user has access to these IP addresses in their account.
Input Parameters
Parameter Description
action=list (Required)
echo_request={0|1} (Optional) Specify 1 to view (echo) input parameters in the XML output. By default these are not included.
ips={value} (Optional) Show only certain excluded IP addresses/ranges. When unspecified, all excluded IPs/ranges in your subscription will be listed. One or more IPs/ranges may be specified. Multiple entries are comma separated. An IP range is specified with a hyphen (for example, 10.10.24.1-10.10.24.20).
network_id={value} (Optional and valid only when the Network Support feature is enabled for the user’s account) Specify a network ID to restrict the request to a certain custom network.
id_min={value} (Optional) Show only those history records in your subscription that have an ID number greater than or equal to an ID number you specify.
335

Chapter 7 - AssetsExcluded Hosts Change History
Sample - Change list for all excluded IPsAPI request:
curl -u user:password -H "X-Requested-With: curl demo 2" -D headers.15 "https://qualysapi.qualys.com/api/2.0/fo/asset/excluded_ip/history/?action=list"
XML output:
<!DOCTYPE HISTORY_LIST_OUTPUT SYSTEM "https://qualysapi.qualys.com/api/2.0/fo/asset/excluded_ip/history/history_list_output.dtd">
<HISTORY_LIST_OUTPUT> <RESPONSE> <DATETIME>2018-01-18T01:48:42Z</DATETIME> <HISTORY_LIST> <HISTORY> <ID>1923</ID> <IP_SET> <IP_RANGE>10.10.10.2-10.10.10.11</IP_RANGE> <IP_RANGE>10.10.10.32-10.10.10.34</IP_RANGE> <IP>10.10.30.70</IP> </IP_SET> <ACTION>Added</ACTION> <DATETIME>2017-12-02T05:19:06Z</DATETIME> <USER_LOGIN>quays_ab</USER_LOGIN> <COMMENTS><![CDATA[DD]]></COMMENTS> </HISTORY> <HISTORY> <ID>1863</ID> <IP_SET> <IP_RANGE>10.10.10.102-10.10.10.120</IP_RANGE> </IP_SET> <ACTION>Removed</ACTION> <DATETIME>2017-06-01T23:51:26Z</DATETIME> <USER_LOGIN>quays_ab</USER_LOGIN> <COMMENTS><
Chapter 7 - AssetsExcluded Hosts Change History
10.10.10.120]]></COMMENTS> </HISTORY> <HISTORY> <ID>1663</ID> <IP_SET> <IP_RANGE>10.10.10.100-10.10.10.120</IP_RANGE> </IP_SET> <ACTION>Added</ACTION> <DATETIME>2016-04-29T06:56:13Z</DATETIME> <USER_LOGIN>quays_ss</USER_LOGIN> <COMMENTS><![CDATA[Scanner shouldn't add Exclude hosts]]></COMMENTS> </HISTORY>
...
</HISTORY_LIST> <WARNING> <CODE>1980</CODE> <TEXT>1,000 record limit exceeded. Use URL to get next batch of results.</TEXT><URL><![CDATA[https://qualysapi.qualys.com/api/2.0/fo/asset/excluded_ip/history/?action=list&id_max=1660]]></URL> </WARNING> <GLOSSARY> <USER_LIST> <USER> <USER_LOGIN>quays_ss</USER_LOGIN> <FIRST_NAME>Sally Unassigned</FIRST_NAME> <LAST_NAME>Storm</LAST_NAME> <ROLE>Scanner</ROLE> </USER> <USER> <USER_LOGIN>quays_ab</USER_LOGIN> <FIRST_NAME>Al</FIRST_NAME> <LAST_NAME>Berger</LAST_NAME> <ROLE>Manager</ROLE> </USER> </USER_LIST> </GLOSSARY> </RESPONSE></HISTORY_LIST_OUTPUT>
DTD
<platform API server>/api/2.0/fo/asset/excluded_ip/history/history_list_output.dtd
337

Chapter 7 - AssetsManage Excluded Hosts
Manage Excluded HostsThe excluded hosts endpoint (/api/2.0/fo/asset/excluded_ip) allows you to add and remove excluded hosts from your account.
Add excluded hosts/api/2.0/fo/asset/excluded_ip/?action=add
[POST]
Add hosts (IPs) to your excluded host list. Hosts in your excluded host list will not be scanned.
Permissions - Managers and Unit Managers have permission to add IPs to the excluded host list.
Input Parameters
Sample - Add excluded hosts
API request:
curl -H "X-Requested-With: curl" -u "USERNAME:PASSWD" -d"action=add&ips=10.100.100.101-10.100.100.255&comment=adding ips&expiry_days=5"
Parameter Description
action=add (Required)
ips={value} (Required) The IP addresses to be added to the excluded IPs list. Enter a comma separated list of IPv4 singletons or ranges. For example: 10.10.10.13,10.10.10.25-10.10.10.29
expiry_days={value} (Optional) The number of days the IPs being added to the excluded IPs list will be considered valid for exclusion. When the expiration is reached, the IPs are removed from the list and made available again for scanning. When unspecified, the IPs being added have no expiration and will remain on the list until removed by a user.
dg_names={value} (Optional) Specify users who will be notified 7 days before hosts are removed from the excluded hosts list (i.e. supply distribution group names as defined in the Qualys UI). Multiple distribution groups are comma separated. A maximum of 15 distribution groups may be entered.
comment={value} (Required) User-defined notes (up to 1024 characters).
network_id={value} (Optional and valid only when the user making the request has access to more than one network) Assign a network ID to the IPs being added to the excluded IPs list. By default, the user’s default network ID is assigned.
338
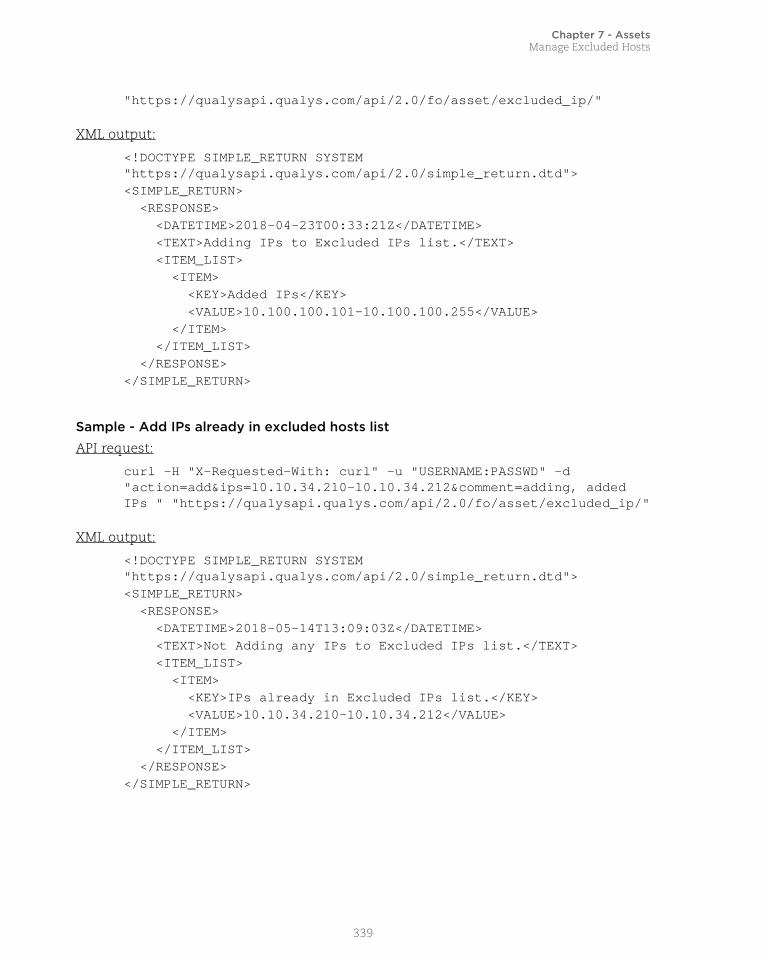
Chapter 7 - AssetsManage Excluded Hosts
"https://qualysapi.qualys.com/api/2.0/fo/asset/excluded_ip/"
XML output:
<!DOCTYPE SIMPLE_RETURN SYSTEM "https://qualysapi.qualys.com/api/2.0/simple_return.dtd"><SIMPLE_RETURN> <RESPONSE> <DATETIME>2018-04-23T00:33:21Z</DATETIME> <TEXT>Adding IPs to Excluded IPs list.</TEXT> <ITEM_LIST> <ITEM> <KEY>Added IPs</KEY> <VALUE>10.100.100.101-10.100.100.255</VALUE> </ITEM> </ITEM_LIST> </RESPONSE></SIMPLE_RETURN>
Sample - Add IPs already in excluded hosts list
API request:
curl -H "X-Requested-With: curl" -u "USERNAME:PASSWD" -d "action=add&ips=10.10.34.210-10.10.34.212&comment=adding, added IPs " "https://qualysapi.qualys.com/api/2.0/fo/asset/excluded_ip/"
XML output:
<!DOCTYPE SIMPLE_RETURN SYSTEM "https://qualysapi.qualys.com/api/2.0/simple_return.dtd"><SIMPLE_RETURN> <RESPONSE> <DATETIME>2018-05-14T13:09:03Z</DATETIME> <TEXT>Not Adding any IPs to Excluded IPs list.</TEXT> <ITEM_LIST> <ITEM> <KEY>IPs already in Excluded IPs list.</KEY> <VALUE>10.10.34.210-10.10.34.212</VALUE> </ITEM> </ITEM_LIST> </RESPONSE></SIMPLE_RETURN>
339
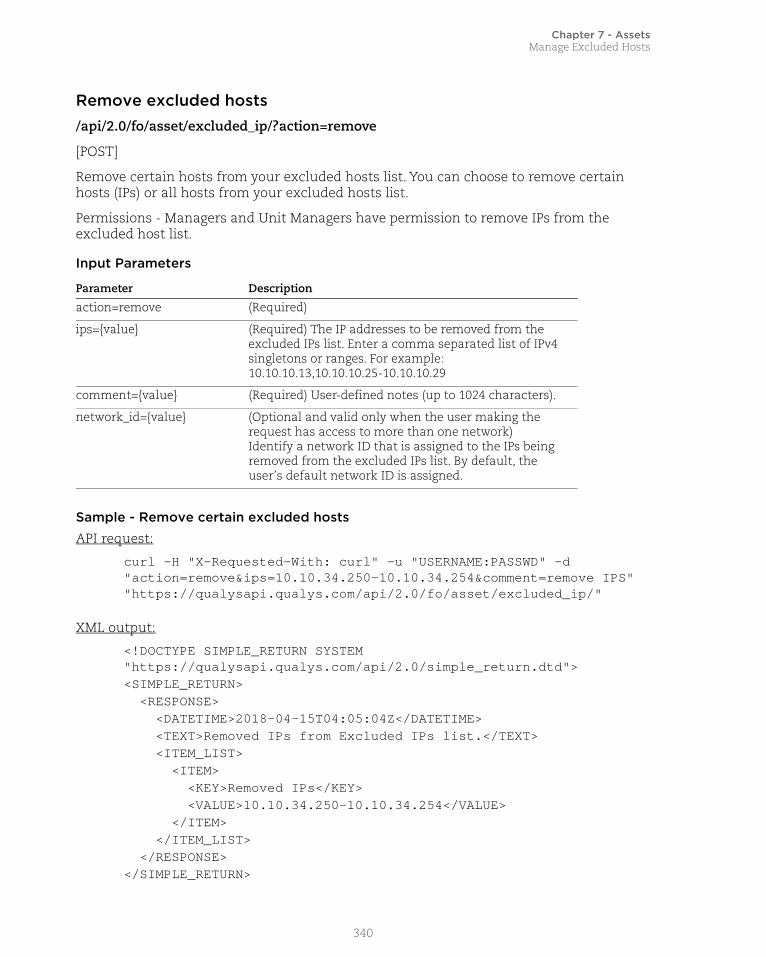
Chapter 7 - AssetsManage Excluded Hosts
Remove excluded hosts/api/2.0/fo/asset/excluded_ip/?action=remove
[POST]
Remove certain hosts from your excluded hosts list. You can choose to remove certain hosts (IPs) or all hosts from your excluded hosts list.
Permissions - Managers and Unit Managers have permission to remove IPs from the excluded host list.
Input Parameters
Sample - Remove certain excluded hosts
API request:
curl -H "X-Requested-With: curl" -u "USERNAME:PASSWD" -d "action=remove&ips=10.10.34.250-10.10.34.254&comment=remove IPS" "https://qualysapi.qualys.com/api/2.0/fo/asset/excluded_ip/"
XML output:
<!DOCTYPE SIMPLE_RETURN SYSTEM "https://qualysapi.qualys.com/api/2.0/simple_return.dtd"><SIMPLE_RETURN> <RESPONSE> <DATETIME>2018-04-15T04:05:04Z</DATETIME> <TEXT>Removed IPs from Excluded IPs list.</TEXT> <ITEM_LIST> <ITEM> <KEY>Removed IPs</KEY> <VALUE>10.10.34.250-10.10.34.254</VALUE> </ITEM> </ITEM_LIST> </RESPONSE></SIMPLE_RETURN>
Parameter Description
action=remove (Required)
ips={value} (Required) The IP addresses to be removed from the excluded IPs list. Enter a comma separated list of IPv4 singletons or ranges. For example: 10.10.10.13,10.10.10.25-10.10.10.29
comment={value} (Required) User-defined notes (up to 1024 characters).
network_id={value} (Optional and valid only when the user making the request has access to more than one network) Identify a network ID that is assigned to the IPs being removed from the excluded IPs list. By default, the user’s default network ID is assigned.
340

Chapter 7 - AssetsManage Excluded Hosts
Remove all excluded hosts/api/2.0/fo/asset/excluded_ip/?action=remove_all
[POST]
Remove all hosts from your excluded hosts list.
Permissions - Managers and Unit Managers have permission to remove IPs from the excluded host list.
Input Parameters
Sample - Remove all excluded hosts
API request:
curl -H "X-Requested-With: curl" -u "USERNAME:PASSWD" -d"action=remove_all&comment=remove all ips""https://qualysapi.qualys.com/api/2.0/fo/asset/excluded_ip/"
XML output:
<!DOCTYPE SIMPLE_RETURN SYSTEM "https://qualysapi.qualys.com/api/2.0/simple_return.dtd"><SIMPLE_RETURN> <RESPONSE> <DATETIME>2018-04-24T00:08:19Z</DATETIME> <TEXT>Removed IPs from Excluded IPs list.</TEXT> <ITEM_LIST> <ITEM> <KEY>Removed IPs</KEY> <VALUE>10.100.100.101-10.100.100.255,100.100.100.101-100.100.100.255</VALUE> </ITEM> </ITEM_LIST> </RESPONSE></SIMPLE_RETURN>
Parameter Description
action=remove_all (Required)
comment={value} (Required) User-defined notes (up to 1024 characters).
network_id={value} (Optional and valid only when the user making the request has access to more than one network) Identify a network ID that is assigned to the IPs being removed from the excluded IPs list. By default, the user’s default network ID is assigned.
341
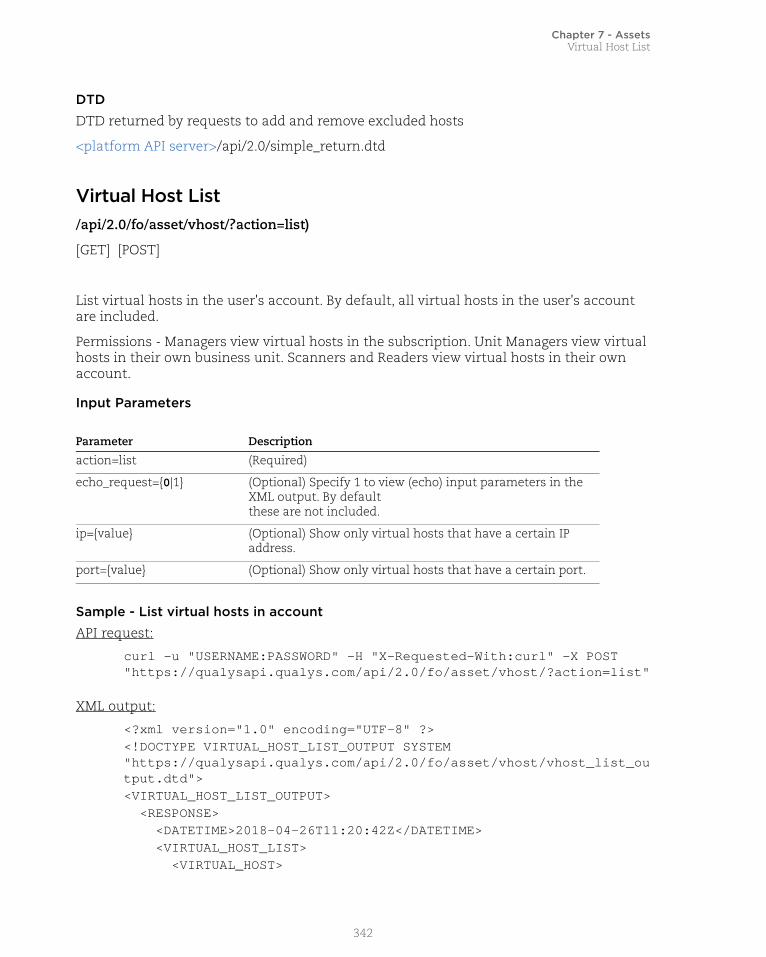
Chapter 7 - AssetsVirtual Host List
DTD
DTD returned by requests to add and remove excluded hosts
<platform API server>/api/2.0/simple_return.dtd
Virtual Host List/api/2.0/fo/asset/vhost/?action=list)
[GET] [POST]
List virtual hosts in the user's account. By default, all virtual hosts in the user's account are included.
Permissions - Managers view virtual hosts in the subscription. Unit Managers view virtual hosts in their own business unit. Scanners and Readers view virtual hosts in their own account.
Input Parameters
Sample - List virtual hosts in account
API request:
curl -u "USERNAME:PASSWORD" -H "X-Requested-With:curl" -X POST "https://qualysapi.qualys.com/api/2.0/fo/asset/vhost/?action=list"
XML output:
<?xml version="1.0" encoding="UTF-8" ?><!DOCTYPE VIRTUAL_HOST_LIST_OUTPUT SYSTEM "https://qualysapi.qualys.com/api/2.0/fo/asset/vhost/vhost_list_output.dtd"><VIRTUAL_HOST_LIST_OUTPUT> <RESPONSE> <DATETIME>2018-04-26T11:20:42Z</DATETIME> <VIRTUAL_HOST_LIST> <VIRTUAL_HOST>
Parameter Description
action=list (Required)
echo_request={0|1} (Optional) Specify 1 to view (echo) input parameters in the XML output. By defaultthese are not included.
ip={value} (Optional) Show only virtual hosts that have a certain IP address.
port={value} (Optional) Show only virtual hosts that have a certain port.
342

Chapter 7 - AssetsManage Virtual Hosts
<IP>10.11.65.3</IP> <PORT>255</PORT> <FQDN>asadfsadf-123.com</FQDN> </VIRTUAL_HOST> <VIRTUAL_HOST> <IP>10.11.65.5</IP> <PORT>246</PORT> <FQDN>asdfsahydk.com</FQDN> </VIRTUAL_HOST> </VIRTUAL_HOST_LIST> </RESPONSE></VIRTUAL_HOST_LIST_OUTPUT>
DTD<platform API server>/api/2.0/fo/asset/vhost/vhost_list_output.dtd
Manage Virtual Hosts/api/2.0/fo/asset/vhost/?action={value}
[POST]
Create, edit and delete virtual hosts in the user account. One subscription can have a maximum of 1024 virtual hosts. The POST access method may be used to make an API request.
Permissions - Managers manage virtual hosts in the subscription. Unit Managers manage virtual hosts in their own business unit when granted this permission. Scanners have permission to manage virtual hosts in their account when granted this permission. Readers, Auditors do not have permission to manage virtual hosts.
Input Parameters
Parameter Description
action={action} (Required) A flag used to make a virtual host request: create (create a virtual host)update (update/edit a virtual host)delete (delete a virtual host)add_fqdn (add one or more FQDNs to a virtual host) delete_fqdn (remove one or more FQDNs from a virtual host)
echo_request={0|1} (Optional) Specify 1 to view (echo) input parameters in the XML output. By default these are not included.
ip={value} (Required) An IP address for the virtual host configuration.
343

Chapter 7 - AssetsManage Virtual Hosts
Sample - Create virtual host
API request:
curl -u "USERNAME:PASSWORD" -H "X-Requested-With:curl" -X POST "action=create&ip=10.10.25.212&port=80&fqdn=www.abc123abc.com" "https://qualysapi.qualys.com/api/2.0/fo/asset/vhost/"
XML output:
<?xml version="1.0" encoding="UTF-8" ?><!DOCTYPE SIMPLE_RETURN SYSTEM "https://qualysapi.qualys.com/api/2.0/simple_return.dtd"><SIMPLE_RETURN> <RESPONSE> <DATETIME>2018-04-27T08:45:22Z</DATETIME> <TEXT>Virtual host successfully created.</TEXT> </RESPONSE></SIMPLE_RETURN>
Sample - Add FQDNs to a virtual host
API request:
curl -u "USERNAME:PASSWORD" -H "X-Requested-With:curl" -X POST "action=add_fqdn&ip=10.10.25.212&port=80&fqdn=www.abc123abc.com""https://qualysapi.qualys.com/api/2.0/fo/asset/vhost/"
XML output:
<?xml version="1.0" encoding="UTF-8" ?><!DOCTYPE SIMPLE_RETURN SYSTEM "https://qualysapi.qualys.com/api/2.0/simple_return.dtd"><SIMPLE_RETURN> <RESPONSE> <DATETIME>2018-04-27T08:45:48Z</DATETIME> <TEXT>Virtual host FQDN(s) successfully added.</TEXT> </RESPONSE></SIMPLE_RETURN>
port={value} (Required) A port number for the virtual host configuration.
fqdn={value} (Required for all actions except “delete”. Invalid for “delete”.)One or more fully-qualified domain names (FQDNs) for the virtual host configuration. Multiple entries are comma separated.*
Parameter Description
344
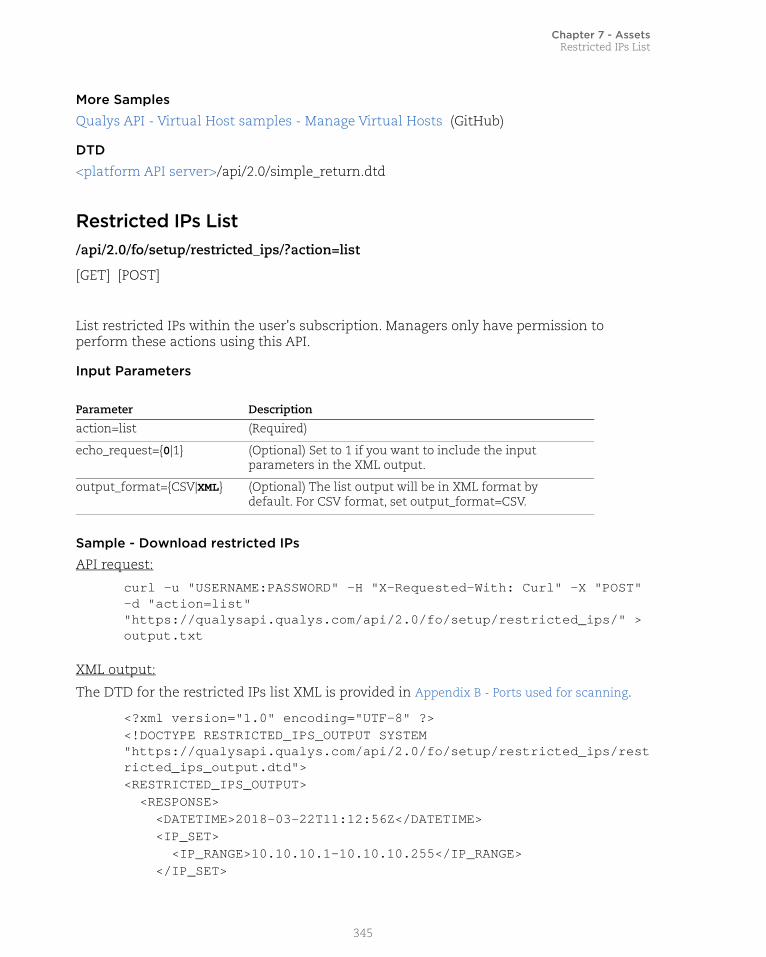
Chapter 7 - AssetsRestricted IPs List
More Samples
Qualys API - Virtual Host samples - Manage Virtual Hosts (GitHub)
DTD
<platform API server>/api/2.0/simple_return.dtd
Restricted IPs List/api/2.0/fo/setup/restricted_ips/?action=list
[GET] [POST]
List restricted IPs within the user's subscription. Managers only have permission to perform these actions using this API.
Input Parameters
Sample - Download restricted IPs
API request:
curl -u "USERNAME:PASSWORD" -H "X-Requested-With: Curl" -X "POST" -d "action=list" "https://qualysapi.qualys.com/api/2.0/fo/setup/restricted_ips/" > output.txt
XML output:
The DTD for the restricted IPs list XML is provided in Appendix B - Ports used for scanning.
<?xml version="1.0" encoding="UTF-8" ?><!DOCTYPE RESTRICTED_IPS_OUTPUT SYSTEM "https://qualysapi.qualys.com/api/2.0/fo/setup/restricted_ips/restricted_ips_output.dtd"><RESTRICTED_IPS_OUTPUT> <RESPONSE> <DATETIME>2018-03-22T11:12:56Z</DATETIME> <IP_SET> <IP_RANGE>10.10.10.1-10.10.10.255</IP_RANGE> </IP_SET>
Parameter Description
action=list (Required)
echo_request={0|1} (Optional) Set to 1 if you want to include the input parameters in the XML output.
output_format={CSV|XML} (Optional) The list output will be in XML format by default. For CSV format, set output_format=CSV.
345

Chapter 7 - AssetsManage Restricted IPs
<STATUS>disabled</STATUS> </RESPONSE></RESTRICTED_IPS_OUTPUT>
DTD for restricted IPs list
<platform API server>/api/2.0/fo/setup/restricted_ips/restricted_ips_output.dtd
Sample - Download Restricted IPs List in CSV format
API request:
curl -u "USERNAME:PASSWORD" -H "X-Requested-With: Curl" -X "POST" -d "action=list&output_format=csv" "https://qualysapi.qualys.com/api/2.0/fo/setup/restricted_ips/"
CSV output:
----BEGIN_RESPONSE_BODY_CSV10.0.0.010.0.0.101-10.255.255.255----END_RESPONSE_BODY_CSV----BEGIN_RESPONSE_FOOTER_CSVSTATUSenabled----END_RESPONSE_FOOTER_CSV
Manage Restricted IPs/api/2.0/fo/setup/restricted_ips/
[GET] [POST]
Manage and update the list of restricted IPs within the user's subscription. Managers only have permission to perform these actions using this API.
346
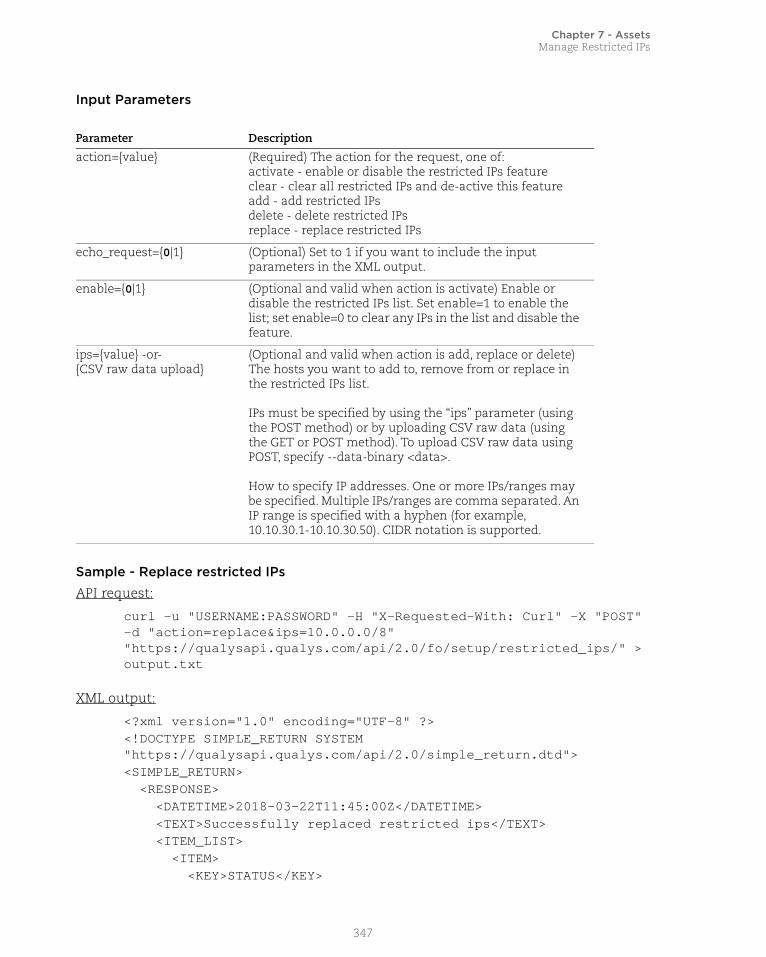
Chapter 7 - AssetsManage Restricted IPs
Input Parameters
Sample - Replace restricted IPs
API request:
curl -u "USERNAME:PASSWORD" -H "X-Requested-With: Curl" -X "POST" -d "action=replace&ips=10.0.0.0/8" "https://qualysapi.qualys.com/api/2.0/fo/setup/restricted_ips/" > output.txt
XML output:
<?xml version="1.0" encoding="UTF-8" ?><!DOCTYPE SIMPLE_RETURN SYSTEM "https://qualysapi.qualys.com/api/2.0/simple_return.dtd"><SIMPLE_RETURN> <RESPONSE> <DATETIME>2018-03-22T11:45:00Z</DATETIME> <TEXT>Successfully replaced restricted ips</TEXT> <ITEM_LIST> <ITEM> <KEY>STATUS</KEY>
Parameter Description
action={value} (Required) The action for the request, one of:activate - enable or disable the restricted IPs featureclear - clear all restricted IPs and de-active this featureadd - add restricted IPs delete - delete restricted IPs replace - replace restricted IPs
echo_request={0|1} (Optional) Set to 1 if you want to include the input parameters in the XML output.
enable={0|1} (Optional and valid when action is activate) Enable or disable the restricted IPs list. Set enable=1 to enable the list; set enable=0 to clear any IPs in the list and disable the feature.
ips={value} -or- {CSV raw data upload}
(Optional and valid when action is add, replace or delete)The hosts you want to add to, remove from or replace in the restricted IPs list.
IPs must be specified by using the “ips” parameter (using the POST method) or by uploading CSV raw data (using the GET or POST method). To upload CSV raw data using POST, specify --data-binary <data>.
How to specify IP addresses. One or more IPs/ranges may be specified. Multiple IPs/ranges are comma separated. An IP range is specified with a hyphen (for example, 10.10.30.1-10.10.30.50). CIDR notation is supported.
347

Chapter 7 - AssetsManage Restricted IPs
<VALUE>disabled</VALUE> </ITEM> </ITEM_LIST> </RESPONSE></SIMPLE_RETURN>
Sample - Delete restricted IPs, upload CSV raw data
CSV raw data:
$ cat file1.csv10.0.0.110.0.0.2-10.0.0.100
API request:
curl -H "X-Requested-with:curl" -H "Content-type:text/csv" -u "USERNAME:PASSWORD" --data-binary "@file1.csv" "https://qualysapi.qualys.com/api/2.0/fo/setup/restricted_ips/?action=delete"
XML output:
<?xml version="1.0" encoding="UTF-8" ?><!DOCTYPE SIMPLE_RETURN SYSTEM "https://qualysapi.qualys.com/api/2.0/simple_return.dtd"><SIMPLE_RETURN> <RESPONSE> <DATETIME>2018-03-22T11:45:34Z</DATETIME> <TEXT>Successfully deleted restricted ips</TEXT> <ITEM_LIST> <ITEM> <KEY>STATUS</KEY> <VALUE>disabled</VALUE> </ITEM> </ITEM_LIST> </RESPONSE></SIMPLE_RETURN>
Sample - Activate Restricted IPs feature and enable list
API request:
curl -u "USERNAME:PASSWORD" -H "X-Requested-With: Curl" -X "POST" -d "action=activate&enable=1" "https://qualysapi.qualys.com/api/2.0/fo/setup/restricted_ips/" > output.txt
348

Chapter 7 - AssetsManage Restricted IPs
XML output:
<?xml version="1.0" encoding="UTF-8" ?><!DOCTYPE SIMPLE_RETURN SYSTEM "https://qualysapi.qualys.com/api/2.0/simple_return.dtd"><SIMPLE_RETURN> <RESPONSE> <DATETIME>2018-03-22T11:46:45Z</DATETIME> <TEXT>Restricted IPs feature has been enabled successfully</TEXT> <ITEM_LIST> <ITEM> <KEY>STATUS</KEY> <VALUE>enabled</VALUE> </ITEM> </ITEM_LIST> </RESPONSE></SIMPLE_RETURN>
Sample - Clear All Restricted IPs and Disable the feature
API request:
curl -u "USERNAME:PASSWORD" -H "X-Requested-With: Curl" -X "POST" -d "action=clear" "https://qualysapi.qualys.com/api/2.0/fo/setup/restricted_ips/"
XML output:
<?xml version="1.0" encoding="UTF-8" ?><!DOCTYPE SIMPLE_RETURN SYSTEM "https://qualysapi.qualys.com/api/2.0/simple_return.dtd"><SIMPLE_RETURN> <RESPONSE> <DATETIME>2018-03-22T12:04:34Z</DATETIME> <TEXT>Successfully cleared restricted ips</TEXT> <ITEM_LIST> <ITEM> <KEY>STATUS</KEY> <VALUE>disabled</VALUE> </ITEM> </ITEM_LIST> </RESPONSE></SIMPLE_RETURN>
349

Chapter 7 - AssetsAsset Group List
Asset Group List/api/2.0/fo/asset/group/?action=list
[GET] [POST]
List asset groups in the user’s account.
Permissions - Managers can view asset groups in the subscription. Unit Managers can view all asset groups in the user’s business unit (those assigned to the business unit, and those owned by all users in the business unit). Scanners and Readers can view asset groups in the user’s account (those assigned to the user, and those owned by the user).
Input Parameters
Parameter Description
action=list (Required)
output_format={csv|xml} (Required) The requested output format: CSV or XML.
echo_request={0|1} (Optional) Specify 1 to show (echo) the request’s input parameters (names, values) in the XML output. When unspecified, parameters are not included in the XML output.
ids={value} (Optional) Show only asset groups with certain IDs. Multiple IDs are comma separated.
id_min={value} (Optional) Show only asset groups that have an ID greater than or equal to the specified ID.
id_max={value} (Optional) Show only asset groups that have an ID less than or equal to the specified ID.
truncation_limit={value} (Optional) Specify the maximum number of asset group records to output. By default this is set to 1000 records. If you specify truncation_limit=0, the output is not paginated and all records are returned in a single output. WARNING This can generate very large output and processing large XML files can consume a lot of resources on the client side. It is recommended to use the pagination logic and parallel processing. The previous page can be processed while the next page is being downloaded.
network_ids={value} (Optional and valid only when the Networks feature is enabled in your account) Restrict the request to certain network IDs. Multiple IDs are comma separated.
unit_id={value} (Optional) Show only asset groups that have a business unit ID equal to the specified ID.
user_id={value} (Optional) Show only asset groups that have a user ID equal to the specified ID.
350

Chapter 7 - AssetsAsset Group List
Sample - List asset groups, show default attributes
API request:
curl -u "USERNAME:PASSWD" -H "X-Requested-With: Curl" -X "POST" -d "action=list&ids=442838" "https://qualysapi.qualys.com/api/2.0/fo/asset/group/"
XML output:
<?xml version="1.0" encoding="UTF-8" ?><!DOCTYPE ASSET_GROUP_LIST_OUTPUT SYSTEM "https://qualysapi.qualys.com/api/2.0/fo/asset/group/asset_group_list_output.dtd"><ASSET_GROUP_LIST_OUTPUT> <RESPONSE> <DATETIME>2018-05-17T08:48:41Z</DATETIME> <ASSET_GROUP_LIST> <ASSET_GROUP> <ID>442838</ID> <TITLE><![CDATA[All]]></TITLE> <OWNER_ID>103448</OWNER_ID> <UNIT_ID>0</UNIT_ID> <NETWORK_ID>0</NETWORK_ID> <IP_SET> <IP_RANGE>10.10.10.0-10.10.10.1</IP_RANGE> <IP_RANGE>10.10.10.3-10.10.10.6</IP_RANGE> <IP>10.10.10.14</IP> <IP_RANGE>10.10.10.16-10.10.10.20</IP_RANGE> <IP_RANGE>10.10.10.22-10.10.10.255</IP_RANGE> <IP>10.10.31.26</IP> </IP_SET> </ASSET_GROUP> </ASSET_GROUP_LIST> </RESPONSE></ASSET_GROUP_LIST_OUTPUT>
title={value} (Optional) Show only the asset group that has a title equal to the specified string - this must be an exact match.
show_attributes={value} (Optional) Show attributes for each asset group along with the ID. Your options are: None, All or a comma-separated list of attribute names. Attribute names: OWNER_USER_NAME, TITLE, OWNER, NETWORK_IDS, LAST_UPDATE, IP_SET, APPLIANCE_LIST, DOMAIN_LIST, DNS_LIST, NETBIOS_LIST, EC2_ID_LIST, HOST_IDS, USER_IDS, UNIT_IDS, BUSINESS_IMPACT, CVSS, COMMENTS.
Parameter Description
351

Chapter 7 - AssetsAsset Group List
Sample - List asset groups, show all attributes
API request:
curl -u "USERNAME:PASSWD" -H "X-Requested-With: Curl" -X "POST" -d "action=list&ids=246385&show_attributes=ALL" "https://qualysapi.qualys.com/api/2.0/fo/asset/group/"
XML output:
<?xml version="1.0" encoding="UTF-8" ?><!DOCTYPE ASSET_GROUP_LIST_OUTPUT SYSTEM "https://qualysapi.qualys.com/api/2.0/fo/asset/group/asset_group_list_output.dtd"><ASSET_GROUP_LIST_OUTPUT> <RESPONSE> <DATETIME>2018-03-17T09:52:59Z</DATETIME> <ASSET_GROUP_LIST> <ASSET_GROUP> <ID>246385</ID> <TITLE>user_john</TITLE> <OWNER_USER_ID>180603</OWNER_USER_ID> <LAST_UPDATE>2018-03-07T11:37:57Z</LAST_UPDATE> <BUSINESS_IMPACT>High</BUSINESS_IMPACT> <DEFAULT_APPLIANCE_ID>199673</DEFAULT_APPLIANCE_ID> <APPLIANCE_IDS>199673, 199674</APPLIANCE_IDS> <IP_SET> <IP_RANGE>10.10.10.10-10.10.10.11</IP_RANGE> <IP_RANGE>10.113.197.131-10.113.197.132</IP_RANGE> </IP_SET> <DNS_LIST> <DNS>qualsss1.com</DNS> </DNS_LIST> <NETBIOS_LIST> <NETBIOS>WIN2003-SRV-O</NETBIOS> </NETBIOS_LIST> <HOST_IDS>634744, 653133</HOST_IDS> <ASSIGNED_USER_IDS>198400, 198401</ASSIGNED_USER_IDS> <ASSIGNED_UNIT_IDS>202741</ASSIGNED_UNIT_IDS> <OWNER_USER_NAME>John Doe</OWNER_USER_NAME> </ASSET_GROUP> </ASSET_GROUP_LIST> </RESPONSE></ASSET_GROUP_LIST_OUTPUT>
DTD for asset group list
<platform API server>/api/2.0/fo/asset/group/asset_group_list_output.dtd
352
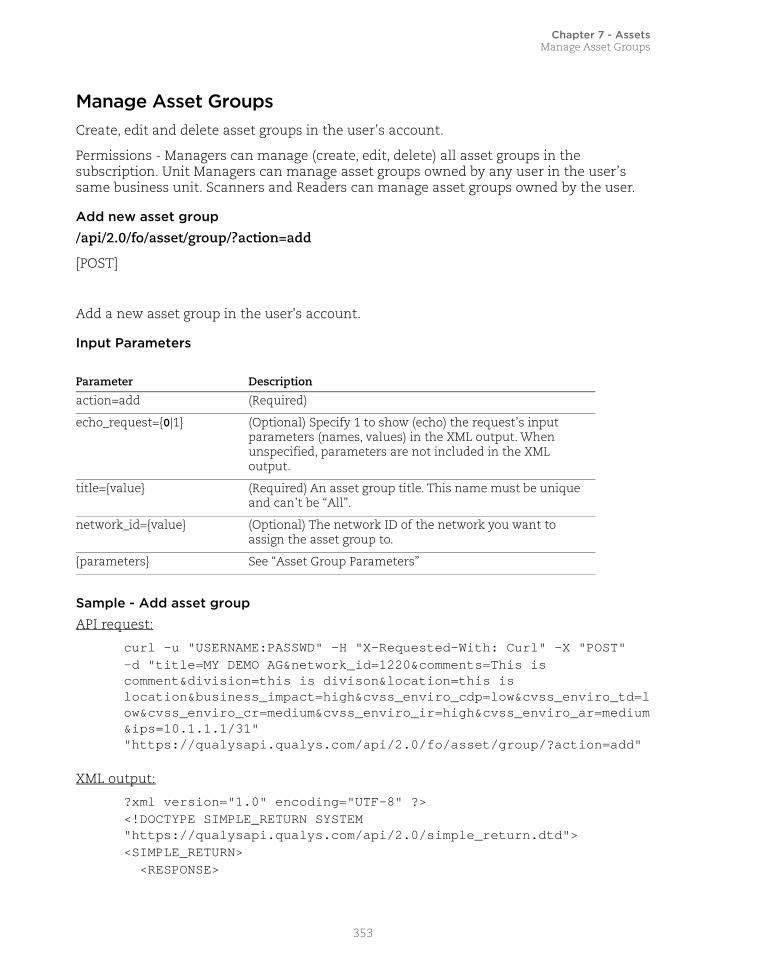
Chapter 7 - AssetsManage Asset Groups
Manage Asset GroupsCreate, edit and delete asset groups in the user’s account.
Permissions - Managers can manage (create, edit, delete) all asset groups in the subscription. Unit Managers can manage asset groups owned by any user in the user’s same business unit. Scanners and Readers can manage asset groups owned by the user.
Add new asset group/api/2.0/fo/asset/group/?action=add
[POST]
Add a new asset group in the user's account.
Input Parameters
Sample - Add asset groupAPI request:
curl -u "USERNAME:PASSWD" -H "X-Requested-With: Curl" -X "POST" -d "title=MY DEMO AG&network_id=1220&comments=This is comment&division=this is divison&location=this is location&business_impact=high&cvss_enviro_cdp=low&cvss_enviro_td=low&cvss_enviro_cr=medium&cvss_enviro_ir=high&cvss_enviro_ar=medium&ips=10.1.1.1/31" "https://qualysapi.qualys.com/api/2.0/fo/asset/group/?action=add"
XML output:
?xml version="1.0" encoding="UTF-8" ?><!DOCTYPE SIMPLE_RETURN SYSTEM "https://qualysapi.qualys.com/api/2.0/simple_return.dtd"><SIMPLE_RETURN> <RESPONSE>
Parameter Description
action=add (Required)
echo_request={0|1} (Optional) Specify 1 to show (echo) the request’s input parameters (names, values) in the XML output. When unspecified, parameters are not included in the XML output.
title={value} (Required) An asset group title. This name must be unique and can’t be “All”.
network_id={value} (Optional) The network ID of the network you want to assign the asset group to.
{parameters} See “Asset Group Parameters”
353

Chapter 7 - AssetsManage Asset Groups
<DATETIME>2018-03-28T22:57:50Z</DATETIME> <TEXT>Asset Group successfully added.</TEXT> <ITEM_LIST> <ITEM> <KEY>ID</KEY> <VALUE>395752377</VALUE> </ITEM> </ITEM_LIST> </RESPONSE></SIMPLE_RETURN>
Edit asset group/api/2.0/fo/asset/group/?action=edit
[POST]
Edit an existing asset group in the user's account.
Input Parameters
Sample - Edit asset group
API request:
curl -u "USERNAME:PASSWORD" -H "X-Requested-With: Curl" -X "POST" -d "id=395752377&set_title=MY ASSET GROUP" "https://qualysapi.qualys.com/api/2.0/fo/asset/group/?action=edit"
XML output:
The XML output uses the simple return (/api/2.0/simple_return.dtd).
<?xml version="1.0" encoding="UTF-8" ?><!DOCTYPE SIMPLE_RETURN SYSTEM "https://qualysapi.qualys.com/api/2.0/simple_return.dtd"><SIMPLE_RETURN> <RESPONSE> <DATETIME>2014-05-29T15:29:00Z</DATETIME>
Parameter Description
action=edit (Required)
echo_request={0|1} (Optional) Specify 1 to show (echo) the request’s input parameters (names, values) in the XML output. When unspecified, parameters are not included in the XML output.
id={value} (Required) The ID of the asset group you want to edit.
{parameters} See “Asset Group Parameters”
354

Chapter 7 - AssetsManage Asset Groups
<TEXT>Asset Group Updated Successfully</TEXT> <ITEM_LIST> <ITEM> <KEY>ID</KEY> <VALUE>395752377</VALUE> </ITEM> </ITEM_LIST> </RESPONSE></SIMPLE_RETURN>
Delete asset group/api/2.0/fo/asset/group/?action=delete
[POST]
Delete an asset group present in the user's account. By deleting an asset group any scheduled scans using the asset group will be deactivated.
Input Parameters
Sample - Delete asset group
API request:
curl -u "USERNAME:PASSWORD" -H "X-Requested-With: Curl" -X "POST" -d "id=395752377" "https://qualysapi.qualys.com/api/2.0/fo/asset/group/?action=delete"
XML output:
<?xml version="1.0" encoding="UTF-8" ?><!DOCTYPE SIMPLE_RETURN SYSTEM "https://qualysapi.qualys.com/api/2.0/simple_return.dtd"><SIMPLE_RETURN> <RESPONSE> <DATETIME>2018-03-29T15:49:35Z</DATETIME> <TEXT>Asset Group Deleted Successfully</TEXT>
Parameter Description
action=delete (Required)
echo_request={0|1} Optional) Specify 1 to show (echo) the request’s input parameters (names, values) in the XML output. When unspecified, parameters are not included in the XML output.
id={value} (Required) The ID of the asset group you want to delete.
355

Chapter 7 - AssetsManage Asset Groups
<ITEM_LIST> <ITEM> <KEY>ID</KEY> <VALUE>395752377</VALUE> </ITEM> </ITEM_LIST> </RESPONSE></SIMPLE_RETURN>
356

Chapter 7 - AssetsManage Asset Groups
Asset Group Parameters
Theses parameters are used for adding and editing an asset group.
The “set” (overwrite) and “remove” operations can cause the asset group to have no IPs, domains, etc depending on the parameter.
Parameter Parameter Nameaction=add
Parameter Nameaction=edit
Comments comments set_comments
(255 characters maximum)
Division division set_division
(64 characters maximum)
Function function set_function
(64 characters maximum)
Location location set_location
(64 characters maximum)
Business Impact business_impact set_business_impact
(One of: critical, high, medium, low, none)
IP addresses/ranges ips add_ipsremove_ipsset_ips
Scanner Appliances appliance_ids
Looking for appliance IDs? Use the Appliance API (/api/2.0/fo/appliance/). See KnowledgeBase
add_appliance_idsremove_appliance_idsset_appliance_ids
Default Scanner Appliance default_appliance_id set_default_appliance_id
Domains domains add_domains remove_domainsset_domains
DNS Names dns_names add_dns_namesremove_dns_namesset_dns_names
NetBIOS Names netbios_names add_netbios_namesremove_netbios_namesset_netbios_names
Title title set_title
(255 characters maximum)
CVSS Environmental Metric: Collateral Damage Potential
cvss_enviro_cdp set_cvss_enviro_cdp
(One of: high, medium-high, low-medium, low, none)
357

Chapter 7 - AssetsPurge Hosts
Purge Hosts/api/2.0/fo/asset/host/?action=purge
[POST]
Purge hosts in your account to remove the assessment data associated with them.
Purging hosts will remove host based data in the user’s account (scan results will not be removed). Purged host information will not appear in new reports generated by users. One or both types of host data is removed, based on the user’s API request: vulnerability data and compliance data.
Permissions - Manager can purge assessment data for all hosts in the subscription, including vulnerability data and compliance data. Auditor can purge compliance data for all compliance hosts in the subscription (vulnerability data will not be removed).
Unit Manager, Scanner, and Reader can purge vulnerability and compliance data in their user account if granted the permission "Purge host information/history". The permission "Manage compliance" permission is required to purge compliance data.
Express Lite - This API is available to Express Lite users.
CVSS Environmental Metric: Target Distribution
cvss_enviro_td set_cvss_enviro_td
(One of: high, medium, low, none)
CVSS Environmental Metric: Confidentiality Requirement
cvss_enviro_cr set_cvss_enviro_cr
(One of: high, medium, low)
CVSS Environmental Metric: Integrity Requirement
cvss_enviro_ir set_cvss_enviro_ir
(One of: high, medium, low)
CVSS Environmental Metric: Availability Requirement
cvss_enviro_ar set_cvss_enviro_ar
(One of: high, medium, low)
Parameter Parameter Nameaction=add
Parameter Nameaction=edit
358

Chapter 7 - AssetsPurge Hosts
Input Parameters
Parameter Description
action=purge (Required)
echo_request={0|1} (Optional) Specify 1 to view input parameters in the XML output. When unspecified, parameters are not included in the XML output.
ids={value} (Optional) Purge host information for certain host IDs/ranges. One or more host IDs/ranges may be specified. Multiple entries are comma separated. A host ID range is specified with a hyphen (for example, 190-400).Valid host IDs are required.
One of these host selection parameters must be specified in an API request: ids, ips, ag_ids or ag_titles. Multiple host selection parameters may be specified together in the same request.
ips={value} (Optional) Purge host information certain IP addresses/ranges. One or more IPs/ranges may be specified. Multiple entries are comma separated. An IP range is specified with a hyphen (for example, 10.10.10.1-10.10.10.100).
ag_ids={value} (Optional) Purge hosts belonging to asset groups with certain IDs. One or more asset group IDs and/or ranges may be specified. Multiple entries are comma separated. A range is specified with a dash (for example, 386941-386945). Valid asset group IDs are required.
One of these host selection parameters must be specified in an API request: ids, ips, ag_ids or ag_titles. Multiple host selection parameters may be specified together in the same request.
ag_titles={value} (Optional) Purge hosts belonging to asset groups with certain strings in the asset group title. One or more asset group titles may be specified. Multiple entries are comma separated (for example, My+First+Asset+Group,Another+Asset+Group).
One of these parameters must be specified in an API request: ids, ips, ag_ids or ag_titles. Multiple host selection parameters may be specified together in the same request. These parameters are mutually exclusive and cannot be specified together: ag_ids and ag_titles.
network_ids={value} (Optional, and valid only when the Network Support feature is enabled for the user’s account) Restrict the request to certain custom network IDs. Multiple network IDs are comma separated.
359

Chapter 7 - AssetsPurge Hosts
no_vm_scan_since={date} (Optional) Purge hosts not scanned since a certain date and time (optional). The date/time is specified in YYYY-MM-DD[THH:MM:SSZ] format (UTC/GMT), like “2007-07-01” or “2007-01-25T23:12:00Z”.
User Permissions: An Auditor cannot be specify this parameter.
no_compliance_scan_since={date}
(Optional) Purge compliance hosts not scanned since a certain date and time (optional). This parameter is invalid for an Express Lite user.
The date/time is specified in YYYY-MM-DD[THH:MM:SSZ] format (UTC/GMT), like “2007-07-01” or “2007-01-25T23:12:00Z”.
User Permissions: A sub-account (Unit Manager, Scanner or Reader) can specify this parameter only when the user account is granted certain permissions to purge compliance information. See “Input Parameters”.
Parameter Description
360

Chapter 7 - AssetsPurge Hosts
Sample - Purge assessment data for hostAPI request:
curl -u "USERNAME:PASSWORD" -H "X-Requested-With:curl" -X POST "action=purge&ips=10.113.195.195""https://qualysapi.qualys.com/api/2.0/fo/asset/host/"
compliance_enabled={0|1} (Optional) This parameter is valid only when the policy compliance module is enabled for the user account. This parameter is invalid for an Express Lite user.
Specify 1 to purge compliance hosts in the user’s account. These hosts are assigned to the policy compliance module. When selected, the service will remove vulnerability information and compliance information associated with the selected hosts.
Specify 0 to purge hosts which are not assigned to the policy compliance module. When selected, the service will remove vulnerability information associated with the selected hosts.
User Permissions: A sub-account (Unit Manager, Scanner or Reader) can specify this parameter only when the user account is granted permissions to purge compliance information. An Auditor does not have permission to set compliance_enabled=0.
os_pattern={expression} (Optional) Purge only hosts which have an operating system matching a certain regular expression. An empty value cannot be specified. Use “%5E%24” to match empty string.
Important: The regular expression string you enter must follow the PCRE standard and it must be URL encoded.
Sample regular expression strings for matching OS names:Qualys API - Host List Detection API samples (GitHub, see sample 17)
For information about the Perl Compatible Regular Expressions (PCRE) standard visit:http://php.net/manual/en/book.pcre.php
For the PCRE syntax, see:http://php.net/manual/en/reference.pcre.pattern.syntax.php
http://www.php.net/manual/en/reference.pcre.pattern.posix.php
Parameter Description
361
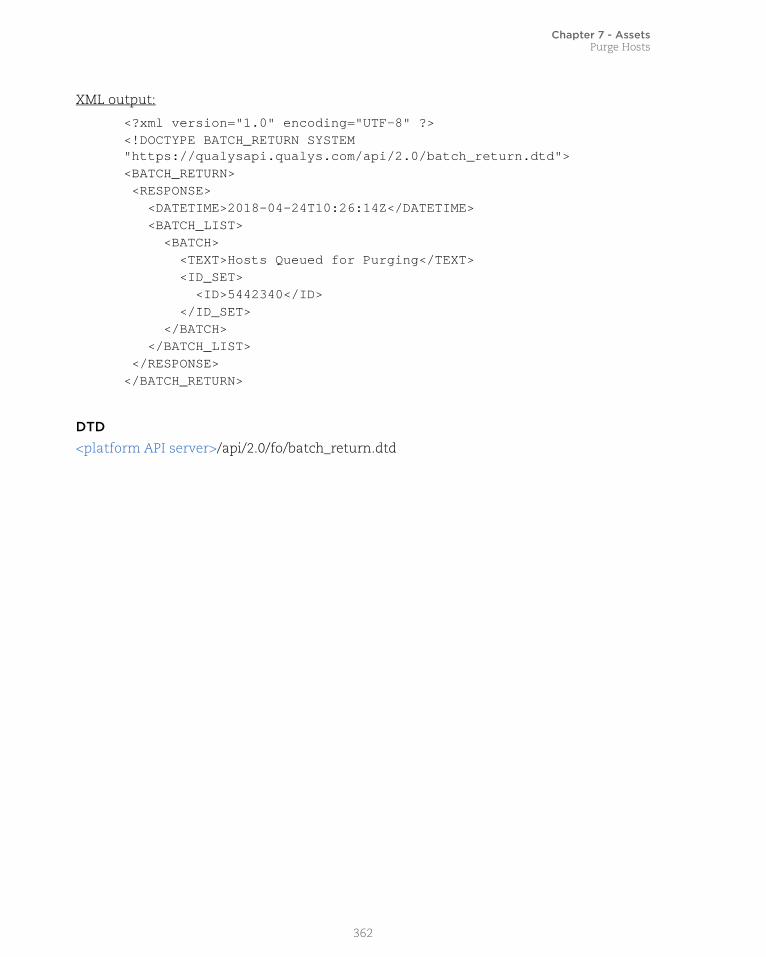
Chapter 7 - AssetsPurge Hosts
XML output:
<?xml version="1.0" encoding="UTF-8" ?><!DOCTYPE BATCH_RETURN SYSTEM "https://qualysapi.qualys.com/api/2.0/batch_return.dtd"><BATCH_RETURN> <RESPONSE> <DATETIME>2018-04-24T10:26:14Z</DATETIME> <BATCH_LIST> <BATCH> <TEXT>Hosts Queued for Purging</TEXT> <ID_SET> <ID>5442340</ID> </ID_SET> </BATCH> </BATCH_LIST> </RESPONSE></BATCH_RETURN>
DTD
<platform API server>/api/2.0/fo/batch_return.dtd
362

Chapter 8 - IPv6 AssetsAPI Support for IPv6 Asset Management and Scanning
Chapter 8 - IPv6 AssetsThe IPv6 Assets API allows Manager users to manage IPv6 assets so they can be scanned using Qualys. The IPv6 API can be used when the IPv6 Support feature is enabled in the user’s subscription. Please contact Support if you would like this feature enabled for your account.
API Support for IPv6 Asset Management and Scanning
IPv6 Mapping Record List
Add IPv6 Mapping Records
Remove IPv6 Mapping Records
API Support for IPv6 Asset Management and ScanningIPv6 Support is a subscription-level option that must be enabled for your subscription by Qualys Support in order to start managing and scanning IPv6 hosts. Follow the steps below to get started with managing and scanning IPv6 hosts using the API.
Step 1: Add Special IPv4 Addresses to your subscriptionUsing the Asset API add to your subscription the special, mapping IPv4 addresses. These IPv4 addresses are used for mapping IPv4 addresses to your IPv6 hosts. The IPv4 addresses for mapping are in the special 0.0.0.0/8 network, in this range:
0.0.0.1-0.254.255.255
A sample request for adding the special IPv4 addresses is shown below (where qualysapi.qualys.com is the server URL where your Qualys account is located):
https://qualysapi.qualys.com/msp/asset_ip.php?action=add&host_ips=0.0.0.1-0.0.0.255
Step 2: Add IPv6 Mapping Records
Manager users can add and remove IPv6 mapping records for the subscription by submitting the records in CSV or XML format. Each mapping record associates one IPv6 address in your network to one IPv4 address in the special mapping range 0.0.0.1-0.254.255.255. A maximum of 10,000 records can be added or removed per API request.
How to Add IPv6 Records in CSVReview the steps below to learn how to add IPv6 mapping records by submitting the records in CSV format. A curl client is used to illustrate this process.
363

Chapter 8 - IPv6 AssetsAPI Support for IPv6 Asset Management and Scanning
1) View Mapping Records in CSV
API request:
$ curl -u username:password -H "X-Requested-With: curl" "https://qualysguard.api.qualys.com/api/2.0/fo/asset/ip/v4_v6/?action=list&output_format=csv"
XML output:
Note: The service automatically returns an ID value in the ID column for each IPv6 mapping record. This ID is assigned by the service when the record is created.
----BEGIN_RESPONSE_BODY_CSVID,IPv4,IPv6"46947","0.0.0.7","2001:db8:85a3::8a2e:370:84""47036","0.0.0.1","2001:db8:85a3::8a2e:370:77"----END_RESPONSE_BODY_CSV----BEGIN_RESPONSE_FOOTER_CSV"Status Message""Finished"----END_RESPONSE_FOOTER_CSV
2) Prepare file1.csv with records to be added The CSV file contents identify one or more IPv6 mapping records to be added. The columns in the CSV upload file are described below.
The CSV file must include the input parameters action=add and csv_data=. The parameter all_or_nothing is optional. When set to 1 or unspecified, the service cancels the request and does not add any new records if it finds the upload data has one record with an IP conflict. When set to 0 the service does not cancel the request if an IP conflict is found.
Sample file1.csv used to add IPv6 mapping records:
$ cat file1.csvaction=add&all_or_nothing=1&csv_data="0.0.0.2","2001:470:8418:a18::a0a:1805"%0A
Column Description
IPv4 (Required) An IPv4 address. The IPv4 address can be defined in only one IPv6 mapping record within your subscription.
IPv6 (Required) An IPv6 address. The IPv6 address can be defined in only one IPv6 mapping record within your subscription.
ID (Optional) A user-defined, custom ID may be included. Important: Custom ID values will not be saved with record data within your subscription.
364

Chapter 8 - IPv6 AssetsAPI Support for IPv6 Asset Management and Scanning
"0.0.0.3","2001:470:8418:a18::a0a:ab7"%0A"0.0.0.4","2001:470:8418:a18::a0a:1849"%0A"0.0.0.5","2001:470:8418:a18::a0a:189c"%0A"0.0.0.6","2001:470:8418:a18::a0a:189d"%0A"0.0.0.8","2001:470:8418:a18::a0a:189e"%0A"0.0.0.9","2001:470:8418:a18::a0a:18d0"%0A"0.0.0.10","2001:470:8418:a18::a0a:18d1"%0A"0.0.0.11","2001:470:8418:a18::a0a:18d2"%0A"0.0.0.12","2001:470:8418:a18::a0a:18d6"%0A"0.0.0.13","2001:470:8418:a18::a0a:18d7"%0A"0.0.0.14","2001:470:8418:a18::a0a:18da"%0A"0.0.0.15","2001:470:8418:a18::a0a:18db"%0A"0.0.0.16","ff00:abcd::1234"%0A
3) POST data from file1.csv (Success)
Input:
$ curl -u username:password -H "X-Requested-With: curl" -d @file1.csv "https://qualysguard.api.qualys.com/api/2.0/fo/asset/ip/v4_v6/"
Output:
<?xml version="1.0" encoding="UTF-8" ?><!DOCTYPE SIMPLE_RETURN SYSTEM "https://qualysguard.api.qualys.com/api/2.0/simple_return.dtd"><SIMPLE_RETURN> <RESPONSE> <DATETIME>2011-11-03T19:31:27Z</DATETIME> <TEXT>Successfully imported 14 records</TEXT> </RESPONSE></SIMPLE_RETURN>
How to Add IPv6 Records in XML
Review the steps below to learn how to add IPv6 mapping records by submitting the records in XML format. A curl client is used to illustrate this process.
1) View mapping records in XMLAPI request:
$ curl -u username:password -H "X-Requested-With: curl""https://qualysguard.api.qualys.com/api/2.0/fo/asset/ip/v4_v6/?action=list&output_format=xml"
365

Chapter 8 - IPv6 AssetsAPI Support for IPv6 Asset Management and Scanning
Output:
Note: The service automatically returns an ID value in the <ID> element for each IPv6 mapping record. This ID is assigned by the service when the record is created.
<?xml version="1.0" encoding="UTF-8" ?><!DOCTYPE IP_MAP_LIST_OUTPUT SYSTEM"https://qualysapi.qualys.com/api/2.0/fo/asset/ip/v4_v6/ip_map_list_output.dtd"><IP_MAP_LIST_OUTPUT> <RESPONSE> <DATETIME>2011-11-28T19:42:10Z</DATETIME> <IP_MAP_LIST> <IP_MAP> <ID>46947</ID> <V4>0.0.0.7</V4> <V6>2001:db8:85a3::8a2e:370:84</V6> </IP_MAP> <IP_MAP> <ID>47036</ID> <V4>0.0.0.1</V4> <V6>2001:db8:85a3::8a2e:370:77</V6> </IP_MAP> </IP_MAP_LIST> </RESPONSE></IP_MAP_LIST_OUTPUT>
2) Prepare file2.xml with records to be added
The XML file contents identify one or more IPv6 mapping records to be added. The element in the XML upload file are described below.
Column Description
<V4> (Required) An IPv4 address. The IPv4 address can be defined in only one IPv6 mapping record within your subscription.
<V6> (Required) An IPv6 address. The IPv6 address can be defined in only one IPv6 mapping record within your subscription.
<ID> (Optional) A user-defined, custom ID may be included. Important: Custom ID values will not be saved with record data within your subscription.
366

Chapter 8 - IPv6 AssetsAPI Support for IPv6 Asset Management and Scanning
The XML file must include the input parameters action=add and xml_data=. The parameter all_or_nothing is optional. When set to 1 or unspecified, the service cancels the request and does not add any new records if it finds the upload data has one record with an IP conflict. When set to 0 the service does not cancel the request if an IP conflict is found.
Sample file2.xml used to add IPv6 mapping records:
$ cat file2.xmlaction=add&xml_data=<IP_MAP_LIST> <IP_MAP> <V4>0.0.0.2</V4> <V6>2001:470:8418:a18::a0a:1805</V6> </IP_MAP> <IP_MAP> <V4>0.0.0.3</V4> <V6>2001:470:8418:a18::a0a:ab7</V6> </IP_MAP></IP_MAP_LIST>
3) POST data from file2.xml (Success)
API request:
$ curl -u username:password -H "X-Requested-With: curl"-d @file2.xml "https://qualysguard.api.qualys.com/api/2.0/fo/asset/ip/v4_v6/"
XML output:
<?xml version="1.0" encoding="UTF-8" ?><!DOCTYPE SIMPLE_RETURN SYSTEM "https://qualysguard.api.qualys.com/api/2.0/simple_return.dtd"><SIMPLE_RETURN> <RESPONSE> <DATETIME>2011-11-03T20:59:07Z</DATETIME> <TEXT>Successfully imported 2 records</TEXT> </RESPONSE></SIMPLE_RETURN>
Step 3: Remove IPv6 Mapping Records (optional)Manager users can remove IPv6 mapping records for the subscription by submitting the records to be removed in CSV or XML format. A maximum of 10,000 records can be removed per API request.
367

Chapter 8 - IPv6 AssetsAPI Support for IPv6 Asset Management and Scanning
It's not necessary to specify both the IPv4 address and the IPv6 address for each record to be deleted in the data file (CSV or XML). If you specify only the IPv4 address, any associated record will be deleted. If you specify only the IPv6 address, any associated record will be deleted. If you specify both the IPv4 and IPv6 addresses, any record containing either address will be deleted. If no IP addresses specified in a mapping record to be deleted match any IP addresses already defined in mapping records in the subscription, the mapping record listed in the data file will be silently ignored.
Important: When an IPv6 mapping record is removed, any scan data associated with your IPv6 host is removed from your subscription and this data is not recoverable.
How to Remove IPv6 Records in CSV
Review the steps below to learn how to remove IPv6 mapping records by submitting the records in CSV format. A curl client is used to illustrate this process.
1) View mapping records in CSVInput:
$ curl -u username:password -H "X-Requested-With: curl" "https://qualysguard.api.qualys.com/api/2.0/fo/asset/ip/v4_v6/?action=list&output_format=csv"
2) Prepare file3.csv with records to be removed The CSV file contents identify one or more IPv6 mapping records to be removed.
Sample file3.csv used to remove IPv6 mapping records:
$ cat file3.csvaction=remove&csv_data="0.0.0.4","2001:470:8418:a18::a0a:1849""0.0.0.5","2001:470:8418:a18::a0a:189c"
3) POST data from file3.csv (Success)
API request:
$ curl -u username:password -H "X-Requested-With: curl" -d @file3.csv "https://qualysguard.api.qualys.com/api/2.0/fo/asset/ip/v4_v6/"
XML output:
<?xml version="1.0" encoding="UTF-8" ?><!DOCTYPE SIMPLE_RETURN SYSTEM "https://qualysguard.api.qualys.com/api/2.0/simple_return.dtd"><SIMPLE_RETURN> <RESPONSE> <DATETIME>2011-11-03T19:31:27Z</DATETIME> <TEXT>Removed 2 records (any associated scanned host data is
368

Chapter 8 - IPv6 AssetsAPI Support for IPv6 Asset Management and Scanning
now queued for purging)</TEXT> </RESPONSE></SIMPLE_RETURN>
How to Remove IPv6 Records in XMLReview the steps below to learn how to remove IPv6 mapping records by submitting the records in XML format. A curl client is used to illustrate this process.
1) View mapping records in XML
Input:
$ curl -u username:password -H "X-Requested-With: curl""https://qualysguard.api.qualys.com/api/2.0/fo/asset/ip/v4_v6/?action=list&output_format=xml"
2) Prepare file4.xml with records to be removed
The XML file contents identify one or more IPv6 mapping records to be removed.
Sample file4.XML used to remove IPv6 mapping records:
$ cat file4.xmlaction=remove&xml_data=<IP_MAP_LIST> <IP_MAP> <V4>0.0.0.4</V4> <V6>2001:470:8418:a18::a0a:1849</V6> </IP_MAP> <IP_MAP> <V4>0.0.0.5</V4> <V6>2001:470:8418:a18::a0a:189c</V6> </IP_MAP></IP_MAP_LIST>
3) POST data from file4.xml (Success)
Input:
$ curl -u username:password -H "X-Requested-With: curl" -d @file4.xml "https://qualysguard.api.qualys.com/api/2.0/fo/asset/ip/v4_v6/"
Output:
<?xml version="1.0" encoding="UTF-8" ?><!DOCTYPE SIMPLE_RETURN SYSTEM "https://qualysguard.api.qualys.com/api/2.0/simple_return.dtd"><SIMPLE_RETURN>
369

Chapter 8 - IPv6 AssetsAPI Support for IPv6 Asset Management and Scanning
<RESPONSE> <DATETIME>2011-11-03T20:59:07Z</DATETIME> <TEXT>Removed 2 records (any associated scanned host data is now queued for purging)</TEXT> </RESPONSE></SIMPLE_RETURN>
Step 4: Enable IPv6 for Scanner Appliance(s)
IPv6 scanning is supported using a scanner appliance enabled with IPv6. You can enable this by editing the appliance within the Qualys user interface. Once IPv6 is enabled, the appliance uses stateless address autoconfiguration to obtain an IPv6 address from the router (note that stateful configuration through DHCPv6 or Static IPv6 is not supported).
Step 5: Launch Scan
Using the Qualys API you can launch scans on the IPv4 addresses which are mapped to IPv6 addresses.
Step 6: View IPv6 Addresses using Host List Detection APIThe scan results XML output will include IPv4 addresses only. Also, scan reports downloaded from the user interface will include IPv4 addresses only.
The host list detection output returned from a host list detection API request (api/2.0/fo/asset/host/vm/detection/?action=list ) gives you the IPv6 address, if available, along with the “automatic” vulnerability detection data.
To request a list of VM scanned hosts which have IPv4 addresses that are mapped to IPv6 addresses in your account, you enter the IPv4 addresses for the ips parameter.
For example, if the special IPv4 address 0.0.0.199 is mapped to an IPv6 address in your account and this IP address has been scanned, you can make this API request:
curl -H "X-Requested-With: Curl Sample" -u "username:password" "https://qualysapi.qualys.com/api/2.0/fo/asset/host/vm/detection/?action=list&ips=0.0.0.100"
XML output returned will show the IPv4 address and the IPv6 address for the host, as shown below (XML fragment):
...<HOST> <ID>276010</ID> <IP>0.0.0.100</IP> <IPV6>2001:470:8418:a18::a0a:18c7</IPV6> <TRACKING_METHOD>IP</TRACKING_METHOD> <OS><![CDATA[Windows 2003 Service Pack 2]]></OS> <DNS><![CDATA[mssql2k8-24-199.patch.ad.vuln.qa.qualys.com]]></DNS> <LAST_SCAN_DATETIME>2018-06-
370

Chapter 8 - IPv6 AssetsIPv6 Mapping Record List
17T19:06:31Z</LAST_SCAN_DATETIME> <DETECTION_LIST> ...
IPv6 Mapping Record List/api/2.0/fo/asset/ip/v4_6
[GET] [POST]
View a list of IPv6 mapping records in the subscription. Each mapping record associates one IPv6 address in your network with one IPv4 address in the special mapping range 0.0.0.1-0.254.255.255.
A maximum of 5,000 IPv6 mapping records will be processed per request, unless the truncation_limit input parameter is specified. If the requested list identifies more than 5,000 records or the number of records specified using truncation_limit, then the XML output includes the <WARNING> element and instructions for making another request for the next batch of records.
Permissions - Managers can view all IPv6 mapping records when the IPv6 Support feature is enabled for the user’s subscription. Other users do not have permission to view IPv6 mapping records.
Input Parameters
Parameter Description
action=list (Required)
echo_request={0|1} (Optional) Show (echo) the request’s input parameters (names and values) in the XML output. When not specified, parameters are not included in the XML output. Specify 1 to view parameters in the XML output.
id_min={value} (Optional) Show only mapping records which have a minimum record ID. A valid mapping record ID is required. When unspecified, records are not filtered by record ID.
id_max={value} (Optional) Show only mapping records which have a maximum record ID. A valid mapping record ID is required.
ipv4_filter={value} (Optional) Show only mapping records with certain IPv4 addresses. When unspecified, records are not filtered by IPv4 addresses.
ipv6_network={value} (Optional) Show only mapping records with certain IPv6 network addresses. When unspecified, records are not filtered by IPv6 network addresses.
371

Chapter 8 - IPv6 AssetsAdd IPv6 Mapping Records
DTD
<platform API server>/api/2.0/fo/asset/ip/v4_v6/asset/ip/v4_v6/ip_map_list_output.dtd
Sample IPv6 Mapping Records List OutputHow to Add IPv6 Records in CSV
How to Add IPv6 Records in XML
Add IPv6 Mapping Records/api/2.0/fo/asset/ip/v4_6
[POST]
Add IPv6 mapping records to the subscription. Each mapping record associates one IPv6 address in your network with one IPv4 address in the special mapping range 0.0.0.1-0.254.255.255. A maximum of 10,000 mapping records can be added per API request.
Permissions - Managers can add IPv6 mapping records, when the IPv6 Support feature is enabled for the user’s subscription. Other user roles do not have these permissions.
Input Parameters
output_format={CSV|XML} (Optional) The requested output format: CSV or XML. When unspecified, the output format will be CSV. Note: When the service outputs CSV, each line ends with a carriage-return and linefeed pair (ASCII/CRLF=0x0D 0x0A).
truncation_limit={value} (Optional) The maximum number of mapping records to be returned by the API request. A valid value is an integer between 1 and 1,000,000. When unspecified, 5,000 records will be returned.
Parameter Description
action=add (Required)
echo_request={0|1} (Optional) Show (echo) the request’s input parameters (names and values) in the XML output. When not specified, parameters are not included in the XML output. Specify 1 to view parameters in the XML output.
csv_data={value} The CSV data file containing the IPv6 mapping records that you want to add. This parameter or xml_data must be specified. See How to Add IPv6 Records in CSV
The parameters csv_data and xml_data cannot be specified in the same request.
Parameter Description
372

Chapter 8 - IPv6 AssetsRemove IPv6 Mapping Records
DTD
<platform API server>/api/2.0/simple_return.dtd
Sample XML OutputHow to Add IPv6 Records in CSV
How to Add IPv6 Records in XML
Remove IPv6 Mapping Records/api/2.0/fo/asset/ip/v4_6
[POST]
Remove IPv6 mapping records from the subscription. A maximum of 10,000 mapping records can be removed per API request.
Important: When an IPv6 mapping record is removed, any scan data associated with your IPv6 host is removed from your subscription and this data is not recoverable.
It's not necessary to specify both the IPv4 address and the IPv6 address for each record to be deleted in the data file (CSV or XML). If you specify only the IPv4 address, any associated record will be deleted. If you specify only the IPv6 address, any associated record will be deleted. If you specify both the IPv4 and IPv6 addresses, any record containing either address will be deleted. If no IP addresses specified in a mapping record to be deleted match any IP addresses already defined in mapping records in the subscription, the mapping record listed in the data file will be silently ignored.
Permissions - Managers can remove all IPv6 mapping records, when the IPv6 Support feature is enabled for the user’s subscription. Other user roles do not have these permissions.
xml_data={value} The CSV data file containing the IPv6 mapping records that you want to add. This parameter or csv_data must be specified. See How to Add IPv6 Records in XML
The parameters csv_data and xml_data cannot be specified in the same request.
all_or_nothing={0|1} (Optional) This parameter controls how the service processes the IPv6 mapping records in the upload data. When unspecified or set to 1, the service cancels the request and does not add any new records once it finds the upload data has one record with an IP conflict. When set to 0 the service does not cancel the request if an IP conflict is found.
Parameter Description
373

Chapter 8 - IPv6 AssetsRemove IPv6 Mapping Records
Input Parameters
DTD<platform API server>/api/2.0/simple_return.dtd
Sample XML Output
How to Remove IPv6 Records in XML
How to Add IPv6 Records in XML
Parameter Description
action=remove (Required)
echo_request={0|1} (Optional) Show (echo) the request’s input parameters (names and values) in the XML output. When not specified, parameters are not included in the XML output. Specify 1 to view parameters in the XML output.
csv_data={value} The CSV data file containing the IPv6 mapping records that you want to remove from your subscription. This parameter or xml_data must be specified. See How to Remove IPv6 Records in CSV
xml_data={value} The CSV data file containing the IPv6 mapping records that you want to remove from your subscription. This parameter or csv_data must be specified. See How to Remove IPv6 Records in XML
374

Chapter 9 - NetworksNetwork List
Chapter 9 - NetworksThe Network API is used to manage networks when the Network Support feature is enabled in the user’s subscription.
Network List
Create Network
Update Network
Assign Scanner Appliance to Network
Network List/api/2.0/fo/network/?action=list
[GET] [POST]
List custom networks in your account.
Permissions - A Manager will view all custom networks in the subscription, a Unit Manager will view custom networks in their business unit’s assigned asset groups, and a Scanner/Reader will view custom networks in their account’s assigned asset groups.
Input Parameters
Sample - List custom networks
API request:
curl -u "USERNAME:PASSWORD" -H "X-Requested-With: Curl" "https://qualysapi.qualys.com/api/2.0/fo/network/?action=list&ids=7343,7345,7350"
XML output:
<?xml version="1.0" encoding="UTF-8" ?><!DOCTYPE NETWORK_LIST SYSTEM "https://qualysapi.qualys.com/network_list_output.dtd"><RESPONSE>
Parameter Description
action=list (Required)
echo_request={0|1} (Optional) Show (echo) the request’s input parameters (names and values) in the XML output. When unspecified, parameters are not included in the XML output. Specify 1 to view parameters in the XML output.
ids={value1,value2} (Optional) Filter the list to view specific networks.
375

Chapter 9 - NetworksCreate Network
<DATETIME>2018-05-28T01:06:45Z</DATETIME> <NETWORK_LIST> <NETWORK> <ID>7343</ID> <NAME><![CDATA[My New Network]]></TITLE> <SCANNER_APPLIANCE_LIST> <SCANNER_APPLIANCE> <ID>1234</ID> <FRIENDLY_NAME><![[CDATA[abc123]]></FRIENDLY_NAME> </SCANNER_APPLIANCE> </SCANNER_APPLIANCE_LIST> </NETWORK> ... </NETWORK_LIST></RESPONSE>
DTD<platform API server>/api/2.0/fo/network/network_list_output.dtd
Create Network/api/2.0/fo/network/?action=create
[POST]
Create a new custom network.
Permissions - This API is available to Managers only.
Know more - Before you’re ready to start scanning, you’ll need to 1) assign scanner appliance(s) to your network, and 2) add host assets to your network (assign asset groups to it).
Input Parameters
Parameter Description
action=create (Required)
echo_request={0|1} (Optional) Show (echo) the request’s input parameters (names and values) in the XML output. When unspecified, parameters are not included in the XML output. Specify 1 to view parameters in the XML output.
name={value} (Required) A user-defined friendly name for your network. A successful request will return a unique network ID and this is used to manage your network using the API.
376

Chapter 9 - NetworksCreate Network
Sample - Create custom network
API request:
curl -u "USERNAME:PASSWORD" -H "X-Requested-With: Curl" -d "action=create&name=My+Network" "https://qualysapi.qualys.com/api/2.0/fo/network/"
XML output:
<?xml version="1.0" encoding="UTF-8" ?><!DOCTYPE SIMPLE_RETURN SYSTEM "https://qualysapi.qualys.com/api/2.0/simple_return.dtd"><SIMPLE_RETURN> <RESPONSE> <DATETIME>2018-01-14T04:37:24Z</DATETIME> <TEXT>Network created with ID</TEXT> <ITEM_LIST> <ITEM> <KEY>id</KEY> <VALUE>1103</VALUE> </ITEM> </ITEM_LIST> </RESPONSE></SIMPLE_RETURN>
DTD<platform API server>/api/2.0/simple_return.dtd
377
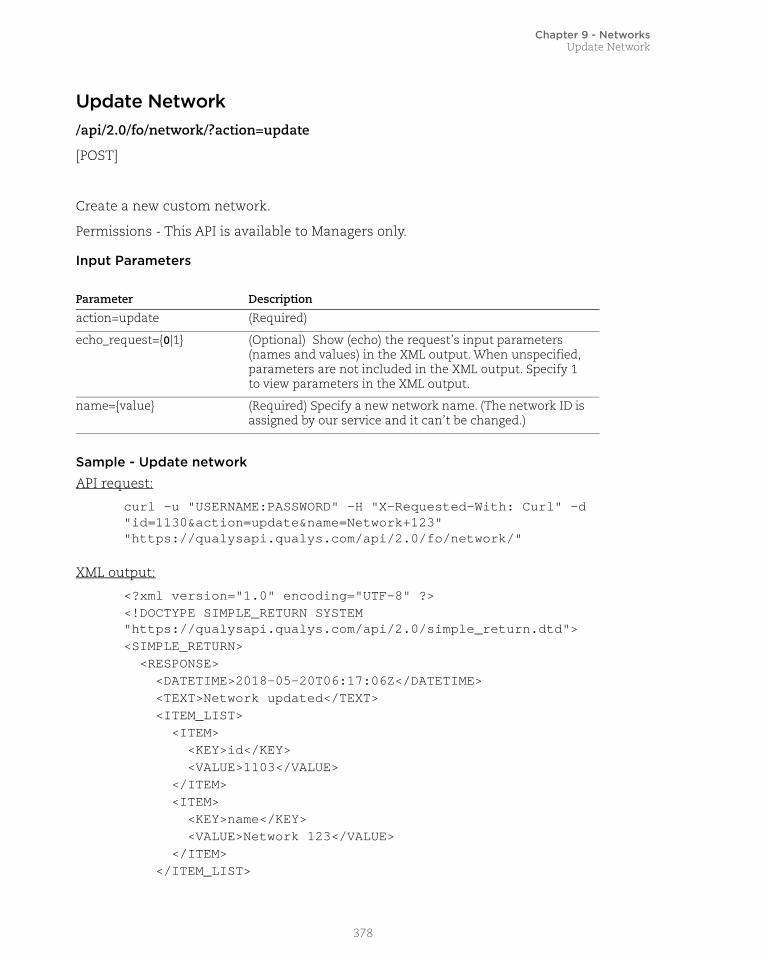
Chapter 9 - NetworksUpdate Network
Update Network/api/2.0/fo/network/?action=update
[POST]
Create a new custom network.
Permissions - This API is available to Managers only.
Input Parameters
Sample - Update networkAPI request:
curl -u "USERNAME:PASSWORD" -H "X-Requested-With: Curl" -d "id=1130&action=update&name=Network+123" "https://qualysapi.qualys.com/api/2.0/fo/network/"
XML output:
<?xml version="1.0" encoding="UTF-8" ?><!DOCTYPE SIMPLE_RETURN SYSTEM "https://qualysapi.qualys.com/api/2.0/simple_return.dtd"><SIMPLE_RETURN> <RESPONSE> <DATETIME>2018-05-20T06:17:06Z</DATETIME> <TEXT>Network updated</TEXT> <ITEM_LIST> <ITEM> <KEY>id</KEY> <VALUE>1103</VALUE> </ITEM> <ITEM> <KEY>name</KEY> <VALUE>Network 123</VALUE> </ITEM> </ITEM_LIST>
Parameter Description
action=update (Required)
echo_request={0|1} (Optional) Show (echo) the request’s input parameters (names and values) in the XML output. When unspecified, parameters are not included in the XML output. Specify 1 to view parameters in the XML output.
name={value} (Required) Specify a new network name. (The network ID is assigned by our service and it can’t be changed.)
378

Chapter 9 - NetworksAssign Scanner Appliance to Network
</RESPONSE></SIMPLE_RETURN>
DTD<platform API server>/api/2.0/simple_return.dtd
Assign Scanner Appliance to Network/api/2.0/fo/appliance/?action=assign_network_id
[POST]
Assign a scanner appliance to a network. When the network support feature is enabled for your subscription, scanner appliances are assigned to networks. Each appliance can be assigned to 1 network only.
Permissions - This API is available to Managers only.
Input Parameters
Sample - Assign scanner appliance to networkAPI request:
curl -k -u "USERNAME:PASSWORD" -H "X-Requested-With: test" -d action=assign_network_id&appliance_id=506&network_id=1002" "https://qualysapi.qualys.com/api/2.0/fo/appliance/"
XML output:
<?xml version="1.0" encoding="UTF-8" ?><!DOCTYPE SIMPLE_RETURN SYSTEM "https://qualysapi.qualys.com/api/2.0/simple_return.dtd"><SIMPLE_RETURN> <RESPONSE>
Parameter Description
action=assign_network_id (Required)
echo_request={0|1} (Optional) Show (echo) the request’s input parameters (names and values) in the XML output. When unspecified, parameters are not included in the XML output. Specify 1 to view parameters in the XML output.
appliance_id={value} (Required) ID of the scanner appliance you want to assign to a network.
network_id={value} (Required) ID of the network you want to assign the scanner appliance to.
379

Chapter 9 - NetworksAssign Scanner Appliance to Network
<DATETIME>2018-03-16T22:50:49Z</DATETIME> <TEXT>Success: Network ID=[1103] assigned to Appliance with ID=[506]</TEXT> </RESPONSE></SIMPLE_RETURN>
Or, if unsuccessful, the response might look like this:
<?xml version="1.0" encoding="UTF-8" ?><!DOCTYPE SIMPLE_RETURN SYSTEM "https://qualysapi.qualys.com/api/2.0/simple_return.dtd"><SIMPLE_RETURN> <RESPONSE> <DATETIME>2018-03-16T22:53:41Z</DATETIME> <CODE>1905</CODE> <TEXT>parameter network_id has invalid value: 1103 (No such network ID)</TEXT> </RESPONSE></SIMPLE_RETURN>
DTD<platform API server>/api/2.0/simple_return.dtd
380

Chapter 10 - Reports
Chapter 10 - ReportsLaunch and manage reports in your account. Report Share must be enabled for your account.
Report List
Launch Report
Sample - Launch Report
Using Asset Tags
Report Template List
Launch Scorecard
Cancel Running Report
Download Saved Report
Delete Saved Report
Scheduled Reports List
Launch Scheduled Report
Asset Search Report
381

Chapter 10 - ReportsReport List
Report List/api/2.0/fo/report/?action=list
[GET] [POST]
View a list of reports in the user’s account when Report Share feature is enabled. The report list output includes all report types, including scorecard reports.
User permissions - Managers and Auditors view all assets in the subscription, Unit Managers view assets in their own business unit, Scanners and Readers view assets in their own account.
Input Parameters
Parameter Description
action=list (Required)
echo_request={0|1} (Optional) Specifies whether to echo the request’s input parameters (names and values) in the XML output. When not specified, parameters are not included in the XML output. Specify 1 to view parameters in the XML output.
id={value} (Optional) Specifies a report ID of a report that is saved in the Report Share storage space. When specified, information on the selected report will be included in the XML output.
state={value} (Optional) Specifies that reports with a certain state will be included in the XML output. By default, all states are included. A valid value is: Running (reports are in progress), Finished, Submitted, Canceled, or Errors.
user_login={value} (Optional) Specifies a user login ID. This parameter is used to restrict the XML output to reports launched by the specified user login ID.
expires_before_datetime={date}
(Optional) Specifies the date and time (optional) when reports will expire in the future. Only reports that expire before this date/time will be included in the XML output.
The date/time is specified in YYYY-MM-DD[THH:MM:SSZ] format (UTC/GMT), like “2007-07-01” or “2007-01-25T23:12:00Z”.
client_id={value} (Optional) Id assigned to the client (Consultant type subscriptions).
client_name={value} (Optional) Name of the client (Consultant type subscriptions).
Note: The client_id and client_name parameters are mutually exclusive and cannot be specified together in the same request.
382

Chapter 10 - ReportsReport List
Sample - List reports
curl -H "X-Requested-With: Curl Sample"-b "QualysSession=71e6cda2a35d2cd404cddaf305ea0208; path=/api; secure" "https://qualysapi.qualys.com/api/2.0/fo/report/?action=list"
<?xml version="1.0" encoding="UTF-8" ?><!DOCTYPE REPORT_LIST_OUTPUT SYSTEM "https://qualysapi.qualys.com/api/2.0/fo/report/report_list_output.dtd">
<REPORT_LIST_OUTPUT> <RESPONSE> <DATETIME>2017-10-30T22:32:15Z</DATETIME> <REPORT_LIST> <REPORT> <ID>42703</ID> <TITLE><![CDATA[Test now]]></TITLE> <TYPE>Scan</TYPE> <USER_LOGIN>acme_aa</USER_LOGIN> <LAUNCH_DATETIME>2017-10-30T17:59:22Z</LAUNCH_DATETIME> <OUTPUT_FORMAT>PDF</OUTPUT_FORMAT> <SIZE>129.1 MB</SIZE> <STATUS> <STATE>Finished</STATE> </STATUS> <EXPIRATION_DATETIME>2017-11-06T17:59:24Z</EXPIRATION_DATETIME> </REPORT> <REPORT> <ID>42700</ID> <TYPE>Scorecard</TYPE> <USER_LOGIN>acme_ts2</USER_LOGIN> <LAUNCH_DATETIME>2017-10-29T22:12:42Z</LAUNCH_DATETIME> <OUTPUT_FORMAT>SECURE_PDF</OUTPUT_FORMAT> <SIZE>18.1 KB</SIZE> <STATUS> <STATE>Finished</STATE> </STATUS> <EXPIRATION_DATETIME>2017-11-05T22:12:44Z</EXPIRATION_DATETIME> </REPORT> <REPORT> <ID>42699</ID> <TYPE>Scorecard</TYPE> <USER_LOGIN>quays_ts2</USER_LOGIN>
383
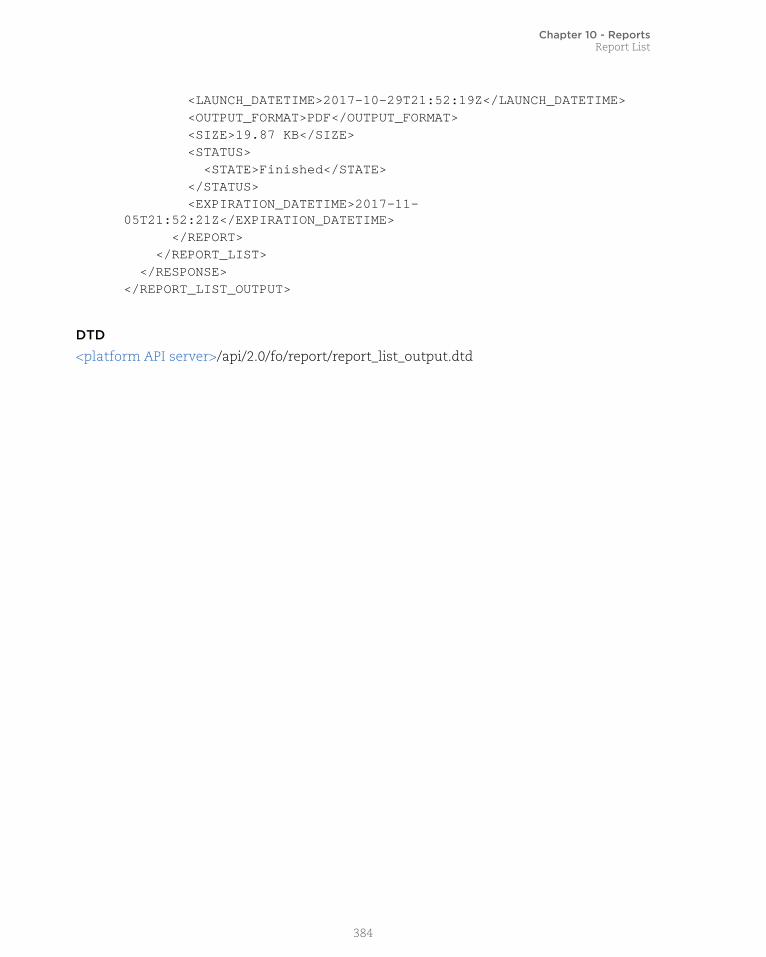
Chapter 10 - ReportsReport List
<LAUNCH_DATETIME>2017-10-29T21:52:19Z</LAUNCH_DATETIME> <OUTPUT_FORMAT>PDF</OUTPUT_FORMAT> <SIZE>19.87 KB</SIZE> <STATUS> <STATE>Finished</STATE> </STATUS> <EXPIRATION_DATETIME>2017-11-05T21:52:21Z</EXPIRATION_DATETIME> </REPORT> </REPORT_LIST> </RESPONSE></REPORT_LIST_OUTPUT>
DTD
<platform API server>/api/2.0/fo/report/report_list_output.dtd
384

Chapter 10 - ReportsLaunch Report
Launch Report/api/2.0/fo/report
[POST]
Launch a report in the user's account. The Report Share feature must be enabled in the user's subscription. When a report is launched with Report Share, the report is run in the background, and the report generation processing does not timeout until the report has completed.
User permissions - Managers and Auditors can launch scorecard reports on all assets in the subscription, Unit Managers can launch scorecard reports on assets in their own business unit, Scanners and Readers can launch scorecard reports on assets in their own account.
Input Parameters
Parameter Description
action=launch (Required)
echo_request={0|1} (Optional) Specifies whether to echo the request’s input parameters (names and values) in the XML output. When not specified, parameters are not included in the XML output. Specify 1 to view parameters in the XML output.
template_id={value} (Required) The template ID of the report you want to launch. Use the /msp/report_template_list.php API to find the template ID you’re interested in. See Report Template List.
report_title=[value} (Optional) A user-defined report title. The title may have a maximum of 128 characters. For a PCI compliance report, the report title is provided by Qualys and cannot be changed.
output_format={value} (Required) One output format may be specified. Supported formats for various reports are below.map report: pdf, html (a zip file), mht, xml, or csvscan report: pdf, html (a zip file), mht, xml, csv, or docxremediation report: pdf, html (a zip file), mht, or csvcompliance report (not PCI): pdf, html (a zip file), or mhtPCI compliance report: pdf or html (a zip file)compliance policy report: pdf, html (a zip file), mht, xml, or csvQualys patch report: pdf, online, xml or csv
hide_header={0|1} (Valid for CSV format report only). Specify hide_header=1 to omit the header information from the report. By default this information is included.
385

Chapter 10 - ReportsLaunch Report
pdf_password={value} (Required for secure PDF distribution, Manager or Unit Manager only)The password to be used for encryption. Requirements:- the password must have a minimum of 8 characters (ascii), and a maximum of 32 characters- the password must contain alpha and numeric characters- the password cannot match the password for the user’s Qualys account. - the password must follow the password security guidelines defined for your subscription (log into your account and go to Users > Setup > Security)
recipient_group={value} (Optional for secure PDF distribution, Manager or Unit Manager only)The report recipients in the form of one or more distribution group names, as defined using the Qualys UI. Multiple distribution groups are comma separated. A maximum of 50 distribution groups may be entered.
The recipient_group parameter can only be specified when the pdf_password parameter is also specified.
The recipient_group parameter cannot be specified in the same request as recipient_group_id
recipient_group_id={value} (Optional for secure PDF distribution, Manager or Unit Manager only)The report recipients in the form of one or more distribution group IDs. Multiple distribution group IDs are comma separated. Where do I find this ID? Log in to your Qualys account, go to Users > Distribution Groups and select Info for a group in the list.
The recipient_group_id parameter can only be specified when the pdf_password parameter is also specified.
The recipient_group_id parameter cannot be specified in the same request as recipient_group
MAP REPORT
report_type=Map (Optional)
domain={value} (Required for map report) Specifies the target domain for the map report. Include the domain name only; do not enter “www.” at the start of the domain name. When the special “none” domain is specified as a parameter value, the ip_restriction parameter is required.
ip_restriction={value} (Optional for map report) For a map report, specifies certain IPs/ranges to include in the report. This parameter is required when the domain parameter is specified with the value “none” (for the special “none” domain).
Multiple IPs and/or ranges are comma separated.
Parameter Description
386

Chapter 10 - ReportsLaunch Report
report_refs={value} (Required for map report) For a map report, specifies the map references (1 or 2) to include. A map reference starts with the string “map/” followed by a reference ID number. When two map references are given, the report compares map results. Two map references are comma separated.
SCAN REPORT - SCAN BASED FINDINGS
report_type=Scan (Optional)
report_refs={value} (Required for Manual scan report) For a Manual scan report, this parameter specifies the scan references to include. A scan reference starts with the string “scan/” followed by a reference ID number. Multiple scan references are comma separated.
ip_restriction={value} (Optional for Manual scan report) For a scan report, the report content will be restricted to the specified IPs/ranges. Multiple IPs and/or ranges are comma separated.
SCAN REPORT - HOST BASED FINDINGS
report_type=Scan (Optional)
ips={value} (Optional) Specify IPs/ranges to change (overwrite) the report target, as defined in the report template. Multiple IPs/ranges are comma separated. When specified, hosts defined in the report template are not included in the report.
You can specify ips and/or asset_group_ids, or asset tags (see “Using Asset Tags”).
asset_group_ids={value} (Optional) Specify asset group IDs to change (overwrite) the report target, as defined in the report template. When specified, hosts defined in the report template are not included in the report.
You can specify ips and/or asset_group_ids, or asset tags (see “Using Asset Tags”).
ips_network_id={value} (Optional, and valid only when the Network Support feature is enabled for the user’s account) The ID of a network that is used to restrict the report’s target to the IPs/ranges specified in the “ips” parameter. Set to a custom network ID (note this does not filter IPs/ranges specified in “asset_group_ids”). Or set to “0” (the default) for the Global Default Network - this is used to report on hosts outside of your custom networks.
Parameter Description
387

Chapter 10 - ReportsLaunch Report
PATCH REPORT
ips={value} (Optional for patch report) Specify IPs/ranges to change (override) the report target, as defined in the patch report template. Multiple IPs/ranges are comma separated. When specified, hosts defined in the report template are not included in the report.
You can specify ips and/or asset_group_ids, or asset tags (see “Using Asset Tags”).
asset_group_ids={value} (Optional for patch report) Specify IPs/ranges to change (override) the report target, as defined in the patch report template. Multiple asset group IDs are comma separated. When specified, hosts defined in the report template are not included in the report.
You can specify ips and/or asset_group_ids, or asset tags (see “Using Asset Tags”).
REMEDIATION REPORT
report_type=Remediation (Optional)
ips={value} (Optional for remediation report) Specify IPs/ranges you want to include in the report. Multiple IPs and/or ranges are comma separated.
You can specify ips and/or asset_group_ids, or asset tags (see “Using Asset Tags”).
asset_group_ids={value} (Optional for remediation report) Specify asset group IDs that identify hosts you want to include in the report. Multiple asset group IDs are comma separated.
You can specify ips and/or asset_group_ids, or asset tags (see “Using Asset Tags”).
assignee_type={User|All} (Optional for remediation report) Specifies whether the report will include tickets assigned to the current user (User is set by default), or all tickets in the user account. By default tickets assigned to the current user are included.
COMPLIANCE REPORT
report_type=Compliance (Optional) For compliance type report. Compliance type reports are Qualys Top 20 Report, SANS Top 20 Report, Qualys PCI Executive Report, and Qualys PCI Technical Report.
Parameter Description
388

Chapter 10 - ReportsLaunch Report
ips={value} (Optional for compliance report) For a compliance report (except a PCI report), specify the IPs/ranges you want to include in the report. Multiple IPs and/or ranges are comma separated.
You can specify ips and/or asset_group_ids, or asset tags (see “Using Asset Tags”).
Optional: Qualys Top 20 Report, SANS Top 20 Report
Invalid: PCI Executive Report, PCI Technical Report
asset_group_ids={value} (Optional for compliance report) For a compliance report (except a PCI report), specify asset groups IDs which identify hosts to include in the report. Multiple asset group IDs are comma separated.
You can specify ips and/or asset_group_ids, or asset tags (see “Using Asset Tags”).
Optional: Qualys Top 20 Report, SANS Top 20 Report
Invalid: PCI Executive Report, PCI Technical Report
report_refs={value} (Required for PCI compliance report) For a PCI compliance report, either the technical or executive report, this parameter specifies the scan reference to include. A scan reference starts with the string “scan/” followed by a reference ID number. The scan reference must be for a scan that was run using the PCI Options profile. Only one scan reference may be specified.
Required: PCI Executive Report, PCI Technical Report
Invalid: Qualys Top 20 Report, SANS Top 20 Report
COMPLIANCE POLICY REPORT
report_type=Policy (Optional)
policy_id={value} (Required) Specifies the policy to run the report on. A valid policy ID must be entered.
asset_group_ids={value} (Optional) Specify asset group IDS if you want to include only certain asset groups in your report. These asset groups must be assigned to the policy you are reporting on. Multiple asset group IDs are comma separated.
You can specify ips and/or asset_group_ids, or asset tags (see “Using Asset Tags”).
ips={value} (Optional) Specify IPs/ranges if you want to include only certain IP addresses in your report. These IPs must be assigned to the policy you’re reporting on. Multiple entries are comma separated.
You can specify ips and/or asset_group_ids, or asset tags (see “Using Asset Tags”).
Parameter Description
389
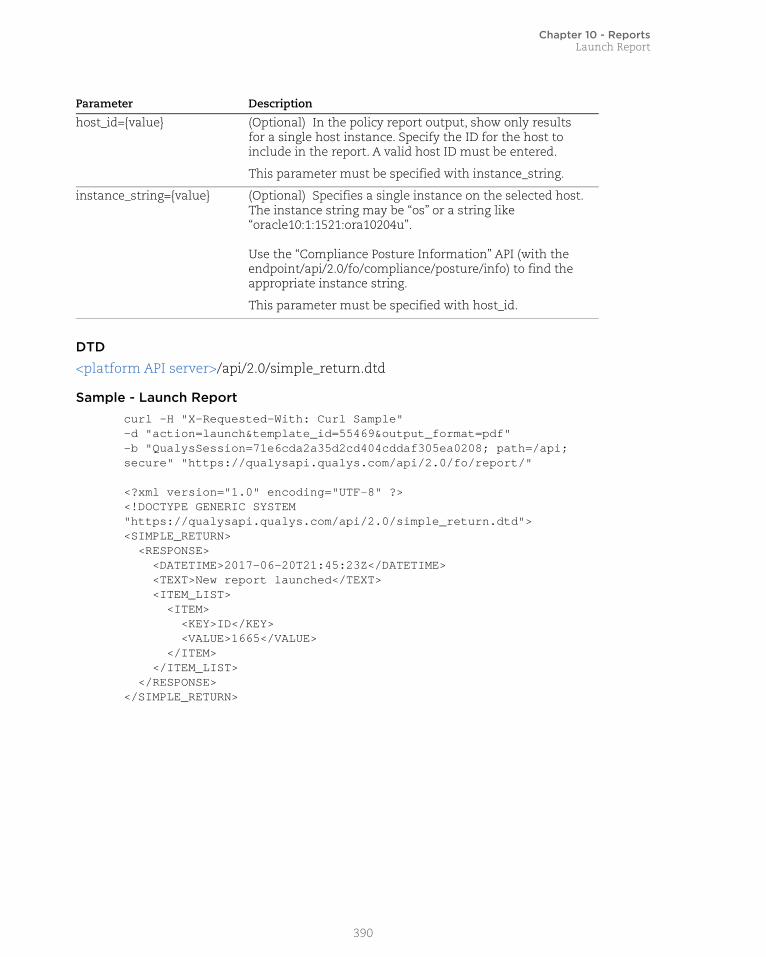
Chapter 10 - ReportsLaunch Report
DTD
<platform API server>/api/2.0/simple_return.dtd
Sample - Launch Reportcurl -H "X-Requested-With: Curl Sample"-d "action=launch&template_id=55469&output_format=pdf" -b "QualysSession=71e6cda2a35d2cd404cddaf305ea0208; path=/api;secure" "https://qualysapi.qualys.com/api/2.0/fo/report/"
<?xml version="1.0" encoding="UTF-8" ?><!DOCTYPE GENERIC SYSTEM "https://qualysapi.qualys.com/api/2.0/simple_return.dtd"><SIMPLE_RETURN> <RESPONSE> <DATETIME>2017-06-20T21:45:23Z</DATETIME> <TEXT>New report launched</TEXT> <ITEM_LIST> <ITEM> <KEY>ID</KEY> <VALUE>1665</VALUE> </ITEM> </ITEM_LIST> </RESPONSE></SIMPLE_RETURN>
host_id={value} (Optional) In the policy report output, show only results for a single host instance. Specify the ID for the host to include in the report. A valid host ID must be entered.
This parameter must be specified with instance_string.
instance_string={value} (Optional) Specifies a single instance on the selected host. The instance string may be “os” or a string like “oracle10:1:1521:ora10204u”.
Use the “Compliance Posture Information” API (with the endpoint/api/2.0/fo/compliance/posture/info) to find the appropriate instance string.
This parameter must be specified with host_id.
Parameter Description
390
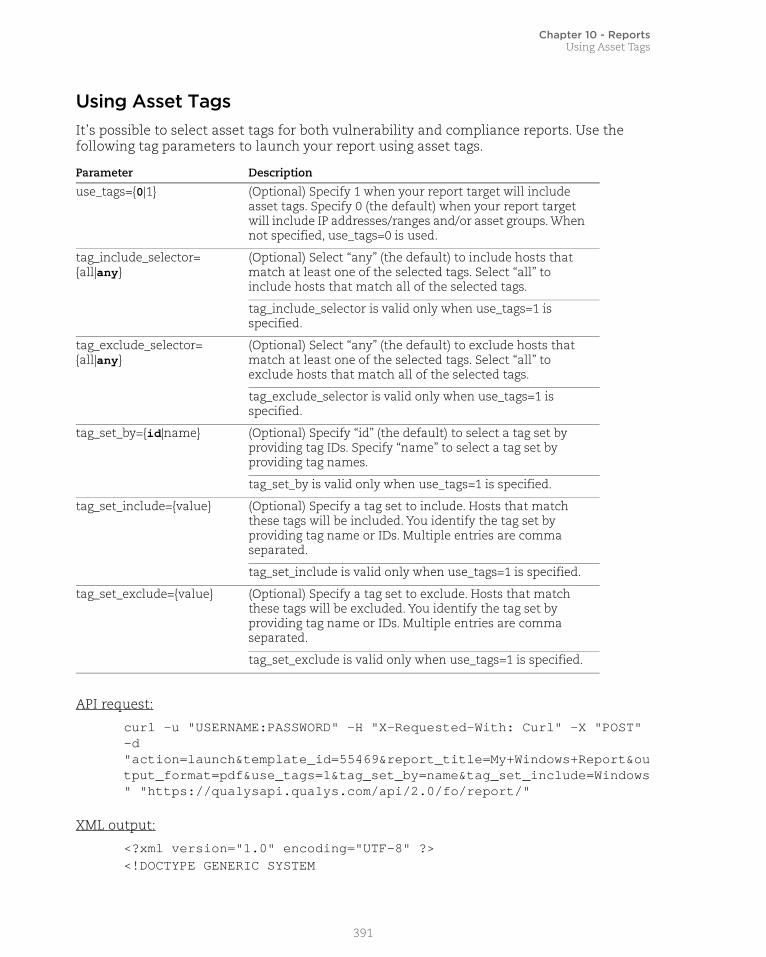
Chapter 10 - ReportsUsing Asset Tags
Using Asset TagsIt’s possible to select asset tags for both vulnerability and compliance reports. Use the following tag parameters to launch your report using asset tags.
API request:
curl -u "USERNAME:PASSWORD" -H "X-Requested-With: Curl" -X "POST" -d "action=launch&template_id=55469&report_title=My+Windows+Report&output_format=pdf&use_tags=1&tag_set_by=name&tag_set_include=Windows" "https://qualysapi.qualys.com/api/2.0/fo/report/"
XML output:
<?xml version="1.0" encoding="UTF-8" ?><!DOCTYPE GENERIC SYSTEM
Parameter Description
use_tags={0|1} (Optional) Specify 1 when your report target will include asset tags. Specify 0 (the default) when your report target will include IP addresses/ranges and/or asset groups. When not specified, use_tags=0 is used.
tag_include_selector={all|any}
(Optional) Select “any” (the default) to include hosts that match at least one of the selected tags. Select “all” to include hosts that match all of the selected tags.
tag_include_selector is valid only when use_tags=1 is specified.
tag_exclude_selector={all|any}
(Optional) Select “any” (the default) to exclude hosts that match at least one of the selected tags. Select “all” to exclude hosts that match all of the selected tags.
tag_exclude_selector is valid only when use_tags=1 is specified.
tag_set_by={id|name} (Optional) Specify “id” (the default) to select a tag set by providing tag IDs. Specify “name” to select a tag set by providing tag names.
tag_set_by is valid only when use_tags=1 is specified.
tag_set_include={value} (Optional) Specify a tag set to include. Hosts that match these tags will be included. You identify the tag set by providing tag name or IDs. Multiple entries are comma separated.
tag_set_include is valid only when use_tags=1 is specified.
tag_set_exclude={value} (Optional) Specify a tag set to exclude. Hosts that match these tags will be excluded. You identify the tag set by providing tag name or IDs. Multiple entries are comma separated.
tag_set_exclude is valid only when use_tags=1 is specified.
391

Chapter 10 - ReportsReport Template List
"https://qualysapi.qualys.com/api/2.0/simple_return.dtd"><SIMPLE_RETURN> <RESPONSE> <DATETIME>2014-02-20T21:45:23Z</DATETIME> <TEXT>New report launched</TEXT> <ITEM_LIST> <ITEM> <KEY>ID</KEY> <VALUE>1665</VALUE> </ITEM> </ITEM_LIST> </RESPONSE></SIMPLE_RETURN>
Report Template List/msp/report_template_list.php
[GET] [POST]
List available report templates, including template titles and IDs, in the user account. The report list includes templates for all report types.
DTD<platform API server>/report_template_list.dtd
Sample - Report template list
API request:
https://qualysapi.qualys.com/msp/report_template_list.php
XML output:
<?xml version="1.0" encoding="UTF-8" ?><!DOCTYPE REPORT_TEMPLATE_LIST SYSTEM "https://qualysapi.qualys.com/report_template_list.dtd"><REPORT_TEMPLATE_LIST> <REPORT_TEMPLATE> <ID>235288</ID> <TYPE>Auto</TYPE> <TEMPLATE_TYPE>Scan</TEMPLATE_TYPE> <TITLE><![CDATA[Windows Authentication QIDs]]></TITLE> <USER> <LOGIN><![CDATA[acme_jk]]></LOGIN> <FIRSTNAME><![CDATA[Jason]]></FIRSTNAME>
392

Chapter 10 - ReportsReport Template List
<LASTNAME><![CDATA[Kim]]></LASTNAME> </USER> <LAST_UPDATE>2018-02-12T18:09:10Z</LAST_UPDATE> <GLOBAL>0</GLOBAL> </REPORT_TEMPLATE> <REPORT_TEMPLATE> <ID>235164</ID> <TYPE>Auto</TYPE> <TEMPLATE_TYPE>Policy</TEMPLATE_TYPE> <TITLE><![CDATA[My Policy Report Template]]></TITLE> <USER> <LOGIN><![CDATA[acme_vs]]></LOGIN> <FIRSTNAME><![CDATA[Victor]]></FIRSTNAME> <LASTNAME><![CDATA[Smith]]></LASTNAME> </USER> <LAST_UPDATE>2017-12-09T22:47:58Z</LAST_UPDATE> <GLOBAL>0</GLOBAL> </REPORT_TEMPLATE> <REPORT_TEMPLATE> <ID>232556</ID> <TYPE>Auto</TYPE> <TEMPLATE_TYPE>Scan</TEMPLATE_TYPE> <TITLE><![CDATA[Executive Report]]></TITLE> <USER> <LOGIN><![CDATA[acme_jk]]></LOGIN> <FIRSTNAME><![CDATA[Jason]]></FIRSTNAME> <LASTNAME><![CDATA[Kim]]></LASTNAME> </USER> <LAST_UPDATE>2017-11-11T17:11:55Z</LAST_UPDATE> <GLOBAL>1</GLOBAL> </REPORT_TEMPLATE> <REPORT_TEMPLATE> <ID>232557</ID> <TYPE>Auto</TYPE> <TEMPLATE_TYPE>Scan</TEMPLATE_TYPE> <TITLE><![CDATA[Technical Report]]></TITLE> <USER> <LOGIN><![CDATA[acme_jk]]></LOGIN> <FIRSTNAME><![CDATA[Jason]]></FIRSTNAME> <LASTNAME><![CDATA[Kim]]></LASTNAME> ...</REPORT_TEMPLATE_LIST>
393

Chapter 10 - ReportsLaunch Scorecard
Each <REPORT_TEMPLATE> element identifies template properties, including the report template ID, template type and title, in the sub-elements described below.
Launch Scorecard/api/2.0/fo/report/scorecard
[POST]
Launch a vulnerability scorecard report in the user’s Report Share. It is not possible to launch any compliance scorecard reports or WAS scorecard reports using this API at this time.
When a scorecard report is launched, the report is run in the background, and the report generation processing does not timeout until the report has completed.
User Permissions - Managers and Auditors can launch scorecard reports on all assets in the subscription, Unit Managers can launch scorecard reports on assets in their own business unit, Scanners and Readers can launch scorecard reports on assets in their own account.
Input Parameters
Element Description
<ID> The template ID number.
<TYPE> The template type: Auto (for automatic) or Manual.
<TEMPLATE_TYPE> The report template type:Scan (for a scan report template)Map (for a map report template)Remediation (for a remediation report template)Compliance (for a compliance report template)Policy (for a compliance policy report template)Patch (for a patch report template)
<TITLE> The template title, as defined in the Qualys user interface.
<USER> The template owner, identified by login, first name and last name. For a system template, the login “system” is reported.
<LAST_UPDATE> The most recent date and time when the template was updated.
<GLOBAL> For a global template, the value 1 appears. For a non global template, the value 0 appears.
Parameter Description
action=launch (Required)
394

Chapter 10 - ReportsLaunch Scorecard
echo_request={0|1} (Optional) Specifies whether to echo the request’s input parameters (names and values) in the XML output. When unspecified, parameters are not included in the XML output. Specify 1 to view parameters in the XML output.
name={value} (Required) Specifies the scorecard name for the vulnerability scorecard report that you want to launch. This name corresponds to a service-provided scorecard or a user-created scorecard. For a service-provided scorecard, specify one of these names:Asset Group Vulnerability ReportIgnored Vulnerabilities ReportMost Prevalent Vulnerabilities ReportMost Vulnerable Hosts ReportPatch Report
report_title=[value} (Optional) Specifies a user-defined report title. The title may have a maximum of 128 characters. When unspecified, the report title will be the scorecard name.
output_format={value} (Required) Specifies the output format of the report. One output format may be specified. A valid value is: pdf, html (a zip file), mht, xml, or csv.
When output_format=pdf is specified, the Secure PDF Distribution may be used. See “Sample - Launch Report.”
hide_header={0|1} (Valid for CSV format report only). Specify hide_header=1 to omit the header information from the report. By default this information is included.
Parameter Description
395

Chapter 10 - ReportsLaunch Scorecard
pdf_password={value} (Required for secure PDF distribution, Manager or Unit Manager only)The password to be used for encryption. The password may have a maximum of 32 characters (ascii). The password cannot match the password for the user’s Qualys login account. The password must follow the password security guidelines defined for the user’s subscription.
Conditions:a) The pdf_password parameter can only be specified by a Manager or Unit Manager.
b) The pdf_password parameter can only be specified when Report Share is enabled for your subscription and the option “Enable Secure PDF Distribution” is selected (log into your account and go to Users > Setup > Security).
recipient_group={value} (Optional for secure PDF distribution, Manager or Unit Manager only)The report recipients in the form of one or more distribution group names, as defined in your Qualys account. Each distribution group identifies a list of users who will receive the secure PDF report. Multiple distribution groups are comma separated. A maximum of 50 distribution groups may be entered.
Conditions:a) The recipient_group parameter can only be specified when the pdf_password parameter is also specified.
b) The recipient_group parameter can only be specified by a Manager or Unit Manager.
c) The recipient_group parameter can only be specified when Report Share is enabled for your subscription and the option “Enable Secure PDF Distribution” is selected (Setup—>Report Share).
d) The recipient_group parameter cannot be specified in the same request as recipient_group_id
Parameter Description
396

Chapter 10 - ReportsLaunch Scorecard
recipient_group_id={value} (Optional for secure PDF distribution, Manager or Unit Manager only) The report recipients in the form of one or more distribution group IDs. Multiple distribution group IDs are comma separated. Where do I find this ID? Log in to your Qualys account, go to Users > Distribution Groups and select Info for a group in the list.
Conditions:a) The recipient_group_id parameter can only be specified when the pdf_password parameter is also specified.
b) The recipient_group_id parameter can only be specified by a Manager or Unit Manager.
c) The recipient_group_id parameter can only be specified when Report Share is enabled for your subscription and the option “Enable Secure PDF Distribution” is selected (Setup—>Report Share).
d) The recipient_group_id parameter cannot be specified in the same request as recipient_group
source={value} (Conditional) The source asset groups for the report. Specify asset_groups to select asset groups. Specify business_unit to select all the asset groups in a business unit.
For a user scorecard, this parameter is optional. When unspecified, the source selection set in the scorecard attributes (as defined in your Qualys account) is used.
Conditions:a) The source parameter is required for a service-provided scorecard.
b) For a user scorecard, the source selection specified in the source parameter replaces an existing source selection set in the scorecard attributes (as defined in your Qualys account). If you set this parameter to asset_groups, you must specify one of these parameters: asset_groups or all_asset_groups. If you set this parameter to business_unit then you must specify one or more of these parameters: business_unit, division, function and/or location.
Parameter Description
397

Chapter 10 - ReportsLaunch Scorecard
asset_groups={value} (Conditional) The titles of asset groups to be used as source asset groups for the scorecard report. One or more asset group titles in your account may be specified. Multiple asset group titles are comma separated.
Conditions: a) The asset_groups parameter can only be specified when source=asset_groups.
b) These parameters cannot be specified for the same API request: asset_groups and all_asset_groups.
all_asset_groups={1} (Conditional) Set to 1 to select all asset groups available in your account as the source asset groups for the scorecard report.
Conditions:a) The asset_groups parameter can only be specified when source=asset_groups.
b) These parameters cannot be specified for the same API request: asset_groups and all_asset_groups.
business_unit={value} (Conditional for a Manager; not valid for other users)The title of a business unit containing the source asset groups for the scorecard report. All asset groups in the business unit will be included in the report source. You may enter the title of a business unit in your account that was created by a Manager user, or you may enter “Unassigned” for the unassigned business unit.
For a user scorecard, the business unit replaces an existing business unit set in the scorecard attributes (as defined in your Qualys account). If an empty value is set (business_unit=), the existing business unit in the scorecard attributes is not included in the scorecard parameters submitted with the API request.
Conditions:a) When source=business_unit, one or more of these parameters must be specified: business_unit, division, function and/or location.
b) The business_unit parameter can only be specified by a Manager.
Parameter Description
398

Chapter 10 - ReportsLaunch Scorecard
division={value} (Conditional) A business info tag identifying a division that asset group(s) belong to. The tag must be defined for an asset group in your account. When specified, only asset groups with this tag are included in the scorecard report source.
For a user scorecard, the division tag replaces an existing tag set in the scorecard attributes (as defined in your Qualys account). If an empty value is set (division=), the existing division tag in the scorecard attributes is not included in the scorecard parameters submitted with the API request.
Conditions:a) When source=business_unit, one or more of these parameters must be specified: business_unit, division, function and/or location.
b) The division parameter can only be specified when source=business_unit.
function={value} (Conditional) A business info tag identifying a business function for asset group(s). The tag must be defined for an asset group in your account. When specified, only asset groups with this tag are included in the scorecard report source.
For a user scorecard, the function tag replaces an existing function tag set in the scorecard attributes (as defined in your Qualys account). If an empty value is set (function=), the existing function tag in the scorecard attributes is not included in the scorecard parameters submitted with the API request.
Conditions:a) When source=business_unit, one or more of these parameters must be specified: business_unit, division, function and/or location.
b) The function parameter can only be specified when source=business_unit.
Parameter Description
399

Chapter 10 - ReportsLaunch Scorecard
location={value} (Conditional) A business info tag identifying a location where asset group(s) are located. The tag must be defined for an asset group in your account. When specified, only asset groups with this tag are included in the scorecard report source.
For a user scorecard, the location tag replaces an existing location tag set in the scorecard attributes (as defined in your Qualys account). If an empty value is set (location=), the existing location tag in the scorecard attributes is not included in the scorecard parameters submitted with the API request.
Conditions:a) When source=business_unit, one or more of these parameters must be specified: business_unit, division, function and/or location.
b) The location parameter can only be specified when source=business_unit.
patch_qids={value} (Conditional for Patch Report scorecard; not valid for other scorecards) Up to 10 QIDs for vulnerabilities or potential vulnerabilities with available patches. Multiple QIDs are comma separated. When the QIDs are detected on a host this means the host does not have the patches installed and it will be reported in the scorecard output.
For a user-defined Patch Report, the patch QIDs list replaces the patch QIDs list set in the scorecard attributes (as defined in your Qualys account). If an empty value is set (patch_qids=), the existing patches QIDs list in the scorecard attributes is not included in the scorecard parameters submitted with the API request.
Conditions:a) The patch_qids parameter may be specified only for a Patch Report.
b) For a Patch Report, patch_qids or missing_qids must be specified. Both parameters may be specified together.
Parameter Description
400

Chapter 10 - ReportsCancel Running Report
DTD
<platform API server>/api/2.0/simple_return.dtd
Cancel Running Report/api/2.0/fo/report
[POST]
Cancel a running report in the user’s account. This is an option when Report Share is enabled in the user’s subscription.
User permissions - Managers can cancel any running report. Unit Managers can cancel a running report in their own business unit (report launched by user in their own business unit). Scanners and Readers can cancel their own running report.
missing_qids={value} (Conditional for Patch Report scorecard; not valid for other scorecards)One or two QIDs for missing software. Two QIDs are comma separated. Typically missing software QIDs are information gathered checks. When the QIDs are not detected on a host this means the host is missing software and it will be reported in the scorecard output.
For a user-defined Patch Report, the missing QIDs list replaces the missing QIDs list set in the scorecard attributes (as defined in your Qualys account). If an empty value is set (missing_qids=), the existing missing QIDs list in the scorecard attributes is not included in the scorecard parameters submitted with the API request.
Conditions:a) The missing_qids parameter may be specified only for a Patch Report.
b) For a Patch Report, patch_qids or missing_qids must be specified. Both parameters may be specified together.
Parameter Description
401
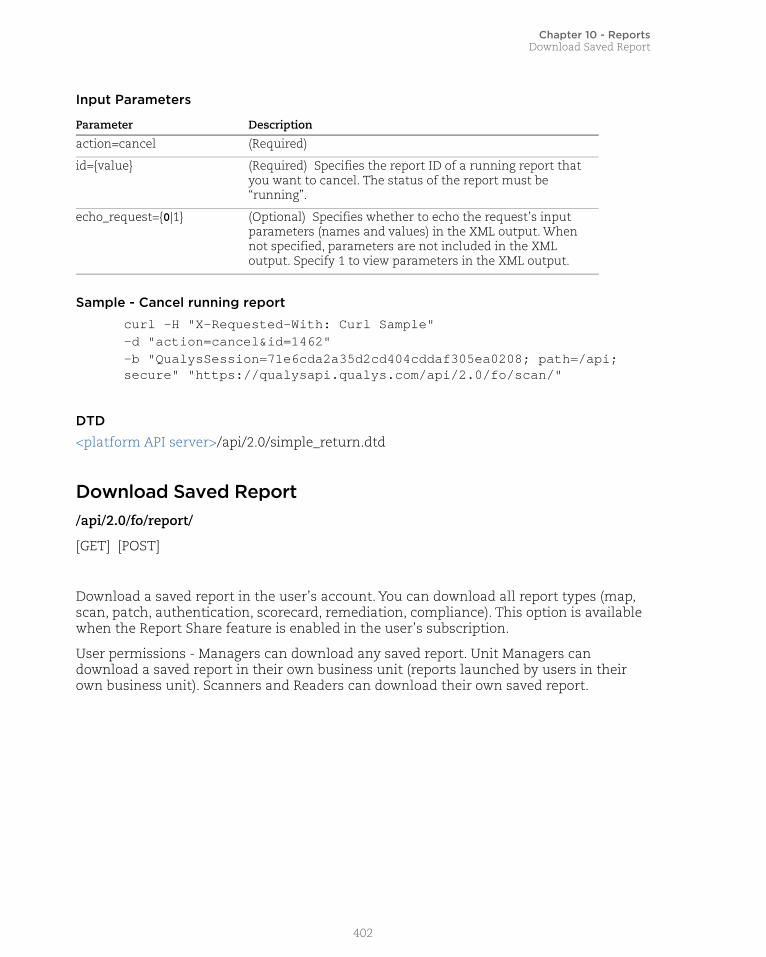
Chapter 10 - ReportsDownload Saved Report
Input Parameters
Sample - Cancel running reportcurl -H "X-Requested-With: Curl Sample"-d "action=cancel&id=1462"-b "QualysSession=71e6cda2a35d2cd404cddaf305ea0208; path=/api; secure" "https://qualysapi.qualys.com/api/2.0/fo/scan/"
DTD
<platform API server>/api/2.0/simple_return.dtd
Download Saved Report/api/2.0/fo/report/
[GET] [POST]
Download a saved report in the user’s account. You can download all report types (map, scan, patch, authentication, scorecard, remediation, compliance). This option is available when the Report Share feature is enabled in the user’s subscription.
User permissions - Managers can download any saved report. Unit Managers can download a saved report in their own business unit (reports launched by users in their own business unit). Scanners and Readers can download their own saved report.
Parameter Description
action=cancel (Required)
id={value} (Required) Specifies the report ID of a running report that you want to cancel. The status of the report must be “running”.
echo_request={0|1} (Optional) Specifies whether to echo the request’s input parameters (names and values) in the XML output. When not specified, parameters are not included in the XML output. Specify 1 to view parameters in the XML output.
402
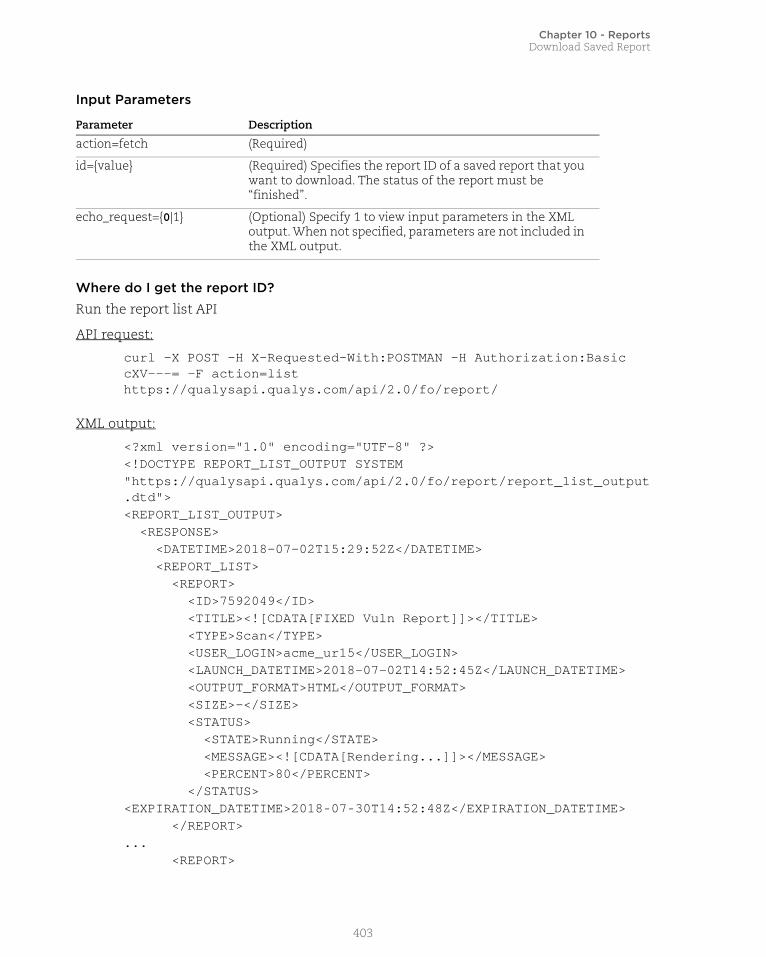
Chapter 10 - ReportsDownload Saved Report
Input Parameters
Where do I get the report ID?
Run the report list API
API request:
curl -X POST -H X-Requested-With:POSTMAN -H Authorization:Basic cXV---= -F action=list https://qualysapi.qualys.com/api/2.0/fo/report/
XML output:
<?xml version="1.0" encoding="UTF-8" ?><!DOCTYPE REPORT_LIST_OUTPUT SYSTEM "https://qualysapi.qualys.com/api/2.0/fo/report/report_list_output.dtd"><REPORT_LIST_OUTPUT> <RESPONSE> <DATETIME>2018-07-02T15:29:52Z</DATETIME> <REPORT_LIST> <REPORT> <ID>7592049</ID> <TITLE><![CDATA[FIXED Vuln Report]]></TITLE> <TYPE>Scan</TYPE> <USER_LOGIN>acme_ur15</USER_LOGIN> <LAUNCH_DATETIME>2018-07-02T14:52:45Z</LAUNCH_DATETIME> <OUTPUT_FORMAT>HTML</OUTPUT_FORMAT> <SIZE>-</SIZE> <STATUS> <STATE>Running</STATE> <MESSAGE><![CDATA[Rendering...]]></MESSAGE> <PERCENT>80</PERCENT> </STATUS><EXPIRATION_DATETIME>2018-07-30T14:52:48Z</EXPIRATION_DATETIME> </REPORT>... <REPORT>
Parameter Description
action=fetch (Required)
id={value} (Required) Specifies the report ID of a saved report that you want to download. The status of the report must be “finished”.
echo_request={0|1} (Optional) Specify 1 to view input parameters in the XML output. When not specified, parameters are not included in the XML output.
403

Chapter 10 - ReportsDownload Saved Report
<ID>7589800</ID> <TITLE><![CDATA[My Authentication Report]]></TITLE> <TYPE>Authentication</TYPE> <USER_LOGIN>acme_ee17</USER_LOGIN> <LAUNCH_DATETIME>2018-07-02T07:00:21Z</LAUNCH_DATETIME> <OUTPUT_FORMAT>PDF</OUTPUT_FORMAT> <SIZE>15 KB</SIZE> <STATUS> <STATE>Finished</STATE> </STATUS> <EXPIRATION_DATETIME>2018-07-30T07:00:24Z</EXPIRATION_DATETIME> </REPORT> </REPORT_LIST> </RESPONSE></REPORT_LIST_OUTPUT>
Another option - go to the user interfaceWithin the user interface find the report you want to download (go to Reports > Reports) then choose View Report. In the Report Information window, at the top you’ll see the ID in the window URL after id= like this:
https://qualysguard.qualys.qualys.com/fo/report/view_report.php?id=2281953
Sample - Download report
curl -H "X-Requested-With: Curl Sample"-b "QualysSession=71e6cda2a35d2cd404cddaf305ea0208; path=/api; secure" "https://qualysapi.qualys.com/api/2.0/fo/report/?action=fetch&id=1462"
DTD
<platform API server>/asset_data_report.dtd
404

Chapter 10 - ReportsDelete Saved Report
Delete Saved Report/api/2.0/fo/report
[POST]
Delete a saved report in the user’s account. This option is available when the Report Share feature is enabled in the user’s subscription.
User permissions - Managers can delete any saved report. Unit Managers can delete a saved report in their own business unit (report launched by users in their own business unit). Scanners and Readers can delete their own saved report.
Input Parameters
Sample - Delete saved report
curl -H "X-Requested-With: Curl Sample"-d "action=delete&id=1234"-b "QualysSession=71e6cda2a35d2cd404cddaf305ea0208; path=/api; secure" "https://qualysapi.qualys.com/api/2.0/fo/scan/"
DTD
<platform API server>/api/2.0/simple_return.dtd
Parameter Description
action=delete (Required)
id={value} (Required) Specifies the report ID of a saved report in Report Share that you want to delete. The status of the report must be “finished”.
echo_request={0|1} (Optional) Specifies whether to echo the request’s input parameters in the XML output. When not specified, parameters are not included in the XML output. Specify 1 to view parameters in the XML output.
405

Chapter 10 - ReportsScheduled Reports List
Scheduled Reports List/api/2.0/fo/schedule/report/ with action=list
[GET] [POST]
List scheduled reports in your account.
Input parameters
Sample - List all scheduled reports in account
curl -u "USERNAME:PASSWORD" -H "X-Requested-With: Curl" "https://qualysapi.qualys.com/api/2.0/fo/schedule/report/?action=list"
DTD
<platform API server>/api/2.0/fo/schedule/report/schedule_report_list_output.dtd
Parameter Description
action=list (Required)
id={value} (Optional) Show only 1 scheduled report that has the report ID you specify.
is_active={true|false} (Optional) Active and inactive scheduled reports are listed by default. Set to “true” to list active scheduled reports only, or set to “false” to list inactive scheduled reports only.
406

Chapter 10 - ReportsLaunch Scheduled Report
Launch Scheduled Report/api/2.0/fo/schedule/report/ with action=launch_now
[POST]
Launch a scheduled report now.
Input parameters
Sample - Launch scheduled report
curl -H "X-Requested-With: Curl" -u USERNAME:PASSWORD -X "POST" -d "action=launch_now&id=12345" "https://qualysapi.qualys.com/api/2.0/fo/schedule/report/"
DTD
<platform API server>/api/2.0/simple_return.dtd
Asset Search Report/api/2.0/fo/report/asset/?action=search
[GET] [POST]
Download report on assets you’re interested in.
Input parameters
Parameter Description
action=launch_now (Required)
id={value} (Required) A valid scheduled report ID.
Parameter Description
action=search (Required)
output_format={csv|xml} (Required) The output format of the asset search report. One output format may be specified: csv or xml.
tracking_method={value} (Optional) Show only IP addresses/ranges which have a certain tracking method. A valid value is: IP, DNS, NETBIOS, EC2, or AGENT.
407

Chapter 10 - ReportsAsset Search Report
ips={value} (Optional) Use this parameter if you want to include only certain IP addresses in the report. One or more IPs/ranges may be specified. Multiple entries are comma separated. An IP range is specified with a hyphen (for example, 10.10.10.1-10.10.10.100).
One of these parameters must be specified in a request: ips, asset_groups, asset_group_ids, or use_tags.
ips_network_id={value} (Optional) The network ID applied on IPs. The default value is ALL.
asset_group_ids={value} (Optional) The IDs of asset groups containing the hosts to be included in the asset search report. Multiple IDs are comma separated.
One of these parameters must be specified in a request: ips, asset_groups, asset_group_ids, or use_tags.
asset_groups={value} (Optional) The titles of asset groups containing the hosts to be included in the asset search report. Multiple titles are comma separated.
One of these parameters must be specified in a request: ips, asset_groups, asset_group_ids, or use_tags.
assets_in_my_network_only={0|1}
(Optional) Specify 1 to include the specified asset groups and/or IP ranges. Valid for 'All' Asset Group and/or specified IP ranges.
ec2_instance_status={value}
(Optional) Specify the EC2 instance status to be searched. Possible values: RUNNING,TERMINATED, PENDING, STOPPING, SHUTTING_DOWN, STOPPED. Values are case-sensitive. See EC2 search samples
ec2_instance_id={value} (Optional) Specify the EC2 instance ID to be searched. See See EC2 search samples
ec2_instance_id is valid only when ec2_instance_id_modifier is specified
ec2_instance_id_modifier={value}
(Optional) Show only hosts with ec2_instance_id that is either: beginning with, containing, matching, ending with, not empty. See EC2 search samples
ec2_instance_id_modifier is valid only when ec2_instance_id is specified
display_ag_titles={0|1} (Optional) Specify 1 to display AssetGroup Titles for each Host in the output. Otherwise the AssetGroup Titles are not displayed in the output.
ports={value} (Optional) Shows the hosts that has the specified open ports. One or more ports may be specified. Multiple ports are comma separated. You can specify upto 10 values.
Parameter Description
408
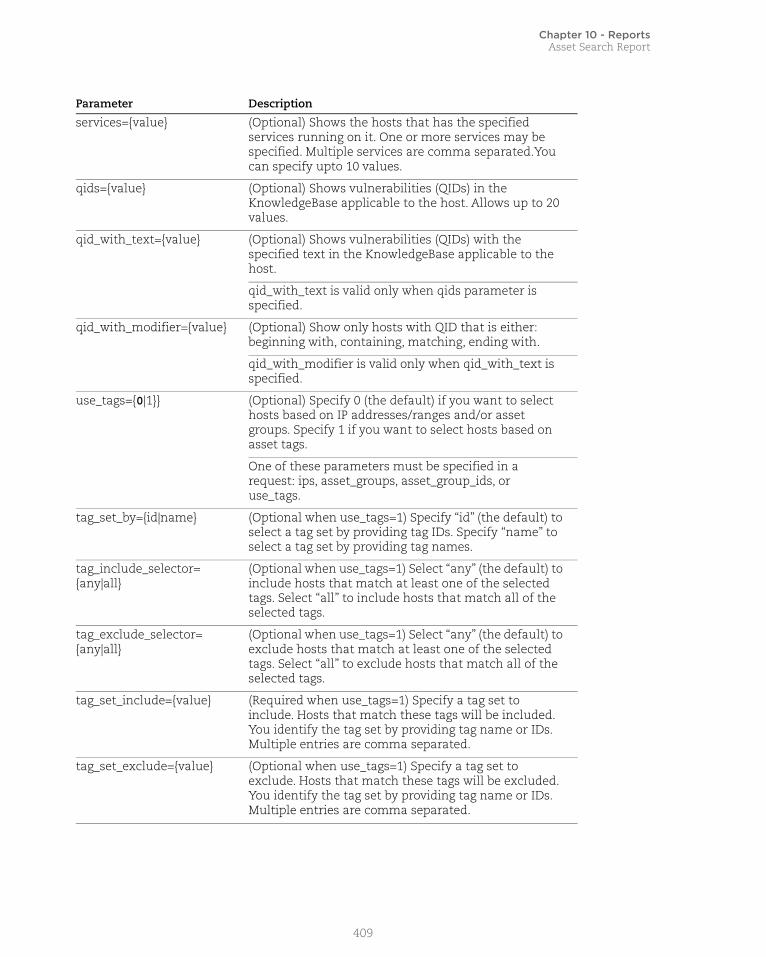
Chapter 10 - ReportsAsset Search Report
services={value} (Optional) Shows the hosts that has the specified services running on it. One or more services may be specified. Multiple services are comma separated.You can specify upto 10 values.
qids={value} (Optional) Shows vulnerabilities (QIDs) in the KnowledgeBase applicable to the host. Allows up to 20 values.
qid_with_text={value} (Optional) Shows vulnerabilities (QIDs) with the specified text in the KnowledgeBase applicable to the host.
qid_with_text is valid only when qids parameter is specified.
qid_with_modifier={value} (Optional) Show only hosts with QID that is either: beginning with, containing, matching, ending with.
qid_with_modifier is valid only when qid_with_text is specified.
use_tags={0|1}} (Optional) Specify 0 (the default) if you want to select hosts based on IP addresses/ranges and/or asset groups. Specify 1 if you want to select hosts based on asset tags.
One of these parameters must be specified in a request: ips, asset_groups, asset_group_ids, or use_tags.
tag_set_by={id|name} (Optional when use_tags=1) Specify “id” (the default) to select a tag set by providing tag IDs. Specify “name” to select a tag set by providing tag names.
tag_include_selector= {any|all}
(Optional when use_tags=1) Select “any” (the default) to include hosts that match at least one of the selected tags. Select “all” to include hosts that match all of the selected tags.
tag_exclude_selector= {any|all}
(Optional when use_tags=1) Select “any” (the default) to exclude hosts that match at least one of the selected tags. Select “all” to exclude hosts that match all of the selected tags.
tag_set_include={value} (Required when use_tags=1) Specify a tag set to include. Hosts that match these tags will be included. You identify the tag set by providing tag name or IDs. Multiple entries are comma separated.
tag_set_exclude={value} (Optional when use_tags=1) Specify a tag set to exclude. Hosts that match these tags will be excluded. You identify the tag set by providing tag name or IDs. Multiple entries are comma separated.
Parameter Description
409
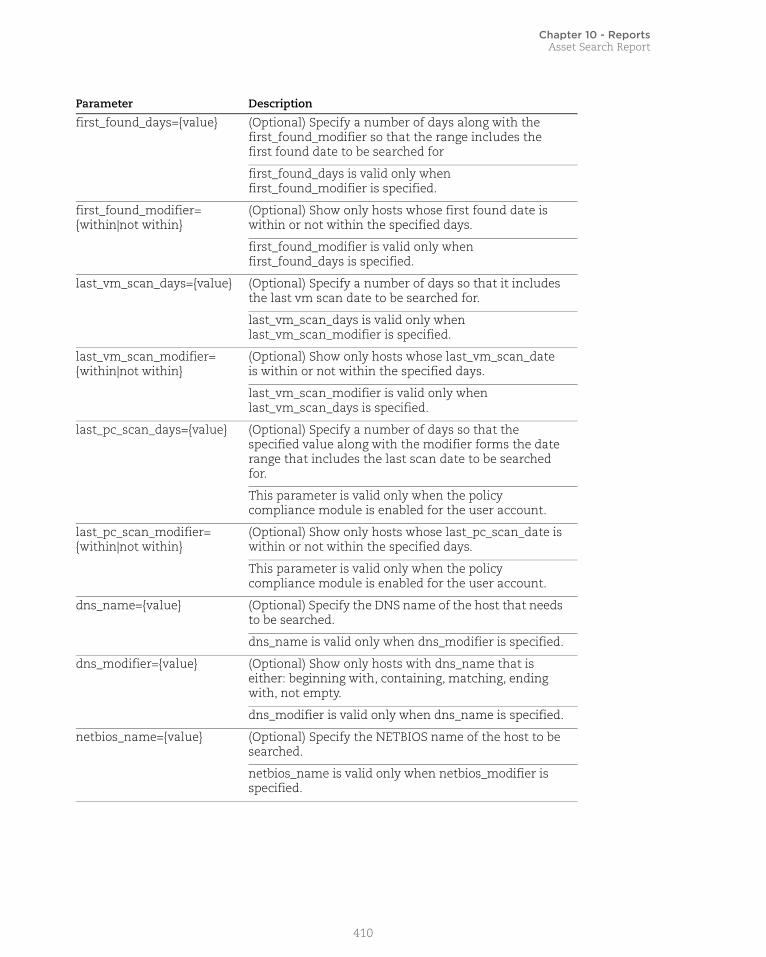
Chapter 10 - ReportsAsset Search Report
first_found_days={value} (Optional) Specify a number of days along with the first_found_modifier so that the range includes the first found date to be searched for
first_found_days is valid only when first_found_modifier is specified.
first_found_modifier={within|not within}
(Optional) Show only hosts whose first found date is within or not within the specified days.
first_found_modifier is valid only when first_found_days is specified.
last_vm_scan_days={value} (Optional) Specify a number of days so that it includes the last vm scan date to be searched for.
last_vm_scan_days is valid only when last_vm_scan_modifier is specified.
last_vm_scan_modifier= {within|not within}
(Optional) Show only hosts whose last_vm_scan_date is within or not within the specified days.
last_vm_scan_modifier is valid only when last_vm_scan_days is specified.
last_pc_scan_days={value} (Optional) Specify a number of days so that the specified value along with the modifier forms the date range that includes the last scan date to be searched for.
This parameter is valid only when the policy compliance module is enabled for the user account.
last_pc_scan_modifier={within|not within}
(Optional) Show only hosts whose last_pc_scan_date is within or not within the specified days.
This parameter is valid only when the policy compliance module is enabled for the user account.
dns_name={value} (Optional) Specify the DNS name of the host that needs to be searched.
dns_name is valid only when dns_modifier is specified.
dns_modifier={value} (Optional) Show only hosts with dns_name that is either: beginning with, containing, matching, ending with, not empty.
dns_modifier is valid only when dns_name is specified.
netbios_name={value} (Optional) Specify the NETBIOS name of the host to be searched.
netbios_name is valid only when netbios_modifier is specified.
Parameter Description
410

Chapter 10 - ReportsAsset Search Report
Sample - Request Asset Search report API request:
curl -u "USERNAME:PASSWORD" -H "X-Requested-With: curl" "https://qualysapi.qualys.com/api/2.0/fo/report/asset/?action=search&output_format=xml&echo_request=1&ips=10.10.10.10-10.10.10.20"
XML output:
<?xml version="1.0" encoding="UTF-8" ?><!DOCTYPE ASSET_SEARCH_REPORT SYSTEM "https://qualysapi.qualys.com/asset_search_report_v2.dtd">
<ASSET_SEARCH_REPORT><HEADER> <REQUEST> <DATETIME>2018-06-03T20:21:13Z</DATETIME> <USER_LOGIN>john_sm</USER_LOGIN> <RESOURCE>https://qualysapi.qualys.com/api/2.0/fo/report/asset/ </RESOURCE> <PARAM_LIST> <PARAM>
netbios_modifier={value} (Optional) Show only hosts with netbios_name that is either: beginning with, containing, matching, ending with, not empty.
netbios_modifier is valid only when netbios_name is specified.
os_cpe_name={value} (Optional) Specify the OS CPE name of the host to searched.
os_cpe_name is valid only when os_cpe_name is specified.
os_cpe_modifier={value} (Optional)) Show only hosts with os cpe_name that is either: beginning with, containing, matching, ending with, not empty.
os_cpe_modifier is valid only when os_cpe_name is specified.
os_name={value} (Optional) Specify the operating system name of the host to be searched.
os_name is valid only when os_modifier is specified.
os_modifier={value} (Optional) Show only hosts with os_name that is either: beginning with, containing, matching, ending with.
os_modifier is valid only when os_name is specified.
Parameter Description
411

Chapter 10 - ReportsAsset Search Report
<KEY>action</KEY> <VALUE>search</VALUE> </PARAM> <PARAM> <KEY>output_format</KEY> <VALUE>xml</VALUE> </PARAM> <PARAM> <KEY>echo_request</KEY> <VALUE>1</VALUE> </PARAM> <PARAM> <KEY>ips</KEY> <VALUE>10.10.10.10-10.10.10.15</VALUE> </PARAM> </PARAM_LIST> </REQUEST> <COMPANY>Corsa</COMPANY> <USERNAME>John Smith</USERNAME> <GENERATION_DATETIME>2018-06-03T20:21:13Z</GENERATION_DATETIME> <TOTAL>2</TOTAL> <FILTERS> <IP_LIST> <RANGE> <START>10.10.10.10</START> <END>10.10.10.15</END> </RANGE> </IP_LIST> </FILTERS></HEADER>
<HOST_LIST> <HOST> <IP><![CDATA[10.10.10.10]]></IP> <TRACKING_METHOD>IP address</TRACKING_METHOD> <OPERATING_SYSTEM><![CDATA[Linux 2.4-2.6 / Embedded Device / F5 Networks Big-IP]]></OPERATING_SYSTEM> <LAST_SCAN_DATE>2018-06-03T09:11:21Z</LAST_SCAN_DATE> <FIRST_FOUND_DATE>2018-06-03T07:11:46Z</FIRST_FOUND_DATE> </HOST>
<HOST> <IP><![CDATA[10.10.10.11]]></IP> <TRACKING_METHOD>IP address</TRACKING_METHOD> <DNS><![CDATA[10-10-10-11.bogus.tld]]></DNS> <NETBIOS><![CDATA[SYS_10_10_10_11]]></NETBIOS>
412
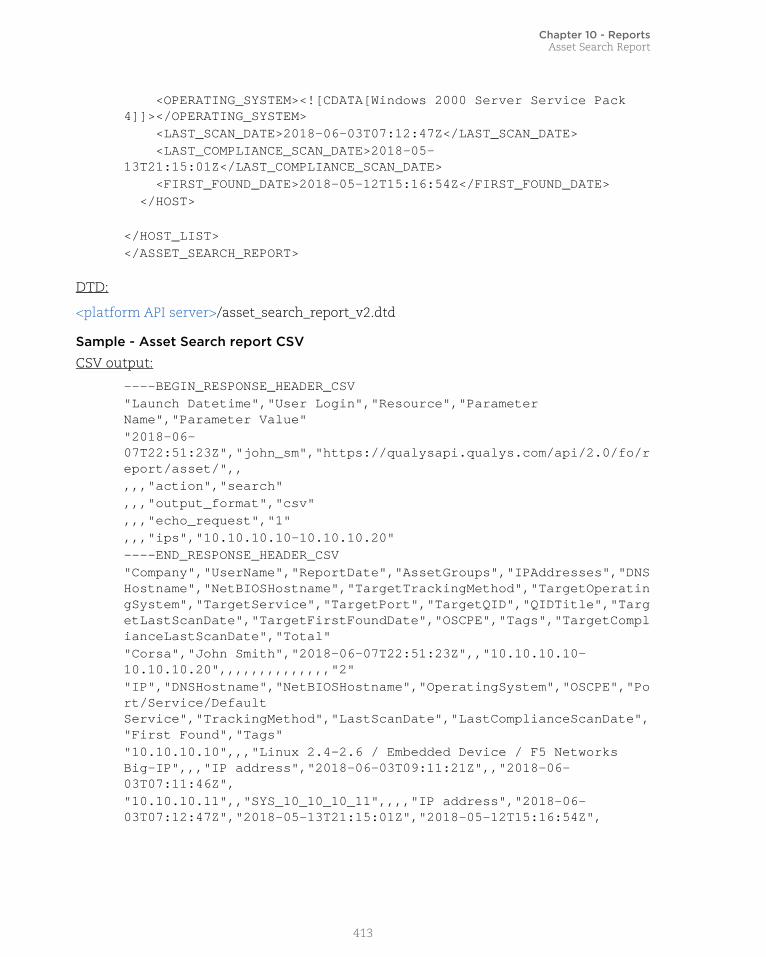
Chapter 10 - ReportsAsset Search Report
<OPERATING_SYSTEM><![CDATA[Windows 2000 Server Service Pack 4]]></OPERATING_SYSTEM> <LAST_SCAN_DATE>2018-06-03T07:12:47Z</LAST_SCAN_DATE> <LAST_COMPLIANCE_SCAN_DATE>2018-05-13T21:15:01Z</LAST_COMPLIANCE_SCAN_DATE> <FIRST_FOUND_DATE>2018-05-12T15:16:54Z</FIRST_FOUND_DATE> </HOST>
</HOST_LIST></ASSET_SEARCH_REPORT>
DTD:
<platform API server>/asset_search_report_v2.dtd
Sample - Asset Search report CSV
CSV output:
----BEGIN_RESPONSE_HEADER_CSV"Launch Datetime","User Login","Resource","Parameter Name","Parameter Value""2018-06-07T22:51:23Z","john_sm","https://qualysapi.qualys.com/api/2.0/fo/report/asset/",,,,,"action","search",,,"output_format","csv",,,"echo_request","1",,,"ips","10.10.10.10-10.10.10.20"----END_RESPONSE_HEADER_CSV"Company","UserName","ReportDate","AssetGroups","IPAddresses","DNSHostname","NetBIOSHostname","TargetTrackingMethod","TargetOperatingSystem","TargetService","TargetPort","TargetQID","QIDTitle","TargetLastScanDate","TargetFirstFoundDate","OSCPE","Tags","TargetComplianceLastScanDate","Total""Corsa","John Smith","2018-06-07T22:51:23Z",,"10.10.10.10-10.10.10.20",,,,,,,,,,,,,,"2""IP","DNSHostname","NetBIOSHostname","OperatingSystem","OSCPE","Port/Service/Default Service","TrackingMethod","LastScanDate","LastComplianceScanDate","First Found","Tags""10.10.10.10",,,"Linux 2.4-2.6 / Embedded Device / F5 Networks Big-IP",,,"IP address","2018-06-03T09:11:21Z",,"2018-06-03T07:11:46Z","10.10.10.11",,"SYS_10_10_10_11",,,,"IP address","2018-06-03T07:12:47Z","2018-05-13T21:15:01Z","2018-05-12T15:16:54Z",
413
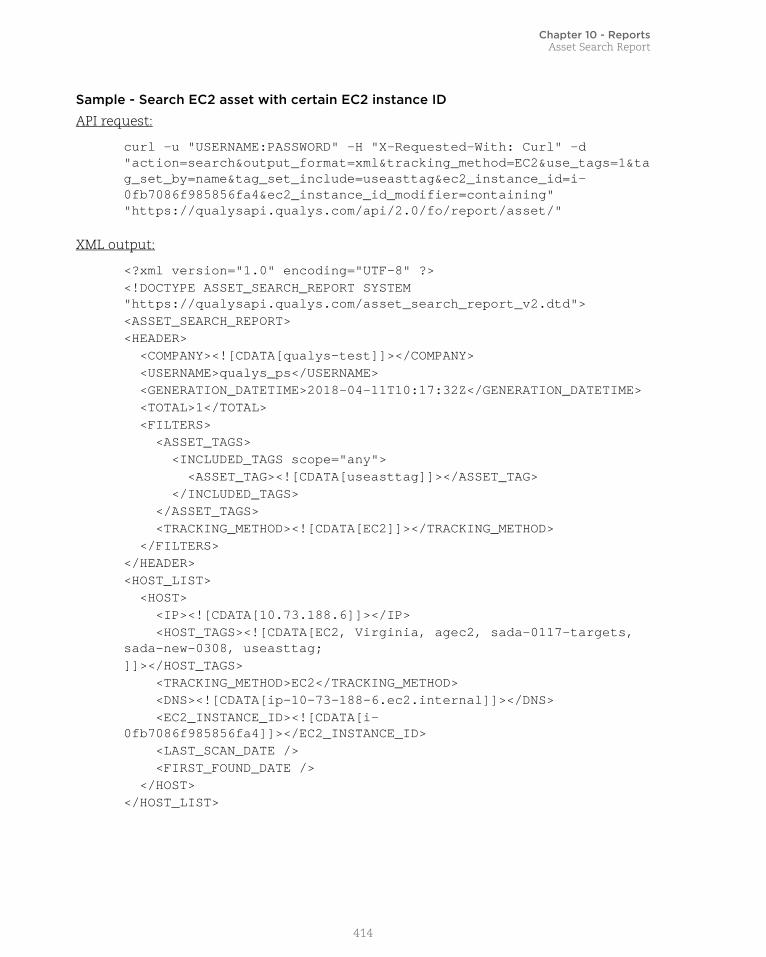
Chapter 10 - ReportsAsset Search Report
Sample - Search EC2 asset with certain EC2 instance ID
API request:
curl -u "USERNAME:PASSWORD" -H "X-Requested-With: Curl" -d "action=search&output_format=xml&tracking_method=EC2&use_tags=1&tag_set_by=name&tag_set_include=useasttag&ec2_instance_id=i-0fb7086f985856fa4&ec2_instance_id_modifier=containing" "https://qualysapi.qualys.com/api/2.0/fo/report/asset/"
XML output:
<?xml version="1.0" encoding="UTF-8" ?><!DOCTYPE ASSET_SEARCH_REPORT SYSTEM "https://qualysapi.qualys.com/asset_search_report_v2.dtd"><ASSET_SEARCH_REPORT><HEADER> <COMPANY><![CDATA[qualys-test]]></COMPANY> <USERNAME>qualys_ps</USERNAME> <GENERATION_DATETIME>2018-04-11T10:17:32Z</GENERATION_DATETIME> <TOTAL>1</TOTAL> <FILTERS> <ASSET_TAGS> <INCLUDED_TAGS scope="any"> <ASSET_TAG><![CDATA[useasttag]]></ASSET_TAG> </INCLUDED_TAGS> </ASSET_TAGS> <TRACKING_METHOD><![CDATA[EC2]]></TRACKING_METHOD> </FILTERS></HEADER><HOST_LIST> <HOST> <IP><![CDATA[10.73.188.6]]></IP> <HOST_TAGS><![CDATA[EC2, Virginia, agec2, sada-0117-targets, sada-new-0308, useasttag;]]></HOST_TAGS> <TRACKING_METHOD>EC2</TRACKING_METHOD> <DNS><![CDATA[ip-10-73-188-6.ec2.internal]]></DNS> <EC2_INSTANCE_ID><![CDATA[i-0fb7086f985856fa4]]></EC2_INSTANCE_ID> <LAST_SCAN_DATE /> <FIRST_FOUND_DATE /> </HOST></HOST_LIST>
414

Chapter 10 - ReportsAsset Search Report
Sample - Search EC2 assets with certain status
Search all EC2 assets which are currently in TERMINATED state and having instance ID i-0b121b9211d7e25cb.
API request:
curl -u "USERNAME:PASSWORD" -k -H "X-Requested-With: Curl" -d "action=search&output_format=xml&tracking_method=EC2&use_tags=1&tag_set_by=name&tag_set_include=useasttag&ec2_instance_status=TERMINATED&ec2_instance_id=i-0b121b9211d7e25cb&ec2_instance_id_modifier=containing" "https://qualysapi.qualys.com/api/2.0/fo/report/asset/"
XML output:
<?xml version="1.0" encoding="UTF-8" ?><!DOCTYPE ASSET_SEARCH_REPORT SYSTEM "https://qualysapi.qualys.com/asset_search_report_v2.dtd"><ASSET_SEARCH_REPORT><HEADER> <COMPANY><![CDATA[qualys-test]]></COMPANY> <USERNAME>sada-customer customer</USERNAME> <GENERATION_DATETIME>2018-04-11T10:49:05Z</GENERATION_DATETIME> <TOTAL>1</TOTAL> <FILTERS> <ASSET_TAGS> <INCLUDED_TAGS scope="any"> <ASSET_TAG><![CDATA[useasttag]]></ASSET_TAG> </INCLUDED_TAGS> </ASSET_TAGS> <TRACKING_METHOD><![CDATA[EC2]]></TRACKING_METHOD> </FILTERS></HEADER><HOST_LIST> <HOST> <IP><![CDATA[10.90.2.175]]></IP> <HOST_TAGS><![CDATA[EC2, Vriginia, por-6586, sada-0117-targets, sada-new-0308, useasttag;]]></HOST_TAGS> <TRACKING_METHOD>EC2</TRACKING_METHOD> <DNS><![CDATA[i-0b121b9211d7e25cb]]></DNS> <EC2_INSTANCE_ID><![CDATA[i-0b121b9211d7e25cb]]></EC2_INSTANCE_ID> <LAST_SCAN_DATE /> <FIRST_FOUND_DATE /> </HOST></HOST_LIST>
415

Chapter 11 - VM Report TemplatesAPI Support for Report Templates
Chapter 11 - VM Report TemplatesThe Report Template API is used to manage report templates and their settings in the user’s subscription.
API Support for Report Templates
Scan Template
PCI Scan Template
Patch Template
Map Template
API Support for Report TemplatesYou can now use APIs to create custom reports with views on your scan results and the current vulnerabilities on your hosts. Use various report templates provided by Qualys as a starting point.
APIs are now available to perform various actions on templates for the following report types: Scan Template, PCI Scan Template, Patch Template, Map Template
The Report Template API allows users to perform the following actions.
Once you have your template the way you want you can run reports using the templates using the Report API /api/2.0/fo/report.
Action Supported Access Method
Description
Create POST Create a report template. A unique template ID is generated for the new template.
Update PUT Update an existing report template.
Delete POST Delete an existing report template.
Export GET Export a specific report template based on the template ID, or all templates for the report type.
416
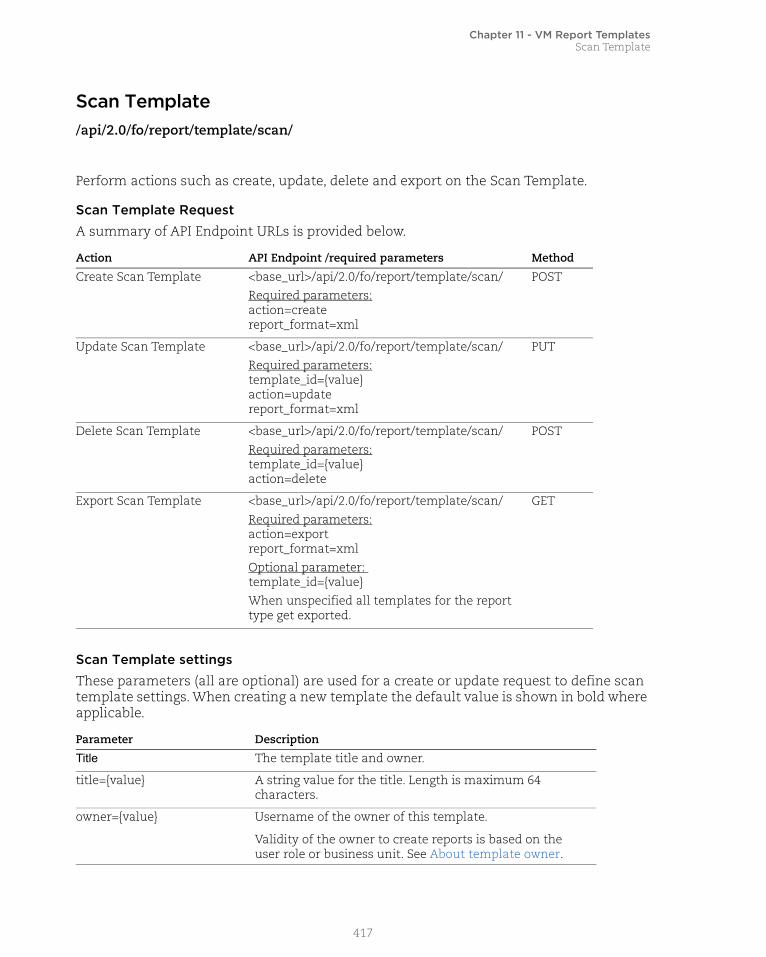
Chapter 11 - VM Report TemplatesScan Template
Scan Template/api/2.0/fo/report/template/scan/
Perform actions such as create, update, delete and export on the Scan Template.
Scan Template Request
A summary of API Endpoint URLs is provided below.
Scan Template settings
These parameters (all are optional) are used for a create or update request to define scan template settings. When creating a new template the default value is shown in bold where applicable.
Action API Endpoint /required parameters Method
Create Scan Template <base_url>/api/2.0/fo/report/template/scan/Required parameters:action=createreport_format=xml
POST
Update Scan Template <base_url>/api/2.0/fo/report/template/scan/Required parameters:template_id={value}action=updatereport_format=xml
PUT
Delete Scan Template <base_url>/api/2.0/fo/report/template/scan/Required parameters:template_id={value}action=delete
POST
Export Scan Template <base_url>/api/2.0/fo/report/template/scan/Required parameters:action=exportreport_format=xmlOptional parameter: template_id={value}When unspecified all templates for the report type get exported.
GET
Parameter Description
Title The template title and owner.
title={value} A string value for the title. Length is maximum 64 characters.
owner={value} Username of the owner of this template.
Validity of the owner to create reports is based on the user role or business unit. See About template owner.
417

Chapter 11 - VM Report TemplatesScan Template
Target What target assets to include in the report.
scan_selection={HostBased|ScanBased|}
Specify HostBased for Host Based Findings (default for new template) or ScanBased for Scan Based Findings. Choosing Host Based Findings allows you to report on the latest vulnerability data from all of your scans. Choosing Scan Based Findings allows you to run a report based on saved scan results.
include_trending={0|1} Specify 1 to include trending. Choose a timeframe (daily, weekly or monthly) to analyze the vulnerability status for the timeframe selected.This parameter is required only if scan_selection=HostBased.
limit_timeframe={0|1} Specify 1 to only include scan results from the specified time frame. This ensures that only vulnerability information gathered in the timeframe that you've specified is included in the report. If unspecified, vulnerability information for hosts that were last scanned prior to the report timeframe may be included.This parameter is required only if scan_selection=HostBased.
selection_type={day|month|weeks|date|none|scans}
Specify whether to include trending information for number of weeks, days or months or a specific date.Specifying none will create a report without any trending information included.Specifying scans will include trending information for the last two detections.This parameter is required only if scan_selection=HostBased.
selection_range={value} Specify the range for the selection type. Specify a number of units (1|3|5|7|15|30|60|90) for days, weeks or months. Date must be in the format yyyy-mm-dd (2017-04-05), and must be less than or equal to today’s date. Trending information since the last number of units or the specified date will be included.This parameter is required only if scan_selection=HostBased.
asset_groups={value} Specify the name of the asset group(s) to report on. Multiple asset groups are comma separated. We'll report on all the IPs in the asset groups.This parameter is required only if scan_selection=HostBased.
asset_group_ids={value} Specify the ID of the asset group(s) to report on. Multiple asset group IDs are comma separated. We'll report on all the IPs in the asset groups.This parameter is required only if scan_selection=HostBased.
Parameter Description
418

Chapter 11 - VM Report TemplatesScan Template
network={value} (Valid only when the Networks feature is enabled for your account.) A network name containing the IPs to include. For a new template the default network is Global Default Network.
ips={value} Specify the IPs or IP ranges to report on. Multiple IPs or IP ranges are comma separated.This parameter is required only if scan_selection=HostBased.
tag_set_by={name|id} Specify the name of the tags or the ID of the tags for the hosts you want to report on. Multiple tag names or tag IDs are comma separated.
tag_include_selector={ALL|ANY}
Specify ALL to match all the asset tags for the hosts you want to report on (This is an AND operation). Specifying ANY will match any of the assets tags (This is an OR operation).This parameter is required only if scan_selection=HostBased.
tag_set_include={value} Specify asset tags for the hosts you want to report on. We'll find the hosts in your account that match your tag selection and include them in the report.Multiple tags can be provided using comma separated values.This parameter is required only if scan_selection=HostBased.
tag_exclude_selector={ALL|ANY}
Specify ALL to match all the asset tags for the hosts you want do not want to report on (This is an AND operation). Specifying ANY will match any of the assets tags (This is an OR operation).This parameter is required only if scan_selection=HostBased.
tag_set_exclude={value} Specify asset tags for the hosts you do not want to report on. We'll find the hosts in your account that match your tag selection and exclude them from the report.Multiple tags can be provided using comma separated values.This parameter is required only if scan_selection=HostBased.
host_with_cloud_agents={all|scan|agent}
What host findings to include in the report when CA module is enabled. Your options are:all - All datascan - Scan data, i.e. include findings from scans that didn’t use Agentless Trackingagent - Agent data, i.e. include findings from the agent when merging is enabled (i.e. Show unified view hosts option in UI under Users > Setup > Cloud Agent Setup)
Parameter Description
419

Chapter 11 - VM Report TemplatesScan Template
display_text_summary={0|1} Specify 1 to include the following summary info for the entire report: total vulnerabilities detected, overall security risk, business risk (for reports sorted by asset group), total vulnerabilities by status, total vulnerabilities by severity and top 5 vulnerability categories.
graph_business_risk={0|1} Specify 1 to include the business risk information. Note that some graphs are only available when trend information is included. Keep in mind that your filter settings will affect the data reflected in your graphs.
graph_vuln_over_time={0|1} Specify 1 to include the vulnerabilities by severity over time.
graph_status={0|1} Specify 1 to include the vulnerabilities by status.
graph_potential_status={0|1} Specify 1 to include the potential vulnerabilities by status.
graph_severity={0|1} Specify 1 to include the vulnerabilities by severity.
Display Display options such as graphs amount of detail.
graph_potential_severity={0|1}
Specify 1 to include the potential vulnerabilities by severity.
graph_ig_severity={0|1} Specify 1 to include the information gathered by severity.
graph_top_categories={0|1} Specify 1 to include the top five vulnerable categories.
graph_top_vulns={0|1} Specify 1 to include the ten most prevalent vulnerabilities.
graph_os={0|1} Specify 1 to include the operating systems detected.
graph_services={0|1} Specify 1 to include the services detected.
graph_top_ports={0|1} Specify 1 to include the ports detected.
display_custom_footer={0|1} Specify 1 to include custom text in the report footer.
display_custom_footer_text={value}
Specify custom text like a disclosure statement or data classification (e.g. Public, Confidential). The text you enter will appear in all reports generated from this template, except reports in XML and CSV formats. Length is maximum 4000 characters.
sort_by={host|vuln|os|group|service|port}
Specify how you want to organize the Detailed Results section of your report - by host, vuln (i.e. vulnerability), group (i.e. asset group), service or port.
cvss={all|cvssv2|cvssv3} Specify the CVSS version score you want to display in reports. all - both CVSS versionscvssv2 - CVSS version 2cvssv3 - CVSS version 3
Parameter Description
420

Chapter 11 - VM Report TemplatesScan Template
host_details={0|1} Specify 1 to include identifying information for each host agent like the asset ID and related IPs (IPv4, IPv6 and MAC addresses). This parameter is required only if scan_selection=HostBased and sort_by=host.
metadata_ec2_instances={0|1}
Specify 1 to include metadata information for each EC2 asset. This could be EC2 instance information such as accountId, region, availabilityZone, instanceId, instanceType, imageId, and kernelId.
include_text_summary={0|1} Specify 1 to include the following summary info for each host, vulnerability, asset group, etc (depending on the sorting method you selected): total vulnerabilities detected, the security risk, the business risk (for reports sorted by asset group), total vulnerabilities by status, total vulnerabilities by severity and top 5 vulnerability categories.
include_vuln_details={0|1} Specify 1 to include additional details for each vulnerability in the report.
include_vuln_details_threat={0|1}
Specify 1 to include a description of the threat.
include_vuln_details_impact={0|1}
Specify 1 to include possible consequences that may occur if the vulnerability is exploited.
include_vuln_details_solution={0|1}
Specify 1 to include a verified solution to remedy the issue, such as a link to the vendor's patch, Web site, or a workaround.
include_vuln_details_vpatch={0|1}
Specify 1 to include virtual patch information correlated with the vulnerability, obtained from Trend Micro real-time feeds.
include_vuln_details_compliance={0|1}
Specify 1 to include compliance information correlated with the vulnerability.
include_vuln_details_exploit={0|1}
Specify 1 to include exploitability information correlated with the vulnerability, includes references to known exploits and related security resources.
include_vuln_details_malware={0|1}
Specify 1 to include malware information correlated with the vulnerability, obtained from the Trend Micro Threat Encyclopedia.
include_vuln_details_results={0|1}
Specify 1 to include specific scan test results for each host, when available. We'll also show the date the vulnerability was first detected, last detected and the number of times it was detected.
include_vuln_details_reopened={0|1}
Specify 1 to include information related to reopened vulnerabilities.
Parameter Description
421

Chapter 11 - VM Report TemplatesScan Template
include_vuln_details_appendix={0|1}
Specify 1 to include more information like IPs in your report target that don't have any scan results, and IPs that were scanned but results are not shown (no vulnerabilities were detected or all vulnerabilities were filtered out).
exclude_account_id={0|1} Specify 1 to exclude the account login ID in the filename of downloaded reports. Use this option to remove the login ID from the filename.
Filters Filter options such as vulnerability status, categories, QIDs, OS.
selective_vulns={complete|custom}
Specify complete to show results for any and all vulnerabilities found.Specify custom to filter your reports to specific QIDs (add static search lists) or to QIDs that match certain criteria (add dynamic search lists). For example, maybe you only want to report on vulnerabilities with severity 4 or 5. Tip - Exclude QIDs that you don't want in the report.
search_list_ids={value} Specify search list ID or QID. Multiple search list IDs or QIDs can be provided using values separated by a comma.This parameter is required only if selective_vulns=custom.
exclude_qid_option={0|1} Specify 1 to exclude QIDs from the report.
exclude_search_list_ids={value}
Specify QID to be excluded from the report. Multiple QIDs can be provided using values separated by a comma.This parameter is required only if exclude_qid_option=1.
included_os={value} Specify the operating system name to filter hosts. For example, to only report on Linux hosts make sure you provide the operating system name for Linux.Multiple operating system names can be provided using values separated by a comma.Specify ALL to include all operating systems.See Identified OS.
status_new={0|1} Specify 1 to include vulnerabilities in your report based on the current vulnerability status - New.
status_active={0|1} Specify 1 to filter vulnerabilities in your report based on the current vulnerability status - Active.
status_reopen={0|1} Specify 1 to filter vulnerabilities in your report based on the current vulnerability status - Re-Opened.
status_fixed={0|1} Specify 1 to filter vulnerabilities in your report based on the current vulnerability status - Fixed.
vuln_active={0|1} Specify 1 to filter confirmed vulnerabilities in your report based on the state - Active.
vuln_disabled={1|1} Specify 1 to filter confirmed vulnerabilities in your report based on the state - Disabled.
Parameter Description
422

Chapter 11 - VM Report TemplatesScan Template
vuln_ignored={0|1} Specify 1 to filter confirmed vulnerabilities in your report based on the state - Ignored.
potential_active={0|1} Specify 1 to filter potential vulnerabilities in your report based on the state - Active.
potential_disabled={0|1} Specify 1 to filter potential vulnerabilities in your report based on the state - Disabled.
potential_ignored={0|1} Specify 1 to filter potential vulnerabilities in your report based on the state - Ignored.
ig_active={0|1} Specify 1 to filter the information gathered in your report based on the state - Active.
ig_disabled={0|1} Specify 1 to filter the information gathered in your report based on the state - Disabled.
ig_ignored={0|1} Specify 1 to filter the information gathered in your report based on the state - Ignored.
display_non_running_kernels={0|1}
Specify 1 to include a list of all vulnerabilities found on non-running kernels.
exclude_non_running_kernel={0|1}
Specify 1 to exclude vulnerabilities found on non-running kernels.Use only one parameter at a time: highlight_arf_kernel or arf_kernel.
exclude_non_running_services={0|1}
Specify 1 to only include vulnerabilities found where the port/service is running.
exclude_qids_not_exploitable_due_to_configuration={0|1}
Specify 1 to exclude vulnerabilities that are not exploitable because there’s a specific configuration present on the host.
exclude_superceded_patches={0|1}
Specify 1 to exclude every patch QID which is superceded (replaced) by another patch QID recommended for the same Host.
categories_list={value} Specify the category name to filter hosts in your report based on various categories. For example, if you're only interested in Windows vulnerabilities make sure you provide the category name for Windows.Multiple category names can be provided using values separated by a comma.Specify ALL to include all categories.See Categories.
Services and Ports Services and ports to include in report.
required_services={value} Specify the name of a required service. Multiple service names can be provided using values separated by a comma. We'll report QID: 38228 (when a required service is NOT detected).See Identified Services.
Parameter Description
423

Chapter 11 - VM Report TemplatesScan Template
DTD
<platform API server>/api/2.0/fo/report/template/scan/scanreporttemplate_info.dtd
Sample - Create scan templateAPI request:
curl -u "USERNAME:PASSWORD" -H "X-Requested-With:curl" -X POST -H "Content-type: text/xml" --data-binary @scan_export.xml "https://qualysapi.qualys.com/api/2.0/fo/report/template/scan/?action=create&report_format=xml"
XML output:
<?xml version="1.0" encoding="UTF-8" ?><!DOCTYPE SIMPLE_RETURN SYSTEM "https://qualysapi.qualys.com/api/2.0/simple_return.dtd"><SIMPLE_RETURN> <RESPONSE> <DATETIME>2017-04-06T05:41:32Z</DATETIME> <CODE>Scan Report Template(s) Created Successfully [89876]</CODE> <TEXT></TEXT> </RESPONSE></SIMPLE_RETURN>
unauthorized_services={value}
Specify the name of an unauthorized service. Multiple service names can be provided using values separated by a comma. We'll report QID: 38175 (when an unauthorizedservice is detected). See Identified Services.
required_ports={value} Specify required ports. Multiple ports can be provided using values separated by a comma. We'll report QID: 82051 (when a required port is NOT detected).
unauthorized_ports={value} Specify unauthorized ports. Multiple ports can be provided using values separated by a comma.We'll report QID: 82043 (when an unauthorized port is detected).
User Access Control user access to template and reports generated from template.
global={0|1} Share this report template with other users by making it global. Specify 1 to make it global.
report_access_users={value} Specify the username to share the report with a user who wouldn't already have access to the report. Multiple usernames can be provided using values separated by a comma. Each user you add will be able to view reports generated from this template even if they don't have access to the IPs in the report.
Parameter Description
424

Chapter 11 - VM Report TemplatesScan Template
Sample - Update Scan template
API request:
curl -u "USERNAME:PASSWORD" -H "X-Requested-With:curl" -X PUT -H "Content-type: text/xml" --data-binary @scan_export.xml "https://qualysapi.qualys.com/api/2.0/fo/report/template/scan/?action=update&template_id=8209&report_format=xml"
XML output:
<?xml version="1.0" encoding="UTF-8" ?><!DOCTYPE SIMPLE_RETURN SYSTEM "https://qualysapi.qualys.com/api/2.0/simple_return.dtd"><SIMPLE_RETURN> <RESPONSE> <DATETIME>2017-04-04T10:52:34Z</DATETIME> <CODE>Scan Report Template Updated Successfully [8209]</CODE> <TEXT></TEXT> </RESPONSE></SIMPLE_RETURN>
Sample - Delete Scan template
API request:
curl -u "USERNAME:PASSWORD" -H "X-Requested-With:curl" -d "action=delete&template_id=8209" "https://qualysapi.qualys.com/api/2.0/fo/report/template/scan/"
XML output:
<?xml version="1.0" encoding="UTF-8" ?><!DOCTYPE SIMPLE_RETURN SYSTEM "https://qualysapi.qualys.com/api/2.0/simple_return.dtd"><SIMPLE_RETURN> <RESPONSE> <DATETIME>2017-04-04T10:54:37Z</DATETIME> <CODE>Scan Report Template(s) Deleted Successfully [8209]</CODE> <TEXT></TEXT> </RESPONSE></SIMPLE_RETURN>
Sample - Export Scan templateExports the report template based on the template ID. When the template ID is not specified, exports all templates for the report type.
425
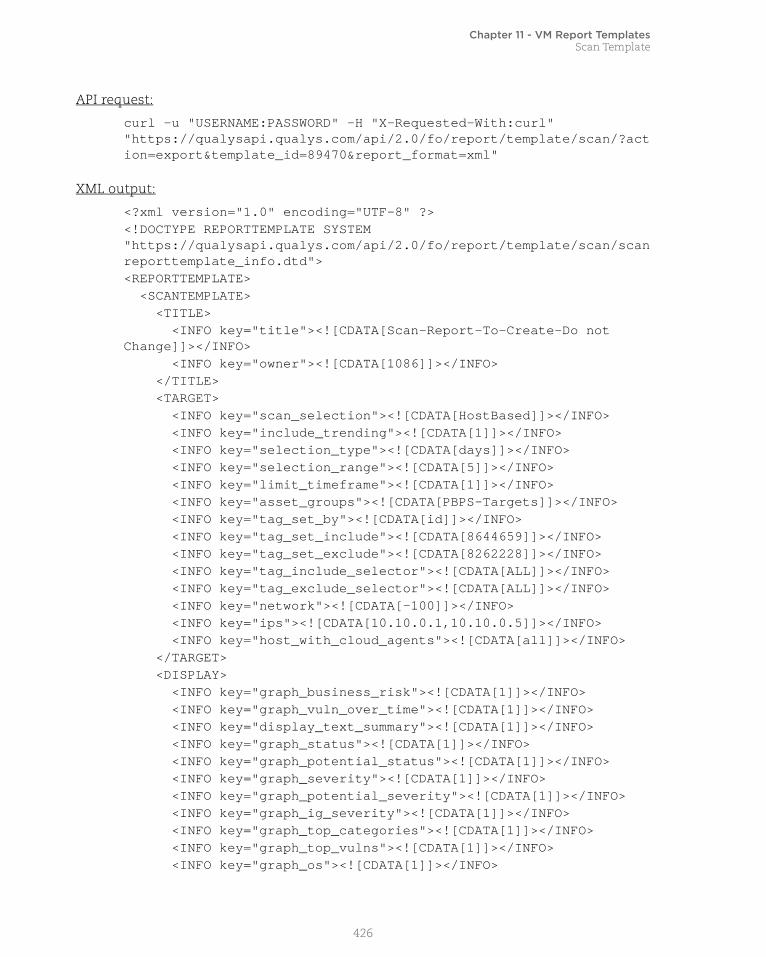
Chapter 11 - VM Report TemplatesScan Template
API request:
curl -u "USERNAME:PASSWORD" -H "X-Requested-With:curl" "https://qualysapi.qualys.com/api/2.0/fo/report/template/scan/?action=export&template_id=89470&report_format=xml"
XML output:
<?xml version="1.0" encoding="UTF-8" ?><!DOCTYPE REPORTTEMPLATE SYSTEM "https://qualysapi.qualys.com/api/2.0/fo/report/template/scan/scanreporttemplate_info.dtd"><REPORTTEMPLATE> <SCANTEMPLATE> <TITLE> <INFO key="title"><![CDATA[Scan-Report-To-Create-Do not Change]]></INFO> <INFO key="owner"><![CDATA[1086]]></INFO> </TITLE> <TARGET> <INFO key="scan_selection"><![CDATA[HostBased]]></INFO> <INFO key="include_trending"><![CDATA[1]]></INFO> <INFO key="selection_type"><![CDATA[days]]></INFO> <INFO key="selection_range"><![CDATA[5]]></INFO> <INFO key="limit_timeframe"><![CDATA[1]]></INFO> <INFO key="asset_groups"><![CDATA[PBPS-Targets]]></INFO> <INFO key="tag_set_by"><![CDATA[id]]></INFO> <INFO key="tag_set_include"><![CDATA[8644659]]></INFO> <INFO key="tag_set_exclude"><![CDATA[8262228]]></INFO> <INFO key="tag_include_selector"><![CDATA[ALL]]></INFO> <INFO key="tag_exclude_selector"><![CDATA[ALL]]></INFO> <INFO key="network"><![CDATA[-100]]></INFO> <INFO key="ips"><![CDATA[10.10.0.1,10.10.0.5]]></INFO> <INFO key="host_with_cloud_agents"><![CDATA[all]]></INFO> </TARGET> <DISPLAY> <INFO key="graph_business_risk"><![CDATA[1]]></INFO> <INFO key="graph_vuln_over_time"><![CDATA[1]]></INFO> <INFO key="display_text_summary"><![CDATA[1]]></INFO> <INFO key="graph_status"><![CDATA[1]]></INFO> <INFO key="graph_potential_status"><![CDATA[1]]></INFO> <INFO key="graph_severity"><![CDATA[1]]></INFO> <INFO key="graph_potential_severity"><![CDATA[1]]></INFO> <INFO key="graph_ig_severity"><![CDATA[1]]></INFO> <INFO key="graph_top_categories"><![CDATA[1]]></INFO> <INFO key="graph_top_vulns"><![CDATA[1]]></INFO> <INFO key="graph_os"><![CDATA[1]]></INFO>
426

Chapter 11 - VM Report TemplatesScan Template
<INFO key="graph_services"><![CDATA[1]]></INFO> <INFO key="graph_top_ports"><![CDATA[1]]></INFO> <INFO key="display_custom_footer"><![CDATA[1]]></INFO> <INFO key="display_custom_footer_text"><![CDATA[Test@123]]></INFO> <INFO key="sort_by"><![CDATA[host]]></INFO> <INFO key="cvss"><![CDATA[all]]></INFO> <INFO key="host_details"><![CDATA[0]]></INFO> <INFO key="include_text_summary"><![CDATA[1]]></INFO> <INFO key="include_vuln_details"><![CDATA[1]]></INFO> <INFO key="include_vuln_details_threat"><![CDATA[1]]></INFO> <INFO key="include_vuln_details_impact"><![CDATA[1]]></INFO> <INFO key="include_vuln_details_solution"><![CDATA[1]]></INFO> <INFO key="include_vuln_details_vpatch"><![CDATA[1]]></INFO> <INFO key="include_vuln_details_compliance"><![CDATA[1]]></INFO> <INFO key="include_vuln_details_exploit"><![CDATA[1]]></INFO> <INFO key="include_vuln_details_malware"><![CDATA[1]]></INFO> <INFO key="include_vuln_details_results"><![CDATA[1]]></INFO> <INFO key="include_vuln_details_appendix"><![CDATA[1]]></INFO> <INFO key="exclude_account_id"><![CDATA[1]]></INFO> <INFO key="include_vuln_details_reopened"><![CDATA[1]]></INFO> <INFO key="metadata_ec2_instances"><![CDATA[0]]></INFO> </DISPLAY> <FILTER> <INFO key="selective_vulns"><![CDATA[complete]]></INFO> <INFO key="search_list_ids"><![CDATA[]]></INFO> <INFO key="exclude_qid_option"><![CDATA[1]]></INFO> <INFO key="exclude_search_list_ids"><![CDATA[]]></INFO> <INFO key="included_os"><![CDATA[ALL]]></INFO> <INFO key="status_new"><![CDATA[1]]></INFO> <INFO key="status_active"><![CDATA[1]]></INFO> <INFO key="status_reopen"><![CDATA[1]]></INFO> <INFO key="status_fixed"><![CDATA[1]]></INFO> <INFO key="vuln_active"><![CDATA[1]]></INFO> <INFO key="vuln_disabled"><![CDATA[1]]></INFO> <INFO key="vuln_ignored"><![CDATA[1]]></INFO> <INFO key="potential_active"><![CDATA[1]]></INFO> <INFO key="potential_disabled"><![CDATA[1]]></INFO> <INFO key="potential_ignored"><![CDATA[1]]></INFO>
427

Chapter 11 - VM Report TemplatesScan Template
<INFO key="ig_active"><![CDATA[1]]></INFO> <INFO key="ig_disabled"><![CDATA[1]]></INFO> <INFO key="ig_ignored"><![CDATA[0]]></INFO> <INFO key="display_non_running_kernels"><![CDATA[1]]></INFO> <INFO key="exclude_non_running_kernel"><![CDATA[0]]></INFO> <INFO key="exclude_non_running_services"><![CDATA[1]]></INFO> <INFO key="exclude_superceded_patches"><![CDATA[1]]></INFO> <INFO key="exclude_qids_not_exploitable_due_to_configuration"><![CDATA[1]]></INFO> <INFO key="categories_list"><![CDATA[ALL]]></INFO> </FILTER> <SERVICESPORTS> <INFO key="required_services"><![CDATA[ActiveSync,akak trojan,Apple Airport Management,Applix TM1 Server]]></INFO> <INFO key="unauthorized_services"><![CDATA[aml,Arkeiad Network Backup,auth]]></INFO> <INFO key="services_info"><![CDATA[aml,Arkeiad Network Backup,auth]]></INFO> <INFO key="required_ports"><![CDATA[12]]></INFO> <INFO key="unauthorized_ports"><![CDATA[21]]></INFO> </SERVICESPORTS> <USERACCESS> <INFO key="report_access_users"><![CDATA[start_rm2,start_su]]></INFO> <INFO key="global"><![CDATA[1]]></INFO> </USERACCESS> </SCANTEMPLATE></REPORTTEMPLATE>
428

Chapter 11 - VM Report TemplatesPCI Scan Template
PCI Scan Template/api/2.0/fo/report/template/pciscan/
Perform actions such as create, update, delete and export on the PCI Scan Template.
PCI Scan Template Request
A summary of API Endpoint URLs is provided below.
Action API Endpoint /required parameters Method
Create PCI Scan Template <base_url>/api/2.0/fo/report/template/pciscan/Required parameters:action=createreport_format=xml
POST
Update PCI Scan Template <base_url>/api/2.0/fo/report/template/pciscan/Required parameters:template_id={value}action=updatereport_format=xml
PUT
Delete PCI Scan Template <base_url>/api/2.0/fo/report/template/pciscan/Required parameters:template_id={value}action=delete
POST
Export PCI Scan Template <base_url>/api/2.0/fo/report/template/pciscan/Required parameters:action=exportreport_format=xmlOptional parameter: template_id={value}When unspecified all templates for the report type get exported.
GET
429

Chapter 11 - VM Report TemplatesPCI Scan Template
PCI Scan Template settings
Go to Scan Template settings. The same parameters used to define PCI Scan Template settings. All parameters (all are optional).
In addition the following parameters are used for PCI Risk Ranking.
DTD
<platform API server>/api/2.0/fo/report/template/pciscan/pciscanreporttemplate_info.dtd
SamplesRefer to Scan template examples for create, update, delete and export sample requests. Requests and outputs for PCI Scan template are similar.
Parameter Description
custom_pci_ranking={0|1}} Specify 1 to enable custom PCI risk ranking. When disabled Qualys will use default PCI ASV risk rankings.
customized_ranking_medium_from={0|1|2|3|4|5|6|7|8|9|10}
By default Qualys uses risk rankings High, Medium, Low. By default for a new template, these are set to the same CVSS scores as required for ASV external scans. You can customize the ASV scores using the scale. When custom PCI risk ranking is enabled, this parameter sets the Medium marker value. Choose between 0 to 10 to set the Medium marker value.
customized_ranking_high_from={0|1|2|3|4|5|6|7|8|9|10}
When custom PCI risk ranking is enabled, this parameter sets the High marker value. Choose between 0 to 10 to set the High marker value.
customized_ranking_comments={value}
When custom PCI risk ranking is enabled, a comment on the custom ranking is required. Enter any string up to 400 characters.
customized_ranking_qid_searchlist_comments={<search list id1/name1>|<SEVERITY>|<comments>,<search list id2/name2>|<SEVERITY>|comments>}
When custom PCI risk ranking is enabled, you can specify custom rankings for QID search lists (i.e. custom rankings per set of vulnerabilities in our KnowledgeBase). Use the format shown. For example: searchlistid1|HIGH|”some comments”,searchlistid2|MEDIUM|”some comments”
430

Chapter 11 - VM Report TemplatesPatch Template
Patch Template/api/2.0/fo/report/template/patch/
Perform actions such as create, update, delete and export on the Patch Template.
Patch Template Request
A summary of API Endpoint URLs is provided below.
Patch Template settings
These parameters (all are optional) are used for a create or update request to define Patch template settings. When creating a new template the default value is shown in bold where applicable.
Action API Endpoint /required parameters Method
Create Patch Template <base_url>/api/2.0/fo/report/template/patch/Required parameters:action=createreport_format=xml
POST
Update Patch Template <base_url>/api/2.0/fo/report/template/patch/Required parameters:template_id={value}action=updatereport_format=xml
PUT
Delete Patch Template <base_url>/api/2.0/fo/report/template/patch/Required parameters:template_id={value}action=delete
POST
Export Patch Template <base_url>/api/2.0/fo/report/template/patch/Required parameters:action=exportreport_format=xmlOptional parameter: template_id={value}When unspecified all templates for the report type get exported.
GET
Parameter Description
Title The template title and owner.
title={value} A string value for the title. Length is maximum 64 characters.
owner={value} Username of the owner of this template.
Validity of the owner to create reports is based on the user role or business unit. See About template owner.
431

Chapter 11 - VM Report TemplatesPatch Template
Target What target assets to include in the report.
patch_evaluation={qidbased|classic}
Specify classic to choose Classic patch evaluation or specify qidbased to choose QID based patch evaluation.
asset_groups Asset groups to include in the report. Multiple asset groups are comma separated.
asset_group_ids={value} Specify the ID of the asset group(s) to report on. Multiple asset group IDs are comma separated. We'll report on all the IPs in the asset groups.
tag_set_by={name|id} Specify the name of the tags or the ID of the tags for the hosts you want to report on. Multiple tag names or tag IDs are comma separated.
tag_include_selector={ALL|ANY}
Specify ALL to match all the asset tags for the hosts you want to report on (This is an AND operation). Specifying ANY will match any of the assets tags (This is an OR operation).
tag_set_include={value} Specify asset tags for the hosts you want to report on. We'll find the hosts in your account that match your tag selection and include them in the report.Multiple tags can be provided using comma separated values.
tag_exclude_selector={ALL|ANY}
Specify ALL to match all the asset tags for the hosts you want do not want to report on (This is an AND operation). Specifying ANY will match any of the assets tags (This is an OR operation).
tag_set_exclude={value} Specify asset tags for the hosts you do not want to report on. We'll find the hosts in your account that match your tag selection and exclude them from the report.Multiple tags can be provided using comma separated values.
network={value} (Valid only when the Networks feature is enabled for your account.) A network name containing the IPs to include. For a new template the default network is Global Default Network.
ips={value} IP addresses to include in the report. Multiple IPs are comma separated.
Display Display options to include in the report.
group_by={HOST|PATCH|OS|AG}
Sort and group the results of the report by any of the following:Host = HOSTPatch = PATCHOperating System = OSAsset Group = AG
include_table_of_qids_fixed={0|1}
Specify 1 to include QIDs that will be fixed by each patch.
include_patch_links={0|1} Specify 1 to include the available links for each patch.
Parameter Description
432

Chapter 11 - VM Report TemplatesPatch Template
include_patches_from_unspecified_vendors={0|1}
Specify 1 to include patches from unspecified vendors.
patch_severity_by={assigned|highest}
Specify assigned to display severity which is assigned to the QID for the patch detection. Specify highest to display the severity which is highest across all QIDs found on the host that can be patched.
patch_cvss_score_by= {assigned|highest|none}
Specify the CVSS version score you want to display in reports. assigned - CVSS score assigned to the QID for the patch detectionhighest - CVSS score highest across all QIDs found on the host that can be patched.none - Do not display CVSS scores.
cvss={all|cvssv2|cvssv3} Specify the CVSS version score you want to display in reports. all - both CVSS versionscvssv2 - CVSS version 2cvssv3 - CVSS version 3
display_custom_footer={0|1} Specify 1 to include custom text in the report footer.
display_custom_footer_text={value}
Specify custom text like a disclosure statement or data classification (e.g. Public, Confidential). The text you enter will appear in all reports generated from this template, except reports in XML and CSV formats. Length is maximum 4000 characters.
exclude_account_id={0|1} Specify 1 to exclude the account login ID in the filename of downloaded reports. Use this option to remove the login ID from the filename.
Filters Filter options such as vulnerabilities, QIDs, patches.
selective_vulns={complete|custom}
Specify complete to show results for any and all vulnerabilities found.Specify custom to filter your reports to specific QIDs (add static search lists) or to QIDs that match certain criteria (add dynamic search lists). For example, maybe you only want to report on vulnerabilities with severity 4 or 5. Tip - Exclude QIDs that you don't want in the report.
search_list_ids={value}
Specify QID to be included in the report. Multiple QIDs can be provided using values separated by a comma.This parameter is required only if selective_vulns=custom.
exclude_qid_option={0|1} Specify 1 to exclude QIDs from the report.
exclude_search_list_ids={value}
Specify QID to be excluded from the report. Multiple QIDs can be provided using values separated by a comma.This parameter is required only if exclude_qid_option=1.
display_non_running_kernels={0|1}
Specify 1 to include a list of all vulnerabilities found on non-running kernels.
Parameter Description
433

Chapter 11 - VM Report TemplatesPatch Template
DTD<platform API server>/api/2.0/fo/report/template/patch/patchreporttemplate_info.dtd
exclude_non_running_kernel={0|1}
Specify 1 to exclude vulnerabilities found on non-running kernels.Use only one parameter at a time: highlight_arf_kernel or arf_kernel.
exclude_non_running_services={0|1}
Specify 1 to only include vulnerabilities found where the port/service is running.
exclude_qids_not_exploitable_due_to_configuration={0|1}
Specify 1 to exclude vulnerabilities that are not exploitable because there’s a specific configuration present on the host.
selective_patches={complete|custom}
Specify complete to show results for any and all patches found.Specify custom to filter your reports to specific QIDs (add static search lists) or to QIDs that match certain criteria (add dynamic search lists). For example, maybe you only want to report on vulnerabilities with severity 4 or 5. Tip - Exclude QIDs that you don't want in the report.
exclude_patch_qid_option={0|1}
Specify 1 to exclude patch QIDs from the report.
patch_search_list_ids={value}
Specify patch QID to be included in the report. Multiple patch QIDs can be provided using values separated by a comma.This parameter is required only if selective_patches=custom.
exclude_patch_search_list_ids={value}
Specify patch QID to be excluded from the report. Multiple patch QIDs can be provided using values separated by a comma.This parameter is required only if exclude_patch_qid_option=1.
found_since_days={7|30|90|365|NoLimit}
Show only patches for vulnerabilities detected during the specified period of time in days. Specify NoLimit for no time limit.
User Access Control user access to template and reports generated from template.
global={0|1} Share this report template with other users by making it global. Specify 1 to make it global.
report_access_users={value} Specify the username to share the report with a user who wouldn't already have access to the report. Multiple usernames can be provided using values separated by a comma. Each user you add will be able to view reports generated from this template even if they don't have access to the IPs in the report.
Parameter Description
434

Chapter 11 - VM Report TemplatesMap Template
Samples
Refer to Scan template examples for create, update, delete and export sample requests. Requests and outputs for Patch template are similar.
Map Template/api/2.0/fo/report/template/map/
Perform actions such as create, update, delete and export on the Map Template.
Map Template Request
A summary of API Endpoint URLs is provided below.
Action API Endpoint /required parameters Method
Create Map Template <base_url>/api/2.0/fo/report/template/map/Required parameters:action=createreport_format=xml
POST
Update Map Template <base_url>/api/2.0/fo/report/template/map/Required parameters:template_id={value}action=updatereport_format=xml
PUT
Delete Map Template <base_url>/api/2.0/fo/report/template/map/Required parameters:template_id={value}action=delete
POST
Export Map Template <base_url>/api/2.0/fo/report/template/map/Required parameters:action=exportreport_format=xmlOptional parameter: template_id={value}When unspecified all templates for the report type get exported.
GET
435

Chapter 11 - VM Report TemplatesMap Template
Map Template settings
These parameters (all are optional) are used for a create or update request to define Map template settings. When creating a new template the default value is shown in bold where applicable..
Parameter Description
Title
title={value} A string value for the title. Length is maximum 64 characters.
owner={value} Username of the owner of this template.
Validity of the owner to create reports is based on the user role or business unit. See About template owner.
global={0|1} Share this report template with other users by making it global. Specify 1 to make it global.
Display
map_sort_by={ipaddress|dns|netbios|router|operatingsystem}
Sort and group the results of the report by any of the following:IP Address = ipaddressDNS = dnsNetBIOS = netbiosRouter = routerOperating System = OS
map_related_info_lastscandate={0|1}
Specify 1 to include the last scan date.
map_related_info_assetgroups={0|1}
Specify 1 to include the asset groups.
map_related_info_authenticationrecords={0|1}
Specify 1 to include the authentication records.
map_related_info_discoverymethod={0|1}
Specify 1 to include the discovery method.
display_custom_footer={0|1} Specify 1 to include custom text in the report footer.
display_custom_footer_text={value}
Specify custom text like a disclosure statement or data classification (e.g. Public, Confidential). The text you enter will appear in all reports generated from this template, except reports in XML and CSV formats. Length is maximum 4000 characters.
map_exclude_account_id={0|1}
Specify 1 to exclude the account login ID in the filename of downloaded reports. Use this option to remove the login ID from the filename.
Filters Filter options to help you specify what to include.
map_included_hosttypes_innetblock={0|1}
Specify 1 to filter the report by host types - In Netblock.
map_included_hosttypes_scannable={0|1}
Specify 1 to filter the report by host types - Scannable
436

Chapter 11 - VM Report TemplatesMap Template
map_included_hosttypes_live={0|1}
Specify 1 to filter the report by host types - Live.
map_included_hosttypes_approved={0|1}
Specify 1 to filter the report by host types - Approved.
map_included_hosttypes_outofnetblock={0|1}
Specify 1 to filter the report by host types - Not In Netblock.
map_included_hosttypes_notscannable={0|1}
Specify 1 to filter the report by host types - Not Scannable.
map_included_hosttypes_notlive={0|1}
Specify 1 to filter the report by host types - Not Live.
map_included_hosttypes_rogue={0|1}
Specify 1 to filter the report by host types - Rouge.
Included Discovery Methods Specify at least one.
map_idm_tcp={0|1} Specify 1 to filter the report by discovery methods - TCP.
map_idm_udp={0|1} Specify 1 to filter the report by discovery methods - UDP.
map_idm_traceroute={0|1} Specify 1 to filter the report by discovery methods - TraceRoute.
map_idm_other={0|1} Specify 1 to filter the report by discovery methods - Other.
map_idm_dns={0|1} Specify 1 to filter the report by discovery methods - DNS.
map_idm_icmp={0|1} Specify 1 to filter the report by discovery methods - ICMP.
map_idm_auth={0|1} Specify 1 to filter the report by discovery methods - AUTH.
Included Status Levels Only applicable for differential map reports.
map_included_statuses_added={0|1}
Specify 1 to filter the report by statuses - Added.
map_included_statuses_removed={0|1}
Specify 1 to filter the report by statuses - Removed.
map_included_statuses_active={0|1}
Specify 1 to filter the report by statuses - Active.
dns_exclusions={none|DNS|DNS-DNSZone}
Exclude hosts discovered only via:none = NoneDNS = DNSDNS-DNSZone = DNS and/or DNS Zone Transfer
included_os={value} Specify the operating system name to filter hosts. For example, to only report on Linux hosts make sure you provide the operating system name for Linux.Multiple operating system names can be provided using values separated by a comma.Specify ALL to include all operating systems.See Identified OS.
Parameter Description
437
Chapter 11 - VM Report TemplatesMap Template
Samples
Refer to Scan template examples for create, update, delete and export sample requests. Requests and outputs for Map template are similar.
About template owner
The user who created the report template is the owner by default. Managers and Unit Managers have the option to specify/change the owner while creating a report template the first time or by updating an existing report template. Use the parameter “owner” to assign a template owner.
Global report templates may be owned by Managers and Unit Managers. Non-global report templates may be owned by Managers, Unit Managers, Scanners and Readers.
Managers / Unit Managers can assign only those users as template owners who are part of their hierarchy and are added in their subscription.
438

Chapter 11 - VM Report TemplatesMap Template
Identified OS
Operating Systems identified by our service as of March 2017 are listed below.
Looking for a more current listing? Sure thing. Just log in to your Qualys account and go to Help > About.
Tip - In API requests replace spaces in OS names with underscores. For example, Apple IOS must be specified as Apple_IOS
3Com3Com HomeConnect3Com NBX3Com OfficeConnect3Com SuperStack3Com Switch3Com Wireless Access PointABAB ControlLogixAdicAdic ScalarAdic StorageADIC StorageAdtranAdtran DeviceAdtran NetVantaAdtran TSUIQADTXADTX ArrayMasStorAIXAIX 4.2-4.3AIX 4.3AIX 4.3.2.0-4.3.3.0AIX 4.33AIX 4.3-5.1AIX 4.xAIX 4.x-5.xAIX 5.1AIX 5.1-5.2AIX 5.1-5.3AIX 5.2AIX 5.3AIX 5.3.0.4AIX 5.xAIX 6.xAlcatelAlcatel OmniStack
Alcatel OmniSwitchAlliedAllied Telesyn SwitchAlteonAlteon ACE SwitchAlteon SwitchAltiumAltium Wireless DeviceAmazon LinuxAMXAMX ModeroAPCAPC InfraStruXureAPC MasterSwitchAPC NetworkAPC Network Management Card AOSAPC Smart-UPSAppCeleraAppCelera ICXAppleApple Airport Wireless Access PointApple iOSApple Wireless Access PointArescomArescom DeviceArescom NetDSLAscendAscend RouterAscentAscent RouterASUSASUS WirelessASUS Wireless Access PointAtenAten KVM SwitchATT NetGateATTO DeviceAudioCodesAudioCodes VOIPAvayaAvaya DeviceAvaya G350Avaya IP PhoneAvaya Wireless Access PointAvocentAvocent CCM ApplianceAxisAxis Network CameraAxis Printer
439

Chapter 11 - VM Report TemplatesMap Template
Axis Storpoint CDAxis Video ServerAxis Wireless Access PointAxonix SuperCDBay NetworksBay Networks RouterBay Networks SwitchBelkinBelkin Wireless Access PointBeOS 5BlueCoat Security GatewayBlueSocket Embedded Linux 2.4-2.6BorderWare FirewallBrocade DeviceBrother PrinterBSDBSD UnixBSDI BSDBT VoyagerBuffalo Wireless Access PointCabletronCabletron SmartSTACKCabletron SwitchCalderaCaldera Open LinuxCaldera Open UNIX 7Caldera Open UNIX 8CanonCanon Network PrinterCanon Print ServerCanon PrinterCayman3000CEKAB DeviceCentOSCentOSCheckPointCheckPoint FW1CheckPoint FW1 NGCheckPoint FW1 on SolarisCheckPoint SecurePlatformCintech SwitchCirronet Wireless Access PointCiscoCisco Analog Phone GatewayCisco Analog Telephone AdaptorCisco Arrowpoint WebNSCisco ASACisco CatalystCisco Content Engine
Cisco Content Services SwitchCisco Content Switching SolutionCisco Content/File EngineCisco ControllerCisco File EngineCisco Firewall Services ModuleCisco IOSCisco IP PhoneCisco IP/TV Program ManagerCisco Local DirectorCisco PIXCisco VPNCisco WGB350Cisco Wireless Access PointClearPath MCPCNT UltraNet EdgeCognitive PrinterCometLabs SwitchCompaqCompaq Insight ManagerCompaq SwitchComputone DeviceConnect2Air Wireless Access PointControlLogix ENETCrossroads Storage RouterCustom Micro DeviceCyberGuard FirewallCyberGuard FirewallDatamax I-ClassDatamax PrinterDawning SNIDebianDellDell LaserDell PowerConnectDell PowerVaultDell Remote Access ControllerDigiDigi One PortServerDigi One SPDigi Port ServerDivar Video CameraD-LinkD-Link DSL ModemD-Link Print ServerD-Link RouterD-Link SwitchD-Link Wireless Access PointDraytek Router
440

Chapter 11 - VM Report TemplatesMap Template
DVD ServerEfficient RouterEFI PrinterEMC's Network-Attached Storage DeviceEnterasysEntry-Master Card Access Control SystemEpson PrinterExtendedNet Print ServerExtremeExtreme AlpineExtreme Networks DeviceExtreme Networks ExtremeWareExtreme Networks SwitchF5 Networks Big-IPFabric OSFaxPressFiery PrinterFile EngineFortigateFoundry NetworksFreeBSDFujitsuFujitsu BladeGestetnerGestetner PrinterGigafastGigafast Wireless Access PointGigafast Wireless Access PointGoogle ApplianceHawking Wireless Access PointHoneyd HoneyPotHPHP 3000 MPEHP AdvanceStack SwitchHP Deskjet PrinterHP Fabric OSHP Guardian Service ProcessorHP iLOHP Inkjet PrinterHP JetDirectHP LaserJetHP OpenVMSHP ProCurveHP RILOHP Surestore LibraryHP SwitchHP Tru64
HP-UXHP-UX 10HP-UX 10.20HP-UX 11Huawei SwitchHVAC controllerIBMIBM 2210IBM 4400 PrinterIBM 4690IBM InfoprintIBM MainframeIBM Network PrinterIBM OS/2IBM OS/390IBM OS/400IBM PrinterIBM Remote Supervisor AdapterIBM Remote Supervisor Adapter IIIBM Tape LibraryIBM Token-Ring Stackable HubIBM z/VMi-data Print ServerIndyme MTS Messaging Telephony Server CU4400Infinity Embedded DeviceInfortrend Serial ATA Storage SubsystemIntelIntel NetportExpress Print ServerIntel SwitchIntel Wireless Access PointIntergy Network Energy Source SystemIntermateIntermate Print ServerIntermate Print ServerIntermecIntermec EasyLAN PrinterIntermec Wireless Access PointInter-Tel IP PhoneIP PhoneIRIXIRIX 6.2IRIX 6.5IRIX behind Firewall or Load BalancerIronPortJuniper Networks
441

Chapter 11 - VM Report TemplatesMap Template
Juniper Networks Application Acceleration Platform DXJuniper Networks JUNOSKentroxKentrox Q2200 RouterKonicaKonica MinoltaKonica PrinterKyoceraKyocera MitaKyocera PrinterLancastLancast Media ConverterLanierLanier PrinterLantronixLantronix CoBoxLantronix ETS32PRLantronix MSS100Lantronix PrinterLeitchLexmarkLexmark OptraLexmark Print ServerLexmark PrinterLinkComLinkCom Xpress Print ServerLinksysLinksys RouterLinksys WirelessLinuxLinux 1.2.8-1.2.13Linux 2.0Linux 2.0.29Linux 2.0.30+Linux 2.0.34-38Linux 2.1.19-2.2.20Linux 2.2Linux 2.2.20Linux 2.4Linux 2.4.0-2.5.20Linux 2.4.20-2.4.25Linux 2.4.20-3Linux 2.4.22Linux 2.4.7Linux 2.4.xLinux 2.4-2.6Linux 2.6Linux 2.x
Linux 3.0Linux Based MRV LX Series ServerLinux behindLucentLucent CajunLucent MAXLucent OrinocoLucent PBXLucent RouterLucent WAPLynxOSMacOSMacOS 10.0.x-10.1.xMacOS 10.10MacOS 10.11MacOS 10.12MacOS 10.3-10.4MacOS 8MacOS 9MacOS Xmagicolormagicolor 2300 Printermagicolor 3300 Printermagicolor PrinterMarkNet Pro PrinterMeditech MAGICMGE Uninterruptible Power Supply SystemsMicrotest DiscZerverMiLANMiLAN Print ServerMiLAN SwitchMiraPointMitel PBXMotorola HomeNet WR850GMoxaMoxa Async ServerMoxa NPort Serial ServerMulti-TechMulti-Tech CommPleteMulti-Tech MultiVOIPMuratec MFX PrinterNCR UnixNEC ProjectorNeoteris Instant Virtual ExtranetNetAppNetApp behind FW1NetBlazerNetBSD
442

Chapter 11 - VM Report TemplatesMap Template
NETBuilder BridgeNetgearNetgear GSMNetgear Print ServerNetgear PrinterNetgear RouterNetgear Smart SwitchNetgear SwitchNetgear Wireless Access PointNetopiaNetopia RouterNetphoneNetphone IP PhoneNetScalerNetScaler VPN DeviceNetScreenNetScreen 100NetScreen 50NetScreen 5XPNetSilicon DeviceNetsilicon DeviceNetWareNetWare 4.11-5.0 SP5NetWare 5NetWare 5.0NetWare 5.1NetWare 6NetWare 6.5NetWare Print ServerNetwork CameraNetwork Print ServerNetwork PrinterNetwork ScannerNGS 500 RouterNIB Network PrinterNokiaNokia IPSONokia Wireless Access PointNortelNortel DeviceNortel Networks BayStackNortel PassportNortel RouterNortel SwitchNRGNRG NetworkNRG PrinterOkidata PrinterOkiLAN Print Server
Open Networks RouterOpenBSDOracle Enterprise LinuxOracle Enterprise Linux 4.5Oracle Enterprise Linux 5.2ORiNOCO Wireless Access PointOrinoco Wireless Access PointPacketeerPacketeer PacketSeekerPacketeer PacketShaperPanasonic Network CameraParadyne DevicePerle JetstreamPocketPro Print ServerPoint Six Point ServerPolycomPolycom DevicePolycom MGCPolycom VSXPower Measurement ION MeterPowerwarePowerware ConnectUPSPowerware UPS DevicePrecidia DevicePrimergy RSBPrintronix PrinterProcom NetFORCEpSOSystemQNXQuantumQuantum NAS SnapServerQuantum PX506 Tape LibraryQuick Eagle DeviceRadiSys iRMXRadware DeviceRaptor FirewallRed HatRedlineRedline Networks ProcessorRedline Wireless Access PointRicohRICOH AficioRicoh AficioRicoh PrinterRingdale DeviceRIO XtremeRiverStone Networks RouterRoamAbout R2Rockwell
443

Chapter 11 - VM Report TemplatesMap Template
Rockwell AutomationS3Wireless Wireless Access PointSavin PrinterScannex NetBufferSchneider Electric ControllerSCOSCO OpenServerSCO UnixSCO UnixWareSCO UnixWare FirewallSensaTronics Environmental MonitorSentry Remote Power ManagerShark supercomputerSharp PrinterShore Microsystems Link ProtectorSidewinder G2SiemensSiemens 5940 RouterSiemens HiPath 3000Siemens I-GateSiemens IP PhoneSiemens Wireless Access PointSignature SystemSilex Pricom Print ServerSIMATIC NET CPSMCSMC Networks SMC8624TSMC RouterSMC Wireless Access PointSMC2671 Wireless Access PointSNAP Ethernet BrainSnap ServerSolarisSolaris 10Solaris 11Solaris 2Solaris 2.5.1Solaris 2.5-2.5.1Solaris 2.6Solaris 2.6-10Solaris 2.6-7Solaris 2.6-8Solaris 2.7Solaris 5Solaris 5.8Solaris 6-8Solaris 7Solaris 7-10Solaris 8
Solaris 8-10Solaris 9Solaris 9-10Solaris behindSpectrum24 Wireless Access PointStallion EasyServerStarDot NetCamSummit SwitchSunSun Cobalt LinuxSun Lights OutSUN StorEdge RAIDSuperScript PrinterSuSESuSE Linux 10SuSE Linux 11SuSE Linux 7SuSE Linux 8SuSE Linux 9Sveasoft FirmwareSymantec Raptor FirewallSymbol Wireless Access PointSymon NetLiteSYSTEC CAN-Ethernet GatewayTandbergTandberg DeviceTandemTandem NSKTektronix Phaser PrinterTelindus RouterTenor SwitchTINITiVoTiVo SeriesTopLayer AppsafeToshiba NWcameraTransition Networks DeviceTrendnet Print ServerTrendware Print ServerTru64Tru64 Unix 4.0dTru64 Unix 5.xTut ModemTV Program ManagerU.S. RoboticsU.S. Robotics Access pointU.S. Robotics ADSL Wireless GatewayU.S. Robotics Broadband RouterU.S. Robotics Wireless Access Point
444

Chapter 11 - VM Report TemplatesMap Template
UbuntuUbuntu Linux 10Ubuntu Linux 11Ubuntu Linux 7Ubuntu Linux 8Ubuntu Linux 9Ubuntu Linux LTSUninterruptible Power Supply DeviceUNIX System VUNIX System V Release 4.2UNIX SystemUNIX System V 4Uptime Devices Monitoring SystemUptimeDevices SensorprobeVAXVAX VMS 6.1VAX VMS 6.1 behind Sidewinder G2VAX VMS 6.2VAX VMS 7.1VAX VMS 7.1 behind Sidewinder G2Verilink WANsuite RouterVertical Horizon StackVirtualAccess LinxpeedProVMwareVMWare ESX 3.5VMWare ESX 4.0VMWare ESX 4.1VMware ESX ServerVMWare ESXi 4.0VMWare ESXi 4.1VMWare ESXi 5.0VMWare ESXi 5.0VxWorks Based DeviceWatchGuard FirewallWeb Smart SwitchWebNet uServerWindowsWindows 10Windows 2000Windows 2003Windows 2008Windows 2012Windows 7Windows 8Windows 95Windows 98Windows 9xWindows CEWindows LonghornWindows ME
Windows NTWindows NT4Windows RTWindows VistaWindows XPWKTI RDS EncoderXeroxXerox DeviceXerox DocuColor PrinterXerox Document CentreXerox DocuPrint PrinterXerox Phaser PrinterXerox PlotterXerox PrinterXerox WorkCentreXerox WorkCentre PrinterXES PrinterXJet Print ServerZebraNet Print ServerZOT Print Server
445

Chapter 11 - VM Report TemplatesMap Template
Identified Services
Services identified by our service as of March 2017 are listed below.
Looking for a more current listing? Just log in to your Qualys account and go to Help > About.
Tip - In API requests replace spaces in service names with underscores. For example, Blackberry Attachment must be specified as Blackberry_Attachment
ActiveSyncADDPafpovertcpakak_trojanamandaidxamlApple_Airport_ManagementApplixApplix_axnetApplix_TM1_Admin_ServerApplix_TM1_ServerArkeiad_Network_BackupARUGIZER_BACKDOORauthBerlios_Global_Positioning_System_DaemonBIGFIX_ENTERPRISE_SERVERBITCOINbitkeeperBlackberry_AttachmentBMC_PatrolBO2K_backdoorbofra_wormbpcdbpjava_msvcca_brightstorCA_License_Management_AgentCA_Unicenter_ServicesCENTUM_CS_3000chargenchargen_udpCHECKPOINT_FW-1_CLIENT_AUTH_SERVERchindicisco_cnrCISCO_CNR_AICSERVAGTCisco_Secure_ACS
cisco_tacitadelCitrix_CMCCitrix_ICACoDeSysCognos_Powerplay_Enterprise_ServerComputer_Associates_License_ManagerCOREid_Access_Servercrystal_infoCrystal_Reports_App_ServerCrystal_Reports_CMScvspserverdaapdamewaredarxitedaytimedaytime_udpDC Directory ServerdcerpcdchubDHCP_or_Bootp_ServerDNS_Serverdtspcdechoecho_udpedonkey_serverEMC_EmailXtenderfingerForte for JavaftpFW1FW1_NG_Servicesgamsoft_telsrvGCS_SysIDGIOPgirlfriendgnutellagopherh323healthdHoneyD_HoneyPotHP_DATAPROTECTHP_printer_servicehparrayhpov_alarmHPOV_BBCHPOV_CODAhpov_topmdhpov_trcsvc
446

Chapter 11 - VM Report TemplatesMap Template
httphttp_over_sslIBM SolidDBIBM_DB2_Universal_DatabaseIBM_TIVOLI_STORAGE_MANAGERicecastidentimapINDUSOFTInfopulse_GatekeeperipmiippircISA_ProxyisakmpISAKMP_over_TCPiSCSIiSNSjabberKadmin-4kazaaKerberos-5l2tpLANDeskLANDESK_CBA_PDSLANDESK_MANAGEMENT_AGENTLANDESK_MANAGEMENT_AGENTldapldap_over_ssllimewirelinuxconflpdmanagesoftMcAfee_ePolicy_Orchestratormelange_chatMERCUR_Control-ServiceMicromuse_Netcool_Object_Servermicrosoft-dsMicrosoft_Message_Queue_ServerminisqlmodbusMODBUS_UDPmqseriesmsdtcMSMQ_Pingmsrpcmsrpc-over-httpmsrpc_udpmssql
mssql_monitorMYDESKTOPmysqlnamed_udpncpnessusnetbios_nsnetbios_ssnnetbusnetopnetstatNetviewer_PC_DuonfsnntpntpocspocssdOmniquad_Serveropen_vpnopennaporacleOracle_Express_ServerOracle_Express_Server_xsagentOracle_Express_Server_xsdaemonoracle_intelligent_agentORACLE_RMIpcanywherepenPolycom_MGC_Managementpop2pop3PostgreSQLpptpPRORAT_TROJANproxy_httpproxy_telnetpsmondpvserverQuote_of_the_Dayquote_of_the_day_udpradiusradius_tcpradminrccmdRealMedia_EncoderServerRed_Carpet_DaemonRELIABLE DATAGRAM SOCKETS OVER TCPResonate_CD_Agentresource_monitor_api
447

Chapter 11 - VM Report TemplatesMap Template
Resource_Monitoring_and_ControlriprloginRMIRegistryrpcrpc_udpRSA_Auth_Mgrrsh/rexecrsyncdrtspSAP_MAXDBSAP_ProtocolSAPguiSGI_Performance_CopilotshellSHOUTcastskinnyskypeslapperSMSsmtpsmuxsnmpsnmp2socks4socks5SPLASHTOP_REMOTE_DESKTOPspychatSpytech_SpyAnywheressdpsshssh_over_sslswagentdswatsybase_adaptive_serverSymantec EMS client serverSymantec_AntiVirusSymantec_AntiVirus_RtvscanSymantec_AntiVirus_Rtvscan_UDPSysGalURsystattalktelnettelnet_over_ssltftptimetime_udptimestamp_over_httptrendmicro_officescan
trojan_firebyunknownunknown_over_sslUPNPut_game_queryportuucpVMware_Authentication_Daemonvncvnetdvoip_sipVolume_Manager_Storage_AdministratorVXWORKS_WDBRPC_UDPwatchguard_adminwebshieldwin_remote_desktopwinmxWINS_ReplicationWonderware_InTouchwsmserverWSUS_SERVERx11X11_Font_ServicexdmcpxinetdXitamixpilotXYZFindYahoo_Instant_MessengeryeempZLink
448

Chapter 11 - VM Report TemplatesMap Template
Categories
Vulnerability Categories as defined by our service as of March 2017 are listed below.
Want a current listing? No problem. Just log in to your Qualys account, go to the KnowledgeBase, click the Search button, and open the Category menu.
Looking for category descriptions? We’ve got you covered. Log in to your Qualys account, go to Help > Online Help and search for Categories and you’ll see the article on Vulnerability Categories with all the details.
Tip - In API requests replace spaces in category names with underscores. For example, Amazon Linux must be specified as Amazon_Linux
AIXAmazon LinuxBackdoors and trojan horsesBrute Force AttackCentOSCGICiscoDatabaseDebianDNS and BINDE-CommerceFedoraFile Transfer ProtocolFingerFirewallForensicsGeneral remote servicesHardwareHP-UXInformation gatheringInternet ExplorerLocalMail servicesMalwareNews ServerNFSOEL
Office ApplicationProxyRedHatRPCSecurity PolicySNMPSolarisSMB / NETBIOSSUSETCP/IPUbuntuVMwareWeb ApplicationWeb Application FirewallWeb serverWindowsX-Window
449
Chapter 12 - VM Remediation TicketsRemediation Tickets overview
Chapter 12 - VM Remediation TicketsList, edit and delete remediation tickets, created using the VM app, in the user’s account.
Remediation Tickets overview
Ticket Parameters
View Ticket List
Edit Tickets
Delete Tickets
View Deleted Ticket List
Get Ticket Information
Remediation Tickets overviewQualys provides fully secure audit trails that track vulnerability status for all detected vulnerabilities. As follow up audits occur, vulnerability status levels - new, active, fixed, and re-opened - are updated automatically and identified in trend reports, giving users access to the most up-to-date security status. Using Remediation Workflow, Qualys automatically updates vulnerability status in remediation tickets, triggering ticket updates and closure in cases where vulnerabilities are verified as fixed.
Ticket information includes
Ticket Due Date - Each ticket has a due date for ticket resolution. The number of days allowed for ticket resolution is set as part of the policy rule configuration. Overdue tickets are those tickets for which the due date for resolution has passed.
Ticket state/status - Several events trigger ticket updates as described earlier. Certain ticket updates result in changes to ticket state/status as indicated below.
Open refers to new and reopened tickets. Tickets are reopened in these cases: 1) when the service detected vulnerabilities for tickets with state/status Resolved or Closed/Fixed, and 2) when users or the service reopened Closed/Ignored tickets.
Resolved refers to tickets marked as resolved by users.
Closed/Fixed refers to tickets with vulnerabilities verified as fixed by the service.
Closed/Ignored refers to tickets ignored by users or the service (based on a user policy). Also, users can ignore vulnerabilities on hosts. If tickets exist for vulnerabilities set to ignore status, the service sets them to Closed/Ignored, and if tickets do not exist for these issues the service adds new tickets and changes them to Closed/Ignored.
Invalid tickets - Tickets are invalid due to the changing status of the IP address or ticket owner. Regarding the IP address, a ticket is marked invalid when the ticket’s IP address is removed from the ticket owner’s account (applies to Unit Manager, Scanner, or Reader). Regarding the ticket owner, a ticket is marked invalid when the ticket owner's account is inactive, deleted, or the user's role was changed to Contact.
450

Chapter 12 - VM Remediation TicketsTicket Parameters
Ticket ParametersMany ticket parameters are available for making API requests to view, update and delete active tickets and defining tickets to take actions on. Overdue and Invalid tickets are selected automatically, unless otherwise requested.
- All ticket parameters are optional and valid for these requests: ticket_list.php, ticket_edit.php and ticket_delete.php.
- At least one parameter is required.
- Multiple parameters are combined with a logical “and”.
Parameter Description
ticket_numbers={nnn,nnn-nnn,...}
Tickets with certain ticket numbers. Specify one or more ticket numbers and/or ranges. Use a dash (-) to separate the ticket range start and end. Multiple entries are comma separated.
since_ticket_number={value}
Tickets since a certain ticket number. Specify the lowest ticket number to be selected. Selected tickets will have numbers greater than or equal to the ticket number specified.
until_ticket_number={value}
Tickets until a certain ticket number. Specify the highest ticket number to be selected. Selected tickets will have numbers less than or equal to the ticket number specified.
show_vuln_details={0|1} (Parameter is valid with ticket_list.php request only) By default, vulnerability details are not included in the ticket list XML output. When set to 1, vulnerability details are included. Vulnerability details provide descriptions for the threat posed by the vulnerability, the impact if exploited, the solution provided by Qualys as well as the scan test results (when available).
Ticket Properties
ticket_assignee={value} Tickets with a certain assignee. Specify the user login of an active user account.
overdue={0|1} Tickets that are overdue or not overdue. When not specified, overdue and non-overdue tickets are selected. Specify 1 to select only overdue tickets. Specify 0 to select only tickets that are not overdue.
invalid={0|1} Tickets that are invalid or valid. When not specified, both valid and invalid tickets are selected. Specify 1 to select only invalid tickets. Specify 0 to select only valid tickets. You can select invalid tickets owned by other users, not yourself.
451

Chapter 12 - VM Remediation TicketsTicket Parameters
states={state} Tickets with certain ticket state/status. Specify one or more state/status codes. A valid value is OPEN (for state/status Open or Open/Reopened), RESOLVED (for state Resolved), CLOSED (for state/status Closed/Fixed), or IGNORED (for state/status Closed/Ignored). Multiple entries are comma separated.
To select ignored vulnerabilities on hosts, specify: states=IGNORED
Ticket History
modified_since_datetime={value}
Tickets modified since a certain date/time. Specify a date (required) and time (optional) since tickets were modified. Tickets modified on or after the date/time are selected.
date/time is specified in YYYY-MM-DD[THH:MM:SSZ] format (UTC/GMT), like “2006-01-01” or “2006-05-25T23:12:00Z”.
unmodified_since_datetime={value}
Tickets not modified since a certain date/time. Specify a date (required) and time (optional) since tickets were not modified. Tickets not modified on or after the date/time are selected.
date/time is specified in YYYY-MM-DD[THH:MM:SSZ] format (UTC/GMT), like “2006-01-01” or “2006-05-25T23:12:00Z”.
Ticket Host Info
ips={nnn,nnn-nnn,...} Tickets on hosts with certain IP addresses. Specify one or more IP addresses and/or ranges. Multiple entries are comma separated.
asset_groups={ag1,ag2,...} Tickets on hosts with IP addresses which are defined in certain asset groups. Specify the title of one or more asset groups. Multiple asset groups are comma separated. The title “All” may be specified to select all IP addresses in the user account.
dns_contains={value} Tickets on hosts that have a NetBIOS host name which contains a certain text string. Specify a text string to be used. This string may include a maximum of 100 characters (ascii).
netbios_contains={value} Tickets on hosts that have a NetBIOS host name which contains a certain text string. Specify a text string to be used. This string may include a maximum of 100 characters (ascii).
Vulnerability Info
vuln_severities={1,2,3,4,5} Tickets for vulnerabilities with certain severity levels. Specify one or more severity levels. Multiple levels are comma separated.
Parameter Description
452

Chapter 12 - VM Remediation TicketsView Ticket List
View Ticket List/msp/ticket_list.php
View remediation tickets and related ticket information in the user’s account.
Basic HTTP authentication is required. Session based authentication is not supported using this API.
Using an account with more than 1,000 tickets (or potentially more than 1,000 tickets), it is recommended that you write a script that makes multiple ticket_list.php requests until all tickets are retrieved.
A maximum of 1,000 tickets can be returned from a single ticket_list.php request. If this maximum is reached, the function returns a “Truncated after 1,000 records” message at the end of the XML output with the last ticket number included. Using an account with more than 1,000 tickets (or potentially more than 1,000 tickets), it is recommended that you write a script that makes multiple ticket_list.php requests until all tickets have been retrieved.
Permissions - Managers can view all tickets in the subscription. Unit Managers can view tickets for IP addresses in the user’s same business unit. Scanners and Readers can view tickets for IP addresses in the user’s own account.
potential_vuln_severities={1,2,3,4,5}
Tickets for potential vulnerabilities with certain severity levels. Specify one or more severity levels. Multiple levels are comma separated.
qids={qid,qid,...} Tickets for vulnerabilities with certain QIDs (Qualys IDs). Specify one or more QIDs. A maximum of 10 QIDs may be specified. Multiple QIDs are comma separated.
vuln_title_contains={value} Tickets for vulnerabilities that have a title which contains a certain text string. The vulnerability title is defined in the KnowledgeBase. Specify a text string. This string may include a maximum of 100 characters (ascii).
vuln_details_contains={value}
Tickets for vulnerabilities that have vulnerability details which contain a certain text string. Vulnerability details provide descriptions for threat, impact, solution and results (scan test results, when available). Specify a text string. This string may include a maximum of 100 characters (ascii).
vendor_ref_contains={value}
Tickets for vulnerabilities that have a vendor reference which contains a certain text string. Specify a text string. This string may include a maximum of 100 characters (ascii).
Parameter Description
453

Chapter 12 - VM Remediation TicketsView Ticket List
Input Parameters
Click here for ticket list input parameters
Samples
View Open tickets for owner:
https://qualysapi.qualys.com/msp/ticket_list.php?ticket_assignee=comp_ja&states=OPEN
View ticket number range:
https://qualysapi.qualys.com/msp/ticket_list.php?ticket_numbers=001800-002800
View tickets with severity 5 confirmed vulnerabilities:
https://qualysapi.qualys.com/msp/ticket_list.php?vuln_severities=5
View tickets that have been marked as Closed/Fixed or Closed/Ignored since June 1, 2018:
https://qualysapi.qualys.com/msp/ticket_list.php?states=CLOSED,IGNORED&modified_since_datetime=2018-06-01
List all ignored vulnerabilities in the user’s account”
https://qualysapi.qualys.com/msp/ticket_list.php?asset_groups=All&states=IGNORED
View tickets related to SSH vulnerabilities:
https://qualysapi.qualys.com/msp/ticket_list.php?vuln_title_contains=SSH&vuln_details_contains=SSH
View Invalid tickets for hosts in the “Desktops” or “Servers” asset groups:
https://qualysapi.qualys.com/msp/ticket_list.php?asset_groups=Desktops,Servers&invalid=1
View Overdue tickets assigned to James Adrian (comp_ja) that have not been modified since May 30, 2018 at 16:30:00 (UTC/GMT) for vulnerabilities with a severity level of 3, 4 or 5 and to include vulnerability details in the results:
https://qualysapi.qualys.com/msp/ticket_list.php?unmodified_since_datetime=2018-05-30T16:30:00Z&vuln_severities=3,4,5&overdue=1&ticket_assignee=comp_ja&show_vuln_details=1
454

Chapter 12 - VM Remediation TicketsEdit Tickets
DTD
<platform API server>/ticket_list_output.dtd
Edit Tickets/msp/ticket_edit.php
Edit remediation tickets in the user’s account. Multiple tickets can be edited at one time in bulk. Many ticket parameters are supported for selecting what tickets you’d like to edit.
Basic HTTP authentication is required. Session based authentication is not supported using this API.
Editing tickets can be a time intensive task, especially when batch editing many tickets. To ensure best performance, a maximum of 20,000 tickets can be edited in one ticket_edit.php request. It’s recommended best practice that you choose to schedule batch updates to occur when ticket processing will least impact user productivity. If the ticket_edit.php request identifies more than 20,000 tickets to be edited, then an error is returned.
Permissions - Managers can edit all tickets in the subscription. Unit Managers can edit tickets for IP addresses in the user’s same business unit. Scanners and Readers do not have permissions to edit tickets.
Input Parameters
Click here to view ticket parameters for selecting tickets to edit
The following parameters are used to define the ticket data to be edited. At least one of the following edit parameters is required.
Parameter Description
change_assignee={value}
(Optional) Used to change the ticket assignee, specified by user login, in all selected tickets. The assignee’s account must have a user role other than Contact, and the hosts associated with the selected tickets must be in the user account.
change_state={value} (Optional) Used to change the ticket state/status to the specified state/status in all selected tickets. A valid value is OPEN (for state/status Open and Open/Reopened), RESOLVED (for state Resolved), or IGNORED (for state/status Closed/Ignored). See “Ticket State/Status Transitions” below for information on valid changes.
455

Chapter 12 - VM Remediation TicketsEdit Tickets
Ticket State/Status Transitions
The Qualys remediation workflow feature is a closed loop ticketing system for remediation management and policy compliance. Users may edit tickets to make certain ticket state changes as shown below.
SamplesEdit ticket and add comment:
https://qualysapi.qualys.com/msp/ticket_edit.php?ticket_numbers=00123456&add_comment=Host+patched,+ready+for+re-scan
Edit multiple tickets to change the ticket owner to Alice Cook (acme_ac) for tickets since ticket number #00215555 (tickets with numbers greater than or equal to #00215555) which are marked invalid):
https://qualysapi.qualys.com/msp/ticket_edit.php?since_ticket_number=00215555&invalid=1&change_assignee=acme_ac
Edit Open tickets on IP addresses in asset groups “New York” and “London” and change the ticket state to Ignored:
https://qualysapi.qualys.com/msp/ticket_edit.php?states=OPEN&asset_groups=New+York,London&change_state=IGNORED
add_comment={value} (Optional) Used to add a comment in all selected tickets. The comment text may include a maximum of 2,000 characters (ascii).
reopen_ignored_days={value}
(Optional) Used to reopen Closed/Ignored tickets in a set number of days. Specify the due date in N days, where N is a number of days from today. A valid value is an integer from 1 to 730.
When the due date is reached, the ticket state is changed from Closed/Ignored to Open, assuming the issue still exists, and the ticket is marked as overdue. If the issue was resolved at some point while the ticket was in the Closed/Ignored state, then the ticket state is changed from Closed/Ignored to Closed/Fixed.
To State/Status
From State/Status Open Resolved Closed/Ignored
Open valid valid valid
Resolved valid valid valid
Closed/Ignored valid invalid valid
Closed/Fixed valid invalid valid
Parameter Description
456

Chapter 12 - VM Remediation TicketsDelete Tickets
Edit Open tickets unmodified since August 1, 2017 that are assigned to Tim Burke (acme_tb) and change the ticket assignee to Alice Cook (acme_ac):
https://qualysapi.qualys.com/msp/ticket_edit.php?states=OPEN&unmodified_since=2017-08-01&ticket_assignee=acme_tb&change_assignee=acme_ac
Reopen all Closed/Ignored tickets on host 10.10.10.120 in 7 days:
https://qualysapi.qualys.com/msp/ticket_edit.php?ips=10.10.10.120&reopen_ignored_days=7
DTD
<platform API server>/ticket_edit_output.dtd
Delete Tickets/msp/ticket_delete.php
Delete remediation tickets in the user’s account.Multiple tickets can be deleted at one time in bulk. Many ticket parameters are supported for selecting what tickets you’d like to edit.
Basic HTTP authentication is required. Session based authentication is not supported using this API.
Deleting tickets can be a time intensive task, especially when batch deleting many tickets. To ensure best performance, a maximum of 20,000 tickets can be deleted in one ticket_delete.php request. It’s recommended best practice that you choose to schedule batch updates to occur when ticket processing will least impact user productivity. If the ticket_delete.php request identifies more than 20,000 tickets to be deleted, then an error is returned.
Permissions - Managers can delete all tickets in the subscription. Unit Managers can delete tickets for IP addresses in their same business unit. Scanners and Readers have no permissions to delete tickets.
Input Parameters
Click here to view ticket parameters for selecting tickets to delete
SamplesDelete certain ticket number:
https://qualysapi.qualys.com/msp/ticket_delete.php?ticket_numbers=2487
Delete tickets between ticket #001000 and ticket #002500:
457

Chapter 12 - VM Remediation TicketsView Deleted Ticket List
https://qualysapi.qualys.com/msp/ticket_delete.php?since_ticket_number=1000&until_ticket_number=2500
Delete Closed/Fixed tickets owned by James Adrian (comp_ja):
https://qualysapi.qualys.com/msp/ticket_delete.php?states=CLOSED&ticket_assignee=comp_ja
Delete tickets on vulnerabilities with an assigned severity level of 1 and potential vulnerabilities with an assigned severity level of 1-3:
https://qualysapi.qualys.com/msp/ticket_delete.php?vuln_severities=1&potential_vuln_severities=1,2,3
Delete Overdue tickets assigned to James Adrian (comp_ja) that have not been modified since July 01, 2018 at 12:00:00 (UTC/GMT)
https://qualysapi.qualys.com/msp/ticket_delete.php?unmodified_since_datetime=2018-07-01T12:00:00Z&overdue=1&ticket_assignee=comp_ja
DTD<platform API server>/ticket_delete_output.dtd
View Deleted Ticket List/msp/ticket_list_deleted.php
View deleted tickets in the user’s account. This function may be run by Managers. The functionality provided allows for real-time integration with third-party applications.
Basic HTTP authentication is required. Session based authentication is not supported using this API.
The XML results returned by the ticket_list_deleted.php function identifies deleted tickets by ticket number and deletion date/time.
A maximum of 1,000 deleted tickets can be returned from a single ticket_list_deleted.php request. If this maximum is reached, the function returns a “Truncated after 1,000 records” message at the end of the XML report with the last ticket number included.
Permissions - Manager user role is required.
Input ParametersAll parameters are optional. At least one parameter is required. Multiple parameters are combined with a logical “and”.
458

Chapter 12 - VM Remediation TicketsView Deleted Ticket List
Samples
View tickets deleted in ticket number range:
https://qualysapi.qualys.com/msp/ticket_list_deleted.php?ticket_numbers=120-200
View tickets deleted since ticket number:
https://qualysapi.qualys.com/msp/ticket_list_deleted.php?since_ticket_number=400
View tickets deleted since date:
https://qualysapi.qualys.com/msp/ticket_list_deleted.php?deleted_since_datetime=2018-01-01
DTD
<platform API server>/ticket_list_deleted_output.dtd
Parameter Description
ticket_numbers={nnn,nnn-nnn,...}
(Optional) Specifies certain ticket numbers. Specify one or more ticket numbers and/or ranges. Ticket range start and end is separated by a dash (-). Multiple entries are comma separated.
since_ticket_number={value}
(Optional) Specifies tickets since a certain ticket number. Specify the lowest ticket number to be selected. Selected tickets will have numbers greater than or equal to the ticket number specified.
until_ticket_number={value}
(Optional) Specifies tickets until a certain ticket number. Specify the highest ticket number to be selected. Selected tickets will have numbers less than or equal to the ticket number specified.
deleted_since_datetime={value}
(Optional) Specifies tickets deleted since a certain date/time. Specify a date (required) and time (optional) to identify this timeframe. Tickets deleted on or after the date/time are selected.date/time is specified in YYYY-MM-DD[THH:MM:SSZ] format (UTC/GMT) like “2006-01-01” or “2006-05-25T23:12:00Z”.
deleted_before_datetime={value}
(Optional) Specifies tickets deleted before a certain date/time. Specify a date (required) and time (optional) to identify this timeframe. Tickets deleted on or before the date/time are selected.date/time is specified in YYYY-MM-DD[THH:MM:SSZ] format (UTC/GMT) like “2006-01-01” or “2006-05-25T23:12:00Z”.
459
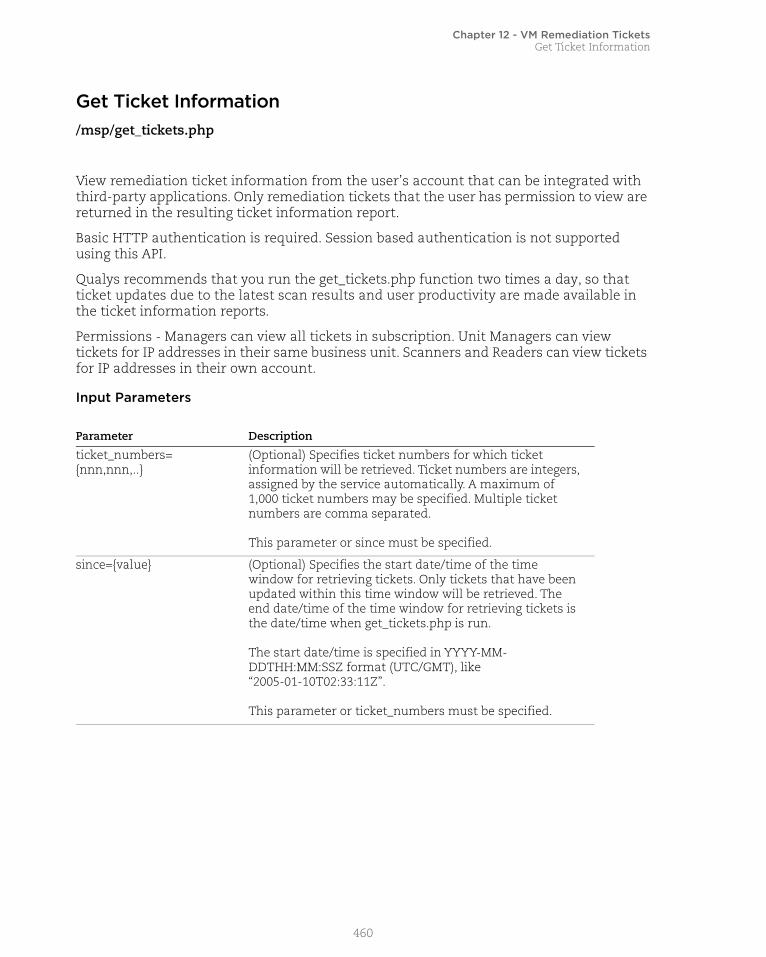
Chapter 12 - VM Remediation TicketsGet Ticket Information
Get Ticket Information/msp/get_tickets.php
View remediation ticket information from the user’s account that can be integrated with third-party applications. Only remediation tickets that the user has permission to view are returned in the resulting ticket information report.
Basic HTTP authentication is required. Session based authentication is not supported using this API.
Qualys recommends that you run the get_tickets.php function two times a day, so that ticket updates due to the latest scan results and user productivity are made available in the ticket information reports.
Permissions - Managers can view all tickets in subscription. Unit Managers can view tickets for IP addresses in their same business unit. Scanners and Readers can view tickets for IP addresses in their own account.
Input Parameters
Parameter Description
ticket_numbers={nnn,nnn,..}
(Optional) Specifies ticket numbers for which ticket information will be retrieved. Ticket numbers are integers, assigned by the service automatically. A maximum of 1,000 ticket numbers may be specified. Multiple ticket numbers are comma separated.
This parameter or since must be specified.
since={value} (Optional) Specifies the start date/time of the time window for retrieving tickets. Only tickets that have been updated within this time window will be retrieved. The end date/time of the time window for retrieving tickets is the date/time when get_tickets.php is run.
The start date/time is specified in YYYY-MM-DDTHH:MM:SSZ format (UTC/GMT), like “2005-01-10T02:33:11Z”.
This parameter or ticket_numbers must be specified.
460

Chapter 12 - VM Remediation TicketsGet Ticket Information
Samples
Retrieve remediation tickets that have been updated since July 1, 2018 at 1:00:00 AM (UTC/GMT) and that have any state (Open, Resolved, or Closed):
https://qualysapi.qualys.com/msp/get_tickets.php? since=2018-07-01T01:00:00Z
Retrieve remediation tickets 002737, 002738, and 002740 with vulnerability details:
https://qualysapi.qualys.com/msp/get_tickets.php? ticket_numbers=002737,002738,002740&vuln_details=1
DTD
<platform API server>/remediation_tickets.dtd
state={value} (Optional) Specifies the current state of tickets to be retrieved. A valid value is OPEN, RESOLVED, or CLOSED. If unspecified, tickets with all states are retrieved.
vuln_details={0|1} (Optional) Specifies whether vulnerability details will be retrieved. Vulnerability details include a description of the threat posed by the vulnerability, the impact if it is exploited, a verified solution, and in some cases test results returned by the scanning engine.
By default, vulnerability details will not be retrieved. To retrieve vulnerability details, specify vuln_details=1.
Parameter Description
461

Chapter 13 - Compliance
Chapter 13 - ComplianceManage compliance policies, exceptions and reports. Policy Compliance (PC) or Security Configuration Assessment (SCA) is required.
Compliance Control List
Compliance Policy List
Compliance Policy - Export
Compliance Policy - Import
Compliance Policy - Merge
Compliance Policy - Manage Asset Groups
Compliance Posture Information
Control Criticality
Exceptions
SCAP Cyberscope Report
SCAP ARF Report
SCAP Policy List
462

Chapter 13 - ComplianceCompliance Control List
Compliance Control List/api/2.0/fo/compliance/control/?action=list
[GET] [POST]
View a list of compliance controls which are visible to the user. Controls in the XML output are sorted by control ID in ascending order. Optional input parameters support filtering the list.
Using the Qualys user interface, it’s possible to customize the list of frameworks at the subscription level. Under PC, go to Policies > Setup > Frameworks to customize the frameworks list. If the frameworks list is customized for your subscription, then the customized list of frameworks will appear in the controls list output returned by a control list API request.
Permissions - Users with PC or SCA enabled have the ability to view compliance controls.
Maximum Controls per API Request
The output of the Compliance Control API is paginated. By default, a maximum of 1,000 control records are returned per request. You can customize the page size (i.e. the number of control records) by using the parameter “truncation_limit=2000” for instance. In this case the results will be return with pages of 2,000 records.
Input Parameters
Parameter Description
action=list (Required)
echo_request={0|1} (Optional) Show (echo) the request’s input parameters (names and values) in the XML output. When not specified, parameters are not included in the XML output. Specify 1 to view parameters in the XML output.
details={Basic|All|None} (Optional) Show the requested amount of information for each control. A valid value is:
None - show control ID only
Basic (default) - show control ID and basic control information: the control category, sub-category, statement, and technology information
All - show control ID, basic control information, and framework mappings
ids={value} (Optional) Show only certain control IDs and/or ID ranges. Multiple entries are comma separated. One or more control IDs/ranges may be specified. A control ID range entry is specified with a hyphen (for example, 3000-3250). Valid control IDs are required.
463
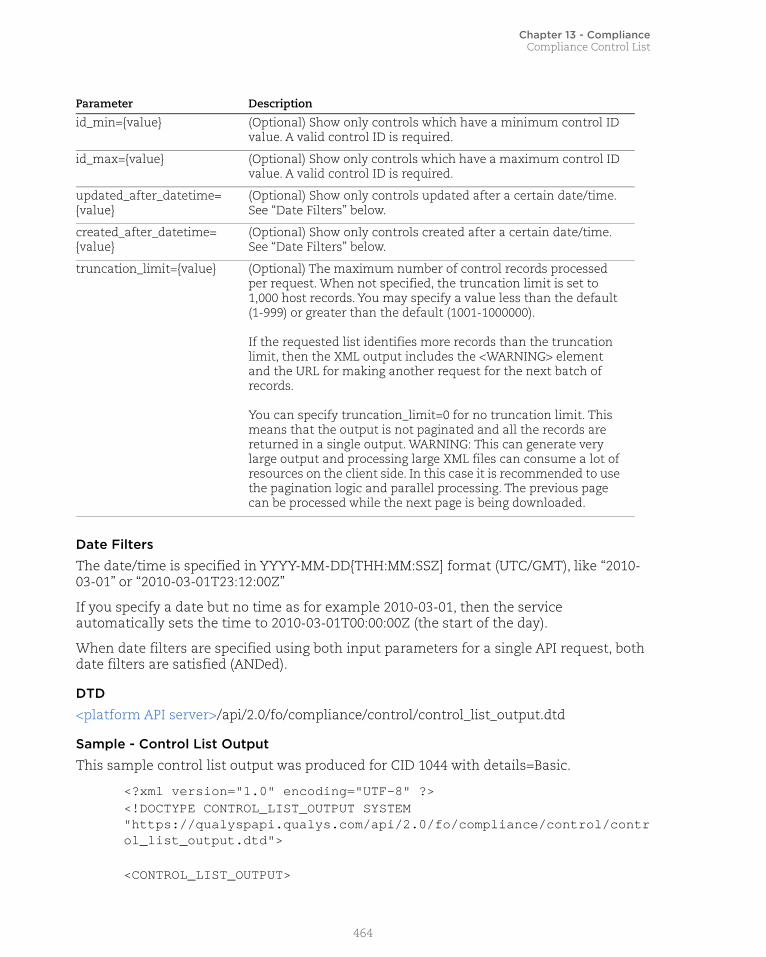
Chapter 13 - ComplianceCompliance Control List
Date Filters
The date/time is specified in YYYY-MM-DD{THH:MM:SSZ] format (UTC/GMT), like “2010-03-01” or “2010-03-01T23:12:00Z”
If you specify a date but no time as for example 2010-03-01, then the service automatically sets the time to 2010-03-01T00:00:00Z (the start of the day).
When date filters are specified using both input parameters for a single API request, both date filters are satisfied (ANDed).
DTD
<platform API server>/api/2.0/fo/compliance/control/control_list_output.dtd
Sample - Control List Output
This sample control list output was produced for CID 1044 with details=Basic.
<?xml version="1.0" encoding="UTF-8" ?><!DOCTYPE CONTROL_LIST_OUTPUT SYSTEM "https://qualyspapi.qualys.com/api/2.0/fo/compliance/control/control_list_output.dtd">
<CONTROL_LIST_OUTPUT>
id_min={value} (Optional) Show only controls which have a minimum control ID value. A valid control ID is required.
id_max={value} (Optional) Show only controls which have a maximum control ID value. A valid control ID is required.
updated_after_datetime={value}
(Optional) Show only controls updated after a certain date/time. See “Date Filters” below.
created_after_datetime={value}
(Optional) Show only controls created after a certain date/time. See “Date Filters” below.
truncation_limit={value} (Optional) The maximum number of control records processed per request. When not specified, the truncation limit is set to 1,000 host records. You may specify a value less than the default (1-999) or greater than the default (1001-1000000).
If the requested list identifies more records than the truncation limit, then the XML output includes the <WARNING> element and the URL for making another request for the next batch of records.
You can specify truncation_limit=0 for no truncation limit. This means that the output is not paginated and all the records are returned in a single output. WARNING: This can generate very large output and processing large XML files can consume a lot of resources on the client side. In this case it is recommended to use the pagination logic and parallel processing. The previous page can be processed while the next page is being downloaded.
Parameter Description
464

Chapter 13 - ComplianceCompliance Control List
<RESPONSE> <DATETIME>2010-03-16T22:53:05Z</DATETIME> <CONTROL_LIST> <CONTROL> <ID>1044</ID> <UPDATE_DATE>2010-02-12T00:00:00Z</UPDATE_DATE> <CREATED_DATE>2007-10-12T00:00:00Z</CREATED_DATE> <CATEGORY>Access Control Requirements</CATEGORY> <SUB_CATEGORY><![CDATA[Authorizations (Multi-user ACL/role)]]></SUB_CATEGORY> <STATEMENT><![CDATA[Status of the 'O7_DICTIONARY_ACCESSIBILITY' setting in init.ora (ORACLE Data Dictionary)]]></STATEMENT> <TECHNOLOGY_LIST> <TECHNOLOGY> <ID>7</ID> <NAME>Oracle 9i</NAME> <RATIONALE><![CDATA[The "O7_DICTIONARY_ACCESSIBILITY" setting allows control/restrictions to be placed on the user's SYSTEM privileges. If this parameter is set to TRUE, SYS schema access will be allowed, which is the default for Oracle operations. Restricting this system privilege with a setting of FALSE will allow users or roles granted SELECT ANY TABLE access to objects in the normal schema, but disallow access to objects in the SYS schema, unless access is specifically granted.]]></RATIONALE> </TECHNOLOGY> <TECHNOLOGY> <ID>8</ID> <NAME>Oracle 10g</NAME> <RATIONALE><![CDATA[The "O7_DICTIONARY_ACCESSIBILITY" setting allows control/restrictions to be placed on the user's SYSTEM privileges. If this parameter is set to TRUE, SYS schema access will be allowed, which is the default for Oracle operations. Restricting this system privilege with a setting of FALSE will allow users or roles granted SELECT ANY TABLE access to objects in the normal schema, but disallow access to objects in the SYS schema, unless access is specifically granted.]]></RATIONALE> </TECHNOLOGY> <TECHNOLOGY> <ID>9</ID> <NAME>Oracle 11g</NAME> <RATIONALE><
Chapter 13 - ComplianceCompliance Control List
the normal schema, but disallow access to objects in the SYS schema, unless access is specifically granted.]]></RATIONALE> </TECHNOLOGY> </TECHNOLOGY_LIST> </CONTROL> <CONTROL> <ID>1045</ID> <UPDATE_DATE>2010-03-03T00:00:00Z</UPDATE_DATE> <CREATED_DATE>2007-10-12T00:00:00Z</CREATED_DATE> <CATEGORY>OS Security Settings</CATEGORY> <SUB_CATEGORY><![CDATA[System Settings (OSI layers 6-7)]]> </SUB_CATEGORY> <STATEMENT><![CDATA[Status of the 'Clipbook' service (Guidance = Disabled)]]></STATEMENT> <TECHNOLOGY_LIST> <TECHNOLOGY> <ID>1</ID> <NAME>Windows XP desktop</NAME> <RATIONALE><![CDATA[The 'Clipbook' service is used to transfer Clipboard information across the LAN and is sent in clear text. The authentication required is a holdover from the 16-bit 'Network Dynamic Data Exchange' protocol, which is a 'network' password among systems sharing the LAN, with a default set allow READ for EVERYONE that has network access. As this Windows service is not required for any other system operations and increases system vulnerability it should be disabled unless there is a demonstrated need for its use set by the business.]]></RATIONALE> </TECHNOLOGY> <TECHNOLOGY> <ID>2</ID> <NAME>Windows 2003 Server</NAME> <RATIONALE><![CDATA[The 'Clipbook' service is used to transfer Clipboard information across the LAN and is sent in clear text. The authentication required is a holdover from the 16-bit 'Network Dynamic Data Exchange' protocol, which is a 'network' password among systems sharing the LAN, with a default set allow READ for EVERYONE that has network access. As this Windows service is not required for any other system operations and increases system vulnerability it should be disabled unless there is a demonstrated need for its use set by the business.]]></RATIONALE> </TECHNOLOGY> <TECHNOLOGY> <ID>12</ID> <NAME>Windows 2000</NAME> <RATIONALE><
Chapter 13 - ComplianceCompliance Control List
'Network Dynamic Data Exchange' protocol, which is a 'network' password among systems sharing the LAN, with a default set allow READ for EVERYONE that has network access. As this Windows service is not required for any other system operations and increases system vulnerability it should be disabled unless there is a demonstrated need for its use set by the business.]]></RATIONALE> </TECHNOLOGY></CONTROL_LIST_OUTPUT>
467

Chapter 13 - ComplianceCompliance Policy List
Compliance Policy List/api/2.0/fo/compliance/policy/?action=list
[GET] [POST]
View a list of compliance policies visible to the user. Policies in the XML output are sorted by compliance policy ID in ascending order. Optional input parameters support filtering the policy list output.
Maximum Policies per API Request
A maximum of 1,000 compliance policy records can be processed per request. If the requested list identifies more than 1,000 policies, then the XML output includes the <WARNING> element and instructions for making another request for the next batch of policy records.
Permissions
User Permissions — Asset Group Information
Asset group information included in the policy list output includes the following, as defined for each asset group: asset group ID, title, and assigned IP addresses. Users are granted permission to view asset group information assigned to policies when the user has permission to view the asset groups.
User Role Permissions
Manager View all compliance policies in subscription. View asset group information for all asset groups assigned to policies.
Auditor View all compliance policies in subscription. View asset group information for all asset groups assigned to policies.
Unit Manager View all compliance policies in subscription. View asset group information for asset groups assigned to policies, when the user has permission to view these asset groups. This user can view groups assigned to the user’s business unit, and groups created by any user in the same business unit.
Scanner View all compliance policies in subscription. View asset group information for asset groups assigned to policies, when the user has permission to view these asset groups. This user can view groups assigned to the user account, and groups created by the user.
Reader View all compliance policies in subscription. View asset group information for asset groups assigned to policies, when the user has permission to view these asset groups. This user can view groups assigned to the user account, and groups created by the user.
468

Chapter 13 - ComplianceCompliance Policy List
For example, when a user makes a request for a compliance policy list and the user does not have permission to view asset groups that are assigned to the target policies, then the asset group information does not appear in the policy list output. The asset group IDs are not listed under the <POLICY> section, and the asset group title and assigned IP addresses are not listed under the <GLOSSARY> section.
In a case where a user makes a request for a compliance policy list and the user does not have permission to see one or more asset groups assigned to a target policy, the following information is provided in the compliance policy list output:
<POLICY> section. The attribute “has_hidden_data=1” is returned in the <POLICY> section in the <ASSET_GROUP_IDS> element. This indicates that the user does not have permission to see one or more asset groups in the policy. When this attribute is present, only the asset group IDs that the user has permission to see, if any, are listed in the <ASSET_GROUP_IDS> element.
<GLOSSARY> section. Asset group information is not displayed for asset groups assigned to compliance policies that the user does not have permission to see.
<WARNING_LIST> section. A warning message is returned for informational purposes. This indicates that at least one of the compliance policies in the output has one or more asset groups that the user does not have permission to see.
Input Parameters
Parameter Description
action=list (Required)
echo_request={0|1} (Optional) Show (echo) the request’s input parameters (names and values) in the XML output. When not specified, parameters are not included in the XML output. Specify 1 to view parameters in the XML output.
details={Basic|All|None} (Optional) Show requested amount of information for each policy. A valid value is:
None — show policy ID only
Basic (default) — show policy ID and title, date/time when the policy was created and last modified, asset groups included, asset tags included, controls included, whether the Evaluate Now option was selected, whether the policy is locked, and glossary of compliance policy data in the output.
All — show the basic policy information, plus a technology list for each control, IP list for each asset group, and a user list
ids={value} (Optional) Show only certain policy IDs and/or ID ranges. One or more policy IDs/ranges may be specified. Multiple entries are comma separated. A policy ID range entry is specified with a hyphen (for example, 160-165). Valid policy IDs are required.
id_min={value} (Optional) Show only policies which have a minimum policy ID value. A valid policy ID is required.
469
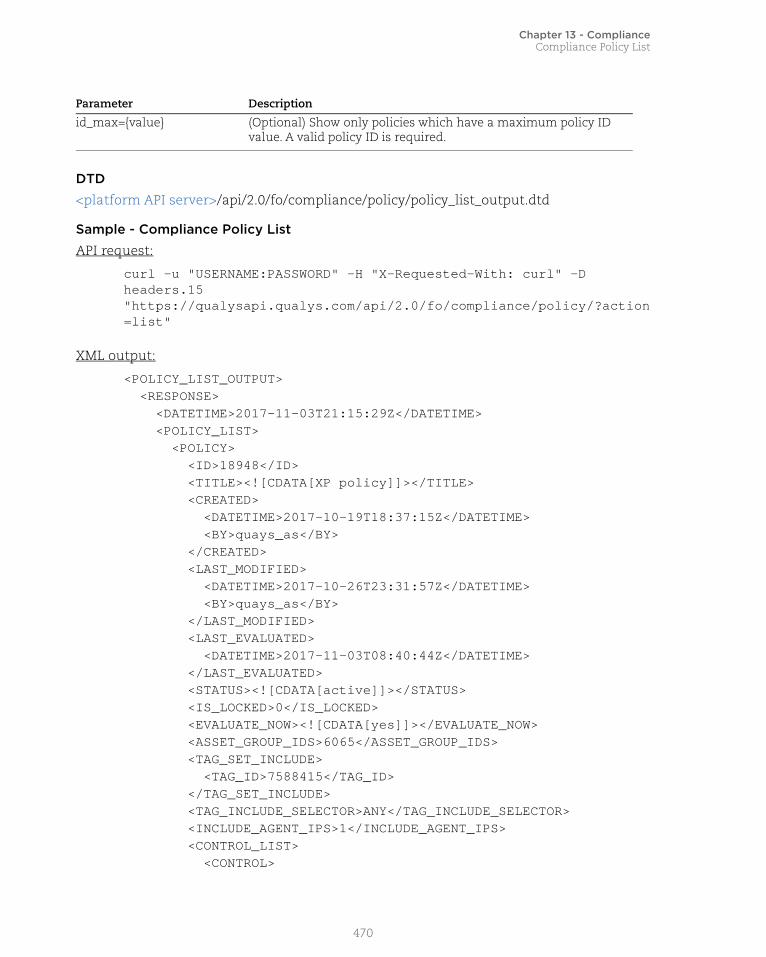
Chapter 13 - ComplianceCompliance Policy List
DTD<platform API server>/api/2.0/fo/compliance/policy/policy_list_output.dtd
Sample - Compliance Policy List
API request:
curl -u "USERNAME:PASSWORD" -H "X-Requested-With: curl" -D headers.15 "https://qualysapi.qualys.com/api/2.0/fo/compliance/policy/?action=list"
XML output:
<POLICY_LIST_OUTPUT> <RESPONSE> <DATETIME>2017-11-03T21:15:29Z</DATETIME> <POLICY_LIST> <POLICY> <ID>18948</ID> <TITLE><![CDATA[XP policy]]></TITLE> <CREATED> <DATETIME>2017-10-19T18:37:15Z</DATETIME> <BY>quays_as</BY> </CREATED> <LAST_MODIFIED> <DATETIME>2017-10-26T23:31:57Z</DATETIME> <BY>quays_as</BY> </LAST_MODIFIED> <LAST_EVALUATED> <DATETIME>2017-11-03T08:40:44Z</DATETIME> </LAST_EVALUATED> <STATUS><![CDATA[active]]></STATUS> <IS_LOCKED>0</IS_LOCKED> <EVALUATE_NOW><![CDATA[yes]]></EVALUATE_NOW> <ASSET_GROUP_IDS>6065</ASSET_GROUP_IDS> <TAG_SET_INCLUDE> <TAG_ID>7588415</TAG_ID> </TAG_SET_INCLUDE> <TAG_INCLUDE_SELECTOR>ANY</TAG_INCLUDE_SELECTOR> <INCLUDE_AGENT_IPS>1</INCLUDE_AGENT_IPS> <CONTROL_LIST> <CONTROL>
id_max={value} (Optional) Show only policies which have a maximum policy ID value. A valid policy ID is required.
Parameter Description
470

Chapter 13 - ComplianceCompliance Policy List
<ID>1045</ID> <STATEMENT><![CDATA[Status of the 'Clipbook' service (startup type)]]></STATEMENT> <CRITICALITY> <LABEL><![CDATA[SERIOUS]]></LABEL> <VALUE>3</VALUE> </CRITICALITY> </CONTROL> <CONTROL> <ID>1048</ID> <STATEMENT><![CDATA[Status of the 'Shutdown: Clear virtual memory pagefile' setting]]></STATEMENT> <CRITICALITY> <LABEL><![CDATA[CRITICAL]]></LABEL> <VALUE>4</VALUE> </CRITICALITY> </CONTROL> </CONTROL_LIST> </POLICY> </POLICY_LIST> <GLOSSARY> <ASSET_GROUP_LIST> <ASSET_GROUP> <ID>6065</ID> <TITLE><![CDATA[Windows XP]]></TITLE> </ASSET_GROUP> </ASSET_GROUP_LIST> <ASSET_TAG_LIST> <TAG> <TAG_ID>7588415</TAG_ID> <TAG_NAME>windows XP</TAG_NAME> </TAG> </ASSET_TAG_LIST> </GLOSSARY> </RESPONSE></POLICY_LIST_OUTPUT>
471
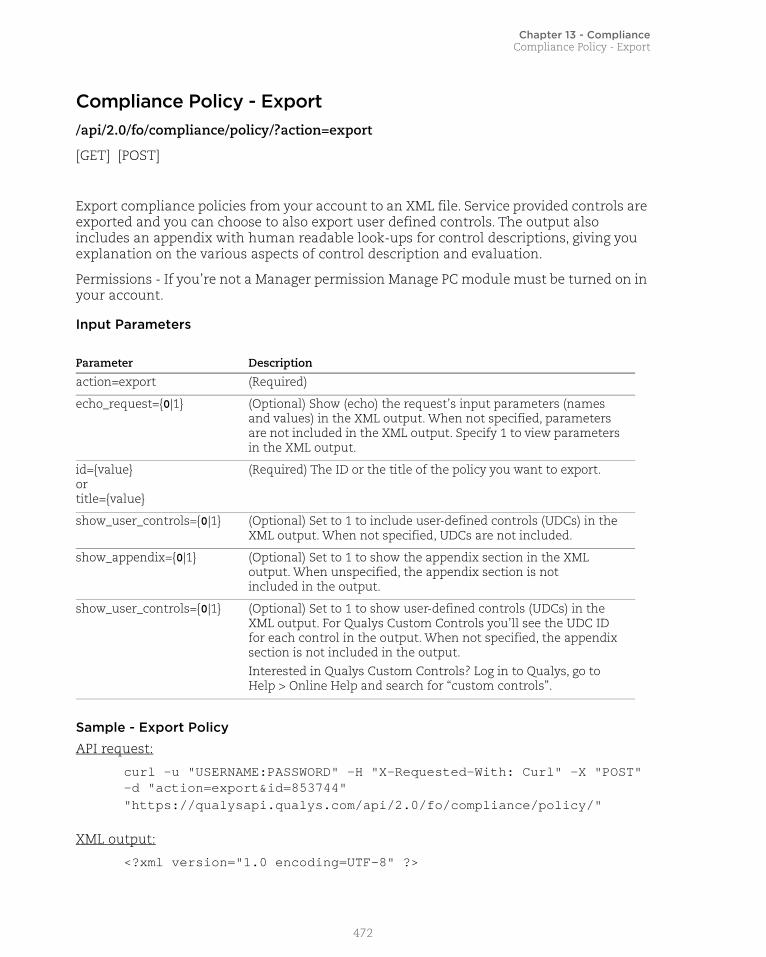
Chapter 13 - ComplianceCompliance Policy - Export
Compliance Policy - Export/api/2.0/fo/compliance/policy/?action=export
[GET] [POST]
Export compliance policies from your account to an XML file. Service provided controls are exported and you can choose to also export user defined controls. The output also includes an appendix with human readable look-ups for control descriptions, giving you explanation on the various aspects of control description and evaluation.
Permissions - If you’re not a Manager permission Manage PC module must be turned on in your account.
Input Parameters
Sample - Export Policy
API request:
curl -u "USERNAME:PASSWORD" -H "X-Requested-With: Curl" -X "POST" -d "action=export&id=853744""https://qualysapi.qualys.com/api/2.0/fo/compliance/policy/"
XML output:
<?xml version="1.0 encoding=UTF-8" ?>
Parameter Description
action=export (Required)
echo_request={0|1} (Optional) Show (echo) the request’s input parameters (names and values) in the XML output. When not specified, parameters are not included in the XML output. Specify 1 to view parameters in the XML output.
id={value}ortitle={value}
(Required) The ID or the title of the policy you want to export.
show_user_controls={0|1} (Optional) Set to 1 to include user-defined controls (UDCs) in the XML output. When not specified, UDCs are not included.
show_appendix={0|1} (Optional) Set to 1 to show the appendix section in the XMLoutput. When unspecified, the appendix section is notincluded in the output.
show_user_controls={0|1} (Optional) Set to 1 to show user-defined controls (UDCs) in the XML output. For Qualys Custom Controls you’ll see the UDC ID for each control in the output. When not specified, the appendix section is not included in the output. Interested in Qualys Custom Controls? Log in to Qualys, go to Help > Online Help and search for “custom controls”.
472

Chapter 13 - ComplianceCompliance Policy - Export
<DOCTYPE POLICY_EXPORT_OUTPUT SYSTEM "https://qualysapi.qualys.com/api/2/fo/compliance/policy/policy_export_output.dtd"><POLICY> <TITLE><![CDATA[My Policy]]></TITLE> <EXPORTED><![CDATA[2013-07-17T18:19:57Z]]></EXPORTED> <COVER_PAGE><![CDATA[]]></COVER_PAGE> <TECHNOLOGIES total="1"> <TECHNOLOGY> <ID>1</ID> <NAME>Windows XP desktop</NAME> </TECHNOLOGY> </TECHNOLOGIES> <SECTIONS total="1"> <SECTION> <NUMBER>1</NUMBER> <HEADING><![CDATA[Default section]]></HEADING> <CONTROLS total="20"> <CONTROL> <ID>1111</ID> <TECHNOLOGIES total="1"> <TECHNOLOGY> <ID>1</ID> <NAME>Windows XP desktop</NAME> <EVALUATE checksum="74378d12a39f82721a3cb156dee58c663a650a9ce422bd311b5e5443c2a20f14"><CTRL><NOT><DP><K>auth.general.logintext</K><OP>re</OP><V><![CDATA[^(\s*|314159265358979|161803399999999)$]]></V></DP></NOT></CTRL></EVALUATE> </TECHNOLOGY> </TECHNOLOGIES> </CONTROL> </SECTION> </SECTIONS></POLICY>
Sample - Export Policy with Appendix with lookups for control descriptionsAPI request:
curl -u "USERNAME:PASSWORD" GET -H "X-Requested-With: curl" -X "POST" -d "action=export&id=5438&show_appendix=1""https://qualysapi.qualys.com/api/2.0/fo/compliance/policy/">showApp.xml
473

Chapter 13 - ComplianceCompliance Policy - Export
XML output:
<?xml version="1.0" encoding="UTF-8" ?><!DOCTYPE POLICY_EXPORT_OUTPUT SYSTEM "https://qualysapi.qualys.com/api/2.0/fo/compliance/policy/policy_export_output.dtd"><POLICY_EXPORT_OUTPUT> <RESPONSE> <DATETIME>2017-09-09T09:07:13Z</DATETIME> <POLICY> <TITLE><![CDATA[Solaris]]></TITLE> <EXPORTED><![CDATA[2017-09-09T09:07:12Z]]></EXPORTED> <COVER_PAGE><![CDATA[]]></COVER_PAGE> <STATUS><![CDATA[active]]></STATUS> <TECHNOLOGIES total="4"> <TECHNOLOGY> <ID>4</ID> <NAME>Solaris 9.x</NAME> </TECHNOLOGY>... <SECTION> <NUMBER>3</NUMBER> <HEADING><![CDATA[Untitled]]></HEADING> <CONTROLS total="4"/> </SECTION> </SECTIONS> <!--Note : Remove APPENDIX section if you wish to import this XML as policy.--> <APPENDIX> <OP_ACRONYMS><OP id="lt">less than</OP> <OP id="gt">greater than</OP> <OP id="le">less than or equal to</OP> <OP id="ge">greater than or equal to</OP> <OP id="ne">not equal to</OP> <OP id="xeq">list OR string list</OP> <OP id="eq">equal to</OP> <OP id="in">in</OP> <OP id="xre">regular expression list</OP> <OP id="re">regular expression</OP> <OP id="range">in range</OP></OP_ACRONYMS> <DATA_POINT_ACRONYMS> <DP> <K id="auth.useraccount.legacy-plus-accounts"><
Chapter 13 - ComplianceCompliance Policy - Export
<B>plus-sign '+'</B> preceding them.]]></K> <FV id="161803399999999"><![CDATA[Setting not found]]></FV> <FV id="314159265358979"><![CDATA[File not found]]></FV> </DP> <DP> <K id="auth.useraccount.minimum-password-length"> <![CDATA[This Integer value <B>X</B> indicates the current status of the <B>PASSLENGTH 'minimum password length'</B> setting within the <B>/etc/default/passwd </B> file.]]></K> <FV id="161803399999999"><![CDATA[Setting not found]]></FV> <FV id="314159265358979"><![CDATA[File not found]]></FV> </DP> ... </DATA_POINT_ACRONYMS> </APPENDIX></POLICY> </RESPONSE></POLICY_EXPORT_OUTPUT>
Sample - Export Library Policy to XMLYou can export a library compliance policy from your account to an XML file. Just like with user created policies you must specify the input parameter show_user_controls=1 to include UDCs in the output. When the policy includes a Qualys Custom Control you’ll see the UDC ID for the control in the output.
API request:
curl -u "USERNAME:PASSWORD" -H "X-Requested-With: curl" -d"action=export&ids=991742279&show_user_controls=1""https://qualysapi.qualys.com/api/2.0/fo/compliance/policy/"
XML output:
<POLICY> <TITLE><![CDATA[Library Policy with 2 UDC v.2.0]]></TITLE> <EXPORTED><![CDATA[2017-04-17T15:02:56Z]]></EXPORTED> <COVER_PAGE><![CDATA[]]></COVER_PAGE> <STATUS><![CDATA[active]]></STATUS> <TECHNOLOGIES total="2"> <TECHNOLOGY>
475

Chapter 13 - ComplianceCompliance Policy - Export
<ID>2</ID> <NAME>Windows 2003 Server</NAME> </TECHNOLOGY> <TECHNOLOGY> <ID>12</ID> <NAME>Windows 2000</NAME> </TECHNOLOGY> </TECHNOLOGIES> <SECTIONS total="1"> <SECTION> <NUMBER>1</NUMBER> <HEADING><![CDATA[Untitled]]></HEADING> <CONTROLS total="1"> <USER_DEFINED_CONTROL> <ID>100005</ID> <UDC_ID>55449d95-1877-7ee5-829a-4eededacb04f</UDC_ID> <CHECK_TYPE>Registry Value Existence</CHECK_TYPE> <CATEGORY> <ID>3</ID> <NAME><![CDATA[Access Control Requirements]]></NAME> </CATEGORY> <SUB_CATEGORY> <ID>1007</ID> <NAME><![CDATA[Authentication/Passwords]]></NAME> </SUB_CATEGORY>...
DTD
<platform API server>/api/2/fo/compliance/policy/policy_export_output.dtd
476

Chapter 13 - ComplianceCompliance Policy - Import
Compliance Policy - Import/api/2.0/fo/compliance/policy/?action=import
[POST]
Import a compliance policy, defined in an XML file, into your account. We’ll include all the service-provided controls from your XML file. You have the option to also include user-defined controls.
Permissions - If you’re not a Manager permission Manage PC module must be turned on in your account.
Input Parameters
Sample - Import policy
API request:
curl -H "X-Requested-With: Curl Sample" -H "Content-type: text/xml" --data-binary @policy.xml -u "USERNAME:PASSWORD" "https://qualysapi.qualys.com/api/2.0/fo/compliance/policy/?action=import&title=My+Policy"
XML output:
<?xml version="1.0" encoding="UTF-8" ?><!DOCTYPE SIMPLE_RETURN SYSTEM"https://qualysapi.qualys.com/api/2.0/simple_return.dtd"><SIMPLE_RETURN> <RESPONSE> <DATETIME>2017-09-15T21:32:40Z</DATETIME> <TEXT>Successfully imported compliance policy</TEXT> <ITEM_LIST> <ITEM> <KEY>ID</KEY>
Parameter Description
action=import (Required)
echo_request={0|1} (Optional) Show (echo) the request’s input parameters (names and values) in the XML output. When not specified, parameters are not included in the XML output. Specify 1 to view parameters in the XML output.
xml_file (Required) The file containing the policy details.
title={value} (Required) The title of the new policy.
create_user_controls={0|1} (Optional) When not specified, user-defined controls are not created when you import a policy. Specify 1 to include UDCs from the XML file.
477

Chapter 13 - ComplianceCompliance Policy - Import
<VALUE>136992</VALUE> </ITEM> <ITEM> <KEY>TITLE</KEY> <VALUE>My Policy</VALUE> </ITEM> </ITEM_LIST></RESPONSE></SIMPLE_RETURN>
478

Chapter 13 - ComplianceCompliance Policy - Merge
Compliance Policy - Merge/api/2.0/fo/compliance/policy/?action=merge
[POST]
Merge (combine) 2 or more compliance policies using Qualys Policy Compliance (PC). You can choose to merge some or all parts of a new policy into an existing one. Also you can preview merge changes before saving them. This API is available to Managers and Auditors.
For example, say you imported a policy from our library (Policy A) and configured it to add asset groups, controls and sections. Later we might release an updated version of this policy (Policy B) with new controls and technologies. In this scenario you can use the Policy Merge API to add the new controls and technologies from Policy B into Policy A (your existing policy) without losing the asset groups, controls and sections you added.
Input ParametersThe policy merge input parameters give you flexibility with merging different parts of a new policy (Policy B) into an existing one (Policy A). For example you can choose to update controls with newer definitions, replace asset groups, and add new technologies and controls. By default no changes are applied to your existing policy unless parameters are specified (see below).
Parameter Description
action=merge (Required)
id={value} (Required) The ID of the policy that will be updated with merged content (let’s call this Policy A).
merge_policy_id={value}-or-policy XML data
(Required) Tell us the policy with the content that will be merged into Policy A (let’s call this Policy B). You can specify a policy ID using “merge_policy_id” or policy XML data. To upload XML data, use this syntax: --data-binary @path_to_xml_file.xml
These options are mutually exclusive: policy XML data and replace_asset_groups.
replace_cover_page={0|1} (Optional) Set replace_cover_page=1 to replace the cover page in Policy A with the cover page in Policy B.
replace_asset_groups={0|1} (Optional) Set replace_asset_groups=1 to replace asset groups in Policy A with asset groups in Policy B.
These options are mutually exclusive: add_asset_groups and replace_asset_groups.
add_asset_groups={0|1} (Optional) Set add_asset_groups=1 to add new asset groups, i.e. add asset groups from Policy B if they are not already present in Policy A.
add_new_technologies={0|1}
(Optional) Set add_new_technologies=1 to add new technologies, i.e. add technologies from Policy B if they are not already in Policy A.
479

Chapter 13 - ComplianceCompliance Policy - Merge
DTD<platform API server>/api/2.0/fo/compliance/policy/policy_merge_result_output.dtd"
Policy Merge Request 1 - preview merged policy
Policy ID 15993 (Policy A) will be updated with content merged from policy ID 15994 (Policy B) and the XML output will show the merged policy in preview mode. Policy changes will not be saved in Policy 15993 since the request includes “preview_merge=1”.
API request:
curl -u "USERNAME:PASSWORD" -H "X-Requested-With: curl" "https://qualysapi.qualys.com/api/2.0/fo/compliance/policy/?action=merge&id=15993&merge_policy_id=15994&replace_cover_page=1&add_new_asset_groups=1&add_new_technologies=1&update_section_heading=1&add_new_controls=1&update_existing_controls=1&preview_merge=1"
XML output:
<?xml version="1.0" encoding="UTF-8" ?><!DOCTYPE POLICY_MERGE_RESULT_OUTPUT SYSTEM "https://qualysapi.qualys.com/api/2.0/fo/compliance/policy/policy_merge_result_output.dtd"><POLICY_MERGE_RESULT_OUTPUT> <RESPONSE> <DATETIME>2018-04-24T05:28:04Z</DATETIME> <POLICY_MERGE_RESULT> <NOTE>Policy changes were not merged or saved since the request had preview_merge=1.</NOTE> <NEW_COVER_PAGE><![CDATA[My Cover Page]]></NEW_COVER_PAGE> <ASSET_GROUPS_ADDED> <ASSET_GROUP> <ID>424422</ID> <NAME><![CDATA[<script>alert("xss");</script>]]></NAME>
add_new_controls={0|1} (Optional) Set add_new_controls=1 to add new controls, i.e. add controls from Policy B if they are not already in Policy A.
update_section_heading={0|1}
(Optional) Set update_section_heading=1 to replace the section heading in Policy A with the one in Policy B, based on section number (applies only to common sections).
This parameter must be specified with: add_new_controls or update_existing_controls.
update_existing_controls={0|1}
(Optional) Set update_existing_controls=1 to replace the common controls in Policy A with the ones in Policy B. These are controls that exist in both policies. (Controls will not be removed).
preview_merge={0|1} (Optional) Set preview_merge= 1 to view the changes merged into Policy A without saving them.
Parameter Description
480

Chapter 13 - ComplianceCompliance Policy - Merge
</ASSET_GROUP> <ASSET_GROUP> <ID>424577</ID> <NAME><![CDATA[10.10.32.26]]></NAME> </ASSET_GROUP> </ASSET_GROUPS_ADDED> <TECHNOLOGIES_ADDED> <TECHNOLOGY> <ID>1</ID> <NAME>Windows XP desktop</NAME> </TECHNOLOGY> </TECHNOLOGIES_ADDED> <SECTIONS_UPDATED> <SECTION> <ID>1</ID> <HEADING><![CDATA[First section]]></HEADING> </SECTION> <SECTION> <ID>2</ID> <HEADING><![CDATA[Second section]]></HEADING> </SECTION> </SECTIONS_UPDATED> <SECTIONS> <SECTION> <ID>1</ID> <CONTROLS_UPDATED> <CONTROL> <ID>1061</ID> </CONTROL> </CONTROLS_UPDATED> </SECTION> <SECTION> <ID>2</ID> <CONTROLS_ADDED> <CONTROL> <ID>1045</ID> </CONTROL> <CONTROL> <ID>1048</ID> </CONTROL> </CONTROLS_ADDED> </SECTION> </SECTIONS> </POLICY_MERGE_RESULT> </RESPONSE>
481
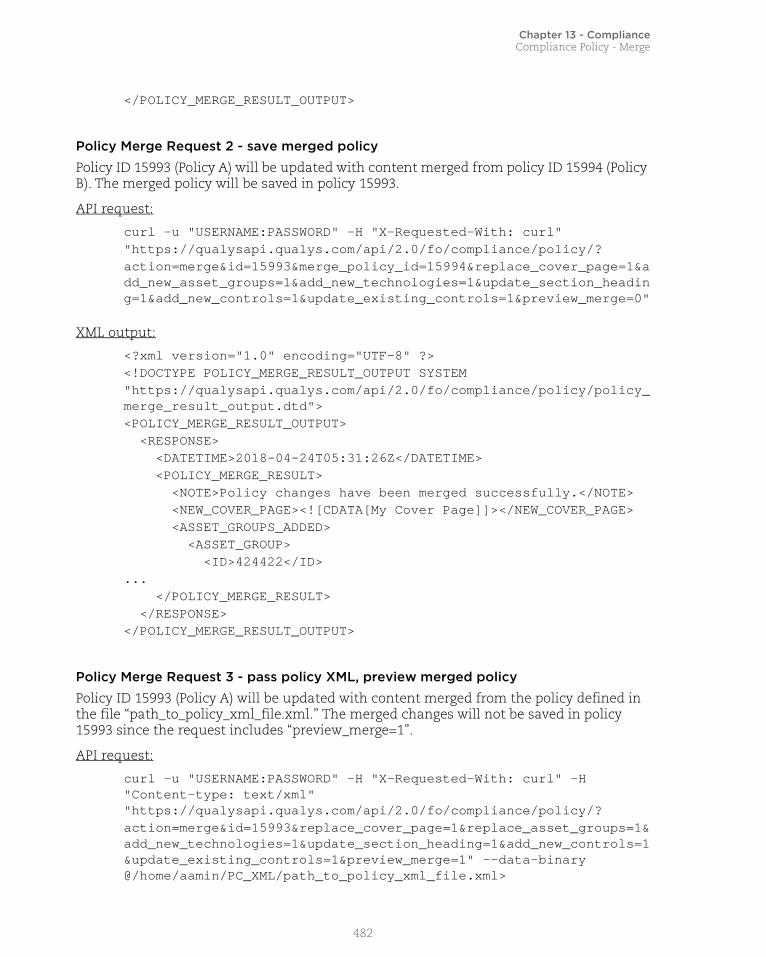
Chapter 13 - ComplianceCompliance Policy - Merge
</POLICY_MERGE_RESULT_OUTPUT>
Policy Merge Request 2 - save merged policy
Policy ID 15993 (Policy A) will be updated with content merged from policy ID 15994 (Policy B). The merged policy will be saved in policy 15993.
API request:
curl -u "USERNAME:PASSWORD" -H "X-Requested-With: curl" "https://qualysapi.qualys.com/api/2.0/fo/compliance/policy/?action=merge&id=15993&merge_policy_id=15994&replace_cover_page=1&add_new_asset_groups=1&add_new_technologies=1&update_section_heading=1&add_new_controls=1&update_existing_controls=1&preview_merge=0"
XML output:
<?xml version="1.0" encoding="UTF-8" ?><!DOCTYPE POLICY_MERGE_RESULT_OUTPUT SYSTEM "https://qualysapi.qualys.com/api/2.0/fo/compliance/policy/policy_merge_result_output.dtd"><POLICY_MERGE_RESULT_OUTPUT> <RESPONSE> <DATETIME>2018-04-24T05:31:26Z</DATETIME> <POLICY_MERGE_RESULT> <NOTE>Policy changes have been merged successfully.</NOTE> <NEW_COVER_PAGE><![CDATA[My Cover Page]]></NEW_COVER_PAGE> <ASSET_GROUPS_ADDED> <ASSET_GROUP> <ID>424422</ID>... </POLICY_MERGE_RESULT> </RESPONSE></POLICY_MERGE_RESULT_OUTPUT>
Policy Merge Request 3 - pass policy XML, preview merged policyPolicy ID 15993 (Policy A) will be updated with content merged from the policy defined in the file “path_to_policy_xml_file.xml.” The merged changes will not be saved in policy 15993 since the request includes “preview_merge=1”.
API request:
curl -u "USERNAME:PASSWORD" -H "X-Requested-With: curl" -H "Content-type: text/xml" "https://qualysapi.qualys.com/api/2.0/fo/compliance/policy/?action=merge&id=15993&replace_cover_page=1&replace_asset_groups=1&add_new_technologies=1&update_section_heading=1&add_new_controls=1&update_existing_controls=1&preview_merge=1" --data-binary @/home/aamin/PC_XML/path_to_policy_xml_file.xml>
482

Chapter 13 - ComplianceCompliance Policy - Merge
XML output:
<?xml version="1.0" encoding="UTF-8" ?><!DOCTYPE POLICY_MERGE_RESULT_OUTPUT SYSTEM "https://qualysapi.qualys.com/api/2.0/fo/compliance/policy/policy_merge_result_output.dtd"><POLICY_MERGE_RESULT_OUTPUT> <RESPONSE> <DATETIME>2018-04-24T05:38:26Z</DATETIME> <POLICY_MERGE_RESULT> <NOTE>Policy changes were not merged or saved since the request had preview_merge=1.</NOTE> <NEW_COVER_PAGE><![CDATA[My Cover Page]]></NEW_COVER_PAGE> <SECTIONS_UPDATED> <SECTION> <ID>1</ID> <HEADING><![CDATA[First section]]></HEADING> </SECTION> <SECTION> <ID>2</ID> <HEADING><![CDATA[Second section]]></HEADING> </SECTION> </SECTIONS_UPDATED> <SECTIONS> <SECTION> <ID>1</ID> <CONTROLS_UPDATED> <CONTROL> <ID>1061</ID> </CONTROL> </CONTROLS_UPDATED> </SECTION> <SECTION> <ID>2</ID> <CONTROLS_ADDED> <CONTROL> <ID>1045</ID> </CONTROL> <CONTROL> <ID>1048</ID> </CONTROL> </CONTROLS_ADDED> </SECTION> </SECTIONS> </POLICY_MERGE_RESULT>
483

Chapter 13 - ComplianceCompliance Policy - Merge
</RESPONSE></POLICY_MERGE_RESULT_OUTPUT>
484

Chapter 13 - ComplianceCompliance Policy - Manage Asset Groups
Compliance Policy - Manage Asset Groups/api/2.0/fo/compliance/policy/
[POST]
Add, remove and set asset groups for a policy. You must have permission to modify the policy you want to update.
Add asset group IDs to policy
API request:
curl -H "X-Requested-With: curl" -u "USERNAME:PASSWD" -X POST -d "id=43400&asset_group_ids=649737,649736" "https://qualysapi.qualys.com//api/2.0/fo/compliance/policy/?action=add_asset_group_ids"
XML output:
<?xml version="1.0" encoding="UTF-8" ?><!DOCTYPE SIMPLE_RETURN SYSTEM "https://qualysapi.qualys.com/api/2.0/simple_return.dtd"><SIMPLE_RETURN> <RESPONSE> <DATETIME>2014-09-11T09:06:17Z</DATETIME> <TEXT>Compliance Policy successfully modified.</TEXT> <ITEM_LIST> <ITEM> <KEY>ID</KEY> <VALUE>43400</VALUE> </ITEM> </ITEM_LIST> </RESPONSE></SIMPLE_RETURN>
Parameter Description
action=add_asset_group_ids
(Required)
id={value} Policy ID for the policy you want to update.
asset_group_ids={value} Asset groups IDs for the asset groups you want to add to the policy specified in “id”. Multiple IDs are comma separated. Each asset group must have at least 1 assigned IP address.
evaluate_now={0|1} (Optional) Specify evaluate_now=1 to immediately evaluate the policy against assigned assets, and select the Evaluate Now check box in the UI Policy Editor. When this check box is selected we’ll start policy evaluation each time you save changes to the policy from the UI or API.
485

Chapter 13 - ComplianceCompliance Policy - Manage Asset Groups
Remove asset group IDs from policy
API request:
curl -H "X-Requested-With: curl" -u "USERNAME:PASSWD" -X POST -d "id=43400&asset_group_ids=649737,649736" "https://qualysapi.qualys.com//api/2.0/fo/compliance/policy/?action=remove_asset_group_ids"
XML output:
<?xml version="1.0" encoding="UTF-8" ?><!DOCTYPE SIMPLE_RETURN SYSTEM "https://qualysapi.qualys.com/api/2.0/simple_return.dtd"><SIMPLE_RETURN> <RESPONSE> <DATETIME>2014-09-11T09:06:17Z</DATETIME> <TEXT>Compliance Policy successfully modified.</TEXT> <ITEM_LIST> <ITEM> <KEY>ID</KEY> <VALUE>43400</VALUE> </ITEM> </ITEM_LIST> </RESPONSE></SIMPLE_RETURN>
Parameter Description
action=remove_asset_group_ids
(Required)
id={value} Policy ID for the policy you want to update.
asset_group_ids={value}
Asset groups IDs for the asset groups you want to delete from the policy specified in “id”. Multiple IDs are comma separated.
evaluate_now={0|1} (Optional) Specify evaluate_now=1 to immediately evaluate the policy against assigned assets, and select the Evaluate Now check box in the UI Policy Editor. When this check box is selected we’ll start policy evaluation each time you save changes to the policy from the UI or API.
486

Chapter 13 - ComplianceCompliance Policy - Manage Asset Groups
Set asset group IDs for policy
Use this action to reset the asset groups for a specified policy. Any assigned asset groups not specified in this request will be removed.
API request:
curl -H "X-Requested-With: curl" -u "USERNAME:PASSWD" -X POST -d "id=43400&asset_group_ids=649737,649736" "https://qualysapi.qualys.com//api/2.0/fo/compliance/policy/?action=set_asset_group_ids"
XML output:
<?xml version="1.0" encoding="UTF-8" ?><!DOCTYPE SIMPLE_RETURN SYSTEM "https://qualysapi.qualys.com/api/2.0/simple_return.dtd"><SIMPLE_RETURN> <RESPONSE> <DATETIME>2014-09-11T09:07:43Z</DATETIME> <TEXT>Compliance Policy successfully modified.</TEXT> <ITEM_LIST> <ITEM> <KEY>ID</KEY> <VALUE>43400</VALUE> </ITEM> </ITEM_LIST> </RESPONSE></SIMPLE_RETURN>
Parameter Description
action=set_asset_group_ids (Required)
id={value} Policy ID for the policy you want to update.
asset_group_ids={value} Asset groups IDs for the asset groups you want to assign to the policy specified in “id”. Multiple IDs are comma separated. Each asset group must have at least 1 assigned IP address.
evaluate_now={0|1} (Optional) Specify evaluate_now=1 to immediately evaluate the policy against assigned assets, and select the Evaluate Now check box in the UI Policy Editor. When this check box is selected we’ll start policy evaluation each time you save changes to the policy from the UI or API.
487

Chapter 13 - ComplianceCompliance Posture Information
Compliance Posture Information/api/2.0/fo/compliance/posture/info/?action=list
[GET] [POST]
View current compliance posture data (info records) for hosts within the user’s account. Each compliance posture info record includes a compliance posture ID and other attributes. Optional input parameters support filtering the posture info record output.
Each compliance posture info record in the output includes:
The user has the ability to select the amount of information to include in the posture information output. By default, basic posture information is included: the posture ID, host ID, control ID, technology ID, technology instance (when applicable), and the compliance status. If an exception has been created, this full exception information is also included: the exception assignee and status, the date/time when the exception was created, when it was last modified, the user who took these actions on the exception, and the date when the exception is set to expire. A glossary of compliance posture information identifies: basic host information and basic control information.
Use the details input parameter to select another level of detail to be included in the policy information output.
By default, the posture information output shows posture information for all hosts (IP addresses) in asset groups assigned to the selected policy, provided the user has permission to view the hosts themselves. If you have a sub-account like a Unit Manager, Scanner or Reader, the posture information output only includes hosts that the your account has permission to see. Optional input parameters allow you to set filters to restrict the posture information output to postures info records with certain IP addresses, host IDs, compliance control IDs, compliance posture IDs, posture info records with changes in status since a specified date, and posture info records with a certain compliance status (Passed, Failed or Error).
Output Description
Compliance Posture ID The service assigns a unique value to each compliance posture info record.
Host ID Identifies a host.
Control ID Identifies a technical control.
Technology ID Identifies a technology.
Instance Identifies a technology instance, when applicable.
Compliance Status Passed, Failed or Error. An error, only assigned to a custom control, indicates control evaluation failed (and the ignore errors configuration option for the control was not selected).
Exception Identifies an exception assignee and status, if an exception has been created.
488

Chapter 13 - ComplianceCompliance Posture Information
The optional glossary in the compliance posture information output includes:
Maximum Postures per API Request
The output of the Compliance Posture Info API is paginated when your API request identifies a single policy to report on using the “policy_id” input parameter. In this case, a maximum of 5,000 posture info records are returned per request by default. You can customize the page size (i.e. the number of posture info records) by using the parameter “truncation_limit=10000” for instance if you want to return pages with 10,000 records.
Permissions
All users have permission view posture information for hosts (IP addresses) in asset groups assigned to the selected policy, when the hosts are available to the user based on user account settings.
Output Description
User List List of users who created, modified, or added comments to exceptions in compliance posture info records which are included in the posture information output. For a policy that was edited, the user who most recently edited the exception is listed.
Host List List of hosts in compliance posture info records which are included in the posture information output. This basic host information is included: host ID, IP address, and tracking method. When details=All is specified, this additional information is included: last vulnerability scan date/time, last compliance scan date/time.
Control List List of controls in compliance posture info records which are included in the posture information output. When details=All is specified, this additional information is included: rationale information and technology information for each control.
Technology List List of technologies for controls in compliance posture info records which are included in the posture list output. This information is included only when details=All is specified.
Evidence List List of evidence information for control data points.
User Role Permissions
Manager View compliance postures for all hosts (IP addresses) in asset groups assigned to the selected policy.
Auditor View compliance postures for all hosts (IP addresses) in asset groups assigned to the selected policy.
Unit Manager View compliance postures for all hosts (IP addresses) in asset groups assigned to the selected policy, when the hosts are included in the user’s business unit.
489

Chapter 13 - ComplianceCompliance Posture Information
User Permissions: Asset Group IPsAll users have permission to view posture information for all hosts (IP addresses) in the asset groups assigned to the selected policy provided they have permission to view the hosts themselves. This permission is granted even when users do not have permission to view the asset groups assigned to the policy.
For example, when a user makes a request for compliance posture information for “Policy A” and this policy has one assigned asset group “Hong Kong”, and the user does not have permission to view this asset group, then the user does have permission to view compliance posture info records for all the IP addresses in the asset group “Hong Kong” provided the IP addresses in the group “Hong Kong” are visible to the user.
Input Parameters
Scanner View compliance postures for all hosts (IP addresses) in asset groups assigned to the selected policy, when the hosts are included in the user’s account.
Reader View compliance postures for all hosts (IP addresses) in asset groups assigned to the selected policy, when the hosts are included in the user’s account.
Parameter Description
action=list (Required)
policy_id={value} (policy_id or policy_ids is required) Show compliance posture info records for a specified policy. A valid policy ID is required.
The parameters policy_id and policy_ids cannot be specified in the same request.
policy_ids={value} (policy_id or policy_ids is required) Show compliance posture info records for multiple policies - up to 10 policies may be requested. Provide a comma-separated list of valid policy IDs. When this parameter is specified, all posture data is downloaded (and the “truncation_limit” parameter is invalid).
The parameters policy_id and policy_ids cannot be specified in the same request. When policy_ids is specified, truncation_limit is invalid. For CSV output, policy_id must be specified (and policy_ids is invalid).
echo_request={0|1} (Optional) Show (echo) the request’s input parameters (names and values) in the XML output. When not specified, parameters are not included in the XML output. Specify 1 to view parameters in the XML output.
output_format={value} (Optional) The output format. A valid value is: xml (default), csv (posture data and metadata i.e. summary and warning data), csv_no_metadata (posture data only, no metadata). For CSV output you can include only one policy for this reason policy_id is required.
User Role Permissions
490

Chapter 13 - ComplianceCompliance Posture Information
details={Basic|All|None|Light}
(Optional) Show a certain amount of information for each compliance posture info record. A valid value is:None - show posture info and minimum exception information (assignee and status) if appropriateBasic (default) - show posture info, full exception information if appropriate, and a minimum glossary (basic info for hosts and controls)Light - show posture info, exception info if appropriate, and a limited glossary (host info and last scan date/time, control ID, and evidence infoAll - show posture info (including the percentage of controls that passed for each host), exception info if appropriate, posture summary (the number of assets, controls, and control instances evaluated) and a glossary (host info and last scan date/time), control info, technology info, evidence info
include_dp_name={value} (Optional) Show the name and ID for each data point in the XML output. This is useful for uniquely identifying data points.
show_remediation_info={0|1} (Optional) Set to 1 to show remediation information in the XML or CSV output. By default, the output does not include the remediation information. When not specified, the remediation information is not included in the output.
cause_of_failure={0|1} (Optional) Set flag to 1 to display the cause of failure of Directory Integrity Monitoring UDCs (user defined controls). When set to 0 or unspecified, cause of failure is not displayed for these UCDs. When set to 1 and Directory Integrity Monitoring UDC control failed assessment, cause of failure info is shown in XML response, i.e. added, removed directories, directories where content changed, permissions changed etc.
truncation_limit={value} (Optional) The parameter is valid only when the API request is for a single policy and the policy_id parameter is specified.
By default, a limit of 5,000 posture info records are returned per request (when “policy_id” is specified). You may specify a value less than the default (1-4999) or greater than the default (5001-1000000) to configure the number records returned per request.
If the requested list identifies more records than the truncation limit, then the XML output includes the <WARNING> element and the URL for making another request for the next batch of records.
You can specify truncation_limit=0 for no truncation limit. This means that the output is not paginated and all the records are returned in a single output. WARNING: This can generate very large output and processing large XML files can consume a lot of resources on the client side. In this case it is recommended to use the pagination logic and parallel processing. The previous page can be processed while the next page is being downloaded.
Parameter Description
491

Chapter 13 - ComplianceCompliance Posture Information
ips={value} (Optional) Show only compliance posture info records for compliance hosts which have certain IP addresses/ranges. One or more IP addresses/ranges may be specified. Multiple IPs/ranges are comma separated.
host_ids={value} (Optional) Show only compliance posture info records for compliance hosts which have certain host IDs and/or ID ranges. One or more host IDs/ranges may be specified. Multiple entries are comma separated. A host ID range entry is specified with a hyphen (for example, 123-125). Valid host IDs are required.
control_ids={value} (Optional) Show only compliance posture info records for controls which have certain control IDs and/or ranges. One or more control IDs/ranges may be specified. Multiple entries are comma separated. An control ID range entry is specified with a hyphen (for example, 1200-1300). Valid control IDs are required.
ids={value} (Optional) Show only compliance posture info records for certain compliance posture IDs and/or ID ranges. One or more posture IDs/ranges may be specified. Multiple entries are comma separated. A posture ID range entry is specified with a hyphen (for example, 1-10). Valid posture IDs are required.
id_min={value} (Optional) Show only compliance posture info records which have a minimum ID value. A valid posture ID is required.
id_max={value} (Optional) Show only compliance posture info records which have a maximum ID value. A valid posture ID is required.
status_changes_since={date}
(Optional) Show compliance posture info records when the compliance status was changed since a certain date and time (optional). If the policy itself was changed, a warning message is generated.
The date/time is specified in YYYY-MM-DD[THH:MM:SSZ] format (UTC/GMT), like “2008-05-01” or “2008-05-01T23:12:00Z”.
asset_group_ids={value} (Optional) Show only hosts in certain asset groups. Provide a comma-separated list of asset group IDs for the asset groups you want to download compliance posture data for. The asset groups specified do not need to be assigned to the one or more policies requested. Posture data will be returned as long as there are common hosts specified by “asset_group_ids” and asset groups that are assigned to the policies requested.
status={Passed|Failed|Error} (Optional) Show only compliance posture info records which have a posture status of Passed, Failed or Error. By default, records with the status Passed, Failed and Error are listed.
criticality_labels={value} (Optional) Show only compliance posture info records for controls which have certain criticality labels. One or more criticality labels (e.g. SERIOUS, CRITICAL, URGENT) may be specified. Multiple entries are comma separated.
The parameters criticality_labels and criticality_values cannot be specified in the same request.
Parameter Description
492

Chapter 13 - ComplianceCompliance Posture Information
DTD<platform API server>/api/2.0/fo/compliance/posture/info/posture_info_list_output.dtd
Sample - Compliance Posture Info
Sample API request to uniquely identify Data Points using Name and ID.
API request:
curl -H "X-Requested-With: Curl" -u "USERNAME:PASSWORD" -d headers.15 'https://qualysapi.qualys.com/api/2.0/fo/compliance/posture/info/?action=list&policy_id=15472&details=All&include_dp_name=1'
XML Response:
... <DPD_LIST> <DPD> <LABEL>:dp_1</LABEL> <ID>136</ID> <NAME><![CDATA[secman.system.clearpageonshut]]></NAME> <DESC><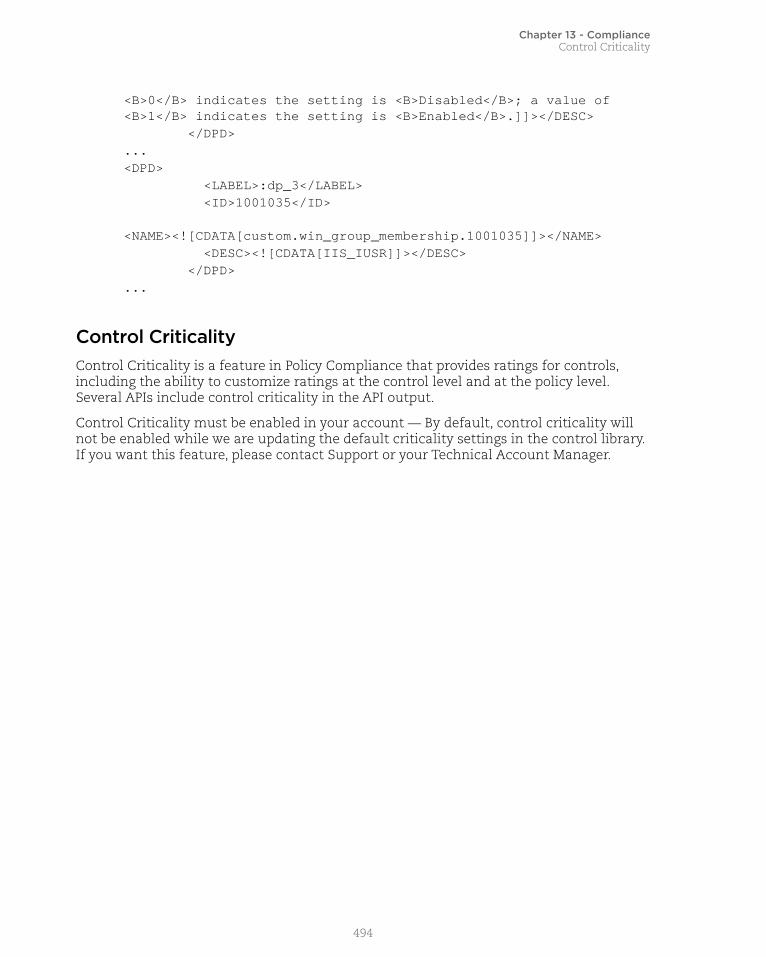
Chapter 13 - ComplianceControl Criticality
<B>0</B> indicates the setting is <B>Disabled</B>; a value of <B>1</B> indicates the setting is <B>Enabled</B>.]]></DESC> </DPD>...<DPD> <LABEL>:dp_3</LABEL> <ID>1001035</ID> <NAME><![CDATA[custom.win_group_membership.1001035]]></NAME> <DESC><![CDATA[IIS_IUSR]]></DESC> </DPD>...
Control CriticalityControl Criticality is a feature in Policy Compliance that provides ratings for controls, including the ability to customize ratings at the control level and at the policy level. Several APIs include control criticality in the API output.
Control Criticality must be enabled in your account — By default, control criticality will not be enabled while we are updating the default criticality settings in the control library. If you want this feature, please contact Support or your Technical Account Manager.
494

Chapter 13 - ComplianceExceptions
Exceptions/api/2.0/fo/compliance/exception/
[GET] [POST]
List, request, update and delete exceptions in your account. Supported method differs per request type, i.e. list, create etc).
The Exception API is only available if you have Policy Compliance (PC) module enabled for your subscription. Non Manager users must be granted this permission in their account settings.
Permissions -
User Permissions
.
.
List exceptions
By default, all exceptions in the user’s account are listed. Use the optional parameters to filter the list output.
User Role Permissions
Manager List, request, update, delete exceptions for all hosts in subscription.
Auditor List, request, update, delete exceptions for all hosts in subscription.
Unit Manager List, request, update, delete exceptions for hosts in their assigned business unit.
Scanner, Reader List, request, update exceptions for hosts in their account. Updates are limited to adding comments.
Parameter Description
action=list (Required)
exception_number={value} (Optional) Show a specific exception by specifying a valid exception number.
ip={value} (Optional) Show exceptions associated with a specific host by specifying a host IP address. You may enter individual IP address that belong to the Policy Compliance module.
network_name={value} (Optional) Show exceptions for a particular network by specifying the network name.
status={value} (Optional) Show exceptions with specified status value: pending, approved, rejected or expired. Tell me about exception status
495

Chapter 13 - ComplianceExceptions
control_id={value} (Optional) Show exceptions for a specific control by specifying valid control ID. If the value is set to 23, the matching control IDs may include 23, 234, 2343, 233.
control_statement={value} (Optional) Show exceptions for certain controls associated with a certain policy by specifying control statement. Partial control statement is also valid.
policy_id={value} (Optional) Show exceptions for controls associated with a certain policy by specifying a valid policy ID.
technology_name={value} (Optional) Show exceptions for controls with a certain technology by specifying the technology name.
assignee_id={value} (Optional) Show exceptions with a certain assignee by specifying an assignee’ user ID.
created_by={value} (Optional) Show exceptions that were created by a particular user by specifying the user ID.
modified_by={value} (Optional) Show exceptions that were modified by a particular user by specifying the user ID.
details={Basic|All|None} (Optional) Show the requested amount of information for each control. A valid value is: None - Only exception numbers.Basic (default) - All details except comments history.All - All details including comments history.
is_active={0|1} (Optional). Show only exceptions that are active or inactivein the output. Specify 1 to show only active exceptions.Specify 0 to show only inactive exceptions. When unspecified, both active and inactive exceptions are shown.
created_after_date={mm/dd/yyyy}
(Optional) Show exceptions created (requested) after the specified date. The valid date format is mm/dd/yyyy.
updated_after_date={mm/dd/yyyy}
(Optional) Show exceptions that were updated after the specified date. The valid date format is mm/dd/yyyy.
expired_before_date={mm/dd/yyyy}
(Optional) Show exceptions that will expire before the specified date. The valid date format is mm/dd/yyyy.
expired_after_date={mm/dd/yyyy}
(Optional) Show exceptions that will expire after the specified date. The valid date format is mm/dd/yyyy.
exception_numbers={value} (Optional) Show a specific exception by specifying a valid exception number. Multiple entries are comma separated. An exception number range is specified with a hyphen (for example, 289-292).
exception_number_min={value}
(Optional) Show only exceptions that have a exception number greater than or equal to the specified value.
Parameter Description
496

Chapter 13 - ComplianceExceptions
Tell me about exception statusPending - An exception is in a Pending state when first requested by a user. Also, if a previously accepted or rejected exception is reopened, then it goes back to Pending.
Approved - An exception is in an Approved state when it is reviewed and accepted by an authorized user. You would accept an exception if it's determined that the host should be exempt from the specified control. As long as the host is exempt for the control, a status of PassedE appears in compliance reports. The status changes back to Failed when the exception expires.
Rejected - An exception is in a Rejected state when it is reviewed and rejected by an authorized user. You would reject an exception if it's determined that the host should not be exempt from the specified control. When an exception is rejected, a status of Failed continues to appear for the host/control in compliance reports.
Expired - An exception is in an Expired state when the exception was previously accepted but the time limit has been reached. When an exception is expired, a status of Failed appears again for the host/control in compliance reports.
Sample - List exceptions with failed status
API request:
curl -s -k -u "USERNAME:PASSWORD" -H "X-Requested-With: Curl demo 2" -D headers.15 "https://qualysapi.qualys.com/api/2.0/fo/compliance/posture/info/?action=list&policy_id=1174&status=Failed"
XML response:
<?xml version="1.0" encoding="UTF-8" ?>"https://qualysapi.qualys.com/api/2.0/fo/compliance/posture/info/posture_info_list_output.dtd"> ... <INFO> <ID>1174</ID> <HOST_ID>563352</HOST_ID> <CONTROL_ID>1072</CONTROL_ID> <TECHNOLOGY_ID>2</TECHNOLOGY_ID> <INSTANCE></INSTANCE> <STATUS>Failed</STATUS> <POSTURE_MODIFIED_DATE>2015-09
exception_number_max={value}
(Optional) Show only exceptions that have exception number less than or equal to the specified value.
truncation_limit={value} (Optional) Specify the maximum number of exceptions to be listed per request. When not specified, the truncation limit is set to 1000 records. You may specify a value less than the default (1-999) or greater than the default (1001-1000000).
Parameter Description
497

Chapter 13 - ComplianceExceptions
-02T08:16:33Z</POSTURE_MODIFIED_DATE> </INFO> ...
Sample - List exception number, show all detailsAPI request:
curl -s -k -u "USERNAME:PASSWORD" -H "X-Requested-With: curl demo 2" -D headers.15 "https://qualysapi.qualys.com/api/2.0/fo/compliance/exception/?action=list&exception_number=58&details=All"
XML response:
<?xml version="1.0" encoding="UTF-8" ?>"https://qualysapi.qualys.com/api/2.0/fo/compliance/exception/exception_list_output.dtd"><EXCEPTION_LIST_OUTPUT> <RESPONSE> <DATETIME>2017-01-15T11:26:34Z</DATETIME> <EXCEPTION_LIST> <EXCEPTION> <EXCEPTION_NUMBER>58</EXCEPTION_NUMBER> <HOST> <IP_ADDRESS>10.10.30.159</IP_ADDRESS> </HOST> <TECHNOLOGY> <ID>11</ID> <NAME><![CDATA[Red Hat Enterprise Linux 5.x]]></NAME> </TECHNOLOGY> <POLICY> <ID>789422824</ID> <NAME><![CDATA[RHEL 5.x]]></NAME> </POLICY> <CONTROL> <CID>1073</CID> <STATEMENT><![CDATA[Status of the 'Maximum Password Age' setting (expiration) / Accounts having the 'password never expires' flag set]]></STATEMENT> <CRITICALITY> <VALUE>5</VALUE> <LABEL><![CDATA[URGENT]]></LABEL> </CRITICALITY> </CONTROL>
498

Chapter 13 - ComplianceExceptions
<ASSIGNEE><![CDATA[Scanner User]]></ASSIGNEE> <STATUS>Rejected</STATUS> <ACTIVE>1</ACTIVE> <REOPEN_ON_EVIDENCE_CHANGE>0</REOPEN_ON_EVIDENCE_CHANGE> <EXPIRATION_DATE>N/A</EXPIRATION_DATE> <MODIFIED_DATE>2017-01-15T08:53:19Z</MODIFIED_DATE> <HISTORY_LIST> <HISTORY> <USER><![CDATA[John (mnc_su)]]></USER> <COMMENT><![CDATA[test]]></COMMENT> <INSERTION_DATE>2017-01-05T06:48:13Z</INSERTION_DATE> </HISTORY> <HISTORY> <USER><![CDATA[Bill (mnc_ru)]]></USER> <COMMENT><![CDATA[test]]></COMMENT> <INSERTION_DATE>2017-01-15T08:48:38Z</INSERTION_DATE> </HISTORY> <HISTORY> <USER><![CDATA[Mark (mnc_au)]]></USER> <COMMENT><![CDATA[test]]></COMMENT> <INSERTION_DATE>2017-01-15T08:53:19Z</INSERTION_DATE> </HISTORY> </HISTORY_LIST> </EXCEPTION>...
DTD<platform API server>/api/2.0/fo/compliance/exception/exception_list_output.dtd
499
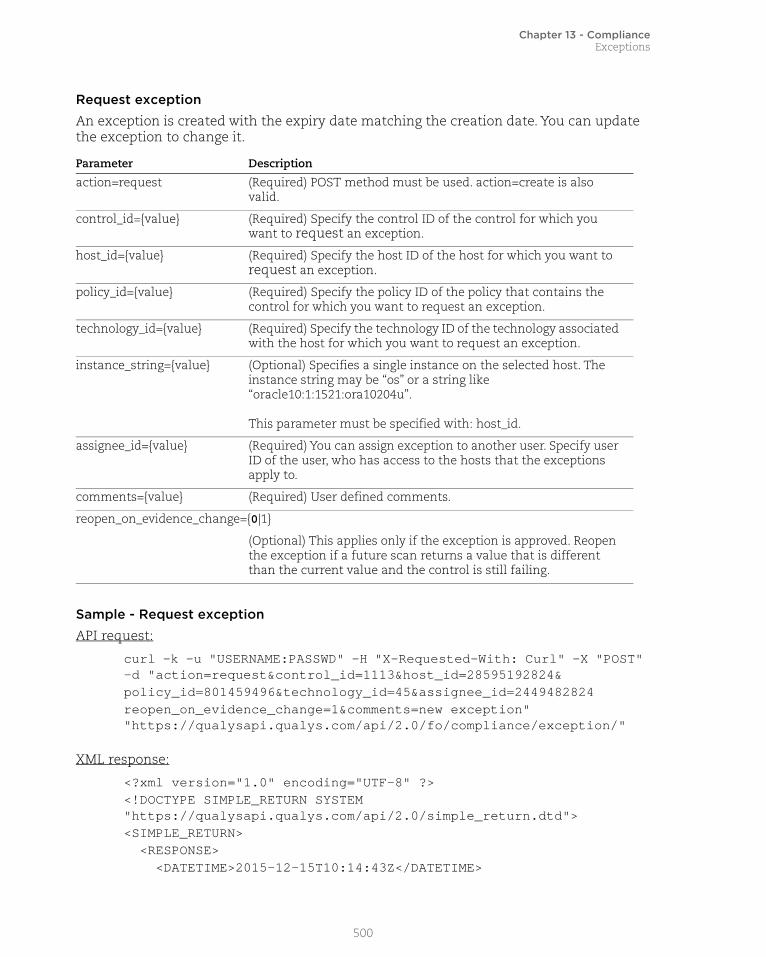
Chapter 13 - ComplianceExceptions
Request exception
An exception is created with the expiry date matching the creation date. You can update the exception to change it.
Sample - Request exception
API request:
curl -k -u "USERNAME:PASSWD" -H "X-Requested-With: Curl" -X "POST" -d "action=request&control_id=1113&host_id=28595192824&policy_id=801459496&technology_id=45&assignee_id=2449482824reopen_on_evidence_change=1&comments=new exception" "https://qualysapi.qualys.com/api/2.0/fo/compliance/exception/"
XML response:
<?xml version="1.0" encoding="UTF-8" ?><!DOCTYPE SIMPLE_RETURN SYSTEM "https://qualysapi.qualys.com/api/2.0/simple_return.dtd"><SIMPLE_RETURN> <RESPONSE> <DATETIME>2015-12-15T10:14:43Z</DATETIME>
Parameter Description
action=request (Required) POST method must be used. action=create is also valid.
control_id={value} (Required) Specify the control ID of the control for which you want to request an exception.
host_id={value} (Required) Specify the host ID of the host for which you want to request an exception.
policy_id={value} (Required) Specify the policy ID of the policy that contains the control for which you want to request an exception.
technology_id={value} (Required) Specify the technology ID of the technology associated with the host for which you want to request an exception.
instance_string={value} (Optional) Specifies a single instance on the selected host. The instance string may be “os” or a string like “oracle10:1:1521:ora10204u”.
This parameter must be specified with: host_id.
assignee_id={value} (Required) You can assign exception to another user. Specify user ID of the user, who has access to the hosts that the exceptions apply to.
comments={value} (Required) User defined comments.
reopen_on_evidence_change={0|1}
(Optional) This applies only if the exception is approved. Reopen the exception if a future scan returns a value that is different than the current value and the control is still failing.
500

Chapter 13 - ComplianceExceptions
<TEXT>Exception created successfully</TEXT> <ITEM_LIST> <ITEM> <KEY>EXCEPTION_NUMBER</KEY> <VALUE>15</VALUE> </ITEM> </ITEM_LIST> </RESPONSE></SIMPLE_RETURN>
DTD<platform API server>/api/2.0/fo/compliance/exception/
Update exceptions
You can make changes to one or more exceptions on your hosts. All the actions you take are logged in the exception history with your name and a time stamp for when the action took place.
Parameter Description
action=update (Required) POST method must be used.
exception_numbers={value} (Required) Show a specific exception by specifying a valid exception number. Multiple entries are comma separated. An exception number range is specified with a hyphen (for example, 50-55).
comments={value} (Required) User defined comments. Your comments are saved in the exception history.
reassign_to={value} (Optional) You can reassign exceptions to another user. Specify user ID of the user, who has access to the hosts that the exceptions apply to.
reopen_on_evidence_change={0|1}
(Optional) This applies only if the exception is approved. Reopen the exception if a future scan returns a value different than the current value and the control is still failing.
status={Pending|Approved|Rejected}
(Optional) Update the status of the exception request. A valid value is: Pending, Approved, and Rejected. Tell me about exception status.
end_date={mm/dd/yyyy} (Optional) Set the end date by entering a future date in mm/dd/yyyy format. For a never ending exception, set the expiry date to 0.
The end date is only relevant to Approved exceptions.
501

Chapter 13 - ComplianceExceptions
Sample - Update exception
API request:
curl -u "USERNAME:PASSWD" -H "X-Requested-With: Curl" -X "POST" -d "action=update&exception_numbers=55&status=Approved&end_date=12/16/2015&comments=status change" "https://qualysapi.qualys.com/api/2.0/fo/compliance/exception/"
XML response:
<?xml version="1.0" encoding="UTF-8" ?><!DOCTYPE BATCH_RETURN SYSTEM "https://qualysapi.qualys.com/api/2.0/fo/compliance/exception/exception_batch_return.dtd"><BATCH_RETURN> <RESPONSE> <DATETIME>2018-01-07T11:24:42Z</DATETIME> <BATCH_LIST> <BATCH> <TEXT>Successfully Updated</TEXT> <NUMBER_SET> <NUMBER>55</NUMBER> </NUMBER_SET> </BATCH> </BATCH_LIST> </RESPONSE></BATCH_RETURN>
DTD<platform API server>/api/2.0/fo/compliance/exception/exception_batch_return.dtd
Delete exceptions
Sample - Delete exceptionsAPI request:
curl -k -u "USERNAME:PASSWD" -H "X-Requested-With: Curl" -X "POST" -d "action=delete&exception_numbers=40-41" "https://qualyapi.qualys.com/api/2.0/fo/compliance/exception/"
Parameter Description
action=delete (Required) POST method must be used.
exception_numbers={value} (Required) Specify the exception number. Enter one or more exception numbers and/or ranges. Multiple entries are comma separated.
502

Chapter 13 - ComplianceExceptions
XML response:
<?xml version="1.0" encoding="UTF-8" ?><!DOCTYPE BATCH_RETURN SYSTEM "https://qualysapi.qualys.com/api/2.0/fo/compliance/exception/exception_batch_return.dtd"><BATCH_RETURN> <RESPONSE> <DATETIME>2018-01-07T11:22:20Z</DATETIME> <BATCH_LIST> <BATCH> <TEXT>Exception(s) deleted successfully</TEXT> <NUMBER_SET> <NUMBER_RANGE>40-41</NUMBER_RANGE> </NUMBER_SET> </BATCH> </BATCH_LIST> </RESPONSE></BATCH_RETURN>
DTD
<platform API server>/api/2.0/fo/compliance/exception/exception_batch_return.dtd
503

Chapter 13 - ComplianceSCAP Cyberscope Report
SCAP Cyberscope ReportUnder the Federal Information Security Management Act of 2002 (FISMA), government agencies are obliged to report on their information security statuses using a common tool called Cyberscope. Qualys customers with the SCAP module enabled can scan their network and generate Cyberscope compatible XML reports, using new API functions, to meet these requirements.
Qualys provides 3 different API functions for generating Cyberscope compatible XML reports as described below. The Cyberscope reports generated using these API functions return XML output in LASR format.
Cyberscope report specification and the LASR format:
http://scap.nist.gov/use-case/cyberscope
SCAP Scan Results
/api/2.0/fo/asset/host/cyberscope/fdcc/scan/
Create a Cyberscope report using scan results for a particular SCAP scan in the user’s account. An SCAP scan ID or scan reference is required as input. The service uses only the data in the raw scan results to generate the report. When the parameters organisation_name1, organisation_name2, and organisation_name3 are specified, the <ai:Organization> elements are included in the XML report.
Permissions: Users have permission to run this API function when the SCAP module is enabled for the user's subscription. Sub-accounts (Unit Managers, Scanners and Readers) must have the "Manage compliance" permission.
Sample 1 - Select SCAP Scan by Scan ID
Use the scan_id parameter to select an SCAP scan by scan ID. (A scan ID or reference number is required.)
curl -u "USERNAME:PASSWORD" -H "X-Requested-With: Curl" "https://qualysapi.qualys.com/api/2.0/fo/asset/host/cyberscope/fdcc/scan/?scan_id=4244823&organisation_name1=Name1&organisation_name2=Name2&organisation_name3=Name3"
To obtain the SCAP scan ID, log into the Qualys application and go to PC/SCAP > Scans > SCAP Scans to view the SCAP scans in your account. Hover over the SCAP scan that you’re interested in and view the scan results (select View from the Quck Actions menu). You’ll see the scan results URL in your browser and the scan ID value appears in the "id" parameter, as shown in this sample URL:
https://qualyguard.qualys.com/fo/report/fdcc/fdcc_scan_result.php?id=4297720
Sample 2 - Select SCAP Scan by Scan Reference
Use the scan_ref parameter to select an SCAP scan by scan reference number. (A scan reference number or scan ID is required.)
504

Chapter 13 - ComplianceSCAP Cyberscope Report
curl -u "USERNAME:PASSWORD" -H "X-Requested-With: Curl" "https://qualysapi.qualys.com/api/2.0/fo/asset/host/cyberscope/fdcc/scan/?scan_ref=qscap/1337984725.4360&organisation_name1=Name1&organisation_name2=Name2&organisation_name3=Name3"
Sample 3 - IPs Filter
Use the optional ips parameter to include only certain IP addresses in the report. You can enter a single IP, multiple IPs and/or IP ranges. Multiple entries are comma separated.
curl -u "USERNAME:PASSWORD" -H "X-Requested-With: Curl" "https://qualysapi.qualys.com/api/2.0/fo/asset/host/cyberscope/fdcc/scan/?scan_id=4268027&ips=10.10.26.183&organisation_name1=Name1&organisation_name2=Name2&organisation_name3=Name3"
SCAP Policy Results/api/2.0/fo/asset/host/cyberscope/fdcc/policy/
Create a Cyberscope report using scan results data saved for a particular SCAP policy in the user’s account. A policy ID is required as input. These parameters allow users to customize the required “OrganisationName” elements in the XML report: organisation_name1, organisation_name2, and organisation_name3.
The service uses automatic SCAP policy data for a selected policy and reports this in the datapoint <sr:DataPoint id:"configuration_management_agency_deviations">. The services uses the evidence data for the special rule "security_patches_up_to_date" and reports this in the datapoint <sr:DataPoint id:"vulnerability_management_product_vulnerabilities">.
Permissions: Users have permission to run this API function when the SCAP module is enabled for the user's subscription and sub-accounts (Unit Managers, Scanners and Readers) have the "Manage compliance" permission.
Sample 1 - Select an SCAP Policy
Use the policy_id parameter to select an SCAP policy. Hosts in the policy will be included in the report unless filters are specified using the parameter ips and/or as_ids.
curl -u "USERNAME:PASSWORD" -H "X-Requested-With: Curl" "https://qualysapi.qualys.com/api/2.0/fo/asset/host/cyberscope/fdcc/policy/?policy_id=30231&organisation_name1=Name1&organisation_name2=Name2&organisation_name3=Name3"
To obtain the SCAP policy ID, log into the Qualys application and go to PC/SCAP > Policies to view the policies in your account. Hover over the SCAP policy that you’re interested in and edit it (select Edit from the Quck Actions menu). You’ll see the policy editor URL in your browser and the policy ID value appears in the "id" parameter, as shown in this sample URL:
505

Chapter 13 - ComplianceSCAP Cyberscope Report
https://qualyguard.qualys.com/fo/fdcc/edit_policy.php?id=12345&refresh_parent=1
Sample 2 - IPs Filter
Use the ips parameter to include only hosts with the specified IP addresses. Enter a single IP, multiple IPs and/or IP ranges using the ips parameter. Multiple entries are comma separated.
curl -u "USERNAME:PASSWORD" -H "X-Requested-With: Curl" "https://qualysapi.qualys.com/api/2.0/fo/asset/host/cyberscope/fdcc/policy/?policy_id=17012&ips=10.10.24.10&organisation_name1=Name1&organisation_name2=Name2&organisation_name3=Name3"
Sample 3 - Asset Groups Filter
Use the as_ids parameter to include only hosts in the specified asset groups. Multiple asset group IDs are comma separated.
curl -u "USERNAME:PASSWORD" -H "X-Requested-With: Curl" "https://qualysapi.qualys.com/api/2.0/fo/asset/host/cyberscope/fdcc/policy/?policy_id=17012&ag_ids=397405&ips=10.10.25.70&organisation_name1=Name1&organisation_name2=Name2&organisation_name3=Name3"
SCAP Global Results
/api/2.0/fo/asset/host/cyberscope/
Create a Cyberscope report using the SCAP scan data saved for all the SCAP policies in the subscription and also the automatic VM scan data saved in the subscription. You must enter IPs/ranges and/or asset group IDs as input. These parameters allow users to customize the required “OrganisationName” elements in the XML report: organisation_name1, organisation_name2, and organisation_name3.
The service uses SCAP scan data for all the SCAP policies in the subscription and reports this in the datapoint <sr:DataPoint id:"configuration_management_agency_deviations">. This datapoint will include multiple Benchmark Data sections, one for each policy. Also the service uses the automatic VM data for applicable IPs (IPs in SCAP policies) and reports this in the datapoint <sr:DataPoint id:"vulnerability_management_product_vulnerabilities">.
Permissions: Users have permission to run this API function when the SCAP module is enabled for the user's subscription. Sub-accounts (Unit Managers, Scanners, and Readers) will view only data for IP addresses that their accounts have access to.
Sample 1 - Select Hosts by IP
Use the ips parameter to select hosts by IP/range. You can enter a single IP, multiple IPs and/or IP ranges using the ips parameter. Multiple entries are comma separated. (This parameter and/or ag_ids is required.)
506

Chapter 13 - ComplianceSCAP Cyberscope Report
curl -u "USERNAME:PASSWORD" -H "X-Requested-With: Curl" "https://qualysapi.qualys.com/api/2.0/fo/asset/host/cyberscope/?ips=10.10.24.52&organisation_name1=Name1&organisation_name2=Name2&organisation_name3=Name3"
Sample 2 - Select Hosts by Asset Group
Use the as_ids parameter to select hosts by asset group ID. You can enter one or more asset group IDs. Multiple IDs are comma separated. (This parameter and/or ips is required.)
curl -u "USERNAME:PASSWORD" -H "X-Requested-With: Curl" "https://qualysapi.qualys.com/api/2.0/fo/asset/host/cyberscope/?ag_ids=503424&organisation_name1=Name1&organisation_name2=Name2&organisation_name3=Name3"
It’s possible to select hosts by entering a combination of IPs/ranges and asset group IDs.
curl -u "USERNAME:PASSWORD" -H "X-Requested-With: Curl" "https://qualysapi.qualys.com/api/2.0/fo/asset/host/cyberscope/?ips=10.10.24.52,10.10.25.2-10.10.25.255&ag_ids=503424,503430&organisation_name1=Name1&organisation_name2=Name2&organisation_name3=Name3"
507

Chapter 13 - ComplianceSCAP ARF Report
SCAP ARF Report/api/2.0/fo/compliance/scap/arf/
Create a SCAP scan report in Asset Reporting Format (ARF), a requirement in the SCAP 1.2 Specifications from NIST.
Permissions - Users have permission to run this API function when the SCAP module is enabled for the user's subscription. Sub-accounts (Unit Managers, Scanners and Readers) must have the "Manage compliance" permission.
Input parameters:
How do I find the scan ID? You’ll see the scan ID in the Qualys user interface, when viewing SCAP scan results. In the scan results window’s title bar you’ll see the report URL with its ID number in the “id” parameter, like this: https:///qualyguard.qualys.com/fo/report/fdcc/fdcc_scan_result.php?id=3362251
API Request:
curl -u "USERNAME:PASSWORD" -H "X-Requested-With: Curl" -X POST -d "scan_id=3362251&ips=10.10.10.1-10.10.10.10" "https://qualysapi.qualys.com/api/2.0/fo/compliance/scap/arf/"
XML Output:
The XML output is compliant with the ARF 1.1 Schema. Show me this schema
Parameter Description
scan_id={value} (Required) The scan ID for a finished SCAP scan.
ips={value} (Optional) Use this parameter if you want to include only certain IP addresses in the report. You can enter a single IP, multiple IPs and/or ranges. Multiple entries are comma separated.
ips_network_id={value} (Optional and valid only when the Network Support feature is enabled and the policy has SCAP 1.2 content) Use this parameter to restrict the report’s target to the IPs specified in the “ips” parameter (“ips_network_id” is valid only when “ips” is specified in the same request).
508

Chapter 13 - ComplianceSCAP Policy List
SCAP Policy List /api/2.0/fo/compliance/fdcc_policy/?action=list
[GET] [POST]
View a list of SCAP policies visible to the user. Optional input parameters support filtering the policy list output.
Maximum Policies per API Request
A maximum of 1,000 SCAP policy records can be processed per request. If the requested list identifies more than 1,000 policies, then the XML output includes the <WARNING> element and instructions for making another request for the next batch of policy records.
Permissions
Input Parameters
User Role Permissions
Manager View all SCAP policies in subscription. View asset group information for all asset groups assigned to policies.
Auditor View all SCAP policies in subscription. View asset group information for all asset groups assigned to policies.
Unit Manager View all SCAP policies in subscription, when the “Manage compliance” permission is turned on in the user account settings. View asset group information for asset groups assigned to SCAP policies, when the user has permission to view these asset groups.
Scanner View all SCAP policies in subscription, when the “Manage compliance” permission is turned on in the user account settings.. View asset group information for asset groups assigned to SCAP policies, when the user has permission to view these asset groups.
Reader View all SCAP policies in subscription, when the “Manage compliance” permission is turned on in the user account settings.. View asset group information for asset groups assigned to SCAP policies, when the user has permission to view these asset groups.
Parameter Description
action=list (Required)
echo_request={0|1} (Optional) Show (echo) the request’s input parameters (names and values) in the XML output. When unspecified, parameters are not included in the XML output. Specify 1 to view parameters in the XML output.
509

Chapter 13 - ComplianceSCAP Policy List
DTD
<platform API server>/api/2.0/fo/compliance/fdcc_policy/fdcc_policy_list_output.dtd
Sample - SCAP Policy ListSample SCAP policy list output (fragment) with details=All is below.
<!DOCTYPE POLICY_LIST_OUTPUT SYSTEM "https://qualysapi.qualys.com/api/2.0/fo/compliance/fdcc_policy/fdcc_policy_list_output.dtd">
<FDCC_POLICY_LIST_OUTPUT> <RESPONSE> <DATETIME>2012-07-19T22:10:16Z</DATETIME> <FDCC_POLICY_LIST> <FDCC_POLICY> <ID>10235</ID> <TITLE><![CDATA[XP policy]]></TITLE> <DESCRIPTION><![CDATA[This benchmark has been created to assist IT professionals, in particular Windows XP system administrators and information security personnel, in effectively securing Windows XP Professional SP2 systems.]]></DESCRIPTION> <BENCHMARK><![CDATA[FDCC-Windows-XP]]></BENCHMARK> <BENCHMARK_PROFILE><![CDATA[federal_desktop_core_configuration_version_1.2.1.0]]></BENCHMARK_PROFILE> <BENCHMARK_STATUS_DATE>2009-04-08T00:00:00Z</BENCHMARK_STATUS_DATE> <VERSION><![CDATA[v1.2.1.0]]></VERSION> <TECHNOLOGY><![CDATA[Windows XP Desktop]]></TECHNOLOGY> <NIST_PROVIDED><![CDATA[No]]></NIST_PROVIDED>
details={Basic|All|None} (Optional) Show the requested amount of host information for each host. A valid value is: Basic - (default) Includes all SCAP policy details except the asset group list and SCAP file listAll - includes all SCAP policy detailsNone - includes SCAP policy ID and title
ids={value} (Optional) Show only certain SCAP policy IDs/ranges. One or more policy IDs/ranges may be specified. Valid host IDs are required. Multiple entries are comma separated. A policy ID range is specified with a hyphen (for example, 190-400).
id_min={value} (Optional) Show only SCAP policies which have a minimum SCAP policy ID value. A valid SCAP policy ID is required.
id_max={value} (Optional) Show only SCAP policies which have a maximum SCAP policy ID value. A valid SCAP policy ID is required.
Parameter Description
510
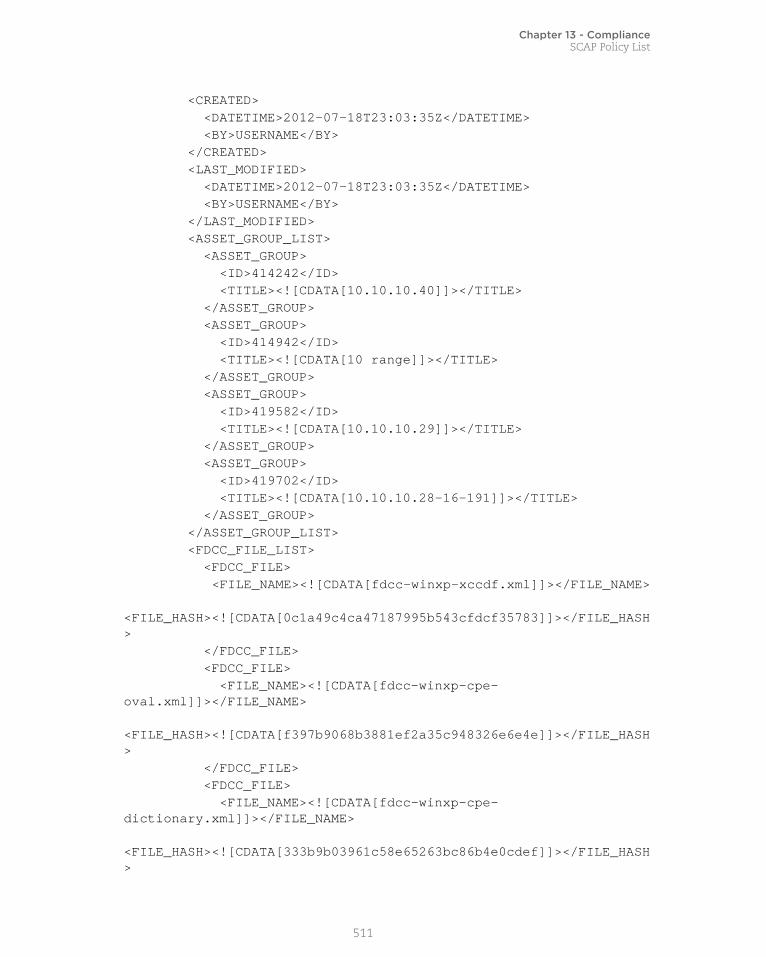
Chapter 13 - ComplianceSCAP Policy List
<CREATED> <DATETIME>2012-07-18T23:03:35Z</DATETIME> <BY>USERNAME</BY> </CREATED> <LAST_MODIFIED> <DATETIME>2012-07-18T23:03:35Z</DATETIME> <BY>USERNAME</BY> </LAST_MODIFIED> <ASSET_GROUP_LIST> <ASSET_GROUP> <ID>414242</ID> <TITLE><![CDATA[10.10.10.40]]></TITLE> </ASSET_GROUP> <ASSET_GROUP> <ID>414942</ID> <TITLE><![CDATA[10 range]]></TITLE> </ASSET_GROUP> <ASSET_GROUP> <ID>419582</ID> <TITLE><![CDATA[10.10.10.29]]></TITLE> </ASSET_GROUP> <ASSET_GROUP> <ID>419702</ID> <TITLE><![CDATA[10.10.10.28-16-191]]></TITLE> </ASSET_GROUP> </ASSET_GROUP_LIST> <FDCC_FILE_LIST> <FDCC_FILE> <FILE_NAME><![CDATA[fdcc-winxp-xccdf.xml]]></FILE_NAME> <FILE_HASH><![CDATA[0c1a49c4ca47187995b543cfdcf35783]]></FILE_HASH> </FDCC_FILE> <FDCC_FILE> <FILE_NAME><![CDATA[fdcc-winxp-cpe-oval.xml]]></FILE_NAME> <FILE_HASH><![CDATA[f397b9068b3881ef2a35c948326e6e4e]]></FILE_HASH> </FDCC_FILE> <FDCC_FILE> <FILE_NAME><![CDATA[fdcc-winxp-cpe-dictionary.xml]]></FILE_NAME> <FILE_HASH><![CDATA[333b9b03961c58e65263bc86b4e0cdef]]></FILE_HASH>
511
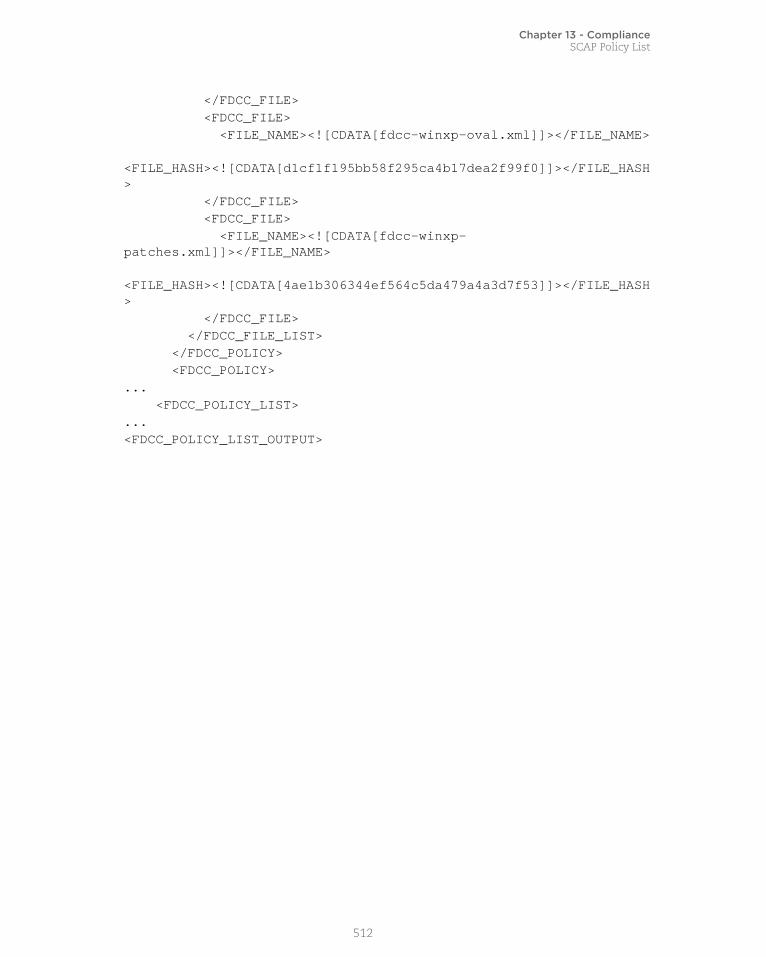
Chapter 13 - ComplianceSCAP Policy List
</FDCC_FILE> <FDCC_FILE> <FILE_NAME><![CDATA[fdcc-winxp-oval.xml]]></FILE_NAME> <FILE_HASH><![CDATA[d1cf1f195bb58f295ca4b17dea2f99f0]]></FILE_HASH> </FDCC_FILE> <FDCC_FILE> <FILE_NAME><![CDATA[fdcc-winxp-patches.xml]]></FILE_NAME> <FILE_HASH><![CDATA[4ae1b306344ef564c5da479a4a3d7f53]]></FILE_HASH> </FDCC_FILE> </FDCC_FILE_LIST> </FDCC_POLICY> <FDCC_POLICY>... <FDCC_POLICY_LIST>...<FDCC_POLICY_LIST_OUTPUT>
512
Chapter 14 - Users and Activity LogUser List
Chapter 14 - Users and Activity LogAdd, update, list and delete users in your subscription.
User List
Add/Edit User
User Registration Process
Accept Qualys EULA
Activate/Deactivate Users
User Password Change
Export User Activity Log
User List/msp/user_list.php
[GET] [POST]
View the users in the subscription. XML responses provides details about each user such as the user’s login ID, account info, assigned asset groups, permissions. Session based authentication is not supported using this API.
When the API request is made by a Manager or Unit Manager, the last login date for each user is provided in the XML results. This is the most recent date and time the user logged into the service. For a Manager, the last login date appears for all users in the subscription. For a Unit Manager, the last login date appears for all users in the Unit Manager’s same business unit.
Permissions - Managers and Administrators can view all users in subscription. See Unit Manager Permissions for full details.
Express Lite - This API is available to Express Lite users.
Unit Manager Permissions
Unit Managers can view full user account details for users in their business unit. Unit Managers may also be able to view partial user account details for users outside of their business unit. This is determined by a subscription level permission set by Managers in the user interface.
If “Restrict view of user information for users outside of business unit” is not selected (the default), then Unit Managers have an unrestricted view and can see partial details about users who are not in their assigned business unit.
513

Chapter 14 - Users and Activity LogUser List
If “Restrict view of user information for users outside of business unit” is selected, then Unit Managers have a restricted view and cannot see any details for users who are not in their assigned business unit. For example, Unit Managers in Business Unit A would not be able to view general information or asset group assignments for users in Business Unit B.
The following table describes the amount of detail visible to Unit Managers for different types of users based on whether the Unit Manager has a restricted or unrestricted view.
Full user account details include: user login, general information, assigned asset groups, user role, business unit, the Unit Manager Point of Contact (POC), the Manager POC, extended permissions, email notifications and user interface style.
With a Partial view, the following details are not visible: user login, extended permissions, email notifications and user interface style.
Input Parameters
DTD<platform API server>/user_list_output.dtd
Amount of Detail Visible
User Type Being Viewed Unrestricted View Restricted View
Unit Manager, Scanner or Reader in the business unit Full Full
Scanner or Reader not in the business unit Partial None
Unit Manager not in the business unit Partial None
Manager Partial None
Parameter Description
external_id_contains={string}
(Optional) Show only user accounts with an external ID value that contains a certain string. The string you specify can have a maximum of 256 characters. The characters can be in uppercase, lowercase or mixed case (the service performs case sensitive matching). HTML or PHP tags cannot be included.
Only one of these parameters may be specified for a single API request: external_id_contains or external_id_assigned.
external_id_assigned={0|1} (Optional) Specify 1 to show only user accounts which have an external ID value assigned. Specify 0 to show only user accounts which do not have an external ID value assigned.
Only one of these parameters may be specified for a single API request: external_id_contains or external_id_assigned.
514

Chapter 14 - Users and Activity LogAdd/Edit User
Add/Edit User/msp/user.php
[GET] [POST]
Add a user account or edit an existing account. You can add users to the “Unassigned” business unit or an existing, custom business unit. For each new account (except when the user role is Contact) the service automatically generates login credentials, including a login ID and “strong” password.
Permissions -Mangers can add/edit user accounts in any business unit. Unit Managers can add/edit users in their own business unit. Administrators can add/edit user all accounts except Manager and Administrator user.
Express Lite - This API is available to Express Lite users. A total of 3 users can be added per subscription.
Adding user to custom business unit
To add users to a custom business unit, follow these steps:
- With a Manager or user administrator account, log into the Qualys user interface and create the business unit. Note business units may be created using the Qualys user interface only.
- If a Unit Manager is not already assigned to the business unit, you must add one. With a Manager account, make a user.php request to add a Unit Manager who is automatically assigned as the business unit’s point of contact (POC).
- With a Manager or Unit Manager account, make a user.php request to add other users to the custom business unit. A Manager and user administrator can add a user to any business unit, while a Unit Manager can add a user to their own business unit.
Delivery of new account credentials to user
When adding a new user (except Contact), the API user has the option to deliver login credentials directly to the user via email or through the application as follows.
Email notification - By default the user.php function sends the new user an email notification with a secure link to their login credentials. When the user clicks the secure link to view the credentials, the service changes the account status automatically from “Pending Activation” to “Active”.
XML output - Instead of sending an email notification, the API user has the option to return the new user’s login credentials in the XML output document. To do this, make a user.php request with the send_email=0 input parameter. As a result the service returns the user’s login ID and password as XML value pairs in the XML output, and the account status is automatically set to “Active”.
515

Chapter 14 - Users and Activity LogAdd/Edit User
First login completes account registration
To complete account registration, a new user must log into the Qualys user interface with their assigned login information (platform URL and login credentials). When the user has been created using the user.php function the user can login using the Qualys user interface or using the acceptEULA.php API function. See “User Registration Process” and “Accept Qualys EULA” or more information.
Editing accounts - edit and clear options
For an existing account, you can edit and clear account parameters as follows.
Edit Parameters - An existing user may be edited using user.php to update the user name, general information and user interface style. Additional parameters can be edited using the Qualys user interface. When editing parameters using user.php, existing parameter values are replaced with newly specified ones. For example, if you edit an existing Scanner with the assigned asset group “New York” and you wish to add the asset group “Hong Kong”, then the edit request must include the parameter (for example, asset_groups=New+York,Hong+Kong).
Clear Parameters - When editing a user using user.php, an edit request can be used to clear (reset) parameters by assigning the empty string ““. For example, if the user interface style is set to olive green and you want to reset the interface to the system default, which is standard blue, send an edit request with this parameter equal to empty string (ui_interface_style=””).
Input Parameters
Parameter Description
action=add|edit A flag indicating an add or edit request. Specify “add” to add a new user, or “edit” to edit an existing user.
Add request: Required
Edit request: Required
login={login} Specifies the Qualys user login of the user account you wish to edit. This parameter is invalid for an add request.
Add Request: Invalid
Edit Request: Required
516

Chapter 14 - Users and Activity LogAdd/Edit User
New User - Login Credentials
Permissions
Parameter Description
send_email={0|1} (Optional and valid only when adding a new account) Specifies whether the new user will receive an email notification with a secure link to their login credentials. This parameter is invalid when the user role is Contact.
1 — (the default) specifies that an email notification will be sent to the new user. The user clicks a secure link in the email to view the login ID and password.
0 — specifies that an email notification will not be sent to the new user, and the XML report returned by the function will include the login ID and password for the user account as XML value pairs.
Add request: Optional
Edit request: Invalid
Parameter Description
user_role={role} Specifies the user role. A valid value is: manager, unit_manager, scanner, reader, contact or administrator. The first user added to a new custom business unit must be unit_manager.
Add request: Required (Invalid for Express Lite user)
Edit request: Invalid
business_unit={title} Specifies the user’s business unit. A valid value is “Unassigned”, or the title of an existing custom business unit. Note a custom business unit may be added using the QualysGuard user interface.
Add request: Required (Invalid for Express Lite user)
Edit request: Invalid
asset_groups={grp1,grp2...} Specifies the asset groups assigned to the user, when the user role is Scanner, Reader or Contact. Multiple asset groups are comma separated. This parameter is invalid when the user role is Manager or Unit Manager.
Add request: Optional
Edit request: Optional
517

Chapter 14 - Users and Activity LogAdd/Edit User
General Information
ui_interface_style={style} Specifies the user interface style. A valid value is: standard_blue, navy_blue, coral_red, olive_green, accessible_high_contrast. When adding a new user, the default is set to standard_blue.
Add request: Optional
Edit request: Optional
Parameter Description
first_name={name} Specifies the user's first name. The name may include a maximum of 50 characters.
Add request: Required
Edit Request: Optional
last_name={name} Specifies the user's last name. The name may include a maximum of 50 characters.
Add request: Required
Edit request: Optional
title={title} Specifies the user's job title. The title may include a maximum of 100 characters.
Add request: Required
Edit request: Optional
phone={value} Specifies the user's phone number. This value may include a maximum of 40 characters.
Add request: Required
Edit request: Optional
fax={value} The user's FAX number. This value may include a maximum of 40 characters.
Add request: Optional
Edit request: Optional
email={value} Specifies the user's email address. The address must be a properly formatted address with a maximum of 100 characters.
Add request: Required
Edit request: Optional
address1={value} Specifies the user’s address line 1. This value may include a maximum of 80 characters.
Add request: Required
Edit request: Optional
Parameter Description
518
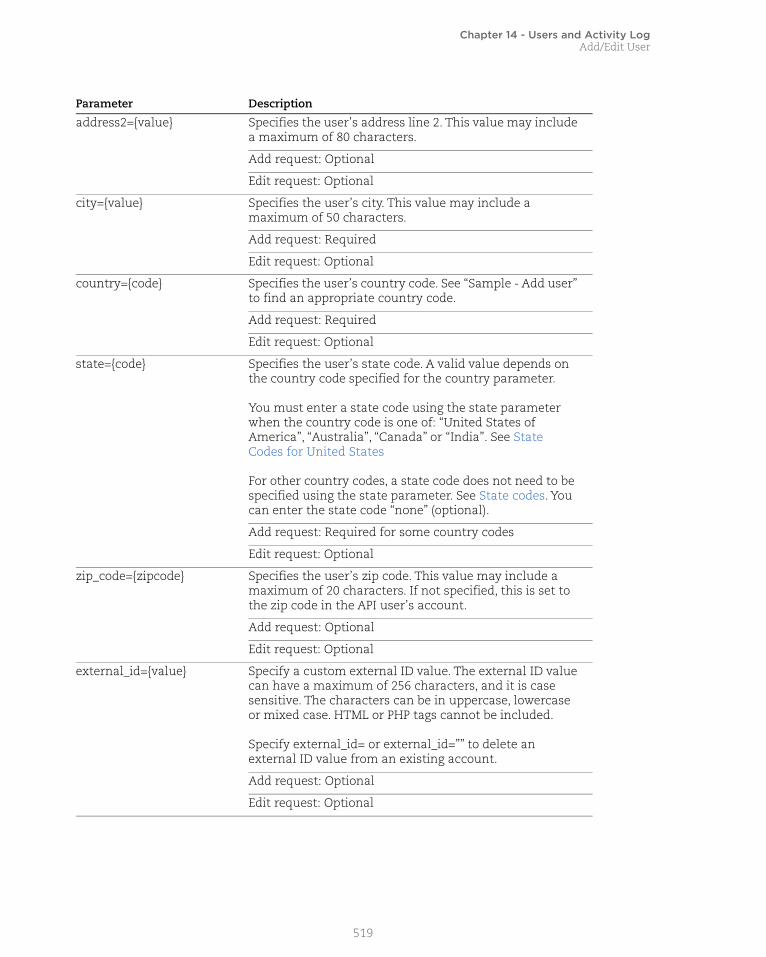
Chapter 14 - Users and Activity LogAdd/Edit User
address2={value} Specifies the user’s address line 2. This value may include a maximum of 80 characters.
Add request: Optional
Edit request: Optional
city={value} Specifies the user’s city. This value may include a maximum of 50 characters.
Add request: Required
Edit request: Optional
country={code} Specifies the user’s country code. See “Sample - Add user” to find an appropriate country code.
Add request: Required
Edit request: Optional
state={code} Specifies the user’s state code. A valid value depends on the country code specified for the country parameter.
You must enter a state code using the state parameter when the country code is one of: “United States of America”, “Australia”, “Canada” or “India”. See State Codes for United States
For other country codes, a state code does not need to be specified using the state parameter. See State codes. You can enter the state code “none” (optional).
Add request: Required for some country codes
Edit request: Optional
zip_code={zipcode} Specifies the user’s zip code. This value may include a maximum of 20 characters. If not specified, this is set to the zip code in the API user’s account.
Add request: Optional
Edit request: Optional
external_id={value} Specify a custom external ID value. The external ID value can have a maximum of 256 characters, and it is case sensitive. The characters can be in uppercase, lowercase or mixed case. HTML or PHP tags cannot be included.
Specify external_id= or external_id=”” to delete an external ID value from an existing account.
Add request: Optional
Edit request: Optional
Parameter Description
519

Chapter 14 - Users and Activity LogAdd/Edit User
Sample - Add user
Add a new user, Chris Washington, to the Unassigned business unit with the Scanner user role, and automatically send the user an email notification with a secure link to his login credentials.
API request:
https://qualysapi.qualys.com/msp/user.php?action=add&user_role=scanner&business_unit=Unassigned&ui_interface_style=standard_blue&first_name=Chris&last_name=Washington&title=Security+Consultant&phone=2126667777&fax=2126667778&[email protected]&address1=500+Charles_Avenue&address2=Suite+1260&city=New+York&country=United+States+of+America&state=New+York&zip_code=10004
XML output:
<?xml version="1.0" encoding="UTF-8" ?><!DOCTYPE USER_OUTPUT SYSTEM "https://qualysapi.qualys.com/user_output.dtd"><USER_OUTPUT> <API name="user.php" username="sabkl_av1" at="2018-07-20T22:54:25Z" /> <RETURN status="SUCCESS"> <MESSAGE>quays_cw4 user has been successfully created.</MESSAGE> </RETURN></USER_OUTPUT>
Sample - Edit user to change title
API request:
https://qualysapi.qualys.com/msp/user.php?action=edit&login=quays_ch&title=CIO
XML output:
<?xml version="1.0" encoding="UTF-8" ?><!DOCTYPE USER_OUTPUT SYSTEM "https://qualysapi.qualys.com/user_output.dtd"><USER_OUTPUT> <API name="user.php" username="sabkl_av1" at="2018-07-20T23:06:35Z" /> <RETURN status="SUCCESS"> <MESSAGE>quays_ch user has been successfully updated.</MESSAGE> </RETURN></USER_OUTPUT>
520

Chapter 14 - Users and Activity LogAdd/Edit User
Sample - External ID
Add the external ID “Qualys123” to the existing user account “qualys_ab5” when that account does not already have an external ID:
https://qualysapi.qualys.com/msp/user.php?action=edit&login=qualys_ab5&external_id=Qualys123
Add the external ID “Qualy123” to the existing user account “qualys_ab” when that account already has an external ID:
https://qualysapi.qualys.com/msp/user.php?action=edit&login=qualys_ab5&external_id=Qualys123
Delete the external ID currently defined for the user account “qualys_ab5”:
https://qualysapi.qualys.com/msp/user.php?action=edit&login=qualys_ab5&external_id=
Sample - Set TimezoneAssign a timezone to a user using the optional parameter “time_zone_code”.
Sample - Set specific timezone (i.e. pass timezone code)
https://qualysapi.qualys.com/msp/user.php?action=add&user_role=scanner&business_unit=Unassigned&asset_groups=New+York,Dallas&ui_interface_style=standard_blue&first_name=Chris&last_name=Woods&title=Security+Consultant&phone=2126667777&fax=2126667778&[email protected]&address1=500+Charles_Avenue&address2=Suite+1260&city=New+York&country=United+States+of+America&state=New+York&zip_code=10004&time_zone_code=US-NY
Sample - Set user profile to browser’s timezone (i.e. pass empty/null)
https://qualysapi.qualys.com/msp/user.php?action=edit&login=acme_ab&time_zone_code="
Looking for timezone codes? Use the time zone code list function to request the list:
<platform API server>/msp/time_zone_code_list.php
DTD
<platform API server>/user_output.dtd
521

Chapter 14 - Users and Activity LogAdd/Edit User
Default Parameters - New User
Several user parameters are set automatically when a new user is created. These are identified below. The parameter value *** is the value defined for the user account making the API request.
ManagerUnitManager
Adminis-trator Scanner Reader Contact
General and User Role
Zip code *** *** *** *** *** ***
Company *** *** *** *** *** ***
Interface Style Standard Blue
Standard Blue
Standard Blue
Standard Blue
Standard Blue
n/a
Language - KnowledgeBase
*** *** *** *** *** ***
User Status Pending activation
Pending activation
Pending activation
Pending activation
Pending activation
Active
Allow access to GUI and API
GUI and API
GUI and API
GUI and API
GUI and API
n/a
Notification Options
Latest Vulnerabilities
Weekly Weekly n/a Weekly Weekly Weekly
Scan Summary All Scans on assigned groups
n/a Scans on assigned groups
Scans on assigned groups
Scans on assigned groups
Map Summary All Maps on assigned groups
n/a Maps on assigned groups
Maps on assigned groups
Maps on assigned groups
Daily Trouble Ticket Updates
NO NO NO NO n/a
Extended Permissions
Add assets n/a NO n/a n/a n/a n/a
Create option profiles
n/a YES n/a YES n/a n/a
Purge host information/history
n/a NO n/a NO n/a n/a
Create/edit remediation policy
n/a NO n/a n/a n/a n/a
Create/edit authentication records
n/a NO n/a n/a n/a n/a
522

Chapter 14 - Users and Activity LogAdd/Edit User
Country codesAfghanistan | Albania | Algeria | Andorra | Angola | Anguilla | Antartica | Antigua and Barbuda | Argentina | Armenia | Aruba |Australia | Austria | Azerbaijan | Bahamas | Bahrain | Bangladesh | Barbados | Belarus | Belgium | Belize | Benin | Bermuda | Bhutan | Bolivia | Bosnia-Herzegovina | Botswana | Bouvet Island | Brazil | British Indian Ocean Territory | Brunei Darussalam | Bulgaria | Burkina Faso | Burundi | Cambodia | Cameroon | Canada | Cape Verde | Cayman Islands | Central African Republic | Chad | Chile | China | Christmas Island | Cocos (Keeling) Islands | Colombia | Comoros | Congo | Cook Islands | Costa Rica | Cote D'Ivoire | Croatia | Cuba | Cyprus | Czech Republic | Denmark | Djibouti | Dominica | Dominican Republic | East Timor | Ecuador | Egypt | El Salvador | Equatorial Guinea | Estonia | Ethiopia | Faeroe Islands | Falkland Islands (Malvinas) | Fiji | Finland | France | French Guiana | French Polynesia | French Southern Territories| Gabon | Gambia | Georgia | Germany | Ghana | Gibraltar | Greece | Greenland | Grenada | Guadeloupe | Guatemala | Guernsey, C.I. | Guinea | Guinea-Bissau | Guyana | Haiti | Heard and McDonald Islands | Honduras | Hong Kong | Hungary | Iceland | India | Indonesia | Iran (Islamic Republic of) | Iraq | Ireland | Isle of Man | Israel | Italy | Jamaica | Japan | Jersey, C.I. | Jordan | Kazakhstan | Kenya | Kiribati | Korea | Kuwait | Kyrgyzstan | Lao Peoples Democratic Republi | Latvia | Lebanon | Lesotho | Liberia | Libyan Arab Jamahiriya | Liechtenstein | Lithuania | Luxembourg | Macau | Macedonia | Madagascar| Malawi | Malaysia | Maldives | Mali | Malta | Marshall Islands | Martinique | Mauritania | Mauritius | Mexico | Micronesia, Fed. States of | Moldova, Republic of | Monaco | Mongolia | Montserrat | Morocco | Mozambique | Myanmar | Namibia | Nauru | Nepal | Netherland Antilles | Netherlands | Neutral Zone (Saudi/Iraq) | New Caledonia | New Zealand | Nicaragua | Niger | Nigeria | Niue | Norfolk Island | Northern Mariana Islands | Norway | Oman | Pakistan | Palau | Panama Canal Zone | Panama | Papua New Guinea | Paraguay | Peru | Philippines | Pitcairn | Poland | Portugal | Puerto Rico | Qatar | Reunion | Romania | Russia | Rwanda | Saint Kitts and Nevis | Saint Lucia | Samoa | San Marino | Sao Tome and Principe | Saudi Arabia | Senegal | Seychelles | Sierra Leone | Singapore | Slovak Republic | Slovenia | Solomon Islands | Somalia | South Africa | Spain | Sri Lanka | St. Helena | St. Pierre and Miquelon | St. Vincent and the Grenadines | Sudan | Suriname | Svalbard and Jan Mayen Islands | Swaziland | Sweden | Switzerland | Syrian Arab Republic | Taiwan | Tajikistan | Tanzania, United Republic of | Thailand | Togo | Tokelau | Tonga | Trinidad and Tobago | Tunisia | Turkey | Turkmenistan | Turks and Caicos Islands | Tuvalu | U.S.Minor Outlying Islands | Uganda | Ukraine | United Arab Emirates | United Kingdom | United States of America | Uruguay | Uzbekistan | Vanuatu | Vatican City State | Venezuela | Vietnam | Virgin Islands (British) | Wallis and Futuna Islands | Western Sahara | Yemen | Yugoslavia | Zaire | Zambia | Zimbabwe
State codes
State Codes for United States
Value state codes when country is “United States of America”:
Alabama | Alaska | Arizona | Arkansas | Armed Forces Asia | Armed Forces Europe | Armed Forces Pacific | California | Colorado | Connecticut | Delaware | District of Columbia |Florida | Georgia | Hawaii | Idaho | Illinois | Indiana | Iowa | Kansas | Kentucky | Louisiana | Maine | Maryland | Massachusetts | Michigan | Minnesota | Mississippi | Missouri | Montana | Nebraska | Nevada | New Hampshire | New Jersey| New Mexico | New York | North Carolina | North Dakota | Ohio | Oklahoma | Oregon | Pennsylvania | Rhode Island |South Carolina | South Dakota | Tennessee | Texas | Utah | Vermont | Virginia | Washington | West Virginia | Wisconsin | Wyoming
State Codes for Australia
Valid state codes when country is “Australia”:
No State | New South Wales | Northern Territory | Queensland | Tasmania | Victoria | Western Australia
523

Chapter 14 - Users and Activity LogUser Registration Process
State Codes for Canada
Valid state codes when country is “Canada”:
No State | Alberta | British Columbia | Manitoba | New Brunswick | Newfoundland | Northwest Territories | Nova Scotia | Nunavut | Ontario | Prince Edward Island | Quebec | Saskatchewan | Yukon
State Codes for India
Valid state codes when country is “India”:
No State | Andhra Pradesh | Andaman and Nicobar Islands | Arunachal Pradesh | Assam | Bihar | Chandigarh | Chattisgarh | Dadra and Nagar Haveli | Daman and Diu | Delhi | Goa | Gujarat | Haryana | Himachal Pradesh | Jammu and Kashmir | Jharkhand | Karnataka | Kerala | Lakshadadweep | Madhya Pradesh | Maharashtra | Manipur | Meghalaya | Mizoram | Nagaland | Orissa | Pondicherry | Punjab |Rajasthan |Sikkim | Tamil Nadu | Tripura | Uttar Pradesh | Uttaranchal | West Bengal
User Registration ProcessWhen a new user account is created, the service by default sends the user an email titled “Registration - Start Now”. This email includes a secure link to the user's login information including platform URL and login credentials. Instead of sending an email notification, the API user has the option to return login credentials using user.php function with the send_email=0 input parameter.
The user must complete the first login to the service in order to complete the account registration and accept the Qualys EULA (End User License Agreement). When the first login is completed, the service sends the user an email titled “Registration - Complete”.
A new user has the option to complete the first login by simply logging into the Qualys user interface, as long as the user is granted the GUI access method. (Note a new user created using the user.php function is automatically granted the GUI and API access methods.) Using the Qualys user interface, the user is directed to the First Login form to complete the registration and accept the Qualys EULA.
The acceptEULA.php API function is provided as a programmatic method for completing the registration and accepting the Qualys EULA. To use complete the first login using the acceptEULA.php function, the user must submit an API request using their platform URL and login credentials.
Important: If a new user account is created using the Qualys user interface and the account is granted the API access method only (without the GUI access method), the user must complete the first login using the acceptEULA.php API function. If the acceptEULA.php API request is not made or it is not successful, the new account will not be activated and any API requests submitted using the new account will fail.
524

Chapter 14 - Users and Activity LogAccept Qualys EULA
Accept Qualys EULA/msp/acceptEULA.php
[GET] [POST]
Allows Qualys users to complete the registration process and accept the Qualys End User License Agreement (EULA) on behalf of their customers. This function provides programmatic acceptance of the Qualys EULA.
A new user can complete the registration process and accept the Qualys EULA through the Qualys user interface as long as their account is granted the GUI access method. (Note a new user created using the user.php function is automatically granted the GUI and API access methods.) Optionally, a new user can complete the registration and accept the Qualys EULA using the acceptEULA.php function. See User Registration Process
A Web application that allows Qualys EULA acceptance can be setup as follows. Inside the third party web application, a developer can setup a Web form that displays the Qualys EULA and has an “I Accept” button. A new Qualys user opens the Web form in a browser, reads the EULA description and clicks “I Accept” in the Web form. The third party’s program submits an HTTP request to the Qualys API server using the acceptEULA.php. Along with the acceptEULA.php URL, the application must send Qualys user account credentials (login and password) as part of the HTTP request.
Permissions - Any user with permission to log in to Qualys can complete the registration and accept the EULA.
Sample - Accept the Qualys EULA on behalf of a user
API request:
https://qualysapi.qualys.com/msp/acceptEULA.php
XML output:
<?xml version="1.0" encoding="UTF-8" ?><!DOCTYPE GENERIC_RETURN SYSTEM "https://qualysapi.qualys.com/generic_return.dtd"><GENERIC_RETURN><API name="acceptEULA.php" username="rob" at="2018-05-10T13:44:23" /><RETURN status="SUCCESS"> TNC accepted within MSP </RETURN></GENERIC_RETURN>
DTD
<platform API server>/generic-return.dtd
525

Chapter 14 - Users and Activity LogActivate/Deactivate Users
Activate/Deactivate Users/msp/user.php
[GET] [POST]
Activate and deactivate user accounts. A user with inactivate status can be activated. A user with active status can be deactivated. Session based authentication is not supported using this API.
These actions correspond to the activate/deactivate options in the Qualys UI. Note new accounts are activated by default after the user completes the account activation process (registration) by logging into the service for the first time.
Permissions -Mangers can activate/deactivate all users in subscription. Unit Managers can activate/deactivate users in their own business unit. Administrators can activate/deactivate all users except Manager and Administrator user.
Express Lite - This API is available to Express Lite users.
Input Parameters
Samples
Deactivate the user account “qualys_ab3” (and this account has an “Active status):
https://qualysapi.qualys.com/msp/user.php?action=deactivate&login=qualys_ab3
Activate the user account “qualys_ab3” (and this account has an “Inactive” status):
https://qualysapi.qualys.com/msp/user.php?action=activate&login=qualys_ab3
DTD
<platform API server>/user_output.dtd
Parameter Description
action=activate|deactivate (Required) A flag indicating the desired action. Specify “activate” to activate a user account that has an “Inactive” status, or specify “deactivate” to deactivate a user account that has an “Active” status. When an account is deactivated, the user’s account settings will not be deleted.
A user account cannot be activated or deactivated if the account status is “Pending Activation”.
login={login} (Required) Specifies the Qualys user login for the user account you wish to activate or deactivate.
526

Chapter 14 - Users and Activity LogUser Password Change
User Password Change/msp/password_change.php
[GET] [POST]
Change passwords for all or some users in the same subscription. Many Qualys customers have an internal security policy requirement to change passwords for users at a particular time interval. Changing password for multiple users at once as batch process is supported. New passwords are automatically generated by the service.
It’s possible to change passwords for user accounts with a status of “active”, “inactive” or “pending activation”. It’s not possible to change passwords for deleted accounts. Since Contact users do not have login access to Qualys, it’s not possible to change passwords for Contacts.
A password change API request returns a password change XML report indicating the user accounts affected and whether password changes were made for each account. A success message is included when passwords were changed on all target accounts. A warning message is included if passwords for any of the target accounts could not be changed. Upon error, an error message is included.
By default the password changes made by the password_change.php API causes the service to automatically send each affected user an email which notifies them of the password change. If you do not wish users to receive this email notification, you have the option to return the user login ID and password for affected users as XML value pairs in the password change report. To do this, make a password_change.php request and specify the email=0 parameter. If you make such a request on an account with the status “pending activation”, the function automatically assigns the “active” status since the login credentials are available in the XML report.
Permissions - Managers can change passwords for all users in subscription, except the user making the request. Unit Managers can change passwords for all users in same business unit, except the user making the request. Administrators can change passwords for all users in subscription, except Manager and the user making the request.
Express Lite - This API is available to Express Lite users.
527

Chapter 14 - Users and Activity LogUser Password Change
Input Parameters
Samples
Make a password change request for two accounts and send affected users an email notification including a secure link to their new password:
https://qualysapi.qualys.com/msp/password_change.php?user_logins=acme_jr,acme_dd
Make a password change request for all users in the API user’s account (except the API user) and return the login ID and password for each affected user in the password change XML response:
https://qualysapi.qualys.com/msp/password_change.php?user_logins=all&email=0
DTD
<platform API server>/password_change_output.dtd
Parameter Description
user_logins={value} (Required) Specifies one or more QualysGuard user login IDs of target user accounts. Multiple user login IDs are comma separated. Specify user_logins=all to change the password for all users in the user’s account, except the requesting user. See Permissions
email={0|1} (Optional) Specifies whether users will receive an email notification alerting them to the password change.
1 — (the default) specifies that an email notification will be sent to affected users. Each user clicks a secure link in the email to view the new password. 0 — specifies that email notifications will not be sent to affected users, and the XML report returned by the function will include the login ID and password for each user account as XML value pairs.
528
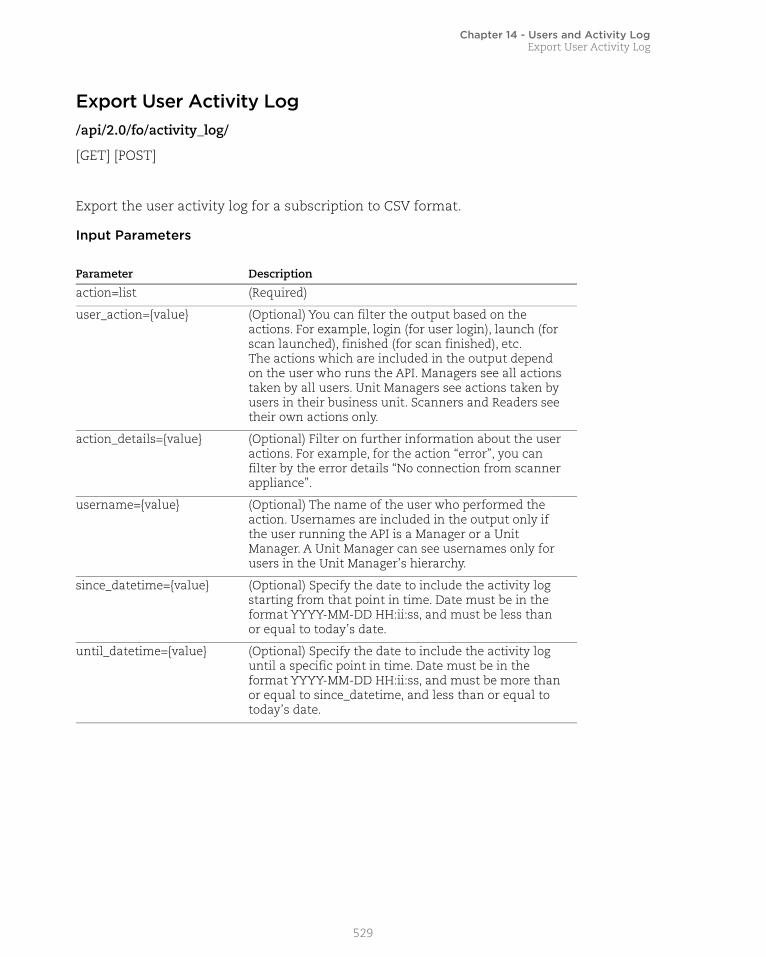
Chapter 14 - Users and Activity LogExport User Activity Log
Export User Activity Log/api/2.0/fo/activity_log/
[GET] [POST]
Export the user activity log for a subscription to CSV format.
Input Parameters
Parameter Description
action=list (Required)
user_action={value} (Optional) You can filter the output based on the actions. For example, login (for user login), launch (for scan launched), finished (for scan finished), etc. The actions which are included in the output depend on the user who runs the API. Managers see all actions taken by all users. Unit Managers see actions taken by users in their business unit. Scanners and Readers see their own actions only.
action_details={value} (Optional) Filter on further information about the user actions. For example, for the action “error”, you can filter by the error details “No connection from scanner appliance”.
username={value} (Optional) The name of the user who performed the action. Usernames are included in the output only if the user running the API is a Manager or a Unit Manager. A Unit Manager can see usernames only for users in the Unit Manager’s hierarchy.
since_datetime={value} (Optional) Specify the date to include the activity log starting from that point in time. Date must be in the format YYYY-MM-DD HH:ii:ss, and must be less than or equal to today’s date.
until_datetime={value} (Optional) Specify the date to include the activity log until a specific point in time. Date must be in the format YYYY-MM-DD HH:ii:ss, and must be more than or equal to since_datetime, and less than or equal to today’s date.
529

Chapter 14 - Users and Activity LogExport User Activity Log
Sample - Export activity log to csv formatAPI request:
curl -u "username:password" -k -H "X-Requested-With:curl" "https://qualysapi.qualys.com/api/2.0/fo/activity_log/?action=list"
Sample CSV output:
"Date","Action","Module","Details","User Name","User Role","User IP""2017-02-03T04:35:38Z","login","auth","user_logged in","saand_rn","Manager","10.113.195.136""2017-02-02T13:58:16Z","login","auth","user_logged in","saand_rn","Manager","10.113.195.136""2017-02-02T13:48:07Z","request","auth","API: /api/2.0/fo/activity_log/index.php","saand_rn","Manager","10.113.195.136""2017-02-02T13:31:19Z","request","auth","API: /api/2.0/fo/activity_log/index.php","saand_rn","Manager","10.113.195.136""2017-02-02T13:28:38Z","request","auth","API: /api/2.0/fo/activity_log/index.php","saand_rn","Manager","10.113.195.136""2017-02-02T13:28:17Z","request","auth","API:
user_role={value} (Optional) A Manager or Unit Manager can choose to export logs for certain user roles instead of all user roles. Specify this parameter to export logs for users with certain user roles. Multiple roles are comma separated.User roles you can specify: - Manager- Unit Manager- Auditor- Scanner- Reader- KnowledgeBase Only- Remediation User- ContactWhat logs are exported by default? For a Manager logs are exported for all users (all user roles) by default. For a Unit Manager logs are exported only for users (all user roles) in the Unit Manager’s hierarchy (i.e. business unit).
output_format=CSV (Optional) CSV (default)
truncation_limit={value} (Optional) Limit the number of log records to include in the CSV output.
Parameter Description
530
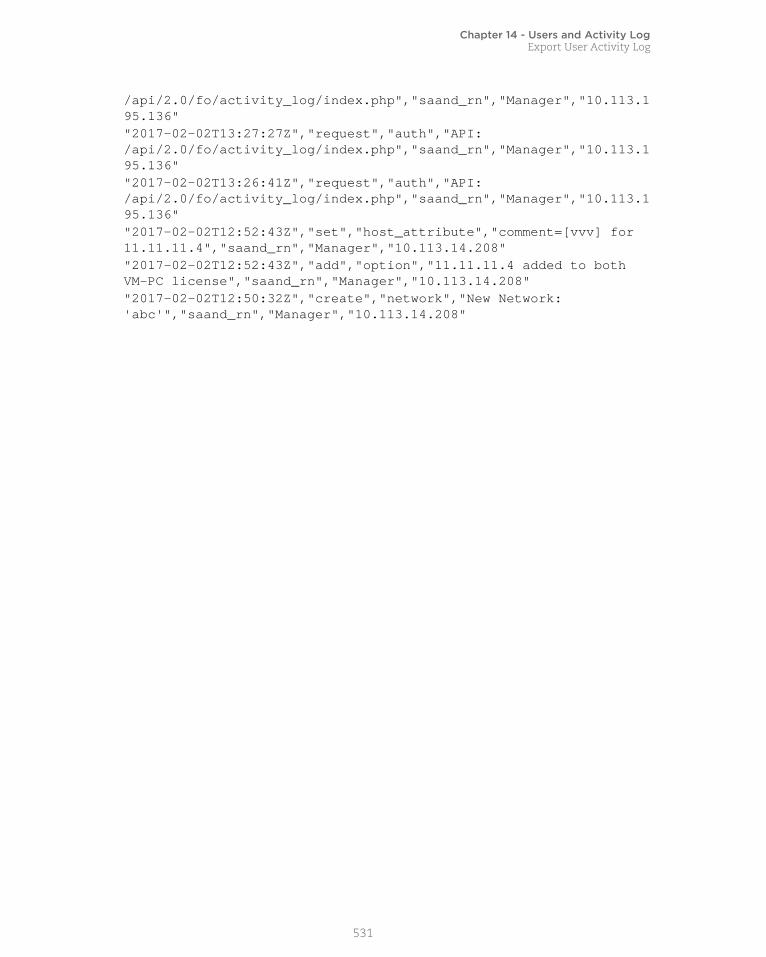
Chapter 14 - Users and Activity LogExport User Activity Log
/api/2.0/fo/activity_log/index.php","saand_rn","Manager","10.113.195.136""2017-02-02T13:27:27Z","request","auth","API: /api/2.0/fo/activity_log/index.php","saand_rn","Manager","10.113.195.136""2017-02-02T13:26:41Z","request","auth","API: /api/2.0/fo/activity_log/index.php","saand_rn","Manager","10.113.195.136""2017-02-02T12:52:43Z","set","host_attribute","comment=[vvv] for 11.11.11.4","saand_rn","Manager","10.113.14.208""2017-02-02T12:52:43Z","add","option","11.11.11.4 added to both VM-PC license","saand_rn","Manager","10.113.14.208""2017-02-02T12:50:32Z","create","network","New Network: 'abc'","saand_rn","Manager","10.113.14.208"
531

532
Appendix A - API Documentation
Appendix A - API DocumentationLooking for details on XML output and DTDs? Download this reference
Qualys API (VM, SCA, PC) XML/DTD Reference
You can find all our latest API Documentation at the Qualys Community at Qualys Documentation
HTML documentation is available through the product for your convenience. Just log into your account, choose Help > Resources from the top menu.
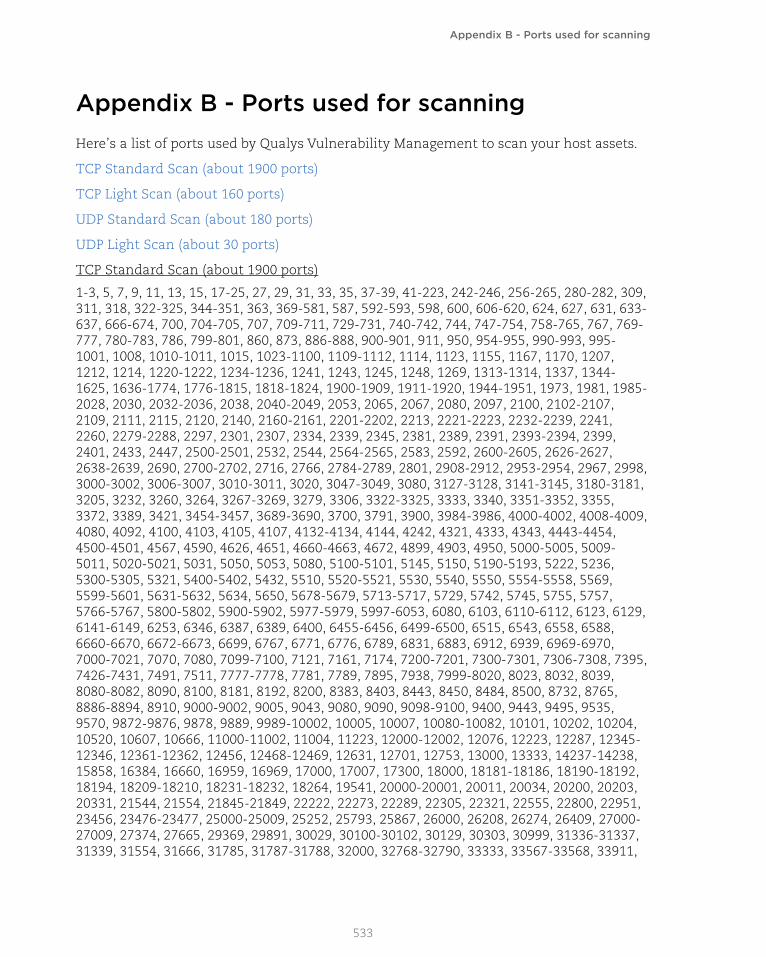
Appendix B - Ports used for scanning
Appendix B - Ports used for scanningHere’s a list of ports used by Qualys Vulnerability Management to scan your host assets.
TCP Standard Scan (about 1900 ports)
TCP Light Scan (about 160 ports)
UDP Standard Scan (about 180 ports)
UDP Light Scan (about 30 ports)
TCP Standard Scan (about 1900 ports)
1-3, 5, 7, 9, 11, 13, 15, 17-25, 27, 29, 31, 33, 35, 37-39, 41-223, 242-246, 256-265, 280-282, 309, 311, 318, 322-325, 344-351, 363, 369-581, 587, 592-593, 598, 600, 606-620, 624, 627, 631, 633-637, 666-674, 700, 704-705, 707, 709-711, 729-731, 740-742, 744, 747-754, 758-765, 767, 769-777, 780-783, 786, 799-801, 860, 873, 886-888, 900-901, 911, 950, 954-955, 990-993, 995-1001, 1008, 1010-1011, 1015, 1023-1100, 1109-1112, 1114, 1123, 1155, 1167, 1170, 1207, 1212, 1214, 1220-1222, 1234-1236, 1241, 1243, 1245, 1248, 1269, 1313-1314, 1337, 1344-1625, 1636-1774, 1776-1815, 1818-1824, 1900-1909, 1911-1920, 1944-1951, 1973, 1981, 1985-2028, 2030, 2032-2036, 2038, 2040-2049, 2053, 2065, 2067, 2080, 2097, 2100, 2102-2107, 2109, 2111, 2115, 2120, 2140, 2160-2161, 2201-2202, 2213, 2221-2223, 2232-2239, 2241, 2260, 2279-2288, 2297, 2301, 2307, 2334, 2339, 2345, 2381, 2389, 2391, 2393-2394, 2399, 2401, 2433, 2447, 2500-2501, 2532, 2544, 2564-2565, 2583, 2592, 2600-2605, 2626-2627, 2638-2639, 2690, 2700-2702, 2716, 2766, 2784-2789, 2801, 2908-2912, 2953-2954, 2967, 2998, 3000-3002, 3006-3007, 3010-3011, 3020, 3047-3049, 3080, 3127-3128, 3141-3145, 3180-3181, 3205, 3232, 3260, 3264, 3267-3269, 3279, 3306, 3322-3325, 3333, 3340, 3351-3352, 3355, 3372, 3389, 3421, 3454-3457, 3689-3690, 3700, 3791, 3900, 3984-3986, 4000-4002, 4008-4009, 4080, 4092, 4100, 4103, 4105, 4107, 4132-4134, 4144, 4242, 4321, 4333, 4343, 4443-4454, 4500-4501, 4567, 4590, 4626, 4651, 4660-4663, 4672, 4899, 4903, 4950, 5000-5005, 5009-5011, 5020-5021, 5031, 5050, 5053, 5080, 5100-5101, 5145, 5150, 5190-5193, 5222, 5236, 5300-5305, 5321, 5400-5402, 5432, 5510, 5520-5521, 5530, 5540, 5550, 5554-5558, 5569, 5599-5601, 5631-5632, 5634, 5650, 5678-5679, 5713-5717, 5729, 5742, 5745, 5755, 5757, 5766-5767, 5800-5802, 5900-5902, 5977-5979, 5997-6053, 6080, 6103, 6110-6112, 6123, 6129, 6141-6149, 6253, 6346, 6387, 6389, 6400, 6455-6456, 6499-6500, 6515, 6543, 6558, 6588, 6660-6670, 6672-6673, 6699, 6767, 6771, 6776, 6789, 6831, 6883, 6912, 6939, 6969-6970, 7000-7021, 7070, 7080, 7099-7100, 7121, 7161, 7174, 7200-7201, 7300-7301, 7306-7308, 7395, 7426-7431, 7491, 7511, 7777-7778, 7781, 7789, 7895, 7938, 7999-8020, 8023, 8032, 8039, 8080-8082, 8090, 8100, 8181, 8192, 8200, 8383, 8403, 8443, 8450, 8484, 8500, 8732, 8765, 8886-8894, 8910, 9000-9002, 9005, 9043, 9080, 9090, 9098-9100, 9400, 9443, 9495, 9535, 9570, 9872-9876, 9878, 9889, 9989-10002, 10005, 10007, 10080-10082, 10101, 10202, 10204, 10520, 10607, 10666, 11000-11002, 11004, 11223, 12000-12002, 12076, 12223, 12287, 12345-12346, 12361-12362, 12456, 12468-12469, 12631, 12701, 12753, 13000, 13333, 14237-14238, 15858, 16384, 16660, 16959, 16969, 17000, 17007, 17300, 18000, 18181-18186, 18190-18192, 18194, 18209-18210, 18231-18232, 18264, 19541, 20000-20001, 20011, 20034, 20200, 20203, 20331, 21544, 21554, 21845-21849, 22222, 22273, 22289, 22305, 22321, 22555, 22800, 22951, 23456, 23476-23477, 25000-25009, 25252, 25793, 25867, 26000, 26208, 26274, 26409, 27000-27009, 27374, 27665, 29369, 29891, 30029, 30100-30102, 30129, 30303, 30999, 31336-31337, 31339, 31554, 31666, 31785, 31787-31788, 32000, 32768-32790, 33333, 33567-33568, 33911,
533

Appendix B - Ports used for scanning
34324, 37651, 40412, 40421-40423, 42424, 44337, 47557, 47806, 47808, 49400, 50000-50001, 50505, 50766, 51102, 51107, 51112, 53001, 54320-54321, 57341, 60008, 61439, 61466, 62078, 65000, 65301, 65512
TCP Light Scan (about 160 ports)
11, 13, 15, 17, 19-23, 25, 37, 42, 53, 66, 69-70, 79-81, 88, 98, 109-111, 113, 118-119, 123, 135, 139, 143, 220, 256-259, 264, 371, 389, 411, 443, 445, 464-465, 512-515, 523-524, 540, 548, 554, 563, 580, 593, 636, 749-751, 873, 900-901, 990, 992-993, 995, 1080, 1114, 1214, 1234, 1352, 1433, 1494, 1508, 1521, 1720, 1723, 1755, 1801, 2000-2001, 2003, 2049, 2301, 2401, 2447, 2690, 2766, 3128, 3268-3269, 3306, 3372, 3389, 4100, 4443-4444, 4661-4662, 5000, 5432, 5555-5556, 5631-5632, 5634, 5800-5802, 5900-5901, 6000, 6112, 6346, 6387, 6666-6667, 6699, 7007, 7100, 7161, 7777-7778, 8000-8001, 8010, 8080-8081, 8100, 8888, 8910, 9100, 10000, 12345-12346, 20034, 21554, 32000, 32768-32790
UDP Standard Scan (about 180 ports)
7, 9, 13, 17, 19, 21, 37, 53, 67-69, 80, 98, 111, 121, 123, 135, 137-138, 161, 177, 371, 389, 407, 443, 445, 456, 464, 500, 512, 514, 517-518, 520, 555, 635, 666, 858, 1001, 1010-1011, 1015, 1024-1049, 1051-1055, 1170, 1194, 1243, 1245, 1434, 1492, 1600, 1604, 1645, 1701, 1807, 1812, 1900, 1978, 1981, 1999, 2001-2002, 2023, 2049, 2115, 2140, 2801, 2967, 3024, 3129, 3150, 3283, 3527, 3700, 3801, 4000, 4092, 4156, 4569, 4590, 4781, 5000-5001, 5036, 5060, 5321, 5400-5402, 5503, 5569, 5632, 5742, 6051, 6073, 6502, 6670, 6771, 6912, 6969, 7000, 7111, 7222, 7300-7301, 7306-7308, 7778, 7789, 7938, 9872-9875, 9989, 10067, 10167, 11000, 11223, 12223, 12345-12346, 12361-12362, 15253, 15345, 16969, 17185, 20001, 20034, 21544, 21862, 22222, 23456, 26274, 26409, 27444, 30029, 31335, 31337-31339, 31666, 31785, 31789, 31791-31792, 32771, 33333, 34324, 40412, 40421-40423, 40426, 47262, 50505, 50766, 51100-51101, 51109, 53001, 54321, 61466
UDP Light Scan (about 30 ports)
7, 13, 17, 19, 37, 53, 67-69, 111, 123, 135, 137, 161, 177, 407, 464, 500, 517-518, 520, 1434, 1645, 1701, 1812, 2049, 3527, 4569, 4665, 5036, 5060, 5632, 6502, 7778, 15345
534

Appendix C - Error codes / descriptions
Appendix C - Error codes / descriptionsHere’s a list of Qualys API error codes along with a description of what each code means. For an API request that had an error, you’ll find the error code and text in the XML response.
HTTPStatus
Error Code
Error Text Meaning
HTTP/1.1 400 Bad Request
1901 Unrecognized parameter(s):...
The API request contained one or more parameters which are not supported, or are not available to the browsing user.
HTTP/1.1 400 Bad Request
1903 Missing required parameter(s):...
The API request did not contain one or more parameters which are required.
HTTP/1.1 400 Bad Request
1904 Please specify only one of these parameters:...
The API request contained 2 or more parameters from a group from which at most one may be specified.
HTTP/1.1 400 Bad Request
1905 parameter ... has invalid value ...
The API request contained a valid parameter specified with an invalid value.
HTTP/1.1 400 Bad Request
1907 The following combination of key=value pairs is not supported:...
The API request contained an invalid or unsupported combination of parameters.
HTTP/1.1 400 Bad Request
1908 Request method (GET or POST) is incompatible with specified parameter(s):...
The API request was made with an unsupported HTTP request method (GET or POST or PUT or DELETE or HEAD).
HTTP/1.1 409
Conflict
1920 The requested operation is blocked by one or more existing Business Objects
The API request was blocked by other API requests. In practice this should be replaced by one of error code 1960 or 1965 (see below).
HTTP/1.1 409
Conflict
1960 The requested operation is blocked by one or more existing Business Objects
Too many other API requests currently running (i.e. concurrency limit).
HTTP/1.1 409
Conflict
1965 The requested operation is blocked by one or more existing Business Objects
Too many other API requests have run recently (i.e. rate limit).
HTTP/1.1 400 Bad Request
1922 Please specify at least one of the following parameters:...
The API request was missing some required information (but not necessarily a single specific parameter).
HTTP/1.1 202
Accepted
1981 Your request is being processed. Please try this same request again later.
The API request is for a business operation which is already underway.
535

Appendix C - Error codes / descriptions
HTTP/1.1 400 Bad Request
999 Internal Error The API request failed for some reason having to do with the (client) request. In practice this should always be expressed as some other error type, giving more information about what was actually wrong with the request.
HTTP/1.1 501
Internal Error
999 Internal Error The API request failed due to a problem with QWEB.
HTTP/1.1 503
Maintenance
1999 We are performing scheduled maintenance on our System. We apologize for any inconvenience.
The API request failed because the Qualys Cloud Platform is in maintenance mode.
HTTP/1.1 401
Unauthorized
2000 Bad Login/Password The API request failed because of an authentication failure.
HTTP/1.1 403
Forbidden
2002 User account is inactive. The API request failed because of an authorization failure.
HTTP/1.1 409
Conflict
2003 Registration must be completed before API requests will be served for this account
The API request failed because nobody has yet accepted the EULA on behalf of the user’s subscription.
HTTP/1.1 409
Conflict
2011 SecureID authentication is required for this account, so API access is blocked
The API request failed because SecureID authentication won't work with API calls.
HTTP/1.1 403
Forbidden
2012 User license is not authorized to run this API.
The API request failed because the user’s subscription does not have API access enabled.
HTTPStatus
Error Code
Error Text Meaning
536

Index
A
add IP addresses 299API limits 11Application Server authentication 188asset search report 407authentication 8, 181authentication to your account 16
B
basic HTTP authentication 16
C
cancel report 401characters in URLs 10compliance control list 463compliance policy export 472compliance policy import 477compliance policy list 468compliance policy merge 479compliance policy, manage asset groups
485compliance posture information 488compliance scan list 35control criticality 494country codes 523Cyberscope report 504
D
date format 10delete report 405discovery scans 73Docker authentication 192download report 402
E
Expires header 20
G
GET method 9
H
header parameter 16host detection list 313host list 305HTTP authentication 195HTTP Expires header 20
I
IBM DB2 authentication 198invalid tickets 450IP list 297IPv4 to IPv6 asset mapping records
remove 373IPv6 asset mapping record list 371
L
launch compliance scan 38launch compliance scan on EC2 assets 39launch report 385launch scorecard report 394launch VM scan 28launch VM scan on EC2 assets 30
M
manage compliance scans 41manage VM scans 32maps 73MariaDB authentication 206MongoDB authentication 210MS SQL authentication 216MySQL authentication 224
N
networkassign appliance to 379create 376update 378
537
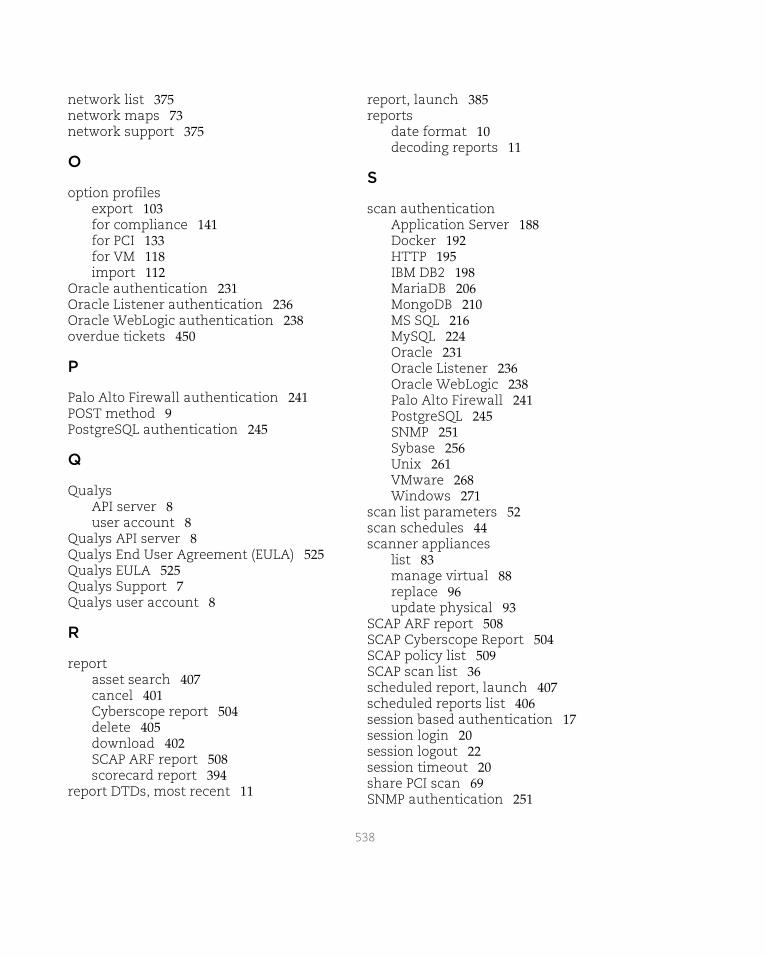
network list 375network maps 73network support 375
O
option profilesexport 103for compliance 141for PCI 133for VM 118import 112
Oracle authentication 231Oracle Listener authentication 236Oracle WebLogic authentication 238overdue tickets 450
P
Palo Alto Firewall authentication 241POST method 9PostgreSQL authentication 245
Q
QualysAPI server 8user account 8
Qualys API server 8Qualys End User Agreement (EULA) 525Qualys EULA 525Qualys Support 7Qualys user account 8
R
reportasset search 407cancel 401Cyberscope report 504delete 405download 402SCAP ARF report 508scorecard report 394
report DTDs, most recent 11
report, launch 385reports
date format 10decoding reports 11
S
scan authenticationApplication Server 188Docker 192HTTP 195IBM DB2 198MariaDB 206MongoDB 210MS SQL 216MySQL 224Oracle 231Oracle Listener 236Oracle WebLogic 238Palo Alto Firewall 241PostgreSQL 245SNMP 251Sybase 256Unix 261VMware 268Windows 271
scan list parameters 52scan schedules 44scanner appliances
list 83manage virtual 88replace 96update physical 93
SCAP ARF report 508SCAP Cyberscope Report 504SCAP policy list 509SCAP scan list 36scheduled report, launch 407scheduled reports list 406session based authentication 17session login 20session logout 22session timeout 20share PCI scan 69SNMP authentication 251
538

special characters in URLs 10state codes
Australia 523Canada 524India 524United States of America 523
Sybase authentication 256
T
ticket state/status 450
U
Unix authentication 261updated IP addresses 301URL elements 10URL encoded variables 10user account
login credentials 8user management functions
acceptEULA.php 525user.php function
country codes 523state codes 523, 524
UTF-8 encoding 10
V
VM scan list 25VM scan statistics 63VM scan summary (hosts not scanned) 66VM scans 25VMware authentication 268
W
Windows authentication 271
539

540