Embed Size (px)
Citation preview

ConnectionQuality%FEJDBUFE�UP�2VBMJUZ�,JB�7FIJDMF�3FQBJST
2017 FORTE 5 SX[Shown with optional features]
www.kia.com
FALL 2017 VOL. 12 | NO. 3
(&55*/(�
$-0463&Striker adjustment alleviates trunk issues
"�5*()5�'*5New part improves hub vacuum sealing
5)&�4*-&/5
53&"5.&/5That’s what your customers want for their vehicles
ES976018_ABRN1117_KIA1_FP.pgs 10.05.2017 00:27 ADV blackyellowmagentacyan

2 QualityConnection www.kiagenuineparts.com | www.kia.com
Continuing a multi-year string of
quality and reliability awards and
accolades, J.D. Power’s 2017 Initial
Quality Study (IQS) recently recognized
Kia Motors as the highest-ranking name-
plate in the United States for the second
year in a row.
Kia’s improvement marks the best
nameplate performance within the last 20
years of the IQS study, driven by fi ve seg-
ment awards — the most of any nameplate
— for the Soul (Compact Multi-Purpose
Vehicle), Forte (Compact Car), Ca-
denza (Large Car), Niro (Small SUV) and
Sorento (Midsize SUV). Th e Kia Soul took
home an IQS award for the third consecu-
tive year while Kia’s two newest models,
Cadenza and Niro, were outstanding
performers in their fi rst model year, with
the Cadenza earning the top score among
all models ranked in the study. Together
with the Optima and Sportage, each of the
seven award eligible Kia models included
in the 2017 IQS study fi nished fi rst or
second in their respective categories.
“When Kia beat out the entire indus-
try in last year’s J.D. Power Initial Quality
Study many people wondered if we could
maintain such a loft y position. Today,
the answer is loud and clear as Kia owns
the top spot for the second straight year
with more 2017 segment award winners
than any other nameplate,” said Michael
Sprague, chief operating offi cer and EVP,
Kia Motors America (KMA). “Our back-
to-back chart-topping IQS performances
reconfi rm Kia’s status as today’s world-
class automaker and refl ect the exacting
standards and craft smanship our team
members instill into every car, crossover
and SUV Kia builds.”
In addition to the IQS announcement,
three of Kia’s highly acclaimed models, the
2016 Optima midsize sedan, the 2016 and
2017 Cadenza premium sedan as well as
the 2017 Sportage Compact CUV, were
named segment winners in AutoPacifi c’s
2017 Vehicle Satisfaction Awards in the
midsize car, large car and compact cross-
over SUV categories, respectively.
“Kia is a leader in design, quality, technol-
ogy and value, and the AutoPacifi c Vehicle
Satisfaction Awards are another validation
of our world-class products and their ability
to meet and exceed customer expectations,”
said Orth Hedrick, vice president of product
planning, KMA. “As a two-time winner,
Optima illustrates that if you buy a Kia,
you are going to love it. With Cadenza and
Sportage also winning their categories, Kia is
delivering what buyers are looking for in any
size of vehicle.”
As for those who service our cars, we
think you will fi nd that they are designed
and engineered to meet the highest
standards making them easy to service
and maintain.
Kia Motors America, Inc.
All trademarks and tradenames are the property
of their respective owners. 2017 Kia Forte 5 SX shown on
the cover and above with optional features. Not all optional
features are available on all trims. Some features may vary.
1 Th e Kia Cadenza received the lowest number of problems
per 100 vehicles refl ecting higher quality among large cars
in the J.D. Power 2017 U.S. Initial Quality Study based
on 77,419 total responses, evaluating 189 models, and
measures the opinions of new 2017 vehicle owners aft er 90
days of ownership, surveyed in February-May 2017. Your
experiences may vary. Visit jdpower.com/cars.
VOL. 12 | NO. 3 FALL 2017 | Quality Connection is published by Kia Motors America
The silent treatmentThat’s what your customers want for their vehicles
A tight fi tNew part improves hub vacuum sealing
Getting closureStriker adjustment alleviates trunk issues
124 8
Quality recognitionKia’s reliability and vehicle satisfaction are touted
*/�5)*4�*446&
Our View
The Cadenza and four other Kia models earned the
prestigious J.D. Power’s 2017 IQS awards.1
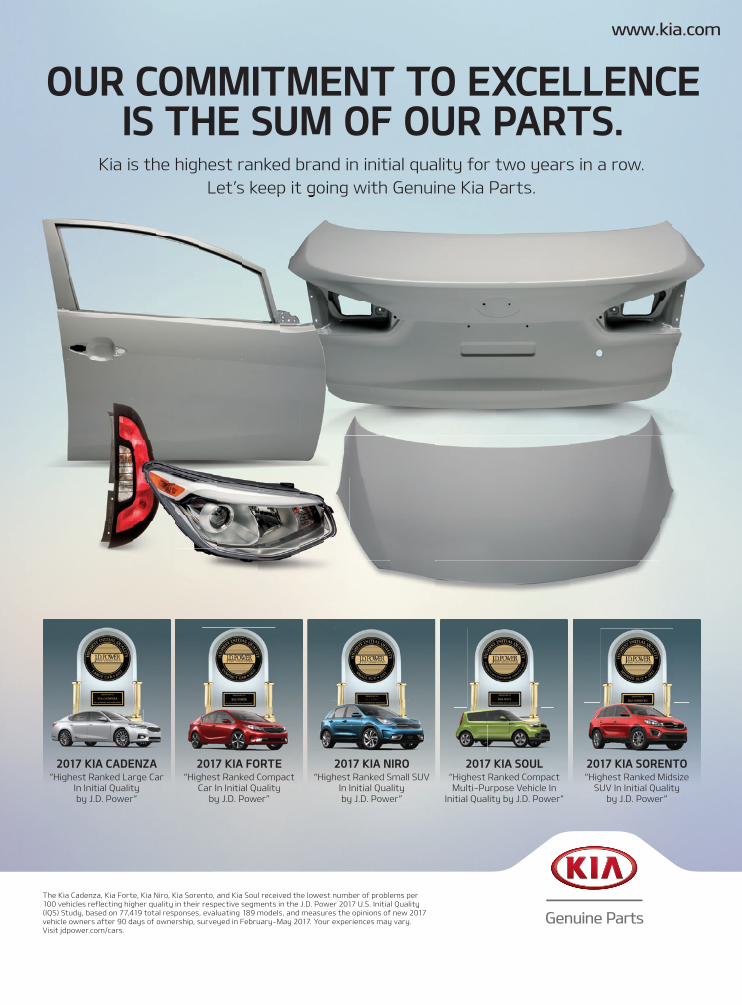
OUR COMMITMENT TO EXCELLENCE
IS THE SUM OF OUR PARTS.Kia is the highest ranked brand in initial quality for two years in a row.
Let’s keep it going with Genuine Kia Parts.
2017 KIA SORENTO
“Highest Ranked Midsize SUV In Initial Quality
by J.D. Power”
2017 KIA SOUL
“Highest Ranked Compact Multi-Purpose Vehicle In
Initial Quality by J.D. Power”
2017 KIA NIRO
“Highest Ranked Small SUVIn Initial Quality by J.D. Power”
2017 KIA FORTE
“Highest Ranked Compact Car In Initial Quality
by J.D. Power”
2017 KIA CADENZA
“Highest Ranked Large CarIn Initial Quality by J.D. Power”
The Kia Cadenza, Kia Forte, Kia Niro, Kia Sorento, and Kia Soul received the lowest number of problems per 100 vehicles reflecting higher quality in their respective segments in the J.D. Power 2017 U.S. Initial Quality (IQS) Study, based on 77,419 total responses, evaluating 189 models, and measures the opinions of new 2017 vehicle owners after 90 days of ownership, surveyed in February-May 2017. Your experiences may vary. Visit jdpower.com/cars.

Mechanical
Repair procedure 1. Raise the vehicle on hoist. Remove the
front wheel/tire assembly.
Remove the two bolts attaching the
brake caliper/anchor to the knuckle and
remove the caliper/anchor assembly
from the rotor. Secure the caliper/anchor
assembly out of the way with wire or tie
wraps.
2. Remove the two screws securing the
brake rotor to the wheel hub and remove
the rotor.
Disconnect the vacuum hose from the
fi tting on the knuckle.
Remove the ABS sensor attaching the
bolt and the sensor from the knuckle (if
ABS equipped).
4 QualityConnection www.kiagenuineparts.com | www.kia.com
A tight fi tNew part improves hub vacuum sealing
Mechanical
In order to improve hub vacuum sealing during 4WD operation
for 1998-2001Sportage 4WD vehicles, we recommend using
a new inner seal, along with corresponding revisions to knuckles and
CV shafts. A service kit is available from Kia to retrofi t the new seal;
installation instructions are described in this article.
Affected Vehicle Production Range
1998, 1999, 2000 and some 2001 MY
Sportage 4WD models with production
dates between 9/1/97 and 10/21/00.
Description Previous P/N New P/N
Knuckle/Hub Assy w/o ABS
Knuckle/Hub Assy w/ABS
0K083 04 500
0K083 04 600
QK081 33 020 DQ
QK082 33 020 EQ
PART NUMBER DESCRIPTION
»TSBs may be updated from time to time. Please refer to TSB Vol. 2, Chassis, 007 at www.kiatechinfo.com for the latest procedures.
»All images are for illustration purposes only.
NEW STYLE
PREVIOUS STYLE

www.kiagenuineparts.com | www.kia.com QualityConnection 5
Notice: Do not allow the caliper/anchor
assembly to hang from the brake hose.
3. Remove the six bolts securing the
vacuum locking hub to the wheel hub
and remove the wheel hub.
Remove the snap ring and washer from
the CV axle shaft . Discard the snap ring.
4. Remove the tie rod cotter pin and nut;
then with a suitable puller (such as
Snap-on® CJ82B), disconnect the tie rod
end from the knuckle.
Notice: Do not use a pickle fork type
tie-rod separator because seal damage
will occur.
5. Remove the lower ball joint cotter pin
and nut; then with a suitable puller (such
as Snap-on® CJ119B), separate the ball
joint from the knuckle.
Notice: Do not use a pickle fork type ball
joint separator because seal damage will
occur.
6. Remove the 10 mm pinch bolt and
nut securing the upper ball joint to the
knuckle.
Remove the knuckle/hub assembly
from the vehicle.
Using a suitable jack under the lower
control arm, load the suspension and
raise the strut fork opening suffi ciently
to allow the drive shaft removal. Pull
the CV shaft free from the front axle by
using the outer part of the shaft as a slide
hammer.
7. Remove the shaft from the vehicle,
carefully guiding the CV joint through
the strut fork.
Notice: Apply lubricant to the CV boot
edge and the fork edges to facilitate
removal. Do not use undue force as
damage to boot may occur.
6
1 4
2
3
5
7
Caliper Secured to
Spring with Wire
ABS Sensor
Washer
Vacuum Line
Connection
Snap Ring
Lower Ball Joint
Removal Tool
Use Outboard CV Joint as
Slide Hammer to Remove Shaft
Apply Lubricant to
Ease Removal
2 Jaw Puller

interference between the lower control
arm and the new knuckle and/or the
inner seal dust shield on the CV shaft .
10. Inspect the retaining ring on the
output shaft of the front axle, replace if
damaged. Position/rotate the new drive
shaft to line up with the splines in the
front axle output shaft , then install by
pushing it in place, using the outer part
of shaft as a slide hammer. Unload the
suspension and remove the jack.
11. Remove four bolts and separate the
old ball joint from the lower control arm.
Install the ball joint on the new knuckle
and hand tighten the attaching nut.
Notice: Installing the knuckle to the upper
control arm fi rst with the lower ball joint
6 QualityConnection www.kiagenuineparts.com | www.kia.com
Mechanical
8. Mark the edge of the lower control
arm at 1/8-inch from edge as shown.
9. Remove the 1/8-inch of material
marked in Step 8 by grinding the edge at
an angle as shown. Touch up reworked
area with black paint.
Notice: Th is material removal on the
lower control arm is necessary to prevent
11
12 13
8
9
10
already installed on the knuckle will help
prevent damage to the dust shield on the
drive shaft and/or seal.
12. Apply grease to the inner bearing
surface and to both sides of the new
knuckle spacer (0K011-33-044, included
in kit) and install onto the CV joint.
Apply grease to the inner seal in the
new knuckle/hub assembly.
Notice: Th e spacer has a chamfer on the
inside diameter; this chamfer must face
the CV joint.
13. Install the knuckle/hub assembly by
fi rst installing it over the CV axle shaft ,
then insert the upper ball joint through
the top of the knuckle. Retain with the
10 mm pinch bolt and nut.
Mark Control Arm as Shown,
at 1/8” from the Edge.
Grind Edge as Shown, to 1/8”
Mark Made in Previous Step
Use Outboard CV Joint as Slide
Hammer to Install Shaft
Hand Tighten Nut
Apply Grease
to Both Sides
Secure Knuckle
with Pinch Bolt
www.kiagenuineparts.com | www.kia.com QualityConnection 7
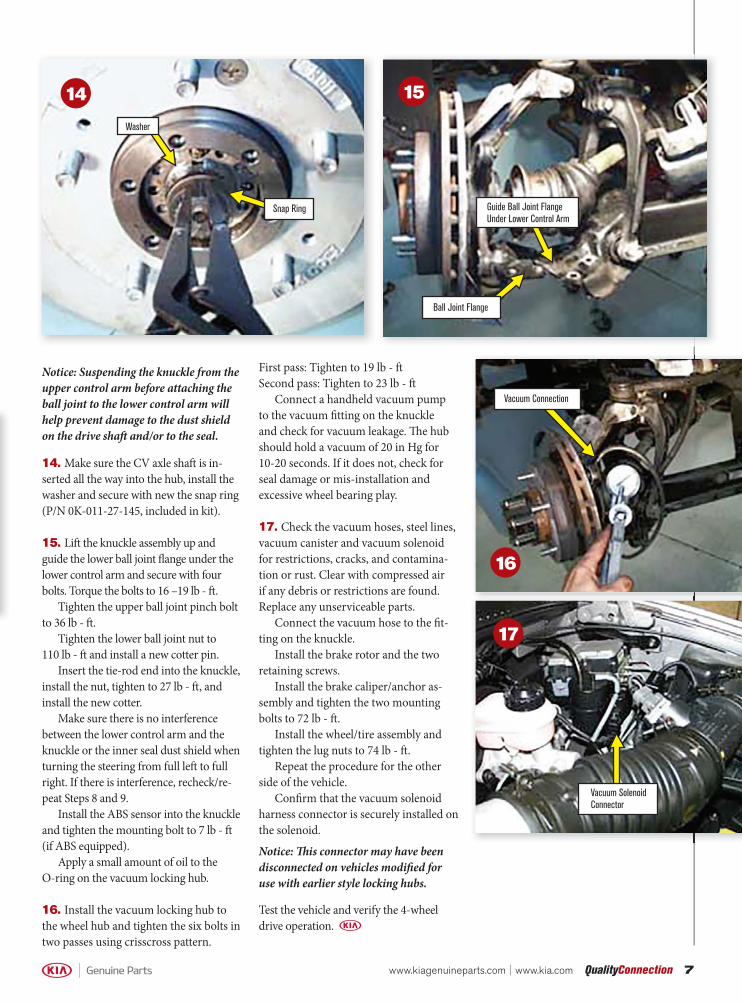
First pass: Tighten to 19 lb - ft
Second pass: Tighten to 23 lb - ft
Connect a handheld vacuum pump
to the vacuum fi tting on the knuckle
and check for vacuum leakage. Th e hub
should hold a vacuum of 20 in Hg for
10-20 seconds. If it does not, check for
seal damage or mis-installation and
excessive wheel bearing play.
17. Check the vacuum hoses, steel lines,
vacuum canister and vacuum solenoid
for restrictions, cracks, and contamina-
tion or rust. Clear with compressed air
if any debris or restrictions are found.
Replace any unserviceable parts.
Connect the vacuum hose to the fi t-
ting on the knuckle.
Install the brake rotor and the two
retaining screws.
Install the brake caliper/anchor as-
sembly and tighten the two mounting
bolts to 72 lb - ft .
Install the wheel/tire assembly and
tighten the lug nuts to 74 lb - ft .
Repeat the procedure for the other
side of the vehicle.
Confi rm that the vacuum solenoid
harness connector is securely installed on
the solenoid.
Notice: Th is connector may have been
disconnected on vehicles modifi ed for
use with earlier style locking hubs.
Test the vehicle and verify the 4-wheel
drive operation.
Notice: Suspending the knuckle from the
upper control arm before attaching the
ball joint to the lower control arm will
help prevent damage to the dust shield
on the drive shaft and/or to the seal.
14. Make sure the CV axle shaft is in-
serted all the way into the hub, install the
washer and secure with new the snap ring
(P/N 0K-011-27-145, included in kit).
15. Lift the knuckle assembly up and
guide the lower ball joint fl ange under the
lower control arm and secure with four
bolts. Torque the bolts to 16 –19 lb - ft .
Tighten the upper ball joint pinch bolt
to 36 lb - ft .
Tighten the lower ball joint nut to
110 lb - ft and install a new cotter pin.
Insert the tie-rod end into the knuckle,
install the nut, tighten to 27 lb - ft , and
install the new cotter.
Make sure there is no interference
between the lower control arm and the
knuckle or the inner seal dust shield when
turning the steering from full left to full
right. If there is interference, recheck/re-
peat Steps 8 and 9.
Install the ABS sensor into the knuckle
and tighten the mounting bolt to 7 lb - ft
(if ABS equipped).
Apply a small amount of oil to the
O-ring on the vacuum locking hub.
16. Install the vacuum locking hub to
the wheel hub and tighten the six bolts in
two passes using crisscross pattern.
14 15
16
17
Washer
Snap Ring Guide Ball Joint Flange
Under Lower Control Arm
Ball Joint Flange
Vacuum Connection
Vacuum Solenoid
Connector

8 QualityConnection www.kiagenuineparts.com | www.kia.com
Getting closure
Body
Striker adjustment alleviates trunk issues You may encounter a 2014MY Forte (YD),
produced between February 1, 2013 through
February 28, 2014, that exhibits a rattling noise
from the trunk area and/or diffi culty closing the
trunk. If you do, following the procedures outlined
in this article may resolve these issues.
»TSBs may be updated from time to time. Please refer to TSB BOD122
at www.kiatechinfo.com for the latest procedures.
»All images are for illustration purposes only.
Model Production Range
Forte (YD) From February 1, 2013 through February 28, 2014
AFFECTED VEHICLE PRODUCTION RANGE

www.kiagenuineparts.com | www.kia.com QualityConnection 9
Service Procedure 1. Locate the two trunk rubber bumpers (A).
2. Check and adjust, if necessary, the height of the rubber
bumper until only one adjustment line (B) is visible above
the trunk surface.
3. Remove the luggage compartment mat (C).
Caution; Use only non-marring trim removal tools (such as
Snap-on® P/N PBN5 or equivalent) to avoid damaging trim
pieces. Wear disposable gloves to avoid soiling interior trim
components.
4. Carefully remove the trunk compartment trim (D).
5. Locate the striker and use a marker to make four reference
marks (E) around the striker, as shown. Note: Th e reference
marks will make it easier to measure striker movement aft er
adjustment.
1
3
42
5
A A
B
C
D
E
FOR
WAR
D

Body
10 QualityConnection www.kiagenuineparts.com | www.kia.com
6. Loosen the two striker mounting bolts (F) by 1/3 of a turn.
Note: Do not loosen the bolts past 1/3 of a turn. Th e bolts must
remain tight.
7. Install a hook adaptor (G) onto the end of a slide hammer,
or a similar tool, and install it onto the striker, as shown.
8. Use the slide hammer to pull straight back on the striker, as
shown. Note: Do not allow the slide hammer to deviate later-
ally while adjusting the striker.
9. Aft er completing the fi rst pulling operation, use a ruler to
measure the amount of striker adjustment, relative to the
reference marks. Note: If more adjustment is required, repeat
step 8 until the striker reaches the required adjustment.
Required adjustment: 0.011”~ 0.019” (0.27 ~ 0.49 mm)
10. Aft er striker adjustment is complete, torque the striker
mounting bolts to specifi cation.
Tightening Torque: 5.1 ~ 8.0 lb-ft (6.9 ~ 10.8 Nm)
11. Reinstall all removed components by reversing the order
of removal.
F
G
6
7
8
9
FOR
WAR
D
10

Nothing compares with genuine when you
expect reliability.
Designed to meet the demands of Kia’s specifications, look no further
than Genuine Kia collision parts. Going with Kia is the best way to
ensure easy installation, precision fitting, durable reliability and value.
Backed by the Kia warranty,* our parts give added confidence when
you’re on the road or away from it.
* Kia Genuine collision parts sold by an Authorized Kia Dealer under warranty are covered for the greater of (1) the duration of the New Vehicle Limited Warranty or (2) the first 12 months from the date of installation of the Kia Genuine replacement parts or 12,000 miles. Labor charges not included when not installed by an Authorized Kia Dealer. Warranty is limited. See Kia’s Replacement Parts and Accessories Limited Warranty for further details.
Reliability
like no other.

�$POUBDU�ZPVS�MPDBM�,JB�EFBMFS�UPEBZ�GPS�BTTJTUBODF�BOE�EFMJWFSZ�PG�ZPVS�QBSUT�
���,JB�(FOVJOF�SFQMBDFNFOU�QBSUT�FYDFQU�CBUUFSZ�TPME�CZ�BO�"VUIPSJ[FE�,JB�%FBMFS�VOEFS�XBSSBOUZ�BSF�DPWFSFE�GPS�UIF�HSFBUFS�PG���UIF�EVSBUJPO
PG�UIF�/FX�7FIJDMF�-JNJUFE�8BSSBOUZ�PS���UIF�GJSTU����NPOUIT�GSPN�UIF�EBUF�PG�JOTUBMMBUJPO�PG�UIF�,JB�(FOVJOF�SFQMBDFNFOU�QBSUT�PS��� ����NJMFT�
-BCPS�DIBSHFT�OPU�JODMVEFE�XIFO�OPU�JOTUBMMFE�CZ�BO�"VUIPSJ[FE�,JB�%FBMFS��8BSSBOUZ�JT�MJNJUFE��4FF�,JBT�3FQMBDFNFOU�1BSUT�BOE�"DDFTTPSJFT�-JNJUFE
8BSSBOUZ�GPS�GVSUIFS�EFUBJMT�
"OE�(FOVJOF�,JB�NVGGMFST�BSF�
FOHJOFFSFE�UP�UIF�IJHIFTU�
TUBOEBSET�UP�BDIJFWF�UIBU�
4PNFUJNFT�JUT�PCWJPVT�UIBU�UIF�
WFIJDMFT�ZPV�TFSWJDF�OFFE�B�OFX�
NVGGMFS�
&WFO�JG�UIF�OPJTF�DPVME�CF�UPMFSBUFE �
IPX�BCPVU�UIF�MFBLBHF�PG�FYIBVTU�
HBTFT �
"OE�JUT�OPU�KVTU�UIF�OPJTF�PS�GVNFT�
UIBU�DVTUPNFST�OFFE�UP�XPSSZ�
BCPVU��5IF�NVGGMFS�JT�B�DSJUJDBM�QBSU�
PG�BO�FNJTTJPOT�TZTUFN��8IFO�JU�
JT�DPNQSPNJTFE �WFIJDMF�FGGJDJFODZ�
NJHIU�CF�DPNQSPNJTFE�JO�UFSNT�PG�
QFSGPSNBODF�BOE�HBT�NJMFBHF�
*OTQFDU�ZPVS�DVTUPNFST�WFIJDMFT�BOE�
BEWJTF�UIFN�BCPVU�UIF�DPOEJUJPO�PG�
UIFJS�NVGGMFST�BOE�FOUJSF�FYIBVTU�
TZTUFN �GPS�UIBU�NBUUFS��*G�UIFSF�JT�
FYDFTTJWF�DPSSPTJPO�PS�EBNBHF�UP�B�
NVGGMFS �SFDPNNFOEJOH�B�SFQMBDFNFOU�
DPVME�CF�JO�PSEFS���
/PUIJOH�TQFBLT�MPVEFS�UIBO�IFMQJOH�
TJMFODF�ZPVS�DVTUPNFST�WFIJDMFT�
$POUBDU�ZPVS�MPDBM�
,JB�EFBMFS�UPEBZ�GPS�
BTTJTUBODF�BOE�EFMJWFSZ�
PG�ZPVS�QBSUT�
5IF�TJMFOU�USFBUNFOU5IBUT�XIBU�ZPVS�DVTUPNFST�XBOU�GSPN�UIFJS�WFIJDMFT���
![KIA ACT KIA.pdf · 2017-10-04 · System of the FBR {that all suppliers have filed their Monthly Returns}] so as ... As the following items have already been included under SIXTH](https://img.pdfslide.us/doc/110x75/5e94252ce9d3c26ae91311cb/kia-act-kiapdf-2017-10-04-system-of-the-fbr-that-all-suppliers-have-filed.jpg)