Embed Size (px)
Citation preview
QUALCOMM GlobalstarPacket DataUser Guide
Attention Windows Users! After this manual was written, QUALCOMM simplified the installation process for you. Instead of reading the Windows chapter in this manual, see the Quick Start guide in your kit.

This guide is based on the production version of the QUALCOMM Globalstar GSP-1600 Tri-Mode Phone. Software changes may have occurred after this printing.
QUALCOMM reserves the right to make changes in technical and product specifications without prior notice.
QUALCOMM Incorporated5775 Morehouse Drive, San Diego, CA 92121-1714 U.S.A.
Document Number 80-99126-1EN Rev. -
Copyright © 2000 QUALCOMM IncorporatedAll rights reserved
This technology was exported from the United States Government. Diversion contrary to U.S. law prohibited.
QUALCOMM® is a registered trademark of QUALCOMM IncorporatedSmart Key™ is a trademark of QUALCOMM Incorporated
Globalstar™ is a trademark of Loral Qualcomm Satellite Services, Incorporated
All other trademarks and registered trademarks are the property of their respective owners.
Printed in the United States of America

iii
Cautions and Warnings
CautionAvoid exposing the phone and accessories to rain or other liquids. If the phone gets wet, turn the power off immediately and remove the battery pack.
NoteWhen using a QUALCOMM Globalstar Tri-Mode Phone for Globalstar packet data, observe the same safety guidelines that apply when making voice calls. For complete details, see the “Cautions and Warnings” and “Safety Information” sections of the QUALCOMM Globalstar GSP-1600 Tri-Mode Phone User Guide (document number 80-98153-1).

iv

v
Contents
Getting Started ..........................................................................................1What Is QUALCOMM Globalstar Packet Data Service? ....................1What Does Globalstar Packet Data Service Let Me Do? .....................1How Does It Work? ................................................................................1What Do I Need to Use Globalstar Packet Data? ................................2
Using Your Tri-Mode Phone ..........................................................2Using Your Computer ....................................................................3Using Cables and Accessories ........................................................4Working with Your Service Provider .............................................4
Windows Computers ................................................................................5Connecting Windows Components .......................................................5Configuring Your Windows PC .............................................................7Instructions for Windows 95, 98, and NT .............................................8
Setting Up a New Modem Driver (95, 98, NT) ..............................8Setting Up Dial-Up Networking (95, 98, NT) .............................15
Instructions for Windows 2000 ...........................................................24Setting Up a New Modem Driver (Windows 2000) .....................24Setting Up a New Connection (Windows 2000) ..........................30
Making a Globalstar Packet Data Connection ...................................40Using Typical Communication Applications ......................................41
Macintosh Computers ............................................................................43Connecting Macintosh Components ...................................................43Configuring Your Macintosh ...............................................................46
Copying the Modem Script File to Your Macintosh ...................46Configuring Remote Access ..........................................................46
Making a Globalstar Packet Data Connection ...................................53Using Typical Communication Applications ......................................54
Palm Handhelds .......................................................................................55Connecting Palm Components ............................................................55Configuring Your Palm Handheld ......................................................57
Setting Up a Modem .....................................................................57Setting Up Your Network Connection .........................................59
Making a Globalstar Packet Data Connection ...................................61Using Palm Communication Applications .........................................63
UNIX Computers ......................................................................................65Connecting UNIX Components ...........................................................65Configuring Your Solaris UNIX Computer ........................................67
Setting Up the PPP Client ...........................................................67Checking the GS Packet Data Setup ...........................................69Making a Globalstar Packet Data Connection ...........................69
Configuring Your Linux Computer .....................................................70Setting Up the Modem and PPP Connection ..............................70Configuring the PPP Connection .................................................72Configuring the Name Server ......................................................75Saving Your Settings ....................................................................76Making a Globalstar Packet Data Connection ...........................77

vi
QUALCOMM Globalstar Hands-Free Car Kit ...................................79Connecting Car Kit Components ........................................................79
Commercially Available Accessories ..................................................81Indoor/Outdoor Extension Cable ........................................................81Palm Cable and Null Modem Adapter ................................................81Macintosh Modem Cable and Adapter ...............................................81QUALCOMM Globalstar Hands-Free Car Kit Cable ........................82
Troubleshooting ......................................................................................83Supported AT Commands .....................................................................87

1
Getting Started
What Is QUALCOMM Globalstar Packet Data Service?
QUALCOMM Globalstar packet data service lets you access the Internet or other TCP/IP packet-switched networks through your QUALCOMM Globalstar GSP-1600 Tri-Mode Phone.
For a packet data connection, your QUALCOMM Globalstar Tri-Mode Phone serves as a wireless modem. It connects a computer, such as a laptop or Palm handheld, to the Internet via the Globalstar Satellite Communications System.
What Does Globalstar Packet Data Service Let Me Do?
Once you have connected, you can use familiar software applications such as Eudora, Netscape Navigator, or Microsoft Internet Explorer for anything you would normally do through your network provider or Internet Service Provider (ISP). For example, you could
■ Browse the Internet■ Access e-mail■ Transmit information■ Use telnet (for example to connect with host applications at work)■ Transfer files using FTP (File Transfer Protocol)And you can do all of these from virtually any location, at over-the-air data rates of up to 9600 bits per second, with no additional modem or dedicated telephone circuits required.
How Does It Work?
Here’s a quick overview of how Globalstar packet data service works.
Cable
■ Connect your QUALCOMM Globalstar Tri-Mode Phone to the computer or Palm handheld, using a QUALCOMM serial data cable and any optional accessories.
Configure
■ Configure your computer or Palm handheld organizer to use Globalstar packet data service (you need to do this only once).
Connect
■ Click a GS Packet Data connection icon or menu on your computer.■ The QUALCOMM Globalstar Tri-Mode Phone establishes a packet
data connection to the Globalstar Satellite Communications System, using Point-to-Point Protocol (PPP).

2 Getting Started
Cruise
■ Open the application you want to use, for example an Internet browser where you type in a Web address.
■ Your computer or Palm handheld sends data packets to the Tri-Mode Phone.
■ The Tri-Mode Phone transmits data packets to a satellite and Gateway in the Globalstar Satellite Communications System.
■ Packets are routed to and from your network service provider through the Globalstar Satellite System.
■ A router in the Globalstar Gateway connects to the Internet.
What Do I Need to Use Globalstar Packet Data?
To use Globalstar packet data service, you need:
■ A QUALCOMM Globalstar GSP-1600 Tri-Mode Phone■ A computer or Palm handheld capable of Internet access using PPP■ QUALCOMM serial data cable (included, along with this manual, in
the QUALCOMM Globalstar Packet Data Kit: For the Tri-Mode Portable Satellite Phone)
■ Optional cables or accessories as needed, to connect the QUALCOMM data cable to your computer (using a TIA/EIA-574 DTE serial interface)
Using Your Tri-Mode PhoneFor packet data connections, your QUALCOMM Globalstar GSP-1600 Tri-Mode Phone works much as it would for a voice call. Here are some general tips for using your Tri-Mode Phone for packet data:
■ Make sure the Tri-Mode Phone battery is charged and properly installed.
■ Position the Tri-Mode Phone outdoors where its Globalstar Satellite Antenna has an unimpeded view of the sky (or mount it in a vehicle using a QUALCOMM Globalstar Hands-Free Car Kit).
i
Computer Tri-Mode PhoneGateway
Satellite Dish
GatewaySatellite Dish
Internet /TCP/IP packet
network
717AA_00

Getting Started 3
■ Make sure that tall obstacles, such as buildings and trees, do not block sky (satellite) access.
■ Extend the Globalstar Satellite Antenna to point straight up to the sky.■ Lay the Tri-Mode Phone on its side on a convenient surface such as a
table for hands-free operation.■ Never hold the Tri-Mode Phone by the Globalstar Satellite Antenna.■ Remember, the Tri-Mode Phone will not work inside a building, nor
will it work in a vehicle unless you are using a car kit.
NoteFor complete details about how to use your QUALCOMM Globalstar Tri-Mode Phone, see the QUALCOMM Globalstar GSP-1600 Tri-Mode Phone User Guide (document number 80-98153-1).
Using Your Computer
Compatible Computer Systems
You can use Globalstar packet data service with the following computers and operating systems (OS):
■ IBM-compatible PCs❑ Microsoft Windows 95, 98, NT 4.0, 2000❑ One available serial port (for connecting the Tri-Mode Phone)❑ For setup instructions, see “Windows Computers” on page 5
■ Apple Macintosh computers❑ Mac OS 7.6 or higher ❑ For setup instructions, see “Macintosh Computers” on page 43
■ Palm handheld organizers❑ Palm OS❑ Palm handheld organizer with a serial port❑ For setup instructions, see “Palm Handhelds” on page 55
■ UNIX Computers❑ Red Hat Linux ❑ Solaris UNIX❑ For setup instructions, see “UNIX Computers” on page 65
Where to Position Your Computer
You have several options for positioning a computer to use Globalstar packet data service:
■ Take a portable computer (laptop or Palm handheld) outdoors and connect it near the Tri-Mode Phone, for example on a picnic table.
■ Connect an optional extension cable (see “Commercially Available Accessories” on page 81) between a computer inside a building and the Tri-Mode Phone outdoors.
■ In a vehicle, use a QUALCOMM Globalstar Hands-Free Car Kit (and serial cable) to connect a computer to a Tri-Mode Phone.

4 Getting Started
Using Cables and AccessoriesCables or accessories connect your QUALCOMM Globalstar Tri-Mode Phone to your computer. They vary depending on the computer type:
NoteFor more information about optional accessories, see “Commercially Available Accessories” on page 81.
Working with Your Service ProviderWhen you use Globalstar packet data service, your network provider or Internet Service Provider (ISP) supplies your Internet service through the Globalstar Gateway.
Check with your service provider for details about their service features.
Computer Cables and accessories needed
IBM-compatible PC (Windows)
■ QUALCOMM serial data cable (included in the QUALCOMM Globalstar Packet Data Kit)
■ optional USB-to-serial adapter, if your PC uses USB (Universal Serial Bus) connectors
■ optional extension cable, if desired
Apple Macintosh
■ QUALCOMM serial data cable (included in kit)■ Macintosh modem cable■ adapter (female 25-pin to male 9-pin)■ optional USB-to-serial adapter, if your Mac uses
USB (Universal Serial Bus) connectors■ optional extension cable, if desired
Palm handheld ■ QUALCOMM serial data cable (included in kit)■ Palm HotSync cable (or appropriate Palm cable)■ null modem adapter, male 9-pin on both ends■ optional extension cable, if desired
Red Hat Linux, Solaris UNIX
■ QUALCOMM serial data cable (included in kit)■ optional extension cable, if desired
QUALCOMM Globalstar Hands-Free Car Kit
■ serial cable with a male 9-pin connector on one end and a female 9-pin connector on the other
■ other cables or adapters as listed above for your specific computer (for setup instructions, see “QUALCOMM Globalstar Hands-Free Car Kit” on page 79)
5
Windows Computers
This chapter tells how to configure a computer running Windows 95, 98, NT, or 2000 to use Globalstar packet data service. To do this, you physically connect the computer to your QUALCOMM Globalstar Tri-Mode Phone, then configure a “modem” driver and a new dial-up networking connection.
NotePhysically connecting hardware components is similar for all Windows versions. However, modem/networking configuration differs significantly for Windows 2000. See “Instructions for Windows 95, 98, and NT” on page 8 or “Instructions for Windows 2000” on page 24, as appropriate.
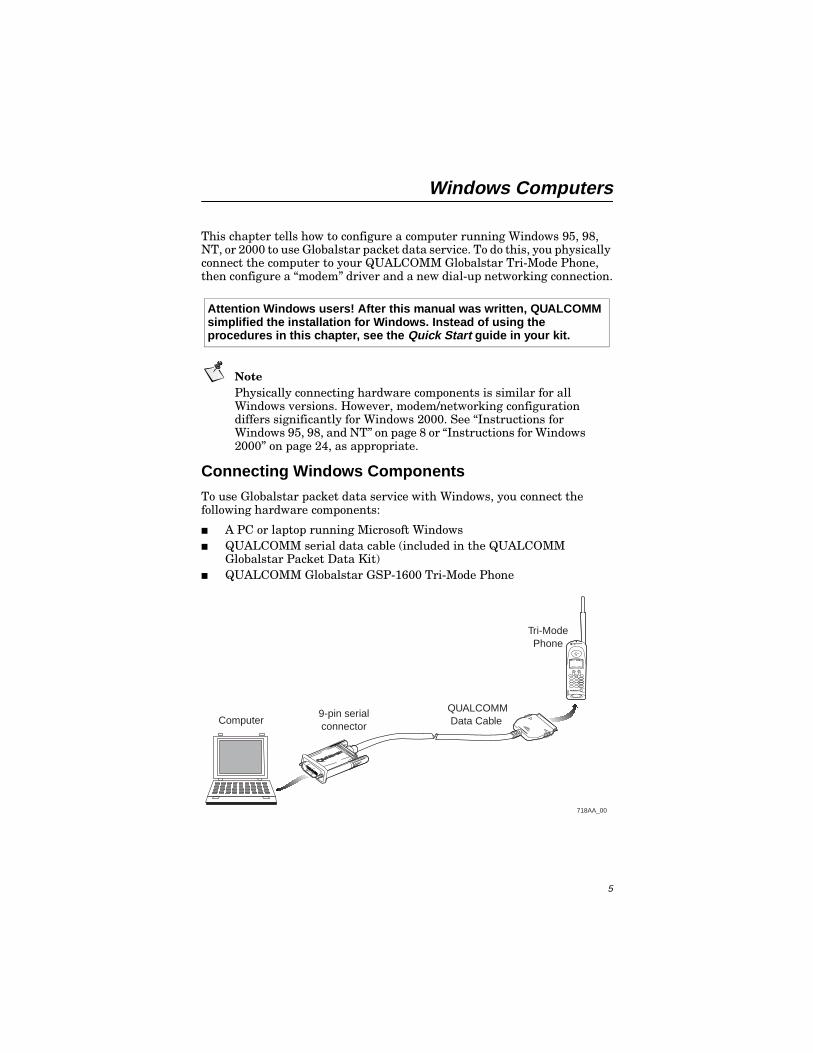
Connecting Windows Components
To use Globalstar packet data service with Windows, you connect the following hardware components:
■ A PC or laptop running Microsoft Windows■ QUALCOMM serial data cable (included in the QUALCOMM
Globalstar Packet Data Kit)■ QUALCOMM Globalstar GSP-1600 Tri-Mode Phone
Attention Windows users! After this manual was written, QUALCOMM simplified the installation for Windows. Instead of using the procedures in this chapter, see the Quick Start guide in your kit.
i
Computer
Tri-ModePhone
Globalstar data cable
9-pin serialconnector
718AA_00
QUALCOMMData Cable

6 Windows Computers
To connect a Windows PC to the Tri-Mode Phone
1. Turn off the power on your QUALCOMM Globalstar Tri-Mode Phone. You can leave your computer turned on.
2. Attach the QUALCOMM data cable’s 9-pin serial connector to a serial COM port (RS-232) on your PC, then manually tighten the screws to hold it in place.
3. Holding the other end of the QUALCOMM data cable, press both buttons on the side of the connector, then insert it into your Tri-Mode Phone with the arrow facing up (toward the phone’s keypad). The connector should snap into place for a secure fit.
4. Turn on your Tri-Mode Phone.5. Extend the Globalstar Satellite Antenna to a 90o position.
NoteIf you cannot obtain a signal with the Globalstar Satellite Antenna in a 90o position, try rotating it further until you feel it click into place.
723AA_00
724AA_00
Pw
rEnd
Sen
d
Info
Clr
1 4 7
2 5 8 0
3 6 9
*#
+abc
def
jkl
mno
tuv
ghi
pqrs
wxy
z
| men
u |
| boo
k |
GLO
BA
LSTA
Ri
90°
Windows Computers 7
Configuring Your Windows PC
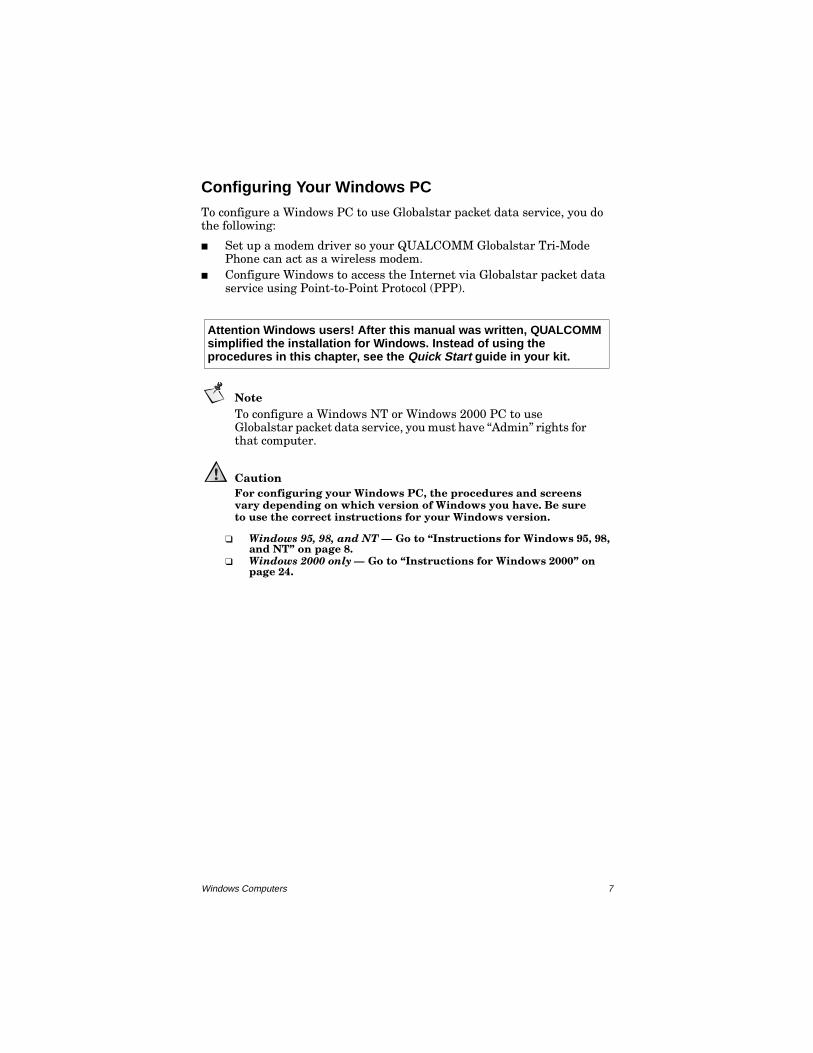
To configure a Windows PC to use Globalstar packet data service, you do the following:
■ Set up a modem driver so your QUALCOMM Globalstar Tri-Mode Phone can act as a wireless modem.
■ Configure Windows to access the Internet via Globalstar packet data service using Point-to-Point Protocol (PPP).
NoteTo configure a Windows NT or Windows 2000 PC to use Globalstar packet data service, you must have “Admin” rights for that computer.
CautionFor configuring your Windows PC, the procedures and screens vary depending on which version of Windows you have. Be sure to use the correct instructions for your Windows version.
❑ Windows 95, 98, and NT — Go to “Instructions for Windows 95, 98, and NT” on page 8.
❑ Windows 2000 only — Go to “Instructions for Windows 2000” on page 24.
Attention Windows users! After this manual was written, QUALCOMM simplified the installation for Windows. Instead of using the procedures in this chapter, see the Quick Start guide in your kit.

8 Windows Computers
Instructions for Windows 95, 98, and NT
This section applies to Windows 95, 98, and NT. The sample screens use Windows 98, but only minor differences exist between versions.
NoteIf you are using Windows 2000, go to “Instructions for Windows 2000” on page 24.
Setting Up a New Modem Driver (95, 98, NT)1. Go to the Windows Control Panel, then double-click Modems.
2. In the Modem Properties dialog, click Add to add your new “modem.”
The Install New Modem wizard appears. Follow the procedures below to enter appropriate information in the wizard dialogs.
Selecting the Type of Modem1. In the Install new Modem dialog, select “Other.”2. Click Next.
2

Windows Computers 9
Telling Windows Not to Auto-Detect the Modem1. Select “Don’t detect my modem; I will select it from a list.”
Since your QUALCOMM Globalstar Tri-Mode Phone acts as a wireless modem, there is no physical modem to detect.
2. Click Next.
1
2
1
2

10 Windows Computers
Selecting a Standard Modem1. From the “Manufacturers:” list, select “(Standard Modem Types).”2. From the “Models” list, select “Standard 33600 bps Modem.
orIf you are using Windows NT, select “Standard 19200 bps Modem.” (Windows NT does not include modem drivers for speeds above 28800.)
3. Click Next.
Selecting the COM Port1. Select the Communications (COM) Port to which you have connected
the QUALCOMM data cable. This must be an RS-232-capable serial COM port (COM1 is the standard).
CautionWindows NT allows only one modem to be assigned to a given COM port. If you connect your Globalstar phone on a port where a modem has alreadybeen installed, Windows NT deletes the setting for the previous modem.
2. Click Next.
2
1
3

Windows Computers 11
3. When the wizard says, “Your modem has been set up successfully,” click Finish to complete the modem installation.
Setting Modem Properties1. In the Modems Properties dialog, on the General tab, select the modem
you previously selected (“Standard 33600 bps Modem” or “Standard 19200 bps Modem”).
2. Click Properties.
1
2
2
1

12 Windows Computers
Setting the Maximum Speed1. In the Standard [33600 or 19200 bps] Modem Properties dialog, make sure
the COM port is correct for your QUALCOMM data cable connection.2. Set “Maximum Speed” to 38400 bps.
The maximum speed for the modem must match the baud rate on your Tri-Mode Phone (38400 bps is the phone’s default). If the speeds are not the same, the computer cannot communicate with the Tri-Mode Phone.
TipYou can check or change the baud rate on your Tri-Mode Phone by selecting menu, then selecting Features > Data > Baud Rate. If the baud rate on your Tri-Mode Phone is not set to 38400 bps, be sure to change the modem’s maximum speed so that the two speeds match.
Note38400 bps is the speed at which the Tri-Mode Phone communicates with your computer, not the speed at which it communicates with the Gateway.
3. Click the Connection tab.
1
2
3
Windows Computers 13
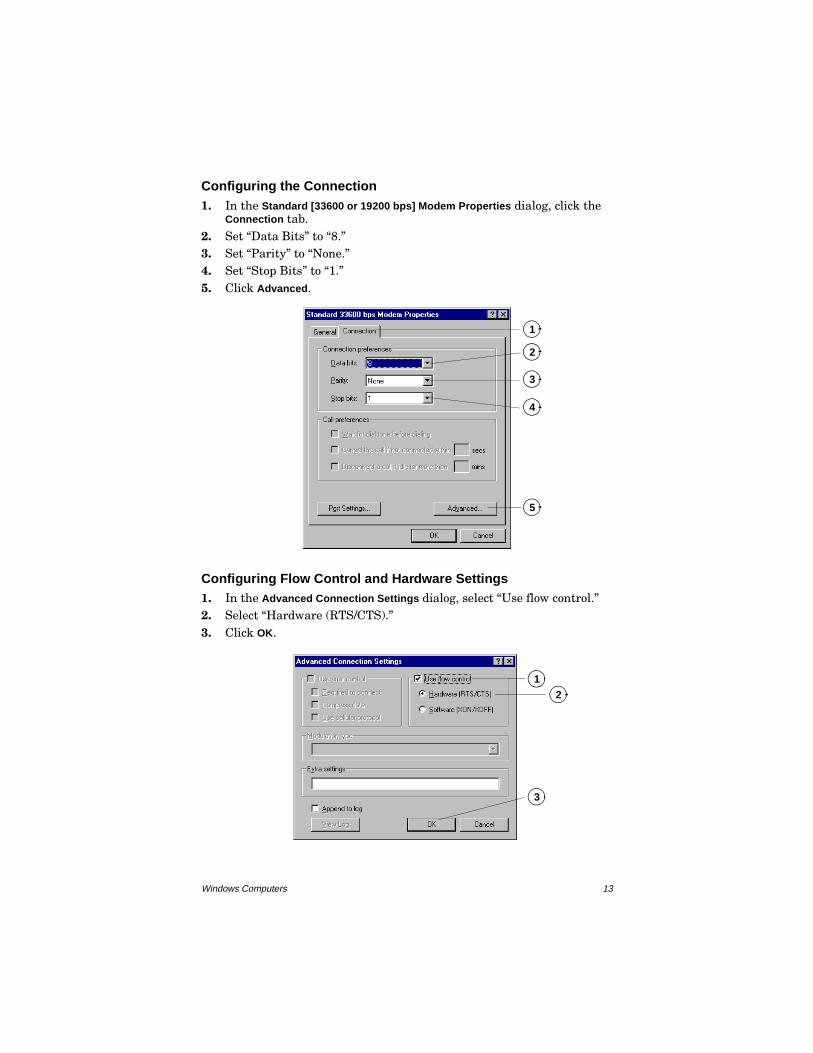
Configuring the Connection1. In the Standard [33600 or 19200 bps] Modem Properties dialog, click the
Connection tab.2. Set “Data Bits” to “8.”3. Set “Parity” to “None.”4. Set “Stop Bits” to “1.”5. Click Advanced.
Configuring Flow Control and Hardware Settings1. In the Advanced Connection Settings dialog, select “Use flow control.”2. Select “Hardware (RTS/CTS).”3. Click OK.
2
3
4
5
1
12
3
14 Windows Computers
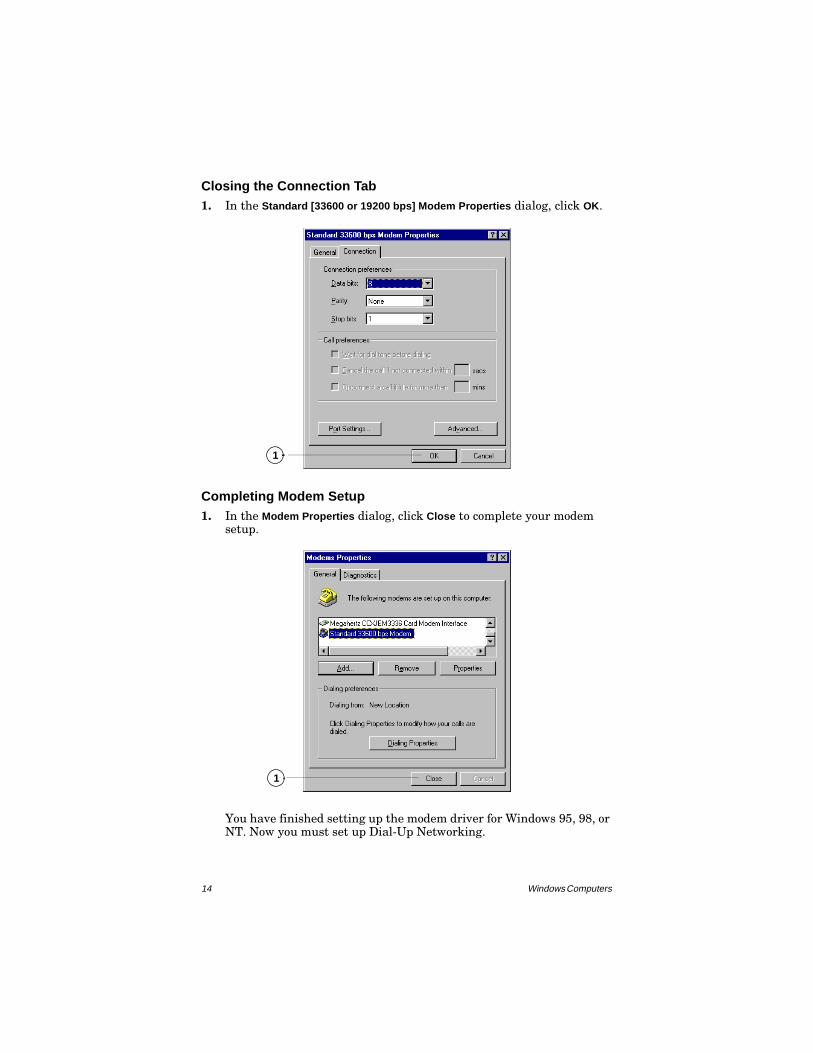
Closing the Connection Tab1. In the Standard [33600 or 19200 bps] Modem Properties dialog, click OK.
Completing Modem Setup1. In the Modem Properties dialog, click Close to complete your modem
setup.
You have finished setting up the modem driver for Windows 95, 98, or NT. Now you must set up Dial-Up Networking.
1
1

Windows Computers 15
Setting Up Dial-Up Networking (95, 98, NT)This section applies to Windows 95, 98, and NT. For Windows 2000, do not use the procedures in this section. Instead, go to “Setting Up a New Connection (Windows 2000)” on page 30.
Making a New Connection1. On your Windows desktop, double-click My Computer.2. In the My Computer window, double-click Dial-Up Networking.3. If a Dial-Up Networking window containing a Make New Connection icon
appears, Dial-Up Networking is already installed on your computer; go to Step 4.
If a Dial-Up Networking wizard containing an Install button appears, Dial-Up Networking is not installed. Click Install, then follow the wizard dialogs to install it. You may need your Windows installation disks. When installation is complete, go to Step 4.
4. In the Dial-Up Networking window, double-click the Make New Connection icon.orIf you are using Windows NT, double-click New.
4
16 Windows Computers
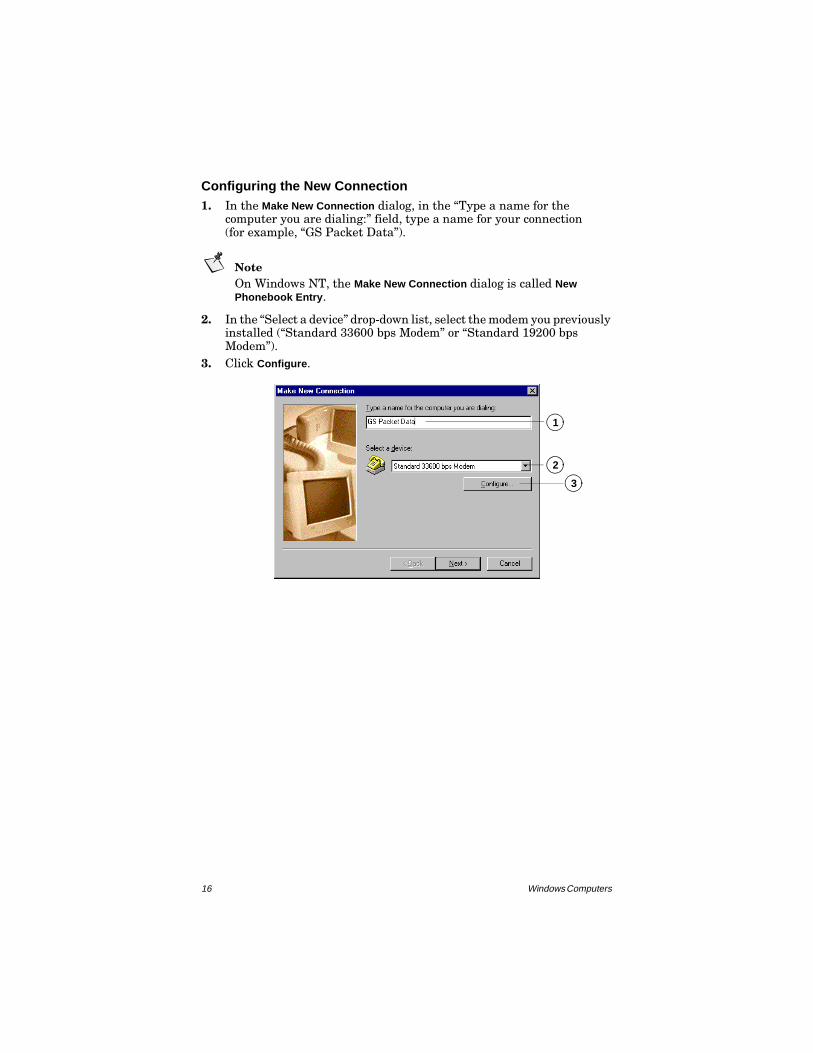
Configuring the New Connection1. In the Make New Connection dialog, in the “Type a name for the
computer you are dialing:” field, type a name for your connection (for example, “GS Packet Data”).
NoteOn Windows NT, the Make New Connection dialog is called New Phonebook Entry.
2. In the “Select a device” drop-down list, select the modem you previously installed (“Standard 33600 bps Modem” or “Standard 19200 bps Modem”).
3. Click Configure.
1
2
3

Windows Computers 17
Configuring Modem Properties1. In the Standard [33600 or 19200 bps] Modem Properties dialog, on the
General tab, make sure the port and maximum speed (38400 bps) match what you set for the modem (under “Setting the Maximum Speed” on page 12).
NoteOn Windows NT, “Maximum speed” is called “Initial speed.”
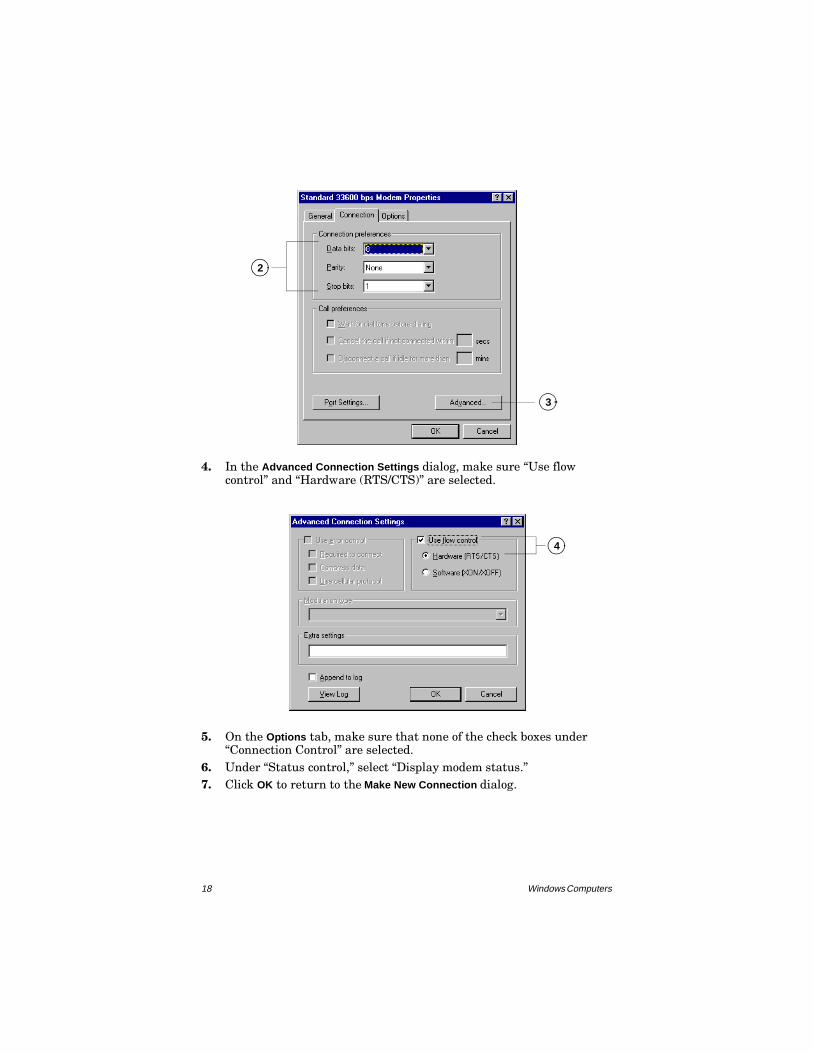
2. On the Connection tab, make sure the “Connection preferences” are set to “8,” “None,” “1.”
3. Click Advanced.
1
18 Windows Computers
4. In the Advanced Connection Settings dialog, make sure “Use flow control” and “Hardware (RTS/CTS)” are selected.
5. On the Options tab, make sure that none of the check boxes under “Connection Control” are selected.
6. Under “Status control,” select “Display modem status.”7. Click OK to return to the Make New Connection dialog.
2
3
4

Windows Computers 19
Making a New Connection1. In the Make New Connection dialog, click Next.2. Do not type anything in the “Area code:” field. Make sure it is empty. 3. In the “Telephone number:” field, type “#777.”
“#777” is a special number that tells the Tri-Mode Phone to make a packet data connection.
4. In the “Country Code” field, select any country (for example, your home country).
5. Click Next.
5
6
7
2 3
4
5

20 Windows Computers
6. To create your connection, click Finish.
Your packet data connection (for instance, “GS Packet Data”) should now appear in the Dial-Up Networking window. You can drag your connection icon to the desktop to create a shortcut, if you prefer.
Setting Connection Properties1. In the Dial-Up Networking window (or on your desktop), right-click the
packet data connection icon that you have created (for instance, “GS Packet Data”) and select Properties.orIf you are using Windows NT, under “Phone entry to dial,” select the connection you created, click More, then select “Edit entry and modem properties....”
6
1

Windows Computers 21
2. In the GS Packet Data dialog, click the Server Types tab.orIf you are using Windows NT, click the Server tab.
3. Under “Type of Dial-Up Server,” select “PPP.”4. Under “Advanced options,” select “Enable software compression.”5. Under “Allowed network protocols,” select “TCP/IP.”6. Click TCP/IP Settings.
3
4
65

22 Windows Computers
Configuring TCP/IP Settings1. In the TCP/IP Settings dialog, select “Server assigned IP address.”2. Select “Specify name server addresses,” then enter the primary and
secondary DNS addresses assigned by your Service Provider or ISP.
NoteDNS address numbers in the illustration are examples only. Ask your Service Provider or ISP for the numbers you should enter.
3. Select “Use IP Header Compression.”4. Select “Use default gateway on remote network.”5. Click OK.
6. In the GS Packet Data dialog, click OK.
Setting Dial Properties1. Double-click your packet data connection icon.
orIf you are using Windows NT, make sure “Phone number preview” reads “#777.” At this point, for Windows NT, you have finished setting up Dial-Up Networking. To make a Globalstar connection, skip ahead to “Making a Globalstar Packet Data Connection” on page 40.
2. In the Connect To dialog, check the “Phone number” field to make sure that the “#” character appears in front of the “777.” If it does not, you must add it to the next dialog, in Step 6.Some versions of Windows may not retain the “#” as part of the telephone number, even though you entered it under “Making a New Connection” on page 15.
2
1
3
4
5
Windows Computers 23
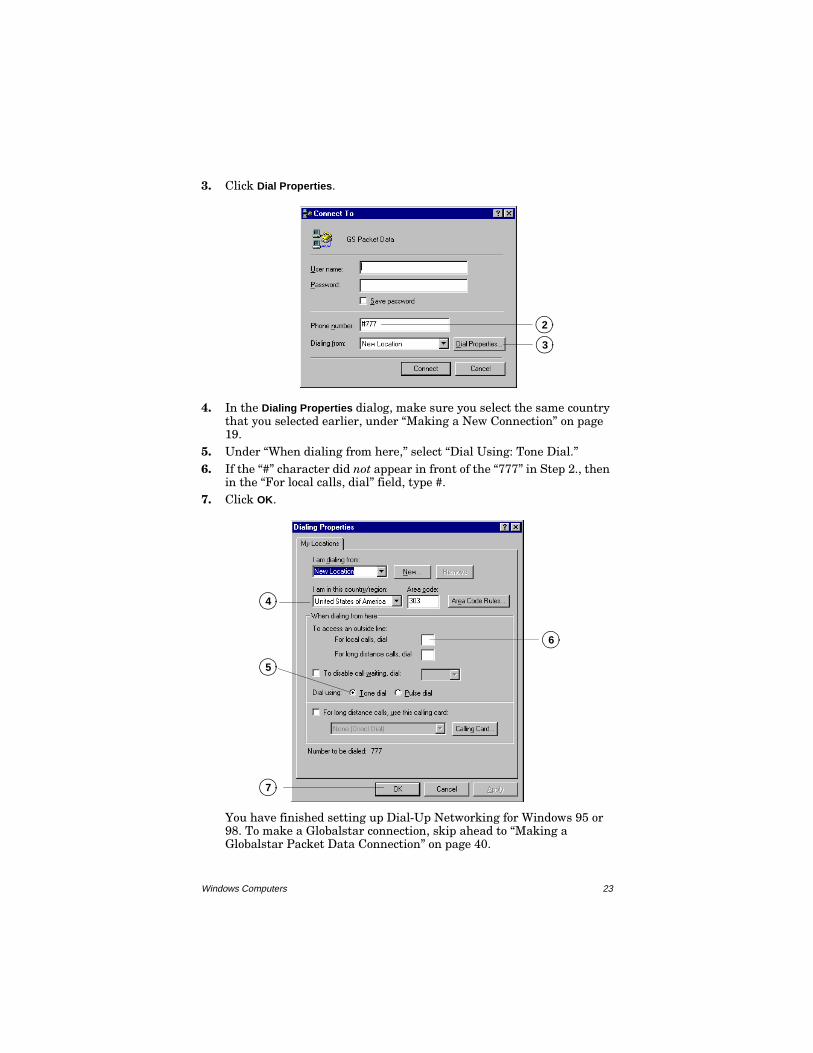
3. Click Dial Properties.
4. In the Dialing Properties dialog, make sure you select the same country that you selected earlier, under “Making a New Connection” on page 19.
5. Under “When dialing from here,” select “Dial Using: Tone Dial.” 6. If the “#” character did not appear in front of the “777” in Step 2., then
in the “For local calls, dial” field, type #.7. Click OK.
You have finished setting up Dial-Up Networking for Windows 95 or 98. To make a Globalstar connection, skip ahead to “Making a Globalstar Packet Data Connection” on page 40.
3
2
4
5
7
6
24 Windows Computers
Instructions for Windows 2000
This section applies only to Windows 2000.
NoteIf you are using another version of Windows, do not use the procedures in this section. Instead, go to “Instructions for Windows 95, 98, and NT” on page 8.
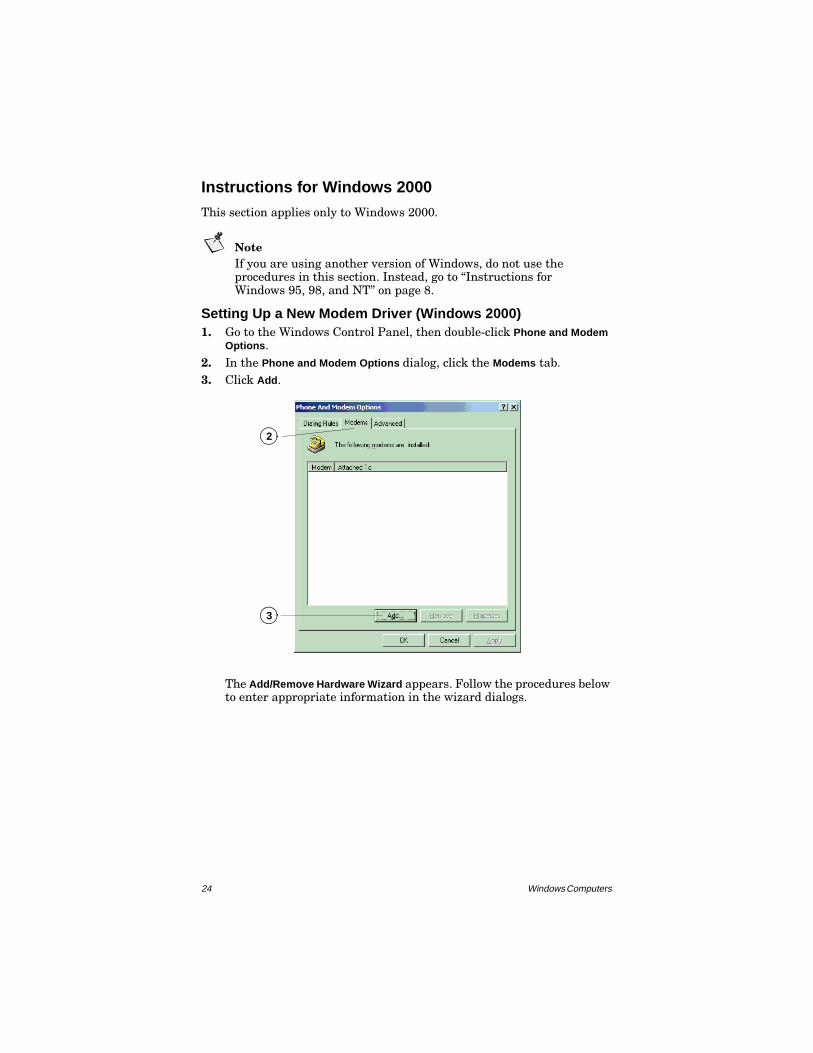
Setting Up a New Modem Driver (Windows 2000)1. Go to the Windows Control Panel, then double-click Phone and Modem
Options.2. In the Phone and Modem Options dialog, click the Modems tab.3. Click Add.
The Add/Remove Hardware Wizard appears. Follow the procedures below to enter appropriate information in the wizard dialogs.
3
2
Windows Computers 25
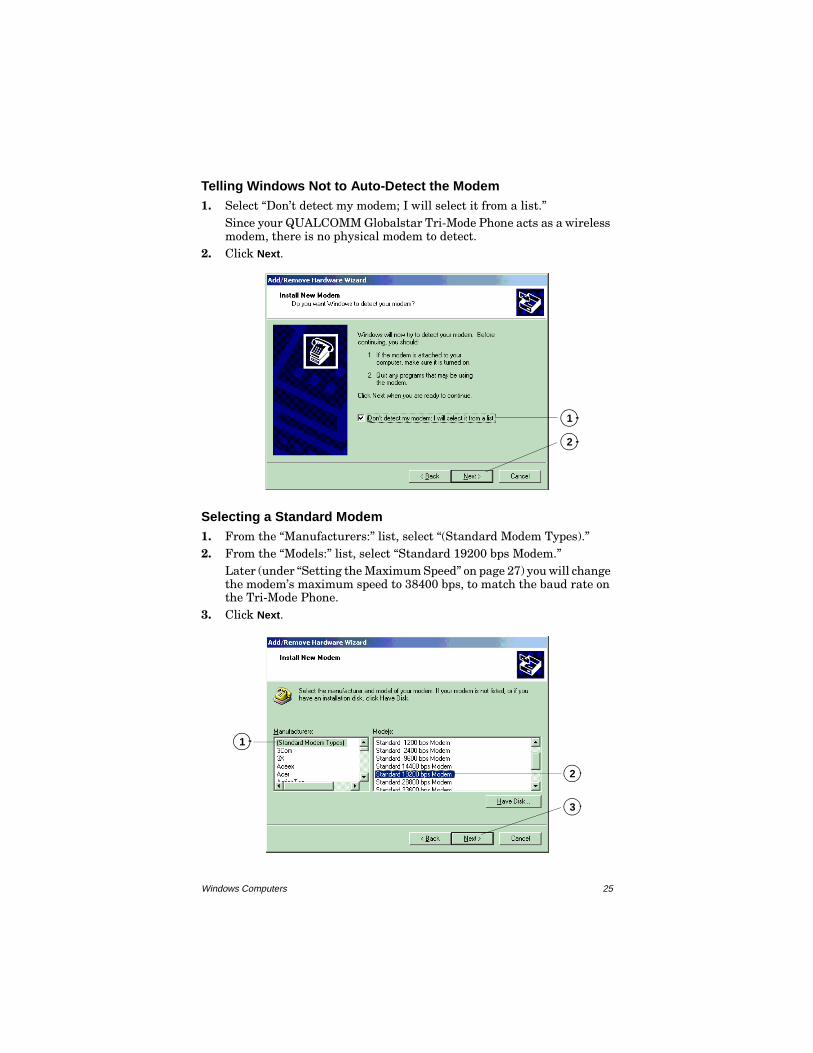
Telling Windows Not to Auto-Detect the Modem1. Select “Don’t detect my modem; I will select it from a list.”
Since your QUALCOMM Globalstar Tri-Mode Phone acts as a wireless modem, there is no physical modem to detect.
2. Click Next.
Selecting a Standard Modem1. From the “Manufacturers:” list, select “(Standard Modem Types).”2. From the “Models:” list, select “Standard 19200 bps Modem.”
Later (under “Setting the Maximum Speed” on page 27) you will change the modem’s maximum speed to 38400 bps, to match the baud rate on the Tri-Mode Phone.
3. Click Next.
1
2
2
1
3
26 Windows Computers
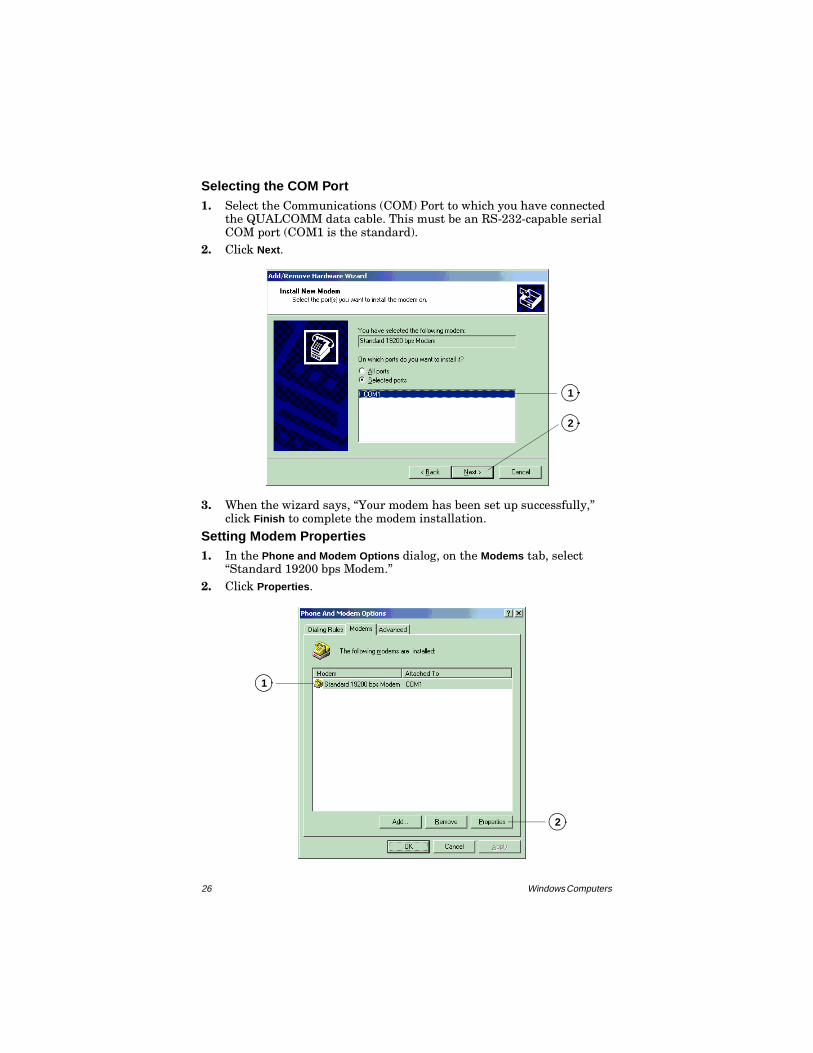
Selecting the COM Port1. Select the Communications (COM) Port to which you have connected
the QUALCOMM data cable. This must be an RS-232-capable serial COM port (COM1 is the standard).
2. Click Next.
3. When the wizard says, “Your modem has been set up successfully,” click Finish to complete the modem installation.
Setting Modem Properties1. In the Phone and Modem Options dialog, on the Modems tab, select
“Standard 19200 bps Modem.”2. Click Properties.
1
2
2
1

Windows Computers 27
Setting the Maximum Speed1. In the Standard 19200 bps Modem Properties dialog, make sure the COM
port is correct for your QUALCOMM data cable connection.2. Set “Maximum Port Speed” to 38400 bps.
The maximum speed for the modem must match the baud rate on your Tri-Mode Phone (38400 bps is the phone’s default). If the speeds are not the same, the computer cannot communicate with the Tri-Mode Phone.
TipYou can check or change the baud rate on your Tri-Mode Phone by selecting menu, then selecting Features > Data > Baud Rate. If the baud rate on your Tri-Mode Phone is not set to 38400 bps, be sure to change the modem’s maximum speed so that the two speeds match.
Note38400 bps is the speed at which the Tri-Mode Phone communicates with your computer, not the speed at which it communicates with the Gateway.
3. In the Standard 19200 bps Modem Properties dialog, click the Advanced tab.
1
23
28 Windows Computers
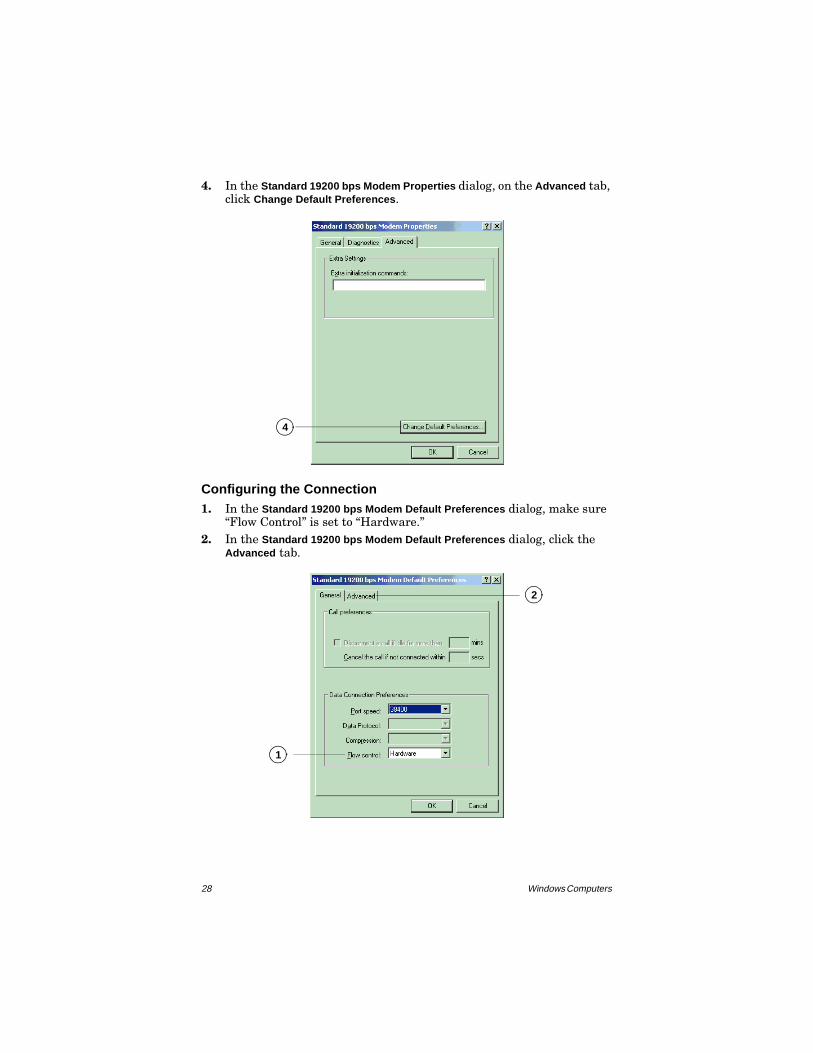
4. In the Standard 19200 bps Modem Properties dialog, on the Advanced tab, click Change Default Preferences.
Configuring the Connection1. In the Standard 19200 bps Modem Default Preferences dialog, make sure
“Flow Control” is set to “Hardware.”2. In the Standard 19200 bps Modem Default Preferences dialog, click the
Advanced tab.
4
1
2

Windows Computers 29
3. Set “Data Bits” to “8.”4. Set “Parity” to “None.”5. Set “Stop Bits” to “1.”6. Click OK.
Completing the Modem Setup1. In the Standard 19200 bps Modem Properties dialog, click OK.
6
3
5
4
1

30 Windows Computers
2. In the Phone and Modem Options dialog, click OK.
You have finished setting up the modem driver for Windows 2000. Now you must set up a new connection.
Setting Up a New Connection (Windows 2000)The procedures in this section apply only to Windows 2000. Before you create a new connection in Windows 2000, you must set up the modem driver. See “Setting Up a New Modem Driver (Windows 2000)” on page 24.
Opening Network and Dial-up Connections1. Go to the Windows Control Panel, then double-click Network and Dial-Up
Connections.
2

Windows Computers 31
Configuring the Connection1. In the Network and Dial-Up Connections window, double-click the Make
New Connection icon.2. In the Network Connection Wizard dialog, click Next.
3. Select “Dial-up to the Internet.” 4. Click Next.
2
3
4

32 Windows Computers
5. Select “I want to set up my Internet connection manually, or I want to connect through a local area network (LAN).
6. Click Next.
7. Under “How do you connect to the Internet?” select “I connect through a phone line and a modem.”
8. Click Next.
5
6
7
8

Windows Computers 33
Providing Account Information1. Under “Internet account connection information,” make sure that the
“Use area code and dialing rules” check box is not selected.2. In the “Telephone number” field, type “#777.”
“#777” is a special number that tells the Tri-Mode Phone to make a packet data connection.
3. Click Next.
4. On the account logon screen, leave the “User name” and “Password” fields blank.
5. Click Next.
3
1
2
4
5

34 Windows Computers
A message box appears, asking if you want to continue with a blank user name.
6. Click Yes.
A similar message box appears, asking if you want to continue with a blank password.
7. Click Yes.If you have a user name and password for connecting to your ISP, you will be prompted for these later when you make a Globalstar packet data connection.
Naming Your Dial-Up Connection1. In the “Connection name” field, type a name for your dial-up connection
(for example, “GS Packet Data”).2. Click Next.
6
1
2

Windows Computers 35
Completing the Configuration1. On the “Set Up Your Internet Mail Account” screen, under “Do you
want to set up an Internet account now?”, select No.An Internet mail account is not required for Globalstar Packet Data.
2. Click Next.
3. On the “Completing the Internet Connection Wizard” screen, make sure the check box for “To connect to the Internet immediately” is not selected.
4. Click Finish.
2
1
4
3

36 Windows Computers
Configuring Networking Properties1. In the Network and Dial-up Connections window, right-click the GS Packet
Data icon (or the icon for whatever you have named your dial-up connection).
2. In the popup menu, select Properties.3. On the GS Packet Data Properties dialog, click the Networking tab.4. Select “Internet Protocol (TCP/IP).”5. Click Properties.
4
5
3
Windows Computers 37
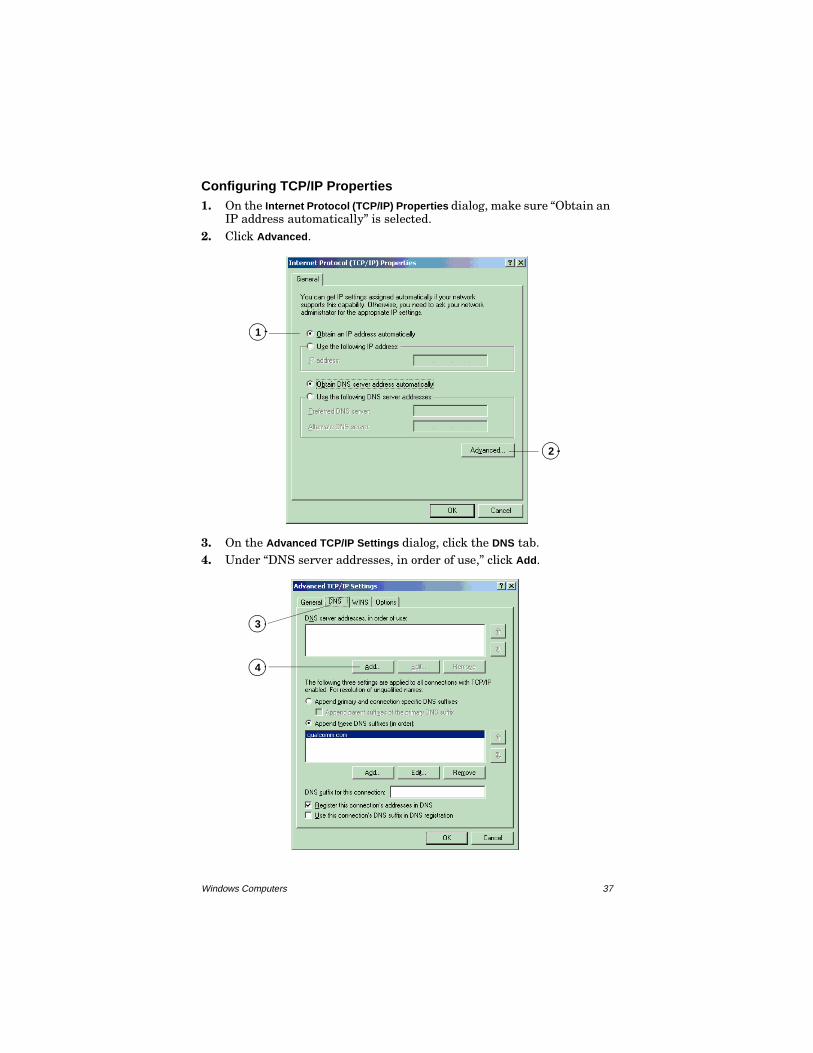
Configuring TCP/IP Properties1. On the Internet Protocol (TCP/IP) Properties dialog, make sure “Obtain an
IP address automatically” is selected.2. Click Advanced.
3. On the Advanced TCP/IP Settings dialog, click the DNS tab.4. Under “DNS server addresses, in order of use,” click Add.
1
2
3
4

38 Windows Computers
5. In the TCP/IP DNS Server dialog, in the “DNS server” field, enter the primary (or “preferred”) DNS address assigned by your Service Provider or ISP.
6. Click Add.
NoteDNS address numbers in the illustration are examples only. Ask your Service Provider or ISP for the numbers you should enter.
7. If you have a secondary (or “alternate”) DNS address, enter it by repeating Step 4., Step 5., and Step 6.
Completing Advanced TCP/IP Settings1. On the Advanced TCP/IP Settings dialog, select “Append these DNS
suffixes (in order).”2. Under “Append these DNS suffixes (in order),” click Add.
6
5
1
2

Windows Computers 39
3. In the TCP/IP Domain Suffix dialog, enter the domain name assigned by your Service Provider or ISP (for example, “abc.company.com”).
4. Click Add.
NoteThe domain name in the illustration is an example only. Ask your Service Provider or ISP for the name you should enter.
5. If you have a secondary domain name (suffix), repeat Step 2., Step 3., and Step 4.
6. On the Advanced TCP/IP Settings dialog, click OK.The Internet Protocol (TCP/IP) Properties dialog appears, showing the DNS server addresses that you entered.
7. On the Internet Protocol (TCP/IP) Properties dialog, click OK.
8. In the GS Packet Data Properties dialog, click OK.You have finished creating your new connection for Windows 2000. To make a Globalstar connection, go to the next section, “Making a Globalstar Packet Data Connection” on page 40.
4
3
7

40 Windows Computers
Making a Globalstar Packet Data Connection
CautionOn your computer, make sure that no other application is using the serial port (e.g., COM1) assigned for Globalstar Packet Data. If another application, such as Palm HotSync Manager, blocks the serial port, disable its control over the port before attempting a Globalstar Packet Data connection.
To make a packet data connection
1. Make sure the Tri-Mode Phone is properly connected to your PC or laptop (as described in “Connecting Windows Components” on page 5).
2. Turn on your Tri-Mode Phone.3. Extend the Tri-Mode Phone’s Globalstar Satellite Antenna and make
sure you have a Globalstar signal.4. On your computer, double-click the icon you created for your packet
data connection (for instance, “GS Packet Data”).5. When the Connect To dialog opens, click Connect.
orFor Windows 2000: Click Dial.(Leave the User name and Password fields blank.)
While the Tri-Mode Phone is establishing the packet data connection, the Tri-Mode Phone screen looks like this:
You are connected to the network when the Verifying Username and Password window on your computer minimizes and the Tri-Mode Phone screen says “PPP @ 9.6.” The “PPP @ 9.6” indicates that the over-the-air data rate is 9600 bps. (The “T R” status stands for Transmit and Receive.)
You can now open typical communication applications to do anything you would normally do through an Internet Service Provider (ISP).
| menu |
Connecting..PPP Data #777
| menu |
Time: 0:12 PPP @ 9.6Status: T R

Windows Computers 41
To disconnect a packet data connection
1. Double-click the packet data connection (or the connection icon in the right-hand bottom corner of the screen).
2. Click Disconnect.
Using Typical Communication Applications
Once you have established a Globalstar packet data service connection, you can use any communication applications using IP network protocol, for instance Internet Web browsers, e-mail, FTP, or telnet applications.
The CD that came with your QUALCOMM Globalstar Packet Data Kit may include some typical communication applications for Windows, such as Eudora, Netscape Navigator, or Microsoft Internet Explorer.

42 Windows Computers
43
Macintosh Computers
This chapter tells how to configure an Apple Macintosh computer to use Globalstar packet data service. To do this, you physically connect the Macintosh to your QUALCOMM Globalstar Tri-Mode Phone, select a modem script, and configure remote access.
You can use Globalstar packet data service with a Macintosh running OS 7.6 or higher.
NoteThe following examples use Macintosh OS 9. Setup for other OS versions and PPP applications may vary.
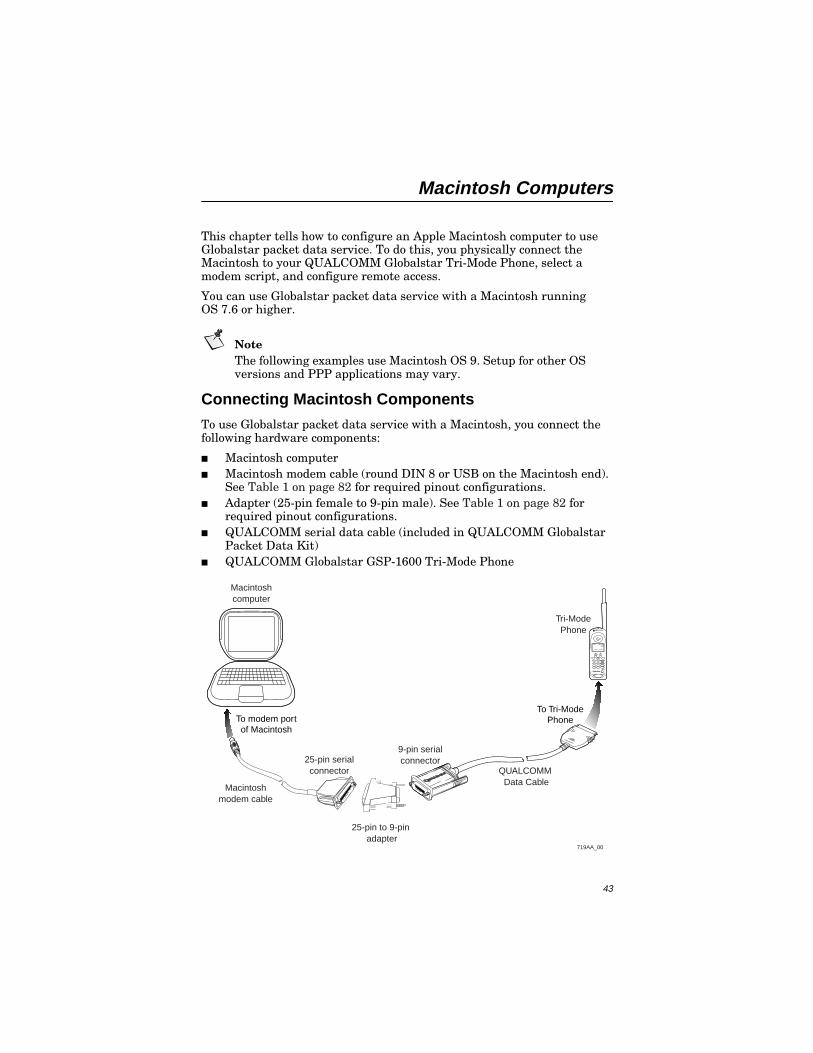
Connecting Macintosh Components
To use Globalstar packet data service with a Macintosh, you connect the following hardware components:
■ Macintosh computer■ Macintosh modem cable (round DIN 8 or USB on the Macintosh end).
See Table 1 on page 82 for required pinout configurations.■ Adapter (25-pin female to 9-pin male). See Table 1 on page 82 for
required pinout configurations.■ QUALCOMM serial data cable (included in QUALCOMM Globalstar
Packet Data Kit)■ QUALCOMM Globalstar GSP-1600 Tri-Mode Phone
i
Macintoshcomputer
Tri-ModePhone
QUALCOMM Data Cable
25-pin serialconnector
Macintoshmodem cable
25-pin to 9-pin adapter
9-pin serialconnector
719AA_00
To modem portof Macintosh
To Tri-ModePhone
44 Macintosh Computers
To connect a Macintosh computer to the Tri-Mode Phone
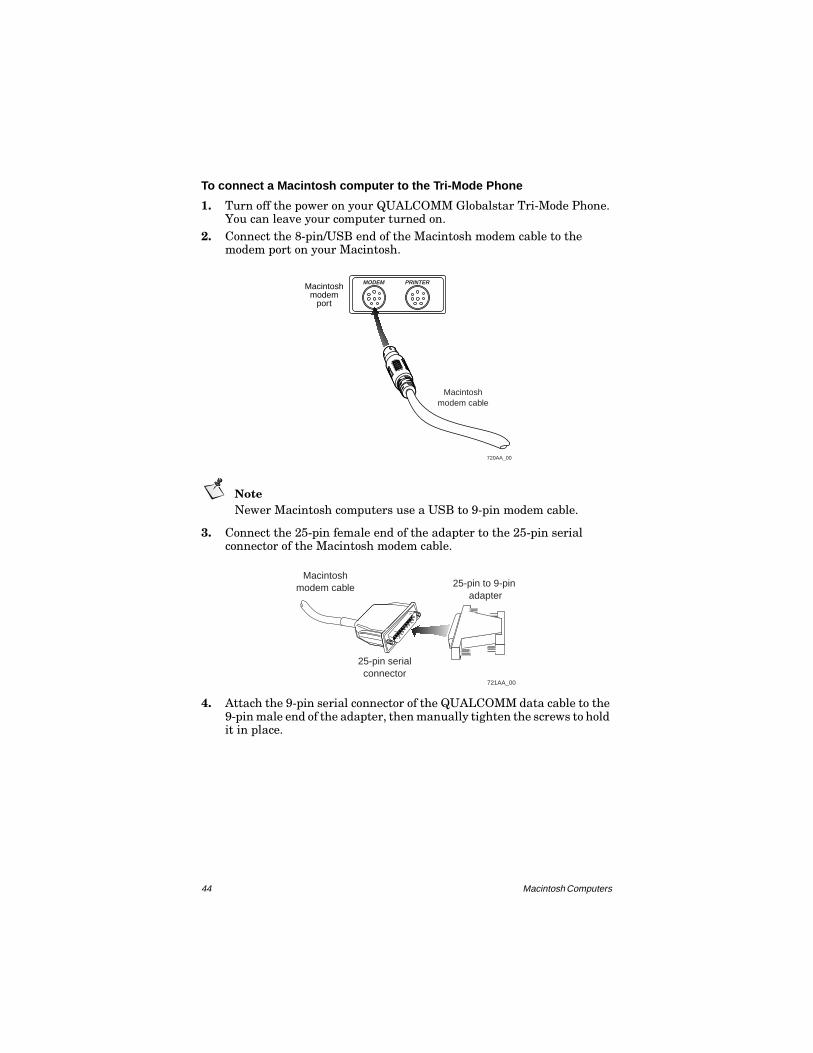
1. Turn off the power on your QUALCOMM Globalstar Tri-Mode Phone. You can leave your computer turned on.
2. Connect the 8-pin/USB end of the Macintosh modem cable to the modem port on your Macintosh.
NoteNewer Macintosh computers use a USB to 9-pin modem cable.
3. Connect the 25-pin female end of the adapter to the 25-pin serial connector of the Macintosh modem cable.
4. Attach the 9-pin serial connector of the QUALCOMM data cable to the 9-pin male end of the adapter, then manually tighten the screws to hold it in place.
Macintoshmodem cable
720AA_00
Macintosh modem
port
MODEM PRINTER
721AA_00
25-pin serialconnector
Macintoshmodem cable 25-pin to 9-pin
adapter

Macintosh Computers 45
5. Holding the other end of the QUALCOMM data cable, press both buttons on the side of the connector, then insert it into your Tri-Mode Phone with the arrow facing up (toward the phone’s keypad). The connector should snap into place for a secure fit.
6. Turn on your Tri-Mode Phone.7. Extend the Globalstar Satellite Antenna to a 90o position.
NoteIf you cannot obtain a signal with the Globalstar Satellite Antenna in a 90o position, try rotating it further until you feel it click into place.
722AA_00
25-pin to 9-pin adapter
9-pin serialconnector
Globalstar data cable
723AA_00
724AA_00
Pw
rEnd
Sen
d
Info
Clr
1 4 7
2 5 8 0
3 6 9
*#
+abc
def
jkl
mno
tuv
ghi
pqrs
wxy
z
| men
u |
| boo
k |
GLO
BA
LSTA
Ri
90°

46 Macintosh Computers
Configuring Your Macintosh
To configure a Macintosh computer to use Globalstar packet data service, you do the following:
■ Copy the modem script file to your Macintosh.■ Configure remote access.■ Configure the protocol and modem settings.
Copying the Modem Script File to Your Macintosh1. Locate the CD included in the QUALCOMM Globalstar Packet Data
Kit, then insert it into the CD-ROM drive of your Macintosh.2. Using the Finder, copy the “QUALCOMM Globalstar Phone Modem”
file from the CD to: System Folder > Extensions > Modem Scripts.The “QUALCOMM Globalstar Phone Modem” file is a script containing modem settings that work with Globalstar packet data service.
Configuring Remote Access
Creating a New Configuration
1. From the Apple menu, select Control Panels, then select Remote Access.The Remote Access dialog appears showing the last active setting.
2. From the Remote Access pulldown menu, select File > Configurations.3. If the Configurations dialog appears (meaning that some Remote Access
configuration already exists), select “Default” from the configuration list.If Remote Access has not been configured previously, a wizard appears to guide you through a process similar to what is documented here.
4. Click Duplicate.
3
4

Macintosh Computers 47
5. In the Duplicate Configuration dialog, type “GS Packet Data” as the name for the duplicate configuration.
6. Click OK.
7. In the Configurations dialog, select your new GS Packet Data configuration in the list.
8. Click Make Active.9. Click Done to accept the changes and close the Configurations dialog.
5
6
9 8
7

48 Macintosh Computers
Setting Up Remote Access
1. In the Remote Access (GS Packet Data) dialog, select “Setup” to see all the fields.
2. In the “Name” field, type your user name.You must fill in this field to activate the Connect button.
3. Leave the “Password” field blank.4. In the “Number” field, type “#777.”
“#777” is a special number that tells the Tri-Mode Phone to make a packet data connection.
5. Click Options.
1
4
2
5
3
Macintosh Computers 49
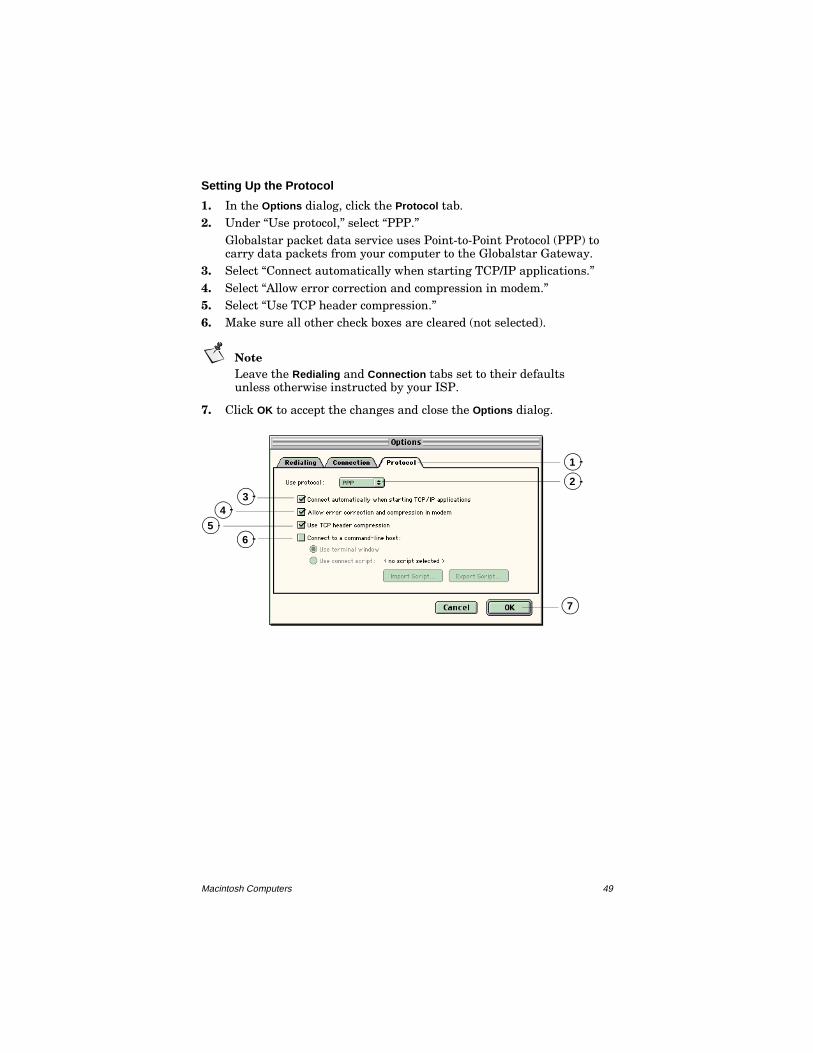
Setting Up the Protocol
1. In the Options dialog, click the Protocol tab.2. Under “Use protocol,” select “PPP.”
Globalstar packet data service uses Point-to-Point Protocol (PPP) to carry data packets from your computer to the Globalstar Gateway.
3. Select “Connect automatically when starting TCP/IP applications.”4. Select “Allow error correction and compression in modem.”5. Select “Use TCP header compression.”6. Make sure all other check boxes are cleared (not selected).
NoteLeave the Redialing and Connection tabs set to their defaults unless otherwise instructed by your ISP.
7. Click OK to accept the changes and close the Options dialog.
45
1
7
23
6
50 Macintosh Computers
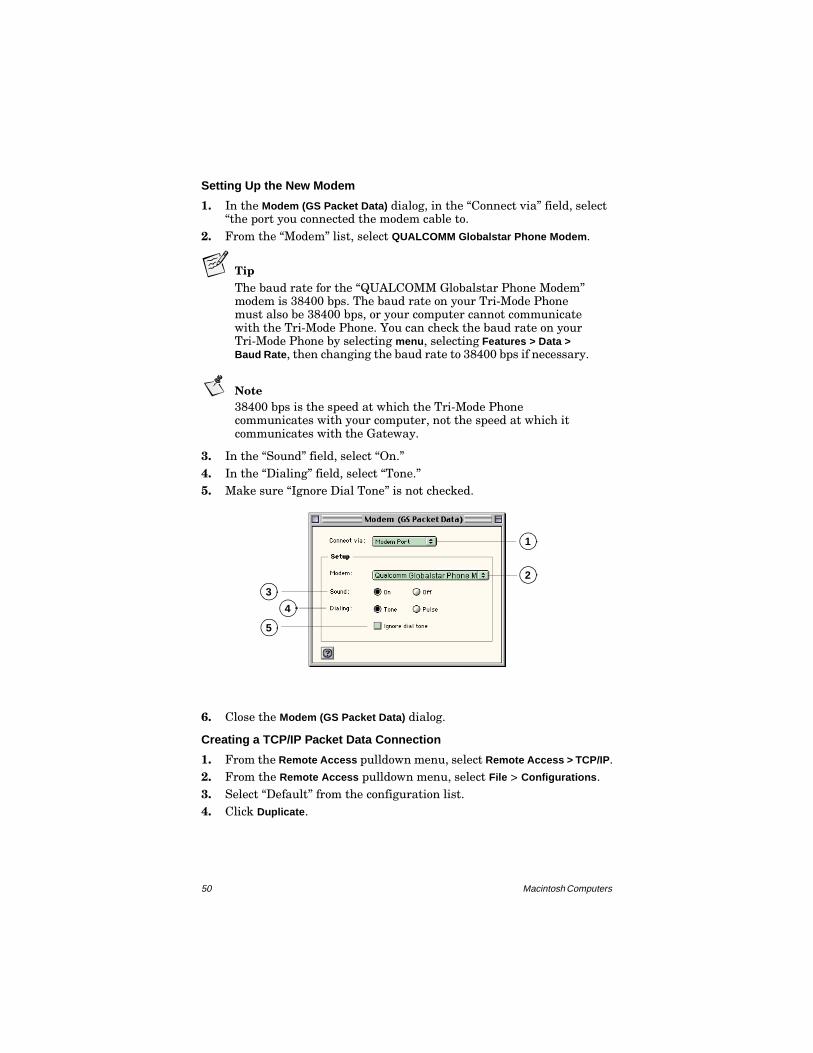
Setting Up the New Modem
1. In the Modem (GS Packet Data) dialog, in the “Connect via” field, select “the port you connected the modem cable to.
2. From the “Modem” list, select QUALCOMM Globalstar Phone Modem.
TipThe baud rate for the “QUALCOMM Globalstar Phone Modem” modem is 38400 bps. The baud rate on your Tri-Mode Phone must also be 38400 bps, or your computer cannot communicate with the Tri-Mode Phone. You can check the baud rate on your Tri-Mode Phone by selecting menu, selecting Features > Data > Baud Rate, then changing the baud rate to 38400 bps if necessary.
Note38400 bps is the speed at which the Tri-Mode Phone communicates with your computer, not the speed at which it communicates with the Gateway.
3. In the “Sound” field, select “On.”4. In the “Dialing” field, select “Tone.”5. Make sure “Ignore Dial Tone” is not checked.
6. Close the Modem (GS Packet Data) dialog.
Creating a TCP/IP Packet Data Connection
1. From the Remote Access pulldown menu, select Remote Access > TCP/IP.2. From the Remote Access pulldown menu, select File > Configurations.3. Select “Default” from the configuration list.4. Click Duplicate.
1
2
3
4
5

Macintosh Computers 51
5. In the Duplicate Configuration dialog, type “GS Packet Data” as the name for the duplicate configuration.
6. Click OK.
7. In the Configurations dialog, select your new GS Packet Data configuration in the list.
8. Click Make Active.9. Click Done to accept the changes and close the Configurations dialog.
3
4
5
6
9 8
7
52 Macintosh Computers
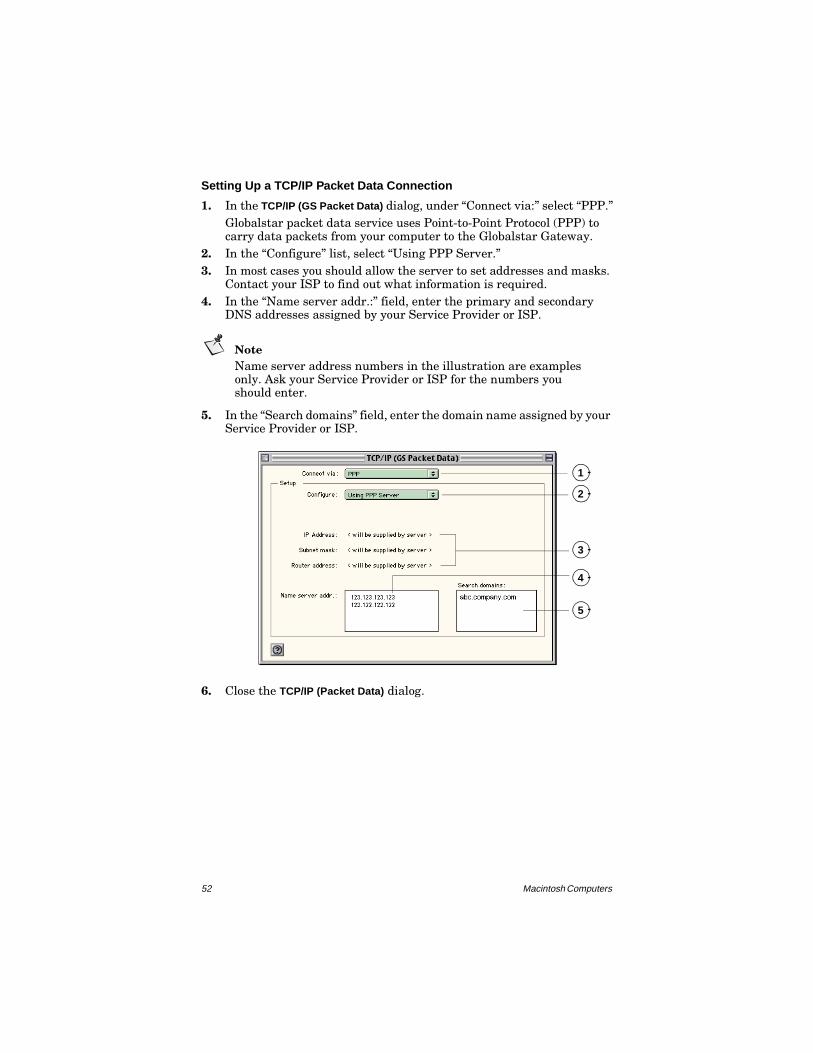
Setting Up a TCP/IP Packet Data Connection
1. In the TCP/IP (GS Packet Data) dialog, under “Connect via:” select “PPP.”Globalstar packet data service uses Point-to-Point Protocol (PPP) to carry data packets from your computer to the Globalstar Gateway.
2. In the “Configure” list, select “Using PPP Server.”3. In most cases you should allow the server to set addresses and masks.
Contact your ISP to find out what information is required.4. In the “Name server addr.:” field, enter the primary and secondary
DNS addresses assigned by your Service Provider or ISP.
NoteName server address numbers in the illustration are examples only. Ask your Service Provider or ISP for the numbers you should enter.
5. In the “Search domains” field, enter the domain name assigned by your Service Provider or ISP.
6. Close the TCP/IP (Packet Data) dialog.
1
2
3
4
5
Macintosh Computers 53
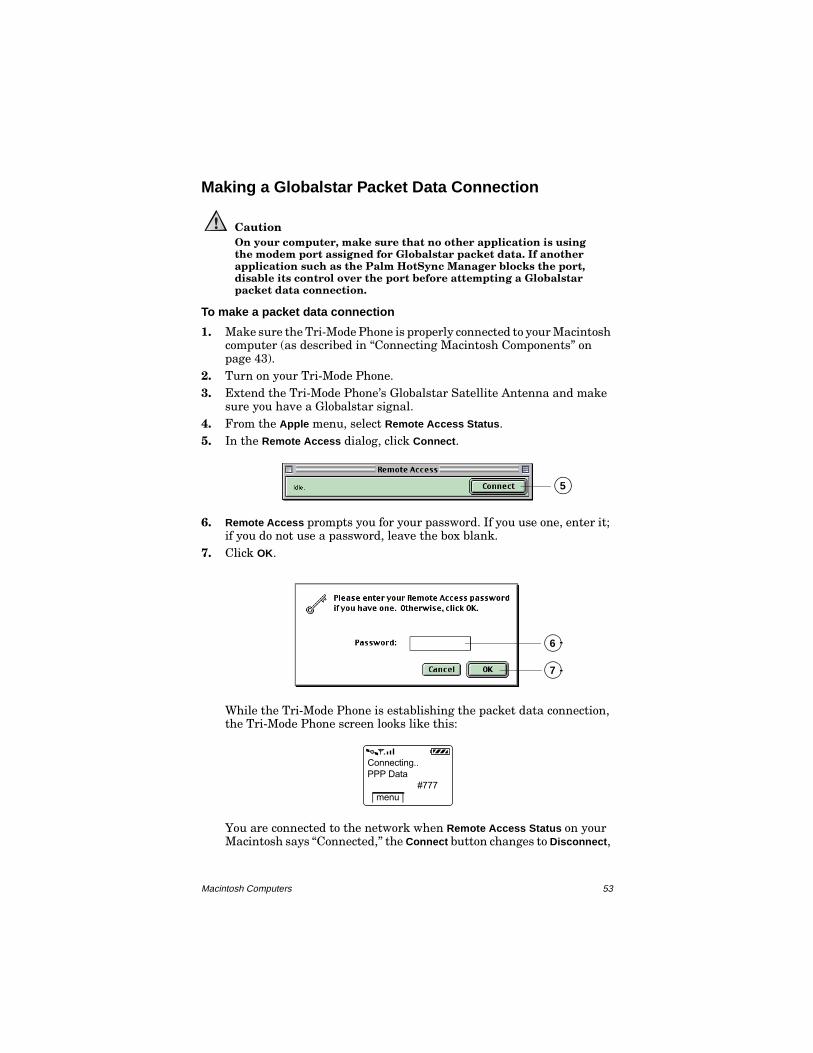
Making a Globalstar Packet Data Connection
CautionOn your computer, make sure that no other application is using the modem port assigned for Globalstar packet data. If another application such as the Palm HotSync Manager blocks the port, disable its control over the port before attempting a Globalstar packet data connection.
To make a packet data connection
1. Make sure the Tri-Mode Phone is properly connected to your Macintosh computer (as described in “Connecting Macintosh Components” on page 43).
2. Turn on your Tri-Mode Phone.3. Extend the Tri-Mode Phone’s Globalstar Satellite Antenna and make
sure you have a Globalstar signal.4. From the Apple menu, select Remote Access Status.5. In the Remote Access dialog, click Connect.
6. Remote Access prompts you for your password. If you use one, enter it; if you do not use a password, leave the box blank.
7. Click OK.
While the Tri-Mode Phone is establishing the packet data connection, the Tri-Mode Phone screen looks like this:
You are connected to the network when Remote Access Status on your Macintosh says “Connected,” the Connect button changes to Disconnect,
5
6
7
| menu |
Connecting..PPP Data #777

54 Macintosh Computers
and the Tri-Mode Phone screen says “PPP @ 9.6.” The “PPP @ 9.6” indicates that the over-the-air data rate is 9600 bps. (The “T R” status stands for Transmit and Receive.)
You can now open typical communication applications to do anything you would normally do through an Internet Service Provider (ISP).
To disconnect a packet data connection
1. From the Apple menu, select Remote Access Status.2. In the Remote Access dialog, click Disconnect.
Using Typical Communication Applications
Once you have established a Globalstar packet data service connection, you can use any communication applications based on IP network protocol, for instance Internet Web browsers, e-mail, FTP, or telnet applications.
The CD that came with your QUALCOMM Globalstar Packet Data Kit may include some typical communication applications for Macintosh, such as Eudora and Netscape Navigator.
| menu |
Time: 0:12 PPP @ 9.6Status: T R

55
Palm Handhelds
This chapter tells how to configure a Palm handheld organizer running the Palm OS to use Globalstar packet data service. To do this, you physically connect the Palm handheld to your QUALCOMM Globalstar Tri-Mode Phone, then set up a wireless “modem” and a network connection.
Configuration procedures are similar for all models of Palm handhelds (III, V, VII). However, to connect different models you may need different cables or optional adapters.
NoteThe examples in this chapter use Palm OS 3.1.1. You may need a newer Palm OS, depending on which Palm you use, and newer Palm OS versions may differ from the examples here.
Connecting Palm Components
To use Globalstar packet data service with a Palm, you connect the following hardware components:
■ Palm handheld organizer or PalmPilot■ HotSync cable (be sure you have the correct cable for your Palm model)■ Null modem adapter, male 9-pin on both ends■ QUALCOMM serial data cable (included in QUALCOMM Globalstar
Packet Data Kit)■ QUALCOMM Globalstar GSP-1600 Tri-Mode Phone
i
Tri-Mode Phone
Palmhandheld
Serial connector
QUALCOMM Data Cable
9-pin serialconnector
HotSynccable andconnector Null modem
adapter 725AA_00
To Tri-ModePhone
56 Palm Handhelds
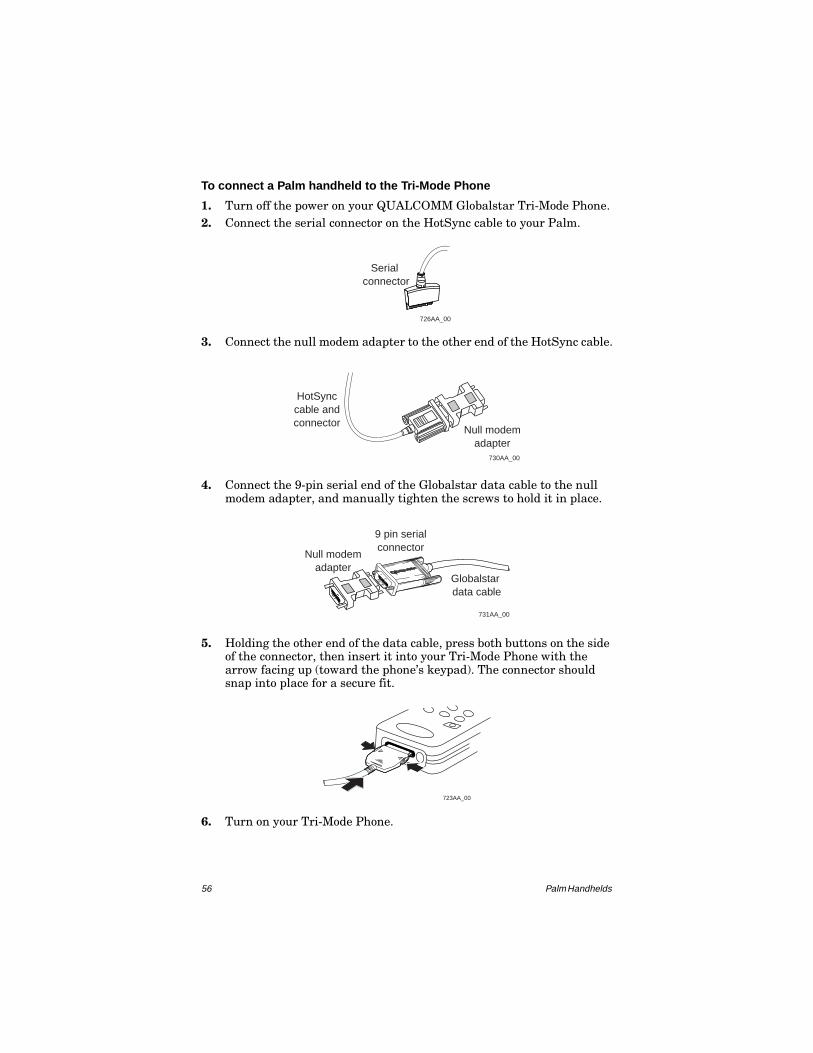
To connect a Palm handheld to the Tri-Mode Phone
1. Turn off the power on your QUALCOMM Globalstar Tri-Mode Phone.2. Connect the serial connector on the HotSync cable to your Palm.
3. Connect the null modem adapter to the other end of the HotSync cable.
4. Connect the 9-pin serial end of the Globalstar data cable to the null modem adapter, and manually tighten the screws to hold it in place.
5. Holding the other end of the data cable, press both buttons on the side of the connector, then insert it into your Tri-Mode Phone with the arrow facing up (toward the phone’s keypad). The connector should snap into place for a secure fit.
6. Turn on your Tri-Mode Phone.
Serial connector
726AA_00
HotSynccable andconnector
Null modemadapter
730AA_00
Globalstar data cable
9 pin serialconnector
Null modemadapter
731AA_00
723AA_00

Palm Handhelds 57
7. Extend the Globalstar Satellite Antenna to a 90o position.
NoteIf you cannot obtain a signal with the Globalstar Satellite Antenna in a 90o position, try rotating it further until you feel it click into place.
Configuring Your Palm Handheld
To configure a Palm handheld computer to use Globalstar packet data service, you must set up the following:
■ A wireless “modem” ■ A network connection
Setting Up a Modem1. On your Palm handheld, tap the Applications (or Home) icon.2. Tap Prefs.3. On the Preferences screen, tap the Categories menu and select Modem.
NoteFor some Palm OS versions, Preferences/Connection replaces Preferences/Modem.
4. Tap Modem and select Standard.
724AA_00
Pw
rEnd
Sen
d
Info
Clr
1 4 7
2 5 8 0
3 6 9
*#
+abc
def
jkl
mno
tuv
ghi
pqrs
wxy
z
| men
u |
| boo
k |
GLO
BA
LSTA
Ri
90°
4
3

58 Palm Handhelds
NoteFor some Palm OS versions, tap New instead of Modem.
5. Tap Speed and select 38,400 bps.
The speed for the modem must match the baud rate on your Tri-Mode Phone (38400 bps is the phone’s default). If the speeds are not the same, your computer cannot communicate with the Tri-Mode Phone.
TipYou can check or change the baud rate on your Tri-Mode Phone by selecting menu, then selecting Features > Data > Baud Rate. If the baud rate on your Tri-Mode Phone is not set to 38400 bps, be sure to change the modem’s speed so that the two speeds match.
Note38400 bps is the speed at which the Tri-Mode Phone communicates with your Palm handheld, not the speed at which it communicates with the Gateway.
6. Set “Speaker” to “Off.”7. Set “Flow Ctl” to “On.”8. In the “String” field, keep the default string. (Alternatively, you can
clear the string, in which case “Modem” changes from “Standard” to “Custom.” Either way should work.)
NoteMake sure the String field does not include any AT commands that the Tri-Mode Phone does not support for packet data. See “Supported AT Commands” on page 87.
9. Make sure “TouchTone™” is highlighted.
5

Palm Handhelds 59
Wireless modem setup is complete. Next you set up the network connection.
Setting Up Your Network ConnectionConfiguring a New Network Service1. On the Preferences screen, tap the Categories menu and select Network.2. Tap Service and create a new network service called “GS Packet Data.”
NoteFor some Palm OS versions there is a “Connection” field that is the name of the modem you are using.
3. “User Name” should remain blank and “Password” should read “-Prompt-”.
NoteIn the “Password” field, “-Prompt-” indicates that if a password is required for connecting to your e-mail or other applications, you will be prompted for it at connection time.
67
8
9
2
1
3

60 Palm Handhelds
Configuring Phone Setup1. On the Preferences/Network screen, tap the “Phone” field.2. On the Phone Setup screen, in the “Phone #” field, enter “#777.”
“#777” is a special number that tells the phone to make a packet data connection.
3. Clear all the other checkboxes.4. Tap OK.
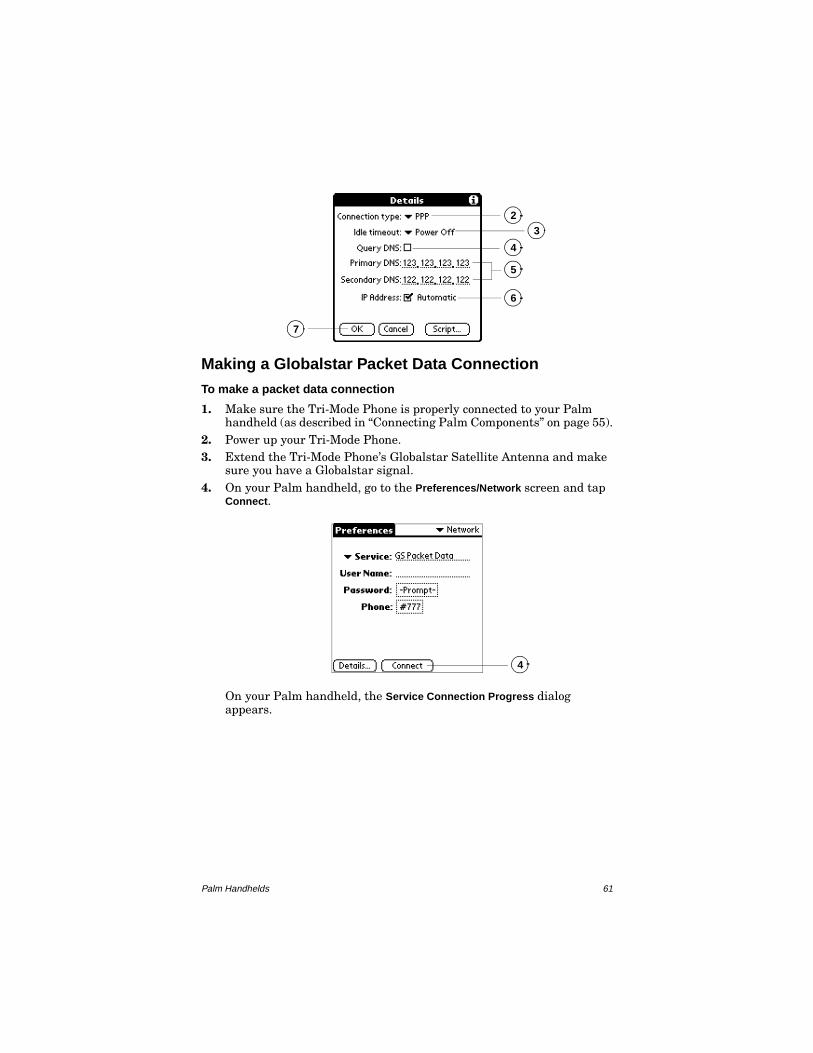
Configuring Network Details1. On the Preferences/Network screen, tap Details....2. On the Details screen, make sure the “Connection type” is “PPP.”
Globalstar packet data service uses Point-to-Point Protocol (PPP) to carry data packets from your computer to the Globalstar Gateway.
3. Make sure “Idle timeout” is set to “Power Off.”4. Make sure “Query DNS” is not checked, so that the “Primary DNS” and
“Secondary DNS” fields appear.5. In the “Primary DNS” and “Secondary DNS” fields, enter the DNS
addresses assigned by your Service Provider or ISP.
NoteDNS address numbers in the illustration are examples only. Ask your Service Provider or ISP for the numbers you should enter.
6. Make sure “IP Address” is checked (“Automatic”).7. Tap OK.
2
3
4
Palm Handhelds 61
Making a Globalstar Packet Data Connection
To make a packet data connection
1. Make sure the Tri-Mode Phone is properly connected to your Palm handheld (as described in “Connecting Palm Components” on page 55).
2. Power up your Tri-Mode Phone.3. Extend the Tri-Mode Phone’s Globalstar Satellite Antenna and make
sure you have a Globalstar signal.4. On your Palm handheld, go to the Preferences/Network screen and tap
Connect.
On your Palm handheld, the Service Connection Progress dialog appears.
23
5
6
7
4
4

62 Palm Handhelds
While the Tri-Mode Phone is establishing a packet data connection, the Tri-Mode Phone screen looks like this:
You are connected to the network when the Service Connection Progress dialog says “Signing on, Established,” and then disappears, the Connect button changes to Disconnect, and the Tri-Mode Phone screen says “PPP @ 9.6.” The “PPP @ 9.6” indicates that the over-the-air data rate is 9600 bps. (The “T R” status stands for Transmit and Receive.)
You can now open typical communication applications to do anything you would normally do through an Internet Service Provider (ISP).
| menu |
Connecting..PPP Data #777
| menu |
Time: 0:12 PPP @ 9.6Status: T R
Palm Handhelds 63
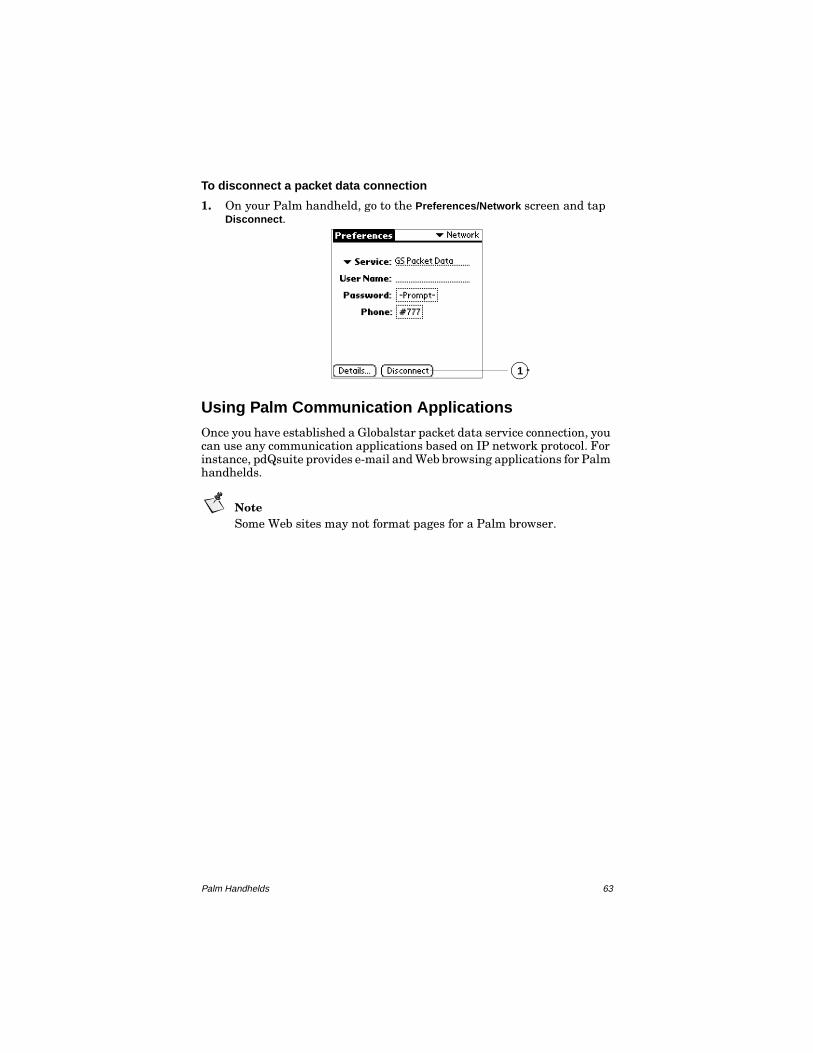
To disconnect a packet data connection
1. On your Palm handheld, go to the Preferences/Network screen and tap Disconnect.
Using Palm Communication Applications
Once you have established a Globalstar packet data service connection, you can use any communication applications based on IP network protocol. For instance, pdQsuite provides e-mail and Web browsing applications for Palm handhelds.
NoteSome Web sites may not format pages for a Palm browser.
1

64 Palm Handhelds

65
UNIX Computers
This chapter tells how to configure a UNIX computer to use Globalstar packet data service. To do this, you physically connect the UNIX computer to your QUALCOMM Globalstar Tri-Mode Phone, then configure a “modem” and packet data or PPP connection.
Globalstar packet data service has been tested with the following:
■ Solaris UNIX■ Red Hat Linux
NoteThe examples in this chapter use Solaris version 2.6 and Red Hat Linux 6.1. Setup for other UNIX OS versions and PPP applications may vary.
Connecting UNIX Components
To use Globalstar packet data service with UNIX, you connect the following hardware components:
■ UNIX computer running Solaris or Red Hat Linux■ QUALCOMM serial data cable (included in QUALCOMM Globalstar
Packet Data Kit)■ QUALCOMM Globalstar GSP-1600 Tri-Mode Phone
i
Computer
Tri-ModePhone
Globalstar data cable
9-pin serialconnector
718AA_00
QUALCOMMData Cable

66 UNIX Computers
To connect a UNIX computer to the Tri-Mode Phone
1. Turn off the power on your Tri-Mode Phone. You can leave your computer on.
2. Attach the QUALCOMM data cable’s 9-pin serial connector to a COM serial port (RS-232) on your workstation, and manually tighten the screws to hold it in place.
NoteSome computers may require an additional adapter if a 9-pin serial port is not available for connecting the QUALCOMM data cable.
3. Holding the other end of the QUALCOMM data cable, press both buttons on the side of the connector, then insert it into your Tri-Mode Phone with the arrow facing up (toward the phone’s keypad). The connector should snap into place for a secure fit.
4. Turn on your Tri-Mode Phone.5. Extend the Globalstar Satellite Antenna to a 90o position.
723AA_00
724AA_00
Pw
rEnd
Sen
d
Info
Clr
1 4 7
2 5 8 0
3 6 9
*#
+abc
def
jkl
mno
tuv
ghi
pqrs
wxy
z
| men
u |
| boo
k |
GLO
BA
LSTA
Ri
90°
UNIX Computers 67
NoteIf you cannot obtain a signal with the Globalstar Satellite Antenna in a 90o position, try rotating it further until you feel it click into place.
Configuring Your Solaris UNIX Computer
You can interact with a Solaris UNIX system in many ways, from the command line to various graphical interfaces. No matter which interface you use, you must provide the same basic information to configure Globalstar packet data service.
The configuration procedures in this section use Solstice PPP 3.0.1 as an example. A license and software for Solstice PPP is included with your purchase of the Solaris media. To install Solstice PPP, see the instructions in your Solaris documentation.
Setting Up the PPP Client1. Log in as root or become superuser.2. From the command line, type /usr/bin/pppinit and press Enter.3. Select “[1] - Asynchronous client.”4. Select “Modem Configuration.”5. Select “[19] - Standard Hayes modem.”6. Press Enter to set the serial port to default.7. For the “Name of the remote server,” type gs_packet_data and
press Enter.8. For “Phone number for this server,” type T#777 and press Enter.
The letter T sets the phone up for tone dialing. The numbers #777 tell the Gateway to set up a packet data connection.
9. For “Filename of the chat script” press Enter to accept the default.This confirms the name of the script but does not create one.
10. When asked to create a template file, press n for no.Globalstar packet data does not use chat scripts. Selecting no means no script will be created.
NoteSome PPP software may require that a chat script exist. After finishing this setup, you will need to “touch” the script named in Step 9.
11. For “Enter your IP address” press Enter for none.12. For “Enter your Server IP address” press Enter for none.
Leaving these fields blank allows the server to set the addresses.13. For “IP netmask for this interface” press Enter for none.14. For “Enter your PAP Id” press Enter for none.
68 UNIX Computers
15. For “Enter your CHAP Name” press Enter for none.16. For “Inactivity timeout” press Enter for the default of 120 seconds.17. For “Do you want to add an access to another server?” press n for no.18. Press E to save your changes and exit pppinit.
Enabling Domain Name ServiceBefore you can enable Domain Name Service (DNS), your ISP must provide the following information:
■ The domain name of the subnetwork■ The IP addresses of your name servers
1. Edit the file /etc/nsswitch.conf.2. For “hosts,” type files dns and press Enter.3. Create the file /etc/resolv.conf.4. For “domain,” type the domain name (for example, abc.company.com)
and press Enter.5. For the first “nameserver,” type the primary DNS (for example,
123.123.123.123) and press Enter.6. For the second “nameserver,” type the secondary DNS (for example,
122.122.122.122) and press Enter.7. Press Enter twice to invoke the changes.
Changes take place automatically.
Completing the Setup1. From the command line, “touch” the chat script, in this case
/etc/opt/SUMWconn/ppp/script/gs_packet_data.scr.This creates an empty script file. If the file already exists, open it with a text editor and make sure that it contains no lines of text.
2. Check the /etc/opt/SUMWconn/ppp/link.conf file and make sure the speed is set to 38400.The speed for the PPP client must match the baud rate on your Tri-Mode Phone (38400 bps is the phone’s default). If the speeds are not the same, your computer cannot communicate with the Tri-Mode Phone.
TipYou can check or change the baud rate on your Tri-Mode Phone by selecting menu, then selecting Features > Data > Baud Rate. If the baud rate on your Tri-Mode Phone is not set to 38400 bps, be sure to change the line speed for the PPP client so that the two speeds match.

UNIX Computers 69
Note38400 bps is the speed at which the Tri-Mode Phone communicates with your computer, not the speed at which it communicates with the Gateway.
3. Type exit to log out as root and invoke the changes.
Checking the GS Packet Data Setup1. Log in as you normally would (root not required).2. From the command line, type /usr/bin/ppptool and press Enter.
The information you provided to pppinit now appears in ppptool. 3. Double-click the host icon you want to connect to.
This is the name of the remote server you entered in pppinit: gs_packet_data.
4. In the Connection window, the “Phone number” field should read “T#777.”
5. The “Local IP address” field should read “unassigned.”6. The “Remote IP address” field should read “unassigned.”
Leaving these fields “unassigned” allows the server to assign the addresses.
7. The “Local inactivity timeout” field should read “120 second(s).”This is the time the connection can remain unused before it automatically closes.
Making a Globalstar Packet Data Connection
To make a packet data connection
1. Make sure the Tri-Mode Phone is properly connected to your UNIX computer (as described in “Connecting UNIX Components” on page 65).
2. Power up your Tri-Mode Phone.3. Extend the Tri-Mode Phone’s Globalstar Satellite Antenna and make
sure you have a Globalstar signal.4. In ppptool, double-click the host icon you want to connect to.5. In the Connection window, click Connect.
The Tri-Mode Phone makes the data call. While the call is connecting, the Tri-Mode Phone screen looks like this:
You are connected to the network when the Status line reads “Connected,” the Disconnect button become active, and the Tri-Mode
| menu |
Connecting..PPP Data #777

70 UNIX Computers
Phone screen says “PPP @ 9.6.” The “PPP @ 9.6” indicates that the over-the-air data rate is 9600 bps. (The “T R” status stands for Transmit and Receive.)
You can now open typical communication applications to do anything you would normally do through an Internet Service Provider (ISP).
To disconnect a Globalstar packet data connection
1. Double-click the host icon you want to disconnect from. 2. In the Connection window, click Disconnect.
The connection is closed, the Status line reads “Disconnected,” and the Connect button becomes active.
Configuring Your Linux Computer
You can interact with Linux systems in many ways, from the command line to various graphical interfaces. No matter which interface you use, you must provide the same basic information to configure Globalstar packet data service.
The configuration procedures in this section use Netconf, a part of the LinuxConf suite, as an example and assume that both Netconf and PPP are installed. To install Netconf and PPP, see the instructions in your Linux documentation.
Setting Up the Modem and PPP ConnectionUsing Netconf, you can set up a modem and a PPP connection in the same series of steps.
1. Log in as root.2. Run netconf.
| menu |
Time: 0:12 PPP @ 9.6Status: T R

UNIX Computers 71
3. Click PPP/SLIP/PLIP to open the Configurations dialog.
4. In the Configurations dialog, click Add.
5. Select PPP and click Accept.
3
4
5

72 UNIX Computers
6. In the “Phone number” field, type “#777.”7. Select the modem port you have connected the Tri-Mode Phone to.
In most cases it should be the default port.8. Leave the “Use PAP authentication” and the “Login name” and
“Password” fields blank unless your ISP tells you to fill them in.9. Click Accept.
The Configurations dialog now has a new entry, “ppp0.”
Configuring the PPP Connection1. In the Configurations dialog, double-click ppp0.
2. On the Hardware tab, select all of the checkboxes except “Escape control characters.”
3. Set “Line speed” to 38400.The line speed for the PPP connection must match the baud rate on your Tri-Mode Phone (38400 bps is the phone’s default). If the speeds are not the same, your computer cannot communicate with the Tri-Mode Phone.
TipYou can check or change the baud rate on your Tri-Mode Phone by selecting menu, then selecting Features > Data > Baud Rate. If the baud rate on your Tri-Mode Phone is not set to 38400 bps, be sure to change the line speed for the PPP connection so that the two speeds match.
6
7
9
8
1

UNIX Computers 73
Note38400 bps is the speed at which the Tri-Mode Phone communicates with your computer, not the speed at which it communicates with the Gateway.
4. The modem port should be set to the port you chose previously.
5. On the Communication tab, make sure that “Modem init string” and “Modem dial command” do not include any AT commands that the Tri-Mode Phone does not support for packet data. (See “Supported AT Commands” on page 87.)
6. Make sure that #777 appears in the “Phone number” field.7. Clear all fields in the “Chat” section.
34
2

74 UNIX Computers
8. The Networking tab should not require any changes.
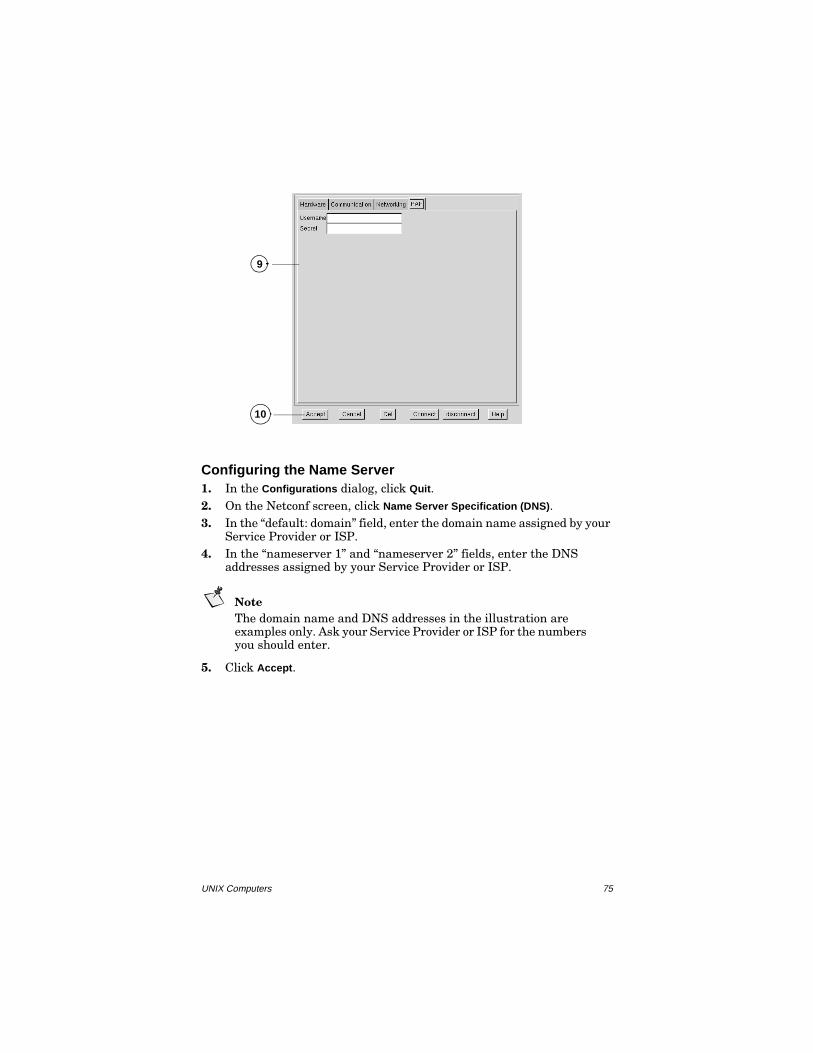
9. Leave the PAP tab blank.10. Click Accept.
65
7
8
UNIX Computers 75
Configuring the Name Server1. In the Configurations dialog, click Quit.2. On the Netconf screen, click Name Server Specification (DNS).3. In the “default: domain” field, enter the domain name assigned by your
Service Provider or ISP.4. In the “nameserver 1” and “nameserver 2” fields, enter the DNS
addresses assigned by your Service Provider or ISP.
NoteThe domain name and DNS addresses in the illustration are examples only. Ask your Service Provider or ISP for the numbers you should enter.
5. Click Accept.
10
9

76 UNIX Computers
Saving Your Settings1. On the Netconf screen, click Quit.2. On the activation dialog that appears, click Activate the changes.
3. Type exit to log out as root.Your computer is now ready to make a packet data connection.
3
4
5
2
UNIX Computers 77
Making a Globalstar Packet Data Connection
To make a packet data connection
1. Make sure the Tri-Mode Phone is properly connected to your Linux computer (as described in “Connecting UNIX Components” on page 65).
2. Power up your Tri-Mode Phone.3. Extend the Tri-Mode Phone’s Globalstar Satellite Antenna and make
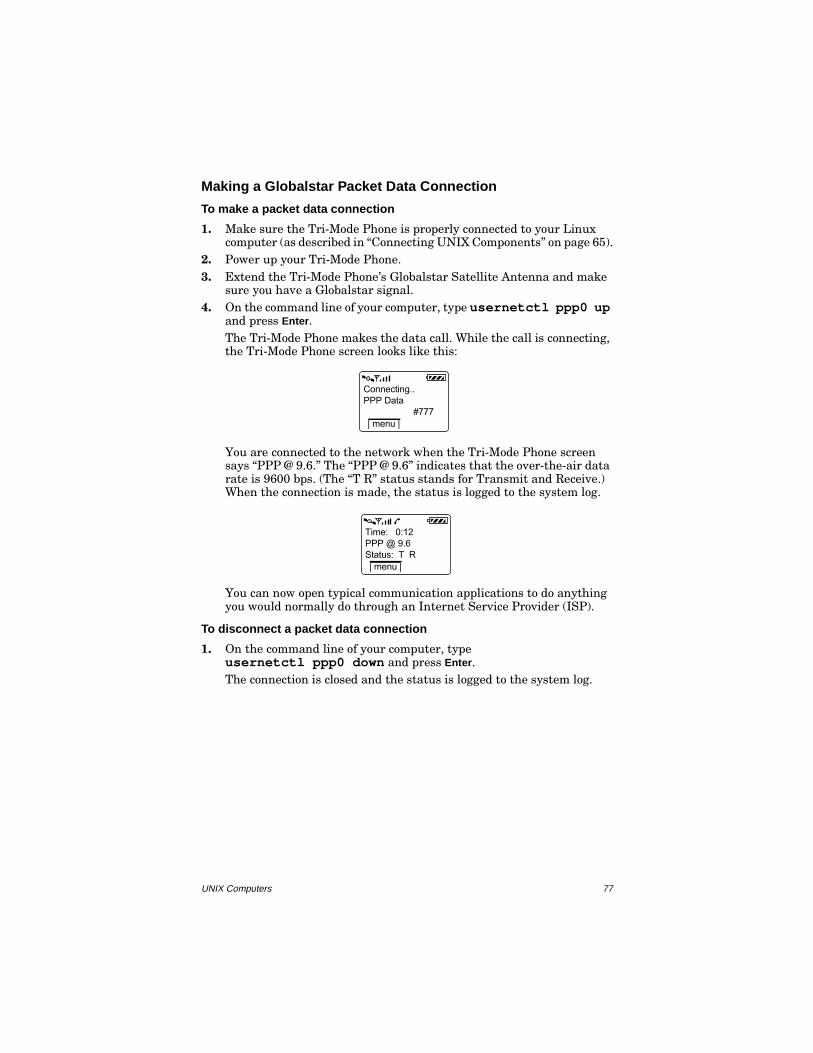
sure you have a Globalstar signal.4. On the command line of your computer, type usernetctl ppp0 up
and press Enter.The Tri-Mode Phone makes the data call. While the call is connecting, the Tri-Mode Phone screen looks like this:
You are connected to the network when the Tri-Mode Phone screen says “PPP @ 9.6.” The “PPP @ 9.6” indicates that the over-the-air data rate is 9600 bps. (The “T R” status stands for Transmit and Receive.) When the connection is made, the status is logged to the system log.
You can now open typical communication applications to do anything you would normally do through an Internet Service Provider (ISP).
To disconnect a packet data connection
1. On the command line of your computer, typeusernetctl ppp0 down and press Enter.The connection is closed and the status is logged to the system log.
| menu |
Connecting..PPP Data #777
| menu |
Time: 0:12 PPP @ 9.6Status: T R

78 UNIX Computers

79
QUALCOMM Globalstar Hands-Free Car Kit
You can use Globalstar packet data service in a vehicle equipped with a QUALCOMM Globalstar Hands-Free Car Kit.
Connecting Car Kit Components
To use Globalstar packet data service with a QUALCOMM Globalstar Hands-Free Car Kit, the car kit should be installed as usual for your QUALCOMM Globalstar Tri-Mode Phone. For details, see the QUALCOMM Globalstar GCK-1400 Hands-Free Car Kit Installation/User Guide (document number 80-98438-1).
In addition, you connect the following hardware components:
■ A laptop or handheld computer■ A serial cable with a male 9-pin connector on one end and a female
9-pin connector on the other■ Other cables or adapters, if required for your specific computer
Car Kit GEM box
9-pin serialconnector
Computer
9-pin serialconnector
Serial cable (not included)
to restof Car Kit
80 QUALCOMM Globalstar Hands-Free Car Kit
To connect a computer or Palm handheld to the car kit
1. Attach the 9-pin connector of the serial cable to the 9-pin serial port on the GEM (Globalstar Electronic Module) box of the car kit.
2. Attach the other end of the serial cable to a 9-pin COM port (RS-232) on your Windows or UNIX computer. orAttach the other end of the serial cable to adapters or additional cables, as required, for your Macintosh computer or Palm handheld. See “Connecting Macintosh Components” on page 43 or “Connecting Palm Components” on page 55 for details.
81
Commercially Available Accessories
The QUALCOMM Globalstar Packet Data Kit includes the following accessories:
■ QUALCOMM serial data cable■ Compact Disc (CD-ROM) that includes this User GuideThis chapter describes optional accessories that you may need to complete your hardware setup, depending on which computer you use. These accessories are readily available from commercial retail outlets that carry computer supplies, for example electronics, computer, or office supply stores such as (but not limited to) Radio Shack, CompUSA, Staples, or Office Depot.
Indoor/Outdoor Extension Cable
An extension cable lets you place the Tri-Mode Phone outdoors and connect it to a computer inside a building, to avoid sun glare and make the computer screen easier to read. The cable should have a 9-pin male connector on one end and a 9-pin female on the other, with a maximum length of 30 meters.
Palm Cable and Null Modem Adapter
If you are using a Palm handheld without a built-in 9-pin D serial port, you need a cable and adapter to interface with the QUALCOMM data cable for the Tri-Mode Phone (TIA/EIA-574 DTE serial interface).
A Palm cable connects a Palm handheld to a null modem adapter, which attaches to the QUALCOMM data cable. Depending on the Palm model, this may be a HotSync cable or other type of Palm cable. For connection details, see “Connecting Palm Components” on page 55.
The null modem adapter (for a TIA/EIA-574 DTE serial interface) should have 9-pin male connectors on each end. Alternatively, you could use a 9-pin male-to-female null modem adapter and a gender-changer adapter to connect to the Palm. (Most commercially available null modem adapters are male-to-female.)
Macintosh Modem Cable and Adapter
If you are using an Apple Macintosh without a built-in 9-pin D serial port, you need a cable and adapter to interface with the QUALCOMM data cable for the Tri-Mode Phone (TIA/EIA-574 DTE serial interface).
A Macintosh modem cable lets you connect your Macintosh computer to the QUALCOMM data cable. The cable should have a 25-pin female connector on one end, and either a round DIN 8 connector on the other, or, if your Macintosh has a USB (Universal Serial Bus) port, a USB connector on the other.
Completing the connection also requires a adapter between the 25-pin end of the Macintosh modem cable and the 9-pin end of the QUALCOMM data
82 Accessories
cable. For connection details, see “Connecting Macintosh Components” on page 43.
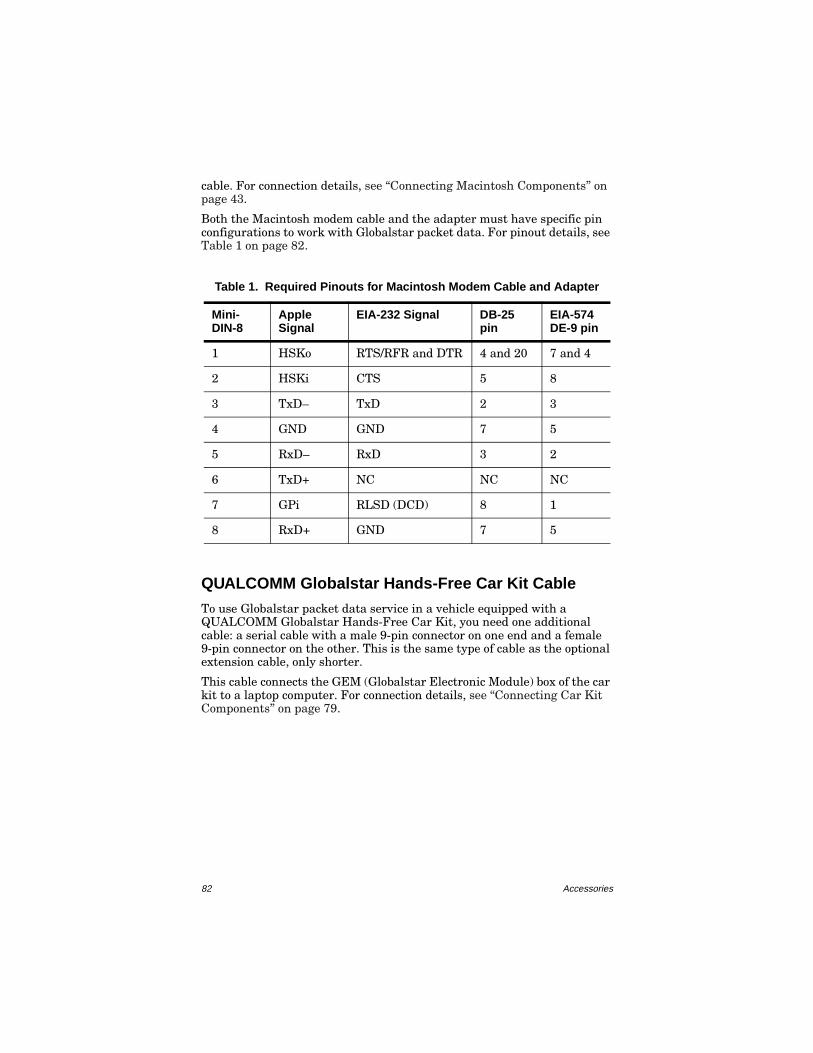
Both the Macintosh modem cable and the adapter must have specific pin configurations to work with Globalstar packet data. For pinout details, see Table 1 on page 82.
QUALCOMM Globalstar Hands-Free Car Kit Cable
To use Globalstar packet data service in a vehicle equipped with a QUALCOMM Globalstar Hands-Free Car Kit, you need one additional cable: a serial cable with a male 9-pin connector on one end and a female 9-pin connector on the other. This is the same type of cable as the optional extension cable, only shorter.
This cable connects the GEM (Globalstar Electronic Module) box of the car kit to a laptop computer. For connection details, see “Connecting Car Kit Components” on page 79.
Table 1. Required Pinouts for Macintosh Modem Cable and Adapter
Mini-DIN-8
Apple Signal
EIA-232 Signal DB-25 pin
EIA-574 DE-9 pin
1 HSKo RTS/RFR and DTR 4 and 20 7 and 4
2 HSKi CTS 5 8
3 TxD– TxD 2 3
4 GND GND 7 5
5 RxD– RxD 3 2
6 TxD+ NC NC NC
7 GPi RLSD (DCD) 8 1
8 RxD+ GND 7 5

83
Troubleshooting
If you are having a problem with Globalstar packet data service, try the following troubleshooting tips. If that does not solve the problem, contact your service provider’s customer care center.
Problem Solution
General
Your Tri-Mode Phone cannot get a Globalstar signal.
■ Make sure the Tri-Mode Phone’s battery is charged and properly installed.
■ Make sure the Tri-Mode Phone is outdoors.
■ Extend the Globalstar Satellite Antenna at least 90o, or, if that does not work, rotate it further until you feel it click into place.
■ Position the Tri-Mode Phone so the Globalstar Satellite Antenna points straight up to the sky.
■ Make sure the Globalstar Satellite Antenna has a clear view of the sky, not blocked by tall obstacles such as buildings and trees.
Your Tri-Mode Phone has a Globalstar signal but you cannot connect to the data network.
■ Make sure the Tri-Mode Phone and your computer are connected correctly and make sure all connectors are tight (see the appropriate chapter for your type of computer).
■ Check your modem and network settings (see the appropriate chapter for your type of computer).
■ Make sure the telephone number being dialed is #777.
84 Troubleshooting
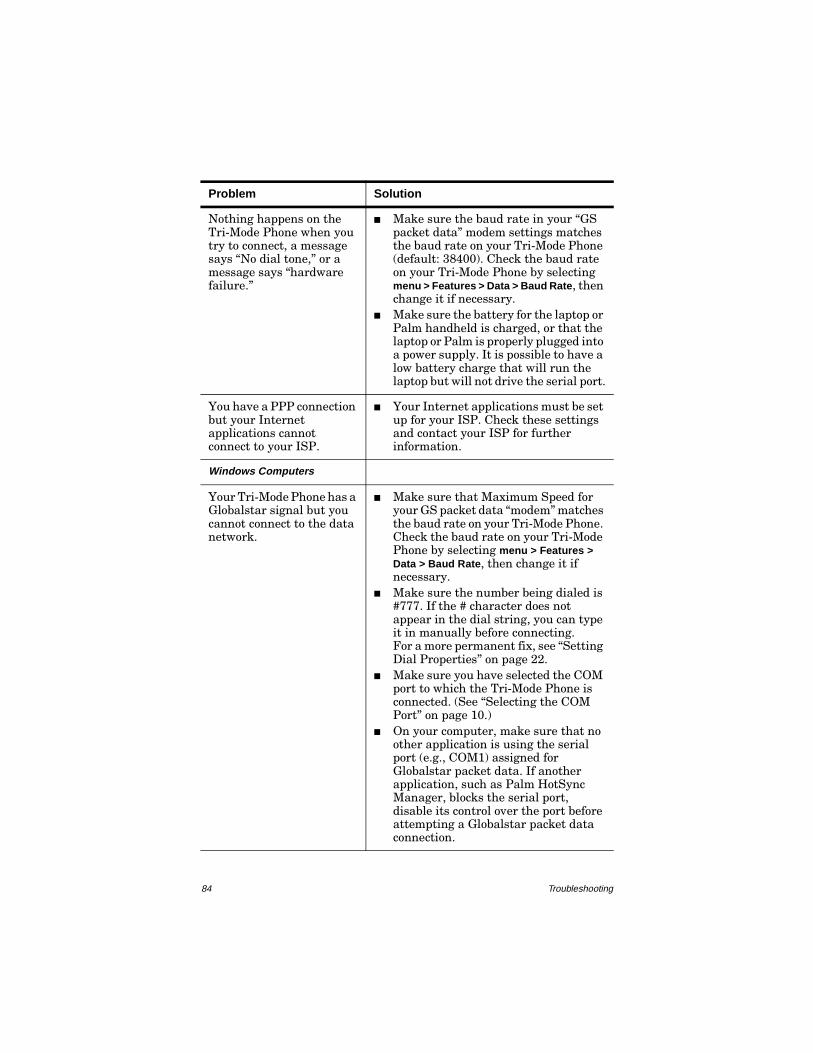
Nothing happens on the Tri-Mode Phone when you try to connect, a message says “No dial tone,” or a message says “hardware failure.”
■ Make sure the baud rate in your “GS packet data” modem settings matches the baud rate on your Tri-Mode Phone (default: 38400). Check the baud rate on your Tri-Mode Phone by selecting menu > Features > Data > Baud Rate, then change it if necessary.
■ Make sure the battery for the laptop or Palm handheld is charged, or that the laptop or Palm is properly plugged into a power supply. It is possible to have a low battery charge that will run the laptop but will not drive the serial port.
You have a PPP connection but your Internet applications cannot connect to your ISP.
■ Your Internet applications must be set up for your ISP. Check these settings and contact your ISP for further information.
Windows Computers
Your Tri-Mode Phone has a Globalstar signal but you cannot connect to the data network.
■ Make sure that Maximum Speed for your GS packet data “modem” matches the baud rate on your Tri-Mode Phone. Check the baud rate on your Tri-Mode Phone by selecting menu > Features > Data > Baud Rate, then change it if necessary.
■ Make sure the number being dialed is #777. If the # character does not appear in the dial string, you can type it in manually before connecting. For a more permanent fix, see “Setting Dial Properties” on page 22.
■ Make sure you have selected the COM port to which the Tri-Mode Phone is connected. (See “Selecting the COM Port” on page 10.)
■ On your computer, make sure that no other application is using the serial port (e.g., COM1) assigned for Globalstar packet data. If another application, such as Palm HotSync Manager, blocks the serial port, disable its control over the port before attempting a Globalstar packet data connection.
Problem Solution

Troubleshooting 85
Your serial mouse does not function properly.
■ A COM port conflict may exist. Make sure you have properly configured the COM port to which the Tri-Mode Phone is attached. Refer to your computer’s manual for additional assistance on managing COM ports.
Your computer locks up when accessing the Tri-Mode Phone.
■ A conflict with COM ports and IRQs may exist. Refer to your computer’s manual for additional assistance.
Macintosh Computers
Your Tri-Mode Phone has a Globalstar signal but you cannot connect to the data network.
■ Make sure the baud rate on your Tri-Mode Phone matches that for the “QUALCOMM Globalstar Phone Modem.” Check the baud rate on your Tri-Mode Phone by selecting menu > Features > Data > Baud Rate, then change it to 38400 bps if necessary.
■ On your computer, make sure that no other application is using the modem port assigned for Globalstar packet data. If another application, such as Palm HotSync Manager, blocks the port, disable its control over the port before attempting a Globalstar packet data connection.
Palm Handhelds
The Palm tries to connect but the Tri-Mode Phone does not respond.
■ Make sure you have a current Palm operating system (OS) installed. Sometimes a newer Palm model running an older OS version cannot make data connections properly.
■ Make sure the String field under Preferences/Modem does not include any AT commands that the Tri-Mode Phone does not support for packet data. (See “Setting Up a Modem” on page 57 and “Supported AT Commands” on page 87.)
Problem Solution

86 Troubleshooting
You have a connection but your browser cannot access a Web page, or you are having authentication problems not due to user name/password errors.
■ If Web pages use CHAP (Challenge Handshake Authentication Protocol), you may need to upgrade your Palm OS to work with them.
UNIX Computers
The computer tries to connect but the Tri-Mode Phone does not respond.
■ Make sure the PPP daemon is running (see the PPP documentation).
■ Make sure the modem initialization string and dial commands do not include any AT commands that the Tri-Mode Phone does not support for packet data. (See “Supported AT Commands” on page 87.)
■ Make sure the baud rate for your GS packet data “modem” matches the baud rate on your Tri-Mode Phone. Check the baud rate on your Tri-Mode Phone by selecting menu > Features > Data > Baud Rate, then change it if necessary.
Problem Solution

87
Supported AT Commands
For Globalstar packet data service, your QUALCOMM Globalstar Tri-Mode Phone works as a wireless modem. In other words, it functions as Data Circuit-Terminating Equipment (DCE) that communicates with your computer, or Data Terminal Equipment (DTE).
In the process, your computer sends AT commands to the Tri-Mode Phone. Table 2 shows the AT (Hayes modem compatible) commands that the Tri-Mode Phone supports for packet data.
NoteTable 2 uses the following notations:
X = command is ignoredNA = not applicable
Table 2. Supported AT Commands
AT Command and Syntax AT Command Description (brief)
Value Range Default If No Value Is Defined
Default Value
E[<val>] Echo ON|OFF [0-1] 0 1
L[<val>] Monitor Speaker Loudness
[0-3] X X
M[<val>] Monitor Speaker Mode
[0-1] X X
P Select Pulse Dialing No value X X
Q[<val>] Result Code Suppression
[0-1] 0 0
T Select Tone Dialing No value X X
V[<val>] DCE Response Format
[0-1] 0 1
Z[<val>] Reset Default Configuration
0 0 0
&C[<val>] DCE RLSD (DCD) Behavior
[0-2] 0 1
&D[value] DTE DTR BehaviorNote: The value 1 is not supported.
[0, 2] 0 2
&F[<val>] Set to QUALCOMM- Defined Default Configuration
0 0 0
A/ Repeat Last Command
No value X X

88 AT Commands
D<dial str> Dial #777 NA NA
H[<val>] Hook Control 0 X X
O[<val>] Return to Online State
0 X X
S0{=<val>|?} Automatic Answer 0 0 0
S3{=<val>|?} Command Line Termination Character
[0-127] 13 13
S4{=<val>|?} Response Format Character
[0-127] 10 10
S5{=<val>|?} Command Edit Character
[0-127] 8 8
S7{=<val>|?} Auto Retry Timeout in seconds
[0-255] 50 50
S777{=<val>|?} Silent Retry Timeout(QUALCOMM specific command)
[0-255] 150 150
+ICF{=<format>{,<parity>|?|=?}
Character Framing Settings
(3-3), (0-3) 3,3 3,3
+IFC{=<tx_ctl>}|?|=?} Local Flow Control Settings
(0-2), (0,2) 2,2 2,2
+IPR{=<baud>|?|=?} Rm Interface Baud Rate Setting
9600, 19200, 38400, 57600, 115200
9600 The power-on default baud rate is set through the phone’s user interface ([menu}|<4>|<3>).
+CRM{=<prot>|?|=?} Rm Interface Protocol Setting
1-1 1 1
Table 2. Supported AT Commands
AT Command and Syntax AT Command Description (brief)
Value Range Default If No Value Is Defined
Default Value
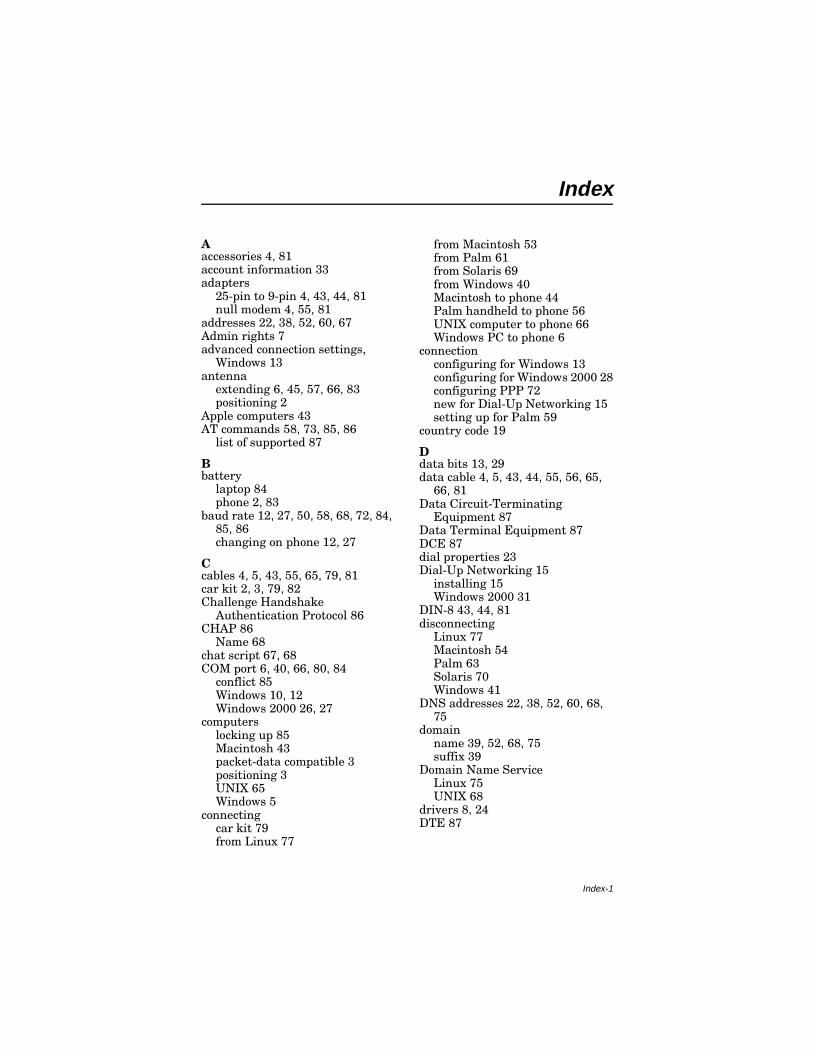
Index-1
Index
Aaccessories 4, 81account information 33adapters
25-pin to 9-pin 4, 43, 44, 81null modem 4, 55, 81
addresses 22, 38, 52, 60, 67Admin rights 7advanced connection settings,
Windows 13antenna
extending 6, 45, 57, 66, 83positioning 2
Apple computers 43AT commands 58, 73, 85, 86
list of supported 87
Bbattery
laptop 84phone 2, 83
baud rate 12, 27, 50, 58, 68, 72, 84, 85, 86changing on phone 12, 27
Ccables 4, 5, 43, 55, 65, 79, 81car kit 2, 3, 79, 82Challenge Handshake
Authentication Protocol 86CHAP 86
Name 68chat script 67, 68COM port 6, 40, 66, 80, 84
conflict 85Windows 10, 12Windows 2000 26, 27
computerslocking up 85Macintosh 43packet-data compatible 3positioning 3UNIX 65Windows 5
connectingcar kit 79from Linux 77
from Macintosh 53from Palm 61from Solaris 69from Windows 40Macintosh to phone 44Palm handheld to phone 56UNIX computer to phone 66Windows PC to phone 6
connectionconfiguring for Windows 13configuring for Windows 2000 28configuring PPP 72new for Dial-Up Networking 15setting up for Palm 59
country code 19
Ddata bits 13, 29data cable 4, 5, 43, 44, 55, 56, 65,
66, 81Data Circuit-Terminating
Equipment 87Data Terminal Equipment 87DCE 87dial properties 23Dial-Up Networking 15
installing 15Windows 2000 31
DIN-8 43, 44, 81disconnecting
Linux 77Macintosh 54Palm 63Solaris 70Windows 41
DNS addresses 22, 38, 52, 60, 68, 75
domainname 39, 52, 68, 75suffix 39
Domain Name ServiceLinux 75UNIX 68
drivers 8, 24DTE 87

Index-2
EEIA-232 Signal 82EIA-574 82e-mail 1, 41, 54, 63Eudora 1, 41, 54extension cable 4, 81
Fflow control 13, 18FTP 1, 41, 54
GGateway 2, 4, 12, 27GEM 80, 82Globalstar
Electronic Module 80, 82packet data service
defined 1overview 1requirements 2
Satellite Antenna 6, 45, 57, 66, 83
Satellite Communications System 1, 2
signal 83, 84GSP-1600 Tri-Mode Phone, see
QUALCOMM Globalstar GSP-1600 Tri-Mode Phone
HHardware (RTS/CTS) 13, 18hardware components
car kit 79Macintosh 43Palm 55UNIX 65Windows 5, 55
hardware failure 84Hayes modem 67, 87host icon 69HotSync
cable 4, 55, 56, 81Manager 40, 53, 84, 85
IIBM-compatible PCs 3, 4Idle timeout 60Ignore Dial Tone 50initialization string 73, 86interface 2, 81Internet 1
applications 84mail account 35
protocol 36Service Provider, see ISPWindows 2000 connection 32
IP address 22, 37, 60, 67, 68IP Header Compression 22IP network protocol 41, 54, 63IRQs 85ISP 1, 4, 22, 38, 39, 40, 52, 54, 62,
70, 75, 77, 84
Kkits
car kit 2, 79, 82packet data 2, 4, 5, 41, 46, 54, 55,
65
LLAN 32line speed, PPP connection 72Linux
computers 70disconnecting 77making connections 77Red Hat 65
LinuxConf suite 70Login name 72
MMacintosh 43
configuring 46disconnecting 54making connections 53modem cable 43, 44, 81pinouts 82Remote Access 46troubleshooting 85
mail account 35masks 52maximum speed 17, 84
modem 12, 27Microsoft Internet Explorer 1, 41modem
19200 bps 2533600 bps 10adapter 81cable 81for Palm 57hardware failure 84initialization string 73, 86port 50port conflicts, Macintosh 53port conflicts, Windows NT 10
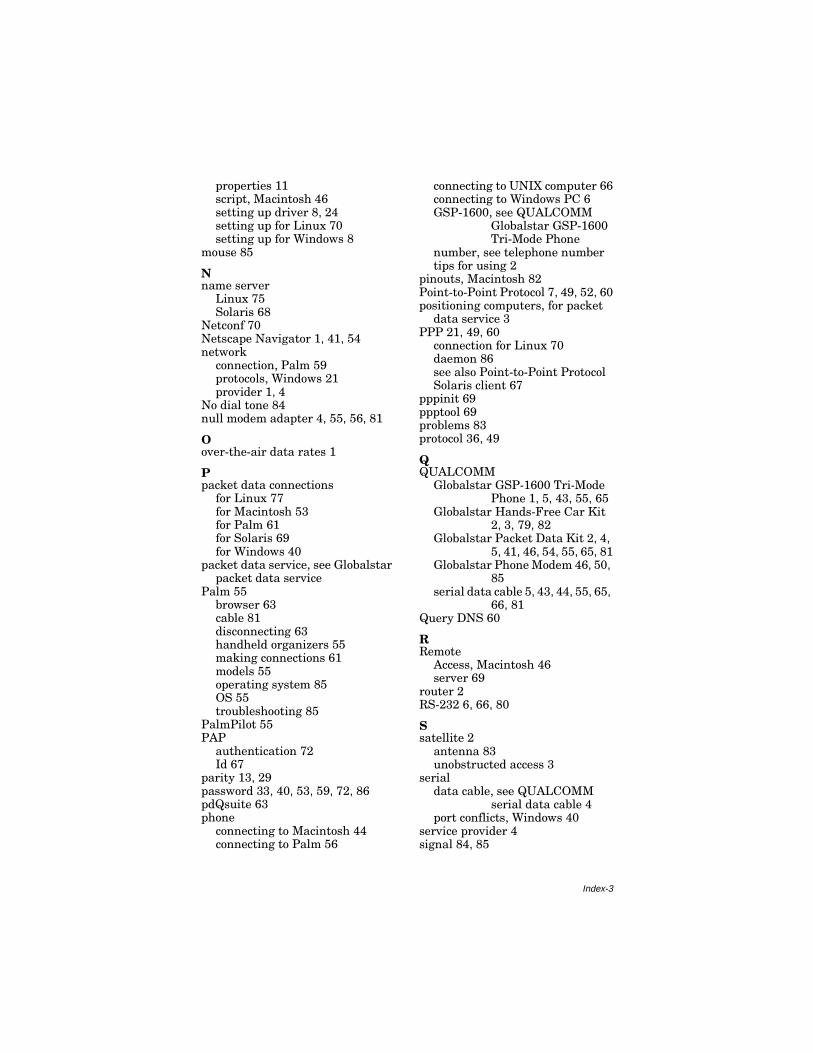
Index-3
properties 11script, Macintosh 46setting up driver 8, 24setting up for Linux 70setting up for Windows 8
mouse 85
Nname server
Linux 75Solaris 68
Netconf 70Netscape Navigator 1, 41, 54network
connection, Palm 59protocols, Windows 21provider 1, 4
No dial tone 84null modem adapter 4, 55, 56, 81
Oover-the-air data rates 1
Ppacket data connections
for Linux 77for Macintosh 53for Palm 61for Solaris 69for Windows 40
packet data service, see Globalstar packet data service
Palm 55browser 63cable 81disconnecting 63handheld organizers 55making connections 61models 55operating system 85OS 55troubleshooting 85
PalmPilot 55PAP
authentication 72Id 67
parity 13, 29password 33, 40, 53, 59, 72, 86pdQsuite 63phone
connecting to Macintosh 44connecting to Palm 56
connecting to UNIX computer 66connecting to Windows PC 6GSP-1600, see QUALCOMM
Globalstar GSP-1600 Tri-Mode Phone
number, see telephone numbertips for using 2
pinouts, Macintosh 82Point-to-Point Protocol 7, 49, 52, 60positioning computers, for packet
data service 3PPP 21, 49, 60
connection for Linux 70daemon 86see also Point-to-Point ProtocolSolaris client 67
pppinit 69ppptool 69problems 83protocol 36, 49
QQUALCOMM
Globalstar GSP-1600 Tri-Mode Phone 1, 5, 43, 55, 65
Globalstar Hands-Free Car Kit 2, 3, 79, 82
Globalstar Packet Data Kit 2, 4, 5, 41, 46, 54, 55, 65, 81
Globalstar Phone Modem 46, 50, 85
serial data cable 5, 43, 44, 55, 65, 66, 81
Query DNS 60
RRemote
Access, Macintosh 46server 69
router 2RS-232 6, 66, 80
Ssatellite 2
antenna 83unobstructed access 3
serialdata cable, see QUALCOMM
serial data cable 4port conflicts, Windows 40
service provider 4signal 84, 85

Index-4
obtaining 6, 45, 57, 67, 83software compression 21Solaris 65
disconnecting 70making connections 69
Solstice PPP 67speed
Palm modem 58see also maximum speed, baud
ratestandard modem 10
Windows 2000 25stop bits 13, 29string, Palm modem 58
TTCP/IP 1, 21, 36, 49, 50, 52
Windows settings 22telephone number 19, 33, 48, 60,
67, 73, 83telnet 1, 41, 54TIA/EIA-574 DTE serial interface
2, 81tone dialing 23, 67touch command 68TouchTone 58Tri-Mode phone, see QUALCOMM
Globalstar GSP-1600 Tri-Mode Phone
troubleshooting 83
UUniversal Serial Bus 4, 81UNIX computers 65
troubleshooting 86USB 4, 43, 44, 81user name 33, 40, 59usernetct command 77using
computers 3Globalstar packet data service 1Globalstar phone 2
Vvehicles 2, 3, 79
WWindows
also see Windows 2000, Windows NT
configuration instructions 8connecting components 5Dial-Up Networking 15
disconnecting 41making packet data connection
40setting up modem driver 8TCP/IP settings 22troubleshooting 84
Windows 2000Admin rights 7configuration instructions 24configuring networking
properties 36configuring PC for 7driver speeds 25Internet connection 32making packet data connection
40naming dial-up connection 34setting up a new connection 30setting up modem driver 24
Windows NTAdmin rights 7configuration instructions 8configuring PC for 7one modem per port 10
wireless modem 1, 7, 59, 87