Embed Size (px)
Citation preview
P a g e | 2
SECTION 1 – INTRODUCTION QROSE is a C++ library for building graphical user-interfaces for ROSE tools. It’s main goal is to enable developers to
prototype their applications rapidly, so that their tools can better interact with users, as well as provide built-in
facilities that allow the visualization and manipulation of ROSE’s intermediate representation. QROSE is built on
top of the Qt4 library (www.qtsoftware.com) but does not require developers to learn Qt. Instead, QROSE
provides the necessary abstractions to build applications with complex layouts and widgets with few lines of code.
In addition, developers can also incorporate Qt's rich library (which includes more than 400 widgets) with QROSE.
The QROSE package is part of the ROSE distribution and can be found in the following directory:
{rose_src }/src/3rdPartyLibraries/qrose
QROSE is divided in three modules: 1) framework, 2) widgets and 3) components. The framework module contains
functionality for managing the GUI, such as execution, windows, layouts and communication between widgets and
components. The widget module contains generic graphical elements such as buttons and list boxes. Finally, the
component module offers three ROSE components: the QRSourceBox which presents the ROSE intermediate
representation as source-code, the QRQueryBox which provides query facilities, and the QRTreeBox which presents
the ROSE IR in hierarchical form. These modules can be combined with Qt. In general, Qt classes use the Q prefix,
whereas QROSE use the QR prefix.

P a g e | 3
SECTION 2 – INSTALLATION QROSE requires the latest version of Qt version 4, including Qt’s meta-object compiler (moc) tool. ROSE must be
configured with the --with-qt configure option to install QROSE.
If the configure script is unable to find your Qt installation, use one or more of the following parameters:
--with-qt=<DIR>: the configure script will attempt to find the headers in <DIR>/include, the libraries in
<DIR>/lib, and the moc tool in <DIR>/bin.
--with-qt-inc=<DIR>: the Qt headers are in <DIR>
--with-qt-lib=<DIR>: the Qt libraries are in <DIR>
--with-qt-bin=<DIR>: the moc tool is in <DIR>
Additionally, the moc tool will be searched in the PATH.
For more information on how to build and install ROSE, check the ROSE manual.
P a g e | 4
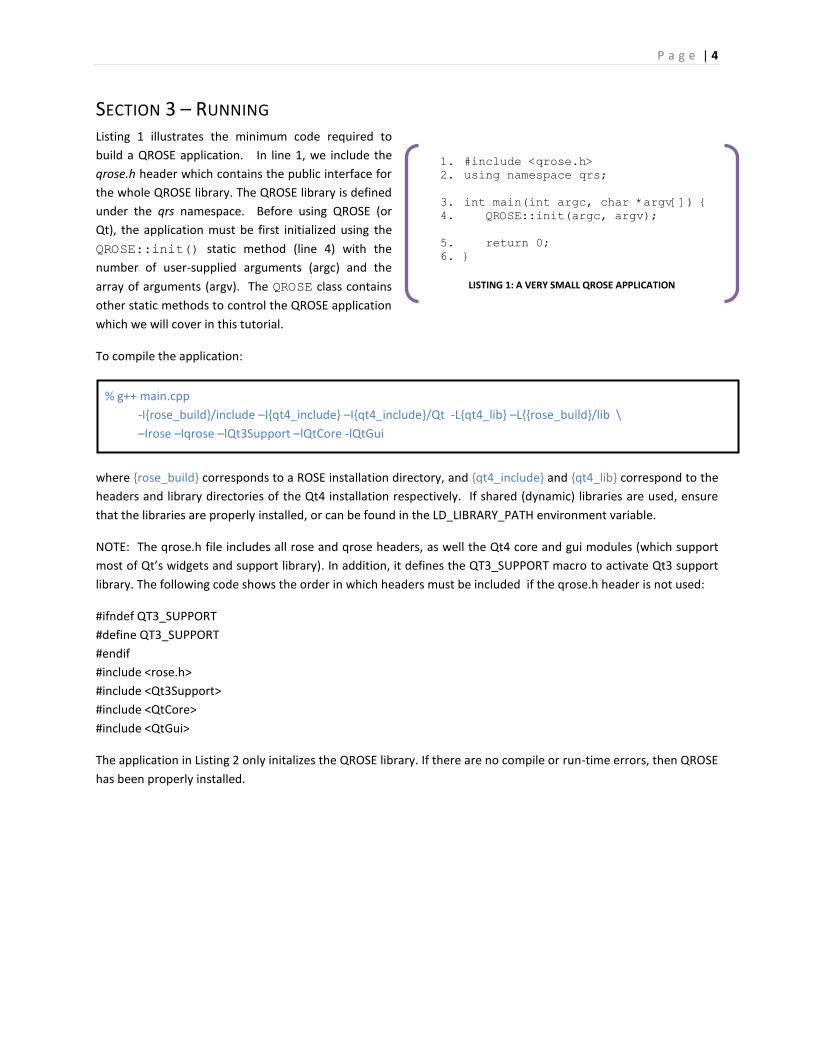
SECTION 3 – RUNNING Listing 1 illustrates the minimum code required to
build a QROSE application. In line 1, we include the
qrose.h header which contains the public interface for
the whole QROSE library. The QROSE library is defined
under the qrs namespace. Before using QROSE (or
Qt), the application must be first initialized using the
QROSE::init() static method (line 4) with the
number of user-supplied arguments (argc) and the
array of arguments (argv). The QROSE class contains
other static methods to control the QROSE application
which we will cover in this tutorial.
To compile the application:
where {rose_build} corresponds to a ROSE installation directory, and {qt4_include} and {qt4_lib} correspond to the
headers and library directories of the Qt4 installation respectively. If shared (dynamic) libraries are used, ensure
that the libraries are properly installed, or can be found in the LD_LIBRARY_PATH environment variable.
NOTE: The qrose.h file includes all rose and qrose headers, as well the Qt4 core and gui modules (which support
most of Qt’s widgets and support library). In addition, it defines the QT3_SUPPORT macro to activate Qt3 support
library. The following code shows the order in which headers must be included if the qrose.h header is not used:
#ifndef QT3_SUPPORT
#define QT3_SUPPORT
#endif
#include <rose.h>
#include <Qt3Support>
#include <QtCore>
#include <QtGui>
The application in Listing 2 only initalizes the QROSE library. If there are no compile or run-time errors, then QROSE
has been properly installed.
% g++ main.cpp
-I{rose_build}/include –I{qt4_include} –I{qt4_include}/Qt -L{qt4_lib} –L{{rose_build}/lib \
–Irose –lqrose –lQt3Support –lQtCore -lQtGui
1. #include <qrose.h> 2. using namespace qrs;
3. int main(int argc, char *argv[]) { 4. QROSE::init(argc, argv);
5. return 0; 6. }
LISTING 1: A VERY SMALL QROSE APPLICATION
P a g e | 5
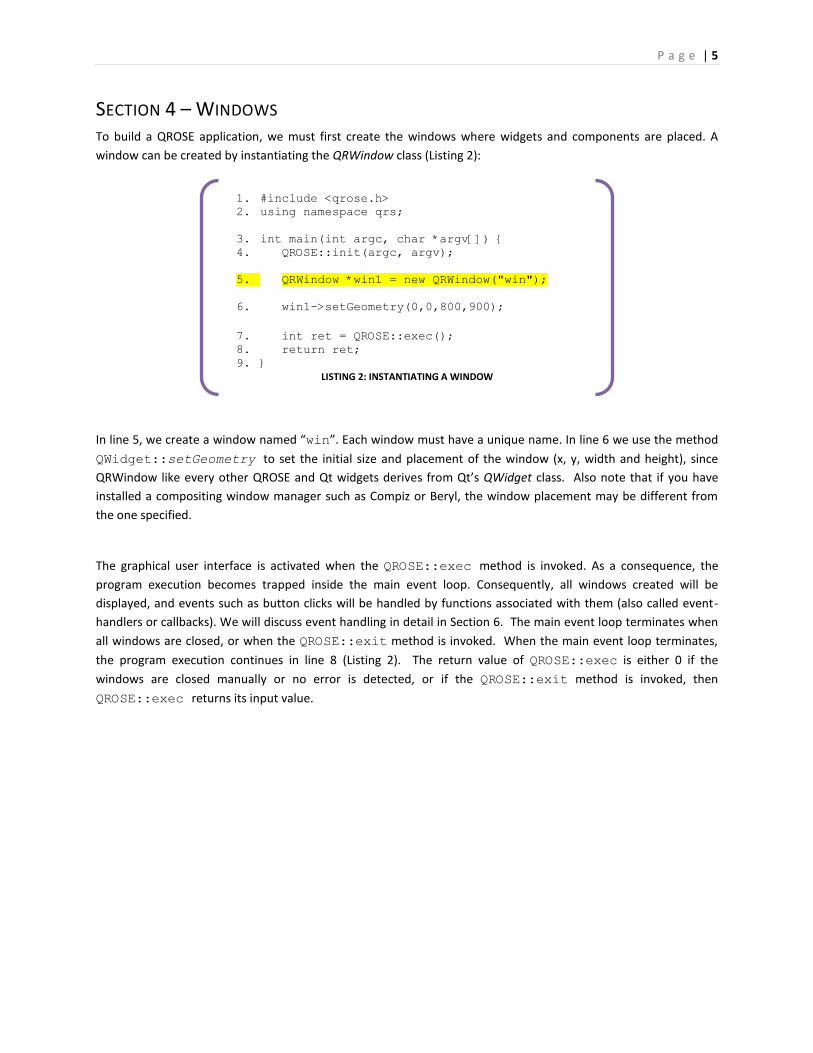
SECTION 4 – WINDOWS To build a QROSE application, we must first create the windows where widgets and components are placed. A
window can be created by instantiating the QRWindow class (Listing 2):
In line 5, we create a window named “win”. Each window must have a unique name. In line 6 we use the method
QWidget::setGeometry to set the initial size and placement of the window (x, y, width and height), since
QRWindow like every other QROSE and Qt widgets derives from Qt’s QWidget class. Also note that if you have
installed a compositing window manager such as Compiz or Beryl, the window placement may be different from
the one specified.
The graphical user interface is activated when the QROSE::exec method is invoked. As a consequence, the
program execution becomes trapped inside the main event loop. Consequently, all windows created will be
displayed, and events such as button clicks will be handled by functions associated with them (also called event-
handlers or callbacks). We will discuss event handling in detail in Section 6. The main event loop terminates when
all windows are closed, or when the QROSE::exit method is invoked. When the main event loop terminates,
the program execution continues in line 8 (Listing 2). The return value of QROSE::exec is either 0 if the
windows are closed manually or no error is detected, or if the QROSE::exit method is invoked, then
QROSE::exec returns its input value.
1. #include <qrose.h> 2. using namespace qrs;
3. int main(int argc, char *argv[]) { 4. QROSE::init(argc, argv);
5. QRWindow *win1 = new QRWindow("win");
6. win1->setGeometry(0,0,800,900);
7. int ret = QROSE::exec(); 8. return ret; 9. }
LISTING 2: INSTANTIATING A WINDOW
P a g e | 6
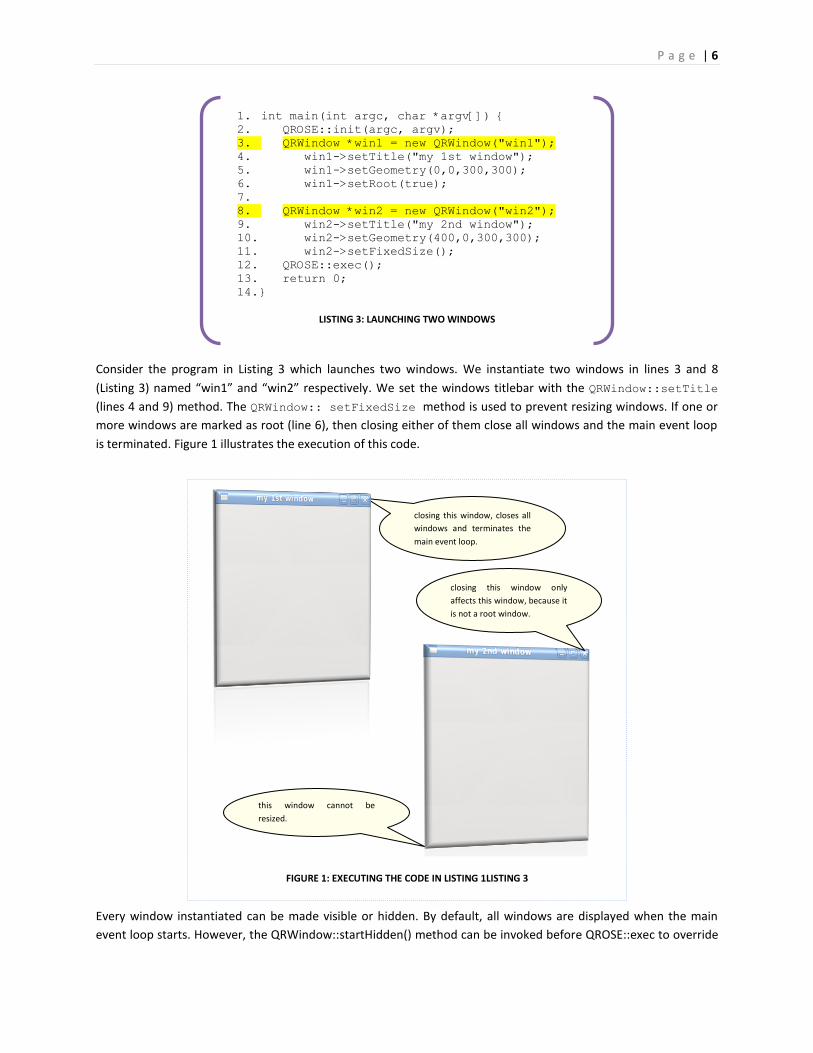
Consider the program in Listing 3 which launches two windows. We instantiate two windows in lines 3 and 8
(Listing 3) named “win1” and “win2” respectively. We set the windows titlebar with the QRWindow::setTitle
(lines 4 and 9) method. The QRWindow:: setFixedSize method is used to prevent resizing windows. If one or
more windows are marked as root (line 6), then closing either of them close all windows and the main event loop
is terminated. Figure 1 illustrates the execution of this code.
Every window instantiated can be made visible or hidden. By default, all windows are displayed when the main
event loop starts. However, the QRWindow::startHidden() method can be invoked before QROSE::exec to override
1. int main(int argc, char *argv[]) { 2. QROSE::init(argc, argv); 3. QRWindow *win1 = new QRWindow("win1"); 4. win1->setTitle("my 1st window"); 5. win1->setGeometry(0,0,300,300); 6. win1->setRoot(true); 7. 8. QRWindow *win2 = new QRWindow("win2"); 9. win2->setTitle("my 2nd window"); 10. win2->setGeometry(400,0,300,300); 11. win2->setFixedSize(); 12. QROSE::exec(); 13. return 0; 14. }
LISTING 3: LAUNCHING TWO WINDOWS
this window cannot be
resized.
FIGURE 1: EXECUTING THE CODE IN LISTING 1LISTING 3
closing this window, closes all
windows and terminates the
main event loop.
closing this window only
affects this window, because it
is not a root window.
P a g e | 7
this behaviour, and make the window invisible after starting the main event loop. After starting the main event
loop, you may use QWidget::hide, QWidget::close and QWidget::show methods for any window or
widget. The QWidget::hide and QWidget::close make the window invisible, whereas QWidget::show
displays the window (see Table 2). There is not much difference between hiding and closing a window (closing a
window can be canceled). However, in both instances, the QRWindow object remains in memory, and can be made
visible at a later time. Deleting a QRWindow object, however, frees up the memory and its identifier becomes
available to new windows.
The QROSE::findWindow and QROSE::getWindow methods are used to retrieve a QRWindow instance
anywhere in the program given its identifier. If the window is not found, QROSE::findWindow returns NULL,
whereas QROSE::getWindow throws an exception.
The execution of a simple QROSE (and Qt) application can be divided in three parts: instantiating the widgets,
executing the GUI, and running the event handlers until the main event loop terminates. QROSE registers all
QRWindow instances automatically, and deletes them (including any widget instantiated inside any QRWindow)
when the application terminates.
Once a window has been created, we can associate it with widgets. As mentioned in the previous section, all Qt
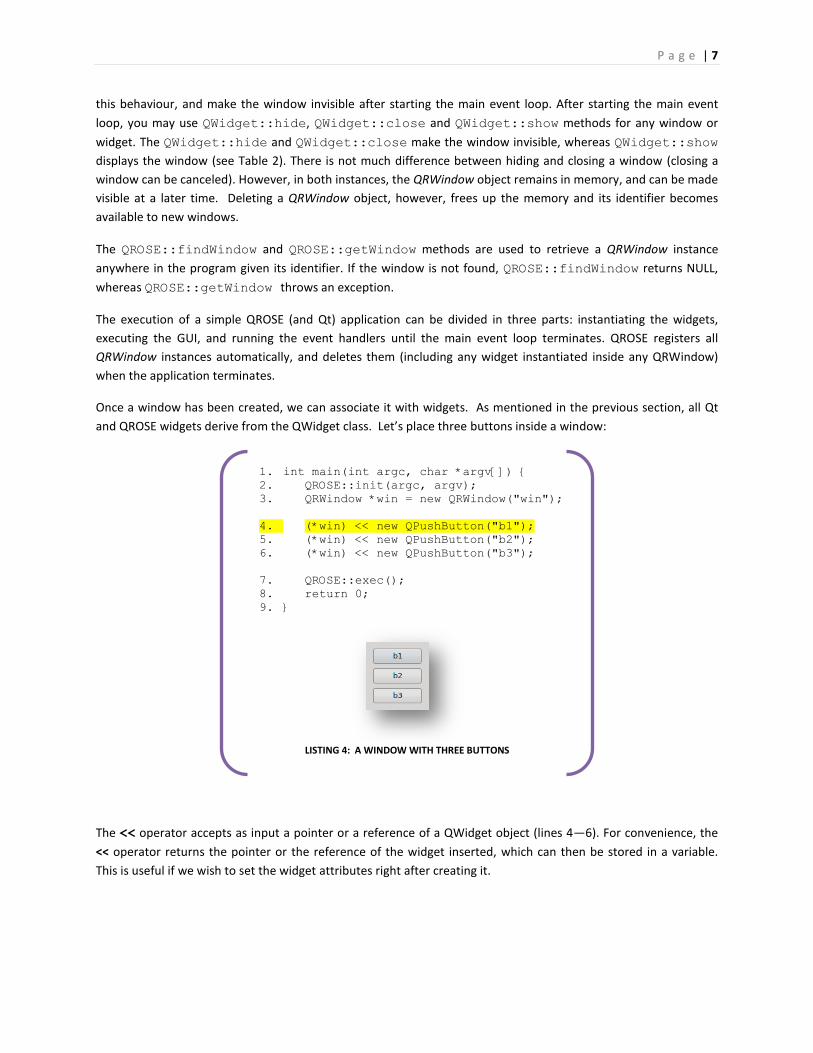
and QROSE widgets derive from the QWidget class. Let’s place three buttons inside a window:
The << operator accepts as input a pointer or a reference of a QWidget object (lines 4—6). For convenience, the
<< operator returns the pointer or the reference of the widget inserted, which can then be stored in a variable.
This is useful if we wish to set the widget attributes right after creating it.
1. int main(int argc, char *argv[]) { 2. QROSE::init(argc, argv); 3. QRWindow *win = new QRWindow("win");
4. (*win) << new QPushButton("b1"); 5. (*win) << new QPushButton("b2"); 6. (*win) << new QPushButton("b3");
7. QROSE::exec(); 8. return 0; 9. }
LISTING 4: A WINDOW WITH THREE BUTTONS
P a g e | 8
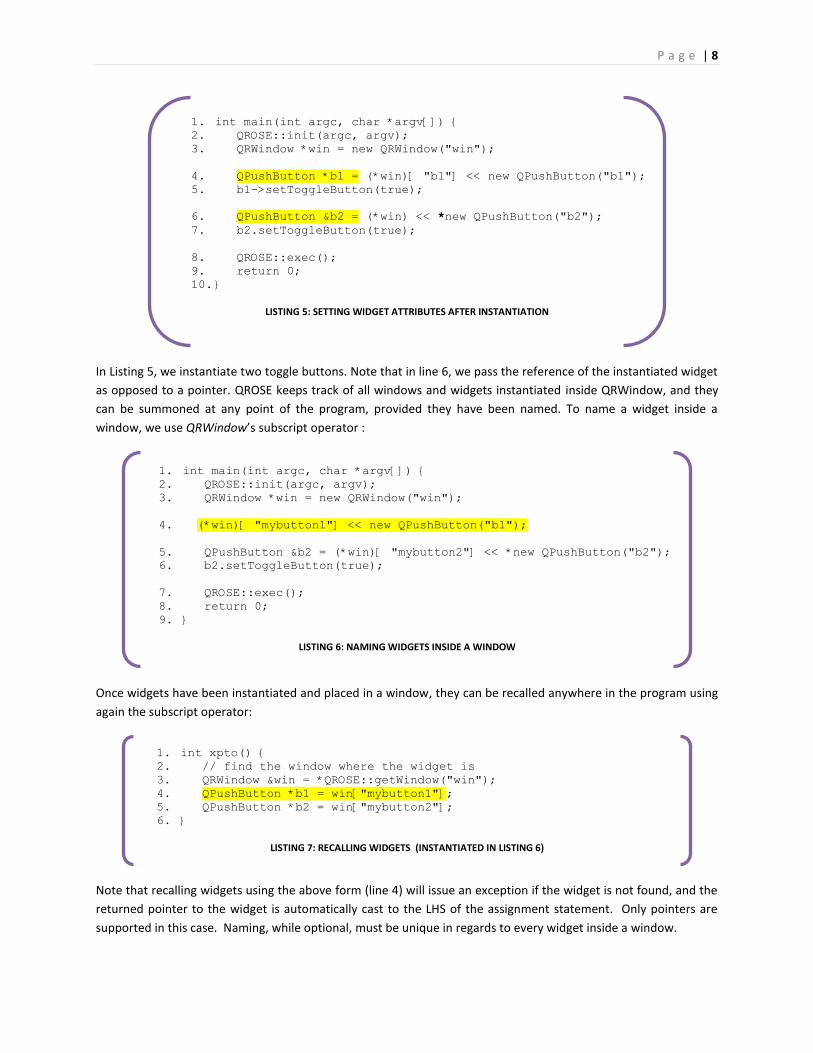
In Listing 5, we instantiate two toggle buttons. Note that in line 6, we pass the reference of the instantiated widget
as opposed to a pointer. QROSE keeps track of all windows and widgets instantiated inside QRWindow, and they
can be summoned at any point of the program, provided they have been named. To name a widget inside a
window, we use QRWindow’s subscript operator :
Once widgets have been instantiated and placed in a window, they can be recalled anywhere in the program using
again the subscript operator:
Note that recalling widgets using the above form (line 4) will issue an exception if the widget is not found, and the
returned pointer to the widget is automatically cast to the LHS of the assignment statement. Only pointers are
supported in this case. Naming, while optional, must be unique in regards to every widget inside a window.
1. int xpto() { 2. // find the window where the widget is 3. QRWindow &win = *QROSE::getWindow("win"); 4. QPushButton *b1 = win["mybutton1"]; 5. QPushButton *b2 = win["mybutton2"]; 6. }
LISTING 7: RECALLING WIDGETS (INSTANTIATED IN LISTING 6)
1. int main(int argc, char *argv[]) { 2. QROSE::init(argc, argv); 3. QRWindow *win = new QRWindow("win");
4. (*win)[ "mybutton1"] << new QPushButton("b1");
5. QPushButton &b2 = (*win)[ "mybutton2"] << *new QPushButton("b2"); 6. b2.setToggleButton(true);
7. QROSE::exec(); 8. return 0; 9. }
LISTING 6: NAMING WIDGETS INSIDE A WINDOW
In ajsasaosj
1. int main(int argc, char *argv[]) { 2. QROSE::init(argc, argv); 3. QRWindow *win = new QRWindow("win");
4. QPushButton *b1 = (*win)[ "b1"] << new QPushButton("b1"); 5. b1->setToggleButton(true);
6. QPushButton &b2 = (*win) << *new QPushButton("b2"); 7. b2.setToggleButton(true);
8. QROSE::exec(); 9. return 0; 10. }
LISTING 5: SETTING WIDGET ATTRIBUTES AFTER INSTANTIATION
In ajsasaosj
P a g e | 9
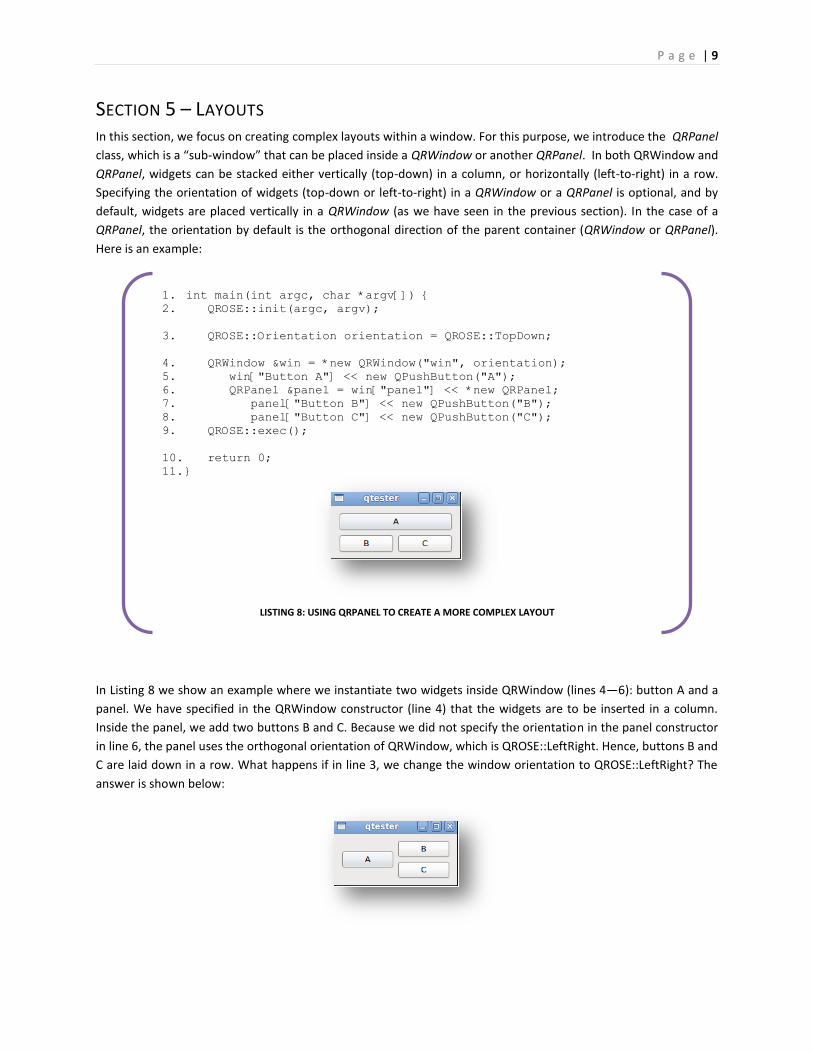
SECTION 5 – LAYOUTS In this section, we focus on creating complex layouts within a window. For this purpose, we introduce the QRPanel
class, which is a “sub-window” that can be placed inside a QRWindow or another QRPanel. In both QRWindow and
QRPanel, widgets can be stacked either vertically (top-down) in a column, or horizontally (left-to-right) in a row.
Specifying the orientation of widgets (top-down or left-to-right) in a QRWindow or a QRPanel is optional, and by
default, widgets are placed vertically in a QRWindow (as we have seen in the previous section). In the case of a
QRPanel, the orientation by default is the orthogonal direction of the parent container (QRWindow or QRPanel).
Here is an example:
In Listing 8 we show an example where we instantiate two widgets inside QRWindow (lines 4—6): button A and a
panel. We have specified in the QRWindow constructor (line 4) that the widgets are to be inserted in a column.
Inside the panel, we add two buttons B and C. Because we did not specify the orientation in the panel constructor
in line 6, the panel uses the orthogonal orientation of QRWindow, which is QROSE::LeftRight. Hence, buttons B and
C are laid down in a row. What happens if in line 3, we change the window orientation to QROSE::LeftRight? The
answer is shown below:
1. int main(int argc, char *argv[]) { 2. QROSE::init(argc, argv);
3. QROSE::Orientation orientation = QROSE::TopDown;
4. QRWindow &win = *new QRWindow("win", orientation); 5. win["Button A"] << new QPushButton("A"); 6. QRPanel &panel = win["panel"] << *new QRPanel; 7. panel["Button B"] << new QPushButton("B"); 8. panel["Button C"] << new QPushButton("C"); 9. QROSE::exec();
10. return 0; 11. }
LISTING 8: USING QRPANEL TO CREATE A MORE COMPLEX LAYOUT
P a g e | 10
More complex layouts can be obtained by placing arbitrary QRPanel objects inside other QRPanel objects. Note
that QRWindow needs to be defined as a top-level widget, and therefore cannot be made a child of QRWindow or
a QRPanel.
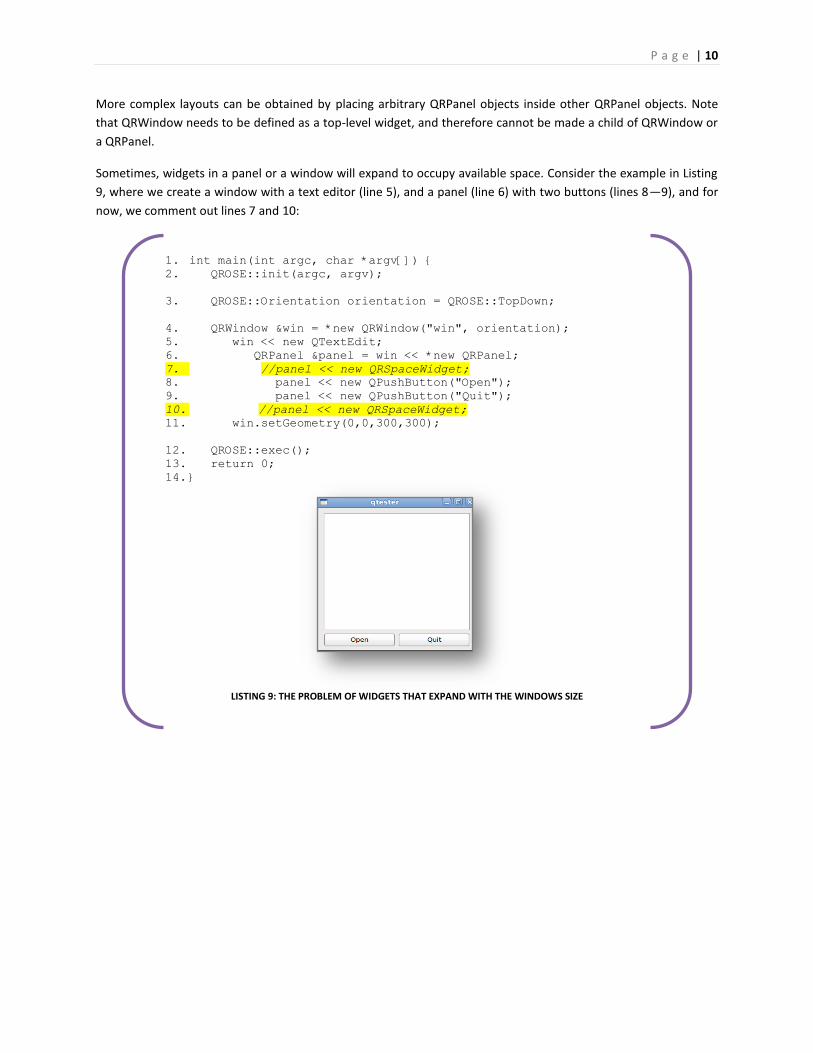
Sometimes, widgets in a panel or a window will expand to occupy available space. Consider the example in Listing
9, where we create a window with a text editor (line 5), and a panel (line 6) with two buttons (lines 8—9), and for
now, we comment out lines 7 and 10:
1. int main(int argc, char *argv[]) { 2. QROSE::init(argc, argv);
3. QROSE::Orientation orientation = QROSE::TopDown;
4. QRWindow &win = *new QRWindow("win", orientation); 5. win << new QTextEdit; 6. QRPanel &panel = win << *new QRPanel; 7. //panel << new QRSpaceWidget; 8. panel << new QPushButton("Open"); 9. panel << new QPushButton("Quit"); 10. //panel << new QRSpaceWidget;
11. win.setGeometry(0,0,300,300);
12. QROSE::exec(); 13. return 0; 14. }
LISTING 9: THE PROBLEM OF WIDGETS THAT EXPAND WITH THE WINDOWS SIZE
P a g e | 11
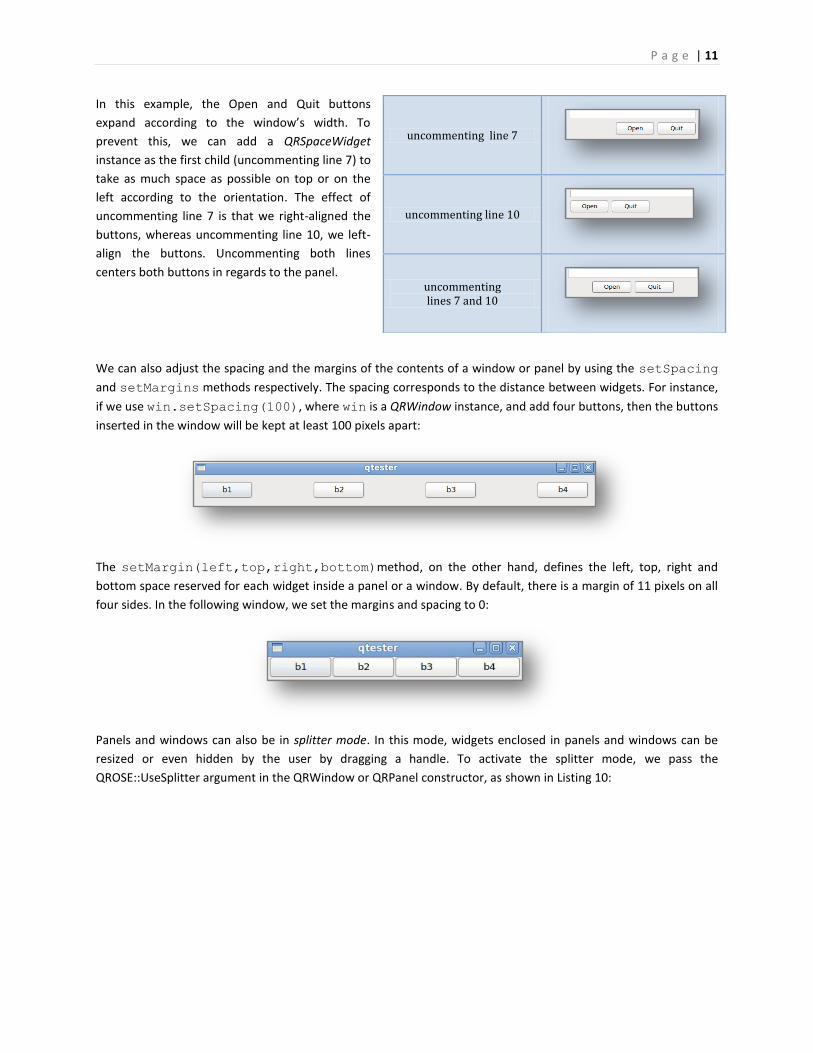
In this example, the Open and Quit buttons
expand according to the window’s width. To
prevent this, we can add a QRSpaceWidget
instance as the first child (uncommenting line 7) to
take as much space as possible on top or on the
left according to the orientation. The effect of
uncommenting line 7 is that we right-aligned the
buttons, whereas uncommenting line 10, we left-
align the buttons. Uncommenting both lines
centers both buttons in regards to the panel.
We can also adjust the spacing and the margins of the contents of a window or panel by using the setSpacing
and setMargins methods respectively. The spacing corresponds to the distance between widgets. For instance,
if we use win.setSpacing(100), where win is a QRWindow instance, and add four buttons, then the buttons
inserted in the window will be kept at least 100 pixels apart:
The setMargin(left,top,right,bottom)method, on the other hand, defines the left, top, right and
bottom space reserved for each widget inside a panel or a window. By default, there is a margin of 11 pixels on all
four sides. In the following window, we set the margins and spacing to 0:
Panels and windows can also be in splitter mode. In this mode, widgets enclosed in panels and windows can be
resized or even hidden by the user by dragging a handle. To activate the splitter mode, we pass the
QROSE::UseSplitter argument in the QRWindow or QRPanel constructor, as shown in Listing 10:
uncommenting line 7
uncommenting line 10
uncommenting lines 7 and 10
P a g e | 12
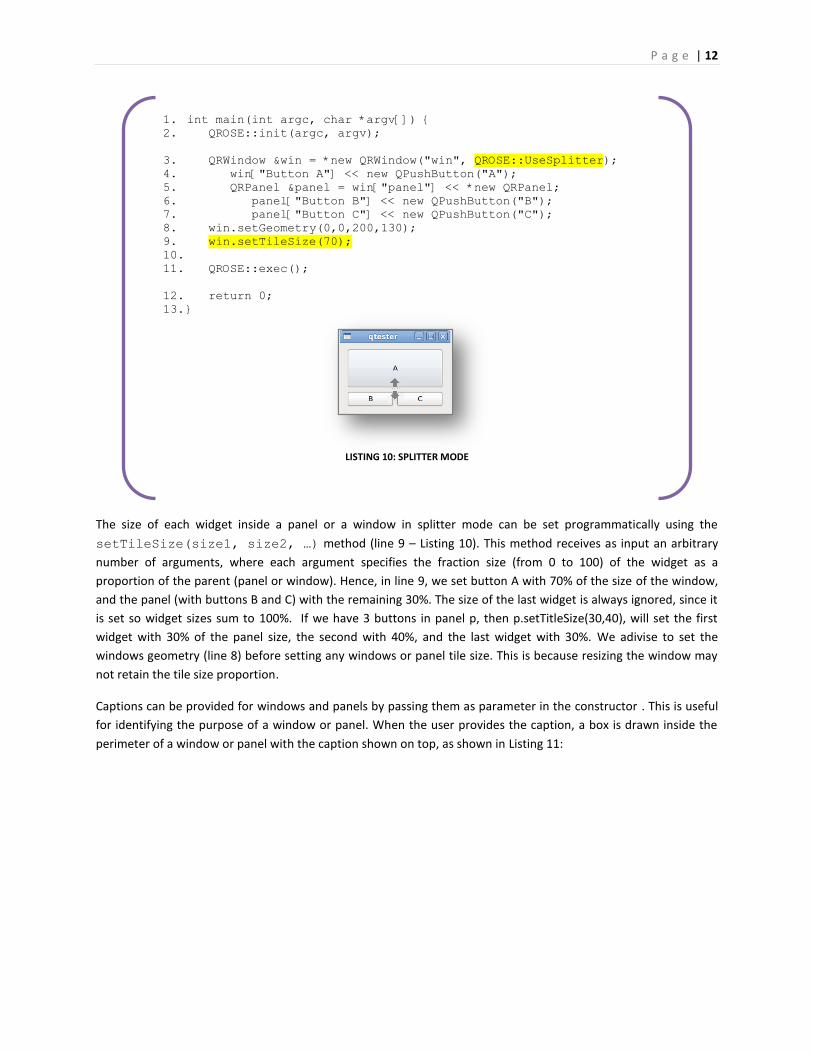
The size of each widget inside a panel or a window in splitter mode can be set programmatically using the
setTileSize(size1, size2, …) method (line 9 – Listing 10). This method receives as input an arbitrary
number of arguments, where each argument specifies the fraction size (from 0 to 100) of the widget as a
proportion of the parent (panel or window). Hence, in line 9, we set button A with 70% of the size of the window,
and the panel (with buttons B and C) with the remaining 30%. The size of the last widget is always ignored, since it
is set so widget sizes sum to 100%. If we have 3 buttons in panel p, then p.setTitleSize(30,40), will set the first
widget with 30% of the panel size, the second with 40%, and the last widget with 30%. We adivise to set the
windows geometry (line 8) before setting any windows or panel tile size. This is because resizing the window may
not retain the tile size proportion.
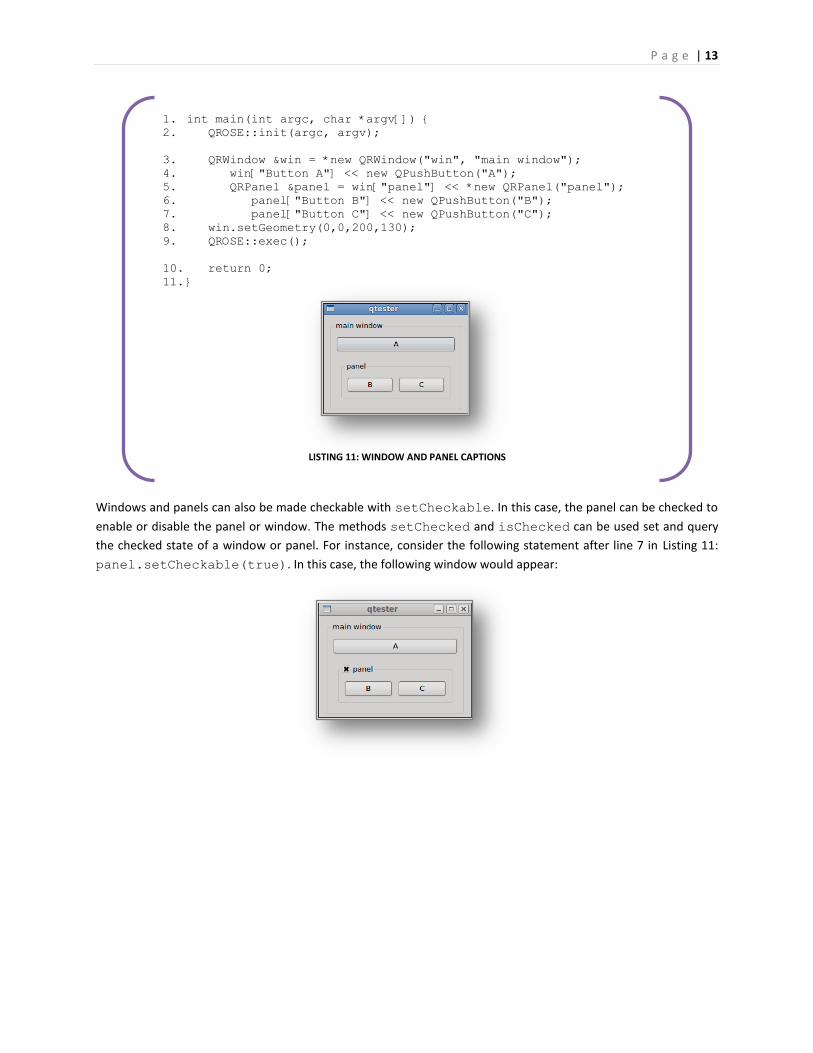
Captions can be provided for windows and panels by passing them as parameter in the constructor . This is useful
for identifying the purpose of a window or panel. When the user provides the caption, a box is drawn inside the
perimeter of a window or panel with the caption shown on top, as shown in Listing 11:
1. int main(int argc, char *argv[]) { 2. QROSE::init(argc, argv);
3. QRWindow &win = *new QRWindow("win", QROSE::UseSplitter); 4. win["Button A"] << new QPushButton("A"); 5. QRPanel &panel = win["panel"] << *new QRPanel; 6. panel["Button B"] << new QPushButton("B"); 7. panel["Button C"] << new QPushButton("C"); 8. win.setGeometry(0,0,200,130); 9. win.setTileSize(70); 10. 11. QROSE::exec();
12. return 0; 13. }
LISTING 10: SPLITTER MODE
P a g e | 13
Windows and panels can also be made checkable with setCheckable. In this case, the panel can be checked to
enable or disable the panel or window. The methods setChecked and isChecked can be used set and query
the checked state of a window or panel. For instance, consider the following statement after line 7 in Listing 11:
panel.setCheckable(true). In this case, the following window would appear:
1. int main(int argc, char *argv[]) { 2. QROSE::init(argc, argv);
3. QRWindow &win = *new QRWindow("win", "main window"); 4. win["Button A"] << new QPushButton("A"); 5. QRPanel &panel = win["panel"] << *new QRPanel("panel"); 6. panel["Button B"] << new QPushButton("B"); 7. panel["Button C"] << new QPushButton("C"); 8. win.setGeometry(0,0,200,130); 9. QROSE::exec();
10. return 0; 11. }
LISTING 11: WINDOW AND PANEL CAPTIONS
P a g e | 14
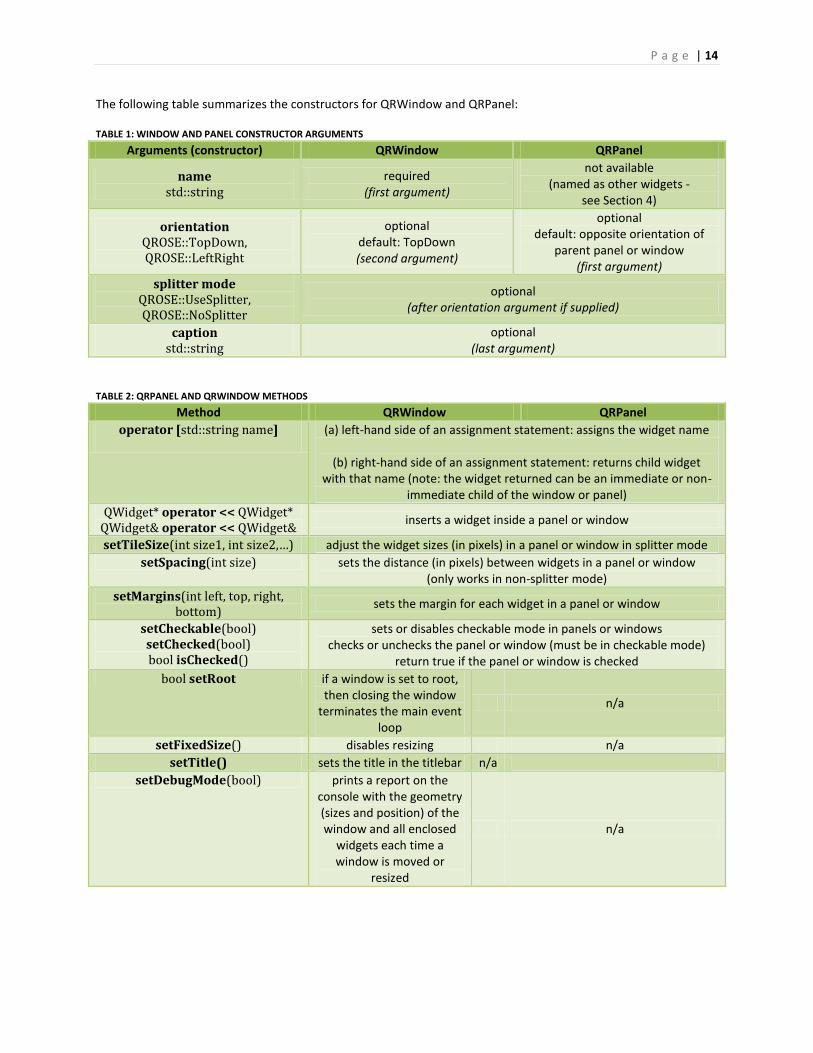
The following table summarizes the constructors for QRWindow and QRPanel:
TABLE 1: WINDOW AND PANEL CONSTRUCTOR ARGUMENTS
Arguments (constructor) QRWindow QRPanel
name std::string
required (first argument)
not available (named as other widgets -
see Section 4)
orientation QROSE::TopDown, QROSE::LeftRight
optional default: TopDown (second argument)
optional default: opposite orientation of
parent panel or window (first argument)
splitter mode QROSE::UseSplitter, QROSE::NoSplitter
optional (after orientation argument if supplied)
caption std::string
optional (last argument)
TABLE 2: QRPANEL AND QRWINDOW METHODS
Method QRWindow QRPanel
operator [std::string name]
(a) left-hand side of an assignment statement: assigns the widget name
(b) right-hand side of an assignment statement: returns child widget with that name (note: the widget returned can be an immediate or non-
immediate child of the window or panel)
QWidget* operator << QWidget* QWidget& operator << QWidget&
inserts a widget inside a panel or window
setTileSize(int size1, int size2,…) adjust the widget sizes (in pixels) in a panel or window in splitter mode
setSpacing(int size) sets the distance (in pixels) between widgets in a panel or window (only works in non-splitter mode)
setMargins(int left, top, right, bottom)
sets the margin for each widget in a panel or window
setCheckable(bool) setChecked(bool) bool isChecked()
sets or disables checkable mode in panels or windows checks or unchecks the panel or window (must be in checkable mode)
return true if the panel or window is checked
bool setRoot if a window is set to root, then closing the window
terminates the main event loop
n/a
setFixedSize() disables resizing n/a
setTitle() sets the title in the titlebar n/a
setDebugMode(bool) prints a report on the console with the geometry (sizes and position) of the window and all enclosed
widgets each time a window is moved or
resized
n/a
P a g e | 15
SECTION 6 – CALLBACKS In the previous two sections we describe how to build a graphical user interface with QROSE. In this section, we
focus on writing code that is executed in response to events, such as a button click. QROSE extends Qt by offering
an additional callback mechanism that does not rely on the meta-object compiler, but it is fully compatible with Qt.
Qt has a sophisticated communication mechanism for Qt objects (such as widgets), which relies on signals and
slots. In a nutshell, Qt objects can emit a signal to notify a change in its state or an event. If we wish to write code
that is triggered when a signal is invoked, then we must write a slot, and connect that signal to the slot. A slot is a
normal method function. The advantage of the signal/slot mechanism is that the object that sends the signal and
the object that handles the event do not know which parties are involved in the communication. A signal can be
associated with several slots, and a single slot can be used to handle multiple signals. Another benefit of the
signal/slot approach is that it is type safe – a connection between a signal and a slot is only accepted if their type
signatures match.
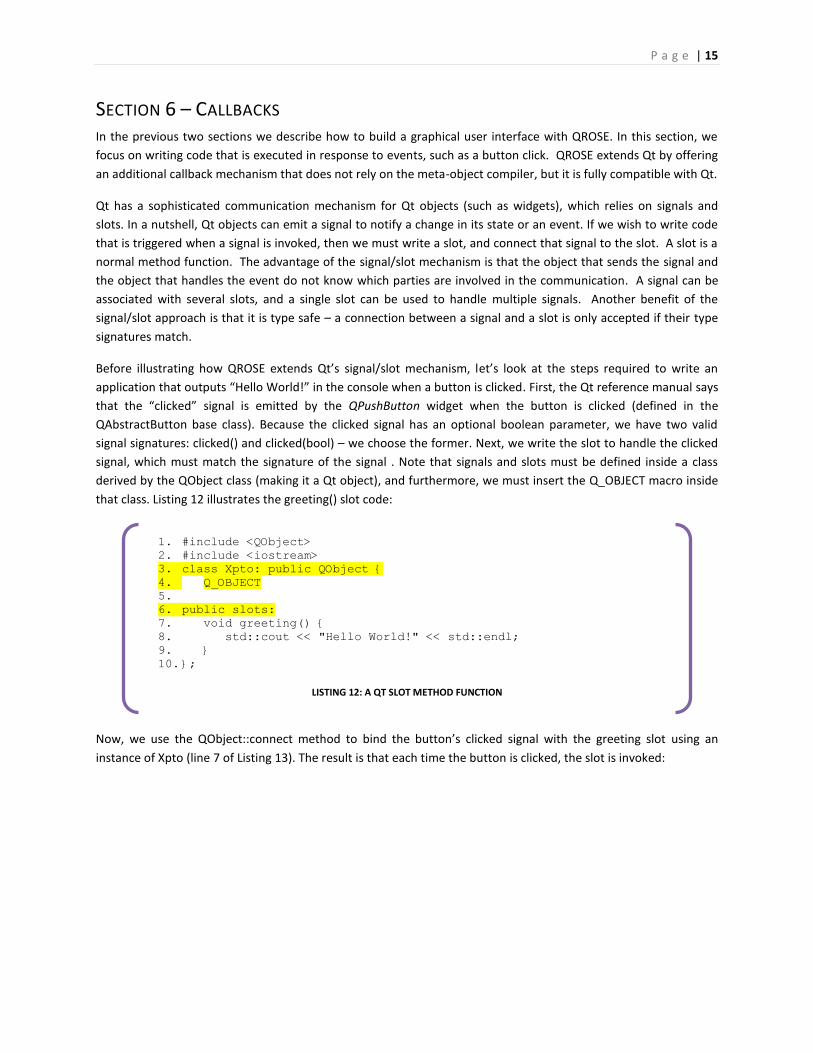
Before illustrating how QROSE extends Qt’s signal/slot mechanism, let’s look at the steps required to write an
application that outputs “Hello World!” in the console when a button is clicked. First, the Qt reference manual says
that the “clicked” signal is emitted by the QPushButton widget when the button is clicked (defined in the
QAbstractButton base class). Because the clicked signal has an optional boolean parameter, we have two valid
signal signatures: clicked() and clicked(bool) – we choose the former. Next, we write the slot to handle the clicked
signal, which must match the signature of the signal . Note that signals and slots must be defined inside a class
derived by the QObject class (making it a Qt object), and furthermore, we must insert the Q_OBJECT macro inside
that class. Listing 12 illustrates the greeting() slot code:
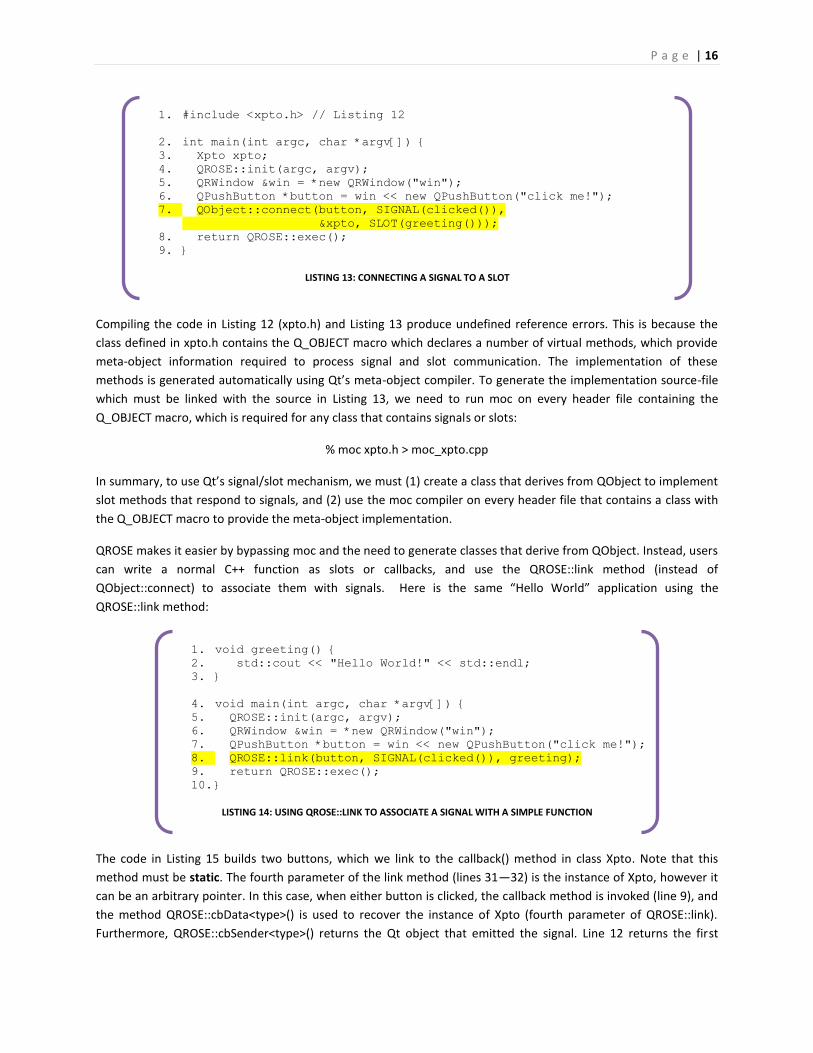
Now, we use the QObject::connect method to bind the button’s clicked signal with the greeting slot using an
instance of Xpto (line 7 of Listing 13). The result is that each time the button is clicked, the slot is invoked:
1. #include <QObject> 2. #include <iostream> 3. class Xpto: public QObject { 4. Q_OBJECT 5. 6. public slots: 7. void greeting() { 8. std::cout << "Hello World!" << std::endl; 9. } 10. };
LISTING 12: A QT SLOT METHOD FUNCTION
P a g e | 16
Compiling the code in Listing 12 (xpto.h) and Listing 13 produce undefined reference errors. This is because the
class defined in xpto.h contains the Q_OBJECT macro which declares a number of virtual methods, which provide
meta-object information required to process signal and slot communication. The implementation of these
methods is generated automatically using Qt’s meta-object compiler. To generate the implementation source-file
which must be linked with the source in Listing 13, we need to run moc on every header file containing the
Q_OBJECT macro, which is required for any class that contains signals or slots:
% moc xpto.h > moc_xpto.cpp
In summary, to use Qt’s signal/slot mechanism, we must (1) create a class that derives from QObject to implement
slot methods that respond to signals, and (2) use the moc compiler on every header file that contains a class with
the Q_OBJECT macro to provide the meta-object implementation.
QROSE makes it easier by bypassing moc and the need to generate classes that derive from QObject. Instead, users
can write a normal C++ function as slots or callbacks, and use the QROSE::link method (instead of
QObject::connect) to associate them with signals. Here is the same “Hello World” application using the
QROSE::link method:
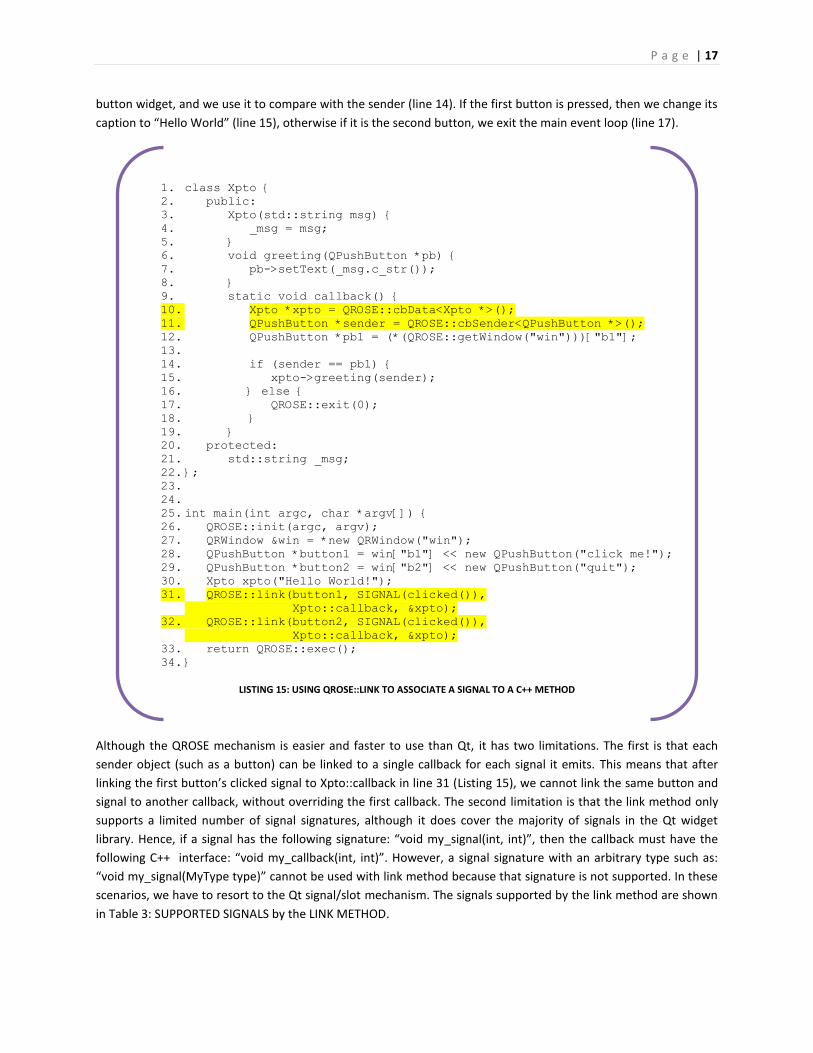
The code in Listing 15 builds two buttons, which we link to the callback() method in class Xpto. Note that this
method must be static. The fourth parameter of the link method (lines 31—32) is the instance of Xpto, however it
can be an arbitrary pointer. In this case, when either button is clicked, the callback method is invoked (line 9), and
the method QROSE::cbData<type>() is used to recover the instance of Xpto (fourth parameter of QROSE::link).
Furthermore, QROSE::cbSender<type>() returns the Qt object that emitted the signal. Line 12 returns the first
1. void greeting() { 2. std::cout << "Hello World!" << std::endl; 3. }
4. void main(int argc, char *argv[]) { 5. QROSE::init(argc, argv); 6. QRWindow &win = *new QRWindow("win"); 7. QPushButton *button = win << new QPushButton("click me!"); 8. QROSE::link(button, SIGNAL(clicked()), greeting); 9. return QROSE::exec(); 10. }
LISTING 14: USING QROSE::LINK TO ASSOCIATE A SIGNAL WITH A SIMPLE FUNCTION
1. #include <xpto.h> // Listing 12
2. int main(int argc, char *argv[]) { 3. Xpto xpto; 4. QROSE::init(argc, argv); 5. QRWindow &win = *new QRWindow("win"); 6. QPushButton *button = win << new QPushButton("click me!"); 7. QObject::connect(button, SIGNAL(clicked()),
&xpto, SLOT(greeting()));
8. return QROSE::exec(); 9. }
LISTING 13: CONNECTING A SIGNAL TO A SLOT
P a g e | 17
button widget, and we use it to compare with the sender (line 14). If the first button is pressed, then we change its
caption to “Hello World” (line 15), otherwise if it is the second button, we exit the main event loop (line 17).
Although the QROSE mechanism is easier and faster to use than Qt, it has two limitations. The first is that each
sender object (such as a button) can be linked to a single callback for each signal it emits. This means that after
linking the first button’s clicked signal to Xpto::callback in line 31 (Listing 15), we cannot link the same button and
signal to another callback, without overriding the first callback. The second limitation is that the link method only
supports a limited number of signal signatures, although it does cover the majority of signals in the Qt widget
library. Hence, if a signal has the following signature: “void my_signal(int, int)”, then the callback must have the
following C++ interface: “void my_callback(int, int)”. However, a signal signature with an arbitrary type such as:
“void my_signal(MyType type)” cannot be used with link method because that signature is not supported. In these
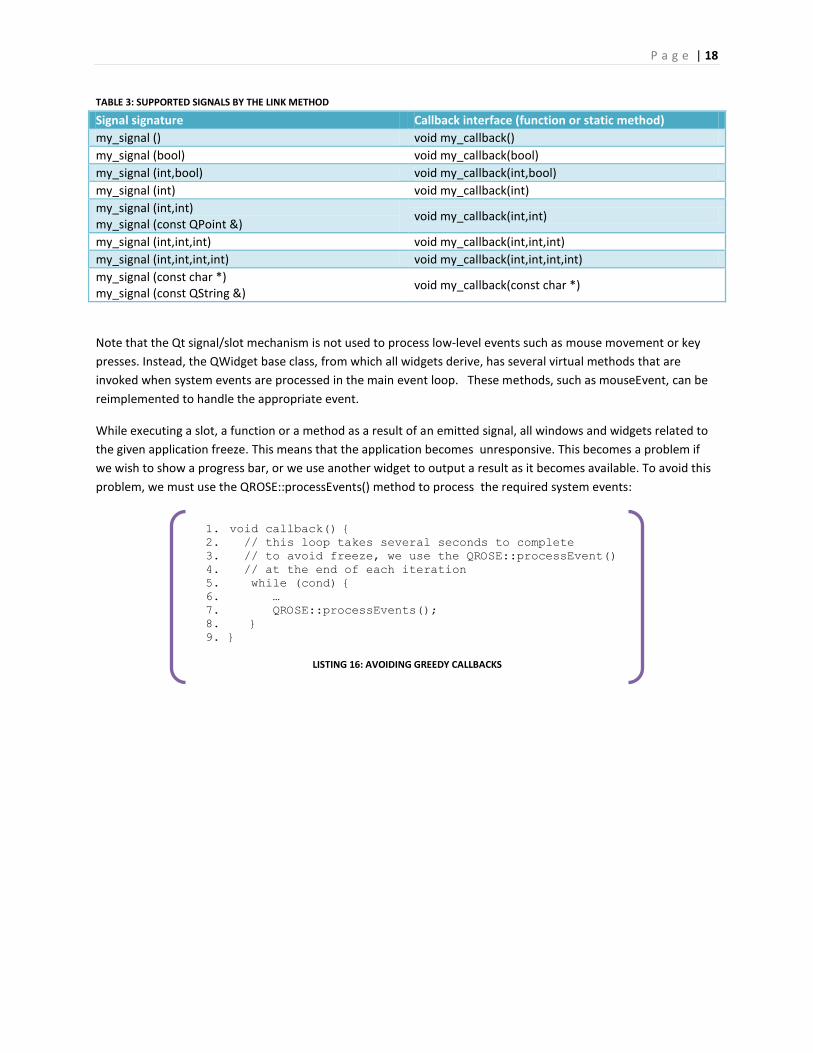
scenarios, we have to resort to the Qt signal/slot mechanism. The signals supported by the link method are shown
in Table 3: SUPPORTED SIGNALS by the LINK METHOD.
1. class Xpto { 2. public: 3. Xpto(std::string msg) { 4. _msg = msg; 5. } 6. void greeting(QPushButton *pb) { 7. pb->setText(_msg.c_str()); 8. } 9. static void callback() { 10. Xpto *xpto = QROSE::cbData<Xpto *>(); 11. QPushButton *sender = QROSE::cbSender<QPushButton *>(); 12. QPushButton *pb1 = (*(QROSE::getWindow("win")))["b1"]; 13. 14. if (sender == pb1) { 15. xpto->greeting(sender); 16. } else {
17. QROSE::exit(0); 18. } 19. } 20. protected: 21. std::string _msg; 22. }; 23. 24. 25. int main(int argc, char *argv[]) { 26. QROSE::init(argc, argv); 27. QRWindow &win = *new QRWindow("win"); 28. QPushButton *button1 = win["b1"] << new QPushButton("click me!"); 29. QPushButton *button2 = win["b2"] << new QPushButton("quit"); 30. Xpto xpto("Hello World!"); 31. QROSE::link(button1, SIGNAL(clicked()),
Xpto::callback, &xpto);
32. QROSE::link(button2, SIGNAL(clicked()), Xpto::callback, &xpto);
33. return QROSE::exec(); 34. }
LISTING 15: USING QROSE::LINK TO ASSOCIATE A SIGNAL TO A C++ METHOD
P a g e | 18
TABLE 3: SUPPORTED SIGNALS BY THE LINK METHOD
Signal signature Callback interface (function or static method)
my_signal () void my_callback()
my_signal (bool) void my_callback(bool)
my_signal (int,bool) void my_callback(int,bool)
my_signal (int) void my_callback(int)
my_signal (int,int) my_signal (const QPoint &)
void my_callback(int,int)
my_signal (int,int,int) void my_callback(int,int,int)
my_signal (int,int,int,int) void my_callback(int,int,int,int)
my_signal (const char *) my_signal (const QString &)
void my_callback(const char *)
Note that the Qt signal/slot mechanism is not used to process low-level events such as mouse movement or key
presses. Instead, the QWidget base class, from which all widgets derive, has several virtual methods that are
invoked when system events are processed in the main event loop. These methods, such as mouseEvent, can be
reimplemented to handle the appropriate event.
While executing a slot, a function or a method as a result of an emitted signal, all windows and widgets related to
the given application freeze. This means that the application becomes unresponsive. This becomes a problem if
we wish to show a progress bar, or we use another widget to output a result as it becomes available. To avoid this
problem, we must use the QROSE::processEvents() method to process the required system events:
1. void callback() { 2. // this loop takes several seconds to complete 3. // to avoid freeze, we use the QROSE::processEvent() 4. // at the end of each iteration 5. while (cond) { 6. … 7. QROSE::processEvents(); 8. } 9. }
LISTING 16: AVOIDING GREEDY CALLBACKS
P a g e | 19
SECTION 7 – QROSE WIDGETS While Qt has a wide range of widgets that can be used with QROSE, we have introduced a number of widgets that
we believe are easier to use. In this section, we present a quick overview of these widgets.
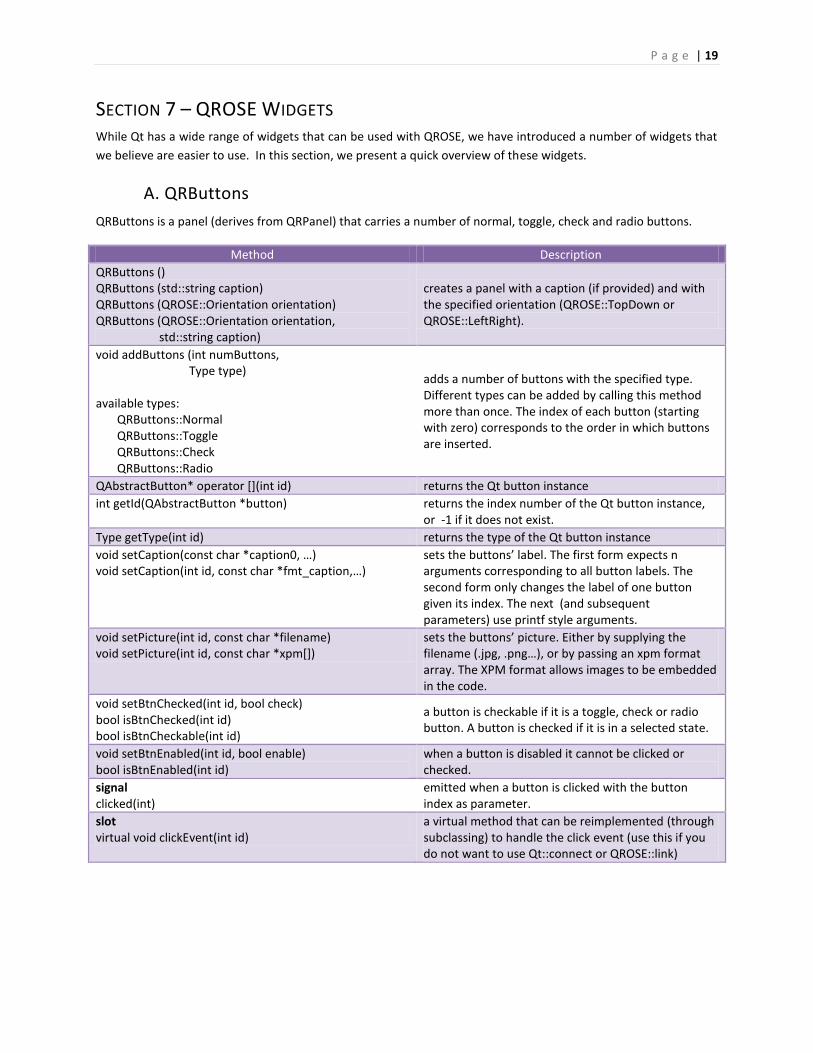
A. QRButtons
QRButtons is a panel (derives from QRPanel) that carries a number of normal, toggle, check and radio buttons.
Method Description
QRButtons () QRButtons (std::string caption) QRButtons (QROSE::Orientation orientation) QRButtons (QROSE::Orientation orientation, std::string caption)
creates a panel with a caption (if provided) and with the specified orientation (QROSE::TopDown or QROSE::LeftRight).
void addButtons (int numButtons, Type type) available types: QRButtons::Normal QRButtons::Toggle QRButtons::Check QRButtons::Radio
adds a number of buttons with the specified type. Different types can be added by calling this method more than once. The index of each button (starting with zero) corresponds to the order in which buttons are inserted.
QAbstractButton* operator [](int id) returns the Qt button instance
int getId(QAbstractButton *button) returns the index number of the Qt button instance, or -1 if it does not exist.
Type getType(int id) returns the type of the Qt button instance
void setCaption(const char *caption0, …) void setCaption(int id, const char *fmt_caption,…)
sets the buttons’ label. The first form expects n arguments corresponding to all button labels. The second form only changes the label of one button given its index. The next (and subsequent parameters) use printf style arguments.
void setPicture(int id, const char *filename) void setPicture(int id, const char *xpm[])
sets the buttons’ picture. Either by supplying the filename (.jpg, .png…), or by passing an xpm format array. The XPM format allows images to be embedded in the code.
void setBtnChecked(int id, bool check) bool isBtnChecked(int id) bool isBtnCheckable(int id)
a button is checkable if it is a toggle, check or radio button. A button is checked if it is in a selected state.
void setBtnEnabled(int id, bool enable) bool isBtnEnabled(int id)
when a button is disabled it cannot be clicked or checked.
signal clicked(int)
emitted when a button is clicked with the button index as parameter.
slot virtual void clickEvent(int id)
a virtual method that can be reimplemented (through subclassing) to handle the click event (use this if you do not want to use Qt::connect or QROSE::link)
P a g e | 20
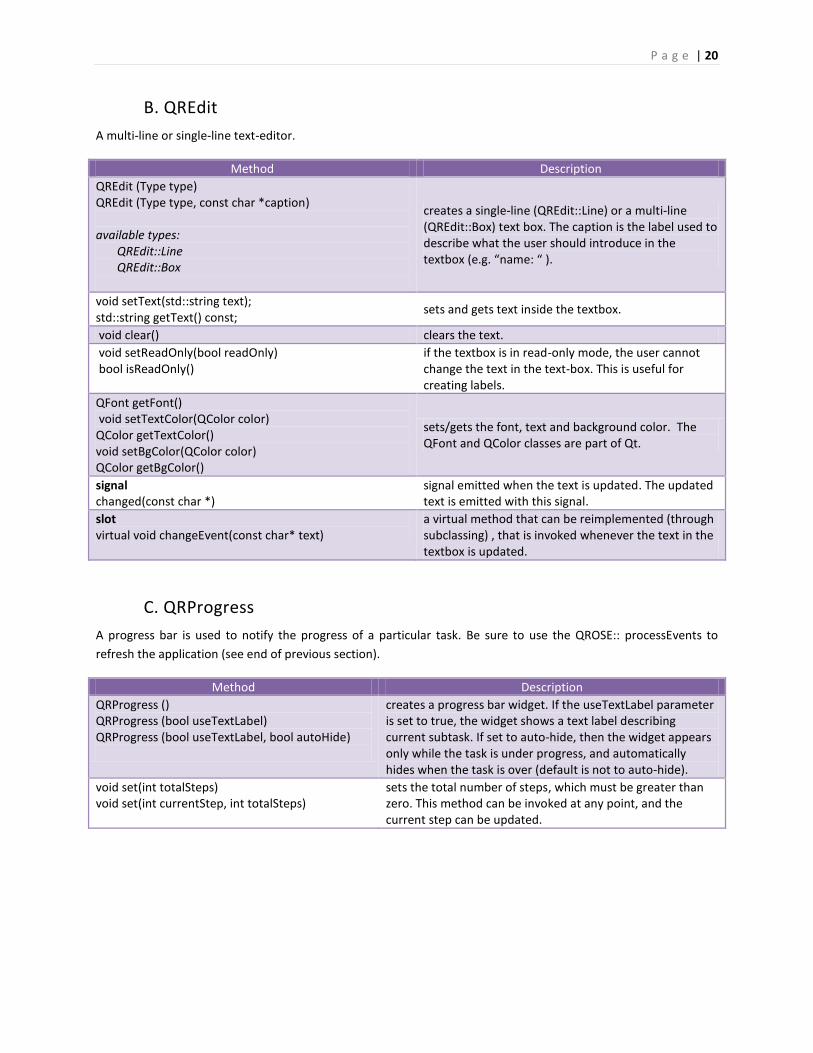
B. QREdit
A multi-line or single-line text-editor.
Method Description
QREdit (Type type) QREdit (Type type, const char *caption) available types: QREdit::Line QREdit::Box
creates a single-line (QREdit::Line) or a multi-line (QREdit::Box) text box. The caption is the label used to describe what the user should introduce in the textbox (e.g. “name: “ ).
void setText(std::string text); std::string getText() const;
sets and gets text inside the textbox.
void clear() clears the text.
void setReadOnly(bool readOnly) bool isReadOnly()
if the textbox is in read-only mode, the user cannot change the text in the text-box. This is useful for creating labels.
QFont getFont() void setTextColor(QColor color) QColor getTextColor() void setBgColor(QColor color) QColor getBgColor()
sets/gets the font, text and background color. The QFont and QColor classes are part of Qt.
signal changed(const char *)
signal emitted when the text is updated. The updated text is emitted with this signal.
slot virtual void changeEvent(const char* text)
a virtual method that can be reimplemented (through subclassing) , that is invoked whenever the text in the textbox is updated.
C. QRProgress
A progress bar is used to notify the progress of a particular task. Be sure to use the QROSE:: processEvents to
refresh the application (see end of previous section).
Method Description
QRProgress () QRProgress (bool useTextLabel) QRProgress (bool useTextLabel, bool autoHide)
creates a progress bar widget. If the useTextLabel parameter is set to true, the widget shows a text label describing current subtask. If set to auto-hide, then the widget appears only while the task is under progress, and automatically hides when the task is over (default is not to auto-hide).
void set(int totalSteps) void set(int currentStep, int totalSteps)
sets the total number of steps, which must be greater than zero. This method can be invoked at any point, and the current step can be updated.
P a g e | 21
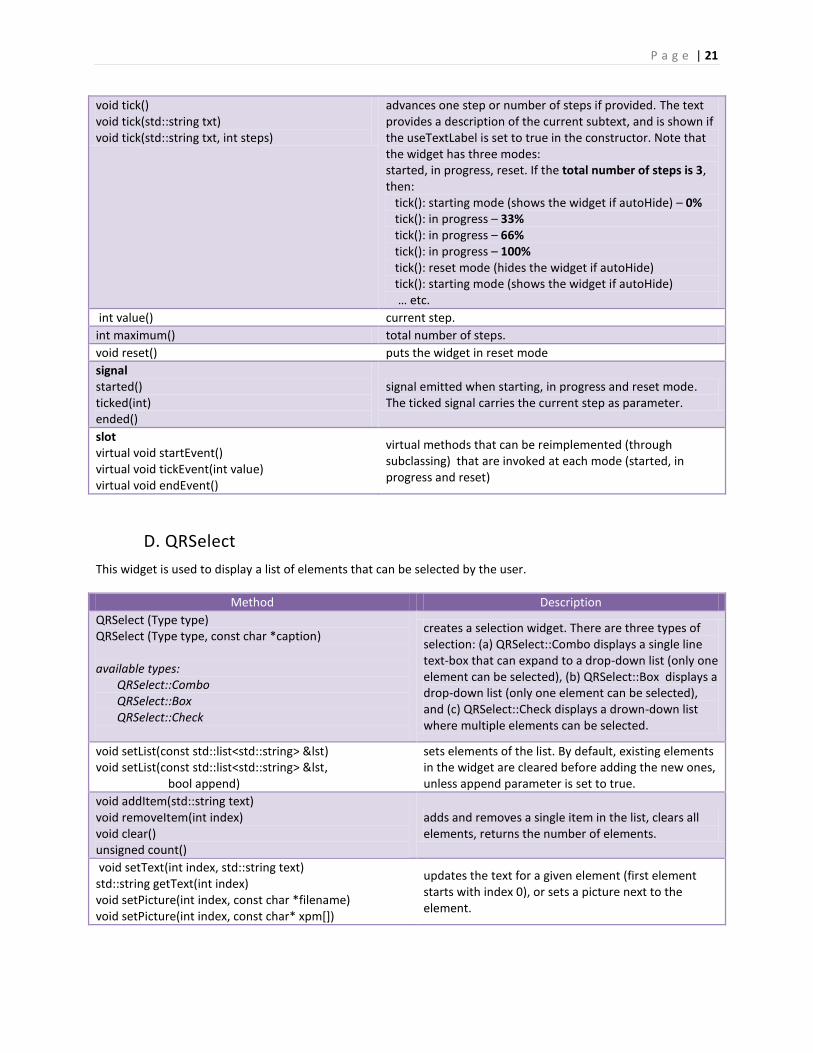
void tick() void tick(std::string txt) void tick(std::string txt, int steps)
advances one step or number of steps if provided. The text provides a description of the current subtext, and is shown if the useTextLabel is set to true in the constructor. Note that the widget has three modes: started, in progress, reset. If the total number of steps is 3, then: tick(): starting mode (shows the widget if autoHide) – 0% tick(): in progress – 33% tick(): in progress – 66% tick(): in progress – 100% tick(): reset mode (hides the widget if autoHide) tick(): starting mode (shows the widget if autoHide) … etc.
int value() current step.
int maximum() total number of steps.
void reset() puts the widget in reset mode
signal started() ticked(int) ended()
signal emitted when starting, in progress and reset mode. The ticked signal carries the current step as parameter.
slot virtual void startEvent() virtual void tickEvent(int value) virtual void endEvent()
virtual methods that can be reimplemented (through subclassing) that are invoked at each mode (started, in progress and reset)
D. QRSelect
This widget is used to display a list of elements that can be selected by the user.
Method Description
QRSelect (Type type) QRSelect (Type type, const char *caption) available types: QRSelect::Combo QRSelect::Box QRSelect::Check
creates a selection widget. There are three types of selection: (a) QRSelect::Combo displays a single line text-box that can expand to a drop-down list (only one element can be selected), (b) QRSelect::Box displays a drop-down list (only one element can be selected), and (c) QRSelect::Check displays a drown-down list where multiple elements can be selected.
void setList(const std::list<std::string> &lst) void setList(const std::list<std::string> &lst, bool append)
sets elements of the list. By default, existing elements in the widget are cleared before adding the new ones, unless append parameter is set to true.
void addItem(std::string text) void removeItem(int index) void clear() unsigned count()
adds and removes a single item in the list, clears all elements, returns the number of elements.
void setText(int index, std::string text) std::string getText(int index) void setPicture(int index, const char *filename) void setPicture(int index, const char* xpm[])
updates the text for a given element (first element starts with index 0), or sets a picture next to the element.
P a g e | 22
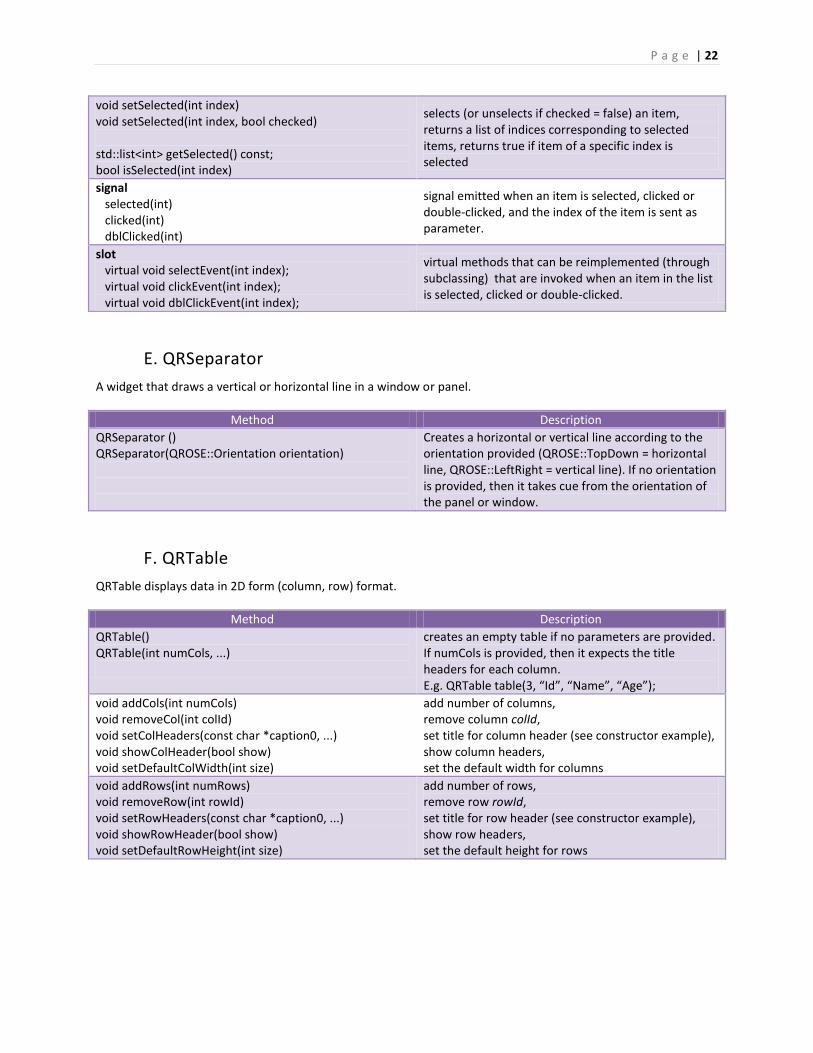
void setSelected(int index) void setSelected(int index, bool checked) std::list<int> getSelected() const; bool isSelected(int index)
selects (or unselects if checked = false) an item, returns a list of indices corresponding to selected items, returns true if item of a specific index is selected
signal selected(int) clicked(int) dblClicked(int)
signal emitted when an item is selected, clicked or double-clicked, and the index of the item is sent as parameter.
slot virtual void selectEvent(int index); virtual void clickEvent(int index); virtual void dblClickEvent(int index);
virtual methods that can be reimplemented (through subclassing) that are invoked when an item in the list is selected, clicked or double-clicked.
E. QRSeparator
A widget that draws a vertical or horizontal line in a window or panel.
Method Description
QRSeparator () QRSeparator(QROSE::Orientation orientation)
Creates a horizontal or vertical line according to the orientation provided (QROSE::TopDown = horizontal line, QROSE::LeftRight = vertical line). If no orientation is provided, then it takes cue from the orientation of the panel or window.
F. QRTable
QRTable displays data in 2D form (column, row) format.
Method Description
QRTable() QRTable(int numCols, ...)
creates an empty table if no parameters are provided. If numCols is provided, then it expects the title headers for each column. E.g. QRTable table(3, “Id”, “Name”, “Age”);
void addCols(int numCols) void removeCol(int colId) void setColHeaders(const char *caption0, ...) void showColHeader(bool show) void setDefaultColWidth(int size)
add number of columns, remove column colId, set title for column header (see constructor example), show column headers, set the default width for columns
void addRows(int numRows) void removeRow(int rowId) void setRowHeaders(const char *caption0, ...) void showRowHeader(bool show) void setDefaultRowHeight(int size)
add number of rows, remove row rowId, set title for row header (see constructor example), show row headers, set the default height for rows
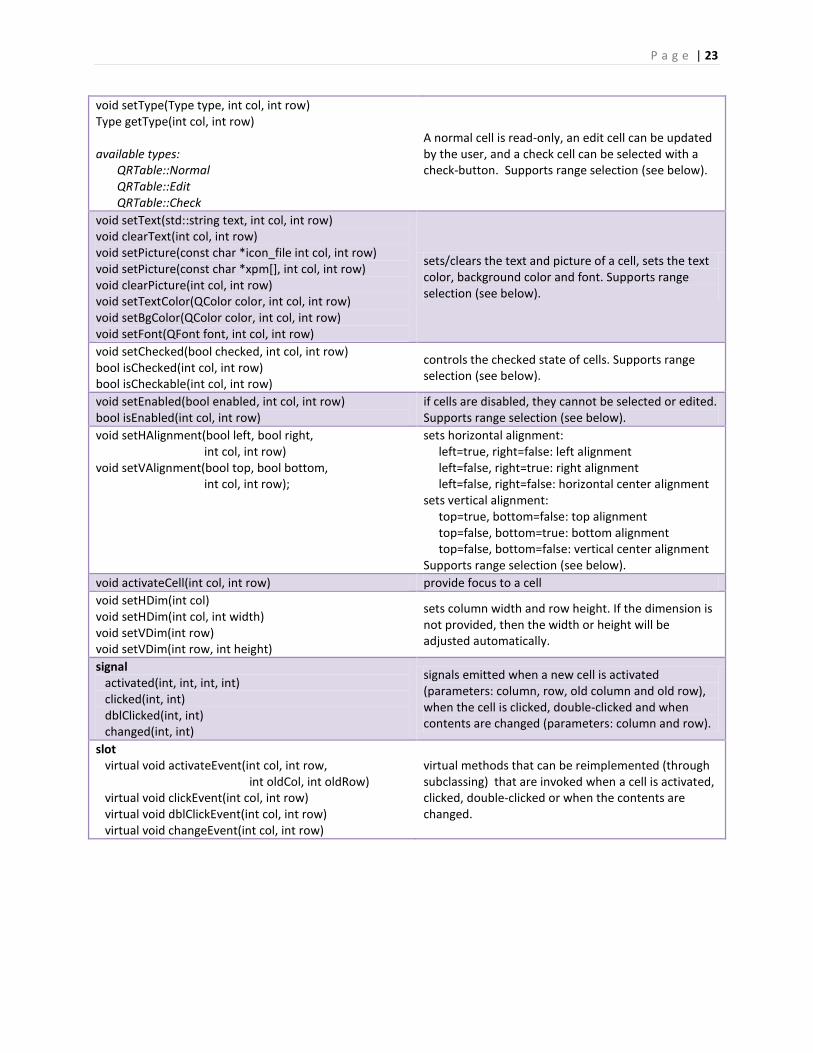
P a g e | 23
void setType(Type type, int col, int row) Type getType(int col, int row) available types: QRTable::Normal QRTable::Edit QRTable::Check
A normal cell is read-only, an edit cell can be updated by the user, and a check cell can be selected with a check-button. Supports range selection (see below).
void setText(std::string text, int col, int row) void clearText(int col, int row) void setPicture(const char *icon_file int col, int row) void setPicture(const char *xpm[], int col, int row) void clearPicture(int col, int row) void setTextColor(QColor color, int col, int row) void setBgColor(QColor color, int col, int row) void setFont(QFont font, int col, int row)
sets/clears the text and picture of a cell, sets the text color, background color and font. Supports range selection (see below).
void setChecked(bool checked, int col, int row) bool isChecked(int col, int row) bool isCheckable(int col, int row)
controls the checked state of cells. Supports range selection (see below).
void setEnabled(bool enabled, int col, int row) bool isEnabled(int col, int row)
if cells are disabled, they cannot be selected or edited. Supports range selection (see below).
void setHAlignment(bool left, bool right, int col, int row) void setVAlignment(bool top, bool bottom, int col, int row);
sets horizontal alignment: left=true, right=false: left alignment left=false, right=true: right alignment left=false, right=false: horizontal center alignment sets vertical alignment: top=true, bottom=false: top alignment top=false, bottom=true: bottom alignment top=false, bottom=false: vertical center alignment Supports range selection (see below).
void activateCell(int col, int row) provide focus to a cell
void setHDim(int col) void setHDim(int col, int width) void setVDim(int row) void setVDim(int row, int height)
sets column width and row height. If the dimension is not provided, then the width or height will be adjusted automatically.
signal activated(int, int, int, int) clicked(int, int) dblClicked(int, int) changed(int, int)
signals emitted when a new cell is activated (parameters: column, row, old column and old row), when the cell is clicked, double-clicked and when contents are changed (parameters: column and row).
slot virtual void activateEvent(int col, int row, int oldCol, int oldRow) virtual void clickEvent(int col, int row) virtual void dblClickEvent(int col, int row) virtual void changeEvent(int col, int row)
virtual methods that can be reimplemented (through subclassing) that are invoked when a cell is activated, clicked, double-clicked or when the contents are changed.
P a g e | 24
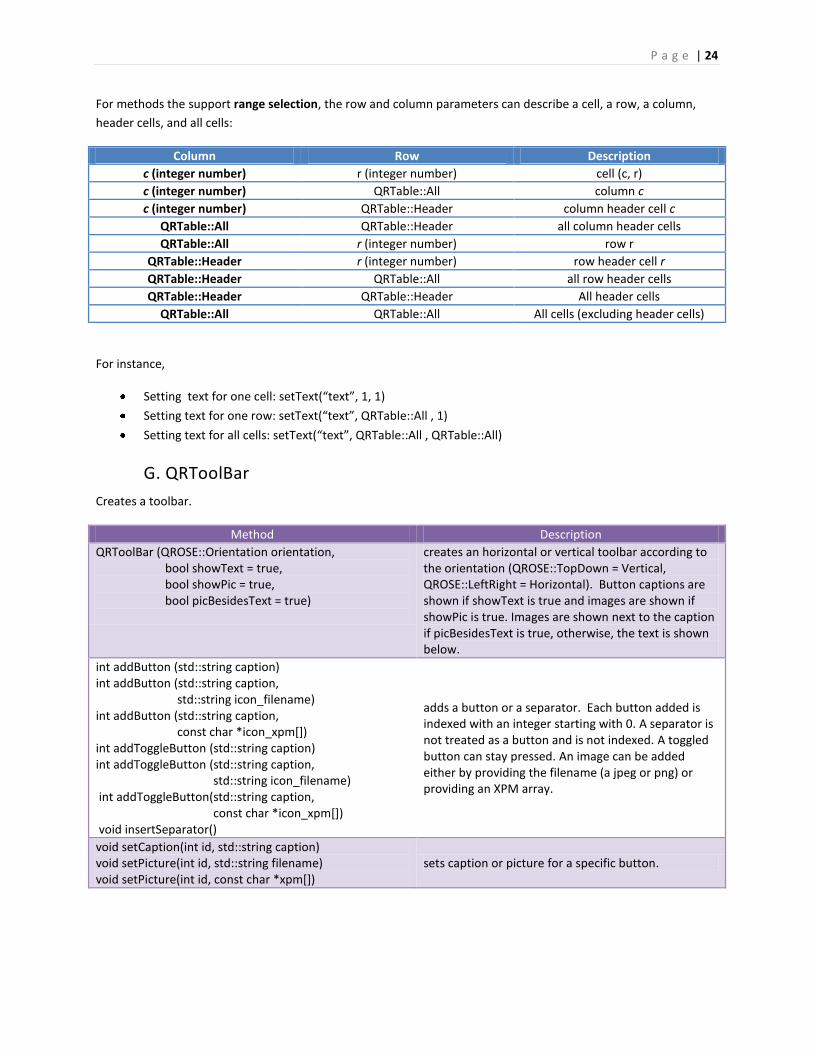
For methods the support range selection, the row and column parameters can describe a cell, a row, a column,
header cells, and all cells:
Column Row Description
c (integer number) r (integer number) cell (c, r)
c (integer number) QRTable::All column c
c (integer number) QRTable::Header column header cell c
QRTable::All QRTable::Header all column header cells
QRTable::All r (integer number) row r
QRTable::Header r (integer number) row header cell r
QRTable::Header QRTable::All all row header cells
QRTable::Header QRTable::Header All header cells
QRTable::All QRTable::All All cells (excluding header cells)
For instance,
Setting text for one cell: setText(“text”, 1, 1)
Setting text for one row: setText(“text”, QRTable::All , 1)
Setting text for all cells: setText(“text”, QRTable::All , QRTable::All)
G. QRToolBar
Creates a toolbar.
Method Description
QRToolBar (QROSE::Orientation orientation, bool showText = true, bool showPic = true, bool picBesidesText = true)
creates an horizontal or vertical toolbar according to the orientation (QROSE::TopDown = Vertical, QROSE::LeftRight = Horizontal). Button captions are shown if showText is true and images are shown if showPic is true. Images are shown next to the caption if picBesidesText is true, otherwise, the text is shown below.
int addButton (std::string caption) int addButton (std::string caption, std::string icon_filename) int addButton (std::string caption, const char *icon_xpm[]) int addToggleButton (std::string caption) int addToggleButton (std::string caption, std::string icon_filename) int addToggleButton(std::string caption, const char *icon_xpm[]) void insertSeparator()
adds a button or a separator. Each button added is indexed with an integer starting with 0. A separator is not treated as a button and is not indexed. A toggled button can stay pressed. An image can be added either by providing the filename (a jpeg or png) or providing an XPM array.
void setCaption(int id, std::string caption) void setPicture(int id, std::string filename) void setPicture(int id, const char *xpm[])
sets caption or picture for a specific button.
P a g e | 25
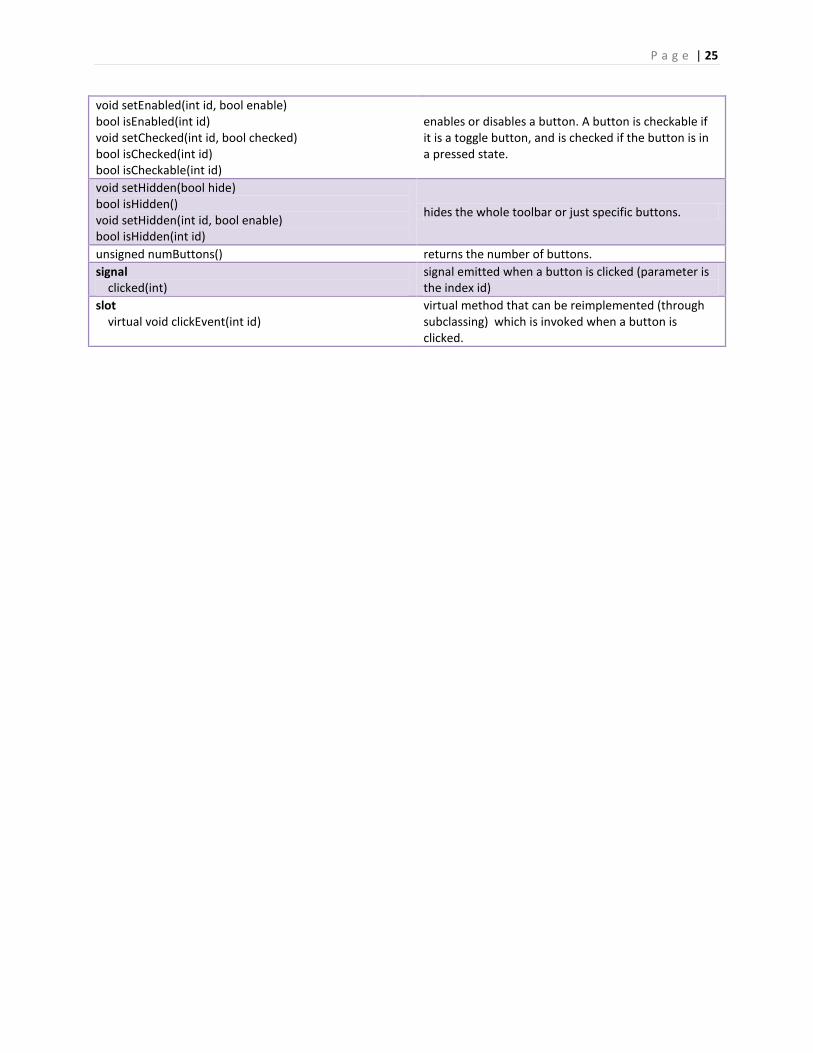
void setEnabled(int id, bool enable) bool isEnabled(int id) void setChecked(int id, bool checked) bool isChecked(int id) bool isCheckable(int id)
enables or disables a button. A button is checkable if it is a toggle button, and is checked if the button is in a pressed state.
void setHidden(bool hide) bool isHidden() void setHidden(int id, bool enable) bool isHidden(int id)
hides the whole toolbar or just specific buttons.
unsigned numButtons() returns the number of buttons.
signal clicked(int)
signal emitted when a button is clicked (parameter is the index id)
slot virtual void clickEvent(int id)
virtual method that can be reimplemented (through subclassing) which is invoked when a button is clicked.
P a g e | 26
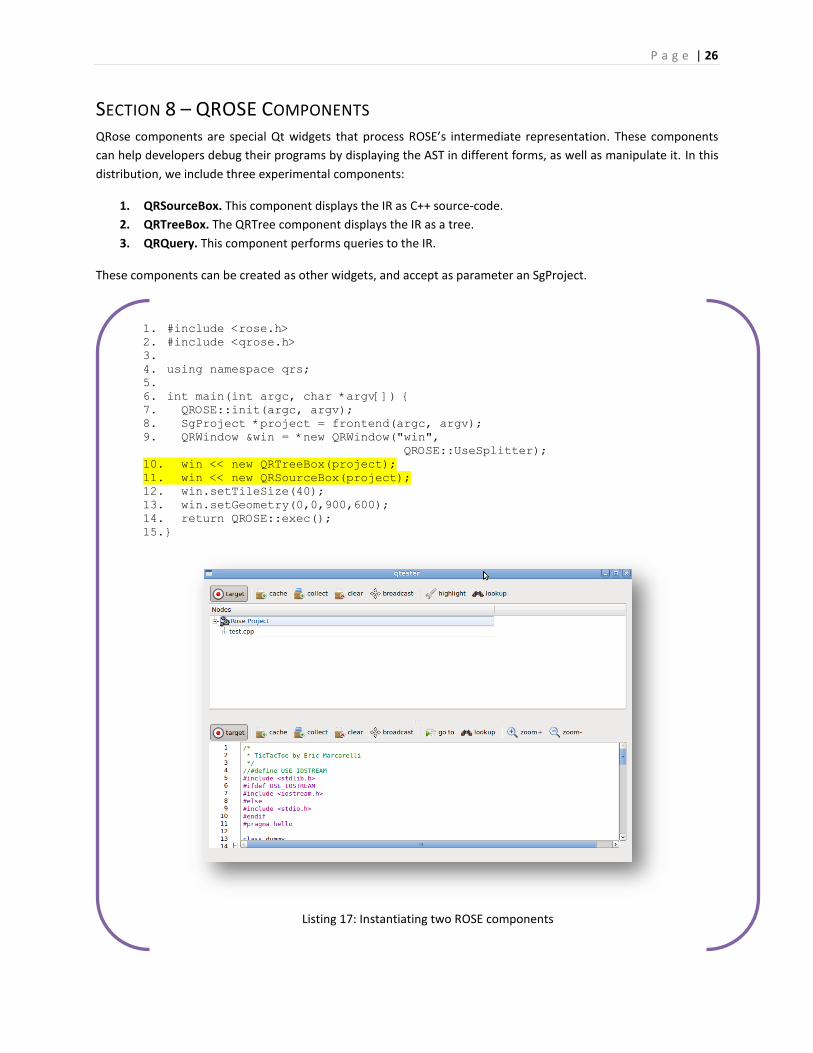
SECTION 8 – QROSE COMPONENTS QRose components are special Qt widgets that process ROSE’s intermediate representation. These components
can help developers debug their programs by displaying the AST in different forms, as well as manipulate it. In this
distribution, we include three experimental components:
1. QRSourceBox. This component displays the IR as C++ source-code.
2. QRTreeBox. The QRTree component displays the IR as a tree.
3. QRQuery. This component performs queries to the IR.
These components can be created as other widgets, and accept as parameter an SgProject.
1. #include <rose.h> 2. #include <qrose.h> 3. 4. using namespace qrs; 5. 6. int main(int argc, char *argv[]) { 7. QROSE::init(argc, argv); 8. SgProject *project = frontend(argc, argv); 9. QRWindow &win = *new QRWindow("win",
QROSE::UseSplitter);
10. win << new QRTreeBox(project); 11. win << new QRSourceBox(project); 12. win.setTileSize(40); 13. win.setGeometry(0,0,900,600); 14. return QROSE::exec(); 15. }
Listing 17: Instantiating two ROSE components
P a g e | 27
In Listing 17, we create an instance of QRTreeBox and QRSourceBox, and pass an SgProject object as parameter.
These components can immediately communicate with each other. SgNodes selected from one component can be
emitted to another component to be processed or visualized. Each component has a cache where nodes received
from other components are kept. To help manage the cache each component has a toolbar attached. The cache
management buttons are:
Target. When the target mode is ON, the component receives any SgNode broadcast including from itself.
When OFF, the component ignores any SgNode broadcast.
Cache. When the cache view is ON, the component visualizes the cache – which is a list of individual
SgNodes that were received. When OFF, the component renders the SgProject instance provided in the
constructor.
Collect. When collect mode is ON, the component adds the SgNodes into the cache. When OFF, the
component clears the cache before receiving new elements.
Clear. Clears the cache.
Broadcast. Broadcasts all elements in the cache to other components.
With this in mind. Let’s do some experiments with this application:
1. compile and run the code in Listing 17.
2. click highlight and lookup in the QRTreeBox component (above). Now go anywhere in the source-code
(below), press right-click which shows a popup menu with all SgNodes associated with that location, and
select one SgNode. This SgNode will be transmitted to the QRTreeBox component, which will
automatically show it. The cache buttons will show 1 element. Pressing the “cache” mode in either
component shows that SgNode.
3. click lookup and collect buttons in the QRSourceBox component. Now press CTRL and double-click any
element in the QRTreeBox, which emits the SgNode. It should automatically highlight the source-code for
each SgNode received. Double-clicking the source-box clears the highlight.
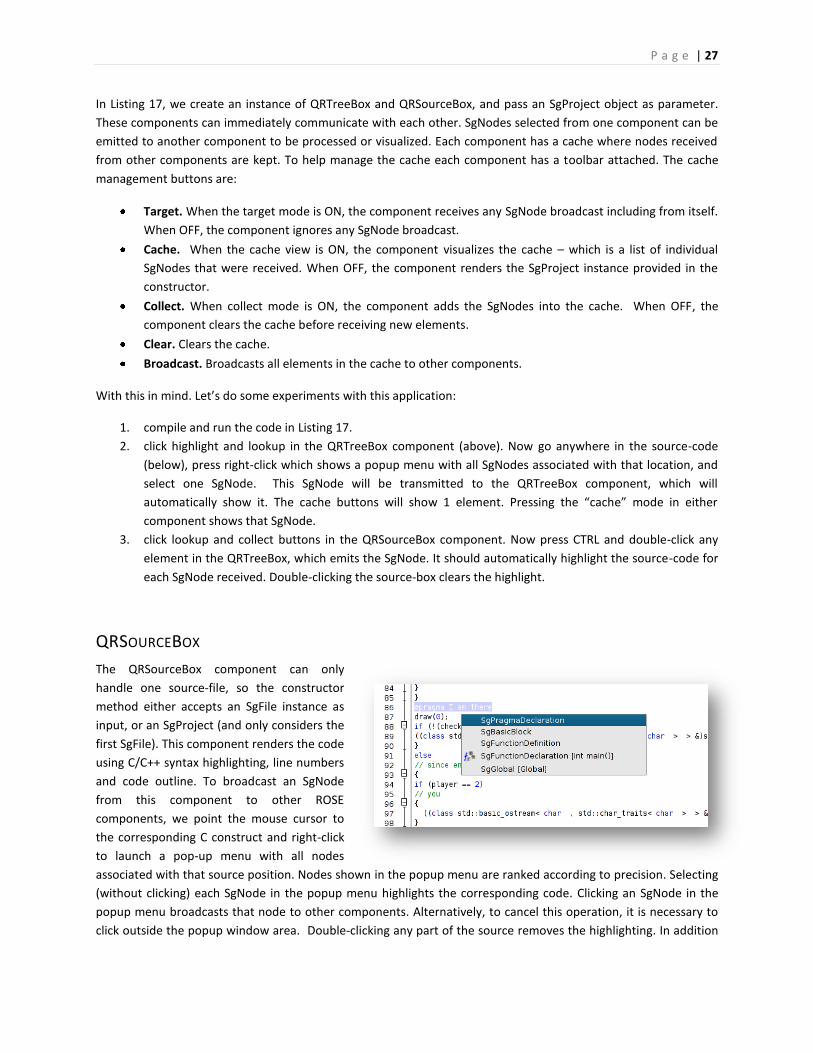
QRSOURCEBOX
The QRSourceBox component can only
handle one source-file, so the constructor
method either accepts an SgFile instance as
input, or an SgProject (and only considers the
first SgFile). This component renders the code
using C/C++ syntax highlighting, line numbers
and code outline. To broadcast an SgNode
from this component to other ROSE
components, we point the mouse cursor to
the corresponding C construct and right-click
to launch a pop-up menu with all nodes
associated with that source position. Nodes shown in the popup menu are ranked according to precision. Selecting
(without clicking) each SgNode in the popup menu highlights the corresponding code. Clicking an SgNode in the
popup menu broadcasts that node to other components. Alternatively, to cancel this operation, it is necessary to
click outside the popup window area. Double-clicking any part of the source removes the highlighting. In addition
P a g e | 28
to the functionality referenced above in regards to the cache, the QRSourceBox toolbar offers the following
features:
Go To. Jumps to a specific line.
Lookup. Each time an SgNode is received, the QRSourceBox component tracks the corresponding source
and highlights it.
Zoom+/Zoom-. Zooms in and out.
Method Description
QRSourceBox() QRSourceBox(SgNode *root)
constructor for the QRSourceBox component. Only accepts two types of SgNode: SgProject and SgFile. If an SgProject instance is provided, then only the first SgFile is shown. If no parameter is provided, then the component works in cache mode only.
QRTREEBOX
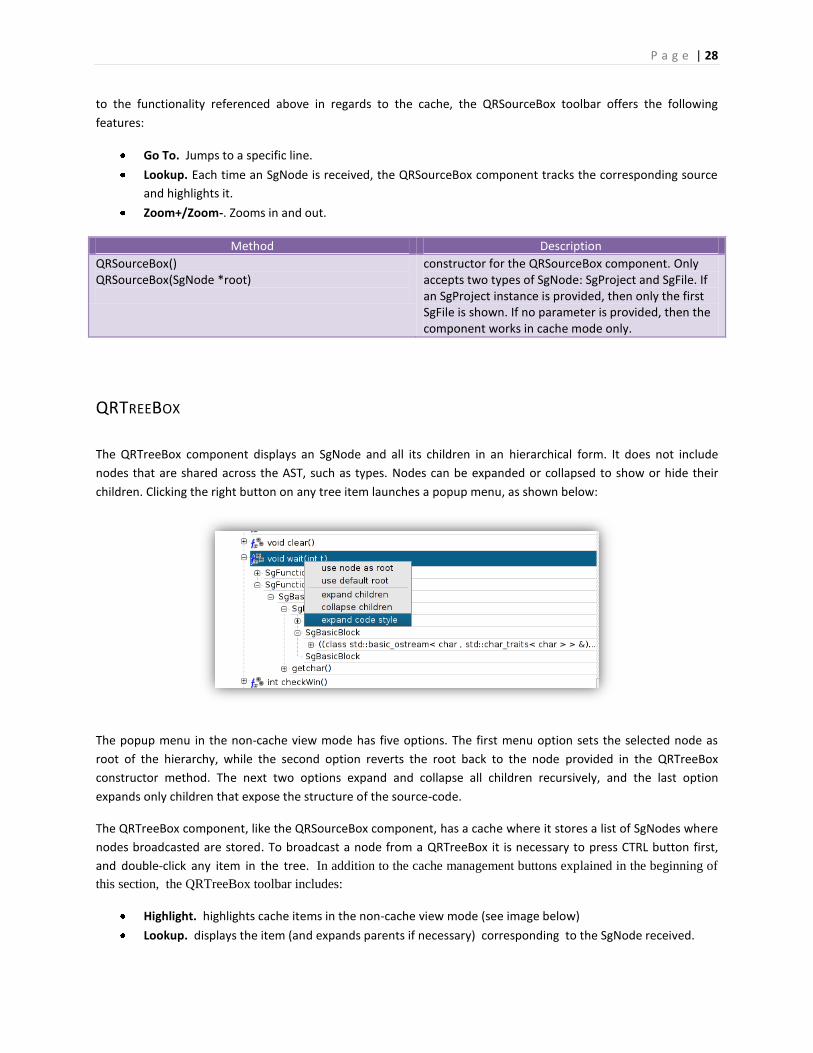
The QRTreeBox component displays an SgNode and all its children in an hierarchical form. It does not include
nodes that are shared across the AST, such as types. Nodes can be expanded or collapsed to show or hide their
children. Clicking the right button on any tree item launches a popup menu, as shown below:
The popup menu in the non-cache view mode has five options. The first menu option sets the selected node as
root of the hierarchy, while the second option reverts the root back to the node provided in the QRTreeBox
constructor method. The next two options expand and collapse all children recursively, and the last option
expands only children that expose the structure of the source-code.
The QRTreeBox component, like the QRSourceBox component, has a cache where it stores a list of SgNodes where
nodes broadcasted are stored. To broadcast a node from a QRTreeBox it is necessary to press CTRL button first,
and double-click any item in the tree. In addition to the cache management buttons explained in the beginning of
this section, the QRTreeBox toolbar includes:
Highlight. highlights cache items in the non-cache view mode (see image below)
Lookup. displays the item (and expands parents if necessary) corresponding to the SgNode received.
P a g e | 29
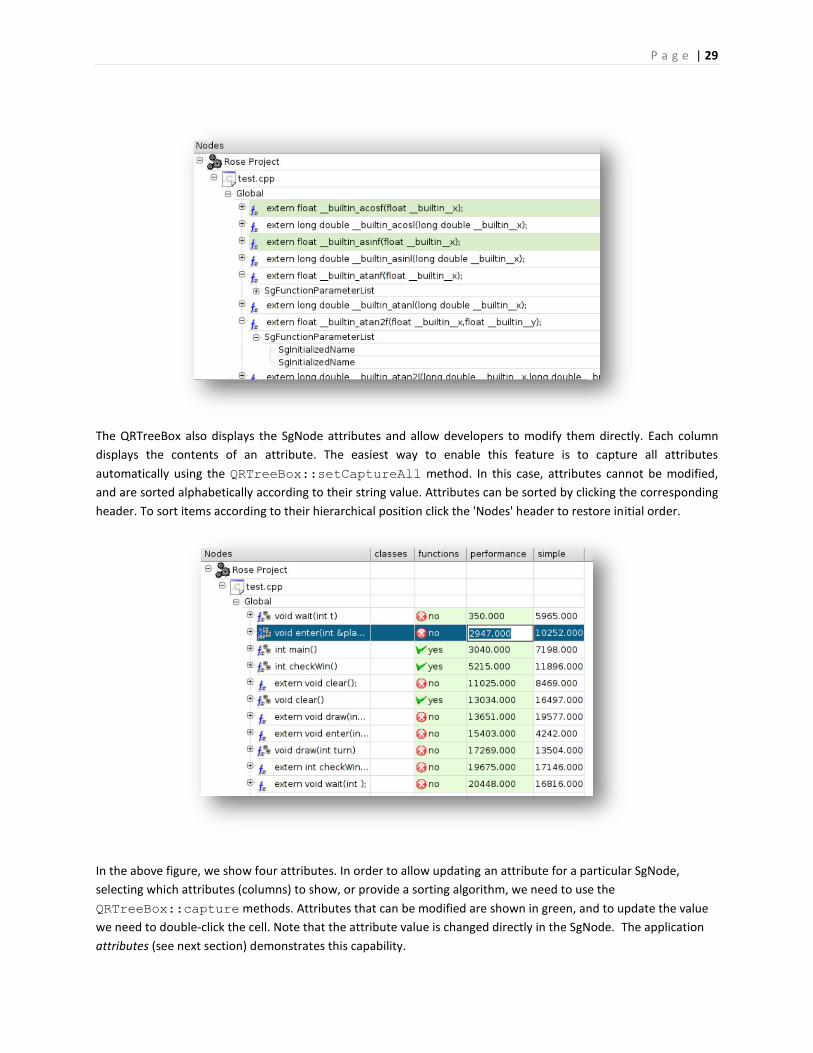
The QRTreeBox also displays the SgNode attributes and allow developers to modify them directly. Each column
displays the contents of an attribute. The easiest way to enable this feature is to capture all attributes
automatically using the QRTreeBox::setCaptureAll method. In this case, attributes cannot be modified,
and are sorted alphabetically according to their string value. Attributes can be sorted by clicking the corresponding
header. To sort items according to their hierarchical position click the 'Nodes' header to restore initial order.
In the above figure, we show four attributes. In order to allow updating an attribute for a particular SgNode,
selecting which attributes (columns) to show, or provide a sorting algorithm, we need to use the
QRTreeBox::capture methods. Attributes that can be modified are shown in green, and to update the value
we need to double-click the cell. Note that the attribute value is changed directly in the SgNode. The application
attributes (see next section) demonstrates this capability.
P a g e | 30
Method Description
QRTreeBox() QRTreeBox(SgNode *root)
constructor for the QRTreeBox component. If the root parameter is not provided, then it works in cache-view mode only. Otherwise displays the tree with the given SgNode as root.
void setCaptureAll(bool capture_all) if capture_all is true, then all attributes are captured and shown in the tree. Attributes are read-only and sorted according to its string value.
void capture(std::string attrib_name)
captures a specific attribute. Attribute is read-only and sorted according to its string value.
template <class T> void capture(std::string attrib_name, void (T::*fromString)(std::string))
captures a specific attribute that can be modified. The callback receives a string (provided by the user), that must be converted to an internal representation.
void captureValues (std::string attrib_name, QRAttribute::QRItems &items)
captures a specific attribute that can be modified, however the values (string and/or image) are provided in items. Double-clicking the cell toggles the value.
template<class T> void capture(std::string attrib_name, int (T::*compare)(T *))
captures a specific attribute. Attribute is read-only, but is sorted according to the compare callback, which returns an integer when comparing an object to another (passed as parameter to the callback). The comparison is as follows: a1 < a2: returns -1 a1 == a2: returns 0 a1 > a2: returns 1
template<class T> void capture(std::string attrib_name, void (T::*fromString)(std::string), int (T::*compare)(T *))
captures a specific attribute that can be modified and sorted according to fromString and compare callbacks (see above).
P a g e | 31
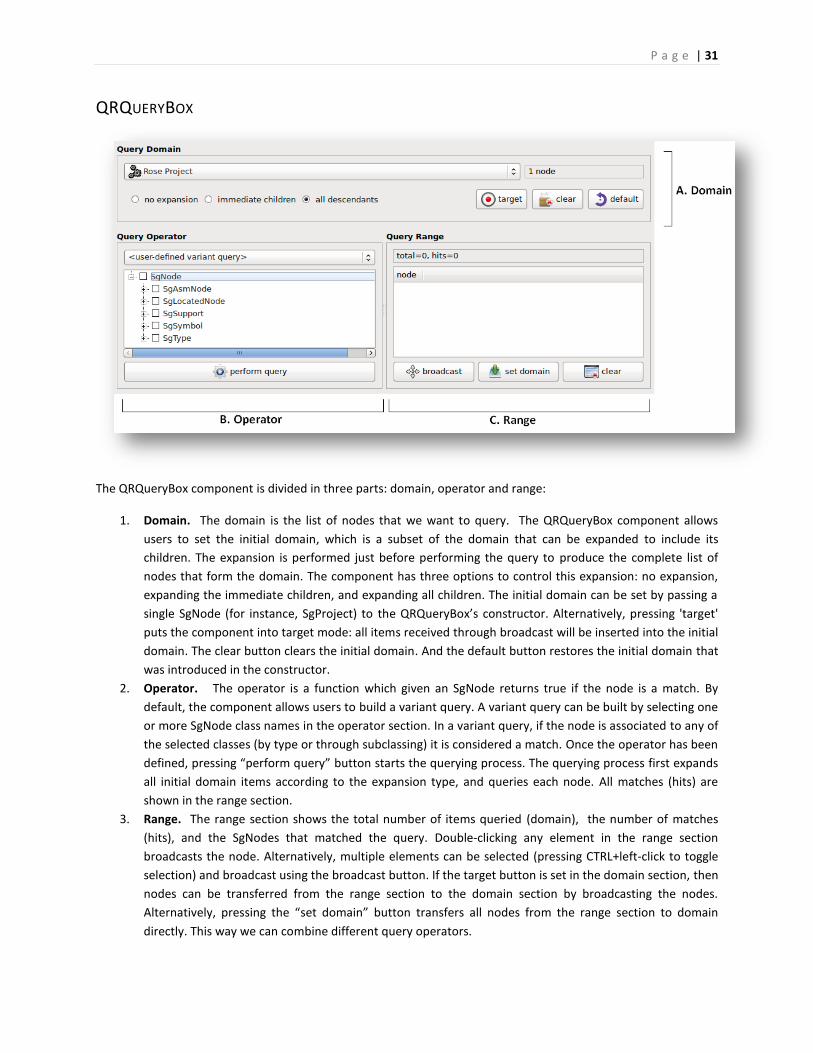
QRQUERYBOX
The QRQueryBox component is divided in three parts: domain, operator and range:
1. Domain. The domain is the list of nodes that we want to query. The QRQueryBox component allows
users to set the initial domain, which is a subset of the domain that can be expanded to include its
children. The expansion is performed just before performing the query to produce the complete list of
nodes that form the domain. The component has three options to control this expansion: no expansion,
expanding the immediate children, and expanding all children. The initial domain can be set by passing a
single SgNode (for instance, SgProject) to the QRQueryBox’s constructor. Alternatively, pressing 'target'
puts the component into target mode: all items received through broadcast will be inserted into the initial
domain. The clear button clears the initial domain. And the default button restores the initial domain that
was introduced in the constructor.
2. Operator. The operator is a function which given an SgNode returns true if the node is a match. By
default, the component allows users to build a variant query. A variant query can be built by selecting one
or more SgNode class names in the operator section. In a variant query, if the node is associated to any of
the selected classes (by type or through subclassing) it is considered a match. Once the operator has been
defined, pressing “perform query” button starts the querying process. The querying process first expands
all initial domain items according to the expansion type, and queries each node. All matches (hits) are
shown in the range section.
3. Range. The range section shows the total number of items queried (domain), the number of matches
(hits), and the SgNodes that matched the query. Double-clicking any element in the range section
broadcasts the node. Alternatively, multiple elements can be selected (pressing CTRL+left-click to toggle
selection) and broadcast using the broadcast button. If the target button is set in the domain section, then
nodes can be transferred from the range section to the domain section by broadcasting the nodes.
Alternatively, pressing the “set domain” button transfers all nodes from the range section to domain
directly. This way we can combine different query operators.
P a g e | 32
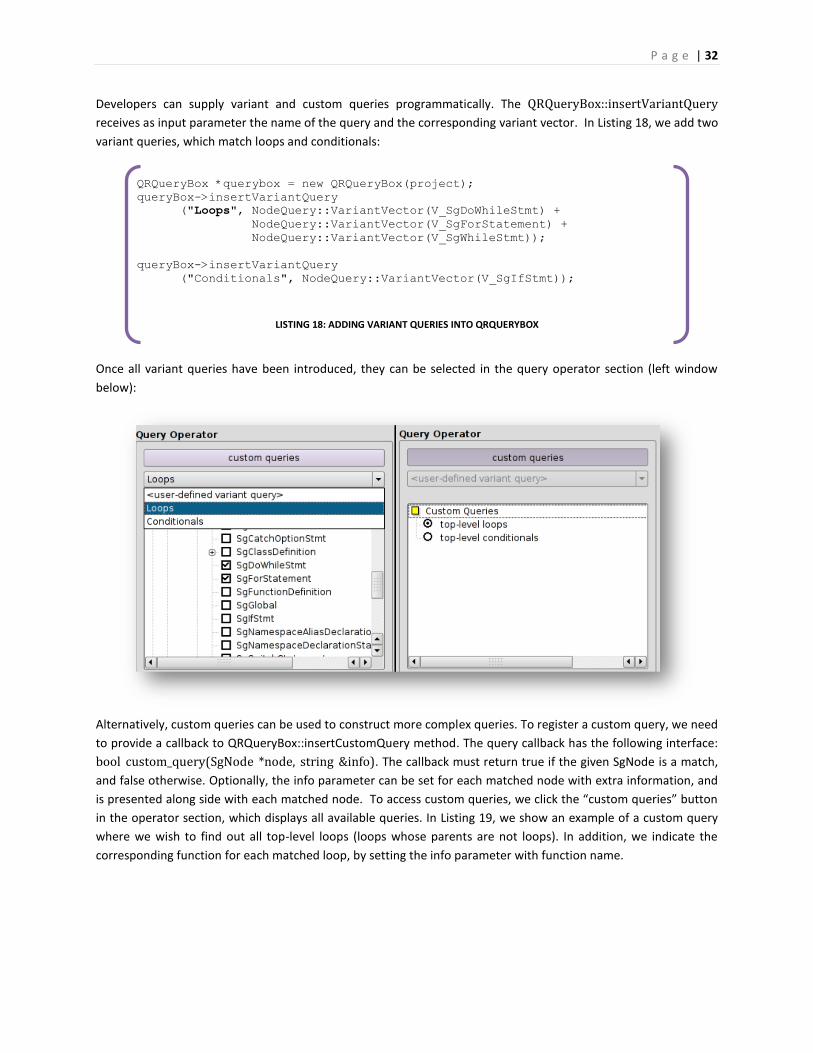
Developers can supply variant and custom queries programmatically. The QRQueryBox::insertVariantQuery
receives as input parameter the name of the query and the corresponding variant vector. In Listing 18, we add two
variant queries, which match loops and conditionals:
Once all variant queries have been introduced, they can be selected in the query operator section (left window
below):
Alternatively, custom queries can be used to construct more complex queries. To register a custom query, we need
to provide a callback to QRQueryBox::insertCustomQuery method. The query callback has the following interface:
bool custom_query(SgNode *node, string &info). The callback must return true if the given SgNode is a match,
and false otherwise. Optionally, the info parameter can be set for each matched node with extra information, and
is presented along side with each matched node. To access custom queries, we click the “custom queries” button
in the operator section, which displays all available queries. In Listing 19, we show an example of a custom query
where we wish to find out all top-level loops (loops whose parents are not loops). In addition, we indicate the
corresponding function for each matched loop, by setting the info parameter with function name.
QRQueryBox *querybox = new QRQueryBox(project);
queryBox->insertVariantQuery
("Loops", NodeQuery::VariantVector(V_SgDoWhileStmt) +
NodeQuery::VariantVector(V_SgForStatement) +
NodeQuery::VariantVector(V_SgWhileStmt));
queryBox->insertVariantQuery
("Conditionals", NodeQuery::VariantVector(V_SgIfStmt));
LISTING 18: ADDING VARIANT QUERIES INTO QRQUERYBOX
P a g e | 33
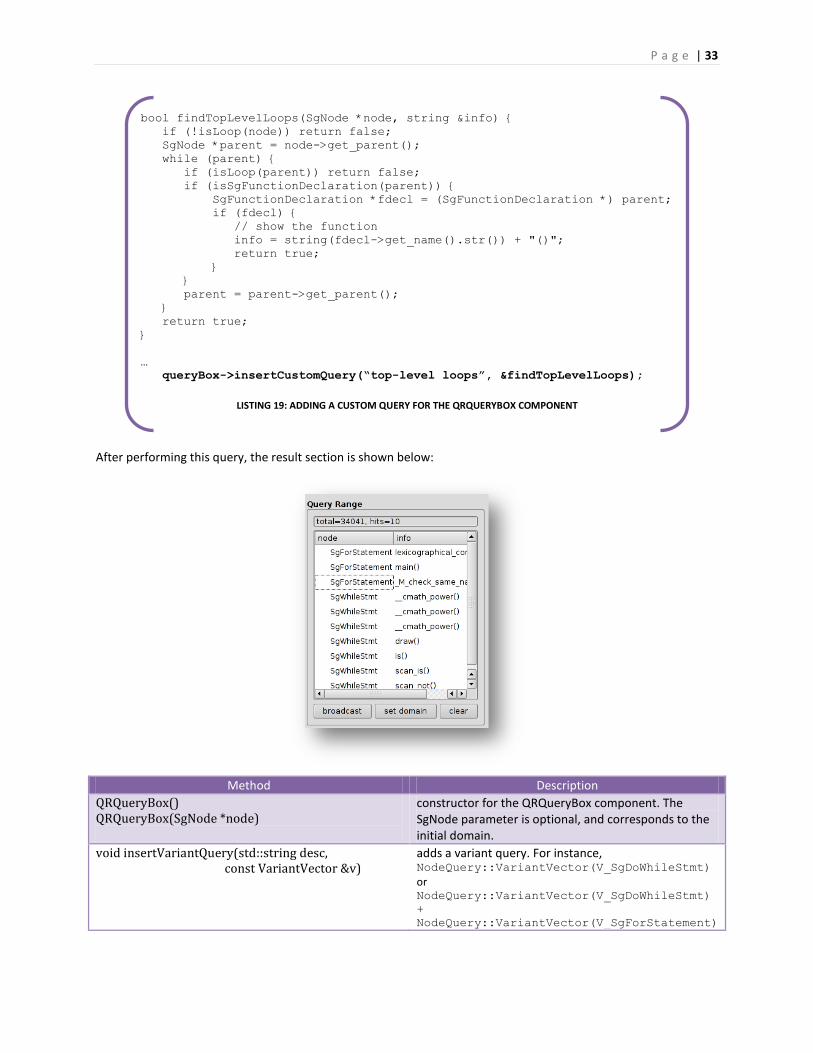
After performing this query, the result section is shown below:
Method Description
QRQueryBox() QRQueryBox(SgNode *node)
constructor for the QRQueryBox component. The SgNode parameter is optional, and corresponds to the initial domain.
void insertVariantQuery(std::string desc, const VariantVector &v)
adds a variant query. For instance, NodeQuery::VariantVector(V_SgDoWhileStmt)
or NodeQuery::VariantVector(V_SgDoWhileStmt)
+
NodeQuery::VariantVector(V_SgForStatement)
bool findTopLevelLoops(SgNode *node, string &info) {
if (!isLoop(node)) return false;
SgNode *parent = node->get_parent();
while (parent) {
if (isLoop(parent)) return false;
if (isSgFunctionDeclaration(parent)) {
SgFunctionDeclaration *fdecl = (SgFunctionDeclaration *) parent;
if (fdecl) {
// show the function
info = string(fdecl->get_name().str()) + "()";
return true;
}
}
parent = parent->get_parent();
}
return true;
}
…
queryBox->insertCustomQuery(“top-level loops”, &findTopLevelLoops);
LISTING 19: ADDING A CUSTOM QUERY FOR THE QRQUERYBOX COMPONENT
P a g e | 34
void insertCustomQuery (std::string desc, bool (*queryFunction) (SgNode *, std::string&) )
add acustom query
void clearVariantQueries() void clearCustomQueries()
clears all variant and custom queries.
signal newQueryResults()
emited when new results are available.
P a g e | 35
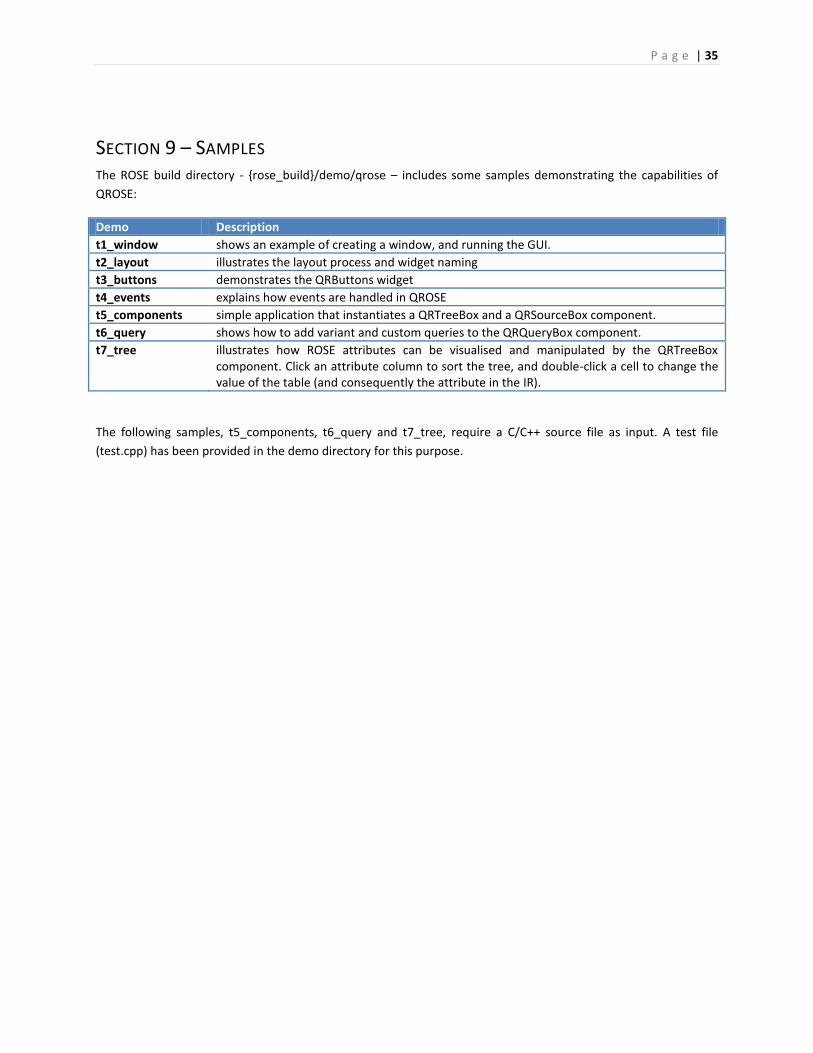
SECTION 9 – SAMPLES The ROSE build directory - {rose_build}/demo/qrose – includes some samples demonstrating the capabilities of
QROSE:
Demo Description
t1_window shows an example of creating a window, and running the GUI.
t2_layout illustrates the layout process and widget naming
t3_buttons demonstrates the QRButtons widget
t4_events explains how events are handled in QROSE
t5_components simple application that instantiates a QRTreeBox and a QRSourceBox component.
t6_query shows how to add variant and custom queries to the QRQueryBox component.
t7_tree illustrates how ROSE attributes can be visualised and manipulated by the QRTreeBox component. Click an attribute column to sort the tree, and double-click a cell to change the value of the table (and consequently the attribute in the IR).
The following samples, t5_components, t6_query and t7_tree, require a C/C++ source file as input. A test file
(test.cpp) has been provided in the demo directory for this purpose.