Embed Size (px)
Citation preview

8/3/2019 QC Material With Screen Shots
http://slidepdf.com/reader/full/qc-material-with-screen-shots 1/90
QC Material with Screenshots
Naresh Technologies – Class Notes
Trainer : Kishore Kanumalli
1
QUALITY CENTER Quality Center is a Test management tool which has developed
by mercury interactive corporation and now it is acquired by
HP.
Test Management Tool: A tool which we are using to manage theentire testing process is called Test Management Tool. In this
tool we can manage Requirements, TC’s, Executing TC’s and also
reporting Defects.
Note: Latest version of Quality Center is 11.0
There are two different types of components in Quality Center.
(as you can see from the below example Figure 1.0 after installing Quality
Center the two components attached on the desktop)
1. Site Administration2. Quality CenterFigure 1.0
Site Administration: This is admin’s activity. In this
component, Admin will create the domain, add the resources,
create the projects and assign the resources to the projects.
CREATING DOMAIN: In this, the Site Administrator i.e.,admin will create an empty domains. Consider a scenario that
some ABC company has got an INSURANCE project, and then admin
will create the INSURANCE domain in site administration as
follows.,
Navigation:1. Login to Site Administration (see Figure 1.1, and
Figure 1.2 below) Figure 1.1
Mercury Quality
Center Icon
Site
Administration
Icon in QC
8/3/2019 QC Material With Screen Shots
http://slidepdf.com/reader/full/qc-material-with-screen-shots 2/90
QC Material with Screenshots
Naresh Technologies – Class Notes
Trainer : Kishore Kanumalli
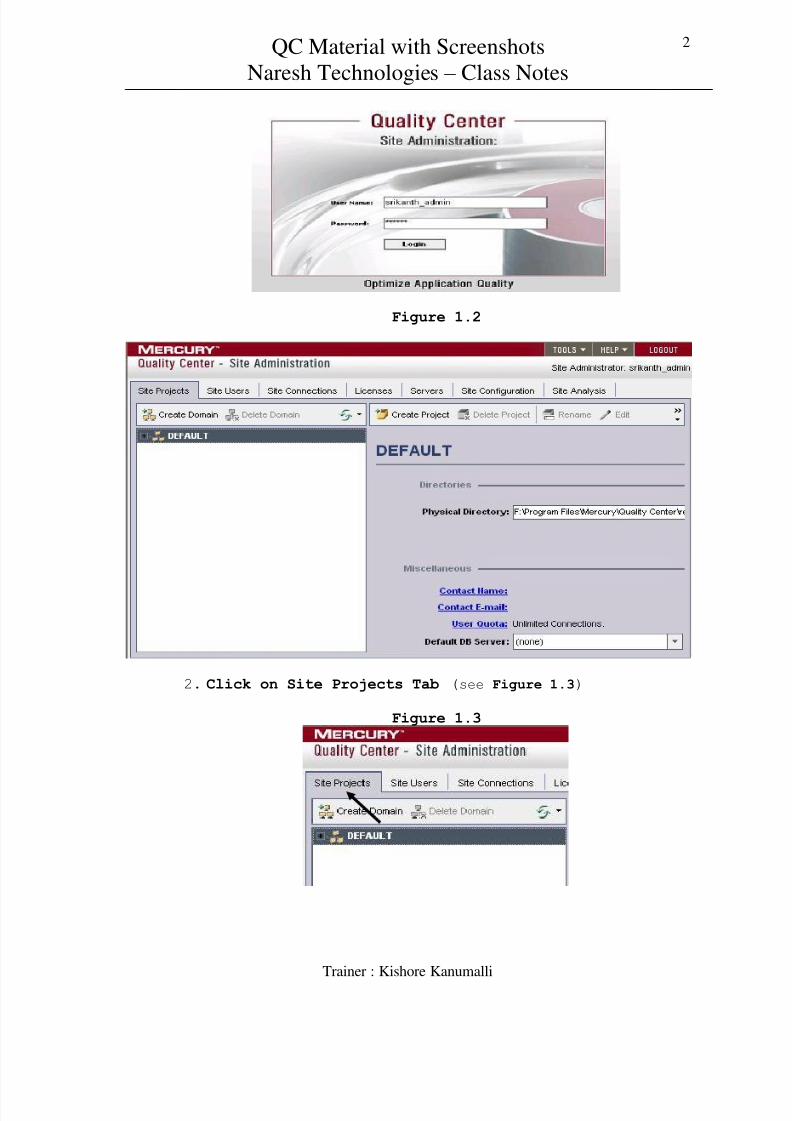
2
Figure 1.2
2. Click on Site Projects Tab (see Figure 1.3)
Figure 1.3

8/3/2019 QC Material With Screen Shots
http://slidepdf.com/reader/full/qc-material-with-screen-shots 3/90
QC Material with Screenshots
Naresh Technologies – Class Notes
Trainer : Kishore Kanumalli
3
3. Click on Create Domain button in Site Projects Tab (see Figure 1.4)
Figure 1.4
4. After you click on Create Domain button, it opensCreate Domain Dialogue Box, here enter your domainname (here in this example Figure 1.5 we are entering
the domain name as INSURANCE, see Figure 1.5). Afterentering domain name click on OK button to finishthe creation of domain name.
Figure 1.5
5. It Creates and Empty Domain with the Domain NameINSURANCE (see Figure 1.6
Figure 1.6
ADDING resources: In this admin will add the resources in
Site Administration.
Navigation:

8/3/2019 QC Material With Screen Shots
http://slidepdf.com/reader/full/qc-material-with-screen-shots 4/90
QC Material with Screenshots
Naresh Technologies – Class Notes
Trainer : Kishore Kanumalli
4
1. Login to Site Administration (see Figure 2.1, and
Figure 2.2 below) Figure 2.1
Figure 2.2
2. Click on Site User Tab (see Figure 2.2 above and Figure2.3)
Figure 2.3

8/3/2019 QC Material With Screen Shots
http://slidepdf.com/reader/full/qc-material-with-screen-shots 5/90
QC Material with Screenshots
Naresh Technologies – Class Notes
Trainer : Kishore Kanumalli
5
3. It Opens Site Users Dialogue Box (see Figure 2.3) and Click on New User Button in Site Users Dialogue Box
(Figure 2.4)
Figure 2.4
4. It Opens New User Dialogue Box (see Figure 2.5) and
here enter the details of the New User and click onOK Button to add a new user (See Figure 2.5, here in
this example we are adding new user as RAMA)Figure 2.5
5. Now you can see the newly added name RAMA in the User Name List (see Figure 2.6)
Figure 2.6

8/3/2019 QC Material With Screen Shots
http://slidepdf.com/reader/full/qc-material-with-screen-shots 6/90
QC Material with Screenshots
Naresh Technologies – Class Notes
Trainer : Kishore Kanumalli
6
CREATING PROJECTS: In this step admin will create projects
and assigns the added users to the projects.
Navigation:
1. Login to Site Administration (see Figure 3.1, 3.2 below)
Figure 3.1
Figure 3.2
2. Click on Site Projects Tab and Select your domain (see Figure 3.3 below).
Figure 3.3
3. Click on Create Project on right side (see Figure3.4)

8/3/2019 QC Material With Screen Shots
http://slidepdf.com/reader/full/qc-material-with-screen-shots 7/90
QC Material with Screenshots
Naresh Technologies – Class Notes
Trainer : Kishore Kanumalli
7
Figure 3.4
4. It opens Create Project Dialogue Box, in this selectCreate an Empty Project radio button and click on
Next (see Figure 3.5). Then it opens create projectname window in that enter the name of the project(see Figure 3.6, here in the example figure we have
given the name of the project as “Proj1”) and thenclick on Next
Figure 3.5
Figure 3.6

8/3/2019 QC Material With Screen Shots
http://slidepdf.com/reader/full/qc-material-with-screen-shots 8/90
QC Material with Screenshots
Naresh Technologies – Class Notes
Trainer : Kishore Kanumalli
8
5. It navigates to another window here simply click on Next (see Figure 3.7), then you are navigated to Assign Users Dialogue Box (see Figure 3.8), in thison the right side there is a list of Available
Users. Select the required names and click on the
Add Selected Users arrow Button to add the selected
name to the project (here in this example we are
adding RAMA, SITA and LAXMANA, in a serial step wisewith numbers see Figure 3.8). After completion ofselecting the name click on OK Button.
Figure 3.7

8/3/2019 QC Material With Screen Shots
http://slidepdf.com/reader/full/qc-material-with-screen-shots 9/90
QC Material with Screenshots
Naresh Technologies – Class Notes
Trainer : Kishore Kanumalli
9
Figure 3.8
6. Now you can see the users added to the project inthe left window (see Figure 3.9 arrow mark where we
have added three users RAMA, SITA & LAXMANA). After
adding names click on OK to navigate to projectfinish window.
Figure 3.9
Here RAMA has
been added to Proj1
from the Available
Users present on the
right side
1
2
3
4

8/3/2019 QC Material With Screen Shots
http://slidepdf.com/reader/full/qc-material-with-screen-shots 10/90
QC Material with Screenshots
Naresh Technologies – Class Notes
Trainer : Kishore Kanumalli
10
7. Here in this Project Creation Finish window, selectthe Activate Project check box as well as StoreProjects Repository in the database options and click on Create Button to finish the creation of Project and Assigning the Users to the project (seeFigure 3.10)
Figure 3.10
8. Here in this Figure 3.11 you can see the successfulcreation of project and assigning of users to the
project, on the left side you can see the created project “Proj1” and on the right side you can see
the project 1 created successfully message box

8/3/2019 QC Material With Screen Shots
http://slidepdf.com/reader/full/qc-material-with-screen-shots 11/90
QC Material with Screenshots
Naresh Technologies – Class Notes
Trainer : Kishore Kanumalli
11
Figure 3.11
Quality Center: Quality Center is tool where both the testers
and developers will perform activity and especially testing
team will design the requirements, write the test cases and
execute the test cases and reports the defects to the
development team.
Different Tabs in QC 9.01. Requirements Tab2. Test Plan Tab3. Test Lab Tab4. Defects Tab5. Dash Board Tab
Different Tabs in QC 10.01. Requirements Tab2. Test Plan Tab3. Test Resources4. Test Lab Tab5. Defects Tab6. Dash Board Tab
Requirements: We are using this Tab to Manage therequirements. In this phase testing team will design the
requirements directly or import the requirements from excel
sheet
As soon as we receive the requirements in the form of use
cases and business rules document, we need to identify
testable requirements in excel sheet. After completion of
identifying testable requirements we need to conduct four
different types of reviews on testable requirements. After

8/3/2019 QC Material With Screen Shots
http://slidepdf.com/reader/full/qc-material-with-screen-shots 12/90
QC Material with Screenshots
Naresh Technologies – Class Notes
Trainer : Kishore Kanumalli
12
completion of client review client will sign-off the
requirements phase.
Once the client has signed off the requirements phase we will
upload those requirements from Excel sheet into requirementstab of quality center.
Requirements Tab consists of below options:1. Add New Requirements2. Add Child Requirements3. Delete Requirements4. Refresh5. Filter6. Select Columns7. Requirement Details8. Attachment
Add New Requirements: By using this option we can create
requirements In requirements Tab.
Navigation:
Login to Quality Center As shown in the below figure.
Click on Requirements Tab, as shown in the below figure
First log on to QC
using abc user andclick on authenticate
user and it providesthe details regarding
the user Domain and
Project after thatclick on login button
to login to QC

8/3/2019 QC Material With Screen Shots
http://slidepdf.com/reader/full/qc-material-with-screen-shots 13/90
QC Material with Screenshots
Naresh Technologies – Class Notes
Trainer : Kishore Kanumalli
13
Then Click on the New Requirements button or Ctrl + N asyou can see from the below figure
Here in this example figure, we are adding the requirementsby simply clicking on the above icon, which is known as
New Requirement option, simply select and double
click on this to open New Requirement Dialogue box as
you can see that from below example figure
Here in this below example figure, you can see the New Requirement Dialogue box opened asa result of clicking on the New Requirement option from the Requirements Tab in QC from
the above figure
Here we are
successfullylogged into the QC
with abc as userand we are at QC
Requirements
Tab.

8/3/2019 QC Material With Screen Shots
http://slidepdf.com/reader/full/qc-material-with-screen-shots 14/90
QC Material with Screenshots
Naresh Technologies – Class Notes
Trainer : Kishore Kanumalli
14
Then enter your requirement name with the namingconvertion and click on submit button as shown in the
below figure

8/3/2019 QC Material With Screen Shots
http://slidepdf.com/reader/full/qc-material-with-screen-shots 15/90
QC Material with Screenshots
Naresh Technologies – Class Notes
Trainer : Kishore Kanumalli
15
Here in this example we are entering the name of the Requirement as
Proj1_ValidateOKButton (as per the naming convention of theproject) and then clicking on SUBMIT button to add the requirement
to requirement tab of QC

8/3/2019 QC Material With Screen Shots
http://slidepdf.com/reader/full/qc-material-with-screen-shots 16/90
QC Material with Screenshots
Naresh Technologies – Class Notes
Trainer : Kishore Kanumalli
16
Here in this example you are seeing the newly added Requirement
with the name as Proj1_ValidateOKButton.
Here in this example you can see the same requirement Proj1_ValidateOKButton
in a more precise and extendable form. After adding this we are adding three more
requirements that you can see from the below Figure

8/3/2019 QC Material With Screen Shots
http://slidepdf.com/reader/full/qc-material-with-screen-shots 17/90
QC Material with Screenshots
Naresh Technologies – Class Notes
Trainer : Kishore Kanumalli
17
Child Requirements: Child requirement is the requirement
which is the part of the main requirement and displays under
main requirement
Navigation:
Login to quality center as shown in the below figure.
Here in this example you can see we have added two more requirements to the
existing requirements all together we have three requirements added to the
requirement tab of QC

8/3/2019 QC Material With Screen Shots
http://slidepdf.com/reader/full/qc-material-with-screen-shots 18/90
QC Material with Screenshots
Naresh Technologies – Class Notes
Trainer : Kishore Kanumalli
18
Click on Requirements Tab and select the mainrequirement for which you want to add a New child requirement as shown in the below figure
Click on button as shown in the below figure then it opens new child requirementsdialogue box.
New Child Re uirement
New Child RequirementButton More Precisely

8/3/2019 QC Material With Screen Shots
http://slidepdf.com/reader/full/qc-material-with-screen-shots 19/90
QC Material with Screenshots
Naresh Technologies – Class Notes
Trainer : Kishore Kanumalli
19
Enter new child requirement details and click on submit button as shown in the below figure.
As you can see the fromthe below figure
Here we are entering the new child requirement for the mainrequirement and then clicking on Submit Button
Newly added child requirement

8/3/2019 QC Material With Screen Shots
http://slidepdf.com/reader/full/qc-material-with-screen-shots 20/90
QC Material with Screenshots
Naresh Technologies – Class Notes
Trainer : Kishore Kanumalli
20
Delete Requirements: We are using this option to delete the
added requirements
Navigation:
Login to QC
Click on Requirements Tab, as shown in the below figure
Select the requirement which we are going to delete, asshown in the below figure
Login to QC using the
authenticated user
name and password

8/3/2019 QC Material With Screen Shots
http://slidepdf.com/reader/full/qc-material-with-screen-shots 21/90
QC Material with Screenshots
Naresh Technologies – Class Notes
Trainer : Kishore Kanumalli
21
Click on Delete button and click on the Yes confirmationdialogue box as shown in the below figures.
You can see from the below figure that what we havedeleted from the above figure, before deleting we havethree requirements after deleting we have tworequirements from the below figure
Note : In Real time Delete Requirement option will be indisabled mode.
Refresh: We are using this option to refresh the requirementstab of quality center
Navigation:
In the requirements tab click on the refresh button orf5 to refresh the requirements as shown in the belowfigure.

8/3/2019 QC Material With Screen Shots
http://slidepdf.com/reader/full/qc-material-with-screen-shots 22/90
QC Material with Screenshots
Naresh Technologies – Class Notes
Trainer : Kishore Kanumalli
22
Filter: We are using this option to identify a value based onselection criteria.
Navigation:
Click on requirements tab, as shown in the below figure
Click on Filter, as shown in the below figure
Give your filter condition based on your requirement and then click on OK button, as shown in the below examplefigures.

8/3/2019 QC Material With Screen Shots
http://slidepdf.com/reader/full/qc-material-with-screen-shots 23/90
QC Material with Screenshots
Naresh Technologies – Class Notes
Trainer : Kishore Kanumalli
23
Selecting the Set Filter/Sort
option in Requirements tab of
QC
You can see more precisely
Set Filter/Sort option in
Requirements tab of QC

8/3/2019 QC Material With Screen Shots
http://slidepdf.com/reader/full/qc-material-with-screen-shots 24/90
QC Material with Screenshots
Naresh Technologies – Class Notes
Trainer : Kishore Kanumalli
24
Here you can see moreprecisely the Set
Filter/Sort Dialogue box
with many filed names
(Ex: Author, Creation
Date, Creation Time)
Here we have selected the Author filed as a
selection criterion to get the values about the
authors who have designed the requirements
After Selection Click on this
button to open Selection Filter
Condition Dialogue Box

8/3/2019 QC Material With Screen Shots
http://slidepdf.com/reader/full/qc-material-with-screen-shots 25/90
QC Material with Screenshots
Naresh Technologies – Class Notes
Trainer : Kishore Kanumalli
25
Here in this we areselecting the Author name
as ‘abc’ from the Name
field of Selection Filter
Condition Dialogue Box
After selecting the name
we are simply click onOK Button to view the
name selection criteria in
Filter Dialogue Box from
the below example figure
Here you can see the
selected name ‘abc’
from Filter Dialogue
Box
After getting name in
the Filter Dialogue Boxwe are clicking on OK
button to get the valuesof selected criteria as
you can see from the
below example figure

8/3/2019 QC Material With Screen Shots
http://slidepdf.com/reader/full/qc-material-with-screen-shots 26/90
QC Material with Screenshots
Naresh Technologies – Class Notes
Trainer : Kishore Kanumalli
26
SELECTING MULTIPLE FIELDS (NAMES) WITH LOGICAL OPERATORS
You are seeing the values of selection criteria
based on the name of the Author ‘abc’ which it is
displaying two values as a result
Here we are selecting author
name as ‘abc’ and also selecting
the logical operator OR

8/3/2019 QC Material With Screen Shots
http://slidepdf.com/reader/full/qc-material-with-screen-shots 27/90
QC Material with Screenshots
Naresh Technologies – Class Notes
Trainer : Kishore Kanumalli
27
And then selecting another author
name as 123 along with logicaloperator OR and Clicking on OK
button
You can see our
selection criteria inFilter Dialogue Box as
“abc or 122” as a
selection criteria to get
the required values andclick on OK Button to
display the values

8/3/2019 QC Material With Screen Shots
http://slidepdf.com/reader/full/qc-material-with-screen-shots 28/90
QC Material with Screenshots
Naresh Technologies – Class Notes
Trainer : Kishore Kanumalli
28
SELECTION BASED ON THE CREATION DATE CRITERIA
Here you can see the different values of authors with 123 and abc, as a result of filtering w
have got four values belonging to both the authors
Values of
author abc Values of author 123
Here we are filtering
the data based on the
Creation Date Field,as you can see from
the figure that
Creation Date Field was selected and then
clicked on the right
side button to open
Creation Time
Selection Criteria Dialogue Box, you can
see from the below
example figure

8/3/2019 QC Material With Screen Shots
http://slidepdf.com/reader/full/qc-material-with-screen-shots 29/90
QC Material with Screenshots
Naresh Technologies – Class Notes
Trainer : Kishore Kanumalli
29
Here in this we have
different Creation
Date Field valuessuch as Today,
Yesterday,
Previous Year etc.,based on our
requirement we can
select theappropriate field.Here in this example
we have selected
TODAY as the
selection criteria andyou can see that
from the figure.
After selecting
Today field from the
available options inthe dialogue box
simply click on OK
button to display the
filtered results

8/3/2019 QC Material With Screen Shots
http://slidepdf.com/reader/full/qc-material-with-screen-shots 30/90
QC Material with Screenshots
Naresh Technologies – Class Notes
Trainer : Kishore Kanumalli
30
You can see theselected Today field
very much clearly in
the Filter Dialogue
box, after selectingthis simply click on
OK button to display
the values.

8/3/2019 QC Material With Screen Shots
http://slidepdf.com/reader/full/qc-material-with-screen-shots 31/90
QC Material with Screenshots
Naresh Technologies – Class Notes
Trainer : Kishore Kanumalli
31
Here in the above figure you are seeing the results of the selection criteria, where the
requirements that are designed Today was displaying and there are four such values
available.

8/3/2019 QC Material With Screen Shots
http://slidepdf.com/reader/full/qc-material-with-screen-shots 32/90
QC Material with Screenshots
Naresh Technologies – Class Notes
Trainer : Kishore Kanumalli
32
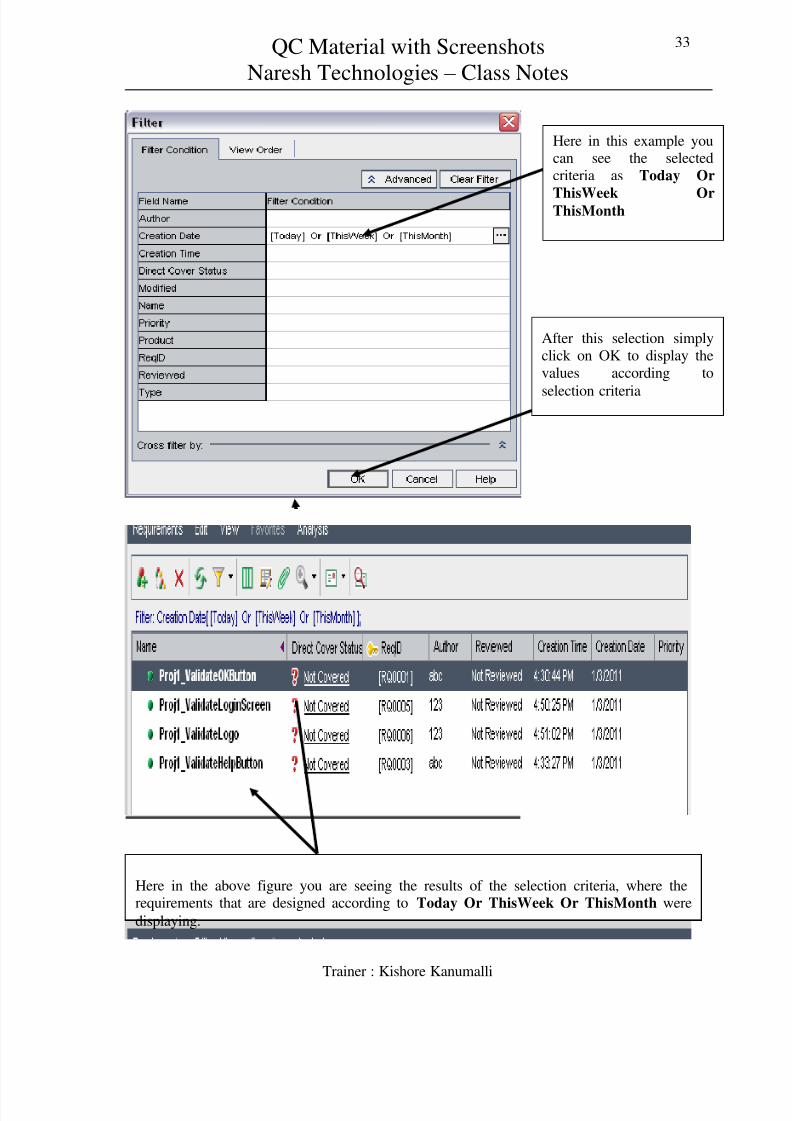
USING LOGICAL OPERATORS ALONG WITH CREATION DATE CRITERIA
Here in this example
we are using differentLogical Operatorsalong with the
Creation Date
Criteria, specially inthis example we are
selecting OR operator
along with Today,
ThisWeek and
ThisMonth to get the
required values based
on the selectioncriteria. After
selecting the criteria
simply click on OK
button to display
values
8/3/2019 QC Material With Screen Shots
http://slidepdf.com/reader/full/qc-material-with-screen-shots 33/90
QC Material with Screenshots
Naresh Technologies – Class Notes
Trainer : Kishore Kanumalli
33
FILTERING THE VALUES BASED ON CREATION TIME
Here in this example youcan see the selected
criteria as Today Or
ThisWeek OrThisMonth
After this selection simply
click on OK to display the
values according to
selection criteria
Here in the above figure you are seeing the results of the selection criteria, where therequirements that are designed according to Today Or ThisWeek Or ThisMonth were
displaying.

8/3/2019 QC Material With Screen Shots
http://slidepdf.com/reader/full/qc-material-with-screen-shots 34/90
QC Material with Screenshots
Naresh Technologies – Class Notes
Trainer : Kishore Kanumalli
34
Here in this examplewe are filtering the
data based on
Creation Timecriteria, first we are
selecting the field
and then clicking theright side button of
this field opens
Filter Creation
Time Dialogue boxas you can see it
from below example
Here in this example
you are seeing the Filter
Creation Time Dialogue
box where we areapplying the search
criteria based on thecreation time. Here we
can use logical operators
along with creation time
option.

8/3/2019 QC Material With Screen Shots
http://slidepdf.com/reader/full/qc-material-with-screen-shots 35/90
QC Material with Screenshots
Naresh Technologies – Class Notes
Trainer : Kishore Kanumalli
35
Here in this example
we are using
>,<,ANDLogical operator along
with time criteria, as
you can see from thesefigures, to get the
required selection
criteria (Ex:
>4:00:00PM And <
5:00:00PM). After
entering the mentioned
values we are simplyclicking on OK, to
display the values

8/3/2019 QC Material With Screen Shots
http://slidepdf.com/reader/full/qc-material-with-screen-shots 36/90
QC Material with Screenshots
Naresh Technologies – Class Notes
Trainer : Kishore Kanumalli
36
Here you can seeexactly selected date as
search criteria (Ex:
>4:00:00PM And <5:00:00PM). After thiswe are simply clicking
on OK, to display the
values , as you can seefrom the below example
figure in the Filter
Dialogue box. After
selecting it, simply click on OK to display the
values.

8/3/2019 QC Material With Screen Shots
http://slidepdf.com/reader/full/qc-material-with-screen-shots 37/90
QC Material with Screenshots
Naresh Technologies – Class Notes
Trainer : Kishore Kanumalli
37
Here in the above figure you are seeing the results of the selection criteria based on
Creation Time option
Here in this example
figure we are usinganother time criteria as
(Ex: >4:30:50PM
And < 4:50:35PM).After this we are
simply clicking on
OK, that will navigateto Filter Dialogue
box. After selecting it
from Filter Dialogue
box, simply click on
OK to display thevalues.

8/3/2019 QC Material With Screen Shots
http://slidepdf.com/reader/full/qc-material-with-screen-shots 38/90
QC Material with Screenshots
Naresh Technologies – Class Notes
Trainer : Kishore Kanumalli
38
Here in the above figure you are seeing the results of the selection criteria based on Creation
Time option that varies with a time span of about 18 Minutes, in this time span two
requirements are added.
Here you
can see
the
selectedtime
Filter
Dialogue
Box

8/3/2019 QC Material With Screen Shots
http://slidepdf.com/reader/full/qc-material-with-screen-shots 39/90
QC Material with Screenshots
Naresh Technologies – Class Notes
Trainer : Kishore Kanumalli
39
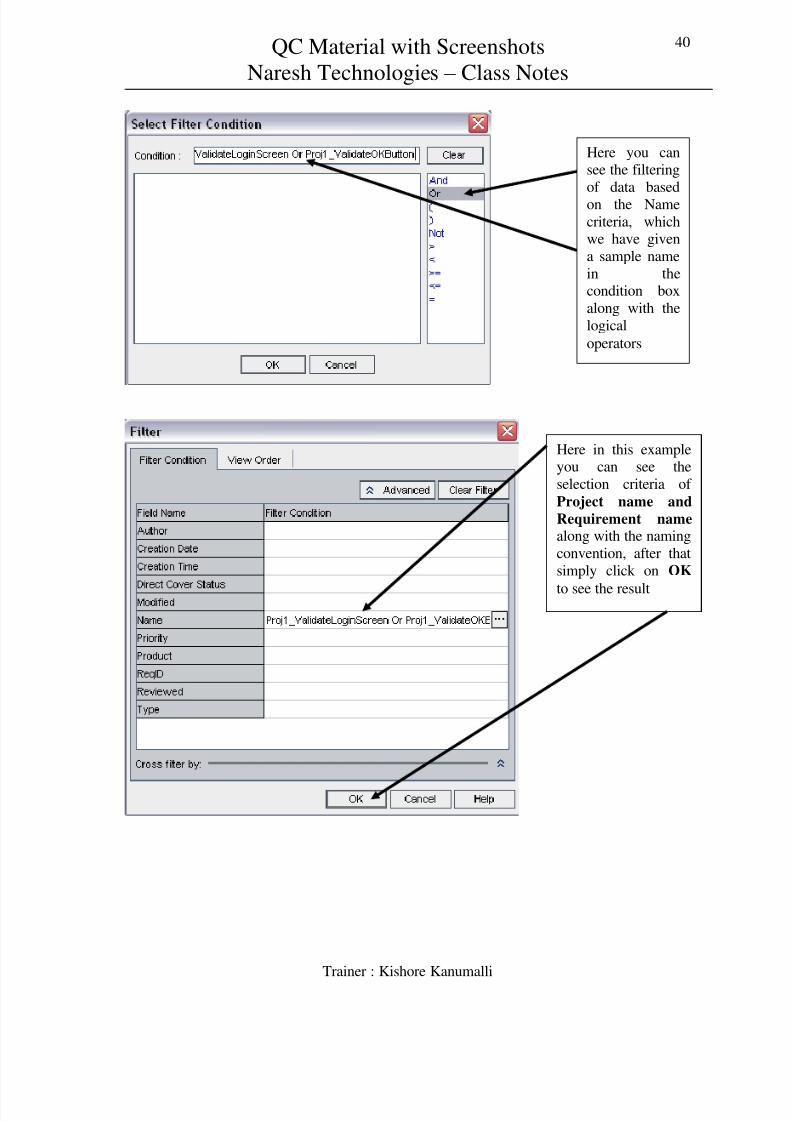
FILTERING THE VALUES BASED NAME FIELD CRITERIA
Here in this examplefigure we are selecting
NAME field as theselection criteria from
Filter Dialogue box
and then clicking onthe right side button of
the same field, to open
Name Filter Dialogue
Box
Here in this example
figure we are using the
Project name and
Requirement name along with the namingconventions and also
along with logical
operator OR as
selection criteria after,
entering the valuesimply click on OK to
see the selectioncriteria in the Filter
Dialogue Box.
8/3/2019 QC Material With Screen Shots
http://slidepdf.com/reader/full/qc-material-with-screen-shots 40/90
QC Material with Screenshots
Naresh Technologies – Class Notes
Trainer : Kishore Kanumalli
40
Here in this exampleyou can see the
selection criteria of
Project name and
Requirement name along with the naming
convention, after that
simply click on OK to see the result
Here you cansee the filtering
of data basedon the Name
criteria, whichwe have given
a sample name
in thecondition box
along with the
logical
operators

8/3/2019 QC Material With Screen Shots
http://slidepdf.com/reader/full/qc-material-with-screen-shots 41/90
QC Material with Screenshots
Naresh Technologies – Class Notes
Trainer : Kishore Kanumalli
41
Select Columns: We are using this option to increase or
decrease the visible columns in a requirements tab. As shown
in the below figure we have a number of columns which we are
going to reduce these columns
Navigation:
Click on Requirements Tab, as shown in the below figure.
Click on the Select Columns Button to increase ordecrease the columns and follow the onscreeninstructions, as shown in the below figure.
Here in the above example figure you can see the results based on the Name field of theFilter Dialogue Box

8/3/2019 QC Material With Screen Shots
http://slidepdf.com/reader/full/qc-material-with-screen-shots 42/90
QC Material with Screenshots
Naresh Technologies – Class Notes
Trainer : Kishore Kanumalli
42
Here we are selecting the Select Columns options from the options of
requirements tab, which will open the Select Columns Dialogue box as you can
see it from below example

8/3/2019 QC Material With Screen Shots
http://slidepdf.com/reader/full/qc-material-with-screen-shots 43/90
QC Material with Screenshots
Naresh Technologies – Class Notes
Trainer : Kishore Kanumalli
43
This Select Columns
Dialogue box consists of two lists of columns they
Available Columns and
Visible Columns andthere are some buttons in
between them to increase
or decrease the columns as
per our requirements. Inthe below example we are
selecting some columnsfrom Reviewed to
Product to increase or
decrease the columns

8/3/2019 QC Material With Screen Shots
http://slidepdf.com/reader/full/qc-material-with-screen-shots 44/90
QC Material with Screenshots
Naresh Technologies – Class Notes
Trainer : Kishore Kanumalli
44
Here after selecting
appropriate columnswe are simply clickingon this Make Column
Available to decrease
the visible columns.After clicking this you
can see moving of
selected columns from
Visible Columns to
Available Columnsfrom the below
example figure

8/3/2019 QC Material With Screen Shots
http://slidepdf.com/reader/full/qc-material-with-screen-shots 45/90
QC Material with Screenshots
Naresh Technologies – Class Notes
Trainer : Kishore Kanumalli
45
Here in both the example figure you are seeing the modified
decreased columns as now we can have only four columns

8/3/2019 QC Material With Screen Shots
http://slidepdf.com/reader/full/qc-material-with-screen-shots 46/90
QC Material with Screenshots
Naresh Technologies – Class Notes
Trainer : Kishore Kanumalli
46
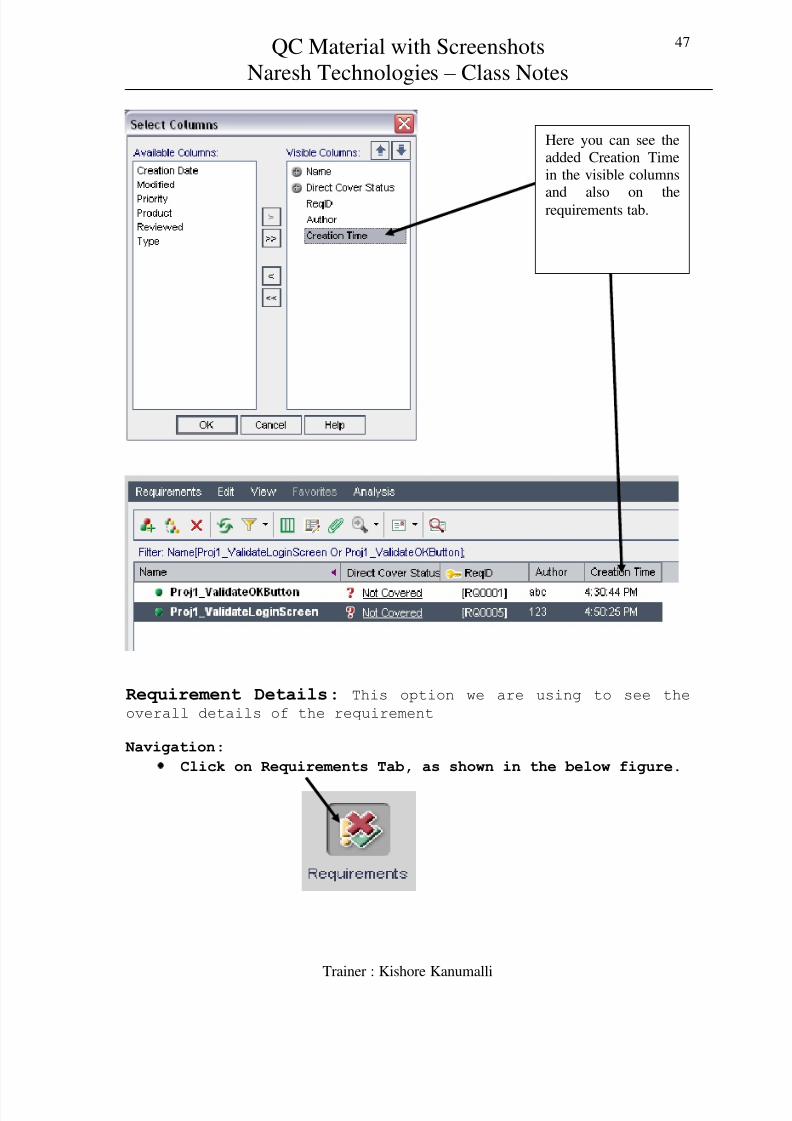
Here in this example we
are increasing the
Visible Columns with
Creating Time in order
to do this first we needto select it from the
Available Columns
and then click on Make
Column Visible option
to increase the visibility
of the Creation time
option.
8/3/2019 QC Material With Screen Shots
http://slidepdf.com/reader/full/qc-material-with-screen-shots 47/90
QC Material with Screenshots
Naresh Technologies – Class Notes
Trainer : Kishore Kanumalli
47
Requirement Details: This option we are using to see the
overall details of the requirement
Navigation:
Click on Requirements Tab, as shown in the below figure.
Here you can see the
added Creation Time
in the visible columns
and also on therequirements tab.

8/3/2019 QC Material With Screen Shots
http://slidepdf.com/reader/full/qc-material-with-screen-shots 48/90
QC Material with Screenshots
Naresh Technologies – Class Notes
Trainer : Kishore Kanumalli
48
Select the requirement for which you want to see therequirement details, as shown in the below figure.
Click on Requirement Details Button, as shown in the below figure.
As you can see from the below figure that it isdisplaying the requirement details of the above selected requirement
Attachments: We are using this option to attach the files to
requirements or test case of defect. In quality center we can
attach in two types
1. Attach as a File2. Attach as a Screen Shot

8/3/2019 QC Material With Screen Shots
http://slidepdf.com/reader/full/qc-material-with-screen-shots 49/90
QC Material with Screenshots
Naresh Technologies – Class Notes
Trainer : Kishore Kanumalli
49
Attach as a File: By using this option we can able to
attach the files to the requirements. (Now in this example we
will add OK button image file to selected requirement)
Navigation:
Click on Requirements Tab, as shown in the below figure.
Select the requirement for which you want to attach afile, as shown in the below figure.
Click on Attachments Button, as shown in the belowfigure.
It opens Requirement Details dialogue box, in that select
and click on the File option as shown in the below figure

8/3/2019 QC Material With Screen Shots
http://slidepdf.com/reader/full/qc-material-with-screen-shots 50/90
QC Material with Screenshots
Naresh Technologies – Class Notes
Trainer : Kishore Kanumalli
50
It Opens File Browser Dialogue box select the filelocation and click on the OPEN button (here in thisexample we are selecting OK button Image located atC:\Documents and Settings\Yashmit\My Documents\My
Pictures\OK Button.jpeg), as shown in the below figure.
Now you can see the OK Button jpeg file was attached toProj1_OKButton Requirement, as shown in the below figure.

8/3/2019 QC Material With Screen Shots
http://slidepdf.com/reader/full/qc-material-with-screen-shots 51/90
QC Material with Screenshots
Naresh Technologies – Class Notes
Trainer : Kishore Kanumalli
51
Attach as a Screen Shot: By using this option we can
attach the screen shots of the application to the
requirements, to test cases and to defects.
Navigation:
Click on Requirements Tab, as shown in the below figure.
Select the requirement for which you want to attach afile, as shown in the below figure.
Click on Attachments Button, as shown in the belowfigure.
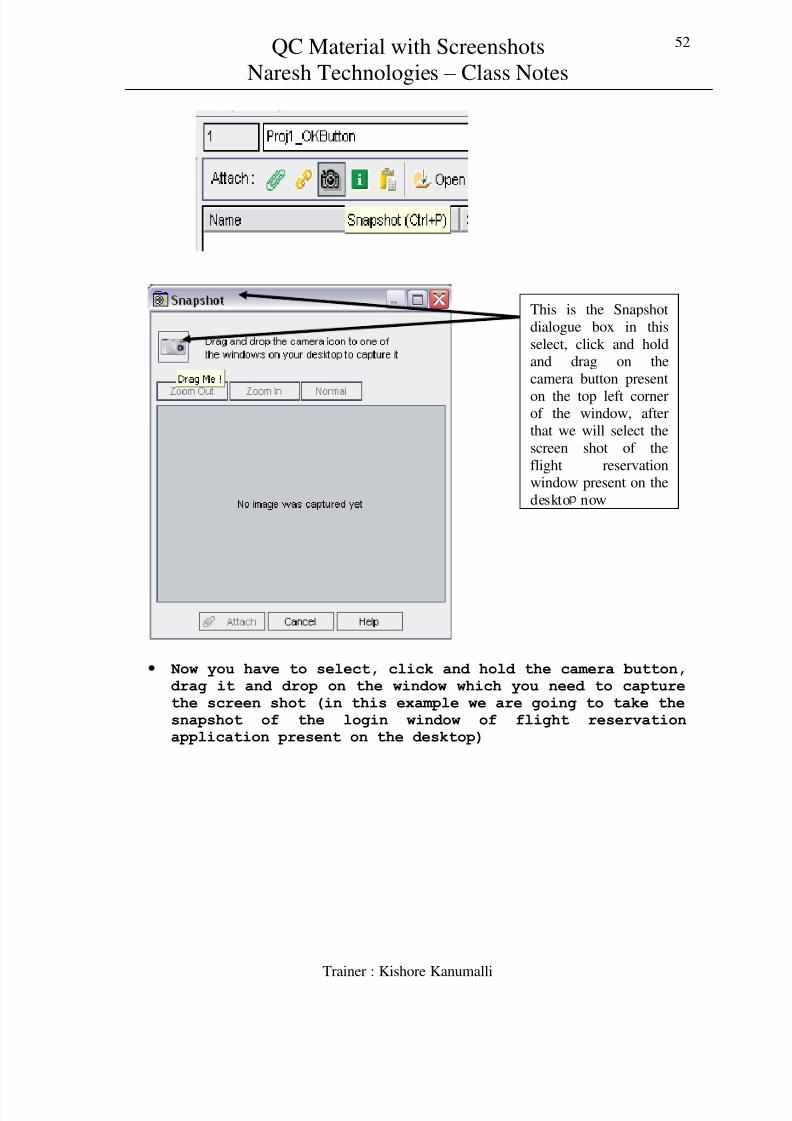
It opens Requirement Details dialogue box, in that selectand click on the Snapshot (black camera symbol) optionwhich will open Snapshot Dialogue Box.
8/3/2019 QC Material With Screen Shots
http://slidepdf.com/reader/full/qc-material-with-screen-shots 52/90
QC Material with Screenshots
Naresh Technologies – Class Notes
Trainer : Kishore Kanumalli
52
Now you have to select, click and hold the camera button,drag it and drop on the window which you need to capturethe screen shot (in this example we are going to take thesnapshot of the login window of flight reservationapplication present on the desktop)
This is the Snapshot
dialogue box in this
select, click and holdand drag on the
camera button presenton the top left cornerof the window, after
that we will select the
screen shot of the
flight reservationwindow present on the
deskto now

8/3/2019 QC Material With Screen Shots
http://slidepdf.com/reader/full/qc-material-with-screen-shots 53/90
QC Material with Screenshots
Naresh Technologies – Class Notes
Trainer : Kishore Kanumalli
53
Now you can see the Snapshot Camera window has selected the login window of the flight reservation application onthe desk top, as shown in the below figure.
Now you can see
that we haveselected the login
window of flight
reservationapplication that
was captured by
the Camera button
Here you can see
that the login
window of theflight reservation
application wascaptured by the
snapshot option.
After capturing
the login
window by the
snapshot window
then click onATTACH option at the endof the window to
attach the file

8/3/2019 QC Material With Screen Shots
http://slidepdf.com/reader/full/qc-material-with-screen-shots 54/90
QC Material with Screenshots
Naresh Technologies – Class Notes
Trainer : Kishore Kanumalli
54
You can see the captured screen shot of Login window offlight reservation application by the snapshot window ofattachments option.
Test Plan Tab: We are using test plan tab to manage the test
cases. In this tab either we can directly design the TC’s or
import TC’s from Excel sheet.
Navigation for design TC’s in QC:
Click on the Test Plan Tab of QC, as shown in the belowfigure.
Create a Project Folder by selecting and clicking on the New Folder Button, it opens New Folder creation dialogue box, as shown in the below figure.

8/3/2019 QC Material With Screen Shots
http://slidepdf.com/reader/full/qc-material-with-screen-shots 55/90
QC Material with Screenshots
Naresh Technologies – Class Notes
Trainer : Kishore Kanumalli
55
You can see the newly added Proj1 folder, as shown in the below figure.
Now under the newly created project folder “Proj1” we
will design the Test Cases to this folder in order to dothis we need to click on the New Test Button, as shown in
the below figure.
It Opens “Create New Test Dialogue” box, in that enter
the New test name and click on OK Button, as shown in the below figure.
Here enter the project
Name (Ex: Proj1) in the
New Folder Dialogue
box and click on OK
Here we have
given the new
empty test name,with the naming
convention of
the project

8/3/2019 QC Material With Screen Shots
http://slidepdf.com/reader/full/qc-material-with-screen-shots 56/90
QC Material with Screenshots
Naresh Technologies – Class Notes
Trainer : Kishore Kanumalli
56
Now you can see the newly added empty test case under theProj1 folder, as shown in the below figure.
Now Select the newly created empty test case and click onthe Design Steps and then click on New Step button.
Newly added empty test case under Proj1

8/3/2019 QC Material With Screen Shots
http://slidepdf.com/reader/full/qc-material-with-screen-shots 57/90
QC Material with Screenshots
Naresh Technologies – Class Notes
Trainer : Kishore Kanumalli
57
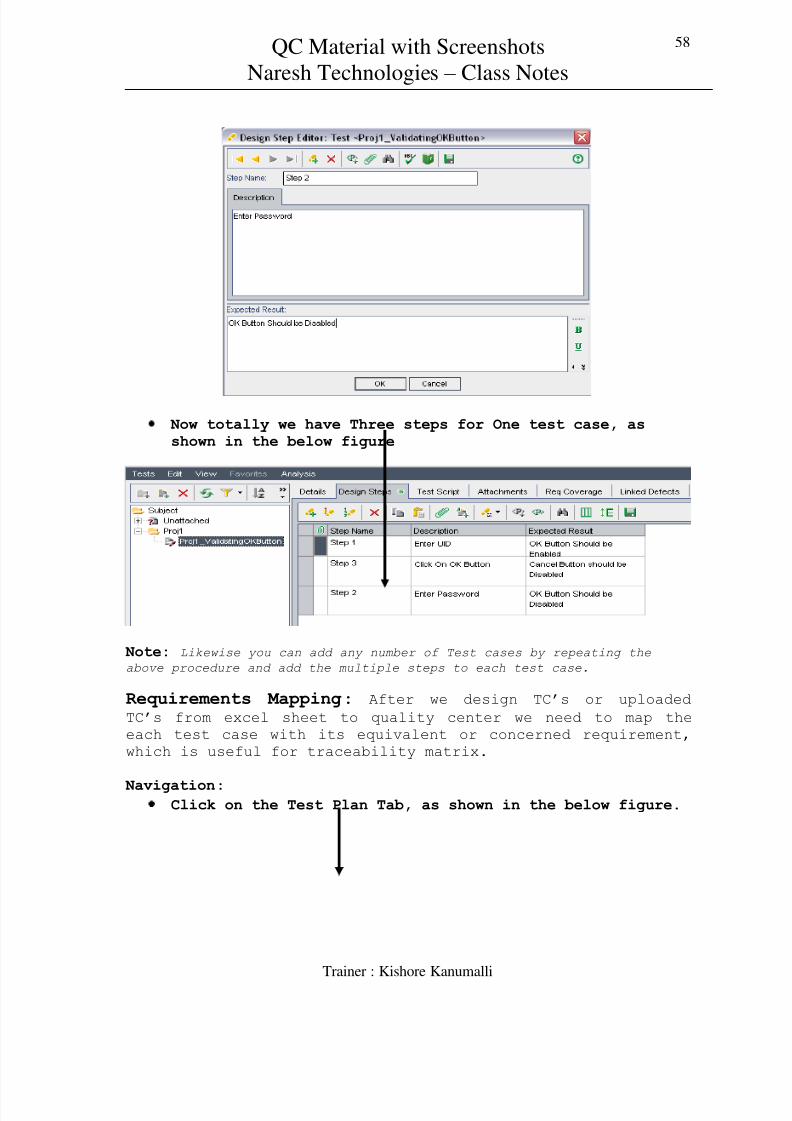
Now it opens New Step Dialogue box, in that enter the
Description and Expected result and then click on OK
Button
Now you can see the newly added Test Case with only onestep, as shown in the below figure.
Now we are adding step number two to the test caseslikewise we will add now three steps to the existing Testcase, as shown in the below figure.
Here we areentering the
Description and
Expectedresult in the
New Step
Dialogue boxand after that
we are
clicking on
OK Button
8/3/2019 QC Material With Screen Shots
http://slidepdf.com/reader/full/qc-material-with-screen-shots 58/90
QC Material with Screenshots
Naresh Technologies – Class Notes
Trainer : Kishore Kanumalli
58
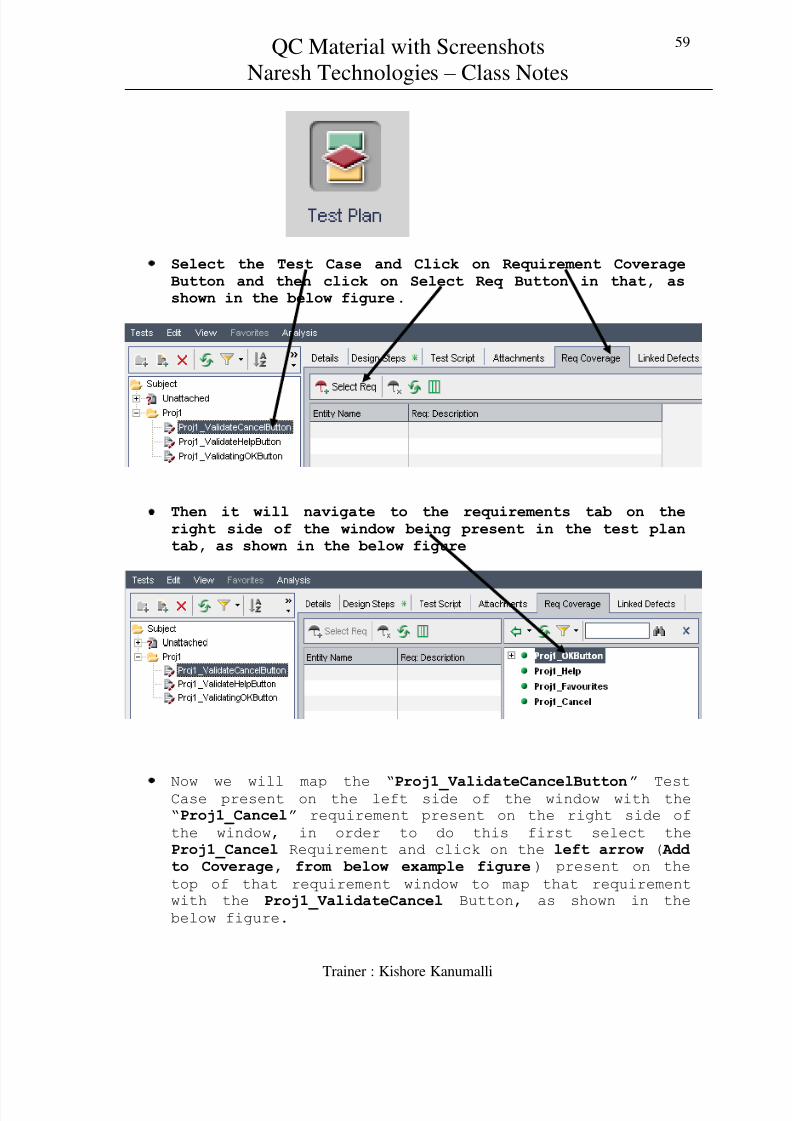
Now totally we have Three steps for One test case, asshown in the below figure
Note: Likewise you can add any number of Test cases by repeating the
above procedure and add the multiple steps to each test case.
Requirements Mapping: After we design TC’s or uploaded
TC’s from excel sheet to quality center we need to map the
each test case with its equivalent or concerned requirement,
which is useful for traceability matrix.
Navigation:
Click on the Test Plan Tab, as shown in the below figure.
8/3/2019 QC Material With Screen Shots
http://slidepdf.com/reader/full/qc-material-with-screen-shots 59/90
QC Material with Screenshots
Naresh Technologies – Class Notes
Trainer : Kishore Kanumalli
59
Select the Test Case and Click on Requirement CoverageButton and then click on Select Req Button in that, asshown in the below figure.
Then it will navigate to the requirements tab on theright side of the window being present in the test plantab, as shown in the below figure
Now we will map the “Proj1_ValidateCancelButton” Test
Case present on the left side of the window with the
“Proj1_Cancel” requirement present on the right side ofthe window, in order to do this first select the
Proj1_Cancel Requirement and click on the left arrow ( Add to Coverage, from below example figure) present on thetop of that requirement window to map that requirement
with the Proj1_ValidateCancel Button, as shown in the
below figure.

8/3/2019 QC Material With Screen Shots
http://slidepdf.com/reader/full/qc-material-with-screen-shots 60/90
QC Material with Screenshots
Naresh Technologies – Class Notes
Trainer : Kishore Kanumalli
60
Now you can see we have mapped Proj1_ValidateCancelButton on the left side of the window with the Proj1_Cancelrequirement on the right side of the window using Add toCoverage option in the Select Requirement window, as
shown in the below figure.
Likewise we will map all the test cases with itsappropriate requirements so that it will be easy for usto conduct the traceability matrix. As shown in the belowthree example figures we have mapped them.
Mapped requirement with the test case

8/3/2019 QC Material With Screen Shots
http://slidepdf.com/reader/full/qc-material-with-screen-shots 61/90
QC Material with Screenshots
Naresh Technologies – Class Notes
Trainer : Kishore Kanumalli
61
Traceability matrix report : After completion of designing
all the TC’s in Test Plan, we need to conduct Traceability
Matrix Report to verify whether every Requirement has covered
in the form TC or not. We can conduct Traceability Matrix
directly in QC or outside QC.
Navigation for conducting Traceability Matrix in QC :
Map all the requirements with TC’s -> Go to Requirements Tab -
> Analysis

8/3/2019 QC Material With Screen Shots
http://slidepdf.com/reader/full/qc-material-with-screen-shots 62/90
QC Material with Screenshots
Naresh Technologies – Class Notes
Trainer : Kishore Kanumalli
62
In analysis column, select Reports -> Tabular Report

8/3/2019 QC Material With Screen Shots
http://slidepdf.com/reader/full/qc-material-with-screen-shots 63/90
QC Material with Screenshots
Naresh Technologies – Class Notes
Trainer : Kishore Kanumalli
63
Now you can see the report with Requirement name and Status
Different Status :
1. Not Covered : Requirement has not covered in TC2. Passed : Requirement is having TC and TC was passed3. No Run : Requirement is having TC and not executed4. Failed : Requirement is having TC and TC was failed
Calling one test case to another test case:Some times we need to execute same Test case for multiple
times in other Test Cases. In that case we need not to design
the same TC for again and again. By using “Call to Test”
option we call one TC into another TC.
Please find the below navigation.
Click on Test Plan -> Select Test Case

8/3/2019 QC Material With Screen Shots
http://slidepdf.com/reader/full/qc-material-with-screen-shots 64/90
QC Material with Screenshots
Naresh Technologies – Class Notes
Trainer : Kishore Kanumalli
64
Right click on Test Case -> Click on Call to Test
Select TC which you want to call

8/3/2019 QC Material With Screen Shots
http://slidepdf.com/reader/full/qc-material-with-screen-shots 65/90
QC Material with Screenshots
Naresh Technologies – Class Notes
Trainer : Kishore Kanumalli
65
Click on OK
Your TC has called into another TC like below.

8/3/2019 QC Material With Screen Shots
http://slidepdf.com/reader/full/qc-material-with-screen-shots 66/90
QC Material with Screenshots
Naresh Technologies – Class Notes
Trainer : Kishore Kanumalli
66
Test Lab: Test lab is the place where we can execute the
test cases in quality center. Before executing the test cases
we need to pull the test cases from test plan to test lab tabin a sequential executable format this we call it as a test
lab setup or test set or test bed.
Test Lab Setup: Before executing the test cases we need topull the test cases from the test plan to test lab in a
sequential executable format. This we call it as a test lab
setup or test set or test bed or Test Suit.
Cycle: All the test cases executed for one time that we callit as Cycle.
Iteration: Whenever we complete all the steps in a single testcase then we will call it as Iteration.
Navigation for Test Lab Setup:
Click on the Test Lab Tab, as shown in the below figure.

8/3/2019 QC Material With Screen Shots
http://slidepdf.com/reader/full/qc-material-with-screen-shots 67/90
QC Material with Screenshots
Naresh Technologies – Class Notes
Trainer : Kishore Kanumalli
67
Create an Empty folder for a Project (Ex: Proj1) byclicking on New Folder button.
It opens New Folder Dialogue box in that enter the nameof the project as Proj1 and then click on OK button, asshown in the below figure.
Now select the project folder and click on the New TestSet button, as shown in the below figure.

8/3/2019 QC Material With Screen Shots
http://slidepdf.com/reader/full/qc-material-with-screen-shots 68/90
QC Material with Screenshots
Naresh Technologies – Class Notes
Trainer : Kishore Kanumalli
68
Now it open New Test Set dialogue box, in that give thename of the Test Set as Cycle1, after that click on OK
button, as shown in the below figure.
Now you can see the newly added Cycle1 to the Proj1, inthis we will setup the test cases in a sequential and executable format.
Now select the New Test Set and then click on the Select
Test on the right side of the window to open the mapped test cases on the right side of the window, as shown inthe below figure.
Step1: Project Selected Here
Step 2: Click on New Test Set

8/3/2019 QC Material With Screen Shots
http://slidepdf.com/reader/full/qc-material-with-screen-shots 69/90
QC Material with Screenshots
Naresh Technologies – Class Notes
Trainer : Kishore Kanumalli
69
Now select your test cases in the order from the test plan on the right side of the window and then click onthe arrow button to setup the test lab, before execution,
as shown in the below figure.
In the above example we have changed the order of the test cases according to their
execution but not according to their design, always the execution of the test cases takes
place in a sequential and executable form but not according to their design

8/3/2019 QC Material With Screen Shots
http://slidepdf.com/reader/full/qc-material-with-screen-shots 70/90
QC Material with Screenshots
Naresh Technologies – Class Notes
Trainer : Kishore Kanumalli
70
After completion of setup test lab once, then we need to start
executing the test cases on the application from test lab tab
of quality center.
Test Execution: Once the application has developed and thathas been deployed into the testing environment we need to
start executing the test cases from the test lab tab in
quality center.
In Test Lab we can execute TC’s in 3 different ways.
1. Run Manually2. Continue Manual Run3. Run test Set1. Run Manually : By using this option we can run TC from
first Step.
We are using this option when we are executing TC first
time
Navigation:
Click on the Test Lab Tab, as shown in the below figure.
Select the Test Set, as shown in the below figure.

8/3/2019 QC Material With Screen Shots
http://slidepdf.com/reader/full/qc-material-with-screen-shots 71/90
QC Material with Screenshots
Naresh Technologies – Class Notes
Trainer : Kishore Kanumalli
71
Select the Test Case in that Test Set which we are goingto execute and then click on RUN Button. As shown in the
below figure.
It opens Manual Runner Dialogue box in that select and
click on the Begin Run button. As shown in the belowfigure.
Execute every step by comparing expected result with theactual result and give the status and click on end run
button
Step 1: From here we are selecting the appropriate step number for testing
8/3/2019 QC Material With Screen Shots
http://slidepdf.com/reader/full/qc-material-with-screen-shots 72/90
QC Material with Screenshots
Naresh Technologies – Class Notes
Trainer : Kishore Kanumalli
72
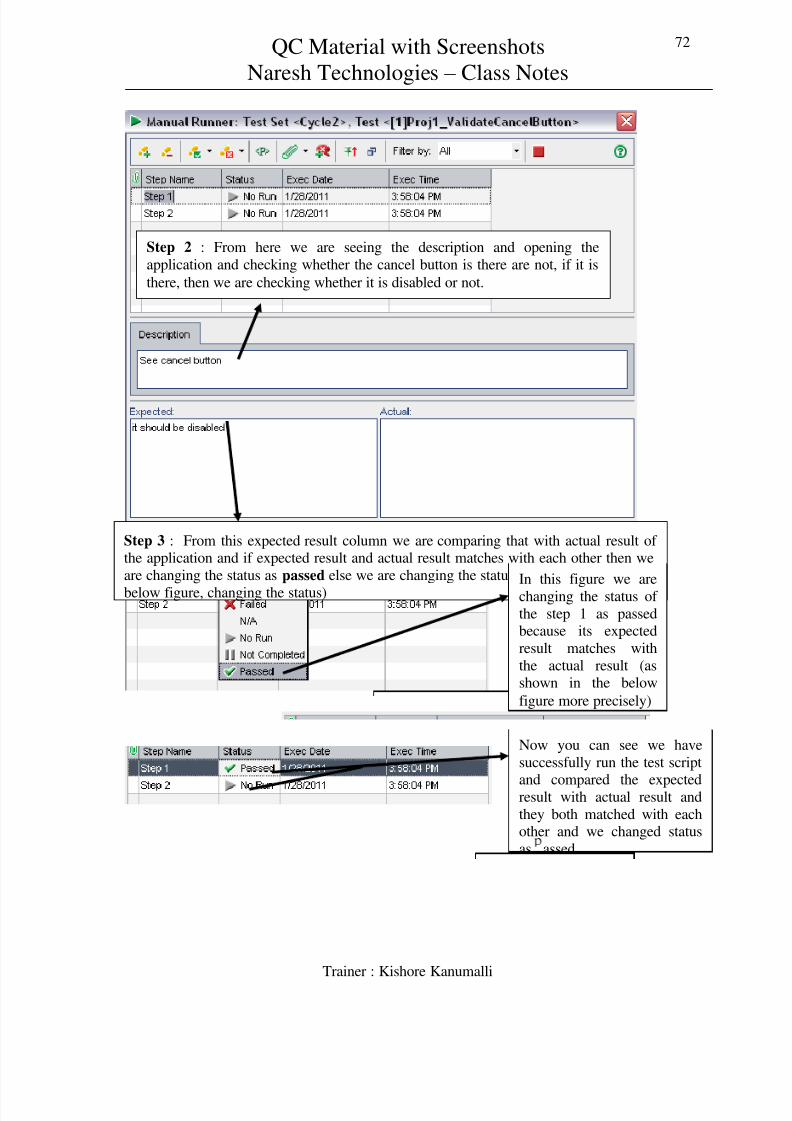
Step 2 : From here we are seeing the description and opening the
application and checking whether the cancel button is there are not, if it is
there, then we are checking whether it is disabled or not.
Step 3 : From this expected result column we are comparing that with actual result of the application and if expected result and actual result matches with each other then we
are changing the status as passed else we are changing the status as fail (as shown in thebelow figure, changing the status)
In this figure we arechanging the status of
the step 1 as passedbecause its expected
result matches with
the actual result (asshown in the below
figure more precisely)
Now you can see we have
successfully run the test scriptand compared the expected
result with actual result and
they both matched with eachother and we changed status
as assed.

8/3/2019 QC Material With Screen Shots
http://slidepdf.com/reader/full/qc-material-with-screen-shots 73/90
QC Material with Screenshots
Naresh Technologies – Class Notes
Trainer : Kishore Kanumalli
73
2. Continue Manual Run : By using this option we run TCfrom stopped position.
Navigation : Select Run dropdown
Click on Continue Manual Run
Now see in this figure, the step 2 is failed, and always remember that if any one of the step
is failed in the entire test case the test case itself is failed, and if any test case is passedmeans it has successfully passed all the steps involved in that test case, now see in the
above mentioned figure the test case is failed at step 2 and we have to treat this failed step
as a defect and we need to report it to development team through defect reporting life cycle.

8/3/2019 QC Material With Screen Shots
http://slidepdf.com/reader/full/qc-material-with-screen-shots 74/90
QC Material with Screenshots
Naresh Technologies – Class Notes
Trainer : Kishore Kanumalli
74
Click on begin Run
Execute your Test Case from last stopped Step
8/3/2019 QC Material With Screen Shots
http://slidepdf.com/reader/full/qc-material-with-screen-shots 75/90
QC Material with Screenshots
Naresh Technologies – Class Notes
Trainer : Kishore Kanumalli
75
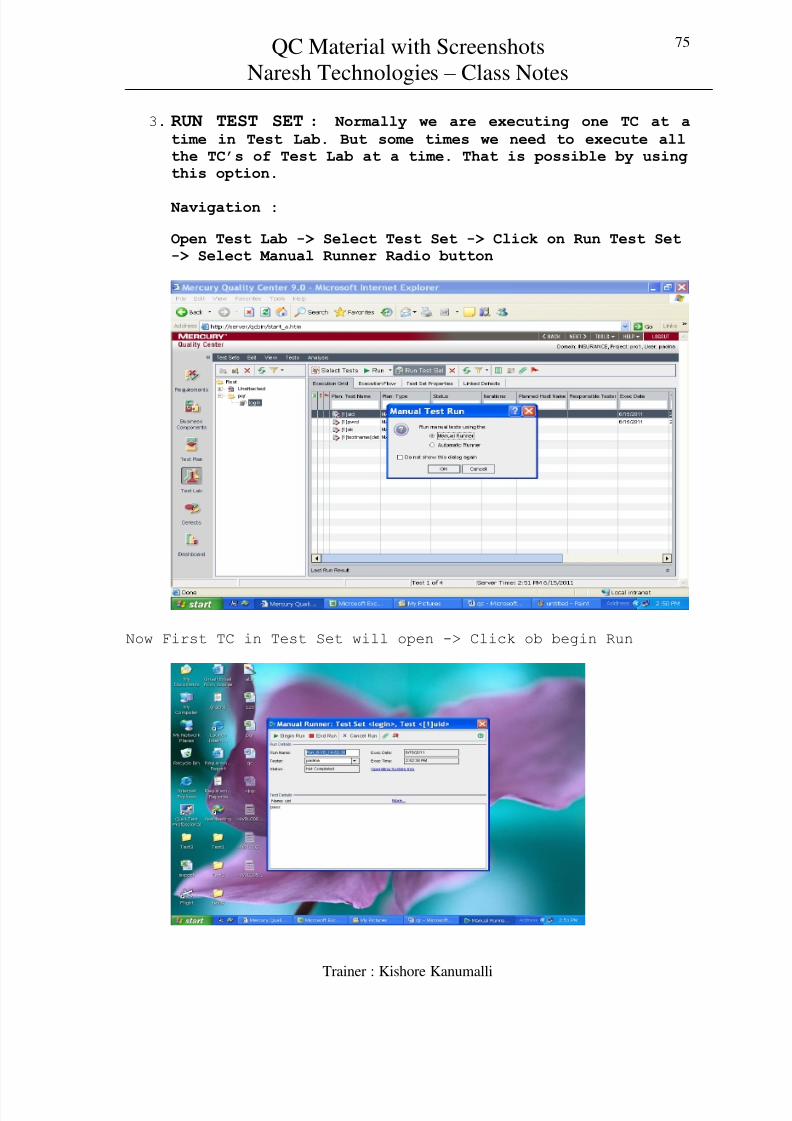
3. RUN TEST SET : Normally we are executing one TC at atime in Test Lab. But some times we need to execute allthe TC’s of Test Lab at a time. That is possible by usingthis option.
Navigation :
Open Test Lab -> Select Test Set -> Click on Run Test Set-> Select Manual Runner Radio button
Now First TC in Test Set will open -> Click ob begin Run

8/3/2019 QC Material With Screen Shots
http://slidepdf.com/reader/full/qc-material-with-screen-shots 76/90
QC Material with Screenshots
Naresh Technologies – Class Notes
Trainer : Kishore Kanumalli
76
Execute All the steps in First TC
After completion of First TC, Second TC will open
automatically -> Click ob Begin Run
Now you can execute second TC also

8/3/2019 QC Material With Screen Shots
http://slidepdf.com/reader/full/qc-material-with-screen-shots 77/90
QC Material with Screenshots
Naresh Technologies – Class Notes
Trainer : Kishore Kanumalli
77
Defects Reporting: At the time of execution if there is any
mismatch between the expected result and actual result we need
to mark the status of the step as failed and we need to report
a defect to the development team from the failed step of the
test case.
Navigation:
Mark the status of the step as failed, as shown in the below figure.
Click on New Defect Button, as shown in the below figure.

8/3/2019 QC Material With Screen Shots
http://slidepdf.com/reader/full/qc-material-with-screen-shots 78/90
QC Material with Screenshots
Naresh Technologies – Class Notes
Trainer : Kishore Kanumalli
78
It Opens New Defect Template fill in that New DefectTemplate and click on submit button, as shown in the
below figure.
Defect Template: It is the template which we are using to
fill it as and when we identify a defect and it contains
following information to be enter (see above figure for defecttemplate).
Summary: It defines the short cut description of the defect
and also we call it as a defect name.
Detected by: It defines who identified this defect during
the execution of test case and by default the name of the
person will be displayed who, logged into the quality center.

8/3/2019 QC Material With Screen Shots
http://slidepdf.com/reader/full/qc-material-with-screen-shots 79/90
QC Material with Screenshots
Naresh Technologies – Class Notes
Trainer : Kishore Kanumalli
79
Severity: This is nothing but the seriousness of the defect
with respect to the functionality. It consists of various
statuses they are Low, Medium, High, Very High and Urgent.
Detected in Version or Release: It defines in which version or
release we have identified this defect
Project: It defines in which project we have identified the
defect.
Status: It defines the status of the defect, by default when
we are reporting the defect the status will be always NEW .
Detected on Date: It gives, the details of the detection
date of the defect which, we are reporting the defect to
development team.
Assigned To: It defines to whom we are reporting this
defect.
Priority: It defines how soon development team has to
respond to the defect. It has various statuses as Low, Medium,
High, Very High and Urgent.
Reproducible: It defines ho the defect is occurring during
execution. If it is Reproducible-Y then the defect is
occurring every time and if it is Reproducible-N then the
defect is not occurring every time.
Subject: It specifies to which functionality this defect is
related to.
Note : Along with above content, we are also having below
contents in real time Defect Template
Client: It defines to which client we are assigning this
defect.
Business Analyst: It defines the business analyst who is
responsible for this defect.
Test Coordinator: It defines the test lead.
Teach Lead or It Coordinator: It defines the development
lead name.
8/3/2019 QC Material With Screen Shots
http://slidepdf.com/reader/full/qc-material-with-screen-shots 80/90
QC Material with Screenshots
Naresh Technologies – Class Notes
Trainer : Kishore Kanumalli
80
Checklist Document :Before starting executing the test
cases we will be receiving a checklist document which contains
entire information about the project like developers, testers,
client, business analyst etc.
Once we fill the defect template we need to attach the screen
shots of the defect and also specifies the test data which we
used to test this defect along with brief description about
the defect and click on submit.
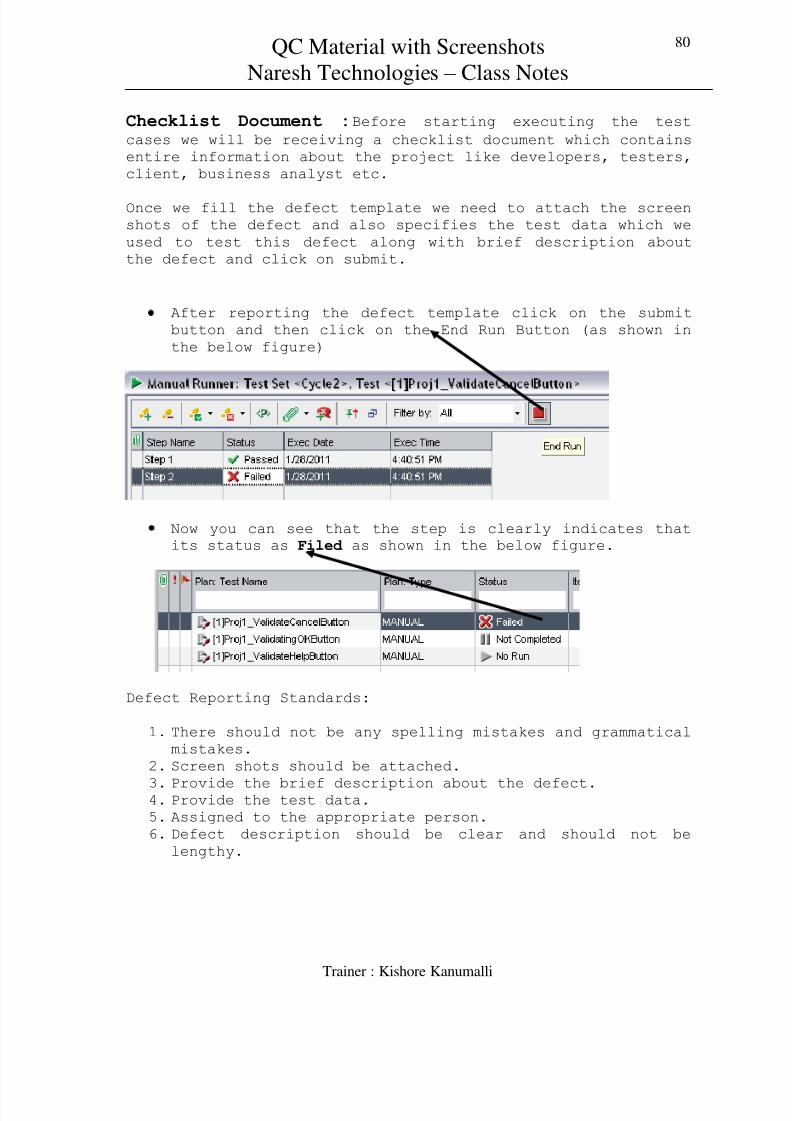
After reporting the defect template click on the submit
button and then click on the End Run Button (as shown in
the below figure)
Now you can see that the step is clearly indicates that
its status as Filed as shown in the below figure.
Defect Reporting Standards:
1. There should not be any spelling mistakes and grammaticalmistakes.
2. Screen shots should be attached.3. Provide the brief description about the defect.4. Provide the test data.5. Assigned to the appropriate person.6. Defect description should be clear and should not be
lengthy.

8/3/2019 QC Material With Screen Shots
http://slidepdf.com/reader/full/qc-material-with-screen-shots 81/90
QC Material with Screenshots
Naresh Technologies – Class Notes
Trainer : Kishore Kanumalli
81
Defects Tab: We are using this Tab to manage the defects in
QC. And also we can report defects from defects tab.
Note : We are not reporting defects from defects tab. Because
if we report defect from defects Tab, there is no link betweenTC and Defect. That is the reason we are reporting defects
only from Failed step of the TC in Test Lab Tab.
Dashboard Tab : Only Project Managers having the access to
Dashboard tab to monitor the QC tabs.
Exporting Test Cases from Excel to QC :
Prepare the test cases in the excel sheet, as shown in the
below figure. Normally we are preparing TC’s in individualsheets. But at the time of exporting, we need to consolidate
all the TC’s in single sheet like below. After consolidate,
select the columns in excel sheet like below.
8/3/2019 QC Material With Screen Shots
http://slidepdf.com/reader/full/qc-material-with-screen-shots 82/90
QC Material with Screenshots
Naresh Technologies – Class Notes
Trainer : Kishore Kanumalli
82
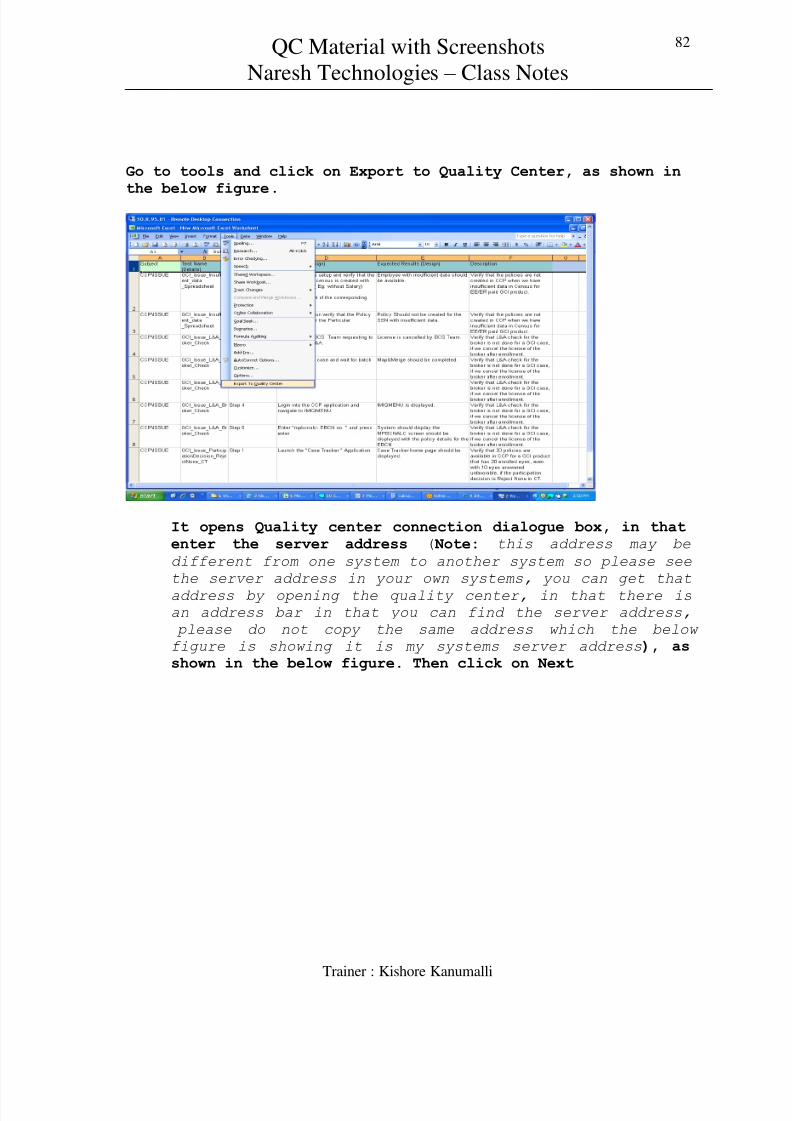
Go to tools and click on Export to Quality Center, as shown in
the below figure.
It opens Quality center connection dialogue box, in thatenter the server address ( Note: this address may be
different from one system to another system so please see
the server address in your own systems, you can get that
address by opening the quality center, in that there is
an address bar in that you can find the server address,
please do not copy the same address which the below
figure is showing it is my systems server address), asshown in the below figure. Then click on Next

8/3/2019 QC Material With Screen Shots
http://slidepdf.com/reader/full/qc-material-with-screen-shots 83/90
QC Material with Screenshots
Naresh Technologies – Class Notes
Trainer : Kishore Kanumalli
83
It opens QC User ID dialogue box in that enter the User ID and Password and click on next, as shown in the below figure (here
in the example I am enter abc as it is the registered user in
my system please do not enter abc and find out the registered
user in you quality center and provide that details).
Give your domain name and project name and click on next, asshown in the below figure.

8/3/2019 QC Material With Screen Shots
http://slidepdf.com/reader/full/qc-material-with-screen-shots 84/90
QC Material with Screenshots
Naresh Technologies – Class Notes
Trainer : Kishore Kanumalli
84
Select the appropriate Tab to which you want to export, asshown in the below figure. Then click on Next
In this step give your map name and click on Next, as shown inthe below figure.

8/3/2019 QC Material With Screen Shots
http://slidepdf.com/reader/full/qc-material-with-screen-shots 85/90
QC Material with Screenshots
Naresh Technologies – Class Notes
Trainer : Kishore Kanumalli
85
Here select the appropriate field and click on > buttonas shown in the below figure.
In this step map the name with the column name of theexcel sheet, as shown in the below figure.

8/3/2019 QC Material With Screen Shots
http://slidepdf.com/reader/full/qc-material-with-screen-shots 86/90
QC Material with Screenshots
Naresh Technologies – Class Notes
Trainer : Kishore Kanumalli
86
Now your TC’s are uploaded to the Test Plan tab of QC, asshown in the below figure. Then click on finish and openthe quality center and go to Test Plan tab and seewhether your TC’s are uploaded to this tab

8/3/2019 QC Material With Screen Shots
http://slidepdf.com/reader/full/qc-material-with-screen-shots 87/90
QC Material with Screenshots
Naresh Technologies – Class Notes
Trainer : Kishore Kanumalli
87
Connecting QC from QTP:
Prepare Test Script in QTP like below
Go to file menu and click on QC Connection
Specify the url of QC and click on Connect

8/3/2019 QC Material With Screen Shots
http://slidepdf.com/reader/full/qc-material-with-screen-shots 88/90
QC Material with Screenshots
Naresh Technologies – Class Notes
Trainer : Kishore Kanumalli
88
Specify Username and Password like below
Select Domain and Project and click on Login button like below

8/3/2019 QC Material With Screen Shots
http://slidepdf.com/reader/full/qc-material-with-screen-shots 89/90
QC Material with Screenshots
Naresh Technologies – Class Notes
Trainer : Kishore Kanumalli
89
Now you can see the connection symbol in QTP window
Now you can save your Test Script in Test Plan Tab in QC

8/3/2019 QC Material With Screen Shots
http://slidepdf.com/reader/full/qc-material-with-screen-shots 90/90
QC Material with Screenshots
Naresh Technologies – Class Notes
90
Now you can able to see QC Test Plan icon when you are trying
to save your Script
Once you save your Script you can able to see your scrpt in
Test Plan Tab in QC