Embed Size (px)
Citation preview

PyPortal Philips Hue Lighting ControllerCreated by Brent Rubell
Last updated on 2020-04-14 06:58:18 PM EDT

Overview
Want to create the right atmosphere to match your mood?
The Philips Hue (https://adafru.it/Ezq) is the most intelligent lighting system on the market. The Hue system iscomprised of a bridge which communicates over the Internet and smart lights. There's lots of different types of lightsto connect to the Hue Bridge - from bulbs to LED strips.
With Hue, you can set light colors to transform the mood of a room, create lighting profiles for different scenarios,create light profiles to wake up to, and even control lights outside of your home.
You can browse the entire Philips Hue product line on their website here (https://adafru.it/Ezr).
In this guide, you'll be building a touchscreen lighting controller with an Adafruit PyPortal to control a light, or groupsof lights, connected to a Philips Hue bridge.
© Adafruit Industries https://learn.adafruit.com/pyportal-philips-hue-lighting-controller Page 3 of 39

The Philips Hue lighting system revolves around
the Hue Bridge. This bridge is connected to your router
and communicates wirelessly over radio (in a format
called ZigBee) to Hue lights and devices linked to the
bridge.
Instead of including a separate WiFi radio in each bulb,
which increases the number of WiFi devices on your
router, only the hub is connected to your router.
If you're looking for a way to interactively control Philips Hue Lights with CircuitPython, follow along!
CircuitPython CodeCircuitPython is perfect for building Internet-of-Things
projects. This project uses the ESP32SPI CircuitPython
(https://adafru.it/DWV)library, which can use the ESP32
as a WiFi-coprocessor to send web requests to the LIFX
HTTP Remote Control API.
We've also built a Philips Hue helper module for
CircuitPython (https://adafru.it/Ezs) to make interfacing
with Hue incredibly easy.
You can rapidly update your code without having to compile and store WiFi and API secret keys on the device. Thismeans that there's no editing code and re-uploading whenever you move the PyPortal to another network - justupdate a file and you're set.
© Adafruit Industries https://learn.adafruit.com/pyportal-philips-hue-lighting-controller Page 4 of 39

PyPortalSay hello to PyPortal! The easiest way to build your IoT
projects with a touchscreen display!
Make sure to walk through the PyPortal introduction
guide and walkthrough the pages. It'll get you setup
with CircuitPython and a handful of demo code to play
with! (https://adafru.it/Ecp)
Prerequisite Guides
If you're new to CircuitPython, take a moment to walk through the following guides to get you started and up-to-speed:
Welcome to CircuitPython (https://adafru.it/cpy-welcome)PyPortal Introduction Guide (https://adafru.it/Ecp)
Parts
Adafruit PyPortal - CircuitPython Powered Internet Display
$54.95IN STOCK
Add To Cart
© Adafruit Industries https://learn.adafruit.com/pyportal-philips-hue-lighting-controller Page 5 of 39

1 x USB CableUSB cable - USB A to Micro-B - 3 foot long
Add To Cart
You can get both of these and a PyPortal stand in AdaBox 011:
AdaBox011 - PyPortal
OUT OF STOCK
Out Of Stock
© Adafruit Industries https://learn.adafruit.com/pyportal-philips-hue-lighting-controller Page 6 of 39

PyPortal CircuitPython Setup
To use all the amazing features of your PyPortal with CircuitPython, you must first install a number of libraries. Thispage covers that process.
Adafruit CircuitPython Bundle
Download the Adafruit CircuitPython Library Bundle. You can find the latest release here:
https://adafru.it/ENC
https://adafru.it/ENC
Download the adafruit-circuitpython-bundle-*.x-mpy-*.zip bundle zip file where *.x MATCHES THE VERSION OFCIRCUITPYTHON YOU INSTALLED, and unzip a folder of the same name. Inside you'll find a lib folder. You have twooptions:
You can add the lib folder to your CIRCUITPY drive. This will ensure you have all the drivers. But it will take abunch of space on the 8 MB diskAdd each library as you need it, this will reduce the space usage but you'll need to put in a little more effort.
At a minimum we recommend the following libraries, in fact we more than recommend. They're basically required. Sograb them and install them into CIRCUITPY/lib now!
adafruit_esp32spi - This is the library that gives you internet access via the ESP32 using (you guessed it!) SPItransport. You need this for anything Internetadafruit_requests - This library allows us to perform HTTP requests and get responses back from servers.GET/POST/PUT/PATCH - they're all in here!adafruit_pyportal - This is our friendly wrapper library that does a lot of our projects, displays graphics and text,fetches data from the internet. Nearly all of our projects depend on it!adafruit_touchscreen - a library for reading touches from the resistive touchscreen. Handles all the analognoodling, rotation and calibration for you.adafruit_cursorcontrol - a library for reading PyGamer and PyBadge joystick and buttons. Handles all thegraphics, button press reading and joystick movement for you.adafruit_io - this library helps connect the PyPortal to our free datalogging and viewing serviceadafruit_imageload - an image display helper, required for any graphics!adafruit_display_text - not surprisingly, it displays text on the screenadafruit_bitmap_font - we have fancy font support, and its easy to make new fonts. This library reads and parsesfont files.adafruit_slideshow - for making image slideshows - handy for quick display of graphics and soundneopixel - for controlling the onboard neopixeladafruit_adt7410 - library to read the temperature from the on-board Analog Devices ADT7410 precisiontemperature sensoradafruit_sdcard - support for reading/writing data from the onboard SD card slot.adafruit_bus_device - low level support for I2C/SPI
© Adafruit Industries https://learn.adafruit.com/pyportal-philips-hue-lighting-controller Page 7 of 39

Internet Connect!
Once you have CircuitPython setup and libraries installed we can get your board connected to the Internet. Note thataccess to enterprise level secured WiFi networks is not currently supported, only WiFi networks that require SSID andpassword.
To get connected, you will need to start by creating a secrets file.
What's a secrets file?
We expect people to share tons of projects as they build CircuitPython WiFi widgets. What we want to avoid is peopleaccidentally sharing their passwords or secret tokens and API keys. So, we designed all our examples to use asecrets.py file, that is in your CIRCUITPY drive, to hold secret/private/custom data. That way you can share your main
project without worrying about accidentally sharing private stuff.
Your secrets.py file should look like this:
# This file is where you keep secret settings, passwords, and tokens!# If you put them in the code you risk committing that info or sharing it
secrets = { 'ssid' : 'home ssid', 'password' : 'my password', 'timezone' : "America/New_York", # http://worldtimeapi.org/timezones 'github_token' : 'fawfj23rakjnfawiefa', 'hackaday_token' : 'h4xx0rs3kret', }
Inside is a python dictionary named secrets with a line for each entry. Each entry has an entry name (say 'ssid' ) and
then a colon to separate it from the entry key 'home ssid' and finally a comma ,
At a minimum you'll need the ssid and password for your local WiFi setup. As you make projects you may need more
tokens and keys, just add them one line at a time. See for example other tokens such as one for accessing github orthe hackaday API. Other non-secret data like your timezone can also go here, just cause its called secrets doesn'tmean you can't have general customization data in there!
For the correct time zone string, look at http://worldtimeapi.org/timezones (https://adafru.it/EcP) and remember that ifyour city is not listed, look for a city in the same time zone, for example Boston, New York, Philadelphia, WashingtonDC, and Miami are all on the same time as New York.
Of course, don't share your secrets.py - keep that out of GitHub, Discord or other project-sharing sites.
Connect to WiFi
OK now you have your secrets setup - you can connect to the Internet. Lets use the ESP32SPI and the Requestslibraries - you'll need to visit the CircuitPython bundle and install (https://adafru.it/ENC):
adafruit_bus_deviceadafruit_esp32spiadafruit_requestsneopixel
© Adafruit Industries https://learn.adafruit.com/pyportal-philips-hue-lighting-controller Page 8 of 39

Into your lib folder. Once that's done, load up the following example using Mu or your favorite editor:
import boardimport busiofrom digitalio import DigitalInOutimport adafruit_esp32spi.adafruit_esp32spi_socket as socketfrom adafruit_esp32spi import adafruit_esp32spiimport adafruit_requests as requests
print("ESP32 SPI webclient test")
TEXT_URL = "http://wifitest.adafruit.com/testwifi/index.html"JSON_URL = "http://api.coindesk.com/v1/bpi/currentprice/USD.json"
# If you are using a board with pre-defined ESP32 Pins:esp32_cs = DigitalInOut(board.ESP_CS)esp32_ready = DigitalInOut(board.ESP_BUSY)esp32_reset = DigitalInOut(board.ESP_RESET)
# If you have an ItsyBitsy Airlift:# esp32_cs = DigitalInOut(board.D13)# esp32_ready = DigitalInOut(board.D11)# esp32_reset = DigitalInOut(board.D12)
# If you have an externally connected ESP32:# esp32_cs = DigitalInOut(board.D9)# esp32_ready = DigitalInOut(board.D10)# esp32_reset = DigitalInOut(board.D5)
spi = busio.SPI(board.SCK, board.MOSI, board.MISO)esp = adafruit_esp32spi.ESP_SPIcontrol(spi, esp32_cs, esp32_ready, esp32_reset)
requests.set_socket(socket, esp)
if esp.status == adafruit_esp32spi.WL_IDLE_STATUS: print("ESP32 found and in idle mode")print("Firmware vers.", esp.firmware_version)print("MAC addr:", [hex(i) for i in esp.MAC_address])
for ap in esp.scan_networks(): print("\t%s\t\tRSSI: %d" % (str(ap["ssid"], "utf-8"), ap["rssi"]))
print("Connecting to AP...")while not esp.is_connected: try: esp.connect_AP(b"MY_SSID_NAME", b"MY_SSID_PASSWORD") except RuntimeError as e: print("could not connect to AP, retrying: ", e) continueprint("Connected to", str(esp.ssid, "utf-8"), "\tRSSI:", esp.rssi)print("My IP address is", esp.pretty_ip(esp.ip_address))print( "IP lookup adafruit.com: %s" % esp.pretty_ip(esp.get_host_by_name("adafruit.com"))
This first connection example doesn't use a secrets file - you'll hand-enter your SSID/password to verify connectivity first! See the detailed instructions after the code below.�
© Adafruit Industries https://learn.adafruit.com/pyportal-philips-hue-lighting-controller Page 9 of 39

"IP lookup adafruit.com: %s" % esp.pretty_ip(esp.get_host_by_name("adafruit.com")))print("Ping google.com: %d ms" % esp.ping("google.com"))
# esp._debug = Trueprint("Fetching text from", TEXT_URL)r = requests.get(TEXT_URL)print("-" * 40)print(r.text)print("-" * 40)r.close()
print()print("Fetching json from", JSON_URL)r = requests.get(JSON_URL)print("-" * 40)print(r.json())print("-" * 40)r.close()
print("Done!")
And save it to your board, with the name code.py .
Then go down to this line
esp.connect_AP(b'MY_SSID_NAME', b'MY_SSID_PASSWORD')
and change MY_SSID_NAME and MY_SSID_PASSWORD to your access point name and password, keeping them
within the '' quotes. (This example doesn't use the secrets' file, but it's also very stand-alone so if other things seem tonot work you can always re-load this to verify basic connectivity.) You should get something like the following:
As mentioned, this first connection example doesn't use a secrets file - you'll hand-enter your SSID/password to verify connectivity first!�
© Adafruit Industries https://learn.adafruit.com/pyportal-philips-hue-lighting-controller Page 10 of 39

In order, the example code...
Initializes the ESP32 over SPI using the SPI port and 3 control pins:
esp32_cs = DigitalInOut(board.ESP_CS)esp32_ready = DigitalInOut(board.ESP_BUSY)esp32_reset = DigitalInOut(board.ESP_RESET)
spi = busio.SPI(board.SCK, board.MOSI, board.MISO)esp = adafruit_esp32spi.ESP_SPIcontrol(spi, esp32_cs, esp32_ready, esp32_reset)
Tells our requests library the type of socket we're using (socket type varies by connectivity type - we'll be using
the adafruit_esp32spi_socket for this example). We'll also set the interface to an esp object. This is a little bit of a
hack, but it lets us use requests like CPython does.
requests.set_socket(socket, esp)
Verifies an ESP32 is found, checks the firmware and MAC address
if esp.status == adafruit_esp32spi.WL_IDLE_STATUS: print("ESP32 found and in idle mode")print("Firmware vers.", esp.firmware_version)print("MAC addr:", [hex(i) for i in esp.MAC_address])
© Adafruit Industries https://learn.adafruit.com/pyportal-philips-hue-lighting-controller Page 11 of 39

Performs a scan of all access points it can see and prints out the name and signal strength:
for ap in esp.scan_networks(): print("\t%s\t\tRSSI: %d" % (str(ap['ssid'], 'utf-8'), ap['rssi']))
Connects to the AP we've defined here, then prints out the local IP address, attempts to do a domain name lookup andping google.com to check network connectivity (note sometimes the ping fails or takes a while, this isn't a big deal)
print("Connecting to AP...")esp.connect_AP(b'MY_SSID_NAME', b'MY_SSID_PASSWORD')print("Connected to", str(esp.ssid, 'utf-8'), "\tRSSI:", esp.rssi)print("My IP address is", esp.pretty_ip(esp.ip_address))print("IP lookup adafruit.com: %s" % esp.pretty_ip(esp.get_host_by_name("adafruit.com")))print("Ping google.com: %d ms" % esp.ping("google.com"))
OK now we're getting to the really interesting part. With a SAMD51 or other large-RAM (well, over 32 KB) device, wecan do a lot of neat tricks. Like for example we can implement an interface a lot like requests (https://adafru.it/E9o) -which makes getting data really really easy
To read in all the text from a web URL call requests.get - you can pass in https URLs for SSL connectivity
TEXT_URL = "http://wifitest.adafruit.com/testwifi/index.html"print("Fetching text from", TEXT_URL)r = requests.get(TEXT_URL)print('-'*40)print(r.text)print('-'*40)r.close()
Or, if the data is in structured JSON, you can get the json pre-parsed into a Python dictionary that can be easily queriedor traversed. (Again, only for nRF52840, M4 and other high-RAM boards)
JSON_URL = "http://api.coindesk.com/v1/bpi/currentprice/USD.json"print("Fetching json from", JSON_URL)r = requests.get(JSON_URL)print('-'*40)print(r.json())print('-'*40)r.close()
Requests
We've written a requests-like (https://adafru.it/Kpa) library for web interfacingnamed Adafruit_CircuitPython_Requests (https://adafru.it/FpW). This library allows you to send HTTP/1.1 requestswithout "crafting" them and provides helpful methods for parsing the response from the server.
# adafruit_requests usage with an esp32spi_socketimport boardimport busiofrom digitalio import DigitalInOutimport adafruit_esp32spi.adafruit_esp32spi_socket as socket
© Adafruit Industries https://learn.adafruit.com/pyportal-philips-hue-lighting-controller Page 12 of 39
import adafruit_esp32spi.adafruit_esp32spi_socket as socketfrom adafruit_esp32spi import adafruit_esp32spiimport adafruit_requests as requests
# If you are using a board with pre-defined ESP32 Pins:esp32_cs = DigitalInOut(board.ESP_CS)esp32_ready = DigitalInOut(board.ESP_BUSY)esp32_reset = DigitalInOut(board.ESP_RESET)
# If you have an externally connected ESP32:# esp32_cs = DigitalInOut(board.D9)# esp32_ready = DigitalInOut(board.D10)# esp32_reset = DigitalInOut(board.D5)
spi = busio.SPI(board.SCK, board.MOSI, board.MISO)esp = adafruit_esp32spi.ESP_SPIcontrol(spi, esp32_cs, esp32_ready, esp32_reset)
print("Connecting to AP...")while not esp.is_connected: try: esp.connect_AP(b"MY_SSID_NAME", b"MY_SSID_PASSWORD") except RuntimeError as e: print("could not connect to AP, retrying: ", e) continueprint("Connected to", str(esp.ssid, "utf-8"), "\tRSSI:", esp.rssi)
# Initialize a requests object with a socket and esp32spi interfacerequests.set_socket(socket, esp)
TEXT_URL = "http://wifitest.adafruit.com/testwifi/index.html"JSON_GET_URL = "http://httpbin.org/get"JSON_POST_URL = "http://httpbin.org/post"
print("Fetching text from %s" % TEXT_URL)response = requests.get(TEXT_URL)print("-" * 40)
print("Text Response: ", response.text)print("-" * 40)response.close()
print("Fetching JSON data from %s" % JSON_GET_URL)response = requests.get(JSON_GET_URL)print("-" * 40)
print("JSON Response: ", response.json())print("-" * 40)response.close()
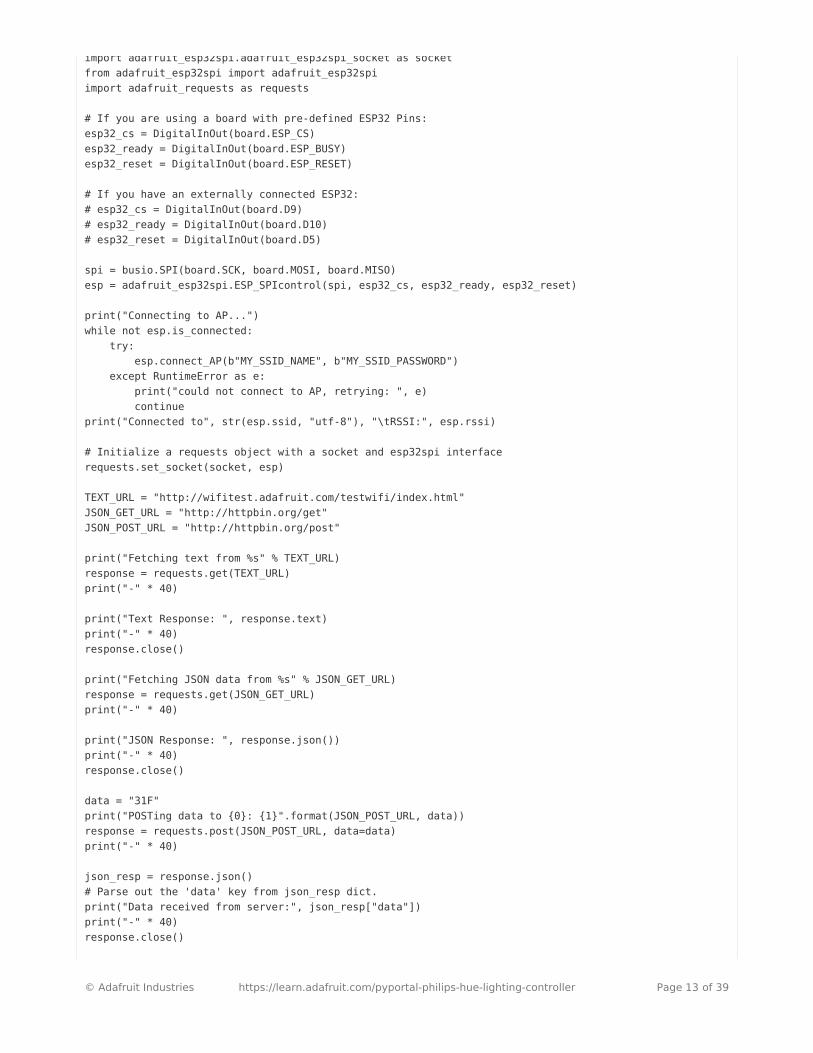
data = "31F"print("POSTing data to {0}: {1}".format(JSON_POST_URL, data))response = requests.post(JSON_POST_URL, data=data)print("-" * 40)
json_resp = response.json()# Parse out the 'data' key from json_resp dict.print("Data received from server:", json_resp["data"])print("-" * 40)response.close()
© Adafruit Industries https://learn.adafruit.com/pyportal-philips-hue-lighting-controller Page 13 of 39

json_data = {"Date": "July 25, 2019"}print("POSTing data to {0}: {1}".format(JSON_POST_URL, json_data))response = requests.post(JSON_POST_URL, json=json_data)print("-" * 40)
json_resp = response.json()# Parse out the 'json' key from json_resp dict.print("JSON Data received from server:", json_resp["json"])print("-" * 40)response.close()
The code first sets up the ESP32SPI interface. Then, it initializes a request object using an ESP32 socket and the
esp object.
import boardimport busiofrom digitalio import DigitalInOutimport adafruit_esp32spi.adafruit_esp32spi_socket as socketfrom adafruit_esp32spi import adafruit_esp32spiimport adafruit_requests as requests
# If you are using a board with pre-defined ESP32 Pins:esp32_cs = DigitalInOut(board.ESP_CS)esp32_ready = DigitalInOut(board.ESP_BUSY)esp32_reset = DigitalInOut(board.ESP_RESET)
# If you have an externally connected ESP32:# esp32_cs = DigitalInOut(board.D9)# esp32_ready = DigitalInOut(board.D10)# esp32_reset = DigitalInOut(board.D5)
spi = busio.SPI(board.SCK, board.MOSI, board.MISO)esp = adafruit_esp32spi.ESP_SPIcontrol(spi, esp32_cs, esp32_ready, esp32_reset)
print("Connecting to AP...")while not esp.is_connected: try: esp.connect_AP(b'MY_SSID_NAME', b'MY_SSID_PASSWORD') except RuntimeError as e: print("could not connect to AP, retrying: ",e) continueprint("Connected to", str(esp.ssid, 'utf-8'), "\tRSSI:", esp.rssi)
# Initialize a requests object with a socket and esp32spi interfacerequests.set_socket(socket, esp)
HTTP GET with Requests
The code makes a HTTP GET request to Adafruit's WiFi testing website- http://wifitest.adafruit.com/testwifi/index.html (https://adafru.it/FpZ).
To do this, we'll pass the URL into requests.get() . We're also going to save the response from the server into a
variable named response .
While we requested data from the server, we'd what the server responded with. Since we already saved the
© Adafruit Industries https://learn.adafruit.com/pyportal-philips-hue-lighting-controller Page 14 of 39

server's response , we can read it back. Luckily for us, requests automatically decodes the server's response into
human-readable text, you can read it back by calling response.text .
Lastly, we'll perform a bit of cleanup by calling response.close() . This closes, deletes, and collect's the response's
data.
print("Fetching text from %s"%TEXT_URL)response = requests.get(TEXT_URL)print('-'*40)
print("Text Response: ", response.text)print('-'*40)response.close()
While some servers respond with text, some respond with json-formatted data consisting of attribute–value pairs.
CircuitPython_Requests can convert a JSON-formatted response from a server into a CPython dict. object.
We can also fetch and parse json data. We'll send a HTTP get to a url we know returns a json-formatted response(instead of text data).
Then, the code calls response.json() to convert the response to a CPython dict .
print("Fetching JSON data from %s"%JSON_GET_URL)response = requests.get(JSON_GET_URL)print('-'*40)
print("JSON Response: ", response.json())print('-'*40)response.close()
HTTP POST with Requests
Requests can also POST data to a server by calling the requests.post method, passing it a data value.
data = '31F'print("POSTing data to {0}: {1}".format(JSON_POST_URL, data))response = requests.post(JSON_POST_URL, data=data)print('-'*40)
json_resp = response.json()# Parse out the 'data' key from json_resp dict.print("Data received from server:", json_resp['data'])print('-'*40)response.close()
You can also post json-formatted data to a server by passing json_data into the requests.post method.
© Adafruit Industries https://learn.adafruit.com/pyportal-philips-hue-lighting-controller Page 15 of 39

json_data = {"Date" : "July 25, 2019"}print("POSTing data to {0}: {1}".format(JSON_POST_URL, json_data))response = requests.post(JSON_POST_URL, json=json_data)print('-'*40)
json_resp = response.json()# Parse out the 'json' key from json_resp dict.print("JSON Data received from server:", json_resp['json'])print('-'*40)response.close()
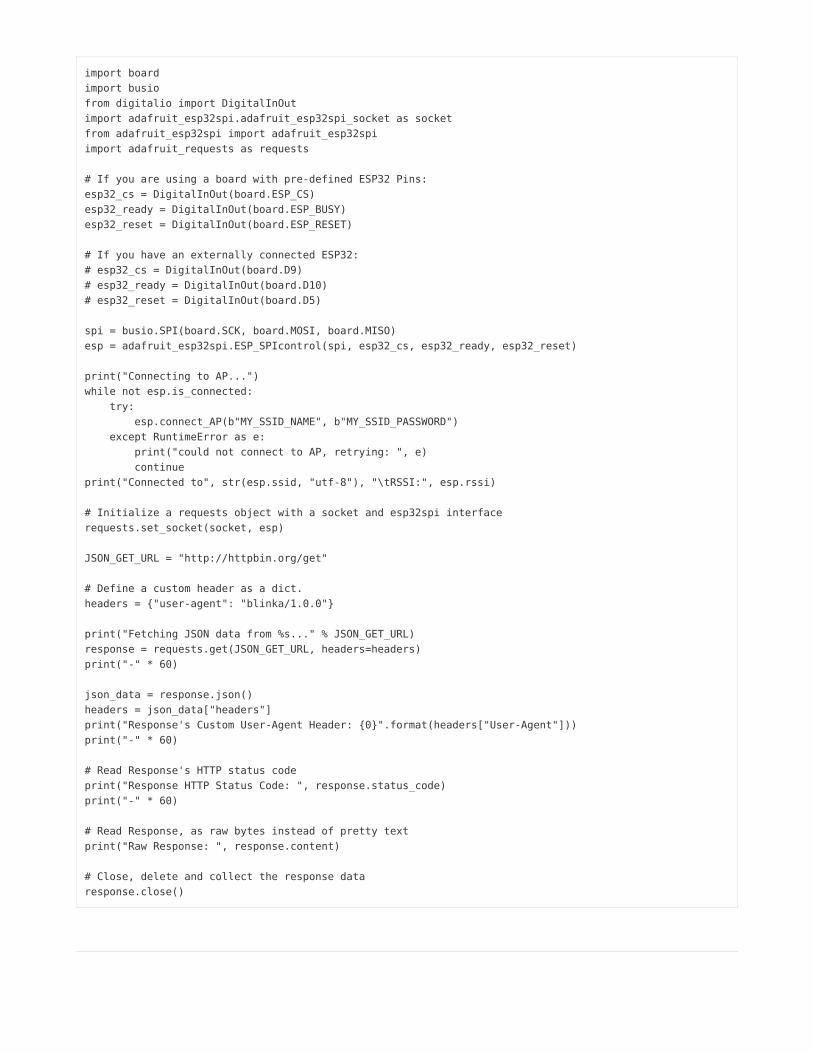
Advanced Requests Usage
Want to send custom HTTP headers, parse the response as raw bytes, or handle a response's http status code in yourCircuitPython code?
We've written an example to show advanced usage of the requests module below.
© Adafruit Industries https://learn.adafruit.com/pyportal-philips-hue-lighting-controller Page 16 of 39
import boardimport busiofrom digitalio import DigitalInOutimport adafruit_esp32spi.adafruit_esp32spi_socket as socketfrom adafruit_esp32spi import adafruit_esp32spiimport adafruit_requests as requests
# If you are using a board with pre-defined ESP32 Pins:esp32_cs = DigitalInOut(board.ESP_CS)esp32_ready = DigitalInOut(board.ESP_BUSY)esp32_reset = DigitalInOut(board.ESP_RESET)
# If you have an externally connected ESP32:# esp32_cs = DigitalInOut(board.D9)# esp32_ready = DigitalInOut(board.D10)# esp32_reset = DigitalInOut(board.D5)
spi = busio.SPI(board.SCK, board.MOSI, board.MISO)esp = adafruit_esp32spi.ESP_SPIcontrol(spi, esp32_cs, esp32_ready, esp32_reset)
print("Connecting to AP...")while not esp.is_connected: try: esp.connect_AP(b"MY_SSID_NAME", b"MY_SSID_PASSWORD") except RuntimeError as e: print("could not connect to AP, retrying: ", e) continueprint("Connected to", str(esp.ssid, "utf-8"), "\tRSSI:", esp.rssi)
# Initialize a requests object with a socket and esp32spi interfacerequests.set_socket(socket, esp)
JSON_GET_URL = "http://httpbin.org/get"
# Define a custom header as a dict.headers = {"user-agent": "blinka/1.0.0"}
print("Fetching JSON data from %s..." % JSON_GET_URL)response = requests.get(JSON_GET_URL, headers=headers)print("-" * 60)
json_data = response.json()headers = json_data["headers"]print("Response's Custom User-Agent Header: {0}".format(headers["User-Agent"]))print("-" * 60)
# Read Response's HTTP status codeprint("Response HTTP Status Code: ", response.status_code)print("-" * 60)
# Read Response, as raw bytes instead of pretty textprint("Raw Response: ", response.content)
# Close, delete and collect the response dataresponse.close()
WiFi Manager
© Adafruit Industries https://learn.adafruit.com/pyportal-philips-hue-lighting-controller Page 17 of 39

That simpletest example works but its a little finicky - you need to constantly check WiFi status and have many loops tomanage connections and disconnections. For more advanced uses, we recommend using the WiFiManager object. Itwill wrap the connection/status/requests loop for you - reconnecting if WiFi drops, resetting the ESP32 if it gets into abad state, etc.
Here's a more advanced example that shows the WiFi manager and also how to POST data with some extra headers:
import timeimport boardimport busiofrom digitalio import DigitalInOutimport neopixelfrom adafruit_esp32spi import adafruit_esp32spifrom adafruit_esp32spi import adafruit_esp32spi_wifimanager
print("ESP32 SPI webclient test")
# Get wifi details and more from a secrets.py filetry: from secrets import secretsexcept ImportError: print("WiFi secrets are kept in secrets.py, please add them there!") raise
# If you are using a board with pre-defined ESP32 Pins:esp32_cs = DigitalInOut(board.ESP_CS)esp32_ready = DigitalInOut(board.ESP_BUSY)esp32_reset = DigitalInOut(board.ESP_RESET)
# If you have an externally connected ESP32:# esp32_cs = DigitalInOut(board.D9)# esp32_ready = DigitalInOut(board.D10)# esp32_reset = DigitalInOut(board.D5)
spi = busio.SPI(board.SCK, board.MOSI, board.MISO)esp = adafruit_esp32spi.ESP_SPIcontrol(spi, esp32_cs, esp32_ready, esp32_reset)"""Use below for Most Boards"""status_light = neopixel.NeoPixel( board.NEOPIXEL, 1, brightness=0.2) # Uncomment for Most Boards"""Uncomment below for ItsyBitsy M4"""# status_light = dotstar.DotStar(board.APA102_SCK, board.APA102_MOSI, 1, brightness=0.2)# Uncomment below for an externally defined RGB LED# import adafruit_rgbled# from adafruit_esp32spi import PWMOut# RED_LED = PWMOut.PWMOut(esp, 26)# GREEN_LED = PWMOut.PWMOut(esp, 27)# BLUE_LED = PWMOut.PWMOut(esp, 25)# status_light = adafruit_rgbled.RGBLED(RED_LED, BLUE_LED, GREEN_LED)wifi = adafruit_esp32spi_wifimanager.ESPSPI_WiFiManager(esp, secrets, status_light)
counter = 0
while True: try: print("Posting data...", end="") data = counter feed = "test"
© Adafruit Industries https://learn.adafruit.com/pyportal-philips-hue-lighting-controller Page 18 of 39

payload = {"value": data} response = wifi.post( "https://io.adafruit.com/api/v2/" + secrets["aio_username"] + "/feeds/" + feed + "/data", json=payload, headers={"X-AIO-KEY": secrets["aio_key"]}, ) print(response.json()) response.close() counter = counter + 1 print("OK") except (ValueError, RuntimeError) as e: print("Failed to get data, retrying\n", e) wifi.reset() continue response = None time.sleep(15)
You'll note here we use a secrets.py file to manage our SSID info. The wifimanager is given the ESP32 object, secretsand a neopixel for status indication.
Note, you'll need to add a some additional information to your secrets file so that the code can query the Adafruit IOAPI:
aio_usernameaio_key
You can go to your adafruit.io View AIO Key link to get those two values and add them to the secrets file, which willnow look something like this:
# This file is where you keep secret settings, passwords, and tokens!# If you put them in the code you risk committing that info or sharing it
secrets = { 'ssid' : '_your_ssid_', 'password' : '_your_wifi_password_', 'timezone' : "America/Los_Angeles", # http://worldtimeapi.org/timezones 'aio_username' : '_your_aio_username_', 'aio_key' : '_your_aio_key_', }
Next, set up an Adafruit IO feed named test
If you do not know how to set up a feed, follow this page and come back when you've set up a feed namedtest . (https://adafru.it/f5k)
We can then have a simple loop for posting data to Adafruit IO without having to deal with connecting or initializing thehardware!
Take a look at your test feed on Adafruit.io and you'll see the value increase each time the CircuitPython board postsdata to it!
© Adafruit Industries https://learn.adafruit.com/pyportal-philips-hue-lighting-controller Page 19 of 39

© Adafruit Industries https://learn.adafruit.com/pyportal-philips-hue-lighting-controller Page 20 of 39

Hue BridgeSetup
CircuitPython Library Installation
First make sure you are running the latest version of Adafruit CircuitPython (https://adafru.it/Egk) for your board.
Next you'll need to install the necessary libraries to use the hardware--carefully follow the steps to find and install theselibraries from Adafruit's CircuitPython library bundle (https://adafru.it/zdx) matching your version of CircuitPython.PyPortal requires at least CircuitPython version 4.0.0.
Before continuing make sure your board's lib folder has the following files and folders copied over.
adafruit_huesimpleioadafruit_bitmap_fontadafruit_bus_deviceadafruit_buttonadafruit_display_shapesadafruit_display_textadafruit_esp32spiadafruit_touchscreenneopixel
Add CircuitPython Code and Project Assets
In the embedded code element below, click on the Download: Project Zip link, and save the .zip archive file to yourcomputer.
Then, uncompress the .zip file, it will unpack to a folder named PyPortal_Philips_Hue_Controller.
Copy the contents of the PyPortal_Philips_Hue_Controller directory to your PyPortal's CIRCUITPY drive. YourCircuitPython code file needs to be named code.py to run on startup.
"""PyPortal Philips Hue Lighting Controller
Brent Rubell for Adafruit Industries, 2019"""import boardimport displayiofrom adafruit_bitmap_font import bitmap_fontfrom adafruit_button import Buttonimport adafruit_touchscreenfrom digitalio import DigitalInOutimport busioimport neopixelfrom adafruit_esp32spi import adafruit_esp32spifrom adafruit_esp32spi import adafruit_esp32spi_wifimanager
# Import Philips Hue Bridgefrom adafruit_hue import Bridge
# Get wifi details and more from a secrets.py file
© Adafruit Industries https://learn.adafruit.com/pyportal-philips-hue-lighting-controller Page 21 of 39

# Get wifi details and more from a secrets.py filetry: from secrets import secretsexcept ImportError: print("WiFi secrets are kept in secrets.py, please add them there!") raise
# ESP32 SPIesp32_cs = DigitalInOut(board.ESP_CS)esp32_ready = DigitalInOut(board.ESP_BUSY)esp32_reset = DigitalInOut(board.ESP_RESET)spi = busio.SPI(board.SCK, board.MOSI, board.MISO)esp = adafruit_esp32spi.ESP_SPIcontrol(spi, esp32_cs, esp32_ready, esp32_reset)status_light = neopixel.NeoPixel(board.NEOPIXEL, 1, brightness=0.2)wifi = adafruit_esp32spi_wifimanager.ESPSPI_WiFiManager(esp, secrets, status_light)
# Attempt to load bridge username and IP address from secrets.pytry: username = secrets['hue_username'] bridge_ip = secrets['bridge_ip'] my_bridge = Bridge(wifi, bridge_ip, username)except: # Perform first-time bridge setup my_bridge = Bridge(wifi) print('Finding bridge address...') ip = my_bridge.discover_bridge() print('Attempting to register username, press the link button on your Hue Bridge now!') username = my_bridge.register_username() print('ADD THESE VALUES TO SECRETS.PY: \ \n\t"bridge_ip":"{0}", \ \n\t"hue_username":"{1}"'.format(ip, username)) raise
# These pins are used as both analog and digital! XL, XR and YU must be analog# and digital capable. YD just need to be digitalts = adafruit_touchscreen.Touchscreen(board.TOUCH_XL, board.TOUCH_XR, board.TOUCH_YD, board.TOUCH_YU, calibration=((5200, 59000), (5800, 57000)), size=(320, 240))
# Make the display contextbutton_group = displayio.Group(max_size=20)board.DISPLAY.show(button_group)# preload the fontprint('loading font...')font = bitmap_font.load_font("/fonts/Arial-12.bdf")glyphs = b'0123456789abcdefghijklmnopqrstuvwxyzABCDEFGHIJKLMNOPQRSTUVWXYZ-,.: 'font.load_glyphs(glyphs)# button propertiesBUTTON_WIDTH = 60BUTTON_HEIGHT = 60buttons = []
print('loading colors...')# color conversions (RGB to Philips Hue-compatible HSB)red = my_bridge.rgb_to_hsb([255, 0, 0])white = my_bridge.rgb_to_hsb([255, 255, 255])orange = my_bridge.rgb_to_hsb([255, 165, 0])yellow = my_bridge.rgb_to_hsb([255, 255, 0])
© Adafruit Industries https://learn.adafruit.com/pyportal-philips-hue-lighting-controller Page 22 of 39

green = my_bridge.rgb_to_hsb([0, 255, 0])blue = my_bridge.rgb_to_hsb([0, 0, 255])purple = my_bridge.rgb_to_hsb([128, 0, 128])pink = my_bridge.rgb_to_hsb([255, 192, 203])
hue_hsb = {'red': red, 'white': white, 'orange': orange, 'yellow': yellow, 'green': green, 'blue': blue, 'purple': purple, 'pink': pink}
print('loading buttons...')# button fill colorsbutton_colors = {'red':0xFF0000, 'white':0xFFFFFF, 'orange':0xFF9900, 'yellow':0xFFFF00, 'green':0x00FF00, 'blue':0x0000FF, 'purple':0x9900FF, 'pink': 0xFF00FF}# list of color buttons and their propertiescolor_btn = [ {'name':'red', 'pos':(15, 80), 'color':button_colors['red']}, {'name':'white', 'pos':(85, 80), 'color':button_colors['white']}, {'name':'orange', 'pos':(155, 80), 'color':button_colors['orange']}, {'name':'yellow', 'pos':(225, 80), 'color':button_colors['yellow']}, {'name':'pink', 'pos':(15, 155), 'color':button_colors['pink']}, {'name':'green', 'pos':(85, 155), 'color':button_colors['green']}, {'name':'blue', 'pos':(155, 155), 'color':button_colors['blue']}, {'name':'purple', 'pos':(225, 155), 'color':button_colors['purple']}]
# generate color buttons from color_btn listfor i in color_btn: button = Button(x=i['pos'][0], y=i['pos'][1], width=BUTTON_WIDTH, height=BUTTON_HEIGHT, name=i['name'], fill_color=i['color'], style=Button.ROUNDRECT) buttons.append(button)
# light property buttons and their propertiesprop_btn = [ {'name':'onoff', 'pos':(15, 15), 'label':'on/off'}, {'name':'up', 'pos':(75, 15), 'label':'+'}, {'name':'down', 'pos':(135, 15), 'label':'-'}, {'name':'room', 'pos':(195, 15), 'label':'room'}, {'name':'lamp', 'pos':(255, 15), 'label':'lamp'}]
# generate property buttons from prop_btn listfor i in prop_btn: button = Button(name=i['name'], x=i['pos'][0], y=i['pos'][1], width=55, height=40, label=i['label'], label_font=font, style=Button.SHADOWROUNDRECT) buttons.append(button)
# add buttons to the groupfor b in buttons: button_group.append(b.group)
# Hue Light/Group Identifiershue_lights={'lamp': 1, 'livingroom': 2}hue_selector = hue_lights['lamp']
# Default to 25% brightnesscurrent_brightness = 25
© Adafruit Industries https://learn.adafruit.com/pyportal-philips-hue-lighting-controller Page 23 of 39

current_brightness = 25
while True: touch = ts.touch_point if touch: for i, button in enumerate(buttons): if button.contains(touch): button.selected = True if button.name == 'room': hue_selector = hue_lights['livingroom'] print('Switching to ', hue_selector) elif button.name == 'lamp': hue_selector = hue_lights['lamp'] print('Switching to ', hue_selector) elif button.name == 'onoff': print('Toggling {0}...'.format(hue_selector)) my_bridge.toggle_light(int(hue_selector)) elif button.name == 'up': current_brightness += 25 print('Setting {0} brightness to {1}'.format(hue_selector, current_brightness)) my_bridge.set_light(int(hue_selector), bri=current_brightness) elif button.name == 'down': current_brightness -= 25 print('Setting {0} brightness to {1}'.format(hue_selector, current_brightness)) my_bridge.set_light(int(hue_selector), bri=current_brightness) else: print('Setting {0} color to {1}'.format(hue_selector, button.name)) my_bridge.set_light(light_id=int(hue_selector), hue=int(hue_hsb[button.name][0]), sat=int(hue_hsb[button.name][1]), bri=int(hue_hsb[button.name][2])) button.selected = False else: button.selected = False
This is what the final contents of the CIRCUITPY drive will look like:
Bridge Setup
The Hue system is built around the Hue Bridge. To communicate with the bridge, you'll need to register a uniqueusername (stored on the bridge) for the PyPortal. you'll also need the Bridge's IP address to communicate with it.
We've built the CircuitPython Hue library (https://adafru.it/Ezw) to automate the process of discovering andregistering a username with the bridge - but, you'll still need to add these values to the secrets.py file. This is a one-time setup and does not need to be repeated.
© Adafruit Industries https://learn.adafruit.com/pyportal-philips-hue-lighting-controller Page 24 of 39

This guide requires you to edit and interact with CircuitPython code. Mu is a simple code editor that works with theAdafruit CircuitPython boards. It's written in Python and works on Windows, MacOS, Linux and Raspberry Pi. The serialconsole is built right in so you get immediate feedback from your board's serial output!
Before proceeding, click the button below to install the Mu Editor. There are versions for PC, mac, and Linux.
https://adafru.it/ANO
https://adafru.it/ANO
Secrets File Setup
First, use Mu to open up a secrets.py file on your CIRCUITPY drive.
Edit the file to enter your local WiFi credentials. For help getting connected to the Internet using it, follow this guideand come back to this page when you've successfully connected to the Internet (https://adafru.it/Eao).
You can then close secrets.py, saving the updated file onto the PyPortal.
Next, open the Mu editor and open the file code.py.
For this next step, you will need to connect to the serial console using Mu (https://adafru.it/ANO) or a different terminalprogram.
Not sure how to connect to your PyPortal's REPL? Read this page here and come back to the guide once you'reconnected. (https://adafru.it/Bec)
Once connected to the PyPortal, the REPL will display that the code is searching for the bridge address using the WiFicredentials entered previously into secrets.py:
code.py output:Finding bridge address...
If the bridge address was found, the code will attempt to register a random, unique username with the bridge:
Attempting to register username, press the link button on your Hue Bridge now!
© Adafruit Industries https://learn.adafruit.com/pyportal-philips-hue-lighting-controller Page 25 of 39

�
When it prints this, you have exactly 120
seconds to press the link button on top of the Hue
Bridge.
We've found that you may need to press this
button more than once during this period to
ensure a username is successfully generated.
Once the button on top of the bridge is pressed, the code will print the bridge IP address and username to the REPL:
ADD THESE VALUES TO SECRETS.PY: "bridge_ip":"192.160.0.00", "hue_username":"UpsdCULBXvOtWXaqgeTpdAp26Np9hu43x5XjkaLX"
Modify the secrets.py file again by adding bridge_ip and hue_username from the REPL output and save the file.
Your secrets.py file should look similar to the sample below.
secrets = { 'ssid' : 'home ssid', 'password' : 'my password', 'timezone' : "America/New_York", # http://worldtimeapi.org/timezones 'bridge_ip' : '192.160.0.00', 'hue_username': 'UpsdCULBXvOtWXaqgeTpdAp26Np9hu43x5XjkaLX' }
Issues?
hue_username displaying as 'None'?
© Adafruit Industries https://learn.adafruit.com/pyportal-philips-hue-lighting-controller Page 26 of 39

If the code is returning None for the hue_username :
ADD THESE VALUES TO SECRETS.PY
"bridge_ip":"192.160.0.00",
"hue_username":"None"
Make sure that you're pressing all the way down on the button. Try tapping it multiple times during the usernamegeneration process to ensure it returns a username back to the PyPortal.
© Adafruit Industries https://learn.adafruit.com/pyportal-philips-hue-lighting-controller Page 27 of 39

� bridge_ip displaying as 'None'?
If the code is returning None for the bridge_ip :
ADD THESE VALUES TO SECRETS.PY
"bridge_ip":"None",
"hue_username":"UpsdCULBXvOtWXaqgeTpdAp26Np9hu43x5XjkaLX"
Ensure the bridge is connected to the same wireless network as the PyPortal.
© Adafruit Industries https://learn.adafruit.com/pyportal-philips-hue-lighting-controller Page 28 of 39

Done
Setting up the PyPortal with the bridge is finished! You do not need to repeat this process again unless you misplacethe randomly generated username string.
© Adafruit Industries https://learn.adafruit.com/pyportal-philips-hue-lighting-controller Page 29 of 39

Code Usage
Hue Lights Setup
Before your can control our lights with the PyPortal, we'll need to set which lights we'd like to control within the code(code.py).
Open the Philips Hue application on your phone/tablet.
Navigate to Settings->Light Setup
The number next to the light is the light identifier. You'll
be using this value in the code to refer to the light which
you're setting.
Tapping the i next to the light's name will bring up
more information about it - like which room/group
it's assigned to and the full name.
Next, you'll modify the following lines of code to correspond with the light identifier you're controlling.
If you're new to creating and editing CircuitPython code: Read through this page and come back to this guidewhen you're ready. (https://adafru.it/BlN)
For example, if you are setting up a lamp an identifier of 3 and a living room light with an identifier of 1, edit thefollowing line in code.py from:
hue_lights={'lamp': 1, 'livingroom': 2}
to
hue_lights={'lamp': 3, 'livingroom': 1}
© Adafruit Industries https://learn.adafruit.com/pyportal-philips-hue-lighting-controller Page 30 of 39

Code Usage
From the Mu Editor, click the Serial button to open the
REPL. You should see the REPL display the code's
status as it loads the interface.
Select a light by tapping the name of the light you'd like
to control. The code will default to the first light
specified within the hue_lights list.
Tap the on/off button to toggle the power of the light
you selected.
Buttons invert their color while they make a
request to the Hue Bridge. Once the request is
complete, the button changes back to its original
color.
If you're having issues with your light not
responding: Scroll down to the Diagnosing
Errors section below.
Diagnosing Errors
© Adafruit Industries https://learn.adafruit.com/pyportal-philips-hue-lighting-controller Page 31 of 39

Tapping a color button will set the light to the button's fill color.
We used the Hue library's rgb_to_hsv method to set different colors for the buttons. For more information about
this method and how the code works, navigate to the Code Walkthrough page for this guide.
© Adafruit Industries https://learn.adafruit.com/pyportal-philips-hue-lighting-controller Page 32 of 39

Code Walkthrough
Importing Libraries
import boardimport displayiofrom adafruit_bitmap_font import bitmap_fontfrom adafruit_button import Buttonimport adafruit_touchscreenfrom digitalio import DigitalInOutimport busioimport neopixelfrom adafruit_esp32spi import adafruit_esp32spifrom adafruit_esp32spi import adafruit_esp32spi_wifimanager
# Import Philips Hue Bridgefrom adafruit_hue import Bridge
The code first imports all of the libraries required to run the Smart Lighting Controller.
Note that the code imports a special adafruit_hue library. To communicate with the Hue Bridge, we wrote a
CircuitPython helper module called CircuitPython_Hue (https://adafru.it/Ezw). This module makes HTTP requests ( or,
"talks") to the Hue Bridge's IP address in order to interact with the bulbs.
For more information about how HTTP works, check out our All The Internet of Things guide on this topichere (https://adafru.it/Evy).
Configuring the PyPortal
# Get wifi details and more from a secrets.py filetry: from secrets import secretsexcept ImportError: print("WiFi secrets are kept in secrets.py, please add them there!") raise
# ESP32 SPIesp32_cs = DigitalInOut(board.ESP_CS)esp32_ready = DigitalInOut(board.ESP_BUSY)esp32_reset = DigitalInOut(board.ESP_RESET)spi = busio.SPI(board.SCK, board.MOSI, board.MISO)esp = adafruit_esp32spi.ESP_SPIcontrol(spi, esp32_cs, esp32_ready, esp32_reset)status_light = neopixel.NeoPixel(board.NEOPIXEL, 1, brightness=0.2)wifi = adafruit_esp32spi_wifimanager.ESPSPI_WiFiManager(esp, secrets, status_light)
The next chunk of code grabs information from a secrets.py file including wifi configuration. Then, it sets up theESP32's SPI connections for use with the PyPortal. The wifi object is set up here too - it's used later in the code to
communicate with the bridge.
Configuring the Hue helper module
© Adafruit Industries https://learn.adafruit.com/pyportal-philips-hue-lighting-controller Page 33 of 39

# Attempt to load bridge username and IP address from secrets.pytry: username = secrets['hue_username'] bridge_ip = secrets['bridge_ip'] my_bridge = Bridge(wifi, bridge_ip, username)except: # Perform first-time bridge setup my_bridge = Bridge(wifi) print('Finding bridge address...') ip = my_bridge.discover_bridge() print('Attempting to register username, press the link button on your Hue Bridge now!') username = my_bridge.register_username() print('ADD THESE VALUES TO SECRETS.PY: \ \n\t"bridge_ip":"{0}", \ \n\t"hue_username":"{1}"'.format(ip, username)) raise
The entire Hue system is built around the Hue Bridge. To communicate with the bridge, you'll need to register a uniqueusername (stored on the bridge) for the PyPortal. you'll also need the Bridge's IP address to communicate with it.There's a bit of a HTTP request/reply "dance" associated with this process and it's tricky.
The CircuitPython Hue library automates the process of discovering and registering a username with the bridge - but,you'll still need to add these values to the secrets.py file.
For more information about the bridge setup - read the Hue Bridge Setup page of thisguide (https://adafru.it/Ezx).
Hue Color Setup
print('loading colors...')# color conversions (RGB to Philips Hue-compatible HSB)red = my_bridge.rgb_to_hsb([255, 0, 0])white = my_bridge.rgb_to_hsb([255, 255, 255])orange = my_bridge.rgb_to_hsb([255, 165, 0])yellow = my_bridge.rgb_to_hsb([255, 255, 0])green = my_bridge.rgb_to_hsb([0, 255, 0])blue = my_bridge.rgb_to_hsb([0, 0, 255])purple = my_bridge.rgb_to_hsb([128, 0, 128])pink = my_bridge.rgb_to_hsb([255, 192, 203])
hue_hsb = {'red': red, 'white': white, 'orange': orange, 'yellow': yellow, 'green': green, 'blue': blue, 'purple': purple, 'pink': pink}
When you want to modify the light's state from within your code, you'd use the set_light method in
CircuitPython_Hue . This method mirrors Philips' set light state API endpoint (https://adafru.it/Ezy) - but it has some non
user-friendly features.
The Hue API uses HSB (Hue, Saturation, Brightness) instead of RGB (red, green, blue) values. It also does not take inbrightness percentages, or hue degrees. Instead, it takes in scaled integer values which directly relate to to thebrightness percentage or hue degrees.
To make this simpler - we added a rgb_to_hsb method within the Hue helper module. Passing a list of RGB values
© Adafruit Industries https://learn.adafruit.com/pyportal-philips-hue-lighting-controller Page 34 of 39

into this method will return a scaled HSB list.
If you wish to use RGB colors with your PyPortal Hue Controller - use this method before calling set_light to
convert and scale your colors.
Our code predefines a few colors (red, white, orange, yellow, green, blue, purple, pink) by converting them from RGBvalues to scaled HSB values. using rgb_to_hsb .
Button Setup
# Make the display contextbutton_group = displayio.Group(max_size=20)board.DISPLAY.show(button_group)# preload the fontprint('loading font...')font = bitmap_font.load_font("/fonts/Arial-12.bdf")glyphs = b'0123456789abcdefghijklmnopqrstuvwxyzABCDEFGHIJKLMNOPQRSTUVWXYZ-,.: 'font.load_glyphs(glyphs)# button propertiesBUTTON_WIDTH = 60BUTTON_HEIGHT = 60buttons = []
Before the code can create buttons, it needs to create a displayio group to hold them. Here - the code selects a font,
preloads it with glyphs, and sets button properties for BUTTON_WIDTH and BUTTON_HEIGHT .
Button Generation
© Adafruit Industries https://learn.adafruit.com/pyportal-philips-hue-lighting-controller Page 35 of 39
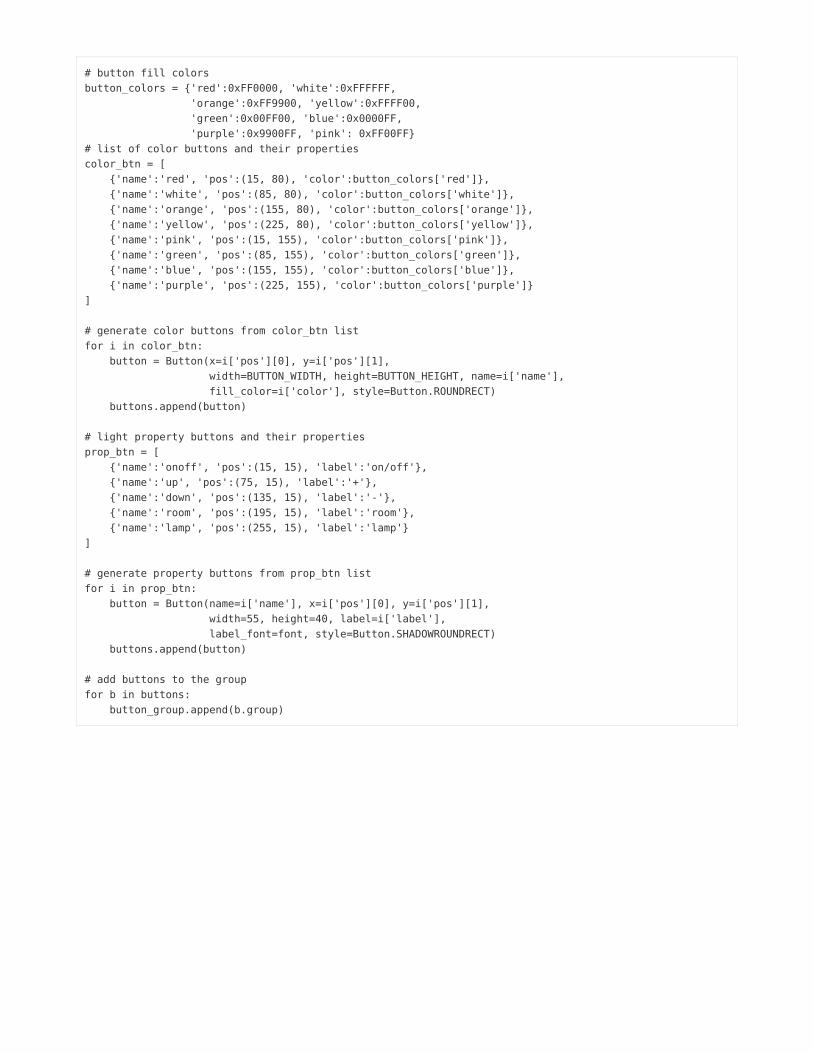
# button fill colorsbutton_colors = {'red':0xFF0000, 'white':0xFFFFFF, 'orange':0xFF9900, 'yellow':0xFFFF00, 'green':0x00FF00, 'blue':0x0000FF, 'purple':0x9900FF, 'pink': 0xFF00FF}# list of color buttons and their propertiescolor_btn = [ {'name':'red', 'pos':(15, 80), 'color':button_colors['red']}, {'name':'white', 'pos':(85, 80), 'color':button_colors['white']}, {'name':'orange', 'pos':(155, 80), 'color':button_colors['orange']}, {'name':'yellow', 'pos':(225, 80), 'color':button_colors['yellow']}, {'name':'pink', 'pos':(15, 155), 'color':button_colors['pink']}, {'name':'green', 'pos':(85, 155), 'color':button_colors['green']}, {'name':'blue', 'pos':(155, 155), 'color':button_colors['blue']}, {'name':'purple', 'pos':(225, 155), 'color':button_colors['purple']}]
# generate color buttons from color_btn listfor i in color_btn: button = Button(x=i['pos'][0], y=i['pos'][1], width=BUTTON_WIDTH, height=BUTTON_HEIGHT, name=i['name'], fill_color=i['color'], style=Button.ROUNDRECT) buttons.append(button)
# light property buttons and their propertiesprop_btn = [ {'name':'onoff', 'pos':(15, 15), 'label':'on/off'}, {'name':'up', 'pos':(75, 15), 'label':'+'}, {'name':'down', 'pos':(135, 15), 'label':'-'}, {'name':'room', 'pos':(195, 15), 'label':'room'}, {'name':'lamp', 'pos':(255, 15), 'label':'lamp'}]
# generate property buttons from prop_btn listfor i in prop_btn: button = Button(name=i['name'], x=i['pos'][0], y=i['pos'][1], width=55, height=40, label=i['label'], label_font=font, style=Button.SHADOWROUNDRECT) buttons.append(button)
# add buttons to the groupfor b in buttons: button_group.append(b.group)
The next chunk of code creates buttons for the light colors and properties.
First, a list of dictionary items is created corresponding to button properties. The color_btn list contains information for
the button such as the button's name, position on the display, and hex color value. The prop_btn list contains the
button's name, position and text label.
Then, buttons are generated from the list and appended to a button list. When all the buttons have been added to
button list, they are appended to the displayio button_group one-by-one.
Light Setup
© Adafruit Industries https://learn.adafruit.com/pyportal-philips-hue-lighting-controller Page 36 of 39

# Hue Light/Group Identifiershue_lights={'lamp': 1, 'livingroom': 2}hue_selector = hue_lights['lamp']
# Default to 25% brightnesscurrent_brightness = 25
The code sets up hue light identifiers in hue_lights and automatically selects the lamp identifier in the list. This
prevents sending the bridge a None type if a button is pressed and no light is selected. It also sets a brightness defaultof 25%.
For more information about setting up light identifiers, read the Hue Lights Setup section of this guide.To enumerate all the lights connected to the bridge, you can run the following line from your code: my_lights =my_bridge.get_lights and print the JSON response from the hue bridge: my_lights .
Main Loop
while True: touch = ts.touch_point if touch: for i, button in enumerate(buttons): if button.contains(touch): button.selected = True
The main loop checks for if the screen was touched. If it was, it searches for which button in the button list was
touched.
Once the button was determined, the button's selected property is set to True - inverting the button's color until the
action is fully performed (i.e: the light is changed, toggled, etc). By doing this, you are creating a visual status indicator.
if button.name == 'living': hue_selector = hue_lights['livingroom'] print('Switching to ', hue_selector) elif button.name == 'room': hue_selector = hue_lights['lamp'] print('Switching to ', hue_selector)
Then, the code checks the button's name against its function (what it does). If the button's name is lamp or room,hue_selector is toggled to the value of the button.
Whenever the code in the main loop sends data to the bridge to modify a light, it uses hue_selector to indicate the
light being modified.
elif button.name == 'onoff': print('Toggling {0}...'.format(hue_selector)) my_bridge.toggle_light(int(hue_selector))
If the on/off button is tapped, the code will toggle the state of the selected light.
The Hue Light API does not support toggling light state - we added a toggle_light method into the
© Adafruit Industries https://learn.adafruit.com/pyportal-philips-hue-lighting-controller Page 37 of 39

CircuitPython_Hue library to get the current state of the light , toggle it, and call set_light with the toggled state
of the light..
elif button.name == 'up': current_brightness += 25 print('Setting {0} brightness to {1}'.format(hue_selector, current_brightness)) my_bridge.set_light(int(hue_selector), bri=current_brightness)elif button.name == 'down': current_brightness -= 25 print('Setting {0} brightness to {1}'.format(hue_selector, current_brightness)) my_bridge.set_light(int(hue_selector), bri=current_brightness)
When either of the brightness buttons are pressed, they'll modify the value of current_brightness by +/-25% and send
that value to the bridge using set_light .
else: print('Setting {0} color to {1}'.format(hue_selector, button.name)) my_bridge.set_light(light_id=int(hue_selector), hue=int(hue_hsb[button.name][0]), sat=int(hue_hsb[button.name][1]), bri=int(hue_hsb[button.name][2]))button.selected = False
If any of the color buttons are pressed, the color's hue, saturation, and brightness values are individually passed intoset_light along with the light ( hue_selector ).
Since the code is finished processing the action, the button's fill is set to its original color by de-selecting the button( button.selected = False ).
Going further!
This guide has only scratched the surface of the Philips Hue API! We've detailed out a good amount of the API actionswithin the Adafruit_CircuitPython_Hue (https://adafru.it/Ezw) library, like discovering new bulbs or setting a scene.
If you didn't see the API action you were looking for, feel free to add it to the library. You may find it useful to readthrough the library and the API reference in different tabs, and cross-referencing them (Docs are here, you'll need tocreate an account (https://adafru.it/Ezz))
If you end up adding a feature to the library - pull requests on the GitHub repository are appreciated!
If you are not sure how to create a pull request, Kattni has a fantastic guide about contributing to CircuitPythonusing GitHub (https://adafru.it/EvC).
© Adafruit Industries https://learn.adafruit.com/pyportal-philips-hue-lighting-controller Page 38 of 39

© Adafruit Industries Last Updated: 2020-04-14 06:58:18 PM EDT Page 39 of 39