Embed Size (px)
Citation preview
USER GUIDE
Introduction 1
Safety 2
PunchLok® II System 5
PunchLok® II Tool 6
Auxiliary Equipment 8
PunchLok® II Tool Operation 12
VSC2 Inspection 15
Contact Information 16
TAB
LE
OF
CO
NT
EN
TS

PL2UG-V1.0 1
INTRODUCTION
The PunchLok II tool is a hand-held, pneumatically-operated tool that joins sidelaps of PunchLok IIsystem roof and floor deck.
All PunchLok II tool users (including employers oftool users and employees) must comply with allsafety rules in this manual, all product guidelines forthe tool and for the PunchLok II system roof andfloor decks being installed, as well as with general“good practice” safety rules not included in themanual.
As with the use of any power equipment, the failureto use the PunchLok II tool in accordance with allguidelines and safety procedures may result ininjury to the operator or others. Employers areresponsible for enforcing compliance with all safetyrules, warnings, and instructions which accompanythis tool as shipped.
This manual must be available to all people who usethe tool and employers shall be responsible forensuring that employees who use the tool areaware of the proper and safe method of operation,prohibitions and restrictions on use of the tool, andthe possible consequences which could result fromimproper use. The employer is also responsible forensuring that individuals who use the tool are fullyqualified for the task.

2 PL2UG-V1.0
SAFETY
Read and understand all safety proceduresbefore using the tool.
Always use personal protective equipmentincluding safety eyeglasses with side shields,steel toe boots, and hearing protection whenusing the tool.
Always stay alert and use common sense whenoperating a powered tool. Do not use the tool ifyou are tired or under the influence of drugs,alcohol, or medication. Avoid distractions andother people who may be distracting you whileoperating the tool.
Always keep hands and body parts away fromactuator arms, blades or other moving parts toavoid possible injury during operation.
Always keep tool blades pointed away from you,others, and obstructions when connecting air tothe tool.
Never use a tool, air hose, or other equipmentthat leaks air or needs repair.
Always remove finger from trigger when not inoperation.
WARNING – Personal Injury!
For personal safety, and properoperation, read and understandthese ins t ruc t ions be fo reoperating the tool.
PL2UG-V1.0 3
SAFETY (CONTINUED)
Always assume the tool is connected to an airsource and can be activated. Keep the toolpointed away from you and others. NO horseplay. Respect the tool and others workingaround you.
Use the tool as intended. Do not use the tool asa welding clamp, hammer, pry bar, or for anyother purpose for which it was not designed.
Never use oxygen, carbon dioxide, or any otherbottled gas as a power source for this tool; thetool may explode and cause injury.
Use the tool only for attaching approved Vercoand Vulcraft products and only in accordancewith installation guidelines for the tool and thoseproducts. Do not use on other surfaces ormaterials.
Do not use the tool over other areas such asend laps, welds or weld splatter, pins, or shearstuds.
Always place yourself in a firmly balanced andsecured position when using or handling thetool. Never use the tool in unauthorized areas orcontrary to guidelines and instructions for use ofthe tool or for the PunchLok II system roof andfloor decks being installed.
Never force the tool or use improper pressures,procedures or equipment.
Be aware of your position. Do not use onunsecured material.
When using the tool on elevated surfaces, all fallprotection or restraining requirements must befollowed and utilized.

4 PL2UG-V1.0
SAFETY (CONTINUED)
Disconnect air from the tool before lubricating;leaving the work area, moving the tool toanother location, or handling the tool in amanner not associated with installation ofPunchLok II system roof and floor decks.
Do not wear loose fitting or flowing clothes whileusing the tool.
Make sure all bolts, nuts or hoses are properlyconnected prior to use. Inspect the tool for freemovements of components. Never use the tool ifparts are missing or the tool is not functioningproperly.
All tools must be placed in a secure and safearea when no t i n use such tha t anyunauthorized or untrained persons cannot useor operate the tool.
Never modify, change, adjust or tamper with thetool. For concerns relating to the operation and/or functions of the tool, notify your Verco orVulcraft representative prior to using the tool.

PL2UG-V1.0 5
PUNCHLOK® II SYSTEM
When used properly, the PunchLok II tool creates apositive connection between the male and femalelips (edges) of the deck by first clinching the sheetstogether, then shearing between the 3 buttress jawswith 2 cutt ing jaws. The 2 cutt ing jaws thenpermanently offset the male and female layers ofmaterial. The connection made by the PunchLok IItool is referred to as a VSC2 (Verco or VulcraftSidelap Connection 2).
The PunchLok II system has been designed andtested to connect the sidelaps of these products,secur ing them from vert ica l and hor izonta lmovement. The PunchLok II tool is to be used onlyon the following properly labeled PunchLok decks:
VERCO® DECKING
Roof Deck: PLB, PLN3, PLN and all related cellularand acoustic deck profiles.
Floor Deck: PLB FORMLOK, PLN3 FORMLOK,PLN FORMLOK, PLW2 FORMLOK, PLW3FORMLOK and all related cellular and acousticdeck profiles.
VULCRAFT ® DECKING
Roof Deck: 1.5PLB, 3.0PLN and all related cellulardeck profiles.
Floor Deck: 1.5PLVLI, 2.0PLVLI, 3.0PLVLI and allrelated cellular and acoustic deck profiles.

6 PL2UG-V1.0
The design of the PunchLok II system maximizesthe speed and efficiency of deck installation. Manyfactors can affect the speed and efficiency of deckinstallation, including:
Properly trained and safe operators.
Proper equipment that is maintained and ingood working condition.
Job site conditions.
Weather related conditions.
Do not use the tool on other surfaces ormaterials or contrary to the guidelines in thisUser Guide. The tool is only intended for makingsidelap connections.
PUNCHLOK® II TOOL
The PunchLok II tool has been manufactured byVerco Decking, Inc. exclusively for use with theVerco and Vulcraft PunchLok II system. It weighsapproximately 50 pounds and is 38" tall, 17" wide(handles) and 10" deep (air pod).
The air pod has a pressure relief valve. This is asafety mechanism that will not allow the tool tooperate safely above required pounds per squareinch (psi). If the air pod pressure is higher than theallowable psi, the pressure relief valve releases theexcess pressure. Do not remove or tamper with thevalve.
Note: The tool is manufactured and tested formaking sidelap connections only on properlylabeled Verco Decking, Inc. and Vulcraft deckpanels.
PL2UG-V1.0 7
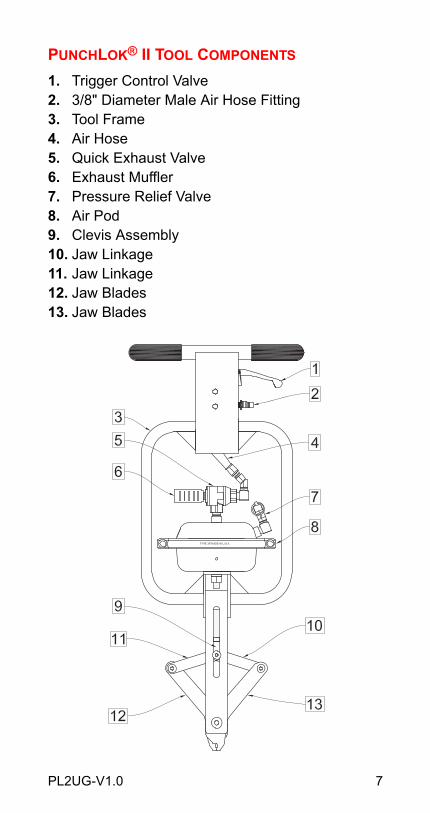
PUNCHLOK® II TOOL COMPONENTS
1. Trigger Control Valve 2. 3/8" Diameter Male Air Hose Fitting3. Tool Frame4. Air Hose5. Quick Exhaust Valve6. Exhaust Muffler7. Pressure Relief Valve8. Air Pod9. Clevis Assembly10. Jaw Linkage11. Jaw Linkage12. Jaw Blades13. Jaw Blades

8 PL2UG-V1.0
AUXILIARY EQUIPMENT
The PunchLok II tool is to be operated only withclean, dry, regulated compressed air delivered atthe recommended pressure. Performance of thetool depends on selection, maintenance, and use ofthe equipment identified in this section whilefollowing proper safety and operating procedures.Neither Verco nor Vulcraft are responsible forproblems arising from the tool operator’s choice ofauxiliary equipment or failure to use auxiliaryequipment properly. The following considerationsare not intended to be an exhaustive list, and thetool operator must independently determinewhether other considerations apply to the choiceand use of auxiliary equipment.
AIR COMPRESSOR
The tool’s cycle time is directly related to the volumerating (cfm) of the air compressor at the operatingpressure (psi), stated as cfm @ psi.
Note that the air pressure measured at the aircompressor may be greater than the air pressuremeasured at the tool. This loss of pressure istypically caused by several factors, including:
Length of air hose
Air hose diameter
Splices or leaks in air hose
Leaks at hose connections
Tool production rates depend on the operator aswell as the compressor and gage of deck. Setuptime, breaks and lunches, job conditions, andweather will affect the overall daily production rateof the PunchLok II tool.

PL2UG-V1.0 9
Air compressors with a maximum pressure of 175psi and a volume rating of 25 cfm have beensuccessfully used, handling many jobsite conditions.
The recommended minimum air pressure required atthe tool is as follows for the appropriate deck gage:
The air compressor tank must be of sufficient size tocarry a reserve at all times so the compressor isoperating within its rated duty cycle. Tool operatorsare responsible for ensuring that the compressortank is adequately sized.
In cold weather, an air dryer may be required on thecompressor to inhibit condensation in the air hosewhich may cause freezing at the tool’s exhaustvalve.
Deck Gage Minimum Pressure@ Tool
22 ga. 40 psi
20 ga. 50 psi
18 ga. 70 psi
16 ga. 90 psi

10 PL2UG-V1.0
Air compressors must be properly equipped for safeand efficient operation:
Always ensure that air lines are fully connectedbefore applying air pressure.
Never disconnect safety devices on equipmentor tool that allows for the operation of the tool athigher air pressures.
Air hoses must be rated for the proper airpressure: the pressure at which the tool isoperated or 150% of the maximum pressureproduced by the compressor, whichever ishigher.
The compressor and auxiliary tanks must beapproved, tested and/or certified as required bystate law. They must be designed to carry therequired operating pressure.
All pressure regulators, bypass valves, and reliefvalves must be appropriate for the system andin good operating condition.
Never operate a system with air leaks or otherdefects.
WARNING – Drain your tank!
Air compressor tanks and hosesshou ld be d ra ined da i l y.Condensation in the tank andhoses reduces tool performanceand may cause tool damage.

PL2UG-V1.0 11
AIR HOSE
Use a minimum 1/2" (inside diameter) air hose. It isrecommended that the air hose have no splices assplices typically cause loss of air pressure. If airhose splices must be used, compression fittings arerecommended to reduce pressure loss. ThePunchLok I I tool is f i t ted with a 3/8" quick-disconnect male compression fitting. The femalefitt ing should be attached to the hose with acompression fitting to ensure uninterrupted air flow.Compression fittings should be used on each end ofthe hose that connects the tank to the tool.
AUXILIARY TANK
In some cases, the use of an auxiliary tank willoptimize performance. The need for an auxiliarytank is influenced by the size of the air compressor,the length of the hose and how many tools arebeing powered by the same compressor. If required,select an auxiliary tank with sufficient volume tosupply the tool for the intended production rate.
Note: The longer the air hose, the more thepressure will drop between the compressor andthe tool.

12 PL2UG-V1.0
PUNCHLOK® TOOL OPERATION
The PunchLok II tool has been designed to connectthe sidelaps of specific, properly labeled VERCOand VULCRAFT deck panels as previouslyidentified. It should never be used with otherproducts.
PREPARATION
1. Before operating the tool, perform a visualinspection of the tool. Look for:
Loose bolts
Bent parts
Missing parts
Cracks in frame or components
Other equipment problems
If any defects are noted, notify Verco Decking, Inc.or Vulcraft Customer Service Department beforeusing tool.
2. Clear work area of all tools, constructionmaterials, and other debris.
3. Identify and eliminate any other conditions thatmight adversely affect the use and operation ofthe tool.
4. Connect air hose to the tool and ensure that thetool is receiving the proper air pressure.

PL2UG-V1.0 13
MAINTENANCE
Lubricate the tool at the beginning of work shift orevery 4 production hours as follows:
1. Disconnect air hose from the tool and actuatetrigger 2 times to ensure there is no built up airpressure in the tool to prevent accidentalactivation while lubricating.
2. Lubricate at pointsA through D wi thl igh t mach ine o i lsuch as 3-In-One®
Multi-Purpose Oil orMarvel Mystery Oil.
3. Clean work area andproperly dispose ofwaste.
OPERATION
Important: When making VSC2 connections, bealert to your surroundings and to others working inyour area.
Never place VSC2 over end laps of deck; thiswill damage tool.
Never place VSC2 adjacent to puddle welds,pins or shear studs located over supports; thiswill damage tool.
Use the tool only for connecting sidelaps betweensupports. Never use the tool on other surfaces ormaterials. Doing so could result in bodily injury ordamage to the tool.
Wear proper personal protective equipment andclothing at all times.

14 PL2UG-V1.0
CONNECTING SIDELAPS
Connect deck sidelaps with VSC2 using thefollowing procedure:
1. Straddle deck seam and lower the tool onto deckseam area.
Note: Make sure that the male leg is fullyengaged into the female leg. Distributing yourbody weight slightly more to the female side jointof the deck will help ensure the male leg is fullyengaged.
2. Hold the tool upright and perpendicular to decking.
3. Pull and hold trigger until cutting jaws shear allthree layers of metal and stop moving. Often theuser will feel or hear a distinctive “click” whenthe punching operation is completed.
4. While releasing trigger, slightly twist the tool, thiswill help the jaws disengage.
5. Once disengaged, move the tool to next VSC2location and repeat.
6. Lubricate every 4 production hours.
WARNING – Tool Damage!
Do not use or store the tool nearareas where welding is beingperformed. Do not let the toolcontact l ive weld ing rod orwelding lead. Doing so wi l ldamage the tool and could resultin bodily injury.

PL2UG-V1.0 15
VSC2 INSPECTION
An acceptable VSC2 has been made when thesidelap material has been sheared and offset so thesheared surface of the male leg is visible.
1. VSC2
2. Sheared surface of male leg.
3. Sheared surface of female leg.
4. Male leg / sheet
5. Female leg / sheet
Note: The VSC2 may be made f rom e i therdirection.
WARNING – Tool Damage!
Jerk ing tool to f ree lodgedcutting jaws may damage tool ordecking and could cause injuryto the operator and others in thearea. Do not leave tool in uprightposit ion wi th jaws engagedin VSC2.

16 PL2UG-V1.0
THIS MANUAL IS INTENDED SOLELYFOR INSTRUCTIONAL PURPOSES. NOWARRANTIES, E ITHER EXPRESSED ORIMPLIED ARE INTENDED TO ARISE OUT OFTHIS MANUAL. USE OF THE PUNCHLOK® IITOOL IS SUBJECT TO THE TERMS ANDCONDITIONS OF THE THEN CURRENTPUNCHLOK® II TOOL SECURITY AND DEPOSITAGREEMENT.
CONTACT INFORMATION
If you have questions or concerns regarding theproper use of this tool, please contact your Verco orVulcraft Customer Service Representative.
Verco Decking, Inc. VulcraftCustomer Service Customer Service(602) 272-1347 (256) 845-2460
PUNCHLOK® II SYSTEM TERRITORY MAP
The PunchLok II tool is the subject of U.S. Patent Nos.6,212,932 and 8,667,656. VERCO® and PUNCHLOK® areregistered trademarks of Verco Decking, Inc. VULCRAFT® is aregistered trademark of NUCOR Corporation. PLB™, PLN3™,PLN™, and FORMLOK™ are trademarks of Verco Decking, Inc.1.5PLB™, 3.0PLN™, 1.5PLVLI™, 2.0PLVLI™, and 3.0PLVLI™are trademarks of NUCOR Corporation.

NOTES