Embed Size (px)
Citation preview

Published by Icon Time Systems
A subsidiary of EPM Digital Systems, Inc. Portland, Oregon
All rights reserved

Table of Contents
CHAPTER 1 - INTRODUCTION TO JOB COSTING FOR TIMESOURCE ® ..............................1-1
CHAPTER 2 - INSTALLING THE TIMESOURCE JOB COSTING MODULE.............................2-2 Activating Job Costing in TimeSource ............................................................................................2-2 Setting up Data Fields....................................................................................................................2-2
CHAPTER 3 – MANAGING YOUR JOBS........................................................................................3-1 Adding Jobs...................................................................................................................................3-1 Using Job Memos...........................................................................................................................3-2
CHAPTER 4 - MATERIAL TRACKING..........................................................................................4-1
CHAPTER 5 - ROSTER REPORTS...................................................................................................5-1
CHAPTER 6 - JOB COST REPORTS ...............................................................................................6-1
CHAPTER 7 - SAMPLE REPORTS..................................................................................................7-1

1-1
Now you may add Job costing to Icon Time Systems popular TimeSource Time and Attendance software. Compatible with TimeSource Full or Lite, version 5.00 and later, job costing is written in Microsoft’s Access and offers these outstanding features: Job Numbers Select up to 9 digits! Employees are prompted to confirm each job number,
accuracy is ensured.
Tasks User definable, your third level of labor tracking. Define this field as a cost center or type of work being performed on each job. Assign an hourly value for the task and it will be added to the employee’s hourly rate for accurate costing.
Piece counts Select this feature in lieu of tasks, track true quantities produced, no more guessing! Simplifies tracking bonus payments, quotas, etc.
Material handling
Include the cost and quantity of materials used in your jobs. Manual entry at the PC allows you to add these all-important costs anytime during a job’s progress.
Estimates Enter your estimates for labor and material and TimeSource’s job costing module will tell you if you’re ahead or behind schedule, by percentage, anytime!
Reports The very heart of TimeSource, the job-costing module employs the same reporting parameters to produce a comprehensive variety of reports. Limited only to the reporting scale of your particular TimeSource version, the dynamics of these powerful reports will enable your management team to make real-time decisions.
Easy to use Like all ICON products, job costing is user friendly. Employees are prompted to enter job numbers, tasks, or piece counts automatically. Additional prompts to confirm values entered mean fewer mistakes, ensuring accuracy.
Non-priority Job setup
With this feature your employees may enter new job numbers before you have installed them in the system. Then, when it is convenient your system administrator can enter the new jobs. Whenever TimeSource detects new job data it automatically assigns it to the correct job or flags it with the warning symbol W. This is posted to the exception report and is treated the same as any other exception. Editing is accomplished at the punch-editing screen.
Chapter 1 - Introduction to Job costing for TimeSource ®
2-2
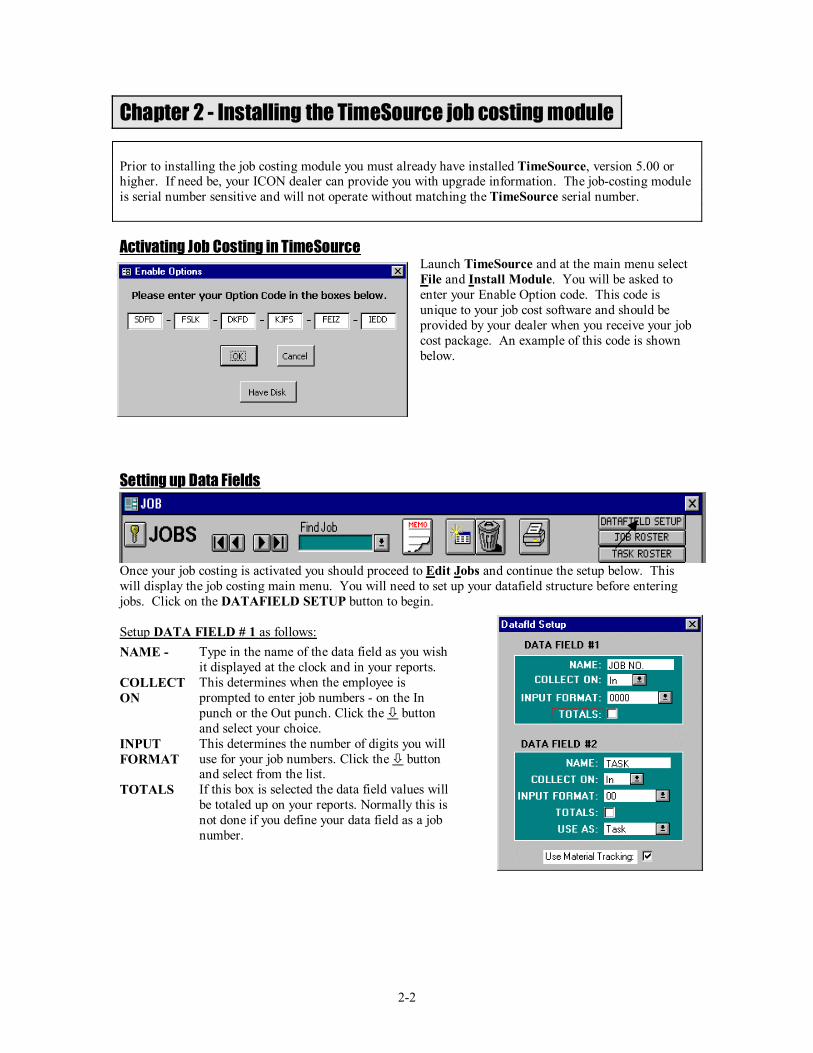
Prior to installing the job costing module you must already have installed TimeSource, version 5.00 or higher. If need be, your ICON dealer can provide you with upgrade information. The job-costing module is serial number sensitive and will not operate without matching the TimeSource serial number. Activating Job Costing in TimeSource
Launch TimeSource and at the main menu select File and Install Module. You will be asked to enter your Enable Option code. This code is unique to your job cost software and should be provided by your dealer when you receive your job cost package. An example of this code is shown below.
Setting up Data Fields
Once your job costing is activated you should proceed to Edit Jobs and continue the setup below. This will display the job costing main menu. You will need to set up your datafield structure before entering jobs. Click on the DATAFIELD SETUP button to begin. Setup DATA FIELD # 1 as follows:
Chapter 2 - Installing the TimeSource job costing module
NAME - Type in the name of the data field as you wish it displayed at the clock and in your reports.
COLLECT ON
This determines when the employee is prompted to enter job numbers - on the In punch or the Out punch. Click the ò button and select your choice.
INPUT FORMAT
This determines the number of digits you will use for your job numbers. Click the ò button and select from the list.
TOTALS If this box is selected the data field values will be totaled up on your reports. Normally this is not done if you define your data field as a job number.

Setup DATA FIELD #2 as follows:
NAME - Type in the name of the data field as you wish it displayed at the clock and in your reports.
COLLECT ON
This determines when the employee is prompted to enter tasks or piece counts; on the In punch or the Out punch. Click the ò button and select your choice.
INPUT FORMAT
This determines the number of digits you will use for your tasks or piece counts. Click the ò button and select from the list.
TOTALS If this box is selected the data field values will be totaled up on your reports. Normally this is used with piece counts. Select by clicking the box. x
USE AS This determines how or whether you wish to use data field #2. Click the ò button to display your choices. Task is generally used with job numbers; Quantity is used with piece count applications. Select Do Not Use if you do not require data field #2.
USE MATERIAL TRACKING
This selection determines if you will use material tracking as part of your system. With this feature you will be able to enter material estimates plus quantities and costs for each job. Data entry is at the PC, not at the clock. You may choose to activate material tracking at a later date if you do not wish to do so now. To activate this feature, click the box. x

3-1
Adding Jobs Begin by clicking the Insert Record button located at the top of the screen. This will display the Add New Job window.
Enter the job number you wish to use in the JOB# window. If you are using a PIN entry clock and do not care if job numbers are sequential, the Find One For Me button will assign one on a random basis. This feature minimizes keypad wear due to repeated use of the same numbers – 001, 002, 003, etc. When you are satisfied with the number, click the OK button to save. Note: Job numbers cannot be changed other than by deletion, so be sure you assign them correctly.
This is the basic job setup screen, shown without material tracking. We’ll go over each setup step, and then address material handling in the next section. Job Name
Enter the name of your job here. Jobs are listed alphabetically on reports, and are posted to look-up screens the same way. If you require your jobs to be listed in a numeric order, enter the number as the first part of the job name.
Active Job reports may include only active jobs if you desire. Jobs may have the active button toggled on or off, as required. Select by clicking the box. x
Task Enter the names of your tasks or cost centers here. The tasks you create will be available to all your jobs; therefore you need only enter them on the list one time. The ID number you assign tasks will be included on regular and job cost reports. Should an employee input an incorrect task number it will generate a W warning symbol and be treated as an exception. Corrections may be performed at the Edit Punches screen.
If you wish you may assign an hourly rate to each task. This amount will be included with the employee’s hourly rate to establish a true cost picture. Task hourly rates are not subject to
Chapter 3 – Managing your jobs

overtime rules and always charged at their established rate. Thus, if an employee were working at a rate of $10.00 per hour, plus a task rate of $25.00 per hour, the effective job cost rate would be $35.00 per hour. If the employee then qualified for overtime – fixed at 1.5 x – the effective job cost hourly rate would be $40.00. Use the arrow buttons on the right to move through your list. Deleting Tasks If you wish to delete a task you may do so. It should be noted that if you choose to delete a task that has been referenced in your database, it would cause an exception to be posted. If you wish to continue, click the OK button, if you do not, click the Cancel button.
Description Use this field to post important job data in. It is a good idea to create a general layout form
to follow for all jobs. In other words, always post the same information in the same place, that way you will find referencing information easy. Important items such as purchase order numbers, contact person’s name and telephone number, the date you established the job, etc., are typical description field entries. This is a very large field; data lines automatically wrap, allowing you to enter as much data as needed. Use the up/down arrows on your keyboard to scroll through the data.
Labor Enter your estimated cost value and the number of hours you expect the job to require.
These values may be changed anytime you need to make an adjustment. To post the Current and Budget % values, click the UPDATE$ button and the UPDATE HRS button. Each time you do so the new values will reflect any changes your system detects. These new values always refer to the estimated values to determine their percentages. For this
reason, when you leave the a job’s editing screen the Current and Budget % fields automatically clear.
Using Job Memos
Memos for each job may be recorded and later reviewed. To enter data click on the memo button at the top of the screen and type in the data. When you are finished click the OK button to exit. If you wish to include memo data on a report you must select the Job # (datafld) as level #1. You may include additional data following the Job #,
such as Task for level #2, etc. Note: If you do not select Job # (datafld) as level #1 the memo data will not be included in the report.

4-1
The material tracking feature is activated if you selected it under DATAFIELD SETUP. If you did not select it, go to that screen via Edit jobs and do so. You may toggle this feature on and off anytime, without loss of data. Whenever you call for a job cost report and have it enabled, material costs will be included with report.
Material handling is strictly a manual entry feature and is maintained in the Edit jobs section of TimeSource. Setup each field as follows: Material Enter your estimated material costs in this field. As in labor, material costs follow the same
rules with one exception: It is not necessary to update material costs; updates occur automatically. Each time you make a new entry the Current and Budget % fields are recalculated and posted. As in labor, if you change the estimated values, either up or down, the Current and Budget % fields will reflect the new value.
Date Enter the date you used the material. This date will be printed on reports.
Item Enter a brief description of the material – part number, etc. Note: once you have entered an item it is automatically saved to a materials database. This allows you to recall materials instead of re-entering each time. To recall the list click on the arrow at the right end of the Item field. Double click the item you wish to select.
Quantity Enter the quantity of the item used. This field may be changed as needed; the new value will be reflected in the total cost field.
Unit Enter the unit of measure for the item; ea., doz., gal., ft., etc.
Unit Cost Enter the cost of each unit.
Total Cost
This field is automatically updated each time you change either the unit cost or quantity field values. Values may be increased or reduced to reflect changes in your job requirements.
Chapter 4 - Material Tracking

5-1
You may obtain a roster report, or list, of jobs and tasks currently installed in your system. Click on either button located on the tool bar and the roster will be displayed. If you wish to print the report, click on the printer icon.
Chapter 5 - Roster reports

6-1
TimeSource job costing provides two separate avenues to obtaining job cost information: Time &Attendance reports
These reports are enhanced to include all jobs, individual jobs, active or inactive, and tasks, all or individual. With these reports you may answer questions such as “Who worked on job #1234 last pay period?”, or “Which jobs did Fred work on yesterday?”, etc. Another might be “What did each department’s labor cost for job #1212 last month, and what were the total costs?” All of these and more may be answered by the standard reports available. Standard reports are configured to print in the default portrait style. Labor costs include employee’s wages only.
Job cost reports Use this report when the job or task is of primary importance, and material costs may be included. Distribution of labor is posted to demonstrate a cost picture easily understood. The format of the report is unique to job costing, however you may define the time & date range and choose whom to include, sorted by class, etc. You may also select the order in which the report is organized; in other words, you may be most interested in departments, then employees, then tasks, etc. Additionally, each of the ordered selections may be totaled. Labor costs include the hourly rate of the tasks added to the employee’s wages.
Chapter 6 - Job cost reports

7-1
The following reports illustrate a few of the many forms you may choose from. Keep in mind reports will vary as you change parameters, therefore if you like a particular format you should assign it a name and save it.
Chapter 7 - Sample Reports
What jobs did this employee work on last pay period and how much did his labor cost? Report Setup: · Type - employee · Time Frame - last pay period · Employee - selected employee by name · Department – All · Sort Field – None · Job. No. – All · Details - selected · Show wages - selected

Who worked on ABC Iron Works last pay period and what did employee labor cost? Report Setup: · Type - employee · Time Frame – last pay period · Employee – All · Department – All · Sort Field – None · Job No. - selected name - ABC Iron Works · Summary selected · Show wages – selected

Note: This job cost report is normally printed in the “Landscape” format. It has been reformatted to “Portrait” for display purposes only.
What is the status on job # 1212 – Fred’s Trucking. Include material plus a summary of task labor & costs. Report Setup: · Type – Job Cost · Time Frame – custom – begin date to current date · Employee – All · Department – All · Sort field – None · Job No. – selected by job name – Fred’s Trucking · Task – All · Summary - selected · Show wages – selected · Ordered by #1 – Job – Total selected · Ordered by #2 – Task – Total selected

Note: This job cost report is normally printed in the “Landscape” format. It has been reformatted to “Portrait” for display purposes only.
What jobs were worked on yesterday, how much time was spent on each one, and what did the labor cost – include task labor. Report Setup: · Type – Job Cost · Time Frame – Yesterday · Employee – All · Department – All · Sort field – None · Job No. – All · Task – All · Summary – selected · Show wages – selected · Ordered by #1 – Job No.


![Untitled-5 [] · 2020. 9. 15. · AMMETER EPM-4A 1 EPM-4C / EPM-4D / EPM-4P EPM-4D (Ammeter with Demand) : EPM-4D is designed to measure RMS value of AC current which flows from the](https://img.pdfslide.us/doc/110x75/60389b94586a40652f159b94/untitled-5-2020-9-15-ammeter-epm-4a-1-epm-4c-epm-4d-epm-4p-epm-4d-ammeter.jpg)