Embed Size (px)
Citation preview

SolidWorks 2004: The Basics
A working knowledge of SolidWorks
David C. Planchard & Marie P. Planchard
SDC Schroff Development Corporation
www.schroff.com www.schroff-europe.com
PUBLICATIONS
ITEM PART NO DESCRIPTION1 44-A28 HOUSING2 99-B04 SWITCH3 44-A27 LENSCAP4 99-B03 O-RING5 99-B02 LENS 6 99-B05 BULB7 99-B01 BATTERY8 44-A26 PLATE
D&M ENGINEERING
FLASHLIGHT ASSEMBLY
INSIDE:
MultiMedia CD
An audio/visual presentation of the
tutorial projects

Copyrighted Material
Copyrighted
Material
Copyrighted Material
Copyrighted
Material
SolidWorks 2004: The Basics Introduction to Part Modeling
PAGE 1 - 1
Project 1 Introduction to Part Modeling
After completing the activities in this project, you will be able to:
• Establish a SolidWorks Session.
• Understand the SolidWorks User Interface.
• Recognize Default reference planes.
• Insert a new sketch and add sketch geometry with tools: Line, Circle, Rectangle, Tangent Arc and Centerline.
• Establish Geometric Relations, dimensions and the sketch status.
• Manipulate existing geometry with the Sketch tools: Convert, Offset, and Mirror Entities.
• Create the Extruded Boss/Base, Extruded Cut, Fillet and Chamfer features.
• Create two part templates: PART-IN-ANSI and PART-MM-ISO.
• Create two parts for the Flashlight assembly:
o BATTERY and BATTERYPLATE.

Copyrighted Material
Copyrighted
Material
Copyrighted Material
Copyrighted
Material
Introduction to Part Modeling SolidWorks 2004: The Basics
PAGE 1 - 2
Notes:

Copyrighted Material
Copyrighted
Material
Copyrighted Material
Copyrighted
Material
SolidWorks 2004: The Basics Introduction to Part Modeling
PAGE 1 - 3
Project 1 – Introduction to Part Modeling
Project Overview
SolidWorks is a 3D design software application used to model and produce parts, assemblies and drawings.
Project 1 introduces you to the SolidWorks software application and user interface.
A template is the foundation for a SolidWorks document. A Template contains settings for units, dimensioning standards and other properties. Create two part templates:
• PART-IN-ANSI.
• PART-MM-ISO.
Create two parts for the FLASHLIGHT assembly in this Project:
• BATTERY.
• BATTERYPLATE.
Parts models consist of 3D features. Features are the building blocks of a part.
A 2D sketch is required to create an Extruded feature.
Utilize the sketch geometry and sketch tools to create the following features:
• Extruded-Base.
• Extruded-Boss.
• Extruded Cut.
Utilize existing faces and edges to create the following features:
• Fillet.
• Chamfer.
BATTERY part
BATTERY-PLATE part
Flashlight Assembly
Copyrighted Material
Copyrighted
Material
Copyrighted Material
Copyrighted
Material
Introduction to Part Modeling SolidWorks 2004: The Basics
PAGE 1 - 4
File Management
File management organizes parts, assemblies, drawings and templates.
Why do you require file management? Answer: A top level assembly has hundreds or even thousands of documents that requires organization.
Utilize folders to organize projects, vendor components, templates and libraries.
Create the folders. The first folder is named SOLIDWORKS-MODELS. Create two sub-folders named MY-TEMPLATES and PROJECTS.
Activity: File Management
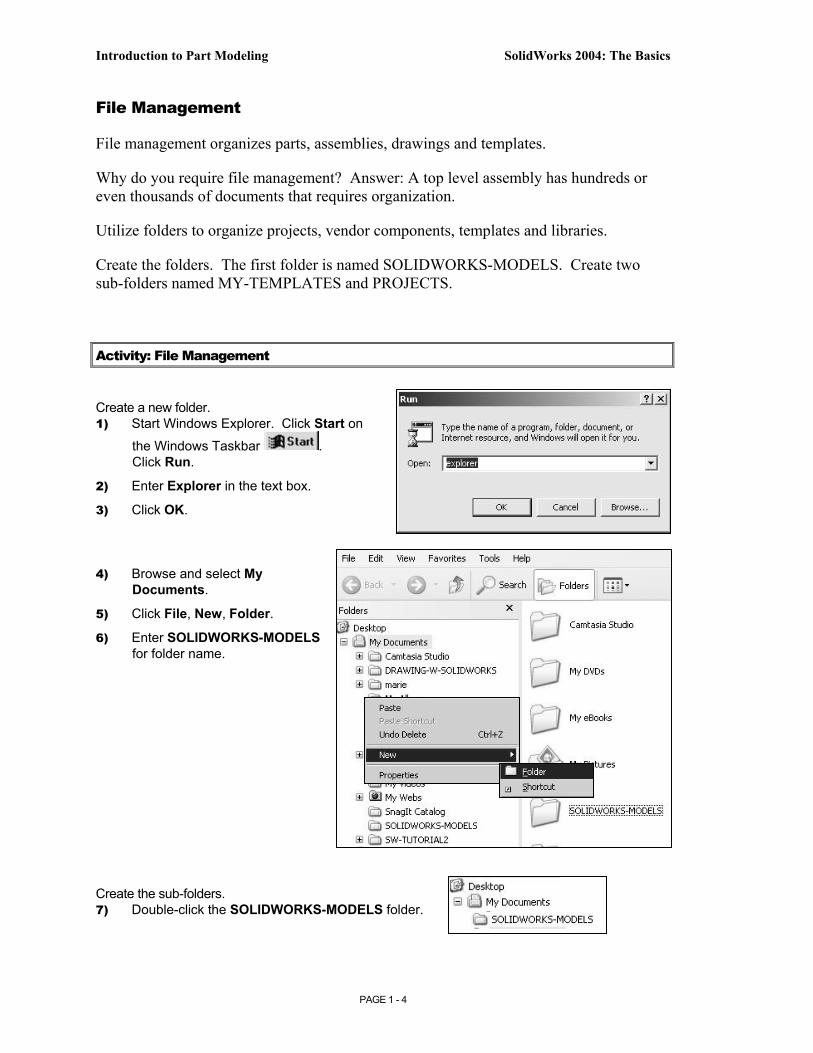
Create a new folder. 1) Start Windows Explorer. Click Start on
the Windows Taskbar . Click Run.
2) Enter Explorer in the text box.
3) Click OK.
4) Browse and select My Documents.
5) Click File, New, Folder.
6) Enter SOLIDWORKS-MODELS for folder name.
Create the sub-folders. 7) Double-click the SOLIDWORKS-MODELS folder.
Copyrighted Material
Copyrighted
Material
Copyrighted Material
Copyrighted
Material
SolidWorks 2004: The Basics Introduction to Part Modeling
PAGE 1 - 5
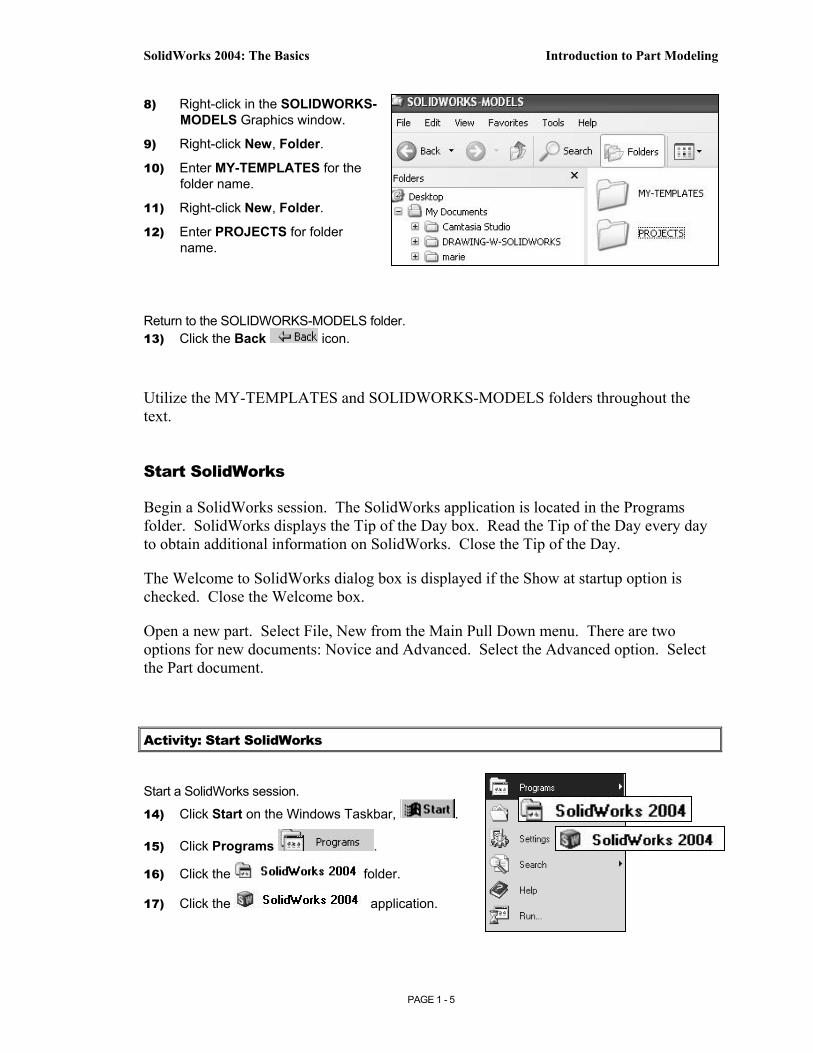
8) Right-click in the SOLIDWORKS-MODELS Graphics window.
9) Right-click New, Folder.
10) Enter MY-TEMPLATES for the folder name.
11) Right-click New, Folder.
12) Enter PROJECTS for folder name.
Return to the SOLIDWORKS-MODELS folder. 13) Click the Back icon.
Utilize the MY-TEMPLATES and SOLIDWORKS-MODELS folders throughout the text.
Start SolidWorks
Begin a SolidWorks session. The SolidWorks application is located in the Programs folder. SolidWorks displays the Tip of the Day box. Read the Tip of the Day every day to obtain additional information on SolidWorks. Close the Tip of the Day.
The Welcome to SolidWorks dialog box is displayed if the Show at startup option is checked. Close the Welcome box.
Open a new part. Select File, New from the Main Pull Down menu. There are two options for new documents: Novice and Advanced. Select the Advanced option. Select the Part document.
Activity: Start SolidWorks
Start a SolidWorks session.
14) Click Start on the Windows Taskbar, .
15) Click Programs .
16) Click the folder.
17) Click the application.

Copyrighted Material
Copyrighted
Material
Copyrighted Material
Copyrighted
Material
Introduction to Part Modeling SolidWorks 2004: The Basics
PAGE 1 - 6
18) The SolidWorks window opens. Read the Tip of the Day.
19) Click Close.
20) The Welcome to SolidWorks window is displayed. Click Close.
Create a new part. 21) Click File from the Main pull down menu.
22) Click New.
There are 2 options: Novice and Advanced.
Novice is the default option.
23) Click the Advanced button to display the New SolidWorks Document dialog box in Advanced mode.
Novice

Copyrighted Material
Copyrighted
Material
Copyrighted Material
Copyrighted
Material
SolidWorks 2004: The Basics Introduction to Part Modeling
PAGE 1 - 7
24) The Templates tab is the default tab. Part is the default template from the New SolidWorks Document dialog box. Click OK.
User Interface and CommandManager
The user interface combines the menus, toolbars and commands with graphic display and Microsoft Windows properties.
Part1 is displayed. Part1 is the new default part window name. The Main menu, Standard Toolbar, View Toolbar and CommandManager are displayed.
Advanced

Copyrighted Material
Copyrighted
Material
Copyrighted Material
Copyrighted
Material
Introduction to Part Modeling SolidWorks 2004: The Basics
PAGE 1 - 8
The CommandManager is divided into the Control Area and an expanded Toolbar. Select a Control Area icon to display the corresponding toolbar. The Features icon and Features Toolbar are selected by default in Part mode.
Select Tools from the Main pull down menu if the CommandManager is not displayed. Select Customize. Check Enable CommandManager.
The Origin is displayed in blue. The Origin represents the intersection of the Front, Top and Right planes.
The positive X-axis is horizontal and points to the right of the Origin.
The positive Y-axis is vertical and point upward in the Front view.
Locate the Feature and Sketch tools. These tools will be utilized to create the BATTERY and BATTERYPLATE parts. Display the Standard Views toolbar and Online Help documents.
Activity: CommandManager and User Interface
Maximize the window. 25) Expand the SolidWorks window to full screen. Click Maximize in the top
right hand corner of the SolidWorks window.
Control Area Sketch icon Selected
Sketch Toolbar
Control Area Feature icon Selected
Feature Toolbar
Copyrighted Material
Copyrighted
Material
Copyrighted Material
Copyrighted
Material
SolidWorks 2004: The Basics Introduction to Part Modeling
PAGE 1 - 9
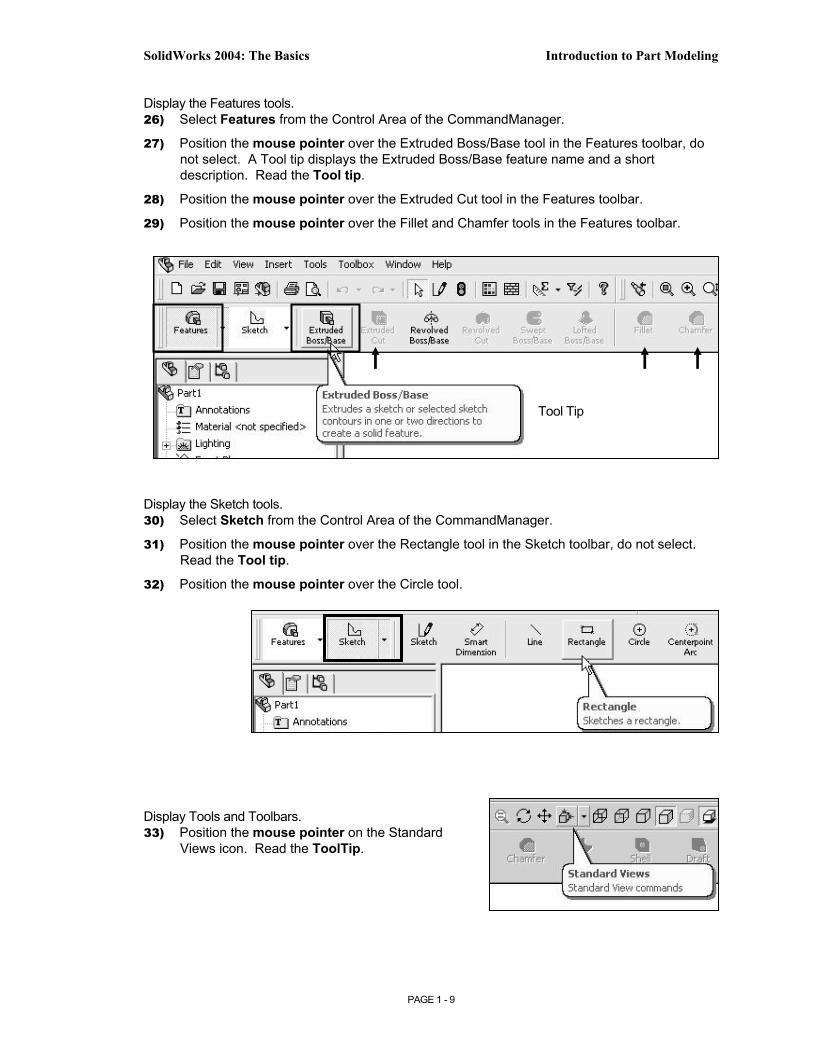
Display the Features tools. 26) Select Features from the Control Area of the CommandManager.
27) Position the mouse pointer over the Extruded Boss/Base tool in the Features toolbar, do not select. A Tool tip displays the Extruded Boss/Base feature name and a short description. Read the Tool tip.
28) Position the mouse pointer over the Extruded Cut tool in the Features toolbar.
29) Position the mouse pointer over the Fillet and Chamfer tools in the Features toolbar.
Display the Sketch tools. 30) Select Sketch from the Control Area of the CommandManager.
31) Position the mouse pointer over the Rectangle tool in the Sketch toolbar, do not select. Read the Tool tip.
32) Position the mouse pointer over the Circle tool.
Display Tools and Toolbars. 33) Position the mouse pointer on the Standard
Views icon. Read the ToolTip.
Tool Tip

Copyrighted Material
Copyrighted
Material
Copyrighted Material
Copyrighted
Material
Introduction to Part Modeling SolidWorks 2004: The Basics
PAGE 1 - 10
34) Click Standard Views from the View toolbar to list the default views. The small black arrow indicates additional information.
Display the Standard Views toolbar. 35) Right-click in the gray area to the right of
Help. Displayed toolbars are checked.
36) Check Standard Views. The Standard Views toolbar is displayed in the SolidWorks window.
37) Position the mouse pointer on the Front icon to display the Large Tool tip.
38) Click Front from the Standard Views toolbar.
39) Drag the blue Standard Views toolbar name above the CommandManager.
Display Online Help for the rectangle. 40) Click Help from the Main menu.
41) Select SolidWorks Help Topics.
42) Click the Index tab. Enter rect for rectangles.

Copyrighted Material
Copyrighted
Material
Copyrighted Material
Copyrighted
Material
SolidWorks 2004: The Basics Introduction to Part Modeling
PAGE 1 - 11
43) Click the Show Me button.
44) Click Close .
The Help menu contains the SolidWorks Online Tutorial, Introducing SolidWorks and Design Portfolio documents. These documents include additional information on using SolidWorks.
The Closer Look symbol indicates additional information about a tool or command is available from Online Help.
The rectangle Show Me button plays the steps to sketch a rectangle. The left corner of the rectangle is coincident with the Origin. You will create a rectangle centered about the Origin to build symmetry into the sketch.
Use the default Toolbar icons and the Shortcut menus throughout the text. Activate Shortcut menus with the Right Mouse Button. The Standard Main Pull down menu is referred to as the Main menu.
The Help option contains tools to assist the user.
The SolidWorks Help Topics contains:
• Contents tab containing the SolidWorks Online User’s Guide documents.
• Index tab and Search tab containing additional information on key words.
• Glossary tab containing definitions.
Introducing SolidWorks and the Design Portfolio are great Online documents for the new SolidWorks user.
The Online Tutorial contains step-by-step examples.
The What’s New Manual contains descriptions of the new functionality in SolidWorks since the last major revision.

Copyrighted Material
Copyrighted
Material
Copyrighted Material
Copyrighted
Material
Introduction to Part Modeling SolidWorks 2004: The Basics
PAGE 1 - 12
Part Template
The Part Template is the foundation for a SolidWorks part. Part1 was created with the default Part Template in the New dialog box.
Document Properties contain the default settings for the Part Template. The Document Properties include the dimensioning standard, units, dimension decimal display, grids, note font and line styles. There are hundreds of document properties. Modify the Document Properties: Dimensioning Standard, Unit and Decimal Places.
The Dimensioning Standard determines the display of dimension text, arrows, symbols and spacing.
Units are the measurement of physical quantities. Millimeter dimensioning and decimal inch dimensioning are the two most common unit types specified for engineering parts and drawings.
Document Properties are stored with the document. Apply the Document Properties to the Part Template.
Create two Part Templates: PART-IN-ANSI and PART-MM-ISO. Save the Part Templates in the MY-TEMPLATE folder.
System Options are stored in the registry of your computer. The File Locations option controls the file folder location of SolidWorks documents. Utilize the File Locations option to reference your Part Templates in the MY-TEMPLATES folder. Add the SOLIDWORKS-MODELS\MY-TEMPLATES folder path name to the Document Templates File Locations list.
Activity: Part Template
Set the Dimensioning Standard to ANSI. 45) Click Tools from the Main menu.
46) Click Options.
47) Click the Document Properties Tab.
48) Select ANSI from the Dimensioning Standard list box.

Copyrighted Material
Copyrighted
Material
Copyrighted Material
Copyrighted
Material
SolidWorks 2004: The Basics Introduction to Part Modeling
PAGE 1 - 13
Set the part units for inch. 49) Click Units. Select
IPS for Unit System.
50) Select 3 for Length units Decimal places.
51) Select 0 for Angular units Decimal places.
52) Click OK.
Set the Grid/Snap option. 53) Click Grid/Snap.
54) Uncheck the Snap options.
Save the Part Template. 55) Click File from the Main
menu.
56) Click Save As.
57) Click Part Templates (*.prtdot) from the Save As type list box.
58) Select My Documents/SOLIDWORKS-MODELS/MY-TEMPLATES from the Save in list.
59) Enter PART-IN-ANSI in the File name text box.
60) Click Save.
Set the Dimensioning Standard to ISO. 61) Click Tools from the Main menu.
62) Click Options.
63) Click the Document Properties Tab.
64) Select ISO from the Dimensioning Standard list box.

Copyrighted Material
Copyrighted
Material
Copyrighted Material
Copyrighted
Material
Introduction to Part Modeling SolidWorks 2004: The Basics
PAGE 1 - 14
Set the part units for millimeter. 65) Click Units.
66) Select MMGS for Unit System.
67) Select 2 for Length units Decimal places.
68) Select 0 for Angular units Decimal places.
69) Click OK to set the document units.
Save the Part Template. 70) Click File from the Main menu.
71) Click Save As.
72) Click Part Templates (*.prtdot) from the Save As type list box.
73) Select My Documents/SOLIDWORKS-MODELS/MY-TEMPLATES from the Save in list.
74) Enter PART-MM-ISO in the File name text box.
75) Click Save.
Set the System Options. 76) Click Tools,
Options.
77) Click File Locations from the System Options tab.
78) Select Document Templates from Show folders for.
79) Click the Add button.
80) Select the MY-TEMPLATES folder.
81) Click OK from Browse for Folder.
82) Click OK from System Options.
Close All documents 83) Click Windows,
Close All.

Copyrighted Material
Copyrighted
Material
Copyrighted Material
Copyrighted
Material
SolidWorks 2004: The Basics Introduction to Part Modeling
PAGE 1 - 15
Display the MY-TEMPLATES folder and templates.
84) Click File, New .
85) Click the MY-TEMPLATES tab.
86) Click Cancel.
Each folder listed in the System Options, File Locations, Document Templates, Show Folders For option produces a corresponding Tab in the New SolidWorks Document dialog box.
The MY-TEMPLATES Tab is visible when the folder contains SolidWorks Template documents.
Create the PART-MM-ANSI template as an exercise.
The PART-IN-ANSI Template contains Document Properties settings for the parts contained in the FLASHLIGHT assembly. Substitute the PART-MM-ISO or PART-MM-ANSI Template to create the identical parts in millimeters.
The primary units in this book are IPS (inch, pound, seconds). The optional secondary units are MMGS (millimeters, grams, second) and are indicated in brackets [ ].
Illustrations are provided in both inches and millimeters.
Select Toolbars, Features in Online Help to review the function of each tool in the Features toolbar.
Additional information on System Options, Document Properties, File Locations and Templates is found in Online Help. Keywords: Options (detailing, units), templates, Files (locations), menus and toolbars (features, sketch).
Millimeters
Inches

Copyrighted Material
Copyrighted
Material
Copyrighted Material
Copyrighted
Material
Introduction to Part Modeling SolidWorks 2004: The Basics
PAGE 1 - 16
Review of the User Interface and Part Templates
The SolidWorks user interface consists of the following: Pull down menus, toolbars, Command Manager, FeatureManager and Graphics area. The CommandManager controls the display of the Sketch toolbar and Features toolbar.
You created two Part Templates: PART-MM-ISO and PART-IN-ANSI. The Document Properties Dimensioning Standard, Units and Decimal Places were stored in the Part Templates.
The File Locations System Option, Document Templates option controls the reference to the MY-TEMPLATES folder.
Note: In some network locations and school environments, the File Locations option must be set to MY-TEMPLATES for each session of SolidWorks.
You can exit SolidWorks at any time during this project. Save your document. Select File, Exit.
BATTERY Part
The BATTERY is a simplified representation of a purchased OEM part. Represent the battery terminals as cylindrical extrusions. The battery dimensions are obtained from the ANSI standard 908D.
A 6-Volt lantern battery weighs approximately 1.38 pounds, (0.62kg). Locate the center of gravity closest to the center of the battery.
Create the BATTERY part.
Use features to create parts. Features are building blocks that add or remove material.
Utilize the Extruded-Base feature. The Extrude Base features add material. The Base feature is the first feature of the part.
Utilize symmetry. Sketch a rectangle profile on the Top plane, centered at the Origin.
Extend the profile perpendicular (⊥) to the Top plane.

Copyrighted Material
Copyrighted
Material
Copyrighted Material
Copyrighted
Material
SolidWorks 2004: The Basics Introduction to Part Modeling
PAGE 1 - 17
Utilize the Fillet feature to round four vertical edges.
The Extruded Cut feature removes material from the top face. Utilize the top face for the Sketch plane. Utilize the Offset Entity Sketch tool to create the profile.
Utilize the Fillet feature to round the top narrow face.
The Extruded Boss feature adds material. Conserve design time. Represent each of the terminals as a cylindrical Extruded Boss feature.
Extruded Base Feature
The Extruded Base feature requires:
• Sketch Plane (Top).
• Sketch Profile (Rectangle).
o Geometric Relations and Dimensions.
• End Condition (Blind Depth).
Create a new part named, BATTERY. Insert an Extruded Base feature. Extruded features require a Sketch Plane. The Sketch Plane determines the orientation of the Extruded Base feature. The Sketch Plane locates the Sketch Profile on any plane or face.
The Top Plane is the Sketch Plane. The Sketch Profile is a Rectangle. The Rectangle consists of 2 horizontal lines and 2 vertical lines.
Fillet -edge

Copyrighted Material
Copyrighted
Material
Copyrighted Material
Copyrighted
Material
Introduction to Part Modeling SolidWorks 2004: The Basics
PAGE 1 - 18
Geometric Relations and Dimensions constrain the sketch in 3D space. The Blind End Condition requires a Depth value to extrude the 2D Sketch Profile and complete the 3D feature.
Activity: New Part – BATTERY and Extruded Base Feature
Create a new part.
87) Click New . 88) Click the MY-TEMPLATES tab.
89) Click PART-IN-ANSI, [PART-MM-ISO] from the Template dialog box.
90) Click OK.
Save the empty part.
91) Click Save .
92) Select SOLIDWORKS-MODELS\PROJECTS for Save in folder.
93) Enter BATTERY for file name.
94) Enter BATTERY, 6-VOLT for Description.
95) Click the Save button.
Select the Sketch plane. 96) Click the Top Plane
from the Feature Manager.

Copyrighted Material
Copyrighted
Material
Copyrighted Material
Copyrighted
Material
SolidWorks 2004: The Basics Introduction to Part Modeling
PAGE 1 - 19
Sketch the profile.
97) Click Sketch from the CommandManager.
98) Click Rectangle from the Sketch toolbar.
99) Click the first point in the lower left quadrant.
100) Click the second point in the upper right quadrant. The Origin is approximately in the middle of the Rectangle.
Sketch the Centerline.
101) Click Centerline from the Sketch Tools toolbar.
102) Sketch a diagonal centerline from the upper left corner to the lower right corner. The endpoints of the centerline are coincident with the corner points of the Rectangle.
Add a Midpoint Relation.
103) Right-click Select in the Graphics window.
104) Select the centerline.
105) Hold the Ctrl key down.
106) Select the Origin.
107) Click Midpoint.
108) Release the Ctrl key.
109) Click Close Dialog from the Properities PropertyManager.
First point
Second point
TOP
Properties PropertyManager

Copyrighted Material
Copyrighted
Material
Copyrighted Material
Copyrighted
Material
Introduction to Part Modeling SolidWorks 2004: The Basics
PAGE 1 - 20
Note: The Line# may be different than the line numbers above. The Line# is dependent on the line number order creation.
To clear entities from the Selected Entities box, right-click Clear Selections.
Add an Equal Relation to create a square. 110) Right-click Select.
111) Click the top horizontal line.
112) Hold the Ctrl key down.
113) Click the left vertical line.
114) Click the Equal button.
115) Release the Ctrl key.
116) Click Close Dialog from the Properties Manager.
Add a Dimension. 117) Click Smart Dimension from the Sketch
toolbar.
118) Select the top horizontal line.
119) Click a position above the horizontal line.
120) Enter 2.700, [68.58] for width.
121) Click the Green Check Mark . The black Sketch status is fully defined.

Copyrighted Material
Copyrighted
Material
Copyrighted Material
Copyrighted
Material
SolidWorks 2004: The Basics Introduction to Part Modeling
PAGE 1 - 21
Display the sketch relations.
122) Click Display/Delete Relations from the Sketch Relations toolbar. The Distance relation was created from the dimension.
123) Select sketched lines to display Relations.
124) Click Close Dialog .
125) The Select icon is displayed. Click the left vertical line. Individual Geometric Relations are displayed in the Relations text box.
126) Select lines in the sketch to display their Relations. The Vertical and Horizontal Relations are created from the Rectangle Sketch tool.
Insert the Extruded-Base feature.
127) Click Extruded Boss/Base from the Features toolbar.
128) Blind is the default option. Enter 4.100, [104.14] for Depth.
129) Click OK .
Fit the part to the Graphics window. 130) Press the f key.
Rename the Extruded-Base feature. 131) Click inside the Extrude1 box in the
FeatureManager.
132) Enter Base Extrude.
Save the BATTERY.
133) Click Save .
Extrude direction
Copyrighted Material
Copyrighted
Material
Copyrighted Material
Copyrighted
Material
Introduction to Part Modeling SolidWorks 2004: The Basics
PAGE 1 - 22
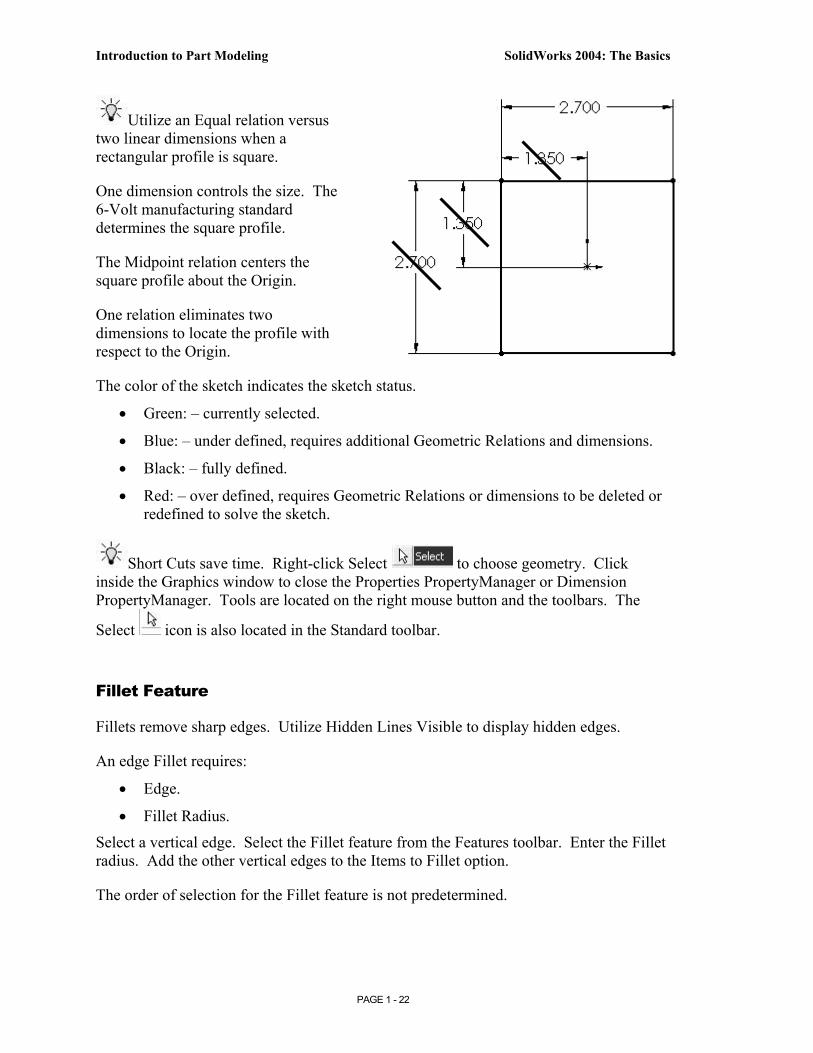
Utilize an Equal relation versus two linear dimensions when a rectangular profile is square.
One dimension controls the size. The 6-Volt manufacturing standard determines the square profile.
The Midpoint relation centers the square profile about the Origin.
One relation eliminates two dimensions to locate the profile with respect to the Origin.
The color of the sketch indicates the sketch status.
• Green: – currently selected.
• Blue: – under defined, requires additional Geometric Relations and dimensions.
• Black: – fully defined.
• Red: – over defined, requires Geometric Relations or dimensions to be deleted or redefined to solve the sketch.
Short Cuts save time. Right-click Select to choose geometry. Click inside the Graphics window to close the Properties PropertyManager or Dimension PropertyManager. Tools are located on the right mouse button and the toolbars. The
Select icon is also located in the Standard toolbar.
Fillet Feature
Fillets remove sharp edges. Utilize Hidden Lines Visible to display hidden edges.
An edge Fillet requires:
• Edge.
• Fillet Radius.
Select a vertical edge. Select the Fillet feature from the Features toolbar. Enter the Fillet radius. Add the other vertical edges to the Items to Fillet option.
The order of selection for the Fillet feature is not predetermined.

Copyrighted Material
Copyrighted
Material
Copyrighted Material
Copyrighted
Material
SolidWorks 2004: The Basics Introduction to Part Modeling
PAGE 1 - 23
Activity: Fillet Feature – Edge
Display the hidden edges. 134) Click Hidden Lines Visible
from the View toolbar.
Insert the Fillet feature. 135) Click the left vertical edge.
136) Click Fillet from the Features toolbar. Edge<1> is displayed in the Items To Fillet box.
137) Click the remaining 3 vertical edges.
138) Enter .500, [12.7] for Radius.
139) Click OK .
140) Rename Fillet1 to Side Fillets.
141) Click Save .
Note: Select edges to produce the correct result.
Extruded Cut Feature
An Extruded Cut feature removes material. An Extruded Cut requires:
• Sketch Plane (top face).
• Sketch Profile (Offset Entities).
• End Condition (Blind Depth)
The Offset Entity Sketch tool uses existing geometry, extracts an edge or face and locates the geometry on the current sketch plane.
Offset the existing Top face for the 2D sketch. Utilize the Blind Depth for End Condition.
Select 4 vertical edges
Offset Entities Sketch tool

Copyrighted Material
Copyrighted
Material
Copyrighted Material
Copyrighted
Material
Introduction to Part Modeling SolidWorks 2004: The Basics
PAGE 1 - 24
Activity: Extruded Cut Feature
Select the Sketch plane. 142) Click the Top face.
Create the Sketch.
143) Click Sketch .
Display the face.
144) Click Top from the Standards View toolbar.
Offset the existing geometry from the boundary of the Sketch plane.
145) Click Offset Entities from the Sketch Tools toolbar.
146) Enter .150, [3.81] for the Offset distance.
147) Click the Reverse check box. The new Offset orange profile displays inside the original profile.
148) Click OK from the Offset PropertyManager.
A leading zero is displayed in the spin box. For inch dimensions less than 1, the leading zero is not displayed in the part dimension in the ANSI standard.
Display the profile.
149) Click Isometric from the Standards View toolbar.
Insert the Extruded Cut feature.
150) Click Extruded Cut from the Features toolbar.
151) Enter .200, [5.08] for Depth.
152) Click OK .
153) Rename Cut-Extrude1 to Top Cut.
154) Click Save .
Offset Direction

Copyrighted Material
Copyrighted
Material
Copyrighted Material
Copyrighted
Material
SolidWorks 2004: The Basics Introduction to Part Modeling
PAGE 1 - 25
The Extruded Cut PropertyManager contains numerous options. The Reverse Direction option determines the direction of the Extruded Cut. The Extruded Cut is valid when the Direction arrow points into material to be removed.
The Flip side to cut option determines if the cut is to the inside or outside of the Sketch Profile. The Flip side to cut arrow points outward. The Extruded Cut occurs on the outside.
Fillet Feature
The Fillet feature rounds sharp edges with a constant radius by selecting a face. A Fillet requires a:
• Face.
• Fillet Radius.
Activity: Fillet Feature – Face
Insert the Fillet feature on the top face. 155) Zoom in on the Top face.
156) Right-click Select. Click the top thin face.
157) Select Fillet from the Features toolbar. Face<1> is displayed in the Edge fillet items box.
158) Click Constant Radius for Fillet Type.
159) Enter .050, [1.27] for Fillet Radius.
160) Click OK .
161) Rename Fillet2 to Top Face Fillet.
Extruded Cut with Flip side to cut option checked
Cut direction not valid, no material to remove
Top Thin Face
Zoom In/Out

Copyrighted Material
Copyrighted
Material
Copyrighted Material
Copyrighted
Material
Introduction to Part Modeling SolidWorks 2004: The Basics
PAGE 1 - 26
162) Click Save .
View the mouse pointer for feedback to select Edges or Faces for the Fillet.
Do not select a Fillet radius which is larger then the surrounding geometry.
Example: The top edge face width is .150, [3.81]. The Fillet is created on both sides of the face. A common error is to enter a Fillet too large for the existing geometry. A minimum face width of .200, [5.08] is required for a Fillet radius of .100, [2.54].
The following error occurs when the Fillet radius is too large for the existing geometry:
Avoid the Fillet Rebuild error. Reduce the Fillet size or increase the face width.
Extruded Boss Feature
The Extruded Boss requires a truncated cone shape to represent the geometry of the battery terminals. The Draft Angle option creates the tapered shape.
Sketch the first circle on the top face. Utilize the Ctrl key to copy the first circle.
The dimension between the center points is critical. Dimension the distance between the two center points with an aligned dimension.
The dimension text toggles between linear and aligned. An aligned dimension is created when the dimension is positioned between the two circles.
An angular dimension is required between the Right plane and the centerline. Acute angles are less than 90°. Acute angles are the preferred dimension standard.
The overall battery height is a critical dimension. The battery height is 4.500in, [114.30mm]. Calculate the depth of the extrusion:
For inches: 4.500in – (4.100in Base-Extrude height – .200in Offset cut depth) = .600in The depth of the extrusion is .600in.
For millimeters: 114.3mm – (104.14mm Base-Extrude height – 5.08mm Offset cut depth) = 15.24mm. The depth of the extrusion is 15.24mm.

Copyrighted Material
Copyrighted
Material
Copyrighted Material
Copyrighted
Material
SolidWorks 2004: The Basics Introduction to Part Modeling
PAGE 1 - 27
Activity: Extruded Boss Feature
Select the Sketch plane. 163) Click the face of the Top Cut feature.
Create the Sketch.
164) Click Sketch from the Sketch toolbar.
Display the Sketch plane.
165) Click Top from the Standards View toolbar.
Sketch the profile. 166) Click Circle from the Sketch Tools toolbar. Click the
center point of the circle coincident to the Origin .
167) Drag the mouse pointer to the right of the Origin. Release the mouse button.
Add Dimensions. 168) Click Dimension .
169) Select the circumference of the circle.
170) Click a position diagonally to the right.
171) Enter .500, [12.7].
172) Click the Green Check Mark . The black Sketch is fully defined.
Copy the sketched circle.
173) Right-click Select .
174) Hold the Ctrl key down.
175) Click the circumference of the circle.
176) Drag the circle to the upper left quadrant.
177) Release the mouse button.
178) Release the Ctrl key. The second circle is selected and is displayed in green.

Copyrighted Material
Copyrighted
Material
Copyrighted Material
Copyrighted
Material
Introduction to Part Modeling SolidWorks 2004: The Basics
PAGE 1 - 28
Add an Equal Relation. 179) Hold the Ctrl key down. Click the
circumference of the first circle. Both circles are selected. Click Equal from the Add Relations text box. Release the Ctrl key.
180) Click Close Dialog from the Properties Manager.
Show the Right Plane for the dimension reference. 181) Right-click the Right Plane from the FeatureManager.
182) Click Show.
Add a Dimension. 183) Click Dimension . 184) Click the two center points of the two circles. Click
a position off the profile in the upper right corner. 185) Enter 1.000, [25.4] for the aligned dimension.
186) Click the Green Check Mark .
Add a Dimension.
187) Click Centerline .
188) Sketch a centerline between the two circle center points.
189) Right-click End Chain to end the line.
190) Click Dimension .
191) Click the centerline between the two circles.
192) Click the Right Plane (vertical line).
193) Click a position between the centerline and the Right plane, off the profile.
194) Enter 45.
195) Click the Green Check Mark .

Copyrighted Material
Copyrighted
Material
Copyrighted Material
Copyrighted
Material
SolidWorks 2004: The Basics Introduction to Part Modeling
PAGE 1 - 29
Create an angular dimension between three points or two lines. Sketch a centerline/construction line when an additional point or line is required.
Insert an Extruded Boss feature.
196) Click Extruded Boss/Base from the Features toolbar. Blind is the default Type option.
197) Enter .600, [15.24] for Depth.
198) Click the Draft ON/OFF button.
199) Enter 5 in the Draft Angle text box.
200) Click OK .
Rename the Feature and Sketch. 201) Rename Extrude2 to Terminals.
202) Expand Terminals.
203) Rename Sketch3 to Sketch-TERMINALS.
Each time you create a feature of the same feature type, the feature name is incremented by one.
Example: Extrude1 is the first Extrude feature. Extrude2 is the second Extrude feature. If you delete a feature, rename a feature or exit a SolidWorks session, the feature numbers will vary from those illustrated in the text.
Rename your features with descriptive names. Standardize on feature names that are utilized in mating parts. Example: Mounting Holes.
Measure the overall BATTERY height. 204) Click Right from the
Standard Views toolbar.
205) Click Tools, Measure
from the Standard toolbar.
206) Click the top edge of the battery terminal.
207) Click the bottom edge of the battery. The overall height, Delta Y is 4.500, [114.3].
208) Click Close.

Copyrighted Material
Copyrighted
Material
Copyrighted Material
Copyrighted
Material
Introduction to Part Modeling SolidWorks 2004: The Basics
PAGE 1 - 30
Right-click Clear Selections in the Selected items block to measure the distance between various edges or faces.
Hide all planes and display the Trimetric view. 209) Click View from the Main
menu. Uncheck Planes.
210) Click Trimetric from the view toolbar.
211) Click Save .
Additional information on Extrude Boss/Base Extrude Cut and Fillets is located in Online Help. Keywords: Extrude (Boss/Base, Cut), Fillet (constant radius fillet), Geometric Relations (sketch, equal, midpoint), Sketch (rectangle, circle), Offset Entities and Dimensions (angular).
View the Show Me option in Online Help for angular dimensions.
Review of the BATTERY
The BATTERY utilized an Extrude Base feature sketched on the Top plane. The rectangle was sketched with a diagonal centerline to build symmetry into the part. A Midpoint geometric relation centered the sketch on the Origin. The Equal relation created a square sketch.
The Fillet feature rounded sharp edges. All four edges were selected to combine common geometry into the same Fillet feature. The Fillet feature also rounded the top face.
The Sketch Offset Entity created the profile for the Extruded Cut feature.
The Terminals were created with an Extruded Boss feature. You sketched a circular profile and utilized the Ctrl key to copy the sketched geometry.

Copyrighted Material
Copyrighted
Material
Copyrighted Material
Copyrighted
Material
SolidWorks 2004: The Basics Introduction to Part Modeling
PAGE 1 - 31
A centerline was required to locate the two holes with an angular dimension. The Draft Angle option tapered the Extruded Boss feature.
All feature names were renamed.
BATTERYPLATE Part
The BATTERYPLATE is a critical plastic part. The BATTERYPLATE:
• Aligns the LENS assembly.
• Creates an electrical connection between the SWITCH assembly, BATTERY and LENS.
Design the BATTERYPLATE.
Utilize features from the BATTERY to develop the BATTERYPLATE.
Edit the BATTERY features. Create two holes from the original sketched circles. Use the Extruded Cut feature.
Modify the dimensions of the Base feature. Add a 1-degree draft angle.
Note: A sand pail contains a draft angle. The draft angle assists the sand to leave the pail when the pail is flipped upside down.
Insert an Extruded Boss feature. Offset the center circular sketch. The Extruded Boss feature contains the LENS. Create an inside draft angle. The draft angle assists the LENS into the Holder.
Connection to LENS
Connection to SWITCH

Copyrighted Material
Copyrighted
Material
Copyrighted Material
Copyrighted
Material
Introduction to Part Modeling SolidWorks 2004: The Basics
PAGE 1 - 32
Insert an Extruded Boss feature using two sketched contours.
Utilize the Sketch Mirror tool to create symmetric contours. Utilize a Multi-body option to create the Extrude Boss.
Insert the second Extruded Boss feature using the multi-body face for a sketch plane and the Up to Surface option for Type.
Insert Face Fillet and insert Edge Fillet features to remove sharp edges.
The Chamfer Feature creates a beveled edge or face. Insert a Chamfer feature on the inside edge of the Holder.
Save As, Delete, Modify and Edit Feature
Create the BATTERYPLATE from the BATTERY. Utilize the File, Save As option to copy the BATTERY to the BATTERYPLATE.
Reuse existing geometry. Create two holes. Delete the Terminals feature and reuse the circle sketch. Select the sketch in the FeatureManager. Insert an Extruded Cut. The Through All Depth option creates two holes that cut through the entire Extruded Base.
Right-click the Extruded Cut in the FeatureManager. Select the Edit Feature option. The Edit Feature option returns to the Extruded Cut PropertyManager. Modify the End Condition from Blind to Through All.
Modify the depth dimension or the Extruded Base feature. Sketch dimensions are displayed in black. Feature dimensions are displayed in blue. Select Rebuild to update the part.

Copyrighted Material
Copyrighted
Material
Copyrighted Material
Copyrighted
Material
SolidWorks 2004: The Basics Introduction to Part Modeling
PAGE 1 - 33
Activity: Save As option and Delete, Modify and Edit Feature
Create a new part. 212) Click File, SaveAs.
213) Enter PROJECTS for Save In Folder.
214) Enter BATTERYPLATE for File name.
215) Enter BATTERY PLATE FOR 6-VOLT for Description.
216) Click Save.
The BATTERYPLATE part icon is displayed at the top of the FeatureManager. The BATTERY part is closed.
Delete the Terminals feature. 217) Right-click Terminals
from the FeatureManager. Click Delete.
218) Click Yes from the Confirm Delete dialog box. Do not delete the two-circle sketch, Sketch-TERMINALS.
Create an Extruded Cut feature from the Sketch–TERMINALS. 219) Click Sketch-TERMINALS from the
FeatureManager.
BATTERYPLATE is the part name

Copyrighted Material
Copyrighted
Material
Copyrighted Material
Copyrighted
Material
Introduction to Part Modeling SolidWorks 2004: The Basics
PAGE 1 - 34
220) Click Extruded-Cut . Click Through All for the Depth. Click OK .
221) Rename Cut-Extrude1 to Holes.
222) Click Save .
Edit the Base-Extrude feature. 223) Right-click Base-Extrude in the FeatureManager.
224) Click Edit Feature from the Pop-up menu.
Change the overall Depth. 225) Double-click 4.100, [104.14]. Enter .400,
[10.16].
226) Click the Draft ON/OFF button.
227) Enter 1.00 in the Angle text box.
228) Click OK .
Fit the model to the Graphics window. 229) Press the f key. 230) Rename Cut Extrude2 to Holes.
231) Click Save .
Select the Also Delete Absorbed Feature check box to delete both the feature and the sketch at the same time.
Extruded Boss Feature
The Holder is created with a circular Extruded Boss feature. Utilize Offset Sketch Entity to create the second circle. Utilize a Draft Angle of 3° in the Extrude Boss options.
When applying the Draft Angle to the two concentric circles, the outside face tapers inwards and the inside face tapers outwards.
Draft Angle displayed at 5°

Copyrighted Material
Copyrighted
Material
Copyrighted Material
Copyrighted
Material
SolidWorks 2004: The Basics Introduction to Part Modeling
PAGE 1 - 35
Plastic parts require a draft angle. A rule of thumb; 1° to 5° is the draft angle. The draft angle is created in the direction of pull from the mold. This is defined by geometry, material selection, mold production and cosmetics. Always verify the draft with the mold designer and manufacturer.
Activity: Extruded Boss Feature
Select the Sketch plane. 232) Click the top face.
Create the Sketch.
233) Click Sketch .
234) Click the top circular edge of the center Hole.
235) Click Offset Entities .
236) Enter .300, [7.62] for Distance.
237) Click OK .
Create the second offset circle.
238) Select the offset circle. Click Offset Entities .
239) Enter .100, [2.54] for Distance.
240) Click OK .
Insert the Extruded Boss feature. 241) Click Extruded Boss/Base .
242) Enter .400, [10.16] for Depth.
243) Click the Draft ON/OFF button.
244) Enter 3 in the Angle text box.
245) Click OK .
246) Rename Extrude2 to Holder.
247) Click Save .
Top face Top circular edge

Copyrighted Material
Copyrighted
Material
Copyrighted Material
Copyrighted
Material
Introduction to Part Modeling SolidWorks 2004: The Basics
PAGE 1 - 36
Multi-body Parts and the Extruded Boss Feature
A Multi-body part has separate solid bodies within the same part document.
A wrench consists of two cylindrical bodies. Each extrusion is a separate body. The oval profile is sketched on the right plane and extruded with the Up to Body option.
The BATTERY consisted of a solid body. The BATTERY is a single body part.
The Connector on the BATTERYPLATE develops two additional solid bodies. The BATTERYPLATE is a Multi-body part.
The next two Extruded Boss features are used to connect the BATTERY to the SWITCH. Utilize the Multi-body option to create the Extruded Bosses.
The second feature utilizes existing geometry for the sketch and the Up to Surface option to create the Extruded Boss.
The sketches utilize symmetry with the Origin, Mirror Sketch Tool and Geometric Relations.
Activity: Multi-body Part and Extrude Boss Features
Create the Sketch. 248) Click the Holder top face.
249) Click Sketch .
250) Select the Top view.
251) Click Centerline .
252) Sketch a horizontal centerline with the first point coincident to the Origin . The second point is to the right of the profile.
Sketch the mirrored profile.
253) Click Sketch Mirror . The centerline displays two parallel mirror marks.
Multi-body part Wrench

Copyrighted Material
Copyrighted
Material
Copyrighted Material
Copyrighted
Material
SolidWorks 2004: The Basics Introduction to Part Modeling
PAGE 1 - 37
254) Click Line . Create a horizontal line to the right of the Extruded Base feature, above the centerline. The line is automatically mirrored.
255) Right-click Tangent Arc . Create the first arc point. Click the
endpoint of the horizontal line. Create a 180° arc. Drag the mouse pointer to the right and then downward until the start point, center point and end point are vertically aligned. Click a position below the center point.
256) Right-click Line . Create a horizontal line from the endpoint of the Tangent arc. Click a position vertically aligned to the start point of the first horizontal line. The first line and second line are equal lengths.
257) Create a vertical line from the endpoint of the horizontal line to the start point of the first line. The sketch contains two closed contours.
258) Deactivate the Sketch Mirror function. Click Sketch Mirror .
259) Press the f key.
Add a Dimension.
260) Click Dimension .
261) Click the arc edge. The mouse pointer displays the Arc
icon. Click a position to the right of the arc.
262) Enter .100, [2.54] for the Radius.
Sketched Line
Mirror Line

Copyrighted Material
Copyrighted
Material
Copyrighted Material
Copyrighted
Material
Introduction to Part Modeling SolidWorks 2004: The Basics
PAGE 1 - 38
Add a Dimension. 263) Click the left most vertical line of the current sketch. Click
the arc edge. Click a position above the top horizontal line of the sketch.
Note: Select the arc edge to create a max. dimension. Do not select the arc center point. The linear dimension uses the arc center point as a reference.
Modify the Properties of the dimension. The Max option references the outside tangent edge of the arc.
Display the Max arc condition. 264) Right-click on the linear dimension
text. Click Properties from the Pop-up menu.
265) Click the Max button from the First arc condition option. Enter 1.000, [25.4] in the Value list box.
266) Click OK.
Add Dimensions. 267) Click the two arc center points.
268) Click a position to the right of the profile.
269) Enter .800, [20.32].
270) Click the Origin.
271) Click the left vertical sketched line.
272) Click a position above the profile. Enter 1.500, [38.10].
273) Display the Isometric view. Click
Isometric .
Insert the Extruded Boss feature.
274) Click Extruded Boss/Base .
275) Enter .100, [2.54] for Depth.
276) Click the Reverse Direction button.
277) Click OK .
278) Rename Extrude3 to ConnectorSwitch.
279) Click Save .

Copyrighted Material
Copyrighted
Material
Copyrighted Material
Copyrighted
Material
SolidWorks 2004: The Basics Introduction to Part Modeling
PAGE 1 - 39
The ConnectorSwitch Extruded Boss feature contains two bodies. The two bodies are not connected to the BATTERYPLATE.
Create the second Extruded Boss feature. 280) Zoom and Rotate the view to clearly display the inside
right face and the ConnectorSwitch feature.
Press the arrow keys to rotate in 15-degree increments.
Create the Sketch. 281) Click the inside rectangular face of the ConnectorSwitch
for Sketch plane.
282) Click Sketch .
283) Display the Left view. Click Left . The Z axis points to the left and the Y axis point upward.
284) Click Hidden Lines Visible .
Sketch the profile.
285) Click Rectangle . Sketch a rectangle. The Origin is approximately in the middle of the sketch.
Add Relations. 286) Right-click Select. Right-click Add
Relations from the Sketch Pop-up menu.
287) Click the top edge of the rectangle.
288) Click the BATTERYPLATE top edge.
289) Click the Collinear button from the Add Relations text box.
290) Click the bottom edge of the rectangle.
291) Click the BATTERYPLATE Origin.
292) Click the Midpoint button from the Add Relations text box.
293) Click the left edge of the rectangle.
294) Click the left edge of the Connector Switch.
295) Click the Collinear button from the Add Relations text box. The sketch is fully defined and symmetric about the Origin.

Copyrighted Material
Copyrighted
Material
Copyrighted Material
Copyrighted
Material
Introduction to Part Modeling SolidWorks 2004: The Basics
PAGE 1 - 40
Geometric relationships are captured as you sketch.
The mouse pointer icon displays the following relationships: horizontal , vertical , coincident , midpoint , intersection , tangent and perpendicular .
Note: Display Automatic Relations. Click Tools from the Main menu. Click Options, General, Automatic Relations in the Sketch box. Utilize Add Relations from the Sketch toolbar if Geometric Relations are not captured. All sketches in this project are fully defined (black).
Insert the Extruded Boss feature. 296) Rotate the BATTERYPLATE to display
the sketch and the right face of the Top Cut.
297) Click Extruded Boss/Base .
298) Select Up to Surface for Type option.
299) Select the inside right face of the Top Cut. The Selected Items text box displays Face<1>.
300) Click OK.
301) Rename Extrude4 to Connector Base.
302) Click Save .
The Up to Surface option terminates the Extruded Boss feature at the selected inside face. The Up to Body option terminates the Extruded Boss at the Holder feature.

Copyrighted Material
Copyrighted
Material
Copyrighted Material
Copyrighted
Material
SolidWorks 2004: The Basics Introduction to Part Modeling
PAGE 1 - 41
Multi-body modeling is a vast topic. Review Multi-body (modeling techniques) in Online Help for additional examples.
Zoom, Rotate and Pan tools are accessed through the wheel mouse button, toolbars, Pop-up menus and keyboard shortcuts.
For a wheel mouse:
• Roll the wheel to Zoom in/out.
• Hold down the wheel to Rotate.
• Ctrl-Hold down the wheel to Pan.
Zoom, Rotate and Pan tools are available from the View toolbar and from the right mouse button Pop-up menu. Select the tool to activate. Select the tool to deactivate.
Review the Keyboard shortcuts listed in the Introduction.
Fillet Features – Full Round, Multiple Radius, Edge/Face options
Fillet features are used to smooth rough edges. Plastic parts require fillets on sharp edges. Create three Fillets. Utilize different techniques.
The current Top Face Fillet produced a flat face. Delete the Top Face Fillet. The first Fillet is a Full Round Fillet. Insert a Full Round Fillet on the top face for a smooth rounded transition.
The second Fillet is a Multiple Radius Fillet. Select a different radius value for each edge in the set. Select the inside and outside edge of the Holder. Select all inside tangent edges of the Top Cut.
A Multiple Radius Fillet is utilized next as an exercise. Note: There are other ways to create Fillets.
The third Fillet is an Edge/Face Fillet. Select small edges first. Selection order and size determines a successful Fillet.
Group Fillets into a Fillet folder.
Copyrighted Material
Copyrighted
Material
Copyrighted Material
Copyrighted
Material
Introduction to Part Modeling SolidWorks 2004: The Basics
PAGE 1 - 42
Activity: Fillet Features – Full Round, Multiple Radius, Edge/Face options
Delete the Top Edge Fillet. 303) Right-click Top Face Fillet from the FeatureManager.
304) Click Delete. Click Yes.
305) Drag the Rollback bar below Top Cut in the FeatureManager.
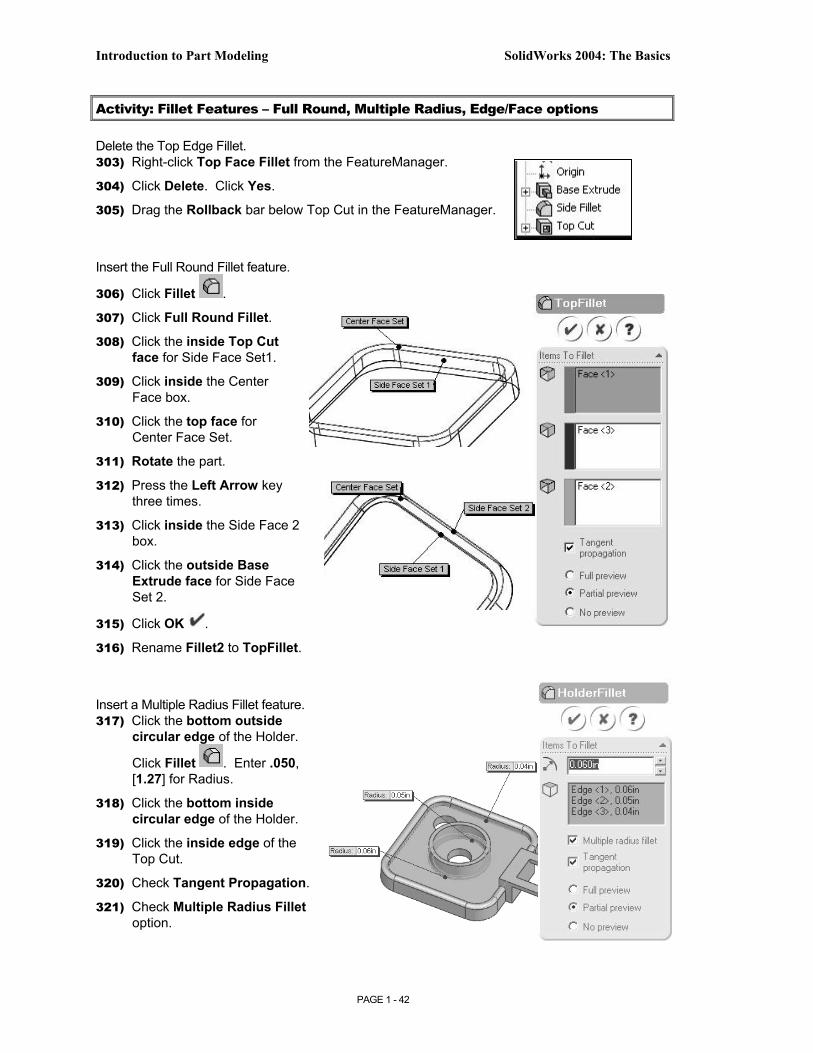
Insert the Full Round Fillet feature.
306) Click Fillet .
307) Click Full Round Fillet.
308) Click the inside Top Cut face for Side Face Set1.
309) Click inside the Center Face box.
310) Click the top face for Center Face Set.
311) Rotate the part.
312) Press the Left Arrow key three times.
313) Click inside the Side Face 2 box.
314) Click the outside Base Extrude face for Side Face Set 2.
315) Click OK .
316) Rename Fillet2 to TopFillet.
Insert a Multiple Radius Fillet feature. 317) Click the bottom outside
circular edge of the Holder.
Click Fillet . Enter .050, [1.27] for Radius.
318) Click the bottom inside circular edge of the Holder.
319) Click the inside edge of the Top Cut.
320) Check Tangent Propagation.
321) Check Multiple Radius Fillet option.

Copyrighted Material
Copyrighted
Material
Copyrighted Material
Copyrighted
Material
SolidWorks 2004: The Basics Introduction to Part Modeling
PAGE 1 - 43
Modify the Fillet values.
322) Click the Radius box for the Holder outside edge. Enter 0.060, [1.52].
323) Click the Radius box for the Top Cut inside edge. Enter 0.040, [1.02].
324) Click OK .
325) Rename Fillet2 to HolderFillet.
Insert the Fillet feature.
326) Zoom in on the ConnectorBase. Click Fillet .
327) Click the two vertical edges.
328) Click the two arcs. Enter .050, [1.27] for Radius.
329) Check Tangent Propagation.
330) Click the ConnectorSwitch top face.
331) Click the ConnectorSwitch right face.
332) Click OK .
333) Rename Fillet3 to ConnectorBaseFillet.
Group the Fillets into a Folder. 334) Click the Top Fillet in the
FeatureManager. Drag the Top Fillet feature below the ConnectorBaseFillet in the FeatureManager.
335) Hold the Ctrl key down. Click the HolderFillet and ConnectorBaseFillet in the FeatureManager. Right-click Add to New Folder. Release the Ctrl key.
336) Rename Folder1 to FilletFolder.
337) Click Save .
Group fillets together at the bottom of the FeatureManager. They are easier to modify.

Copyrighted Material
Copyrighted
Material
Copyrighted Material
Copyrighted
Material
Introduction to Part Modeling SolidWorks 2004: The Basics
PAGE 1 - 44
Features listed in the FeatureManager must be continuous in order to be placed as a group into a Folder.
Chamfer Feature
A Chamfer feature bevels an edge or a face. There are three options for the Chamfer feature:
• Angle – distance.
• Distance – distance.
• Vertex (point).
The Chamfer feature for the Holder requires:
• Edge or face.
• Angle and distance.
Exit SolidWorks after you complete the Chamfer feature.
Activity: Chamfer Feature and Exit SolidWorks
Insert a Chamfer feature. 338) Select the inside circular edge of the
Holder.
339) Click Chamfer from the Features toolbar.
340) Enter .050 [1.27] for Distance.
341) Enter 45 for Angle.
342) Click OK .
343) Click Save .
Exit SolidWorks. 344) Click File, Exit.
The BATTERYPLATE is complete.

Copyrighted Material
Copyrighted
Material
Copyrighted Material
Copyrighted
Material
SolidWorks 2004: The Basics Introduction to Part Modeling
PAGE 1 - 45
Additional information on Save, Extrude Boss/Base, Extrude Cut, Fillets, Copy Sketched Geometry and Multi-body are located in Online Help. Keywords: Save (save as copy), Extrude (Boss/Base, Cut), Fillet (face blends, variable radius), Chamfer, Geometric Relations (sketch), Copy (sketch entities), Multi-body (extrude, modeling techniques).
Review of the BATTERYPLATE
The File, Save As option was utilized to copy the BATTERY part to the BATTERYPLATE part. You edited, modified and deleted features in the BATTERYPLATE.
The BATTERYPLATE is a plastic part. The Draft Angle option was added in the Extrude Base feature.
The Holder Extruded Boss utilized a circular sketch and the Draft Angle option. The Sketch Offset tool created the circular ring profile.
The Connector Switch Extruded Boss used two sketched contours. The Sketch Mirror tool created symmetric contours. The BATTERYPLATE was defined as a Multi-body part.
The second Extruded Boss feature utilized the Multi-body face for a sketch plane and the Up to Surface option for Type.
Edge Fillets and Face Fillets removed sharp edges. Similar Fillets were grouped together into a Folder. All features were renamed in the Feature Manager.
The BATTERY and BATTERYPLATE utilized an Extruded Base feature.

Copyrighted Material
Copyrighted
Material
Copyrighted Material
Copyrighted
Material
Introduction to Part Modeling SolidWorks 2004: The Basics
PAGE 1 - 46
Project Summary
SolidWorks is a 3D design software application utilized to create parts, assemblies and drawings. You are designing a FLASHLIGHT assembly that is cost effective, serviceable and flexible for future design revisions. The FLASHLIGHT assembly consists of various parts. The BATTERY and BATTERYPLATE parts were modeled in this project.
The SolidWorks Windows based user interface is divided into: Pull down menus, toolbars, Pop-up menus, the CommandManager, FeatureManager Status bar and the Graphics window.
Folders organized your models and templates. The Part Template is the foundation for all parts in the FLASHLIGHT assembly. You created the PART-IN-ANSI and PART-MM-ISO Templates.
Project 1 concentrated on the Extruded Base feature. The Extruded Base feature required a Sketch Plane, Sketch Profile and End Condition (Depth). The BATTERY and BATTERYPLATE parts incorporated an Extruded Base feature:
You addressed four major features in this project: Extruded Boss/Base, Extruded Cut, Fillet and Chamfer.
You addressed the following Sketch tools in this project: Sketch, Smart Dimension, Line, Rectangle, Circle, Tangent Arc and Centerline.
You addressed additional Sketch tools that utilized existing geometry: Add Relations, Display/Delete Relations, Mirror Entities, Convert Entities and Offset Entities.
Geometric Relations were utilized to build symmetry into the sketches.
Practice these concepts with the project exercises.

Copyrighted Material
Copyrighted
Material
Copyrighted Material
Copyrighted
Material
SolidWorks 2004: The Basics Introduction to Part Modeling
PAGE 1 - 47
Project Terminology
Assembly: An assembly is a document in which parts, features and other assemblies (sub-assemblies) are put together. The filename extension for a SolidWorks assembly file name is .SLDASM. The FLASHLIGHT is an assembly. The BATTERY is a part in the FLASHLIGHT assembly.
Chamfer: A feature that bevels sharp edges or faces by a specified distance and angle or by two specified distances.
Convert Entities: A sketch tool that extracts sketch geometry to the current sketch plane.
Cursor Feedback: Feedback is provided by a symbol attached to the cursor arrow indicating your selection.
Dimension: A value indicating the size of feature geometry.
Dimensioning Standard: A set of drawing and detailing options developed by national and international organizations. A few key dimensioning standard options are: ANSI, ISO, DIN, JIS, BSI, GOST and GB.
Draft angle: A draft angle is the degree of taper applied to a face. Draft angles are usually applied to molds or castings.
Drawing: A document containing a 2D representation of a 3D part or assembly. The filename extension for a SolidWorks drawing file name is .SLDDRW.
Edit Feature: A tool utilized to modify existing feature parameters. Right-click the feature in the FeatureManager. Click Edit Feature.
Edit Sketch: A tool utilized to modify existing sketch geometry. Right-click the feature in the FeatureManager. Click Edit Sketch.
Extruded Boss/Base: A feature that adds material utilizing a 2D sketch profile and a depth perpendicular to the sketch plane. The Base feature is the first feature in the part.
Extruded Cut: A feature that removes material utilizing a 2D sketch profile and a depth perpendicular to the sketch plane.
Features: Features are geometry building blocks. Features add or remove material. Features are created from sketched profiles or from edges and faces of existing geometry.
Fillet: A feature that rounds sharp edges or faces by a specified radius.
Geometric relationships: Relations between geometry that are captured as you sketch.
Menus: Menus provide access to the commands that the SolidWorks software offers.

Copyrighted Material
Copyrighted
Material
Copyrighted Material
Copyrighted
Material
Introduction to Part Modeling SolidWorks 2004: The Basics
PAGE 1 - 48
Mirror Entities: A sketch tool that mirrors sketch geometry to the opposite side of a sketched centerline.
Mouse Buttons: The left and right mouse buttons have distinct meanings in SolidWorks. The left mouse button is utilized to select geometry. The right-mouse button is utilized to invoke commands.
Offset Entities: A sketch tool that offsets sketch geometry to the current sketch plane by a specific amount.
Part: A part is a single 3D object that consists of various features. The filename extension for a SolidWorks part is .SLDPRT.
Plane: Planes are flat and infinite. Planes are represented on the screen with visible edges. The reference plane in Project 1 is the Top Plane.
Relation: A relation is a geometric constraint between sketch entities or between a sketch entity and a plane, axis, edge or vertex. Utilize Add Relations to manually connect related geometry.
Sketch: The name to describe a 2D profile is called a sketch. 2D sketches are created on flat faces and planes within the model. Typical geometry types are lines, arcs, rectangles, circles, polygons and ellipses.
States of a Sketch: There are four key states that are utilized in this Project:
• Fully Defined: Has complete information, (Black).
• Over Defined: Has duplicate dimensions, (Red).
• Under Defined: There is inadequate definition of the sketch, (Blue).
• Selected: The current selected entity, (Green).
Template: A template is the foundation of a SolidWorks document. A Part Template contains the Document Properties such as: Dimensioning Standard, Units, Grid/Snap, Precision, Line Style and Note Font.
Toolbars: The toolbars provide shortcuts enabling you to access the most frequently used commands.
Units: Used in the measurement of physical quantities. Decimal inch dimensioning and Millimeter dimensioning are the two types of common units specified for engineering parts and drawings.

Copyrighted Material
Copyrighted
Material
Copyrighted Material
Copyrighted
Material
SolidWorks 2004: The Basics Introduction to Part Modeling
PAGE 1 - 49
Questions
1. Identify and describe the function of the following features:
• Extruded Base/Boss.
• Fillet.
• Chamfer.
• Extruded Cut.
2. Explain the differences between a Template and a Part.
3. Explain the steps in starting a SolidWorks session.
4. Describe the procedure to commence a new sketch.
5. Explain the steps required to change part unit dimensions from inches to millimeters.
6. Identify the three default reference planes.
7. What is the Base feature? Provide an example.
8. Describe the differences between an Extruded-Base feature and an Extruded-Cut feature.
9. The sketch color, black indicates a sketch is ___________ defined.
10. The sketch color, blue indicates a sketch is ___________ defined.
11. The sketch color, red indicates a sketch is ___________ defined
12. True or False. Folders are utilized to only store part documents.
13. Describe a symmetric relation.
14. Describe an angular dimension.
15. What is a draft angle? Provide an example.
16. An arc requires _______ points?
17. Identify the properties of a Multi-body part.

Copyrighted Material
Copyrighted
Material
Copyrighted Material
Copyrighted
Material
Introduction to Part Modeling SolidWorks 2004: The Basics
PAGE 1 - 50
Exercises
Exercise 1.1: Part document templates
Create a Metric part document template using an ANSI dimension standard.
Exercise 1.2: L-SHAPE
Create 3 parts: L-SHAPE-FRONT, L-SHAPE-TOP and L-SHAPE-RIGHT. Utilize your own dimensions. Locate each profile on a different Sketch Plane.
Exercise 1.3: AXLE
Create the AXLE part. Utilize the Front plane for the Sketch plane.
Exercise 1.4: SHAFT COLLAR
Create the SHAFT COLLAR part. Utilize the Front plane for the Sketch plane.
AXLE Courtesy of GEARS Educational Systems, LLC
Hanover, MA USA www.gearseds.com
SHAFT COLLAR Courtesy of GEARS Educational Systems, LLC
Hanover, MA USA www.gearseds.com
Front Top Right

Copyrighted Material
Copyrighted
Material
Copyrighted Material
Copyrighted
Material
SolidWorks 2004: The Basics Introduction to Part Modeling
PAGE 1 - 51
Exercise 1.5a -15.d: Create the following parts utilizing the Extrude Boss/Base, Extrude-Cut, Fillet and Chamfer features. Dimensions are not provided. Utilize symmetry.
Exercise 1.5a: RING
Utilize a Tangent Arc Sketch tool. The part is symmetrical about the Front plane. Utilize two diagonal centerlines to locate the centerpoints of the circles at the Midpoint of the centerline.
Exercise 1.5b: PLAQUE
Utilize the Offset Entities Sketch tool and Extruded Cut (Flip side) feature. The Base feature is symmetric about the Right Plane.
Exercise 1.5c: CASTING
Utilize a 3º Draft Angle for the Extruded Base and Extrude Boss features. Add Fillets and Chamfers. Center the Base feature about the Origin.
Exercise 1.5d: FITTING
Sketch the profile for the Extruded Base feature to the left of the Origin. Insert the Extruded Boss feature on the Right Plane. Utilize the Up to Surface option. Add an Extruded-Cut utilizing Offset Entities.
Insert Fillets and Chamfers.
Extruded-Base Extruded-Cut
Boss

Copyrighted Material
Copyrighted
Material
Copyrighted Material
Copyrighted
Material
Introduction to Part Modeling SolidWorks 2004: The Basics
PAGE 1 - 52
Notes: