Embed Size (px)
Citation preview
PROVIDER WEB PORTAL GUIDE
April 2021F-2692

Healthplex Provider Web Portal Guide
2
I. Registering for Web Access........…………………………………………………………………………………..……….3-4
II. Resetting Your Password.………………………………………………………………............….…………………….....5
III. Updating Your Office Email.……………………………………………………………………………………………….…....6
IV. Adding/Removing a Provider.……………………………….………………………………..………………………..….7-8
V. Retrieving PPO Fee Schedules………………………………………………………………...…………......……………….9
VI. Retrieving Government Managed Care Fee Schedules........………………….…….……………........10-11
VII. Determining what PPOs your office participates with (PPO REPORTS).....…………………...12
VIII. Check Reports......................................................................................................................................13-14
IX. Direct Deposit Reports.………………………………………………………………………………………………………15-16
X. Obtaining Managed Care Rosters…………………………....………………………………………..………………17-18
XI. HEDIS Gauge.........………….………….....…………………………………………………………………………………...…18-19
XII. Claims Dashboard......…………………………………………………….………………………………………………………20-21
XIII. Checking Member Eligibility/Benefits......…………………………………………………………………………22-26
XIV. Additional Topics (Help Search)......……………………………………………………………………………………....27
XV. Ortho Refer…………………..........................................................................................……………………………..28
This guide serves to capacitate providers with the knowledge of how to effectively take full advantage of the various tools available to them through the Healthplex Provider Web Portal. The self-service features that are accessible through the Healthplex Provider Web Portal will serve to reduce the amount of time that our provider partners must wait to receive the answers they are calling in to our Provider Services Hotline for.
Please take a few moments to review this guide and see how easy it can be to work with Healthplex. The features which we have brought to the web portal have all been driven through provider feedback, and as time goes on, we will revise this guide to include additional features that we implement thanks to the input from our community of participating providers.
TABLE OF CONTENTS
3
Healthplex Provider Web Portal Guide
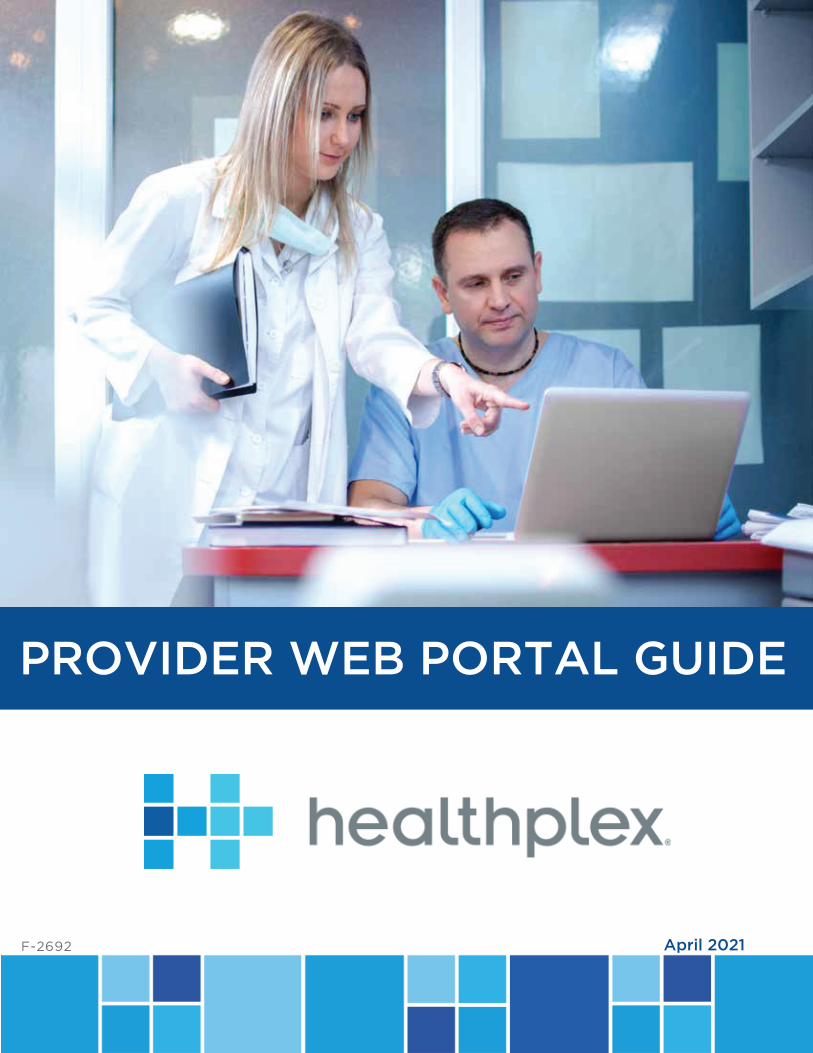
(1) Go to Healthplex.com, and click on “I’m a Provider”.
Under “Healthplex Providers” on the following screen, click the registration link.
REGISTERING FOR WEB ACCESS

Healthplex Provider Web Portal Guide
4
(2) There are two methods to register for the web portal:
I. Complete the form asking for your office identifying information. Once you enter in your TIN or SSN, click “here” to look up the doctor prefix before clicking on “Continue”.
II. If there is enough claims data on file, you are required to answer three randomized questions related to members that you’ve recently treated in your office.
If Healthplex doesn’t have enough claims data on file, you will asked to be complete a form. Further instructions on how to complete the web registration will be sent to the email provided.
a. Register by verifying member history
b. Register by email
II.
5
Healthplex Provider Web Portal Guide
RESETTING YOUR PASSWORD
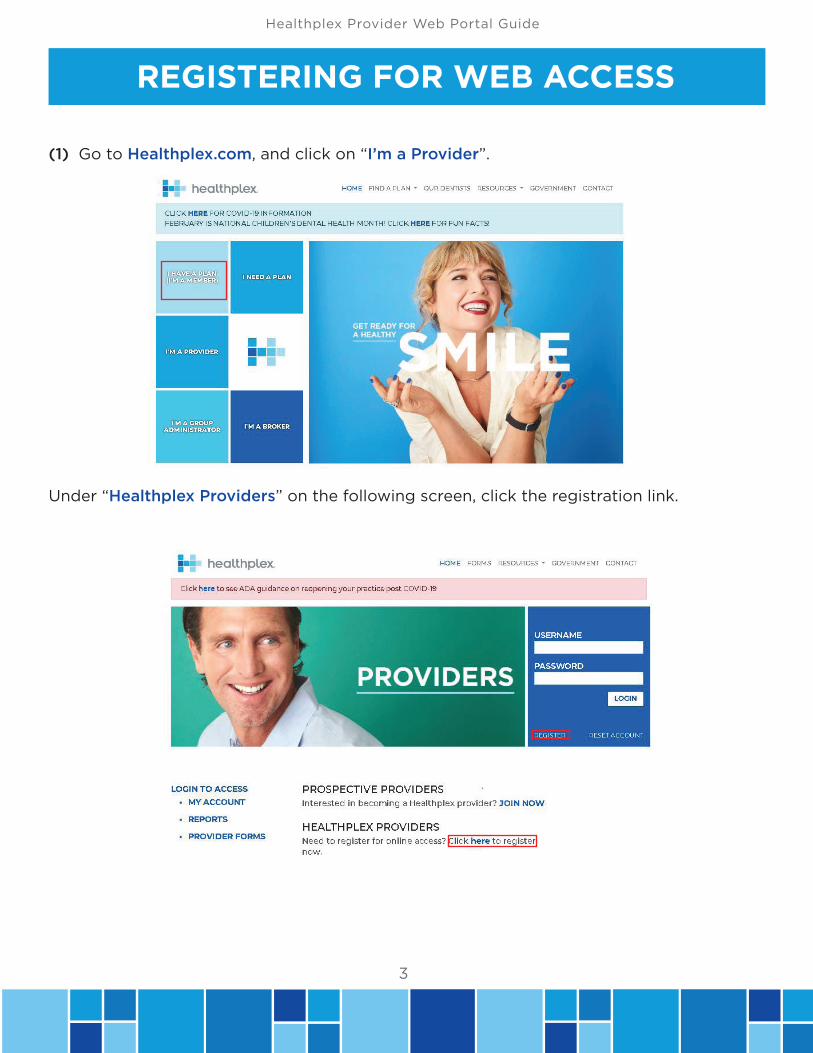
(1) If you forget your password, click “Reset Account”.
(2) Please complete the following information below. Once you complete this information, you will be sent an email with instructions on how to regain access to your account.
Healthplex Provider Web Portal Guide
6
UPDATING YOUR OFFICE EMAIL
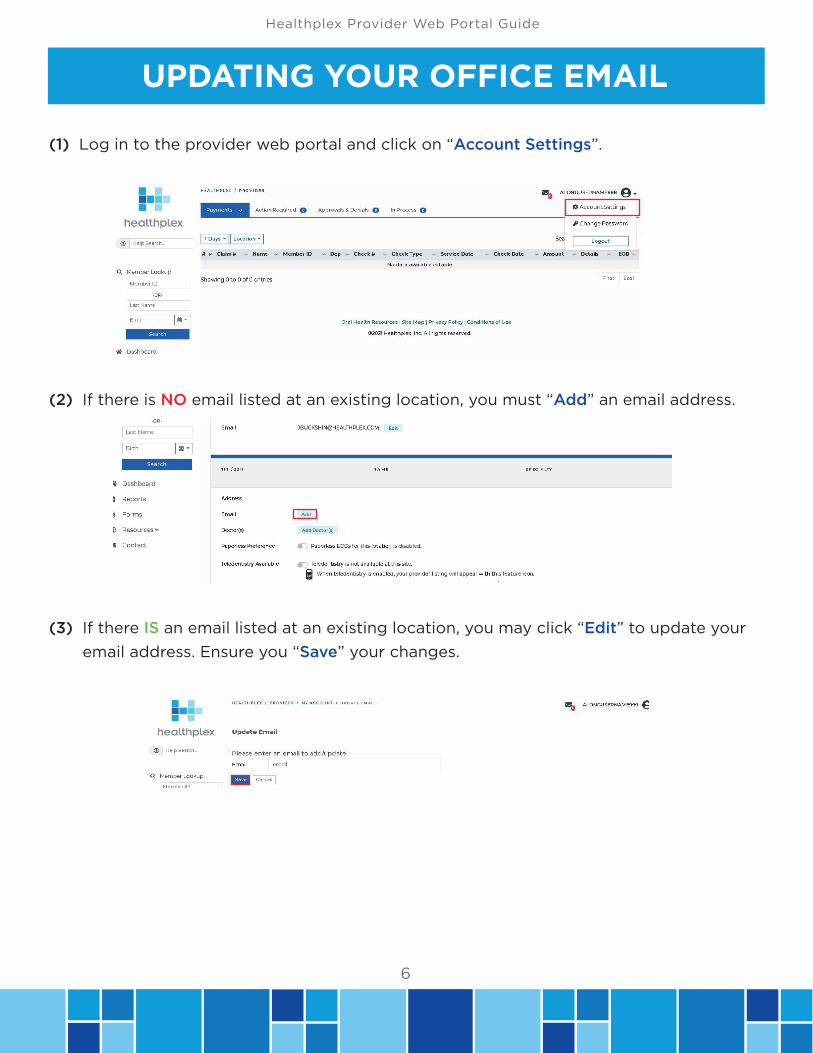
(1) Log in to the provider web portal and click on “Account Settings”.
(2) If there is NO email listed at an existing location, you must “Add” an email address.
(3) If there IS an email listed at an existing location, you may click “Edit” to update your email address. Ensure you “Save” your changes.

7
Healthplex Provider Web Portal Guide
ADDING/REMOVING A PROVIDER (1) Log in to the provider web portal and click on “Account Settings”.
(2) All active participating doctors at the office(s), and their corresponding role (associate or owner), are listed.
(3) To ADD a provider to a location
a. Click on “Add Doctor(s)” or “Update Doctor(s)”
b. Indicate how many providers (option to add 1-3 providers at a time) you’d like to add at the indicated location. User will have to indicate the First Name, Last Name, NPI, and specialty of the doctor(s) being added.

Healthplex Provider Web Portal Guide
8
(4) To REMOVE a provider from a location
(5) After all the required information is entered, please press “Save”. You will then be redirected back to the “Account Settings Page”. Once you’ve indicated which locations you’d like to have updated, The “Update Doctor(s)” button will be orange. At this point, you will not be able to modify anything until a Healthplex representative has verified and updated this information.
You have successfully updated your provider information!
a. Click on “Update Doctor(s)”
b. Click the checkbox next to the corresponding provider you would like to remove. Once you click on a checkbox, please provide the reason you are removing this provider from this location.
9
Healthplex Provider Web Portal Guide
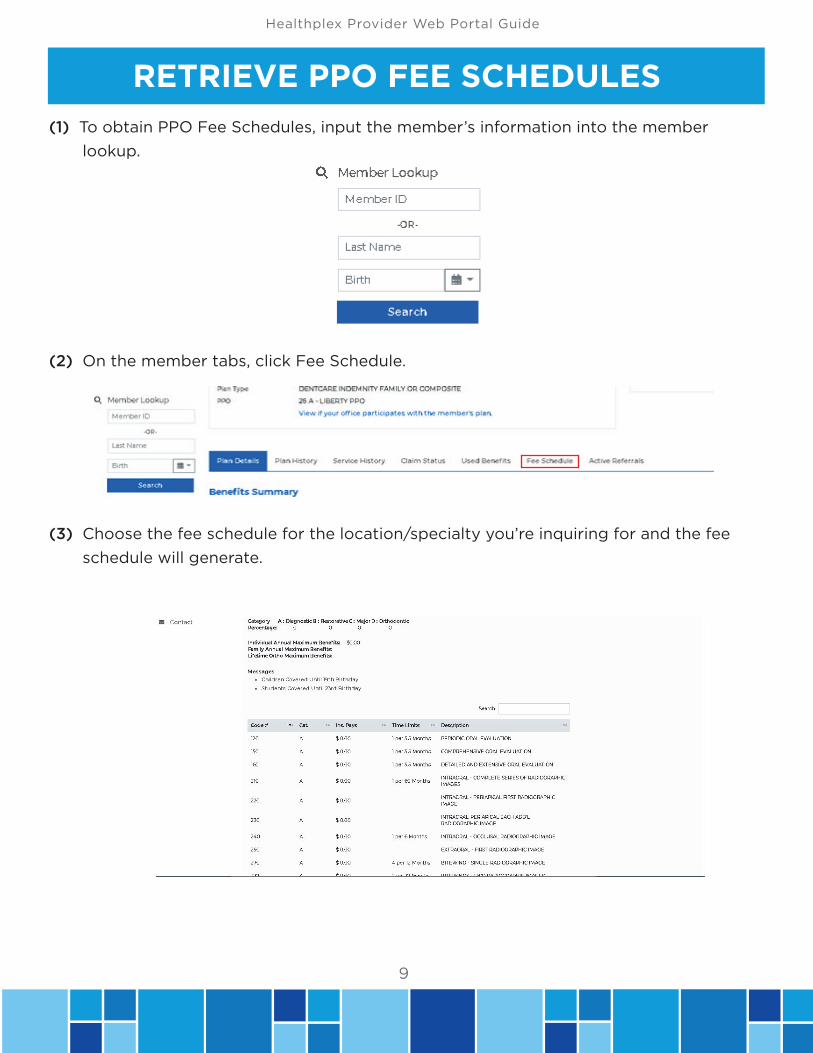
RETRIEVE PPO FEE SCHEDULES (1) To obtain PPO Fee Schedules, input the member’s information into the member lookup.
(2) On the member tabs, click Fee Schedule.
(3) Choose the fee schedule for the location/specialty you’re inquiring for and the fee schedule will generate.
Healthplex Provider Web Portal Guide
10
RETRIEVING GOVERNMENT MANAGED CARE FEE SCHEDULES
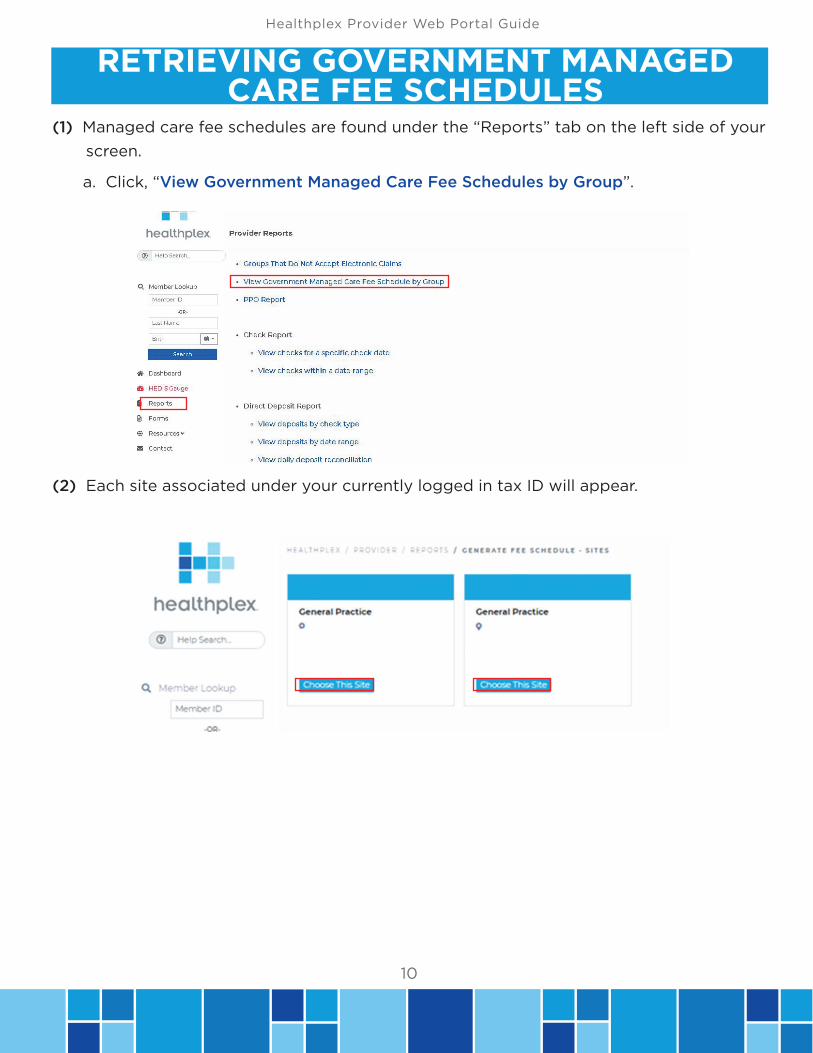
(1) Managed care fee schedules are found under the “Reports” tab on the left side of your screen.
(2) Each site associated under your currently logged in tax ID will appear.
a. Click, “View Government Managed Care Fee Schedules by Group”.

11
Healthplex Provider Web Portal Guide
(3) Your selected site will list all the managed care plans your office participates with.
(4) You are now able to see the fee schedule for the indicated plans. The Group Name/ Number, ADA Code, Description, and fees are listed.
(5) You also have the ability to search for specific ADA codes. You can either print or download the fee schedule into an Excel, CSV, or PDF.
a. You can choose one or multiple plans. (Please note that the more groups you select, the longer it will take to generate the fee schedule.)
b. Once you’ve selected which plans you’d like to view the fee schedule for, click on “Generate”.

Healthplex Provider Web Portal Guide
12
a. Click “PPO Report”.
a. You may further refine your report to search for specific groups. You also have the ability to either print/download the list of plans into an Excel, CSV, or PDF.
DETERMINING WHAT PPOS YOUR OFFICE PARTICIPATES WITH (PPO REPORTS)
(1) PPO reports are found under the “Reports” tab on the left side of your screen.
(2) You will be presented with a list of locations and/or specialties that are currently on PPO plans. Participation status may differ for each locations and/or specialty.
(3) You will be presented with a list of PPO plans your office participates with along with the effective dates.

13
Healthplex Provider Web Portal Guide
CHECK REPORTSThe check reports are found under the “Reports” tab on the left side of your screen. You can either review this information by a specific check date or by date range.
a. Select which specialties/locations you’d like to receive a specific check datereport for.
b. You now can view checks within a specific date by using the filter.
(1) View Checks for a Specific Date Range

Healthplex Provider Web Portal Guide
14
a. Select which specialties/locations you’d like to receive a specific check date report for.
b. You now can view checks within a date range by using the filters.
(2) View Checks within a Date Range

15
Healthplex Provider Web Portal Guide
DIRECT DEPOSIT REPORT Direct Deposit reports are found under the “Reports” tab on the left side of your screen. You can either review this information by check type, date range, or by daily deposit reconciliation.
a. Select which specialties/locations you’d like to receive a direct deposit summary by plan type for (commercial plans, government plans, Medicare, etc.).
b. Direct deposit information is available by plan type and transaction dates.
(1) View deposits by check type .

Healthplex Provider Web Portal Guide
16
a. Select which specialties/locations you’d like to receive a direct deposit summary using a date range for.
b. Define the date range for your inquiry.
c. A report is presented with detailed claim information by member including the check type, service date, check date, and the amount paid.
This is a report that lists what each specialty at the office was paid daily. Click on the dropdown box to see a more detailed breakdown of direct deposit by specialty.
(2) View Direct Deposit by Date Range
(2) Daily Reconciliation Report

17
Healthplex Provider Web Portal Guide
OBTAINING MANAGED CARE ROSTERS (MEMBERS ASSIGNED TO YOUR
(1) To view Managed Care Rosters, go to the reports tab and click “Managed Care Roster by Billing Office”
(2) Select the site to retrieve the roster for.
(3) Chose a site to see your roster history using the date range feature.

Healthplex Provider Web Portal Guide
18
(4) “View Report”, will give a detailed member roster including the monthly capitation
HEDIS GAUGE “HEDIS” is a quality measure used to determine utilization rates for a select segment of the population, mainly consisting of Medicaid eligible children aged 2 – 20 years old. The importance of these children being seen by a dentist at least once per calendar year is imperative to the overall health of our communities, and Healthplex partners with providers like you to drive these quality standards every day.
One way we do this is by providing you with the tools needed to identify which of these HEDIS eligible members are assigned to your office but have not been seen yet this year. Through joint outreach efforts from Healthplex and providers our goal is to raise the state-wide average every year in dental benefit utilization.
Providers with the highest HEDIS scores in their area are awarded additional member assignment from Healthplex.
19
Healthplex Provider Web Portal Guide
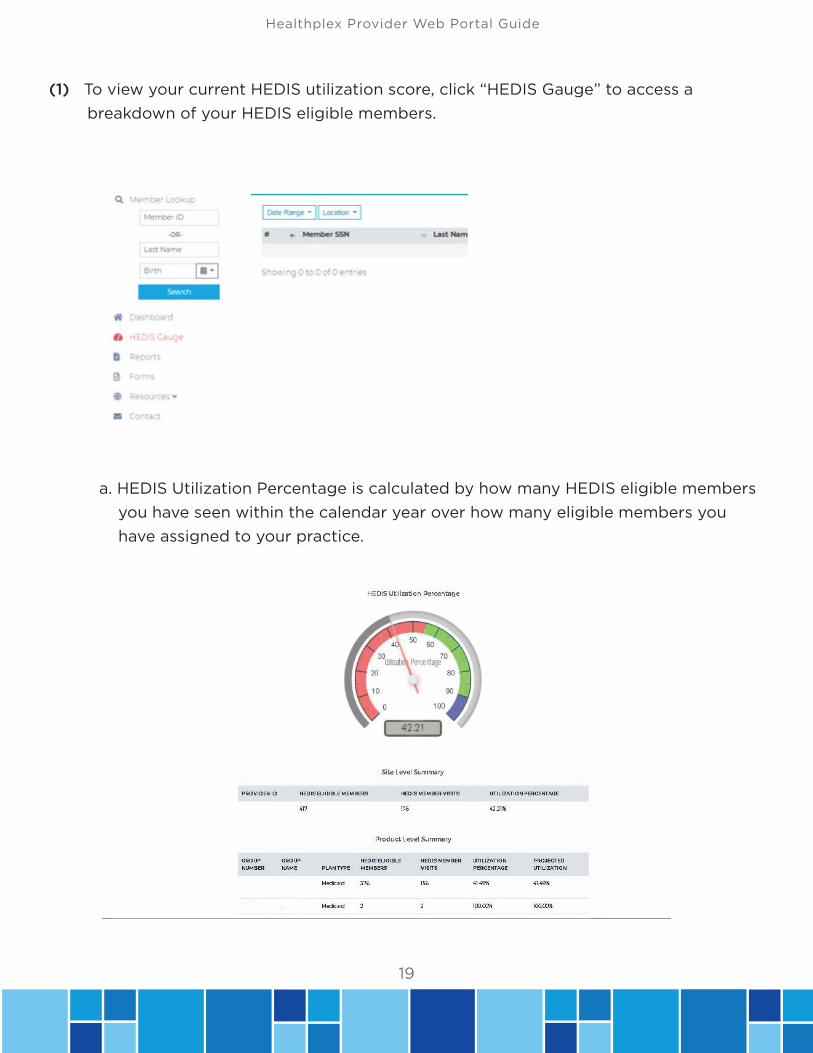
(1) To view your current HEDIS utilization score, click “HEDIS Gauge” to access a breakdown of your HEDIS eligible members.
a. HEDIS Utilization Percentage is calculated by how many HEDIS eligible members you have seen within the calendar year over how many eligible members you have assigned to your practice.
Healthplex Provider Web Portal Guide
20
CLAIMS DASHBOARD
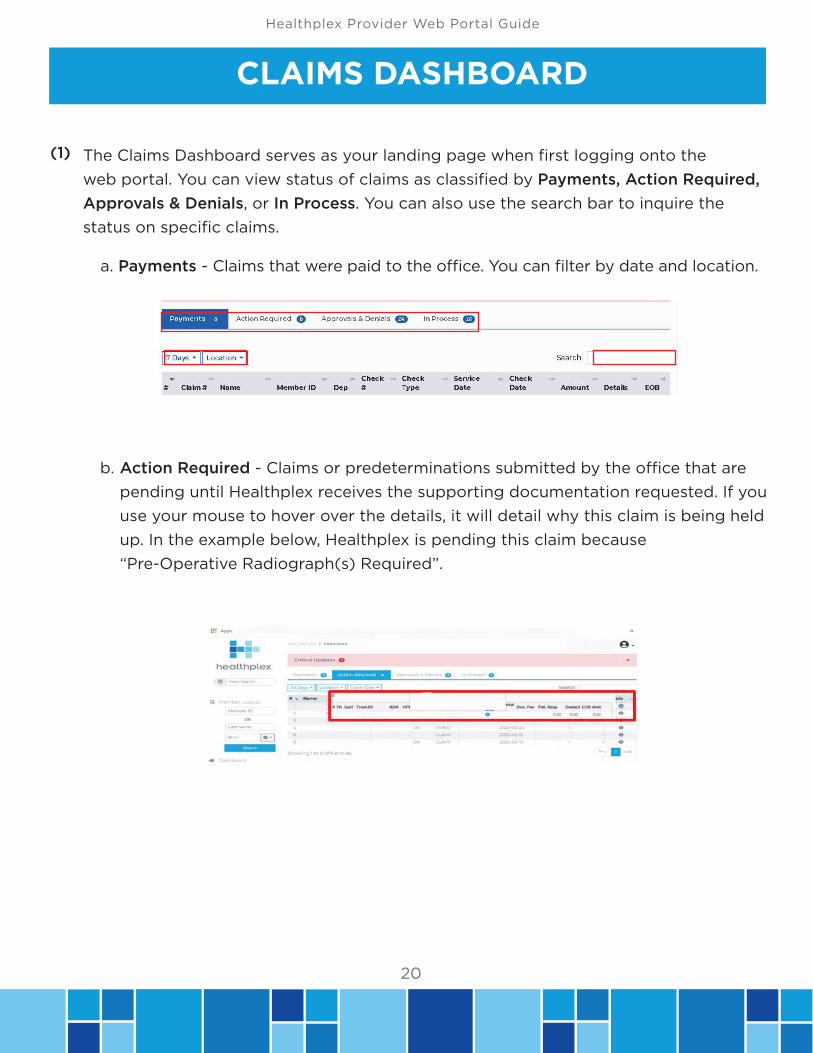
(1) The Claims Dashboard serves as your landing page when first logging onto the web portal. You can view status of claims as classified by Payments, Action Required, Approvals & Denials, or In Process. You can also use the search bar to inquire the status on specific claims.
Action Required - Claims or predeterminations submitted by the office that are pending until Healthplex receives the supporting documentation requested. If you use your mouse to hover over the details, it will detail why this claim is being held up. In the example below, Healthplex is pending this claim because “Pre-Operative Radiograph(s) Required”.
a. Payments - Claims that were paid to the office. You can filter by date and location.
b.

21
Healthplex Provider Web Portal Guide
In Process - These are claims or Pre Determinations that have been submitted and not yet reviewed.
d.
Please keep in mind that Healthplex has up to 30 days to process clean e-claims and up to 45 days to process clean paper claims.
Approvals and Denials - A list of claims/predeterminations that have either been approved or denied. If a claim is denied or a predetermination is denied, you are provided a detail explanation of why coverage of those services were denied.
c.
Healthplex Provider Web Portal Guide
22
CHECKING MEMBER ELIGIBILITY/BENEFITS Checking member eligibility on the Provider Web Portal is the best way to ensure that the member is active on the date of service
When your office checks member eligibility using the provider web portal, a record is created within Healthplex’s system under your office’s history to reflect that your office checked eligibility for the member and the result that you were presented with at the time. THIS PROTECTS YOU if a member is retro terminated at a later date and a claim is then denied due to eligibility not being in force at the time the claim was received. Checking eligibility over the phone does not offer you this protection.
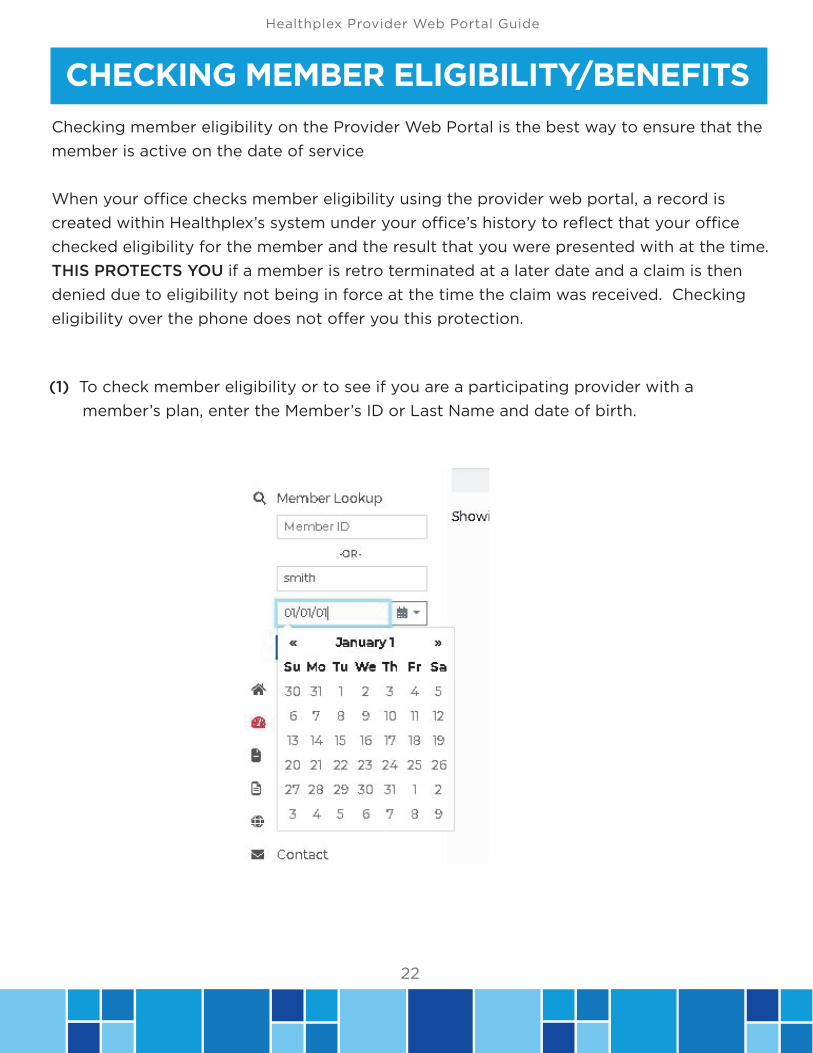
(1) To check member eligibility or to see if you are a participating provider with a member’s plan, enter the Member’s ID or Last Name and date of birth.
23
Healthplex Provider Web Portal Guide
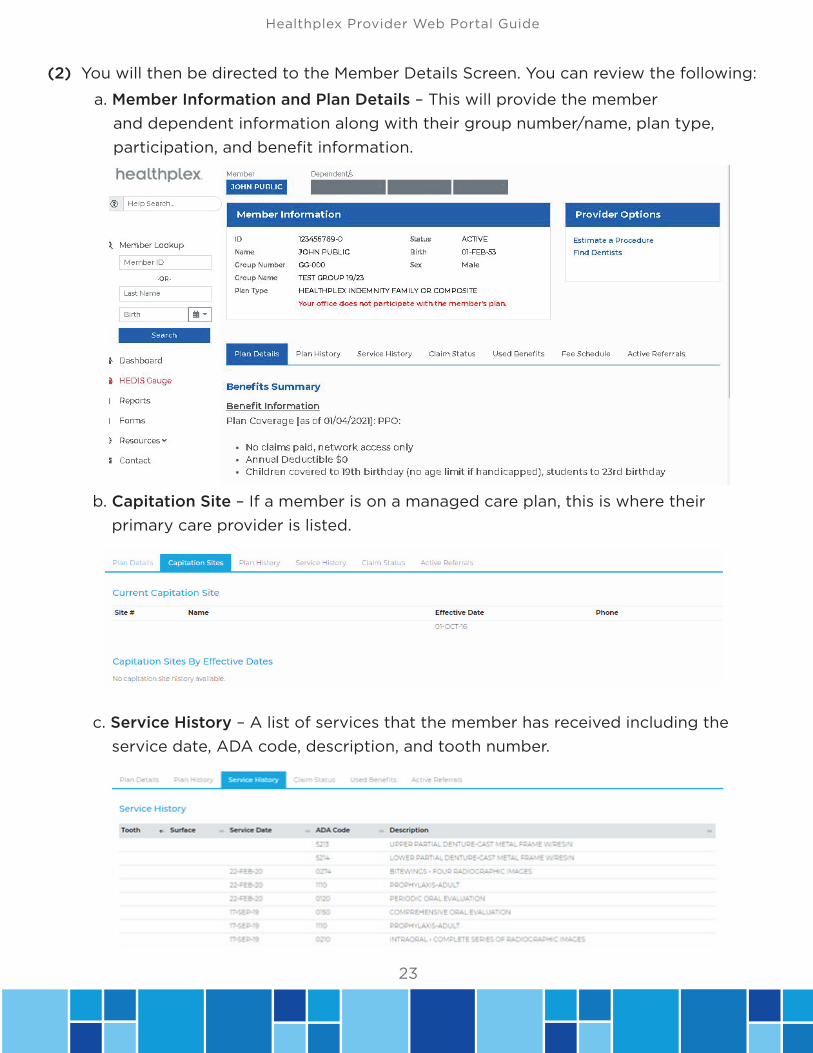
a. Member Information and Plan Details – This will provide the member and dependent information along with their group number/name, plan type, participation, and benefit information.
b. Capitation Site – If a member is on a managed care plan, this is where their primary care provider is listed.
c. Service History – A list of services that the member has received including the service date, ADA code, description, and tooth number.
(2) You will then be directed to the Member Details Screen. You can review the following:
Healthplex Provider Web Portal Guide
24
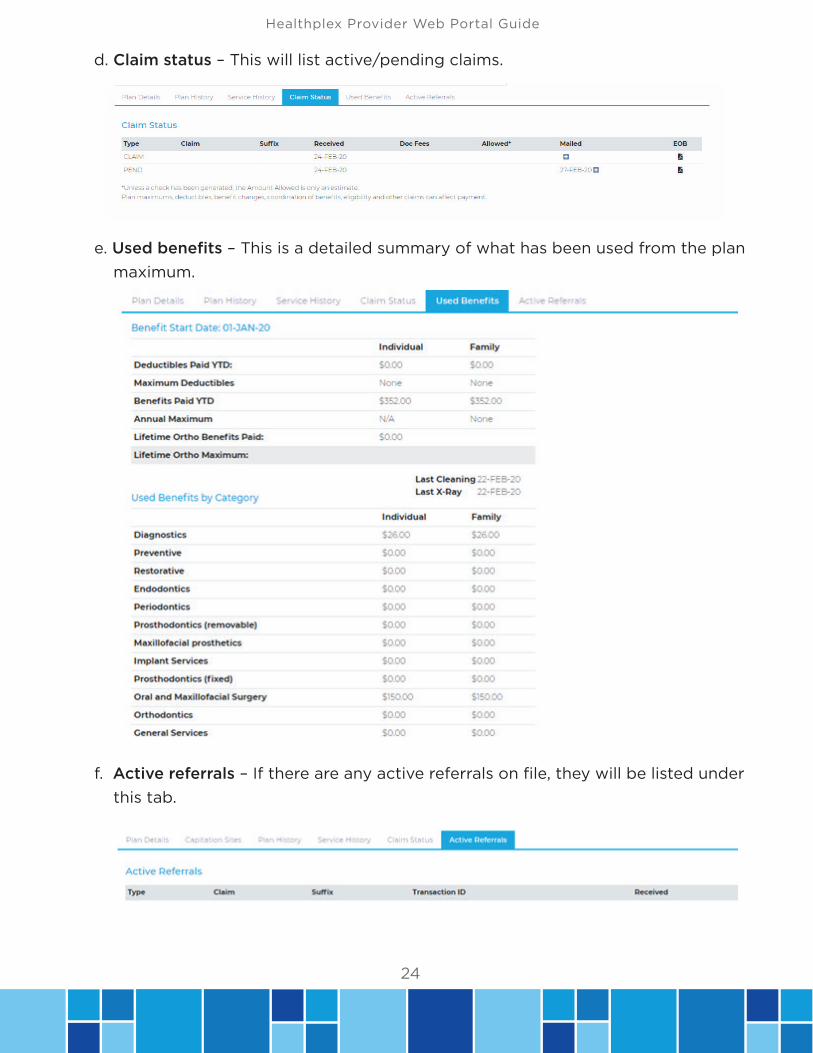
d. Claim status – This will list active/pending claims.
e. Used benefits – This is a detailed summary of what has been used from the plan maximum.
f. Active referrals – If there are any active referrals on file, they will be listed under this tab.
25
Healthplex Provider Web Portal Guide
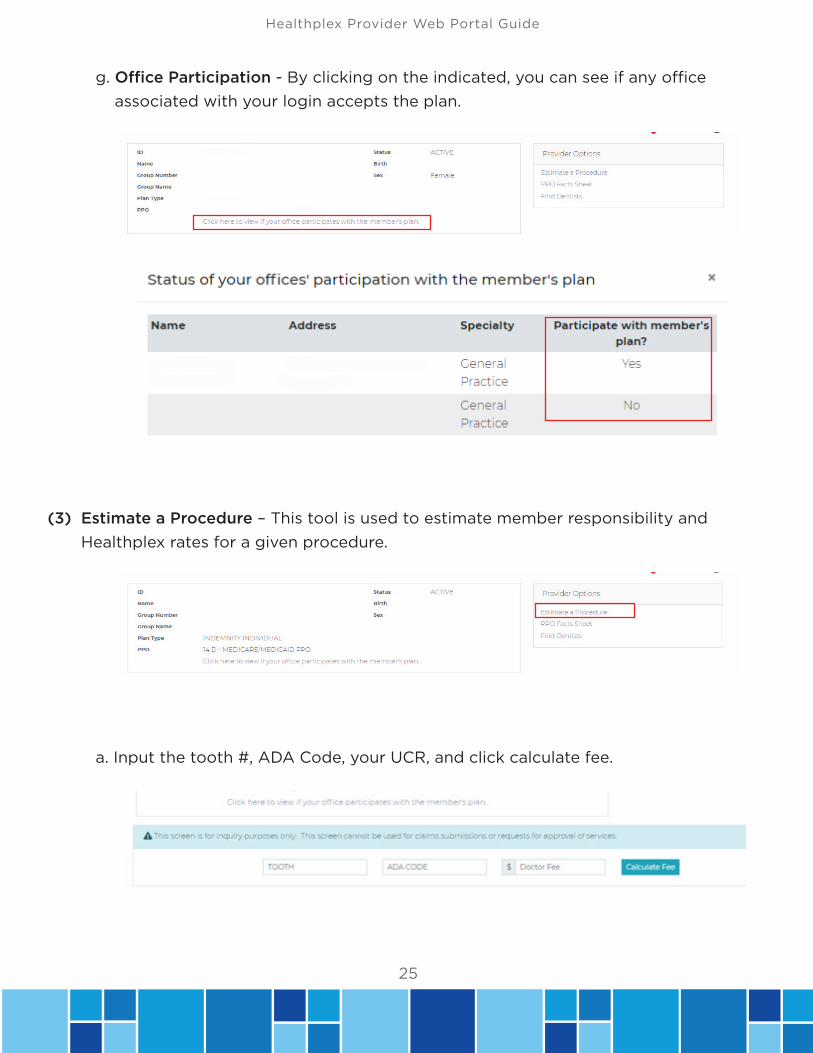
g. Office Participation - By clicking on the indicated, you can see if any office associated with your login accepts the plan.
a. Input the tooth #, ADA Code, your UCR, and click calculate fee.
(3) Estimate a Procedure – This tool is used to estimate member responsibility and Healthplex rates for a given procedure.
Healthplex Provider Web Portal Guide
26
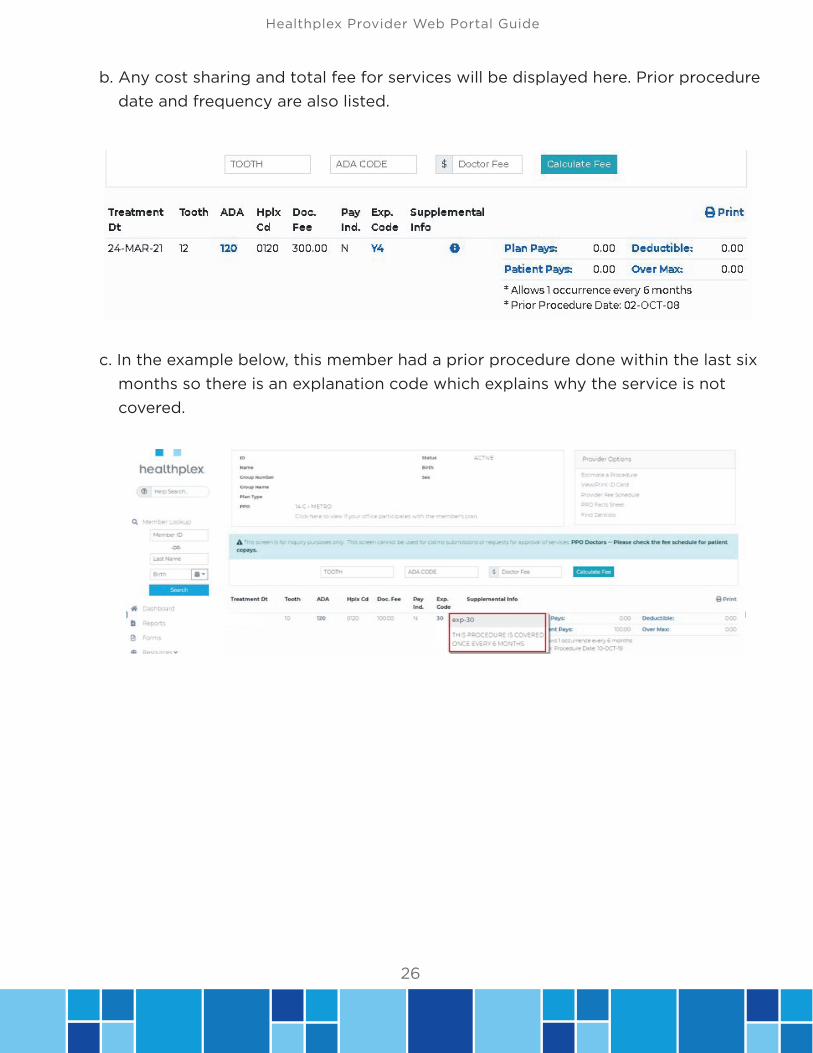
b. Any cost sharing and total fee for services will be displayed here. Prior procedure date and frequency are also listed.
c. In the example below, this member had a prior procedure done within the last six months so there is an explanation code which explains why the service is not covered.
27
Healthplex Provider Web Portal Guide
Additional Topics (Help Search )
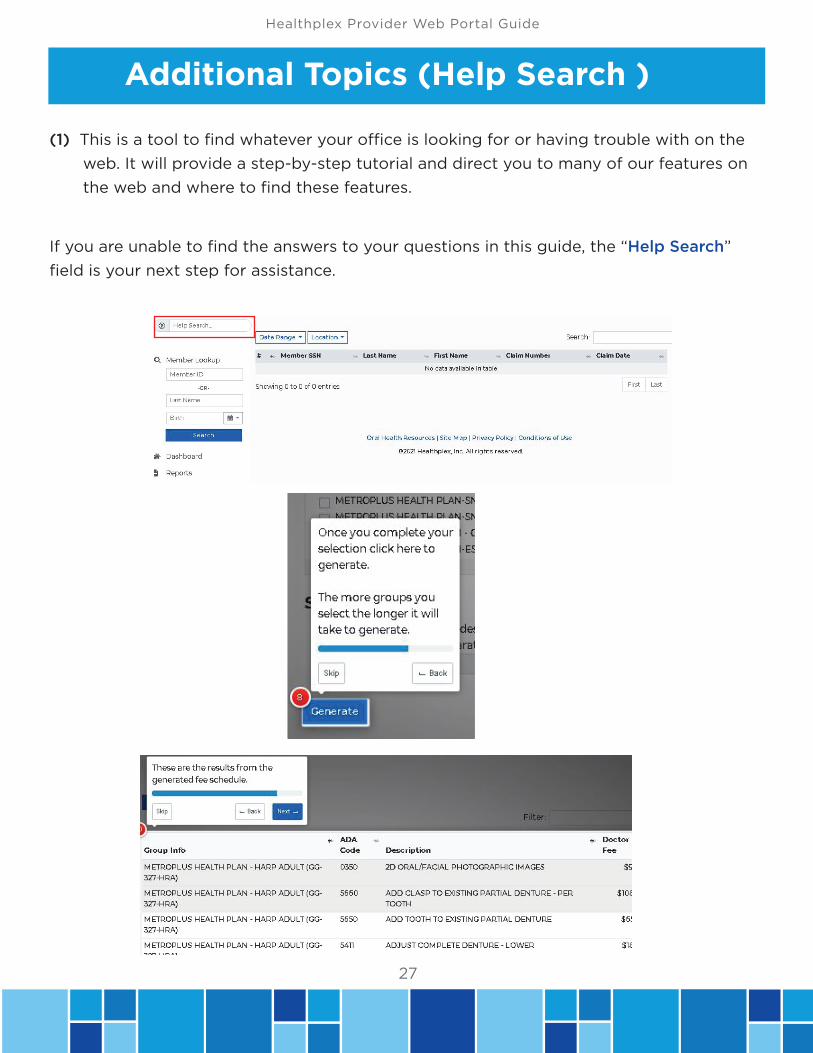
(1) This is a tool to find whatever your office is looking for or having trouble with on the web. It will provide a step-by-step tutorial and direct you to many of our features on the web and where to find these features.
If you are unable to find the answers to your questions in this guide, the “Help Search” field is your next step for assistance.
Healthplex Provider Web Portal Guide
28
CREATE ORTHODONTIC REFERRAL
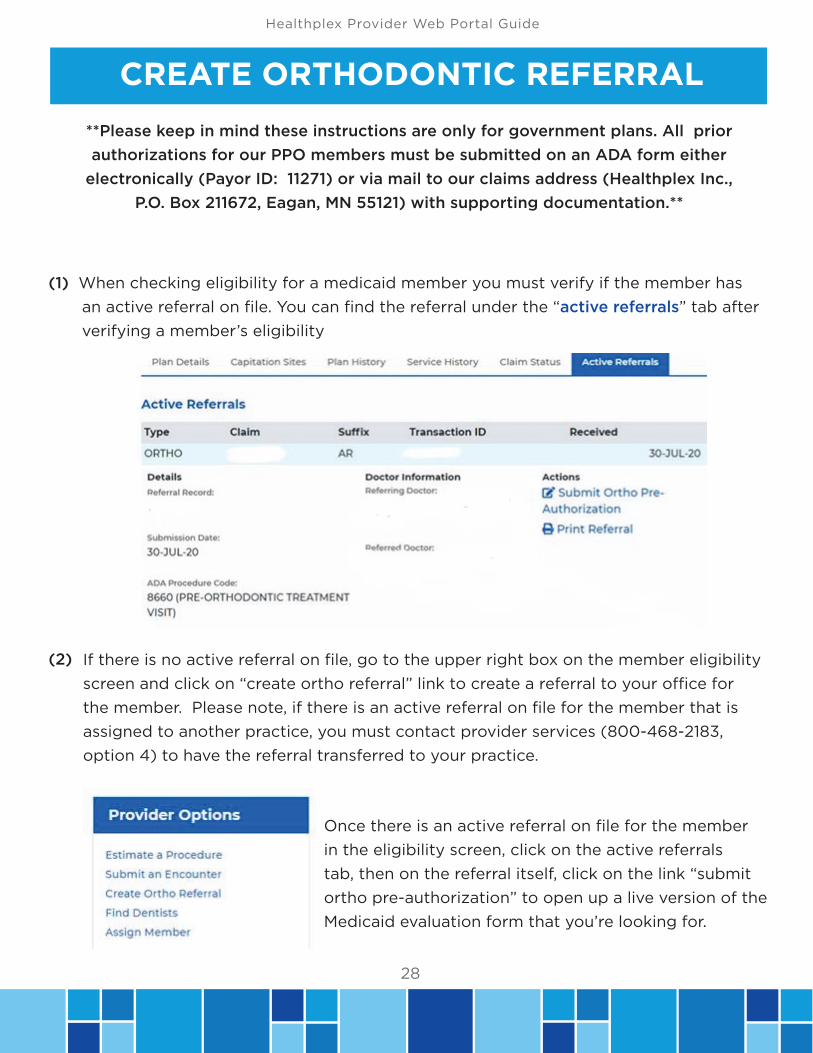
(1) When checking eligibility for a medicaid member you must verify if the member has an active referral on file. You can find the referral under the “active referrals” tab after verifying a member’s eligibility
(2) If there is no active referral on file, go to the upper right box on the member eligibility screen and click on “create ortho referral” link to create a referral to your office for the member. Please note, if there is an active referral on file for the member that is assigned to another practice, you must contact provider services (800-468-2183, option 4) to have the referral transferred to your practice.
Once there is an active referral on file for the member in the eligibility screen, click on the active referrals tab, then on the referral itself, click on the link “submit ortho pre-authorization” to open up a live version of the Medicaid evaluation form that you’re looking for.
**Please keep in mind these instructions are only for government plans. All prior authorizations for our PPO members must be submitted on an ADA form either
electronically (Payor ID: 11271) or via mail to our claims address (Healthplex Inc., P.O. Box 211672, Eagan, MN 55121) with supporting documentation.**