Embed Size (px)
Citation preview
Oregon Health Information Technology (HIT) Portfolio Project
PROVIDER DIRECTORY
IMPLEMENTATION GUIDE
FOR
OREGON HEALTH INFORMATION
TECHNOLOGY (HIT) PORTFOLIO
REVISION 2.0
5 AUGUST 2019
Oregon Health Authority, Office of Health Information and Technology (Agency)
Version 1.0
Approved: June 2019

Oregon Health Information Technology (HIT) Portfolio Project
i
Oregon Health Information Technology (HIT) Portfolio Project
ii
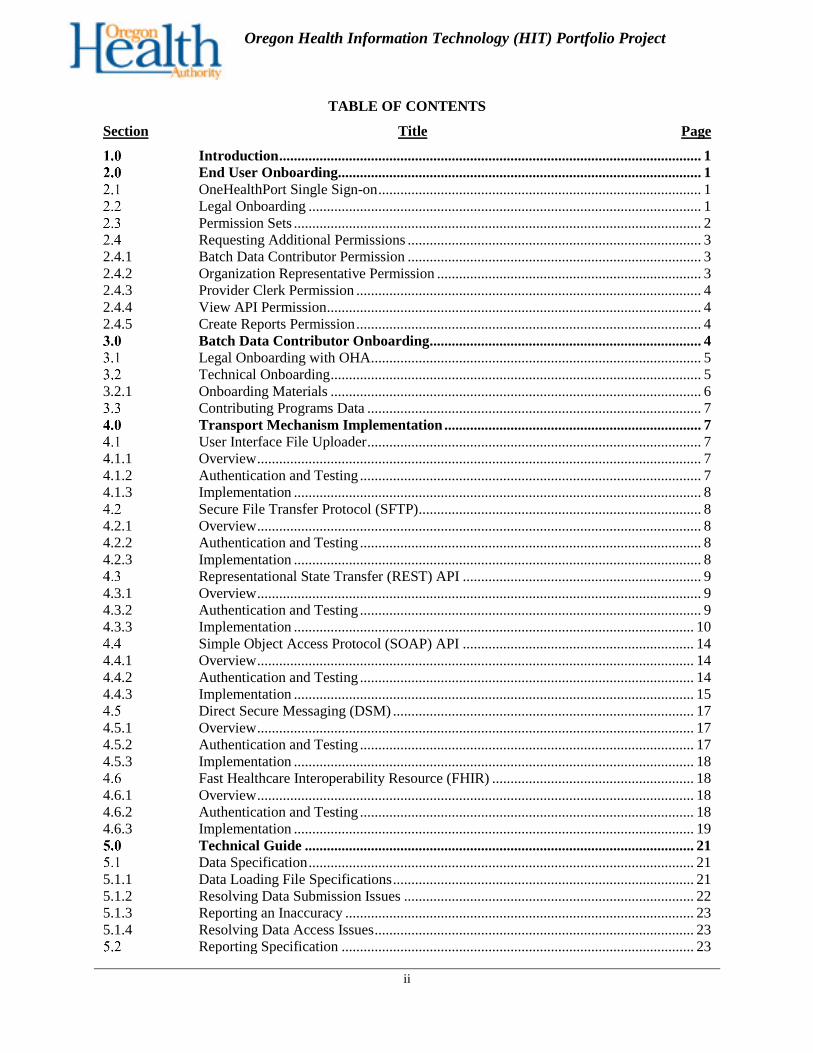
TABLE OF CONTENTS
Section Title Page
Introduction ................................................................................................................... 1 End User Onboarding................................................................................................... 1 OneHealthPort Single Sign-on ........................................................................................ 1 Legal Onboarding ........................................................................................................... 1 Permission Sets ............................................................................................................... 2 Requesting Additional Permissions ................................................................................ 3
2.4.1 Batch Data Contributor Permission ................................................................................ 3 2.4.2 Organization Representative Permission ........................................................................ 3 2.4.3 Provider Clerk Permission .............................................................................................. 4 2.4.4 View API Permission ...................................................................................................... 4 2.4.5 Create Reports Permission .............................................................................................. 4
Batch Data Contributor Onboarding .......................................................................... 4 Legal Onboarding with OHA .......................................................................................... 5 Technical Onboarding ..................................................................................................... 5
3.2.1 Onboarding Materials ..................................................................................................... 6 Contributing Programs Data ........................................................................................... 7 Transport Mechanism Implementation ...................................................................... 7 User Interface File Uploader ........................................................................................... 7
4.1.1 Overview ......................................................................................................................... 7 4.1.2 Authentication and Testing ............................................................................................. 7 4.1.3 Implementation ............................................................................................................... 8
Secure File Transfer Protocol (SFTP) ............................................................................. 8 4.2.1 Overview ......................................................................................................................... 8 4.2.2 Authentication and Testing ............................................................................................. 8 4.2.3 Implementation ............................................................................................................... 8
Representational State Transfer (REST) API ................................................................. 9 4.3.1 Overview ......................................................................................................................... 9 4.3.2 Authentication and Testing ............................................................................................. 9 4.3.3 Implementation ............................................................................................................. 10
Simple Object Access Protocol (SOAP) API ............................................................... 14 4.4.1 Overview ....................................................................................................................... 14 4.4.2 Authentication and Testing ........................................................................................... 14 4.4.3 Implementation ............................................................................................................. 15
Direct Secure Messaging (DSM) .................................................................................. 17 4.5.1 Overview ....................................................................................................................... 17 4.5.2 Authentication and Testing ........................................................................................... 17 4.5.3 Implementation ............................................................................................................. 18
Fast Healthcare Interoperability Resource (FHIR) ....................................................... 18 4.6.1 Overview ....................................................................................................................... 18 4.6.2 Authentication and Testing ........................................................................................... 18 4.6.3 Implementation ............................................................................................................. 19
Technical Guide .......................................................................................................... 21 Data Specification ......................................................................................................... 21
5.1.1 Data Loading File Specifications .................................................................................. 21 5.1.2 Resolving Data Submission Issues ............................................................................... 22 5.1.3 Reporting an Inaccuracy ............................................................................................... 23 5.1.4 Resolving Data Access Issues ....................................................................................... 23
Reporting Specification ................................................................................................ 23
Oregon Health Information Technology (HIT) Portfolio Project
iii
Section Title Page
5.2.1 Standard Reports ........................................................................................................... 23 5.2.2 Custom Reports ............................................................................................................. 25
Service Level Availability Specification ...................................................................... 26 Configuration Guide ................................................................................................... 26 Organization Account Management ............................................................................. 26 Security and Access ...................................................................................................... 27 Configuration Management .......................................................................................... 27 Release Management .................................................................................................... 28 Support ........................................................................................................................ 28 Appendices ................................................................................................................... 29 Appendix A: Salesforce Standard REST API Documentation ..................................... 29 Appendix B: Data Source Loading Specifications ....................................................... 29 Appendix C: Data Dictionary ....................................................................................... 29 Appendix D: Onboarding Form and Onboarding Meeting Presentation ...................... 29
LIST OF FIGURES
Figure Title Page
Figure 1: Basic View Rights Permission Set Workflow ........................................................................... 2 Figure 2: Basic Data Contributor Permission Set Workflow .................................................................... 3 Figure 3: Onboarding Timeline ................................................................................................................. 4 Figure 4: SFTP Request Form .................................................................................................................. 8 Figure 5: Sample SFTP Guide .................................................................................................................. 8 Figure 6: REST API Guide ..................................................................................................................... 14 Figure 7: SOAP API Developer Guide ................................................................................................... 15 Figure 8: Sample DSM Request Form .................................................................................................... 17 Figure 9: FHIR API: Body as a Post ....................................................................................................... 19 Figure 10: Received Access Token ......................................................................................................... 20 Figure 11: Query With Access Token ..................................................................................................... 20 Figure 12: Organization Record Query ................................................................................................... 21
LIST OF TABLES
Table Title Page
Table 1: FHIR Mapping .......................................................................................................................... 18 Table 2: Standard List of Provider Directory Reports and Fields ........................................................... 24
Oregon Health Information Technology (HIT) Portfolio Project
1
INTRODUCTION
The purpose of this implementation guide is to describe how end-users and data contributors
connect, contribute to and access the Oregon Provider Directory (PD). This document is best for
technical analysts and onboarding coordinators representing data sources which are contributing
data to the PD through the user interface or a recurring electronic transport method.
Basic end users: End-users will login through OneHealthPort and be granted permissions
based on roles as specified by OHA and assigned by OneHealthPort. The user interface
displays the provider and organization data content in an easy to navigate web interface. End
users can contribute data on individual records in PD through data attestation. Any data
contributed as an individual end user will display that individual’s name as the record’s data
source.
Batch data contributor: Batch data contributors are critical for populating the solution with
provider and organization information. This guide explains details on how end users may
become batch data contributors which allows for large amounts of data to be submitted to the
PD through one of the transport mechanisms. End users connect to the PD and then if
appropriate, request the additional permission to become a batch data contributor through the
MiHIN onboarding process. Any data contributed as a batch data contributor will display that
organization’s name as the record’s data source.
END USER ONBOARDING
ONEHEALTHPORT SINGLE SIGN-ON
User registration and role-based access to the PD is provided via OneHealthPort (OHP). OHP
provides Identity Verification and Multi Factor Authentication (MFA) options to end-users. OHP
does not provide any additional PD features or functions beyond user authorization and access to
the PD solution. Once the user has accessed the PD, they have access to data and functionality
based on the assigned role(s) specified by OneHealthPort. OneHealthPort provides Single Sign-
on (SSO) capability to all end-users, including those that already have an account for
OneHealthPort’s other services.
The Provider Directory “splash screen” within OneHealthPort provides registration instructions,
useful links, and access to the PD Login interface at the following link:
http://onehealthportdev.prod.acquia-sites.com/payer/oregon-provider-directory
LEGAL ONBOARDING
All end users will enter the PD user interface through the OneHealthPort Single Sign-on. Before
an end user can access the PD, OHA will determine if their organization qualifies as a Medicaid
entity, and execute all legal agreements with the organization. OHA will then confirm in writing
Oregon Health Information Technology (HIT) Portfolio Project
2
that the appropriate legal agreements have been established by requesting the organization’s TIN
be added to the PD login workflow approved TIN list via the PD help desk.
Once MiHIN receives this confirmation, the organization’s TIN will be added to the approved
TIN list which allows end users associated with that TIN in OneHealthPort to enter the PD user
interface.
PERMISSION SETS
PD solution access is granted by OneHealthPort, and permission sets are assigned within the PD
to each role. The PD roles are mapped to OneHealthPort roles and OHA functions.
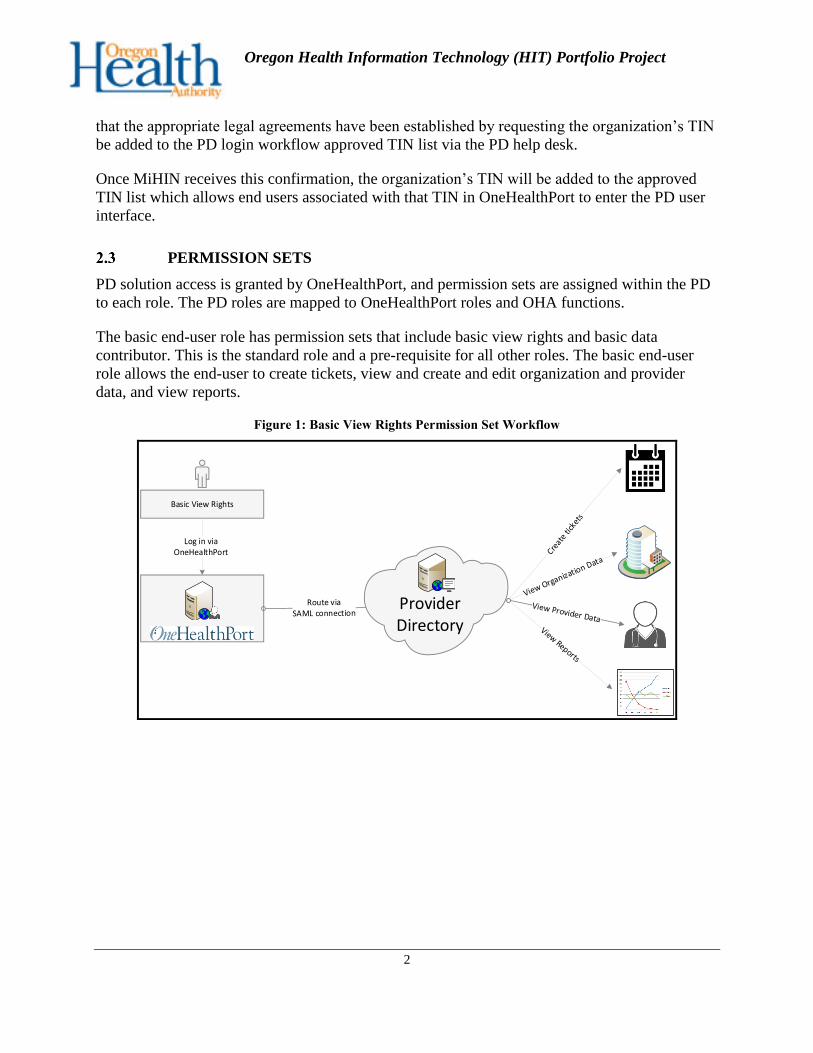
The basic end-user role has permission sets that include basic view rights and basic data
contributor. This is the standard role and a pre-requisite for all other roles. The basic end-user
role allows the end-user to create tickets, view and create and edit organization and provider
data, and view reports.
Figure 1: Basic View Rights Permission Set Workflow
Basic View Rights
Log in via OneHealthPort
Provider Directory
Oregon Health Information Technology (HIT) Portfolio Project
3
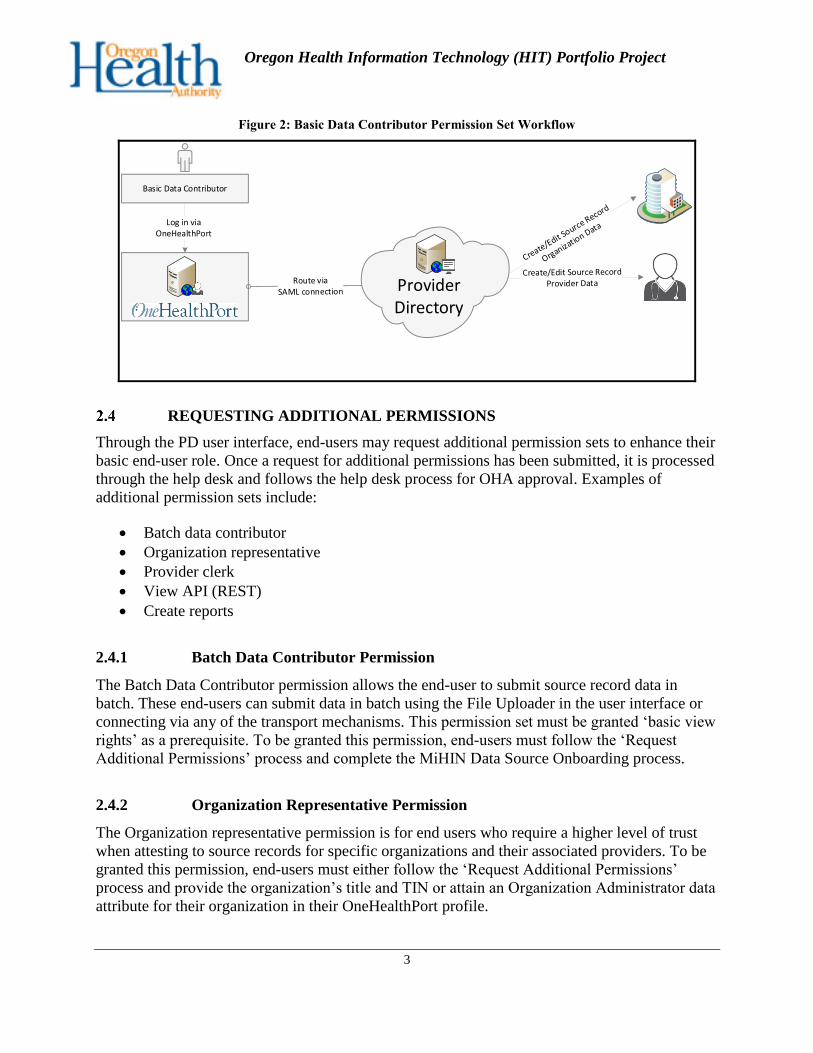
Figure 2: Basic Data Contributor Permission Set Workflow
Basic Data Contributor
Log in via OneHealthPort
Provider Directory
REQUESTING ADDITIONAL PERMISSIONS
Through the PD user interface, end-users may request additional permission sets to enhance their
basic end-user role. Once a request for additional permissions has been submitted, it is processed
through the help desk and follows the help desk process for OHA approval. Examples of
additional permission sets include:
• Batch data contributor
• Organization representative
• Provider clerk
• View API (REST)
• Create reports
2.4.1 Batch Data Contributor Permission
The Batch Data Contributor permission allows the end-user to submit source record data in
batch. These end-users can submit data in batch using the File Uploader in the user interface or
connecting via any of the transport mechanisms. This permission set must be granted ‘basic view
rights’ as a prerequisite. To be granted this permission, end-users must follow the ‘Request
Additional Permissions’ process and complete the MiHIN Data Source Onboarding process.
2.4.2 Organization Representative Permission
The Organization representative permission is for end users who require a higher level of trust
when attesting to source records for specific organizations and their associated providers. To be
granted this permission, end-users must either follow the ‘Request Additional Permissions’
process and provide the organization’s title and TIN or attain an Organization Administrator data
attribute for their organization in their OneHealthPort profile.
Oregon Health Information Technology (HIT) Portfolio Project
4
2.4.3 Provider Clerk Permission
The Provider clerk permission is for end users who require a higher level of trust when attesting
to source records for specific providers. To be granted this permission, end-users must follow the
‘Request Additional Permissions’ process and provide the provider’s first name, last name and
NPI.
2.4.4 View API Permission
The View API permission is for end users who would like to view and/or export PD data from an
API. To be granted this permission, end-users must follow the ‘Request Additional Permissions’
process. This permission is a pre-requisite to contributing data via API.
2.4.5 Create Reports Permission
The Create reports permission is for advanced technical users who have business needs to create
custom reports. To be granted this permission, end-users must follow the ‘Request Additional
Permissions’ process.
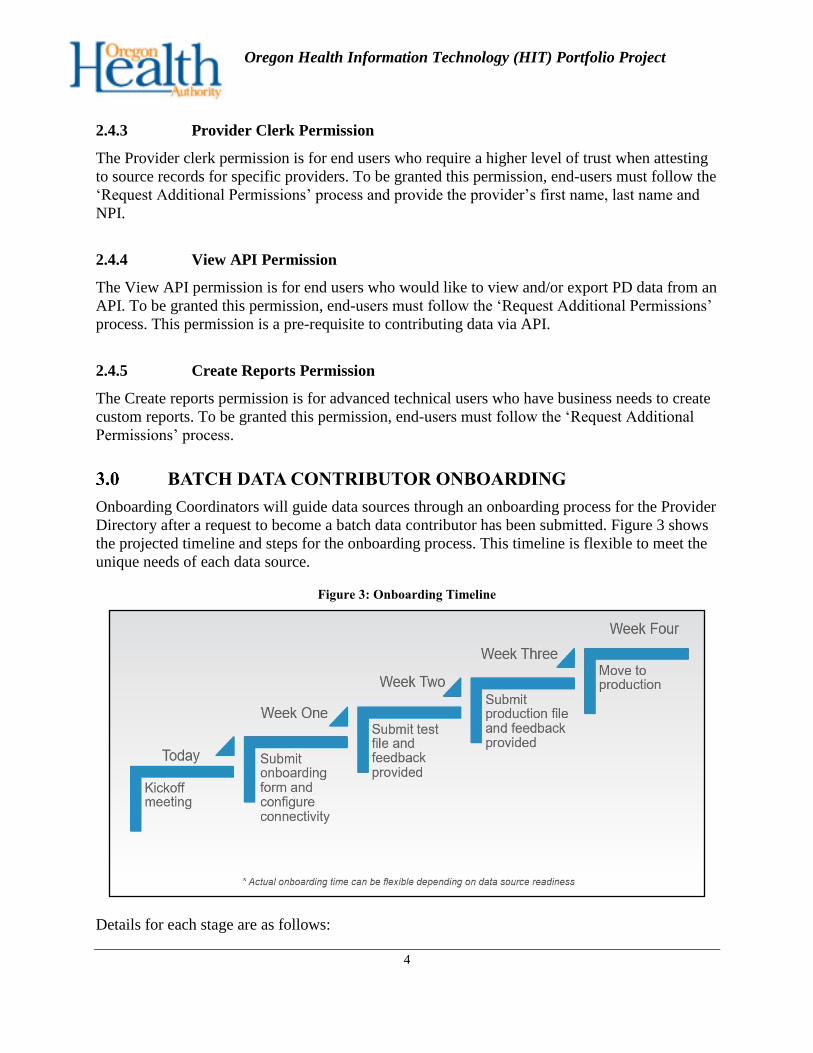
BATCH DATA CONTRIBUTOR ONBOARDING
Onboarding Coordinators will guide data sources through an onboarding process for the Provider
Directory after a request to become a batch data contributor has been submitted. Figure 3 shows
the projected timeline and steps for the onboarding process. This timeline is flexible to meet the
unique needs of each data source.
Figure 3: Onboarding Timeline
Details for each stage are as follows:
Oregon Health Information Technology (HIT) Portfolio Project
5
• Stage 1: Kickoff Meeting
• Stage 2: Submit onboarding form and configure connectivity
• Stage 3: Submit test file and feedback provided to data source
• Stage 4: Data Quality Assurance Period: Submit production file and feedback provided
to data source
• Stage 5: Move to production
LEGAL ONBOARDING WITH OHA
Eligibility: OHA will continuously identify eligible batch data contributors for the PD. Data
sources can also submit a help desk ticket to MiHIN if they are interested in submitting data to
the PD. For data sources submitting a ticket, MiHIN will review the ticket and follow the data
governance model described in section 2.0. OHA will approve or reject the data source’s request.
Once OHA approves or rejects the data source, MiHIN will communicate the decision to the data
source. If approved, data source onboarding will be initiated. Review section 3.1 for onboarding
details.
Legal Agreements: All data sources must first be Oregon PD end users through the
OneHealthPort Single Sign-on. Before an end user can access the PD, OHA will determine if
their organization qualifies as a Medicaid entity, and execute all legal agreements with the
organization. OHA will then confirm in writing that the appropriate legal agreements have been
established by requesting the organization’s TIN be added to the PD login workflow approved
TIN list via the PD help desk.
Once MiHIN receives this confirmation, the organization’s TIN will be added to the approved
TIN list which allows end users associated with that TIN in OneHealthPort to enter the PD user
interface. Once an end user has successfully logged in to the PD user interface, they can then
apply to become a batch data contributor to submit batch data files. OHA and the data
contributor will work together with MiHIN to provide the necessary onboarding materials to
proceed to technical onboarding.
TECHNICAL ONBOARDING
Details for each stage are as follows:
Stage 1: Kickoff Meeting
The data source will be presented a brief overview of the PD. The MiHIN onboarding team will
walk the data source through the PD data source onboarding form to determine the format and
type of data that will be submitted to the PD. If the data source needs to take the worksheet back
to their organization to accurately complete the required information, they are expected to return
it to the MiHIN onboarding team as soon as possible. MiHIN will provide the data loading
specifications which outline the required fields, other fields, validation rules per field, maximum
character limits per field, accepted values for restricted fields, etc.
Oregon Health Information Technology (HIT) Portfolio Project
6
The minimum data requirements established by OHA are defined in Appendix B: Data Source
Loading Specifications on the Specifications tab and noted as required. The data source will also
be briefed on the help desk ticket processes during the onboarding meeting and presentation.
Stage 2: Submit onboarding form and configure connectivity
The data source will complete the onboarding form to begin configuration. Configuration of
requirements will be dependent on the method of transport selected by the data source. See
Section 4.0 Transport mechanism implementation to review transport method options. Any
necessary connectivity testing will be completed within this stage with the data source.
Stage 3: Submit data for testing and feedback provided to data source
The data source will submit sample data for MiHIN to load into the pre-production PD
environment. Sample data will be in the format agreed upon during the earlier stages of
onboarding. MiHIN will provide feedback about the success or failure of the data load to the data
source.
If the data source has a production ready data set with which they would like to perform testing
with instead of a sample data set, they may do so.
Stage 4: Data Quality Assurance Period: Submit production file and feedback provided to
data source
After the sample data is successfully loaded, the data source will provide MiHIN with a
production ready file. If the provided test file is valid it may be used for DQA.
This initiates the Data Quality Assurance period (DQA). The production file will be loaded into
the pre-production PD environment. MiHIN will provide feedback about the success or failure of
the data load to the data source. If necessary, a meeting can be scheduled with the data source to
review the import process and to confirm the final data loaded in the PD.
Stage 5: Move to production
When the production file has successfully passed the DQA period, MiHIN will communicate to
the data source that they will be loading the data into the production PD. At this point, the data
source will be expected to provide the data in the agreed upon format, transport method, and
frequency. If a data source requires a change in the established transport method, format, or
frequency, the data source will need to submit a help desk ticket.
3.2.1 Onboarding Materials
The data source must provide the following items which are necessary for MiHIN to continue the
onboarding process:
1. PD data source onboarding form
Oregon Health Information Technology (HIT) Portfolio Project
7
2. Production-ready file
Additionally, OHA shall provide data source maps which contain the level at which the new data
source is trusted for each field.
Note: The onboarding process SLA measurement begins when MiHIN receives all the above
onboarding requisites.
CONTRIBUTING PROGRAMS DATA
Programs data to be submitted to the PD must be provided by the program itself, such as PDMP
or PCPCH. The program point of contact can become a batch data contributor through the PD
user interface to begin the data source onboarding process. The program can choose a transport
mechanism and frequency for data submissions. Programs do not have the option to use file
uploader for data quality purposes regarding other file uploader users. Since only programs can
enter program information as the source of truth.
TRANSPORT MECHANISM IMPLEMENTATION
During the data source onboarding process, a transport mechanism is selected that best fits the
data source’s needs. To be granted the batch data contributor permission, end-users must follow
the ‘Request Additional Permissions’ process. This permission is a pre-requisite to contributing
batch data. The details of the specific data source transport mechanism are reviewed and tested
during the onboarding process before going into production. All traffic inbound to PD is required
to be TLS v1.2 or higher. The Provider Directory solution provides encryption of data at rest via
native encryption (AES 256) within the Salesforce platform. PD does not accept any protocol of
lower versions. The PD solution accepts data from the following electronic transport
mechanisms:
USER INTERFACE FILE UPLOADER
4.1.1 Overview
Users can drag and drop or upload their file within the PD user interface. The file must be in the
MiHIN recommended data specification to utilize this option. Validation feedback is returned in
near real time within the user interface as well as within email.
4.1.2 Authentication and Testing
Upon receiving a file from a batch data contributor, the pre-loading data validator will review the
format and data content. When data is not provided in the correct format, tasks can present error
messages and a notification will automatically generate with more details about the error(s) and
how it can be addressed. Batch data contributors will be notified through email and through the
file uploader user interface page that the data was not loaded due to errors. Errors details will
also be listed. The validator identifies errors by column and by row, however it will only list the
first error in each row.
Oregon Health Information Technology (HIT) Portfolio Project
8
4.1.3 Implementation
The Batch Data Contributor permission allows the end-user to submit source record data in
batch. These end-users can submit data in batch using the File Uploader in the user interface or
connecting via any the transport mechanisms. This permission set must be granted ‘basic view
rights’ as a prerequisite. To be granted this permission, end-users must follow the ‘Request
Additional Permissions’ process and complete the MiHIN Data Source Onboarding process.
SECURE FILE TRANSFER PROTOCOL (SFTP)
4.2.1 Overview
Secure File Transfer Protocol (SFTP) is a network protocol for secure data transfer via a Secure
Shell (SSH) data stream connection. This is the most commonly used and most preferred method
of transport for batch files. SFTP files will be loaded into PD using Informatica Extract,
Transfer, & Load (ETL). During initial data source onboarding kickoff meeting, data sources
will confirm if they choose to submit batch files through this transport method.
4.2.2 Authentication and Testing
Authentication and testing are conducted as part of the onboarding process in section 3.2.
To be granted the batch data contributor permission, end-users must follow the ‘Request
Additional Permissions’ process. This permission is a pre-requisite to contributing batch data.
If a data source chooses to submit recurring batch files through SFTP, the PD onboarding team
will provide a form to fill out necessary information. A SFTP form is available below:
Figure 4: SFTP Request Form
Using this information, the PD onboarding team initiates the SFTP internal processes.
4.2.3 Implementation
Once the SFTP account has been created, the PD onboarding team securely communicates to the
data source their SFTP account username and password. Generally, usernames are sent via email
and passwords are sent via text message from MiHIN to the user. With this information, the data
source logs into the SFTP account and utilizes an SFTP process to move files into the secure
location. An example process using WinSCP to Access SFTP is below:
Figure 5: Sample SFTP Guide
Oregon Health Information Technology (HIT) Portfolio Project
9
REPRESENTATIONAL STATE TRANSFER (REST) API
4.3.1 Overview
Representational State Transfer (REST) APIs can return formats such as XML, JSON, and
YAML for transactional record updates as well as data retrieval. REST API provides a powerful,
convenient, and simple Web services API for interacting with the Salesforce Lightning
Platform. Its advantages include ease of integration and development, and it’s an excellent
choice of technology for use with mobile applications and Web 2.0 projects. If you have many
records to process, consider using Bulk API, which is based on REST principles and optimized
for large sets of data.1 REST queries will use object and field names from the Data Dictionary in
Appendix C.
4.3.2 Authentication and Testing
Authentication and testing are conducted as part of the onboarding process in section 3.2. To be
granted the view API permission or batch data contributor permission, end-users must follow the
‘Request Additional Permissions’ process. This process is a pre-requisite to viewing data via API
and/or contributing batch data.
Salesforce uses the OAuth protocol to allow users of applications to securely access data without
having to reveal username and password credentials. Before making REST API calls, data
sources must authenticate the application user using Auth 2.0. The steps include:
1. Set up your application as a connected app in the Salesforce organization.
2. Determine the correct Salesforce OAuth endpoint for your connected app to use.
3. Authenticate the connected app user via one of several different OAuth 2.0 authentication
flows. 2
An OAuth authentication flow defines a series of steps used to coordinate the authentication
process between your application and Salesforce. Supported OAuth flows include:
• Web server flow, where the server can securely protect the consumer secret.
• User-agent flow used by applications that cannot securely store the consumer secret.
• Username-password flow, where the application has direct access to user credentials.3
After successfully authenticating the connected app user with Salesforce, users receive an access
token which can be used to make authenticated REST API calls.
Limits for native REST API queries from Salesforce are as follows:
1 https://developer.salesforce.com/docs/atlas.en-us.api_rest.meta/api_rest/intro_what_is_rest_api.htm 2 https://resources.docs.salesforce.com/214/latest/en-us/sfdc/pdf/api_rest.pdf 3 https://resources.docs.salesforce.com/214/latest/en-us/sfdc/pdf/api_rest.pdf
Oregon Health Information Technology (HIT) Portfolio Project
10
• The maximum possible result size is 2000 rows. This limit is also driven by the number
of characters included in the response.
• The maximum total result size is bound by the URL limit around 20,000 characters.
• Each field included in the query reduces the number of possible results.
• The native REST API will not limit results beyond this.
4.3.3 Implementation
Salesforce provides extensive documentation regarding REST API connections. The following
information has been compiled from Salesforce resources to provide an overview to data sources
who wish to utilize this transport mechanism. All the information mentioned below is available
in more detail here: https://developer.salesforce.com/docs/atlas.en-
us.api_rest.meta/api_rest/quickstart.htm.
1. Prerequisites:
o Install development platform according to its product documentation.
o Become familiar with cURL, the tool used to execute REST requests in this quick
start. If you use another tool, you should be familiar enough with it to translate the
example code.
o Become familiar with JSON which is used in this quick start or be able to translate
samples from JSON to the standard you use.
o Enable an SSL endpoint in your application server.
o Become familiar with OAuth 2.0, which requires some setup. We provide the steps,
but it will help if you are familiar with the basic concepts and workflow.
o Read through all the steps before beginning this quick start. You may also wish to
review the rest of this document to familiarize yourself with terms and concepts. 4
2. Obtain a Salesforce Developer Edition Organization for testing the code:
o If not already a member of the Lightning Platform developer community, go to
developer.salesforce.com/signup and follow the instructions for signing up for a
Developer Edition organization. Even if you already have Enterprise Edition,
Unlimited Edition, or Performance Edition, use Developer Edition for developing,
staging, and testing your solutions against sample data to protect your organization’s
live data. This is especially true for applications that insert, update, or delete data (as
opposed to simply reading data).
o If you already have a Developer Edition organization, verify that the API Enabled
permission. This permission is enabled by default but may have been changed by an
administrator. For more information, see the help in the Salesforce user interface. 5
4 https://developer.salesforce.com/docs/atlas.en-us.api_rest.meta/api_rest/quickstart_prereq.htm 5 https://developer.salesforce.com/docs/atlas.en-us.api_rest.meta/api_rest/quickstart_dev_org.htm
Oregon Health Information Technology (HIT) Portfolio Project
11
3. Set Up Authorization
There are two methods to set up authorization, OAuth 2.0 or by passing a session ID.
If you’re handling someone else’s password, don’t use session ID.
o Setting up OAuth 2.0 requires that you take some steps within Salesforce and in other
locations. If any of the steps are unfamiliar, see Understanding Authentication. The
following example uses the Web server OAuth flow. 6
a. Create a connected app if you haven’t already done so.
b. In Salesforce Classic, from Setup, enter Apps in the Quick Find box, select Apps
(under Build | Create), then click the name of the connected app.
c. In Lightning Experience, from Setup, enter Apps in the Quick Find box, select
App Manager, click, and then select Edit.
d. Click Enable OAuth Settings and specify your callback URL and OAuth scopes.
The Callback URL you supply here is the same as your application’s callback URL.
Usually it is a servlet if you work with Java. It must be secure: http:// does not work,
only https://. For development environments, the callback URL is like
https://localhost:8443/RestTest/oauth/_callback. When you click Save, the
Consumer Key is created and displayed, and a Consumer Secret is created (click
the link to reveal it).
e. The OAuth 2.0 specification uses “client” instead of “consumer.” Salesforce
supports OAuth 2.0.
f. The values here correspond to the following values in the sample code in the rest
of this procedure:
g. client_id is the Consumer Key
h. client_secret is the Consumer Secret
i. redirect_uri is the Callback URL.
j. In your client application, redirect the user to the appropriate Salesforce
authorization endpoint. On successful user login, Salesforce calls your redirect URI
with an authorization code. You use the authorization code in the next step to get
the access token. The authorization code expires after 15 minutes.
k. From your Java or other client application, make a request to the appropriate
Salesforce token request endpoint that passes in grant_type, client_id, client_secret,
and redirect_uri. The redirect_uri is the URI that Salesforce sends a callback to.
l. If the value of client_id (or consumer key) and client_secret (or consumer secret)
are valid, Salesforce sends a callback to the URI specified in redirect_uri that
contains a value for access_token.
6 https://developer.salesforce.com/docs/atlas.en-us.api_rest.meta/api_rest/quickstart_oauth.htm
Oregon Health Information Technology (HIT) Portfolio Project
12
m. Store the access token value as a cookie to use in all subsequent requests.
n. This step completes the authentication. Once authenticated, every request must pass
in the access_token value in the header. It cannot be passed as a request parameter
Further information plus examples of syntax associated with the commands can be found here:
https://developer.salesforce.com/docs/atlas.en-us.api_rest.meta/api_rest/quickstart_oauth.htm.
A Session ID instead of an OAuth 2.0 access token can also be used following the steps below.
a. Obtain a session ID, for example, a SOAP API login() call returns the session
ID. You can also have the session ID, for example as part of the Apex current
context. If you need a session ID just for testing purposes during development,
use the username-password OAuth flow in a cURL command like the following 7:
curl https://login.salesforce.com/services/oauth2/token -d "grant_type=password" -
d "client_id=myclientid" -d "client_secret=myclientsecret"
-d "[email protected]" -d "password=mypassword123456"
b. You must provide your client id, client secret, username, and password with user
security token appended.
c. Use the session ID when you send a request to the resource. Substitute the ID for
the token value. The syntax is the same:
Authorization: Bearer access_token:
For example:
curl https:// instance_name.salesforce.com/services/data/v20.0/ -H 'Authorization:
Bearer access_token
4. Send HTTP Requests with cURL
o To interact with the Lightning Platform REST API, the application needs to be set up
to construct HTTP requests.
The REST API uses HTTP GET and HTTP POST methods to send and receive JSON
and XML content, so it is very simple to build applications using the tool or the
language of your choice. We use a command-line tool called cURL to simplify
sending and receiving HTTP requests and responses. cURL is pre-installed on many
Linux and Mac systems. Windows users can download a version at curl.haxx.se/.
When using HTTPS on Windows, ensure that your system meets the cURL
requirements for SSL.8
7 https://developer.salesforce.com/docs/atlas.en-us.api_rest.meta/api_rest/quickstart_oauth.htm 8 https://developer.salesforce.com/docs/atlas.en-us.api_rest.meta/api_rest/intro_usage_rest_resources.htm
Oregon Health Information Technology (HIT) Portfolio Project
13
o Your HTTP requests to a REST API resource should contain the following
information:
➢ An HTTP method (HEAD, GET, POST, PATCH, or DELETE).
➢ An OAuth 2.0 access token used to authenticate the request. For information on
how to retrieve the token, see Quick Start.
➢ An HTTP ACCEPT header used to indicate the resource format (XML or JSON),
or a .json or .xml extension to the URI. The default is JSON.
➢ The Lightning Platform REST resource.
➢ Any JSON or XML files containing information needed for requests, such as
updating a record with new information.
o The HTTP methods are used to indicate the desired action, such as retrieving
information, as well as creating, updating, and deleting records.9
➢ HEAD is used to retrieve resource metadata.
➢ GET is used to retrieve information, such as basic resource summary information.
➢ POST is used to create a new object.
➢ PATCH is used to update a record.
➢ DELETE is used to delete a record.
To access a resource, submit an HTTP request containing a header, method, and
resource name.
For an example with associated syntax, navigate here. For a list of the resources and
their corresponding URIs, see Reference.
5. Walk through the Sample Code
Salesforce provides users an opportunity to test their connections by creating a series
of REST requests. cURL will be used to construct the requests, and JSON will be
used as the format for all requests and responses.10
For more information or to completes these examples navigate to this page.
6. Using Workbench
If cURL is not being used, the Workbench tool can be used to obtain data about your
organization. Navigate using the following steps11:
9 https://developer.salesforce.com/docs/atlas.en-us.api_rest.meta/api_rest/intro_usage_rest_resources.htm 10 https://developer.salesforce.com/docs/atlas.en-us.api_rest.meta/api_rest/quickstart_code.htm 11 https://developer.salesforce.com/docs/atlas.en-
us.api_rest.meta/api_rest/quickstart_using_workbench.htm
Oregon Health Information Technology (HIT) Portfolio Project
14
a. Log in to your organization.
b. Open a new browser tab and navigate
to https://developer.salesforce.com/page/Workbench.
c. Log in to Workbench and allow access to your organization. Workbench is a public
site and won’t retain your data.
d. Click Utilities | REST Explorer.
e. Ensure that Get is selected. The Execute text box is prepopulated with a portion of
a resource path. Add the remaining information for your resource. Click Execute.
f. Click Expand All or Show Raw Response to view your data.
g. If you receive a “Service not found” message, verify your resource path.
Salesforce Documentation also includes a table which lists supported REST resources in the API
and provides a brief description for each.
For more information about using the Provider Directory’s APIs, review the Salesforce REST
API Guide here:
Figure 6: REST API Guide
SIMPLE OBJECT ACCESS PROTOCOL (SOAP) API
4.4.1 Overview
Simple Object Access Protocol (SOAP) APIs can be used for transactional record update as well
as data retrieval. Use SOAP API to create, retrieve, update or delete records, such as accounts,
leads, and custom objects. With more than 20 different calls, SOAP API also allows you to
maintain passwords, perform searches, and much more. Use SOAP API in any language that
supports Web services.12 SOAP queries will use object and field names from the Data Dictionary
in Appendix C.
4.4.2 Authentication and Testing
Authentication and testing are conducted as part of the onboarding process in section 3.2. To be
granted the batch data contributor permission, end-users must follow the ‘Request Additional
Permissions’ process. This process is a pre-requisite to contributing batch data.
Client applications must log in using valid credentials for an organization. The server
authenticates these credentials and, if valid, provides the client application with the following:
12 https://developer.salesforce.com/docs/atlas.en-us.214.0.api.meta/api/sforce_api_quickstart_intro.htm
Oregon Health Information Technology (HIT) Portfolio Project
15
• A session Id that must be set into the session header so that all subsequent calls to the
Web service are authenticated
• A URL address (server URL) for the client application's Web service requests
Salesforce supports only the Transport Layer Security (TLS) protocol and frontdoor.jsp. Ciphers
must have a key length of at least 128bits. The SOAP API maximum number of rows is 200 to
submit per API call.
Detailed information can be found in the attached SOAP API document (see Figure 7).
Figure 7: SOAP API Developer Guide
4.4.3 Implementation
Salesforce provides extensive documentation regarding their SOAP API. The following
information has been compiled from Salesforce resources to provide an overview to Data
Sources who wish to utilize this transport mechanism. All the information mentioned below plus
more is available here: https://developer.salesforce.com/docs/atlas.en-
us.214.0.api.meta/api/sforce_api_quickstart_steps.htm
1. Obtain a Salesforce Developer Edition Organization for testing the code
o If not already a member of the Lightning Platform developer community, go
to developer.salesforce.com/signup and follow the instructions for signing up for a
Developer Edition organization. Even if you already have Enterprise Edition,
Unlimited Edition, or Performance Edition, use Developer Edition for developing,
staging, and testing your solutions against sample data to protect your organization’s
live data. This is especially true for applications that insert, update, or delete data (as
opposed to simply reading data). 13
o If you already have a Developer Edition organization, verify that the API Enabled
permission. This permission is enabled by default but may have been changed by an
administrator. For more information, see the help in the Salesforce user interface. 14
2. Generate or Obtain the Web Service WSDL
o To access the Lightning Platform Web service, you need a Web Service Description
Language (WSDL) file. The WSDL file defines the Web service that is available to
you. Your development platform uses this WSDL to generate an API to access the
Lightning Platform Web service it defines. You can either obtain the WSDL file from
your organization’s Salesforce administrator or you can generate it yourself if you
have access to the WSDL download page in the Salesforce user interface. You can
13 https://developer.salesforce.com/docs/atlas.en-
us.214.0.api.meta/api/sforce_api_quickstart_steps_obtain_dev_org.htm 14 https://developer.salesforce.com/docs/atlas.en-
us.214.0.api.meta/api/sforce_api_quickstart_steps_obtain_dev_org.htm
Oregon Health Information Technology (HIT) Portfolio Project
16
navigate to the most recent WSDL for your organization from Setup by entering API
in the Quick Find box, then selecting API. For more information about WSDL, see
http://www.w3.org/TR/wsdl. 15
o Generating the WSDL File for Your Organization: Any user with the Modify All
Data permission can download the Web Services Description Language (WSDL) file
to integrate and extend Salesforce using the API. (The System Administrator profile
has this permission.) The WSDL file is dynamically generated based on which type of
WSDL file (enterprise or partner) you download. The generated WSDL defines all
the API calls, objects (including standard and custom objects), and fields that are
available for API access for your organization. 16
To generate the WSDL file for your organization:
a. Log in to your Enterprise, Unlimited, Performance, or Developer Edition
Salesforce account. You must log in as an administrator or as a user who has the
“Modify All Data” permission. Logins are checked to ensure they are from a
known IP address. For more information, see “Restrict Where and When Users
Can Log In to Salesforce” in the Salesforce online help.
b. From Setup, enter API in the Quick Find box, then select API to display the WSDL
download page.
c. Download the appropriate WSDL:
d. If you’re downloading an enterprise WSDL and you have managed packages
installed in your org, click Generate Enterprise WSDL. Salesforce prompts you to
select the version of each installed package to include in the generated WSDL.
e. Otherwise, right-click the link for the appropriate WSDL document to save it to a
local directory. In the menu, Internet Explorer users can choose Save Target As,
while Mozilla Firefox users can choose Save Link As. 17
3. Import the WSDL File Into Your Development Platform
Once you have the WSDL file, you need to import it into your development platform
so that your development environment can generate the necessary objects for use in
building client Web service applications in that environment. Click here for sample
instructions regarding Java(WSC) Environments and Microsoft Visual Studio. 18
4. Walk Through the Sample Code
15 https://developer.salesforce.com/docs/atlas.en-
us.214.0.api.meta/api/sforce_api_quickstart_steps_generate_wsdl.htm 16 https://developer.salesforce.com/docs/atlas.en-
us.214.0.api.meta/api/sforce_api_quickstart_steps_generate_wsdl.htm 17 https://developer.salesforce.com/docs/atlas.en-us.214.0.api.meta/api/sforce_api_quickstart_steps_generate_wsdl.htm 18 https://developer.salesforce.com/docs/atlas.en-us.214.0.api.meta/api/sforce_api_quickstart_steps_import_wsdl.htm

Oregon Health Information Technology (HIT) Portfolio Project
17
Once you have imported your WSDL file, you can begin building client applications
that use the API. Use the following samples to create a basic client application.
Comments embedded in the sample explain each section of code.19
For more information about using the Provider Directory’s APIs, review the
Salesforce SOAP API Guide in Appendix A.
DIRECT SECURE MESSAGING (DSM)
4.5.1 Overview
Direct Secure Messaging (DSM) is a national encryption standard that utilizes a secure email
type of communication to electronically transport healthcare data.20 A Direct Secure Messaging
address is like a typical email address and can be issued to an individual, organization, or system,
but all addresses must have a primary owner. Files sent through DSM will be loaded into PD
using Informatica Extract, Transfer, & Load (ETL). During their initial onboarding meeting, data
sources will confirm whether they choose to submit batch files through this method.
4.5.2 Authentication and Testing
Authentication and testing are conducted as part of the onboarding process in section 3.2. To be
granted the batch data contributor permission, end-users must follow the ‘Request Additional
Permissions’ process. This process is a pre-requisite to contributing batch data.
If a data source chooses to submit batch files through Direct Secure Messaging, the PD
onboarding team provides them a form to fill out with necessary information. Using the
information populated onto the form by the data source, the PD onboarding team initiates the
Direct Secure Messaging internal processes, Due to its secure nature, completed DSM forms
must be notarized to proceed. A sample DSM request form is included as Figure 8.
Figure 8: Sample DSM Request Form
19 https://developer.salesforce.com/docs/atlas.en-us.214.0.api.meta/api/sforce_api_quickstart_steps_walk_through_code.htm 20 DataMotionHealth: Direct Secure Messaging, Copyright 2017, https://www.datamotion.com/products/direct/what-is-direct-
secure-messaging/
Oregon Health Information Technology (HIT) Portfolio Project
18
4.5.3 Implementation
Once the Direct Secure Messaging account has been created, the PD onboarding team will
provide the data source with all necessary connection information to access and utilize the DSM
account for sending provider and organization information to be loaded into the PD.
This System Direct Secure Messaging Account is used for system-to-system communications
(e.g. sending from an electronic health record to a health information network). A System
address uses the following format: [email protected].
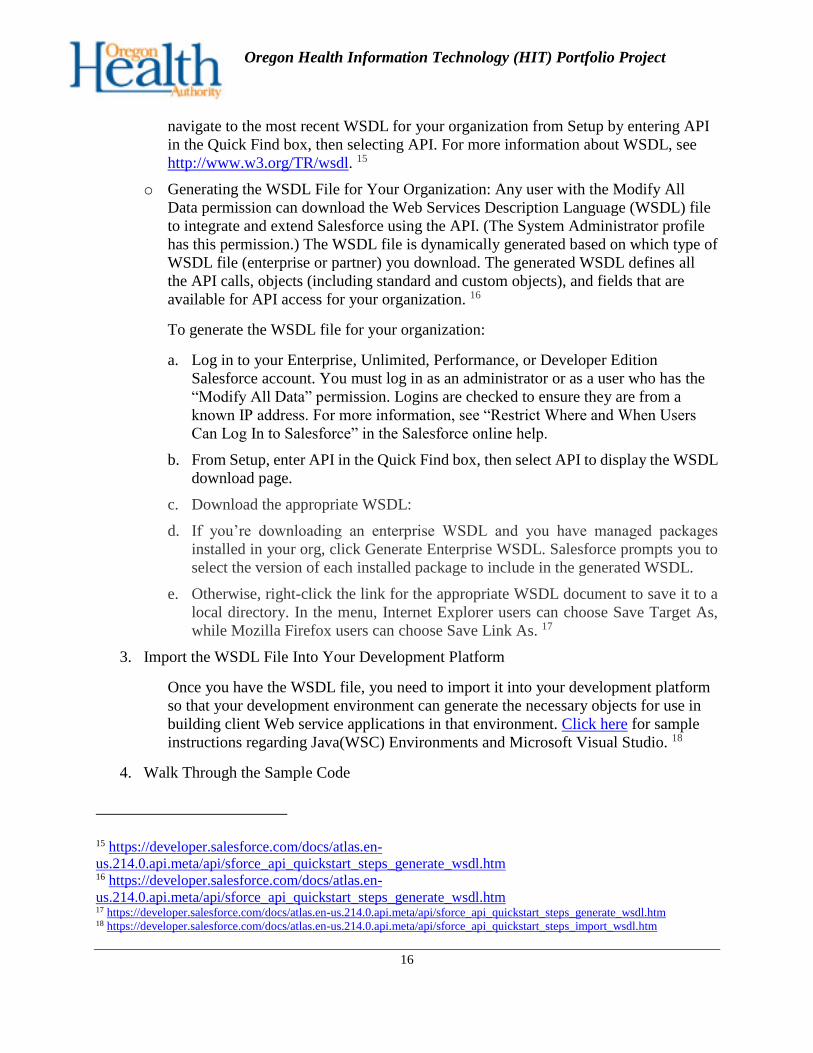
FAST HEALTHCARE INTEROPERABILITY RESOURCE (FHIR)
4.6.1 Overview
The PD solution may utilize FHIR for data retrieval in the post go-live enhancement period, if
prioritized by OHA.
Fast Healthcare Interoperability Resource (FHIR) is a standard framework created by HL7 using
modular components called “resources” suitable for health information exchange21. In the PD
solution, FHIR can be used for data retrieval at a future time. See Table 1 for FHIR Mapping.
Table 1: FHIR Mapping
FHIR Resource Mapped PD Object
Practitioner Provider
Organization Organization
PractitionerRole Affiliation Provider Organization
Coverage Insurance Product Line
Coverage.contract In-Network Provider
4.6.2 Authentication and Testing
Authentication and testing are conducted as part of the onboarding process in section 3.2. To be
granted the batch data contributor permission, end-users must follow the ‘Request Additional
Permissions’ process. This process is a pre-requisite to contributing batch data.
OAuth (Open Authorization) is an open protocol that provides secure API authorization from
applications in a simple and standardized way. OAuth can authorize access to resources without
21 FHIR: Introducing HL7 FHIR, Last updated April 2017, https://www.hl7.org/fhir/summary.html
Oregon Health Information Technology (HIT) Portfolio Project
19
revealing user credentials to apps. Apps that use OAuth can also directly authenticate and access
Salesforce resources without a user present.
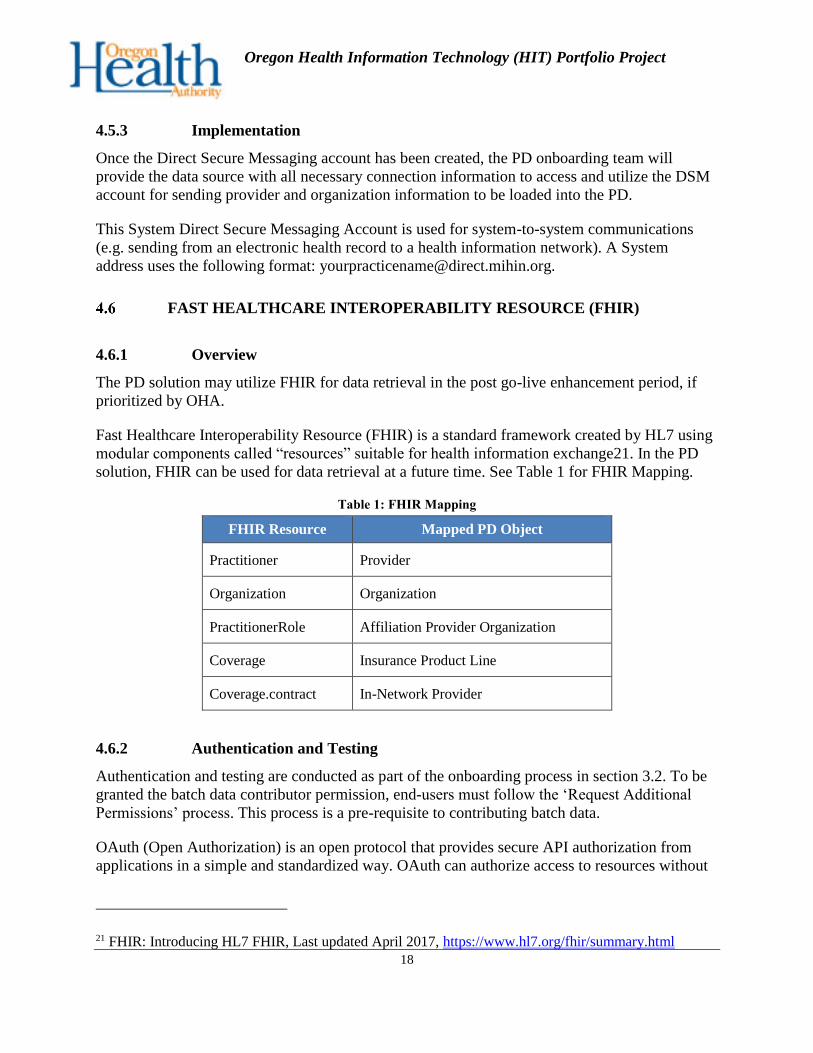
Data source username and password credentials are required to request an access token, which
are used as a session ID. Submit an out-of-band POST request to the token endpoint, with the
following parameters:
• grant_type — Value must be password for FHIR resources
• client_id — Consumer key value.
• client_secret — Consumer secret from the connected app definition.
• Username — End-user username.
• Password — End-user password
Note: password = Salesforce Password + Salesforce Security Token
4.6.3 Implementation
Data sources submitting files via FHIR API can view the following implementation example for
reference. Again, the PD onboarding team will be available for questions and will help the data
source implement as part of the initial onboarding process outlined in section 3.2.
1. Request and Access Token
Pass specified values in the BODY as a POST to the token endpoint.
Figure 9: FHIR API: Body as a Post
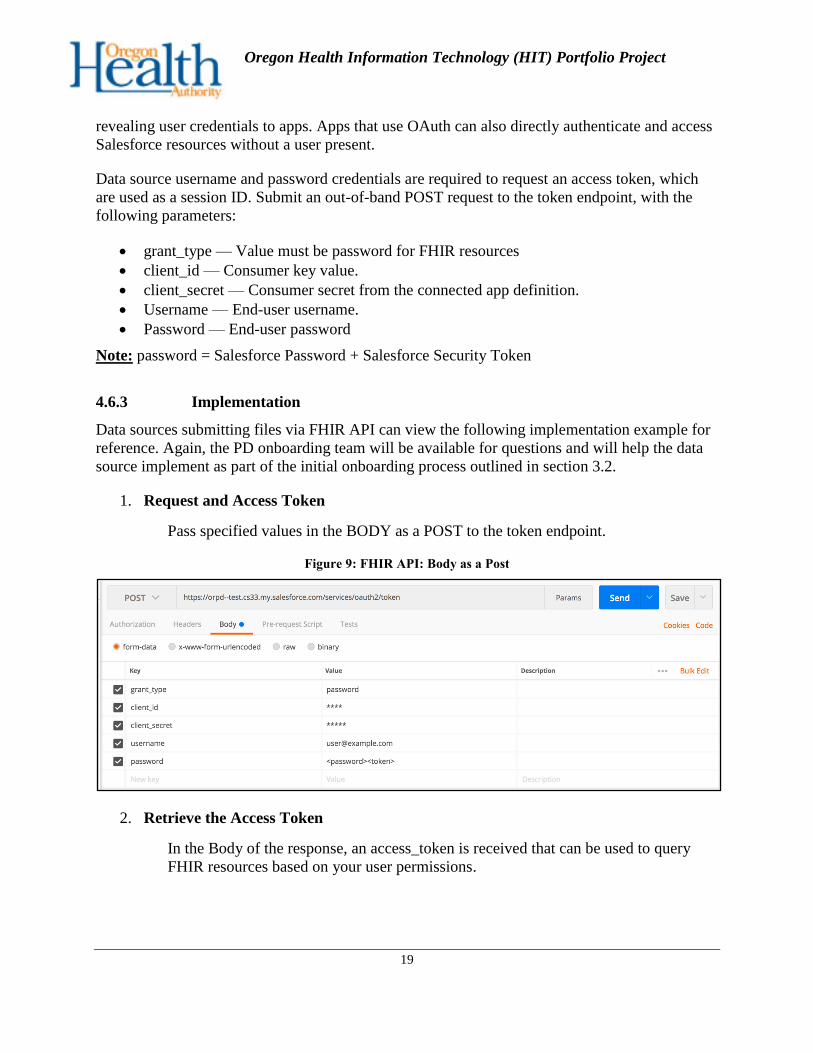
2. Retrieve the Access Token
In the Body of the response, an access_token is received that can be used to query
FHIR resources based on your user permissions.
Oregon Health Information Technology (HIT) Portfolio Project
20
Figure 10: Received Access Token
3. User Access Token to Query Resource
In this example we used the access token to query an Organization Record. Use the
access_token with the Authorization Key in the header to perform the query.
Figure 11: Query With Access Token
Oregon Health Information Technology (HIT) Portfolio Project
21
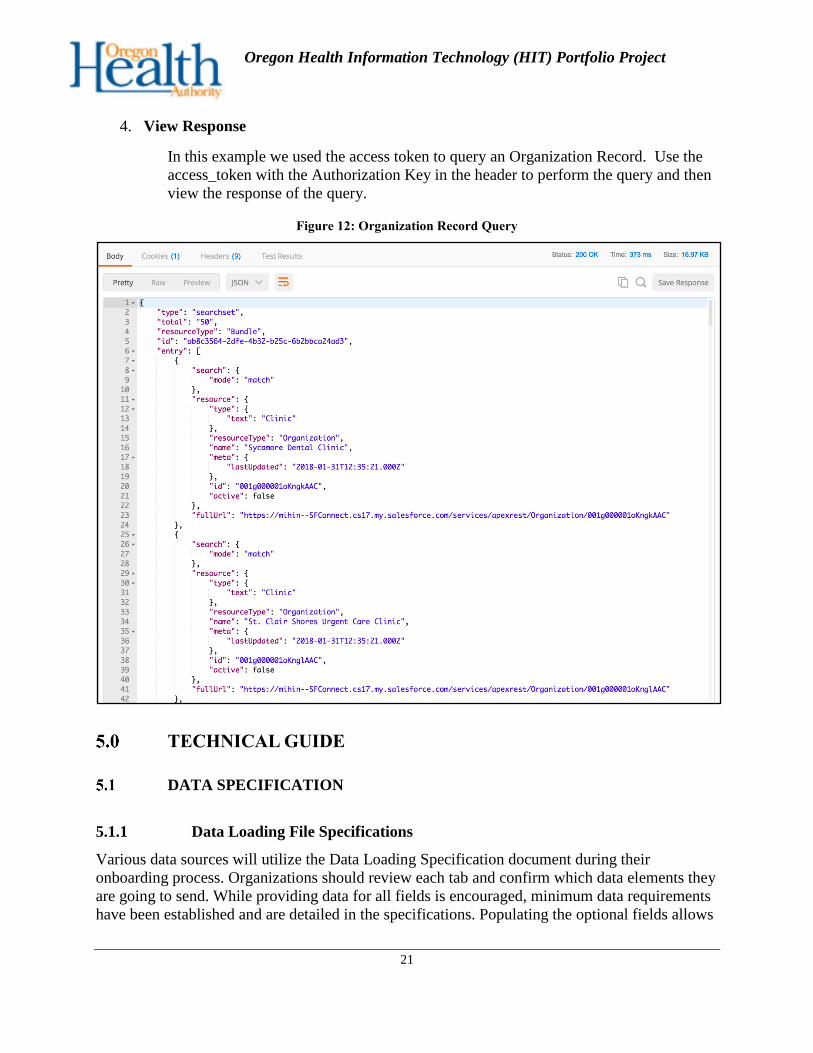
4. View Response
In this example we used the access token to query an Organization Record. Use the
access_token with the Authorization Key in the header to perform the query and then
view the response of the query.
Figure 12: Organization Record Query
TECHNICAL GUIDE
DATA SPECIFICATION
5.1.1 Data Loading File Specifications
Various data sources will utilize the Data Loading Specification document during their
onboarding process. Organizations should review each tab and confirm which data elements they
are going to send. While providing data for all fields is encouraged, minimum data requirements
have been established and are detailed in the specifications. Populating the optional fields allows
Oregon Health Information Technology (HIT) Portfolio Project
22
for more robust and accurate records within the Provider Directory. The PD data specification
can be found in Appendix B.
The data source file must be submitted as a comma separated value file (CSV). All data will be
double quoted, and comma separated. This is to allow for fields that contain commas like
addresses and organization names.
Example: “a”,”b”,”c”
If the value has a double quote, then another double quote is used to escape it. For example,
when reporting the two fields: “Name”, “Age” with the values of: "a""b,c",”12”. The person's
name is interpreted as a" b, c and their age as 12 because there is no comma in between a and b.
The two quotation marks on their own are not field separators and therefore need the separating
commas to correctly provide the data. Incorrectly formatted data will be likely to cause errors
and delay the processing time.
When the file has successfully passed pre-production validation, it is communicated to the data
source that the data will be loaded into the production environment of the Provider Directory.
From that point on, the data source is expected to provide the same data format, through the
same agreed upon transport method, as well as the same agreed upon frequency. The data
sources may submit a help desk ticket for any change requested for transport method, format or
frequency.
As mentioned before, any additional data is beneficial to the directory. Provider Directory data
stewards coordinate with each data source to map supplementary data to the fields available
within the Provider Directory.
If a batch data contributor is unable to conform to the PD data loading specifications, please
contact OHA at [email protected] to determine if eligible to
submit data in an alternate format.
5.1.2 Resolving Data Submission Issues
To resolve data submission issues quickly, please contact the PD help desk (see Section 7:
Support).
Batch data submission
It is recommended that provider and organizational data that is submitted by a batch data
contributor be reviewed and updated as frequently as possible. Intervals of weekly, monthly, or
quarterly are ideal. Data quality is reviewed and evaluated by data stewards based on the initial
agreed upon format and frequency decided during the onboarding process.
Confirmation notifications to batch data contributors for data submission acceptance/failure are
initially established during the data source onboarding process. Each file submission will receive
a notification.
Oregon Health Information Technology (HIT) Portfolio Project
23
The File Uploader notifications are:
1. Passed validation/ Queued for loading
2. Failed validation
3. Data load
Individual data submission (attestation)
All end users in the PD user interface have permission to create source records and edit their own
source records. Data submission through individual creation is validated immediately upon
‘save’ and will display any errors with the data entered.
Additionally, business rules are used to create the master record, trigger notifications, and
identify data discrepancies. The master record is populated from source records that OHA has
identified as the most trusted data sources for each field.
5.1.3 Reporting an Inaccuracy
Data discrepancy business rules are managed by the PD analysts. End-users can “flag”
discrepancies within the Provider Directory. When a data discrepancy is identified, it is assigned
to an active data steward for review and that field is marked as ‘under review.’ Data sources are
notified by phone, mail or electronically when a discrepancy is reported in their data. The ‘under
review’ flag may be seen by end-users. When a data discrepancy is verified the indicated change
will be made to the master record and the ‘under review’ flag on that field is removed.
5.1.4 Resolving Data Access Issues
User registration and access to the PD is provided via OneHealthPort (OHP). If end-users are
unable to access the PD due to an account setting, locked username, or locked password, please
contact the OneHealthPort help desk.
Once in the PD solution, if end-users are not able to find or access data they are encouraged to
review the training materials related to searching for data and creating reports. End-users may
also contact the PD help desk.
REPORTING SPECIFICATION
Report access is available for all basic end-users. The PD user interface has a tab for viewing
reports on the home page.
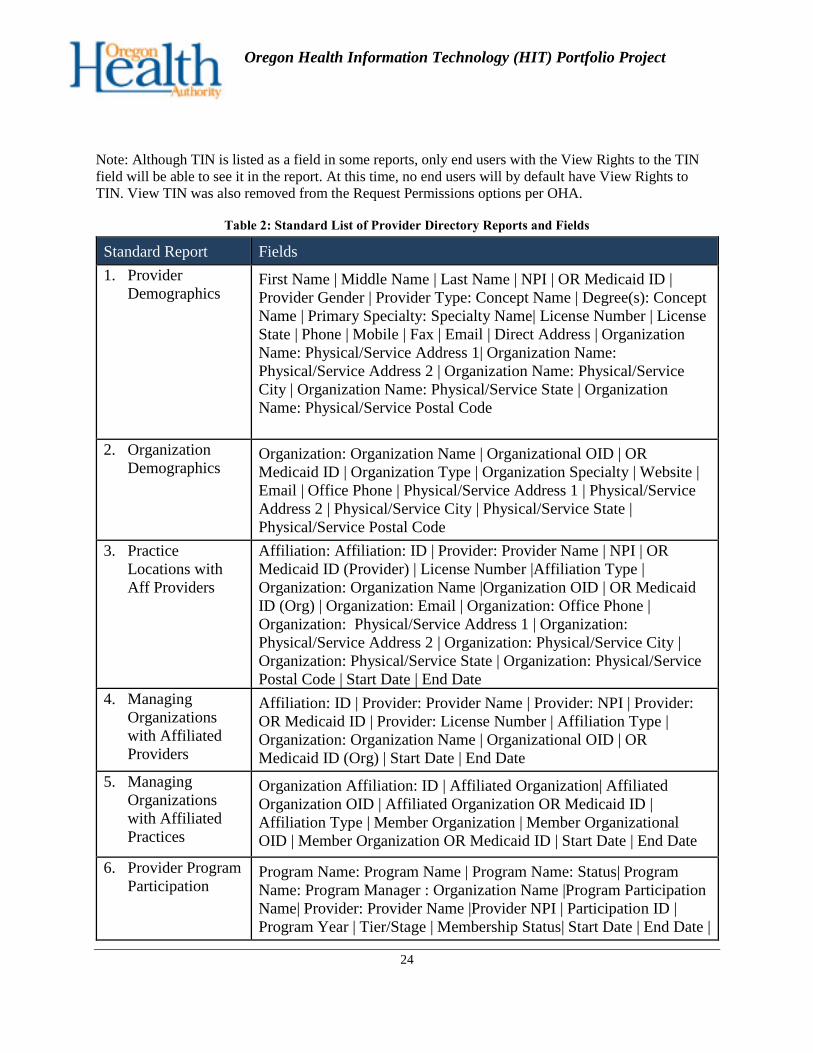
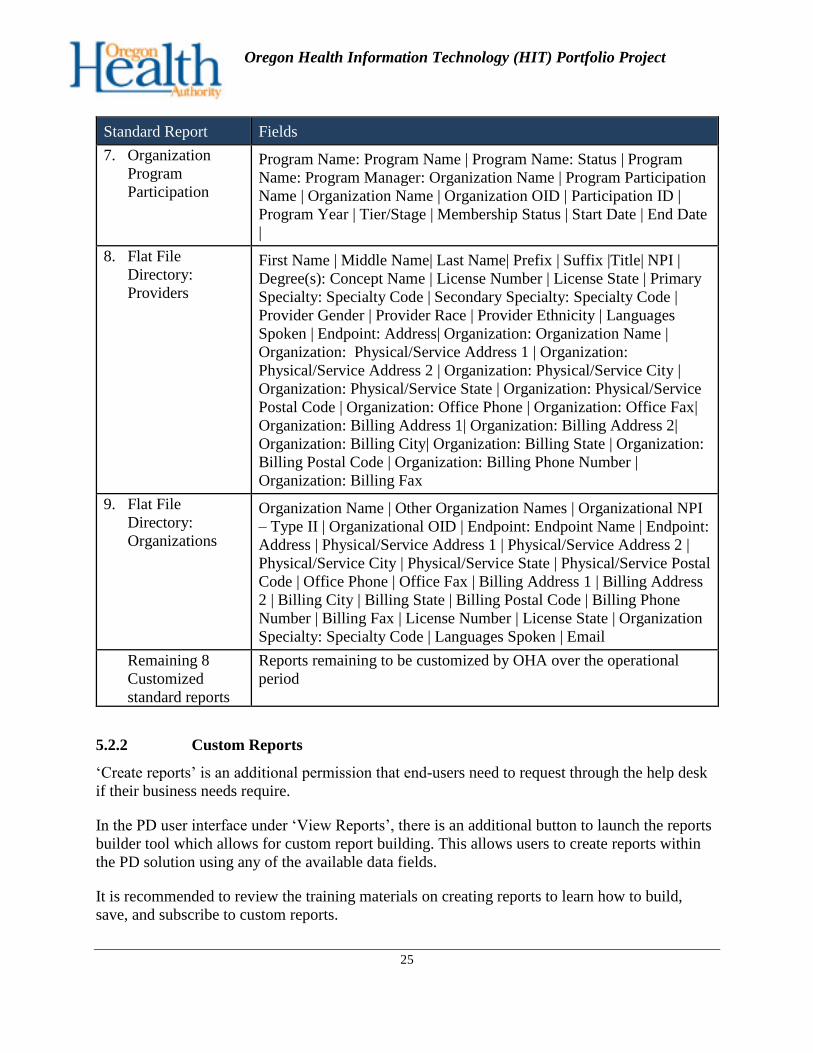
5.2.1 Standard Reports
The table below captures the list of standard reports in the Oregon Provider Directory as of the
delivery of the latest version of this Implementation Guide. For the latest list of standard reports
and their fields, reference the PD Standard Reports Criteria document, maintained as a stand-
along program artifact.
Oregon Health Information Technology (HIT) Portfolio Project
24
Note: Although TIN is listed as a field in some reports, only end users with the View Rights to the TIN
field will be able to see it in the report. At this time, no end users will by default have View Rights to
TIN. View TIN was also removed from the Request Permissions options per OHA.
Table 2: Standard List of Provider Directory Reports and Fields
Standard Report Fields
1. Provider
Demographics First Name | Middle Name | Last Name | NPI | OR Medicaid ID |
Provider Gender | Provider Type: Concept Name | Degree(s): Concept
Name | Primary Specialty: Specialty Name| License Number | License
State | Phone | Mobile | Fax | Email | Direct Address | Organization
Name: Physical/Service Address 1| Organization Name:
Physical/Service Address 2 | Organization Name: Physical/Service
City | Organization Name: Physical/Service State | Organization
Name: Physical/Service Postal Code
2. Organization
Demographics Organization: Organization Name | Organizational OID | OR
Medicaid ID | Organization Type | Organization Specialty | Website |
Email | Office Phone | Physical/Service Address 1 | Physical/Service
Address 2 | Physical/Service City | Physical/Service State |
Physical/Service Postal Code
3. Practice
Locations with
Aff Providers
Affiliation: Affiliation: ID | Provider: Provider Name | NPI | OR
Medicaid ID (Provider) | License Number |Affiliation Type |
Organization: Organization Name |Organization OID | OR Medicaid
ID (Org) | Organization: Email | Organization: Office Phone |
Organization: Physical/Service Address 1 | Organization:
Physical/Service Address 2 | Organization: Physical/Service City |
Organization: Physical/Service State | Organization: Physical/Service
Postal Code | Start Date | End Date
4. Managing
Organizations
with Affiliated
Providers
Affiliation: ID | Provider: Provider Name | Provider: NPI | Provider:
OR Medicaid ID | Provider: License Number | Affiliation Type |
Organization: Organization Name | Organizational OID | OR
Medicaid ID (Org) | Start Date | End Date
5. Managing
Organizations
with Affiliated
Practices
Organization Affiliation: ID | Affiliated Organization| Affiliated
Organization OID | Affiliated Organization OR Medicaid ID |
Affiliation Type | Member Organization | Member Organizational
OID | Member Organization OR Medicaid ID | Start Date | End Date
6. Provider Program
Participation Program Name: Program Name | Program Name: Status| Program
Name: Program Manager : Organization Name |Program Participation
Name| Provider: Provider Name |Provider NPI | Participation ID |
Program Year | Tier/Stage | Membership Status| Start Date | End Date |
Oregon Health Information Technology (HIT) Portfolio Project
25
Standard Report Fields
7. Organization
Program
Participation
Program Name: Program Name | Program Name: Status | Program
Name: Program Manager: Organization Name | Program Participation
Name | Organization Name | Organization OID | Participation ID |
Program Year | Tier/Stage | Membership Status | Start Date | End Date
|
8. Flat File
Directory:
Providers
First Name | Middle Name| Last Name| Prefix | Suffix |Title| NPI |
Degree(s): Concept Name | License Number | License State | Primary
Specialty: Specialty Code | Secondary Specialty: Specialty Code |
Provider Gender | Provider Race | Provider Ethnicity | Languages
Spoken | Endpoint: Address| Organization: Organization Name |
Organization: Physical/Service Address 1 | Organization:
Physical/Service Address 2 | Organization: Physical/Service City |
Organization: Physical/Service State | Organization: Physical/Service
Postal Code | Organization: Office Phone | Organization: Office Fax|
Organization: Billing Address 1| Organization: Billing Address 2|
Organization: Billing City| Organization: Billing State | Organization:
Billing Postal Code | Organization: Billing Phone Number |
Organization: Billing Fax
9. Flat File
Directory:
Organizations
Organization Name | Other Organization Names | Organizational NPI
– Type II | Organizational OID | Endpoint: Endpoint Name | Endpoint:
Address | Physical/Service Address 1 | Physical/Service Address 2 |
Physical/Service City | Physical/Service State | Physical/Service Postal
Code | Office Phone | Office Fax | Billing Address 1 | Billing Address
2 | Billing City | Billing State | Billing Postal Code | Billing Phone
Number | Billing Fax | License Number | License State | Organization
Specialty: Specialty Code | Languages Spoken | Email
Remaining 8
Customized
standard reports
Reports remaining to be customized by OHA over the operational
period
5.2.2 Custom Reports
‘Create reports’ is an additional permission that end-users need to request through the help desk
if their business needs require.
In the PD user interface under ‘View Reports’, there is an additional button to launch the reports
builder tool which allows for custom report building. This allows users to create reports within
the PD solution using any of the available data fields.
It is recommended to review the training materials on creating reports to learn how to build,
save, and subscribe to custom reports.
Oregon Health Information Technology (HIT) Portfolio Project
26
SERVICE LEVEL AVAILABILITY SPECIFICATION
The Service Level Availability requirements which apply to PD implementation are listed below:
SLA ID 1: Access to the solution
The vendor will acknowledge receipt of 100% of user's/organization's access requests to the
Provider Directory and provide acknowledgement back to the user and OHA within one (1)
business day of the request.
The vendor shall electronically notify the user/organization and OHA of acceptance/denial of
user/organizations access request to the Provider Directory within two (2) business days of
receipt unless additional non‐standard verification is required in which case the vendor will
electronically notify the user of acceptance/denial within ten (10) business days of receipt.
SLA ID 33: System availability
The software or service applications that comprise the Provider Directory Solution (along with
associated Web Portal) shall be available 99% of the time except for pre‐authorized and
approved Planned Outages, including regularly scheduled maintenance windows.
SLA: Access to be a data source
The vendor shall acknowledge receipt of new organization's requests to be a data contributor for
the Provider Directory and provide acknowledgement back to the organization and OHA within
one (1) business day of the request. Additionally, the vendor shall either onboard each requesting
organization to the Provider Directory as a data contributor (including configuration of any
vendor side data mapping and business rules engine) or electronically notify the data
contributing organization and OHA of denial of each organizations request (with denial reason if
applicable) to contribute data to the Provider Directory within sixty (60) calendars days of
vendor receipt of all requirements prerequisites needed for onboarding (e.g. data specification)
and OHA approval of data source.
CONFIGURATION GUIDE
ORGANIZATION ACCOUNT MANAGEMENT
End-users must login through the OneHealthPort website with their OneHealthPort credentials to
be authenticated. Single Factor Authentication has been implemented on the PD solution for all
users. After logging in, the user will navigate to the Provider Directory user interface.
The PD connects to OneHealthPort via SAML 2.0 connection. OneHealthPort will serve as the
SAML identity provider which will send session attributes to the PD upon log in. Information
about the user’s organization will be used to associate them with an organization in the PD
hierarchy and its corresponding data source.
Oregon Health Information Technology (HIT) Portfolio Project
27
SECURITY AND ACCESS
All technologies included in the PD solution are HITRUST-certified. This multi-layered security
model consistently monitors and adjusts system performance, applies patches, security updates
and service packs, and repairs/upgrades for the Provider Directory service. In addition,
Salesforce has robust security guarding, monitoring, and detection which incorporates Open Web
Application Security Project (OWASP) recommendations into its security layer as well. 22
The hosting environment is Service Organization Controls 2 (SOC 2) and Federal Risk and
Authorization Management Program (FedRAMP) certified. It is a highly-secure environment
that is compliant with industry security guidelines (ISO 27001, SSAE16/ISAE 3402 SOC-1,
SOC-2, SOC-3, FedRAMP, PCI-DSS, TUEV Rheinland Certified Cloud Service, and HITRUST
Certified Privacy Seal). Lists of certifications can be found at the provided link below:
https://trust.salesforce.com/en/compliance/.
All system resources are continuously monitored using automated monitoring tools, monitored
system logs and access authorizations are established and maintained. The PD currently supports
TLS 1.2 to protect data in transit. Salesforce allows role-based access control using stackable
permission sets.
All software releases will be internally scanned for any security vulnerability prior to promoting
to the production environment.
All transport methodologies listed in the transport mechanism section conform to secure
encrypted protocol ensuring data integrity.
End-user access via browser utilizes the ‘https’ encryption with pre-determined session settings
ensure a secure connection to the PD solution.
All data is covered by Salesforce security including firewalls. There are no application servers
dedicated to OHA in the Salesforce cloud architecture. Salesforce uses a runtime engine that
materializes all application data from metadata – data about the data itself. ETL tools use the
same connection SSL 3.0/TLS 1.2.
For more information, Salesforce outlines in detail its Security, Privacy, and Architecture
overview here:
https://help.salesforce.com/servlet/servlet.FileDownload?file=0150M000003wzJAQAY
CONFIGURATION MANAGEMENT
The PD Configuration Management process follows industry standards including interface
management, role-based access, release changes, and version control. Using populations and
22 Salesforce Security Guide version 42.0 Last updated February 2018,
https://resources.docs.salesforce.com/212/latest/en-us/sfdc/pdf/salesforce_security_impl_guide.pdf

Oregon Health Information Technology (HIT) Portfolio Project
28
profile templates, user privileges can be administered at large scale. Only PD administrators are
permitted to configure Salesforce.
Configuration management is an essential part of system maintenance. It is aided with version
control tools to control configuration versions or patch management.
Quality is ensured through change management, reporting, and audit logging. PD operations
reporting displays data to show services are performing as expected. If reports show unexpected
data, then steps are taken to follow the standard operations process to ensure integrity of data.
RELEASE MANAGEMENT
Release management is coordinated through the production team. All configurations begin in the
lowest development environment and are promoted up one environment at a time with testing at
each site. A deployed package can be uninstalled, and the last deployment can be rolled back to
return to previous state. A full back-up including meta-data will be taken prior to any
deployments. Pre-production deployment testing will be performed to minimize the risk and
impact of having to do a rollback.
The PD support team ensures that testers and implementers have independent roles and user
interface changes are encapsulated in "change sets" which isolates the change being promoted.
Weekly maintenance windows are reserved for critical security patches and bug fixes.
SUPPORT
Help desk support is available Monday through Friday from 8am to 5pm PST. For assistance,
users may call, email, or submit a ticket through the PD user interface to contact the help desk.
• Phone: Help desk support can be reached via phone at: 1 (877) 285-1954. All calls to the
help desk are recorded for quality assurance and will be stored for two months. A help
desk agent will create a ticket for the issue or request upon receiving the call.
• Email: For PD items, the help desk can be reached via email at [email protected] with
a description of the issue. A ticket containing the information included in the email
autogenerates when an email is sent to this address and will be routed to the help desk.
• User Interface: The Oregon Help Desk can be reached by submitting a ticket through the
OPD user interface by following these steps:
1. Log into OneHealthPort, then access the Provider Directory and navigate to the “Contact
Support” option located in the Support tab.
2. Fill out the subject line and description text box.
3. Click “Submit.”
4. The ticket will be routed to the help desk.
Oregon Health Information Technology (HIT) Portfolio Project
29
APPENDICES
APPENDIX A: SALESFORCE STANDARD REST API DOCUMENTATION
1. Salesforce API Documentation and Developer Guide
2. SF Reports and Dashbards REST API
3. SF REST API Cheatsheet
APPENDIX B: DATA SOURCE LOADING SPECIFICATIONS
The PD Data Loading Specification spreadsheets are managed as stand-alone program artifacts
and not embedded in this document to improve document control. At the time of version 0.3
delivery of this Implementation Guide, there were 13 Data Loading Specifications.
APPENDIX C: DATA DICTIONARY
The PD Data Dictionary spreadsheet is managed as stand-alone program artifacts and not
embedded in this document to improve document versioning control.
APPENDIX D: ONBOARDING FORM AND ONBOARDING MEETING
PRESENTATION
The PD Data Source Onboarding form (word document) and Data Source Onboarding Kickoff
presentation (PowerPoint) are managed as stand-alone program artifacts.