Embed Size (px)
Citation preview
CHAPTER 8
PROSTHODONTIC ASSISTANCE
To be an effective prosthodontic assistant, youneed to be familiar with the following generalinformation and basic skills. Your duties will includesome of the following:
Assisting the dentist in prosthodontic procedures
Setting up prosthodontic instrument trays
Preparing material for prostliodontic procedures
Making diagnostic impressions and casts
Trimming dental casts
Fabricating mouth and bite guards and customtrays
Performing simple acrylic repairs
A prosthodontist is a dentist with specializedtraining in replacing missing teeth; however, manygeneral dentists in your clinic will be able to provideprosthodontic care. Your prostliodontic assistingduties are very similar to those in other specialties. Theprimary differences are the types of treatment thedentist performs, the material you mix or manipulate,the instruments the dentist uses, and the coordinationrequired with the dental laboratory personnel.
Prosthodontic dentistry deals with the substitutionor replacement of oral structures. Prosthodonticdentistry can include anything from replacing onemissing tooth to constructing a complex—designeddevice to replace structures of the face such as eyes,ears, or a cleft palate. Prosthodontic treatment isconcerned primarily with replacing missing teeth withsome type of artificial substitute. Substitutes fornatural teeth are called prosthodontic prostheses.Prosthodontic prostheses are either fixed permanentlyinto the patient's mouth or removable.
TYPES OF FIXED PROSTHETICS
A fixed prosthesis is any variety of replacementsfor a missing tooth or part of a tooth that a dentistcements in place and the patient cannot remove.Restorations, such as inlays, onlays, crowns, and fixedpartial dentures fall into this category. A fixedprosthesis may be constructed entirely from a castmetal alloy, acrylic resin, or porcelain. Frequently, afixed prosthesis is made of a combination of these
materials. For example, a complete crown may have ametal substructure and a porcelain veneer (facing).
INLAY
An inlay is a dental restoration that fits into aprepared cavity, and is held there by its precision fitand a cementing medium. Inlays are, for the most part,surrounded by intact tooth structures. For this reason,they are often called intracoronal restorations. Thevarious forms of inlays are used primarily to restoreIndividual tooth contours and function. In the majorityof cases, an inlay is not a suitable anchor casting(retainer) for a fixed partial denture. Inlays are usuallycast in medium hard gold, but can be made of othermaterials (porcelain, resin).
There are five classes of inlays (class I, II, III, IV,and V) based on the location of the surfaces beingrestored. A more specific way of naming an inlay is tocite the tooth surfaces it restores; for example, MO(mesio-occlusal) inlay, or a MOD (mesio-occlusal-distal) inlay as shown in figure 8-1.
ONLAYS
Onlays are cast gold, resin, or porcelainrestorations that ordinarily cover the mesial, occlusal,and distal surfaces (MOD) of posterior teeth. Onlaysdiffer from inlays in that an onlay covers the entireocclusal surface of a tooth to include the cusps. Anonlay is the smallest of the fixed prosthetic restorations
Figure 8-1.—MOD inlay.
8-1
classified as an extracoronal. An intracoronalreplacement like an inlay fits into a tooth. Anextracoronal restoration fits around what remains of atooth.
ARTIFICIAL CROWNS
An artificial crown is a fixed prosthetic restorationthat covers more than half of the coronal portions of thetooth. There are several types of crowns. They may bemade of gold, porcelain, acrylic, or a combination ofthese materials. Along with onlays, which areclassified as extracoronal restorations, are the variouskinds of crowns that make up the balance of theextracoronal category.
Partial Crown
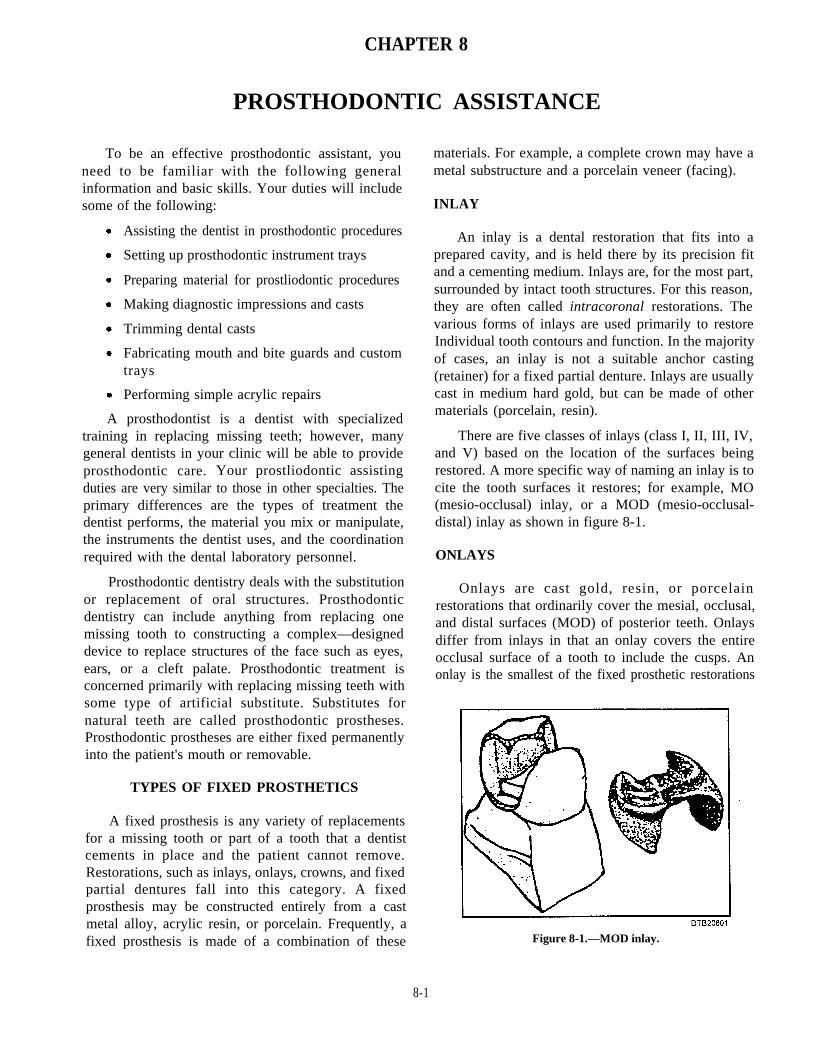
A partial crown is a cast restoration made entirelyfrom metal and covers more than half but not all of thetooth's clinical crown. A partial crown is namedaccording to the fractional amount of the clinicalcrown it covers. Examples are the half, three-quarters(see fig. 8-2(A)), four-fifths, and seven-eighths crowns(see fig. 8-2 (B)). In most instances, the facial surfaceof the tooth is not disturbed for esthetic reasons.
Complete Crown
A complete crown covers the entire anatomy of atooth’s clinical crown. There are several types ofcomplete crowns. A complete metal crown isconstructed entirely of a noncorrosive metal, such asgold (see fig. 8-2(C)). A complete veneered crownconsists of complete coronal coverage of the tooth witha metal substructure overlaid with porcelain or resinfor esthetic effect (see fig. 8-2(D)). A complete crownconstructed of cast metal with a fused porcelain(ceramic) veneer is commonly called a PFM(porcelain-fused-to-metal) crown.
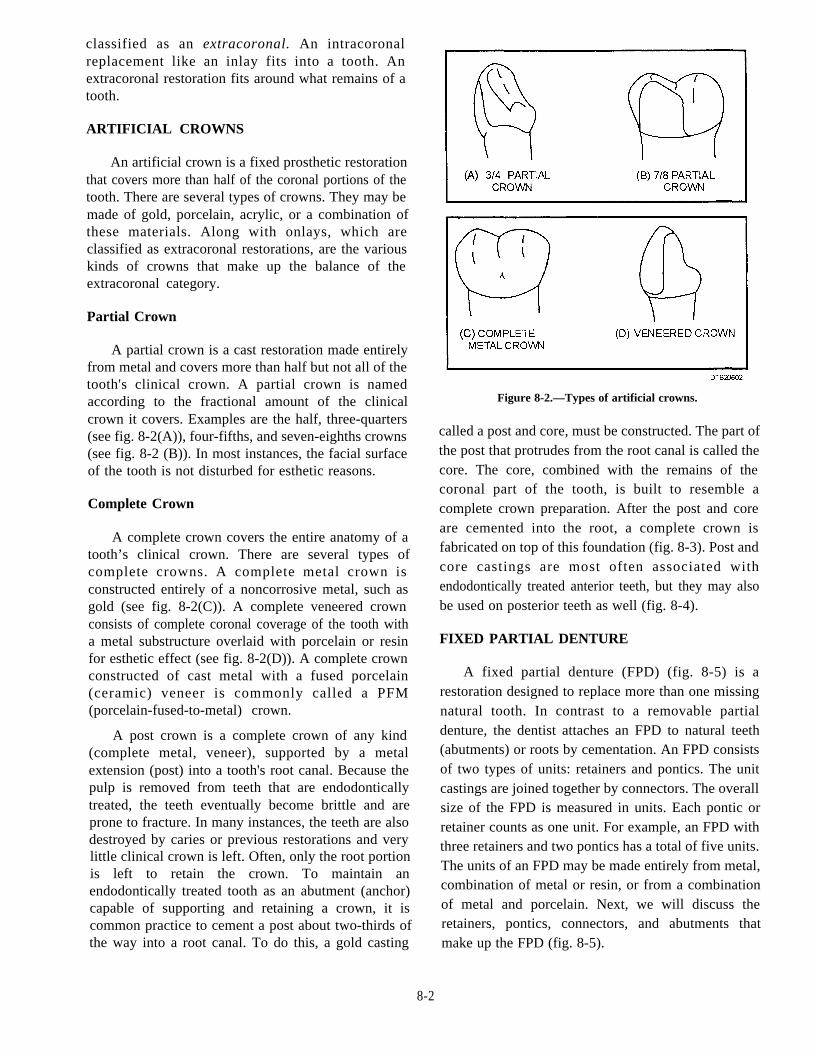
A post crown is a complete crown of any kind(complete metal, veneer), supported by a metalextension (post) into a tooth's root canal. Because thepulp is removed from teeth that are endodonticallytreated, the teeth eventually become brittle and areprone to fracture. In many instances, the teeth are alsodestroyed by caries or previous restorations and verylittle clinical crown is left. Often, only the root portionis left to retain the crown. To maintain anendodontically treated tooth as an abutment (anchor)capable of supporting and retaining a crown, it iscommon practice to cement a post about two-thirds ofthe way into a root canal. To do this, a gold casting
Figure 8-2.—Types of artificial crowns.
called a post and core, must be constructed. The part ofthe post that protrudes from the root canal is called thecore. The core, combined with the remains of thecoronal part of the tooth, is built to resemble acomplete crown preparation. After the post and coreare cemented into the root, a complete crown isfabricated on top of this foundation (fig. 8-3). Post andcore castings are most often associated withendodontically treated anterior teeth, but they may alsobe used on posterior teeth as well (fig. 8-4).
FIXED PARTIAL DENTURE
A fixed partial denture (FPD) (fig. 8-5) is arestoration designed to replace more than one missingnatural tooth. In contrast to a removable partialdenture, the dentist attaches an FPD to natural teeth(abutments) or roots by cementation. An FPD consistsof two types of units: retainers and pontics. The unitcastings are joined together by connectors. The overallsize of the FPD is measured in units. Each pontic orretainer counts as one unit. For example, an FPD withthree retainers and two pontics has a total of five units.The units of an FPD may be made entirely from metal,combination of metal or resin, or from a combinationof metal and porcelain. Next, we will discuss theretainers, pontics, connectors, and abutments thatmake up the FPD (fig. 8-5).
8-2
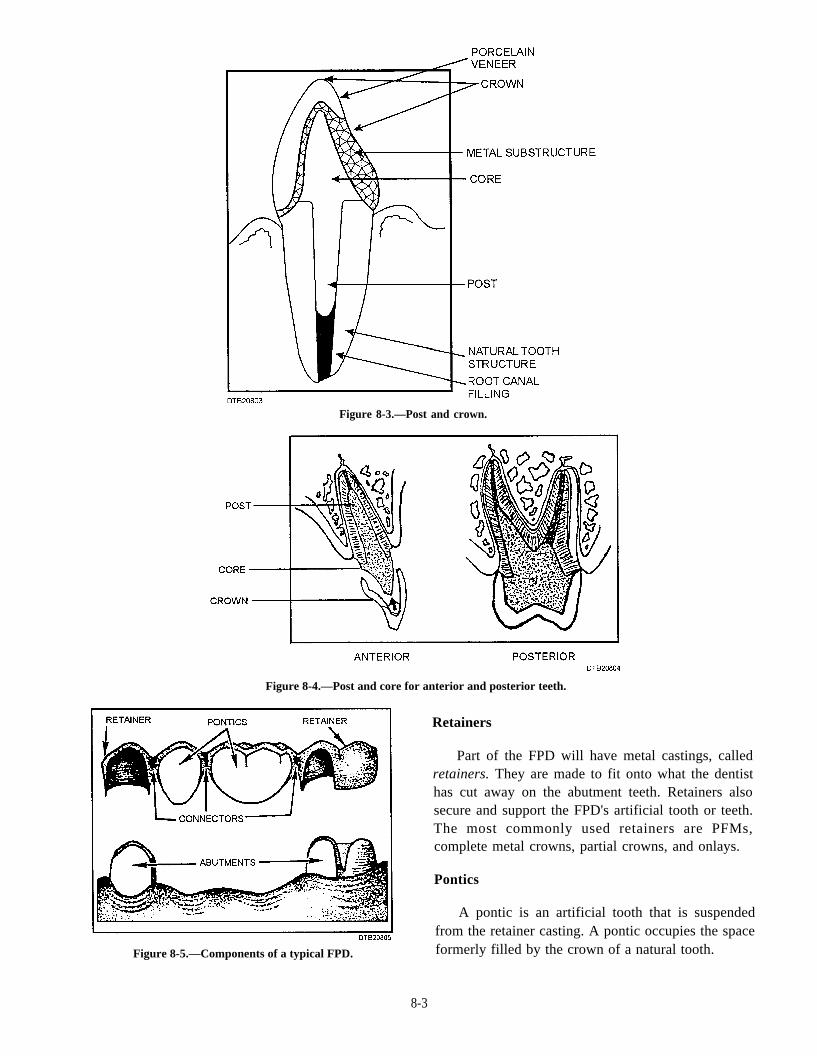
Figure 8-3.—Post and crown.
Figure 8-4.—Post and core for anterior and posterior teeth.
from the retainer casting. A pontic occupies the space
Figure 8-5.—Components of a typical FPD. formerly filled by the crown of a natural tooth.
8-3
Retainers
Part of the FPD will have metal castings, calledretainers. They are made to fit onto what the dentisthas cut away on the abutment teeth. Retainers alsosecure and support the FPD's artificial tooth or teeth.The most commonly used retainers are PFMs,complete metal crowns, partial crowns, and onlays.
Pontics
A pontic is an artificial tooth that is suspended
Connectors
A pontic is attached to a retainer by a connector.Connectors can be rigid or nonrigid. Nonrigidconnectors take the form of male- and female-lockingarrangements. Rigid connectors are classified as eithercast or soldered.
Abutments
The teeth that support and hold the retainer arecalled abutments. It is almost mandatory that an FPDbe supported by an abutment at both ends. Thisrequirement is waived in special situations. When apontic is suspended from only one retainer, it iscantilevered.
FIXED SPLINTS
A number of teth can share a load being placed onone of them. This helps prolong the life of loose teethor those that have lost supporting bone. Stabilizing amobile tooth or teeth is called splinting. Whenstabilizing adjacent teeth with connected castings thatare cemented in the mouth, the prosthesis becomes aform of fixed splinting. Such splints are made in thesame fashion as an FPD.
RESIN-BONDED FIXED PARTIALDENTURES (MARYLAND BRIDGE)
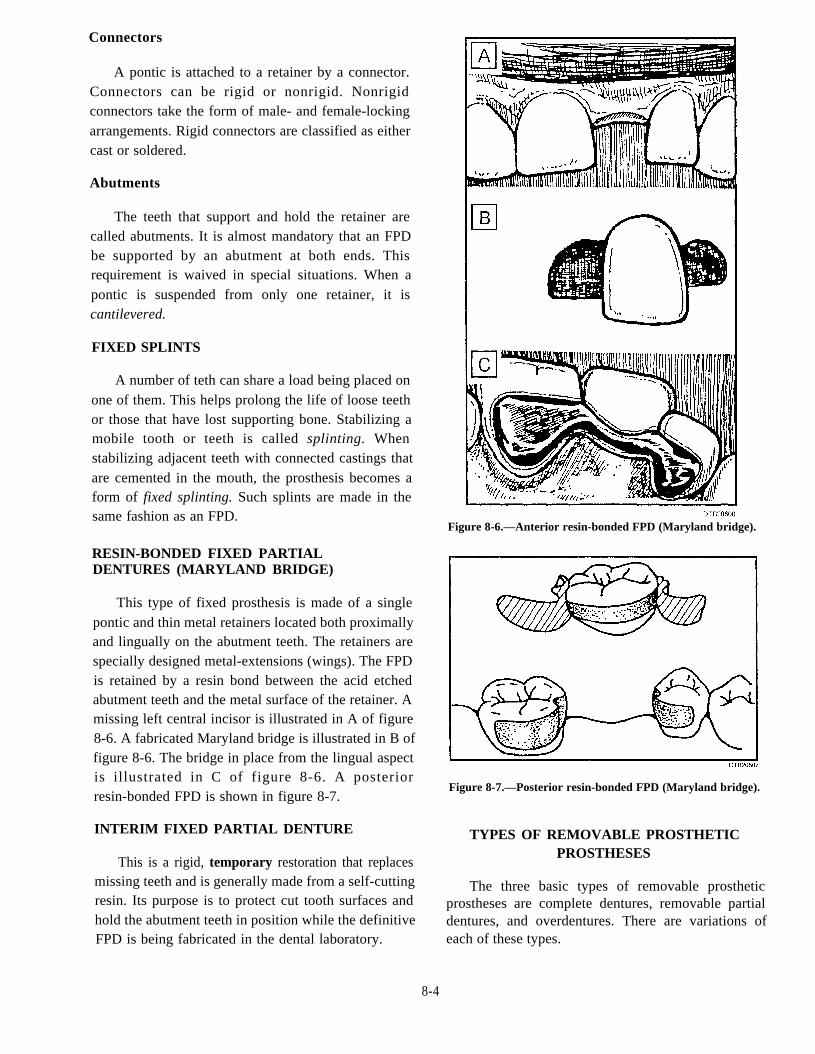
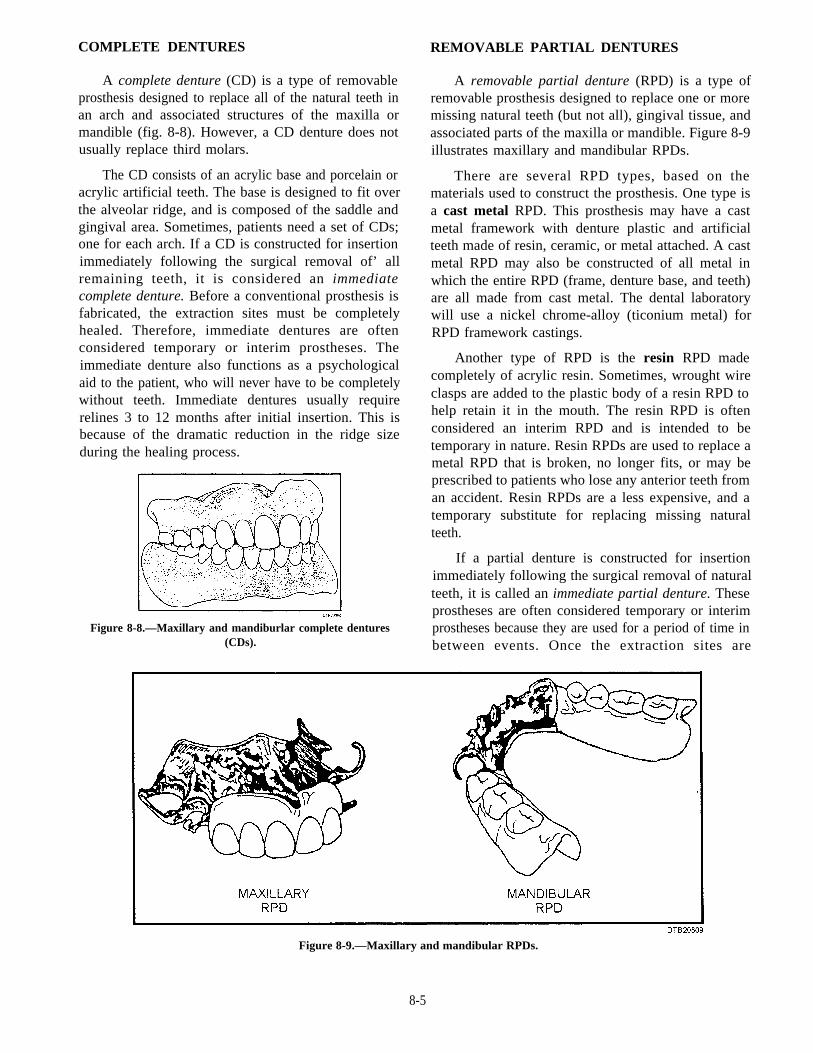
This type of fixed prosthesis is made of a singlepontic and thin metal retainers located both proximallyand lingually on the abutment teeth. The retainers arespecially designed metal-extensions (wings). The FPDis retained by a resin bond between the acid etchedabutment teeth and the metal surface of the retainer. Amissing left central incisor is illustrated in A of figure8-6. A fabricated Maryland bridge is illustrated in B offigure 8-6. The bridge in place from the lingual aspectis illustrated in C of figure 8-6. A posteriorresin-bonded FPD is shown in figure 8-7.
INTERIM FIXED PARTIAL DENTURE
This is a rigid, temporary restoration that replacesmissing teeth and is generally made from a self-cuttingresin. Its purpose is to protect cut tooth surfaces andhold the abutment teeth in position while the definitiveFPD is being fabricated in the dental laboratory.
Figure 8-6.—Anterior resin-bonded FPD (Maryland bridge).
Figure 8-7.—Posterior resin-bonded FPD (Maryland bridge).
TYPES OF REMOVABLE PROSTHETICPROSTHESES
The three basic types of removable prostheticprostheses are complete dentures, removable partialdentures, and overdentures. There are variations ofeach of these types.
8-4
COMPLETE DENTURES
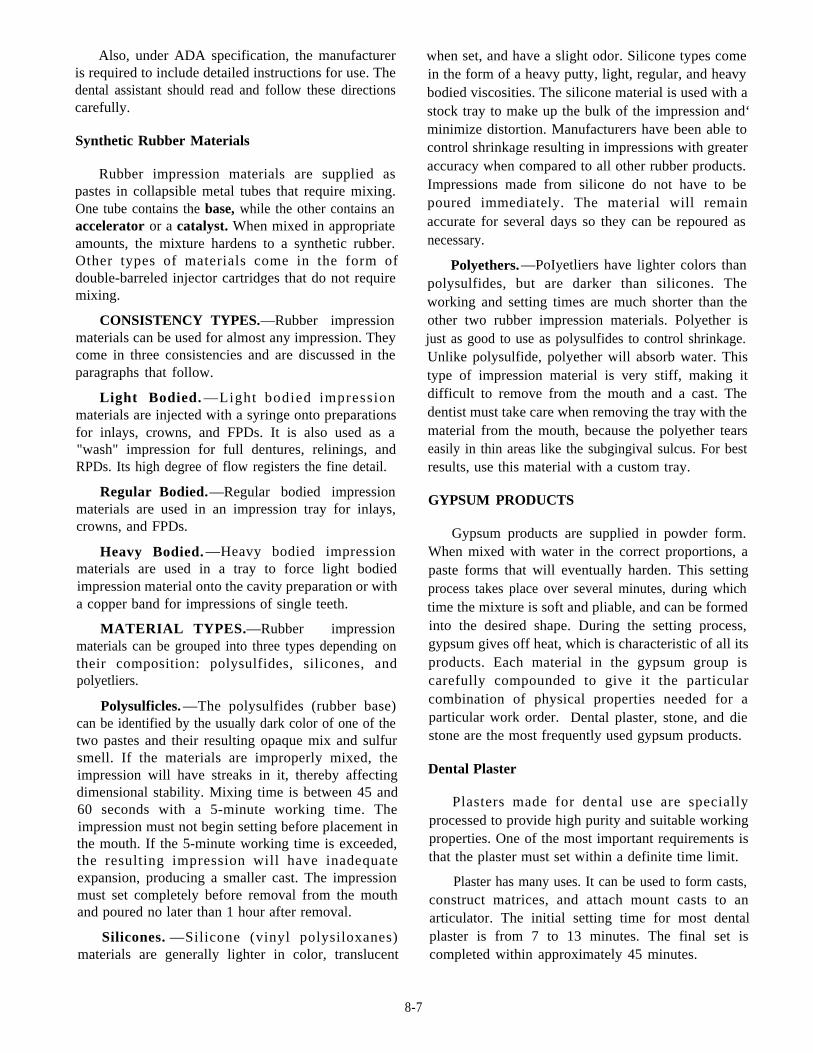
A complete denture (CD) is a type of removableprosthesis designed to replace all of the natural teeth inan arch and associated structures of the maxilla ormandible (fig. 8-8). However, a CD denture does notusually replace third molars.
The CD consists of an acrylic base and porcelain oracrylic artificial teeth. The base is designed to fit overthe alveolar ridge, and is composed of the saddle andgingival area. Sometimes, patients need a set of CDs;one for each arch. If a CD is constructed for insertionimmediately following the surgical removal of’ allremaining teeth, it is considered an immediatecomplete denture. Before a conventional prosthesis isfabricated, the extraction sites must be completelyhealed. Therefore, immediate dentures are oftenconsidered temporary or interim prostheses. Theimmediate denture also functions as a psychologicalaid to the patient, who will never have to be completelywithout teeth. Immediate dentures usually requirerelines 3 to 12 months after initial insertion. This isbecause of the dramatic reduction in the ridge sizeduring the healing process.
Figure 8-8.—Maxillary and mandiburlar complete dentures(CDs).
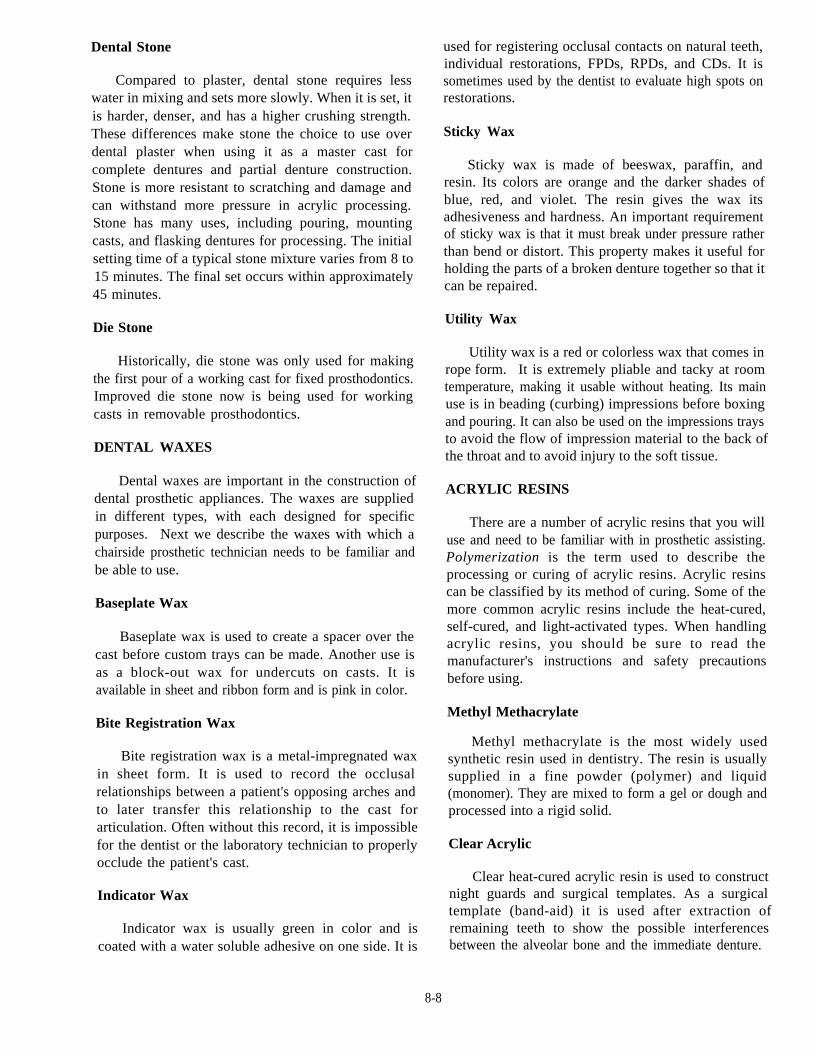
REMOVABLE PARTIAL DENTURES
A removable partial denture (RPD) is a type ofremovable prosthesis designed to replace one or moremissing natural teeth (but not all), gingival tissue, andassociated parts of the maxilla or mandible. Figure 8-9illustrates maxillary and mandibular RPDs.
There are several RPD types, based on thematerials used to construct the prosthesis. One type isa cast metal RPD. This prosthesis may have a castmetal framework with denture plastic and artificialteeth made of resin, ceramic, or metal attached. A castmetal RPD may also be constructed of all metal inwhich the entire RPD (frame, denture base, and teeth)are all made from cast metal. The dental laboratorywill use a nickel chrome-alloy (ticonium metal) forRPD framework castings.
Another type of RPD is the resin RPD madecompletely of acrylic resin. Sometimes, wrought wireclasps are added to the plastic body of a resin RPD tohelp retain it in the mouth. The resin RPD is oftenconsidered an interim RPD and is intended to betemporary in nature. Resin RPDs are used to replace ametal RPD that is broken, no longer fits, or may beprescribed to patients who lose any anterior teeth froman accident. Resin RPDs are a less expensive, and atemporary substitute for replacing missing naturalteeth.
If a partial denture is constructed for insertionimmediately following the surgical removal of naturalteeth, it is called an immediate partial denture. Theseprostheses are often considered temporary or interimprostheses because they are used for a period of time inbetween events. Once the extraction sites are
Figure 8-9.—Maxillary and mandibular RPDs.
8-5

well-healed, a conventional RPD is constructed.In-mediate partial dentures are usually fabricatedcompletely of a resin base and denture teeth.
OVERDENTURES
These prostheses include complete, partial, andimmediate overdentures. A complete overdenturereplaces the entire dentition and is constructed forinsertion over one or more remaining prepared teeth,roots, or dental implants. A partial overdenturereplaces the partially missing dentition and isconstructed for insertion over one or more remainingprepared teeth or roots. If the overdenture isconstructed for insertion immediately following thesurgical removal of natural teeth, leaving no strategicteeth to support the denture, the prosthesis isconsidered an immediate prosthesis.
PROSTHODONTIC MATERIALS
Many dental materials are unique to prosthodonticprocedures. The improper use of any of these materialscould cause a delay in the treatment and aninconvenience to the patient. You should be familiarwith the use, handling, reaction time, and storingprocedures for these materials. This knowledge isnecessary for your successful performance as aprosthodontic assistant.
DENTAL ALLOYS
Although you do not make dental prostheses as abasic dental assistant, you must know enough about thematerials used in their construction to documentproperly the treatment patients receive. When apatient’s prosthesis is given to a dental lab for repair orchange, they need to know its history to do the workproperly, or a tragic result may follow. You shoulddocument al I laboratory requests and patient dentalrecords with information, such as alloy type used,solder type, and tooth shade if applicable.
Dental alloys can be classified as precious,semiprecious, and nonprecious. For the purpose oftraining and clarification, we will classify them asnoble metal or base metal alloys.
Noble Metal Alloys
Noble metals resist oxidation and corrosion. Thefour noble metals used primarily in dentistry are silver,platinum, palladium, and gold. Gold is very useful fordental put-poses. Although too soft for use alone, it can
be combined with other metals in varying proportionsto produce alloys of almost any desired properties.Other noble metals are used in most dental labs tofabricate crowns and FPDs because of the high cost ofgold.
Base Metal Alloys
Since base metal alloys do not contain noblemetals, they are much stiffer and harder. Thus, they areuseful for constructing RPDs and certain types ofFPDs.
IMPRESSION MATERIALS
Many types of impression materials are used in thedental clinic. However, no one material fulfills allrequirements for making a perfect negativereproduction of the oral structures. The dentist willdetermine which material will best meet therequirements for each case. The two commonly usedimpression materials are alginate hydrocolloids andsynthetic rubbers.
Alginate Hydrocolloids
Hydrocolloids that change state because ofthe rmal changes a re known as revers ib lehydrocolloids because the process can be changedback and forth by altering the temperature. Those thatare altered through a chemical change are known asirreversible hydrocolloids. Once the chemical changehas taken place, it cannot be reversed or turned back tothe previous state.
Irreversible hydrocolloids, more commonlyknown as alginates, were developed from seaweedduring World War II. Alginate impression material haslargely replaced the reversible type for impressions.The advantages of alginate material are that it is easy toprepare and handle, it does not require excessequipment and advanced preparation, it is comfortablefor the patient, and it is inexpensive. Alginate is usedin making preliminary impressions for all study castsand most final impressions for RPD working casts.
According to the American Dental Association(ADA) specifications, alginate materials are dividedinto two types based on gelling time:
Type I—Fast set material, must gel in 1 to 2minutes.
Type II—Regular set material, must gel in 2 to4.5 minutes after the beginning of the mix.
8-6
Also, under ADA specification, the manufactureris required to include detailed instructions for use. Thedental assistant should read and follow these directionscarefully.
Synthetic Rubber Materials
Rubber impression materials are supplied aspastes in collapsible metal tubes that require mixing.One tube contains the base, while the other contains anaccelerator or a catalyst. When mixed in appropriateamounts, the mixture hardens to a synthetic rubber.Other types of materials come in the form ofdouble-barreled injector cartridges that do not requiremixing.
CONSISTENCY TYPES.—Rubber impressionmaterials can be used for almost any impression. Theycome in three consistencies and are discussed in theparagraphs that follow.
Light Bodied. —Light bodied impressionmaterials are injected with a syringe onto preparationsfor inlays, crowns, and FPDs. It is also used as a"wash" impression for full dentures, relinings, andRPDs. Its high degree of flow registers the fine detail.
Regular Bodied.—Regular bodied impressionmaterials are used in an impression tray for inlays,crowns, and FPDs.
Heavy Bodied. —Heavy bodied impressionmaterials are used in a tray to force light bodiedimpression material onto the cavity preparation or witha copper band for impressions of single teeth.
MATERIAL TYPES.—Rubber impressionmaterials can be grouped into three types depending ontheir composition: polysulfides, silicones, andpolyetliers.
Polysulficles. —The polysulfides (rubber base)can be identified by the usually dark color of one of thetwo pastes and their resulting opaque mix and sulfursmell. If the materials are improperly mixed, theimpression will have streaks in it, thereby affectingdimensional stability. Mixing time is between 45 and60 seconds with a 5-minute working time. Theimpression must not begin setting before placement inthe mouth. If the 5-minute working time is exceeded,the resulting impression will have inadequateexpansion, producing a smaller cast. The impressionmust set completely before removal from the mouthand poured no later than 1 hour after removal.
Silicones. —Silicone (vinyl polysiloxanes)materials are generally lighter in color, translucent
when set, and have a slight odor. Silicone types comein the form of a heavy putty, light, regular, and heavybodied viscosities. The silicone material is used with astock tray to make up the bulk of the impression and‘minimize distortion. Manufacturers have been able tocontrol shrinkage resulting in impressions with greateraccuracy when compared to all other rubber products.Impressions made from silicone do not have to bepoured immediately. The material will remainaccurate for several days so they can be repoured asnecessary.
Polyethers.—PoIyetliers have lighter colors thanpolysulfides, but are darker than silicones. Theworking and setting times are much shorter than theother two rubber impression materials. Polyether isjust as good to use as polysulfides to control shrinkage.Unlike polysulfide, polyether will absorb water. Thistype of impression material is very stiff, making itdifficult to remove from the mouth and a cast. Thedentist must take care when removing the tray with thematerial from the mouth, because the polyether tearseasily in thin areas like the subgingival sulcus. For bestresults, use this material with a custom tray.
GYPSUM PRODUCTS
Gypsum products are supplied in powder form.When mixed with water in the correct proportions, apaste forms that will eventually harden. This settingprocess takes place over several minutes, during whichtime the mixture is soft and pliable, and can be formedinto the desired shape. During the setting process,gypsum gives off heat, which is characteristic of all itsproducts. Each material in the gypsum group iscarefully compounded to give it the particularcombination of physical properties needed for aparticular work order. Dental plaster, stone, and diestone are the most frequently used gypsum products.
Dental Plaster
that the plaster must set within a definite time limit.
Plasters made for dental use are speciallyprocessed to provide high purity and suitable workingproperties. One of the most important requirements is
Plaster has many uses. It can be used to form casts,construct matrices, and attach mount casts to anarticulator. The initial setting time for most dentalplaster is from 7 to 13 minutes. The final set iscompleted within approximately 45 minutes.
8-7
Dental Stone
Compared to plaster, dental stone requires lesswater in mixing and sets more slowly. When it is set, itis harder, denser, and has a higher crushing strength.These differences make stone the choice to use overdental plaster when using it as a master cast forcomplete dentures and partial denture construction.Stone is more resistant to scratching and damage andcan withstand more pressure in acrylic processing.Stone has many uses, including pouring, mountingcasts, and flasking dentures for processing. The initialsetting time of a typical stone mixture varies from 8 to15 minutes. The final set occurs within approximately45 minutes.
Die Stone
Historically, die stone was only used for makingthe first pour of a working cast for fixed prosthodontics.Improved die stone now is being used for workingcasts in removable prosthodontics.
DENTAL WAXES
Dental waxes are important in the construction ofdental prosthetic appliances. The waxes are suppliedin different types, with each designed for specificpurposes. Next we describe the waxes with which achairside prosthetic technician needs to be familiar andbe able to use.
Baseplate Wax
Baseplate wax is used to create a spacer over thecast before custom trays can be made. Another use isas a block-out wax for undercuts on casts. It isavailable in sheet and ribbon form and is pink in color.
Bite Registration Wax
Bite registration wax is a metal-impregnated waxin sheet form. It is used to record the occlusalrelationships between a patient's opposing arches andto later transfer this relationship to the cast forarticulation. Often without this record, it is impossiblefor the dentist or the laboratory technician to properlyocclude the patient's cast.
Indicator Wax
Indicator wax is usually green in color and iscoated with a water soluble adhesive on one side. It is
used for registering occlusal contacts on natural teeth,individual restorations, FPDs, RPDs, and CDs. It issometimes used by the dentist to evaluate high spots onrestorations.
Sticky Wax
Sticky wax is made of beeswax, paraffin, andresin. Its colors are orange and the darker shades ofblue, red, and violet. The resin gives the wax itsadhesiveness and hardness. An important requirementof sticky wax is that it must break under pressure ratherthan bend or distort. This property makes it useful forholding the parts of a broken denture together so that itcan be repaired.
Utility Wax
Utility wax is a red or colorless wax that comes inrope form. It is extremely pliable and tacky at roomtemperature, making it usable without heating. Its mainuse is in beading (curbing) impressions before boxingand pouring. It can also be used on the impressions traysto avoid the flow of impression material to the back ofthe throat and to avoid injury to the soft tissue.
ACRYLIC RESINS
There are a number of acrylic resins that you willuse and need to be familiar with in prosthetic assisting.Polymerization is the term used to describe theprocessing or curing of acrylic resins. Acrylic resinscan be classified by its method of curing. Some of themore common acrylic resins include the heat-cured,self-cured, and light-activated types. When handlingacrylic resins, you should be sure to read themanufacturer's instructions and safety precautionsbefore using.
Methyl Methacrylate
Methyl methacrylate is the most widely usedsynthetic resin used in dentistry. The resin is usuallysupplied in a fine powder (polymer) and liquid(monomer). They are mixed to form a gel or dough andprocessed into a rigid solid.
Clear Acrylic
Clear heat-cured acrylic resin is used to constructnight guards and surgical templates. As a surgicaltemplate (band-aid) it is used after extraction ofremaining teeth to show the possible interferencesbetween the alveolar bone and the immediate denture.
8-8
Crown and Bridge Resin
These tooth-shaded acrylic resins are used in fixedprosthodontics to make temporary and permanentrestorations. The self-curing type is used as an interimrestoration while the permanent one is beingfabricated. This resin is normally used with a vacuumor pressure-formed matrix to sculpt the contours of theinterim crown or bridge.
Orthodontic Resin
Self-curing orthodontic resin is used to fabricatenightguards and orthodontic retainers. It is normallysupplied in the clear and pink types and can be usedwith several tinted liquids to produce different shades.
Repair Resins
These resins are used to fabricate interim RPDsand to repair any acrylic prosthesis. They are normallyonly stocked by the dental clinic in self-curing pinkand light-pink fibered shades.
oral tissues, head, and neck. Custom fluoride trays alsoare made out of this material for prescribed hometreatment with fluoride gels.
Separating Media
Separating media prevents one material frombonding to another material. The medium coats thecast and seals off the pores so acrylic resins can now befabricated on a dental cast and removed.
One type of separating media is tinfoil substitutethat when used, forms a film on the cast. To use, paintit on the cast with a soft bristle brush. The film isfragile and can easily be scuffed off. If this occurs,remove the entire film and repaint. Place the acrylicresin to the cast within 1 hour of painting the film onthe cast to avoid deterioration. Do not allow gypsumparticles to contaminate the bottle of tinfoil substitutewhen applying to a cast. Many other commerciallyprepared separators are available to prevent bonding.
Tray AdhesiveTray Acrylic
Self-curing tray acrylic is used to makecustomized impression trays. Tray acrylic is usuallylight blue or white in color. You can lengthen theworking time of this material by submersing the doughin cold water before it is ready to use.
OTHER PROSTHODONTICMATERIALS
Along with the prosthodontic materials previouslyexplained in the above categories, you need to becomefamilar with other miscellaneous materials such asalcohols, mouthguard materials, separating media,tray adhesive, and treatment liners.
Alcohols
Isopropyl, methanol, and denatured ethanol areexamples of fuels used in an alcohol torch for softeningplastic or melting wax. Of the three, denatured ethanolis preferred since it is safer to use and burns cleaner.
Mouthguard Materials
Mouthguards are made from polyvinyl materials.This thermoplastic resin is molded over a cast bymeans of a vacuum-forming machine. The use ofmouth protectors in sports is to reduce injuries to the
Custom impression trays are coated with thisadhesive before they are filled with rubber impressionmaterial. This ensures that the impression materialstays in the tray when it is removed from the mouth.Tray adhesive in spray form is also available for usewith alginate impression materials and stockimpression trays.
Treatment Liners
Treatment liners, also know as tissue conditioners,allow oral tisses to recover, improving tone andhealth, before making a new denture or reling anexisting one. The dentist changes the tissueconditioner at 3- to 4-day intervals since liners stiffenrapidly.
BASIC PROSTHODONTlCEQUIPMENT
The prosthodontic equipment that you will usewill be located in the dental laboratory and theprosthodontic DTR. Only the basic equipment ismentioned. Never operate or use any type ofequipment without first reading the manufacturer'sinstructions on use, safety precautions, andmaintenance.
8-9
ALCOHOL TORCH
The alcohol torch (fig. 8-10) is used for smoothingwax surfaces, setting teeth, and waxing. It is also usedwith a variety of tasks that require an accurate,controlled pointed flame. It draws fuel through a wickfrom a reservoir near the top of the torch. Periodicallytrim all irregular or burned areas of the wick and checkthe nozzle tip to ensure that it is free from obstructions.
CAUTION
Never overfill the fuel reservoir or attemptto fill it with the flame lit.
Before using an alcohol torch, you should checkthe fuel level. Many different types of fuels can beused with an alcohol torch. Isopropyl alcohol in asolution containing about 70-percent alcohol and30-percent distilled water by volume produces a flameof very poor quality. Further, 100 percent isopropylalcohol tends to smoke badly while burning, whichmakes it somewhat undesirable as torch fuel. The bestchoice fuel for the alcohol torch is denatured alcohol(ethenol), which produces a clear blue flame.However, care with the accountability of denaturedalcohol must be taken when used and distributed.Rubbing alcohol is unsuitable as a fuel.
Note: Methyl alcohol is highly poisonous if takeninternally.
Do not leave the torch unattended when lit.Extinguish the torch when not in use by covering thewick with the nozzle holder assembly.
Figure 8-10.—Alcohol torch.
ARTICULATOR
The articulator (fig. 8-11) is used to reproduce thepatient’s jaw movements. The dental cast made fromimpressions are mounted onto the articulator. Thisallows the dentist and the laboratory technician torecreate the normal movement of the patient’s jawduring the fabrication of the prosthesis. There areseveral types of articulators. The type of articulatorused depends upon the type of prosthesis beingfabricated.
BENCH LATHE
The bench lathe (fig. 8-12) is used during grinding,finishing, and polishing procedures. Always wearprotective glasses or goggles when working with thebench lathe. Ensure that all chucks and attachmentsare securely mounted before starting the lathe.
WARNING
Never leave an unattended lathe running,or attempt to stop the lathe by grasping theattachment with your hands.
Figure 8-11.—Articulator.
Figure 8-12.—Bench lathe.
8-10
The lathe is used with rotary instruments (burs,stones, arbor bands, and ragwheels, etc.). An adapterand/or chuck is required to attach these instruments tothe lathe.
BUNSEN BURNER
The Bunsen burner (fig. 8-13) heats wax-carvinginstruments, waxes, and modeling compound. Itrequires a balanced air and gas mixture to produce aclean blue flame. It is attached to a gas valve with anon-collapsible hose.
Inspect the unit and hose daily for looseconnections and defects. Have the hose replaced whenit shows signs of wear. When wax or similar materialdrops into the burner, the burner assembly detacheseasily for boiling out and cleaning.
WARNING
Never leave an unattended burner lit orreach over an open flame, because theflame is almost invisible and can causeserious harm.
CAST TRIMMER
The cast trimmer (fig. 8-14) is used to trim andcontour casts. A cast should present a neat, attractiveappearance. This electrically operated machine has a10-inch abrasive wheel, a small work table, and awater-dispensing mechanism to keep the abrasivewheel rinsed clean and clog free.
Before using the trimmer, ensure the water supplyis on. Allow the water to run for at least 1 minute after
Figure 8-13.—Bunsen burner.
Figure 8-14.—Cast trimmer.
the procedure is complete. This will flush most of theparticles from the trimmer drain and help preventclogging.
WARNING
When operating the trimmer, be sure tokeep your fingers away from the wheel.Always wear safety glasses or goggles.
Using light pressure, press the cast against thetrimming wheel. Ensure that the water spray issufficient to contain the grindings.
Check the unit for water leaks and the power cordfor wear or damage. If the unit it does not operatecorrectly, contact the dental equipment repairtechnician. Clean the trimmer at least quarterly, ormore frequently, depending on the amount of usage.
Figure 8-15.—Face-bow.
8-11
FACE-BOW
The face-bow is a mechanical device (fig. 8-15)used to duplicate the position of the maxilla to anarticulator. The face-bow rests on the patient's faceand a wax bite plate is inserted into the oral cavity torecord the patient's bite. Several types of face-bows areavailable for use.
IMPRESSION TRAYS
Impression trays hold the impression material inplace while it sets. The impression may include aportion of the arch or the entire arch. Generally, theimpression tray is shaped to match the natural contourof the arch. The two basic types of trays are stock andcustom trays. With either type, the tray used for themandibular impression differs from the maxillary traybecause it allows free tongue movement.
Stock Trays
Stock trays come in many sizes for both themaxillary and mandibular arches. As figures 8-16 and8-17 illustrate, stock trays may be rimlocking or mesh.Both stock trays are available in regular, edentulous,and orthodontic styles. Generally, the size of a traywill be identified on the handle tray.
Custom Trays
Rimlock trays are easily identified by a rim thatresembles a metal wire soldered along the inner part ofthe tray at the edge of the outer borders. The maxillaryimpression tray has a U-shaped wire soldered to apalatal area on the tray. Semiliquid impression
Figure 8-17.—Maxillary and mandibular mesh stock trays.
material flows into the undercuts (ledges) formed bythe rim and sets (hardens). This locks the material in
the tray.
Use liquid tray adhesive or the spray type on
impression trays to ensure that the impression material
does not separate from the tray. Stock trays are used for
hydrocolloid impression materials. Unless disposable,
stock trays must be cleaned and sterilized after each
patient use.
Custom trays are made in the dental laboratoryfrom tray acrylic. Since custom trays are made for
individual patients, you must have a dental cast of the
patient's teeth. The fabrication of custom trays isdiscussed later in this chapter.
Figure 8-16.—Maxillary and mndibular rimrock stock trays.
8-12

MIXING BOWL
The mixing bowl is made of flexible material,either rubber (fig. 8-18) or flexible plastic, and used tomix alginate impression material and dental stone. Itcomes in small, medium, large, and extra large sizes.All sizes are used in the dental laboratory. A spatula isused to blend the powdered alginate or dental stone andwater together. You may also find that a regular tableknife may be used as a mixing spatula. In either case,the rounded ends on the spatula or table knife shouldapproximate the contour of the mixing bowl.
PNEUMATIC CURING UNIT
The pneumatic curing unit (fig. 8-19) is commonlycalled a pressure pot . I t is used during thepolymerization of self-curing acrylic resins. It is usedto cure relines and repairs of complete and removablepartial dentures. The unit has a compressed air inletthat allows air pressure to fill the pot. Curing of theresin under pressure significantly reduces thepossibility of pores or voids with the resin. Lukewarmwater (115°F) is usually placed in the pot to hastenpolymerization. To use, place the appliance that is tobe cured in the pot. Ensure the appliance is completelysubmerged in the water. Secure the pot top. Fill the potwith compressed air. The normal curing time is 30minutes at 20 psi.
WARNING
You must never exceed the maximum airpressure indicated in the manufacturer'sinstructions. Excessive pressure may causethe pot to explode.
Curing time may vary depending on the thicknessof the resin being cured. After curing, use the air reliefvalve to let the air escape. Ensure that no air pressureremains in the pot when retrieving the cured prosthesisfrom the pot.
Figure 8-19.—Pneumatic curing unit.
Periodically check the seals, air inlets, and outletsfor malfunction. Activate the pressure relief valve toensure it is operational. When necessary, lubricate the"O" ring inside the lid with petrolatum.
VACUUM ADAPTER
The vacuum adapter (fig. 8-20) is used for therapid fabrication of custom trays, stents, mouthguards,and bite guards. This unit is also referred to as thevacuum former. The vacuum former will soften asheet of plastic or acrylic resin and then draw it onto thecast with suction.
Figure 8-18.—Rubber mixing bowl. Figure 8-20.—Vacuum adapter.
8-13
Clean the exterior of the unit and inspect the electricalcord and plug before each use.
The heating element is housed inside a metalassembly at the very top portion of the unit. Thissection will become extremely hot when in use. Usecaution. Before use, inspect the vacuum holes in theplatform to make sure they are not obstructed. Inspectthe rubber sealing gasket for cracks and deterioration.
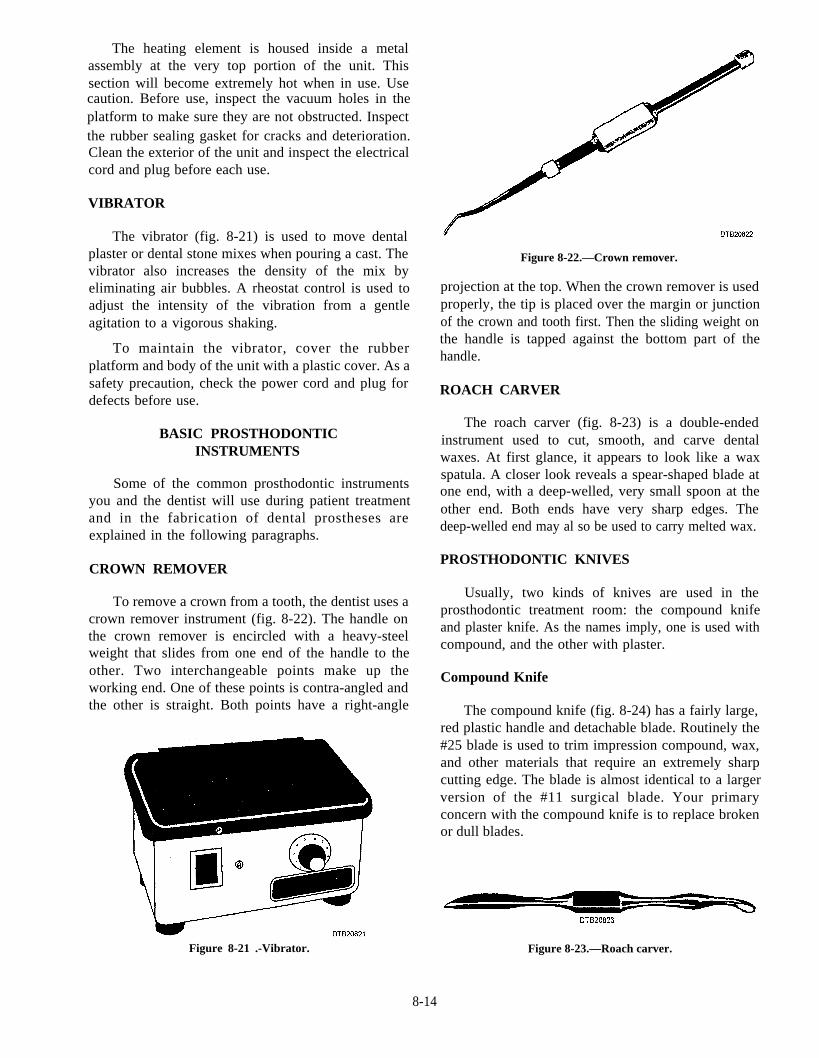
VIBRATOR
The vibrator (fig. 8-21) is used to move dentalplaster or dental stone mixes when pouring a cast. Thevibrator also increases the density of the mix byeliminating air bubbles. A rheostat control is used toadjust the intensity of the vibration from a gentleagitation to a vigorous shaking.
To maintain the vibrator, cover the rubberplatform and body of the unit with a plastic cover. As asafety precaution, check the power cord and plug fordefects before use.
BASIC PROSTHODONTICINSTRUMENTS
Some of the common prosthodontic instrumentsyou and the dentist will use during patient treatmentand in the fabrication of dental prostheses areexplained in the following paragraphs.
CROWN REMOVER
To remove a crown from a tooth, the dentist uses acrown remover instrument (fig. 8-22). The handle onthe crown remover is encircled with a heavy-steelweight that slides from one end of the handle to theother. Two interchangeable points make up theworking end. One of these points is contra-angled andthe other is straight. Both points have a right-angle
Figure 8-21 .-Vibrator.
Figure 8-22.—Crown remover.
projection at the top. When the crown remover is usedproperly, the tip is placed over the margin or junctionof the crown and tooth first. Then the sliding weight onthe handle is tapped against the bottom part of thehandle.
ROACH CARVER
The roach carver (fig. 8-23) is a double-endedinstrument used to cut, smooth, and carve dentalwaxes. At first glance, it appears to look like a waxspatula. A closer look reveals a spear-shaped blade atone end, with a deep-welled, very small spoon at theother end. Both ends have very sharp edges. Thedeep-welled end may al so be used to carry melted wax.
PROSTHODONTIC KNIVES
Usually, two kinds of knives are used in theprosthodontic treatment room: the compound knifeand plaster knife. As the names imply, one is used withcompound, and the other with plaster.
Compound Knife
The compound knife (fig. 8-24) has a fairly large,red plastic handle and detachable blade. Routinely the#25 blade is used to trim impression compound, wax,and other materials that require an extremely sharpcutting edge. The blade is almost identical to a largerversion of the #11 surgical blade. Your primaryconcern with the compound knife is to replace brokenor dull blades.
Figure 8-23.—Roach carver.
8-14
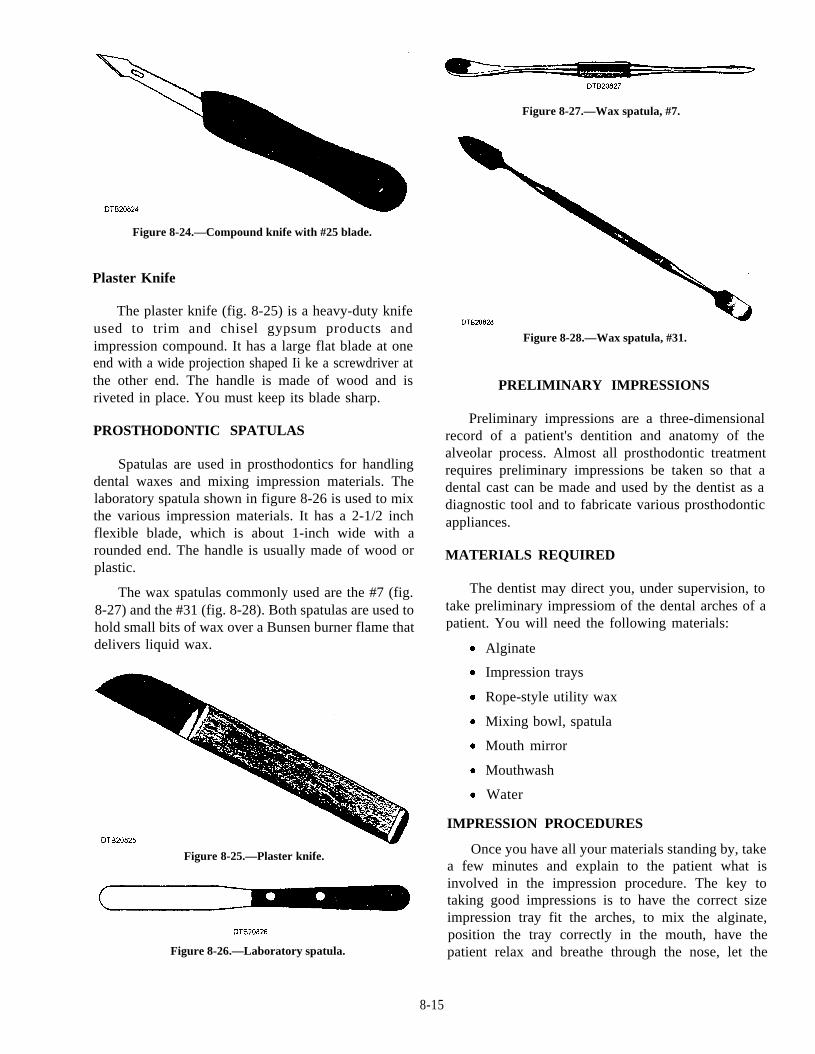
Figure 8-24.—Compound knife with #25 blade.
Plaster Knife
Figure 8-27.—Wax spatula, #7.
The plaster knife (fig. 8-25) is a heavy-duty knifeused to trim and chisel gypsum products andimpression compound. It has a large flat blade at oneend with a wide projection shaped Ii ke a screwdriver atthe other end. The handle is made of wood and isriveted in place. You must keep its blade sharp.
Figure 8-28.—Wax spatula, #31.
PRELIMINARY IMPRESSIONS
PROSTHODONTIC SPATULASPreliminary impressions are a three-dimensional
record of a patient's dentition and anatomy of thealveolar process. Almost all prosthodontic treatmentrequires preliminary impressions be taken so that adental cast can be made and used by the dentist as adiagnostic tool and to fabricate various prosthodonticappliances.
MATERIALS REQUIRED
Spatulas are used in prosthodontics for handlingdental waxes and mixing impression materials. Thelaboratory spatula shown in figure 8-26 is used to mixthe various impression materials. It has a 2-1/2 inchflexible blade, which is about 1-inch wide with arounded end. The handle is usually made of wood orplastic.
The wax spatulas commonly used are the #7 (fig.8-27) and the #31 (fig. 8-28). Both spatulas are used tohold small bits of wax over a Bunsen burner flame thatdelivers liquid wax.
Figure 8-25.—Plaster knife.
Figure 8-26.—Laboratory spatula.
The dentist may direct you, under supervision, totake preliminary impressiom of the dental arches of apatient. You will need the following materials:
Alginate
Impression trays
Rope-style utility wax
Mixing bowl, spatula
Mouth mirror
Mouthwash
Water
IMPRESSION PROCEDURES
Once you have all your materials standing by, takea few minutes and explain to the patient what isinvolved in the impression procedure. The key totaking good impressions is to have the correct sizeimpression tray fit the arches, to mix the alginate,position the tray correctly in the mouth, have thepatient relax and breathe through the nose, let the
8-15

alginate set, and correctly remove the impression tray.Use the fol lowing steps to take prel iminaryimpressions:
1. Select the correct size impression tray andensure its fit in the patient's mouth is correct. Allow 3-4mm of space between the tray, teeth, and soft tissueswhen the tray is positioned in the mouth.
2. Place utility rope wax around the top border ofthe maxillary and mandibular trays to extend theirheight. This will also act as a "pad effect" on the softtissues. Place the trays in the mouth again to ensure thefit.
3. Mix the alginate and water together in themixing bowl with a spatula. Follow the manufacturer'sinstructions. Mix into a creamy, smooth consistency.Use the sides of the mixing bowl and press the mixtureagainst it to eliminate air bubbles. Total mixing time isusually 1 minute depending on the type or manufactureof alginate used.
4. Have the patient rinse with mouthwashvigorously. This aids in removing food particles andthick saliva that may cause voids in the impression.
5. As the patient is rinsing, load the maxillary traywith the mixed alginate. Load the tray with one largeportion of alginate on the spatula using a wipingmovement to avoid air being trapped in the material.
6. Wipe off any excess alginate, and smooth thesurface of the tray with your index finger. Use theexcess alginate from the mixing bowl and place somedirectly onto the palate with your index finger beforeseating the impression tray. This prevents a large voidwithin the palatal vault.
7. Have the patient open his/her mouth abouthalfway. Using your left index finger, retract thepatient’s right cheek. Carefully place the filled tray intothe patient's mouth and use the tray to move the leftcheek out of the way.
8. Guide the tray in the mouth and center it over themaxillary teeth. Pressing up with the posterior border ofthe tray, raise the tray to the hard palate area to form aseal.
9. Keeping the posterior border of the hard palatein place, next raise the tray up over the maxillary teeth.The tray should be seated so that it is parallel with theocclusal plane.
10. Holding the tray in place with your right hand,use your left hand to gently lift the patient's lips andcheeks away from the tray until it is completely seated.
The maxillary arch should now be completelyem bedded in the alginate material.
11. While keeping the tray parallel with the occlusalplane, pull the upper lip over the anterior border of thetray to form the anterior section of the impression. Theaverage working time from mixing the alginate materialto this step is 1 1/2 minutes. After this time, the alginatebegins to gel and set up.
12. Still holding the tray in place, look in thepatient's mouth and ensure that no alginate material isrunning down into the throat area. If needed use amouth mirror to remove any excess. Have the patientrelax and tilt the head down and breathe through thenose as the material is setting up. A saliva ejector orpatient napkin needs to be in place to catch any excesssaliva while the alginate is setting up.
13. After the alginate has set, place one of yourindex fingers along the lateral border of the tray andpress down to break the seal formed by the set alginatematerial. Once the seal is broken, carefully remove thetray from the patient's mouth and wrap the tray in amoist paper towel. Have the patient rinse his/her mouthout to remove any excess material left from theimpression. Have the dental officer inspect themaxillary impression for accuracy.
14. Next, take the mandibular arch impression usingthe same basic steps as with the maxillary archtechnique. When seating the mandibular tray onto thelower arch, have the patient raise the tongue to allow thealginate in the tray to take an accurate impression of thelingual aspects of the alveolar process.
15. Once the tray is seated, gently pull the lower lipover the anterior border of the mandibular tray to formthe anterior section of the impression.
16. After the alginate has set, remove themandibular tray in the same fashion as with themaxillary arch, except push up to break the seal.
17. Have the patient rinse his/her mouth again, andhave the dental officer inspect the mandibularimpression for accuracy. Wrap in a moist paper towel.
18. The dental assistant will now disinfect themaxillary and mandibular impressions. While in theDTR, remove the moist paper towels. Rinse anddisinfect using an accepted phenyl disinfectant on theimpression material and trays. Wrap in moist papertowels again and place impressions in a headrest coverfor transportation to the dental laboratory.
8-16
FABRICATING CAST
The laboratory technicians will usually pour mostof the impressions, but there will be times when youmust perform this task. To fabricate a quality cast, youmust first start with a quality impression.
PREPARING TO POUR IMPRESSIONS
Once you have an accurate impression, producingan accurate cast is simple if the impression andmaterials are prepared correctly. A minor mistake inany of these areas could cause a distorted cast.
IMPRESSION
Pour the impressions as soon as possible becauseall impression materials are subject to distortion.Cleanse impressions to remove mucous and saliva.This helps to ensure accurate surface detail and
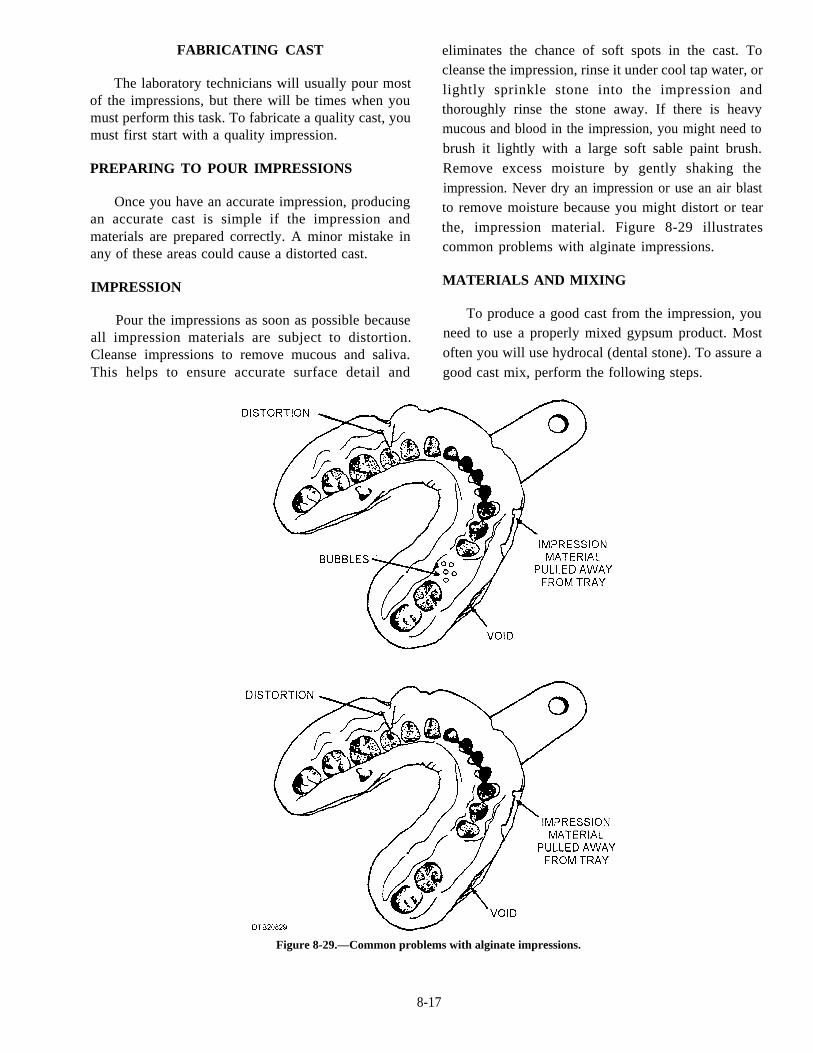
eliminates the chance of soft spots in the cast. Tocleanse the impression, rinse it under cool tap water, orlightly sprinkle stone into the impression andthoroughly rinse the stone away. If there is heavymucous and blood in the impression, you might need tobrush it lightly with a large soft sable paint brush.Remove excess moisture by gently shaking theimpression. Never dry an impression or use an air blastto remove moisture because you might distort or tearthe, impression material. Figure 8-29 illustratescommon problems with alginate impressions.
MATERIALS AND MIXING
To produce a good cast from the impression, youneed to use a properly mixed gypsum product. Mostoften you will use hydrocal (dental stone). To assure agood cast mix, perform the following steps.
Figure 8-29.—Common problems with alginate impressions.
8-17

1. Always use a clean mixing bowl and spatula.The best time to clean a bowl and spatula is immediatelyafter pouring the impression while the material is stillsoft and easy to remove.
2. Measure the volume of water and weigh thepowder before you mix any gypsum material. Anaccurate water-to-powder ratio is a must to preserve theproperties of any gypsum product.
3. Always add the powder to the water, never thewater to the powder.
4. Spatulate thoroughly by hand, incorporating althe powder evenly throughout the mix until creamyAvoid whipping the mix; doing so will cause the finalproduct to have excessive air bubbles.
5. Vacuum mix using a power mixer-investorwhenever possible. Vacuum mixing helps to eliminateincorporation of air into the mix. If you can't vacuummix, tap the mixing bowl against the bench top or hold iton the vibrator for a few moments to express any air thatmight be trapped in the mix.
6. Never add water to a mix that is too thick; thisinterferes with the setting properties. It would be betterto discard the mix and start over again.
POURING IMPRESSIONS
The primary objective when you pour a cast is tocapture all the surface detail of the impression, and asbubble-free as possible. This is done using a vibratorto make a thick gypsum mix, which flows into all thecrevices of the impression. There are several ways topour impressions, such as the upright, two-step, andboxed methods. We will only discuss the two-stepmethod of pouring a cast, because it is the mostsuccessful method of pouring preliminary and finalimpressions.
First Pour
Begin by holding the impression tray so that thehandle rests against the vibrator. Start at one end of thearch and flow a small amount of stone into theimpression, letting it slowly advance to the other sideas shown in figure 8-30. Flow the stone slowly enoughto watch the progress of the stone as you fill each toothimprint. This should eliminate bubbles. If a bubbleappears and does not go away with vibration, pop itwith a small instrument. Use an acrylic mixing spatulato place small amounts of stone into minutepreparations or teeth with wide incisal and narrow
cervixes. Touch the impression to the vibrator to floweach addition of stone.
After covering all the critical surfaces of theimpression, you may safely add progressively largeramounts of the mix. There is a rate of vibration that isbest for each mix's ability to flow. The vibrationintensity should be set high enough to make thematerial move across the surface of the impression.The vibrator is set too high if the impression "jumps" inyour hand, moves so fast that it skips over surfacedetail, or if vibration wave patterns develop on thesurface of the mix. Continue filling the impressionstone to a level slightly above the height of theimpression walls (about 2 mm thick). Do not flowstone over the outside of the tray because it must beremoved before the impression can be separated fromthe cast.
Lastly, add retention nodules to this first pour asshown in figure 8-31(A). Stone retention nodules areused between the first and second pours so the twostone layers can be locked together mechanically.Place the handle of the tray in a holding device; do notlay the impression on the counter or the cast will bedistorted. Now let this first pour set for about 45minutes, or at least until the stone loses its glazedappearance before making the cast base.
Second Pour
It is now time for you to make the cast base. Usethe cast trimmer to grind down the long retentionnodules (if completely set), reduce the base of thecast's thickness, and make the top of the tray parallel tothe cast's bottom. In general, the length of the retentionnodules should equal the height of the trav flanges.
Figure 8-30.—Pouring the first pour of an impression.
8-18
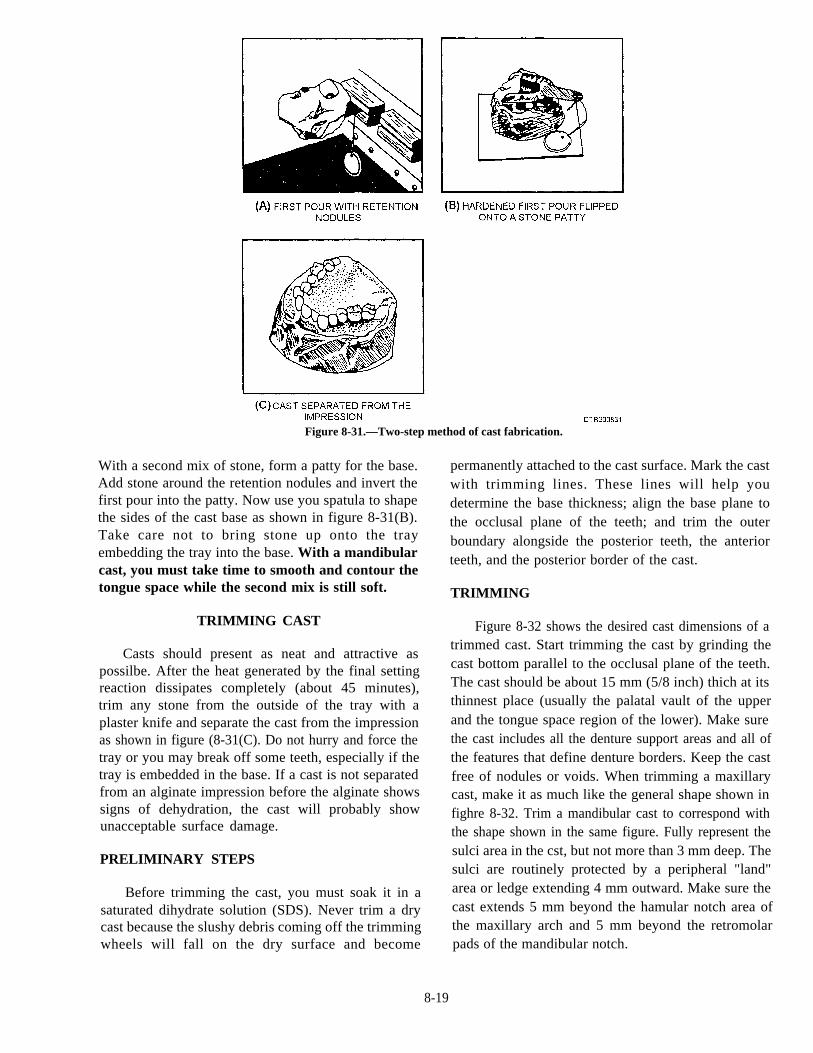
Figure 8-31.—Two-step method of cast fabrication.
With a second mix of stone, form a patty for the base.Add stone around the retention nodules and invert thefirst pour into the patty. Now use you spatula to shapethe sides of the cast base as shown in figure 8-31(B).Take care not to bring stone up onto the trayembedding the tray into the base. With a mandibularcast, you must take time to smooth and contour thetongue space while the second mix is still soft.
TRIMMING CAST
Casts should present as neat and attractive aspossilbe. After the heat generated by the final settingreaction dissipates completely (about 45 minutes),trim any stone from the outside of the tray with aplaster knife and separate the cast from the impressionas shown in figure (8-31(C). Do not hurry and force thetray or you may break off some teeth, especially if thetray is embedded in the base. If a cast is not separatedfrom an alginate impression before the alginate showssigns of dehydration, the cast will probably showunacceptable surface damage.
PRELIMINARY STEPS
Before trimming the cast, you must soak it in asaturated dihydrate solution (SDS). Never trim a drycast because the slushy debris coming off the trimmingwheels will fall on the dry surface and become
permanently attached to the cast surface. Mark the castwith trimming lines. These lines will help youdetermine the base thickness; align the base plane tothe occlusal plane of the teeth; and trim the outerboundary alongside the posterior teeth, the anteriorteeth, and the posterior border of the cast.
TRIMMING
Figure 8-32 shows the desired cast dimensions of atrimmed cast. Start trimming the cast by grinding thecast bottom parallel to the occlusal plane of the teeth.The cast should be about 15 mm (5/8 inch) thich at itsthinnest place (usually the palatal vault of the upperand the tongue space region of the lower). Make surethe cast includes all the denture support areas and all ofthe features that define denture borders. Keep the castfree of nodules or voids. When trimming a maxillarycast, make it as much like the general shape shown infighre 8-32. Trim a mandibular cast to correspond withthe shape shown in the same figure. Fully represent thesulci area in the cst, but not more than 3 mm deep. Thesulci are routinely protected by a peripheral "land"area or ledge extending 4 mm outward. Make sure thecast extends 5 mm beyond the hamular notch area ofthe maxillary arch and 5 mm beyond the retromolarpads of the mandibular notch.
8-19
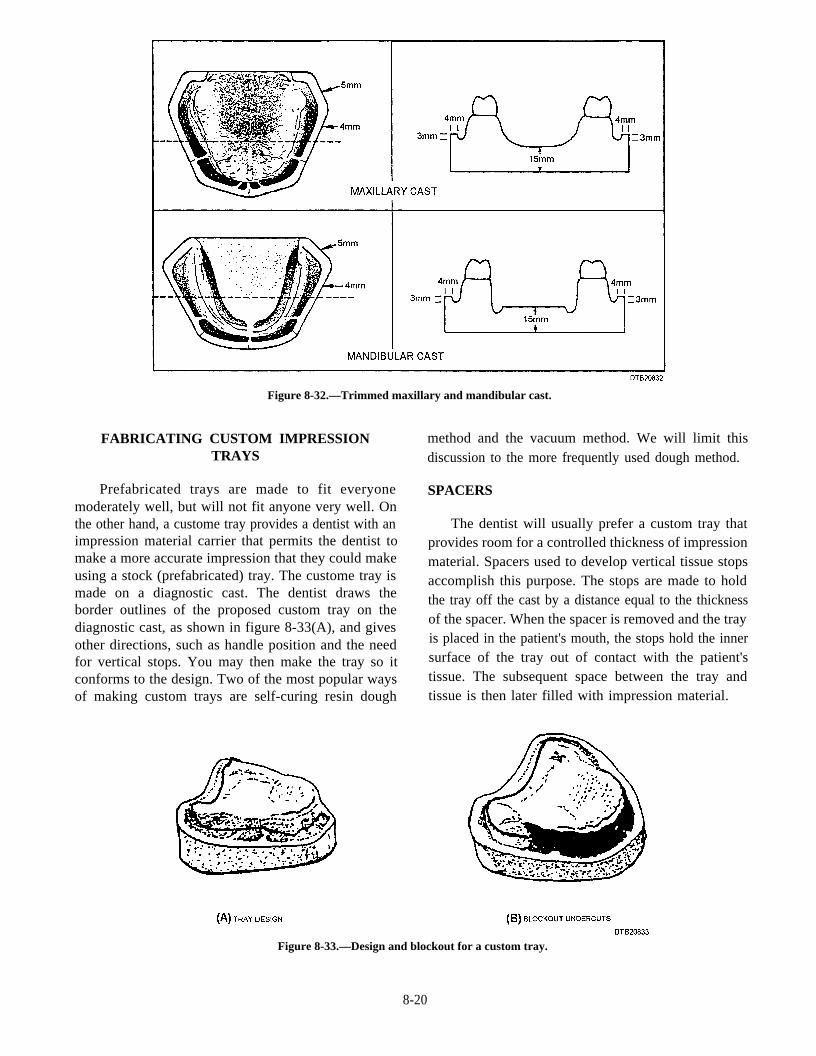
Figure 8-32.—Trimmed maxillary and mandibular cast.
FABRICATING CUSTOM IMPRESSION method and the vacuum method. We will limit thisTRAYS discussion to the more frequently used dough method.
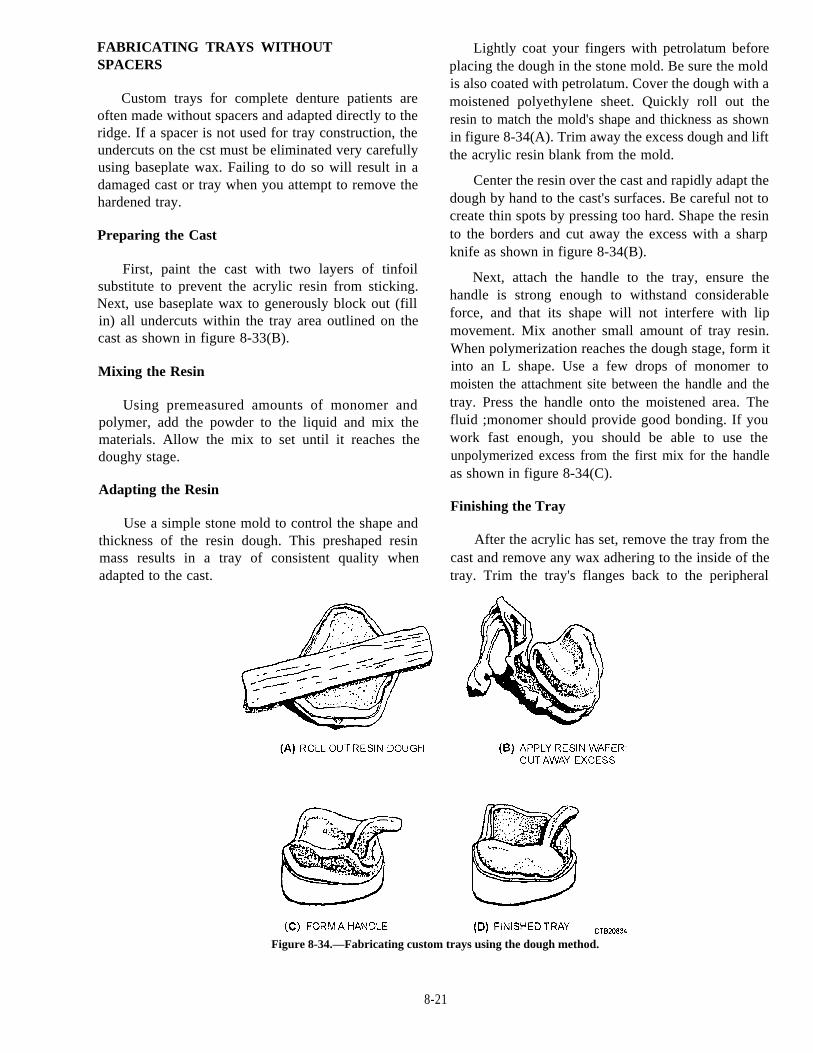
Prefabricated trays are made to fit everyonemoderately well, but will not fit anyone very well. Onthe other hand, a custome tray provides a dentist with animpression material carrier that permits the dentist tomake a more accurate impression that they could makeusing a stock (prefabricated) tray. The custome tray ismade on a diagnostic cast. The dentist draws theborder outlines of the proposed custom tray on thediagnostic cast, as shown in figure 8-33(A), and givesother directions, such as handle position and the needfor vertical stops. You may then make the tray so itconforms to the design. Two of the most popular waysof making custom trays are self-curing resin dough
SPACERS
The dentist will usually prefer a custom tray thatprovides room for a controlled thickness of impressionmaterial. Spacers used to develop vertical tissue stopsaccomplish this purpose. The stops are made to holdthe tray off the cast by a distance equal to the thicknessof the spacer. When the spacer is removed and the trayis placed in the patient's mouth, the stops hold the innersurface of the tray out of contact with the patient'stissue. The subsequent space between the tray andtissue is then later filled with impression material.
Figure 8-33.—Design and blockout for a custom tray.
8-20
FABRICATING TRAYS WITHOUTSPACERS
Custom trays for complete denture patients areoften made without spacers and adapted directly to theridge. If a spacer is not used for tray construction, theundercuts on the cst must be eliminated very carefullyusing baseplate wax. Failing to do so will result in adamaged cast or tray when you attempt to remove thehardened tray.
Preparing the Cast
First, paint the cast with two layers of tinfoilsubstitute to prevent the acrylic resin from sticking.Next, use baseplate wax to generously block out (fillin) all undercuts within the tray area outlined on thecast as shown in figure 8-33(B).
Mixing the Resin
Using premeasured amounts of monomer andpolymer, add the powder to the liquid and mix thematerials. Allow the mix to set until it reaches thedoughy stage.
Adapting the Resin
Use a simple stone mold to control the shape andthickness of the resin dough. This preshaped resinmass results in a tray of consistent quality whenadapted to the cast.
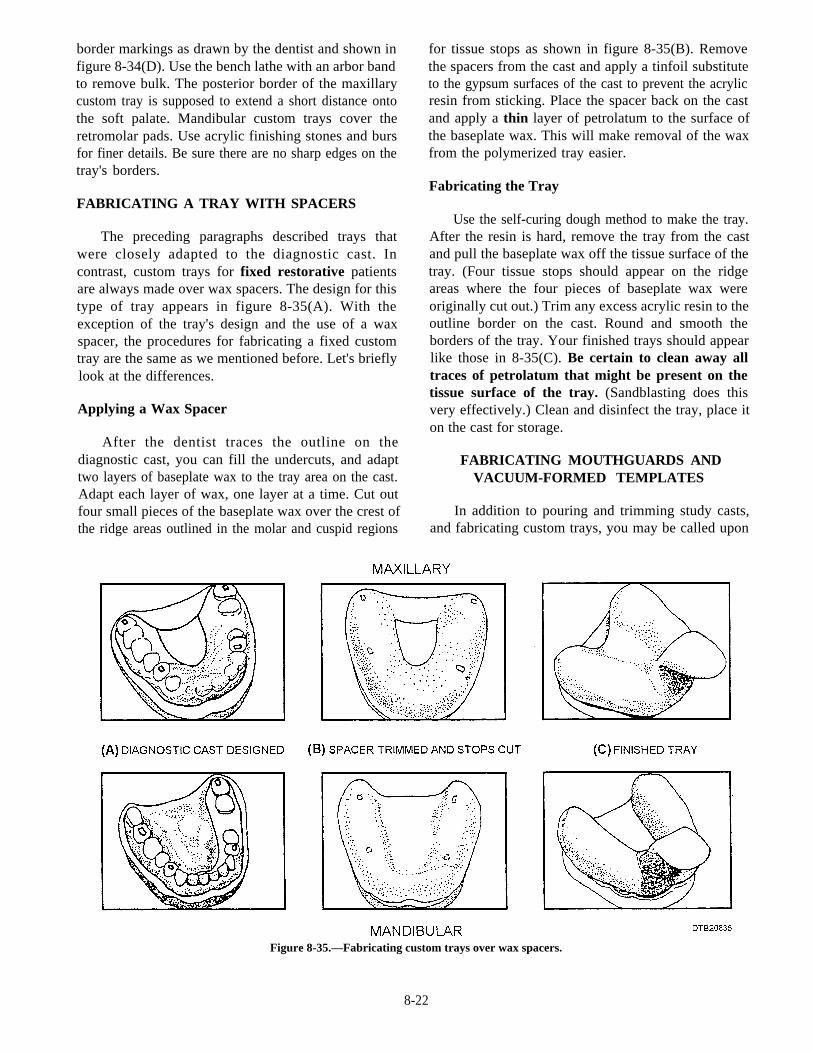
Lightly coat your fingers with petrolatum beforeplacing the dough in the stone mold. Be sure the moldis also coated with petrolatum. Cover the dough with amoistened polyethylene sheet. Quickly roll out theresin to match the mold's shape and thickness as shownin figure 8-34(A). Trim away the excess dough and liftthe acrylic resin blank from the mold.
Center the resin over the cast and rapidly adapt thedough by hand to the cast's surfaces. Be careful not tocreate thin spots by pressing too hard. Shape the resinto the borders and cut away the excess with a sharpknife as shown in figure 8-34(B).
Next, attach the handle to the tray, ensure thehandle is strong enough to withstand considerableforce, and that its shape will not interfere with lipmovement. Mix another small amount of tray resin.When polymerization reaches the dough stage, form itinto an L shape. Use a few drops of monomer tomoisten the attachment site between the handle and thetray. Press the handle onto the moistened area. Thefluid ;monomer should provide good bonding. If youwork fast enough, you should be able to use theunpolymerized excess from the first mix for the handleas shown in figure 8-34(C).
Finishing the Tray
After the acrylic has set, remove the tray from thecast and remove any wax adhering to the inside of thetray. Trim the tray's flanges back to the peripheral
Figure 8-34.—Fabricating custom trays using the dough method.
8-21
border markings as drawn by the dentist and shown infigure 8-34(D). Use the bench lathe with an arbor bandto remove bulk. The posterior border of the maxillarycustom tray is supposed to extend a short distance ontothe soft palate. Mandibular custom trays cover theretromolar pads. Use acrylic finishing stones and bursfor finer details. Be sure there are no sharp edges on thetray's borders.
FABRICATING A TRAY WITH SPACERS
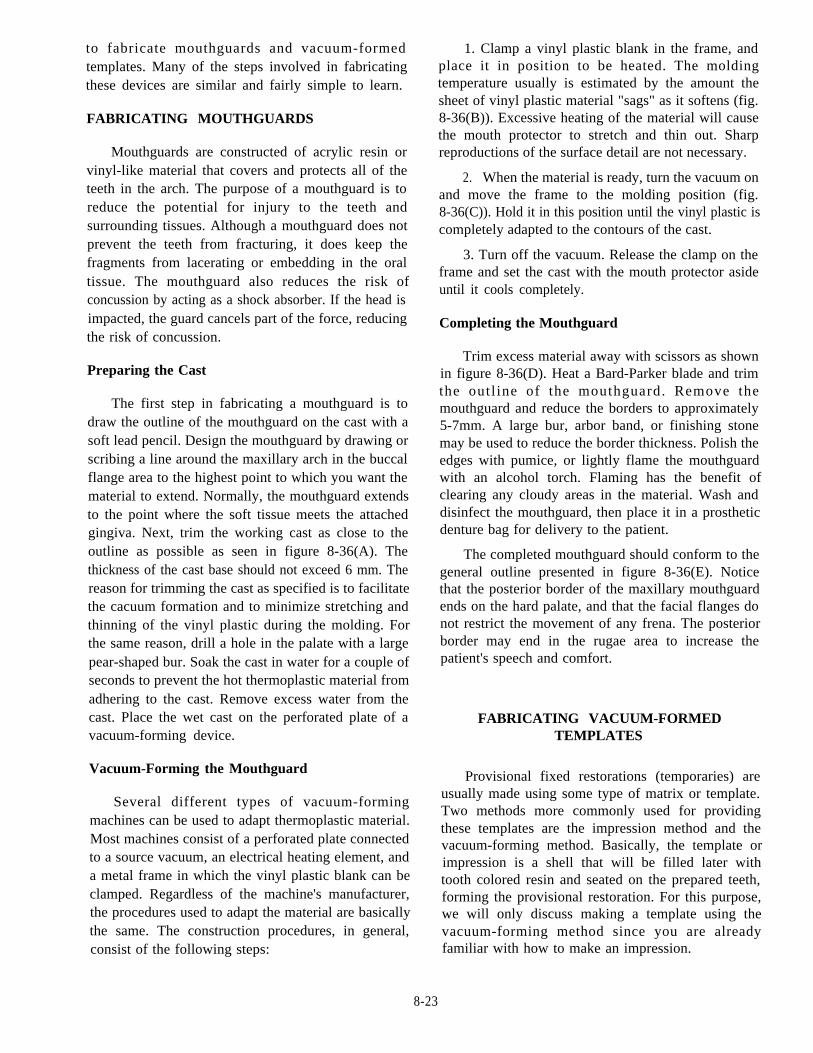
The preceding paragraphs described trays thatwere closely adapted to the diagnostic cast. Incontrast, custom trays for fixed restorative patientsare always made over wax spacers. The design for thistype of tray appears in figure 8-35(A). With theexception of the tray's design and the use of a waxspacer, the procedures for fabricating a fixed customtray are the same as we mentioned before. Let's brieflylook at the differences.
Applying a Wax Spacer
After the dentist traces the outline on thediagnostic cast, you can fill the undercuts, and adapttwo layers of baseplate wax to the tray area on the cast.Adapt each layer of wax, one layer at a time. Cut outfour small pieces of the baseplate wax over the crest ofthe ridge areas outlined in the molar and cuspid regions
for tissue stops as shown in figure 8-35(B). Removethe spacers from the cast and apply a tinfoil substituteto the gypsum surfaces of the cast to prevent the acrylicresin from sticking. Place the spacer back on the castand apply a thin layer of petrolatum to the surface ofthe baseplate wax. This will make removal of the waxfrom the polymerized tray easier.
Fabricating the Tray
Use the self-curing dough method to make the tray.After the resin is hard, remove the tray from the castand pull the baseplate wax off the tissue surface of thetray. (Four tissue stops should appear on the ridgeareas where the four pieces of baseplate wax wereoriginally cut out.) Trim any excess acrylic resin to theoutline border on the cast. Round and smooth theborders of the tray. Your finished trays should appearlike those in 8-35(C). Be certain to clean away alltraces of petrolatum that might be present on thetissue surface of the tray. (Sandblasting does thisvery effectively.) Clean and disinfect the tray, place iton the cast for storage.
FABRICATING MOUTHGUARDS ANDVACUUM-FORMED TEMPLATES
In addition to pouring and trimming study casts,and fabricating custom trays, you may be called upon
Figure 8-35.—Fabricating custom trays over wax spacers.
8-22
to fabricate mouthguards and vacuum-formedtemplates. Many of the steps involved in fabricatingthese devices are similar and fairly simple to learn.
FABRICATING MOUTHGUARDS
Mouthguards are constructed of acrylic resin orvinyl-like material that covers and protects all of theteeth in the arch. The purpose of a mouthguard is toreduce the potential for injury to the teeth andsurrounding tissues. Although a mouthguard does notprevent the teeth from fracturing, it does keep thefragments from lacerating or embedding in the oraltissue. The mouthguard also reduces the risk ofconcussion by acting as a shock absorber. If the head isimpacted, the guard cancels part of the force, reducingthe risk of concussion.
Preparing the Cast
The first step in fabricating a mouthguard is todraw the outline of the mouthguard on the cast with asoft lead pencil. Design the mouthguard by drawing orscribing a line around the maxillary arch in the buccalflange area to the highest point to which you want thematerial to extend. Normally, the mouthguard extendsto the point where the soft tissue meets the attachedgingiva. Next, trim the working cast as close to theoutline as possible as seen in figure 8-36(A). Thethickness of the cast base should not exceed 6 mm. Thereason for trimming the cast as specified is to facilitatethe cacuum formation and to minimize stretching andthinning of the vinyl plastic during the molding. Forthe same reason, drill a hole in the palate with a largepear-shaped bur. Soak the cast in water for a couple ofseconds to prevent the hot thermoplastic material fromadhering to the cast. Remove excess water from thecast. Place the wet cast on the perforated plate of avacuum-forming device.
Vacuum-Forming the Mouthguard
Several different types of vacuum-formingmachines can be used to adapt thermoplastic material.Most machines consist of a perforated plate connectedto a source vacuum, an electrical heating element, anda metal frame in which the vinyl plastic blank can beclamped. Regardless of the machine's manufacturer,the procedures used to adapt the material are basicallythe same. The construction procedures, in general,consist of the following steps:
1. Clamp a vinyl plastic blank in the frame, andplace it in position to be heated. The moldingtemperature usually is estimated by the amount thesheet of vinyl plastic material "sags" as it softens (fig.8-36(B)). Excessive heating of the material will causethe mouth protector to stretch and thin out. Sharpreproductions of the surface detail are not necessary.
2. When the material is ready, turn the vacuum onand move the frame to the molding position (fig.8-36(C)). Hold it in this position until the vinyl plastic iscompletely adapted to the contours of the cast.
3. Turn off the vacuum. Release the clamp on theframe and set the cast with the mouth protector asideuntil it cools completely.
Completing the Mouthguard
Trim excess material away with scissors as shownin figure 8-36(D). Heat a Bard-Parker blade and trimthe outl ine of the mouthguard. Remove themouthguard and reduce the borders to approximately5-7mm. A large bur, arbor band, or finishing stonemay be used to reduce the border thickness. Polish theedges with pumice, or lightly flame the mouthguardwith an alcohol torch. Flaming has the benefit ofclearing any cloudy areas in the material. Wash anddisinfect the mouthguard, then place it in a prostheticdenture bag for delivery to the patient.
The completed mouthguard should conform to thegeneral outline presented in figure 8-36(E). Noticethat the posterior border of the maxillary mouthguardends on the hard palate, and that the facial flanges donot restrict the movement of any frena. The posteriorborder may end in the rugae area to increase thepatient's speech and comfort.
FABRICATING VACUUM-FORMEDTEMPLATES
Provisional fixed restorations (temporaries) areusually made using some type of matrix or template.Two methods more commonly used for providingthese templates are the impression method and thevacuum-forming method. Basically, the template orimpression is a shell that will be filled later withtooth colored resin and seated on the prepared teeth,forming the provisional restoration. For this purpose,we will only discuss making a template using thevacuum-forming method since you are alreadyfamiliar with how to make an impression.
8-23
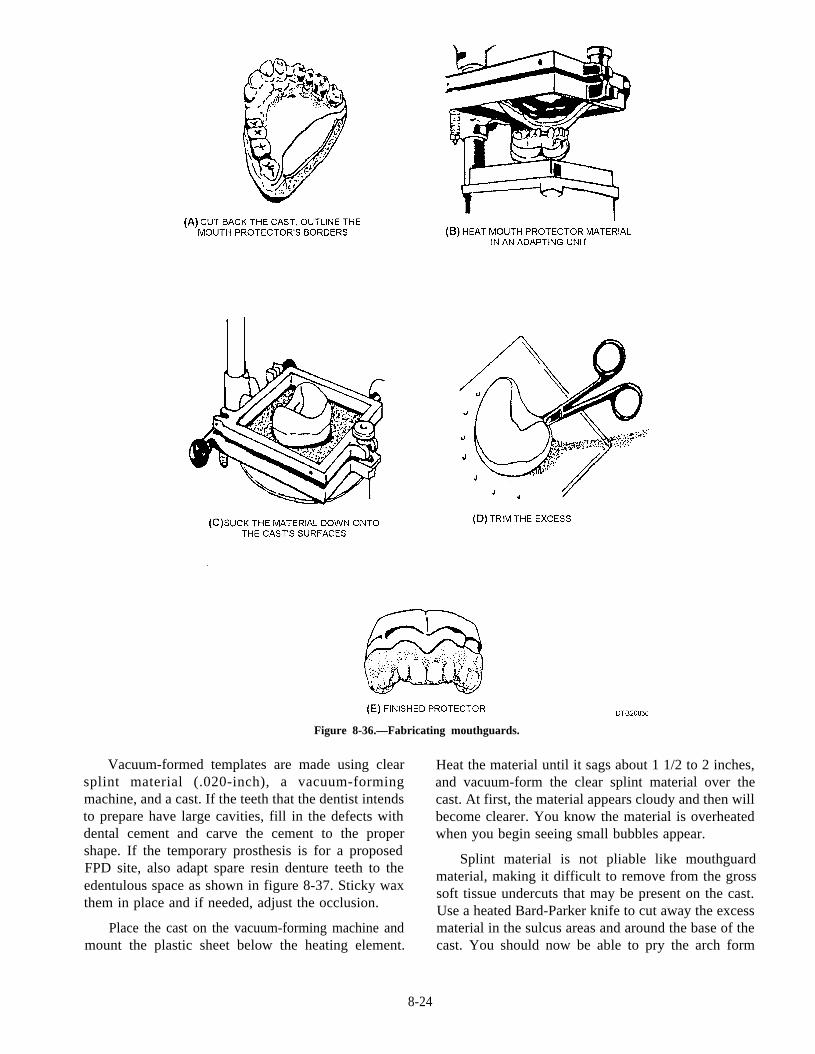
Figure 8-36.—Fabricating mouthguards.
Vacuum-formed templates are made using clear Heat the material until it sags about 1 1/2 to 2 inches,splint material (.020-inch), a vacuum-forming and vacuum-form the clear splint material over themachine, and a cast. If the teeth that the dentist intends cast. At first, the material appears cloudy and then willto prepare have large cavities, fill in the defects with become clearer. You know the material is overheateddental cement and carve the cement to the proper when you begin seeing small bubbles appear.shape. If the temporary prosthesis is for a proposedFPD site, also adapt spare resin denture teeth to theedentulous space as shown in figure 8-37. Sticky waxthem in place and if needed, adjust the occlusion.
Splint material is not pliable like mouthguardmaterial, making it difficult to remove from the grosssoft tissue undercuts that may be present on the cast.Use a heated Bard-Parker knife to cut away the excessmaterial in the sulcus areas and around the base of thecast. You should now be able to pry the arch form
Place the cast on the vacuum-forming machine andmount the plastic sheet below the heating element.
8-24
space.Figure 8-37.—adapting a denture tooth to the edentulous
template off the cast for final trimming with scissors.Cut out the section needed for the provisionalrestoration plus one or two uninvolved teeth anteriorand posterior to it as shown in figure 8-38. When youare finished, clean and disinfect the template; andplace it and any of the unused arch sections back on thecast so they won't distort. Often, subsequentrestorations are made for the same patient, and theunused arch sections are kept in case they will beneeded at a later date.
SIMPLE ACRYLIC REPAIRS
Occasionally, you will be required to performminor repairs on complete and removable partialdentures. These repairs may include fractureddentures, or replacing fractured, missing or loose teeth.These repairs may be caused by changes in the oraltissues, careless handling, etc. The dentist will decidedif any impression of the patient's mouth is needed forthe repair, and will tell you what needs to be done tocomplete the repair. Since every repair is a littledifferent, these next procedures describe some, but notall, of the possible repair solutions. If you needassistance, refer your questions to the dentist orprosthetic technician.
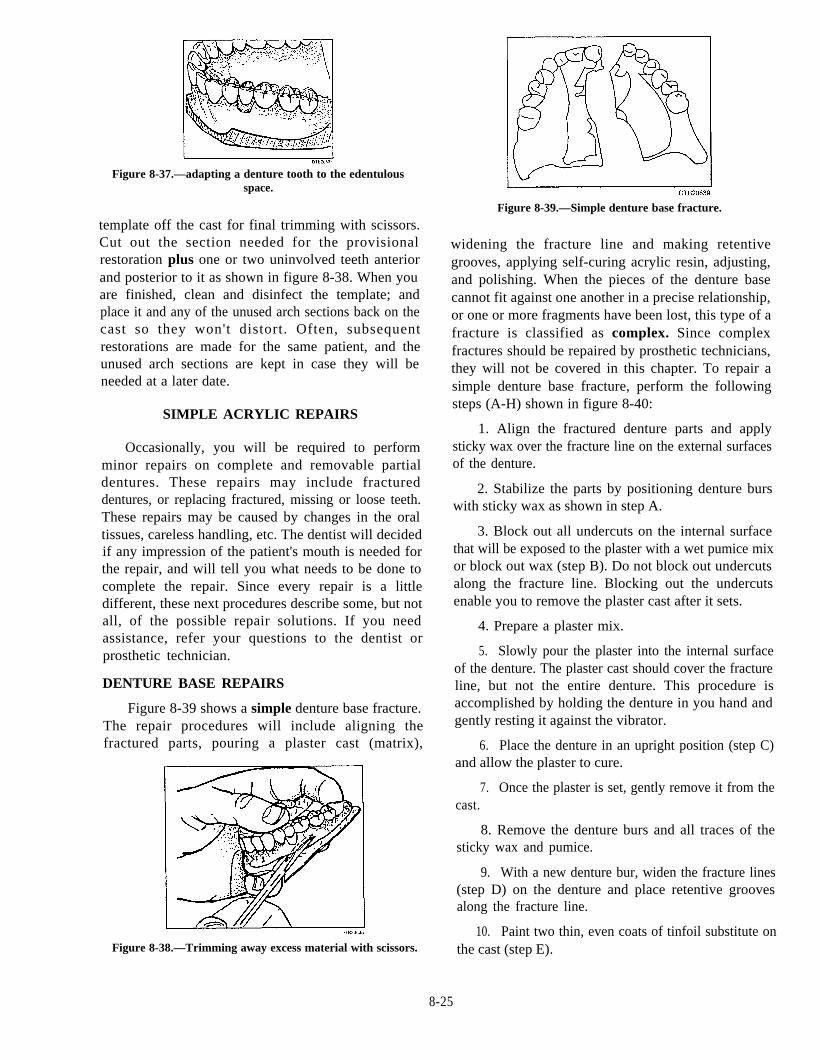
DENTURE BASE REPAIRS
Figure 8-39 shows a simple denture base fracture.The repair procedures will include aligning thefractured parts, pouring a plaster cast (matrix),
Figure 8-38.—Trimming away excess material with scissors.
Figure 8-39.—Simple denture base fracture.
widening the fracture line and making retentivegrooves, applying self-curing acrylic resin, adjusting,and polishing. When the pieces of the denture basecannot fit against one another in a precise relationship,or one or more fragments have been lost, this type of afracture is classified as complex. Since complexfractures should be repaired by prosthetic technicians,they will not be covered in this chapter. To repair asimple denture base fracture, perform the followingsteps (A-H) shown in figure 8-40:
1. Align the fractured denture parts and applysticky wax over the fracture line on the external surfacesof the denture.
2. Stabilize the parts by positioning denture burswith sticky wax as shown in step A.
3. Block out all undercuts on the internal surfacethat will be exposed to the plaster with a wet pumice mixor block out wax (step B). Do not block out undercutsalong the fracture line. Blocking out the undercutsenable you to remove the plaster cast after it sets.
4. Prepare a plaster mix.
5. Slowly pour the plaster into the internal surfaceof the denture. The plaster cast should cover the fractureline, but not the entire denture. This procedure isaccomplished by holding the denture in you hand andgently resting it against the vibrator.
6. Place the denture in an upright position (step C)and allow the plaster to cure.
7. Once the plaster is set, gently remove it from thecast.
8. Remove the denture burs and all traces of thesticky wax and pumice.
9. With a new denture bur, widen the fracture lines(step D) on the denture and place retentive groovesalong the fracture line.
10. Paint two thin, even coats of tinfoil substitute onthe cast (step E).
8-25
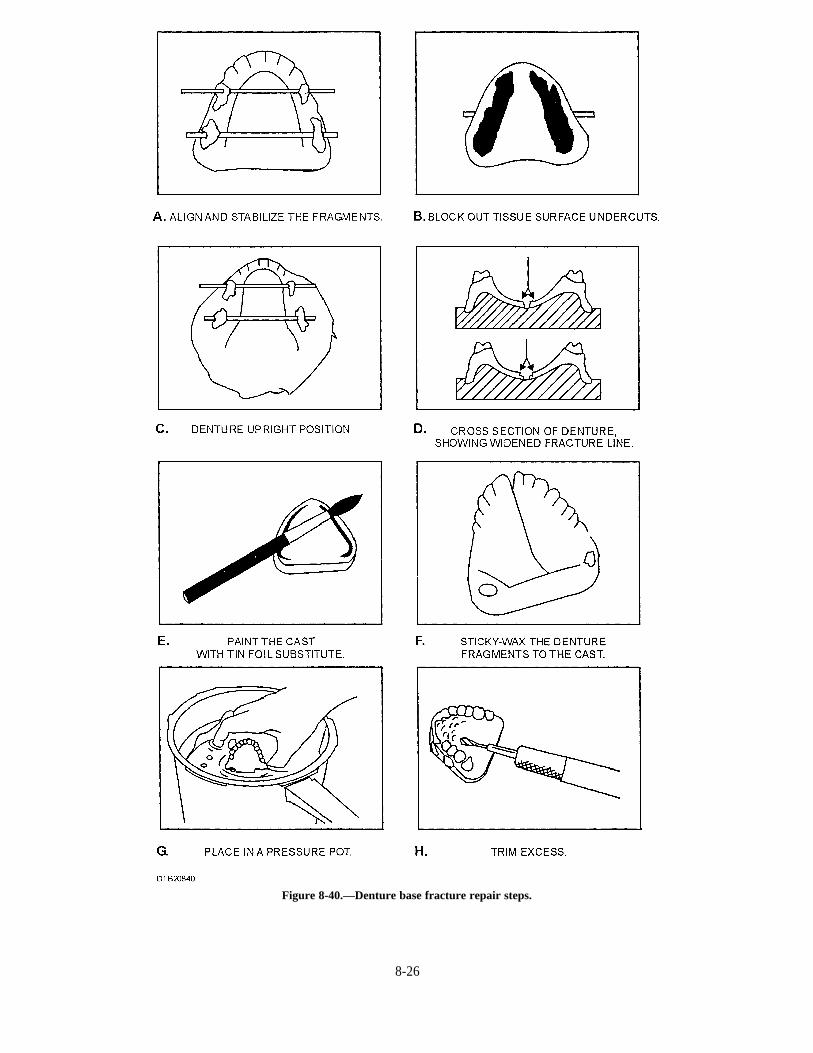
Figure 8-40.—Denture base fracture repair steps.
8-26
11. Align the denture parts on the cast and hold themin place with sticky wax at the posterior edges (step F).
12. Prepare the self-curing acrylic resin.
13. Moisten the brush with monomer and dip it intothe polymer (powder), and apply it to the fractured area.Repeat this procedure until the fracture is covered andslightly overfilled.
14. Allow the denture to stand for a few minutesuntil the sheen of the resin disappears from the surface.
15. Place the denture and the cast in a pneumaticcuring unit (step G).
16. Cover the denture with lukewarm water (115°F)and secure the lid.
17. Attach the rubber tubing to the air valve on thelid and till with compressed air to 20 psi.
18. The curing process will take 30 minutes.
Note: If a pneumatic curing unit is not available, placedenture and cast in a bowl of lukewarm water for 30minutes or until the resin hardens. This is not therecommended procedure but may be used inemergencies.
19. Gradually turn the air release valve on the lid torelieve the inside pressure. When the pressure gaugereads zero, carefully remove the lid.
20. Remove the repaired denture base from thepressure pot.
21. Using a denture bur, trim all excess acrylic fromthe denture (step H).
22. Polish the external surfaces with pumice and amuslin or brush wheel that is mounted on a bench lathe.If a lathe is not available, you may use a mandrel-mounted wheel on a straight handpiece.
23. Disinfect and place denture in a prosthetic bagwith water for delivery.
DENTURE TOOTH REPAIRS
The original tooth can be reattached if it is stillintact, but some repairs will require a new denturetooth. The following procedures describe simpledenture tooth repairs that do not involve the facialdenture base plastic (complex fracture). The examplegiven is of an anterior tooth that fell out. If the facialdenture base plastic needs repair, a prosthetictechnician or a dental officer will perform the repair.To accomplish a denture tooth repair, perform thefollowing steps (A-F) as shown in figure 8-41:
1. Roughen the lingual aspect of the acrylic teeth toguarantee good chemical bonding with the repairmaterial. Use an inverted bur to undercut a hollowopening in the lingual aspect of the acrylic tooth.
2. Make a box preparation (step A) in the denturebase, lingual to the tooth to be repaired.
3. Position the tooth (step B) in its seat and stickywax it in place from the lingual.
4. Construct a plaster cast facial matrix to hold thetooth in position during repair. It should include thetooth that is being repaired and the tooth on each side(step C).
3.clean all wax from the box preparation (step D).
After the plaster has set, remove the matrix and
6. Paint the matrix with a tinfoil substitute (step E).
7. Reassemble the denture, the tooth, and thematrix in correct aligment. Sticky wax the tooth to thematrix, and the matrix to the denture (step F).
8. Place self-curing resin to the repair area in thesame manner as described in the denture base repairsection. Build up the repair resin slightly higher than thesurrounding denture base.
9. Place the tooth repair in a pneumatic curingunit and follow the same steps as described in thedenture base repair section for curing, finishing, andpolishing.
10. Disinfect and place the repaired denture in aprosthetic bag with water.
PROSTHODONTIC CHAIRSIDEASSISTING
The basic clinical procedures are essentially thesame as in all direct patient care in dentistry. Theprosthodontic procedures, sequence of treatment, andmaterials required vary with the specific treatmentrequirements for the patient and the individual dentist.This section covers the basic chairside duties aprosthodontic assistant performs with a dentist.In-depth techniques and procedures should be learnedfrom on-the-job training.
Most prosthodontic cases require a series ofappointments. It is your duty as the assistant toschedule these appointments. Two basic factorsinfluence the scheduling of prosthodontic patients:
The procedures to be done during theappointment
8-27
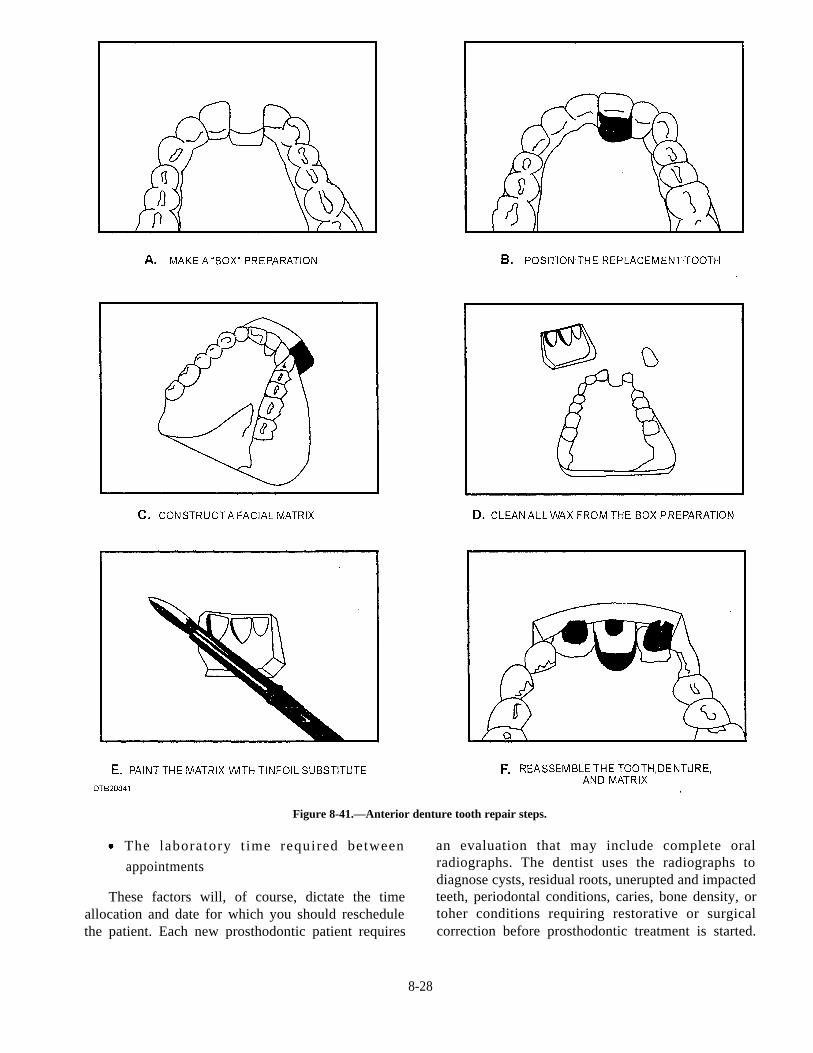
Figure 8-41.—Anterior denture tooth repair steps.
The laboratory t ime required between
appointments
These factors will, of course, dictate the timeallocation and date for which you should reschedulethe patient. Each new prosthodontic patient requires
an evaluation that may include complete oralradiographs. The dentist uses the radiographs todiagnose cysts, residual roots, unerupted and impactedteeth, periodontal conditions, caries, bone density, ortoher conditions requiring restorative or surgicalcorrection before prosthodontic treatment is started.
8-28
At the evaluat ion appointment, prel iminaryimpressions are made and diagnostic casts are thenpoured from the preliminary impressions
USE AND COMPLETION OFDD FORM 2322
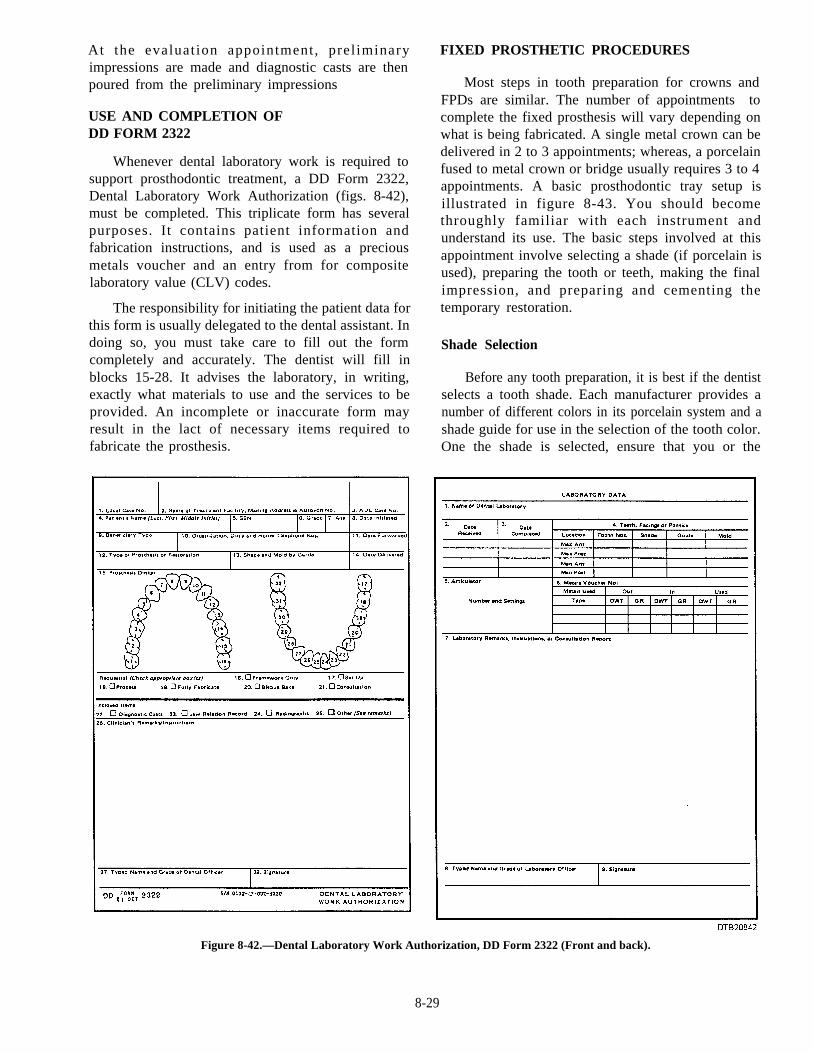
Whenever dental laboratory work is required tosupport prosthodontic treatment, a DD Form 2322,Dental Laboratory Work Authorization (figs. 8-42),must be completed. This triplicate form has severalpurposes. It contains patient information andfabrication instructions, and is used as a preciousmetals voucher and an entry from for compositelaboratory value (CLV) codes.
The responsibility for initiating the patient data forthis form is usually delegated to the dental assistant. Indoing so, you must take care to fill out the formcompletely and accurately. The dentist will fill inblocks 15-28. It advises the laboratory, in writing,exactly what materials to use and the services to beprovided. An incomplete or inaccurate form mayresult in the lact of necessary items required tofabricate the prosthesis.
FIXED PROSTHETIC PROCEDURES
Most steps in tooth preparation for crowns andFPDs are similar. The number of appointments tocomplete the fixed prosthesis will vary depending onwhat is being fabricated. A single metal crown can bedelivered in 2 to 3 appointments; whereas, a porcelainfused to metal crown or bridge usually requires 3 to 4appointments. A basic prosthodontic tray setup isillustrated in figure 8-43. You should becomethroughly familiar with each instrument andunderstand its use. The basic steps involved at thisappointment involve selecting a shade (if porcelain isused), preparing the tooth or teeth, making the finalimpression, and preparing and cementing thetemporary restoration.
Shade Selection
Before any tooth preparation, it is best if the dentistselects a tooth shade. Each manufacturer provides anumber of different colors in its porcelain system and ashade guide for use in the selection of the tooth color.One the shade is selected, ensure that you or the
Figure 8-42.—Dental Laboratory Work Authorization, DD Form 2322 (Front and back).
8-29
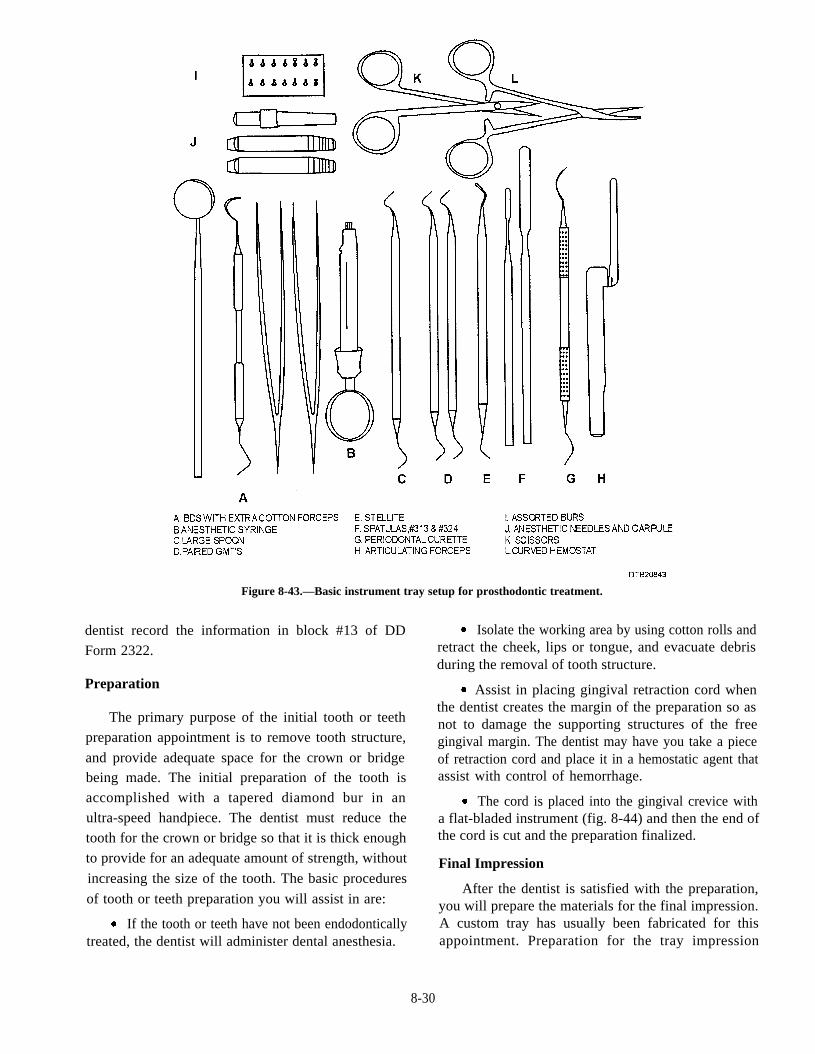
Figure 8-43.—Basic instrument tray setup for prosthodontic treatment.
dentist record the information in block #13 of DD
Form 2322.
Preparation
The primary purpose of the initial tooth or teeth
preparation appointment is to remove tooth structure,
and provide adequate space for the crown or bridgebeing made. The initial preparation of the tooth is
accomplished with a tapered diamond bur in an
ultra-speed handpiece. The dentist must reduce the
tooth for the crown or bridge so that it is thick enough
to provide for an adequate amount of strength, without
increasing the size of the tooth. The basic procedures
of tooth or teeth preparation you will assist in are:
If the tooth or teeth have not been endodonticallytreated, the dentist will administer dental anesthesia.
Isolate the working area by using cotton rolls andretract the cheek, lips or tongue, and evacuate debrisduring the removal of tooth structure.
Assist in placing gingival retraction cord whenthe dentist creates the margin of the preparation so asnot to damage the supporting structures of the freegingival margin. The dentist may have you take a pieceof retraction cord and place it in a hemostatic agent thatassist with control of hemorrhage.
The cord is placed into the gingival crevice witha flat-bladed instrument (fig. 8-44) and then the end ofthe cord is cut and the preparation finalized.
Final Impression
After the dentist is satisfied with the preparation,you will prepare the materials for the final impression.A custom tray has usually been fabricated for thisappointment. Preparation for the tray impression
8-30
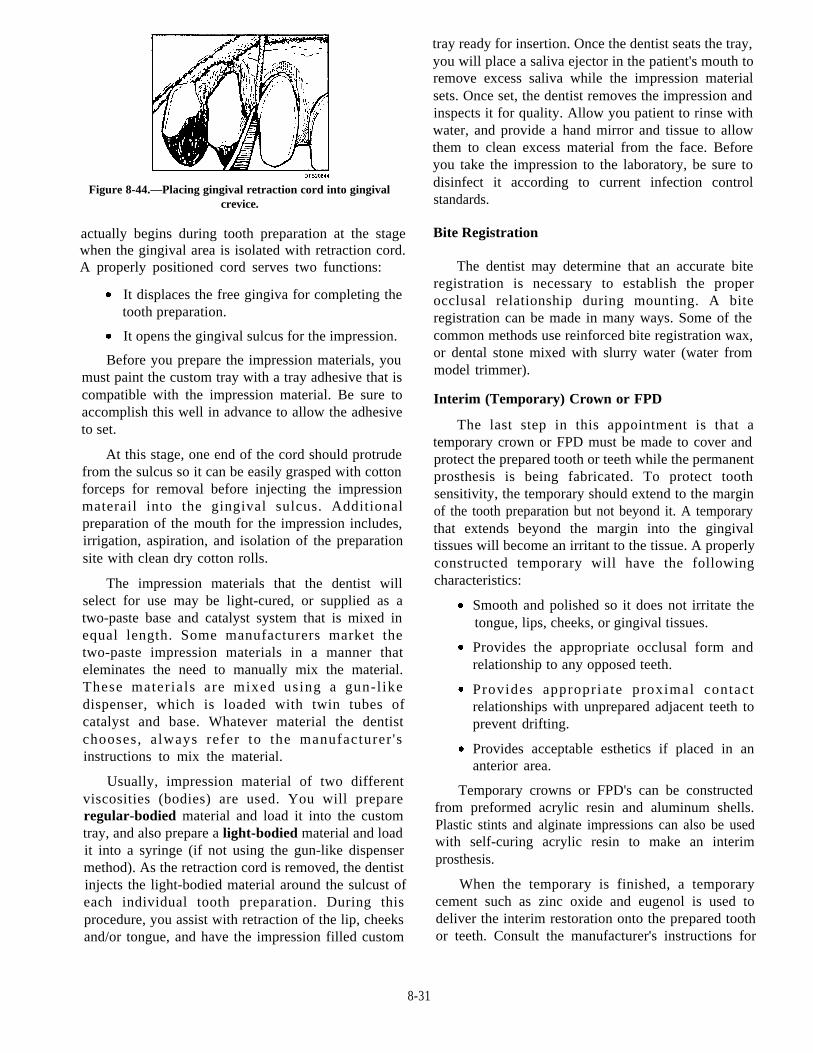
Figure 8-44.—Placing gingival retraction cord into gingivalcrevice.
actually begins during tooth preparation at the stagewhen the gingival area is isolated with retraction cord.A properly positioned cord serves two functions:
It displaces the free gingiva for completing thetooth preparation.
It opens the gingival sulcus for the impression.
Before you prepare the impression materials, youmust paint the custom tray with a tray adhesive that iscompatible with the impression material. Be sure toaccomplish this well in advance to allow the adhesiveto set.
At this stage, one end of the cord should protrudefrom the sulcus so it can be easily grasped with cottonforceps for removal before injecting the impressionmaterail into the gingival sulcus. Additionalpreparation of the mouth for the impression includes,irrigation, aspiration, and isolation of the preparationsite with clean dry cotton rolls.
The impression materials that the dentist willselect for use may be light-cured, or supplied as atwo-paste base and catalyst system that is mixed inequal length. Some manufacturers market thetwo-paste impression materials in a manner thateleminates the need to manually mix the material.These materials are mixed using a gun-l ikedispenser, which is loaded with twin tubes ofcatalyst and base. Whatever material the dentistchooses, always refer to the manufacturer 'sinstructions to mix the material.
Usually, impression material of two differentviscosities (bodies) are used. You will prepareregular-bodied material and load it into the customtray, and also prepare a light-bodied material and loadit into a syringe (if not using the gun-like dispensermethod). As the retraction cord is removed, the dentistinjects the light-bodied material around the sulcust ofeach individual tooth preparation. During thisprocedure, you assist with retraction of the lip, cheeksand/or tongue, and have the impression filled custom
tray ready for insertion. Once the dentist seats the tray,you will place a saliva ejector in the patient's mouth toremove excess saliva while the impression materialsets. Once set, the dentist removes the impression andinspects it for quality. Allow you patient to rinse withwater, and provide a hand mirror and tissue to allowthem to clean excess material from the face. Beforeyou take the impression to the laboratory, be sure todisinfect it according to current infection controlstandards.
Bite Registration
The dentist may determine that an accurate biteregistration is necessary to establish the properocclusal relationship during mounting. A biteregistration can be made in many ways. Some of thecommon methods use reinforced bite registration wax,or dental stone mixed with slurry water (water frommodel trimmer).
Interim (Temporary) Crown or FPD
The last step in this appointment is that atemporary crown or FPD must be made to cover andprotect the prepared tooth or teeth while the permanentprosthesis is being fabricated. To protect toothsensitivity, the temporary should extend to the marginof the tooth preparation but not beyond it. A temporarythat extends beyond the margin into the gingivaltissues will become an irritant to the tissue. A properlyconstructed temporary will have the followingcharacteristics:
Provides the appropriate occlusal form andrelationship to any opposed teeth.
Smooth and polished so it does not irritate thetongue, lips, cheeks, or gingival tissues.
Provides appropriate proximal contactrelationships with unprepared adjacent teeth toprevent drifting.
Provides acceptable esthetics if placed in ananterior area.
Temporary crowns or FPD's can be constructedfrom preformed acrylic resin and aluminum shells.Plastic stints and alginate impressions can also be usedwith self-curing acrylic resin to make an interimprosthesis.
When the temporary is finished, a temporarycement such as zinc oxide and eugenol is used todeliver the interim restoration onto the prepared toothor teeth. Consult the manufacturer's instructions for
8-31
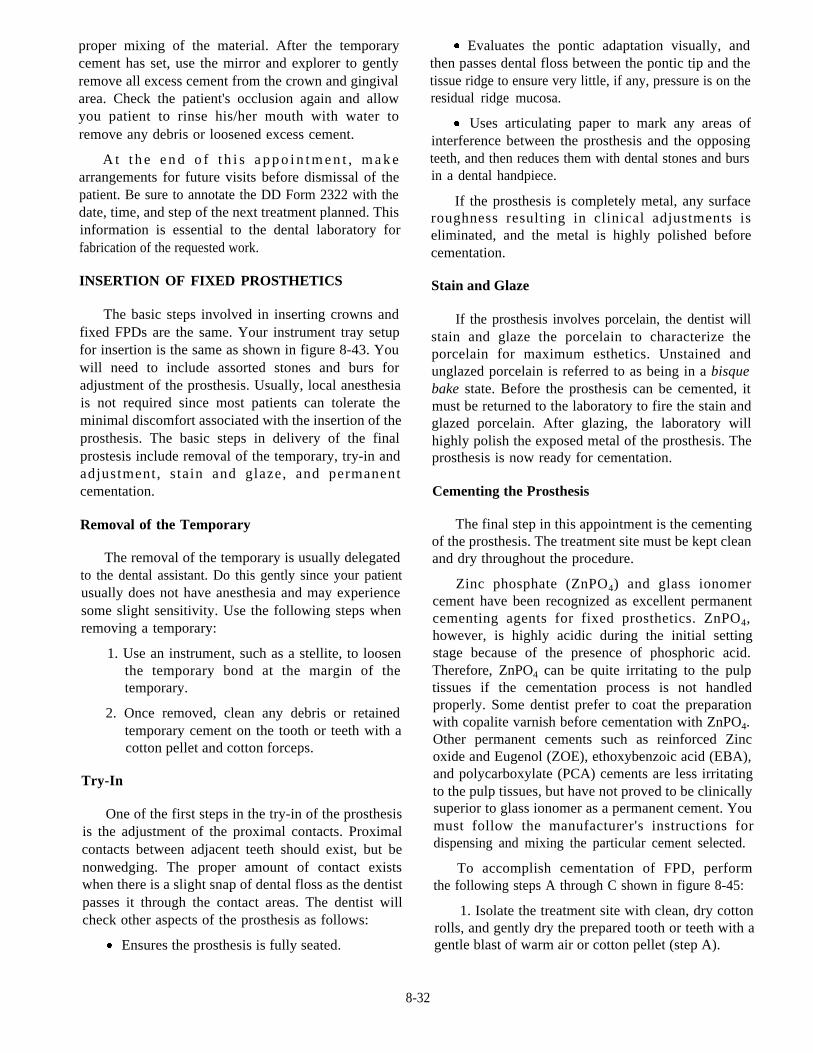
proper mixing of the material. After the temporarycement has set, use the mirror and explorer to gentlyremove all excess cement from the crown and gingivalarea. Check the patient's occlusion again and allowyou patient to rinse his/her mouth with water toremove any debris or loosened excess cement.
A t t h e e n d o f t h i s a p p o i n t m e n t , m a k earrangements for future visits before dismissal of thepatient. Be sure to annotate the DD Form 2322 with thedate, time, and step of the next treatment planned. Thisinformation is essential to the dental laboratory forfabrication of the requested work.
INSERTION OF FIXED PROSTHETICS
The basic steps involved in inserting crowns andfixed FPDs are the same. Your instrument tray setupfor insertion is the same as shown in figure 8-43. Youwill need to include assorted stones and burs foradjustment of the prosthesis. Usually, local anesthesiais not required since most patients can tolerate theminimal discomfort associated with the insertion of theprosthesis. The basic steps in delivery of the finalprostesis include removal of the temporary, try-in andadjustment, s tain and glaze, and permanentcementation.
Removal of the Temporary
The removal of the temporary is usually delegatedto the dental assistant. Do this gently since your patientusually does not have anesthesia and may experiencesome slight sensitivity. Use the following steps whenremoving a temporary:
1. Use an instrument, such as a stellite, to loosenthe temporary bond at the margin of thetemporary.
2. Once removed, clean any debris or retainedtemporary cement on the tooth or teeth with acotton pellet and cotton forceps.
Try-In
One of the first steps in the try-in of the prosthesisis the adjustment of the proximal contacts. Proximalcontacts between adjacent teeth should exist, but benonwedging. The proper amount of contact existswhen there is a slight snap of dental floss as the dentistpasses it through the contact areas. The dentist willcheck other aspects of the prosthesis as follows:
Ensures the prosthesis is fully seated.
Evaluates the pontic adaptation visually, andthen passes dental floss between the pontic tip and thetissue ridge to ensure very little, if any, pressure is on theresidual ridge mucosa.
Uses articulating paper to mark any areas ofinterference between the prosthesis and the opposingteeth, and then reduces them with dental stones and bursin a dental handpiece.
If the prosthesis is completely metal, any surfaceroughness resulting in clinical adjustments iseliminated, and the metal is highly polished beforecementation.
Stain and Glaze
If the prosthesis involves porcelain, the dentist willstain and glaze the porcelain to characterize theporcelain for maximum esthetics. Unstained andunglazed porcelain is referred to as being in a bisquebake state. Before the prosthesis can be cemented, itmust be returned to the laboratory to fire the stain andglazed porcelain. After glazing, the laboratory willhighly polish the exposed metal of the prosthesis. Theprosthesis is now ready for cementation.
Cementing the Prosthesis
The final step in this appointment is the cementingof the prosthesis. The treatment site must be kept cleanand dry throughout the procedure.
Zinc phosphate (ZnPO4) and glass ionomercement have been recognized as excellent permanentcementing agents for fixed prosthetics. ZnPO4,however, is highly acidic during the initial settingstage because of the presence of phosphoric acid.Therefore, ZnPO4 can be quite irritating to the pulptissues if the cementation process is not handledproperly. Some dentist prefer to coat the preparationwith copalite varnish before cementation with ZnPO4.Other permanent cements such as reinforced Zincoxide and Eugenol (ZOE), ethoxybenzoic acid (EBA),and polycarboxylate (PCA) cements are less irritatingto the pulp tissues, but have not proved to be clinicallysuperior to glass ionomer as a permanent cement. Youmust follow the manufacturer's instructions fordispensing and mixing the particular cement selected.
To accomplish cementation of FPD, performthe following steps A through C shown in figure 8-45:
1. Isolate the treatment site with clean, dry cottonrolls, and gently dry the prepared tooth or teeth with agentle blast of warm air or cotton pellet (step A).
8-32
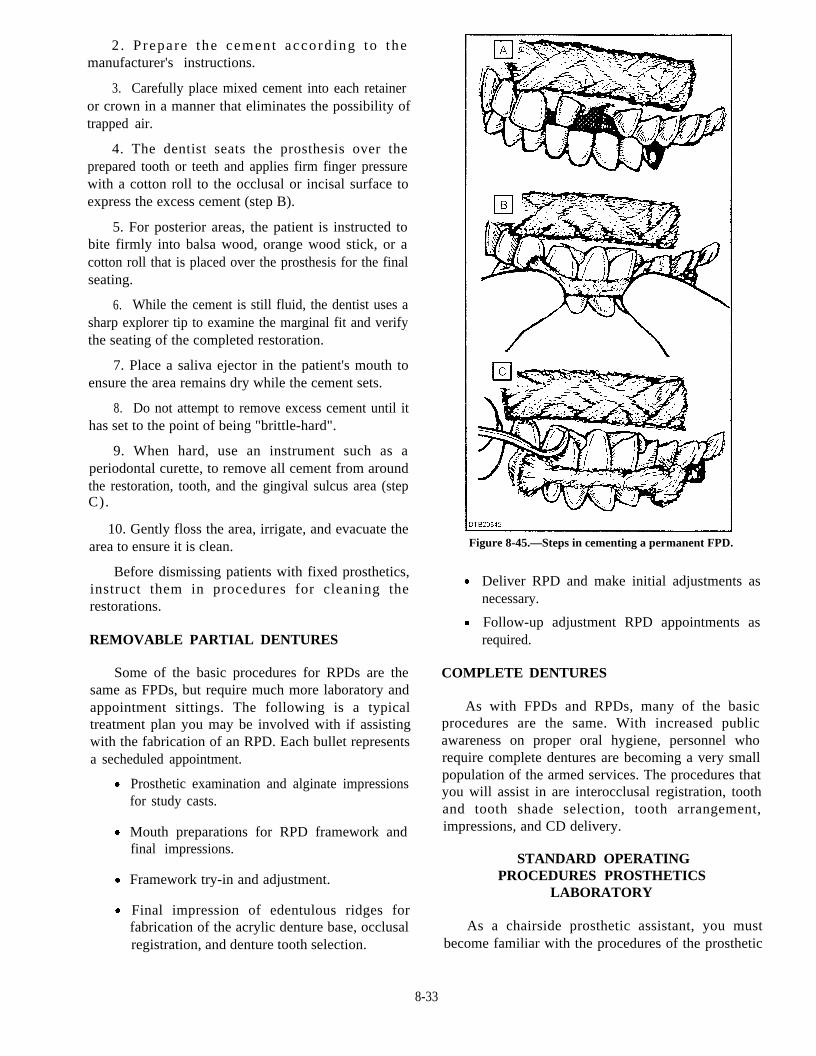
2 . P repare the cement accord ing to themanufacturer's instructions.
3. Carefully place mixed cement into each retaineror crown in a manner that eliminates the possibility oftrapped air.
4. The dentist seats the prosthesis over theprepared tooth or teeth and applies firm finger pressurewith a cotton roll to the occlusal or incisal surface toexpress the excess cement (step B).
seating.
5. For posterior areas, the patient is instructed tobite firmly into balsa wood, orange wood stick, or acotton roll that is placed over the prosthesis for the final
6. While the cement is still fluid, the dentist uses asharp explorer tip to examine the marginal fit and verifythe seating of the completed restoration.
7. Place a saliva ejector in the patient's mouth toensure the area remains dry while the cement sets.
8. Do not attempt to remove excess cement until ithas set to the point of being "brittle-hard".
9. When hard, use an instrument such as aperiodontal curette, to remove all cement from aroundthe restoration, tooth, and the gingival sulcus area (stepC).
10. Gently floss the area, irrigate, and evacuate thearea to ensure it is clean.
Before dismissing patients with fixed prosthetics,instruct them in procedures for cleaning therestorations.
REMOVABLE PARTIAL DENTURES
Some of the basic procedures for RPDs are thesame as FPDs, but require much more laboratory andappointment sittings. The following is a typicaltreatment plan you may be involved with if assistingwith the fabrication of an RPD. Each bullet representsa secheduled appointment.
Prosthetic examination and alginate impressionsfor study casts.
Mouth preparations for RPD framework andfinal impressions.
Framework try-in and adjustment.
Final impression of edentulous ridges forfabrication of the acrylic denture base, occlusalregistration, and denture tooth selection.
Figure 8-45.—Steps in cementing a permanent FPD.
Deliver RPD and make initial adjustments asnecessary.
Follow-up adjustment RPD appointments asrequired.
COMPLETE DENTURES
As with FPDs and RPDs, many of the basicprocedures are the same. With increased publicawareness on proper oral hygiene, personnel whorequire complete dentures are becoming a very smallpopulation of the armed services. The procedures thatyou will assist in are interocclusal registration, toothand tooth shade selection, tooth arrangement,impressions, and CD delivery.
STANDARD OPERATINGPROCEDURES PROSTHETICS
LABORATORY
As a chairside prosthetic assistant, you mustbecome familiar with the procedures of the prosthetic
8-33
laboratory. If you do not know these procedures,patient cases can be lost or routed improperly. If youhave any questions about different procedures, ask thedentist or prosthetic technician.
CASE REQUESTS
Cases entering the laboratory are required to beaccompanied with a work authorization request (DDForm 2322). Requests are to be filled out withinstructions, signed by the requesting doctor, and mustindicate desired completion date. The case is thenentered into the Prosthetic Log and assigned a casenumber. This entry must be made by the persondelivering the case to the laboratory.
IMPRESSIONS
Before entering the laboratory ALL impressionsare to be sprayed with an approved disinfectant inaccordance with BUMEDINST. 6610.10, chapter 6,and covered with a plastic wrap (head rest covers workgreat). The laboratory technician is to be informed ofthe arrival of the impressions.
Alginate Impressions
Alginate impressions are to be placed into the trayholder at the plaster bench to prevent distortion of theimpression (a moist paper towel should be placed overthe impression to prevent dehydration of the material).
Final Impressions
This includes complete dentures, removablepartial dentures, crowns, and bridges. Theseimpressions are poured as prescribed by the doctor; ifno instructions are provided, they will be poured withstone mixed with liquid stone hardener.
Study Casts
Study casts are fabricated for diagnostic purposesand poured as prescribed by the doctor. If noinstructions are provided, they will be poured inplaster.
STONE OR PLASTER CASTS
Trim the casts once they are separated from thetray. Casts are trimmed to remove excess material byuse of the model trimmer.
You are required to don protective ear andeyewear.
Turn on water supply to desired flow.
Activate the model trimmer.
Trimmed casts will be rinsed, dried, and markedwith the patient's last name and case number (if spaceis available). The case will then be routed according tothe work authorization request.
CASES WHILE IN THE LABORATORY
Casts will be kept in case pans, protected in plastic(when available). Case pans will be labeled withpatient's name, doctor, date started, and prothesisbeing fabricated.
Pumice and polishing procedures for thefabrication of new protheses will not require specialprecatutions. Repairs, relines, rebases, or adjustmentsof any prosthesis that has had contact with patient'sbody fluids are considered old cases and will requireprecautions. Lathe instructions for pumice andpolishing are as follows:
The technician is required to ensure correctplacement of the protective shield is in the downposition before activating the lathe.
Pumice is to be replaced after each use.
Wheels/brushes used for pumice and polishingare to be removed from machine and sent toCSR.
Prostheses should be put into a glass beaker orziplock bag containing cleaning solution, thenplaced into ultrasonic.
Ultrasonic Cleaner
The prosthetic ultrasonic cleaning machine is thesame as the CSRs except that dental prostheses are runthrough. The following are guidelines for its use:
Ultrasonic to contain water approximately 1 to1-1/2 inches. Special solutions to be used inziplock bags or glass beakers.
General-purpose cleaner or stone and plasterremover solutions can be reused when used onnew cases. Once solution is used for an old case,the solution is to be discarded.
Stain and tarter solution is used for old cases andwill be used one time then discarded.
Once the ultrasonic cleaning procedure iscompleted, the prosthesis is then brushed and rinsedwith water. It is then bagged and replaced into theassigned case pan.
8-34
Completed Cases EPA-registered disinfectant. Also disinfect pliers andother special instruments after each use, even if they donot come in contact with blood or saliva. An alternatemethod is immersing the instruments in anEPA-registered intermediate or high-level disinfectantsuch as iodophor or 2 percent glutaraldehyde.
The work authorization request will be closed outin the Prosthetic Log by entering the date ofcompletion. This is done by the delivering dentist orthe technician. The work authorization request will beretained in the laboratory for two years. The case panand its contents will be placed on the plaster bench forcleaning. Cleaning includes the emptying of usedmodels and the spraying down of the case pan.
GUIDELINES FOR INFECTIONCONTROL IN THE DENTAL
LABORATORY
When you are working in the prosthet icdepartment or the laboratory, infection control is still amajor concern. Follow BUMEDINST 6600.10, DentalInfection Control Program, for complete guidance andinstructions. Prostheses or impressions may carry amultitude of bacteria in dental plaque, blood, or saliva.To protect everyone from cross contamination andpossible infection, dental personnel must use propertechniques for disinfection of material before sendingit to the laboratory from the DTR and vice versa.
BARRIER CONTROL
Place barriers wherever possible to prevent crosscontamination. Establish a designated area in thedental laboratory where technicians disinfect allincoming and outgoing items.
DTR INFECTION CONTROL
Wipe contaminated shade guides, face-bows,a r t i c u l a t o r s , a n d a l c o h o l t o r c h e s w i t h a n
Instrument Sets
When possible, use trays to allow sterilization ordisinfection of multiple instruments.
Unit Dose Concept
Use o f the un i t dose concep t p reven t scontamination of bulk supplies. Dispense enough tocomplete the entire procedure when using such itemsas petroleum jelly, impression materials, waxes,pressure disclosing or indicator paste, disposablebrushes, and orthodontic brackets and wires.
Processing and Transfer to the Laboratory
When possible, rinse and disinfect impressions,prostheses, and intraoral devices before transfer to thelaboratory to reduce chances of cross contamination.If the integrity of the item or material is compromisedby this disinfection, a waiver should be requestedthrough the command on the item (for example,procelain-stained crown before bake). Place casts andprostheses in self-sealing plastic bags to preventcontact with adjacent materials, the shipping box,foam insulation, or paper work. Consider everythingreturned from a dental laboratory as contaminated.The receiving facility must disinfect these items.
8-35