Embed Size (px)
Citation preview
9/17 TM512
T E C H N I C A L M A N U A L
ProNex® DNA QC Assay Analysis Software
Promega Corporation · 2800 Woods Hollow Road · Madison, WI 53711-5399 USA · Toll Free in USA 800-356-9526 · 608-274-4330 · Fax 608-277-2516 1www.promega.com TM512 · 9/17
All technical literature is available at: www.promega.com/protocols/ Visit the web site to verify that you are using the most current version of this Technical Bulletin.
E-mail Promega Technical Services if you have questions on use of this system: [email protected]
ProNex® DNA QC Assay Analysis Software
1. Description .........................................................................................................................................1
2. General Considerations .......................................................................................................................32.A. Overview ...................................................................................................................................32.B. Download ..................................................................................................................................32.C. System Requirements..................................................................................................................3
3. Getting Started ...................................................................................................................................43.A. Installation ................................................................................................................................43.B. Uninstallation ............................................................................................................................93.C. Multi-User Installation ............................................................................................................. 113.D. User Accounts .......................................................................................................................... 113.E. The Main Menu ........................................................................................................................ 14
4. ProNex® DNA QC Assay Analysis Software Workflow ........................................................................... 184.A. Adding a Plate Map, Sample Assessment or Flag Settings ............................................................. 194.B. Importing the qPCR Results File ................................................................................................ 294.C. The DNA QC Export File Worksheets ......................................................................................... 30
5. Troubleshooting................................................................................................................................ 40
6. Appendix .......................................................................................................................................... 436.A. References ............................................................................................................................... 436.B. Related Products ...................................................................................................................... 43
1. Description
The ProNex® DNA QC Assay evaluates the quantity and quality of genomic DNA extracted from formalin-fixed paraffin-embedded (FFPE) samples or other potentially degraded DNA sources. It is a human-specific, multiplexed probe-based quantitative polymerase chain reaction (qPCR) assay that may also be used to evaluate the ratio of circulating cell-free DNA (ccfDNA) to higher molecular weight genomic DNA in plasma samples. The multiplex assay detects 75bp, 150bp and 300bp human genomic DNA sequences, and it includes an internal positive control (IPC) to test for false-negative results that may occur in the presence of PCR inhibitors. This technical manual describes the ProNex® DNA QC Assay Analysis Software. The ProNex® DNA QC Assay Analysis Software is available for download at: www.promega.com/resources/software-firmware/pronex-dna-qc-assay/
2 Promega Corporation · 2800 Woods Hollow Road · Madison, WI 53711-5399 USA · Toll Free in USA 800-356-9526 · 608-274-4330 · Fax 608-277-2516TM512 · 9/17 www.promega.com
1. Description (continued)
The ProNex® DNA QC Assay Analysis Software will process qPCR data generated with the ProNex® DNA QC Assay. The software includes calculations and sections to define values for the following:• Standard curves (acceptable R2 and slope values)• Sample quantity (based on the Standard Curves)• Sample quality (possible inhibition, contamination, or degradation)
The ProNex® DNA QC Assay Analysis Software can import results from the Applied Biosystems® 7500, 7500 Fast or QuantStudio™ 6 Flex Real-Time PCR Systems, and the BioRad CFX96 Touch™ Real-Time PCR Detection System. For questions regarding instrument compatibility, contact Promega Technical Services for more information. Email: [email protected].
After exporting the results file from the qPCR instrument software, the file is imported into the ProNex® DNA QC Assay Analysis Software. The software calculates standard curves for each of the three targets (75bp, 150bp and 300bp). The sample quantity is calculated for all unknown samples, using the standard curves, and ratios between all three targets ([75bp/150bp], [75bp/300bp] and [150bp/300bp]) are calculated. The software calculates the difference in Cq values for the IPC in an unknown sample and the IPC in the closest DNA standard of the standard curve (to monitor PCR inhibition).
Promega Corporation · 2800 Woods Hollow Road · Madison, WI 53711-5399 USA · Toll Free in USA 800-356-9526 · 608-274-4330 · Fax 608-277-2516 3www.promega.com TM512 · 9/17
2. General Considerations
2.A. Overview
• Cq value (quantification cycle) is used rather than CT (cycle threshold) or Cp (crossing point) per MIQE guidelines (1).
• You can input sample names in the qPCR instrument software or in the Table Results screen of the ProNex® DNA QC Assay Analysis Software.
• The worksheets have been locked to prevent editing of the formulas, linked cells and named ranges in the worksheets. Saving as an Excel workbook will allow you to edit the entire worksheet (after unprotecting it), including the formulas, linked cells and named ranges. To unprotect the worksheet, go to the Review tab on the ribbon in Excel. Select “Unprotect Sheet” under the Changes menu in the Review ribbon. There is no password.
• Data exported from the Applied Biosystems® 7500, 7500 Fast or QuantStudio™ 6 Flex Real-Time PCR Systems, and the BioRad CFX96 Touch™ Real-Time PCR Detection System are compatible with the ProNex® DNA QC Assay Analysis Software.
Note: For support of other instruments with similar fluorescent dye capabilities, contact Promega Technical Services for more information. Email: [email protected].
• You can save standard curves, flag settings, sample assessment settings and plate maps in the database and use them repeatedly.
Note: For both Degradation and Genomic DNA Contamination applications, individual laboratories should determine acceptable threshold values relevant to their downstream application success. The diversity of downstream applica-tions, sample types and purifications, and potential PCR inhibitors does not allow for specific threshold value recom-mendations. Default threshold settings in the ProNex® DNA QC Assay Analysis Software are values intended to be customized by the user. You should validate the correlation between success in downstream applications and one (or more) target ratios. See the ProNex® DNA QC Assay for Use on the Bio-Rad CFX96 Touch™ Real-Time PCR Detec-tion System Technical Manual #TM513 and ProNex® DNA QC Assay for Use on the Applied Biosystems® 7500/7500 Fast Real-Time PCR Systems Technical Manual #TM514 for guidance on how these parameters could be set.
2.B. Download
The ProNex® DNA QC Assay Software is available for download at: www.promega.com/resources/tools. There is no cost for this download, but registration is required. The ProNex® DNA QC Assay Software part number is 7002422. Two files will download: DNASetup.msi and setup.exe. Either can be used for installation.
2.C. System Requirements
• Operating system: Microsoft Windows 7, 8, 10 (x86 and x64).
• Installed memory: 2GB RAM
• External resource: Microsoft .NET Framework 3.5 (available at no charge from www.microsoft.com)
• Processor requirement: dual-core processor
4 Promega Corporation · 2800 Woods Hollow Road · Madison, WI 53711-5399 USA · Toll Free in USA 800-356-9526 · 608-274-4330 · Fax 608-277-2516TM512 · 9/17 www.promega.com
3. Getting Started
3.A. Installation
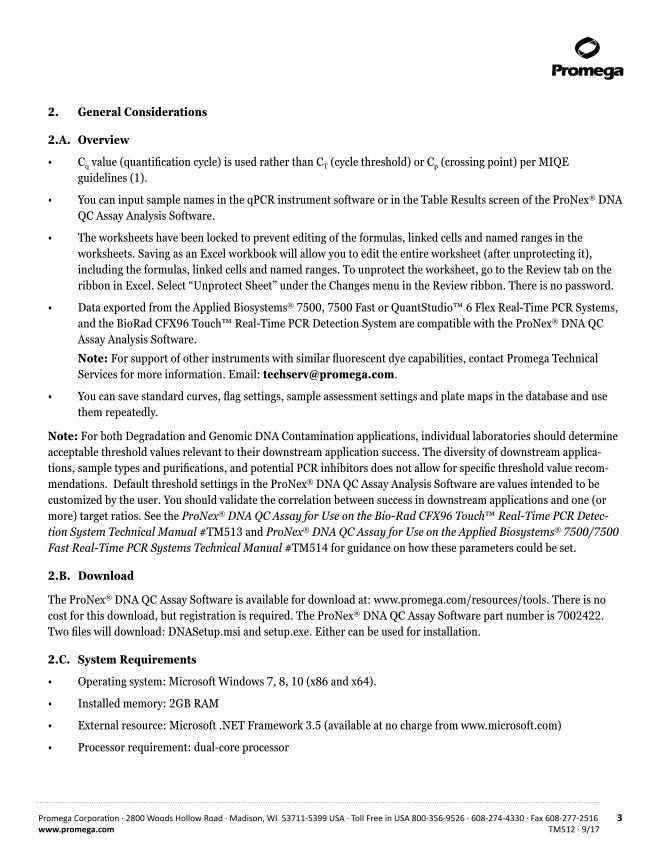
The software will install into the Promega\DNA QC Assays folder automatically. You cannot change the install location.The installation must be performed by an administrator account on the computer.
1. Double-click the DNASetup.msi file. A window titled “Welcome to the DNA QC Assays Setup Wizard” will appear. Select “Next >” to proceed with installation, or “Cancel” to abort.
1417
5TA
Figure 1. The Welcome to the DNA QC Assays Setup Wizard screen.
Promega Corporation · 2800 Woods Hollow Road · Madison, WI 53711-5399 USA · Toll Free in USA 800-356-9526 · 608-274-4330 · Fax 608-277-2516 5www.promega.com TM512 · 9/17
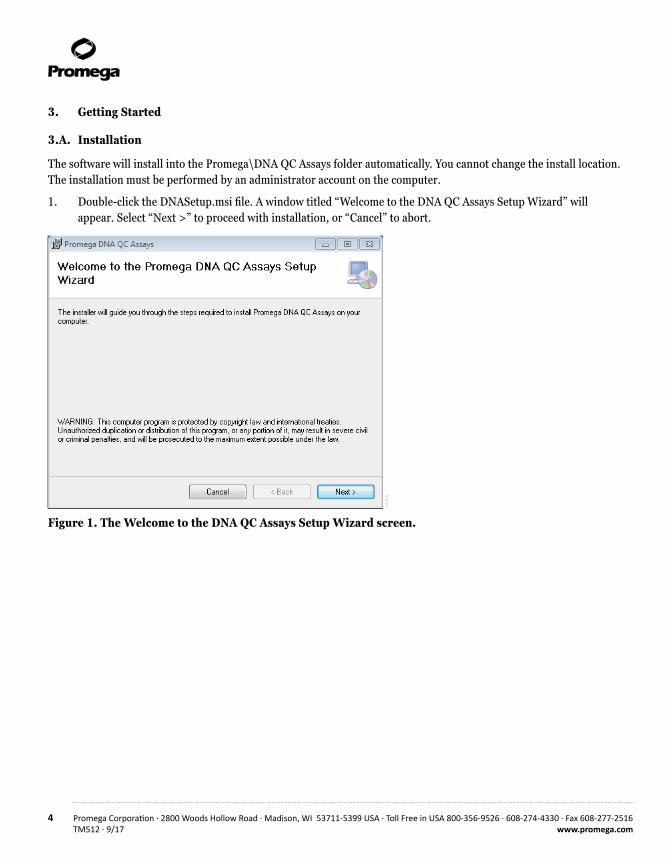
2. The License Agreement will be displayed. Read it and select “I Agree”.
1417
6TA
Figure 2. The License Agreement screen.
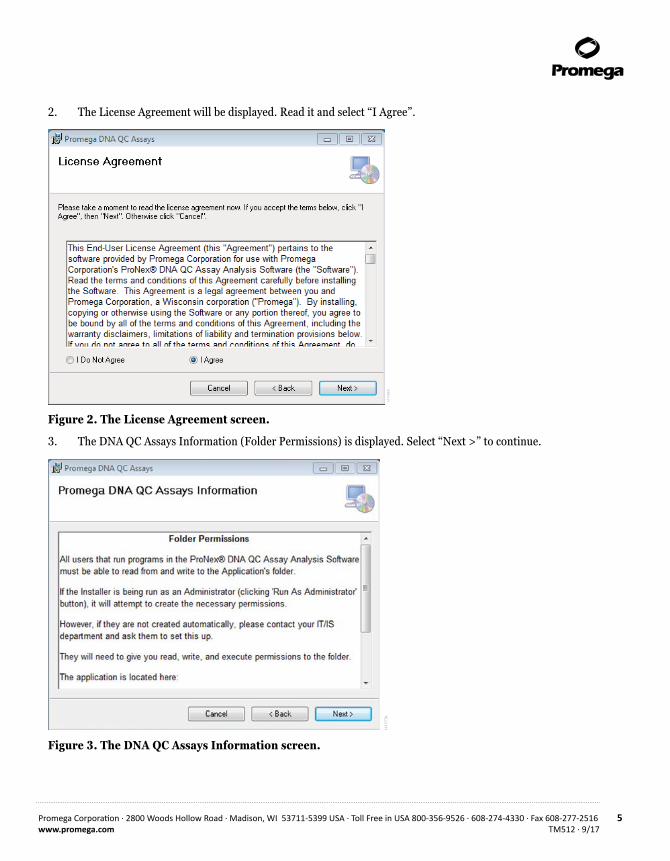
3. The DNA QC Assays Information (Folder Permissions) is displayed. Select “Next >” to continue.
1417
7TA
Figure 3. The DNA QC Assays Information screen.
6 Promega Corporation · 2800 Woods Hollow Road · Madison, WI 53711-5399 USA · Toll Free in USA 800-356-9526 · 608-274-4330 · Fax 608-277-2516TM512 · 9/17 www.promega.com
3.A. Installation (continued)
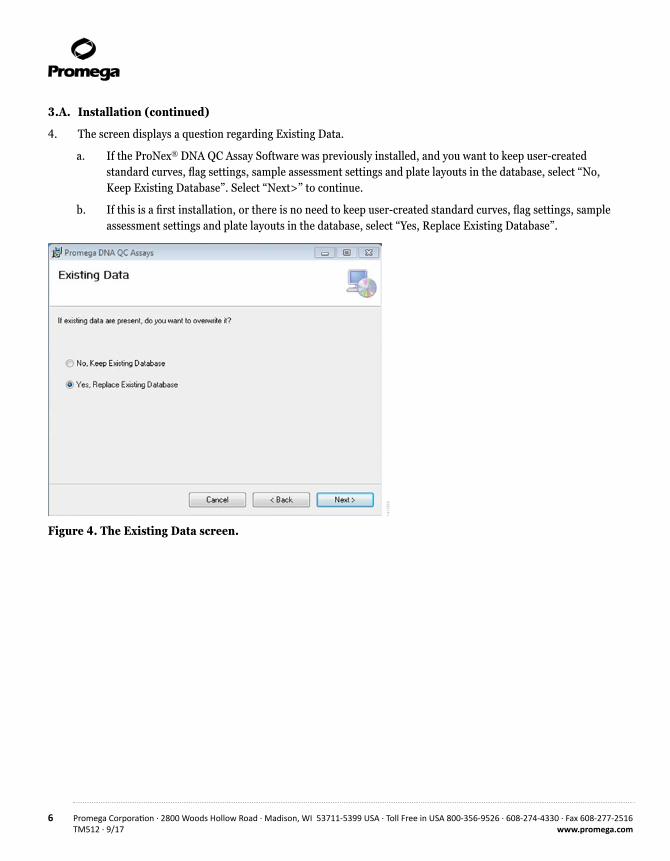
4. The screen displays a question regarding Existing Data.
a. If the ProNex® DNA QC Assay Software was previously installed, and you want to keep user-created standard curves, flag settings, sample assessment settings and plate layouts in the database, select “No, Keep Existing Database”. Select “Next>” to continue.
b. If this is a first installation, or there is no need to keep user-created standard curves, flag settings, sample assessment settings and plate layouts in the database, select “Yes, Replace Existing Database”.
1417
8TA
Figure 4. The Existing Data screen.
Promega Corporation · 2800 Woods Hollow Road · Madison, WI 53711-5399 USA · Toll Free in USA 800-356-9526 · 608-274-4330 · Fax 608-277-2516 7www.promega.com TM512 · 9/17
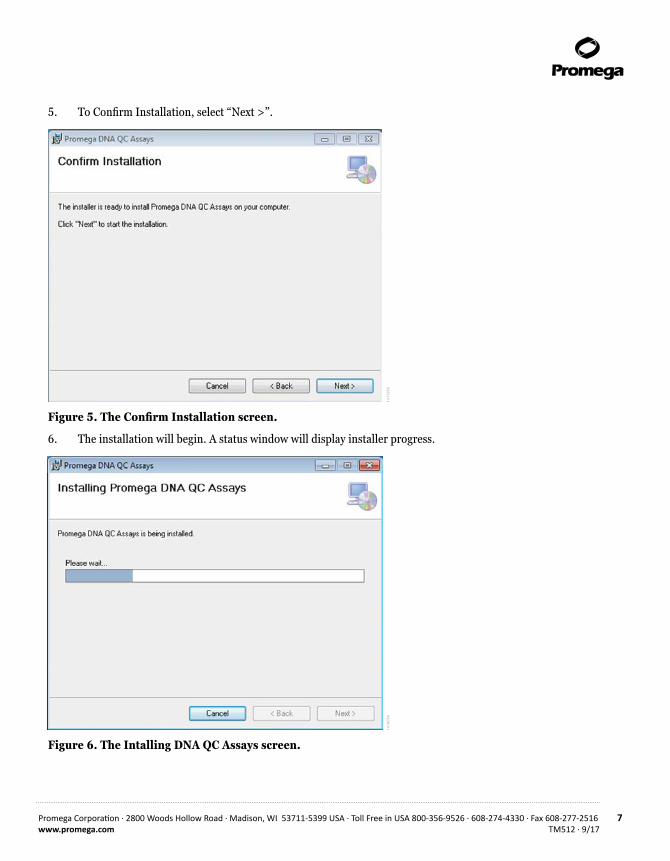
5. To Confirm Installation, select “Next >”.
1417
9TA
Figure 5. The Confirm Installation screen.
6. The installation will begin. A status window will display installer progress.
1418
0TA
Figure 6. The Intalling DNA QC Assays screen.
8 Promega Corporation · 2800 Woods Hollow Road · Madison, WI 53711-5399 USA · Toll Free in USA 800-356-9526 · 608-274-4330 · Fax 608-277-2516TM512 · 9/17 www.promega.com
3.A. Installation (continued)
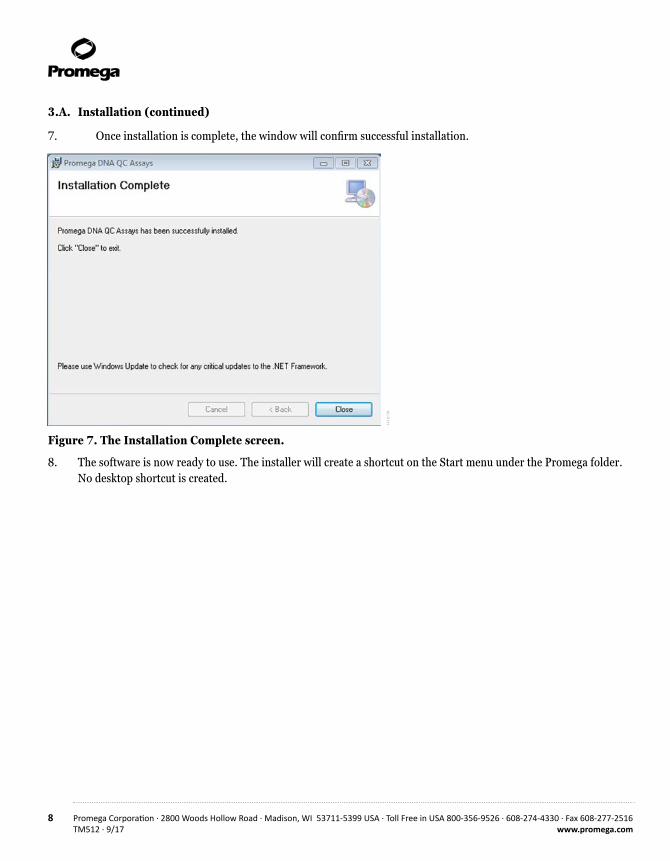
7. Once installation is complete, the window will confirm successful installation.
1418
1TA
Figure 7. The Installation Complete screen.
8. The software is now ready to use. The installer will create a shortcut on the Start menu under the Promega folder. No desktop shortcut is created.
Promega Corporation · 2800 Woods Hollow Road · Madison, WI 53711-5399 USA · Toll Free in USA 800-356-9526 · 608-274-4330 · Fax 608-277-2516 9www.promega.com TM512 · 9/17
3.B. Uninstallation
1. Double-click the DNASetup.msi file.
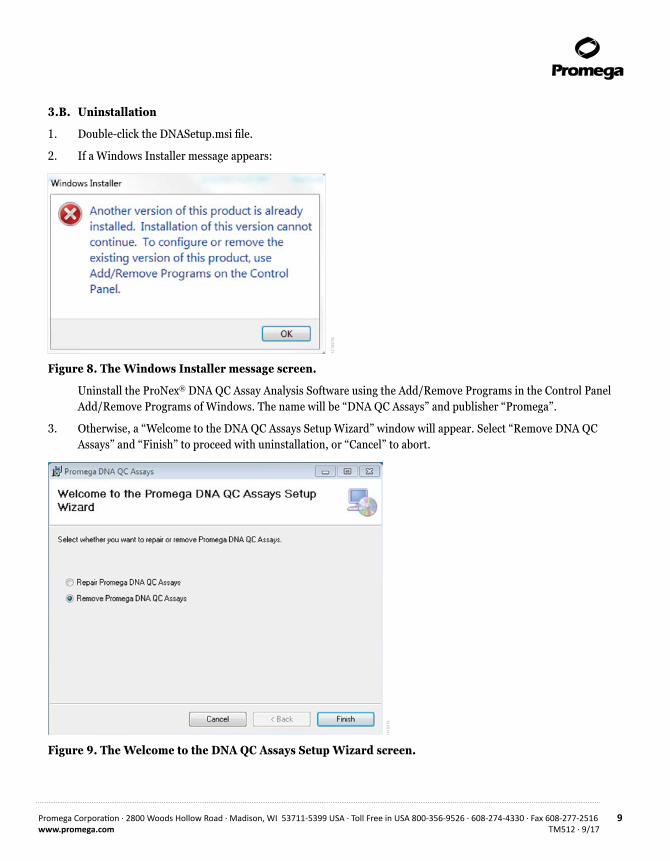
2. If a Windows Installer message appears:
1418
2TA
Figure 8. The Windows Installer message screen.
Uninstall the ProNex® DNA QC Assay Analysis Software using the Add/Remove Programs in the Control Panel Add/Remove Programs of Windows. The name will be “DNA QC Assays” and publisher “Promega”.
3. Otherwise, a “Welcome to the DNA QC Assays Setup Wizard” window will appear. Select “Remove DNA QC Assays” and “Finish” to proceed with uninstallation, or “Cancel” to abort.
1418
3TA
Figure 9. The Welcome to the DNA QC Assays Setup Wizard screen.
10 Promega Corporation · 2800 Woods Hollow Road · Madison, WI 53711-5399 USA · Toll Free in USA 800-356-9526 · 608-274-4330 · Fax 608-277-2516TM512 · 9/17 www.promega.com
3.A. Installation (continued)
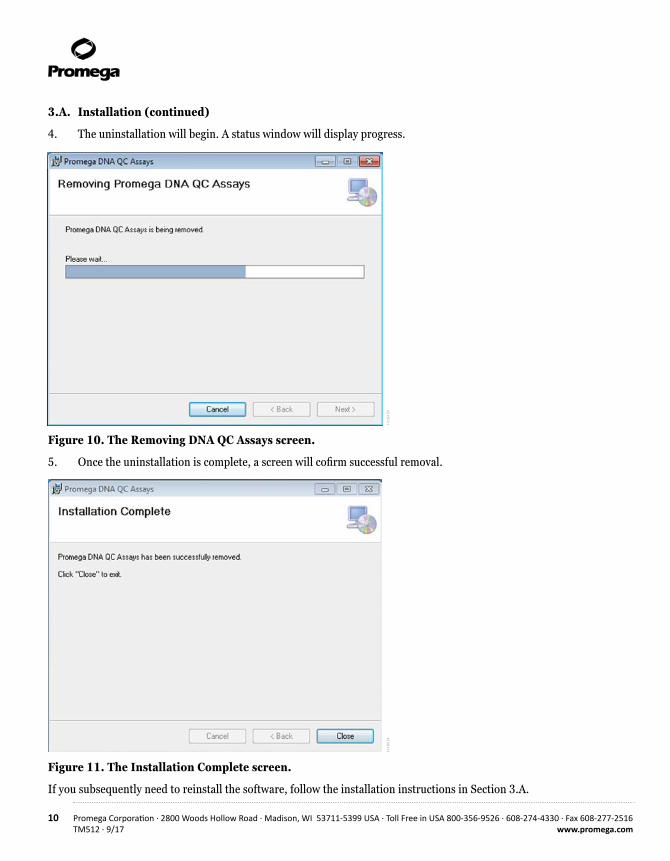
4. The uninstallation will begin. A status window will display progress.
1418
4TA
Figure 10. The Removing DNA QC Assays screen.
5. Once the uninstallation is complete, a screen will cofirm successful removal.
1418
5TA
Figure 11. The Installation Complete screen.
If you subsequently need to reinstall the software, follow the installation instructions in Section 3.A.
Promega Corporation · 2800 Woods Hollow Road · Madison, WI 53711-5399 USA · Toll Free in USA 800-356-9526 · 608-274-4330 · Fax 608-277-2516 11www.promega.com TM512 · 9/17
3.C. Multi-User Installation
You can configure the ProNex® DNA QC Assay Analysis Software to accommodate several user-access models. The installer creates a directory in Program Files or Program Files (x86) that contains all the files required to run the program. This directory allows all users of the computer to use the same program and data.
However, by copying the Application folder (located in Promega\DNA QC Assays) to other locations, you can achieve different methods of access.
Single-User (Private) Deployment
If there are several users of the computer, and each user requires their own database, you can copy the contents of the “Promega\DNA QC Assays” folder to another folder and create a shortcut to this folder on the desktop. If the folder is copied to an indivdual user’s “C:\Users\UserName” folder, then they would be the only one able to access their data. Each individual would need to be logged into the computer to do this step.
Multi-User/Multi-Computer Deployment
If several users need to access a common database, you can copy the contents of the “Promega\DNA QC Assays” folder to a shared drive on your network.
3.D. User Accounts
User Categories
A Standard user can:
• View standard curves, flag settings and sample assessment settings.
• Create, edit and delete plate maps.
• Use the import tab to analyze data.
An Admin user can:
• Create, edit and delete standard curves, flag settings and sample assessment settings.
• Create, edit and delete plate maps.
• Use the import tab to analyze data.
• Perform user-management tasks (create, edit and delete new users).
Launching the ProNex® DNA QC Assay Analysis Software grants Standard user access. To access the Admin functions, users must log in as an administrator with a password.

12 Promega Corporation · 2800 Woods Hollow Road · Madison, WI 53711-5399 USA · Toll Free in USA 800-356-9526 · 608-274-4330 · Fax 608-277-2516TM512 · 9/17 www.promega.com
3.D. User Accounts (continued)
Initial Login and User Management
1. Select the Configuration Tools tab and select “Design Parameters”.
1418
6TA
Figure 12. The Configuration Tools tab screen.
2. The Administrative Tools application opens and the Administrator Login will open in another window.
1418
7TA
Figure 13. The Administrator Login screen.
3. To log in as an Administrator for the first time, enter the following informaton:
a. User Name: DNAdmin
b. Password: Promega
Note: The User Name and Password fields are case-sensitive.
c. Select “OK”.
Promega Corporation · 2800 Woods Hollow Road · Madison, WI 53711-5399 USA · Toll Free in USA 800-356-9526 · 608-274-4330 · Fax 608-277-2516 13www.promega.com TM512 · 9/17
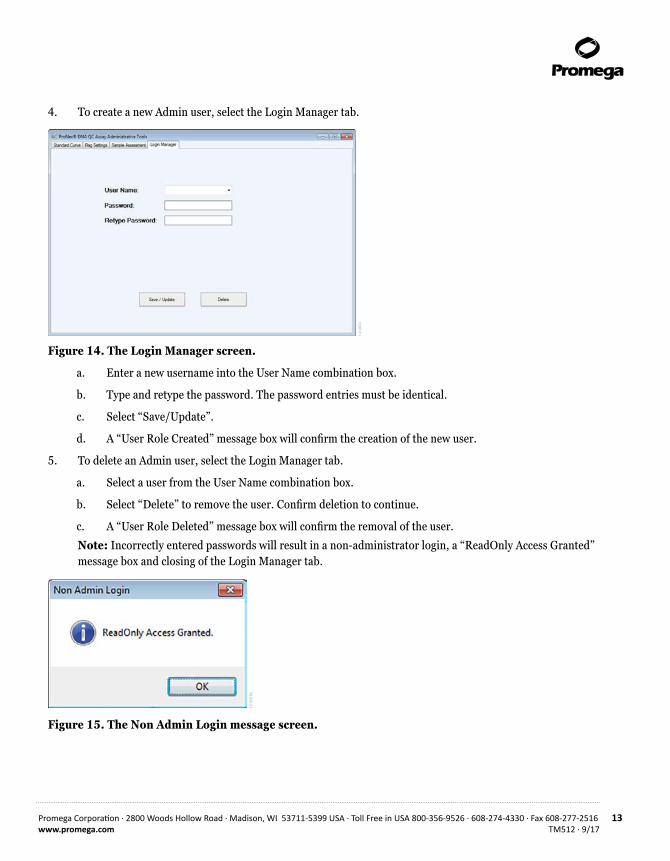
4. To create a new Admin user, select the Login Manager tab.
1418
8TA
Figure 14. The Login Manager screen.
a. Enter a new username into the User Name combination box.
b. Type and retype the password. The password entries must be identical.
c. Select “Save/Update”.
d. A “User Role Created” message box will confirm the creation of the new user.
5. To delete an Admin user, select the Login Manager tab.
a. Select a user from the User Name combination box.
b. Select “Delete” to remove the user. Confirm deletion to continue.
c. A “User Role Deleted” message box will confirm the removal of the user.
Note: Incorrectly entered passwords will result in a non-administrator login, a “ReadOnly Access Granted” message box and closing of the Login Manager tab.
1418
9TA
Figure 15. The Non Admin Login message screen.
14 Promega Corporation · 2800 Woods Hollow Road · Madison, WI 53711-5399 USA · Toll Free in USA 800-356-9526 · 608-274-4330 · Fax 608-277-2516TM512 · 9/17 www.promega.com
3.D. User Accounts (continued)
To attempt the login again, close the Design Parameters window. Select the Configuration Tools tab, select “Design Parameters” on the tab and follow the instructions for an Admin user login.
Note: The database (including standard curves, flag settings, sample assessment settings and plate maps) is independent of the computer’s Windows login. Therefore, any user can see all database entries. See Section 3.C. for more information on multi-user installation.
3.E. The Main Menu
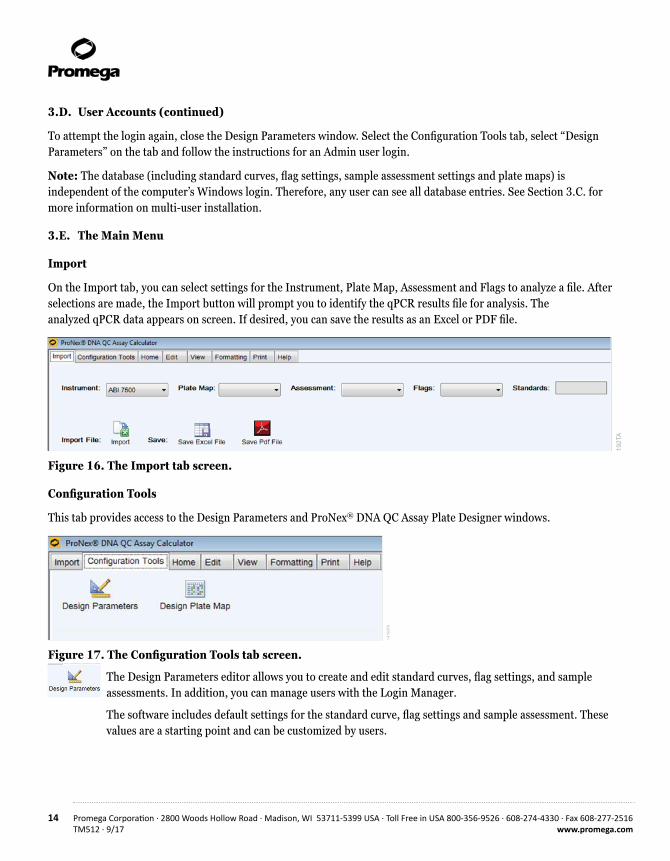
Import
On the Import tab, you can select settings for the Instrument, Plate Map, Assessment and Flags to analyze a file. After selections are made, the Import button will prompt you to identify the qPCR results file for analysis. The analyzed qPCR data appears on screen. If desired, you can save the results as an Excel or PDF file.
1419
2TA
Figure 16. The Import tab screen.
Configuration Tools
This tab provides access to the Design Parameters and ProNex® DNA QC Assay Plate Designer windows.
1419
3TA
Figure 17. The Configuration Tools tab screen.
The Design Parameters editor allows you to create and edit standard curves, flag settings, and sample assessments. In addition, you can manage users with the Login Manager.
The software includes default settings for the standard curve, flag settings and sample assessment. These values are a starting point and can be customized by users.
1419
3TA
Promega Corporation · 2800 Woods Hollow Road · Madison, WI 53711-5399 USA · Toll Free in USA 800-356-9526 · 608-274-4330 · Fax 608-277-2516 15www.promega.com TM512 · 9/17
1419
4TA
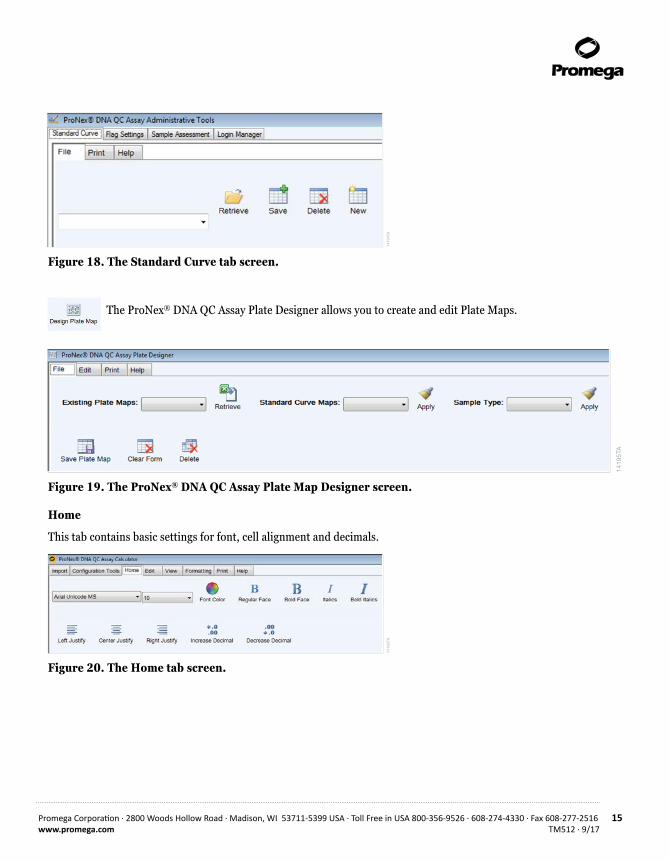
Figure 18. The Standard Curve tab screen.
The ProNex® DNA QC Assay Plate Designer allows you to create and edit Plate Maps.
1419
5TA
Figure 19. The ProNex® DNA QC Assay Plate Map Designer screen.
Home
This tab contains basic settings for font, cell alignment and decimals.
1419
6TA
Figure 20. The Home tab screen.
1419
3TA
16 Promega Corporation · 2800 Woods Hollow Road · Madison, WI 53711-5399 USA · Toll Free in USA 800-356-9526 · 608-274-4330 · Fax 608-277-2516TM512 · 9/17 www.promega.com
3.E. The Main Menu (continued)
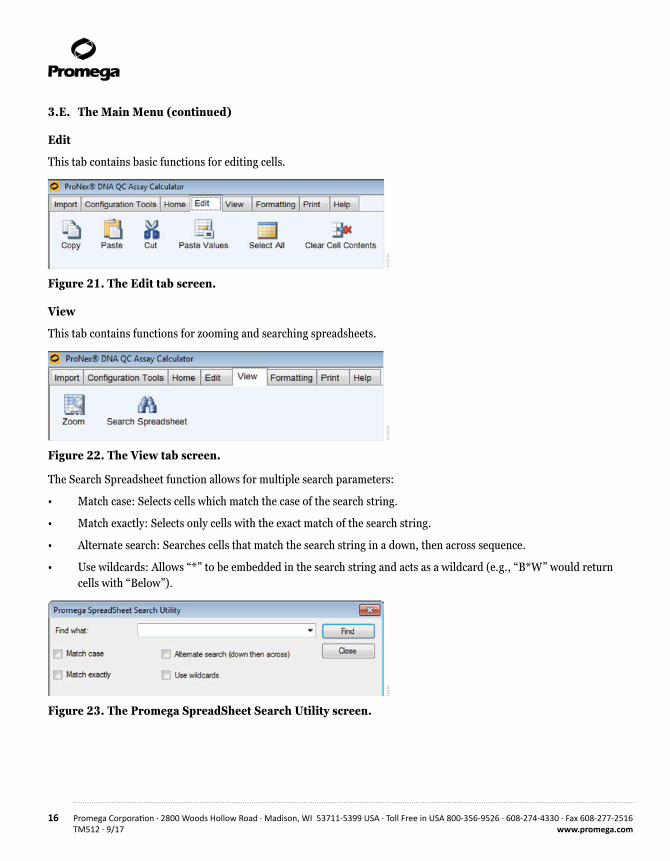
Edit
This tab contains basic functions for editing cells.
1419
7TA
Figure 21. The Edit tab screen.
View
This tab contains functions for zooming and searching spreadsheets.
1419
8TA
Figure 22. The View tab screen.
The Search Spreadsheet function allows for multiple search parameters:
• Match case: Selects cells which match the case of the search string.
• Match exactly: Selects only cells with the exact match of the search string.
• Alternate search: Searches cells that match the search string in a down, then across sequence.
• Use wildcards: Allows “*” to be embedded in the search string and acts as a wildcard (e.g., “B*W” would return cells with “Below”).
1419
9TA
Figure 23. The Promega SpreadSheet Search Utility screen.
Promega Corporation · 2800 Woods Hollow Road · Madison, WI 53711-5399 USA · Toll Free in USA 800-356-9526 · 608-274-4330 · Fax 608-277-2516 17www.promega.com TM512 · 9/17
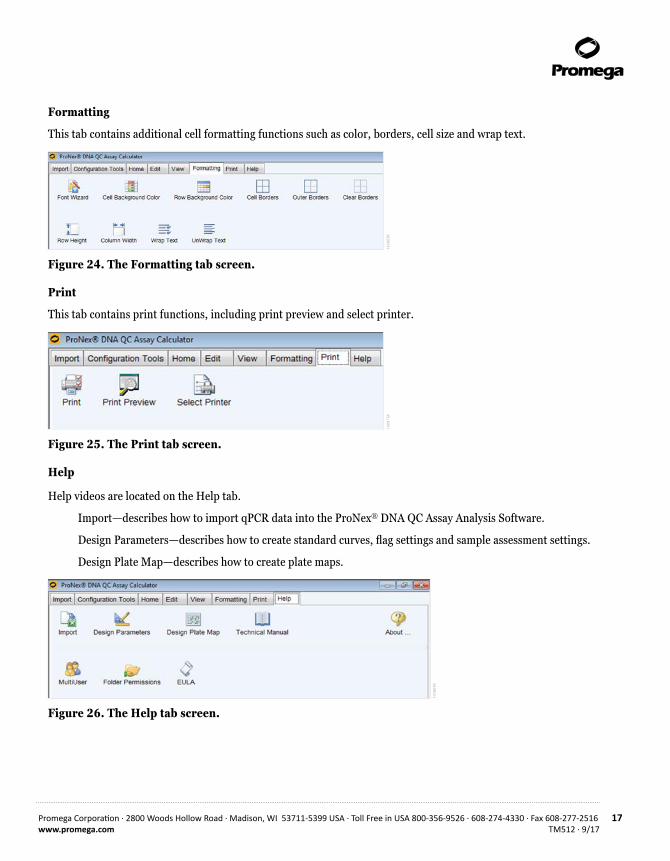
Formatting
This tab contains additional cell formatting functions such as color, borders, cell size and wrap text.
1420
0TA
Figure 24. The Formatting tab screen.
This tab contains print functions, including print preview and select printer.
1420
1TA
Figure 25. The Print tab screen.
Help
Help videos are located on the Help tab.
Import—describes how to import qPCR data into the ProNex® DNA QC Assay Analysis Software.
Design Parameters—describes how to create standard curves, flag settings and sample assessment settings.
Design Plate Map—describes how to create plate maps.
1419
0TA
Figure 26. The Help tab screen.
18 Promega Corporation · 2800 Woods Hollow Road · Madison, WI 53711-5399 USA · Toll Free in USA 800-356-9526 · 608-274-4330 · Fax 608-277-2516TM512 · 9/17 www.promega.com
3.E. The Main Menu (continued)
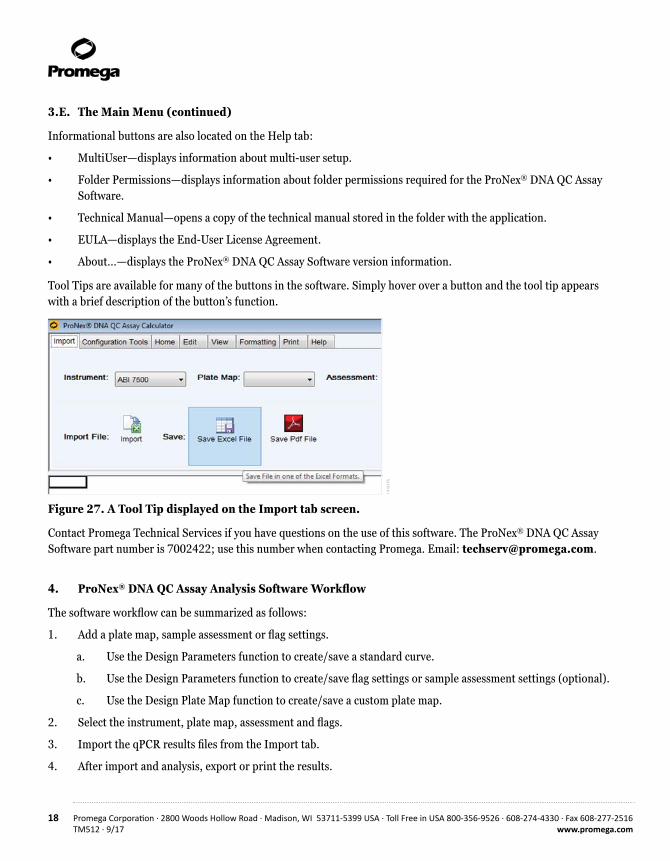
Informational buttons are also located on the Help tab:
• MultiUser—displays information about multi-user setup.
• Folder Permissions—displays information about folder permissions required for the ProNex® DNA QC Assay Software.
• Technical Manual—opens a copy of the technical manual stored in the folder with the application.
• EULA—displays the End-User License Agreement.
• About…—displays the ProNex® DNA QC Assay Software version information.
Tool Tips are available for many of the buttons in the software. Simply hover over a button and the tool tip appears with a brief description of the button’s function.
1419
1TA
Figure 27. A Tool Tip displayed on the Import tab screen.
Contact Promega Technical Services if you have questions on the use of this software. The ProNex® DNA QC Assay Software part number is 7002422; use this number when contacting Promega. Email: [email protected].
4. ProNex® DNA QC Assay Analysis Software Workflow
The software workflow can be summarized as follows:
1. Add a plate map, sample assessment or flag settings.
a. Use the Design Parameters function to create/save a standard curve.
b. Use the Design Parameters function to create/save flag settings or sample assessment settings (optional).
c. Use the Design Plate Map function to create/save a custom plate map.
2. Select the instrument, plate map, assessment and flags.
3. Import the qPCR results files from the Import tab.
4. After import and analysis, export or print the results.
Promega Corporation · 2800 Woods Hollow Road · Madison, WI 53711-5399 USA · Toll Free in USA 800-356-9526 · 608-274-4330 · Fax 608-277-2516 19www.promega.com TM512 · 9/17
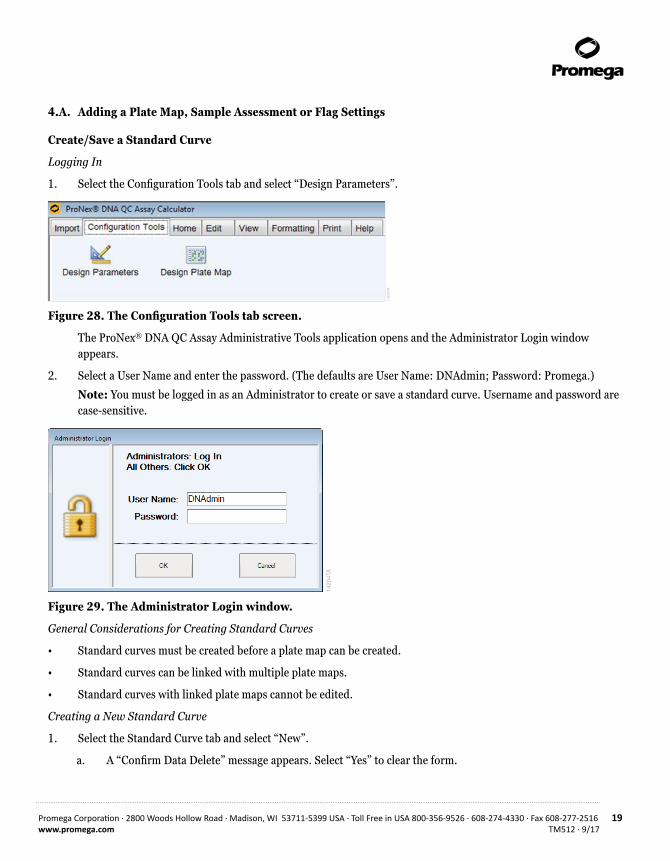
4.A. Adding a Plate Map, Sample Assessment or Flag Settings
Create/Save a Standard Curve
Logging In
1. Select the Configuration Tools tab and select “Design Parameters”.
1420
3TA
Figure 28. The Configuration Tools tab screen.
The ProNex® DNA QC Assay Administrative Tools application opens and the Administrator Login window appears.
2. Select a User Name and enter the password. (The defaults are User Name: DNAdmin; Password: Promega.)
Note: You must be logged in as an Administrator to create or save a standard curve. Username and password are case-sensitive.
1420
4TA
Figure 29. The Administrator Login window.
General Considerations for Creating Standard Curves
• Standard curves must be created before a plate map can be created.
• Standard curves can be linked with multiple plate maps.
• Standard curves with linked plate maps cannot be edited.
Creating a New Standard Curve
1. Select the Standard Curve tab and select “New”.
a. A “Confirm Data Delete” message appears. Select “Yes” to clear the form.
20 Promega Corporation · 2800 Woods Hollow Road · Madison, WI 53711-5399 USA · Toll Free in USA 800-356-9526 · 608-274-4330 · Fax 608-277-2516TM512 · 9/17 www.promega.com
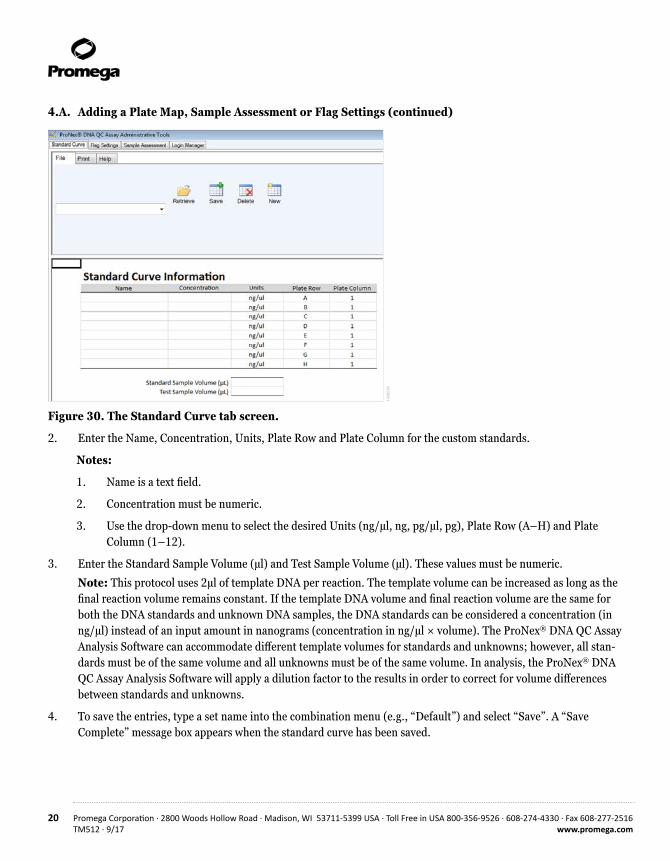
4.A. Adding a Plate Map, Sample Assessment or Flag Settings (continued)
1420
5TA
Figure 30. The Standard Curve tab screen.
2. Enter the Name, Concentration, Units, Plate Row and Plate Column for the custom standards.
Notes:
1. Name is a text field.
2. Concentration must be numeric.
3. Use the drop-down menu to select the desired Units (ng/µl, ng, pg/µl, pg), Plate Row (A–H) and Plate Column (1–12).
3. Enter the Standard Sample Volume (µl) and Test Sample Volume (µl). These values must be numeric.
Note: This protocol uses 2μl of template DNA per reaction. The template volume can be increased as long as the final reaction volume remains constant. If the template DNA volume and final reaction volume are the same for both the DNA standards and unknown DNA samples, the DNA standards can be considered a concentration (in ng/μl) instead of an input amount in nanograms (concentration in ng/μl × volume). The ProNex® DNA QC Assay Analysis Software can accommodate different template volumes for standards and unknowns; however, all stan-dards must be of the same volume and all unknowns must be of the same volume. In analysis, the ProNex® DNA QC Assay Analysis Software will apply a dilution factor to the results in order to correct for volume differences between standards and unknowns.
4. To save the entries, type a set name into the combination menu (e.g., “Default”) and select “Save”. A “Save Complete” message box appears when the standard curve has been saved.
Promega Corporation · 2800 Woods Hollow Road · Madison, WI 53711-5399 USA · Toll Free in USA 800-356-9526 · 608-274-4330 · Fax 608-277-2516 21www.promega.com TM512 · 9/17
1420
6TA
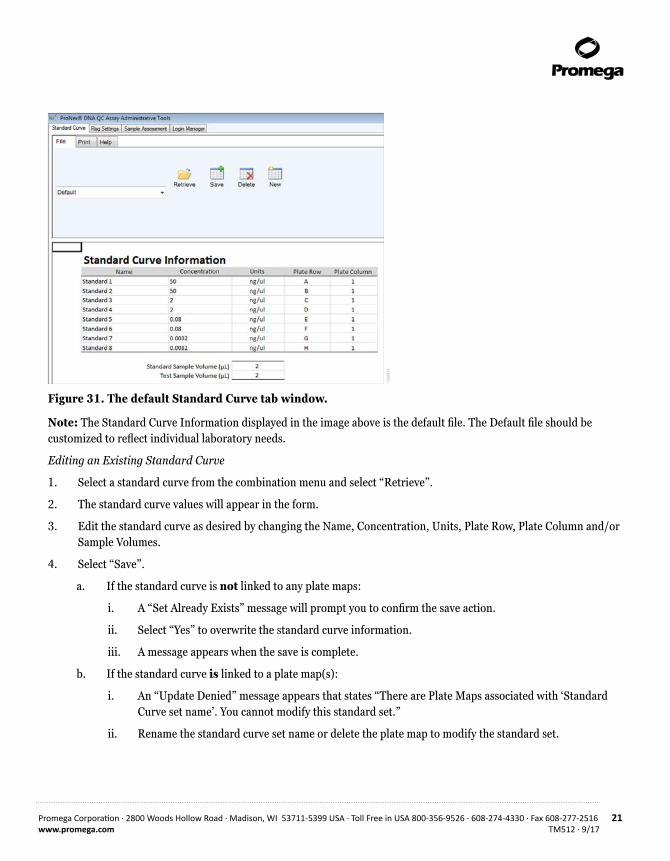
Figure 31. The default Standard Curve tab window.
Note: The Standard Curve Information displayed in the image above is the default file. The Default file should be customized to reflect individual laboratory needs.
Editing an Existing Standard Curve
1. Select a standard curve from the combination menu and select “Retrieve”.
2. The standard curve values will appear in the form.
3. Edit the standard curve as desired by changing the Name, Concentration, Units, Plate Row, Plate Column and/or Sample Volumes.
4. Select “Save”.
a. If the standard curve is not linked to any plate maps:
i. A “Set Already Exists” message will prompt you to confirm the save action.
ii. Select “Yes” to overwrite the standard curve information.
iii. A message appears when the save is complete.
b. If the standard curve is linked to a plate map(s):
i. An “Update Denied” message appears that states “There are Plate Maps associated with ‘Standard Curve set name’. You cannot modify this standard set.”
ii. Rename the standard curve set name or delete the plate map to modify the standard set.
22 Promega Corporation · 2800 Woods Hollow Road · Madison, WI 53711-5399 USA · Toll Free in USA 800-356-9526 · 608-274-4330 · Fax 608-277-2516TM512 · 9/17 www.promega.com
4.A. Adding a Plate Map, Sample Assessment or Flag Settings (continued)
Deleting an Existing Standard Curve
1. Select a standard curve from the combination menu.
2. Select “Delete”.
a. If the standard curve is not linked to any plate maps:
i. A “Confirm Delete” message will appear.
ii. Select “No” to cancel the deletion; or
iii. Select “Yes” to confirm the deletion. A “Deletion Complete” message appears that states “The Standard Set and its associated Plate Maps have been deleted”.
b. If the standard curve is linked to a plate map(s):
i. A form appears that lists all plate maps linked to the selected standard curve that will be removed if the delete action is continued.
ii. Select “No” to cancel the deletion; or
iii. Select “Yes” to confirm the deletion. A “Deletion Complete” message appears that states “The Standard Set and its associated Plate Maps have been deleted”.
Create/Save Flag Settings
Creating a New Custom Flag Setting
1. Select the Flag Settings tab and select “New”.
2. A “Confirm Data Delete” message appears. Select “Yes” to clear the form.
3. Enter the values for Minimum Acceptable R2 and Minimum and Maximum Acceptable Slope. All entries must be numeric.
4. To save the entries, type a name into the combination menu and select “Save”. A “Save Complete” message box appears when the flag settings have been saved.
Promega Corporation · 2800 Woods Hollow Road · Madison, WI 53711-5399 USA · Toll Free in USA 800-356-9526 · 608-274-4330 · Fax 608-277-2516 23www.promega.com TM512 · 9/17
1420
7TA
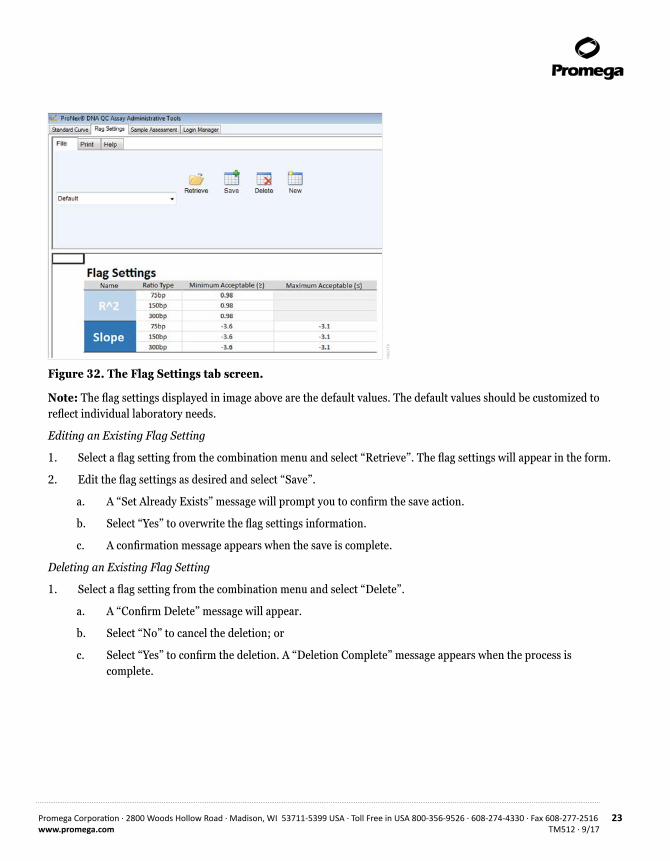
Figure 32. The Flag Settings tab screen.
Note: The flag settings displayed in image above are the default values. The default values should be customized to reflect individual laboratory needs.
Editing an Existing Flag Setting
1. Select a flag setting from the combination menu and select “Retrieve”. The flag settings will appear in the form.
2. Edit the flag settings as desired and select “Save”.
a. A “Set Already Exists” message will prompt you to confirm the save action.
b. Select “Yes” to overwrite the flag settings information.
c. A confirmation message appears when the save is complete.
Deleting an Existing Flag Setting
1. Select a flag setting from the combination menu and select “Delete”.
a. A “Confirm Delete” message will appear.
b. Select “No” to cancel the deletion; or
c. Select “Yes” to confirm the deletion. A “Deletion Complete” message appears when the process is complete.
24 Promega Corporation · 2800 Woods Hollow Road · Madison, WI 53711-5399 USA · Toll Free in USA 800-356-9526 · 608-274-4330 · Fax 608-277-2516TM512 · 9/17 www.promega.com
4.A. Adding a Plate Map, Sample Assessment or Flag Settings (continued)
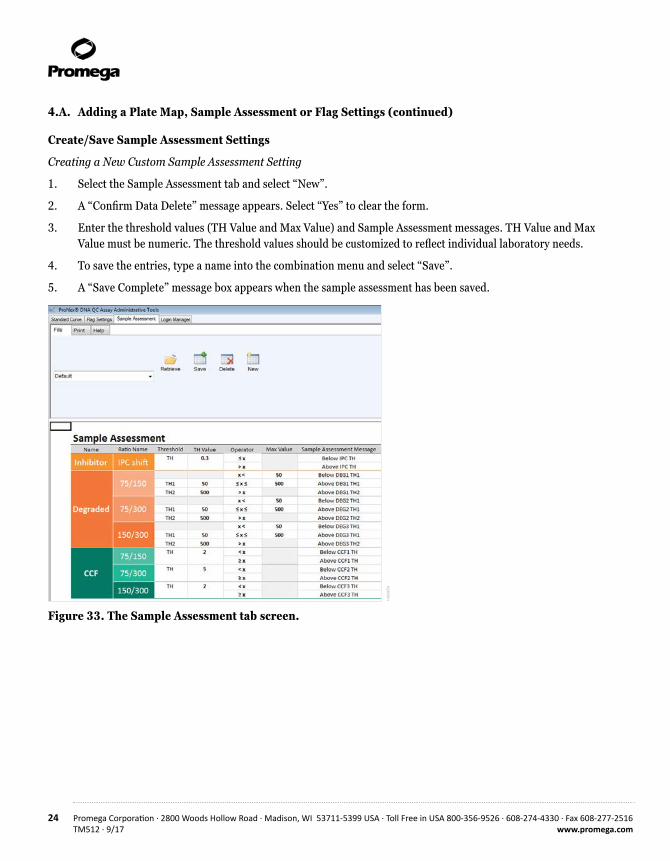
Create/Save Sample Assessment Settings
Creating a New Custom Sample Assessment Setting
1. Select the Sample Assessment tab and select “New”.
2. A “Confirm Data Delete” message appears. Select “Yes” to clear the form.
3. Enter the threshold values (TH Value and Max Value) and Sample Assessment messages. TH Value and Max Value must be numeric. The threshold values should be customized to reflect individual laboratory needs.
4. To save the entries, type a name into the combination menu and select “Save”.
5. A “Save Complete” message box appears when the sample assessment has been saved.
1420
8TA
Figure 33. The Sample Assessment tab screen.
Promega Corporation · 2800 Woods Hollow Road · Madison, WI 53711-5399 USA · Toll Free in USA 800-356-9526 · 608-274-4330 · Fax 608-277-2516 25www.promega.com TM512 · 9/17
Notes:
1. The sample assessment settings displayed in the image above is the default file. The default values should be customized to reflect individual laboratory needs.
2. For both Degradation and Genomic DNA Contamination applications, individual laboratories should determine acceptable threshold values relevant to their downstream application success. The diversity of downstream applications, sample types and purifications, and potential PCR inhibitors does not allow for specific threshold value recommendations. Default threshold settings in the ProNex® DNA QC Assay Analysis Software are values intended to be customized by the user. You should validate the correlation between success in downstream applications and one (or more) target ratios. See the ProNex® DNA QC Assay for Use on the Bio-Rad CFX96 Touch™ Real-Time PCR Detection System Technical Manual #TM513 and ProNex® DNA QC Assay for Use on the Applied Biosystems® 7500/7500 Fast Real-Time PCR Systems Technical Manual #TM514 for guidance on how these parameters could be set.
Editing an Existing Sample Assessment
1. Select a sample assessment from the combination menu and select “Retrieve”.
2. The sample assessment will appear in the form. Edit the sample assessment as desired and select “Save”.
a. A “Set Already Exists” message will prompt you to confirm the save action.
b. Select “Yes” to overwrite the sample assessment information.
c. A confirmation message appears when the save is complete.
Deleting an Existing Sample Assessment
1. Select a sample assessment name from the combination menu and select “Delete”.
a. A “Confirm Delete” message will appear.
b. Select “No” to cancel the deletion; or
c. Select “Yes” to confirm the deletion. A “Deletion Complete” message appears when the process is complete.
26 Promega Corporation · 2800 Woods Hollow Road · Madison, WI 53711-5399 USA · Toll Free in USA 800-356-9526 · 608-274-4330 · Fax 608-277-2516TM512 · 9/17 www.promega.com
4.A. Adding a Plate Map, Sample Assessment or Flag Settings (continued)
Create/Save a Plate Map
General Considerations on Creating a Plate Map
• Any user can create or save a plate map.
• You must create a standard curve before creating a plate map.
• You cannot edit or clear a standard curve within the ProNex® DNA QC Assay Plate Designer. Create a new standard curve with the Design Parameters if a change is required.
• Wells not assigned as a standard can be assigned as CCF, DEG, NTC or unassigned.
CCF (ccfDNA): In analysis, results will be compared to the threshold values in the CCF Sample Assess-ment Settings. CCF Sample Type Ratios will be compared to a single threshold value. (For use with ccfDNA samples or other samples where gDNA contamination is of concern.)
DEG (degredation): In analysis, results will be compared to threshold values in the DEG Sample Assess-ment Settings. DEG Sample Types will be compared to two threshold values. Comparisons will report below the lower threshold value (smaller number), between the two thresholds (between the small and large numbers) and above the higher threshold (larger number). (For use with FFPE samples or other samples where the level of DNA degradation is of concern.)
NTC (no template control): In analysis, Cq and quantity results will be reported but no comparison to threshold values will be made.
Standard or Unassigned: No analysis.
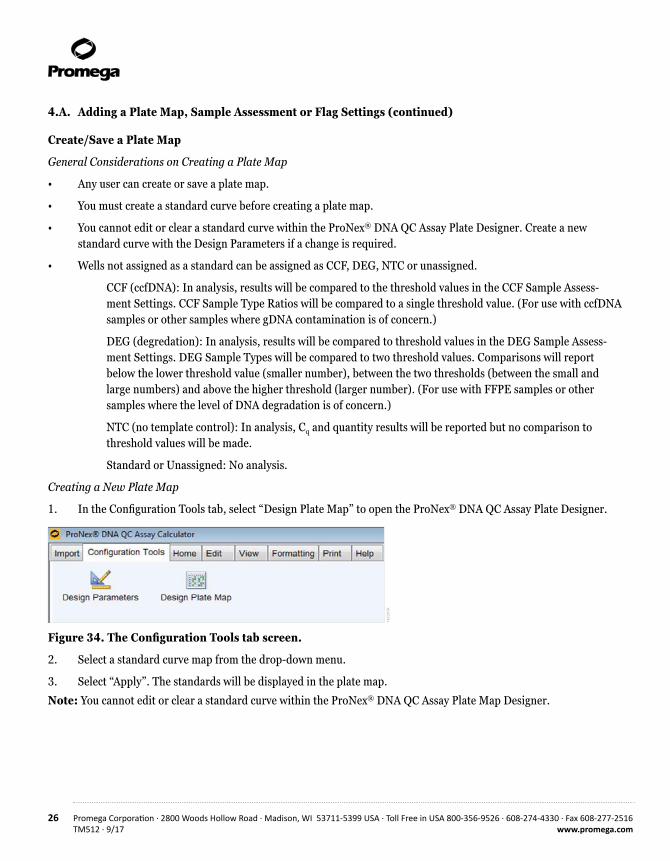
Creating a New Plate Map
1. In the Configuration Tools tab, select “Design Plate Map” to open the ProNex® DNA QC Assay Plate Designer.
1420
9TA
Figure 34. The Configuration Tools tab screen.
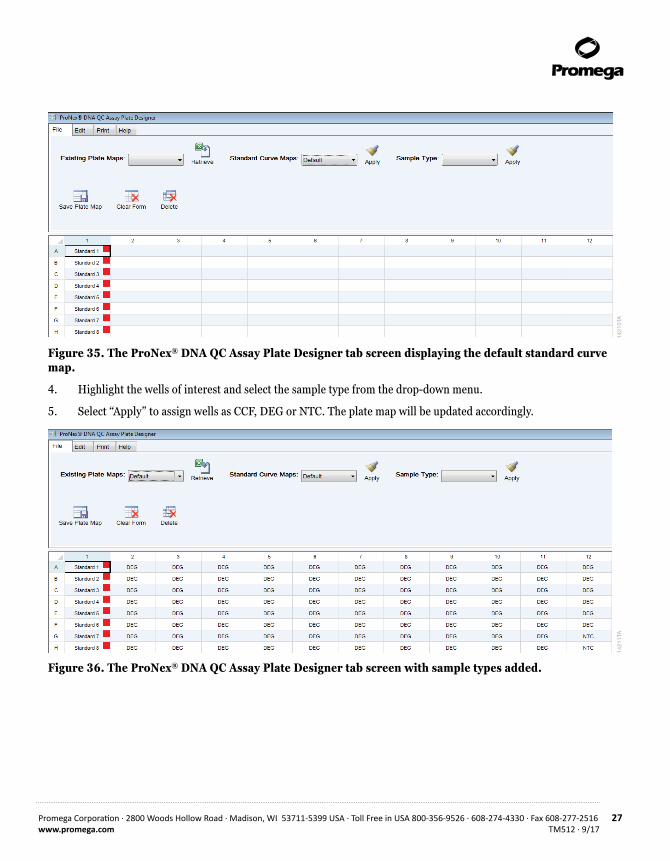
2. Select a standard curve map from the drop-down menu.
3. Select “Apply”. The standards will be displayed in the plate map.
Note: You cannot edit or clear a standard curve within the ProNex® DNA QC Assay Plate Map Designer.
Promega Corporation · 2800 Woods Hollow Road · Madison, WI 53711-5399 USA · Toll Free in USA 800-356-9526 · 608-274-4330 · Fax 608-277-2516 27www.promega.com TM512 · 9/17
1421
0TA
Figure 35. The ProNex® DNA QC Assay Plate Designer tab screen displaying the default standard curve map.
4. Highlight the wells of interest and select the sample type from the drop-down menu.
5. Select “Apply” to assign wells as CCF, DEG or NTC. The plate map will be updated accordingly.
1421
1TA
Figure 36. The ProNex® DNA QC Assay Plate Designer tab screen with sample types added.
28 Promega Corporation · 2800 Woods Hollow Road · Madison, WI 53711-5399 USA · Toll Free in USA 800-356-9526 · 608-274-4330 · Fax 608-277-2516TM512 · 9/17 www.promega.com
4.A. Adding a Plate Map, Sample Assessment or Flag Settings (continued)
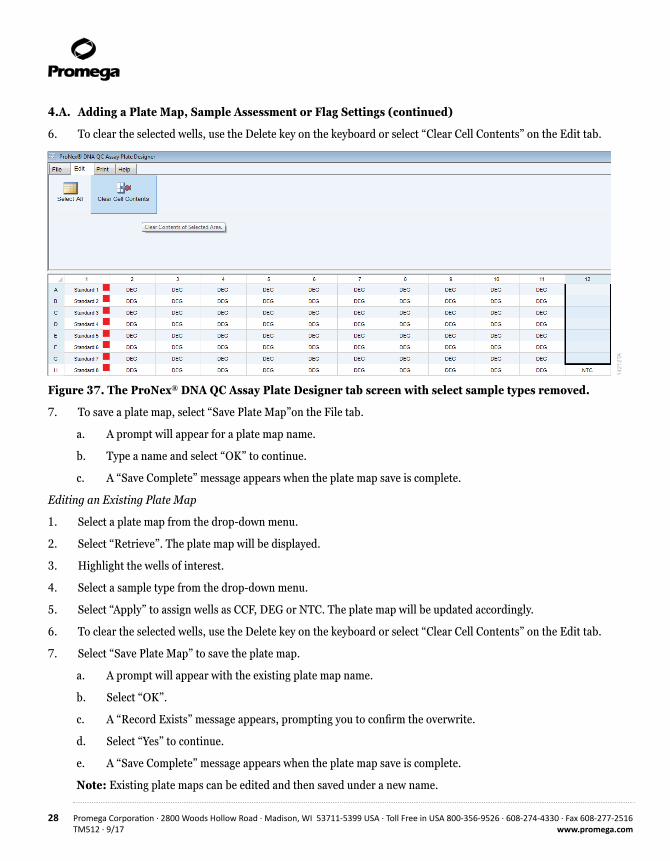
6. To clear the selected wells, use the Delete key on the keyboard or select “Clear Cell Contents” on the Edit tab.
1421
2TA
Figure 37. The ProNex® DNA QC Assay Plate Designer tab screen with select sample types removed.
7. To save a plate map, select “Save Plate Map”on the File tab.
a. A prompt will appear for a plate map name.
b. Type a name and select “OK” to continue.
c. A “Save Complete” message appears when the plate map save is complete.
Editing an Existing Plate Map
1. Select a plate map from the drop-down menu.
2. Select “Retrieve”. The plate map will be displayed.
3. Highlight the wells of interest.
4. Select a sample type from the drop-down menu.
5. Select “Apply” to assign wells as CCF, DEG or NTC. The plate map will be updated accordingly.
6. To clear the selected wells, use the Delete key on the keyboard or select “Clear Cell Contents” on the Edit tab.
7. Select “Save Plate Map” to save the plate map.
a. A prompt will appear with the existing plate map name.
b. Select “OK”.
c. A “Record Exists” message appears, prompting you to confirm the overwrite.
d. Select “Yes” to continue.
e. A “Save Complete” message appears when the plate map save is complete.
Note: Existing plate maps can be edited and then saved under a new name.
Promega Corporation · 2800 Woods Hollow Road · Madison, WI 53711-5399 USA · Toll Free in USA 800-356-9526 · 608-274-4330 · Fax 608-277-2516 29www.promega.com TM512 · 9/17
Deleting an Existing Plate Map
1. Select a plate map from the drop-down menu.
2. Select “Delete”.
a. A “Confirm Delete” message will appear.
b. Select “No” to cancel the deletion; or
c. Select “Yes” to confirm the deletion. The plate map name will be removed from the drop-down menu.
4.B. Importing the qPCR Results File
You can import the qPCR results file(s) from the Import tab by selecting the appropriate instrument, plate map, assessment and flags.
General Information
The light blue shaded cells in the worksheets identify user-editable cells.
The Date and Experiment Title fields from the Settings worksheet are displayed at the top of the page for the other worksheets.
1. Use the drop-down boxes to select the instrument, plate map, sample assessment and flag settings to be used. The standards used (linked to the plate map) will be displayed after file import.
2. Select “Import File”. A “Make Sure You Have Saved Your Work Before Proceeding” message will appear. Select “No” to abort the import, or “Yes” to clear the form.
3. Use the file explorer to navigate to the file of interest, select the file and select “Open”. The analysis will begin.
4. When the import is complete, the software will display the Settings worksheet.
a. Use the Home, Edit, View and Formatting tabs to modify the formatting in the worksheets.
b. Type information in the light blue user-editable cells.
c. To preview the printouts, select “Print Preview” on the Print tab.
i. A “Select Sheet(s) to Preview” form will appear.
ii. Use the Ctrl or Shift keys on the keyboard to select multiple sheets for preview.
iii. Select “OK” to view the first worksheet.
iv. Select “Close” to close the Print Preview Form and display the next worksheet.
d. Print pages using the print functions on the Print tab. Select “Print” to choose the sheets to print.
i. A “Select Sheet(s) to Print” form will appear.
ii. Use the Ctrl or Shift keys on the keyboard to select multiple sheets for printing.
iii. Select “OK” to send the print job to the default printer.

30 Promega Corporation · 2800 Woods Hollow Road · Madison, WI 53711-5399 USA · Toll Free in USA 800-356-9526 · 608-274-4330 · Fax 608-277-2516TM512 · 9/17 www.promega.com
5. To save the file as an Excel workbook, select “Save Excel File” on the Import tab.
a. A file explorer will open.
b. Navigate to the location of interest, enter a file name and select “Save”.
6. To save the file as a PDF, select “Save Pdf File” on the Import tab.
a. A file explorer will open.
b. Navigate to the location of interest, enter a file name and select “Save”.
c. A “PDF Save Complete” message will appear when the save is complete.
4.C. The DNA QC Export File Worksheets
General Information
The ProNex® DNA QC Assay Software worksheets have been locked to prevent editing of the formulas, linked cells and named ranges. Saving an Excel workbook will allow you to edit the entire worksheet (after unprotecting it) including the formulas, linked cells and named ranges. To unprotect the worksheet, go to the Review tab on the ribbon in Excel. Select “Unprotect Sheet” under the Changes menu in the Review ribbon. There is no password.
Settings
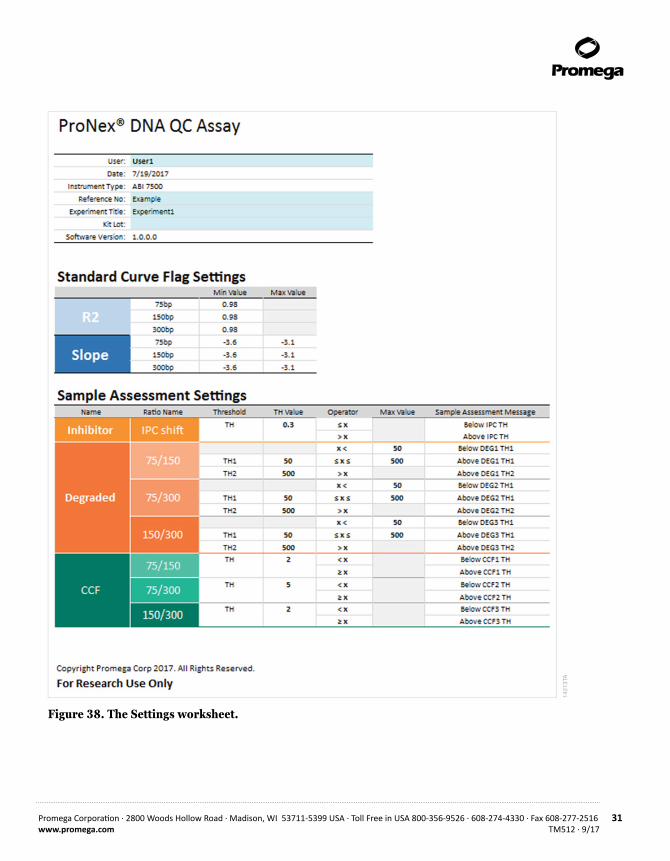
The Settings worksheet displays general information about the analysis, standard curve, flag settings and sample assessment settings.
4.B. Importing the qPCR Results File (continued)
Promega Corporation · 2800 Woods Hollow Road · Madison, WI 53711-5399 USA · Toll Free in USA 800-356-9526 · 608-274-4330 · Fax 608-277-2516 31www.promega.com TM512 · 9/17
1421
3TA
Figure 38. The Settings worksheet.
32 Promega Corporation · 2800 Woods Hollow Road · Madison, WI 53711-5399 USA · Toll Free in USA 800-356-9526 · 608-274-4330 · Fax 608-277-2516TM512 · 9/17 www.promega.com
4.C. The DNA QC Export File Worksheets (continued)
Sample Name Map Worksheet
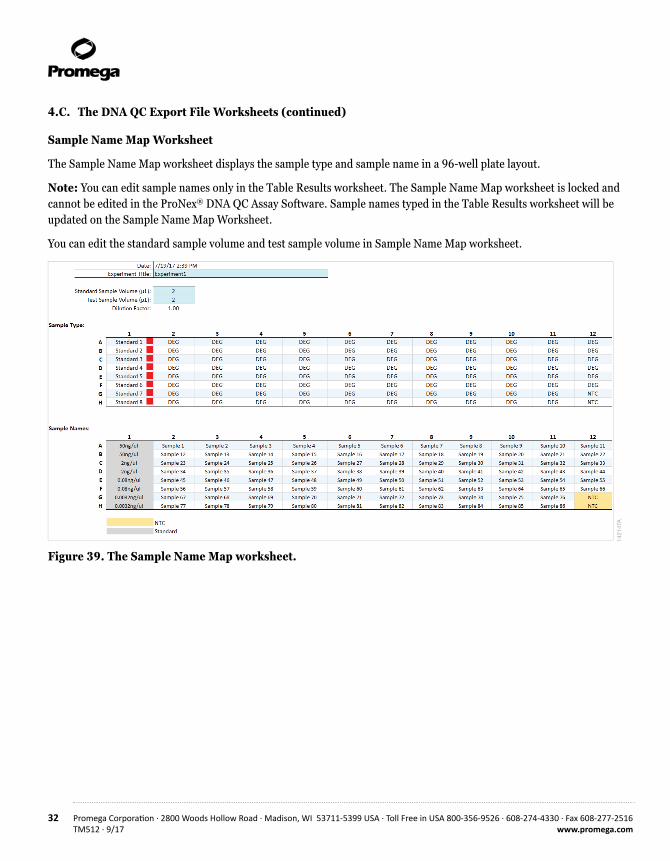
The Sample Name Map worksheet displays the sample type and sample name in a 96-well plate layout.
Note: You can edit sample names only in the Table Results worksheet. The Sample Name Map worksheet is locked and cannot be edited in the ProNex® DNA QC Assay Software. Sample names typed in the Table Results worksheet will be updated on the Sample Name Map Worksheet.
You can edit the standard sample volume and test sample volume in Sample Name Map worksheet.
1421
4TA
Figure 39. The Sample Name Map worksheet.
Promega Corporation · 2800 Woods Hollow Road · Madison, WI 53711-5399 USA · Toll Free in USA 800-356-9526 · 608-274-4330 · Fax 608-277-2516 33www.promega.com TM512 · 9/17
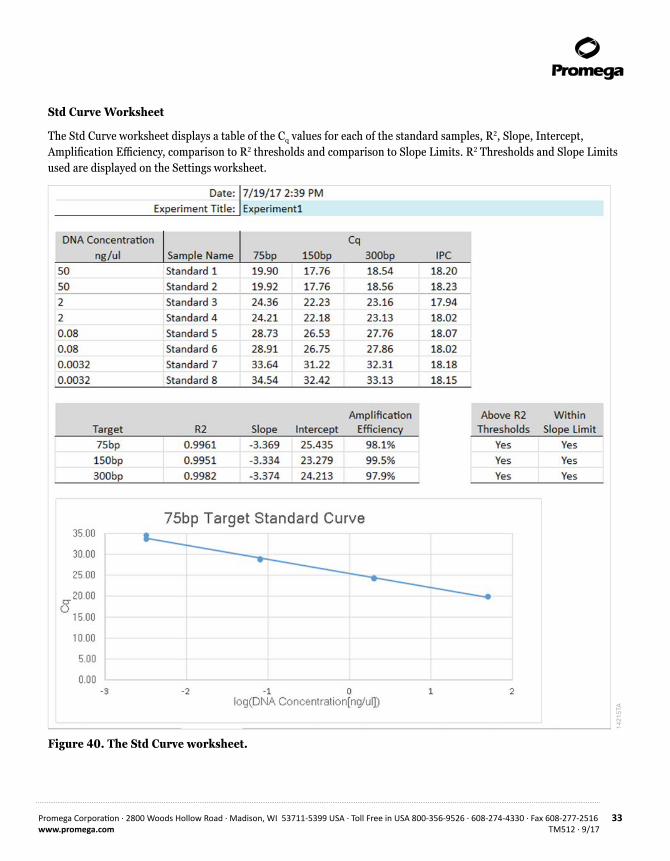
Std Curve Worksheet
The Std Curve worksheet displays a table of the Cq values for each of the standard samples, R2, Slope, Intercept, Amplification Efficiency, comparison to R2 thresholds and comparison to Slope Limits. R2 Thresholds and Slope Limits used are displayed on the Settings worksheet.
1421
5TA
Figure 40. The Std Curve worksheet.
34 Promega Corporation · 2800 Woods Hollow Road · Madison, WI 53711-5399 USA · Toll Free in USA 800-356-9526 · 608-274-4330 · Fax 608-277-2516TM512 · 9/17 www.promega.com
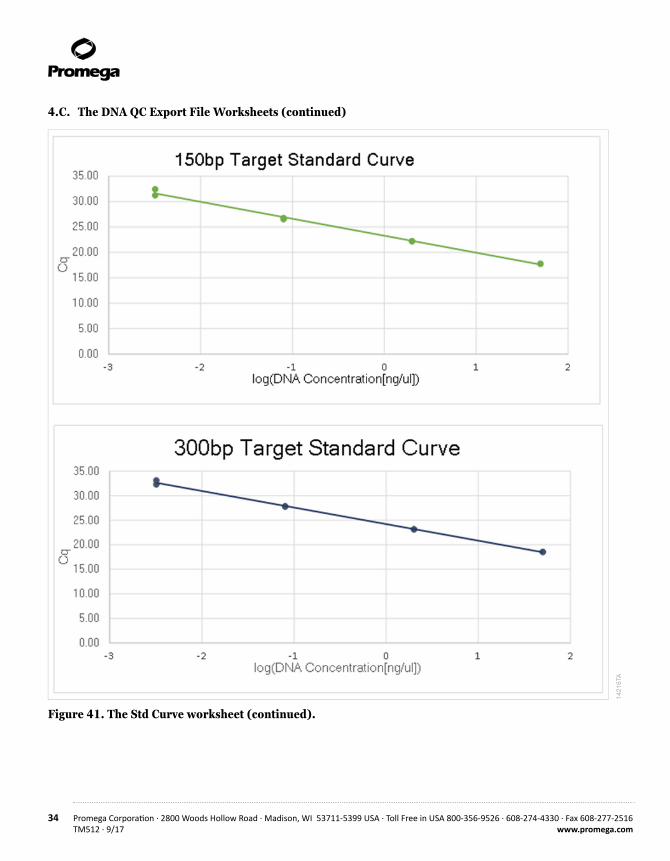
4.C. The DNA QC Export File Worksheets (continued)
1421
6TA
Figure 41. The Std Curve worksheet (continued).
Promega Corporation · 2800 Woods Hollow Road · Madison, WI 53711-5399 USA · Toll Free in USA 800-356-9526 · 608-274-4330 · Fax 608-277-2516 35www.promega.com TM512 · 9/17
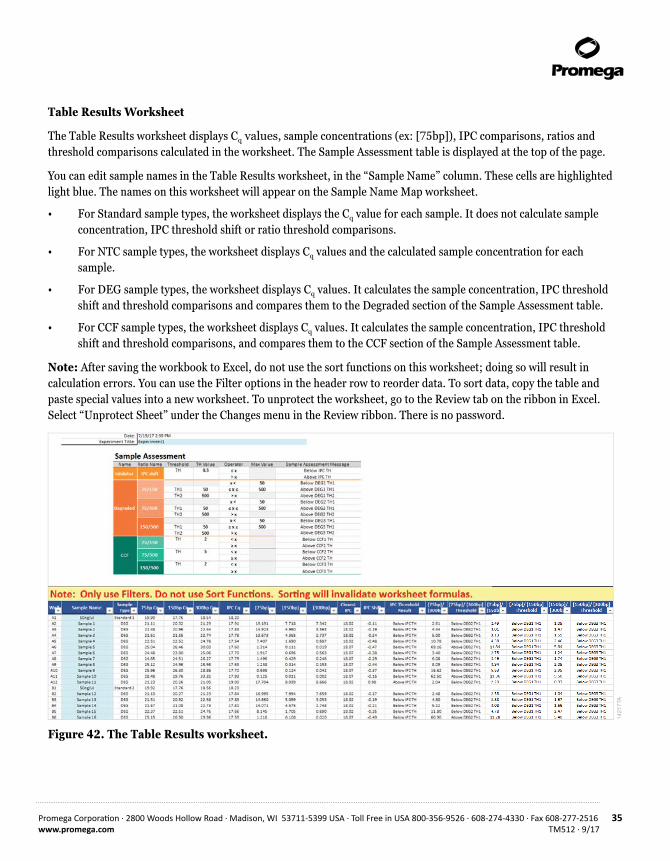
Table Results Worksheet
The Table Results worksheet displays Cq values, sample concentrations (ex: [75bp]), IPC comparisons, ratios and threshold comparisons calculated in the worksheet. The Sample Assessment table is displayed at the top of the page.
You can edit sample names in the Table Results worksheet, in the “Sample Name” column. These cells are highlighted light blue. The names on this worksheet will appear on the Sample Name Map worksheet.
• For Standard sample types, the worksheet displays the Cq value for each sample. It does not calculate sample concentration, IPC threshold shift or ratio threshold comparisons.
• For NTC sample types, the worksheet displays Cq values and the calculated sample concentration for each sample.
• For DEG sample types, the worksheet displays Cq values. It calculates the sample concentration, IPC threshold shift and threshold comparisons and compares them to the Degraded section of the Sample Assessment table.
• For CCF sample types, the worksheet displays Cq values. It calculates the sample concentration, IPC threshold shift and threshold comparisons, and compares them to the CCF section of the Sample Assessment table.
Note: After saving the workbook to Excel, do not use the sort functions on this worksheet; doing so will result in calculation errors. You can use the Filter options in the header row to reorder data. To sort data, copy the table and paste special values into a new worksheet. To unprotect the worksheet, go to the Review tab on the ribbon in Excel. Select “Unprotect Sheet” under the Changes menu in the Review ribbon. There is no password.
1421
7TA
Figure 42. The Table Results worksheet.
36 Promega Corporation · 2800 Woods Hollow Road · Madison, WI 53711-5399 USA · Toll Free in USA 800-356-9526 · 608-274-4330 · Fax 608-277-2516TM512 · 9/17 www.promega.com
4.C. The DNA QC Export File Worksheets (continued)
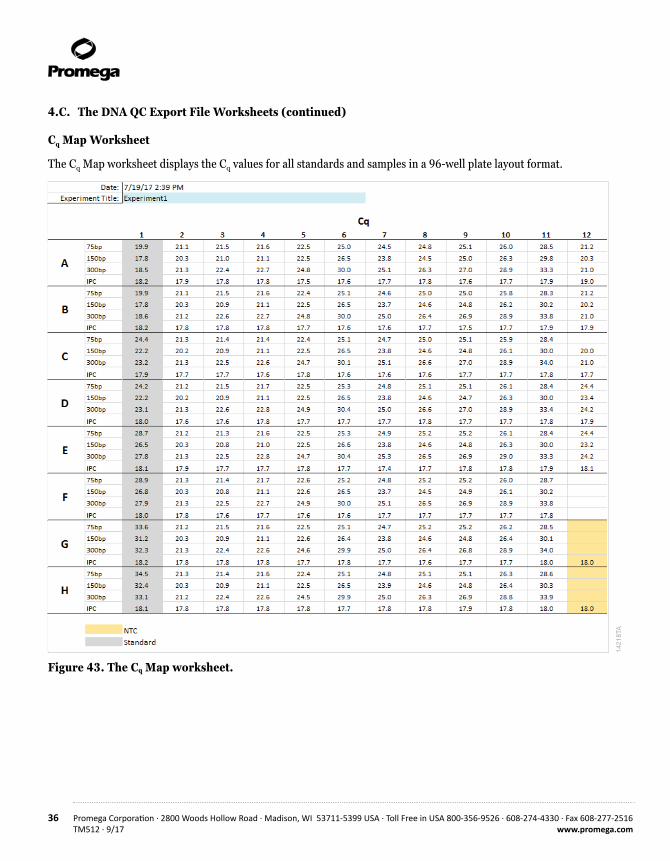
Cq Map Worksheet
The Cq Map worksheet displays the Cq values for all standards and samples in a 96-well plate layout format.
1421
8TA
Figure 43. The Cq Map worksheet.
Promega Corporation · 2800 Woods Hollow Road · Madison, WI 53711-5399 USA · Toll Free in USA 800-356-9526 · 608-274-4330 · Fax 608-277-2516 37www.promega.com TM512 · 9/17
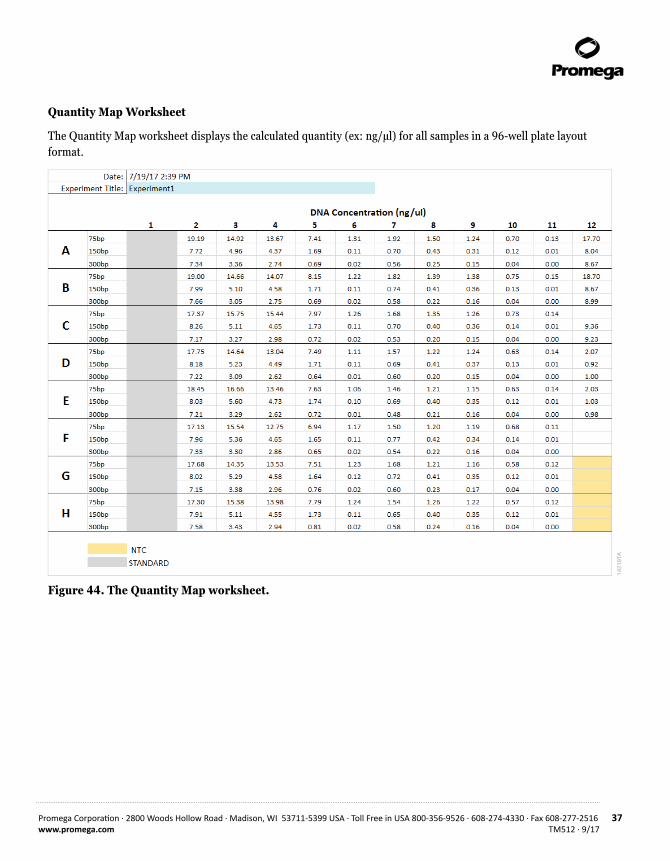
Quantity Map Worksheet
The Quantity Map worksheet displays the calculated quantity (ex: ng/µl) for all samples in a 96-well plate layout format.
1421
9TA
Figure 44. The Quantity Map worksheet.
38 Promega Corporation · 2800 Woods Hollow Road · Madison, WI 53711-5399 USA · Toll Free in USA 800-356-9526 · 608-274-4330 · Fax 608-277-2516TM512 · 9/17 www.promega.com
4.C. The DNA QC Export File Worksheets (continued)
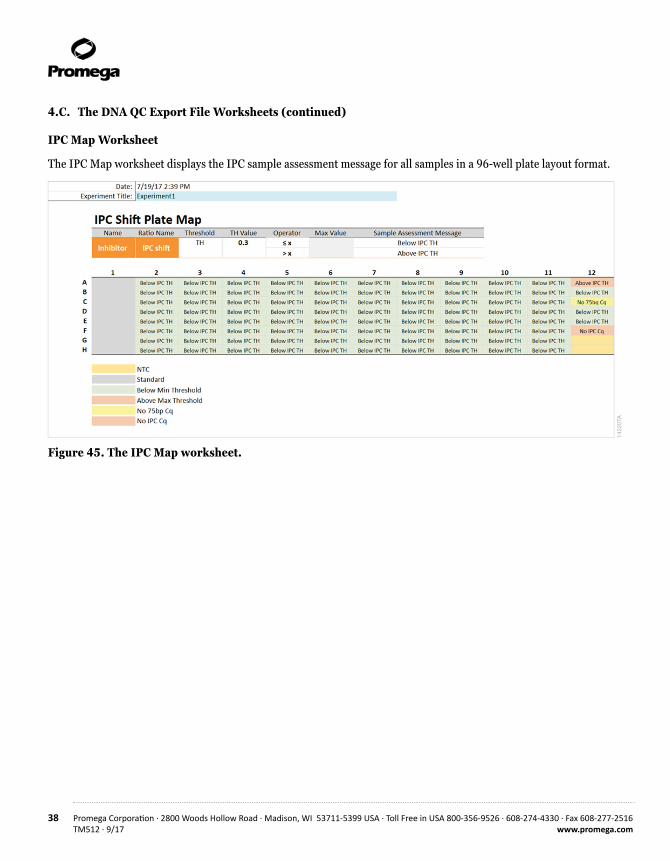
IPC Map Worksheet
The IPC Map worksheet displays the IPC sample assessment message for all samples in a 96-well plate layout format.
1422
0TA
Figure 45. The IPC Map worksheet.
Promega Corporation · 2800 Woods Hollow Road · Madison, WI 53711-5399 USA · Toll Free in USA 800-356-9526 · 608-274-4330 · Fax 608-277-2516 39www.promega.com TM512 · 9/17
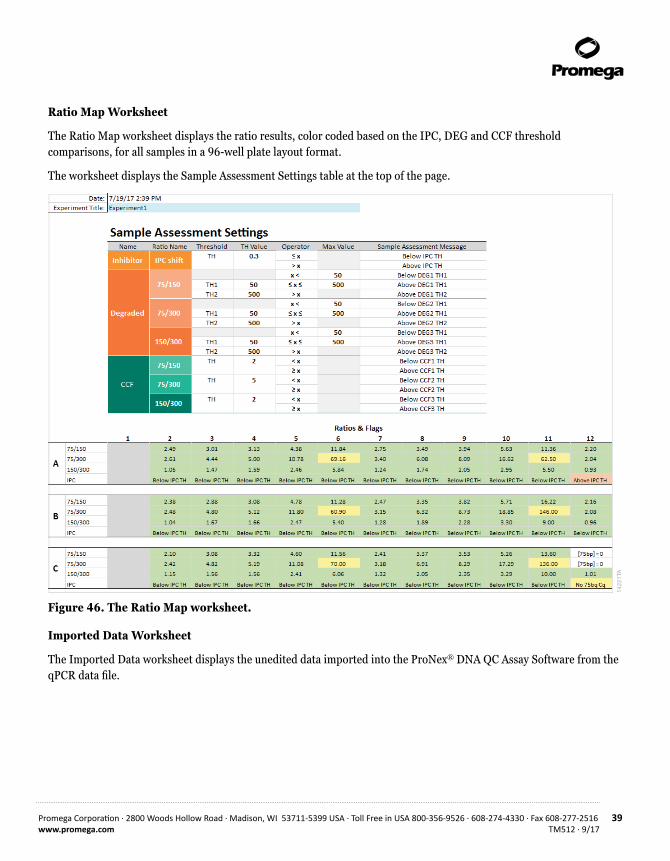
Ratio Map Worksheet
The Ratio Map worksheet displays the ratio results, color coded based on the IPC, DEG and CCF threshold comparisons, for all samples in a 96-well plate layout format.
The worksheet displays the Sample Assessment Settings table at the top of the page.
1422
1TA
Figure 46. The Ratio Map worksheet.
Imported Data Worksheet
The Imported Data worksheet displays the unedited data imported into the ProNex® DNA QC Assay Software from the qPCR data file.
40 Promega Corporation · 2800 Woods Hollow Road · Madison, WI 53711-5399 USA · Toll Free in USA 800-356-9526 · 608-274-4330 · Fax 608-277-2516TM512 · 9/17 www.promega.com
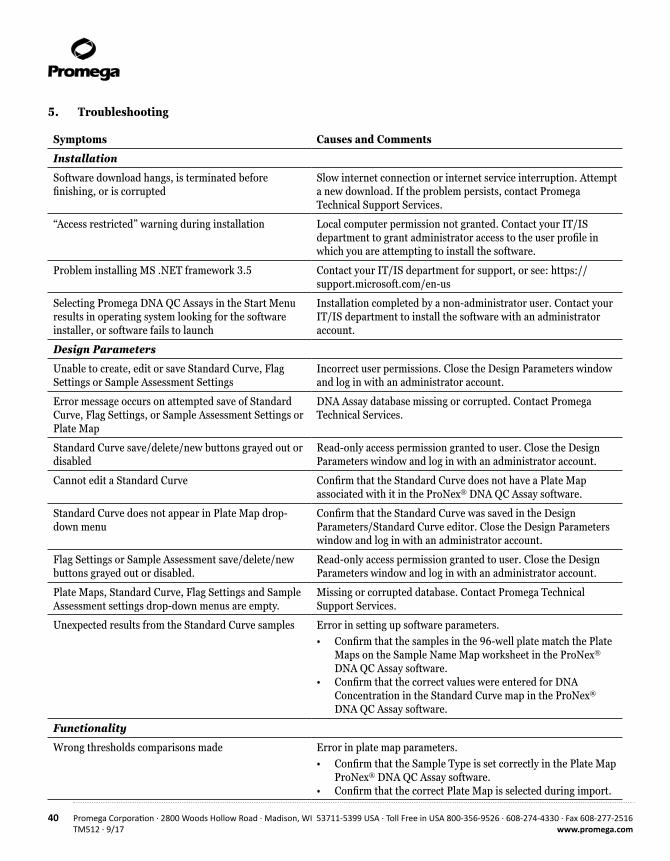
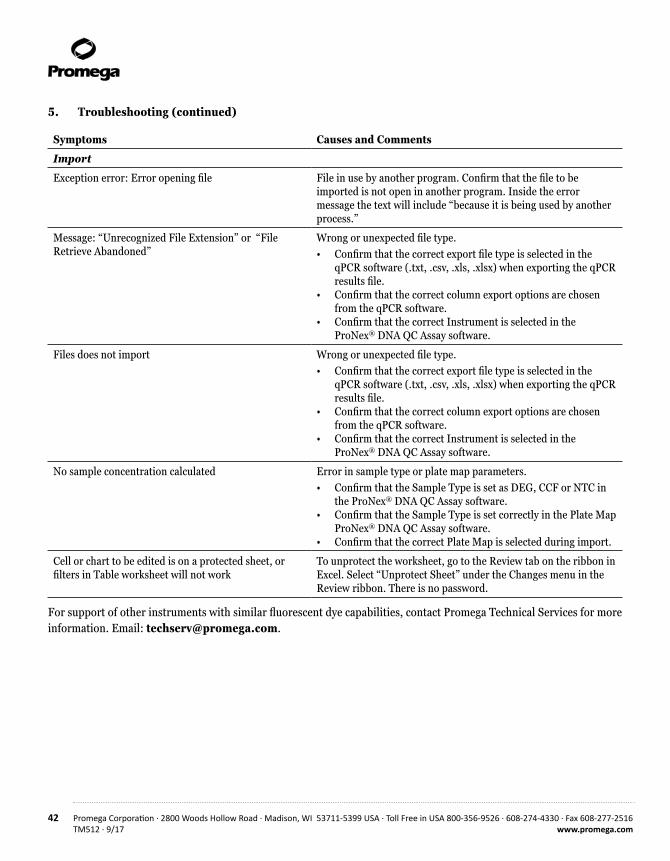
5. Troubleshooting
Symptoms Causes and Comments
Installation
Software download hangs, is terminated before finishing, or is corrupted
Slow internet connection or internet service interruption. Attempt a new download. If the problem persists, contact Promega Technical Support Services.
“Access restricted” warning during installation Local computer permission not granted. Contact your IT/IS department to grant administrator access to the user profile in which you are attempting to install the software.
Problem installing MS .NET framework 3.5 Contact your IT/IS department for support, or see: https://support.microsoft.com/en-us
Selecting Promega DNA QC Assays in the Start Menu results in operating system looking for the software installer, or software fails to launch
Installation completed by a non-administrator user. Contact your IT/IS department to install the software with an administrator account.
Design Parameters
Unable to create, edit or save Standard Curve, Flag Settings or Sample Assessment Settings
Incorrect user permissions. Close the Design Parameters window and log in with an administrator account.
Error message occurs on attempted save of Standard Curve, Flag Settings, or Sample Assessment Settings or Plate Map
DNA Assay database missing or corrupted. Contact Promega Technical Services.
Standard Curve save/delete/new buttons grayed out or disabled
Read-only access permission granted to user. Close the Design Parameters window and log in with an administrator account.
Cannot edit a Standard Curve Confirm that the Standard Curve does not have a Plate Map associated with it in the ProNex® DNA QC Assay software.
Standard Curve does not appear in Plate Map drop-down menu
Confirm that the Standard Curve was saved in the Design Parameters/Standard Curve editor. Close the Design Parameters window and log in with an administrator account.
Flag Settings or Sample Assessment save/delete/new buttons grayed out or disabled.
Read-only access permission granted to user. Close the Design Parameters window and log in with an administrator account.
Plate Maps, Standard Curve, Flag Settings and Sample Assessment settings drop-down menus are empty.
Missing or corrupted database. Contact Promega Technical Support Services.
Unexpected results from the Standard Curve samples Error in setting up software parameters.• Confirm that the samples in the 96-well plate match the Plate
Maps on the Sample Name Map worksheet in the ProNex® DNA QC Assay software.
• Confirm that the correct values were entered for DNA Concentration in the Standard Curve map in the ProNex® DNA QC Assay software.
Functionality
Wrong thresholds comparisons made Error in plate map parameters.• Confirm that the Sample Type is set correctly in the Plate Map
ProNex® DNA QC Assay software. • Confirm that the correct Plate Map is selected during import.

Promega Corporation · 2800 Woods Hollow Road · Madison, WI 53711-5399 USA · Toll Free in USA 800-356-9526 · 608-274-4330 · Fax 608-277-2516 41www.promega.com TM512 · 9/17
Symptoms Causes and Comments
User Access
Missing or forgotten password Incorrect user permissions. Log in as DNAdmin and replace the original user’s password, or delete and recreate the user profile. Contact Promega Technical Support Services for additional assistance.
Read-only access granted Incorrect user permissions. To attempt the login again, close the ProNex® DNA QC Assay Adminstrator Tools window. Select the Configuration Tools tab, select “Design Parameters” on the tab and follow the instructions for an Admin user login.
Incorrect password entered. To attempt the login again, close the Design Parameters window. Select the Configuration Tools tab, select “Design Parameters” on the tab and follow the instructions for an Admin user login.
Design Parameters will not launch Promega.Administrator.Toolz.exe was removed from the Promega\DNA QC Assays install folder. Uninstall and reinstall the ProNex® DNA QC Assay Software (see Section 3).
ProNex® DNA QC Assay Plate Designer will not launch Promega.Plate.Designer.exe was removed from the Promega\DNA QC Assays install folder. Uninstall and reinstall ProNex® DNA QC Assay Software.
Help Tab
Help videos will not launch Missing software components.• Confirm that Windows Media Player is installed on the
computer.• DesigningHelp.wmv, ImportingHelp.wmv or
PlateMapsHelps.wmv was removed from the Promega\DNA QC Assays install folder. Uninstall and reinstall the ProNex® DNA QC Assay Software.
Technical Manual will not open from software button Missing software components. The ProNex® DNA QC Assays Technical Manual.pdf was removed from the Promega\DNA QC Assays install folder. Uninstall and reinstall the ProNex® DNA QC Assay Software. The ProNex® DNA QC Assay Technical Manual #TM512 is available online at: www.promega.com.
System Errors
Message: “Cannot Find a Base Path” Database missing from the Promega\DNA QC Assays folder. Contact Promega Technical Services. Email: [email protected]
Exception Error: System.IO.FileNotFoundException One or more required files for the ProNex® DNA QC Assay Software missing.• Uninstall and reinstall the ProNex® DNA QC Assay Software.• Contact Promega Technical Services. Email: techserv@
promega.com.
42 Promega Corporation · 2800 Woods Hollow Road · Madison, WI 53711-5399 USA · Toll Free in USA 800-356-9526 · 608-274-4330 · Fax 608-277-2516TM512 · 9/17 www.promega.com
Symptoms Causes and Comments
Import
Exception error: Error opening file File in use by another program. Confirm that the file to be imported is not open in another program. Inside the error message the text will include “because it is being used by another process.”
Message: “Unrecognized File Extension” or “File Retrieve Abandoned”
Wrong or unexpected file type. • Confirm that the correct export file type is selected in the
qPCR software (.txt, .csv, .xls, .xlsx) when exporting the qPCR results file.
• Confirm that the correct column export options are chosen from the qPCR software.
• Confirm that the correct Instrument is selected in the ProNex® DNA QC Assay software.
Files does not import Wrong or unexpected file type. • Confirm that the correct export file type is selected in the
qPCR software (.txt, .csv, .xls, .xlsx) when exporting the qPCR results file.
• Confirm that the correct column export options are chosen from the qPCR software.
• Confirm that the correct Instrument is selected in the ProNex® DNA QC Assay software.
No sample concentration calculated Error in sample type or plate map parameters.• Confirm that the Sample Type is set as DEG, CCF or NTC in
the ProNex® DNA QC Assay software. • Confirm that the Sample Type is set correctly in the Plate Map
ProNex® DNA QC Assay software. • Confirm that the correct Plate Map is selected during import.
Cell or chart to be edited is on a protected sheet, or filters in Table worksheet will not work
To unprotect the worksheet, go to the Review tab on the ribbon in Excel. Select “Unprotect Sheet” under the Changes menu in the Review ribbon. There is no password.
For support of other instruments with similar fluorescent dye capabilities, contact Promega Technical Services for more information. Email: [email protected].
5. Troubleshooting (continued)
Promega Corporation · 2800 Woods Hollow Road · Madison, WI 53711-5399 USA · Toll Free in USA 800-356-9526 · 608-274-4330 · Fax 608-277-2516 43www.promega.com TM512 · 9/17
6. Appendix
6.A. References
1. Bustin, S.A. et al. (2009) The MIQE guidelines: Minimum information for publication of quantitative real-time PCR experiments. Clin. Chem. 55, 611–22.
6.B. Related Products
Product Size Cat.#ProNex® DNA QC Assay Calibration Kit, 7500 1 kit NG1001
ProNex® DNA QC Assay ABI 7500/7500FAST 200 reactions NG1002
800 reactions NG1003
ProNex® DNA QC Assay BioRad CFX96™ 200 reactions NG1004
800 reactions NG1005
Maxwell® RSC DNA FFPE Kit 48 preps AS1450
ReliaPrep™ FFPE gDNA Miniprep System 10 reactions A2351
100 reactions A2352
Maxwell® RSC ccfDNA Plasma Kit 48 preps AS1480
© 2017 Promega Corporation. All Rights Reserved.
ProNex is a registered trademark of Promega Corporation.
Applied Biosystems is a registered trademarks of Applied Biosystems. CAL Fluor and Quasar are registered trademarks of Biosearch Technologies, Inc. CFX96 Touch™, CFX96 Touch™ Deep Well, CFX Connect™, and CFX384 Touch™ are trademarks of Bio-Rad. Excel is a registered trademark of Microsoft Corporation. ROX is a trademark of Applera Corporation. FAM is a trademark of Applera Corporation.
All prices and specifications are subject to change without prior notice.
Product claims are subject to change. Please contact Promega Technical Services or access the Promega online catalog for the most up-to-date information on Promega products.