Embed Size (px)
Citation preview

106 Make: Volume 11
PROJECTS: VACUUM FORMER
KITCHEN FLOORVACUUM FORMERBy Bob Knetzger
M_106-115_ProjV_F1.indd 106M_106-115_ProjV_F1.indd 106 7/30/07 1:11:58 PM7/30/07 1:11:58 PM
107Make:
Ph
otog
rap
hy b
y B
ob K
net
zger
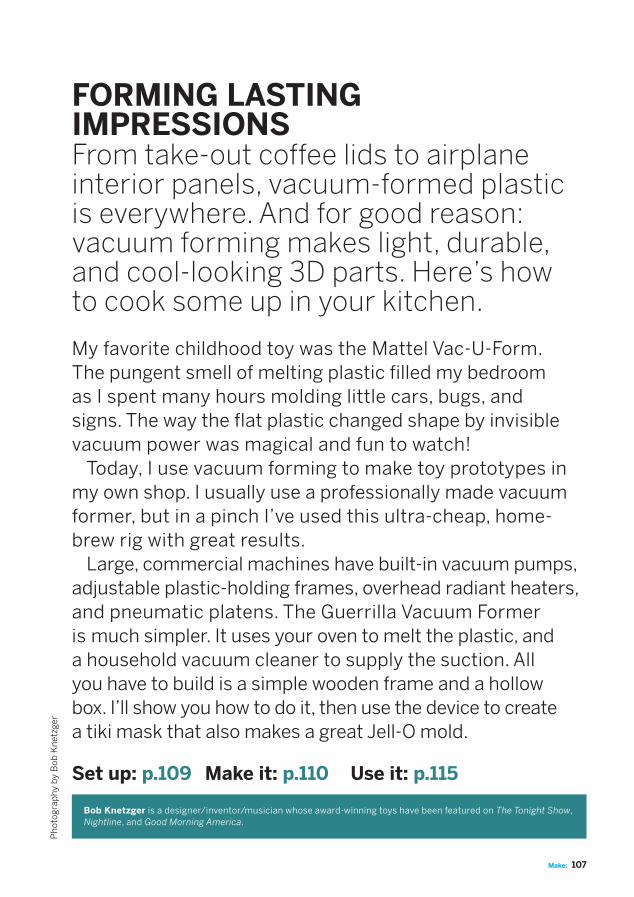
Bob Knetzger is a designer/inventor/musician whose award-winning toys have been featured on The Tonight Show, Nightline, and Good Morning America.
Set up: p.109 Make it: p.110 Use it: p.115
FORMING LASTING IMPRESSIONSFrom take-out coffee lids to airplaneinterior panels, vacuum-formed plasticis everywhere. And for good reason:vacuum forming makes light, durable,and cool-looking 3D parts. Here’s howto cook some up in your kitchen.
My favorite childhood toy was the Mattel Vac-U-Form.The pungent smell of melting plastic filled my bedroomas I spent many hours molding little cars, bugs, andsigns. The way the flat plastic changed shape by invisiblevacuum power was magical and fun to watch! Today, I use vacuum forming to make toy prototypes in my own shop. I usually use a professionally made vacuum former, but in a pinch I’ve used this ultra-cheap, home-brew rig with great results. Large, commercial machines have built-in vacuum pumps, adjustable plastic-holding frames, overhead radiant heaters, and pneumatic platens. The Guerrilla Vacuum Formeris much simpler. It uses your oven to melt the plastic, anda household vacuum cleaner to supply the suction. Allyou have to build is a simple wooden frame and a hollowbox. I’ll show you how to do it, then use the device to createa tiki mask that also makes a great Jell-O mold.
M_106-115_ProjV_F1.indd 107M_106-115_ProjV_F1.indd 107 7/30/07 1:12:27 PM7/30/07 1:12:27 PM

108 Make: Volume 11
PROJECTS: GUERRILLA VACUUM FORMER
Illu
stra
tion
s by
Dam
ien
Sco
gin
The resulting parts are impermeable, uniform, and stackable, which makes the process ideal for mass-producing things like blister packs, coffee cup lids, cookie package trays, costume masks, store signs, protective panels, and raised-relief maps.
The vacuum-forming process isn’t something the public ordinarily sees, but it’s amazing to watch. In the 1960s, Mattel’s Vac-U-Form toy let kids actually run the process themselves. Compatible plastic sheets and mold sets were sold separately, of course.
1. First, a sheet of thermoplastic material is softened with heat.
2. Then, using suction, the pliable plastic is pulled and stretched over a form. When the plastic cools, it stays in its new shape and can be removed from the mold.
OPERATING IN A VACUUMVacuum forming is a two-stage process that’s common in manufacturing.
M_106-115_ProjV_F1.indd 108M_106-115_ProjV_F1.indd 108 7/31/07 12:04:01 PM7/31/07 12:04:01 PM
109Make:
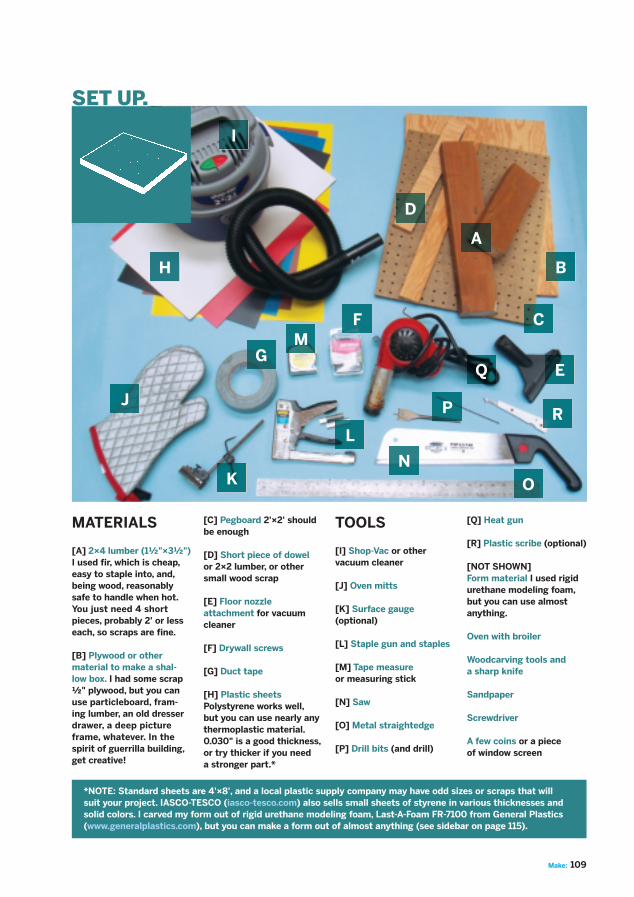
SET UP.
MATERIALS
[A] 2×4 lumber (1½"×3½") I used fir, which is cheap, easy to staple into, and, being wood, reasonably safe to handle when hot. You just need 4 shortpieces, probably 2' or less each, so scraps are fine.
[B] Plywood or other material to make a shal-low box. I had some scrap ½" plywood, but you can use particleboard, fram-ing lumber, an old dresser drawer, a deep picture frame, whatever. In the spirit of guerrilla building, get creative!
B
C
D
A
EG
[C] Pegboard 2'×2' should be enough
[D] Short piece of dowelor 2×2 lumber, or other small wood scrap
[E] Floor nozzleattachment for vacuum cleaner
[F] Drywall screws
[G] Duct tape
[H] Plastic sheets Polystyrene works well, but you can use nearly any thermoplastic material. 0.030" is a good thickness, or try thicker if you needa stronger part.*
TOOLS
[I] Shop-Vac or othervacuum cleaner
[J] Oven mitts
[K] Surface gauge(optional)
[L] Staple gun and staples
[M] Tape measureor measuring stick
[N] Saw
[O] Metal straightedge
[P] Drill bits (and drill)
[Q] Heat gun
[R] Plastic scribe (optional)
[NOT SHOWN]Form material I used rigid urethane modeling foam, but you can use almost anything.
Oven with broiler
Woodcarving tools anda sharp knife
Sandpaper
Screwdriver
A few coins or a pieceof window screen
H
I
N
J
K
Q
L
O
M
P
F
*NOTE: Standard sheets are 4'×8', and a local plastic supply company may have odd sizes or scraps that will suit your project. IASCO-TESCO (iasco-tesco.com) also sells small sheets of styrene in various thicknesses and solid colors. I carved my form out of rigid urethane modeling foam, Last-A-Foam FR-7100 from General Plastics (www.generalplastics.com), but you can make a form out of almost anything (see sidebar on page 115).
R
M_106-115_ProjV_F1.indd 109M_106-115_ProjV_F1.indd 109 7/30/07 1:13:24 PM7/30/07 1:13:24 PM

110 Make: Volume 11
PROJECTS: GUERRILLA VACUUM FORMER
BUILD YOURGUERRILLA FORMER
START>>
MAKE IT.
1. MAKE THE FRAME
Time: 1 Hour Complexity: Easy
1a. Measure the interior of your oven, then subtract a few inches from the width and depth for clearance. This gives the size of the biggest frame you can make, which in turn determines the maximum size sheet of plastic you’ll be able to mold. My oven is 21"×16", so I made an 18"×13" frame.
1b. Measure and cut the lengths of 2×4 you need to make your frame, allowing for the thickness of the sides. Make square cuts with your favorite saw: circular, jig, or handsaw. My frame called for two 18" pieces and two 10" pieces.
1c. Assemble the frame using 2 screws in each corner, for maximum strength. Drill pilot and clearance holes before fastening, and stagger the screws so as not to split the wood.
NOTE: The only critical feature of the frame is that it must lay flat with no gaps or high spots. This will ensure a good air seal when you vacuum form.
2. MAKE THE VACUUM BOX
2a. Calculate the dimensions of a shallow box with a footprint slightly larger than your frame; mine was 20"×15". The height should be enough to let you mount the vacuum nozzle attachment along one side. When you have the dimensions, cut 4 side pieces and a bottom out of plywood or other material, accounting for material thickness again.
2b. Cut a top panel for the box out of pegboard, large enough to overlap all 4 sides. The pegboard’s holes are used to suck air from under and around the form.
M_106-115_ProjV_F1.indd 110M_106-115_ProjV_F1.indd 110 7/30/07 1:13:52 PM7/30/07 1:13:52 PM

111Make:
2d. Use screws to assemble the 4 sides of the box, then add the back.
2e. Cut a piece of wood dowel or 2×2 to make a post that will support the center of the top panel. During vac-uum forming, the top panel tends to bow in, and this support post prevents that, like one of those little plastic “pizza stacks.”
2c. Drill a large hole in the side of the box where you’ll mount the vacuum floor tool. This is the main air vent.
2f. Screw in the center post from the back of the box, then use screws to fasten the pegboard to the box sides.
2g. Mount the vacuum attachment over the side hole with small screws.
2h. Finally, seal all edges with duct tape. Don’t forget the seams around the vacuum tool. Also tape a border around the top, leaving an open area in the center slightly smaller than your frame.
M_106-115_ProjV_F1.indd 111M_106-115_ProjV_F1.indd 111 7/30/07 1:14:25 PM7/30/07 1:14:25 PM
112 Make: Volume 11
PROJECTS: GUERRILLA VACUUM FORMER
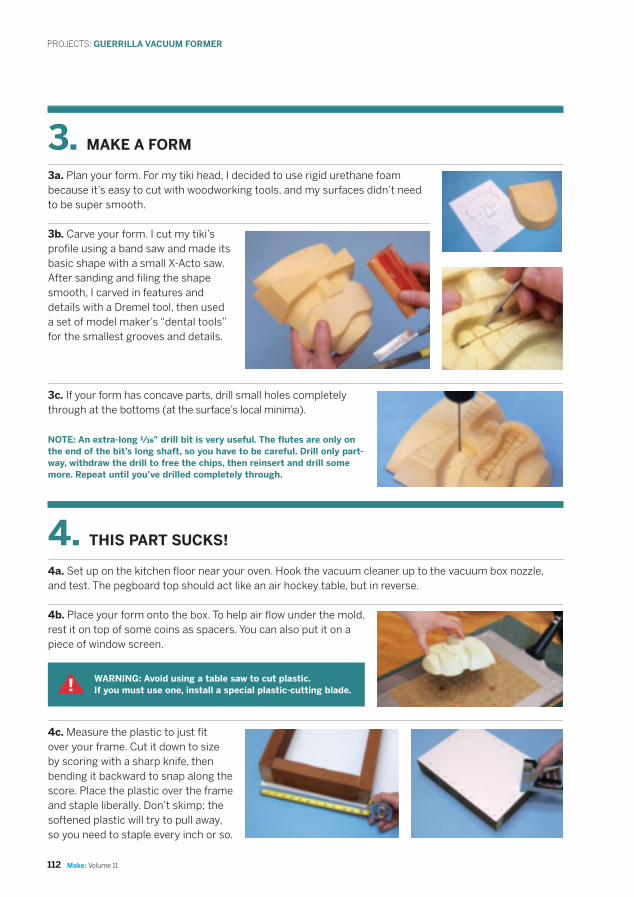
3. MAKE A FORM
3a. Plan your form. For my tiki head, I decided to use rigid urethane foam because it’s easy to cut with woodworking tools, and my surfaces didn’t need to be super smooth.
3b. Carve your form. I cut my tiki’s profile using a band saw and made its basic shape with a small X-Acto saw. After sanding and filing the shape smooth, I carved in features and details with a Dremel tool, then used a set of model maker’s “dental tools” for the smallest grooves and details.
3c. If your form has concave parts, drill small holes completely through at the bottoms (at the surface’s local minima).
4. THIS PART SUCKS!
4a. Set up on the kitchen floor near your oven. Hook the vacuum cleaner up to the vacuum box nozzle, and test. The pegboard top should act like an air hockey table, but in reverse.
4b. Place your form onto the box. To help air flow under the mold, rest it on top of some coins as spacers. You can also put it on a piece of window screen.
4c. Measure the plastic to just fit over your frame. Cut it down to size by scoring with a sharp knife, then bending it backward to snap along the score. Place the plastic over the frame and staple liberally. Don’t skimp; the softened plastic will try to pull away, so you need to staple every inch or so.
NOTE: An extra-long 5" drill bit is very useful. The flutes are only on the end of the bit’s long shaft, so you have to be careful. Drill only part-way, withdraw the drill to free the chips, then reinsert and drill some more. Repeat until you’ve drilled completely through.
WARNING: Avoid using a table saw to cut plastic. If you must use one, install a special plastic-cutting blade.!
M_106-115_ProjV_F1.indd 112M_106-115_ProjV_F1.indd 112 7/30/07 1:15:25 PM7/30/07 1:15:25 PM
113Make:
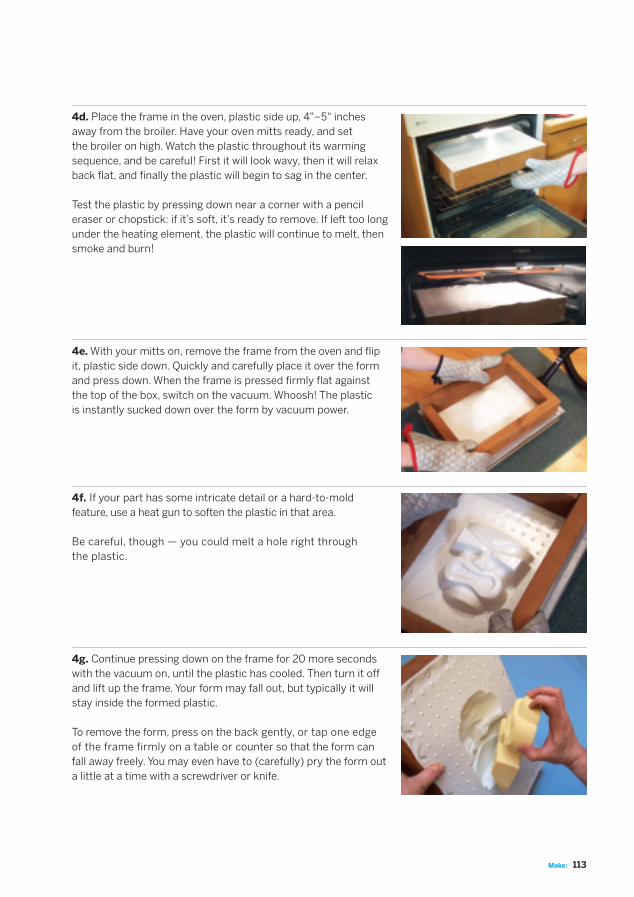
4d. Place the frame in the oven, plastic side up, 4"–5" inches away from the broiler. Have your oven mitts ready, and set the broiler on high. Watch the plastic throughout its warming sequence, and be careful! First it will look wavy, then it will relax back flat, and finally the plastic will begin to sag in the center.
Test the plastic by pressing down near a corner with a pencil eraser or chopstick: if it’s soft, it’s ready to remove. If left too long under the heating element, the plastic will continue to melt, then smoke and burn!
4e. With your mitts on, remove the frame from the oven and flip it, plastic side down. Quickly and carefully place it over the form and press down. When the frame is pressed firmly flat against the top of the box, switch on the vacuum. Whoosh! The plastic is instantly sucked down over the form by vacuum power.
4f. If your part has some intricate detail or a hard-to-mold feature, use a heat gun to soften the plastic in that area.
Be careful, though — you could melt a hole right throughthe plastic.
4g. Continue pressing down on the frame for 20 more seconds with the vacuum on, until the plastic has cooled. Then turn it off and lift up the frame. Your form may fall out, but typically it will stay inside the formed plastic.
To remove the form, press on the back gently, or tap one edge of the frame firmly on a table or counter so that the form can fall away freely. You may even have to (carefully) pry the form out a little at a time with a screwdriver or knife.
M_106-115_ProjV_F1.indd 113M_106-115_ProjV_F1.indd 113 7/30/07 1:16:15 PM7/30/07 1:16:15 PM
114 Make: Volume 11
PROJECTS: GUERRILLA VACUUM FORMER
5. TRIM AND FINISH
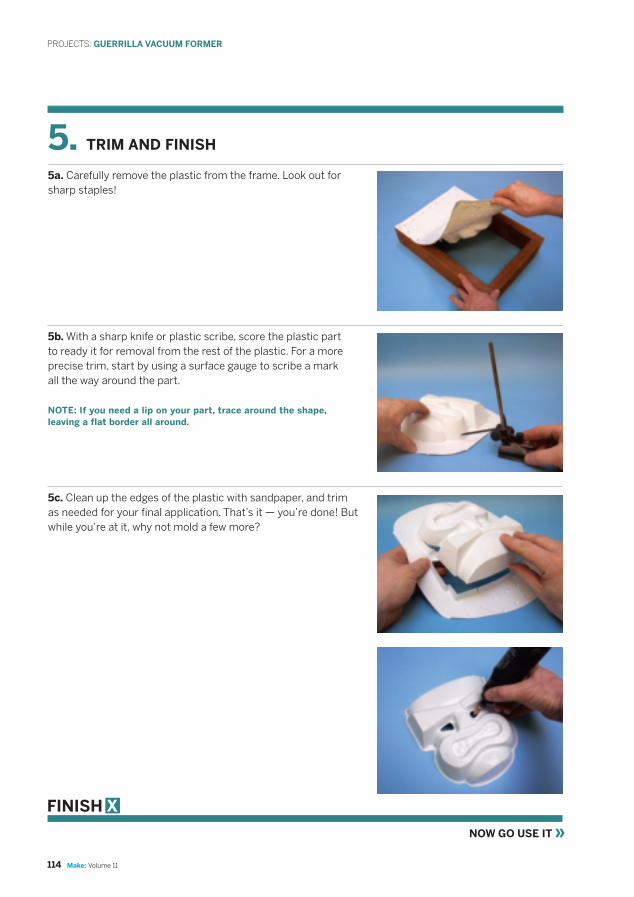
5a. Carefully remove the plastic from the frame. Look out for sharp staples!
FINISH X
NOW GO USE IT »
5b. With a sharp knife or plastic scribe, score the plastic part to ready it for removal from the rest of the plastic. For a moreprecise trim, start by using a surface gauge to scribe a markall the way around the part.
5c. Clean up the edges of the plastic with sandpaper, and trim as needed for your final application. That’s it — you’re done! But while you’re at it, why not mold a few more?
NOTE: If you need a lip on your part, trace around the shape,leaving a flat border all around.
M_106-115_ProjV_F1.indd 114M_106-115_ProjV_F1.indd 114 7/30/07 1:16:58 PM7/30/07 1:16:58 PM

115Make:
FUN WITH MOLDSUSE IT.
Like any plastic mold, this mask has many applica-tions, many of which happen to be party-related:• Paint and add elastic to make the mask wearable.• Use untrimmed, unpainted masks to make tiki-shaped Jell-O molds and punch bowl ice blocks for your next luau.
FORM MATERIALS AND PRACTICESYou can make your form out of nearly anything. This project uses urethane foam, but wood is another good choice: it’s cheap; easy to drill, saw, and sand; and strong enough to form many parts. For finely detailed forms, you can sculpt clay and then cast liquid plaster all around it. After the plaster hardens, remove the clay and drill air vents (see below). Parts made with this “female” mold will have details that match your clay original perfectly. Found objects are a great source of shapes and details. You can add small plastic letters, caps and lids, or pieces of toys onto forms. When designing a vacuum-form mold, there are a few guidelines to follow:1. Avoid undercuts. Otherwise the plastic will wrap around underneath your form, trapping it.2. Maintain some draft. For easier part release, avoid using vertical sides. Make your form with a few degrees of angle (draft) on all sides.3. Drill vent holes. For concave details, drill a series
• Glue two masks back-to-back and install a bulb inside to make a glowing tiki lamp. • Or enclose small speakers for an outdoor sound system. What will you make with your Guerrilla Vacuum Former?
of tiny vent holes using a 5" drill bit. These allow the softened plastic to be sucked into the details.4. Add height. If you’ll trim your part away from the sheet, add a little extra height to the form, so that your part won’t have any unformed edges.
M_106-115_ProjV_F1.indd 115M_106-115_ProjV_F1.indd 115 7/30/07 1:17:48 PM7/30/07 1:17:48 PM