Embed Size (px)
Citation preview

Advanced Video Imaging
Projection Color TVPicture-In-Picture
MTS Stereo AudioSurround Sound
Return the Product
RegistrationCard,andyour TV
could be
FREE!
OPERATINGGUIDE& WARRANTY
for models...
PVR4869,PVR5269,PVR6069
ZENITH ELECTRONICS CORPORATION1000 MILWAUKEE AVENUEGLENVIEW, ILLINOIS 60025
Part No. 206-2923-01Pdnted in U.S,A.EP-EDCBA -
WATCH US.

WARNING: TO REDUCE THE RISK OF ELECTRIC SHOCK DO NOT
REMOVE COVER (OR BACK). NO USER SERVICEABLEPARTS INSIDE. REFER TO QUALIFIED SERVICE
PERSONNEL.
TO PREVENT FIRE OR SHOCK HAZARDS, DO NOT EXPOSE
THIS PRODUCT TO RAIN OR MOISTURE.
The lightning flash with arrowhead symbol, within an equilateral
triangle, is intended to alert the user to the presence of uninsulated"dangerous voltage" within the product's enclosure that may be of
sufficient magnitude to constitute a risk of electric shock to persons.
The exclamation point within an equilateral triangle is intended toalert the user to the presence of important operating and maintenance
(servicing) instructions in the literature accompanying the appliance.
Safety Tips
Refer to the "Safety Tips" booklet that came with your
product for important safety considerations.
Note to Cable TV System Installer
This reminder is provided to call the cable TV systeminstaller's attention to Article 820-40 of the NEC that
provides guidelines for proper grounding and, in particular,
specifies that the cable ground shall be connected to the
grounding system of the building, as close to the point of
the cable entry as practical.
Power-Cord Polarization
This product is equipped with a polarized alternating-current line plug (a plug having one blade wider than the
other.) This plug will fit into the power outlet only one
way. This is a safety feature. If you are unable to insert theplug fully into the outlet, try reversing the plug. If the plugshould still fail to fit, contact your electrician to replace
your obsolete outlet. Do not defeat the safety purpose ofthe polagized plug.
CAUTION
To prevent electric shock, match wide blade of plug towide slot, fully insert.
ATTENTION
Pour _viter les chocs _lectriques, inlroduire la lame la plus
large de la fiche dans la borne correspondante de la prise et
pousser jusqu'au fond.
rvw_m Copyright © Zenith Electronics Corporation 1995

CONTENTS
Part 1. Connections andBasic
OperationsINTRODUCTIONWelcome ............................................ iiInstallation Considerations .............................. ii
Methods of Operation ................................. iiiModel/Features Chart ................................. iii
STANDARD CONNECTIONS FOR YOUR TVConnection Center, Cable, VCR, S-Video,Accessory Jacks, Speakers, Audio Amplifier,and Connections For Using PIP ........................ 1-1
FIRST TIME YOU OPERATE YOUR TVControl Panel, Power, Source, AutoProgram, Clock, and Other Options ..................... 2-1
PIP OPERATION
Introduction, Selecting Main Picture and PIP InsetSource, PIP Functions, Operation With VariousConfigurations ...................................... 3-1
Part 2. Universal Remote Controland Menus
UNIVERSAL REMOTE CONTROL
Battery Installation, Operating Mode, TV Operations,StarSight Operations, Operational Modes, Programming,Special Features, Auto Find, and Brand Codes ............ 4-1
QUICK REFERENCE TO MENUSAvailable Menus, and Basic Operation .................. 5-1
SOURCE MENU
Menu Operation, Source Selection,and Source Identification ............................. 6-1
SETUP MENU
Auto Program, Ch. Add/Del, Ch. Labels, Source ID,Clock Set, Timer Setup, Parental Ctl, Caption/Text, Background, and StarSight ....................... 7-1
AUDIO MENUBass, Treble, Balance, Audio, and Enhancement .......... 8-1
VIDEO MENUContrast, Brightness, Color, Tint, Sharpness, Color Temp,Video Filter, Auto Flesh, Picture Pref, and Projo Setup ..... 9-1
PIP MENUCh. Guide, Ch. Review, PIP Color, PIP Tint,and PIP Size, ...................................... 10-1
Part 3. Z-Trek Remote Controland Menus
Z.TRAK REMOTE CONTROL
Battery Installation, Operating Mode,Basic Operations and Auto Find ........................ 11-1
QUICK REFERENCE TO MENUSAvailable Menus, Accessing the Menu,Channel Icons and Volume Control .................... 12-1
TV OPTIONS MENU
Timer, Captions, Z-Trak, PIP, Freeze and Move PIP ....... 13-1
SOURCE MENU
Menu Operation, Source Selection,and Source Identification ............................ 14-1
SETUP MENU
Auto Program, Ch. Add/Del, Ch. Labels, Source ID,Clock Set, Timer Setup, Parental Ctl, Caption/Text, Background, and StarSight ...................... 15-1
AUDIO MENUBass, Treble, Balance, Audio, and Enhancement ......... 16-1
VIDEO MENU
Contrast, Brightness, Color, Tint, Sharpness, Color Temp,Video Filter, Auto Flesh, Picture Pref, and Projo Setup .... 17-1
PIP MENU
Ch. Guide, Ch. Review, PIP Color, PIP Tint,and PIP Size ...................................... 18-1
Part 4. Maintenance, Accessories,and Warranty
MAINTENANCE AND TROUBLESHOOTINGCaring, Extended Absence, Interference,Before Calling for Service ........................... 19-1
Replacement Product Registration CardAccessories for Your TV
Your Zenith Warranty
How to use this operating guide
Standard TV installation and operation is given in this portion of the operating guide. Follow the procedures given if you will not
be using StarSight®.
_k Refer to the StarSight® portion of this operating guide for StarSight® installation and operation.
_92_t-o i

INTRODUCTION
WELCOME
Welcome into the family of Zenith Color Television owners.This guide provides instructions on how to operate your new'IV. It is supplemented by a booklet containing Safety Tips.We urge you to read these publications carefully so that you
will receive full enjoyment from your new Zenith "IV for
many years to come.
Your new Zenith projection "IV has been designed and built to
give you the very best in quality, features and performance.There are many regional Zenith authorized service centersthroughout the U.S., Canada and Mexico who can attendpromptly and effectively to ordinary service needs.
If you should have an unusual performance or service problemthat cannot be satisfactorily resolved by your Zenith authorizedservice center, call or write:
Zenith Electronics CorporationCustomer Service Department1000 Milwaukee Avenue
Glenview, IL 60025
Telephone: (708) 391-8752Mon-Fri, 8:00 a.m. - 4:30 p.m. Central Time
Send the model number, serial number, and date of purchaseor original installation, with a full explanation of the problemand the service history. We will welcome the opportunity tolook into your specific question or problem and to be of assis-
tance in resolving it promptly.
The model and serial numbers of your new TV are located on theback of the TV cabinet. For your future convenience and protec-
tion, we suggest that you record these numbers here:
Model No.
Serial No.
I'11"11 -. IPRO • LOGIC
Manufactured under license from Dolby Laboratories Licensing Corporation.
Additionally licensed under Canadian patent number 1,037,877. "Dolby",
"Pro Logic" and the double-D symbol are trademarks of Dolby Laboratories
Licensing Corporation.
INSTALLATION CONSlDERATIONS
Before you install your TV...
Ventilation m Proper ventilation keeps your TVrunning cool. Air circulates through perforationsin the back and bottom of the cabinet. Do not
block these vents or you will shorten the life ofyour TV.
_ Power Source m Your TV is designed to operateon normal household current, 120 volt 60 Hertz AC.
Do not attempt to operate it on DC current.
Power Cord _ Your power cord has a polarized
plug as required by Underwriters' Laboratories. Ithas one regular blade and one wide blade and fitsonly one way into a standard electrical outlet. Ifthe blades will not enter either way, your outlet isvery old and non-standard. A new outlet should beinstalled by a qualified electrician.
Please read and observe each safety point in the "Safety
Tips" folder when installing and using your TV.
VIDEO GAMES AND OTHER FIXED
PATTERN DISPLAY CAUTION _ If you use your TV forvideo games, teletext or other fixed displays, avoid setting theBRIGHTNESS control for an excessively bright picture. A
bright, fixed pattern, if used for long periods of time, can re-sult in a permanent imprint on the TV picture tube. You can re-
duce this possibility by alternating the use of the fixed patterndisplay with normal TV picture viewing, by turning down theCONTRAST control for sustained fixed pattern use, and by
turning off the fixed pattern display when not in use.
PLUGGING IN YOUR TV -- Be sure to plug your TV intoan "unswitched" AC power source. The "switched" AC out-lets found on some video equipment will not continue supply-
ing power to the TV once the equipment is turned off. If thepower to the TV is interrupted, you will have to reset the clockin the TV to the current time.
Safe Operation -- Your TV is manufactured andtested with your safety in mind. However, unusualstress caused by dropping or mishandling, expo-sure to flood, fire, rain or moisture, or accidental
spilling of liquids into the TV, can result in poten-tial electrical shock or fire hazards. If this hap-
pens, have your TV checked by a servicetechnician before using it again.
WEU_ODP ii

INTRODUCTION
METHODS OF OPERATION
Your TV is a very sophisticated appliance. Optional features, video picture adjustments and audio sound adjustments are performedthrough on-screen menus and displays. Self explanatory ICONS are used throughout. Most features can be selected and adjustedfrom the comfort of your favorite chair by using either of the infrared remote controls.
Either of two remote controls can be used to operate the TV. Use the multi-brand programmable remote if you have different brandsand types of equipment in your video system which you need to control remotely. Use the Z-Trak programmable remote if you feelcomfortable using track-ball access similar to that provided by the familiar computer mouse device. Many features can be selected
and adjusted by using the control panel provided on the TV.
StarSight® provides an electronic programming guide which is updated with new scheduling information automatically on a peri-
odic basis. StarSight® allows you to rapidly scan through the programming guide to find a program for viewing or recording. Pro-grams can be searched and selected by category if desired.
Method of Operation
• Control Panel on "IV.
* Universal Remote Control
• Z-Trak Remote Control
Standard TV
YES
YES
YES
starSight NO
YES
YES
FEATURES PROVIDED WITH YOUR TV
This operating guide describes a family of TV models. Not all models have all of the features described in this guide. Differentcontrol panels may be used from model to model. Most models include the following features:
MODELFEATURE
• StarSight® Electronic Program Guide
• StarSight® Demonstration
* On-Screen Menus Accessed By Remote or TV Controls
• Universal Programmable Remote Control
• Z-Trak Programmable Remote Control
• Picture-In-Picture
• 181 Channel Tuning (STD/HRC/ICC Band Selected Automatically)
• Automatic Channel Programming
• Favorite Channel Add/Delete
* Channel Labels (ABC, TNT, etc.) for Easy Channel Identification
• Multiple Input Sources
• Source Identification (VCR, Cable, etc.)
• Antenns/Cable and Loop Out Jacks
• Audio/Video (A/V) Jacks
• Super-VHS A/V Input Jacks
• Additional A/V Jacks
• Surround Sound System
• MTS Stereo with SEQ (Spatial Equalization)
• Surround Sound Speaker Terminals
• Variable Audio Output Jacks
• Surround Sound Speakers
• Sleep Timer and On/Off Timer
• Closed Caption and Text Modes
• Parental Control
PVR4669, PVR5269, PVR6069
Y
Y
Y
Y
Y
Y
Y
Y
Y
Y
Y
Y
Y
Y
Y
Y
Dolby Pro LogicY
Y
Y
OptionalY
Y
Y
°oo2923-0143 In

STANDARD CONNECTIONS FOR YOUR TV
LOCATION OF USER ITEMS
/Built-inspeakers
Control Panel
(On top of "IV)
I
//
¢r
Remote Control(Pointtowardscreento operateTV)
Front View of TV
Place VCR Shelf Here
AdditionalA/V Input Jacks
ConnectionCenter
!
i
Power Cord Entry
Rear View of TV
CONNECTION CENTER
ANTENNA/CABLE 2 LOOP OUTTO DECODER
Routes the cable-TV input to Antenna/Cable 2 back to the cable box supplied
by the cable service.
STARSIGHT STARSIGHT
CONTROL PORTJack for connection of--
StarSight Remote morn _.rEmitter cable.
MONITOR OUT
Audio and video outputjacks to route A!V to an --
optional extra monitor orother A/V component.
Whatever is currently be-ing watched on your TV is
provided at these jacks.
VIDEO 1 or 2 IN
Jacks for audio and video input from a stereoVCR or other A/V component. (You must
connect to these jacks in order to hear stereosound when playing a stereo tape.)
//--AUOIO
(_ RIGHT UEFTTO EXTERNALAlP
LOOPOUT ANTENNA ANTENNATOo,'coo'Ea CABLE CABLE
• O,ITO,orr '_ VtOtOlIN V_OEO,,,_NIIL___J• nE0 r--AU010_ r- "7 Vi0E0 r--tU010-"a |1I1"_/IIIIM
@®®@®®_ ,0o,_ i-'wo ' t su.ouNo,n-
VIDEO 1 LOOP OUTUse these to send the incoming audioand video (from Video 1In) to anothercomponent, such as a second VCR.
ANTENNA/CABLE 1 or 275-ohm antenna or cable-TV connection to your 'IV.Attach your antenna, cable-TV line or VCR to these jacks.
VARIABLE AUDIOOUTPUTStandard phono jackconnectors for outputto an optional stereoamplifieror to externalspeakers.
SURROUNDSPEAKERTERMINALSConnections for output tooptional surround soundspeakers.
S-VIDEO I INJacks for audio and video input froma Super-VHS VCR.
2923-01-O 1 -- 1
STANDARD CONNECTIONS FOR YOUR TV
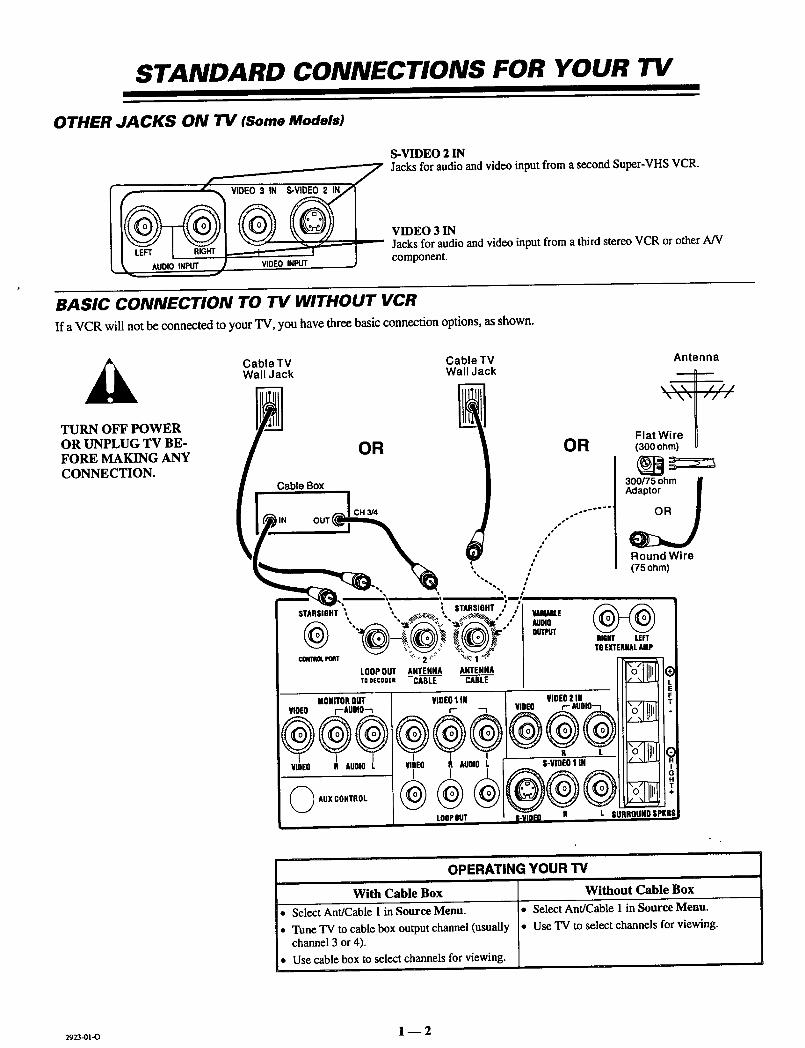
OTHER JACKS ON TV (Some Models)
S-VIDEO 2 IN
t'f VIDEO 3 tN S-VIDEO2 IN / Jacks for audio and video input from a second Super-VHS VCR.Jacks for audio and video input from a third stereo VCR or other A/V
X... AUOlOtN_'r .,.] VIOEOiNPUT J component.
BASIC CONNECTION TO TV WITHOUT VCR
Ifa VCR will not be connected to your TV, you have three basic connection options, as shown.
Cable TV Cable TVWall Jack Wall Jack
TURN OFF POWEROR UNPLUG TV BE-FORE MAKING ANYCONNECTION.
OR OR
Antenna
,,, I,;,
x \x !Flat Wire(300 ohm)
MONITOROUTVIDEO r--tUOlO---_
®®®VIDEO R AUOIOL
O AUX CONTROL
VIDEO1INF" "--J
IVIDEO
, ,@@@LOOP_T
300/75 ohm i
Adaptor I
Round Wire(75 ohm)
VIDEOl INVIDEO i"- AUOlO--t
@@@N L ,
|-VIDEO1 IN
@®®l-Win
iUBHT LEFTTO EXTERNALAMP
i÷
R L SURROUND SPKR|
OPERATING YOUR "iV
With Cable Box
• Select Ant/Cable 1 in Source Menu.
• Tune TV to cable box output channel (usuallychannel 3 or 4).
• Use cable box to select channels for viewing.: Without Cable Box
Select Ant/Cable 1 in Source Menu.
Use TV to select channels for viewing.
2923-ot-o 1 -- 2

STANDARD CONNECTIONS FOR YOUR 715
BASIC CONNECTION TO TV WITH VCR
If you are connecting a VCR to your TV, you have three basic connection options, as shown.
Cable TV Cable TVWall Jack Wall Jack
OR OR
Cable Box :_._...
_IN OUT _ IN
t tSTARSIGHT
@
"'°'" VCR .... "'-..
OUT
STARSIGHT :t I i _..
LOOP OUT ANTENHA ANTENNA
ToOiECOOEn CABLE CABLE
VARIABLEAUOm
MONITOROUTWOEO r-AUOlO-_
_ AUXCONTROL
VIDEO1IN
, ,@@@LOOPOUT
VIDEO2 INWD[O _.--AUOM--_
@R L
S-VIDEO1 IN
@®i.WEo n t
Antenna
,;;,Flat Wire II(300 ohm) .
Round Wire(75 ohm)
RI6HT LEFT
TOEXTERNALAMP
_ L
!GH
÷
SURROUNDOPKRS
OPERATING YOUR 13/i
VCR's TV/VCR* With Cable Box Without Cable Box
Switch SettingTV • Select Antenna/Cable 1 in Source Menu.
• Use TV to select channels for viewing.
VCR
• Select Antenna/Cable I in Source Menu.
• Tune TV to cable box output channel (usually channel3 or 4).
• Use the cable box to select channels for viewing.• Select Antenna/Cable 1 in Source Menu.
• Tune VCR to cable box output channel (usually channel3 or4).
* Tune TV to VCR output channel (usually channel3 or 4).
• Use the cable box to select channels for viewing.
• Select Antenna/Cable l in Source Menu.
• Tune "IV to VCR output channel (usually channel3 or4).
• Use VCR to select channels for viewing.
* May be labeled TV/Video.
2923_1_ 1--3

STANDARD CONNECTIONS FOR YOUR TV
ADDITIONAL CONNECTIONS FOR STEREO VCR
If you have a stereo VCR, or other stereo audio/video (MV) component, you must make these additional connections shown below in or-der to hear stereo sound from the component.
STARSIGHT
@¢QNTROL PORT
MONITOROUTVIDEO [--AUDIO--_
®®®VIDEO D AUDIO L
STARSIGUT• _, _ VARIABLE
_ '_2 ) AUDIOe} TOEXTERNALAMP
LOOPOUT ANTEHHA ANTENNATODECODER CABLE CABLE
• " LE
VIDEO1 IN VIDEO2 IN Fp .-_ VIDEO r'AUOlO'_ _ T
' VIDEO , R AUDIO'L I P "_,.VIDEOIIN : ' '! _
f ,nnPOUT I ,,, .... ,_ P, L SURROUNDSPKRS
s ! i o
,, , : • ,_oo ° ## i ,,
VIDEO L RAUDIO
A/V OUTPUT
lrst Stereo VCR
VIDEO L RAUDIO
AJV OUTPUT
Optional 2nd Stereo VCR
STARSIGHT STARSIDHT
LOOPOUT ANTENNA ANTENNA1or,tcooe. CABLE CABLE
VNNUUBLEAtmlOOUTPUT
• NONITOROUTVIDEO s--AUDIO-_
®®®VlIDEO R AUDIOL
O AUXCONTROL
VIDEO1 INp-
®vIREo
I I
®@LOOPOUT S-VIDEO
RIGHT LEFTTOEXTERNALAMP
R L BURROUND|PKRS,
Super-VHS VCR
AIVOUTPUT I
OPERATING YOUR "IVUSING AN JACKS
• Select Video l* in the Source Menu.
• Use VCR (or other component) to selectchannels for viewing.or,
• Watch a tape playing in the VCR.
* Select the Source in the Source Menu thatcorresponds to the jacks to which the A/Vcomponent is connected.
_2_0t-o 1 _ 4

STANDARD CONNECTIONS FOR YOUR TV
AUDIO/VIDEO (A/V) CONNECTIONS FOR OPTIONAL VIDEO EQUIPMENT
Connections to VIDEO 3 IN or S-VIDEO 2 IN jacks.(Some TV models only.)
Stereo Camcorder [__
Jxl, ,,RII--I
_\""_"g""--_*', VlOEO| I_1 S-_ | IN
Super-VHSVCR AUDIOOUT
OPERATING YOUR TVUSING AN JACKS
• Select Video 3* in the Sol]rce Menu.
• Use VCR (or other component) to se-lect channels for viewing.or,
• Watch a tape playing in the VCR.
• Select the Source in the SourceMenu that corresponds to the jacksto which the A/V component is con-nected.
OPTIONAL AUDIO AMPLIFIER/SURROUND SOUND CONNECTIONS TO TV
If you wish to listen to the TV audio through an external amplifier or stereo system, or listen to surround sound audio, make the connec-tions to the TV shown in the illustration below.
TURN OFF POWER OR UNPLUG TV BEFORE MAKING ANY CONNECTION.
PUT
L R
8PKROUTPUT
Back of OptionalStereo Amplifier
8ohmSurroundSpeaker8
°lLt SURROUNOSPgM
$a.YER
8 ohmSurroundSpeaker
Amplifier and Dual Surround Speaker Connections Single Surround Speaker Connection
DIFFERENT WAYS TO LISTEN TO YOUR TV
Surround SoundTV Speakers• Use the TV's volume control to raise and
lower the level of sound being heard fromthe TV's speakers.
• Set the options in the Audio Menu for yourown personal listening preferences.
External Amplifier Speakers
• You may also listen to yout2TV through thespeakers of your stereo or externalamplifier when it is connected as shown inthe illustration. Use the TV's volumecontrol to raise and lower the level ofsound being heard from the TV's speakersand the amplifier's speakers.
• Set the options in the Audio Menu for yourown personal listening preferences.
• Connect surround sound speakers as shown.The level of surround sound will vary,depending on the program being viewed.Note that not all programs have surroundsound audio.
• If you want to connect only one surroundspeaker to your TV, connect the speakerwire to the terminals adjacent to the positive(+) and negative (-) symbols that are circled.
2923-01-A 1 -- 5

STANDARD CONNECTIONS FOR YOUR TV
CONNECTIONS FOR USING PIP
The illustrations that follow show the most common connections for using Picture-In-Picture (PIP). For further information on theactual use of PIP, refer to the "PIP OPERATION" section of this operating guide.
Cable TV ANTENNAWall Jack
OR
IIOIITOROUTVCR mEO r-tUm-_A/V OUTPUT IN
/JJ_OL R VIOE0 ANTENNA
PIP Inset Source
Connected to the Video 1 In jacks.
Main Picture Source
Connected to the Antenna/Cable I jack.
Option 1: Antenna or Direct Cable Connection To VCR.(Cables are not supplied with television.)
Cable TVWall Jack
CABLE BOXSTAflII|HT
Main Picture Source
",,,Connected to theAntenna/Cable1 or2 jack.
STARStGHT _
0=1PUT $mlff t.IFT
T0E]ffBtN_UlP
CABLE O_
LOOPOb'T
Connected to the Video 1 In jacks.
Option 2: Cable-TV Decoder Connection via Loop Out To VCR.(Cables are not supplied with television.)
2923-01-O 1 -- 6

THE FIRST TIME YOU OPERATE YOUR TV
TYPICAL CONTROL PANEL
The control panel on your TV may differ from the one shown but its operation is the same.
SELECT (SEL)Press during on-screen menuoperations to select a menuoption.
__/_. v
ENTER (ENT)Press to see the ChannelfFime
display, or to remove any on-screen display or menu.
..->
\
MENU ENT
I •
VOLUME (VOL) Up/DownPress to increase or decrease thesound level.
VOLV
JVOLA
#'_ • J
CH CH OFF,4k ON
/
OFF-ONPress to turnTV
power ON or OFF.
//
ADJUST (ADJ) Left/RightPress during on-screen menu op-eration to see information/status
display for selected option. Pressagain to adjust the selected menuoption.
MENUPress once to see a menu. Press
repeatedly to sequence throughthe available menus.
CHANNEL (CH) Up/DownPress to select channels higher orlower than the current channel.To add or delete channels stored
in the scanning sequence, see CH.ADD/DEL option.
STEP 1. INSTALL THE BA ITERIES INTO THE REMOTE CONTROL
Batteries are provided for each remote, but they must be in-stalled before using the remote controls. When a remote nolonger function normally, or when it loses memory, replacethe batteries with two high-quality, alkaline, batteries. Matchplus with plus (+ with +), minus with minus (- with -), asshown in the battery compartment.
Unless your equipment responds to the factory preset codes,you will need to reprogram the remote control with the codesof your particular equipment each time you replace batteries.
NOTES:
• Do not place heavy objects on top of the remote controlkeys. Prolonged unintentional operation of the remoteshortens battery life.
• Remov_ the batteries if the remote control will not be usedfor a month or more. THEM,_aJFACTORERISNOT RE-,
SPONSIBLE FOR DAMAGE CAUSED BY BATTERY LEAKAGE.
Universal Remote
(Uses 2 size AAAbatteries.)
Z-Trak Remote
(Uses 2 size AAbatteries.)
STEP 2. CONNECT THE POWER
1. Plug your TV into an unswitched AC power source.
2. Turn the TV on by pressing OFF-ON.] r'_ [_ I'_-_'1
Do not plug TV into switched outleton a VCR or cable-TV decoder
2923_1_ 2 m 1

THE FIRST TIME YOU OPERATE YOUR TV
STEP 3. SELECT YOUR MAIN SOURCE & PIP SOURCE
A TV source refers to the equipment connected to the TV that supplies the picture and sound to your TV. You select the viewing
source by using the Source Menu.
MainSeurce
• Press SOURCE on yourremote to view the SourceMenu.
* Press SOURCE repeatedly toselect the source which
corresponds to the jack on theTV connection panel that isreceiving the input signal.
• Press QUIT to remove themenu.
PIP Source
Press SOURCE on yourremote to view the SourceMenu.
Press the Left or Right key toselect PIP Source column.
I• Press SOURCE repeatedly toselect the source whichcorresponds to the jack that isreceiving the PIP input signal.
• ress QUIT to remove themenu.
Ant/Cable 1Ant/Cable 2Video 1Video 2S-Video 1Video 3S-Video 2
<1,. Main/PIP
PiP Source
Ant/Cable 1
Video 1Video 2S-Video 1Video 3S-Video 2
I'4,1"o Select Source I
Source Menu with Main Source set to Ant/Cable 1 and PIPSource set to Video I. Connection must made to the correspond-ing jacks on the connection panel.
STEP 4. USE AUTO PROGRAM
Auto Program finds all available channels on the currently se-lected source and stores them in the memory of the "IV.
To start the Auto Program procedure, press the Left orRight arrow key. Follow the instructions on the TV.
.Auto Program :Ch. Add/DelCh. LabelsSource IDClock Set"l]merSetupParental CtlCaption/TextBackgroundStarSight
Press ,_ To Program I
Setup Menu with Auto Program Highlighted
Press 1",1,to select either OFF AIR ANTENNA or CABLE TV.
Press <---_ to begin channel search.
Wait a few seconds for the TV screen to clear.
PPESST£ TO_ SELECIION
OFFNRN_NA
I r,_UETV J
PRESS'0, TOB_GIN_G
J
SEARCHING CABLE "IV INPUT TYPE
SF.ARO-IINGC/_BI.EW _AUTO_HAS_ TM
"------b / ___ _FOLI_
CHANf_L __ _ IS 0_") FOUND LPRESSsr_ R)R' DBaONStRAaONOfs'rMsl;
Message appears only ifTV has not been authorized for StarSight.
STEP 5. SET THE CLOCK
Set The Clock
• Press MENU on your remote until the SETUP icon is selectedand the Setup Menu is displayed.
• Press the Up or Down arrow key to select Clock Set.• Use the numbered buttons on the universal remote control to
enter the correct time. Press TIMER to select AM or PM.orPress the Left or Right arrow keys to advance the clock.
• Press QUIT to remove the menu.
STEP 6. USE OTHER OPTIONS
You may want to consider using the following options:.
• Delete undesirable channels or add additional channels: Refer
to the CIL (Channel) Add/Del option for details.
• Apply "labels" to your available channels: Refer to theCh. (Channel) Labels option for details.
• Label the input sources with descriptive names such as VCR.Refer to the Source ID option for details.
• Adjust options in the Audio and Video Menus.
2923et-o 2 -- 2

PIP OPERATION
INTRODUCTION
Your TV must be connected to two separate sources in order to view a different picture in the PIP inset from that which isshowing in the main picture area of the TV. One source (such as an antenna) must be connected to the ANT/CABLE I or 2jack. The other source (such as a VCR) must be connected to one set of the Video or Super Video jacks.
If you have not already selected the input Sources for your main TV picture and the PIP inset, refer to the instructions below. Makesure you select those sources that correspond to the jacks on the TV connection panel that are receiving the input signals.
L_lin ,_muroe
Ant/CablezVideo 1Video 2S-Video 1Video 3S-Video2
41_Main/PIP
PIPSource
Ant/Cable1
Video1Video2S-Video 1Video3S-Video2
'1'4,ToSelect Source I
Source of main pictureshows here
Source of PIP pictureshows here
SELECTING MAIN PICTURE AND PIP INSET SOURCES
Universal Remote
• Make sure remote is in TVmode.
• Press SOURCE on your re-mote to view the SourceMenu.
• Press SOURCE repeatedly toselect the source whichcorresponds to the jack on theTV connection panel that isreceiving the input signal.
• Press QUIT to remove themenu.
SELECT MAIN SOURCE
Z-Trak Remote
• Make sure remote is in TVmode.
* Point and press on theSOURCE icon (at the top ofthe screen).
• Point and press on the MainSource which corresponds tothe jack on the TV connectionpanel that is receiving theinput signal.
* Move the pointer off the menuand press the TrackbaU toremove the menu.
SELECT PIP SOURCE *
Universal Remote
Make sure remote is in TV mode.
Press SOURCE on your remoteto view the Source Menu.
Press the Left or Right key toselect PIP Source column.
Press SOURCE repeatedly toselect the source which
corresponds to the jack that isreceiving the PIP input signal.
Press QUIT to remove the menu.
Z-Trak Remote• Make sure remote is in 'IV mode.'
• Point and press on the SOURCEicon (at the top of the screen).
• Point and press on the PIPSource which corresponds to thejack on the TV connection panelthat is receiving the input signal.
j• Move the pointer off the menuand press the Trackball toremove the menu.
* A PIP inset appears while the Source icon is selected to show the effect of selecting a PIP source.
PICTURE-IN-PICTURE FUNCTIONS
While using the various PIP functions, refer to the illustration below and the instructions on the following pages. Note that the op-eration of these functions differ, depending which remote control you are using.
Arrow Keys l: _ [ ff_"i
SWAP 11!PIP
SOURCE [
PIP Functions, Universal Remote Control
Select these optionswith the Z-Trak remoteto perform the PIPfunctions described onthe following page.
-I'ir'r_r
CaptionsZ-TrakPI P OnFreezeMovePIP
Swap
PIP Functions, Z-Trak Remote Control
continued on next page
29234)1-O 3 m 1

PIP OPERATION
• PIP On/Off: Press the PIP key to display the PIP inset. Press itagain to remove the PIP inset.
• SWAP: Press the SWAP key to swap the main picture with thePIP inset. Press SWAP again to return to the original display.
• FREEZE: Press FREEZE to freeze motion of the picture shownin the PIP inset. Press FREEZE again to return to a live PIP inset.
• PIP Size: Select PIP Size in the PIP Menu to choose betweenseeing a small or large PIP inset.
• Moving the PIP Inset: Use the Left/Right and Up/Down arrowkeys to move the PIP inset to the desired corner of the TV screen.
PIP On/Off: Move pointer to left of TV screen and press on PIP Onto display the PIP inset. Move the PIP inset to desired location on thescreen and press the trackball to set it in place. Press on PIP Off toremove the PIP inset.
SWAP: Move pointer to left of TV screen and press on Swap toswap the main picture with the PIP inset. Press on Swap again toreturn to the original display.
FREEZE: Move pointer to left of TV screen and press on Freeze tofreeze motion of the picture shown in the PIP inset. Press on Freezeagain to retum to a live PIP inset.
• PIP Size: Select PIP Size in the PIP Menu to choose betweenseeing a small or large PIP inset.
• Moving the PIP Inset: Move pointer to left of TV screen and presson Move PIP and move the PIP inset to desired location on thescreen. Press the trackball to set the inset in place.
OPERATION WITH ANTENNAOR DIRECT CABLE
This illustration shows the basic connection of your TV to astereo VCR. With your equipment setup in this manner, yourtelevision has the following PIP capabilities:
• Simultaneously view a video tape playing in the VCR anda channel selected by the TV's tuner.
Simultaneously view two different channels; one selectedby the TV's tuner and another using the VCR's tuner.
Swap the main picture and the PIP inset.
Viewing Two DifferentChannels
• Set VCR's TV/VCR* switch toTV.
• Select Ant/Cable 1as the MainSource in the Source Menu.
• Select Video 1 as the PIP Sourcein the Source Menu.
• Select a channel with the TV'schannel selector.
• Turn on PIP.
Select a PIP channel using theVCR's channel selector.
PIP VIEWING OPTIONS
Viewing a Video Tapeanda TV Channel
Set VCR's TV/VCR* switchtoTV.
Select Ant/Cable 1 as the MainSource in the Source Menu.
Select Video 1 as the PIPSource in the Source Menu.
Select a channel with the TV'schannel selector.
Turn on PIP.
Play a tape in the VCR andview it in the PIP inset.
* May be labeled TVNideo.
Cable TV ANTENNAWall Jack
Main Picture Source
Connected to the Antenna/Cable I jack.
OR
VCR
AIV OUTPUT IN
AumoL R VIii0 ANTENNA
PIP Inset Source
Connected to the Video 1 In jacks.
STARLIGHT .
mclmt t_m" "_ ! _¢"
LOOPOUT ANTENNA/ ANTENNAri K¢0IilI CABLE p_IILE
IIONITINIOUT YIDEO1IN
................... i"
Option 1: Antenna or Direct Cable Connection To VCR.(Cables are not supplied with television.)
29234)143 3 _ 2

PIP OPERATION
OPERATION WITH CABLE DECODER
With your equipment setup in this manner, your television hasthe following PIP capabilities:
• Simultaneously view a video tape playing in the VCR anda basic cable channel selected by the TV's tuner.
• Simultaneously view two different cable channels; onecable channel selected by the TV's tuner and anothercable channel selected by the cable box.
• Swap the main picture and the PIP inset.
NOTE:
• The cable channels you can view depends on the serviceyou have purchased from your cable company.
PIP VIEWING OPTIONS
Viewing Two DifferentCable Channels
• Select Ant/Cable 2 as theMain Source in the SourceMenu.
• Select Video 1as the PIPSource in the Source Menu.
i. Select a channel with theTV's channel selector.
• Turn on PIP inset.
• Select a PIP channel using thetuner in the Cable Box.
Viewing a Video Tapeand a Cable Channel
• Select Ant/Cable 2 as theMain Source in the SourceMenu.
• Select Video 1 as the PIPSource in the Source Menu.
* Select a channel with theTV's channel selector.
• Turn on PIP inset.
• Play a tape in the VCR andview it in the PIP inset.
Out fromCable-TVDecoder
Cable "IVWall Jack
CABLE BOX
I
VCR
PIP Inset source
Connected to the Video 1 In jacks.
Main Picture Source
Connectedto the Antenna/Cable 2 jack.
LOOPOUT ANTENNA ,*ANTENNA
10 li|lltn CABLE /' CABLE
LOOPOIT
Option 2: Cable-TV Decoder Connection via Loop Out To VCR.(Cables are not supplied with television.)
2_3_t_ 3--3

UNIVERSAL REMOTE CONTROL
INTRODUCTION
This universal remote control operates the common features of most, but not all, models and brands of IR (infrared) controlled TVs,VCRs, cable converters, video disc players, and audio equipment. The remote may provide functions that are not available on your
equipment, e.g., menu operations. Some functions of your particular equipment may not be controlled by this remote. In such cases,use the original remote control for your equipment.
BATTERY INSTALLATION
Batteries are provided, but must be installed before using the
remote control. When it no longer functions normally, or
when it loses memory, replace the batteries with two high-
quality, alkaline, size AAA batteries. Match plus with plus (+
with +), minus with minus (- with -) in the battery compartment.
Unless your equipment responds to the factory preset codes,i.e.. 101 for TV, 201 for VCR, 353 for CABLE, and 401 for
AUX., you will need to reprogram the remote with the codes
of your particular equipment after you replace the batteries.
NOTES:
• Do not place heavy objects on top of the remote control
keys. Prolonged unintentional operation of the remote short-ens battery life.
• Remove the batteries if the remote control will not be used
for a month or more. THE MANUFACTURER IS NOT RE-
SPONSIBLE FOR DAMAGE CAUSED BY BATrERY LEAKAGE.
Push tab in
CHOOSING OPERATING MODE
To control your TV, VCR, cable box, or auxiliary equipment with this remote, you must first choose the mode of operation. Pressthe desired mode key for TV, VCR, CABLE or AUX. Pressing the Jr (Star) key will put the remote into StarSight mode. Press TVto return to TV mode. Some keys on the remote will always operate a particular product function. For example, VOLUME controlsthe TV sound level, and PLAY controls the VCR play function.
INDICATOR LIGHTIlluminates whenever
remote sends signal.
OPERATING MODE KEYS
Selects equipment to be controlled.
• NUMBER KEY PAD
Initiates menu/equipment programming,direct channel selection
and other functions.
LOWER ARROW KEY PAD
Keys perform different functionsdepending on the operating mode
currently selected. See the followingpages for more details of the
various operating modes.
POWER KEYSwitches power ON or OFF to selectedequipment.
UPPER ARROW KEY PADKeys perform different functionsdepending on the operating modecurrently selected. See the followingpages for details of each operating mode.
SPECIAL FUNCTION KEYSActivates special features on some TVsand VCRs.
StarSight®is a trademark of StarSight Telecast Inc., Fremont, CA 94538.
2923-01-A 4- I

UNIVERSAL REMOTE CONTROL
TV OPERA TIONS
These descriptions apply to functions and operations of your "IV. First, press the TV button on the remote control to select the TVmode of operation.
FLASHBK (Flashback)Press to return to the previous TV
channel selected for viewing.
CC (Closed Captioning)Press to display the closed caption
menu. Press repeatedly to select yourchoice. Press ENTER/TUNE to
exit the menu.
CHANNEL/DAY (Up Arrow)Tunes to the next (higher) channel
programmed into TV memory.Press and hold to repeat.
DAY/CHANNEL (Down Arrow)Tunes to the previous (lower) channel
programmed into TV memory.Press and hold to repeat.
NUMBER KEY PADEnter number for direct
channel tuning.
MENU/GUIDE
Displays on-screen menus for "IVmode of operation. Press repeatedly to
view other on-screen menus.
LEFT/RIGHT ARROW KEYS
Used to respond when an on-screenmenu needs an ADJUST response.
Press to move the highlight bar withinthe menu. Also used to move the PIP
inset to new location on the screen.
PIP, SWAP, and FREEZ KEYSSee PIP Operation
• section for more details.
TIMER
Displays the SLEEP TIMER menu.Press repeatedly to set desired TV
shut-off time. Also used to specify AMor PM when setting the TV's clock or
programming a timer feature.
See "Getting to Know Your TV."section for more details.
tPoint Remote at TV.
TV Operations
POWERTurns TV ON or OFF.
TV
Press to select TV mode of operation.
MUTEPress to turn offsound while the
picture remains. Press again to restorethe sound.
VOLUME/PAGE (Left Arrow)Decreases the TV's sound level. Press
and hold to repeat.
VOLUME/PAGE (Right Arrow)Increases the TV's sound level. Press
and hold to repeat.
ENTER/TUNE
Press to see the Channel/Time displayor enter channel numbers.
QUIT/SEQExits from the current on-screen
display or pop-up and returns to thecurrent channel. If no display is on,this is the normal spatial equalizationON/OFF.
UP/DOWN ARROW KEYS
Used to respond when an on-screenmenu needs a SELECT response.Press to move the highlight bar withinthe menu. Also used to move the PIPinset to new location on the screen.
* (Star)Press the * (Star) key to exit the TVmode and enter the StarSight mode.See the StarSight section of thisguide for more details.
TV/VCR SOURCE
Displays the menu of TV sources.Press repeatedly to step through thesource selections.
NOTE:
• Keys dedicated to VCR functions may be used to operateyour VCR while the remote is in TV mode.
29_-ot-o 4 -- 2
UNIVERSAL REMOTE CONTROL
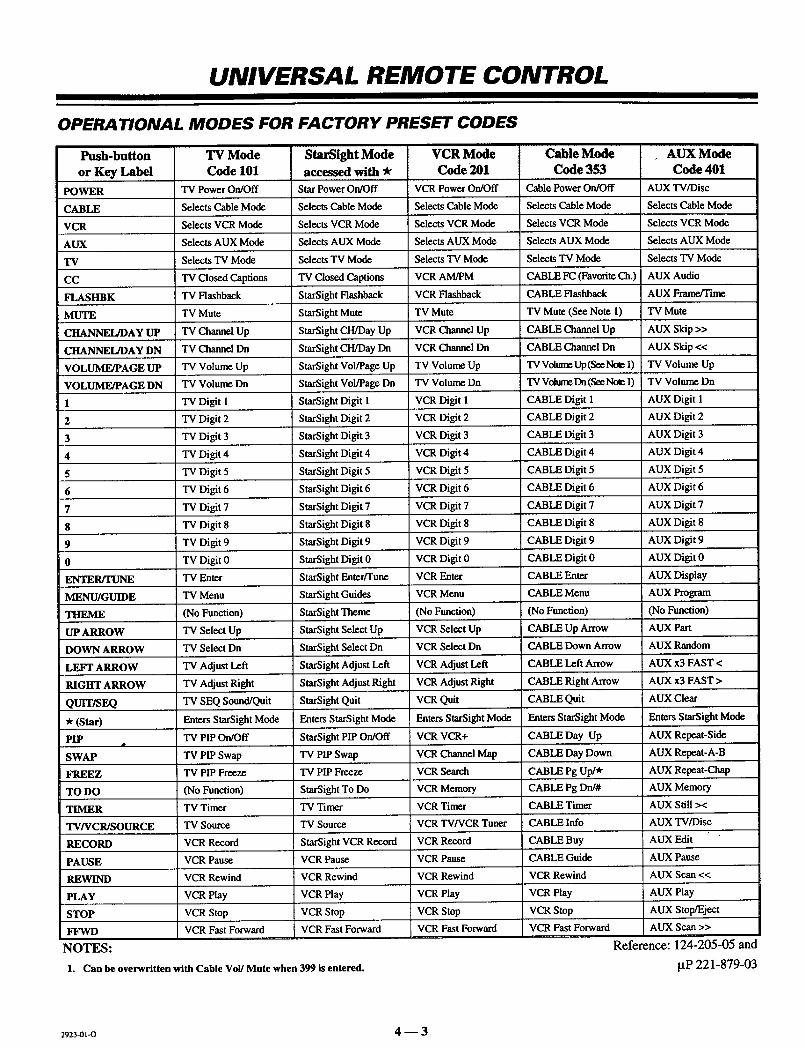
OPERATIONAL MODES FOR FACTORY PRESET CODES
Push-button
or Key Label
POWER
CABLE
VCR
AUX
TV
CC
FLASHBK
MUTE
CHANNEL/DAY UP
CHANNEl/DAY DN
VOLUME/PAGE UP
VOLUME/PAGE DN
1
2
3
4
5
6
7
8
9
0
ENTER/TUNE
MENU/GUIDE
THEME
UP ARROW
DOWN ARROW
LElrr ARROW
RIGHT ARROW
QUIT/SEQ
* (Star)
PIP
SWAP
FBEEZ
TO DO
TIMF.R
TV/VCR/SOURCE
RECORD
PAUSE
REWIND
PLAY
STOP
FFWD
NOTES:
TV ModeCode 101
"IV Power On/Off
Selects Cable Mode
Selects VCR Mode
Selects AUX Mode
Selects TV Mode
TV Closed Captions
TV Flashback
TV Mute
TV Channel Up
TV Channel Dn
TV Volume Up
TV Volume Dn
TV Digit 1
TV Digit 2
TV Digit 3
"IV Digit 4
"IV Digit 5
TV Digit 6
TV Digit 7
"IV Digit 8
TV Digit 9
TV Digit 0
"IV Enter
TV Menu
(No Function)
TV Select Up
TV Select Dn
TV Adjust Left
TV Adjust Right
TV SEQ Sound/Quit
Enters StarSight Mode
TV PIP On/Off
TV PIP Swap
TV PIP Freeze
(NoFunction)TV Timer
"IV Source
VCR Record
VCR Pause
VCR Rewind
VCR Play
VCR Stop
VCR Fast Forward
StarSight Modeaccessed with *
Star Power On/Off
Selects Cable Mode
Selects VCR Mode
Selects AUX Mode
Selects TV Mode
TV Closed Captions
StarSight Flashback
StarSight Mute
StarSight CH/Day Up
StarSight CH/Day Dn
StarSight Vol/Page Up
StarSight Vol/Page Dn
StarSight Digit 1
StarSight Digit 2
StarSight Digit 3
StarSight Digit 4
StarSight Digit 5
StarSight Digit 6
StarSight Digit 7
StarSight Digit 8
StarSight Digit 9
StarSight Digit 0
StarSight Enter/Tune
StarSight Guides
StarSight Theme
StarSight Select Up
StarSight Select Dn
StarSight Adjust Left
StarSight Adjust Right
StarSight Quit
Enters StarSight Mode
StarSight PIP On/Off
TV PIP Swap
TV PIP Freeze
StarSight To Do
TV Timer
TV Source
StarSight VCR Record
VCR Pause
VCR Rewind
VCR Play
VCR Stop
VCR Fast Forward
1. Can be overwritten with Cable Vol/Mute when 399 is entered.
VCR ModeCode 201
VCR Power On/Off
Selects Cable Mode
Selects VCR Mode
Selects AUX Mode
Selects TV Mode
VCR AM/PM
VCR Flashback
TV Mute
VCR Channel Up
VCR Channel Dn
TV Volume Up
TV Volume Dn
VCR DigitI
VCR Digit2
VCR Digit3
VCR Digit4
VCR Digit5
VCR Digit6
VCR Digit7
VCR Digit8
VCR Digit9
VCR Digit0
VCR Enter
VCR Menu
(No Function)
VCR Select Up
VCR Select Dn
VCR AdjustLeft
VCR AdjustRight
VCR Quit
Enters StarSight Mode
VCR VCR+
VCR Channel Map
VCR Search
VCR Memory
VCR Timer
VCR TV/VCR Tuner
VCR Record
VCR Pause
VCR Rewind
VCR Play
VCR Stop
VCR Fast Forward
Cable ModeCode 353
Cable Power On/Off
Selects Cable Mode
Selects VCR Mode
Selects AUX Mode
Selects TV Mode
CABLE FC (Favorite Ch.)
CABLE Flashback
TV Mute (See Note 1)
CABLE Claannel Up
CABLE Channel Dn
TV VolumeUp (SeeNcm I)
TV Vohm_ Dn (SeeNoteI)
CABLE DigitI
CABLE Digit2
CABLE Digit3
CABLE Digit4
CABLE Digit5
CABLE Digit6
CABLE Digit7
CABLE Digit8
CABLE Digit9
CABLE Digit0
CABLE Enter
CABLE Menu
(No Function)
CABLE Up Arrow
CABLE Down Arrow
CABLE Left Arrow
CABLE Right Arrow
CABLE Quit
Enters StarSight Mode
CABLE Day Up
CABLE Day Down
CABLE Pg Up/*
CABLE Pg Dn/#
CABLE Timer
CABLE Info
CABLE Buy
CABLE Guide
VCR Rewind
VCR Play
VCR Stop
VCR Fast Forward
AUX ModeCode 401
AUX TV/Disc
Selects Cable Mode
Selects VCR Mode
Selects AUX Mode
Selects "IV Mode
AUX Audio
AUX FrameJTime
TV Mute
AUX Skip >>
AUX Skip <<
TV Volume Up
TV Volume Dn
AUX Digit l
AUX Digit 2
AUX Digit 3
AUX Digit 4
AUX Digit 5
AUX Digit 6
AUX Digit 7
AUX Digit 8
AUX Digit 9
AUX Digit 0
AUX Display
AUX Program
(No Function)
AUX Part
AUX Random
AUX x3 FAST <
AUX x3FAST >
AUX Clear
Enters StarSight Mode
AUX Repeat-Side
AUX Repeat-A-B
AUX Repeat-Chap
AUX Memory
AUX Still ><
AUX TV/Disc
AUX Edit
AUX Pause
AUX Scan <<
AUX Play
AUX Stop/Eject
AUX Scan >>
Reference: 124-205-05 and
tiP 221-879-03
2923-01"O 4 _ 3
UNIVERSAL REMOTE CONTROL
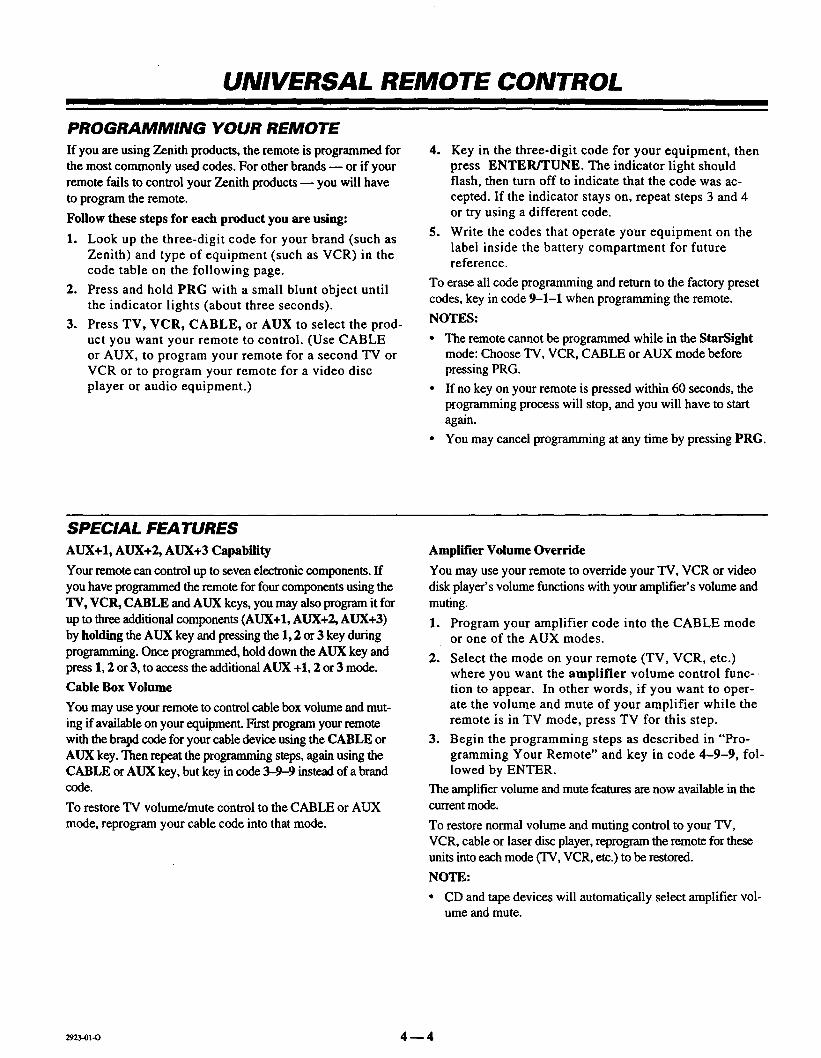
PROGRAMMING YOUR REMOTE
If you are using Zenith products, the remote is programmed forthe most commonly used codes. For other brands -- or if yourremote fails to control your Zenith products -- you will haveto program the remote.
Follow these steps for each product you are using:
1. Look up the three-digit code for your brand (such asZenith) and type of equipment (such as VCR) in thecode table on the following page.
2. Press and hold PRG with a small blunt object untilthe indicator lights (about three seconds).
3. Press TV, VCR, CABLE, or AUX to select the prod-uct you want your remote to control. (Use CABLEor AUX, to program your remote for a second TV orVCR or to program your remote for a video discplayer or audio equipment.)
4. Key in the three-digit code for your equipment, thenpress ENTER/TUNE. The indicator light shouldflash, then turn off to indicate that the code was ac-
cepted. If the indicator stays on, repeat steps 3 and 4or try using a different code.
5. Write the codes that operate your equipment on thelabel inside the battery compartment for futurereference.
To erase all code programming and return to the factory presetcodes, key in code 9-1-1 when programming the remote.
NOTES:
• The remote cannot be programmed while in the StarSightmode: Choose TV, VCR, CABLE or AUX mode beforepressing PRG.
• If no key on your remote is pressed within 60 seconds, theprogramming process will stop, and you will have to startagain.
° You may cancel programming at any time by pressing PRG.
SPECIAL FEATURES
AUX+I, AUX+2, AUX+3 Capability
Your remote can control up to seven electronic components. Ifyou have programmed the remote for four components using theTV, VCR, CABLE and AUX keys, you may also program it for
up to three additional components (AUX+I, AUX+2, AUX+3)by holding the AUX key and pressing the 1, 2 or 3 key duringprogramming. Once programmed, hold down the AUX key andpress 1, 2 or 3, to access the additional AUX +1, 2 or 3 mode.
Cable Box Volume
You may use your remote to control cable box volume and mut-ing if available on your equipment. Firstprogram your remotewith the bragd code for your cable device using the CABLE orAUX key. Then repeat the progranuning steps, again using theCABLE or AUX key, butkey in code 3-9--9 instead of a brandcode.
To restore TV volume/mute control to the CABLE or AUX
mode, reprogram your cable code into that mode.
Amplifier Volume Override
You may use your remote to override your TV, VCR or videodisk player's volume functions with your amplifier's volume andmuting.
1. Program your amplifier code into the CABLE modeor one of the AUX modes.
2. Select the mode on your remote (TV, VCR, etc.)where you want the amplifier volume control func-tion to appear. In other words, if you want to oper-ate the volume and mute of your amplifier while theremote is in TV mode, press TV for this step.
3. Begin the programming steps as described in "Pro-gramming Your Remote" and key in code 4-9-9, fol-lowed by ENTER.
The amplifiervolume and mute features are now available in thecurrent mode.
To restore normal volume and muting control to your TV,VCR, cable or laser disc player, reprogram the remote for theseunits into each mode (TV, VCR, etc.) to be restored.
NOTE:
• CD and tape devices will automatically select amplifier vol-ume and mute.
2923-0t-o 4 -- 4

UNIVERSAL REMOTE CONTROL
AUTO FIND OPTION
If you have tried all the codes listed for your brand and type ofproduct in the code table, and none of those codes operate yourequipment,you can use Auto Find to search for the code you need.
Follow these steps for each product you are using:
1. Turn the product ON and aim the remote toward it.
2. Press and hold PRG with a small blunt object untilthe indicator lights (about three seconds).
3. Press the mode key on the remote for the productyou want to control: TV, VCR, CABLE, or AUX.
4. Key in code 0-0-0, then press ENTER within twoseconds. When the indicator light flashes three timesand remains lit, Auto Find is active.
St
,
Press and hold POWER, then release it, repeatingthis action about once a second until the productturns OFF.
Press ENTER immediately to save the code. If yourremote fails to operate the functions you use mostoften, you can re-enter Auto Find and search for abetter code.
NOTES:
• The indicator light should flash OFF when you pressPOWER and back ON when you release it. If the indicatorlight stays on when you press POWER, Auto Find has triedall available codes. If you finish Auto Find and the productyou want to control has not turned off, your remote cannotcontrol that product.
• Pressing PRG at any time during the use of Auto Find willcancel Auto Find, and you will have to start again.
ON
POWER I1_OFF
Equipment to becontrolled
Typical RemoteControl
_23_1_ 4--5

UNIVERSAL REMOTE CONTROL
OPERA TIN(3 CODES BY BRAND NAME
TVSAdmlml
_vom.n_N_
AOC
Bell & Howell
Broksomc
Candk
Centurion
Cg.tzen
'.on[_
_omnado
_rown
Cunts Mathes
Dnewoo
Daewoo TV/VCR
Daytron
ElekWa
Emerson
Emerson TV/VCR
Hsher
Funa,t TV/VCR
GeneralElectru:
Goldstar
Goldstar TVNCR
Hitachi
J.C Penney
WC
KMC
KTV
(urazal
Lodgenet
Logtk
LXI
Magnavox
Magnavox TVNCRw
MaFsUc
Maran_
M_a_n
Memomx
MGNMl_ub_ht
Mon_ome_Ward
NEC
Parla._onlc
Panasonic TV/V(_
Phflco
Phthps
Ihoneer
Portl_d
ProScan
116,121.130,133
154
I04
103.146
104
121
131,136
139
119
121,139
141
103
I03
116,119,121
149,159
148
119
121
103.104.123.124.
131.136.145
158
109.118
154
I06.107.114,
116,117,161
I03,104,119,147
153
102.103,129,163 !
104.I I0.114,
117,119
125. 132,164
103
103. 104, 138
121
121
121
133, 137
103. 112. 113,117. 119. 127.
128. 139. 165
173
121
104, 120. 155
146
121
104. 119. 120.
130. 140. 155
103, 104. 105.
113, 114. 119,
121. 130. 133
104. 119
1(}6. 107. 160. 166
174
lo3. 104. 112.
113, 139
112. 113
135
1113
116. 157. 162, 167
QuasarRCA
Realistic
Sampo
Samsung
Sanyo
Scott
_ars
sha_
Signature 2000
Sony
Soundestgn
Sylvania
Sympha_rV/VC_Tatung
Tckmka
Tele_nt
Toshiba
XRI000
Yorx
Zemth
Zenith TV/VCR
Admiral
Adventura
Alwa
Akai
Audio
Dynanucs
Bell& Howell
Broksomc
Canon
Citizen
Craig
Cures Mathes
Daewoo
Daytron
DBX
Emerson
Fisher
Fumu
General
Elecmc
Goldstar
Go Video
Hitachi
Instant REplay
J C Penney
JVC
Kenwood
Loglk
LXI
106, 107
104,116, 126,157,
161.162,167.168
105. 123, 124
119
103. 119, 134. 141
108.109. I I 8
119.124
103.108.109.110.
IlL 118. 134
103. 105.122. 133.
137. 156.169
103. 104. 105.
113. 114. 119.
121. 130. 133
115. 143. 151. 170
139
112.113. 117.119.127.128,139
154
106
103, 112, 121.124, 139
103,121
110. 111, 134,171
121
119
101, 149
153.154. 172
VCRS
208, 261
231
231
223, 238. 241
202, 218
206.247
221.226.250,255
214
2O9
212
214,259
244,246,248,254
236,246
202.218
203. 221. 223.
226. 233. 235.243.250
21I.212, 213,247
231
214.216. 220
2O9
256.262.263
215.257
214.227
214.215.218.227
202.225.258
202
239
2O9.231
Magnavox
Maramz
Memorcx
Mitsubtshi
MontSonwa'yWard
Multi Tech
NEC
)non
Panasomc
Pentax
Phdco
Phdlps
Pmneer
Portland
Pro Scan
Quasar
RCA
Reahstic
Samsung
SanStll
Sanyo
Scott
Sears
sharp
Shimom
Signature 2000
Sony
Sylvama
Symphonic
Tashiko
Tatung
Teac
Tekn_,a
Toshiba
XRI000
Vector Research
Yamaha
Zemth
207.214.231
207.218
209
206. 212. 214. 231
204. 222. 252
208.214. 216.219. 231. 249
239
202. 218
250
214.251. 259
215
207.214
207. 214. 227
210.215
246
216. 260
214,259
215.216,220.227,
240,242,260
206,208,212.
214,231
220. 230
239
206. 212. 247
204, 205. 233. 243
206. 209.211.
212.215
208.26 I
239
208.214.216.
219. 231. 249
217. 232, 237
207. 214. 227
231
2O9
202
202.231
234
205. 215
239
204.218
202. 218
20l. 224. 225.229. 237
:ABLE/SATELLITE
Allegro
Allegro/fiB Swttch
Germm
General Elecmc
GeneralInsmmaent
Hamlm
lerrold
Ka]€ Vk_lon
Macom
Magnavox
NSC
358.362
361
305. 331.338
367
305.306
302.303.345.
365.366
304.307.308.309.
310.318. 360.363
335
314.321
334
335.339.368.
369.370
Pana._nic
Paragon
Philips
Piolle_r
RCA DSS
Regency
Samsung
Scientific Atlanta
Sprucer
Standard Comp
Temcan
Tocom
Unika
United Satelhtc
Umversal
Vid Tcch
Video Way
Vtcwstar
Zenith
Zenflh Satelhte
311.332. 342
313. 320
333
347. 350. 352.
354. 355
315. 343
373
329
335
316. 323. 336. 364
313
335
339. 356.371
317. 318.346
348. 362
344
358. 362
34O
349
354. 355. 372
301. 353
312. 328. 330. 351
VIDEO DISKPLAYERS
Paoneet [ 402. 403
Sa, yo 1401
Sony 404
Zemth 401
AUDIO CDPLAYERS
Akai 409. 424
Crown 410
Denon 411
Fisher 412, 438
Goldstar 460
Harman/Kardon 413
JVC 415
Kenwood 412, 416. 417. 441
Magnavox 421,422, 433,434
Mitsubkdd 423,424
NAD 425. 426,447
4akamichi 427.428
NEC 429
Onkyo 430
P_aasonic 431. 432
Phihps 421,433,434
Pioneer 43 I. 435
Quasar 432
Radio Shack 431. 436. 439. 440.
441
RCA 437
Sanyo 438.439
Scott 440
Sharp 44 I.442
Sony 443. 444. 445
Soundesign 461. 498.501,502
Tedmics 432.459
Toshiba 447
Yamaha 448
7Pnith 460. 461,498.501.
5O2
AUDIO TAPEDECKS
Demm 455
Hanuan/Kardon 456
WC 457
Kcnwood 450
Onkyo 458
Philips DCC 454
Pionne_ 451.478
Sony 452
Technics 454. 497
Yamaha 453i
AUDIO TUNERSAND AMPLIFIERS
Denon 462. 463
Fts_r 464
Goldslar 460
Hannah/ 465
Kardon
IVC 466
I_nwood 468, 469
Marantz 472.503
Onkyo 473
Philips 475,476
Pioneer 477,478.479
Radio Shack 487. 488
Re.alk_c 480
Sanyo 481
Scott 482
Sharp 483
Sherwood 487.488
Sony 489. 490. 491. 492
Soundesign 461. 498. 501. 502
Tcac 494, 495
Techn_ 497
Yamaha 496
Zenith 460, 461. 498. 501,
5O2
Ref: 124-205-05 and
BP 221-879-03
2923-01-O 4 -- 6

QUICK REFERENCE TO MENUS: UNIVERSAL REMOTE
AVAILABLE MENUS
Your TV is icon and menu operated. In other words, an icon is selected at the top of the TV screen and a menu of adjustmentoptions appears.
Highlighted Icon
The menu for theselected icon ap-pears below theicons.
I
5DUREE [_ VIDEO] J J
I
i]
ii!
i
I Main Source I
StarSightAnt/Cable 2Video 1Video 2S-Video 1Video 3S-Video 2
I
_. Main/PIP '1',1,To Select Source ]
PIP Source
StarSight
Video 1Video 2S-Video 1Video 3S-Video 2
PIP Inset
A PIP inset appears while theSource icon is selected to show
the result of selecting a PIPsource.
BASIC MENU OPERATION
Press MENUrepeatedly to choosefrom the available
menus.
Press the Up orDown arrows
repeatedly until thedesired option ishighlighted.
V
O O(D
_ ....
@®®@
t Press the Left or
, Right arrows to ""_-"_'_ladjust or change aselected option.
Press QUIT toremove menus orwait a few secondsand the TV will
return automaticallyto normal operation.
Typical Remote Control
2923-01-O 5 -- 1

SOURCE MENU
Video 3 and S-Video 2 are
source options for some TVmodels only.
I
Main Source
StarSightAnt/Cable 2Video 1Video 2S-Video 1
fVideo 3%S-Video 2q)* Main/PIP
PIP Source
StarSight
Video 1Video 2S-Video 1
Video 3 _S-Video
1'4, To Select Source
1A PIP inset appears while theSource icon is selected to show theeffect of choosing a PIP source.
If the PIP Source is changed, thePIP inset will remain on the screenafter you exit from menu opera-tions°
MENU OPERA "lION
@ Press SOURCE for direct entryto the Source Menu, or pressMENU repeatedly until theSource Menu is selected.
Press SOURCE repeatedly untilthe desired source is selected.
Press the Left/Right keys to se-lect either Main Source columnor PIP Source column.
Press QUIT or wait a few sec-onds for the TV to return to nor-
mal operation.
SOURCE SELECTION
ANT/CABLE 1 or 2 Routes the antenna or cable-TV source to the TV for viewing. You see program material from
whichever signal source is connected to the ANT/CABLE 1 or 2 jack. (If the signal is from a VCR ora cable box, tune the TV to either channel 3 or 4.)
VIDEO 1, 2 or 3 Routes the audio and video from an A/V source (such as a VCR or a video disc player) to the TV for
viewing. The source must be connected tO the corresponding VIDEO 1, 2 or 3 IN jacks.
S-VIDEO I or 2 Routes the audio and video from an auxiliary Super-VHS video source (such as a VCR or a video disc
player) to the "IV for viewing. The source must be connected to the corresponding S-VIDEO 1 or 2 IN
jacks.
Refer to the "Standard Connections for Your "IV" section to make the proper equipment connections to the TV. For information about PIPsources, refer to the "PIP Operation" section.
SOURCE IDENTIFICATION
Blue White
Auxiliary A/V Jacks (Some TV Models)
Magenta
NOTE:
• The color of the Channel/Time display corresponds to thecolor rings around the connectors of the jack panels. For ex-ample, the Channel/Time display will be Red if you arewatching a program on Ant/Cable 1 source.
Yellow Red
LOOP OUT ANTENNA ANTENNA
10 Mceett CABLE CABLE
lIOliITOAOUT VIOE61IN YIOEOZ Illi--All040--1 lrlmEO r-- AIIMO--I
Connection Center on Back of TV
Lt. Blue
I
2923.1_ 6 -- 1

SETUP MENU
Ch. Add/DelCh. LabelsSource IDClockSetTimer SetupParentalCtlCaption/TextBackgroundStarSight
Press 4), To Program
Clock SetTimer SetupParental CtlCaption/TextBackground
I Press 4).To Label Sources]
While a Video or Super-Video 2 Source is Chose.
MENU OPERATION
@ Press MENU repeatedly until theSETUP MENU is shown.
Press the Left/Right keys toadjust the selected option.
Press the Up/Down keys until thedesired option is selected.
Press QUIT or wait a few sec-onds for the TV to return to
normal operation.
Auto Program Finds all active channels and stores them in the TV's memory for use by CHANNEL up/down. See"THE FIRST TIME YOU OPERATE YOUR TV" for more details.
Ch. (Channel) Edits the channels found by Auto Program to create your own personal list of favorite channels. See theAdd/Del information following this chart for more details.
Ch. (Channel) Assigns a network/station label, name or call letters to specified channels. For example, if you chooseLabels the label "ABC" for channel 9, then "ABC" will appear in the Channel/Time display whenever channel
9 is selected. See the information following this chart for more details.
Source ID Assigns a descriptive "name" to the input sources. For example, the Video 1 source may be namedVCR. "VCR" will now appearin the Source Menu as a reminder that your VCR is connected to the
Video 1 input jacks.
Clock Set" Sets the clock in the TV to the correct time. Press the Left/Right arrow keys to advance the 24-hourclock, or use numbered buttons on the remote to enter time. Press ENTER to start the clock.
Timer Setup Sets the TV's Sleep Timer and On/Off Timer features. See the information following this chart formore details.
Parental Ctl. Use this feature to block viewing of any undesirable channels or an entire input video source. See the(Control) information following this chart for more details.
Caption/Text Displays closed captioning or informational text when available on the selected channel. Options are:Off, Caption 1, Caption 2, Caption 3, Caption 4, Text 1, Text 2, Text 3, Or Text 4. See the
information following this chart for more details.
Background Adds or removes a solid-color background behind the on-screen menus.
StarSight Begins the StarSight setup procedure. Refer to the StarSight section of this guide for details.
2923-ol-o 7 -- 1
continued on next page

SETUP MENU
USING CH. (CHANNEL) ADD/DEL
Add Channels to Scan
Press the Up/Down keys to se-lect Ch. Add/Delete.
Press Left/Right keys to viewthe add/delete screen.
Use the Left/Right and Up/Down keys to move selectorto the channel being added.
Add the channel by pressingSOURCE until the displayshows Added.
Delete Channels from Scan
• Press the Up/Down keys toselect Ch. Add/Delete.
• Press Left/Right keys to viewthe add/delete screen.
• Use the Left/Right and Up/Down keys to move selectorto the channel being deleted.
* Delete the channel bypressing SOURCE until thedisplay shows Deleted.
NOTE:
• Ch. Add/Del can only be used with ANT/CABLE 1or 2 Source.• The audio of deleted channels is muted.
Selector Highlight Available Channels
o O13 14 15 16 17 18
19 20 21 22 23 24
25 26 27 28 29 30
31 32 33 34 35 36
37 38 39 40 41 42 Added "_43 44 45 46 47 48 /
49 50 51 52 53 54 Press55 56 57 58 59 60 Source |61 62 63 64 65 66 ToChange I67 68 69 70 71 72
73 74 75 76 77 78
I..,. C,a..e,.+1Available channels are:
Broadcast Band -- VHF 2 to 13, UHF 14 to 83
Cable-TV Band -- 1 to 139
Live view ofselected channel.
----" Channel
Status
Instructions
Use Down key to,.- move selector to
additional numbersif present.
USING CHANNEL LABELS
i Assi_ Labels I
• Press the Up/Down keys to se- ;lect Ch. Labels.
• Press Left/Right keys to viewthe Channel Label screen.
• Select a channel by pressingthe CHANNEL Up/Downkeys.
• Use the Left/Right and Up/Down keys to move selectorto the desired label.
Press the Up/Down keys toselect Ch. Labels.
Press Left/Right keys to viewthe Channel Label screen.
Select a channel by pressingthe CHANNEL Up/Downkeys.
Use the Left/Right and Up/Down keys to move selectorto the four dashes or NONE.
NOTE:
• Ch. Labels can only be used with ANT/CABLE I or 2 Source.
• Selecting the four dashes (- - - -) specifies that no channel label is as-signed. Or, in addition to not assigning a label, NONE blocks the sta-tion or network labels that are transmitted by some television stations.
Selector Highlight Available Labels
NONE
ADC AMC BCC BET BRAVCA CBC CBN CBS CMTV
CNBC CNN COM CSPN CSP2CTN CTV DIS DISC E!ENC ESPN ESPN2 ET EWTNFAM FNN FOX F&V FX
GALA HBO HN HSE HSNIC INSP JCN LIFE MAXME/U MMT MTV NBC NICKNOS PBS PLAY PTL OVCRDS REQ SC SCFI SHOWSIN TBS TBN TELE TLC
I MoreLabels 4, t
%
Ch9
[ABC I
Live view of"'-" selected channel.
-.--- Current Channel
Selected Label
Press Down arrow"--" for more labels.
USING SOURCE ID
NmesTo rourSou :: !• In the Setup Menu, press the Up/Down keys to select Source ID. I
• Press the Left/Right keys to view the Source ID screen. I
• Press the Up/Down keys to choose a Source. ]
• Press the Left/Right keys to Label the chosen Source. !
VIDEO GAMES AND OTHER FIXEDPATI'ERN DISPLAY CAUTION
If you use your TV for video games or other fixed displays, avoid set-ting the BRIGHTNESS control for an excessively bright picture. Abright, fixed pattern, if used for long periods of time, can result in apermanent imprint on the TV picture tube. You can reduce this possi-bility by alternating the use of the fixed pattern display with normalTV picture viewing, by turning down the CONTRAST control forsustained fixed pattern use, and by turning off the fixed pattern dis-play when not in use.
Live view ofselecW_xlSource.
Source I
Ant/Cable I 1
AnVCable 2Video 1Video 2S-Video I
Label
StarSightAntennaVCRDisabledVideo Game
NOTE:
• "Disabling" a Source prevents it fromappearing in the Source Menu.
Optional names forANT/CABLE 1 or 2Sources are:
.... , Disabled, An-tenna, Cable, CableBox, Satellite, VCR,StarSight (Ant/Cable1only). ' -
Optional names forVIDEO Sources are:
.... , Disabled, VCR,VCR2, Camcorder,Video Game, LaserDisc, Audio Only,Satellite (some modelsonly).
2923-01-A 7 -- 2

SETUP MENU
TIMER SETUP: Sleep Timer
The Sleep Timer programs the TV to automatically turn itself off after a period from 15 minutes up to 4 hours.
From Setup Menu• Make sure the TV's clock is
set.
• Press the Up/Down keys toselect Timer Setup and viewthe Timer Menu.
• Press the Up/Down keys toselect Sleep Timer.
• Use the Left/Right keys to setthe period of time the TV willremain on.
Direct Access
• With no menus showing onthe TV, press TIMER on yourremote to directly access theSleep Timer.
• Press TIMER repeatedly toset the period of time the TVwill remain on.
• One minute before the TV turns off, the GOOD NIGHT displayappears on the screen. At this time you have a choice of thefollowing two actions.
,. Do nothing. The GOOD NIGHT display remains on the screen.The TV will turn off in one minute.
I" Delay the turn-off by resetting the timer with a new time period.
NOTES:
• To cancel the Sleep Timer, turn off the TV or press TIMER repeat-edly until OFF is showing.
• As the Good Night display counts down.the f'mal 60 seconds, theaudio and video of the TV also "dim" for a soft, discreet turn-off.
Timer Menu ]
On TimeOff TimeOn/Off Timer
0:15 }
Timer Set to Turn TV OFF in 15 Minutes
Sleep Timer ]Good Night 0:58
"Good Night" Display Appears 60 Seconds Before Shut-Off
TIMER SETUP: On/Off Timer
The On/Off Timer programs the TV to automatically turn itself on at a specific time then turn itself off at another time.
• Make sure the TV's clock is set.
• Press the Up/Down keys to select Timer Setup
• Press Up/Down keys to select On Time. and use the numberedbuttons on your remote to enter a time for the "IV to turn itselfON. Press TIMER on the remote to select AM or PM. (You canalso use the Left/Right keys to advance the time.)
• Press the Up/Down keys to select OffTime and use thenumbered buttons on your remote to enter a time for the TV toturn itself OFF. Press TIMER on the remote to select AM or PM.(You can also use the Left/Right keys to advance the time.)
• Press the Up/Down keys to select On/OffTimer and use theLeft/Right keys to turn the timer ON (or OFF).
NOTE:
• A time must be set for either On Time or Off Time in order to turnthe timer ON.
I Timer Menu
Timer
I
11:00 AM k]
On/Off Timer Set to Turn TV ON at 11:00 am
2923-01-O 7 w 3

SETUP MENU
USING PARENTAL CONTROL (PC)
Period of time PC [ ]Parental Control Menuwill be active. _1 t
Blocks entire source. _",,,pBlocks individual _ Block Hourschannels for Ant/ 1" Block Source
Cable I or 2 sources. _ Block Channels(Does not appear ifthe entire Ant/Cablesource is blocked by I O FFBlock Source.) t
f
1 2 3 4 S 6
7 8 [] 10 11 12
13 14 15 16 17 1819 20 21 22 23 24
25 26 27 28 29 30
31 32 33 34 35 36
37 38 39 40 41 42
43 44 45 46 47 48
49 50 51 52 53 54
55 56 57 58 59 60
61 62 63 64 65 66
67 68 69 70 71 72
73 74 75 76 77 78
Unblocked
Press +SourceTo Change
Live view ofselected channel.
Channel
Status
----- Instructions
Block Entire Source Re-enter PC While it is Activated
• Press the Up/Down keys to select ParentalCtl and press the Left/Right keys to viewthe PC Menu.
• Select Block Hours and use Left/Right keysto set the length of time PC will be active:OFF, 12, 24, 48 or 72 hours.
• Select Block Source and use Left/Rightkeys to"Block" the current input source.
• To block other sources, press the SOURCEkey and set them to "Block."
• Press ENTER to exit and enter any 4-digit"Parental Access Code" when prompted todo so. (You will be prompted to verify thenumber by entering it a second time.)
Block Individual Channels
(Ant/Cable I or 2 Sources Only)
Press the Up/Down keys to select ParentalCtl and press the Left/Right keys to view thePC Menu.
Select Block Hours and use Left/Right keysto set the length of time PC will be active:OFF, 12, 24, 48 or 72 hours.
DO NOTHING WITH BLOCK SOURCE.
Select Block Channels.
Use Left/Right and Up/Down keys to selecta channel and press the SOURCE key to setit to "Block." Repeat this for each channelyou want blocked.
Press ENTER to exit and enter any 4-digit"Parental Access Code" when prompted todo so. (You will be prompted to verify thenumber by entering it a second time.)
• Press the Up/Down keys to select ParentalCtl and press the Left/Right keys to viewthe PC Menu.
• Enter your access code.
• Make your changes (block more channels,reset the time period, etc.).
• Press ENTER to exit.
• You will be prompted to change your accesscode. Either enter a new 4-digit code or donothing to retain the current code.
REMEMBER YOUR CODE! TO RE-ACCESS PARENTAL CONTROL WHILE IT IS ACTIVATED, YOU MUST ENTER THISNUMBER. Otherwise, simply allow the specified period of time to elapse.
NOTE:
• Do not unplug the TV in an attempt to deactivate the Parental Control. This only resets Parental Control.
USING CAPTIONS
Activating Captions
(With CC Button)J
• Press CC button on remote.
• Press CC repeatedly to togglethrough the five choices: Off,Caption 1, Caption 2, Caption3 And Caption 4.
Activating Captions/Text
(From Setup Menu)
• Press the Up/Down keys toselect Caption/Text.
• Press Left/Right keys totoggle through the ninechoices: Off, Caption I,Caption 2, Caption 3, Caption4, Text 1,Text 2, Text 3, orText 4.
NOTE:
• At present, very few TV programs or video tapes offer text caption-ing for any option other than Caption 1. Therefore, Caption 1 is theonly recommended choice, unless you know that a specific program isproviding captioning using one of the other selections.
"J_4_IIoIAre you I '_
_ [°utthere? I ._ /
Typical Captions Display
Captions may be shown any-where on the screen.
m m m m m m m m m m
See special newscasttonight at 7:00PM bnchannel2.C )
Typical Text DisplayFixed size text window fillslower half of screen.
2923_1-o 7 -- 4

AUDIO MENUI I I
RUDID
:::,BassTrebleBalanceAudioEnhancement
MENU OPERATION
Press MENU repeatedly until theAUDIO MENU is shown.
Press the Left/Right keys toadjust the selected option.
Press the Up/Down keys until thedesired option is either high-lighted or selected.
Press QUIT or wait a few sec-onds for the TV to return to
normal operation.
Bass
Treble
Balance
Audio
(SAP is not an optionfor the video sources.
Audio signals receivedfrom a video source areassumed to be monaural
or stereo. )
Enhancement
Adjusts the BASS (low-frequency) level.
Adjusts the TREBLE (high-frequency) level.
Adjusts the balance of sound between the two speakers.
Allows you to select STEREO, MONO or 2ND AUDIO/SAP operation. See information below this chartfor more details.
STEREO:
MONO:
Directs the sound to the Left and Right speakers as supplied by the program. Stereo is
the recommend choice: The TV switches automatically between the STEREO and
MONO modes depending on the type of signal being-received.
Directs the same sound to both Left and Right speakers, even if the program beingreceived is in stereo.
2ND AUDIO/SAP:
Directs the sound for the Second Audio Program (second language) to both the Left
and Right speakers. SAP sound is always monaural. If SAP is selected, you hear theSAP (usually a second language). When the SAP broadcast ends, the TV switchesautomatically (defaults) to the type of signal being received, STEREO or MONO. TheTV switches back to 2ND AUDIO/SAP when the SAP broadcast resumes.
Mono or 2ndAudio/SAPSelected:
Stereo Selected:
Provides a list of options for enhancing the TV's audio. The options shown depend on what is selectedfor the AUDIO option above.
Your audio Enhancement options are Off and Pseudo Stereo. Off specifies _at noEnhancement is activated. Pseudo Stereo enhances monaural audio to emulate stereo-like sound.
Your audio Enhancement options are Off, Concert Hall, Theater, Night Club,
Stadium, Dolby Pro Logic-Normal and Dolhy Pro Logic-Phantom. Off specifies
that no Enhancement is activated. For the other options, see "Stereo Operation," and
"Dolby Pro Logic Operation."
NOTE:
• All adjustments on the Audio Menu are optional. You do not have to adjust these features in order to use your TV.
2923-os-o 8- 1

AUDIO MENU
SPEAKER BALANCE
Stereo Operation
is Select Stereo as the Audio option.
• Select a desired Enhancement: Concert llall, Theater, NightClub or Stadium, or set Enhancement to Off.
, Adjust Bass and Treble for the most pleasing sound.
, Select Balance and press the Left/Right arrow key to view thespeaker balance screen.
. Press the Up/Down keys to choose the speakers you want toadjust; either the front speakers (those in the TV) or the optionalsurround sound speakers.
• Press the Left/Right keys to adjust the selected speakers.
Dolby Pro Logic-NormalSelect Dolby Pro Logic-Normal as the Enhancement.
Turn on the external amplifierand set its volume toapproximately the samevolume as the TV.
Bass and Treble can not beadjusted for Pro LogicNormal.
• Select Balance and press theLeft/Right arrow key to viewthe Pro Logic balance screen.
* Press the Up/Down keys toselect a speaker (Left, Rightor Surround) to adjust.
• A highlight box and anaudible "hissing" sound will"bounce" between theselected speaker and theCenter,Reference.
Press the Left/Right keys toset the volume of the"hissing" (for the selectedspeaker) to approximately thesame level as the "hissing" ofthe Center Reference. Do
this for each speaker.
Dolby Pro Logic.Phantom
• Select Dolby Pro LogicPhantom as the Enhancement.
• Adjust Bass and Treble for themost pleasing sound.
• Select Balance and press theLeft/Right arrow key to viewthe Pro Logic balance screen.
• Press the Up/Down keys toselect a speaker (Left, Right orSurround) to adjust.
• A highlight box and anaudible "hissing" sound will"bounce" between the selected
speaker and the CenterReference.
Press the Left/Right keys toset the volume of the"hissing" (for the selectedspeaker) to approximately thesame level as the "hissing" ofthe Center Reference. Dothis for each speaker.
NOTES:
• Optional Surround speakers must be connected to hear Surround Sound.
• An external amplifier must be connected to use Dolby Pro Logic-Normal audio enhancement.
• To fully appreciate the quality of sound provided by the Dolby ProLogic audio system, make sure the speakers are balanced as de-scribed above.
• While Pro Logic-Normal is selected, Bass and Treble adjustments
on the TV are not possible. These must be adjusted using the exter-nal amplifier.
Press 4, 1' To Change SpeakerPress • • To Change Level
1; Front Speakers R_IIIIIIIII1(I)1111111111
u,n Surround Speakers Max[
<l i i I I I I I I I(DIII III I II1• I
I SurroundSpeakersRequiredI
Message appears when adjust-ing Surround Sound.
STEREO SOUND BALANCE
Up/Down arrow keys select the speakers.
Left/Right arrow keys balance sound to left and fightspeakers in television and increase/decrease surroundsound.
Highlight box"bounces"between selectedspeaker andCenterReference.
Press 4, 1' To Change SpeakerPress • • To Change Level
4
CenterReferenceSpeake_. I
I I I I I I t I ll_t I I1"11 1 It I_
Right Speaker II I I I I I I I I I_)1 I I I I I III I_.
Surround Speakers II I I I I I I I I Ill_l I I I I I I I•
I ExtemalAmTiflerRequirsd I
Message appears only for ProLogic Normal selection.
PRO LOGIC BALANCE
Up/Down arrow keys select the speakers.
Left/Right arrow keys adjusts the level of sound.
2923-o,-o 8 _ 2

VIDEO MENU
|UIOEO
BrightnessColorTintSharpnessColorTempVideo FilterAuto FleshPicture PrefProjoSetup
• O ,I
MENU OPERATION
@ Press MENU repeatedly until theVIDEO MENU is shown.
Press the Left/Right keys toadjust the selected option.
Press the Up/Down keys until thedesired option is either high-lighted or selected.
Press QUIT or wait a few sec-onds for the TV to return tonormal operation.
Contrast Adjusts the overall contrast and color level of the picture.
Brightuess Adjusts the brightness level of black areas in the picture.
Color Adjusts the intensity of the colors in the picture.
Tint Adjusts the color of the flesh tones to more Green or more Red.
Sharpness Adjusts the clarity of the edges around objects for the clearest picture quality.
Color Temp Changes the "color temperature" or picture white balance between cooler natural whites and warmer(Temperature) (red) colors.
Video Filter Reduces video "noise" or interference in dark picture areas resulting in clearer overall pictures.
Auto Flesh Automatically maintains natural skin tones under changing scene and video source conditions.
Picture PreT. Lets you decide if you want to use your own CUSTOM video settings, the factory PRESET video(Preference) settings or the factory preset THEATER video settings. The THEATER settings are preset to provide
optimum visual performance in low light "theater-like" conditions
Projo Setup Lets you verify and adjust, if needed, the dynamic color convergence of the TV picture. See theinformation following this chart for more details.
NOTES:
All adjustments on the Video Menu are optional. It is not necessary to adjust these features in order to operate the TV.
Any adjustments made to the Video Menu settings while Picture Pref. is in PRESET or THEATER mode will automaticallystore the current settings as the CUSTOM setting.
continued on next page
_23.1_ 9 N 1

REMOTE CONTROL Z-TRAK
INTRODUCTION
This multi-brand remote control operates the common features of most, but not all, models and brandsof IR (infrared) controlledVCRs. Some functions of yourparticularequipmentmay not be controlledby this remote. Insuch cases, use the originalremote controlfor
yourequipment,
BATTERY INSTALLATION
Batteries are provided, but must be installed before using the
remote control. When it no longer functions normally, or if it
loses memory, replace the batteries with two high-quality,
alkaline, size AA batteries. Match plus with plus (+ with +),
minus with minus (- with -) in the battery compartment.
Unless your equipment responds to the factory preset code,
you will need to reprogram the remote after you replace thebatteries.
NOTES:
• Do not place heavy objects on top of the remote controlkeys. Prolonged unintentional operation of the remote short-ens battery life.
• Remove the batteries if the remote control will not be usedfor a month or more. THE MANUFACTURER IS NOTRESPONSIBLE FOR DAMAGE CAUSED BY BAT-TERY LEAKAGE.
CHOOSING OPERATING MODE
To control your TV or VCR with this remote, you must firstchoose the mode of operation. Press the desired mode key for TV orVCR. Press TV to return to TV mode.
TV
SetremotetoTVmode
POWER
VCR
Z-Trak Remote
2923.ot_o 11 _ 1

REMOTE CONTROL Z-TRAK
BASIC OPERATIONS
Point Remote at TV or VCR
TVSet remote to"Iv mode.
VOL Up/_When operating TV: Increase volume
When operating VCR: Fast forward
VOL Down/'_When operating TV: Decrease volume
When operating VCR: Rewind
MUTE II
When operating TV: Mute sound
When operating VCR: Pause
RECRDWhen operating TV: Begin StarSight
record function
When operating VCR: Begin VCRrecord function
POWER
VCRremote to VCR mode
TRACKBALLoperating TV or VCR: Moves
on-screen pointer to desired TVmenu selection. Press on thetrackball to "choose" the selection.
CHAN Up/_When operating TV: Go to the nextchannelWhen operating VCR: Play
CHAN Down/•
When operating TV: Go to theprevious channel
When operating VCR: STOP
ENTERWhen operating TV: ViewChannel/Time display
When operating VCR: View VCRdisplay
FLSHBK
When operating TV: Tune TV tothe last channel viewed
When operating VCR: TV./VCRswitch
Z-Trak Remote
2923-01-0 11 -- 2

REMOTE CONTROL Z-TRAK
PROGRAMMING YOUR Z-TRAK REMOTE
Your Z-Trak remote is already programmed to work with mostZenith VCR's. If you have a non-Zenith VCR, or if your ZenithVCR does not respond to your Z-Trak remote, you will need toprogram your remote as follows:
1. Refer to the table of VCR Codes, in this section ofthe guide. Locate the 3-digit number which corre-sponds to your brand of VCR.
2. Make sure your TV is turned on.
3. While pointing the Z-Trak remote towards yourZenith TV, simultaneously hold the MUTE andENTER keys until the TV displays a VCR "Setup"screen (about three seconds). The VCR key will alsolight upon entering the Programming mode.
4. Notice that the current VCR brand code (initially"201") is displayed on the TV screen. Roll the track-ball up or down (or use CHAN Up/Down) to choosethe 3-digit number of your VCR.
5. When the correct 3-digit number is displayed on theTV screen, use the POWER key to make sure thatyour VCR turns on and off properly. If it does notrespond, refer to the VCR Codes table to select adifferent 3-digit number.
6. If your VCR turns on and off successfully, press thetrackball (or ENTER) to save the current VCR brandcode. The setup screen will disappear from the TV.Also, the VCR key will flash 3 times upon exitingthe Programming mode. The remote will be in theVCR mode.
7. Now try other controls on your VCR, such as Play,Rewind, etc., to make sure that the correct VCRbrand code number was selected. (If not, repeatsteps 3 to 7.)
8. The MUTE key can be pressed at any time to cancelProgramming mode. The original VCR brand codewill remain unchanged.
NOTE: Only the VCR mode can be programmed.
9. The Z-Trak remote will exit Programming modeautomatically after 60 seconds if no key press ortrackball movement is detected.
AUTO FIND OPTION
If you have tried all 3-digit codes listed for your VCR manufac-turer, and none of them operate your VCR, you will need to try"AutoFind" to see if a different code will operate your VCR:
1. Make sure your VCR is turned on.
2. Simultaneously hold the MUTE and ENTER keys un-til the VCR key lights up (about three seconds).
f
I
TV displaysVCR code
/
Equipment to becontrolled
Z-Trak RemoteControl
2923-o,-0 11 -- 3

REMOTE CONTROL Z-TRAK
3. Point the Z-Trak remote towards your VCR. PressCHAN UP followed by POWER. If your VCR didnot turn off, keep repeating CHAN UP followed byPOWER until the VCR responds.
4. If your VCR turned off, press ENTER to save thecode. The VCR button will flash three times after
ENTER is pressed.
5. Now try other controls on your VCR, such as Play,Rewind, etc., to make sure that the correct VCRbrand code number was selected. (If not, repeatsteps 2 to 4.)
6. The MUTE key can be pressed at any time to cancelAutoFind mode. The original VCR brand code willremain unchanged.
7, The remote will exit AutoFind mode automaticallyafter 60 seconds if no key press or trackball move-ment is detected.
NOTE:
• To view the code that was programmed, performSteps 2 and 3 of "Programming Your Z-TrakRemote."
VCR CODES BY BRAND NAME
Admiral
Adventura
Aiwa
Akai
Audio
Dynamics
Bell & Howell
Broksonic
Canon
Citizen
Craig
Curtis Mathes
Dacwoo
Daytron
DBX
Emerson
Fisher
Funai
General
Electric
Coldatar
Go Video
Hitachi
Instant Replay
J.C. Penney
JVC
Kenwood
Logik
LXI
Magnavox
Maratttz
Marta
, Memorcx
Mitsubishi
VCRS208, 261
231
231
223. 238, 241
202, 218
206,247
221.226,250,255
214
209
212
214,259
244,246,248,254
236,246
202,218
203.221,223,226,
233,235.243,250
211,212,213,247
231
214,216.220
209
256.262,263
215,257
214,227
214,215,218,227
202,225,258
2O2
239
209, 231
207. 214, 231
207, 218
209
206,212,214,231
204,222,252,264
Montgomery Ward
Multi Tech
NEC
Orion
Panasonic
Pentax
Philco
Philips
Pion_r
Portland
Pro Scan
Quasar
RCA
Realistic
Samstmg
Sansui
Sanyo
Scott
Sears
Shalp
Shintom
Signature2000
Sony
Sylvania
Symphonic
Tashiko
Tatung
Teac
Tcknika
Toshiba
Vector Research
Yamaha
Zenith
XRI000
208, 214, 216, 219,
231,249
239
202. 218
250
214,251,259
215
207.214
207,214,227
210,215
246
2 t6, 260
214. 259
215.216,220,227,240.
242,260
206,208,212.214,231
220,230
239
206,212,247
204,205.233,243
206,209,2-II,212.215
208,261
239
20_,214,216.219,
23I,249
217,232.237
207,214,227
231
12O9
202
202,231
234
205.215
204, 218
202,218
201.224.225,229,237
239
CLEANING THE TRACKBALL
To keep the Z-Trak remote functioning properly, it is necessary to occasionally clean the TRACKBALL device. To do this:
1, Use a solution of mild dish washing detergent and water.
2, Moisten a clean soft cloth with the solution and lay the cloth flat on a table.
3. Turn the Z-Trak remote upside down and gently roll the TRACKBALL on the cloth.
4. Allow the remote to air-dry before using it again.
CAUTION:
• DO NOT USE ALCOHOL OR OTHER CLEANING FLUIDS TO CLEAN THE TRACKBALL AS THESE MAYDAMAGE THE REMOTE.
2923-01-O 11 -- 4

QUICK REFERENCE TO MENUS: Z-TRAK
AVAILABLE MENUS
Your TV is icon and menu operated. In other words, an iconis selected at the top of the TV screen and a menu of adjust-ment options appears.
Ch 11
PBS
3:15
Stereo
TimerCaptionsZ TrakPiPFreeze
ChAll Ch
Flash
J<_[(_!_[_ VOLUME I>J
BASIC MENU OPERATION
1. Make sure that your Z-Trak remote is in the TV mode (rather thanVCR mode), by pressing the TV button on the top.
+ Press the trackball. A small square, known as the pointer, appearsin the middle of the screen. It should be blue, indicating TV mode.If you have StarSight, the pointer may be red, indicating StarSightmode. The next step tells you how to switch modes.
Q The pointer is moved by rolling the trackball up, down, left, andright. Move the pointer to the left edge of the screen. A column ofTV options appears. The icon at the top indicates which mode isactiv_ -- TV or StarSight (if connected). A TV icon represents TVmode; a circle with a star represents StarSight mode. You canswitch between the two modes by locating the pointer on the iconand pressing the trackball. The icon switches and the pointerchanges color.
Set the mode to TV (a blue pointer).
+
The various menus are not all visible on the screen simultane-
ously. Each menu appears when you move the pointer on top of it.
NOTE: Whenever the text reads "point to the option", itmeans "position the pointer on the option".
To make the pointer disappear, move it to the center of the screenand press the trackball.
2923-01-0 12-- 1

QUICK REFERENCE TO MENUS: Z-TRAK
CHANNEL ICONS
Ch 11
PBS3:15Stereo
The Channel/Time display accompanies the ChannelIcons Menu.
c. tChAll ChFlash
Chan I' and ,_
All Ch
Flash
Channel up or down; equivalent to CHAN Up or Down on the remote. Point to the arrow and press.
Gives you a complete listing of all channels on the screen. Channels currently stored in memory (via AutoProgram) are shown in color. However, you can tune to any channel on the list. Point and press on a channel;the program on that channel is shown in the PIP, along with the channel label. To tune to that channel, press onit again.
Tunes the TV to the last channel viewed. The FLSHBK button on the Z-Trak remote performs the samefunction.
VOLUME CONTROL
[ <t('-M_-_ VOLUME '_>"
Move the pointer to the bottom of the screen toview the Volume Control.
Point to the desired volume level on the slider
bar, and press the trackbaU. The volume levelautomatically jumps to the new value. Or, presson the arrows to gradually raise or lower thevolume.
Point and press on MUTE to turn the sound offcompletely.
You may also control volume and mute usingthe VOL Up/Down and MUTE buttons on theZ-Trak remote.
2923-01-0 12 -- 2

TV OPTIONS MENUI
_ ,_---...._._
Timer
CaptionsZ TrakPIP ONFreezeMove PIP*
Swap*
The TV icon will only
appear for Ant/Cable 1Source selection.
*Not always displayed.See table below
MENU OPERATION
Move the pointer to the left of
the screen to view the TV ,_Options Menu.
Press the trackball to select theoption. See the table below.
Point to the desired option.(Its status is shown at thebottom of the screen.)
Move pointer off the menu toremove it from view.
Timer The sleep timer allows you to program the TV to automatically turn itself off after a period from 15
minutes up to 4 hours. To activate this feature and change the interval, press the trackball while pointingat Timer.
Captions By pressing on this option, you can select Caption 1, Caption 2, Caption 3, Caption 4 or OFF.
Z-Trak This determines how fast the pointer moves as you roll the trackball. By pressing on this option, you canset this response speed to Slow, Medium, or Fast, according to your preference.
PIP ON - This turns the PIP (Picture-In-Picture) on or off. When you first turn the PIP on, the options menu(or OFF) disappears and the pointer moves into the PIP. You can then move the PIP around the screen, using the
trackball. Pressing the trackball then locks the PIP in place and removes the pointer.
Freeze Pressing on this option "freezes" the action of the picture in the PIP inset. See PIP Operation section fordetails.
Move PIP This option only appears when the PIP is on. Pressing on it causes the options list to disappear, and thepointer appears in the PIP. You can then move the PIP around the screen with the trackball. Pressing againlocks the PIP in its new location and returns the TV to normal viewing.
Swap This option only appears when the PIP is on and the PIP source is different from the main source. Thisoption "swaps" the main picture with the picture in the PIP inset.
2923-ol-o 13 _ 1

SOURCE MENU
Video 3 and S-Video 2 aresource options for some
TV models only.
[ Main Source I IPIP Source
StarSightAnt/Cable2Video 1Video 2
-Vidnn 1ideo 3-Video 2
IEXlT]
StarSight
Video 1Video 2R-Vidc_n 1
Video 3 )S-Video 2
MENU OPERATION
Move the pointer to the top left ofthe screen and point to theSOURCE icon. Press the trackball.
Point to the desired Main or PIPsource. Press the trackball. Or,press repeatedly on Main Sourceor PIP Source to toggle throughyour source options
tA PIP inset appears while theSource icon is selected to showthe effect of choosing a PIPsource.
If the PIP Source is changed,the PIP inset will remain on the
screen after you exit the menuoperations.
Point to "EXIT" and press thetrackball to remove the menufrom view.
SOURCE SELECTION
ANT/CABLE 1 or 2 Routes the antenna or cable-TV source to the TV for viewing. You see program material from
whichever signal source is connected to the ANT/CABLE 1 or 2 jack. (If the signal is from a VCR or acable box, tune the TV to either channel 3 or 4.)
VIDEO 1, 2 or 3 Routes the audio and video from an A/V source (such as a VCR or a video disc player) to the TV for
viewing. The source must be connected to the corresponding VIDEO 1, 2 or 3 IN jacks.
S-VIDEO I or 2 Routes the audio and video from an auxiliary Super-VHS video source (such as a VCR or a video disc
player) to the TV for viewing. The source must be connected to the corresponding S-VIDEO 1 or 2 INjacks.
Refer to the "Standard Connections for Your TV'" section to make the proper equipment connections to the TV. For information about PIP sources, refer to the
"PIP Operation" section.
SOURt2E IDENTIFICATION
Blue White
DEO 11IN N
MJDIO INPUT VIDEO INPUT
Auxiliary A/V Jacks (Some TV Models)
NOTE:
• The color of the Channel/Time display corresponds to the colortings around the connectors of the jack panels. For example, theChannel/Time display will be Red if you am watching a programon Ant/Cable 1 source.
Magenta
Yellow Red
Iff&nm_n't
©
Id01_tl'Ofl0Ltl
_ Green
Connection Center on Back of TV
Lt. _lue
2923-01-0 14- 1
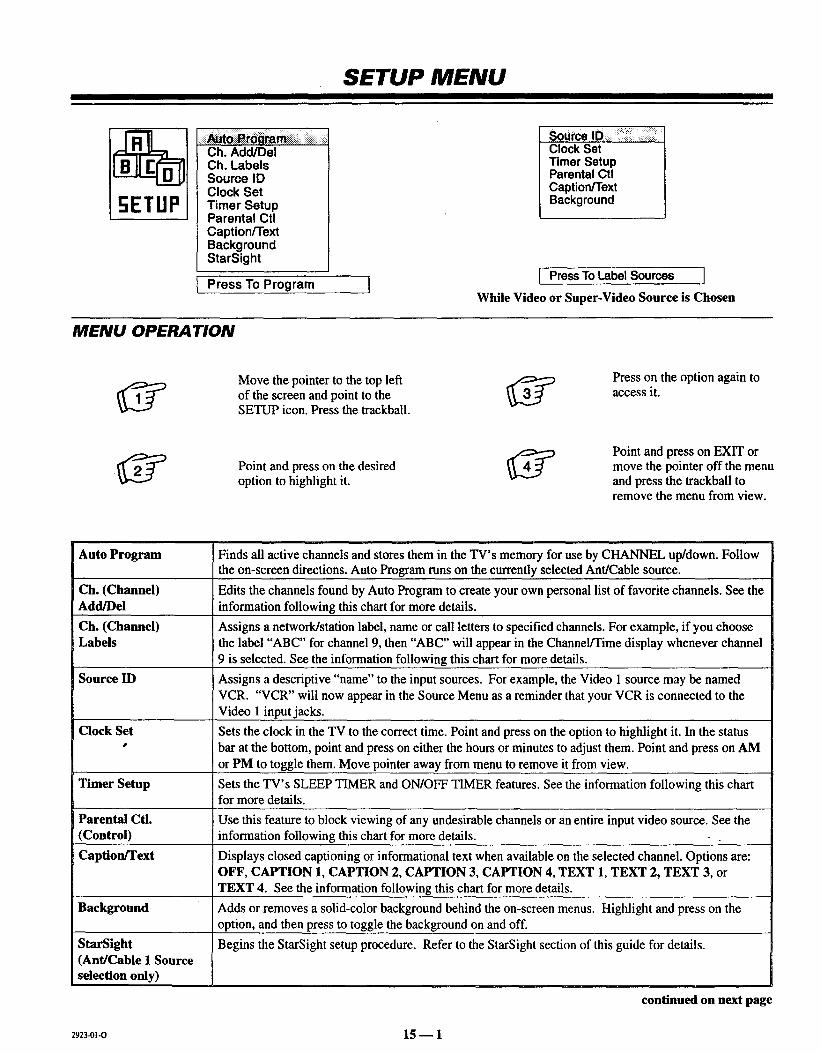
SETUP MENU
5ETUP
iiiiiii!A_!i!i_iiiiiiiiiiiiiiiiii!iii!iiiiiii_i,liiiiii_iCh. Add/DelCh. LabelsSource IDClock SetTimer SetupParental CtlCaption/TextBackgroundStarSight
l Press To Program 1
J ource IDClock SetTimer SetupParental CtlCaption/Text
Background
[ Press To Label Sources I
While Video or Super-Video Source is Chosen
MENU OPERATION
Move the pointer to the top leftof the screen and point to theSETUP icon. Press the trackball.
Press on the option again to
access it.
fro::1"- Point and press on the desired _\4:_option to highlight it.
Point and press on EXIT ormove the pointer off the menuand press the trackball toremove the menu from view.
Auto Program Finds all active channels and stores them in the TV's memory for use by CHANNEL up/down. Followthe on-screen directions. Auto Program runs on the currently selected Ant/Cable source.
Ch. (Channel) Edits the channels found by Auto Program to create your own personal list of favorite channels. See theAdd/Del information following this chart for more details.
Ch. (Channel) Assigns a network/station label, name or call letters to specified channels. For example, if you chooseLabels the label "ABC" for channel 9, then "ABC" will appear in the Channel/Time display whenever channel
9 is selected. See the information following this chart for more details.
Source ID Assigns a descriptive "name" to the input sources. For example, the Video 1 source may be namedVCR. "VCR" will now appear in the Source Menu as a reminder that your VCR is connected to theVideo 1 input jacks.
Clock Set Sets the clock in the TV to the correct time. Point and press on the option to highlight it. In the status° bar at the bottom, point and press on either the hours or minutes to adjust them. Point and press on AM
or PM to toggle them. Move pointer away from menu to remove it from view.
Timer Setup Sets the TV's SLEEP TIMER and ON/OFF TIMER features. See the information following this chartfor more details.
Parental Ctl. Use this feature to block viewing of any undesirable channels or an entire input video source. See the(Control) information following this chart for more details.
Caption/Text Displays closed captioning or informational text when available on the selected channel. Options are:OFF, CAPTION 1, CAPTION 2, CAPTION 3, CAPTION 4, TEXT 1, TEXT 2, TEXT 3, orTEXT 4. See the information following this chart for more details.
Background Adds or removes a solid-color background behind the on-screen menus. Highlight and press on theoption, and then press to toggle the background on and off.
StarSight Begins the StarSight setup procedure. Refer to the StarSight section of this guide for details.(Ant/Cable 1 Source
selection only)
continued on next page
2923-01-O 15 --1

SETUP MENU
USING CHANNEL ADDADEL
Add Channels to Scan Delete: Cha.elS fr?_iS _
:* Select Ch. Add/Del. • Select Ch. Add/Delete.
• Point to the desired channel. • Point to the desired channel.
!• Press trackball until channel • Press trackball until channelstatus shows Added. status shows Deleted.
Press on EXIT to tune to the channel pointed to by the highlight.
NOTE:
• Ch. Add/Del can only be used with ANT/CABLE 1or 2 Sourceselection.
• The Audio of deleted channels is muted.
13 14
19 2025 26
31 32
37 38
43 4449 50
55 56
61 6267 68
73 74 75 76 777_.B,- _']
• I Morn_mml. _
Available channels are:
Selector Highlight
I 1 27 8 _
4 5 6 I Chg__
10 11 12
15 16 17 1821 22 23 24
27 28 29 30
33 34 35 36 I Added39 40 41 42
51 52 53 54
57 58 59 60
63 64 65 66
69 70 71 72
Available Channels
Live view of"- selected channel.
--- Channel
.... Status
Press here to_" access additional
numbers if present.
Broadcast Band -- VHF 2 to 13, UHF 14 to 83
Cable-TV Band-- 1 to 139
USING CHANNEL LABELS
• Select Ch. Labels.
i• Select a channel by pointingand pressing Ch 1` or .[..
• Point and press on the desiredlabel.
• Press on EXIT to return to
normal viewing.
NOTE:
• Select Ch. Labels.
• Select a channel by pointingand pressing Ch 1"or ,1,.
• Point and press on the fourdashes or NONE.
• Press on EXIT to returntonormal viewing.
• Ch. Labels can only be used with ANT/CABLE 1or 2 Sourceselection.
• Selecting the four dashes (.... ) specifies no channel label. Or,selecting NONE blocks the station or network labels that aretransmitted by some television stations.
Selector Highlight Av.ailable Labels
--- NONE A&EADC AMC SCC BET BRAVCA CBC CBN CBS CMTV
CNBC CNN COB CSPN CSP2CTN CTV DIS DISC El
ENC ESPN ESPN2 ET EWTNFAM FNN FOX F&V FX
GALAHBO HN HSE HSNIC INSP JCN LIFE MAXME/UMM'r MTV NBC NICKNOS PBS PLAY PTL OVCRDS REO SC SCFI SHOW
Ch 9 _
ABC
° I-pCh
s,. rss r.. r ts rtc[ .oret.ab.,,S
_..
. Live view ofselected channel.
Current Channel
,Selected Label
- Channel Selector
- Point and press onthis box for morelabels.
USING SOURCE ID
• Select Source ID.
• Point to the desired "Source/Label" line and press to highlight it.[
Press repeatedy to scroll through the available labels.Press on EXIT to return to normal viewing.
VIDEO GAMES AND OTHER FIXEDPATTERN DISPLAY CAUTION
If you use your TV for video games or other fixed displays, avoid set-ting the BRIGHTNESS control for an excessively bright picture. Abright, fixed pattern, if used for long periods of time, can result in a ,.permanent imprint on the TV picture tube. You can reduce this possi-bility by alternating the use of the fixed pattern display with normalTV picture viewing, by turning down the CONTRAST control forsustained fixed pattern use, and by turning off the fixed pattern dis- NOTE:play when not in use.
Live view ofselected Source.
Source Label
Ant/Cable 1Ant/Cable 2Video 1Video 2S-Video 1
StarSight I
AntennaVCRVCR 2Video Game
Optional names forANT/CABLE 1 or 2Sources are:
_, Disabed, An-tenna, Cable, CableBox, Satellite, VCR,StarSight (Ant/Cable1 only)." -
Optional names forVIDEO Sources are:
_, Disabled, VCR,Camcorder, VideoGame, Laser Disc,Audio Only, VCR2,Satellite (somemodels only).
• Disabling a Source prevents it from appearing in the Source Menu.
29234)1-0 15 -- 2
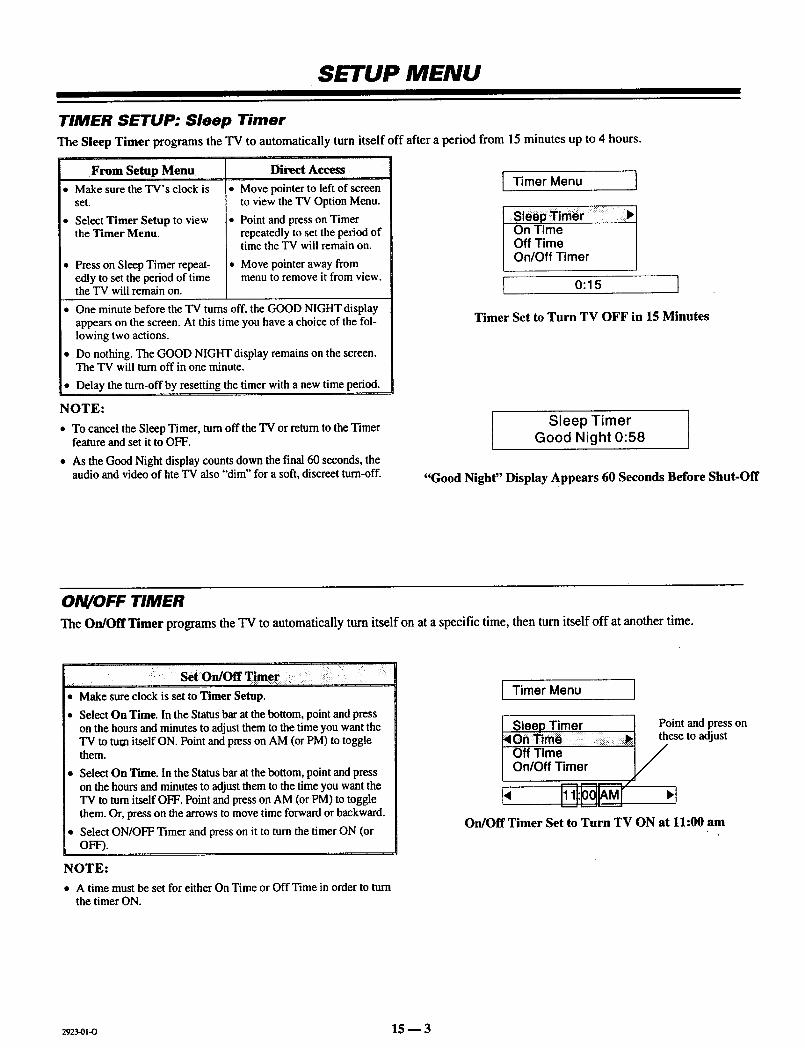
SETUP MENU
TIMER SETUP: Sleep Timer
The Sleep Timer programs the TV to automatically turn itself off after a period from 15 minutes up to 4 hours.
From Setup Menu
* Make sure the TV's clock isset.
- Select Timer Setup to viewthe Timer Menu.
• Press on Sleep Timer repeat-edly to set the period of timethe TV will remain on.
Direct Access.
• Move pointer to left of screento view the TV Option Menu.
• Point and press on Timerrepeatedly to set the period oftime the TV will remain on.
• Move pointer away frommenu to remove it from view.
• One minute before the TV turns off, the GOOD NIGHT display
appears on the screen. At this time you have a choice of the fol-lowing two actions.
• Do nothing. The Cd3OD NIGHT display remains on the screen.The TV will turn off in one minute.
• Delay the turn-off by resetting the timer with a new time period.
I Timer Menu I
On Time IOff Time /
On/Off Timer l
I o:15 ITimer Set to Turn TV OFF in 15 Minutes
NOTE:
• To cancel the Sleep Timer, turn off the TV or return to the Timerfeature and set it to OFF.
• As the Good Night display counts down the final 60 seconds, theaudio and video of hte TV also "dim" for a soft, discreet turn-off.
Sleep Timer IGood Night 0:58
"Good Night" Display Appears 60 Seconds Before Shut-Off
ON/OFF TIMER
The On/Off Timer programs the TV to automatically turn itself on at a specific time, then turn itself off at another time.
,,d
• Make sure clock is set to Timer Setup.
• Select On Time. In the Status barat the bottom, point and presson the hours and minutes to adjust them to the time you want theTV to ttu_nitself ON. Point and press on AM (or PM) to togglethem.
• Select On Time. In the Status bar at the bottom, point and presson the hours and minutes to adjust them to the time you want theTV to turn itself OFF. Point and press on AM (or PM) to togglethem. Or, press on the arrows to move time forward or backward.
• Select ON/OFF Timer and press on it to turn the timer ON (orOFF).
NOTE:
• A time must be set for either On Time or Off Time in order to turnthe timer ON.
I Timer Menu I
lSleep Timer ! Point and press on....• ......... .:.: these to adjust
[Off Time ............ I/I°"/°"+'m°'F
On/Off Timer Set to Turn TV ON at 11:00 am
292r01_ 15 -- 3

SETUP MENU
USING PARENTAL CONTROL (PC)
I Enter Parental Access Code: I
] <0><1><2><3><4><5><6><7><8><9>]
Point and press
I Parental Control Menu I _ on these digits toenter code.
Block HoursBlock SourceBlock Channels
14 OFF
_ eriod of time PC
will be active.
Blocks entire source.Blocks individual
P] channels for Ant/
Cable 1 or 2 sources.
1 2 3 4 5 6
7 8 [] 10 11 1213 14 15 16 17 18
19 20 21 22 23 2425 26 27 28 29 30
31 32 33 34 35 36
37 38 39 40 41 4243 44 45 46 47 48
49 50 51 52 53 5455 56 57 58 59 60
61 62 63 64 65 66
67 68 69 70 71 72
73 74 75 76 77 78
l More Channels i
Live view ofselected channel.
I Channel
Status
Block Entire Source Block Individual Channels
• Select Parental Cfl. • SelectParental Ctl.
• Select Block Hours and press on the arrowto set the length of time PC will be active:OFF, 12, 24, 48, or 72 hours.
• Set Block Source. Move the pointer tothe status bar at the bottom and press on"unblocked" to change it to "blocked."
• To block other sources, move the pointer tothe left side of the status bar and press to se-lect another source. Move the pointer backto the right side and press to show"blocked."
• Point and press on Exit and enter any4-number access code by pressing on theindividual numbers. You will be asked toverify the code by entering it again.
i• Select Block Hours and press on the arrow
to set the length of time PC will be active:OFF, 12, 24, 48, or 72 hours.
, DO NOTHING WITH BLOCK SOURCE.
• Select Block Channels.
• For each channel to be blocked, move thepointer to the number and press the trackballtwice.
• Point and press on Exit twice and enter a4-number access code by pressing on theindividual numbers.
Re-enter PC While it is Activated
• Select Parental Ctl.
;* Enter your access code when prompted todo so.
* Make your changes (block more channels,reset the time period, etc.)
• Point and press on Exit.
• You will be prompted to "change code ifdesired." Either enter a new 4-number code
or do nothing to retain the current code.
REMEMBER YOUR ACCESS CODE! TO RE-ACCESS PARENTAL CONTROL WHILE IT IS ACTIVATED, YOU MUSTENTER THIS NUMBER. Otherwise, simply allow the specified period of time to elapse.
NOTE:
• Do not unplug the TV in an attempt to deactivate the Parental Control. This only resets Parental Control.
USlN(; CAPTIONS
: Activating Captions
Highlight and press Caption/Text.
Press the trackball repeatedly to toggle through the nine choices:Off, Caption 1, Caption 2, Caption 3, Caption 4, Text 1,Text 2,Text 3, or Text 4.
NOTE:
• At present, very few TV programs or video tapes offer text caption-ing for any option other than CAPTION 1. Therefore, CAPTION1 is the only recommended choice, unless you know that a specificprogram is providing captioning using one of the other selections.
Typical Captions Display
Captions may be shownanywhere on the screen.
spedal n_ tonightat 7.'OOPMon I I_annel 2. )_r
Typical Text Display
Fixed size text windowfills lower half ofscreen.
2923-ol-o 15 -- 4

AUDIO MENU
; Treble'_l_J:_ I ] B_unal_nnCceement
,unlnj14 t o
MENU OPERATION
Move the pointer to the top left ofthe screen and point to theAUDIO icon. Press the trackball.
Press on the option or on theslider bar to adjust the option.
Point and press on the desiredoption to highlight it.
Move the pointer off the menuand press the trackball to removethe menu from view.
Bass
Treble
Balance
Audio
(SAP is not an optionfor thevideo sources.
Audio signals receivedfrom a video source areassumed to be monaural
or stereo.)
Enhancement
Adjusts the BASS (low-frequency) level.
Adjusts the TREBLE (high-frequency) level.
Adjusts the balance of sound between the two speakers.
Allows you to select STEREO, MONO or 2ND AUDIOISAP operation. After highlighting the option,press to toggle through the choices:
STEREO: Directs the sound to the Left and Right speakers as supplied by the program. Stereo isthe recommended choice: The TV switches automatically between the STEREO andMONO modes depending on the type of signal being received.
MONO: Directs the same sound to both Left and Right speakers, even if the program being• received is in stereo.
2ND AUDIO/SAP:
Directs the sound for the Second Audio Program (second language) to both the Leftand Right speakers. SAP sound is always monaural. If SAP is selected, you hear theSAP (usually a second language). When the SAP broadcast ends, the TV switchesautomatically (defaults) to the type of signal being received, STEREO or MONO. TheTV switches back to 2ND AUDIO/SAP when the SAP broadcast resumes.
Mono or 2ridAudio/SAPSelected:
Stereo Selected:
Provides a list of options for enhancing the TV's audio. The options shown depend on what is selected
for the AUDIO option above.
Your audio Enhancement options are Off and Pseudo Stereo. Off specifies that noEnhancement is activated. Pseudo Stereo enhances monaural audio to emulatestereo-
like sound.
Your audio Enhancement options are Off, Concert Hall, Theater, Night Club,
Stadium, Dolby Pro Logic-Normal and Dolby Pro Logic-Phantom. Off specifies
that no Enhancement is activated. For the other options, see "Stereo Operation," and"Dolby Pro Logic Operation."
NOTE:
• All adjustments on the AUDIO MENU are optional. You do not have to use these features in order to use your TV.
Continued on next page
2923-ol-o 16- 1

AUDIO MENU
SPEAKER BALANCE
• Stereo Operation i
• Select Stereo as the Audio option.
• Select a desired Enhancement: Concert Hall, Theater, NightClub or Stadium, or set Enhancement to Off.
• Adjust Bass and Treble for the most pleasing sound.
• Select Balance to view the speaker balance screen.
• Point and press on the speakers you want to adjust; either thefront speakers (those in the TV) or the optional surround soundspeakers.
• Press on the arrows or on a specific point on the slider bar toadjust the selected speakers.
Dolby Pro I Dolbyerol..... L_c,Phanto,:: :...... m
• Select Dolby Pro Logic-Normal as the Enhancement.
• Turn on the external amplifierand set is volume to approxi-mately the same volume as theTV.
• Bass and Treble can not beadjusted for Pro Logic-Normal
• Select Balance to view the Pro
Logic balance screen.
• Point and press on the speaker(Left, Right or Surround) youwant to adjust.
A highlight box and an audible"hissing" sound will "bounce"between the selected speakerand the Center Reference.
• Press on the arrows or on a
specific point on the slider barto set the volume of the"hissing" (for the selectedspeaker) to approximately thesame level as the "hissing" ofthe Center Reference. Do thisfor each speaker.
• Select Dolby Pro LogicPhantom as the Enhancement.
, Adjust the Bass and Treble forthe most pleasing sound.
• Select Balance and press theLeft/Right arrow key to viewthe Pro Logic balance screen.
Press the Up/Down keys toselect a speaker (Left, Right orSurround) to adjust.
• A highlight box and an audible"hissing" sound will "bounce"between the selected speakerand the Center Reference.
Press on the arrows or on a
specific point on the slider barto set the volume of the"hissing" (for the selectedspeaker) to approximately thesame level as the "hissing" ofthe Center Reference. Do this
for each speaker.
NOTES:
• Optional Surround speakers must be connected to hear SurroundSound.
• An external amplifier must be connected to use Dolby Pro Logic-Normal audio enhancment.
• To fully appreciate the quality of sound provided by the Dolby ProLogic audio system, make sure the speakers are balanced as de-scribed above.
• While Pro Logic-Normal is selected, Bass and Treble adjustmentson the TV are not possible. These must be adjusted using theexternal amplifier.
[_ FrontSpeakers RgtI I I I I I I I I I_11 I I I I I I I I_
MIn Surround Speakers Max[
411 I I I I I I I I_l I I I I I I I I I_ I
• I Surround Speakers Required I
I "Message appears when adjust-ing Surround Sound.
STEREO SOUND BALANCE
Point and press on slider bar to adjust balance.
Highlight box"bounces"
between selectedspeaker andCenter Reference. Right Speaker I4111 Illl Ill(I)ll I I I I Ill IDl"
[ SurroundSpeakers I4111111111 II1_1111 I II1_
External Amplifier Required I
Message appears only for ProLogic Normal selection.
PRO LOGIC BALANCE
Point and press on slider bar to adjust balance.
2923-01-O 16 -- 2

VIDEO MENU
1UInEn
ContrastBrightnessColorTint
SharpnessColor TempVideo FilterAuto FleshPicture PrefProjo Setup
MENU OPERATION
Move the pointer to the top left of thescreen and point to the VIDEO icon.Press the trackball.
Press on the option or on the sliderbar to adjust the option.
Point and press on the desired optionto highlight it. LL.ZJMove the pointer off the menu andpress the trackball to remove themenu from view.
Contrast Adjusts the overall contrast and color level of the picture.
Brightness Adjusts the brightness level of black areas in the picture.
Color Adjusts the intensity of the colors in the picture.
Tint Adjusts the color of the flesh tones to more Green or more Red.
Sharpness Adjusts the clarity of the edges around objects for the clearest picture quality.
Color Temp Changes the "color temperature" or picture white balance between cooler natural whites and warmer(Temperature) (red) colors.
Video Filter Reduces video "noise" or interference in dark picture areas resulting in clearer overall pictures.
Auto Flesh Automatically maintains natural skin tones under changing scene and video source conditions.
Picture Pref. Lets you decide if you want to use your own CUSTOM video settings, the factory PRESET video(Preference) settings or the factory preset THEATER video settings. The THEATER settings are preset to provide
optimum visual performance in low light "theater-like" conditions
Projo Setup Lets you verify and adjust, if needed, the dynamic color convergence of the TV picture. See theinformation following this chart for more details.
NOTES:
• All adjustments on the Video Menu are optional. It is notnecessary to adjust these features in order to operate theTV.
Any adjustments made to the Video Menu settings whilePicture Pref. is in PRESET or THEATER mode will
automatically store the current settings as the CUSTOMsetting.
continued on next page2923-01-o 17 -- 1

VIDEO MENU
PROJO SETUP
If you move your TV from its original location, or if aftertime, you notice color "fringes" around objects in the picture,you may want to realign the colors by adjusting the conver-gence as described in the following steps.
: : i!i__i:i :_i¸,, ' ....... i
• Press on bar to select Projo Setup.
• Press the Left/Right keys to view the "Converge" lines.
• Press on bar to select either RED or Blue lines to converge.
• Press the Up/Down and Left/Right arrow keys to place the colorlines directly on top of the white lines. (Do this for both colors ifnecessary.)
NOTES:
• Any adjustments made to the Video Menu settings while PicturePref. is in PRESET mode will automatically store the current set-tings as the CUSTOM setting.
• Each time the TV is moved to a different location, the convergenceshould be checked.
I nEDtOnBtoO-----I
/xA
<]t>t>
Four intersecting WHITE lines indicate properly converged tele-vision: No adjustment is necessary.
a_a to_8ton)----I _
e_ _.
Four RED (or Blue) lines offset from the WHITE lines indicateconverging is necessary. Follow the steps to align the color lineswith the white lines.
2923-01-O 17 -- 2

PIP MENU
PIP
Ch.ReviewPIPColorPIP TintPIPSize
Press To View [
Selecting the PIP Menu does not"activate" PIP. However, a PIP insetwill appear during menu operation toshow the effect of any setting changes.
MENU OPERA TION
Move the pointer to the top leftI_1_-" of the screen and point to the I_"_-_
PIP icon. Press the trackball.
Press on the option or on theslider bar to adjust the option.
Point and press the desired op-
tion to highlight it.
Move the pointer off the menuand press the trackball to removethe menu from view.
Ch. Guide Provides a visual review of all channels in the channel scan memory for the currently selectedANT/CABLE source. Press on a PIP inset to tune to the channel shown in the inset.
Ch. Review Provides a visual review of the last three (3) channels tuned on the TV. Press on a PIP inset to tune tothe channel shown in the inset.
PIP Color Adjusts the intensity of the colors in the PIP inset. Point and press on the arrows or slider bar.
PIP Tint Adjusts the color of the flesh tones in the PIP inset to more Green or more Red. Point and press on thearrows or slider bar.
PIP Size Adjusts the size of the PIP inset. Choose between small or large.
lCH 2
CH 3
CH 5
CH 6
CH7
CH 9
Ch. Guide Screen
Shows 3-second live displays of all channelssaved in the channel scan sequence.
CH 2
l JCH 3
CH 5
Ch. Review Screen
Shows3-secondlive displaysof thelast 3 channelsviewed on the TV.
2923-01-O 18 -- 1

MAINTENANCE AND TROUBLESHOOTING
CARING FOR YOUR PROJECTION TV
Your projection TV will look better, have a longer life and per-form better if you care for it properly.
_k irst check to see that the TV is off. For addedsafety, disconnect AC power to your TV.
NOTE: If you unplug your TV, you will have toreset the clock to the current time.
Cabinet Care
Non-Wood Cabinet or Cabinet Components Moisten a softcloth with a mild soap solution or Ivory dishwashing deter-gent. Wipe the surface with a damp cloth. Then rinse the clothin clean water and wipe the surface again. Allow the TV to air-dry before turning it on.
Wood Cabinets or Cabinet Components Use any good fur-
niture cleaner and polish. Regular care will help preserve thefinish.
Picture Screen Cleaning
Use a soft cloth moistened with warm water and rub lightly inthe soiled areas of the screen. DO NOT USE A TISSUE ORPAPER TOWEL, AS THESE MAY DAMAGE SURFACE.
Wipe only in the vertical (up/down) direction (along thegrooves). If there is a dirt buildup, a mild solution of warmwater and Ivory dishwashing detergent may be used. Use drysoft cloth to dry the screen. Care should be taken to avoid
scratches or damage to the screen surface.
NOTE -- The TV screen is easily damaged. Avoid acciden-tal contact with the screen.
EXTENDED ABSENCE
Before an extended absence (such as a vacation) you maywant to disconnect AC power to your TV. This will protectthe projection TV from possible damage from lightning orpower line surges. If you have an outdoor antenna, you mayalso want to disconnect the antenna from the wall plate con-nection center
NOTE: If you unplug your TV, you will have to reset theclock to the current time.
PICTURE INTERFERENCE
Your picture may be affected by interference caused by one ora number of factors. These include:
Speckled or Streaked Picture Can be caused by nearby auto-mobile ignition, electrical appliances, etc. This is most notice-able in weak signal areas.
Snow in Picture Caused by insufficient signal. Usuallycaused by the TV being located too far from the TV station orby an improper antenna installation.
Ghosts or Reflections Caused by signals being reflectedfrom surrounding buildings, water tanks, or other high struc-tures.
Radio Signal Police, amateur or CB radio transmitters maycause interference.
These interference problems can often be corrected throughthe use of a better antenna, signal amplifiers, or various filterdevices. See your TV dealer for additional information, and ac-cessories available for your projection TV.
TVCARPRO 19 -- 1

MAINTENANCE AND TROUBLESHOOTING
BEFORE CALLING FOR SERVICE
Check these items and see if you can correct the rouble by changing the adjustment of a control or the setting of a switch. By makingthese simple checks before calling for service, you may save time and money.
Problem
Picture OK. Poor sound.
Try This
Re-orient antenna. Try another channel -- possible station trouble.Adjust Audio Menu options. Check for local interference. Isantenna/cable connection loose?
Sound OK. Poor picture. Re-orient antenna. Try another channel -- possible station trouble.Adjust Video Menu options. Trouble with cable-TV system? Isantenna/cable connection loose?
No picture or sound. Is TV on? Is there power in wall outlet? Is TV plugged in? Is antennahooked up? Is cable hooked up? Trouble with cable-TV system?Check auxiliary audio/video equipment. Check channel selection. Isthe channel blocked by Parental Control?
Picture blurred or distorted. Ghost in picture. Check antenna or cable hook up for broken wires. Try anotherchannel -- possible station trouble. Check for local interference.
No color, or poor color. Is it a color program? Check antenna or cable hook up for brokenwires. Adjust Video Menu options.
No sound. Volume setting may be too low. Check MUTE button operation onremote control.
Cannot select certain channels. Channels may be skipped in Ch. Add/Del option of Setup Menu. UseAuto Program a second time.
No closed captions Are captions available? Is Caption 1, Caption 2, Caption 3, OrCaption 4 selected using the Captions option on the Setup Menu?
Black or blue box covers half of screen. Is text information available? Is Text 1, Text 2, Text 3 Or Text 4
selected in the Captions option of the Setup Menu.
No picture or sound when a video or Is audio/video source hooked up properly? Are all wires connected tosuper-video source is selected, the video source input jacks on connection center?
No stereo sound or weak stereo sound Check AUDIO mode. Was stereo sound present before selectingwhen using a stereo VCR. the video or super-video source?
PIP inset frame is black or lacks contrast when Adjust Pip Color and Contrast settings in PIP Menu. Are all wires
selecting a video or super-video source for PIP inset, connected to the video source input jacks on connection center?
PIP inset frame is "snowy" when using Ant/ Is TV/VCR switch on the VCR in the TV position?Cable 1 or'2 for PIP and Video 1 for main picture.
No picture when using a video source for the PIP Is TV/VCR switch on the VCR in the TV position?inset and Ant/Cable I or 2 for main picture.
Remote control does not work. Are batteries okay? Is TV turned ON? Is remote in TV mode?
Always request that your technician use only genuine Zenithexact replacement parts for continued Quality and Safety per-formance. Keep your Zenith ALL Zenith.
NOTES:
If your TV fails to respond to the Picture Pref. selection,or to any other menu selection, you must reset the TV.Simply disconnect the AC power cord from the power out-let. Wait a few minutes, then plug the TV back into theoutlet. You will have to reset the clock to the current time.
• Unplugging the TV does not deactivate the ParentalControl.
2923-o,-0 19 -- 2

REPLACEMENT PRODUCT REGISTRATION CARD
You could win a full refund on your new Zenith product.
Look for the Product Registration Card on your new video
product.
Each month a drawing is held by Zenith from the completed
Product Registration Cards received during the preceding
month. Zenith will reimburse the winner for the full purchase
price of the product purchased.
In order to participate, simply complete and return the Product
Registration Card at once, even if you choose not to complete
the information and interests portion of the questionnaire.
The odds of winning the free drawing described above, de-
pend on the number of participants. Free drawing offer is
void in Canada and other places where restricted or prohib-
ited by law. Offer is void for Hotel/Motel and Institutional
models. Rental models are not eligible.
Product Card lost or misplaced?
The Product Registration Card furnished with your video prod-uct is pre-printed with its Model and Serial numbers. Pleasefill out the card and mail it at your earliest convenience. It is
imperative that Zenith know how to reach you promptly if wediscover a safety problem that would affect you. If the originalcard has been lost or misplaced, you may use the replacementcard provided below. Either card will qualify you for the freedrawing, but you are limited to only one entry in the drawing.Complete the card, place it in an envelope and mail it to:
Zenith Electronics CorporationP. O. Box 173257
Denver, CO 80217-3257
Use the replacement Product Registration Card only if theoriginal card has been misplaced or lost.
|
|
i
||i=
i=
iii
PHOTOCOPY AND CUT ALONG DASHED LINE
Zenith Product Registration Card HSZ01-01(_) Please Print Clearly or Type (_) Area Code Telephone
1. l"-]Mr. 2. D Mrs. 3. _] Ms. 4. [7 Miss l
First Name Initial Last Name
IIIIIIIIII IIIIIIIIStreet
IIIIIIIIIIIIIIIIICity
IIIIIIIIIIIIIIIIState Zip Code
IIIIIIII1-11111
IIIIII1-11111
IIII IIIIIIApt. No.
IIIIIIIII II
® Date of Purchase
Mo. Day Yr.
IIIIIIIII
CopyNumbers HereFrom Label on Set
Pleaserecordthemodelnumberandserialnumberfromthestickeronthebackofyourset.
!
ii
|||
i=
mii
l
"rvc._dlD3

BROKENORLOSTREMOTECONTROL?
ForanExactReplacementRemoteControlfor your newZenithTelevision,seeyour localZenithDealeror orderdirect by calling1-800-255-6790. Toassurethe correct
remotefor your newZenith,pleasehaveyour television'smodel number
ready! ONLYs39.95OTHERFINEACCESSORIESFORYOURVCR.
WirelessSpeakerSystem:• Wirelessspeakersreceivesoundfrom IV,VCR,or Stereothrough walls, floors,oroutside.
• Createsan instanthomeentertainmentcenter!
• Speakersare easyto move--'nocordclutter."Anattractiveadditionto anyroom.
• Works up to 150feet! Indoorsand outdoors.
WirelessHeadphoneSystem:• WirelessHeadphonesreceivesound from IV,VCRor Stereothrough walls, floors or outside.
• Allowsfreedomof activitywhile relaxingorworking aroundyour home.
• Listento your stereowhile otherswatch IV inthe sameroom.
• Works upto 150feet! Indoorsandoutdoors.
WirelessInfrared HeadphoneSystem:• Enjoyyour favoriteIV show in privacywithout disturbingothers in the sameroom.
• Completelycordless,simpleto use.
• Rich, full sound--virtually interferencefree.
• Greatfor the hearing-impaired.
• Workswith anyIV, VCR,or audiodevice.
ZHBO0WIRELESSSPEAKERSYSTEM
ONLY$249.95 ONLY$119.95 ONLY$69.95
WIRELESS WIRELESSHEADPHONESYSTEM STEREOHEADPHONES
PHOTOCOPYPAGEANDDETACHHERE
Toorder these fineaccessories, ITEMNUMBER DESCRIPTION [QUANTITYPRICEPERITEM PRICEpleasefill outthis cardandreturn a photocopyto:
Attn: AccessoryOffersZenithVideoTechCorporation1000 MiLwaukeeAvenueGlenview,lUinois60025-2493
orcall1-800-255-6790
[] Check or moneyorder(MadepayabletoZenithVideoTechCorp.)
SUBTOTAL
CA7 3/4%,GA4°/o,IL8 3/4%,KS4.9°/o,k'Y6%,ME8°/o,PA8%,RI 7%,TX7 3/4°/o,VA41/2°/o,WA8.2°/o.
$4.50
[] Visa [] Mastercard
Account#
Illlllllllllllllt
SalesTax:Pleaseaddyourstatesalestaxifyouliveinoneofthefollowingstates.
ExpirationDate: Signature:
SHIPTO:
Telephone:( )
STATESALESTAX
SHIPPING& HANDLING
TOTALAMOUNTOFORDER
Name:
IMPORTANT:PLEASEBESURETOCOMPLETETHEINFORMATIONBELOW.
"IVModelNumber(fromstickeronbackofunit)
/ /TMSerialNumber Mo. Day Yr.(fromstickeronbackofunit) (Approx.dateofpurchase.)
PLEASEALLOWUPTO3WEEKSFORDELIVERY.THANKYOU!VCRACCS3611/95
Address:
Apt#
State
City
ZipCode
NOTE:OrderscanonlybesenttocustomerswitflintheUnitedStates.

YOUR ZENITH WARRANTY
Consumer Protection Plan for Zenith Projection TV
Welcome into the Zenith family! We believe that you will be
pleased with your new Zenith Projection TV. Please read this
Consumer Protection Plan carefully. It is a "ONE YEAR
FULL WARRANTY," plus a limited second year picture tube
warranty, as defined under federal law. This warranty gives
you specific legal rights, and you may also have other rights
that vary from state to state within the U.S.A.
Zenith's Responsibility
Service Labor and Parts -- During a period of one year
from effective warranty date, Zenith will supply new or
remanufactured replacement picture tubes or other parts, and
will pay for service labor by a Zenith authorized service
center, when such parts or service labor are needed to repair
the product as a result of manufacturing defects. Further,
Zenith will supply a new or remanufactured replacement for
any picture tube which fails during the second year after
effective warranty date because of a manufacturing defect.
Replacement parts are warranted for the remaining portion of
the original warranty period. The above service labor warranty
applies only in the U.S.A.
On-Site Service -- Warranty service is provided where the
Projection TV is installed.
Not Covered -- This warranty covers manufacturing defects
and does not cover installation, adjustment of customer
controls in the home, installation or repair of home antenna
systems, cable converters or cable company-supplied
equipment; it also does not cover damage due to misuse,
abuse, negligence, acts of God or other causes beyond the
control of Zenith. Any alteration of the product after
manufacture voids this warranty in its entirety.
Owner's Responsibility
Effective Warranty Date -- Warranty begins on the date oforiginal consumer installation. For your convenience, keep thedealers dated bill of sale or delivery ticket as evidence of thepurchase date.
Operating Guide -- Read your Operating Guide carefully sothat you will understand the operation of your set and how toadjust the customer controls.
Antenna -- Reception problems caused by inadequate homeantennas or faulty antenna connections are the owner'sresponsibility.
Important: Product Registration -- Please fill out and mallyour Owner Registration Card. It is imperative that Zenithknow how to reach you promptly if we should discover asafety problem that could affect you.
Warranty Service -- For warranty service information,contact any Zenith authorized service center. Parts and servicelabor that are Zenith's responsibility (see above) will beprovided without charge. Other service is at the owner'sexpense. If you have any problem in obtaining satisfactorywarranty service, call or write:
Zenith Electronics CorporationCustomer Service Department1000 Milwaukee AvenueGlenview, IL 60025
Telephone: (708) 391-8752Mon-Fri, 8:00 a.m. - 4:30 p.m. Central Time
NOTE: Before you ask for Warranty service, check theOperating Guide section entitled, "MAINTENANCEAND TROUBLESHOOTING." It may be possible toavoid a service call.
_RPRO2


SIGHT ®
STAR StarSight Telecast, Inc.39650 Liberty Street
s I G H T. Fremont, CA94538
Part No. 206-2923-01
Printed in U.S.A.
EP-EDCBA
WATCH US.

TO BE LICENSED TO USE THE STARSIGHT ® SYSTEM AND STARSIGHT
FEATURES OF THIS EQUIPMENT, YOU MUST BE REGISTERED WITHSTARSIGHT OR AN AUTHORIZED REPRESENTATIVE. LICENSED UNDERU.S. PATENT NUMBERS 4,706,121 AND 5,151,789. USE RIGHTS RESERVED.
STARSIGHT IS NOT IN ANY WAY LIABLE FOR THE ACCURACY OF THEPROGRAM SCHEDULE INFORMATION PROVIDED BY THE STARSIGHTSYSTEM. IN NO EVENT SHALL STARSIGHT BE LIABLE FOR ANYAMOUNTS REPRESENTING LOSS OF PROFITS, OR INDIRECT, SPECIAL, OR
CONSEQUENTIAL DAMAGES IN CONNECTION WITH THE PROVISION ORUSE OF ANY INFORMATION, EQUIPMENT, OR SERVICE RELATING TOTHE STARSIGHT SYSTEM.
© 1995 StarSight Telecast Inc.
StarSight is a trademark of StarSight Telecast.StarSight is a subscription service.This Operating Guide may not be duplicated,copied or transferred in any way without priorwritten permission of StarSight Telecast, Inc.
Patent Statement
The StarSight Guide system and its use are pro-
tected by one or more of the following U.S. pat-ents: U.S. Patent No. 4,706,121, U.S. Patent No.
5,151,789; use rights reserved. For licensing and
subscription information, call (800) 643-STAR.
Compliance Statement
This device complies with Part 15 of the FCC
Rules. Operation is subject to the following twoconditions: ( 1) this device may not cause harm-ful interference and (2) this device must accept
any interference received, including interference
that may cause undesired operation.
Trademark Statement
StarSight is a trademark of StarSight Telecast Inc.

INTRODUCTION ....................................... bWelcome ............................................... b
Cable Box and VCR Requirements ........................... h
INSTALLING STARSIGHT ............................ A-1
STEP 1. Fill out the StarSight Checklist ..................... A-1
STEP 2. Hook-Up Equipment ............................. A-2
STEP 3. Activate StarSight ............................... A-6
STEP 4. Checking Your StarSight Setup .................... A-7
PBS Stations .......................................... A-8
Cable Box Codes ...................................... A-10
VCR Codes .......................................... A-10
USING STARSIGHT WITH THE UNIVERSAL REMOTE . B-I
Basic Operation ........................................ B-1
Finding out more about what you're watching: the STAR button. B-2
What's on when you change channels: Grazing ............... B-3
What's on without changing channels: Browsing .............. B-4
Finding out what's on all channels: Grid Guide ............... B-5
Viweing what's on a single channel: Channel Guide ........... B-6
Choosing programs by category: Theme Guide ............... B-7
R_:ording what you're watching: Current Recording .......... B-8
Scheduling a recording from StarSight guides: Future Recording. B-9
Reviewing your schedule of individual recordings:Recordings List ................................... B- 10
Reviewing daily or weekly series recordings:Series Recordings List .............................. B- 11
How to watch one channel while recording another:Watch and record .................................. B- 12
Selecting and de-selecting channels ....................... B-13
Changing the channel order .............................. B-14
USING STARSIGHT WITH THE Z-TRAK REMOTE ..... (2-1
Quick Reference Guide .................................. C- 1
Getting started with the Z-Trak remote ...................... C-2
Finding out more about what you're watching:Channel Pop-Ups ................................... C-.4
What's on when you change channels: Grazing ............... C-5
What's on without changing channels: Browsing ............. C-5
Finding out what's on all channels: Grid Guide ............... C-6
Choosing a program: Tuning from a Guide .................. C-7
Viewing what's on a specific channel: Channel Guide ......... C-8
Choosing programs by category: Theme Guide ............... C-9
Recording what you're watching: Current Recording ......... (2-10
Reviewing your schedule of individual recordings:Recordings List ................................... C-11
Reviewing daily or weekly series recordings:Series Recordings List .............................. C-12
How to watch one channel while recording another: Watch andRecord .......................................... C- 12
CHANGING YOUR EQUIPMENT SETUP ............... D-IWhat you should do when you get a new VCR ............... D-1
What you should do when you change your cable box orservice or when you move ............................ D-2
TROUBLESHOOTING ................................ E-1
Before calling for service ................................ E*I
i i
How to use this operating guide
StarSight ir_stallation and operation is given in this portion of the operating guide. Follow the procedures given if you are
going to use StarSight.
_, Refer to the TV portion of this operating guide for TV installation and operation without StarSight.

Welcome
Welcome to StarSight, an innovative way to locateprograms and manage the many channels that you receive.
With StarSight, you can:
* See an instant description of what's on any channel.
• Select a program from a list that displays your
favorite types of shows by theme (movies, sports,
comedies, etc.).
• Get information about plots, casts, content ratings,
and running times.
• Tune from an on-screen guide right to the program
you selected.
• Program your VCR with the touch of one button.
• Re-arrange the order of your channels to put yourfavorites first.
Cable" Box and VCR Requirements.
Be sure to read these requirements carefully. They containimportant information you need to ensure that StarSightperforms properly.
• A VCR is required for recording capability. To take
full advantage of StarSight, your VCR must be
controllable by a wireless infrared remote control.
Otherwise, StarSight can still provide program
information, but will not be able to automatically
tune to or record a specific program on your VCR.
• If your VCR remote control does not have a number
pad with at least 10 digits, StarSight will be unableto tune the VCR.
• If you have a Cable Box, it must be controllable by awireless infrared remote control.
• Your Cable company should be able to provide a
remote-controlled Cable Box, if you do not alreadyhave one.
Your StarSight-equipped television is not designed
to operate with, or control, a satellite dish. For
information on StarSight products specifically
designed for satellite systems, see your local satellitedealer.
UniversalRemote
Z-TrakRemote
StarSight grid display shown on direct view TV for reference only.

StarSight must be installed properly for you to enjoy all of its benefits. To ensure proper installation, follow the procedure inthis section in the order they are presented.
STEP 1. Fill out the StarSight Checklist.
STARSlGHT CHECKLIST
Complete sections A and B, and keep this checklist close at hand during subsen'ption,
A PBS Station: Consult the table of PBS Stations, located at the end of this section.
Find the PBS station that is closest to your city. (If you receive two or more stations,
select the one with the clearest picture.) Write the PBS Station letters and channelnumber below.
PBS Station Letters:
PBS Station Channel Number:
For Cable Users Only: Check your Cable company's channel line-Up Oryourlocal
newspaper's TV listings to see if the PBS station in yourarea has a different channel
number from the one you wrotedown above. •
If so, write your PBS station's Cable channel number here:
(You will use this channel number during the Setup process.)
S Code Numbers: Consult the table of Cable Box Codes and VCR Codes, located at
the end of this section.
Find the code numbers that apply to your brands of Cable Box and VCR and writethem below.
C
CABLE BOX "
Code 1: :_ Code 2_ Code 3: ...................
Code 4: ,, . Code 5: ..... Code 6: ...............
VCR :-,
Code !: Code 2: . " Code 3:" " Code 4:
.Code 5: Code 6:. ................. Cod_ 7: :C_lo 8"...
Now proceed to "Step 2. Hook-Up Equipment."
During Subscription,.. StarSight will display on-screen your personal STAR numbe r
and I,D. number. When these numbers appear on your TV s_a_n, write them heze.
Star#
i.D.#
,,,,,, ,,,,, , ,, ,,, ,,, ,,, ,
A-I

STEP 2. Hook-Up Equipment.
There are four possible choices for hooking up yourequipment. Only one of these choices will apply to yourparticular equipment setup.
Turn to the appropriate Setup and follow the instructions,then proceed to "STEP 3. Activate StarSight."
If you have... Turn to
TV Only Setup 1
TV and Cable Box Setup 2
TV and VCR Setup 3
TV, VCR and Cable Box Setup 4
Setup 1: TV Only
If you receive your television signal by antenna or basicCable TV (no Cable Box):
,t
3_
Attach the cable coming out of the wall • to the
"ANT/CABLE 1" jack on the back of your TV.
Plug your TV into a power outlet not controlled by alight switch and turn your TV on.
Proceed to "Step 3. Activate StarSight."
CABLE A
A-2

Setup 2: TV and Cable Box
NOTE: DO NOT UNPLUG YOUR CABLE BOX ATANYTIME.
le
2.
e
e
Turn off, but do not unplug, your Cable Box.
Attach the cable coming out of the wall O to yourCable Box's "Input" or "Cable In" jack.
Attach an RF cable O to your Cable Box' s "Output"
or '"IV Set" jack, and the other end of this cable to the"ANT/CABLE 1" jack on the back of your TV.
Take the Remote Emitter -- it's a wire with a plug at
one end and two plastic bulbs at the other ends -- andpush the plug of the Remote Emitter wire into the"StarSight Control Port" on the back of the TV. Runthe Remote Emitter wire _ under the Cable Box and
place either one of the plastic bulbs about two inchesin front of the front panel of the Cable Box _. Makesure that the plastic bulb is facing the front panel ofthe Cable Box (see diagram below). Do not adhere the
Remote Emitter at this time. After you havecompleted subscribing to StarSight, and you haveconfirmed the correct code that operates your CableBox, you can peel off the backing of the sticker on theRemote Emitter and adhere it permanently.
5, Turn on your Cable Box.
6. Plug your TV into a power outlet not controlled by alight switch.
NOTE: DO NOT PLUG YOUR TV INTO THE
BACK OF YOUR CABLE BOX.
o
So
Tune your Cable Box to the PBS channel listed onyour StarSight Checklist.
Turn on your TV. Using the number pad on yourUniversal TV remote control, tune your TV to thechannel that allows you to watch Cable TV, usuallychannel 3 or 4. If these channels don't show your
Cable TV service, then try putting your TV onchannel 2, 5, or 6.
9. Proceed to "Step 3. Activate StarSight."
TO FRONT OFCABLE BOX
CABLE A
©00I I
Loop OUT
IN
BOXFRONT
A-3

Setup 3: TV and VCR 4.
3_
Attach the cable coming out of the wall O to the"VHF In" (FROM ANTENNA) jack of your VCR.
Attach an RF cable O to your VCR's "VHF Out" (TOTV) jack, and the other end of this cable to the"ANT/CABLE I" jack on the back of your TV.
Take the Remote Emitter -- it's a wire with a plug atone end and two plastic bulbs at the other ends -- andpush the plug of the Remote Emitter wire _ into the"StarSight Control Port" on the back of the TV. Run
the Remote Emitter wire under the VCR and placeeither one of the plastic bulbs about two inches infront of the front panel of the VCR. Make sure that theplastic bulb is facing the front panel of the VCR O.Do not adhere the Remote Emitter at this time. After
you have completed activating StarSight, and youhave confirmed the correct code that operates yourVCR you can peel off the backing of the sticker on theRemote Emitter and adhere it permanently.
Locate the section.on the back of your TV labeled"Video 1 In." Attach the three Audio/Video cables to
the "Video," "Audio R" and "Audio L" jacksand attach the other ends of the cables to the
corresponding "Video Out," "Audio R Out" and"Audio L Out" jacks on the back of your VCR. This isnecessary if...
• You have a VCR without a front panel channel
indicator that uses an on-screen display.
• You have a stereo VCR and would like to take
advantage of the stereo feature.
You would like to take advantage of PIP.
5o Plug your VCR into a power outlet and leave it off.
6° Plug your TV into a power outlet not controlled by.a
light switch and turn your TV on.
7. Proceed to "Step 3. Activate StarSight."
TO FRONT OF VCR
CABLE A
AUDIo L AUOIoR VIDEoour
_D_01 IN
VHFIN
T
VHF OUTVCR FRONT
A-4

Setup 4: TV and VCR and Cable Box
NOTE: DO NOT UNPLUG YOUR CABLE BOX AT
ANY TIME.
lo
2.
e
o
.
,
Turn off your Cable Box.
Attach the cable coming out of the wall O to the"ANT/CABLE 2" jack on the back of your TV.
Attach an RF cable Q to your TV's "LOOP OUT TODECODER" jack, and the other end of this cable to
your Cable Box's "Input" or "Cable In" jack.
Attach an RF cable I_ to your Cable Box's "Output"
or "TV Set" jack, and the other end of this cable to the"VHF In" (FROM ANTENNA) jack of your VCR.
Attach an RF cable _ to your VCR's "VHF Out" (TOTV) jack, and the other end of this Cable to the"ANT/CABLE 1" jack on the back of your TV.
Take the Remote Emitter -- it's a wire with a plug atone end and two plastic bulbs at the other ends -- andpush the plug of the Remote Emitter O wire into the"StarSight Control Port" on the back of the TV. Runone Remote Emitter wire under the VCR and place
one of the plastic bulbs about two inches in front ofthe front panel of the VCR Q. Make sure that theplastic bulb is facing the front panel of the VCR. Dothe same for the Cable Box. Do not adhere the Remote
Emitters at this time. After you have completed
activating StarSight, and you have confirmed thecorrect codes that operate your VCR and Cable Box,you can peel off the backing of the stickers on theRemote Emitters and adhere them permanently.
7. ocate the section on the back of your TV labeled"Video 1 In." Attach the three Audio/Video cables to
the "Video," "Audio R" and "Audio L" jacksand attach the other ends of the cables to the
corresponding "Video Out," "Audio R Out" and"Audio L Out" jacks on the back of your VCR. This isnecessary if...
• You have a VCR without a front panel channel
indicator that uses an on-screen display.
You have a stereo VCR and would like to take
advantage of the stereo feature.
You would like to take advantage of PIP.
8. Plug your VCR into a power outlet and leave it off.
9. Turn on your Cable Box.
10. Plug your TV into a power outlet not controlled by a
light switch.
NOTE: DO NOT PLUG YOUR TV INTO THE
BACK OF YOUR CABLE BOX.
11.
12.
Tune your Cable Box to the PBS channel listed onyour StarSight Checklist.
Turn on your TV. Using the number pad on yourUniversal TV remote control, tune your TV to the
channel that allows you to watch Cable TV, usuallychannel 3 or 4. If these channels don't show your
Cable TV service, then try putting your TV onchannel 2, 5, or 6.
13. Proceed to Installation "Step 3. Activate StarSight."
TO FRONT OF VCRAND CABLE BOX
CABLEA
A-5

STEP 3. Activate StarSight
To bring StarSight information into your home, you mustactivate StarSight. You start the process directly throughyour TV, in a series of easy steps that take only minutes.
How to Activate StarSight:
le
First, you must be sure that you:
• have completed the StarSight Checklist. 2.
• have followed the step-by-step installation
instructions on the preceding pages that apply to
your video equipment
• have your Universal remote control handy. 3.
• have a videotape ready that you can use for a
30-second recording test (if you have a VCR) 4.
• have a telephone nearby to call StarSight's toll-freeactivation number: 1-800-643-STAR.
e
e
e
If you have a Cable Box, make sure that it is tuned to
the PBS channel listed on the StarSight Checklist.
If you do not have a Cable Box, be sure that your TVis tuned to the correct PBS channel. StarSight willsearch for schedule information on this channel.
Press STAR on your remote control to get intoStarSight mode.
The StarSight Menu will be displayed with "ActivateStarSight" highlighted.
Press ENTER/TUNE to begin activation. Then followthe on-screen instructions.
StarSight will ask you about your equipment, searchfor schedule information on your PBS station anddisplay your STAR # and ID #. (Enter these numbers
in paragraph "C" of your StarSight Checklist.) Youwill also be asked to call StarSight.
The StarSight representative will ask you for some
subscriber information, and will activate StarSight.
When you have been authorized, you'll see a screenthat says: Congratulations?
Proceed to "Step 4. Checking Your StarSight Setup."
YOU SHOULD ALSO KNOW...
• If no schedule data is found, you may be tuned to the wrong PBS station. Check the PBS station written on yourStarSight Checklist and try again. Or, try tuning to a different PBS station that is listed for your area at the end ofthis section. (If no station is listed for your area, call 1-800-628-STAR for further information.)
A-6
Step 4. Checking Your StarSight Setup
If you do not have a VCR or Cable Box, proceed to
number 4.
Now that you' ve activated StarSight, the final step is to
test your equipment setup. Here's how:
le Press ENTER/TUNE on your remote control when
you see the "Congratulations!" message.
StarSight will now guide you through a series of
on-screen displays. Please follow the instructions
carefully. All you have to do is respond to the
on-screen prompts. If you're using a VCR, you'll be
prompted to insert a videotape that can be used for a
30-second recording test.
e Find the Cable Box and VCR codes on your
StarSight Checklist.
If you' ve listed more than one code for a given
brand of Cable Box and VCR, don't worry:
StarSight lets you test each code until the correctone has been found.
Be sure the Remote Emitters you placed previously
are positioned according to the instructions earlier in
this section.
e
e
Follow the on-screen instructions until you see a
screen that says: Congratulations!
If you have any difficulty finding the correct code or
getting your VCR or Cable Box to respond, call the
StarSight Help Desk at (800) 628-STAR.
Your StarSight System is now all set up and ready
to collect program information. You'll begin to
receive StarSight program information whenever
your TV is turned off or turned to your PBS station.
Initially, it will take between 4 and 12 hours to
collect program information, so we recommend that
you simply wait overnight. While your TV is off, it
will gather the information that it needs. Following
this initial process, your system will automatically
be updated with the latest program information any
time your TV is turned off.
YOU SHOULD ALSO KNOW...
It is important that you:
• Always be sure your"IV set is plugged in.
• Always leave your Cable Box ON, otherwise you risk losing your StarSight program information.
• Be sur_ you leave your VCR OFF when it's not being used. If you forget to turn off your VCR, a scheduled recordingcannot occur.
• It will normally take from 3 to 5 seconds for Cable Box channels to change. This is the time it takes for the RemoteEmitter's infrared signal to communicate with your Cable Box.
A-7

PBS Stations
City Station Channel
AlabamaAnniston WCIQBirmingham WBIQDothan WGIQ
Decatur WHIQ
tluntsville WHIQ
Mobile WEIQ
Montgomery WAIQ
AlaskaAnchorage KAKMFairbanks KUAC
ArizonaPhoenix KAETTucson KUAT
7
I0
43
25
25
42
26
7
9
8
6
CaliforniaFmreka KEET i 3
Fresno KVPT !8
Los Angeles KCET 28Monterey KTEH 54Sacramento KVIE 6
Salinas KTEH 54
San Diego KPBS !5Santa Barbara KCET 28
San Francisco KQED 9
San Jose KQED 9Stockton KVIE 6
Redding KIXE 9Visalia KVPT 18
ColoradoColorado Springs KTSCDenver KRMA
Pueblo KTSC
8
6
8
ConnecticutBridgeport WEDW 49Hartford WEDH 24
New Haven WEDY 65
Norwich WEDN 53
DelawareSea ford WDPB
Wilmington WHYY
Dist. of ColumbiaWashington, D.C. WETA
FloridaDaytona Beach WMFEFt. Lauderdale WPBT
Ft. Myers WSFPGainesville WUFT
I acksonville WJCT
Miami WPBT
Naples WSFP
Orlando WMFE
Panama City WFSGPensacola WSRE
Tampa WEDU
St. Petersburg WEDUTallahassee WFS U
Thomasville WFS U
West Palm Beach WXEL
64
12
26
24
2
30
5
7
2
30
24
56
23
3
3
II!1
42
City
GeorgiaAlbanyAtlanta
AugustaChatsworth
ColumbusDawsonMaconSavannah
Waycross
HawaiiHonolulu
Waikiki
IdahoBoiseIdaho Falls
Twin Falls
IllinoisCarbondale
Champaign
ChicagoMolinePeoria
QuincyRock Island
Springfield
IndianaElkhartEvansville
Fort Wayne
Lafayette
IndianapolisSouth Bend
Vincennes
IowaAmes
Cedar RapidsCouncil Bluffs
DavenportDes Moines
Fort Dodge
Iowa City
Mason CityRed Oak
Sioux CityWaterloo
KansasHutchinson
Lakin
Topeka
'KentuckyBowling GreenCape GirardeauLexingtonLouisvillePaducah
Tri-Cities
Station
WABW
WGTV
WCES
WCLP
WJSPWACS
WDCO
WVAN
WXGA
KHET
KMEB
KAID
KISU
KITT
WSIU
WILL
WTTW
WQPTWTVP
WQECWQPTWILL
WNIT
WNIN
WFWA
WFYI
WFYI
WNIT
WVUT
KDIN
KIIN
KBIN
KQCTKDIN
KTIN
KIlN
KYIN
KHIN
KSIN
KRIN
KOOD
KSWK
KTWU
WKYU
WSIU
WKLE
WKPC
WSIU
WSBN
A-8
Channel
14
820
1828
25
159
8
1110
4
10
13
812
11
24
47
27
24
12
34
9
39
20
20
34
22
111232
36
11
21
1224
36
27
32
9
3
!1
24
8
46
15
8
47
City Station Channel
LouisianaAlexandria KLPA 25
Baton Rouge WLPB 27El Dorado KLTM 13
Lafayette KLPB 27Lake Charles KLTL 18Monroe KLTM 13
New Orleans WYES 12
Shreveport KITS 24
MaineBangor WMEB 12Calais WMED 13
Lewiston WCBB 10
Presque Isle WMEM 10
MarylandAnnapolis WMPT 22Baltimore WMPB 67
Frederick WFPT 62
Hagerstown WWPB 31Oakland WGPT 36
Salisbury WCPB 28
MassachusettsBoston WGBH 2
Springfield WGBY 57
Holyoke WGBY 57
MichiganAlpena WCML 6Bad Axe WUCX 35
Bay City WUCM 19Detroit WTVS 56
Flint WFUM 28
Grand Rapids WGVU 35Kalamazoo WGVU 35
WGVK 52
Lansing WKAR 23
Marquette WNMU 13Mount Pleasant WCMU 14
Saginaw WFUM 28
Traverse City WCMW 21
MinnesotaAustin KYIN 24
Duluth WDSE 8
La Crescent WHLA 31
Mason City KYIN 24
Minneapolis-St. Paul KTCI 17
Superior WDSE 8
MississippiBiloxi WMAH 19
Bude WMAU 17
Columbus WMAB 2
Gulfport WMAH 19Greenville WMAO 23
Greenwood WMAO 23
Jackson WMPN 29
Meridian WMAW 14
Oxford WMAV 18
(Continued on next page)

PBS Stations
City Station Channel City Station Channel City Station Channel
MissouriHannibal WQEC 27Joplin KOZ! 26Kansas City KCPT 19Springfield KOZK 21St. Louis KETC 9
MontanaBozemanButte
KUSM
KUSM
99
NebraskaBassett KMNE 7
Hastings KUON 12KHNE 29
Lexington KLNE 3Lincoln KUON 12Merdrnan KRNE 12Norfolk KXNE 19North Platte KPNE 9Omaha KYNE 26Scottsbluff KTNE 13
NevadaLas VegasReno
New HampshireDurham
Keene
Littleton
KLVX 10KNPB 5
WENH 1IWNET 13WEKW 52WLED 49
WNET 13WHYY 12
New JerseyN. New Jersey
S. New Jersey
New MexicoAlbuquerque KNMESanta Fe KNME
55
New YorkAlbany-
Schenectady WMHT 17Binghampton WSKG 46Buffalo WNED 17New York WNET 13Norwood WNPI 18
Plattsburgfl WCFE 57Rochester WXXI 21
Syracuse WCNY 24Watertown WNPE 16
North CarolinaAsheville WUNFCharlotte WUNGColumbia WUNDGreenville WUNK
Greensboro WUNLJacksonville WUNMLinville WUNE
Raleigh-Durham WUNCRoanoke Rapids WUNPWilmington WUNJ
33582
252619174
3639
North DakotaBismarck KBME 3Drakinson KDSE 9
Ellendale KJRE 19
Fargo KFME 13Grand Forks KGFE 2
Minor KBME 3KSRE 6
Williston KWSE 4
OhioAkron WV1Z 25
WEAU 49Cleveland WV IZ 25Cincinnati WCET 48Columbus WOSU 34
Dayton WPTD 16Lima WBGU 27Portsmouth WPBO 42Steubenville WOUC 44Toledo WGTE 30
Youngstown WNEO 45
OklahomaCheyenne KWET !2Eufaula KOET 3
Oklahoma City KETA 13Tulsa KOED 1!
OregonBend KOAB 3
Eugene KEPB 28Klamath Falls KFFS 22Medford KSYS 8Portland KOPB 10
PennsyvaniaAltoona WPSX 3Erie WQLN 54
Harrisburg WITF 33Johnstown WPSX 3
Lancaster WITF 33
Philadelphia WHYY 12Pittsburgh WQED 13Scranton WVIA 44Wilkes-Barre WVIA 44
Rhode IslandNew Bedford WSBEProvidence WSBE
South CarolinaAllendale WEBA
Beaufort WJWJCharleston WITVColumbia WRLK
Conway WHMCFlorence WJPMGreenville WNTVGreenwood WNEH
Huntington WPBYRock Hill WNSC
Spartanburg WRETSumter WRJA
3636
14
167
3523332938333O4927
South DakotaAberdeen KDSD 16
Brookings KESD 8Eagle Butte KPSD 13Lowry • KQSD I lMartin KZSD 8Pierre KTS D I0
Rapid City KBHE 9Vermillion KUSD 2
TennesseeChattanooga WTCI 45
Jackson WLIT i 1Knoxville WKOP 15Memphis WKNO 10Nashville WDCN 8
TexasAmarillo KACV 2Austin KLRU 18
Corpus Christi KEDT 16Dallas KERA 13El Paso KCOS 13Ft. Worth KERA 13
Harlingen KMBH 60Houston KUHT 8Lubbock KTXT 5Odessa Midland KOCV 36San Antonio KLRN 9
Temple KNCT 46Waco KNCT 46
UtahSalt Lake City
"VermontBurlington
KUED
WCFE 57
VirginiaArlington WETA 26Charlottesville WHTJ 41
Harrisonburg WVPT 51Lynchburg WBRA 15Norfolk WHRO 15Norton WSBN 47
Petersburg WCVE 23Portsmouth WHRO 15
Richmond WCVE 23Roanoke WB RA 15
WashingtonSeattle KCTS 9
Spokane KSPS 7Tacoma KCTS 9Yakima KYVE 47
West VirginiaBeckley WSWP 9Bluefield WSWP 9Charleston WPBY 33
Clarkbarg WNPB 24Huntington WPBY 33Parkersburg WOUB 20Weston WNPB 24
Wheeling WOUC 44
WisconsinAppleton WPNE 38Eau Clair WHLA 31
Green Bay WPNE 38La Crosse WHLA 31Madison WHA 21Menomonie WHWC 28Milwaukee WMVS 10Park Falls WLEF 36
Rhinelander WHRM 20Wassau WHRM 20
WyomingCheyenneEvanston
KTNE 13KUED 7
A-9

Cable Box Codes
Cable Box Brand
Allegro
OE
Gemini
General Instrument
Hamlin
Jerrold
Kale Vision
Macom
Magnavox
Code
62
67
05, 31, 3804, 05, 06, 07,
08,09, 10, 18,6002, 45, 65, 66
04,07,08,09,10, 18, 60
3521
34
Cable Box Brand
NorthcoastNSCOakPanasonic
PhilipsPioneer
RegencySamsungScientific Atlanta
Signal
Sprucer
Code
75
35, 39, 68, 69, 70
11, 32, 42
13, 20
47, 50, 52, 54, 55
15, 4329
35
16, 23, 36, 6476
13
Cable Box Brand
StandardComponentsTexscan
Tocom
Unika
Universal
Video WayVid Tech
Viewstar
Zenith
Zenith HT-2000
Code
35
39, 56, 71
17, 18, 46
48, 62
58, 6249
40
54, 55, 7201
19
VCR CodesVCR Brand
AdmiralAdventura
Aiwa
Akai
AudioDynamicsBell& Howell
Broksonic
Canon
Cir.izen
CraigCurtis MathesD_ewoo
DaytronDBX
Emerson
FisherFunaiGeneral ElectricGo Video
Goldstar
Hitachi
Instant Replay
JC Penney
Code
08, 6131
31
23, 38, 41
02,18
06, 47
21, 26, 50, 55
14
09
12
14, 59
46, 48, 5446
02, 18
03, 21, 23, 26, 33,35, 43, 50
11, 12, 13, 4731
14, 16, 20
56, 62, 63
01,0915, 57
14, 27
14, 15, 18, 27
VCR Brand
JerroldJVCKenwood
LogikLXI
MagnavoxMarantzMartaMemorexMitsubishi
Montgomery WardMulti Tech
NEC
Orion
PanasonicPentaxPhilco
PhilipsPioneer
Portland
Proscan
QuasarRCARealistic
Code
18
02, 25, 58
02
39
09,31
07, 14, 31
07, 18
09
06, 12, 14, 31
04, 22
08, 14, 16, 31, 49
39
02, 18
50
14, 51, 5915
07, 14
07, 14, 27
lO,15"46
16, 60
14, 59
15, 16, 20, 27, 60
06, 08, 12, 14, 31
VCR Brand
SamsungSansui
SanyoScott
Sears
SharpShintom
Signature 2000
Sony Video8
Sony VHS
Sony
Sony Beta
Sylvania
SymphonicTashiko
TatungTeac
TeknikaToshiba
Vector Research
Yamaha
Zenith
Zenith VHS
Zenith Beta
Code
20
39
06,12,47
04,05,33,43
06,09,11.12,15
08,61
39
08,14,16,31,4917
32
32, 37
37
07, 14, 27
31
09
02
02, 31
09, 34
05, 15
04,18
02, 1800
01.24, 2537
A-10

Basic Operation
This section of the guide discusses the use of StarSight with the Universal Remote. The following illustration shows theUniversal Remote and its controls.
VCR_PressVCRbutton,then_POWER buttonto tum_
VCR onand off
FLASHBK "Return to the previously
tuned channel
DAYMove ahead24 hoursfromthe
screentime currentlydisplayedin StarSight Program Guides
(hold to repeat)
PAGE LEFT
Display the previous page
in StarSight Program
Guides (hold to repeat)
Move back 24 hours from the
screen time currently displayedin StarSight Program Guides
(hold to repeat)
NUMBER PADEnter number for direct
channel tuning', enternumber selections in
StarSight Setup
MENU/GUIDE
Display the Grid Guide orChannel Guide; access TV
on-ser_cfl _Bus
THEME
Display the Theme
Guide's program categones
Displays Ln-theGuide for some o
LEFTMove left one time slot or
column (hold to repeat)
RECORD
Schedule a program forrecording; confirm or
cancelrecordings
DOWN ARROWMove down one row or
selection; while viewingTV, display information
for programs on other
channels (hold to repeat)
RIGHT ARROW
Move right one time slot orcolumn (hold to repeat)
UPGo to the nextchannel
RIGHT
Display the next page inStarSight Program Guides
(hold to repeat)
•.'LDOWN
Go to the previouschannel
ENTER/TUNE
channel; enter selections in
StarSight Setup
UP ARROW
Move up onerow or selection;while viewing TV, displayinformation for programs onother channels-(hold to repeat)
QUIT/SEQExit the current screen or
Pop-up, or return to thecurrently tuned channel
STAR
Press to useStarSight;displayStarSight InformationPop-ups; make and confLrmselections
TO DO
Display list of single
recordings, series recordings,and StarSight Setup Menu
TV/VCR SOURCE
Select different equipmentconnected to your TV(eg. VCR)
B-1

Finding out more about what you'rewatching: the STAR button
1. Press the STAR button. You'll see the program titleand time remaining "Pop up" for five seconds.
e
e
Press STAR again. The Pop-up changes to providemore detailed information. (It goes away in 30seconds.) Or...
Press STAR again to resume watching TV.
i obert FoPbes Perkins paddles
along the canals and rivers ofEngland and Scotland.
Stereo (CC)
_ _ _::_ °_ :_ ..... i ...... _:_ _'___ C.BL I_
8:08PII
YOU SHOULD ALSO KNOW...
• If at anytime youfindyoucannotactivatethe StarSightfunctions,justpressthe STAR button.
B-2

What's on when you change channels:Grazing
1. Press CHANNEL/Day Up or Down to changechannels.The Pop-up for the new programautomatically displays and then disappears in fiveseconds.
CBL
2,, Press STAR while the Pop-up is displayed to get evenmore information on the program.
i!i!!i!i!Travels
3. Press STAR again to resume watching TV.
8:08
YOU SHOULD ALSO KNOW...
• If you press STAR twice and then change channels, you will get full program descriptions while you are channelsurfing. (Does not apply to Cable Box Setups.)
p,_'_

What's on without changing channels:
Browsing
1. Press 1"or ,1,to see what's on other channels. Notice that
you will continue to see your presently tuned program,but will get a Pop-up for a program on a differentchannel.
2. Press 1"or ,[, as many times as you'd like (or hold to
repeat) to see Pop-ups for different programs.
e Press STAR while the Pop-up is displayed to get evenmore information on the program.
4. Press STAR again. The Pop-up disappears.
........A middle-aged couplediscoversnew sides to their relationship
YOU SHOULD ALSO KNOW.,.
• Press ENTER/TUNE to go directlyto the program in the Pop-up.
• If the PIP window is displayed, press the STAR button and then press T or ,1,to browse channels.
• The program title Pop-up appears inyellow for the currently tuned program.
B-4

Finding out what's on all channels:Grid Guide
Using the StarSight Grid Guide to see:
• *what's on right now
• what's on for the next seven days
• what the programs are about
le Press MENU/GUIDE to see a full listing of allprograms. (Remember: If the Grid Guide doesn'tappear, you may not be in StarSight mode. Just pressSTAR.)
2. Press ,_, •, T, or _ to move the highlight bar aroundthe Grid Guide.
SEP7
SEP7
STARSIGHT
e
ome ALOne
In A Day's NorM,a"ior League Baseball (L)BatmanZn th'e Be'st ofTimesCasabLancaThe Prince of Tides
WET_<_:PBS CBL_ 9:00P
S T A R S I G H T
3. Press STAR any time to get information about the
highlighted show.
4. Press PIP to view the currently highlighted show.
5. Press ENTER!TUNE to tune to any currently
highlighted show.
6. • Press QUIT/SEQ to resume watching TV.
Scott and Roll
9:00P
YOU SHOULD ALSO KNOW...
• Press numbers followed by • or • to move to a specifictime in the guide.
• Press RECORD to record any highlighted show.
• Press VOLUME/Page Left or Right to see additional channel listings.
• Press CHANNEL/Day Up or Down to see different days for the same time.
- If you have a cable box, the PIP window will only show your presentlytuned channel.
B-5

Viewing what's on a single channel:Channel Guide
Do you have a favorite channel? Showtime?Nickelodeon?
Whatever it is, StarSight can show you a channel'sschedule for an entire week.
1, Press MENU/GUIDE to see the Grid Guide.
2, Press 1"or ,1, to move the highlight bar to the channelyou want to know about.
STARSIGHT
I4 1
Scott and MoLlyBingoALL in a Day's WorkMajor League BasebaLLBatmanFresh Prince tBlossomAvonleaThe Prince of Tides
CNN_: _.:_-._. CBL
(L)
7:25P
e
de
e
6.
Press MENU/GUIDE again to see the Channel Guidefor the channel you highlighted.
Press VOLUME/Page Right to see more programs onthe same channel.
Press ENTER/TUNE to tune to a current program.
Press QUIT/SEQ to resume watching TV.
YOU SHOULD ALSO KNOW...
7:00P Moneyline._"- -_ X _ v w _ .: _ _.e_- _ "
8:00P Primenews
9:00P Larry King Live!
IO:OOP WorLd News
11:00P Sports Tonight
11:30P Moneyline
12:00A Newsnight12:30A Inside Politics
I:00A Showbiz Today
1:30A Newsnight Update
2:00A Worldwide Update
'92
7:25P
• Press STAR to learn more about a program.
- Press CHANNEL/Day Up or CHANNEL!Day Down to see the Channel Guide for other channels.
• Press MENU/GUIDE to go back and forth between the Channel Guide and Grid Guide.
• Press RECORD to record any highlighted show.
B--6
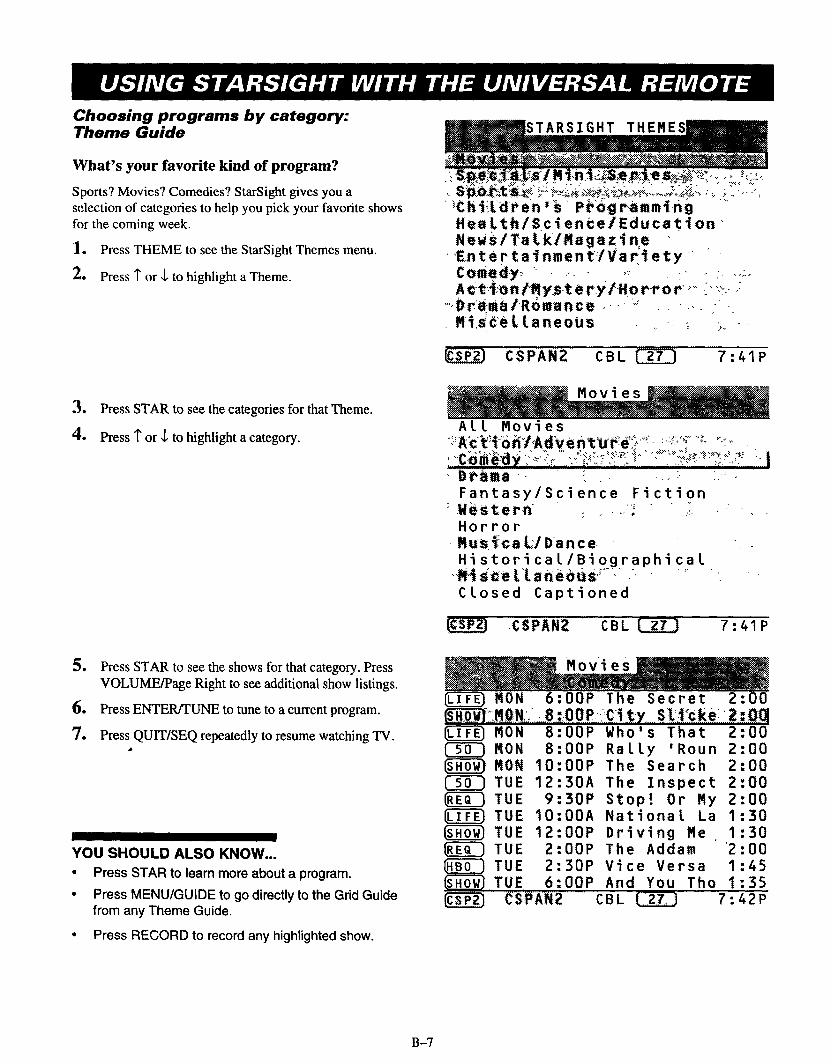
Choosing programs by category:Theme Guide
What's your favorite kind of program?
Sports? Movies? Comedies? StarSight gives you aselection of categories to help you pick your favorite shows
for the coming week.
1. Press THEME to see the StarSight Themes menu.
2. Press 1"or ,L to highlight a Theme.
TARSIGHT
CSPAN2 CBL _ 7:41P
3. Press STAR to see the categories for that Theme.
4o Press 1"or ,1,to highlight a category.
Movies
ALL Movies
"_'_c_i_ _1_ dv ent_'_d_ °÷: _'_ _;_ "°:_• _-,;,,,-,. -._ ,'_ ,,,, o:_,:,o.%_ _^" o_,_.,_:_ ? _ _.i _-o$_dy..,.._...::_ ........._..._._.._._..._.:.........!.................._:: .....::_,..:,.:...... I
Fantasy/Science Fiction
MeStern- : .. ::Horror
-Rus._cat;/Bance-HistoricaL/Biographical
,,_¢.eL-Laneb_S; o--,........
Closed Captioned
.CSPANZ CBL _ 7 : 41P
m
°
7.
Press STAR to see the shows for that category. PressVOLUME/Page Right to see additional show listings.
Press ENTER/TUNE to tune to a current program.
Press QUIT/SEQ repeatedly to resume watching TV.
YOU SHOULD ALSO KNOW...
• Press STAR to learn more about a program.
• Press MENU/GUIDE to go directly to the Grid Guidefrom any Theme Guide.
• Press RECORD to record any highlighted show,
MON 8:00P Who's That 2:00
CED
EE3
MON 8NON 10TUE 12TUE 9TUE 10TUE 12TUE 2TUE 2:30PTUE 6:00P
_S'PAN2 CBL
:OOP Rally 'Roun 2:OOP The Search 2
:30A The Inspect 2:30P Stop! Or My 2:OOA National La 1
:OOP Driving Me 1:OOP The Addam 2
Vice VersaAnd You Tho
:00:00:O0:00:30:30:00
1:451:35
7:42P
B-7

Recording what you're watching:Current Recording
IMPORTANT: Your VCR must be turned off when you'renot using it.Also, be sure you have inserted a blankvideotape in the VCR.
le Press RECORD to see a Recording Pop-up. Noticethat the yellow highlight bar is on "ONCE."
If you're recording an event that might run over (for
example, a baseball game), press • on the Record-
ing Pop-up to extend the end time of the recording in5 minute increments.
2. Press RECORD again to confirm your recording.
StarSight will turn on your VCR and begin recordingin a few seconds.
:3. To cancel a recording in progress, press RECORDagain and then press STAR to confirm.
YOU SHOULD ALSO KNOW...
• To turn your VCR on and off with the remote control,press the VCR button, followed by the POWERbutton. (See "Programming Your Remote" in the TVsection of this guide.)
• Do not press VCR buttons while a StarSightrecording is in progress.
• "ONCE" records the current program only, "DAILY"records the same program every day (M-F), and"WEEKLY" records it once a week.
8:25P
B-8

Scheduling a recording from StarSight
guides: Future Recording
fMPORTANT: Your VCR must be turned off when you're
not using it.Also, be sure you have inserted a blankvideotape in the VCR.
1. Press MENU/GUIDE to see the Grid Guide.
2. Press ,_, I_, 1",or ,1,to highlight a current or future
program.
e
4.
5.
Press RECORD to see a Recording Pop-up for theselected program.
Press T or J, to select ONCE, DAILY or WEEKLY.
Press RECORD again to confirm your recording. Justbefore your scheduled recording, StarSight turns onyour VCR and begins recording.
STARSIGHT
PrimenewsMathnet: Desp] Hath ,., WhoScott and HollyBi,og9ALL In A Day's Work
Majo,r League Basebali '(L)Batman
Blossom [ in the Best
Avonlea [ CasablancaThe Prince of Tides
_N_::_ _ CBL _ 8:00P
S T A R S I G H T
U.S. Senate Coverage
Larry King Live!9:00P-10:00P
Press RECORD
DAILY (M-F) again to confirm L
WEEKLY recording _
_NH_-:;_:,-_? CBL _ 8:00P
Use [4IF Ito change end time
REMINDER: Leave VCR off.
6. To cancel a selected recording, highlight the program
on the Grid Guide (it will be shown in red), pressRECORD and then press STAR to confirm.
You can schedule recordings or cancel them from the GridGuide, Cl_annel Guide or Theme Guide.
YOU SHOULD ALSO KNOW...
• Selecting ONCE records the selected program.
• Selecting DAILY records a program every day (M-F).
S T A R S I G H TSEP M0N -
__ .-'._._:-I
[SHOW) Scott and MoL,,L,zBingoALL In A .Day's WorkMajor League Baseball.(L)Barman
BLossom _ i_ the BestAvonlea [CasabLancaThe Prince of Tides
CNN :._: CBL _ 8:OOP
• Selecting WEEKLY records a program once a week.
• You can extend the end time of a recording in 5 minute increments by pressing _ on the Recording Pop-up.
• For more information on recording,see "YOU SHOULD ALSO KNOW... Recording what you're watching: CurrentRecording."
B-9

Reviewing your schedule of individualrecordings: Recordings List
StarSight keeps track of up to 25 scheduled recordings,including the four most recently completed.
1. Press TO DO to review your scheduled recordings.
RECORDINGS
TUE I:00A Showbiz Tod :30
TUE
_ TUEWED
WED
THUFeZ
4:00A
6:30A
6:30A
8:00P
6:30A
6:30A
Casablanca
Getting Fit
Getting Fit
Beverly Hil
Getting Fit
Getting Fit
2:00:30:30
1:00:30:30
2. Press 1"or $ to highlight a recording.
:.SHOg_IRE CBL _ 10:05P
L_t_)RECORDINGS
MON IO:OOP
MON 11:00P
TUE I:00A
TUE 4:00A
TUE 6:30A
WED 6:30A
WED 8:00P
THU 6:30A
FRI 6:30A
Northern Ex
GaslightShowbiz Tod
Casablanca
Getting Fit
Getting Fit
Beverly Hil
Getting Fit
Getting Fit
:052:00:30
2:00:30:30
1:00:30:30
3. Press STAR to see information about the program.
4. Press QUIT/SEQ to resume watching TV.
YOU SHOULD ALSO KNOW...
• To cancel a recording, simply highlightthe programand press RECORD, then STAR.
• If you see a question mark symbol on a scheduledrecording, press MENU/GUIDE to see why there is arecording mismatch.
• Pressing 1"repeatedly displays the last fourcompleted recordings.
Programs with a white background are scheduled to berecorded; those with a gray background have alreadybeen recorded.
SHOWTIME CBL _ 10:05P
RECORDINGS
Scott and Molly
FRI 8:00P 2 hours
A middle-aged couple discovers
new sides to their relationship
over a long, holiday weekend.
Todd Blake, Kim Jones.
l
_**(1988,PG-13) Movies: comedy.
Adult Situations, Adult
Language.
_HOUTIRe CBL _ 10:05P
B-10
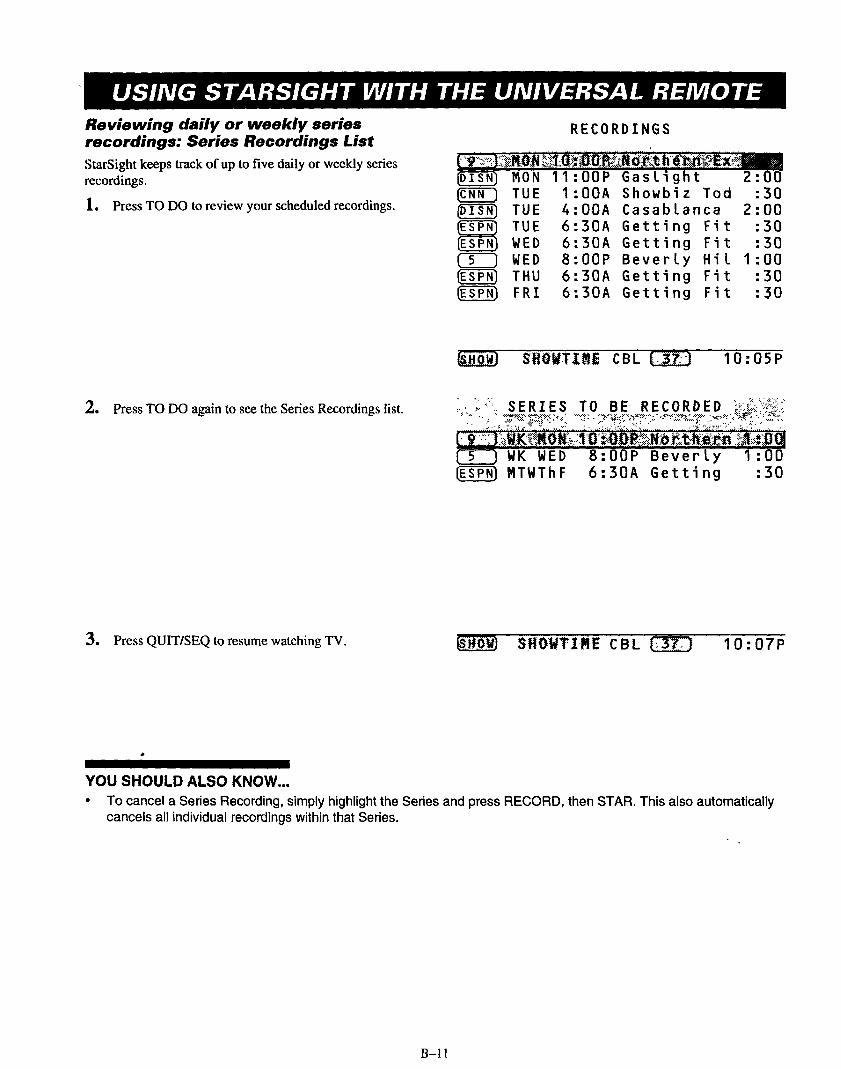
Reviewing daily or weekly seriesrecordings: Series Recordings List
StarSight keeps track of up to five daily or weekly seriesrecordings.
L Press TO DO to review your scheduled recordings.
RECORDINGS
MON
(_ TUE
TUE
_ TUEWED
WEDTHU
(_ FRI
11:00P
I:00A
4:00A
6:30A
6:30A
8:00P
6:30A
6:30A
GaslightShowbiz Tod
Casablanca
Getting Fit
Getting Fit
Beverly Hil
Getting Fit
Getting Fit
2:00:30
2:00:30:30
1:00
:30:30
SHOWTIME CBL _ I0:05P
2. Press TO DO again to see the Series Recordings list. _.._/;..SERIES TO BE RECORDED _!-:_;:'.:i2_.(;,o...., _,_,_._-_ -,_- ,,,._:.;7.%_;_=_7:_.:.,.-.-÷;_z_,k,,_._.-,,,.>_-;? _;°_:..-:,,;:_+.,o,
, :.:..:.._.::._..::_',:,.<..Y...._,..I._._?.:.......:.:,...'...:_:L.:/X>.o;!_.L..:.......................:_:._._,'._::_:..,.-:_:;."...:.._............'(':9:_:_?)':_K°_,' ON_.:._O°_O(O._N__-h"_i_.._:_l.,_:_O!
WK WED 8:00P BeverLy 1:00MTWThF 6:30A Getting :30
3. Press QUIT/SEQ to resume watching TV. SHOWTi-ME CBL _ I0:07P
YOU SHOULD ALSO KNOW...
• To cancel a Series Recording, simply highlightthe Series and press RECORD, then STAR. This also automaticallycancels all individual recordings within that Series.
B-ll

How to watch one channel while
recording another: Watch and Record
If you have a Cable Box: __°__-='.. _[ _[_[ :_
1. After recording begins, press TV/VCR SOURCE.You will see the TV SOURCE menu highlighted.
Ant/CabLe 1 Ant/CabLe 1
e
am
e
Press ,I, to highlight "Ant/Cable 2," then press
QUIT/SEQ. You can now watch any unscrambledchannel.
Use CHANNEL/Day Up or Down to watch otherchannels. (Note: you will not be able to use StarSightfunctions while on the ANT/CABLE 2 source.)
To resume normal viewing once recording has beencompleted (and to resume using StarSight) pressTV/VCR SOURCE to see the source menu. Then
press 1"to highlight "Ant/Cable 1." Press QUIT/SEQ.
Ant/CabLe 1
Ant/CabLe 2
If you DO NOT have a Cable Box:
1. While you're recording a program, simply pressCHANNEL/Day Up or Down to watch a different
program.
2. For more information about the SOURCE menu, refer
to the TV portion of this guide.
B-12
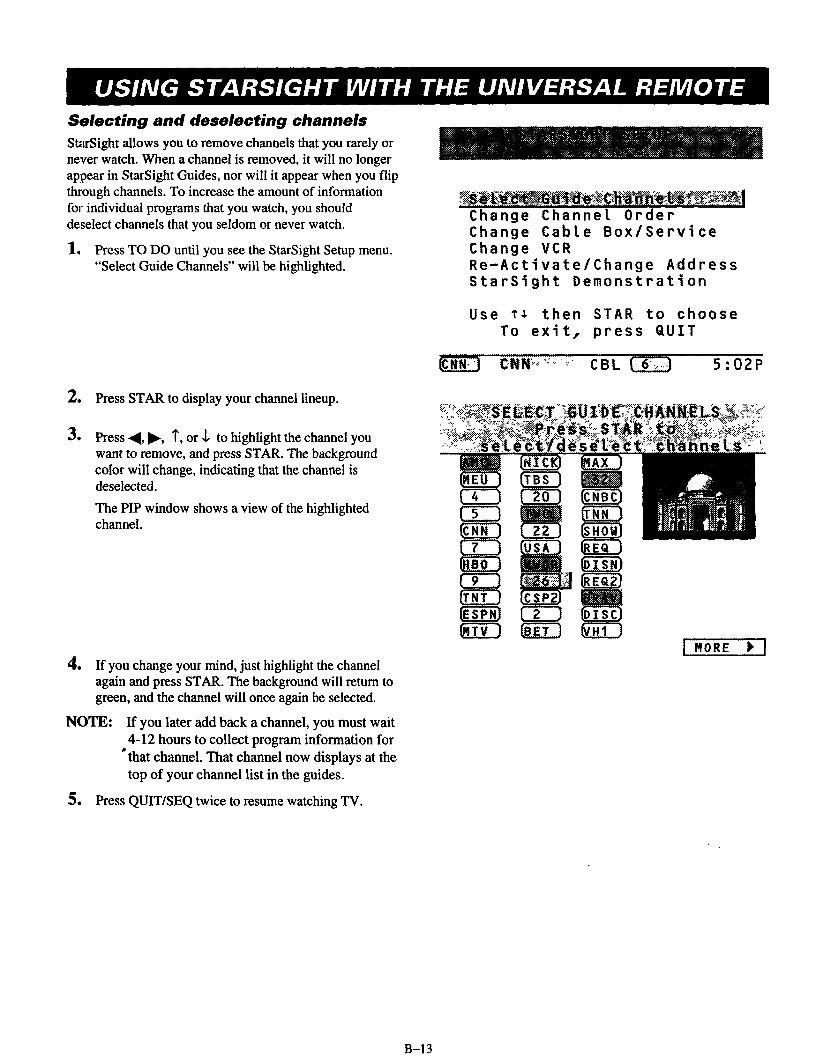
Selecting and deselecting channels
SUtrSight allows you to remove channels that you rarely ornever watch. When a channel is removed, it will no longerappear in StarSight Guides, nor will it appear when you flipthrough channels. To increase the amount of informationfor individual programs that you watch, you should
deselect channels that you seldom or never watch.
1, Press TO DO until you see the StarSight Setup menu."Select Guide Channels" will be highlighted.
e
3.
Press STAR to display your channel lineup.
Press 41, I_, 1",or $ to highlight the channel youwant to remove, and press STAR. The background
color will change, indicating that the channel isdeselected.
The PIP window shows a view of the highlightedchannel.
4. If you change your mind, just highlight the channel
again and press STAR. The background will return togreen, and the channel will once again be selected.
NOTE: If you later add back a channel, you must wait
4-12 hours to collect program information for• that channel. That channel now displays at the
top of your channel list in the guides.
5. Press QUIT/SEQ twice to resume watching TV.
Change Channel OrderChange CabLe Box/ServiceChange VCRRe-Activate/Change AddressStarSight Demonstration
Use t¢ then STAR to chooseTo exit, press QUIT
_NN -,':__-- CBL _ 5:02P
I MORE
B-13

Changing the channel order
You can list your channels on the Grid Guide in any order
you want. Your channels will also be in this order as youswitch from channel to channel.
1o Press TO DO until you see the StarSight Setup menu.
2. Press ,1, to highlight "Change Channel Order," and
press STAR to display your list of channels.
3. Press _I, I_, T, or ,I,to highlight the channel you want
to move, and press STAR. The channel will moveslightly to the left.
e Press 4, I_, T, or ,1, to move the highlighted channel
to the new location and press STAR to insert thechannel in its new position.
5. Press QUIT/SEQ twice to resume watching TV.
YOU SHOULD ALSO KNOW...
• To reset your channels to the original order, press 1"to highlightthe RESET box at the top of the ChangeChannel Order screen and press STAR.
, To maximize show descriptions, you should placeyour most frequently-watched channels at thebeginning of your list.
SeLect Guide ChanneLs
Change Cable Box/Service
Change VCRRe-Activate/Change AddressStarSight Demonstration
Use t, then STAR to chooseTo exit. press QUIT
........ cBL 5:02P
B-14

Quick Reference Guide
This section of the guide discusses the use of StarSight with the Z-Trak trackbaU remote. Operation with the Z-Trak isdifferent than with conventional remote controls. There are far fewer buttons, because the trackball is used to move an
on-screen pointer through various menus. The following illustration shows the Z-Trak and its controls.
Set remote to operate"IV
VOL Up/l_t_When operating "IV: lnciease volume
When operating VCR: Fast forward
VOL Down/q_lWhen operating TV: Decrease volume
When operating VCR: Rewind
MUTE II
When operating TV: "IV mute
When operating VCR: Pause
RECRD
When operating TV: Schedule aprogram for recording; confirm or
cancel recordings
When operating VCR: Sets VCR to record
POWER
TV: TV power On/Off
When operating VCR: VCR power On/Off
Set remote to operate VCR
3ALLPress ball to activate
CHAN Up/I_When operating "IV: Go to the next channel
When operating VCR: Play
CHAN Down/•
When operating "IV: Go to the previous channelWhen operating VCR: Stop
ENTER
When operating TV: Tune TV to a programhighlighted on the StarSight screen; when
watching TV displays the program title
"FLSHBK
When operating TV: Tune TV to the lastchannel viewed
When operating VCR: TV/VCR Switch
In the following sections, you will be exploring the
various screen menus available in StarSight. As you do
so, keep in mind the following guidelines (quite literally,
"rules of thumb") for Z-Trak operation:
• To display the pointer, press the trackball.
• To highlight an option or make a selection, point tothe desired option and press the trackball.
• To close a StarSight screen, point to the QUIT icon
and press the trackball.
To tune a channel, point to a channel icon and pressthe trackball. You can also simply highlight aprogram and press the ENTER button to tune thatprogram.
Many StarSight program guides have more than onescreen full (one "page") of information. You can
point to the "P_'" or "P,L" icons and press the
trackball to flip through the pages. You can alsomove more slowly by moving the pointer to the top,bottom, or side edges of the screen and continuing toroll the ball in that direction.
Be sure that the pointer is red, indicating that you are in
StarSight mode. If the pointer is blue, move the pointer
to the left side of the TV screen, point to the TV icon
and press the trackball.
C-I

Getting started with the Z-Trak remote
]. Press the TV button on the top of the remote. Thissets the remote's buttons for TV control, rather thanVCR control.
e
3.
e
e
Press the trackball. The pointer, a small square,appears in the middle of the screen.
You can move the pointer by rolling the trackball
up, down, left, and right. Point to the left edge of
the screen, a column of TV options appears. The
icon at the top indicates which mode is active --
StarSight or TV. A circle with a star, the StarSight
logo, represents StarSight mode; a TV icon
represents TV mode. You can switch between the
two modes by locating the pointer on the StarSight
or TV icon and pressing the trackball. The icon
switches, and the pointer changes color. A red
pointer indicates that you are in StarSight mode. A
blue pointer indicates TV mode.
Set the mode to StarSight.
As you move the pointer around the screen, youwill discover various menus. These menus are not
visible on the screen simultaneously. Each Menu
appears when you move the pointer on top of it.There are 2 different sets of menus---one for the
StarSight mode and one for the TV mode. This
section discusses the StarSight options. For
information on the TV menus, see the TV portion
of this guide.
Move the pointer to the top of the screen. At the topyou'll see your StarSight icons:
SOURCE: When you press on this option, a selection
screen appears which allows you to specify
• the video/audio source for your TV and the
PIP. Simply point to the desired source and
press. To return to normal TV viewing, pointand press on "EXIT". For more information
see the TV portion of the guide.
TO DO:
THEME:
GUIDE:
When you press on this option, a list of
scheduled recordings and series recordings
appears.
When you press on this option, a list of theme
categories appears.
When you press on this option, the Grid
Guide and Channel Guide appear.
C-2
Continued on next page

6. Movethe pointer to the right of the screen. The
channel icons appear:
All Chan: Gives you a complete listing of all channels.
Point to a channel icon and press the trackball
to tune. Or, point to the number pad and pressthe trackball to tune by channel number.
Tune: When browsing (see below), you can tune
immediately to the show being described in the
Pop-up, by pointing to "Tune" and pressing thetrackball.
Browse "_and .1.: Allows you to get information aboutshows on different channels without
actually changing to those channels.
Place the pointer on or near an arrow
and press the trackball.
Chan "_and ,!,: Allows you to change channels up or
down. Place the pointer on or near an
arrow and press the trackball.
lnfo: Displays additional program information. Move
the pointer to "Info" and press the trackball.
e Move the pointer to the bottom of the screen. The
volume control appears. To adjust the volume,point to the desired volume level on the slider bar
and press the trackball. Point to "MUTE" and press
the trackball to turn the sound off completely.
8, Move the pointer toward the middle of the screen to
make the menu disappear.
9. Press the trackball to make the pointer disappear.
C-3

Finding out more about what you'rewatching: Channel Pop-Ups
1. Move the pointer to the right edge of the screen.
You'll see the program title and time remaining
"Pop-up".
8:
e
e
Point to the "Info" box and press the trackball. The
Pop-up changes to provide more detailedinformation.
Move the pointer toward the middle of the screen.The Pop-up disappears.
TraveLsTHU 8:00P hour
C-4

What's on when you change channels:Grazing
1. Move the pointer to the right edge of the screen.
You'll see the channel display.
2. Point to the "Chan" box and place it on or near the
1"or ,I, symbol. Press the trackball to change
channels. The Pop-up for the new programautomatically displays.
3. Point to the "Info" box and press the trackball to get
even more information on the program.
4. Move the pointer toward the center of the screen,
and the Pop-up disappears.
YOU SHOULD ALSO KNOW...
• If you press on "lnfo" and then change channels, you'll get full program descriptions while you're channel-surfing.
What's on without changing channels: Browsing
1. Move the pointer to the right edge of the screen.
You'll see the channel display.
e Point to the "Browse" box and place it on or near
the T or ,I, symbol. Press the trackball to see what's
on other channels. Notice that you will continue to
see your presently-tuned program, but will get a
Pop-up for a program on a different channel.
e Keep the pointer on "Browse" and press the
trackball as many times as you'd like (or
hold-down the trackball) to see Pop-ups for
different programs.
de Point to the "Info" box and press the trackball while
the,Pop-up is displayed to get even more
information on the program.
5. Press on "Info" again or continue browsing, and the
Pop-up disappears.
6. Move the pointer toward to the center of the screen
and the channel display disappears.
YOU SHOULD ALSO KNOW...
• To go directly to the program you see in the Pop-up, simply press the ENTER buttonon the remote control. Or,point to "Tune" and press the trackball.
• The program title Pop-up appears in yellow for the currently tuned program.
C-5

Finding out what's on all channels:Grid Guide
You can use StarSight to see what' s on fight now, the
rest of today and the next six days, and what the
programs are about.
1. Move the pointer to the top of the screen and point
to "'GUIDE". Press the trackball to see a full listing
of all programs, known as the "Grid Guide."
2. To highlight a specific show, point to that show and
press the trackball.
e Once a show is highlighted, point to the highlighted
show and press the trackball to get informationabout it. Press the trackball on the information
Pop-up to make the Pop-up disappear.
4, Point to "PIP" and press the trackball to view the
currently highlighted show.
e To view more "pages" of the grid, that is, to see
listings for additional channels, point to "PI" or
"P_." and press. You can also move the listings up
and down more slowly by moving the pointer to the
top or bottom edge and continuing to roll the ball inthat direction.
SEP7
U.S. Senate. :€overage;_). °-Larry King L'ive! i
Scott and Ro!.l.y ......BingoArt in a Day's WorkMajor League Baseb'a!.l. (L)BatmanFresh Princd B!.ossomAvonLeaThe Prince of TidesW,E_;A._..,P,B$CBL _ 9 : 00P
'he Prince of
YOU SHOULD ALSO KNOW...
• If you have a cable box, the PIP window will only showyour presently tuned channel.
• Press RECORD to record any highlighted show.
Continued on next page
C-6

e
e
e
To view listings for a different time slot, point toone of the time slots shown directly below the dayof the week line, Press the trackball. You will get alist of the next eleven time slots. Point to one and
press the trackball; the Grid Guide will shift to thattime slot.
NOTE: You can only move forward in time withthis feature.
You can also move forward or back more slowly by
moving the pointer to the right or left edge andcontinue to roll the trackball in that direction.
To learn about shows on any of the next six days
point to the desired day ("MON", "TUE", etc.) and
press the trackball.
To exit the Grid Guide, point to "QUIT" at the top of
the screen and press the trackball.
U.S. Senate. C(IO:OOP
Larry* Kin_ Li_ 11:OOP
Scott and Moll I:00A
....B!ngo .............._......... 2:00AALL in a Daz',_ 3:OOA,,Maj,or,le, ague,,r i 4:00A (L)
Batman 5:00AFresh Pr'inceJ,,, 6:00AA.v_nLea ........... 7:00AThe Prince of 8:00A ,WE'T:_PB_ CBL C_ 9:00e
Choosing a program: Tuning from a Guide
1. Point to "GUIDE" and press the trackbaU to see the
Grid Guide.
e
Q
Point to the desired channel icon (left edge of the
Grid Guide) and press the trackball. StarSight will
tune directly to that channel.
Remember, you can make other channels visible in
the Grid Guide by either using P'I" or P,I., or by
moving the pointer to the top or bottom edge of the
Guide and rolling the trackball.
SEP7
IESPN}
(4 1
_EQ ]
U,S.._ Senate Coverage o,,,
:_Larry King Live!.
Scott and Molly..el n.go.ALL in a Day's Work
Major League Baseball (L)Barman
Fresh Prince" B'LossomAvonLea
The Pr_nce of TidesW_._ CBL _ 9:00P
YOU SHOULD ALSO KNOW...
• You can also tune directly to a program by highlightingthat program and pressing the ENTER button.
C-7

Viewing what's on a specific channel:Channel Guide
Do you have a favorite channel? Showtime?Nickelodeon?
Whatever it is, StarSight can show you a channel'ss_-hedule for an entire week.
le Move the pointer to the top of the screen and pointto "GUIDE". Press the trackball to see the Grid
Guide. Press the trackbaU again on "GUIDE" to seethe Channel Guide.
2. To highlight a specific show, point to that show and
press the trackball.
e Once a show is highlighted, point to the highlighted
show and press the trackball to get information
about it. Press the trackball again on the
information Pop-up to make the Pop-up disappear.
e To view more "pages" of the Channel Guide, point
to "PT" or "P,l." and press the trackbaU. To view
program titles one by one, point to the top or
bottom edge of the Guide, and continue to roll thetrackball in that direction.
tP Honey,: ne" , _ .-
8:00P
9:00P
O:OOP
I:00P
1:30P
2:00A
2:30A
I:00A
1:30A
2:00A Worldwide Update_N'N_;;:_ ,_ C B L _g 7 : 25 P
1
1
I
1
1
PrimenewsLarry King Live!World News
Sports TonightHoneylineNewsnightInside Politics
Showbiz TodayNewsnight Update
8:0OP Primenews
9_10
11_.
I
1:30A Newsnight Update2:00A Worldwide Update
_NN;_:_ CBL _ 7:25P
5. To exit the Channel Guide, point to "QUIT" at the
top of the screen and press the trackbaU.
YOU SHOULD ALSO KNOW..
. To see information for another channel, press the CHAN 1"or $ buttonson the Z-Trek remote.
• To tune to the channel in the guide, simply press the ENTER button on the remote, or point to the channel bannerat the bottom of the screen and press the trackball,
• To go back and forth between the Channel Guide and the Grid Guide, point to "GUIDE" and press the trackball.
• Press RECORD to record any highlighted show.
C-8

Choosing programs by category:Theme Guide
What's your favorite kind of program? Sports?Movies? Comedies?
StarSight gives you a selection of categories to help you
pick your favorite shows for the coming week.
I. Move the pointer to the top of the screen and pointto "'THEME". Press the trackball to see the
StarSight Themes Menu.
2. Point to your theme selection and press the
trackball to see the categories for that Theme.
e
e
e
e
We
Point to a category and press the trackball to see the
shows for that category.
To highlight a specific show, point to that show and
press the trackball.
Once a show is highlighted, point to the highlighted
show and press the trackball to get information
about it. Press the trackball again on the
Information Pop-up to make the Pop-up disappear.
To see other pages of program information for the
same theme and category, use "PI"" or "P J,". To
view program titles one by one, point to the top orbottom edge of the Guide and roll the trackball.
To exit the Theme Guide, point to "QUIT" at the
top of the screen and press the trackball.
YOU SHOULD ALSO KNOW...
• To tune to the channel in the guide, pointto achannel icon or the channel banner at the bottom of
the screen and press the trackball. Or, you cansimply highlightthe desired program and pressENTER on the remote.
• Press RECORD to record any highlighted show.
Ac t !on'!Ry.St:_._i--y_-Ho. r¢:O,..r:'::?:".::.:.:ii(i '-a r,ama°IRo_°_'e-_S._:_:iJ;_:?:?:_i:::L:;_.:..'-_::--_:-_'"._,i:-.,
"CSP:AJi2;i_::: CBL {_ 7:41P
ALL Movies
• Act ion_Adventu_ '_-....:_."_"_.: °:_ '. ;":....... " ;,,,, _'-._,_:,_',K-.-.,',_,;::_'_,'-,'-_.':": ',. , . "':L:.:.::" " .: :°..-,;-: _
:% _" .:• Drama .:-;.': .._-_:_:'," .... '_ ............... .!_:#_,!.,,': :_'_ _÷._-:"_,:'.-:-:-_'_---', - _ "_'._'L
Fantasy/Science FictionI':_,,, _v-" ::-<. ;:., ,:°::. :, " _-: ,"., -'' . .,.-.""
Horror
Hi stor i ca l,/Biographi ca l
Closed Captioned
CSP,AN2_:-:-_ CB L _ 7 : 41 P
MON 8:00P Who's That 2:00
_ MON 8:00P RaLL_ 'Roun 2:00MON IO:OOP The Search 2:00TUE 12:30A The Inspect 2:00TUE 9:30P Stop! Or My 2:00TUE IO:OOA National La 1:30
TUE 12:00P Driving Me.. 1:30TUE 2:00P The Addam 2:00TUE 2:30P Vice Versa t:45TUE 6:00P And You Tho I:35
SHO_-_ECBL _ 7:42P
C-9
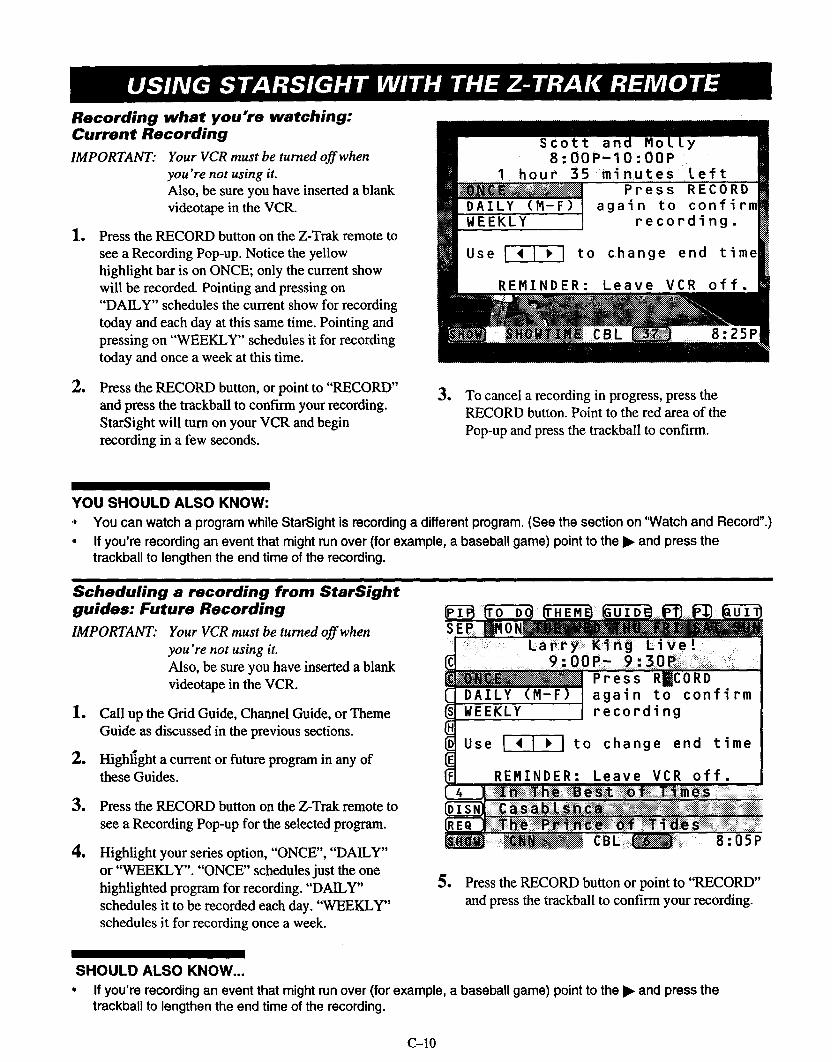
Recording what you're watching:Current Recording
IMPORTANT: Your VCR must be turned off when
you're not using it.Also, be sure you have inserted a blank
videotape in the VCR.
l.e Press the RECORD button on the Z-Trak remote to
see a Recording Pop-up. Notice the yellow
highlight bar is on ONCE; only the current show
will be recorded. Pointing and pressing on
"DAILY" schedules the current show for recording
today and each day at this same time. Pointing and
pressing on "WEEKLY" schedules it for recording
today and once a week at this time.
o Press the RECORD button, or point to "RECORD"
and press the trackbaU to confirm your recording.
StarSight will turn on your VCR and begin
recording in a few seconds.
e To cancel a recording in progress, press theRECORD button. Point to the red area of the
Pop-up and press the trackball to confirm.
YOU SHOULD ALSO KNOW:
• You can watch a program while StarSight is recording a different program. (See the section on 'Watch and Record".)
• If you're recording an event that might run over (for example, a baseball game) point to the I_ and press thetrackball to lengthen the end time of the recording.
Scheduling a recording from StarSightguides: Future Recording
IMPORTANT: Your VCR must be turned off when
you're not using it.
Also, be sure you have inserted a blank
videotape in the VCR.
le
e
Call up the Grid Guide, Channel Guide, or Theme
Guide as discussed in the previous sections.
Highlight a current or future program in any ofthese Guides.
SEP
..... _:":'i'_ Larry_ King Live! _
__t_'_ :I: _:_ _ _ Press R'_CORDDAILY (M-F) again to confirmWEEKLY recording
Use [ < I _ I to change end time
RERINDER: Leave VCR off.
e
e
Press the RECORD button on the Z-Trak remote to
see a Recording Pop-up for the selected program.
Highlight your series option, "ONCE", "DAILY"
or "WEEKLY". "ONCE" schedules just the one
highlighted program for recording. "DAILY"
schedules it to be recorded each day. "WEEKLY"
schedules it for recording once a week.
e
_I_CB 8:05P
Press the RECORD button or point to "RECORD"and press the trackball to confirm your recording.
SHOULD ALSO KNOW...
• If you're recording an event that might run over (for example, a baseball game) point to the I_ and press thetrackball to lengthen the end time of the recording.
C-10

Reviewing your schedule of individualrecordings: Recordings List
StarSight keeps track of up to 25 scheduled recordings,
including the four most recently completed.
1. Move the pointer to the top of the screen and point
to "'TO DO". Press the trackball to review your
scheduled recordings.
2. Point to an entry and press the trackball to highlight
a recording.
MON
NONTUETUE 4TUE 6WED 6
RECORDINGS
IO:OOP Northern Ex
11:00P Gaslight
I:00A Showbiz Ted
:OOA Casablanca
:30A Getting Fit
:30A Getting Fit
WED 8:00P Beverly Hil
THU 6:30A Getting Fit
:05
2:00
:30
2:00
:30
:30
1:00
:30
FRI 6:30A Getting Fit :30
e
e
e
o
Point to the highlighted recording and press the
trackball to see information about the program.
To cancel a scheduled recording, highlight the
program scheduled for recording and press theRECORD button on the Z-Trak remote. You will
see a Pop-up asking you to confirm the
cancellation. To confirm, point to the red area and
press the trackball.
To view a list of your last four completed
recordings, press on "PT", or roll the pointer past
the top of the list. Programs with a white
background are scheduled to be recorded. Those
with a gray background have already been recorded.
Point to "QUIT" and press the trackball to resume
watching TV.
S_IO.WI_,]_M,,ECBL _ I0:05P
RECORDINGS
Scott and Molly
FRI 8:00P 2 hours
A middle_aged couple discovers
new sides to their relationship
over a long, holiday weekend.
Todd Blake, Kim Jones.!
_**(1988,PG-13) Movies: Comedy.
_dult Situations, Adult
Language.
8flOW,-.TIItIL!ECBL _ I0:05P
RECORDINGS
MON IO:OOP Northern Ex :05
MON 11:00P Gaslight 2:00
TUE 1:00A Showbiz Ted :30
TUE 4:00A Casablanca 2:00
Scott and Molly
8:OOP-IO:OOP
FRI 6:30A Getting Fit. :30
YOU SHOULD ALSO KNOW... _ s'HOW_TImE CBL _ 10:05P
• If you see a question mark on a scheduled recording, point to "GUIDE" and press the trackball to see why there is arecording mismatch.
• When you return to the Grid Guide, programs scheduled to be recorded, and their time slots, are designated in redas a reminder.
C-11

Reviewing daily or weekly seriesrecordings: Series Recordings List
StarSight keeps track of five daily or weekly series
recordings.
1.
:2.
Call up the Recordings list, as shown in the last
section. Point again to "TO DO" and press thetrackball. You will see the Series Recordings list.
To cancel a Series Recording, simply highlight the
series and press the RECORD button on the Z-Trak
remote. Then point to the red area on the
confirmation Pop-up and press the trackball. This
automatically cancels all individual recordingswithin that series.
3, Point to "QUIT" and press the trackball to resume
watching TV.
WK WED 8:01 Beverly 1:00
_ _TWThF 6:30A Getting :30
How to watch one channel while recording another: Watch and Record
If you have a cable box: If you do not have a cable box:
|. After recording begins, move the pointer to the top 1.of the screen and point to "SOURCE." Press the
trackball. The pointer will now appear in blue.
e
e
e
Point to "Ant/Cable 2" and press the trackbaU.You
can now watch any unscrambled channel.
Move the pointer to the right side of the screen to
change channels. (NOTE: you will not be able touse S,tarSight functions while on the "Ant/Cable 2"source.)
To resume normal viewing once the recording has
completed (and to resume using StarSight) point to
the "'SOURCE" symbol at the top of the screen and
press the trackball. Point to "Ant/Cable 1" and
press the trackbaU.
e
While you're recording a program, simply change
channels to watch a different program. You can still
access the StarSight menus while your recording is
in progress. Of course, don't attempt to record
another current program.
For more information about the SOURCE menu,
refer to the TV portion of this guide.
NOTE: If you only see snow, put your TWVCR
switch on the VCR in the TV position.
C-12

What you should do when you get anew VCR
NOTE: THIS PROCEDURE REQUIRES THE USEOF THE UNIVERSAL REMOTE.
Make sure your Remote Emitter is positioned 2-3 inches in
front of your new VCR. Find the code(s) for your brand ofnew VCR on the "VCR Code" chart and write the code(s)here.
1. Press TO DO until you see the StarSight Setup menu.
2, Press the ,1,to highlight "Change VCR."
Change Channel OrderChange Cable Box/ServiceChange VCRRe-Activate/Change AddressStarSight Demonstration
Use t¢ then STAR to choose
To exit, press QUIT
cNN( .... CBL _ 5:02P
3. Press STAR and follow the on-screen instructions.
YOU SHOULD ALSO KNOW...
• It is important that your equipment works properlyduring each test. For example, make sure your VCRturr_ on. If the equipment does not respond, youneed to try another VCR code and test your VCRagain.
• Remember to reprogram your remote so it canoperate your new VCR. See the section on=Universal Remote Control" in the TV portion ofthis guide.
• If you have tried all the codes and need assistance,call the StarSight Help Desk at (800) 62B-STAR.
Select Guide ChannelsChange Channel Order
Change Cable Box/Service
Re-Activate/Change AddressStarS_ght Demonstration
Use _ then STAR to choose
To exit, press QUIT
C-I_N-::": - _° CBL 5:02P
What changes areto your VCR?
you making
1. Add VCR2. Replace VCR2. Remove VCR
Enter
To
your selection here:
continue, press ENTER.
D-I

What you should do when you changeyour cable box or service or when youmove
NOTE: THIS PROCEDURE REQUIRES THE USEOF THE UNIVERSAL REMOTE.
If you are changing your cable box, find the code(s) foryour brand of new Cable Box on the "Cable Box Code"chart and write the code(s) here.
1. Press TO DO until you see the StarSight Setup menu.
_:.___e ct._ u] d.e*_h_n _ e..[.s.__,_.__,...,IChange Channel OrderChange Cable Box/ServiceChange VCRRe-Activate/Change AddressStarSight Demonstration
Use t_ then STAR to choose
To exit, press QUIT
CNN :o.-. CBL _ 5:02P
e Press the J, to highlight "Change Cable Box/Service."
or
Press the ,1,to highlight "Re-Activate!Change Address."
3. Press STAR.
Select Guide ChannelsChange Channel Order
.....¢ h a_._e._ _:b:{i_..:B._Y.S:e._:_! ._.e..:::....,...lChange VCRRe-Activate/Change AddressStarStght Demonstration
Use t_ then STAR to choose
To exit, press QUIT
CNN:X-: _ : CBL _ 5:02P
4. Follow the on-screen instructions.
Before you proceed...
1. Please complete the
StarSight Checklist in your
Installation Guide.
• Make sure you connect your TV
to any other equipment
according to the diagrams in
your StarSight InstallationGuide.
To continue, press ENTER.
To exit, press QUIT.01
I)-2

Before calling for service...
1. LEAVE YOUR CABLE BOX ON AT ALL TIMES.
2. LEAVE YOUR VCR OFF WHENEVER YOU ARE NOT WATCHING A VIDEOTAPE.
3. DO NOT PLUG YOUR TV INTO THE POWER PLUG ON THE BACK OF YOUR CABLE BOX.
Installation Problems
Problem
StarSight is not controlling my cable box andVCR.
My VCR turns off and on, but won't changechannels.
No Picture - "snow."
I do not get any channels above 13.
My TV turned off during Cable Box testing.
I can't r_ake StarSight appear using the Universalremote control.
I can't make StarSight appear using the Z-Trakremote control.
Try this
Make sure the Remote Emitter is plugged into the Starsight Control Port on the backof your TV.
Check the placement of your Remote Emitter(s)---the bulbs should be facing and a
few inches in front of the front panel of your VCR and Cable Box.
Make sure you have completed the equipment test with the proper code for your
brand of equipment. See "Cable Box Codes" and "VCR Codes" charts.
If you have a Cable Box, your VCR does not need to change channels. (The Cable
Box will change channels.)
Try additional VCR codes until you pass the VCR tuning test. See "VCR Codes"
chart. To test the code see "Changing Your Equipment Setup".
Your VCR must be capable of direct tuning, i,e. your VCR's original remote control
must have a 10 digit number pad.
Check the connections between your TV, VCR and/or Cable Box.
Run "Auto Program" for your TV's "Ant/Cable 1" source. If your Setup is #4, thenyou should also Auto Program your"Ant/Cable 2" source. (See the TV portion of
the guide.)
If you have a Cable Box, tune your TV to channel 3, or to the cable box outputchannel.
Run "Auto Program" for your TV's "Ant/Cable 1" source. If your Setup is #4, thenyou should also Auto Program your "Ant/Cable 2" source. (See the TV portion ofthe guide.)
Make sure your TV is not plugged into the back of the Cable Box or into a poweroutlet that is controlled by a light switch.NOTE: LEAVE YOUR CABLE BOX ON AT ALL TIMES.
Press STAR to get your remote control to operate StarSight.
Press TV/VCR Source and select "Ant/Cable 1" or StarSight if named.
If you press a button on the remote control and its red light does not appear, thenyou need to change your remote control's batteries.
Make sure you have activated StarSight! (See Installation Step 3, "ActivateStarSight".)
Check that the on-screen pointer is red, indicating StarSight mode.
If the pointer is blue, move it to the TV options menu on the left side of the screen.Point and press on the TV icon. The pointer will turn red and the StarSight logo willappear indicating StarSight mode.
Refer to the next page for Operation Problems.
E-1

Operation Problems
Problem
I've registered for StarSight but don't have anyprogram data yet.
The background color for the date and time arered.
There are some blank spots in StarSight's guides.
StarSight's list of channels does not match thosethat appear on my TV.
The entire show did not record.
I have a Cable Box, and want to watch oneprogram while recording another.
I canceled the recordings of all episodes of aseries, but new episodes for that same series arestill being recorded.
A red question mark appears on a program title inthe Recordings list.
I can't control my VCR with my remote control.
I can't see the videotape when playing back on 1.the VCR. 2.
The program wasn't recorded.
Try this
1. Make sure your TV is turned offor tuned to PBS in order to receive information.It may take anywhere from 4-12 hours to initially get the full 7 days ofinformation. For best results wait overnight. Check the PBS channel for goodpicture.
2. If you have a cable box, make sure the cable box automatically tunes to the PBSchannel when TV is turned off.
Your TV lost power momentarily. StarSight will correct the time and date whenyour TV is turned off for a few minutes.
StarSight may not have received all the program information. Your TV will collectprogram information whenever the TV is turned off.
Call the StarSight Help Desk at 1-800-628-STAR, or fax corrections directly to1 (800) 229-9640.
Make sure you have enough tape to record the whole program. StarSight recordsprograms based upon the scheduled start and stop times. If a program may runovertime, you should extend the end time of your recording. (See the section"Current Recording" or "Future Recording".)
While a recording is in progress, change your source to "ANT/CABLE 2" to watcha different non-scrambled program.
You must cancel the whole series from the Series to be Recorded list. See thesection "Series Recordings List".
My picture turns to "snow" when recordingbegins.
StarSight keeps playing a demonstration, and Iwant to stop it.
The program information in the Recordings list does not match the programinformation in the Grid Guide. Position the highlight bar on the question mark andpress MENU/GUIDE to see the program that will be recorded. If you don't want torecord this program, press record to cancel the recording.
You need to program your remote control for your particular brand of VCR. (Seethe sections on Remote Controls in the TV portion of this guide.)
Check the connections between your TV and VCR.
Make sure your TV is on channel 3 or 4.
3. If you still do not have a picture, try a different videotape that you know has agood picture.
1. YOUR VCR MUST BE LEFt OFF WHENEVER YOU ARE.NOTWATCHING A VIDEOTAPE. Otherwise, a recording will not take place. Makesure you have a videotape with tape remaining.
2. Check the placement of your Remote Emitter. Has it fallen out of place?
3. Make sure you are confirming the recordings when you schedule a program forrecording.
4. Check your Recordings List to see if you actually did schedule a recording forthat specific program.
5. For a current recording, make sure you don't press any buttons until the recordinghas begun.
6. If you have changed your VCR, you will probably need to change the VCR code.
To watch TV while recording, wait until recording has begun, then set the"TV/VCR" switch on your VCR to "TV." Or, on your Universal remote control,press the "VCR" button and then the "TV/VCR Source" button. (So the VCR is in"TV" mode.)
If you are running a Quick StarSight Demo, press any key.If you are running a Continuous Retail Demo (recommended for retailers only), waltfor the message "To cancel this demonstration, press any button now," and pressany button on the remote.
Refer to the previous page for Installation Problems.
E-2