Embed Size (px)
Citation preview

Project Systems Display TrainingProject Systems Display Training

2Project Systems Display TrainingProject Systems Display Training
Capital Budget & Project Systems OverviewCapital Budget & Project Systems Overview
Projects created in the project systems module will be for Facilities and Site projects only.
District wide activities will reside in the Funds Management Module with a specified Functional Area as its cost identifier.
Projects will be created by the Project Scheduling Group when the project is ready to begin.
Planned values will be captured in PS Planning for both Capital and Site Projects. Capital Budget will be notified when funds are ready to be loaded to a project. Appropriated funds for projects that have not been created in project systems will
remain in a Non Consumable Funds Center. SAP does not allow budgetary overrides. Budget must be assigned at the phase level
prior to posting costs. Availability Control (AVC) at the phase level will allow some flexibility. Costs are always posted at the sub-phase level. The BI-IP module will capture the DEFP (five-year capital plan) with Record ID
allowing reconciliation with projects in Project Systems SAP will be the single source for Project Scope. Primavera will remain the project scheduling source but will now interface project
milestone date in SAP. PPO work orders will be posted in SAP’s general ledger via interface with Compass. Automated settlement of projects to fixed assets (Wave 2)
3Project Systems Display TrainingProject Systems Display Training
Project Definition and WBS ElementsProject Definition and WBS Elements
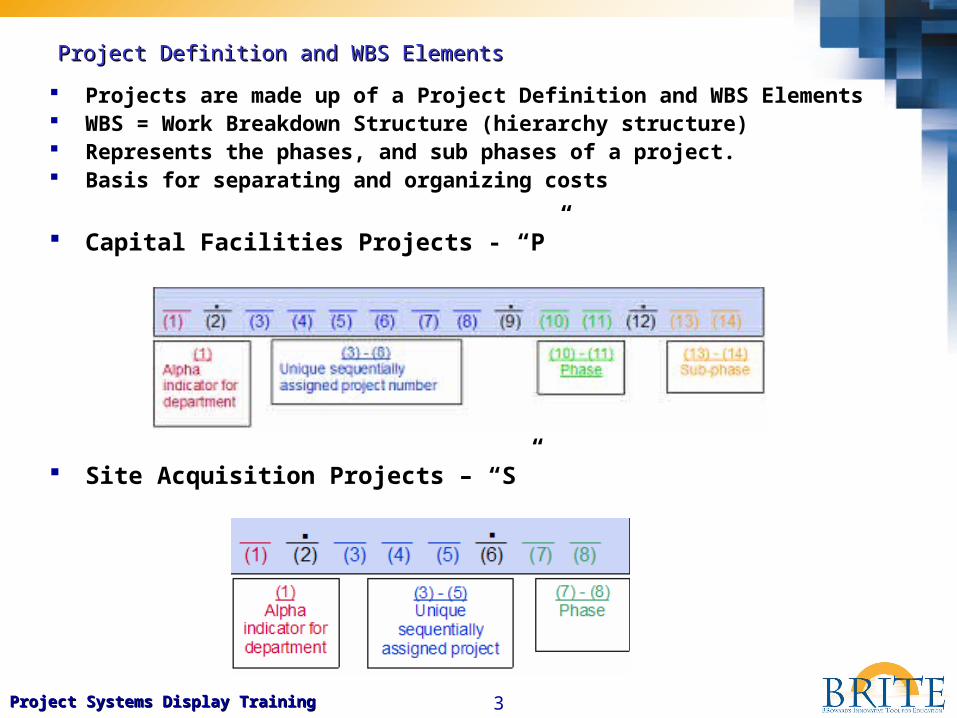
Projects are made up of a Project Definition and WBS Elements WBS = Work Breakdown Structure (hierarchy structure) Represents the phases, and sub phases of a project. Basis for separating and organizing costs
Capital Facilities Projects - “P”
Site Acquisition Projects – “S”

4Project Systems Display TrainingProject Systems Display Training
Capital Project WBS Element StructureCapital Project WBS Element Structure
Site Acquisition WBS Element Structure

5Project Systems Display TrainingProject Systems Display Training
Review of T Codes for Project SystemsReview of T Codes for Project Systems
Transaction Use
CJ20N Project Builder Organize and collect costAssign responsible Cost CenterAssign Responsible PersonIdentify funding sourceControl the availability of finding resources (Availability Control / AVC)View Project InformationChange Project status:
oCreated (CRT)oReleased (REL)oTechnically Completed (TECO)oClosed (CLSD)
Change Funding StatusPost charges, e.g., material, labor, etc…
CN43N – WBS Element Overview Display Project WBS Element data Drill into and review WBS Element data
6Project Systems Display TrainingProject Systems Display Training
Review of T Codes for Project SystemsReview of T Codes for Project Systems
Transaction Use
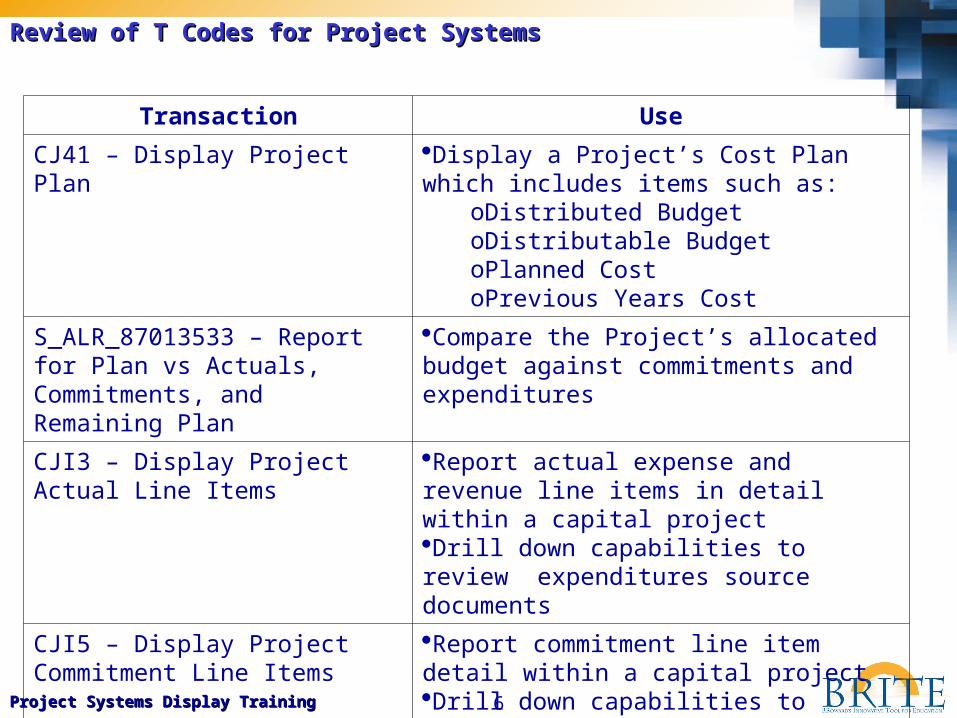
CJ41 – Display Project Plan Display a Project’s Cost Plan which includes items such as:
oDistributed BudgetoDistributable BudgetoPlanned CostoPrevious Years Cost
S_ALR_87013533 – Report for Plan vs Actuals, Commitments, and Remaining Plan
Compare the Project’s allocated budget against commitments and expenditures
CJI3 – Display Project Actual Line Items
Report actual expense and revenue line items in detail within a capital projectDrill down capabilities to review expenditures source documents
CJI5 – Display Project Commitment Line Items
Report commitment line item detail within a capital project Drill down capabilities to review expenses placed against a commitment item
7Project Systems Display TrainingProject Systems Display Training
CJ20N- Project BuilderCJ20N- Project Builder
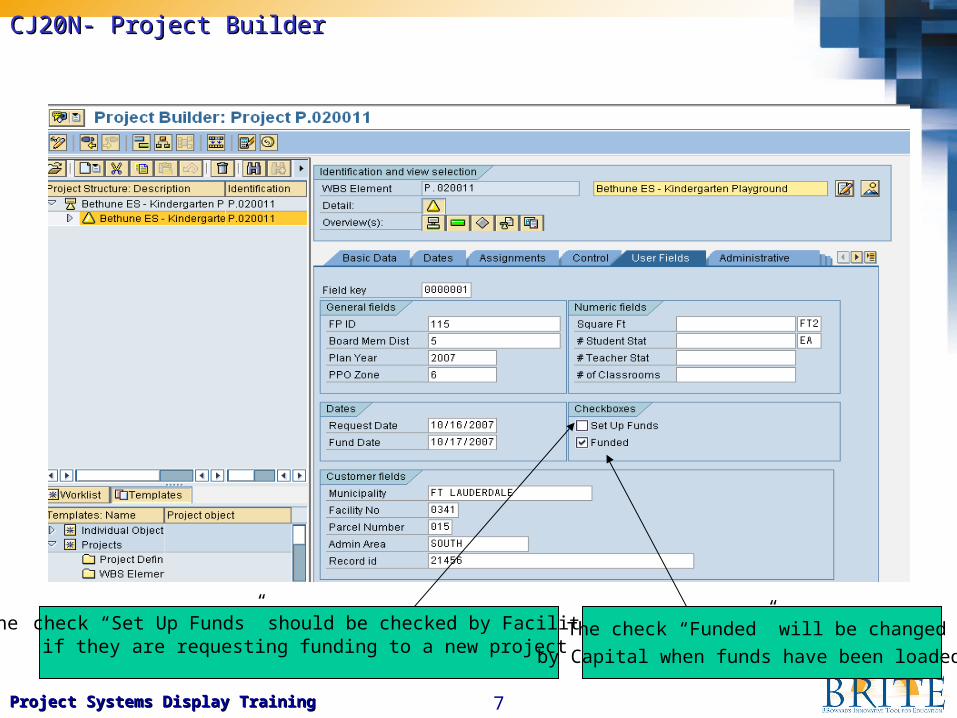
The check “Set Up Funds” should be checked by Facilities if they are requesting funding to a new project
The check “Funded” will be changed
by Capital when funds have been loaded.

8Project Systems Display TrainingProject Systems Display Training
CN42N – Project Definition OverviewCN42N – Project Definition Overview
View Details Double Click- Drill into Project Definition

9Project Systems Display TrainingProject Systems Display Training
CN43N – WBS Element OverviewCN43N – WBS Element Overview
Select a project rangeSelect WBS levels
Double click

10Project Systems Display TrainingProject Systems Display Training
CN43N – WBS Element Overview- ContinuedCN43N – WBS Element Overview- Continued
Customize reports from any of the Basic Data and User Fields
Top level of the WBS Element

11Project Systems Display TrainingProject Systems Display Training
S_ALR_87013533 Plan/Actual/Commitment/Remaining PlanS_ALR_87013533 Plan/Actual/Commitment/Remaining Plan

12Project Systems Display TrainingProject Systems Display Training
Display Project Systems WBS Elements
T-code: CJ43N WBS Elements
DemonstrationDemonstration
13Project Systems Display TrainingProject Systems Display Training
CJ43N WBS ElementCJ43N WBS Element
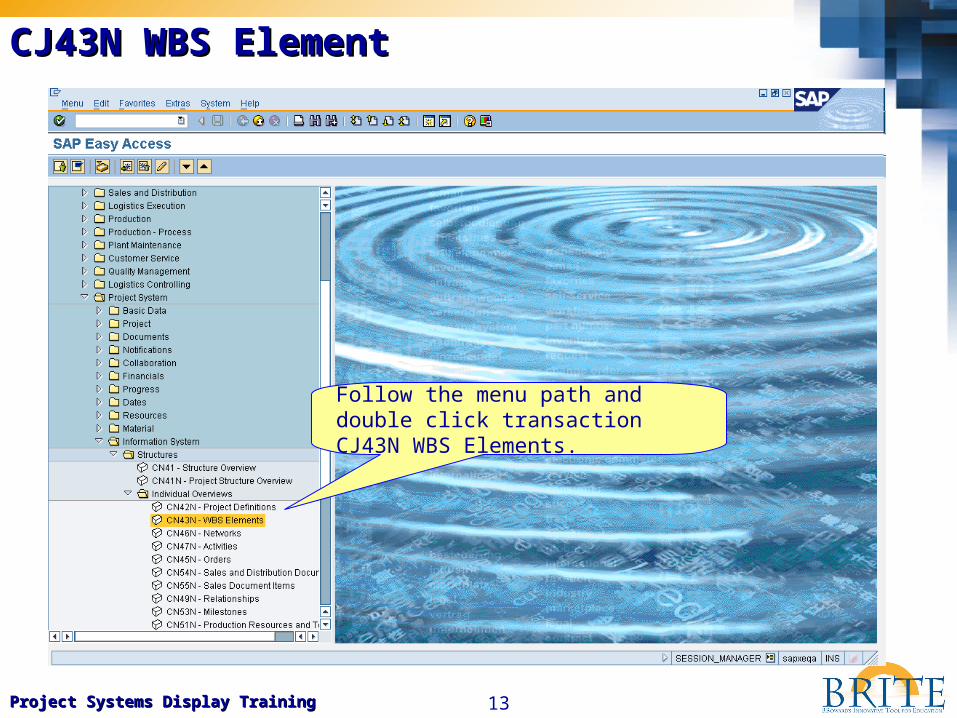
Follow the menu path and double click transaction CJ43N WBS Elements.

14Project Systems Display TrainingProject Systems Display Training
CJ43N WBS ElementCJ43N WBS Element Search icon
The Enter profile pop up box appears. 1. Click the Data prof. search icon.
The Profile for logistical database pop
up box appears. 2. Double click to select DB
Profile 000000000001 from the
list.
The Enter profile pop up box appears. 3. Click the Enter icon
(green check).
DB Profile 000000000001
Enter icon

15Project Systems Display TrainingProject Systems Display Training
CJ43N WBS ElementCJ43N WBS Element
The Project info System: WBS Elements Initial Screen appears.
1. Enter the project number, e.g., P000002.
2. Click the Execute icon.
Execute icon

16Project Systems Display TrainingProject Systems Display Training
CJ43N WBS ElementCJ43N WBS Element
The Project info System: WBS Elements Overview appears.
The individual elements may be reviewed in greater detail by double clicking
the WBS element number.
1. Enter the project number, e.g., P000002.
Double click the WBS element number
17Project Systems Display TrainingProject Systems Display Training
CJ43N WBS ElementCJ43N WBS Element
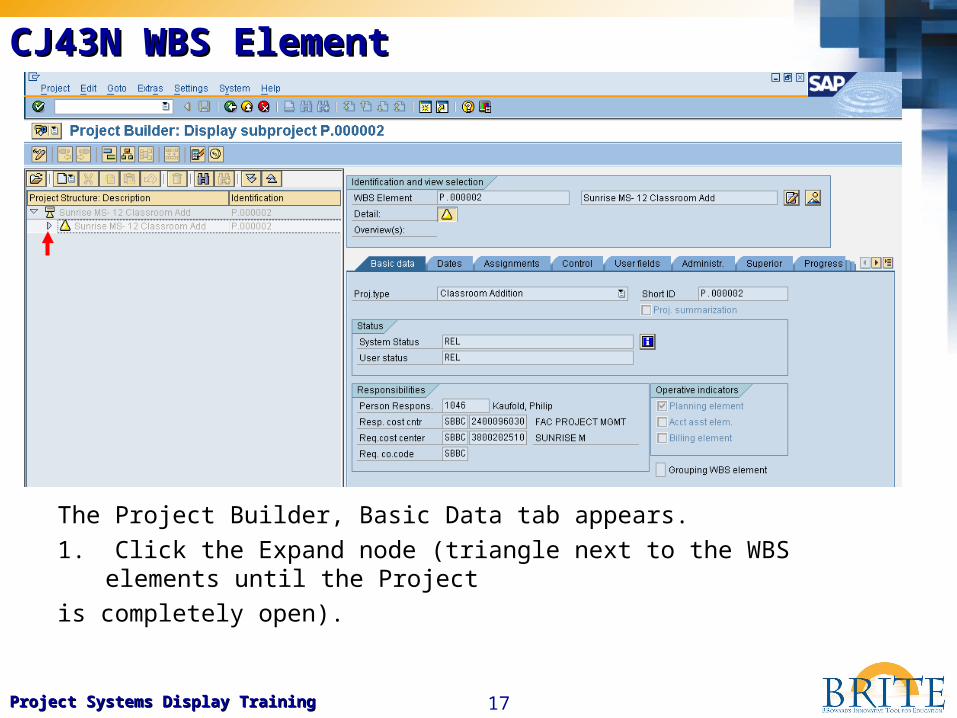
The Project Builder, Basic Data tab appears.
1. Click the Expand node (triangle next to the WBS elements until the Project
is completely open).

18Project Systems Display TrainingProject Systems Display Training
CJ43N WBS ElementCJ43N WBS Element
Displayed is the level 1 WBS element P.000002 Sunrise MS- 12 Classroom Add.
2400096030 - FAC PROJECT MGMT is the Responsible Cost Center.
3800202510 - SUNRISE M is the Requesting Cost Center.

19Project Systems Display TrainingProject Systems Display Training
CJ43N WBS ElementCJ43N WBS Element
Displayed is the level 2 WBS element P.000002.01 Planning.
2400096030 - FAC PROJECT MGMT is the Responsible Cost Center.
3800202510 - SUNRISE M is the Requesting Cost Center.

20Project Systems Display TrainingProject Systems Display Training
CJ43N WBS ElementCJ43N WBS Element
Displayed is the level 3 WBS element P.000002.01.01 (Planning)-Basic Fees.
2400096030 - FAC PROJECT MGMT is the Responsible Cost Center.
3800202510 - SUNRISE M is the Requesting Cost Center.
21Project Systems Display TrainingProject Systems Display Training
CJ43N WBS ElementCJ43N WBS Element
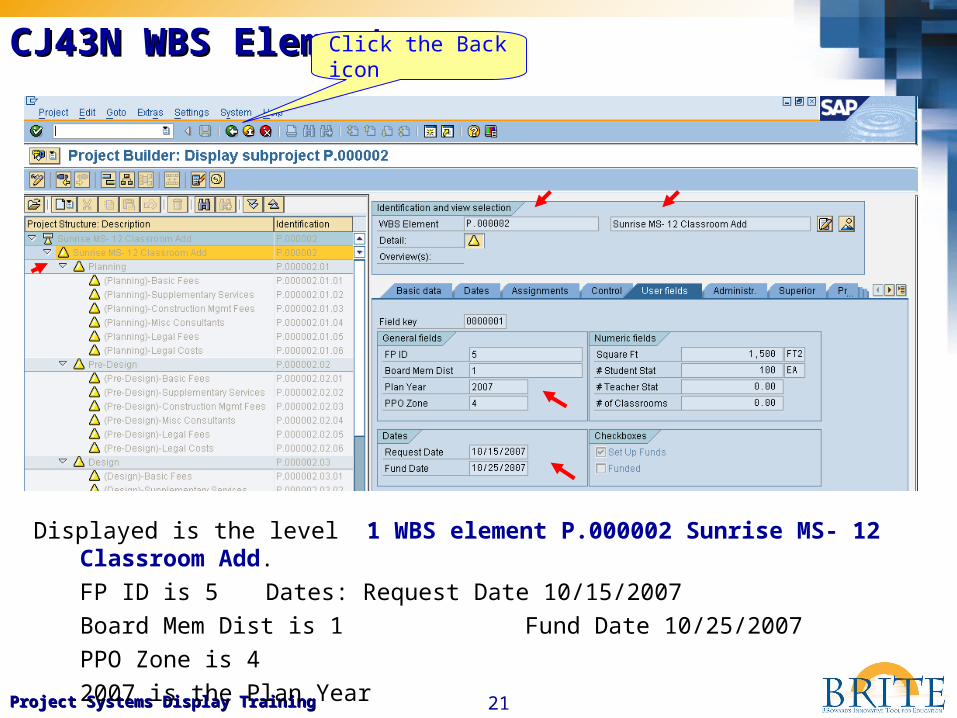
Displayed is the level 1 WBS element P.000002 Sunrise MS- 12 Classroom Add.
FP ID is 5 Dates: Request Date 10/15/2007
Board Mem Dist is 1 Fund Date 10/25/2007
PPO Zone is 4
2007 is the Plan Year
Click the Back icon

22Project Systems Display TrainingProject Systems Display Training
CJ43N WBS ElementCJ43N WBS Element
Review the displayed data columns.
Many times additional information such as, Fund Date, Requested Date and Set up
date is needed or desired. The CHANGE LAYOUT icon function can be used to
add, removed or rearrange the displayed information.
1. Click the Change Layout icon.
2. Select Change layout from the dropdown list.
Click the CHANGE LAYOUT icon

23Project Systems Display TrainingProject Systems Display Training
The CHANGE LAYOUT pop-up
screen appears and allows users to add or
remove columns from the displayed list.
Columns that are not displayed are listed
on the right side of the screen. Columns
that are displayed are listed on the left side
of the screen.
1. While holding down the CTRL key
select Basic Finish Date from the
Displayed Columns list (left side).
2. Continuing to hold down the
CTRL key select Basic start the
Displayed Columns list.
3. Click the HIDE SELECTED
FIELDS icon.
CJ43N WBS ElementCJ43N WBS Element
Notice the selected fields are no longer displayed in the Displayed Columns (left side column) list.

24Project Systems Display TrainingProject Systems Display Training
CJ43N WBS ElementCJ43N WBS Element
Columns my be arranged in
alphabetic order by clicking the
Column Header.
1. Click the Column Header “Column
Name”.
Column Header
Notice fields in the Column Set list (right column) are displayed in alphabetic order.

25Project Systems Display TrainingProject Systems Display Training
CJ43N WBS ElementCJ43N WBS Element
1. While holding down the CTRL key
select Basic Finish Date from the
Displayed Columns list (left side).
2. Continue to hold down the
CTRL key and select Basic start the
Displayed Columns list.
3. Click the Show Selected field icon.
Notice the selected fields have been brought over to the Displayed Columns list (left side column).

26Project Systems Display TrainingProject Systems Display Training
CJ43N WBS ElementCJ43N WBS Element
Data columns will be displayed
in the order in which they appear in
the list.
The sequence in which the data
columns are displayed can be
rearranged by identifying a
column and moving it up or down the
list using the Move Column icons.
- Move Column up one position
- Move Column down one position
- Move Column to the top
- Move column to the bottom
27Project Systems Display TrainingProject Systems Display Training
CJ43N WBS ElementCJ43N WBS Element
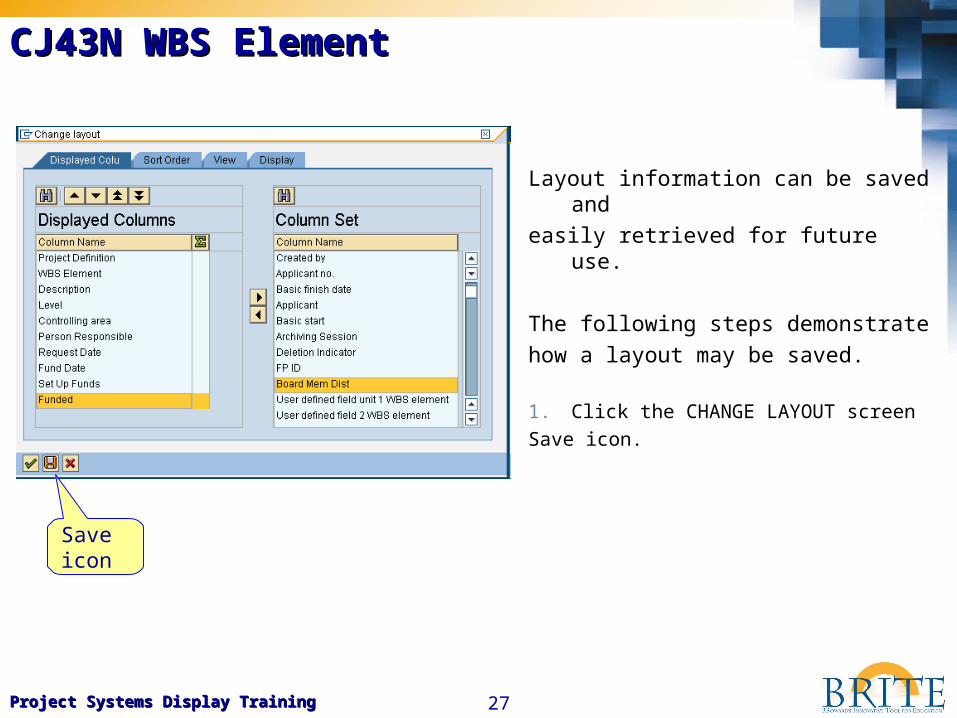
Layout information can be saved and
easily retrieved for future use.
The following steps demonstrate
how a layout may be saved.
1. Click the CHANGE LAYOUT screen
Save icon.
Save icon

28Project Systems Display TrainingProject Systems Display Training
CJ43N WBS ElementCJ43N WBS Element
The Save Layout screen appears.1. Enter a unique identification for the
layout in the Save Layout field.
Note: If this layout is to be used system
wide as a default setting layout the Save
Layout name must start with a back slash
(\).
2. Enter a unique layout Name, e.g.,
TRN 001 Ind WBS Element Overview.
3. Select the User-specific selection.
Click the Continue icon (green check). Continue icon

29Project Systems Display TrainingProject Systems Display Training
CJ43N WBS ElementCJ43N WBS ElementThe Change Layout screen appears. The new display layout has been saved as indicated
by the message, Layout saved displayed at the bottom of the screen.
1. Click the Change Layout screen’s Continue icon (green check).
Continue icon
30Project Systems Display TrainingProject Systems Display Training
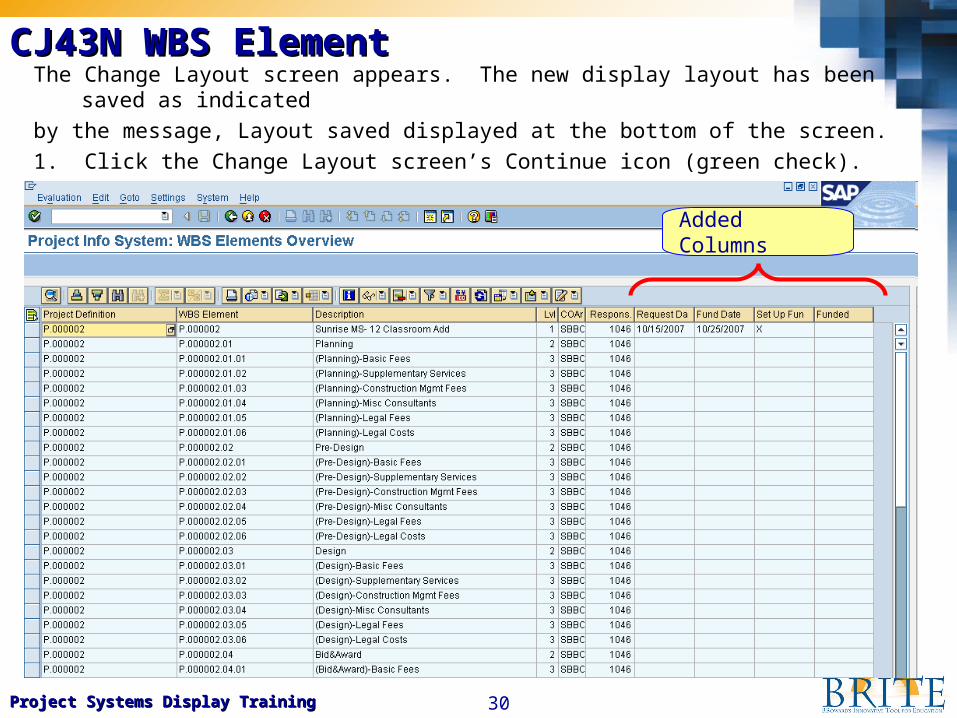
CJ43N WBS ElementCJ43N WBS ElementThe Change Layout screen appears. The new display layout has been saved as indicated
by the message, Layout saved displayed at the bottom of the screen.
1. Click the Change Layout screen’s Continue icon (green check).
Added Columns

31Project Systems Display TrainingProject Systems Display Training
CJ43N WBS ElementCJ43N WBS Element
1. Click the Layout field’s Search icon.
Searchicon
32Project Systems Display TrainingProject Systems Display Training
CJ43N WBS ElementCJ43N WBS Element
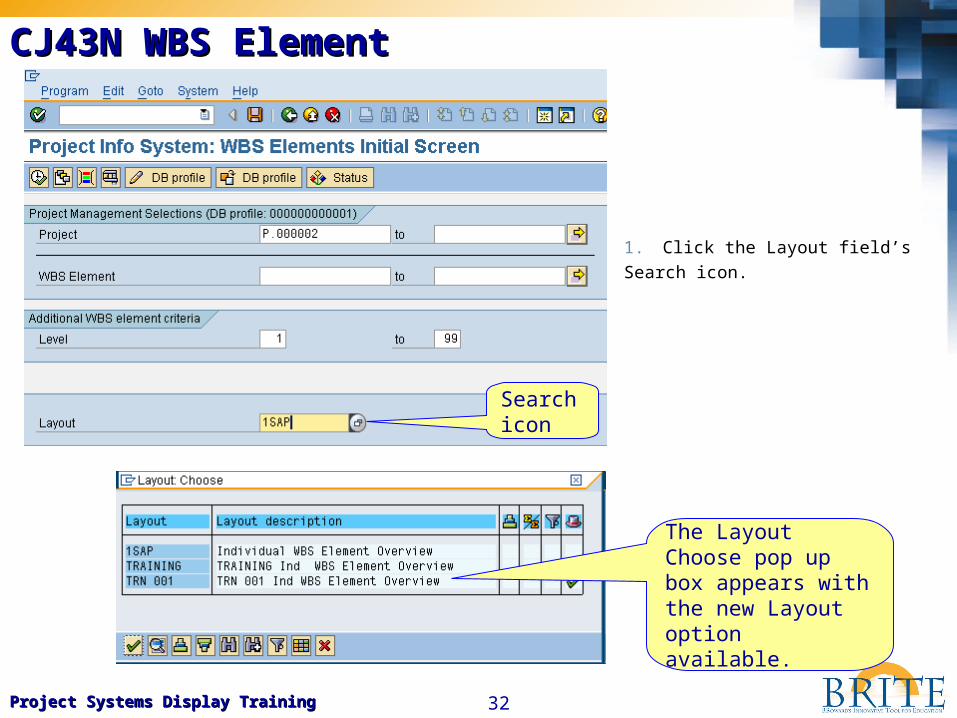
1. Click the Layout field’s
Search icon.
Searchicon
The Layout Choose pop up box appears with the new Layout option available.
33Project Systems Display TrainingProject Systems Display Training
PS Cost Element Report: Plan vs Actuals and Commitments
T-code: S_ALR_87013542
DemonstrationDemonstration

34Project Systems Display TrainingProject Systems Display Training
S_ALR_87013542S_ALR_87013542
Follow the menu path and double click transaction S_ALR_87013542 PS Cost Element Report: Plan vs Actuals and Commitments.

35Project Systems Display TrainingProject Systems Display Training
S_ALR_87013542S_ALR_87013542Search icon
The Enter profile pop up box appears.
1. Click the Data prof. search icon.
The Profile for logistical database pop
up box appears.
2. Double click to select DB
Profile 000000000001 from the list.
The Enter profile pop up box appears.
3. Click the Enter icon (green check).
DB Profile 000000000001
Enter icon

36Project Systems Display TrainingProject Systems Display Training
S_ALR_87013542S_ALR_87013542
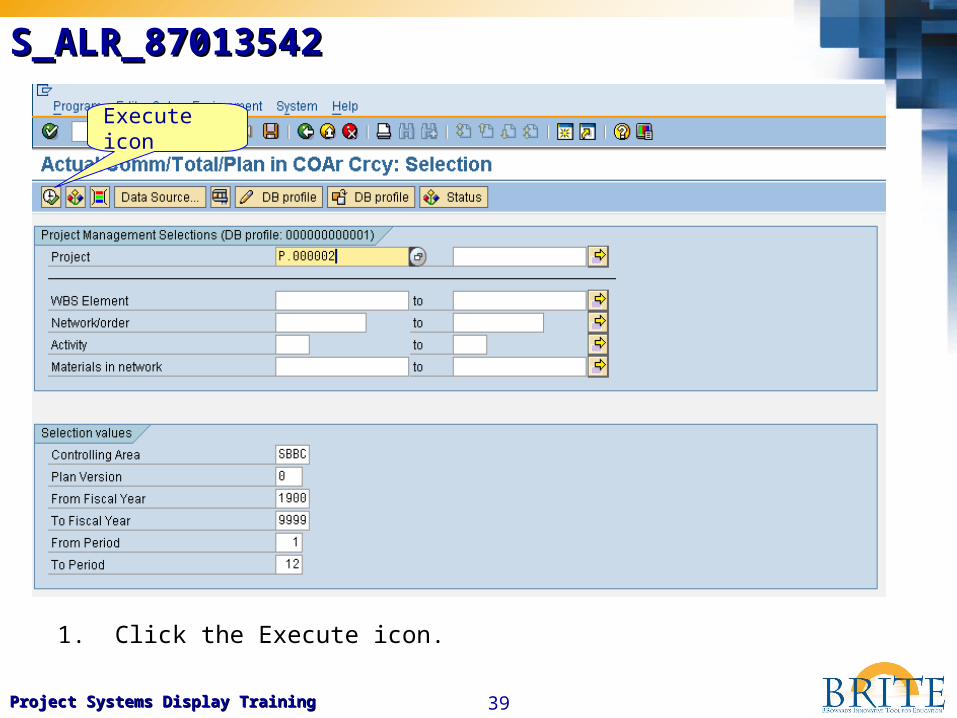
The Actual/Comm/Total/Plan in COAr Crcy: Selection screen appears.
1. Enter SBBC in the Controlling Area field.
2. Click the Project field.
3. Click the Project field Search icon.
Controlling Area, enter SBBC
Search icon

37Project Systems Display TrainingProject Systems Display Training
S_ALR_87013542S_ALR_87013542
The Project Definition search pop up box appears and can be used to locate
for projects using a variety of different search criterion.
1. Enter P* in the Project Definition field.
2. Click Start Search icon.
Note: The system recognizes the asterisk “*” symbol as a wildcard while
processing search information. By entering a P followed by the asterisk “*”
symbol the system will search and locate all projects that start with the letter P.
Start Search icon
Enter P* in the Project Definition field

38Project Systems Display TrainingProject Systems Display Training
S_ALR_87013542S_ALR_87013542
Note: The system has
located all projects that
start with the letter P.
1. Double click to select
a project from the list,
e.g., P.000002.
Double click to select project P.000002
39Project Systems Display TrainingProject Systems Display Training
S_ALR_87013542S_ALR_87013542
1. Click the Execute icon.
Execute icon
40Project Systems Display TrainingProject Systems Display Training
S_ALR_87013542S_ALR_87013542
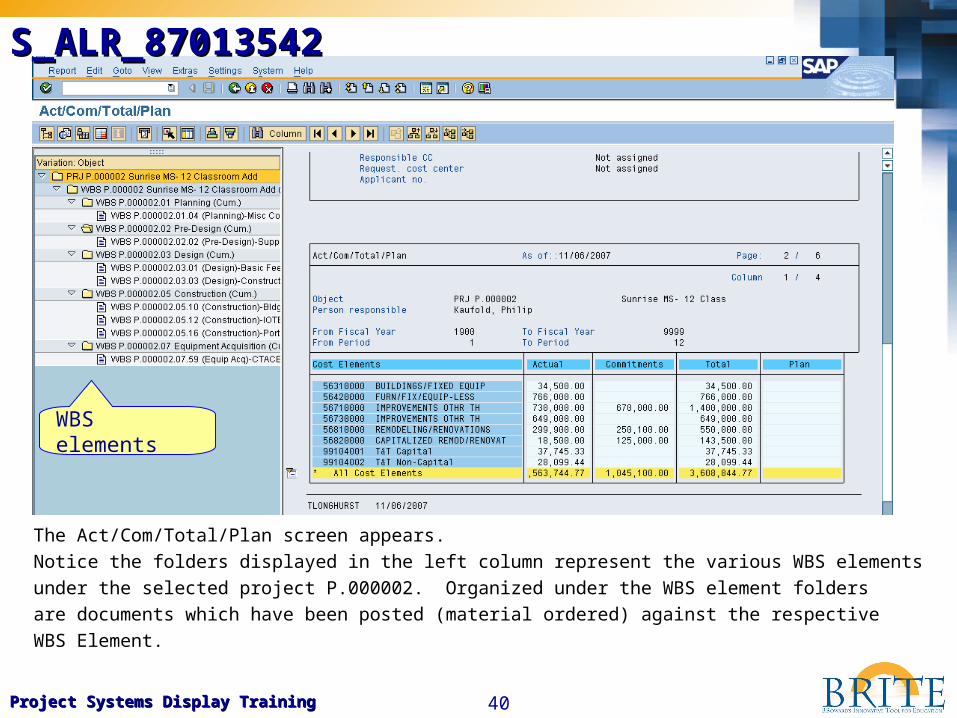
The Act/Com/Total/Plan screen appears.
Notice the folders displayed in the left column represent the various WBS elements
under the selected project P.000002. Organized under the WBS element folders
are documents which have been posted (material ordered) against the respective
WBS Element.
WBS elements
41Project Systems Display TrainingProject Systems Display Training
S_ALR_87013542S_ALR_87013542
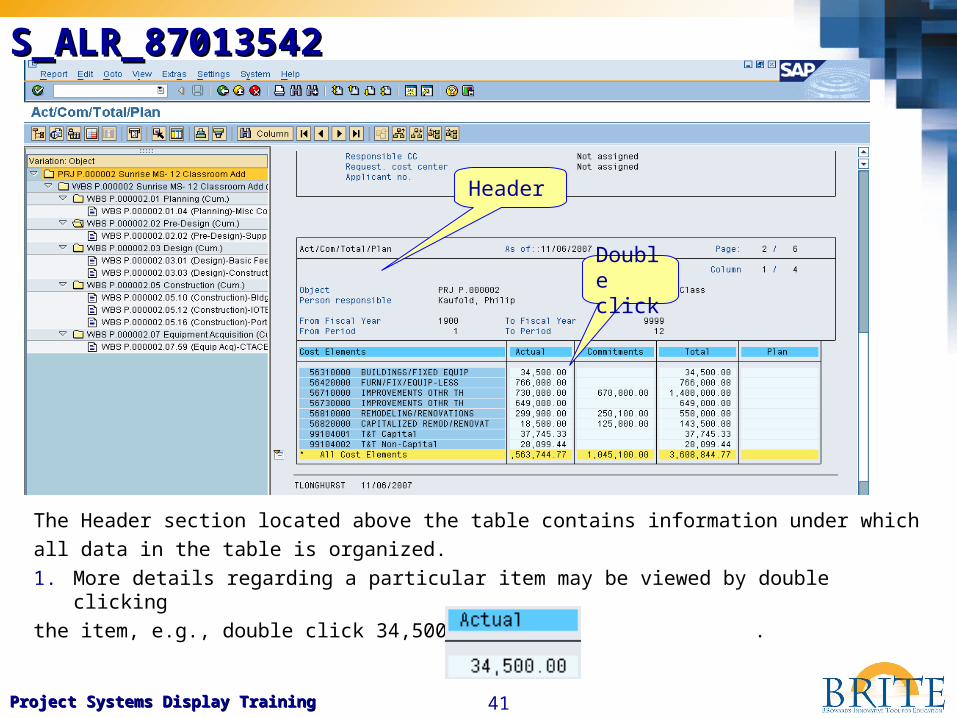
The Header section located above the table contains information under which
all data in the table is organized.
1. More details regarding a particular item may be viewed by double clicking
the item, e.g., double click 34,5000.00 .
Header
Double click

42Project Systems Display TrainingProject Systems Display Training
S_ALR_87013542S_ALR_87013542
The Header section located above the table contains information under which
all data in the table is organized.
1. More details regarding a particular item may be viewed by double clicking the
line item, e.g., P.0000002.01.04.
Header
Double click

43Project Systems Display TrainingProject Systems Display Training
S_ALR_87013542S_ALR_87013542
1. Review the displayed information then click the Back icon.
Back icon
Additional information regarding individual cost may be obtained by double clicking the Purchase Requisition number.

44Project Systems Display TrainingProject Systems Display Training
S_ALR_87013542S_ALR_87013542
1. Review the displayed information then click the Back icon.
As previously described in this presentation data fieldssuch as, Posted Date, Doc.
Type and Document Number may be added by using the Change Layout icon
functionality.
Back iconChange Layout

45Project Systems Display TrainingProject Systems Display Training
S_ALR_87013542S_ALR_87013542
The Header section located above the table contains information under which all data in the
table is organized. In this example information contained in the table roles up from lower WBS
elements into the higher project. Example: $34,500.00 has been posted against Cost Element
56310000. The exact WBS element in which these cost were placed my be identified by
clicking the individual WBS element folders located in the left column.
1. Click folder WBS P.000002.01.
Header
Click folder WBS P.000002.01
46Project Systems Display TrainingProject Systems Display Training
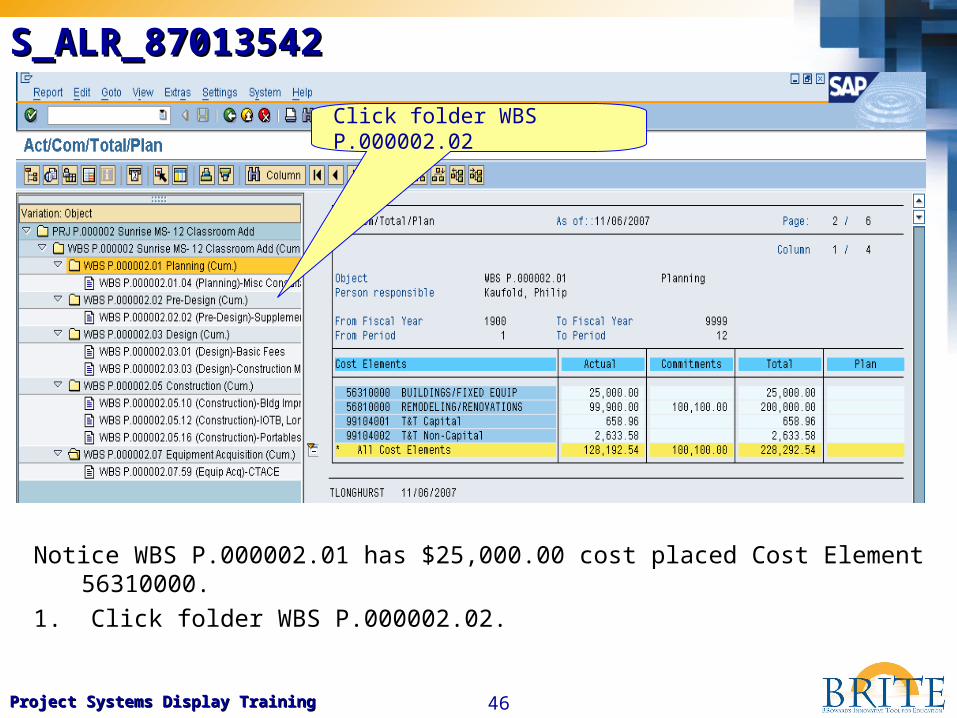
S_ALR_87013542S_ALR_87013542
Notice WBS P.000002.01 has $25,000.00 cost placed Cost Element 56310000.
1. Click folder WBS P.000002.02.
Header
Click folder WBS P.000002.01Click folder WBS P.000002.02

47Project Systems Display TrainingProject Systems Display Training
S_ALR_87013542S_ALR_87013542
Notice WBS P.000002.02 has $9,500.00 cost placed Cost Element 56310000.
WBS P.000002.01 has $25,000.00 & WBS P.000002.02 has $9,500.00
25,000.00 + $9,500.00 = $34,500.00 (total cost for Cost Element 56310000 under
project P.000002)
Back icon