Embed Size (px)
Citation preview
Pattern may be downloaded for personal use only. No electronic or printed reproduction permitted without the prior written consent of Meredith Corporation. ©Meredith Corporation 2021. All rights reserved.
1AllPeopleQuilt.com
PROJECT BROUGHT TO YOU BY:
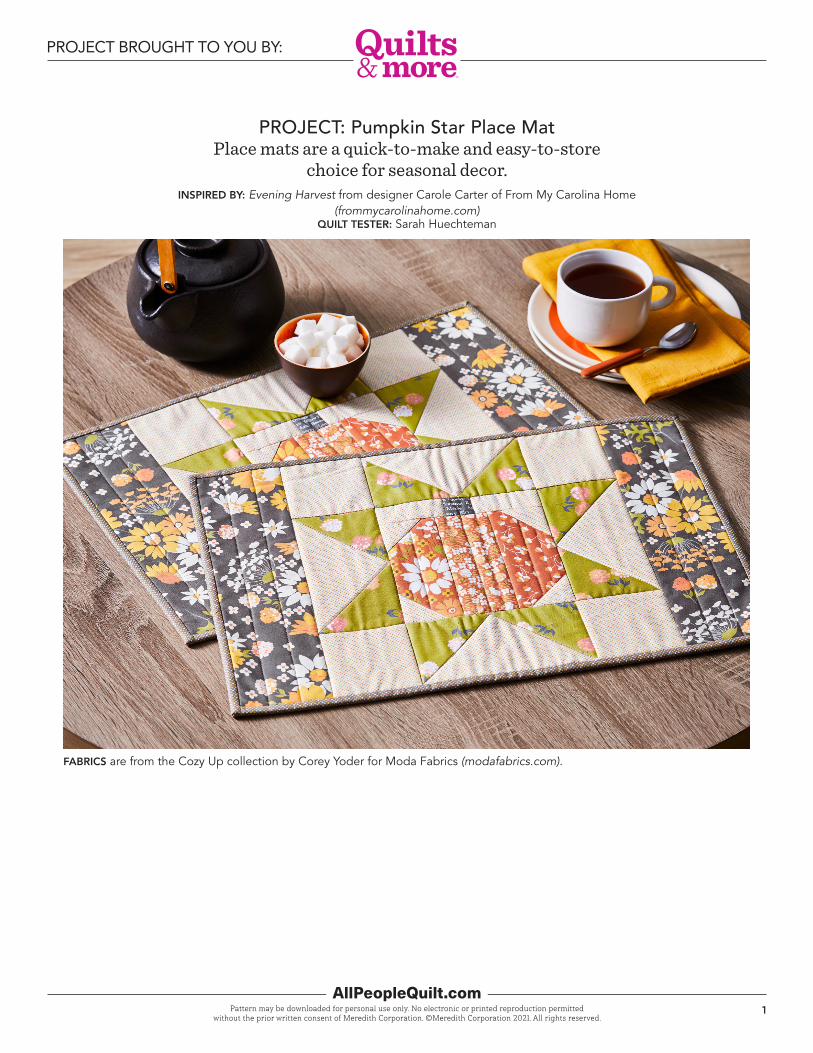
FABRICS are from the Cozy Up collection by Corey Yoder for Moda Fabrics (modafabrics.com).
PROJECT: Pumpkin Star Place MatPlace mats are a quick-to-make and easy-to-store
choice for seasonal decor.INSPIRED BY: Evening Harvest from designer Carole Carter of From My Carolina Home
(frommycarolinahome.com)QUILT TESTER: Sarah Huechteman

Pattern may be downloaded for personal use only. No electronic or printed reproduction permitted without the prior written consent of Meredith Corporation. ©Meredith Corporation 2021. All rights reserved.
2AllPeopleQuilt.com
PROJECT BROUGHT TO YOU BY:
7) Referring to Diagram 7, align a marked green print square with corner of a Step 6 unit. Sew together with two seams, stitching 1⁄4" on each side of drawn line. Cut apart on drawn line to make two Flying Geese units; press open (Diagram 8). Trim Flying Geese units to 31⁄2 ×61⁄2". Repeat with remaining marked green print square and remaining triangle unit to make four Flying Geese units total.
8) Referring to Diagram 9, lay out cream print 31⁄2" squares, Flying Geese units, and pumpkin center in three rows. Sew together pieces in rows. Join rows to make a pumpkin star block. The block should be 121⁄2" square including seam allowances.
9) Sew gray floral 31⁄2 ×121⁄2" rectangles to left- and right-hand edges of block (Place Mat Assembly Diagram) to complete place mat top. The place mat top should be 121⁄2×181⁄2" including seam allowances.
FINISH PLACE MAT1) Layer place mat top with batting
and gray floral 121⁄2 ×181⁄2" backing rectangle; baste. Quilt as desired.
2) Bind with gray print binding strips.
PLACE MATFinished size: 121⁄2 ×181⁄2" Finished block: 12" square
MATERIALS for one place matYardages and cutting instructions are based on 42" of usable fabric width.
o Scraps of assorted orange prints (place mat top)
o 18×21" piece (fat quarter) cream print (place mat top)
o 10" square green print (place mat top)
o 18×21" piece (fat quarter) gray print (place mat top, binding)
o 1⁄2 yard gray floral (place mat top, backing)
o 121⁄2 ×181⁄2" batting
CUT FABRICSCut pieces in the following order.
From assorted orange prints, cut:n 3—21⁄2 ×51⁄2" rectanglesFrom cream print, cut:n 1—73⁄8" squaren 4—31⁄2" squaresn 4—2" squaresn 2—11⁄2 ×3" rectanglesFrom green print, cut:n 4— 4" squaresFrom gray print, cut:n 4—21⁄2×21" binding stripsn 1—11⁄2" squareFrom gray floral, cut:n 1—121⁄2 ×181⁄2" backing rectanglen 2—31⁄2 ×121⁄2" rectangles
ASSEMBLE PLACE MAT TOPMeasurements include 1⁄4" seam allowances. Sew with right sides together unless otherwise stated.
Press seams in directions indicated by arrows on diagrams. If no direction is specified, press seam toward darker fabric.
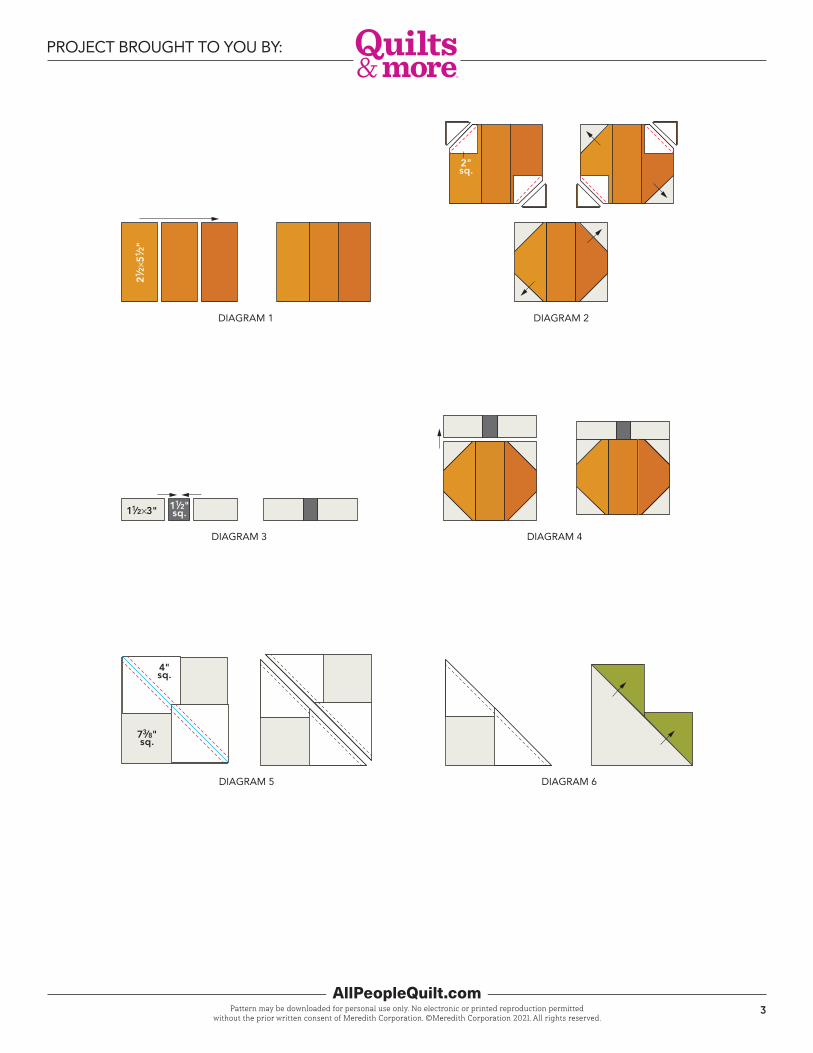
1) Referring to Diagram 1, sew together assorted orange print 21⁄2 ×51⁄2" rectangles in a row to make pumpkin body subunit. The subunit should be 51⁄2 ×61⁄2" including seam allowances.
2) Use a pencil to mark a diagonal line on wrong side of each cream print 2" square and each green print 4" square. (To prevent fabric from stretching as you draw lines, place 220-grit sandpaper under each square.)
3) Align marked cream print squares with opposite corners of pumpkin body subunit (Diagram 2; note direction of marked lines). Sew on marked lines. Trim seam allowances to 1⁄4". Press open attached triangles. Repeat with remaining marked cream print squares to make pumpkin body unit. The unit still should be 51⁄2 ×61⁄2" including seam allowances.
4) Sew together cream print 11⁄2 ×3" rectangles and gray print 11⁄2" square to make stem unit (Diagram 3). The unit should be 11⁄2 ×61⁄2" including seam allowances.
5) Join pumpkin body unit and stem
unit to make pumpkin center (Diagram 4). The center should be 61⁄2" square including seam allowances.
6) Referring to Diagram 5, align two marked green print squares with opposite corners of cream print 73⁄8" square. Sew together with two seams, stitching 1⁄4" on each side of drawn lines. Cut apart on drawn lines to make two triangle units; press open (Diagram 6).
Pattern may be downloaded for personal use only. No electronic or printed reproduction permitted without the prior written consent of Meredith Corporation. ©Meredith Corporation 2021. All rights reserved.
3AllPeopleQuilt.com
PROJECT BROUGHT TO YOU BY:
DIAGRAM 1
21 ⁄2×5
1 ⁄2"
DIAGRAM 2
2"sq.
DIAGRAM 3
11⁄2"sq.11⁄2×3"
DIAGRAM 4
DIAGRAM 5
4"sq.
73⁄8"sq.
DIAGRAM 6

Pattern may be downloaded for personal use only. No electronic or printed reproduction permitted without the prior written consent of Meredith Corporation. ©Meredith Corporation 2021. All rights reserved.
4AllPeopleQuilt.com
PROJECT BROUGHT TO YOU BY:
DIAGRAM 7
4"sq.
DIAGRAM 8
DIAGRAM 9
31⁄2"sq.
PLACE MAT ASSEMBLY DIAGRAM
31 ⁄2×1
21 ⁄2"