Embed Size (px)
Citation preview
BC105
BONUS CHAPTER
4 Programming with .NET
IN THIS CHAPTER
Understanding .NET and AutoCAD
Creating VB.NET code
Using the command line to obtain user input
Using dialog boxes to obtain complex user input
Modifying objects using constants and functions
Troubleshooting errors
.NET is an application development platform that allows you to create applications using pro-gramming languages like Visual Basic.NET (VB.NET) or C# (pronounced C sharp). VB.NET is an evolution of the Visual Basic and Visual Basic for Applications (VBA) programming lan-
guages. Unlike VBA, the VB.NET development environment is stand-alone and not part of an applica-tion like Microsoft Word or AutoCAD.
Prior to deploying .NET applications, you need to install the .NET Framework on all computers that will run your programs. Fortunately, AutoCAD installs the .NET Framework if it is not already on your computer, because several commands in AutoCAD require the .NET Framework. LAYERS, CUI, and EATTEXT are examples.
AUTOCAD ONLY AutoCAD LT does not support .NET or VBA. This entire chapter applies to AutoCAD only.
NOTE While VBA is still available in AutoCAD 2015, Autodesk no longer installs it by default. If you want to use and develop
VBA applications, you can download and install the VBA module from www.autodesk.com/vba-download . On
the website, choose the file for your operating system. After installing the VBA enabler, VBA commands and functions
work as they did in previous releases. The reason for this change is because Microsoft had dropped VBA support for
third-party developers.
VB.NET is ideal for situations in which you need to work with more than one application at a time because it supports .NET APIs and ActiveX. (API is short for application programming interface.) APIs are used to store common classes and methods that you can use to create your own programs. We talk about classes and methods later in this chapter. VBA and ActiveX, which we discuss in Bonus Chapter 3 , enables you to access AutoCAD objects in other applications. This chapter introduces you to VB.NET
56_9781118880364-BC4.indd BC10556_9781118880364-BC4.indd BC105 8/6/2014 12:25:32 PM8/6/2014 12:25:32 PM

BC106
Programming with .NET
and shows how you can start to use this powerful language to customize AutoCAD. For more infor-mation, see the sidebar, “ Using ActiveX with VB.NET .”
As previously mentioned, Visual Basic.NET (VB.NET) is a variation of Visual Basic (VB). You must compile VB.NET code into a stand-alone executable program or as an assembly (DLL) file that you can load into another program. When working with .NET and AutoCAD, you compile your project into an assembly file. VB.NET does have a learning curve if you’re not familiar with it, but once you get past that, you will find that it is a simple way to extend the behavior of AutoCAD and automate complex tasks.
Starting to Work with VB.NET After you decide to program AutoCAD, the first step is to select a programming language to use. In this chapter, you’ll be using Visual Basic.NET (VB.NET).
VB.NET has the following advantages:
• VB.NET is faster than AutoLISP and VBA, even when AutoLISP is compiled.
• VB.NET is a standard programming language, so you are more likely to find other pro-grammers who know VB.NET, compared to those with an understanding of AutoLISP. Companies with an IT or IS department most likely have skilled individuals that are famil-iar with VB.NET. If you’ve used VB or VBA before, you should find that you can transfer your existing knowledge to learning VB.NET.
• VB.NET is generally easier to learn than AutoLISP because of its syntax and the numerous learning resources available.
On the other hand, AutoLISP and VBA have the advantage of backward compatibility with prior AutoCAD releases in many situations. Of course, if you’re familiar with AutoLISP but not with VB.NET, it’s hard to beat the ease of working with a language that you already know.
VB.NET programs are saved in projects. A project contains references to all the required parts nec-essary to load and execute the program in AutoCAD. Once you load a VB.NET assembly into AutoCAD, you use the defined commands and AutoLISP functions just like you would use native commands and AutoLISP functions in AutoCAD.
Before you get started, you need to install Microsoft Visual Studio 2013 or Microsoft Visual Studio 2013 Express for Windows Desktop. Which one you install and use will most likely depend on the following:
• Cost. Microsoft Visual Studio 2013 Express for Windows Desktop is free, while you must purchase Microsoft Visual Studio 2013 after a 90-day trial to continue using it.
• Features. While Microsoft Visual Studio 2013 Express for Windows Desktop and Microsoft Visual Studio 2013 are similar, Microsoft Visual Studio 2013 Express for Windows Desktop is targeted at hobby programmers and not professional developers. As a result, it lacks fea-tures that are designed to create applications for the cloud, Microsoft SharePoint, and Windows Phone. There are other differences between the two. For a full comparison of the two development environments, visit the Microsoft website ( www.microsoft.com ) and do a search on “Visual Studio 2013 Editions.”
56_9781118880364-BC4.indd BC10656_9781118880364-BC4.indd BC106 8/6/2014 12:25:37 PM8/6/2014 12:25:37 PM

BC107
B O N U S
4
Programming with .NET
• Support. Even though you can use Microsoft Visual Studio 2013 Express for Windows Desktop or Microsoft Visual Studio 2013, only Microsoft Visual Studio 2012 is officially supported. If you encounter an issue while using Microsoft Visual Studio 2013 Express for Windows Desktop, you will not get support from Autodesk.
NOTE While Microsoft Visual Studio 2013 should work just fine for building custom AutoCAD applications, Microsoft Visual Studio
2012 is the officially supported development platform.
This chapter covers using Microsoft Visual Studio 2013 Express for Windows Desktop, but all con-cepts also apply to Microsoft Visual Studio 2012 and Microsoft Visual Studio 2013. To download and install Microsoft Visual Studio 2013 Express for Windows Desktop, follow these steps:
1 . Go to www.microsoft.com/express/downloads/ .
2 . On the Visual Studio Express page, under the Express 2013 for Windows Desktop section, click the Download link.
3 . On the Downloads page, from the Download Language drop-down list, select English or the language you want to install.
4 . Click Install Now.
5 . Log into your Microsoft Live account or create an account if needed.
6 . Fill out the form and click the Express 2013 for Windows Desktop link.
7 . Click the security banner and click Run. You might need to click Download File before you can click Run.
8 . Follow the prompts for the installation process. For example, you must accept the license terms.
Opening the VB.NET environment To start working with VB.NET, you must first open the VB.NET environment. Like AutoLISP with the Visual LISP Editor or VBA with the Visual Basic for Applications Editor, VB.NET has its own interface.
VB.NET projects are a collection of files that define your program, from functions that perform a specific task to a Windows form (dialog box). To define the type of file you will compile from the development environment, you choose the appropriate template at the time you create your project. For AutoCAD, you use the Class Library template. A project file in VB.NET has the vbproj file extension.
To open the VB.NET environment and create a new project, do the following:
1 . Choose Start ➪ (All) Programs ➪ Visual Studio 2013 ➪ VS Express 2013 for Desktop.
2 . In Microsoft Visual Studio Express 2013 for Windows Desktop, choose File ➪ New Project.
3 . In the New Project dialog box, choose Class Library from the Templates list. Enter a name for the new project in the Name text box and click OK.
56_9781118880364-BC4.indd BC10756_9781118880364-BC4.indd BC107 8/6/2014 12:25:37 PM8/6/2014 12:25:37 PM
BC108
Programming with .NET
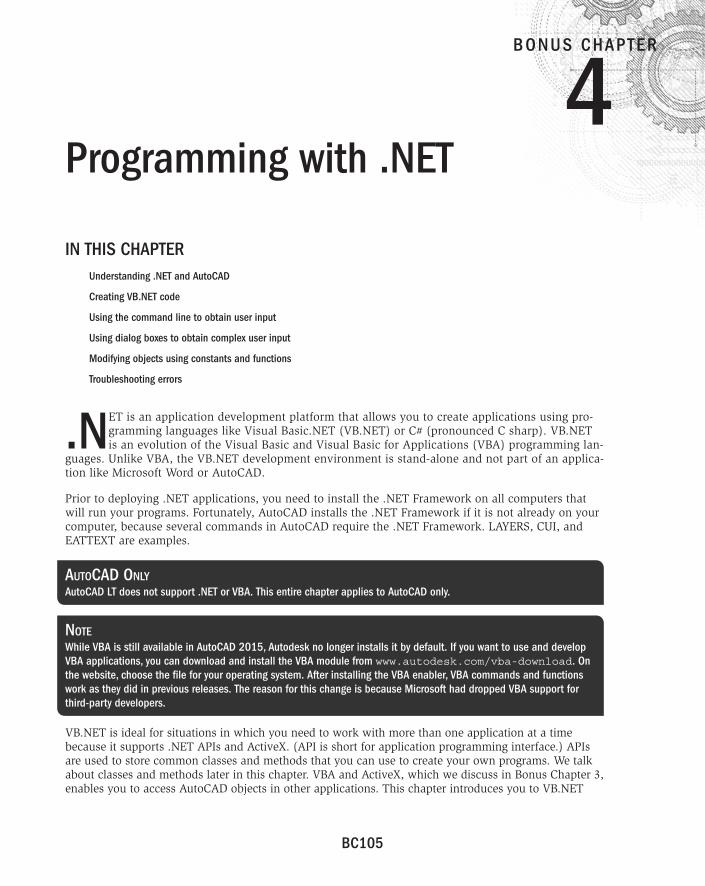
After you create a project, an editor window and all of the common development tools are dis-played. Figure B4.1 shows the project ABProject open in Microsoft Visual Studio Express 2013 for Windows Desktop. The large window at the center is known as the editor . You use the editor to change a project’s properties, or edit the code in a module or the controls on a Windows form. The Solution Explorer and Properties windows are along the right side of the application window by default. The menu bar and Standard toolbar along the top allow you to access many of the tools discussed in this chapter.
TIP You can switch between open code modules and user forms by clicking the tabs above the editor or clicking the down arrow
to the right of the tabs to display a list of all open files and windows.
FIGURE B4.1
The VB.NET development environment
Getting acquainted with VB.NET After you start a new project, you need to reference the AutoCAD libraries. Most of the objects that you will work with are in the AcCoreMgd, AcMgd, and AcDbMgd libraries.
NOTE A library is a set of subroutines (code) or classes that you can use to develop your programs. Using a library makes it easy
to add modules of code. A class is a construct that is like a template to help you create objects of that class. The class
describes the state and behavior for all the objects of that class.
56_9781118880364-BC4.indd BC10856_9781118880364-BC4.indd BC108 8/6/2014 12:25:37 PM8/6/2014 12:25:37 PM
BC109
B O N U S
4
Programming with .NET
To reference the required Managed AutoCAD .NET libraries, do the following:
1 . Choose Project ➪ Add Reference to display the Add Reference dialog box.
2 . In the Add Reference dialog box, click the Browse tab and browse to C:\Program Files\Autodesk\AutoCAD 2015 .
3 . Press and hold the Ctrl key, and select accoremgd.dll , acdbmgd.dll , and acmgd.dll . Click OK.
To get a list of the objects in the referenced libraries, open the Object Browser by clicking Object Browser on the Standard toolbar or choosing View ➪ Object Browser. Objects in a library are orga-nized into one or more namespaces.
NOTE Namespaces organize and group classes contained in a loaded library. They also help to reduce potential naming conflicts
when loading multiple libraries.
To see only the AutoCAD objects in the referenced libraries, click the Ellipsis button to the right of the Choose Object Browsing Scope drop-down list along the top of the Object Browser to display the Edit Custom Component Set dialog box. Click the Browse tab, browse to C:\Program Files\Autodesk\AutoCAD 2015 , and select accoremgd.dll , acdbmgd.dll , and acmgd.dll . Click Add and then click OK. The left pane displays the namespaces and objects in the selected librar-ies. Select All Components from the Choose Object Browsing Scope drop-down list to see all refer-enced libraries.
TIP You can resize the panes in the Object Browser. Place the mouse cursor on the bar between the panes until you see the left-
right pointing arrows, and drag left or right.
Namespaces and objects
In the left pane, you see the list of namespaces and objects that are part of a referenced or selected library. Namespaces are near the top and have an icon that looks like two curly brackets ( { } ). You import namespaces into code modules and Windows forms to access the objects that they hold. In .NET, you can have both individual objects and collections of objects. For example, the Document object represents a drawing window for a drawing file that is open in AutoCAD, and the DocumentCollectionExtension collection object represents each drawing file that is open in AutoCAD. The purpose of collections is to enable you to work with a group of similar objects. For example, to open or create a drawing, you add a document object to the collection of documents; this is because the new document is not related to any other open document.
Properties and methods
What can you do with objects in VB.NET? First, objects can have properties. For example, you can set an ellipse to the color red because one of the properties of the ellipse object is ColorIndex . (Of course, all drawing objects have ColorIndex as one of their properties.)
56_9781118880364-BC4.indd BC10956_9781118880364-BC4.indd BC109 8/6/2014 12:25:38 PM8/6/2014 12:25:38 PM
BC110
Programming with .NET
Second, objects have methods. A method is an action that you can perform on the object. For example, you can erase an ellipse because Erase is a method of the ellipse object (as well as all drawing objects).
The right pane of the Object Browser displays the properties and methods of any object that you choose from the left pane.
Investigating the hierarchy model Although you might first think that an object in .NET is the same as an object in an AutoCAD drawing, there is more to the story. In .NET, everything is an object. For example, AutoCAD is an application object. Your current drawing is an object. Model space and paper space are also objects. Therefore, to specify an object such as a line in a drawing, you need to specify the application, the drawing, the block table (which stores block definitions), a block, and finally the object in the block. To do this, .NET works with a hierarchy of objects.
NOTE Although you don’t usually think about your drawing in this way, model space is actually a block definition that you are
always manipulating. That is why you can insert a drawing as a block; when you do so, you use the *model_space block
definition.
Objects are specified from the most general to the most specific, with a period between each part of the definition. In most cases, you must obtain one object before you can traverse further down the object hierarchy. You then add the method or property you want to use after another period. For example, you use the following VB.NET code to get the current drawing:
Autodesk.AutoCAD.ApplicationServices.Application. _ DocumentManager.MdiActiveDocument
In order to work with any object, you need to know where it fits in the hierarchy. The quickest way to see the hierarchical structure of an object is to use the Search text box at the top of the Object Browser to locate the object, method, or property you want to work with. Then choose one of the results in the left pane (choose items with the Class icon) to display information about the item in the Members list of the right pane.
NOTE The AutoCAD .NET Developer’s Guide is part of AutoCAD’s Help system, but the Managed Class Reference Guide is part of
the ObjectARX software development kit (SDK). ObjectARX is the AutoCAD Runtime Extension and is used to program
AutoCAD with C++. For information on downloading and installing the ObjectARX SDK, see the “ Accessing help ” section
later in this chapter.
STEPS: Becoming Acquainted with the VB.NET Environment
1 . Choose Start ➪ (All) Programs ➪ Visual Studio 2013 ➪ VS Express 2013 for Desktop.
2 . In Microsoft Visual Studio Express 2013 for Windows Desktop, choose File ➪ New Project.
3 . In the New Project dialog box, expand Installed ➪ Templates ➪ Visual Basic and select Windows.
56_9781118880364-BC4.indd BC11056_9781118880364-BC4.indd BC110 8/6/2014 12:25:38 PM8/6/2014 12:25:38 PM
BC111
B O N U S
4
Programming with .NET
4 . In the Templates list, select Class Library. Type ABProject in the Name text box.
5 . Click Browse to the right of the Location text box. In the Project Location dialog box, browse to the AutoCAD Bible folder that you created for the exercises in this book. Select the AutoCAD Bible folder and click Select Folder.
6 . Click OK.
7 . Choose Project ➪ Add Reference to display the Add Reference dialog box.
8 . In the Add Reference dialog box, click Browse and browse to C:\Program Files\Autodesk\AutoCAD 2015 .
9 . Press and hold the Ctrl key, and select accoremgd.dll , acdbmgd.dll , and acmgd.dll . Click Add and then click OK. These files need to be referenced for each new project that you create.
10 . Choose Project ➪ <Project name> Properties.
11 . On the Properties page, along the left side, click References.
12 . In the References list, press and hold Ctrl, and select accoremgd, acdbmgd, and acmgd.
13 . In the Properties window, docked along the right side of the application window, click the Copy Local field and choose False.
14 . Choose View ➪ Object Browser. Click the Ellipsis button to the right of the Choose Object Browsing Scope drop-down list. (By default, the drop-down list displays the text, All Components.) Click the Browse tab. Browse to and select the accoremgd.dll , acdb-mgd.dll , and acmgd.dll files again from the AutoCAD installation folder. Click Add and then click OK.
15 . In the Search text box, type line ↵. You see the search results displayed in the Objects (left) pane. Select Autodesk.AutoCAD.DatabaseServices.Line to see the properties and methods associated with the class.
16 . In the Members (right) pane, select [Erase]() . You see the following at the bottom of the window: Public Sub [Erase] () Member of Autodesk.AutoCAD.DatabaseServices.DBObject
If you don’t see the [Erase]() method listed in the Members pane, right-click in the Members pane and choose Show Inherited Members.
NOTE DatabaseServices is a namespace that contains the database-related components of the AutoCAD libraries, includ-
ing the Line and Circle objects. Sub indicates the start of a VB.NET subroutine. Methods are listed in this way.
17 . In the Members pane, click AcadObject() As Object . At the bottom of the window, you see the following: Public ReadOnly Property AcadObject() As Object Member of Autodesk.AutoCAD.DatabaseServices.DBObject
This indicates that AcadObject is a property of DBObject . Object refers to the data type, discussed later in this chapter. The Line object inherits the properties and methods of the DBObject class, which is why both AcadObject and Erase are members of Autodesk.AutoCAD.DatabaseServices.Line .
56_9781118880364-BC4.indd BC11156_9781118880364-BC4.indd BC111 8/6/2014 12:25:38 PM8/6/2014 12:25:38 PM
BC112
Programming with .NET
18 . Click the DBObject link at the bottom of the window. The Objects pane changes and you see that DBObject is a member of Autodesk.AutoCAD.DatabaseServices . DBObject is a base class that is used to define other meaningful objects, such as Line and Circle . If you scroll down the left pane, you should see other classes for objects that you are familiar with, like Line , Circle , and MText .
Don’t close the project, as you will continue working with it later in this chapter.
Accessing help The help for the AutoCAD Managed .NET API is divided into two guides: AutoCAD .NET Developer’s Guide and Managed Class Reference Guide. The AutoCAD .NET Developer’s Guide is by far the more valuable of the two guides when you are first getting started. This guide contains exercises on creat-ing projects, as well as a large number of code samples in VB.NET and C#. You can find these two help files in the following locations:
• AutoCAD .NET Developer’s Guide. Located in the AutoCAD Help system or online at help.autodesk.com/view/ACD/2015/ENU/ . In AutoCAD, press F1 when no command is active. On the Help landing page, under the Resources section, click the Developer Home Page link.
• Managed Class Reference Guide. Located in the ObjectARX SDK. You can download the ObjectARX SDK at www.objectarx.com and click the License & Download link. On the License & Download page, fill out the required fields and click Submit. Download and exe-cute the ObjectARX SDK installer. Accept the default settings of the installer. Then browse to C:\ObjectARX 2015\docs\arxmgd.chm to view the Managed Class Reference Guide.
TIP Because the two guides for the AutoCAD Managed .NET API are located in two different locations, we recommend creating
shortcuts for the two files on your desktop to make them easier to access.
Writing VB.NET Code Now that you’re familiar with the structure of .NET objects, methods, and properties, you’re ready to start writing some code. As with any programming language, you need to learn syntax and understand variables and when to use them. After you write some code and define at least one command, you can use it in AutoCAD.
Table B4.1 lists the common components of VB.NET code. This table defines various terms that you often use when working with VB.NET.
TABLE B4.1 Components of VB.NET Code Term Definition
Procedure Code that does something and has a name. A procedure can be a subroutine or function.
Project A set of files (code and Windows forms) that are compiled into an executable or assem-bly file.
56_9781118880364-BC4.indd BC11256_9781118880364-BC4.indd BC112 8/6/2014 12:25:38 PM8/6/2014 12:25:38 PM
BC113
B O N U S
4
Programming with .NET
Term Definition
Module A set of subroutines, functions, and declarations that are usually related and comprise a distinct component in a project. A module can contain zero (0) or more procedures (sub-routines and functions).
Windows Form A container for the visual components, such as buttons and text boxes, of a dialog box that you create for your VB.NET project.
Subroutine A procedure, written in VB.NET code, that does not return a value.
Function A procedure, written in VB.NET code, that returns a value.
Class A container for the procedures and global variables that you create. Each module con-tains at least one class definition.
Imports A statement, imports a namespace that is defined in your project or a referenced library.
Declaration One or more non-executable statements that name constants or variables and define their attributes (such as data type).
When you start to write code, you need to decide two qualities of the procedure:
• Public or Private. Public makes the procedure accessible to other modules in your proj-ect, and Private makes the procedure available only to the current file.
• Return a value or not. If your procedure needs to return a value, you need to define it using the Function declaration instead of the Sub (short for subroutine) declaration (which does not return a value).
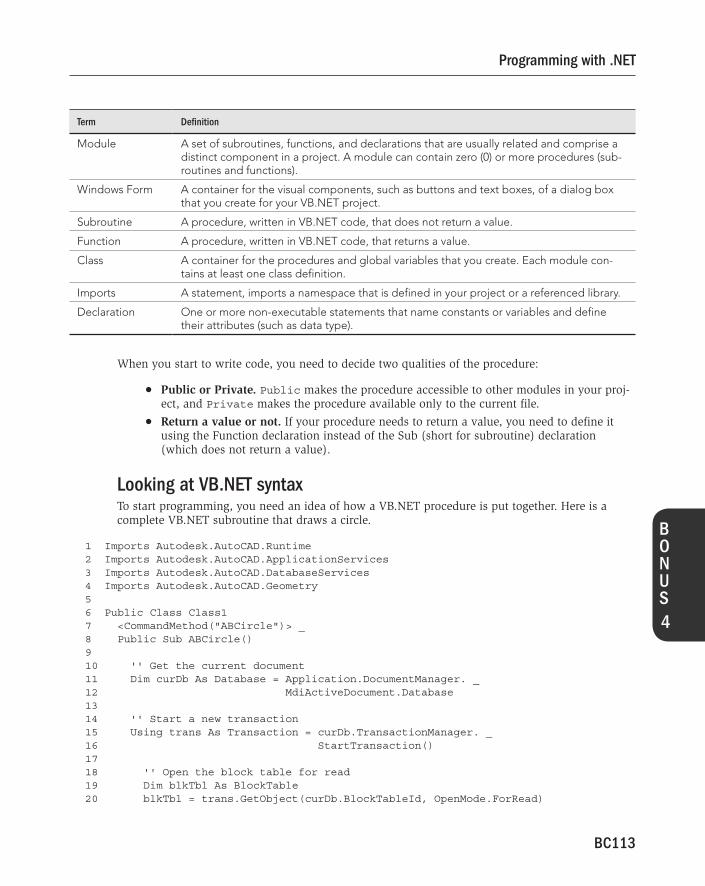
Looking at VB.NET syntax To start programming, you need an idea of how a VB.NET procedure is put together. Here is a complete VB.NET subroutine that draws a circle.
1 Imports Autodesk.AutoCAD.Runtime 2 Imports Autodesk.AutoCAD.ApplicationServices 3 Imports Autodesk.AutoCAD.DatabaseServices 4 Imports Autodesk.AutoCAD.Geometry 5 6 Public Class Class1 7 <CommandMethod("ABCircle")> _ 8 Public Sub ABCircle() 9 10 '' Get the current document 11 Dim curDb As Database = Application.DocumentManager. _ 12 MdiActiveDocument.Database 13 14 '' Start a new transaction 15 Using trans As Transaction = curDb.TransactionManager. _ 16 StartTransaction() 17 18 '' Open the block table for read 19 Dim blkTbl As BlockTable 20 blkTbl = trans.GetObject(curDb.BlockTableId, OpenMode.ForRead)
56_9781118880364-BC4.indd BC11356_9781118880364-BC4.indd BC113 8/6/2014 12:25:38 PM8/6/2014 12:25:38 PM

BC114
Programming with .NET
21 22 '' Open the model space block table for write 23 Dim blkTblRec As BlockTableRecord 24 blkTblRec = trans.GetObject(blkTbl(BlockTableRecord.ModelSpace), _ 25 OpenMode.ForWrite) 26 27 '' Define the parameters for the circle 28 Dim centerPoint As New Point3d(2, 3, 0) 29 Dim normalVector As New Vector3d(0, 0, 1) 30 Dim radius As Double = 4.2 31 32 '' Create the circle 33 Using circleObject As New Circle(centerPoint, _ 34 normalVector, _ 35 radius) 36 '' Add the circle to model space 37 blkTblRec.AppendEntity(circleObject) 38 trans.AddNewlyCreatedDBObject(circleObject, True) 39 End Using 40 41 '' Save the new object 42 trans.Commit() 43 End Using 44 End Sub 45 End Class
TIP You can turn line numbering on in the Visual Basic development environment to make reading your code easier. To turn line
numbering on, choose Tools ➪ Options. In the Options dialog box, expand Text Editor and select Basic. Click Line Numbers
to turn line numbering on or off, and then click OK.
Here’s what the code means:
• Line 1. Import the AutoCAD Runtime namespace. This namespace is necessary to use the CommandMethod attribute to define a command.
• Line 2. Import the AutoCAD ApplicationServices namespace. This namespace con-tains the Application object and access to the DocumentManager , which allows you to access all open drawings.
• Line 3. Import the AutoCAD DatabaseServices namespace. This namespace contains all of the classes for creating and editing drawing objects.
• Line 4. Import the AutoCAD Geometry namespace. This namespace contains definitions of custom data types that are specific to AutoCAD, such as Point3d and Vector3d .
• Line 6. Start of the Class1 class definition in the module. Each code module contains at least one class.
• Line 7. Defines the ABCircle command. The command definition line must appear before the public subroutine that should be named when you execute the command in AutoCAD.
56_9781118880364-BC4.indd BC11456_9781118880364-BC4.indd BC114 8/6/2014 12:25:38 PM8/6/2014 12:25:38 PM

BC115
B O N U S
4
Programming with .NET
• Line 8. Public Sub indicates the start of a public subroutine procedure, which is a named, unified piece of code. You can have several subroutines in a VB.NET module. The next word is the name of the subroutine. Within the parentheses, you can add arguments, if any. Use an empty set of parentheses if there are no arguments. If you are defining a procedure for a command, you shouldn’t define a procedure that requires any arguments. Declaring arguments is discussed later in this chapter.
• Line 10. Any text starting with an apostrophe ( ' ) is a comment. Two or more apostrophes are also okay, and can help you find your comments more easily. It’s always a good idea to add comments to your code, indicating what is happening and reminding yourself of what the code is doing.
• Lines 11–12. Declares variables with the Dim statement. Here curDb is used as the vari-able for the database of the current drawing. Database is the type of variable declared. We discuss variable types later. This statement assigns Application.DocumentManager.MdiActiveDocument.Database to the curDb variable, which is the database of the cur-rent drawing open in AutoCAD. The underscore (_) at the end of Line 11 indicates that the line of code extends to the next line. Using the underscore allows you to keep your code lines shorter to reduce horizontal scrolling.
• Line 14. Another comment describing the next few lines of code.
• Lines 15–16. The Using keyword defines a variable which only exists in the current scope until the next End Using statement is evaluated. In this case, the variable is named trans and is defined as a Transaction . The trans variable is assigned curDb.TransactionManager.StartTransaction() , which is a new transaction object in the current database. You use a transaction to control changes to objects.
• Lines 18–20. Another comment followed by the declaration of a variable named blkTbl as a BlockTable . The block table stores all blocks defined in the current drawing; it includes user-defined blocks, and model and paper space, which are also blocks. The GetObject function in the last line of this code grouping retrieves an object from the cur-rent drawing and opens it for read (access) or write (change) operations. In this situation, the code opens the block table for read. You open the block table for write when you create a new block. The GetObject function requires an ObjectID and the access mode you want to use to open the object.
• Lines 22–25. Another comment followed by the declaration of a variable named blkTblRec as a BlockTableRecord . A block table record represents a block definition stored in the block table. blkTbl ( BlockTableRecord.ModelSpace ) obtains the ObjectID of model space in the block table object, which is assigned to the blkTbl variable in this procedure. The GetObject function opens the block table record object for write, and assigns it to the blkTblRec variable.
• Lines 27–30. Another comment followed by the declaration of three variables that are nec-essary later to define the Circle object. The variable named centerPoint is declared as a Point3d , which holds the coordinates 2,3,0. The second variable (named normalVector ) is defined as a Vector3d , which defines the plane in which you want to draw the circle. The 0,0,1 plane is the same as the world coordinate system (WCS). The final variable is radius as a Double and it is assigned the value of 4.2. ( Double is a data type; see Table B4.2 for a definition.)
• Lines 32–35. Another comment followed by the declaration of a variable named circle Object as a Circle . The code creates a new Circle object and assigns it to circle Object , defined using the variables centerPoint , normalVector , and radius .
56_9781118880364-BC4.indd BC11556_9781118880364-BC4.indd BC115 8/6/2014 12:25:38 PM8/6/2014 12:25:38 PM
BC116
Programming with .NET
• Line 36. Another comment.
• Line 37. Appends the new circle object to the block table record; model space. When you create objects, they only exist in memory until you append them to a block table record or another object in a drawing file.
• Line 38. Adds the circle object to the transaction started earlier in the procedure.
• Line 39. Ends the Using statement that was started in Line 32.
• Lines 41–42. Another comment and a commitment of the changes made during the trans-action to the drawing. Until you commit the transaction, the circle object does not actually exist in the drawing.
• Line 43. End Using ends the Using statement started in Line 15.
• Line 44. End Sub ends the subroutine started in Line 8.
• Line 45. End Class ends the Class1 class started in Line 6.
To learn more about the functions used in the above syntax, see the Managed Class Reference Guide mentioned earlier under the “ Accessing help ” section in this chapter.
Saving and opening a VB.NET project You save a VB.NET project just as you do files in other Windows-based programs. Choose File ➪ Save to save the current module, or File ➪ Save All to save all changed modules in the current project. When you close a project the first time, you are prompted to specify a name and location for the proj-ect if one wasn’t provided when the project was initially created. If you want to create a copy of a module or project, choose File ➪ Save <module/project name> As and specify a new name and loca-tion. You can also rename modules and projects using the Properties window. Select the module or project you want to rename in the Solution Explorer and enter a new name in the Properties window.
After you close a project (choose File ➪ Close Solution), you can open an existing project by choos-ing File ➪ Open Project and then specifying the project you want to open. If you want to work with a recent project, you can choose File ➪ Recent Projects and Solutions and choose the project or solu-tion you want to open. You can also open a recent file that you worked on by choosing File ➪ Recent Files and then choosing the file you want to open.
NOTE When you create a new project, you can also create a solution (SLN) file that contains your project. A solution file allows
you to group multiple projects together. Using solutions, you can work more efficiently between multiple projects and even
share common code with multiple projects. At the time of saving your project, you can create a solution, which contains a
single project. Choose File ➪ Add and select one of the options to add a project to a solution.
Compiling, loading, and using a VB.NET project Before you can load a VB.NET project in AutoCAD, you need to compile it. Compilation creates a DLL assembly file. To compile a project, follow these steps:
1 . Open the project in Microsoft Visual Studio Express 2013 for Windows Desktop (choose File ➪ Open Project), if it is not already open.
2 . Choose Build ➪ Build Solution.
56_9781118880364-BC4.indd BC11656_9781118880364-BC4.indd BC116 8/6/2014 12:25:38 PM8/6/2014 12:25:38 PM
BC117
B O N U S
4
Programming with .NET
3 . You need to know the location of the compiled file to load it into AutoCAD. Choose View ➪ Output. The last line in the Output window indicates if the project built success-fully or if the build failed. The line just above that will let you know where the assembly DLL file was saved. Here you see an example of the output: ------ Build started: Project: ABproject, Configuration: Release Any CPU ------ ABproject -> C:\AutoCAD Bible\ABproject\ABproject\bin\Release\ABproject.dll ========== Build: 1 succeeded or up-to-date, 0 failed, 0 skipped
==========
Use the NETLOAD command in AutoCAD to load your project. Type netload ↵ in the command line. In the Choose .NET Assembly dialog box, browse to the compiled DLL file, and click Open. You can’t unload a loaded DLL file, except by closing AutoCAD. If the File Loading – Security Concern dialog box is displayed, click Load. ➟ Starting with AutoCAD 2014, custom applications are identified as trusted or non-trusted. The location
where an application is placed determines whether it is trusted or not. For more information on setting up
AutoCAD to trust your custom applications, see Appendix A.
To use a command defined in a loaded assembly file, type the name of the command at the Command prompt and press Enter. The command name appears after CommandMethod in the code. In the example code from the previous section of this chapter, you would type abcircle ↵. (Command names are not case sensitive.) ➟ You can define a command alias for the command in the PGP file or use it as part of a command macro in
the Customer User Interface (CUI) Editor. For more information on editing the PGP file and creating custom
commands in the CUI Editor, see Chapter 28 .
Using the VB.NET Editor When you type code from scratch in the VB.NET editor, you immediately notice that the code changes colors as you type. The most common colors are:
Plain text Black
Syntax-error Black with blue, squiggly underline
Comments Green
Keyword text Blue
Keywords include reserved words that VB.NET recognizes, such as Dim and Sub . NOTE You can customize these colors by choosing Tools ➪ Options from the Visual Studio 2013 Express for Windows Desktop
menu bar and then choosing Environment ➪ Fonts and Colors from the options tree on the left. Choose a type of text from
the Display Items list and then choose the desired foreground and background colors for the item. Click OK.
56_9781118880364-BC4.indd BC11756_9781118880364-BC4.indd BC117 8/6/2014 12:25:38 PM8/6/2014 12:25:38 PM

BC118
Programming with .NET
When you start to type a keyword that VB.NET recognizes, you’ll often see a box pop up that enables you to choose from a list, or that helps you to complete the word. The editor also adds or removes spaces and capitalizes certain words for you to improve your syntax. If you make a syntax mistake, the text is underlined with a red, squiggly line. In these ways, the VB.NET editor helps you to type accurate code.
ON THE WEB The drawing that you need for the following exercise on compiling, loading, and using a VB.NET program, abb4-a.txt , is
in the Drawings download on the companion website.
STEPS: Compiling, Loading, and Using a VB.NET Program
1 . Close AutoCAD. If you don’t have the project ABProject open, choose File ➪ Open Project and browse to the AutoCAD Bible folder. Double-click the ABProject folder and select ABProject.sln . Click Open. If you didn’t complete the steps under “Becoming Acquainted with the VB.NET Environment” earlier in this chapter, go back and do Steps 1 to 6 to create and set up a new project, named ABProject .
2 . In the Solution Explorer, double-click Class1.vb . The Class1.vb file opens in the editor. Open Notepad, choose File ➪ Open, and open abb4-a.txt , available from the Drawings download on the companion website. Select all of the text and copy it to the Clipboard.
3 . In the Class1.vb editor window, delete the two existing lines of default code and paste the following code: Imports Autodesk.AutoCAD.Runtime Imports Autodesk.AutoCAD.ApplicationServices Imports Autodesk.AutoCAD.DatabaseServices Imports Autodesk.AutoCAD.Geometry Public Class Class1 <CommandMethod("ABLine")> _ Public Sub ABLine() '' Get the current document Dim curDb As Database = Application.DocumentManager. _ MdiActiveDocument.Database '' Start a new transaction Using trans As Transaction = curDb.TransactionManager. _ StartTransaction() '' Open the block table for read Dim blkTbl As BlockTable blkTbl = trans.GetObject(curDb.BlockTableId, OpenMode.ForRead) '' Open the model space block table for write Dim blkTblRec As BlockTableRecord blkTblRec = _ trans.GetObject(blkTbl(BlockTableRecord.ModelSpace), _ OpenMode.ForWrite)
56_9781118880364-BC4.indd BC11856_9781118880364-BC4.indd BC118 8/6/2014 12:25:38 PM8/6/2014 12:25:38 PM
BC119
B O N U S
4
Programming with .NET
'' Create the line from 0,0, to 5,8 Using lineObject As New Line(New Point3d(0, 0, 0), _ New Point3d(5, 8, 0)) '' Add the line to model space blkTblRec.AppendEntity(lineObject) trans.AddNewlyCreatedDBObject(lineObject, True) End Using '' Save the new object trans.Commit() End Using End Sub End Class
4 . Choose File ➪ Save All. If the Save Project dialog box is displayed, make sure ABProject is in the Name and Solution Name text boxes. Click Browse and browse to the location of the AutoCAD Bible folder. Click Select Folder to return to the Save Project dialog box. Check the Create Directory for Solution check box if it is not checked, and click Save.
5 . Choose View ➪ Output to display the Output window if it is not already displayed.
6 . Choose Build ➪ Configuration Manager.
7 . In the Configuration Manager, click the Active Solution Configuration drop-down list, and choose Release. Click Close.
NOTE .NET applications must be built for release before they can be used on other machines that don’t have Visual Studio 2013
installed on them.
8 . Choose Build ➪ Build Solution to compile the project into the file ABProject.dll . NOTE It is best to close AutoCAD before compiling your project; this helps to avoid possible issues with your DLL being locked if it
is loaded in AutoCAD when you compile a new version of the program.
9 . Start AutoCAD and create a new drawing using the acad.dwt template.
10 . In AutoCAD, type netload ↵ in the command line. In the Choose .NET Assembly dialog box, browse to AutoCAD Bible\ABProject\ABProject\bin\Release and select ABProject.dll . Click Open.
11 . In the File Loading – Security Concern dialog box, click Load.
12 . Type abline ↵ in the command line. Zoom to the extents of the drawing to see the new line drawn. Select the line and display the Properties palette (Ctrl+1) to make sure the line is drawn from 0,0 to 5,8.
Don’t save your drawing, but keep the project open.
56_9781118880364-BC4.indd BC11956_9781118880364-BC4.indd BC119 8/6/2014 12:25:38 PM8/6/2014 12:25:38 PM
BC120
Programming with .NET
Understanding variables A variable holds a value for use later in your program. In VB.NET, you need to explicitly declare your variables in advance (as long as you don’t include Option Explicit Off in your code, which we explain later). If you don’t explicitly declare a variable, VB.NET assigns the variable the variant data type. The variant data type can contain numbers, dates, strings (of text), and even objects.
However, declaring variables explicitly in advance has two advantages:
• You can specify the type of variable, which usually uses less memory than the default variant type.
• As you continue to enter code, VB.NET checks the variable’s spelling for you, thus reduc-ing the chance for errors.
You declare variables by using the Dim statement. Here’s an example:
Dim radius As Double
You can create three different levels of variables:
• A Public variable is available to all the procedures in the project. It is shown as follows: Public dRadius As Double
• A module-level variable is available to all the procedures in the module where it is defined. You create a module-level variable by placing the declaration (with the Dim statement) at the top of a module, in a Declarations section. Another way to create a module-level vari-able is to use the Private statement. Examples are shown here: Dim number3 as Double Private number2 as Double
• A procedure-level variable is used only within a procedure. You can place the variable anywhere within the procedure, as long as you declare the variable before you use it.
You can use the Using statement to declare a variable. You use the Using statement when you need to dispose a variable. Disposing a variable removes it from memory so that it is freed from the computer’s memory. In the ABLine example of the Compiling, Loading, and Using a VB.NET Program exercise, the Using statement declares a Transaction object, which needs to be dis-posed of after it is no longer needed. You can use the Dispose method to manually dispose of the Transaction object, but the Using statement allows you to group the code that applies to the Transaction object, making the code easier to read and debug. You want to make sure that you control the disposal of the Transaction to ensure that it is freed from memory at the appropriate time. The .NET Framework will dispose of objects, but only when it thinks it needs to be done, which can lead to performance issues or even crashes.
Placing the statement Option Explicit On at the top of the module requires you to declare all variables. Option Explicit is used to force you to declare your variables before you use them, resulting in the compiler doing a better job at checking the syntax of your code. Declared variables are easier to debug because they’re easier to find. If you do not want to declare your variables before you use them, use the statement Option Explicit Off .
Table B4.2 describes the kinds of variables that you can declare.
56_9781118880364-BC4.indd BC12056_9781118880364-BC4.indd BC120 8/6/2014 12:25:38 PM8/6/2014 12:25:38 PM
BC121
B O N U S
4
Programming with .NET
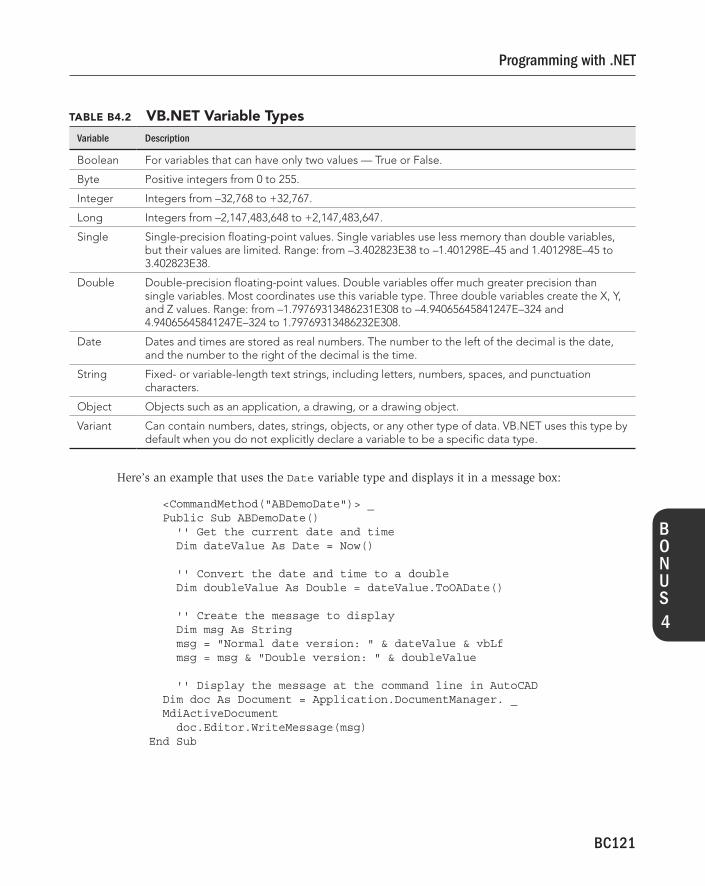
TABLE B4.2 VB.NET Variable Types Variable Description
Boolean For variables that can have only two values — True or False.
Byte Positive integers from 0 to 255.
Integer Integers from –32,768 to +32,767.
Long Integers from –2,147,483,648 to +2,147,483,647.
Single Single-precision floating-point values. Single variables use less memory than double variables, but their values are limited. Range: from –3.402823E38 to –1.401298E–45 and 1.401298E–45 to 3.402823E38.
Double Double-precision floating-point values. Double variables offer much greater precision than single variables. Most coordinates use this variable type. Three double variables create the X, Y, and Z values. Range: from –1.79769313486231E308 to –4.94065645841247E–324 and 4.94065645841247E–324 to 1.79769313486232E308.
Date Dates and times are stored as real numbers. The number to the left of the decimal is the date, and the number to the right of the decimal is the time.
String Fixed- or variable-length text strings, including letters, numbers, spaces, and punctuation characters.
Object Objects such as an application, a drawing, or a drawing object.
Variant Can contain numbers, dates, strings, objects, or any other type of data. VB.NET uses this type by default when you do not explicitly declare a variable to be a specific data type.
Here’s an example that uses the Date variable type and displays it in a message box:
<CommandMethod("ABDemoDate")> _ Public Sub ABDemoDate() '' Get the current date and time Dim dateValue As Date = Now() '' Convert the date and time to a double Dim doubleValue As Double = dateValue.ToOADate() '' Create the message to display Dim msg As String msg = "Normal date version: " & dateValue & vbLf msg = msg & "Double version: " & doubleValue '' Display the message at the command line in AutoCAD Dim doc As Document = Application.DocumentManager. _ MdiActiveDocument doc.Editor.WriteMessage(msg) End Sub
56_9781118880364-BC4.indd BC12156_9781118880364-BC4.indd BC121 8/6/2014 12:25:38 PM8/6/2014 12:25:38 PM

BC122
Programming with .NET
Compile the code in a project and execute the ABDemoDate command at the command line in AutoCAD. Once the command is executed, you should see something similar to the following:
Normal date version: 2/23/2014 11:49:05 PM Double version: 41693.9924229398
Creating VB.NET statements Although a complete discussion of how to write VB.NET code is beyond the scope of this book, some general principles will be helpful.
A statement in VB.NET is the most basic unit of code, and it contains a complete instruction. There are three kinds of statements:
• A declaration defines a variable, constant, or procedure, as in this example: Dim origin as Double
• An assignment assigns a value to a variable or constant. For example: origin = 0#
• An executable creates an action. For example, it can execute a method or function, or create a loop or branch that acts on a block of code, as shown here: Dim doc As Document = DocumentCollectionExtension. _ Add(Application.DocumentManager, "c:\AutoCAD Bible\mytemplate.dwt")
VB.NET has many keywords, functions, and other components that you can use to create code. To find the basic components of the VB.NET language, choose Help ➪ View Help from the Visual Studio Express 2013 for Windows Desktop editor. From the navigation tree on the left, click Visual Studio 2013 ➪ Visual Basic and Visual C# ➪ Visual Basic ➪ Visual Basic Reference ➪ Visual Basic Language Reference. Here are some examples:
• Constants. You can use constants anywhere in your code to provide a named value. For example, VB.NET offers color and date constants that you can use to specify colors and dates.
• Methods. VB.NET includes many functions that you’ll find familiar if you’ve used AutoLISP or VBA. For example, the MATH.ABS function returns the absolute value (without a plus or minus sign) of any number. The NOW function returns the current system date and time.
• Keywords. Keywords are words that have a special meaning in VB.NET. They are often used as parts of VB.NET statements. For example, Else is a keyword that is used in the If...Then...Else statement. You’re already familiar with the Dim keyword, which is used in the Dim statement.
• Operators. VB.NET includes all the usual arithmetic operations, such as + , - , * , / , and ̂ . You can also use & to concatenate text strings. There are several logical operators, such as and , not , and or .
• Statements. Statements help you to create the flow of your code. You’re already familiar with the Dim statement. Other statements are For Each...Next and If...Then...Else . These provide looping capabilities in VB.NET.
Remember that you can also find a list of objects and their properties and methods in the Object Browser, as we explained earlier in this chapter.
56_9781118880364-BC4.indd BC12256_9781118880364-BC4.indd BC122 8/6/2014 12:25:38 PM8/6/2014 12:25:38 PM
BC123
B O N U S
4
Programming with .NET
Getting User Input The examples shown so far in this chapter weren’t very useful, partly because the programs provided no way to get user input for the properties of the objects that they drew. There are two main ways to get user input: at the Command prompt and through a dialog box. In this section, we explain how to get user input at the Command prompt.
NOTE You need to add the statement Imports Autodesk.AutoCAD.EditorInput at the top of a module to use the
functions in this section.
In order to use the user-input methods, you need to reference the Editor object. The Editor object belongs to the Document object and controls the methods that get user input. The following shows an example of getting user input, in the form of an integer:
Dim intResult As PromptIntegerResult intResult = doc.Editor.GetInteger(vbLf & "Enter an integer: ")
Here you declare a variable named intResult that is assigned the returned value of the GetInteger function, which could be the user pressing Esc or an integer value. The GetInteger function takes a string argument that represents the prompt to be displayed at the Command prompt; in this example, the prompt is Enter an integer: . vbLf forces the prompt to be displayed on a new line in the Command Line window. This helps to avoid multiple prompts appearing on the same line.
You can use this type of user input to get a pick point, a numeric value (such as the radius of a circle), a text string, or an object. Use this method when the input is short and sweet.
Here’s an example that illustrates how to get user input at the Command prompt:
1 <CommandMethod("ABUserInput")> _ 2 Public Sub ABUserInput() 3 '' Get the current document 4 Dim doc As Document = Application.DocumentManager. _ 5 MdiActiveDocument 6 7 Dim curDb As Database = doc.Database 8 9 '' Start a new transaction 10 Using trans As Transaction = curDb.TransactionManager. _ 11 StartTransaction() 12 13 '' Open the block table for read 14 Dim blkTbl As BlockTable 15 blkTbl = trans.GetObject(curDb.BlockTableId, OpenMode.ForRead) 16 17 '' Open the model space block table for write 18 Dim blkTblRec As BlockTableRecord 19 blkTblRec = _ 20 trans.GetObject(blkTbl(BlockTableRecord.ModelSpace), _ 21 OpenMode.ForWrite)
56_9781118880364-BC4.indd BC12356_9781118880364-BC4.indd BC123 8/6/2014 12:25:38 PM8/6/2014 12:25:38 PM

BC124
Programming with .NET
22 23 '' Prompt user for a point 24 Dim pointResult As PromptPointResult 25 pointResult = doc.Editor.GetPoint(vbLf & "Enter center: ") 26 27 If pointResult.Status = PromptStatus.Cancel Then GoTo ErrHandler 28 29 '' Prompt user for a double 30 Dim doubleResult As PromptDoubleResult 31 doubleResult = doc.Editor.GetDouble(vbLf & "Enter radius: ") 32 33 If doubleResult.Status = _ 34 PromptStatus.Cancel Then GoTo ErrHandler 35 36 '' Create the circle 37 Using circleObject As New Circle() 38 circleObject.Center = pointResult.Value 39 circleObject.Radius = doubleResult.Value 40 41 '' Add the circle to model space 42 blkTblRec.AppendEntity(circleObject) 43 trans.AddNewlyCreatedDBObject(circleObject, True) 44 End Using 45 46 '' Save the new object 47 trans.Commit() 48 49 ErrHandler: 50 End Using 51 End Sub
For more information on the ErrHandler code, see the “ Trapping Errors ” section later in this chapter.
Table B4.3 lists some commonly used methods for getting user input. If you know the GET func-tions in AutoLISP or VBA, you’ll be familiar with these methods.
TABLE B4.3 Common User-Input Methods Method Description
GetEntity The user selects an object (entity) by picking it. This returns a PromptEntityResult object. The method supports two different arguments: a string message or a PromptEntityOptions argument, which defines the behavior and message for GetEntity .
GetInteger Any integer from –32,768 to +32,767 is valid. This returns a PromptIntegerResult object. The method supports two different arguments: a string message or a PromptIntegerOptions argument, which defines the behavior and message for GetInteger.
56_9781118880364-BC4.indd BC12456_9781118880364-BC4.indd BC124 8/6/2014 12:25:38 PM8/6/2014 12:25:38 PM
BC125
B O N U S
4
Programming with .NET
Method Description
GetPoint The user can pick a point, or type in a coordinate. This returns a PromptPointResult object. The method supports two different arguments: a string message or a PromptPointOptions argument, which defines the behavior and message for GetPoint.
GetDouble Gets any double (positive or negative) number. This returns a PromptDoubleResult object. The method supports two different arguments: a string message or a PromptDoubleOptions argument, which defines the and message for GetDouble.
GetString Gets a text string. This returns a PromptResult object. The method supports two different arguments: a string message or a PromptStringOptions argument, which defines the behavior and message for GetString.
ON THE WEB The drawing that you need for the following exercise on requesting input from a user with a VB.NET program, abb4-b.txt , is in the Drawings download on the companion website.
STEPS: Requesting input from a user with a VB.NET program
1 . If you don’t have the project ABProject open, choose File ➪ Open Project and browse to the AutoCAD Bible folder. Double-click the ABProject folder and select ABProject.sln . Click Open. If you didn’t complete the steps under “Compiling, Loading, and Using a VB.NET Program” earlier in this chapter, go back and do Steps 1 to 4.
2 . In the Solution Explorer, double-click Class1.vb . The Class1.vb file opens in the editor.
3 . In the Class1.vb editor window, at the top of the module, copy and paste the following line of code from abb4-b.txt : Imports Autodesk.AutoCAD.EditorInput
4 . Copy and paste the following code between the lines Public Class Class1 and End Class . <CommandMethod("ABSmiley")> _ Public Sub ABSmiley() Dim pi As Double = 3.1415 '' Get the current document Dim doc As Document = Application.DocumentManager. _ MdiActiveDocument Dim curDb As Database = doc.Database '' Start a new transaction Using trans As Transaction = curDb.TransactionManager. _ StartTransaction() '' Open the block table for read Dim blkTbl As BlockTable blkTbl = trans.GetObject(curDb.BlockTableId, OpenMode.ForRead)
56_9781118880364-BC4.indd BC12556_9781118880364-BC4.indd BC125 8/6/2014 12:25:38 PM8/6/2014 12:25:38 PM
BC126
Programming with .NET
'' Open the model space block table for write Dim blkTblRec As BlockTableRecord blkTblRec = _ trans.GetObject(blkTbl(BlockTableRecord.ModelSpace), _ OpenMode.ForWrite) '' Prompt user for a point Dim pointOptions As PromptPointOptions = _ New PromptPointOptions("") pointOptions.Message = vbLf & "Specify center point: " Dim pointResult As PromptPointResult pointResult = doc.Editor.GetPoint(pointOptions) If pointResult.Status = PromptStatus.Cancel Then GoTo ErrHandler '' Prompt user for a distance (double) Dim distanceOptions As PromptDistanceOptions = _ New PromptDistanceOptions("") distanceOptions.Message = vbLf & "Specify radius: " Dim doubleResult As PromptDoubleResult doubleResult = doc.Editor.GetDistance(distanceOptions) distanceOptions.UseBasePoint = True distanceOptions.BasePoint = pointResult.Value If doubleResult.Status = _ PromptStatus.Cancel Then GoTo ErrHandler '' Create the circle Dim center As Point3d = pointResult.Value Dim radius As Double = doubleResult.Value Using circleObject1 As New Circle() circleObject1.Center = center circleObject1.Radius = radius '' Create the arc Using arcObject As New Arc() arcObject.Center = center arcObject.Radius = radius / 2 arcObject.StartAngle = 225 * pi / 180 arcObject.EndAngle = 315 * pi / 180 Using circleObject2 As New Circle() circleObject2.Center = New Point3d(center.X - radius / 4, _ center.Y + radius / 4, _ center.Z) circleObject2.Radius = radius / 8
56_9781118880364-BC4.indd BC12656_9781118880364-BC4.indd BC126 8/6/2014 12:25:38 PM8/6/2014 12:25:38 PM
BC127
B O N U S
4
Programming with .NET
Using circleObject3 As New Circle() circleObject3.Center = New Point3d(center.X + radius / 4, _ center.Y + radius / 4, _ center.Z) circleObject3.Radius = radius / 8 '' Add the new objects to model space blkTblRec.AppendEntity(circleObject1) blkTblRec.AppendEntity(circleObject2) blkTblRec.AppendEntity(circleObject3) blkTblRec.AppendEntity(arcObject) trans.AddNewlyCreatedDBObject(circleObject1, True) trans.AddNewlyCreatedDBObject(circleObject2, True) trans.AddNewlyCreatedDBObject(circleObject3, True) trans.AddNewlyCreatedDBObject(arcObject, True) End Using End Using End Using End Using '' Save the new object trans.Commit() ErrHandler: End Using End Sub
5 . Choose File ➪ Save All to save all changed files.
6 . Choose View ➪ Output to display the Output window if it is not already displayed.
7 . Close AutoCAD. Choose Build ➪ Build Solution to compile the project into the file ABProject.dll .
8 . Start AutoCAD and create a new drawing by using the acad.dwt template.
9 . In AutoCAD, type netload ↵ in the command line. In the Choose .NET Assembly dialog box, browse to AutoCAD Bible \ ABProject\ABProject\bin\Release and choose ABProject.dll . Click Open.
10 . In the File Loading – Security Concern dialog box, click Load.
11 . Type absmiley ↵ in the command line. Follow the prompts and zoom to the extents of the drawing to see the new objects drawn. Three circles and an arc should be drawn in the form of a smiley face.
Don’t save your drawing and don’t close the project.
The previous example uses GetDistance instead of GetDouble to enable the user to select the radius of the circle with the mouse. The GetDistance function uses the center point as the base point to obtain a distance value. Also, there are calculations to convert degrees to radians. The location and size of the eyes and smile are relative to the center and radius.
56_9781118880364-BC4.indd BC12756_9781118880364-BC4.indd BC127 8/6/2014 12:25:38 PM8/6/2014 12:25:38 PM

BC128
Programming with .NET
Creating Dialog Boxes One of the main characteristics of VB.NET is the ease with which you can create dialog boxes to get user input. Whenever you need input that is more complex than you can get using the Get methods, you should use a dialog box. You can also use a dialog box to create a more professional look or for ease of use.
When working with a dialog box, you generally create the dialog box first and then attach code to the dialog box controls. You then use a second module to define a subroutine and command method to display the dialog box.
In VB.NET, a dialog box is called a Windows form. To create one, choose Project ➪ Add Windows Form. VB.NET displays the Add New Item – <ProjectName> dialog box. Select the Windows Form template, and enter a name for the new form or accept the default name. Click Add to add the new Windows form to the project and open it in the editor. A new VB file is added to the Solution Explorer and your project. You use the Toolbox window to add controls to the Windows form. To display the Toolbox, choose View ➪ Toolbox. If the Toolbox window covers up another part of your screen, click the Pin icon at the top of the Toolbox to have it collapse to a tab along the side. Your screen should look similar to Figure B4.2 .
FIGURE B4.2
The VB.NET development environment with a blank Windows form and the Toolbox window
After you add a Windows form to your project, you need to add some additional libraries to your project before you can successfully compile it. The development environment lets you know when something is missing or not right through the Error List window.
56_9781118880364-BC4.indd BC12856_9781118880364-BC4.indd BC128 8/6/2014 12:25:38 PM8/6/2014 12:25:38 PM
BC129
B O N U S
4
Programming with .NET
Some of the common libraries that you use when working with Windows forms are:
• PresentationCore
• PresentationFramework
• WindowBase
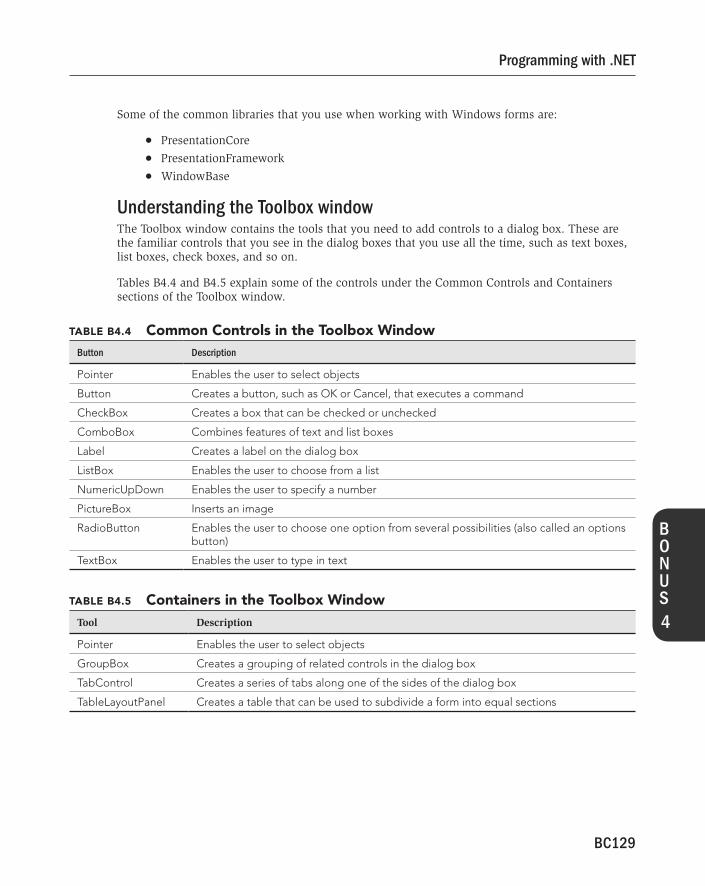
Understanding the Toolbox window The Toolbox window contains the tools that you need to add controls to a dialog box. These are the familiar controls that you see in the dialog boxes that you use all the time, such as text boxes, list boxes, check boxes, and so on.
Tables B4.4 and B4.5 explain some of the controls under the Common Controls and Containers sections of the Toolbox window.
TABLE B4.4 Common Controls in the Toolbox Window Button Description
Pointer Enables the user to select objects
Button Creates a button, such as OK or Cancel, that executes a command
CheckBox Creates a box that can be checked or unchecked
ComboBox Combines features of text and list boxes
Label Creates a label on the dialog box
ListBox Enables the user to choose from a list
NumericUpDown Enables the user to specify a number
PictureBox Inserts an image
RadioButton Enables the user to choose one option from several possibilities (also called an options button)
TextBox Enables the user to type in text
TABLE B4.5 Containers in the Toolbox Window Tool Description
Pointer Enables the user to select objects
GroupBox Creates a grouping of related controls in the dialog box
TabControl Creates a series of tabs along one of the sides of the dialog box
TableLayoutPanel Creates a table that can be used to subdivide a form into equal sections
56_9781118880364-BC4.indd BC12956_9781118880364-BC4.indd BC129 8/6/2014 12:25:39 PM8/6/2014 12:25:39 PM
BC130
Programming with .NET
TIP For more possibilities, right-click the Toolbox window and select Choose Items. From the Choose Toolbox Items dialog box,
you can choose from many more controls. For example, on the WPF Components tab you can find the ScrollBar (item
named VScrollBar) and Slider (item named TrackBar) controls, which are common in Windows dialog boxes. You might need
to look under the All Windows Forms section for the additional controls you add. Choose the item you want and click OK.
NOTE Windows Presentation Foundation (WPF) is a technology in the .NET Framework that is used to render user interfaces
in Windows. WPF utilizes DirectX, and supports hardware acceleration and modernized UI effects like gradient fills and
transparency.
Changing dialog box properties After you add a Windows form (dialog box), you should name it. Select the new Windows form in the Solution Explorer and find the Name property in the Properties window. Change it from Form1.vb (the default name) to any useful name that you want. You might find it useful to use the suffix Form . For example, for a routine to draw a circle, you could call the user form CircleForm.vb .
NOTE If you have been using VB or VBA for years, you might normally use prefixes such as frm and cmd for your forms and con-
trols. With .NET, Microsoft recommends that you don’t use such abbreviations when naming variables, modules, Windows
forms, or controls.
Figure B4.2 , on the right side, shows the properties for a Windows form in the Properties window.
One property that you’ll want to change is the Text property of the dialog box, which is a caption that appears at its top. The caption should summarize the dialog box’s purpose. Type the new cap-tion in the Text field and press Enter (or leave the field), to change the caption on the dialog box.
Adding dialog box controls One of the more commonly used controls is the command button. A command button is a button that you click in a dialog box to execute an action. The most common use for command buttons are the OK and Cancel buttons.
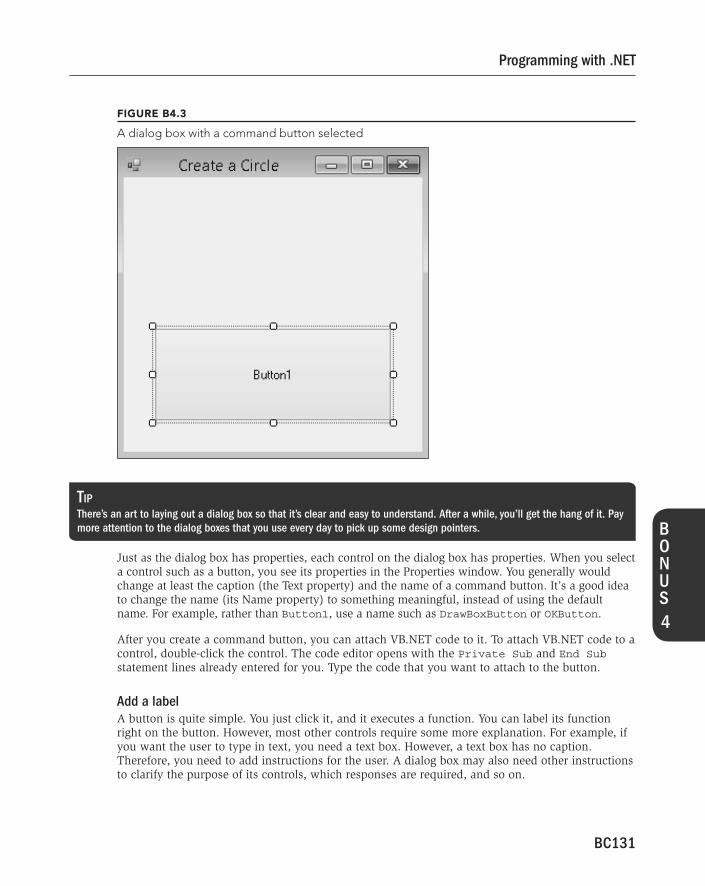
Add a command button
To add a command button, expand the Common Controls section of the Toolbox window and click Button. Move your cursor over the dialog box, and drag to create a button. Figure B4.3 shows a dialog box with a new command button. The selection border and handles indicate that the button is a selected object. You can move the button by dragging it. You can resize the button by dragging one of the handles. Add all the command buttons that you need. Don’t forget to include at least a Cancel button. Many dialog boxes also have an OK button. If you know in advance all the controls that you’ll need, you can add them all at once.
56_9781118880364-BC4.indd BC13056_9781118880364-BC4.indd BC130 8/6/2014 12:25:39 PM8/6/2014 12:25:39 PM
BC131
B O N U S
4
Programming with .NET
FIGURE B4.3
A dialog box with a command button selected
TIP There’s an art to laying out a dialog box so that it’s clear and easy to understand. After a while, you’ll get the hang of it. Pay
more attention to the dialog boxes that you use every day to pick up some design pointers.
Just as the dialog box has properties, each control on the dialog box has properties. When you select a control such as a button, you see its properties in the Properties window. You generally would change at least the caption (the Text property) and the name of a command button. It’s a good idea to change the name (its Name property) to something meaningful, instead of using the default name. For example, rather than Button1 , use a name such as DrawBoxButton or OKButton .
After you create a command button, you can attach VB.NET code to it. To attach VB.NET code to a control, double-click the control. The code editor opens with the Private Sub and End Sub statement lines already entered for you. Type the code that you want to attach to the button.
Add a label
A button is quite simple. You just click it, and it executes a function. You can label its function right on the button. However, most other controls require some more explanation. For example, if you want the user to type in text, you need a text box. However, a text box has no caption. Therefore, you need to add instructions for the user. A dialog box may also need other instructions to clarify the purpose of its controls, which responses are required, and so on.
56_9781118880364-BC4.indd BC13156_9781118880364-BC4.indd BC131 8/6/2014 12:25:39 PM8/6/2014 12:25:39 PM
BC132
Programming with .NET
You add instructions with the Label tool from the Common Controls section of the Toolbox window. Click Label and drag a rectangle on your dialog box. You can resize or move the label as needed. Select the label and edit the text string in the Text field in the Properties window to change the caption of the label.
Add other dialog box controls
The code for some of the dialog box controls can be quite complex. For example, to create a list box that enables the user to choose from an existing list of options, you’d probably create the list of options in advance. For help on working with a control such as the ListBox, add the control to the dialog box. Make sure the control is still selected and press F1. Help opens to the ListBox Members topic. Click on one of the member links, such as ClearSelected, to see how to use the method and code examples.
Displaying a dialog box Dialog boxes can be displayed as modal or modeless. Modal dialog boxes require the user to dismiss them before anything else can be done in AutoCAD, while a modeless dialog box can be displayed on screen and you can continue to interact with the drawing or AutoCAD user interface. The ShowDialog method is used to display a Windows form, and the Close method closes a dialog box. You typically close a dialog box as the last action performed when the user clicks OK or Cancel.
Controls placed on a dialog box can’t be used until the dialog box is displayed — clicking a com-mand button, typing in a text box, and so on is not allowed. To show the dialog box, add a module (choose Project ➪ Add Module) or use an existing module, and create code that looks similar to this:
Imports ABProject.ArcForm <CommandMethod("ABDrawArc")> Public Sub DrawArc() Dim dialog As New ArcForm dialog.ShowDialog() End Sub
ArcForm is an example of a class name that might be assigned to a Windows form in a project. Right-click the Windows form in the Solution Explorer and choose View Code to open the code editor for the form. For example, if Public Class Form1 is displayed at the top of the editor, you use the statement Dim dialog As New Form1 to declare a variable that is assigned the dialog box.
The class name and filename of the Windows form might not be the same, so it is best to view the form’s code to find out the name of the form’s class. Before you can work with a Windows form, you need to use the Imports statement to import the class for the dialog box into the code mod-ule that you want to call the dialog box from. The Imports statement is defined using the ProjectName and the dialog box’s class name ( Imports <ProjectName>.<FormClass> ).
NOTE To return to the form editor, double-click the form in the Solution Explorer.
56_9781118880364-BC4.indd BC13256_9781118880364-BC4.indd BC132 8/6/2014 12:25:39 PM8/6/2014 12:25:39 PM
BC133
B O N U S
4
Programming with .NET
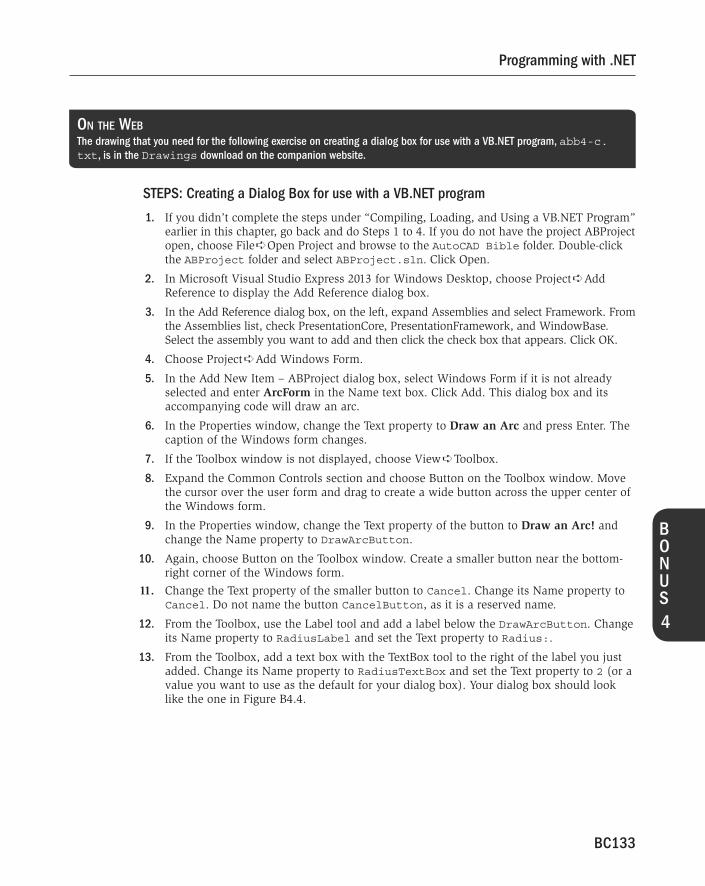
ON THE WEB The drawing that you need for the following exercise on creating a dialog box for use with a VB.NET program, abb4-c.txt , is in the Drawings download on the companion website.
STEPS: Creating a Dialog Box for use with a VB.NET program
1 . If you didn’t complete the steps under “Compiling, Loading, and Using a VB.NET Program” earlier in this chapter, go back and do Steps 1 to 4. If you do not have the project ABProject open, choose File ➪ Open Project and browse to the AutoCAD Bible folder. Double-click the ABProject folder and select ABProject.sln . Click Open.
2 . In Microsoft Visual Studio Express 2013 for Windows Desktop, choose Project ➪ Add Reference to display the Add Reference dialog box.
3 . In the Add Reference dialog box, on the left, expand Assemblies and select Framework. From the Assemblies list, check PresentationCore, PresentationFramework, and WindowBase. Select the assembly you want to add and then click the check box that appears. Click OK.
4 . Choose Project ➪ Add Windows Form.
5 . In the Add New Item – ABProject dialog box, select Windows Form if it is not already selected and enter ArcForm in the Name text box. Click Add. This dialog box and its accompanying code will draw an arc.
6 . In the Properties window, change the Text property to Draw an Arc and press Enter. The caption of the Windows form changes.
7 . If the Toolbox window is not displayed, choose View ➪ Toolbox.
8 . Expand the Common Controls section and choose Button on the Toolbox window. Move the cursor over the user form and drag to create a wide button across the upper center of the Windows form.
9 . In the Properties window, change the Text property of the button to Draw an Arc! and change the Name property to DrawArcButton .
10 . Again, choose Button on the Toolbox window. Create a smaller button near the bottom-right corner of the Windows form.
11 . Change the Text property of the smaller button to Cancel . Change its Name property to Cancel . Do not name the button CancelButton , as it is a reserved name.
12 . From the Toolbox, use the Label tool and add a label below the DrawArcButton . Change its Name property to RadiusLabel and set the Text property to Radius: .
13 . From the Toolbox, add a text box with the TextBox tool to the right of the label you just added. Change its Name property to RadiusTextBox and set the Text property to 2 (or a value you want to use as the default for your dialog box). Your dialog box should look like the one in Figure B4.4 .
56_9781118880364-BC4.indd BC13356_9781118880364-BC4.indd BC133 8/6/2014 12:25:39 PM8/6/2014 12:25:39 PM
BC134
Programming with .NET
FIGURE B4.4
A simple dialog box created in VB.NET
14 . Double-click the larger button labeled ‘Draw an Arc!’. In the text editor, find the following code in abb4-c.txt (on the companion website), and copy and paste it at the cursor’s current location between the Private Sub DrawArcButton_Click and End Sub statements: Dim ed As Editor ed = Application.DocumentManager.MdiActiveDocument.Editor '' Hide the dialog box so you can interact with the drawing window edUserInt = ed.StartUserInteraction(Me.Handle) Try '' Get the current document Dim doc As Document = Application.DocumentManager. _ MdiActiveDocument Dim curDb As Database = doc.Database '' Start a new transaction Using trans As Transaction = curDb.TransactionManager. _ StartTransaction()
56_9781118880364-BC4.indd BC13456_9781118880364-BC4.indd BC134 8/6/2014 12:25:39 PM8/6/2014 12:25:39 PM
BC135
B O N U S
4
Programming with .NET
'' Open the block table for read Dim blkTbl As BlockTable blkTbl = trans.GetObject(curDb.BlockTableId, OpenMode.ForRead) '' Open the model space block table for write Dim blkTblRec As BlockTableRecord blkTblRec = _ trans.GetObject(blkTbl(BlockTableRecord.ModelSpace), _ OpenMode.ForWrite) '' Prompt user for a point Dim pointOptions As PromptPointOptions = _ New PromptPointOptions("") pointOptions.Message = vbLf & "Specify center point: " Dim pointResult As PromptPointResult pointResult = doc.Editor.GetPoint(pointOptions) If pointResult.Status = PromptStatus.Cancel Then GoTo ErrHandler '' Create the arc Using arcObject As New Arc() arcObject.Center = pointResult.Value arcObject.Radius = RadiusTextBox.Text arcObject.StartAngle = 0 arcObject.EndAngle = 100 '' Add the new object to model space blkTblRec.AppendEntity(arcObject) trans.AddNewlyCreatedDBObject(arcObject, True) End Using '' Save the new object trans.Commit() ErrHandler: End Using Catch ex As System.Exception MsgBox(ex.Message, MsgBoxStyle.Critical, "Error") Finally '' Close the dialog box Me.DialogResult = System.Windows.Forms.DialogResult.OK Me.Close() '' Use the following to redisplay the dialog box '' and end user interaction '' edUserInt.End() End Try
56_9781118880364-BC4.indd BC13556_9781118880364-BC4.indd BC135 8/6/2014 12:25:39 PM8/6/2014 12:25:39 PM

BC136
Programming with .NET
15 . In the text editor, type the following code above the Public Class ArcForm statement: Imports Autodesk.AutoCAD.ApplicationServices Imports Autodesk.AutoCAD.DatabaseServices Imports Autodesk.AutoCAD.Geometry Imports Autodesk.AutoCAD.EditorInput
16 . Type the following code below the Public Class ArcForm statement: Dim edUserInt As EditorUserInteraction
Using ActiveX with VB.NET
You can use the ActiveX library with VB.NET. ActiveX is valuable when you want to access objects in other applications or when migrating VBA projects that you might have so that they work with future releases of AutoCAD. You must download and install the ObjectARX 2015 SDK, if you have not done so already, before continuing. For information on downloading and installing the ObjectARX SDK, see the “ Accessing help ” section later in this chapter. To use the ActiveX library with VB.NET, follow these steps:
1 . In the development environment, choose Project ➪ Add Reference. In the Reference Manager, click Browse. In the Select the Files to Reference dialog box, browse to C:\ObjectARX 2015 or the install location of the ObjectARX 2015 SDK. If you are using Windows 32-bit, double-click the inc-win32 folder; if you are using Windows 64-bit, double-click the inc-x64 folder.
2 . Press and hold Ctrl, and then select the files Autodesk.AutoCAD.Interop.Common.dll and Autodesk.AutoCAD.Interop.dll . Click Add and then click OK.
3 . At the top of the code editor window in which you will use the library, add the following Imports statements:
Imports Autodesk.AutoCAD.Interop Imports Autodesk.AutoCAD.Interop.Common
4 . Create a new subroutine and define the command to execute the function; then add the code to your module. The following is an example of ActiveX code that demonstrates how to draw a circle.
Dim doc As AcadDocument doc = DocumentExtension.GetAcadDocument(Application. _ DocumentManager.MdiActiveDocument) Dim center(0 To 2) As Double Dim radius As Double Dim circleObject as AcadCircle center(0) = 0# center(1) = 0# center(2) = 0# radius = 2.5 Set circleObject = doc.ModelSpace.AddCircle(center, radius) circleObject.Update
For more information on using the ActiveX library, see C:\Program Files\Common Files\Autodesk Shared\ acadauto.chm or the AutoCAD Help system.
56_9781118880364-BC4.indd BC13656_9781118880364-BC4.indd BC136 8/6/2014 12:25:39 PM8/6/2014 12:25:39 PM

BC137
B O N U S
4
Programming with .NET
17 . From the left (Object) drop-down list at the top of the text editor, choose CancelButton and then choose Click from the right (Method) drop-down list to add the code for the second button. In the space below the start of the subroutine (Private Sub Cancel_Click()) , type the following: Me.DialogResult = System.Windows.Forms.DialogResult.Cancel Me.Close()
18 . In the Solution Explorer, double-click Class1.vb . In the text editor, type the following below the other Imports statements at the top of the file (above the statement Public Class Class1 ): Imports ABProject.ArcForm
19 . In the editor window, type the following below the statement Public Class Class1 and above the statement <CommandMethod("ABLine")> _ : <CommandMethod("ABArcForm")> _ Public Sub ABArcForm() Dim dialog As New ArcForm dialog.ShowDialog() End Sub
20 . Choose File ➪ Save All to save all changed files.
21 . Choose View ➪ Output to display the Output window if it is not already displayed.
22 . Choose Build ➪ Build Solution to compile the project into the file ABProject.dll .
23 . Close and restart AutoCAD. Create a new drawing using the acad.dwt template.
24 . In AutoCAD, type netload ↵ in the command line. In the Choose .NET Assembly dialog box, browse to AutoCAD Bible\ABProject\ABProject\bin\Release and select ABProject.dll . Click Open.
25 . In the File Loading – Security Concern dialog box, click Load.
26 . Type abarcform ↵ in the command line. The Draw an Arc dialog box opens. Enter a radius value and click Draw an Arc!. The dialog box hides and you get a prompt for the center of the arc. Specify a center point for the arc to finish the command.
Modifying Objects Modifying objects is usually very easy. You need to know the name of the object. If you’ve created it, you assign it to a variable, and then you can use that variable.
For example, if you created a circle named circleObject , the following code changes its layer to “ fixtures ”, assuming that “ fixtures ” exists:
circleObject.layer = "fixtures"
To add a layer, reference the layer table object ( LayerTable ) and append a new layer table record ( LayerTableRecord ):
<CommandMethod("ABCreateLayer")> _ Public Sub ABCreateLayer()
56_9781118880364-BC4.indd BC13756_9781118880364-BC4.indd BC137 8/6/2014 12:25:39 PM8/6/2014 12:25:39 PM

BC138
Programming with .NET
'' Get the current document Dim doc As Document = Application.DocumentManager. _ MdiActiveDocument Dim curDb As Database = doc.Database '' Start a new transaction Using trans As Transaction = curDb.TransactionManager. _ StartTransaction() '' Open the block table for read Dim lyrTbl As LayerTable lyrTbl = trans.GetObject(curDb.LayerTableId, OpenMode.ForRead) '' Create a new layer Dim layerName As String = "fixtures" If lyrTbl.Has(layerName) = False Then '' Create the new layer Using lyrTblRec As New LayerTableRecord lyrTblRec.Name = layerName '' Open the layer table for write lyrTbl.UpgradeOpen() '' Add the new layer table record lyrTbl.Add(lyrTblRec) trans.AddNewlyCreatedDBObject(lyrTblRec, True) End Using '' Save the new object trans.Commit() Else '' Abort any changes made trans.Abort() End If End Using End Sub
You can then set the layer’s properties. For example, the following code makes the layer not plottable.
lyrTblRec.IsPlottable = False
Using constants Constants are names for commonly used values. For instance, AutoCAD defines three constants that are used for accessing objects with the GetObject method. These constants are Open.ForNotify , Open.ForRead , and Open.ForWrite . The ABUserInput example earlier in this chapter uses the
56_9781118880364-BC4.indd BC13856_9781118880364-BC4.indd BC138 8/6/2014 12:25:39 PM8/6/2014 12:25:39 PM
BC139
B O N U S
4
Programming with .NET
OpenMode.ForRead constant that defines how to open the BlockTable and BlockTableRecord . To open the BlockTable for write instead of read, you could use the following code:
Dim blkTbl As BlockTable blkTbl = trans.GetObject(curDb.BlockTableId, OpenMode.ForWrite)
Most functions or properties that have a standard set of values have corresponding constants.
Using functions Functions are a type of procedure (like subroutines), except that they return a value. Here’s an example if you are counting the days until January 1, 2015. (If you’re reading this after that date, you can change it to a later date.) Alternatively, it tells you how many days ago January 1, 2015, occurred (indicated by a negative value).
'' Function returns an Integer Private Function DaysTil2015() As Integer Dim dtToday As Date '' Holds today's date Dim dt2015 As Date '' Holds Jan 1, 2015 dtToday = Now() '' Assign today's date dt2015 = CDate("1/1/2015") '' Assign Jan 1, 2015 '' Calculate and return the difference DaysTil2015 = dt2015.Subtract(dtToday).TotalDays End Function
To use this function, you must do something with the return value through an assignment, or use it as a parameter to another procedure. For example:
<CommandMethod("ABDaysTil2015")> _ Public Sub ABDaysTil2015() Dim doc As Document = Application.DocumentManager. _ MdiActiveDocument doc.Editor.WriteMessage("Days until 2015: " & _ DaysTil2015().ToString()) End Sub
You can then run the ABDaysTil2015 subroutine to open a message box that tells you how many days are left until the year 2015.
Trapping Errors Microsoft Visual Studio 2013 Express for Windows Desktop doesn’t allow you to debug your appli-cations when loaded in AutoCAD. However, you can use error handling to help you troubleshoot your programs. As you create complex programs, you will encounter unexpected errors. For exam-ple, a file that you attempt to open may not exist, your system may run out of memory and not be able to insert that AutoCAD block into your drawing, or you may unintentionally write a routine
56_9781118880364-BC4.indd BC13956_9781118880364-BC4.indd BC139 8/6/2014 12:25:39 PM8/6/2014 12:25:39 PM
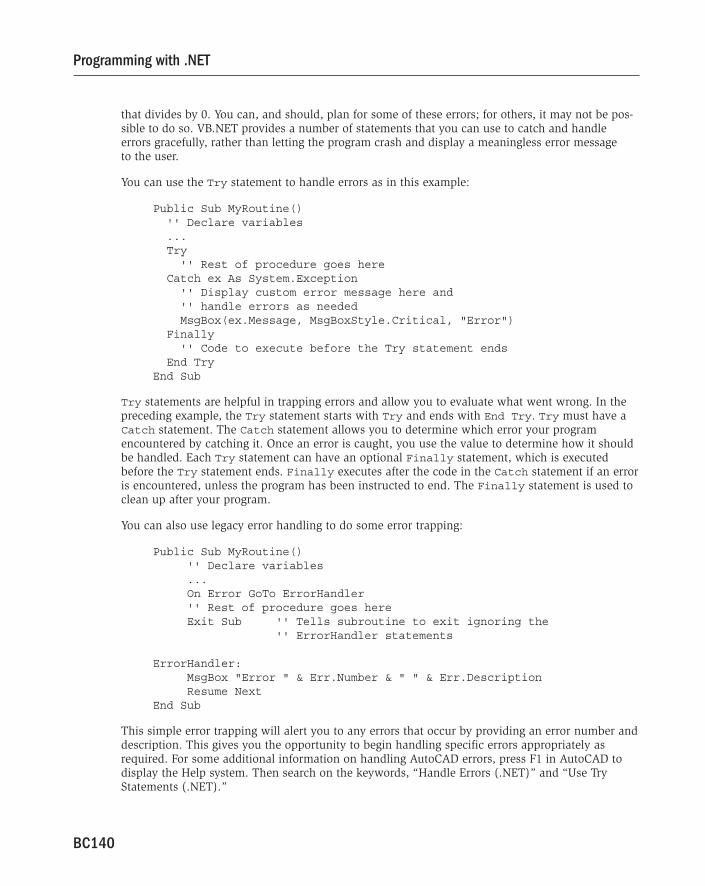
BC140
Programming with .NET
that divides by 0. You can, and should, plan for some of these errors; for others, it may not be pos-sible to do so. VB.NET provides a number of statements that you can use to catch and handle errors gracefully, rather than letting the program crash and display a meaningless error message to the user.
You can use the Try statement to handle errors as in this example:
Public Sub MyRoutine() '' Declare variables ... Try '' Rest of procedure goes here Catch ex As System.Exception '' Display custom error message here and '' handle errors as needed MsgBox(ex.Message, MsgBoxStyle.Critical, "Error") Finally '' Code to execute before the Try statement ends End Try End Sub
Try statements are helpful in trapping errors and allow you to evaluate what went wrong. In the preceding example, the Try statement starts with Try and ends with End Try . Try must have a Catch statement. The Catch statement allows you to determine which error your program encountered by catching it. Once an error is caught, you use the value to determine how it should be handled. Each Try statement can have an optional Finally statement, which is executed before the Try statement ends. Finally executes after the code in the Catch statement if an error is encountered, unless the program has been instructed to end. The Finally statement is used to clean up after your program.
You can also use legacy error handling to do some error trapping:
Public Sub MyRoutine() '' Declare variables ... On Error GoTo ErrorHandler '' Rest of procedure goes here Exit Sub '' Tells subroutine to exit ignoring the '' ErrorHandler statements ErrorHandler: MsgBox "Error " & Err.Number & " " & Err.Description Resume Next End Sub
This simple error trapping will alert you to any errors that occur by providing an error number and description. This gives you the opportunity to begin handling specific errors appropriately as required. For some additional information on handling AutoCAD errors, press F1 in AutoCAD to display the Help system. Then search on the keywords, “Handle Errors (.NET)” and “Use Try Statements (.NET).”
56_9781118880364-BC4.indd BC14056_9781118880364-BC4.indd BC140 8/6/2014 12:25:39 PM8/6/2014 12:25:39 PM

BC141
B O N U S
4
Programming with .NET
Moving to Advanced Programming The chapters and Bonus chapters in this book covered the fundamentals of AutoLISP, VBA, and VB.NET, and you’ve seen the power that these languages provide for automating your work. If you want to learn more about AutoLISP and VBA, we encourage you to also take a look at the AutoCAD Platform Customization books published by Sybex and written by Lee Ambrosius (one of the authors of this book).
Other programming options available for creating custom programs with AutoCAD are ObjectARX and JavaScript. ObjectARX applications share the same memory space as AutoCAD like .NET applications do, and are many times faster than routines written in AutoLISP. ObjectARX is based on C++ and enables full object-oriented interfacing with AutoCAD. An object-oriented interface enables the programmer to create an object in memory (such as an arc), modify its attributes, and then modify the AutoCAD database.
You can create custom objects that inherit properties from AutoCAD objects; that is, your object can assume all the properties of a given object that is already in AutoCAD, and you can add to it. For example, you can inherit from a line so that your custom object has everything that the line does, and then you can add width to it if you want. ObjectARX offers a variety of tools that are unavailable to AutoLISP and .NET programmers; however, ObjectARX involves much greater devel-opment time. You can obtain ObjectARX at the Autodesk-related website www.objectarx.com .
NEW FEATURE JavaScript is the newest programming option that AutoCAD supports. While the AutoCAD JavaScript API is very young com-
pared to the other API choices, it can still be used to automate tasks in AutoCAD. You can learn more about the AutoCAD
JavaScript API at the Autodesk-related website http://www.autocadws.com/jsapi/v1/docs/ .
Summary In this bonus chapter, you learned some basic principles of Visual Basic.NET (VB.NET) as applied to AutoCAD. Specifically, we discussed:
• Working with the VB.NET development environment
• Understanding .NET objects, methods, and properties
• Writing VB.NET code
• Getting user input
• Creating dialog boxes
• Modifying objects
• Referencing the ActiveX library
• Trapping errors
56_9781118880364-BC4.indd BC14156_9781118880364-BC4.indd BC141 8/6/2014 12:25:39 PM8/6/2014 12:25:39 PM

56_9781118880364-BC4.indd BC14256_9781118880364-BC4.indd BC142 8/6/2014 12:25:39 PM8/6/2014 12:25:39 PM