Embed Size (px)
Citation preview
PROFLIGHTAVIATION HEADSET
Owner’s Guide-German
Owner’s Guide-Spanish
Owner’s Guide-French
Owner’s Guide-Portu-
guese
IMPORTANT SAFETY INSTRUCTIONS
2 | E N G L I S H
Please read and keep all safety and use instructions.
Important Safety Instructions
WARNINGS/CAUTIONS• Do NOT use the headphones with noise canceling mode at any time the inability to hear surrounding sounds may
present a danger to yourself or others, e.g., while riding a bicycle or walking in or near traffic, a construction site or railroad, etc.
• Keep batteries out of reach of children.
• Please dispose of used batteries properly, following any local regulations.
• Danger of explosion if batteries are incorrectly replaced.
• Batteries may cause a fire or chemical burn if mishandled. Do not recharge, disassemble, heat, or incinerate.
• When a replacement is needed, use only a AA (LR06) alkaline batteries.
Please read and save this guidePlease read this guide carefully. Save this guide for future reference and make it easily accessible for passengers and third parties who use this headset.
• Switch to an alternate communications method in the event of a headset issue.In the unlikely event of any headset issue or failure in the passive noise reducing mode, switch to an alternate communications method and use standard cockpit resource management skills to minimize distractions.
• Use the headset at a moderate volume level.To avoid hearing damage, use the headset at a comfortable, moderate volume level. Limit the headset volume to safe levels that do not interfere with your ability to hear informational sounds and warning alarms, such as stall warnings or gear up, while piloting.
• Turn the headset off if it emits any loud noise.As with any complex electronic device, it is possible for this headset to fail during operation. Symptoms of failure, which may include loud tones, distortion, feedback squeals and loss of communications signal in the headset, can occur in either the Acoustic Noise Cancelling™ mode (turned on) or in the passive mode (turned off). If the headset emits any loud noise and the related loss of communications in the Acoustic Noise Cancelling™ mode, turn off the power switch. The headset will continue to provide communications in the passive noise-reducing mode. If the problem persists, see “Troubleshooting” on page 45.
• Be aware of sound differences while wearing the headset.With the headset’s active and passive noise reduction, typical aircraft sounds (such as engines, propellers, warning alarms, and other sound sources) may not sound familiar. Make sure you can hear and recognize these sounds when using the headset while operating any aircraft.
• Do NOT make phone calls while piloting.Do not use the headset for telephone calls during flight operations.
• Make sure your aircraft communications system volume control is easily accessible.This control affects the strength of the communications signal coming into the headset. Make sure you can understand critical communications even with Acoustic Noise Canceling mode turned off. In this case, you may need to turn up the aircraft communications system volume. In passive mode, the volume controls on the control module will automatically be set to maximum volume. For additional volume control, use the intercom or radio volume control. If your headset is aircraft powered, connect the headset to the aircraft power sources only as described in “Aircraft Connectors” on page 29”.
IMPORTANT SAFETY INSTRUCTIONS
3 | E N G L I S H
• Make sure portable devices do not interfere with the aircraft’s navigation and communication systems. Reference FAA AC 91.21-1D, or later revision, for installation approval.It is the pilot’s responsibility to ensure that portable devices do not interfere with the aircraft’s navigation and communication systems, as well as to determine if the portable device is suitable for use with the headset.
• Use only AA alkaline batteries.To avoid risk of explosion, replace the batteries only with AA alkaline batteries. Properly dispose of used batteries.
• Do NOT repair the headset yourself.Contact the Bose organization in your country/region for specific care, return and shipping instructions. Visit: global.Bose.com
• Do not use the headset with a helmet or as part of a crash protection system.The headset is not intended for such use, and has not been certified for crash protection. Dismantling, reassembly or modification of the headset, or any part, for use in a helmet or other crash protection system could result in severe bodily injury and such unauthorized use will void the limited product warranty.
• Do NOT immerse the headset or any parts in water or any other liquid.See “Clean the headset” on page 41 for cleaning instructions.
Contains small parts which may be a choking hazard. Not suitable for children under age 3.
This product contains magnetic material. Consult your physician on whether this might affect your implantable medical device.
• Do NOT expose this product to dripping or splashing, and do not place objects filled with liquids, such as vases, on or near the product.
• Do NOT make unauthorized alterations to this product.
• Do not expose products containing batteries to excessive heat (e.g. from storage in direct sunlight, fire or the like).
REGULATORY INFORMATION
4 | E N G L I S H
NOTE: This equipment has been tested and found to comply with the limits for a Class B digital device, pursuant to Part 15 of the FCC Rules. These limits are designed to provide reasonable protection against harmful interference in a residential installation. This equipment generates, uses, and can radiate radio frequency energy and, if not installed and used in accordance with the instructions, may cause harmful interference to radio communications. However, there is no guarantee that interference will not occur in a particular installation. If this equipment does cause harmful interference to radio or television reception, which can be determined by turning the equipment off and on, the user is encouraged to try to correct the interference by one or more of the following measures:
• Reorient or relocate the receiving antenna.
• Increase the separation between the equipment and receiver.
• Connect the equipment into an outlet on a circuit different from that to which the receiver is connected.
• Consult the dealer or an experienced radio/TV technician for help.
Changes or modifications not expressly approved by Bose Corporation could void the user’s authority to operate this equipment.
This device complies with part 15 of the FCC Rules and with Industry Canada license-exempt RSS standard(s). Operation is subject to the following two conditions: (1) This device may not cause harmful interference, and (2) this device must accept any interference received, including interference that may cause undesired operation.
This device complies with FCC and Industry Canada radiation exposure limits set forth for general population. This transmitter must not be co-located or operating in conjunction with any other antenna or transmitter.
CAN ICES-3 (B)/NMB-3(B)
Bose Corporation hereby declares that this product is in compliance with the essential requirements and other relevant provisions of Directive 2014/53/EU and all other applicable EU directive requirements. The complete declaration of conformity can be found at: www.Bose.com/compliance
Frequency band of operation 2400 to 2480 MHz:
• Bluetooth: Maximum transmit power less than 20 dBm EIRP.
• Bluetooth Low Energy: Maximum power spectral density less than 10 dBm/MHz EIRP.
Please dispose of used batteries properly, following local regulations. Do not incinerate.
This symbol means the product must not be discarded as household waste, and should be delivered to an appropriate collection facility for recycling. Proper disposal and recycling helps protect natural resources, human health and the environment. For more information on disposal and recycling of this product, contact your local municipality, disposal service, or the shop where you bought this product.
REGULATORY INFORMATION
5 | E N G L I S H
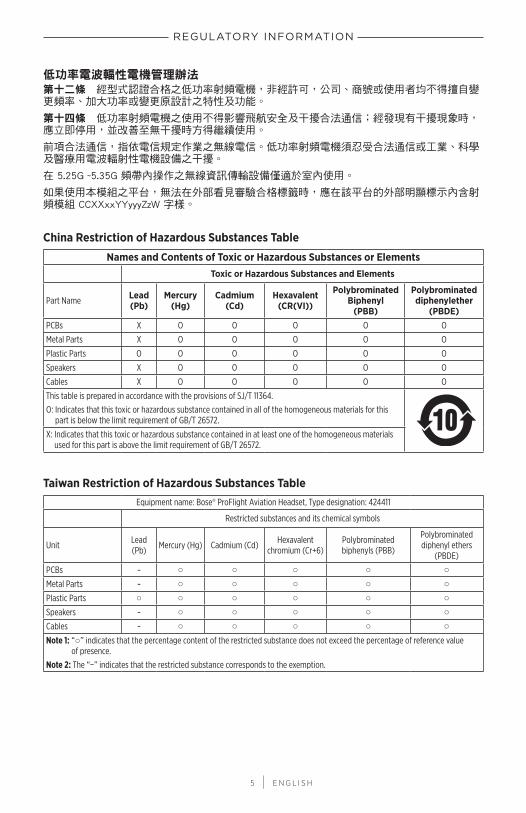
低功率電波輻性電機管理辦法第十二條 經型式認證合格之低功率射頻電機,非經許可,公司、商號或使用者均不得擅自變更頻率、加大功率或變更原設計之特性及功能。
第十四條 低功率射頻電機之使用不得影響飛航安全及干擾合法通信;經發現有干擾現象時,應立即停用,並改善至無干擾時方得繼續使用。
前項合法通信,指依電信規定作業之無線電信。低功率射頻電機須忍受合法通信或工業、科學及醫療用電波輻射性電機設備之干擾。
在 5.25G ~5.35G 頻帶內操作之無線資訊傳輸設備僅適於室內使用。
如果使用本模組之平台,無法在外部看見審驗合格標籤時,應在該平台的外部明顯標示內含射頻模組 CCXXxxYYyyyZzW 字樣。
China Restriction of Hazardous Substances Table
Names and Contents of Toxic or Hazardous Substances or ElementsToxic or Hazardous Substances and Elements
Part Name Lead (Pb)
Mercury (Hg)
Cadmium (Cd)
Hexavalent (CR(VI))
Polybrominated Biphenyl
(PBB)
Polybrominated diphenylether
(PBDE)PCBs X O O O O O
Metal Parts X O O O O O
Plastic Parts O O O O O O
Speakers X O O O O O
Cables X O O O O O
This table is prepared in accordance with the provisions of SJ/T 11364.
O: Indicates that this toxic or hazardous substance contained in all of the homogeneous materials for this part is below the limit requirement of GB/T 26572.
X: Indicates that this toxic or hazardous substance contained in at least one of the homogeneous materials used for this part is above the limit requirement of GB/T 26572.
Taiwan Restriction of Hazardous Substances TableEquipment name: Bose® ProFlight Aviation Headset, Type designation: 424411
Restricted substances and its chemical symbols
Unit Lead (Pb) Mercury (Hg) Cadmium (Cd) Hexavalent
chromium (Cr+6)Polybrominated biphenyls (PBB)
Polybrominated diphenyl ethers
(PBDE)
PCBs - ○ ○ ○ ○ ○Metal Parts - ○ ○ ○ ○ ○Plastic Parts ○ ○ ○ ○ ○ ○Speakers - ○ ○ ○ ○ ○Cables - ○ ○ ○ ○ ○Note 1: “○” indicates that the percentage content of the restricted substance does not exceed the percentage of reference value
of presence.
Note 2: The “−” indicates that the restricted substance corresponds to the exemption.
REGULATORY INFORMATION
6 | E N G L I S H
Date of Manufacture: The eighth digit in the serial number indicates the year of manufacture; “8” is 2008 or 2018.
China Importer: Bose Electronics (Shanghai) Company Limited, Part C, Plan 9, No. 353 North Riying Road, China (Shanghai) Pilot Free Trade Zone
EU Importer: Bose Products B.V., Gorslaan 60, 1441 RG Purmerend, The Netherlands
Taiwan Importer: Bose Taiwan Branch, 9F-A1, No.10, Section 3, Minsheng East Road, Taipei City 104, Taiwan Phone Number: +886-2-2514 7676
Mexico Importer: Bose de México, S. de R.L. de C.V. , Paseo de las Palmas 405-204, Lomas de Chapultepec, 11000 México, D.F. Phone Number: +5255 (5202) 3545
Apple and the Apple logo are trademarks of Apple Inc. registered in the U.S. and other countries. App Store is a service mark of Apple Inc.
Android, Google Play, and the Google Play logo are trademarks of Google Inc.
The Bluetooth® word mark and logos are registered trademarks owned by Bluetooth SIG, Inc. and any use of such marks by Bose Corporation is under license.
Bose Corporation Headquarters: 1-877-230-5639
©2018 Bose Corporation. No part of this work may be reproduced, modified, distributed or otherwise used without prior written permission.
CONTENTS
7 | E N G L I S H
CONTENTS
BOSE® CONNECT APPFeatures .............................................................................................................................. 11
WHAT’S IN THE BOXContents ............................................................................................................................. 12
Headset components .................................................................................................... 13
IMPORTANCE OF PROPER FITFit the headband ............................................................................................................. 14
Choose the correct StayHear®+ tips ........................................................................ 15
Fit the earbuds to your ear ......................................................................................... 15
Single earbud use ................................................................................................... 16
Change the StayHear®+ tips ....................................................................................... 16
Adjust the microphone ................................................................................................. 17
Conditions related to fit ............................................................................................... 18
Secure clothing clip and control module holder ................................................ 18
HEADSET CONTROLSPower on ............................................................................................................................ 19
Power off ............................................................................................................................ 19
ACOUSTIC NOISE CANCELLATIONAcoustic Noise Cancelling™ functions .................................................................... 20
Tap Control for talk-through communication ...................................................... 21
Reset Tap Control ................................................................................................... 21
OPERATION SWITCHESOperation switch functions ......................................................................................... 22
Change the operation switches................................................................................. 23
CONTENTS
8 | E N G L I S H
CONTENTS
MICROPHONE PLACEMENTMove the microphone ................................................................................................... 25
BATTERIESReplace the batteries .................................................................................................... 28
AIRCRAFT CONNECTORSDual plug ............................................................................................................................ 29
Disconnect from the aircraft .............................................................................. 29
5-pin XLR, 6-pin Lemo, and 7-pin XLR ................................................................... 30
Connect to the aircraft ......................................................................................... 30
Disconnect from the aircraft .............................................................................. 30
STATUS INDICATORSBluetooth® indicator ....................................................................................................... 31
Power indicator................................................................................................................ 32
BLUETOOTH CONNECTIONSConnect using the Bluetooth menu on your mobile device .......................... 33
Connect your mobile device using the Bose® Connect app .......................... 34
Bluetooth audio priority ............................................................................................... 34
Disconnect a mobile device ........................................................................................ 35
Reconnect a mobile device ......................................................................................... 36
Recover a lost connection ........................................................................................... 36
MANAGING MULTIPLE BLUETOOTH CONNECTIONSConnect an additional mobile device ..................................................................... 37
Switch between connected devices ........................................................................ 37
Clear the headset pairing list ..................................................................................... 37
CONTENTS
9 | E N G L I S H
CONTENTS
BLUETOOTH FUNCTIONSBluetooth volume functions ....................................................................................... 38
Call functions .................................................................................................................... 38
CARE AND MAINTENANCEStore the headset ........................................................................................................... 40
Clean the headset ........................................................................................................... 41
Limited warranty ............................................................................................................. 41
Serial number location .................................................................................................. 42
Replacement parts and accessories ........................................................................ 42
Side pad cushion ..................................................................................................... 42
Headband cushion ................................................................................................. 43
StayHear®+ tips ....................................................................................................... 44
Microphone windscreen ....................................................................................... 44
Batteries ..................................................................................................................... 44
Microphone or terminator cover ....................................................................... 44
TROUBLESHOOTINGTry these first .................................................................................................................... 45
Other solutions ................................................................................................................ 45
Acoustic Noise Cancelling™ ................................................................................ 45
Intercom communications................................................................................... 46
Audio ........................................................................................................................... 47
Microphone ............................................................................................................... 48
Bluetooth audio source ........................................................................................ 48
Auto on/off ................................................................................................................ 49

CONTENTS
1 0 | E N G L I S H
CONTENTS
INSTALLATIONMount the aircraft panel connector ......................................................................... 50
Mono connection diagram .................................................................................. 51
Stereo connection diagram ................................................................................ 52
Details on making the connections ................................................................. 53
TECHNICAL INFORMATIONFAA Technical Standard Order .................................................................................. 56

1 1 | E N G L I S H
BOSE® CONNECT APP
Enhance your headset experience with the Bose Connect app.
FEATURESEasily connect to and switch between multiple mobile devices with a single swipe.
Customize your headset experience:
Name your headset.
Share audio and music.
Adjust Bluetooth volume.
Find answers to frequently asked questions.
1 2 | E N G L I S H
WHAT’S IN THE BOX
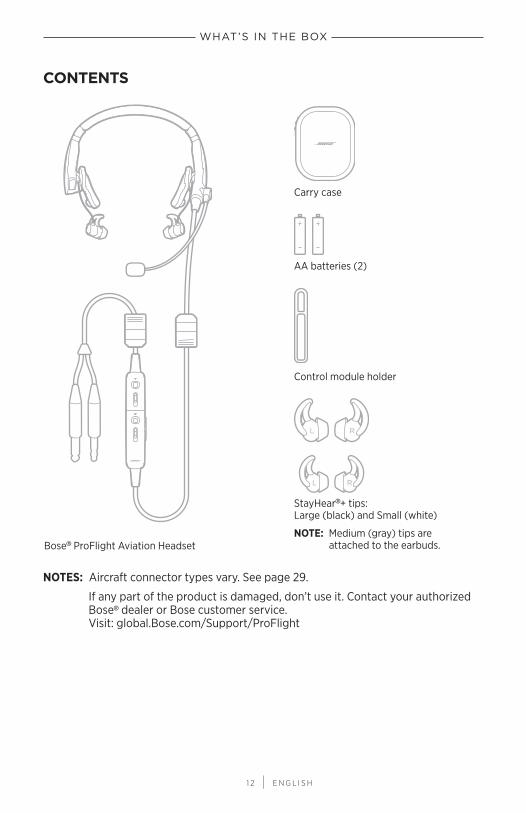
CONTENTS
Carry case
AA batteries (2)
Control module holder
StayHear®+ tips: Large (black) and Small (white)
NOTE: Medium (gray) tips are attached to the earbuds.Bose® ProFlight Aviation Headset
NOTES: Aircraft connector types vary. See page 29.
If any part of the product is damaged, don’t use it. Contact your authorized Bose® dealer or Bose customer service. Visit: global.Bose.com/Support/ProFlight
WHAT’S IN THE BOX
1 3 | E N G L I S H
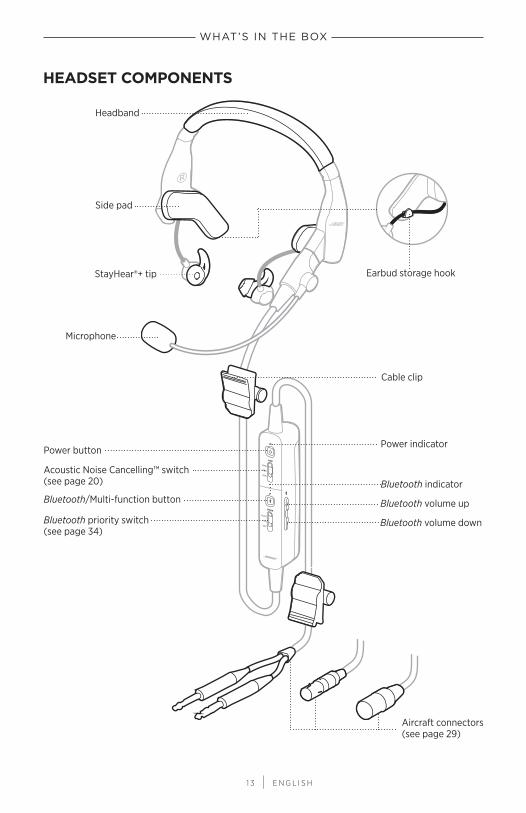
HEADSET COMPONENTS
Side pad
Bluetooth volume downBluetooth priority switch (see page 34)
Power indicatorPower button
Bluetooth volume up
Bluetooth indicator
Bluetooth/Multi-function button
Acoustic Noise Cancelling™ switch (see page 20)
Earbud storage hookStayHear®+ tip
Microphone
Cable clip
Aircraft connectors (see page 29)
Headband
1 4 | E N G L I S H
IMPORTANCE OF PROPER FIT
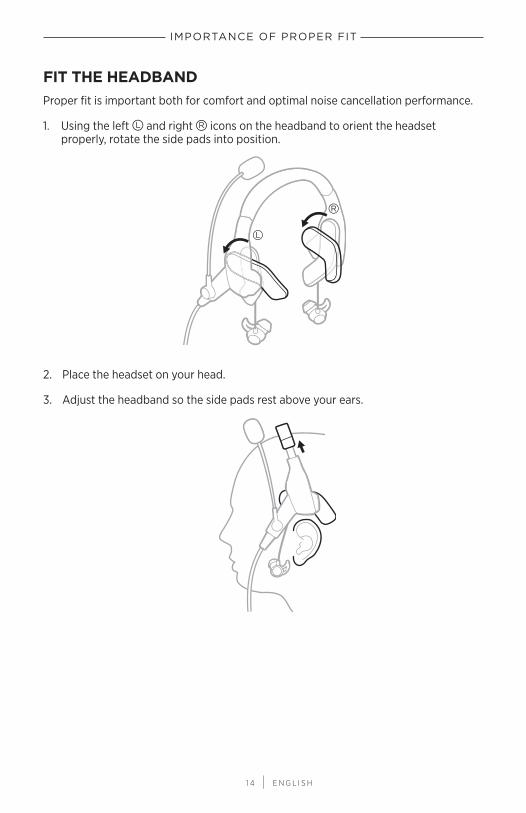
FIT THE HEADBANDProper fit is important both for comfort and optimal noise cancellation performance.
1. Using the left T and right U icons on the headband to orient the headset properly, rotate the side pads into position.
2. Place the headset on your head.
3. Adjust the headband so the side pads rest above your ears.
IMPORTANCE OF PROPER FIT
1 5 | E N G L I S H
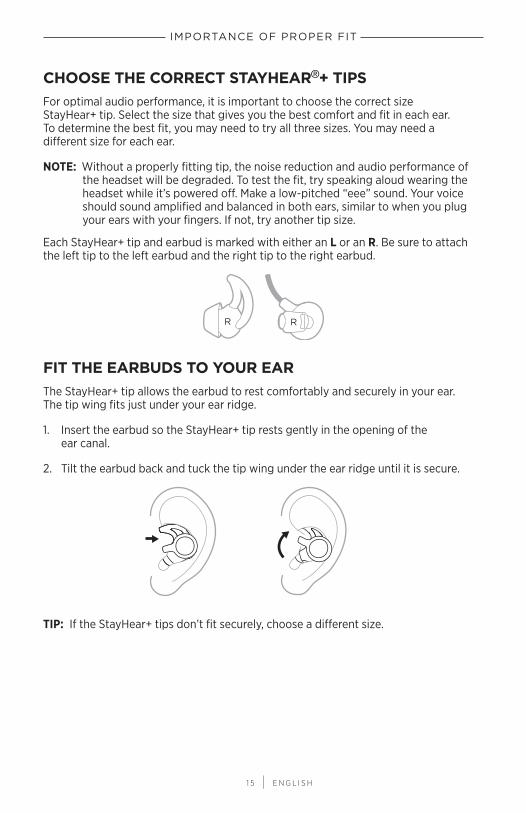
CHOOSE THE CORRECT STAYHEAR®+ TIPSFor optimal audio performance, it is important to choose the correct size StayHear+ tip. Select the size that gives you the best comfort and fit in each ear. To determine the best fit, you may need to try all three sizes. You may need a different size for each ear.
NOTE: Without a properly fitting tip, the noise reduction and audio performance of the headset will be degraded. To test the fit, try speaking aloud wearing the headset while it’s powered off. Make a low-pitched “eee” sound. Your voice should sound amplified and balanced in both ears, similar to when you plug your ears with your fingers. If not, try another tip size.
Each StayHear+ tip and earbud is marked with either an L or an R. Be sure to attach the left tip to the left earbud and the right tip to the right earbud.
FIT THE EARBUDS TO YOUR EARThe StayHear+ tip allows the earbud to rest comfortably and securely in your ear. The tip wing fits just under your ear ridge.
1. Insert the earbud so the StayHear+ tip rests gently in the opening of the ear canal.
2. Tilt the earbud back and tuck the tip wing under the ear ridge until it is secure.
TIP: If the StayHear+ tips don’t fit securely, choose a different size.
IMPORTANCE OF PROPER FIT
1 6 | E N G L I S H
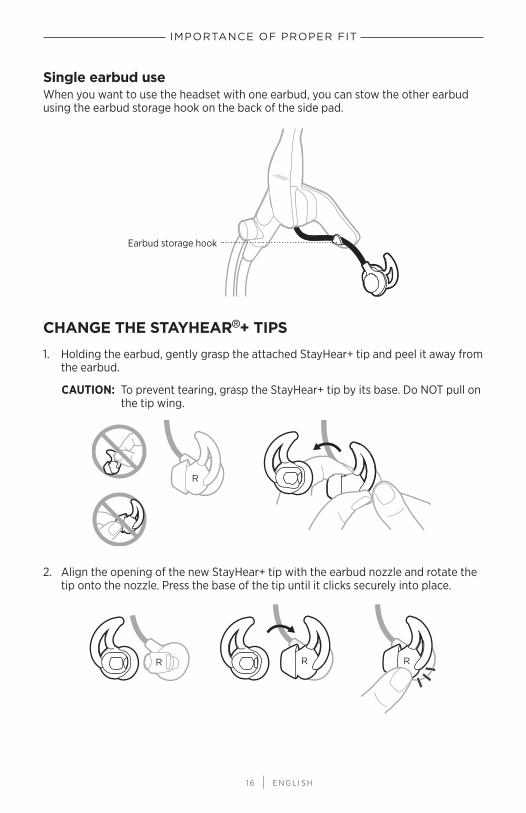
Single earbud useWhen you want to use the headset with one earbud, you can stow the other earbud using the earbud storage hook on the back of the side pad.
Earbud storage hook
CHANGE THE STAYHEAR®+ TIPS
1. Holding the earbud, gently grasp the attached StayHear+ tip and peel it away from the earbud.
CAUTION: To prevent tearing, grasp the StayHear+ tip by its base. Do NOT pull on the tip wing.
R
2. Align the opening of the new StayHear+ tip with the earbud nozzle and rotate the tip onto the nozzle. Press the base of the tip until it clicks securely into place.
R R R
IMPORTANCE OF PROPER FIT
1 7 | E N G L I S H
IMPORTANCE OF PROPER FIT
ADJUST THE MICROPHONE
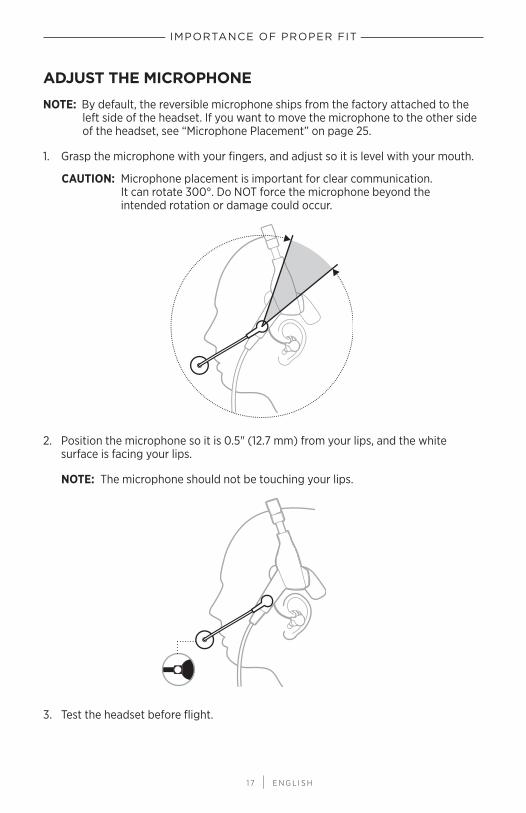
NOTE: By default, the reversible microphone ships from the factory attached to the left side of the headset. If you want to move the microphone to the other side of the headset, see “Microphone Placement” on page 25.
1. Grasp the microphone with your fingers, and adjust so it is level with your mouth.
CAUTION: Microphone placement is important for clear communication. It can rotate 300°. Do NOT force the microphone beyond the intended rotation or damage could occur.
2. Position the microphone so it is 0.5" (12.7 mm) from your lips, and the white surface is facing your lips.
NOTE: The microphone should not be touching your lips.
3. Test the headset before flight.
IMPORTANCE OF PROPER FIT
1 8 | E N G L I S H
IMPORTANCE OF PROPER FIT
CONDITIONS RELATED TO FITIn very loud conditions, such as during takeoff, you may experience a brief reduction in noise cancellation as the headset compensates for a momentary pressure change. If this continues when the sound level returns to normal, see “Acoustic Noise Cancellation” on page 20. If it persists, see “Troubleshooting” on page 45.
A low rumbling sound or frequent, brief losses of noise cancellation may indicate an improper fit or blocked earbud ports. See “Choose the correct StayHear®+ tips” on page 15 for information on proper fit or “Clean the headset” on page 41 for instructions on removing blockages.
During a long flight, you may feel a slight pressure point, which can be relieved by adjusting the headband position.
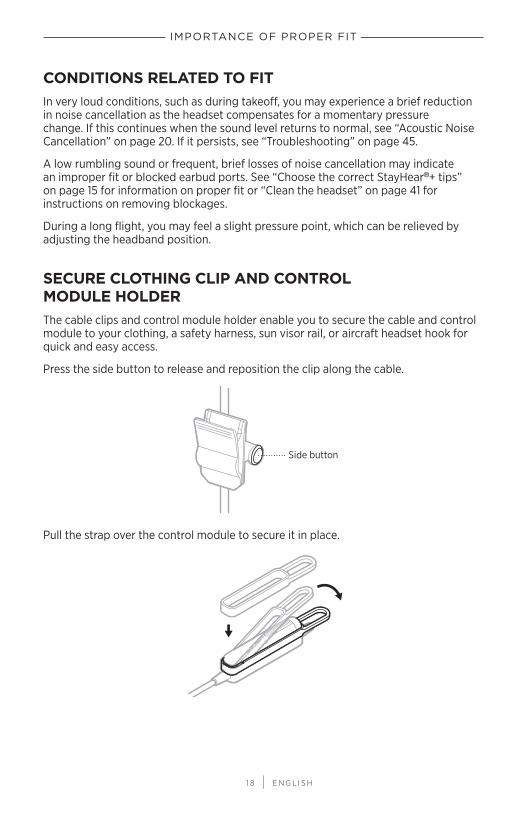
SECURE CLOTHING CLIP AND CONTROL MODULE HOLDERThe cable clips and control module holder enable you to secure the cable and control module to your clothing, a safety harness, sun visor rail, or aircraft headset hook for quick and easy access.
Press the side button to release and reposition the clip along the cable.
Side button
Pull the strap over the control module to secure it in place.
1 9 | E N G L I S H
HEADSET CONTROLS
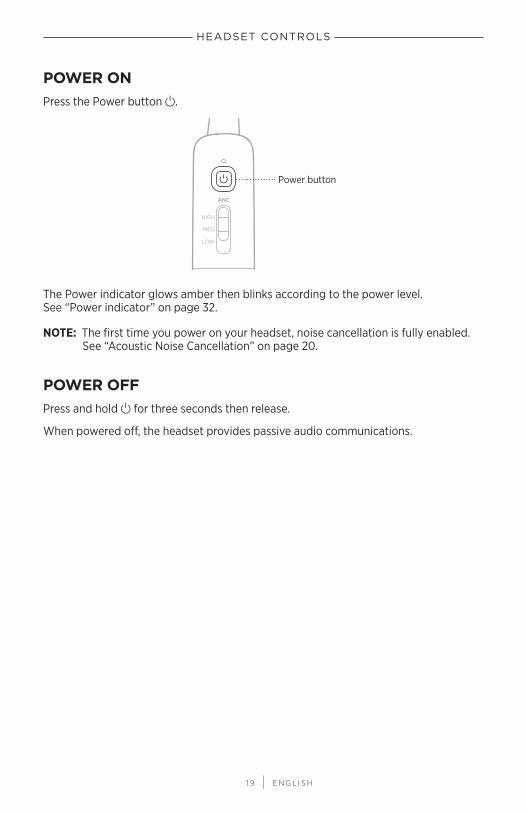
POWER ONPress the Power button I.
Power button
The Power indicator glows amber then blinks according to the power level. See “Power indicator” on page 32.
NOTE: The first time you power on your headset, noise cancellation is fully enabled. See “Acoustic Noise Cancellation” on page 20.
POWER OFFPress and hold I for three seconds then release.
When powered off, the headset provides passive audio communications.
2 0 | E N G L I S H
ACOUSTIC NOISE CANCELLATION
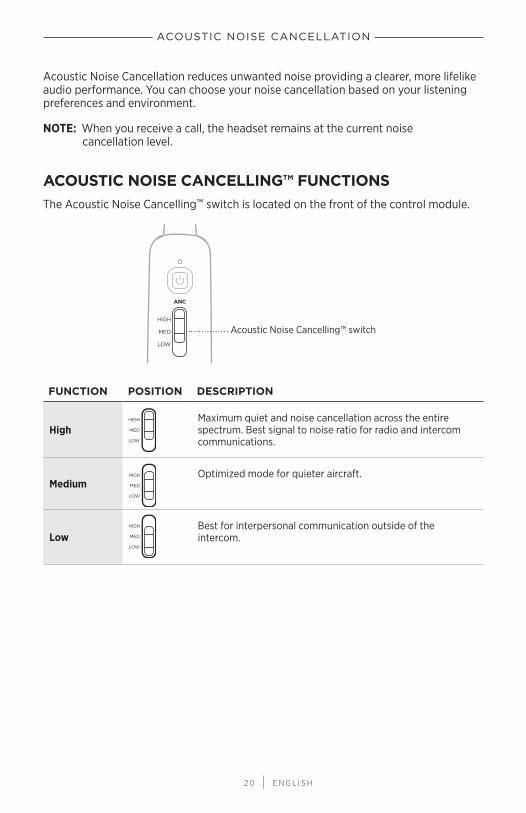
Acoustic Noise Cancellation reduces unwanted noise providing a clearer, more lifelike audio performance. You can choose your noise cancellation based on your listening preferences and environment.
NOTE: When you receive a call, the headset remains at the current noise cancellation level.
ACOUSTIC NOISE CANCELLING™ FUNCTIONSThe Acoustic Noise Cancelling™ switch is located on the front of the control module.
Acoustic Noise Cancelling™ switch
FUNCTION POSITION DESCRIPTION
HighMaximum quiet and noise cancellation across the entire spectrum. Best signal to noise ratio for radio and intercom communications.
MediumOptimized mode for quieter aircraft.
LowBest for interpersonal communication outside of the intercom.
2 1 | E N G L I S H
ACOUSTIC NOISE CANCELLATION
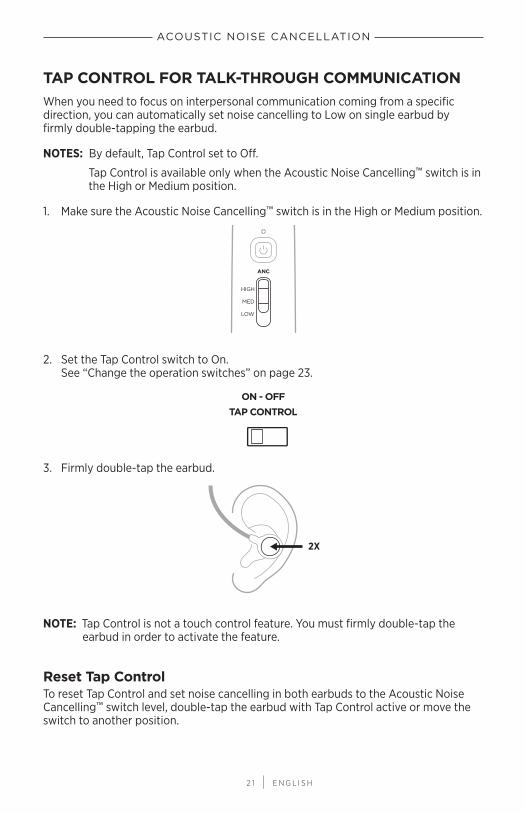
TAP CONTROL FOR TALK-THROUGH COMMUNICATIONWhen you need to focus on interpersonal communication coming from a specific direction, you can automatically set noise cancelling to Low on single earbud by firmly double-tapping the earbud.
NOTES: By default, Tap Control set to Off.
Tap Control is available only when the Acoustic Noise Cancelling™ switch is in the High or Medium position.
1. Make sure the Acoustic Noise Cancelling™ switch is in the High or Medium position.
2. Set the Tap Control switch to On. See “Change the operation switches” on page 23.
3. Firmly double-tap the earbud.
2X
NOTE: Tap Control is not a touch control feature. You must firmly double-tap the earbud in order to activate the feature.
Reset Tap ControlTo reset Tap Control and set noise cancelling in both earbuds to the Acoustic Noise Cancelling™ switch level, double-tap the earbud with Tap Control active or move the switch to another position.
2 2 | E N G L I S H
OPERATION SWITCHES
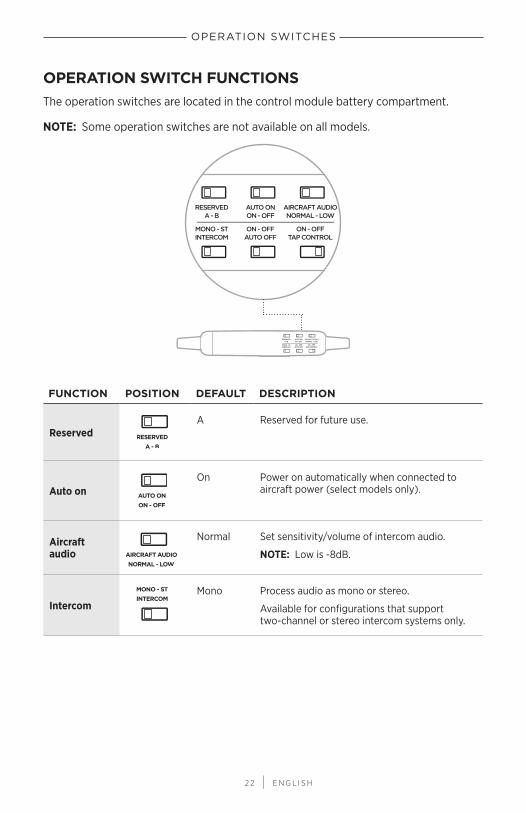
OPERATION SWITCH FUNCTIONSThe operation switches are located in the control module battery compartment.
NOTE: Some operation switches are not available on all models.
FUNCTION POSITION DEFAULT DESCRIPTION
ReservedA Reserved for future use.
Auto onOn Power on automatically when connected to
aircraft power (select models only).
Aircraft audio
Normal Set sensitivity/volume of intercom audio.
NOTE: Low is -8dB.
IntercomMono Process audio as mono or stereo.
Available for configurations that support two-channel or stereo intercom systems only.
OPERATION SWITCHES
2 3 | E N G L I S H
OPERATION SWITCHES
FUNCTION POSITION DEFAULT DESCRIPTION
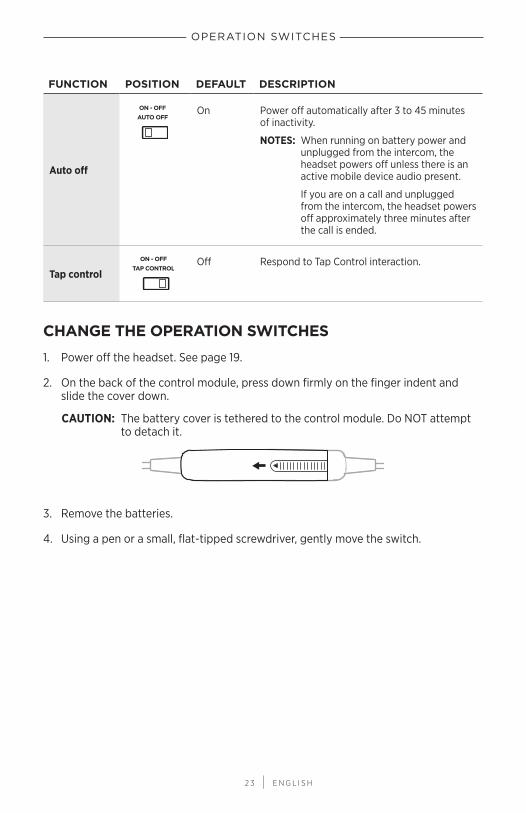
Auto off
On Power off automatically after 3 to 45 minutes of inactivity.
NOTES: When running on battery power and unplugged from the intercom, the headset powers off unless there is an active mobile device audio present.
If you are on a call and unplugged from the intercom, the headset powers off approximately three minutes after the call is ended.
Tap controlOff Respond to Tap Control interaction.
CHANGE THE OPERATION SWITCHES
1. Power off the headset. See page 19.
2. On the back of the control module, press down firmly on the finger indent and slide the cover down.
CAUTION: The battery cover is tethered to the control module. Do NOT attempt to detach it.
3. Remove the batteries.
4. Using a pen or a small, flat-tipped screwdriver, gently move the switch.
OPERATION SWITCHES
2 4 | E N G L I S H
OPERATION SWITCHES
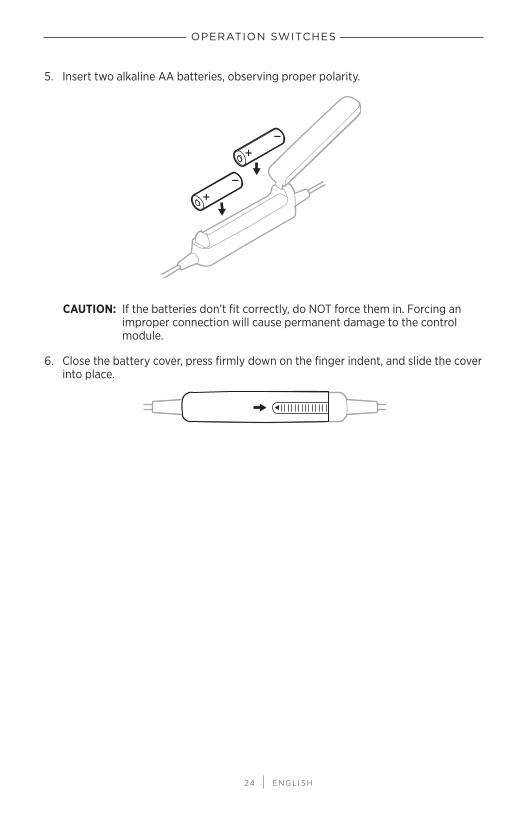
5. Insert two alkaline AA batteries, observing proper polarity.
CAUTION: If the batteries don’t fit correctly, do NOT force them in. Forcing an improper connection will cause permanent damage to the control module.
6. Close the battery cover, press firmly down on the finger indent, and slide the cover into place.
2 5 | E N G L I S H
MICROPHONE PLACEMENT
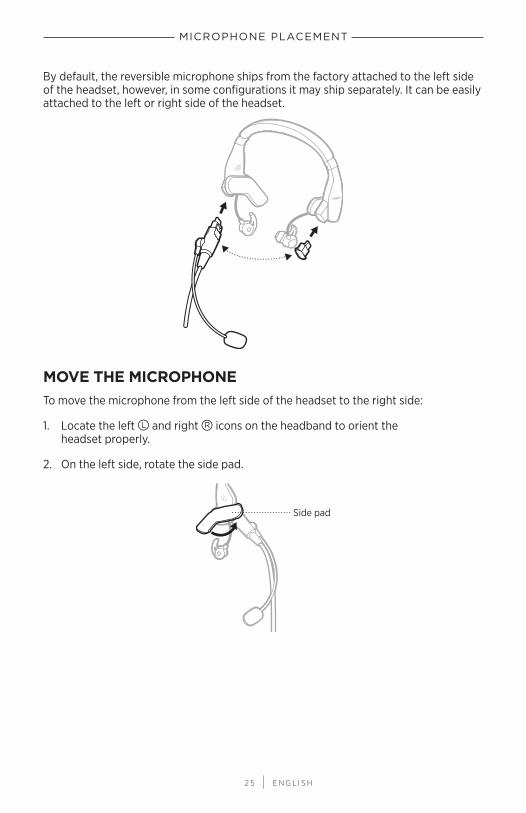
By default, the reversible microphone ships from the factory attached to the left side of the headset, however, in some configurations it may ship separately. It can be easily attached to the left or right side of the headset.
MOVE THE MICROPHONETo move the microphone from the left side of the headset to the right side:
1. Locate the left T and right U icons on the headband to orient the headset properly.
2. On the left side, rotate the side pad.
Side pad
MICROPHONE PLACEMENT
2 6 | E N G L I S H
MICROPHONE PLACEMENT
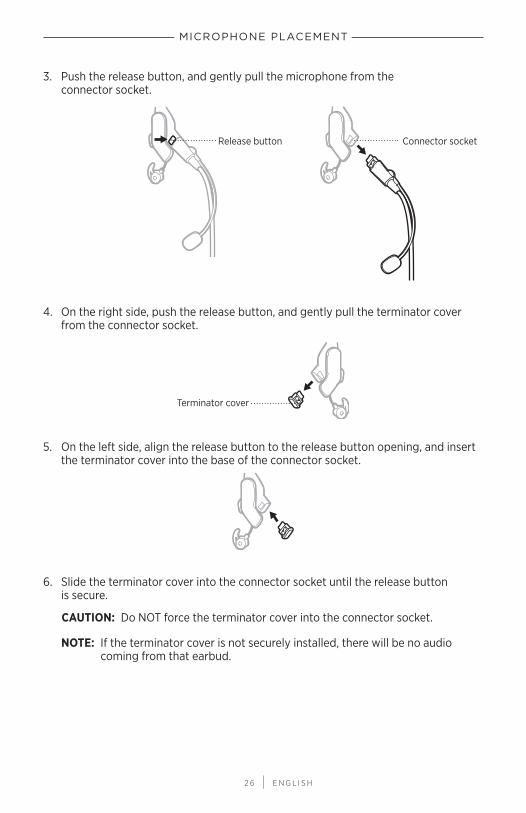
3. Push the release button, and gently pull the microphone from the connector socket.
Release button
4. On the right side, push the release button, and gently pull the terminator cover from the connector socket.
Terminator cover
5. On the left side, align the release button to the release button opening, and insert the terminator cover into the base of the connector socket.
6. Slide the terminator cover into the connector socket until the release button is secure.
CAUTION: Do NOT force the terminator cover into the connector socket.
NOTE: If the terminator cover is not securely installed, there will be no audio coming from that earbud.
Connector socket
2 7 | E N G L I S H
MICROPHONE PLACEMENT
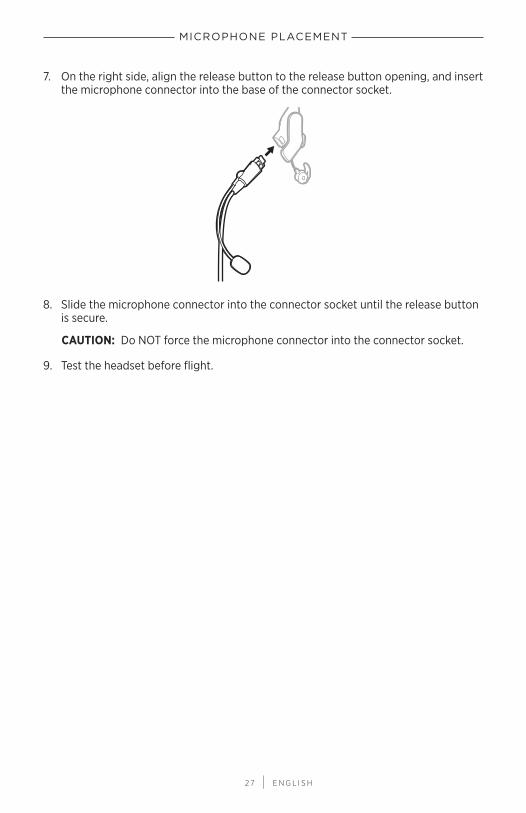
7. On the right side, align the release button to the release button opening, and insert the microphone connector into the base of the connector socket.
8. Slide the microphone connector into the connector socket until the release button is secure.
CAUTION: Do NOT force the microphone connector into the connector socket.
9. Test the headset before flight.

2 8 | E N G L I S H
BATTERIES
REPLACE THE BATTERIESWhen the battery indicator blinks red, the batteries must be replaced.
NOTE: For aircraft-powered headsets, batteries are not required for operation if aircraft power is available. See “Aircraft Connectors” on page 29.
1. Power off the headset. See page 19.
2. On the back of the control module, press down firmly on the finger indent and slide the cover down.
CAUTION: The battery cover is tethered to the control module. Do NOT attempt to detach it.
3. Remove the batteries.
4. Insert two alkaline AA batteries, observing proper polarity.
CAUTION: If the batteries don’t fit correctly, do NOT force them in. Forcing an improper connection will cause permanent damage to the control module.
5. Close the battery cover, press firmly down on the finger indent, and slide the cover into place.
New alkaline AA batteries supply 45 hours of power for the headset. Battery life varies with the ambient noise level of the aircraft, temperature, ear tip condition, Bluetooth use, and age of the batteries.

2 9 | E N G L I S H
AIRCRAFT CONNECTORS
Aircraft connectors are available in several standard aircraft connector options.
POWER TYPE CONNECTOR OPTIONS
Battery power only. Dual plug (general aviation)
Flex Power - Aircraft power or battery power. No battery needed when connected to aircraft power.
NOTE: This version is often called Flex powered and comes with an Auto On function.
5-pin XLR
6-pin Lemo
7-pin XLR
NOTE: An adapter is available to convert a 6-pin Lemo connector to a Dual plug for additional connection flexibility.
NOTE: Contact Bose customer service for more information about these connectors.
DUAL PLUGThe battery (only) powered version of the headset has two general aviation aircraft connectors that insert into specific jacks on the aircraft control panel. The microphone connector is shorter, thinner and has a slightly different shape than the intercom connector.
Microphone
Intercom/audio
Connect to the aircraft1. Insert the thicker intercom connector into the audio jack on the aircraft
control panel.
2. Insert the thinner microphone connector into the microphone jack on the aircraft control panel.
Disconnect from the aircraftGently pull back on each connector to remove the connector from the aircraft control panel.
BATTERIES
3 0 | E N G L I S H
AIRCRAFT CONNECTORS
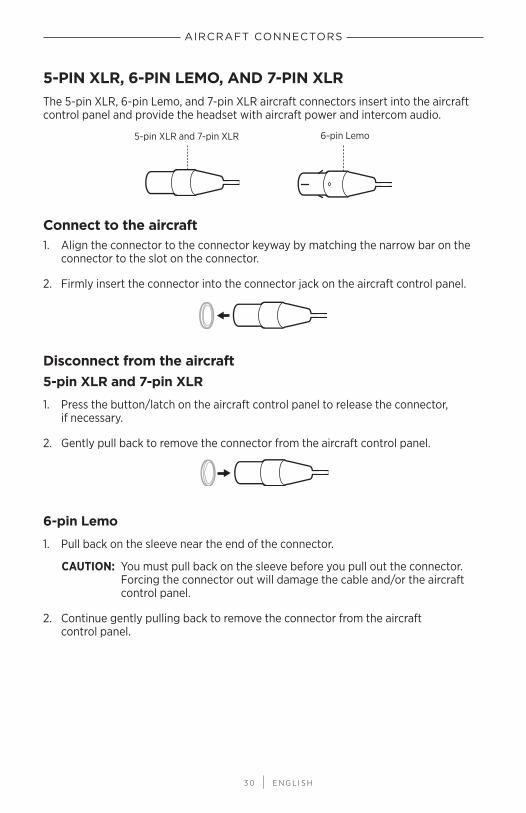
5-PIN XLR, 6-PIN LEMO, AND 7-PIN XLRThe 5-pin XLR, 6-pin Lemo, and 7-pin XLR aircraft connectors insert into the aircraft control panel and provide the headset with aircraft power and intercom audio.
6-pin Lemo5-pin XLR and 7-pin XLR
Connect to the aircraft1. Align the connector to the connector keyway by matching the narrow bar on the
connector to the slot on the connector.
2. Firmly insert the connector into the connector jack on the aircraft control panel.
Disconnect from the aircraft5-pin XLR and 7-pin XLR
1. Press the button/latch on the aircraft control panel to release the connector, if necessary.
2. Gently pull back to remove the connector from the aircraft control panel.
6-pin Lemo
1. Pull back on the sleeve near the end of the connector.
CAUTION: You must pull back on the sleeve before you pull out the connector. Forcing the connector out will damage the cable and/or the aircraft control panel.
2. Continue gently pulling back to remove the connector from the aircraft control panel.
3 1 | E N G L I S H
STATUS INDICATORS
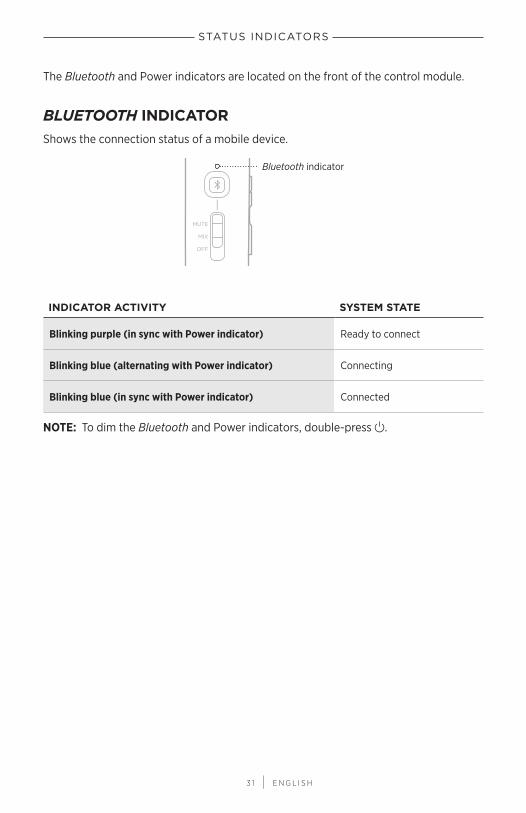
The Bluetooth and Power indicators are located on the front of the control module.
BLUETOOTH INDICATORShows the connection status of a mobile device.
Bluetooth indicator
INDICATOR ACTIVITY SYSTEM STATE
Blinking purple (in sync with Power indicator) Ready to connect
Blinking blue (alternating with Power indicator) Connecting
Blinking blue (in sync with Power indicator) Connected
NOTE: To dim the Bluetooth and Power indicators, double-press I.
STATUS INDICATORS
3 2 | E N G L I S H
STATUS INDICATORS
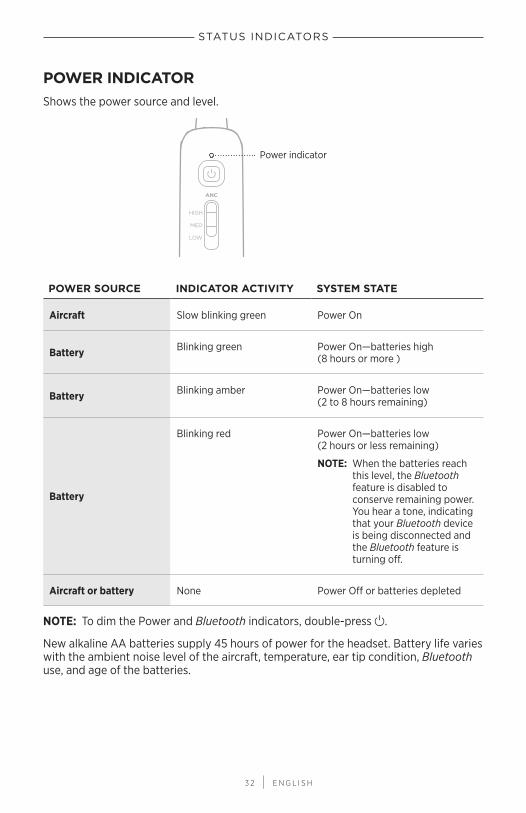
POWER INDICATORShows the power source and level.
Power indicator
POWER SOURCE INDICATOR ACTIVITY SYSTEM STATE
Aircraft Slow blinking green Power On
Battery Blinking green Power On—batteries high (8 hours or more )
Battery Blinking amber Power On—batteries low (2 to 8 hours remaining)
Battery
Blinking red Power On—batteries low (2 hours or less remaining)
NOTE: When the batteries reach this level, the Bluetooth feature is disabled to conserve remaining power. You hear a tone, indicating that your Bluetooth device is being disconnected and the Bluetooth feature is turning off.
Aircraft or battery None Power Off or batteries depleted
NOTE: To dim the Power and Bluetooth indicators, double-press I.
New alkaline AA batteries supply 45 hours of power for the headset. Battery life varies with the ambient noise level of the aircraft, temperature, ear tip condition, Bluetooth use, and age of the batteries.
3 3 | E N G L I S H
BLUETOOTH CONNECTIONS
Bluetooth wireless technology lets you stream audio from mobile devices such as smartphones, tablets, and laptop computers. Before you can stream audio from a device, you must connect the device with your headset.
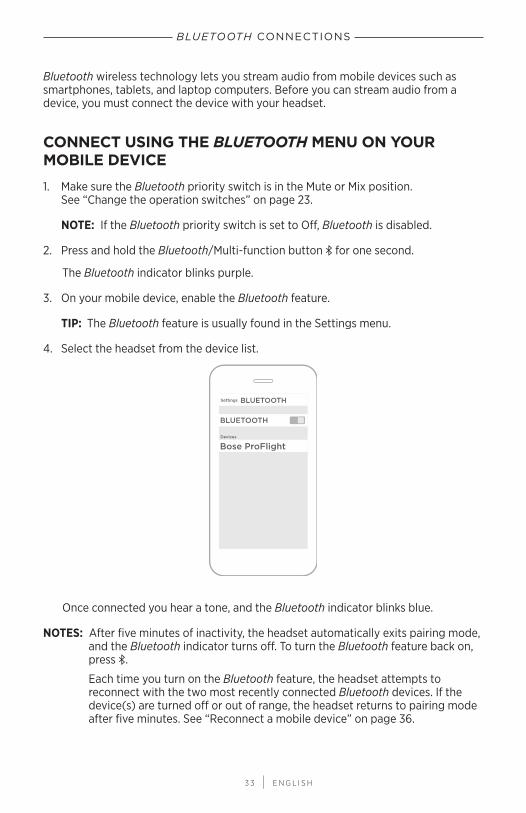
CONNECT USING THE BLUETOOTH MENU ON YOUR MOBILE DEVICE
1. Make sure the Bluetooth priority switch is in the Mute or Mix position. See “Change the operation switches” on page 23.
NOTE: If the Bluetooth priority switch is set to Off, Bluetooth is disabled.
2. Press and hold the Bluetooth/Multi-function button l for one second.
The Bluetooth indicator blinks purple.
3. On your mobile device, enable the Bluetooth feature.
TIP: The Bluetooth feature is usually found in the Settings menu.
4. Select the headset from the device list.
Once connected you hear a tone, and the Bluetooth indicator blinks blue.
NOTES: After five minutes of inactivity, the headset automatically exits pairing mode, and the Bluetooth indicator turns off. To turn the Bluetooth feature back on, press l.
Each time you turn on the Bluetooth feature, the headset attempts to reconnect with the two most recently connected Bluetooth devices. If the device(s) are turned off or out of range, the headset returns to pairing mode after five minutes. See “Reconnect a mobile device” on page 36.
3 4 | E N G L I S H
BLUETOOTH CONNECTIONS
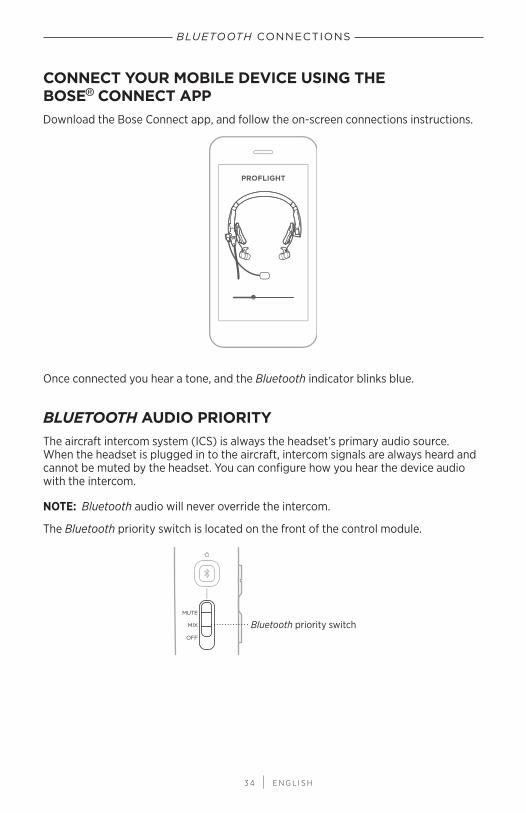
CONNECT YOUR MOBILE DEVICE USING THE BOSE® CONNECT APPDownload the Bose Connect app, and follow the on-screen connections instructions.
PROFLIGHT
Once connected you hear a tone, and the Bluetooth indicator blinks blue.
BLUETOOTH AUDIO PRIORITYThe aircraft intercom system (ICS) is always the headset’s primary audio source. When the headset is plugged in to the aircraft, intercom signals are always heard and cannot be muted by the headset. You can configure how you hear the device audio with the intercom.
NOTE: Bluetooth audio will never override the intercom.
The Bluetooth priority switch is located on the front of the control module.
Bluetooth priority switch
BLUETOOTH CONNECTIONS
3 5 | E N G L I S H
BLUETOOTH CONNECTIONS
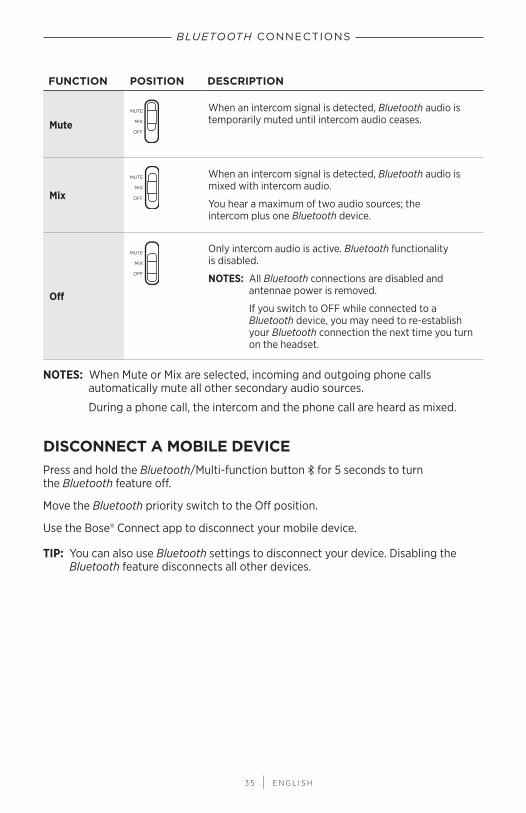
FUNCTION POSITION DESCRIPTION
Mute
When an intercom signal is detected, Bluetooth audio is temporarily muted until intercom audio ceases.
Mix
When an intercom signal is detected, Bluetooth audio is mixed with intercom audio.
You hear a maximum of two audio sources; the intercom plus one Bluetooth device.
Off
Only intercom audio is active. Bluetooth functionality is disabled.
NOTES: All Bluetooth connections are disabled and antennae power is removed.
If you switch to OFF while connected to a Bluetooth device, you may need to re-establish your Bluetooth connection the next time you turn on the headset.
NOTES: When Mute or Mix are selected, incoming and outgoing phone calls automatically mute all other secondary audio sources.
During a phone call, the intercom and the phone call are heard as mixed.
DISCONNECT A MOBILE DEVICEPress and hold the Bluetooth/Multi-function button l for 5 seconds to turn the Bluetooth feature off.
Move the Bluetooth priority switch to the Off position.
Use the Bose® Connect app to disconnect your mobile device.
TIP: You can also use Bluetooth settings to disconnect your device. Disabling the Bluetooth feature disconnects all other devices.
BLUETOOTH CONNECTIONS
3 6 | E N G L I S H
BLUETOOTH CONNECTIONS
RECONNECT A MOBILE DEVICE
When powered on, the headset tries to reconnect with the two most recently-connected devices.
NOTE: The devices must be within range (30 ft. or 9 m) and powered on.
RECOVER A LOST CONNECTIONWhen your connected mobile device moves out of range, the connection is lost. The headset automatically attempts to reconnect. If the headset is unable to reconnect, it returns to pairing mode. After five minutes of inactivity, the Bluetooth feature turns off.
1. Move the device back into range.
2. Press the Bluetooth/Multifunction button l to reconnect.
3 7 | E N G L I S H
MANAGING MULTIPLE BLUETOOTH CONNECTIONS
You can pair additional devices to your headset. These Bluetooth connections are controlled with the Bluetooth/Multi-function button l. Before connecting an additional mobile device, make sure this feature is enabled.
TIP: You can also easily manage multiple connected devices using the Bose® Connect app.
CONNECT AN ADDITIONAL MOBILE DEVICE
You can store up to eight paired devices in the headset pairing list, and your headset can be actively connected to two devices at a time.
To connect an additional device, use the Bluetooth menu on your device or download the Bose Connect app.
NOTES: Only one device can be heard at a time.
Bluetooth audio will never override the intercom.
SWITCH BETWEEN CONNECTED DEVICES
1. Pause audio on your first device.
2. Play audio on your second device.
CLEAR THE HEADSET PAIRING LIST
1. Press and hold l and z simultaneously for seven seconds, or until the Bluetooth indicator blinks purple in sync with the Power indicator.
2. Delete the headset from the Bluetooth list on your device.
All devices are cleared, and the headset is ready to connect. See “Bluetooth Connections” on page 33.
3 8 | E N G L I S H
BLUETOOTH FUNCTIONS
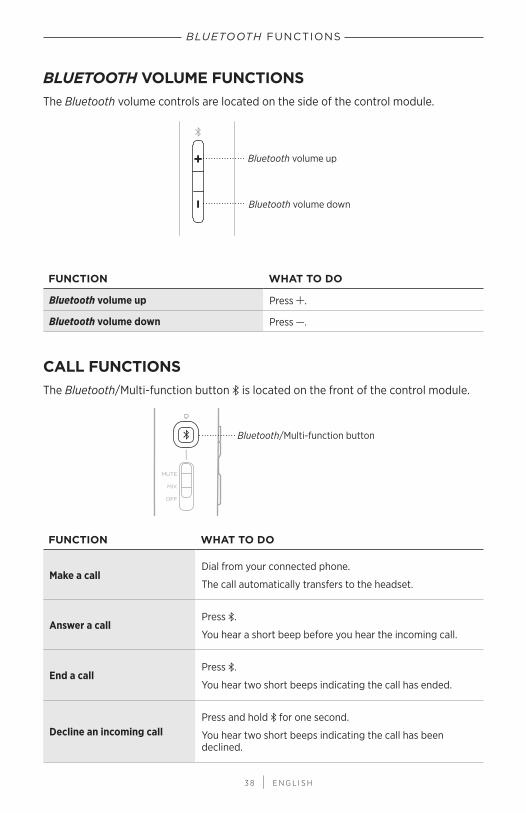
BLUETOOTH VOLUME FUNCTIONSThe Bluetooth volume controls are located on the side of the control module.
Bluetooth volume up
Bluetooth volume down
FUNCTION WHAT TO DO
Bluetooth volume up Press H.
Bluetooth volume down Press z.
CALL FUNCTIONSThe Bluetooth/Multi-function button l is located on the front of the control module.
Bluetooth/Multi-function button
FUNCTION WHAT TO DO
Make a callDial from your connected phone.
The call automatically transfers to the headset.
Answer a callPress l.
You hear a short beep before you hear the incoming call.
End a callPress l.
You hear two short beeps indicating the call has ended.
Decline an incoming callPress and hold l for one second.
You hear two short beeps indicating the call has been declined.
3 9 | E N G L I S H
BLUETOOTH FUNCTIONS
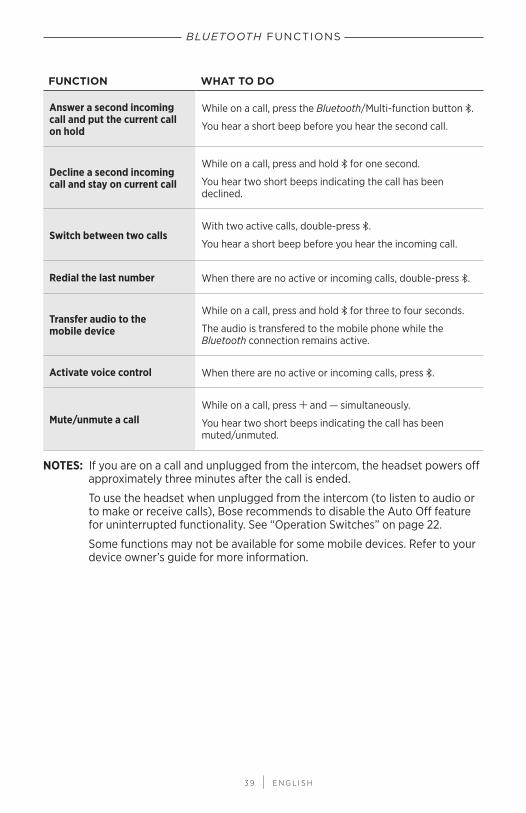
FUNCTION WHAT TO DO
Answer a second incoming call and put the current call on hold
While on a call, press the Bluetooth/Multi-function button l.
You hear a short beep before you hear the second call.
Decline a second incoming call and stay on current call
While on a call, press and hold l for one second.
You hear two short beeps indicating the call has been declined.
Switch between two callsWith two active calls, double-press l.
You hear a short beep before you hear the incoming call.
Redial the last number When there are no active or incoming calls, double-press l.
Transfer audio to the mobile device
While on a call, press and hold l for three to four seconds.
The audio is transfered to the mobile phone while the Bluetooth connection remains active.
Activate voice control When there are no active or incoming calls, press l.
Mute/unmute a callWhile on a call, press H and z simultaneously.
You hear two short beeps indicating the call has been muted/unmuted.
NOTES: If you are on a call and unplugged from the intercom, the headset powers off approximately three minutes after the call is ended.
To use the headset when unplugged from the intercom (to listen to audio or to make or receive calls), Bose recommends to disable the Auto Off feature for uninterrupted functionality. See “Operation Switches” on page 22.
Some functions may not be available for some mobile devices. Refer to your device owner’s guide for more information.
4 0 | E N G L I S H
CARE AND MAINTENANCE
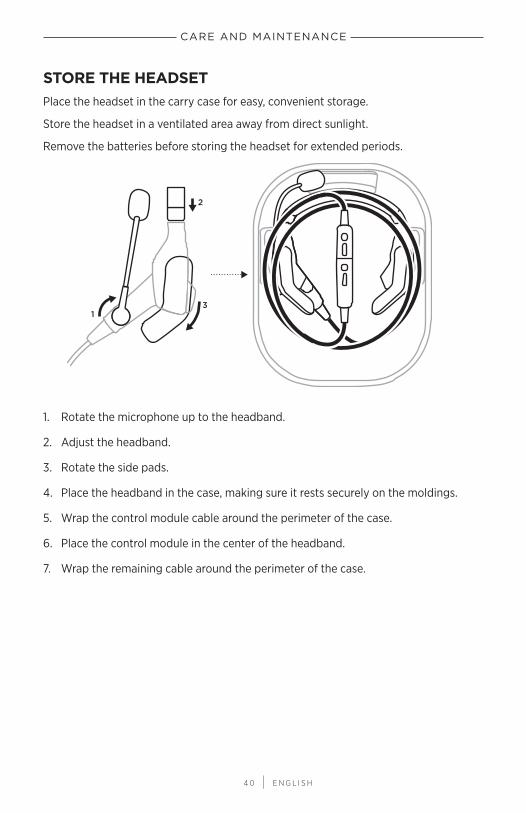
STORE THE HEADSETPlace the headset in the carry case for easy, convenient storage.
Store the headset in a ventilated area away from direct sunlight.
Remove the batteries before storing the headset for extended periods.
1. Rotate the microphone up to the headband.
2. Adjust the headband.
3. Rotate the side pads.
4. Place the headband in the case, making sure it rests securely on the moldings.
5. Wrap the control module cable around the perimeter of the case.
6. Place the control module in the center of the headband.
7. Wrap the remaining cable around the perimeter of the case.
CARE AND MAINTENANCE
4 1 | E N G L I S H
CARE AND MAINTENANCE
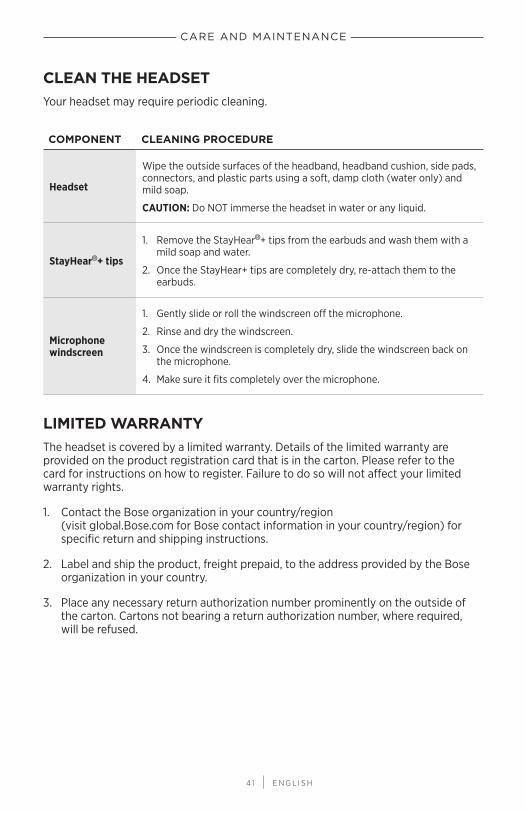
CLEAN THE HEADSETYour headset may require periodic cleaning.
COMPONENT CLEANING PROCEDURE
Headset
Wipe the outside surfaces of the headband, headband cushion, side pads, connectors, and plastic parts using a soft, damp cloth (water only) and mild soap.
CAUTION: Do NOT immerse the headset in water or any liquid.
StayHear®+ tips
1. Remove the StayHear®+ tips from the earbuds and wash them with a mild soap and water.
2. Once the StayHear+ tips are completely dry, re-attach them to the earbuds.
Microphone windscreen
1. Gently slide or roll the windscreen off the microphone.
2. Rinse and dry the windscreen.
3. Once the windscreen is completely dry, slide the windscreen back on the microphone.
4. Make sure it fits completely over the microphone.
LIMITED WARRANTYThe headset is covered by a limited warranty. Details of the limited warranty are provided on the product registration card that is in the carton. Please refer to the card for instructions on how to register. Failure to do so will not affect your limited warranty rights.
1. Contact the Bose organization in your country/region (visit global.Bose.com for Bose contact information in your country/region) for specific return and shipping instructions.
2. Label and ship the product, freight prepaid, to the address provided by the Bose organization in your country.
3. Place any necessary return authorization number prominently on the outside of the carton. Cartons not bearing a return authorization number, where required, will be refused.
CARE AND MAINTENANCE
4 2 | E N G L I S H
CARE AND MAINTENANCE
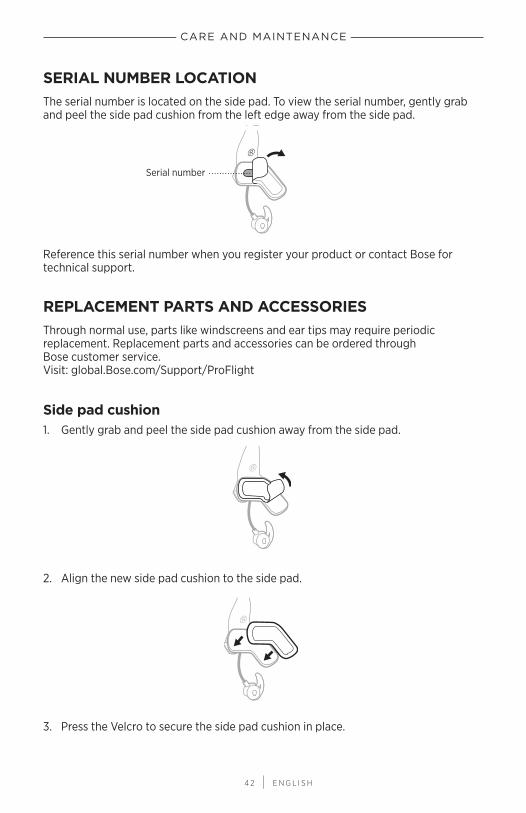
SERIAL NUMBER LOCATIONThe serial number is located on the side pad. To view the serial number, gently grab and peel the side pad cushion from the left edge away from the side pad.
Reference this serial number when you register your product or contact Bose for technical support.
REPLACEMENT PARTS AND ACCESSORIESThrough normal use, parts like windscreens and ear tips may require periodic replacement. Replacement parts and accessories can be ordered through Bose customer service. Visit: global.Bose.com/Support/ProFlight
Side pad cushion1. Gently grab and peel the side pad cushion away from the side pad.
2. Align the new side pad cushion to the side pad.
3. Press the Velcro to secure the side pad cushion in place.
Serial number
CARE AND MAINTENANCE
4 3 | E N G L I S H
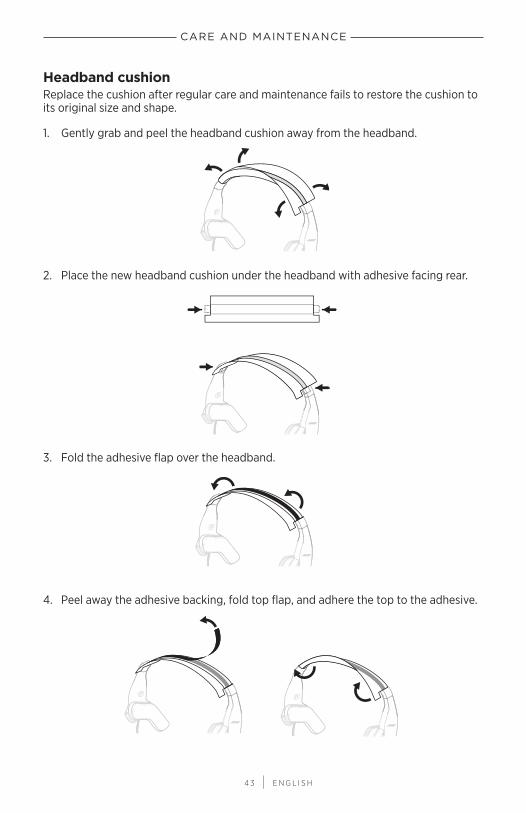
Headband cushionReplace the cushion after regular care and maintenance fails to restore the cushion to its original size and shape.
1. Gently grab and peel the headband cushion away from the headband.
2. Place the new headband cushion under the headband with adhesive facing rear.
3. Fold the adhesive flap over the headband.
4. Peel away the adhesive backing, fold top flap, and adhere the top to the adhesive.
CARE AND MAINTENANCE
4 4 | E N G L I S H
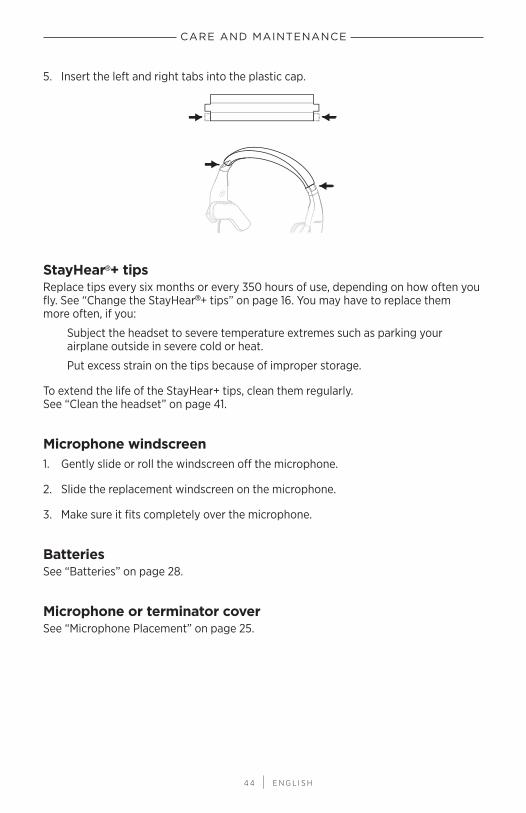
5. Insert the left and right tabs into the plastic cap.
StayHear®+ tips Replace tips every six months or every 350 hours of use, depending on how often you fly. See “Change the StayHear®+ tips” on page 16. You may have to replace them more often, if you:
Subject the headset to severe temperature extremes such as parking your airplane outside in severe cold or heat.
Put excess strain on the tips because of improper storage.
To extend the life of the StayHear+ tips, clean them regularly. See “Clean the headset” on page 41.
Microphone windscreen1. Gently slide or roll the windscreen off the microphone.
2. Slide the replacement windscreen on the microphone.
3. Make sure it fits completely over the microphone.
BatteriesSee “Batteries” on page 28.
Microphone or terminator coverSee “Microphone Placement” on page 25.
4 5 | E N G L I S H
TROUBLESHOOTING
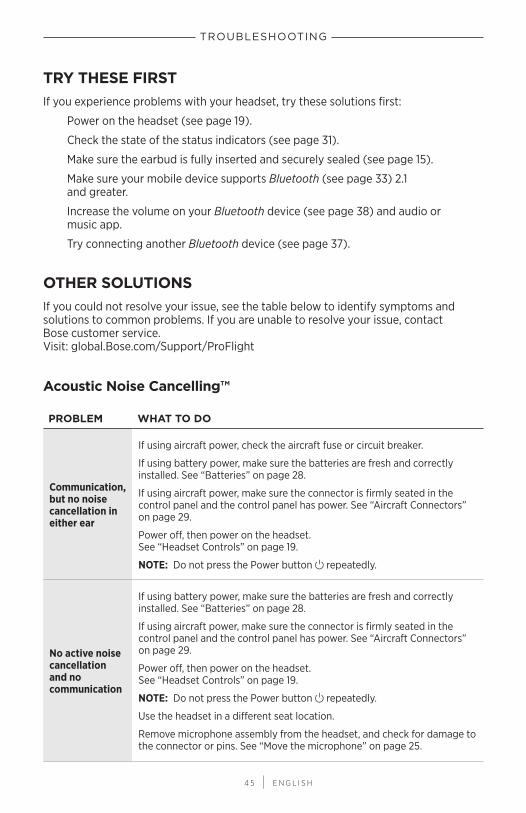
TRY THESE FIRSTIf you experience problems with your headset, try these solutions first:
Power on the headset (see page 19).
Check the state of the status indicators (see page 31).
Make sure the earbud is fully inserted and securely sealed (see page 15).
Make sure your mobile device supports Bluetooth (see page 33) 2.1 and greater.
Increase the volume on your Bluetooth device (see page 38) and audio or music app.
Try connecting another Bluetooth device (see page 37).
OTHER SOLUTIONSIf you could not resolve your issue, see the table below to identify symptoms and solutions to common problems. If you are unable to resolve your issue, contact Bose customer service. Visit: global.Bose.com/Support/ProFlight
Acoustic Noise Cancelling™
PROBLEM WHAT TO DO
Communication, but no noise cancellation in either ear
If using aircraft power, check the aircraft fuse or circuit breaker.
If using battery power, make sure the batteries are fresh and correctly installed. See “Batteries” on page 28.
If using aircraft power, make sure the connector is firmly seated in the control panel and the control panel has power. See “Aircraft Connectors” on page 29.
Power off, then power on the headset. See “Headset Controls” on page 19.
NOTE: Do not press the Power button I repeatedly.
No active noise cancellation and no communication
If using battery power, make sure the batteries are fresh and correctly installed. See “Batteries” on page 28.
If using aircraft power, make sure the connector is firmly seated in the control panel and the control panel has power. See “Aircraft Connectors” on page 29.
Power off, then power on the headset. See “Headset Controls” on page 19.
NOTE: Do not press the Power button I repeatedly.
Use the headset in a different seat location.
Remove microphone assembly from the headset, and check for damage to the connector or pins. See “Move the microphone” on page 25.
4 6 | E N G L I S H
TROUBLESHOOTING
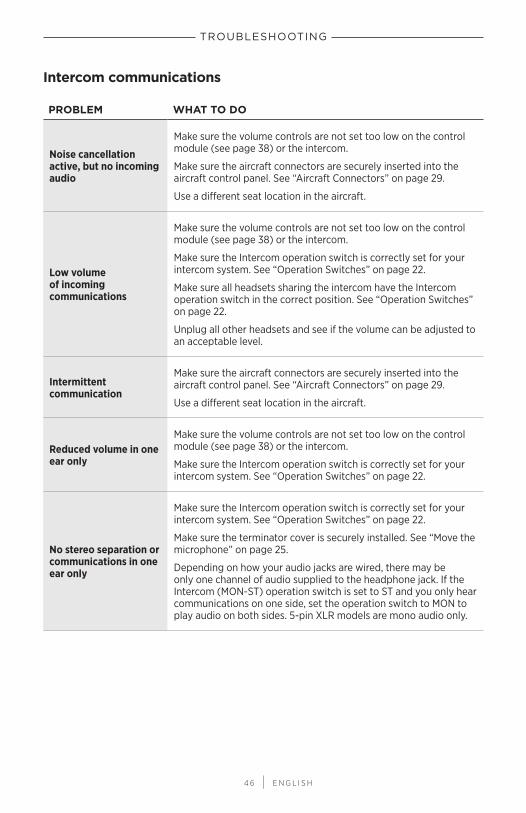
Intercom communications
PROBLEM WHAT TO DO
Noise cancellation active, but no incoming audio
Make sure the volume controls are not set too low on the control module (see page 38) or the intercom.
Make sure the aircraft connectors are securely inserted into the aircraft control panel. See “Aircraft Connectors” on page 29.
Use a different seat location in the aircraft.
Low volume of incoming communications
Make sure the volume controls are not set too low on the control module (see page 38) or the intercom.
Make sure the Intercom operation switch is correctly set for your intercom system. See “Operation Switches” on page 22.
Make sure all headsets sharing the intercom have the Intercom operation switch in the correct position. See “Operation Switches” on page 22.
Unplug all other headsets and see if the volume can be adjusted to an acceptable level.
Intermittent communication
Make sure the aircraft connectors are securely inserted into the aircraft control panel. See “Aircraft Connectors” on page 29.
Use a different seat location in the aircraft.
Reduced volume in one ear only
Make sure the volume controls are not set too low on the control module (see page 38) or the intercom.
Make sure the Intercom operation switch is correctly set for your intercom system. See “Operation Switches” on page 22.
No stereo separation or communications in one ear only
Make sure the Intercom operation switch is correctly set for your intercom system. See “Operation Switches” on page 22.
Make sure the terminator cover is securely installed. See “Move the microphone” on page 25.
Depending on how your audio jacks are wired, there may be only one channel of audio supplied to the headphone jack. If the Intercom (MON-ST) operation switch is set to ST and you only hear communications on one side, set the operation switch to MON to play audio on both sides. 5-pin XLR models are mono audio only.
TROUBLESHOOTING
4 7 | E N G L I S H
TROUBLESHOOTING
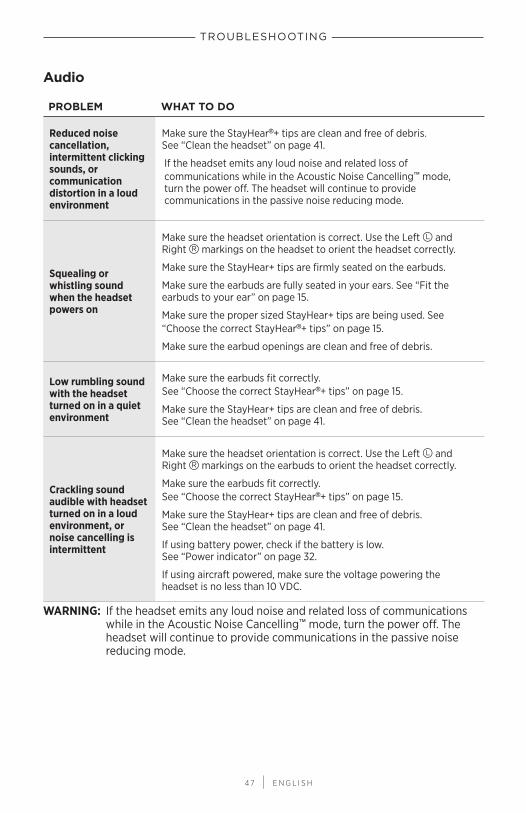
Audio
PROBLEM WHAT TO DO
Reduced noise cancellation, intermittent clicking sounds, or communication distortion in a loud environment
Make sure the StayHear®+ tips are clean and free of debris. See “Clean the headset” on page 41.
If the headset emits any loud noise and related loss of communications while in the Acoustic Noise Cancelling™ mode, turn the power off. The headset will continue to provide communications in the passive noise reducing mode.
Squealing or whistling sound when the headset powers on
Make sure the headset orientation is correct. Use the Left T and Right U markings on the headset to orient the headset correctly.
Make sure the StayHear+ tips are firmly seated on the earbuds.
Make sure the earbuds are fully seated in your ears. See “Fit the earbuds to your ear” on page 15.
Make sure the proper sized StayHear+ tips are being used. See “Choose the correct StayHear®+ tips” on page 15.
Make sure the earbud openings are clean and free of debris.
Low rumbling sound with the headset turned on in a quiet environment
Make sure the earbuds fit correctly. See “Choose the correct StayHear®+ tips” on page 15.
Make sure the StayHear+ tips are clean and free of debris. See “Clean the headset” on page 41.
Crackling sound audible with headset turned on in a loud environment, or noise cancelling is intermittent
Make sure the headset orientation is correct. Use the Left T and Right U markings on the earbuds to orient the headset correctly.
Make sure the earbuds fit correctly. See “Choose the correct StayHear®+ tips” on page 15.
Make sure the StayHear+ tips are clean and free of debris. See “Clean the headset” on page 41.
If using battery power, check if the battery is low. See “Power indicator” on page 32.
If using aircraft powered, make sure the voltage powering the headset is no less than 10 VDC.
WARNING: If the headset emits any loud noise and related loss of communications while in the Acoustic Noise Cancelling™ mode, turn the power off. The headset will continue to provide communications in the passive noise reducing mode.
TROUBLESHOOTING
4 8 | E N G L I S H
TROUBLESHOOTING
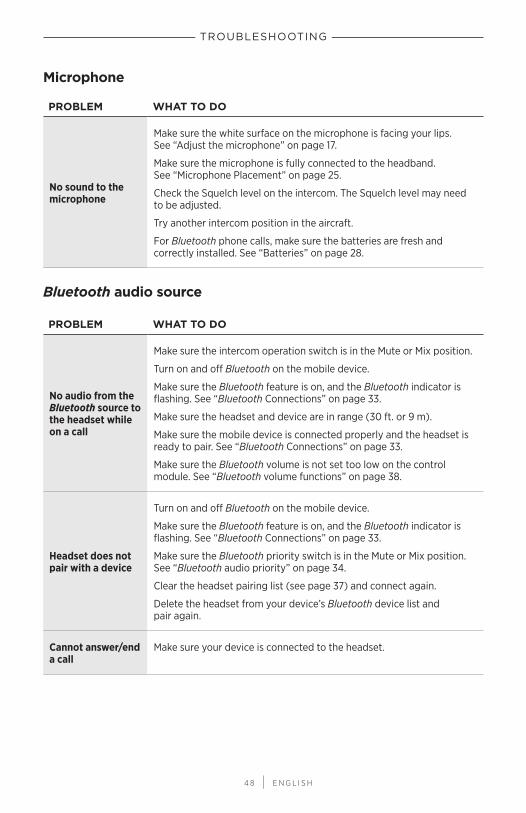
Microphone
PROBLEM WHAT TO DO
No sound to the microphone
Make sure the white surface on the microphone is facing your lips. See “Adjust the microphone” on page 17.
Make sure the microphone is fully connected to the headband. See “Microphone Placement” on page 25.
Check the Squelch level on the intercom. The Squelch level may need to be adjusted.
Try another intercom position in the aircraft.
For Bluetooth phone calls, make sure the batteries are fresh and correctly installed. See “Batteries” on page 28.
Bluetooth audio source
PROBLEM WHAT TO DO
No audio from the Bluetooth source to the headset while on a call
Make sure the intercom operation switch is in the Mute or Mix position.
Turn on and off Bluetooth on the mobile device.
Make sure the Bluetooth feature is on, and the Bluetooth indicator is flashing. See “Bluetooth Connections” on page 33.
Make sure the headset and device are in range (30 ft. or 9 m).
Make sure the mobile device is connected properly and the headset is ready to pair. See “Bluetooth Connections” on page 33.
Make sure the Bluetooth volume is not set too low on the control module. See “Bluetooth volume functions” on page 38.
Headset does not pair with a device
Turn on and off Bluetooth on the mobile device.
Make sure the Bluetooth feature is on, and the Bluetooth indicator is flashing. See “Bluetooth Connections” on page 33.
Make sure the Bluetooth priority switch is in the Mute or Mix position. See “Bluetooth audio priority” on page 34.
Clear the headset pairing list (see page 37) and connect again.
Delete the headset from your device’s Bluetooth device list and pair again.
Cannot answer/end a call
Make sure your device is connected to the headset.

TROUBLESHOOTING
4 9 | E N G L I S H
TROUBLESHOOTING
PROBLEM WHAT TO DO
Headset does not reconnect to a previously connected device
Make sure the headset and device are in range (30 ft. or 9 m).
Make sure the Bluetooth priority switch is in the Mute or Mix position. See “Bluetooth audio priority” on page 34.
Make sure the Bluetooth feature is on, and the Bluetooth indicator is flashing. See “Bluetooth Connections” on page 33.
On your mobile device, make sure the Bluetooth feature is on.
Delete the headset from your device’s Bluetooth device list and pair again.
Auto on/offNOTE: This function is not available for Dual plug connectors.
PROBLEM WHAT TO DO
Headset does not power on automatically
Make sure the Auto on operation switch is set to ON. See “Operation Switches” on page 22.
Check the aircraft specifications to see if the jack is getting power from the aircraft’s electrical system.
Headset does not power off automatically
Make sure the Auto off operation switch is set to ON. See “Operation Switches” on page 22.
Disconnect the headset from the aircraft. Then power on the headset and wait 15 minutes.
It may take up to 9 minutes for the headset to power off when not in use immediately after initial power up. If the headset has not powered off after 15 minutes, contact Bose technical support.
5 0 | E N G L I S H
INSTALLATION
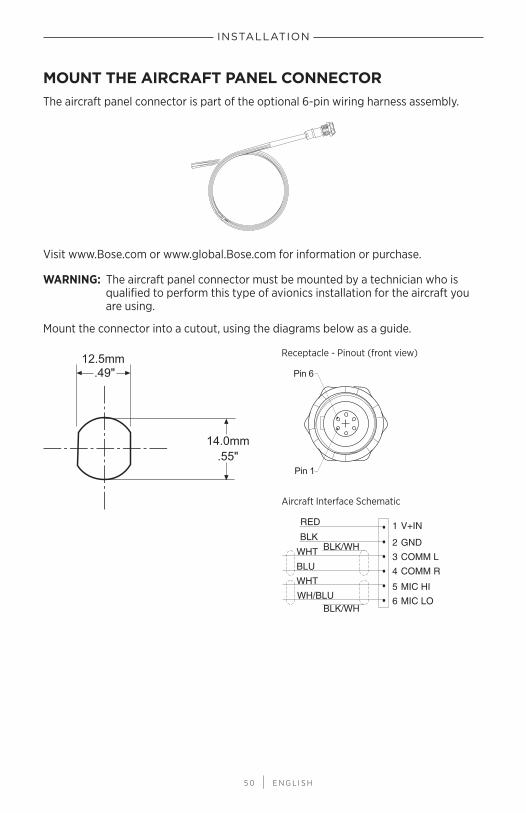
MOUNT THE AIRCRAFT PANEL CONNECTORThe aircraft panel connector is part of the optional 6-pin wiring harness assembly.
Visit www.Bose.com or www.global.Bose.com for information or purchase.
WARNING: The aircraft panel connector must be mounted by a technician who is qualified to perform this type of avionics installation for the aircraft you are using.
Mount the connector into a cutout, using the diagrams below as a guide.
12.5mm.49"
.55"14.0mm
RED• 1 V+IN
BLK • 2 GNDWHT • 3 COMM LBLU • 4 COMM RWHT • 5 MIC HIWH/BLU • 6 MIC LO
BLK/WH
BLK/WH
Pin 6
Pin 1
Aircraft Interface Schematic
Receptacle - Pinout (front view)
5 1 | E N G L I S H
INSTALLATION
Connect the eight wires as follows:
Two for the microphone
Two for audio
One for power
One for ground
Two for audio shields
Audio and microphone wires should be connected to the back of the existing microphone and headphone jacks, leaving existing jacks intact for use with conventional headsets. This is usually the fastest installation method.
CAUTION: Do NOT use excessive force or bend the installed connector. This may damage or break internal solder joints.
NOTE: The aircraft panel connector cannot be installed in an audio system using transformer-coupled audio outputs. Contact Bose technical support.
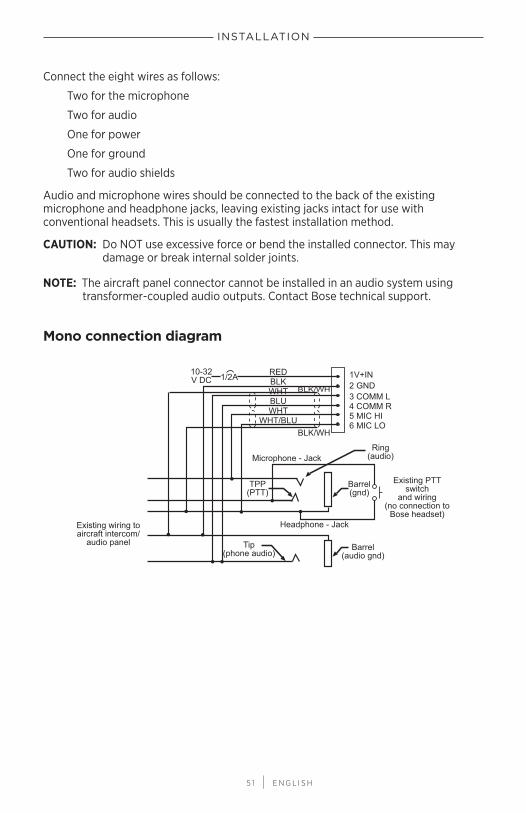
Mono connection diagram
10-32V DC 1/2A 1V+IN
2 GND3 COMM L4 COMM R5 MIC HI6 MIC LO
REDBLKWHTBLUWHT
WHT/BLU
BLK/WH
BLK/WH
Ring(audio)
Existing PTTswitch
and wiring(no connection to
Bose headset)
Microphone - Jack
TPP(PTT)
Barrel(gnd)
Headphone - Jack
Barrel(audio gnd)
Tip(phone audio)
Existing wiring toaircraft intercom/
audio panel
TROUBLESHOOTING
5 2 | E N G L I S H
INSTALLATION
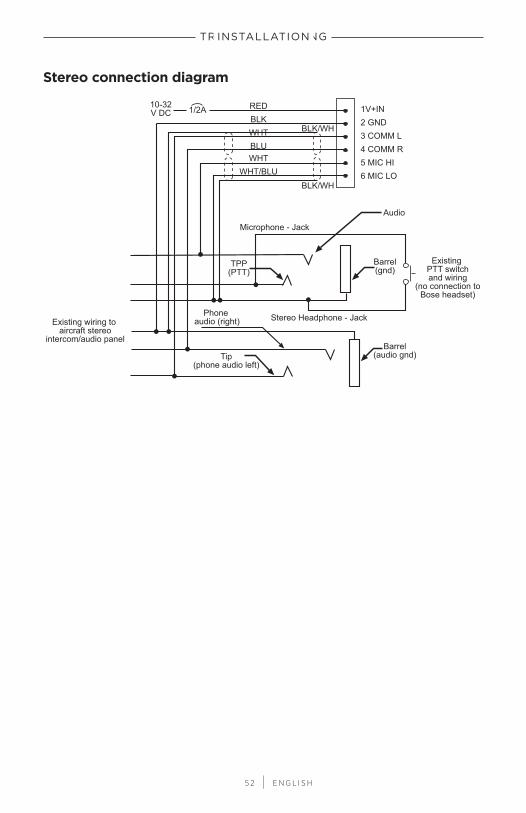
Stereo connection diagram
Existing wiring to aircraft stereo
intercom/audio panel
10-32V DC 1/2A 1V+IN
2 GND3 COMM L4 COMM R5 MIC HI6 MIC LO
REDBLKWHTBLUWHT
WHT/BLU
BLK/WH
BLK/WH
Audio
Existing PTT switchand wiring
(no connection toBose headset)
Microphone - Jack
TPP(PTT)
Barrel(gnd)
Stereo Headphone - Jack
Barrel(audio gnd)Tip
(phone audio left)
Phone audio (right)
TROUBLESHOOTING
5 3 | E N G L I S H
INSTALLATION
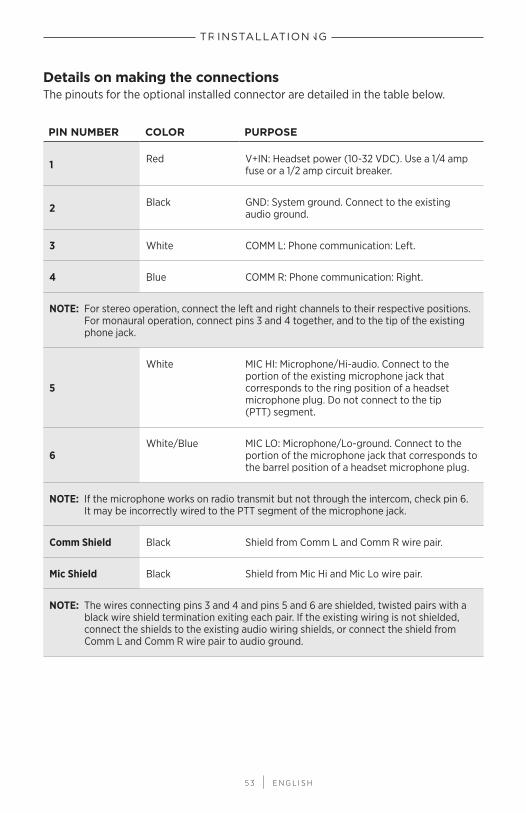
Details on making the connectionsThe pinouts for the optional installed connector are detailed in the table below.
PIN NUMBER COLOR PURPOSE
1 Red V+IN: Headset power (10-32 VDC). Use a 1/4 amp fuse or a 1/2 amp circuit breaker.
2 Black GND: System ground. Connect to the existing audio ground.
3 White COMM L: Phone communication: Left.
4 Blue COMM R: Phone communication: Right.
NOTE: For stereo operation, connect the left and right channels to their respective positions. For monaural operation, connect pins 3 and 4 together, and to the tip of the existing phone jack.
5
White MIC HI: Microphone/Hi-audio. Connect to the portion of the existing microphone jack that corresponds to the ring position of a headset microphone plug. Do not connect to the tip (PTT) segment.
6White/Blue MIC LO: Microphone/Lo-ground. Connect to the
portion of the microphone jack that corresponds to the barrel position of a headset microphone plug.
NOTE: If the microphone works on radio transmit but not through the intercom, check pin 6. It may be incorrectly wired to the PTT segment of the microphone jack.
Comm Shield Black Shield from Comm L and Comm R wire pair.
Mic Shield Black Shield from Mic Hi and Mic Lo wire pair.
NOTE: The wires connecting pins 3 and 4 and pins 5 and 6 are shielded, twisted pairs with a black wire shield termination exiting each pair. If the existing wiring is not shielded, connect the shields to the existing audio wiring shields, or connect the shield from Comm L and Comm R wire pair to audio ground.
5 4 | E N G L I S H
TECHNICAL INFORMATION
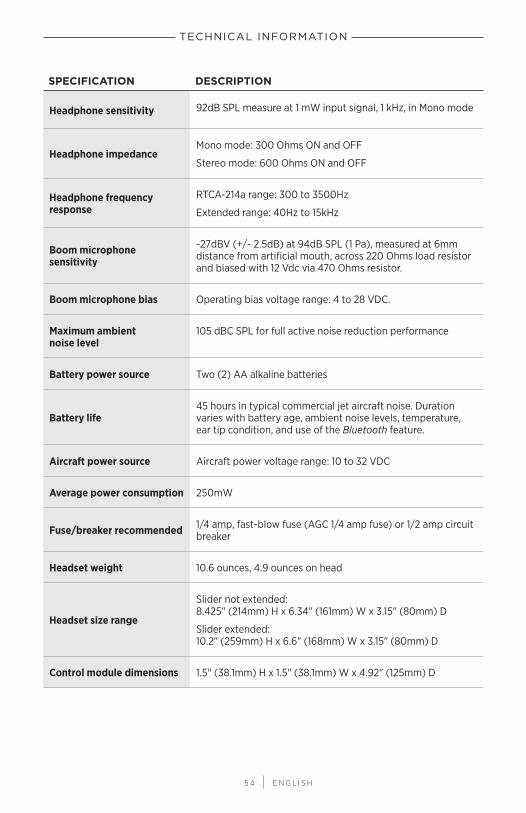
SPECIFICATION DESCRIPTION
Headphone sensitivity 92dB SPL measure at 1 mW input signal, 1 kHz, in Mono mode
Headphone impedanceMono mode: 300 Ohms ON and OFF
Stereo mode: 600 Ohms ON and OFF
Headphone frequency response
RTCA-214a range: 300 to 3500Hz
Extended range: 40Hz to 15kHz
Boom microphone sensitivity
-27dBV (+/- 2.5dB) at 94dB SPL (1 Pa), measured at 6mm distance from artificial mouth, across 220 Ohms load resistor and biased with 12 Vdc via 470 Ohms resistor.
Boom microphone bias Operating bias voltage range: 4 to 28 VDC.
Maximum ambient noise level
105 dBC SPL for full active noise reduction performance
Battery power source Two (2) AA alkaline batteries
Battery life45 hours in typical commercial jet aircraft noise. Duration varies with battery age, ambient noise levels, temperature, ear tip condition, and use of the Bluetooth feature.
Aircraft power source Aircraft power voltage range: 10 to 32 VDC
Average power consumption 250mW
Fuse/breaker recommended 1/4 amp, fast-blow fuse (AGC 1/4 amp fuse) or 1/2 amp circuit breaker
Headset weight 10.6 ounces, 4.9 ounces on head
Headset size range
Slider not extended: 8.425" (214mm) H x 6.34" (161mm) W x 3.15" (80mm) D
Slider extended: 10.2" (259mm) H x 6.6" (168mm) W x 3.15" (80mm) D
Control module dimensions 1.5" (38.1mm) H x 1.5" (38.1mm) W x 4.92" (125mm) D
TROUBLESHOOTING
5 5 | E N G L I S H
TECHNICAL INFORMATION
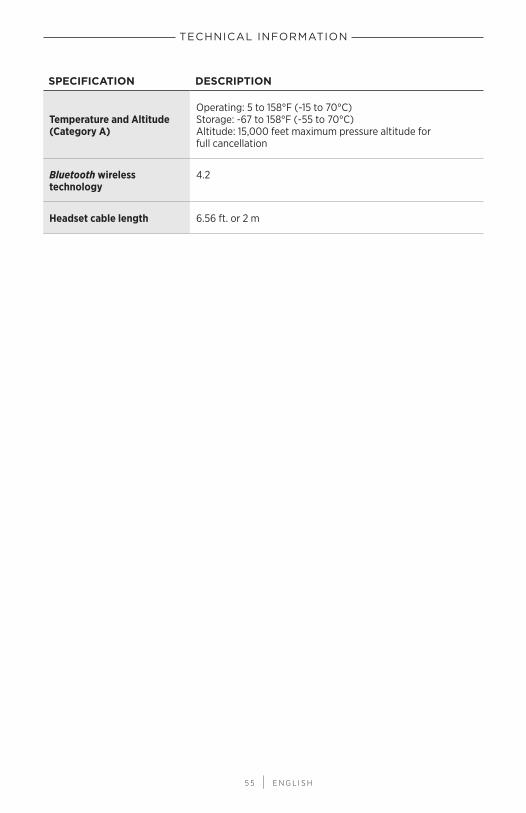
SPECIFICATION DESCRIPTION
Temperature and Altitude (Category A)
Operating: 5 to 158°F (-15 to 70°C) Storage: -67 to 158°F (-55 to 70°C) Altitude: 15,000 feet maximum pressure altitude for full cancellation
Bluetooth wireless technology
4.2
Headset cable length 6.56 ft. or 2 m
TROUBLESHOOTING
5 6 | E N G L I S H
TECHNICAL INFORMATION
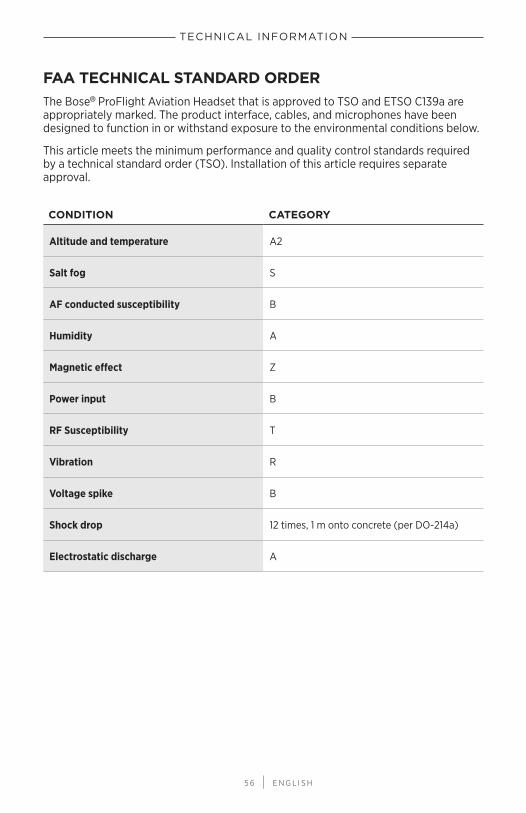
FAA TECHNICAL STANDARD ORDERThe Bose® ProFlight Aviation Headset that is approved to TSO and ETSO C139a are appropriately marked. The product interface, cables, and microphones have been designed to function in or withstand exposure to the environmental conditions below.
This article meets the minimum performance and quality control standards required by a technical standard order (TSO). Installation of this article requires separate approval.
CONDITION CATEGORY
Altitude and temperature A2
Salt fog S
AF conducted susceptibility B
Humidity A
Magnetic effect Z
Power input B
RF Susceptibility T
Vibration R
Voltage spike B
Shock drop 12 times, 1 m onto concrete (per DO-214a)
Electrostatic discharge A
5 7 | E N G L I S H
TECHNICAL INFORMATION
Environmental categories cited refer to RTCA/DO-160G and RTCA/DO-214a (December 18, 2013).
The conditions and tests required for TSO approval of this are minimum performance standards. It is the responsibility of those installing this article either on or within a specific type or class of aircraft to determine that the aircraft installation conditions are within the TSO standards. TSO articles must have separate approval for installation in aircraft. The article may be installed only if performed under 14 CFR part 43 or the applicable airworthiness requirements.
This device complies with FCC and Industry Canada RF radiation exposure limits for general population. It must not be collocated or operating in conjunction with any other antenna or transmitter.

©2018 Bose Corporation, The Mountain, Framingham, MA 01701-9168 USA AM802347 Rev. 02