Embed Size (px)
Citation preview

Profile synchronization guide for Microsoft SharePoint Server 2010
Microsoft Corporation
Published: August 2011
Author: Microsoft Office System and Servers Team ([email protected])
Abstract
This book describes how to plan and configure profile synchronization in Microsoft
SharePoint Server 2010. Also included is technical reference information about profile
properties, data types, and permissions.
The content in this book is a copy of selected content in the SharePoint Server 2010
technical library (http://go.microsoft.com/fwlink/?LinkId=181463) as of the publication
date. For the most current content, see the technical library on the Web.

iii
This document is provided “as-is”. Information and views expressed in this document,
including URL and other Internet Web site references, may change without notice. You
bear the risk of using it.
Some examples depicted herein are provided for illustration only and are fictitious. No
real association or connection is intended or should be inferred.
This document does not provide you with any legal rights to any intellectual property in
any Microsoft product. You may copy and use this document for your internal, reference
purposes.
© 2011 Microsoft Corporation. All rights reserved.
Microsoft, Access, Active Directory, Backstage, Excel, Groove, Hotmail, InfoPath,
Internet Explorer, Outlook, PerformancePoint, PowerPoint, SharePoint, Silverlight,
Windows, Windows Live, Windows Mobile, Windows PowerShell, Windows Server, and
Windows Vista are either registered trademarks or trademarks of Microsoft Corporation in
the United States and/or other countries.
The information contained in this document represents the current view of Microsoft
Corporation on the issues discussed as of the date of publication. Because Microsoft
must respond to changing market conditions, it should not be interpreted to be a
commitment on the part of Microsoft, and Microsoft cannot guarantee the accuracy of any
information presented after the date of publication.

iv
Table of Contents
Getting help ......................................................................................................... vii
I. PLANNING FOR PROFILE SYNCHRONIZATION ..................................... 1
Profile synchronization overview ....................................................................... 2
Synchronization components .......................................................................... 2
Importing profiles from a directory service .................................................... 4
Importing properties from a business system ............................................... 5
Exporting properties to a directory service .................................................... 5
Creating user profiles without synchronizing ................................................ 6
Synchronizing groups ....................................................................................... 6
Types of synchronization ................................................................................. 6
Supported directory services ........................................................................... 7
Concepts............................................................................................................. 7
Plan user profiles .................................................................................................. 8
What are user profiles? .................................................................................... 8
About user profile properties ......................................................................... 10
About property policies ................................................................................... 11
Planning user profiles ..................................................................................... 15
Other Resources ............................................................................................. 21
Plan for profile synchronization ........................................................................ 22
About planning for profile synchronization .................................................. 23
Plan synchronization connections ................................................................ 23
Identify property mappings ............................................................................ 30
Synchronizing groups ..................................................................................... 32
Plan for the synchronization server .............................................................. 32
Plan the synchronization schedule ............................................................... 33
Plan account permissions .............................................................................. 33
Next steps......................................................................................................... 35
Worksheets ...................................................................................................... 35
Concepts........................................................................................................... 35
II. PROFILE SYNCHRONIZATION OPERATIONS ...................................... 36
Best practices for people and profiles ............................................................. 37
1. Clean up the directory service .................................................................. 37
2. Use synchronization filters ........................................................................ 37
3. Configure policies for profile properties .................................................. 38

v
4. Specify the domain controller to synchronize with ................................ 38
5. Make friends with the directory service administrator ........................... 38
6. Restart the synchronization service after installing updates ................ 38
7. Run database maintenance jobs before synchronizing profiles .......... 39
8. Optimize the profile and synchronization databases ............................ 39
9. Check timer job settings ............................................................................ 40
10. Do not synchronize during large directory service updates ............... 40
11. Avoid synchronizing large objects ......................................................... 40
Acknowledgements ......................................................................................... 41
Configure profile synchronization .................................................................... 42
Prerequisites .................................................................................................... 42
Procedures ....................................................................................................... 44
Acknowledgements ......................................................................................... 61
Concepts........................................................................................................... 61
Configure profile synchronization using a Lightweight Directory Interchange Format (LDIF) file ...................................................................... 62
Overview ........................................................................................................... 62
Task requirements .......................................................................................... 63
Tasks in this article ......................................................................................... 64
Create an LDIF MA ......................................................................................... 64
Add custom profile properties to the default profile property schema .... 65
Concepts........................................................................................................... 69
Start profile synchronization manually ............................................................ 70
Concepts........................................................................................................... 71
Schedule profile synchronization ..................................................................... 72
Concepts........................................................................................................... 73
Maintain profile synchronization ...................................................................... 74
Task requirements .......................................................................................... 74
Procedures in this article ................................................................................ 75
Rename users or change user domains ..................................................... 75
Exclude users whose accounts have been disabled ................................. 76
Remove obsolete users and groups ............................................................ 76
Maintain profile schema changes ................................................................. 78
Rename a profile synchronization server .................................................... 78
Move the User Profile Synchronization service to a new server ............. 78
Reset profile synchronization ........................................................................ 79
Restrict profile synchronization communication to a specific domain controller ........................................................................................................ 81
Adjust profile synchronization time-outs ...................................................... 82

vi
Configure a profile synchronization connection in SharePoint Server 2010 (video) ............................................................................................................... 85
Related resources ........................................................................................... 85
Other Resources ............................................................................................. 86
Configure a synchronization connection to a SQL Server database in SharePoint Server 2010 (video) ................................................................... 87
Related resources ........................................................................................... 87
Other Resources ............................................................................................. 88
III. PROFILE SYNCHRONIZATION REFERENCE ...................................... 89
Default user profile properties .......................................................................... 90
Concepts........................................................................................................... 92
Default user profile property mappings ........................................................... 93
Default user profile property mappings for Active Directory Domain Services ......................................................................................................... 93
Default user profile property mappings for Novell eDirectory, Sun Java System Directory Server, or IBM Tivoli Directory Server ...................... 94
Concepts........................................................................................................... 95
Connection filter data types and operators .................................................... 96
Concepts........................................................................................................... 98
User profile property data types ....................................................................... 99
AD DS data type compatibility ...................................................................... 99
.NET data type compatibility ........................................................................ 100
Concepts......................................................................................................... 101
Grant Active Directory Domain Services permissions for profile synchronization .............................................................................................. 102
Grant Replicate Directory Changes permission on a domain ................ 102
Add an account to the Pre-Windows 2000 Compatible Access group . 103
Grant Replicate Directory Changes permission on the cn=configuration container ...................................................................................................... 103
Grant Create Child Objects and Write permission ................................... 104
Concepts......................................................................................................... 105

vii
Getting help
Every effort has been made to ensure the accuracy of this book. This content is also
available online in the Office System TechNet Library, so if you run into problems you can
check for updates at:
http://technet.microsoft.com/office
If you do not find your answer in our online content, you can send an e-mail message to
the Microsoft Office System and Servers content team at:
If your question is about Microsoft Office products, and not about the content of this book,
please search the Microsoft Help and Support Center or the Microsoft Knowledge Base
at:
http://support.microsoft.com

1
I. Planning for profile synchronization
In this section:
Profile synchronization overview (SharePoint Server 2010)
Plan user profiles (SharePoint Server 2010)
Plan for profile synchronization (SharePoint Server 2010)

2
Profile synchronization overview (SharePoint Server 2010)
Published: April 7, 2011
This article describes profile synchronization, also referred to as "profile sync," in
Microsoft SharePoint Server 2010.
A user profile is a collection of properties that describes a SharePoint user. Features
such as My Sites and People Search use user profiles to provide a rich, personalized
experience for the users in your organization. You can create user profiles by importing
data from directory services, such as Active Directory Domain Services (AD DS). You
can augment user profiles by importing data from business systems, such as SAP or
Microsoft SQL Server. If users update their profiles in Microsoft SharePoint Server 2010,
you can write the modified data back to directory services. The process of importing
profile data from external systems and writing data back to these systems is called profile
synchronization.
When you synchronize user profiles, you can also synchronize groups. Synchronizing
groups gives SharePoint Server 2010 information about which users are members of
which group.
In this article:
Synchronization components
Importing profiles from a directory service
Importing properties from a business system
Exporting properties to a directory service
Creating user profiles without synchronizing
Synchronizing groups
Types of synchronization
Supported directory services
Synchronization components The following figure shows the components that are involved in synchronizing profiles in
SharePoint Server 2010. Shaded boxes represent external systems. The SharePoint
Server components are described in the paragraphs that follow the figure.

3
Note:
Throughout this topic, the phrase "business system" is used to mean an external system
that is not a directory service. SAP, Siebel, SQL Server, and custom applications are all
examples of business systems.
Your solution must have a User Profile service application to use any of the social
computing features in SharePoint Server 2010. When you create the User Profile service
application, you can specify the synchronization server (also known as the profile
synchronization instance), which is the computer that will be used to synchronize profile
information. Creating the User Profile service application creates several databases, such
as the profile database.
The User Profile Synchronization service is the core of the synchronization architecture in
SharePoint Server 2010. When you start the User Profile Synchronization service on the
synchronization server, SharePoint Server 2010 provisions a version of Microsoft
Forefront Identity Manager (FIM) to participate in synchronization. A User Profile service
application can only have one User Profile Synchronization service. A User Profile
Synchronization service is associated with connections and mappings.
A connection is a way to access profile data in an external system. A User Profile
Synchronization service can have multiple connections, and each external system
requires its own connection. Connections can be divided into two types: connections to
directory services, and connections to business systems.

4
When you create a connection to a directory service, you specify which containers in the
directory service contain the information that you want to synchronize. You can also
create a filter to exclude users and groups that you do not want to import. For example,
you could synchronize with the Users container in AD DS, but filter out users whose
accounts are disabled.
When you create a connection to a business system, you specify the external content
type that represents the information from the business system.
Mappings define how SharePoint user profile properties relate to data in external
systems. A mapping for a particular user profile property consists of three things:
The connection that identifies the external system.
The attribute from the external system that the user profile property is related to.
The direction of the mapping, which can be either "import" for a property that receives
its value from the external attribute, or "export" for an external attribute whose value
is provided by the SharePoint user profile property.
Importing profiles from a directory service You can create new profiles and import profile properties by synchronizing with a
directory service. When you synchronize with a directory service, SharePoint Server
2010 does the following:
Creates a user profile for each new user in the directory service containers that are
being synchronized, and fills in the properties of each new profile with data from the
directory service.
Deletes the profile of any user that was removed from the directory service.
For properties that are being imported, updates the property in the SharePoint user
profile if the corresponding value in the directory service has changed.
If you synchronize with multiple directory services, each directory service must provide
unique users. You cannot synchronize a single user profile with multiple directory
services.

5
Note:
Active Directory resource and logon forests present the only case in which you can
synchronize the same users with two directory services. The connection to the logon
forest provides the users. The connection to the resource forest merely augments the
properties of existing profiles, similarly to a connection to a business system.
Importing properties from a business system You can populate the properties of existing user profiles from a business system. You
cannot create new user profiles in this manner, and you cannot write data back to a
business system.
To import data from a business system, you must first create an external content type to
bring the data from the business system into SharePoint Server 2010. Then you can
synchronize user profiles with the external content type. For more information about
external content types, see Business Connectivity Services overview (SharePoint Server
2010) (http://technet.microsoft.com/en-us/library/ee661740.aspx).
There must be some information that is shared by the external content type and a user
profile. SharePoint Server 2010 uses this shared information to match an instance of the
external content type to the correct user profile during synchronization. When you define
the external content type, you specify that the field to match against is the identifier for
the external content type. You specify which user profile property to match against when
you create a synchronization connection to a business system. For example, if the
business system contains an employee's email address, birth date, and office location,
you could specify the email address as the identifier of the external content type, and
create a connection that matches against the WorkEmail profile property. For each user
profile, SharePoint Server 2010 would synchronize information from the instance of the
external content type whose email address matched the WorkEmail property of the user
profile.
Exporting properties to a directory service Once user profiles exist, you can let users modify the values of certain profile properties.
You can configure these properties so that data that is changed in SharePoint Server
2010 will be written back to a directory service. Each property can be either imported or
exported. You cannot both import and export the same property. You can only export
data about a user to the directory service from which the user was imported. You cannot
create new user accounts in the directory service by exporting user profile information.

6
Creating user profiles without synchronizing You can create a custom solution that uses the SharePoint object model to create user
profiles. If your solution does not use profile synchronization, you can remove the profile
synchronization features from the SharePoint user interface by selecting the Enable
External Identity Manager option on the Configure Synchronization Settings page of
Central Administration.
Synchronizing groups If you synchronize groups in addition to users, SharePoint Server 2010 imports
information about the groups that exist in the directory service containers that you are
synchronizing with, as well as about which SharePoint Server 2010 users are members
of these groups. Each time that you synchronize, SharePoint Server 2010 updates the
group and membership information. Groups do not have profiles, and you cannot
manipulate them by using SharePoint Server. You must manage groups and their
membership in the directory service itself. Within SharePoint Server, groups are only
used to create audiences (see Audience and content targeting planning (SharePoint
Server 2010) (http://technet.microsoft.com/en-us/library/cc261958.aspx)) and to display
which memberships a visitor has in common with the person whose My Site the person is
visiting (see My Sites overview (SharePoint Server 2010)
(http://technet.microsoft.com/en-us/library/ff382643.aspx)).
Types of synchronization You can perform two kinds of synchronization: full and incremental. Full synchronization
can take a long time—for directories that contain hundreds of thousands of users, it could
take several days. Incremental synchronization only synchronizes data that has changed
in the external system or SharePoint Server 2010, and is more efficient. You must
perform a full synchronization the first time that you synchronize. After that, you can use
incremental synchronization unless one of the following conditions is true:
A mapped property has changed. For example, you mapped a new property, or
added or changed a mapping associated with a property.
You changed the containers that a connection uses to synchronize with a directory
service.
You changed or added a filter.
An external content type that you are synchronizing with has changed.
You added or deleted a connection.
You can configure a timer job to run an incremental synchronization on a set schedule,
ranging from every few minutes through monthly. You can also start either a full
synchronization or an incremental synchronization manually.

7
Supported directory services With SharePoint Server 2010 you can create connections to the following directory
services:
Active Directory Domain Services (AD DS) 2003 SP2 and AD DS 2008
Sun Java System Directory Server version 5.2
Novell eDirectory version 8.7.3
IBM Tivoli version 5.2
You can use any of these directory services to synchronize users. Synchronizing groups
is only supported for AD DS.
All of these directory services support full synchronization. All except Novell eDirectory
support incremental synchronization.
You can also import data from other Lightweight Directory Access Protocol (LDAP)
providers by using a Lightweight Directory Interchange Format (LDIF) file. For more
information about how to import LDIF data, see Configure profile synchronization using a
Lightweight Directory Interchange Format (LDIF) file (SharePoint Server 2010).
Concepts Plan for profile synchronization (SharePoint Server 2010)
Plan user profiles (SharePoint Server 2010)
Configure profile synchronization using a Lightweight Directory Interchange Format
(LDIF) file (SharePoint Server 2010)
Other Resources
Audience and content targeting planning (SharePoint Server 2010)
(http://technet.microsoft.com/en-us/library/cc261958.aspx)
My Sites overview (SharePoint Server 2010) (http://technet.microsoft.com/en-
us/library/ff382643.aspx)
Business Connectivity Services overview (SharePoint Server 2010)
(http://technet.microsoft.com/en-us/library/ee661740.aspx)

8
Plan user profiles (SharePoint Server 2010)
Published: May 12, 2010
This article describes the Microsoft SharePoint Server 2010 user profiles feature and
gives guidance on planning user profiles.
In this article:
What are user profiles?
About user profile properties
About property policies
Planning user profiles
Note:
Profile synchronization is the process of synchronizing data from directory services and
business systems with user profiles. Along with understanding the concepts and activities
described in this article, you should read the related article Profile synchronization
overview (SharePoint Server 2010).
What are user profiles? A user profile is a collection of properties that describes a single user, along with the
policies and other settings associated with each property. The user that a profile
describes is represented by a unique identifier in the profile, and the remaining properties
provide information about that user, such as the user's phone numbers, manager, office
number, job title, and so forth. The set of user profiles for a SharePoint deployment are
stored in the profiles database associated with a User Profile Service application.
User profiles help identify connections between users in an enterprise, such as their
common managers, workgroups, group membership, and common Web sites. They can
also contain critical information about a user, such as the products the user works on, the
user's interests or areas of expertise, and the user's place in the organization's structure.
By exposing this information in features such as My Sites, user profiles provide the basis
for enterprise social networking in SharePoint Server. Some of the enterprise social
networking features that user profiles support are:

9
My Sites
Profile pages
People searching
Organizational charts
Expertise search
Social tagging
Audiences
As shown in the following illustration, user profiles can be composed of properties that
are imported from a directory service, imported from business systems, and supplied by
users.
For example, a directory service could supply essential information needed across the
organization, such as users' account names, work telephone numbers, titles, and work e-
mail addresses. Business systems could supply business-related critical information,
such as the customer accounts or product lines managed by each team member. Users
could supply supplemental information about themselves, such as their areas of expertise
or hobbies.
New user profiles are created in the following ways:
If an authenticated user does not have a user profile, a new one is created using
properties taken from the appropriate directory service when that user initially
accesses his or her My Site.
One or more new user profiles can be created using profile synchronization. For
details, see Plan for profile synchronization (SharePoint Server 2010).

10
A custom solution can be developed to create user profiles. For more information,
see How to: Create User Profiles and Organization Profiles
(http://msdn.microsoft.com/en-us/library/ms545122.aspx).
Note:
User profiles are distinct from SharePoint Server user accounts and exist in their own
data store. User accounts provide security and access rights to objects in SharePoint
Server. User profiles are used to organize information about users and about the
relationships among users. Updating a user's profile has no effect on that user's user
account.
About user profile properties A user profile is composed of a set of user properties. Each user property provides an
item of information related to a user. User property values can come from directory
services, business systems, or user input. You can configure some properties so that
they can be exported to a directory service. Many of the decisions you make in planning
user profiles are about which user properties to include and how their values are set.
A rich set of data types is available for user properties. For a list of the supported data
types and their definitions, see PropertyDataType Fields (http://msdn.microsoft.com/en-
us/library/microsoft.office.server.userprofiles.propertydatatype_fields.aspx).
User profiles include a set of default user profile properties. Many of these properties are
included because they are used by SharePoint Server social networking or
personalization features, and a subset of the properties are mapped automatically to their
corresponding directory service attributes after you run profile synchronization. For a list
of default user properties, see Default user profile properties (SharePoint Server 2010).
SharePoint Server includes a managed metadata feature. Managed metadata is a
hierarchical collection of centrally managed terms that you can define and then use as
attributes for items in SharePoint Server. A set of managed terms is a term set. You can
associate a term set with an editable user profile property. By doing this, you can govern
the values associated with that property and make it easier for users to enter appropriate
values for it. For example, by associating a term set that defines the job titles in an
enterprise, you can help promote consistent use of those titles in user profiles. For
information on planning managed metadata, see Plan managed metadata (SharePoint
Server 2010) (http://technet.microsoft.com/en-us/library/ee530389.aspx).

11
About property policies As described above, user profiles are used in many SharePoint Server 2010 social
networking features. You can set policies on each user property in a user profile to help
govern how the information in that property can be used. You can specify:
Whether or not a property is included in user profiles
Whether or not it is required
Whether or not users can change the default privacy setting of a property
Who the property is visible to, based on their role in the organization
The following table describes each policy setting option.
Policy setting option Description
Enabled or Disabled You can configure a property to be available
for use in features that incorporate it, or you
can disable the use of that property.
Required You can specify that a property must
contain information.
Optional You can specify that a property is not
required to have a value. Each user can
provide values for the property or leave the
property empty.
Default privacy setting This determines who can see information for
a property, as follows:
Everyone: Every user who has viewer or
higher permissions to a site can see the
relevant information.
Note:
Only properties that have a
privacy setting of Everyone will
be used by search.
My colleagues: Every user in the user's
My Colleagues list can see the
information for this user.
My team: Every colleague in the user's

12
Policy setting option Description
immediate team, a subset of the My
Colleagues list, can see the information.
My manager: Only the user and the
user's immediate manager can see the
information.
Only Me: Only the user can see the
information.
Note:
User Profile service
administrators can always view
the information in a user profile
regardless of its default privacy
setting.
Users Can Override When this option is selected, users can
change the property's default privacy
setting. When this option is not selected,
only administrators of the User Profile
Service can change default privacy settings.
Replicable The property's value will be replicated to
user information lists in other sites when its
value changes. For a property to be
replicable, its default privacy setting must be
set to Everyone and the User can override
policy must not be selected.
Along with setting policies on each user profile property, you can set similar policies on
some SharePoint Server features that provide profile-related information in lists, Web
parts, or Web sites. The personalization feature settings that you can set policies on
include:
The display of SharePoint site memberships
The display of distribution list memberships
The display of colleagues on My Sites
Auto-population of colleagues based on organizational hierarchy

13
The display of colleague recommendations
The display of links on My Sites
Other sites pinned to My Sites
For example, if the display of distribution list memberships is enabled with a privacy
setting of "My Team," then only members of a user's team will be able to view which
distribution lists that user belongs to.
The following considerations can help you determine which policies are appropriate for
your organization:
Which properties should be required? Some properties are required by default
and can be configured so that they cannot be overridden or changed by users. In
most organizations, these properties are key ways to enable collaboration and
develop relationships across the organization. SharePoint Server 2010 also uses
many of them to enable other features, such as colleagues and audiences. For more
information, see Audience and content targeting planning (SharePoint Server 2010)
(http://technet.microsoft.com/en-us/library/cc261958.aspx) and Default user profile
properties (SharePoint Server 2010).
Which properties should be visible to everyone? By default, most properties are
visible to everyone, but sensitive information can be configured to have limited
visibility. For example, a company that has many employees in the field might decide
that mobile phone information is important for everyone to see. Other organizations
might choose to keep all non-work telephone numbers private.
Which properties policies can be changed by users? Some property policies
have settings that can be changed by users. For example, some users might not
want automatic population of colleague lists. Other users might want to change the
default visibility setting for a property.
When planning the policy setting for a property or personalization feature, consider the
factors shown in the following table.
Condition Disable the property Make the property
optional
Make
the
property
required
The property is used by key
user features.
X
The property is associated with
key business data for
applications in the Microsoft
Business Connectivity Services.
X

14
Condition Disable the property Make the property
optional
Make
the
property
required
The property is used when you
create audiences.
X
User Profile Service
administrators expect
consistent and meaningful
values for the property.
X
The property will rarely be
used.
X
The property will distract from
more important properties.
Note:
You can change the
display settings for
properties to hide them.
X
You decide to provide default
values for properties, but want
users to be able to change or
remove those values.
X
When you plan the default visibility settings for properties, consider the factors shown in
the following table.
Condition Action
You want to use the property in search so
that users can be found by searches for the
property.
Set the default access policy to Everyone.
Note:
Only properties that have a

15
Condition Action
privacy setting of Everyone will
be used by search.
The property is useful across workgroups
and other divisions in your organization and
does not contain sensitive information.
Make the property visible to everyone.
The property is mostly useful for
collaboration inside an immediate
workgroup or with a specific group of
individually selected colleagues.
Make the property visible only to colleagues.
The property is of a private or sensitive
nature.
Note:
What is considered private
information can vary from
organization to organization.
Make the property visible only to the
immediate manager, or in some cases, only
the individual user.
Planning user profiles This section provides guidance to help in planning user profiles. It is recommended that
your planning tasks are done in the following order:
1. Identify stakeholders
2. Identify how the profile information will be used
3. Identify directory services and business systems
4. Determine which properties to include
5. Determine property details
6. Determine personalization settings policies
7. Plan for capacity

16
Some sections below refer to the User Profile Properties Planning worksheet
(http://go.microsoft.com/fwlink/?LinkId=202832). Use this workbook to record your user
profile properties configuration decisions along with personalization feature settings. The
workbook also has a place to record contact information for the profiles stakeholders in
your enterprise and for members of the governing body that oversees profile properties
decisions.
Identify stakeholders
User profiles are part of an enterprise's information architecture and must meet the needs
of workgroups that depend on the profile information. Decisions about which properties
to include in profiles should be based on input from stakeholders representing the
workgroups that use My Sites and other social computing features.
Decisions about user profiles must strike a balance between meeting the social
computing needs of the organization and its security, privacy, and regulatory
responsibilities. Therefore, decisions about which information to expose in user profiles
and which properties to include should be made with the participation of executive
sponsors, legal advisors, and human resources team members. This helps to ensure that
the use of profile information is compliant with enterprise policies and legal requirements.
If your solution spans multiple locales, it is a recommended practice to include represents
from the various locales in making these decisions.
Use the Stakeholders tab on the User Profile Properties Planning worksheet to record
the contact information for the members of your profiles stakeholders.
Identify how profile information will be used
How user profile information is intended to be used in your SharePoint solution is the key
determinant in planning user profile properties. Your functional specifications and
architectural documents should provide this information and should help guide you in
designing effective user profiles to meet your users' needs. As with any SharePoint
Server solution, it is recommended that you develop your solutions using standard best
practices such as functional specifications, software development and configuration
management tools, pilot projects, and other standard techniques. Your development
team's functional specification, architecture diagrams, and other artifacts will be key
resources in determining requirements for user profile properties.
Identify directory services and business systems
User profiles contain data from directory services and business systems. Directory
services can supply the members of your user community and provide data about those
users. Additional user information can be imported from business systems such as
external databases or Web services. The particular directory services and business
systems to use depend on your enterprise's environment.
For more information about integrating user profiles with directory services and business
systems, see Plan for profile synchronization (SharePoint Server 2010). That article
includes information on planning directory service and business system integration and

17
includes a Connection Planning worksheet in which you should list the directory services
and business systems required by your solution.
Determine which properties to include
Review the article Default user profile properties (SharePoint Server 2010). Those
properties that are mapped by default support basic SharePoint Server social computing
and personalization features.
Also, determine which additional custom properties to include based on your social
computing solution goals, your solution's functional requirements, and the data available
from directory services and business systems.
In the Property column of the User Profile Properties Planning worksheet, list each
property to include. Information about filling in the rest of the worksheet is provided in the
following section.
Determine property details
Use the User Profile Properties Planning worksheet to record the set of properties to
include in user profiles, as shown in the following table.
Property Information to provide
Source Indicate the source for the property: a
directory service, business system, or "user
input" for a write-in field. For business
systems, it is recommended that you enter
the particular business system, such as "HR
system".
Type Indicate the property's type. A list of the
supported data types and their definitions is
available at PropertyDataType Fields
(http://msdn.microsoft.com/en-
us/library/microsoft.office.server.
userprofiles.propertydatatype_fields.aspx).
Description Define the property and describe its
intended use.
Enable Indicate if this property should be enabled.
Enabling a property makes it available for
use in features such as My Sites. Disabled
properties are only visible to administrators
of the User Profile service.
Require Indicate if the property is required to have a

18
Property Information to provide
value.
Editable Indicate if users can edit this property's
value.
Term set If this is an editable property, you can
optionally supply the name of a term set
containing acceptable values for the
property.
Default privacy setting Indicate who can see information for the
property: everyone, colleagues, team
members, manager, or only the user.
Privacy setting override Indicate if users can change the property's
default privacy setting.
Display options Indicate if this property's value should
appear in the following places:
On My Profile pages
On the page on which users edit their
profile information
On a user's newsfeed, when the
property value changes
Replication Indicate if the property can be configured to
be replicated to user information lists on
other sites when a user changes its value.
This requires that the property's default
privacy setting is Everyone and that users
cannot override the property's default
privacy setting.
Search-related attributes There are two search-related attributes:
Alias to user name: Indicate if the
property's value should be treated as an
equivalent to the user's name for
searching.
Index: Indicate if the value of this
property should be indexed for
searching.
For tips on designing user profiles that are
19
Property Information to provide
searchable, see Build a My Site profile to
help people find you
(http://office.microsoft.com/en-
us/sharepoint-server-help/build-a-my-site-
profile-to-help-people-find-you-
HA102507597.aspx).
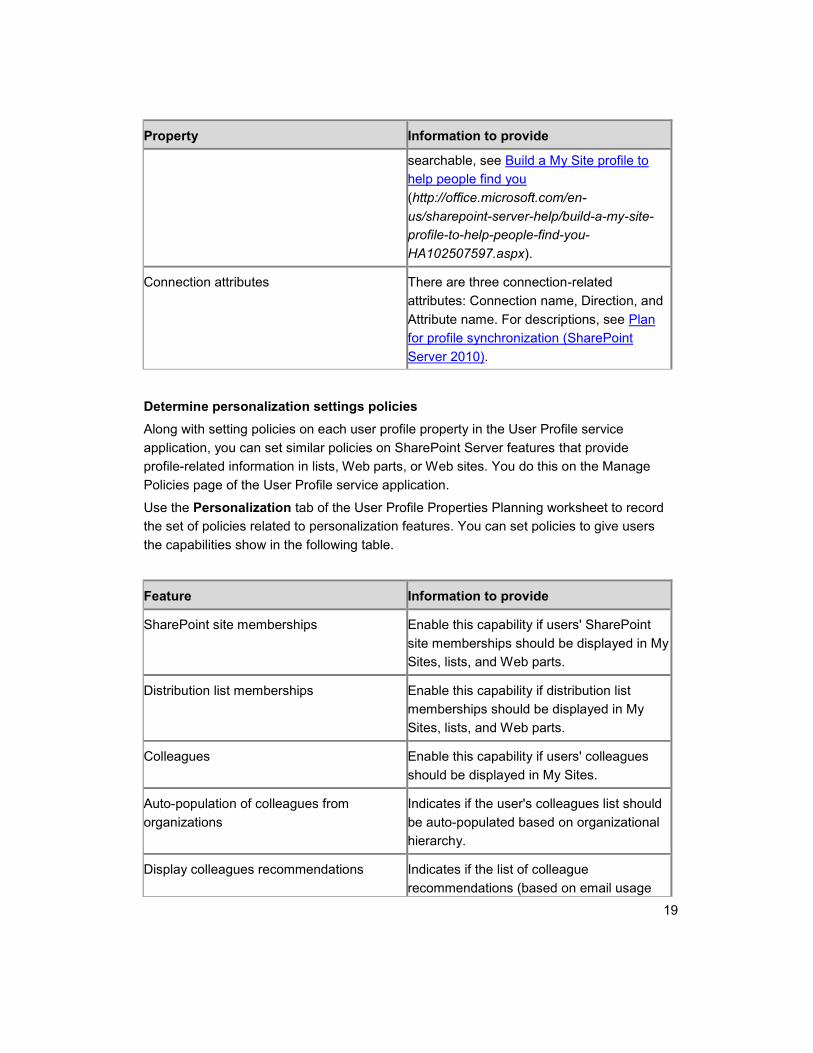
Connection attributes There are three connection-related
attributes: Connection name, Direction, and
Attribute name. For descriptions, see Plan
for profile synchronization (SharePoint
Server 2010).
Determine personalization settings policies
Along with setting policies on each user profile property in the User Profile service
application, you can set similar policies on SharePoint Server features that provide
profile-related information in lists, Web parts, or Web sites. You do this on the Manage
Policies page of the User Profile service application.
Use the Personalization tab of the User Profile Properties Planning worksheet to record
the set of policies related to personalization features. You can set policies to give users
the capabilities show in the following table.
Feature Information to provide
SharePoint site memberships Enable this capability if users' SharePoint
site memberships should be displayed in My
Sites, lists, and Web parts.
Distribution list memberships Enable this capability if distribution list
memberships should be displayed in My
Sites, lists, and Web parts.
Colleagues Enable this capability if users' colleagues
should be displayed in My Sites.
Auto-population of colleagues from
organizations
Indicates if the user's colleagues list should
be auto-populated based on organizational
hierarchy.
Display colleagues recommendations Indicates if the list of colleague
recommendations (based on email usage

20
Feature Information to provide
and other factors) should be displayed in My
Sites, lists, and Web parts.
Display links on My Sites Enable this capability if links to users'
frequently visited Web sites should be
displayed in My Sites.
Display other sites pinned to My Sites Indicates if the sites that users have pinned
to their My Sites can be viewed by other
users.
You can enable or disable personalization features, and you can configure privacy
settings on them. In the User Profile Properties Planning worksheet, record your privacy
policy preferences for each personalization features, as shown in the following table.
Setting Information to provide
Enable Indicate if this personalization feature
should be enabled. Enabling a capability
makes it available for use in features such
as My Sites.
Default privacy setting Indicate who can see information provided
by the feature: everyone, colleagues, team
members, manager, or only the user.
Privacy setting override Indicate if users can change the feature's
default privacy setting.
Plan for capacity
The number and types of properties in your user profiles can affect your system's
performance during profile synchronization and other operations. It is beyond the scope
of this article to provide guidance about how to plan user profile properties with capacity
and performance in mind. The white paper "Capacity Planning for Microsoft SharePoint
2010 My Sites and Social Computing features
(MySitesSocialComputingCapacityPlanningDoc.docx)," available from the Microsoft
Download Center, uses test data to describe the performance and capacity impact of a
range of choices in configuring user profiles and other social computing features in
SharePoint Server. Read this white paper to help determine the best way to design your
user profile properties to achieve your performance and capacity planning goals.

21
Other Resources User profile properties and profile synchronization planning worksheets (http://www.microsoft.com/download/en/details.aspx?displaylang=en&id=16076) Plan for social computing and collaboration (SharePoint Server 2010) (http://technet.microsoft.com/en-us/library/ee662531.aspx) Understanding Forefront Identity Manager 2010 (http://technet.microsoft.com/en-us/library/ff621362(WS.10).aspx) Resource Center: Enterprise Collaboration in SharePoint Server 2010 (http://technet.microsoft.com/en-us/sharepoint/ff191265.aspx) Resource Center: Social Computing in SharePoint Server 2010 (http://technet.microsoft.com/en-us/sharepoint/ee263906.aspx)

22
Plan for profile synchronization (SharePoint Server 2010)
Updated: August 12, 2010
This article provides guidance to help you plan how to implement profile synchronization
in Microsoft SharePoint Server 2010. Profile synchronization (also known as "profile
sync") allows you to create user profiles by importing information from other systems that
are used in your organization. Before you read this article you should understand the
concepts introduced in the article Profile synchronization overview (SharePoint Server
2010).
This article will explain:
How to get the information that you will need to configure profile synchronization.
Who you will need to work with to gather the necessary information.
The external content types that will have to be created, if any.
As you go through this article, you can fill out Worksheets to record your decisions. When
you have finished this article and completed the worksheets, you will have the information
that you need to configure profile synchronization by using Central Administration. You
can either give the completed worksheets to the profile synchronization administrator, or
you can use them to do the configuration yourself. If you will need external content types
to represent information from external business systems, you will have specified the
requirements for these external content types. You can give the specifications to the
developer who will create the external content types.
This article will not describe how to implement your plan. That information is covered in
the article Configure profile synchronization (SharePoint Server 2010).
Before you work through the planning tasks in this article, you should already:
Know which users you want to have profiles in SharePoint Server.
Know what properties a user profile will have, and have filled out the User Profile
Properties Planning worksheet as explained in the article Plan user profiles
(SharePoint Server 2010).
Understand general concepts about directory services.
In this article:
About planning for profile synchronization
Plan synchronization connections
Identify property mappings

23
Synchronizing groups
Plan for the synchronization server
Plan the synchronization schedule
Plan account permissions
Next steps
Worksheets
About planning for profile synchronization As the first step towards planning for profile synchronization, you will identify
synchronization connections, and gather information that you will need when you create
the connection. If you will need any external content types, you will document the
requirements for those external content types, provide the requirements to a developer,
and receive the details that you will use to specify a synchronization connection to the
business system.
Next, you will figure out how to map user profile properties to information in the external
systems so that they can be synchronized.
Finally, you will answer more straightforward questions such as whether you will
synchronize groups, which server you will use to run the synchronization service, and
how often you will synchronize profile information.
Plan synchronization connections Each property in a user's profile can come from an external system. There are two types
of external systems: directory services and business systems. Throughout this article, the
phrase business system is used to mean an external system that is not a directory
service. SAP, Siebel, SQL Server, and custom applications are all examples of business
systems.
Note:
For a list of supported directory services, see the Supported directory services section in
the "Profile synchronization overview" article.
In SharePoint Server, a synchronization connection is a means to get user profile
information from an external system. To import profiles from one of the supported
directory services, you create a synchronization connection to the directory service. To
import additional profile properties from a business system, you create an external
content type to bring the data from the business system into SharePoint Server, and then
create a synchronization connection to the external content type. The following sections

24
explain how to gather the information that you will need about each synchronization
connection.
Note:
To import profiles from an unsupported directory service, you can import a Lightweight
Directory Interchange Format (LDIF) file. To create user profiles in any other manner, you
must write a custom program. See Configure profile synchronization using a Lightweight
Directory Interchange Format (LDIF) file (SharePoint Server 2010) for more information
about how to import an LDIF file.
Connections to directory services
Each user that you want to have a profile in SharePoint Server must have an identity in a
directory service. (If users are not represented in a directory service, you cannot
synchronize user profiles.) Identify which directory services contain information about
these users. Unless you are able to access the directory service yourself, you should also
identify an administrator of the directory service. You will need this person's help to
gather some of the information that will be needed to create synchronization connections.
The Connection Planning worksheet (http://go.microsoft.com/fwlink/?LinkId=202832)
contains templates for the information that you need to gather for each type of
connection. Each template is in a separate tab that is labeled with the name of the
directory service provider it applies to. Create a new tab for each directory service that
you identified. Copy the template for the type of directory service into the new tab. Then
fill in the information on each new tab according to the following table.
Row name in worksheet Applies to connection
type
Instructions
Synchronization connection
name
All Choose a name that will help
you remember which directory
service this is a connection to.
Connection type All The type of directory service that
this is a connection to.
This information is already filled
in on each tab.
Forest AD DS The name of the directory
service forest.
Domain controller AD DS The name of the preferred

25
Row name in worksheet Applies to connection
type
Instructions
domain controller. You only
need to identify the domain
controller if there are multiple
domain controllers in the forest
and you want to synchronize
with a specific domain controller.
Authentication provider type All The type of authentication
SharePoint Server should use to
connect to the directory service.
This is one of the following:
Windows authentication
Forms-based authentication
Claims-based authentication
The systems architect should be
able to provide this information.
Authentication provider All If forms-based authentication or
claims-based authentication will
be used, fill in the name of the
trusted provider. The systems
architect should be able to
provide this information. An
authentication provider is not
needed for Windows
authentication.
Synchronization account All The account, including the
domain, that will be used to
connect to the directory service.
It is likely that the directory
service administrator will create
a new account to be used for
synchronization.
Note:
The permissions that
the synchronization

26
Row name in worksheet Applies to connection
type
Instructions
account must have are
described in the Plan
account permissions
section of this topic.
Synchronization account
password
All The password for the
synchronization account.
Security Note:
You will need to know
the password for the
synchronization
account, but we
recommend that you do
not record the password
in the worksheet.
Connection port All The port that will be used to
connect to the directory service.
Use SSL? AD DS Whether to use an SSL-secured
connection to connect to the
directory service. SSL is only
supported for connections to
AD DS.
Directory service server Tivoli, Sun, eDirectory The name of the directory
service server.
Username attribute Tivoli, Sun, eDirectory The name of the attribute in the
directory service that serves as
the unique identifier for each
profile. In most cases, the
default username attribute of
"uid" is correct.

27
Row name in worksheet Applies to connection
type
Instructions
Containers All The names of the directory
service containers, also known
as organizational units (OU),
that contain the profiles to
synchronize.
Filter for users All See the detailed instructions in
the section About exclusion
filters.
Filter for groups All See the section Synchronizing
groups.
About exclusion filters
SharePoint Server will synchronize all of the profiles from the containers that you identify
unless you choose to exclude profiles by using a filter. For example, you might create a
filter to exclude users whose accounts are disabled.
A filter consists of a set of clauses and the connector to use to join the clauses. Each
clause has three parts:
Attribute: The directory service attribute to compare.
Value: The value to compare the attribute to.
Operator: The type of comparison. For more information about which operators are
available for each Active Directory Domain Services (AD DS) data type, see
Connection filter data types and operators (SharePoint Server 2010).
There are two ways to join the clauses of an exclusion filter:
All apply (AND): An account matches the filter if all of the clauses apply.
Any apply (OR): An account matches the filter if any clause applies.
You cannot mix ANDs and ORs within a filter.
For example, assume that temporary employees in your organization are given Active
Directory accounts that begin with "T-". You want to synchronize profiles for all
permanent (non-temporary) users whose accounts are not disabled. You could create a
filter that uses the clauses in the following table.
Attribute Operator Value
sAMAccountName starts with T-

28
Attribute Operator Value
userAccountControl bit on equals 2
The filter would join the clauses by using Any apply (OR).
Note:
In AD DS, userAccountControl is a bitmask that represents several useful aspects
about the status of the user account. For a list of some of the more frequently-used filters
that you can create by using the userAccountControl attribute, see
http://go.microsoft.com/fwlink/?LinkId=217163.
You cannot create a filter that is based on membership in a directory service group, such
as a distribution list. For alternatives to importing users based on group membership, see
http://go.microsoft.com/fwlink/?LinkId=220892.
Connections to business systems
To import properties from a business system, you will need an external content type that
brings the property value from the external system into SharePoint Server 2010. This
article does not cover how to create an external content type. That task is usually done
by a developer. This article describes what data you must gather and give to the
developer, and tell you what to do with the information that you receive. For developer
information, see How to: Create External Content Types (http://msdn.microsoft.com/en-
us/library/ee557704.aspx).
You can use the External Content Type Planning worksheet
(http://go.microsoft.com/fwlink/?LinkId=202832) to specify the external content types to
be created. Go through the User Profile Properties Planning worksheet that you
completed when you read the article Plan user profiles (SharePoint Server 2010). In the
External Content Type Planning worksheet, create one row for each user profile property
that comes from a business system. Fill in the first three columns of each row according
to the instructions in the following table.
Column in worksheet Instructions
Business system A name of your choosing that identifies the
business system that contains the property.
Item The data in the business system that
corresponds to the property. Be as specific
as possible. For example, if the business

29
Column in worksheet Instructions
system is a database, provide the name of
the table and column, if known.
Possible identifiers A list of the user profile properties that could
uniquely identify a user.
After you have filled in the first three columns of each row, give the worksheet to the
external content type developer. The developer should perform the following tasks, and
then return the worksheet:
Create external content types to provide the external system data that is described in
the worksheet.
Choose an appropriate identifier for each external content type.
If user profiles will have a one-to-one relationship with items of the external content
type, create a specific finder method. An external content type that contains a user's
birthdate is an example of a one-to-one relationship. Each user profile will match one
item of the external content type.
If user profiles will have a one-to-many relationship with items of the external content
type, create a finder method and a comparison filter. An external content type that
contains the license plate of a vehicle the user owns is an example of a one-to-many
relationship. A user might own multiple vehicles, so each user profile might match
more than one item of the external content type.
Update the worksheet to describe the external content types that were created.
The Connection Planning worksheet (http://go.microsoft.com/fwlink/?LinkId=202832)
contains a tab for a connection to a business system. When you receive the information
back from the external content type developer, group together all user profile properties
that share the same external content type. Create a new tab in the Connection Planning
worksheet for each external content type, and copy the information from the Business
systems tab to each new tab. Fill in the information on each tab that you created
according to the instructions in the following table.
Row in worksheet Instructions
Synchronization connection name Choose a name that will help you remember
which business system this is a connection
to.
Connection type "Business data connectivity"
This information is already filled in.

30
Row in worksheet Instructions
Business data connectivity entity The name of the external content type.
One-to-one or one-to-many mapping The number of items of the external content
type that might match a given user profile.
Enter "one-to-one" or "one-to-many" as
appropriate.
Profile property to match against The name of the user profile property that
corresponds to the external content type's
identifier.
Comparison filter The name of the comparison filter.
A filter is only required for one-to-many
mappings.
Identify property mappings To indicate that a user profile property comes from an external system, you map the
property to a specific attribute of the external system. Certain user profile properties are
mapped by default. For a list of the default mappings for each type of directory service,
see Default user profile property mappings (SharePoint Server 2010). You can only map
a profile property to an attribute whose data type is compatible with the data type of the
property. For example, you cannot map the SPS-HireDate user profile property to the
homePhone Active Directory attribute because SPS-HireDate is a date and
homePhone is a Unicode string. For a list of which user profile property data types are
compatible with which AD DS data types, see User profile property data types
(SharePoint Server 2010).
When you synchronize profile information, in addition to importing profile properties from
external systems, you can also write data back to a directory service. You cannot write
data back to a business system. To indicate that SharePoint Server should export a user
profile property, you map the property, and set the direction of the mapping to Export.
Each property can only be mapped in one direction. You cannot both import and export
the same user profile property. The data that is exported overwrites any values that might
already be present in the directory service. This is true for multivalued properties as
well—the exported value is not appended to the existing values, it overwrites them.
Examine the User Profile Properties Planning worksheet that you completed as you read
the Plan user profiles (SharePoint Server 2010) topic. For each row (property) whose
value will be imported from an external system, fill in the final three columns according to
the instructions in the following table.

31
Row in worksheet Instructions
Direction "Import", indicating that the property will be
imported into SharePoint Server.
Synchronization connection The name of the synchronization connection
through which this property will be provided.
Attribute The name of the external system element
that will provide the value of the user profile
property.
If the synchronization connection is to a
directory service, this is the name of the
directory service attribute.
If the synchronization connection is to a
business system, this is the name of the
column in the external content type.
Note:
You cannot use a connection to a business system to map a binary property to a property
that implements the Stream accessor method.
For each row (property) whose value will be exported to a directory service, fill in the final
three columns according to the instructions in the following table.
Row in worksheet Instructions
Direction "Export", indicating that the property will be
exported from SharePoint Server to a
directory service.
Synchronization connection The name of the synchronization connection
through which this property will be exported.
This can only be a connection to a directory
service.
Attribute The name of the directory service attribute
whose value should be updated with the

32
Row in worksheet Instructions
value of the user profile property.
Synchronizing groups By default, SharePoint Server synchronizes groups, such as distribution lists, when it
synchronizes user profiles. You can turn off this functionality from the Configure
Synchronization Settings page of Central Administration. Synchronizing groups is only
supported for AD DS.
If you synchronize groups in addition to users, SharePoint Server imports information
about the groups as well as about which users are members of the groups.
Synchronizing a group does not create a profile for the group, and does not cause any
additional user profiles to be created. In SharePoint Server, groups are only used to
create audiences and to display which memberships a visitor has in common with the
person whose My Site the person is visiting.
If you decide to synchronize groups, SharePoint Server will import information about all of
the groups that exist in the directory service containers that you are synchronizing unless
you choose to exclude groups by using a filter. The filter for excluding groups is different
than the filter for excluding users, although both follow the same format.
Return to the Connection Planning worksheet and fill in the Filter for groups cell.
Plan for the synchronization server In addition to determining the synchronization connections and identifying the property
mappings, you also have to plan for the more straightforward aspects of synchronizing
profiles. The first of these is identifying the synchronization server.
You can only run one instance of the User Profile Synchronization service on a farm. The
computer on which the User Profile Synchronization service runs is called the
synchronization server. You specify the synchronization server when you create the User
Profile service application. SharePoint Server provisions a version of Microsoft Forefront
Identity Manager (FIM) on this computer to participate in synchronization.
When SharePoint Server synchronizes profiles, it makes heavy use of the network to
communicate between the synchronization server and the domain controllers. Choosing
a synchronization server that is physically close to the domain controllers will reduce the
time it takes to synchronize.

33
Plan the synchronization schedule The first time that you synchronize profile information between SharePoint Server and
external systems, you must run a full synchronization. After that, you should configure the
User Profile Incremental Synchronization timer job to perform an incremental
synchronization on a recurring schedule. You can configure the timer job to run every few
minutes, hourly, daily, weekly, or monthly. With the hourly, daily, weekly, and monthly
options, you specify when you want the timer job to start.
The more often the synchronization timer job runs, the fewer changes there will be to
synchronize, and therefore the quicker the job will finish. The default frequency is daily.
We recommend that you schedule synchronization to start at a time when the network is
lightly utilized.
For instructions about how to configure the User Profile Incremental Synchronization
timer job, see Schedule profile synchronization (SharePoint Server 2010).
Plan account permissions In the Connection Planning worksheet, you provided the name of a synchronization
account for each directory service. These synchronization accounts must be granted
specific permissions so that the synchronization service can obtain the information it
needs from the directory service. The following sections identify which permissions are
needed for each type of directory service. Work with the administrator of the directory
service to grant the accounts the appropriate permissions.
Active Directory Domain Services (AD DS)
The synchronization account for a connection to Active Directory Domain Services
(AD DS) must have the following permissions:
It must have Replicate Directory Changes permission on the domain that you will
synchronize with. For more information, see the Grant Replicate Directory Changes
permission on a domain section of the "Grant Active Directory Domain Services
permissions for profile synchronization" procedural reference article.
Note:
The Replicate Directory Changes permission allows an account to query for the changes
in the directory. This permission does not allow an account to make any changes in the
directory.
If the domain controller is running Windows Server 2003, the synchronization account
must be a member of the Pre-Windows 2000 Compatible Access built-in group. For
more information, see the Add an account to the Pre-Windows 2000 Compatible
Access group section of the "Grant Active Directory Domain Services permissions for
profile synchronization" procedural reference article.

34
If the NetBIOS name of the domain differs from the fully qualified domain name, the
synchronization account must have Replicate Directory Changes permission on the
cn=configuration container. For example, if the NetBIOS domain name is contoso
and the fully qualified domain name is contoso-corp.com, you must grant Replicate
Directory Changes permission on the cn=configuration container. For more
information, see the Grant Replicate Directory Changes permission on the
cn=configuration container section of the "Grant Active Directory Domain Services
permissions for profile synchronization" procedural reference article.
If you will export property values from SharePoint Server to AD DS, the
synchronization account must have Create Child Objects (this object and all
descendants) and Write All Properties (this object and all descendants) permissions
on the organizational unit (OU) that you are synchronizing with. For more information,
see the Grant Create Child Objects and Write permission section of the "Grant Active
Directory Domain Services permissions for profile synchronization" procedural
reference article.
Novell eDirectory version 8.7.3
The synchronization account for a connection to Novell eDirectory must have the
following permissions:
Entry Rights: Browse rights for the specified tree.
All Attributes Rights: Read, Write, and Compare rights for the specified tree.
Sun Java System Directory Server version 5.2
The synchronization account for a connection to a Sun Java System Directory Server
must have the following permissions:
Read, Write, Compare, and Search permissions to the RootDSE.
To perform incremental synchronization, the synchronization account must also have
Read, Compare, and Search permissions to the change log (cn=changelog). If the
change log does not exist, you must create it before synchronizing.
IBM Tivoli version 5.2
The synchronization account for a connection to IBM Tivoli must have the following
permission:
The synchronization account must be a member of an administrative group.
The farm account
The User Profile Synchronization service runs under the farm account. The farm account
requires specific permissions in order to configure profile synchronization. A person with
administrator rights on the synchronization server can grant these permissions.
The account must be a member of the Administrators group on the synchronization
server. You can remove this permission after you have configured the User Profile
Synchronization service.

35
The account must be able to log on locally to the synchronization server.
Note:
The farm account is not the same as the farm administrator account. To determine the
farm account, from Central Administration, click Configure service accounts, and then
click Farm account.
If you will synchronize user profiles with a business system by using an external content
type, the farm account must also have permission to execute operations on the external
content type. A farm administrator can use the procedure "Set permissions on an external
content type" (http://technet.microsoft.com/en-us/library/ee524076.aspx#setpermissions)
to give the farm account Execute permission on each external content type that you will
synchronize with.
Next steps To implement your profile synchronization plan, follow the instructions in the article
Configure profile synchronization (SharePoint Server 2010). After you have configured
profile synchronization and synchronized profile information for the first time, implement
your synchronization schedule by following the procedure described in the article
Schedule profile synchronization (SharePoint Server 2010).
Worksheets Download the connection planning worksheet, the external content type planning
worksheet, and the user profile planning worksheet from the following source:
http://go.microsoft.com/fwlink/?LinkId=202832.
Concepts Profile synchronization overview (SharePoint Server 2010)
Plan user profiles (SharePoint Server 2010)
Configure profile synchronization (SharePoint Server 2010)
Grant Active Directory Domain Services permissions for profile synchronization
(SharePoint Server 2010)
Other Resources
Resource Center: Enterprise Collaboration in SharePoint Server 2010
(http://technet.microsoft.com/en-us/sharepoint/ff191265.aspx)
Resource Center: Social Computing in SharePoint Server 2010
(http://technet.microsoft.com/en-us/sharepoint/ee263906.aspx)

36
II. Profile synchronization operations
In this section:
Best practices for people and profiles (SharePoint Server 2010)
Configure profile synchronization (SharePoint Server 2010)
Configure profile synchronization using a Lightweight Directory Interchange Format
(LDIF) file (SharePoint Server 2010)
Start profile synchronization manually (SharePoint Server 2010)
Schedule profile synchronization (SharePoint Server 2010)
Maintain profile synchronization (SharePoint Server 2010)
Configure a profile synchronization connection in SharePoint Server 2010 (video)
Configure a synchronization connection to a SQL Server database in SharePoint
Server 2010 (video)

37
Best practices for people and profiles (SharePoint Server 2010)
Published: August 11, 2011
This article is one of a series of best practices articles for Microsoft SharePoint Server
2010. This article describes the typical characteristics and best practices for working with
user profiles in SharePoint Server. For additional information and resources about best
practices for SharePoint Server 2010, see Best Practices for SharePoint Server 2010
(http://go.microsoft.com/fwlink/p/?LinkId=220280).
1. Clean up the directory service The organization of objects in your directory service has a large impact on how long it
takes to synchronize profile information. To improve the performance of synchronization,
prune the objects in the directory service.
SharePoint Server uses Microsoft Forefront Identity Manager (FIM) to import all of
the objects in the containers that you select, and then applies the synchronization
filters to the imported objects. To the extent possible, move user accounts that you
do not want to be imported into containers that are not synchronized. Similarly, move
groups that you do not want to be synchronized into containers that you are not
synchronizing with.
Audit your organization's use of groups within the directory service, and delete any
groups that are no longer needed.
Ensure that you do not synchronize the same group membership information multiple
times. For example, if you represent the same distribution group on multiple farms,
place all except one instance of the distribution group into containers that you are not
synchronizing.
2. Use synchronization filters Use filters to synchronize only the users whom you want to have profiles in SharePoint
Server. For example, if user accounts and service accounts both exist in a directory
service container that you are synchronizing with, create a filter to exclude service
accounts from synchronization. For more information about synchronization filters, see
the About exclusion filters section in the Plan for profile synchronization (SharePoint
Server 2010) article.

38
3. Configure policies for profile properties Use policies to specify privacy settings for profile properties. There are default policies for
properties. However, you should review them and determine whether to change them
depending on your organization, company, and governmental rules. You can allow users
to override a policy setting or specify that the policy cannot be changed.
For more information about these policies, see the About property policies section in the
Plan user profiles (SharePoint Server 2010) article.
4. Specify the domain controller to synchronize with When you create a synchronization connection to a forest that has multiple domain
controllers, select a specific domain controller to synchronize with. The connection
between the domain controller and the synchronization server should have as low latency
as possible. For information about how to specify a domain controller when you create a
profile synchronization connection, see the Create a synchronization connection to a
directory service section in the Configure profile synchronization (SharePoint Server
2010) article.
In a very large directory services forest, optimize the domain controller itself. Move as
much of the directory service database as possible to RAM, and use fast disk drives. This
will reduce the time that is required for profile synchronization. For more information
about the directory service database for Active Directory Domain Services (AD DS), see
Administering the Active Directory Database
(http://go.microsoft.com/fwlink/p/?LinkId=225582).
5. Make friends with the directory service administrator Stay in contact with the administrators of the directory services that you synchronize with.
Make sure that you are notified if the administrator plans to restart a domain controller or
to make large changes to the directory service, and try to get those events scheduled for
a time when profile synchronization is not occurring.
6. Restart the synchronization service after installing updates Whenever you install an update to Microsoft SharePoint Server 2010, stop and then
restart the User Profile Synchronization service.
When you start the User Profile Synchronization service, SharePoint Server provisions a
version of Microsoft Forefront Identity Manager (FIM) to participate in synchronization. If

39
you install a SharePoint Server 2010 service pack, cumulative update, or other update
that modifies the SharePoint Server private version of FIM, the modification will not take
effect until FIM is reprovisioned. To reprovision FIM, stop and then restart the User
Profile Synchronization service. For instructions about how to start and stop a service,
see Manage services on the server (SharePoint Server 2010)
(http://technet.microsoft.com/en-us/library/ee704549.aspx).
7. Run database maintenance jobs before synchronizing profiles If profile synchronization will have to process many changes, run a full scan of the
profiles database before starting profile synchronization.
Microsoft SQL Server uses historical statistics about a database to optimize queries. For
the optimization to be as good as possible, the statistics should be as fresh as possible.
Running a full scan generates the most accurate statistics. To update statistics with a full
scan of the database, run the Health Analyzer rule Databases used by SharePoint have
outdated index statistics.
8. Optimize the profile and synchronization databases The configuration of the profile database and the synchronization database has a
significant impact on the overall performance of profile synchronization. For
recommendations about how to optimize database performance, see Storage and SQL
Server capacity planning and configuration (SharePoint Server 2010)
(http://technet.microsoft.com/en-us/library/cc298801.aspx) and Best practices for SQL
Server 2008 in a SharePoint Server 2010 farm (http://technet.microsoft.com/en-
us/library/hh292622.aspx). In particular, if you have many user profiles, consider the
following:
Proactively manage the size of the profiles database. Use a fixed size data (.mdf) file
and log file, but also enable autogrowth in case the size is too small.
If you enable autogrowth, use a fixed growth size — for example, 100 MB — instead
of a growth percentage.
Profile synchronization creates a lot of disk I/O. For the profiles and synchronization
databases, use disk drives that can perform high Input/Output Operations Per
Second (IOPS), and consider using solid-state drives (SSD).
If you have many profiles and you run profile synchronization frequently, consider
placing the data (.mdf) file and the log file on separate physical disks.

40
Have at least one data (.mdf) file for tempdb per CPU core. For more information
about how to optimize tempdb, see Optimizing tempdb Performance
(http://go.microsoft.com/fwlink/p/?LinkId=225583).
In the event of heavy utilization, consider a dedicated SQL Server instance to support
the User Profile service application databases.
9. Check timer job settings Timer jobs propagate information through SharePoint Server and to and from directory
services. In some cases, one timer job performs work that another timer job takes further
action on. For example, the User Profile Incremental Import job updates SharePoint
Server user profiles with information about the user that has changed in the directory
service. The Activity Feed job computes activities to be shown in the Activity Feed
section of a user's My Site. If a user's job title changes in the directory service, that
change might not show up in the activity feeds of the user's colleagues, depending on the
progress of one timer job relative to the other timer job. To get more consistent results
and improve performance, adjust the timing at which timer jobs run.
For more information about the SharePoint Server timer jobs, see Timer job reference
(SharePoint Server 2010) (http://technet.microsoft.com/en-us/library/cc678870.aspx).
10. Do not synchronize during large directory service updates Ensure that profile synchronization is not running while you are making large changes to
the directory service. For example, stop profile synchronization if you are updating
directory service schemas or preparing a Microsoft Exchange Server forest. When the
directory service changes are complete, perform a full synchronization.
11. Avoid synchronizing large objects A user's profile is probably not the best place to store large binary data. Consider storing
binary large objects (BLOBs) elsewhere, such as in a database, and keeping only a link
to the BLOB in the profile.
The time that is required to run profile synchronization is related to the size of the
attributes being synchronized, and also the frequency with which the attributes change. If
you replicate profile information across farms, the impact of storing large objects in
profiles is even greater.

41
Acknowledgements The SharePoint Server 2010 Content Publishing team thanks the following contributors to
this article:
Chris Gideon, Microsoft Premier Field Engineering
Steve Peschka, Microsoft Consulting Services
Bill Baer, Microsoft SharePoint Technical Product Marketing
Yancho Yanev, Microsoft SharePoint Product Team
Siva Subbiah, Microsoft SharePoint Product Team
Jon Rosenberg, Microsoft SharePoint Product Team
Spencer Harbar, Enterprise Architect
Todd Lehmann, Microsoft Information Services
Sheyi Adenouga, Microsoft Customer Support Services
Joe McTaggart, Microsoft Premier Field Engineering
Ron Grzywacz, Microsoft Premier Field Engineering
Bassem Yacoube, Microsoft Consulting Services

42
Configure profile synchronization (SharePoint Server 2010)
Updated: June 28, 2011
Configuring profile synchronization (or profile sync) is a process that involves many
steps. This article divides the process into shorter phases, both so that you can see
progress and to reduce the number of steps through which you have to backtrack if you
make an error. Depending on your organization's needs, you may not have to implement
all of the phases.
In this article:
Prerequisites
This section identifies the information and accounts that you must have to perform
these procedures. It also describes how your Microsoft SharePoint Server 2010 farm
should be configured before you start the procedures.
Procedures
This section contains detailed instructions for each of the procedures that are
required to configure profile synchronization.
Prerequisites As you configure profile synchronization, you will need information to answer questions in
the user interface. You will also need accounts that have the appropriate permissions and
a SharePoint Server 2010 farm that is already partly configured. The subsections within
this section explain the prerequisites that you must have before you configure profile
synchronization.
In this section:
Gather information
Grant account permissions
Install prerequisites
Gather information
Before you perform the procedures in this article, you should complete the following
worksheets. You will use the information that you record in the worksheets as you
perform the procedures in this article.

43
Connection planning worksheet: Contains details about each profile synchronization
connection that you will create. The article Plan for profile synchronization
(SharePoint Server 2010) contains instructions for filling out the worksheet.
User profile properties worksheet: Identifies user profile properties and how the
properties are mapped to external data sources. The article Plan user profiles
(SharePoint Server 2010) explains how to fill out most of the worksheet, and the
article Plan for profile synchronization (SharePoint Server 2010) contains instructions
for adding the property mapping information.
Profile synchronization planning worksheet: Collects the information that you will
need to create the User Profile service application and its prerequisites. If your farm
already contains a User Profile service application, you can omit this worksheet.
The worksheets are available from the following source:
http://go.microsoft.com/fwlink/?LinkId=202832.
You will need to know the name of the synchronization server. The synchronization
server is the server on which the User Profile Synchronization service will run. The Plan
for the synchronization server section of the "Plan for profile synchronization" article
provides guidance on how to select the synchronization server.
Grant account permissions
To configure profile synchronization you will need to know the farm account and the farm
account's password, and you will need a synchronization account for each directory
service that you will synchronize with. The permissions that are required for each account
are described in the Plan account permissions section of the "Plan for profile
synchronization" article. If an account does not have the correct permissions, you might
not know that the permissions are wrong until you have progressed part of the way
through the configuration procedure.
Note:
Incorrect permissions are the most common cause of errors in configuring profile
synchronization.
Install prerequisites
To set up profile synchronization you will need Microsoft SharePoint Server 2010
installed in a farm configuration. We recommend that you also install the most recent
SharePoint Server 2010 Cumulative Update, because improvements to profile
synchronization are present in most updates. For more information, see the Updates
resource center (http://go.microsoft.com/fwlink/?LinkID=220218).

44
You must have a full installation of Microsoft SQL Server, not the Express edition. If you
are using SQL Server 2008, you must have Service Pack 1 (SP1) and Cumulative
Update 2 (CU2).
Procedures There are four phases to configuring profile synchronization. Depending on your
situation, you might not have to perform all of the phases. This article also includes
Phase 0, which contains instructions for configuring the prerequisites that are required
before you can configure profile synchronization. The phases are as follows:
Phase 0: Configure the farm
During this phase, you create a site collection to host My Sites and create a User Profile
service application. You must be both a farm administrator and a member of the
Administrators group on the computer that is running SharePoint Server to perform these
tasks.
Phase 1: Start the User Profile Synchronization service
During this phase, you start the User Profile Synchronization service. You must be both a
farm administrator and a member of the Administrators group on the computer that is
running SharePoint Server to perform these tasks.
Phase 2: Configure connections and import data from directory services
During this phase, you create a synchronization connection to each directory service from
which you want to import profile information, and then perform the initial synchronization.
You must be a farm administrator or an administrator of the User Profile service
application to perform these procedures.
Phase 3: Configure connections and import data from business systems
During this phase, you create a synchronization connection to each business system
from which you want to import profile information, and then perform the synchronization.
You must be a farm administrator or an administrator of both the User Profile service
application and the Business Data Connectivity service application to perform these
procedures.
Phase 4: Configure connections and export data to directory services
During this phase, you modify the profile property mappings that you created during
Phase 2 to export data from SharePoint Server to directory services. You must be a farm
administrator or an administrator of the User Profile service application to perform these
procedures.
After you have configured profile synchronization, you can use the information in
Schedule profile synchronization (SharePoint Server 2010) to set up a regular
synchronization schedule.
Phase 0: Configure the farm

45
During this phase, you configure the infrastructure for synchronizing profiles.
This phase involves the following tasks:
1. Create a Web application to host My Sites
2. Create a managed path for My Sites
3. Create a My Site Host site collection
4. Create a User Profile service application
5. Enable NetBIOS domain names
6. Start the User Profile service
To perform the tasks in this phase, you must be a member of the Farm Administrators
SharePoint group and a member of the Administrators group on the computer that is
running SharePoint Server.
Create a Web application to host My Sites
In this procedure, you create the Web application that My Sites will reside in. We
recommend that My Sites be in a separate Web application, although the Web
application may be in an application pool that is shared with other collaboration sites, or it
may be in a separate application pool but in a shared IIS Web site. For more information
about SharePoint Server 2010 sites, application pools, and IIS Web sites, see Logical
architecture components (SharePoint Server 2010) (http://technet.microsoft.com/en-
us/library/cc263121.aspx). For more detailed instructions about how to create a Web
application, see Create a Web application (SharePoint Server 2010)
(http://technet.microsoft.com/en-us/library/cc261875.aspx).
To create a Web application
1. On the Central Administration Home page, in the Application Management section,
click Manage web applications.
2. On the ribbon, click New.
3. On the Create New Web Application page, in the Authentication section, select the
authentication mode that will be used for this Web application.
4. In the IIS Web Site section, you can configure the settings for your new Web
application by selecting one of the following two options (see the Profile
Synchronization Planning worksheet):
Click Use an existing web site, and then select the Web site on which to install
your new Web application.
Click Create a new IIS web site, and then type the name of the Web site in the
Name box.
You may also provide the port number, host header, or path for the new IIS Web
site.

46
5. In the Security Configuration section, select an authentication provider, whether to
allow anonymous access, and whether to use Secure Sockets Layer (SSL).
6. In the Application Pool section, do one of the following:
If the My Site application pool (see the Profile Synchronization Planning
worksheet) is an existing application pool, click Use existing application pool,
and then select the My Site application pool from the drop-down menu.
If the My Site application pool (see the Profile Synchronization Planning
worksheet) is a new application pool, click Create a new application pool, type
the name of the My Site application pool, and either select the account that the
application pool will run under (see the Profile Synchronization Planning
worksheet) or create a new managed account for the application pool to run
under.
7. In the Database Name and Authentication section, select the database server,
database name, and authentication method for your new Web application.
8. If you use database mirroring, in the Failover Server section, in the Failover
Database Server box, type the name of a specific failover database server that you
want to associate with a content database.
9. In the Service Application Connections section, select the service application
connections that will be available to the Web application.
10. In the Customer Experience Improvement Program section, click Yes or No.
11. Click OK to create the new Web application.
12. When the Application Created page appears, click OK.
Enter the name of the Web application in the My Site Web application row of the Profile
Synchronization Planning worksheet. You will need this information later.
Create a managed path for My Sites
If you want the My Site host (and, therefore, users' My Sites) to be at a URL that does not
already have a managed path, use the procedure in Define managed paths (SharePoint
Server 2010) (http://technet.microsoft.com/en-us/library/cc261845.aspx) to create the My
Site managed path in the My Site Web application that you previously created. In most
cases, the existing managed paths will be sufficient.
Create a My Site Host site collection
In this procedure, you create the site collection that will host users' My Sites. For more
detailed instructions about how to create a site collection, see Create a site collection
(SharePoint Server 2010) (http://technet.microsoft.com/en-us/library/cc263094.aspx).
To create a My Site Host site collection
1. On the Central Administration Web site, in the Application Management section,
click Create site collections.

47
2. On the Create Site Collection page, in the Web Application section, select the My
Site Web application (see the Profile Synchronization Planning worksheet).
3. In the Title and Description section, type the title and description for the site
collection.
4. In the Web Site Address section, select the path to use for the URL of the My Site
host. In most cases, using the root directory (/) is appropriate.
5. In the Template Selection section, click the Enterprise tab, and then select My Site
Host.
6. In the Primary Site Collection Administrator section, type the user name (in the
form <DOMAIN>\<username>) for the user who will be the site collection
administrator.
7. In the Secondary Site Collection Administrator section, type the user name for the
secondary administrator of the site collection.
8. If you are using quotas to manage storage for site collections, in the Quota Template
section, click a template in the Select a quota template list.
9. Click OK.
The Top-Level Site Successfully Created page will appear when the My Site Host site
collection is created. Enter this URL in the My Site Host site collection URL row of the
Profile Synchronization Planning worksheet. Although you can click the link to browse to
the root of the site collection, doing so will result in an error because the user profile
cannot be loaded. This behavior is to be expected; user profiles have not been imported
at this point.
Create a User Profile service application
In this procedure, you create the User Profile service application through which you will
manage profile synchronization.
For more detailed instructions about how to create a User Profile service application, see
Create a User Profile Service application (http://technet.microsoft.com/en-
us/library/ee721052.aspx#createapp).
To create a User Profile Service application
1. On the Central Administration Web site, in the Application Management section,
click Manage service applications.
2. On the Manage Service Application page, on the ribbon, click New, and then click
User Profile Service Application.
3. In the Name section, type the User Profile service application name (see the Profile
Synchronization Planning worksheet).
4. In the Application Pool section, select the application pool that the User Profile
service application will run in (if it exists), or create a new application pool. (See the
Profile Synchronization Planning worksheet.)

48
5. Accept the defaults for the profile database, the synchronization database, and the
social tagging database (unless you want different names), and specify failover
servers if you are using them.
6. In the Profile Synchronization Instance section, select the synchronization server
(see the Profile Synchronization Planning worksheet).
7. In the My Site Host URL section, enter the My Site Host site collection URL that you
created in the previous step (see the Profile Synchronization Planning worksheet).
8. In the My Site Managed Path section, enter the part of the path which, when
appended to the My Site host URL, will give the path to users' My Sites (see the
Profile Synchronization Planning worksheet). For example, if the My Site host URL is
http://server:12345/ and you want each user's My Site to be at
http://server:12345/personal/<username>, enter /personal for the My Site managed
path. The managed path that you enter is created; there does not already have to be
a managed path with the name that you provide.
9. In the Site Naming Format section, select a naming scheme.
10. In the Default Proxy Group section, select whether you want the proxy of this User
Profile Service to be a part of the default proxy group on this farm.
11. Click Create.
12. When the Create New User Profile Service Application page displays the message
Profile Service Application successfully created, click OK.
To verify that the User Profile service application was created, refresh the Manage
Service Applications page. You should see two entries whose value in the Name column
is the name that you provided for the User Profile service application that you previously
created. The first entry is the service application itself. The second entry is a connection
(that is, a "proxy") to the service application.
Enable NetBIOS domain names
If the NetBIOS name of any domain that you are synchronizing with differs from its fully
qualified domain name, you must enable NetBIOS domain names on the User Profile
service application. If all NetBIOS names are the same as the domain names, you may
skip this procedure.
To enable NetBIOS domain names
1. Verify that you meet the following minimum requirements:
See Add-SPShellAdmin.
You must read about_Execution_Policies
(http://go.microsoft.com/fwlink/?LinkId=193050).
2. Copy the following code and paste it into a text editor, such as Notepad:

49
$ServiceApps = Get-SPServiceApplication
$UserProfileServiceApp = ""
foreach ($sa in $ServiceApps)
{if ($sa.DisplayName -eq "<UPSAName>")
{$UserProfileServiceApp = $sa}
}
$UserProfileServiceApp.NetBIOSDomainNamesEnabled = 1
$UserProfileServiceApp.Update()
3. Replace <UPSAName> with the name of the User Profile service application.
4. Save the file, naming it EnableNetBIOS.ps1
.
Note:
You can use a different file name, but you must save the file as an ANSI-encoded text file
whose extension is .ps1.
5. On the Start menu, click All Programs.
6. Click Microsoft SharePoint 2010 Products.
7. Click SharePoint 2010 Management Shell.
8. Change to the directory where you saved the file.
9. At the Windows PowerShell command prompt, type the following command:
.\EnableNetBIOS.ps1
Start the User Profile service
In this procedure, you start the User Profile service.
To start the User Profile service
1. On the Central Administration Web site, in the System Settings section, click
Manage services on server.
2. On the Services on Server page, in the Server box, select the synchronization server
(see the Profile Synchronization Planning worksheet).
3. Find the row whose Service column value is User Profile Service. If the value in the
Status column is Stopped, click Start in the Action column.
Phase 1: Start the User Profile Synchronization service
During this phase, you start the User Profile Synchronization service.
This phase involves the following tasks:
1. Start the User Profile Synchronization service
2. Remove unnecessary permissions
3. Reset IIS

50
To perform the tasks in this phase, you must be a member of the Farm Administrators
SharePoint group and a member of the Administrators group on the computer that is
running SharePoint Server.
Start the User Profile Synchronization service
In this procedure, you start the User Profile Synchronization service. The User Profile
Synchronization service interacts with Microsoft Forefront Identity Manager (FIM) to
synchronize information with external systems.
To start the User Profile Synchronization service
1. On the Central Administration Web site, in the System Settings section, click
Manage services on server.
2. On the Services on Server page, in the Server box, select the synchronization
server.
3. Find the row whose Service column value is User Profile Synchronization Service.
If the value in the Status column is Stopped, click Start in the Action column.
4. On the User Profile Synchronization Service page, in the Select the User Profile
Application section, select the User Profile service application.
5. In the Service Account Name and Password section, the farm account is already
selected. Enter the password for the farm account in the Password box, and enter it
again in the Confirm Password box.
6. Click OK.
The Services on Server page shows that the User Profile Synchronization service has a
status of Starting. When you start the User Profile Synchronization service, SharePoint
Server provisions FIM to participate in synchronization. This may take up to 10 minutes.
To determine whether the User Profile Synchronization service has started, refresh the
Services on Server page.
If the User Profile Synchronization service does not start, confirm that the farm account
has the necessary permissions on the synchronization server. For more information
about which permissions are required, see the Plan account permissions section of the
article "Plan for profile synchronization."
Remove unnecessary permissions
After the User Profile Synchronization service is started, the farm account is no longer
required to be an administrator on the synchronization server. To improve the security of
your SharePoint Server installation, remove the farm account from the Administrators
group on the synchronization server.
Reset IIS
If the Central Administration Web site and the User Profile Synchronization service are
running on the same server, you must reset IIS after the User Profile Synchronization
service starts. If they are running on different servers, you may skip this procedure.

51
To reset IIS
1. On the synchronization server, click Start, click All Programs, expand Accessories,
right-click Command Prompt, and then click Run as administrator.
2. In the User Account Control dialog box, click Yes.
3. In the Administrator: Command Prompt window, type iisreset and then press
ENTER.
4. When the message Internet services successfully restarted is displayed, close the
Administrator: Command Prompt window.
Note:
After you reset IIS, pages of the Central Administration Web site will take several
seconds to load.
Phase 2: Configure connections and import data from directory services
To import profiles, you must have at least one synchronization connection to a directory
service. During this phase, you create a synchronization connection to each directory
service that you want to import profiles from. You can synchronize after you create each
connection, or you can synchronize one time, after you have created all of the
connections. Synchronizing after each connection will take longer, but doing this will
make it easier to troubleshoot any problems that you might encounter.
To watch a video that demonstrates the tasks in Phase 2, see Configure a profile
synchronization connection in SharePoint Server 2010 (video).
You must be a farm administrator or an administrator of the User Profile service
application to perform these procedures. If you are not a farm administrator, start each
procedure by using the Manage Profile Service page.
This phase involves the following tasks:
1. Create a synchronization connection to a directory service
2. Define exclusion filters for a synchronization connection
3. Map user profile properties
4. Start profile synchronization
Create a synchronization connection to a directory service
In this procedure, you create a connection to a directory service. The connection
identifies the items to synchronize and contains the credentials that are used to interact
with the directory service. The information that you enter comes from the Connection
Planning worksheet.

52
To create a Profile Synchronization connection to a directory service
1. On the Central Administration Web site, in the Application Management section,
click Manage service applications.
2. On the Manage Service Applications page, select the User Profile service application.
3. On the Manage Profile Service page, in the Synchronization section, click
Configure Synchronization Connections.
4. On the Synchronizations Connections page, click Create New Connection.
5. On the Add new synchronization connection page, type the synchronization
connection name in the Connection Name box.
6. From the Type list, select the type of directory service to which you want to connect.
7. Fill in the Connection Settings section according to the directory service to which
you are creating a connection.
For Active Directory Domain Services (AD DS), perform the following steps:
a) In the Forest name box, type the name of the forest.
b) Do one of the following:
If there is only one domain controller in the forest, click Auto discover domain
controller.
If there are multiple domain controllers in the forest, click Specify a domain
controller and type the domain controller name in the Domain controller name
box.
a) In the Authentication Provider Type box, select the type of authentication
provider.
b) If you select Forms Authentication or Trusted Claims Provider
Authentication, select an authentication provider from the Authentication
Provider Instance box.
The Authentication Provider Instance box lists only the authentication
providers that are currently used by a Web application.
Tip:
You may have to select Trusted Claims Provider Authentication and then select
Forms authentication in the Authentication Provider Type box before the list of
authentication providers is displayed.
c) In the Account name box, type the synchronization account.
d) In the Password box, type the password for the synchronization account.
e) In the Confirm Password box, type the password for the synchronization
account again.
f) In the Port box, enter the connection port.

53
g) If a Secure Sockets Layer (SSL) connection is required to connect to the
directory service, select Use SSL-secured connection.
Important:
To create a connection that uses SSL, you must install the SharePoint Server 2010
August 31, 2010 Cumulative Update or a more recent cumulative update. For more
information, see the Updates resource center
(http://go.microsoft.com/fwlink/?LinkID=220218).
Important:
If you use an SSL connection, you must export the certificate of the domain controller
from the Active Directory server and import the certificate into the synchronization server.
For Novell eDirectory, Sun Java System Directory Server, or IBM Tivoli
Directory Server (ITDS), perform the following steps:
h) In the Directory Service Server Name box, type the name of the directory
service server.
i) In the Authentication Provider Type box, select the type of authentication
provider.
j) In the Authentication Provider Instance box, select the authentication
provider.
The Authentication Provider Instance box lists only the authentication
providers that are currently used by a Web application.
Tip:
You may have to select Trusted Claims Provider Authentication and then select
Forms authentication in the Authentication Provider Type box before the list of
authentication providers is displayed.
k) In the Account name box, type the synchronization account in LDAP format,
for example, uid=username,ou=ouname,dc=yourcompany,dc=Com.
l) In the Password box, type the password for the synchronization account.
m) In the Confirm Password box, type the password for the synchronization
account again.
n) In the Port box, enter the connection port.
o) Verify that the Use SSL-secured connection check box is not selected. SSL
connections are not supported for these directory services.
p) In the Username attribute box, type the name of the attribute in the directory
service that serves as the unique identifier of each profile.
8. In the Containers section, click Populate Containers, and then select the
containers from the directory service that you want to synchronize.

54
9. Click OK.
Define exclusion filters for a synchronization connection
In this procedure, you define filters for the connection to indicate which user profiles and
which groups to exclude from synchronization. The information that you enter comes
from the Connection Planning worksheet.
To define connection filters
1. On the Central Administration Web site, in the Application Management section,
click Manage service applications.
2. On the Manage Service Applications page, click the User Profile service application
name.
3. On the Manage Profile Service page, in the Synchronization section, select
Configure Synchronization Connections.
4. On the Synchronization Connections page, right-click the connection for which you
want to configure Profile Synchronization connection filters, and then click Edit
Connection Filters.
5. On the Edit connection filters page, in the Exclusion Filters for Users section,
select the operator to use to join the clauses of the filter.
To specify that all of the clauses of the filter must be true, select All apply
(AND).
To specify that at least one of the clauses of the filter must be true, select Any
apply (OR).
6. In the Attributes list, select the directory service attribute to compare.
7. In the Operator list, select the comparison operator to use.
Note:
The operators that are available depend on the data type of the attribute that you
selected. For a list of which operators are available for each data type, see Connection
filter data types and operators (SharePoint Server 2010).
8. In the Filter box, type the value to compare the attribute to.
9. Click Add.
The clause that you added is displayed in the Exclusion Filter for Users area.
10. To add additional clauses to the filter, repeat steps 6 through 9.
11. To filter which groups are synchronized, repeat steps 5 through 9, using the
Exclusion Filters for Groups section of the page.
12. When you have finished adding connection filters, click OK.
Map user profile properties

55
In this procedure, you determine how the properties of SharePoint Server user profiles
map to the user information that is retrieved from the directory service. You should have
identified how you will map user profile properties on the User profile properties data
sheet in the User Profile Properties worksheet.
You will come back to this procedure in later phases to map user profile properties to
information that is retrieved from business systems and to map how user profile
properties in SharePoint Server can be used to write information back to the directory
service. If you have not yet reached these phases, ignore the parts of the procedure that
deal with business systems and exporting data.
To map user profile properties
1. On the Central Administration Web site, in the Application Management section,
click Manage service applications.
2. On the Manage Service Applications page, click the User Profile service application
name.
3. On the Manage Profile Service page, in the People section, click Manage User
Properties.
4. On the Manage User Properties page, right-click the SharePoint Server property that
you want to map to a directory service property, and then click Edit.
5. To remove an existing mapping, in the Property Mapping for Synchronization
section, select the mapping that you want to remove, and then click Remove.
6. To add a new mapping, do the following:
a) In the Add New Mapping section, in the Source Data Connection list, select
the data connection that represents the external system to which you want to
map the SharePoint Server property.
b) In the Attribute list, select the name of the attribute in the external system to
which you want to map the property,
Tip:
You can only map a user profile property to an attribute of an external system if their data
types are compatible. If you do not see an attribute listed when you try to create a new
mapping, it might be due to a data type mismatch between the user profile property and
the attribute. For more information about which data types are compatible, see User
profile property data types (SharePoint Server 2010).
c) In the Direction list, select the mapping direction.
A direction of Import means that the value of the attribute in the external
system will be imported into SharePoint Server and used to set the value of
the SharePoint Server property. A direction of Export means that the value of
the property in SharePoint Server will be exported to the external system and
used to set the value of the attribute in the external system.

56
Note:
You cannot edit a mapping. To change the direction of a mapping, you must first remove
the mapping with the old direction, and then create a mapping in the new direction and
add the mapping.
d) Click Add.
7. Click OK.
8. Repeat steps 4 through 7 to map additional properties.
Start profile synchronization
Use this procedure to synchronize profile information between SharePoint Server 2010
and external systems such as directory services or business systems.
To start profile synchronization
1. On the Central Administration Web site, in the Application Management section,
click Manage service applications.
2. On the Manage Service Applications page, click the User Profile service application
name.
3. On the Manage Profile Service page, in the Synchronization section, click Start
Profile Synchronization.
4. On the Start Profile Synchronization page, select Start Full Synchronization if this
is the first time that you are synchronizing or if you have added or modified any
synchronization connections or property mappings since the last time that you
synchronized. Select Start Incremental Synchronization to synchronize only
information that has changed since the last time that you synchronized.
5. Click OK.
The Manage Profile Service page is displayed.
A full synchronization can take a long time. If you refresh the Manage Profile Service
page, you will see the progress of the synchronization job on the right side of the page.
Be aware that profile synchronization consists of several stages, and the profiles will not
be imported immediately. The Manage Profile Service page is not refreshed automatically
as synchronization progresses.
Phase 3: Configure connections and import data from business systems
You can import data from a business system, such as a personnel system or a financial
system, and use that data to add properties to existing user profiles. You should already
have created an external content type that brings the information from the external
system into SharePoint Server 2010. For more information about creating an external
content type to synchronize with a business system, see Plan for profile synchronization
(SharePoint Server 2010).

57
To watch a video that demonstrates creating external content types and completing the
tasks in Phase 3, see Configure a synchronization connection to a SQL Server database
in SharePoint Server 2010 (video).
This phase is optional.
You must be a farm administrator, or an administrator of both the User Profile service
application and the Business Data Connectivity service application, to perform these
procedures. If you are not a farm administrator, start each procedure at the Manage
Profile Service page.
This phase involves the following tasks:
1. Give the User Profile service application permission to use the external content type
2. Configure a Business Data Connectivity synchronization connection
3. Add or edit user profile properties
4. Import data
Give the User Profile service application permission to use the external content
type
Use this procedure to give the farm account permission to execute operations on the
external content type. For more information about how to set permissions on an external
content type, see Set permissions on an external content type
(http://technet.microsoft.com/en-us/library/ee524076.aspx#setpermissions).
Note:
Business Connectivity Services uses the permissions on the external content type and
the permissions on the business system to determine authorization rules. You must
ensure that the farm account also has permission to access the business system. For
more information about authentication and permissions, see Business Connectivity
Services security overview (SharePoint Server 2010) (http://technet.microsoft.com/en-
us/library/ee661743.aspx).
To perform this procedure, you must have one of the following administrative credentials:
You must be a farm administrator.
You must be an administrator of the Business Data Connectivity service application
and have Set Permissions permission on the external content type that you are
synchronizing with.
To give the User Profile service application permission to use the external content
type
1. On the Central Administration Web site, in the Application Management section,
click Manage service applications.

58
2. On the Manage Service Application page, select Business Data Connectivity
Service.
3. Select the check box of the external content type that represents the information that
you want to synchronize with.
4. In the Permissions group, click Set Object Permissions.
5. In the box, type the farm account, and then click Add.
6. In the Permissions for <account> box, select Execute.
Note:
If the farm account is the only account listed in the Permissions for <account> box, you
must also give the farm account Set Permissions to the external content type. At least
one user, group, or claim in the external content type's access control list must have the
Set Permissions permission.
7. Click OK.
8. Verify that the Propagate permissions to all methods of this external content
type. Doing so will overwrite existing permissions. check box is selected.
9. Repeat steps 3 through 8 to set permissions on additional external content types.
Configure a Business Data Connectivity synchronization connection
In this procedure, you create a connection for each external content type. The connection
specifies how the business system data relates to the profile properties. The information
that you enter comes from the Connection Planning worksheet.
To create a Profile Synchronization connection
1. On the Central Administration Web site, in the Application Management section,
click Manage service applications.
2. On the Manage Service Applications page, select the User Profile service application.
3. On the Manage Profile Service page, in the Synchronization section, click
Configure Synchronization Connections.
4. On the Synchronizations Connections page, click Create New Connection.
5. On the Add new synchronization connection page, type a name for the
synchronization connection in the Connection Name box.
6. From the Type list, select Business Data Connectivity.
7. In the Business Data Connectivity Entity box, type the name of the external
content type.

59
Tip:
If you do not know the name of the external content type, click the Select External
Content Type button to see all external content types. Select the external content type
from the list, and then click OK.
8. If each user profile maps to only one external content type instance, do the following:
a) Click Connect User Profile Store to Business Data Connectivity Entity
as a 1:1 mapping.
b) In the Return items identified by this profile property list, select the user
profile property that is used to match user profiles to external content type
instances. The user profile property and the external content type identifier
define the 1:1 relationship between the user profiles and the external content
type, and are used to ensure that the imported properties are applied to the
correct user profile.
Tip:
The Return items identified by this profile property list returns all user profile
properties that have a similar data type to the external content type identifier.
9. If a user profile can map to multiple external content type instances, do the following:
a) Click Connect User Profile Store to Business Data Connectivity Entity
as a 1:many mapping.
b) In the Filter items by list, select the filter that is used to find the set of
external content type instances that apply to a user profile.
Note:
The Filter items by list displays all filters that are defined in the external content type.
c) In the Use this profile property as the filter value list, select the user
profile property that is used to match user profiles to external content type
instances.
10. Click OK.
11. Repeat steps 4 through 10 to add more connections.
Add or edit user profile properties
Before you can import the business system data, you must specify how the business
system data maps to the user profile properties. The User profile properties data sheet
in the User profile properties worksheet lists the business system properties that you
want to import and how those properties map to the profile properties in the SharePoint
Server profile store.
Follow the procedure in the Map user profile properties section to map additional user
profile properties. If the data maps to an existing user profile property, edit the property

60
and add a new mapping. If the data does not map to an existing user profile property, add
a new custom property and then map the property.
Import data
To import data from the business system, you must perform a full synchronization. Follow
the procedure in the Start profile synchronization section to start a full synchronization.
Phase 4: Configure connections and export data to directory services
In previous phases, you configured the profile synchronization connections that you
need. To write profile information back to a directory service, you map the profile
properties to attributes in the directory service with a mapping direction of Export. The
next time that profile synchronization runs, properties will be imported and exported
according to the mappings that you configured.
Note:
Although you can import profile data from business systems by using the Business
Connectivity Service, you cannot export profile data to business systems.
This phase is optional.
You must be a farm administrator or an administrator of the User Profile service
application to perform these procedures. If you are not a farm administrator, start each
procedure by using the Manage Profile Service page.
Do not create a new synchronization connection to export properties. To export
properties to a directory service, use the same synchronization connection that you
created to import properties from the directory service. You cannot use a synchronization
connection only to export properties.
Follow the procedure to Map user profile properties again, this time selecting Export for
the mapping direction. The properties that you map will be exported from SharePoint
Server to the directory service whose connection you select.
Follow the procedure to Start profile synchronization again, this time selecting to do an
incremental synchronization. The values of any SharePoint Server profile properties that
have been mapped to be exported to directory service attributes will be updated.

61
Note:
For certain directory services, additional permissions may be required to write data back
to the directory service. Review the information in the Plan account permissions section
of the "Plan for profile synchronization" article, and ensure that the synchronization
account has the necessary permissions.
Acknowledgements The SharePoint Server 2010 Content Publishing team thanks Spencer Harbar, Enterprise
Architect, for contributing to this article. His blog can be found at http://www.harbar.net.
Concepts Schedule profile synchronization (SharePoint Server 2010)
Plan for profile synchronization (SharePoint Server 2010)
Configure a profile synchronization connection in SharePoint Server 2010 (video)
Configure a synchronization connection to a SQL Server database in SharePoint Server
2010 (video)

62
Configure profile synchronization using a Lightweight Directory Interchange Format (LDIF) file (SharePoint Server 2010)
Updated: March 10, 2011
This article describes how to use a Lightweight Directory Interchange Format (LDIF) file
to synchronize user and group profile information between Microsoft SharePoint Server
2010 and a Lightweight Directory Access Protocol (LDAP) provider not directly supported
by Microsoft SharePoint Server 2010. For a list of directly supported LDAP providers,
such as Active Directory Domain Services (AD DS), see Identify directory services and
business systems. We recommend that you only use the following procedures for those
LDAP providers not in the directly supported LDAP provider list.
Overview An LDIF file is an ASCII file that can be used to exchange information with LDAP
Directory System Agents (DSAs). You can also use an LDIF file to synchronize profile
information with SharePoint Server 2010. To do this, you must create an LDIF file by
using your LDAP provider and save it to the %rootdir%\Program Files\Microsoft Office
Servers\14.0\Synchronization Service\Ma-data\ directory on the server running
SharePoint Server. The LDIF file must be saved to the LDIF <MA_Name> folder within
this directory and must contain the profile information that you want to synchronize with
SharePoint Server 2010. The schema for the LDIF file should be similar to the schema
shown in the import.ldif sample file, which can be downloaded using the following link:
http://go.microsoft.com/fwlink/?LinkId=202107. The configuration file that contains the
schema shown in import.ldif can be downloaded using the following link:
http://go.microsoft.com/fwlink/?LinkId=202107. This config.xml file contains the default
properties that will be imported from the LDIF file into SharePoint Server. This schema is
used to create an LDIF management agent (MA) that links the information in the LDIF file
to SharePoint Server 2010. Creating an LDIF MA is done by using the Import
Management Agent function in the SharePoint Server Synchronization Services
Manager.
Once you have created an LDIF file that conforms to the schema shown in the sample
LDIF file and created an LDIF MA, you can customize the default profile property schema
by adding properties not included in the default schema. To do this, you must first use the

63
SharePoint Server Synchronization Service Manager to add the additional profile
properties to the MOSS MA. After you have added any additional profile properties to the
MOSS MA, you must then add the additional properties to the Forefront Identity Manager
(FIM) metaverse by using the Synchronization Management Service. The final step is to
add the additional profile properties to the LDIF MA.
Because the MOSS MA only imports profile properties into SharePoint Server if they are
present in the LDIF file, unwanted profile properties can be excluded from
synchronization by excluding them from the LDIF file. Although you can also exclude
properties from import by excluding them from the MOSS MA schema, the preferred
method is to exclude any unwanted profile properties from the LDIF file.
After you have created an LDIF MA and added any additional properties that you want to
synchronize, you can then run Profile Synchronization from SharePoint Server 2010
Central Administration to import the profiles into SharePoint Server. This will synchronize
the profile information in the LDIF file with the profile information in the SharePoint Server
profile store and will also synchronize profile information from other directory services or
business systems that are based on any other profile synchronization connections that
you have configured.
Task requirements Before you perform this procedure, confirm the following:
The farm is running either the Standard or Enterprise version of SharePoint Server
2010 and you have run the farm configuration wizard. Profile Synchronization does
not work on a single-server installation of SharePoint Server 2010.
An instance of the User Profile service application exists and is started. For more
information, see Create, edit, or delete a User Profile Service application (SharePoint
Server 2010) (http://technet.microsoft.com/en-us/library/ee721052.aspx).
Profile Synchronization has been provisioned on the server where you plan to
synchronize profile information from an LDIF file. For more information about
provisioning Profile Synchronization, see Configure Profile Synchronization settings.
If you are using Microsoft SQL Server 2008, Microsoft SQL Server 2008 with Service
Pack 1 (SP1) with Cumulative Update 2 (CU2)
(http://go.microsoft.com/fwlink/?LinkId=165962) is required.
The WCF hotfix (KB976462) for Windows Server 2008 R2 is installed.

64
Important:
See the SharePoint Server 2010 release notes for other task requirements that may be
needed for Profile Synchronization.
Tasks in this article Create an LDIF MA
Add custom profile properties to the default profile property schema
Create an LDIF MA You can create an LDIF MA to synchronize user and group profile information between
Microsoft SharePoint Server 2010 and a Lightweight Directory Access Protocol (LDAP)
by using the Synchronization Service Manager.
To create an LDIF MA by using the Synchronization Service Manager
1. Verify that you have the following administrative credentials:
To use the Synchronization Service Manager to create an LDIF MA, you must be
a Service Application Administrator for the User Profile Service application. The
Service Application Administrator for the User Profile Service application must
also have write permissions on the %rootdir%\Program Files\Microsoft Office
Servers\14.0\Synchronization Service\Ma-data\ directory.
2. Download the default schema file (config.xml) from
http://go.microsoft.com/fwlink/?LinkId=202107 and save it to the %rootdir%\Program
Files\Microsoft Office Servers\14.0\Synchronization Service\Ma-data\ directory.
3. Open the Synchronization Service Manager by browsing to %rootdir%\Program
Files\Microsoft Office Servers\14.0\Synchronization Service\UIShell\ and double-
clicking miisclient.exe.
4. In the Synchronization Service Manager, click Management Agents and then, under
Actions, click Import Management Agent.
5. Select the config.xml file and then click Open.
6. On the Create Management Agent page of the Create Management Agent wizard,
type a name for the LDIF MA in the Name field. The name must be preceded by
"MOSSLDAP-", for example, MOSSLDAP-TestLDIFMA.
7. Optionally, type a description for the LDIF MA in the Description box.
8. Click Next through the remaining pages of the Create Management Agent wizard.

65
9. On the Configure Extensions page of the Create Management Agent wizard, click
Finish.
10. Save the LDIF file you generated by using your LDAP provider in the newly created
LDIF <MA_Name> folder in the %rootdir%\Program Files\Microsoft Office
Servers\14.0\Synchronization Service\Ma-data\ directory.
You can now run profile synchronization from Central Administration in SharePoint
Server 2010 to import the profiles from the LDIF file into the SharePoint Server profile
store. For more information about how to run profile synchronization in SharePoint
Server 2010, see Start profile synchronization manually (SharePoint Server 2010).
Note:
If you need to add any custom profile properties to the default property schema, you
should add them before running profile synchronization.
Add custom profile properties to the default profile property schema Before you run profile synchronization, you can add a custom profile property to the
default profile property schema by creating the following:
1. The custom property in SharePoint Server by using Central Administration
2. The custom property in the MOSS MA
3. The custom property in the FIM metaverse
4. The custom property in the LDIF MA
5. An export mapping from the LDIF MA to the FIM metaverse
6. An import mapping from the FIM metaverse to the MOSS MA
Important:
Complete the procedures in the following order to add a new profile property to the
default profile property schema.
To create a custom profile property in SharePoint Server
If the profile property does not exist in SharePoint Server, create a custom profile
property in SharePoint Server by using Central Administration.
To create a custom profile property in the MOSS MA
1. Verify that you have the following administrative credentials:
To use the Synchronization Service Manager to create a new profile property in
the MOSS MA, you must be a Service Application Administrator for the User

66
Profile Service application. The Service Application Administrator for the User
Profile Service application must also have write permissions on the
%rootdir%\Program Files\Microsoft Office Servers\14.0\Synchronization
Service\Ma-data\ directory.
2. Open the Synchronization Service Manager by browsing to %rootdir%\Program
Files\Microsoft Office Servers\14.0\Synchronization Service\UIShell\ and double-
clicking miisclient.exe.
3. Select the MOSS MA from the Management Agent list in the Synchronization Service
Manager and then, under Actions, click Properties.
Note:
The MOSS MA appears in the Management Agent list in the Synchronization Service
Manager as "MOSSGUID".
4. On the Properties page, under Management Agent Designer, click Configure
Attributes.
5. On the Properties page, under Configure Attributes, click New.
6. In the New Attribute dialog box, enter the name of the new profile property in the
Name field. This name must be the same name as the profile property that you
created in the SharePoint Server Central Administration.
7. Select a data type for the new profile property from the drop-down list. This data type
must be the same as the one specified in SharePoint Server.
8. In the New Attribute dialog box, in the Value constraints section, enter a minimum
and maximum character length for the new profile property and then click OK.
9. On the Properties page, under Management Agent Designer, click Define Object
Type.
10. On the Properties page, under Define Object Types, select User and then click
Edit.
11. In the Edit Object Type dialog box, in the Select mandatory attributes section,
select the new profile property and then click Add to make the new profile property
either a required profile property or an optional profile property. When you are done,
click OK.
Create a new profile property in the FIM metaverse
1. Verify that you have the following administrative credentials:
To use the Synchronization Service Manager to create a new profile property in
the FIM Metaverse, you must be a Service Application Administrator for the User
Profile Service application. The Service Application Administrator for the User
Profile Service application must also have write permissions on the
%rootdir%\Program Files\Microsoft Office Servers\14.0\Synchronization
Service\Ma-data\ directory.

67
2. Open the Synchronization Service Manager by browsing to %rootdir%\Program
Files\Microsoft Office Servers\14.0\Synchronization Service\UIShell\ and double-
clicking miisclient.exe.
3. Click Metaverse Designer.
Under Object Types, select the person object.
In the lower Actions section, click Add Attribute.
4. In the Add Attribute To Object Type dialog box, click New attribute.
5. In the New Attribute dialog box, type the name of the new profile property in the
Attribute name field. This name must be the same name as the profile property that
you created in the SharePoint Server Central Administration.
6. Select the data type from the Attribute type drop-down list. This data type must be
the same as the one specified in SharePoint Server.
7. If the new profile property is a multi-valued property, click to select Multi-valued and
then click OK.
Create a new profile property in the LDIF MA
1. Verify that you have the following administrative credentials:
To use the Synchronization Service Manager to a new profile property in the
LDIF MA, you must be a Service Application Administrator for the User Profile
Service application. The Service Application Administrator for the User Profile
Service application must also have write permissions on the %rootdir%\Program
Files\Microsoft Office Servers\14.0\Synchronization Service\Ma-data\ directory.
2. Open the Synchronization Service Manager by browsing to %rootdir%\Program
Files\Microsoft Office Servers\14.0\Synchronization Service\UIShell\ and double-
clicking miisclient.exe.
3. Select the LDIF MA from the Management Agent list in the Synchronization Service
Manager and then, under Actions, click Properties.
4. On the Properties page, under Management Agent Designer, click Configure
Attributes.
5. On the Properties page, under Configure Attributes, click New.
6. In the New Attribute dialog box, enter a name for the new profile property in the
Name field. This name must be the same name as the profile property that you
created in the SharePoint Server Central Administration.
7. Select a data type for the new profile property from the drop-down list. This data type
must be the same as the one specified in SharePoint Server.
8. In the New Attribute dialog box, in the Value constraints section, enter a minimum
and maximum character length for the new profile property and then click OK.
9. On the Properties page, under Management Agent Designer, click Define Object
Type.

68
10. On the Properties page, under Define Object Types, select User and then click
Edit.
11. In the Edit Object Type dialog box, in the Select mandatory attributes section,
select the new profile property and then click Add to make the new profile property
either a required profile property or an optional profile property. When you are done,
click OK.
Create an import mapping from a new LDIF MA profile property to a new metaverse
profile property
1. Verify that you have the following administrative credentials:
To use the Synchronization Service Manager to create an import mapping from a
new LDIF MA profile property to a new Metaverse profile property, you must be a
Service Application Administrator for the User Profile Service application. The
Service Application Administrator for the User Profile Service application must
also have write permissions on the %rootdir%\Program Files\Microsoft Office
Servers\14.0\Synchronization Service\Ma-data\ directory.
2. Open the Synchronization Service Manager by browsing to %rootdir%\Program
Files\Microsoft Office Servers\14.0\Synchronization Service\UIShell\ and double-
clicking miisclient.exe.
3. Select the LDIF MA from the Management Agent list in the Synchronization Service
Manager and then, under Actions, select Properties.
Under Management Agent Designer, click Configure Attribute Flow.
4. In the Configure Attribute Flows section, select Object Type: User from the Data
Source Attribute column.
5. In the Build Attribute Flow section, under Flow Direction, select Import.
6. In the Build Attribute Flows section, under Data source attribute, select the name
of the new profile property.
7. In the Build Attribute Flows section, under Metaverse attribute, select the name of
the new profile property, click New, and then click OK. The new import mapping
should now show in the Configure Attribute Flow section of the Properties pane.
Create an export mapping from a new metaverse profile property to a new MOSS
MA profile property
1. Verify that you have the following administrative credentials:
To use the Synchronization Service Manager to create an export mapping from a
new Metaverse profile property to a new MOSS MA profile property, you must be
a Service Application Administrator for the User Profile Service application. The
Service Application Administrator for the User Profile Service application must
also have write permissions on the %rootdir%\Program Files\Microsoft Office
Servers\14.0\Synchronization Service\Ma-data\ directory.

69
2. Open the Synchronization Service Manager by browsing to %rootdir%\Program
Files\Microsoft Office Servers\14.0\Synchronization Service\UIShell\ and double-
clicking miisclient.exe.
3. Select the MOSS MA from the Management Agent list in the Synchronization Service
Manager and then, under Actions, select Properties.
Under Management Agent Designer, click Configure Attribute Flow.
4. In the Configure Attribute Flows section, select Object Type: User from the Data
Source Attribute column.
5. In the Build Attribute Flow section, under Flow Direction, select Export.
6. In the Build Attribute Flows section, under Data source attribute, select the name
of the new profile property.
7. In the Build Attribute Flows section, under Metaverse attribute, select the name of
the new profile property, click New, and then click OK. The new export mapping
should now show in the Configure Attribute Flow section of the Properties pane.
Concepts Plan for profile synchronization (SharePoint Server 2010)
Configure profile synchronization (SharePoint Server 2010)
Start profile synchronization manually (SharePoint Server 2010)
Schedule profile synchronization (SharePoint Server 2010)

70
Start profile synchronization manually (SharePoint Server 2010)
Updated: June 28, 2011
This article describes how to start profile synchronization for Microsoft SharePoint Server
2010 manually. You can start a full synchronization or an incremental synchronization of
profile information. You might want to consider starting profile synchronization manually if
you have made considerable changes to user profiles, for example if you want to test the
profile synchronization feature.
For information about when to use full or incremental synchronization, see Types of
synchronization in Profile synchronization overview (SharePoint Server 2010).
You can also schedule profile synchronization to run automatically according to a
schedule. For more information, see Schedule profile synchronization (SharePoint Server
2010).
Before you perform this procedure, ensure that you have completed the steps that are
described in Configure profile synchronization (SharePoint Server 2010).
To start profile synchronization manually
1. Verify that you have the following administrative credentials:
You must be a farm administrator or an administrator of the User Profile service
application to perform this procedure. If you are not a farm administrator, start
this procedure by using the Manage Profile Service page.
2. On the Central Administration Web site, in the Application Management section,
click Manage service applications.
3. On the Manage Service Applications page, click in the Name column of the User
Profile Service Application row.
4. On the Manage Profile Service page, in the Synchronization section, click Start
Profile Synchronization.
5. On the Start Profile Synchronization page, select Start Incremental
Synchronization to synchronize only profiles that have changed since the last
synchronization, or select Start Full Synchronization to synchronize all profiles.

71
Note:
Full synchronization can take a long time. For more information about when to use full
synchronization and incremental synchronization, see Types of synchronization in Profile
synchronization overview (SharePoint Server 2010).
6. Click OK.
Note:
Refresh the Manage Profile Service page to view the profile synchronization status.
Concepts Profile synchronization overview (SharePoint Server 2010)
Plan for profile synchronization (SharePoint Server 2010)
Configure profile synchronization (SharePoint Server 2010)
Schedule profile synchronization (SharePoint Server 2010)

72
Schedule profile synchronization (SharePoint Server 2010)
Updated: June 28, 2011
This article describes how to configure the Profile Incremental Synchronization timer job
to define the schedule for running incremental profile synchronization. You must have
first performed a full synchronization before you can set the incremental synchronization
schedule. For more information, see Plan for profile synchronization (SharePoint Server
2010).
Before you perform this procedure, ensure that you have completed the steps that are
described in Configure profile synchronization (SharePoint Server 2010).
To schedule profile synchronization
1. Verify that you have the following administrative credentials:
You must be a farm administrator or an administrator of the User Profile service
application to perform these procedures. If you are not a farm administrator, start
this procedure by using the Manage Profile Service page.
2. On the Central Administration Web site, in the Application Management section,
click Manage service applications.
3. On the Manage Service Applications page, click in the Name column of the User
Profile service application row.
4. On the Manage Profile Service page, in the Synchronization section, click
Configure Synchronization Timer Job.
5. On the Edit Timer Job page, in the Recurring Schedule section, select the
frequency at which you want recurring profile synchronization to occur.
If you select Minutes, type the number of minutes that should pass between the
start of each timer job.
If you select Hourly, type the number of minutes past every hour that the timer
job should start to run at the earliest, and type the number of minutes past every
hour that the timer job should start to run at the latest.
If you select Daily, select the time at which the timer job should start to run, at
the earliest and at the latest, every day.
If you select Weekly, select the earliest and latest day and time at which the
timer job should start to run every week.

73
If you select Monthly, either select the earliest and latest date and time at which
the timer job should start to run every month, or select a day and time at which
the timer job should start to run every month.
Note:
If you want to specify an exact starting time for the timer job to run, set the same value in
the start and end times of the interval in which the timer job should start.
6. Click OK.
If you want to start the profile synchronization immediately, click Run Now.
Concepts Configure profile synchronization (SharePoint Server 2010)
Start profile synchronization manually (SharePoint Server 2010)
Plan for profile synchronization (SharePoint Server 2010)
Other Resources
Timer jobs cmdlets (SharePoint Server 2010) (http://technet.microsoft.com/en-
us/library/ee906546.aspx)
74
Maintain profile synchronization (SharePoint Server 2010)
Published: May 12, 2010
Profile Synchronization in SharePoint Server 2010 enables an administrator of an
instance of the user profile service to synchronize user and group profile information that
is stored in the SharePoint Server 2010 profile store with profile information that is stored
in directory services across the enterprise. After you have configured Profile
Synchronization, you must complete tasks to maintain those settings. These tasks
include, for example, removing users whose accounts have been disabled or deleted,
moving or renaming a server, and starting or stopping the User Profile Synchronization
service. For more information, see Plan for profile synchronization (SharePoint Server
2010).
Before you complete the procedures in this article, you must have completed the
procedures in Configure profile synchronization (SharePoint Server 2010).
Task requirements The farm is running either the Standard or Enterprise version of SharePoint Server
2010 and you have run the farm configuration wizard.
Caution:
Profile Synchronization does not work on a stand-alone installation of SharePoint Server
2010.
An instance of the User Profile service application exists and is started. For more
information, see Create, edit, or delete a User Profile service application (SharePoint
Server 2010) (http://technet.microsoft.com/en-us/library/ee721052.aspx).
If you are using Microsoft SQL Server 2008, Microsoft SQL Server 2008 with Service
Pack 1 (SP1) with Cumulative Update 2 (CU2)
(http://go.microsoft.com/fwlink/?LinkId=165962) is required.
The WCF hotfix (KB976462) for Windows Server 2008 R2 is installed.

75
Important:
See release notes for other task requirements that may be needed for Profile
Synchronization.
Procedures in this article Rename users or change user domains
Exclude users whose accounts have been disabled
Remove obsolete users and groups
Maintain profile schema changes
Rename a profile synchronization server
Move the User Profile Synchronization service to a new server
Reset profile synchronization
Restrict profile synchronization communication to a specific domain controller
Adjust profile synchronization time-outs
Rename users or change user domains SharePoint Server 2010 provides a way to handle several different user migration
scenarios. The following are examples of the scenarios handled for Active Directory
Domain Services (AD DS):
Account name (sAMAccountName) changes in the AD DS where the user exists.
Security Identifier (SID) changes.
Distinguished Name (DN) changes that include changes in the Organizational Unit
(OU) container in the AD DS where the user account exists. This is new in
SharePoint Server 2010. For example, if a user's DN is moved in AD DS from "User=
EUROPE\John Smith, Manager=CN=John Rodman, OU=Users, DC=EMEA1,
DC=corp, DC=contoso, DC=com" to "User= EUROPE\John Smith,
Manager=CN=John Rodman, OU=Managers, DC=EMEA1, DC=corp,
DC=contoso,DC=com", the MigrateUser command updates the user profile store for
this user. The user profile for John Smith is updated when synchronizing user profiles
from the EMEA1.corp.contoso.com AD DS to the SharePoint Server user profile
store.
To rename users or to change user domains
1. Verify that you have the following administrative credentials:
See Add-SPShellAdmin.

76
You must be a member of the Farm Administrators group on the computer that is
running the SharePoint Central Administration Web site.
The Farm Administrator account, which is created during the SharePoint farm
setup, must also be a Local Administrator on the server where the User Profile
Synchronization service is deployed.
2. If a profile synchronization run is in progress, go to the Central Administration page
and click Manage service applications in the Application Management section.
Select the appropriate User Profile service application from the list of service
applications. On the Manage service application page, click Stop Profile
Synchronization.
3. Disable the incremental Profile Synchronization timer job.
4. Ensure that user migration by using stsadm -o migrateuser
has succeeded.
5. Ensure that the profile of the migrated user can be accessed by browsing to the My
Site for that user, for example, http://mysite/person.aspx?accountname=<new
account name>.
6. Run Profile Synchronization. For more information, see Perform a nonrecurring
profile synchronization.
7. Recheck access to the profile of the migrated user by browsing to the My Site for that
user.
8. Enable the incremental Profile Synchronization timer job.
Exclude users whose accounts have been disabled You can exclude users whose accounts have been disabled in AD DS by using exclusion
filters in SharePoint Server 2010. For the steps that are needed to exclude users whose
accounts have been disabled, see Edit Profile Synchronization connection filters.
Remove obsolete users and groups There are two reasons why obsolete users or groups can exist in the SharePoint Server
2010 user profile store:
Obsolete users: The My Site cleanup timer job is not active. The User Profile
Synchronization timer job marks for deletion users who have been deleted from the
directory source. When the My Site cleanup job runs, it looks for all users marked for
deletion and deletes their profiles. Respective My Sites are then assigned to the
manager for the deleted user and an e-mail message notifies the manager of this
deletion.

77
Obsolete users and groups: Users and groups that were not imported by Profile
Synchronization exist in the user profile store. This can occur, for example, if you
upgraded from an earlier version of SharePoint Server and chose to only synchronize
a subset of domains with SharePoint Server 2010.
To find and remove obsolete users and groups by using Windows PowerShell
1. Verify that you meet the following minimum requirements:
See Add-SPShellAdmin.
You must have Execute permission on the
ImportExport_GetNonimportedObjects and the
ImportExport_PurgeNonimportedObjects stored procedures in the profile
database.
You can use SQL Management Studio or Transact-SQL to grant permissions.
For more information, see GRANT Object Permissions (Transact-SQL)
(http://go.microsoft.com/fwlink/?LinkId=213464).
2. On the Start menu, click All Programs.
3. Click Microsoft SharePoint 2010 Products.
4. Right-click SharePoint 2010 Management Shell and then click Run as
administrator.
5. In the User Account Control dialog box, click Yes.
6. At the Windows PowerShell command prompt, type the following commands:
a) To get the User Profile Service application object, type the following
command:
$upa = Get-spserviceapplication <identity>
Where <identity> is the GUID of the User Profile Synchronization
service application.
b) To view the users and groups to delete, type the following command:
Set-SPProfileServiceApplication $upa -GetNonImportedObjects $true
c) To delete the obsolete users and groups, type the following command:
Warning:
This action cannot be undone.
Set-SPProfileServiceApplication $upa -PurgeNonImportedObjects $true
For more information, see Get-SPServiceApplication (http://technet.microsoft.com/en-
us/library/ff607714.aspx) and Set-SPProfileServiceApplication
(http://technet.microsoft.com/en-us/library/ff608004.aspx).

78
Maintain profile schema changes Profile schema changes include things such as adding a new user profile property,
changing a user profile property mapping, or changing a Profile Synchronization
connection filter. When the profile schema changes, you must first perform a full
nonrecurring synchronization before scheduling recurring profile synchronization. For the
steps that are needed to perform full nonrecurring profile synchronization, see Start
profile synchronization manually (SharePoint Server 2010).
Rename a profile synchronization server Use the following procedure to rename a profile synchronization server.
To rename a profile synchronization server by using Windows PowerShell
1. Verify that you meet the following minimum requirements: See Add-SPShellAdmin.
2. On the Start menu, click All Programs.
3. Click Microsoft SharePoint 2010 Products.
4. Click SharePoint 2010 Management Shell.
5. At the Windows PowerShell command prompt, type the following command:
Rename-SPServer <Identity> -Name <newName>
Where:
Identity is the old name of the server.
newName is the new name for the server.
For more information about renaming a server by using Windows PowerShell, see
Rename-SPServer (http://technet.microsoft.com/en-us/library/ff607556.aspx).
Move the User Profile Synchronization service to a new server Use the following procedure to move the User Profile Synchronization service to a new
server.
To move the User Profile Synchronization service to a new server by using Central
Administration
1. Verify that you have the following administrative credentials:
See Add-SPShellAdmin.
You must be a member of the Farm Administrators group on the computer that is
running the SharePoint Central Administration Web site.

79
The farm account, which is created during the SharePoint farm setup, must also
be a Local Administrator on the server where the User Profile Synchronization
service is deployed.
This is required to start the User Profile Synchronization service. After the User
Profile Synchronization service is started you can remove the farm account from
the Administrators group.
2. On the current Profile Synchronization server, on the SharePoint Central
Administration Web site, in the System Settings section, click Manage services on
Server.
3. Next to the User Profile Synchronization Service, click Stop to stop the User
Profile Synchronization service.
4. On the new Profile Synchronization server, on the SharePoint Central Administration
Web site, in the System Settings section, click Manage services on Server.
5. Next to the User Profile Synchronization Service, click Start to start the User
Profile Synchronization service.
6. On the new Profile Synchronization server, on the SharePoint Central Administration
Web site, in the Application Management section, click Manage service
applications.
7. On the Service Applications page, click the link for the name of the appropriate User
Profile service application.
8. On the User Profile Service Application page, in the Synchronization section, click
Start Profile Synchronization.
9. On the Start Profile Synchronization page, select Start Full Synchronization, and
then click OK.
Reset profile synchronization The User Profile Synchronization database serves as a staging area for user profile
information. User Profile information that is stored in the profile store and synchronization
database is consumed by the User Profile service. By following the below steps, you can
safely reset a User Profile Synchronization database without losing information in the
profile store.
To reset profile synchronization by using Windows PowerShell
1. Verify that you meet the following minimum requirements:
See Add-SPShellAdmin.
You must be a member of the Farm Administrators group on the computer that is
running the SharePoint Central Administration Web site.

80
The farm account, which is created during the SharePoint farm setup, must also
be a Local Administrator on the server where the User Profile Synchronization
service is deployed.
This is required to start the User Profile Synchronization service. After the User
Profile Synchronization service is started you can remove the farm account from
the Administrators group.
2. As a precaution, back up the User Profile service application. For more information,
see Back up a service application (SharePoint Server 2010)
(http://technet.microsoft.com/en-us/library/ee428318.aspx).
3. On the Start menu, click All Programs.
4. Click Microsoft SharePoint 2010 Products.
5. Right-click SharePoint 2010 Management Shell and then click Run as
administrator.
6. In the User Account Control dialog box, click Yes.
7. At the Windows PowerShell command prompt, type the following command to stop
the SharePoint 2010 Timer service:
net stop sptimerv4
8. Copy the following code and paste it into a text editor, such as Notepad:
$syncdb=Get-SPDatabase <SyncDBGUID>
$syncdb.Unprovision()
$syncdb.Status='Offline'
$upa=Get-SPServiceApplication <USPAppGUID>
$upa.ResetSynchronizationMachine()
$upa.ResetSynchronizationDatabase()
$syncdb.Provision()
9. Replace the following placeholders with values where:
<SyncDBGUID> is the GUID of the synchronization database.
<UPSAppGUID> is the GUID of the User Profile Service application.
10. Save the file as an ANSI-encoded text file and name the file ResetSyncDB.ps1.
11. At the Windows PowerShell change to the directory where you saved the file.
12. Type the following command:
./ResetSyncDB.ps1
13. Using SQL Server Management Studio, create a login in SQL Server for the User
Profile Synchronization service account (that is, the farm account). Then, in the Sync
database, create a database user that maps to the login and grant it access to the
db_owner database role. For more information, see How to: Create a SQL Server

81
Login (http://go.microsoft.com/fwlink/?LinkId=211993), How to: Create a Database
User (http://go.microsoft.com/fwlink/?LinkId=211994), and Database-Level Roles
(http://go.microsoft.com/fwlink/?LinkId=211995).
14. At the Windows PowerShell command prompt, type the following command to start
the SharePoint 2010 Timer service:
net start sptimerv4
15. Start the Profile Synchronization service. For more information, see the Start the
User Profile Synchronization service section of the "Configure profile
synchronization" topic.
16. Reset IIS. For more information about how to reset IIS, see the Reset IIS section of
the "Configure profile synchronization" topic.
17. Create connections to the data sources. For more information, see Restore a service
application (Search Server 2010) (http://technet.microsoft.com/en-
us/library/ff428105.aspx).
18. Run full profile synchronization. For more information, see Perform a nonrecurring
profile synchronization.
For more information, see Get-SPDatabase (http://technet.microsoft.com/en-
us/library/ff607889.aspx).
Restrict profile synchronization communication to a specific domain controller Use the following procedure to restrict profile synchronization communication to a specific
domain controller.
To restrict profile synchronization communication to a specific domain controller
by using Windows PowerShell
1. Verify that you meet the following minimum requirements: See Add-SPShellAdmin.
2. On the Start menu, click All Programs.
3. Click Microsoft SharePoint 2010 Products.
4. Right-click SharePoint 2010 Management Shell and then click Run as
administrator.
5. In the User Account Control dialog box, click Yes.
6. At the Windows PowerShell command prompt, type the following commands:
a) To get the User Profile Service application object, type the following
command:

82
$upa=Get-SPServiceApplication <GUID>
Where <GUID> is the GUID of the User Profile Synchronization
Service application.
b) To restrict profile synchronization communication to a specific domain
controller, type the following command:
Set-SPProfileServiceApplication $upa -UseOnlyPreferredDomainControllers $true
Note:
It may take up to five minutes for the changed property value to propagate to the Central
Administration Web site. Resetting IIS on the Central Administration server will force the
new value to be loaded immediately. For more information about resetting IIS, see IIS
Reset Activity (http://go.microsoft.com/fwlink/?LinkId=179336).
For more information, see Get-SPServiceApplication (http://technet.microsoft.com/en-
us/library/ff607714.aspx) and Set-SPProfileServiceApplication
(http://technet.microsoft.com/en-us/library/ff608004.aspx).
Adjust profile synchronization time-outs A time-out can occur on the following occasions:
When trying to connect to the directory service server on the Add/Edit a
synchronization connection page in Central Administration.
Note:
This time-out is available in the Microsoft SharePoint Server 2010 June 2010 Cumulative
Update. For more information about the cumulative update, see
http://support.microsoft.com/kb/983497.
When trying to populate the list of containers on the Add/Edit a synchronization
connection page in Central Administration. This will occur as a JavaScript timeout
error in the status bar.
When clicking OK on the Add/Edit a synchronization connection page in Central
Administration. This will result in the following error message and occurs because of
a timeout by the Forefront Identity Manager Web service when creating or updating a
profile synchronization connection:
"The request channel timed out while waiting for a reply after 00:01:29.9062626.
Increase the timeout value passed to the call to Request or increase the
SendTimeout value on the Binding. The time allocated to this operation may have
been a part of a longer timeout."
To adjust profile synchronization timeouts by using Windows PowerShell
1. Verify that you meet the following minimum requirements: See Add-SPShellAdmin.

83
2. If you want to change the time-out value for connecting to the directory service
server, do the following:
a) Copy the following code and paste it into a text editor, such as Notepad:
$upsAppProxy = Get-SPServiceApplicationProxy <UPSAppProxyGUID>
$upsAppProxy.LDAPConnectionTimeout = <NewTimeout>
$upsAppProxy.Update()
b) Replace <UPSAppProxyGUID> with the GUID of the User Profile service
application proxy and <NewTimeout> with the new time-out value in
seconds. The default time-out is 120 seconds.
c) Save the file as an ANSI-encoded text file whose extension is .ps1.
3. If you want to change the time-out value for the Populate Containers control, do the
following:
a) Copy the following code and paste it into a text editor, such as Notepad:
$upsAppProxy = Get-SPServiceApplicationProxy <UPSAppProxyGUID>
$upsAppProxy.ImportConnAsyncTimeout = <NewTimeout>
$upsAppProxy.Update()
b) Replace <UPSAppProxyGUID> with the GUID of the User Profile service
application proxy and <NewTimeout> with the new time-out value in
seconds. The default time-out is 1,000 seconds (approximately 17 minutes).
c) Save the file as an ANSI-encoded text file whose extension is .ps1.
4. If you want to change the time-out value for calls into the Forefront Identity Manager
Web service, do the following:
a) Copy the following code and paste it into a text editor, such as Notepad:
$upsApp = Get-SPServiceApplication <UPSAppGUID>
$upsApp.FIMWebClientTimeOut = <NewTimeout>
$upsApp.Update()
b) Replace <UPSAppGUID> with the GUID of the User Profile service
application and <NewTimeout> with the new time-out value in milliseconds.
The default time-out is 300,000 milliseconds (5 minutes).
c) Save the file as an ANSI-encoded text file whose extension is .ps1.
5. On the Start menu, click All Programs.
6. Click Microsoft SharePoint 2010 Products.
7. Click SharePoint 2010 Management Shell.
8. Change to the directory where you saved the file(s).
9. At the Windows PowerShell command prompt, type the following command to
execute a script file:

84
./<filename>.ps1
Where <filename> is the name of the file to execute.
For more information, see Get-SPServiceApplicationProxy
(http://technet.microsoft.com/en-us/library/ff607727.aspx) and Get-SPServiceApplication
(http://technet.microsoft.com/en-us/library/ff607714.aspx).

85
Configure a profile synchronization connection in SharePoint Server 2010 (video)
Published: February 10, 2011
This video shows the process of creating a profile synchronization connection in
Microsoft SharePoint Server 2010. It demonstrates creating a connection to Active
Directory Domain Services (AD DS), creating a synchronization filter, and mapping profile
properties. The video includes both importing profile properties and exporting profile
properties.
Running time: 12:26
Watch the "Configuring a profile
synchronization connection in SharePoint Server 2010" video (http://go.microsoft.com/fwlink/?LinkId=210718)
For an optimal viewing
experience, download the "Configuring a profile synchronization connection in
SharePoint Server 2010" video. (http://go.microsoft.com/fwlink/?LinkId=210717) Right-click the link, and then click Save Target As to download a copy. Clicking the link will open a .wmv file in the default video viewer for full-resolution viewing.
Related resources
Resource Description
Plan for profile synchronization (SharePoint
Server 2010)
This article provides guidance to help you
plan how to implement profile
synchronization in SharePoint Server 2010.

86
Resource Description
Profile synchronization allows you to create
user profiles by importing information from
other systems that are used in your
organization.
Configure profile synchronization
(SharePoint Server 2010)
Configuring profile synchronization is a
process that involves many steps. This
article divides the process into shorter
phases, both so that you can see progress
and to reduce the number of steps through
which you have to backtrack if you make an
error. Depending on your organization's
needs, you may not have to implement all of
the phases.
SharePoint Products Tech Center
(http://technet.microsoft.com/en-
us/sharepoint/default.aspx)
Find details about related technologies,
downloads, and additional resources.
Other Resources Video demos and training for SharePoint Server 2010 (http://technet.microsoft.com/en-
us/library/cc262880.aspx)

87
Configure a synchronization connection to a SQL Server database in SharePoint Server 2010 (video)
Published: June 16, 2011
This video shows how to perform profile synchronization (also known as "profile sync")
with a business system in Microsoft SharePoint Server 2010. It demonstrates creating
external content types from data in Microsoft SQL Server tables, creating synchronization
connections, and mapping user profile properties.
Running time: 9:48
Watch the "Configuring a profile
synchronization connection to a SQL Server database in SharePoint Server 2010" video (http://go.microsoft.com/fwlink/?LinkId=221193)
For an optimal viewing experience, download the "Configuring a profile synchronization connection to a SQL Server
database in SharePoint Server 2010" video. (http://go.microsoft.com/fwlink/?LinkId=221194) Right-click the link, and then click Save Target As to download a copy. Clicking the link will open a .wmv file in the default video viewer for full-resolution viewing.
Related resources
Resource Description
Plan for profile synchronization (SharePoint
Server 2010)
This article provides guidance to help you
plan how to implement profile
synchronization in SharePoint Server 2010.
Profile synchronization allows you to create

88
Resource Description
user profiles by importing information from
other systems that are used in your
organization.
Configure profile synchronization
(SharePoint Server 2010)
Configuring profile synchronization is a
process that involves many steps. This
article divides the process into shorter
phases, both so that you can see progress
and to reduce the number of steps through
which you have to backtrack if you make an
error. Depending on your organization's
needs, you may not have to implement all of
the phases.
SharePoint Products Tech Center
(http://technet.microsoft.com/en-
us/sharepoint/default.aspx)
Find details about related technologies,
downloads, and additional resources.
Other Resources Video demos and training for SharePoint Server 2010 (http://technet.microsoft.com/en-
us/library/cc262880.aspx)

89
III. Profile synchronization reference
In this section:
Default user profile properties (SharePoint Server 2010)
Default user profile property mappings (SharePoint Server 2010)
Connection filter data types and operators (SharePoint Server 2010)
User profile property data types (SharePoint Server 2010)
Grant Active Directory Domain Services permissions for profile synchronization
(SharePoint Server 2010)

90
Default user profile properties (SharePoint Server 2010)
Published: April 28, 2011
This article lists the user profile properties that SharePoint Server 2010 provides by
default.
The following table lists the default user profile properties.
Use profile property Display name User profile service data
type
AboutMe About me HTML
AccountName Account name Person
ADGuid Active Directory Id binary
Assistant Assistant Person
CellPhone Mobile phone string (single-value)
Department Department string (single-value)
Fax Fax string (single-value)
FirstName First name string (single-value)
HomePhone Home phone string (single-value
LastName Last name string (single-value)
Manager Manager Person
Office Office string (single-value)
PersonalSpace Personal site URL
PictureURL Picture URL
PreferredName Name string (single-value)
PublicSiteRedirect Public site redirect URL
QuickLinks Quick links string (single-value)

91
Use profile property Display name User profile service data
type
SID SID binary
SPS-Birthday Birthday date no year
SPS-ClaimID Claim User Identifier string (single-value)
SPS-ClaimProviderID Claim Provider Identifier string (single-value)
SPS-ClaimProviderType Claim Provider Type string (single-value)
SPS-DataSource Data source string (single-value)
SPS-DisplayOrder Display Order integer
SPS-DistinguishedName Distinguished Name string (single-value)
SPS-DontSuggestList Don't Suggest List Person
SPS-Dotted-line Dotted-line Manager Person
SPS-EmailOptin Email Notifications integer
SPS-HireDate Hire date date
SPS-Interests Interests string (multi-value)
SPS-JobTitle Job Title string (single-value)
SPS-LastColleagueAdded Last Colleague Added date
SPS-LastKeywordAdded Last Keyword Added date
SPS-Location Office Location string (single-value)
SPS-MemberOf MemberOf string (multi-value)
SPS-MySiteUpgrade My Site Upgrade boolean
SPS-ObjectExists Object Exists string (single-value)
SPS-OWAUrl Outlook Web Access URL URL
SPS-PastProjects Past projects string (multi-value)
SPS-Peers Peers string (single-value)
SPS-PhoneticDisplayName Phonetic Display Name string (single-value)
SPS-PhoneticFirstName Phonetic First Name string (single-value)

92
Use profile property Display name User profile service data
type
SPS-PhoneticLastName Phonetic Last Name string (single-value)
SPS-ProxyAddresses Proxy addresses string (multi-value)
SPS-ResourceSID Resource Forest SID binary
SPS-Responsibility Ask Me About string (multi-value)
SPS-SavedAccountName Saved Account Name string (single-value)
SPS-SavedSID Saved SID binary
SPS-School Schools string (multi-value)
SPS-SipAddress SIP Address string (single-value)
SPS-Skills Skills string (multi-value)
SPS-SourceObjectDN Source Object Distinguished
Name
string (multi-value)
SPS-StatusNotes Status Message string (single-value)
SPS-TimeZone Time Zone time zone
Title Title string (single-value)
UserName User name string (single-value)
UserProfile_GUID Id unique identifier
WebSite Web site URL
WorkEmail Work e-mail E-mail
WorkPhone Work phone string (single-value)
Concepts Plan for profile synchronization (SharePoint Server 2010)
Default user profile property mappings (SharePoint Server 2010)

93
Default user profile property mappings (SharePoint Server 2010)
Published: April 28, 2011
Some user profile properties are mapped automatically to their corresponding directory
service attributes after you run a profile synchronization. This topic describes the user
profile properties that are mapped by default.
In this topic:
Default user profile property mappings for Active Directory Domain Services
Default user profile property mappings for Novell eDirectory, Sun Java System
Directory Server, or IBM Tivoli Directory Server
Default user profile property mappings for Active Directory Domain Services The following table describes the user profile properties that are automatically mapped
when you import user profiles from Active Directory Domain Services (AD DS).
User profile property AD DS attribute
SPS-DistinguishedName dn
SID objectSid
Manager manager
PreferredName displayName
FirstName givenName
LastName sn
SPS-PhoneticDisplayName msDS-PhoneticDisplayName
SPS-PhoneticFirstName msDS-PhoneticFirstName
SPS-PhoneticLastName msDS-PhoneticLastName
WorkPhone telephoneNumber
WorkEmail mail

94
User profile property AD DS attribute
Office physicalDeliveryOfficeName
SPS-JobTitle title
Department department
UserName sAMAccountName
PublicSiteRedirect wWWHomePage
SPS-ProxyAddresses proxyAddresses
SPS-SourceObjectDN msDS-SourceObjectDN
SPS-ClaimID <specific to connection>
SPS-ClaimProviderID <specific to connection>
SPS-ClaimProviderType <specific to connection>
Default user profile property mappings for Novell eDirectory, Sun Java System Directory Server, or IBM Tivoli Directory Server The following table describes the user profile properties that are mapped automatically
when you import user profiles from Novell eDirectory, Sun Java System Directory Server,
or IBM Tivoli Directory Server.
User profile property Directory service attribute
SPS-DistinguishedName dn
FirstName givenName
LastName sn
WorkPhone telephoneNumber
WorkEmail mail
Office physicalDeliveryOfficeName
SPS-JobTitle title
UserName <specific to connection>

95
User profile property Directory service attribute
SPS-ClaimID <specific to connection>
SPS-ClaimProviderID <specific to connection>
SPS-ClaimProviderType <specific to connection>
Concepts Plan for profile synchronization (SharePoint Server 2010)
Configure profile synchronization (SharePoint Server 2010)
Default user profile properties (SharePoint Server 2010)

96
Connection filter data types and operators (SharePoint Server 2010)
Published: June 3, 2011
When you synchronize profile information with a directory service in Microsoft SharePoint
Server 2010, you can provide a filter that identifies the users or groups to exclude from
synchronization. A filter consists of a set of clauses in the format
<attribute><operator><value>, and the way to join the clauses. The data type of the
attribute determines which operators are available. For more information about filters and
how to create them, see Plan for profile synchronization (SharePoint Server 2010).
The following table identifies the operators that are available for each Active Directory
Domain Services (AD DS) data type.
AD DS data type Operators
Boolean is present, is not present, true, false
Case insensitive string is present, is not present, equals, does not
equal, starts with, does not start with, ends
with, does not end with, contains, does not
contain
Distinguished name is present, is not present, equals, does not
equal, starts with, does not start with, ends
with, does not end with, contains, does not
contain
IA5-String is present, is not present, equals, does not
equal, starts with, does not start with, ends
with, does not end with, contains, does not
contain
Integer is present, is not present, equals, does not
equal, less than, less than or equal, greater
than, greater than or equal, bit on equals, bit
off equals
Large integer or interval is present, is not present
Numerical string is present, is not present, equals, does not

97
AD DS data type Operators
equal, starts with, does not start with, ends
with, does not end with, contains, does not
contain
Octet string is present, is not present
Note:
The AD DS attribute
unicodePwd is an octet string,
but SharePoint Server treats it as
a Unicode string for the purpose
of profile synchronization.
SID is present, is not present
Unicode string is present, is not present, equals, does not
equal, starts with, does not start with, ends
with, does not end with, contains, does not
contain
UTC coded time is present, is not present, equals, does not
equal, starts with, does not start with, ends
with, does not end with, contains, does not
contain

98
Note:
The bit on equals operator checks whether specific bits are turned on. For example, the
clause "userAccountControl bit on equals 2" is true if the second bit of the
userAccountControl attribute is a one. Similarly, the bit off equals operator checks
whether specific bits are turned off (zero). The value that you provide for the bit
comparison operators is the decimal equivalent of the bitmask you want to compare with.
If, for example, you want to check the fifth bit (0000 0000 0001 0000), you would use the
value 16.
Concepts Plan for profile synchronization (SharePoint Server 2010)

99
User profile property data types (SharePoint Server 2010)
Published: June 3, 2011
When you map a SharePoint Server 2010 user profile property to an element in an
external system, the property and the element must have compatible data types. This
article identifies Active Directory Domain Services (AD DS) data types and the .NET data
types that are compatible with the data types of SharePoint Server 2010 user profile
properties.
In this article:
AD DS data type compatibility
.NET data type compatibility
AD DS data type compatibility The following table lists the AD DS data types that are compatible with each user profile
data type.
User profile service data type AD DS data type
big integer Large Integer, Integer
binary Octet String, SID
boolean Boolean
date UTC Coded Time
date no year UTC Coded Time
date time UTC Coded Time
E-mail Unicode String, IA5-String, Case Insensitive
String
float Unicode String
HTML Unicode String, IA5-String, Case Insensitive
String
integer Integer

100
User profile service data type AD DS data type
Person Distinguished Name
string (multi-value) Unicode String, IA5-String, Case Insensitive
String
string (single-value) Unicode String, IA5-String, Case Insensitive
String
time zone Integer
unique identifier Octet String, SID
URL Unicode String, IA5-String, Case Insensitive
String
Note:
The AD DS attribute unicodePwd is an octet string, but SharePoint Server treats it as a
Unicode string for the purpose of profile synchronization.
.NET data type compatibility When you create an external content type in SharePoint Server 2010, you specify the
.NET data type of each column of the external content type. If you map user profile
properties to columns of an external content type by using a Business Data Connectivity
connection, the data types must be compatible. The following table lists the user profile
property data types that are compatible with each .NET data type.
.NET data type User Profile service data type
System.Boolean Boolean
System.String String (Only multi-value string is supported)
System.DateTime Date/DateTime
System.Int64 BigInteger
System.Int32 BigInteger/Integer
System.Int16 BigInteger/Integer

101
System.SByte BigInteger/Integer
System.UInt64 BigInteger
System.UInt32 BigInteger/Integer
System.UInt16 BigInteger/Integer
System.Byte BigInteger/Integer
System.Single Float
System.Double Float
Note:
You cannot use a business data connectivity connection to map a binary property to a
property that implements the Stream accessor method.
Concepts Default user profile properties (SharePoint Server 2010)
Plan for profile synchronization (SharePoint Server 2010)

102
Grant Active Directory Domain Services permissions for profile synchronization (SharePoint Server 2010)
Published: June 16, 2011
This article contains procedures that an Active Directory Domain Services (AD DS)
administrator can use to configure the permissions that are required to synchronize
profile information with Microsoft SharePoint Server 2010. The Plan account permissions
section of the "Plan for profile synchronization" article describes which permissions are
needed in which circumstances.
The procedures in this article use the phrase "synchronization account" for the account to
which you grant permissions. The synchronization account is the account that SharePoint
Server uses to connect to AD DS during profile synchronization.
In this article:
Grant Replicate Directory Changes permission on a domain
Add an account to the Pre-Windows 2000 Compatible Access group
Grant Replicate Directory Changes permission on the cn=configuration container
Grant Create Child Objects and Write permission
Grant Replicate Directory Changes permission on a domain Use this procedure to grant Replicate Directory Changes permission on a domain to an
account.
The Replicate Directory Changes permission enables the synchronization account to
read AD DS objects and to discover AD DS objects that have been changed in the
domain. The Grant Replicate Directory Changes permission does not enable an account
to create, modify or delete AD DS objects.
To grant Replicate Directory Changes permission on a domain
1. On the domain controller, click Start, click Administrative Tools, and then click
Active Directory Users and Computers.
2. In Active Directory Users and Computers, right-click the domain, and then click
Delegate Control.
3. On the first page of the Delegation of Control Wizard, click Next.

103
4. On the Users or Groups page, click Add.
5. Type the name of the synchronization account, and then click OK.
6. Click Next.
7. On the Tasks to Delegate page, select Create a custom task to delegate, and then
click Next.
8. On the Active Directory Object Type page, select This folder, existing objects in
this folder, and creation of new objects in this folder, and then click Next.
9. On the Permissions page, in the Permissions box, select Replicating Directory
Changes (select Replicate Directory Changes on Windows Server 2003), and then
click Next.
10. Click Finish.
Add an account to the Pre-Windows 2000 Compatible Access group Use this procedure to add an account to the Pre-Windows 2000 Compatible Access
group.
To add an account to the Pre-Windows 2000 Compatible Access group
1. On the domain controller, click Start, click Administrative Tools, and then click
Active Directory Users and Computers.
2. In Active Directory Users and Computers, expand the domain, expand Builtin, right-
click Pre-Windows 2000 Compatible Access, and then click Properties.
3. In the Properties dialog box, click the Members tab, and then click Add.
4. Type the name of the synchronization account, and then click OK.
5. Click OK.
Grant Replicate Directory Changes permission on the cn=configuration container Use this procedure to grant Replicate Directory Changes permission on the
cn=configuration container to an account.
To grant Replicate Directory Changes permission on the cn=configuration
container
1. On the domain controller, click Start, click Run, type adsiedit.msc, and then click
OK.
2. If the Configuration node is not already present, do the following:
a) In the navigation pane, click ADSI Edit.
b) On the Action menu, click Connect to.

104
c) In the Connection Point area of the Connection Settings dialog box, click
Select a well know Naming Context, select Configuration from the drop-
down list, and then click OK.
3. Expand the Configuration node, right-click the CN=Configuration... node, and then
click Properties.
4. In the Properties dialog box, click the Security tab.
5. In the Group or user names section, click Add.
6. Type the name of the synchronization account, and then click OK.
7. In the Group or user names section, select the synchronization account.
8. In the Permissions section, select the Allow check box next to the Replicating
Directory Changes (Replicate Directory Changes on Windows Server 2003)
permission, and then click OK.
Grant Create Child Objects and Write permission Use this procedure to grant Create Child Objects and Write permission to an account.
To grant Create Child Objects and Write permission
1. On the domain controller, click Start, click Run, type adsiedit.msc, and then click
OK.
2. If the Default naming context node is not already present, do the following:
a) In the navigation pane, click ADSI Edit.
b) On the Action menu, click Connect to.
c) In the Connection Point area of the Connection Settings dialog box, click
Select a well know Naming Context, select Default naming context from
the drop-down list, and then click OK.
3. In the navigation pane of the ADSI Edit window, expand the domain, expand the
DC=... node, right-click the OU to which you want to grant permission, and then click
Properties.
4. On the Security tab of the Properties dialog box, click Advanced.
5. In the Advanced Security Settings dialog box, select the row whose value in the
Name column is the synchronization account and whose value in the Inherited From
column is <not inherited>, and then click Edit. If this row is not present, click Add,
click Locations, select Entire Directory, click OK, type the synchronization account,
and then click OK. This adds the appropriate row, which you can now select.

105
Note:
Do not select the row for the synchronization account that is inherited from another
location. Doing so would only enable you to apply the permissions to the OU and not to
the contents of the OU.
6. In the Permission Entry dialog box, select This object and all descendant objects
from the Apply to box, (select This object and all child objects on Windows Server
2003), select the Allow check box in the rows for the Write all properties and
Create all child objects properties, and then click OK.
7. Click OK to close the Advanced Security Settings dialog box.
8. Click OK to close the Properties dialog box.
9. Repeat steps 3 through 8 to grant permissions on any additional OUs.
Concepts Plan for profile synchronization (SharePoint Server 2010)
Configure profile synchronization (SharePoint Server 2010)