Embed Size (px)
Citation preview

En
Professional
Technical Guide
2
Table of ContentsUsing the Menus ........................................................... 4
AutofocusAutofocusFocusing with Autofocus ............................................. 7
Behind the Goal ........................................................11
Tracking erratically moving subjects that are frequently
obscured by other objects
Pitcher or Runner? ....................................................12
Switching instantly between subjects at diff erent dis-
tances from the camera
The Inside Track.........................................................13
Tracking subjects that are obscured by objects passing
in front of the camera
At the Finish Line ......................................................14
Quick shutter response
Poor Lighting or Bad Weather ...............................15
Poorly lit or low-contrast scenes
ExposureExposureAuto ISO Sensitivity Control ...................................... 16
A Daytime Stadium Match ......................................17
Switching between sunlight and shade
Active D-Lighting (ADL) ............................................. 19
A Daytime Stadium Match Revisited ....................19
High-contrast lighting
Easy Exposure Compensation ................................... 21

3
Image QualityImage QualityFX and DX Formats .....................................................22
Vignette Control.........................................................27
Lens OptionsLens OptionsVibration Reduction (VR) ...........................................28
Options for Long Lenses ............................................30
Camera SettingsCamera SettingsSharing Settings .........................................................31
4
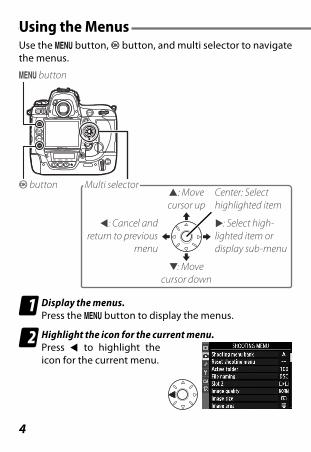
Using the MenusUse the G button, J button, and multi selector to navigate
the menus.
1: Move cursor up
2: Select high-lighted item or display sub-menu
3: Move cursor down
4: Cancel and return to previous
menu
Center: Select highlighted item
G button
J button Multi selector
1 Display the menus.Press the G button to display the menus.
2 Highlight the icon for the current menu.Press 4 to highlight the
icon for the current menu.
5
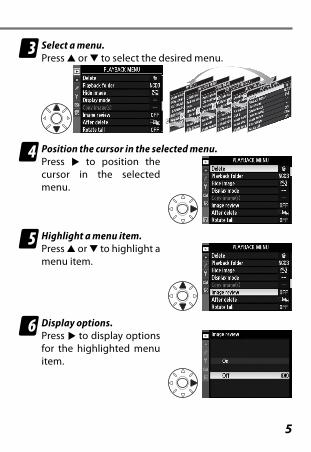
3 Select a menu.Press 1 or 3 to select the desired menu.
4 Position the cursor in the selected menu.Press 2 to position the
cursor in the selected
menu.
5 Highlight a menu item.Press 1 or 3 to highlight a
menu item.
6 Display options.Press 2 to display options
for the highlighted menu
item.
6
Using the Menus
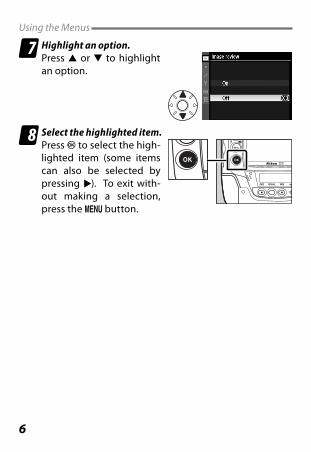
7 Highlight an option.Press 1 or 3 to highlight
an option.
8 Select the highlighted item.Press J to select the high-
lighted item (some items
can also be selected by
pressing 2). To exit with-
out making a selection,
press the G button.
7
The a Autofocus group in the fi rst level of the Custom
Settings menu contains a variety of advanced autofocus
options. This chapter details options that can be used to
frame moving subjects at sporting events: a1 (AF-C priority
selection), a3 (Dynamic AF area), and a4 (Focus tracking
with lock-on). These options are best used with the focus
mode selector rotated to C (continuous-servo AF) and the
AF-area mode selector rotated to I (dynamic-area AF).
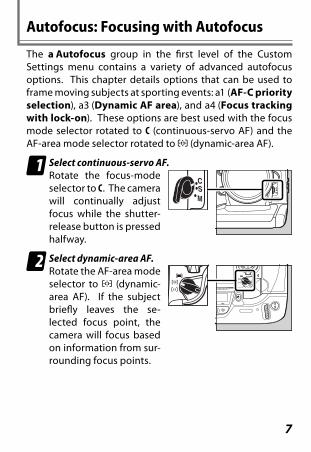
1 Select continuous-servo AF.Rotate the focus-mode
selector to C. The camera
will continually adjust
focus while the shutter-
release button is pressed
halfway.
2 Select dynamic-area AF.Rotate the AF-area mode
selector to I (dynamic-
area AF). If the subject
briefl y leaves the se-
lected focus point, the
camera will focus based
on information from sur-
rounding focus points.
Autofocus: Focusing with Autofocus

8
3 Choose an option for Custom Setting a1.Choose whether the camera gives
priority to focus or to shutter re-
sponse in focus mode C.
4 Choose an option for Custom Setting a3.Choose the number of focus
points used for dynamic-area AF.
Select 9 points or 21 points for
track-and-fi eld events or for sub-
jects that move unpredictably.
Autofocus

9
Focusing with Autofocus
5 Choose an option for Custom Setting a4.Choose how quickly the camera
responds when an object moves
between the subject and the
camera.
10
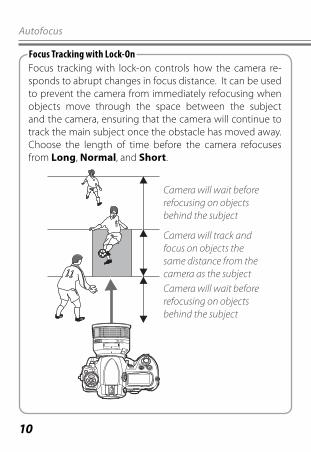
Focus tracking with lock-on controls how the camera re-
sponds to abrupt changes in focus distance. It can be used
to prevent the camera from immediately refocusing when
objects move through the space between the subject
and the camera, ensuring that the camera will continue to
track the main subject once the obstacle has moved away.
Choose the length of time before the camera refocuses
from Long, Normal, and Short.
Camera will wait before refocusing on objects behind the subject
Camera will wait before refocusing on objects behind the subject
Camera will track and focus on objects the same distance from the camera as the subject
Focus Tracking with Lock-On
Autofocus
11
Focusing with Autofocus
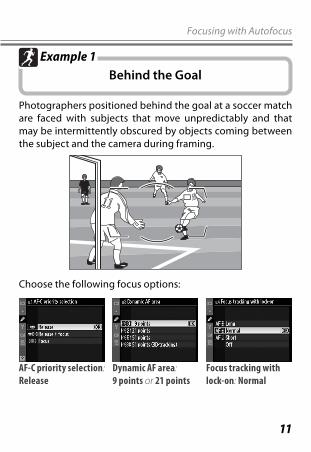
Behind the Goal
Example 1
Photographers positioned behind the goal at a soccer match
are faced with subjects that move unpredictably and that
may be intermittently obscured by objects coming between
the subject and the camera during framing.
Choose the following focus options:
AF-C priority selection: Release
Dynamic AF area: 9 points or 21 points
Focus tracking with
lock-on: Normal
12
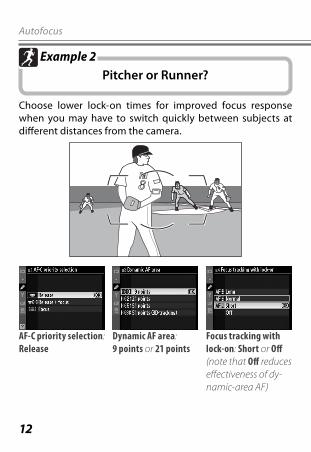
Pitcher or Runner?
Example 2
Choose lower lock-on times for improved focus response
when you may have to switch quickly between subjects at
diff erent distances from the camera.
AF-C priority selection: Release
Dynamic AF area: 9 points or 21 points
Focus tracking with
lock-on: Short or Off (note that Off reduces eff ectiveness of dy-namic-area AF)
Autofocus

13
Focusing with Autofocus
The Inside Track
Example 3
Choose longer lock-on times when photographing a runner
on the inside track or in other situations in which your subject
may be blocked for relatively long periods.
Your subject
AF-C priority selection: Release
Dynamic AF area: 9 points or 21 points
Focus tracking with
lock-on: Long
14
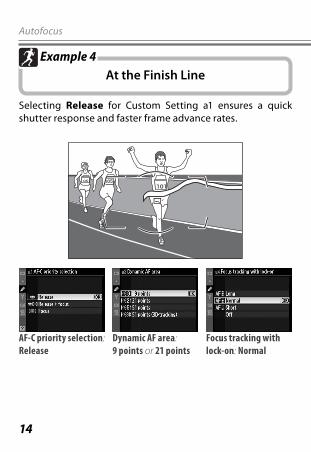
At the Finish Line
Example 4
Selecting Release for Custom Setting a1 ensures a quick
shutter response and faster frame advance rates.
AF-C priority selection: Release
Dynamic AF area: 9 points or 21 points
Focus tracking with
lock-on: Normal
Autofocus
15
Focusing with Autofocus
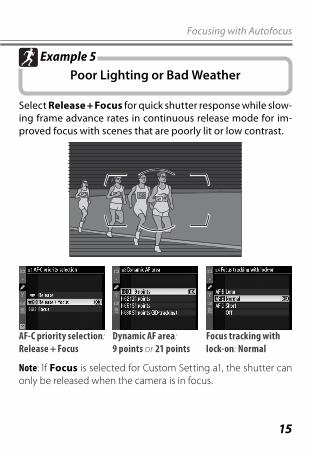
Poor Lighting or Bad Weather
Example 5
Select Release + Focus for quick shutter response while slow-
ing frame advance rates in continuous release mode for im-
proved focus with scenes that are poorly lit or low contrast.
AF-C priority selection: Release + Focus
Dynamic AF area: 9 points or 21 points
Focus tracking with
lock-on: Normal
Note: If Focus is selected for Custom Setting a1, the shutter can
only be released when the camera is in focus.
16
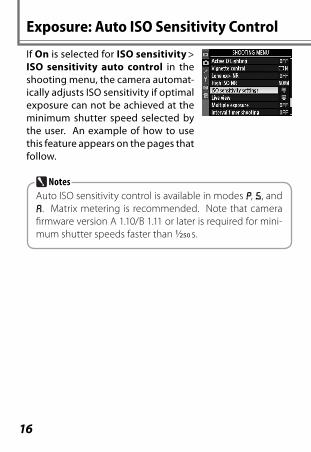
If On is selected for ISO sensitivity >
ISO sensitivity auto control in the
shooting menu, the camera automat-
ically adjusts ISO sensitivity if optimal
exposure can not be achieved at the
minimum shutter speed selected by
the user. An example of how to use
this feature appears on the pages that
follow.
Auto ISO sensitivity control is available in modes e, f, and
g. Matrix metering is recommended. Note that camera
fi rmware version A 1.10/B 1.11 or later is required for mini-
mum shutter speeds faster than 1/250 s.
Notes
Exposure: Auto ISO Sensitivity Control
17
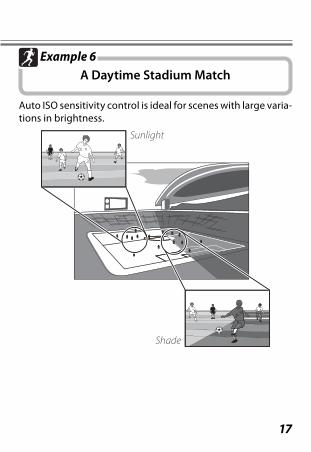
A Daytime Stadium Match
Example 6
Auto ISO sensitivity control is ideal for scenes with large varia-
tions in brightness.
Sunlight
Shade
18
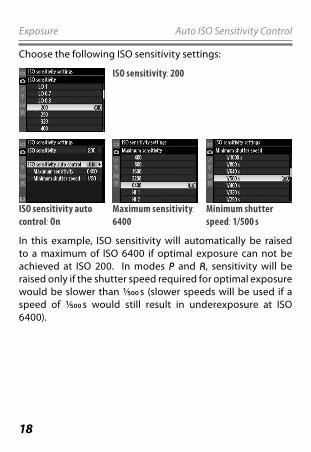
Choose the following ISO sensitivity settings:
ISO sensitivity: 200
ISO sensitivity auto
control: On
Maximum sensitivity: 6400
Minimum shutter
speed: 1/500 s
In this example, ISO sensitivity will automatically be raised
to a maximum of ISO 6400 if optimal exposure can not be
achieved at ISO 200. In modes e and g, sensitivity will be
raised only if the shutter speed required for optimal exposure
would be slower than 1/500 s (slower speeds will be used if a
speed of 1/500 s would still result in underexposure at ISO
6400).
Exposure Auto ISO Sensitivity Control
19
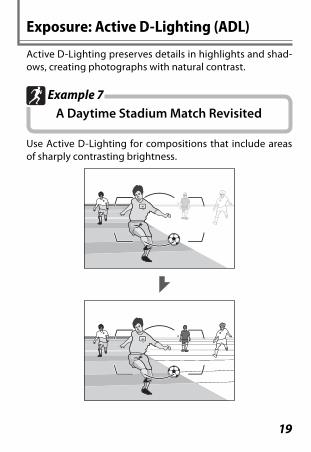
Active D-Lighting preserves details in highlights and shad-
ows, creating photographs with natural contrast.
A Daytime Stadium Match Revisited
Example 7
Use Active D-Lighting for compositions that include areas
of sharply contrasting brightness.
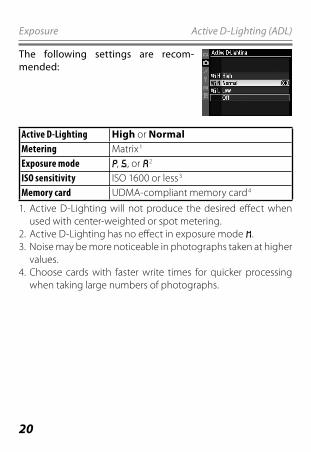
Exposure: Active D-Lighting (ADL)
20
The following settings are recom-
mended:
Active D-Lighting High or Normal
Metering Matrix 1
Exposure mode e, f, or g 2
ISO sensitivity ISO 1600 or less 3
Memory card UDMA-compliant memory card 4
1. Active D-Lighting will not produce the desired eff ect when
used with center-weighted or spot metering.
2. Active D-Lighting has no eff ect in exposure mode h.
3. Noise may be more noticeable in photographs taken at higher
values.
4. Choose cards with faster write times for quicker processing
when taking large numbers of photographs.
Exposure Active D-Lighting (ADL)
21
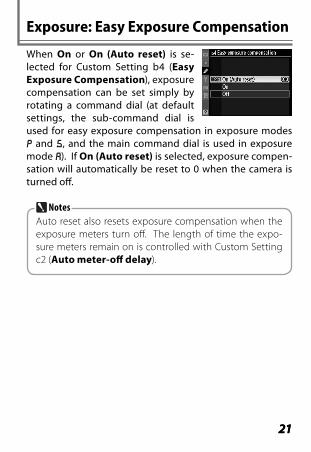
When On or On (Auto reset) is se-
lected for Custom Setting b4 (Easy
Exposure Compensation), exposure
compensation can be set simply by
rotating a command dial (at default
settings, the sub-command dial is
used for easy exposure compensation in exposure modes
e and f, and the main command dial is used in exposure
mode g). If On (Auto reset) is selected, exposure compen-
sation will automatically be reset to 0 when the camera is
turned off .
Auto reset also resets exposure compensation when the
exposure meters turn off . The length of time the expo-
sure meters remain on is controlled with Custom Setting
c2 (Auto meter-off delay).
Notes
21
Exposure: Easy Exposure Compensation
22
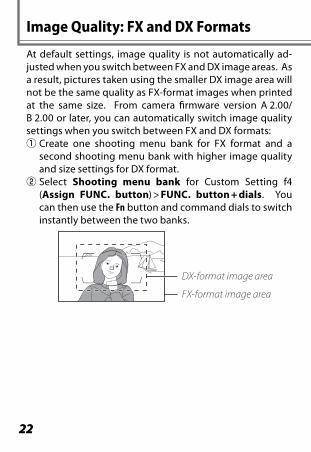
At default settings, image quality is not automatically ad-
justed when you switch between FX and DX image areas. As
a result, pictures taken using the smaller DX image area will
not be the same quality as FX-format images when printed
at the same size. From camera fi rmware version A 2.00/
B 2.00 or later, you can automatically switch image quality
settings when you switch between FX and DX formats:
q Create one shooting menu bank for FX format and a
second shooting menu bank with higher image quality
and size settings for DX format.
w Select Shooting menu bank for Custom Setting f4
(Assign FUNC. button) > FUNC. button + dials. You
can then use the Fn button and command dials to switch
instantly between the two banks.
DX-format image area
FX-format image area
22
Image Quality: FX and DX Formats
23
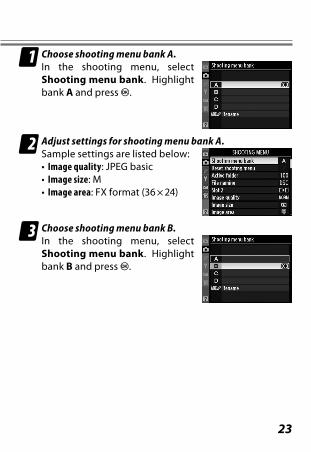
1 Choose shooting menu bank A.In the shooting menu, select
Shooting menu bank. Highlight
bank A and press J.
2 Adjust settings for shooting menu bank A.Sample settings are listed below:
Image quality: JPEG basic
Image size: M
Image area: FX format (36 × 24)
•
•
•
3 Choose shooting menu bank B.In the shooting menu, select
Shooting menu bank. Highlight
bank B and press J.
24
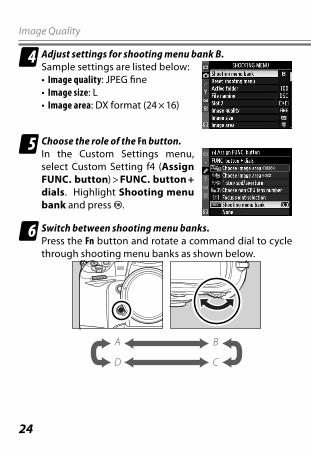
4 Adjust settings for shooting menu bank B.Sample settings are listed below:
Image quality: JPEG fi ne
Image size: L
Image area: DX format (24 × 16)
•
•
•
5 Choose the role of the Fn button.In the Custom Settings menu,
select Custom Setting f4 (Assign
FUNC. button) > FUNC. button +
dials. Highlight Shooting menu
bank and press J.
6 Switch between shooting menu banks.Press the Fn button and rotate a command dial to cycle
through shooting menu banks as shown below.
A
D C
B
Image Quality
25
FX and DX Formats
Shooting menu bank can also be assigned to the
“button + dials” options for Custom Settings f5 (Assign
preview button) and f6 (Assign AE-L/AF-L button).
Apart from image quality, image size, and image area, set-
tings for banks A and B should be identical. Any changes to
bank A should also be made to bank B. Note that although
separate Picture Controls may be selected for each bank,
modifi cations to Picture Control settings (including quick
adjust and other manual adjustments) and changes to In-
terval timer shooting and Multiple exposure apply to
all banks.
If the settings in bank C are the same as bank A and those
in bank D the same as bank B, you will be able to identify
the selected image area by the crop displayed in the view-
fi nder.
Notes
26
Although maximum frame advance rate when FX format is
selected for image area is fi xed at 9 fps, the maximum frame
rate for DX format can be selected from 9, 10, and 11 fps
using Custom Setting d2 (Shooting speed). Note that at
settings of 10 and 11 fps, focus will be fi xed at the setting for
the fi rst photograph in each series, and exposure may be
fi xed at the value for the fi rst photograph in each series if
the subject is poorly lit.
Frame Rate (Continuous High-Speed Release Mode)
The camera has four shooting menu banks (A, B, C, and D).
Diff erent combinations of shooting menu settings can be
stored in diff erent banks, allowing the user to switch instant-
ly from one combination to another using the Shooting
menu bank option in the shooting menu.
Shooting Menu Banks
Image Quality FX and DX Formats
27
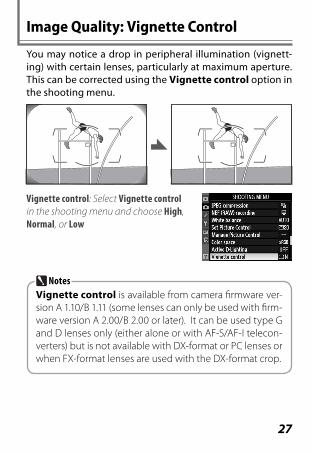
You may notice a drop in peripheral illumination (vignett-
ing) with certain lenses, particularly at maximum aperture.
This can be corrected using the Vignette control option in
the shooting menu.
Vignette control: Select Vignette control in the shooting menu and choose High, Normal, or Low
Vignette control is available from camera fi rmware ver-
sion A 1.10/B 1.11 (some lenses can only be used with fi rm-
ware version A 2.00/B 2.00 or later). It can be used type G
and D lenses only (either alone or with AF-S/AF-I telecon-
verters) but is not available with DX-format or PC lenses or
when FX-format lenses are used with the DX-format crop.
Notes
Image Quality: Vignette Control

28
The D3 supports vibration reduction with VR lenses. Turn vi-
bration reduction off when shooting at fast shutter speeds.
Other vibration reduction settings may result in slower
frame advance rates and increased shutter lag.
The table on the following page lists the recommended set-
tings for diff erent subjects. ACTIVE and TRIPOD vibration
reduction are available with the following lenses; other VR
lenses support only ON and OFF:
ACTIVE
AF-S VR Zoom-Nikkor ED 70–200 mm f/2.8G (IF)
AF-S VR Zoom-Nikkor ED 200–400 mm f/4G (IF)
AF-S VR Nikkor ED 200 mm f/2G (IF)
AF-S VR Nikkor ED 300 mm f/2.8G (IF)
TRIPOD
AF-S NIKKOR 400 mm f/2.8G ED VR
AF-S NIKKOR 500 mm f/4G ED VR
AF-S NIKKOR 600 mm f/4G ED VR
•
•
•
•
•
•
•
Lens Options: Vibration Reduction (VR)
29
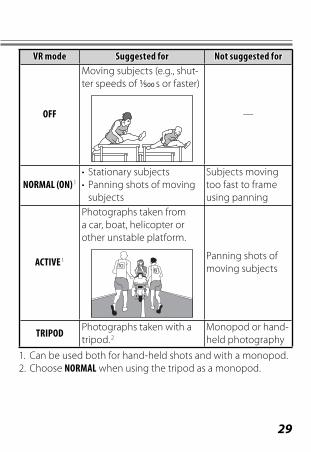
VR modeVR mode Suggested forSuggested for Not suggested forNot suggested for
OFF
Moving subjects (e.g., shut-
ter speeds of 1/500 s or faster)
—
NORMAL (ON) 1
Stationary subjects
Panning shots of moving
subjects
•
•
Subjects moving
too fast to frame
using panning
ACTIVE 1
Photographs taken from
a car, boat, helicopter or
other unstable platform.
Panning shots of
moving subjects
TRIPODPhotographs taken with a
tripod. 2Monopod or hand-
held photography
1. Can be used both for hand-held shots and with a monopod.
2. Choose NORMAL when using the tripod as a monopod.
30
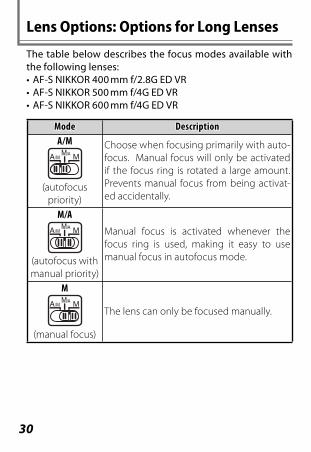
The table below describes the focus modes available with
the following lenses:
AF-S NIKKOR 400 mm f/2.8G ED VR
AF-S NIKKOR 500 mm f/4G ED VR
AF-S NIKKOR 600 mm f/4G ED VR
ModeMode DescriptionDescription
A/M
(autofocus
priority)
Choose when focusing primarily with auto-
focus. Manual focus will only be activated
if the focus ring is rotated a large amount.
Prevents manual focus from being activat-
ed accidentally.
M/A
(autofocus with
manual priority)
Manual focus is activated whenever the
focus ring is used, making it easy to use
manual focus in autofocus mode.
M
(manual focus)
The lens can only be focused manually.
•
•
•
Lens Options: Options for Long Lenses
31
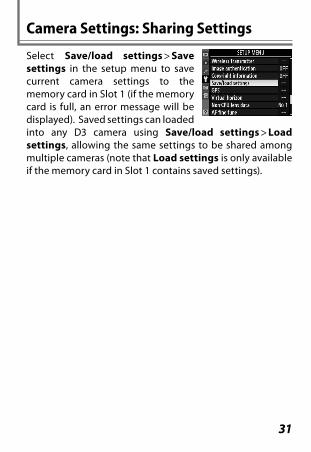
Select Save/load settings > Save
settings in the setup menu to save
current camera settings to the
memory card in Slot 1 (if the memory
card is full, an error message will be
displayed). Saved settings can loaded
into any D3 camera using Save/load settings > Load
settings, allowing the same settings to be shared among
multiple cameras (note that Load settings is only available
if the memory card in Slot 1 contains saved settings).
Camera Settings: Sharing Settings

© 2008 Nikon Corporation Printed in Japan


![Nikkormat FTn [4153002] 1999 – 2020 Nikon D800E [6010886 ...The Nikon D800 is a 36.3-megapixel professional-grade full-frame digital single-lens reflex camera produced by Nikon](https://img.pdfslide.us/doc/110x75/6055e9fb73ff6b7883668976/nikkormat-ftn-4153002-1999-a-2020-nikon-d800e-6010886-the-nikon-d800-is.jpg)