Embed Size (px)
Citation preview
�
product safety
Please read these instructions before operating the appliance and retain them for future use.
This product is not suitable for use by children, and may not be suitable for persons requiring supervision unless they receive instruction by a competent person on how to safely use the product. Children should be supervised to ensure that they do not play with the product.Never use this appliance for anything other than its intended use. This appliance is for household use only. Do not use this appliance outdoors.Always ensure that hands are dry before handling the plug or switching on the appliance.Always use the appliance on a stable, secure, dry and level surface.Do not touch the metal parts of the appliance during use as they may become very hot.Never operate the appliance by means of an external timer or separate remote-control system.Bread may burn therefore do not use the appliance near or below combustible materials such as curtains. Never use the toaster below wall cupboards or shelves.This appliance must not be placed on or near any potentially hot surfaces (such as a gas or electric hob).The power cord is not replaceable by the user. Always return the appliance if the power cord is damaged to avoid any hazard. Do not use the appliance if it has been dropped or if there are any visible signs of damage.Ensure the appliance is switched off and unplugged from the supply socket after use and before cleaning.Always allow the appliance to cool before cleaning or storing.Never immerse any part of the appliance or power cord and plug in water or any other liquid.Never let the power cord hang over the edge of a worktop, touch hot surfaces or become knotted, trapped or pinched.Never leave the appliance unattended when in use.Never position the antenna over the bread slots
!
!
!
!!!
!
!
!
!
!
!!
!
!!
�
features
Due to our policy of continuous improvement, the actual product may differ slightly from the one illustrated in these instructions.
q
r
y
o
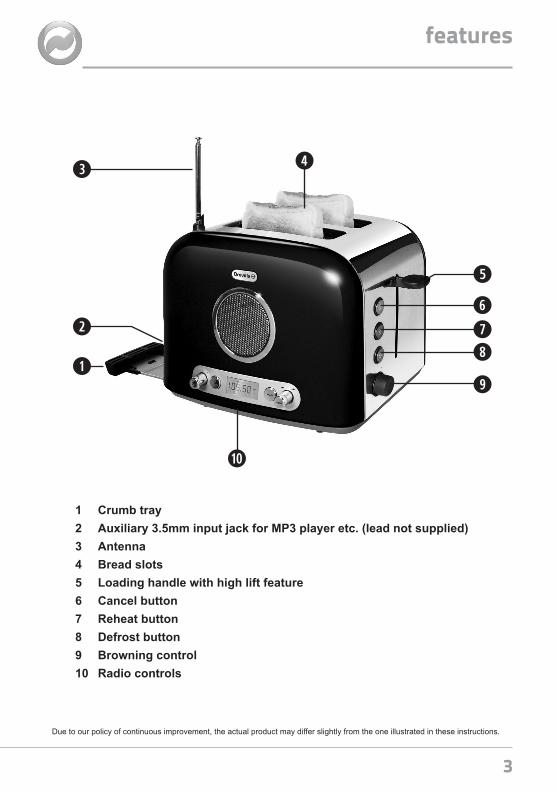
1 Crumb tray2 Auxiliary 3.5mm input jack for MP3 player etc. (lead not supplied)3 Antenna4 Bread slots5 Loading handle with high lift feature6 Cancel button7 Reheat button8 Defrost button9 Browning control10 Radio controls
ui
t
a
e
w
�
toaster controls
Browning controlThe browning control regulates how much the bread is toasted—in other words, the colour of the toast. Lower settings produce lighter toast and higher settings produce darker toast.
When setting the browning control, remember that dry or thin slices of bread will toast quicker and require a lower setting. Moist or thick slices of bread will require a higher setting.
Cancel buttonThe toasting process can be stopped at any time by pressing the cancel button.
High lift featureThe high lift feature uses the loading handle to help you to remove the toast. When toasting has finished, simply lift the loading handle upwards from its rest position to raise the toast and make it easier to remove.
Defrost functionThe defrost function allows you to toast bread straight from the freezer. Insert the bread into your toaster, press the loading handle down and then press the defrost button. Your toaster will extend the toasting time to allow the bread time to defrost. Keep a careful eye on the toast to ensure that it doesn’t burn.
Reheat functionThe reheat function will heat up toast that has cooled or gone cold. Press the loading handle down then press the reheat button. Keep a careful eye on the toast to ensure that it doesn’t burn. Don’t use the reheat function on buttered toast.
�
before using your toaster
Carefully remove your toaster from its box. Remove all packaging from inside the toasting slots.
Position your toaster on a stable, secure, dry and level work surface away from the edge. Bread may burn therefore do not use the appliance near or below combustible materials such as curtains. Never use the toaster below wall cupboards or shelves.
Before connecting to a power source, make sure your mains supply voltage is the same as the one indicated on the appliance. Connect the plug to a suitable power outlet and make sure that the power cord does not overhang the work surface.
When you first use your toaster, there may be a slight odour as the heating elements warm up for the first time. This is quite normal and not a cause for concern. To remove the odour, simply operate your toaster for the first time without any bread in it.
�
using your toaster
Never force bread into the toasting slots. Bread should fit easily into the toasting slots. Never toast slices of bread that have been buttered. Never use your toaster with any food item that contains sugar, or any product that contains jam or preserves. Don’t use bent, damaged or broken bread in your toaster as it may cause it to jam.
Set the level of toasting using the browning control. The higher the number selected, the darker the toast will be.Place the bread into the toasting slots. You can toast one or two slices of bread but only place a single slice in each slot. Press the loading handle down until it latches. The bread will be lowered into the toaster and toasting will begin. The loading handle will not latch if your toaster is not connected to the mains supply, and may not latch if the browning control is set to its minimum or lowest setting.When toasting has finished, the loading handle will rise and the toasted bread can be removed. You can lift the loading handle upwards beyond its rest position to help you remove the toast.If the toast is not done enough it can be toasted again. Turn the browning control to a lower setting and keep a careful eye on the toast to ensure that it doesn’t burn.Toasting can be stopped at any time by pressing the cancel button.
1.
2.
3.
4.
5.
�
using your toaster
Toasting tipsToasting is a combination of drying and cooking the bread and, because moisture levels differ from one bread to another, toasting times can vary.
For slightly dry bread, use a lower setting than normal.
For fresh bread or whole wheat bread, use a higher setting than normal.
Bread which has a very uneven surface will require a higher setting.
Thicker cut pieces of bread (including crumpets) will take longer to toast—sometimes significantly longer. This is because more moisture must be evaporated from the bread before toasting can occur. Very thick pieces of bread may require two toasting cycles.
When toasting raisin or other fruit breads, remove any loose raisins or fruit from the surface of the bread before putting it into your toaster. This will help prevent fruit pieces from falling into your toaster or sticking to the guard wires in the toasting slot.
Single slice toastingIf you are toasting a single slice of bread, set the browning control to a lower setting than normal. By using a lower setting when toasting a single slice of bread, it will not be over toasted.
If your toaster jams Never use a knife or any other utensil or implement to remove jammed bread.
Never insert your fingers into the bread slots.
Switch the toaster off at the mains supply socket and unplug it. Allow the toaster to completely cool down.Carefully ease the bread out of the toaster being careful not to damage the heating element.
•
•
•
•
•
•
1.2.3.
�
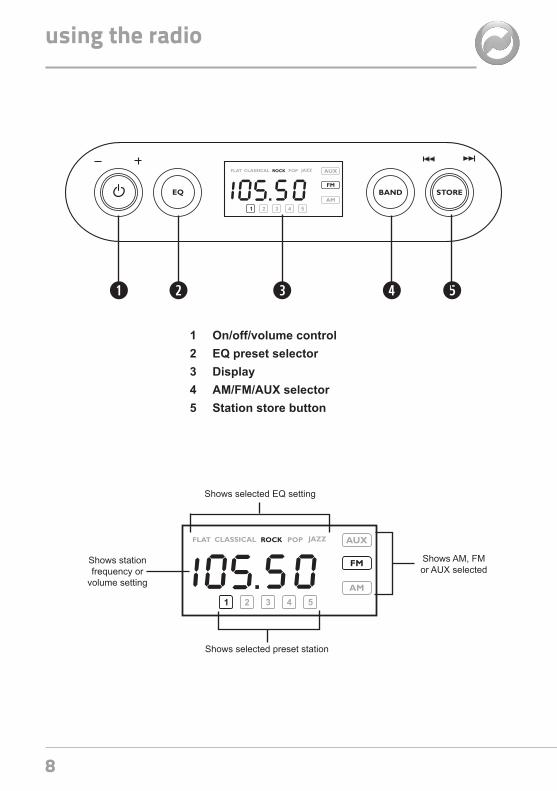
Shows selected EQ setting
Shows selected preset station
Shows station frequency or
volume setting
Shows AM, FM or AUX selected
1 On/off/volume control2 EQ preset selector3 Display4 AM/FM/AUX selector5 Station store button
q w r te
using the radio
�
using the radio
AntennaFor FM, extend and rotate the antenna for the best FM reception. Keep the antenna retracted when not being used to avoid damage. DO NOT position the antenna over the bread slots.
For AM reception the FM aerial is not used and a built-in aerial is used instead, therefore, it might be necessary to re-position the toaster for the optimum reception. Ensure all safety precautions have been followed.
On/Off/Volume controlPress the on/off/volume control knob once to turn the radio on or to turn the radio off. The radio automatically selects the last source/station selected - see note on page 10.
Rotate to the right (+) to increase the volume or to the left (-) to decrease the volume. When you make an adjustment, the display indicates the selected volume level.
EQ Preset SelectorPress the EQ button repeatedly to cycle through the five preset equaliser settings. (FLAT, CLASSICAL, ROCK, POP and JAZZ).
AM/FM/AUX Selector (BAND)Press the BAND button to select the desired waveband or AUX input. The display will indicate the selection made. When switched to the auxiliary input, the station frequency will not be displayed.
To listen to an auxiliary device, such as a MP3 or MiniDisc, plug it into the AUX input jack socket located on the side of the toaster. You will need a lead with a 3.5mm stereo jack on one end and a connector suitable for your auxiliary device on the other (lead not supplied). Select AUX using the BAND button and playback will be heard through the toaster speaker.
10
Station Store Button
You can store 10 stations, five FM and five AM.
Rotate the STORE knob slowly to the left or right to select your desired radio station. To rapidly scan through the stations, rotate the knob quickly, then release. The radio will automatically stop on the next strongly received station. To stop scanning turn the knob either way once.
Note: The radio will remember your settings whilst connected to the mains. When unplugged, however, it will revert to the default setting when next switched on. Stored preset stations will not be affected.
Storing stationsSelect either FM or AM.Press the STORE knob to select a preset number (shown at the bottom of the display).Tune to the station you would like to store in the preset memory.Press and hold the STORE button. The preset number at the bottom of the display will start to flash, and then a beep will be heard confirming that the station has been stored. The preset number will then be highlighted.
To listen to preset stationsSelect either FM or AM.Press the STORE knob repeatedly until the desired station preset number has been selected.
1.2.
3.4.5.
1.2.
using the radio
11
Always switch off, unplug and allow the toaster to cool down before moving, cleaning or storing. Never immerse the toaster or power cord and plug in water or any other liquid.
Clean the outside of your toaster with a damp cloth then dry thoroughly.
Never use harsh, abrasive or caustic cleaners.
Crumb removalIt is important that crumbs are not allowed to build up inside your toaster. Excess crumbs are unhygienic and could catch fire.
Crumbs can be removed by sliding the crumb trays out from the bottom of your toaster. You can then tip the crumbs out. Always make sure that your toaster has completely cooled down and is disconnected from the mains supply before removing crumbs. Never use your toaster without the crumb trays fitted. Always replace the crumb trays before using your toaster.
•
•
cleaning
1�
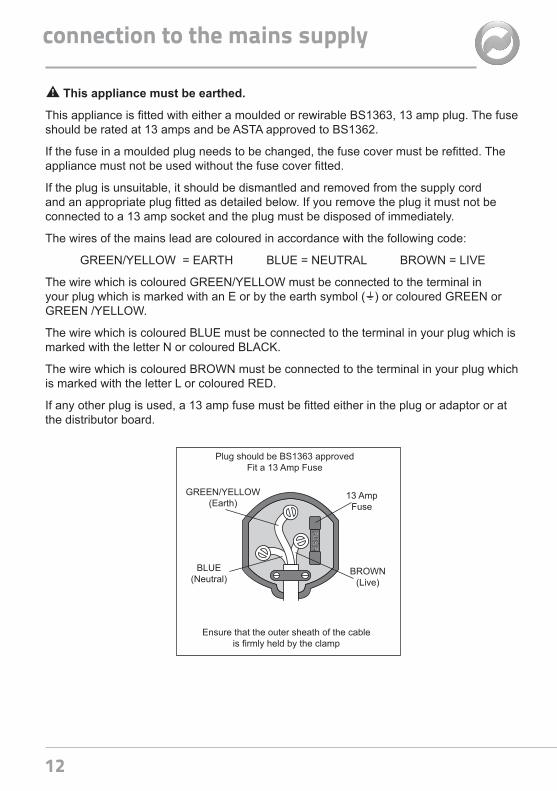
This appliance must be earthed.
This appliance is fitted with either a moulded or rewirable BS1363, 13 amp plug. The fuse should be rated at 13 amps and be ASTA approved to BS1362.
If the fuse in a moulded plug needs to be changed, the fuse cover must be refitted. The appliance must not be used without the fuse cover fitted.
If the plug is unsuitable, it should be dismantled and removed from the supply cord and an appropriate plug fitted as detailed below. If you remove the plug it must not be connected to a 13 amp socket and the plug must be disposed of immediately.
The wires of the mains lead are coloured in accordance with the following code:
GREEN/YELLOW = EARTH BLUE = NEUTRAL BROWN = LIVE
The wire which is coloured GREEN/YELLOW must be connected to the terminal in your plug which is marked with an E or by the earth symbol ( ) or coloured GREEN or GREEN /YELLOW.
The wire which is coloured BLUE must be connected to the terminal in your plug which is marked with the letter N or coloured BLACK.
The wire which is coloured BROWN must be connected to the terminal in your plug which is marked with the letter L or coloured RED.
If any other plug is used, a 13 amp fuse must be fitted either in the plug or adaptor or at the distributor board.
Plug should be BS1363 approved Fit a 13 Amp Fuse
Ensure that the outer sheath of the cable is firmly held by the clamp
BROWN (Live)
13 Amp Fuse
BLUE (Neutral)
GREEN/YELLOW (Earth)
connection to the mains supply

1�
after sales service
These appliances are built to the very highest of standards. There are no user serviceable parts. Follow these steps if the unit fails to operate:
Check the instructions have been followed correctly.Check that the fuse has not blown.Check that the mains supply is functional.
If the appliance will still not operate, return the appliance to the place it was purchased for a replacement. To return the appliance to the Customer Service Department, follow the steps below:
Pack it carefully (preferably in the original carton). Ensure the unit is clean.Enclose your name and address and quote the model number on all correspondence.Give the reason why you are returning it.If within the guarantee period, state when and where it was purchased and include proof of purchase (e.g. till receipt).Send it to our Customer Service Department at the address below:
Customer Service Department
Pulse Home Products Limited
Middleton Road
Royton
Oldham
OL2 5LN, UK.
Telephone: 0161 621 6900 Fax: 0161 626 0391
e-mail: [email protected]
1.2.3.
1.2.3.4.
5.
1�
This product is guaranteed for a period of 1 year from the date of purchase against mechanical and electrical defects.
This guarantee is only valid if the appliance is used solely for domestic purposes in accordance with the instructions provided, that it is not connected to an unsuitable electricity supply, dismantled or interfered with in any way or damaged through misuse. Under this guarantee we undertake to repair or replace free of charge any parts found to be defective.
Nothing in this guarantee or the instructions relating to the product excludes, restricts or otherwise affects your statutory rights.
In line with our policy of continuous development, we reserve the right to change this product, packaging and documentation without notice.
guarantee

1�

93203-0VTT296_Iss_1 09/10


![Welcome [m.media-amazon.com]](https://img.pdfslide.us/doc/110x75/61f84db65c2ed92cb32be4fc/welcome-mmedia-.jpg)